Compiling Your Android Application v1.0 By - Buzztouch
17
Compiling Your Android Application v1.0 By GoNorthWest 30 November 2011 So, you read my other document, Setting Up Your Android Development Environment, and now you want to compile and run that super cool Android app you created on Buzztouch. Fair enough! You’ve done the hard part up to now…the rest is pretty easy once you understand how things work. This document will show you two different ways to get your app running in the Android emulator you set up previously and ultimately on a device! Scroll down to the next page to start with Method 1 : Import Your Project. I haven’t quite worked out all the formatting issues yet. Yeah…next page…it’s there..really! Have fun! Here’s a picture I took this summer to keep you entertained until the next page.
Transcript of Compiling Your Android Application v1.0 By - Buzztouch

Compiling Your Android Application
v1.0
By GoNorthWest
30 November 2011
So, you read my other document, Setting Up Your Android Development Environment, and now you
want to compile and run that super cool Android app you created on Buzztouch. Fair enough! You’ve
done the hard part up to now…the rest is pretty easy once you understand how things work. This
document will show you two different ways to get your app running in the Android emulator you set up
previously and ultimately on a device!
Scroll down to the next page to start with Method 1 : Import Your Project. I haven’t quite worked out all
the formatting issues yet.
Yeah…next page…it’s there..really!
Have fun!
Here’s a picture I took this summer to keep you entertained until the next page.

Method One: Import Your Project
When you download your Android code package from Buzztouch, you’re essentially getting a complete
project. All the files you need are contained in the zipped folder you get. So, importing your project into
Eclipse is as easy as specifying the folder location, proving a bit of info, and hitting OK! Let’s get started!
1. Start Eclipse. Start Eclipse by either double-clicking on the icon you set up for it somewhere, or
double-clicking on the eclipse.exe file that is found In your installation path. For me, it’s at
c:\eclipse\eclipse.exe.
2. Import Your Project.
a. Go to File…Import.

b. From the resulting dialogue box, expand General if necessary, and then select Existing
Projects into Workspace. Hit Next.

c. Make sure Select root directory is selected, then hit Browse and select the unzipped
folder that you got from Buzztouch. Just select the root folder…none of the ones
beneath it, and none of the files.

d. Your project should show up in the Projects: box, and should be checkmarked. hit
Finish.
e. Wait while Eclipse builds your workspace. You can see the progress in the lower right-
hand corner of Eclipse.
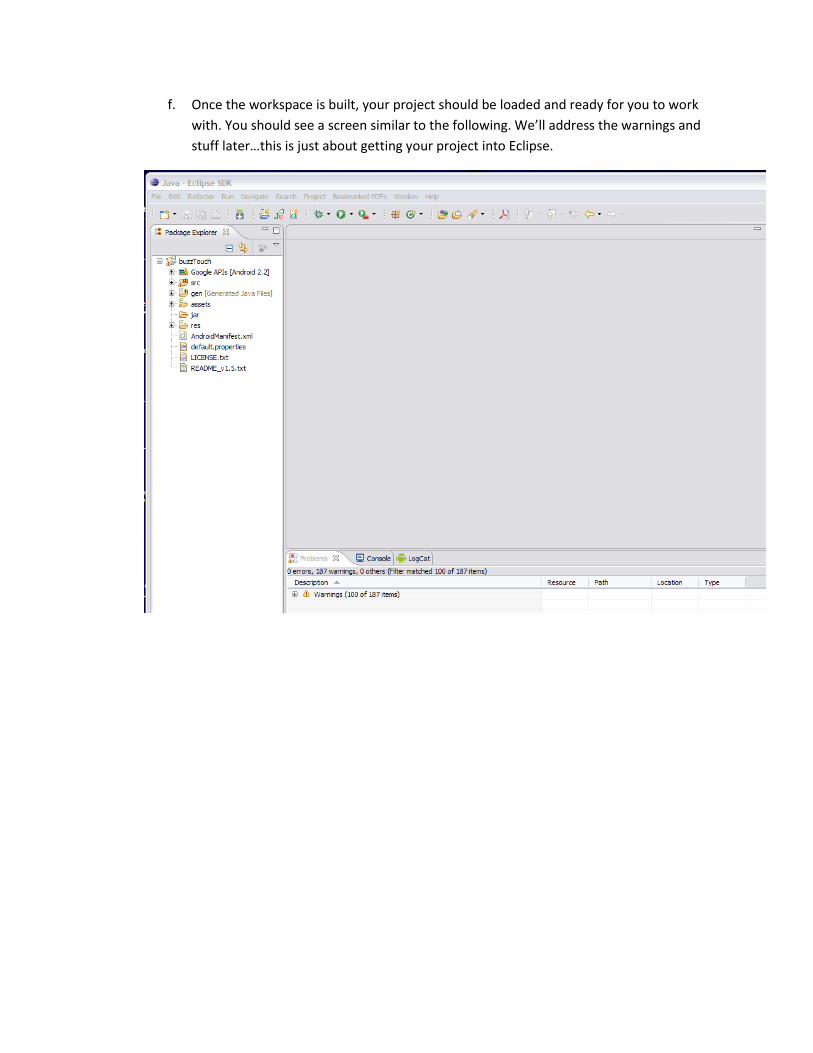
f. Once the workspace is built, your project should be loaded and ready for you to work
with. You should see a screen similar to the following. We’ll address the warnings and
stuff later…this is just about getting your project into Eclipse.

Method Two: Start A New Android Project.
This method starts an entirely new project, but uses files that you point Eclipse to. It’ll say a project
already exists in your source folder, but that’s OK, just select it, and it’ll build the project based on those
files.
1. Start Eclipse. Start Eclipse by either double-clicking on the icon you set up for it somewhere, or
double-clicking on the eclipse.exe file that is found In your installation path. For me, it’s at
c:\eclipse\eclipse.exe.
2. Start a new Android Project.
1. Go to File…New…Project. You might have an option for Android Project, but you might
not. So, just select Project.

2. From the resulting dialogue box, expand Android if necessary, and select Android
Project. Hit Next.
3. Specify a Project Name (I use the same name as what I have in the BT control panel for
the app). Select Create Project From Existing Source and browse to your download
folder. Select the root folder from the source package you downloaded and unzipped
from BT. Hit Finish.

4. Wait while Eclipse builds your workspace. You can see the progress in the lower right-
hand corner of Eclipse.

5. Once the workspace is built, your project should be loaded and ready for you to work
with. You should see a screen similar to the following. We’ll address the warnings and
stuff later…this is just about getting your project into Eclipse.
Congratulations! Your project is now loaded into Eclipse and ready for you to work with. See…that
wasn’t so bad!
Before you can actually run your application, you’ll need to make sure it’s error free. It’s OK if there are
warnings in your application…those are just what they sound like, but you can’t have any errors. Take a
look at the Problems tab and see what’s there.
In this particular example, there are only warnings, so that’s a good thing. However…initially, when I
loaded this project, it came up with a bunch of errors. I struggled for a bit to understand why, and then

decided to check and make sure the correct Google API was being referenced. It was not, and when I
corrected it, all was well. So, if you see errors in you project, do the following:
1. Go to File….Properties and click on Android. For Buzztouch v1.5 apps, you need to make
sure you have selected Google APIs 2.2/8. If you have not, none of this will work. Make sure
that, and only that, API is checked, and hit Apply. Then hit OK.
2. Go to File…Refresh (F5) and refresh your project. Hopefully all the errors will disappear! If
they don’t, something else is wrong, and you’ll need to post a message on the forum to ask
for help.
Now that your app is error free (remember, warnings are OK), you’r e ready to compile and run it in the
simulator. You should have an Android Virtual Device set up in Eclipse per my other document. It will get
loaded automatically when you run your app.
To run your app in the virtual device, do the following:
1. Highlight your project in Package Explorer
2. Go to Run…Run As…Android Application. Or, you could hit the green circle icon you see on
the toolbar.
3. Click on the Console tab so you can monitor what’s happening. If things are going well,
you’ll see output that looks like this:
[2011-11-30 14:26:28 - buzzTouch] ------------------------------
[2011-11-30 14:26:28 - buzzTouch] Android Launch!
[2011-11-30 14:26:28 - buzzTouch] adb is running normally.
[2011-11-30 14:26:28 - buzzTouch] Performing com.thunderdroid.BT_activity_root activity
launch
[2011-11-30 14:26:29 - buzzTouch] Automatic Target Mode: launching new emulator with
compatible AVD 'Buzztouch_v1.5'
[2011-11-30 14:26:29 - buzzTouch] Launching a new emulator with Virtual Device
'Buzztouch_v1.5'
[2011-11-30 14:27:15 - buzzTouch] New emulator found: emulator-5554
[2011-11-30 14:27:15 - buzzTouch] Waiting for HOME ('android.process.acore') to be
launched...
4. Wait while everything loads…this often takes several minutes. Seriously…you can get a cup
of coffee, or perhaps arrange to send me a case of SoBe Fruit Punch (my favorite drink!)
while it’s loading. The AVD is super slow to load.
5. If everything goes well, your app will show up in your AVD, and you’ll be doing the happy
dance!

(Yeah, I know that’s a totally lame looking app, but it was just something I threw together to
demonstrate this stuff for you. I’m working on some better stuff…I promise!)
So, now you know that your app works, and after spending countless hours making it look beautiful,
you’re ready to test it on a real device, or publish it somewhere for the general masses. Let’s take a look
at how you Export your app and create the .apk package you need in order to install it on a device.
Depending on whether you are creating a debug (test) package, or a release package, you are going to
need to use the Debug Keystore or Release Keystore that I showed you how to create in the previous
document. Just a heads up.

Here’s the process for creating a debug package:
1. Highlight your project in Package Explorer.
2. Go to File…Export, and select Export Android Application. Expand the Android section if you
don’t see that option. Hit Next.
3. Select the project to export. It should already be filled in with your project name. If not, browse
to the folder your project is in. Note the statement “The manifest ‘debuggable’ attribute is set to
true.” This is what you want. Hit Next.
4. Navigate to your debug.keystore file, and enter the keystore password (‘android’ is the default).
Hit Next.
5. Choose Use Existing Key, and select your debug.keystore alias (default is ‘androiddebugkey’)
and password (‘android’). Hit Next.

6. Browse to the location you want to have your package saved to, then hit Finish.

7. Check the location to make sure the file was created! If all is good, you can now deploy this on
your test device. I’ve found that putting it on the web somewhere and having a person surf to
the package is the easiest way to install.
Creating a release package is basically the same process as a debug package. The main differences are
the keystore you use, and the fact that the debuggable attribute is set to ‘false.’ Here’s what you do:
1. Double-click on the AndroidManifest.xml file in your project tree. You’ll find that in Project
Explorer. Several tabs should open up, one called Application. In that tab you will find many
fields that can be changed, one of which is called Debuggable. You want to set this to false.

2. Highlight your project in Package Explorer.
3. Go to File…Export, and select Export Android Application. Expand the Android section if you
don’t see that option. Hit Next.
4. Select the project to export. It should already be filled in with your project name. If not, browse
to the folder your project is in. Hit Next.
5. Navigate to your release.keystore file, and enter the keystore password (I have no idea what it
would be for you). Hit Next.
6. Choose Use Existing Key, and select your release.keystore alias and password. Hit Next.
7. Browse to the location you want to have your package saved to, then hit Finish.

That’s it! Just like with the debug process, you should now have a .apk file somewhere that can be
loaded into whatever marketplace you want to distribute from.
Hopefully this document has helped get you on your way to getting a super sweet Android application
out to the world. If I’m missing anything, or there are better ways of doing things, please let me know!
Constructive criticism is always appreciated!
Comments? Post them in the forum or email me at [email protected].
Revision Log
v1.0 11/30/11 Initial release of document. GoNorthWest