COMPILED BY MakErBOt EDuCatIOn
31
COMPILED BY MAKERBOT EDUCATION
Transcript of COMPILED BY MakErBOt EDuCatIOn

COMPILED BY MakErBOt EDuCatIOn
Copyright © 2015 by MakerBot®
www.makerbot.com
All rights reserved. No part of this publication may be reproduced, distributed, or
transmitted in any form or by any means, including photocopying, recording, or
other electronic or mechanical methods, without the prior written permission of
the publisher, except in the case of brief quotations embodied in critical reviews
and certain other noncommercial uses permitted by copyright law.
The information in this document concerning non-MakerBot products or
services was obtained from the suppliers of those products or services or from
their published announcements. Specific questions on the capabilities of
non-MakerBot products and services should be addressed to the suppliers
of those products and services.
ISBN: 978-1-4951-6175-9
Printed in the United States of America
First Edition
10 9 8 7 6 5 4 3 2 1

Compiled by MakerBot Education
MakerBot Publishing • Brooklyn, NY

06 IntroductIon to 3d PrIntIng In the classroom 08 lesson 1: IntroductIon to 3d PrIntIng 11 MakerBot Stories: Education
12 MakerBot Stories: Medical
13 MakerBot Stories: Business
14 MakerBot Stories: Post-Processing
15 MakerBot Stories: Design
16 lesson 2: usIng a 3d PrInter 24 lesson 3: PreParIng FIles For PrIntIng35 three WaYs to maKe 36 WaYs to doWnload 40 WaYs to scan 46 WaYs to desIgn51 ProJects and desIgn soFtWare 52 ProJect: PrImItIve modelIng WIth tInKercad 53 Make Your Own Country
55 Explore: Modeling with Tinkercad
59 Investigate: Geography and Climates
60 Create: Design a Water Tile
62 Create: Design a Forest Tile
66 Create: Design a Mountain Tile
69 Create: Design a Land Tile
71 Further Activities: Explore Your New World
74 ProJect: ParametrIc modelIng WIth oPenscad 75 Learn to Code for 3D Printing: Make a Nametag
77 Investigate: Parametric and Customizable Models
78 Explore: Modeling with OpenSCAD Code
83 Create: Customize a Name Tag Using OpenSCAD Code
88 Create: Write OpenSCAD Code from Scratch to Design a Model
90 Further Activities: OpenSCAD and Thingiverse Customizer
taBle oFcontents

92 ProJect: dIgItal sculPtIng WIth sculPtrIs 93 Making 3D Printed Fossils
95 Investigate: Fossils and the Geological Timescale
96 Explore: Designing with Sculptris
100 Create: Design a Shell Fossil
103 Create: Design a Tooth Fossil
106 Create: Design Your Own Fossils
108 Further Activities: Plaster Molds, Timescale Fossil Dig
110 ProJect: solId modelIng WIth 123d desIgn 111 Experimental Engineering: Build a Bridge
113 Investigate: Bridges and Other Load-Bearing Structures
114 Explore: Modeling with 123D Design
118 Create: Modeling Strength Test Beams
123 Create: Design a Four-Point Connector
127 Create: Design a Hexagonal Connector
130 Create: Design an Arc Connector
133 Create: Design Additional Connectors
134 Further Activities: Bridge Testing, Upcycled Structures
136 advanced 3d PrIntIng technIques and trouBleshootIng 137 Using Autodesk Meshmixer In 3D Printing
142 conclusIon and neXt stePs 144 acKnoWledgments

IntroductIon to 3d PrIntIng In the classroom
At MakerBot, we believe that 3D printing and modeling offer a rich way to enhance and reinforce
science, technology, engineering, art, math, and design skills already being taught in the classroom.
Presenting real-world challenges to students engages them with a hands-on approach to problem
solving.
Everyone’s journey when approaching 3D printers is different. It doesn’t matter what your
background is; anyone can learn to create with 3D printing through project-based learning and
experimentation.
3D printing is a tool that allows people to create new things, limited only by imagination. 3D printing
and modeling projects should empower your students to take chances and make mistakes. Though
it may sound unconventional, we encourage students to fail early and often, thereby acquiring the
problem-solving skills and confidence that will convince them to keep trying until their designs
succeed.
Use this book as a starting point to help you integrate 3D printing into your curriculum and teach
your students the basics of 3D printing. Before you know it, your class will be creating amazing things
that you never thought possible.
Inspiration is all around you. We can’t wait to see what you make!
he MakerBot Education eam6 INTRODUCTION TO 3D PRINTING IN THE CLASSROOM | MAKERBOT IN THE CLASSROOM

MAKERBOT IN THE CLASSROOM | INTRODUCTION TO 3D PRINTING IN THE CLASSROOM 7
learnIng oBJectIves
Our goal is to provide you with:
• A solid foundation to learn and teach 3D printing
• Ideas for bringing 3D printing into your classroom
• Knowledge about different types of 3D modeling software and their strengths
• Foundational projects that make it easy to integrate 3D printing into your curriculum
• Confidence to take projects further and tailor them to your students’ needs
Our goal is to help students:
• Increase their planning, critical thinking, reasoning, and creative skills
• Develop strong communication and collaboration skills
• Practice visualization and decision making
• Know how and when to use this technology and how to choose appropriate tools
• Learn the importance of iteration in the design cycle
• Understand how to use a 3D printer
3d PrIntIng as a tool
Remember that a 3D printer is another tool in your toolbox, one that’s immensely helpful for creating
a range of objects, both simple and complex. By learning the ins and outs of this emerging technology,
you can find new and interesting uses beyond just the printer itself.
hoW to use thIs BooK
Use this book as a starting point to approach 3D printing. In the following sections, we’ll share our
knowledge and demonstrate a few projects that can be incorporated into your classroom. However,
what you can do with a 3D printer doesn’t stop at what we’ve outlined. 3D printers can be a part of
any subject if you understand a few basics and think outside the box.
The first portion of this book focuses on how MakerBot Replicator� 3D Printers work and how to
teach the technology of the printers themselves. Each section provides you with background
knowledge, learning objectives, terminology, example activities, and discussion materials.
The second portion covers Three Ways to Make, the three major approaches to finding models to
3D print. We will go over downloading from an online community, navigating a 3D scanner and
designing models from scratch using a variety of 3D design programs.
The third portion of this book focuses on specific project-based learning examples that are meant
to be steppingstones to integrating 3D printing into your classroom. You and your students will
investigate the subject matter, explore a variety of 3D modeling tools, then create and print original
designs. We encourage you to look at the Further Exploration section of each project for ideas on
how to tie the project into the rest of your curriculum.

ProJect: PrImItIve modelIng WIth tInKercad
52 PROJECT: PRIMITIVE MODELING WITH TINKERCAD | MAKERBOT IN THE CLASSROOM
MAKERBOT IN THE CLASSROOM | PROJECT: PRIMITIVE MODELING WITH TINKERCAD 53
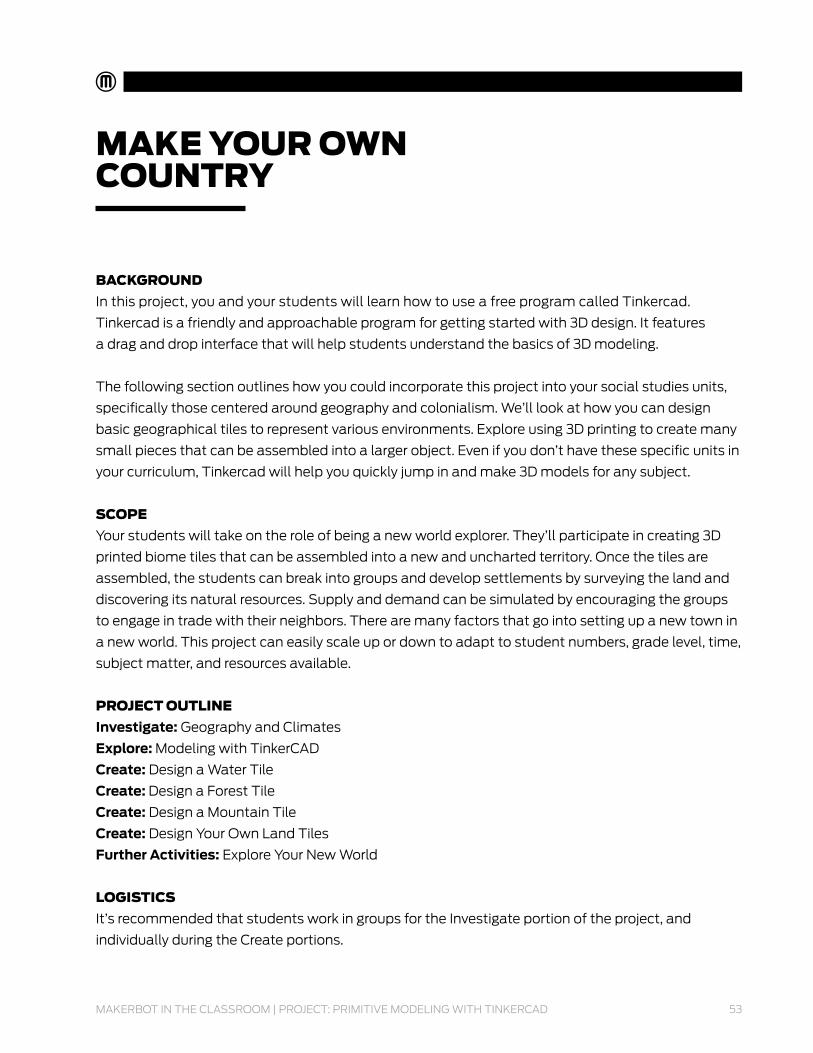
BacKground
In this project, you and your students will learn how to use a free program called Tinkercad.
Tinkercad is a friendly and approachable program for getting started with 3D design. It features
a drag and drop interface that will help students understand the basics of 3D modeling.
The following section outlines how you could incorporate this project into your social studies units,
specifically those centered around geography and colonialism. We’ll look at how you can design
basic geographical tiles to represent various environments. Explore using 3D printing to create many
small pieces that can be assembled into a larger object. Even if you don’t have these specific units in
your curriculum, Tinkercad will help you quickly jump in and make 3D models for any subject.
scoPe
Your students will take on the role of being a new world explorer. They’ll participate in creating 3D
printed biome tiles that can be assembled into a new and uncharted territory. Once the tiles are
assembled, the students can break into groups and develop settlements by surveying the land and
discovering its natural resources. Supply and demand can be simulated by encouraging the groups
to engage in trade with their neighbors. There are many factors that go into setting up a new town in
a new world. This project can easily scale up or down to adapt to student numbers, grade level, time,
subject matter, and resources available.
ProJect outlIne
Investigate: Geography and Climates
Explore: Modeling with TinkerCAD
Create: Design a Water Tile
Create: Design a Forest Tile
Create: Design a Mountain Tile
Create: Design Your Own Land Tiles
Further Activities: Explore Your New World
logIstIcs
It’s recommended that students work in groups for the Investigate portion of the project, and
individually during the Create portions.
maKe Your oWn countrY
54 PROJECT: PRIMITIVE MODELING WITH TINKERCAD | MAKERBOT IN THE CLASSROOM
• Technology
• MakerBot Replicator
• Computers with a WebGL-enabled browser (for example, Google Chrome or Mozilla Firefox) and
MakerBot Desktop installed
• Three-button mouse (optional)
• Suggested print time: 20–30 minutes per tile
• Suggested model size: 30 mm x 30 mm per tile
• Suggested number of prints: one or two per student
• Visit www.tinkercad.com to create an account(s).
• You can set up one free account for your whole class or, if possible, have each student create
their own free account.
Note: Because Tinkercad runs in an internet browser instead of locally, disruptions in wireless or
networked internet access, as well as server problems at Tinkercad, could cause a disruption to
your class schedule. It’s a good idea to always have a backup plan when working with Tinkercad.
learnIng oBJectIves
General
• Explore the history of colonialism
• Research the geography of different regions
• Understand the importance of natural resources
• Learn basic principles of economics (supply and demand)
• Create 3D printed visuals for the classroom
3D Printing
• Building in pieces
• Optimizing print time
• Printing multiple objects at a time
3D Design (Primitive Modeling)
• Navigation
• Shape Generators
• Primitives
• Holes
termInologY
• Primitive: A basic 3D geometric shape
• Terrain: A stretch of land with focus on its physical features
• Hotkey: A keyboard shortcut to a tool
• Group: Combining primitives into one shape
• Hole: A primitive that removes material when grouped with other objects

MAKERBOT IN THE CLASSROOM | PROJECT: PRIMITIVE MODELING WITH TINKERCAD 55
Tinkercad is a browser-based program that requires an account to sign in. According to its
developers, it will work best on Firefox or Chrome. You can set up a class account and distribute
the password. Once everyone is signed in, click the blue Create new design button.
eXPlore: PrImItIve modelIng WIth tInKercad

56 PROJECT: PRIMITIVE MODELING WITH TINKERCAD | MAKERBOT IN THE CLASSROOM
InterFace
The following elements of the interface should look like the image below.
1. Workplane – Blue grid surface where you’ll build your models
2. Camera navigation buttons – Use these to navigate around your Workplane or use the mouse
shortcuts described below
3. System options – Save your design, edit properties, and access help topics
4. File name – Notice that Tinkercad will automatically give your project a crazy name; you’ll be
able to change that later if you wish
5. Action buttons – Undo/redo actions and modify your design by grouping or aligning objects
6. Primitives menu – Long column of menus containing lots of modeling tools; you’ll use these
primitives to build your models
7. Grid options – Change the size of your Workplane and the snap interval value
W
1
?
+-
2
Design Edit Help3
Glorious Blad 4
Undo Redo Group UngroupAdjust
5
A 16
Edit grid
1.0Snap grid
7

MAKERBOT IN THE CLASSROOM | PROJECT: PRIMITIVE MODELING WITH TINKERCAD 57
steP 1: Place oBJects on the WorKPlane.
Let’s start by dragging and dropping to add some objects to our design.
• In the Primitives menu, scroll down until you see Geometric. You should see objects like Box,
Cylinder, and Pyramid. If the triangle points right, it means the section is closed. Just click on
the triangle to open it.
• Scroll up and down the Primitives menu and drag interesting things onto the Workplane.
steP 2: learn hoW to navIgate.
You can move around in Tinkercad by pressing the navigation buttons in the upper left corner.
With a three-button mouse, you can also use these shortcuts to become a navigation pro:
• Orbit – Left-click and drag to turn around the model.
• Pan – Hold Shift key, right-click and drag to move the Workplane around.
• Zoom – Scroll the mouse wheel up and down.
steP 3: move and resIze oBJects.
• Drag a red box primitive onto the Workplane. Orbit and/or pan your view as necessary to view the
box from different angles.
• To move the box up or down, drag the black handle above the box.
• Experiment with the ways you can resize the box by clicking and dragging the small white and
black boxes along its perimeter.
• To preserve the proportions of an object, hold down the Shift key when resizing. Now you can
make an object bigger or smaller without changing its overall shape.
TIPS: THE VIEW WINDOW IS EASIER TO MANIPULATE WITH A THREE-BUTTON
MOUSE THAN WITH A TOUCH PAD. USE THE HOME ICON TO RESET YOUR VIEW
IF YOU GET LOST WHILE NAVIGATING.
TIP: TINKERCAD ALSO HAS BUILT-IN TUTORIALS THAT
YOU CAN USE TO EXPLORE MORE FEATURES AND TECHNIQUES.
58 PROJECT: PRIMITIVE MODELING WITH TINKERCAD | MAKERBOT IN THE CLASSROOM
steP 4: use the ruler tool.
• The Ruler is one of the most important tools in Tinkercad. You can find it in the Primitives menu
under Helpers.
• Drag the Ruler to any place on the Workplane.
• When the Ruler is on the Workplane, clicking on an object will also reveal its position and size
values in each direction. You can modify the position or size of an object by clicking on the
numbers and typing in values directly. This is useful when you need an object to be a specific size.
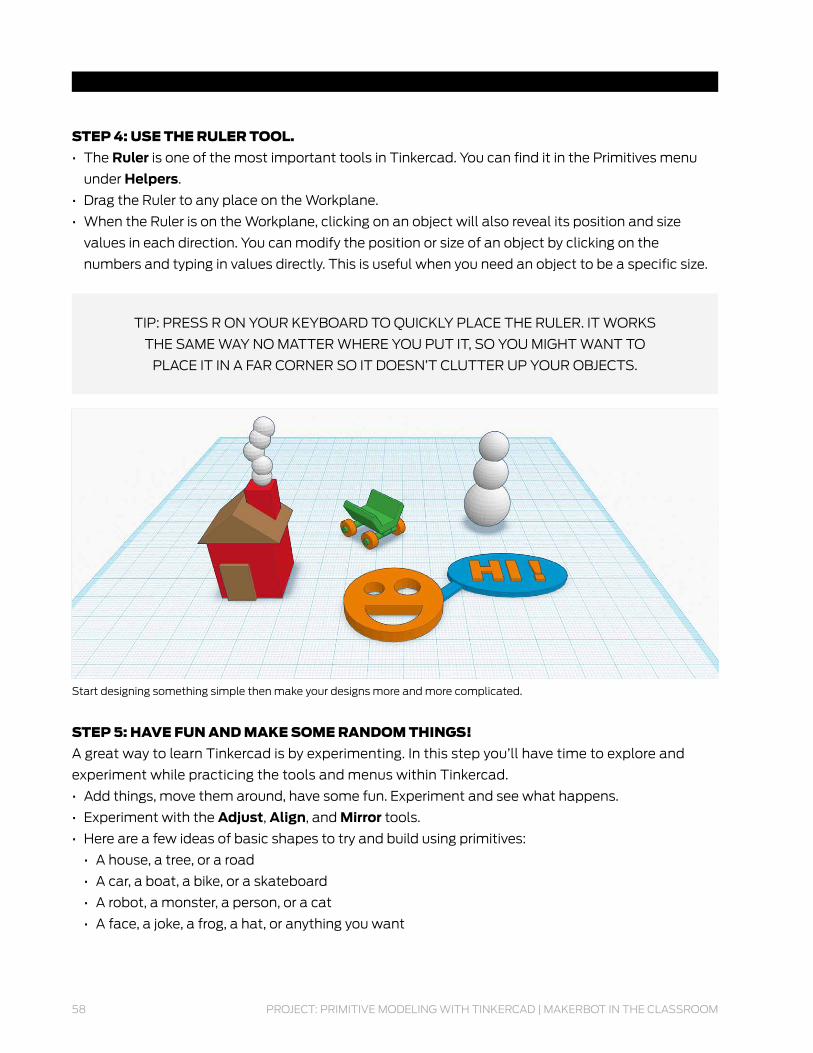
steP 5: have Fun and maKe some random thIngs!
A great way to learn Tinkercad is by experimenting. In this step you’ll have time to explore and
experiment while practicing the tools and menus within Tinkercad.
• Add things, move them around, have some fun. Experiment and see what happens.
• Experiment with the Adjust, Align, and Mirror tools.
• Here are a few ideas of basic shapes to try and build using primitives:
• A house, a tree, or a road
• A car, a boat, a bike, or a skateboard
• A robot, a monster, a person, or a cat
• A face, a joke, a frog, a hat, or anything you want
Start designing something simple then make your designs more and more complicated.
TIP: PRESS R ON YOUR KEYBOARD TO QUICKLY PLACE THE RULER. IT WORKS
THE SAME WAY NO MATTER WHERE YOU PUT IT, SO YOU MIGHT WANT TO
PLACE IT IN A FAR CORNER SO IT DOESN’T CLUTTER UP YOUR OBJECTS.

MAKERBOT IN THE CLASSROOM | PROJECT: PRIMITIVE MODELING WITH TINKERCAD 59
to Integrate thIs ProJect Into Your classroom consIder havIng Your students research the dIFFerent BIomes (desert, raInForest, tundra, etc.), eIther In PaIred grouPs or IndIvIduallY.
• What defines the biomes?
• Where are these biomes located?
• What makes each biome difficult to live in?
• What resources are abundant in each of the biomes?
have an oPen dIscussIon aBout the resources Your students use daIlY. a resource Is a suPPlY From WhIch BeneFIt Is Produced.
• Have the students write down their favorite resource, and have them explain why.
• Have the students research which resources come from which biomes.
the students should research hoW PeoPle use these BIomes.
• What kinds of cultures live in each biome?
• How do residents grow or manage food?
• How are buildings made in response to living in these climates?
InvestIgate: geograPhY and clImates

60 PROJECT: PRIMITIVE MODELING WITH TINKERCAD | MAKERBOT IN THE CLASSROOM
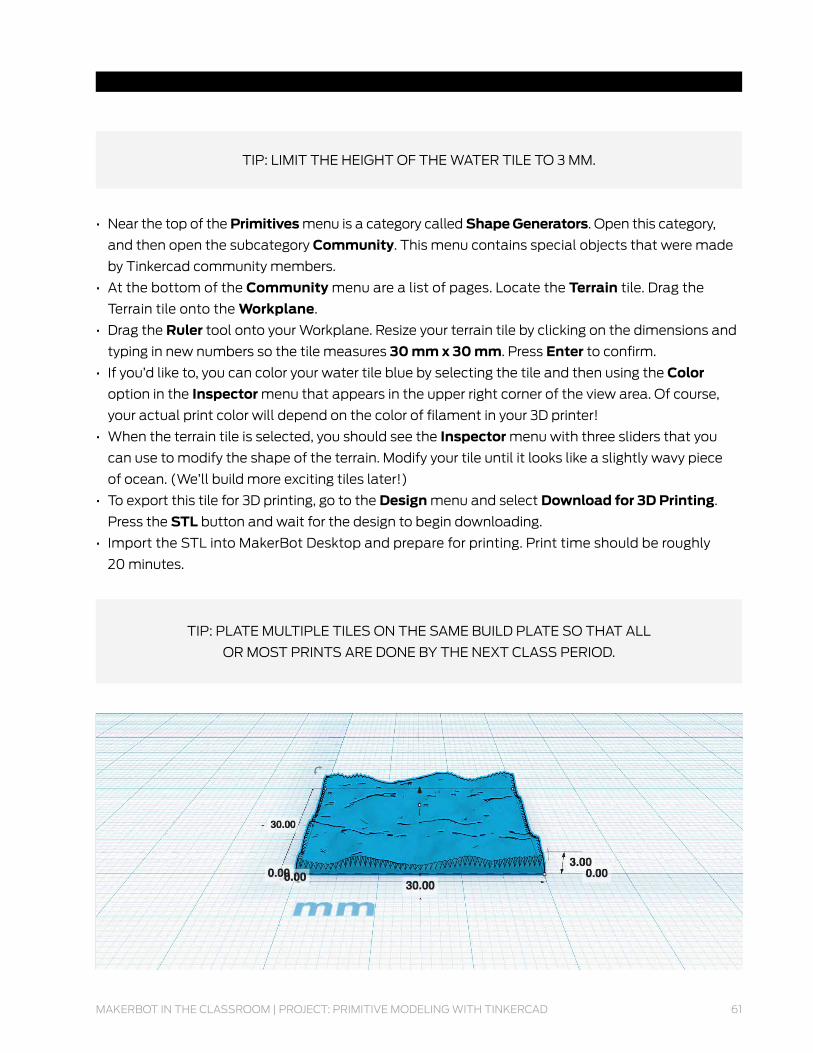
steP 1: create a terraIn tIle WIth a terraIn shaPe generator.
The Create projects below will all be based on a Shape Generator object called Terrain (found in
the Primitives menu). In this step we’ll learn how to find and use Terrain to make a simple water
tile like this one.
create: desIgn a Water tIle
MAKERBOT IN THE CLASSROOM | PROJECT: PRIMITIVE MODELING WITH TINKERCAD 61
• Near the top of the Primitives menu is a category called Shape Generators. Open this category,
and then open the subcategory Community. This menu contains special objects that were made
by Tinkercad community members.
• At the bottom of the Community menu are a list of pages. Locate the Terrain tile. Drag the
Terrain tile onto the Workplane.
• Drag the Ruler tool onto your Workplane. Resize your terrain tile by clicking on the dimensions and
typing in new numbers so the tile measures 30 mm x 30 mm. Press Enter to confirm.
• If you’d like to, you can color your water tile blue by selecting the tile and then using the Color
option in the Inspector menu that appears in the upper right corner of the view area. Of course,
your actual print color will depend on the color of filament in your 3D printer!
• When the terrain tile is selected, you should see the Inspector menu with three sliders that you
can use to modify the shape of the terrain. Modify your tile until it looks like a slightly wavy piece
of ocean. (We’ll build more exciting tiles later!)
• To export this tile for 3D printing, go to the Design menu and select Download for 3D Printing.
Press the STL button and wait for the design to begin downloading.
• Import the STL into MakerBot Desktop and prepare for printing. Print time should be roughly
20 minutes.
TIP: PLATE MULTIPLE TILES ON THE SAME BUILD PLATE SO THAT ALL
OR MOST PRINTS ARE DONE BY THE NEXT CLASS PERIOD.
TIP: LIMIT THE HEIGHT OF THE WATER TILE TO 3 MM.

62 PROJECT: PRIMITIVE MODELING WITH TINKERCAD | MAKERBOT IN THE CLASSROOM
In this project you’ll modify your water tile to make a forest tile. Everyone’s forest tile will look
different, but the printed result might look something like the image below.
create: desIgn a Forest tIle

MAKERBOT IN THE CLASSROOM | PROJECT: PRIMITIVE MODELING WITH TINKERCAD 63
steP 1: create the ground terraIn oF Your tIle.
• Make a copy of your 30 mm x 30 mm water tile.
• Click on the tile and use the Inspector menu to adjust the terrain of the tile to your liking. Also
adjust the height of your tile to make the terrain more dramatic. Will it be a hilly forest or a flat
landscape? You decide.
• You might also want to change the color of your terrain from blue to green.
steP 2: create a tree trunK and a treetoP.
The most important part of creating a forest tile is populating it with trees! In this step we’ll set up
the basic shapes that make up the tree.
• Make sure you have the Ruler somewhere on the Workplane.
• Drag a cylinder primitive from the Geometric menu onto the Workplane.
• Resize the cylinder to 2 mm long, 2 mm wide, and 3 mm high.
• Now repeat the same procedure to select and place a cone primitive.
• Resize the cone to 4 mm long, 4 mm wide, and 6 mm high.
• Your Tinkercad design might now look something like this picture. Feel free to change the colors
of your trunk and treetop as you like.
steP 3: alIgn and grouP the tree comPonents.
Assembling your trunk and top into a tree requires a few new tools. If you make a mistake, use the
Undo button and try again.
TIP: LIMIT THE HEIGHT OF THE FOREST TILE TO 10 MM.

64 PROJECT: PRIMITIVE MODELING WITH TINKERCAD | MAKERBOT IN THE CLASSROOM
• Select the cone and look at its measurements. Drag the black handle on top of the cone and pull it
upward 3 mm, so it’s at the same height as the top of the cylinder.
• Now you need to get the cone lined up directly over the cylinder. You can try to do this by moving
the cone with the mouse and/or arrow keys, but it’s much easier and more accurate to use
Tinkercad’s powerful Align tool. Select the cylinder and the cone at the same time by holding
Shift and selecting both objects.
• Click on the Adjust button in the top menu bar, and choose Align from the dropdown menu. You
should see black pins around your two selected objects. These pins represent different possible
alignment positions for the objects.
• You want the cone and the cylinder to be center-aligned in both the x-axis direction and the
y-axis direction. To do this, click on the center pin in the x-axis direction and the center pin
in the y-axis direction. Your objects will snap into alignment.
• Now group the cylinder and cone objects together so they act as one combined unit. Make sure
that both objects are still selected, and then press Group in the top menu bar.
steP 4: Place and sIze Your tree.
• Select and drag your tree onto the terrain tile. You can raise or lower the position of the tree with
the black arrow handle above the tree.
• If you want to make your tree taller, shorter, wider, thinner, larger, or smaller, you can do so with the
white and black handles around the tree object. For example, pull on the top white dot to stretch
the tree taller, or pull out a corner dot to make the tree wider.
TIP: REMEMBER THAT YOU CAN HOLD SHIFT WHILE DRAGGING A CORNER
IF YOU WANT TO MAKE THE ENTIRE TREE PROPORTIONALLY LARGER OR
SMALLER WHILE KEEPING ITS SHAPE THE SAME.

MAKERBOT IN THE CLASSROOM | PROJECT: PRIMITIVE MODELING WITH TINKERCAD 65
steP 5: rePeat to maKe a Forest oF trees.
To make an interesting forest tile, you’ll need a lot of trees of different shapes and sizes. Use your
creativity to make and place your own unique set of trees.
• Select your first tree and copy/paste to make a second one by using the Edit menu (or by using
the hotkeys on your keyboard).
• Arrange your trees to make a small clustered forest, a large dense forest, or a sparse forest with
room for a path, depending on what you like.
• Scale some trees up and down using the black and white squares around each object. Not all trees
are the same in real life, so your forest may be more realistic if you vary the tree sizes. Make sure
the trees don’t exceed a height of 15 mm, and the cylinder trunks don’t get too thin or fragile.
• Try making a few different kinds of trees by experimenting with different geometric shapes for the
treetops.
• When you’re done with your forest tile, click and drag a selection window around all of its
components and press Group. If you’d like to keep the multiple colors of your trees and landscape,
click on Color in the Inspector window and select Multicolor. Of course, the color of your final 3D
printed tile will be determined by the color of filament in your printer, not by the colors you choose
in Tinkercad.
• Import the STL into MakerBot Desktop and prepare for printing.

66 PROJECT: PRIMITIVE MODELING WITH TINKERCAD | MAKERBOT IN THE CLASSROOM
In this project you’ll use the design techniques you’ve learned so far to make a mountain tile. Along
the way you’ll learn about Tinkercad’s Hole tool. Everyone’s mountain tile will be unique, but yours
might look something like the image below when you’re done.
create: desIgn a mountaIn tIle
MAKERBOT IN THE CLASSROOM | PROJECT: PRIMITIVE MODELING WITH TINKERCAD 67
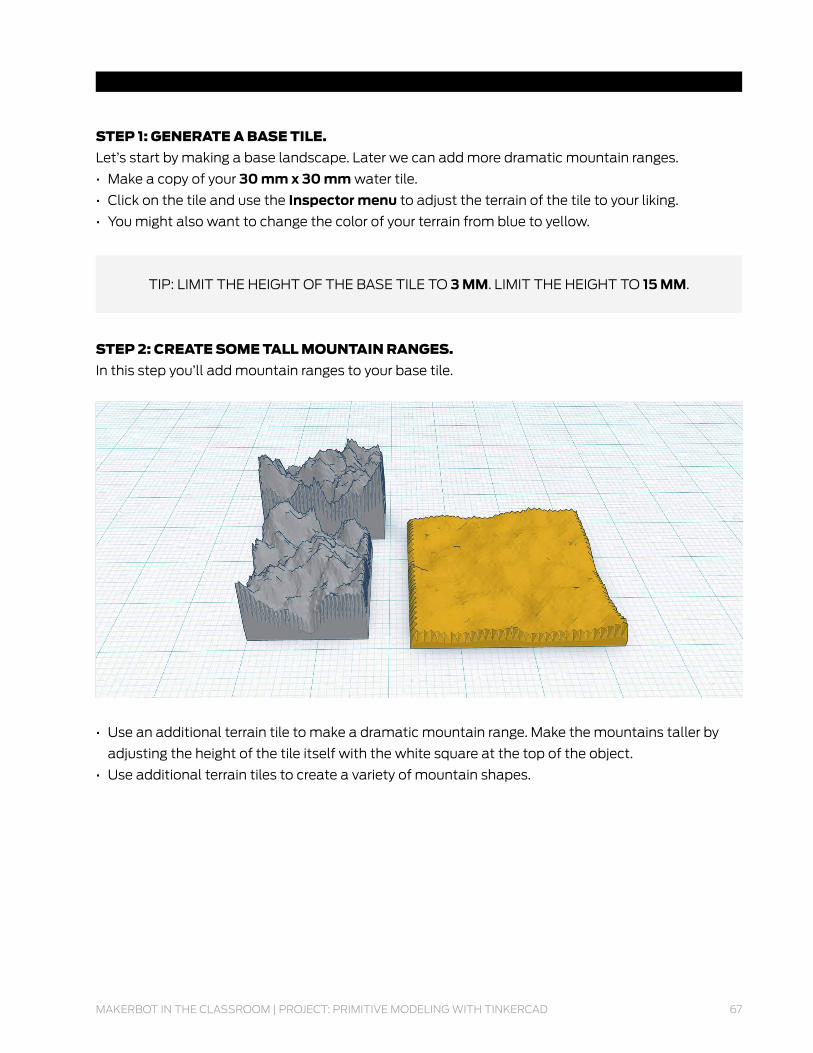
steP 1: generate a Base tIle.
Let’s start by making a base landscape. Later we can add more dramatic mountain ranges.
• Make a copy of your 30 mm x 30 mm water tile.
• Click on the tile and use the Inspector menu to adjust the terrain of the tile to your liking.
• You might also want to change the color of your terrain from blue to yellow.
steP 2: create some tall mountaIn ranges.
In this step you’ll add mountain ranges to your base tile.
• Use an additional terrain tile to make a dramatic mountain range. Make the mountains taller by
adjusting the height of the tile itself with the white square at the top of the object.
• Use additional terrain tiles to create a variety of mountain shapes.
TIP: LIMIT THE HEIGHT OF THE BASE TILE TO 3 MM. LIMIT THE HEIGHT TO 15 MM.

68 PROJECT: PRIMITIVE MODELING WITH TINKERCAD | MAKERBOT IN THE CLASSROOM
steP 3: arrange the mountaIn ranges on Your tIle.
In this step you’ll merge the mountain ranges you’ve created into your base tile.
• Drag your mountain tiles onto the base and rotate or arrange them however you like.
• To make the transition between the mountains and the ground a bit more natural, select a
mountain range and use the black handle above the object to push it down further into the base
tile. This will make the bottom of the mountain range extend below the base tile, but that’s okay;
we’ll cut that part off in the next step!
steP 4: cut oFF the Bottom oF the tIle usIng the hole tool.
One of the most powerful tools that Tinkercad offers is the ability to make some objects holes
that cut away pieces of other objects. In this step you’ll use that tool to cut off any stray pieces of
mountain range that extend below your base tile.
• Orbit your view so that you can see underneath the base tile.
• Drag a cube from the Primitives menu onto the Workplane.
• Resize the cube so that it’s comfortably larger than your base tile, and shift it downward so its top
is exactly at the bottom of your tile.
• Select the cube and then click the Hole button in the Inspector menu.
• Select all objects and press Group to combine them. Notice that the hole will cut away from the
rest of the object.
TIP: IF YOUR CUBE HEIGHT IS 50 MM
THEN YOU CAN DO THIS BY SETTING
THE DISTANCE BETWEEN THE
BOTTOM OF THE CUBE AND THE
WORKPLANE TO –50 MM.

MAKERBOT IN THE CLASSROOM | PROJECT: PRIMITIVE MODELING WITH TINKERCAD 69
Now use the techniques from the previous three Create sections to make your own land tile! On the
next page you’ll see some variations on the forest, water, and mountain tiles that we’ve designed.
create: desIgn a land tIle

70 PROJECT: PRIMITIVE MODELING WITH TINKERCAD | MAKERBOT IN THE CLASSROOM
• Make a 30 mm x 30 mm base tile with the Terrain Shape Generator. Randomize the shape of
the terrain until it has the look you want, and make the land contours taller or shorter by stretching
the tile itself from the top.
• Create land features to add to your tile. Try things from nature like hills, mountains, valleys, rivers,
and trees. Or if you want to add man-made structures like bridges and houses, you can try that
too! Just make sure your structures aren’t so small that they won’t print.
• Once the students have completed their designs, ask each to download one or two tiles and
get them ready for 3D printing. To export this tile for 3D printing, go to the Design menu and select
Download for 3D Printing. Press the STL button and wait for the design to begin downloading.
• Import the STL into MakerBot Desktop and prepare for printing. Print time should be roughly
20–40 minutes.
TIPS: PLATE MULTIPLE TILES ON THE SAME BUILD PLATE SO THAT ALL OR
MOST TILES ARE DONE BY THE NEXT CLASS PERIOD. EACH CLIMATE COULD
HAVE A FILAMENT COLOR THAT’S ASSOCIATED WITH IT. IF YOU WANT TO ADD
EVEN MORE COLOR, TRY USING PAINT OR PAINT MARKERS TO DECORATE
YOUR TILES AFTER PRINTING.

MAKERBOT IN THE CLASSROOM | PROJECT: PRIMITIVE MODELING WITH TINKERCAD 71
Further actIvItIes: eXPlore Your neW World
actIvItY 1: resources and settlements After you’ve modeled and printed everyone’s tiles, assemble them on a large surface as a group.
This 3D printed map will serve as the new world, established by your class.
72 PROJECT: PRIMITIVE MODELING WITH TINKERCAD | MAKERBOT IN THE CLASSROOM
Materials
• 3D printed land tiles
• Paint (optional)
• Large surface (for assembling map)
Steps
1. Have your students investigate and use their critical thinking skills to learn about historical
settlements and how they were founded. Each student picks or is assigned a historical state,
country, or place to research.
• Investigate the geography and climate of the place.
• Describe the natural resources of the area and how they were used.
• Consider where the settlements were located and why they were built there.
• Did the settlement have an economic system? What did it look like? Was there a currency?
• Whom did the settlers trade with? What were they trading for?
• Did they have any religious systems or cultural traits?
2. Following this research, break the students into teams. Give them the follow prompt: Your home
country has sent your team on an expedition to discover and colonize new and uncharted lands.
After sailing for many weeks on end, your fleet has spotted a new world and is landing to investigate.
• Each team will pick a formation of 6–10+ tiles on the class map as its landing point.
• Based on the location, the team will survey and establish a settlement in the region.
• Using criteria similar to those in Step 1, have the teams compile information about their new
settlements.
• Have the students write a short description of their team’s new settlement. They should take
into consideration natural resources they get from each tile, and how they plan to set up their
buildings and transportation.
actIvItY 2: create transPortatIon sYstems Now that you’ve established your settlement in your new world, it’s time to think about how you’re
going to travel around. What would the transportation look like in your new environment?
Materials
• Computer with Tinkercad
• 3D printed tiles creating your class map
Steps
1. Have your students research traditional transportation systems, using history as a reference.
• What are the benefits and drawbacks of each?
• Are certain types of transportation specific to certain climates or geographies?

MAKERBOT IN THE CLASSROOM | PROJECT: PRIMITIVE MODELING WITH TINKERCAD 73
2. Have the teams brainstorm transportation systems for their settlements. What’s the best way to
travel the terrain? Roads, waterways, flying? The sky’s the limit.
3. Have the students create these transportation systems in Tinkercad, either by modifying their
original tiles or by modeling new parts to add to the existing class map. Perhaps they’ll model a
car, a hot air balloon, or a boat. Or maybe they’ll invent a new type of transportation.
KnoWledge checKs
• What are the benefits of modeling small, separate pieces for printing?
• What tools do you use to build objects in Tinkercad?
• What are the strengths and weaknesses of Tinkercad?
• How do you navigate in Tinkercad?
• When building the mountain tiles, why was it important to use the Hole tool to cut off the base
of the tile?
• What are the benefits of plating multiple prints at a time?
movIng ForWard
Tinkercad is a great tool for getting started with 3D modeling. Despite the simplicity of its interface,
Tinkercad is a very powerful tool, and many modelers have used it to create complex objects. In
situations where you need to create a visual aid or prototype, Tinkercad can help you model an idea
quickly and refine it further when needed. If you’re not sure where or how to integrate 3D modeling
into your subject, Tinkercad might be the tool for you.

Empower your students to design, collaborate, and create amazing things you never thought
possible with MakerBot in the Classroom: An Introduction to 3D Printing and Design. Packed with
resources, MakerBot in the Classroom gives you the basics of 3D printing and design as well as
ideas, projects, and activities for integrating 3D printers in your curriculum.
As the future of 3D printing continues to be defined, MakerBot Education is working together
with educators to provide the tools, resources, and support for getting started with this newly
accessible technology. Join the thousands of educators already using desktop 3D printing to
enhance lesson plans and supercharge student creativity and engagement.
We can’t wait to see what you make!


![MakerBot Replicator 2 - tecnocopia.ch · MakerBot ® Replicator ™2 ... MAKERBOT ® REPLICATOR ... support@makerbot.com [Mon–Sat, 9 AM–6 PM ET]. ·ach of our support team members](https://static.fdocuments.us/doc/165x107/5bd6f9ce09d3f29b748c4b24/makerbot-replicator-2-makerbot-replicator-2-makerbot-replicator.jpg)