COMPASS Provider Quick Reference - Seton Healthcare … · COMPASS Provider Quick Reference ......
18
` 1 COMPASS Provider Quick Reference Table of Contents Introduction ................................................................................................................................................................... 3 COMPASS Overview ................................................................................................................................................ 3 PART I PowerChart (FirstNet Where Applicable) ........................................................................................................ 3 Patient Lists - PowerChart ......................................................................................................................................... 3 Patient Lists - Creating a Location List ..................................................................................................................... 3 Patient Lists - Creating Custom Patient Lists ............................................................................................................ 3 Patient Lists - Add/Remove a Patient to/from a Custom List .................................................................................... 3 Patient Lists - Creating a Provider Group List ........................................................................................................... 4 Patient Lists - Deleting a List .................................................................................................................................... 4 Toolbar Summary ...................................................................................................................................................... 4 Message Center - Overview....................................................................................................................................... 4 Message Center - Proxies .......................................................................................................................................... 5 Message Center - Co-signatures ................................................................................................................................ 5 Allergies .................................................................................................................................................................... 5 Orders Management .................................................................................................................................................. 5 Entering an Order ...................................................................................................................................................... 6 Medication Clinical Decision Support (mCDS) ........................................................................................................ 6 Weight-Based Dosage Calculator .............................................................................................................................. 6 Power Plan Overview ................................................................................................................................................ 6 Care Set Overview ..................................................................................................................................................... 7 Discontinue Power Plans ........................................................................................................................................... 7 Orders - Favorite Folders ........................................................................................................................................... 7 Orders - Organizing Favorite Folders ........................................................................................................................ 7 Documenting Medication by Hx (Home Meds) ........................................................................................................ 8 Medication Reconciliation - Admission .................................................................................................................... 8 Medication Reconciliation - Transfer ........................................................................................................................ 8 Medication Reconciliation - Suspend/Resume .......................................................................................................... 9 Medication Reconciliation - Discharge ...................................................................................................................... 9 Prescriptions .............................................................................................................................................................. 9 Depart - Discharging a Patient ................................................................................................................................... 9 Patient Education ..................................................................................................................................................... 10 Adding a Diagnosis ................................................................................................................................................. 10 Diagnoses and Problems - Favorites Folders ........................................................................................................... 11 PowerNote ............................................................................................................................................................... 11 Saving a PowerNote ................................................................................................................................................ 11 Editing a Saved PowerNote ..................................................................................................................................... 12 ePrescribe ................................................................................................................................................................ 12 PART II FirstNet ......................................................................................................................................................... 12 FirstNet .................................................................................................................................................................... 12 Tracking List—Checking-in .................................................................................................................................... 12 Tracking List—Assigning Self ................................................................................................................................ 13 Tracking List - Navigation....................................................................................................................................... 13 Tracking List - Columns .......................................................................................................................................... 13 Tracking List - Shortcuts ......................................................................................................................................... 14 Critical Value Review.............................................................................................................................................. 14 FirstNet Specifics Features- ED Triage View ......................................................................................................... 14 ED Order Folders..................................................................................................................................................... 14 ED Displayed Orders ............................................................................................................................................... 15 ED Reducing Clicks When Placing Orders ............................................................................................................. 15 ED Specific Single Orders ....................................................................................................................................... 15
Transcript of COMPASS Provider Quick Reference - Seton Healthcare … · COMPASS Provider Quick Reference ......

`
1
COMPASS Provider Quick Reference
Table of Contents Introduction ................................................................................................................................................................... 3
COMPASS Overview ................................................................................................................................................ 3 PART I PowerChart (FirstNet Where Applicable) ........................................................................................................ 3
Patient Lists - PowerChart ......................................................................................................................................... 3 Patient Lists - Creating a Location List ..................................................................................................................... 3 Patient Lists - Creating Custom Patient Lists ............................................................................................................ 3 Patient Lists - Add/Remove a Patient to/from a Custom List .................................................................................... 3 Patient Lists - Creating a Provider Group List ........................................................................................................... 4 Patient Lists - Deleting a List .................................................................................................................................... 4 Toolbar Summary ...................................................................................................................................................... 4 Message Center - Overview ....................................................................................................................................... 4 Message Center - Proxies .......................................................................................................................................... 5 Message Center - Co-signatures ................................................................................................................................ 5 Allergies .................................................................................................................................................................... 5 Orders Management .................................................................................................................................................. 5 Entering an Order ...................................................................................................................................................... 6 Medication Clinical Decision Support (mCDS) ........................................................................................................ 6 Weight-Based Dosage Calculator .............................................................................................................................. 6 Power Plan Overview ................................................................................................................................................ 6 Care Set Overview ..................................................................................................................................................... 7 Discontinue Power Plans ........................................................................................................................................... 7 Orders - Favorite Folders ........................................................................................................................................... 7 Orders - Organizing Favorite Folders ........................................................................................................................ 7 Documenting Medication by Hx (Home Meds) ........................................................................................................ 8 Medication Reconciliation - Admission .................................................................................................................... 8 Medication Reconciliation - Transfer ........................................................................................................................ 8 Medication Reconciliation - Suspend/Resume .......................................................................................................... 9 Medication Reconciliation - Discharge ...................................................................................................................... 9 Prescriptions .............................................................................................................................................................. 9 Depart - Discharging a Patient ................................................................................................................................... 9 Patient Education ..................................................................................................................................................... 10 Adding a Diagnosis ................................................................................................................................................. 10 Diagnoses and Problems - Favorites Folders ........................................................................................................... 11 PowerNote ............................................................................................................................................................... 11 Saving a PowerNote ................................................................................................................................................ 11 Editing a Saved PowerNote ..................................................................................................................................... 12 ePrescribe ................................................................................................................................................................ 12
PART II FirstNet ......................................................................................................................................................... 12 FirstNet .................................................................................................................................................................... 12 Tracking List—Checking-in .................................................................................................................................... 12 Tracking List—Assigning Self ................................................................................................................................ 13 Tracking List - Navigation ....................................................................................................................................... 13 Tracking List - Columns .......................................................................................................................................... 13 Tracking List - Shortcuts ......................................................................................................................................... 14 Critical Value Review.............................................................................................................................................. 14 FirstNet Specifics Features- ED Triage View ......................................................................................................... 14 ED Order Folders ..................................................................................................................................................... 14 ED Displayed Orders ............................................................................................................................................... 15 ED Reducing Clicks When Placing Orders ............................................................................................................. 15 ED Specific Single Orders ....................................................................................................................................... 15

`
2
ED Power Plans ....................................................................................................................................................... 15 ED Disposition Orders ............................................................................................................................................. 16 ED Prescription (Rx) Meds ..................................................................................................................................... 16 PowerNote ED ......................................................................................................................................................... 16 PowerNote ED Templates ....................................................................................................................................... 16 PowerNote ED Procedure Notes .............................................................................................................................. 17 FirstNet Tracking List Icons .................................................................................................................................... 17 Helpful Information ................................................................................................................................................. 17 Notes: ....................................................................................................................................................................... 18

`
3
Introduction
COMPASS Overview COMPASS is the name of the Electronic Medical Record (EMR) used by clinicians at the Seton Healthcare Family. COMPASS is a Cerner product. Providers use COMPASS to look up real-time diagnostic data, place orders electronically, complete medication reconciliation (med rec), write progress notes, and sign medical records online. Seton affiliated providers access COMPASS via PowerChart (Part I of this guide) with the exception of Emergency Medicine providers which access COMPASS via FirstNet (Part II). Note: Some sections of PowerChart (Part I) may apply to FirstNet users. This will be indicated with the FN icon next to the title How to Access COMPASS From inside a Seton facility, COMPASS is accessible by selecting the appropriate COMPASS application icon from the active desktop. http://compass.seton.org From outside a Seton facility, COMPASS is accessible through Seton Doctor Link, Seton’s Internet resource for providers. http://doctors.seton.net/compass
PART I PowerChart (FirstNet Where Applicable)
Patient Lists - PowerChart Providers (excluding Emergency Medicine providers) access COMPASS via PowerChart, Once inside COMPASS, providers may build numerous types of patients lists. The most common lists used by providers are:
Custom List—Allows providers to build and maintain patient list independent of any other activity, i.e. provider can add or delete specific patients based on user preferences. This list is not impacted by the facility’s admission/registration system.
Location List—Allows providers to display all patients in a particular location, i.e. 3rd floor, ICU, etc.
Provider Group List—Displays all patients seen by any provider in a provider group.
Patient Lists - Creating a Location List From the Patient List tab, click the List Maintenance icon on the horizontal toolbar at the top of the screen
Click New. The Patient List Type window opens
Select Location from the List Location. Click on the ‘plus’ sign to open up more options. Select criteria option by selecting the boxes
from the Filter section.
Select Discharged Criteria. From the window, select Not Discharged.
Click Finish
Select the list in the Available Lists window
Click the Add arrow to move the list to the Active List window
Click OK
Patient Lists - Creating Custom Patient Lists
From the Patient List, select the List Maintenance icon on the horizontal toolbar at the top of the screen
Select New. The Patient List Type window will open.
Select Discharged Criteria. From the window, select Only Display Patients That Have Not Been Discharged.
Select Custom, Select Next,
Name the custom list
Select Finish. The Patient List Type window will close
Select the list in the Available Lists window
Select the Add arrow to move the list to the Active List window
Select OK
Patient Lists - Add/Remove a Patient to/from a Custom List Select the custom list in which to add a patient Back to Top
`
4
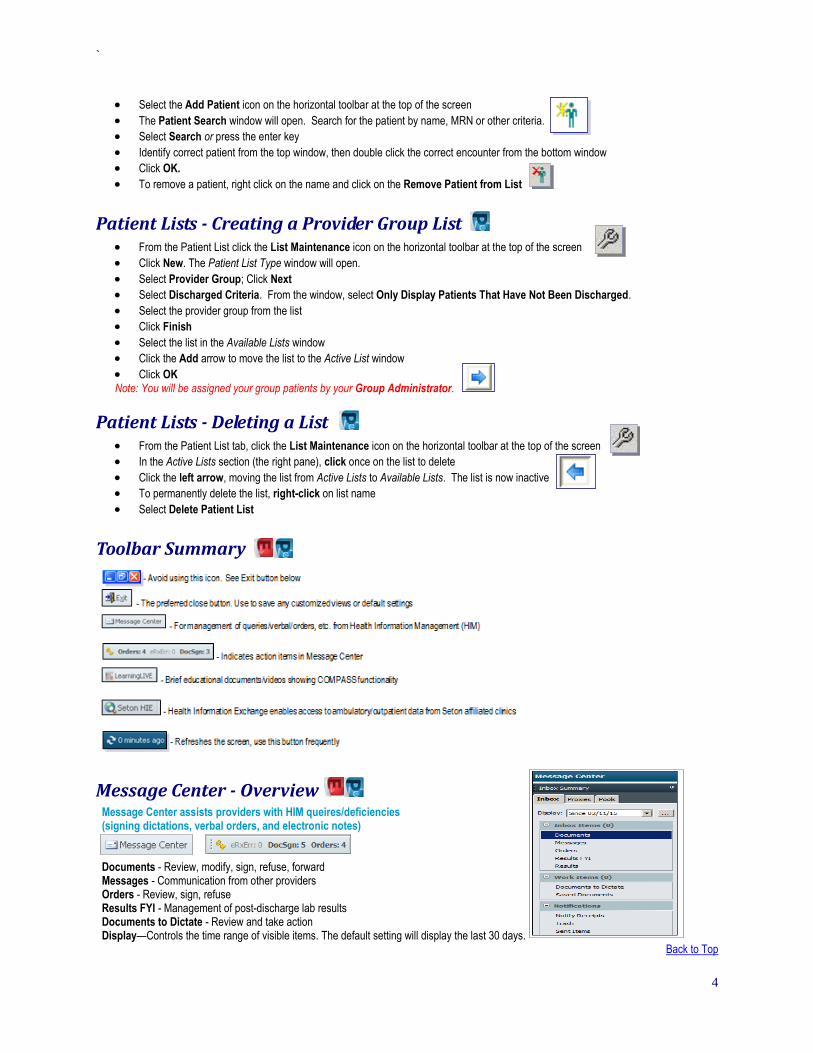
Select the Add Patient icon on the horizontal toolbar at the top of the screen
The Patient Search window will open. Search for the patient by name, MRN or other criteria.
Select Search or press the enter key
Identify correct patient from the top window, then double click the correct encounter from the bottom window
Click OK.
To remove a patient, right click on the name and click on the Remove Patient from List
Patient Lists - Creating a Provider Group List From the Patient List click the List Maintenance icon on the horizontal toolbar at the top of the screen
Click New. The Patient List Type window will open.
Select Provider Group; Click Next
Select Discharged Criteria. From the window, select Only Display Patients That Have Not Been Discharged.
Select the provider group from the list
Click Finish
Select the list in the Available Lists window
Click the Add arrow to move the list to the Active List window
Click OK Note: You will be assigned your group patients by your Group Administrator.
Patient Lists - Deleting a List From the Patient List tab, click the List Maintenance icon on the horizontal toolbar at the top of the screen
In the Active Lists section (the right pane), click once on the list to delete
Click the left arrow, moving the list from Active Lists to Available Lists. The list is now inactive
To permanently delete the list, right-click on list name
Select Delete Patient List
Toolbar Summary
Message Center - Overview Message Center assists providers with HIM queires/deficiencies (signing dictations, verbal orders, and electronic notes) Documents - Review, modify, sign, refuse, forward Messages - Communication from other providers Orders - Review, sign, refuse Results FYI - Management of post-discharge lab results Documents to Dictate - Review and take action Display—Controls the time range of visible items. The default setting will display the last 30 days.
Back to Top

`
5
Message Center - Proxies To proxy a medical provider:
From Message Center, select Proxies from the Inbox
Click the Manage tab
Select Add
Search the physician’s name using the binocular search
The begin date defaults to today’s date and remains for 30 days
Under Available Items, select functions you want to proxy or select, Grant All to grant all signing functions
Once selections are made, click Accept & Next
Then, click OK
Message Center - Co-signatures Medical provider students, residents, and allied health providers are required to route electronic notes to a supervising provider. *All medical provider student notes, MUST be cosigned *Resident and/or allied health providers may require review and/or co-signature depending on specialty. *Notes that have been reviewed can be Forward Only to the author.
Allergies Providers can minimize needless discern alerts by accurately modifying/documenting (adding)patient allergy information early in the patient encounter. Modify— Highlight previously documented allergen and select Modify. Edit the allergy details in section 4 under Allergy details Add— Select +Add. Type the allergen in the Search box and hit enter. Double click on the desired allergen. Type the reaction in the same Search box and hit enter. Double click on the desired reaction. Complete points 1 - 4 on the right side of the screen and hit Apply.
Orders Management Providers need to review all active orders before adding new orders From within the Orders View, left-click on the Displayed Orders banner. Then select All Active Orders and Apply
Back to Top

`
6
Stop, Think, Act and Review
It is important for Providers to review all active orders before adding new orders The process to remember is:
Review all active orders
Ask: Do these orders apply to current situation?
If the answer is YES, do not add additional orders
If the answer is NO, can they be modified to make appropriate? If so, modify
Should they be discontinued? If so, discontinue
After all current orders have been addressed, then ADD new orders.
Note: This process helps to reduce duplicate and conflicting orders entered into the chart
Entering an Order From within the button there are four steps of placing order(s):
Search - use the search window and related synonyms
Review - order details should be reviewed and modified if necessary
Sign - when all details are complete
Refresh - use the minutes ago button to complete the ordering process To remove an order, right-click on the order and select Cancel/D/C Note: Orders which are in a status of, “Processing” can not be discontinued. (Click on the refresh button first, then right-click to discontinue). Note: The medication routes cannot be modified. The order must be canceled and reordered Note: Rad/Lab orders which are “In Process” cannot be modified. A call must be made to radiology or lab.
Medication Clinical Decision Support (mCDS) There are three types of alerts:
Allergy
Drug/Drug
Duplicate Orders To manage these alerts, read the details in the window, use the hyperlinks to obtain more details, and make an appropriate selection from the Reason drop down Use the Continue or Remove New Order buttons
Weight-Based Dosage Calculator
The “Dosage Calculator” icon is located in the Orders Detail section of the order screen. The icon will note which medications will invoke the Dosing Calculator to calculate the final dose.
If the med will be dosed per patient weight, the Dosage Calculator will open
The patient’s dose will calculate from the patient’s charted “Dosing Weight”.
Review the default Target dose
Adjust the weight or enter a more appropriate Final Dose. Use the Rounding function to round dose more easily
Click Apply Dose Note: The Dosing Weight displays in the banner bar. Note: The calculator does NOT cap for maximum/minimum doses in the Final Dose window!
Power Plan Overview A Power Plan is an order set utilizing Evidenced Based Practice (EBP). Plans can be found by typing the comprehensive diagnosis into the search field:
Orders may be Selected/deselected (check or uncheck) and modified as appropriate
- Power Plans may be initiated for immediate use
- Power Plans may be signed and left in a planned state to be initiated later. Back to Top

`
7
- Use the Initiate Power Plan single order to delegate initiation of the plan
- Additional orders may be added to the Plan by using +Add to Phase.
The Banner Bar should show inpatient status. If the Banner Bar does not show this status, leave the Power Plan orders planned and place the Initiate the Power Plan single order.
- “Show Only Selected Items”, orders which are pre-checked in the Power Plan
- “View Excluded Components”, shows orders not initially selected in the Power Plan
- Customize a Power Plan and save it to a Favorites folder before signing the Power Plan - The Ellipse shows other common choices available or that order
- A protocol is imbedded inside a Power Plan
Care Set Overview A Care Set is a smaller collection of pre-built orders conveniently bundled together for a specific test, condition, or care process. Meds typically ordered as loading doses with maintenance infusions are built as Care Sets.
Care Sets are differentiated from Power Plans and single orders by a square icon with white background
Individual orders within a Care Set may be edited and modified like any other order
Care Sets do not need to be initiated. They become active orders once signed
Example of Care Sets:
Discontinue Power Plans
To Discontinue a Power Plan Before a Power Plan is signed— Right-click on the Power Plan name and select Remove After a Power Plan is signed —Right click on the Power Plan name, select Discontinue. Then, from the “Discontinue” pop up box, indicate the items to be kept by placing a check in the “Keep” column
Orders - Favorite Folders Separate Favorite folders may be created for Orders, Rx Meds, and for Customized Power Plans To Save Favorites:
Right-click the order, select Add to Favorites before signing. The Favorites folder opens the opportunity to create New Folder or the order.
Power Plans may be saved, using the, Save As My Favorite button prior to and after modifications
When creating favorites, if those orders/Power Plans are not intended for that patient , simply right-click on the order/Power Plan and choose Remove
The Favorite Folder is accessed by clicking on the Star icon
Orders - Organizing Favorite Folders
Click the drop-down button beside the star icon
Select Organize Favorites
Favorites may be organized by these actions: Create Folder Move Rename Delete
Sort Alphabetically Back to Top
`
8
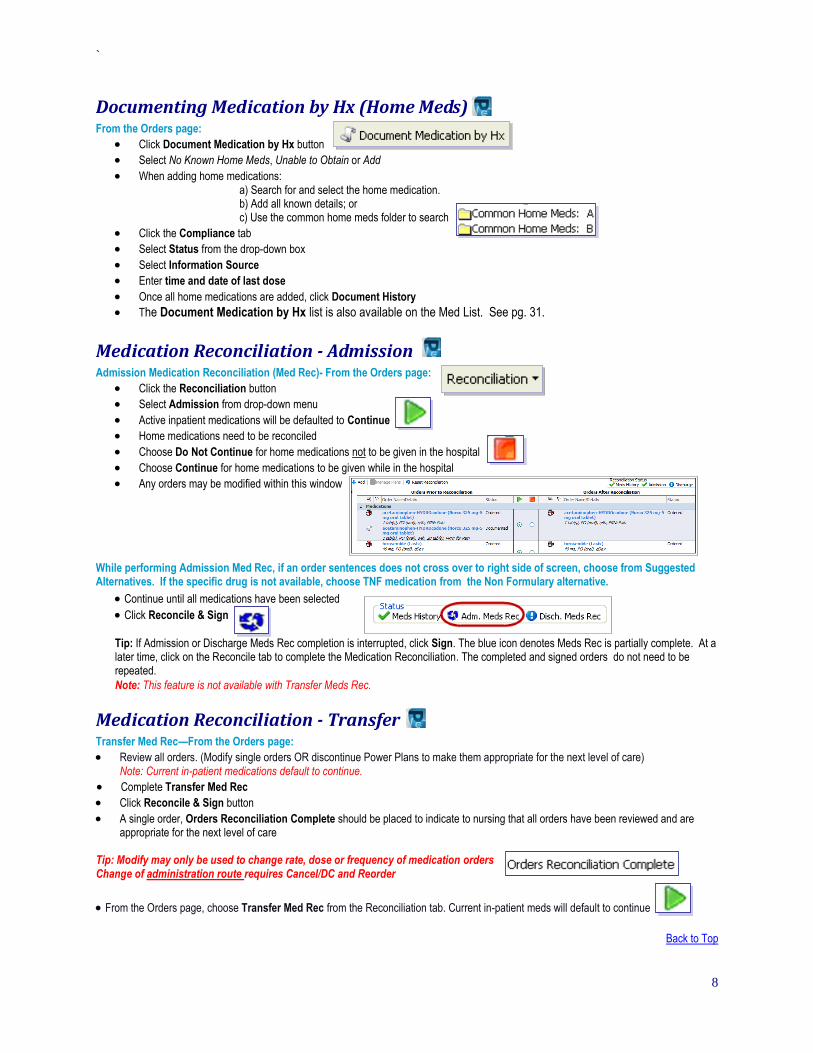
Documenting Medication by Hx (Home Meds) From the Orders page:
Click Document Medication by Hx button
Select No Known Home Meds, Unable to Obtain or Add
When adding home medications: a) Search for and select the home medication. b) Add all known details; or c) Use the common home meds folder to search
Click the Compliance tab
Select Status from the drop-down box
Select Information Source
Enter time and date of last dose
Once all home medications are added, click Document History
The Document Medication by Hx list is also available on the Med List. See pg. 31.
Medication Reconciliation - Admission Admission Medication Reconciliation (Med Rec)- From the Orders page:
Click the Reconciliation button
Select Admission from drop-down menu
Active inpatient medications will be defaulted to Continue
Home medications need to be reconciled
Choose Do Not Continue for home medications not to be given in the hospital
Choose Continue for home medications to be given while in the hospital
Any orders may be modified within this window
While performing Admission Med Rec, if an order sentences does not cross over to right side of screen, choose from Suggested Alternatives. If the specific drug is not available, choose TNF medication from the Non Formulary alternative.
Continue until all medications have been selected
Click Reconcile & Sign
Tip: If Admission or Discharge Meds Rec completion is interrupted, click Sign. The blue icon denotes Meds Rec is partially complete. At a later time, click on the Reconcile tab to complete the Medication Reconciliation. The completed and signed orders do not need to be repeated.
Note: This feature is not available with Transfer Meds Rec.
Medication Reconciliation - Transfer Transfer Med Rec—From the Orders page:
Review all orders. (Modify single orders OR discontinue Power Plans to make them appropriate for the next level of care) Note: Current in-patient medications default to continue.
Complete Transfer Med Rec
Click Reconcile & Sign button
A single order, Orders Reconciliation Complete should be placed to indicate to nursing that all orders have been reviewed and are appropriate for the next level of care
Tip: Modify may only be used to change rate, dose or frequency of medication orders Change of administration route requires Cancel/DC and Reorder
From the Orders page, choose Transfer Med Rec from the Reconciliation tab. Current in-patient meds will default to continue
Back to Top

`
9
Use the Continue and Discontinue columns to decide which medications the patient should receive at the next level of care
Medication Reconciliation - Suspend/Resume Suspend allows the adjustment of individual med dosing schedules by placing a med “on hold”. Resume reactivates the previously suspended order. To suspend: 1. Right-click the medication and choose Suspend 2. Enter a reason. 3. Sign and refresh the order. 4. The medication shows as dithered on the MAR Summary. To resume: 1. Right-click the medication and choose Resume 2. Enter a reason for resuming the medication. 3. Sign and refresh the order. 4. A suspended med may also be resumed while performing Transfer Meds Rec. Note: This feature only allows current time actions. You cannot suspend or resume for a future date or time.
Medication Reconciliation - Discharge From the Orders page, or from within The Depart icon choose Discharge Med Rec from the Reconciliation tab. Current in-
patient meds will default to continue
Use the Continue and Discontinue columns to decide which medications the patient should receive at the next level of care.
Tip: If Discharge Meds Rec completion is interrupted, click Sign. The blue icon denotes Meds Rec is partially complete. At a later time, click on the Reconcile tab to complete the Medication Reconciliation. The completed and signed orders do not need to be repeated.
Prescriptions Prescriptions may be printed or sent electronically. Printing:
1. Choose Discharge Meds as Rx from order catalog
2. Search for the medication
3. Complete the order details:
4. In the Send To tab, select the desired printer to print the Rx on watermarked paper.
5. The script will print with the providers name as Prescribed by.
6. The printed prescription must be signed.
Depart - Discharging a Patient Using the Depart icon on the tool bar open each section by clicking on the pencil/paper icons.
Back to Top
`
10
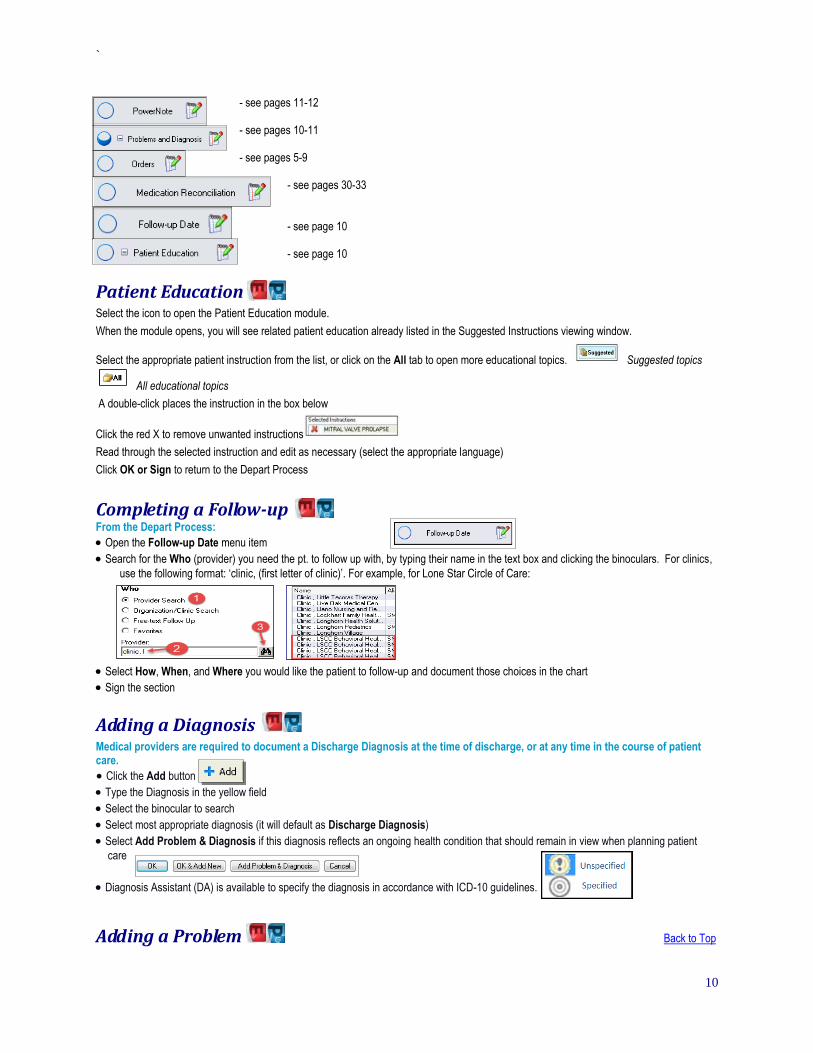
- see pages 11-12 - see pages 10-11
- see pages 5-9
- see pages 30-33
- see page 10
- see page 10
Patient Education Select the icon to open the Patient Education module.
When the module opens, you will see related patient education already listed in the Suggested Instructions viewing window.
Select the appropriate patient instruction from the list, or click on the All tab to open more educational topics. Suggested topics
All educational topics
A double-click places the instruction in the box below
Click the red X to remove unwanted instructions
Read through the selected instruction and edit as necessary (select the appropriate language)
Click OK or Sign to return to the Depart Process
Completing a Follow-up From the Depart Process:
Open the Follow-up Date menu item
Search for the Who (provider) you need the pt. to follow up with, by typing their name in the text box and clicking the binoculars. For clinics,
use the following format: ‘clinic, (first letter of clinic)’. For example, for Lone Star Circle of Care:
Select How, When, and Where you would like the patient to follow-up and document those choices in the chart
Sign the section
Adding a Diagnosis Medical providers are required to document a Discharge Diagnosis at the time of discharge, or at any time in the course of patient care.
Click the Add button
Type the Diagnosis in the yellow field
Select the binocular to search
Select most appropriate diagnosis (it will default as Discharge Diagnosis)
Select Add Problem & Diagnosis if this diagnosis reflects an ongoing health condition that should remain in view when planning patient
care
Diagnosis Assistant (DA) is available to specify the diagnosis in accordance with ICD-10 guidelines.
Adding a Problem Back to Top
`
11
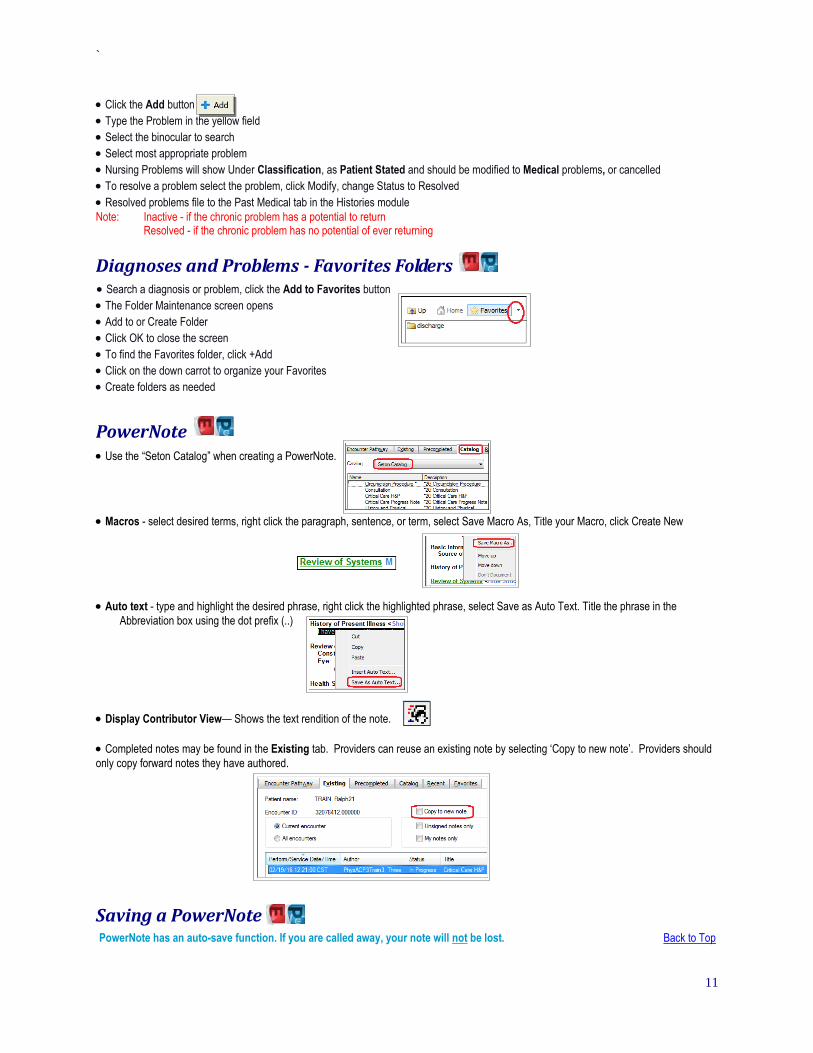
Click the Add button
Type the Problem in the yellow field
Select the binocular to search
Select most appropriate problem
Nursing Problems will show Under Classification, as Patient Stated and should be modified to Medical problems, or cancelled
To resolve a problem select the problem, click Modify, change Status to Resolved
Resolved problems file to the Past Medical tab in the Histories module
Note: Inactive - if the chronic problem has a potential to return Resolved - if the chronic problem has no potential of ever returning
Diagnoses and Problems - Favorites Folders Search a diagnosis or problem, click the Add to Favorites button
The Folder Maintenance screen opens
Add to or Create Folder
Click OK to close the screen
To find the Favorites folder, click +Add
Click on the down carrot to organize your Favorites
Create folders as needed
PowerNote Use the “Seton Catalog” when creating a PowerNote.
Macros - select desired terms, right click the paragraph, sentence, or term, select Save Macro As, Title your Macro, click Create New
Auto text - type and highlight the desired phrase, right click the highlighted phrase, select Save as Auto Text. Title the phrase in the
Abbreviation box using the dot prefix (..)
Display Contributor View— Shows the text rendition of the note.
Completed notes may be found in the Existing tab. Providers can reuse an existing note by selecting ‘Copy to new note’. Providers should
only copy forward notes they have authored.
Saving a PowerNote PowerNote has an auto-save function. If you are called away, your note will not be lost. Back to Top

`
12
PowerNotes can be saved to finish at a later time. To save a note, click the Save & Close button at the bottom of the screen.
To complete a saved note, go to the Existing tab in the PowerNotes Section
Highlight the note you wish to complete. It will have a status of In Progress. Double-click on the note to open.
When you are finished modifying the note, click the Sign & Submit button at the bottom of the screen.
Editing a Saved PowerNote
Highlight the note you wish to edit and click Modify Note or Correct Note. Click OK
Sign the note. The note will now display:
Click on the Track Changes icon. This will allow the changes to be visible.
ePrescribe
Prepare the Rx and complete all fields.
Ensure the correct pharmacy is listed in the Send To field and Sign.
The electronic Prescription Preview window opens to prompt the provider to verify the destination of the transmitted prescription. If correct,
select Continue.
Providers can view the status of the transmission to SureScripts by right-clicking on the prescription and selecting Order Information in the
Additional Information Tab.
Transmission errors are managed in Message Center. The Pharmacy contact information will be available.
NOTE: Print a new prescription or call the errant pharmacy in cases of transmission errors.
PART II FirstNet
FirstNet FirstNet is the application used to access Emergency Department Tracking Lists. From the Tracking List, patient progress through the Emergency Department can be tracked including timestamps and the patient EMR accessed.
The Tracking List
Tracking List—Checking-in Checking-in as an Available Provider
Provider Check-in/Check-out icons: (1 icon; 2 functions) The green checkmark icon = NOT checked-in Back to Top

`
13
The red X icon = Checked-in To check in: Click on the green checkmark icon Select Provider Role (yellow field indicating a required field)
Select Default Relation (not required, but strongly advised) Select Available Reviewer and Associated Provider Color
Tracking List—Assigning Self Assigning Self to the Patient Provider Assign/Un-assign icons: (1 icon: 2 functions) The white icon = To Assign self to patient The red circle icon = To Un-assign self from patient
Tracking List - Navigation Most EM providers will use the EP tab to optimize their workflow as here, the patient names are sorted by acuity and then by LOS. This tab also has a Cosign column to indicate outstanding verbal orders/SMDOs. Double-clicking on the icon allows for immediate co-signature of the VO/SMDOs via a shortcut to Message Center.
The ED Dashboard shows the number of patients in the waiting room (WR:) the number of patients who have been registered (Total:) and the average length of stay from check-in time to current time (Avg LOS:)
Tracking List - Columns
Back to Top
`
14
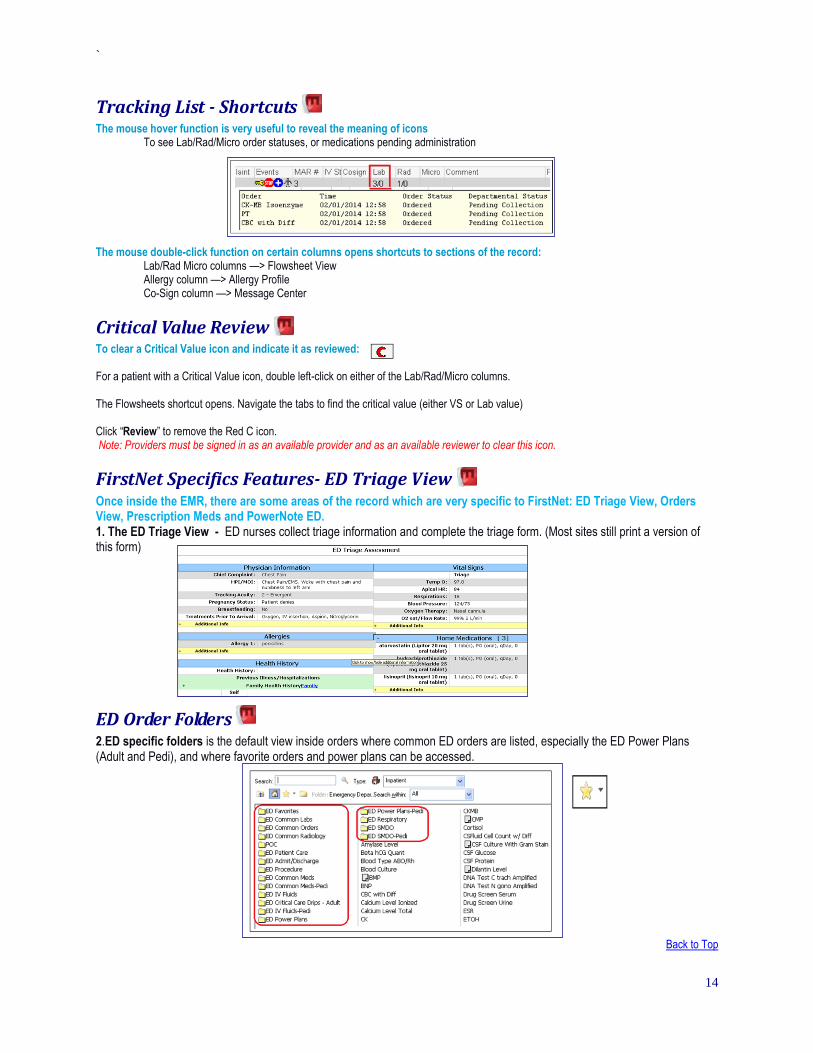
Tracking List - Shortcuts The mouse hover function is very useful to reveal the meaning of icons To see Lab/Rad/Micro order statuses, or medications pending administration The mouse double-click function on certain columns opens shortcuts to sections of the record: Lab/Rad Micro columns —> Flowsheet View Allergy column —> Allergy Profile Co-Sign column —> Message Center
Critical Value Review To clear a Critical Value icon and indicate it as reviewed: For a patient with a Critical Value icon, double left-click on either of the Lab/Rad/Micro columns. The Flowsheets shortcut opens. Navigate the tabs to find the critical value (either VS or Lab value) Click “Review” to remove the Red C icon. Note: Providers must be signed in as an available provider and as an available reviewer to clear this icon.
FirstNet Specifics Features- ED Triage View
Once inside the EMR, there are some areas of the record which are very specific to FirstNet: ED Triage View, Orders View, Prescription Meds and PowerNote ED. 1. The ED Triage View - ED nurses collect triage information and complete the triage form. (Most sites still print a version of this form)
ED Order Folders
2.ED specific folders is the default view inside orders where common ED orders are listed, especially the ED Power Plans (Adult and Pedi), and where favorite orders and power plans can be accessed.
Back to Top
`
15
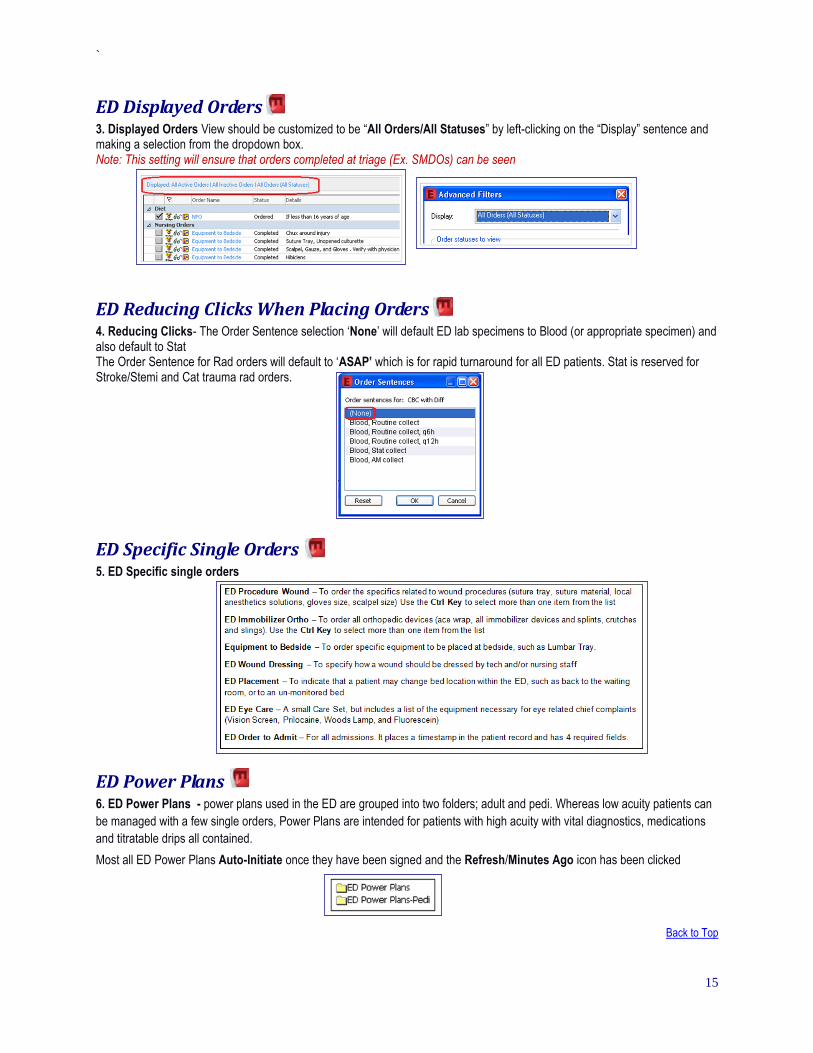
ED Displayed Orders
3. Displayed Orders View should be customized to be “All Orders/All Statuses” by left-clicking on the “Display” sentence and making a selection from the dropdown box. Note: This setting will ensure that orders completed at triage (Ex. SMDOs) can be seen
ED Reducing Clicks When Placing Orders 4. Reducing Clicks- The Order Sentence selection ‘None’ will default ED lab specimens to Blood (or appropriate specimen) and also default to Stat The Order Sentence for Rad orders will default to ‘ASAP’ which is for rapid turnaround for all ED patients. Stat is reserved for Stroke/Stemi and Cat trauma rad orders.
ED Specific Single Orders 5. ED Specific single orders
ED Power Plans 6. ED Power Plans - power plans used in the ED are grouped into two folders; adult and pedi. Whereas low acuity patients can
be managed with a few single orders, Power Plans are intended for patients with high acuity with vital diagnostics, medications
and titratable drips all contained.
Most all ED Power Plans Auto-Initiate once they have been signed and the Refresh/Minutes Ago icon has been clicked
Back to Top

`
16
ED Disposition Orders 7. ED Patient Disposition orders are all contained in the ED Admit/Discharge folder There are 5 disposition orders:
ED Prescription (Rx) Meds 8. Rx Medication Orders In the Discharge Meds as Rx window, there are many ED folders with common Rx meds. The DCMC Med Favorites folder contains common pedi Rx meds divided into 1 Kg weight increment folders Note: ED prescriptions will all default to maintenance, but can be changed to acute if a duration unit is completed
PowerNote ED PowerNote ED Part 1 The Tracking List should have an additional column, Doc Mgmt for provider electronic note management Red icon = electronic note not yet started Yellow icon = note has been launched/begun/saved Green icon = note has been signed and submitted
PowerNote ED Templates
ED templates should all originate from the Reason for Visit tab Use the PNED RFV dropdown or use the *Search window Note 1: The Note *Type will default in Note 2: Frequently used notes will also show in the Recent tab and can be added to the Favorites tab Back to Top
`
17
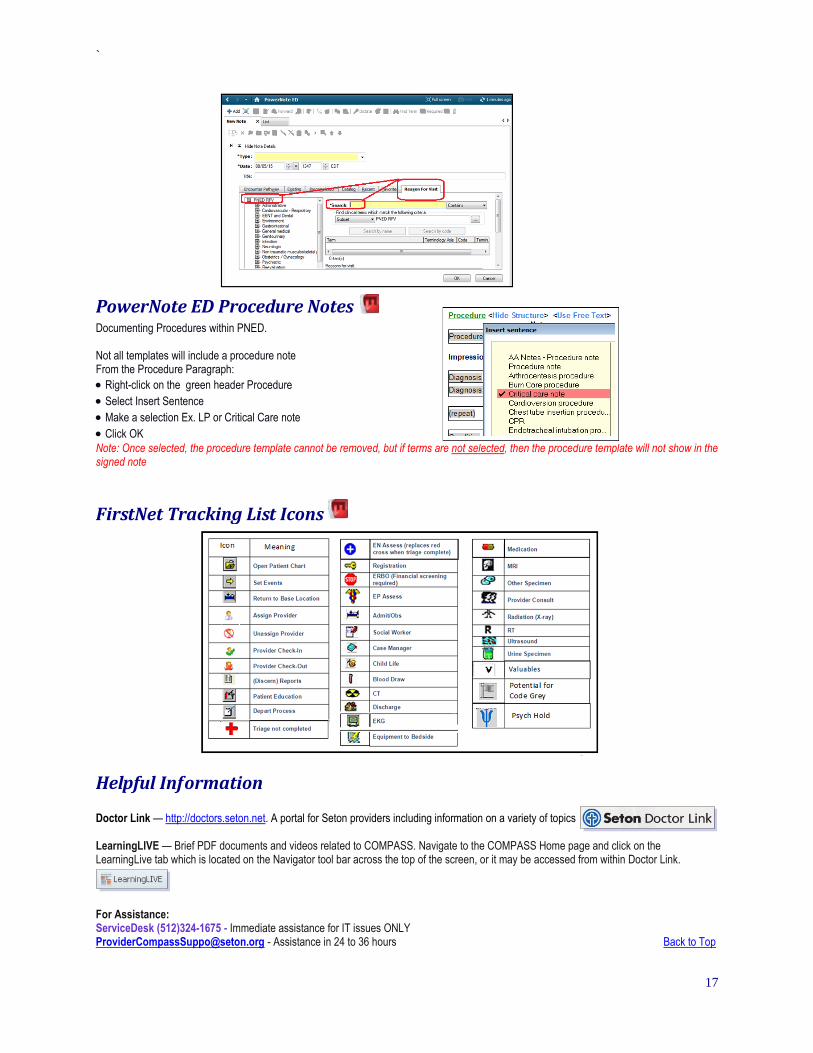
PowerNote ED Procedure Notes Documenting Procedures within PNED. Not all templates will include a procedure note From the Procedure Paragraph:
Right-click on the green header Procedure
Select Insert Sentence
Make a selection Ex. LP or Critical Care note
Click OK
Note: Once selected, the procedure template cannot be removed, but if terms are not selected, then the procedure template will not show in the signed note
FirstNet Tracking List Icons
Helpful Information Doctor Link — http://doctors.seton.net. A portal for Seton providers including information on a variety of topics LearningLIVE — Brief PDF documents and videos related to COMPASS. Navigate to the COMPASS Home page and click on the LearningLive tab which is located on the Navigator tool bar across the top of the screen, or it may be accessed from within Doctor Link. For Assistance: ServiceDesk (512)324-1675 - Immediate assistance for IT issues ONLY [email protected] - Assistance in 24 to 36 hours Back to Top

`
18
Notes:
Back to Top
Updated as of June of 2016