COMP2330 Data Communications and Networkingcomp2330/lab/notes/lab3.pdf · · 2010-01-29... 1 2....
9
COMP2330 Data Communications and Networking Dr. Chu Xiaowen (Second semester, 2009-2010 academic year) Laboratory 3 Last update: Feb-3-2009 Use Wireshark to Analyze IP Packet Objectives: (1) Use Wireshark (Ethereal) to capture packets (2) Analyze IP Packet (3) Experience on Networking Outline: 1. Introduction to Wireshark ................................................................................................. 1 2. Using Wireshark................................................................................................................ 2 2.1 Capturing Packets ....................................................................................................... 2 2.2 How to look at the packets captured by Wireshark ..................................................... 3 3. Analyzing Packets ............................................................................................................. 4 3.1 Analyzing a general IP Packet ..................................................................................... 4 3.2 Analyzing a HTTP Packet ........................................................................................... 5 4. Sniffing account and password ......................................................................................... 7 4.1 Sniffing my password ................................................................................................. 7 4.2 Using SSH................................................................................................................... 8 1. Introduction to Wireshark Wireshark (former name Ethereal) is a network packet analyzer. It’s used for network troubleshooting, examining security problems, debugging protocol implementations, education, etc. It has all of the standard features as a protocol analyzer. What’s more, Wireshark is an open source software. You use it free under GNL. “You could think of a network packet analyzer as a measuring device used to examine what's going on inside a network cable, just like a voltmeter is used by an electrician to examine what's going on inside an electric cable (but at a higher level, of course).” [1] Benefiting from the open source, Wireshark can run on most of the perform, including Unix and Unix-like operation system, such as Linux, Solaris(SUN), FreeBSD, NetBSD, OpenBSD, Mac OS X, and also MS Windows. GET WIRESHARK NOW:
Transcript of COMP2330 Data Communications and Networkingcomp2330/lab/notes/lab3.pdf · · 2010-01-29... 1 2....

COMP2330
Data Communications and Networking
Dr. Chu Xiaowen
(Second semester, 2009-2010 academic year)
Laboratory 3 Last update: Feb-3-2009
Use Wireshark to Analyze IP Packet Objectives:
(1) Use Wireshark (Ethereal) to capture packets
(2) Analyze IP Packet
(3) Experience on Networking
Outline: 1. Introduction to Wireshark .................................................................................................1 2. Using Wireshark................................................................................................................2
2.1 Capturing Packets .......................................................................................................2 2.2 How to look at the packets captured by Wireshark.....................................................3
3. Analyzing Packets .............................................................................................................4 3.1 Analyzing a general IP Packet.....................................................................................4 3.2 Analyzing a HTTP Packet ...........................................................................................5
4. Sniffing account and password .........................................................................................7 4.1 Sniffing my password .................................................................................................7 4.2 Using SSH...................................................................................................................8
1. Introduction to Wireshark
Wireshark (former name Ethereal) is a network packet analyzer. It’s used for
network troubleshooting, examining security problems, debugging protocol
implementations, education, etc. It has all of the standard features as a protocol
analyzer. What’s more, Wireshark is an open source software. You use it free
under GNL.
“You could think of a network packet analyzer as a measuring device used to
examine what's going on inside a network cable, just like a voltmeter is used by
an electrician to examine what's going on inside an electric cable (but at a
higher level, of course).” [1]
Benefiting from the open source, Wireshark can run on most of the perform,
including Unix and Unix-like operation system, such as Linux, Solaris(SUN),
FreeBSD, NetBSD, OpenBSD, Mac OS X, and also MS Windows.
GET WIRESHARK NOW:

http://www.wireshark.org
(http://wireshark.cs.pu.edu.tw/download/win32/wireshark-setup-1.0.5.exe)
You can install it follow the instruction on the manual. Make sure you choose
to install WinPcap . This is very important.
2. Using Wireshark
2.1 Capturing Packets Now that you have installed the Wireshark on your computer, now you can use it to
capture the packets which is sent to your computer or bypasses. Here give you some
instructions (MS Windows XP):
1. Start Wireshark: Start � all programs � Wireshark �Wireshark
2. From the menu, click “Capture” � “interfaces”
3. In the pop window, select a interface to capture. Usually it’s your network adapter card,
click button “start” on right.
4. So you can capture the packets live. The result will be showed as following
2
3
4

2.2 Work with packets captured by Wireshark
In this part, we will look at the packets. Before we going, take some hints:
Window Area 1:
At the top of the windows is the Menu and Tool bar, you can find all the
functions of Wireshark here. Refer [1] for more details.
Windows Area 2:
Area 2 is a colorful list of all of the packets captured. Each column is a
property of frame or packet and each row is a single frame or packet.
Considering frame as a data entry, so this is a small database of captured frames.
Windows Area 3:
Here is an area for you to view the select frame in a structure mode; it’s always
consisting of four or five hierarchical components. As show below,
(1) Row 1, Frame information: This row is created by Wireshark. It shows the
general information of the very frame.
(2) Data Link Layer. Row 2 is the Ethernet packet header
(3) Network Layer. Row 3, since the payload of this Enthernet packet is an
Internet Protocol packet (IP packet), this row is a IP header.
(4) Transport Layer. Row 4 is a TCP header.
(5) Application Layer. Finally, Row 5 is the Data which will be sent by TCP.
Windows Area 4:
In this Area, you can view the original frame as hex number. Area 4 has two
parts. The one on left are sixteen columns of two-characters each. This is the
1111
2222
3333
4444

raw hexadecimal code that consist the packet. And one on right are the
corresponding Unicode. If you click on an “http” row in Are 3, you might
notice such word looking like “get” commands or “html” code.
3. Analyzing Packets
3.1 Analyzing a general IP Packet
Above is the IPv4 Header
Below is an example of a captured IP Header in Wireshark
Exercise 1:
1) Using Wireshark to capture your network card traffic for about 30
seconds.
2) Select an IP packet that carries a TCP protocol as its data.
3) Click to extend the Internet Protocol part, and extend the Flags option.
4) Look at both the Wireshark information and Hexadecimal code, Find
out the IP Version, IHL, Type of Service, Total Length, Source IP
and Destination IP
5) In this packet, find out the information about Flags, Fragment offset,
Time to Live, and Protocol type.
6) Click the Flags information, find its corresponding Hexadecimal code
in the window below, and translate the highlighted two bytes code (such
as 40 in the example) into its Binary format (0x40 == 0100 0000).
Explain the Flags information, according to the Wireshark instruction.
E.g. if you read your flag is 010, that indicates “don’t fragment”, if it’s
001, that means “more fragments”. Try to understand the fragmentation
mechanism.
7) Click to extend the Transmission Control Protocol, find out the Source
Port Destination Port and Window Size.
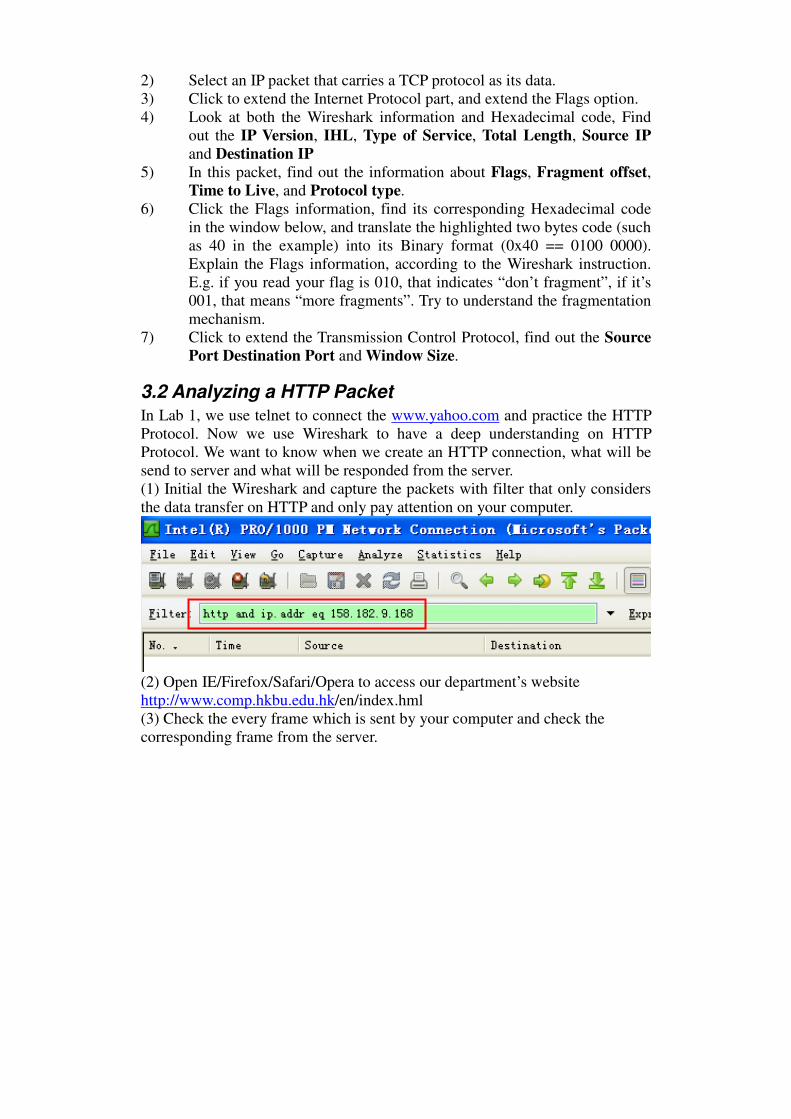
3.2 Analyzing a HTTP Packet
In Lab 1, we use telnet to connect the www.yahoo.com and practice the HTTP
Protocol. Now we use Wireshark to have a deep understanding on HTTP
Protocol. We want to know when we create an HTTP connection, what will be
send to server and what will be responded from the server.
(1) Initial the Wireshark and capture the packets with filter that only considers
the data transfer on HTTP and only pay attention on your computer.
(2) Open IE/Firefox/Safari/Opera to access our department’s website
http://www.comp.hkbu.edu.hk/en/index.hml
(3) Check the every frame which is sent by your computer and check the
corresponding frame from the server.
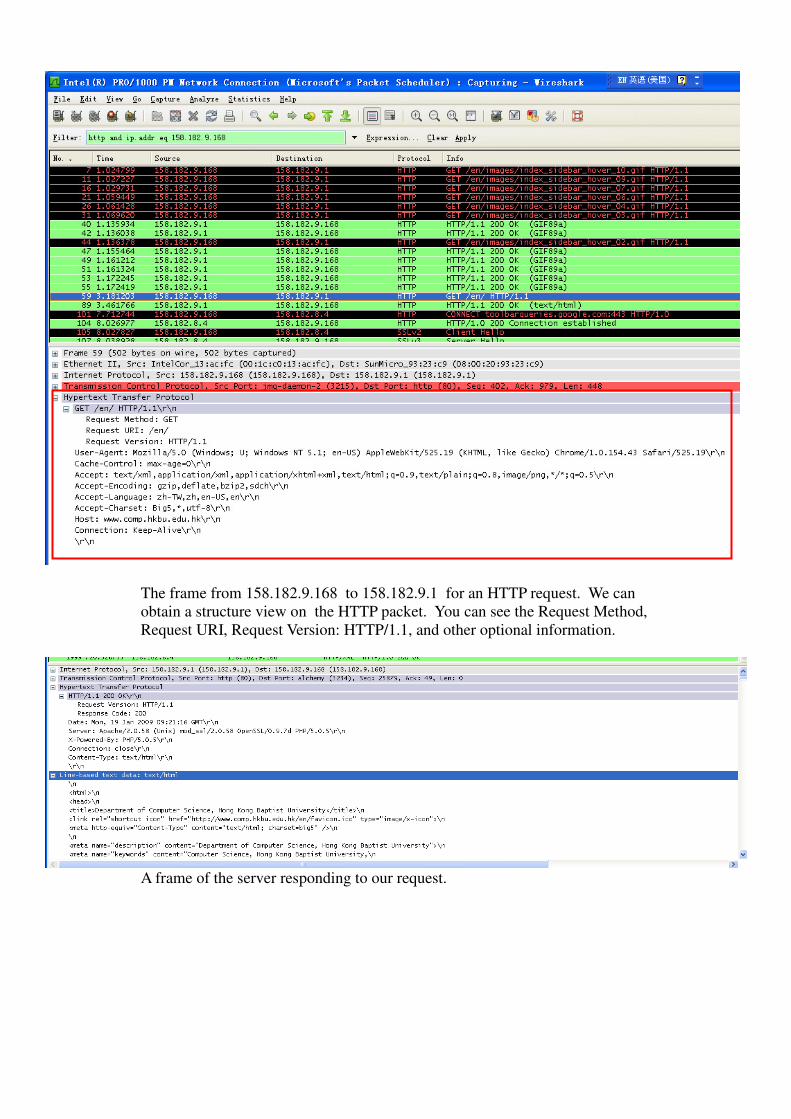
The frame from 158.182.9.168 to 158.182.9.1 for an HTTP request. We can
obtain a structure view on the HTTP packet. You can see the Request Method,
Request URI, Request Version: HTTP/1.1, and other optional information.
A frame of the server responding to our request.

This is a frame to get the “index_sidebar_hover_10.gif” file.
4. Sniffing account and password
4.1 Sniffing my password
In this session, I will demonstrate sniffing the account and password by
Wireshark for an education purpose during the telnet connection. By this
demonstrate you aware the security of internet is very important. DO
NOT practice in the real world. Stealing account and
password would constitute a crime in HK.
For telnet connection, the data is send without encryption. So if we
capture the telnet data, we can see the original word directly. Follow the
instruction to see what telnet transfer when we create a telnet connection.
(1) Open Wireshark, and capture the data with filter “telnet”
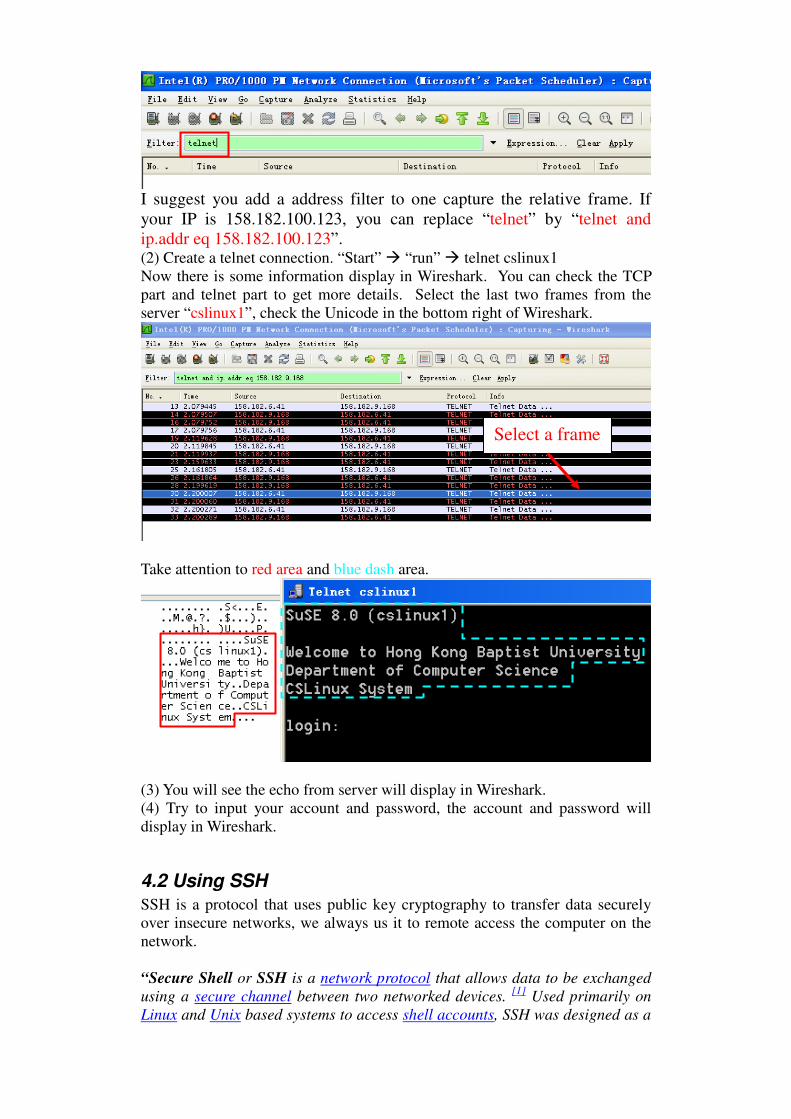
I suggest you add a address filter to one capture the relative frame. If
your IP is 158.182.100.123, you can replace “telnet” by “telnet and
ip.addr eq 158.182.100.123”. (2) Create a telnet connection. “Start” � “run” � telnet cslinux1
Now there is some information display in Wireshark. You can check the TCP
part and telnet part to get more details. Select the last two frames from the
server “cslinux1”, check the Unicode in the bottom right of Wireshark.
Take attention to red area and blue dash area.
(3) You will see the echo from server will display in Wireshark.
(4) Try to input your account and password, the account and password will
display in Wireshark.
4.2 Using SSH
SSH is a protocol that uses public key cryptography to transfer data securely
over insecure networks, we always us it to remote access the computer on the
network.
“Secure Shell or SSH is a network protocol that allows data to be exchanged
using a secure channel between two networked devices. [1]
Used primarily on
Linux and Unix based systems to access shell accounts, SSH was designed as a
Select a frame

replacement for TELNET and other insecure remote shells, which sent
information, notably passwords, in plaintext, leaving them open for
interception.[2]
The encryption used by SSH provides confidentiality and
integrity of data over an insecure network, such as the Internet.” [5]
In this session, we demonstrate that we use SSH instead of Telnet to protect our
data, especially the account and password. The instruction following:
(1). Initial step: get the server’s ip , eg. 158.182.155.181. Open the Wireshark
and capture packets with filter which only captures the packets between your
computer and the server.
(2). Use a SSH client connect to server and check the packets between yours
and server. You can see the data transferred between you and the server is
encrypted. You can not find the account and the password again.
Exercise 2. When you are designing a software to transfer the account and
password, how to protect your account and password?
Remind you again. DO NOT try to steal any information from others.
Stealing account and password would
constitute a crime in HK.
References
[1] Wireshark Co. Wireshark User's Guide, #27252. http://www.wireshark.org.
Jan-19-2009
[2] W. Stallings. Data and Computer Communications (7-th). Pearson
Education. 2004
[3] Wikipedia. Wireshark. http://en.wikipedia.org/wiki/Wireshark. Jan-19-2009
[4] GSP Services, Inc. http://www.gsp.com/support/virtual/admin/telnet.html.
Jan-19-2009
[5] Wikipedia. Secure Shell. http://en.wikipedia.org/wiki/Secure_Shell. Jan-19-
2009