Community Health Worker Scale-up and CHW-delivered chronic interventions in Brazil

1
Community Health Worker
Training Manual
Copyright, 2013, Rush University Medical Center, All Rights Reserved

2
Table of Contents
Pages Overview Background Rush Center for Urban Health Equity…………………..…… 3 Community Health Workers………………………………..… 3-4 Community Health Worker Training…………………….…… 4 Pedagogy…………………………………………………………... 5 Curriculum………………………………………………………….. 6 Section 1: Self-Management (CORE content)…………….. 7 Section 2: Pediatric Asthma…………………………………. 7 Section 3: Pediatric Obesity…………………………………. 7 Section 4: Heart Failure……………………………………… 7-8 Section 5: Home Visitation…………….…………………….. 8 Evaluation………………………………………………………. 8 Continuing Education…………………………………………. 9 Layout of Training Manual………………………………………... 10 Who Should Lead the Training Modules………………………... 11 How to Use this Manual…………………………………………... 12-15 Acknowledgements……………………………………………….. 16 Contact Information……………………………………………….. 16 References………………………………………………………… 17-18 Training Modules Section 1 (Core Content): Self-Management………………….. 19-41 Section 2: Pediatric Asthma…………………………………….. 42-63 Section 3: Pediatric Obesity…………………………………….. 64-93 Section 4: Heart Failure……………………………….…………. 94-139 Section 5: Home Visitation………………………………………. 140-144 Evaluation Tools…………………………………………………….. 145-146 Continuing Education…………………………….………………… 147-149 Extra Documents…………………………………………………….. 150

3
Overview
Background
The Rush Center for Urban Health Equity (CUHE) under the Department of
Preventive Medicine at Rush University Medical Center was established in 2010
through a $10 million grant from the National Institutes of Health. Under the NIH’s
nation-wide initiative to alleviate health disparities, the Center is conducting rigorous
behavioral intervention clinical trials by partnering with health professionals,
researchers, community members, and the greater public to reduce health inequities in
heart and lung diseases. The clinical trials will investigate heart failure, depression,
metabolic syndrome, and pediatric asthma with co-morbid obesity with an emphasis on
the role of stress in the disease process. By testing innovative interventions across the
spectrum from children to the elderly, the Center aims to improve health outcomes and
quality of life. The Center also seeks to empower underserved communities to become
active participants in developing interventions through education and training. A goal of
the center is to bring together researchers, behavioral scientists, primary care providers,
medical specialists, and the community with a shared vision and passion to eliminate
the health disparities that affect residents of America’s cities, in particular low-income
persons of color. The Rush Center for Urban Health Equity seeks to partner with
underserved communities and to develop, conduct, evaluate and sustain rigorous multi-
level interventions to reduce disparities in cardiopulmonary diseases. The Rush Center
for Urban Health Equity seeks to partner with underserved communities and to develop,
conduct, evaluate and sustain rigorous multi-level interventions to reduce disparities in
cardiopulmonary diseases.
This training manual has been created to aid in the training of Community Health
Workers (CHWs). CHWs, also known as health outreach workers, health advisors, and
promotores de salud have been a part of health promotion and disease prevention
efforts in the US for many decades. The use of CHWs has increased in the last few
years. In 2005, there were more than 121,200 CHWs in the United States; up from an
estimated 86,000 in 2000.1 CHWs work almost exclusively in community settings,
acting as a bridge between residents and healthcare providers. The CHWs serve as
liaisons between health service providers and the community. CHWs typically provide
health education, information, assistance with services, and build individual and
community capacity for health.1 Research has shown positive associations between
CHW interventions and improved community health, particularly in the areas of
childhood immunization, some infectious diseases, and breastfeeding promotion.2-3
Successful CHWs have special qualities. They know their communities well. They are
dedicated to improving the life of their community. They enjoy teaching others, feel

4
comfortable in front of a group, and know how to work with a group. In the United
States, CHWs help to meet national Healthy People goals by conducting community-
level activities and interventions that promote health and prevent diseases and
disability. CHWs are trusted and respected members of the community. They provide
an important service by establishing and improving relationships between these
professionals and members of the community. As community health educators and role
models, CHWs promote, encourage, and support positive, healthful self-management
behaviors among their peers. They have the ability to strengthen their community’s
understanding and acceptance of medical care.
The CHW model is limited by inconsistencies in CHW training. While many CHW
curriculums can be found at local universities and agencies, no formal CHW curriculum
or certification exist which results in tremendous variability in the existing CHW
curriculums. Most focus on knowledge, but it is behaviors that CHWs typically target.
Many curriculums use didactic teaching methods while CHWs typically work one-on-one
or in small groups with their clients. The Rush Center for Urban Health Equity has
developed specialized training curriculums in a number of disease areas including
pediatric asthma, pediatric obesity, and heart failure. These all contain the same
disease non-specific base—self-management skills (problem solving, social support,
self-monitoring, environmental restructuring, and action planning). These skills are
taught using popular education methods and then incorporated into target diseases.
CHWs practice these skills in their own lives and in structured role plays. They are
assessed on their skills during training, and then monitored when in the field to
continually reinforce the self-management skills with their clients and in their own lives.
The impact of CHWs under this rigorous training and maintenance protocol is currently
under investigation.

5
Pedagogy
We recommend CHW trainings use Paulo Friere’s critical pedagogy or popular
education model in order to provide a curriculum for people of varying literacy levels,
languages, and cultures. Friere’s education model was designed with disenfranchised
people of color with low literacy levels in mind. It differs from traditional education and
medical education models because it places emphasis on high levels of participation,
learning through people’s experience and the lack of distinction between the teacher
and learner. The model and the modules in the curriculum utilize minimal lectures,
brainstorming exercises, self-discover learning exercises, and role playing to facilitate
learning.
The popular education model has been used in other CHW training programs. La
Palabra es Salud, a comparative study of the effectiveness of popular education vs.
traditional education models in CHW trainings found that “popular education can help
participants develop a deeper sense of empowerment and community and more multi-
faceted skills and understandings, with no accompanying sacrifice in the acquisition of
knowledge”.4 Project MATCH (Mexican American Trial for Community Health Workers),
a clinical trial to test the effectiveness of a promotora-based intervention for Mexicans
with diabetes, found similar results in their evaluation of skills acquisition among its
CHWs.5

6
Curriculum
The curriculum is intended to be delivered to groups. We recommend group sizes of
10-15 adults. We typically train more people than we intend to hire. One reason is
because it provides trained back-up staff to replace CHWs that leave the project. The
other reason is because this type of basic education is meaningful and useful even if it
does not directly translate into employment. We typically do not announce who we will
hire until after the training is completed. This helps with attendance and inspires full
participation. All trainees who complete the training should receive certificates and
instructions for how to report the training on their resumes.
We implemented the curriculum in multiple stages. The initial stage is intended to
provide the basic CHW training on the target disease and intervention delivery. The
second stage is to provide more in-depth training for the CHWs as they prepare to enter
the field. We deliver the second stage training only to those we plan to send into the
field. This includes training on home visitation and documentation. Third, observation
of other CHWs in the field is recommended. Finally, CHWs require regular reviews of
core topics and also new topics as they arise during delivery of the intervention.
The CHW curriculum includes instruction in four main content areas: self-management
skills, pediatric obesity, pediatric asthma, and heart failure. The self-management skills
area should be covered for all CHWs. The other topic areas can be combined (for
example pediatric asthma and obesity) or used alone. The home visitation section is an
optional module for projects that use home visitation.
Self-Management
Pediatric Asthma
Pediatric Obesity
Heart Failure
Stage 1 Initial basic
training (this manual)
Stage 2 Additional in-depth training
(optional)
Stage 3 In the field
observation
Stage 4 Ongoing
review and education

7
Section 1: Self-Management (Core Training)
The self-management section is the core training content to be used in combination with
the other trainings in this manual. This section should be mandatory and should be
referred back to throughout the manual in each specific disease content area. Self-
management techniques are to be introduced prior to beginning the other training
manuals provided. Self-management techniques will be emphasized and explored in
more detail in the subsequent disease-specific trainings.
Section 2: Pediatric Asthma
Asthma, the most common chronic health condition in children, is a major cause of
pediatric hospitalizations and missed school days. National Health Interview Survey
data from 2001 reported lifetime asthma prevalence of 20% in African-American
children, 26% in Puerto Rican children, 13% in White children, and 10% in Mexican
children.6 Current asthma prevalence has been increasing among children at a rate of
1.4% per year from 2001-2010 and asthma disparities by race/ethnicity still persist.7
Pediatric asthma results in high emergency department and urgent care use.7 Asthma
related school absenteeism, caregiver missed work, and activity limitations compromise
the ability of children to learn and limit other areas of well being. For example, in 2008,
58.7% of children ages 5-17 with current asthma had at least one day of missed school
in the past year, with 5.5% reporting some activity limitation due to asthma.7 This
translates into significant individual and societal costs. In 1996, the total economic
costs of asthma in school-age children was estimated at almost $2 billion.8
Section 3: Pediatric Obesity
Pediatric obesity has reached epidemic proportions.9 From 2005- 2008, 21% of African
American children were obese, compared to 14% of White children, and 22% of
Mexican children.10 Several meta-analyses have shown mild to moderate efficacy of
physical activity and combined lifestyle interventions in the home context.11-12 To date,
no known pediatric CHW intervention data have been reported although such testing is
underway.
Section 4: Heart Failure
The current epidemic of acute decompensated heart failure is a major public health
problem.13 Incidence of new cases has been stable but survival has improved, resulting
8
in increased prevalence, particularly among the disadvantaged.14 After discharge, 50%
of patients will be rehospitalized within 6 months.15 Currently there are more than 1
million heart failure hospitalizations annually,16 accounting for the single largest
Medicare expenditure.17 Two key modifiable factors are associated with repeat
hospitalizations, non-adherence to prescribed medications and non-adherence to salt
restriction.18-19 Factors associated with non-adherence to drug and lifestyle
recommendations include economic constraints, difficulties in navigating the health care
system, inadequate patient knowledge at discharge, low motivation, and stress.20 A
CHW intervention helps dissolve some of the challenges faced by heart failure patients.
Section 5: Home Visitation (optional)
The most common roles of CHWs are to perform navigation services in the clinical
settings, to conduct group sessions in clinical or community settings, or to perform
home visitation. Home visitation offers unique insights into the lives of patients. The
CHW can see the physical environment patients navigate daily. They can check what
medicines or resources the patient actually has and see how they use them. They
usually have the opportunity to meet family members and others living in or frequenting
the home. Home visitation is also very helpful for patients with limited resources or
mobility, or patients with caregiving responsibilities because the patient does not need
to leave the home. Challenges to home visitation are that they are time consuming for
the CHWs, they can involve threats to safety, and not everyone is willing to have an
outsider in their home.
Evaluation
Evaluation of CHW competencies at the completion of the training is essential to
determine who is ready for the field. We recommend the standard assessment of
CHWs knowledge through pre/post testing. We also describe how to assess the
competency of CHWs to deliver knowledge and skills using skill demonstrations with
asthma devices and role plays. The role plays gauge CHW skill at interacting with
peers and delivering information. Each CHW will have to demonstrate proficiency with
all project equipment and conduct a standardized role play for the instructors in order to
determine if they have sufficient mastery of training content.

9
Continuing Education
Continuing education is a critical component for CHW programs. We have created
continuing education sessions that address two domains: 1) CHW self discovery via
goal setting, addressing barriers and successes, and CHW group social support; and 2)
Topics brought forth by CHWs after their work in the field. We use local experts in our
medical center to facilitate discussion of identified topics. Ongoing education is a work
in progress and will be driven by CHW identified needs.

10
Layout of Training Manual
Each Section Contains
i. A Summary for that content area
ii. Diagram with main topics and length
Each Lesson will contain:
i. Lesson Objectives
ii. Time Required
iii. Unit Overview with lists of Activities
iv. Documents
v. Outline of the Content
Whenever possible, we included materials such as pre/post test questions, role plays,
and handouts. Due to copyright restrictions, we could not include all materials. Feel
free to contact the manuscript authors for more information and materials.
11
Who Should Lead the Training Modules
Multiple trainers may be used to cover the different content areas.
The self-management content requires no specific knowledge other than how to teach
using popular education methods and self-discovery methods.
The asthma curriculum requires a solid foundation of asthma physiology, triggers, and
medications. This manual does not contain sufficient information for someone without
strong asthma knowledge to deliver the training. Our curriculum was delivered by a
pediatrician but previous iterations have been delivered by a certified asthma educator
with group education experience. If the training is delivered by a non-clinician, a
clinician should be consulted for part of the training to asthma specific medical
questions that arise. We contracted educators on smoking cessation and integrated
pest management because these are specialized topics with well-developed
curriculums.
The obesity curriculum requires a solid foundation in nutrition and health. In our center,
this portion of the training was delivered by a pediatrician but that level of clinical
expertise is not necessary. A nutritionist, nurse, or other educator familiar with nutrition
and health could also deliver the curriculum.
The heart failure curriculum was delivered by a master-level project manager who was
closely supported by a cardiologist and a PhD-level clinical psychologist.

12
How to Use this Manual
This manual is Adaptable. It has been created and used, but is a suggested template
and guide for facilitator’s to follow. Presenters may choose to alter or adapt as they see
fit including the length and activities provided in this manual.
The manual is arranged in sections. There are many different ways to deliver these
sections. The order will depend on which content areas are delivered and the timing of
the training. For example, some trainings are delivered in several full consecutive days.
Others are delivered in smaller sessions and spread over several weeks. We make
three primary recommendations:
1. All trainings should start with the self-management modules
2. At the end of each training day, trainees should make change plans for themselves
about a content area and skill covered that day.
3. When training resumes, the first action should be to discuss change plans from the
previous session. Change plans serve as the tool for gauging individual
understanding of the content. General review of material from a previous day is
helpful but when trainees try to teach or implement the material or skill on their own
outside of the group, they realize new questions and challenges. These should be
discussed and will create a robust forum for review.
Trainers and trainees should already have a firm grasp of the roles and expectations of
Community Health Workers. Understanding how to build trust, work with participants,
and facilitating home visits should be concepts to understand in conjunction with this
manual.
13
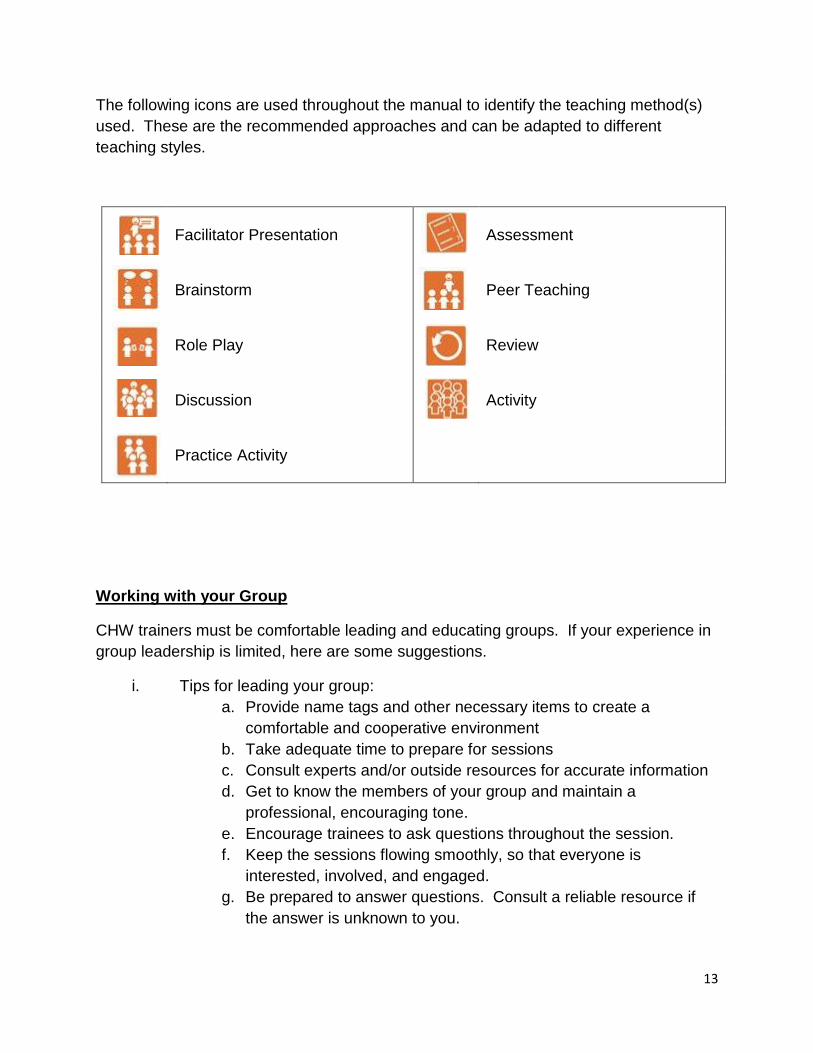
The following icons are used throughout the manual to identify the teaching method(s)
used. These are the recommended approaches and can be adapted to different
teaching styles.
Facilitator Presentation
Assessment
Brainstorm
Peer Teaching
Role Play
Review
Discussion
Activity
Practice Activity
Working with your Group
CHW trainers must be comfortable leading and educating groups. If your experience in
group leadership is limited, here are some suggestions.
i. Tips for leading your group:
a. Provide name tags and other necessary items to create a
comfortable and cooperative environment
b. Take adequate time to prepare for sessions
c. Consult experts and/or outside resources for accurate information
d. Get to know the members of your group and maintain a
professional, encouraging tone.
e. Encourage trainees to ask questions throughout the session.
f. Keep the sessions flowing smoothly, so that everyone is
interested, involved, and engaged.
g. Be prepared to answer questions. Consult a reliable resource if
the answer is unknown to you.
14
h. Use frequent checks for understanding throughout each session to
ensure that group members understand the material.
i. Be observant. Watch for clues from group members who are
falling behind or in need of a break.
j. Be flexible. Allow group members to explore content areas with
self-discovery.
k. Constantly monitor how much the moderator is talking. If he or
she is talking a lot, they are not facilitating optimally. Be sure to
listen. Allow lots of space for the group to generate ideas.
ii. References on how to effectively lead a group include:
http://www.toi.edu/Training%20Materials/leading_groups/Student%20N
otes/C5How%20to%20Lead%20%20Group%20dicussion.pdf
http://www.mindtools.com/pages/article/instructor-led-training.htm
http://www.thiagi.com/article-secrets.html
http://www.mindtools.com/pages/article/RoleofAFacilitator.htm
http://www.kickstartall.com/documents/KS_Articles/9Characteristicsofa
GoodFacilitator_March2012.html
iii. Motivating Group Members
a. Praise or reward group members’ efforts.
b. Maintain a positive, encouraging environment.
c. Strive to link the content to situations that group
members can relate to.
d. Accommodate for adequate settings, refreshments, and
breaks to keep participants motivated and ready to learn.
e. Encourage group members to share their opinions or
ideas.

15
Individual Change Plans:
Change plan creation and implementation are recommended as the main tool for CHWs
to use with their clients to achieve behavior change. Change planning can be very
difficult to master. Therefore, CHW training should focus heavily on action planning
beginning with the CHWs. Once they can successful create and achieve change plans
for themselves, they can begin to teach the exercise to others. Each trainee should
complete an individual change plan at the end of each training day. This change plan
should include details on the specific intended action, when this will occur, how,
potential barriers, and potential solutions to these barriers. Regardless of how the
trainings and days are organized and structured, a change plan should always be a part
of the day’s training. These individual change plans are to be discussed and shared at
the beginning of the following training day.
Example of change plans that can be used:
PDFs of the change plans are in the Extra Documents link.

16
Acknowledgements
These manuals were the hard work of many people. The self-management curriculum
was developed for a diabetes intervention by Drs. Steven Rothschild, Susan Swider,
and Carmen Tumialán Lynas.5 The curriculum was then modified by Dr. Molly Martin
for pediatric asthma in Spanish-speaking populations.21 The pediatric obesity
curriculum was created by Dr. Martin and Lucretia Hoffman, MPH. The heart failure
curriculum was designed by Dr. Lynda Powell, Dr. James Calvin, and Rebecca
Liebman, MPH.
This manual was written mainly by Molly Martin, Rebecca Liebman, and Sheila Dugan.
Lucretia Hoffman and Melanie Santarelli contributed greatly to formatting and
organization of the manual, under the mentorship of Molly Martin and Sheila Dugan.
Contact Information
For more information, contact:
Molly A Martin, MD, MAPP
Rush University Medical Center
Department of Preventive Medicine
1700 W Van Buren, Suite 470
Chicago, IL 60612
Tel: 312-942-2540
Email: [email protected]
Rebecca Liebman, MPH
Rush University Medical Center
Department of Preventive Medicine
1700 W Van Buren, Suite 470
Chicago, IL 60612
Tel: 312-563-3705
Email: [email protected]
Rush Center for Urban Health Equity
Rush University Medical Center
Department of Preventive Medicine
Tel: 312-942-2337

17
References
1. U.S. Health Resources and Services Administration, Health Resources and Services
Administration, Bureau of Health Professions, Community Health Workers National
Workforce Study, (Rockville, Md.: HRSA, March 2007).
http://bhpr.hrsa.gov/healthworkforce/chw/
2. Viswanathan M, Kraschnewski J, Nishikawa B, Morgan LC, Thieda P, Honeycutt A, Lohr
KN, Jonas D. Outcomes of Community Health Worker Interventions. Evidence
Report/Technology Assessment No. 181 (Prepared by the RTI International–University
of North Carolina Evidence-based Practice Center under Contract No. 290 2007 10056
I.) AHRQ Publication No. 09-E014. Rockville, MD: Agency for Healthcare Research and
Quality. June 2009.
3. Lewin SA, Dick J, Pond P, Zwarenstein M, Aja G, van Wyk B, Bosch-Capblanch X,
Patrick M. Lay health workers in primary and community health care. Cochrane
Database Syst Rev. 2005;25(1):CD004015.
4. Wiggins N. La Palabra Es Salud: A Comparative Study of the Effectiveness of Popular
Education vs. Traditional Education for Enhancing Health Knowledge and Skills and
Increasing Empowerment among Parish-Based Community Health Workers. 2010.
http://search.proquest.com/docview/577306942.
5. Swider SM, Martin M, Lynas C, Rothschild S. Project MATCH: training for a promotora
intervention. Diabetes Educ. 2010 Jan-Feb;36(1):98-108.
6. Lara M, Akinbami L, Flores G, Morgenstern H. Heterogeneity of childhood asthma
among Hispanic children: Puerto Rican children bear a disproportionate burden.
Pediatrics 2006;117(1):43-53.
7. Moorman JE, Akinbami LJ, Bailey CM, et al. National Surveillance of Asthma: United
States, 2001–2010. National Center for Health Statistics. Vital Health Stat 3(35). 2012.
8. Wang LY, Zhong Y, Wheeler L. Direct and indirect costs of asthma in school-age
children. Prev Chronic Dis. 2005 Jan;2(1):A11.
9. Ogden C, Carroll M. Prevalence of Obesity among Children and Adolescents: United
States, Trends 1963-1965 Through 2007-2008. Available at:
http://www.cdc.gov/nchs/data/hestat/obesity_child_07_08/obesity_child_07_08.htm,
December, 2010.
10. Centers for Disease Control and Prevention. Obesity, ages 2-19: US, 1988-2008
(Source: NHANES). Available at:
http://205.207.175.93/HDI/TableViewer/tableView.aspx?ReportId=543, December 16,
2010.
11. McGovern L, Johnson JN, Paulo R, Hettinger A, Singhal V, Kamath C, et al. Clinical
review: treatment of pediatric obesity: a systematic review and meta-analysis of
randomized trials. J Clin Endocrinol Metab. 2008;93(12):4600-4605.
12. Wilfley DE, Tibbs TL, Van Buren DJ, Reach KP, Walker MS, Epstein LH. Lifestyle
interventions in the treatment of childhood overweight: a meta-analytic review of
randomized controlled trials. Health Psychol. 2007;26(5):521-532.
13. Braunwald E. Shattuck lecture. Carediovascular medicine at the turn of the millennium,
triumps, concerns and opportunities. N Eng J Med. 1997;337:160-9.

18
14. McCullough PA, Philbin EF, SPertus JA, Kaatz S, Sandberg KR, Weaver WD.
Confirmation of a heart failure epidemic: Findings from the resource utilization among
congestive heart failure (REACH) study. J Am Coll Cardiol. 2002;39(1):60-9
15. Jencks SF, Williams MV, Coleman EA. Rehospitalizations among patients in the
medicare fee-for-service program. N Egl J Med. 2009;360(14):1418-28.
16. Rosamond W, Flegal K, Friday G, Furie K, Go A, Greenlund K, Haase N, Ho M, Howard
V, Kissela B, et al. 2007. Heart disease and stroke statistics – 2007 update: A report
from the American heart association statistics committee and stroke statistics
subcommittee. Circulation. 2007;115(5):e69-e171.
17. Massie BM and Shah NB. Evolving trends in the epidemiologic factors of heart failure:
Rationale for preventive strategies and comprehensive disease management. Am Heart
J. 1997;133(6):703-12.
18. Van der Wal MHL and Jaarsma T. Adherence in heart failure in the elderly: Problem and
possible solutions. Int J Cardiol. 2008;125(20):203-8.
19. Tsuyuki RT, McKelvie RS, Arnold JMO, Avezum A.J, Barretto ACP, Carvalho ACC,
Isaac DL, Kitching AD, Piegas LS, Teo KK, et al. Acute precipitants of congestive heart
failure exacerbations. Arch Intern Med. 2001;161(19):2337-42.
20. Feenstra J, Grobbee DE, Jonkman FAM, Hoes AW, Stricker BHC. Prevention of relapse
in patients with congestive heart failure: The role of precipitating factors. Heart
7998;80(5):432-6.
21. Martin MA, Mosnaim GS, Rojas D, Hernandez O, Sadowski LS. Evaluation of an
Asthma Medication Training Program for Immigrant Mexican Community Health
Workers. Progress in Community Health Partnerships: Research, Education, and
Action. 2011;5(1):95-103.

19
SECTION 1: SELF-MANAGEMENT
(Core Content)
Summary
The self-management section is the core training content to be used in combination with
the other trainings in this manual. This section is mandatory and will be referred back to
throughout the manual in each specific disease content area. Self-management
techniques should be fully understood prior to beginning the other training manuals in
order to be able to apply them to each specific disease. All materials and flip charts or
white boards used throughout this section should be saved and kept visible throughout
disease specific trainings as this information should be referred to throughout the
manual. The information in this section will be discussed and examined within each
subsequent section.
Main Topics and Approximate Lengths
Self-Management Topic
Time Needed
Problem Solving
75 minutes
Social Support
90 minutes
Environmental Rearrangement
80 minutes
Self-Monitoring
90 minutes
Culture
30 minutes
Action/Change Plans
55 minutes

20
Lesson #1: Problem Solving
Lesson Objectives
By the end of this lesson, trainees will be able to:
1. Define Problem Solving. 2. Give examples of how to facilitate brainstorming. 3. Identify several challenges to implementing problem solving. 4. Demonstrate Problem Solving in a role play. 5. Successfully apply concepts and knowledge to real world situations.
Estimated Time Required
1 hour 15 minutes
Documents
None
Materials
Large flip chart and/or whiteboard

21
Lesson Overview
Activity Topic Recommended
Method(s) Estimated
Time Documents/
Materials
1 Definition of
Problem Solving
Brainstorm
5 minutes Large flip chart
and/or whiteboard
2 Steps of Problem
Solving
Brainstorm, Facilitator
Presentation
15 minutes Large flip chart
and/or whiteboard
3 Benefits and
Challenges of Problem Solving
Brainstorm, Facilitator
Presentation, Discussion
20 minutes Large flip chart
and/or whiteboard
4 Role Play on
Problem Solving
Role Play, Discussion
35 minutes
5 Review of Main
Messages
Review
10 minutes
22
Content
1. Definition of Problem Solving
Brainstorm: Ask the group, what is problem solving?
Make sure they realize problem solving is an active purposeful process involved in solving a problem. It might be helpful here to discuss what problem solving is NOT. It is NOT giving someone an answer to their problem or generating a list for them.
2. Steps of Problem Solving
Brainstorm: Ask the group what do they think the steps of problem solving are? Write them down on a flip chart or whiteboard. Get to the final list and post it somewhere that it can be repeatedly referenced during the rest of the training:
1. Identify the problem 2. Brainstorm possible solutions 3. Choose one behavior specific strategy 4. Assess success of strategy 5. Try plan B, assess success 6. Consider additional resource 7. Consider that the problem might not be
solvable at the moment
3. Benefits and Challenges of Problem Solving
Brainstorm: Ask the group “What are the benefits and/or challenges of problem solving?” Write down answers on flip chart or whiteboard. Get to the final list:
a. Increases sense of control in life b. Helps you to see that there might be more than one cause
to the problem c. Helps you to see that there might be more than one
solution to the problem
Encourage discussion of list
4. Role Play on Problem Solving
Work in pairs
23
a. Each person Identify a problem in their own life and write it down
b. Help each other identify a problem and work through the steps to solve the problem
Return to full group and discuss challenges and benefits of the process, both from perspective of person with the problem and also as the person helping. It is very important that the participants identify their own solutions to problems. The CHWs should not provide the solutions, even when they think they know them. Identifying it for yourself is a critical part of the process. This is easier said than done and usually needs to be learned through practice.
5. Review
Summarize problem solving Review steps, benefits, challenges Check for understanding Answer questions

24
Lesson #2: Social Support
Lesson Objectives
By the end of this lesson, trainees will be able to:
1. Learn the different forms of social support.
2. Learn the role of Social Support in lifestyle change.
3. Successfully apply concepts and knowledge to real world situations.
Estimated Time Required
1 hour 30 minutes
Documents
None
Materials
Large flip chart and/or whiteboard
25
Lesson Overview
Activity Topic Recommended
Method(s) Estimated Time
Documents/ Materials
1 Definition of
Social Support
Brainstorm, Facilitator
Presentation
10 minutes Large flip chart
and/or whiteboard
2 Benefits and
Challenges of Social Support
Brainstorm, Discussion
20 minutes Large flip chart
and/or whiteboard
3 Role Play on
Social Support
Role Play. Discussion
40 minutes
4 Review of Main
Messages
Review
10 minutes
26
Content
1. Definition of Social Support
Brainstorm: Ask the group, what is social support? Write down ideas. Present formal definition of Social Support: Support people receive from others that can be divided into three general categories: Emotional, Informational, and Tangible. One person can offer several types of support.
a. Emotional: Includes things that people do to make us feel loved and cared for, boosting our sense of self-worth, such as providing encouragement, a shoulder to cry on, etc.
b. Informational: Includes people who offer assistance by way of information, such as advice from a friend, information from the doctor/pharmacist/nurse, etc.
c. Tangible: Includes things people provide that are practical, such as running errands, help with childcare, etc.
It may be helpful again to discuss what social support is NOT. It is NOT taking over or solving someone else’s problem. The CHW’s role is to identify sustainable sources of social support for the client, NOT to become the primary source of social support.
2. Benefits and Challenges of Social Support
Brainstorm: Ask the group “What are the benefits and/or challenges of social support?”Write down answers on flip chart or whiteboard. Get to the final list:
a. Improved sense of support, improved mood b. Increase human reminders of healthy behaviors c. Improved collaborative relationship with medical team
(come up with treatment plan that works for you) d. Increased accountability to achieving goals e. Feel less alone f. Gain assistance with other tasks, more time to focus on
health g. Learn more about illness h. Feel good about teaching others about healthy lifestyle i. Feel good about volunteering or helping others j. Give others opportunity to feel good
Encourage discussion of list

27
3. Role Play on Social Support
Work in pairs (different partner than Lesson 1) a. Remember and identify problem identified in Lesson 1
problem solving role play activity b. Work with partner to come up with a social support solution.
(If this solution was already discussed previously, then think of a different problem).
Return to full group and discuss challenges and benefits of the process, both from perspective of person with the problem and also as the person helping. Consider discussing reflective (or active) listening and how that can be useful. Discuss the importance of just being present.
4. Review
Summarize social support Review benefits and challenges Check for understanding Answer questions

28
Lesson #3: Environmental Rearrangement
Lesson Objectives
By the end of this lesson, trainees will be able to:
1. Understand the definition of Environmental Rearrangement.
2. Learn the importance of Environmental Rearrangement in lifestyle change.
3. Successfully apply concepts and knowledge of environmental rearrangement to
real world situations.
Estimated Time Required
1 hour 20 minutes
Documents
None
Materials
Large flip chart and/or whiteboard
29
Lesson Overview
Activity Topic Recommended
Method(s) Estimated Time
Documents/ Materials
1 Definition of
Environmental Rearrangement
Brainstorm/ Facilitator
Presentation
10 minutes Large flip chart
and/or whiteboard
2
Benefits and Challenges of Environmental
Rearrangement
Brainstorm/ Discussion
20 minutes Large flip chart
and/or whiteboard
3 Role Play on
Environmental Rearrangement
Role Play, Discussion
40 minutes
4 Review of Main
Messages
Review
10 minutes

30
Content
1. Definition of Environmental Rearrangement/Restructuring
Brainstorm: “What is environmental rearrangement or restructuring?” Write down ideas.
Define: Change the physical environment to make a behavior easier. This means move things around. This is easier to define when describing with examples. For example, if you can never find your keys, hang a hook by the front door and start putting them on the hook whenever you come inside. If you forget your medicines routinely because your medicine cabinet is too cluttered, consider reorganizing your medicine cabinet so that the things you use everyday are on the front lower shelves and put things you use less often in a different place or farther back.
2. Benefits and Challenges of Environmental Rearrangement/Restructuring
Brainstorm: “What are the benefits and/or challenges of environmental rearrangement/restructuring?”Write down answers on flip chart or whiteboard. Some ideas: a. Make desired behaviors easier to remember and do b. Can improve or compromise safety, depends c. Can benefit or inconvenience others in the family, depends
Encourage discussion of list
3. Role Play on Environmental Rearrangement/Restructuring
Consider a different set up for role play such as conducting role plays in front of group
a. Pick CHW and parent b. Give each group a scenario - You can easily create these by coming up with simple
relevant problems the group can relate to. (kids always throw their coats on the floor making it hard to walk, husband tracks mud in the house every day, can never find car keys, getting late fees because forget to pay bills on time, etc) Make sure they have a solution that involves environmental rearrangement. Write the problems on paper and give a different problem to each group. (You could also give the same problem to each group to see the
31
differences in solutions.) c. Give the group time to rehearse
Role play scenarios in front of group
In the full group, discuss challenges and benefits of the process, both from perspective of person with the problem and also of the CHW.
4. Review
Summarize environmental rearrangement Review benefits and challenges Check for understanding Answer questions

32
Lesson #4: Self-Monitoring
Lesson Objectives
By the end of this lesson, trainees will be able to:
1. Learn the importance of Self-Monitoring in managing asthma and obesity
2. Identify the benefits and challenges of using Self-Monitoring
3. Successfully apply concepts and knowledge to real world situations.
Estimated Time Required
1 hour 30 minutes
Documents
None
Materials
Large flip chart and/or whiteboard

33
Lesson Overview
Activity Topic Recommended
Method(s) Estimated Time
Documents/ Materials
1 Definition of Self-
Monitoring
Brainstorm/ Facilitator
Presentation
10 minutes Large flip chart
and/or whiteboard
2 Benefits and
Challenges of Self-Monitoring
Brainstorm/ Discussion
30 minutes Large flip chart
and/or whiteboard
3 Role Play on
Self-Monitoring
Role Play, Discussion
40 minutes
4 Review of Main
Messages
Review
10 minutes

34
Content
1. Definition of Self-Monitoring
Brainstorm: “What is self-monitoring?” “What are some examples of self-monitoring you do in your life?” Write down ideas.
Define: The ability to observe, detect and/or record signs, symptoms, and behaviors.
2. Benefits and Challenges of Self-Monitoring
Brainstorm: “What are the benefits and/or challenges of self-monitoring?”Write down answers on flip chart or whiteboard. Make sure they get to: a. Helps identify/solve problems b. Monitor and reinforce progress on short- and long-term goals c. A tool for communicating with medical team d. Monitoring feelings can be an example of self-monitoring.
Sometimes feelings are a very potent modulator of behavior change.
Encourage discussion of list
3. Role Play on Self-Monitoring
A. Work in pairs (partner you’ve never worked with) - Remember problem identified in lesson 1 problem solving
and used again in lesson 2 social support. - Work with partner to come up with a self-monitoring
solution. (If this was already discussed previously, then think of a different problem).
In the full group, discuss challenges and benefits of the process, both from perspective of person with the problem and also of the person helping.
Review
Summarize self-monitoring Review benefits and challenges Check for understanding Answer questions
35
Lesson #5: Culture
Lesson Objectives
By the end of this lesson, trainees will be able to:
1. Understand the role of culture in addressing asthma and obesity.
2. Understand the role of culture in lifestyle.
Estimated Time Required
30 minutes
Documents
None
Materials
None
36
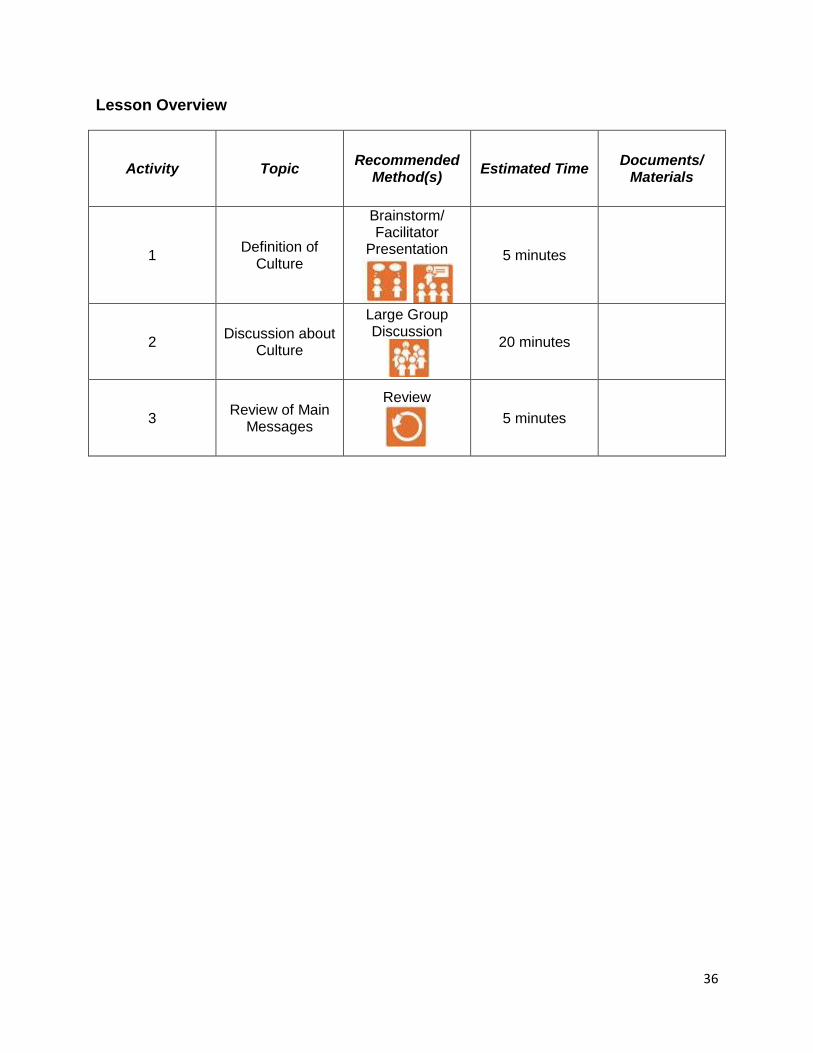
Lesson Overview
Activity Topic Recommended
Method(s) Estimated Time
Documents/ Materials
1 Definition of
Culture
Brainstorm/ Facilitator
Presentation
5 minutes
2 Discussion about
Culture
Large Group Discussion
20 minutes
3 Review of Main
Messages
Review
5 minutes
37
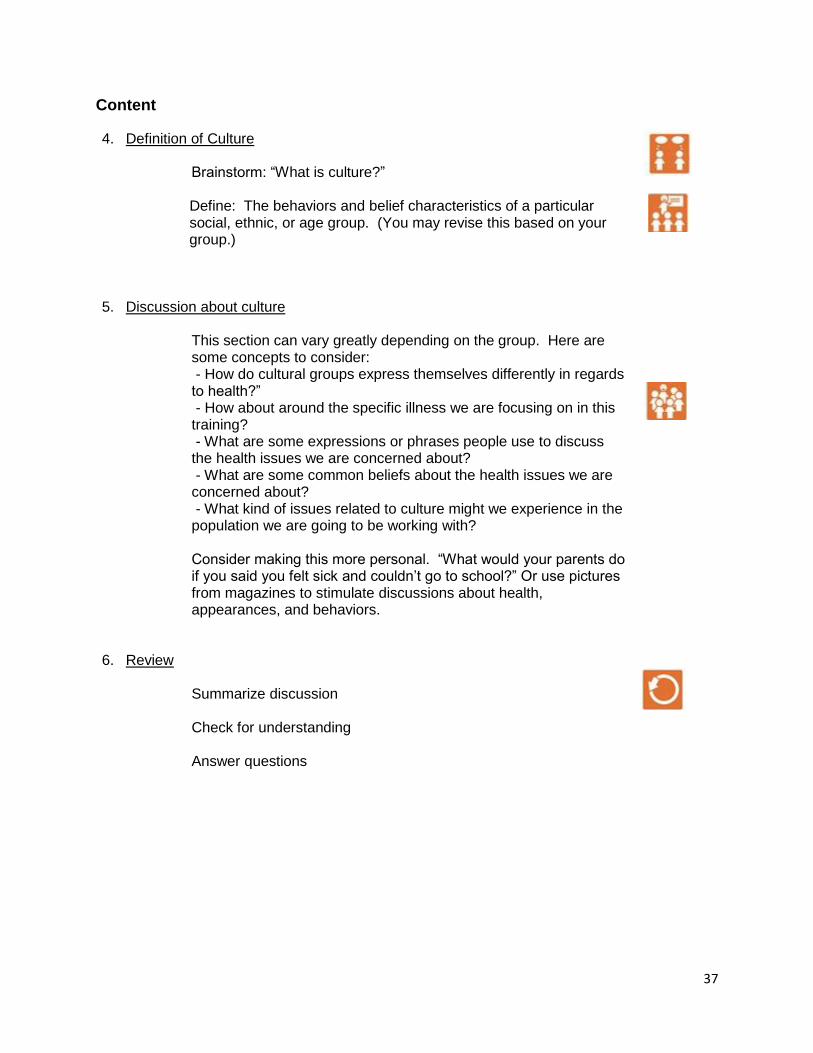
Content
4. Definition of Culture
Brainstorm: “What is culture?”
Define: The behaviors and belief characteristics of a particular social, ethnic, or age group. (You may revise this based on your group.)
5. Discussion about culture
This section can vary greatly depending on the group. Here are some concepts to consider: - How do cultural groups express themselves differently in regards to health?” - How about around the specific illness we are focusing on in this training? - What are some expressions or phrases people use to discuss the health issues we are concerned about? - What are some common beliefs about the health issues we are concerned about? - What kind of issues related to culture might we experience in the population we are going to be working with? Consider making this more personal. “What would your parents do if you said you felt sick and couldn’t go to school?” Or use pictures from magazines to stimulate discussions about health, appearances, and behaviors.
6. Review
Summarize discussion Check for understanding Answer questions
38
Lesson #6: Change Plans
Lesson Objectives
By the end of this lesson, trainees will be able to:
1. Learn what a change plan is. 2. Learn how to create and complete a change plan. 3. Develop a change plan for a problem. 4. Successfully apply concepts and knowledge to real world situations.
5. Understand how to apply self-management concepts to specific diseases.
Estimated Time Required
55 minutes
Documents
1. Change Plan worksheet. You will need to customize this for yourself. Some
examples are included in the Extra Documents. Required components are:
a. Name and date
b. What exactly am I going to do
c. How much
d. When
e. How often
f. What is my confidence level for success
g. Optional components include: potential barriers, potential solutions,
signature
Materials
Large flip chart and/or whiteboard

39
Lesson Overview
Activity Topic Recommended
Method(s) Estimated Time
Documents/ Materials
1 Elements of
Behavior Change
Facilitator Presentation
15 minutes Large flip chart
and/or whiteboard
2 Creating a
Change Plan
Practice Activity
30 minutes Change Plan
worksheet
3 Review of Main
Messages
Review
10 minutes

40
Content
1. Definition of Change Plans
Making change is difficult. Think about a time you have tried to make an important change in your life and how difficult it was to achieve it. We often fail at these kinds of changes so many times that we quit. But it doesn’t have to be that way. Usually when we fail, it is because we didn’t make our plan properly. Change plans help us to set small achievable goals. They help us to problem solve and apply the other self-management concepts we discussed. Use the SMART mnemonic to set goals: specific, measurable, action-oriented, realistic, and time bound. To be successful, the chosen behavior you are trying to change must: - Be something you want to do - Be specific - Be measurable - Be something you can feasibly change Then you have to answer:
- What exactly am I going to do - How much am I going to change - When am I going to do it - How often am I going to do it - What is my confidence level for success (Reevaluate if
lower than 7)
Here is an example. I know I need to exercise more. I have repeatedly made plans to exercise more but I never succeed. This is clearly something I want to do. It is measurable. It is reasonable, and specific. So now I have to generate the right details:
- What am I going to do: Go to the gym (Get specific – What gym? Do you have a membership? If not, then that should be the first change plan! You could make one about exercising after you accomplish the one about joining)
- How much: 30 minutes - When: mornings, before I shower (Get real specific again
– Set a time. Are the mornings really feasible? What time do you leave for work?)
- How often: Twice a week (Someone who says every day would be setting themselves up for failure. This should start tiny. Once you succeed at one level, you can step it up. No goal is too small – the greater problem is most goals are too big.)
- Confidence: 8 The trick to successful change plans are ones that are very small and very specific. Making good change plans comes with practice. Consider listing

41
possible barriers and potential solutions when creating plans. This can help to make sure the plan is feasible. Remember – the goal is for people to achieve their plan!!! Writing down the plan and sharing it with others helps with accountability.
2. Practice making Change Plans Each person reflects on themselves and thinks about something they want to change. They then make out a change plan. Have each person share their change plan with the group and challenge them about the details – is it specific, small, etc? They need to bring these home and work on them. Remind them you will discuss them the next time you meet.
3. Review
Summarize change plans Check for understanding Answer questions
Remember:
These self-management skills will continue to be developed and
integrated into the specific disease areas throughout the rest of
the training.
Self-management skills require practice. Make sure trainees are
continually making change plans for themselves and using the
skills to address their own challenges.
42
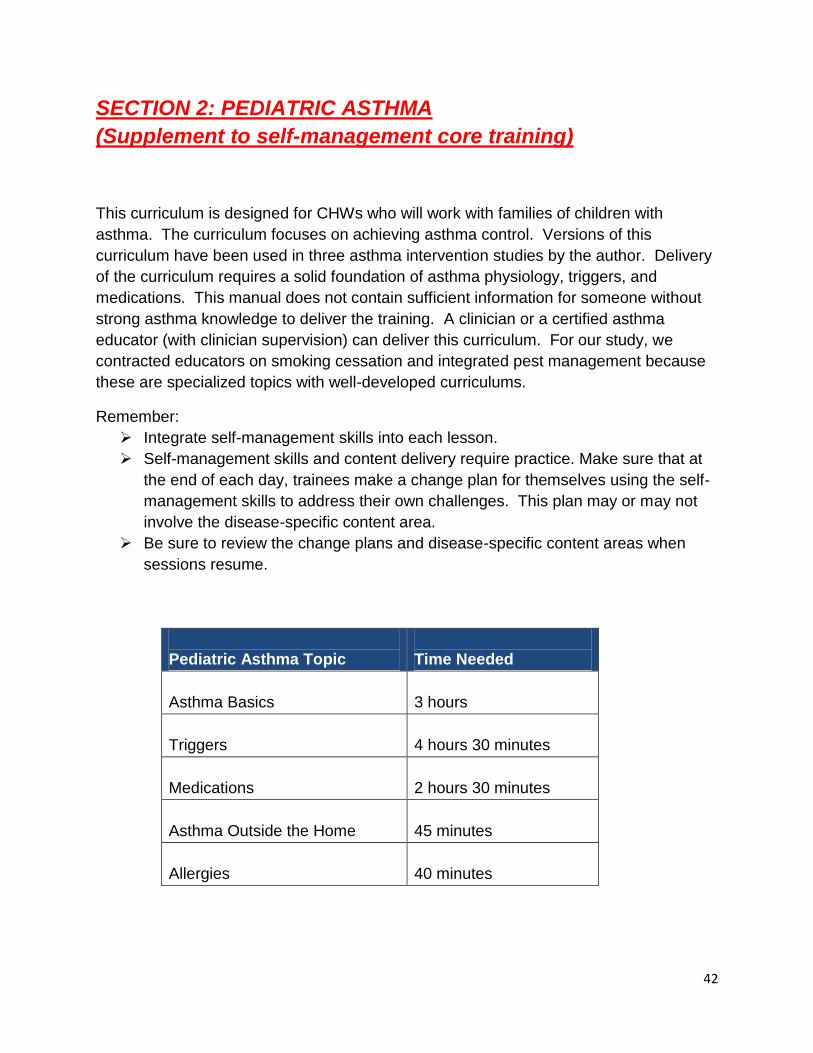
SECTION 2: PEDIATRIC ASTHMA
(Supplement to self-management core training)
This curriculum is designed for CHWs who will work with families of children with
asthma. The curriculum focuses on achieving asthma control. Versions of this
curriculum have been used in three asthma intervention studies by the author. Delivery
of the curriculum requires a solid foundation of asthma physiology, triggers, and
medications. This manual does not contain sufficient information for someone without
strong asthma knowledge to deliver the training. A clinician or a certified asthma
educator (with clinician supervision) can deliver this curriculum. For our study, we
contracted educators on smoking cessation and integrated pest management because
these are specialized topics with well-developed curriculums.
Remember:
Integrate self-management skills into each lesson.
Self-management skills and content delivery require practice. Make sure that at
the end of each day, trainees make a change plan for themselves using the self-
management skills to address their own challenges. This plan may or may not
involve the disease-specific content area.
Be sure to review the change plans and disease-specific content areas when
sessions resume.
Pediatric Asthma Topic
Time Needed
Asthma Basics
3 hours
Triggers
4 hours 30 minutes
Medications
2 hours 30 minutes
Asthma Outside the Home
45 minutes
Allergies
40 minutes
43
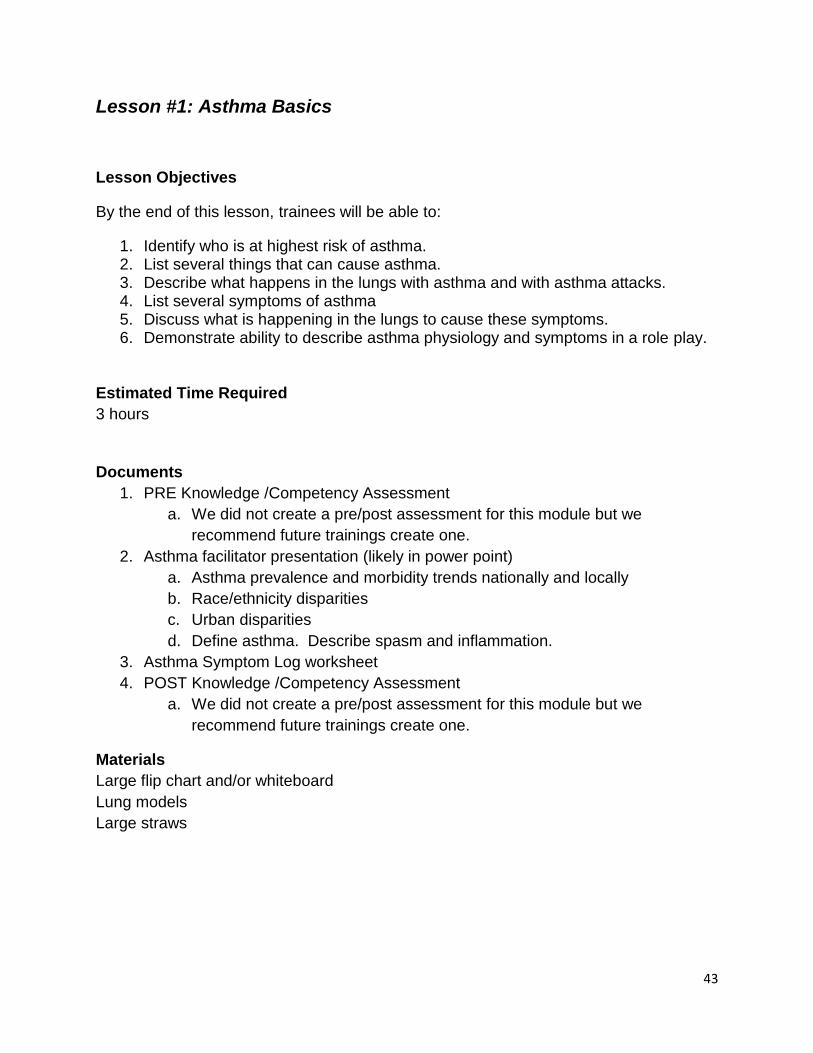
Lesson #1: Asthma Basics
Lesson Objectives
By the end of this lesson, trainees will be able to:
1. Identify who is at highest risk of asthma. 2. List several things that can cause asthma. 3. Describe what happens in the lungs with asthma and with asthma attacks. 4. List several symptoms of asthma 5. Discuss what is happening in the lungs to cause these symptoms. 6. Demonstrate ability to describe asthma physiology and symptoms in a role play.
Estimated Time Required
3 hours
Documents
1. PRE Knowledge /Competency Assessment
a. We did not create a pre/post assessment for this module but we
recommend future trainings create one.
2. Asthma facilitator presentation (likely in power point)
a. Asthma prevalence and morbidity trends nationally and locally
b. Race/ethnicity disparities
c. Urban disparities
d. Define asthma. Describe spasm and inflammation.
3. Asthma Symptom Log worksheet
4. POST Knowledge /Competency Assessment
a. We did not create a pre/post assessment for this module but we
recommend future trainings create one.
Materials
Large flip chart and/or whiteboard
Lung models
Large straws

44
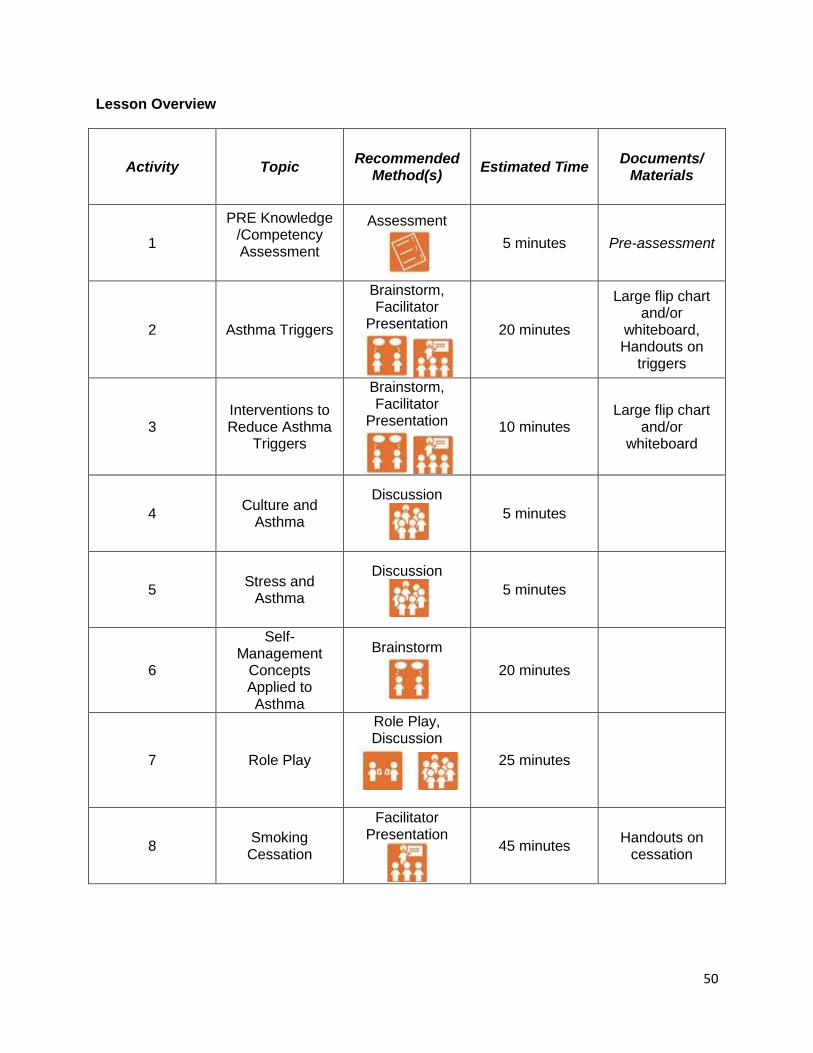
Lesson Overview
Activity Topic Recommended
Method(s) Estimated Time
Documents/ Materials
1
PRE Knowledge /Competency Assessment
Assessment
5 minutes Pre-assessment
2 Asthma Experiences
Discussion
10 minutes
3 The Big Picture of
Asthma
Facilitator Presentation
20 minutes Asthma
presentation
4 Causes of Asthma
Brainstorm, Facilitator
Presentation
20 minutes Large flip chart
and/or whiteboard
5 Asthma Physiology
Facilitator Presentation,
Activity
20 minutes Lung models, Large straws
6 Asthma Symptoms
Facilitator Presentation, Brainstorming
30 minutes Large flip chart
and/or whiteboard
7 Self-Management
Concepts as Applied to Asthma
Brainstorming, Facilitator
Presentation,
20 minutes
Large flip chart and/or
whiteboard, Asthma
Symptom Log worksheet

45
8 Role Play
Role Play, Discussion
40 minutes
9 Review of Main
Messages
Review
10 minutes
10
POST Knowledge /Competency Assessment
Assessment
5 minutes Post-assessment

46
Content
1. PRE Knowledge /Competency Assessment
Distribute, complete, and collect Pre-Assessment
2. Discussion of Previous Asthma Experiences Ask group what they already know about asthma. Prompt about personal experiences with asthma, general reactions and thoughts
3. The Big Picture of Asthma Prevalence Morbidity and mortality trends Disparities
4. Causes of Asthma
Brainstorm: “What causes asthma?” Differentiate between asthma the disease and attacks. Causes of Disease
a. Genetics (genetic/environmental interaction) b. Prematurity or birth trauma c. Maybe obesity d. Maybe some exposures such as toxic chemicals or
certain allergens (cockroach) Causes of Attacks
a. Triggers b. Allergies c. Obesity
Other associations
a. Mental health, stress b. Socioeconomic Status

47
5. Physiology of Asthma (use lung models to demonstrate)
Where are the lungs, what do they look like What is spasm What is inflammation Straw exercise: Give everyone a straw. Have them pinch their noses shut and breathe only through straw for a minute. Then run in place while still breathing only through straw. Breathe normally. Have group talk about how they felt. (It is relatively easy when not moving but gets harder with exercise. Some people experience significant anxiety.) This is how people with asthma feel all the time when not controlled. (Be careful with trainees who have asthma or other respiratory problems, they may not be able to participate fully.)
6. Symptoms – Recognizing Asthma
Brainstorm: “What are the symptoms of asthma?” Symptoms
a. Cough, wheeze, fatigue (tired), tightness or pain in chest, breathing too fast, scared, can’t do exercise or play, cold goes to the chest and won’t go away
Refer back to physiology, discuss what is happening during symptoms (spasm, inflammation) Brainstorm: “What is the Influence of stress on symptoms?” (causal role, influence on recognition/reaction)
7. Self-Management Concepts as Applied to Asthma Look at list of symptoms and consider physiology. Look at lists of self-management concepts. Ask “How can we apply self-management concepts to teaching about asthma symptoms?” Examples:
– Self-monitoring: Use symptoms log – Social support: Have teacher help monitor day symptoms

48
8. Role Play on Asthma Physiology & Symptoms
Work in pairs Provide different scenarios (see examples) In pairs, practice teaching basic asthma physiology and symptoms using self-management when possible. When groups have had adequate time, reconvene full group to discuss techniques and observations
9. Review of Main Messages
Review asthma prevalence, causes, physiology, symptoms Check for understanding Answer questions
10. POST Knowledge /Competency Assessment
Distribute and have trainees complete Review and collect

49
Lesson #2: Asthma Triggers
Lesson Objectives
By the end of this lesson, trainees will be able to:
1. List common triggers. 2. Describe how stress and culture influence triggers. 3. Discuss strategies to reduce tobacco smoke exposure. 4. Demonstrate the ability to apply integrated pest management techniques. 5. Demonstrate incorporation of a self-management skill around trigger reduction in
a role play.
Estimated Time Required 4 hours 30 minutes
Documents
1. PRE Knowledge /Competency Assessment
A. We did not create a pre/post assessment for this module but we
recommend future trainings create one.
2. We used handouts from local asthma organizations about mold, dust mites, and
general indoor and outdoor triggers.
3. We created handouts on smoking cessation.
4. POST Knowledge /Competency Assessment
A. We did not create a pre/post assessment for this module but we
recommend future trainings create one.
Materials
Large flip chart and/or whiteboard
The Safer Pest Control Project used a variety of materials for their integrated
management discussion including caulk, steel wool, insecticides, and traps.
50
Lesson Overview
Activity Topic Recommended
Method(s) Estimated Time
Documents/ Materials
1
PRE Knowledge /Competency Assessment
Assessment
5 minutes Pre-assessment
2 Asthma Triggers
Brainstorm, Facilitator
Presentation
20 minutes
Large flip chart and/or
whiteboard, Handouts on
triggers
3 Interventions to Reduce Asthma
Triggers
Brainstorm, Facilitator
Presentation
10 minutes Large flip chart
and/or whiteboard
4 Culture and
Asthma
Discussion
5 minutes
5 Stress and
Asthma
Discussion
5 minutes
6
Self-Management
Concepts Applied to Asthma
Brainstorm
20 minutes
7 Role Play
Role Play, Discussion
25 minutes
8 Smoking Cessation
Facilitator Presentation
45 minutes Handouts on
cessation
51
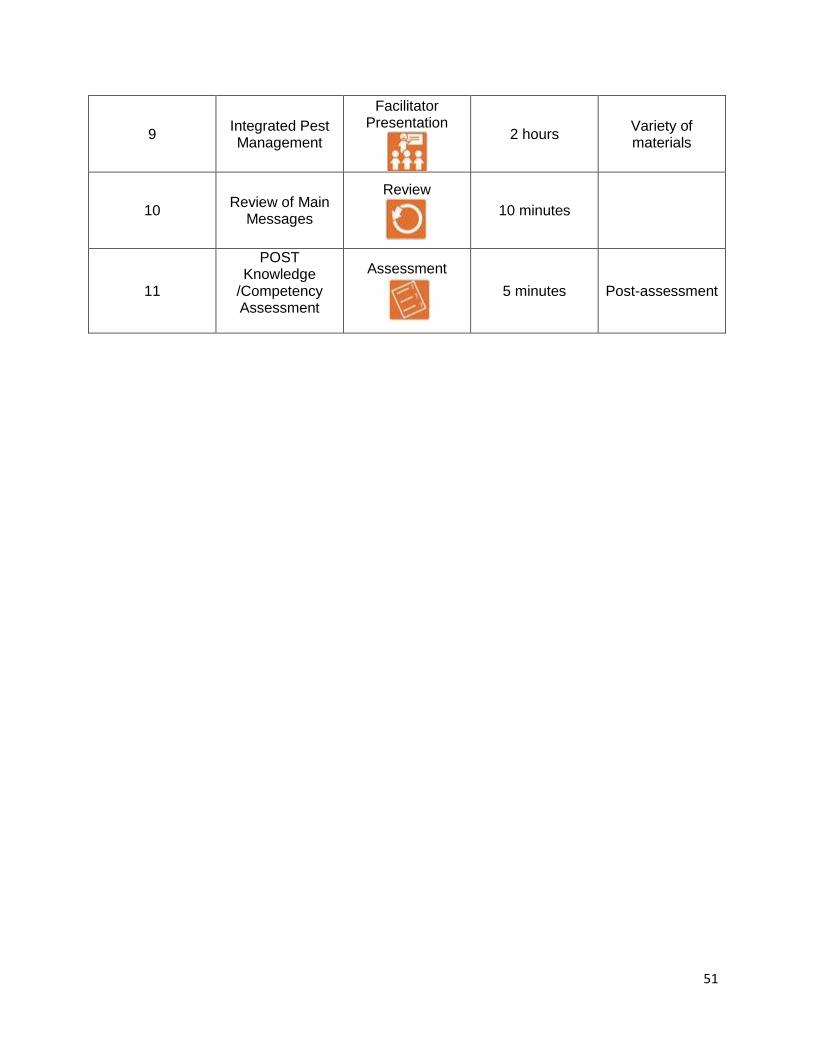
9 Integrated Pest Management
Facilitator Presentation
2 hours Variety of materials
10 Review of Main
Messages
Review
10 minutes
11
POST Knowledge
/Competency Assessment
Assessment
5 minutes Post-assessment

52
Content
1. PRE Knowledge /Competency Assessment
Distribute, complete, and collect Pre-Assessment
2. Asthma Triggers
Brainstorming: Ask “What are some triggers?” (Write on board and save for later use.) Make sure ultimately all indoor and outdoor triggers are listed. Refer back to physiology, discuss what is happening when exposed to triggers (spasm, inflammation)
3. Interventions to Reduce Asthma Triggers
Brainstorming: “What can be done to reduce triggers? (Write on board and save for later use.) Make sure all major indoor routine interventions are listed.
4. Culture and Asthma Group discussion: What is the role of culture in asthma? Discuss culture-related behaviors (Example: specific cleaning products, candles, protective pets, hot/cold beliefs) How to approach families: Discuss how families in the target group prefer to communicate about health information (Example: include whole family or just head of household, is authoritarian style preferred or would helping peer be better received, etc)
5. Stress and Asthma Discuss how stress affects behaviors and asthma
6. Self-Management Concepts Use trigger reduction ideas generated in Lesson 3 Brainstorm how to apply self-management concepts

53
7. Role Play
Work in pairs Practice trigger reduction methods using self-management concepts When groups have had adequate time, reconvene full group to discuss techniques and observations
8. Smoking Cessation We had a guest lecture by a family physician who discussed different techniques for smoking cessation and resources CHWs can use.
9. Integrated Pest Management We had a guest lecture from the Safer Pest Control Project (www.spcpweb.org) which explained integrated pest management and taught how to implement it.
10. Review of Main Messages Overview of asthma basics: physiology and symptoms Review major themes and takeaway points (what are triggers, smoking cessation, integrated pest management) Check for understanding Answer any questions
11. POST Knowledge /Competency Assessment Distribute and have trainees complete Review and collect
54
Lesson #3: Medications
Lesson Objectives
By the end of this lesson, trainees will be able to:
1. Compare reliever to controller medicines. 2. Discuss medication side effects. 3. Demonstrate proper technique for medication devices. 4. Describe how stress and culture influence medication usage. 5. Demonstrate incorporation of a self-management skill around medication
technique or adherence in a role play. Estimated Time Required 2 hours 30 minutes Documents
1. PRE Knowledge /Competency Assessment
2. Medication pictures (worksheet , power point, or both)
3. We used instruction sheets on how to use and clean each type of inhaler from
the CHEST Foundation, www.chestnet.org.
4. Medication log
5. POST Knowledge/Competency assessment
Materials
Large flip chart and/or whiteboard
Asthma devices (demonstration metered dose inhaler, spacer, spacer with mask,
discus, symbicort)

55
Lesson Overview
Activity Topic Recommended
Method(s) Estimated
Time Documents/
Materials
1
PRE Knowledge /Competency Assessment
Assessment
5 minutes Pre-assessment
2 Asthma
Medications & Their Categories
Brainstorm, Facilitator Presentation
20 minutes
Large flip chart and/or
whiteboard, Medication
pictures
3 Why People Don’t Take Medications
Brainstorm, Discussion
20 minutes Large flip chart
and/or whiteboard
4 Self-
Management Concepts
Brainstorm
20 minutes - d
f
5 Role Play
Role Play, Discussion
20 minutes
6 Asthma Devices
Facilitator Presentation, Activity, Peer Teaching
50 minutes
-Asthma Devices - Device
technique instruction handouts
7 Review of Main
Messages
Review
10 minutes
8
POST Knowledge/Com
petency assessment
Assessment
5 minutes Post-assessment
56
Content
1. PRE Knowledge /Competency Assessment Distribute, complete, and collect Pre-Assessment
2. Asthma Medications Brainstorm: List all asthma medications. Write on whiteboard. Brainstorm: “Let’s categorize these medications into different groups”. Help them to end up with three categories: Quick relief (rescue), controller, allergy) Refer back to physiology and explain what medicines do (quick relief reduces spasm, controller reduces inflammation) Brainstorm. “What are side effects of these medicines?” (Quick relief = fast heart rate, shaky. Controller = yeast in mouth.) It is important to say what is NOT a side effect such as addiction or obesity. Oral prednisone/prednisolone should be compared to inhaled corticosteroids.
3. Why People Don’t Take Medicines Brainstorm why people don’t take medicines (write on board and save for later use). Some examples: Fear of side effects, forget, no time, don’t understand them, etc. Role of Culture: Discuss culture-related behaviors related to medicine. What is the best way to approach families in this community about medicine. (For example, is the target population very open to medicines or do they prefer a more “natural” approach? Are they trusting of doctors?)
4. Self-Management Concepts Using the list from Activity 3 about why people don’t take medicines, brainstorm how to apply self-management concepts.

57
5. Role Play Work in pairs Provide different scenarios Practice teaching about ways to improve medication acquisition/adherence using self-management concepts When groups have had adequate time, reconvene full group to discuss techniques and observations
6. Asthma Devices: Metered dose inhaler with and without spacer, discus inhaler Facilitator demonstration of technique steps Activity : Practice using demonstration devices Peer teaching: In pairs, teach each other how to use the devices.
7. Review of Main Messages Overview of asthma medications Review major themes and takeaway points (medication physiology and medication categories, when they need to be taken, medication technique) Check for understanding Answer any questions
8. POST Knowledge /Competency Assessment Distribute and have trainees complete Review and collect
58
Lesson #4: Asthma Outside the Home
Lesson Objectives
By the end of this lesson, trainees will be able to:
1. Discuss strategies for improving communication with health care providers. 2. List the rights of children with asthma in schools regarding medications, physical
education, and services.
Estimated Time Required
45 minutes
Documents
- Asthma Action Plan: We recommend the Asthma Action Plan used by your clinical
partner or the school district
- School forms (disability form, school asthma forms for self-carry)
Materials
Large flip chart and/or whiteboard
59
Lesson Overview
Activity Topic Recommended
Method(s) Estimated Time
Documents/ Materials
1 Health Care Providers
Discussion, Facilitator
Presentation, Brainstorm
20 minutes
Asthma Action Plan,
Large flip chart and/or
whiteboard
2 Schools, and Their Roles &
Responsibilities
Facilitator Presentation, Discussion, Brainstorm
20 minutes School forms
3 Review of Main
Messages
Review
5 minutes

60
Content
1. Health Care Providers Discussion: “What doctors have you liked or disliked? Why? What qualities did they have?” (write answers on whiteboard) Discussion: What can/should doctors do for you? (facilitate to get to answers of general health, medicines, basic education, referral to specialists, asthma action plans) Insurance Options: Explain coverage of medications, referrals, and trigger reduction with public insurance and private plans (copays, refill restrictions, access to allergists and pulmonologists, air purifiers, etc) Brainstorm: “What are some ways to communicate better with your doctor?”
- Have lists of questions - Keep a record of medication use - Keep a record of medication symptoms - Others…
2. Schools and their Roles and Responsibilities Describe the roles of different personnel around asthma management: Principal, nurse, teachers Describe what schools are allowed to do: self-carry laws, parent and physician forms, physical education, 504 plans Brainstorm: “What are some ways to effectively communicate with your school?” Discussion
3. Review of Main Messages Review major themes and takeaway points (communication is important and there are specific ways to improve communication) Answer any questions

61
Lesson #5: Allergies
Lesson Objectives
By the end of this lesson, trainees will be able to:
1. Review the role of allergies in asthma.
2. Explain the importance of medicine intervention for those with allergies.
Estimated Time Required
40 minutes
Documents
Medication pictures (handouts, power point, or both)
Materials
Allergy medication devices (nasal inhalers)

62
Lesson Overview
Activity Topic Recommended
Method(s) Estimated Time
Documents/ Materials
1 Allergies and
Asthma
Review, Brainstorming
15 minutes
2 Allergy
Medicines
Facilitator Presentation, Discussion
20 minutes
Medication pictures, allergy
medication devices
3 Review of Main
Messages
Review
5 minutes
63
Content
1. Allergies and Asthma Brainstorm: “What is an allergy?” “How do allergies affect asthma?” (allergies trigger asthma, can worsen asthma) Tie back to physiology Food versus environmental allergies Allergy versus irritant (smoke, smells, weather, temperature are irritants but not real allergies)
2. Allergy Medications and Devices Discuss main allergy medications and devices (antihistamines, singulair, inhaled corticosteroid nasal sprays)
3. Review of Main Messages Review major themes and takeaway points (controlling allergies is important for asthma control, allergens are different than irritants) Check for understanding Answer any questions
64
SECTION 3: PEDIATRIC OBESITY
(Supplement to self-management core training)
We could find no pediatric obesity CHW curriculums and therefore created our own.
The area of pediatric obesity is broad. We chose to focus on several key areas:
physical activity, portion control (using the My Plate concept), sugar sweetened
beverages, and screen time. We also include a module for the co-morbid condition of
asthma and obesity. This module is optional but we do recommend discussion of the
obesity recommendations in the context of co-existing medication conditions. The
obesity curriculum requires a solid foundation in nutrition and health. In our center, this
portion of the training was delivered by a pediatrician but that level of clinical expertise
is not necessary. A nutritionist, nurse, or other educator familiar with nutrition and
health could also deliver the curriculum.
Remember:
Integrate self-management skills into each lesson.
Self-management skills and content delivery require practice. Make sure that at
the end of each day, trainees make a change plan for themselves using the self-
management skills to address their own challenges. This plan may or may not
involve the disease-specific content area.
Be sure to review the change plans and disease-specific content areas when
sessions resume.
Obesity Topic
Time Needed
Obesity Overview
2 hours
Physical Activity
1 hour 30 minutes
Food Groups
1 hour
Portions
2 hours 15 minutes
Beverages
2 hours 30 minutes
Screen Time
1 hour 15 minutes
Other Topics
1 hour
Asthma and Obesity
1 hour 45 minutes
65
Lesson #1: Obesity Overview
Lesson Objectives
By the end of this lesson, trainees will be able to:
1. Increase general knowledge of the effect of excess weight on the body. 2. Understand the importance of BMI and how/why it is used by physicians. 3. Dispel common myths about food, weight and physical exercise. 4. Successfully apply concepts and knowledge to real world situations.
Estimated Time Required
2 hours
Documents
1. PRE Knowledge /Competency Assessment
2. Obesity presentation (likely power point)
a. Obesity and overweight prevalence over time nationally and
locally
b. Race, sex, age differences
c. How is obesity determined? Using BMI. BMI = kg/m2,
overweight is BMI ≥ 85% and <95%, obese is BMI ≥ 95%,
adjust for sex and age
d. Health consequences (complications) of obesity
a. For children: High blood pressure and high
cholesterol which are risk factors for heart disease;
increased risk of impaired glucose tolerance, insulin
resistance and type 2 diabetes; breathing problems,
such as sleep apnea, and asthma; joint problems and
musculoskeletal discomfort; fatty liver disease,
gallstones, and gastro-esophageal reflux (heartburn);
social and psychological problems, such as
discrimination and poor self-esteem
b. For adults: Obese children are more likely to become
obese adults; adult obesity is associated with many
serious health conditions including heart disease,
diabetes, and some cancers; if children are

66
overweight, obesity in adulthood is likely to be more
severe
3. CDC growth charts for boys and girls
4. Body image diagrams, Stevens J, et al. Weight-related attitudes and
behaviors in fourth grade American Indian children. Obes Res. 1999
Jan;7(1):34-42.
5. We referred to materials on the 54321 go! Campaign produced by the
Consortium to Lower Obesity in Chicago Children (www.clocc.org)
6. We created worksheets that discussion facts and myths about food,
exercise, and weight
7. POST Knowledge /Competency Assessment
Materials
Large flip chart and/or whiteboard
67
Lesson Overview
Activity Topic Recommended
Method(s) Estimated
Time Documents/
Materials
1
PRE Knowledge /Competency Assessment
Assessment
5 minutes Pre=assessment
2 Definition of
Obesity
Brainstorm, Facilitator Presentation
30 minutes
Obesity presentation, BMI growth
charts
3 Causes of Obesity
Brainstorm, Facilitator Presentation
20 minutes
4 Health
Consequences of Obesity
Brainstorm, Facilitator Presentation, Discussion
10 minutes
Obesity presentation, large flip chart
and/or whiteboard
5 Solutions
Brainstorm, Discussion
20 minutes
54321 go! worksheet,
Myths & Facts worksheet, large flip chart and/or
whiteboard
6 Role Play
Role Play
20 minutes
7 Review of Main
Messages
Review
10 minutes
8
POST Knowledge /Competency Assessment
Assessment
5 minutes Post-assessment

68
Content
1. PRE Knowledge /Competency Assessment Distribute, complete, and collect Pre-Assessment
2. Definition of Obesity Brainstorm “What is obesity?” Generate definitions Presentation: CDC growth charts, BMI definition and ranges, obesity prevalence. Body image diagrams can be very useful here as many people do not recognize (or agree with) clinical definitions of obesity. For urban minority children, the diagrams in the following article are useful: Stevens J, et al. Weight-related attitudes and behaviors in fourth grade American Indian children. Obes Res. 1999 Jan;7(1):34-42.
3. Causes of Obesity Brainstorm “What causes obesity?” Presentation: Describe the multi-factorial causes of obesity.
4. Health Consequences of Obesity Brainstorm, “Why do we care about obesity?” The answer is because obesity has serious health consequences. List them. Presentation: Describe the multi-factorial causes of obesity (individual and societal) Group discussion: “How do we describe the health consequences of obesity to others?”
- “How do we raise awareness of health consequences?” - “What are myths related to health consequences?”
5. Solutions Brainstorm, “What are some things people can do to avoid these complications?” (from previous discussion) Generate list of all possible solutions.

69
6. Role Play Work in pairs Provide different scenarios In pairs, practice teaching causes and consequences of obesity. When groups have had adequate time, reconvene full group to discuss techniques and observations
7. Review of Main Messages Review major themes and takeaway points (causes and consequences of obesity) Check for understanding Answer any questions
8. POST Knowledge/Competency Assessment Distribute and have trainees complete Review and collect

70
Lesson #2: Physical Activity
Lesson Objectives
By the end of this lesson, trainees will be able to:
1. Understand the importance of physical activity in a healthy lifestyle. 2. Know the recommended daily amount of physical activity for children and adults. 3. Identify ways to increase physical activity with or without “exercising”. 4. Successfully apply concepts and knowledge to real world situations.
Estimated Time Required
1 hour 30 minutes
Documents
1. PRE Knowledge /Competency Assessment
2. We made a handout that listed different kinds of physical activity
3. POST Knowledge /Competency Assessment
Materials
Large flip chart and/or whiteboard
Pedometers for each trainee

71
Lesson Overview
Activity Topic Recommended
Method(s) Estimated Time
Documents/ Materials
1
PRE Knowledge /Competency Assessment
Assessment
5 minutes Pre-assessment
2 General physical
activity discussion
Brainstorm, Facilitator
Presentation
10 minutes Physical Activity
Made Easy handout
3 Group Activity
Activity
35 minutes Pedometers
4 Local Resources
Brainstorm
10 minutes Large flip chart
and/or whiteboard
5 Self-
Management Concepts
Brainstorm
15 minutes
6 Review of Main
Messages
Review
10 minutes
7
POST Knowledge
/Competency Assessment
Assessment
5 minutes Post-assessment
72
Content
1. PRE Knowledge/Competency Assessment Distribute, complete, and collect pre-assessment
2. Physical activity Brainstorm type of physical activity. Facilitator add terms sedentary, light, moderate, vigorous. Discuss occupational exercise. Playing. Brainstorm benefits of exercise (cardiovascular disease, diabetes, mental health). Facilitator to provide some details on physiology of exercise. Current exercise recommendations: For adults, 10,000 steps per day. For children, 60 minutes of moderate/vigorous activity per day. Discuss intensity of exercise compared to length and how that impacts health benefits. Brainstorm barriers to achieving current exercise recommendations.
3. Group Activity We gave each trainee a pedometer and helped them to set them up. Then we went on a 20 minute walk around the neighborhood. Discuss the amount of steps we just accumulated. Was this easy, hard, pleasant, stressful? Discuss how people now feel about how many steps they could get in a day?
4. Local Resources We had the group brainstorm a list of local organizations and places that people can go to receive opportunities for physical activity or assistance related to physical activity.
5. Self-Management Concepts Think about barriers and to recommendations. Brainstorm ways that self-management concepts could be used to overcome these barriers and achieve the recommendations. Homework for the day is to set a goal for how many steps they want to achieve and keep the pedometer on. This needs to be addressed again the next time the group convenes. Ask if they reached their

73
goals and if so, how did it feel? How did they do it? If not, why do they think it didn’t work? What can they change to be more successful next time?
6. Review of Main Messages Review major themes and takeaway points (causes and consequences of obesity) Check for understanding Answer any questions
7. POST Knowledge/Competency Assessment Distribute and have trainees complete Review and collect

74
Lesson #3: Food Groups
Lesson Objectives
By the end of this lesson, trainees will be able to:
1. Distinguish between the different food groups 2. Explain the USDA’s nutrition guidelines
Estimated Time Required
1 hour
Documents
1. PRE Knowledge /Competency Assessment
a. We did not create a pre/post assessment for this module but we
recommend future trainings create one.
2. Pictures of USDA divided plate and pyramid
3. POST Knowledge /Competency Assessment
a. We did not create a pre/post assessment for this module but we
recommend future trainings create one.
Materials
Large flip chart and/or whiteboard
75
Lesson Overview
Activity Topic Recommended
Method(s) Estimated Time
Documents/ Materials
1
PRE Knowledge /Competency Assessment
Assessment
5 minutes Pre-assessment
2 Food Groups
Brainstorm, Facilitator
Presentation
45 minutes Large flip chart
and/or whiteboard, USDA pictures
3 Review of Main
Messages
Review
5 minutes
4
POST Knowledge
/Competency Assessment
Assessment
5 minutes Post-assessment

76
Content
1. PRE Knowledge/Competency Assessment Distribute, complete, and collect pre-assessment
2. Food Groups List categories and provide examples: starchy grains, proteins, fruits, vegetables, fats, dairy Explain carbohydrates (This project was not focused on diabetes and covered a lot of material so a detailed discussion of carbohydrates was not provided. Trainees were told examples of some kinds of foods that were carbohydrates.) Brainstorm and Discussion: “Why do we need each of these different types of foods? What is the importance of balance?” - Carbohydrates - Give the body energy but too much turns to fat. - Protein - Builds bones and muscle and fills you up so you aren’t as hungry (have to watch fat levels with protein) - Vegetables - Provide key vitamins and minerals that help the body to work and make skin, hair nice etc. - Fats – Frying is not good, using low fat meats (ground turkey et al), etc. USDA recommendations: Used to use the pyramid (show pictures), now using plate (show example). Discuss why plate is better than the pyramid, and uses of plate (don’t need to count for whole day which people are bad at, make every meal perfect).
3. Review of Main Messages Review major themes and takeaway points (different food categories) Check for understanding Answer any questions
4. POST Knowledge/Competency Assessment Distribute and have trainees complete Review and collect
77
Lesson #4: Portions
Lesson Objectives
By the end of this lesson, trainees will be able to:
1. Understand the difference between portion-size and serving-size. 2. Develop a system for identifying appropriate portions for children and adults. 3. Identify various types and ways to implement portion control using self-
management concepts. 4. Understand the importance of the divided plate. 5. Develop healthier versions of traditional recipes. 6. Successfully apply concepts and knowledge to real world situations.
Estimated Required
2 hours 15 minutes
Documents
1. PRE Knowledge /Competency Assessment
2. We made a worksheet with food swapping recommendations
3. POST Knowledge /Competency Assessment
Materials
Large flip chart and/or whiteboard
We created our own portion plates and provided each trainee with one
Food models

78
Lesson Overview
Activity Topic Recommended
Method(s) Estimated Time
Documents/ Materials
1
PRE Knowledge /Competency Assessment
Assessment
5 minutes Pre-assessment
2 Definition of
portions
Facilitator Presentation, Discussion
20 minutes Food models, portion plates
3 Group Activity
Activity, Discussion
50 minutes Food models, portion plates
4 Group Activity
Brainstorm, Activity
30 minutes
Food Swapping worksheet, large flip chart and/or
whiteboard
5
Self-Management
and Food Groups
Brainstorm, Discussion
15 minutes
6 Review of Main
Messages
Review
10 minutes
7
POST Knowledge
/Competency Assessment
Assessment
5 minutes Post-assessment

79
Content
1. PRE Knowledge/Competency Assessment Distribute, complete, and collect pre-assessment
2. Definition of Portions Ask group “What is a normal serving size?” Show recommended portion sizes for a variety of common foods using measuring cups and food models Discuss child verses adult portions (formal recommendations for child portion sizes are not easy to find but put the emphasis on smaller plates, smaller portions) Demonstrate how to determine portion or servings from food labels
3. Activity 1 Organize into pairs. Give each pair a set of fake food. Instruct them to make a “perfect plate” using the USDA recommendations. Then discuss in the larger group.
4. Activity 2 Brainstorm “What are some food substitutions or preparation tricks that can make food healthier?” List on board. Recipe redo: Ask trainees for a favorite recipe. Write it on one side of the board. Then go through it item by item and discuss any possible substitutions to make the recipe more healthy. (Examples: bake instead of fry, use whole grains, increase vegetables, can substitute some vegetables for potatoes such as cauliflower, canola or olive oil, substitute fruit for butter or oils, low fat cheese, turkey meat instead of beef)

80
5. Self-Management Concepts Brainstorm ways that self-management concepts could be used to encourage proper portions and healthier food choices.
6. Review of Main Messages Review major themes and takeaway points (portions important, perfect plate, food substitutions) Check for understanding Answer any questions
7. POST Knowledge/Competency Assessment Distribute and have trainees complete Review and collect

81
Lesson #5: Beverages
Lesson Objectives
By the end of this lesson, trainees will be able to:
1. Understand the effect of beverages on the body. 2. Identify the sugar content in popular beverages. 3. Develop list of healthier alternatives to sugary beverages. 4. Successfully apply concepts and knowledge to real world situations.
Estimated Time Required
2 hours 30 minutes
Documents
1. PRE Knowledge /Competency Assessment
a. We did not create a pre/post assessment for this module but we
recommend future trainings create one.
2. Beverage consumption trends (power point or handout)
3. Reading labels handout
a. We made a handout with a picture of a bag of chips and the label
on the bag. We pointed out serving size, servings per container,
calories, fat, sugar
4. POST Knowledge /Competency Assessment
a. We did not create a pre/post assessment for this module but we
recommend future trainings create one.
Materials
- For sugar exercise: Gather empty (or full) beverage containers in different sizes. We
recommend Coke or Pepsi, orange Fanta, ice tea, Sprite, orange juice, Capri sun,
Gatorade. Get different sizes, some 12 ounce, some of the larger 24-30 ounce
containers. You also need a bag of sugar, a teaspoon, box of small plastic spoons,
plastic beverage cups (clear best). Calculators can be helpful.
- We purchased milk models from HealthEdCo that show amount of fat in each type of
milk.

82
Lesson Overview
Activity Topic Recommended
Method(s) Estimated Time
Documents/ Materials
1
PRE Knowledge /Competency Assessment
Assessment
5 minutes Pre-assessment
2 Beverage Lecture
Facilitator Presentation
25 minutes Consumption
trends
3 Group Exercise
Large Group Activity
60 minutes Sugar exercise
4 Beverages Discussion
Brainstorm, Facilitator
Presentation
15 minutes Milk fat models
5 Self-
Management Concepts
Brainstorm
5 minutes
6 Role Play
Role Play
25 minutes
7 Review of Main
Messages
Review
10 minutes
8
POST Knowledge
/Competency Assessment
Assessment
5 minutes Post-assessment
83
Content
1. PRE Knowledge/Competency Assessment Distribute, complete, and collect pre-assessment
2. Beverage lecture Review types of beverages: Water, milk, soda, juice, energy drinks, sports drinks, coffee, tea Recommendations: NO juice. 2-3 cups/day of lowfat milk. The rest water. Show trends over time in beverage consumption. Point out the drop in price for soda, the widespread availability of soda and sugar drinks, and the increased overall consumption of sugar drinks compared to several decades ago. Explain the huge impact this has on weight – show data linking sugar beverage consumption with obesity.
3. Sugar Exercise Everyone gets a cup filled with sugar, an empty cup, and a spoon. Take the first soda bottle and hand it to a trainee. Ask them how many grams of sugar are in the bottle. If they don’t know where to find that information, show them on the label. Then show the rest of the class. 4 g sugar equals 1 teaspoon of real sugar. So if the label says 24g sugar, have the class do 24/4 = 6 tsp sugar. Have them measure out 6 spoons of sugar and put into the empty cup. Now look at the serving size. Many of the sodas have more than one serving and report the sugar for only one serving. If the label says 24 g sugar per serving and the bottle has 2 servings, we assume most people will drink the whole bottle so we need to add another 6 spoons of sugar to our cup. Now look at how much sugar is in that cup. Have the group discuss. Are they surprised? Repeat for each of the beverages. It is important to include a clear beverage like Sprite and a sports drink like Gatorade because people assume these don’t have much sugar but they do. Also orange juice or apple juice really shock people so it is important to include one or both of those. Do not pre-measure out the sugar and just show people – they need to self-discover by calculating and measuring themselves.

84
4. Beverages Discussion Brainstorm healthy beverage replacements (water, low calorie drinks like diet soda or crystal light, lowfat milk) It is important to define “lowfat” milk. People generally think 2% is lowfat and it is better than whole milk but it still has a high fat content, much more than most people realize. We used milk models for HealthEdCo that demonstrate the amount of fat in the different milks and this is a useful tool for teaching this concept. We encourage everyone to move towards skim milk.
5. Self-Management Concepts Brainstorm ways that self-management concepts could be used to encourage proper portions and healthier food choices.
6. Role Play Work in pairs Provide different scenarios In pairs, practice having families self-discover and change beverage practices When groups have had adequate time, reconvene full group to discuss techniques and observations
7. Review of Main Messages Review major themes and takeaway points (recommend no drinks with sugar) Check for understanding Answer any questions
8. POST Knowledge/Competency Assessment Distribute and have trainees complete Review and collect

85
Lesson #6: Screen Time
Lesson Objectives
By the end of this lesson, trainees will be able to:
1. Understand the impact of “screen time” (television, movies, video games) on eating and lifestyle.
2. Understand the relationship between screen time, asthma and obesity. 3. Identify ways that screen time can have a positive impact on eating and lifestyle. 4. Successfully apply concepts and knowledge to real world situations.
Estimated Time Required
1 hour 15 minutes
Documents
1. PRE Knowledge /Competency Assessment
a. We did not create a pre/post assessment for this module but we
recommend future trainings create one.
2. Television statistics (power point or handout), Neilsen data are a good
place to start.
3. POST Knowledge /Competency Assessment
a. We did not create a pre/post assessment for this module but we
recommend future trainings create one.
Materials
None
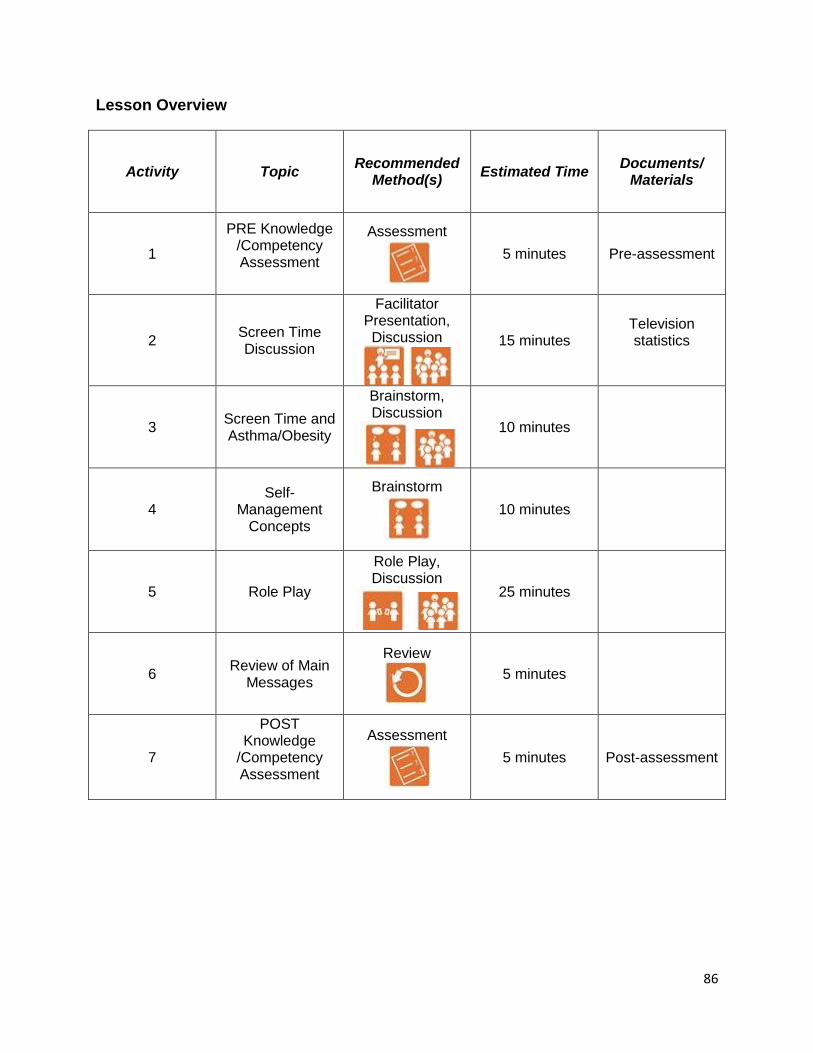
86
Lesson Overview
Activity Topic Recommended
Method(s) Estimated Time
Documents/ Materials
1
PRE Knowledge /Competency Assessment
Assessment
5 minutes Pre-assessment
2 Screen Time Discussion
Facilitator Presentation, Discussion
15 minutes Television statistics
3 Screen Time and Asthma/Obesity
Brainstorm, Discussion
10 minutes
4 Self-
Management Concepts
Brainstorm
10 minutes
5 Role Play
Role Play, Discussion
25 minutes
6 Review of Main
Messages
Review
5 minutes
7
POST Knowledge
/Competency Assessment
Assessment
5 minutes Post-assessment

87
Content
1. PRE Knowledge/Competency Assessment Distribute, complete, and collect pre-assessment
2. Screen Time Discussion Types of screen time: television, video games, computer, tablet, telephone games How much screen time do children average? Present data on averages for children and teens. Recommendations: 2 hours or less of screen time in a day. Many parents say the television is on but the children aren’t watching it, they are playing. We say that if the television is on in the same room as the child, it counts as screen time. What about educational programs for children? Programs on PBS and other learning channels typically have a slower pace and an educational message than other cartoons or programs. This has been shown to have less harmful effects on child development than faster paced cartoons (ie. SpongeBob Squarepants). However, no tv is best for cognitive development. Also, commercials during children’s programming are almost all geared towards unhealthy foods and should be avoided. Discuss what else children can do instead of television time? (Examples: games, reading, go outside, help with housework, cook meals, arts and crafts). Need to emphasize the importance of parent modeling – parents have to limit their own screen time as well.
3. Asthma and Obesity Brainstorm “What are the links between screen time, asthma, and obesity?” (Asthma may limit activity so they have more screen time which leads to more obesity. Obesity can limit activity so more screen time, more time indoors can lead to more trigger exposure and worsen asthma. People eat more when watching tv so more obesity. Obviously people are less active when watching tv so more obesity. Obesity worsens asthma.)

88
4. Self-Management Concepts Brainstorm ways that self-management concepts could be used to encourage less screen time. (Pediatricians recommend no tv in bedroom. Limit video games to weekends. Work together to decide on favorite tv programs. No tv in eating areas.).
5. Role Play Work in pairs Provide different scenarios In pairs, practice helping families reduce screen time. When groups have had adequate time, reconvene full group to discuss techniques and observations.
6. Review of Main Messages Review major themes and takeaway points (types of screen time, 2 hours or less per day) Check for understanding Answer any questions
7. POST Knowledge/Competency Assessment Distribute and have trainees complete Review and collect
89
Lesson #7: Other Topics
Our qualitative work suggested families experience challenges related to effective
shopping (strategies for buying healthy foods and using their food stamps). We also
heard a lot of feedback from families that they had difficulty controlling their children
when it came to food. The children would eat everything in the house right after it was
bought. Some families did not know how to restrict the food their children ate and
others did not feel comfortable withholding food or saying no to a hungry child. We did
not have any content around these subjects so we treated the trainees as a focus group
to ask their opinions around the subjects. In one hour, they came up with the following
recommendations:
- Know the tricks to effective shopping
o Make shopping lists
o Plan menus (specifically plan so the perishables do not spoil)
o Do not go shopping hungry
o Have a plan for controlling your children (involve them in the
process by giving them responsibilities/jobs, reward them for good
behavior, leave them home)
o Coupons can cause you to buy things you do not need
- Find ways to supplement the family’s food supply
o Need lists of local food pantries
- Make sure family getting full food stamps benefits
- If children eat all the food too quickly, may not be able to bulk shop
- It is OK to set limits on what and when children can eat. This will
be difficult in some cultural groups. Families need to be reminded
of the higher caloric content of foods today and the long-term harm
obesity can cause.
- Families may need help with parenting skills to control children’s
behavior.

90
Lesson #8: Asthma & Obesity (OPTIONAL)
Lesson Objectives
By the end of this lesson, the trainee will be able to:
1. Describe the bidirectional relationships between asthma and obesity.
2. Demonstrate incorporation of a self-management skill to an issue related to co-
morbid condition in a role play.
Estimated Time Required
1 hour 45 minutes
Documents
1. PRE Knowledge /Competency Assessment
a. We did not create a pre/post assessment for this module but we recommend
future trainings create one.
2. POST Knowledge /Competency Assessment
a. We did not create a pre/post assessment for this module but we recommend
future trainings create one.
Materials
Large flip chart and/or whiteboard

91
Lesson Overview
Activity Topic Recommended
Method(s) Estimated Time
Documents/ Materials
1
PRE Knowledge /Competency Assessment
Assessment
5 minutes Pre-assessment
2 Connections
between Asthma & Obesity
Brainstorm, Discussion
15 minutes
3 Self-
Management Concepts
Brainstorm
15 minutes
4 Role Play
Role Play, Discussion
60 minutes
5 Review of Main
Messages
Review
5 minutes
6
POST Knowledge
/Competency Assessment
Assessment
5 minutes Post-assessment

92
Content
1. PRE Knowledge /Competency Assessment Distribute, complete, and collect Pre-Assessment
2. Connections Brainstorm: “What are the possible connections between asthma and obesity?” List. Ensure exercise limitations and medications are discussed
3. Self-Management Concepts Brainstorm: “What are some ways to apply self-management concepts with regards to asthma and obesity?” Discuss ways to apply self-management concepts
4. Role Play Work in pairs Provide different scenarios (see examples) Practice teaching about ways to discuss the connection between asthma and obesity When groups have had adequate time, reconvene full group to discuss techniques and observations
5. Review of Main Messages Review major themes and takeaway points (how the diseases are connected) Check for understanding Answer any questions

93
6. POST Knowledge /Competency Assessment Distribute and have trainees complete Review and collect

94
SECTION 4: HEART FAILURE
(Supplement to self-management core training)
Summary:
The purpose of CHART is to improve the quality of care delivered to low-income heart
failure patients and improve the patients’ ability to maintain health-related
recommendation. This multi-level intervention attempts to reengineer the relationship
between the doctor and the patient. CHART will inform the doctor if the patient is not
receiving evidence-based treatment and provide appropriate recommendations. The
patient will receive a culturally sensitive intervention by Community Health Workers
(CHWs) to help the patient improve medication adherence and salt reduction. By
providing an intervention to both the patient and the doctor, we aim to reduce the
number of days patients are hospitalized. The purpose of CHART is to keep heart
failure patients healthy and out of the hospital.
Remember:
Integrate self-management skills into each lesson.
Self-management skills and content delivery require practice. Make sure that at
the end of each day, trainees make a change plan for themselves using the self-
management skills to address their own challenges. This plan may or may not
involve the disease-specific content area.
Be sure to review the change plans and disease-specific content areas when
sessions resume.
Heart Failure Topic Time Needed
Introduction to Heart Failure
1 hour 45 minutes
Medications
2 hours 10 minutes
Medication Adherence & Problem-Solving
3 hours 25 minutes
Sodium & Food Label Reading
1 hour 35 minutes
Community Resources
1 hour 45 minutes
Get Walking
1 hour
Reduce Stress
2 hours
Heart Failure & Depression
50 minutes
95
Lesson 1: Introduction to Heart Failure
Lesson Objectives
By the end of this session, the trainee will be able to:
1. Explain heart failure using simple terms
2. Identify heart failure symptoms
3. Identify the 3 CHART Rules to manage heart failure
4. Check heart rate
Estimated Time Required
1 hour 25 minutes
Documents
1. Introduction to Heart Failure in trainee manual (provided upon request)
2. CHART Participant Manual (provided upon request)
3. What Can You Do handout (provided upon request)
4. Body diagram (provided upon request)
5. YouTube video: 3D Medical Animation – Congestive Heart Failure
Materials
Computer with internet access and projector
1 and 2 gallons of water

96
Lesson Overview
Activity Topic Recommended
Method(s) Estimated Time
Documents/ Materials
1 How the Heart
Works
Facilitator Presentation,
5 minutes
-Computer -Internet Access
-Projector -YouTube video
2 What is Heart
Failure?
Facilitator Presentation
20 minutes
-What Can You Do handout
-Body diagram visualization
3 Living with heart
failure
Brainstorming, Discussion
30 minutes
4 Heart Rate
Facilitator Presentation,
Activity
20 minutes -1 gallon of water
-2 gallons of water
5 Review of Main
Messages
Review
10 minutes
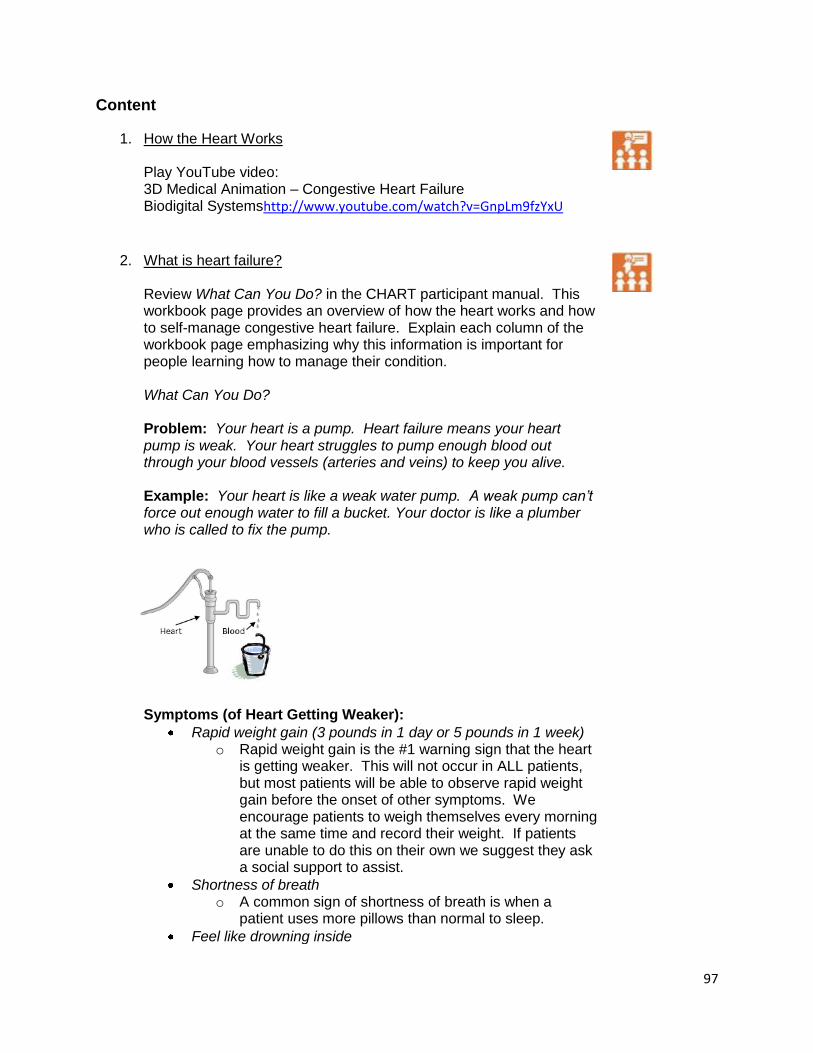
97
Content
1. How the Heart Works
Play YouTube video: 3D Medical Animation – Congestive Heart Failure Biodigital Systemshttp://www.youtube.com/watch?v=GnpLm9fzYxU
2. What is heart failure? Review What Can You Do? in the CHART participant manual. This workbook page provides an overview of how the heart works and how to self-manage congestive heart failure. Explain each column of the workbook page emphasizing why this information is important for people learning how to manage their condition. What Can You Do?
Problem: Your heart is a pump. Heart failure means your heart pump is weak. Your heart struggles to pump enough blood out through your blood vessels (arteries and veins) to keep you alive. Example: Your heart is like a weak water pump. A weak pump can’t force out enough water to fill a bucket. Your doctor is like a plumber who is called to fix the pump.
Symptoms (of Heart Getting Weaker):
Rapid weight gain (3 pounds in 1 day or 5 pounds in 1 week) o Rapid weight gain is the #1 warning sign that the heart
is getting weaker. This will not occur in ALL patients, but most patients will be able to observe rapid weight gain before the onset of other symptoms. We encourage patients to weigh themselves every morning at the same time and record their weight. If patients are unable to do this on their own we suggest they ask a social support to assist.
Shortness of breath o A common sign of shortness of breath is when a
patient uses more pillows than normal to sleep.
Feel like drowning inside
98
Tired all of the time
Swelling in hands, feet, or stomach When working with patients ask them what symptom they feel most often. It is more important that patients are able to recognize their own symptoms of heart failure than to “know” all of the symptoms of heart failure. Solutions (3 CHART Rules):
1. Take medications as prescribed by the doctor (see Lesson 2: Medications and Lesson 3: Medication Adherence and Problem-Solving for more details).
Explain the purpose of each heart medication.
Teach the patient about the importance of taking the correct dose at the correct time every day.
Discuss strategies on how to organize medication.
Discuss strategies on how to obtain refills and remember when it is time to call the pharmacy to refill a medication
Encourage patient to bring all of their medications to their doctor’s appointment so the doctor knows exactly what the patient is taking. .
2. Eat less salt (see Lesson 4: Sodium and Food Label Reading for more details).
Help patient identify foods high in sodium and low in sodium.
Teach patients how to identify lower sodium foods by reading food labels and using the CHART Sodium Rule. Only eat foods with less than 300mg of sodium per serving.
3. Weigh yourself every day (see Lesson 2: Medications for more details).
Demonstrate how to properly weigh yourself using the patient’s scale (if conducting a home visit). Encourage patient to weigh themselves every morning as part of their morning routine.
Encourage patient to contact someone from their health care team if they observe rapid weight gain.
Teach patient how to track their weight using a weight log.
99
Encourage patient to bring their weight log to their doctor’s appointment. The doctor can better assist the patient with this additional information.
3. Living with Heart Failure Brainstorm: How is life different for someone who has heart failure than someone who does not? (Think about how life is different for someone who lives with a chronic disease.)
Takes a lot of medication
Has to rest more
Symptoms can make it hard to do everyday chores or activities
Not able to participate in some of the activities they use to do before they were diagnosed
Brainstorm – How will different people respond to having heart failure? Potential responses:
Denial
Angry
Depressed
Concerned
Eager to learn more information about HF Discussion – How a person responds to having heart failure may impact how you choose to approach the patient.
4. Heart Rate
Demonstrate and teach CHWs how to check their own heart rate by taking their pulse.
Demonstration: Show 1 liter bottle
The heart pumps 5 liters of blood every minute
It beats about 100,000 times a day
Activity
Two volunteers walk back and forth for a couple of minutes.
One of the trainees has to hold 2 gallons of water while walking.
Compare to see who has the higher heart rate.
100
The more weight your body has to carry around, the harder your heart has to work.
Explain that when heart failure patients retain water, their heart has to work harder to carry the extra weight.
5. Review Main Messages
Overview of topic
Review major themes and takeaway points
Check for understanding
Answer any questions

101
Lesson 2: Medications
Lesson Objectives
By the end of this lesson, the trainee will be able to:
1. Name 3 types of heart failure medications
2. Explain the purpose of heart failure medications
3. Identify warning signs of worsening heart failure
Estimated Time Required
2 hours 10 minutes
Documents
1. Heart Failure Medications in trainee manual (provided upon request)
2. Laminated Metaphor Cards (provided upon request)
3. CHART Program Manual (provided upon request)
Materials
Industrial sponges
Wide straws
Coffee stirrers
Heart sounds CD and CD player
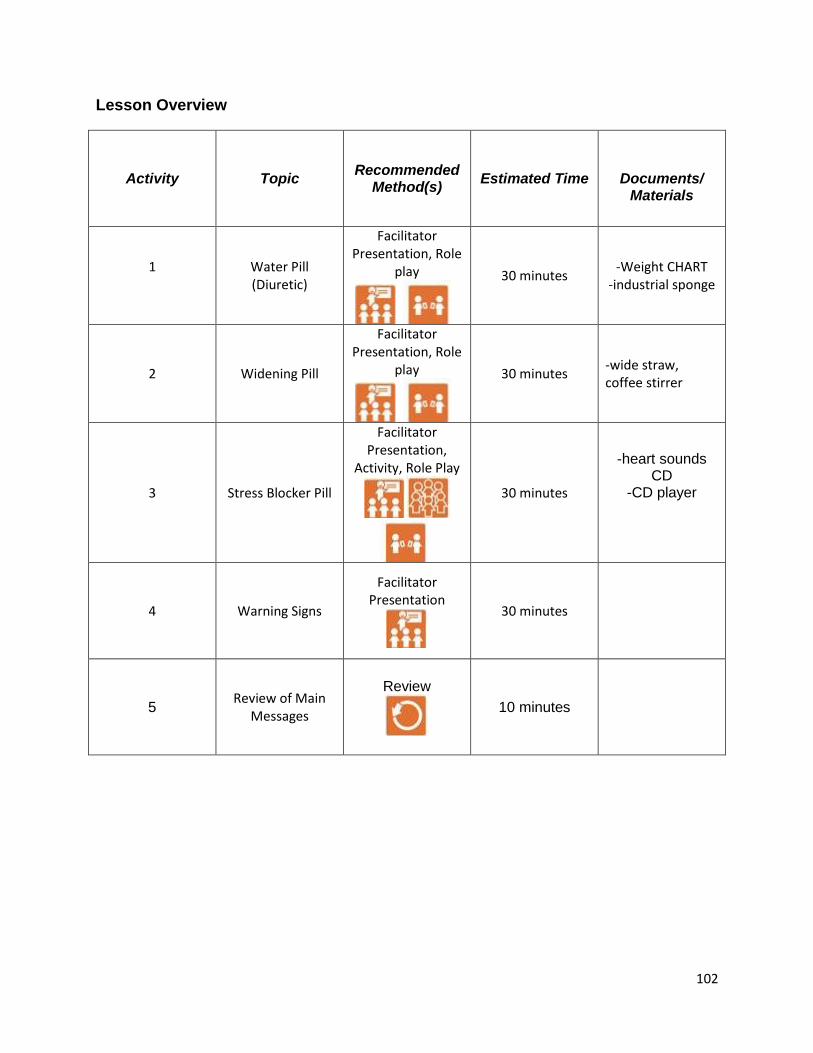
102
Lesson Overview
Activity Topic Recommended
Method(s) Estimated Time
Documents/
Materials
1
Water Pill (Diuretic)
Facilitator Presentation, Role
play
30 minutes -Weight CHART
-industrial sponge
2 Widening Pill
Facilitator Presentation, Role
play
30 minutes -wide straw, coffee stirrer
3 Stress Blocker Pill
Facilitator Presentation,
Activity, Role Play
30 minutes
-heart sounds CD
-CD player
4 Warning Signs
Facilitator Presentation
30 minutes
5 Review of Main
Messages
Review
10 minutes
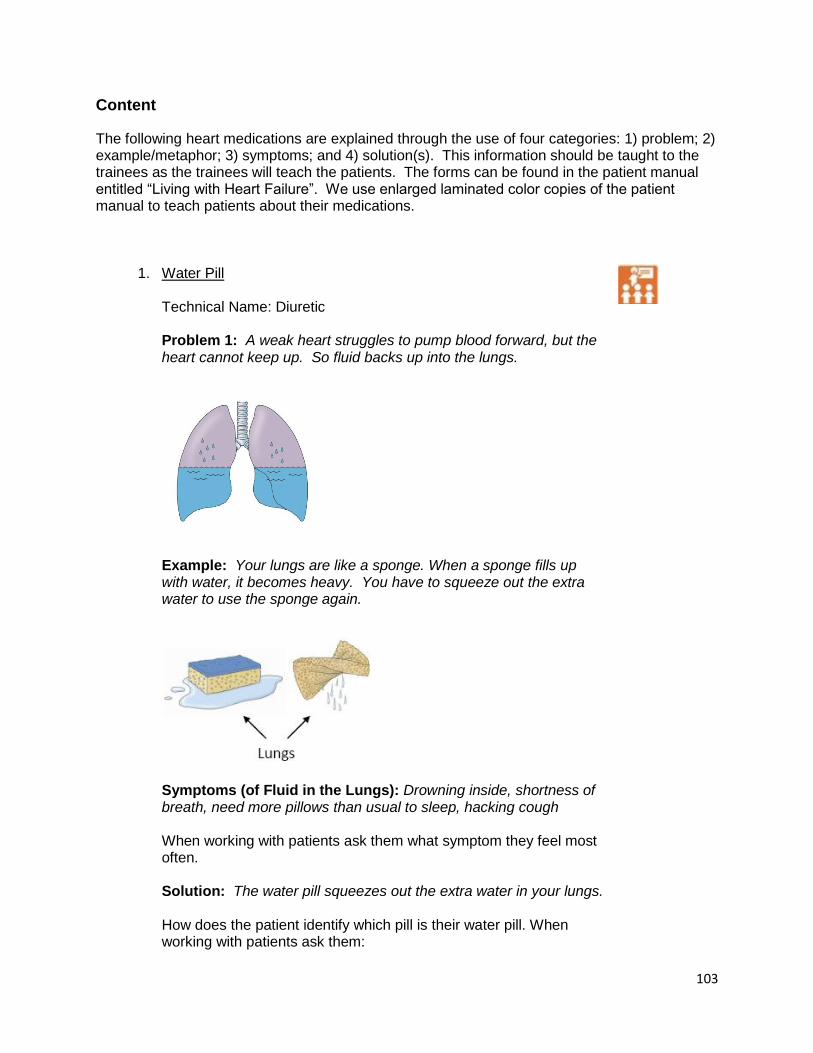
103
Content
The following heart medications are explained through the use of four categories: 1) problem; 2) example/metaphor; 3) symptoms; and 4) solution(s). This information should be taught to the trainees as the trainees will teach the patients. The forms can be found in the patient manual entitled “Living with Heart Failure”. We use enlarged laminated color copies of the patient manual to teach patients about their medications.
1. Water Pill Technical Name: Diuretic Problem 1: A weak heart struggles to pump blood forward, but the heart cannot keep up. So fluid backs up into the lungs.
Example: Your lungs are like a sponge. When a sponge fills up with water, it becomes heavy. You have to squeeze out the extra water to use the sponge again.
Symptoms (of Fluid in the Lungs): Drowning inside, shortness of breath, need more pillows than usual to sleep, hacking cough When working with patients ask them what symptom they feel most often. Solution: The water pill squeezes out the extra water in your lungs. How does the patient identify which pill is their water pill. When working with patients ask them:

104
Drug name
Pill color
Pill shape
Dose
Problem 2: A weak heart cannot pump enough blood to the kidneys. This puts the body under stress and the kidneys respond by holding on to salt and water. This causes swelling (edema).
Normal Swelling (Edema) Example: Swelling in the body is like a bathtub that is overflowing. Your water pill is like a bucket bailing out the extra water. Eating too much salt pours more water into the tub.
Eating salty foods, processed foods, and fast foods is like pouring water into a tub that is already clogged and full to the rim. Symptoms (of Fluid in the Body): Rapid weight gain (3 pounds in a day or 5 pounds in a week), ring does not fit, shoes too tight, ankles swell, pants too tight. When working with patients ask them what symptom they feel most often.

105
Solutions:
The water pill gets rid of the extra water in your body
Eat less salt
Weigh daily Side Effects of Water Pill One reason people do not want to take their medication is because of the side effects. These include:
Dizziness
Weakness
Abdominal or muscle cramps
It is important for the patient to understand the difference between medication side effects and heart failure symptoms. Medication Adherence Issues Patients are often reluctant to take their “water pill” as prescribed because it causes frequent urination. We will discuss this issue in more depth in the Medication Adherence section.
There is a common belief that the “water pill” will damage a patient’s kidneys. The CHW can inform the patient that their doctor should be monitoring their renal function from time to time to make sure their kidneys remain healthy.
Role play Practice teaching each other about the water pill in pairs.
2. Widening Pill Problem: Heart failure, especially with high blood pressure, narrows blood vessels. This causes the heart to work harder to pump blood through the narrowed vessels. Blood vessels become narrowed because of old age, heart disease, and high blood pressure.
Normal Narrowed Vessel Vessel

106
Example: Your blood vessels are like pipes. Skinny pipes restrict water flow.
Wide pipe increase water flow. Better water flow means less work for the pump.
Symptoms (or Narrowed Vessels): Tired all of the time, cold feet or fingers When working with patients ask them what symptom they feel most often. Solution: The widening pill widens blood vessels to improve blood flow. How does the patient identify which pill is their widening pill. When working with patients ask them:
Drug name
Pill color
Pill shape
Dose Notes: Drug categories include ACE Inhibitors, ARBs, and other vasodilators. People either take an ACE Inhibitor or an ARB, but not both. Patients will often refer to this medication as their “blood pressure” medication.

107
Side Effects of Widening Pill One reason people do not want to take their medication is because of the side effects. These include:
Rash
Dizziness that does not go away
Swelling of face, mouth, hands, feet
Trouble breathing or swallowing
It is important for the patient to understand the difference between medication side effects and heart failure symptoms. Additional Metaphor: We use straws to show the difference in the size of blood vessels on the medication and off the medication. A large straw that is used for drinking a milk shake or large ice coffee at Dunkin Donuts is the visual for blood vessels on a “widening pill”. A coffee stirrer is the visual we use for patients who have heart failure, but are not on a “widening pill”. From experience working in the community, the straws play into another metaphor. We tell patients to pretend that they want to drink a delicious thick milk shake. They can use one of the two straws, which one would they choose. The larger straw obviously would make that task much easier than the coffee stirrer.
Role play Practice teaching each other about the widening pill in pairs.
3. Stress Blocker Pill Problem: The weak heart struggles to pump blood forward. This puts the body under stress. The brain responds by making the heart beat faster. Play heart sounds for trainees so they can hear the difference in pace. The healthy heart is a strong beat while the heart failure heart is fast and soft sounding Heart Sounds “Lub Dub” (Healthy Heart)

108
“Kentucky” (Heart Failure)
We teach the trainees to mimic the sounds of the heart as a medical student learns in school. “Lub Dub” is a strong low beat. “Kentucky” is a quick short beat. The trainees teach this to their patients since they are unable to play the heart sounds in patient homes.
Example: A body with a weak heart is like a stressed guy trying to pump water. His stress makes him pump fast and in a hurry, but his short stroke causes the water to dribble out.
If he relaxes, he can pump strong and slow and the water will flow.
Symptoms: Racing heart, Heart rate faster than 25 beats every 15 seconds When working with patients ask them if they ever feel like their heart

109
is racing. You can teach the participant how to check their pulse during times they feel their heart is racing. Solution: The stress blocker slows down and strengthens the heart beat, reducing the hearts work.
Reduces the heart’s work
By slowing down the heart, blood can fill the heart and then forcefully push all of the blood out through the blood vessels
How does the patient identify which pill is their widening pill. When working with patients ask them:
Drug name
Pill color
Pill shape
Dose Notes: The technical name is Beta Blocker. Side Effects of Stress Blocker One reason people do not want to take their medication is because of the side effects. These include:
Dizziness that does not go away
Fatigue
Asthma
It is important for the patient to understand the difference between medication side effects and heart failure symptoms. Medication Adherence Issues
Some Beta Blockers such as Lopressor and Coreg are only effective for 12 hours. Sometimes patients prefer to take two doses at one time because it is easier to remember. Encourage CHWs to bring these questions to a physician so they can best help the patient understand why it is important to take the medication as prescribed.
A common complaint is that people feel dizzy because the medication lowers their blood pressure. Side effects are most common when a patient first starts the medication. If possible, the patient should try to stay on the medication for a couple of weeks. If the side effects are too great then encourage your patient to contact their health care provider immediately for suggestions. Patients should not go off their medications without informing their health care provider.
Role play Practice teaching each other about the stress blocker in pairs.

110
4. Warning Signs
Patients must learn how to identify when their heart failure is getting worse. Many symptoms experienced by patients are not recognized as early warning signs. For example, if a patient is experiencing difficulty breathing, s/he may add a couple of pillows to their bed to help them sleep and breathe easier. This may be a sign that the heart is getting worse. Patients often wait until they feel that they cannot breathe and go to the emergency room. In efforts to prevent this situation, we teach patients how to identify their symptoms and when it is appropriate to contact their health care team. We provide scales for all of our patients so they can notice rapid weight gain. This is the most common warning sign, but not everyone needs to experience rapid weight gain to experience symptoms of heart failure. It is extremely important the trainee identifies with each patient the symptoms experienced by the patient. How do you know when your heart failure worsens?
#1 Warning Sign o Gain 3 pounds in 1 day or 5 pounds in 1 week o Rapid weight gain often occurs before other
symptoms are experienced o Contact health care team if you experience rapid
weight gain. Help the patient identify who from their health care team they can contact if experiencing heart failure symptoms. Encourage patients to build a relationship with at least one member of their health care team. This also includes building a relationship with the pharmacist.
o Demonstrate how to use a weight log to record daily weights. Encourage patients to bring their weight log to their doctor’s appointments.
Common warning signs: o Rapid weight gain o Shortness of breath o Feel like drowning inside o Tired all the time o Swelling feet, hands, or stomach
5. Review Main Messages
Overview of topic
Review major themes and takeaway points

111
Check for understanding
Answer any questions

112
Lesson 3: Medication Adherence & Problem-Solving
Lesson Objectives
By the end of this lesson, the trainee will be able to:
1. Understand the importance of medication adherence
2. Identify problems and solutions for taking medications as prescribed
3. Use problem-solving as a tool to help trainees find solutions.
Estimated Time Required
3 hours 25 minutes
Documents
How to problem solve
Materials
Large flip chart and/or whiteboard
113
Lesson Overview
Activity Topic Recommended
Method(s) Estimated
Time Documents/
Materials
1 Importance of
Medication Adherence
Facilitator Presentation, Brainstorming,
Discussion
30 minutes
2 Barriers to taking
Medications
Brainstorming. Discussion
20 minutes Large flip
chart and/or whiteboard
3 Problem-Solving
Facilitator Presentation
75 minutes How to
Problem-Solve
4 Applying
Problem-Solving Techniques
Role Play, Discussion
30 minutes
5 Improving Medication Adherence
Brainstorming
10 minutes
6 Decision Making
Role Play, Discussion
20 minutes Large flip
chart and/or whiteboard
7
Partnering with Hospitals and Clinics
Facilitator Presentation
30 minutes
8 Doctor Visits
Facilitator Presentation
10 minutes
9 Review of Main
Messages
Review
10 minutes

114
Content
1. Importance of Medication Adherence 37% of patients are not taking at least 80% of their prescribed medications for heart failure (HART) Brainstorming/Discussion Why is it important to take your heart medications? Some reasons include:
Helps strengthen your heart
Keep you out of the hospital
Reduce symptoms
Make you feel better
Improve your quality of life
What can happen if you don’t take your heart medications? Some reasons include:
Increases likelihood of experiencing heart failure symptoms (e.g. shortness of breath, swelling)
Your heart will get weaker
Your heart does not receive the help it needs to pump blood throughout your body
If your symptoms worsen, you will have to go to the ER or possibly be admitted to the hospital
Your condition will continue get worse instead of remaining stable
Define “medication as prescribed”
Taking the exact dose of medication the doctor prescribed. This includes taking the medication the number of times per day the doctor ordered and at the time of day the doctor ordered.
2. Barriers to Taking Medications as Prescribed
Brainstorming/Discussion What are some reasons people may not take their medication as prescribed? Allow the group to brainstorm and write all ideas on the white board. Some reasons include:

115
Money
Transportation to doctor to get prescription
Transportation to pharmacy to pick up medication
Side effects
Forgetfulness
Patient takes too many pills
Doesn’t understand why they need to take the medication
Lack of trust of the medical community
3. Problem-Solving Please see the Problem-Solving lesson in the Self Management section on page 18. Note: Sometimes the hardest part of problem-solving is identifying the problem. For example, if a patient is not taking their medication there are many potential reasons. If the patient is unable to articulate “why” then the CHW should probe the patient. In our experience, when the CHW engages in conversation and does some detective work the problem ultimately unfolds.
4. Applying Problem-Solving Techniques Role Play Trainees can work in pairs. One person plays the role of the CHW and the other person plays the role of the patient. You can use the problems identified while brainstorming for Section 2: Barriers to Taking Medications as Prescribed activity. After role playing for 5-10 minutes, regroup and discuss what was learned. What were some of the challenges in applying the problem-solving technique? What worked well in applying the problem-solving technique?
5. Improving Medication Adherence Brainstorm: What are different ways we can help participants to remember to take their medications?
Pill box
Placement of pill box
Set alarm for medication times
Keep a schedule by the pill box

116
Keep a calendar for refill dates
Contact pharmacy several days before prescription is out
6. Decision Making Model how CHWs can work with patients to discuss the benefits and limitations of engaging in a specific behavior. On the white board draw two columns. On one side write “Reason for Change” and on the other side write “Reason not to Change”. Choose a specific behavior that you are thinking about engaging in. For example, a patient may not have their medications because they did not go to their doctor’s appointment to pick up the prescription. The decision the patient made was to not go to the doctor visit. The CHW helps the patient identify the benefits of the decision made (not going to the doctor visit) and the benefits of making the opposite decision (going to the doctor visit). This approach allows the patient to objectively view both sides of the decision. This does not mean that the patient will automatically change their decision, but at least they will be aware of the pros and cons. This exercise can also be used when patients are reviewing their action plan and having difficulty cultivating the motivation to engage in the behavior identified on the action plan.
Reason for Change
(Go to the doctor visit)
Reason Not to Change
(Skip the doctor visit)
Pick up new prescription
Get checked by medical provider
Know it’s what I am suppose to do
Feel better when I take my medication
Dislike waiting hours for my visit
Dislike public transportation
Feeling okay without my medications
7. Partnering with Hospitals and Clinics In efforts to better assist our patients, we have taken the time to learn how our partner clinics/hospitals function. This helps the trainees assist patients in scheduling doctor appointments, using mail order systems,

117
contacting the pharmacy, and provides an overall awareness of public services available for low-income populations. For example, at one of our partner institutions, there is an existing heart failure program that connects the clinic with the pharmacy. After a clinic visit, the patient brings their pill organizer to the pharmacy. The pharmacist fills the pill organizer and then reviews the medications with the patient. We encourage our CHWs to help patients find additional support within their health care setting or community so when the CHW disengages there are systems set up to support the patient in successfully self-management of their condition. Important areas to get more information from your partner sites:
Social services o Is there a social worker for the clinic or hospital to
contact? o What programs are available to help patients pay for
their medications? o What services can a social worker provide when the
patient is in-patient versus out-patient? o How can we help patients find free or affordable
transportation to doctor visits?
Who to contact to schedule or reschedule a doctor’s appointment
Who to contact when patient is experiencing symptoms of heart failure, such as, rapid weight gain
How does a patient get their medication filled or refilled Note: The more processes you can learn about how to navigate the hospital, the more useful you will be to your patient. Recommendation: If you are partnering with clinics/hospitals, set up a meeting to introduce the trainees to the key staff members they will be interacting with at the clinics/hospitals. Take the trainees on a tour of the areas their patients will most likely be located while visiting their clinic.
8. Doctor Visits Key points to discuss with trainees
Heart failure patients should be scheduled to see a doctor two weeks after being hospitalized. Patients can bring all of their medications in a bag and have the doctor make sure the medications are correct.
Encourage the patient to build a relationship with a member of their health care team. Every patient should have a person to contact on the health care team. This is especially important if

118
the patient begins to experience HF symptoms. Preventive measures can only be taken if the patient notifies the doctor of existing problems. The doctor can then tell the patient to adjust their medication or schedule a doctor’s visit.
9. Review Main Messages
Overview of topic
Review major themes and takeaway points
Check for understanding
Answer any questions
119
Lesson 4: Sodium & Food Label Reading
Lesson Objectives
By the end of this lesson, the trainee will be able to:
1. Explain to heart failure patients why it is important to eat less salt
2. Read and understand a food label
3. Identify low-salt foods and high-salt foods
Estimated Time Required
1 hour 35 minutes
Documents
CHART Participant Manual (provided upon request):
Lower My Salt
How to Read a Food Label
Materials
Salt test tubes from NASCO
Food labels

120
Lesson Overview
Activity Topic Recommended
Method(s) Estimated Time
Documents/ Materials
1 Eat Less Salt
Facilitator Presentation, Discussion
5 minutes
2 Strategies to Eat
Less Salt
Brainstorming
20 minutes Workbook
handout: “Lower My Salt”
3 How Much Salt Demonstration
Group Activity
20 minutes Salt test tubes from NASCO
4 How To Read a
Food Label
Facilitator Presentation, Group Activity
,
20 minutes
Workbook handout: “How to Read a Food
Label”
5 Practice Reading
Food Labels
Facilitator Presentation, Group Activity
,
20 minutes Food labels
6 Review of Main
Messages
Review
10 minutes
121
Content
1. Eat Less Salt One of the most important things that people with heart failure can do to manage their condition is to eat a low-salt diet. For our purpose today, we will use the words sodium and salt interchangeably. Sodium is salt and salt is sodium. Sodium makes the body hold onto fluid. To pump the added fluid, the heart has to work harder. People with heart failure can’t afford to put this extra strain on their hearts. Discussion: Why do people with HF need to eat less salt? Too much salt can worsen HF symptoms such as, swelling and shortness of breath. Often HF patients will notice rapid weight gain after eating a meal high in sodium. Discussion: How much salt should people with HF eat? How do we figure that out? The American Heart Association recommends eating less than 1500 milligrams (mg) per day. Since most people do not read food labels and add up the amount of sodium they eat every day, we have decided to use a simple rule. Only eat food items that are less than 300mg per serving. Any item higher than 300mg is a DANGER food. By the end of this session you should hear the words “DANGER, DANGER, DANGER” go off in your head when you see a food label greater than 300mg. Before discussing this rule, let’s discuss some strategies on how to lower your salt intake without reading food labels.
122
2. Strategies to Eat Less Salt Brainstorm: Think of some ways you can cut back on your salt intake.
Remove salt shaker from the kitchen table or counter top
Experiment with herbs, pepper, lemon, vinegar, & Mrs. Dash
Stop eating fast foods
Eat fresh or frozen vegetables
Rinse canned foods in water
Use low or reduced sodium foods
Eat less lunch meats, pre-seasoned mixes, snack foods, salted butter and nuts, Ramen, bacon and sausage
Brainstorm: What kind of changes can you make to your home environment to help lower your salt intake?
Put salt shaker in cabinet
Put a bowl of fresh fruit on the table for snacking
Put your sodium-free spices on the counter
Buy more whole foods and less processed foods
Throw out sauces that are high in sodium
Do you know where most of your salt comes from?
5% of salt is added while cooking
6% of salt is added while eating
12% of salt comes from natural sources
77% of salt comes from processed and fast foods
3. How Much Salt? Demonstration We have found the use of visuals to be helpful in teaching trainees about the amount of salt in commonly eaten foods. One way to use the salt test tubes below is to cover up the labels and create a handout where trainees have to match the labels with the salt test tubes on display. This exercise helps trainees compare the amount of salt in different foods as well as the amount of salt the average American intakes on a daily basis.

123
You can purchase the above product from NASCO. The link below will provide a brief description of the product. http://www.enasco.com/product/WA16056HR
4. How to Read a Food Label Pass out food labels to all of your trainees. These food labels should include all types of foods, especially the kinds of foods eaten by the population you are serving. Model how to teach food label reading. Explain to the group that we have made this process very simple. There is no adding that needs to be done. You just look at the food label and can identify if the food is a lower-salt choice or a DANGER food. Ask the trainees to look at their food label and identify the line labeled “Sodium”. If the amount next to the Sodium line is greater than 300mg then that item is a DANGER food. If the amount of sodium is less than 300mg then that item is a lower-salt choice. We encourage patients to find foods that are quite a bit lower than 300mg of sodium per serving. The closer the food is to containing 300mg of sodium, the more aware the patient needs to be of the serving size. Explain how to read serving sizes and how that reflects the amount of sodium in the food. Be Aware: People will sometimes misunderstand the rule and think that is healthy to eat as much of a product as they want as long as the sodium is less than 300mg. This is NOT what we are teaching. We recommend that people eat the serving size on the package and choose foods that contain less than 300mg of sodium per serving.
,

124
5. Practice Reading Food Labels
Provide food labels for the trainees to practice food label reading. Go around the room and have the trainees report the following:
Product name
Serving size
Amount of sodium in milligrams
Is the food a DANGER food?
Other questions/ideas:
Ask questions about serving size to make sure the trainees understand how the serving size correlates with the amount of sodium in the product
Compare food labels such as, seasoning salt and Mrs. Dash
Look at foods labeled “Low-sodium” and see if the sodium is low or just lower than the regular product
The CHART CHWs teach patients how to read food labels at home. This is an excellent self-discovery method of teaching. Patients start to learn what they are putting into their bodies. Some people may not be able to see the small print on food labels so it is always a good idea to be equipped with a magnified glass.
,
6. Review Main Messages
Overview
Review major themes and takeaway points
Check for understanding
Answer any questions

125
Lesson 5: Community Resources
Lesson Objectives
By the end of this lesson, the trainee will be able to:
1. Identify ways to find and identify community resources.
2. Describe what is like to live with heart failure
3. Describe what challenges the doctor faces in treating heart failure patients
Estimated Time Required
1 hour 45 minutes
Documents
Brochures from community resources
Materials
None
126
Lesson Overview
Activity Topic Recommended
Method(s) Estimated Time
Documents/ Materials
1 Identifying Community Resources
Brainstorming, Discussion
20 minutes
2 Meet People
Living with Heart Failure
Activity
45 minutes
3 Meet the Doctor
Activity
30 minutes
4 Review of Main
Messages
Review
10 minutes
127
Content
1. Community Resources Brainstorm: Low-income populations face many challenges on a daily basis. What are some of the challenges you think they face? What are some of the services they might need to seek for help?
Identify community resources that will benefit study participants. For CHART, we created a binder that would assist low-income populations in securing basic needs. For example:
Government agency programs
Medicaid/Medicare services
Transportation services
Housing opportunities
Food pantries
Medication assistance
2. Meet People Living with Heart Failure Question & Answer session with in-person heart failure patients This is one of the best sessions in the training if you have contacts whom are willing to discuss with a group of people what it means to them to be diagnosed with heart failure. Understanding the patient’s perspective is extremely important if you plan to work with HF patients.
3. Meet the Doctor Question & Answer session with in-person heart failure physician
4. Review Main Messages
Review major themes and takeaway points from discussions
Check for understanding
Answer any questions
128
Lesson 6: Get Walking
Lesson Objectives
By the end of this lesson, the trainee will be able to:
1. Demonstrate an understanding of the importance of walking for HF patients
2. Create an action plan around walking.
Estimated Time Required
60 minutes
Estimated Time Required
60 minutes
Documents
CHART Participant Manual (provided upon request)
Materials
None

129
Lesson Overview
Activity Topic Recommended
Method(s) Estimated Time
Documents/ Materials
1 Walking and Heart Failure
Facilitator Presentation,
Group Discussion
20 minutes
4 Create Action
Plan for Walking
Role Play, Group
Discussion
30 minutes
5 Review Main
Messages
Review
10 minutes

130
Content
1. Walking and Heart Failure
Why is it important to walk when you have heart failure?
Your heart is a muscle and walking makes it stronger
A stronger heart muscle increases blood flow
Walking reduces stress
Note: HF patients should not engage in heavy lifting.
Ask trainees to identify some of the barriers people may face for walking. Potential barriers:
Severe weather (too hot or too cold)
Experiences shortness of breath
No place safe to walk in the neighborhood
Not interested in walking
Potential solutions:
Find a walking partner
Start slow, walk 5 minutes a day, twice a day
Find a way to reward yourself if you walk for the day
Local community centers with walking tracks
Park further from the grocery store
2. Create Action Plan for Walking
In pairs, one person plays the role of the HF patient and the other of the CHW. Practice creating an action plan for walking. For example, where are you going to walk, when are you going to walk, for how long are you going to walk, how many days will you walk this week? Discuss in the group some of the challenges in creating action plans around walking. Ask trainees what kind of questions needed to be asked to help the participant be more specific in setting their goal.
3. Review Main Messages
Overview of benefits of walking
Review major themes and takeaway points
Check for understanding
Answer any questions
131
Lesson 7: Reduce Stress
Lesson Objectives
By the end of this lesson, the trainee will be able to:
1. Teach several methods of stress reduction.
2. Describe the impact of stress on HF patients
Estimated Time Required
2 hours
Documents
CHART Participant Manual (provided upon request)
Materials
None
132
Lesson Overview
Activity Topic Recommended
Method(s) Estimated
Time Documents/
Materials
1 Stress Reduction
Brainstorming, Facilitator Presentation
30 minutes
2 Mind-Body Connection
Group Activity
20 minutes
3 Stress
Management
Facilitator Presentation, Brainstorming, Group
Discussion
20 minutes
4 The “Hook”
Facilitator Presentation,
30 minutes
5 Deep Breathing
Group Activity
15 minutes
6 Review Main
Messages
Review
5 minutes
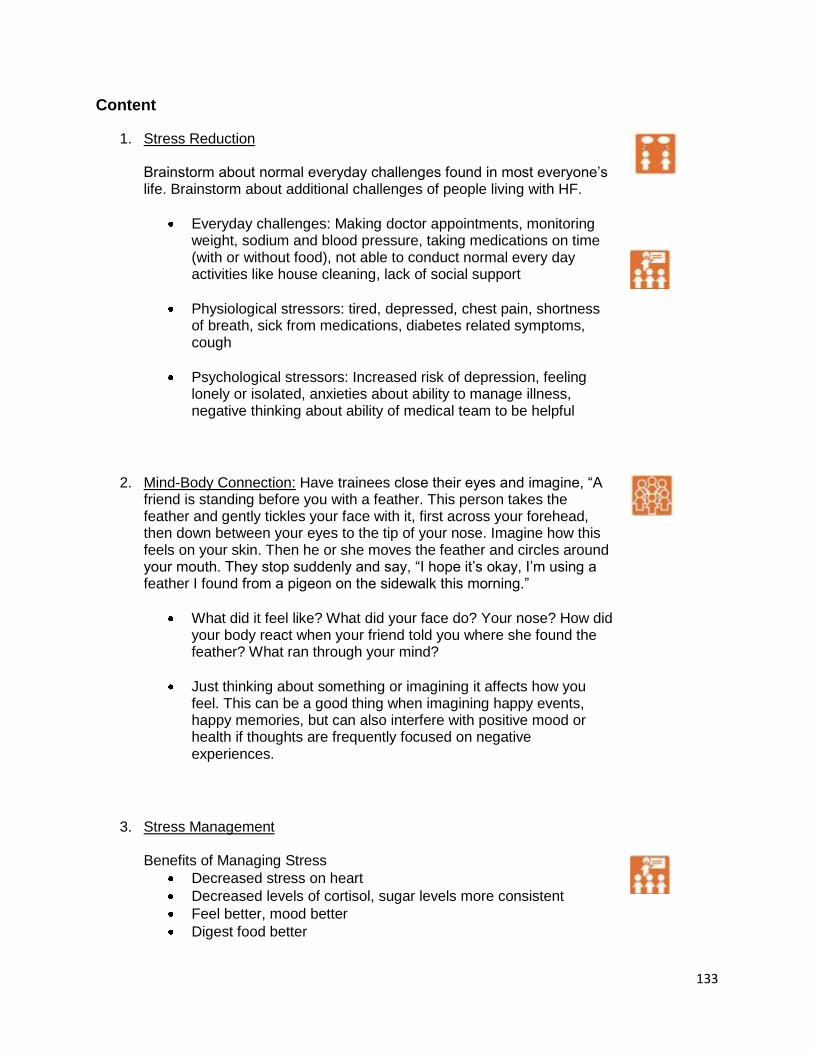
133
Content
1. Stress Reduction
Brainstorm about normal everyday challenges found in most everyone’s life. Brainstorm about additional challenges of people living with HF.
Everyday challenges: Making doctor appointments, monitoring weight, sodium and blood pressure, taking medications on time (with or without food), not able to conduct normal every day activities like house cleaning, lack of social support
Physiological stressors: tired, depressed, chest pain, shortness of breath, sick from medications, diabetes related symptoms, cough
Psychological stressors: Increased risk of depression, feeling lonely or isolated, anxieties about ability to manage illness, negative thinking about ability of medical team to be helpful
2. Mind-Body Connection: Have trainees close their eyes and imagine, “A friend is standing before you with a feather. This person takes the feather and gently tickles your face with it, first across your forehead, then down between your eyes to the tip of your nose. Imagine how this feels on your skin. Then he or she moves the feather and circles around your mouth. They stop suddenly and say, “I hope it’s okay, I’m using a feather I found from a pigeon on the sidewalk this morning.”
What did it feel like? What did your face do? Your nose? How did your body react when your friend told you where she found the feather? What ran through your mind?
Just thinking about something or imagining it affects how you feel. This can be a good thing when imagining happy events, happy memories, but can also interfere with positive mood or health if thoughts are frequently focused on negative experiences.
3. Stress Management
Benefits of Managing Stress
Decreased stress on heart
Decreased levels of cortisol, sugar levels more consistent
Feel better, mood better
Digest food better
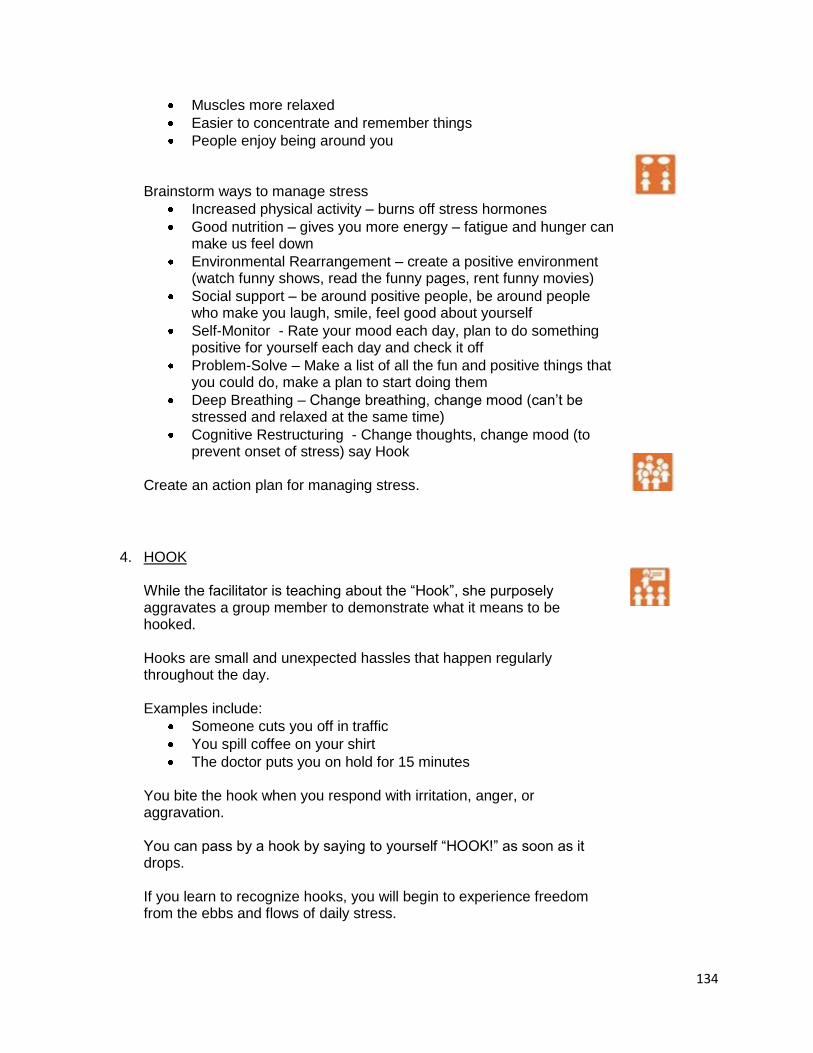
134
Muscles more relaxed
Easier to concentrate and remember things
People enjoy being around you
Brainstorm ways to manage stress
Increased physical activity – burns off stress hormones
Good nutrition – gives you more energy – fatigue and hunger can make us feel down
Environmental Rearrangement – create a positive environment (watch funny shows, read the funny pages, rent funny movies)
Social support – be around positive people, be around people who make you laugh, smile, feel good about yourself
Self-Monitor - Rate your mood each day, plan to do something positive for yourself each day and check it off
Problem-Solve – Make a list of all the fun and positive things that you could do, make a plan to start doing them
Deep Breathing – Change breathing, change mood (can’t be stressed and relaxed at the same time)
Cognitive Restructuring - Change thoughts, change mood (to prevent onset of stress) say Hook
Create an action plan for managing stress.
4. HOOK
While the facilitator is teaching about the “Hook”, she purposely aggravates a group member to demonstrate what it means to be hooked. Hooks are small and unexpected hassles that happen regularly throughout the day. Examples include:
Someone cuts you off in traffic
You spill coffee on your shirt
The doctor puts you on hold for 15 minutes
You bite the hook when you respond with irritation, anger, or aggravation. You can pass by a hook by saying to yourself “HOOK!” as soon as it drops. If you learn to recognize hooks, you will begin to experience freedom from the ebbs and flows of daily stress.

135
5. Deep Breathing Technique Practice breathing exercise with the group. Step 1: Sit, or lay down on your back with knees bent. Place one hand on your chest and on your belly. Step 2: Take a deep breath through your nose like you are smelling a flower and push your belly out. Step 3: Now breathe out slowly, letting your belly relax. Step 4: Repeat slowly 10 times. Ask if any of the participants have a breathing exercise to share with the group.
6. Review Main Messages Overview of stress reduction
Review major themes and takeaway points o Managing stress is an important part of taking care of your
heart
Check for understanding
Answer any questions
136
Lesson 8: Heart Failure & Depression
Lesson Objectives
By the end of this lesson, the trainee will be able to:
1. Identify signs of depression.
2. Administer PHQ-2
Estimated Time Required
50 minutes
Documents
CHART Participant Manual (provided upon request)
Materials
None
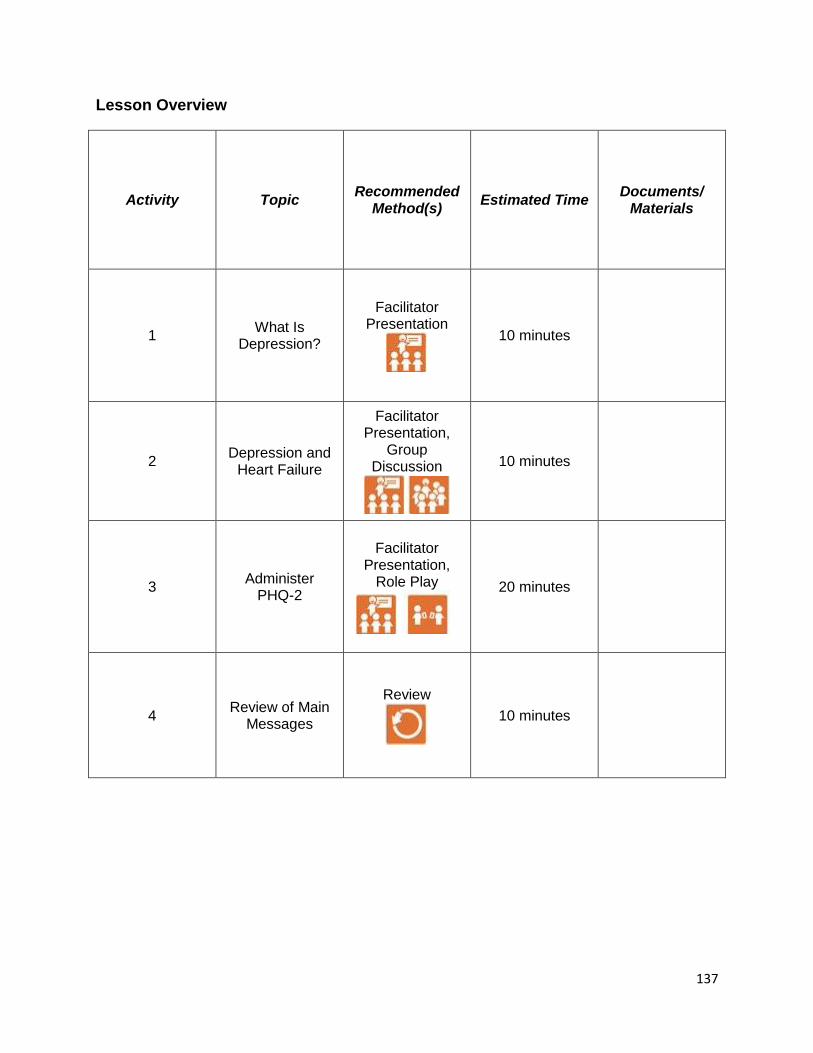
137
Lesson Overview
Activity Topic Recommended
Method(s) Estimated Time
Documents/ Materials
1 What Is
Depression?
Facilitator Presentation
10 minutes
2 Depression and
Heart Failure
Facilitator Presentation,
Group Discussion
10 minutes
3 Administer
PHQ-2
Facilitator Presentation,
Role Play
20 minutes
4 Review of Main
Messages
Review
10 minutes
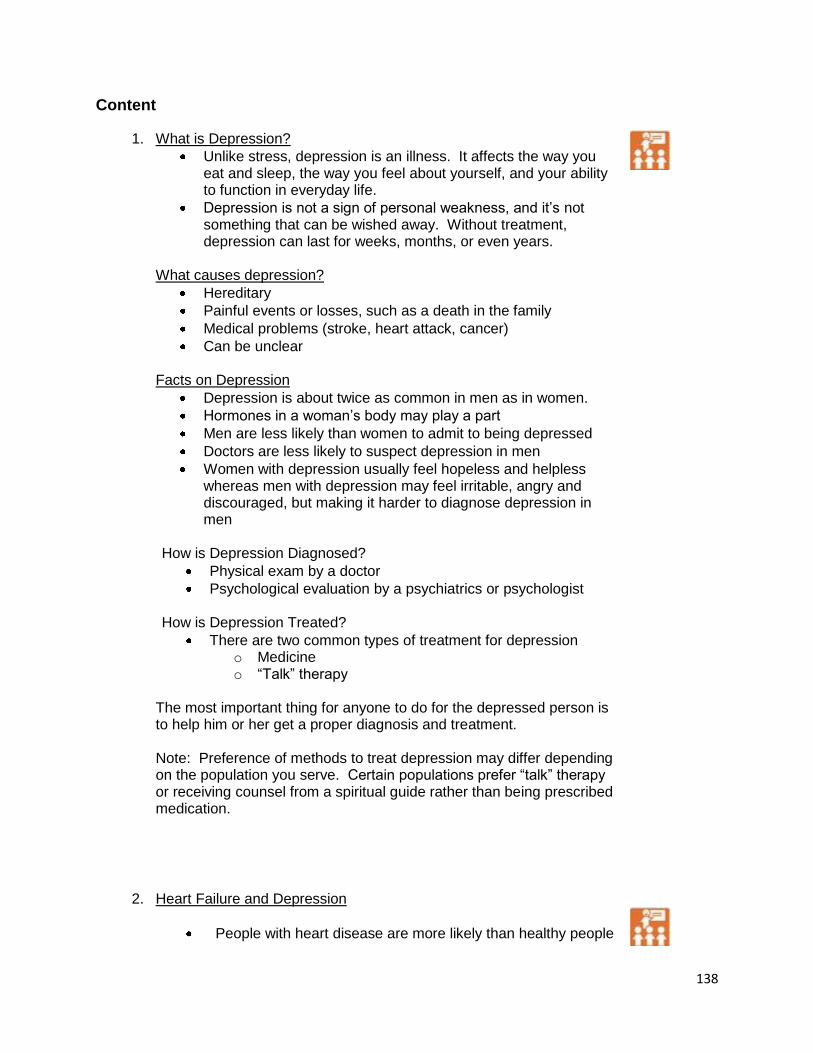
138
Content
1. What is Depression?
Unlike stress, depression is an illness. It affects the way you eat and sleep, the way you feel about yourself, and your ability to function in everyday life.
Depression is not a sign of personal weakness, and it’s not something that can be wished away. Without treatment, depression can last for weeks, months, or even years.
What causes depression?
Hereditary
Painful events or losses, such as a death in the family
Medical problems (stroke, heart attack, cancer)
Can be unclear
Facts on Depression
Depression is about twice as common in men as in women.
Hormones in a woman’s body may play a part
Men are less likely than women to admit to being depressed
Doctors are less likely to suspect depression in men
Women with depression usually feel hopeless and helpless whereas men with depression may feel irritable, angry and discouraged, but making it harder to diagnose depression in men
How is Depression Diagnosed?
Physical exam by a doctor
Psychological evaluation by a psychiatrics or psychologist
How is Depression Treated?
There are two common types of treatment for depression o Medicine o “Talk” therapy
The most important thing for anyone to do for the depressed person is to help him or her get a proper diagnosis and treatment.
Note: Preference of methods to treat depression may differ depending on the population you serve. Certain populations prefer “talk” therapy or receiving counsel from a spiritual guide rather than being prescribed medication.
2. Heart Failure and Depression
People with heart disease are more likely than healthy people

139
to suffer from depression
People with depression have a greater risk for developing heart disease
People with heart disease who are depressed have a greater risk of dying after a heart attack and stroke than those who are not depressed
Discussion: “Why do you believe these statistics to be true?”
Depression can make it hard to function in everyday life
Depression makes it hard to care about taking medicine or remembering to take medicine
Making lifestyle changes such as increasing physical activity, eating healthy foods, and quitting smoking can seem impossible to someone suffering from depression
Depression may affect heart rhythm, increase blood pressure, and affect the blood’s clotting ability
Depression can also lead to higher blood sugar and blood cholesterol levels
3. Teach Trainees how to administer the Patient Health Questionnaire 2 (PHQ-2)
The following questions screen for depression. In the past two weeks, how often…
Have you felt little interest or pleasure in doing things?
Have you felt down, depressed, or hopeless?
Role Play
Split up into pairs
Role play on how to incorporate PHQ-2 questions into regular conversation.
Discuss in large group
4. Review Main Messages
Overview of heart failure and depression
Review major themes and takeaway points
Check for understanding
Answer any questions

140
SECTION 5: HOME VISITATION
(Optional)
Summary
The CHWs in our projects performed home visitation. In one of the projects, the CHWs
hired already had significant experience in home visitation and therefore this module
was not provided. For the other project, all trainees were instructed in home visitation.
Another option to consider would be to complete the home visitation training after the
main training for the subset of CHWs who were selected to deliver the intervention.
This is not a complete or exhaustive guide to home visitation. We recommend trainers
who do not have experience in home visitation to consult with someone who does.
CHWs should shadow other more experienced CHWs before embarking on their own in
order to gain confidence in home visitation, as well as the curriculum delivery.
Consider adding a module on motivational interviewing to the end of this session.
Motivational interviewing is an excellent strategy for CHWs to use when working one-
on-one with clients to make change.
Lesson Objectives
By the end of this lesson, trainees will be able to:
1. Understand the importance of home visitation. 2. Know how to safety and effectively conduct a home visit. 3. Discuss strategies for building trust.
Estimated Time Required
2 hours
Documents
Find a collection of photographs of the inside of different homes
Materials
Large flip chart and/or whiteboard
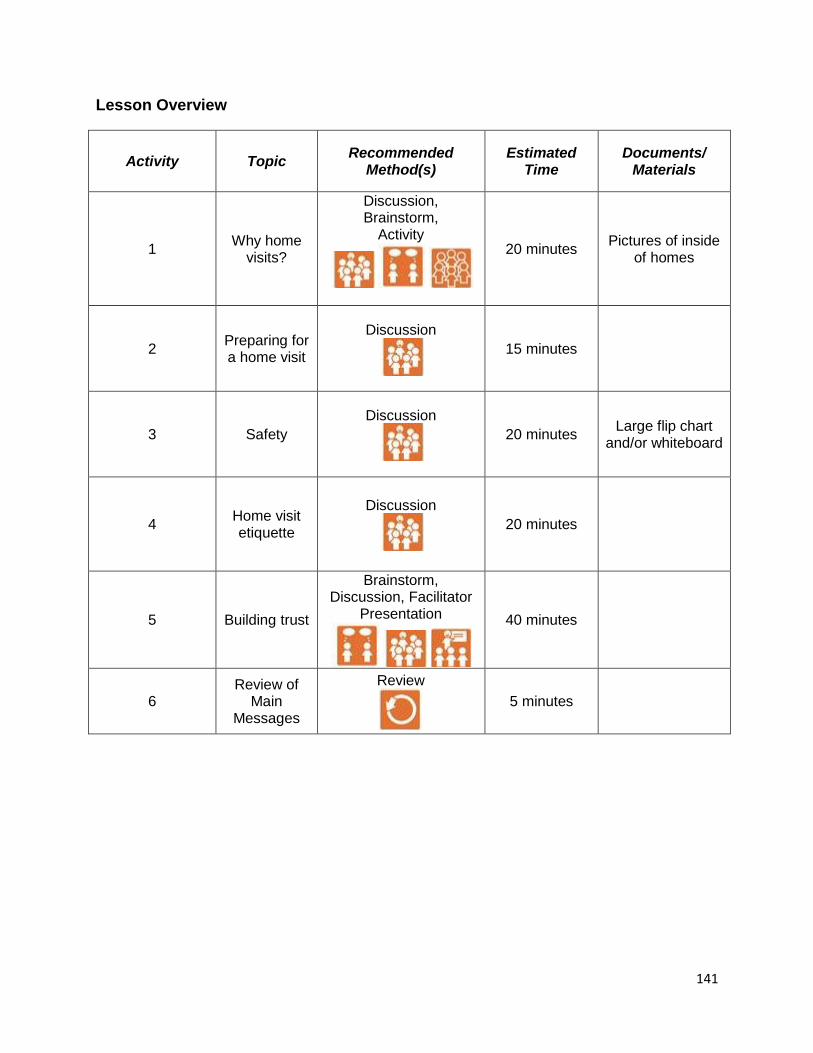
141
Lesson Overview
Activity Topic Recommended
Method(s) Estimated
Time Documents/
Materials
1 Why home
visits?
Discussion, Brainstorm,
Activity
20 minutes Pictures of inside
of homes
2 Preparing for a home visit
Discussion
15 minutes
3 Safety
Discussion
20 minutes Large flip chart
and/or whiteboard
4 Home visit etiquette
Discussion
20 minutes
5 Building trust
Brainstorm, Discussion, Facilitator
Presentation
40 minutes
6 Review of
Main Messages
Review
5 minutes

142
Content
1. Why home visits?
Discussion: How many have conducted home visits before? (share stories, common experiences) Brainstorm: Think about the clients you will be seeing. (Age, demographics, disease, etc). What do you expect to see in their homes? Activity: Show pictures of insides of homes. Discuss what they tell you. Examples: Show examples of clutter, poverty, children, elderly, disabilities. Also show positives such as very clean, organized, highly educated, resources (such as a computer with internet). Discuss how you can use this information.
.
2. Preparing for a home visit
Discussion: How should you prepare for a home visit? Some ideas: a. Call to confirm b. Review what you covered last time c. Plan what you will cover d. Have materials all ready e. Have a backup plan for what you will cover in case original plan
doesn’t work out or you move more quickly than expected f. Dress comfortably but respectfully g. Charge your phone and bring it with
3. Safety
Discussion: How do you keep safe on a home visit? Some ideas: a. Call to confirm b. Always have a working, charged cell phone c. Go during safe hours (daylight if possible) d. Find out who will be in the home before you go e. Go in pairs when possible or if there is any concern about
safety (this is often a good strategy for first visits if you do not know the family)
f. Tell a friend or family member before you leave and when you should be back. Have a plan for what they will do if you do not return or contact them by a certain time.
g. Bring only what you need with you.

143
h. Do not wear fancy clothes or jewelry. i. Do not keep anything visible in your car. j. Make sure you know where the exits are in the home. k. Have a ID badge with your name and photo on it that identifies
you with the agency or project. Wear it. Most importantly – trust your instincts. Do NOT go into a home if your gut tells you it is not safe. If you are in a home and feel unsafe for any reason, LEAVE.
4. Home visit etiquette
Discussion: What are some things you can and cannot do when in someone else’s home? Much of this depends on the project protocol. In general, we recommend:
- Do not eat or drink your own food or beverage. Do not accept any they offer you. This can be blamed on the supervisor: “My boss won’t let me accept anything from you, I am so sorry. But thank you for the offer.”
- Do not smoke. - Do not accept money or gifts. - Do not give money or gifts except those explicitly part of the
protocol. - You can ask them to turn down the television or radio if
needed. - You can rearrange things in order to create a space to sit or
put your things if needed. - You can ask to open a window or change the temperature if
needed. - You can ask to use the bathroom if needed. - Consider bringing small games or distractions for children. - Be clear from the start how long you intend to stay. If they
ask you to leave early, leave. If they ask you to stay longer, it is up to you and your supervisor BUT do not stay longer than you are comfortable. Make up excuses if you have to.
- You can reveal some personal things about yourself but do not reveal too much. Do NOT give information such as your address or telephone number unless authorized to do so by your supervisor.
5. Building trust
Brainstorm: Think about someone you trust. What qualities do they have? Would you trust this person’s opinion or advice about your healthcare?

144
Would that require the same kind of trust or different? Discussion: Trusting a CHW – discuss what the participant might expect/feel about having a CHW. Do they automatically trust you? Or do you have to earn it? What tools do you currently use to gain trust? Teaching about types of credibility (Sue & Zane, 1987):
1. Ascribed status = one’s position or role that is ascribed by others or by cultural norms. Participants may ascribe high or low credibility to the CHW and or the research project depending on the cultural values. Examples: CHW title, education/degrees, gender, age, Medical Center project. Basically what you come labeled as.
2. Achieved status = CHW’s skills and actions that lead participants to view the CHW as competent and helpful. Basically what you earn from your interactions.
If there is low ascribed credibility, the person is not likely to volunteer for the program. They won’t believe it would help them. If there is high ascribed credibility (and they agree to volunteer) but low achieved credibility, the person is likely to not follow through on home visits and may even drop out of the program.
Ascribed credibility will get you in the door. Achieved credibility will get you the home visits.
Discuss: CHW examples of ascribed status and achieved status.
6. Review Main Messages
Home visits are important
Preparing for and conducting home visits
How to build trust
Answer questions

145
Evaluation
Evaluation is a critical step for all trainings. Throughout, trainees have been completing
pre- and post-examinations of their knowledge. However the true test of their skills is if
they can apply this knowledge in a real-life situation.
The following is the training evaluation performed with the asthma/obesity trainees in
our study. We anticipate others will modify this training as needed depending on the
content areas covered and the aims of the project.
Objectives
By the end of this evaluation, trainees will be able to:
1. Demonstrate they can correctly use a metered dose inhaler, a metered dose
inhaler with spacer, and a discus inhaler.
2. Demonstrate the application of self-management skills in a situation where the
CHW is trying to help a family struggling with multiple issues.
Estimated Time Required
It depends on the number of trainees. Each trainee takes about 10 minutes to
demonstrate the medications, and about 20 minutes for the role play.
Documents
- Role play (see example in Extra Documents)
- Role play evaluation form (see example in Extra Documents)
- Medication steps evaluation form (see example in Extra
Documents)
Materials
Demonstrator metered dose inhaler, spacer, discus inhaler
Other
You will need a quiet separate room from the main room where each trainee can be
tested alone.
You will need a minimum of 3 evaluators.
You will need an “actor” for the role plays.

146
Evaluation instructions
1. Trainees should know beforehand how they will be tested. They will get very
nervous about this. Reassure them.
2. Give everyone the role play to study beforehand.
3. Give everyone some time to practice with the demonstration devices.
4. Medication technique evaluation
i. Bring trainees one-by-one into a separate room.
ii. Face the trainee across from the evaluators.
iii. Give them the metered dose inhaler, spacer, and discus.
iv. Instruct them to show how to use each one.
v. When they have demonstrated all three and the evaluators are done
documenting, tell the trainee what they did right or wrong.
5. Role play evaluation
i. Bring trainees one-by-one into a separate room.
ii. Face the trainee across from the evaluators and next to the actor..
iii. Instruct them to be the CHW.
iv. You can decide if you want this to be a “first” visit (in which case they
need to evaluate needs and goals of the participant) or a follow-up visit
(where they will apply more self-management concepts. Give the CHW
clear instructions about which visit but do not tell them what to
specifically focus on. The actor needs to follow the same script and
pattern for each trainee..
v. Give them 20 minutes. You can warn them when time is ending.
vi. When they have completed the role play and the evaluators have
completed their documentation, give the trainee feedback.
6. Score forms
Final determination of CHW competencies
Many factors go into to the final determination of CHW competencies. Demonstrated
knowledge in pre- and post-tests as well as the medication demonstration test are
important. It is also important if CHWs can demonstrate they know how to draw out
participants, react to their needs, and apply self-management concepts.
147
Continuing Education
CHWs require continuing education on all the topics covered in the initial training.
Questions about the medical content will come up repeatedly when they are delivering
their services and they need regular access to a supervisor who can clarify these
questions. They also need continued practice with behavior change plans and the
application of self-management. Finally, they need general supervisory support and
social support from their peers.
CHWs in our Center meet bimonthly. This frequency of meeting was chosen to avoid
overburdening CHWs. We meet mid-morning to facilitate parenting schedules and we
serve a healthy snack. The continuing education sessions address two domains: 1)
CHW self discovery via goal setting, addressing barriers and successes, and CHW
group social support; and 2) topics brought forth by CHWs related to their work in the
field. We used local experts in our medical center to facilitate discussion of identified
topics. Ongoing education is a work in progress and will be driven by CHW identified
needs and topics.
Meeting format
1) CHW Self Discovery (60 minutes total)
Each CHW should complete an individual change plan at the end of each CHW
continuing education meeting. This change plan should include details on the
specific intended action, when this will occur, how, potential barriers, and
potential solutions to these barriers. (15 minutes)
Progress on individual change plans should be discussed and shared at the
beginning of the following CHW continuing education meeting. Each CHW is
asked if they would like to present their experience with goal achievement from
the previous CHW continuing education session. The group gives verbal
feedback and makes recommendations or shares personal experiences to give
insights to goal achievement. Some examples of goals include: including
children in meal preparation, organizing a home office or storage space, meeting
specific daily step counts, or practicing mindfulness 10 minutes per day. (45
minutes)
Examples of individual change plans are in the Extra Documents and they are
also described in the Introduction section of this manual.
148
2) Continuing Education Content (60 minutes total)
45 minutes of content
15 minutes of role playing and questions
The following are content areas that our Center has chosen to cover.
Lesson #1: Stages of Change
Lesson Objectives
By the end of this lesson, the CHW will be able to:
1. Describe the Stages of Change related to human behavior
2. Demonstrate incorporation of an interview technique to discover participant stage
of change
3. Understand appropriate goal setting based on state of change.
Reference: Prochaska JO, DiClemente CC, Norcross JC. In search of how people change. Am Psychol. 1992;47:1102–4.
Lesson #2: Research and Confidentiality
Lesson Objectives
By the end of this lesson, the CHW will be able to:
1. Understand why protecting confidentiality is important
2. Describe what information is considered confidential in research studies.
3. Demonstrate behaviors that safeguard paperwork, computer use, telephone
calls, etc. while striking a balance between operational necessity and maintaining
maximal security
4. Be familiar with reporting of any perceived breach of confidentiality
Reference: Rush Center for Urban Health Equity (CUHE) Research and Confidentiality Policy and Rush CUHE List of Confidential Participant Information to Protect
149
Lesson #3: Care Giver Burden and Burnout & Self Care
Lesson Objectives
By the end of this lesson, the CHW will be able to:
1. Recognize signs of caregiver/CHW burnout
2. Demonstrate techniques to reduce caregiver/CHW burnout and increase self
care
Reference: Rush CUHE Avoiding Caregiver Burnout and Rush Employee Assistance
Program and Employee Wellness Information
Lesson #4: Addiction
Lesson Objectives
By the end of this lesson, the CHW will be able to:
1. Describe principles of a 12-step program
2. Demonstrate communication techniques to consider the level of spiritual wellness
of a participant
Reference: Rush CUHE Spiritual Listening and 12 Step Program of Recovery
VandenBos, Gary R. (2007). APA dictionary of psychology (1st ed.). Washington, DC:
American Psychological Association.
150
Extra Documents
- Change plans (CURA and CHART)
- Role plays asthma physiology and symptoms
- Asthma symptom log
- Role plays triggers
- Asthma medication pictures
- Asthma medication log
- Pre/post asthma medications
- Pre/post obesity general
- Pre/post physical activity
- Pre/post portions
- Role plays asthma obesity combined
- CHART medication cards
- CURA final evaluation role play
- Role play review form
- Medication technique evaluation form
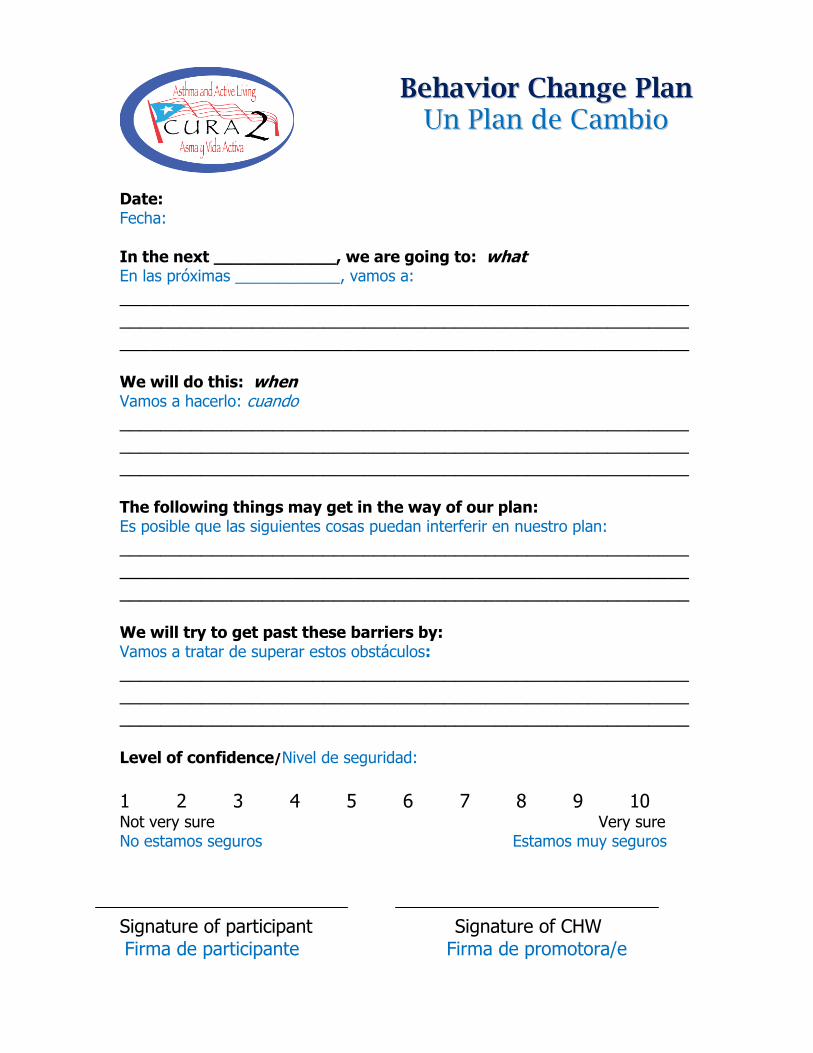
Date: Fecha: In the next ____________, we are going to: what En las próximas ____________, vamos a:
________________________________________________________________________________________________________________________________________________________________________ We will do this: when Vamos a hacerlo: cuando
________________________________________________________________________________________________________________________________________________________________________ The following things may get in the way of our plan: Es posible que las siguientes cosas puedan interferir en nuestro plan:
________________________________________________________________________________________________________________________________________________________________________ We will try to get past these barriers by: Vamos a tratar de superar estos obstáculos:
________________________________________________________________________________________________________________________________________________________________________ Level of confidence/Nivel de seguridad:
1 2 3 4 5 6 7 8 9 10 Not very sure Very sure No estamos seguros Estamos muy seguros
Signature of participant Signature of CHW Firma de participante Firma de promotora/e
BBeehhaavviioorr CChhaannggee PPllaann UUnn PPllaann ddee CCaammbbiioo
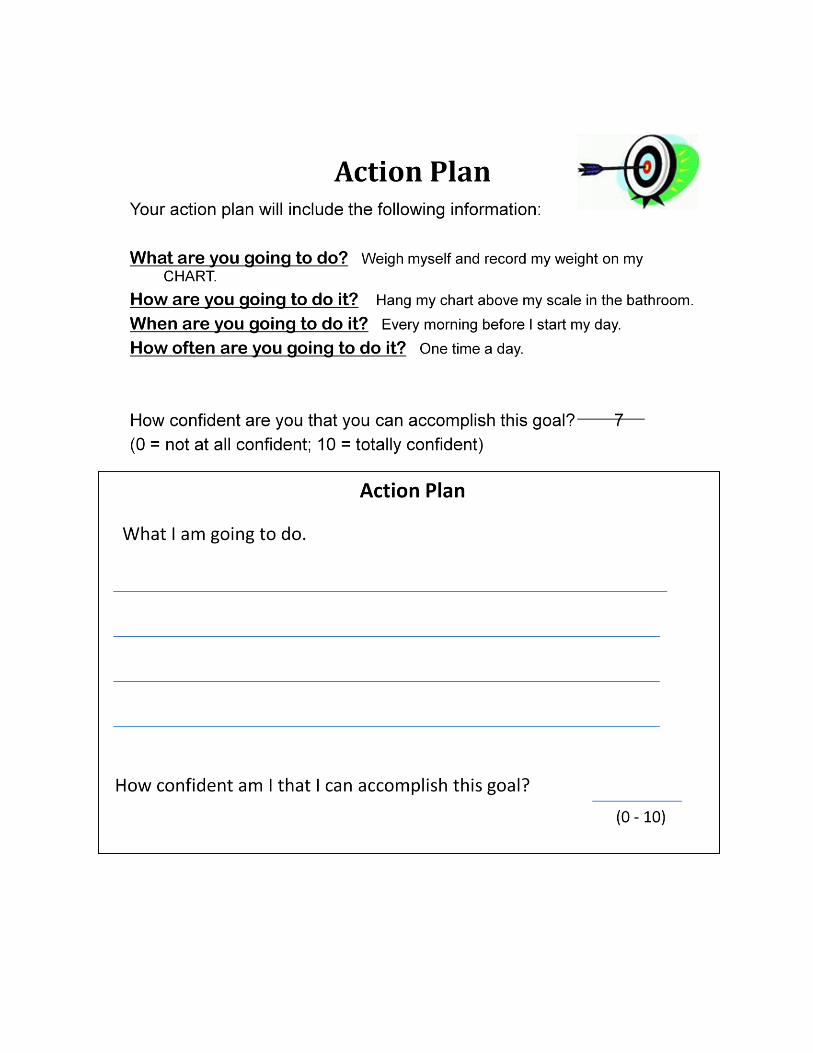
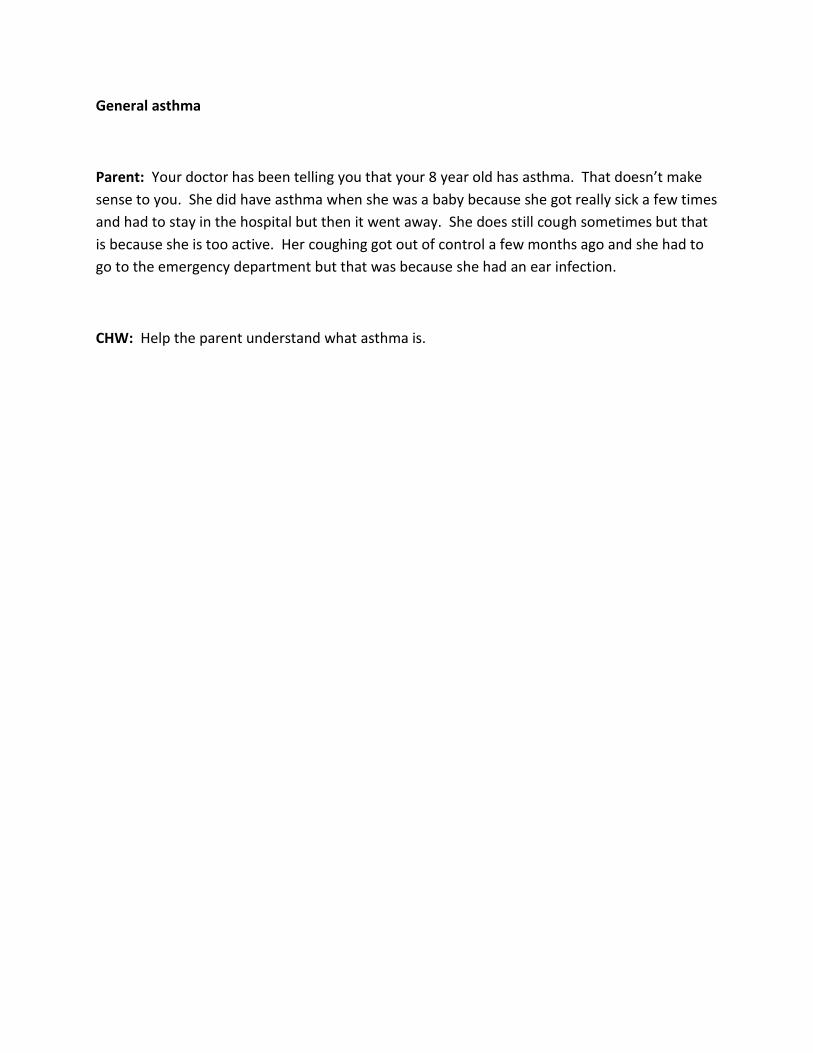
General asthma
Parent: Your doctor has been telling you that your 8 year old has asthma. That doesn’t make
sense to you. She did have asthma when she was a baby because she got really sick a few times
and had to stay in the hospital but then it went away. She does still cough sometimes but that
is because she is too active. Her coughing got out of control a few months ago and she had to
go to the emergency department but that was because she had an ear infection.
CHW: Help the parent understand what asthma is.

Asthma Symptoms
Parent: You have two children, one is 10 and one is 5. They both have asthma. Your doctor
told you to give them the breathing medicine when they need it but you don’t know when they
need it. They always seem fine to you. They don’t complain.
CHW: Educate the parent on symptoms. Use a self-management concept.

Use this to keep track of when your child has asthma symptoms. Put this somewhere you will see it every day. Remember, little coughs or symptoms are just as important to mark down as big ones.
Date Daytime Nighttime
□ Wheeze □ Cough □ Difficulty breathing
□ Wheeze □ Cough □ Difficulty breathing
□ Wheeze □ Cough □ Difficulty breathing
□ Wheeze □ Cough □ Difficulty breathing
□ Wheeze □ Cough □ Difficulty breathing
□ Wheeze □ Cough □ Difficulty breathing
□ Wheeze □ Cough □ Difficulty breathing
□ Wheeze □ Cough □ Difficulty breathing
□ Wheeze □ Cough □ Difficulty breathing
□ Wheeze □ Cough □ Difficulty breathing
□ Wheeze □ Cough □ Difficulty breathing
□ Wheeze □ Cough □ Difficulty breathing
□ Wheeze □ Cough □ Difficulty breathing
□ Wheeze □ Cough □ Difficulty breathing
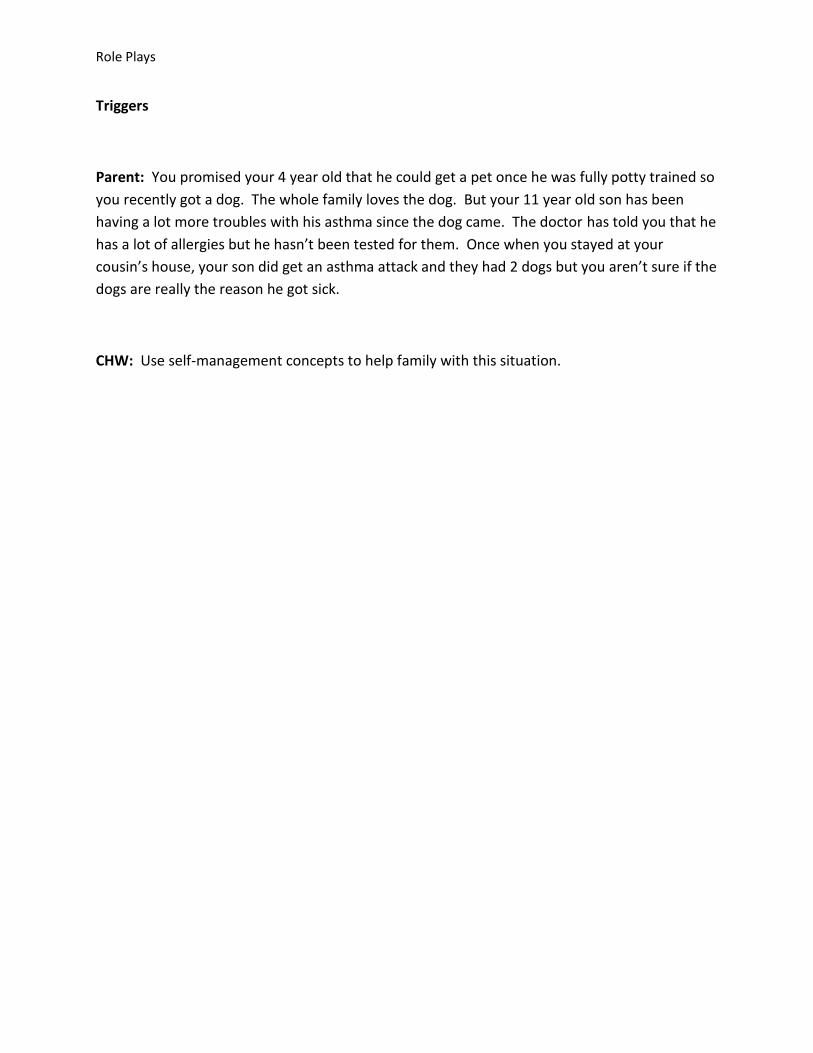
Role Plays
Triggers
Parent: You promised your 4 year old that he could get a pet once he was fully potty trained so
you recently got a dog. The whole family loves the dog. But your 11 year old son has been
having a lot more troubles with his asthma since the dog came. The doctor has told you that he
has a lot of allergies but he hasn’t been tested for them. Once when you stayed at your
cousin’s house, your son did get an asthma attack and they had 2 dogs but you aren’t sure if the
dogs are really the reason he got sick.
CHW: Use self-management concepts to help family with this situation.

Role Plays
Triggers
Parent: You like your house to be really clean because your little 5 year old daughter has bad
asthma. You don’t want anything to make it worse. To you, a clean house seems fresh. You
like your clothes to be clean too, that is why you only use Tide. It is expensive, but it is the best.
You are always washing and vacuuming to keep things clean around her.
CHW: Use self-management skills to help parent understand how strong smells and cleaning
products can make asthma worse. Decide on some “safe” strategies for keeping the house and
clothes clean.
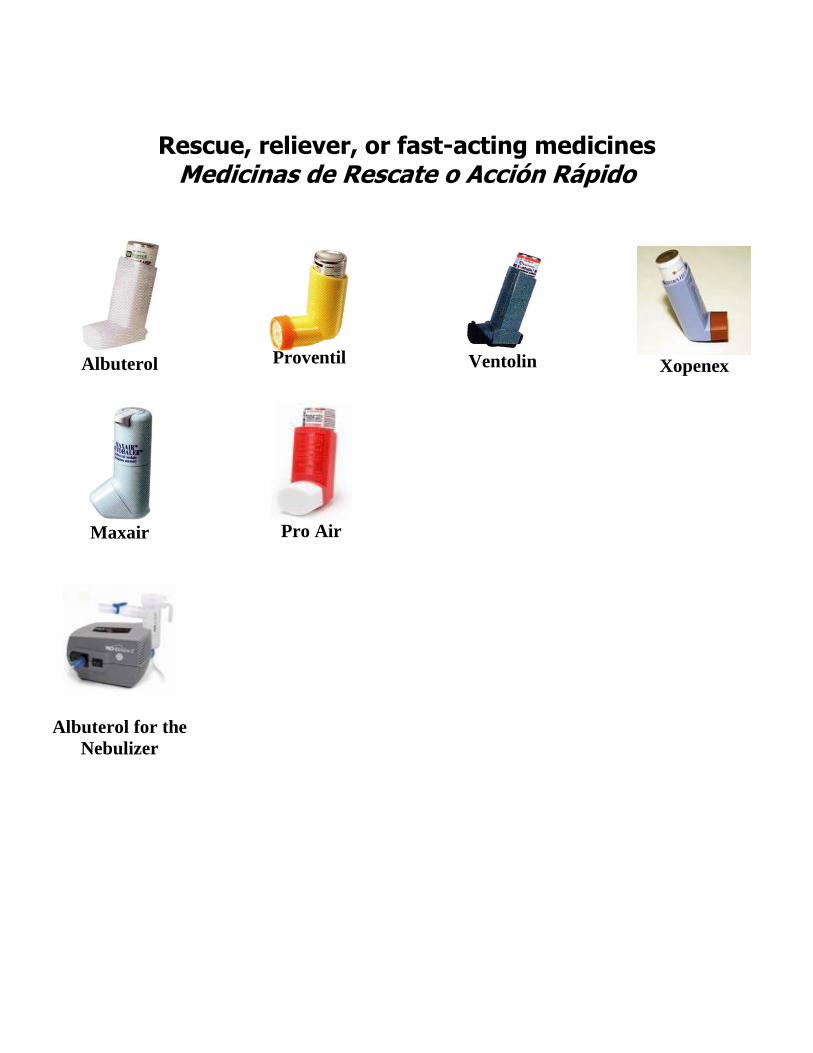
Rescue, reliever, or fast-acting medicines Medicinas de Rescate o Acción Rápido
Albuterol
Proventil
Ventolin
Xopenex
Maxair
Pro Air
Albuterol for the
Nebulizer

Controller Medicines, Inhaled corticosteroids Medicinas de Controlar, corticosteroides inhaladores
Pulmicort
Flexhaler
Asmanex
Azmacort
Qvar (40mcg)
Qvar (80mcg)
Flovent
Pulmicort Respules for the Nebulizer
Advair
Advair MDI
Symbicort
(80/4.5 or 40/4.5)

Other asthma medicines Otras Medicinas de Asma
Intal
Controller
Para controlar
Singulair For allergies and a controller
Para alergias y a controlar
Prednisone/
Prednisolone For bad asthma attacks
Para ataques de asma fuertes
Serevent DIP
Controller
Para controlar
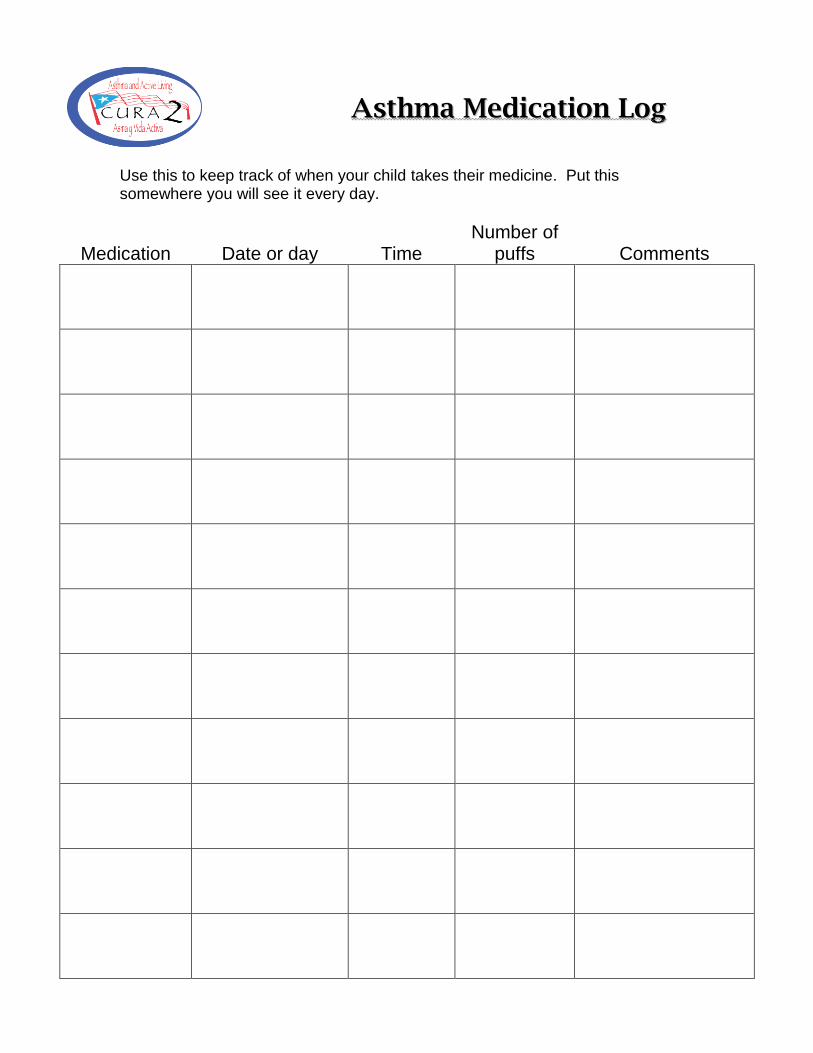
AAsstthhmmaa MMeeddiiccaattiioonn LLoogg
Use this to keep track of when your child takes their medicine. Put this somewhere you will see it every day.
Medication Date or day Time Number of
puffs Comments

Name: ___________________________________________ PreTest or Posttest (circle one) The below statements are either TRUE or FALSE. Please circle what you think is correct. Asthma Medications
1. Inhaler use can lead to dependence or addiction. True or False
2. It’s not good for children to use any inhaler for too long.
True or False
3. Children with asthma should use asthma medications only when they have
symptoms (coughing, congestion, or wheezing.) True or False
4. An inhaled corticosteroid medicine is one that you take every day, even when
you don’t have symptoms, to prevent asthma attacks. True or False
5. It’s better to use inhalers directly, without a holding chamber, so the medication
can go more directly to the lungs. True or False
6. A controller medicine is a medicine given every day to prevent asthma symptoms
and asthma attacks. True or False
7. A reliever medicine is a medicine that you give when your child is sick or has
symptoms of asthma. True or False
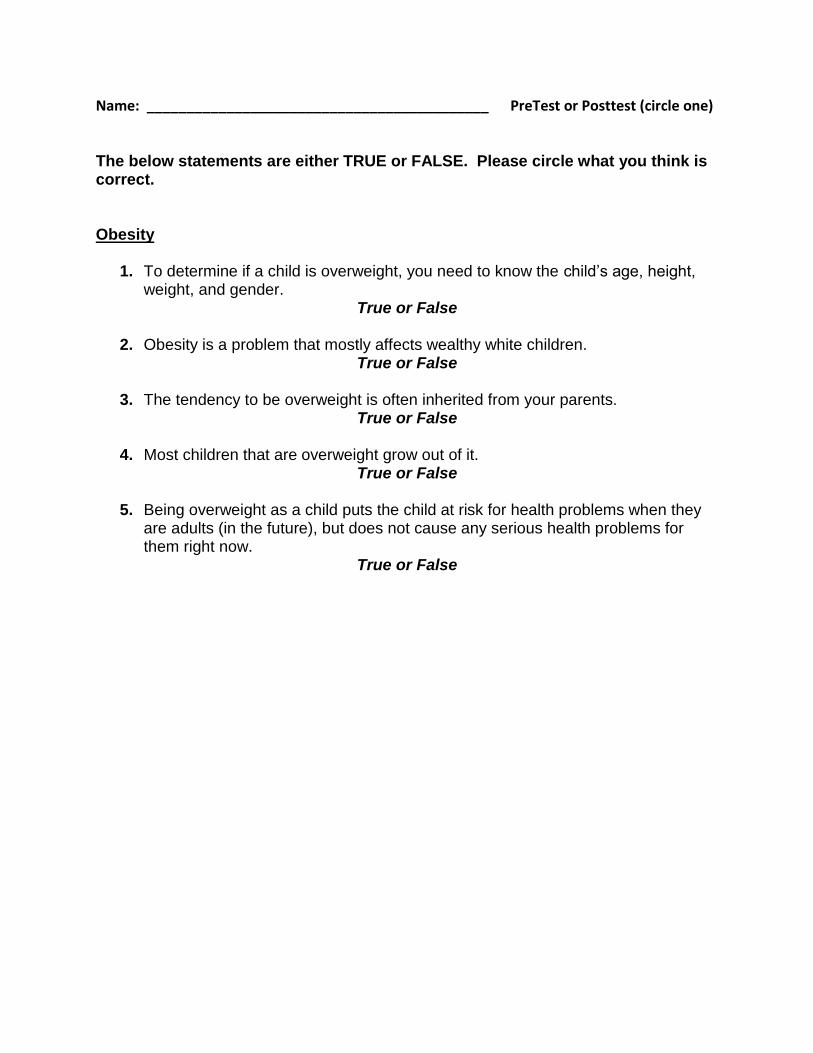
Name: ___________________________________________ PreTest or Posttest (circle one) The below statements are either TRUE or FALSE. Please circle what you think is correct. Obesity
1. To determine if a child is overweight, you need to know the child’s age, height, weight, and gender.
True or False
2. Obesity is a problem that mostly affects wealthy white children. True or False
3. The tendency to be overweight is often inherited from your parents.
True or False
4. Most children that are overweight grow out of it. True or False
5. Being overweight as a child puts the child at risk for health problems when they
are adults (in the future), but does not cause any serious health problems for them right now.
True or False

Name: ___________________________________________ PreTest or Posttest (circle one) The below statements are either TRUE or FALSE. Please circle what you think is correct. Physical activity
1. Exercise only counts if it causes you to sweat a lot and makes your muscles hurt. True or False
2. Exercise can reduce stress.
True or False
3. Children are naturally active—they don’t need to worry about getting enough exercise.
True or False
4. Parents should ask a doctor to tell the school that a child with asthma shouldn’t exercise or participate in physical education classes.
True or False
5. Children who have asthma can have full participation in the same sports as children without asthma.
True or False

Name: ___________________________________________ PreTest or Posttest (circle one) The below statements are either TRUE or FALSE. Please circle what you think is correct. Food groups and portions
1. Meat (or another protein) should fill up ¼ of your plate or less. True or False
2. It is dangerous to give heavy children smaller portions of food because they need
the extra nutrition and energy since they are bigger. True or False
3. Foods are usually packaged or sold in single serving portions.
True or False
4. Sometimes parts of recipes can be changed to reduce the fat or to add fiber without the flavor being affected.
True or False
5. Restaurant foods usually have more calories and fat than foods prepared in the home.
True or False

Parent:
Mom is 24 years old. She has two children. One is 6 and one is 2. The 6 year old has asthma. She has
taken him to the emergency department several times for asthma. The last time was about 3 months
ago. He has no controller medicine. She takes him to the clinic for his shots and for refills on his
albuterol. They never say anything, which is good because she doesn’t have insurance so she just uses
his extra albuterol for her asthma. He gets asthma attacks when he plays a lot so she tries to not let him
go out much. He is happy with his video games. She told the teacher not to let him do gym class. They
don’t have any pets. Mom does not smoke but her boyfriend does and watches the kids on weekends
when she has to work.
She thinks that maybe he might be a little overweight, she isn’t sure. She has to buy him the special
sized clothes. But he isn’t any bigger than any of his cousins and his dad was big so they probably just
have big bones in their family. She isn’t a very good cook, her mom didn’t teach her much. Her son eats
breakfast and lunch at school and for dinner they usually go out or she heats up something. He isn’t big
on meals anyways, he mostly likes to snack.
CHW:
Your goal is to identify an issue mom is interested in and help her make a behavior change plan.
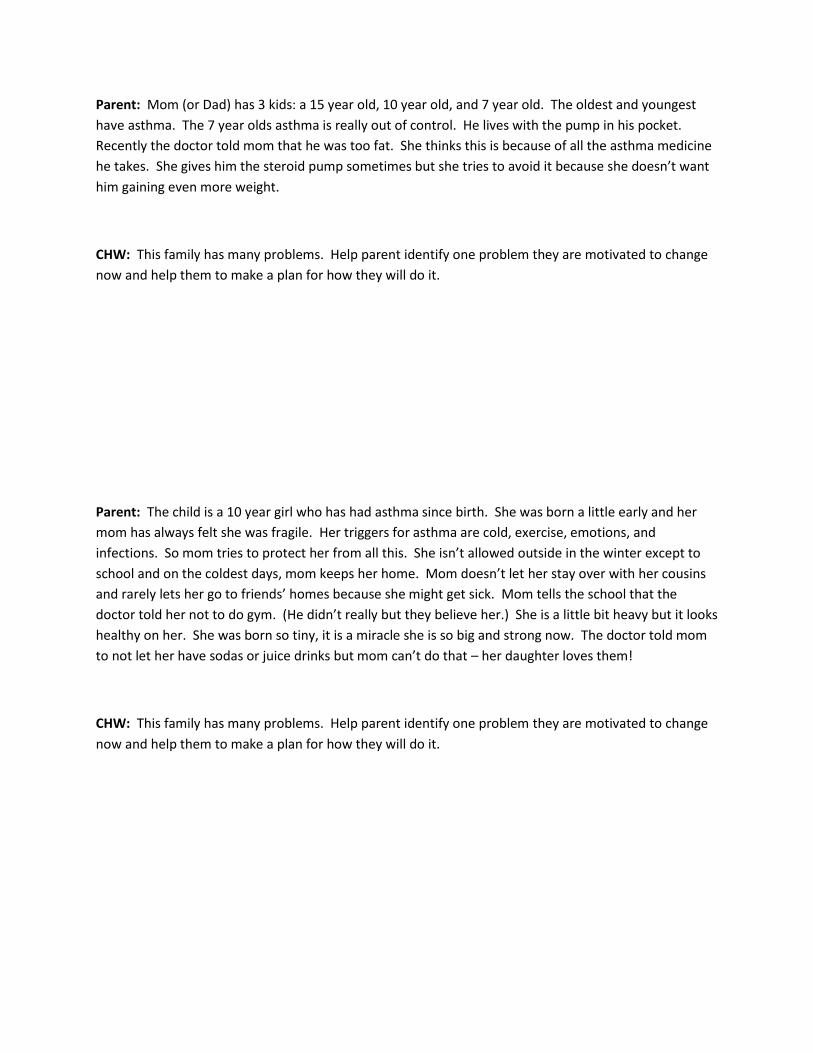
Parent: Mom (or Dad) has 3 kids: a 15 year old, 10 year old, and 7 year old. The oldest and youngest
have asthma. The 7 year olds asthma is really out of control. He lives with the pump in his pocket.
Recently the doctor told mom that he was too fat. She thinks this is because of all the asthma medicine
he takes. She gives him the steroid pump sometimes but she tries to avoid it because she doesn’t want
him gaining even more weight.
CHW: This family has many problems. Help parent identify one problem they are motivated to change
now and help them to make a plan for how they will do it.
Parent: The child is a 10 year girl who has had asthma since birth. She was born a little early and her
mom has always felt she was fragile. Her triggers for asthma are cold, exercise, emotions, and
infections. So mom tries to protect her from all this. She isn’t allowed outside in the winter except to
school and on the coldest days, mom keeps her home. Mom doesn’t let her stay over with her cousins
and rarely lets her go to friends’ homes because she might get sick. Mom tells the school that the
doctor told her not to do gym. (He didn’t really but they believe her.) She is a little bit heavy but it looks
healthy on her. She was born so tiny, it is a miracle she is so big and strong now. The doctor told mom
to not let her have sodas or juice drinks but mom can’t do that – her daughter loves them!
CHW: This family has many problems. Help parent identify one problem they are motivated to change
now and help them to make a plan for how they will do it.

Problem
A weak heart struggles to pump blood forward, but the heart cannot keep up. So fluid backs up into the lungs.
Water Pill
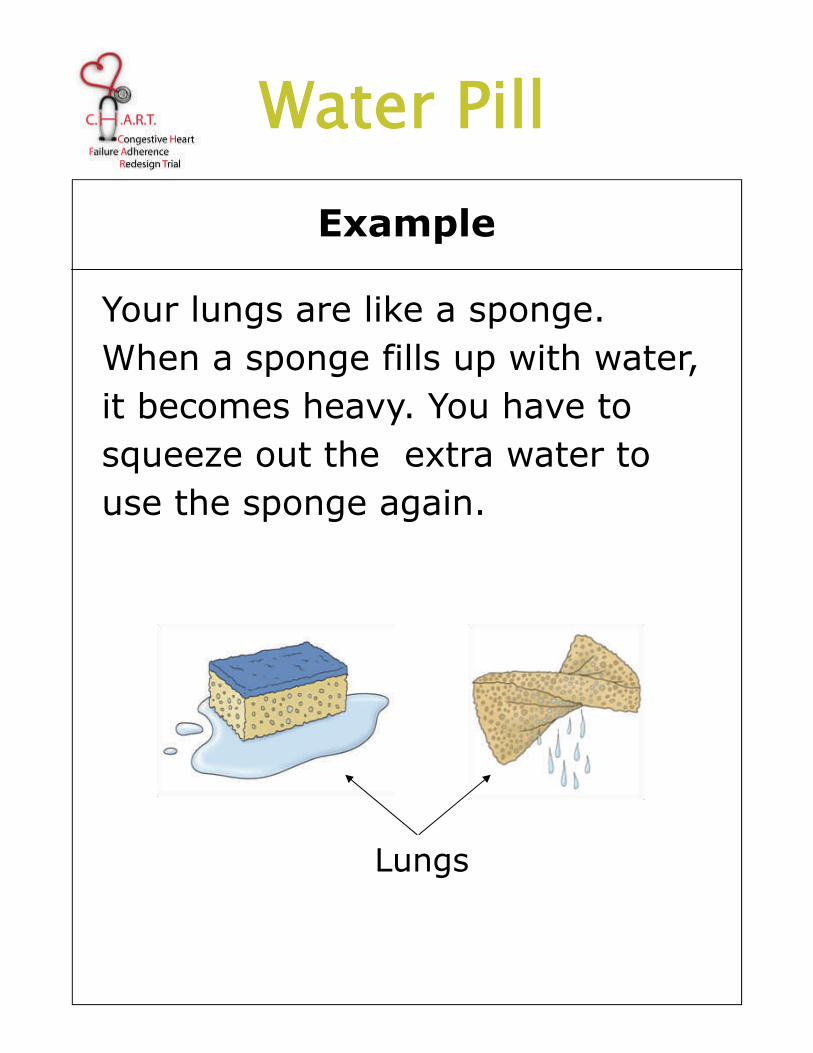
Example
Your lungs are like a sponge. When a sponge fills up with water, it becomes heavy. You have to squeeze out the extra water to use the sponge again.
Lungs
Water Pill

Problem
A weak heart cannot pump enough blood to the kidneys. This puts the body under stress and the kidneys respond by holding on to salt and water. This causes swelling (edema).
Water Pill
Normal Swelling (Edema)
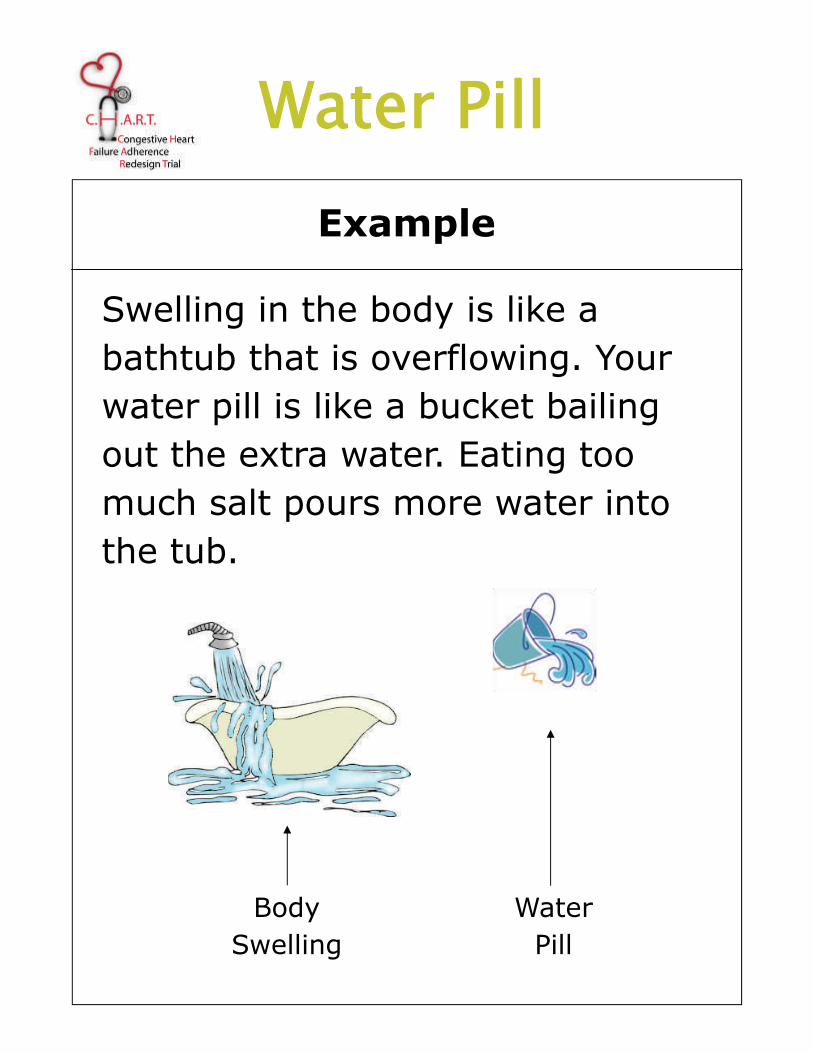
Example
Swelling in the body is like a bathtub that is overflowing. Your water pill is like a bucket bailing out the extra water. Eating too much salt pours more water into the tub.
Water Pill
Water Pill
Body Swelling

Problem
Heart failure, especially with high blood pressure, narrows blood vessels. This causes the heart to work harder to pump blood through the narrowed vessels.
Widening Pill
Normal Vessel
Narrowed Vessel
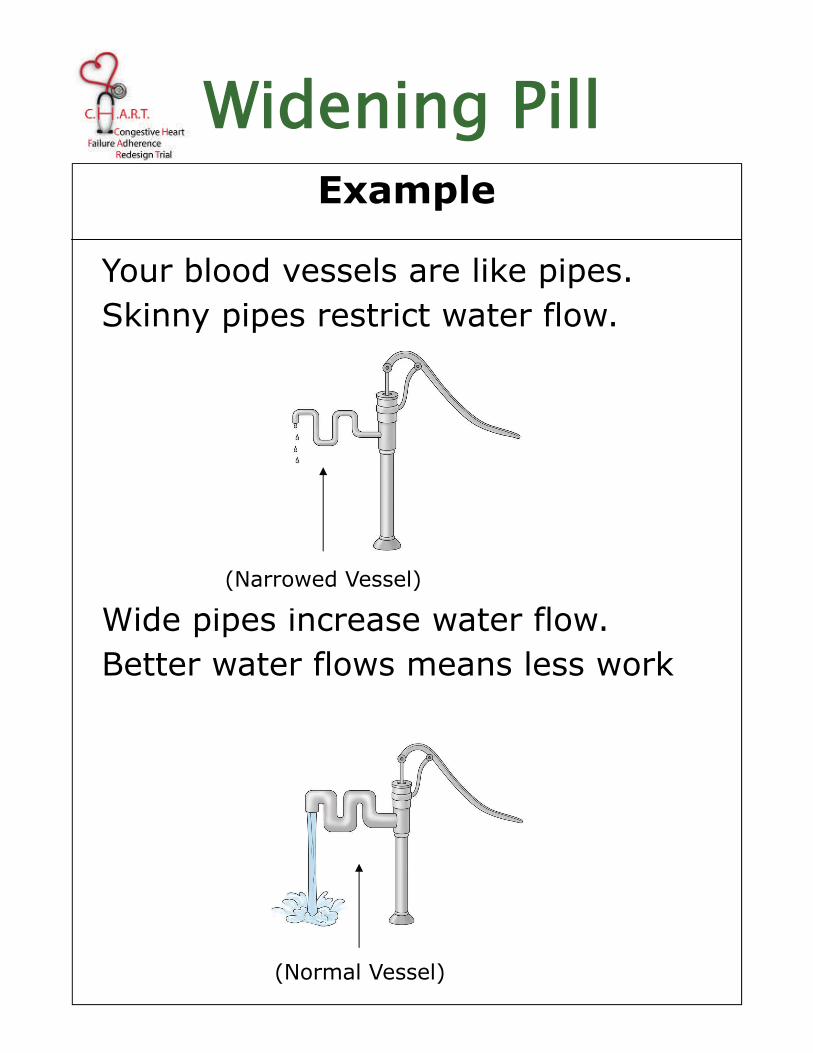
Example
Your blood vessels are like pipes. Skinny pipes restrict water flow.
Wide pipes increase water flow. Better water flows means less work
(Normal Vessel)
Widening Pill
(Narrowed Vessel)
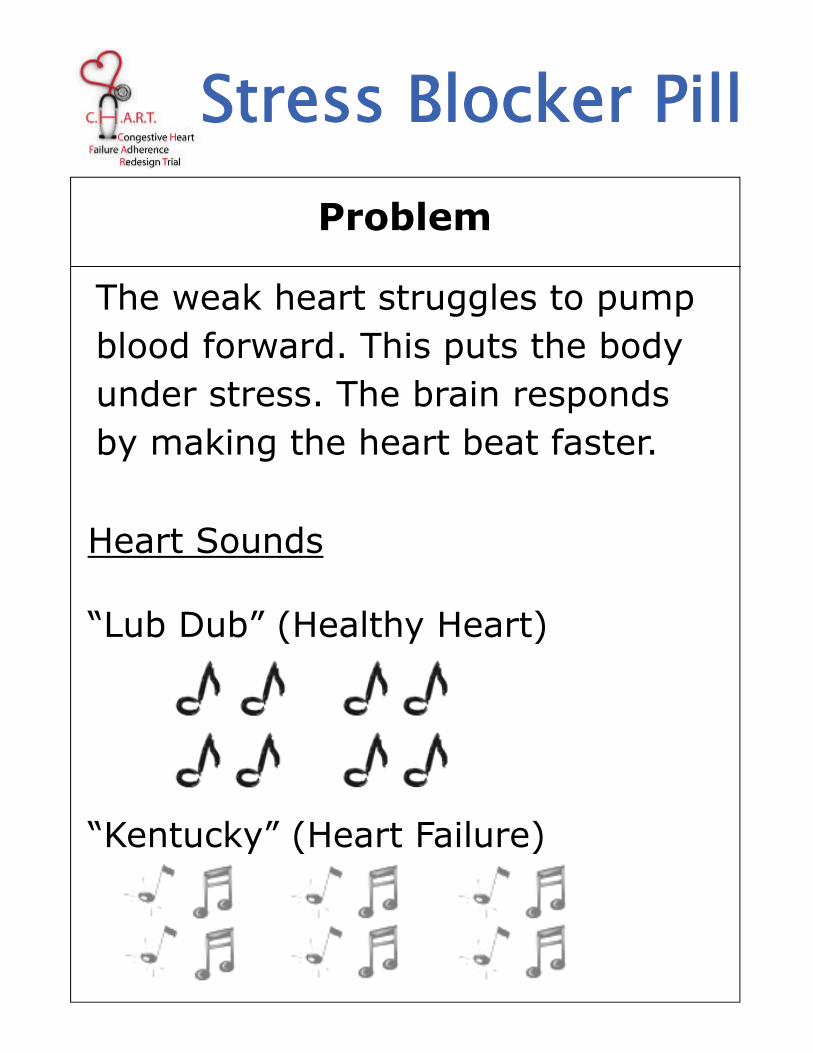
Problem
The weak heart struggles to pump blood forward. This puts the body under stress. The brain responds by making the heart beat faster.
Stress Blocker Pill
Heart Sounds “Lub Dub” (Healthy Heart) “Kentucky” (Heart Failure)
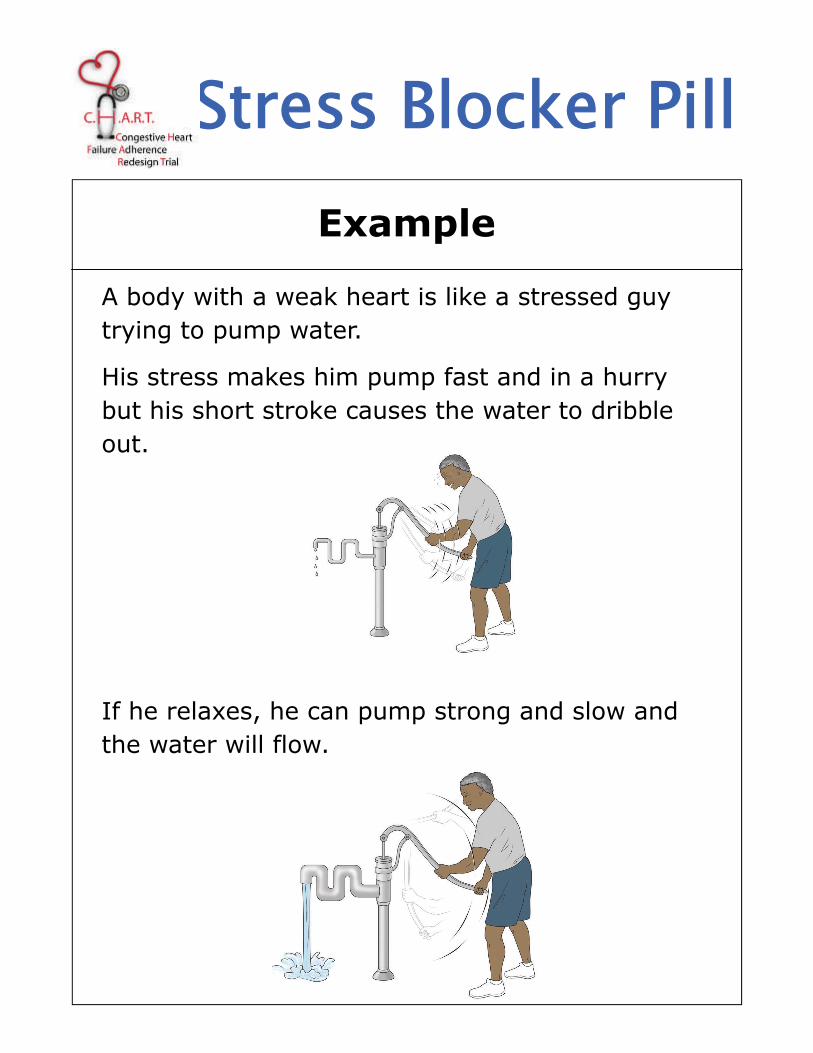
Example
A body with a weak heart is like a stressed guy trying to pump water.
His stress makes him pump fast and in a hurry but his short stroke causes the water to dribble out.
If he relaxes, he can pump strong and slow and the water will flow.
Stress Blocker Pill

Role Plays
FINAL EXAM ROLE PLAY
Parent:
Mom is 24 years old. She has two children. One is 6 and one is 2. The 6 year old has asthma. She has
taken him to the emergency department several times for asthma. The last time was about 3 months
ago. He has no controller medicine. She takes him to the clinic for his shots and for refills on his
albuterol. They never say anything, which is good because she doesn’t have insurance so she just uses
his extra albuterol for her asthma. He gets asthma attacks when he plays a lot so she tries to not let him
go out much. He is happy with his video games. She told the teacher not to let him do gym class. They
don’t have any pets. Mom does not smoke but her boyfriend does and watches the kids on weekends
when she has to work.
She thinks that maybe he might be a little overweight, she isn’t sure. She has to buy him the special
sized clothes. But he isn’t any bigger than any of his cousins and his dad was big so they probably just
have big bones in their family. She isn’t a very good cook, her mom didn’t teach her much. Her son eats
breakfast and lunch at school and for dinner they usually go out or she heats up something. He isn’t big
on meals anyways, he mostly likes to snack.
CHW:
Your goal is to identify an issue mom is interested in and help her make a behavior change plan.

CHW Training October 2011
Evaluator: ______________________________________
Role Play Review Form
CHW: Date of Rating: __ __ / __ __ / __ __
Description of Role Play:
Directions: For items, 1-9, assess the CHW on a scale from 1 – 5. Calculate the average rating at the bottom of the page.
1 Needs review of content and additional practice in this area
2 Demonstrates a basic understanding of the skill and is ready to practice a more complicated skill
3 Demonstrates an adequate understanding of a complicated skill, but needs more practice before starting on a clinical trial
4 Demonstrates an adequate understanding of the skill and is ready for entering the field on a clinical trial
5 Demonstrates a sophisticated understanding of the skill and could likely be role model for his/her peers.
N/E Not evaluated: This role play scenario did not allow opportunity to evaluate this skill
SKILL RATING COMMENTS/SUGGESTIONS
1 ACCURACY OF CONTENT: CHW demonstrates knowledge of
asthma/obesity information or self-management skill.
2 CLARITY OF CONTENT: Communicates content in lay person’s
language, keeps the level of detail simple, and limits amount of material
covered so it’s likely to be retained, and not overwhelm the participant.
3 OPENNESS TO QUESTIONS: Responds to questions from participant.
If does not know the answer, talks about how participant could pursue
the answer or assures participant that they will learn what they can and
get back to them at the next meeting.
4 INDIVIDUALIZING the CONTENT and PROCESS: Shows an ability
to find out what is most relevant to this participant and tailors the
protocol to maximize acceptance of material.
5 MODEL & GUIDE: CHW used modeling and experiential learning.
Used conversational and problem-solving approaches (rather than lecture
or debate) to promote guided discovery and learning, helping
participants to draw their own conclusions.
6 CHECK FOR PARTICIPANT UNDERSTANDING of MATERIAL:
CHW checks for participant understanding by asking the participant to
answer open-ended questions, to put presented material into their own
words, and/ or to demonstrate knowledge by practicing the skill within
the session.
7 ACTION: Discussed an action plan for weekly practice of skills.
Encouraged participant to tie the content of material to their daily lives
by developing a plan to take some action or to practice a skill in the time
before their next meeting.
8 ASKED FOR FEEDBACK: CHW asked participant for feedback on
how this meeting and the overall process in the study is going.
9 INTERPERSONAL EFFECTIVENESS: CHW displayed optimal levels
of warmth, concern, confidence, genuineness, professionalism, and
maintained appropriate boundaries.
AVERAGE RATING (Calculated)

CHW Training Oct 21, 2011
Date: _______________ CHW: _______________________________________ Evaluator: ________________________________________
MEDICATION EVALUATION TECHNIQUE
Inhaler Alone Required Steps Yes No Comments
1. Shake inhaler before use
2. Remove cap
3. Exhale completely before actuation
4. Place mouthpiece between teeth and enclose it with lips
5. Actuate once at the start of an inhalation
6. Inhale slowly
7. Hold breath after inhalation for at least 5 seconds, then exhale
8. Wait 20-30 seconds before second actuation
1 point for each yes. Add. Total score: _____________
Inhaler with Holding Chamber
Required Steps Yes No Comments
1. Shake inhaler before use
2. Connect inhaler and holding chamber
3. Insert mouthpiece between lips
4. Actuate the inhaler one time
5. Inhale slowly and deeply (no whistle)
6. Hold breath after inhalation for at least 5 seconds, then exhale (Ok to Inhale and exhale multiple times as long as inhalations are slow and breath is held for 5 seconds.)
7. Wait 20-30 seconds before second actuation
1 point for each yes. Add. Total score: _____________
Dry Powder Inhaler (DPI) Required Steps Yes No Comments
1. Hold DPI in correct position
2. Load device once
3. Exhale away from mouthpiece
4. Place mouthpiece between teeth and enclose with lips
5. Inhale forcefully and deeply
6. Hold breath after inhalation for at least 5 seconds, then exhale
1 point for each yes. Add. Total score: _____________