Communications SL 17B, 17C Helmets, KMB 18/28 General ... · PDF fileCommunications on...
7
Communications on SuperLite ® 17B and 17C Helmets, KMB 18 and 28 BandMasks ® Contents 17COM-1 1.1 General 17COM-1 1.2 Earphone Inspection 17COM-2 1.3 Microphone Removal and Replacement 17COM-4 1.4 Earphone Removal and Replacement 17COM-5 1.5 Waterproof Connector 17COM-5 1.5.1 Connector Removal 17COM-6 1.5.2 Connector Replacement 17COM-6 1.6 Communications Posts 17COM-6 1.6.1 Communications Post Removal 17COM-6 1.6.2 Communications Post Replacement 1.1 General The communications system in the SuperLite ® 17B, 17C, the KMB 18 and 28, requires regular attention and maintenance for proper function. Clear two-way speech communications between the diver and surface crew is one of the most im- portant capabilities of surface-supplied diving operations. 1.2 Earphone Inspection To service the earphones, first remove the head cushion from the helmet. The earphones can be carefully pulled out of the retainers in the helmet shell for inspection and disassembly. To gain access to the earphones, you must first remove the head cushion. Remove the earphones from the retainers to inspect the speaker cones. 1) Remove the (clear) cover first and slide it along the wire to get it out of the way. Remove the ear- phone protector and then peel back the (black) rear cover. © MMXV Kirby Morgan Dive Systems, Inc. All rights reserved. Document # 150427001 17COM-1 Communications SL 17B, 17C Helmets, KMB 18/28 General
Transcript of Communications SL 17B, 17C Helmets, KMB 18/28 General ... · PDF fileCommunications on...
Communications on SuperLite® 17B and 17C Helmets, KMB 18 and 28 BandMasks®
Contents
17COM-1 1.1 General
17COM-1 1.2 Earphone Inspection
17COM-2 1.3 Microphone Removal and Replacement
17COM-4 1.4 Earphone Removal and Replacement
17COM-5 1.5 Waterproof Connector
17COM-5 1.5.1 Connector Removal
17COM-6 1.5.2 Connector Replacement
17COM-6 1.6 Communications Posts
17COM-6 1.6.1 Communications Post Removal
17COM-6 1.6.2 Communications Post Replacement
1.1 GeneralThe communications system in the SuperLite® 17B, 17C, the KMB 18 and 28, requires regular attention and maintenance for proper function. Clear two-way speech communications between the diver and surface crew is one of the most im-portant capabilities of surface-supplied diving operations.
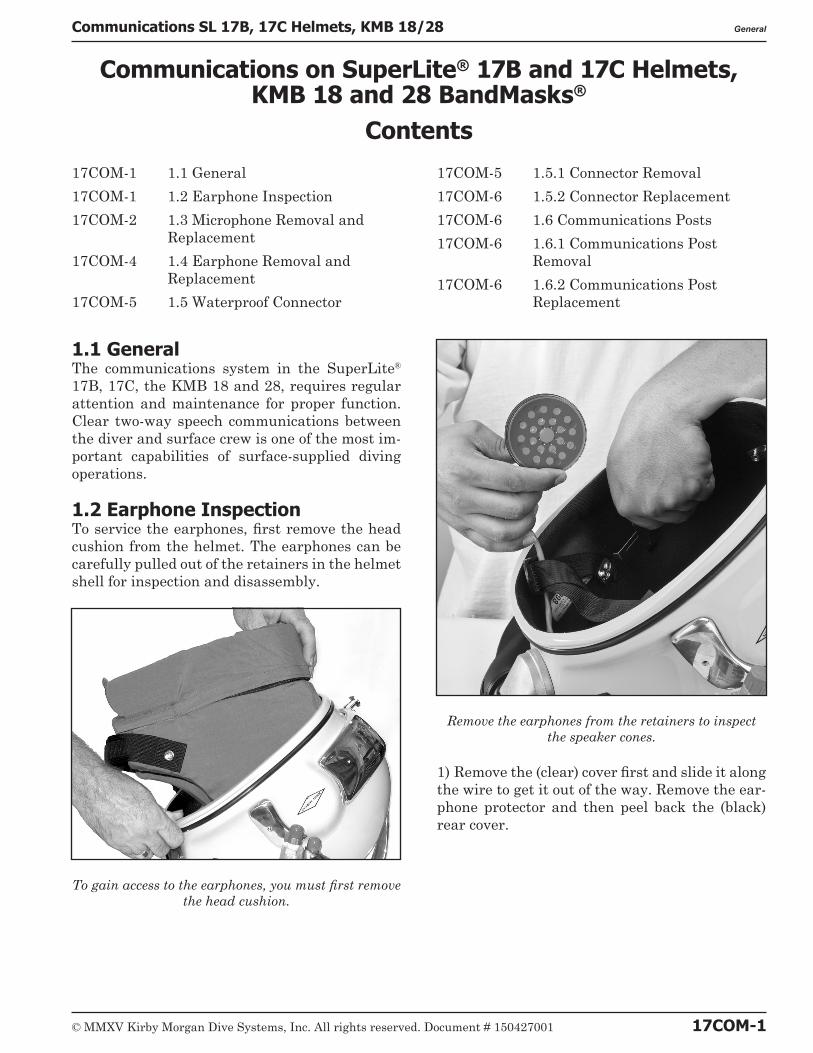
1.2 Earphone InspectionTo service the earphones, first remove the head cushion from the helmet. The earphones can be carefully pulled out of the retainers in the helmet shell for inspection and disassembly.
To gain access to the earphones, you must first remove the head cushion.
Remove the earphones from the retainers to inspect the speaker cones.
1) Remove the (clear) cover first and slide it along the wire to get it out of the way. Remove the ear-phone protector and then peel back the (black) rear cover.
© MMXV Kirby Morgan Dive Systems, Inc. All rights reserved. Document # 150427001 17COM-1
Communications SL 17B, 17C Helmets, KMB 18/28 General

Removing the rubber cover from the earphone.
2) Check the wire connections. They should be solid.
3) Check the mylar diaphragm. If the mylar is torn or loose, replace the entire unit, see "1.4 Ear-phone Removal and Replacement" on page 17COM-4.
Inspect the mylar earphone.
4) If the rubber covers are worn or damaged, re-place them also.
1.3 Microphone Removal and ReplacementTools Required:1/8" Flat Blade Screwdriver
EARPHONE
MICROPHONE
TERMINAL BLOCK
HEX NUT
WATERPROOF CONNECTOR ASSEMBLY
PLUG
NUT
HELMET SHELL
COMM. POSTS
WASHER
O-RING
Components of the communication system on the SuperLite® 17B and 17C, KMB 18
and 28 BandMasks.
17COM-2 © MMXV Kirby Morgan Dive Systems, Inc. All rights reserved. Document # 150427001
Microphone Removal and Replacement Communications SL 17B, 17C Helmets, KMB 18/28
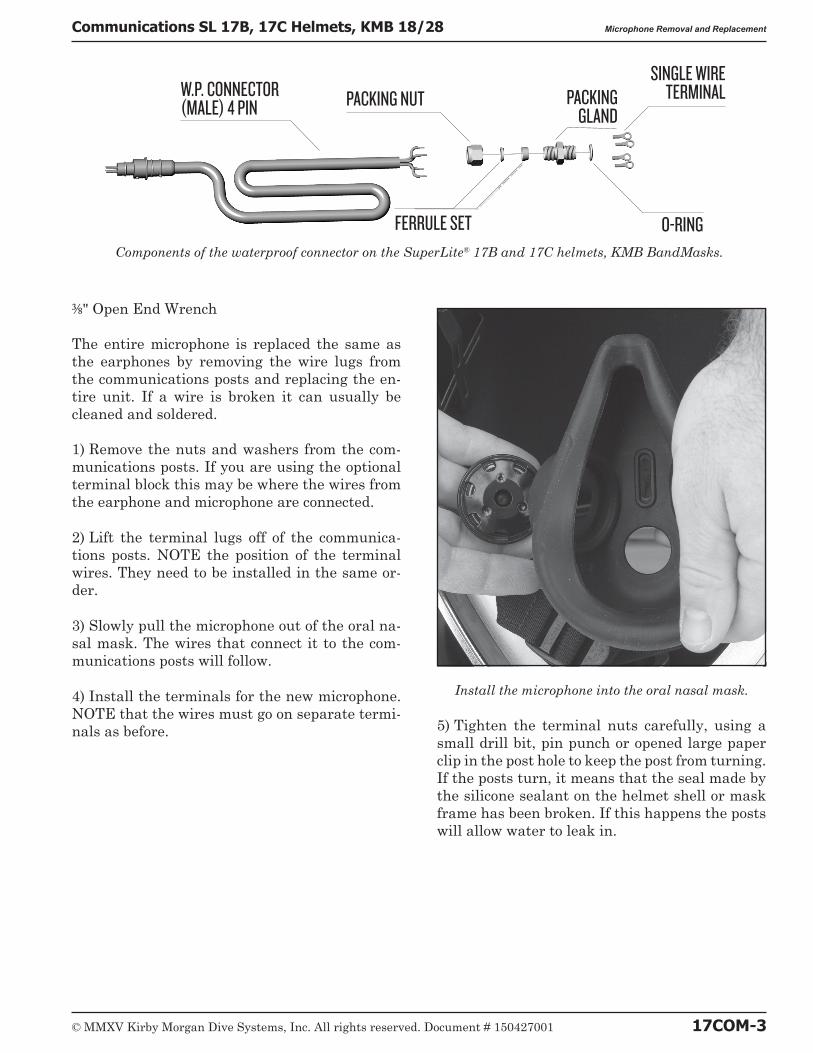
3/8" Open End Wrench
The entire microphone is replaced the same as the earphones by removing the wire lugs from the communications posts and replacing the en-tire unit. If a wire is broken it can usually be cleaned and soldered.
1) Remove the nuts and washers from the com-munications posts. If you are using the optional terminal block this may be where the wires from the earphone and microphone are connected.
2) Lift the terminal lugs off of the communica-tions posts. NOTE the position of the terminal wires. They need to be installed in the same or-der.
3) Slowly pull the microphone out of the oral na-sal mask. The wires that connect it to the com-munications posts will follow.
4) Install the terminals for the new microphone. NOTE that the wires must go on separate termi-nals as before.
Install the microphone into the oral nasal mask.
5) Tighten the terminal nuts carefully, using a small drill bit, pin punch or opened large paper clip in the post hole to keep the post from turning. If the posts turn, it means that the seal made by the silicone sealant on the helmet shell or mask frame has been broken. If this happens the posts will allow water to leak in.
Components of the waterproof connector on the SuperLite® 17B and 17C helmets, KMB BandMasks.
SINGLE WIRE TERMINALPACKING
GLAND
O-RING
W.P. CONNECTOR (MALE) 4 PIN PACKING NUT
FERRULE SET
© MMXV Kirby Morgan Dive Systems, Inc. All rights reserved. Document # 150427001 17COM-3
Communications SL 17B, 17C Helmets, KMB 18/28 Microphone Removal and Replacement

B WARNINGTake care not to break the seal made by the silicone sealant where the com-munications posts penetrate. If these posts turn, the helmet or mask will leak and resealing using silicone seal-ant will be necessary.
1.4 Earphone Removal and ReplacementNOTE: If only the earphone speaker is damaged, it can be replaced by removing the tie wrap in-side the covers, unscrewing the wire connection and replacing the necessary components. There is no need to completely remove the assembly from the helmet or mask.
Tools Required:1/8" flat Blade Screwdriver
NOTE: The earphones may be replaced indi-vidually if needed.
1) Remove the nuts and washers from the com-munications posts. Remove the wires from the
terminal block (or from the posts if no terminal block).
The terminal block is where you will disconnect the earphones from the helmet or mask.
2) Lift the terminal lugs off of the communica-tions posts. NOTE the position of the terminal wires.
Earphone and microphone assemblies
Earphone (right)
Earphone (left)
Microphone
CommunicationWire
Earphone SpeakerCover
Earphone
Speaker Cover Cap
Earphone Protector
ScrewTie-Wrap
17COM-4 © MMXV Kirby Morgan Dive Systems, Inc. All rights reserved. Document # 150427001
Earphone Removal and Replacement Communications SL 17B, 17C Helmets, KMB 18/28

Microphone Earphones
White Red
White Black Red Green
Red BlackLEFT RIGHT RIGHT LEFT
Red Black
Wiring diagram for the SuperLite® 17B, 17C and BandMasks
3) Install the terminals for the new earphones. Note that the wires must go on separate termi-nals as before.
4) Tighten the terminal nuts carefully, using a small drill bit, pin punch or opened large paper clip in the post hole to keep the post from turning. If the posts turn, it means that the seal made by the silicone sealant on the helmet shell or mask frame has been broken. If this happens the posts will allow water to leak into the helmet or mask, requiring resealing.
B WARNINGTake care not to break the seal made by the silicone sealant where the com-munications posts penetrate the mask or helmet shell. If these posts turn, the helmet will leak and resealing using silicone sealant will be necessary.
5) Test the communications to see if they are working.
1.5 Waterproof Connector SuperLite® 17B and 17C helmets are supplied with a set of communications posts and/or an optional waterproof connector. The waterproof connector is durable but can fail if the wire and fitting receives rough handling. To replace the connector use the following procedure.
1.5.1 Connector RemovalTools Required:3/8" Open-end Wrench5/8" Open-end Wrench 11/16" Open-end WrenchTorque Wrench with 11/16 Open End Attachment
1) Remove the earphone wire lugs from the in-terior of the communications posts and terminal block.
2) Remove the nut from the packing gland on the interior of the helmet or mask.
3) Separate the connector/packing gland assem-bly from the helmet or mask.
Removal of the waterproof connector.
4) Place the packing gland in a vice and unscrew the packing nut.
5) Pull the connector through the gland.
NOTE: It will be much easier to do this if the terminals are cut off the end of the connec-
© MMXV Kirby Morgan Dive Systems, Inc. All rights reserved. Document # 150427001 17COM-5
Communications SL 17B, 17C Helmets, KMB 18/28 Waterproof Connector

tor first. Save the front and back ferrules and the packing nut.
1.5.2 Connector Replacement1) Lubricate the new connector with silicone lu-bricant (or recommended equivalent).
2) Slide the packing nut and ferrules onto the new connector.
3) Feed the connector through the packing gland.
4) Check the O-ring on the packing gland. Re-place or lubricate as necessary.
5) Install the waterproof connector assembly into the helmet or mask.
6) Tighten the nut on the packing gland until snug.
7) Connect the wire terminals on the connector to the terminal block (or posts if no terminal block).
8) Test the communications to ensure they are working.
1.6 Communications Posts1.6.1 Communications Post RemovalTools Required;3/8" Open-end Wrench
1) Disconnect the communications set as per "1.5.1 Connector Removal" on page 17COM-5.
2) Remove the nuts and washer.
3) Pull the communications post away from the helmet shell or mask frame.
1.6.2 Communications Post Replacement
1) Clean off all the old RTV silicone sealant from the shell and communications posts.
2) Apply fresh RTV to the communications post(s). Check posts for cracks and smooth turn-ing for proper wire capture. Replace post if neces-sary.
B CAUTIONUse good ventila-tion when using RTV sealant. Fumes from this material may irritate your lungs. Read and follow the directions in the MSDS before using this material.
B CAUTIONWear eye protec-tion when using RTV sealant. This material may irritate your eyes. Read and follow the directions in the MSDS before using this material.
B CAUTIONWear hand protec-tion when using RTV sealant. This material may irritate your skin. Read and follow the directions in the MSDS before using this material
The communications posts are sealed in place with silicone sealant.
3) Insert the communications posts into the hel-
17COM-6 © MMXV Kirby Morgan Dive Systems, Inc. All rights reserved. Document # 150427001
Communications Posts Communications SL 17B, 17C Helmets, KMB 18/28

met or mask. Before bottoming it against the shell, rotate it slightly to ensure an even spread of the RTV to completely seal the hole.
Make sure the holes in the binding posts are properly aligned so that you will be able to thread the
communications wire through them easily when you are ready to dive.
4) The hole in the post should end up angled to-wards the earphone area of the helmet.
5) Install the washer followed by the nuts. Tight-en the nuts to "Snug—DO NOT overtighten", us-ing a small drill bit, pin punch or opened large paper clip in the post hole to keep the post from turning.
6) Wipe off all the excess silicone sealant from the helmet or BandMask
© MMXV Kirby Morgan Dive Systems, Inc. All rights reserved. Document # 150427001 17COM-7
Communications SL 17B, 17C Helmets, KMB 18/28 Communications Posts