COMMON CRITERIA CONFIGURATION GUIDANCE ARUBA OS 8.2 ...
29
COMMON CRITERIA CONFIGURATION GUIDANCE ARUBA OS 8.2 SUPPLEMENTAL GUIDANCE 3333 SCOTT BLVD | SANTA CLARA, CA 95054 [email protected] www.arubanetworks.com COMMON CRITERIA CONFIGURATION GUIDANCE ARUBA OS 8.2 SUPPLEMENTAL GUIDANCE Aruba Mobility Master with ArubaOS 8.2-FIPS Version 1.8 May, 2020
Transcript of COMMON CRITERIA CONFIGURATION GUIDANCE ARUBA OS 8.2 ...

COMMON CRITERIA CONFIGURATION GUIDANCE ARUBA OS 8.2 SUPPLEMENTAL GUIDANCE
3333 SCOTT BLVD | SANTA CLARA, CA 95054
www.arubanetworks.com
COMMON CRITERIA CONFIGURATION GUIDANCE
ARUBA OS 8.2 SUPPLEMENTAL GUIDANCE Aruba Mobility Master with ArubaOS 8.2-FIPS Version 1.8 May, 2020

2
CONTENTS
Aruba OS 8.2 Supplemental Guidance .........................................................................................................1 1 Introduction ..............................................................................................................................................4 1.1 Evaluated Platforms .............................................................................................................................4 1.2 Version Information ..............................................................................................................................4 1.3 Aruba Firewall high-level concepts ......................................................................................................4 2 Configuration ...........................................................................................................................................5 2.1 Security Audit (FAU) ............................................................................................................................5 2.1.1 FAU_GEN.1 ......................................................................................................................................5 2.1.2 FAU_GEN.2 ................................................................................................................................... 11 2.1.3 FAU_STG.1 .................................................................................................................................... 11 2.1.4 FAU_STG_EXT.1 ........................................................................................................................... 11 2.2 Cryptographic Support (FCS) ........................................................................................................... 12 2.2.1 FCS_CKM.1 ................................................................................................................................... 12 2.2.2 FCS_CKM.4 ................................................................................................................................... 12 2.2.3 FCS_COP.1 ................................................................................................................................... 12 2.2.4 FCS_HTTPS_EXT.1 ...................................................................................................................... 12 2.2.5 FCS_IPSEC_EXT.1 ....................................................................................................................... 12 2.2.6 FCS_RBG_EXT.1 .......................................................................................................................... 18 2.2.7 FCS_SSHS_EXT.1 ........................................................................................................................ 18 2.2.8 FCS_TLSS_EXT.1 ......................................................................................................................... 18 2.3 Identification and Authentication (FIA) .............................................................................................. 20 2.3.1 FIA_AFL.1 ...................................................................................................................................... 20 2.3.2 FIA_PMG_EXT.1 ........................................................................................................................... 20 2.3.3 FIA_UAU.7 ..................................................................................................................................... 21 2.3.4 FIA_UAU_EXT.2 ............................................................................................................................ 21 2.3.5 FIA_UIA_EXT.1 .............................................................................................................................. 21 2.3.6 FIA_X509_EXT.1/2 ........................................................................................................................ 22 2.3.7 FIA_X509_EXT.3 ........................................................................................................................... 25 2.4 Security Management (FMT) ............................................................................................................ 25 2.4.1 FMT_MOF.1/ManualUpdate .......................................................................................................... 25 2.4.2 FMT_MOF.1/Functions .................................................................................................................. 25 2.4.3 FMT_MTD.1/CoreData................................................................................................................... 25 2.4.4 FMT_MTD.1/CryptoKeys ............................................................................................................... 25 2.4.5 FMT_SMF.1 ................................................................................................................................... 25 2.4.6 FMT_SMR.2 ................................................................................................................................... 26 2.5 Protection of the TSF (FPT) .............................................................................................................. 26 2.5.1 FPT_APW_EXT.1 .......................................................................................................................... 26 2.5.2 FPT_SKP_EXT.1 ........................................................................................................................... 26 2.5.3 FPT_STM_EXT.1 ........................................................................................................................... 26 2.5.4 FPT_TST_EXT.1 ............................................................................................................................ 26 2.5.5 FPT_TUD_EXT.1 ........................................................................................................................... 26

3
2.6 TOE Access (FTA) ............................................................................................................................ 27 2.6.1 FTA_SSL.3 ..................................................................................................................................... 27 2.6.2 FTA_SSL.4 ..................................................................................................................................... 27 2.6.3 FTA_SSL_EXT.1 ............................................................................................................................ 27 2.6.4 FTA_TAB.1 ..................................................................................................................................... 27 2.7 Trusted Path/Channels (FTP) ........................................................................................................... 28 2.7.1 FTP_ITC.1 ...................................................................................................................................... 28 2.7.2 FTP_TRP.1/Admin ......................................................................................................................... 28 3 Reference Documents ......................................................................................................................... 29

4
1 Introduction This document serves as a supplement to the official Aruba user guidance (documentation),
consolidating configuration information specific to the Common Criteria Network Device
Collaborative Protection Profile 2.1.
This document contains configuration "snippets" from an ArubaOS configuration file. For the sake
of simplicity, only command-line interface (CLI) commands are included. When configuring an
Aruba controller, a graphical user interface (WebUI) is also available; this document does not
include screenshots from the WebUI. Refer to the official ArubaOS User Guide for WebUI
instructions, if needed.
The ordering of items in this document is based on the ordering of items in the Protection Profil es
and Security Target. Configuration guidance in this document is provided so that specific test
activities within the PP may be completed.
1.1 Evaluated Platforms
The following platforms are covered under the evaluated configuration:
• MM-HW-1K-F1
• MM-HW-5K-F1
• MM-HW-10K-F1
1.2 Version Information
This document covers Aruba Mobility Masters running ArubaOS 8.2. Customers are advised to
use the newest available 8.2 release in order to take advantage of defect fixes, which may include
fixes for security vulnerabilities.
1.3 Aruba Firewall high-level concepts
In an ArubaOS, firewall rules may be applied in multiple ways:
1. To traffic entering a physical port (Ethernet interface) or logical port (VLAN or tunnel) which
has been labeled in the configuration as “trusted”. The notion of “trusted” does not mean
that the interface necessarily connects to a trusted network. The “trusted” marking in the
configuration means that no user-focused processing takes place on traffic entering this
interface. That is, the concept of users and user-roles is not applied, and IP addresses
learned through this interface will not appear in the user table. This configuration of the
mobility master corresponds to the traditional view of a firewall as a physical device sitting
between two networks. The examples used in this configurat ion guidance will focus on this
mode of operation.
2. To traffic entering from an untrusted user . The concept of a “user” can be described as “an
IP address learned through an untrusted interface”. Wi-Fi users connecting through
Access Points (APs) are automatically untrusted. VPN users connecting to the mobility
master with a VPN client are automatically untrusted. Physical ports and logical ports
(VLAN or tunnel) may be configured as “untrusted”, in which case every source IP address
5
learned through that interface will appear in the user table and will have a role/firewall
policy assigned to it.
3. To traffic directed to the mobility master itself (i.e. management traffic). Management
traffic may be filtered using the two methods previously described, or it may be filtered
through a special “service ACL” configuration which applies universally to all interfaces.
See the ArubaOS User Guide and CLI Reference Guide for full details on roles, firewall policies,
authentication, and user management.
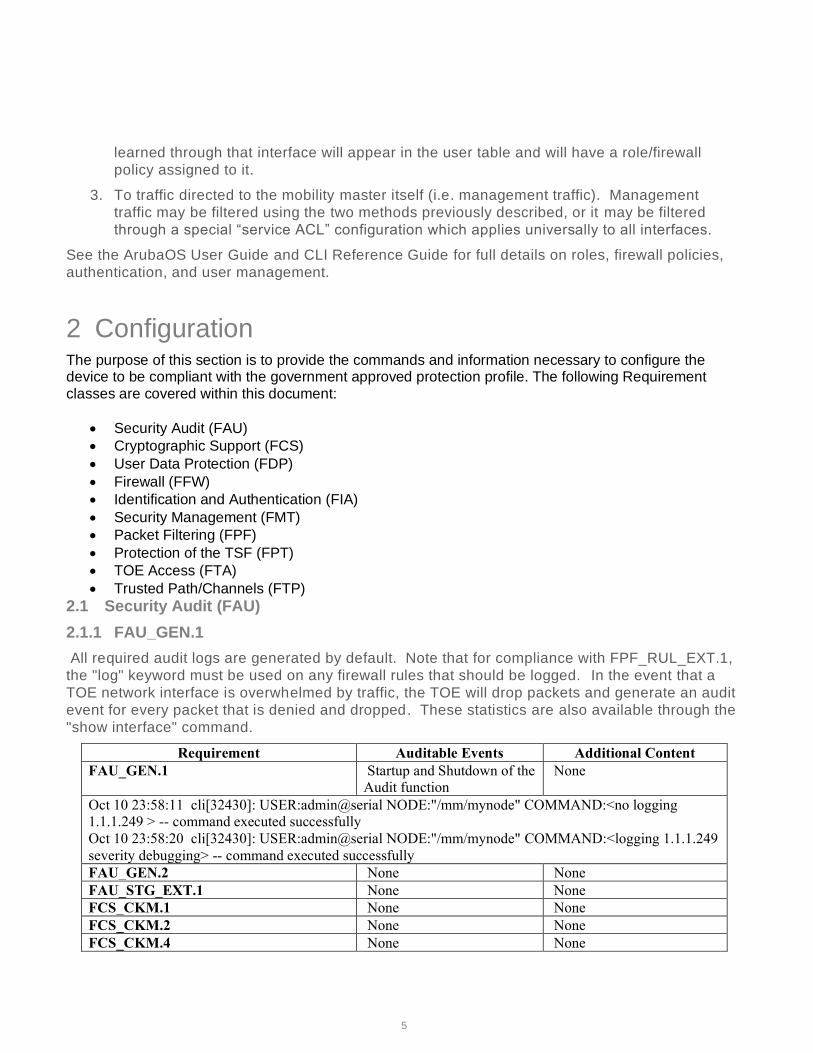
2 Configuration The purpose of this section is to provide the commands and information necessary to configure the device to be compliant with the government approved protection profile. The following Requirement classes are covered within this document:
• Security Audit (FAU)
• Cryptographic Support (FCS)
• User Data Protection (FDP)
• Firewall (FFW)
• Identification and Authentication (FIA)
• Security Management (FMT)
• Packet Filtering (FPF)
• Protection of the TSF (FPT)
• TOE Access (FTA)
• Trusted Path/Channels (FTP)
2.1 Security Audit (FAU)
2.1.1 FAU_GEN.1
All required audit logs are generated by default. Note that for compliance with FPF_RUL_EXT.1,
the "log" keyword must be used on any firewall rules that should be logged. In the event that a
TOE network interface is overwhelmed by traffic, the TOE will drop packets and generate an audit
event for every packet that is denied and dropped. These statistics are also available through the
"show interface" command.
Requirement Auditable Events Additional Content
FAU_GEN.1 Startup and Shutdown of the Audit function
None
Oct 10 23:58:11 cli[32430]: USER:admin@serial NODE:"/mm/mynode" COMMAND:<no logging
1.1.1.249 > -- command executed successfully
Oct 10 23:58:20 cli[32430]: USER:admin@serial NODE:"/mm/mynode" COMMAND:<logging 1.1.1.249
severity debugging> -- command executed successfully
FAU_GEN.2 None None
FAU_STG_EXT.1 None None
FCS_CKM.1 None None
FCS_CKM.2 None None
FCS_CKM.4 None None
6
FCS_COP.1/DataEncryption None None
FCS_COP.1/Hash None None
FCS_COP.1/KeyedHash None None
FCS_COP.1/SigGen None None
FCS_HTTPS_EXT.1 Failure to establish a HTTPS
Session.
Reason for failure.
Jul 28 19:28:24 httpd[5853]: [ssl:error] [pid 5853:tid 870642864] [client 192.168.144.249:53892]
AH02039: Certificate Verification: Error (19): self signed certificate in certificate chain, referer:
FCS_IPSEC_EXT.1 Failure to establish an IPsec
SA.
Reason for failure.
Oct 11 00:37:22 isakmpd[3947]: <103063> <3947> <DBUG> |ike| 192.168.145.249:500-> I <--
Notify: NO_PROPOSAL_CHOSEN spi={67790220aa016a9f 0000000000000000} np=SA
FCS_NTP_EXT.1 Configuration of a new time
server
Removal of configured time
server
Identity if new/removed
time server
May 27 14:11:22 profmgr[5703]: USER:[email protected] NODE:"/mm/mynode" COMMAND:<ntp
server 192.10.1.13 > -- command executed successfully
May 27 14:18:47 profmgr[5703]: USER:[email protected] NODE:"/mm/mynode" COMMAND:< no
ntp server 192.10.1.13 > -- command executed successfully
FCS_RBG_EXT.1 None None
FCS_SSHS_EXT.1 Failure to establish an SSH
session.
Reason for failure.
Oct 11 01:59:46 sshd[7305]: <199801> <7305> <INFO> |sshd| Failed password for admin from
192.168.144.249 port 36920 ssh2
FCS_TLSS_EXT.1 Failure to establish a TLS
Session.
Reason for failure.
Feb 25 08:02:01 httpd[5131]: [ssl:warn] [pid 5131:tid 715980496] AH01909: ECC certificate configured
for webui.securelogin.arubanetworks.com:443 does NOT include an ID which matches the server name,
referer:
FIA_AFL.1 Unsuccessful login attempts
limit is met or exceeded.
Origin of the attempt (e.g.,
IP address).
FIA_PMG_EXT.1 None None
FIA_UAU.7 None None
FIA_UAU_EXT.2 All use of identification and
authentication mechanism.
Origin of the attempt (e.g.,
IP address).
Tested as part of FIA_UIA_EXT.1
FIA_UIA_EXT.1 All use of identification and
authentication mechanism.
Origin of the attempt (e.g.,
IP address).
AOS 58:
Oct 11 00:09:18 sshd[24685]: <199801> <24685> <DBUG> |sshd| debug1: userauth-request for user
admin service ssh-connection method password

7
Oct 11 00:09:18 sshd[24685]: <199801> <24685> <INFO> |sshd| Accepted password for admin from
192.168.144.249 port 36904 ssh2
Feb 28 02:11:41 authmgr[3950]: <522038> <3950> <NOTI> |authmgr| username=user1
MAC=b8:d7:af:8d:1a:05 IP=0.0.0.0 Authentication result=Authentication Successful method=802.1x
server=rad1
Feb 28 02:13:30 authmgr[3950]: <522274> <3950> <ERRS> |authmgr| Mgmt User Authentication failed.
username=admin userip=0.0.0.0 servername=rad1 serverip=192.168.144.249
Feb 28 01:34:15 cli[29241]: USER: admin has logged in using serial.
Feb 28 01:37:53 webui[3800]: USER: admin has logged in from 192.168.144.253.
Feb 28 01:48:27 cli[30967]: USER: admin connected using serial has logged out.
Feb 28 01:50:15 cli[32640]: USER: admin has logged in using serial.
FIA_X509_EXT.1/Rev Unsuccessful attempt to
validate a certificate.
Reason for failure.
Feb 28 00:43:34 isakmpd[3949]: <103063> <3949> <DBUG> |ike| 192.168.145.249:4500-> ike2_state.c
(7792): errorCode = ERR_CERT_FAILED_VERIFY_ROOTCA
FIA_X509_EXT.2 None None
FIA_X509_EXT.3 None None
FMT_MOF.1/Functions Modification of the
behaviour of the
transmission of audit data to
an external IT entity, the
handling of audit data, the
audit functionality when
Local Audit Storage Space is
full.
None
Feb 28 02:21:21 aaa[3870]: <125021> <3870> <WARN> |aaa| Authentication failed for User
seccertmgmt, connection type SERIAL
Feb 28 02:21:12 aaa[3870]: <125021> <3870> <WARN> |aaa| Authentication failed for User
syslogadmin, connection type SERIAL
FMT_MOF.1/ManualUpdate Any attempt to initiate a
manual update.
None
Feb 28 02:18:39 authmgr[3950]: <522274> <3950> <ERRS> |authmgr| Mgmt User Authentication failed.
username=version userip=0.0.0.0 servername=rad1 serverip=192.168.144.249
Feb 28 02:18:50 aaa[3870]: <125021> <3870> <WARN> |aaa| Authentication failed for User
firmwareshow, connection type SERIAL
FMT_MTD.1/CoreData All management activities of
TSF data.
None
Feb 28 01:29:42 cli[22014]: USER:admin@serial NODE:"/mm/mynode" COMMAND:<write mem> --
command executed successfully
FMT_MTD.1/CryptoKeys Management of
cryptographic keys.
None

8
Feb 25 08:02:00 httpd[5131]: [ssl:error] [pid 5131:tid 715980496] AH01877: Init: Skipping generating
temporary 512 bit RSA private key in FIPS mode, referer:
Feb 25 08:02:00 httpd[5131]: [ssl:error] [pid 5131:tid 715980496] AH01880: Init: Skipping generating
temporary 512 bit DH parameters in FIPS mode, referer:
Feb 28 02:49:16 isakmpd[3916]: <103063> <3916> <DBUG> |ike| IKE_cipherSuite: TfmId:12 policy-
enc:12 keylen:24 policy-keylen:32
FMT_SMF.1 None None
FMT_SMR.2 None None
FPT_APW_EXT.1 None None
FPT_SKP_EXT.1 None None
FPT_STM_EXT.1 Discontinuous changes to time - either Administrator
actuated or changed via an
automated process. (Note
that no continuous changes
to time need to be logged.
See also application note on
FPT_STM_EXT.1)
For discontinuous changes to time: The old and new
values for the time. Origin
of the attempt to change
time for success and failure
(e.g., IP address).
Oct 2 18:50:00 cli[19855]: USER:admin@serial NODE:"/mm/mynode" COMMAND:<clock set 2018 october 2 18 50 00> -- command executed successfully Sep 1 01:26:34 nanny[5174]: <399814> <5174> <DBUG> |nanny| PROCESS_RUNNING Process ntpwrap marked as PROCESS_RUNNING Timeout value : 240 Time updated: 56 sec Oct 2 20:55:43 nanny[5174]: <399814> <5174> <DBUG> |nanny| PROCESS_RUNNING Process ntpwrap marked PROCESS_NOT_RESPONDING Timeout value : 240 Time since not updated : 2748544 sec FPT_TST_EXT.1 None None
FPT_TUD_EXT.1 Initiation of update; result of
the update attempt (success
or failure).
Jan 9 00:34:31 upgradeImageNew: <399816> <7592> <ERRS> || Image Header Validation failed Jan 9 00:34:31 upgradeImageNew: Image verification: Image header sign not found Feb 18 20:33:47 cli[5877]: USER:admin@serial NODE:"/mm/mynode" COMMAND:<copy tftp: 192.168.144.253 C_ArubaOS_70xx_8.2.2.2-FIPS_69148 system: partition 0 > -- command executed successfully
FTA_SSL.3 The termination of a remote
session by the session
locking mechanism.
None
Feb 27 10:52:23 webui[3800]: USER: admin connected from 192.168.144.3 has timed out.
FTA_SSL.4 The termination of an
interactive session.
None
Feb 28 02:26:52 webui[3800]: USER: admin connected from 192.168.144.253 has logged out.

9
Feb 28 02:57:47 sshd[15323]: <199801> <15323> <INFO> |sshd| Close session: user admin from
192.168.144.253 port 51968 id 0
FTA_SSL_EXT.1 (if 'lock the session' is
selected) Any attempts at
unlocking of an interactive
session. (if 'terminate the
session' is selected)
The termination of a local
session by the session
locking mechanism.
None
Interactive:
Feb 28 03:00:52 cli[15921]: USER: admin has logged in from 192.168.144.253.
Feb 28 03:01:13 cli[12950]: USER: admin connected using serial has logged out.
Local:
Feb 28 02:23:45 cli[8023]: USER: admin has logged in using serial.
Feb 28 02:24:42 cli[8023]: USER: admin connected using serial has logged out.
FTA_TAB.1 None None
FTP_ITC.1 Initiation of the trusted
channel.
Termination of the trusted
channel.
Failure of the trusted channel
functions.
Identification of the initiator
and target of failed trusted
channels establishment
attempt.
Initiation:
Oct 11 01:52:12 isakmpd[3922]: <103076> <3922> <DBUG> |ike| IKEv2 IPSEC Tunnel created for peer
192.168.144.243:50750
Termination:
Feb 27 14:46:53 isakmpd[3949]: <103102> <3949> <INFO> |ike| IKE SA deleted for peer
192.168.145.249
Failure:
Oct 11 01:36:37 isakmpd[3922]: <103060> <3922> <DBUG> |ike| 192.168.144.243:50750->
ike_phase_1.c:attribute_unacceptable:2850 Proposal match failed in auth algo, configured=RSA_SIG, peer
using=unknown
FTP_TRP.1/Admin Initiation of the trusted path.
Termination of the trusted
path.
Failure of the trusted path
functions.
None

10
Initiation:
Jul 28 11 01:59:46 sshd[7305]: <125032> <7305> <info> |sshd| Authentication Succeeded for User admin, Logged in from 192.167.144.253 port 22, Connecting to 192.168.144.5 port 22 connection type SSH
Feb 28 01:37:53 webui[3800]: USER: admin has logged in from 192.168.144.253.
Termination:
Feb 27 10:52:23 webui[3800]: USER: admin connected from 192.168.144.3 has timed out.
Feb 28 02:57:47 sshd[15323]: <199801> <15323> <INFO> |sshd| Close session: user admin from
192.168.144.253 port 51968 id 0
Failure:
Jul 28 19:28:24 httpd[5853]: [ssl:error] [pid 5853:tid 870642864] [client 192.168.144.249:53892]
AH02039: Certificate Verification: Error (19): self signed certificate in certificate chain, referer:
Jul 28 11 01:59:46 sshd[7305]: <199801> <7305> <error> |sshd| Failed to refresh ssh public key
authorized keys file
All Administrative actions are audited by the TOE. As noted within the Syslog Guide for 8.X
(https://support.hpe.com/hpsc/doc/public/display?docId=emr_na-c05321932), the Master creates
syslog entries for all commands and configuration changes that alter system behavior, the user
name of the user making the change, and the location of the user. This information appears in the
output of the syslog, with the keyword COMMAND. This same information also appears in the
output of the CLI command show audit-trail.
The syslog information in the example below shows that a user with the username admin logged
in to the Master through the serial port, changed logging levels, loaded new software onto partition
1, then updated the system clock.
(host) #show audit-trail
Jul 4 21:53:54 cli[1439]: USER:admin@serial COMMAND: -- command executed successfully
Jul 4 22:20:22 cli[1439]: USER:admin@serial COMMAND: -- command executed successfully
Jul 4 22:31:00 fpcli: USER:[email protected] COMMAND: -- command executed
successfully
By default, the Master does not generate a log entry for show commands issued using the CLI, as
these commands display existing settings but do not change system behavior. To create a log
entry for all commands issued, (including show commands) access the CLI in config mode and
issue the command audit-trail all.
A full record of audit records generated by the Master can be found at the following link:
https://support.arubanetworks.com/Documentation/tabid/77/DMXModule/512/Command/Core_Dow
nload/Default.aspx?EntryId=32318

11
2.1.2 FAU_GEN.2
No configuration required.
2.1.3 FAU_STG.1
No configuration required.
2.1.4 FAU_STG_EXT.1
Local storage space for audit logs is limited on a mobility master. To operate in the evaluated
configuration, an external syslog server must be used. To configure an external syslog server:
(config)# logging <ip address>
The connection between the mobility master and the syslog server must be protected using IPsec.
Configure a site-to-site VPN tunnel to carry this traffic. The syslog server must use a different IP
address for the syslog receiver process than it uses for IPsec termination. Alternatively, a VPN
gateway (such as an Aruba mobility master) may front-end the syslog server to provide the IPsec
tunnel. The following is an example of an IPsec tunnel which assumes that the syslog receiver
process listens on 192.168.1.1, and the IPsec tunnel terminates on 192.168.2.1 – these IP
addresses may be on the same server, or on different systems.
crypto-local ipsec-map <name> 10
version v2
set ikev2-policy <policy>
peer-ip <ip address>
src-net <ip address> <subnet>
dst-net <ip address> <subnet>
set transform-set "<transform-set>"
set security-association lifetime seconds <seconds>
set security-association lifetime kilobytes <kilobytes>
pre-connect enable
trusted enable
uplink-failover disable
force-natt disable
set ca-certificate root-ca
set server-certificate server-cert
Adjust the above ipsec-map as appropriate, following instructions in the ArubaOS User Guide. The
peer-ip and dst-net addresses cannot be the same. Note that bi-directional communication is not
necessary – syslog is sent using UDP, so the only requirement is that packets are able to flow
from the mobility master to the syslog server. Note also that IKEv1 must not be used.

12
2.2 Cryptographic Support (FCS)
2.2.1 FCS_CKM.1
No configuration required. Ensure the Master has FIPS mode enabled so that cryptographic
requirements are met.
(config)# fips enable
During regular operation of the TOE, key generation is invoked during session establishment
between the TOE and external IT entities for user sessions. An administrator can invoke th e use
of RSA and ECDSA during generation of certificates used for X.509. Information on configuration
X.509 can be found in Section 2.5.10 through Section 2.5.12.
2.2.2 FCS_CKM.4
No configuration required. During runtime, all CSPs will be zeroized automaticall y when no longer
needed. To erase all CSPs stored in flash memory (as well as software images and configuration
files), issue the command ‘zeroize-tpm-keys’. This command will overwrite the entire flash with an
alternating pattern. The Master must be restored through TFTP after this process. In addition files
in the flash can be zeroized using the ‘write erase all’ command.
For further details on sanitizing systems, request the document “Identification of Non -Volatile
Storage and Sanitization of System Components” from Aruba Networks.
2.2.3 FCS_COP.1
Ensure that the Advanced Cryptography License is installed in order for all required cryptographic
algorithms to be enabled. Ensure the Master has FIPS mode enabled so that cryptographic
requirements are met.
(config)# fips enable
2.2.4 FCS_HTTPS_EXT.1
No configuration is required. The TOE will function over HTTPS, compliant to RFC 2818, when
operation under FIPS mode.
2.2.5 FCS_IPSEC_EXT.1
Note that IKEv1 must not be used for the IPsec VPN tunnel.
2.2.5.1 FCS_IPSEC_EXT.1.1/2
RFC 4301 references an explicit Security Policy Database (SPD) with rules for DISCARD,
BYPASS, and PROTECT. ArubaOS does not implement an explicit SPD, but equivalent behavior
may be obtained through the use of firewall policies and “routing” ACLs.
In the following configuration, ICMP echo-request traffic from Client A to Client C takes the
BYPASS action. All other ICMP traffic between the same hosts takes the PROTECT action.
HTTP traffic is dropped.
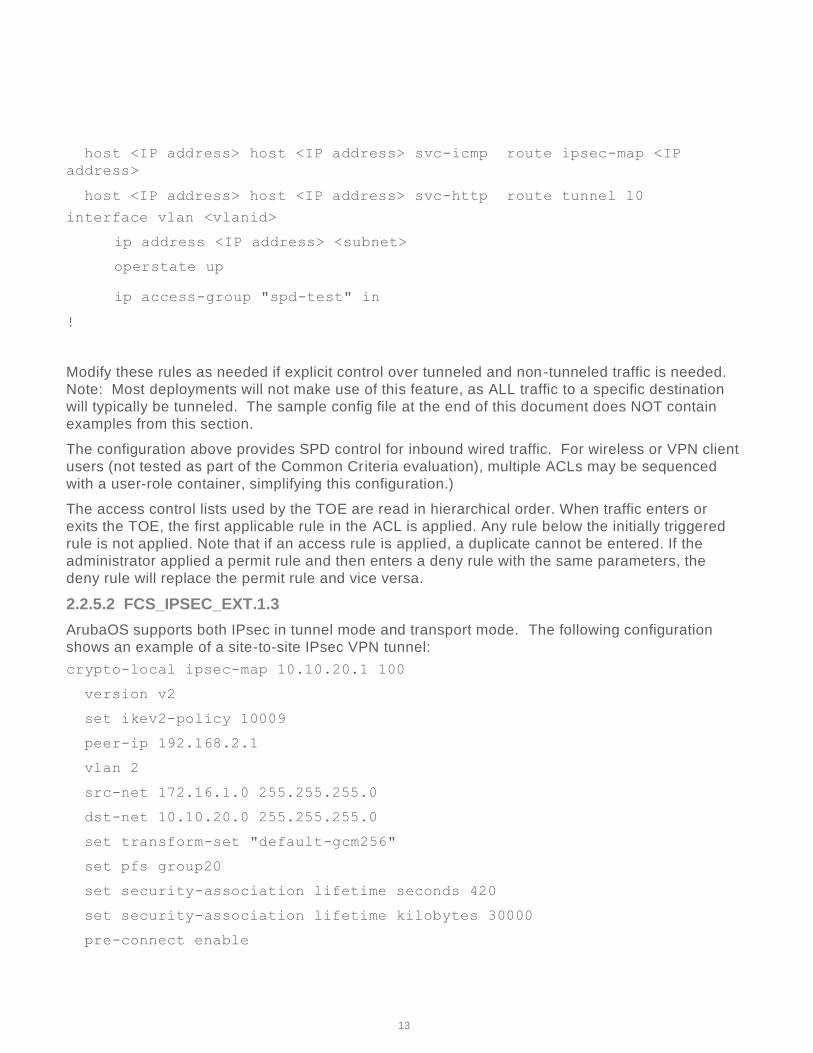
ip access-list route spd-test
host <IP address> host <IP address> icmp echo forward
13
host <IP address> host <IP address> svc-icmp route ipsec-map <IP
address>
host <IP address> host <IP address> svc-http route tunnel 10
interface vlan <vlanid>
ip address <IP address> <subnet>
operstate up
ip access-group "spd-test" in
!
Modify these rules as needed if explicit control over tunneled and non-tunneled traffic is needed.
Note: Most deployments will not make use of this feature, as ALL traffic to a specific destination
will typically be tunneled. The sample config file at the end of this document does NOT contain
examples from this section.
The configuration above provides SPD control for inbound wired traffic. For wireless or VPN client
users (not tested as part of the Common Criteria evaluation), multiple ACLs may be sequenced
with a user-role container, simplifying this configuration.)
The access control lists used by the TOE are read in hierarchical order. When traffic enters or
exits the TOE, the first applicable rule in the ACL is applied. Any rule below the initially triggered
rule is not applied. Note that if an access rule is applied, a duplicate cannot be entered. If the
administrator applied a permit rule and then enters a deny rule with the same parameters, the
deny rule will replace the permit rule and vice versa.
2.2.5.2 FCS_IPSEC_EXT.1.3
ArubaOS supports both IPsec in tunnel mode and transport mode. The following configuration
shows an example of a site-to-site IPsec VPN tunnel:
crypto-local ipsec-map 10.10.20.1 100
version v2
set ikev2-policy 10009
peer-ip 192.168.2.1
vlan 2
src-net 172.16.1.0 255.255.255.0
dst-net 10.10.20.0 255.255.255.0
set transform-set "default-gcm256"
set pfs group20
set security-association lifetime seconds 420
set security-association lifetime kilobytes 30000
pre-connect enable
14
trusted enable
uplink-failover disable
force-natt disable
set ca-certificate root-ca
set server-certificate server-cert
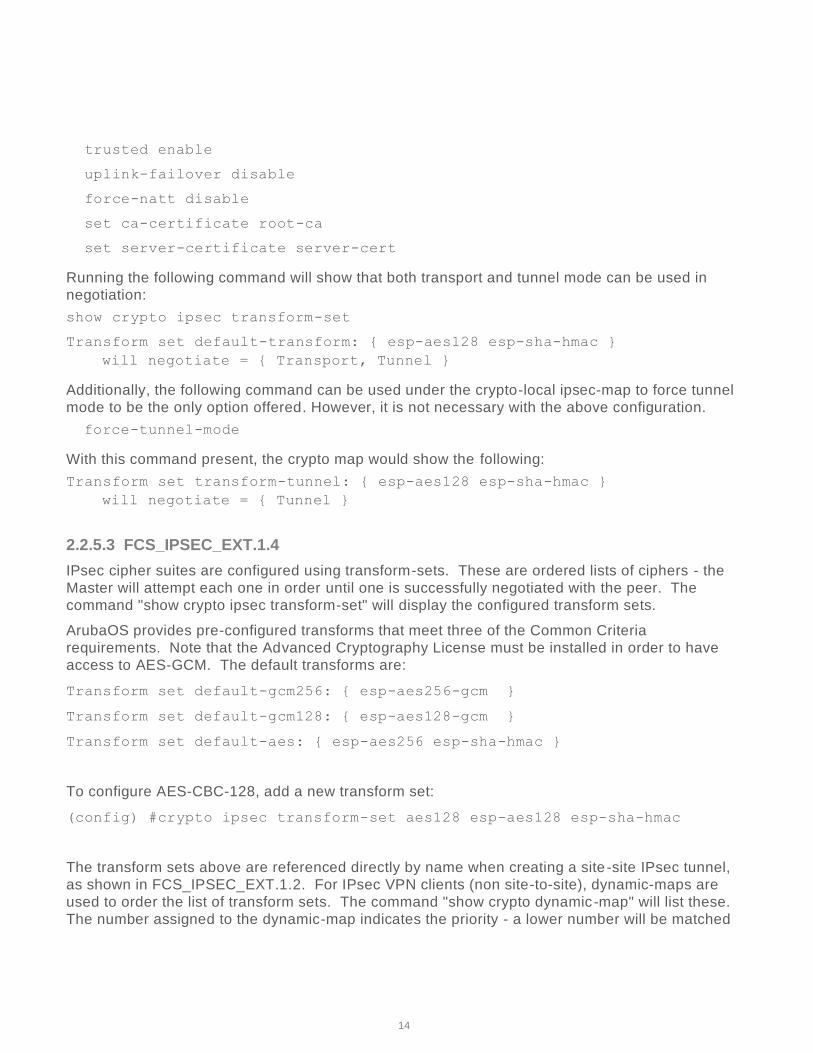
Running the following command will show that both transport and tunnel mode can be used in
negotiation:
show crypto ipsec transform-set
Transform set default-transform: { esp-aes128 esp-sha-hmac }
will negotiate = { Transport, Tunnel }
Additionally, the following command can be used under the crypto-local ipsec-map to force tunnel
mode to be the only option offered. However, it is not necessary with the above configuration.
force-tunnel-mode
With this command present, the crypto map would show the following:
Transform set transform-tunnel: { esp-aes128 esp-sha-hmac }
will negotiate = { Tunnel }
2.2.5.3 FCS_IPSEC_EXT.1.4
IPsec cipher suites are configured using transform-sets. These are ordered lists of ciphers - the
Master will attempt each one in order until one is successfully negotiated with the peer. The
command "show crypto ipsec transform-set" will display the configured transform sets.
ArubaOS provides pre-configured transforms that meet three of the Common Criteria
requirements. Note that the Advanced Cryptography License must be installed in order to have
access to AES-GCM. The default transforms are:
Transform set default-gcm256: { esp-aes256-gcm }
Transform set default-gcm128: { esp-aes128-gcm }
Transform set default-aes: { esp-aes256 esp-sha-hmac }
To configure AES-CBC-128, add a new transform set:
(config) #crypto ipsec transform-set aes128 esp-aes128 esp-sha-hmac
The transform sets above are referenced directly by name when creating a site -site IPsec tunnel,
as shown in FCS_IPSEC_EXT.1.2. For IPsec VPN clients (non site-to-site), dynamic-maps are
used to order the list of transform sets. The command "show crypto dynamic-map" will list these.
The number assigned to the dynamic-map indicates the priority - a lower number will be matched
15
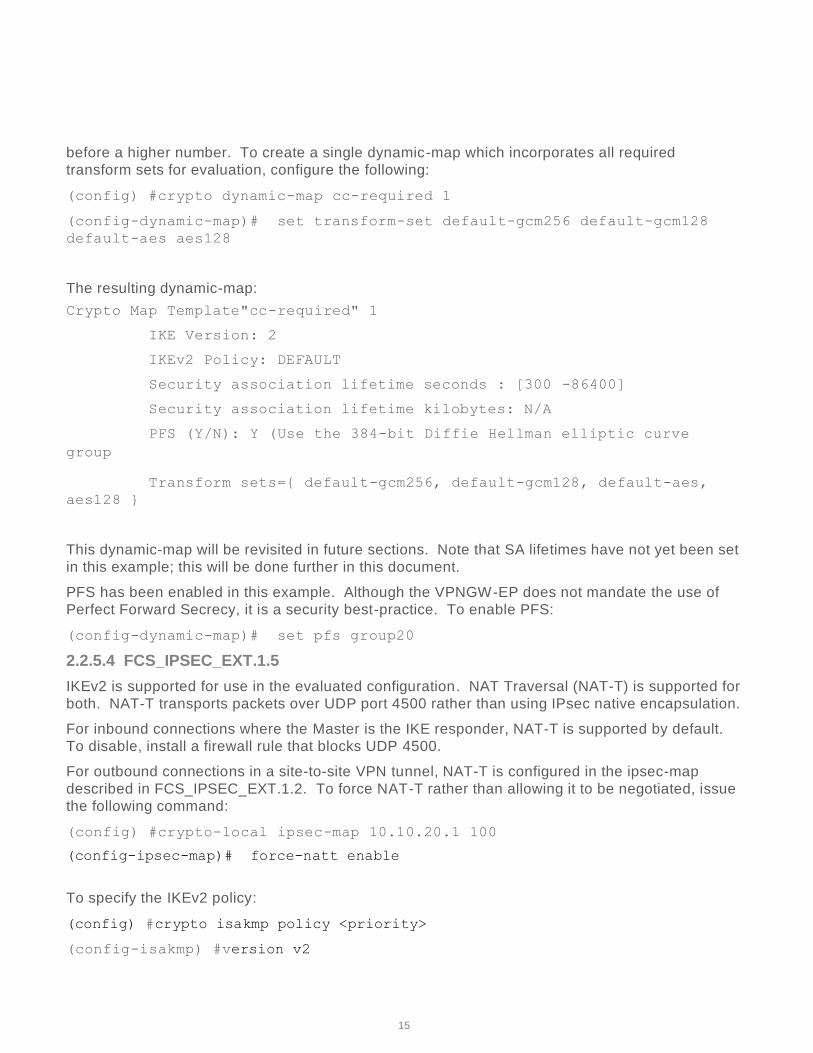
before a higher number. To create a single dynamic-map which incorporates all required
transform sets for evaluation, configure the following:
(config) #crypto dynamic-map cc-required 1
(config-dynamic-map)# set transform-set default-gcm256 default-gcm128
default-aes aes128
The resulting dynamic-map:
Crypto Map Template"cc-required" 1
IKE Version: 2
IKEv2 Policy: DEFAULT
Security association lifetime seconds : [300 -86400]
Security association lifetime kilobytes: N/A
PFS (Y/N): Y (Use the 384-bit Diffie Hellman elliptic curve
group
Transform sets={ default-gcm256, default-gcm128, default-aes,
aes128 }
This dynamic-map will be revisited in future sections. Note that SA lifetimes have not yet been set
in this example; this will be done further in this document.
PFS has been enabled in this example. Although the VPNGW-EP does not mandate the use of
Perfect Forward Secrecy, it is a security best-practice. To enable PFS:
(config-dynamic-map)# set pfs group20
2.2.5.4 FCS_IPSEC_EXT.1.5
IKEv2 is supported for use in the evaluated configuration. NAT Traversal (NAT-T) is supported for
both. NAT-T transports packets over UDP port 4500 rather than using IPsec native encapsulation.
For inbound connections where the Master is the IKE responder, NAT-T is supported by default.
To disable, install a firewall rule that blocks UDP 4500.
For outbound connections in a site-to-site VPN tunnel, NAT-T is configured in the ipsec-map
described in FCS_IPSEC_EXT.1.2. To force NAT-T rather than allowing it to be negotiated, issue
the following command:
(config) #crypto-local ipsec-map 10.10.20.1 100
(config-ipsec-map)# force-natt enable
To specify the IKEv2 policy:
(config) #crypto isakmp policy <priority>
(config-isakmp) #version v2

16
2.2.5.5 FCS_IPSEC_EXT.1.6
IKE policies are matched in numerical order, with lower numbers having higher priority. A number
of IKE policies are pre-configured - to view these, issue the command "show crypto isakmp
policy".
Default policies may not be deleted, but may be disabled. To disable a policy:
(config) #crypto isakmp policy <policy>
(config-isakmp)# disable
It is recommended that when deployed as a VPN gateway, all default IKE policies be disabled,
and only user-defined policies configured for use.
To configure an IKEv2 policy that uses AES-256, issue the following commands:
(config) # crypto isakmp policy 100
(config-isakmp)# encryption aes256
(config-isakmp)# version v2
To configure AES128, adjust the encryption to ‘encryption aes128’.
2.2.5.6 FCS_IPSEC_EXT.1.7/8
Phase 1 (IKE) lifetimes are configured in the IKE policies. To adjust the previously -created IKE
policy for a 24-hour lifetime (this is the default value), issue the following commands:
(config) # crypto isakmp policy 100
(config-isakmp)# lifetime 86400
Phase 2 (IPsec) lifetimes are configured in the ipsec-map (for site-to-site):
(config) #crypto-local ipsec-map 10.10.20.1 100
(config-ipsec-map)# set security-association lifetime seconds 28800
or the dynamic-map (for client VPN):
(config) #crypto dynamic-map cc-required 1
(config-dynamic-map)# set security-association lifetime seconds 28800
SA lifetimes may also be configured based on the number of bytes transmitted. Replace the
keyword "seconds" with "kilobytes" in the above configuration and supply the lifetime value. Both
time-based and volume-based lifetimes may be configured simultaneously.
2.2.5.7 FCS_IPSEC_EXT.1.9/10
No configuration required to meet these requirements.
2.2.5.8 FCS_IPSEC_EXT.1.11
ArubaOS supports DH groups 14, 19, and 20. To configure, modify the IKE policy:
(config) # crypto isakmp policy 100

17
(config-isakmp)# group 20
2.2.5.9 FCS_IPEC_EXT.1.13
ArubaOS supports both RSA and ECDSA certificates. Note that the Advanced Cryptography
License must be installed to make use of ECDSA.
Loading of certificates onto the Master for both authentication to peers and for verification of other
peers is described in the User Guide. Minimally, both a "server certificate" and a "trusted root CA"
certificate must be loaded onto the Master in order to perform IPsec operations. Once these
certificates are loaded on the Master, configure them for use in IPsec. For use with dynamic VPN
clients:
(config) #crypto-local isakmp server-certificate "server-cert"
(config) #crypto-local isakmp ca-certificate "trusted-root-ca-cert"
For a site-to-site VPN tunnel:
(config) #crypto-local ipsec-map 10.10.20.1 100
(config-ipsec-map)# set server-certificate server-cert
(config-ipsec-map)# set ca-certificate root-ca
To configure an IKE policy to authenticate RSA certificates sent by peers, use the following
command:
(config) #crypto isakmp policy 100
(config-isakmp)# authentication rsa-sig
To configure an IKE policy for ECDSA-384 authentication, use the following command:
(config) #crypto isakmp policy 100
(config-isakmp)# authentication ecdsa-384
ECDSA-256 may be supported by replacing "384" with "256".
Administrators should take care to configure IKE/IPsec policies so that the strength of the IKE
association is greater than or equal to the strength of the IPsec tunnel (for example, by always
using AES-256). However, if a misconfiguration is made, the Master will reject the security
association along with generating an audit log message.
When the IPsec connection is configured to use pre-shared keys, the administrator can follow the
following steps to configure a pre-shared key on the TOE:
To configure the key, pick one of the following options:
(config) #crypto-local isakmp key DEADBEEF01010202abc!@# address 0.0.0.0
netmask 0.0.0.0
When configuring the pre-shared key, the administrator must ensure that the PSK is at least 22
characters, contains at least one uppercase character, one lowercase character, one special

18
character, and one digit. If the PSK is configured as a bit-based key, the ‘key-hex’ field should be
used instead.
(config) #crypto-local isakmp key-hex DEADBEEF01010202ABA010 address
0.0.0.0 netmask 0.0.0.0
2.2.5.10 FCS_IPSEC_EXT.1.14
The TOE does not support SAN extension.
To configure the TOE reference identifier for the distinguished name of the peer, an administrator
may use the following commands:
(config) #crypto-local ipsec-map testmap 1
(config-submode)#peer-cert-dn
<peer-dn> Subject-Name DN string of the Peer's Certificate
To ensure appropriate compliance within the evaluated configuration, the administrator should
generate a CA chain with one Root CA and two Intermediate CAs. The OCSP configuration and
information on this can be found under Sections 2.5.10 through 2.5.12.
2.2.6 FCS_RBG_EXT.1
No configuration required.
2.2.7 FCS_SSHS_EXT.1
Telnet or SSH access requires that you configure an IP address and a default gateway . No
configuration is needed to specific the permitted algorithms after ‘fips enable’ has been set. The
Master will attempt negotiations using AES128-CBC, AES256-CBC, AES128-CTR, and AES256-
CTR.
To view configuration for SSH, the following command can be used:
show ssh
To configure the SSH server, the following commands can be used:
ssh disable_dsa
ssh mgmt-auth {public-key [username/password]|username/password [public-
key]}
To configure authentication for SSH using public key, the following commands can be used:
ssh mgmt-auth public-key
mgmt-user ssh-pubkey client-cert ssh-pubkey cli-admin root
SSH rekey intervals are non-configurable and are set to a maximum time interval of one (1) hour
or 512M, whichever occurs first.
2.2.8 FCS_TLSS_EXT.1
No configuration is required to set the permitted cipher suites once ‘fips enable’ has been entered
on the Master. The Master negotiates using the following ciphersuites:
• RSA:

19
o TLS_RSA_WITH_AES_128_CBC_SHA
o TLS_RSA_WITH_AES_256_CBC_SHA
o TLS_DHE_RSA_WITH_AES_128_CBC_SHA
o TLS_DHE_RSA_WITH_AES_256_CBC_SHA
o TLS_ECDHE_RSA_WITH_AES_128_CBC_SHA
o TLS_ECDHE_RSA_WITH_AES_256_CBC_SHA
o TLS_RSA_WITH_AES_128_CBC_SHA256
o TLS_RSA_WITH_AES_256_CBC_SHA256
o TLS_DHE_RSA_WITH_AES_128_CBC_SHA256
o TLS_DHE_RSA_WITH_AES_256_CBC_SHA256
o TLS_ECDHE_RSA_WITH_AES_128_GCM_SHA256
o TLS_ECDHE_RSA_WITH_AES_256_GCM_SHA384
• ECDSA:
o TLS_ECDHE_ECDSA_WITH_AES_128_CBC_SHA
o TLS_ECDHE_ECDSA_WITH_AES_256_CBC_SHA
o TLS_ECDHE_ECDSA_WITH_AES_128_CBC_SHA256
o TLS_ECDHE_ECDSA_WITH_AES_256_CBC_SHA384
o TLS_ECDHE_ECDSA_WITH_AES_128_GCM_SHA256
o TLS_ECDHE_ECDSA_WITH_AES_256_GCM_SHA384
To view configuration for TLS, the following command can be used:
show web-server profile
show web-server statistics
The following commands can be used to configure the TLS web-server profile:
web-server profile
absolute-session-timeout <30-3600>
ciphers high
mgmt-auth username/password
session-timeout <30-3600>
ssl-protocol tlsv1.2
web-max-clients <25-320>
web-https-port-443
switch-cert <name>

20
2.3 Identification and Authentication (FIA)
2.3.1 FIA_AFL.1
All configuration related to administrative login is configured using "aaa password -policy mgmt".
Note that if the remote authentication server locks out a user, the local account with the same
name will not be marked as locked. However, the local user will not be able to authenticate when
configured authenticate against the remote authentication server. To configure failed
authentication lockout that will lock an administrative account for five minutes, when five failed
login attempts occur in a three minute period, use the following commands:
(config) #aaa password-policy mgmt
(Mgmt Password Policy) #password-lock-out 5
(Mgmt Password Policy) #password-lock-out-time 5
(Mgmt Password Policy) #enable
When an account has been locked out for a specified duration, the process of unlocking the
account may take up to 60 seconds beyond the configured lockout period that has been
configured.
To ensure Security Administrators cannot be fully locked out from the TOE, a password recovery
account can be configured that can be accessed via local console only in order to reset a Security
Administrator account that has been locked out from the TOE.
To disable the recovery account, the following command should be executed on the local console:
password-recovery-disable
In the evaluated configuration, the default recovery account should be disabled and an alternative
account should be created, if required, with the commands below.
password-recovery-user <username>
The alternate recovery user username can be 16 characters long and the alternate recovery user
password can be 32 characters long and should comply with the password complexity
requirements identified in FIA_PMG_EXT.1.
To remove the alternative account, the following command can be executed on the local con sole.
no password-recovery-user <username>
2.3.2 FIA_PMG_EXT.1
Administrative password policies are configured under “aaa password -policy mgmt”.
(config) #aaa password-policy mgmt
(Mgmt Password Policy) #password-min-length 8
(Mgmt Password Policy) #password-min-lowercase-characters 1
(Mgmt Password Policy) #password-min-uppercase-characters 1

21
(Mgmt Password Policy) #password-min-special-characters 1
(Mgmt Password Policy) #password-min-digit 1
(Mgmt Password Policy) #enable
The following special characters can be used when configuring passwords: !, @, #, $, %, ^, &, *,
<, >, {, }, [, ], :, ., comma, |, +, ~, `
Once configured, the TOE only permits the use of strong passwords.
2.3.3 FIA_UAU.7
No configuration required.
2.3.4 FIA_UAU_EXT.2
Configure administrative users with “mgmt-user”. For example, to add a read-only user with the
username “ops”, use the following command:
(config) # mgmt-user ops read-only
Password:***************
Re-Type password:***************
2.3.5 FIA_UIA_EXT.1
A warning banner may be configured as follows. Ensure that no line is longer than 255
characters.
#configure terminal
Enter Configuration commands, one per line. End with CNTL/Z
(config) #banner motd =
Enter TEXT message [maximum of 4095 characters].
Each line in the banner message should not exceed 255 characters.
End with the character '='.
You are accessing a U.S. Government (USG) Information System (IS) that is
provided for USG-authorized use only. By using this IS (which includes
any device attached to this IS), you consent to the following conditions:
-The USG routinely intercepts and monitors communications on this IS for
purposes including, but not limited to, penetration testing, COMSEC
monitoring, network operations and defense, personnel misconduct (PM),
law enforcement (LE), and counterintelligence (CI) investigations.
-At any time, the USG may inspect and seize data stored on this IS.

22
-Communications using, or data stored on, this IS are not private, are
subject to routine monitoring, interception, and search, and may be
disclosed or used for any USG-authorized purpose.
-This IS includes security measures (e.g., authentication and access
controls) to protect USG interests -- not for your personal benefit or
privacy.
-Notwithstanding the above, using this IS does not constitute consent to
PM, LE or CI investigative searching or monitoring of the content of
privileged communications, or work product, related to personal
representation or services by attorneys, psychotherapists, or clergy, and
their assistants. Such communications and work product are private and
confidential. See User Agreement for details
=
The TOE permits authentication by an administrator through SSH or Web UI over TLS.
Authentication is permitted through username/password and public key authentication via local
authentication or by a remote authentication server (RADIUS/TACACS+). Authentication to the
TOE through a wireless connection does not permit administration by default.
No user can perform any actions prior to successful authentication to the TOE outside of viewing
the warning banner as defined under FTA_TAB.1 and above.
2.3.6 FIA_X509_EXT.1/2
Certificate Signing Requests (CSRs) may be generated by the Master. This process is described
in the ArubaOS User Guide. Best practice is to generate the CSR on the Master, then load the
resulting certificate after issuance by the CA. This protects the private key from disclosure. If the
private key is generated externally, the Master can also accept a certificate/key combination in the
form of a PKCS#12 file.
ArubaOS supports certificate revocation checking using either an installed CRL, or using OCSP.
CRLs support a maximum of 512 entries, and the Master does not support automatic retrieval of
new CRLs through a distribution point. OCSP is the recommended method of revocation
checking.
When a root CA or intermediate CA certificate is loaded on the Master, an automatic Revocation
Check Point (RCP) section is created in the configuration file. These may be shown using "show
crypto-local pki rcp". For each RCP, the revocation check method may be configured, and may be
set to none, crl, or ocsp. If set for CRL, a CRL filename must be specified. This corresponds to a
CRL file that has been uploaded to the Master using one of the file copy methods. If OCSP has
been specified, then an OCSP responder URL and OCSP responder certificate must be specified.
In addition, an administrator may configure the behavior if an OCSP responder is unreachable -
treat the certificate as valid or treat the certificate as revoked.
For the purpose of verifying OCSP responses, ArubaOS requires that the responses be signed,
and requires that the nonce extension be supported by the OCSP responder. Signed responses
are verified using the "OCSP Responder" certificate. Two methods are supported: direct trust
23
and delegated trust. For direct trust, the signing certificate of the OCSP responder must be
loaded onto the Master through the WebUI Certificate Management section, and its name
configured in the relevant RCP. When used, the Master makes a direct comparison between the
signer certificate included in the OCSP response, and the OCSP responder certificate that was
loaded - they must be exactly the same certificate. Direct Trust is cumbersome in environments
where the OCSP responder certificate expires frequently. An alternative is Delegated Trust. In
this method, the "OCSP Responder" type certificate must still be loaded into the Master, in the
same way just described. However, the certificate should be the Issuing CA certificate for the CA
that issues a signing certificate to the OCSP responder. When this type of configuration is
performed, ArubaOS will examine the certificate in the OCSP response, then chain one level up to
see if that certificate was issued by the CA configured in the RCP. Note, OCSP does not support
multiple levels of certificate chaining for delegated trust, so the direct issuer of the OCSP
responder's signing certificate must be configured In the RCP. If multiple levels of certificate
checking will be performed (e.g. for a peer's IPsec certificate and one level up to an Intermediate
CA) then a separate RCP must be configured for each, along with an appropriate OCSP
responder certificate.
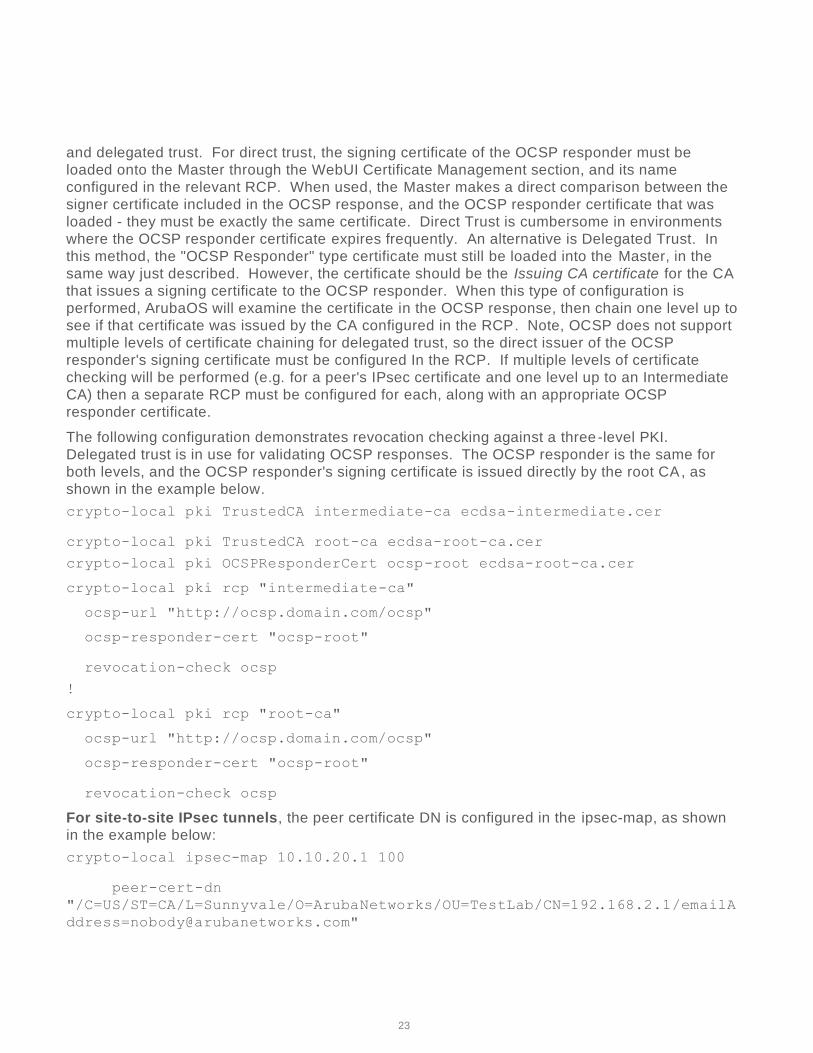
The following configuration demonstrates revocation checking against a three-level PKI.
Delegated trust is in use for validating OCSP responses. The OCSP responder is the same for
both levels, and the OCSP responder's signing certificate is issued directly by the root CA, as
shown in the example below.
crypto-local pki TrustedCA intermediate-ca ecdsa-intermediate.cer
crypto-local pki TrustedCA root-ca ecdsa-root-ca.cer
crypto-local pki OCSPResponderCert ocsp-root ecdsa-root-ca.cer
crypto-local pki rcp "intermediate-ca"
ocsp-url "http://ocsp.domain.com/ocsp"
ocsp-responder-cert "ocsp-root"
revocation-check ocsp
!
crypto-local pki rcp "root-ca"
ocsp-url "http://ocsp.domain.com/ocsp"
ocsp-responder-cert "ocsp-root"
revocation-check ocsp
For site-to-site IPsec tunnels, the peer certificate DN is configured in the ipsec-map, as shown
in the example below:
crypto-local ipsec-map 10.10.20.1 100
peer-cert-dn
"/C=US/ST=CA/L=Sunnyvale/O=ArubaNetworks/OU=TestLab/CN=192.168.2.1/emailA
24
Note: It may be difficult to determine the exact DN to configure, simply by looking at a peer's
certificate. Attempting to establish an IPsec tunnel while examining the log file (possibly after
enabling "logging level debugging security") will generally show the exact DN string that must be
configured, once it is received from the peer.
For client VPN: ArubaOS will extract the User Principal Name field from the client certificate, and
will pass it through an authentication/authorization process when this functionality has been
enabled. Configuring authentication servers is described in the ArubaOS User Guide. VIA clients
will be authenticated according to configuration found under "aaa authentication via
auth-profile". Third-party VPN clients will be authenticated according to configuration found
under "aaa authentication vpn". Both types of profiles are configured in a similar way. The
following configuration allows the Master to perform authentication for VIA clients against a
RADIUS server. After a client certificate has been validated, including revocation checking, the
Master will pass the User Principal Name to a configured RADIUS server using an "authorize -only"
transaction.
(config) #aaa authentication via auth-profile VIA_CERT_AUTH
(VIA Authentication Profile "VIA_CERT_AUTH") #cert-cn-lookup
(VIA Authentication Profile "VIA_CERT_AUTH") #server-group CPPM_CLUSTER
If authentication is not desired, set "cert-cn-lookup" to disabled.
To configure the behavior in the event an OCSP responder cannot be reached, use the "server -
unreachable" keyword under the RCP configuration. As an example, to permit peers to connect
even when an OCSP responder cannot be reached, perform the following configuration:
(config) #crypto-local pki rcp intermediate-ca
(RCP-intermediate-ca) #server-unreachable allow-cert
To configure delegated trust on the TOE for OCSP verification of each CA, ensure that CA
certificates are uploaded as bundles. The following procedures should be followed:
1. Create a full CA bundle, from the leaf’s issuing CA to the rootca.
2. Upload that as a trustedCA bundle.
3. Upload the same CA bundle as an OCSP responder cert.
4. Click on the RCP for the full CA bundle.
5. Ensure that the correct OCSP responder cert is selected.
6. Input the OCSP responder URL for the top most intermediary CA in the bundle.
7. For the next CA bundle, remove the top most intermediary CA and save it as a new bundle.
8. Repeat above steps until you’re left with just the rootca.
25
2.3.7 FIA_X509_EXT.3
An example of the commands that can be used to generate a certificate sign request are provided
below:
crypto pki
csr rsa
key_len 2048
common_name <common_val>
country <country>
organization <org>
unit <org_unit>
To export the request, you may show the CSR with the follow command:
Show crypto pki csr
Before creating a CSR, the administrator must ensure that the CN, country, O, and OU have been
set as identified above.
When signing the certificate request, the RSA certificates for the TOE (and the peer) must be
signed with sha1WithRSAEncryption.
2.4 Security Management (FMT)
2.4.1 FMT_MOF.1/ManualUpdate
See FPT_TUD_EXT.1 for information. No configuration is required to restrict updates to administrator role. Updates for the TOE should be performed through the CLI (SSH or Local Console).
2.4.2 FMT_MOF.1/Functions
An administrator with the management role of “root” has full privileges to modify, add, and delete
configuration settings on the TOE. The “root” role maps to the Security Administrator role.
2.4.3 FMT_MTD.1/CoreData
An administrator with the management role of “root” has full privileges to modify, add, and delete
configuration and user accounts. The “root” role maps to the Security Administrator role.
2.4.4 FMT_MTD.1/CryptoKeys
An administrator with the management role of “root” has full privileges to modify, add, and delete
configuration and user accounts. The “root” role maps to the Security Administrator role.
2.4.5 FMT_SMF.1
No additional configuration required. Please reference the Aruba OS CLI Reference Guide and
Aruba OS User Guide for a full list of configuration instructions through the CLI and Web GUI.

26
2.4.6 FMT_SMR.2
No additional configuration required.
2.5 Protection of the TSF (FPT)
2.5.1 FPT_APW_EXT.1
No additional configuration required.
2.5.2 FPT_SKP_EXT.1
No additional configuration required.
2.5.3 FPT_STM_EXT.1
Mobility masters require clock synchronization using NTP in order to generate reliable timestamps.
To specify an NTP server:
(config) # ntp server <IP address>
(config) # ntp server <IP address>
More NTP options, including authentication, are available. See the ArubaOS User Guide for more
information.
Additionally, an administrator can configure a manual system time with the following command:
(config) # clock set <year> <month> <day> <HH:MM:SS>
If a remote NTP server is used, the administrator must ensure that the connection is protected via IPsec.
2.5.4 FPT_TST_EXT.1
No configuration required.
If a self-test fails, the TOE will immediately halt operation and enter an error state thereby preventing potentially insecure operations (i.e., maintaining a secure state). The Master will reboot after a self-test failure. During reboot, memory is re-initialized, which wipes all keys and user data. If a self-test failure continues to occur, the Master will continue to reboot repeatedly and will require return to manufacturer. The error output of a failed self-test will appear as follows: “FIPS Aruba Cryptographic asymmetric key KAT failure, main:
FIPS_powerupSelfTest failed.” If a firmware image fails its integrity check, the TOE will load the previous image (if one is present). An error will be output during boot in this instance stating that the firmware validation failed.
If the issue continues, the administrator should contact support at http://support.arubanetworks.com.
2.5.5 FPT_TUD_EXT.1
Use the command “show version” and “show image version” to view the firmware version.
Use the “copy” command to download new firmware images from an FTP or TFTP server.
ArubaOS images are integrity-protected through three methods:

27
1. When downloading a firmware image from http://support.arubanetworks.com, a file may be
found in the download directory that contains SHA256 hashes of each file. This hash may
be checked manually after downloading an image.
2. ArubaOS images are digitally signed. The mobility master will check the digital signature
immediately after downloading a new firmware image, and will refuse to install an image
whose digital signature does not match.
3. Mobility masters also check the digital signature of an ArubaOS image when booting. The
Master will refuse to boot a corrupted ArubaOS image file.
No configuration is needed to achieve this requirement. Updates for the TOE should be performed
through the CLI (SSH or Local Console).
2.6 TOE Access (FTA)
2.6.1 FTA_SSL.3
For both local and remote administrative sessions, an idle timeout may be set to disconnect idle
sessions. The default value is 300 seconds (5 minutes). To configure the timer value, use the
following:
(config) #aaa timers idle-timeout <seconds> seconds
2.6.2 FTA_SSL.4
No configuration required. An administrator can terminate their own session by exiting the SSH
session or logging out from the Web UI session. To enforce a timeout interval, please see Section
2.9.1 above.
2.6.3 FTA_SSL_EXT.1
For both local and remote administrative sessions, an idle timeout may be set to disconnect idle
sessions. The default value is 300 seconds (5 minutes). To configure the timer value, use the
following:
For the CLI:
(config) #loginsession timeout <value>
In the above command, <session-timeout> can be any number of seconds from 30 to 3600,
inclusive.
For the WebUI:
(config) #web-server sessiontimeout <value>
In the above command, <val> can be any number of minutes from 5 to 60 or seconds from 1 to
3600, inclusive.
2.6.4 FTA_TAB.1
See FIA_UIA_EXT.1.1 above for a description of how to configure a notice and consent banner
message.

28
2.7 Trusted Path/Channels (FTP)
2.7.1 FTP_ITC.1
ArubaOS supports IPsec as the inter-TSF trusted channel. This channel is to be used between a
Mobility masters and a) a syslog server, b) a RADIUS server, and c) VPN Gateway/Mobility
Controller.
If for any reason a connection is unintentionally broken, the TOE will re -establish the connection
once connectivity is restored. If the timeout period has expired, re-authentication/re-negotiation is
required.
2.7.2 FTP_TRP.1/Admin
Communication between a Mobility master and a remote administrator may be protected by
TLS/HTTPS (when using the Web-based interface) or SSH (when using the command-line
interface). All remote administration must take place over one of these interfaces. Remote
administration MAY also be protected by IPsec, however this would be in addition to TLS/HTTPS
or SSH.

29
3 Reference Documents The Guidance documentation for ArubaOS can be found in its entirety at the link below: https://support.arubanetworks.com/Documentation/tabid/77/DMXModule/512/EntryId/218/Default.aspx