COMMERCIAL PRODUCTS DIVISION
44
C O M M E R C I A L P R O D U C T S D I V I S I O N USA R COMMERCIAL TREADMILL OWNER’S MANUAL
Transcript of COMMERCIAL PRODUCTS DIVISION

C O M M E R C I A L P R O D U C T S D I V I S I O N
i
C O M M E R C I A L P R O D U C T S D I V I S I O N
USAR
COMMERCIAL TREADMILL OWNER’S MANUAL

C O M M E R C I A L P R O D U C T S D I V I S I O N
ii
Thank you for purchasing the Precor C964i or C962i Commercial Treadmill. Builtto the exacting standards of the health club environment, these treadmills are forcommercial use and can withstand the rigors of club use with little maintenance.
The C964i features the Precor Smart RateTM system and a CSAFE compatibilityoption. With the C964i Smart Rate display, users can easily maintain their heartrate intensity within a few beats per minute. The chosen course also appears onthe display and a blinking segment indicates the user's position.
The C962i is similar to the C964i, but lacks Smart Rate and a course profiledisplay. On both units, the easy-to-use electronic console prompts users tobegin their workout. Throughout the workout, the display can present a varietyof statistics including: elapsed time, distance travelled, speed, incline, caloriesburned, and heart rate. During a workout, a user can easily change the speedor incline to decrease or increase their effort level and affect their heart rate.
Note : For a user’s heart rate to appear, the Precor Heart Rate Option must beused and the optional heart rate receiver must be installed in the treadmill.
Another important feature, “safety ,” is insured when the user attaches the safetycord clip to his or her clothing during a workout. If the safety switch is moved orjerked into the OFF position, the running belt automatically slows to a stop.
ABOUT THIS MANUAL
Inside this manual, you will find instructions for installing and using the C964i andC962i treadmills. To maximize the use of the treadmill, please study this manualthoroughly. The manual uses the following conventions:
“Note: ” Contains additional information that applies to the preceding text.
“Important: ” Indicates information to which you should pay special attention.
“CAUTION: ” Indicates steps or information necessary to prevent harm toyourself or damage to the equipment.
“WARNING: ” Provides instructions to prevent electrical damage to theequipment and prevent injuries to yourself.
“DANGER: ” Indicates steps you must take to prevent electrical shock.
OBTAINING SERVICE
Do not attempt to service the treadmill yourself except for the maintenance anddiagnostic tasks described in this manual. The C964i and C962i treadmills do notcontain any user-serviceable parts. For information about the product, contactPrecor Commercial Products Customer Service, at 1-888-665-4404.
To help customer service expedite your call, have the serial number readilyavailable. The serial number on the treadmill is located on the inboard-side of therunning bed at the left, rear corner of the treadmill. Be sure the treadmill is turnedOFF before getting on your knees and bending down to see it. For futurereference, write the serial number in the space provided below:
Model number: _____________ Serial number: ______________________
Before You Begin
C964i or C962i
C O M M E R C I A L P R O D U C T S D I V I S I O N
iii
When using an electrical appliance, basic precautions should always be followed,including the following:
• Read all instructions before using the C964i or C962i Commercial Treadmill. Theseinstructions were written to ensure your safety and to protect the treadmill.
• To ensure the proper use and safety of the C964i or C962i treadmill, make sure thatall users read this manual. Please make this manual a part of your trainingprogram.
Before beginning any fitness program, you should have a complete physical exami-nation by your physician.
Il est conseillé de subir un examen médical complet avant d’entreprendre toutprogramme d’exercise. Si vous avez des étourdissements ou des faiblesses, arrêtezles exercices immédiatement.
• When it is plugged in, do not leave the treadmill unattended. Unplug the treadmillfrom the outlet when it is not in use, and before putting on or taking off parts.
• Do not allow children, invalids, or disabled persons on or near the treadmillwithout adult supervision.
• Use the treadmill only for its intended use as described in this manual. Do not useaccessory attachments that are not recommended by the manufacturer—suchattachments might cause injuries.
• Never operate the treadmill if it has a damaged cord or plug, if it is not workingproperly, if it has been dropped or damaged, or dropped in water. Return thetreadmill to a service center for examination and repair.
• Keep the power cord away from heated surfaces. Keep hands away from movingparts.
• Never block the air openings on the hood while operating the treadmill. Keep theair openings clean and free of lint, hair, or anything that might impede the free flowof air. Never drop or insert objects into any opening.
• Do not operate where aerosol (spray) products are being used or where oxygen isbeing administered.
• Do not use outdoors.
• To disconnect, turn all controls to the OFF (O) position, then remove the powerplug from the outlet.
IMP
OR
TA
NT
S
AFE
TY
IN
ST
RU
CT
ION
S
IMPORTANT SAFETY INSTRUCTIONS
DANGER— To reduce the risk of electrical shock, always unplug the C964ior C962i from the electrical outlet immediately after using andbefore cleaning.
To reduce the risk of burns, fire, electric shock, or injury topersons, take the following precautions:
WARNING—
SAVE THESE INSTRUCTIONS
Connect the treadmill to a properly grounded outlet only.See Grounding Instructions .
WARNING—
C O M M E R C I A L P R O D U C T S D I V I S I O N
iv
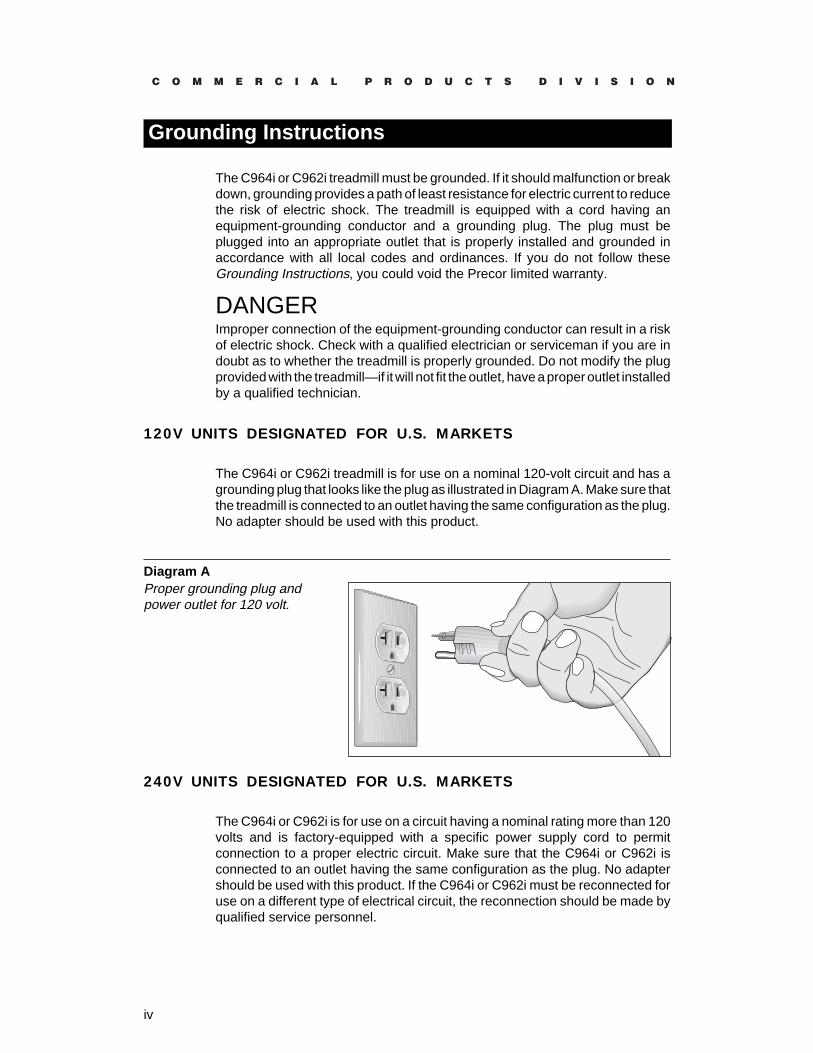
The C964i or C962i treadmill must be grounded. If it should malfunction or breakdown, grounding provides a path of least resistance for electric current to reducethe risk of electric shock. The treadmill is equipped with a cord having anequipment-grounding conductor and a grounding plug. The plug must beplugged into an appropriate outlet that is properly installed and grounded inaccordance with all local codes and ordinances. If you do not follow theseGrounding Instructions, you could void the Precor limited warranty.
DANGERImproper connection of the equipment-grounding conductor can result in a riskof electric shock. Check with a qualified electrician or serviceman if you are indoubt as to whether the treadmill is properly grounded. Do not modify the plugprovided with the treadmill—if it will not fit the outlet, have a proper outlet installedby a qualified technician.
120V UNITS DESIGNATED FOR U.S. MARKETS
The C964i or C962i treadmill is for use on a nominal 120-volt circuit and has agrounding plug that looks like the plug as illustrated in Diagram A. Make sure thatthe treadmill is connected to an outlet having the same configuration as the plug.No adapter should be used with this product.
Grounding Instructions
Diagram AProper grounding plug andpower outlet for 120 volt.
240V UNITS DESIGNATED FOR U.S. MARKETS
The C964i or C962i is for use on a circuit having a nominal rating more than 120volts and is factory-equipped with a specific power supply cord to permitconnection to a proper electric circuit. Make sure that the C964i or C962i isconnected to an outlet having the same configuration as the plug. No adaptershould be used with this product. If the C964i or C962i must be reconnected foruse on a different type of electrical circuit, the reconnection should be made byqualified service personnel.

C O M M E R C I A L P R O D U C T S D I V I S I O N
v
FCC Communications Commission, part 15
The C964i and C962i treadmills have been tested and found to comply with thelimits for a Class A digital device, pursuant to part 15 of the FCC Rules. Theselimits are designed to provide reasonable protection against harmful interfer-ence when the equipment is operated in a commercial environment. The C964iand C962i treadmills generate, use, and can radiate radio frequency energy and,if not installed and used in accordance with the instruction manual, may causeharmful interference to radio communications. Operation of the C964i or C962itreadmill in a residential area is likely to cause harmful interference in which casethe user will be required to correct the interference at his or her own expense.
CAUTION: Per the requirements of the Federal Communications Commis-sion, changes or modifications to this product not expressly approved byPrecor, could void the user’s authority to operate the product.
Canadian Department of Communications
This digital apparatus does not exceed the Class A limits for radio noiseemissions from digital apparatus set out in the Radio Interference Regulationsof the Canadian Department of Communications.
“Le présent appareil numérique n’émet pas de bruits radioéélectriques dépassantles limites applicables aux appareils numériques de la class A prescrites dansle Règlement sur le brouillage radioélectrique édicté par le ministére desCommunications du Canada.”
European ApplicationsThis product conforms to the requirements of the European Council Directive 89/336/EEC, Electromagnetic Compatibility and has been tested to the followingstandards:
EN55022, Limits & Methods of Measurement of Radio Interference, Infor-mation Technology Equipment (Class A).
EN50082-1, Generic Immunity Standard for Residential, Commercial andLight Industrial Products (Class B).
This apparatus additionally conforms to the requirements of the EuropeanCouncil Directive 73/23/ECC, Low Voltage Directive and has been tested to thefollowing standard:
IEC 335-1, Safety of Household and similar Electrical Appliances.
European Applications—240 Volt Units OnlyThese products have been tested to the requirements of EN55022, “Limits andmethods of measurement of radio interference of information technology equip-ment.” Per that standard, the C964i or C962i treadmill is a Class A product. Ina domestic environment,
Information Regarding International Use
C O M M E R C I A L P R O D U C T S D I V I S I O N
vi
When using the C964i or C962i, take the following precautions:
WARNING — MAXIMUM SPEED MAY EXCEED USER’S CAPABILITIES
While the C964i or C962i treadmill is set at the manufacturer’s for a maximumspeed of 12 miles per hour, the treadmill can be programmed for a maximumspeed of 15 mph (24 kph), or 4 minute miles (6 minute kilometers). The higherspeed is designed for the occasional use of a highly competitive runner, and mayexceed the capabilities of many users, particularly with extended use. If the unitis programmed for a maximum speed of 15 mph (24 kph), then each user mustbe individually informed of the higher limit, and warned that the speed mayexceed that user’s capabilities. In addition, the unit must be clearly marked thatit has been set for a maximum speed of 15 mph (24 kph).
• Do not allow children on or near the treadmill without adult supervision. Donot leave children unsupervised around the treadmill. Turn OFF the tread-mill and switch the safety key OFF, to help guard against unauthorized use.
• Turn OFF and unplug the treadmill when adjusting or working near the rearroller. Do not make any adjustments to the running belt when someone isstanding on the unit.
• Keep all electrical components, such as the motor, power cable etc., awayfrom water or other liquids to prevent shock. Do not set anything on thehandrail, display console, or hood. Never place liquids on any part of the unit.
• Always attach the safety clip to your clothing prior to beginning your workout.A cord connects the safety clip to the safety switch on the treadmill. Bypulling on the cord, you can stop the running belt if you encounter difficulties.
• Assemble and operate the treadmill on a solid, level surface. Locate it atleast 4 feet from walls or furniture. Keep the area behind the treadmill clear.
• Wear proper exercise clothing and shoes for your workout—no looseclothing. Do not wear shoes with heels or leather soles. Check the soles ofyour shoes and remove any dirt and embedded stones. Tie long hair back.
• Keep all loose clothing and towels away from the running surface. The beltwill not stop immediately if an object becomes caught in the belt or rollers.
• Use care when getting on or off the treadmill. Use the handrails wheneverpossible. Do not get on or off the treadmill when the running belt is moving.
• Before the running belt begins moving (prior to your workout), and after itstops (at the end of a workout), straddle the belt by placing your feet firmlyon the right and/or left staging platforms.
• Never turn ON the treadmill when someone is standing on the unit.
• Keep your body and head facing forward. Never attempt to turn around onthe treadmill when the running belt is moving.
• Do not rock the unit or stand/climb on the handrails, display console, or hood.
• Do not attempt to service the treadmill yourself other than the assembly andmaintenance instructions found in this manual. See Obtaining Service.
• Do not overexert yourself or work to exhaustion. Stop your workout imme-diately if you feel any pain or abnormal symptoms. Consult your physician.
Personal Safety

C O M M E R C I A L P R O D U C T S D I V I S I O N
vii
Precor Heart Rate Option—Safety Guidelines
The Precor Heart Rate Option was created and designed exclusively for Precorproducts. Before using this option, read and follow the instructions found in theowner’s manual that accompanies your option kit or chest strap transmitter.
The equipment is extremely sensitive—you should use the heart rate option withthis in mind and take time to read the following guidelines:
• Do not drop the equipment. It might damage the transmitter and you couldvoid the manufacturer’s limited warranty.
• Do not place the chest strap near strong electromagnetic radiation sources.Television sets, electric motors, radios, and high voltage power lines caninterfere with the heart rate signal and might affect the heart rate readingsthat appear on the electronic console.
• Use only one chest strap at a time inside the range of the receiver. If thereceiver tries to process several signals simultaneously, an incorrect heartrate reading could result. Be sure to keep any other transmitters at least 5feet (1.5 meters) away from the receiver on your treadmill.
• The chest strap should not be immersed in water, however, wetting theelectrodes and your chest improves initial performance. Note that perspira-tion on the chest strap during workouts is normal and actually enhances thesignal being sent from the chest strap’s transmitter.
• To conduct the electrical impulses from your heart, the chest strap’selectrodes require a certain percentage of salts and minerals in the waterused to wet them. The electrodes transmit your heart rate reading as longas they are in contact with your skin and your skin is providing enoughmoisture through your perspiration to keep the electrodes wet. However, ifthe concentration of salts in your perspiration is not high enough to conductelectrical impulses and send them to the receiver, your heart rate reading willappear erratic or not appear at all. Some people cannot use the heart ratefeature because they do not have the proper body chemistry.
Note : The spray in the option package may help increase the conductivityof the chest strap electrodes. Use it as described in the option kit.
• Do not use the chest strap if you are taking any medication or have a cardiacpacemaker. Inaccurate heart rate readings can occur due to medication orelectrical impulses from the cardiac pacemaker.
• Stretching or bending the electrode strips on the chest strap may cause thestrips to lose their conductivity. Handle the chest strap with care.
• After extensive use, the chest strap (transmitter) may wear out, causinginaccurate heart rate readings. With every use, check the strap for excessivewear. To replace it, see Obtaining Service on the inside front cover.
Precor treadmills are designed for the enjoyment of the serious runner as wellas the dedicated walker. By following the above precautions and using goodcommon sense, you will have many safe and pleasurable hours of healthfulexercise with your Precor treadmill.
C O M M E R C I A L P R O D U C T S D I V I S I O N
viii
Table of Contents
Before You Begin.................................................................................. iiAbout this Manual ....................................................................... iiObtaining Service ....................................................................... iiImportant Safety Instructions ...................................................... iiiGrounding Instructions ............................................................... ivInformation Regarding International Use .................................... vPersonal Safety .......................................................................... viPrecor Heart Rate Option—Safety Guidelines ........................... vii
Unpacking the Treadmill ...................................................................... 1Setting Up the Treadmill ...................................................................... 2
Installation Requirements ........................................................... 2Assembly Instructions................................................................. 3Checking the Alignment of the Running Belt .............................. 6
Using the Commercial Treadmill ......................................................... 8Using the Club Program ............................................................. 8Choosing between U.S. Standard and Metric Displays .............. 10Checking Odometer, Time Meter and Software Version ............ 10
Working Out on the Commercial Treadmill ........................................ 11Turning the Treadmill ON and OFF ............................................ 11Using the Safety Features .......................................................... 12Understanding the Electronic Console ....................................... 12Left Display ................................................................................. 15Right Display .............................................................................. 15Understanding Smart Rate on the C964i .................................... 17
Exercising on the C964i/C962i Treadmill ........................................... 18Cooling Down After Your Workout .............................................. 20Pausing During Your Workout .................................................... 21Ending Your Workout ................................................................. 21
Utilizing the Heart Rate Interactive Courses ...................................... 22Using Manual Mode and the Quick Start Key............................. 23Using the C964i Heart Rate Course ........................................... 23Using the C964i Weight Loss Program ...................................... 25Changing the C964i Interval Course Profile ............................... 26Using the C964i Random Course ............................................... 26
Maintaining the Commercial Treadmill ............................................... 27Cleaning the Treadmill ................................................................ 27Aligning the Running Belt ........................................................... 27Correcting Inconsistent Heart Rate Readings ............................ 29Troubleshooting Heart Rate Error Messages ............................. 30Servicing the Treadmill ............................................................... 30Power Cord Maintenance ........................................................... 30Long Term Storage..................................................................... 30
Special Forms ....................................................................................... 31Workout Statistics Log ................................................................ 31
page 1
C O M M E R C I A L P R O D U C T S D I V I S I O N
Your C964i or C962i treadmill is carefully inspected before shipment, so it shouldarrive in good operating condition. Precor ships the unit in two pieces: the baseframe and the upright/console assembly.
Carefully unpack the parts from the shipping container.
CAUTION: This unit weighs over 350 pounds. To avoid injury and ensurethe safety of the unit and yourself, get appropriate assistance beforeremoving the base frame assembly from its container.
After unpacking the treadmill, open the hardware kit and make sure that youhave the following items:
twelve bolts—for installing the upright/console assembly
one 3/16" hex key—for installing the upright/console assembly
one 1/4" hex key—for adjusting the belt tension
If any items are missing, contact your Precor Commercial Products ServiceRepresentative at 1-888-665-4404.
Note: After assembling the treadmill, be sure to store the hex keys in a secureplace. The tools are for specific maintenance procedures that are described inthis manual.
Optional equipment that you can purchase from your dealer includes:
• Precor Heart Rate Option
• Precor Smart Weights
• C964i/C962i Handrail Installation Kit — provides long and short handrails
• C964i/C962i Security Lock — helps to prevent unauthorized use
• CSAFE option— (C964i only)
If you are interested in obtaining Precor option kits for your unit, check with yourdealer. To locate the dealer nearest you, call 1-888-665-4404. For customerservice see Obtaining Service on the inside front cover.
Unpacking the Treadmill
page 2
C O M M E R C I A L P R O D U C T S D I V I S I O N
You do not need any special knowledge or experience to set up a C964i or C962itreadmill, however you will need assistance. Because of the size and weight ofthe treadmill, it is recommended that at least three people assemble it.
INSTALLATION REQUIREMENTS
Follow the installation requirements below when installing and assembling thetreadmill. If you do not install the treadmill according to the following guidelines,you could void the Precor limited warranty.
• Set up the treadmill on a solid, flat surface. A flat surface is required foryour safety and proper alignment of the running belt. An adjustable footexists to help “fine tune” the unit once it is in place.
• Locate the treadmill at least 4 feet from walls, equipment, and furniture.Be sure to allow ample space in front of the machine to allow easy accessto the ON/OFF switch. Open space to the sides and rear of the unit makesfor a safer mount and dismount and easier belt adjustment.
• Fill out and mail the limited warranty card. The serial number is locatedon the inboard-side of the running bed at the left, rear corner of the treadmill.You will need to be on your knees and bend down to see it. Write the serialnumber in the space provided on the inside front cover of this manual.
• Use the appropriate voltage, dedicated circuit, and grounding asspecified on the treadmill. The treadmill is available in both 120-volt and240-volt models. Refer to the treadmill’s identification label to determine thevoltage that your treadmill requires. Both the 120-volt and 240-volt modelsrequire a dedicated 20 amp circuit.
• Acquire the appropriate tools. You will need assistance and a wire cutter.A bubble level is also useful to check the running surface of the treadmillonce it is assembled and placed in its final location.
CAUTION: Do not use a non-grounded outlet or transformer. Do notremove or otherwise bypass the plug with an adapter. Electrical damagecan occur and void the Precor limited warranty if the treadmill is connectedto an improper power source.
Setting Up the C964 Treadmill ErgometerSetting Up the Treadmill
page 3
C O M M E R C I A L P R O D U C T S D I V I S I O N
ASSEMBLY INSTRUCTIONS
Take the following steps to assemble the C964i or C962i treadmill. We recom-mend that at least three people assemble this treadmill.
1. Unpack the treadmill and remove the packing materials from the base andupright/console assembly.
CAUTION: To avoid injury and ensure your safety, get appropriateassistance before lifting the treadmill off the pallet and rolling it ontothe floor. Do not drop the unit.
2. Remove the treadmill from the shipping pallet. Use a wire cutter to cut thecable tie wraps that secure the front and hold down the rear of the treadmill.Once the cable ties are cut, ask for assistance to lift the treadmill off theshipping pallet.
3. Make sure that the treadmill is unplugged and turned OFF. Do not assemblethe treadmill if it is plugged into a power outlet.
4. Use a 3/16" hex key to remove the six screws located around the base of thehood. Stand at the front of the treadmill and pull up on the base of the hoodto detach it from the treadmill. Set the hood aside.
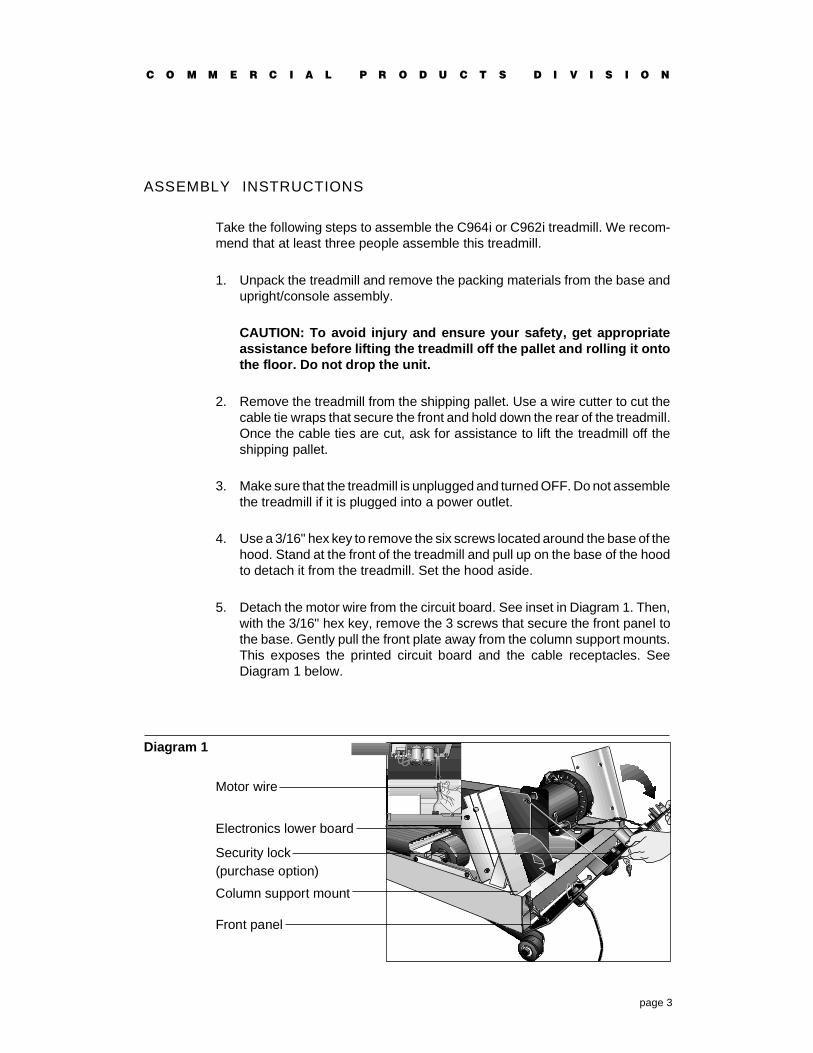
5. Detach the motor wire from the circuit board. See inset in Diagram 1. Then,with the 3/16" hex key, remove the 3 screws that secure the front panel tothe base. Gently pull the front plate away from the column support mounts.This exposes the printed circuit board and the cable receptacles. SeeDiagram 1 below.
Diagram 1
Front panel
Security lock(purchase option)
Electronics lower board
Column support mount
Motor wire
page 4
C O M M E R C I A L P R O D U C T S D I V I S I O N
6. Take the following steps to secure the upright/console assembly to the baseof the treadmill:
a. Position the upright/console assembly so that both the right and lefthandrail columns align over the column support mounts. Have anassistant thread the round jacketed cable through the left side columnsupport as shown in Diagram 2.
CAUTION: Be sure not to crimp or pinch the cable as you place theupright/console assembly into position. Cables pinched or other-wise damaged by improper installation will not be covered by thelimited warranty.
b. Carefully lower the upright/console assembly onto the column supportmounts on the base frame (see Diagram 2).
c. Take the twelve bolts from the hardware kit and secure the upright/console assembly to the base frame.
d. Finger-tighten each bolt. Using the hex key, alternately tighten the boltsuntil all twelve bolts are secure against the upright/console assembly.
Diagram 2
Column support mount
Upright/console assembly
Base frame
Round jacketed cable
Bolt holes
Security key (optional)
page 5
C O M M E R C I A L P R O D U C T S D I V I S I O N
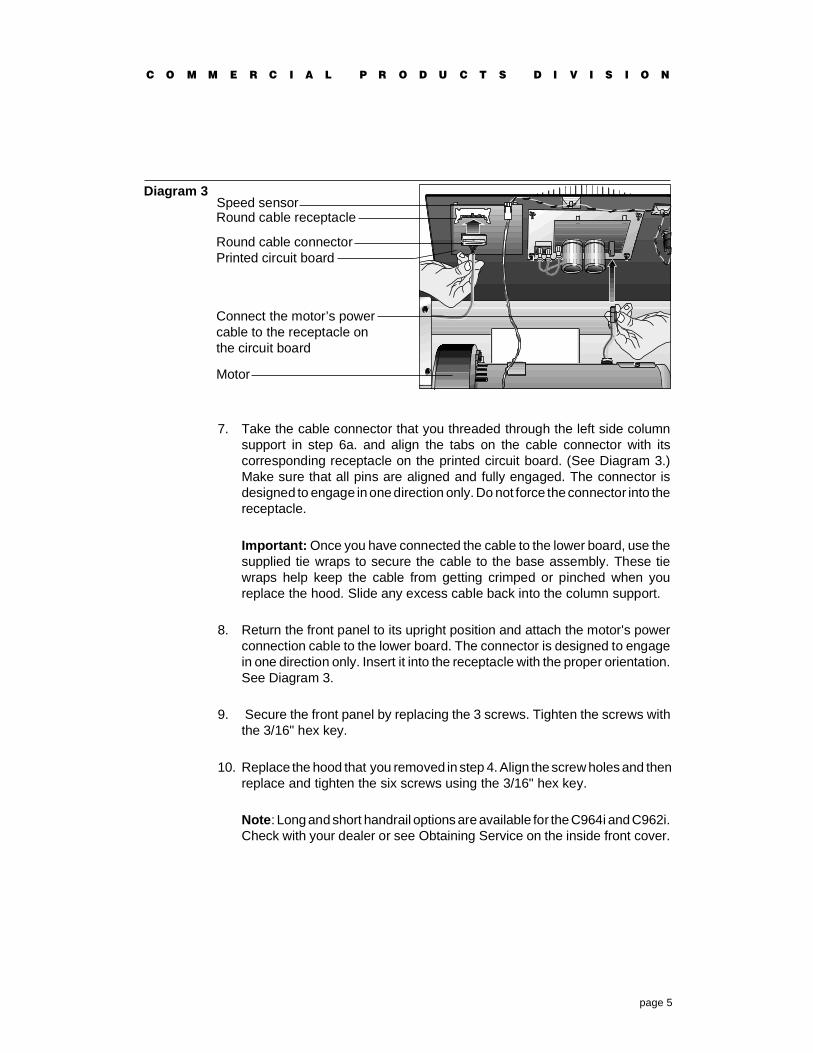
7. Take the cable connector that you threaded through the left side columnsupport in step 6a. and align the tabs on the cable connector with itscorresponding receptacle on the printed circuit board. (See Diagram 3.)Make sure that all pins are aligned and fully engaged. The connector isdesigned to engage in one direction only. Do not force the connector into thereceptacle.
Important: Once you have connected the cable to the lower board, use thesupplied tie wraps to secure the cable to the base assembly. These tiewraps help keep the cable from getting crimped or pinched when youreplace the hood. Slide any excess cable back into the column support.
8. Return the front panel to its upright position and attach the motor's powerconnection cable to the lower board. The connector is designed to engagein one direction only. Insert it into the receptacle with the proper orientation.See Diagram 3.
9. Secure the front panel by replacing the 3 screws. Tighten the screws withthe 3/16" hex key.
10. Replace the hood that you removed in step 4. Align the screw holes and thenreplace and tighten the six screws using the 3/16" hex key.
Note: Long and short handrail options are available for the C964i and C962i.Check with your dealer or see Obtaining Service on the inside front cover.
Diagram 3
Printed circuit board
Round cable receptacle
Round cable connector
Speed sensor
Motor
Connect the motor’s powercable to the receptacle onthe circuit board
page 6
C O M M E R C I A L P R O D U C T S D I V I S I O N
CAUTION: Be sure to get the appropriate number of people to help youmove the treadmill to its final location. A fully-assembled C964i orC962i treadmill is very heavy and you might injure yourself if you movethe treadmill improperly.
11. If you need to move the treadmill, ask for assistance. Roll the treadmill onits front wheels to its new location by lifting the rear end of the unit.
CAUTION: Do not remove or otherwise bypass the 3-prong plug withan adapter in order to use a non-grounded outlet. Do not plug thetreadmill into a power transformer in an attempt to adjust the voltagerequirements.
12. The treadmill requires a dedicated circuit. Plug the treadmill into a groundedoutlet with a dedicated circuit. Make sure that no other product or machineuses the same circuit as the treadmill.
13. Continue to Checking the Alignment of the Running Belt to complete theinstallation of the treadmill.
CHECKING THE ALIGNMENT OF THE RUNNING BELT
The belt is aligned at the factory before shipment. However, during shipment orby using the treadmill on an uneven surface, the belt might move off center.Proper belt alignment is important because it allows the belt to remain centeredand assures smooth operation.
Follow these steps to check the alignment:
CAUTION: Do not walk on the running belt during this procedure.
1. The C964i and C962i have adjustable rear feet. Check to make sure that therunning surface is level before continuing with the following steps. If thetreadmill is placed on a slightly, uneven surface, adjusting the rear feet canhelp, but will not compensate for extremely uneven surfaces.
Important: The maximum recommended height that you raise or lower therear of the treadmill should be no more than a 1/4". You can turn the rear footcounterclockwise or clockwise using a crescent or open-end wrench.
2. Check to be sure that the safety switch is positioned at the green dot beforeturning ON the treadmill. Locate the ON/OFF power switch at the front of thehood and turn it to ON ( I ).

page 7
C O M M E R C I A L P R O D U C T S D I V I S I O N
3. Stand next to the treadmill and press QUICK START. The running beltbegins moving at 1 mph (1.6 kph) after a warning message scrolls acrossthe display.
4. Continue to stand next to the treadmill and increase the running belt speedto 2 mph (3.2 kph) using the SPEED key.
CAUTION: If you hear any chafing or the belt begins to shred, stop therunning belt immediately by pressing the STOP key. Turn OFF the unitand do not use the treadmill. Consult with your local dealer or Precorrepresentative.
5. Walk around to the rear of the treadmill and observe the belt as it runs overthe rear roller (watch for about one minute).
• If the running belt remains centered on the treadmill, then the belt isfunctioning correctly and no adjustment is necessary.
• If the running belt drifts to one side, then you need to adjust the belt; seeAligning the Running Belt in the maintenance section of this manual forinstructions.
Important: If you notice that the belt needs alignment, make theadjustments at once before using the treadmill. Failure to do so mightcause the belt to tear or fray which is not covered by the limited warranty.
6. Press STOP/PAUSE to slow the running belt to a gradual stop.
If the belt is functioning correctly, the treadmill is assembled and ready to use.

page 8
C O M M E R C I A L P R O D U C T S D I V I S I O N
This section familiarizes you with the C964i/C962i display and the differentprograms you can use to customize the unit to your customers needs.
USING THE CLUB PROGRAM
The Club Program lets you customize these features:
• Maximum speed—You can set the internal maximum speed of the tread-mill between 1 and 15 miles per hour (1 and 24 kilometers per hour) on boththe 120v and 240v units. Once you designate a maximum speed, a usercannot exceed that speed during a workout.
• Maximum workout time—You can set a workout time limit between 10 and240 minutes in variable increments (see the list below). For example, if youset the maximum workout time to 20 minutes, the treadmill allows users tospecify a workout time from 10 to 20 minutes. Users could not specify aworkout time longer than 20 minutes. When you buy the treadmill, theworkout limit is set at 60 minutes. The incremental displays vary as shownbelow:
Time settings: Displays increments of: For example:10 to 20 minutes 1 minute 11, 12, 13,...20 to 60 minutes 5 minute 25, 30, 35,...60 to 240 minutes 15 minute 75, 90, 105,...
• Language—The prompts and informational messages in the display canappear in one of four languages. Whichever language you choose (English,German, Spanish, or French), affects all the prompts and informationalmessages that appear on the display.
• Custom courses (C964i only)—You can design two custom courses tomeet your customers’ needs. The entire course profile appears on thedisplay and you use the INCLINE and SPEED or keys to make changesto the profile.
Note: After accessing the Club Program, you can exit it at any time bypressing RESET. Any changes you may have made will not be saved.
Accessing the Club Program requires pressing specific keys on the display. Thisdesign helps secure the treadmill from unauthorized access and changes.
To use the Club Program, take the following steps:
1. Make sure that the treadmill is placed in its final location andplugged in.
Using the Commercial Treadmill
page 9
C O M M E R C I A L P R O D U C T S D I V I S I O N
2. Check to see that the safety switch is positioned at the green dot. If the safetyswitch is in the OFF position, the treadmill will not turn ON. Change itsposition and align it with the green dot.
3. If necessary, turn ON the treadmill using the ON/OFF power switch. Thisswitch is located on the front of the treadmill, near the power cable.
4. When start-up prompt “PRESS ENTER TO BEGIN OR PRESS QUICKSTART” appears, access the Club Program by sequentially pressingSTOP, SPEED , SPEED , SPEED , RESET, SPEED , SPEED , andSPEED . (Numbers on the display appear in sequence: 4, 5, 6, 5, 1, 5, 6,and 5.)
Note: You must sequentially press each key within 4 seconds of each otheror the display reverts back to the start-up prompt.
6. Maximum Speed: Use any or key to designate a speed limit between1 and 15 mph (1 and 24 kph). The speed you designate limits the speed ofthe treadmill. Press ENTER when the desired speed appears.
7. Maximum Workout Time: Use any or key to designate a time limitbetween 10 and 240 minutes. The amount of time you choose limits thelength of a person’s workout. (This does not include the automatic 5-minutecool-down period.) Press ENTER to accept the time limit.
Note: Continuous pressure on the arrow key lets you scroll through thenumbers being displayed.
8. Language: Use any or key if you want to change the language. You canchoose between English, German, Spanish, or French. When you changethe language, you affect all the prompts and informational messages thatappear on the display. Select the language being displayed by pressingENTER.
9. Custom Courses (C964i only): The course profile appears in the centerdisplay. (If you want to customize course number 2, press ENTER.)
When you enter custom mode, you have the ability to “draw over” an existingcourse profile. The entire course appears on the display. A blinking LED cellappears at the top of the far left column and indicates your position. Anychanges that you make occur only in that column. Begin modifying thecourse profile one cell at a time using any INCLINE or key. If you aresatisfied with the column, press SPEED to move to the next column.
Note: The SPEED or keys move the blinking segment to the right andleft on the display. The INCLINE or keys move the blinking segment upor down. Negative incline is not available in custom mode.

page 10
C O M M E R C I A L P R O D U C T S D I V I S I O N
10. Once you have completed customizing the course, select ENTER to savethe course profile.
Note: Any time you are customizing a course on the C964i, you can pressSTOP and exit the program. Any changes are not saved. The course profilereverts back to the previous profile stored in memory.
11. If you were customizing Course 1, Course 2 appears on the display. You canmodify the profile or press ENTER to return to the C964i banner.
When the “C964i” banner appears, the treadmill is ready to use. To review yourcustom course modifications, do not use QUICK START. Instead, select theappropriate custom course number at the “SELECT COURSE” prompt. See thesection titled, Exercising on the C964i/C962i Treadmill.
CHOOSING BETWEEN U.S. STANDARD AND METRIC DISPLAYS
The treadmill lets you select either U.S. Standard or Metric, by taking thefollowing steps:
1. At the start-up prompt “PRESS ENTER TO BEGIN OR PRESS QUICKSTART,” press STOP, SPEED , SPEED , and QUICK START. (Numberson the display appear in sequence: 4, 5, 6, and 7.
Note: You must sequentially press each key within 4 seconds of each otheror the display reverts back to the start-up prompt.
2. A message appears in the right display window explaining the selections(either U.S. Standard or Metric). Use a or key, to select the unit ofmeasure and then press ENTER.
CHECKING ODOMETER, TIME METER, AND SOFTWARE VERSION
To display the total accumulated miles (or kilometers), the cumulative time thatthe motor and running belt have been in operation, and the software versionnumber, press the following keys in sequence: STOP, SPEED and SPEED .
The accumulated miles or kilometers appear in the right display windows. PressENTER and the numbers that appear indicate the total time the that the motorand running belt have been in operation. Press ENTER again and the softwareversion number and the software prom part number appear.
All these numbers are useful if you need to call Customer Service. Press ENTERto return to the C964i banner or C962i start-up prompt.
page 11
C O M M E R C I A L P R O D U C T S D I V I S I O N
The C964i and C962i treadmills are designed so that users can work out withoutinstruction or training. The directions on the console and the prompts on thedisplay will guide a user through the entire workout session. Before the treadmillis used, however, we recommend familiarizing yourself with it so it will be usedsafely and effectively. This section covers the following information:
• instructions for turning the treadmill ON and OFF
• instructions on how to use the safety features
• an overview of the features provided on the electronic console
• instructions for exercising on the treadmill
• an explanation about using Manual mode and the QUICK START key
• information about Smart RateTM and the Heart Rate Interactive Courses(Heart Rate and Weight Loss) on the C964i
• an explanation about the C964i Interval and Random courses
TURNING THE TREADMILL ON AND OFF
To turn ON the treadmill, take the following steps:
1. Insert the security key on the front of the hood and lock it into position. Thisis an optional step and can only be done if you have purchased the PrecorSecurity Key Option.
2. Align the safety switch with the green dot.
3. Use the ON/OFF power switch to turn ON the treadmill. This switch is locatedon the front of the treadmill, near the power cable.
To turn OFF the treadmill:
1. Use the ON/OFF power switch to turn OFF the treadmill.
2. Remove the security key (if you have purchased this option) and store it ina safe place to prevent unauthorized use.
Working Out on the Commercial Treadmill
page 12
C O M M E R C I A L P R O D U C T S D I V I S I O N
USING THE SAFETY FEATURES
Security Lock: A security key can be purchased from your dealer and isoptional equipment that can help prevent unauthorized use. It is located near theON/OFF switch and must be inserted and locked into position before power canbe supplied to the treadmill. You can remove the security key, during non-business hours when the treadmill is not being used, and store it in a safe placeto prevent unauthorized use.
The three-position safety switch lets the user stop the running belt in anemergency situation. In preparing for a workout, align the safety switch with thegreen dot and clip the safety switch cord to clothing at the waistline before youstep onto the running belt. By taking this precaution, a tug on the safety switchcord trips the safety switch and slows the running belt to a safe stop.
Important: Always attach the safety switch cord to your clothing before eachworkout. Use the clip provided on the end of the cord. Be sure that the safetyswitch is positioned at the green dot before working out.
If the safety switch trips while you are working out, the treadmill retains yourworkout statistics. Realign the safety switch at the green dot and press theSPEED key to return to the desired speed.
UNDERSTANDING THE ELECTRONIC CONSOLE
Once the treadmill is assembled, it is ready to use. There are no complexinstructions to follow or mandatory programming steps required to operate thetreadmill. Choose either the Quick Start feature which lets you immediately startthe Manual program, or the Setup Mode which prompts you for more specificinformation. On the C964i, you can also select one of several workout programs.
When you use the Precor Heart Rate Option, the Smart RateTM feature providesvisual aids regarding your heart rate. The Precor chest strap that you weartransmits a signal which is picked up by the software and displayed numerically(when the Heart Rate indicator is lit) and, on the C964i, graphically along thebottom of the left window display. The blinking segment helps you maintain yourheart rate in the weight loss or cardiovascular zones.
Informative messages also scroll across the display. These messages requestinformation and action, or explain problems that may arise while you are usingthe treadmill. Some problems you can solve (see Troubleshooting Heart RateError Messages). Other problems require a qualified service technician.
page 13
C O M M E R C I A L P R O D U C T S D I V I S I O N
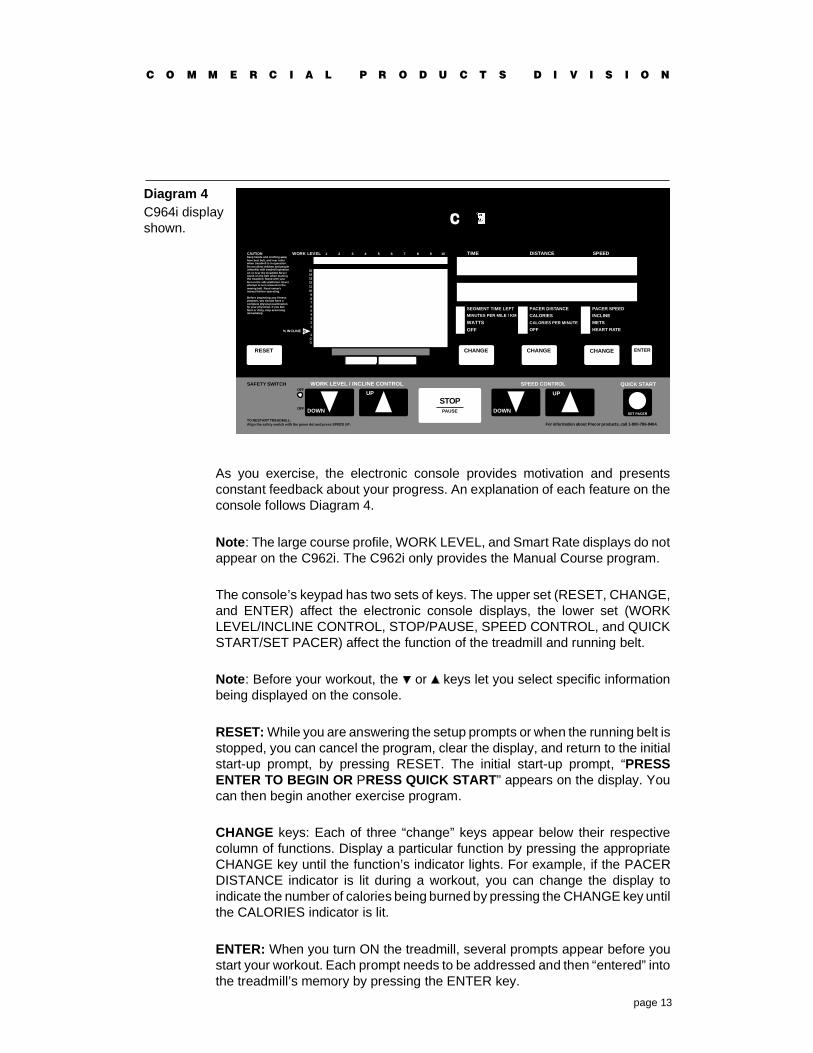
1 2 3 4 5 6 7 8 9 01WORK LEVEL TIME DISTANCE SPEED
% INCLINE
CAUTIONKeep hands and clothing awayfrom bed, belt, and rear rollerwhen treadmill is in operation.Do not allow children and peopleunfamiliar with treadmill operationon or near the treadmill. Neverstand on the belt when startingthe treadmill. Stand with yourfeet on the side platforms. Neverattempt to turn around on themoving belt. Read owner'smanual before operating.
Before beginning any fitnessprogram, you should have acomplete physical examinationby your physician. If you feelfaint or dizzy, stop exercisingimmediately.
SAFETY SWITCH
151413121110987654321
-1-2-3
OFF
OFF
TO RESTART TREADMILL:Align the safety switch with the green dot and press SPEED UP.
ENTERRESET CHANGE CHANGE CHANGE
DOWN
UP
SPEED CONTROL
STOP
WORK LEVEL / INCLINE CONTROL
PAUSEDOWN
UP
SEGMENT TIME LEFTMINUTES PER MILE / KM
WATTS
OFF
PACER DISTANCE
CALORIES
CALORIES PER MINUTE
OFF
QUICK START
SET PACER
For information about Precor products, call 1-800-786-8404.
0
PACER SPEED
INCLINE
METS
HEART RATE
As you exercise, the electronic console provides motivation and presentsconstant feedback about your progress. An explanation of each feature on theconsole follows Diagram 4.
Note: The large course profile, WORK LEVEL, and Smart Rate displays do notappear on the C962i. The C962i only provides the Manual Course program.
The console’s keypad has two sets of keys. The upper set (RESET, CHANGE,and ENTER) affect the electronic console displays, the lower set (WORKLEVEL/INCLINE CONTROL, STOP/PAUSE, SPEED CONTROL, and QUICKSTART/SET PACER) affect the function of the treadmill and running belt.
Note: Before your workout, the or keys let you select specific informationbeing displayed on the console.
RESET: While you are answering the setup prompts or when the running belt isstopped, you can cancel the program, clear the display, and return to the initialstart-up prompt, by pressing RESET. The initial start-up prompt, “PRESSENTER TO BEGIN OR PRESS QUICK START” appears on the display. Youcan then begin another exercise program.
CHANGE keys: Each of three “change” keys appear below their respectivecolumn of functions. Display a particular function by pressing the appropriateCHANGE key until the function’s indicator lights. For example, if the PACERDISTANCE indicator is lit during a workout, you can change the display toindicate the number of calories being burned by pressing the CHANGE key untilthe CALORIES indicator is lit.
ENTER: When you turn ON the treadmill, several prompts appear before youstart your workout. Each prompt needs to be addressed and then “entered” intothe treadmill’s memory by pressing the ENTER key.
C964i displayshown.
Diagram 4
page 14
C O M M E R C I A L P R O D U C T S D I V I S I O N
WORK LEVEL/INCLINE CONTROL: The and keys adjust the incline of therunning bed from -3% to +15%. On the display, changes in incline can be seenin the course profile. In Manual mode, the and keys affect the current blinkingsegment and adjust the remainder of the course. In the Interval course, the and
keys affect the current segment and all subsequent work or rest segments(depending on which one you changed).
STOP/PAUSE: To pause or end your workout, press this key. The running beltslows to a safe stop. The workout statistics remain displayed on the console untilyou press the SPEED key again. To clear the displays, press RESET.
Important: If a pause continues for more than two minutes, the treadmillautomatically resets and returns to the start-up prompt.
SPEED CONTROL: These and keys let you decrease or increase thetreadmill’s speed. The maximum speed can be set in the custom mode. (SeeUsing the Club Program.) The range of speed is from .5 to 15 mph or .8 to 24 kph.
Note: The treadmill’s running belt starts moving at 1 mph (1.6 kph). However,you can lower the speed to .5 mph (.8 kph) by pressing the SPEED key.
QUICKSTART/SET PACER: To use the Manual program, you can bypass thesetup prompts by pressing the QUICK START key while the start-up prompt isdisplayed. Otherwise, you can select a course and press QUICK START.
QUICK START Default Values
Prompts Default Value
Course ManualTime 30 minutes* *Or Club limit whichever is less. Weight
Loss Course is fixed at 28 minutes.Weight 150 lbs (70 kg)Age 30* *Only appears if the Precor Heart Rate Option
is installed in the console.
If you press QUICK START any time during the setup prompts, the default valuesbecome effective for the prompts that you bypassed. When you press QUICKSTART to bypass some or all of the setup prompts, a message scrolls across thedisplay “Belt Starting 3, 2, 1,...” The running belt begins moving at 1 mph.
SET PACER: If you want to use a pacer, you need to press the SET PACER keyonce your workout has begun. During a workout, you can press the SET PACERkey to reset the speed of the pacer to your current travelling speed.
The pacer’s speed and distance appears in numeric form and provides informa-tion that can help motivate you while you work out.
page 15
C O M M E R C I A L P R O D U C T S D I V I S I O N
LEFT DISPLAY
The left display on the electronic console provides graphic information aboutyour workout session. The course profile that appears in the left window displaycorresponds to the program you selected. As you proceed through your workout,your position is indicated by a blinking cell.
WORK LEVEL: Shows the selected effort level, from 1 to 10. The higher thenumber you select, the greater the inclines become. You can change the worklevel anytime during a workout by using the WORK LEVEL/INCLINE CONTROL
and keys to increase or decrease the degree of effort in your workout.
Note: A WORK LEVEL prompt does not appear when you use the manual orinterval programs.
%INCLINE: Shows percent of incline in a bar graph format from -3% to +15%.
SMART RATETM: The name given to the bar graph that appears at the bottomof the C964i display. When you wear the Precor Heart Rate Option’s chest strap,a blinking segment approximates a percentage of your maximum aerobic heartrate and shows you the zone that your heart rate is in: either Weight Loss orCardiovascular. Refer to Understanding Smart Rate.
RIGHT DISPLAY
The right display windows on the electronic console provide alphanumericdisplays. The top right display window indicates what you are doing on thetreadmill and the lower right display window explains how to do it. Promptsappear in the top right display window prior to your workout; what you need todo to answer the prompts appears in the lower right display window. Once youbegin a workout, the top right display window indicates the time, distance, andspeed and the lower right display window shows the information you choose tohighlight in the rows of columns beneath the right display windows.
During your workout, indicator lights appear in the columns below the rightdisplay windows indicating which information is being displayed. You candetermine what information will appear by pressing the CHANGE keys andhighlighting a particular feature.
TIME: Displays the time that has elapsed since beginning a specified program.Use this display to pace yourself during a workout.
DISTANCE: Shows the distance that you have travelled during your workout.Distance can appear in miles or kilometers. If you wish to change the display,follow the instructions found in Using the Club Program.
page 16
C O M M E R C I A L P R O D U C T S D I V I S I O N
SPEED: Once you begin a workout, the speed at which you are travellingappears in this display. Your speed can appear in miles per hour or kilometersper hour. If you wish to change the type of units being displayed, follow theinstructions found in Choosing Between U.S. Standard and Metric Displays.
SEGMENT TIME LEFT: Indicates the amount of time left in a particular column(or segment) before the cell at the top of the next column begins blinking.
MINUTES PER MILE (KM): Indicates how many minutes it would take you totravel one mile (kilometer) at your current speed.
WATTS: Indicates the amount of energy currently being expended.
PACER DISTANCE: Shows the distance that the pacer has travelled.
Note: If you press the QUICK START/SET PACER key during a workout, thepacer’s distance display is reset to your current distance.
CALORIES: Provides the cumulative number of calories burned in the workout.
CALORIES PER MINUTE: Indicates the number of calories per minute.
PACER SPEED: The current speed appears in this display when the PACERkey is pressed.
Note: If you press the QUICK START/PACER key during your workout, thepacer’s speed resets to your current travelling speed.
INCLINE: Displays the percent of incline during your workout. The INCLINEdisplay appears any time the incline changes. After a few seconds, the displayresets to its current settings.
METS: Displays the metabolic units associated with your workout.
HEART RATE: The heart rate display helps you monitor your heart rate and, inthe C964i Heart Rate and Weight Loss courses, keeps you at your target heartrate. You must wear the Precor Heart Rate Option chest strap transmitter beforeyour heart rate can appear on the display. For more information, see your PrecorHeart Rate Option Owner’s Manual.
OFF: The OFF indicator at the bottom of the first two rows lets you choose whatyou want displayed in the lower right display window. If you move the indicatorlight to OFF using the CHANGE key, no information is displayed for that column.
page 17
C O M M E R C I A L P R O D U C T S D I V I S I O N
UNDERSTANDING SMART RATE ON THE C964i
The C964i software incorporates the latest in cardiac monitoring to provideSmart RateTM—a visual aid that lets the user know what his or her heart rate isat a glance. When the Precor Heart Rate Option chest strap is worn, the graphon the display lights up with colored cells to indicate exercise intensity. A specificpercent of the user’s heart rate appears as a blinking cell within that zone.
Important: The Smart Rate blinking indicator light and the heart rate display onlyappear when a receiver is installed in the electronic display and the chest straptransmitter is used. If the Smart Rate lights appear, but do not blink, it means thata receiver is installed, but the user is not wearing the chest strap transmitter orit is not working properly. Refer to Obtaining Service on the inside front cover.
Smart Rate simplifies the correlation between heart rate and exercise. You don’thave to stop concentrating on your workout to find your pulse anymore. SmartRate performs all the calculations for you and displays a graphic image of whereyou are in your zone. Smart Rate uses your age and your maximum aerobic heartrate to calculate a zone. The blinking cell symbolizes the percent at which yourheart rate is working and displays it in the cardiovascular or weight loss zone.
Using Smart Rate during a workout with any C964i program helps maximize theuser’s weight loss or cardiovascular fitness regimen. While a user works out ina particular course, show him or her the Smart Rate display and change theincline to position his or her heart rate in the desired Smart Rate zone.
Important: The Smart Rate indicator lights do not appear when you use theQUICK START key.
When the heart rate is maintained between 70% and 85% of a person’smaximum aerobic heart rate, overall improvement occurs to their cardiorespira-tory fitness level. If a person maintains his or her heart rate between 55% and70% of their maximum aerobic heart rate, he or she is burning enough caloriesthat, when continued on a regular basis for 30 minutes or more, providesprimarily fat-burning (weight loss) benefits.
page 18
C O M M E R C I A L P R O D U C T S D I V I S I O N
This section explains how to exercise on the treadmill. The Manual course is theonly program available on the C962i. The C964i comes with a variety ofpreprogrammed courses which differ in the “terrain” you cover.
Important: Skip steps 5 and 8 if you are using the C962i.
All the preprogrammed courses can be performed at any of the work levels.To select the work level appropriate for your level of fitness, start withlevel 1 (beginner exercise or warm-up).
In addition to the C964i preprogrammed courses, you can choose a Customcourse that the club owner has designed (see Using the Club Program ). TheC964i also provides Heart Rate, Weight Loss, Manual, Interval, or Randomcourses which let you control your work level while the program is in progress.For more information about using the different C964i courses, refer to thesections following Exercising on the C964i/C962i Treadmill.
CAUTION: Before beginning any fitness program, you should have acomplete physical examination by your physician.
To exercise on the treadmill, take the following steps:
1. If the treadmill is OFF, turn it ON using the ON/OFF power switch. The switchis at the front of the treadmill, near the power cable. “PRESS ENTER TOBEGIN OR PRESS QUICK START” appears on the display.
Note: If you have purchased the security key option, you must insert thesecurity key properly on the front of the hood before you can turn ON thetreadmill. And, if the prompt, “RESET SAFETY SWITCH” appears, thesafety switch has been tripped. To display the initial start-up prompt, alignthe safety switch with the green dot. The running belt will not move until thesecurity key is in place and the safety switch is positioned at the green dot.
2. Stand to the side of the running belt with your feet firmly planted on the rightor left side platforms. (Stand close enough to the electronic console so youcan extend your arms and touch the keys.)
3. Using the clip provided, attach the safety switch’s cord to your exerciseclothing at your waistline, where it will not interfere with your workout.
4. Press ENTER to set up the workout session. If you plan on using the Manualprogram, you can press QUICK START to bypass the setup prompts.
Note: If you choose the QUICK START feature, skip steps 5 through 8.Using the QUICK START feature causes the calories display to show thecalories being burned based on a 150 pound (70 kg) person and the amountof time you can use the treadmill defaults to the club limit. You can onlyaccess the Manual course mode.
Exercising on the C964i/C962i Treadmill

page 19
C O M M E R C I A L P R O D U C T S D I V I S I O N
5. At the “SELECT COURSE” prompt (C964i only), choose the course numberor name using any or key. Refer to the label on either side of the consolefor a list of the program numbers and their associated course profiles. Whenthe desired course number or name is displayed, press ENTER. The worklevel defaults to a level 4. You can change the work level by pressing theWORK LEVEL or keys while you work out.
Note: Pressing QUICK START any time during the setup prompts, by-passes the remaining prompts and causes the running belt to start movingat 1 mph after a warning message scrolls across the display. Stand at theside of the running belt with your feet firmly planted on the right or left sideplatforms
6. At the “SELECT TIME” prompt, specify the duration of your workout usingthe and keys. Press ENTER when the correct time is displayed. Thelength of time allowed for a workout can be limited. When specifying aworkout time, you can choose any time up to, but not longer than, this limit.For example, if the time limit is set at 20 minutes, you can set a workout timefrom 10 to 20 minutes.
7. At the “SELECT WEIGHT” prompt, specify your weight using any or key.The console displays weight in 5-pound (2.3 kilogram) increments. PressENTER when your weight is displayed. Entering a weight allows thetreadmill to accurately calculate how many calories you burn during yourworkout.
8. At the “SELECT AGE” prompt (C964i only) select your age using any or key and then, press ENTER.
Note: The “SELECT AGE” prompt only appears if the heart rate receiver isinstalled in the electronic console display.
9. You are prompted to press the SPEED key.
10. Step onto the running belt while the speed is at or below 1 mph (1.6 kph).Hold onto the handrail until you are comfortable with the speed.
During a workout, you can change your work level using the WORK LEVEL/INCLINE CONTROL or keys. Doing this affects the incline and how hardyou work. It also changes the entire level of the course profile.
11. Continue your workout and maintain your exercise intensity by keeping thesame speed as the pacer.
Note: You can pause during your workout by pressing the STOP/PAUSEkey. The belt slows to a gradual stop and your workout statistics remaindisplayed on the electronic console. To continue your workout, follow theinstructions in steps 9 and 10.

page 20
C O M M E R C I A L P R O D U C T S D I V I S I O N
12. When the selected exercise program ends or you reach the time limit, a5-minute cool-down period occurs. The TIME display counts down from5 to 0 minutes. Speed is reduced to 1 mph (2 kph) and the incline returnsto 0% grade. (You have the option to increase the speed by pressing theSPEED key.) Your workout statistics continue to accumulate until the cool-down period has ended. For information regarding the cool-down period,refer to Cooling Down After Your Workout.
13. Review your workout statistics. If you have gone through the cool-downperiod, your workout statistics remain on the display for about 2 minutesbefore the display returns to the initial start-up prompt. If you ended yourworkout prior to the cool-down period, press RESET to return to the initialstart-up prompt.
We recommend that you keep track of your workouts by writing them down. Thisway you can monitor your progress toward your fitness goals and also use theinformation as a reference in planning interesting and challenging workouts inthe future. A form for recording your workout statistics is provided on page 31.
COOLING DOWN AFTER YOUR WORKOUT
The treadmill incorporates a cool-down period into your workout if you choosea C964i preprogrammed or C964i custom course at the “SELECT COURSE”prompt or reach the club time limit in the manual or interval courses.
When you reach the end or time limit of a course, the following occurs:
• A prompt appears explaining that you are entering the cool-down period.If your speed was greater than 3 mph (4.8 kph), the running belt slows to3 mph (4.8 kph). The lift moves to a 0% incline. The treadmill returns toManual mode. You can override the incline and speed by pressing theINCLINE or SPEED or keys.
Note: The speed remains constant if you were at or below 1 mph (1.6 kph).
• The TIME display resets and begins counting down from 5 minutes.
• Your workout statistics continue to accumulate and appear on the displayduring the cool-down period. After the 5-minute cool down has ended, aprompt “FINAL WORKOUT RESULTS” scrolls across the display. Theworkout statistics remain visible on the display for approximately 2 minutes,then, the initial start-up prompt appears.
page 21
C O M M E R C I A L P R O D U C T S D I V I S I O N
PAUSING DURING YOUR WORKOUT
Once you press QUICK START or answer the start-up prompts to beginexercising in a workout program, you can pause the program by pressing STOP/PAUSE. Pressing STOP/PAUSE saves your workout statistics and freezes thedisplays. The treadmill provides a 2-minute pause before resetting the displaysand deleting your workout statistics. To resume your workout during thetwo-minute pause, press the SPEED key.
ENDING YOUR WORKOUT
If you wish to end your workout, press the STOP key. The running belt comesto a gradual stop and a prompt, “PRESS RESET OR SPEED UP” appears. Pressthe RESET key to clear the displays. The initial start-up prompt, “PRESS ENTERTO BEGIN OR PRESS QUICK START” appears.
Note: If you are using one of the C964i preprogrammed courses, the running beltslows when you reach the end of the course and provides a 5-minute cool-downperiod. After the cool down, the running belt slows to a gradual stop. To stop yourworkout before the end of the course, press STOP. Press RESET to return to theC964i banner.

page 22
C O M M E R C I A L P R O D U C T S D I V I S I O N
The Precor Heart Rate Interactive System is based on research conducted at theworld-renowned Cooper Institute for Aerobics Research.
Important: Any program, that you wish to make heart rate interactive, must beused in conjunction with the Precor Heart Rate Option. The receiver must beinstalled in the console and a compatible chest strap must be worn by the user.See Obtaining Service on the inside front cover.
Before using the C964i Heart Rate Course or any program where you wish todisplay your heart rate, take time to read the following guidelines.
• Consult with your physician before engaging in any vigorous exercise. Donot use the C964i Heart Rate Course until authorized by your physician.
• Slow down and stop the workout immediately if you experience any pain orabnormal symptoms.
• Gently stretch you lower body and back before and after the course to helpprevent stiffness or soreness.
• Know your heart rate (pulse) and your physician-recommended heart ratetraining zone. Individual heart rates vary according to several physiologicalfactors and may not correspond directly with the tables provided.
• You should not use the C964i Heart Rate Course if you are taking anymedications that either speed up or slow down your heart rate.
• After putting on the chest strap, turn the treadmill ON and position yourselfon the running belt for a minimum of 15 seconds. This allows the treadmillto acknowledge the presence of the transmitter.
• While using the chest strap, face the electronic console and stay within 3 feetof it. If you move outside of the 3-foot range, the receiver might have difficultypicking up your heart rate signal.
• A warm-up and cool-down period has been incorporated into the C964iHeart Rate Course.
Note: On the C962i, the Manual course is the only course available. It canbe made heart rate interactive if the Precor Heart Rate Option is installed andthe chest strap worn by the user. It is up to the user to monitor his or her heartrate at the appropriate beats per minute. Use the CHANGE key to highlightHEART RATE so it can appear on the display.
Utilizing the Heart Rate Interactive Courses

page 23
C O M M E R C I A L P R O D U C T S D I V I S I O N
USING MANUAL MODE AND THE QUICK START KEY
Manual mode lets you control your work level and change the incline while youwork out. You can choose the Manual mode in two different ways. When thestart-up prompt “PRESS ENTER TO BEGIN OR PRESS QUICK START” isdisplayed, press:
• QUICK START. The QUICK START option bypasses the setup promptsand, after a 3-second delay, starts the running belt moving at 1 mph (1.6kph). The weight setting defaults to 150 pounds (70 kg) so all caloriecalculations and their associated displays are based on a body weight of 150pounds (70 kg). You cannot change the weight or time settings if you use theQUICK START option.
Note: The C964i Smart Rate indicator lights do not appear if you use theQuick Start key. However, if you are wearing the Precor Heart Rate Option’schest strap, you can view your HEART RATE by pressing the CHANGE keyto highlight the HEART RATE indicator.
• ENTER. This causes the treadmill to display a number of prompts asexplained in the previous section titled Exercising on the C964i/C962iTreadmill and allows the Smart Rate display to be activated on the C964i ifthe Precor receiver is installed.
When you choose the MANUAL program, use the INCLINE CONTROL or keys to change the incline level. On the C964i, a blinking cell represents yourposition in the course as you proceed through your workout.
USING THE C964i HEART RATE COURSE
Once you set you target heart rate and the running belt’s speed, the C964i HeartRate Course monitors your heart rate and automatically maintains it within a fewbeats per minute (bpm) of the selected target. Blinking lights on the Smart RateTM
bar graph appear to show the “zone” that you are in. Use the CHANGE key tohighlight the HEART RATE indicator and your heart rate (beats per minute)appears in the right window display.
Note: For the C964i software to detect a heart rate, the receiver must be installedin your unit and you must wear the Precor chest strap transmitter.
To use the Heart Rate Course follow the steps in Exercising on the C964i/C962iTreadmill and choose the appropriate program number at the “SELECT COURSE”prompt. Once you have finished answering the remaining setup prompts, thefollowing occurs:
• The software verifies that it detects a heart rate signal. You need to pressthe SPEED key to begin your workout.
page 24
C O M M E R C I A L P R O D U C T S D I V I S I O N
Note: If your heart rate cannot be detected or no heart rate information istransmitted for more than 20 seconds, the incline returns to 0% and amessage appears stating that no heart rate signal has been detected.
• The treadmill provides a 3-minute warm-up period before entering the actualHeart Rate Course. During this time, you need to make any changes to thetarget heart rate by using the INCLINE or keys. Use the SPEED or keys to set the running belt’s speed.
After the warm-up period, the treadmill automatically adjusts the incline tokeep your heart rate close to the selected target. Check the Smart Ratedisplay on the C964i to see if you are in your preferred zone (cardiovascularor weight loss).
Note: You can change your heart rate or speed anytime during a workout,but doing so affects the treadmill’s ability to maintain your target heart rate.It takes time for the treadmill to readjust the incline so that your heart rateremains on target.
• To view your heart rate’s target percent zone and beats per minute, brieflypress an INCLINE or key. To change the heart rate, press and hold theINCLINE or key.
Important: A warning message will appear if you go above your maximumrecommended heart rate target zone. Heed the warning and get permissionfrom your personal physician before working out above the maximumrecommended zone for your age and fitness level.
• When you reach the time limit, a cool-down period begins. The running beltslows to 3 mph (4.8 kph) and the incline returns to 0% incline. You canoverride the speed and incline by pressing the or keys.
Note: The speed remains constant, if you were at or below 1 mph (1.6 kph).
During your cool down, the displays on the console continue to appear. TheTIME display counts down from five minutes so you know how long you havebeen in the cool-down period. Refer to Cooling Down After Your Workout.
• To end a cool-down period before the five minutes elapse, hold onto thehandrail and press STOP.
When the running belt comes to a complete stop, straddle the running belt,remove the safety clip from your clothing, and step off the treadmill if you havefinished your workout.
page 25
C O M M E R C I A L P R O D U C T S D I V I S I O N
USING THE C964i WEIGHT LOSS PROGRAM
The Weight Loss program is similar to the heart rate interactive programbecause you set the target heart rates. The C964i software automatically adjuststhe incline of the treadmill and maintains your heart rate settings while in the restor work intervals.
Note: For the C964i software to detect a heart rate, the receiver must be installedin your unit and you must wear the Precor chest strap transmitter.
To use the Weight Loss program, follow the steps found in the section titledExercising on the C964i/C962i Treadmill. When the electronic console displayprompts you to select a course, choose the appropriate program number. Referto the program course label to the side of the display.
Note: The recommended percent of maximum aerobic heart rate that you shouldtry to maintain is 55% while in the “rest” intervals and 70% while in the “work”intervals. See Diagram 5.
Important: You can change the incline, but doing so will cause the effectivenessof the weight loss program to vary.
Training ZonesDiagram 5
HEART RATE TRAINING ZONE
70
80
90
100
120
130
140
150
160
170
180
190
200
20 25 30 35 40 45 50 55 60 65 70 75YOUR AGE
MAX.HEARTRATE
80% OFMAX.HEARTRATE65% OFMAX.HEARTRATE
130 127120 117 114 111 107 104
97
160156
148144
140136
132128
124120
190185
180175
170165
160155
150145
94
124
152
116
101
195200
page 26
C O M M E R C I A L P R O D U C T S D I V I S I O N
CHANGING THE C964i INTERVAL COURSE PROFILE
The interval courses on the C964i allow you to set two custom intervalsaccording to your training regimen. You set the speed and incline for the twointervals (first two columns of the course) and the software takes over from there,repeating the intervals throughout the course until the time limit runs out or youpress the STOP key.
To set the interval for a course, take the following steps:
1. At the “SELECT COURSE” prompt, use the and keys to displayINTERVAL. Press ENTER.
Important: Be sure you have attached the safety switch’s cord to yourclothing at your waistline before beginning your workout.
2. The INTERVAL course profile appears in the left display window. Continueto stand next to the running belt while you press the SPEED key. Step ontothe running belt while the speed is at or below 1 mph (1.6 kph). Hold ontothe handrail until you have completed setting the two interval speeds andinclines for the course. Be sure you are comfortable with the speed of therunning belt before you release your grip from the handrail.
3. While the cell is blinking at the top of the first column, press the SPEED or keys to set the first interval speed. Press the INCLINE or keys tochoose the incline.
4. When the cell at the top of the second column begins blinking, use theSPEED or keys to set the second interval speed. Choose an appropriateincline by pressing the INCLINE or keys.
After you set the speed and incline on the first two columns of the course profile,the treadmill’s software takes over and continues repeating those intervalsthroughout the remaining course profile at the levels you selected.
Note: Anytime during your workout, you can change the interval levels by usingthe SPEED or INCLINE or keys. The treadmill’s software reprograms theremainder of the course profile to the newly specified intervals.
USING THE C964i RANDOM COURSE
Selecting a random course on C964i treadmill provides a different course profileevery time you work out. The random program provides variable course profiles.Every time the random course is displayed, a different course profile appears.
page 27
C O M M E R C I A L P R O D U C T S D I V I S I O N
Because of its advanced design, the treadmill requires little maintenancebeyond periodic cleaning, which is explained in this section. Keep in mind that,as owner of this machine, you are solely responsible for its maintenance.
CAUTION: Turn OFF and unplug the treadmill from the power outlet beforeperforming any maintenance tasks, such as cleaning. Remove the secu-rity key and store it in a safe place to prevent unauthorized use.
CLEANING THE TREADMILL
Your Precor treadmill relies on low friction for efficient operation. To keep thefriction low, the treadmill must be as clean as possible.
Everyday use a damp, soft cloth to clean the staging platform, running bed, andbetween the belt and running bed surface as far as you can easily reach. Thisremoves any dirt or dust which might affect the smooth operation of the treadmill.
Vacuum underneath and around the unit every week to prevent the accumula-tion of dust and dirt.
CAUTION: Never pour water or spray liquids on the electronic console ortreadmill. Allow the treadmill to dry completely before using.
Periodically, clean the treadmill’s frame, electronic console, and running belt.Use mild soap and water for this. To clean the running belt and the grooves onthe plastic trim, use a soft nylon scrub brush.
ALIGNING THE RUNNING BELT
The correct alignment of the running belt is critical to the smooth operation of thetreadmill. The belt is properly aligned at the factory. However, during shippingand handling or by use on an uneven surface, the belt may move off center andrequire a few simple adjustments.
Before adjusting the running belt, check its operation by following the steps inChecking the Alignment of the Running Belt earlier in this manual. If youdetermine that the belt needs adjustment, follow the instructions here.
CAUTION: To avoid injury, special care must be taken when adjusting therunning belt. Turn OFF the treadmill and wait for the running belt to cometo a complete stop before adjusting or working near the rear roller. Removeany loose clothing and tie back your hair. Be very careful to keep yourfingers or any other object clear of the belt and rollers. The treadmill willnot stop immediately if any object becomes caught in the belt or rollers.
Maintaining the Commercial Treadmill
page 28
C O M M E R C I A L P R O D U C T S D I V I S I O N
Take the following steps to adjust the running belt on the C964i treadmill. Toensure proper safety while aligning the running belt, all adjustments must bemade when the treadmill is OFF.
CAUTION: Do not walk on the running belt during this procedure.
1. Make sure the treadmill is OFF and the running belt is completely stopped.
2. Locate the belt adjustment bolt at the rear of the treadmill. (It is on the righthand side as you stand behind the rear roller and face the display.) Thedirection you turn the bolt depends on how the belt is tracking. Make all beltadjustments on the rear corner bolt using the hex key provided.
• If the belt is off center to the LEFT, turn the adjusting bolt 1/4 turn clockwise,which moves the running belt to the right.
• If the belt tracks off center to the RIGHT, turn the bolt 1/4 turn counterclock-wise; this moves the belt to the left.
Important: Do not turn the adjusting bolt more than 1/4 turn at a time.Overtightening the bolt can damage the treadmill.
3. With the safety switch positioned at the green dot, turn ON the treadmill.Press the QUICK START key and then increase the speed of the runningbelt to 2 mph (3.2 kph) using the SPEED key.
4. Observe the running belt for about a minute. The belt should track centeredon the running bed.
5. Press STOP/PAUSE to stop the running belt.
6. If the belt needs additional alignment, repeat steps 1 through 5 of thisprocedure until the belt is properly aligned.
7. Once the running belt is properly aligned, press RESET to display the initialstart-up prompt.
page 29
C O M M E R C I A L P R O D U C T S D I V I S I O N
CORRECTING INCONSISTENT HEART RATE READINGS
If you have purchased the Precor Heart Rate Option and the treadmill cannotpick up your heart rate signal, or messages appear on the display regardingheart rate errors, stop your workout and take the following steps:
Important: Be sure that the heart rate being displayed correlates to your “normal”heart rate during exertion. Also, review the information found in the Precor HeartRate Option—Safety Guidelines.
1. Check with the club manager to make sure that the C964i treadmill containsthe heart rate receiver inside the electronic console display.
2. Make sure that the electrodes on the chest strap are moist and placedproperly against your skin. Check to be sure that the strap is comfortablytight around your chest and centered in the middle of your chest. Refer to thesection in your Precor Heart Rate Option Owner’s Manual titled, Wearing theChest Strap Transmitter.
3. Be sure that you are within 3 feet of the electronic console and facing towardit. Allow a few seconds for the receiver to display your heart rate on theelectronic console’s display.
4. Make sure that the treadmill is turned ON and the safety switch and securitykey (optional equipment) are in place and properly aligned.
If you have taken the steps above and still get erratic readings, you may needto replace the chest strap transmitter or its battery. Refer to your Precor HeartRate Option Owner’s Manual. Most often, when the chest strap fails to transmita heart rate signal, the cause is incorrect placement or conduction of the cheststrap electrodes. Check with your local servicer, he or she has a chest strap/heart rate simulator that can test your equipment to make sure that it is operatingproperly.
TROUBLESHOOTING HEART RATE ERROR MESSAGES
While you are performing the Heart Rate or Weight Loss courses, situations canarise that cause certain messages to scroll across the display. These messagesindicate that a problem has occurred and briefly explain the solution.
Several messages have a variety of solutions. Most error messages can beresolved by reviewing the steps in Correcting Inconsistent Heart Rate Readings.However, some error messages require more sophisticated tools and a qualifiedservice technician. If you have difficulty correcting a problem, call your localservicer. Refer to the Obtaining Service section on the inside front cover.
page 30
C O M M E R C I A L P R O D U C T S D I V I S I O N
SERVICING THE TREADMILL
Do not attempt to service the C964i yourself except for the maintenance tasksdescribed in this manual. The C964i does not contain any user-serviceable partsor parts that require lubrication. For information about product operation orservice, contact an authorized Precor dealer.
POWER CORD MAINTENANCE
When the C964i is in use, ensure that the power supply cord is away from movingparts and cannot be damaged.
If the C964i power supply cord is damaged, it can only be replaced in a repairshop appointed by Precor because special tools are required.
ACHTUNGBei Beschädigung der Anschlußleitung dieses Gerätes darf diese nur durch einevom Hersteller benannte Reparaturwerkstatt ersetzt werden, weilSpezialwerkzeug erforderlich ist.
LONG TERM STORAGE
When the C964i is not in use, ensure that the power supply cord is unpluggedfrom the wall outlet and is positioned so that it will not become damaged orinterfere with other equipment or people.
There are no special storage requirements for the C964i other than ensuring thatit is kept free from dirt, moisture, or damage.
ATTENTION: Haute TensionDébranchez avant de réparer.
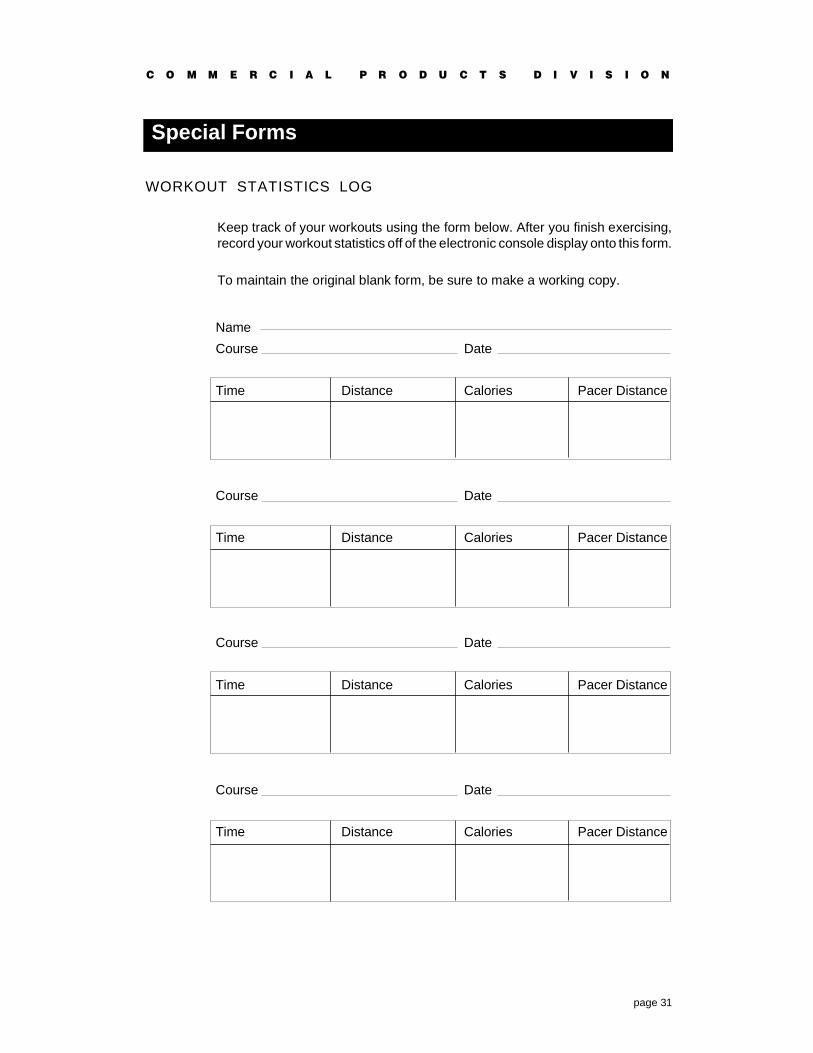
page 31
C O M M E R C I A L P R O D U C T S D I V I S I O N
WORKOUT STATISTICS LOG
Keep track of your workouts using the form below. After you finish exercising,record your workout statistics off of the electronic console display onto this form.
To maintain the original blank form, be sure to make a working copy.
Name
Course Date
Time Distance Calories Pacer Distance
Course Date
Time Distance Calories Pacer Distance
Course Date
Time Distance Calories Pacer Distance
Course Date
Time Distance Calories Pacer Distance
Special Forms
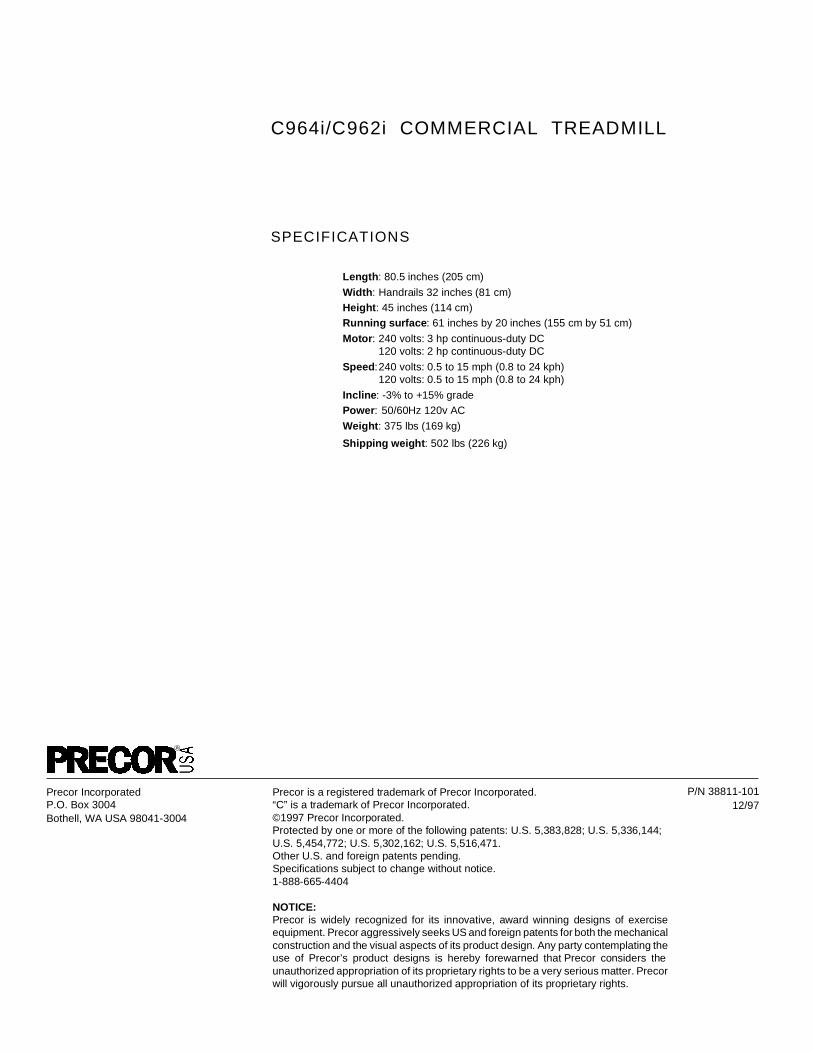
page 32
C O M M E R C I A L P R O D U C T S D I V I S I O N
Precor IncorporatedP.O. Box 3004Bothell, WA USA 98041-3004
P/N 38811-10112/97
C964i/C962i COMMERCIAL TREADMILL
SPECIFICATIONS
Length: 80.5 inches (205 cm)
Width: Handrails 32 inches (81 cm)Height: 45 inches (114 cm)Running surface: 61 inches by 20 inches (155 cm by 51 cm)
Motor: 240 volts: 3 hp continuous-duty DC120 volts: 2 hp continuous-duty DC
Speed:240 volts: 0.5 to 15 mph (0.8 to 24 kph)120 volts: 0.5 to 15 mph (0.8 to 24 kph)
Incline: -3% to +15% gradePower: 50/60Hz 120v AC
Weight: 375 lbs (169 kg)
Shipping weight: 502 lbs (226 kg)
Precor is a registered trademark of Precor Incorporated.“C” is a trademark of Precor Incorporated.©1997 Precor Incorporated.Protected by one or more of the following patents: U.S. 5,383,828; U.S. 5,336,144;U.S. 5,454,772; U.S. 5,302,162; U.S. 5,516,471.Other U.S. and foreign patents pending.Specifications subject to change without notice.1-888-665-4404
NOTICE:Precor is widely recognized for its innovative, award winning designs of exerciseequipment. Precor aggressively seeks US and foreign patents for both the mechanicalconstruction and the visual aspects of its product design. Any party contemplating theuse of Precor’s product designs is hereby forewarned that Precor considers theunauthorized appropriation of its proprietary rights to be a very serious matter. Precorwill vigorously pursue all unauthorized appropriation of its proprietary rights.
R
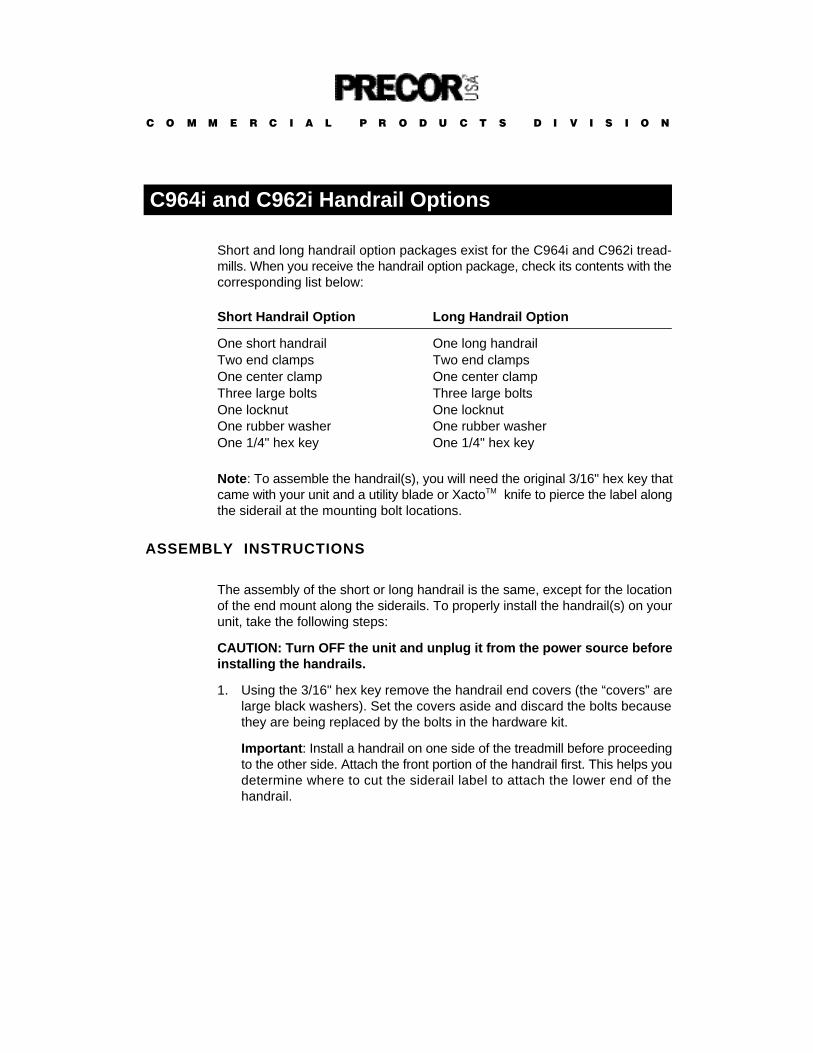
C O M M E R C I A L P R O D U C T S D I V I S I O N
Short and long handrail option packages exist for the C964i and C962i tread-mills. When you receive the handrail option package, check its contents with thecorresponding list below:
Short Handrail Option Long Handrail Option
One short handrail One long handrailTwo end clamps Two end clampsOne center clamp One center clampThree large bolts Three large boltsOne locknut One locknutOne rubber washer One rubber washerOne 1/4" hex key One 1/4" hex key
Note: To assemble the handrail(s), you will need the original 3/16" hex key thatcame with your unit and a utility blade or XactoTM knife to pierce the label alongthe siderail at the mounting bolt locations.
ASSEMBLY INSTRUCTIONS
The assembly of the short or long handrail is the same, except for the locationof the end mount along the siderails. To properly install the handrail(s) on yourunit, take the following steps:
CAUTION: Turn OFF the unit and unplug it from the power source beforeinstalling the handrails.
1. Using the 3/16" hex key remove the handrail end covers (the “covers” arelarge black washers). Set the covers aside and discard the bolts becausethey are being replaced by the bolts in the hardware kit.
Important: Install a handrail on one side of the treadmill before proceedingto the other side. Attach the front portion of the handrail first. This helps youdetermine where to cut the siderail label to attach the lower end of thehandrail.
C964i and C962i Handrail Options
C O M M E R C I A L P R O D U C T S D I V I S I O N
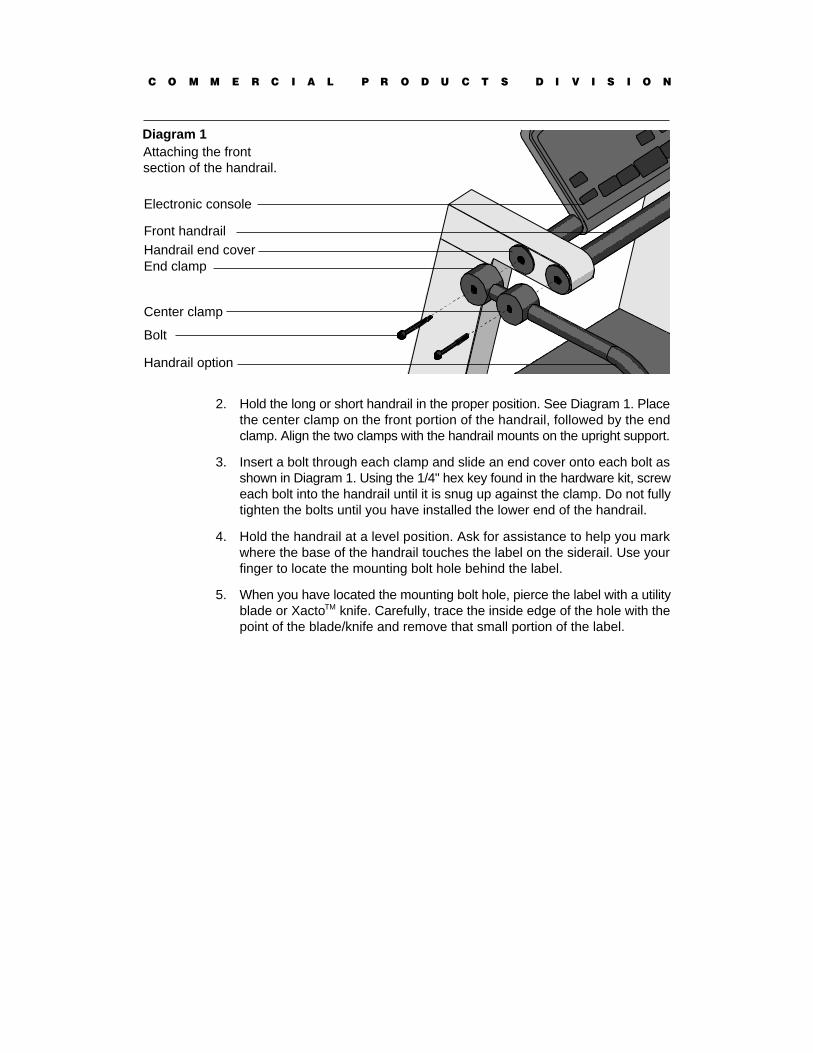
C O M M E R C I A L P R O D U C T S D I V I S I O N
Attaching the frontsection of the handrail.
2. Hold the long or short handrail in the proper position. See Diagram 1. Placethe center clamp on the front portion of the handrail, followed by the endclamp. Align the two clamps with the handrail mounts on the upright support.
3. Insert a bolt through each clamp and slide an end cover onto each bolt asshown in Diagram 1. Using the 1/4" hex key found in the hardware kit, screweach bolt into the handrail until it is snug up against the clamp. Do not fullytighten the bolts until you have installed the lower end of the handrail.
4. Hold the handrail at a level position. Ask for assistance to help you markwhere the base of the handrail touches the label on the siderail. Use yourfinger to locate the mounting bolt hole behind the label.
5. When you have located the mounting bolt hole, pierce the label with a utilityblade or XactoTM knife. Carefully, trace the inside edge of the hole with thepoint of the blade/knife and remove that small portion of the label.
Diagram 1
Handrail end coverEnd clamp
Electronic console
Front handrail
Handrail option
Bolt
Center clamp
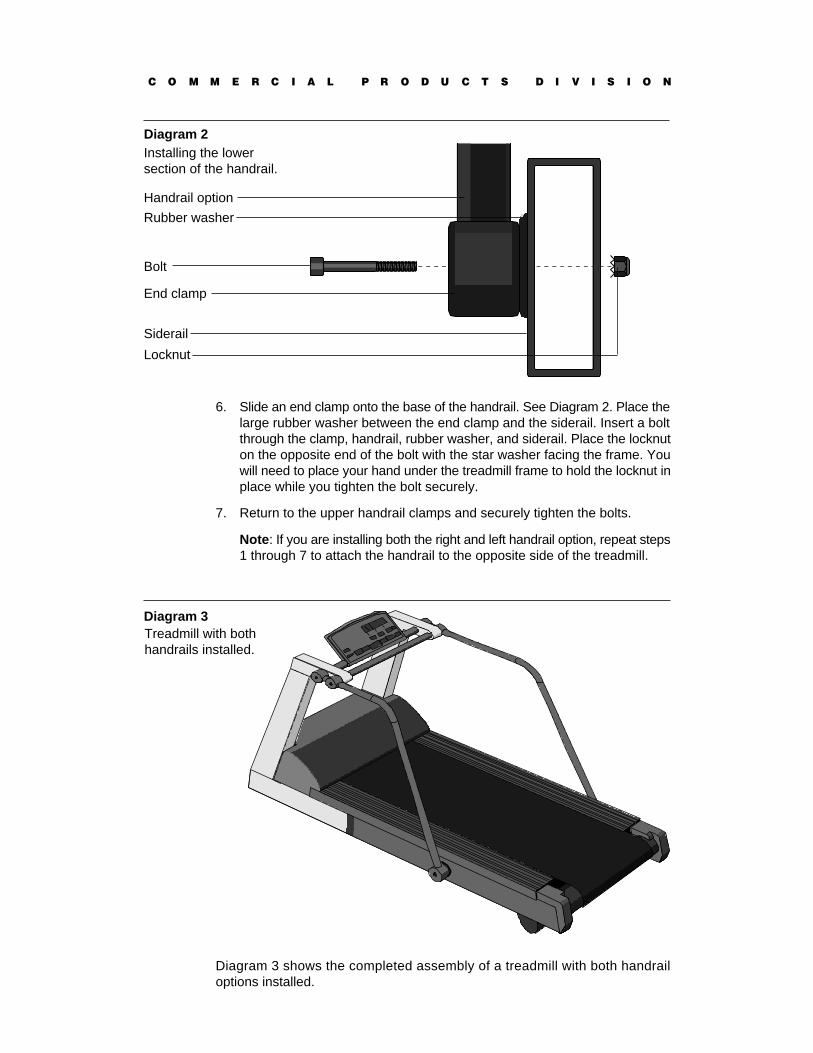
C O M M E R C I A L P R O D U C T S D I V I S I O N
Diagram 2Installing the lowersection of the handrail.
End clamp
Bolt
Siderail
Handrail option
Rubber washer
Locknut
6. Slide an end clamp onto the base of the handrail. See Diagram 2. Place thelarge rubber washer between the end clamp and the siderail. Insert a boltthrough the clamp, handrail, rubber washer, and siderail. Place the locknuton the opposite end of the bolt with the star washer facing the frame. Youwill need to place your hand under the treadmill frame to hold the locknut inplace while you tighten the bolt securely.
7. Return to the upper handrail clamps and securely tighten the bolts.
Note: If you are installing both the right and left handrail option, repeat steps1 through 7 to attach the handrail to the opposite side of the treadmill.
Diagram 3 shows the completed assembly of a treadmill with both handrailoptions installed.
Diagram 3Treadmill with bothhandrails installed.

C O M M E R C I A L P R O D U C T S D I V I S I O N
Precor is a registered trademark of Precor Incorporated.“C” is a trademark of Precor Incorporated.©1997 Precor Incorporated.
Specifications subject to change without notice.1-800-4-PRECOR
NOTICE:Precor is widely recognized for its innovative, award winning designs of exerciseequipment. Precor aggressively seeks US and foreign patents for both the mechanicalconstruction and the visual aspects of its product design. Any party contemplating theuse of Precor’s product designs is hereby forewarned that Precor considers theunauthorized appropriation of its proprietary rights to be a very serious matter. Precorwill vigorously pursue all unauthorized appropriation of its proprietary rights.
Precor IncorporatedP.O. Box 3004Bothell, WA USA 98041-3004
P/N 34065-10312/97
R