Combat Tactics - Nexwaydlpdf.nexway.com/prima/ArcaniaGoth4_PP_up.pdf · Combat, Weapons, and...
27
PRIMA OFFICIAL GAME GUIDE 26 TABLE OF CONTENTS Guide Use Basics Abilities Equipment Crafting Bestiary Walkthrough Quest Book Chest Log Achievements Equipment Combat, Weapons, and Equipment Combat Tactics Target Lock Exploration While exploring the lands and dungeons in the game, it is highly recom- mended to hold the target lock button at all times. This alerts you of nearby enemies long before they’re within range to detect your presence. This gives you the opportunity to size up the odds of your next encounter and use a ranged attack to gain the upper hand. There are times when you may lock on to a rabbit, deer, or other harmless enemy, but it’s a small annoyance com- pared to the advantage gained by detecting an enemy before it detects you. Dodge When an enemy prepares its strongest attack... ...dodge to left or right to avoid it. The ability to dodge is the most important ability in the game, espe- cially for close-range combat. A vast majority of the enemies in the game have a green aura around them just before they unleash a powerful at- tack. There’s also a sound effect that coincides with the attack. When you see the aura and hear the sound effect, be prepared to dodge. Do not dodge as soon as you know the attack is coming. If you dodge too soon, the enemy will simply realign and the attack will still connect. Instead, wait a moment until the attack is about to be unleashed, then dodge. It is also best to dodge to the right or left instead of dodging backwards. Some enemies have a longer reach than others, and dodging backwards may not move you far enough away to avoid the attack. In addition, all enemy attacks are linear, so dodging to either side works so long as you have proper timing. Fighting a Single Enemy When you fight against a single enemy, the combat is fairly basic. Dodge when the enemy unleashes a powerful attack, otherwise continue to attack the enemy as much as possible. Under most circumstances, if you’re attack- ing the enemy, they are stunned long enough to prevent them from attacking you. However, if you are separated from the enemy, as soon as the enemy gets within attack range, it almost always unleashes its most powerful attack. This is especially true when fighting enemies later in the game. This makes it difficult because you can only get a few swings in before the enemy prepares their most damaging attack. When this happens, start attacking before you’re within range, so that as soon as the enemy is close enough, it gets hit. With proper timing, the stun from the first two attacks is enough to prevent the enemy from using its most powerful attack. Protected by copyright. Unauthorized or unlawful copying or downloading expressly prohibited.
Transcript of Combat Tactics - Nexwaydlpdf.nexway.com/prima/ArcaniaGoth4_PP_up.pdf · Combat, Weapons, and...
PRIMA OFFICIAL GAME GUIDE26
TABLE OF CONTENTS
Guide Use Basics Abilities Equipment Crafting Bestiary W
alkthrough Quest Book Chest Log Achievements
Equipment
Combat, Weapons, and Equipment
Combat Tactics
Target Lock ExplorationWhile exploring the lands and dungeons in the game, it is highly recom-mended to hold the target lock button at all times. This alerts you of nearby enemies long before they’re within range to detect your presence. This gives you the opportunity to size up the odds of your next encounter and use a ranged attack to gain the upper hand. There are times when you may lock on to a rabbit, deer, or other harmless enemy, but it’s a small annoyance com-pared to the advantage gained by detecting an enemy before it detects you.
Dodge
When an enemy prepares its strongest attack...
...dodge to left or right to avoid it.
The ability to dodge is the most important ability in the game, espe-cially for close-range combat. A vast majority of the enemies in the game have a green aura around them just before they unleash a powerful at-tack. There’s also a sound effect that coincides with the attack. When you see the aura and hear the sound effect, be prepared to dodge. Do not dodge as soon as you know the attack is coming. If you dodge too soon, the enemy will simply realign and the attack will still connect. Instead, wait a moment until the attack is about to be unleashed, then dodge. It is also best to dodge to the right or left instead of dodging backwards. Some enemies have a longer reach than others, and dodging backwards may not move you far enough away to avoid the attack. In addition, all enemy attacks are linear, so dodging to either side works so long as you have proper timing.
Fighting a Single EnemyWhen you fight against a single enemy, the combat is fairly basic. Dodge when the enemy unleashes a powerful attack, otherwise continue to attack the enemy as much as possible. Under most circumstances, if you’re attack-ing the enemy, they are stunned long enough to prevent them from attacking you. However, if you are separated from the enemy, as soon as the enemy gets within attack range, it almost always unleashes its most powerful attack. This is especially true when fighting enemies later in the game. This makes it difficult because you can only get a few swings in before the enemy prepares their most damaging attack. When this happens, start attacking before you’re within range, so that as soon as the enemy is close enough, it gets hit. With proper timing, the stun from the first two attacks is enough to prevent the enemy from using its most powerful attack.
Protected by copyright. Unauthorized or unlawful copying or downloading expressly prohibited.

PRIMA OFFICIAL GAME GUIDE28
Equipment
TABLE OF CONTENTS
Guide Use Basics Abilities Equipment Crafting Bestiary W
alkthrough Quest Book Chest Log Achievements
There are a limited number of merchant NPCs in Argaan. While they sell quite a few items, they do not sell every item, piece of equipment, and weapon found throughout your adventures.
NOTE
Murdra
LoCATioN: Cleaved Maiden inn - Argaan (initial Area)
MurdrA’s iTeMs
iTeM PriCe QTY
Apple 2 99
Arrow 1 1
Bellied Vial 35 99
Brass ring 50 1
Carrot 2 99
Cooking recipe for Meat stew 10 1
Hemp Bandages 1 54
Minor Healing Potion 100 25
Minor Mana Potion 130 15
Minor stamina Potion 130 60
stringy Meat 5 6
Torch 3 1
Vial 20 99
Ulfrich
LoCATioN: east of the Cleaved Maiden inn - Argaan (initial Area)
uLfriCH’s iTeMs
iTeM PriCe QTY
Alchemical recipe for Lesser elixir of Prowess
1200 1
Ampulla 15 99
Bellied Vial 35 99
Bracers of the Apprentice 100 1
Budding Healing Plant 15 4
Budding ogre Leaf 25 1
Cucumber 2 23
Cut Vial 25 99
demon’s Cap 20 3
engraved Vial 30 99
Hemp Bandages 1 99
Lesser elixir of strength 250 1
rune of the four Winds 500 1
Vial 20 99
Merchant Shops
Protected by copyright. Unauthorized or unlawful copying or downloading expressly prohibited.

PRIMA OFFICIAL GAME GUIDE 29
Guide Use Basics Abilities Equipment Crafting Bestiary W
alkthrough Quest Book Chest Log Achievements
TABLE OF CONTENTS
Elgan the Merchant
LoCATioN 1: At the bridge upon first entering the lands of stewark.
LoCATioN 2: stewark Castle - southern part of town, out in the open.
eLgAN’s iTeMs
iTeM PriCe QTY
Alchemical recipe for Lesser elixir of Prowess
1200 1
Arrow 1 999
Bread 2 13
dried Herbs 20 99
Hemp Bandages 1 99
Leather Helmet 100 1
Minor Healing Potion 100 16
ruby 400 1
sour Apple 4 99
Torch 3 1
Vial 20 1
Ingor the Innkeeper
LoCATioN: stewark Castle
iNgor’s iTeMs
iTeM PriCe QTY
Apple 2 99
Cucumber 2 99
dried Herbs 20 99
Meat stew 4 1
Minor stamina Potion 130 4
sour Apple 4 99
Worgan the Alchemist
LoCATioN: stewark Castle
WorgAN’s iTeMs
iTeM PriCe QTY
Alchemical recipe for Minor Healing Potion
250 1
Alchemical recipe for the Nighteye elixir
50 1
Ampulla 15 99
Bellied Vial 35 99
Budding Healing Plant 15 6
Budding Mana Plant 20 5
Cut Vial 25 99
demon’s Cap 20 18
engraved Vial 30 99
glowing Amulet 50 1
Lead glass Vial 35 99
Lesser eagle eye elixir 250 24
Lesser elixir of strength 250 25
Minor Healing Potion 100 99
Minor Mana Potion 130 99
Minor stamina Potion 130 99
stoneskin elixir 100 18
sun Berry 15 15
Vial 20 99
Protected by copyright. Unauthorized or unlawful copying or downloading expressly prohibited.
PRIMA OFFICIAL GAME GUIDE 37
Guide Use Basics Abilities Equipment Crafting Bestiary W
alkthrough Quest Book Chest Log Achievements
TABLE OF CONTENTS
Not all items, equipment, and weapons can be sold or purchased from NPC merchants. some must be crafted or found elsewhere in the game (chests, enemy drops, etc.).
NOTE
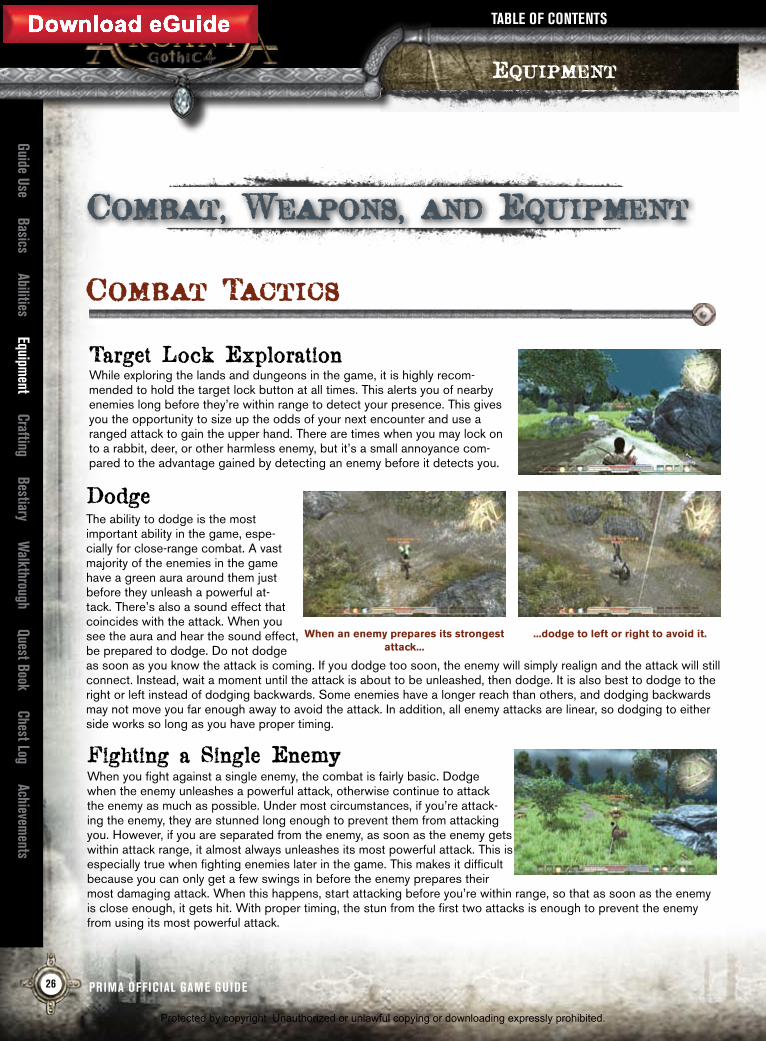
ConsumablesiTeM TYPe effeCTs PurCHAse
PriCe seLL PriCe desCriPTioN firsT seeN
Alma’s Best Elixir +30 Health Regeneration for 20 seconds. +10 Armour for 60 seconds.
60 12 Keeps you fresh and healthy and helps against cuts, viruses, rashes, warts, midget bites and diarrhea.
Feshyr
Apple Alchemical ingredient. Cooking ingredient, food.
+5 Health 2 1 Not just fruit, but also main component of very potent distillates.
Feshyr
Blueberries Alchemical ingredient. Food.
+14 Health” into the effects column and push everything to the right one column.
4 2 These common berries are used in some alchemy recipes as well. The main reason for that is to make the potion drinkable without influencing the effect.
Valley of Blood
Bread Food. +7 Health 2 1 Basic food on the larger islands and the continent.
Argaan (Initial Area)
Carrot Food. +8 Health 2 1 Basic food on the larger islands and the continent.
Feshyr
Cucumber Food. +10 Health 2 1 Basic food on the larger islands and the continent.
Argaan (Initial Area)
dried Cod Food. +15 Health 6 3 Basic food on the larger islands and the continent.
Tooshoo - Goblin Cave
eggplant Food. +13 Health 4 2 Basic food on the larger islands and the continent.
Valley of Blood
elixir of Arcane Might
Elixir. +90 Mana Regeneration for 30 seconds. +9 Magic Power for 60 seconds.
500 100 Experienced mages always carry a few vials on them. Raises concentration and will-power to a supernatural level.
Tooshoo
elixir of Black Bile
Elixir. +140 Mana Regeneration for 30 seconds. +15 Magic Power for 60 seconds. -80 Armour for 60 seconds.
750 150 This mixture is even more potent than the Elixir of Dark Tears. It not only attacks the bones, but also the heart and liver.
Tooshoo
elixir of dark Tears
Elixir. +60 Mana Regeneration for 30 seconds. +6 Magic Power for 60 seconds. -20 Armour for 60 seconds.
250 50 This elixir refined by Beliar cultists leads to painful bone decay and constant lachryma-tion. But the reward for all this suffering is... power.
Valley of Blood
Items, Equipment and Weapons
Protected by copyright. Unauthorized or unlawful copying or downloading expressly prohibited.

PRIMA OFFICIAL GAME GUIDE38
Equipment
TABLE OF CONTENTS
Guide Use Basics Abilities Equipment Crafting Bestiary W
alkthrough Quest Book Chest Log Achievements
ConsumablesiTeM TYPe effeCTs PurCHAse
PriCe seLL PriCe desCriPTioN firsT seeN
elixir of Prowess
Elixir. +60 Health Regeneration for 30 seconds. +40 Armour for 60 seconds. +6 Melee Power for 60 seconds. +6 Ranged Power for 60 seconds. +6 Magic Power for 60 seconds.
550 100 A popular tonic that strength-ens blood and circulation. Is drunk by whoever can afford it.
Silverlake Castle
elixir of the Berserker
Elixir. +100 Stamina Regeneration for 30 seconds. +12 Melee Power for 60 seconds.
850 170 Puts the user in a wild fury. Tooshoo - Ruins
elixir of the seven Winds
Elixir. Increases movement speed for 30 seconds.
375 75 Enables the drinker to move with great speed for 30 seconds. On the continent, a similar elixir based on snapper weed exists.
Monastery
elixir of the Warrior
Elixir. +40 Health Regeneration for 30 seconds. +20 Armour for 60 seconds. +3 Melee Power for 60 seconds.
250 50 Puts the user into a fighting frenzy.
Silverlake Castle
elixir of the Whirling Hand
Elixir. Slows the world down for 10 seconds.
1425 285 Multiplies the drinker’s reflexes and speed of thought. This elixir used to be a well-kept secret of the royal Setarrifian alchemists, but Rhobar III’s spies put an end to that.
Monastery
feshyr fruit Food. +5 Health 2 1 On Feshyr these fruit are called ‘Melgan’s Eyes.’
Feshyr
fried Chicken Legs
Food. +25 Health 16 8 After pork and fish, chicken is the most popular source of meat on Argaan.
Thorniara
greater elixir of Arcane Might
Elixir. +140 Mana Regeneration for 30 seconds. +15 Magic Power for 60 seconds.
1475 295 Together with healing potions, these potions are the most needed in times of war. A handful of capable mages under the influence of this elixir are a threat to a whole company.
Jungle
grilled Meat Food. +10 Health N/A 1 A little chewy maybe, but after all meat is meat.
Argaan (Initial Area)
Healing Potion Potion. +100 Health 200 40 A distillate of healing plants. This vial only contains a moderate dose of active components.
Valley of Blood
Heartsting elixir
Elixir. +120 Mana Regeneration for 30 seconds. +15 Ranged Power for 60 seconds. -15 Health Regeneration for 30 seconds.
800 160 Prepared correctly, this poison reduces breathing and heart-beat to an absolute minimum and sharpens the senses to a supernatural degree. With devastating effects on health....
Tooshoo - Elemental Shrine
Hemp Ban-dages
Remedy. +100 Health 1 1 Rough hemp bandages soaked in vinegar. Bandag-ing a wound takes time and patience. Cannot be used in combat.
Feshyr
ironhide elixir Elixir. +150 Armour for 60 sec-onds. +80 Health Regenera-tion for 30 seconds.
700 140 A refined variant of the Stoneskin Elixir. Expensive, but worth every coin.
Monastery
Lesser eagle eye elixir
Elixir. +40 Mana Regneration for 30 seconds. +4 Health for 30 seconds. +3 Ranged Power for 60 seconds.
250 50 Grants a sharp eye and a steady hand.
Argaan (Initial Area)
Lesser elixir of Arcane Might
Elixir +60 Mana Regeneration for 30 seconds. +4 Magic Power for 60 seconds.
250 50 Made by mages, for mages. Increases concentration and willpower.
Silverlake Castle
Protected by copyright. Unauthorized or unlawful copying or downloading expressly prohibited.

PRIMA OFFICIAL GAME GUIDE 41
Guide Use Basics Abilities Equipment Crafting Bestiary W
alkthrough Quest Book Chest Log Achievements
TABLE OF CONTENTS
EquipmentiTeM TYPe sTATs PurCHAse
PriCeseLL PriCe desCriPTioN firsT seeN
Amulet of Protection
Pendant. +20 Health; +10 Armour 200 40 A protection rune is etched into this amulet.
Rebel Hideout
Amulet of renewal
Pendant. +4 Mana Rengeration; +2 Health Regeneration
425 85 Runes of life and growth are engraved in this amulet.
Valley of Blood
Amulet of Tenacity
Pendant. +7 Health; +6 Armour 75 15 A small amulet made of granite. Feshyr
Amulet of the stalker
Pendant. +7 Health; +2 Ranged Power
75 15 A small amulet made of horn. Stewark Castle
Amulet of the Wild
Pendant. +20 Mana; +10 Ranged Power; +2 Mana Regeneration
900 180 A wooden pendant with delicate carv-ings showing trees and an interwoven canopy of leaves.
Jungle
Arcane ring Ring. +15 Mana; +15 Magic Power
250 50 The ring is old and inconspicuous, but it holds magic power.
South Silver-lake
Ash Wood Amulet
Pendant +20 Mana; +10 Ranged Power; +10 Magic Power
800 160 In the mythology of Stewark and Setarrif the ash tree is worshipped as the first of all trees, whereas the rangers’ guild of Silverlake only sees it as Argaan’s best source of bow wood.
Jungle
Astral Amulet Pendant +15 Health; +10 Mana; +10 Armour; +4 Magic Power; +2 Mana Regeneration; +1 Health Regeneration
2,000 400 A small amulet with astral motives. Stewark Castle
Battered Pointed Long shield
Shield 14 Armour 10 2 Loot. Argaan (Initial Area)
Battered shield of the setarrifian sea guard
Shield 22 Armour 45 9 Loot. Jungle
Blackwater shield
Shield 65 Armour; +5 Health; +2 Health Regeneration
1,800 360 This primitive shield has been crafted in Blackwater. The wood is light and very robust and suffused with the magic of Tooshoo.
Tooshoo - Elemental Shrine
Blood Helm Helmet 10 Armour; +10 Mana N/A N/A Light head protection. This ritual head cover used to be worn by the head of the Beliar cult in Stewark.
Stewark
Bloodfly Bracers Arm pro-tection
+10 Armour; +8 Health; +8 Mana; +3 Stamina Regeneration; +3 Melee Power; +3 Ranged Power; +2 Health Regeneration
300 60 Made from the carapace of a bloodfly, with minor runes of wrath.
Silverlake
Bracers of Nobility
Arm protection
+40 Health; +40 Mana; +2 Health Regeneration
2,250 450 The motifs of these bracers consist of symbols for wealth and fame. The delicate runes have been added expertly, and blend in smoothly with the decoration.
Thorniara
Bracers of Protection
Arm protection
+15 Health; +10 Armour; +2 Health Regeneration
200 40 A protection rune is engraved here. Stewark
Bracers of recovery
Arm protection
+15 Health; +2 Health Regeneration
500 100 These simple bracers carry minor runes of healing and vitality.
Tooshoo
Bracers of the Aesthetic
Arm protection
+25 Mana; +15 Health; +7 Magic Power; +2 Health Regeneration
600 120 Crafted and enchanted by the monks on the sea cliff.
Bone Crusher Cave
Bracers of the Apprentice
Arm protection
+7 Mana; +2 Magic Power
100 20 A minor rune of wisdom is engraved here. Argaan (Initial Area)
Bracers of the Arcanist
Arm protection
+30 Mana; +15 Health; +12 Magic Power; +6 Mana Regeneration; +2 Health Regeneration
2,600 520 Made by mages, for mages. These brac-ers are devoid of ornaments, and the runes have been etched on the inside, where they are better protected. Not a trinket, but a tool.
Thorniara
Protected by copyright. Unauthorized or unlawful copying or downloading expressly prohibited.

PRIMA OFFICIAL GAME GUIDE 79
Guide Use Basics Abilities Equipment Crafting Bestiary W
alkthrough Quest Book Chest Log Achievements
TABLE OF CONTENTS
ArgaanSpeak with Diego, then head east to find Grengar at his cabin. Talk to Grengar, then head northeast to find the stable. Inside the stable, on the eastern side, a stable boy is sitting on the floor. Just behind the stable boy is chest A01. Open the chest, then head northwest into the Cleaved Maiden tavern. Go upstairs and enter the first door on the left to find Murdra sleeping on the bed. Speak with Murdra to continue The Cleaved Maiden quest and access her merchant shop.
ITEM KEYITEM dEscrIpTIon
Chest
Stone Circle
Beliar Artefact
Ancient Relic
Forgotten Grave
Innos Statuette
Chest (2nd Floor)
NPC Merchant
1
2
3
Argaan Dungeon
1
2
3 The Abandoned Mine
Protected by copyright. Unauthorized or unlawful copying or downloading expressly prohibited.

PRIMA OFFICIAL GAME GUIDE80
TABLE OF CONTENTS
Guide Use Basics Abilities Equipment Crafting Bestiary W
alkthrough Quest Book Chest Log Achievements
Argaan
Follow the southwest coast road...
Follow the southwest coast road to Garv’s hut, but be cautious of the Bloodflies and Goblins along the way. When you see the old Setarrifian watchtower (which looks like a run down castle tower) to the west, head up the path to find Rauter, who you need to speak with to continue the New Friends, New Foes quest.
Follow the western road up to the watchtower... ...to speak with rauter.
If you pay Garv 200 gold, you earn a total of 500 Xp for the quest. However, if you fight Garv and his friends, you must select the “I’ve got gold.“ option before initiating the fight to earn the full 500 Xp. In this situation you earn 200 Xp for completing Two Kegs of Mead, 50 Xp for thinking about avoiding the fight, 50 Xp for defeating
Garv’s two friends, and 150 Xp for defeating Garv.
TIP
...to find Garv’s hut.
Continue down the hallway through the opening to the left, then into the next room on the right to find Daranis. Speak with him to complete The Cleaved Maiden quest and start the New Friends,
New Foes quest. An Innos Statuette and Beliar Artefact can be found on the table in Daranis’ room. Pick up the Innos Statuette to begin The Statuettes of Lord Dominique quest, and the Beliar Artefact to begin the Hatred’s Reaper quest.
Head out of Daranis’ room and go south down the hallway to the next room. Just inside the door is chest A02. Open the chest, then head downstairs and
speak with Murdra to begin the Two Kegs of Mead quest. Go back outside to find an Innos Statuette on the southeast side of the Cleaved Maiden. Pick it up, then take the southwest coast road once you pass Grengar. You can speak to Grengar again if you wish to know more about the Two Kegs of Mead quest..
After you speak with Rauter, look just behind him to find chest A03. Open the chest, then go up the stairs to the top of the watchtower and speak with Lorn to start The Lost Leg quest. Head southeast down the road to reach Garv’s hut. Speak with Garv to determine how you wish to complete the Two Kegs of Mead quest. You can choose to pay Garv 200 gold to avoid fighting, or you can fight Garv and his two woodcutter friends by selecting “Just give me two kegs of mead and I’ll leave your face in one piece”. Determine how you want to deal with Garv and complete the Two Kegs of Mead quest to begin the Two Kegs of Mead II quest. A rusty saw can be found just west of Garv. Pick it up, then head up to Garv’s hut to find apples and bread on the porch, along with chest A04. Inside the hut, blunt knives can be found on the floor next to the bed and on the table.
Talk to daranis, then examine the two objects on the table.
Follow the southwest coast road...
Protected by copyright. Unauthorized or unlawful copying or downloading expressly prohibited.

PRIMA OFFICIAL GAME GUIDE 81
Guide Use Basics Abilities Equipment Crafting Bestiary W
alkthrough Quest Book Chest Log Achievements
TABLE OF CONTENTS
In the southeast corner, by the Goblin camp, there’s a skeleton. Next to the skeleton are two arrows, a ranger key, torch, and strongtoe
applebrew. Slightly northeast of the skeleton is a Beliar Artefacts, needed for the Hatred’s Reaper quest.
Ancient relic.
Continue north to the road that runs east and west. Head east to reach another Goblin camp. Defeat the Goblins and search their
camp to find chest A18, also known as Loran’s Camp. Turn around and search the south side of the road to find one of the ancient relics (needed for the Ancient Relics quest) on the ground by one of the trees.
some loot laying on the ground.
Head west along this road, then continue south when the road forks. Follow it around to a group of Blood-flies. Defeat them and explore the area around their camp to find chest A19. Follow the road to the north until you reach a path that leads west just before an-other Goblin camp. Defeat the Goblins, then explore the western path to find a lesser elixir of prowess, minor healing potion, round wood shield, and rusty sword lying on the ground. Continue west until you are just north of an under-ground entrance. Explore the area here to find chest A20, which contains the peg leg needed for The Lost Leg quest. At this point, you must enter the under-ground entrance just south of the chest. However, you cannot move directly south due to the terrain. Follow the road around to the entrance, or cut through the trees, but watch out for Goblins and other enemies as you make your way to the entrance.
speak with digger to begin the quest.
This is the north entrance to Digger’s abandoned mine. Head inside and speak with Digger to begin The Abandoned Mine quest. Move out of the mine and follow the road west until you can head south. Continue to the south to find chest A05. Head down the road to the entrance of the mine. Just outside the entrance, watch out for Bloodflies. In-side the mine, three Goblins await in the first room. Dispatch of them and open chest A06 on the east side of the room. There’s also an Innos Statuette a little further to the east.Two Demon’s Caps can also be found on the north side of the room.
Beliar Artefact.
Head back up to the road that runs east and west along the south side of the Cleaved Maiden, and fol-low it east of the tavern. Be careful of the Vagabonds and Goblins that attack along this road. Explore the Vagabond’s camp to find chest A15. Ulfrich awaits at the fork in the road. Speak with him to begin the Goblin Squatters quest, then head north and defeat one Shaman of the Bugeater Tribe and two Bugeater Tribe Warrior Goblins. An alchemical recipe for the Nighteye Elixir can be found at their camp, along with chest A16. Collect these items, then head back to Ulfrich and speak with him to complete the quest. Continue south from here, making quick work of the Goblins and Bloodflies that attack along the road. When you reach another fork, head south until you reach the Goblin camp where the road turns west. Defeat the Goblins, then explore their camp to find chest A17 near the southeast corner.
Protected by copyright. Unauthorized or unlawful copying or downloading expressly prohibited.

PRIMA OFFICIAL GAME GUIDE82
TABLE OF CONTENTS
Guide Use Basics Abilities Equipment Crafting Bestiary W
alkthrough Quest Book Chest Log Achievements
argaan
Pick up all of the items and head down the northern path. Molerats attack along the way from an alcove to the west. Inside the alcove, three more demon’s caps can be found. Continue down the path to the next alcove and move to the southern side to find The Mages’ Graves and the Digger’s Alembic quest items. Keep heading down the path to come across the Digger again. Speak with him, then move northeast to the rubble and access it to remove the blockade and complete the Abandoned Mine quest. Continue down the corridor and access the iron lode on the right just past the first passageway. Obtain the Iron Ore from the Iron Lode and continue down the corridor, accessing any other Iron Lodes you come across. Follow the path around in a circle, then head northwest to reach the rest of the mine.
THE ABANDONED MINE
1
2
3
ITEM KEYITEM dEscrIpTIon
Chest
Stone Circle
Beliar Artefact
Ancient Relic
Forgotten Grave
Innos Statuette
Chest (2nd Floor)
NPC Merchant
The Abandoned Mine
The Abandoned MineChests: A06
Enemies: Cave Crawlers,
Goblins,
Gulthard the Damned, Meatbugs,
Molerats
Items: Battered Money Box,
Battered Pickaxe (2),
Coal (3),
Demon’s Cap (22),
Iron Bolete (3),
Iron Ore (41),
Rune Shards, (Forgotten Grave
Torch
Weapons: Great Hammer,
Gulthard’s Hatchet
NPCs: Digger
Protected by copyright. Unauthorized or unlawful copying or downloading expressly prohibited.

PRIMA OFFICIAL GAME GUIDE 83
Guide Use Basics Abilities Equipment Crafting Bestiary W
alkthrough Quest Book Chest Log Achievements
TABLE OF CONTENTS
pick up any iron boletes you come across in the abandoned mine. You will need them for the Iron
Boletes quest you receive later in the game.
TIP
Defeat the Molerats that attack and continue down the path, ignoring any other corridors until you
reach the Forgotten Grave. Access the grave to find Rune Shards, an item needed for The Forgotten Graves quest. Explore the circular area around the grave to find several Molerats, two battered pickaxes, more iron lodes, and an iron bolete.
Head north out of the circular area until you can turn right down another corridor. De-feat the Cave Crawl-ers that attack, then pick up the Demon’s Caps on the ground and access the iron lode just ahead. Head east down the new corridor into the open area. Move to the upper area at the end to find a Great Hammer, alongside more iron lodes and Demon’s Caps. Do not jump down from here or else you will take damage. Instead, follow the same path you used to reach the upper area. Follow the path around in a circle to find more Molerats, Demon’s Caps, an iron lode, and an iron bolete. Travel back down the western corridor to the path you originally came from. Continue to the west and around the corner. Take out the Molerats as you proceed down the corridor. Molerats attack in the next open area. Defeat them, then access the iron lode and pick up the torch in one of the broken boxes. Go north, then down the next corridor to the west until you see Gulthard the Damned on the right. Defeat Gulthard and pick up the hatchet he drops. Just behind where Gulthard was standing is a battered money box quest item and a coal lode, which provides coal when examined. Continue down the corridor until you reach a den of Molerats at the end. Defeat the Molerats, then break down the rubble blocking your way.
Drop down to the room below to find chest A07, a Ranger Armoury, and chest A08, a Food Supplies chest. There is also a locked chest, but you do not have access to that at this time. Open both accessible chests, then head outside to find yourself behind the Cleaved Maiden tavern. Go inside and speak with Mur-dra to complete the New Friends, New Foes and Iron Boletes quests, and begin the Murdra’s Mixture quest.
Activate the stone circle for later use.
Head to the upper area to find a Great Hammer.
The first Forgotten Grave.
To reach another forgotten grave, leave the Cleaved Maiden and head south along the
same road you took to reach the watchtower. When you reach the fork in the road that leads to the watchtower, stop at the boulder and explore the area
around it to find one of the forgotten graves needed for The Forgotten Graves quest.
Head west from the Cleaved Maiden to reach the fisherman’s hut by the beach. Speak with Lorn to com-
plete The Lost Leg quest, then explore the northern hut to find some bread on the porch and a blunt knife on the table inside. Another blunt knife can be found
in the southern hut on top of the boxes on the western wall. Make sure you get close to the stone circle to
activate it so you can use it to teleport at a later time.
FORGOTTEN GRAVE SIDE QUEST
Protected by copyright. Unauthorized or unlawful copying or downloading expressly prohibited.

PRIMA OFFICIAL GAME GUIDE84
TABLE OF CONTENTS
Guide Use Basics Abilities Equipment Crafting Bestiary W
alkthrough Quest Book Chest Log Achievements
Argaan
Move north along the beach to find chest A21. Head back to the huts and use the road between the two huts to head back to the Cleaved Maiden. Just before you reach the tavern, walk close to the stone circle on the northern side of the road to activate it for later use. Follow the road north of the tavern and speak with Hiulad at the gate. Give him a sip of your mead, but be prepared for combat. As soon as the gate opens, three Brigands and Dartan attack. You must defeat all four enemies, but you must take out Dartan to earn 400 XP and continue the Murdra’s Mixture quest.
You can find Budding ogre Leaf around the fort here.
TIP
Head into the fort and explore the hut inside to find chest A22. Circle around behind the hut to find another Beliar Artefact. Continue through
the gate and across the bridge to speak with Elgan the Merchant. This completes the Murdra’s Mixture quest and begins The Road to Stewark quest.
To reach another Beliar Artefact, as soon as you cross the bridge and speak with Elgan the Merchant, follow the cliff edge west until it turns
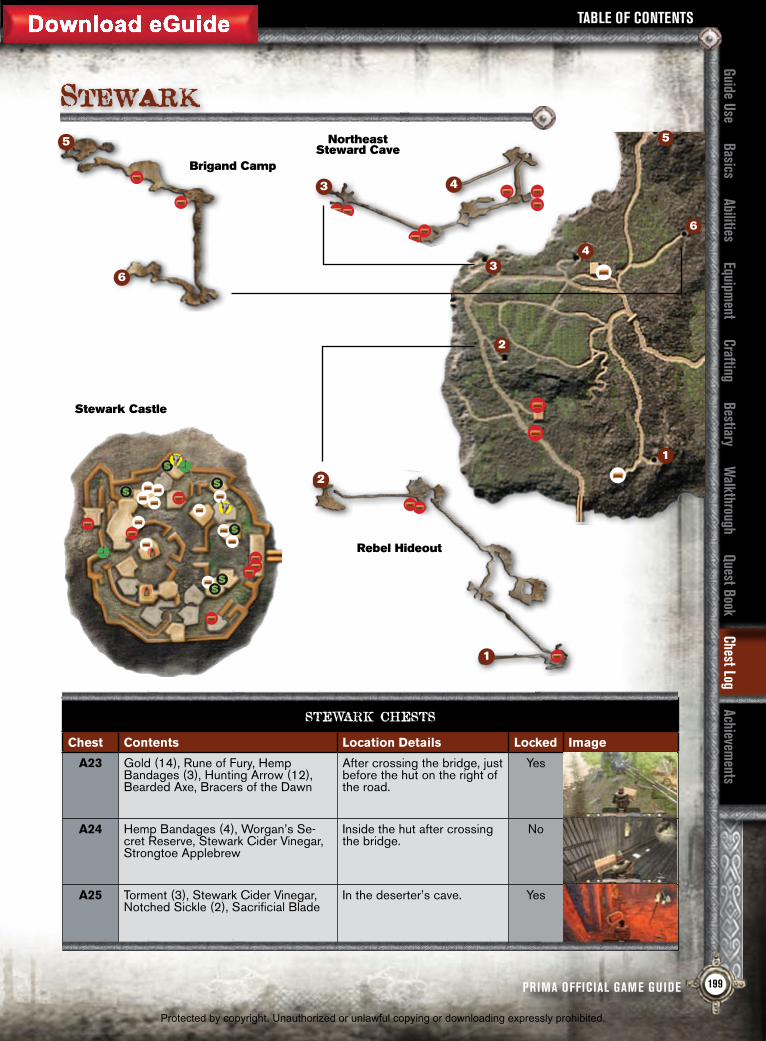
to the north. A Beliar Artefact is found on the edge of the cliff, shortly after it turns north. Continue north along the road until you reach chest A23 on the right, just before the hut. The chest is locked and cannot be opened at this time, but explore the inside of the hut to find chest A24. A rusty axe is found on the pile of wood just outside the hut. Activate the stone circle just west of the hut and continue along the road to the north.
HATRED’S REAPER SIDE QUEST
To reach another forgotten grave, leave the Cleaved Maiden and head south along the same road you took to reach the watchtower.
When you reach another road that heads southeast, follow it into a cave. Defeat the three Deserters in the cave and explore the area to find locked chest A25 and accessible chest A26. On the table next to the chests is a blunt knife and minor mana potion. South of the chests and table is an obsidian deposit mining point, which yields three Obsidian. There’s another blunt knife next to the table in the center of the room, and locked chest A25a on the opposite side of the room, but you cannot access it for the time being.
FORGOTTEN GRAVE SIDE QUEST
Protected by copyright. Unauthorized or unlawful copying or downloading expressly prohibited.

PRIMA OFFICIAL GAME GUIDE 85
Guide Use Basics Abilities Equipment Crafting Bestiary W
alkthrough Quest Book Chest Log Achievements
TABLE OF CONTENTS
Stewark
Head out of the cave and continue down the road, heading to the north. When you reach Stewark to the west (which looks like a castle), head up the drawbridge and speak with Dak, the guard. Go through the gate, then to the left and up the stairs into the inn. Speak with Ingor the Innkeeper about Diego, then browse his merchandise if you need supplies. Leave the inn and head southwest to the Alchemist Guild. Speak with Worgan the Alchemist to begin the Alkaloid Derivatives quest. If you need any alchemical ingredients, browse Worgan’s store, then go upstairs to find chest A27. Obtain the items in the chest, then go downstairs and head due north to the blacksmith work-
1
2
34
5
6
Stewark Dungeons
5
6
Brigand Camp
3 4
2
1
Rebel Hideout
Northeast Steward Cave
shop. Speak with Rhonda the Blacksmith to browse her store if you need equipment and supplies. There is an Oak Shield in the building on the south side next to chest A28. Head upstairs to find chest A29. Go back downstairs and out the door, then head up the stairs just north of the door to find two vials at the top.
Stewark Castle
Protected by copyright. Unauthorized or unlawful copying or downloading expressly prohibited.

PRIMA OFFICIAL GAME GUIDE86
TABLE OF CONTENTS
Guide Use Basics Abilities Equipment Crafting Bestiary W
alkthrough Quest Book Chest Log Achievements
Stewark
Side with Lord HertanSpeak with Winstan to continue the Diego in Trouble quest. Go through all of the text options, but do not select “I’ve had enough - I’m not interested in your stories! Tell me where Mermund is or there’ll be trouble!”. This results in fighting Winstan and you do not want to do that. Go back to the citadel and speak with Gorn again. He walks you over to Liuven’s living quarters. Explore the build-ing to find chest A31 on the first floor and A32 (Liuven’s Chest) on the second floor. Chest A32 contains Liuven’s key, which is required to continue the quest.
Liuven’s hiding place.
Head to the northwest corner of Stewark to find stairs leading down. Follow the stairs, then go around the corner and down the path to find a
rundown building. If you have Liuven’s key, open the door to the building and head upstairs to find Liuven. Speak with her to complete the Diego in Trouble quest and begin The Treacherous Baron quest.
Go back out the way you came in and use the wooden plank to the west of the door to get around behind the building and find chest A33. Head back across the bridge and south until you can move west
to the beach. Travel south down the beach, fighting the Bloodflies and Colossal Goos that attack. When you reach the southern tip, two Colossal Goos surround the Wooden Casket you need to continue The Treacherous Baron quest. You must now find the rebel hideout and speak to Hertan.
Based on your responses to Winstan, you will go down a path that has you siding with Lord Hertan or Lord renwick. These choices have no effect on the overall story line and the items you receive from either path are either identical, or have the exact same stats. There is no benefit to following one path over the other.
TIP
Head back out the way
you came and up the stairs. Continue past the gate and up the stairs to the south. Enter the door on the left to
find Chuck. Speak with him to continue
The Creepy Neighbor quest. Defeat Chuck in battle, then head back out the way you came in and down the stairs. Go west from the main gate and up the stairs. Head north at the top of the stairs and go up the staircase directly ahead. Enter the door at the top and head upstairs again. Kill the three Beliar Cult-ists at the top of the stairs. There is another Beliar Artefact on the floor in the northwest corner and the currently inaccessible locked chest A39 on the north wall. Head back to Gerrick to complete the quest. Go up the stairs due north of the main gate to reach the citadel at the center of Stewark. Speak with Gorn to complete The Road to Stewark quest and begin the Diego in Trouble quest. Head down the stairs to the southeast and down the next flight of stairs to the south. Move east to the next southward set of stairs, then down the final flight of stairs just ahead to find Aldrich in front of the prison. Talk to Aldrich to gain access to the prison and
continue the Diego in Trouble quest. Go into the prison to find a Knight Sword in the corner by the barrels. Speak with Diego to continue the quest and obtain lock-picking tools necessary to open most locked chests. Head up the stairs to the west until you reach Winstan. From here you have two options based on your conversation with Winstan.
Another Beliar Artefact is found among three Beliar cultists.
Go back toward the main gate and head north to enter Gerrick’s Curiosities. Continue north through the open door and speak with Gerrick
the Curiosity Vendor, view his store, and start The Creepy Neighbor quest. Chest A30 can be found
right around where Gerrick is standing.
FORGOTTEN GRAVE SIDE QUEST
Wooden casket on the beach.
Protected by copyright. Unauthorized or unlawful copying or downloading expressly prohibited.

PRIMA OFFICIAL GAME GUIDE 87
Guide Use Basics Abilities Equipment Crafting Bestiary W
alkthrough Quest Book Chest Log Achievements
TABLE OF CONTENTS
To complete the Alkaloid derivatives side quest, go back to town and talk to Worgan.
NOTE
Go back to the road, then head east until you come to a path that winds north up the side of the cliff. Follow the path northward and head through the gate at the top of the cliff. Continue to the north along the road until you reach another road that allows you to travel south.
When you reach a boulder that splits the road...
Head back in the direction of Stew-ark, but instead of going back into town, head east through Ogtar’s
farm to find another Beliar Artefact on the southern cliff and Hem slightly east of the artefact. Speak with Hem to continue the Alkaloid Derivatives quest. Follow the winding path down into the farm lands below and stop by the Forgotten Grave on the way down. Kill the five Field Raiders in the farm lands below, then talk to Hem again. You can find him just north of the farm lands. Head back up the winding
path and go north to the farm house. Speak with Ogtar just outside to begin the Blood on the Fields quest. Kill 10 Field Raiders, then speak with Ogtar again to complete the quest. Head around the side of the farm house until you see the stairs leading to the second floor. Go up the stairs to find locked chest A34. At the end of the room, in the southwest corner is an Innos Statu-ette needed for The Statuettes of Lord Dominique quest. Go back downstairs and around to the north side of the farm house to find a scythe and hayfork leaning up against the wall.
Alkaloid Derivatives, Blood on the Fields, Hatred’s Reaper, Forgotten Graves,
and The Statuettes of Lord Dominique Side Quests
Find another Beliar Artefact on the southern cliff of ogtar’s farm...
...then travel east to find Hem. Head down the winding path to find another Forgotten Grave.
...head right to find a Forgotten Grave in a small clearing.
Head south until you reach a large boulder that splits the
road. Take the path to the right to find another Forgotten Grave and some plants in a small clearing to the west. Continue south over the rocks and en-gage the Scavengers that attack.
Follow the road until you reach the entrance to the rebel hideout.
Defeat the Scavengers and follow the road south until it breaks off to the east where the entrance to the rebel hideout is found.
Protected by copyright. Unauthorized or unlawful copying or downloading expressly prohibited.

PRIMA OFFICIAL GAME GUIDE88
TABLE OF CONTENTS
Guide Use Basics Abilities Equipment Crafting Bestiary W
alkthrough Quest Book Chest Log Achievements
Stewark
REBEL HIDEOUT
NPCs: Clargor, Lord Hertan, Rebel (4), Ricklen
Chests: A35, A36, A37
Enemies: Crypt Guardian, Crypt Sentinel, Crypt Ward, Lord of the Crypt, Meatbugs, Servant of the Grave Lord
Equipment: Stewarkian Sallet
Items: Battered Pickaxe (2), Demon’s Cap (7), Engraved Vial, Iron Lode (4), Iron Ore (16), Minor Healing Potion, Minor Mana Potion, Sour Apple (3), Strongtoe Applebrew, Vial
Weapons: Cold Hatred, War Bow
1
2
REBEL HIDEOUT
ITEM KEYITEM dEscrIpTIon
Chest
Stone Circle
Beliar Artefact
Ancient Relic
Forgotten Grave
Innos Statuette
Chest (2nd Floor)
NPC Merchant
Rebel Hideout
Protected by copyright. Unauthorized or unlawful copying or downloading expressly prohibited.

PRIMA OFFICIAL GAME GUIDE 89
Guide Use Basics Abilities Equipment Crafting Bestiary W
alkthrough Quest Book Chest Log Achievements
TABLE OF CONTENTS
Examine ricklen’s body to continue the quest.
Side with Lord RenwickSpeak with Winstan to continue the Diego in Trouble. Go through all of the text options, but you select “I’ve had enough - I’m not interested in your stories! Tell me where Mermund is or there’ll be trouble!”. This results in fighting Winstan. Defeat him to complete the Diego in Trouble quest and begin The True Culprits quest. Head out the main gate of Stewark and over the bridge, then follow the road east, past Ogtar’s farm house, then northeast to the cave. If you head due north from the farm house you will end up at the wrong cave. Make sure you use the northeast road. Be careful of the scavengers that lurk around the area leading to the cave.
cold Hatred, a powerful two-handed weapon.
Head northeast through the hideout and speak with Clargor. There is a sour apple on the table just behind Clargor. Make your way around the wooden barrier, then to the south to find a table that holds strongtoe applebrew and a vial. Just north of the table is an engraved vial and southeast of the table are two more sour apples. Head due north to find an iron lode at the end of the hideout. Mine it to obtain four iron ores. Travel down the path to the west and speak with Lord Hertan to complete The Treacherous Baron quest and begin the No Man Left Behind quest. Continue past Hertan and follow the path to the west. When you reach the next small opening, there’s a battered pickaxe on the right next to three demon’s caps and another battered pickaxe on the left next to a stewarkian sallet. On the far west side of the open-ing is another iron lode. Pick up all of the loot and head down the north-ern passage. Drop down into the room below to find Ricklen on the ground next to a war bow. Examine Ricklen to find his key and continue the No Man Left Behind quest. Head west and battle two Crypt Senti-nels and two Crypt Wards.
Head back to Stewark and go to the citadel where you first spoke with Gorn. Go inside and talk to Lord Hertan to complete the No Man Left Behind quest and begin The Silverlake Border quest. Make your way upstairs to find locked chest A38. In the northwest corner of the room is another Innos Statuette.
Defeat the enemies and examine a crypt to the east to find a minor healing potion. An old sword rests on the ground in front of a crypt to the west and be-hind the gate on the west side of the room. Continue down the path to find three more Crypt Wards. There is another iron lode on the far end of the room on the north side.
Head into the wooden structure on the south side and up the ramp to engage two more Crypt Wards, a Crypt Sentinel, and a Servant of the Grave Lord. Defeat the en-emies and pick up Cold Hatred, a two-handed weapon on the west side of the room. Go up the ramp to the north to find a minor mana potion on the table at the top. Move around the right side of the wooden barrier behind the table to return to the previous room, then fol-low the path to the west. Two Crypt Guardians, a Crypt Ward, and a Lord of the Crypt wait in the next open area. Defeat them and head into the small opening to the south to find another iron lode and chests A36 and A37. Continue down the path to the west to reach the exit. Follow the path and jump down into the room below to find yourself in the cave where you fought the deserters.
Protected by copyright. Unauthorized or unlawful copying or downloading expressly prohibited.

PRIMA OFFICIAL GAME GUIDE90
TABLE OF CONTENTS
Guide Use Basics Abilities Equipment Crafting Bestiary W
alkthrough Quest Book Chest Log Achievements
Stewark
The cave also serves as the brigand camp and can be identified by the rebel that stands guard outside. Defeat the rebel to continue The True Culprits quest, then head inside. Three more rebels attack when you get inside, one from the ground and two more from platforms above. Take out the first one on the ground, then use the ramps behind the platforms to reach the rebels on higher ground. Head deeper into the cave and access the iron lodes as you come across them. When you reach the next open area, three more rebels attack. Defeat them, then continue deeper into the cave. The next opening contains three Rebels and Clargor, one of their leaders. Defeat the enemies, then explore the structure to the southwest to find chest A51. Explore the northern structure to find a blunt knife on the west side and a strongtoe applebrew and three sour apples on the table. Continue down the western path to the next open area. A few demon’s caps and an iron lode are found to the south as you enter the area. Four sour apples are around the apple crate, a battered pickaxe is located
BRIGAND CAMP
5
6
Brigand Camp
3 4
NortheastStewark Cave
ITEM KEYITEM dEscrIpTIon
Chest
Stone Circle
Beliar Artefact
Ancient Relic
Forgotten Grave
Innos Statuette
Chest (2nd Floor)
NPC Merchant
BRIGAND CAMPChests: A51, A52
Enemies: Clargor, Master of Inquiry, Meatbug, Rebel (9)
Items: Apple, Arrow (4), Cut Vial, Demon’s Cap (16), Iron Lode (2), Iron Ore (8), Minor Mana Potion, Sour Apple (7), Strongtoe Applebrew, Vial
Weapons: Battered Pickaxe, Blunt Knife (3)
NPCs: Mermund
Protected by copyright. Unauthorized or unlawful copying or downloading expressly prohibited.
PRIMA OFFICIAL GAME GUIDE 91
Guide Use Basics Abilities Equipment Crafting Bestiary W
alkthrough Quest Book Chest Log Achievements
TABLE OF CONTENTS
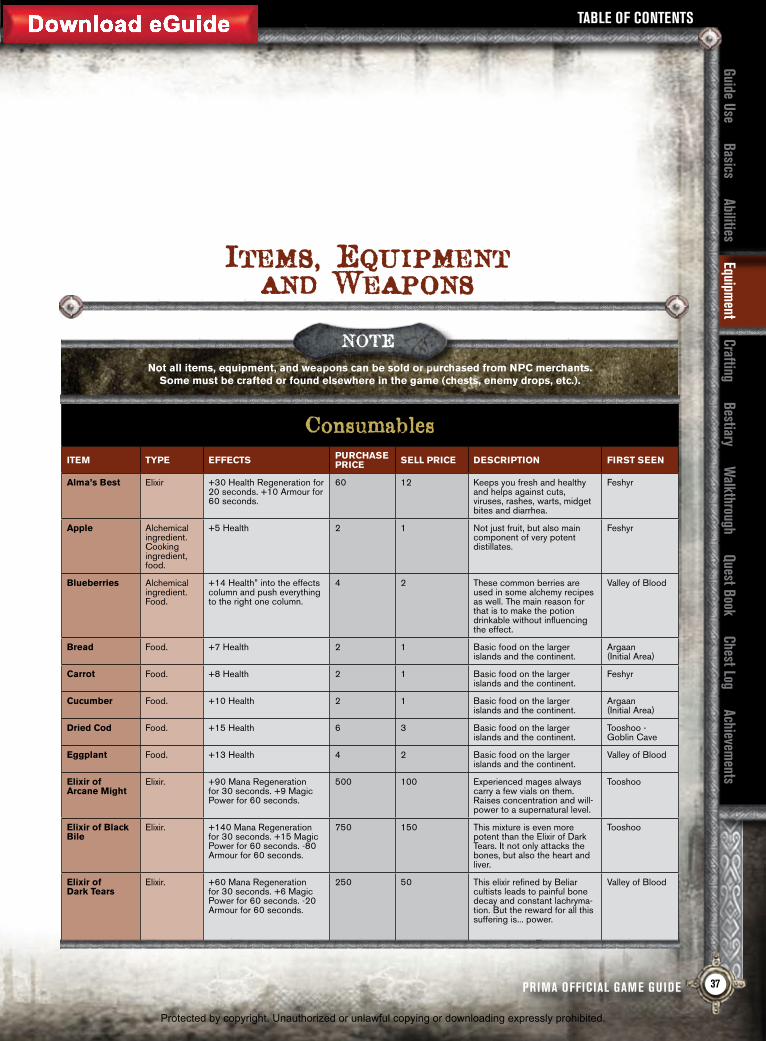
Take care of any remaining business you have in Stewark, then head east along the road past Ogtar’s farm house, then southeast to the Silverlake gates. Go up the stairs and speak with Kastor to continue The Silverlake Border quest. Move past Kastor and examine the trap door on the right to complete The Silverlake Border quest and begin the Too Much Honour quest.
Head into the cave and engage the three rebels that attack when you reach the first open area. There are some demon’s caps and an iron lode on the eastern side of the room. Continue down the next passage to the south until you reach the next open area. Chest A53 is found up the ramp on the east side of the room, with a rusty shield and blunt knife found along the way. Chest A54 is down the ramp and east of A53, next to three vials. Four demon’s caps are found in the middle of the room, with chest A55 due north of the demon’s caps behind the boulder. Continue down the southwest passage to find three more rebels and Hertan in the next open area. There is a minor healing potion on the table just as you enter the room. Defeat Hertan and his allies to continue the quest,
then head down the western passage. When you reach an opening to the south, explore it to find chest A56 and A57, and a strongtoe applebrew on the nearby table. Proceed down the main path again until and drop down into the area below. Demon’s caps and an iron lode are found to the north, while shests A49 and A50 are due south. Collect the loot and head out the exit to the west. Head back to the citadel in Stewark and speak with Gorn just outside to complete the In the Wrong Hands quest. Go inside and speak with Lord Renwick to obtain a new set of armour and begin The Silverlake Border quest.
Examine the trap door to complete The silverlake Border quest.
by the fire, with a vial and a cut vial on the ground just south of the fire. There are also two blunt knives, four arrows, and an apple next to the beds, and chest A52 just south of the beds. Gather all of the loot and keep following the west-ern path until you reach a barred door. Go through the door to engage in battle against the Master of Inquiry. Defeat him then explore the west side of the room to find a minor mana potion. Open the barred door on the east side of the room to find Mermund. Speak with Mermund to complete The True Culprits quest, then head west and out the gate and go south to the cave entrance just west of Ogtar’s farm house. Talk to Winstan outside the cave, then head inside.
NORTHEAST STEWARK CAVE
As soon as you come out of the brigand camp cave, head northwest to find another Beliar Artefact in the
corner by the rocks.
ANCIENT RELICS SIDE QUEST
Northeast Stewark Cave
Chests: A49, A50, A53, A54, A55, A56
Enemies: Hertan, Meatbugs, Rebel (5)
Items: Demon’s Cap (11), Iron Lode (2), Iron Ore (8), Minor Healing Potion, Rusty Shield, Sour Apple, Strongtoe Applebrew, Vial (3)
Weapons: Blunt Knife
Protected by copyright. Unauthorized or unlawful copying or downloading expressly prohibited.

TABLE OF CONTENTS
Guide Use Basics Abilities Equipment Crafting Bestiary W
alkthrough Quest Book Chest Log Achievements
PRIMA OFFICIAL GAME GUIDE168
TABLE OF CONTENTS
Guide Use Basics Abilities Equipment Crafting Bestiary W
alkthrough Quest Book Chest Log Achievements
Protected by copyright. Unauthorized or unlawful copying or downloading expressly prohibited.

PRIMA OFFICIAL GAME GUIDE 169
Guide Use Basics Abilities Equipment Crafting Bestiary W
alkthrough Quest Book Chest Log Achievements
TABLE OF CONTENTS
South Silverlake
Tooshoo
Stewark
Thorniara
Stewark Castle
1
2
3
The Abandoned Mine
1
2
3
Setarrif
45
45
The Lost Temple— Setarrif
Protected by copyright. Unauthorized or unlawful copying or downloading expressly prohibited.

TABLE OF CONTENTS
Guide Use Basics Abilities Equipment Crafting Bestiary W
alkthrough Quest Book Chest Log Achievements
PRIMA OFFICIAL GAME GUIDE170
TABLE OF CONTENTS
Guide Use Basics Abilities Equipment Crafting Bestiary W
alkthrough Quest Book Chest Log Achievements
Protected by copyright. Unauthorized or unlawful copying or downloading expressly prohibited.

PRIMA OFFICIAL GAME GUIDE 171
Guide Use Basics Abilities Equipment Crafting Bestiary W
alkthrough Quest Book Chest Log Achievements
TABLE OF CONTENTS
Short-Term Quests
A BiTTEr NuT TO SwALLOwTypE: Side
prErEquiSiTE: Talk to Gunda in the Valley of Blood
rEWArd: Alchemical recipe for Healing potions
quEST proGrESSioN
Kill six pigged-out Black Boars.
Talk to Gunda in Silverlake Castle.
A BAg FuLL OF TrOuBLETypE: Side
prErEquiSiTE: Talk to Shakes in Tooshoo
rEWArd: 1200 Gold
quEST proGrESSioN
Collect the Gold Embroidered Bag from the lurker nests east of Tooshoo.
Talk to Shakes in Tooshoo.
Talk to Shakes.
Battle against Shakes.
Talk to Shakes.
Talk to Freemonger Borran.
northern Goblin Cave
2
Southern Goblin Cave
1
Valley of Blood
1
2
Protected by copyright. Unauthorized or unlawful copying or downloading expressly prohibited.

PRIMA OFFICIAL GAME GUIDE172
Quest Book
TABLE OF CONTENTS
Guide Use Basics Abilities Equipment Crafting Bestiary W
alkthrough Quest Book Chest Log Achievements
A MAN OF MANy FriENdSTypE: Main
prErEquiSiTE: Complete A Hot Lead
rEWArd: None
quEST proGrESSioN
Talk to Milten, Grand Master of Fire, in Lester’s hut southeast of Tooshoo.
Follow the trail to the Cave of the Bone Crusher Tribe.
Find Xesha in the cave and talk to her.
Kill the five orcs in the cave that abducted Lester.
Speak with Lester in the cave.
Examine the statue in the cave.
A JEALOuS FArMErTypE: Main
prErEquiSiTE: Begin itchy Feet
rEWArd: None
quEST proGrESSioN
Speak with Knut.
defeat Knut.
Speak with Knut.
A HOT LEAdTypE: Main
prErEquiSiTE: Complete Welcome to the Sanctuary
rEWArd: None
quEST proGrESSioN
Talk to Calamus in the library in Tooshoo.
Attempt to speak with icarius in Tooshoo.
Speak to Calamus.
A HArSH wOrLdTypE: Main
prErEquiSiTE: None
rEWArd: None
quEST proGrESSioN
Speak with ivy just after the dream sequence at the beginning of the game.
Speak with Gromar at the center of town.
Protected by copyright. Unauthorized or unlawful copying or downloading expressly prohibited.

PRIMA OFFICIAL GAME GUIDE194
TABLE OF CONTENTS
Guide Use Basics Abilities Equipment Crafting Bestiary W
alkthrough Quest Book Chest Log Achievements
Chest Log
4
7
3
1
2
5 6
4
3
1
2
7
5
6
Chest Log
Feshyr
The contents of each chest vary depending on the difficulty setting. For example, a chest on Easy may contain 100 pieces of gold, but that same chest on Hard may only contain 30 pieces of gold. For more
specific chest locations, please reference the Walk Through chapter.
NOTE
Feshyr Dungeons
ITEM KEYITEM dEscrIpTIon
Chest
Chest (2nd Floor)
Protected by copyright. Unauthorized or unlawful copying or downloading expressly prohibited.
PRIMA OFFICIAL GAME GUIDE 195
Guide Use Basics Abilities Equipment Crafting Bestiary W
alkthrough Quest Book Chest Log Achievements
TABLE OF CONTENTS
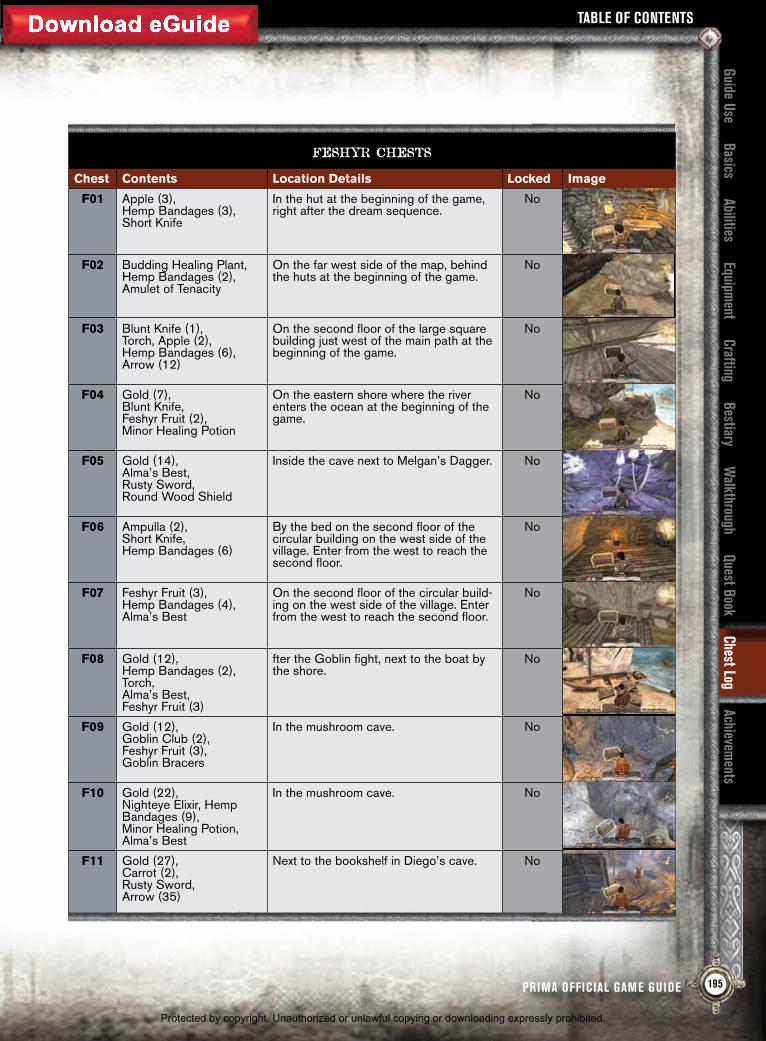
Feshyr Chests
chest contents Location details Locked Image
F01 Apple (3), Hemp Bandages (3), Short Knife
In the hut at the beginning of the game, right after the dream sequence.
No
F02 Budding Healing Plant, Hemp Bandages (2), Amulet of Tenacity
On the far west side of the map, behind the huts at the beginning of the game.
No
F03 Blunt Knife (1), Torch, Apple (2), Hemp Bandages (6), Arrow (12)
On the second floor of the large square building just west of the main path at the beginning of the game.
No
F04 Gold (7), Blunt Knife, Feshyr Fruit (2), Minor Healing Potion
On the eastern shore where the river enters the ocean at the beginning of the game.
No
F05 Gold (14), Alma’s Best, Rusty Sword, Round Wood Shield
Inside the cave next to Melgan’s Dagger. No
F06 Ampulla (2), Short Knife, Hemp Bandages (6)
By the bed on the second floor of the circular building on the west side of the village. Enter from the west to reach the second floor.
No
F07 Feshyr Fruit (3), Hemp Bandages (4), Alma’s Best
On the second floor of the circular build-ing on the west side of the village. Enter from the west to reach the second floor.
No
F08 Gold (12), Hemp Bandages (2), Torch, Alma’s Best, Feshyr Fruit (3)
fter the Goblin fight, next to the boat by the shore.
No
F09 Gold (12), Goblin Club (2), Feshyr Fruit (3), Goblin Bracers
In the mushroom cave. No
F10 Gold (22), Nighteye Elixir, Hemp Bandages (9), Minor Healing Potion, Alma’s Best
In the mushroom cave. No
F11 Gold (27), Carrot (2), Rusty Sword, Arrow (35)
Next to the bookshelf in Diego’s cave. No
Protected by copyright. Unauthorized or unlawful copying or downloading expressly prohibited.
PRIMA OFFICIAL GAME GUIDE 199
Guide Use Basics Abilities Equipment Crafting Bestiary W
alkthrough Quest Book Chest Log Achievements
TABLE OF CONTENTS
1
2
34
5
6
5
6
Brigand Camp
3 4
Northeast Steward Cave
Stewark
2
1
Rebel Hideout
stewArk Chests
chest contents Location details Locked Image
A23 Gold (14), Rune of Fury, Hemp Bandages (3), Hunting Arrow (12), Bearded Axe, Bracers of the Dawn
After crossing the bridge, just before the hut on the right of the road.
Yes
A24 Hemp Bandages (4), Worgan’s Se-cret Reserve, Stewark Cider Vinegar, Strongtoe Applebrew
Inside the hut after crossing the bridge.
No
A25 Torment (3), Stewark Cider Vinegar, Notched Sickle (2), Sacrificial Blade
In the deserter’s cave. Yes
Stewark Castle
Protected by copyright. Unauthorized or unlawful copying or downloading expressly prohibited.


![1 Lecture 2 Animation References: [1] Gregory Junker, Pro OGRE 3D Programming, Apress, 2006 [2] Ogre Tutorials – Ogre Wiki .](https://static.fdocuments.us/doc/165x107/56649e7e5503460f94b81c53/1-lecture-2-animation-references-1-gregory-junker-pro-ogre-3d-programming.jpg)