COM 002
104
YEAR I: SEMESETER II Version 1: July 2009 UNESCO-NIGERIA TECHNICAL & VOCATIONAL EDUCATION REVITALISATION PROJECT-PHASE II NATIONAL DIPLOMA IN STATISTICS (COM)
-
Upload
ayariseifallah -
Category
Documents
-
view
3 -
download
2
description
com
Transcript of COM 002

ND STATISTICS
YEAR I: SEMESETER II
Version 1: July 2009
UNESCO-NIGERIA TECHNICAL & VOCATIONAL EDUCATION
REVITALISATION PROJECT-PHASE II
NATIONAL DIPLOMA IN
STATISTICS
(COM)

TABLE OF CONTENTS
WEEK 1: Getting Started
WEEK 2: Customize
WEEK 3: Working with Content
WEEK 4: Adding Shape
WEEK 5: Slide Show Options
WEEK 6: The Internet
WEEK 7: Surfing the Web with Internet Explorer
WEEK 8: Saving Your Favorite Pages
WEEK 9: Searching the Web
WEEK 10: Sending and Receiving Email
WEEK 11: Sending and Receiving Email (continue)
WEEK 12: Managing Your Email
WEEK 13: Protecting Against Spam, Phishing Scams, and Viruses
WEEK 14: Connecting to the Internet at Home and on the Road
WEEK 15: Setting Up a New Connection

Week1:Getting Started
Microsoft Office Toolbar The Ribbon Quick Access Toolbar Mini Toolbar
Navigation Slide Views
There are three features that you should remember as you work within PowerPoint
2007: the Microsoft Office Button, the Quick Access Toolbar, and the Ribbon. The function of these features will be more fully explored below.
Presentations
A presentation is a collection of data and information that is to be delivered to a
specific audience. A PowerPoint presentation is a collection of electronic slides that
can have text, pictures, graphics, tables, sound and video. This collection can run automatically or can be controlled by a presenter.
Microsoft Office Button
The Microsoft Office Button performs many of the functions that were located in the
File menu of older versions of PowerPoint. This button allows you to create a new presentation, Open an existing presentation, save and save as, print, send, or close.
Ribbon
The ribbon is the panel at the top portion of the document It has seven tabs:
Home, Insert, Design, Animations, Slide Show, Review and View. Each tab is divided
into groups. The groups are logical collections of features designed to perform function that you will utilize in developing or editing your PowerPoint slides.
Commonly utilized features are displayed on the Ribbon. To view additional features within each group, click the arrow at the bottom right corner of each group.
Home: Clipboard, Slides, Font, Paragraph, Drawing, and Editing
Insert: Tables, Illustrations, Links, Text, and Media Clips
Design: Page Setup, Themes, Background
Animations: Preview, Animations, Transition to this Slide
Slide Show: Start Slide Show, Set Up, Monitors
Review: Proofing, Comments, Protect
View: Presentation Views, Show/Hide, Zoom, Window, Macros
Quick Access Toolbar
The quick access toolbar is a customizable toolbar that contains commands that
you may want to use. You can place the quick access toolbar above or below the
ribbon. To change the location of the quick access toolbar, click on the error at the
end of the toolbar and click Show Below the Ribbon.
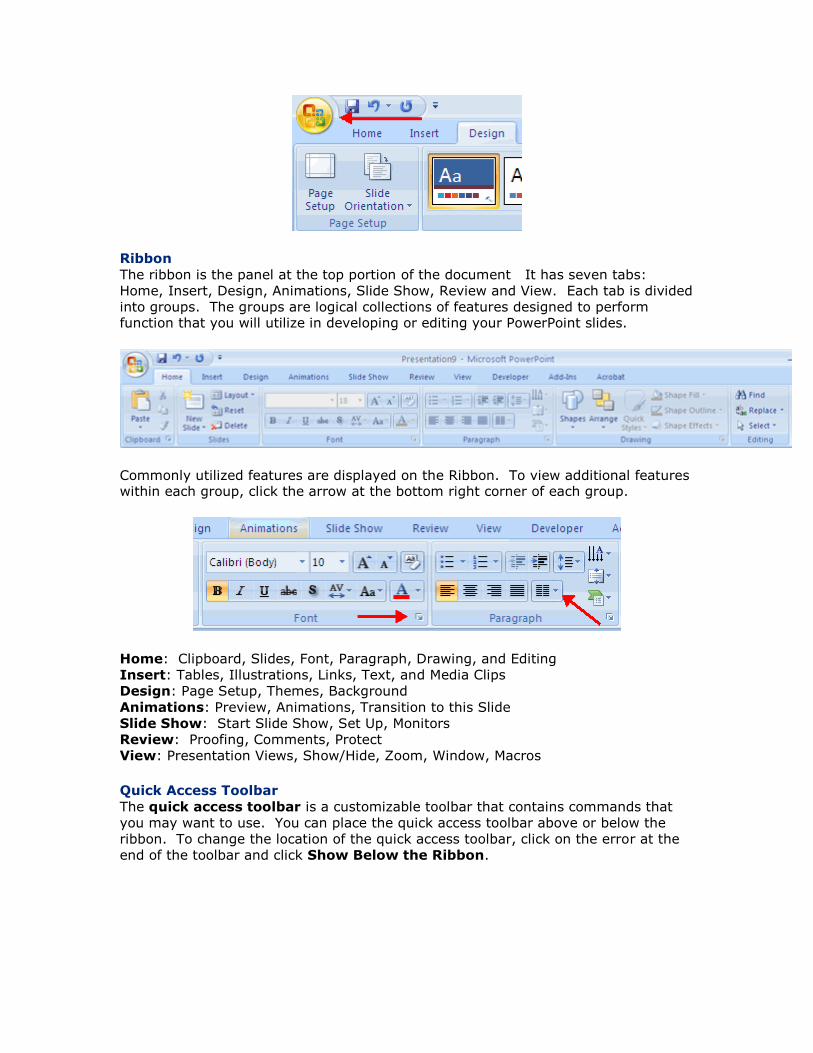
You can also add items to the quick access toolbar. Right click on any item in the
Office Button or the Ribbon and click Add to Quick Access Toolbar and a shortcut will be added.
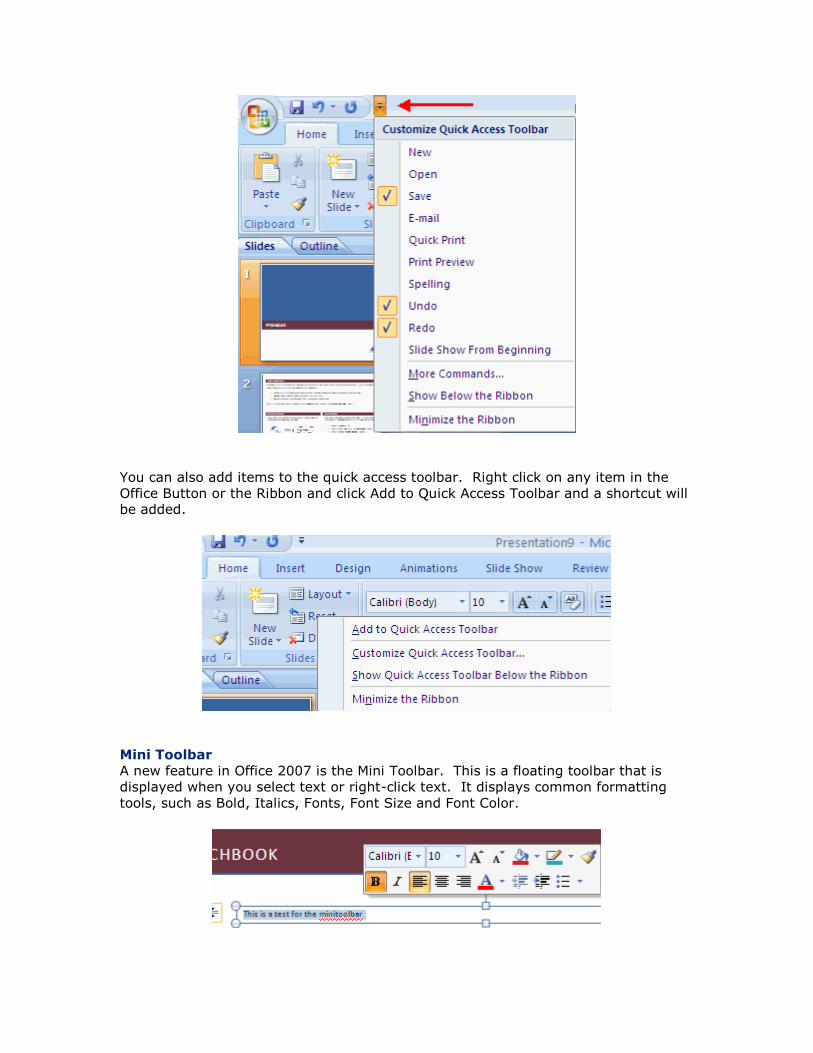
Mini Toolbar
A new feature in Office 2007 is the Mini Toolbar. This is a floating toolbar that is
displayed when you select text or right-click text. It displays common formatting
tools, such as Bold, Italics, Fonts, Font Size and Font Color.

Navigation
Navigation through the slides can be accomplished through the Slide Navigation
menu on the left side of the screen. Also, an outline appears from materials that have been entered in the presentation. To access the outline, click the outline tab.
Slide Views
Presentations can be viewed in a variety of manners. On the View tab, the
Presentation Views group allows you to view the slides as Normal, Slide Sorter,
Notes Page, Slide Show, Slide Master, Handout Master, and Notes Master.

Customize
Popular Proofing Save Advanced Customize
PowerPoint 2007 offers a wide range of customizable options that allow you to make PowerPoint work the best for you. To access these customizable options:
Click the Office Button Click PowerPoint Options include picture of OB menu.
Popular
These features allow you to personalize your work environment with the mini
toolbar, color schemes, personalize your user name and allow you to access the Live
Preview feature. The Live Preview feature allows you to preview the results of
applying design and formatting changes without actually applying it.
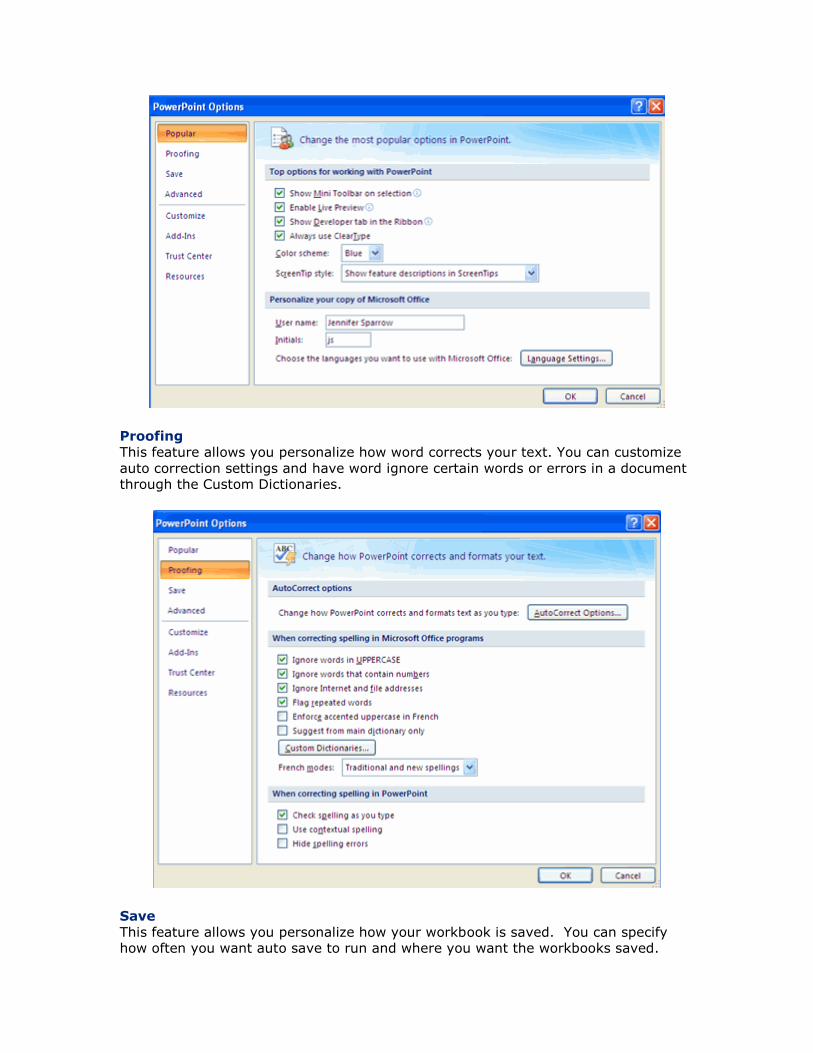
Proofing
This feature allows you personalize how word corrects your text. You can customize
auto correction settings and have word ignore certain words or errors in a document through the Custom Dictionaries.
Save
This feature allows you personalize how your workbook is saved. You can specify how often you want auto save to run and where you want the workbooks saved.

Advanced
This feature allows you to specify options for editing, copying, pasting, printing, displaying, slide shows, and other general settings.
Activity1.1 1: Explain in your own term the three features you should remember as you work with power point environment. 2: Demonstrate in the lab. How to personalize your workbook is saved .

Week2:Customize
Customize allows you to add features to the Quick Access Toolbar. If there are tools
that you are utilizing frequently, you may want to add these to the Quick Access Toolbar.
Creating a Presentation
New Presentation Save a Presentation Add Slides Themes
New Presentation
You can start a new presentation from a blank slide, a template, existing presentations, or a Word outline. To create a new presentation from a blank slide:
Click the Microsoft Office Button Click New Click Blank Presentation

To create a new presentation from a template:
Click the Microsoft Office Button Click New Click Installed Templates or Browse through Microsoft Office Online Templates Click the template you choose
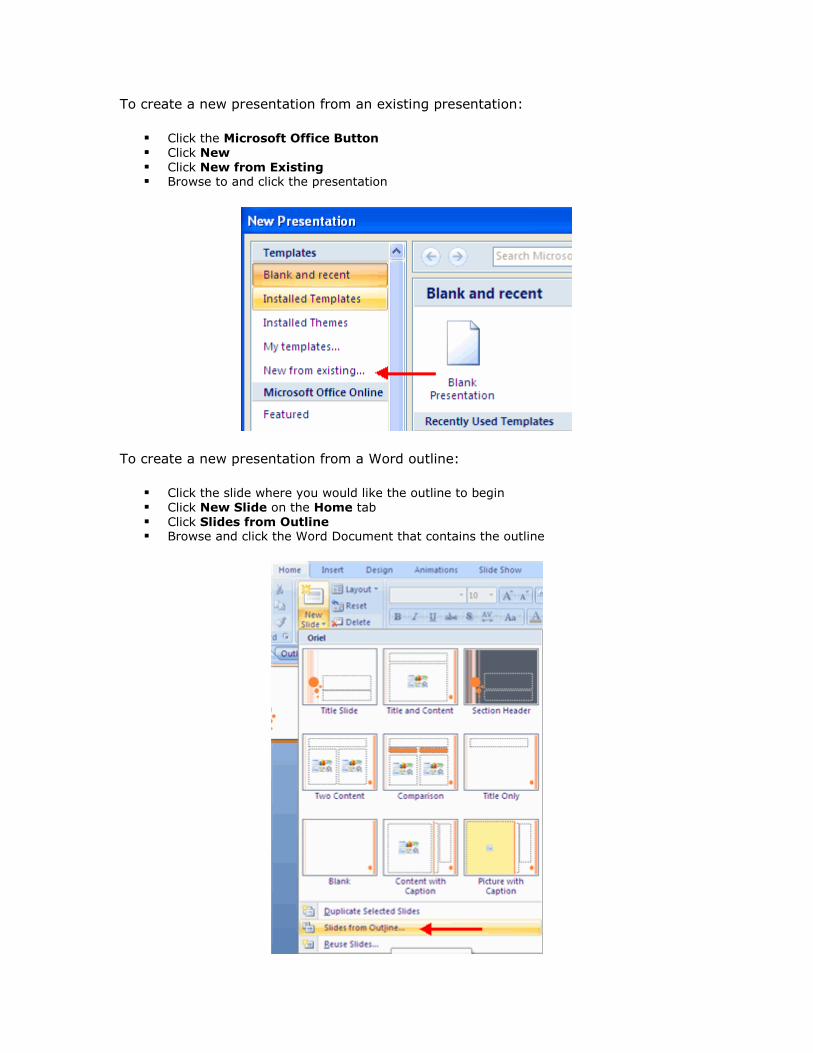
To create a new presentation from an existing presentation:
Click the Microsoft Office Button Click New Click New from Existing Browse to and click the presentation
To create a new presentation from a Word outline:
Click the slide where you would like the outline to begin Click New Slide on the Home tab Click Slides from Outline Browse and click the Word Document that contains the outline
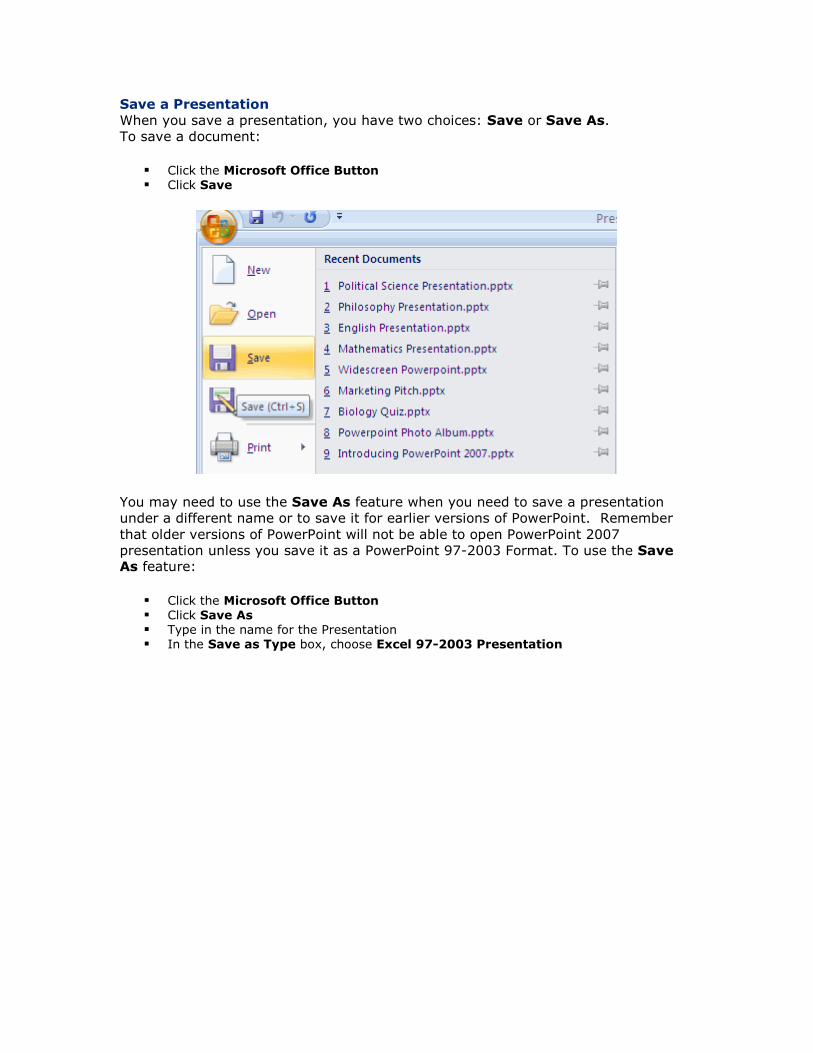
Save a Presentation
When you save a presentation, you have two choices: Save or Save As.
To save a document:
Click the Microsoft Office Button Click Save
You may need to use the Save As feature when you need to save a presentation
under a different name or to save it for earlier versions of PowerPoint. Remember
that older versions of PowerPoint will not be able to open PowerPoint 2007
presentation unless you save it as a PowerPoint 97-2003 Format. To use the Save As feature:
Click the Microsoft Office Button Click Save As Type in the name for the Presentation In the Save as Type box, choose Excel 97-2003 Presentation
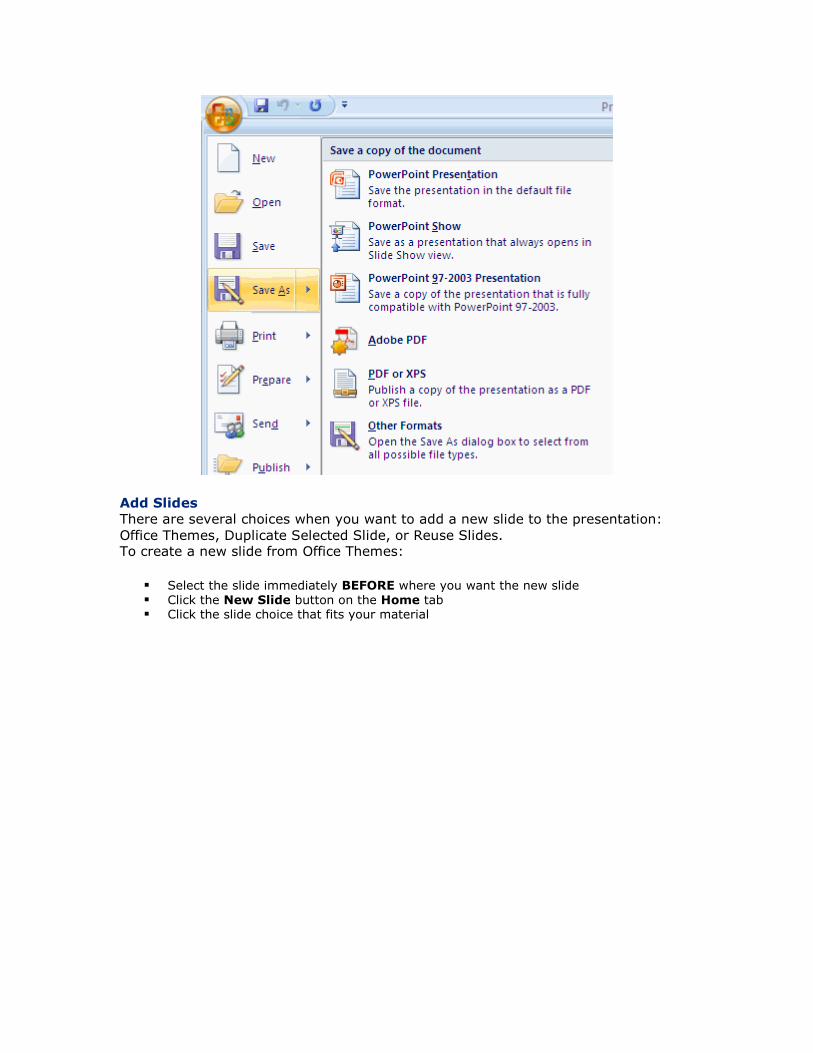
Add Slides
There are several choices when you want to add a new slide to the presentation:
Office Themes, Duplicate Selected Slide, or Reuse Slides. To create a new slide from Office Themes:
Select the slide immediately BEFORE where you want the new slide Click the New Slide button on the Home tab Click the slide choice that fits your material
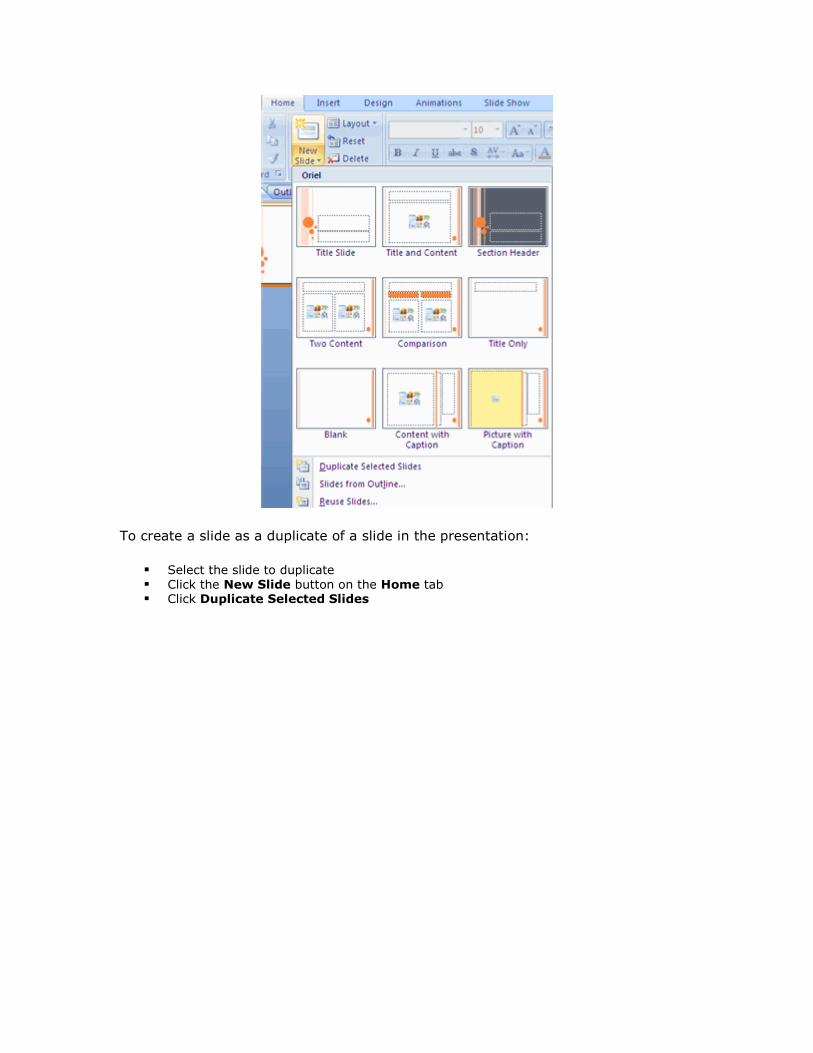
To create a slide as a duplicate of a slide in the presentation:
Select the slide to duplicate
Click the New Slide button on the Home tab Click Duplicate Selected Slides
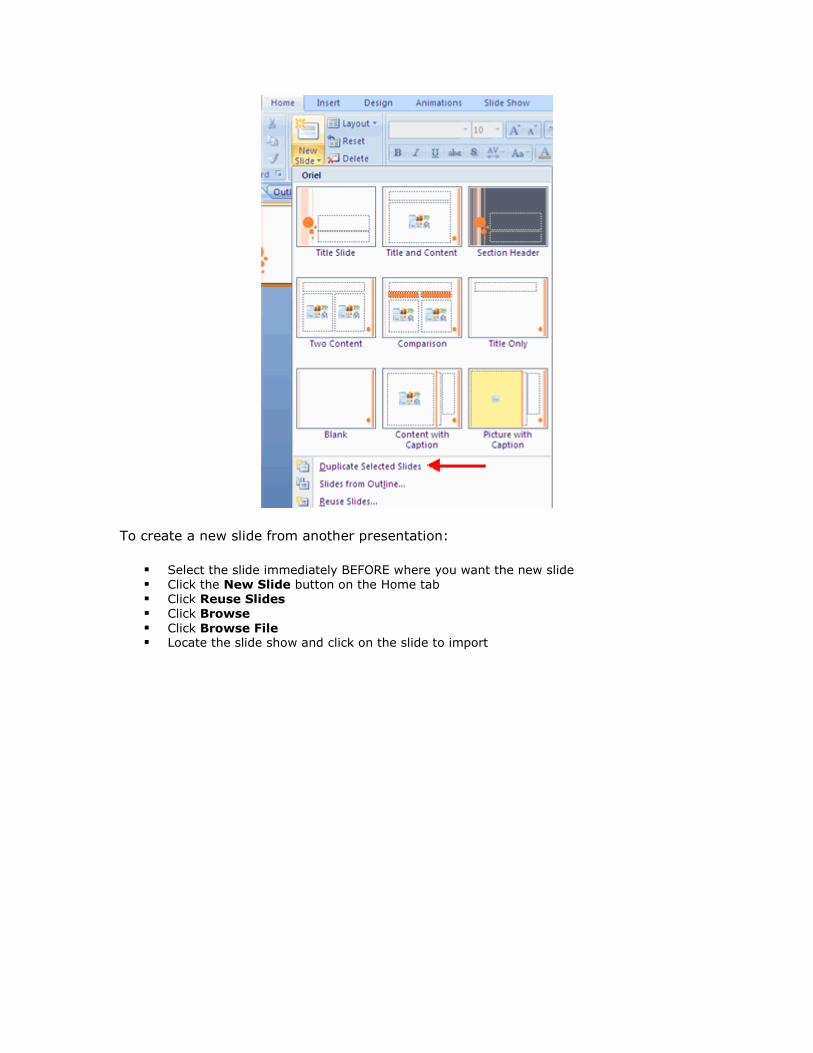
To create a new slide from another presentation:
Select the slide immediately BEFORE where you want the new slide
Click the New Slide button on the Home tab Click Reuse Slides Click Browse
Click Browse File Locate the slide show and click on the slide to import

Themes
Themes are design templates that can be applied to an entire presentation that
allows for consistency throughout the presentation. To add a theme to a presentation:
Click the Design tab Choose one of the displayed Themes or click the Galleries button
To apply new colors to a theme:
Click the Colors drop down arrow Choose a color set or click Create New Theme Colors
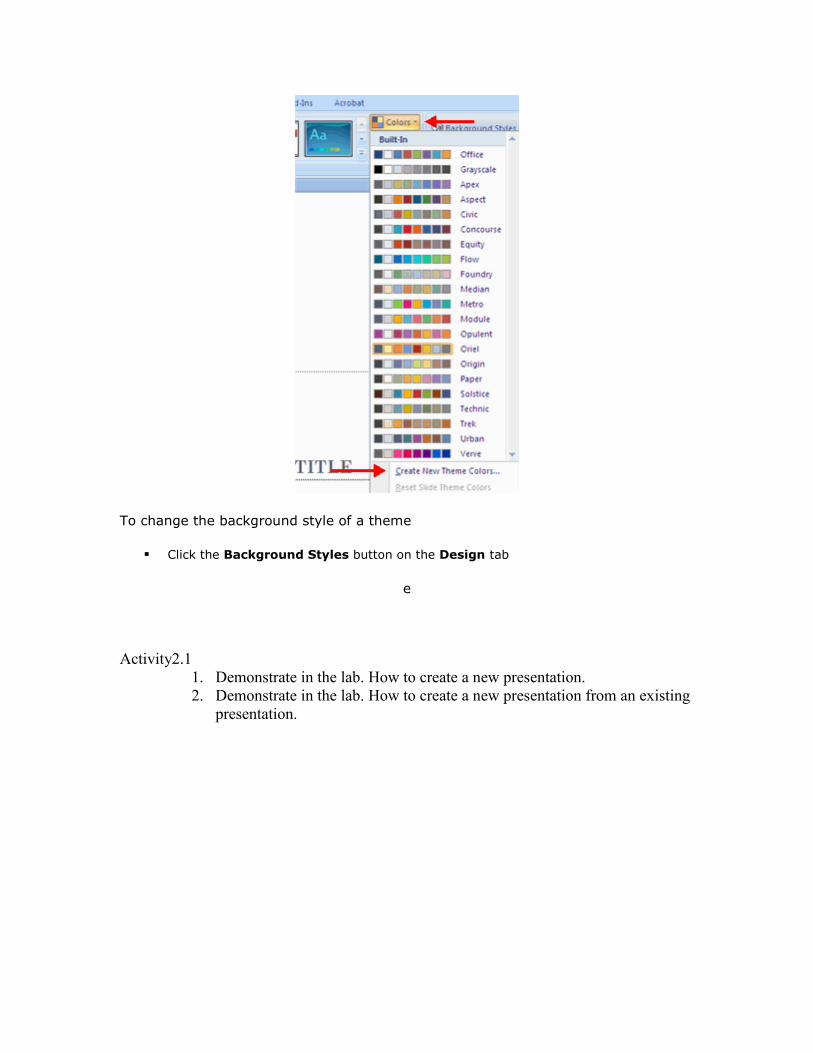
To change the background style of a theme
Click the Background Styles button on the Design tab
e
Activity2.1 1. Demonstrate in the lab. How to create a new presentation. 2. Demonstrate in the lab. How to create a new presentation from an existing
presentation.
Week3:Working with Content
Enter Text Select Text Copy and Paste Cut and Paste
Undo/Redo Spell Check
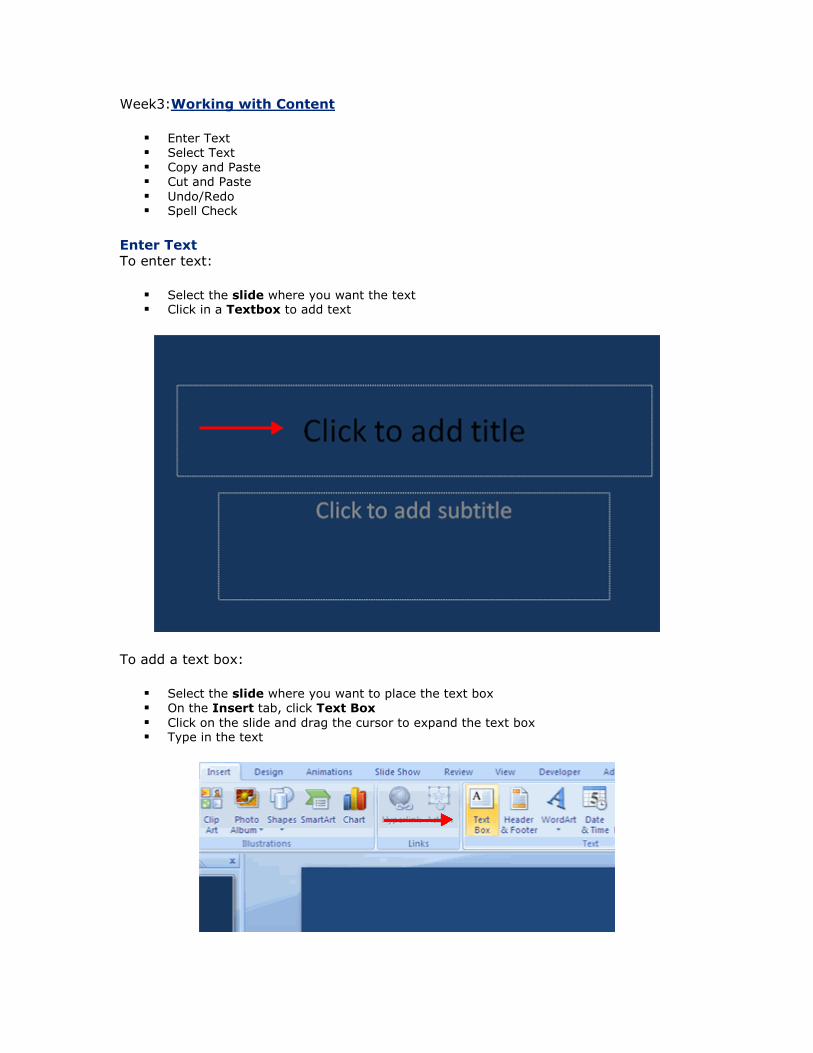
Enter Text To enter text:
Select the slide where you want the text Click in a Textbox to add text
To add a text box:
Select the slide where you want to place the text box On the Insert tab, click Text Box
Click on the slide and drag the cursor to expand the text box Type in the text
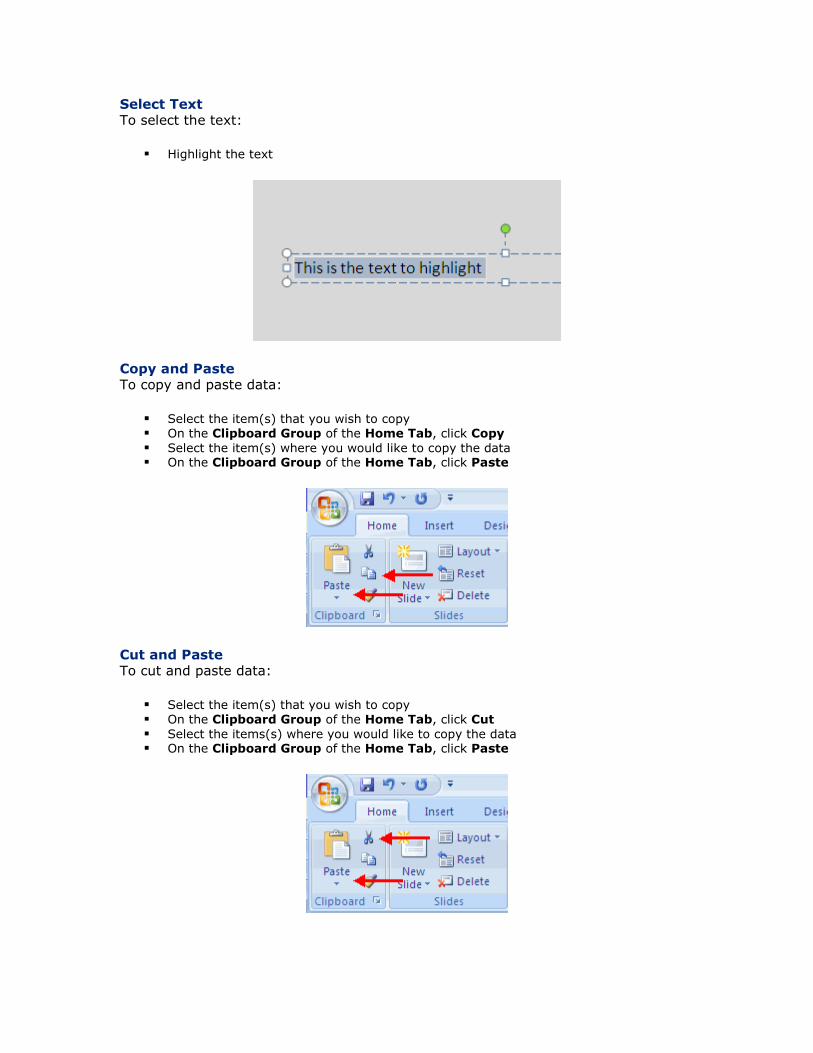
Select Text To select the text:
Highlight the text
Copy and Paste To copy and paste data:
Select the item(s) that you wish to copy On the Clipboard Group of the Home Tab, click Copy
Select the item(s) where you would like to copy the data On the Clipboard Group of the Home Tab, click Paste
Cut and Paste To cut and paste data:
Select the item(s) that you wish to copy On the Clipboard Group of the Home Tab, click Cut
Select the items(s) where you would like to copy the data On the Clipboard Group of the Home Tab, click Paste
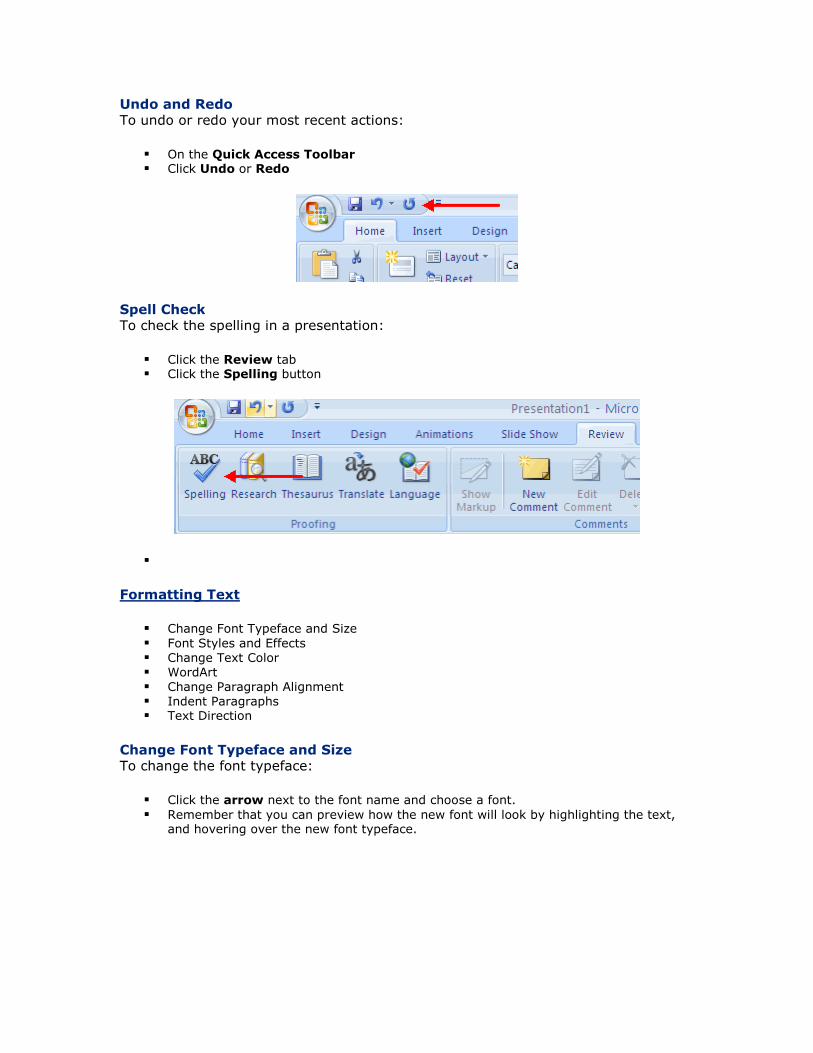
Undo and Redo To undo or redo your most recent actions:
On the Quick Access Toolbar Click Undo or Redo
Spell Check To check the spelling in a presentation:
Click the Review tab Click the Spelling button
Formatting Text
Change Font Typeface and Size
Font Styles and Effects Change Text Color WordArt Change Paragraph Alignment Indent Paragraphs Text Direction
Change Font Typeface and Size To change the font typeface:
Click the arrow next to the font name and choose a font.
Remember that you can preview how the new font will look by highlighting the text, and hovering over the new font typeface.

To change the font size:
Click the arrow next to the font size and choose the appropriate size, or Click the increase or decrease font size buttons.
Font Styles and Effects
Font styles are predefined formatting options that are used to emphasize text. They include: Bold, Italic, and Underline. To add these to text:
Select the text and click the Font Styles included on the Font group of the Home tab or
Select the text and right click to display the font tools
Change Text Color To change the text color:
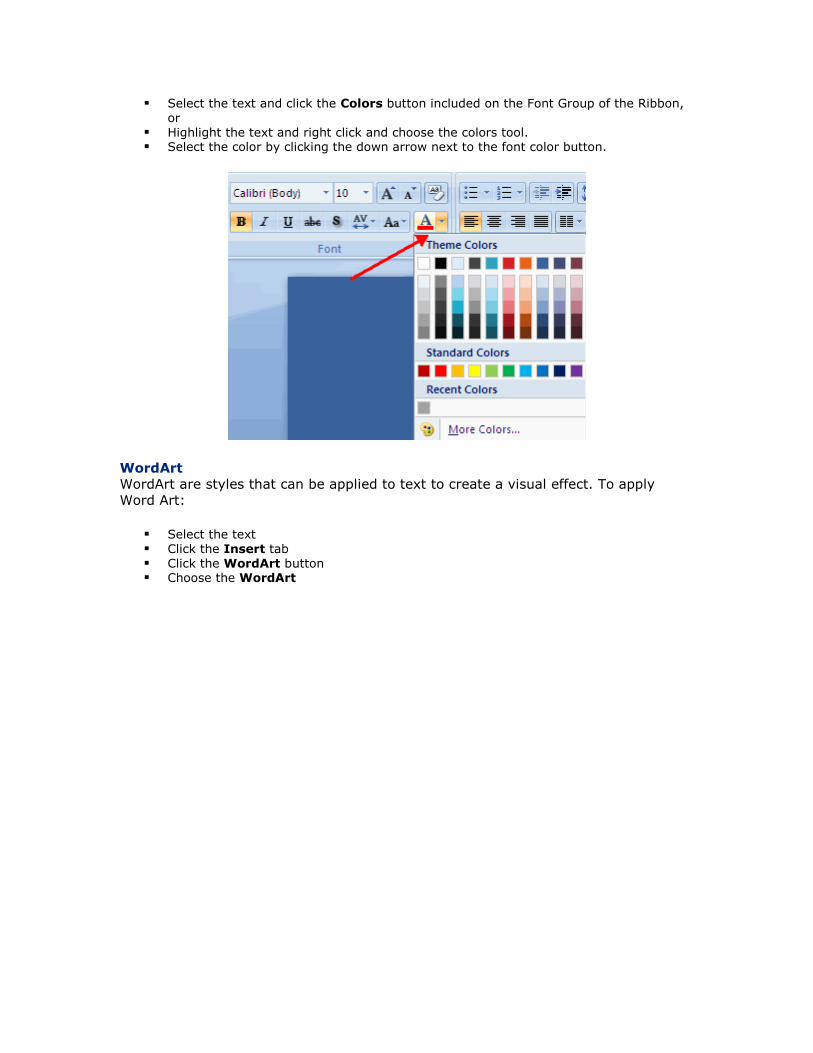
Select the text and click the Colors button included on the Font Group of the Ribbon,
or Highlight the text and right click and choose the colors tool. Select the color by clicking the down arrow next to the font color button.
WordArt
WordArt are styles that can be applied to text to create a visual effect. To apply
Word Art:
Select the text Click the Insert tab Click the WordArt button Choose the WordArt
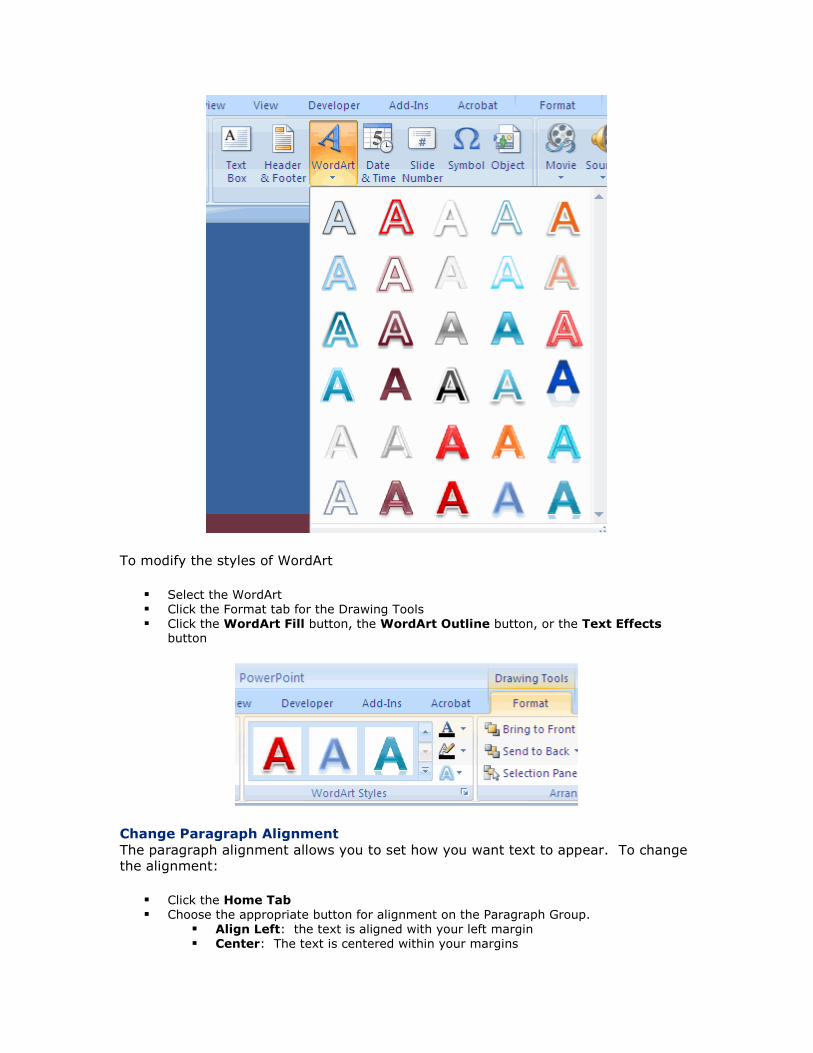
To modify the styles of WordArt
Select the WordArt Click the Format tab for the Drawing Tools Click the WordArt Fill button, the WordArt Outline button, or the Text Effects
button
Change Paragraph Alignment
The paragraph alignment allows you to set how you want text to appear. To change the alignment:
Click the Home Tab Choose the appropriate button for alignment on the Paragraph Group.
Align Left: the text is aligned with your left margin Center: The text is centered within your margins

Align Right: Aligns text with the right margin Justify: Aligns text to both the left and right margins.
Indent Paragraphs
To indent paragraphs, you can do the following:
Click the Indent buttons to control the indent. Click the Indent button repeated times to increase the size of the indent.
Text Direction To change the text direction:
Select the text Click the Text Direction button on the Home tab Click the selection
Adding Content
Resize a Textbox Bulleted and Numbered Lists Nested Lists
Formatting Lists Adding Video Adding Audio
Resize a Textbox
To resize a textbox:
Click on the textbox Click the corner of the box and drag the cursor to the desired size
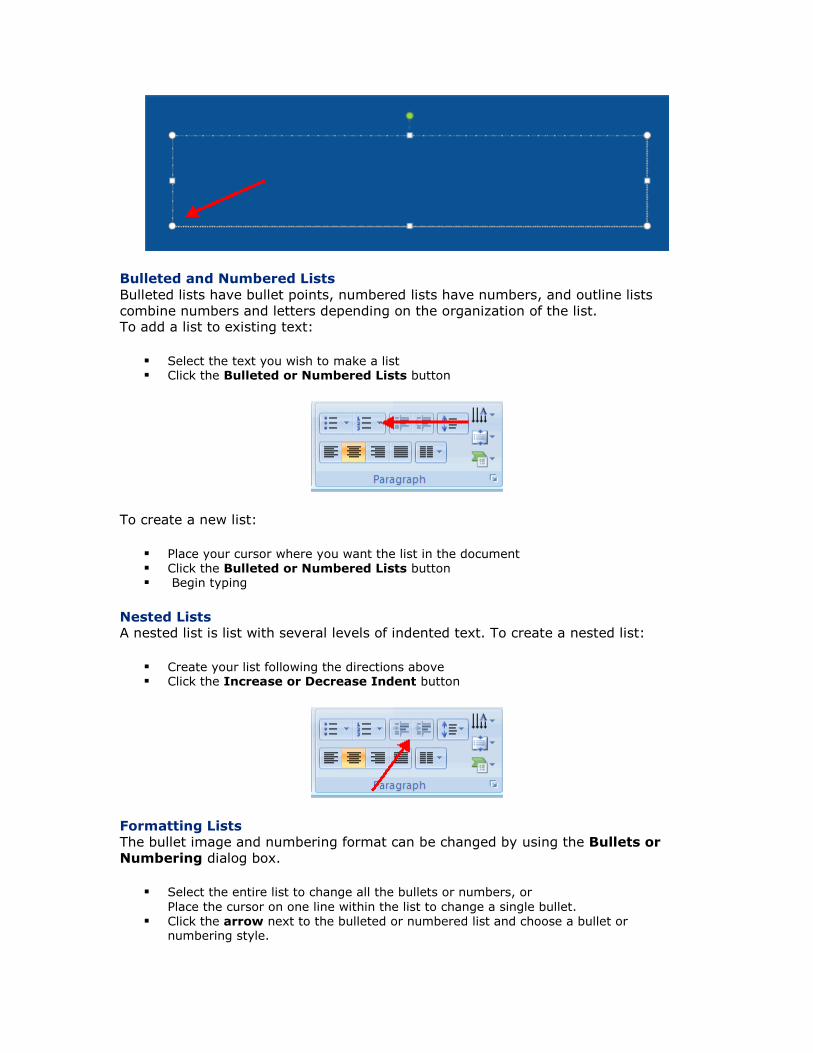
Bulleted and Numbered Lists
Bulleted lists have bullet points, numbered lists have numbers, and outline lists
combine numbers and letters depending on the organization of the list. To add a list to existing text:
Select the text you wish to make a list Click the Bulleted or Numbered Lists button
To create a new list:
Place your cursor where you want the list in the document Click the Bulleted or Numbered Lists button Begin typing
Nested Lists A nested list is list with several levels of indented text. To create a nested list:
Create your list following the directions above Click the Increase or Decrease Indent button
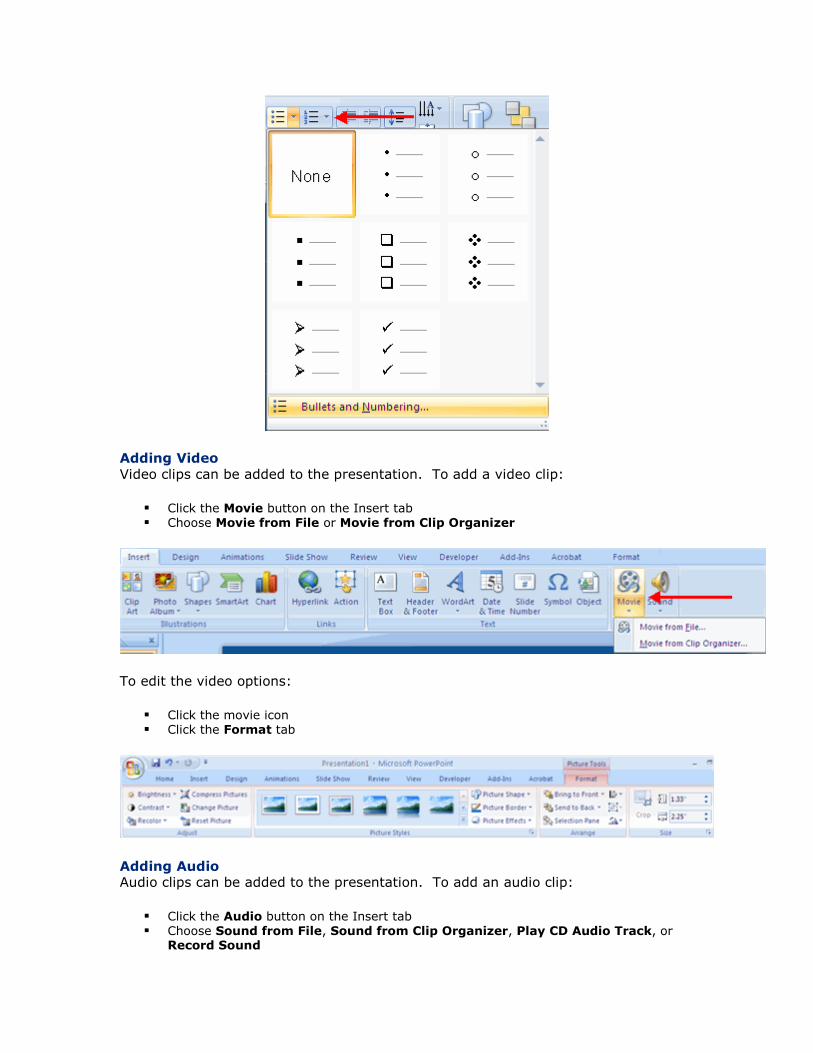
Formatting Lists
The bullet image and numbering format can be changed by using the Bullets or
Numbering dialog box.
Select the entire list to change all the bullets or numbers, or
Place the cursor on one line within the list to change a single bullet. Click the arrow next to the bulleted or numbered list and choose a bullet or
numbering style.
Adding Video
Video clips can be added to the presentation. To add a video clip:
Click the Movie button on the Insert tab Choose Movie from File or Movie from Clip Organizer
To edit the video options:
Click the movie icon Click the Format tab
Adding Audio Audio clips can be added to the presentation. To add an audio clip:
Click the Audio button on the Insert tab Choose Sound from File, Sound from Clip Organizer, Play CD Audio Track, or
Record Sound
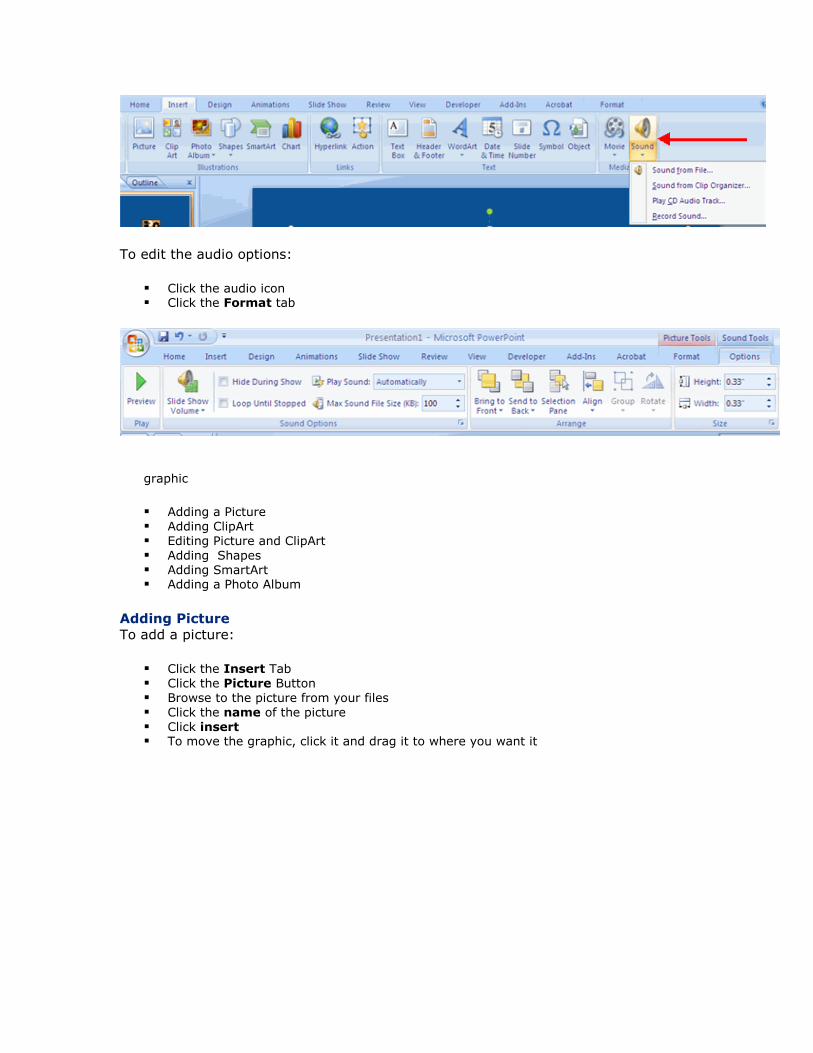
To edit the audio options:
Click the audio icon Click the Format tab
graphic
Adding a Picture Adding ClipArt Editing Picture and ClipArt Adding Shapes Adding SmartArt Adding a Photo Album
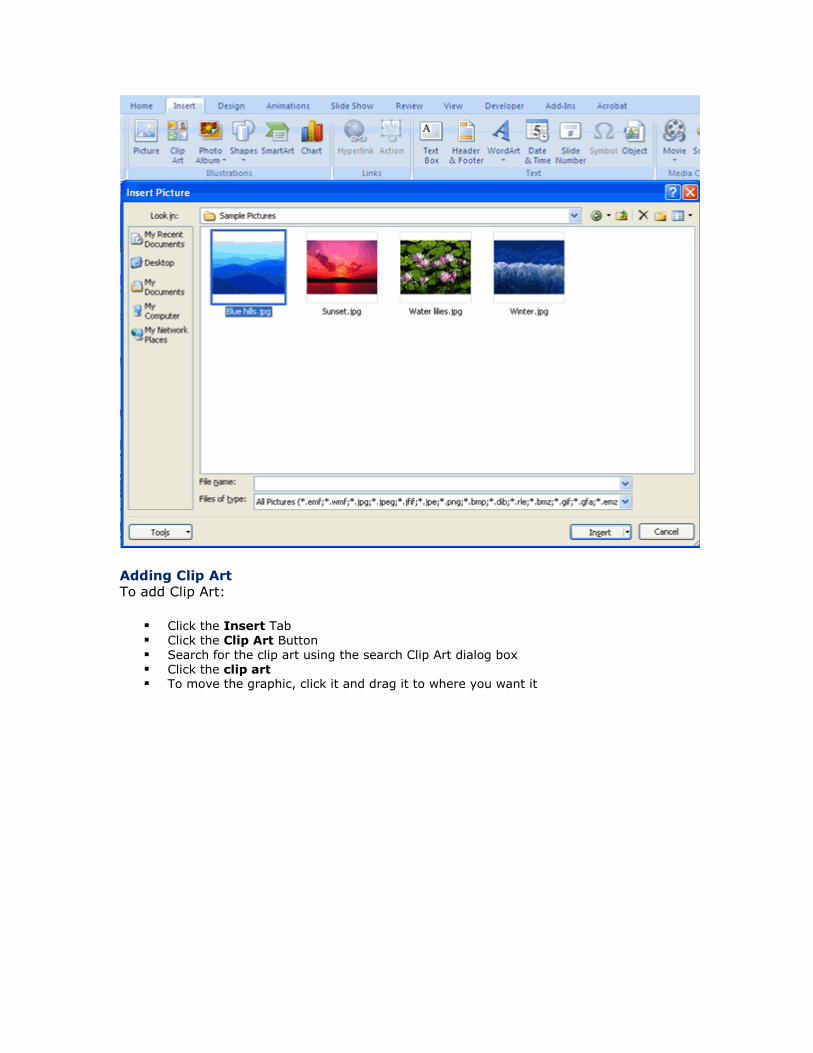
Adding Picture
To add a picture:
Click the Insert Tab Click the Picture Button Browse to the picture from your files Click the name of the picture Click insert To move the graphic, click it and drag it to where you want it
Adding Clip Art
To add Clip Art:
Click the Insert Tab Click the Clip Art Button Search for the clip art using the search Clip Art dialog box Click the clip art To move the graphic, click it and drag it to where you want it
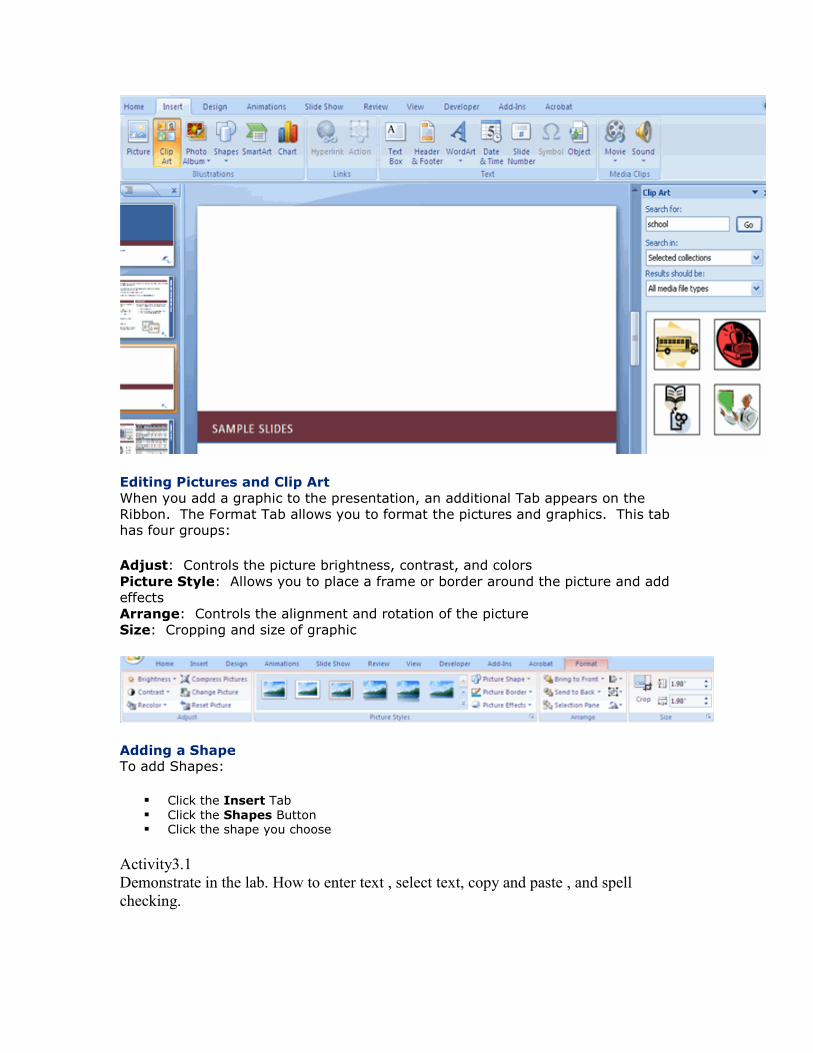
Editing Pictures and Clip Art
When you add a graphic to the presentation, an additional Tab appears on the
Ribbon. The Format Tab allows you to format the pictures and graphics. This tab has four groups:
Adjust: Controls the picture brightness, contrast, and colors
Picture Style: Allows you to place a frame or border around the picture and add
effects
Arrange: Controls the alignment and rotation of the picture
Size: Cropping and size of graphic
Adding a Shape To add Shapes:
Click the Insert Tab
Click the Shapes Button Click the shape you choose
Activity3.1 Demonstrate in the lab. How to enter text , select text, copy and paste , and spell checking.

Week4:Add Shapes:
Click the Insert Tab
Click the Shapes Adding a Shape To Button
Click the shape you choose
Click the Slide Drag the cursor to expand the Shape
To format the shapes:
Click the Shape Click the Format tab

Adding SmartArt
SmartArt is a feature in Office 2007 that allows you to choose from a variety of graphics, including flow charts, lists, cycles, and processes. To add SmartArt:
Click the Insert Tab
Click the SmartArt Button Click the SmartArt you choose
Click the SmartArt Drag it to the desired location in the slide
To format the SmartArt:
Click the SmartArt Click either the Design or the Format tab Click the SmartArt to add text and pictures.

Adding a Photo Album
The photo album feature is new in PowerPoint 2007 and allows you to easily create a
photo album to share pictures. To create a photo album:
Click the Photo Album button on the Insert tab
Click New Photo Album Click File/Disk to add pictures to the photo album Move the pictures up and down in the order of the album but clicking the up/down
arrows
Tables
Create a Table Enter Data in a Table Format a Table Insert a Table from Word or Excel
Tables are used to display data in a table format.
Create a Table To create a table:
Place the cursor on the page where you want the new table Click the Insert Tab of the Ribbon Click the Tables Button on the Tables Group. You can create a table one of four
ways: Highlight the number of row and columns Click Insert Table and enter the number of rows and columns

Click the Draw Table, create your table by clicking and entering the rows and
columns Click Excel Spreadsheet and enter data
Enter Data in a Table Place the cursor in the cell where you wish to enter the information. Begin typing.
Modify the Table Structure and Format a Table To modify the structure of a table:
Click the table and notice that you have two new tabs on the Ribbon: Design and Layout. These pertain to the table design and layout.
On the Design Tab, you can choose:
Table Style Options Table Styles Draw Borders
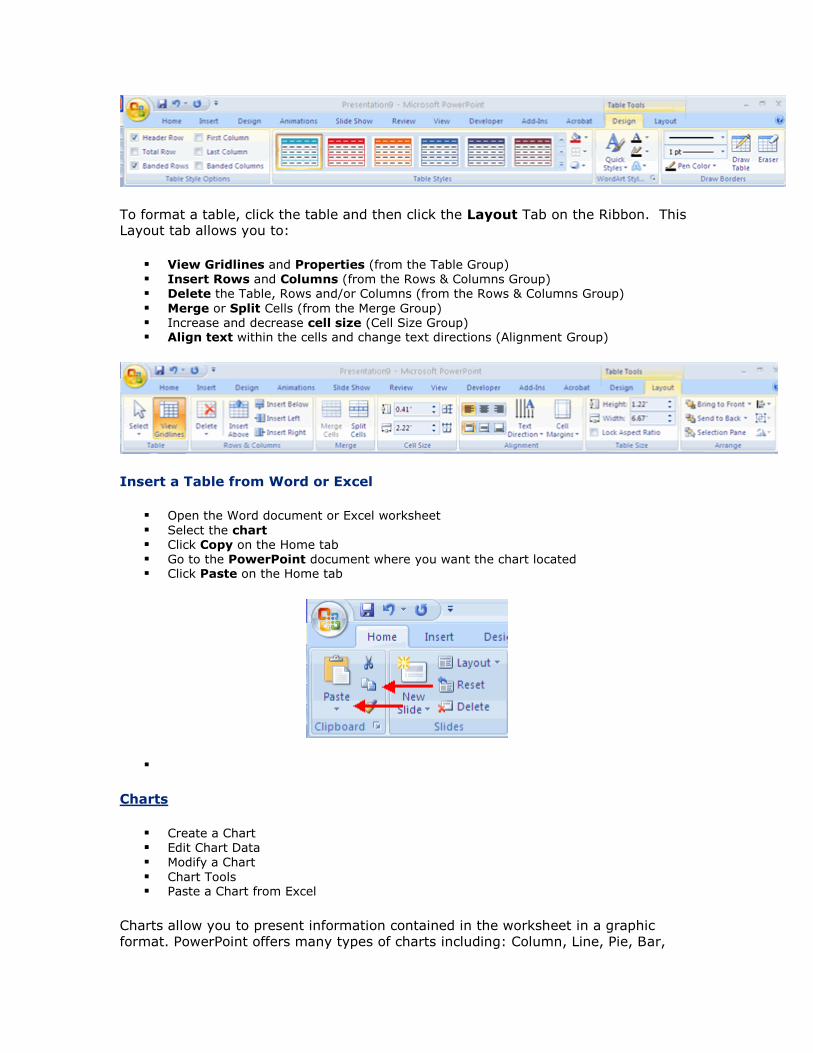
To format a table, click the table and then click the Layout Tab on the Ribbon. This Layout tab allows you to:
View Gridlines and Properties (from the Table Group) Insert Rows and Columns (from the Rows & Columns Group) Delete the Table, Rows and/or Columns (from the Rows & Columns Group)
Merge or Split Cells (from the Merge Group) Increase and decrease cell size (Cell Size Group) Align text within the cells and change text directions (Alignment Group)
Insert a Table from Word or Excel
Open the Word document or Excel worksheet
Select the chart Click Copy on the Home tab Go to the PowerPoint document where you want the chart located Click Paste on the Home tab
Charts
Create a Chart Edit Chart Data Modify a Chart
Chart Tools Paste a Chart from Excel
Charts allow you to present information contained in the worksheet in a graphic
format. PowerPoint offers many types of charts including: Column, Line, Pie, Bar,
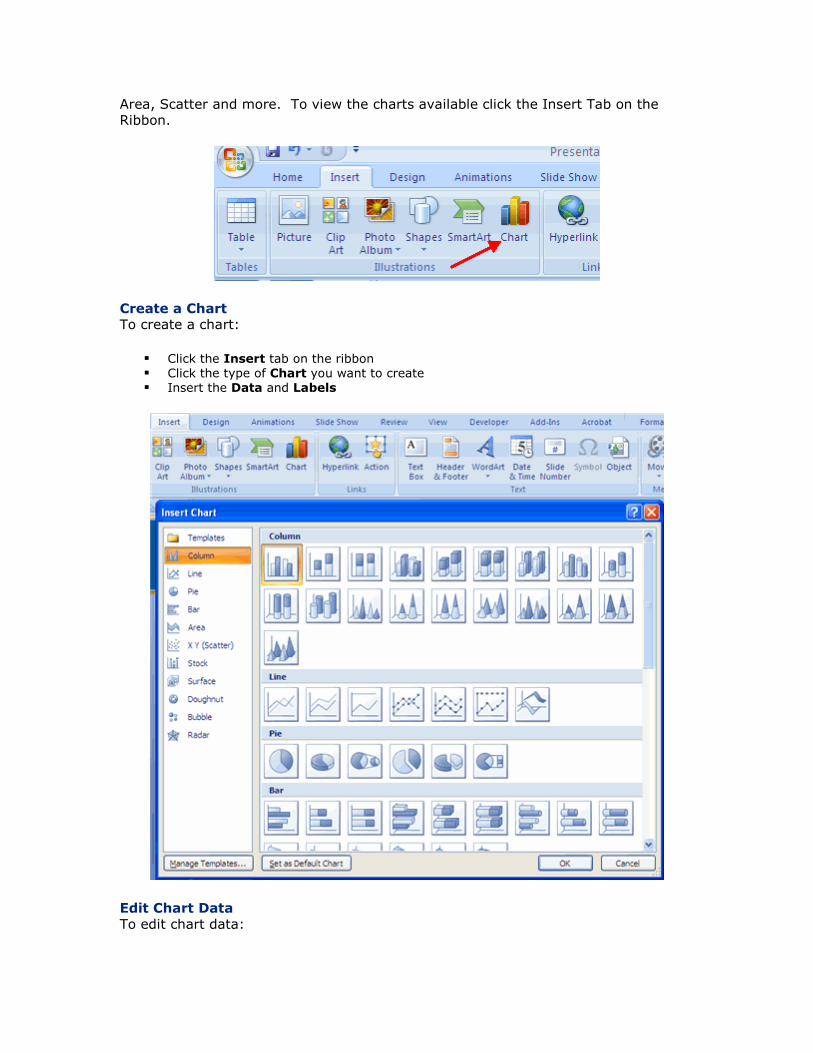
Area, Scatter and more. To view the charts available click the Insert Tab on the Ribbon.
Create a Chart To create a chart:
Click the Insert tab on the ribbon Click the type of Chart you want to create Insert the Data and Labels
Edit Chart Data
To edit chart data:
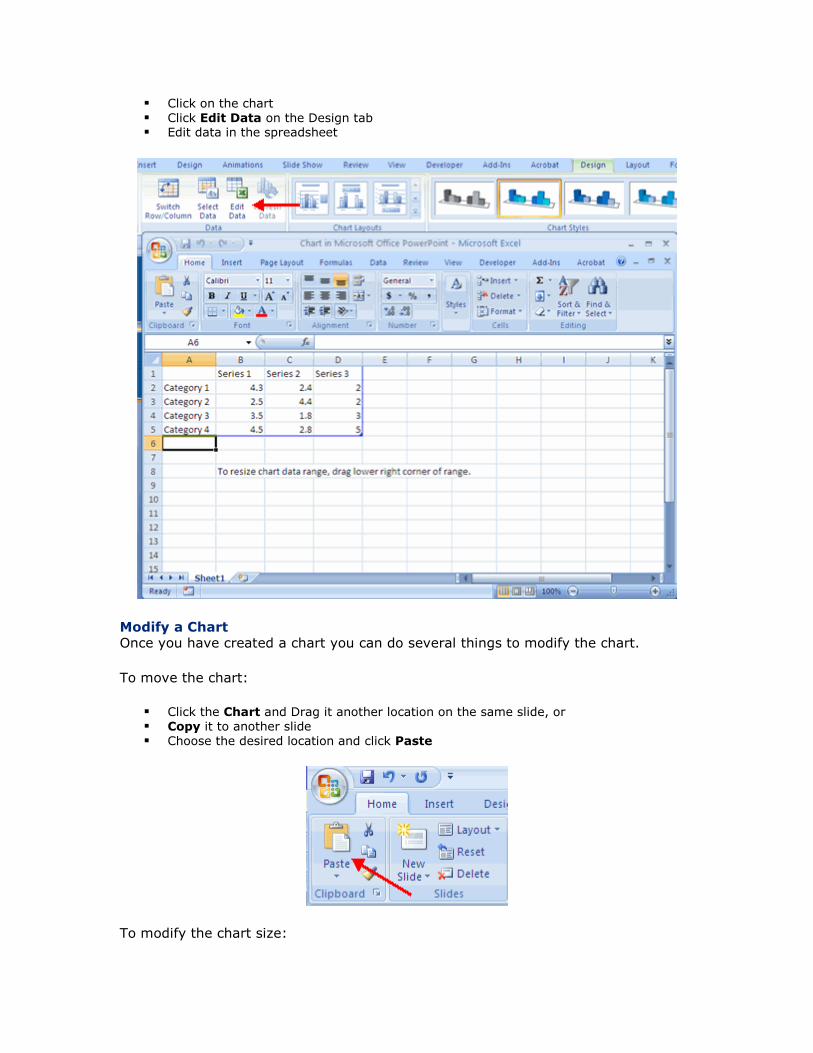
Click on the chart
Click Edit Data on the Design tab Edit data in the spreadsheet
Modify a Chart Once you have created a chart you can do several things to modify the chart.
To move the chart:
Click the Chart and Drag it another location on the same slide, or Copy it to another slide Choose the desired location and click Paste
To modify the chart size:
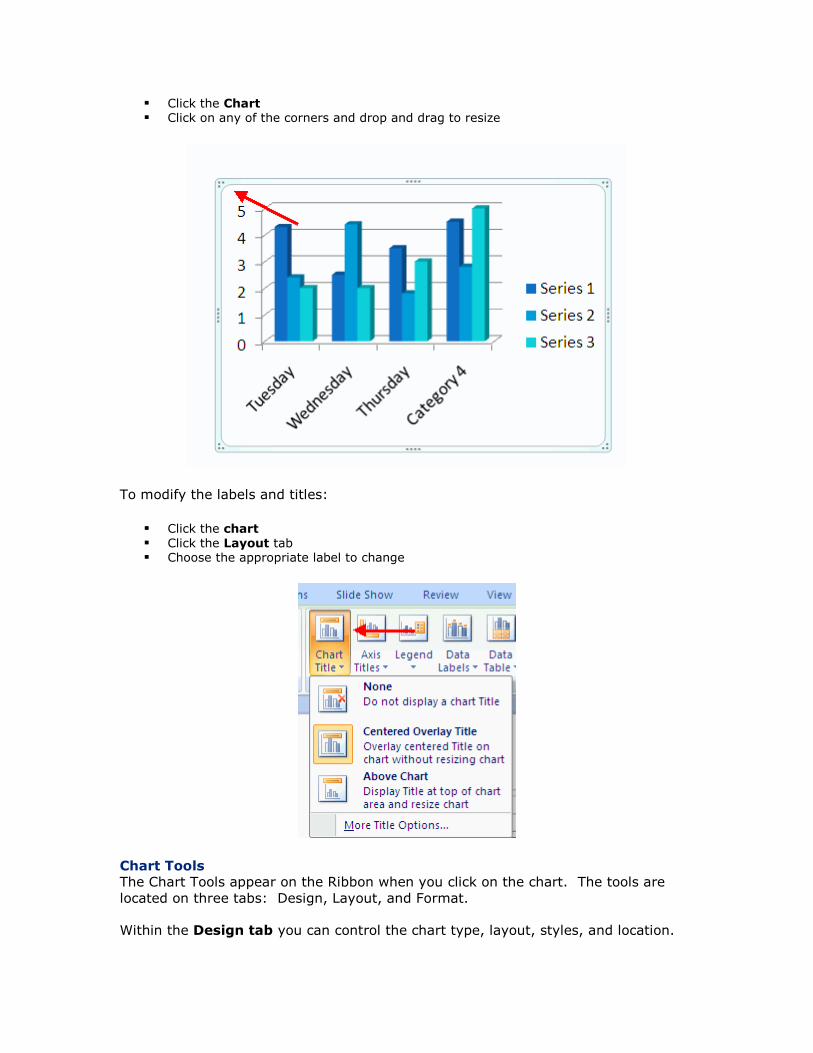
Click the Chart Click on any of the corners and drop and drag to resize
To modify the labels and titles:
Click the chart Click the Layout tab Choose the appropriate label to change
Chart Tools
The Chart Tools appear on the Ribbon when you click on the chart. The tools are
located on three tabs: Design, Layout, and Format.
Within the Design tab you can control the chart type, layout, styles, and location.

Within the Layout tab you can control the insertion of pictures, textboxes, and
shapes, labels, backgrounds, and data analysis.
Within the Format tab you can adjust the Fill Colors and Word Styles.
Paste a Chart from Excel
Open the Excel worksheet
Select the chart Click Copy on the Home tab Go to the PowerPoint document where you want the chart located Click Paste on the Home tab
Slide Effects
Slide Transitions Slide Animation Animation Preview Slide Show Options

Slide Transitions
Transitions are effects that are in place when you switch from one slide to the next.
To add slide transitions:
Select the slide that you want to transition
Click the Animations tab Choose the appropriate animation or click the Transition dialog box
To adjust slide transitions:
Add sound by clicking the arrow next to Transition Sound
Modify the transition speed by clicking the arrow next to Transition Speed
To apply the transition to all slides:

Click the Apply to All button on the Animations tab
To select how to advance a slide:
Choose to Advance on Mouse Click, or Automatically after a set number of seconds
Slide Animation
Slide animation effects are predefined special effects that you can add to objects on a slide. To apply an animation effect:
Select the object Click the Animations tab on the Ribbon Click Custom Animation
Click Add Effect Choose the appropriate effect
Animation Preview
To preview the animation on a slide:
Click the Preview button on the Animations tab
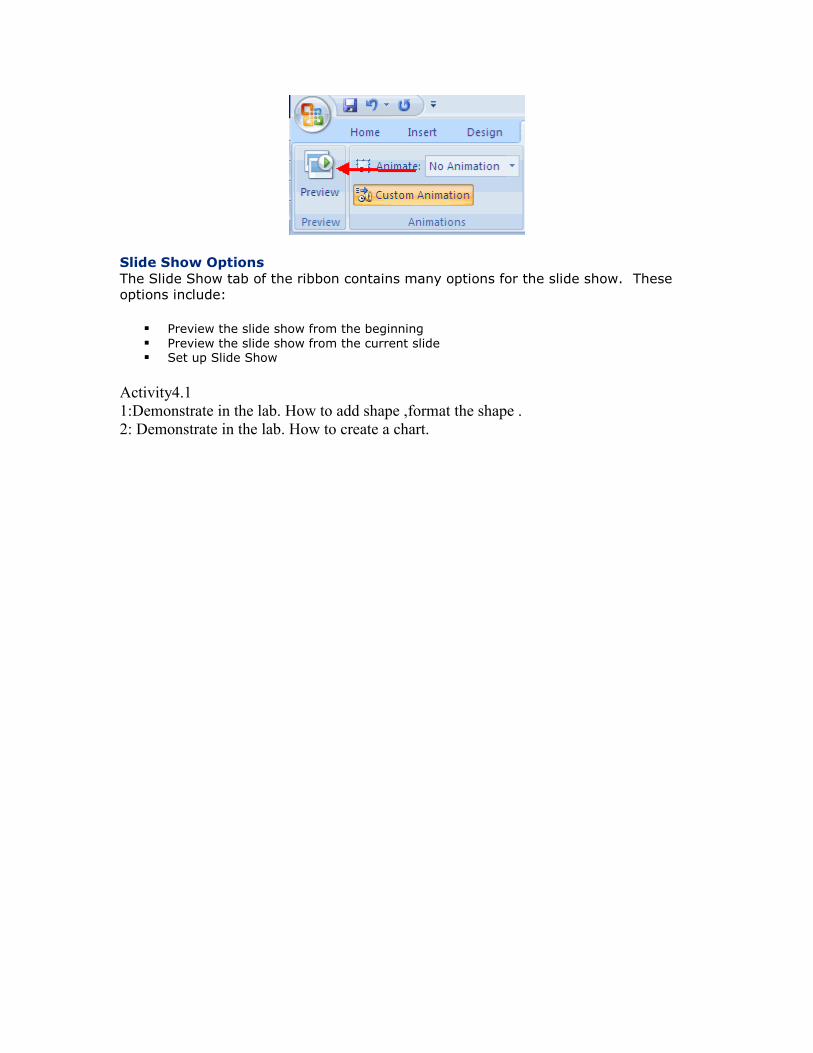
Slide Show Options
The Slide Show tab of the ribbon contains many options for the slide show. These options include:
Preview the slide show from the beginning
Preview the slide show from the current slide Set up Slide Show
Activity4.1 1:Demonstrate in the lab. How to add shape ,format the shape . 2: Demonstrate in the lab. How to create a chart.
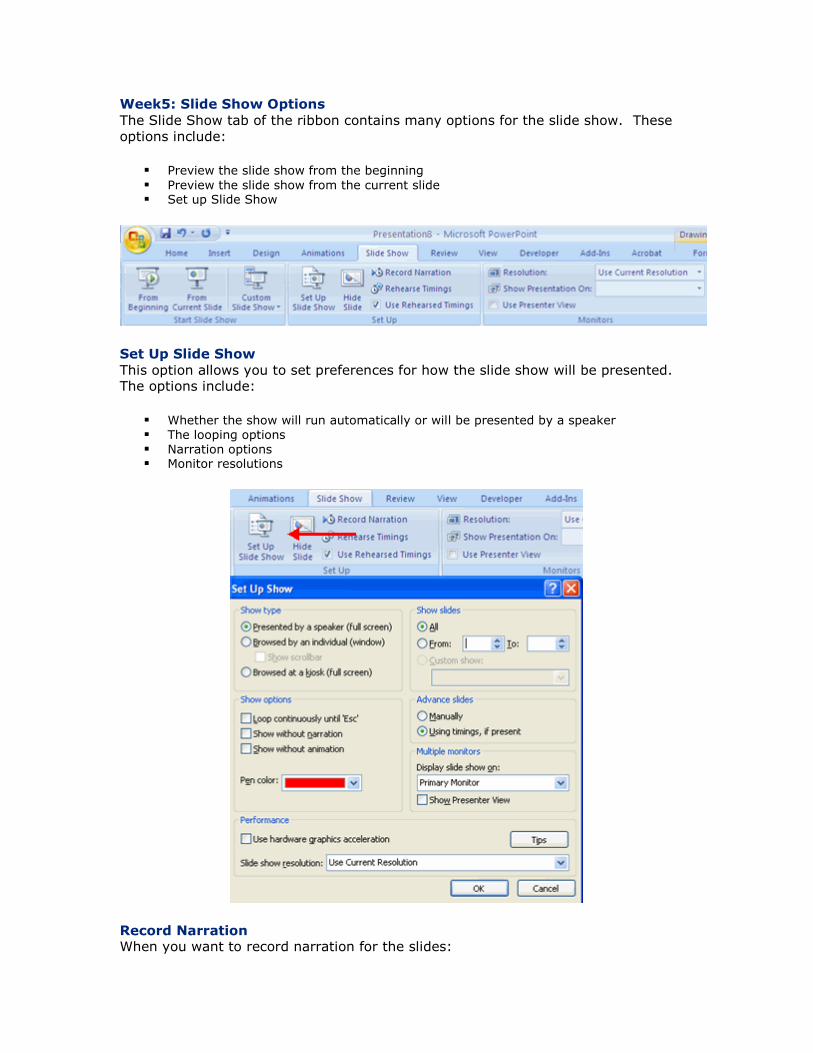
Week5: Slide Show Options
The Slide Show tab of the ribbon contains many options for the slide show. These
options include:
Preview the slide show from the beginning
Preview the slide show from the current slide Set up Slide Show
Set Up Slide Show
This option allows you to set preferences for how the slide show will be presented. The options include:
Whether the show will run automatically or will be presented by a speaker The looping options Narration options Monitor resolutions
Record Narration When you want to record narration for the slides:

Click the Record Narration button
Click Set Microphone Level to check the levels of audio input Click OK to record the narration
Rehearse Timings
Use Rehearsed Timings to rehearse the timings of slide with audio.
Click the Rehearse Timings button Practice speaking and advance the slides as you would in the presentation
When you have completed this click through the end of the slide Choose whether or not to keep this timing or to retry
Printing
Create Speaker Notes Print a Presentation Package a Presentation
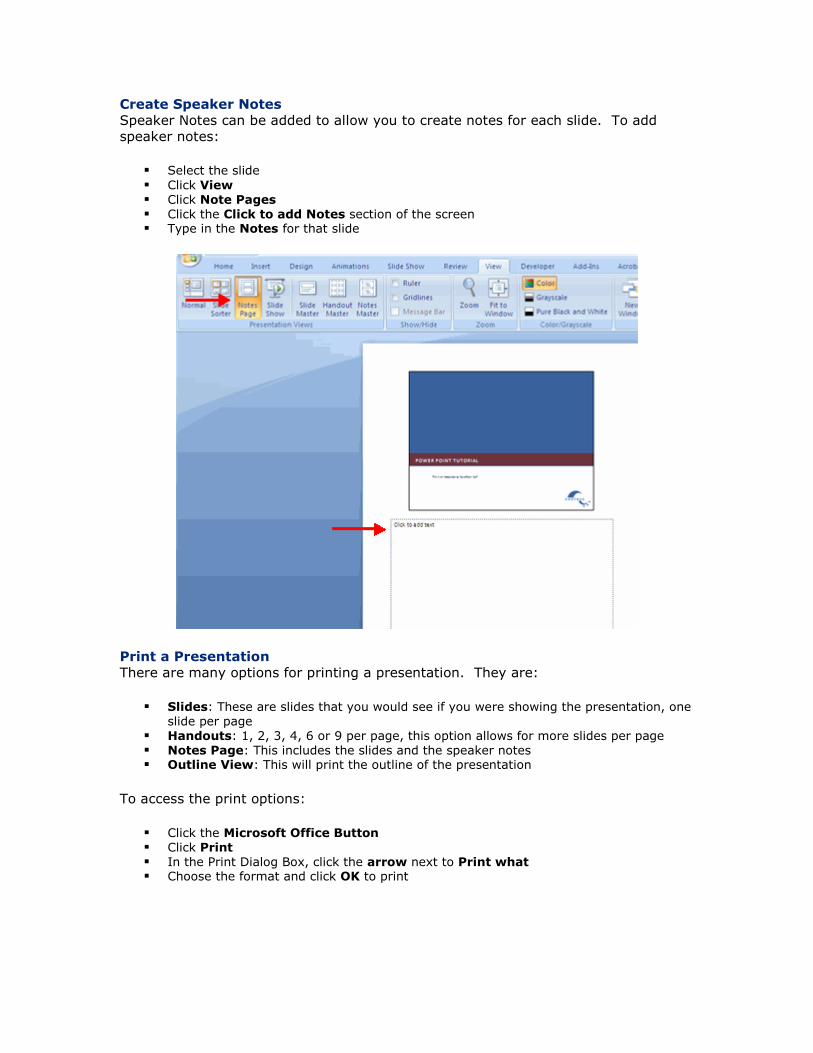
Create Speaker Notes
Speaker Notes can be added to allow you to create notes for each slide. To add
speaker notes:
Select the slide
Click View Click Note Pages Click the Click to add Notes section of the screen Type in the Notes for that slide
Print a Presentation
There are many options for printing a presentation. They are:
Slides: These are slides that you would see if you were showing the presentation, one slide per page
Handouts: 1, 2, 3, 4, 6 or 9 per page, this option allows for more slides per page Notes Page: This includes the slides and the speaker notes Outline View: This will print the outline of the presentation
To access the print options:
Click the Microsoft Office Button Click Print In the Print Dialog Box, click the arrow next to Print what Choose the format and click OK to print

To print preview:
Click the Microsoft Office Button Place the cursor over Print
Click Print Preview Click the arrow next to Print What to change print options To print from Print Preview, click Print

To Exit Print Preview:
Click the Close Print Preview button
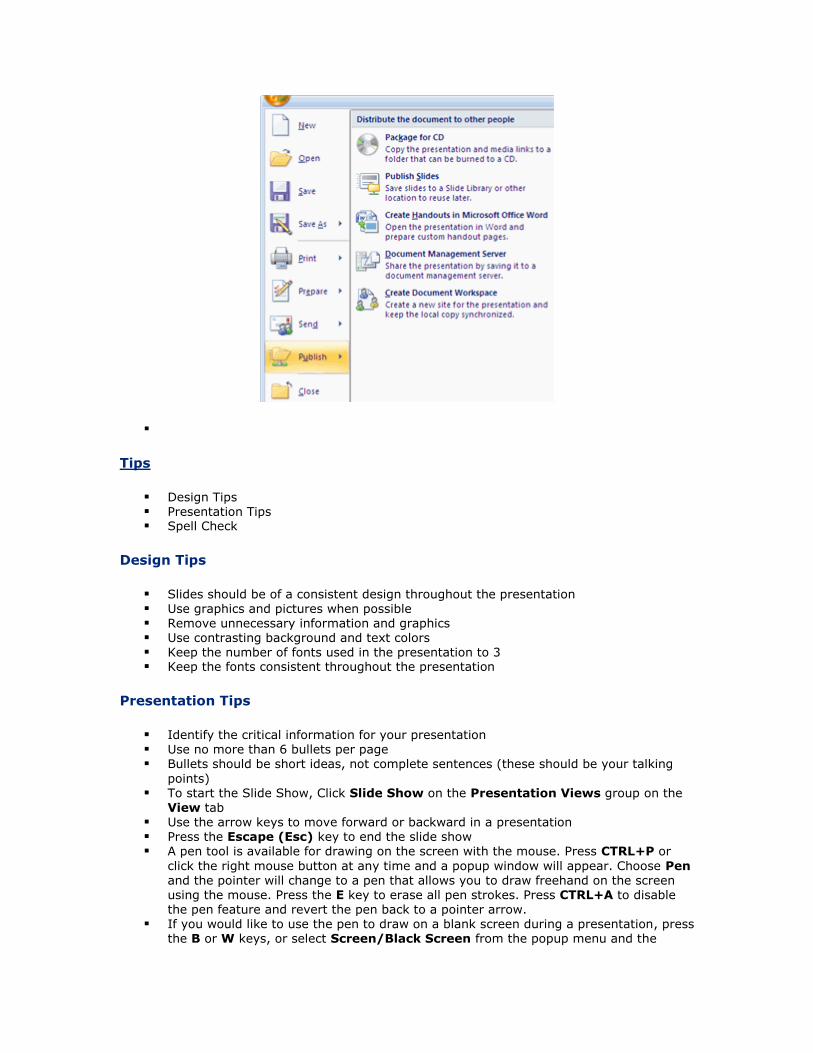
Package a Presentation
There are times when you want to package a presentation with all of the additional files attached as well. To package a presentation for CD:
Click the Microsoft Office Button Click Publish Click Package for CD Type a name for the CD Click Copy to CD or Copy to Folder
Tips
Design Tips Presentation Tips Spell Check
Design Tips
Slides should be of a consistent design throughout the presentation Use graphics and pictures when possible Remove unnecessary information and graphics Use contrasting background and text colors Keep the number of fonts used in the presentation to 3 Keep the fonts consistent throughout the presentation
Presentation Tips
Identify the critical information for your presentation Use no more than 6 bullets per page Bullets should be short ideas, not complete sentences (these should be your talking
points) To start the Slide Show, Click Slide Show on the Presentation Views group on the
View tab Use the arrow keys to move forward or backward in a presentation Press the Escape (Esc) key to end the slide show A pen tool is available for drawing on the screen with the mouse. Press CTRL+P or
click the right mouse button at any time and a popup window will appear. Choose Pen and the pointer will change to a pen that allows you to draw freehand on the screen using the mouse. Press the E key to erase all pen strokes. Press CTRL+A to disable the pen feature and revert the pen back to a pointer arrow.
If you would like to use the pen to draw on a blank screen during a presentation, press the B or W keys, or select Screen/Black Screen from the popup menu and the

screen will turn black. Press B or W again or choose Next from the popup menu to
return to the presentation when you are finished drawing. To hide the pointer and button from the screen press the A key. Be sure to preview the slide show using a projector if one will be used during the
presentation. Words or graphics that are close to the edge of the screen may be cut off by the projector.
Spell Check To check the spelling throughout a presentation:
Click the Spelling button in the Proofing group on the Review tab
Activity5.1
o Demonstrate in the lab. How to preview the slide show from the beginning. o Demonstrate in the lab. How to preview the slide show from the current slide. o Demonstrate in the lab. How to set up slide show.

WEEK 6 THE INTERNET Terminology The Internet is a global system of interconnected computer networks that interchange data by packet switching using the standardized Internet Protocol Suite (TCP/IP). It is a "network of networks" that consists of millions of private and public, academic, business, and government networks of local to global scope that are linked by copper wires, fiber-optic cables, wireless connections, and other technologies. The Internet carries various information resources and services, such as electronic mail, online chat, file transfer and file sharing, online gaming, and the inter-linked hypertext documents and other resources of the World Wide Web (WWW).
Visualization of the various routes through a portion of the Internet.
The terms Internet and World Wide Web are often used in every-day speech without much distinction. However, the Internet and the World Wide Web are not one and the same. The Internet is a global data communications

system. It is a hardware and software infrastructure that provides connectivity between computers. In contrast, the Web is one of the services communicated via the Internet. It is a collection of interconnected documents and other resources, linked by hyperlinks and URLs.[1]
History
A 1946 comic science-fiction story, A Logic Named Joe, by Murray Leinster laid out the Internet and many of its strengths and weaknesses. However, it took more than a decade before reality began to catch up with this vision.
The USSR's launch of Sputnik spurred the United States to create the Advanced Research Projects Agency, known as ARPA, in February 1958 to regain a technological lead.[2][3] ARPA created the Information Processing Technology Office (IPTO) to further the research of the Semi Automatic Ground Environment (SAGE) program, which had networked country-wide radar systems together for the first time. J. C. R. Licklider was selected to head the IPTO, and saw universal networking as a potential unifying human revolution.
Licklider moved from the Psycho-Acoustic Laboratory at Harvard University to MIT in 1950, after becoming interested in information technology. At MIT, he served on a committee that established Lincoln Laboratory and worked on the SAGE project. In 1957 he became a Vice President at BBN, where he bought the first production PDP-1 computer and conducted the first public demonstration of time-sharing.
At the IPTO, Licklider recruited Lawrence Roberts to head a project to implement a network, and Roberts based the technology on the work of Paul Baran,[citation needed] who had written an exhaustive study for the U.S. Air Force that recommended packet switching (as opposed to circuit switching) to make a network highly robust and survivable. After much work, the first two nodes of what would become the ARPANET were interconnected between UCLA and SRI International in Menlo Park, California, on October 29, 1969. The ARPANET was one of the "eve" networks of today's Internet. Following on from the demonstration that packet switching worked on the ARPANET, the British Post Office, Telenet, DATAPAC and TRANSPAC collaborated to create the first international packet-switched network service. In the UK, this was referred to as the International Packet Switched Service (IPSS), in 1978. The collection of X.25-based networks grew from Europe

and the US to cover Canada, Hong Kong and Australia by 1981. The X.25 packet switching standard was developed in the CCITT (now called ITU-T) around 1976. X.25 was independent of the TCP/IP protocols that arose from the experimental work of DARPA on the ARPANET, Packet Radio Net and Packet Satellite Net during the same time period. Vinton Cerf and Robert Kahn developed the first description of the TCP protocols during 1973 and published a paper on the subject in May 1974. Use of the term "Internet" to describe a single global TCP/IP network originated in December 1974 with the publication of RFC 675, the first full specification of TCP that was written by Vinton Cerf, Yogen Dalal and Carl Sunshine, then at Stanford University. During the next nine years, work proceeded to refine the protocols and to implement them on a wide range of operating systems.
The first TCP/IP-based wide-area network was operational by January 1, 1983 when all hosts on the ARPANET were switched over from the older NCP protocols. In 1985, the United States' National Science Foundation (NSF) commissioned the construction of the NSFNET, a university 56 kilobit/second network backbone using computers called "fuzzballs" by their inventor, David L. Mills. The following year, NSF sponsored the conversion to a higher-speed 1.5 megabit/second network. A key decision to use the DARPA TCP/IP protocols was made by Dennis Jennings, then in charge of the Supercomputer program at NSF.
The opening of the network to commercial interests began in 1988. The US Federal Networking Council approved the interconnection of the NSFNET to the commercial MCI Mail system in that year and the link was made in the summer of 1989. Other commercial electronic e-mail services were soon connected, including OnTyme, Telemail and Compuserve. In that same year, three commercial Internet service providers (ISP) were created: UUNET, PSINET and CERFNET. Important, separate networks that offered gateways into, then later merged with, the Internet include Usenet and BITNET. Various other commercial and educational networks, such as Telenet, Tymnet, Compuserve and JANET were interconnected with the growing Internet. Telenet (later called Sprintnet) was a large privately funded national computer network with free dial-up access in cities throughout the U.S. that had been in operation since the 1970s. This network was eventually interconnected with the others in the 1980s as the TCP/IP protocol became increasingly popular. The ability of TCP/IP to work over virtually any pre-existing communication networks allowed for a great ease of growth, although the rapid growth of the Internet was due primarily to the
availability of commercial routers from companies such as Cisco Systems, Proteon and Juniper, the availability of commercial Ethernet equipment for local-area networking and the widespread implementation of TCP/IP on the UNIX operating system.
Growth
Although the basic applications and guidelines that make the Internet possible had existed for almost a decade, the network did not gain a public face until the 1990s. On August 6, 1991, CERN, which straddles the border between France and Switzerland, publicized the new World Wide Web project. The Web was invented by English scientist Tim Berners-Lee in 1989.
An early popular web browser was ViolaWWW, patterned after HyperCard and built using the X Window System. It was eventually replaced in popularity by the Mosaic web browser. In 1993, the National Center for Supercomputing Applications at the University of Illinois released version 1.0 of Mosaic, and by late 1994 there was growing public interest in the previously academic, technical Internet. By 1996 usage of the word Internet had become commonplace, and consequently, so had its use as a synecdoche in reference to the World Wide Web.
Meanwhile, over the course of the decade, the Internet successfully accommodated the majority of previously existing public computer networks (although some networks, such as FidoNet, have remained separate). During the 1990s, it was estimated that the Internet grew by 100% per year, with a brief period of explosive growth in 1996 and 1997.[4] This growth is often attributed to the lack of central administration, which allows organic growth of the network, as well as the non-proprietary open nature of the Internet protocols, which encourages vendor interoperability and prevents any one company from exerting too much control over the network
Internet protocols
The complex communications infrastructure of the Internet consists of its hardware components and a system of software layers that control various aspects of the architecture. While the hardware can often be used to support

other software systems, it is the design and the rigorous standardization process of the software architecture that characterizes the Internet.
The responsibility for the architectural design of the Internet software systems has been delegated to the Internet Engineering Task Force (IETF). The IETF conducts standard-setting work groups, open to any individual, about the various aspects of Internet architecture. Resulting discussions and final standards are published in Request for Comments (RFCs), freely available on the IETF web site.
The principal methods of networking that enable the Internet are contained in a series of RFCs that constitute the Internet Standards. These standards describe a system known as the Internet Protocol Suite. This is a model architecture that divides methods into a layered system of protocols (RFC 1122, RFC 1123). The layers correspond to the environment or scope in which their services operate. At the top is the space (Application Layer) of the software application, e.g., a web browser application, and just below it is the Transport Layer which connects applications on different hosts via the network (e.g., client-server model). The underlying network consists of two layers: the Internet Layer which enables computers to connect to one-another via intermediate (transit) networks and thus is the layer that establishes internetworking and the Internet, and lastly, at the bottom, is a software layer that provides connectivity between hosts on the same local link (therefore called Link Layer), e.g., a local area network (LAN) or a dial-up connection. This model is also known as the TCP/IP model of networking. While other models have been developed, such as the Open Systems Interconnection (OSI) model, they are not compatible in the details of description, nor implementation.
The most prominent component of the Internet model is the Internet Protocol (IP) which provides addressing systems for computers on the Internet and facilitates the internetworking of networks. IP Version 4 (IPv4) is the initial version used on the first generation of the today's Internet and is still in dominant use. It was designed to address up to ~4.3 billion (109) Internet hosts. However, the explosive growth of the Internet has led to IPv4 address exhaustion. A new protocol version, IPv6, was developed which provides vastly larger addressing capabilities and more efficient routing of data traffic. IPv6 is currently in commercial deployment phase around the world.

IPv6 is not interoperable with IPv4. It essentially establishes a "parallel" version of the Internet not accessible with IPv4 software. This means software upgrades are necessary for every networking device that needs to communicate on the IPv6 Internet. Most modern computer operating systems are already converted to operate with both version of the Internet Protocol. Network infrastructures, however, are still lagging in this development.
Internet structure
There have been many analyses of the Internet and its structure. For example, it has been determined that the Internet IP routing structure and hypertext links of the World Wide Web are examples of scale-free networks.
Similar to the way the commercial Internet providers connect via Internet exchange points, research networks tend to interconnect into large subnetworks such as the following:
GEANT GLORIAD The Internet2 Network (formally known as the Abilene Network) JANET (the UK's national research and education network)
These in turn are built around relatively smaller networks. See also the list of academic computer network organizations.
In computer network diagrams, the Internet is often represented by a cloud symbol, into and out of which network communications can pass.
Common Uses of the Internet
The concept of sending electronic text messages between parties in a way analogous to mailing letters or memos predates the creation of the Internet. Even today it can be important to distinguish between Internet and internal e-mail systems. Internet e-mail may travel and be stored unencrypted on many other networks and machines out of both the sender's and the recipient's control. During this time it is quite possible for the content to be
read and even tampered with by third parties, if anyone considers it important enough. Purely internal or intranet mail systems, where the information never leaves the corporate or organization's network, are much more secure, although in any organization there will be IT and other personnel whose job may involve monitoring, and occasionally accessing, the e-mail of other employees not addressed to them.
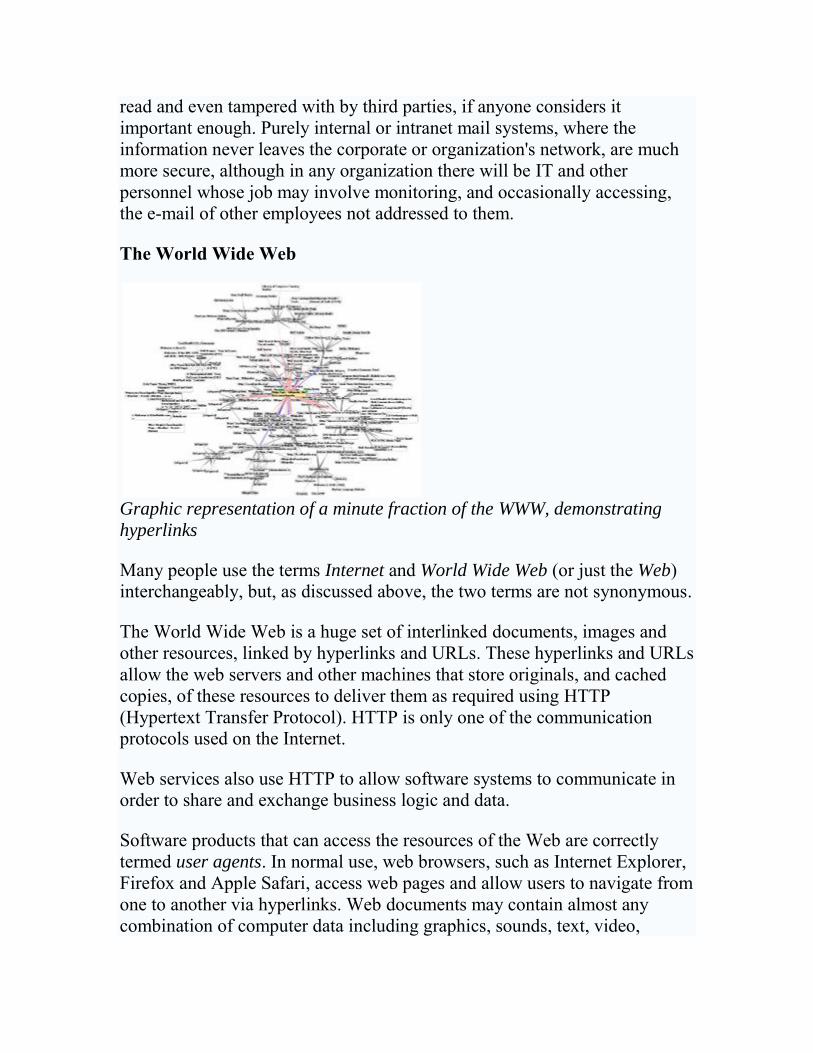
The World Wide Web
Graphic representation of a minute fraction of the WWW, demonstrating
hyperlinks
Many people use the terms Internet and World Wide Web (or just the Web) interchangeably, but, as discussed above, the two terms are not synonymous.
The World Wide Web is a huge set of interlinked documents, images and other resources, linked by hyperlinks and URLs. These hyperlinks and URLs allow the web servers and other machines that store originals, and cached copies, of these resources to deliver them as required using HTTP (Hypertext Transfer Protocol). HTTP is only one of the communication protocols used on the Internet.
Web services also use HTTP to allow software systems to communicate in order to share and exchange business logic and data.
Software products that can access the resources of the Web are correctly termed user agents. In normal use, web browsers, such as Internet Explorer, Firefox and Apple Safari, access web pages and allow users to navigate from one to another via hyperlinks. Web documents may contain almost any combination of computer data including graphics, sounds, text, video,

multimedia and interactive content including games, office applications and scientific demonstrations.
Through keyword-driven Internet research using search engines like Yahoo! and Google, millions of people worldwide have easy, instant access to a vast and diverse amount of online information. Compared to encyclopedias and traditional libraries, the World Wide Web has enabled a sudden and extreme decentralization of information and data.
Using the Web, it is also easier than ever before for individuals and organisations to publish ideas and information to an extremely large audience. Anyone can find ways to publish a web page, a blog or build a website for very little initial cost. Publishing and maintaining large, professional websites full of attractive, diverse and up-to-date information is still a difficult and expensive proposition, however.
Many individuals and some companies and groups use "web logs" or blogs, which are largely used as easily updatable online diaries. Some commercial organisations encourage staff to fill them with advice on their areas of specialization in the hope that visitors will be impressed by the expert knowledge and free information, and be attracted to the corporation as a result. One example of this practice is Microsoft, whose product developers publish their personal blogs in order to pique the public's interest in their work.
Collections of personal web pages published by large service providers remain popular, and have become increasingly sophisticated. Whereas operations such as Angelfire and GeoCities have existed since the early days of the Web, newer offerings from, for example, Facebook and MySpace currently have large followings. These operations often brand themselves as social network services rather than simply as web page hosts.
Advertising on popular web pages can be lucrative, and e-commerce or the sale of products and services directly via the Web continues to grow.
In the early days, web pages were usually created as sets of complete and isolated HTML text files stored on a web server. More recently, websites are more often created using content management system (CMS) or wiki software with, initially, very little content. Contributors to these systems, who may be paid staff, members of a club or other organisation or members of the public, fill underlying databases with content using editing pages
designed for that purpose, while casual visitors view and read this content in its final HTML form. There may or may not be editorial, approval and security systems built into the process of taking newly entered content and making it available to the target visitors.
Remote access
The Internet allows computer users to connect to other computers and information stores easily, wherever they may be across the world. They may do this with or without the use of security, authentication and encryption technologies, depending on the requirements.
This is encouraging new ways of working from home, collaboration and information sharing in many industries. An accountant sitting at home can audit the books of a company based in another country, on a server situated in a third country that is remotely maintained by IT specialists in a fourth. These accounts could have been created by home-working bookkeepers, in other remote locations, based on information e-mailed to them from offices all over the world. Some of these things were possible before the widespread use of the Internet, but the cost of private leased lines would have made many of them infeasible in practice.
An office worker away from his desk, perhaps on the other side of the world on a business trip or a holiday, can open a remote desktop session into his normal office PC using a secure Virtual Private Network (VPN) connection via the Internet. This gives the worker complete access to all of his or her normal files and data, including e-mail and other applications, while away from the office.
This concept is also referred to by some network security people as the Virtual Private Nightmare, because it extends the secure perimeter of a corporate network into its employees' homes; this has been the source of some notable security breaches, but also provides security for the workers.
Collaboration
The low cost and nearly instantaneous sharing of ideas, knowledge, and skills has made collaborative work dramatically easier. Not only can a group cheaply communicate and test, but the wide reach of the Internet allows such groups to easily form in the first place, even among niche interests. An example of this is the free software movement in software development,
which produced GNU and Linux from scratch and has taken over development of Mozilla and OpenOffice.org (formerly known as Netscape Communicator and StarOffice).
Internet "chat", whether in the form of IRC "chat rooms" or channels, or via instant messaging systems, allow colleagues to stay in touch in a very convenient way when working at their computers during the day. Messages can be sent and viewed even more quickly and conveniently than via e-mail. Extension to these systems may allow files to be exchanged, "whiteboard" drawings to be shared as well as voice and video contact between team members.
Version control systems allow collaborating teams to work on shared sets of documents without either accidentally overwriting each other's work or having members wait until they get "sent" documents to be able to add their thoughts and changes.
File sharing
A computer file can be e-mailed to customers, colleagues and friends as an attachment. It can be uploaded to a website or FTP server for easy download by others. It can be put into a "shared location" or onto a file server for instant use by colleagues. The load of bulk downloads to many users can be eased by the use of "mirror" servers or peer-to-peer networks.
In any of these cases, access to the file may be controlled by user authentication; the transit of the file over the Internet may be obscured by encryption, and money may change hands before or after access to the file is given. The price can be paid by the remote charging of funds from, for example, a credit card whose details are also passed—hopefully fully encrypted—across the Internet. The origin and authenticity of the file received may be checked by digital signatures or by MD5 or other message digests.
These simple features of the Internet, over a worldwide basis, are changing the basis for the production, sale, and distribution of anything that can be reduced to a computer file for transmission. This includes all manner of print publications, software products, news, music, film, video, photography, graphics and the other arts. This in turn has caused seismic shifts in each of the existing industries that previously controlled the production and distribution of these products.
Internet collaboration technology enables business and project teams to share documents, calendars and other information. Such collaboration occurs in a wide variety of areas including scientific research, software development, conference planning, political activism and creative writing.
Streaming media
Many existing radio and television broadcasters provide Internet "feeds" of their live audio and video streams (for example, the BBC). They may also allow time-shift viewing or listening such as Preview, Classic Clips and Listen Again features. These providers have been joined by a range of pure Internet "broadcasters" who never had on-air licenses. This means that an Internet-connected device, such as a computer or something more specific, can be used to access on-line media in much the same way as was previously possible only with a television or radio receiver. The range of material is much wider, from pornography to highly specialized, technical webcasts. Podcasting is a variation on this theme, where—usually audio—material is first downloaded in full and then may be played back on a computer or shifted to a digital audio player to be listened to on the move. These techniques using simple equipment allow anybody, with little censorship or licensing control, to broadcast audio-visual material on a worldwide basis.
Webcams can be seen as an even lower-budget extension of this phenomenon. While some webcams can give full-frame-rate video, the picture is usually either small or updates slowly. Internet users can watch animals around an African waterhole, ships in the Panama Canal, the traffic at a local roundabout or their own premises, live and in real time. Video chat rooms, video conferencing, and remote controllable webcams are also popular. Many uses can be found for personal webcams in and around the home, with and without two-way sound.
YouTube, sometimes described as an Internet phenomenon because of the vast amount of users and how rapidly the site's popularity has grown, was founded on February 15, 2005. It is now the leading website for free streaming video. It uses a flash-based web player which streams video files in the format FLV. Users are able to watch videos without signing up; however, if users do sign up they are able to upload an unlimited amount of videos and they are given their own personal profile. It is currently estimated that there are 64,000,000 videos on YouTube, and it is also currently estimated that 825,000 new videos are uploaded every day.

Voice telephony (VoIP)
VoIP stands for Voice over IP, where IP refers to the Internet Protocol that underlies all Internet communication. This phenomenon began as an optional two-way voice extension to some of the instant messaging systems that took off around the year 2000. In recent years many VoIP systems have become as easy to use and as convenient as a normal telephone. The benefit is that, as the Internet carries the actual voice traffic, VoIP can be free or cost much less than a normal telephone call, especially over long distances and especially for those with always-on Internet connections such as cable or ADSL.
Thus, VoIP is maturing into a viable alternative to traditional telephones. Interoperability between different providers has improved and the ability to call or receive a call from a traditional telephone is available. Simple, inexpensive VoIP modems are now available that eliminate the need for a PC.
Voice quality can still vary from call to call but is often equal to and can even exceed that of traditional calls.
Remaining problems for VoIP include emergency telephone number dialing and reliability. Currently, a few VoIP providers provide an emergency service, but it is not universally available. Traditional phones are line-powered and operate during a power failure; VoIP does not do so without a backup power source for the electronics.
Most VoIP providers offer unlimited national calling, but the direction in VoIP is clearly toward global coverage with unlimited minutes for a low monthly fee.
VoIP has also become increasingly popular within the gaming world, as a form of communication between players. Popular gaming VoIP clients include Ventrilo and Teamspeak, and there are others available also. The PlayStation 3 and Xbox 360 also offer VoIP chat features.
Activity6.1 Many people use the terms internet and world wide web (or just the web ) interchangeably, but as discussed in the note above, the two terms are not synonymous. Briefly discuss the differences.

WEEK 7
SURFING THE WEB WITH INTERNET EXPLORER
After you’re signed up with an ISP and connected to the Internet, it’s time to
get surfing. The World Wide Web is a particular part of the Internet with all
sorts of cool content and useful services, and you surf the Web with a piece
of software called a web browser.
The most popular web browser today is Microsoft’s Internet Explorer, and
you probably have a copy of it already installed on your new PC.
Understanding the Web
Before you can surf the Web, you need to understand a little bit about how it
works.
Information on the World Wide Web is presented in pages. A web page is
similar to a page in a book, made up of text and graphics. A web page differs
from a book page, however, in that it can include other elements, such as
audio and video, and links to other web pages.
It’s this linking to other web pages that makes the Web such a dynamic way
to present information. A link on a web page can point to another web page
on the same site or to another site. Most links are included as part of a web
page’s text and are called hypertext links, or just hyperlinks. (If a link is part
of a graphic, it’s called a graphic link.) These links are usually in a different
color from the rest of the text and often are underlined; when you click a
link, you’re taken directly to the linked page.
Web pages reside at a website. A website is nothing more than a collection
of web pages (each in its own individual computer file) residing on a host
computer. The host computer is connected full-time to the Internet so that
you can access the site—and its web pages— anytime you access the
Internet. The main page at a website usually is called a home page, and it
often serves as an opening screen that provides a brief overview and menu of
everything you can find at that site. The address of a web page is called a
URL, which stands for uniform resource locator. Most URLs start with
http://, add a www., continue with the name of
the site, and end with a .com.
Using Internet Explorer 7
The web browser included in Windows is Internet Explorer (IE). In
Windows Vista, the version of IE is Internet Explorer 7. This version is also
available for Windows XP, although you may need to upgrade from a
previous version to get IE7.
Internet Explorer 7 is easy to use. To launch IE, follow these steps:
1. Click the Start button to display the Start menu.
2. Select Internet Explorer (at the upper-left part of the menu).

Figure 2.1 shows the various parts of the IE program
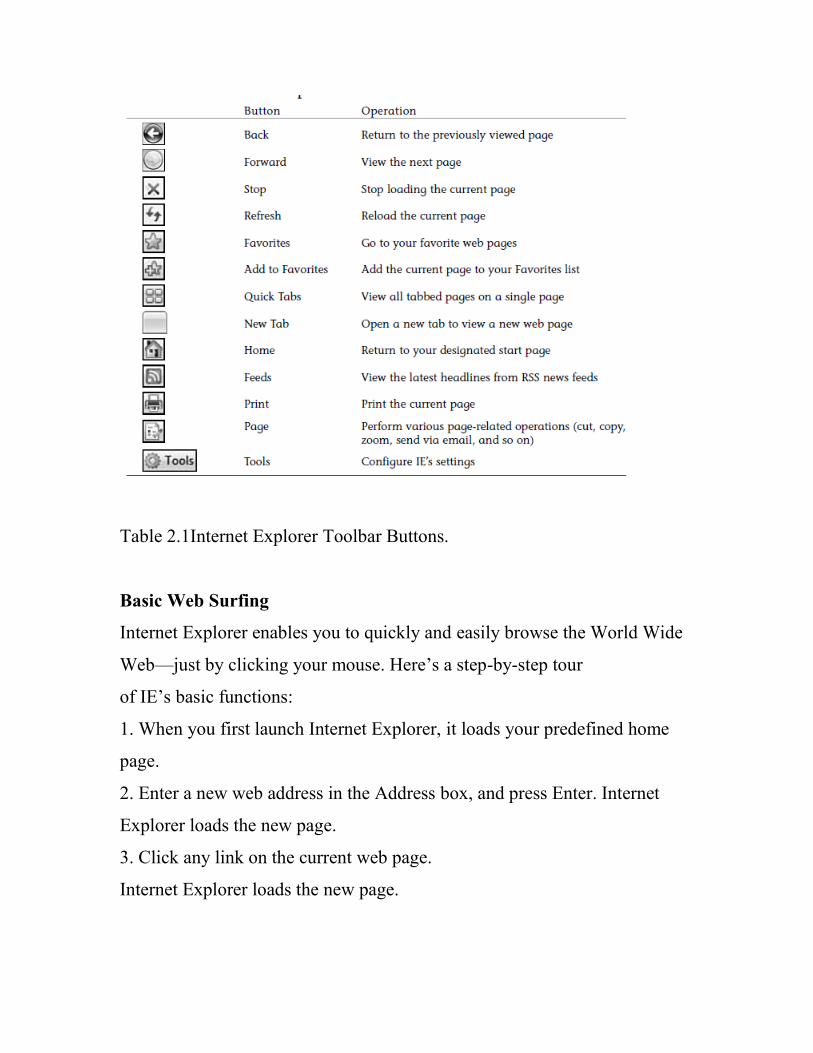
Table 2.1Internet Explorer Toolbar Buttons.
Basic Web Surfing
Internet Explorer enables you to quickly and easily browse the World Wide
Web—just by clicking your mouse. Here’s a step-by-step tour
of IE’s basic functions:
1. When you first launch Internet Explorer, it loads your predefined home
page.
2. Enter a new web address in the Address box, and press Enter. Internet
Explorer loads the new page.
3. Click any link on the current web page.
Internet Explorer loads the new page.

4. To return to the previous page, click the Back button (or press the
Backspace key on your keyboard). If you’ve backed up several pages and
want to return to the page you were on last, click the Forward button.
5. To return to your start page, click the Home button.
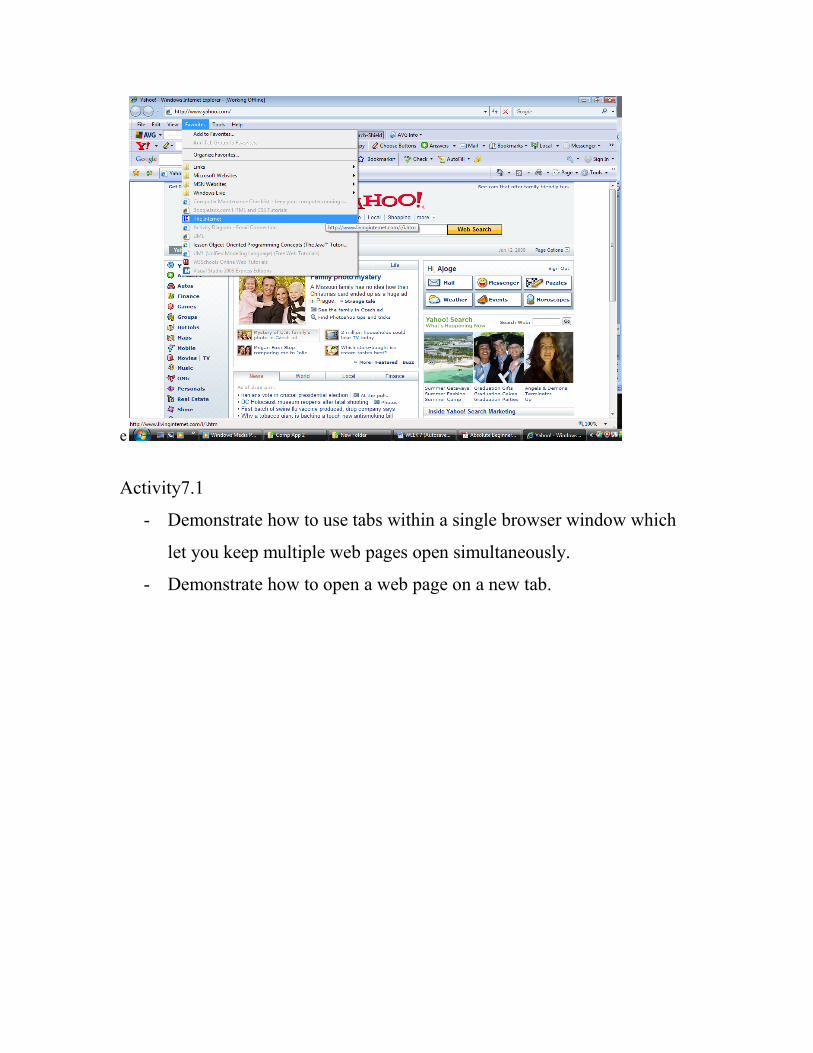
Using Tabbed Browsing
In previous versions, Internet Explorer utilized a single-document
interface—that is, each browser window could contain only a single web
page. IE7, in contrast, has a multidocument interface, with multiple web
pages displayed in a single browser window via the use of tabs.
The use of tabs within a single browser window lets you keep multiple web
pages open simultaneously. This is great when you want to keep previous
pages open for reference or want to run web-based applications in the
background.
To open a web page on a new tab, just click the next (empty) tab and enter a
URL.
You can also choose to open a link within a page in a new tab, by right-
clicking the link and selecting Open in New Tab.
You switch between tabs by clicking a tab with your mouse or by pressing
Ctrl+Tab on your keyboard. You can also reorder your tabs by dragging and
dropping them into a new position.
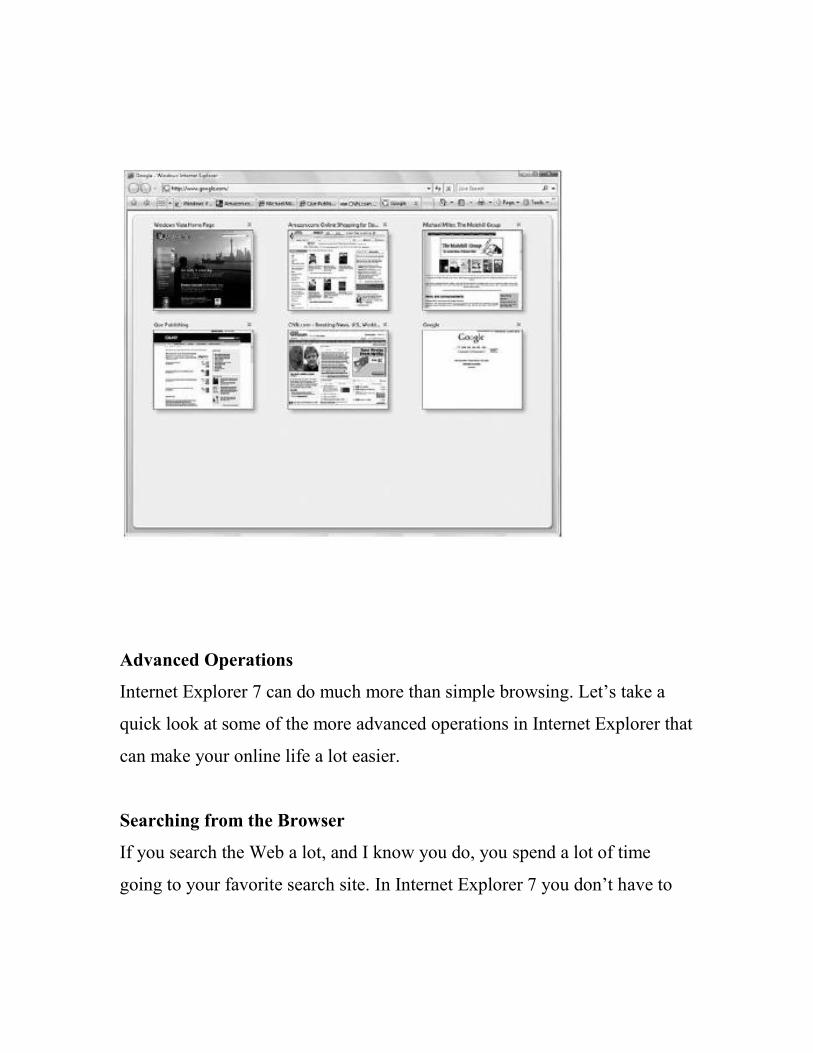
You can view the contents of all open tabs with IE’s Quick Tabs feature.
When you click the Quick Tab icon or press Ctrl+Q, all open web pages are
displayed as thumbnails in a single window, as shown in Figure 2.2.
Click any thumbnail to open that tab in the full window.
Advanced Operations
Internet Explorer 7 can do much more than simple browsing. Let’s take a
quick look at some of the more advanced operations in Internet Explorer that
can make your online life a lot easier.
Searching from the Browser
If you search the Web a lot, and I know you do, you spend a lot of time
going to your favorite search site. In Internet Explorer 7 you don’t have to

keep going back to that site; you can do all your searching from within the
browser window.
That’s because Internet Explorer 7 adds an Instant Search box to the main
toolbar, to the right of the Address box. This lets you perform web searches
without having to first navigate to a separate search site.
To conduct a search from within IE7, just enter your query into the Search
box and press the Enter key on your keyboard. Your query is sent via IE
over the Internet to the selected search provider. The search site receives the
query, searches its own previously compiled index of web pages, and returns
a page of search results, which is displayed in the Internet Explorer window.
It’s that easy.
By default, IE routes your search to Microsoft’s Windows Live Search site.
If you prefer to use another search engine, such as Google, you can change
this default. Just click the down arrow next to the Search box and select
Change Search Defaults; when the next dialog box appears, select the search
engine you want and click the Set Default button.
If the search site you want isn’t listed in the Change Search Defaults list,
select Find More Providers from the pull-down list, instead. When the Add
Search Providers web page appears, click the search engine you want to use.
You can then return to the Change Search Defaults dialog box to select this
new search engine as your default.
e
Activity7.1
- Demonstrate how to use tabs within a single browser window which
let you keep multiple web pages open simultaneously.
- Demonstrate how to open a web page on a new tab.
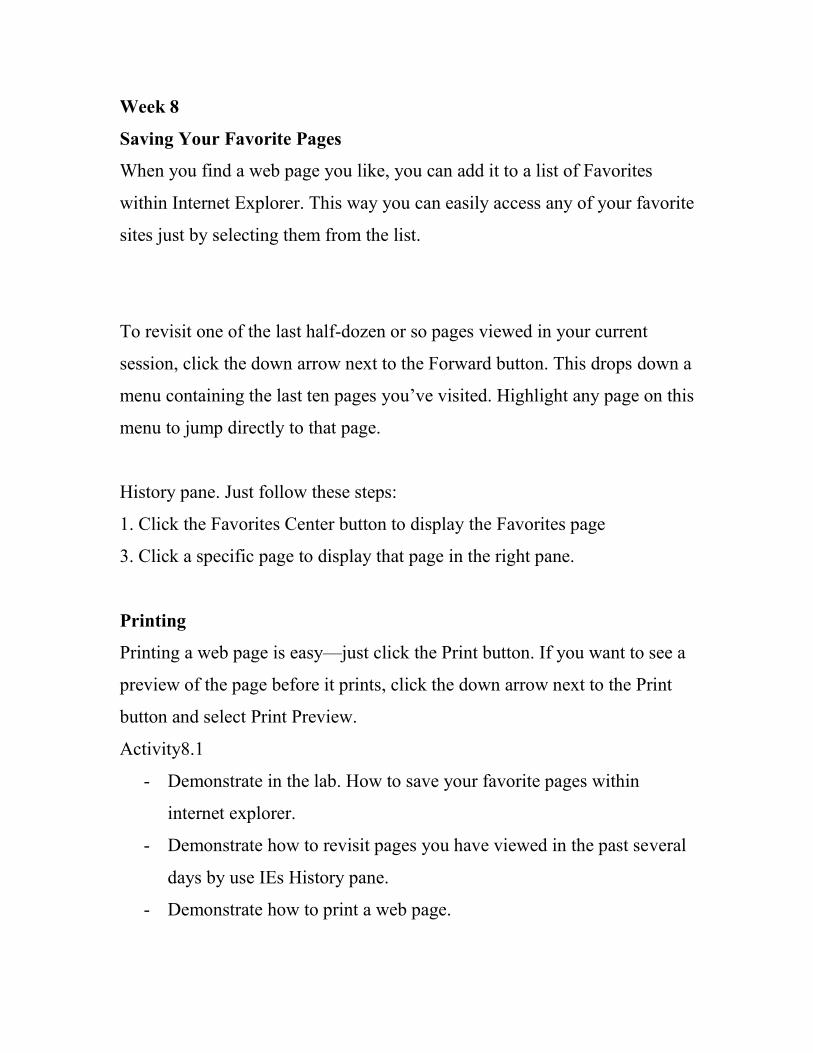
Week 8
Saving Your Favorite Pages
When you find a web page you like, you can add it to a list of Favorites
within Internet Explorer. This way you can easily access any of your favorite
sites just by selecting them from the list.
To revisit one of the last half-dozen or so pages viewed in your current
session, click the down arrow next to the Forward button. This drops down a
menu containing the last ten pages you’ve visited. Highlight any page on this
menu to jump directly to that page.
History pane. Just follow these steps:
1. Click the Favorites Center button to display the Favorites page
3. Click a specific page to display that page in the right pane.
Printing
Printing a web page is easy—just click the Print button. If you want to see a
preview of the page before it prints, click the down arrow next to the Print
button and select Print Preview.
Activity8.1
- Demonstrate in the lab. How to save your favorite pages within
internet explorer.
- Demonstrate how to revisit pages you have viewed in the past several
days by use IEs History pane.
- Demonstrate how to print a web page.

Week 9 Searching the Web Now that you know how to surf the Web, how do you find the precise information you’re looking for? Fortunately, there are numerous sites that help you search the Web for the specific information you want. Not surprisingly, these are among the most popular sites on the Internet. You’ll learn the best places to search, and the best ways to search. I’ll even
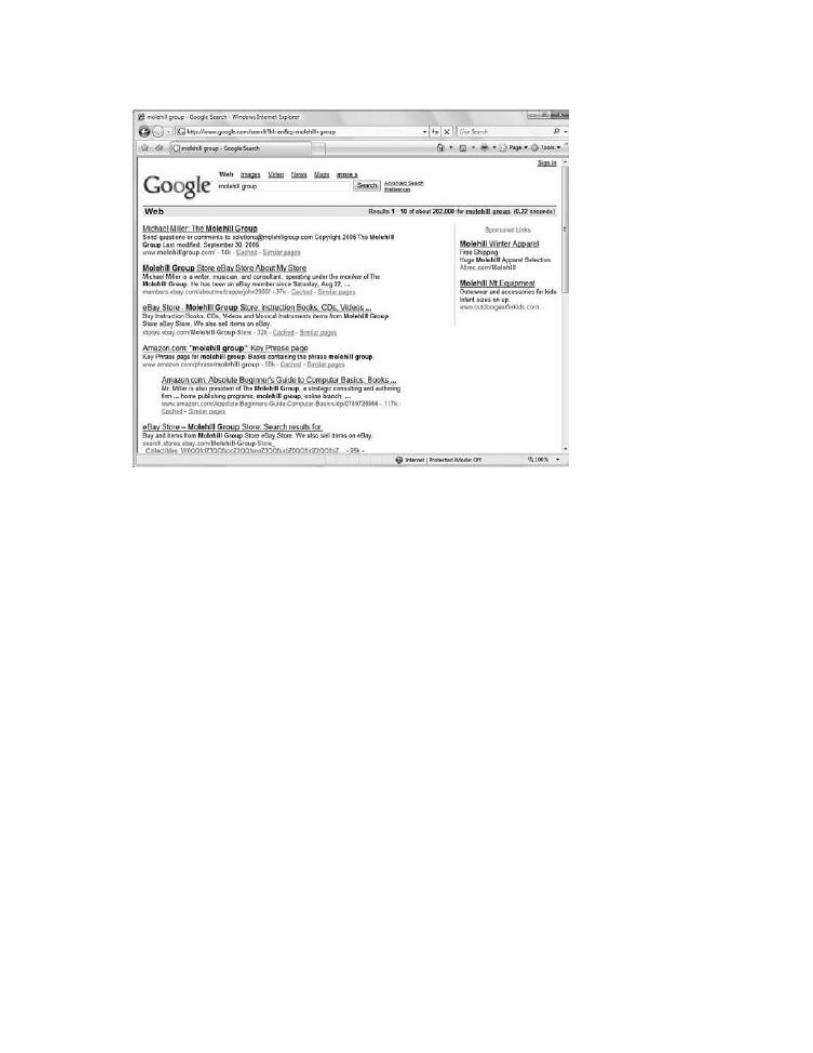
help you cheat a little by listing some of the most popular sites for different types of information. So pull up a chair, launch your web browser, and loosen up those fingers— it’s time to start searching! How to Search the Web Most Internet search sites are actually search engines. They employ special software programs (called spiders or crawlers) to roam the Web automatically, feeding what they find back to a massive bank of computers. These computers then build giant indexes of the Web, hundreds of millions of pages strong. When you perform a search at a search engine site, your query is sent to the search engine’s index. (You never actually search the Web itself, you only search the index that was created by the spiders crawling the Web.) The search engine then creates a list of pages in its index that match, to one degree or another, the query you entered. Constructing a Query Almost every search site on the Web contains two basic components—a search box and a search button. You enter your query—one or more keywords that describe what you’re looking for—into the search box, and then click the Search button (or pressthe Enter key) to start the search. The search site then returns a list of web pages that match your query; click any link to go directly to the page in question. How you construct your query determines how relevant the results will be that you receive. It’s important to focus on the keywords you use, because the search sites look for these words when they process your query. Your keywords are compared to the web pages the search site knows about; the more keywords found on a web page, the better the match. Choose keywords that best describe the information you’re looking for—
using as many keywords as you need. Don’t be afraid of using too many
keywords; in fact, using too few keywords is a common fault of many novice

searchers. The more words you use, the better idea the search engine has of what you’re looking for. Using Wildcards But what if you’re not quite sure which word to use? For example, would the best results come from looking for auto, automobile, or automotive? Many search sites let you use wildcards to ―stand in‖ for parts of a word that
you’re not quite sure about. In most instances, the asterisk character (*) is used as a wildcard to match any character or group of characters, from its particular position in the word to the end of that word. So, in the previous example, entering auto* would return all three words—auto, automobile, and automotive (as well as automatic, autocratic, and any other word that starts with ―auto‖). Searching for an Exact Phrase Normally, a multiple-word query searches for web pages that include all the words in the query, in any order. There is a way, however, to search for an exact phrase. All you have to do is enclose the phrase in quotation marks. For example, to search for Monty Python, don’t enter Monty Python. Instead, enter “Monty Python”—surrounded by quotation marks. Putting the phrase between quotation marks returns results about the comedy troupe, while entering the words individually returns pages about snakes and guys named Monty. Where to Search Now that you know how to search, where should you search? There’s one
obvious choice, and a lot of alternatives. Where to Search Now that you know how to search, where should you search? There’s one
obvious choice, and a lot of alternatives. Google—The Most Popular Search Site on the Web The best (and most popular) search engine today is Google (www.google.com). Google is easy to use and extremely fast and returns highly relevant results. That’s because it indexes more pages than any other site—billions and billions of pages, if you’re counting. Most users search Google several times a week, if not several times a day. The Google home page, shown below, is a marvel of simplicity and elegant web page design. All you have to do to start a search is to enter one or more
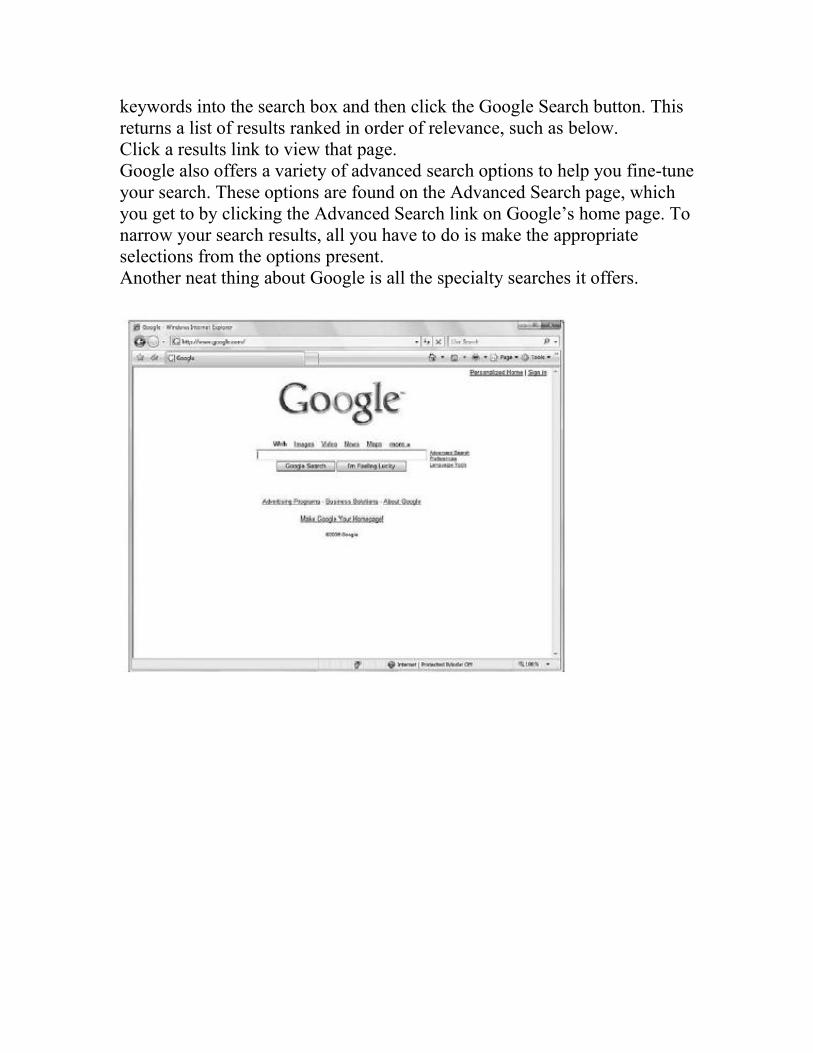
keywords into the search box and then click the Google Search button. This returns a list of results ranked in order of relevance, such as below. Click a results link to view that page. Google also offers a variety of advanced search options to help you fine-tune your search. These options are found on the Advanced Search page, which you get to by clicking the Advanced Search link on Google’s home page. To
narrow your search results, all you have to do is make the appropriate selections from the options present. Another neat thing about Google is all the specialty searches it offers.

Google Search Options
Google also owns a number of related websites that might be of interest. Of particular interest are Blogger (www.blogger.com), home to tens of thousands of personal weblogs, and YouTube (www.youtube.com), the Web’s premiere site for posting and viewing videos. Other Search Sites Although Google is far and away the most popular search engine, many other search engines provide excellent (and sometimes different) results. These search engines include ■ AllTheWeb (www.alltheweb.com) ■ AltaVista (www.altavista.com) ■ Ask.com (www.ask.com) ■ ChaCha (www.chacha.com) ■ HotBot (www.hotbot.com) ■ LookSmart (search.looksmart.com)

■ Open Directory (www.dmoz.org) ■ Windows Live Search (www.live.com) ■ Yahoo! (www.yahoo.com) Searching for People and Businesses As good as Google and other search sites are for finding specific web pages, they’re not always that great for finding people. (Although, to be fair, Google is getting much better at this.) When there’s a person (or an address
or a phone number) you want to find, you need to use a site that specializes in people searches. People listings on the web go by the common name of white pages directories, the same as traditional white pages phone books. These directories typically enable you to enter all or part of a person’s name
and then search for his address and phone number. Many of these sites also let you search for personal email addresses and business addresses and phone numbers. The best of these directories include ■ AnyWho (www.anywho.com) ■ InfoSpace (www.infospace.com) ■ Switchboard (www.switchboard.com) ■ WhitePages.com (www.whitepages.com) In addition, all of these white pages directories also serve as yellow pages directories for looking up businesses. They’re one-stop search sites for any individual or business you want to look up! Activity9.1
- Demonstrate how to seach the web. - Demonstrate how to construct a Query. - Demonstrate how to use wildcards.

Week 10 SENDING AND RECEIVING EMAIL Email is a modern way to communicate with friends, family, and colleagues. An email message is like a regular letter, except that it’s composed electronically and delivered almost immediately via the Internet. You can use several programs to send and receive email messages. If you’re in a corporate environment, or running Microsoft Office, you can use Microsoft Outlook for your email. (Outlook is also a scheduler and personal information manager.) If you’re connecting from home, the simpler Windows Mail (in Windows Vista) or Outlook Express (in Windows XP) might be a better choice; these programs are easier to learn and use than their bigger brother, Outlook. Because Windows Mail is included free with all Windows Vista PCs, that’s
the one we’ll cover in this chapter. Know, however, that it’s almost identical
to the older Outlook Express, so if you’re a Windows XP user, most of what you see
here is directly applicable to the program you’re using. In fact, most of
what’s here also works with Microsoft Outlook; all of these email programs look and act similarly. Setting Up Your Email Account To configure Windows Mail for a new email account, you’ll need to know
the following information: ■ The email address assigned by your ISP, in the format [email protected]. ■ The type of email server you’ll be using; it’s probably a POP3 server. (It
could also be an HTTP or IMAP server, but POP3 is more common.) ■ The name or address of the incoming email and outgoing email servers. ■ The account name and password you use to connect to the email servers. After you have this information (which should be supplied by your ISP), you can enter it manually into Windows Mail by following these steps: 1. From within Windows Mail, select Tools, Accounts to display the Internet Accounts dialog box. 2. When the Internet Accounts dialog box appears, click Add. 3. When prompted, choose to add an E-mail Account and then click Next. 4. When the next dialog box appears, enter your name and then click Next.

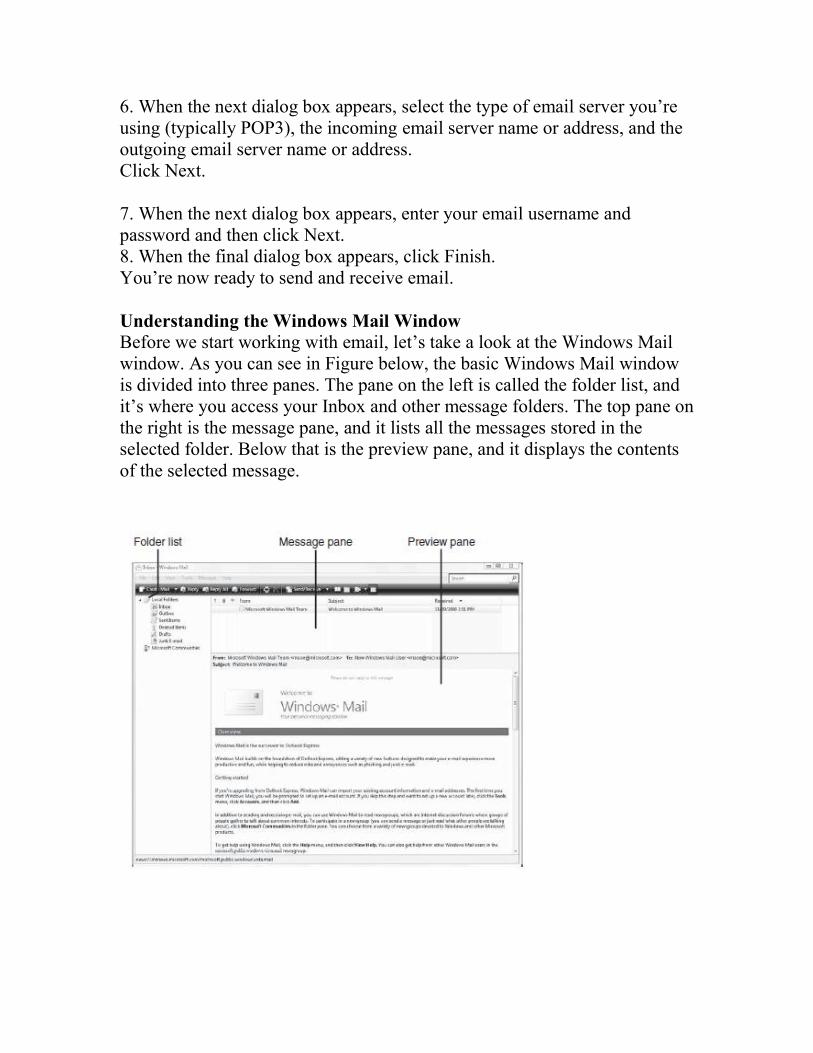
5. When the next dialog box appears, enter the email address assigned by your ISP; then click Next. 6. When the next dialog box appears, select the type of email server you’re using (typically POP3), the incoming email server name or address, and the outgoing email server name or address. Click Next. 7. When the next dialog box appears, enter your email username and password and then click Next. 8. When the final dialog box appears, click Finish. You’re now ready to send and receive email. Understanding the Windows Mail Window Before we start working with email, let’s take a look at the Windows Mail
window. As you can see in Figure below, the basic Windows Mail window is divided into three panes. The pane on the left is called the folder list, and it’s where you access your Inbox and other message folders. The top pane on the right is the message pane, and it lists all the messages stored in the selected folder. Below that is the preview pane, and it displays the contents of the selected message.

Activity10.1
- List and explain the information needed to configure windows mail for a new email account.
- Demonstrate the steps involve to enter the above informations which supplied by ISP into windows mail.

WEEK 11 SENDING AND RECEIVING EMAIL Email is a modern way to communicate with friends, family, and colleagues. An email message is like a regular letter, except that it’s composed electronically and delivered almost immediately via the Internet. You can use several programs to send and receive email messages. If you’re in a corporate environment, or running Microsoft Office, you can use Microsoft Outlook for your email. (Outlook is also a scheduler and personal information manager.) If you’re connecting from home, the simpler Windows Mail (in Windows Vista) or Outlook Express (in Windows XP) might be a better choice; these programs are easier to learn and use than their bigger brother, Outlook. Because Windows Mail is included free with all Windows Vista PCs, that’s
the one we’ll cover in this chapter. Know, however, that it’s almost identical
to the older Outlook Express, so if you’re a Windows XP user, most of what you see
here is directly applicable to the program you’re using. In fact, most of
what’s here also works with Microsoft Outlook; all of these email programs look and act similarly. Setting Up Your Email Account To configure Windows Mail for a new email account, you’ll need to know
the following information: ■ The email address assigned by your ISP, in the format [email protected]. ■ The type of email server you’ll be using; it’s probably a POP3 server. (It
could also be an HTTP or IMAP server, but POP3 is more common.) ■ The name or address of the incoming email and outgoing email servers. ■ The account name and password you use to connect to the email servers. After you have this information (which should be supplied by your ISP), you can enter it manually into Windows Mail by following these steps: 1. From within Windows Mail, select Tools, Accounts to display the Internet Accounts dialog box. 2. When the Internet Accounts dialog box appears, click Add. 3. When prompted, choose to add an E-mail Account and then click Next. 4. When the next dialog box appears, enter your name and then click Next. 5. When the next dialog box appears, enter the email address assigned by your ISP; then click Next.
6. When the next dialog box appears, select the type of email server you’re using (typically POP3), the incoming email server name or address, and the outgoing email server name or address. Click Next. 7. When the next dialog box appears, enter your email username and password and then click Next. 8. When the final dialog box appears, click Finish. You’re now ready to send and receive email. Understanding the Windows Mail Window Before we start working with email, let’s take a look at the Windows Mail
window. As you can see in Figure below, the basic Windows Mail window is divided into three panes. The pane on the left is called the folder list, and it’s where you access your Inbox and other message folders. The top pane on the right is the message pane, and it lists all the messages stored in the selected folder. Below that is the preview pane, and it displays the contents of the selected message.

Week 12
Managing Your Email
Using Windows Mail is easy—and composing a new email
message isn’t much different from writing a memo in Microsoft
Word. You just have to know which buttons to push!
Composing a Message
It’s easy to create a new email message. Just follow these steps:
1. Click the Create Mail button on the Windows Mail toolbar;
this launches a New Message window, similar to the one
shown in Figure below.
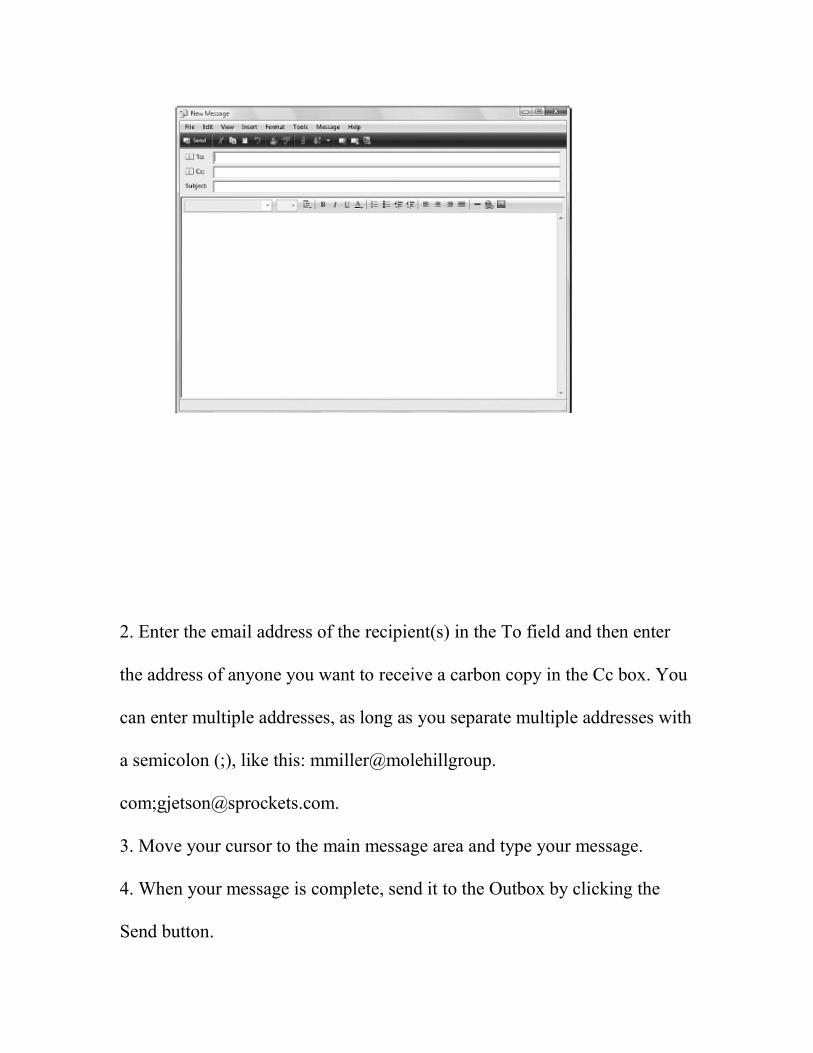
2. Enter the email address of the recipient(s) in the To field and then enter
the address of anyone you want to receive a carbon copy in the Cc box. You
can enter multiple addresses, as long as you separate multiple addresses with
a semicolon (;), like this: mmiller@molehillgroup.
com;[email protected].
3. Move your cursor to the main message area and type your message.
4. When your message is complete, send it to the Outbox by clicking the
Send button.
Now you need to send the message from your Outbox over the Internet to
the intended recipient (you!). You do this by clicking the Send/Receive
button on the Windows Mail toolbar. Assuming your computer is connected
to the Internet, your message will now be sent.
Reading New Messages
When you receive new email messages, they’re stored in the Windows Mail
Inbox.
To display all new messages, select the Inbox icon from the Folders list. All
waiting messages now appear in the Message pane.
To read a specific message, select its header in the Message pane. The
contents of that message are displayed in the Preview pane.
Replying to a Message
To reply to an email message, follow these steps:
1. Select the message header in the Message pane.
2. Click the Reply button on the Windows Mail toolbar; this opens a Re:
window, which is just like a New Message window except with the text
from the original message ―quoted‖ in the text area and the email address of
the recipient (the person who sent the original message) pre-entered in the
To field.
3. Enter your reply text in the message window.
4. Click the Send button to send your reply back to the original sender.
Sending Files Via Email
The easiest way to share a file with another user is via email, as an
attachment.
Attaching a File to an Email Message
To send a file via email, you attach that file to a standard email message.
When the message is sent, the file travels along with it; when the message is
received, the file is right there, waiting to be opened. To attach a file to an
outgoing email message, follow these steps:
1. Start with a new message and then click the Attach button in the
message’s toolbar; this displays the Insert Attachment dialog box.
2. Click the Browse button to locate and select the file you want to send.
3. Click Attach.
The attached file is now listed in a new Attach: field below the Subject: field
in the message window. When you click the Send button, the email message
and its attached file are sent together to your Outbox.
Opening an Email Attachment
When you receive a message that contains a file attachment, you’ll see a
paper clip icon in the message header and a paper clip button in the preview
pane header. You can choose to view (open) the attached file or save it to
your hard disk.
To view or open an attachment, click the paper clip button in the preview
pane header, and then click the attachment’s filename. (At this point you
may be prompted by a security message; make sure you know where the
attachment came from before you proceed.) This opens the attachment in its
associated application. If you’re asked whether you want to save or view the
attachment, select view.
To save an attachment to your hard disk, click the paper clip button in the
preview pane header, and then select Save Attachments. When the Save
Attachments dialog box appears, select a location for the file and click the
Save button.
Activity12.1

- Demonstrate in the lab. How to write a memo in microsoft
word.And demonstrate which buttons to push.
- Demonstrate how to create a new email message.
- Demonstrate how to reply to an email message.
- Demonstrate how to open an Email Attachment.

Week 13
Protecting Against Spam, Phishing Scams, and Viruses
Although Windows Mail may look a lot like its predecessor, Outlook
Express, it’s much improved under the hood. Some of the most important
improvements have to do with security—in particular, the capability to block
spam, phishing scams, and email viruses.
Spam Blocking
If you’re like most users, you get more than your fair share of junk email
messages—also known as spam. These spam messages can fill up your
inbox and are a major annoyance.
To help stop the flood of spam email messages, Windows Mail includes a
powerful Junk Mail Filter. This new filter uses Bayesian filtering, which
analyzes the probability of any given word being included in spam messages
and then applies that analysis to all incoming messages. Emails that include
high-probability spam words are automatically routed to the Junk E-mail
folder.
You can open the Junk E-mail folder to view your spam messages, or just
delete the messages without review. In either case, you don’t have to deal
with them clogging your inbox!
Phishing Filter
Also new in Windows Vista is the inclusion of anti-phishing technology.
Microsoft’s Phishing Filter helps protect you from identity theft by warning
you of the fake email messages common to phishing scams.
Phishing is a technique used by online scam artists to steal your identity by
tricking you into disclosing valuable personal information, such as
passwords, credit card numbers, and other financial data. A phishing scam
typically starts with a phony email message that appears to be from a
legitimate source, such as your bank, eBay, or PayPal.
When you click the link in the phishing email, you’re taken to a fake website
masquerading as the real site, complete with logos and official-looking text.
You’re encouraged to enter your personal information into the forms on the
web page; when you do so, your information is sent to the scammer, and you
become a victim of identity theft. When your data falls into the hands of
criminals, it can be used to hack into your online accounts, make

unauthorized charges on your credit card, and maybe even drain your bank
account.
Microsoft’s Phishing Filter compares all the links in your Windows Mail
email messages to an online list of known phishing websites. If the link
matches a fraudulent site, Windows Mail blocks the links in the email and
displays a warning message at the top of the message. When you see this
type of message, just delete the email— and never, never click through any
of the links!
Virus Protection
Computer viruses are files that can attack your system and damage your
programs and documents. Most viruses are spread when someone sends you
an email message with an unexpected file attachment—and then you open
the file. It’s just too easy to receive an email message with a file attached,
click the file to open it, and then launch the virus file. Boom! Your computer
is infected.
Viruses can be found in many types of files. The most common file types for
viruses are .EXE, .VBS, .PIF, and .COM. Viruses can also be embedded in

Word (.DOC) or Excel (.XLS) files. You can’t catch a virus from a picture
file, so viewing a .JPG, .GIF, .TIF, and .BMP file is completely safe.
The best way to avoid catching a virus via email is to not open any
files attached to incoming email messages. Period. That includes messages
where you know the sender, because some viruses are capable of taking over
an email program and ―spoofing‖ other users’ addresses. An email message
might look like it’s coming from a friend, but it’s really coming from
another machine and includes a virus.
(Pretty tricky, eh?)
By default, Windows Mail is configured to automatically reject files that
might contain viruses.
You can verify this setting (or turn it off, if you want to receive a file), by
opening the Options dialog box, selecting the Security tab, and checking
both options in the Virus Protection section.

Using Address Book to Manage Your Contacts
Windows includes a contact manager application, called Windows Contacts,
that you can use to store information about your friends, family, and
business associates. (In older versions of Windows, this was called the
Address Book.) You can then import this contact information into Windows
Mail (to send email), Windows Calendar (to remind you of birthdays), and
Microsoft Word (to personalize letters and address
envelopes and labels).
To add a new contact to your Windows Contacts, click the New button on
the Windows Contacts toolbar and then select New Contact. Enter all the
information you know (you don’t have to fill in all the blanks) and click OK.
(You can also add a contact directly from Windows Mail by selecting File,
New, Contact.)
You can also add contacts from any email messages you receive. Just right-
click the sender’s name in the email message and select Add to Contacts.
This creates a new contact for that person; you can then
go to Windows Contacts and add more detailed information later—as
described next.
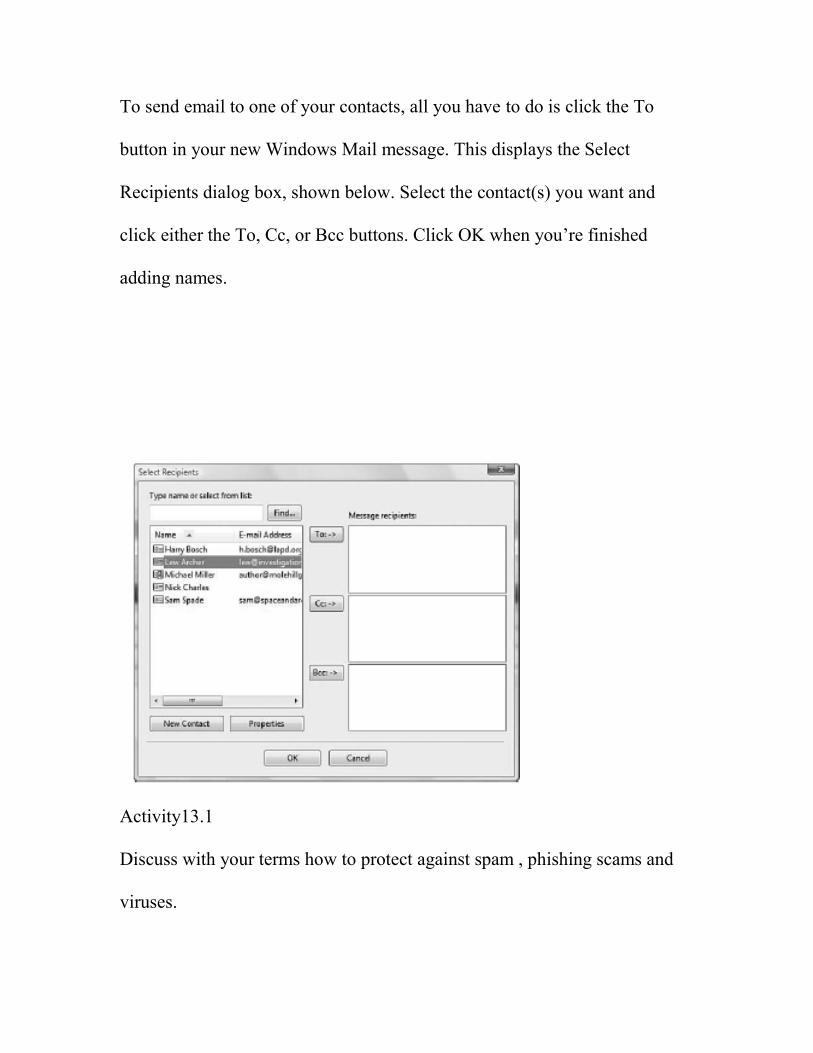
To send email to one of your contacts, all you have to do is click the To
button in your new Windows Mail message. This displays the Select
Recipients dialog box, shown below. Select the contact(s) you want and
click either the To, Cc, or Bcc buttons. Click OK when you’re finished
adding names.
Activity13.1
Discuss with your terms how to protect against spam , phishing scams and
viruses.

Week 14
CONNECTING TO THE INTERNET—AT HOME AND ON THE
ROAD
It used to be that most people bought personal computers to do work—
word processing, spreadsheets, databases, the sort of programs that still
make up the core of Microsoft Works and Microsoft Office. But today,
the majority of people also buy PCs to access the Internet—to send and
receive email, surf the Web, and chat with other users.
Different Types of Connections
The first step in going online is establishing a connection between your
computer and the Internet. To do this, you have to sign up with an
Internet service provider (ISP), which, as the name implies, provides
your home with a connection to the Internet.
Depending on what’s available in your area, you can choose from two
primary types of connections—dial-up or broadband. Dial-up is slower
than broadband, but it’s also lower priced. That said, dial-up
connections are going the way of the dodo bird; if you do a lot of web
surfing, it’s probably worth a few extra dollars a month to get the faster
broadband connection.
Whichever type of connection you choose, you’ll connect your PC to a
modem, which will then connect to the phone or cable line coming into
your house. Most PCs have a built-in dial-up modem; if you choose
broadband service, you’ll get an external broadband modem from your
ISP. Read on to learn more.
Traditional Dial-Up
A dial-up connection provides Internet service over normal phone lines.
The fastest dial-up connections transmit data at 56.6Kbps (kilobits per
second), which is okay for normal web surfing but isn’t fast enough for
downloading music or videos. Most ISPs charge $20 or so per month
for normal dial-up service.
Broadband DSL
DSL is a phone line-based technology that operates at broadband
speeds. DSL service piggybacks onto your existing phone line, turning
it into a high-speed digital connection. Not only is DSL faster than dial-
up (384Kbps to 3Mbps, depending on your ISP), you also don’t have to
surrender your normal phone line when you want
to surf; DSL connections are ―always on.‖ Most providers offer DSL
service for $30–$50 per month. Look for package deals that offer a
discount when you subscribe to both Internet and phone services.
Broadband Cable
Another popular type of broadband connection is available from your
local cable company. Broadband cable Internet piggybacks on your
normal cable television line, providing speeds in the 500Kbps to
30Mbps range, depending on the provider.
Most cable companies offer broadband cable Internet for $30–$50 per
month. As with DSL, look for package deals for your cable company,
offering some sort of discount on a combination of Internet, cable, and
(sometimes) digital phone service.
Broadband Satellite
If you can’t get DSL or cable Internet in your area, you have another
option—connecting to the Internet via satellite. Any household or
business with a clear line of sight to the southern sky can receive digital
data signals from a geosynchronous satellite at 700Kbps.
The largest provider of satellite Internet access is HughesNet. (Hughes
also developed and markets the popular DIRECTV digital satellite
system.) The HughesNet system (www.hughesnet.com) enables you to
receive Internet signals via a small dish that you mount outside your
house or on your roof. Fees range from $60 to $100 per month,
depending on the plan.
Before You Connect
When you sign up with an ISP, both you and the ISP have to provide
certain information to each other. You provide your name, address,
and credit card number; your ISP provides a variety of semitechnical
information, including
■ Your username and password
■ Your email address

■ Your email account name and password
■ The names of the ISP’s incoming and outgoing mail servers (which
you’ll need to set up your email program)
■ The phone number to dial into (if you’re using a dial-up connection)
You’ll need this information when you configure Windows for your
new Internet connection—which we’ll discuss next.
Activity14.1
Discuss different types of connections e.g
- Traditional Dial-up.
- Broadband DSL.
- Broadband Cable.
- Broadband satellite.
Week 15
Setting Up a New Connection
Naturally, you need to configure your computer to work with your ISP.
How you do this depends on which operating system you’re using.
Connecting in Windows Vista
In Windows Vista, how you set up a new Internet connection depends
on the type of connection you have. If you’re connecting to a
broadband connection via your home network, you don’t have to do
anything more than connect your computer to the network; Vista does
the rest.
On the other hand, if you’re connecting to a dial-up connection or a
broadband connection that requires a username and password, you have
a little work to do.
Follow these steps:
1. Click the Start button; then select Control Panel.
2. From the Control Panel, select Network and Internet, and then select
Connect to a Network.

3. When the next window appears, select Set Up a Connection or
Network.
4. Select Connect to the Internet, and click Next.
5. You’re now asked how you want to connect. Select either Broadband
or Dial-Up.
6. If you selected Broadband, enter the username and password
supplied by your ISP.
7. If you selected Dial-Up, follow the onscreen instructions to select
which modem you’re using and enter your ISP’s dial-up phone number,
your username, and your password. That’s it. Vista does a good job of
configuring your Internet connection automatically, without a lot of
input on your part.
Connecting in Windows XP
The configuration process isn’t as simple in Windows XP. After you
connect your computer to the broadband modem (or connect your PC’s
dialup modem to your telephone line), you follow these steps:
1. Click the Start button; then select Connect To, Show All
Connections.

2. When the Network Connections window opens, select Create a New
Connection from the Network Tasks panel.
3. When the New Connection Wizard dialog box appears, click the
Next button.
4. When the Network Connection Type screen appears, check the
Connect to the Internet option and then click the Next button.
5. When the Getting Ready screen appears, check the Set Up My
Connection Manually option and then click Next.
6. When the Internet Connection screen appears, select which type of
connection you have—dial-up broadband with username and password,
or always-on broadband— then click Next.
7. If prompted, enter the name of your Internet service provider and
then click Next.
8. If you have a dial-up ISP, enter the provider’s dial-up phone number
and then click Next.
9. If prompted, enter your username and password (as provided by your
ISP); then click Next.
10. Click the Finish button to complete the process.
Whew—that’s a lot of work! Still, after you get it set up, you’re good
to go and ready to start exploring the Internet.
Sharing an Internet Connection
If you have more than one PC in your home, you can connect them to
share a single Internet connection. This is particularly useful if you
have a high-speed broadband connection.
You share an Internet connection by connecting your broadband
modem to your home network. It doesn’t matter whether you have a
wired or a wireless network; the connection is similar in both instances.
All you have to do is run an Ethernet cable from your broadband
modem to your network hub or router and then Windows will do the
rest, connecting your modem to the network so that all your computers
can access the connection.
To work through all the details of this type of connection, turn to
Chapter 9, ―Setting Up a Home Network.‖ It’s really quite easy!

Connecting to a Public WiFi
Hotspot
If you have a notebook PC, you also have the option to connect to the
Internet when you’re out and about. Many coffeehouses, restaurants,
libraries, and hotels offer wireless WiFi Internet service, either free or
for an hourly or daily fee.
Assuming that your notebook has a built-in WiFi adapter (and it
probably does), connecting to a public WiFi hotspot is a snap.
When you’re near a WiFi hotspot, your PC should automatically pick
up the WiFi signal. Make sure that your WiFi adapter is turned on
(some notebooks have a switch for this, either on the front or
on the side of the unit), and then look for a wireless connection icon in
Windows’ system tray or notification area. Click this icon (or select
Start, Connect To), and Windows displays a list of available wireless
networks near you. Select the network you want to connect to; then
click the Connect button.
After Windows connects to the selected hotspot, you can log on to the
wireless network. This is typically done by opening Internet Explorer
or a similar web browser. If the hotspot has free public
access, you’ll be able to surf normally. If the hotspot requires a
password, payment, or other logon procedure, it will intercept the
request for your normal home page and instead display its own login
page. Enter the appropriate information, and you’ll be surfing in no
time!
Activity15.1
Demonstrate the steps when connecting to a dial-up connection or a
broadband connection that requires a username and password.