
color Multi-Function Display pilot’s guideoroca.com/Group 6/documents/MX20_PilotsGuide.pdf ·...
152
MX20 TM color Multi-Function Display pilot’s guide
Transcript of color Multi-Function Display pilot’s guideoroca.com/Group 6/documents/MX20_PilotsGuide.pdf ·...

MX20TM
color Multi-Function Displaypilot’s guide

© 2005 Garmin Ltd. or its subsidiaries
Garmin International, Inc. Garmin AT 1200 East 151st Street, Olathe, Kansas 66062, U.S.A. 2345 Turner Rd., SE Salem, OR 97302 Tel. 913/397.8200 or 800/800.1020 Tel. 503/581.8101 or 800/525.6726 Fax 913/397.8282 Fax. 503/364.2138
Garmin (Europe) Ltd. Unit 5, The Quadrangle, Abbey Park Industrial Estate, Romsey, SO51 9DL, U.K. Tel. 44/0870.8501241 Fax 44/0870.8501251
Garmin Corporation No. 68, Jangshu 2nd Road, Shijr, Taipei County, Taiwan Tel. 886/2.2642.9199 Fax 886/2.2642.9099
All rights reserved. Except as expressly provided herein, no part of this manual may be reproduced, copied, transmitted, disseminated, downloaded or stored in any storage medium, for any purpose without the express prior written consent of Garmin. Garmin hereby grants permission to download a single copy of this manual onto a hard drive or other electronic storage medium to be viewed and to print one copy of this manual or of any revision hereto, provided that such electronic or printed copy of this manual must contain the complete text of this copyright notice and provided further that any unauthorized commercial distribution of this manual or any revision hereto is strictly prohibited.
Information in this document is subject to change without notice. Garmin reserves the right to change or improve its products and to make changes in the content with-out obligation to notify any person or organization of such changes or improvements. Visit the Garmin Web site (www.garmin.com) for current updates and supplemental information concerning the use and operation of this and other Garmin products.
Garmin®, GPSMAP®, AutoLocate®, TracBack®, Apollo, and MapSource® are registered trademarks of Garmin Ltd. or its subsidiaries and may not be used without the express permission of Garmin.
May 2005 Part Number 560-1026-08 Rev. B (Garmin P/N 190-00479-00 Rev C) Printed in the USA
i
Introduction
Cautions
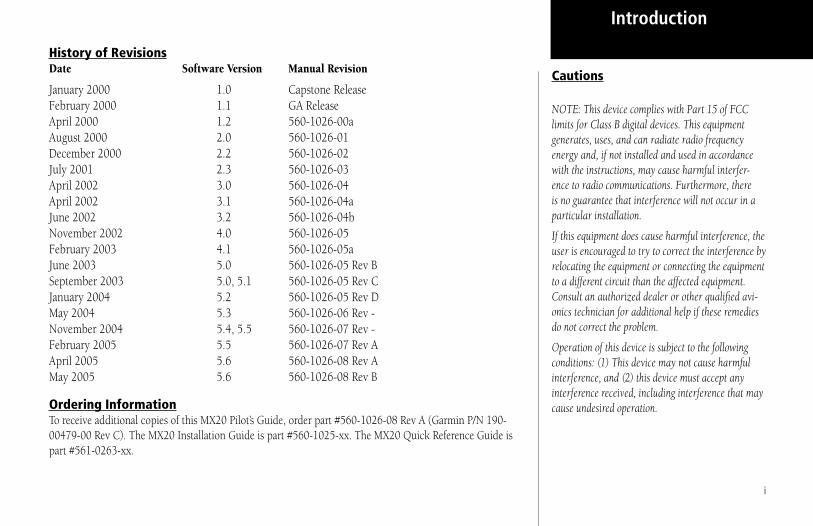
History of RevisionsDate Software Version Manual Revision
January 2000 1.0 Capstone ReleaseFebruary 2000 1.1 GA ReleaseApril 2000 1.2 560-1026-00aAugust 2000 2.0 560-1026-01December 2000 2.2 560-1026-02July 2001 2.3 560-1026-03April 2002 3.0 560-1026-04April 2002 3.1 560-1026-04aJune 2002 3.2 560-1026-04bNovember 2002 4.0 560-1026-05February 2003 4.1 560-1026-05aJune 2003 5.0 560-1026-05 Rev BSeptember 2003 5.0, 5.1 560-1026-05 Rev CJanuary 2004 5.2 560-1026-05 Rev DMay 2004 5.3 560-1026-06 Rev -November 2004 5.4, 5.5 560-1026-07 Rev -February 2005 5.5 560-1026-07 Rev AApril 2005 5.6 560-1026-08 Rev AMay 2005 5.6 560-1026-08 Rev B
Ordering InformationTo receive additional copies of this MX20 Pilot’s Guide, order part #560-1026-08 Rev A (Garmin P/N 190-00479-00 Rev C). The MX20 Installation Guide is part #560-1025-xx. The MX20 Quick Reference Guide is part #561-0263-xx.
NOTE: This device complies with Part 15 of FCC limits for Class B digital devices. This equipment generates, uses, and can radiate radio frequency energy and, if not installed and used in accordance with the instructions, may cause harmful interfer-ence to radio communications. Furthermore, there is no guarantee that interference will not occur in a particular installation.
If this equipment does cause harmful interference, the user is encouraged to try to correct the interference by relocating the equipment or connecting the equipment to a different circuit than the affected equipment. Consult an authorized dealer or other qualified avi-onics technician for additional help if these remedies do not correct the problem.
Operation of this device is subject to the following conditions: (1) This device may not cause harmful interference, and (2) this device must accept any interference received, including interference that may cause undesired operation.

ii
Introduction
End User License Agreement (“EULA”)
You have acquired a device (MX20) which includes software licensed by Garmin International, Inc. or its subsidiaries (Garmin) from one or more software licensors Garmin’s Software Suppliers. Such software products, as well as associated media, printed materials, and “online” or electronic documentation (“SOFTWARE”) are protected by international intellectual property laws and treaties. The SOFTWARE is licensed, not sold. All rights reserved.
• This EULA is valid and grants the end-user rights ONLY if the SOFTWARE is genuine and a genuine Certificate of Authenticity for the SOFTWARE is included. For more information on identifying whether your software is genuine, please see http://www.microsoft.com/piracy/howtotell.
• IF YOU DO NOT AGREE TO THIS END USER LICENSE AGREEMENT (“EULA”), DO NOT USE THE MX20 OR COPY THE SOFTWARE. INSTEAD, PROMPTLY CONTACT GARMIN FOR INSTRUCTIONS ON RETURN OF THE UNUSED MX20) FOR A REFUND. ANY USE OF THE SOFTWARE, INCLUDING BUT NOT LIMITED TO USE ON THE MX20, WILL CONSTITUTE YOUR AGREEMENT TO THIS EULA (OR RATIFICATION OF ANY PREVIOUS CONSENT).
• GRANT OF SOFTWARE LICENSE. This EULA grants you the following license:
> You may use the SOFTWARE only on the MX20.
> Restricted Functionality. You are licensed to use the SOFTWARE to provide only the limited functionality (specific tasks or processes) for which the MX20 has been designed and marketed by Garmin. This license specifically prohibits any other use of the software programs or functions, or inclusion of additional software programs or functions that do not directly support the limited functionality on the MX20. Notwithstanding the foregoing, you may install or enable on a MX20, systems utilities, resource management or similar software solely for the purpose of administration, performance enhancement and/or preventive maintenance of the MX20.
> If you use the MX20 to access or utilize the services or functionality of Microsoft Windows Server products (such as Microsoft Windows Server 2003), or use the MX20 to permit workstation or computing devices to access or utilize the services or functionality of Microsoft Windows Server products, you may be required to obtain a Client Access License for the MX20 and/or each such workstation or computing device. Please refer to the end user license agreement for your Microsoft Windows Server product for additional information.
> NOT FAULT TOLERANT. THE SOFTWARE IS NOT FAULT TOLERANT. GARMIN HAS INDEPENDENTLY DETERMINED HOW TO USE THE SOFTWARE IN THE MX20, AND MS HAS RELIED UPON GARMIN TO CONDUCT SUFFICIENT TESTING TO DETERMINE THAT THE SOFTWARE IS SUITABLE FOR SUCH USE.
> NO WARRANTIES FOR THE SOFTWARE. THE SOFTWARE is provided “AS IS” and with all faults. THE ENTIRE RISK AS TO SATISFACTORY QUALITY, PERFORMANCE, ACCURACY, AND EFFORT (INCLUDING LACK OF NEGLIGENCE) IS WITH YOU. ALSO, THERE IS NO WARRANTY AGAINST INTERFERENCE WITH YOUR ENJOYMENT OF THE SOFTWARE OR AGAINST INFRINGEMENT. IF YOU HAVE RECEIVED ANY WARRANTIES REGARDING THE MX20 OR THE SOFTWARE, THOSE WARRANTIES DO NOT ORIGINATE FROM, AND ARE NOT BINDING ON, MS.
> No Liability for Certain Damages. EXCEPT AS PROHIBITED BY LAW, MS SHALL HAVE NO LIABILITY FOR ANY INDIRECT, SPECIAL, CONSEQUENTIAL OR INCIDENTAL DAMAGES ARISING FROM OR IN CONNECTION WITH THE USE OR PERFORMANCE OF THE SOFTWARE. THIS LIMITATION SHALL APPLY EVEN IF ANY REMEDY FAILS OF ITS ESSENTIAL PURPOSE. IN NO EVENT SHALL MS BE LIABLE FOR ANY AMOUNT IN EXCESS OF U.S. TWO HUNDRED FIFTY DOLLARS (U.S.$250.00).
> Restricted Uses. The SOFTWARE is not designed or intended for use or resale in hazardous environments requiring fail-safe performance, such as in the operation of nuclear facilities, aircraft navigation or communication systems, air traffic control, or other devices or systems in which a malfunction of the SOFTWARE would result in foreseeable risk of injury or death to the operator of the device or system, or to others.
> Limitations on Reverse Engineering, Decompilation, and Disassembly. You may not reverse engineer, decompile, or disassemble the SOFTWARE, except and only to the extent that such activity is expressly permitted by applicable, law notwithstanding this limitation.
> SOFTWARE as a Component of the MX20 - Transfer. This license may not be shared, transferred to or used concurrently on different computers. The SOFTWARE is licensed with the MX20 as a single integrated product and may only be used with the MX20. If the SOFTWARE is not accompanied by a MX20, you may not use the SOFTWARE. You may permanently transfer all of your rights under this EULA only as part of a permanent sale or transfer of me MX20, provided you retain no copies of the SOFTWARE. If the SOFTWARE is an upgrade, any transfer must also include all prior versions of the SOFTWARE. This transfer must also include the Certificate of Authenticity label. The transfer may not be an indirect transfer, such as a consignment. Prior to the transfer, the end user receiving the SOFTWARE must agree to all the EULA terms.
> Consent to Use of Data. You agree that MS, Microsoft Corporation and their affiliates may collect and use technical information gathered in any manner as part of product support services related to the SOFTWARE. MS, Microsoft Corporation and their affiliates may use this information solely to improve their products or to provide customized services or technologies to you. MS, Microsoft Corporation and their affiliates may disclose this information to others, but not in a form that personally identifies you.
> Internet Gaming/Update Features. If the SOFTWARE provides, and you choose to utilize, the Internet gaming or update features within the SOFTWARE, it is necessary to use certain computer system, hardware, and software information to implement the features. By using these features, you explicitly authorize MS, Microsoft Corporation and/or their designated agent to use this information solely to improve their products or to provide customized services or technologies to you. MS or Microsoft Corpora-tion may disclose this information to others, but not in a form that personally identifies you.

iii
Introduction
> Internet-Based Services Components. The SOFTWARE may contain components that enable and facilitate the use of certain Internet -based services. You acknowledge and agree that MS, Microsoft Corporation or their affiliates may automatically check the version of the SOFTWARE and/or its components that you are utilizing and may provide upgrades or supplements to the SOFTWARE that may be automatically downloaded to your MX20. Microsoft Corporation or their affiliates do not use these features to collect any information that will be used to identify you or contact you. For more information about these features, please see the privacy statement at http://go.imcrosoft.com/fwlmk/?LinkId=25243.
> Links to Third Party Sites. You may link to third party sites through the use of the SOFTWARE. The third party sites are not under the control of MS or Microsoft Corporation, and MS or Microsoft are not responsible for the contents of any third party sites, any links contained in third party sites, or any changes or updates to third party sites, MS or Microsoft Corporation is not responsible for webcasting or any other form of transmission received from any third party sites. MS or Microsoft Corporation are providing these links to third party sites to you only as a convenience, and the inclusion of any link does not imply an endorsement by MS or Microsoft Corporation of the third party site.
> Notice Regarding Security. To help protect against breaches of security and malicious software, periodically back up your data and system information, use security features such as firewalls, and install and use security updates.
> No Rental/Commercial Hosting. You may not rent, lease, lend or provide commercial hosting services with the SOFTWARE to others.
> Separation of Components. The SOFTWARE is licensed as a single product. Its component parts may not be separated for use on more than one computer.
> Additional Software/Services. This EULA applies to updates, supplements, add-on components, product support services, or Internet-based services components (“Supplemental Components”), of the SOFTWARE that you may obtain from Garmin, MS, Microsoft Corporation or their subsidiaries after the date you obtain your initial copy of the SOFTWARE, unless you accept updated terms or another agreement governs. If other terms are not provided along with such Supplemental Components and the Supplemental Components are provided to you by MS, Microsoft Corporation or their �osoft Corporation or their subsidiaries providing the Supplemental Components will be the licensor with respect to such S�W. THE SUPPLEMENTAL COMPONENTS AND ANY (IF ANY) SUPPORT SERVICES RELATED TO THE SUPPLEMENTAL COMPONENTS ARE PROVIDED AS IS AND WITH ALL FAULTS. ALL OTHER DISCLAIMERS, LIMITATION OF DAMAGES, AND SPECIAL PROVISIONS PROVIDED BELOW AND/OR OTHERWISE WITH THE SOFTWARE SHALL APPLY TO SUCH SUPPLEMENTAL COMPONENTS. MS, Microsoft Corporation or their subsidiaries reserve the right to discontinue any Internet-based services provided to you or made available to you through the use of the SOFTWARE.
> Recovery Media. If SOFTWARE is provided by Garmin on separate media and labeled “Recovery Media” you may use the Recovery Media solely to restore or reinstall the SOFTWARE originally installed on the MX20.
> Backup Copy. You may make one (1) backup copy of the SOFTWARE. You may use this backup copy solely for your archival purposes and to reinstall the SOFTWARE on the MX20. Except as expressly provided in this EULA or by local law, you may not otherwise make copies of the SOFTWARE, including the printed materials accompanying the SOFTWARE. You may not loan, rent, lend or otherwise transfer the backup copy to another user.
> End User Proof of License. If you acquired the SOFTWARE on a MX20, or on a compact disc or other media, a genuine Microsoft “Proof of License’”/Certificate of Authenticity label with a genuine copy of the SOFTWARE identifies a licensed copy of the SOFTWARE. To be valid, the label must be affixed to the MX20, or appear on Garmin’s software packaging. If you receive the label separately other than from Garmin, it is invalid. You should keep the label on the MX20 or packaging to prove that you are licensed to use the SOFTWARE.
> Product Support. Product support for the SOFTWARE is not provided by MS, Microsoft Corporation, or their affiliates or subsidiaries. For product support, please refer to Garmin’s support number provided in the documentation for the MX20. Should you have any questions concerning this EULA or if you desire to contact Garmin for any other reason, please refer to the address provided in the documentation for the MX20.
> Termination. Without prejudice to any other rights�oy all copies of the SOFTWARE and all of its component parts.
> EXPORT RESTRICTIONS. You acknowledge that SOFTWARE is subject to U.S. and European Union export jurisdiction. You agree to comply with all applicable international and national laws that apply to the SOFTWARE, including, the U.S. Export Administration Regulations, as well as end-user, end-use and destination restrictions issued by U.S. and other governments. For additional information see http://www.microsoft.com/exporting/ .

iv
Introduction
Welcome…Welcome to a new era of aviation navigation. Once again, Garmin has set new standards in features and ease of use for the general aviation public. The MX20 Multi-Function Display provides a focal point for integrating many of your navigation needs in an easy to use and convenient package.
The MX20 presents a wealth of information on its six-inch diagonal, 640x480 pixel, color display. The many features are organized as distinct functions and are designed to closely mimic the traditional instruments used in the standard cockpit. Each function allows varying degrees of customization. The custom map function is customizable so you can create a display for almost any configuration you require. The other functions provide more limited levels of customization so that they retain the look and feel of the instruments they reflect.
The MX20 is capable of creating powerful overlay views where information from a variety of sources can be presented simultaneously in proper relationship to each other, thus greatly increasing situational awareness for the pilot.
You can be confident in knowing that you are the owner of the state-of-the-art in aviation and navigation. The MX20 architecture is designed to support full expansion for both software and hardware enhancements. This flexibility protects your investment and allows for the ease of adding new features. Our products are built to last and to allow the flexibility to meet your needs as they change in the future.
About This ManualThis manual may be used as a summary, a reference, and a learning tool. Information is provided about all of the functions available to the MX20. Your specific installation may not include all of these functions.
Take a few moments to familiarize yourself with the various sections in this manual. The Getting Started sec-tion gives an introduction to the controls, basic operation, and organization of the functions in your MX20. Be sure to read the Getting Started section to learn the rules for using the MX20. The Detailed Operation section is the reference for each of the functions in the MX20. Refer to the Detailed Operation section when you want to get into the details on every function and option along with step-by-step instructions.
Not every function is available in all software versions or in every installations.
Accessories and Packing List
To obtain accessories for your MX20 please contact your Garmin dealer.
Help us better support you by completing our on-line registration form today! Registration ensures that you will be notified of product updates and new products and provides lost or stolen unit tracking. Please, have the serial number of your MX20 handy, connect to our web site (www.garmin.com) and look for our Product Registration link on the home page.
The MX20 display lens is coated with a special anti-reflective coating which is very sensitive to skin oils, waxes, and abrasive cleaners. It is very important to clean the lens using an eyeglass cleaner that is specified as safe for anti-reflective coatings (one suit-able product is Wal-Mart Lens Cleaner) and a clean, lint-free cloth.

v
Introduction
LimitationsThe Traffic function is not a collision avoidance system. It is an aid to visual acquisition and does not relieve the flight crew of their responsibility to “see and avoid.” There are no evasive aircraft maneuvers authorized, recommended, or provided for as a result of displayed traffic targets. Refer to the traffic sensor documentation for additional information.
All pilots/operators are reminded that the airborne equipment that displays other ADS-B equipped aircraft and transponder equipped aircraft via TIS-B is for pilot situational awareness and is not approved as a colli-sion avoidance tool. Any deviation from an air traffic control clearance based on cockpit information must be approved by the controlling ATC facility prior to commencing the maneuver. Uncoordinated deviations may place an aircraft in close proximity to other aircraft under ATC control not seen on the airborne equipment and may possibly result in the issuance of a pilot deviation.
The Terrain function shows you the general terrain elevations relative to your altitude and are advisory in nature. Individual obstructions may be shown if available in the database. Terrain is displayed from database information and may therefore contain errors. The Terrain function does not relieve the flight crew of their responsibility to “see and avoid.” Do not use this information for navigation.
The moving map, weather information, and other displayed information are intended only as aids to situ-ational awareness. The pilot should rely on the appropriate primary means of navigation and consult official and approved data sources prior to and during each flight.
Refer to your airplane flight manual supplement for more information.
Table of Contents

vi
IntroductionTable of Contents
Table of ContentsHistory of Revisions ............................................. iOrdering Information ........................................... i
Introduction ..................................... iCautions ............................................................... iAccessories and Packing List ...............................ivWelcome… .........................................................ivAbout This Manual ..............................................ivLimitations ...........................................................v
Getting Started ..................................................... 1Functions ............................................................ 1Controls .............................................................. 3
Power/Brightness ........................................... 3Function (FN) ............................................... 3Menu/Enter ................................................... 3Menu Item .................................................... 4
Data Card ............................................................ 4Display ................................................................ 5Annunciations ..................................................... 6
Advisory Flags ............................................... 6ADS-B Traffic ................................................. 6Skywatch/TCAD/TIS-A Traffic ....................... 6Terrain .......................................................... 6Lightning ...................................................... 6Message Flag ................................................. 7
Basic Operation ................................................... 9Brightness .......................................................... 9
Rotary Switch Model ..................................... 9Rocker Switch Model .................................... 9Power On ..................................................... 9Pre-Heat Mode .............................................. 9
Start Up Screen ................................................. 10Confirm Current Baro Correction ..................... 10Function Selection ............................................ 11Advisory Hot Key .............................................. 12
Normal Cruise Condition ............................ 12Viewing the Advisory .................................. 12Returning To Normal Condition .................. 12
Alert Hot Key .................................................... 13Options Menu ................................................... 13Thumbnail Feature ............................................ 13
Traffic on Thumbnail ................................... 14Terrain on the Thumbnail ........................... 14Obstructions on the Thumbnail .................. 14Thumbnail Activation .................................. 14
Traffic Information Services (TIS) ...................... 14Message Log (MSG) ............................................ 18Custom Map (MAP) ............................................. 19
Auto Zoom ........................................................ 19Map Scale .......................................................... 19Pan .................................................................. 20Info .................................................................. 20Info In Pan Mode .............................................. 21Initial Zoom Level ............................................. 21Custom Map Menu Option Page 1 .................... 21
Flight Plan ......................................................... 21Map Orientation ................................................ 21Invert ................................................................ 22Nav Data ........................................................... 22Load Chart (Optional) ....................................... 22Custom Map Menu Option Page 2 .................... 23
Airports ....................................................... 23VORs ................................................................. 23
VOR Highlight ............................................ 23VOR OBS .......................................................... 24
ILS/Localizer Depiction .............................. 24NDBs ................................................................ 25Intersections ...................................................... 25Airspace ............................................................ 25Custom Map Menu Option Page 3 .................... 26Low Airways ..................................................... 26High Airways .................................................... 26Water ................................................................ 26Roads ................................................................ 26Boundaries ........................................................ 26Custom Map Menu Option Page 4 .................... 27Airport Chart .................................................... 27Terrain .............................................................. 27Obstructions ..................................................... 28Traffic ................................................................ 28Strikes .............................................................. 29
IFR En Route (IFR) Chart Function ....................... 30IFR Option Page 1 ............................................. 30
vii
Introduction
Flight Plan ......................................................... 30Map Orientation ................................................ 30Invert ................................................................ 31Nav Data ........................................................... 31Label ................................................................. 31IFR Option Page 2 ............................................. 31Low Airways ..................................................... 31High Airways .................................................... 31Airport Chart .................................................... 32Load Chart ........................................................ 32
VFR Chart (VFR) Function .................................... 33Flight Plan ......................................................... 33Map Orientation ................................................ 33Invert ................................................................ 33Nav Data ........................................................... 34Label ................................................................. 34
Split Screen (SPLIT) Function ............................... 35TAS / TCAD Traffic (TRAF) Function ..................... 36
Traffic Depiction ................................................ 36Alert Hot Key .................................................... 36Traffic Alert Pop-Up .......................................... 36Symbology ........................................................ 37Vert Smart Key (TAS) ......................................... 37Traffic Status Indicators ..................................... 37
Off Scale ...................................................... 37Standby (TAS) ............................................. 37Test (Skywatch) ........................................... 38Not Displayed ............................................. 38TAS Fail ...................................................... 38
TAS Data Fail .............................................. 38TAS Time-Out ............................................. 38
No Bearing Advisories ....................................... 38TAS Menu Options ............................................ 38
Traffic Alert Mode (Pop-Up/Prompt) ........... 38Standby Mode ............................................. 38Self-Test ...................................................... 39
TCAD 9900B Menu Options ............................. 39Altitude Option (Relative/Pressure) ............. 39Filter ........................................................... 39Volume ........................................................ 39Approach Mode ........................................... 39Mute Duration ............................................. 39Shield .......................................................... 39Shield Heights ............................................. 40Shield Ranges .............................................. 40
TCAD 9900BX Menu Options ........................... 40Altitude Option (Relative/Pressure) ............. 40Filter ........................................................... 40Volume ........................................................ 40Approach Mode ........................................... 40Ground/Flight Mode ................................... 40
ADS-B Traffic (TRAF) Function ............................. 41Traffic Description ............................................. 43
TIS-B Traffic ................................................ 44TIS-B Limitations ........................................ 45Degraded Target .......................................... 46Target Color ................................................ 46Surface Targets ........................................... 46
Traffic Altitude Values .................................. 46Ident (GDL 90 UAT only) ........................... 46Operation .................................................... 47
Traffic Option Page 1 ......................................... 47Flight Plan ......................................................... 47Traffic Map Orientation .................................... 47Display Mode .................................................... 48
Graphic Display .......................................... 48Text Display ................................................ 48
Label ................................................................. 48Altitude Option (Relative/Pressure) ................. 48Traffic Menu Option Page 2 ............................... 49Transmit Altitude ............................................. 49ADS-B Broadcast Mode Control ......................... 49
Broadcast FID .............................................. 49Broadcast VFR ............................................. 49Standby (Legacy UAT only) ......................... 50
Flight ID Editing ............................................... 50Time .................................................................. 50Enter Code (GDL 90 UAT only) ........................ 50Traffic Menu Option Page 3 ............................... 51Services ............................................................. 51Traffic Altitude Filter ......................................... 51
TIS-A Traffic (TRAF) Function .............................. 52Traffic Depiction ................................................ 52TIS-A Menu Options ......................................... 53
Alert Hot Key (TA Prompt) ......................... 53Traffic Alert Pop-Up (TA Popup) ................. 53Operate/Standby ........................................ 53
Table of Contents

viii
IntroductionTable of Contents
Symbology ........................................................ 53Traffic Status Indicators ..................................... 54
Flight Plan (FPL) Function .................................... 55Terrain (TER) Function ......................................... 56
Internal MX20-Based Terrain ............................. 56Terrain Option Page .......................................... 57Flight Plan ......................................................... 57TRK Up Arc/TRK Up 360 .................................. 57Set Barometer .................................................... 58TER Data Flag ................................................... 58External TAWS-Based Terrain Display ............... 58TAWS Pop-Up Modes ........................................ 58
UAT Flight Information Service (FIS) Function ... 59Text Display ...................................................... 60
Viewing Text ............................................... 60Clearing Text FIS Messages .......................... 60Sorting Text FIS Messages ........................... 60
WSI InFlight™ Flight Information Service (FIS) Func-tion ................................................................ 61
Product Times ................................................... 61Graphical Weather (WX) Display ...................... 62
Graphical WX Overlay Options ................... 62Menu Options for Overlay Page 1 ............... 63METARs ...................................................... 63SIGMETs & AIRMETs .................................. 63Echo Tops ................................................... 63Temporary Flight Restrictions (TFRs) .......... 64US or Canadian Weather Radar ................... 64
Menu Options for Overlay Page 2 ............... 64Label ........................................................... 64Flight Plan ................................................... 64Legend ........................................................ 65Map Detail .................................................. 65Map Orientation .......................................... 65
Text Display ...................................................... 66Selecting Text Data ...................................... 66Smart Key Function .................................... 67Viewing Text TAFs ....................................... 67Sorting FIS Messages ................................... 68
Status Information ............................................. 68GDL 69/69A Flight Information Service (FIS) Func-
tion ............................................................... 69Weather Product Zoom Scale ............................. 69Temporary Flight Restrictions (TFRs) ................ 70NEXRAD Description ........................................ 70
NEXRAD Abnormalities .............................. 70NEXRAD Limitations .................................. 70NEXRAD Intensity ...................................... 71
Current ............................................................. 71NEXRAD ..................................................... 71METARs ...................................................... 72Lightning .................................................... 72Cell Movement ............................................ 72Cloud Tops .................................................. 73Echo Tops ................................................... 73Winds Aloft ................................................. 74
Winds Aloft Altitude ................................... 74TFR Lbl ....................................................... 74Label ........................................................... 74Flight Plan ................................................... 74Legend ........................................................ 75Map Detail .................................................. 75Product Times ............................................. 75Map Orientation .......................................... 76
Forecast ............................................................. 77City ............................................................. 77Forecast Time .............................................. 77SIGMET ...................................................... 77AIRMET ...................................................... 78Freezing Levels ............................................ 78County ........................................................ 78Cyclone ....................................................... 79Label ........................................................... 79Flight Plan ................................................... 79Legend ........................................................ 79Map Detail .................................................. 79Map Orientation .......................................... 79
Text ................................................................... 80Selecting Categories and Messages ............... 80View ............................................................ 80Sorting TAFs and METARs .......................... 81Temporary Flight Restrictions (TFRs) .......... 81
Status ................................................................ 81Product Status ............................................. 82

ix
Introduction
Diagnostics .................................................. 82Activation .................................................... 82
Activating XM Radio Services ............................ 83Gather Information ..................................... 83XM Satellite Radio Activation .................... 83
Lightning Strikes (LT) Function ............................ 84Lightning Menu Option Page 1 ......................... 84Flight Plan ......................................................... 84360/120 ............................................................ 84Lightning ........................................................... 84
Strike .......................................................... 85Cell ............................................................. 85
Heading Stabilization ........................................ 85System Data ...................................................... 85Lightning Menu Option Page 2 ......................... 85Demo ................................................................ 85Self-Test ............................................................ 85Noise Monitor ................................................... 86Strike Test ......................................................... 86Antenna Change Message .................................. 86
Chart View (CHART) Function (Optional) ............. 87Overview ........................................................... 87Chart Data Source ............................................. 88
Data Card .................................................... 88Chart Geo-Referencing ............................... 88
Chart Overlay in the Custom/IFR Map .............. 89Selecting the Airport .................................... 89Loading the Approach Chart ....................... 90
Viewing the Chart as an Overlay ....................... 90Display of Coverage Area ............................. 90Chart Zooming ............................................ 91Chart Panning ............................................. 91Chart Orientation ........................................ 91Chart Info ................................................... 91
Chart View Function ......................................... 92Menu Items ....................................................... 93
Search ID .................................................... 93Select Airport .............................................. 93Select Chart ................................................. 93Select Loaded .............................................. 93Load Current ............................................... 94
Airport Surface Charts ....................................... 94Viewing Surface Charts ............................... 94
Operational Considerations ............................... 95When to Load a Chart ................................. 95Flying an Approach ..................................... 95Approach to Surface Map Transitions .......... 95Chart NOTAMS ........................................... 96Important System Limitations ..................... 96Invert Option .............................................. 96
Typical Operational Scenario ............................. 97Typical Taxi Scenario ................................... 97Typical Takeoff Scenario .............................. 97Typical Approach Scenario .......................... 97Typical Landing Scenario ............................. 97
Radar (RADAR) Function ...................................... 98
Off Mode ..................................................... 98Standby Mode ............................................ 99Weather Mode ............................................ 99MAP Mode .................................................. 99Horizontal Mode ....................................... 100Vertical Mode (ART2000/2100 only) ......... 100Range Control ........................................... 100Tilt Control ............................................... 100Bearing Control (ART2000/2100 only) ...... 100Gain Control ............................................. 100Hold Control ............................................. 101
Cursor Pre-Select Operation (ART2000/2100 only) ................................................................. 101
Radar Return Signals ....................................... 101Radar Setup Page ............................................. 102
Stabilization (STAB) .................................. 102XM Satellite Radio ............................................. 103
Menu Page 1 ................................................... 103Radio ID .................................................... 104Save Preset ................................................ 105Last Channel ............................................. 105
Menu Pages 2-4 ............................................... 106Volume ............................................................ 106
Mute ......................................................... 106Channels ......................................................... 106Categories ....................................................... 107Direct Access ................................................... 107XM Advisory Messages .................................... 108
Table of Contents
x
Introduction
Activating XM Satellite Radio Services ............. 109Gather Information ................................... 109
System (SYS) Function ....................................... 111System Nav Pages ............................................ 111
Ownship Symbol ...................................... 111Lat/Lon Format ......................................... 111Set Baro Correction Units .......................... 111Set Baro Correction .................................. 111Display Latitude/Longitude Lines ............. 112Initial En Route Zoom and Initial Ground Zoom
Transition Speed .................................. 112Slave Zoom to GPS Zoom .......................... 113AutoLoad Electronic Charts ....................... 113Display ICAO for US Airports ................... 113Altitude Units ............................................ 113GPS and Data Link Status ......................... 114
System Test Page ............................................. 115Test Pattern 1 ............................................ 115Red, Green, Blue, White Test Pattern ......... 115
Caring For Your MX20 ........................................ 116Display Care and Cleaning .............................. 116Contacting the Factory .................................... 116
Troubleshooting ................................................ 117Garmin Data Cards ............................................ 121
Installing and Removing Data Cards ................ 121Specifications .................................................... 122
Physical Specifications ..................................... 122Power .............................................................. 122
Environmental ................................................. 122GDL 69/69A FIS Legends ................................... 123
Appendix .................................... 123Sample GDL 69/69A FIS Displays ....................... 124Care Information ............................................... 125
Cleaning the Unit ............................................ 125Display Backlight ............................................ 125
Glossary ............................................................. 126Compliance, License, and Warranty Information 131
FCC Compliance ............................................. 131Software License Agreement ............................ 132Product Registration and Support .................... 132
Contacting the Factory ..................................... 134

1
Getting Started
Getting StartedThis section explains how to get started using the MX20. Information in this section describes the controls, data card, display, and basic operation. After reading this section, go to the Detailed Operation section for expanded explanations for each feature.
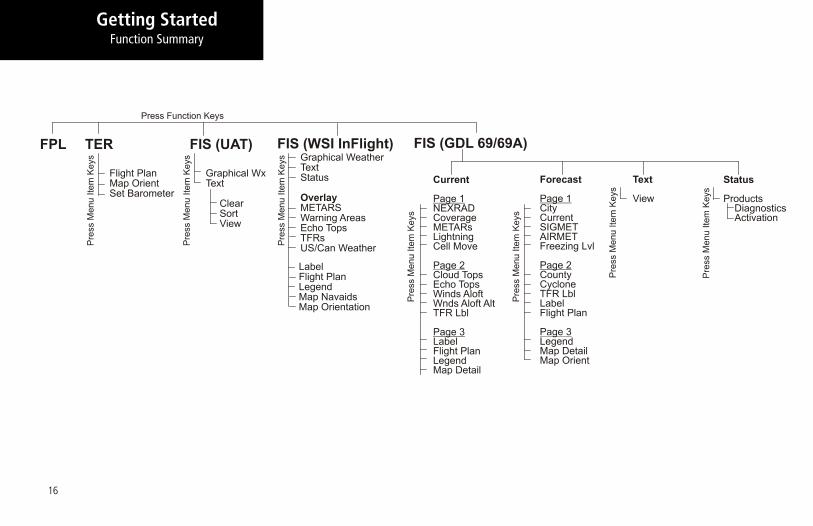
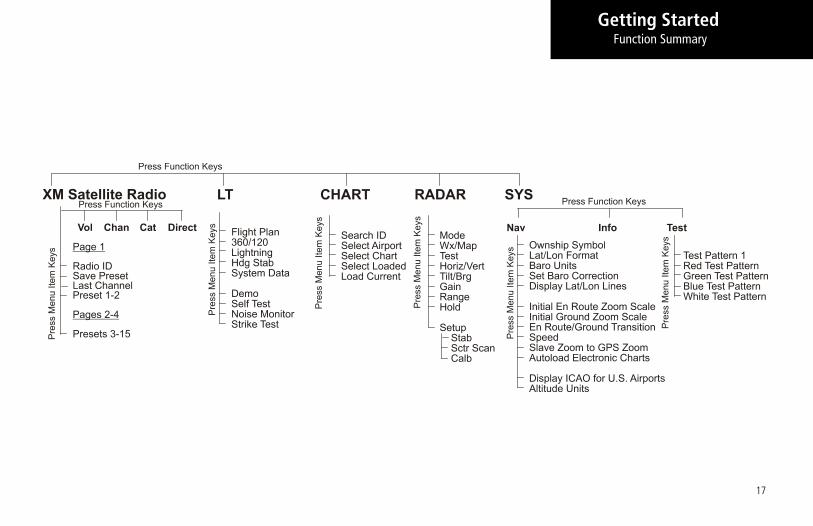
FunctionsThe MX20 contains thirteen major separate functions for the display of information. The function names are shown as “smart” keys at the bottom of the display. The “smart” key is the combination of a label above a tri-angle key at the bottom of the display. The labels above the triangle keys change to reflect the choices available to you for each function. Press the FN key to show the available functions. Press the “smart” key below the function label to go to the desired function. While in each function, press the MENU/ENTER key to show the options for each function. The options are shown on the right side of the display. Press the MENU ITEM key to manipulate the options. Some options toggle on/off, while some are tri-state (three choices).
MX20 Functions
• MSG - Message Log• MAP - Custom Map• IFR - IFR Chart• VFR - VFR Chart• Split - Split Screen• Traffic - Skywatch/TCAD/IHAS (TAS) • Traffic - ADS-B TRAF• Traffic - TIS-A• FPL - Flight Plan• TER - Internal/TAWS Terrain• FIS-B - Flight Information Service
(GDL 90 or Legacy UAT)• FIS - Flight Information Service
(WSI InFlight)• FIS - Flight Information Service
(GDL 69/69A)• XM - XM Satellite Radio• LT - Lightning Strikes• CHART - Chart View• RADAR - Weather Radar• SYS - System Information
Functions

2
Getting Started
The Message Log displays information from the MX20 or reported to the MX20 by its external sensors. A flashing MSG annunciator notifies you of a new message that should be viewed.
The Custom Map function allows you to completely customize the displayed map by overlaying selected information. The Custom Map can become “cluttered” if you choose every option, so use discretion.
The IFR Chart function provides an IFR en route style map on the display.
The VFR Chart function provides a VFR sectional style map for the display.
The Split Screen function allows up to two of the other functions to be displayed side by side and an optional vertical profile across the bottom of the display.
The Traffic function (when installed) shows nearby traffic and details about each target.
The Flight Plan function provides details about your flight plan and each waypoint.
The Terrain function shows a color coded map of terrain elevation in relation to your altitude.
The Flight Information Services (FIS) function, when installed, is capable of displaying text and graphic weather information with GDL 90 or legacy UAT- and WSI-equipped, and GDL 69/69A installations.
The Lightning (LT) function, when connected to the Goodrich WX500 Stormscope, controls the overlay of lightning strike information on the map displays.
The Chart View feature provides the capability to view Jeppesen Sanderson Inc. electronic charts. Two basic types of charts can be viewed: Approach charts and airport surface charts.
The XM function allows the reception of XM Satellite Radio entertainment broadcasts when the GDL 69A is installed and a subscription to the XM Radio service is activated.
The Radar Function allows weather radar from the ART2000, ART2100, or RS-181A to be displayed.
The System Information function lets you set general preferences, show software version information, and test the display.
Functions
3
Getting Started
Controls
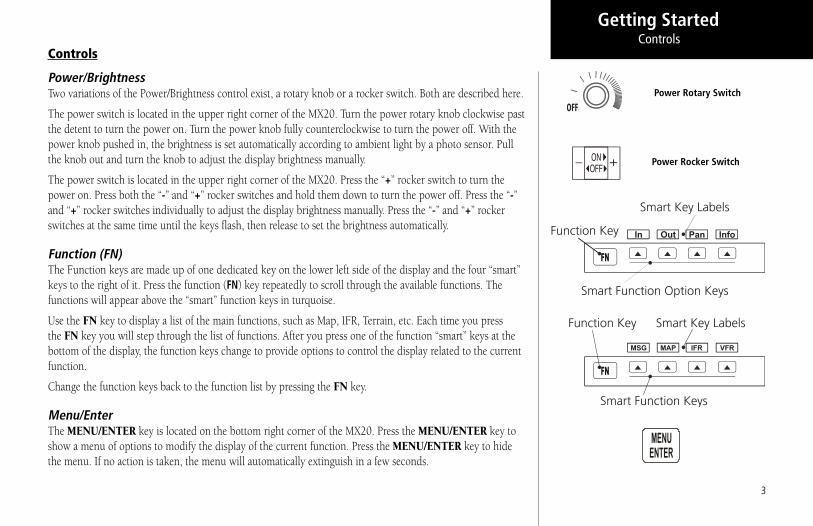
Power/BrightnessTwo variations of the Power/Brightness control exist, a rotary knob or a rocker switch. Both are described here.
The power switch is located in the upper right corner of the MX20. Turn the power rotary knob clockwise past the detent to turn the power on. Turn the power knob fully counterclockwise to turn the power off. With the power knob pushed in, the brightness is set automatically according to ambient light by a photo sensor. Pull the knob out and turn the knob to adjust the display brightness manually.
The power switch is located in the upper right corner of the MX20. Press the “+” rocker switch to turn the power on. Press both the “-” and “+” rocker switches and hold them down to turn the power off. Press the “-” and “+” rocker switches individually to adjust the display brightness manually. Press the “-” and “+” rocker switches at the same time until the keys flash, then release to set the brightness automatically.
Function (FN)The Function keys are made up of one dedicated key on the lower left side of the display and the four “smart” keys to the right of it. Press the function (FN) key repeatedly to scroll through the available functions. The functions will appear above the “smart” function keys in turquoise.
Use the FN key to display a list of the main functions, such as Map, IFR, Terrain, etc. Each time you press the FN key you will step through the list of functions. After you press one of the function “smart” keys at the bottom of the display, the function keys change to provide options to control the display related to the current function.
Change the function keys back to the function list by pressing the FN key.
Menu/EnterThe MENU/ENTER key is located on the bottom right corner of the MX20. Press the MENU/ENTER key to show a menu of options to modify the display of the current function. Press the MENU/ENTER key to hide the menu. If no action is taken, the menu will automatically extinguish in a few seconds.
Controls
Power Rotary Switch
Power Rocker Switch

4
Getting Started
Menu ItemThe Menu Item keys are on the right side of the MX20. Press the MENU/ENTER key to see the options for the current function. Press the MENU ITEM key next to each option to scroll through the choices for each option. Some options support tri-state choices, such as in Map mode. When you select a tri-state option, the option label will change with each key press between completely filled, partially filled, and empty.
Data CardThe Map database and other information is stored on a data card. The use of a data card allows you to easily update information.
Only change the data card when the power is turned off.
Handle your data card carefully. Do not touch the connector edge of the data card. To eject the card, use a soft blunt object to press the data card ejector. Gently pull the card straight out of the slot. Insert a data card by pushing the card straight into the slot. When fully inserted, the data card and eject button will be flush and slightly recessed into the bezel.
When contacting your dealer or the Garmin customer service department, eject the data card and write down the information shown on the label.
Data Card
Front View of Data Card Slot
Menu Item Key Layout
Data Card Label
5
Getting Started
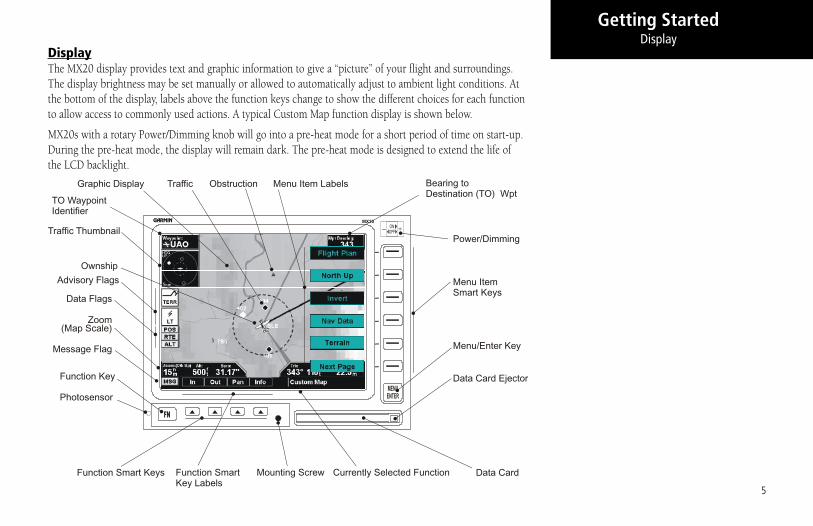
DisplayThe MX20 display provides text and graphic information to give a “picture” of your flight and surroundings. The display brightness may be set manually or allowed to automatically adjust to ambient light conditions. At the bottom of the display, labels above the function keys change to show the different choices for each function to allow access to commonly used actions. A typical Custom Map function display is shown below.
MX20s with a rotary Power/Dimming knob will go into a pre-heat mode for a short period of time on start-up. During the pre-heat mode, the display will remain dark. The pre-heat mode is designed to extend the life of the LCD backlight.
MX20
Power/Dimming
Graphic Display
Menu ItemSmart Keys
Menu/Enter Key
Data Card Ejector
Data CardFunction Smart Keys
Function Key
Function Smart Key Labels
Currently Selected FunctionMounting Screw
Advisory Flags
Message Flag
Zoom(Map Scale)
TO Waypoint Identifier
Bearing toDestination (TO) Wpt
Menu Item Labels
Data Flags
Photosensor
Ownship
Traffic
Traffic Thumbnail
Obstruction
Display

6
Getting Started
AnnunciationsAdvisory flags, data flags, and messages appear on the display to give information about the status of the MX20 or to provide operating information.
Advisory FlagsAnnunciations will appear on the upper left side of the display to provide advisories for Traffic, Terrain, and Lightning. Advisory information is monitored and displayed regardless of the selected function. Advisory flags will flash for approximately 10 seconds when they first appear and then turn solid while they are still valid. Advisory icons will reduce in size if more than two advisory conditions exist.
ADS-B TrafficThe Traffic advisory flag will appear on the left side of the display when traffic is reported to be within ±2000 feet of your altitude and 5 nm of your location. This Traffic advisory is only available when the ADS-B system with a UAT data link is installed and operational. Refer to the TIS Traffic section for a description of TIS-A and TIS-B.
Skywatch/TCAD/TIS-A TrafficThe Traffic Advisory/Alert will appear in amber on the left side of the display when the traffic sensor indicates an alerting condition. Refer to the TIS Traffic section for a description of TIS-A and TIS-B.
TerrainThe Terrain advisory flag will appear on the left side of the display when the terrain surface or obstacle altitude is within approximately 500 feet of your altitude and within approximately two minutes of flight in any direc-tion.
LightningThe Lightning advisory flag will show on the left side of the display when the WX500 sends an indication that lightning has been detected within 50 nm of your location. See the WX500 manual for details about range and other capabilities.
Annunciations
Advisory Flags

7
Getting Started
Data Flags
Data flags appear on the left side of the display to notify you when there is a loss of reported information. The data usually displayed, such as lightning or nearby terrain, may still exist, but may not be displayed for technical reasons. For instance, when the amber TRAF data flag appears it means that the MX20 is not receiving Traffic information from the sensor. So, traffic may exist in your vicinity, but will not be displayed on the MX20. All flags are amber unless otherwise indicated.
Data Flag Description
No valid position information is available from the source. Do not expect a valid position representation on the maps. The Ownship symbol will have an “X” through it.
No valid route (flight plan) is available from the exter-nal navigation source. Route (flight plan) information will not be shown on the maps.
No valid altitude information is available from the external source. Altitude related functions will not operate, such as terrain awareness.
No traffic information is received from the optional traffic sensor. Traffic will not be displayed. Your posi-tion information may not be broadcast in ADS-B capable systems.
The GPS receiver in the GDL 90 UAT is not reporting a valid position. ADS-B broadcast will not include a position report.
No valid lightning detection information is being received from the optional Stormscope sensor. Strike and cell information will not be displayed.
Message FlagThe Message flag will appear on the lower left side of the display when a new message is posted. Go to the Message function to view the information about the operation or status of the MX20.
Data Flags
8
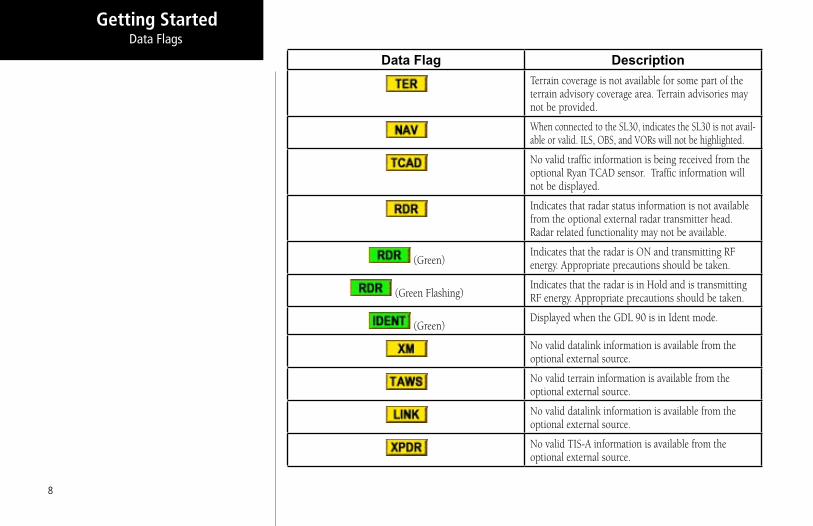
Getting Started
Data Flag DescriptionTerrain coverage is not available for some part of the terrain advisory coverage area. Terrain advisories may not be provided.
When connected to the SL30, indicates the SL30 is not avail-able or valid. ILS, OBS, and VORs will not be highlighted.
No valid traffic information is being received from the optional Ryan TCAD sensor. Traffic information will not be displayed.
Indicates that radar status information is not available from the optional external radar transmitter head. Radar related functionality may not be available.
(Green)Indicates that the radar is ON and transmitting RF energy. Appropriate precautions should be taken.
(Green Flashing)Indicates that the radar is in Hold and is transmitting RF energy. Appropriate precautions should be taken.
(Green)Displayed when the GDL 90 is in Ident mode.
No valid datalink information is available from the optional external source.
No valid terrain information is available from the optional external source.
No valid datalink information is available from the optional external source.
No valid TIS-A information is available from the optional external source.
Data Flags

9
Getting Started
Basic OperationUse the following items to get a basic feel for the operation of the MX20. The basic steps for using any of the separate functions of the MX20 are:
• Turn the power on. • Adjust the brightness or set it to automatic. • Check that all tests pass on the Start Up screen. • Press the FN key to view available functions. Each press of the FN key will step through the lists of
functions. • Press the key below the function label to select the desired function. • Confirm or enter the current barometric pressure• Press the MENU/ENTER key to display available options. • Press the MENU ITEM key next to the displayed option to choose desired capabilities. Some options
use multiple key presses for different states for the option. Press the MENU/ENTER key again to extinguish the option display.
• Refer to the Detailed Operation section for more details on each function.
Brightness
Rotary Switch ModelWith the Power knob pulled out, turn the knob in each direction to adjust the display brightness manually. Manual brightness mode may be selected to adjust the display for difficult lighting conditions. Push the knob in, and the brightness is adjusted automatically according to the ambient light. When the brightness is set automatically, the display will not dim below a pre-defined level.
Rocker Switch ModelPress the “-” and “+” rocker switches at the same time briefly to set the brightness automatically according to ambient light by the photo sensor. Press the “-” and “+” rocker switches alone to adjust the display brightness manually. When the brightness is set automatically, the display will not dim below a pre-defined level.
Power On Turn the power rotary knob clockwise past the detent to turn the power on OR press the “+” rocker switch to turn the power on. The MX20 will progress through a series of startup screens. The final startup screen shows System Information and the results of the Self-Test.
Pre-Heat ModeMX20s with the rotary power/dimmer knob will go into a pre-heat mode for a short period of time on start-up. During the pre-heat mode, the display will remain dark. The pre-heat mode is designed to extend the life of the LCD backlight.
Basic Operation
10
Getting Started
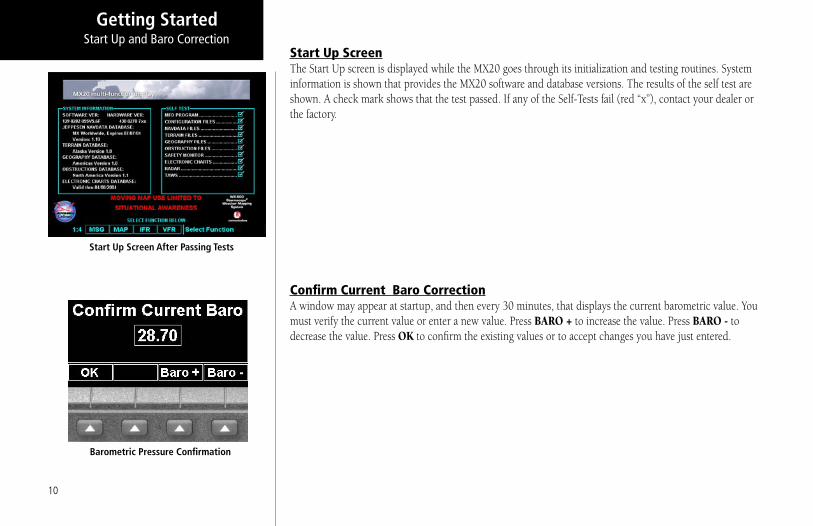
Start Up ScreenThe Start Up screen is displayed while the MX20 goes through its initialization and testing routines. System information is shown that provides the MX20 software and database versions. The results of the self test are shown. A check mark shows that the test passed. If any of the Self-Tests fail (red “x”), contact your dealer or the factory.
Confirm Current Baro CorrectionA window may appear at startup, and then every 30 minutes, that displays the current barometric value. You must verify the current value or enter a new value. Press BARO + to increase the value. Press BARO - to decrease the value. Press OK to confirm the existing values or to accept changes you have just entered.
Start Up and Baro Correction
Barometric Pressure Confirmation
Start Up Screen After Passing Tests

11
Getting Started
Function SelectionPress the FN key to view the different Functions. The functions are shown above the function “smart” keys on the lower part of the display in blue. Press the function key under the function label to activate that function. The labels above the function key will change to reflect the custom “smart” controls for that function. All of the described functions may not be available in each installation.
Function DescriptionMSG Message Log Function
MAP Custom Map Function
IFR IFR En Route Map
VFR VFR Sectional Map
SPLIT Split Screen (Displays Two Functions)
TRAF Traffic Display
FPL Flight Plan Information
TER Terrain Depiction
FIS Flight Information Service - Graphic and Text Weather
XM XM Satellite Radio Audio
LT Lightning Detection and Reporting
CHART Chart View
RADAR Weather Radar Function
SYS System Information
Function Selection

12
Getting Started
Advisory Hot KeyThe “Advisory Hot Key” feature allows advisory conditions to be quickly viewed with minimal effort by the pilot. This feature is comprised of three components:
1) An advisory condition is indicated by a white advisory flag on the left side of the screen and the corresponding Function label will also be highlighted in white when selecting a new Function with the FN key. This feature allows any Function with a pending advisory to be quickly recognized in the Function menu.
2) When a function is entered that has an advisory posted, the zoom level will be adjusted to show the advisory causing object (terrain for example), and the map orientation will be forced to “Track Up 360” to get a good view of what is around the aircraft.
3) When returning to the previous Function after viewing a Function with an advisory, the original zoom and map mode will be restored.
This feature is designed to allow the pilot to establish a preferred “cruise” map setup and quickly view an advisory, then return back to the previous setting. For example:
Normal Cruise ConditionCustom Map Function is being viewed at 5 nm in the ARC mode.
Terrain Advisory Occurs at 10 nm in front of aircraft: The Terrain Advisory Indicator flashes then goes steady on the left side of the display.
Viewing the AdvisoryThe pilot presses the FN key and sees the TER Function highlighted in white, indicating it has an advisory condition. Pressing the TER key to enter the Terrain Function at this point will automatically adjust the zoom level to 10 nm and place the unit in full “360” mode to show overall situational awareness.
Returning To Normal ConditionAfter evaluating the advisory, to return to normal viewing simply select the original Function that was being viewed before the advisory was viewed. When this is done, the zoom level will be set back to 5 nm and the display mode will be returned to ARC mode.
Advisory Hot Key
13
Getting Started
Alert Hot KeyTraffic alerts go one step further than the Advisory hot key feature and will automatically bring up the Func-tion Menu showing the Traffic function. This is called the “prompt” mode. A single key press can then be used to switch the display to the Traffic function. The Alert hot key feature will automatically clear when the traffic alert condition no longer exists.
Also note that a “pop-up” mode can be enabled on the Traffic function, which makes the Traffic page “pop-up” when a Traffic Advisory occurs. The “prompt” or “pop-up” mode is selected in the Traffic function.
Options MenuMost functions have a number of options available. Press the MENU/ENTER key to see the options for the current function. You change an option by pressing one of the Menu Item keys that are to the right of the dis-played option. Many options have more than two choices. Press the same MENU ITEM key repeatedly to view or select the available choices. Some functions have several pages of options. The lower MENU ITEM key will allow you to reach the Next Page when multiple pages are available. Press the MENU/ENTER key a second time to remove the menu from view or wait a few seconds for the options to automatically extinguish.
Thumbnail FeatureThe Thumbnail feature provides a small map depiction that is overlaid in the upper left corner of the MX20 display. It provides for enhanced traffic and terrain situational awareness when not specifically viewing traffic or terrain related functions. For example, both traffic and terrain situational awareness can be maintained while viewing the Flight Plan Function.
The Thumbnail is shown in both a small and large format, depending on the function currently being viewed. The Thumbnail is typically presented in the larger format when overlaid on a map. However, on some func-tions where the Thumbnail would overlay critical information, the smaller format is utilized.
The Thumbnail provides a fixed 5 nm range view of conflicting traffic and terrain. The range depicted by the Thumbnail is not affected by the current zoom scale set on the main map functions.
Alert Hot Key, Options, Thumbnail

14
Getting StartedTraffic on ThumbnailTIS, TAS, or TCAS traffic is shown on the Thumbnail in the same symbology used within the Traffic Function. ADS-B traffic is not shown on the Thumbnail. Any traffic within sensor range and 5 nm is shown, in addition to traffic causing an amber Traffic Alert (TA) traffic. Note that the MX20 supports one traffic sensor in any installation. Terrain on the ThumbnailOnly “Red” terrain within the 5 nm range is presented on the Thumbnail. This correlates directly to terrain that is rendered in red on the normal Terrain Function based on the internal terrain database. External TAWS-based terrain from the Goodrich Landmark is not shown on the Thumbnail. Obstructions on the ThumbnailOnly “Red” obstructions within the 5 nm range are presented on the Thumbnail. This correlates directly to obstructions that are rendered in red on the other functions. Thumbnail ActivationThe Thumbnail incorporates logic that will either show or hide the thumbnail from view. It will only be shown when there is data to be presented and will be removed if not. For example, if there is no “Red” terrain or traffic within 5 nm, the Thumbnail will be hidden from view. The Thumbnail will not appear on the Traffic Func-tion page if only traffic is presented in the Thumbnail. Correspondingly, it is not shown on the Terrain page if only terrain is presented in the Thumbnail. This logic eliminates redundant views that would be created by the Thumbnail and normal views of traffic and terrain. Additionally, the Thumbnail is disabled while operating on the ground. This state is determined by the “En Route/Ground Transition Speed” set in the System Function page and is based on GPS ground speed.
Traffic Information Services (TIS)There are two versions of TIS: TIS-A and TIS-B. Both are described below.
In the TIS-A system, ground radar sensors collect target information. The ground radar sensor then determines the targets in the vicinity of your aircraft and their bearing relative to your track. Up to eight of the targets are transmitted by the ground radar sensor the next time it communicates with your TIS-A enabled transponder.
In the TIS-B system, the ground radar sensors collect target information much the same as in the TIS-A system. However, with TIS-B, all targets collected by the ground radar sensor are broadcast to all aircraft equipped with UAT data link radios and that are within coverage of UAT ground broadcast stations.
Thumbnail and TIS
Thumbnail view of conflicting terrain and traffic

15
Getting StartedFunction Summary
16
Getting StartedFunction Summary
17
Getting StartedFunction Summary
18
Detailed Operation
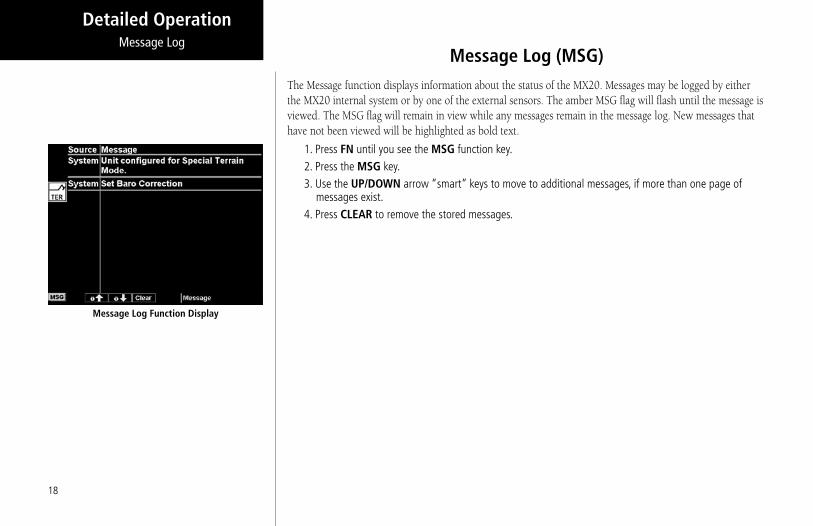
Message Log (MSG) The Message function displays information about the status of the MX20. Messages may be logged by either the MX20 internal system or by one of the external sensors. The amber MSG flag will flash until the message is viewed. The MSG flag will remain in view while any messages remain in the message log. New messages that have not been viewed will be highlighted as bold text.
1. Press FN until you see the MSG function key. 2. Press the MSG key. 3. Use the UP/DOWN arrow “smart” keys to move to additional messages, if more than one page of
messages exist. 4. Press CLEAR to remove the stored messages.
Message Log
Message Log Function Display

19
Detailed OperationCustom Map
Custom Map (MAP)The Custom Map function provides a graphic display of map features in relation to the aircraft location to help improve your situational awareness. Review the Limitations section in the front of this guide that apply to the use of data displayed on the moving map. The custom map function is unique in that it has the ability to selectively “overlay” all available types of information onto a single display. You can customize the map display by overlaying information selected from a menu of options. Press the MENU key to display a list of options on the right side of the screen. Press the MENU ITEM key next to the displayed option. Repeated presses of the MENU ITEM key will scroll through the available selections for each option.
The “smart” keys at the bottom of the display over the function keys control the map scale by zooming in or out, moving the map view around with the Pan feature, and viewing Info about the current destination waypoint.
Auto ZoomAuto Zoom is activated by adjusting the zoom level to the far extremes of the zoom range. When activated, the indicated zoom level will change from a number to the text “A,” followed by the zoom scale.
While in the Auto Zoom mode, the screen will automatically adjust the current zoom level to maintain the current “TO” waypoint on the screen. When approaching the waypoint, the zoom level will not drop below 1 nm. When the waypoint is reached and the next waypoint in the flight plan becomes active, the zoom level will automatically adjust to bring that waypoint on the map.
When installed with a GNS 480-series GPS receiver, the MX20 zoom level can be controlled by the GNS 480. This feature must be enabled in the System function with the “Slave Zoom to GPS Zoom” setting enabled.
To exit the autozoom mode, simply increase or decrease the current zoom level to re-enter the manual adjust mode.
Map ScaleThe In and Out function keys control the map scale by zooming in and out. You can zoom in to 0.25 nm and zoom out to 250 nm. The scale distance is measured from the location of your aircraft symbol to the top of the screen. The Map Scale is shown in the lower left corner of the screen. The map orientation appears above the map scale on one of the three Nav Data options.
Map Orientation and Zoom Level (Map Scale)

20
Detailed Operation
Pan The Pan keys are used to move the display around so you can see beyond the initial boundaries of the screen. The PAN function key is one of the “smart” keys available at the bottom of the screen. When you select the Pan function, four “arrow” keys appear on the right side of the screen next to the MENU ITEM keys. Move the map in the desired direction by pressing the MENU ITEM key next to the arrow that shows you want the map to move. Press the PAN key again to exit the Pan mode. While panning, a green reference line is drawn from the center of the viewed area back to your current position.
Info Press the INFO “smart” key to toggle viewing of information about the current “TO” waypoint. Press the INFO key again to hide the information.
Each press of the key will step through the available information for the current destination waypoint. The number of pages depends on the amount of information about the destination waypoint. Press the WX key to view any available METARs for the selected waypoint. Note that not all airports will have METARs available. The Wx key is available with the WSI and UAT FIS sensors.
Runway diagrams of airports will be displayed in the same orientation as the main map (i.e., North Up, Track Up, or DTK Up).
Custom Map
Info page 1 Info page 2
Info page 3 Info page 4
Info Weather
Panning Controls
21
Detailed Operation
Info In Pan ModeThe INFO smart key supports operation in conjunction with the PAN feature.
On any of the maps (Custom Map, IFR and VFR), entering the INFO mode while pan is active, will show information about the nearest airport to the center of the screen. This allows panning around the immediate area and obtaining information about airports in the vicinity without changing the current “TO” waypoint.
While in this mode, only the INFO smart key is highlighted. The PAN key is highlighted when exiting the Info mode. Only information about airports can be obtained with this feature.
Initial Zoom LevelThe initial zoom level that is used on start-up is determined by a setting made in the System Function.
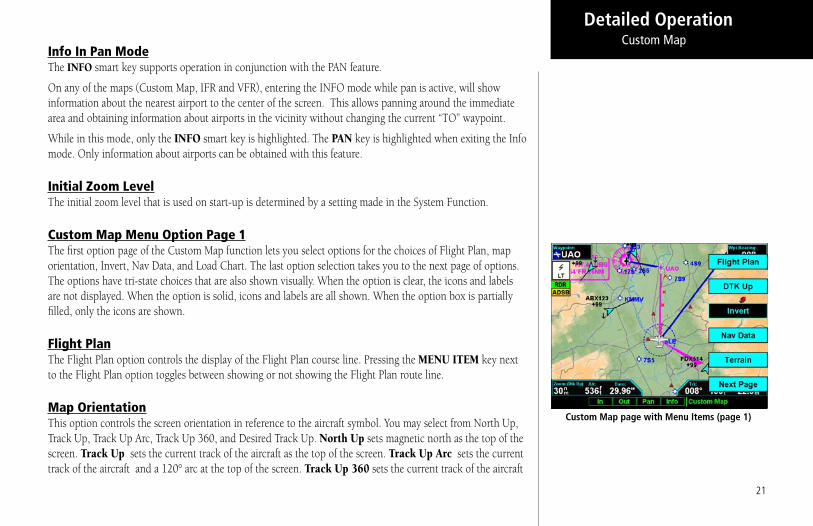
Custom Map Menu Option Page 1The first option page of the Custom Map function lets you select options for the choices of Flight Plan, map orientation, Invert, Nav Data, and Load Chart. The last option selection takes you to the next page of options. The options have tri-state choices that are also shown visually. When the option is clear, the icons and labels are not displayed. When the option is solid, icons and labels are all shown. When the option box is partially filled, only the icons are shown.
Flight PlanThe Flight Plan option controls the display of the Flight Plan course line. Pressing the MENU ITEM key next to the Flight Plan option toggles between showing or not showing the Flight Plan route line.
Map OrientationThis option controls the screen orientation in reference to the aircraft symbol. You may select from North Up, Track Up, Track Up Arc, Track Up 360, and Desired Track Up. North Up sets magnetic north as the top of the screen. Track Up sets the current track of the aircraft as the top of the screen. Track Up Arc sets the current track of the aircraft and a 120° arc at the top of the screen. Track Up 360 sets the current track of the aircraft
Custom Map
Custom Map page with Menu Items (page 1)

22
Detailed Operation
at the top of the screen and a 360° ring with the aircraft symbol position in the center. Desired Track Up sets the desired track to the next waypoint as the top of the screen. Press the MENU ITEM key next to this option to scroll through the options.
InvertThe Invert option changes the display of text and the background color. Depending on which layers are turned on, inverting the display may help readability for the current lighting conditions. For instance, when Terrain is shown, the Invert option switches between white and black text. When terrain is turned off, the Invert option switches between a white background with black text and a black background with white text.
Nav DataThe Nav Data option allows to control the display of navigation data on the display. Subsequent presses of the MENU ITEM key for this option provides choices of no nav data, nav data in the corners (waypoint, bearing, zoom, and distance), or full nav data. The full nav data option includes the information in the four corners selection plus altitude, barometer setting, track, and ground speed. Altitude and barometer setting information is not shown in TAWS installations.
Load Chart (Optional)Once the airport is selected, the individual approach chart to be overlaid can be loaded from a list of geo-ref-erenced approach charts available for that airport. Not all approach charts can be overlaid in this fashion and only geo-referenced charts will be presented for selection from the Custom Map. Because of this, it is possible that approach charts that are viewable under the Chart View Function may not be presented in this list.
NOTE: The pilot must be aware that not all charts in the loaded database can be used as an overlay. The Chart function is automatic when connected to a GNS 480-series GPS receiver.
Press the Next Page MENU ITEM key to display the next page of menu items.
Custom Map
Full Nav data information shown
Partial Nav data information shown
Minimum Nav data information shown

23
Detailed Operation
Custom Map Menu Option Page 2The second option page of the Custom Map function lets you select options for the choices of Airports, VORs, NDBs, Intersections, and Airspace. The last option selection takes you to the next page of options.
AirportsThe Airports option allows you to choose the level of airport information displayed on the Map screen. You may select the display of airport icon and identifier, icon only, or no information by each subsequent press of the Airport MENU ITEM option keys.
VORsThe VORs option allows you to choose the type of VOR information displayed on the Map screen. You may select the display of VOR icon and identifier, icon only, or no information by each subsequent press of the VOR MENU ITEM key.
The MX20 supports full integration with the SL30 Nav/Com. This feature allows tuned VORs along with ILS and localizer approaches to be shown on the MX20 moving map. This high level of integration is designed to provide additional, simple to interpret situational awareness during high work-load phases of flight. The graphic display of Nav/Comm information on the MX20 provides another source to help make sure you are using the intended navigational aid and your To/From orientation to the reference station is as desired.
You can turn the display of VOR and ILS information in the Custom Map page on or off. VOR and ILS infor-mation is always shown in the IFR and VFR Chart functions.
VOR HighlightThe MX20 highlights the VOR in magenta on the moving map when the SL30 is either tuned to or monitor-ing a nearby VOR station. The highlighted VOR station is determined by using the tuned or monitored VOR frequency of the SL30 with the MX20 internal database.
The SL30 must be receiving a valid signal from the VOR.
Custom Map
Custom Map page with Menu Items (page 2)
Custom Map information when connected to SL30

24
Detailed Operation
The VOR information box for the selected VOR will show the distance and radial-from bearing between your present position and the VOR. The radial and distance information comes from your GPS, not the SL30.
The MX20 must have VOR symbols turned on for this feature to be active in the Custom Map function. VOR information is always shown in the IFR and VFR Chart functions.
VOR OBSThe OBS (Omni-Bearing Selector) value selected in the SL30 will be shown as a line from the tuned VOR station in magenta on the MX20 display. The selected value will be shown on the line. This feature provides a quick view of your position relative to both the VOR and the tuned radial to help improve situational aware-ness. The OBS line will only be drawn from the active VOR, not the monitored VOR.
The SL30 must be receiving a valid signal from the VOR and the MX20 must have VOR symbols turned on for this feature to be active.
ILS/Localizer Depiction When either an ILS or localizer is tuned on the SL30, the MX20 will display the currently tuned approach on the appropriate airport runway. The SL30 Nav function provides an overall graphic view of the selected airport and approach based on runway extensions and the selected frequencies. The standard ILS symbol is shown in magenta on the MX20 display.
Localizer Back Course Display The MX20 will draw the “front course” on its display when a localizer frequency is tuned into the SL30. If you enable the localizer back course feature of the SL30, the MX20 will then draw a localizer “front course” graphic extending from the reciprocal runway.
The localizer front course graphic is shaded on the right side. The localizer back course graphic is shaded on the left side. Since the SL30 reverse-senses the needles, a standard “chase the needle” approach may be made and the localizer “front course” graphic is always used on the MX20.
A published localizer back course approach at the airport is not necessary to enable this feature.
The SL30 must be receiving a valid ILS, or localizer, and the MX20 must have airports turned on for this feature to be active.
Custom Map
ILS for currently tuned approach by SL30
VOR information detail

25
Detailed Operation
NDBs The NDBs option allows you to choose the type of NDB information displayed on the Map screen. You may select the display of NDB icon and identifier, icon only, or no information by each subsequent press of the NDB MENU ITEM key.
IntersectionsThe Intersections option allows you to choose the type of Intersection information displayed on the Map screen. You may select the display of the Intersection icon and identifier, icon only, or no information by each subsequent press of the Intersection MENU ITEM key.
AirspaceThe Airspace option allows you to control the display of airspaces. Pressing the MENU ITEM key next to Air-space toggles between either the display of airspace boundaries and altitude information, boundaries alone, or no display of airspaces. Airspaces defined as Class B, C, Alert, Caution, Danger, Training, Warning, MOA, Re-stricted, and Prohibited are depicted on the display. Note that not all airspaces may be defined in the database as one of these airspaces. Class D airspaces are not drawn; however, a circular airspace with a five mile radius is drawn around airports with control towers. Airspaces defined as Unknown, such as the Grand Canyon, are not drawn on the display.
Press the Next Page MENU ITEM key to display the next page of menu items.
Custom Map
Custom Map page with NDBs, Intersections, and Airspace selected with Menu Items (Page 2)
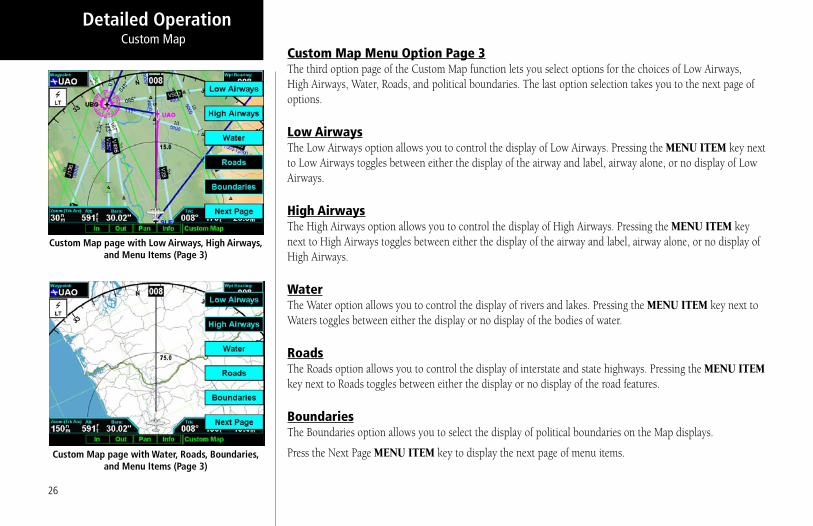
26
Detailed Operation
Custom Map Menu Option Page 3The third option page of the Custom Map function lets you select options for the choices of Low Airways, High Airways, Water, Roads, and political boundaries. The last option selection takes you to the next page of options.
Low AirwaysThe Low Airways option allows you to control the display of Low Airways. Pressing the MENU ITEM key next to Low Airways toggles between either the display of the airway and label, airway alone, or no display of Low Airways.
High AirwaysThe High Airways option allows you to control the display of High Airways. Pressing the MENU ITEM key next to High Airways toggles between either the display of the airway and label, airway alone, or no display of High Airways.
WaterThe Water option allows you to control the display of rivers and lakes. Pressing the MENU ITEM key next to Waters toggles between either the display or no display of the bodies of water.
RoadsThe Roads option allows you to control the display of interstate and state highways. Pressing the MENU ITEM key next to Roads toggles between either the display or no display of the road features.
BoundariesThe Boundaries option allows you to select the display of political boundaries on the Map displays.
Press the Next Page MENU ITEM key to display the next page of menu items.
Custom Map
Custom Map page with Low Airways, High Airways, and Menu Items (Page 3)
Custom Map page with Water, Roads, Boundaries, and Menu Items (Page 3)

27
Detailed Operation
Custom Map Menu Option Page 4The fourth option page of the Custom Map function lets you select options for choices of Airport Charts, Ter-rain, Obstructions, Traffic, and Lightning Strikes.
Airport ChartAirport surface charts provide a graphical presentation of the airport surface area (runways, taxiways, build-ings, towers and other objects), within the immediate airport vicinity.
From either the Custom Map or the IFR En Route Map, airport surface charts will automatically be loaded and displayed as an overlay if the following conditions are met:
• The airport surface chart is within the loaded database• The airport surface chart is geo-referenced by Jeppesen• Airport Chart menu layer is turned on• The aircraft position is within the coverage of the chart• A loaded chart is not being “flown”
TerrainThe Terrain option allows you select the display of topographical features. Pressing the MENU ITEM key next to the Terrain option toggles between sectional (absolute), terrain awareness (relative), or no display of topographical features. The sectional (absolute) display shows a display similar to a sectional map. The terrain awareness (absolute) display shows a color coded view where the colors relate to terrain elevation relative to your altitude. For more information about the terrain awareness option, see the Terrain function section. When you turn the Terrain feature off, the background is either black or white depending on your selection in the Invert option. When no terrain data is available, the missing areas will be shown in light blue. Water will not be shown in relative mode. Review the Limitations section in the front of this guide.
Custom Map
Custom Map page with Terrain and Menu Items (Page 4)
Custom Map page with Chart View loaded and Menu Items (Page 4)

28
Detailed Operation
ObstructionsObstructions, such as towers and other man-made objects, are part of the MX20 updateable database. Obstruc-tions over 250 feet high are shown on the maps with tower symbols. The symbol is color coded to signify the relative altitude of the tower to your aircraft’s altitude and follows the same conventions as the color coding for terrain. Objects that are at your altitude are shown in red; objects that are near your altitude are shown in yellow; objects with towers that are significantly below your altitude colored green. Obstructions are shown on the Custom Map and in the Terrain function. For info on color coding, see the section about the Internal MX20-Based Terrain. Review the Limitations section in the front of this guide.
Current coverage for obstructions is North America only and are drawn only when the zoom level is below 50 nm.
TrafficThe Traffic option turns the display of traffic information on or off. ADS-B Traffic information includes the location and identifier of a reporting aircraft, its direction of travel, elevation, and the estimated path for the selected time interval. See the section on the Traffic mode for more details on how traffic information is used.
For Skywatch/TCAD/GTX 330 installations, a small thumbnail presentation of traffic is presented in the upper left corner of the display. In TCAD, Skywatch, and GTX 330 installations, the traffic targets can also be overlaid on the Custom Map page.
The Traffic function is not available in all software versions. Check your Approved Flight Manual Supplement to verify if this feature is available. Review the Limitations section in the front of this guide.
Custom Map
Custom Map page with Obstructions, Traffic, Lightning Strikes, and Menu Items (Page 4)
Obstruction icon

29
Detailed Operation
Strikes The Strikes menu option controls the display of lightning strike information if the MX20 receives strike data from an external source, such as the WX500. Each reported lightning strike is shown as a red “x” on the display. Strikes are not shown if the zoom level is below 20 nm.
Press the Next Page MENU ITEM key to display the next page of menu items.
Lightning strike icon (red “x”)

30
Detailed Operation
IFR En Route (IFR) Chart FunctionThe IFR En Route Chart function shows an IFR en route style map for the display. The IFR display shows navigational aid information and the flight plan course line. The “smart” keys on the bottom of the screen control zooming in and out, panning, and the display of information on the current TO waypoint. The menu of options available for the IFR mode include Flight Plan, map orientation, Invert, and turning labels on or off.
This data is advisory only and does not replace primary indicators, such as the CDI. Navigation should not be based on the data presented on the MX20. Review the Limitations section in the front of this guide.
IFR Option Page 1The first option page of the IFR Chart function lets you select options for the choices of Flight Plan, Map Ori-entation, Invert display, Nav Data, and Labels. The last option selection takes you to the next page of options.
Flight PlanThe Flight Plan option controls the display of the Flight Plan course line. Pressing the MENU ITEM key next to the Flight Plan option toggles between showing and not showing the Flight Plan route line.
Map OrientationThis option controls the screen orientation in reference to the aircraft symbol. You may select from North Up, Track Up, Track Up Arc, Track Up 360, and Desired Track Up. North Up sets magnetic north as the top of the screen. Track Up sets the current track of the aircraft as the top of the screen. Track Up Arc sets the current track of the aircraft and a 120° arc at the top of the screen. Track Up 360 sets the current track of the aircraft at the top of the screen and a 360° ring with the aircraft symbol position in the center. Desired Track Up sets the desired track to the next waypoint as the top of the screen. Press the MENU ITEM key next to this option to scroll through the options.
IFR En Route Chart
IFR En Route Chart page with Menu Items (Page 1)

31
Detailed Operation
InvertThe Invert option changes the display of text and the background color. The Invert option switches between a white background with black text and a black background with white text.
Nav DataThe Nav Data option allows you to control the display of navigation data on the Map displays. Subsequent presses of the MENU ITEM key for this option provides choices of no nav data, nav data in the corners (waypoint, bearing, zoom, and distance), or full nav data. The full nav data option includes the information in the four corners selection plus altitude, barometer setting, track, and ground speed.
LabelThe LABEL key turns the labels for each item on or off for easy decluttering. When Labels are turned off, only the symbol for waypoints along the flight plan will remain in view when the flight plan is enabled.
IFR Option Page 2The second option page of the IFR Chart function lets you select options for the choices of Low Airways, High Airways, Airport Chart, and Terrain. The last option selection takes you back to the first page of options.
Low AirwaysThe Low Airways option allows you to control the display of Low Airways. Pressing the MENU ITEM key next to Low Airways toggles between either the display of the airway and label, airway alone, or no display of Low Airways.
High AirwaysThe High Airways option allows you to control the display of High Airways. Pressing the MENU ITEM key next to High Airways toggles between either the display of the airway and label, airway alone, or no display of High Airways.
IFR En Route Chart
IFR En Route Chart page inverted
IFR En Route Chart page with Menu Items (Page 2)

32
Detailed Operation
Airport ChartAirport surface charts provide a graphical presentation of the airport surface area (runways, taxiways, build-ings, towers and other objects), within the immediate airport vicinity.
From either the Custom Map or the IFR en route Map, airport surface charts will automatically be loaded and displayed as an overlay if the following conditions are met:
• The airport surface chart is within the loaded database• The airport surface chart is geo-referenced by Jeppesen• Airport Chart menu layer is turned on• The aircraft position is within the coverage of the chart• A loaded chart is not being “flown”
Load ChartOnce the airport is selected, the individual approach chart to be overlaid can be loaded from a list of geo-ref-erenced approach charts available for that airport. Not all approach charts can be overlaid in this fashion and only geo-referenced charts will be presented for selection from the Custom Map. Because of this, it is possible that approach charts that are viewable under the Chart View Function may not be presented in this list.
NOTE: The pilot must be aware that not all charts in the loaded database can be used as an overlay. When enabled, a chart may be automatically loaded if installed with a GNS 480-series GPS receiver. See the System Function to enable this feature.
IFR En Route Chart

33
Detailed Operation
VFR Chart (VFR) FunctionThe VFR Chart function shows an VFR sectional style map for the display. Topographic features are shown. The VFR display shows navigational aid information and the flight plan course line. The “smart” keys on the bottom of the screen control zooming in and out, panning, and the display of information about the current TO waypoint. The options available for the VFR mode include Flight Plan, screen orientation, Invert, and turn-ing labels on or off. Review the Limitations section in the front of this guide for the limitations that apply to the data displayed on the moving map.
Flight PlanThe Flight Plan option controls the display of the Flight Plan course line. Pressing the MENU ITEM key next to the Flight Plan option toggles between showing and not showing the Flight Plan route line.
Map OrientationThis option controls the screen orientation in reference to the aircraft symbol. You may select from North Up, Track Up, Track Up Arc, Track Up 360, and Desired Track Up. North Up sets magnetic north as the top of the screen. Track Up sets the current track of the aircraft as the top of the screen. Track Up Arc sets the current track of the aircraft and a 120° arc at the top of the screen. Track Up 360 sets the current track of the aircraft at the top of the screen and a 360° ring with the aircraft symbol position in the center. Desired Track Up sets the desired track to the next waypoint as the top of the screen. Press the MENU ITEM key next to this option to scroll through the options.
InvertThe Invert option changes the text and background color. Inverting the display may help readability for the current lighting conditions and the color of the terrain in a given area.
VFR En Route Chart
VFR En Route Chart page with Menu Items

34
Detailed Operation
Nav DataThe Nav Data option allows to control the display of navigation data on the Map displays. Subsequent presses of the MENU ITEM key for this option provides choices of no nav data, nav data in the corners (waypoint, bearing, zoom, and distance), or full nav data. The full nav data option includes the information in the four corners selection plus altitude, barometer setting, track, and ground speed.
LabelThe LABEL key turns the labels over each item of information on or off. When Labels are turned off, only the symbol for waypoints along the flight plan will remain in view when the flight plan is enabled.
VFR En Route Chart

35
Detailed Operation
Split Screen (SPLIT) FunctionThe Split Screen capability allows you to display up to two enabled functions side by side. Press the MENU ITEM key next to the desired map to highlight the selection. When two functions are displayed, you must first deselect a highlighted selection before selecting another function. Review the Limitations section in the front of this guide for the limitations that apply to the data displayed on the moving map.
A vertical profile may be optionally selected to be shown on the lower portion of the display. The profile view is only available when there is no TAWS sensor enabled and the Terrain function is based on the internal terrain database. The profile display is always oriented in the Track-Up mode, where the depicted terrain is a cross-section of the terrain just below the aircraft’s current track. Obstacles are not shown on the profile display and the aircraft current altitude is provided next to the ownship symbol. The altitude scale adjusts automati-cally with the aircraft altitude. The zoom scale and map orientation are displayed in the upper right corner of the profile display.
When two functions are displayed, the left and right quarter of each function is not displayed, leaving the center half of the original display. The image is not compressed from full width to half width.
Functions with an ownship symbol are displayed in Track-Up map orientation and do not include the track line and compass rose.
Press the Main Menu Item key to go to the next page of the Menu.
Split Screen
Split Screen showing Custom Map and Flight Plan pages with Menu Items
Split Screen showing Custom Map and Flight Plan pages along with the Vertical Profile & Menu Items
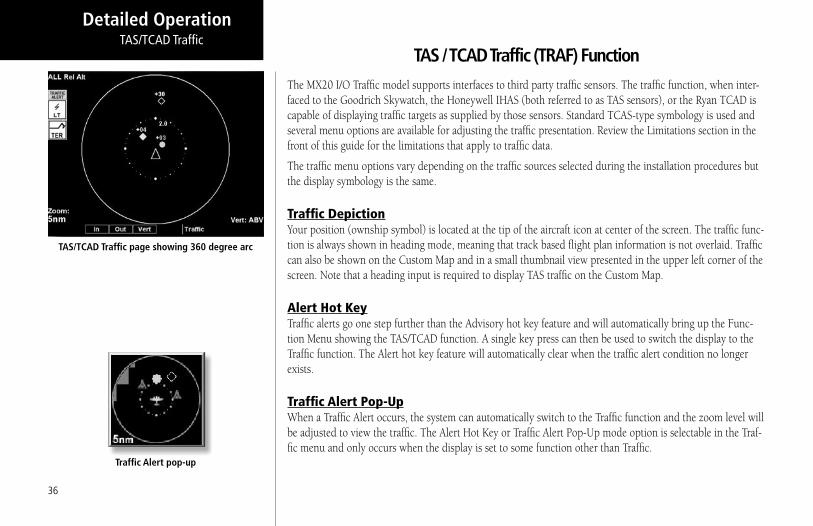
36
Detailed Operation
TAS / TCAD Traffic (TRAF) Function The MX20 I/O Traffic model supports interfaces to third party traffic sensors. The traffic function, when inter-faced to the Goodrich Skywatch, the Honeywell IHAS (both referred to as TAS sensors), or the Ryan TCAD is capable of displaying traffic targets as supplied by those sensors. Standard TCAS-type symbology is used and several menu options are available for adjusting the traffic presentation. Review the Limitations section in the front of this guide for the limitations that apply to traffic data.
The traffic menu options vary depending on the traffic sources selected during the installation procedures but the display symbology is the same.
Traffic DepictionYour position (ownship symbol) is located at the tip of the aircraft icon at center of the screen. The traffic func-tion is always shown in heading mode, meaning that track based flight plan information is not overlaid. Traffic can also be shown on the Custom Map and in a small thumbnail view presented in the upper left corner of the screen. Note that a heading input is required to display TAS traffic on the Custom Map.
Alert Hot KeyTraffic alerts go one step further than the Advisory hot key feature and will automatically bring up the Func-tion Menu showing the TAS/TCAD function. A single key press can then be used to switch the display to the Traffic function. The Alert hot key feature will automatically clear when the traffic alert condition no longer exists.
Traffic Alert Pop-UpWhen a Traffic Alert occurs, the system can automatically switch to the Traffic function and the zoom level will be adjusted to view the traffic. The Alert Hot Key or Traffic Alert Pop-Up mode option is selectable in the Traf-fic menu and only occurs when the display is set to some function other than Traffic.
TAS/TCAD Traffic
TAS/TCAD Traffic page showing 360 degree arc
Traffic Alert pop-up

37
Detailed Operation
SymbologyTraffic is shown with either the relative or absolute altitude indicated above or below the target symbol. If the traffic is below or equal to your ownship altitude, the label is shown below the symbol. If the traffic is above your ownship altitude, the label is shown above the symbol. For traffic with no altitude information, the label will be shown as dashes (---).
• Traffic shown with an amber filled circle corresponds to traffic generating an alerting condition • Traffic shown with a cyan filled diamond corresponds to traffic generating an advisory condition • Traffic shown with a cyan open diamond is considered “other traffic”
Vert Smart Key (TAS)The Vertical Mode (Vert) “smart” key is used to select the vertical filtering mode for the TAS unit. The following options are available and will allow traffic that is within the indicated range to be displayed:
• ABV (Above) +9000/-2700 • NRM (Normal) +2700/-2700 • BLW (Below) +2700/-9000• UNR (Unrestricted) No Limit
Traffic Status Indicators
Off ScaleIf a Traffic Alert target is not shown on the display because the zoom level is set too high, an amber Traffic Off Scale (OS) indicator will show on the display.
Standby (TAS)If the traffic sensor is in the Standby Mode, a white TAS Standby message will show on the display.
TAS/TCAD Traffic
“Other” traffic target with relative altitude
Traffic alert target with direction of ascent or descent and relative altitude
Traffic advisory target with relative altitude

38
Detailed Operation
Test (Skywatch)TAS Test will be displayed if the Traffic sensor is in the Test Mode.
Not DisplayedAn amber “Traffic Not Displayed” will be shown if the GPS position or the Traffic sensor has failed.
TAS FailSystem Failure, shown in amber.
TAS Data FailLabel set sent by the Skywatch unit has failed the integrity check. Shown in amber.
TAS Time-OutMX20 is not receiving labels from the TAS unit. Shown in amber.
No Bearing AdvisoriesTraffic advisories without a valid bearing will be listed in text form below the ownship symbol.
TAS Menu Options
Traffic Alert Mode (Pop-Up/Prompt)The Traffic Alert mode allows you to configure the currently selected Traffic Alert response. If Pop Up is selected, the Traffic function will automatically pop up when a Traffic Alert occurs. If the Prompt mode is selected, the Traffic Alert hot key prompt is shown when a Traffic Alert occurs. If the Traffic function is already being viewed, neither will occur.
Standby ModeThe Standby mode places the TAS unit into the standby mode. In this mode, the unit will not display traffic targets or generate traffic alerts. See the TAS Users Guide for additional information.
TAS/TCAD Traffic

39
Detailed Operation
Self-TestWhen in Standby Mode, a TAS Self-Test can be initiated by selecting this option.
TCAD 9900B Menu Options
Altitude Option (Relative/Pressure)The Altitude option lets you select between relative and pressure altitude in hundreds of feet. The Altitude op-tion choice is shown in the upper left corner of the screen. Relative altitudes are shown with a “+” or “-”, while absolute altitudes are shown as just a number.
FilterAn altitude filter allows targets that are outside of a ±2000’ vertical range to be filtered off the display. The cur-rent mode is shown in the upper left corner of the display as “ALL” (no filtering) or “±2000” when the filtering is active.
VolumeThe volume of the TCAD voice alert can be adjusted by pressing the Volume button. This opens a text menu where a value from 0 – 10 can be entered.
Approach ModeThe Approach Mode sends the approximate elevation of the destination airport to the TCAD unit for Approach mode operations. See the TCAD operator’s manual for additional details.
Mute DurationThe Mute Duration allows the duration of the mute command to be sent to the TCAD unit. See the TCAD operator’s manual for additional details.
ShieldThis allows the current shield to be selected from a pop-up window. En Route, Unrestricted, Terminal, Ground, and Standard are the available modes. See the TCAD operator’s manual for additional details.
TAS/TCAD Traffic

40
Detailed Operation
Shield HeightsThis allows the shield heights to be adjusted for the En Route, Standard, and Terminal shield modes. See the TCAD operator’s manual for additional details.
Shield RangesThis allows the shield ranges to be adjusted for the En Route, Standard, and Terminal shield modes. See TCAD operator’s manual for additional details.
TCAD 9900BX Menu Options
Altitude Option (Relative/Pressure)The Altitude option lets you select between relative and pressure altitude in hundreds of feet. The Altitude op-tion choice is shown in the upper left corner of the screen. Relative altitudes are shown with a “+” or “-”, while absolute altitudes are shown as just a number.
FilterAn altitude filter allows targets that are outside of a ±2000’ vertical range to be filtered off the display. The current mode is shown in the upper left corner of the display as “ALL” (no filtering) or “±2000” when the filtering is active.
VolumeThe volume of the TCAD voice alert can be adjusted by pressing the Volume button. This opens a text menu where a value from 0 – 10 can be entered.
Approach ModeThe Approach Mode sends the approximate elevation of the destination airport to the TCAD unit for approach mode operations. See the TCAD operator’s manual for additional details.
Ground/Flight ModeThe GND/FLT mode commands the TCAD unit into the corresponding mode. See the TCAD operator’s manual for additional details.
TAS/TCAD Traffic

41
Detailed Operation
ADS-B Traffic (TRAF) Function The Traffic Function allows you to view other traffic in the area, when installed with a UAT data link radio. One of two UATs may be installed in your aircraft. The term “UAT” refers to both unless specific models are identified as either the “legacy” UAT for the original Capstone installations or the “GDL 90” UAT. This screen can also show your flight plan. Traffic is shown in relationship to your aircraft. “Smart” keys allow you to zoom in and out, show traffic labels, and select an individual traffic target. The Traffic function is not available in all software versions. Review the Limitations section in the front of this guide for the limitations that apply traffic data.
ADS-B Traffic
ADS-B Traffic page showing 360 degree arc
ADS-B Traffic information detail
ADS-B System Description
42
Detailed Operation
Automatic Dependent Surveillance-Broadcast (ADS-B) is a surveillance technology being deployed in selected areas of the NAS. ADS-B broadcasts a radio transmission approximately once per second containing the aircraft’s position, velocity, identification, and other information. ADS-B can also receive reports from other suitably equipped aircraft within reception range. Additionally, these broadcasts can be received by Ground Based Transceivers (GBTs) and used to provide air traffic surveillance services, along with fleet operator moni-toring of aircraft. No ground infrastructure is necessary for ADS-B equipped aircraft to detect each other.
In the United States, two different data links have been adopted for use with ADS-B: 1090 MHz Extended Squitter (1090 ES) and the Universal Access Transceiver (UAT). The 1090 ES link is intended for aircraft that primarily operate at FL180 and above, whereas the UAT link is intended for use by aircraft that primarily operate at 18,000 feet and below. From a pilot’s standpoint, the two links operate similarly and support ADS-B and Traffic Information Service-Broadcast (TIS-B). The UAT link additionally supports Flight Information Services-Broadcast (FIS-B).
ADS-B equipment may be certified as an air-to-air system for enhancing situational awareness and as a surveil-lance source for air traffic services. Refer to the aircraft’s flight manual supplement for the specific aircraft installation.
ADS-B enables improved surveillance services, both air-to-air and air-to-ground, especially in areas where radar is ineffective due to terrain or where it is impractical or cost prohibitive. Initial NAS applications of air-to-air ADS-B are for “advisory” use only, enhancing a pilot’s visual acquisition of other nearby equipped aircraft either when airborne or on the airport surface. Additionally, ADS-B may enable ATC and fleet operators to monitor aircraft throughout the available ground station coverage area. Other applications of ADS-B may include enhanced search and rescue operations and advanced air-to-air applications such as spacing, sequencing, and merging.
ADS-B avionics typically allow pilots to enter the aircraft’s call sign and Air Traffic Control (ATC)-assigned transponder code, which will be transmitted to other aircraft and ground receivers. Pilots are cautioned to use care when selecting and entering the aircraft’s identification and transponder code.
Some ADS-B avionics panels are not interconnected to the transponder. Therefore, it is extremely important to ensure that the transponder code is identical in the ADS-B and transponder panels.
ADS-B Traffic

43
Detailed OperationADS-B Traffic
Additionally, UAT systems provide a VFR mode that may be used by pilots when not wanting to receive air traffic services. This feature will broadcast a “VFR” ID to other aircraft and ground receivers, similar to the “1200” transponder code.
ADS-B is intended to be used in-flight and on the airport surface. ADS-B systems should be turned “on” -- and remain “on” -- whenever operating in the air and on the airport surface, thus helping to reduce the likelihood of mid-air collisions and runway incursions. Civil and military Mode A/C transponders and ADS-B systems should be adjusted to the “on” or normal operating position as soon as practical, unless the change to “standby” has been accomplished previously at the request of ATC. Mode S transponders should be left on whenever power is applied to the aircraft.
The ADS-B cockpit display of traffic is NOT intended to be used as a collision avoidance system and does not relieve the pilot’s responsibility to “see and avoid” other aircraft. ADS-B shall not be used for avoidance maneu-vers during IMC or other times when there is no visual contact with the other target aircraft. ADS-B is intended only to assist in visual acquisition of other aircraft. No avoidance maneuvers are provided for, nor authorized, as a direct result of an ADS-B target being displayed in the cockpit.
Use of ADS-B radar services is limited to the service volume of the GBT. Note that the coverage volume of GBTs is limited to line-of-sight.
Traffic DescriptionYour position is located at the tip of the empty triangle (Ownship symbol). The other traffic is shown as a large solid cyan (light blue) arrow pointing in its direction of travel. Next to the traffic arrow symbol is the traffic identifier, and altitude. Altitude is selected as either Pressure or Relative Altitude as noted in the upper left corner of the display.
A small up or down arrow next to the identifier indicates that the traffic is climbing or descending at a rate of at least 500 feet per minute. The end of the vector line that extends beyond the point of the traffic arrow indi-cates where it will be at the end of the selected time interval. The currently selected time interval is indicated in the upper left corner of the display.

44
Detailed Operation
TIS-B TrafficTraffic Information Service – Broadcast (TIS-B) is supported by displaying non ADS-B equipped aircraft that are received over the UAT data link radio. Non ADS-B equipped aircraft that are detected by ground-based radar can be up-linked to all aircraft in the area that are UAT data link equipped and within the GBT service volume.
As TIS target location is determined by ground based radar, coverage, range and target positional accuracy are highly dependent on relative location to the actual radar site.
Traffic Information Services-Broadcast (TIS-B) is the broadcast of traffic information to ADS-B equipped aircraft from ADS-B ground stations. The source of this traffic information is derived from ground-based air traffic surveillance sensors, typically radar. TIS-B is intended to provide ADS-B equipped aircraft with a more complete traffic picture in situations where not all nearby aircraft are equipped with ADS-B. The advisory-only applica-tion enhances a pilot’s visual acquisition of other traffic. TIS-B service is becoming available in selected locations where there are both adequate surveillance coverage from ground sensors and adequate broadcast coverage from Ground Based Transceivers (GBTs). The quality level of traffic information provided by TIS-B is dependent upon the number and type of ground sensors available as TIS-B sources and the timeliness of the reported data.
In order to receive TIS-B services, the following conditions must exist:
1. The host aircraft must be equipped with a UAT ADS-B transmitter / receiver or transceiver, and a cock-pit display of traffic (CDTI). As the ground system evolves, the ADS-B data link may be either UAT or 1090 ES, or both.
2. The host aircraft must fly within the coverage volume of a compatible GBT that is configured for TIS-B up-links. (Not all GBTs provide TIS-B due to a lack of radar coverage or because a radar feed is not available).
3. The target aircraft must be within the coverage of, and detected by, at least one of the ATC radars serv-ing the GBT in use.
Only transponder-equipped targets (i.e., Mode A/C or Mode S transponders) are detected. Current radar citing may result in limited radar surveillance coverage at lower altitudes near some general aviation airports, with subsequently limited TIS-B Service volume coverage. If there is no radar coverage in a given area, then there will be no TIS-B coverage in that area.
ADS-B Traffic

45
Detailed OperationADS-B Traffic
TIS-B Limitations1. TIS-B is NOT intended to be used as a collision avoidance system and does not relieve the pilot’s
responsibility to “see and avoid” other aircraft. TIS-B shall not be used for avoidance maneuvers during times when there is no visual contact with the aircraft. TIS-B is intended only to assist in the visual acquisition of other aircraft. No avoidance maneuvers are provided for nor authorized as a direct result of a TIS-B target being displayed in the cockpit.
2. While TIS-B is a useful aid to visual traffic avoidance, its inherent system limitations must be understood to ensure proper use.
(a) A pilot may receive an intermittent TIS-B target of their own aircraft, typically when maneu-vering (e.g., climbing turn) due to the radar not tracking the aircraft as quickly as ADS-B.
(b) The ADS-B-to-radar association process within the ground system may at times have difficulty correlating an ADS-B report with corresponding radar returns from the same aircraft. When this happens the pilot will see duplicate traffic symbols (i.e., “TIS-B shadows”) on the cockpit display.
(c) Updates of TIS-B traffic reports will occur less often than ADS-B traffic updates. (TIS-B posi-tion updates will occur approximately once every 3-13 seconds depending on the radar coverage. In comparison, the update rate for ADS-B is nominally once per second).
(d) The TIS-B system only detects and uplinks data pertaining to transponder equipped aircraft. Aircraft without a transponder will not be displayed as a TIS-B target. Assume that there are more aircraft in the vicinity of your aircraft.
(e) There is no indication provided when any aircraft is operating inside (or outside) the TIS-B Service Volume, therefore it is difficult to know if one is receiving uplinked TIS-B traffic informa-tion. Assume that not all aircraft are displayed as TIS-B targets.
3. Pilots and operators are reminded that the airborne equipment that displays TIS-B targets is for pilot situational awareness only and is not approved as a collision avoidance tool. Unless there is an immediate emergency requiring immediate action, any deviation from an air traffic control
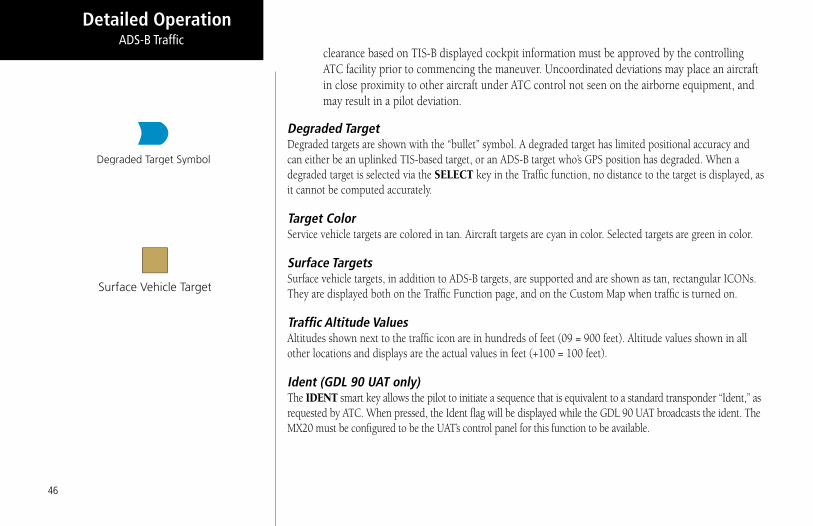
46
Detailed Operation
clearance based on TIS-B displayed cockpit information must be approved by the controlling ATC facility prior to commencing the maneuver. Uncoordinated deviations may place an aircraft in close proximity to other aircraft under ATC control not seen on the airborne equipment, and may result in a pilot deviation.
Degraded TargetDegraded targets are shown with the “bullet” symbol. A degraded target has limited positional accuracy and can either be an uplinked TIS-based target, or an ADS-B target who’s GPS position has degraded. When a degraded target is selected via the SELECT key in the Traffic function, no distance to the target is displayed, as it cannot be computed accurately.
Target ColorService vehicle targets are colored in tan. Aircraft targets are cyan in color. Selected targets are green in color.
Surface Targets Surface vehicle targets, in addition to ADS-B targets, are supported and are shown as tan, rectangular ICONs. They are displayed both on the Traffic Function page, and on the Custom Map when traffic is turned on.
Traffic Altitude ValuesAltitudes shown next to the traffic icon are in hundreds of feet (09 = 900 feet). Altitude values shown in all other locations and displays are the actual values in feet (+100 = 100 feet).
Ident (GDL 90 UAT only) The IDENT smart key allows the pilot to initiate a sequence that is equivalent to a standard transponder “Ident,” as requested by ATC. When pressed, the Ident flag will be displayed while the GDL 90 UAT broadcasts the ident. The MX20 must be configured to be the UAT’s control panel for this function to be available.
ADS-B Traffic

47
Detailed OperationADS-B Traffic
OperationThe controls at the bottom of the screen allow you to zoom in and out, initiate an Ident when connected to a GDL 90 UAT, and to select each traffic target on the screen.
1. Press the FN key to reach the Function page showing the TRAF (Traffic) “smart” key. 2. Press TRAF. 3. Press the IN key to zoom in. Press the OUT key to zoom out. 4. With the GDL 90 UAT only, press the IDENT key to initiate an Ident for ATC purposes. A green flag will
appear on the left side of the display when the GDL 90 UAT reports that it is sending an ident over the air. 5. Press the SELECT key to consecutively select each Traffic item that is shown on the display. When a
target is selected, additional information about that target is shown in the upper right corner of the display. The selected target will be highlighted in green on the display. Surface vehicle targets cannot be selected.
Information about the selected target includes: ID, aircraft type, position between target and ownship, distance, speed, and altitude. Position is noted in clock numerals as relative to direction of travel for each aircraft. For instance, a position noted as 11/2 means that the traffic is at your aircraft (ownship) 11 o’clock position and your aircraft (ownship) is at the targets 2 o’clock position.
Traffic Option Page 1The first option page of the Traffic function lets you select options for the choices of Flight Plan, Traffic Map Ori-entation, Display mode, Labeling, and Altitude. The last option selection takes you to the next page of options.
Flight PlanThe Flight Plan option controls the display of the Flight Plan course line. Pressing the MENU ITEM key next to the Flight Plan option toggles between showing and not showing the Flight Plan route line.
Traffic Map Orientation The Traffic Map Orientation option lets you choose between a 360-degree compass rose or an arc that covers about 90 degrees over the top of the display. Your aircraft position (ownship) is shown by an empty white triangle near the center of the display. The Traffic function display is always in the Track Up mode.
ADS-B Traffic Menu Items (Page 1)
Selected ADS-B Target Information Detail

48
Detailed Operation
Display ModeThe display mode lets you select either a graphic or text version of traffic information.
Graphic DisplayThe graphic traffic display shows your location, nearby traffic, and information about the traffic.
Text DisplayThe text traffic display shows the distance to the traffic item, flight id, category, position, speed, and altitude. The currently selected target is shown in green. The traffic list is sorted by distance with the closest traffic to your current position shown on the top line. The total number of targets tracked is shown in the upper left corner. Up to 12 of the nearest targets are listed.
LabelThe LABEL menu key toggles the state of the labels adjacent to the target symbols. Turning labels off will remove the Flight ID and flight vector.
Altitude Option (Relative/Pressure) The altitude option lets you select between relative and pressure altitude in hundreds of feet. The altitude op-tion choice is shown on the upper left corner of the screen while in the graphic display option. When Relative Altitude is selected, the altitude value on the traffic is shown relative to your altitude. A “+” indicates the target is above your altitude. A “-” indicates the target is below your altitude. For instance, if a value of +80 is shown, the value means that the indicated traffic is 8000 feet above your altitude. When Pressure Altitude is selected, if a value of 121 is shown, the value means that the indicated traffic is at 12,100 feet pressure altitude. Pressure altitude does not show a + or -. Remember that pressure altitude can be substantially different than the baro-corrected altitude shown on the altimeter in your aircraft.
ADS-B Traffic Text Display
ADS-B Traffic
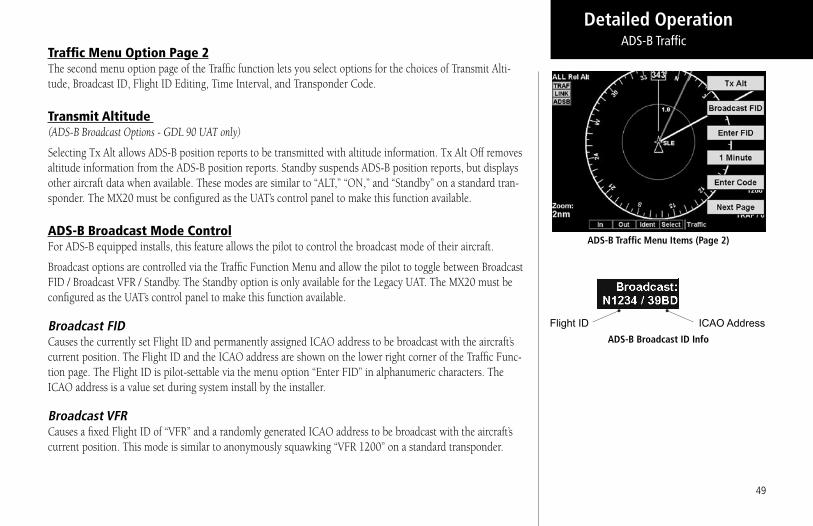
49
Detailed Operation
Traffic Menu Option Page 2The second menu option page of the Traffic function lets you select options for the choices of Transmit Alti-tude, Broadcast ID, Flight ID Editing, Time Interval, and Transponder Code.
Transmit Altitude (ADS-B Broadcast Options - GDL 90 UAT only)
Selecting Tx Alt allows ADS-B position reports to be transmitted with altitude information. Tx Alt Off removes altitude information from the ADS-B position reports. Standby suspends ADS-B position reports, but displays other aircraft data when available. These modes are similar to “ALT,” “ON,” and “Standby” on a standard tran-sponder. The MX20 must be configured as the UAT’s control panel to make this function available.
ADS-B Broadcast Mode ControlFor ADS-B equipped installs, this feature allows the pilot to control the broadcast mode of their aircraft.
Broadcast options are controlled via the Traffic Function Menu and allow the pilot to toggle between Broadcast FID / Broadcast VFR / Standby. The Standby option is only available for the Legacy UAT. The MX20 must be configured as the UAT’s control panel to make this function available.
Broadcast FIDCauses the currently set Flight ID and permanently assigned ICAO address to be broadcast with the aircraft’s current position. The Flight ID and the ICAO address are shown on the lower right corner of the Traffic Func-tion page. The Flight ID is pilot-settable via the menu option “Enter FID” in alphanumeric characters. The ICAO address is a value set during system install by the installer.
Broadcast VFRCauses a fixed Flight ID of “VFR” and a randomly generated ICAO address to be broadcast with the aircraft’s current position. This mode is similar to anonymously squawking “VFR 1200” on a standard transponder.
ADS-B Traffic Menu Items (Page 2)
ADS-B Broadcast ID Info
ADS-B Traffic

50
Detailed Operation
Standby (Legacy UAT only)When the Standby menu item is selected, it causes the transmit function of ADS-B to enter the standby mode. Other aircraft can be seen, but no data is transmitted. This mode is similar to setting a standard transponder to the “standby” mode.
Flight ID EditingThe Enter Flight ID option allows you to edit your broadcasted Flight ID when the editing function is enabled. The Function “smart” keys at the bottom of the screen change to arrow keys. Use the UP/DOWN arrow keys to change the characters. Use the LEFT/RIGHT arrow keys to move between characters. Press the MENU/ENTER key to save the displayed Flight ID. The Flight ID is only sent when the Flight ID broadcast option is enabled. Note that the GDL 90 UAT does not allow the space or period characters. The MX20 must be configured as the UAT’s control panel to make this function available.
TimeThe time interval option sets the amount of time to estimate the path and location of the traffic. The path of the traffic is shown by the line extending from the point on the end of the traffic arrow icon. The end of the line shows the point where the traffic item will be at the end of the selected time interval. Select 1, 1.5, 2-5, or 10 minutes.
Press the Main MENU ITEM key to display the next page of menu items.
Enter Code (GDL 90 UAT only)This is where you enter the ATC-assigned transponder code. This code entered into the MX20 does not control the code on Mode A, C, or S transponders. It only sends the selected code to the GDL 90 UAT for inclusion into the position report. The MX20 must be configured as the UAT’s control panel to make this function avail-able.
UAT Flight ID Editing
ADS-B Traffic
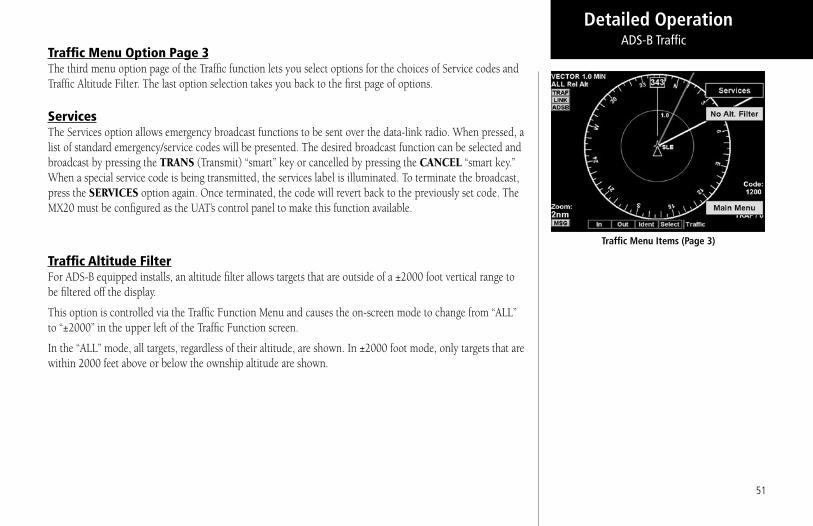
51
Detailed Operation
Traffic Menu Option Page 3The third menu option page of the Traffic function lets you select options for the choices of Service codes and Traffic Altitude Filter. The last option selection takes you back to the first page of options.
ServicesThe Services option allows emergency broadcast functions to be sent over the data-link radio. When pressed, a list of standard emergency/service codes will be presented. The desired broadcast function can be selected and broadcast by pressing the TRANS (Transmit) “smart” key or cancelled by pressing the CANCEL “smart key.” When a special service code is being transmitted, the services label is illuminated. To terminate the broadcast, press the SERVICES option again. Once terminated, the code will revert back to the previously set code. The MX20 must be configured as the UAT’s control panel to make this function available.
Traffic Altitude FilterFor ADS-B equipped installs, an altitude filter allows targets that are outside of a ±2000 foot vertical range to be filtered off the display.
This option is controlled via the Traffic Function Menu and causes the on-screen mode to change from “ALL” to “±2000” in the upper left of the Traffic Function screen.
In the “ALL” mode, all targets, regardless of their altitude, are shown. In ±2000 foot mode, only targets that are within 2000 feet above or below the ownship altitude are shown.
Traffic Menu Items (Page 3)
ADS-B Traffic
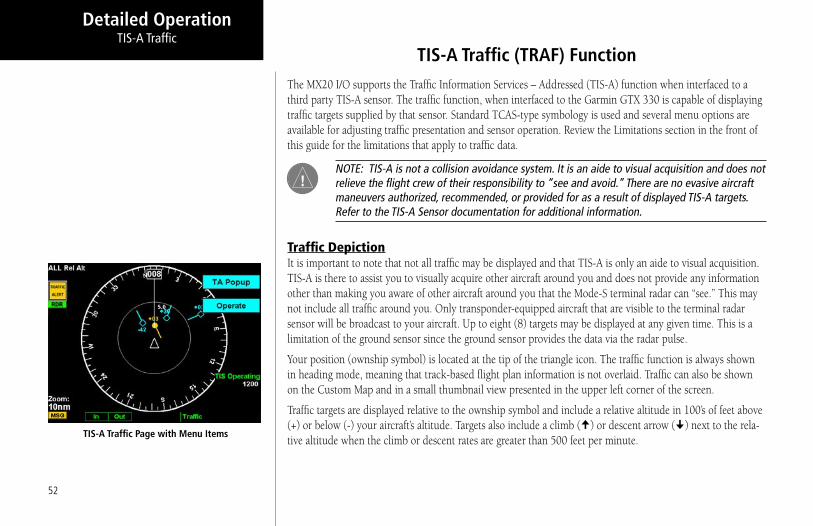
52
Detailed Operation
TIS-A Traffic (TRAF) Function The MX20 I/O supports the Traffic Information Services – Addressed (TIS-A) function when interfaced to a third party TIS-A sensor. The traffic function, when interfaced to the Garmin GTX 330 is capable of displaying traffic targets supplied by that sensor. Standard TCAS-type symbology is used and several menu options are available for adjusting traffic presentation and sensor operation. Review the Limitations section in the front of this guide for the limitations that apply to traffic data.
NOTE: TIS-A is not a collision avoidance system. It is an aide to visual acquisition and does not relieve the flight crew of their responsibility to “see and avoid.” There are no evasive aircraft maneuvers authorized, recommended, or provided for as a result of displayed TIS-A targets. Refer to the TIS-A Sensor documentation for additional information.
Traffic DepictionIt is important to note that not all traffic may be displayed and that TIS-A is only an aide to visual acquisition. TIS-A is there to assist you to visually acquire other aircraft around you and does not provide any information other than making you aware of other aircraft around you that the Mode-S terminal radar can “see.” This may not include all traffic around you. Only transponder-equipped aircraft that are visible to the terminal radar sensor will be broadcast to your aircraft. Up to eight (8) targets may be displayed at any given time. This is a limitation of the ground sensor since the ground sensor provides the data via the radar pulse.
Your position (ownship symbol) is located at the tip of the triangle icon. The traffic function is always shown in heading mode, meaning that track-based flight plan information is not overlaid. Traffic can also be shown on the Custom Map and in a small thumbnail view presented in the upper left corner of the screen.
Traffic targets are displayed relative to the ownship symbol and include a relative altitude in 100’s of feet above (+) or below (-) your aircraft’s altitude. Targets also include a climb () or descent arrow () next to the rela-tive altitude when the climb or descent rates are greater than 500 feet per minute.
TIS-A Traffic
TIS-A Traffic Page with Menu Items

53
Detailed OperationTIS-A Traffic
Targets are displayed at full brightness for the first six (0 to 6) seconds. If the TIS-A data is not refreshed, the targets will be displayed at a reduced brightness for the next six (6 to 12) seconds during an interval known as “coasting,” and removed from the display after 12 seconds. “Coasting” usually results from the TIS-A sensor missing a radar sweep. This typically happens because the aircraft antenna line of sight to the radar has been obstructed, most likely by either terrain or because the aircraft is banking.
TIS-A Menu OptionsThe MX20 displays the current operating mode when the MENU key is pressed.
Alert Hot Key (TA Prompt) When selected and viewing another function, this feature will automatically display the function menu at the bottom of the screen with the TRAF function highlighted when a Traffic Advisory (TA) alert is received from the TIS-A sensor. You may select the traffic function by pressing the corresponding Smart key or continue to view the currently displayed function.
Traffic Alert Pop-Up (TA Popup)When selected and viewing another function, this feature will automatically display the traffic function screen when a Traffic Advisory (TA) alert is received from the TIS-A sensor. You may then view another function by pressing the FN key and selecting the desired function.
Operate/Standby The MX20, when installed with a control wire to the GTX 330, controls the TIS-A sensor operating mode. The TIS-A sensor defaults to “Operate” when turned on.
Symbology• TIS-A targets are categorized as either “Proximate Traffic” or “Traffic Advisories.” • Proximate Traffic targets are depicted as hollow blue diamonds. • Traffic Advisory targets are depicted as solid yellow/amber circles. • Vectors extending from the targets indicate the target’s direction of travel as reported by the TIS-A
sensor. The vector length has no meaning.
Ownship (Your Aircraft)
Proximate traffic target with direction of flight vector and relative altitude
Traffic advisory target with direction of flight vector and relative altitude

54
Detailed Operation
Traffic Status IndicatorsThe following status indicators are displayed in the lower right portion of the display:
“TIS Operating” to indicate the TIS-A Sensor is operating and within TIS-A service coverage.
“TIS Coasting” to indicate that the target information is between 6 and 12 seconds old. This may happen if the TIS-A sensor has missed a radar sweep. Target brightness is also reduced to indicate this condition.
“TIS Unavailable” to indicate the TIS-A sensor is operating, but outside of TIS-A service coverage.
“TIS Standby” to indicate the TIS-A sensor is in standby mode and not processing TIS-A information, even if it is available.
“Traffic Off Scale,” noted in amber in the lower center of the display, indicates that traffic has been reported but is not displayed because it is beyond the current map scale (zoom level).
TIS-A Traffic
TIS-A Traffic Page with Traffic Off-Scale

55
Detailed Operation
Flight Plan (FPL) FunctionUse the Flight Plan function to view details about your flight plan route. Press the UP/DOWN arrow “smart” keys to step through the waypoints in your flight plan. Press the INFO “smart” key to view information about the waypoint. The Flight Plan Function shows the Current Flight Plan that is active in the connected navigation source (i.e. GPS receiver). The Current To Waypoint box shows the current leg of the flight plan. The Current Flight Plan box shows all of the legs of your flight plan with the current leg indicated in magenta. Listed are each leg with the bearing and distance between the legs. The Current Nav Data box shows the air-craft current position in latitude and longitude, ground speed, and track. In the lower right corner information for the current waypoint is displayed in the Waypoint Info box. The Nearest Center frequency is shown just above the flight plan. The Flight Plan function does not have any options.
Runway diagrams of airports will be displayed in the same orientation as the main map (i.e., North Up, Track Up, or DTK Up).
1. Press the FPL function smart key to reach the Flight Plan function. 2. Press the Up or Down function smart keys to move up and down the flight plan list in the Current
Flight Plan window. The details for the selected waypoint are shown in the Waypoint Info window on the right side of the screen.
3. Each press the Info function smart key will step through the available pages of Waypoint Information.
Flight Plan
Flight Plan Information (UAO selected)
Flight Plan Information (PDX selected)

56
Detailed Operation
Terrain (TER) FunctionThe Terrain Function shows a map of the terrain in the area relative to your airplane’s position and altitude. The MX20 has a standard internal based terrain function. The MX20 also supports an external TAWS sensor. When the external TAWS sensor is connected, it replaces the MX20’s internal Terrain function.
Terrain information can be supplied by one of two sources:
• Internal MX20-Based Terrain• External TAWS-Based Terrain
Review the Limitations section in the front of this guide for the limitations that apply to the terrain data.
Internal MX20-Based TerrainThe altitude information comes from an external altitude encoder. The displayed altimeter setting has to be adjusted, or baro-corrected, just like the one in your aircraft’s instrument panel.
The terrain screen has a 360-degree and a 120-degree display. Both screens will show terrain relative to your position. Colors used for terrain display are shown below.
NOTE: The Terrain function shows you the general terrain elevations relative to your altitude and are advisory in nature. Individual obstructions may be shown if available in the database. Terrain is displayed from database information and may therefore potentially contain some degree of error. Do not use this information for navigation.
Use the IN and OUT keys at the bottom of the screen to zoom in and zoom out. The zoom range is shown in the lower left corner of the screen.
Use the BARO+ and BARO- keys at the bottom of the screen to make minor adjustments to the barometric pressure value.
Terrain
Terrain Page with MX20-Based Data
Terrain Elevation Color Coding Reference

57
Detailed OperationTerrain
Color DescriptionRED Terrain that is within 500 feet, or above, your current altitude
YELLOW Terrain that is within 1000 feet of your current altitude
GREEN Terrain that is within 2000 feet of your current altitude
BLACK Terrain that is more than 2000 feet below your current altitude
LIGHT BLUE No terrain data is available
Terrain Option PageThe Terrain option page lets you select options for the choices of Flight Plan, Map Orientation, and setting the barometric pressure.
Flight PlanThe Flight Plan option controls the display of the Flight Plan course line. Pressing the MENU ITEM key next to the Flight Plan option toggles between showing and not showing the Flight Plan route line.
TRK Up Arc/TRK Up 360This ring is marked in nautical miles from your airplane with the ring placed at one half the distance of the map scale. For instance if you have the map scales at 50 miles, the ring will be at 25 miles. The ring will change automatically as you change the map scale. The Terrain function display is always in the Track Up mode.
Terrain option page showing 120 degree arc
Terrain option page showing 360 degree arc

58
Detailed Operation
Set BarometerUse the Set Barometer option to enter the correct barometric pressure for your area or adjust the current value. This option is best for making large changes. The BARO + and BARO - keys are more useful for minor correc-tions. Use the UP/DOWN arrow keys to increase or decrease the values. Use the LEFT/RIGHT arrow keys to move between characters. Press the ENTER key to save the displayed barometric pressure.
A “Confirm Current Baro” message is displayed at the initial power-up and again once every 30 minutes of operation as a reminder to check your baro setting.
TER Data FlagThe TER flag will appear if no terrain data is available for the advisory coverage area.
External TAWS-Based Terrain DisplayThe external TAWS-based Terrain feature shows terrain as provided by an external TAWS sensor when con-nected to and configured to receive that data from either the KGP-560, Landmark 8000, or KMH 820.
When displaying external TAWS-based terrain, the external sensor determines the color coding and graphical presentation of terrain in the proximity of the aircraft. See the Pilots Guide for the Honeywell KGP-560, L3 (Goodrich) Landmark, or KMH 820 for additional information on how to interpret this information.
NOTE: When the MX20 is configured for an external Terrain Awareness and Warning System (TAWS), the “Alt” and “Baro” fields normally present on the Navigational Bar will not be displayed.
TAWS Pop-Up ModesThe MX20 will detect TAWS based terrain alerts and will force a pop-up of the Terrain Function when re-quired. Terrain based Pop-Ups have higher priority over traffic based pop-up functionality.
Terrain
Terrain Display of External TAWS-Based Data

59
Detailed Operation
UAT Flight Information Service (FIS) Function The FIS Function is a graphic weather display capable of displaying graphical weather information on UAT equipped installations. Graphical data is overlaid on the map indicating the rainfall detected by ground based radar for a specific area. The colors indicating increasing levels of rainfall progresses from light green for light rainfall to magenta for heavy rainfall. Review the Limitations section in the front of this guide for the limita-tions that apply to the FIS data. Rainfall data is color coded as follows:
Brown/Blue Zero rainfall (transparent color) Light Green Light rainfall Dark Green Yellow Amber Red Magenta Heavy rainfall Cyan No rainfall data available
A cyan checkerboard pattern indicates that no data is available for area, and rainfall in that area is unknown.
When weather data is received, the airborne system will display that data for 20 minutes, or until the power is cycled. If no new data has been received for a given area, the rainfall will be removed and the area will revert back to the cyan checkerboard pattern.
The FIS Function is based on a ground-to-air data link and requires that the appropriate ground systems are broadcasting weather data and the aircraft is within reception range of the Ground Broadcast Transceiver (GBT).
If any weather data has been received in the previous two minutes, the “Service” indicator in the lower left of the screen will display “Available.” If no data has been received in this time period, “Not Available” will be shown. This indicator shows if the aircraft is currently within reception coverage of a ground station with weather broadcast capabilities.
The ground system determines the weather coverage area and extent of data that is transmitted by each ground station. The MX20 will display any weather received for the entire world.
UAT - FIS
UAT FIS Graphic Weather Info with GDL 90

60
Detailed Operation
Text DisplayFIS text messages are available on the text display and include METARs and TAFs. Messages are composed of four parts: message type, location, time, and message body.
Viewing Text1. Press the FN key and then the FIS function key when displayed. 2. Press the Menu/Enter key brings up the menu items. 3. Press the Text Menu key to select the Text (Text) sub-function. 4. Press the or function smart keys to move up or down the FIS category list to highlight TAF or
METAR. 5. Press the arrow key to move to the items in the list for the TAF or METAR category. 6. While in the list for the selected category, press the or function smart keys to highlight a
particular message for the selected category. The text for the selected message is shown in the FIS Message window in the upper portion of the screen.
7. Press the arrow key to move to the FIS message time stamp in the farthest right column. The smart key to the farthest right on the bottom of the screen will change to View. Press View to expand the FIS Message window at the top of the screen. A green arrow at the bottom of the FIS Message window indicates the more text is available.
Clearing Text FIS MessagesWhile the FIS Category is highlighted, the smart key to the farthest right on the bottom of the screen will show as Clear. Pressing the Clear key will clear all FIS messages for the highlighted category type. Messages will be displayed again as they are refreshed.
Sorting Text FIS MessagesWhile the cursor is in the Ident column, the smart key to the farthest right on the bottom of the screen will show as Sort. Pressing the Sort key repeatedly will step through the sorting choices of: Nearest Present Position, Nearest Final Waypoint, or Nearest Next Waypoint.
UAT - FIS
UAT FIS Text Weather Info with GDL 90
UAT FIS Text Weather Message Time Stamp

61
Detailed Operation
WSI InFlight™ Flight Information Service (FIS) FunctionThe Flight Information Service (FIS) Function allows access to graphic and text weather data messages on WSI InFlight-equipped installations. Graphical weather includes US and Canadian radar, METARs, and TAFs. You can select Graphical WX, Text, or Status information by pressing the MENU/ENTER key and then choosing the type of information with the MENU ITEM keys. Review the Limitations section in the front of this guide for the limitations that apply to the FIS data.
Product TimesProduct times shown on the lower portion of the display are: GM for Graphical METARs, RD for weather radar, ETP for EchoTops, and WB for Warning Boxes. Times are Zulu times when the data was assembled on the ground, not the time the data was received by the FIS sensor.
For MX20s that have any GPS receiver that provides time, the Zulu time is the time reported by the GPS receiver. For MX20s that do not have time provided by a GPS receiver, this field is invalid and dashed out.
Product times are shown in white when they are 0 to 5 minutes old, gray when they are 5 to 10 minutes old, and yellow when they are older than 10 minutes. For MX20s that have time available from a GPS receiver, age is based on the time reported by the GPS receiver. For MX20s that do not have time available from a GPS receiver, age is based on the time the data was received from the FIS sensor. In this case, the age of the data may be older than what is shown by the color coding.
WSI - FIS
WSI FIS Graphic Weather Info
WSI FIS Graphic Weather Product Times
Zulu Time Graphical METARs Weather Radar Echo Tops Warning Boxes
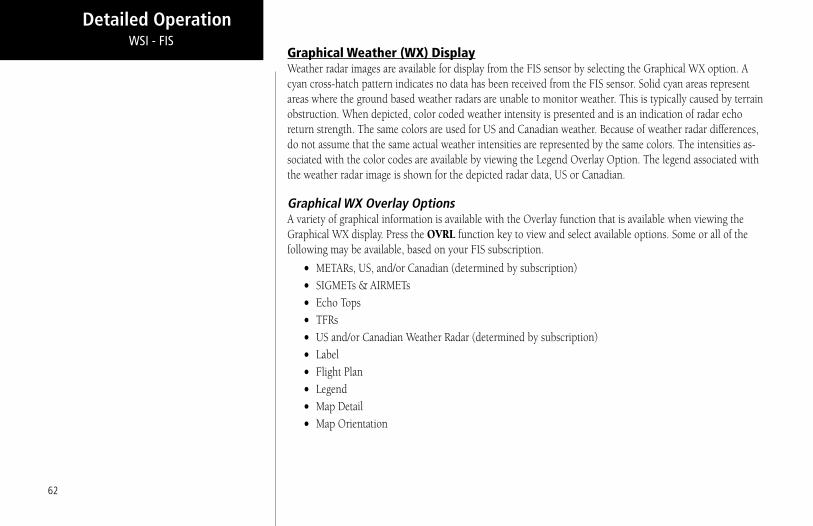
62
Detailed Operation
Graphical Weather (WX) DisplayWeather radar images are available for display from the FIS sensor by selecting the Graphical WX option. A cyan cross-hatch pattern indicates no data has been received from the FIS sensor. Solid cyan areas represent areas where the ground based weather radars are unable to monitor weather. This is typically caused by terrain obstruction. When depicted, color coded weather intensity is presented and is an indication of radar echo return strength. The same colors are used for US and Canadian weather. Because of weather radar differences, do not assume that the same actual weather intensities are represented by the same colors. The intensities as-sociated with the color codes are available by viewing the Legend Overlay Option. The legend associated with the weather radar image is shown for the depicted radar data, US or Canadian.
Graphical WX Overlay OptionsA variety of graphical information is available with the Overlay function that is available when viewing the Graphical WX display. Press the OVRL function key to view and select available options. Some or all of the following may be available, based on your FIS subscription.
• METARs, US, and/or Canadian (determined by subscription)• SIGMETs & AIRMETs• Echo Tops• TFRs• US and/or Canadian Weather Radar (determined by subscription) • Label• Flight Plan• Legend• Map Detail• Map Orientation
WSI - FIS

63
Detailed Operation
Menu Options for Overlay Page 11. Press the OVRL function key to allow selection of the Overlay choices when viewing the Graphical WX
option. 2. Press MENU/ENTER to display menu items for the Overlay. Press NEXT PAGE to see more
options.
METARsWhen enabled, METARs are available as colored circles or diamonds at airports that provide METAR reports. Press the METARs Menu Item key to cycle through the options of circular, diamond, or no METARs. Refer to the Legend for a description of the color code. US and Canadian METARS use the same color coding and will be shown at the same time with a subscription to both products.
SIGMETs & AIRMETsWhen enabled, the following SIGMETs and AIRMETs are available for display:
• “SIGMETs” are for Convective SIGMETs• “T AIRMET” is for Surface/Aloft Turbulence AIRMETs• “Z AIRMET” is for Icing AIRMET• “S AIRMET” is for an IFR condition, such as a mountain obstruction• “Other” is for other types of AIRMETs• “No Warn. Area” is to turn off all SIGMETs and AIRMETs
These are collectively known as Warning Boxes and are displayed as color coded outlines of the affected area. Refer to the Legend for a description of the color coding.
Echo TopsEcho Tops indicate the location, elevation, and direction the highest radar echo. This is typically associated with storms. This may not indicate the top of a storm or clouds, only the highest radar return echo. Refer to the Legend for a description of the Echo Tops coding.
WSI - FIS
WSI FIS Graphic Weather Overlay Menu Items (Page1)

64
Detailed Operation
Temporary Flight Restrictions (TFRs)Temporary Flight Restrictions (TFRs) indicate areas where flight restrictions have been imposed. They are depicted as areas with reddish-brown outlines and a cross-hatch pattern. The area may also contain the TFR identifier. The TFR identifier includes the TFR number and upper altitude.
US or Canadian Weather RadarThis option is only available when subscribed to both radar products. WSI offers subscriptions for US and Ca-nadian radar data. Because of differences in radar technology, both data types cannot be displayed at the same time. When subscribed to both weather radar products, you can alternate between the two with the Overlay option.
Menu Options for Overlay Page 21. Press the OVRL function key to allow selection of the Overlay choices when viewing the Graphical WX
option. 2. Press MENU/ENTER to display menu items for the Overlay. 3. Press MAIN MENU to return to the Main Menu.
LabelPress MENU/ENTER key and then press the LABEL Menu Item key to toggle the station labels on and off.
Flight PlanPress MENU/ENTER key and then press the FLIGHT PLAN Menu Item key to toggle the Flight Plan course line on and off. The magenta line is the active leg.
WSI - FIS
WSI FIS Graphic Weather Menu Items

65
Detailed Operation
LegendPress MENU/ENTER key and then press the LEGEND Menu Item key to display the legends describing the graphic display colors. Press the LEGEND Menu Item key once to display a legend for the Metar, Weather, and Radar colors. Press the LEGEND key a second time to display a legend for AIRMET and SIGMET colors and EchoTop graphics.
When viewing the Canadian radar data, the following legends will appear. Only the lower portion of the legend changes for Canadian radar data.
Map DetailPress MENU/ENTER key and then press the Map Detail Menu Item key to choose between the display of No Overlays, the Base Map, or Map and Nav Aids.
Map OrientationPress MENU/ENTER key and then press the Map Orientation Menu Item key to choose the configuration of the map orientation of DTK Up, North Up, TRK Up, TRK Up Arc, or TRK Up 360.
WSI - FIS
WSI FIS Graphic Weather Legend (US)
WSI FIS Graphic Weather Legend (Canada)
WSI FIS Graphic Weather Menu Items (Trk Arc Up)

66
Detailed Operation
Text DisplayFIS text messages are available on the text display and include METARs, TAFs, AIRMETs, SIGMETs, and TFRs. Individual text messages are updated every five minutes and composed of four parts: message type, location, time and message body.
Text Information Examples:
TYPE LOCATION TIME MESSAGE BODY
METAR KSLE 191534Z METAR TEXT
METAR KMMV 181423Z METAR TEXT
TAF KSLE 171423Z TAF TEXT
The upper portion of the FIS Function page is used for displaying the contents of an individual FIS message while the lower portion of the screen is used for categorization and sorting of different message types, such as METARS, TAFs, SIGMETS, etc.
The lower portion of the screen is divided into three distinct columns to provide simple categorization of received text messages. The columns are loosely defined as message type, location and time stamp to handle the most common type of FIS up-link data.
The different message types and data content are fully controlled by the ground broadcast systems. The air-borne system will automatically display any message type that is received.
US and Canadian text METARs, text and graphical TAFs are available at the same time when subscribed to both US and Canadian products. US and Canadian METARs and TAFs use the same format as described below.
Selecting Text DataGreen colored Selection Pointers above the smart keys can be used to select an alternate message for display. The selected line in the section above the smart keys is noted by a green circle with an “I” inside. The pilot is able to move the green Selection Pointer within the lower portion of the page to select the desired category, location and time that is of interest with the use of the arrow keys.
WSI - FIS
WSI FIS Text Weather Messages

67
Detailed Operation
Using this interface, the pilot can easily select the desired message type (such as METAR), then select the airport of interest (such as KPDX), then select a specific METAR report by time (such as 141512Z).
At all times, the message displayed in the upper FIS Message area on the screen matches the highlighted entry in the FIS Category area below.
The system shows text METAR and TAF data for the 25 locations nearest the present position and up to the 25 locations nearest to the destination in the flight plan that are reporting weather information. The system will show all other data provided by the FIS sensor.
Smart Key FunctionThe fourth “smart” key performs special functions within the FIS Function:
When the Selection Pointer is located in the first of the three columns, the fourth “smart” key displays the label “Clear”. When pressed, all messages for the currently selected category will be cleared from the MX20. This feature can be used to clear old, bad or corrupted data received over the data link.
When the Selection Pointer is in the center-most column, the fourth “smart” key displays the label “Sort.” See below for how the sort option works.
When the Selection Pointer is in the right most column, the fourth “smart” key displays the label “View.” When pressed, the currently viewed message is presented in a full screen mode. This feature provides a mechanism to view large textual messages that do not fit within the upper half of the display area. Some messages may be longer than can be displayed in the full screen mode. These are indicated by a small arrow at the bottom of the area. Press the arrow keys to scroll through the information.
Viewing Text TAFsPressing the “View” key when highlighting TAFs will display a full screen with the text TAF at the top and a graphic representation in the lower portion of the screen. The Time column includes both date and time. The METARs column displays active METAR information. The Prev column displays prevailing conditions. The Tempo column displays temporary conditions. The Prob column displays probable conditions. Press the ar-row keys to scroll the information and the View key to exit this view.
WSI - FIS
WSI FIS Graphic and Text TAF Weather Messages

68
Detailed Operation
Sorting FIS MessagesSpecial sorting capabilities are provided for in the central “location” column. This sorting allows weather reports to be sorted by location based on different criteria.
When the green Selection Pointer is located in the second column, the fourth “smart” key changes to read “Sort.” When consecutively pressed, the sorting of the messages toggle with the following options:
• (Distance to) Nearest Present Position• (Distance to) Nearest Final Waypoint• (Distance to) Nearest Next Waypoint Alphanumerically
When the sorting is based on distances from current ownship to a given airport, the system must be able to correlate a Jeppesen airport that matches the location field of the received message. If this lookup is successful, a distance shall be presented adjacent to the location text. If no corresponding location can be determined, no distance is as-signed but the message is presented at the end of the list.
The default sorting method is “Nearest Present Position” and is reset when the FIS Function is re-entered.
Status InformationStatus information shows satellite signal reception status, the amount of data received, and the weather prod-ucts that have been activated. Contact your FIS service provider to activate and deactivate products.
WSI - FIS
XM FIS Data Link Status

69
Detailed Operation
GDL 69/69A Flight Information Service (FIS) Function The FIS Function is capable of displaying graphical weather information through the XM Satellite Radio Ser-vice when activated in the optional installation of the GDL 69/69A. A variety of graphical data can be overlaid on the map at the touch of a button. Review the Limitations section in the front of this guide for the limitations that apply to the FIS data. To minimize the possibility of display clutter, up to four weather products may be displayed at any one time. When four weather products are displayed, you must first disable a product before enabling another.
XM Satellite Radio offers several subscriptions, that are differentiated by the products provided with each level. Refer to the XM Satellite Radio web site for a description of the subscription options. The MX20 provides options via the menu item keys for all supported functions, even those that are not available for all subscription levels.
1. Press the FN key and then the FIS function key when displayed. 2. The first two function smart keys at the bottom of the screen zoom IN and OUT on the map. 3. The PAN key brings up the movement menu item keys at the right of the screen that allow you to move
the view of the map. 4. The fourth function smart key on the right will step through the four sub-functions of GDL 69/69A FIS:
Current, Forecast, Text, and Status. 5. The Menu/Enter key brings up menu items for more detail on each sub-function.
Weather Product Zoom ScaleThe weather products available using the GDL 69/69A are divided into two classes: those drawn at all zoom settings and those drawn when the zoom scale is greater than 15 nm.
Products shown at all zoom levels: METARs, Cell Movement, City Forecast, County Warnings, Cyclones (or Hurricane Track), Lightning, and TFRs.
Products shown at zoom levels greater than 15 nm: AIRMETs, SIGMETs, Freezing Level, Echo Tops, Cloud Tops, NEXRAD, Winds Aloft, and Coverage. When any of these products are displayed and the zoom level is less than 20 nm, “Map Scale Limts Wx” will be displayed in the lower right corner.
GDL 69/69A - FIS
GDL 69/69A FIS Menu Page 1
GDL 69/69A FIS Menu Page 1 with NEXRAD Activated
Weather in Current Function Limited to 20 nm or more

70
Detailed Operation
Temporary Flight Restrictions (TFRs)Temporary Flight Restrictions (TFRs) indicate areas where flight restrictions have been imposed. They are depicted as areas with reddish-brown outlines. The area may also contain the TFR identifier label. The TFR identifier label includes the TFR number and upper altitude. Press the TFR Lbl Menu Item key to toggle the TFR Identifier Labels on and off. TFRs are drawn on the FIS page when provided by the FIS sensor and can not be enabled or disabled. TFR text information is described on page 81.
NEXRAD DescriptionWSR-88D weather surveillance radar or NEXRAD (NEXt generation RADar) is a Doppler radar system that has greatly improved the detection of meteorological events such as thunderstorms, tornadoes, and hurricanes. An extensive network of NEXRAD stations provides almost complete radar coverage of the continental United States, Alaska, and Hawaii. The unobstructed range of each NEXRAD is 124 nautical miles. NEXRAD AbnormalitiesThere are possible abnormalities regarding displayed NEXRAD images. Some, but not all, causes of abnormal displayed information include:
• Ground Clutter• Strobes and spurious radar data• Sun strobes, when the radar antenna points directly at the sun• Military aircraft deploy metallic dust which can cause alterations in radar scans• Interference from buildings or mountains, which may cause shadows
NEXRAD LimitationsCertain limitations exist regarding the NEXRAD radar displays. Some, but not all, are listed for the user’s awareness:
• NEXRAD base reflectivity does not provide sufficient information to determine cloud layers or precipitation characteristics (hail vs. rain, etc).
• NEXRAD base reflectivity is sampled at the minimum antenna elevation angle. An individual NEXRAD site cannot depict high altitude storms at close ranges, and has no information about storms directly over the site.
• The resolution of displayed NEXRAD data is 2 kilometers. Therefore, when zoomed in on the display, each square block is 2 kilometers. The intensity level reflected by the square will be the highest level sampled within the 2 kilometer square area.
GDL 69/69A - FIS
NEXRAD Color Legend
TFR Outline with TFR Number and Upper Altitude

71
Detailed Operation
NEXRAD IntensityColors are used to identify the different NEXRAD echo intensities (reflectivity) measured in dBZ (decibels of Z). “Reflectivity” is the amount of transmitted power returned to the radar receiver. Reflectivity (designated by the letter Z) covers a wide range of signals (from very weak to very strong). So, a more convenient number for calculations and comparison, a decibel (or logarithmic) scale (dBZ), is used. The dBZ values increase as the strength of the signal returned to the radar increases. CurrentThe Current sub-function provides an overlay of the currently selected weather information. The four pages of menu item selections allow you to modify the display of NexRad, radar coverage, METARs, lightning, thunder-storm cell movement, cloud tops, echo tops, winds aloft, information labels, flight plan course line, weather legends, map and navaids, and map orientation.
1. Press the FN key and then the FIS function key when displayed. 2. Press the fourth function smart key on the right to select the Current (Crnt) sub-function. 3. The Menu/Enter key brings up menu items for more detail on each sub-function.
NEXRADWhen enabled, NEXRAD weather information is shown. Composite data from all of the NEXRAD radar sites in the United States is shown. This data is composed of the maximum reflectivity from the individual radar sweeps. The display of the information is color-coded to indicate the weather level severity. Information about which sites are operational or off-line is also available (see coverage below). The update rate is every five min-utes. Refer to the legend for a description of the color code.
1. Press the or arrow keys to display the legends for the selected services. 2. Press Done to turn the Legends off.
CoverageThe Coverage menu item when selected shows the currently available NEXRAD radar coverage areas in cyan where information is being collected. Areas where radar capability exists, but is not active or is off-line, will not be shown as available.
GDL 69/69A FIS Radar Coverage
GDL 69/69A FIS with NEXRAD Weather and Legend
GDL 69/69A - FIS

72
Detailed Operation
METARsWhen enabled, METARs (METeorological Aviation Reports) are shown as colored flags at airports that provide METAR reports. Press the METARs Menu Item key to enable or disable METARs. Refer to the Legend for a description of the color code. The update rate is every 12 minutes.
1. Press the or arrow keys to display the legends for the selected services. 2. Press Done to turn the Legends off.
LightningWhen enabled, lightning strikes and cells are shown. Lightning information indicates the location of cloud-to-ground lightning strikes. The update rate is every five minutes.
Cell MovementWhen enabled, Cell Movement shows the storm cells identified by the ground-based system. The movement is depicted by an arrow. The tip of the arrow represents where the cell is expected to be in 10 minutes from the time the cell location was determined.
GDL 69/69A FIS METARs
GDL 69/69A - FIS
METAR Legend

73
Detailed Operation
Cloud TopsWhen enabled, Cloud Tops data depicts the cloud top altitude determined from satellite imagery. Refer to the legend for a description of the Cloud Tops color coding. The update rate is every 15 minutes.
Note: Cloud Tops and Echo Tops use the same color scaling to represent altitude. Both products can not be displayed at the same time. Selecting Cloud Tops automatically disables Echo Tops.
Echo TopsEcho Tops indicate the location, elevation, and direction the highest radar echo. This is typically associated with storms. This may not indicate the top of a storm or clouds, only the highest radar return echo. The information is derived from NEXRAD information and indicates the highest altitude at which precipitation is falling. Refer to the Legend for a description of the Echo Tops coding. The update rate is every 7.5 minutes.
Note: Cloud Tops and Echo Tops use the same color scaling to represent altitude. Both products can not be displayed at the same time. Selecting Echo Tops automatically disables Cloud Tops.
GDL 69/69A FIS Cloud Tops
GDL 69/69A FIS Echo Tops
GDL 69/69A - FIS
Cloud Top Legend
Echo Tops Legend

74
Detailed Operation
Winds AloftThe Winds Aloft selection provides the pilot with the wind speed and direction. The winds at a given altitude are selected in the Winds Aloft Alt menu item. The update rate is every 12 minutes.
Winds Aloft AltitudeThe Winds Aloft selection provides the pilot with the wind speed and direction at a selected altitude from the ground up to 42,000 feet in altitude and is selected in 3,000 foot increments. When no data is shown at a given altitude, the data for that altitude has not been received. Wait for the next update. The update rate is every 12 minutes.
TFR LblPress MENU/ENTER key and then press the TFR Lbl Menu Item key to toggle the TFR Identifier Labels on and off. The TFR Identifier Labels note the TFR number and upper altitude near the TFR outline.
LabelPress MENU/ENTER key and then press the LABEL Menu Item key to toggle the station labels on and off.
Flight PlanPress MENU/ENTER key and then press the FLIGHT PLAN Menu Item key to toggle the Flight Plan course line on and off. The magenta line is the active leg.
XM FIS Winds Aloft
GDL 69/69A - FIS
Winds Aloft Legend

75
Detailed Operation
LegendPress MENU/ENTER key and then press the LEGEND Menu Item key to display the legends describing the graphic display coding.
1. Press the or arrow keys to display the legends for the selected services.
2. Press Done to turn the Legends off.
Map DetailPress MENU/ENTER key and then press the Map Detail Menu Item key to choose between the display of No Overlays, the Base Map, or Map and Nav Aids. Product TimesProduct times are shown on the lower portion of the display and cannot be hidden. The times for each of the enabled products (up to four at a time) are displayed. The following product times are shown: Nexrad for NEXRAD radar, Coverage for active NEXRAD radar coverage areas, METAR, Echo Tops, Cloud Tops, Light-ning, and Winds Aloft. Times are Zulu times when the data was assembled on the ground, not the time the data was received or displayed by the FIS sensor.
Product times are shown in white when they are initially shown and change to blue and then yellow as they pass certain age thresholds. A product time aging table is shown on the next page. For MX20s that do not have time available from a GPS receiver, age is based on the time the data was received from the GDL 69/69A sensor. In this case, the age of the data may be older than what is shown by the color coding.
AIRMET/SIGMET Legend
City Forecast Legend
County Warnings Legend
Freezing Levels Legend
NEXRAD Legend
METAR Legend
Cloud Tops Legend
Echo Tops Legend
GDL 69/69A - FIS
Winds Aloft Legend

76
Detailed Operation
FIS Product TimesGoes Blue After (Minutes) Goes Yellow After (Minutes)
NEXRAD 8 13
Graphical METAR 15 75
Lightning 8 23
TFR 15 51
Cell Movement 4.25 5.5
Radar Coverage 8 13
METAR 15 75
Echo Tops 10.5 18
Winds Aloft 15 75
AIRMET 15 51
SIGMET 15 51
Cyclone 15 51
County Warnings 8 23
Freezing Level 15 75
City Forecasts 15 51
TAF 15 75
Cloud Tops 10.5 18
Map OrientationPress MENU/ENTER key and then press the Map Orientation Menu Item key to choose the configuration of the map orientation of DTK Up, North Up, TRK Up, TRK Up Arc, or TRK Up 360.
GDL 69/69A - FIS
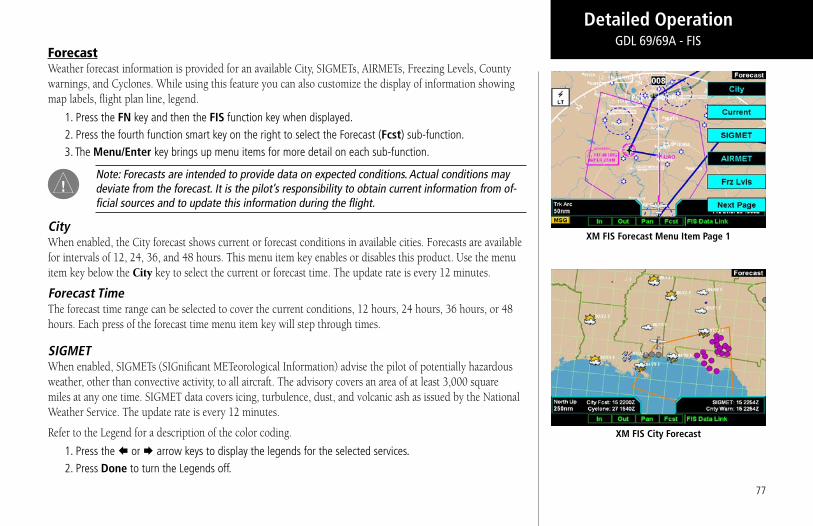
77
Detailed Operation
ForecastWeather forecast information is provided for an available City, SIGMETs, AIRMETs, Freezing Levels, County warnings, and Cyclones. While using this feature you can also customize the display of information showing map labels, flight plan line, legend.
1. Press the FN key and then the FIS function key when displayed. 2. Press the fourth function smart key on the right to select the Forecast (Fcst) sub-function. 3. The Menu/Enter key brings up menu items for more detail on each sub-function.
Note: Forecasts are intended to provide data on expected conditions. Actual conditions may deviate from the forecast. It is the pilot’s responsibility to obtain current information from of-ficial sources and to update this information during the flight.
CityWhen enabled, the City forecast shows current or forecast conditions in available cities. Forecasts are available for intervals of 12, 24, 36, and 48 hours. This menu item key enables or disables this product. Use the menu item key below the City key to select the current or forecast time. The update rate is every 12 minutes.
Forecast TimeThe forecast time range can be selected to cover the current conditions, 12 hours, 24 hours, 36 hours, or 48 hours. Each press of the forecast time menu item key will step through times.
SIGMETWhen enabled, SIGMETs (SIGnificant METeorological Information) advise the pilot of potentially hazardous weather, other than convective activity, to all aircraft. The advisory covers an area of at least 3,000 square miles at any one time. SIGMET data covers icing, turbulence, dust, and volcanic ash as issued by the National Weather Service. The update rate is every 12 minutes.
Refer to the Legend for a description of the color coding.
1. Press the or arrow keys to display the legends for the selected services. 2. Press Done to turn the Legends off.
XM FIS Forecast Menu Item Page 1
XM FIS City Forecast
GDL 69/69A - FIS

78
Detailed Operation
AIRMETAIRMETs (AIRman’s METeorological Information) advises the pilot of weather that may be hazardous to single engine, other light aircraft, and Visual Flight Rule (VFR) pilots. This advisory affects an area of a least 3,000 square miles at any one time and provides data about ceiling, obscuration, and turbulence issued by the National Weather Service (NWS). The update rate is every 12 minutes.
When enabled, the following AIRMETs are available for display:
• Icing• Turbulence• IFR conditions• Mountain obscuration• Surface winds
Refer to the Legend for a description of the color coding.
1. Press the or arrow keys to display the legends for the selected services. 2. Press Done to turn the Legends off.
Freezing LevelsThis product is not available at this time.
CountyThe County selection provides specific public awareness and protection weather warnings for Hurricanes, Tor-nados, Severe Thunderstorms, Floods, Flash Floods, and special Maritime conditions provided by the National Weather Service (NWS).
Refer to the Legend for a description of the color coding.
1. Press the or arrow keys to display the legends for the selected services. 2. Press Done to turn the Legends off.
XM FIS County Warnings Legend
XM FIS AIRMET and SIGMET Legend
GDL 69/69A - FIS

79
Detailed Operation
CycloneThis product is not available at this time.
LabelPress MENU/ENTER key and then press the LABEL Menu Item key to toggle the station labels on and off.
Flight PlanPress MENU/ENTER key and then press the FLIGHT PLAN Menu Item key to toggle the Flight Plan course line on and off. The magenta line is the active leg.
LegendPress MENU/ENTER key and then press the LEGEND Menu Item key to display the legends describing the graphic display colors. Press the or arrow keys to display the legends for the selected services. Press Done to turn the Legends off. A graphic of each product legend is shown on page 75.
Map DetailPress MENU/ENTER key and then press the Map Detail Menu Item key to choose between the display of No Overlays, the Base Map, or Map and Nav Aids.
Map OrientationPress MENU/ENTER key and then press the Map Orientation Menu Item key to choose the configuration of the map orientation of DTK Up, North Up, TRK Up, TRK Up Arc, or TRK Up 360.
Text
XM FIS Forecast Menu Item Page 3
GDL 69/69A - FIS

80
Detailed Operation
The Text sub-function displays text messages of the available weather information. Use the function smart keys at the bottom of the display to select the message that you would like to view from the list in the FIS Category window. The text message for the selected item is displayed in the FIS Message window at the top portion of the display.
1. Press the FN key and then the FIS function key when displayed. 2. Press the fourth function smart key on the right to select the Text (Text) sub-function. 3. The Menu/Enter key brings up menu items for more detail on each sub-function.
Selecting Categories and Messages1. Press the or function smart keys to move up or down the FIS category list. The selected category
is highlighted. 2. Press the arrow key to move the items in the list for that category. 3. While in the list for a category, press the or function smart keys to highlight a particular message
for the selected category. The text for the selected message is shown in the FIS Message window in the upper portion of the screen.
4. Press the arrow key again to return to the category list.
ViewSome text products may provide more information than can be shown in the message window when the category window is also shown. You can customize the Text display to show both the FIS Category and FIS Message windows at the same time or to view the FIS Messages only.
1. Press Menu/Enter. 2. Press the View menu item to toggle between the choices.
Sorting TAFs and METARs
XM FIS Text Messages
Moving to another FIS category
GDL 69/69A - FIS

81
Detailed Operation
Displayed text products can be sorted by distance from your present position (Nearest Pos), distance from destination (Nearest Dest), or alphabetically (Alpha).
1. Press Menu/Enter. 2. Press the top menu item to toggle between the choices.
Temporary Flight Restrictions (TFRs)The full page view of the TFR is available when TFR Text is selected. TFR information includes: type, minimum and maximum altitude, and Notam ID. If TFR text extends beyond the page size, no scrolling is available.
1. Press the FN key and then the FIS function key when displayed. 2. Press the fourth function smart key on the right to select the Text (Text) sub-function. 3. The Menu/Enter key brings up the menu items. Press View, if necessary, to display the FIS Category
window. 4. Press the or function smart keys to move up or down the FIS category list to highlight TFR. 5. Press the arrow key to move the items in the list for the TFR category. 6. While in the list for the TFR category, press the or function smart keys to highlight a particular
message for the selected category. The text for the selected message is shown in the FIS Message window in the upper portion of the screen.
StatusThe Status sub-function displays information about the available XM products, receiver performance, and subscription level.
1. Press the FN key and then press the FIS function key when displayed. 2. Press the fourth function smart key on the right to select the Status (Status) sub-function. 3. The Menu/Enter key brings up the menu item. 4. Press the top menu item smart key on the right to step through the pages for Product Status,
Diagnostics, and Activation.
GDL 69/69A - FIS
Viewing TFR Text
Sorting TAF and METAR Text (Nearest Position Shown)
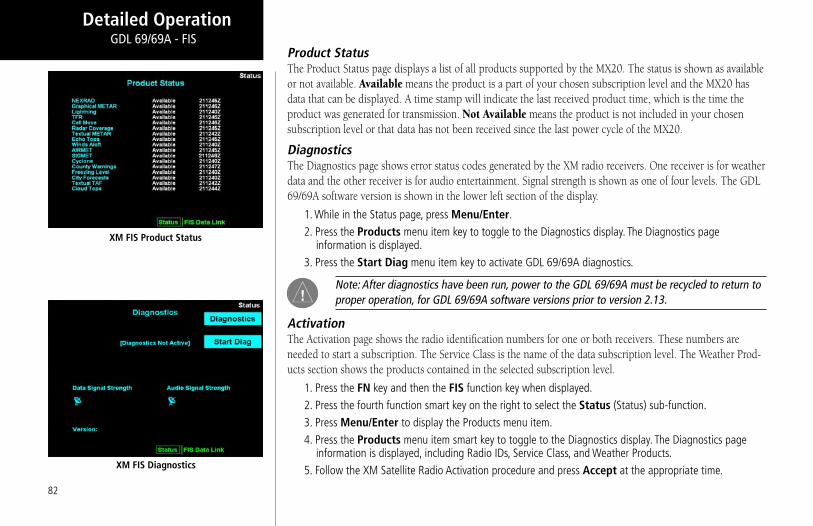
82
Detailed Operation
Product StatusThe Product Status page displays a list of all products supported by the MX20. The status is shown as available or not available. Available means the product is a part of your chosen subscription level and the MX20 has data that can be displayed. A time stamp will indicate the last received product time, which is the time the product was generated for transmission. Not Available means the product is not included in your chosen subscription level or that data has not been received since the last power cycle of the MX20.
DiagnosticsThe Diagnostics page shows error status codes generated by the XM radio receivers. One receiver is for weather data and the other receiver is for audio entertainment. Signal strength is shown as one of four levels. The GDL 69/69A software version is shown in the lower left section of the display.
1. While in the Status page, press Menu/Enter. 2. Press the Products menu item key to toggle to the Diagnostics display. The Diagnostics page
information is displayed. 3. Press the Start Diag menu item key to activate GDL 69/69A diagnostics.
Note: After diagnostics have been run, power to the GDL 69/69A must be recycled to return to proper operation, for GDL 69/69A software versions prior to version 2.13.
ActivationThe Activation page shows the radio identification numbers for one or both receivers. These numbers are needed to start a subscription. The Service Class is the name of the data subscription level. The Weather Prod-ucts section shows the products contained in the selected subscription level.
1. Press the FN key and then the FIS function key when displayed. 2. Press the fourth function smart key on the right to select the Status (Status) sub-function. 3. Press Menu/Enter to display the Products menu item. 4. Press the Products menu item smart key to toggle to the Diagnostics display. The Diagnostics page
information is displayed, including Radio IDs, Service Class, and Weather Products. 5. Follow the XM Satellite Radio Activation procedure and press Accept at the appropriate time.
GDL 69/69A - FIS
XM FIS Product Status
XM FIS Diagnostics

83
Detailed Operation
Activating XM Radio ServicesBefore the GDL 69/69A can be used, the unit must be activated by XM Satellite Radio and services are sub-scribed to XM Satellite Radio. Please note that the GDL 69 is a weather data link. The GDL 69A is a weather data link and audio receiver. The data link service and the audio entertainment services must be activated separately.
Gather InformationYour GDL 69 or GDL 69A is shipped with one or two radio hardware identifications, respectively. These IDs serve as identification codes for your XM-equipped GDL 69/69A and are needed in the activation process. The ID(s) is attached to this instruction sheet and printed on a label on the back of the unit. The IDs can also be retrieved through the MX20 in the Activation page of the Status sub-function. Contact your dealer if you are unable to locate the radio hardware IDs.
XM Satellite Radio Activation Weather and/or audio data from your GDL 69/69A are provided by XM Satellite Radio, a company separate and independent from Garmin Corporation. Have your radio hardware IDs ready before contacting XM Satel-lite Radio. During the process, you can select services for subscription. Keep in mind that the GDL 69 has no audio capability, audio services will not be available with the unit.
Follow the GDL 69/69A XM Satellite Radio Activation Instructions (190-00355-04) enclosed with your GDL 69/69A unit to activate the XM products.
XM FIS Data Activation
GDL 69/69A - FIS

84
Detailed Operation
Lightning Strikes (LT) FunctionThe Lightning Strike mode allows you to view lightning strikes that are reported by an L3 WX500 Stormscope Weather Mapping Sensor. The “T” marks are used as reference marks to aid in locating strikes in reference to your position. The Lightning function is not available in all software versions. Your display range must be se-lected to be greater than 25 nm to display lightning strikes. The display range is shown in the lower left corner of the display. For instance, if you zoom In to a range of 20 nm, no strikes will be shown, but if you zoom Out to 30 nm strikes will be shown. Review the Limitations section in the front of this guide for the limitations that apply to the Lightning data.
The In and Out keys control the map scale (zoom in or out). The Clear key clears the current lightning strikes, which will be refreshed on the next update cycle.
Lightning Menu Option Page 1The first option page of the Lightning function lets you select options for the choices of Flight Plan, Display view, Lightning groups, Heading Stabilization, and Stormscope (System Data) info. The last option selection (Next Page) takes you to the next page of options.
Flight PlanThe Flight Plan option controls the display of the Flight Plan course line. Pressing the MENU ITEM key next to the Flight Plan option toggles between showing and not showing the Flight Plan route line.
360/120Two display views of the lightning information may be selected. The 360 view shows a 360° view the airspace surrounding your aircraft. The 120 view shows a 120° forward view from your aircraft’s position and the display is divided into three segments.
LightningThe WX500 detects electrical discharges within a range determined by the installation of your Stormscope. These discharge locations are noted as Lightning strikes and displayed as a red “x.” You may select either single Strike or Cell (groups) of lightning representations.
Lightning
Lightning Function Menu Items (Page 1)

85
Detailed Operation
StrikeIndividual strikes are noted.
CellOnly lightning strikes associated with a group, or cell, of strikes are displayed.
Heading StabilizationThe Heading Stabilization function of the WX500 can be turned on or off with this selection.
System DataSelect the System Data option to display information about the WX500.
Press the Next Page MENU ITEM key to display the next page of menu items.
Lightning Menu Option Page 2The second option page of the Lightning function lets you select options for the choices of Demo, Self-Test for the Stormscope, Noise Monitor, and Strike Test. The last option selection takes you back to the first page of options.
DemoThe Demo option places the WX500 sensor in a demonstration mode that simulates lightning strikes.
Self-TestThe Self-Test option performs a number of tests on the operation of the WX500 and provides a report of its status.
Lightning
Lightning Function Menu Items (Page 2)

86
Detailed Operation
Noise MonitorThe Noise Monitor feature is a function of the WX500. For details about using this feature refer to the WX500 owner’s documents.
The Noise Monitor displays reports of electrical noise, whether they are from lightning or other noise sources within the range of the system. This function is used to help determine if electrical noise is present that may affect normal system operation.
Strike TestThe Strike Test feature is a function of the WX500. For details about using this feature refer to the WX500 owner’s documents.
The Strike Test feature is used by installers to verify proper operation of the WX500. Test strikes are sent to the antenna. The received test strike is then visually presented on the screen.
Antenna Change MessageWhen an “Antenna Change” message is shown, the lightning sensor may have failed. When this message is displayed, the sensor is automatically shut down for the remainder of the flight. The installation should be inspected before the lightning function is used again.
Lightning

87
Detailed Operation
Chart View (CHART) Function (Optional)The optional MX20 Chart View feature provides the capability to view Jeppesen Sanderson Inc. electronic charts. Two basic types of charts can be viewed: Approach charts and airport surface charts.
Approach charts can be manually loaded and overlaid on the moving map during flight, while airport surface charts are automatically overlaid while on the ground. Both types of charts are also viewable from the Chart View Function in a chart manual fashion. Approach charts may also be loaded automatically when installed with a GNS 480-series GPS receiver.
The electronic chart data is generated from the standard Jeppesen CD ROM product, which is distributed and updated by Jeppesen on a two-week schedule. The in-flight data resides on the pilot removable front-loading data card and is updated by the pilot using a home PC-based data loader.
The MX20 Chart View feature does not currently represent a sole replacement for the paper chart within the cockpit. The presentation of the chart data is intended for supplemental use and to provide additional situ-ational awareness. The pilot must still have access to the printed chart as required by FAA regulations.
Overview• Charts are viewed either as a dynamic overlay on the Custom/IFR Map, or as a static page through the
dedicated Chart View Function (“Chart” on the function menu). • When viewed as a dynamic overlay on the Custom/IFR Map, the chart will be properly geo-referenced
with respect to the base map. Orientation (track up, north up, etc.), zoom scale, and aircraft position will all be properly presented relative to the chart data, using the standard map controls.
• When viewed under the Chart View Function, more selection options are available for locating a specific chart among the charts in the database, and the chart is displayed similar to a standard chart manual (north up) with no position overlay.
• A given approach chart must be “loaded” for map overlay usage by first selecting the airport of interest, then selecting the individual chart for that airport. Approach charts can be loaded from either the Custom/IFR Map or from the Chart View Function.
Chart View
ChartView as viewed on the Custom Map Page

88
Detailed Operation
• Pressing the INFO key while a chart is loaded or being viewed will bring up the header, profile and minimums associated with the chart.
Chart Data SourceThe same set of charts that are available in electronic form from the Jeppesen JeppView™ product are available for loading onto the MX20 platform. These consist of approaches, SIDS, STARS, airspace charts, and airport surface diagrams. The MX20 can display all of these charts from the Chart View Function, or a more limited sub-set as dynamic overlays on the “Custom Map” when the corresponding chart has been “Geo-Referenced” by Jeppesen.
Data CardAs there are more charts available from Jeppesen than will fit on the physical data card, predetermined cover-age areas are loaded instead of the entire contents of the Jeppesen CD ROM. This process is performed using the data loader software tool provided by Jeppesen. The MX20 Chart View data card can hold approximately 10,000 charts at a given time.
Chart Geo-Referencing For the ownship position to be overlaid on the chart (as viewed from the Custom/IFR Map), the chart must be available in a “Geo-Referenced” version, as supplied by Jeppesen. Currently not all charts and airport surface charts are geo-referenced.
When a chart is viewed and a red “X” is present on the earth symbol (to the left of the chart name), the chart is NOT geo-referenced and thus cannot be “loaded.”
Chart View

89
Detailed Operation
Chart Overlay in the Custom/IFR MapOn the Custom Map or the IFR En Route Map, approach charts (not airport surface charts) must be manually “loaded” as there are multiple approach charts that can apply for a given region (i.e. multiple approach charts for the same airport). An approach chart will be displayed as an overlay when the following conditions are met:
• The approach chart is within the database residing on the card• The approach chart is geo-referenced by Jeppesen• The approach chart has been loaded• The aircraft position is within the coverage of the approach chart• The aircraft speed is above the air/ground threshold (aircraft is in flight)
Load a specific approach chart for use as an overlay by first selecting the airport and then selecting the approach chart.
Selecting the AirportPressing the LOAD CHART key on the Custom or IFR Map menu will present a list of airports that have geo-referenced approach charts available. The first airport within the list is the final destination waypoint as selected on the external GPS navigator, with additional airports listed based on a nearest to present position search. Airports and approach charts that are not geo-referenced will not be shown for selection on this menu.
NOTE: Prior to loading an approach chart, there is an operational benefit to selecting the desired airport on the GPS navigator as the final destination waypoint. The MX20 can then detect this and will place the corresponding airport at the top of the airport list menu for convenience.
The remaining number of airports within the list will vary depending on the complexity of the database within the current region and the number of geo-referenced approach charts associated with the airports in the area. The MX20 performs a complex filtering process that eliminates airports and associated approach charts that are not geo-referenced, based on present position. This task is time limited to three seconds, meaning that if extensive filtering is required, the nearest based list may be shorter in some circumstances than in others.
Chart View
Chart View Function Menu Items

90
Detailed Operation
Loading the Approach ChartOnce the airport is selected, the individual approach chart to be overlaid can be loaded from a list of geo-ref-erenced approach charts available for that airport. Not all approach charts can be overlaid in this fashion and only geo-referenced charts will be presented for selection from the Custom Map. Because of this, it is possible that approach charts that are viewable under the Chart View Function may not be presented in this list.
NOTE: The pilot must be aware that not all charts in the loaded database can be used as an overlay.
Once the approach chart is loaded, a green Annunciator will illuminate at the top of the screen indicating the airport name and specific chart that has been loaded.
Overlay Chart Loading Example
1. Press FN and then MAP or IFR. 2. Press MENU and then the LOAD CHART Menu Item key. 3. Highlight the desired airport with the arrow “smart” keys and then press the SELECT “smart” key. 4. Highlight the desired approach with the arrow “smart” keys and then press the LOAD “smart” key. 5. Adjust the zoom level using the IN or OUT “smart” keys.
Viewing the Chart as an Overlay
Display of Coverage AreaOnce the desired approach chart has been loaded, a green Annunciator bar with the approach name is illumi-nated at the top of the Custom and IFR maps. If the aircraft is outside the coverage area of the approach chart, a black rectangular box will be presented that shows the coverage of the chart itself.
Once the aircraft has entered the coverage area, the chart contents will be displayed on the screen. Note that a loaded approach chart is only viewable from the maps when the aircraft is in flight, otherwise, the airport surface chart has priority and the approach chart must be viewed from the Chart View function.
Chart View
Selecting an Airport in the IFR Function
Selecting an Approach Chart in the IFR Function
Selecting an Approach Chart in the IFR Function
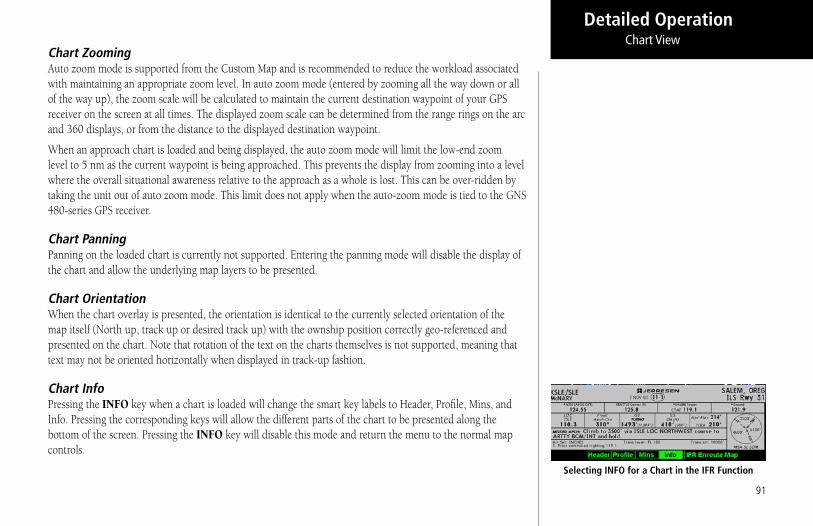
91
Detailed Operation
Chart ZoomingAuto zoom mode is supported from the Custom Map and is recommended to reduce the workload associated with maintaining an appropriate zoom level. In auto zoom mode (entered by zooming all the way down or all of the way up), the zoom scale will be calculated to maintain the current destination waypoint of your GPS receiver on the screen at all times. The displayed zoom scale can be determined from the range rings on the arc and 360 displays, or from the distance to the displayed destination waypoint.
When an approach chart is loaded and being displayed, the auto zoom mode will limit the low-end zoom level to 5 nm as the current waypoint is being approached. This prevents the display from zooming into a level where the overall situational awareness relative to the approach as a whole is lost. This can be over-ridden by taking the unit out of auto zoom mode. This limit does not apply when the auto-zoom mode is tied to the GNS 480-series GPS receiver.
Chart PanningPanning on the loaded chart is currently not supported. Entering the panning mode will disable the display of the chart and allow the underlying map layers to be presented.
Chart OrientationWhen the chart overlay is presented, the orientation is identical to the currently selected orientation of the map itself (North up, track up or desired track up) with the ownship position correctly geo-referenced and presented on the chart. Note that rotation of the text on the charts themselves is not supported, meaning that text may not be oriented horizontally when displayed in track-up fashion.
Chart InfoPressing the INFO key when a chart is loaded will change the smart key labels to Header, Profile, Mins, and Info. Pressing the corresponding keys will allow the different parts of the chart to be presented along the bottom of the screen. Pressing the INFO key will disable this mode and return the menu to the normal map controls.
Chart View
Selecting INFO for a Chart in the IFR Function

92
Detailed Operation
Chart View FunctionThe Chart View Function is accessed by pressing the FN Function key and selecting the Chart View (CHART) function.
The Chart View Function incorporates five menu items that control two basic operations: • Selecting a chart (for static viewing)• Loading a chart (for map overlay)
The term “Selecting a chart” is used to designate that a given chart is selected for static viewing on the screen. This is typically done by first specifying the airport, then the specific chart for that airport.
The term “Loading a chart” is used to designate that a given chart is loaded for flight operations and can be used as an actual overlay on the maps. Loading a chart through the Chart View Function is identical to loading a chart from the Custom/IFR map as described in previous sections.
All charts within the database, geo-referenced or not, can be statically viewed from the Chart View Function. Only geo-referenced charts can be loaded for map overlay purposes.
The Chart View Function will retain the last view set and will not change the chart, zoom level, or pan setting when the function is exited and re-entered, allowing it to operate similar to a physical chart manual. An excep-tion to this is when a chart is loaded in the Custom or IFR Map functions. When this is done, the loaded chart is set as the currently selected chart in the Chart View function.
Chart View Example:
1. Press FN and then CHART. 2. Depending on Chart status last used:
a. Press MENU and then the SELECT AIRPORT Menu Item key; or
b. Highlight the desired airport with the arrow “smart” keys and then press the SELECT “smart” key. 3. Highlight the desired chart with the arrow “smart” keys and then press the LOAD or VIEW “smart”
key.
Chart View

93
Detailed Operation
4. View the chart. Adjust the zoom level using the IN or OUT “smart” keys. Press the PAN “smart” key and use the movement Menu Item keys on the right side of the display. Use the INFO “smart” key to step through the different details of the chart.
Menu Items
Search IDThe Search ID menu option within the Chart View Function allow you to search for a specific airport identi-fier. As this operation requires multiple key-strokes to look up a specific chart, it is not recommended as the primary mechanism for accessing the charts, but does allow for flexibility. When an airport is located, it will be set as the currently selected airport. Airport identifiers can be entered with or without the “K” prefix.
Select AirportThe Select Airport operation allows the airport of interest to be selected from a pop-up list. The airports pre-sented in the list are determined based on the final destination waypoint as the first entry, and a nearest type search for the remaining entries. This method allows the airport to be quickly located based on the current flight plan on the external GPS navigator.
Once the airport is located, the Select Chart menu is presented (see below), allowing a specific chart for that airport to be either loaded or simply viewed.
Select ChartThe Select Chart operation allows the list of charts for the currently selected airport to be listed in a pop-up list. Within this list, a circular earth symbol indicates that the chart is geo-referenced and therefore can be loaded for use as an overlay on the maps. If a red “X” is presented through the earth symbol, then that specific chart is not geo-referenced and can be viewed, but not loaded as a map overlay.
Select LoadedThe Select Loaded operation allows the currently loaded chart to be selected for viewing. This is typically done if a given chart was LOADED from the Custom/IFR Map, and viewing it from the Chart View Function is desired. Note that loading a chart from the Custom/IFR Map will also load and select the chart for viewing.
Chart View
Searching for an Airport by Ident in Chart Function
Selecting an Airport from a list in the Chart Function
Selecting a Chart from a list in the Chart Function
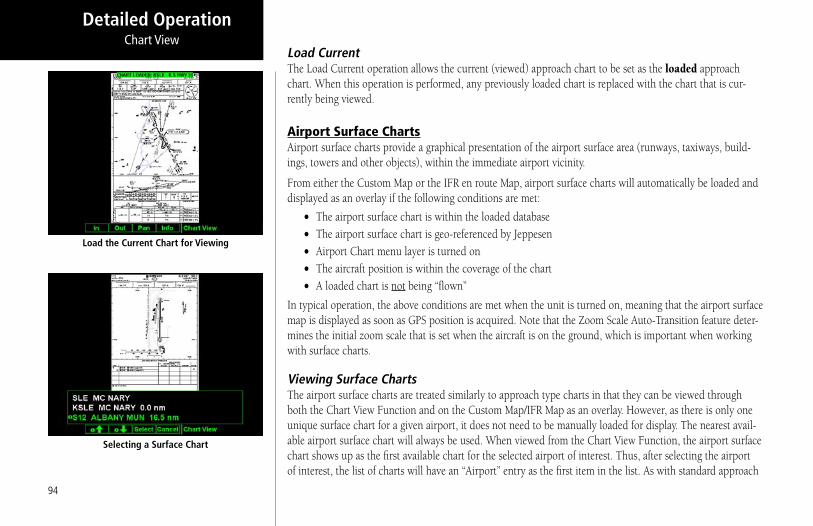
94
Detailed Operation
Load CurrentThe Load Current operation allows the current (viewed) approach chart to be set as the loaded approach chart. When this operation is performed, any previously loaded chart is replaced with the chart that is cur-rently being viewed.
Airport Surface ChartsAirport surface charts provide a graphical presentation of the airport surface area (runways, taxiways, build-ings, towers and other objects), within the immediate airport vicinity.
From either the Custom Map or the IFR en route Map, airport surface charts will automatically be loaded and displayed as an overlay if the following conditions are met:
• The airport surface chart is within the loaded database• The airport surface chart is geo-referenced by Jeppesen• Airport Chart menu layer is turned on• The aircraft position is within the coverage of the chart• A loaded chart is not being “flown”
In typical operation, the above conditions are met when the unit is turned on, meaning that the airport surface map is displayed as soon as GPS position is acquired. Note that the Zoom Scale Auto-Transition feature deter-mines the initial zoom scale that is set when the aircraft is on the ground, which is important when working with surface charts.
Viewing Surface ChartsThe airport surface charts are treated similarly to approach type charts in that they can be viewed through both the Chart View Function and on the Custom Map/IFR Map as an overlay. However, as there is only one unique surface chart for a given airport, it does not need to be manually loaded for display. The nearest avail-able airport surface chart will always be used. When viewed from the Chart View Function, the airport surface chart shows up as the first available chart for the selected airport of interest. Thus, after selecting the airport of interest, the list of charts will have an “Airport” entry as the first item in the list. As with standard approach
Chart View
Load the Current Chart for Viewing
Selecting a Surface Chart
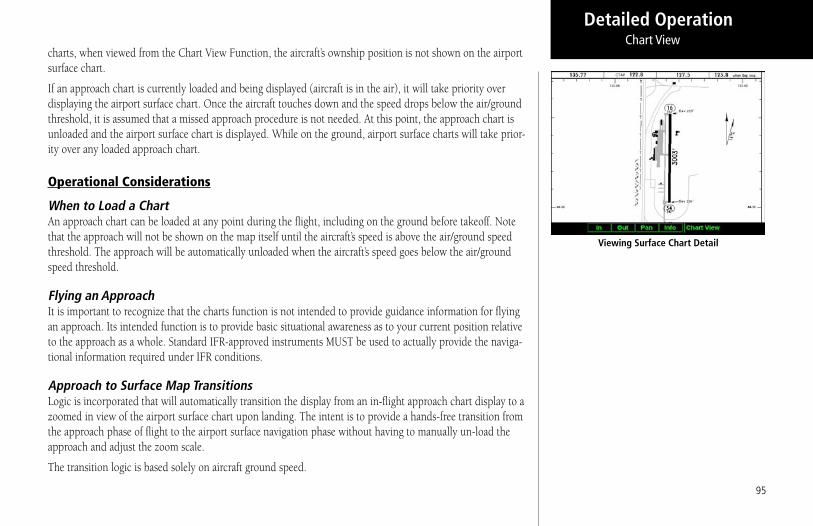
95
Detailed Operation
charts, when viewed from the Chart View Function, the aircraft’s ownship position is not shown on the airport surface chart.
If an approach chart is currently loaded and being displayed (aircraft is in the air), it will take priority over displaying the airport surface chart. Once the aircraft touches down and the speed drops below the air/ground threshold, it is assumed that a missed approach procedure is not needed. At this point, the approach chart is unloaded and the airport surface chart is displayed. While on the ground, airport surface charts will take prior-ity over any loaded approach chart.
Operational Considerations
When to Load a ChartAn approach chart can be loaded at any point during the flight, including on the ground before takeoff. Note that the approach will not be shown on the map itself until the aircraft’s speed is above the air/ground speed threshold. The approach will be automatically unloaded when the aircraft’s speed goes below the air/ground speed threshold.
Flying an ApproachIt is important to recognize that the charts function is not intended to provide guidance information for flying an approach. Its intended function is to provide basic situational awareness as to your current position relative to the approach as a whole. Standard IFR-approved instruments MUST be used to actually provide the naviga-tional information required under IFR conditions.
Approach to Surface Map TransitionsLogic is incorporated that will automatically transition the display from an in-flight approach chart display to a zoomed in view of the airport surface chart upon landing. The intent is to provide a hands-free transition from the approach phase of flight to the airport surface navigation phase without having to manually un-load the approach and adjust the zoom scale.
The transition logic is based solely on aircraft ground speed.
Chart View
Viewing Surface Chart Detail

96
Detailed Operation
When an approach chart is loaded and being flown, and the aircraft ground speed drops below the air/ground threshold (set from within the SYS Function), it is assumed that a landing has been performed. At this point, the loaded approach chart is automatically unloaded and the airport surface chart will be presented on the screen showing runways, taxiways, etc.
However, if approach chart is loaded and being flown and the aircraft crosses the missed approach point with-out slowing, it is assumed that a missed approach procedure is being performed. In this case, the automatic transition to surface maps does not occur and the approach is not automatically un-loaded. See the Initial Zoom and Transition Speed selection in the System Function.
Chart NOTAMSAny applicable NOTAMS that apply for a given chart are shown under the INFO key when that chart is selected. The chart should be viewed for NOTAMS before use.
Important System LimitationsNote that while on the ground and viewing airport surface charts, the display can be oriented in the “Track Up” mode. In this mode, the last known GPS-based track as obtained from the external GPS navigation system is used to orient the map. GPS track is typically not accurate at low speeds and does not reflect the actual head-ing of the aircraft at all times.
Invert OptionAs with the basic maps, the chart image can be inverted using the standard invert key.
Chart View
97
Detailed Operation
Typical Operational ScenarioThe following scenarios makes the assumption that:
• The appropriate charts are available and geo-referenced• The default ground zoom level is set to 0.5 nm• The default air zoom level is set to “AUTO”
Typical Taxi ScenarioOn power up and GPS position acquisition, the Custom Map Function will show the aircraft on the surface chart at a zoom level of 0.5 nm. The aircraft will be shown relative to taxiways and runways throughout the taxi procedure.
Typical Takeoff ScenarioOn takeoff roll, when the aircraft reaches the air/ground speed threshold, the display will automatically transi-tion to the en route zoom mode of “AUTO” and adjust the display to show the current destination waypoint.
Typical Approach ScenarioSetting the destination waypoint to the destination airport on the GPS navigation system and pressing LOAD CHART from the Custom/IFR Map will present the destination airport in the selection list. Selecting this airport will then bring up the approach charts that are available for that airport, which can then be loaded by pressing the LOAD “smart” key.
Typical Landing ScenarioWith an approach chart being “flown,” upon touchdown and rollout, the chart will be unloaded and the map will automatically switch to the airport surface chart with the zoom level set to 0.5 nm.
Chart View
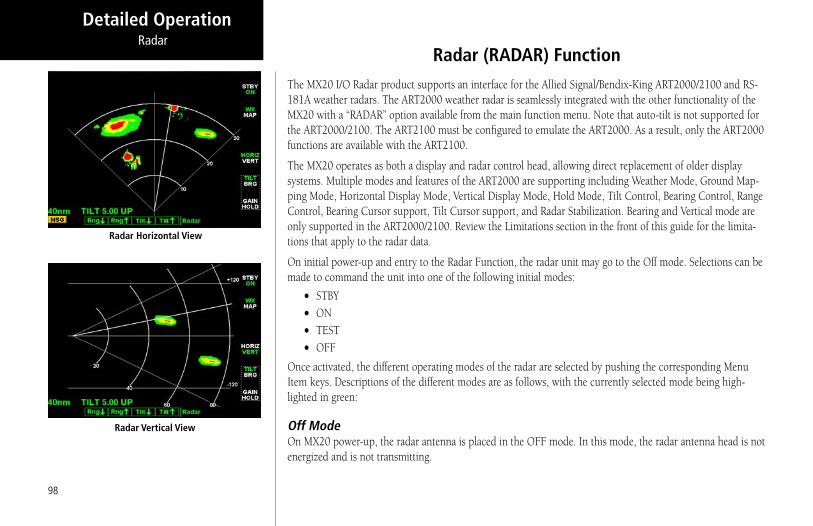
98
Detailed Operation
Radar (RADAR) FunctionThe MX20 I/O Radar product supports an interface for the Allied Signal/Bendix-King ART2000/2100 and RS-181A weather radars. The ART2000 weather radar is seamlessly integrated with the other functionality of the MX20 with a “RADAR” option available from the main function menu. Note that auto-tilt is not supported for the ART2000/2100. The ART2100 must be configured to emulate the ART2000. As a result, only the ART2000 functions are available with the ART2100.
The MX20 operates as both a display and radar control head, allowing direct replacement of older display systems. Multiple modes and features of the ART2000 are supporting including Weather Mode, Ground Map-ping Mode, Horizontal Display Mode, Vertical Display Mode, Hold Mode, Tilt Control, Bearing Control, Range Control, Bearing Cursor support, Tilt Cursor support, and Radar Stabilization. Bearing and Vertical mode are only supported in the ART2000/2100. Review the Limitations section in the front of this guide for the limita-tions that apply to the radar data.
On initial power-up and entry to the Radar Function, the radar unit may go to the Off mode. Selections can be made to command the unit into one of the following initial modes:
• STBY• ON• TEST• OFF
Once activated, the different operating modes of the radar are selected by pushing the corresponding Menu Item keys. Descriptions of the different modes are as follows, with the currently selected mode being high-lighted in green:
Off ModeOn MX20 power-up, the radar antenna is placed in the OFF mode. In this mode, the radar antenna head is not energized and is not transmitting.
Radar
Radar Horizontal View
Radar Vertical View
99
Detailed Operation
Standby Mode In the standby mode, the radar head is powered up, but is not transmitting. Placing the unit into standby mode initiates the warm-up sequence that is required by the transmitter within the radar head assembly.
Weather Mode In the weather (WX) mode, the antenna is transmitting and painting reflected returns on the screen. This mode is intended for painting airborne weather and is the normal operating mode for the unit. Radar returns are painted in the following colors:
• Black• Green• Yellow• Red• Magenta
Black is the weakest return while Magenta shows where the strongest returns were obtained. While in the weather mode (or any other time the radar is transmitting), a green RDR indicator is presented in the upper left corner of the display.
MAP ModeThe Map (MAP) mode is used for obtaining returns from the ground. Map mode is available for the ART2000. In this mode, the return data is rendered in the following colors:
• Black• Cyan• Green• Yellow• Magenta
While in the Map mode, the gain can be adjusted (see below).
Radar

100
Detailed Operation
Horizontal ModeThe Horizontal Mode (HORIZ) commands the radar head to scan in the horizontal plane at a pilot selectable tilt angle. In this mode, the current Tilt angle is shown on the lower half of the display in green.
Vertical Mode (ART2000/2100 only)The Vertical Mode (VERT) commands the radar head to scan in the vertical plane at a pilot selectable bearing off of the nose of the aircraft. In this mode, the current Bearing angle is shown on the lower half of the display in green.
Range ControlThe range can be adjusted using the RNG UP and RNG DOWN keys. Values of 10 nm to 240 nm can be selected.
Tilt ControlThe Tilt (TILT) control is used to adjust the current tilt angle of the radar head when horizontal sweeping is being performed. The value can be adjusted from a +15° to –15° range.
While in the Horizontal mode, the tilt is adjusted using the TILT UP and TILT DOWN “smart” keys.
Bearing Control (ART2000/2100 only)The Bearing (BRG) control is used to adjust the current bearing angle of the radar head when vertical sweeping is being performed. The value can be adjusted from 45° Left to 45° Right. Bearing adjustment is available for the ART2000.
While in the Vertical mode, the bearing is adjusted using the BRG RIGHT and BRG LEFT “smart” keys.
Gain ControlAvailable only when the MAP mode is current, the gain is used to adjust the sensitivity of the radar receiver. It can be used in map mode to adjust the characteristics of the returns from the surface.
While in the Ground mode, the gain is adjusted using the GAIN UP and GAIN DOWN “smart” keys.
Radar
Radar Range and Bearing Control
Radar Tilt Control
Radar Gain Control

101
Detailed Operation
Hold ControlThe Hold mode is used to freeze the display. While in the hold mode, the green RDR indicator flashes, indicat-ing that the display is not being updated.
Cursor Pre-Select Operation (ART2000/2100 only)Cursor pre-select option can be used to pre-select a bearing or tilt angle prior to switching the vertical or horizontal scan mode of the display. The cursor is a cyan line extending along the Radar’s projected path and can be displayed in both the horizontal and vertical modes.
For example, if horizontal scanning is occurring, a cursor line can be activated to pre-select a specific bearing to a weather cell of interest. Once selected, changing the scan mode to vertical will automatically set the bear-ing of the vertical sweeps to the bearing previously indicated by the cursor line.
Conversely, if vertical scanning is occurring, a cursor line can be activated to pre-select a specific tilt to a weather cell of interest. Once selected, changing the scan mode to horizontal will automatically set the tilt angle of the horizontal sweeps to the tilt angle previously indicated by the cursor line.
The bearing cursor is activated any time the Tilt/Bearing control is changed from its default position.
Radar Return SignalsInterpreting radar return signals is beyond the scope of this manual. Please refer to the radar user’s guide for details on interpreting radar data.
Radar

102
Detailed Operation
Radar Setup PagePressing the MENU key while in the Radar Function allows the stabilization to be turned on or off. The cur-rently selected mode is displayed at the top of the radar screen during normal operations.
Additional status information is also shown while the radar menu is active.
Stabilization (STAB)When Stabilization is On, a command is sent to the radar head instructing it to use the supplied gyro com-mands to compensate the sweep patterns for pitch and roll of the aircraft. When stabilization is activated, the STAB label will be green. When Stabilization is turned off, the STAB label is white.
Radar
Radar Setup Page

103
Detailed Operation
XM Satellite RadioAudio entertainment is available through the XM Satellite Radio Service when activated in the optional installa-tion of the GDL 69A. The MX20 serves as the control head for your remotely mounted GDL 69A. XM Satellite Radio allows you to enjoy a variety of radio programming over long distances without having to constantly search for new stations. Based on signal from satellites, coverage far exceeds land-based transmissions. When enabled, the XM Satellite Radio audio entertainment is accessible by using the XM function smart key.
The information on the XM Satellite Radio display is composed of four areas: the Active channel, available Channels, Category of the highlighted channel, and the Volume setting. The Active Channel window shows the Channel Name and Number, artist, Song Title, Category, and provides an indication of signal strength. A bar graph to the right of the antenna symbol describes the signal strength. Maximum signal strength is shown by three full bars.
1. Press the FN key and then the XM function key when displayed. 2. The function smart keys at the bottom of the screen let you control the Volume (Vol), Channel (Chan),
Category (Cat), or select the channel directly by entering the number (Direct). 3. The Menu/Enter key brings up menu items for more detail on each sub-function.
Menu Page 1The first option page of the XM Radio function lets you select the options for viewing the Radio ID, saving a channel preset, going to the last channel, or selecting preset channels 1 and 2. The last option takes you to the next pages of options for preset channels 3 through 15.
XM Satellite Radio
XM Radio with Active Channel
XM Radio Menu Page 1
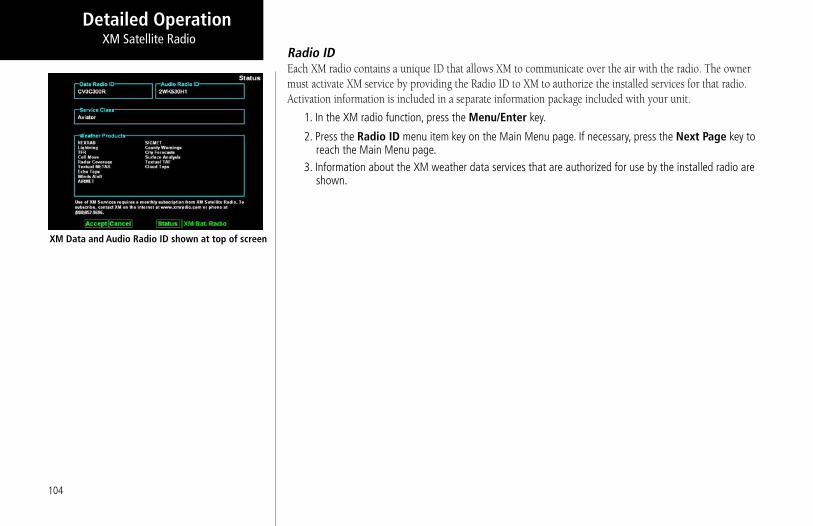
104
Detailed Operation
Radio IDEach XM radio contains a unique ID that allows XM to communicate over the air with the radio. The owner must activate XM service by providing the Radio ID to XM to authorize the installed services for that radio. Activation information is included in a separate information package included with your unit.
1. In the XM radio function, press the Menu/Enter key.
2. Press the Radio ID menu item key on the Main Menu page. If necessary, press the Next Page key to reach the Main Menu page.
3. Information about the XM weather data services that are authorized for use by the installed radio are shown.
XM Satellite Radio
XM Data and Audio Radio ID shown at top of screen
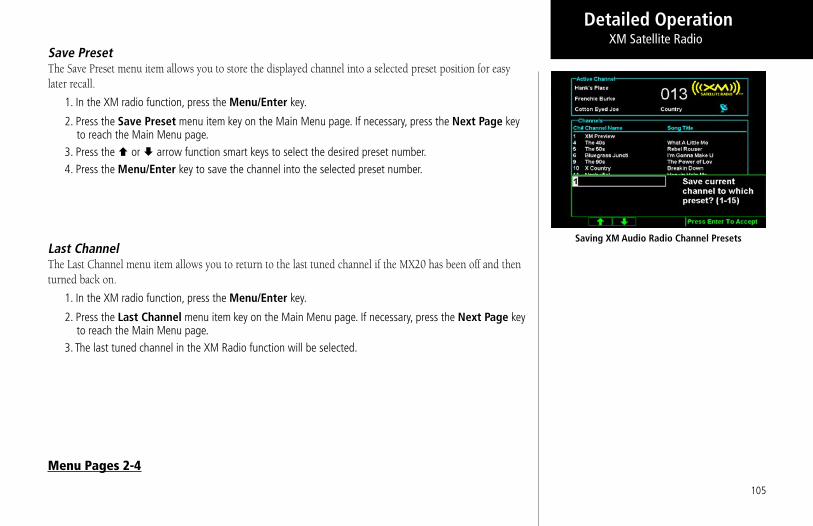
105
Detailed Operation
Save PresetThe Save Preset menu item allows you to store the displayed channel into a selected preset position for easy later recall.
1. In the XM radio function, press the Menu/Enter key.
2. Press the Save Preset menu item key on the Main Menu page. If necessary, press the Next Page key to reach the Main Menu page.
3. Press the or arrow function smart keys to select the desired preset number. 4. Press the Menu/Enter key to save the channel into the selected preset number.
Last ChannelThe Last Channel menu item allows you to return to the last tuned channel if the MX20 has been off and then turned back on.
1. In the XM radio function, press the Menu/Enter key.
2. Press the Last Channel menu item key on the Main Menu page. If necessary, press the Next Page key to reach the Main Menu page.
3. The last tuned channel in the XM Radio function will be selected.
Menu Pages 2-4
XM Satellite Radio
Saving XM Audio Radio Channel Presets
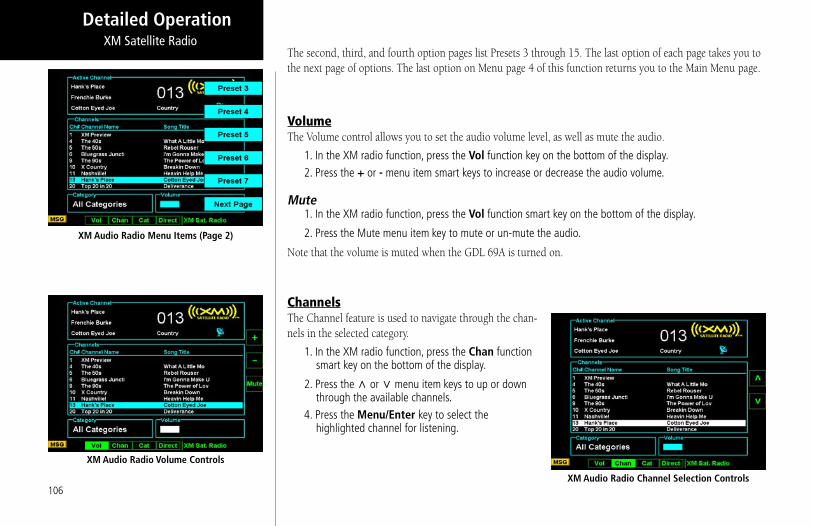
106
Detailed Operation
The second, third, and fourth option pages list Presets 3 through 15. The last option of each page takes you to the next page of options. The last option on Menu page 4 of this function returns you to the Main Menu page.
VolumeThe Volume control allows you to set the audio volume level, as well as mute the audio.
1. In the XM radio function, press the Vol function key on the bottom of the display. 2. Press the + or - menu item smart keys to increase or decrease the audio volume.
Mute1. In the XM radio function, press the Vol function smart key on the bottom of the display.
2. Press the Mute menu item key to mute or un-mute the audio.
Note that the volume is muted when the GDL 69A is turned on.
ChannelsThe Channel feature is used to navigate through the chan-nels in the selected category.
1. In the XM radio function, press the Chan function smart key on the bottom of the display.
2. Press the or menu item keys to up or down through the available channels.
4. Press the Menu/Enter key to select the highlighted channel for listening.
XM Satellite Radio
XM Audio Radio Menu Items (Page 2)
XM Audio Radio Volume Controls
XM Audio Radio Channel Selection Controls

107
Detailed Operation
CategoriesCategories of channels, such as Jazz, Rock, or News, can be selected to list the available channels for a type of music or other contents.
1. In the XM radio function, press the Cat function smart key on the bottom of the display.
2. Press the Up or Down arrow menu item keys to up or down through the available categories. Pressing the All menu item key will select all categories.
4. Press the Menu/Enter key to select the highlighted category. 5. You can now use the Channel function to select a channel from the category list selected.
Direct AccessChannels can be accessed directly by entering the channel number using the smart keys.
1. In XM mode, press the Direct function smart key. The number values will be shown above the function and to the left of the menu item smart keys.
2. Press the function and menu item keys for the three digit channel number. 3. Press Menu/Enter.
XM Satellite Radio
XM Audio Radio Categories
Direct Access of XM Audio Radio Channels

108
Detailed Operation
XM Advisory Messages
Message Condition DescriptionCheck Antenna Antenna not connected The XM antenna(s) or antenna cable are disconnected
from the radio.
Updating Updating encryption code The encryption code has been changed over the air by XM and the radio has not received the newest code information yet from the XM signal.
No Signal Loss of signal The radio is not able to receive a strong enough XM signal to decode it.
Loading Acquiring channel audio or information
Either the corresponding audio or text is temporarily unavailable for a given channel selected because the radio still has to receive and decode this information.
Off Air Channel not in service A valid XM channel number (and its corresponding service ID) is not broadcasting any programming.
--- or Channel ---
Channel no longer avail-able
--- Corresponding Artist Name/Feature or Song/Program Title are empty
--- or Channel ---
No channel available for the chosen category
XM Satellite Radio

109
Detailed Operation
Activating XM Satellite Radio ServicesBefore audio entertainment can be used, the unit must be activated by XM Satellite Radio and services are sub-scribed to XM Satellite Radio. Please note that the GDL 69 is a weather data link. The GDL 69A is a weather data link and audio entertainment receiver.
1. Press the FN key and then the XM function key when displayed. 2. Press Menu/Enter to display the Radio ID menu item. 3. Press the Radio menu item smart key to display the Radio IDs, Service Class, and Weather Products. 4. Follow the XM Satellite Radio Activation procedure and press Accept at the appropriate time.
Gather InformationYour GDL 69 or GDL 69A is shipped with one or two radio hardware identifications, respectively. These IDs serve as identification codes for your XM-equipped GDL 69/69A and are needed in the activation process. The ID(s) is attached to this instruction sheet and printed on a label on the back of the unit. The IDs can also be retrieved through the MX20 in the Radio ID page of the XM Satellite Radio function. Contact your dealer if you are unable to locate the radio hardware IDs.
Contact XM Satellite Radio
Weather and/or audio data from your GDL 69/69A are provided by XM Satellite Radio, a company separate and independent from Garmin Corporation. Have your radio hardware IDs ready before contacting XM Satel-lite Radio. During the process, you can select services for subscription. Keep in mind that the GDL 69 has no audio capability, audio services will not be available with the unit.
Follow the GDL 69/69A XM Satellite Radio Activation Instructions (190-00355-04) enclosed with your GDL 69/69A unit to activate the XM products.
XM Satellite Radio

110
Detailed Operation
This page intentionally left blank

111
Detailed Operation
System (SYS) FunctionThe System function allows you to set general Nav preferences, obtain version information, and perform tests on the operation of your MX20.
System Nav Pages
Ownship Symbol The Ownship Symbol option allows you to choose the type of icon that will represent your aircraft on the display. You can make selections of Single, Twin, Jet, or Helicopter .
Lat/Lon FormatThe Lat/Lon format option allows you to select between two choices for the display of Lat/Lon coordinates. Choose between degrees-minutes-seconds-seconds decimals (DD MM SS.SS) or degrees-minutes-minutes decimals (DD MM.MM).
Set Baro Correction UnitsBaro-Correction (QNH) can now be entered in Millibars in addition to Hg. This preference is set under the SYS function.
Set Baro Correction You may enter the corrected barometric pressure so that the proper pressure altitude will be displayed.
1. Press the MENU ITEM key for Set Baro Correction. 2. The Function “smart” keys at the bottom of the display will have direction arrows above them. Press the
UP/DOWN arrow keys to change the value of the highlighted number. Press the LEFT/RIGHT arrow keys to move to another number.
3. Press MENU/ENTER to save the changed values and leave the Set Baro Correction option.
System Nav Setup Menu Items (Page 1)

112
Detailed Operation
Display Latitude/Longitude Lines Use this option to choose to display or not display Lat/Lon lines on the map displays.
Initial En Route Zoom and Initial Ground Zoom Transition SpeedA zoom scale auto-transition point is supported that helps to reduce the pilot workload by automating the selection of the zoom scale based on the phase of flight. The two transitions are:
• Ground-to-Air mode (Takeoff)• Air-to-Ground mode (Landing)
When the aircraft transitions from Ground-to-Air, the zoom scale is automatically set to a user selected “en route” zoom scale. When the aircraft transitions from Air-to-Ground, the zoom scale is automatically set to a user selected “Ground” zoom scale. The transition point is based on a user selected En Route/Ground Transi-tion Speed and is based on GPS ground speed.
The Auto-Transition feature allows for optimal close-in viewing while on the ground and optimal long range viewing while in flight, without the user having to make manual zoom scale adjustments while in the takeoff and landing phases of flight. The Zoom scale is shown in the lower left corner of the display.
The En Route and Ground zoom scales and the transition point are adjusted under the SYS Function.
“En Route/Ground Transition Speed” – 10-100 kts
“Initial En Route Zoom Scale” – Auto, 0.25 – 250 nm
“Initial Ground Zoom Scale” – 0.25 – 5 nm
The recommended settings for the initial zoom scales are Auto for the en route mode and 0.5 nm for the ground mode.
1. Press FN until you see the SYS function key. 2. Press the SYS function key. 3. With the “NAV” selection highlighted press MENU/ENTER. 4. Press the NEXT PAGE Menu Item key. 5. Press the Menu Item keys as needed to select the settings. Press MENU/ENTER to save your settings.
System
System Nav Setup Menu Items (Page 2)

113
Detailed Operation
Slave Zoom to GPS ZoomThis is only available when installed with a GNS 480-series GPS navigator. When enabled and the MX20 is in Auto Zoom mode, the MX20 will automatically set the zoom scale to that used on the GNS 480-series naviga-tor.
AutoLoad Electronic ChartsThis is only available when installed with an GNS 480-series GPS navigator. This feature must be disabled when the MX20 is connected to a GPS navigator other than an GNS 480-series navigator. It allows the GNS 480-series equipment to instruct the MX20 to load a selected approach chart.
Display ICAO for US AirportsPress the Menu Item key to toggle on/off the display of ICAOs for US airports. When enabled, the leading “K” character for United States airports is displayed according to the ICAO format. When disabled, the leading “K” is not displayed.
Altitude UnitsPress the Menu Item key to set the display of altitude in either feet or meters.
System
System Nav Setup Menu Items (Page 3)

114
Detailed Operation
System Info The System Info page includes information about the software and database versions of the MX20. The data port status is also displayed. The Data port status description allows you to verify correct system installation and to monitor the health of each of the devices sending information to the MX20. Use this information when you contact your dealer or the factory.
GPS and Data Link Status For GPS/UAT equipped installs, the SYS/INFO page shows additional details for both the internal GPS engine and the data-link status. When the MX20 is connected to a legacy UAT, the ADS-B and TIS-B Data Link Status lines are displayed. When the MX20 is connected to a GDL 90 UAT, only the ADS-B Data Link Status line is present because there is no differentiation between ADS-B and TIS-B target data.
GPS satellite usage and signal strength are presented in the upper right of the info page in addition to each satellite’s position in the sky. If no GPS is installed in the MX20, the text “Internal GPS Not Available” will be shown.
Data-link information is monitored as follows:
HB Heart-Beat from the UAT data-link radio
ADS-B ADS-B broadcast packets received
TIS-B TIS-B broadcast packets received (legacy UAT only)
FIS TX Textual weather data packets received
FIS WX Graphical weather data packets received
System
System Info Page

115
Detailed Operation
System Test PageThe System Test Page allows you to test the display of the MX20 to ensure proper operation.
Test Pattern 1The Test Pattern option displays a number of patterns and colors to test the MX20 display. Use this option to verify proper operation of the display or when contacting Customer Service.
Red, Green, Blue, White Test PatternChoosing the Red, Green, Blue, or White options floods the screen with the selected color. Use this option to verify proper operation of the display or when contacting Garmin Customer Service.
System
System Test Page Menu Items
System Test Test Pattern Page

116
Appendix
Caring For Your MX20
Display Care and CleaningYour MX20 has a durable display, but reasonable care must be taken to maintain its performance and life. To remove stains, smudges, fingerprints, and so forth, we recommend these cleaning methods. If the first method fails to remove the problem, try the next method.
• Wipe with a clean, dry, non-abrasive fabric (for example, cotton or handi-wipes). Do NOT use paper products, such as paper towels or facial tissues.
• Blow on the area to condense moisture on the display and then wipe the area with the clean fabric. • Moisten a clean fabric with a small amount of water and wipe the display area. • Apply a small amount of glass cleaner (without ammonia) to the fabric and wipe the area. • Apply a small amount of isopropyl alcohol and wipe the area (this is your last resort).
Contacting the FactoryIf efforts to resolve the problem fail, contact your dealer or the factory for technical assistance. The Garmin customer service staff will gladly assist you.
Garmin International, Inc. Customer Service Department 1200 East 151st Street Olathe, KS 66062-3426 USA (913) 397-8200 FAX (913) 397-8282
Caring for Your MX20
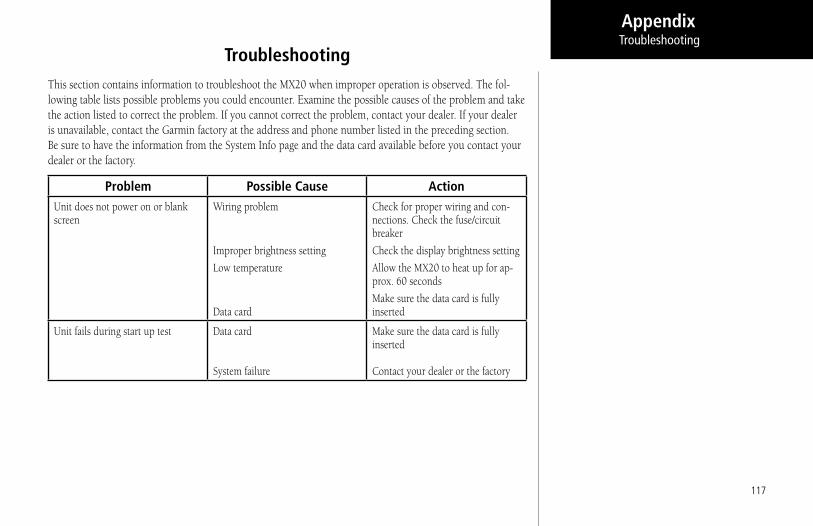
117
Appendix
TroubleshootingThis section contains information to troubleshoot the MX20 when improper operation is observed. The fol-lowing table lists possible problems you could encounter. Examine the possible causes of the problem and take the action listed to correct the problem. If you cannot correct the problem, contact your dealer. If your dealer is unavailable, contact the Garmin factory at the address and phone number listed in the preceding section. Be sure to have the information from the System Info page and the data card available before you contact your dealer or the factory.
Problem Possible Cause ActionUnit does not power on or blank screen
Wiring problem
Improper brightness setting
Low temperature
Data card
Check for proper wiring and con-nections. Check the fuse/circuit breaker
Check the display brightness setting
Allow the MX20 to heat up for ap-prox. 60 seconds
Make sure the data card is fully inserted
Unit fails during start up test Data card System failure
Make sure the data card is fully inserted Contact your dealer or the factory
Troubleshooting

118
Appendix
Problem Possible Cause ActionPOS data flag shows Antenna or wiring
Position source wpt
Position source serial data Interference
Installation setup
Check the antenna and wiring
Ensure that a waypoint is selected as the current destination and a Nav flag is not shown
Ensure that the serial data output is configured properly
Have dealer/installer check for any interference sources
Have dealer/installer check for proper MX20 setup
RTE (Route) flag Position source route Ensure that the external position source has an active route engaged
ALT (Altitude) flag Serial altitude source Ensure the serial altitude encoder is powered up and working properly
Have dealer/installer check for proper installation and setup of the encoder
If altitude data is provided by an Apollo GX product, ensure that the GPS position has been acquired and a waypoint is selected as the current destination
LT (Lightning) flag WX500 installation Have dealer/installer check for proper installation of the WX500
Troubleshooting
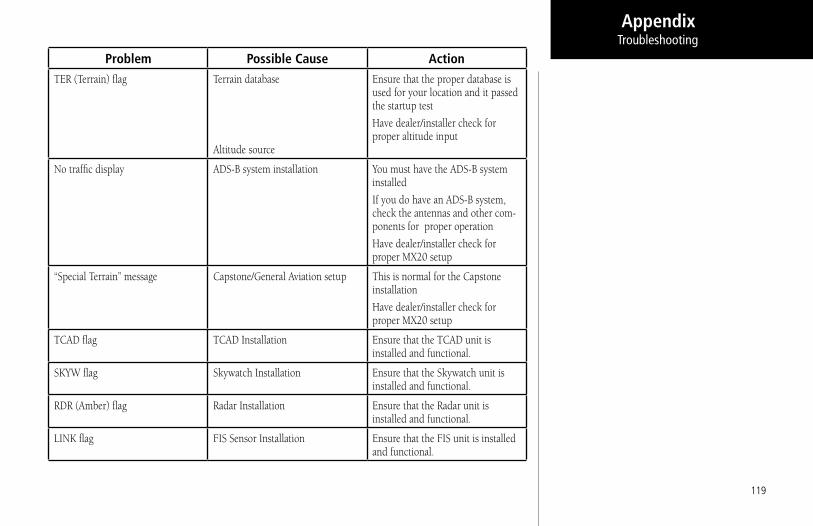
119
Appendix
Problem Possible Cause ActionTER (Terrain) flag Terrain database
Altitude source
Ensure that the proper database is used for your location and it passed the startup test
Have dealer/installer check for proper altitude input
No traffic display ADS-B system installation You must have the ADS-B system installed
If you do have an ADS-B system, check the antennas and other com-ponents for proper operation
Have dealer/installer check for proper MX20 setup
“Special Terrain” message Capstone/General Aviation setup This is normal for the Capstone installation
Have dealer/installer check for proper MX20 setup
TCAD flag TCAD Installation Ensure that the TCAD unit is installed and functional.
SKYW flag Skywatch Installation Ensure that the Skywatch unit is installed and functional.
RDR (Amber) flag Radar Installation Ensure that the Radar unit is installed and functional.
LINK flag FIS Sensor Installation Ensure that the FIS unit is installed and functional.
Troubleshooting
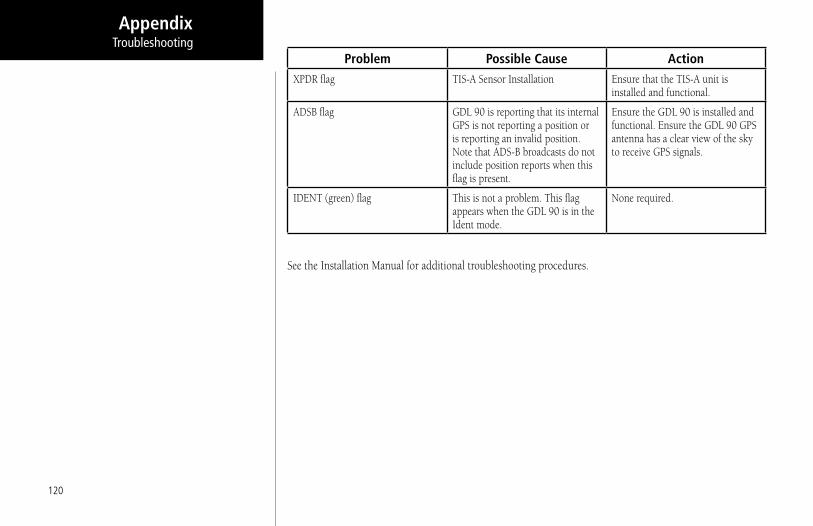
120
Appendix
Problem Possible Cause ActionXPDR flag TIS-A Sensor Installation Ensure that the TIS-A unit is
installed and functional.
ADSB flag GDL 90 is reporting that its internal GPS is not reporting a position or is reporting an invalid position. Note that ADS-B broadcasts do not include position reports when this flag is present.
Ensure the GDL 90 is installed and functional. Ensure the GDL 90 GPS antenna has a clear view of the sky to receive GPS signals.
IDENT (green) flag This is not a problem. This flag appears when the GDL 90 is in the Ident mode.
None required.
See the Installation Manual for additional troubleshooting procedures.
Troubleshooting

121
Appendix
Garmin Data Cards
Installing and Removing Data CardsThe MX20 uses an optional Garmin data card to display digital charts and maps on-screen or save user data. Install the data card in the card slots located on the left side of the unit. Install or remove the data card only when the unit is off.
To install a data card:1. Insert the card with the label facing to the left of the unit into the slot. 2. Firmly push the card into the unit. It is not necessary to force the card. The handle is still exposed when
it is properly inserted. DO NOT insert or remove the data card while the unit is powered on.
If you insert a data card and get a “card format not recognized” message, try removing the card and reinserting it. If the card is still not recognized, contact Garmin Customer Service or your Garmin dealer for assistance. Data cards are not waterproof, should not be exposed to moisture or excessive static charges, and should be stored in the case supplied with the card.
To remove a data card:1. Press in on the data card ejector for easy removal. 2. Pull the card out of the card slot on the bottom of the unit.
Front View of Data Card Slot
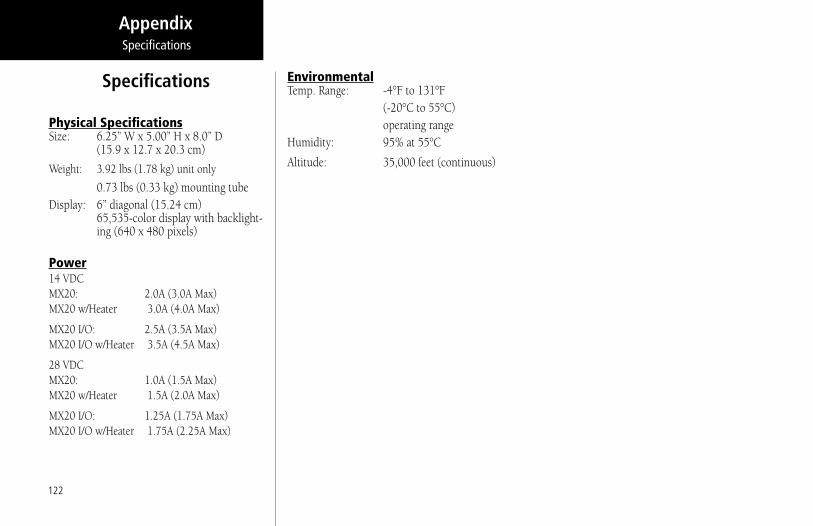
122
Appendix
Specifications
Physical SpecificationsSize: 6.25” W x 5.00” H x 8.0” D
(15.9 x 12.7 x 20.3 cm)
Weight: 3.92 lbs (1.78 kg) unit only
0.73 lbs (0.33 kg) mounting tubeDisplay: 6” diagonal (15.24 cm)
65,535-color display with backlight-ing (640 x 480 pixels)
Power14 VDC MX20: 2.0A (3.0A Max) MX20 w/Heater 3.0A (4.0A Max)
MX20 I/O: 2.5A (3.5A Max) MX20 I/O w/Heater 3.5A (4.5A Max)
28 VDC MX20: 1.0A (1.5A Max) MX20 w/Heater 1.5A (2.0A Max)
MX20 I/O: 1.25A (1.75A Max) MX20 I/O w/Heater 1.75A (2.25A Max)
EnvironmentalTemp. Range: -4°F to 131°F (-20°C to 55°C) operating rangeHumidity: 95% at 55°C
Altitude: 35,000 feet (continuous)
Specifications

123
AppendixGDL 69/69A FIS Screens
AIRMET/SIGMET Legend
City Forecast Legend
County Warnings Legend Freezing Levels Legend
NEXRAD Legend
METAR Legend
Cloud Tops Legend
Echo Tops Legend
GDL 69/69A FIS LegendsThe following legends describe the graphical information on the GDL 69/69A FIS displays.
Winds Aloft Legend

124
AppendixGDL 69/69A FIS Screens
XM FIS Echo Tops
XM FIS METARs
XM FIS Winds Aloft
XM FIS with NEXRAD Weather and Legend
XM FIS Radar Coverage
XM FIS City Forecast
Sample GDL 69/69A FIS DisplaysThe following displays provide examples of information shown in the GDL 69/69A FIS function.

125
Appendix
Care Information
Cleaning the UnitYour MX20 has a durable display, but reasonable care must be taken to maintain its performance and life. To remove stains, smudges, fingerprints, and so forth, we recommend these cleaning methods. If the first method fails to remove the problem, try the next method.
• Wipe with a clean, dry, non-abrasive fabric (for example, cotton or handi-wipes). Do NOT use paper products, such as paper towels or facial tissues.
• Blow on the area to condense moisture on the display and then wipe the area with the clean fabric.
• Moisten a clean fabric with a small amount of water and wipe the display area.
• Apply a small amount of glass cleaner (without ammonia) to the fabric and wipe the area.
• Apply a small amount of isopropyl alcohol and wipe the area (this is your last resort).
To resolve problems that cannot be remedied using this guide, contact Garmin Product Support in the U.S.A. at 800/800.1020 or Garmin Europe at 44/1794.519944.
Display BacklightThe display backlight is rated by the manufacturer as having a usable life of 20,000 hours. This life may be more or less than the rated time depending on the operating conditions of the MX20. Over time, the backlight will dim and the display will not perform as well in direct sunlight conditions. The user must determine by observation when the display brightness is not suitable for its intended use. Contact Garmin AT repair station or factory authorized repair station when the backlight requires service.
Care Information

126
Appendix
Accuracy— Estimated position accuracy in feet or meters.
Advisories and Alerts — all alerting on the MX20 is advisory in nature only. Any alerting must be accompanied by visual acquisition of the traffic or terrain and no aircraft maneuvering is allowed based upon data presented by the MX20.
Altitude—Height above mean sea level (MSL).
Back Course — Localizer backcourse approach where the signal on the “back” side of the localizer is used for alignment to the runway opposite of normal localizer alignment. Without compensation the CDI would reverse sense.
Bearing —The direction from your current location to a destination.
Coasting — With regard to TIS, coasting indicates that a radar sweep was missed and displayed data is not the latest.
Course —The direction from your starting location to a destination.
Decluttering— Reduction in displayed elements on the moving map at higher zoom scales.
Distance (Destination)— The “great circle” distance from current location to a Go To destination, or the final waypoint in a route.
Distance (Next) — The “great circle” distance from current location to a Go To destination, or the next waypoint in a route.
Elevation — The altitude (height) above or below sea level.
Geo-Referenced — a proper relationship is established between displayed information and real-world coordinates. For instance, the ChartView charts are geo-referenced because they are correctly oriented on the map display in relationship to actual coordinates.
Ownship — Your aircraft. A variety of symbols are available to represent your aircraft on the display.
Skywatch® — An active surveillance traffic advisory system. Skywatch is a registered trademark of L3 Communications.
Glossary
Glossary

127
Appendix
Speed —Display rate of travel in miles/kilometers/nautical miles per hour.
Time —The time for the selected time zone.
Track — The direction of movement relative to a ground position. Also referred to as “ground track.”
Waypoint (Destination) — The final waypoint in the route, or the destination waypoint.
Waypoint (Next) — The next waypoint in the route.
Glossary
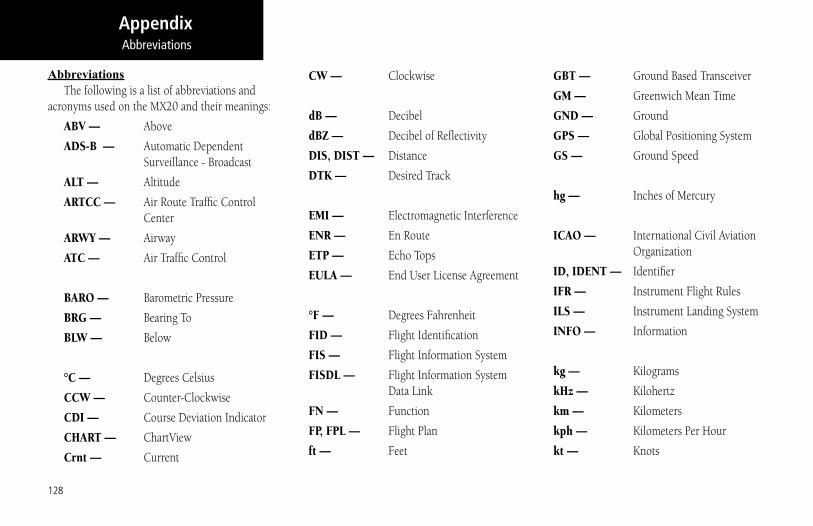
128
Appendix
AbbreviationsThe following is a list of abbreviations and
acronyms used on the MX20 and their meanings:
ABV — Above
ADS-B — Automatic Dependent Surveillance - Broadcast
ALT — Altitude
ARTCC — Air Route Traffic Control Center
ARWY — Airway
ATC — Air Traffic Control
BARO — Barometric Pressure
BRG — Bearing To
BLW — Below
°C — Degrees Celsius
CCW — Counter-Clockwise
CDI — Course Deviation Indicator
CHART — ChartView
Crnt — Current
CW — Clockwise
dB — Decibel
dBZ — Decibel of Reflectivity
DIS, DIST — Distance
DTK — Desired Track
EMI — Electromagnetic Interference
ENR — En Route
ETP — Echo Tops
EULA — End User License Agreement
°F — Degrees Fahrenheit
FID — Flight Identification
FIS — Flight Information System
FISDL — Flight Information System Data Link
FN — Function
FP, FPL — Flight Plan
ft — Feet
GBT — Ground Based Transceiver
GM — Greenwich Mean Time
GND — Ground
GPS — Global Positioning System
GS — Ground Speed
hg — Inches of Mercury
ICAO — International Civil Aviation Organization
ID, IDENT — Identifier
IFR — Instrument Flight Rules
ILS — Instrument Landing System
INFO — Information
kg — Kilograms
kHz — Kilohertz
km — Kilometers
kph — Kilometers Per Hour
kt — Knots
Abbreviations

129
Appendix
LAT/LON — Latitude/Longitude
lb — Pounds
LINK — Data Link
LT — Lightning
°M — Degrees Magnetic
m — Meters
mb — Millibars (of Pressure)
METAR — Meteorological Aviation Report
MHz — Megahertz
mi — Statute Miles
MOA — Military Operations Area
MON — Monitor
mph — Statute Miles Per Hour
MSG — Message
MSL — Mean Sea Level
NAV — Navigation
NAVAID — Navigational Aid
NDB — Non-Directional Radio
Beacon
NEXRAD — Next Generation RADAR
nm — Nautical Miles
NOTAM — Notice to Airmen
NRM — Normal
OBS — Omnibearing Selector
OS — Off Scale
OVRL — Overlay
POS — Position
RD, RDR — RADAR
RTE — Route
SCTR — Sector
SIDS — Standard Instrument Departures
SIGMET — Significant Meteorological Information
SKYW — Skywatch®
STAB — Stabilization
STARS — Standard Terminal Arrival Route
STBY — Standby
SYS — System
TAF — Terminal Aerodrome Forecast
TAS — Traffic Advisory System
TAWS — Terrain Awareness and Warning System
TCAD — Traffic/Collision Avoidance Device
TCAS — Traffic Alert/Collision Avoidance System
TER — Terrain
TFR — Temporary Flight Rules
TIS-A — Traffic Information Services - Addressed
TIS-B — Traffic Information Service - Broadcast
TRAF — Traffic
Abbreviations

130
Appendix
TRANS — Transmit
TRK — Track (also Ground Track)
UAT — Universal Access Transceiver
UNR — Unrestricted
VFR — Visual Flight Rules
VOL — Volume
VOR — VHF Omnidirectional Radio Range
WB — Warning Boxes
WX — Weather
XPDR — Transponder
Abbreviations

131
Appendix
Compliance, License, and Warranty Information
FCC ComplianceThe MX20 complies with Part 15 of the FCC interference limits for Class B digital devices FOR HOME OR OFFICE USE. These limits are designed to provide more reasonable protection against harmful interference in a residential installation, and are more stringent than “outdoor” requirements.
Operation of this device is subject to the following conditions: (1) This device may not cause harmful interference, and (2) this device must accept any interference received, including interference that may cause undesired operation.
This equipment generates, uses and can radiate radio frequency energy and, if not installed and used in ac-cordance with the instructions, may cause harmful interference to radio communications. However, there is no guarantee that interference will not occur in a particular installation. If this equipment does cause harmful interference to radio or television reception, which can be determined by turning the equipment off and on, the user is encouraged to try to correct the interference by one of the following measures:
• Reorient or relocate the receiving antenna.
• Increase the separation between the equipment and the receiver.
• Connect the equipment into an outlet on a circuit different from that to which the receiver is connected.
• Consult the dealer or an experienced radio/TV technician for help.
The MX20 does not contain any user-serviceable parts. Repairs should only be made by an authorized Garmin service center. Unauthorized repairs or modifications could result in permanent damage to the equipment, and void your warranty and your authority to operate this device under Part 15 regulations.

132
Appendix
Software License AgreementBY USING THE MX20, YOU AGREE TO BE BOUND BY THE TERMS AND CONDITIONS OF THE FOL-LOWING SOFTWARE LICENSE AGREEMENT. PLEASE READ THIS AGREEMENT CAREFULLY.
Garmin grants you a limited license to use the software embedded in this device (the “Software”) in binary ex-ecutable form in the normal operation of the product. Title, ownership rights, and intellectual property rights in and to the Software remain with Garmin.
You acknowledge that the Software is the property of Garmin and is protected under the United States of America copyright laws and international copyright treaties. You further acknowledge that the structure, organization, and code of the Software are valuable trade secrets of Garmin and that the Software in source code form remains a valuable trade secret of Garmin. You agree not to decompile, disassemble, modify, reverse assemble, reverse engineer or reduce to human readable form the Software or any part thereof or create any derivative works based on the Software. You agree not to export or re-export the Software to any country in violation of the export control laws of the United States of America.
Product Registration and SupportHelp us better support you by completing your online registration today! Have the serial number of your MX20 handy and connect to the Garmin Web site (www.garmin.com). Look for the Product Registration link on the home page. Also, be sure to record your serial number in the space provided to the left.
If you have any questions, Garmin’s Product Support department may be reached Monday through Friday, 8:00 AM to 5:00 PM Central Standard Time, by phone at 1-800-800-1020, or by e-mail at [email protected].
Compliance, License, and Warranty Information
Serial NumberUse this area to record the serial number in case it is lost, stolen, or needs service. Be sure to keep your original sales receipt in a safe place or attach a photocopy inside the manual. The serial
number is located on the back of the unit.
Serial Number:
NOTE: If you have previously registered a Garmin product purchase, we invite you to re-register using our NEW on-line
system. Many services provided by our new product registration system are now being automated and re-registering your
purchase ensures you the best possible support from Garmin.

133
Appendix
Limited WarrantyThis Garmin product is warranted to be free from defects in materials or workmanship for 24 months from the date of purchase. Within this period, Garmin will at its sole option, repair or replace any components that fail in normal use. Such repairs or replacement will be made at no charge to the customer for parts or labor, pro-vided that the customer shall be responsible for any transportation cost. This warranty does not cover failures due to abuse, misuse, accident or unauthorized alteration or repairs.
THE WARRANTIES AND REMEDIES CONTAINED HEREIN ARE EXCLUSIVE AND IN LIEU OF ALL OTHER WARRANTIES EXPRESS OR IMPLIED OR STATUTORY, INCLUDING ANY LIABILITY ARISING UNDER ANY WARRANTY OF MERCHANTABILITY OR FITNESS FOR A PARTICULAR PURPOSE, STATUTORY OR OTHERWISE. THIS WARRANTY GIVES YOU SPECIFIC LEGAL RIGHTS, WHICH MAY VARY FROM STATE TO STATE.
IN NO EVENT SHALL GARMIN BE LIABLE FOR ANY INCIDENTAL, SPECIAL, INDIRECT OR CONSE-QUENTIAL DAMAGES, WHETHER RESULTING FROM THE USE, MISUSE, OR INABILITY TO USE THIS PRODUCT OR FROM DEFECTS IN THE PRODUCT. Some states do not allow the exclusion of incidental or consequential damages, so the above limitations may not apply to you.
Garmin retains the exclusive right to repair or replace the unit or software or offer a full refund of the purchase price at its sole discretion. SUCH REMEDY SHALL BE YOUR SOLE AND EXCLUSIVE REMEDY FOR ANY BREACH OF WARRANTY.
To obtain warranty service, call your local Garmin authorized dealer. Or call Garmin Customer Service at one of the numbers listed to the left for shipping instructions and an RMA tracking number. The unit should be se-curely packed with the tracking number clearly written on the outside of the package. The unit should be sent, freight charges prepaid, to any Garmin warranty service station. A copy of the original sales receipt is required as the proof of purchase for warranty repairs.
Products sold through online auctions are not eligible for rebates or other special offers from Garmin. Online auction confirmations are not accepted for warranty verification. To obtain warranty service, an original or copy of the sales receipt from the original retailer is required. Garmin will not replace missing components from any package purchased through an online auction.
134
Appendix
Contacting the Factory If the MX20 unit fails to operate despite troubleshooting efforts, contact Garmin Technical Support for as-sistance.
GARMIN International, Inc. 1200 East 151st Street Olathe, KS 66062-3426 USA
Phone: (913) 397-8200 FAX: (913) 397-8282
http://www.garmin.com
Be prepared to offer the following information about the installation:
• Installation configuration (list of any accessories)
• Model number, part number with mod levels, and serial number
• Software Versions
• Description of problem
• Efforts made to isolate the problem
135
Index
IndexAAbbreviations 128Absolute 27Accessories ivActivation 82ADS-B 6, 7, 11, 41, 49, 119Advisory flags 6Advisory Hot Key 12Aircraft symbol 111AIRMET 63, 78Airports 20, 23, 55, 89, 93Airport chart 27, 32Airspace 25Alert Hot Key 13, 36, 38, 53ALT 7Altitude 39, 40, 46, 48, 49, 51, 113Annunciations 6Antenna 86Approach 39, 40, 95Approach Chart 90Arc 47AutoLoad 113
BBacklight 125Back course 24Barometer 58Barometric correction 10, 111Baro keys 56Basic operation 9Bearing 100, 126Boundaries 26Brightness 3, 9
CCards 121Care Information 125Categories 80Cautions iCell 85Cell Movement 72Chart View 87, 91, 92
AutoLoad 113Chart View;Airport surface 94Chart View;Approach chart 90Chart View;Chart overlay 89Chart View;Considerations 95Chart View;Data source 88Chart View;Geo-Referencing 88Chart View;Menu items 93Chart View;Overlay 90
City 77Cleaning 125Clear 60Cloud Tops 73Code 50Contacting Factory 134Contacting the factory 116Controls 3County 78Course 126Coverage 71Current
Chart 94Weather 71
Cursor Pre-Select 101Custom Map 19Cyclone 79
DData-link 114Database version 114Data card 4, 88, 117, 121Data Fields 126Data flags 7Data port status 114Demo 85Desired track up 22, 30, 33Diagnostics 82
Direct Access 107Display 5, 48, 90Display;Care 116Display;Graphic 48Display;Text 48Display Lat/Lon lines 112
EEcho Tops 63, 73Enter key 3En Route Zoom 112EULA ii
FFCC Compliance 131FID 49Filter 39FIS 59, 60
WSI 61XM Radio 69
Flight ID;Editing 50Flight plan 7, 21, 30, 33, 47, 55, 57,
64, 74, 79, 84Forecast 77Forecast Time 77Freezing Levels 78Functions 1Function key 11
136
IndexFunction keys 3
GGain Control 100Geo-Referencing 88, 91, 126Getting started 1Glossary of Terms 126GPS 114Graphical Weather 59, 62Ground/Flight Mode 40Ground Zoom 112GTX 330 52
HHeater 9High airways 26, 31Hold 101Horizontal Mode 98, 100
IICAO address 49, 113Ident 8, 46IFR 30ILS 23, 24Info 20, 91, 114Initial Zoom level 21, 112Intersection 25Invert 31, 33, 96
LLabel 31, 34, 48, 64, 74, 79Last Channel 103, 105Lat/Lon format 111Lat/Lon lines 112Legend 65, 75, 79, 123License agreement iiLightning 6, 29, 72, 84Limitations v, 70, 96Limited Warranty 133Line selection key 4Link 8Loaded 93Load Chart 22, 32, 90Localizer 23, 24Low airways 26, 31LT 7
MMap 19, 99
Detail 65Map;Info 20Map;Orientation 12, 19, 21, 30, 33, 35,
47, 57, 65, 71, 76, 79Map;Pan 20Map;Scale 19Menu Item 4Menu key 3
Messages 7, 18METARs 63, 66, 72Mute 39, 106
NNav 8, 24Nav Data 19, 21, 22, 34, 55NDB 25NexRad 70, 71, 73, 75No-bearing 38Noise monitor 86North up 21, 30, 33NOTAM 96
OOBS 24Obstructions 28Off 3, 98Off scale 37On 3Options Menu 13Overlay 62, 64Ownship symbol 7, 43, 111
PPan 19, 20, 21, 30, 33, 69, 91, 93Photosensor 3, 9Pop-Up 13, 36, 38, 39, 53, 58, 93
POS 7Power 3, 9Pre-Heat 9Preset 103, 105, 106Pressure altitude 43, 48Product Status 82Product Support 132Product Times 61, 75, 82Prompt 13, 38, 53
RRadar 8, 98Radar Coverage 71Radar range control 100Radio ID 104Range ring 47RDR 8Registration 132Relative 27Relative altitude 43, 48Roads 26Route 7RTE 7
SSave Preset 105Search 93Search ID 93

137
Index
Select Airport 93Select Chart 93Select Loaded Chart 93Self-Test 9, 10, 39, 85, 98Serial Number 132Services 51Set baro 111Shield 39, 40SIDS 88SIGMET 63, 77Skywatch 6, 28, 36, 38SL30 23Slave Zoom 113Software version 114Sorting 60, 66, 68, 81Specifications 122Split Screen 2, 11, 35Stabilization 84, 85, 98, 102Standby 37, 38, 39, 49, 50, 53, 54, 98,
99, 129STARS 88Start Up 10Status 37, 54, 61, 68, 69, 81, 82Stormscope 2, 84, 85Strike 85Strikes 29Strike test 86Subscription 62, 63, 64, 69, 81, 82
Support 132Surface Chart 87, 88, 89, 90, 94, 95, 96Surface targets 46Symbology 14, 36, 37, 46, 52, 53System 111System;Data 85System;Info 114System;Test 115
TTAF 66, 67, 81Target 41, 48, 51Target;Color 46Target;Degraded 46Target;Surface 46TAS 36TAS Data Fail 38TAS Fail 38TAS Self-Test 39TAS Time-Out 38TAWS 8, 56, 58TCAD 8, 36, 39, 40Technical Support 134TER 8, 58Terrain 2, 6, 7, 11, 22, 27, 56, 57, 119Test 2, 9, 10, 38, 85, 86, 98, 111, 115,
117, 119Test pattern 115
Text 66, 80TFR 64, 66, 70, 81TFR Label 74Thumbnail 13, 14, 28, 36, 52Tilt Control 100Time 50TIS 6, 14, 46, 52TIS-A 1, 8, 14, 52TIS-B 14, 44Track up 21, 30, 33, 57Track up 360 21, 30, 33, 57Track up arc 21, 30, 33, 57TRAF 7Traffic 6, 28, 41, 52
Status 37Traffic Alert 38Traffic Map Orientation 47Traffic not displayed 38Transition speed 112Transmit Altitude 49Troubleshooting 117
UUAT 41, 47, 49, 50, 59, 114
VVertical Filtering 37, 39, 40Vertical Mode 37, 98, 100
Vertical Range 39, 40VFR 33View 67, 80Volume 39, 40VOR 23
WWarranty 133Waters 26Weather v, 62, 64, 65, 67, 68, 98, 99,
109, 114, 123, 124WSI 61XM Radio 69, 104
Winds Aloft 74WSI 61WX500 6, 29, 84
XXM Radio 2, 8, 103, 104, 106
Activating 81, 82, 83, 109Advisory Messages 108Audio 103Categories 107Channels 106FIS 69Radio ID 104Volume 106Weather 69

138
Index
XPDR 8
ZZoom 13, 19, 22, 30, 31, 33, 34, 35, 36, 37, 41, 47,
56, 69, 87, 90, 91, 92, 93, 94, 95, 96, 112, 113Zoom level 12, 19, 21, 28, 29, 69


© 2005 Garmin Ltd. or its subsidiaries
Garmin International, Inc. 1200 East 151st Street, Olathe, Kansas 66062, U.S.A.
Garmin (Europe) Ltd. Unit 5, The Quadrangle, Abbey Park Industrial Estate, Romsey, SO51 9DL, U.K.
Garmin Corporation No. 68, Jangshu 2nd Road, Shijr, Taipei County, Taiwan
www.garmin.com
Garmin AT P/N 560-1026-08 Rev. B (Garmin P/N 190-00479-00 Rev C)


