College of Education - uta.edu · About This Guide This guide was created using the following...
44
College of Education Teacher Observation Record Forms Collection via iPad Version 5 – Revision Date January 2019
Transcript of College of Education - uta.edu · About This Guide This guide was created using the following...
College of Education
Teacher Observation RecordForms Collection via iPad
Version 5 – Revision Date January 2019
About This GuideThis guide was created using the following configurations:• iOS 12.1• Adobe Acrobat Reader for iPad 18.12.00
If your iPad or Reader does not match these software versions, your screens and buttons may look a little different from the illustrations in this guide.
This guide assumes that you know the basics of using an iPad: accessing the Home Screen, using apps like Safari and Mail, using the keyboard, and switching between applications. Apple has helpful guides for new iOS users, such as the iPad User Guide, and of course: practice makes perfect!
Before You BeginYou must have set up the following on your iPad:• Access to the UT Arlington Wireless Network• Your UT Arlington E-Mail account• Access to the App Store using a working AppleID and
password• The official Adobe Acrobat Reader App
Need help with any of these? Contact COEd Technology ([email protected])
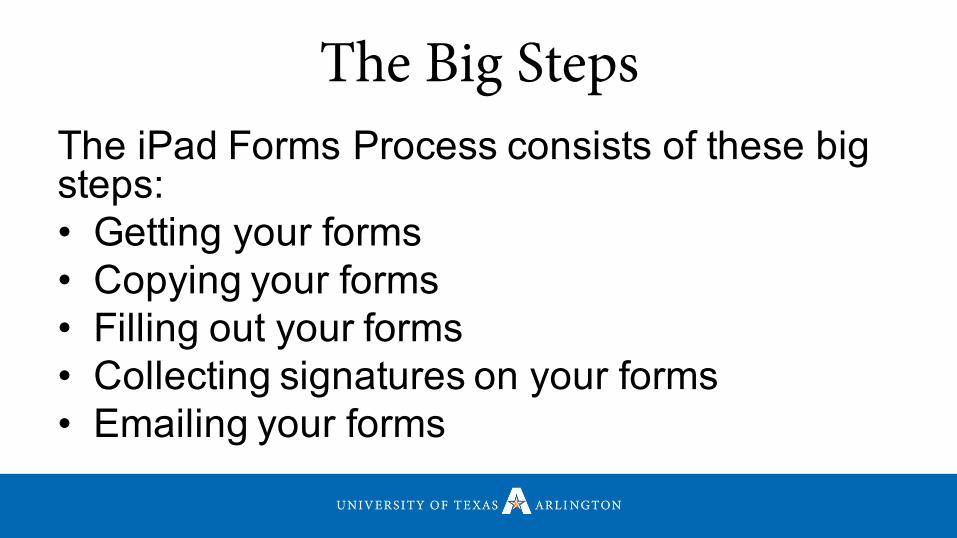
The Big StepsThe iPad Forms Process consists of these big steps:• Getting your forms• Copying your forms• Filling out your forms• Collecting signatures on your forms• Emailing your forms
GETTING YOUR FORMSBig Step Number One
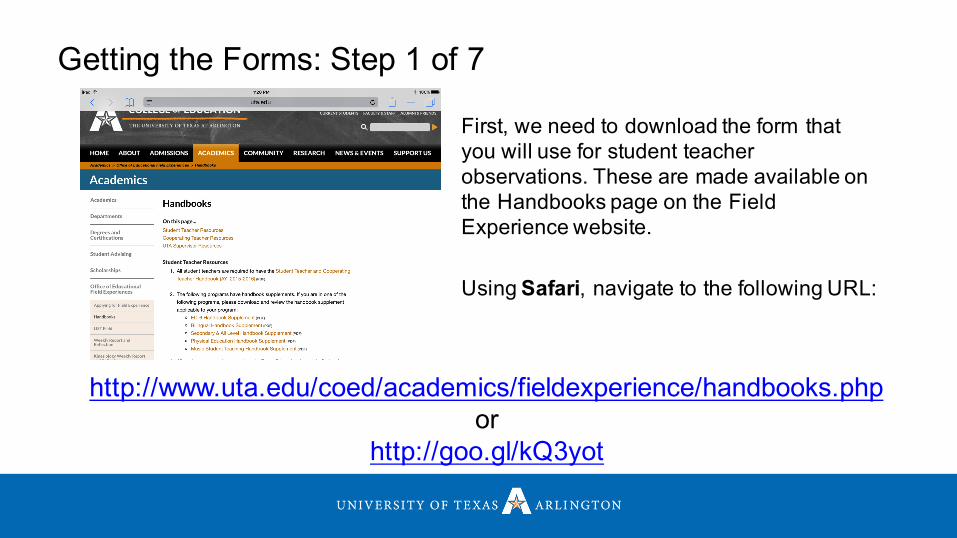
First, we need to download the form that you will use for student teacher observations. These are made available on the Handbooks page on the Field Experience website.
Using Safari, navigate to the following URL:
Getting the Forms: Step 1 of 7
http://www.uta.edu/coed/academics/fieldexperience/handbooks.phpor
http://goo.gl/kQ3yot
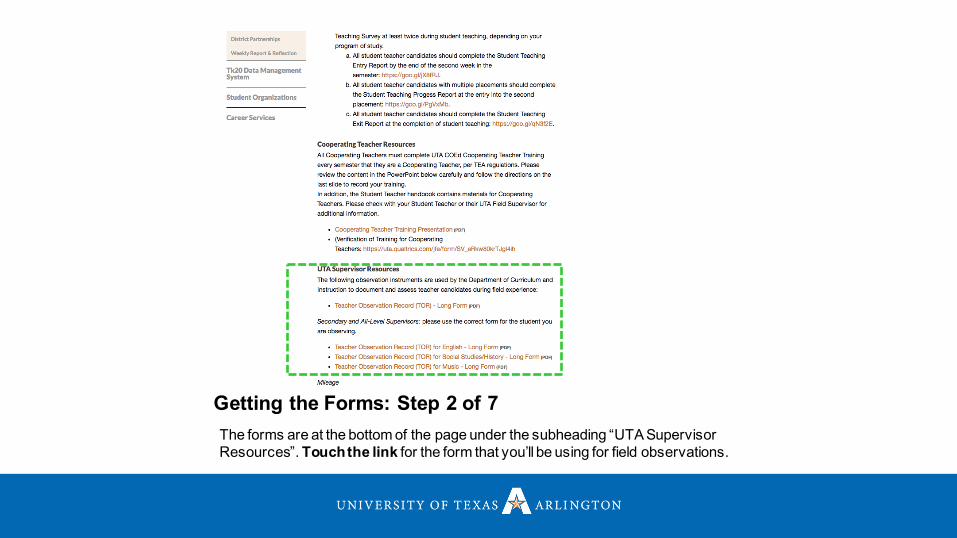
Getting the Forms: Step 2 of 7The forms are at the bottom of the page under the subheading “UTA Supervisor Resources”. Touch the link for the form that you’ll be using for field observations.
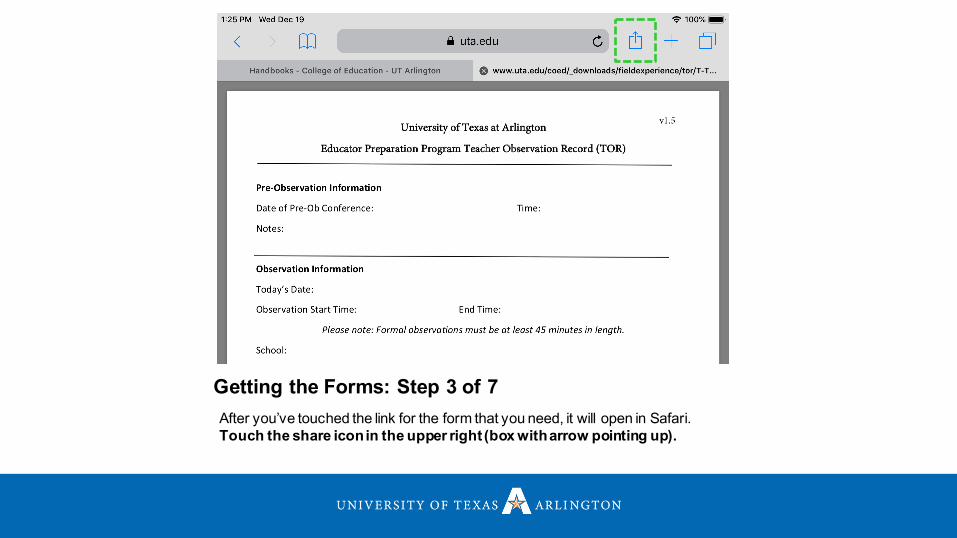
Getting the Forms: Step 3 of 7After you’ve touched the link for the form that you need, it will open in Safari. Touch the share icon in the upper right (box with arrow pointing up).
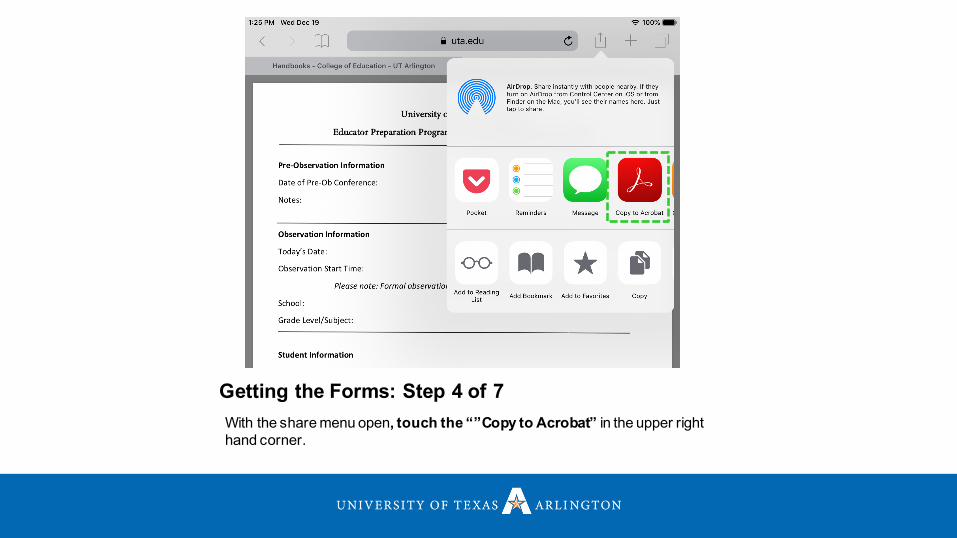
Getting the Forms: Step 4 of 7With the share menu open, touch the “”Copy to Acrobat” in the upper right hand corner.
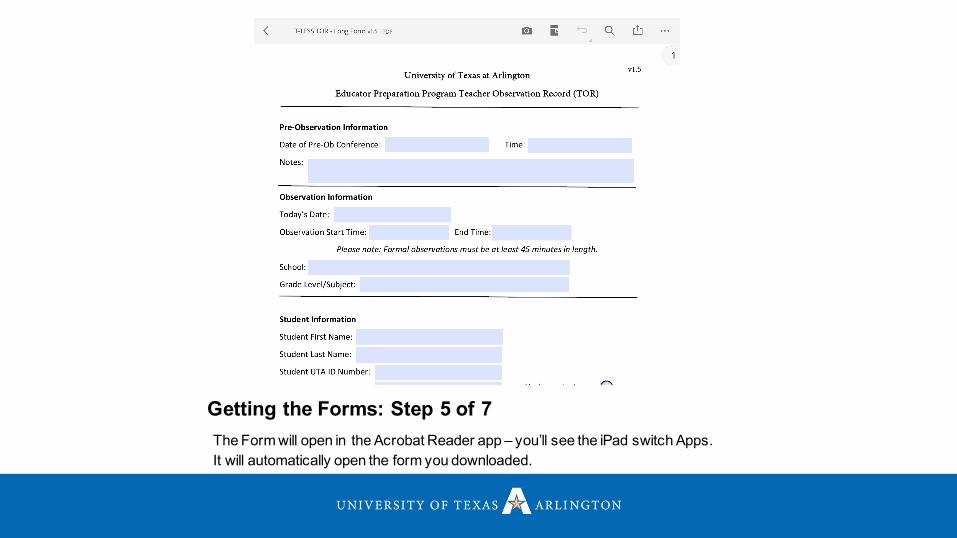
Getting the Forms: Step 5 of 7The Form will open in the Acrobat Reader app – you’ll see the iPad switch Apps.It will automatically open the form you downloaded.

Getting the Forms: Step 6 of 7Touch the arrow (<) to go back to Adobe Reader’s file manager, the Documents screen. If the top menu does not appear, touch the screen once away from any fillable field on the document to make it appear.
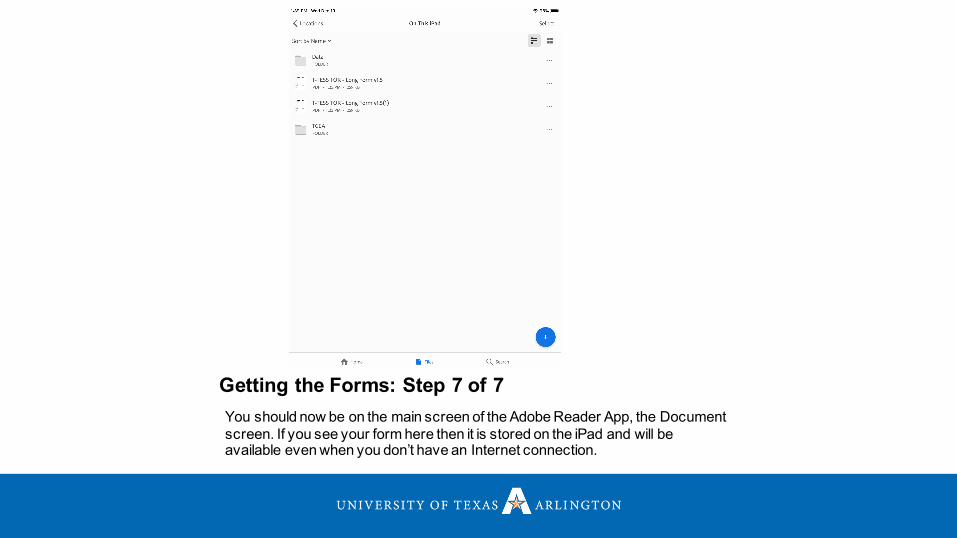
Getting the Forms: Step 7 of 7You should now be on the main screen of the Adobe Reader App, the Document screen. If you see your form here then it is stored on the iPad and will be available even when you don’t have an Internet connection.

COPYING YOUR FORMSBig Step Number Two
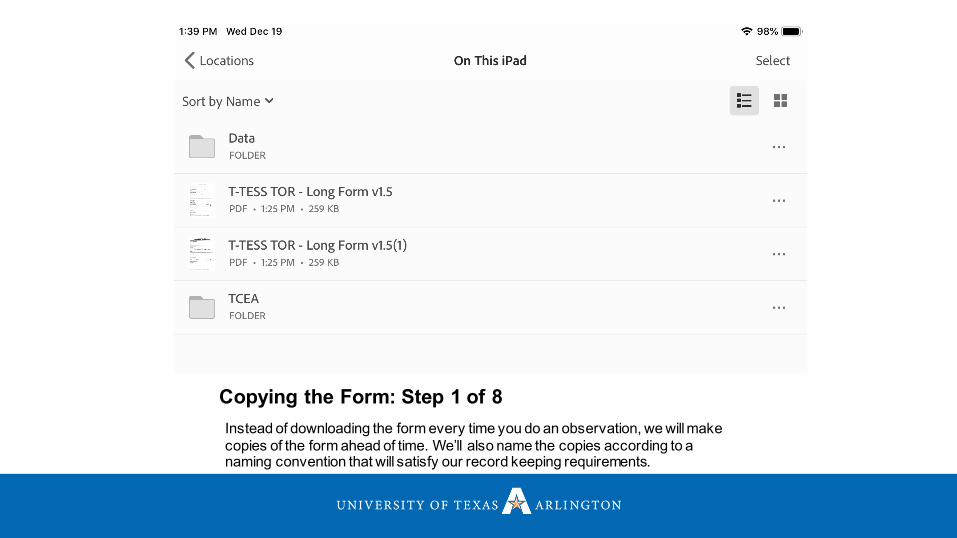
Copying the Form: Step 1 of 8Instead of downloading the form every time you do an observation, we will make copies of the form ahead of time. We’ll also name the copies according to a naming convention that will satisfy our record keeping requirements.
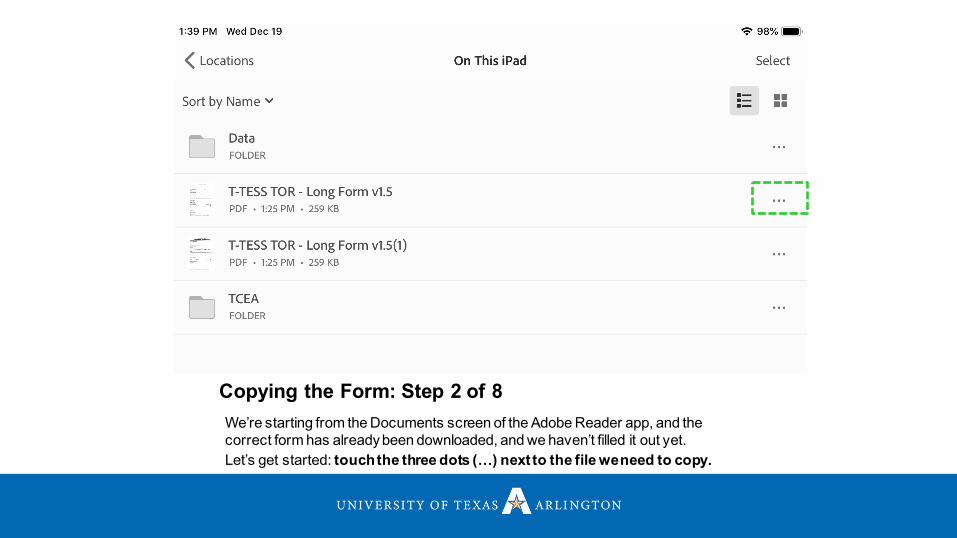
Copying the Form: Step 2 of 8We’re starting from the Documents screen of the Adobe Reader app, and the correct form has already been downloaded, and we haven’t filled it out yet.Let’s get started: touch the three dots (…) next to the file we need to copy.
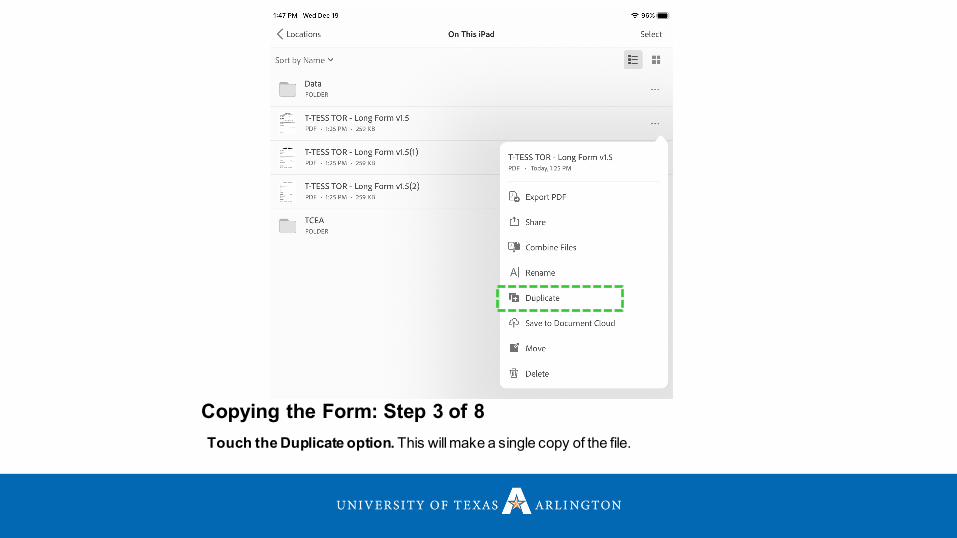
Copying the Form: Step 3 of 8Touch the Duplicate option. This will make a single copy of the file.
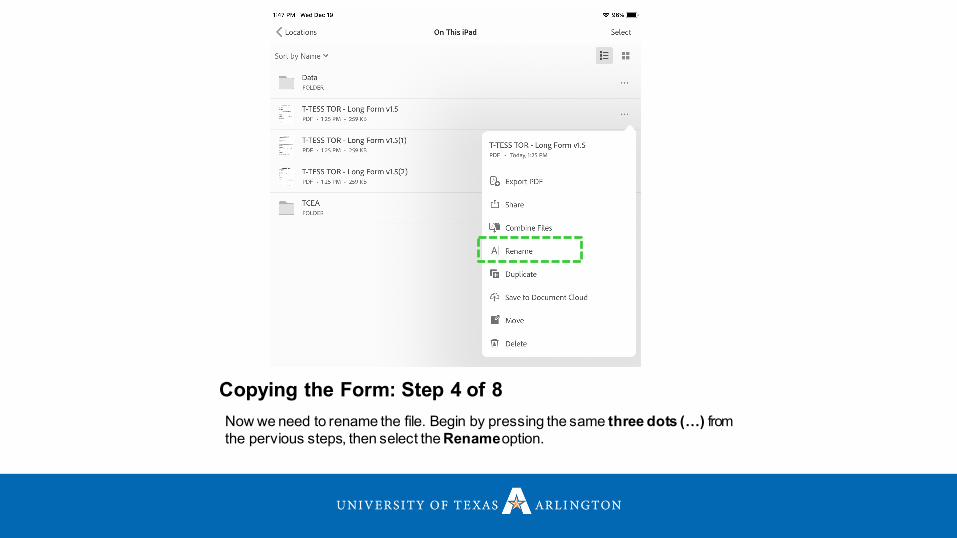
Copying the Form: Step 4 of 8Now we need to rename the file. Begin by pressing the same three dots (…) from the pervious steps, then select the Renameoption.

Copying the Form: Step 5 of 8Because this form is an official record of student performance we must associate it with the Student’s ID number. Since most people make their forms ahead of time, you should go ahead and label the form copies as 1, 2, or 3, for the student’s first, second, and third observations.
The naming convention:
Document Name LastName FirstName StudentID Observation#
Document Name: Original Document Name minus Long/Short FormLastName: Student’s last nameFirstName: Student’s first nameStudentID: Student’s 10-digit UT Arlington ID#Observation#: The observation number: 1, 2, 3, or 4Observation Letter: The observation letter (A, B, or C) is added to the number indicates the observations needed for TEA (4).
Only use letters, numbers, and spaces in the filename – no punctuation!
Example of a renamed file: T-TESS TOR Brown Brian 1234567890 1T-TESS TOR Brown Brian 1234567890 2A
Email to the student, the Cooperating Teacher, the principal, and [email protected]. These must be emailed all at the same time through the use of the TO and/or CC fields. Do not use the BCC field.
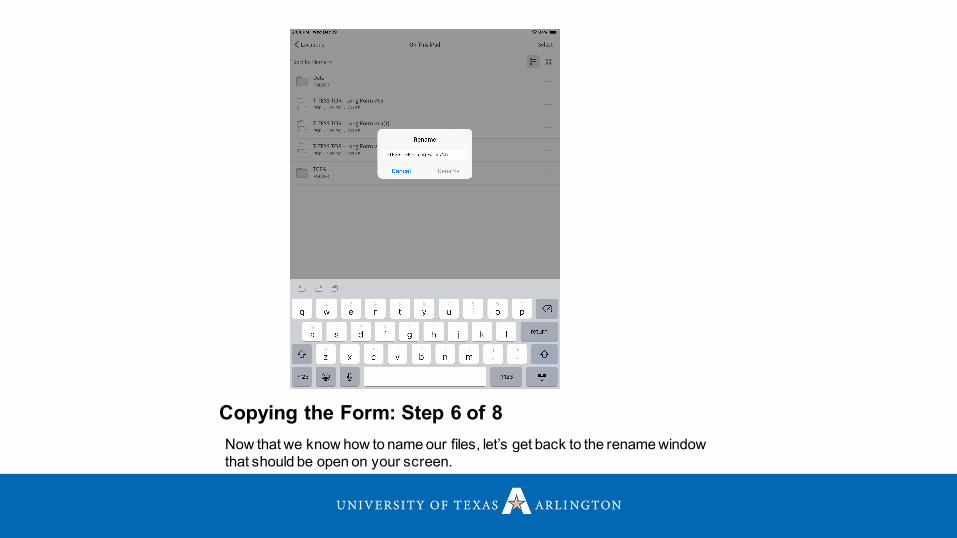
Copying the Form: Step 6 of 8Now that we know how to name our files, let’s get back to the rename window that should be open on your screen.

Copying the Form: Step 7 of 8Delete everything after T-TESS TOR and complete using the aforementioned naming convention. Click Rename when you are done.

Copying the Form: Step 8 of 8You should be back at the Documents screen and the form will have its new name.You’ll repeat these Copying steps every time you need a fresh copy of the Observation form for use during a supervision.

FILLING OUT YOUR FORMSBig Step Number Three

Filling Out the Form: Step 1 of 6Here we have forms that have been prepared for use with a specific student’s observations. Touch a form to open it for editing. Take care to not edit the original you downloaded from the Field Experience website; keep it blank as a master copy.

Filling Out the Form: Step 2 of 6The editable fields should be highlighted. Touch a field to select and edit it.The usual iPad way of scrolling also works here in the Adobe Reader app (touch, hold, and drag). The form will save as you go, so there’s no need to press a “Save” button.

Filling Out the Form: Step 3 of 6Adobe Reader has a few special buttons you can use while filling out forms that some observers find useful. Previous moves you up to the fillable field above the one you have selected. Next takes you to the next fillable field. Reset Field will blank the field.
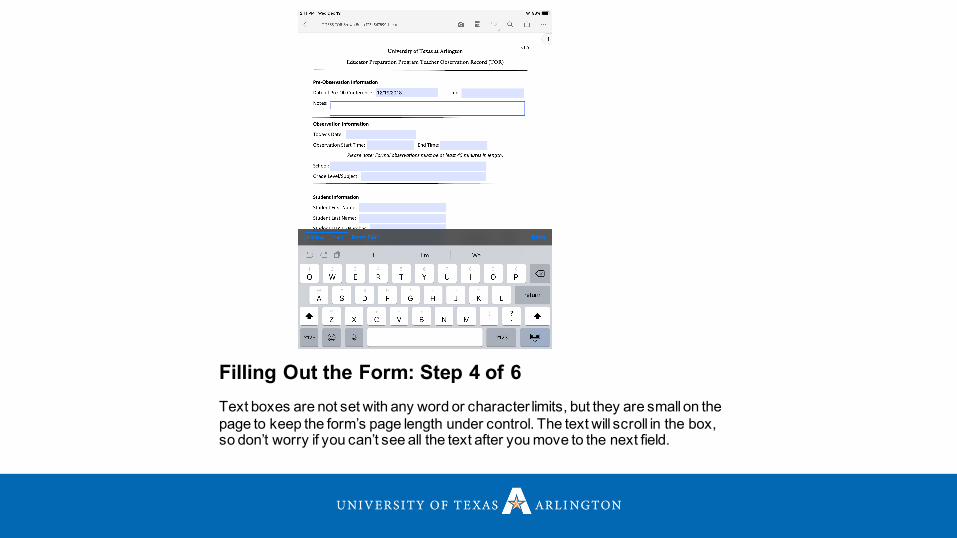
Filling Out the Form: Step 4 of 6Text boxes are not set with any word or character limits, but they are small on the page to keep the form’s page length under control. The text will scroll in the box, so don’t worry if you can’t see all the text after you move to the next field.

Filling Out the Form: Step 5 of 6A note about notes: Adobe Reader has the ability to add text annotations that are not part of the form. Please do not use the note function of Reader. These notes are not captured during our data collection process, so please instead use the per element or per cluster comments to give feedback to students so that we have a record of that feedback.
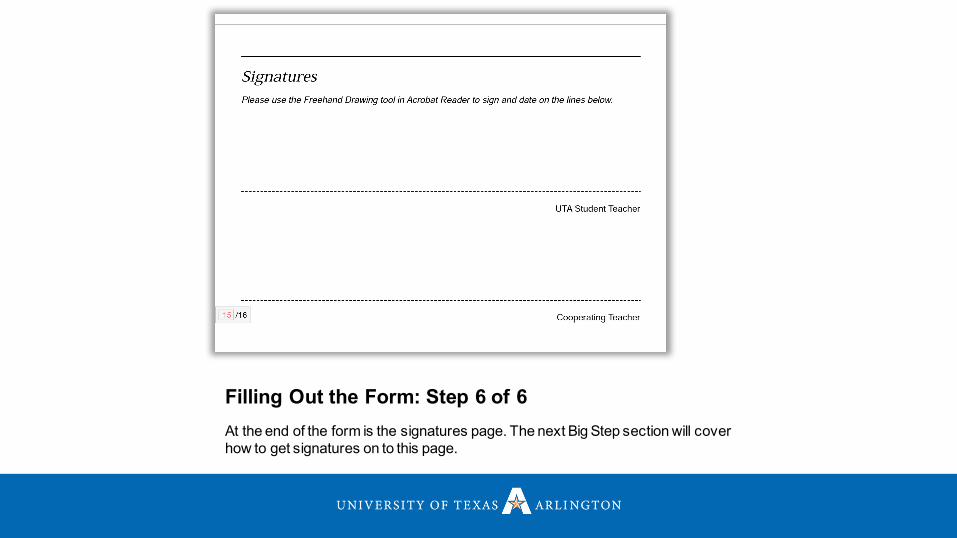
Filling Out the Form: Step 6 of 6At the end of the form is the signatures page. The next Big Step section will cover how to get signatures on to this page.
COLLECTING SIGNATURES ON YOUR FORMS
Big Step Number Four

Collecting Signatures: Step 1 of 6The last page of our formal field observation form is the signatures page. We collect real signatures using the iPad and the freehand drawing tool in Reader. Let’s get started.

Collecting Signatures: Step 2 of 6We recommend that you put your iPad into Portrait mode: pick up your iPad rotate it and the contents of the screen should rotate as well. If it won’t rotate, give it a little wiggle, and double-check that your rotation lock is off. Make sure your observation form is scrolled all the way down so that all three signature lines can be seen.
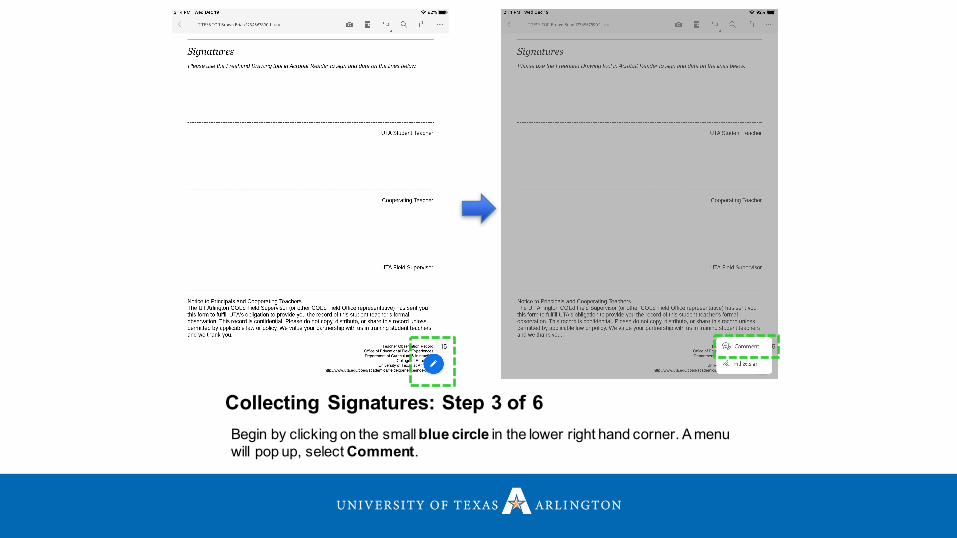
Collecting Signatures: Step 3 of 6Begin by clicking on the small blue circle in the lower right hand corner. A menu will pop up, select Comment.
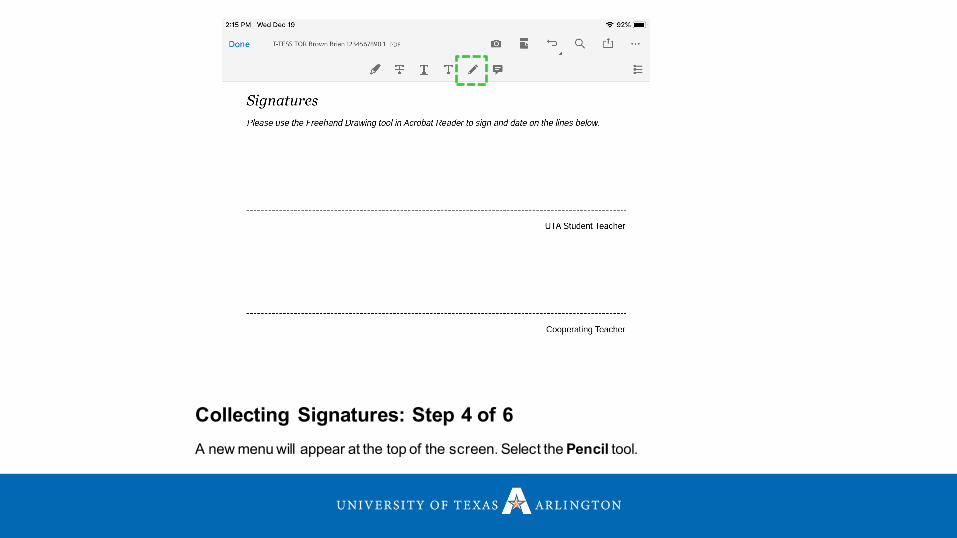
Collecting Signatures: Step 4 of 6A new menu will appear at the top of the screen. Select the Pencil tool.

Collecting Signatures: Step 5 of 6You may now collect signatures. You can either use an iPad stylus, or use your fingertip to sign. The page will not scroll while you are in this mode.
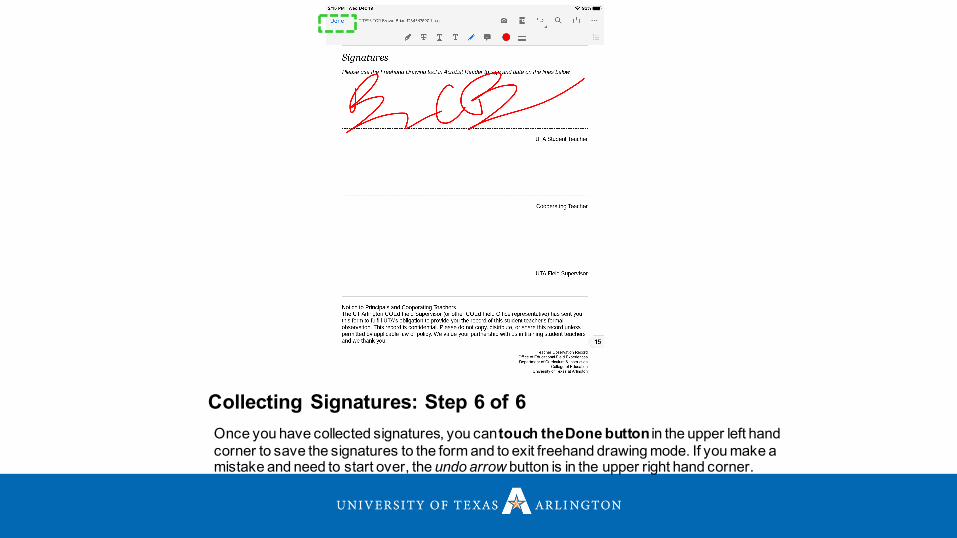
Collecting Signatures: Step 6 of 6Once you have collected signatures, you can touch the Done button in the upper left hand corner to save the signatures to the form and to exit freehand drawing mode. If you make a mistake and need to start over, the undo arrow button is in the upper right hand corner.
E-MAILING YOUR FORMSBig Step Number Five

E-Mailing the Form: Step 1 of 7We strongly recommend that as soon as your form is done that you email it. This saves you from having to remember to do it later, and increases the chances that you’ll have a copy of the form in case something happens to your iPad. Let’s get started.
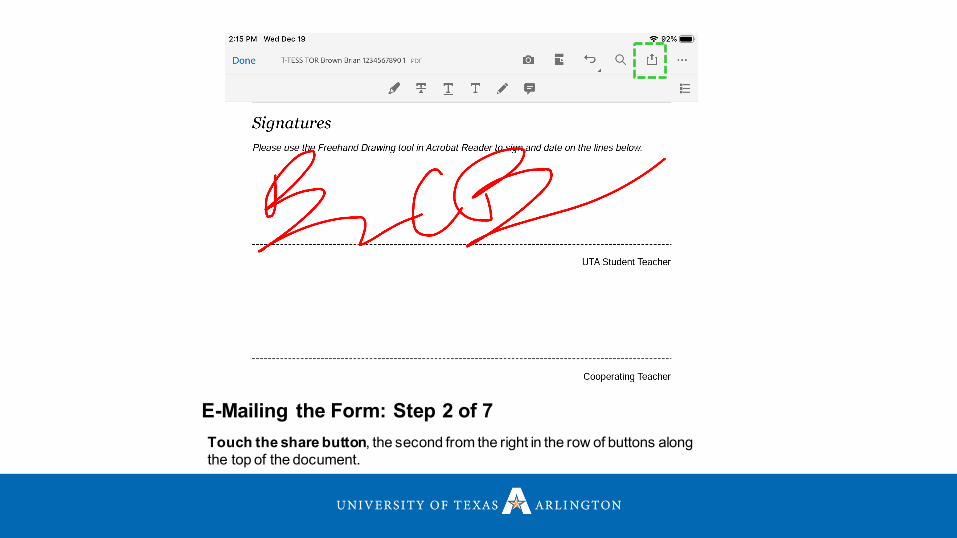
E-Mailing the Form: Step 2 of 7Touch the share button, the second from the right in the row of buttons along the top of the document.
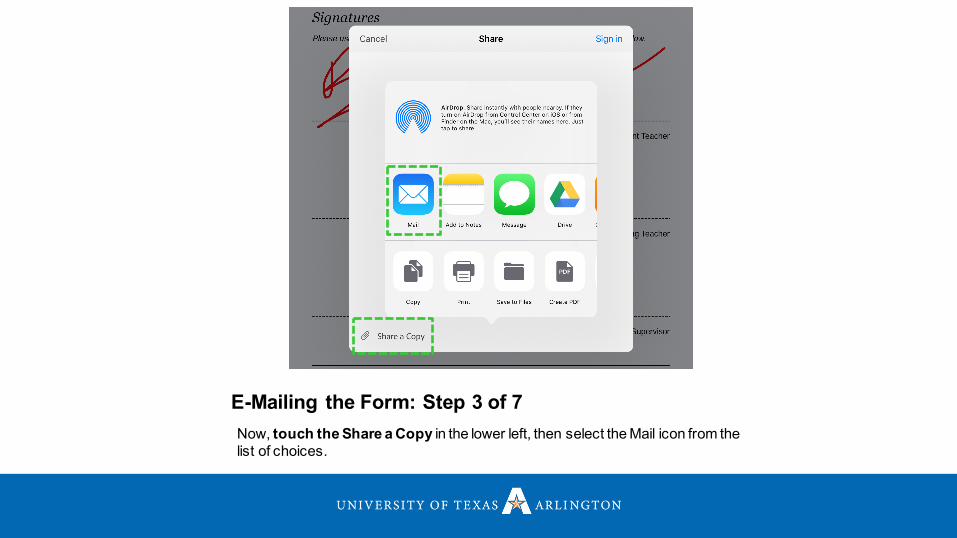
E-Mailing the Form: Step 3 of 7Now, touch the Share a Copy in the lower left, then select the Mail icon from the list of choices.
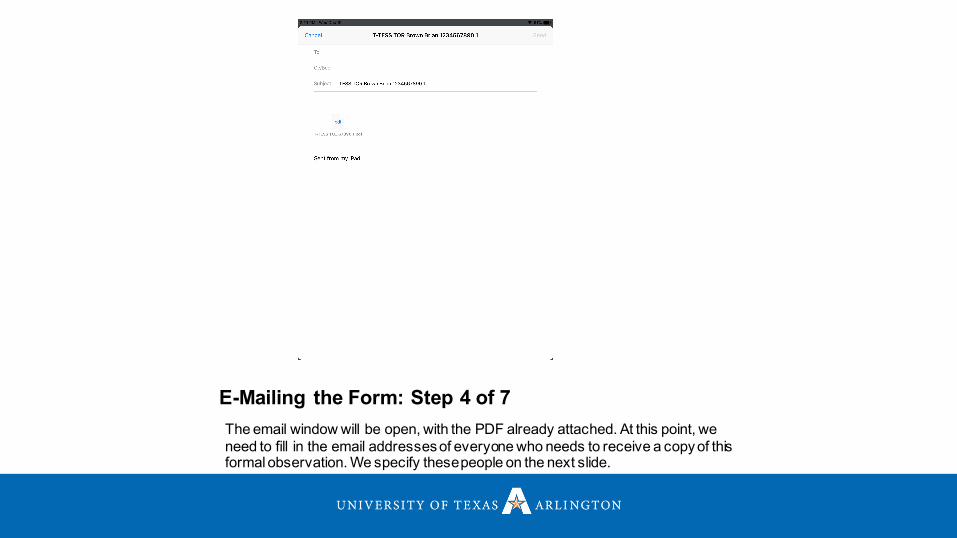
E-Mailing the Form: Step 4 of 7The email window will be open, with the PDF already attached. At this point, we need to fill in the email addresses of everyone who needs to receive a copy of this formal observation. We specify these people on the next slide.
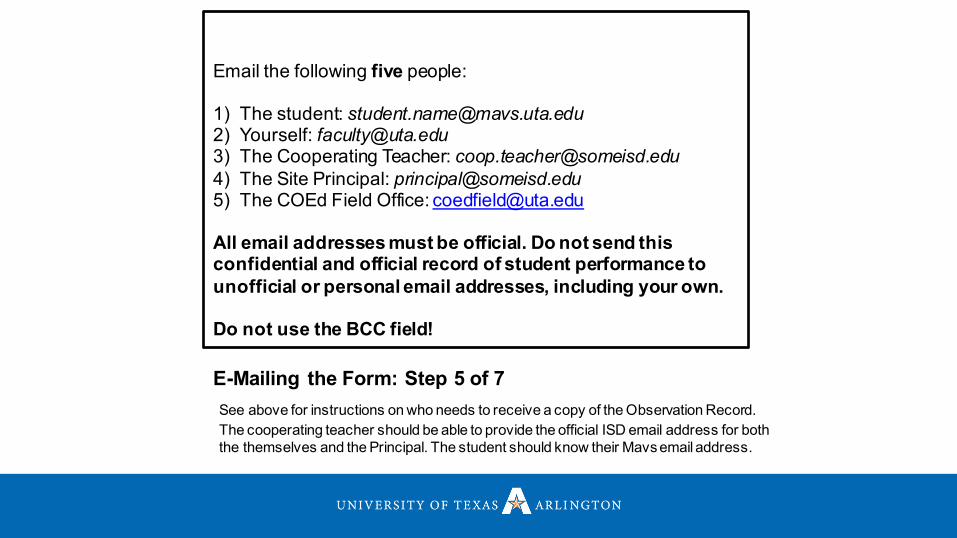
E-Mailing the Form: Step 5 of 7See above for instructions on who needs to receive a copy of the Observation Record. The cooperating teacher should be able to provide the official ISD email address for both the themselves and the Principal. The student should know their Mavs email address.
Email the following five people:
1) The student: [email protected]) Yourself: [email protected]) The Cooperating Teacher: [email protected]) The Site Principal: [email protected]) The COEd Field Office: [email protected]
All email addresses must be official. Do not send this confidential and official record of student performance to unofficial or personal email addresses, including your own.
Do not use the BCC field!
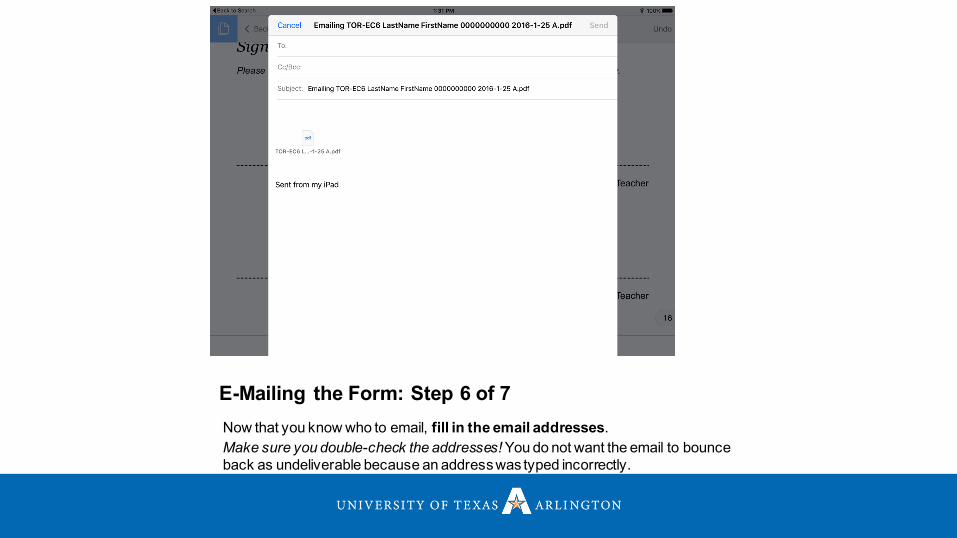
E-Mailing the Form: Step 6 of 7Now that you know who to email, fill in the email addresses.Make sure you double-check the addresses! You do not want the email to bounce back as undeliverable because an address was typed incorrectly.

E-Mailing the Form: Step 7 of 7Once you have all of the email addresses set and double-checked, touch the Send button that’s in the upper right-hand corner of the email editor. Even if you are not currently online, the iPad will automatically queue and send your email once you reach a network.

College of Education
Office of Educational Field [email protected] Collins, Ph.D.
Technical [email protected] Southerland