COLLECTING AND UTILIZINGCOLLECTING AND UTILIZING …which collects water from rain gutters for...
32
COLLECTING AND UTILIZING COLLECTING AND UTILIZING COLLECTING AND UTILIZING COLLECTING AND UTILIZING RAINFALL RUNOFF RAINFALL RUNOFF RAINFALL RUNOFF RAINFALL RUNOFF A Homeowner’s Manual of Ideas for Harvesting Rainwater Thomas Jefferson Soil and Water Conservation District
Transcript of COLLECTING AND UTILIZINGCOLLECTING AND UTILIZING …which collects water from rain gutters for...
COLLECTING AND UTILIZINGCOLLECTING AND UTILIZINGCOLLECTING AND UTILIZINGCOLLECTING AND UTILIZING
RAINFALL RUNOFFRAINFALL RUNOFFRAINFALL RUNOFFRAINFALL RUNOFF
A Homeowner’s
Manual of Ideas
for Harvesting Rainwater
Thomas Jefferson Soil and
Water Conservation District

FOREWORDFOREWORDFOREWORDFOREWORD
This handbook was developed in response to a need to
improve the way stormwater runoff is managed in
residential areas. The current edition includes revisions
and updates which reflect practical experience in the
design, installation and use of such systems in the four
counties the district serves.
The descriptions of the practices are intended to provide
general information only; site-specific designs are
strongly recommended and may be necessary. Most of
the practices described are still in the experimental
stages, and improvements to the designs will likely be
developed. Please contact the Thomas Jefferson Soil and
Water Conservation District for updated information, for
site-specific technical assistance, or to offer your own
suggestions on improvements or additions to this
handbook.
Thomas Jefferson Soil and Water
Conservation District
2134 Berkmar Drive
Charlottesville VA 22901
web site: avenue.org/tjswcd
i

ACKNOWLEDGEMENTSACKNOWLEDGEMENTSACKNOWLEDGEMENTSACKNOWLEDGEMENTS
The following resources and individuals contributed to the production of this manual:
• Design of Stormwater Filtering Systems, Center For Watershed
Protection, December 1996
• Bioretention Practices Manual, Prince Georges County Dept. of
Environmental Resources (manual produced by Engineering
Technologies Associates, Inc., and Biohabitats Inc.)
• Evaluation of Rainfall Collection—Cistern Storage Systems in
Southwest Virginia, Special Publication SP3-1998, Virginia Polytechnic
Institute and State University, Virginia Water Resources Resource
Center, 1998
• Garden Gate Magazine: online at www.gardengatemagazine.com
• Rainwater Harvesting: Supply from the Sky, City of Albuquerque,
Water Conservation Office
• Texas Guide to Rainwater Harvesting, 2nd Edition, Texas Water
Development Board, Austin, Texas, 1997
• Michael Collins, Director of Planning, ENSAT, Culpeper VA
• Chris French, Conservation Technician, TJSWCD
• David Hirschman, Albemarle County Water Resources Manager
• Rod Lafever, P.E., Charlottesville VA, Associate Director, TJSWCD
• Shea Wither, Intern, TJSWCD
• www.dof.state.va.us/rfb/riparian/rain_gardens.htm
Compiled and Edited by:
1st Edition: Alyson Sappington, District Manager, TJSWCD
2nd Edition: Martin Johnson, Conservation Field Technician, TJSWCD
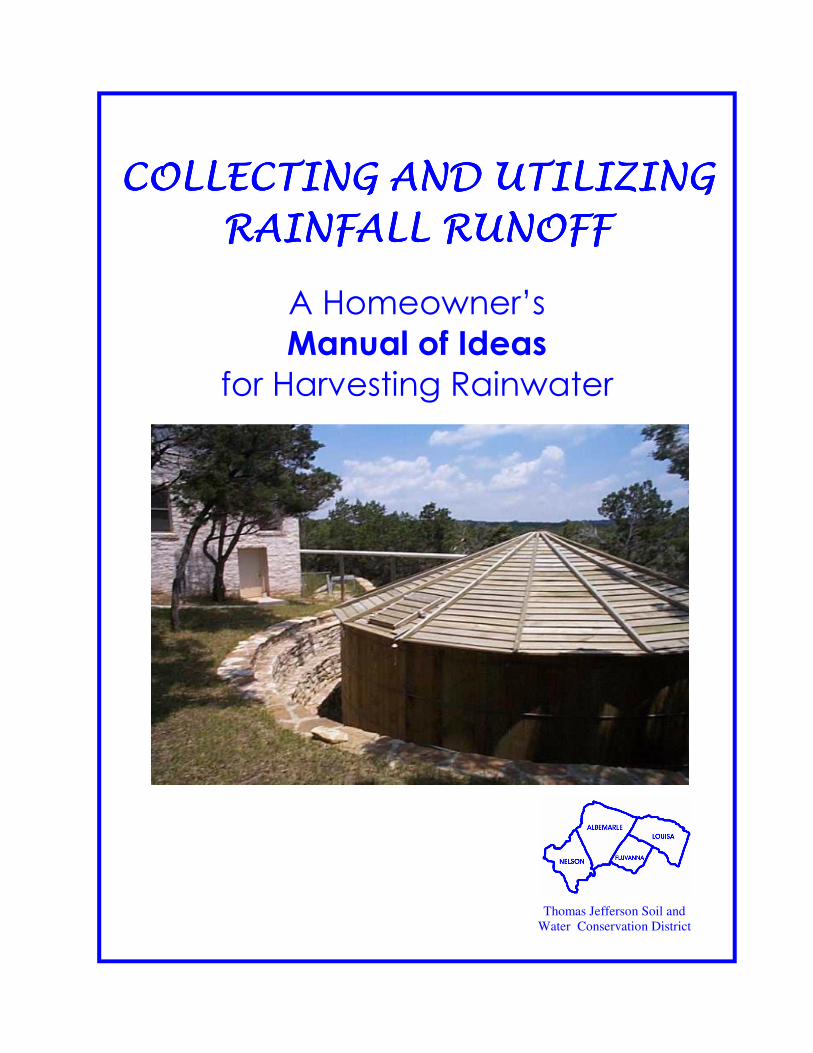
Cover photograph courtesy of American Rainwater Catchment Systems Association.
ii
Rainwater Harvesting: A Forgotten Practice ……..……. 1
Rainwater Harvesting Systems ………………………………. 3
• Roofing Material ……………………………………... 3
• Rain Gutters …………………………………………... 4
• Roof Washers ……………………………………….... 5
• Storage Tanks/Cisterns …………………………… 5
• Conveyance Systems ………………………….……. 10
• Water Treatment ………………………………..…... 10
Harvesting Water for Landscape Use ………………..…… 13
• Recommended Plant List ………………………... 15
• Raingardens ………………………………………….… 16
Downspout to French Drain …………………………….……. 18
Rain Barrels ……………………………………………………..…. 20
• Making a Rain Barrel ………………………………. 21
• Hooking up “Buddy Barrels” ……………………. 23
Cistern for Outdoor Water Uses ………………….…….…… 24
Cistern for Household Water Uses ………….….…….……. 26
TABLE OF CONTENTSTABLE OF CONTENTSTABLE OF CONTENTSTABLE OF CONTENTS
Page
iii

I. Rainwater Harvesting I. Rainwater Harvesting I. Rainwater Harvesting I. Rainwater Harvesting – A Forgotten Practice
A total of 34,300 gallons of rain fall on a 30 foot by 40 foot roof in Central Vir-
ginia each year (based on an annual average rainfall of 45.72 inches) - a bountiful
source of water! In urban areas rooftop rainfall runs directly into roadside ditches and
storm sewers, which carry it to rivers and streams. In more rural areas, it runs over
lawns and roads, picking up excess nutrients and other pollutants along the way. Some
of the rooftop rainfall may infiltrate into the soil, but much is lost as runoff, leading to
problems such as streambank erosion, flooding, and the movement of pollutants into
waterways.
The 34,300 gallons per year which falls on an average roof could potentially
provide water for:
• 4,287 showers, or
• 686 loads of laundry, or
• 6,860 flushes of a commode, or
• 45 1-inch waterings of a typical lawn, or
• any combination of the above water uses
For centuries, a common practice in many areas of the world, including some
parts of Virginia, has been to capture and store rainwater runoff for later use. Systems
can be as simple as a channel which carries rooftop runoff to a garden, or a “rain barrel”
which collects water from rain gutters for outdoor use (car washing, irrigation, filling
children’s swimming pools). Other systems can be more complex, using reservoirs and
pumping systems for the collection and storage of large quantities of water for domestic
use. With proper filtration and treatment, rainwater can even be used for drinking and
cooking, although such systems require careful design and maintenance.
As communities grow, providing an adequate municipal water supply becomes
an important issue. Political debates often center around costly options such as mu-
nicipal wells, the building of new reservoirs, and the dredging and expansion of old res-
ervoirs. In rural areas, an increase in the number of wells can threaten groundwater
supplies.
Conservation is a more cost-effective option. Utilizing rooftop runoff can be an
important component in a community conservation effort, and can significantly de-
crease the cost of creating new, or expanding old, municipal water supplies.
Collecting rooftop runoff for use, or allowing the runoff to infiltrate into the
ground, also minimizes some of the rainfall management problems associated with land
development. As land is developed, the natural water storage capacity of the land is
1
lost, and groundwater and surface water is impacted in a number of ways:
• Groundwater supplies are reduced with reductions in infiltration and re-
charge.
• The total volume of rainwater runoff increases.
• The velocity (or speed) of rainwater runoff increases.
• Streambank erosion increases with more, and faster, runoff.
• Flooding increases when stream channels are overwhelmed by the increase.
• More pollution is carried into streams by runoff.
This manual is intended to provide individual homeowners, and neighborhood
groups, some ideas for collecting and utilizing rainfall that runs off the roofs of homes.
The manual is by no means comprehensive; many other alternatives are possible.
We recommend that you seek site specific technical assistance before you install
the more sophisticated systems described here.
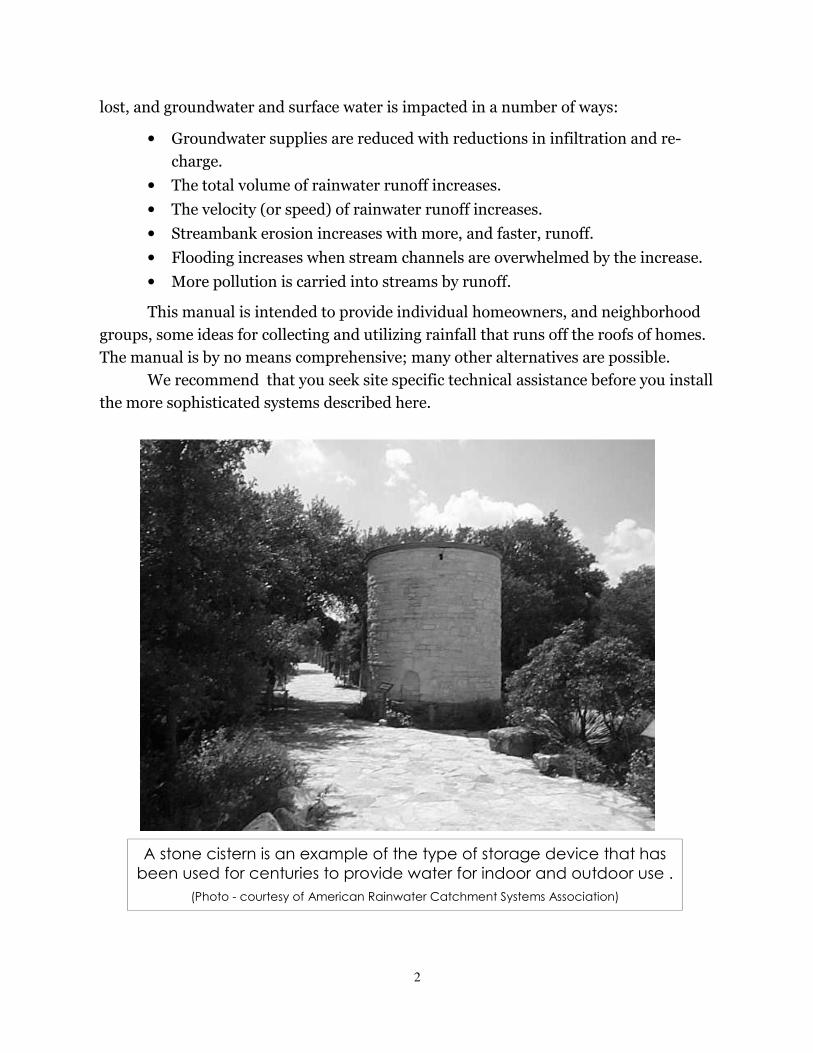
A stone cistern is an example of the type of storage device that has
been used for centuries to provide water for indoor and outdoor use .
(Photo - courtesy of American Rainwater Catchment Systems Association)
2

II. Rainwater Harvesting SystemsII. Rainwater Harvesting SystemsII. Rainwater Harvesting SystemsII. Rainwater Harvesting Systems
All rainwater harvesting systems have three main components: the supply
(rainfall), the need (landscaping, bathing, drinking water), and the system that moves
water to where it is needed.
Rainwater runoff refers to water that flows off a surface. If the surface is
impermeable, runoff occurs immediately. If the surface is permeable, runoff will not
occur until the surface is saturated. Runoff can be harvested (captured) and used
immediately to water plants, or can be stored for later use. The amount of rain
received, its duration and intensity all affect how much water is available for
harvesting. The timing of the rainfall is also important, because if only one rainfall
occurs, water percolates into the dry soil until it becomes saturated. If a second rainfall
occurs soon after the first, more water may run off because the soil is already wet.
The simplest harvesting systems are those designed to convey water directly to
landscaped areas. They consist of a catchment (such as a roof), a distribution system
and a landscaped holding area, which is a concave or planted area with an earthern
berm or other border to retain water for immediate use by plants. A good example of a
simple water harvesting system is water dripping from the edge of a roof to a planted
area or diversion channel located directly below the drip edge. Gravity moves the water
to where it can be used. Rainwater used for this purpose does not need to be filtered or
disinfected.
To increase the efficiency of rainwater use, the runoff can be collected in storage
tanks or cisterns. If water will be used inside the house, a pump and compressor may
be needed, as well as some filtration. If water will be used for cooking and drinking, it
will also need to be disinfected.
A. Roofing MaterialA. Roofing MaterialA. Roofing MaterialA. Roofing Material A catchment is any area where water can be collected, which includes roofs,
paved areas, and the soil surface. The best catchments have hard smooth surfaces such
as concrete or metal roofing material. The amount of water harvested depends on the
size, surface, texture and slope of the catchment area.
Many types of roofing materials can contribute some contamination to runoff
water. If the collected water will be used for human consumption it is important to test
runoff before designing the appropriate water treatment system. You should avoid any
paint, coatings, flashing or roofing materials that may contain lead, cadmium, or
copper.
The following table can be used as a guide to the contamination you might
expect from various types of roofs:
3
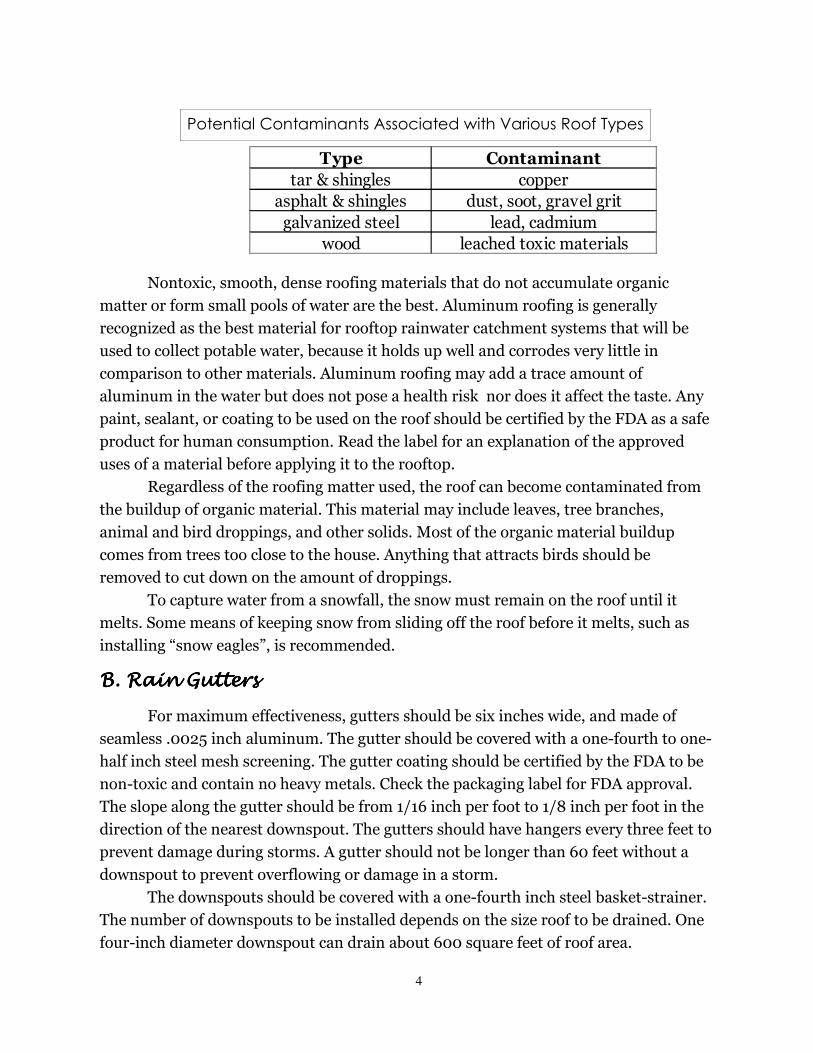
Nontoxic, smooth, dense roofing materials that do not accumulate organic
matter or form small pools of water are the best. Aluminum roofing is generally
recognized as the best material for rooftop rainwater catchment systems that will be
used to collect potable water, because it holds up well and corrodes very little in
comparison to other materials. Aluminum roofing may add a trace amount of
aluminum in the water but does not pose a health risk nor does it affect the taste. Any
paint, sealant, or coating to be used on the roof should be certified by the FDA as a safe
product for human consumption. Read the label for an explanation of the approved
uses of a material before applying it to the rooftop.
Regardless of the roofing matter used, the roof can become contaminated from
the buildup of organic material. This material may include leaves, tree branches,
animal and bird droppings, and other solids. Most of the organic material buildup
comes from trees too close to the house. Anything that attracts birds should be
removed to cut down on the amount of droppings.
To capture water from a snowfall, the snow must remain on the roof until it
melts. Some means of keeping snow from sliding off the roof before it melts, such as
installing “snow eagles”, is recommended.
B. Rain GuttersB. Rain GuttersB. Rain GuttersB. Rain Gutters
For maximum effectiveness, gutters should be six inches wide, and made of
seamless .0025 inch aluminum. The gutter should be covered with a one-fourth to one-
half inch steel mesh screening. The gutter coating should be certified by the FDA to be
non-toxic and contain no heavy metals. Check the packaging label for FDA approval.
The slope along the gutter should be from 1/16 inch per foot to 1/8 inch per foot in the
direction of the nearest downspout. The gutters should have hangers every three feet to
prevent damage during storms. A gutter should not be longer than 60 feet without a
downspout to prevent overflowing or damage in a storm.
The downspouts should be covered with a one-fourth inch steel basket-strainer.
The number of downspouts to be installed depends on the size roof to be drained. One
four-inch diameter downspout can drain about 600 square feet of roof area.
4
Type Contaminant
tar & shingles copper
asphalt & shingles dust, soot, gravel grit
galvanized steel lead, cadmium
wood leached toxic materials
Potential Contaminants Associated with Various Roof Types

C. Roof WashersC. Roof WashersC. Roof WashersC. Roof Washers Roof washing, or the collection and disposal of the first flush of water from a
roof, is of particular concern if the collected rainwater is to be used for human
consumption, since the first flush picks up most of the dirt, debris and contaminants,
such as the bird droppings that have collected on the roof and in the gutters during dry
periods. The most simple of these systems consists of a gutter drain and a vertical pipe
located ahead of the downspout from the gutter to the cistern. The pipe is usually 6 or 8
inch PVC which has a valve and clean out at the bottom. Once the pipe has filled, the
rest of the water flows to the downspout connected to the cistern. The roof washer
should hold at least 10 gallons for every 1,000 square feet of roof area. Several types of
commercial roof washers which contain filters and strainer boxes are also available.
D. Storage Tanks/CisternsD. Storage Tanks/CisternsD. Storage Tanks/CisternsD. Storage Tanks/Cisterns
Cisterns may be placed either above ground or below ground. Above ground
installations avoid the costs associated with excavation and certain maintenance
issues; on the other hand, cisterns that are below ground benefit from cooler ground
temperatures in summer and warmer ground temperatures in winter. To maximize
efficiency, cisterns should be located as close to both the supply and demand points as
possible. To facilitate the use of gravity and/or lower stress on a pump, the cistern
should be placed on the highest level that is workable.
A cistern that is located in the shade of the house or trees avoids the heat of the
direct sun that can encourage algae and bacterial growth.
Tank placement should also take into consideration the possible need to add
water to the tank from an auxiliary source such as a water truck in the event the water
Illustration courtesy of Water Filtration Co. Illustration courtesy of Texas Water Development Board.
5
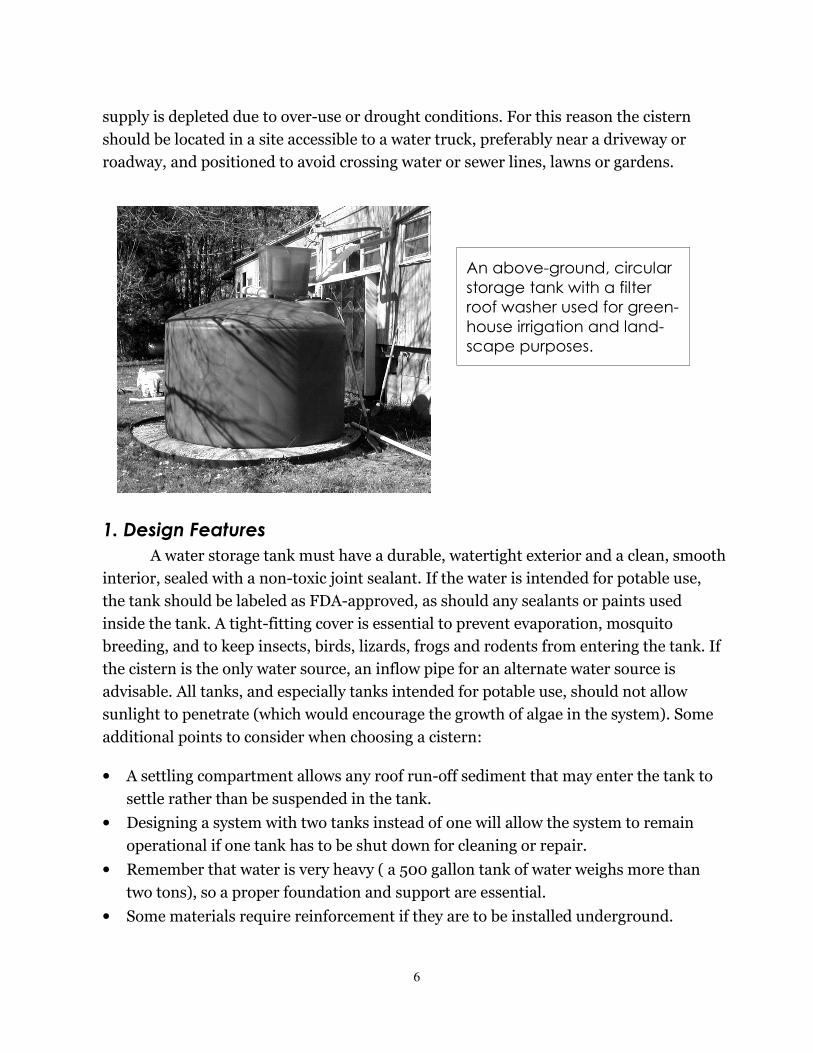
supply is depleted due to over-use or drought conditions. For this reason the cistern
should be located in a site accessible to a water truck, preferably near a driveway or
roadway, and positioned to avoid crossing water or sewer lines, lawns or gardens.
1. Design Features
A water storage tank must have a durable, watertight exterior and a clean, smooth
interior, sealed with a non-toxic joint sealant. If the water is intended for potable use,
the tank should be labeled as FDA-approved, as should any sealants or paints used
inside the tank. A tight-fitting cover is essential to prevent evaporation, mosquito
breeding, and to keep insects, birds, lizards, frogs and rodents from entering the tank. If
the cistern is the only water source, an inflow pipe for an alternate water source is
advisable. All tanks, and especially tanks intended for potable use, should not allow
sunlight to penetrate (which would encourage the growth of algae in the system). Some
additional points to consider when choosing a cistern:
• A settling compartment allows any roof run-off sediment that may enter the tank to
settle rather than be suspended in the tank.
• Designing a system with two tanks instead of one will allow the system to remain
operational if one tank has to be shut down for cleaning or repair.
• Remember that water is very heavy ( a 500 gallon tank of water weighs more than
two tons), so a proper foundation and support are essential.
• Some materials require reinforcement if they are to be installed underground.
6
An above-ground, circular
storage tank with a filter
roof washer used for green-
house irrigation and land-
scape purposes.
2. Materials
Tanks are available in a variety of materials and sizes, new and used. Some
sources recommend that it is advantageous to paint above-ground tanks white to
reflect the sun's rays, reduce evaporation, and keep the water cool. Sunlight should not
be allowed to penetrate the tank as it will encourage the growth of algae.
Concrete
Reinforced concrete tanks can be built above or below ground by a commercial
contractor or owner-builder. Because of their weight they are usually poured in place to
specifications and are not portable. However, concrete tanks may also be fashioned
from prefabricated components, such as septic tanks and storm drain culverts, and
from concrete blocks. Concrete is durable and long-lasting, but is subject to cracking.
Below-ground tanks should be checked periodically for leaks, especially in clay soils
where expansion and contraction may place extra stress on a tank. An advantage of
concrete cistern chambers is their ability to decrease the natural corrosiveness of
rainwater by allowing the dissolution of calcium carbonate from the walls and floors.
Ferrocement
Ferrocement is a term that is used to describe a relatively low-cost steel-mortar
composite material. Its use over the past 100 years has been prevalent in developing
countries in a range of low-cost applications, such as water tanks. It has also gained
popularity among do-it-yourselfers throughout the U.S. Although it is a form of
reinforced concrete, its distinctive characteristics relative to performance, strength,
and flexible design potentials generally warrant classification of ferrocement as a
separate material. Unlike reinforced concrete, ferrocement's reinforcement is
composed of multiple layers of steel mesh (often chicken wire), shaped around a light
framework of rebar, that is impregnated with cement mortar. Because its walls can be
7
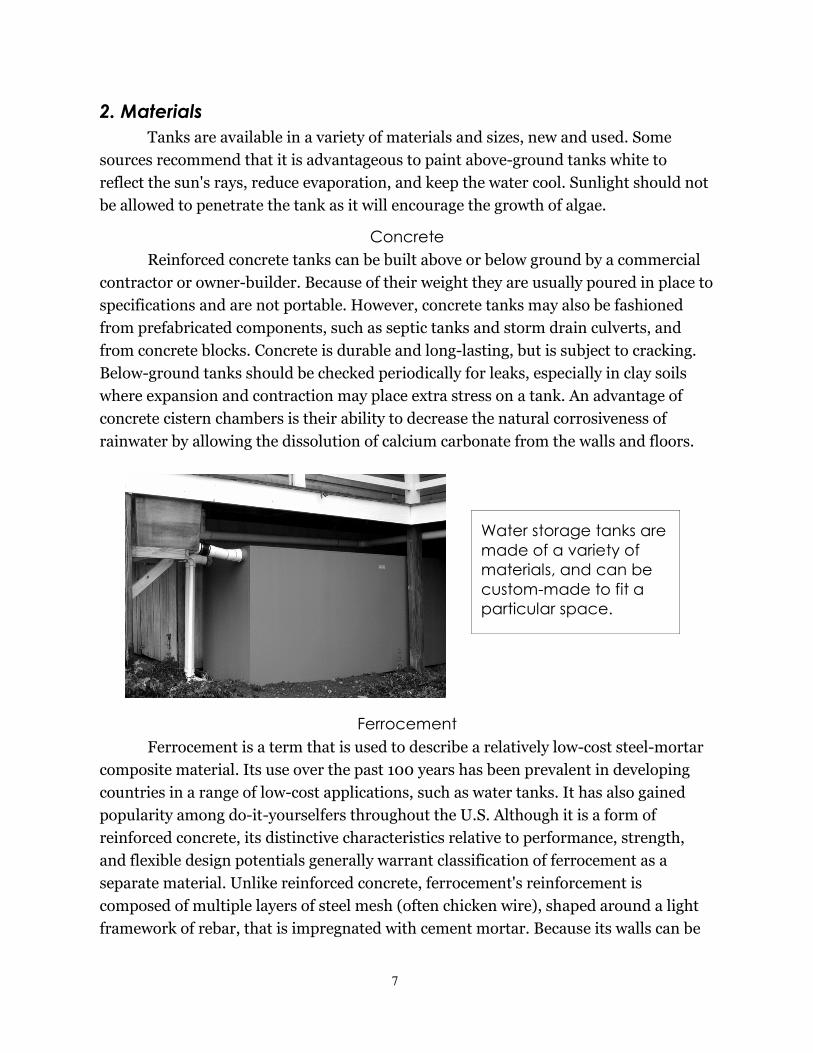
Water storage tanks are
made of a variety of
materials, and can be
custom-made to fit a
particular space.
as thin as one inch, it uses less material than conventional poured-in-place concrete
tanks, and thus can be less expensive.
Ferrocement lends itself to low-cost construction projects, since it can take
advantage of self-help labor and prevalent, low-cost materials such as rebar, chicken
wire, cement and sand. Ferrocement tanks are likely to require greater ongoing
maintenance than tanks constructed of other materials. Small cracks and leaks can be
easily repaired with a mixture of cement and water, which can also applied where wet
spots appear on the tank's exterior. Though ferrocement is most commonly a site-built
method, commercially available ferrocement tanks are sometimes available. Check to
be sure that the ferrocement mix does not contain any toxic compounds which could
make the water unfit for use.
Stone
In locations where abundant rock is available, site-built stone cisterns have
historically been a favored approach to tank fabrication. The mass of stone walls helps
keep the interior water temperature cool. As with cement tanks, these constructions are
permanent. Construction procedures should be careful to exclude any compounds
which may be toxic, such as some types of mortars and sealants, especially if the system
is planned to store potable water.
Fiberglass
Fiberglass tanks are lightweight, reasonably priced, and long-lasting, making
them one of the most popular tanks in contemporary installations. As with
polyethylene and galvanized tanks, fiberglass tanks are commercially available and
easy to transport. They are available in a wide range of sizes and can be specified for
potable water. Fiberglass tanks should be coated or constructed to prevent penetration
of sunlight into the tank.
Plastic Liner
Plastic liners are sometimes used to line concrete tanks, or tanks that have
developed leaks. These liners can also be used to line low-cost, temporary collection
tanks constructed of materials such as plywood. Plastic liners that are specified for
potable use are commercially available. It is important to remember when using liners
that they must be fully supported since they have no structural strength of their own.
Polyethylene
These tanks are commercially available in a variety of sizes, shapes, and colors,
and can be constructed for above or below ground installations. Polyethylene tanks are
gaining popularity due to their relative low cost and long life expectancy – they are
considered slightly more durable than fiberglass with comparable life expectancy. Their
8

light weight makes them easy to transport and relocate, if needed, while their smooth
interior surface makes them easy to clean. Repairs are relatively easy to carry out – heat
can be used to soften the plastic and reshape as necessary. To ensure a long life,
polyethylene tanks should be chosen which have ultra-violet (UV) inhibitors for outdoor
use, or can be placed in an enclosure or painted with a protective surface to provide
protection from the sun. Black tanks have the greatest UV resistance, with a life
expectancy of 25 years. They will tend to absorb heat, however, which can affect water
quality. If you intend to use the tank for potable water, be sure it is FDA approved.
Galvanized Steel
Steel tanks have historically been a predominate choice where building stone was
not readily available. Galvanized steel tanks are commercially available and reasonably
priced. They are noted for their strength, yet are relatively lightweight and easy to move.
Corrosion can be a problem if exposed to acidic conditions; some suppliers provide an
inside liner to guard against this problem. In addition, high and low pH water
conditions can result in the release of zinc. As with other tank materials, be sure that any
galvanized metal tank used as a potable source is FDA approved. If salvaging an old
metal tank, be aware that these were generally soldered with lead, and should not be
used as a potable water source.
9
Two underground 1,700 gallon polyethylene tanks during installation.
There is a filtering roof washer in the top left corner.

E. Conveyance SystemsE. Conveyance SystemsE. Conveyance SystemsE. Conveyance Systems
Water only flows downhill unless a pump is used. The water pressure of a
gravity system depends on the difference in elevation between the storage tank and the
faucet where the water is accessed. Water gains one pound of pressure per square inch
(psi) for every 2.3 feet of rise or lift. Many plumbing fixtures and appliances require 20
psi for proper operation, while standard municipal water supply pressures are typically
40 to 60 psi. To achieve a comparable pressure, a cistern would have to be 92.4 feet
above the home's highest plumbing fixture. That explains why pumps are frequently
used.
To approximate the water pressure one would get from a municipal system,
pressure tanks are often installed with a pump. Pressure tanks have a pressure switch
with adjustable settings between 5 and 65 psi. For example, to keep in-house pressure
at about 35 psi, the switch is set to turn off the pump when the pressure reaches 40 psi
and turn it on again when the pressure drops down to 30 psi.
F. Water TreatmentF. Water TreatmentF. Water TreatmentF. Water Treatment
The use to which harvested rainwater is put will determine whether and how
thoroughly it needs to be treated. If rainwater will only be used for landscaping,
gardens or lawns, the system only needs to filter out the largest debris, such as twigs
and leaves, before it reaches the storage container. Water that is used for laundry and
dishwashing may need some treatment to adjust pH or to filter out undesirable
sediment or minerals. If the system will be used as a source of drinking and cooking
water, some method of killing microorganisms will need to be used. In any case, the
water should be tested by an approved laboratory.
1. Filters
Filtration can be as simple as the use of cartridge filters or those used in
swimming pools and hot tubs. Once large debris is removed by screens and roof
washers, other filters are available which help improve rainwater quality. As most
filters on the market are designed to treat municipal or well water, filter selection
requires careful consideration.
Screening, sedimentation and prefiltering occur between catchment (the roof)
and storage. A cartridge sediment filter, which traps and removes particles of 5 microns
or larger, is the most common filter used for rainwater harvesting. Sediment filters
used in series, referred to as multi-cartridge or in-line filters, sieve the particles from
increasing to decreasing size. When a disinfectant such as chlorine is used in the tank,
an activated carbon filter may be used at the tap to remove the chlorine before use.
10

Chemical disinfectants such as chlorine or iodine must be added to the water prior to
the activated charcoal filter. If ultraviolet light or ozone is used for disinfection, the
system should be placed after the activated carbon filter.
2. Disinfection
If the harvested rainwater is used to wash clothes, water plants or other tasks
that do not involve direct human consumption or contact, treatment beyond screening
and sedimentation removal is optional. However, if the water is plumbed into the
house for general indoor use such as drinking, bathing and cooking, disinfection is
needed.
Ultraviolet Light (UV)
UV water disinfection units are often the method of choice. They kill most
microbiological organisms that pass through them. Since particulates offer a hiding
place for bacteria and microorganisms, prefiltering is necessary for UV systems. To
determine whether the minimum dosage is distributed throughout the disinfection
chamber, UV water treatment units should be equipped with a light sensor. Either an
alarm or shut-off switch is activated when the water does not receive an adequate level
of UV radiation. The UV unit must be correctly calibrated and tested after installation
to insure that the water is being adequately disinfected.
Ozone
Ozone is the disinfectant of choice in many European countries, but it has not
been used in American water treatment facilities until recently. Ozone (O3) is a form of
oxygen produced by passing air through a strong electric field. Ozone readily kills
microorganisms and oxidizes organic matter in the water into carbon dioxide and
water. Any remaining ozone reverts back to dissolved oxygen (O2) in the water.
11
From left to right: pressure
tank, inline cartridge filter
and UV sterilizer in basement
between cistern and house-
hold water system.
Compact ozone units have recently been made available for home use. Since ozone is
produced by equipment at the point of use with electricity as the only input, many
rainwater catchment system owners use it to avoid having to handle chlorine and other
chemicals. Ozone can be used to keep the water in cisterns "fresh". When it is used as the
final disinfectant, it should be added prior to the tap, but after an activated carbon filter,
if one is used.
Chlorine or Iodine
Chlorine is the most common disinfectant because of its dependability, water
solubility and availability. Granular or tablet forms are available (calcium hypochlorite),
but the recommended application for rainwater disinfecting is in a liquid solution
(sodium hypochlorite). Household bleach contains a 5.0% solution of sodium
hypochlorite, and is proven to be reliable, inexpensive and easily obtained. A dose of one
liquid ounce of bleach for each 100 gallons (one and a quarter cups of bleach per 1,000
gallons) of rainwater collected will most likely be sufficient to disinfect the collected
rainwater. When disinfecting, never overdose with bleach. Mixing occurs naturally over a
day or so, but a clean paddle may be used to accelerate the process.
When chlorine bleach is added directly to the tank as described above, the
chlorine will have a longer time to kill bacteria and will achieve a better rate of
disinfection. Chlorine feed pumps which release small amounts of solution while the
water is being used can also be used. Chlorine concentrations are easily measured with a
swimming pool test kit. A level between 0.2 mg/L (milligrams per liter) and 1.5 mg/L is
recommended.
Iodine is another water disinfectant that is less soluble than chlorine, although it
is effective over a pH range of 5 to 9 and displays greater antibacterial activity in water
temperatures of 75 to 98.6 degrees Fahrenheit.
3. Buffering
Rainwater tends to be more acidic than municipal water. Controlling the pH of
rainwater by buffering can be easily accomplished by adding one level teaspoon of
baking soda to the storage tank for each 1,000 gallons of water collected. An easy method
is to mix this amount of baking soda in a jar of water and pour it in the tank.
Note: Other treatment devices, such as reverse osmosis (RO), nano-filtration,
membrane processes and distillation equipment are primarily designed to remove
dissolved materials such as salts or metals. As rainwater contains extremely low levels of
dissolved salts and metals, such systems would be redundant and expensive to use.
12
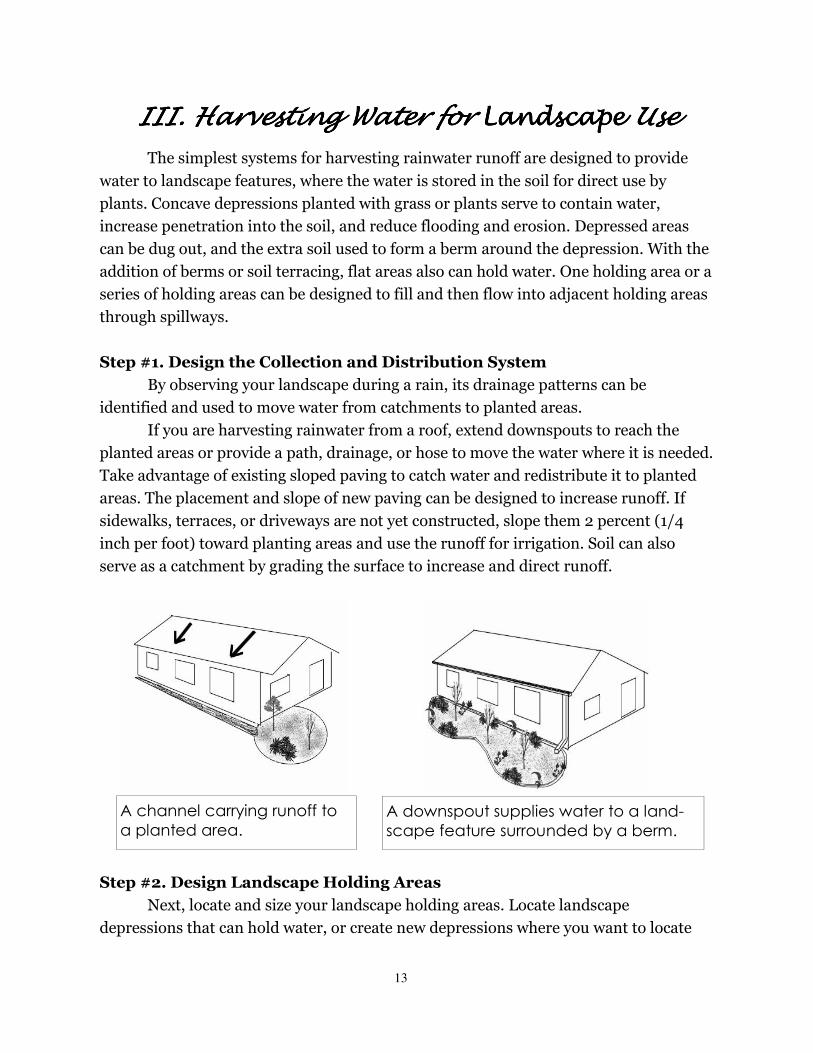
III. Harvesting Water for III. Harvesting Water for III. Harvesting Water for III. Harvesting Water for LandscapeLandscapeLandscapeLandscape Use Use Use Use
The simplest systems for harvesting rainwater runoff are designed to provide
water to landscape features, where the water is stored in the soil for direct use by
plants. Concave depressions planted with grass or plants serve to contain water,
increase penetration into the soil, and reduce flooding and erosion. Depressed areas
can be dug out, and the extra soil used to form a berm around the depression. With the
addition of berms or soil terracing, flat areas also can hold water. One holding area or a
series of holding areas can be designed to fill and then flow into adjacent holding areas
through spillways.
Step #1. Design the Collection and Distribution System
By observing your landscape during a rain, its drainage patterns can be
identified and used to move water from catchments to planted areas.
If you are harvesting rainwater from a roof, extend downspouts to reach the
planted areas or provide a path, drainage, or hose to move the water where it is needed.
Take advantage of existing sloped paving to catch water and redistribute it to planted
areas. The placement and slope of new paving can be designed to increase runoff. If
sidewalks, terraces, or driveways are not yet constructed, slope them 2 percent (1/4
inch per foot) toward planting areas and use the runoff for irrigation. Soil can also
serve as a catchment by grading the surface to increase and direct runoff.
Step #2. Design Landscape Holding Areas
Next, locate and size your landscape holding areas. Locate landscape
depressions that can hold water, or create new depressions where you want to locate
A downspout supplies water to a land-
scape feature surrounded by a berm.
A channel carrying runoff to
a planted area.
13

new plants. Rather than digging a basin around existing plants, construct level berms
or moats on the surface to avoid damaging roots. Do not mound soil at the base of trees
or other plants.
Holding areas around existing plants should extend beyond the "drip line" that
extends to the farthest reaches of branches around the trunk to accommodate and
encourage extensive root systems. Plants with a well-developed root system have
greater tolerance for drought because the roots have a larger area to find water. For
new plantings, locate the plants at the upper edge of concave holding areas to
encourage extensive rooting and to avoid extended flooding. For both existing and new
landscapes you may want to connect several holding areas with spillways or channels
to distribute water throughout the site. It is important to design the holding area so
that the water it holds will infiltrate, evaporate or drain within 4 days to prevent
mosquitoes from breeding.
Step #3. Select Plant Material
Proper plant selection is a major factor in the success of a water harvesting
project. Some plants cannot survive in the actual water detention area if the soil is
saturated for a long period of time, so careful plant selection for these low-lying areas is
important. Select native plants that can withstand both dry conditions and prolonged
inundation.
It may be necessary to provide a basin to hold water flowing from rain gutter
downspouts, and to slow it down. It may be desirable to place rocks or other hard
material under and around down spouts to slow the flow of water and prevent erosion.
If you're working with a sloped site, large, connected, descending holding areas can be
constructed for additional plants.
Seeding is another alternative for planting holding basins. Select seed mixes
containing native wildflowers, grasses and herbaceous plants. Perennial grasses are
particularly valuable for preventing soil loss.
A series of landscape water harvesting
basins fill and spill runoff in sequence. Crescent–shaped landscape
holding areas on a slope.
14

Take care not to compact soils in landscape holding areas; this inhibits the
movement of water into and through the soil. If the soil is compacted, loosen it by
tilling. If the soil is too sandy and will not hold water for any length of time, you may
wish to add composted organic matter to increase its moisture-holding potential. After
planting, apply a 2-3 inch layer of mulch to reduce evaporation.
See the list below of native plants that are tolerant of both wet and dry
conditions. You can learn more about these plants at local nurseries, or online by
searching the Natural Resources Conservation Service plant database at
plants.usda.gov. This web site has a wealth of information about plants, as well as
photographs and drawings of most species.
Common Name Scientific Name
Joe Pye Weed Eupatorium fistulosum
Rough-stemmed Goldenrod Solidago rugosa
Atamasco Lily Zephranrthes atamasco
Deer Tongue Dichanthelium clandestinum
Virginia Creeper Parthenocissus quinquefolia
Virgin’s Bower Clematis virginiana
Southern Wax Myrtle Myrica cerifera
Common Elderberry Sambucus canadensis
Broad-leaved Meadowsweet Spiraea latifolia
Canada Serviceberry Amelianchier canadensis
Cut-leaved Coneflower Rudbeckia laciniata
New York Ironweed Vernonia noveboracensis
Thick-leaved Phlox Phlox carolina
Broom Sedge Dryopteris intermedia
New England Aster Aster novae angliae
Highbush blueberry Vaccinium corymbosum
Mist Flower Eupatorium coelestinum
Balsam Ragwort Packera paupercaulus
Some Native Plant Species that are Tolerant of both Wet and Dry Conditions
15
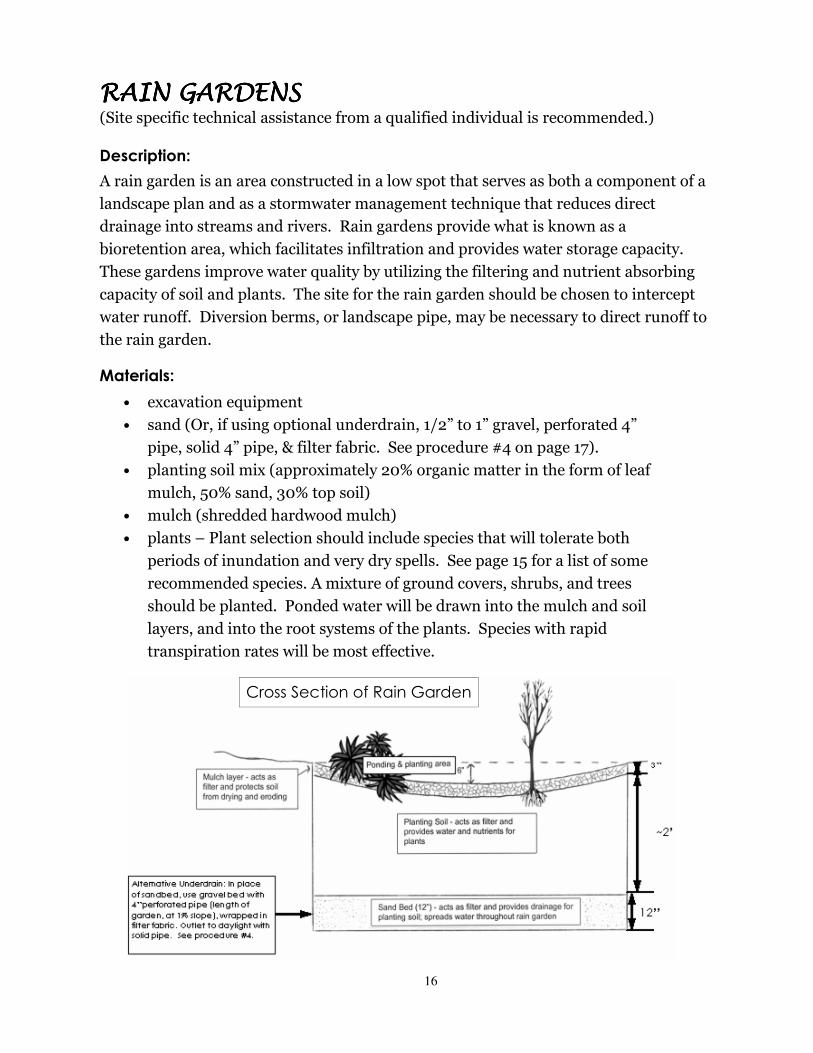
RAIN GARDENSRAIN GARDENSRAIN GARDENSRAIN GARDENS (Site specific technical assistance from a qualified individual is recommended.)
Description:
A rain garden is an area constructed in a low spot that serves as both a component of a
landscape plan and as a stormwater management technique that reduces direct
drainage into streams and rivers. Rain gardens provide what is known as a
bioretention area, which facilitates infiltration and provides water storage capacity.
These gardens improve water quality by utilizing the filtering and nutrient absorbing
capacity of soil and plants. The site for the rain garden should be chosen to intercept
water runoff. Diversion berms, or landscape pipe, may be necessary to direct runoff to
the rain garden.
Materials:
• excavation equipment
• sand (Or, if using optional underdrain, 1/2” to 1” gravel, perforated 4”
pipe, solid 4” pipe, & filter fabric. See procedure #4 on page 17).
• planting soil mix (approximately 20% organic matter in the form of leaf
mulch, 50% sand, 30% top soil)
• mulch (shredded hardwood mulch)
• plants – Plant selection should include species that will tolerate both
periods of inundation and very dry spells. See page 15 for a list of some
recommended species. A mixture of ground covers, shrubs, and trees
should be planted. Ponded water will be drawn into the mulch and soil
layers, and into the root systems of the plants. Species with rapid
transpiration rates will be most effective.
Cross Section of Rain Garden
16
17
Maintenance:
• The soils in the planting bed should be tested, and lime applied to maintain the appropriate pH for the
selected plant materials.
• If the soil bed experiences some erosion, it should be repaired to limit the damage. (Erosion is most
likely to occur during the first two years of plant establishment.)
• The mulch layer should be replaced approximately every two years.
• Inspect plantings for dead or diseased plants, and replace as needed.
• Some plantings may benefit from pruning.
Procedure:
Notes: For new home construction, the rain garden should not be built until the area draining to it is completely stabilized with vegetation. Silt in runoff from construction areas will clog and ruin rain gardens. Rain gardens should also be installed a safe distance away from home foundations, especially if a basement is present. The rain garden is designed so that water will infiltrate and/or evaporate within four days, preventing mosquitoes from breeding.
1. If possible, a grass buffer should be created beween the impervious areas from which
water will be collected (roofs, driveways, patios, decks, etc.), and the rain garden. This
buffer will slow and filter water as it enters the rain garden.
2. The rain garden area should be marked with flagging or stakes. The garden should be
approximately 5% of the size of the drainage area. Ideally, the width should be a
minimum of 10 feet and the length a minimum of 30 feet. A 10 x 30 foot rain garden
would be appropriate for up to 6,000 sq. ft. of drainage. For single family home sites,
if space is limited, 150 square feet is usually an acceptable size. (A minimum 2:1
length to width ratio should be maintained.)
3. Excavate a trench, approximately four feet deep, in the rain garden area.
4. Spread a 12-inch layer of sand on the bottom of the trench.
Optional: An underdrain can also be installed if the size of the garden is limited. An
underdrain consists of a 4” perforated pipe in a bed of gravel, centered along the
length of the garden, sloped at approximately 1%. Wrap the pipe in filter fabric to
prevent clogging. Outlet with a solid pipe to daylight.
5. Spread the soil layer (described above in “materials”), so that the top is shaped to form
a swale (see diagram on p. 16). The low point of that swale should be 6 inches below
the ground level on either side of it. (This will allow for 3 inches of settling over time.)
6. Spread about 3 inches of shredded mulch on top, following the contours of the soil
layer. This will provide 6 inches of ponding area at the low point of the swale, after
settling.
7. The rain garden should include an overflow system to convey large storm volumes.
This may consist of a pipe or channel system, above the six-inch ponding area,
directed to a receiving channel.
8. Plant selected trees, shrubs, and ground covers (see p. 15 for a list of plants).
18
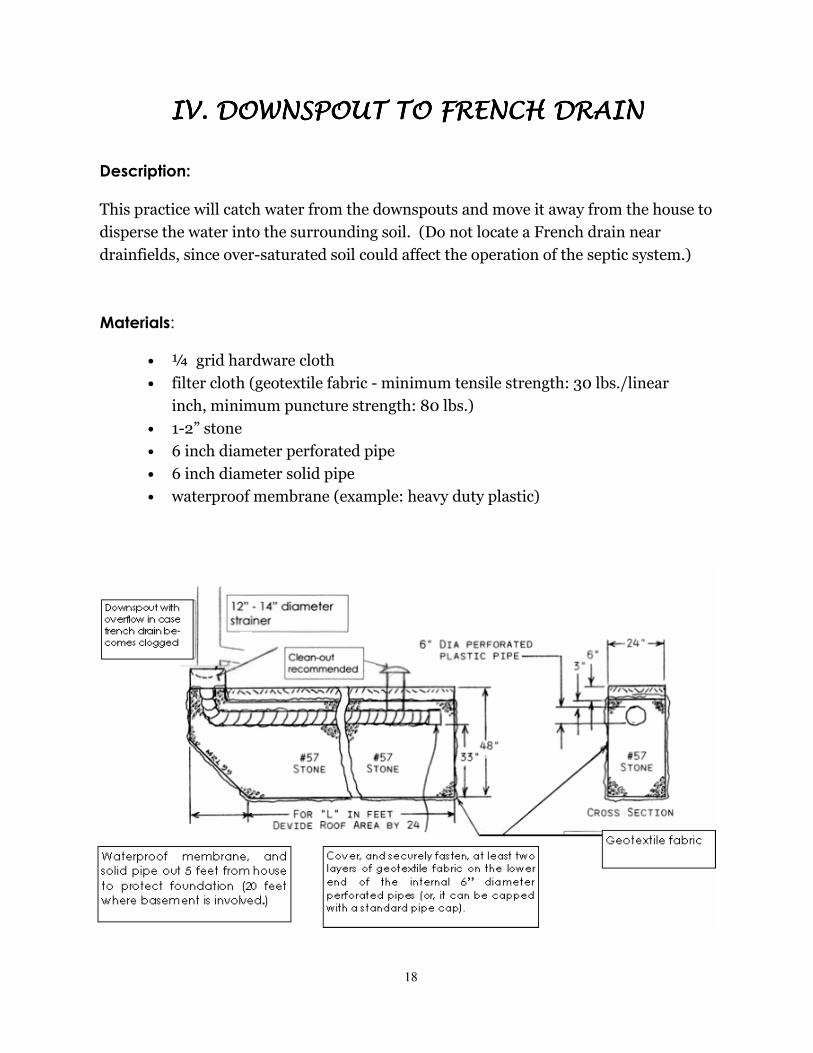
IV. DOWNSPOUT TO FRENCH DRAINIV. DOWNSPOUT TO FRENCH DRAINIV. DOWNSPOUT TO FRENCH DRAINIV. DOWNSPOUT TO FRENCH DRAIN
Description:
This practice will catch water from the downspouts and move it away from the house to
disperse the water into the surrounding soil. (Do not locate a French drain near
drainfields, since over-saturated soil could affect the operation of the septic system.)
Materials:
• ¼ grid hardware cloth
• filter cloth (geotextile fabric - minimum tensile strength: 30 lbs./linear
inch, minimum puncture strength: 80 lbs.)
• 1-2” stone
• 6 inch diameter perforated pipe
• 6 inch diameter solid pipe
• waterproof membrane (example: heavy duty plastic)

Procedure (Use the diagram above to aid in the procedure):
1. Before beginning this project, a percolation test should be run on the soil to determine
if the water will draw down as needed. To perform the test, dig a 4-foot deep hole in the
soil and fill it with water. If the water draws down in 24 hours, then this method can be
used. If not, do not try this practice.
2. Divide the area of the roof by 24 to determine the length of perforated pipe needed. If
the pipe length cannot fit in the available space, more than one pipe, placed parallel to
each other about one foot apart, may be used to reach the length needed. Example: If the
length needed is 100 feet, then 2 pipes of 50 feet or 3 pipes of 33.3 feet can be used.
3. Using the measurement above, dig a ditch 48 inches deep by 24 inches wide (or wider, if
parallel pipes are used). The ditch length should be the length of perforated pipe calcu-
lated, plus 5 feet for houses without basements, or 20 feet for houses with basements.
4. At the base of the ditch next to the house place the waterproof membrane to a distance of
5 feet for houses without basements and 20 feet for houses with basements. The rest of
the ditch will be enveloped in geotextile fabric. The geotextile envelope around the stone
helps to keep the voids between the stone from filling in with soil, and minimizes sinking
of stone.
5. Carefully place the stone on top of the geotextile, to a depth of 33 inches from the base of
the ditch.
6. Place the pipe on top of the stone, beginning with the solid pipe section bending in an
“elbow” up to ground level below the downspout (using 5 feet solid pipe without base-
ment, 20 feet with basement). Connect to perforated pipe. Install optional clean-out.
Wrap the outlet end of the perforated pipe in at least two layers of geotextile fabric.
Cover the pipe with 3 inches of stone.
7. Place additional geotextile fabric on top of stone. Cover with 6 inches of soil. Make sure
to completely cover the cloth. Geotextile fabric becomes brittle when exposed to the sun.
8. If debris is a problem, gutter screens, available at hardware stores, can help. Alterna-
tively, at the opening of the pipe below the downspout, place a removable, bowl shaped
strainer between downspout and pipe leading into stone chamber. This will keep leaves
and debris out of voids between stones. This can be constructed using ¼ grid hardware
cloth, anchored, so that it can be removed and cleaned, when needed.
9. Some of the excavated soil from the ditch can also be used to create a sloping surface
away from the downspout and the house. Additional soil can be used to build a berm at
the lower end of the structure to temporarily hold runoff until it infiltrates below.
19
Maintenance:
• Clean strainer as needed.
• If pipe becomes clogged, use clean-out for access to unclog.
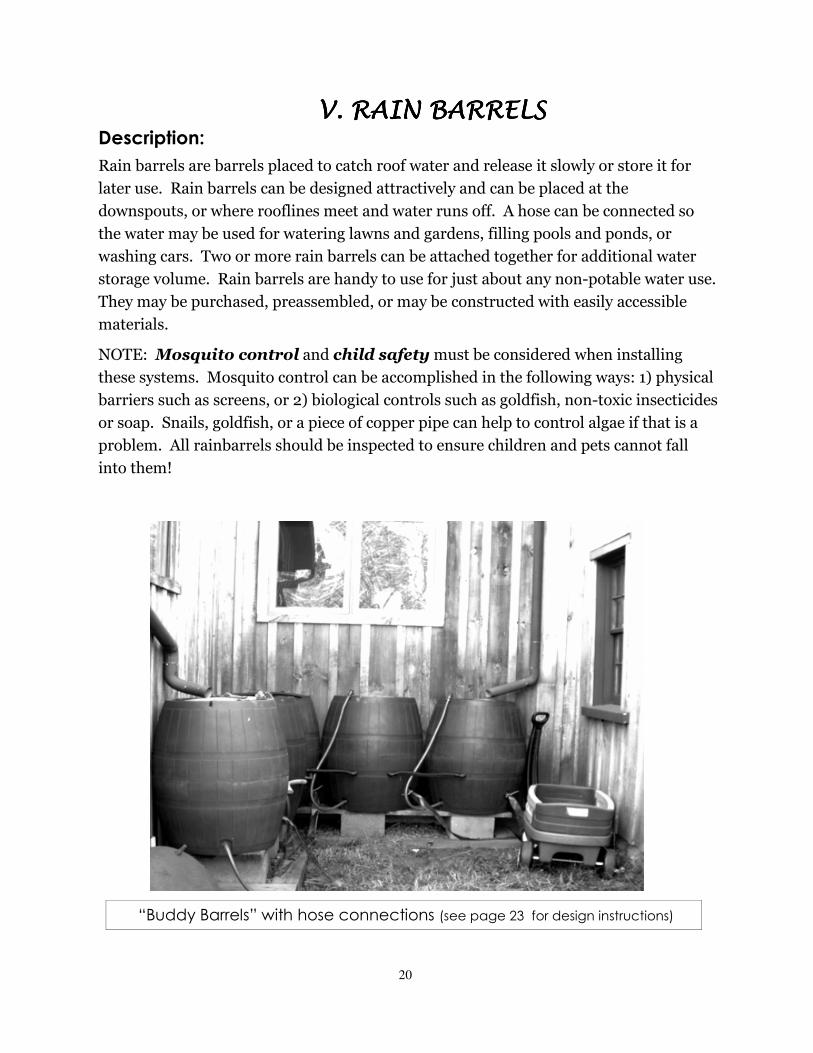
V. RAIN BARRELSV. RAIN BARRELSV. RAIN BARRELSV. RAIN BARRELS Description:
Rain barrels are barrels placed to catch roof water and release it slowly or store it for
later use. Rain barrels can be designed attractively and can be placed at the
downspouts, or where rooflines meet and water runs off. A hose can be connected so
the water may be used for watering lawns and gardens, filling pools and ponds, or
washing cars. Two or more rain barrels can be attached together for additional water
storage volume. Rain barrels are handy to use for just about any non-potable water use.
They may be purchased, preassembled, or may be constructed with easily accessible
materials.
NOTE: Mosquito control and child safety must be considered when installing
these systems. Mosquito control can be accomplished in the following ways: 1) physical
barriers such as screens, or 2) biological controls such as goldfish, non-toxic insecticides
or soap. Snails, goldfish, or a piece of copper pipe can help to control algae if that is a
problem. All rainbarrels should be inspected to ensure children and pets cannot fall
into them!
20
“Buddy Barrels” with hose connections (see page 23 for design instructions)

21
Making a Rain BarrelMaking a Rain BarrelMaking a Rain BarrelMaking a Rain Barrel If you have a gutter and downspout system on your house or garage, you can build a
rain barrel to gather water for your garden. To find a barrel, check with companies that
buy bulk food ingredients. Some of their supplies come in large plastic containers.
Scrub the inside thoroughly with soap and water to remove any residues. Because
they’re often hard to clean, barrels that contained motor oil or fuel products don’t make
good rain barrels. If you can’t locate a barrel, substitute a large plastic garbage can.
Level the area for your barrel and set the concrete blocks in place. Place the barrel
on the blocks. Hold the new elbow on top of the barrel against the downspout. The bot-
tom of the new piece should reach just above the barrel — an inch or so. Mark the exist-
ing downspout where you’ll cut it off. Set the barrel and the elbow aside and measure
down 2 inches from the pencil mark on the downspout. That’ll allow room for the old
downspout to fit into the elbow securely. Use the hacksaw to cut off the old downspout.
Fit the new elbow over the end of the down-
spout and fasten it in place with sheet metal
screws or pop rivets.
Drill a ¾-inch hole in the barrel wall high
enough to allow you to place a bucket under-
neath. Squeeze caulk around the hole on both
sides. Assemble the spigot and coupling, wrap-
ping a piece of Teflon tape on each threaded
section to form a tight seal. Slip on a washer
and poke the threaded end of the coupling
through the hole from the outside. On the in-
side of the barrel put a washer over the pipe
and fasten everything together with the bush-
ing.
A couple of inches down from the top of the
barrel drill another ¾-inch hole for the over-
flow valve. Squeeze some caulk around the
hole, inside and out, and place a washer on the
hose adapter and push it through the hole. On
the inside slip on a washer and Teflon tape and
tighten everything together with the lock nut.
With a garden hose connected to this safety
valve, you can direct some of the overflow after
22
a heavy rain out into the garden.
If your barrel has a lid, cut a hole in it where the new downspout elbow will drain
into it. Cover the hole with a piece of screen. If there is no lid, lay a large piece of
window screen over the top to prevent mosquitoes from breeding in the water.
Set the barrel on the concrete blocks, make sure the downspout will direct the
water properly, then sit back and wait for rain.
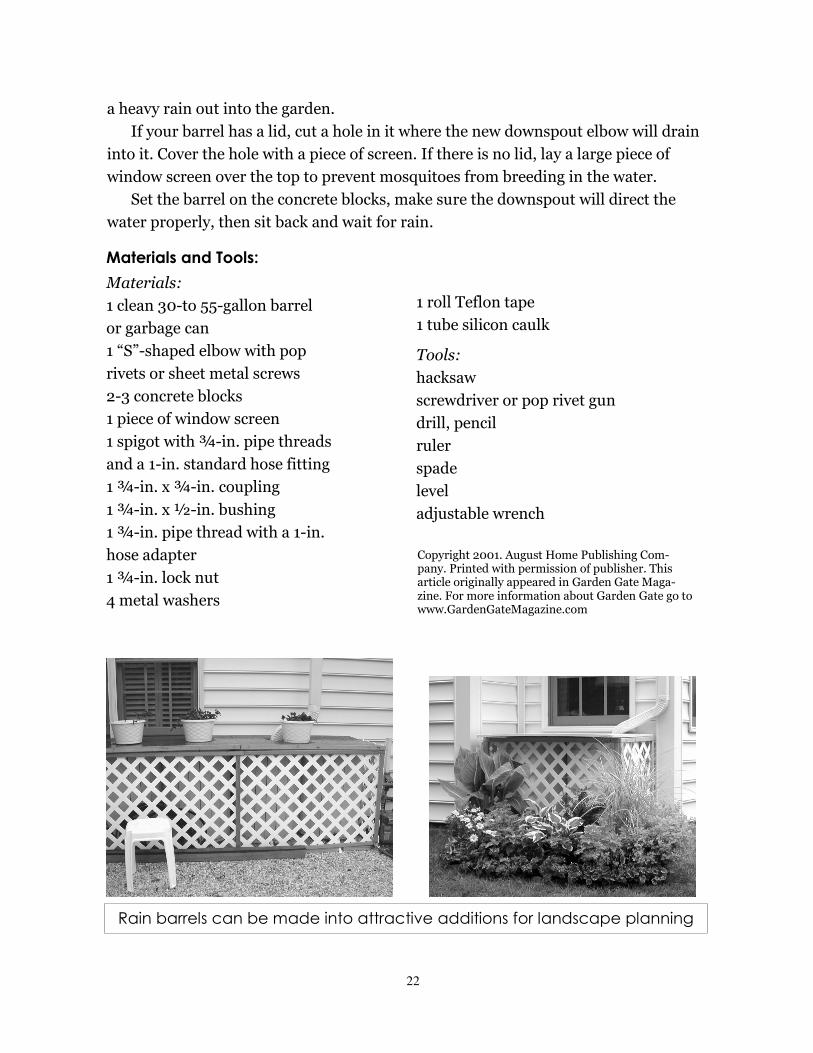
Rain barrels can be made into attractive additions for landscape planning
Materials and Tools:
Materials:
1 clean 30-to 55-gallon barrel
or garbage can
1 “S”-shaped elbow with pop
rivets or sheet metal screws
2-3 concrete blocks
1 piece of window screen
1 spigot with ¾-in. pipe threads
and a 1-in. standard hose fitting
1 ¾-in. x ¾-in. coupling
1 ¾-in. x ½-in. bushing
1 ¾-in. pipe thread with a 1-in.
hose adapter
1 ¾-in. lock nut
4 metal washers
1 roll Teflon tape
1 tube silicon caulk
Tools:
hacksaw
screwdriver or pop rivet gun
drill, pencil
ruler
spade
level
adjustable wrench
Copyright 2001. August Home Publishing Com-pany. Printed with permission of publisher. This article originally appeared in Garden Gate Maga-zine. For more information about Garden Gate go to www.GardenGateMagazine.com
23
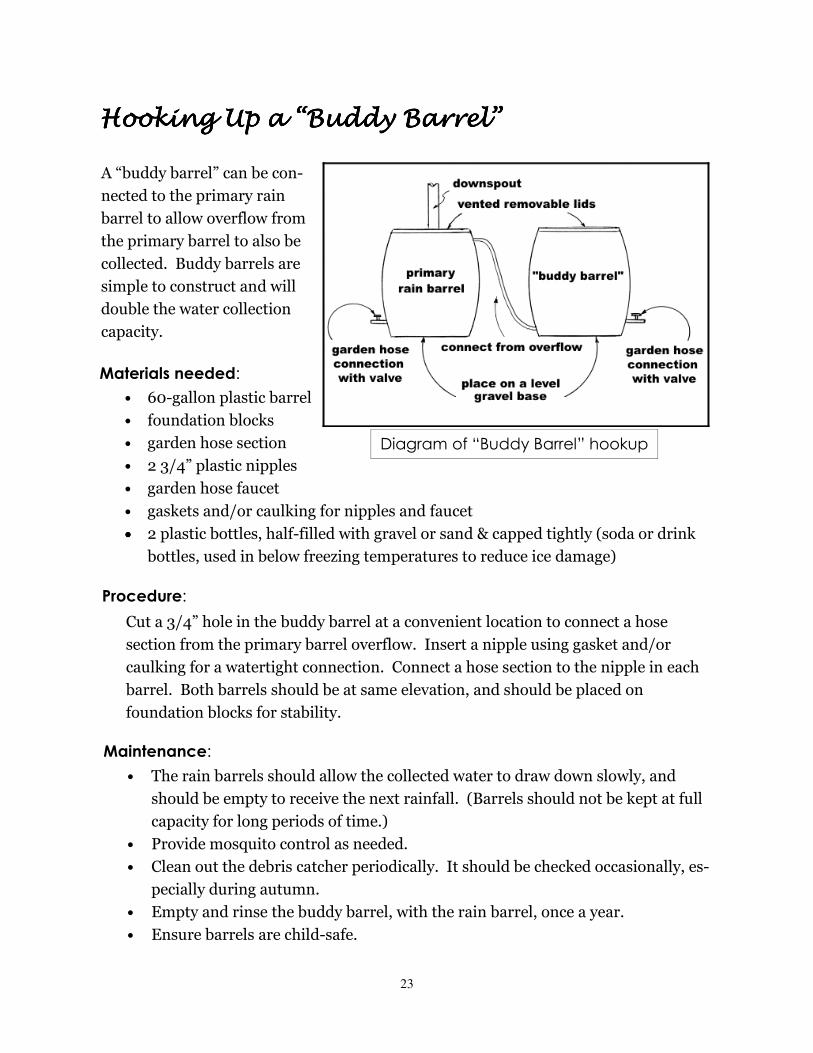
Materials needed:
• 60-gallon plastic barrel
• foundation blocks
• garden hose section
• 2 3/4” plastic nipples
• garden hose faucet
• gaskets and/or caulking for nipples and faucet
•••• 2 plastic bottles, half-filled with gravel or sand & capped tightly (soda or drink
bottles, used in below freezing temperatures to reduce ice damage)
Procedure:
Cut a 3/4” hole in the buddy barrel at a convenient location to connect a hose
section from the primary barrel overflow. Insert a nipple using gasket and/or
caulking for a watertight connection. Connect a hose section to the nipple in each
barrel. Both barrels should be at same elevation, and should be placed on
foundation blocks for stability.
Maintenance:
• The rain barrels should allow the collected water to draw down slowly, and
should be empty to receive the next rainfall. (Barrels should not be kept at full
capacity for long periods of time.)
• Provide mosquito control as needed.
• Clean out the debris catcher periodically. It should be checked occasionally, es-
pecially during autumn.
• Empty and rinse the buddy barrel, with the rain barrel, once a year.
• Ensure barrels are child-safe.
Diagram of “Buddy Barrel” hookup
Hooking Up a “Buddy Barrel”Hooking Up a “Buddy Barrel”Hooking Up a “Buddy Barrel”Hooking Up a “Buddy Barrel”
A “buddy barrel” can be con-
nected to the primary rain
barrel to allow overflow from
the primary barrel to also be
collected. Buddy barrels are
simple to construct and will
double the water collection
capacity.

24
VI. CISTERN FOR OUTDOOR WATER USESVI. CISTERN FOR OUTDOOR WATER USESVI. CISTERN FOR OUTDOOR WATER USESVI. CISTERN FOR OUTDOOR WATER USES
Materials:
• excavation equipment • storage tank(s) - see pages 5-9 for more information (Note: 1,500 gallons
of storage will hold two inches of rain from a 1,200 sq. ft. roof.) • lid for tank. • ¼ grid hardware cloth • filter cloth (geotextile fabric - minimum tensile strength: 30 lbs./linear
inch, minimum puncture strength: 80 lbs.) • 1-2” stone • 4”-6” flexible plastic pipe • pump (electric or hand), including necessary fittings and pipe • gaskets or caulking for watertight seals
Description:
A cistern is a water storage tank that can be buried underground. Rooftop runoff is
directed into the tank by means of rain gutters and downspouts, and can be pumped
(electrically or with a hand pump) for outdoor uses. Examples of uses include water-
ing lawns and landscaped areas, washing cars, and filling swimming pools.
NOTE: A building contractor may be required, and should be consulted, for the
installation of a cistern.
Diagram of underground cistern installation

25
Procedure:
1. Locate a site for the tank(s) a minimum of 25 feet from the home.
2. Cut two holes on opposite sides of the tank, near the top — one for the inflow pipe
and one for the overflow pipe.
3. Dig a trench from the gutter downspout to the tank site, at least 18 inches deep,
maintaining a downhill grade.
4. At the tank site, excavate earth at least eight inches larger than the concrete tank
on all sides. Line with geotextile fabric, and spread six inches of gravel on the
bottom.
5. Place the tank on stone in the center of the hole.
6. Dig a trench from the tank overflow hole, downgrade to an area where an overflow
pipe can outlet. The outlet area should be protected from erosion. You might also
consider installing some sort of animal guard on the end of the overflow pipe to
prevent access by insects, rodents and other animals.
7. Lay pipe from the downspout area to the tank, and attach to the tank’s inflow hole
with a watertight seal (using a gasket or caulking).
8. Lay pipe from the tank’s overflow hole to the outlet area using a watertight seal at
the tank. Maintain a steady downward grade on both pipe sections.
9. At the opening of the pipe below the downspout, place a removable, bowl-shaped
strainer between the downspout and pipe leading to the tank. This will keep leaves
and debris out of the tank. The strainer can be constructed using ¼ grid hardware
cloth, anchored, so that it can be removed and cleaned on a regular basis (also, see
p. 5 for information about roof washers).
10. Cover tank with lid.
11. Backfill around the tank with stone.
12. Backfill the pipe trenches with soil.
13. Dispose of excess soil. It can be spread and seeded, or used as fill material in
another area. (Construction companies often look for fill dirt, and may be willing
to haul it off-site.)
14. Install a pump system from the storage tank. Use a filter to keep particles from
clogging pumping system.
Maintenance:
• Clean downspout and pump filters regularly.
•••• Debris and silt may have to be removed periodically from the bottom of the
storage tank.

26
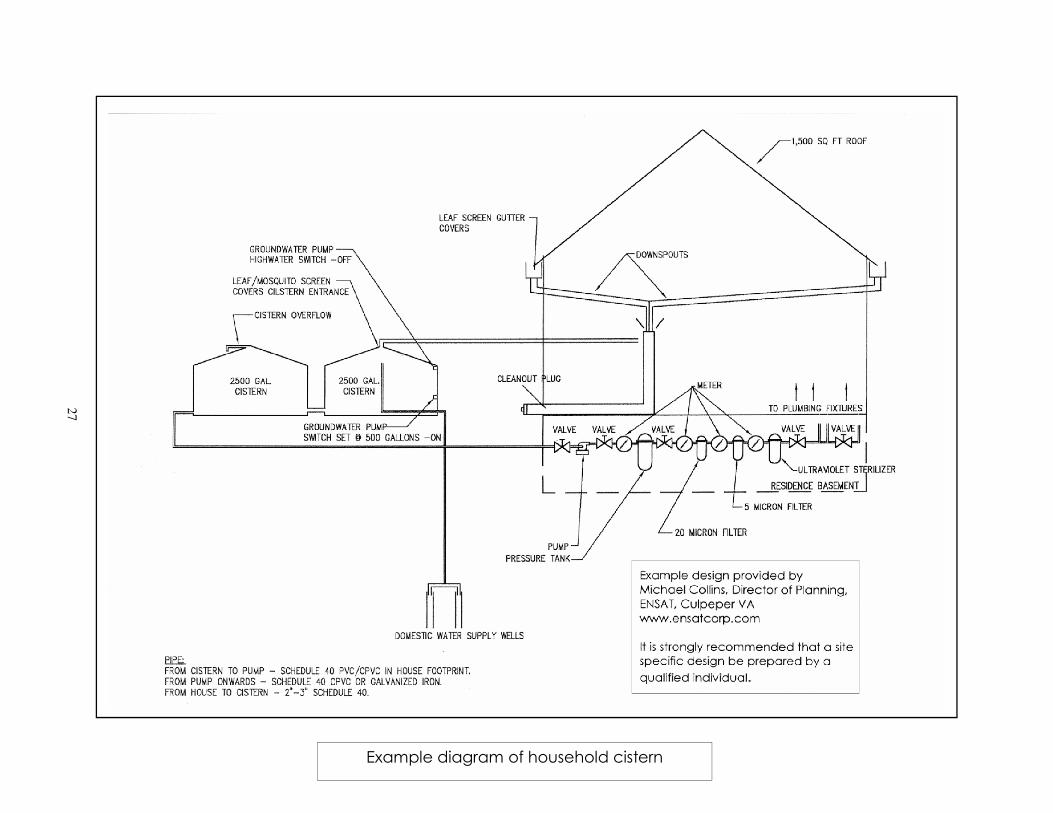
VII. CISTERN FOR HOUSEHOLD WATER USESVII. CISTERN FOR HOUSEHOLD WATER USESVII. CISTERN FOR HOUSEHOLD WATER USESVII. CISTERN FOR HOUSEHOLD WATER USES (Site specific technical assistance from a qualified individual is recommended.)
Description:
A water collection cistern system can be utilized for household water uses
by connecting it to a household plumbing system. The water can be used for all
household needs, or, if water quality is a concern, the cistern water can be
diverted for only specific, non-potable needs (i.e. commodes, washing machines).
Because of the detailed plumbing and filtering connections, these systems
should be designed and installed by a professional. Therefore, materials and
procedures are not listed for this system.
The example diagram on the following is intended to be used only as a
starting point for a site specific design. Along with the information provided in
Section II.D. of this manual, the following options could be considered when
designing a system:
• Cistern water may be diverted to only specific household uses such as
commodes and washing machines, while well water is diverted to potable
uses.
• A backflow preventer should be used in the waterline from the well to
prevent contamination.
• A clearly visible water level gauge in the cistern(s) is helpful.
The example on the following page uses two 2,500 gallon cisterns,
providing 5,000 gallons of storage for general household use. This amount of
storage would hold over five inches of rain from a 1500 sq. ft. roof. One
advantage of using two tanks is that when one is being cleaned or repaired, the
other will still be available for use.
The average precipitation in central Virginia is approximately 46 inches
per year. On the roof shown in the example, 43,000 gallons (5,750 cubic feet) of
rain will runoff in an average year. With domestic water usage averaging 70
gallons per person per day, 43,000 gallons could supply 85% of the annual
household water needs for two people.
27
Example diagram of household cistern