Colibri Automatic C4, C5, LX Installation Manual 02-07
52
USE AND INSTALLATION MANUAL DOC. NO. H 266U00 EDITION 1 02-2007 EN English Colibrì Espresso semi-automatic automatic UL 120V
-
Upload
ana-rosa-lopez -
Category
Documents
-
view
137 -
download
2
Transcript of Colibri Automatic C4, C5, LX Installation Manual 02-07

USE AND INSTALLATION MANUAL
DOC. NO. H 266U00
EDITION 1 02-2007
EN English
Colibrì Espresso semi-automaticautomatic
UL 120V


DICHIARAZIONE DI CONFORMITA’
DECLARATION OF CONFORMITY
DÉCLARATION DE CONFORMITÉ
KONFORMITÄTSERKLÄRUNG
DECLARACIÓN DE CONFORMIDAD
DECLARAÇÃO DE CONFORMIDADE
VERKLARING VAN OVEREENSTEMMING
INTYG OM ÖVERENSSTÄMMELSE
OVERENSSTEMMELSESERKLÆRING
YHDENMUKAISUUSTODISTUS
Dichiara che la macchina descritta nella targhetta di identificazione, è conforme alle disposizioni legislative delle direttive:98/37/CE, 89/336, 73/23 CEE e successive modifiche ed integrazioni.
Declares that the machine described in the identification plate conforms to the legislative directions of the directives:98/37/CE, 89/336, 73/23 EEC and further amendments and integrations.
Déclare que l’appareil décrit dans la plaque signalétique satisfait aux prescriptions des directives:98/37/CE, 89/336, 73/23 CEE et modifications/intégrations suivantes.
Erklärt, daß das im Typenschild beschriebene Gerät den EWG Richtlinien98/37/CE, 89/336, 73/23 sowie den folgenden Änderungen/Ergänzungen entspricht.
Declara que la máquina descripta en la placa de identificación, resulta conforme a las disposiciones legislativas de lasdirectivas: 98/37/CE, 89/336, 73/23 CEE y modificaciones y integraciones sucesivas.
Declara que o distribuidor descrita na chapa de identificação é conforme às disposições legislativas das directivas98/37/CE, 89/336 e 73/23 CEE e sucessivas modificações e integrações.
Verklaart dat de op de identificatieplaat beschreven machine overeenstemt met de bepalingen van de EEG richtlijnen98/37/CE , 89/336 en 73/23 en de daaropvolgende wijzigingen en aanvullingen.
Intygar att maskinen som beskrivs på identifieringsskylten överensstämmer med lagstiftningsföreskrifterna i direktiven:98/37/CE, 89/336, 73/23 CEE och påföljande och kompletteringar.
Det erklæres herved, at automaten angivet på typeskiltet er i overensstemmelse med direktiverne98/37/CE, 89/336 og 73/23 EU og de senere ændringer og tillæg.
Forsikrer under eget ansvar at apparatet som beskrives i identifikasjonsplaten, er i overensstemmelse med vilkårene iEU-direktivene 98/37/CE, 89/336, 73/23 med endringer.
Vahvistaa, että arvokyltissä kuvattu laite vastaa EU-direktiivien 98/37/CE, 89/336, 73/23 sekä niihin myöhemmin tehtyjenmuutosten määräyksiä.
Valbrembo, 01/04/2005
ANTONIO CAVO
C.E.O

1© by N&W GLOBAL VENDING SpA 02-2007 266 00
TABLE OF CONTENTS
INTRODUCTION PAGE 2
IDENTIFICATION OF THE VENDING MACHINE PAGE 2
IN CASE OF FAILURE PAGE 2
TRANSPORT AND STORAGE PAGE 2
POSITIONING THE VENDING MACHINE PAGE 3
WARNING FOR INSTALLATION PAGE 3
PRECAUTIONS IN USING THE MACHINE PAGE 3
WARNING FOR SCRAPPING PAGE 3
TECHNICAL SPECIFICATIONS PAGE 3POWER CONSUMPTION PAGE 4
CHANGEABLE COMBINATION LOCK PAGE 5
ACCESSORIES PAGE 5
LOADING AND CLEANING PAGE 6
DOOR SWITCH PAGE 6
CLEANING AND DISINFECTION PAGE 6
USING THE VENDING MACHINE PAGE 6
CONTROLS AND INFORMATION PAGE 7NOISE LEVEL PAGE 7
LOADING CUPS PAGE 8
LOADING INSTANT PRODUCTS PAGE 8
LOADING COFFEE PAGE 8
SANITISING THE MIXERS PAGE 9
CLEANING THE WATER SUPPLY TANK PAGE 9
PERIODIC CLEANING OF THE COFFEE UNIT PAGE 9
CLEANING THE CUP SHIFT ARM PAGE 9
CLEANING THE SUGAR DISPENSER PAGE 9
CLEANING THE WASTE TRAYS PAGE 10
SUSPENDING FROM USE PAGE 10
INSTALLATION PAGE 11
DOOR SWITCH PAGE 11
UNPACKING THE VENDING MACHINE PAGE 11
INSERTING THE SELECTION LABELS PAGE 12
CONNECTING THE MACHINE TOTHE WATER MAINS PAGE 12
CONNECTING TO THE POWER SUPPLY PAGE 12
INSTALLING THE PAYMENT SYSTEM PAGE 13
FILLING THE WATER SYSTEM PAGE 13
WATER SOFTENER UNIT PAGE 13
OPERATION PAGE 14PRE-SELECTIONS PAGE 14
COFFEE DISPENSING CYCLE PAGE 14
CHECKING AND ADJUSTINGTHE MACHINE SETTINGS PAGE 15
SETTINGS PAGE 15
WATER TEMPERATURE CONTROL PAGE 15
IDENTIFICATION OF THE BREWER UNIT PAGE 15
ADJUSTING THE BREWING CHAMBER VOLUME PAGE 16
ADJUSTING THE GRADE OF GRINDING PAGE 16
ADJUSTING THE COFFEE DOSE PAGE 16
NOTES ON PROGRAMMING PAGE 17
NORMAL VENDING MODE PAGE 17
MAINTENANCE MENU PAGE 18SPECIAL FUNCTIONS PAGE 18
STATISTICS PAGE 19
PROGRAMMING MENU PAGE 20MANUAL INSTALLATION PAGE 21
RESETTING THE FAILURES PAGE 21
DISPLAYING FAILURES PAGE 21
WATER AND POWDER DOSES PAGE 22
PROGRAMMING THE PRICES PAGE 22
PROGRAMMING THE PRICESAND THE PUSH-BUTTON STATUS PAGE 22
BASIC COIN AND DECIMAL POINT PAGE 22
PAYMENT SYSTEMS PAGE 22
INITIALISING PAGE 23
SETTING THE MACHINE CODE PAGE 23
MACHINE CONFIGURATION PAGE 24
SELECTION COUNTER PAGE 24
SETTING THE PROMOTIONAL MESSAGE PAGE 24
LANGUAGE SELECTION PAGE 24
WHIPPING TIME PAGE 24
PROGRAMMING ACCESS PASSWORD PAGE 24
SELECTION CONFIGURATION PAGE 24
SPECIAL SALES PAGE 25
SETTING DATE AND TIME PAGE 25
AUTOMATIC WASHING OF THE MIXERS PAGE 25
SETTING THE TIME BAND PAGE 25
SETTING THE TIME BAND PRICES PAGE 25
CONSECUTIVE SELECTIONS PAGE 25
PRE-GRINDING PAGE 25
TEMPERATURE SETTING PAGE 25
DISPLAY PRE-SELECTIONS PAGE 25
SYRUP PRE-SELECTION PAGE 25
SETTING THE OVERPRICE FOR SYRUPS PAGE 25
SYRUP CYCLE PAGE 25
DEX UCS - EVADTS PAGE 25
MAINTENANCE PAGE 26
ESPRESSO UNIT MAINTENANCE PAGE 26
PERIODICAL CLEANING PAGE 27
EMPTYING THE BOILER PAGE 27
PRINTED BOARD FUNCTIONSAND INDICATOR LAMPS PAGE 28
CONTROL BOARD PAGE 28
PAYMENT SYSTEM EXPANSION BOARD PAGE 29
PUSH-BUTTON BOARD PAGE 29
HYDRAULIC SYSTEMS PAGE 30
PROGRAMMING MENU SUMMARY PAGE 31
WIRING DIAGRAMS PAGE 39
ENGLISH

2© by N&W GLOBAL VENDING SpA 02-2007 266 00
IN CASE OF FAILURE
In most cases, any technical problems are corrected bysmall repair operations; however, before contacting themanufacturer we recommend that this manual be readcarefully.Should there be serious failures or malfunctions, contactthe following:
N&W GLOBAL VENDING SpAVia Roma 2424030 ValbremboItaly - Tel. +39 - 035606111
TRANSPORT AND STORAGE
To prevent any damage, special care should be takenwhen loading or unloading the vending machine.The machine can be lifted by a motor-driven or manual forklift truck, and the blades are to be placed underneath themachine.
Do not:
- overturn the vending machine;
- drag the vending machine with ropes or similar;
- lift the vending machine by its sides;
- lift the vending machine with slings or ropes;
- shake or jolt the vending machine and its packing.
The machine should be stored in a dry room where thetemperature remains between 0" C and 40 "C.Using the original packing, no more than 2 machines canbe stacked one on top of the other and must always keptupright as indicated by the arrows on the packing.
INTRODUCTION
This technical documentation is part and parcel of thevending machine and must always follow the machinein case it is moved or transfer of ownership, so as toallow consultation by different operators.
Before starting installation and using the machine, it is firstnecessary to carefully read and understand the instruc-tions contained in this manual, as they offer importantinformation on installation safety, operating instructionsand maintenance.
This manual is divided into three chapters.
The first chapter describes the loading and routine main-tenance operations which are carried out in areas of themachine accessible with simple use of the door key,without using any other tools.The second chapter contains the instructions for correctinstallation and all information necessary for optimum useof the machine.The third chapter describes maintenance operationswhich involve the use of tools to access potentially danger-ous areas.
The operations described in the second and thirdchapters must be carried out only by personnel whohave the specific knowledge of the machine function-ing from a point of view of electrical safety and healthregulations.
IDENTIFICATION OF THE VENDINGMACHINE AND ITS CHARACTERISTICS
Every machine is identified by its own serial number,indicated on the rating plate attached inside the cabinet onthe right side.This plate (see figure below) is the only one acknowledgedby the manufacturer and indicates all of the data whichreadily and safely gives technical information supplied bythe manufacturer. It also assists in spare parts manage-ment.
Water mains characteristics
Absorbed power
Operating voltage
Model
Product code
Boiler data
Current
Frequency
Serialnumber
Type
Fig. 1

3© by N&W GLOBAL VENDING SpA 02-2007 266 00
POSITIONING THE VENDING MACHINE
The vending machine is not suitable for outdoor installa-tion. It must be positioned in a dry room where the tempera-ture remains between 2"C and 32"C, and not where waterjets are used for cleaning (e.g. in large kitchens, etc.). The machine should be placed close to a wall, so that theback panel is at a minimum distance of 4 cm from it andcorrect ventilation may be ensured. The machine mustnever be covered with cloth or the like.The machine should be positioned with a maximum incli-nation of 2".If necessary provide proper levelling by way of the adjust-able feet included.
Important notice!!
Access to the machine interior for maintenance and/orrepairs is via the back panel.Therefore the machine is designed to be rotated, thusallowing removal of the back panel.
Installation on a cabinet
The machine can be installed on a table or on any othersuitable stand.If possible, it is advisable to use the special cabinet, whichcan house the liquid waste tray, the water supply kit, thepayment system and, in the case of very hard water, thesoftener unit.
WARNING FOR INSTALLATION
The machine installation and the following mainte-nance operations should be carried out by qualifiedpersonnel only, who are trained in the correct use ofthe machine according to the standards in force.
The machine is sold without payment system, thereforethe installer of such system has sole responsibility for anydamage to the machine or to things and persons caused byfaulty installation.
The integrity of the machine and compliance with thestandards of the relevant systems must be checked atleast once a year by qualified personnel.
All packing materials shall be disposed of in a mannerwhich is safe for the environment.
PRECAUTIONS IN USING THE MACHINE
The following precautions will assist in protecting theenvironment:
- use biodegradable products only to clean the machine;
- adequately dispose of all containers of the productsused for loading and cleaning the machine;
- switch the machine off during periods of inactivity, thusachieving considerable energy savings.
WARNING FOR SCRAPPING
The symbol indicates that the machine may not bedisposed of as ordinary waste; it must be disposed of inaccordance with the provisions of the European directive2002/96/CE (Waste Electrical and Electronic Equipment -WEEE) and of any resulting national laws, for preventingany possible negative consequences to the environmentand to health.For correct disposal of the machine, contact the dealerfrom whom you have purchased the machine or our after-sales service.
TECHNICAL SPECIFICATIONS
Height mm 650
Height with container mm 760
Width mm 410
Depth mm 490
Overall depth with door open mm 830
Height of base cabinet (optional) mm 820
Weight Kg 38
Power supply voltage V~ 120
Power supply frequency Hz 60
Installed power W 1300
Fig. 2

4© by N&W GLOBAL VENDING SpA 02-2007 266 00
CUP DISPENSER
Only in automatic models for cups with a rim diameter of73-74 mm with a capacity of approximately 170 cups.
PAYMENT SYSTEM
The machine is supplied with all prearrangements for anMDB coin mechanism; the machine can accommodate the“cashless” payment system, while the “change-giver” pay-ment system must be installed in the special base cabinet.
SALES PRICES
A different programmable price can be set for each selec-tion;
COIN BOX
Made of plastic with lock as optional accessory.
WATER SUPPLY
From the mains, with a water pressure of 7.3 to 123 Psig(0.5 - 8.5 bar).
AVAILABLE SETTINGS
- Grade of grinding for espresso coffee
- Coffee and water doses by volume
- Time adjustment for instant products
- Water temperature adjusted via software
CONTROLS
- Presence of water
- Presence of coffee
- Operating temperature reached
SAFETY DEVICES
- Door switch
- Presence of coffee waste tray
- Manual-reset boiler safety thermostat
- Air-break float jamming (only with water supply fromthe mains)
- Overflow solenoid valve (only with water supply fromthe mains)
- Timer protection for:
PumpCoffee unit ratiomotorCoffee grinder
- Overheating protection for:
Doser unitsCoffee unit ratiomotorMagnetsPumpElectric mixersCoffee grinder motor
- Fuse protection for:
Main electrical circuitBoard power supply transformer
CAPACITY OF CONTAINERS
Products quantities are indicated in the following table:
The effective quantity of product can differ from what isindicated, according to the density of the various products.
POWER CONSUMPTION
The machine power consumption depends on many fac-tors, such as the temperature and ventilation of the roomwhere it is installed, the inlet water and boiler temperature,etc.With an ambient temperature of 22" C the following powerconsumption levels resulted:
To reach operating temperature: 28.6 W/hFor 24 h in stand-by: 1414 W/h
The above power consumption calculated from averagedata should only be taken as an indication.
Capacity of containers (Kg) Espresso
Coffee beans 2
Ground decaffeinated coffee 0.4
Instant decaffeinated coffee 0.6
Instant coffee 0.5
Milk 0.8
Chocolate 1
French Vanilla 1.4

5© by N&W GLOBAL VENDING SpA 02-2007 266 00
CHANGEABLE COMBINATION LOCK
Some machine models are fitted with a changeable com-bination lock.The lock is supplied with one silver colour key, withstandard combination, to be used for normal opening andclosing.The lock can be customised by means of a kit, available asaccessory, permitting changing of the lock combination.This kit includes a change key (black) for the standard lockcombination as well as the change (gold) and use (silver)keys for the new combination.Sets of change and use keys with other combinations canbe supplied on request.Additional sets of use keys (silver) may be requested,indicating the combination stamped on the keys.Generally, only the use key (silver) is used, while thecombination change keys (gold) can be kept as spares.
Do not use the change key for normal opening, as itmay damage the lock.
To change combination do as follows:
- open the machine door to avoid forcing the rotation;
- lightly lubricate the inside of the lock with a spray;
- insert the current change key (black) and rotate to thechange position (reference notch at 120");
- remove the current change key and insert the changekey (gold) with the new combination;
- rotate to the close position (0") and remove the changekey.
The lock will now have the new combination.
The keys with the old combination cannot be used forthe new combination.
ACCESSORIES
A wide range of accessories can be installed on themachine to vary its performance:The installation kits are supplied with their own installationand test instructions, which must be strictly observed toensure the machine safety.
Important notice!!
The use of kits which are not approved by the manufacturerof the vending machine does not guarantee compliancewith safety standards, especially for energised parts.The manufacturer declines all responsibility for the use ofnon approved components.
Installation and the following testing operations mustbe carried out exclusively by personnel who have aspecific knowledge of the machine functions from apoint of view of electrical safety and health regula-tions.
Fig. 3
6© by N&W GLOBAL VENDING SpA 02-2007 266 00
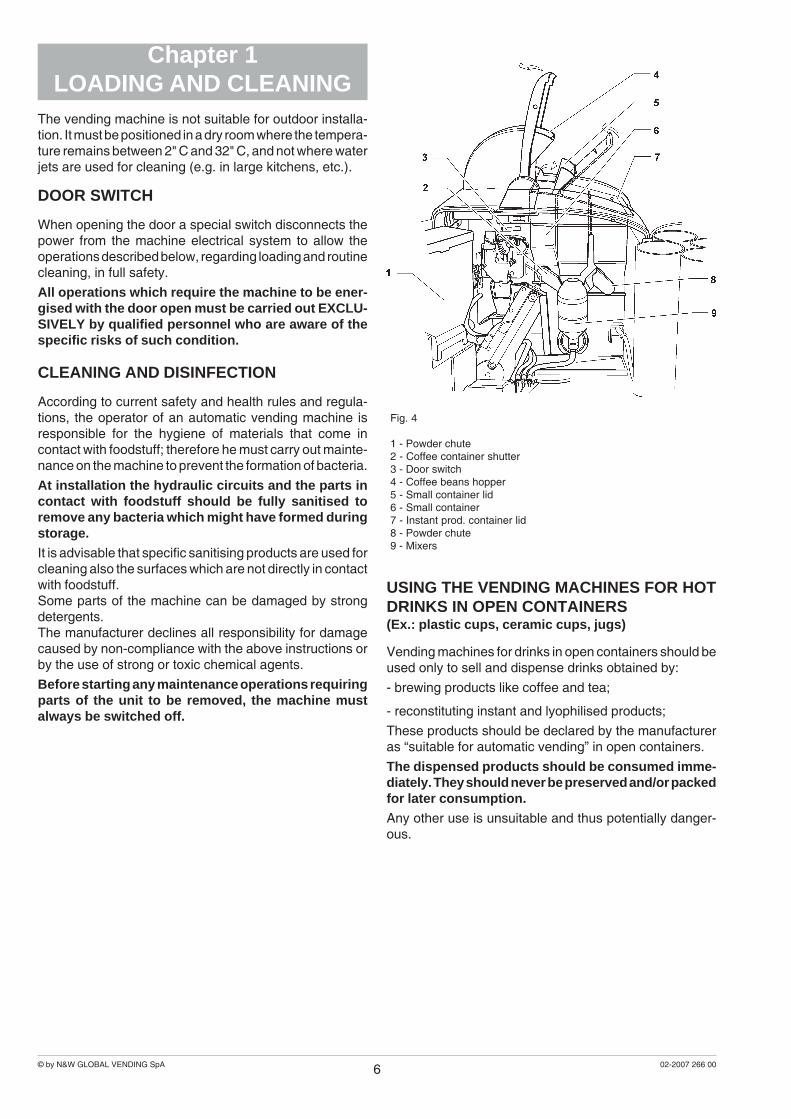
Chapter 1LOADING AND CLEANING
The vending machine is not suitable for outdoor installa-tion. It must be positioned in a dry room where the tempera-ture remains between 2" C and 32" C, and not where waterjets are used for cleaning (e.g. in large kitchens, etc.).
DOOR SWITCH
When opening the door a special switch disconnects thepower from the machine electrical system to allow theoperations described below, regarding loading and routinecleaning, in full safety.
All operations which require the machine to be ener-gised with the door open must be carried out EXCLU-SIVELY by qualified personnel who are aware of thespecific risks of such condition.
CLEANING AND DISINFECTION
According to current safety and health rules and regula-tions, the operator of an automatic vending machine isresponsible for the hygiene of materials that come incontact with foodstuff; therefore he must carry out mainte-nance on the machine to prevent the formation of bacteria.
At installation the hydraulic circuits and the parts incontact with foodstuff should be fully sanitised toremove any bacteria which might have formed duringstorage.
It is advisable that specific sanitising products are used forcleaning also the surfaces which are not directly in contactwith foodstuff.Some parts of the machine can be damaged by strongdetergents.The manufacturer declines all responsibility for damagecaused by non-compliance with the above instructions orby the use of strong or toxic chemical agents.
Before starting any maintenance operations requiringparts of the unit to be removed, the machine mustalways be switched off.
USING THE VENDING MACHINES FOR HOTDRINKS IN OPEN CONTAINERS(Ex.: plastic cups, ceramic cups, jugs)
Vending machines for drinks in open containers should beused only to sell and dispense drinks obtained by:
- brewing products like coffee and tea;
- reconstituting instant and lyophilised products;
These products should be declared by the manufactureras “suitable for automatic vending” in open containers.
The dispensed products should be consumed imme-diately. They should never be preserved and/or packedfor later consumption.
Any other use is unsuitable and thus potentially danger-ous.
Fig. 4
1 - Powder chute2 - Coffee container shutter3 - Door switch4 - Coffee beans hopper5 - Small container lid6 - Small container7 - Instant prod. container lid8 - Powder chute9 - Mixers

7© by N&W GLOBAL VENDING SpA 02-2007 266 00
CONTROLS AND INFORMATION
The user controls and information are located on theoutside of the door (see fig. 5).The labels with the selection menu and instructions, sup-plied with the machine, must be inserted at the time ofinstallation.The “Programming” buttons and the “Mixer wash” buttonare located inside the machine.
Fig. 5
1 - Liquid waste tray2 - Dispensing compartment3 - Door lock4 - Product label5 - Display6 - Selection button7 - Prearrangement for front validator8 - Prearrangement for “cashless” payment systems
NOISE LEVEL
The continuous, weighted equivalent acoustic pressurelevel is below 70 dB.
LOADING CUPS
For automatic models only
In order to load the columns of the cup dispenser do asfollows:
- Open the door of the machine.
- Slightly lift the cup dispenser and tilt it (see fig. 6).
- Do not rotate the columns during the loading opera-tions.
- Load the columns with cups, without exceedingthe dispenser height.
- Re-engage the cup dispenser.
- Close the machine and make a test selection.
Fig. 6
1 - Spacer washer2 - Knurled nut3 - Cup shift arm4 - Cup dispenser

8© by N&W GLOBAL VENDING SpA 02-2007 266 00
LOADING INSTANT PRODUCTSThe covers can be opened only with the door open (see fig.7).Only after having lifted their cover, fill the single containerswith the appropriate products, taking care not to compressthem to prevent packing.Make sure the products do not contain any clots.
LOADING COFFEEThe cover can be opened only with the door open.(see fig. 7)Lift lid and fill the canister with coffee, ensuring that theshutter is open.
SANITISING THE MIXERS AND THEFOODSTUFF CIRCUITS
When installing the machine, and then at least once aweek or even more frequently according to the use of themachine and the quality of the inlet water, the mixers andthe dispensing conduits must be thoroughly sanitised(cleaned and disinfected), to guarantee proper hygiene ofthe dispensed products.The parts to be cleaned are as follows:- powder deposit drawers, mixer and instant drink
dispensing conduit;- dispensing tubes and spouts;- dispensing compartment;- remove the powder and the water funnels, the feeders,
the powder deposit drawers and the mixer impellersfrom the mixers (see fig. 8);
Fig. 7
1 - Powder chute2 - Coffee container shutter3 - Door switch4 - Coffee beans hopper5 - Small container lid6 - Small container7 - Powder chute8 - Port9 - Mixer
Fig. 8
1 - Powder funnel2 - Powder deposit drawer3 - Water funnel4 - Mixer feeder5 - Mixer impeller
Fig. 9
- in order to unscrew the wheels, simply block the diskfitted on the mixer shaft with a finger;

9© by N&W GLOBAL VENDING SpA 02-2007 266 00
- wash all parts with detergent (using the doses indi-cated by the manufacturer) being sure that all visibleresidue and product layers are mechanically removed,using a brush if necessary.
Disinfection should be carried out using sanitising prod-ucts.
- Soak all components for approx. 20 minutes in acontainer filled with the previously prepared sanitisingsolution;
- reinstall the feeders and the water funnels;
- reinstall the powder deposit drawers and the powderfunnels after thoroughly rinsing and drying them.
After reinstalling all parts the following is howeverrequired:
- Perform a mixer wash cycle and add few drops of thesanitising solution in the various funnels.
- After disinfection thoroughly rinse all components toensure that all residue of the detergent solution isremoved.
CLEANING THE WATER SUPPLY TANK(OPTIONAL)
For machines equipped with a water tank inside the basecabinet, such tank must be sanitised at least once a weekwith the sanitising products used for the mixers.
PERIODIC CLEANINGOF THE COFFEE UNIT
Every time coffee is refilled, or at least once a week, anypowder residue should be removed from the external partsof the coffee unit, particularly from the coffee funnel.
CLEANING THE CUP SHIFT ARM
For the automatic models the cup shift arm must becleaned periodically after removing it from the machine. Inorder to remove it, completely undo the fastening knurlednut (see fig. 6).When reinstalling it, ensure that the spacer washer ispositioned correctly.
CLEANING THE SUGAR DISPENSER
(for automatic models only)
For models with sugar dispensed directly into the cup, thesugar dispensing system must be cleaned periodicallyusing hot water, proceeding as follows:
- Release the return spring.
- Lift the flexible lever to free the pin.
- Remove the pin and the sugar dispensing spout.
- After cleaning, thoroughly dry all parts and reinstallthem in the reverse order.
Fig. 10
1 - Sugar dispensing spout2 - Pin3 - Flexible lever4 - Return spring

10© by N&W GLOBAL VENDING SpA 02-2007 266 00
CLEANING THE WASTE TRAYS
The waste trays can be easily removed even with the doorclosed (see fig. 11) permitting quick emptying and clean-ing.The coffee canister capacity is greater than that of thewaste tray (if the base cabinet is not used).The machine control software indicates on the display thatthe maximum number of coffee selections has been reachedwith the message “Waste tray full”.After a few further selections the machine will lock.The waste tray must be emptied without switching themachine off, to allow the software to detect the operation.With the coffee waste tray removed, the machine is stillavailable for instant drink selections but indicating the
message “Insert waste tray” on the display.The selection counters are reset with the door closed,doing as follows:
- press button 8 for 2 seconds
- the display will indicate the request for a password
- press in a quick succession buttons 4231 to reset thecounters.
SUSPENDING FROM USE
If for any reason the machine is switched off for a periodexceeding the use-by date of the products, the followingwill be necessary:
- completely empty the containers and thoroughly washthem with the sanitising products used to clean themixers;
- completely empty the dosing grinder by dispensingcoffee until the empty condition is indicated.
- completely empty the hydraulic system.
Fig. 12
Fig. 11
1 - Coffee waste tray2 - Dispensing compartment drip tray

11© by N&W GLOBAL VENDING SpA 02-2007 266 00
Chapter 2INSTALLATION
Installation and the following maintenance operationsshould be carried out with the machine switched on andtherefore by qualified personnel only, who are trained inthe correct use of the machine and informed about thespecific risks of such situation.To energize the system with the open door, simply insertthe special key into the door switch (see fig. 13).The door can be closed only after removing the yellow keyfrom door switch.
The machine must be installed in a dry room withtemperature between 2" C and 32" C.
At installation the hydraulic circuits and the parts incontact with foodstuff should be fully sanitised toremove any bacteria which might have formed duringstorage.
DOOR SWITCH
When opening the door a special micro-switch discon-nects the power from the machine electrical system.To energize the system with the open door, simply insertthe special key into the door switch (see fig. 13).
With the door open, there is no access to energisedparts. Inside the machine, the only parts that stayenergised are those protected by covers and carryinga plate with the warning “Disconnect the power beforeremoving the protective cover”.
Before removing such covers disconnect the machinefrom the power supply.
All operations requiring the machine to be energizedwith the door open should be carried out with the doorswitch key inserted, and therefore by qualified per-sonnel informed about the specific risks of suchsituation.
The door can be closed only after removing the key fromthe door switch.
UNPACKING THE VENDING MACHINE
After removing the packing, ensure that the machine isintact.If in doubt do not use the machine.
No packing elements (i.e. plastic bags, polystyrenefoam, nails, etc.) should be left within the reach ofchildren, as they are potentially dangerous.
Packing materials must be disposed of in authorisedcontainers and the recyclable ones must be recovered byqualified companies.
Important notice!!
The machine should be positioned with a maximum incli-nation of 2".If necessary provide proper levelling by way of the adjust-able feet included (see fig. 14).
Fig. 13
1 - Door switch2 - Instant prod. canisters3 - Mixers4 - Dispensing compartment5 - Liquid waste tray6 - Espresso unit7 - Instant prod. shelf
Fig. 14
1 - Adjustable foot

12© by N&W GLOBAL VENDING SpA 02-2007 266 00
INSERTING THE SELECTION LABELS
The selection labels are supplied with the machine andmust be inserted at the time of installation according to thelayout and to the language (see “selection dose” table).According to the layout settings, the buttons may performdifferent selections.
CONNECTING THE MACHINETO THE WATER MAINS
The machine must be connected to the drinking watermains, taking into account law provisions in force in thecountry where the machine is installed.The water pressure must be 7.3 to 123.3 Psig (0.5 - 8.5bar).Run some water from the mains until it is clear and withoutimpurities.Use a hose capable of withstanding the water mainspressure and suitable for use with foodstuffs (minimuminside diameter of 6mm) to connect the water supply to the3/4" gas-type union of the water inlet solenoid valve.
OVERFLOW DEVICE
The water inlet solenoid valve (see fig. 15) is equipped withan overflow device which mechanically stops the waterinlet if there is a malfunction in the solenoid valve or in theboiler water level control device.To restore normal operation, proceed as follows:- disconnect the electricity from the machine;
- drain the water contained in the overflow hose;
- shut off the water supply using the tap outside themachine;
- loosen the nut which secures the solenoid valvesupply hose to relieve the water mains residual pres-sure and then tighten again (see fig. 15);
- open the tap and switch the machine on.
WATER SOFTENER UNIT
The machine is sold without water softener.Should the water be very hard, a water softener unit can beinstalled.The water softener, available as accessory, must bereplaced or regenerated regularly following the directionsfrom the manufacturer.
CONNECTING TO THE POWER SUPPLY
The machine is designed to operate under single-phase120V~ voltage and is protected by 15 A fuses.Before making the connection, ensure that the ratingcorresponds to that of the power grid, and more specifi-cally:
- the supply voltage rating must be within the rangerecommended for the connection points;
- the main switch should be capable of withstanding thepeak load required, and at the same time ensureproper omnipolar disconnection from the power gridwith an opening gap of the contacts of at least 3 mm.
The switch, the power outlet and the plug must belocated in an easily accessible position.
The electrical safety of the machine is ensured only whenit is correctly earthed according to the safety standards inforce.
This fundamental safety requirement must be dulyverified, and if in doubt the system must be carefully
tested by qualified technicians.
The power supply cable is of the type with a fixed plug.When necessary, the power supply cable (see fig. 16)should be replaced by qualified personnel only, usingcables type UL SJTO 3x16 AWG.
Do not use adapters, multiple sockets and/or exten-sions.
THE MANUFACTURER DECLINES ALL RESPONSI-BILITY FOR ANY DAMAGE CAUSED BY NON-COM-PLIANCE WITH THE ABOVE MENTIONED PRECAU-TIONS.
Fig. 15
1 - 3/4" water inlet hose2 - Water supply hose3 - Overflow hose
Fig. 16
1 - Lift cover2 - Cable clamp3 - Power supply cable

13© by N&W GLOBAL VENDING SpA 02-2007 266 00
INSTALLING THE PAYMENT SYSTEM
The machine is sold without payment system, there-fore the installer of such a system has sole responsi-bility for any damage to the machine or to things andpersons caused by incorrect installation.
The machine is electrically pre-set for the installation ofMDB payment systems, and namely:
- coin accepter or “validator”
- change-giver coin mechanisms or “changer”
- bill accepter or “bill validator”
- key / magnetic card reader or “cashless”
that can be used in various combinations.
Compatibility for housing the payment systems mustbe ascertained by and under the sole responsibility ofthe installer.
When switched on, the machine goes through a controlroutine to determine which payment systems are actuallyinstalled and therefore configure the correct system.Install the validator and make sure that the programmingof the relevant parameters is correct.Other payments systems such as “change giver” and“cashless” can be installed by using the specific kits.The “cashless” systems can be housed inside the ma-chine; other payments systems such as “change giver”must be housed inside the base cabinet.
FILLING THE WATER SYSTEM
When the machine is switched on the conditions of thefollowing are checked: air-break (full or empty), pumppriming and boiler.When pressing twice the programming button located onthe inside of the vending machine door, the machine goesinto Programming mode.Press in a sequence buttons 3 and 6 to perform theinstallation routine; the installation routine consists of:
- Opening the water mains solenoid valve and filling theair-break.
- Opening the solenoid valve so that the air may be bledfrom the boiler and 400 cc of water filled.
- The message “Installation” will be shown on the LCDdisplay for the entire duration of the cycle.
N.B.: If there is no water flow from the mains during theinstallation cycle, the machine will stop until water isresumed or the machine is switched off.Important notice!!!If a considerable amount of air bubbles is formed in thewater system, for example during maintenance, it is pos-sible that an installation cycle is automatically startedwhen the machine is switched on.
WATER SOFTENER UNIT
The machine is sold without water softener.Should the water be very hard, a water softener unit(optional) can be installed.The water softener, available as accessory, must bereplaced or regenerated regularly following the directionsfrom the manufacturer.

14© by N&W GLOBAL VENDING SpA 02-2007 266 00
OPERATION
PRE-SELECTIONS
According to the layout settings, it is possible to havedifferent pre-selections; the available pre-selections foreach layout are indicated in the selection dose tablesupplied with the machine.
Decaffeinated
This pre-selection is used for choosing whether the nextcoffee based selection will be with decaffeinated typecoffee.
Syrups (with syrup kit only)
This pre-selection is used for choosing whether to addsyrup to the next selection.
Sugar (only for models with sugar dispenser)
This pre-selection is used, in unsweetened selections, foradding sugar to the next selection
COFFEE DISPENSING CYCLE
After each time the machine is switched on, the coffee unitis rotated completely before the normal cycle to ensurethat the device is in the correct start position.According to the layout settings of the machine, the dis-pensing cycle can be:
- With single grinding and single coffee release:
The grinder operates until filling the coffee doser chamber.When the doser is full, the ground coffee dose is releasedinto the brewing chamber (1) positioned vertically (see fig.17).
- With double grinding and double coffee release:
The grinder operates until filling the coffee doser chamber.When the doser is full, the ground coffee dose is releasedinto the coffee brewer unit. The grinder starts for a secondgrinding cycle and the dose is released again into thebrewing chamber (1) positioned vertically (see fig. 17).After the release of ground coffee dose(s) is completed,the ratiomotor handle engaged with the disk (2) locatedoutside of the assembly rotates by 180", making the brewchamber swing and lowering the upper piston (3) (see fig.18).Due to the water pressure, the pre-brewing spring (5) sinksand the lower piston (4) goes down 4 mm, thus forming awater cushion which allows an even use of the coffee dose.At the end of the dispensing cycle and during a pause of 3seconds, the pre-brewing spring (5) will discharge thewater through the third way of the dispensing solenoidvalve, lightly pressing the used coffee dose.By completing its rotation, the ratiomotor makes the swing-ing lever (6) lift the pistons and the coffee dose.At the same time, when the brewing chamber returns to itsvertical position, the scraper on the coffee hopper stopsthe used coffee dose and drops it.The lower piston now returns to the bottom dead centre.
Fig. 17
1 - Brewing chamber2 - External disk3 - Upper piston4 - Lower piston5 - Pre-brewing spring6 - Swinging lever7 - Markers
Fig. 18
1 - Brewing chamber2 - External disk3 - Upper piston4 - Lower piston5 - Pre-brewing spring6 - Swinging lever

15© by N&W GLOBAL VENDING SpA 02-2007 266 00
CHECKING AND ADJUSTINGTHE MACHINE SETTINGS
To get the best results from the product used, the followingshould be checked:
- That the used coffee dose is lightly compressed anddamp.
- The grade of grinding of ground coffee.
- The dose weight of the products.
- The drink temperature.
- The water dose.
Should the standard settings need to be changed, proceedas indicated in the next sections of this manual.The dose weight of instant products, the water dose andtemperature are directly controlled by the microprocessor.
To adjust them it is therefore necessary to follow theprogramming procedures.
SETTINGS
The vending machine is supplied with the following set-tings:
- coffee temperature (at the spout) approx. 85-89"C
- instant product temperature (at the spout) approx.75"C
The machine standard settings assign the same price,expressed in number of basic coins, to all selections.
WATER TEMPERATURE CONTROL
The boiler temperature is controlled by the software (92"Cby default) and can be adjusted directly from a menu.
IDENTIFICATION OF THE BREWER UNIT
Some adjustments and/or setting changes are specific tothe espresso unit installed in the machine; before proceed-ing to any adjustments and/or settings it is indispensableto identify the type of brewer unit installed.To identify the brewer unit refer to the diameter of thebrewing chamber (see fig. 19).
Standard brewer unit
It has a brewing chamber with diameter of 37 mm; the unitoperates with coffee doses between 5.5 and 8.5 gr.
Large brewer unit
It has a brewing chamber with diameter of 45 mm; the unitoperates with coffee doses between 5.5 and 8.5 gr.It is possible to use a layout with double dose release.In this case the dose will have to be 6 gr maximum (for atotal of 12 gr); greater doses can jam the brewer unit.
Fig. 19
1 - Brewing chamber
16© by N&W GLOBAL VENDING SpA 02-2007 266 00
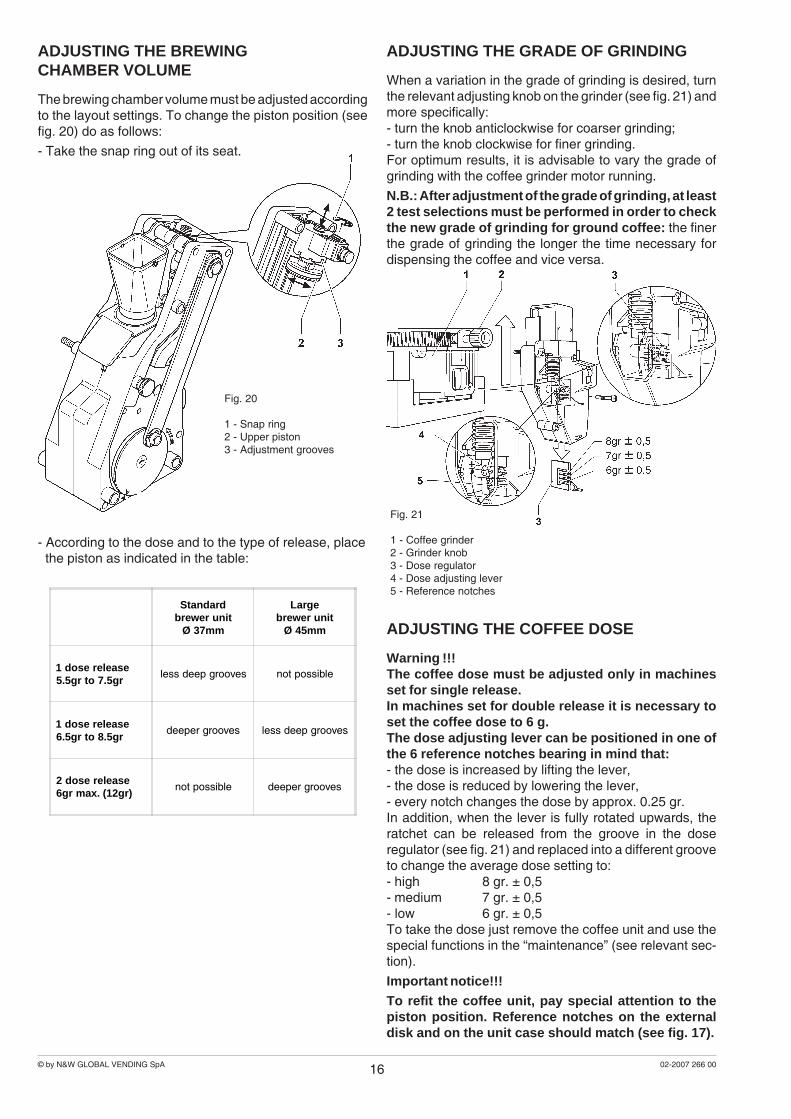
ADJUSTING THE BREWINGCHAMBER VOLUME
The brewing chamber volume must be adjusted accordingto the layout settings. To change the piston position (seefig. 20) do as follows:
- Take the snap ring out of its seat.
ADJUSTING THE GRADE OF GRINDING
When a variation in the grade of grinding is desired, turnthe relevant adjusting knob on the grinder (see fig. 21) andmore specifically:- turn the knob anticlockwise for coarser grinding;- turn the knob clockwise for finer grinding.For optimum results, it is advisable to vary the grade ofgrinding with the coffee grinder motor running.
N.B.: After adjustment of the grade of grinding, at least2 test selections must be performed in order to checkthe new grade of grinding for ground coffee: the finerthe grade of grinding the longer the time necessary fordispensing the coffee and vice versa.
- According to the dose and to the type of release, placethe piston as indicated in the table:
ADJUSTING THE COFFEE DOSE
Warning !!!The coffee dose must be adjusted only in machinesset for single release.In machines set for double release it is necessary toset the coffee dose to 6 g.The dose adjusting lever can be positioned in one ofthe 6 reference notches bearing in mind that:- the dose is increased by lifting the lever,- the dose is reduced by lowering the lever,- every notch changes the dose by approx. 0.25 gr.In addition, when the lever is fully rotated upwards, theratchet can be released from the groove in the doseregulator (see fig. 21) and replaced into a different grooveto change the average dose setting to:- high 8 gr. ± 0,5- medium 7 gr. ± 0,5- low 6 gr. ± 0,5To take the dose just remove the coffee unit and use thespecial functions in the “maintenance” (see relevant sec-tion).
Important notice!!!
To refit the coffee unit, pay special attention to thepiston position. Reference notches on the externaldisk and on the unit case should match (see fig. 17).
Fig. 20
1 - Snap ring2 - Upper piston3 - Adjustment grooves
Fig. 21
1 - Coffee grinder2 - Grinder knob3 - Dose regulator4 - Dose adjusting lever5 - Reference notches
Standardbrewer unit
Ø 37mm
Largebrewer unit
Ø 45mm
1 dose release5.5gr to 7.5gr
less deep grooves not possible
1 dose release6.5gr to 8.5gr
deeper grooves less deep grooves
2 dose release6gr max. (12gr)
not possible deeper grooves
17© by N&W GLOBAL VENDING SpA 02-2007 266 00
The machine electronic control allows or not the use ofmany functions:All of the available functions are described in the machineprogram, including the ones that are not used for thespecific configuration of the model (layout).The machine is supplied with a dose table, describing thedifferent functions and layouts available for the specificmodel and the flowchart of the programming menu.Below is listed a summary explanation of the main func-tions useful for managing the operation of the machine, notnecessarily in the order in which they are displayed in themenu.The messages on the display that indicate the currentoperationare fixed, while any action required by the user is blinking.
POWER ON
When closing the door, the display indicates the softwareversion number to which referring; after which the machinegoes into normal vending operation.The machine can be programmed for displaying, for a fewsecond, the number of selections made.
OPERATING MODES
The machine can be in three different operating modes.According to the operating mode, the buttons take ondifferent functions.The available operating modes are as follows:
MODE FUNCTIONS
Normal vending mode Coins are accepted
Products are dis-pensed
Maintenance mode Test dispensing
Machine maintenance
Programming mode Programming thedifferent parameters
NORMAL VENDING MODE
During the normal vending mode the display shows themessage for the user with the prompt to select the drink.The function of the buttons can be different according tothe layout and to the choices made during programming.The massages displayed according to the operation beingcarried out can be the following:
DISPLAY DESCRIPTIONMESSAGE
“Ready for use” Machine ready
“Price:....” Displaying the price of theselected product
“Credit:.....” Displaying the inserted credit
“Out of service” Machine out of service
“Drink in process” Drink preparation
“Temperature” Waiting to reach the boileroperating temperature
“Installation” Installation under way
“Sel. disabled” Selection disabled
“Coffee off” Coffee unit out of service
“Take” Drink ready
PRE-SELECTIONS
According to the layout set at the time of initialising buttons“1”, “5” and “8” can take on the following functions:- Decaffeinated pre-selection- Syrup pre-selection (with KIT only)- Sugar pre-selection (only for models with sugar dis-penser)
NOTES ON PROGRAMMING

18© by N&W GLOBAL VENDING SpA 02-2007 266 00
MAINTENANCE MENU
Press once the programming button located on the internalside of the push-button board for the machine to go into“Maintenance” mode.When in maintenance mode the buttons take on thefollowing functions:
Previous function / Decrease data item (-1)Exit function / Cancel changeNext function / Increase data item (+1)Confirm function / Confirm data itemChange data item
Scroll through the menu with the “ ”and “ ” buttons toshow the following functions:
“STATISTICS”
Functions: display statistics, print statistics, delete statis-tics, display selection counters.
“COMPLETE SEL.”(For automatic models only)Function of test dispensing complete with cup, sugar andstirrer
“POWD. ONLY”
Function of test dispensing (powder only)
“WATER ONLY”
Function of test dispensing (water only)
“NO ACCESSORIES”
(For automatic models only)
Function of test dispensing without cup, sugar and stirrerIn the test dispensing functions, when pressing the confirmbutton “ ” the selection buttons will take on the originalfunction for 7 seconds, permitting the test dispensingprovided for each function.
N.B.: For espresso coffee based selections, only theadditions are dispensed with the partial dispensing ofpowder and water; if a selection requires no additionthe message “Sel. disabled” will be displayed, indicat-ing a disabled selection.
“SPECIAL FUNCTIONS”
When the display shows “Special functions” the buttonstake on the following functions:
2 Grind a coffee dose3 Dispense sugar (automatic models only)4 Autotest6 Rotate the coffee unit7 Release a cup (automatic models only)8+6 Empty the air-break8+4 Empty the boiler
Grinding a coffee dose (direct function)
Press button “2” for grinding coffee; this function is usefulfor getting a dose of ground coffee and checking its weight.
Dispensing sugar (direct function)
Automatic models only.Press button “3” for performing a sugar dispensing test.
Autotest (direct function)
Before performing this operation, remove the waste trayand the powder and coffee canisters.From the “Special functions” menu press button “4” on thedisplay and the message “AUTOTEST” will start blinking.Press button “2” to cancel the operation, confirm withbutton “6” to start the autotest cycle.In a sequence:
- The doser units are activated for 2 seconds
- The mixers are activated for 2 seconds
- A cup is released (automatic models only)
- A stirrer is released (automatic models only)
- The coffee unit is rotated
- Liquid waste container float
- Push-button panel test; the machine displays thenumber of the button which must be pressed and waitsfor this to be done before going to the next button(number 9 corresponds to the wash button).
Fig. 22
Fig. 23

19© by N&W GLOBAL VENDING SpA 02-2007 266 00
Rotating the coffee unit (direct function)
Press button “6” for a complete rotation of the brewer unit
Releasing a cup (direct function)
Automatic models only.Press button “7” for performing a cup releasing test.
Emptying the air-break (direct function)
This function is used for partially emptying the air-break,dispensing water from the milk solenoid valve for 8 sec-onds before blocking the machine, to allow the machine tobe moved without spilling water. To restore normal func-tioning the machine must be switched off and then on.From the “Special functions” menu:
- Press in a sequence buttons “8” and “6” to empty theair-break
Before moving the machine over a long distance, espe-cially if involving the use of a vehicle, the hydraulic systemmust be emptied.
Emptying the boiler (direct function)
Emptying of the boiler may become necessary in the eventthe vending machine is placed on storage or when theboiler needs maintenance.This function is used for emptying the boiler. To correctlyempty the boiler refer to the maintenance chapter.
“FILLING THE CHANGE TUBES”
It is used for filling the change tubes manually.To fill the change tubes manually do as follows:
- Press any button to enable filling; the display willindicate “Credit: ——” which is the value of money inthe tubes available as change.
- Insert the desired coin into the selector (the display willindicate the value of money in the tubes available aschange).
- Press button “8” to end the operation.
STATISTICS
DISPLAYING THE STATISTICS
Press button “ ” when the display indicates the “Displaystatistics” function; then the stored data will be shown onthe screen, and more precisely:
- counter by single selection;
- counter by single price;
- counter by type of coin cashed;
- total cashed counter;
- failure counter.
PRINTING THE STATISTICS
Connect an RS-232 serial printer with a Baud rate of 9600,8 data bit, no parity, 1 stop bit to the serial port located onthe push button board, to print all the statistics describedin section “Displaying the statistics”. The hardcopy print-out will also contain the machine code number and theprintout progressive number.The progressive hard-copy printout number can only bereset by initialising the machine.To connect the printer, do as follows:
- Press button “ ” when the display indicates the “Printstatistics” function and the message “Confirm?” will bedisplayed;
- before confirming connect and switch on the printer;
- press the confirm button “ ” again to start printing.
RESETTING THE STATISTICS
Press button “ ” when the display indicates the “Resetstatistics“ function, then the message “Confirm?” will bestart blinking.Press the confirm button “ ”, the message “Running” isdisplayed for a few seconds and all statistics are reset.
GENERAL COUNTER
The machine stores all selections in this counter, whichcannot be reset.This function allows reading or displaying of the counterwhen the machine is switched started.Press button “ ” when the display indicates the “Generalcounter” function and the function status (ON/OFF) will bedisplayed; press button “ ”, the status will start blinkingand then can be changed with the “ ”and “ ” buttons.Press button “ ” again and the stored value will be dis-played for 3 seconds.

20© by N&W GLOBAL VENDING SpA 02-2007 266 00
PROGRAMMING MENU
When the programming button located on the internal sideof the push-button board (see Fig. 30) is pressed twice themachine will be set to “Programming” mode.The message “Programming” is shown on the display forapprox. 2 seconds and then the first option of the Program-ming menu is presented.When in Programming mode the buttons take on thefollowing functions:
“Machine config.” Setting the machine configuration
“Selec. counter” Setting the number of selectionsafter which the machine will lock
“Prom. message” Enabling and setting thepromotional message
“Language” Setting the language used todisplay the messages
“Whipping time” Setting whipping time for instantcoffee
“Prog. password” Enabling the password to accessprogramming
“Selec. configuration” Determining the accessories tobe dispensed with each singlebutton (automatic models only)
“Special sales” Setting free vend andjug facilities parameters
“Set date/time” Setting the system date/time
“Set wash” Setting the time for mixerwashing
“Discount time band” Setting a time band withdifferential price selections
“Consecutive sel.” setting the number of selectionsafter which the machine willpause for heating
“Pre-grinding” Setting the option of pre-grinding
“Set Temperature” Setting the boiler temperature
“Display pre-sel.” Setting the pre-selection on thedisplay (semiautomatic modelsonly)
“Syrup pre-sel.” Setting the syrup pre-selectionon the display (semiautomaticmodels only)
“Syrup overprice” Setting an overprice if selectionswith syrup are made
“Syrup cycle” Dispensing syrup before or afterthe selection
“Dex UCS-EVADTS” Acquiring the EVADTS statistics
1 - Previous function / Decrease data item (-1)2 - Exit function / Cancel change3 - Machine manual installation4 - //5 - Next function / Increase data item (+1)6 - Confirm function / confirm data7 - Change data item8 - Reset failures
Buttons “1”, “2”, “5”, “6”, “7” are used for scrolling throughthe menu or changing data.Buttons “3” and “8” are for direct functions: press button “3”for filling the hydraulic system, even with the air break full.Press button “8” for resetting the present failures.Scroll through the menu with the “ ”and “ ” buttons toshow the following functions:
“Curr. failures” Reading current failures
“Water dose” Setting the water doses
“Powder dose” Setting the powder doses
“Set Prices” Setting the prices
“Set Prices/button” Prices/button combinationenables/disables button
“Basic coin / DP” Setting the basic coin value anddecimal point position
“Payment systems” ValidatorMDB
“Initialise” Initialising the RAM
“Machine code” Setting the machine identification code
Fig. 24

21© by N&W GLOBAL VENDING SpA 02-2007 266 00
MANUAL INSTALLATION (direct function)
Press the installation button “3” to fill the hydraulic system,even with the air-break full.
RESETTING FAILURES (direct function)
Press the failure reset button “8”; the message “Running”is displayed for a few seconds and all present failures arereset.
DISPLAYING THE CURRENT FAILURES
When the “Present failure” function from the “program-ming” menu is displayed, press the confirm button “ ” todisplay the error code of the current failure;then each time button “ ” is pressed the error code of thenext failure is displayed (if present). If no failures arepresent, when pressing the confirm button “ ” the mes-sage “No Failure” is displayed.The possible failures are indicated in the following cases:
AIR-BREAK
The machine will lock if after dispensing water correspond-ing to 150 pulses of the volumetric counter the micro-switch has not signalled the lack of water.
BOILER
The machine will lock if after 10 minutes of heating from themachine start, or from the last selection, the boiler fails toreach the operating temperature.
COIN MECHANISM
The machine will lock if it receives an impulse longer than2 seconds on a validator line or there is no communicationwith the serial coin mechanism for more than 30 seconds.
RAM DATA
The data in the EEprom (i.e. the chip that stores the settingvariations) contains errors and must be retrieved from theEprom, thus losing all statistics information.The message “INITIALISE” will be shown on the display.
WATER FAILURE
Models with water supply from the mains
The machine locks if the air-break micro-switch is closedfor more than 10 seconds. When pressing a selectionbutton the water inlet solenoid valve is triggered to checkthe water flow from the mains.
Models with water supply from the tank
The machine locks if the water level in the tank falls tobelow approximately 300 cc.
CUP FAILURE (for automatic models only)
When the empty cup column micro-switch opens, thecolumn shift motor is activated. If after one full turn, themicro-switch is not closed the message “Cup failure” isdisplayed and the machine locks.
WATER LEAK
If water is requested by the air-break without having beenused (selections, washing, etc.) the machine will blockfurther water requests.
IMPELLER FAILURE
Failed computation of the volumetric counter within a max.given time.
COFFEE UNIT FAILURE
Due to mechanical blocking of the unit.The machine is not locked, but all coffee-based selectionsare disabled.
COFFEE FAILURE
If after a period of 15 seconds of grinding coffee a dose isnot obtained, all coffee-based selections are disabled.
WASTE CONTAINER FAILURE
If the machine is equipped with a liquid waste container(housed in the base cabinet) and the overflow warningdevice is triggered, the machine locks.
COFFEE RELEASE FAILURE
If after releasing the ground coffee dose the micro-switchof the coffee doser unit indicates the presence of coffee inthe dosing chamber, all coffee-based selections are disa-bled.
CUP RELEASE FAILURE (for automatic models only)
If after releasing one cup the positioning micro-switch isnot triggered the control software disconnects the powerfrom the release motor and the machine locks.
WATER FAILURE
The machine locks if the air-break micro-switch is closedfor more than 10 seconds.When pressing a selection button the water inlet solenoidvalve is triggered to check the water flow from the mains.If the failure is not reset automatically, it will be necessaryto restart the machine to be able to reset the failure againby pressing a selection button.
CHANGER FAILURE (MDB only)
The change-giver coin mechanism is not working or doesnot communicate.
BILL VALIDATOR FAILURE (MDB only)
The bill accepter is not working or does not communicate.
CASHLESS FAILURE (MDB only)
The key or magnetic card reader is not working or does notcommunicate.

22© by N&W GLOBAL VENDING SpA 02-2007 266 00
WATER AND POWDER DOSES
When either the “Water dose” or the “Powder dose”functions from the “programming” menu are displayed therelated doses can be changed.The different doses are identified by a dose code, which isdisplayed each time.The dose code locates the water and powder dosesrelated to a given selection; any changes to one selectiondose also affects the compound selections where the dosecode is used.Refer to the selection dose table for the dose code list.The displayed values for the doses are expressed in:
- tenths of a second for powders;
- number of pulses of the volumetric counter for water.
Press the confirm button “ ” from the “programming”menu to access the dose code list, which can be scrolledwith the “ ” and “ ” buttons.When pressing change button “ ”, this value will startblinking and can be modified as necessary.The water dose settings cannot be increased to more thana certain limit.
PROGRAMMING THE PRICES
When the “Set Prices” (price programming) function fromthe “programming” menu is displayed, the 8 sales pricesstored can be changed.The prices are indicated as number of basic coins.Press the confirm button “ ” from the “programming”menu to access the price list, which can be scrolled withthe “ ” and “ ” buttons.When pressing the change button “ ”, this value will startblinking and can be modified as necessary.
PROGRAMMING THE PRICES AND THEPUSH-BUTTON STATUS
When the “Set Prices/Button” (price combination) functionof the “programming” menu is displayed, the status of aselection and the combination of the button to one of thestored prices can be changed.Press the confirm button “ ” from the “programming”menu to access the button list, which can be scrolled withthe “ ” and “ ” buttons.When pressing the change button “ ”, the selection statusstarts blinking.Using the “ ” and “ ” buttons, the selection status can bechanged from enabled (ON) to disabled (OFF).Press again the confirm button “ ” to display the pricenumber referred to in the 8 programmed prices.When pressing the change button “ ”, this value will startblinking and can be modified as necessary.The buttons which control the pre-selections do not needto have a combination with prices. In any case prices haveno effect on the pre-selection buttons.
PROGRAMMING THE BASIC COIN ANDTHE DECIMAL POINT
When the “Basic coin / DP” (basic coin value) function fromthe “programming” menu is displayed, the value of thebasic coin as well as the position of the decimal point canbe modified.Press the confirm button “ ” from the “programming”menu to display the current value of the basic coin.Using the “ and “ ” buttons, the value of the basic coinand the number of the decimal point position “dP” aredisplayed alternately, and namely:
0 decimal point disabled
1 XXX.X
2 XX.XX
3 X.XXX
Press the change button “ ”, these values will start blink-ing and can then be modified as necessary.
PAYMENT SYSTEMS
When the “Payment system” function is displayed, it ispossible to define which payment system with MDB com-munication protocol to use, selecting among:- Validator- MDBIn order to install payment systems different from avalidator or “cashless” systems, special kits must beused.The payment systems must be housed in the basecabinet.
VALIDATOR
If the selected payment system is a validator, its operatingparameters must be defined.“Credit control”It is possible to decide whether any excess credit paid is tobe cashed or made available to the user.“Operating voltage”According to the type of validator it necessary to select theoperating voltage, 12 V or 24 V.“Validator lines”When the “Validator lines” function (line programming) isdisplayed, the value of the 6 validator coin lines can bechanged.The value of the lines is indicated as number of basic coins.Press the confirm button “ ” from the “programming”menu to access the line list, which can be scrolled with the“ ” and “ ” buttons.When pressing the change button “ ”, this value will startblinking and can be modified as necessary.

23© by N&W GLOBAL VENDING SpA 02-2007 266 00
MDB
The menu of the MDB protocol is used for defining:
Type of vending
Setting the operating mode for multiple or single dispens-ing. With multiple dispensing, the change is not returnedafter a successful selection; however the credit is availablefor further selections. When pressing the coin return button(if the function is enabled), the available credit is returnedup to the maximum change value.
Change control
To enable/disable the operation of the coin return button.
Maximum credit
It is used to define the maximum accepted credit.
Maximum change
It is possible to set a limit to the total amount of changereturned by the coin mechanism when pressing the coinreturn button or after a single dispensing serving.Any credit exceeding the amount programmed with thisfunction will be cashed.
Accepted coins
It is possible to define which, among the coins recognisedby the validator, are to be accepted when the change tubesare full.Check the coin mechanism configuration for the correctcoin to value matching.
Returned coins
It is possible to define which, among the coins available inthe tubes, are to be used for returning the change. Thisparameter is active only with coin mechanisms that auto-matically control the choice of tube to be used (Autochanger payout).Check the coin mechanism configuration for the correctcoin to value matching.
Accepted bills
It is possible to define which, among the bills recognisedby the reader, are to be accepted.Check the reader configuration for the correct bill to valuematching.
Minimum level of tubes
This function is used for setting the number of coins (0 to15) to determine the status of full change tubes and the“Insert exact amount” message for the user.
Accepted coins with “exact amount”
It is possible to define which, among the coins recognisedby the validator, are to be accepted when the machine isin the “exact amount” condition.Check the coin mechanism configuration for the correctcoin to value matching.
Accepted coins with “exact amount”
It is possible to define which, among the bills recognisedby the accepter, are to be accepted when the machine isin the “exact amount” condition.Check the accepter’s configuration for the correct bill tovalue matching.
INITIALISING
When the “Initialise” function is displayed the vendingmachine can be initialised restoring all default data.This function should be used if there is a memory data erroror when the EPROM is replaced.All statistic information will be reset.Press the confirm button “ ” and the display will indicatethe message “Confirm?”. Press the button “ ” again todisplay the first changeable parameter to define the ma-chine configuration.The available options (blinking) can be scrolled with the“ ” and “ ” buttons, the selection is confirmed with button“ ” and the next parameter is presented. When pressingbutton “ ” after the last parameter the display will show themessage “Working” for a few seconds and the machine isinitialised.The parameters are as follows:
Machine type
According to the models, it is possible to select Automaticor Semiautomatic
“Country”
By setting the country it is possible to set the type of dosesto be used for the selections
“Layout”
Layout of containers and selection menu from the avail-able ones
“Tank”
Water supply from the mains or from the internal tank
SETTING THE MACHINE CODE
When the “Machine code” function is displayed the identi-fication code number of the machine can be changed (fromthe default 0000 up to 9999).Press the confirm button “ ” and the current code numberis displayed; then press the change button “ ” and the firstdigit will start blinking.The value of the blinking digit can be increased or de-creased with the “ ” and “ ” buttons.When pressing the confirm button “ ”, the blinking digit willtake on the displayed value and the next digit startsblinking.

24© by N&W GLOBAL VENDING SpA 02-2007 266 00
MACHINE CONFIGURATION
When the “Machine Config.” function is displayed, themachine configuration can be changed, and namely:- cup dispensing / without cup (for automatic models)- water supply from the mains or from the tank- presence of the equipped base cabinet- fast cycles ON / OFF- coffee grounds tray ON / OFFPress the confirm button “ ” to display the current status;when pressing the change button “ ” the data item startsblinking and can be changed with the “ ” and “ ” buttons.
IMPORTANT NOTICE!!!
When initialising the machine, the configuration takeson the default values.
THEREFORE, AFTER INITIALISING THE MACHINEMUST BE RECONFIGURED.
When the “fast cycles” function is enabled, some of thetime that is useful for improving the drink quality is elimi-nated.
Instant selections
- All of the products that compose the drink are dis-pensed at the same time.
- the “post-whipping” time is eliminated.
Espresso selections
- Pre-brewing of ground coffee is not performed.
- the pump, used to increase the boiler pressure after aninstant drink selection, is not started;
- the “post-whipping” time is eliminated.
SELECTION COUNTER
This function is used to lock the machine after a program-mable number of coffee selections, and a programmablenumber of instant selections; alternatively, the machinecan be locked after a programmable number of selections.Since this is a control tool used only by the vendingoperator, a 4-digit password must be entered.After entering the password, it is possible to set the numberof selections after which the machine locks, read thenumber of selections already made and reset the lockcounter.
N.B.: The counters are set to zero by default.
With the counters set to zero, this function is disabled.
SETTING THE PROMOTIONAL MESSAGE
When this menu is displayed, press the confirm button “ ”to display whether or not the message is enabled (disabledby default).If the message is enabled, when pressing the confirmbutton “ ” the first character will start blinking and can bechanged.The buttons will take on the following functions:
1 - Go to the next character2 - Go to the previous character3 - Upper case/lower caseThe values are displayed alternately by pressing thebutton sequentially.The message is stored by pressing button “2” when on thelast position.
LANGUAGE SELECTION
This function is used to select the language to be used fordisplaying the messages.
WHIPPING TIME
This function is used to define how long (in tenths of asecond) instant coffee is to be whipped according to theamount of drink to be obtained.
PROGRAMMING ACCESS PASSWORD
This function is used to enable the request for a passwordto access the programming procedures.The password is the button sequence 1 1 2 2 and cannotbe changed.
SELECTION CONFIGURATION(for automatic models only)
This function is used to determine, as an exception to themachine configuration, which accessories should or shouldnot be dispensed for a specific selection.The following is possible for each selection button (1 to 8,excluding the pre-selection buttons):- not dispense the cup (if the machine configuration
includes the cup, but not vice versa);- not dispense the stirrer if the selection is unsweet-
ened;- not dispense sugar and stirrer for selections which are
defined as sweetened (but not dispense sugar forselections which are defined as unsweetened).
The settings defined with the selection configuration areused also for complete test selections.
Fig. 25

25© by N&W GLOBAL VENDING SpA 02-2007 266 00
SPECIAL VENDING
It is possible to enable or disable Free Vend, to enable ordisable the “jug facilities” function and to set the number ofconsecutive selections (1 to 9; 5 by default) that aredispensed when “jug facilities” is enabled.The password and the number of selections for each jugfacilities cycle can be programmed only if the function towhich they are connected is enabled.A password already used for other functions is not ac-cepted and a different button combination must be used.The password must be entered for each special vendingcycle, after pressing button “8” for 2 seconds in normalvending mode.
SETTING DATE AND TIME
This function is used for setting date and time in the controlsoftware.
AUTOMATIC WASHING OF THE MIXERS
Option of setting the time when automatically cleaning themixers and rotating the brewer unit.When setting the time to 24.00 the function is disabled.The time must be in the hh.mm. format.
SETTING THE TIME BAND
A time band can be programmed for vending at differenti-ated prices. This function requires the entry of the starttime and of the end time, which must be in the hh.mm.format.
SETTING THE TIME BAND PRICES
This function is used for defining the the price of eachsingle selection when the machine is within the time bandfor vending at differentiated prices.The function is active if the start time and the end time wereset for the time band.
CONSECUTIVE SELECTIONS
It is possible to set the number of consecutive selections(0 to 99) (dispensed at less than 2 minutes intervals) afterwhich the machine will not dispense other selections untilthe boiler reaches the correct temperature.With the value set to 0 (default) the function is disabled.
PRE-GRINDING
This function is used for enabling/disabling the grinding ofcoffee for the next selection.This permits the reduction of dispensing time for a coffeeselection. The function is disabled by default.
TEMPERATURE SETTING
With this function, it is possible to set the boiler tempera-ture directly in "C.
DISPLAYING THE PRE-SELECTION
For semiautomatic models only.It is possible to set which of the available pre-selectionmessages is to be shown on the display.
SYRUP PRE-SELECTION
For semiautomatic models only.For models with syrup KIT. It is possible to set which of theavailable syrup pre-selection messages is to be shown onthe display.
SETTING THE OVERPRICE FOR SYRUPSFor models with syrup KIT. This function is used for settingan overprice to the selection if drinks with syrups areselected.
SETTING THE SYRUP CYCLE
For models with syrup KIT. This function is used for settingif syrups are to be dispensed before or after the selection.
DEX UCS - EVADTS
This function sets the machine in wait mode for theconnection with a device to acquire the EVADTS statistics.

© by N&W GLOBAL VENDING SpA 26 02-2007 266 00
The integrity of the machine and compliance with thestandards of the relevant systems must be checked atleast once a year by qualified personnel.
Before starting any maintenance operations requiringparts of the unit to be removed, the machine mustalways be switched off.
The operations described below must be carried outonly by personnel who have the specific knowledge ofthe machine functioning from a point of view of elec-trical safety and health regulations.
INTRODUCTION
To ensure correct operation for a long period, the machinemust be subjected to regular maintenance.The following sections contain the procedures and themaintenance schedule, which are only a general indica-tion, as they greatly depend on the operating conditions(e.g. water hardness, environmental humidity and tem-perature, type of product used, etc.).The procedures described in this chapter are not exhaus-tive of all maintenance operations to be carried out.More complex operations (e.g. boiler descaling) should becarried out by qualified technicians only having specificknowledge of the machine.To prevent oxidation or the action of chemical agents, thestainless steel and varnished surfaces should be keptclean by using mild detergents (solvents must not beused).
Under no circumstances should water jets be used toclean the machine.
ESPRESSO UNIT MAINTENANCE
Every 10,000 selections or every 6 months some mainte-nance of the coffee unit must be carried out.Maintenance is carried out as follows:
- remove the boiler Teflon hose connection from the upperpiston, paying attention not to lose the seal (see fig. 23);
- undo the knob securing the unit to the bracket;
- remove the coffee unit.
Removing the upper filter
- Take the snap ring out of its seat- Remove the piston from the crosspiece- Remove the filter and the piston seal
Chapter 3MAINTENANCE
Removing the lower filter
- Open the two half-shells to access the internal brewingchamber
- Extract the brewing chamber and remove the lower pistonsnap ring.
- Take the piston out of brewing chamber and remove thefilter.
Soak all components removed from the unit in a solution ofboiling hot water and coffee machine detergent for approx.20 minutes.Thoroughly rinse and dry all parts, then reinstall them in thereverse order of disassembly, taking particular care in:
- matching the two reference notches and inserting thecoffee unit;
- checking the efficiency of the seals, lubricating them withfood-safe grease.
Important notice!!!
During reassembly, check that the handle pin of theratiomotor is correctly engaged in its seat.
Fig. 26
1 - Ratiomotor handle pin2 - Coffee funnel3 - Brass ring nut4 - Snap ring5 - Brewer unit fastening knurled knob6 - Lower piston fastening snap ring7 - Reference notches

27© by N&W GLOBAL VENDING SpA 02-2007 266 00
PERIODICAL CLEANING
At least once a year, or more frequently according to theuse of the machine and the quality of the inlet water, theentire foodstuff circuit system must be cleaned and sani-tized as described below.
SANITISING
- all parts of the hydraulic system in contact with food,including the hoses, must be removed from the unit andfully disassembled;
- all visible residue and product films are mechanicallyremoved using brushes or similar tools, if necessary;
- all components must be soaked in a sanitising solution forat least 20 minutes;
- the unit internal surfaces are to be cleaned with the samesanitising solution;
- thoroughly rinse and then reinstall the parts.
Before restarting the machine, the same sanitisingprocedure described in section “Sanitising the mixersand the foodstuff circuits” should be repeated.
CLEANING THE PRODUCT CONTAINERS
- Remove the containers from the machine;
- undo the product ports and slide out the augers from backof the container;
- clean all parts in a solution of hot water and chlorine-based detergents and dry thoroughly.
EMPTYING THE BOILER
Emptying of the boiler may become necessary in theevent the vending machine is placed on storage orwhen the boiler needs maintenance.
During its operation the boiler contains very hot waterunder pressure and can cause injury to persons.
- Open the vending machine door and make sure themachine is switched off.
- Completely empty the air-break.
- Wait for the water inside the boiler to cool down.
- Undo and remove, from the by-pass end, the tubeconnecting the by-pass to the boiler and direct it to acontainer.
- Insert the yellow key into the door switch.
- Access the maintenance menu and find the item “Specialfunctions”. Press in a sequence buttons 8 and 4; waterwill start flowing from the boiler.
When emptying is completed, switch off the machine ereconnect the by-pass tube.

© by N&W GLOBAL VENDING SpA 28 02-2007 266 00
PRINTED BOARD FUNCTIONSAND INDICATOR LAMPS
CONTROL BOARD
This board, placed at the back of the machine, (see fig. 28)processes the information from the push-buttons and fromthe payment system; it also controls the actuations and thepush-button board.The 15 V AC voltage required for board operation issupplied by a transformer which is protected by a 160 mATfuse on the primary and by a 1.25 AT fuse on the secondarywinding. The voltage supply is rectified and stabiliseddirectly by the board.The board also houses the EPROM (see fig. 28).
- the yellow LED indicates the presence of 12 V DC;
- the green LED blinking indicates that the microprocessoris working correctly;
- the red LED indicates the operating status of the boilerheating element.
RELAY CARDS
The 2 relay card is controlled by the actuation board andcontrols some of the 120 V~ power users in the automaticmodels.
Fig. 27
1 - 120 V~ users2 - RAM3 - EPROM4 - Input signal5 - Green LED6 - Not used7 - To the push-button board8 - Expansion board for payment systems (optional)9 - Yellow LED10 - Board power supply11 - Red LED12 - Boiler heating element triac13 - To boiler heating element14 - 120 V~ users15 - Relays K1÷K1516 - C.P.U. board17 - Transformer fuses18 - 2-relay expansion board (automatic models only)
Fig. 28
RELAY ESPRESSO INSTANT
K1 ER E3
K2 ESC MD3
K3 MAC MF2
K4 PM PM/EIA
K5 M MD4
K6 EV2 EV2
K7 EV1 EV1
K8 MF1 MF1
K9 MD3 MD3
K10 MD2 MD2
K11 MD1 MD1
K12 EIA EIA
K13
K14
K15 MD4 MD4
RELAY POWER USER
K1
K2 MSCB
K3 MSB

29© by N&W GLOBAL VENDING SpA 02-2007 266 00
PAYMENT SYSTEM EXPANSION BOARD
This board (see fig. 29) is supplied with the installation kitof “change giver” or “cashless” payment systems.It must be connected to the control board using the specialconnector.According to the communication protocol used by thepayment system, the 2 minidips will have to be set to OFF(Executive) or to ON (MDB).
PUSH-BUTTON BOARD
This board controls the alphanumeric display, the selec-tion buttons and the programming button (see fig. 30).It supports the coin mechanism connectors as well as theprinter port.
Fig. 29
1 - Power supply (MDB - BDV)2 - To the the payment system (with special cable)3 - To the control board4 - Payment system configuration minidips
OFF = Executive / BDV ON = MDB
Fig. 30
1 - To the front validator2 - Not used3 - To machine board4 - Signals: free vend - jug facilities5 - To display board6 - Display contrast adjusting trimmer7 - Programming button8 - Wash button9 - RS232 port10 - To the programmer11 - Display board

© by N&W GLOBAL VENDING SpA 30 02-2007 266 00
HYDRAULIC SYSTEMSEMI-AUTOMATIC MODEL
HYDRAULIC SYSTEMAUTOMATIC MODEL
1 - Water inlet solenoid valve2 - Air-break3 - Volumetric counter4 - Pump5 - By-pass6- Boiler7- Espresso unit
1 - Water inlet solenoid valve2 - Air-break3 - Volumetric counter4 - Pump5 - By-pass6- Boiler7- Espresso unit

Programming menu summary
The machine can function in 3 different operating modes:
- Normal vending mode
- Maintenance Menu
- Programming menu
In order to access the programming menus, press the pro-gramming button located on the inside of the door.
The buttons shown in the figure are used for surfingthrough the different menus:
Fig. 31
1 - Programming access button
© by N&W GLOBAL VENDING S.p.A. 31 02-2007 266 00
Fig. 32
When pressing the programming button, the machine goesinto “Maintenance menu” mode.
SCROLLING BUTTONS UP ( ) AND DOWN ( )
The UP and DOWN scrolling buttons are used for movingfrom one programming menu item to the next one, locatedin the same level, and at the same time change the statusor the numeric value of the corresponding functions.
CONFIRM / ENTER BUTTON ( )
The confirm / enter button is used for moving to the lowerlevel or for confirming a value after being entered orchanged.
EXIT BUTTON ( )
The exit button is used for returning to the higher level orfor exiting a change field of a function. When reaching thehighest level in the menu, this button is pressed for goingfrom the Programming menu into the Maintenance menuand vice versa.
INSERTING THE VALUES
When the control software requests the entry of lettersand/or numbers the buttons take on the following func-tions:The confirm button “ ” is for changing / entering the firstcharacter, then for confirming it and going to the next char-acter.The “ ” and “ ” buttons are for scrolling through the avail-able values.After entering the values, press the confirm button “ ” andthe display will show the message “Confirm?”; press againthe confirm button to store the values.

© by N&W GLOBAL VENDING S.p.A. 32 02-2007 266 00
1 - Previous function / Decrease data item (-1)2 - Exit function / Cancel change3 - Machine installation4 - //5 - Next function / Increase data item (+1)6 - Confirm function / Confirm data item7 - Change data item8 - Reset failures
"Maintenance" menu summary
STATISTICS
Display statistics
Statistic N. 1
Coin 1= XXXX
...
Coin 8= XXXX
Statistic N. 2
Sel.1 P= XXXXX
Sel.1 F= XXXXX
Sel.1 T= XXXXX
Sel.1 D= XXXXX
.....
Sel.8 P= XXXXX
.....
Statistic N. 3
Failure 1 = XXX
.....
Failure 15 = XXX
Statistic N. 4
Price 1 = XXX
.....
Price 8 = XXX
Print statistics
P= paid dispensingF= free dispensingT= test dispensingD= discounted dispens-ing
x 8 selectons
Failure list:
1 Air-break2 Boiler3 Coin mechanism4 RAM data5 Water failure6 Water leak or Cup failure (automatic models only)7 Impeller failure8 Coffee unit9 Coffee failure10 Coffee release11 Waste container12 Water failure13 Changer (MDB)14 Bill validator (MDB)15 Cashless (MDB)

33© by N&W GLOBAL VENDING S.p.A. 02-2007 266 00
1 - Previous function / Decrease data item (-1)2 - Exit function / Cancel change3 - Machine installation4 - //5 - Next function / Increase data item (+1)6 - Confirm function / Confirm data item7 - Change data item8 - Reset failures
"Maintenance" menu summary
COMPLETE SEL.
POWDER ONLY
WATER ONLY
SPEC. FUNCTIONS
1= Previous function2= //3= Dispense sugar (automatic models only)4= Perform autotest5= Next function6= //7= Release a cup (automatic models only)8+6= Empty the air-break8+4= Empty the boiler
TUBES FILLING
8= Terminate the operation

© by N&W GLOBAL VENDING S.p.A. 34 02-2007 266 00
1 - Previous function / Decrease data item (-1)2 - Exit function / Cancel change3 - Machine installation4 - //5 - Next function / Increase data item (+1)6 - Confirm function / Confirm data item7 - Change data item8 - Reset failures
"Programming" menu summary
PRESENT FAILURESFailure list:
1 Air-break2 Boiler3 Coin mechanism4 RAM data5 Water failure6 Water leak or Cup failure (automatic models only)7 Impeller failure8 Coffee unit9 Coffee failure10 Coffee release11 Waste container12 Water failure13 Changer (MDB)14 Bill validator (MDB)15 Cashless (MDB)
WATER DOSESDose C1..........Dose SF
POWDER DOSESDose C1..........Dose SF
SET PRICESPrice 1 = XXXXPrice 2 = XXXXPrice 3 = XXXXPrice 4 = XXXXPrice 5 = XXXXPrice 7 = XXXXPrice 8 = XXXX
1= Previous function2= //3= Installation4= Perform autotest5= Next function6= Confirm button7= //8= Reset failures
Refer to the selection dose table for the dosesequence
Refer to the selection dose table for the dosesequence

35© by N&W GLOBAL VENDING S.p.A. 02-2007 266 00
1 - Previous function / Decrease data item (-1)2 - Exit function / Cancel change3 - Machine installation4 - //5 - Next function / Increase data item (+1)6 - Confirm function / Confirm data item7 - Change data item8 - Reset failures
"Programming" menu summary
SET PRICES/BUT.
Button 1 = on/off Price N. XButton 2 = on/off Price N. XButton 3 = on/off Price N. XButton 4 = on/off Price N. XButton 5 = on/off Price N. XButton 7 = on/off Price N. XButton 8 = on/off Price N. X
BASE UNIT / DP
Base unit = XXXXDecimal point = X
PAYMENT SYST.
Validator
Credit = on/off
Power supply =12/24 V
Line A= XXXX
Line B= XXXX
Line C= XXXX
Line D= XXXX
Line E= XXXX
Line F= XXXX
INITIALISING
MACHINE CODE
Code= XXXXX
Values for decimal point:0 = decimal point disabled1 = xxx.x (one digit after the decimal point)2 = xx.xx (two digits after the decimal point)3 = x.xxx (three digits after the decimal point)
Refer to the selection dose table for the "Price N./Price"combination

© by N&W GLOBAL VENDING S.p.A. 36 02-2007 266 00
1 - Previous function / Decrease data item (-1)2 - Exit function / Cancel change3 - Machine installation4 - //5 - Next function / Increase data item (+1)6 - Confirm function / Confirm data item7 - Change data item8 - Reset failures
"Programming" menu summary
MACHINE CONFIG.
Tank = on /off
Equipped cabinet = on /off
Fast cycles = on /off
Coffee grounds tray = on /off
SELEC. COUNTER
Password = XXXXX
PROM. MESSAGE
Prom. message = enabled / disabled
LANGUAGE
Language = XXXXXXXX
WHIPPING TIME
Whip. time = XX
PASSWORD PROG.
Password prog. = on /off

37© by N&W GLOBAL VENDING S.p.A. 02-2007 266 00
1 - Previous function / Decrease data item (-1)2 - Exit function / Cancel change3 - Machine installation4 - //5 - Next function / Increase data item (+1)6 - Confirm function / Confirm data item7 - Change data item8 - Reset failures
"Programming" menu summary
SPECIAL VENDING
Free vend = on /off
Jug facility = on /off
Drink jug N. = X
SET DATE/TIME
Year = XXXX
Month = XXXX
Day = XXXX
Hour = XXXX
Minutes = XXXX
SET WASHING
Wash = XX.XX
SET BAND
Start = XX.XX
End = XX.XX
SET PRICES BAND
Price 1 = XXXX
...
...
Price 8 = XXXX

© by N&W GLOBAL VENDING S.p.A. 38 02-2007 266 00
1 - Previous function / Decrease data item (-1)2 - Exit function / Cancel change3 - Machine installation4 - //5 - Next function / Increase data item (+1)6 - Confirm function / Confirm data item7 - Change data item8 - Reset failures
CONSECUTIVE SEL.
PRE-GRINDING
Pre-grinding = on/off
SET TEMPERATURE
Temperature = XXXXX
PRESEL. DISPLAY
PRESEL. FLAVOURS
FLAVOURS UPCHARGE
upcharge = XXXXX
FLAVOURS CYCLE
Before the selection
After the selection
DEX UCS - EVADTS
"Programming" menu summary
Semiautomatic models only
Semiautomatic models only

© by N&W GLOBAL VENDING SpA 02-2007 266 00
INITIALS DESCRIPTION
WIRING DIAGRAM LEGEND
INITIALS DESCRIPTION
39
CM1-2 MICROSWITCH FOR BREW UNIT MOTOR
CMSB CUP RELEASE MOTOR CAM
CV VOLUMETRIC COUNTER
E1-... INSTANT SOLENOID VALVE
EEA WATER INLET SOLENOID VALVE
ER COFFEE DISPENSER SOLENOID VALVE
ESC COFFEE RELEASE MAGNET
EX EXECUTIVE COIN MECH CONNECTOR
FA RADIO INTERFERENCE SUPPRESSOR
ID COFFEE DOSE SWITCH
IP DOOR SWITCH
IPF WASTE CONTAINER OVERFLOW SWITCH
IVA EMPTY BOILER MICRO-SWITCH
IVB EMPTY CUP DISPENSER MICRO SWITCH
KC1-.. COFFEE BOILER CUTOUT
KS1-.. SAFETY CUTOUT
LCD LIQUID CRYSTAL DISPLAY
M COFFEE UNIT MOTOR
MAC GRINDER
MD1-.. INGREDIENT MOTOR - INSTANT
MDB CONNECTOR FOR MDB COIN MECHANI
MDTE-. FRESH TEA INGREDIENT MOTOR
MDZ INGREDIENT MOTOR - SUGAR
MF1-.. WHIPPER MOTORS
MSB CUP RELEASE MOTOR
MSCB CUP CONTAINER SHIFT MOTOR
MSP STIRRER RELEASE MOTOR
NTC TEMPERATURE PROBE
PM PUMP
RCC COFFEE BOILER HEATING ELEMENT
RIS COFFEE UNIT HEATER
RS232 SERIAL PORT
SM CONTROL BOARD
SP PUSH-BUTTON BOARD
TR TRANSFORMER
TR1 TRANSFORMER 230 V 24 V
TX.... DELAYED FUSE (X=CURRENT)
VAR VARISTOR
VENT FAN


© by N&W GLOBAL VENDING SpA NOTE

© by N&W GLOBAL VENDING SpA NOTE

© by N&W GLOBAL VENDING SpA NOTE

EDITION 1 02-2007 CODE: H 266U 00
The Manufacturer reserves the right to modify, without prior notice, the characteristics of the equipment described in thispublication; and further declines to accept any responsibility for any inaccuracies contained in this publication which can beascribed to printing and/or transcription errors.All instructions, drawings, tables and information contained in this publication are confidential and can neither be repro-duced completely or in part, nor be transmitted to third parties without the written permit of the Manufacturer, who has thesole ownership.