Cohesive Networks Support Docs: Welcome to VNS3 3.5
32
© 2016 Welcome to VNS3 3.5 2016
-
Upload
cohesive-networks -
Category
Technology
-
view
162 -
download
0
Transcript of Cohesive Networks Support Docs: Welcome to VNS3 3.5

© 2016
Welcome to VNS3 3.52016
© 2016
Introduction
2

© 2016
Goals for VNS3 3.5
3
• Improved status information
• Improved clientpack management
• Firewall extensions
• Improved administration
• Improved manageability
• Desire for Layer 4-7 capabilities
• Forward/Reverse Proxy • SSL Termination • Content Caching • IDS/XPS • In-app load balancing
• Substrate for future improvements
• IPv6 capabilities • Multi-tenant networks • Overlay Flexibility
• “Software as an appliance” allows for rapid releases (VPN3 0.5, 0.6, 1.0, 1.5, 2.0, 2.2, 2.5, 2.7, 3.0.1, 3.0.2, 3.0.4)
• This has allowed us to react to customer needs, but some accretion of inconsistency, increasing customer “cognitive load”.
• Our challenge was to add increased functionality while simplifying usage and providing customers even greater control of their networks
• Redesigned menu system
• Information consolidation
• Plug-in system for layer 4-7 providing significant functionality using emerging de facto standard of “docker containers”
• First release of integrated management tool
Simplicity Features

© 2016
Improved Status Information
4

© 2016
VPN Advanced Settings Page

© 2016
Enhanced Clientpack and System Information on “Status” Page
6

© 2016
Improved Clientpack Management
7
© 2016
Client Configuration: Clientpack Page
8
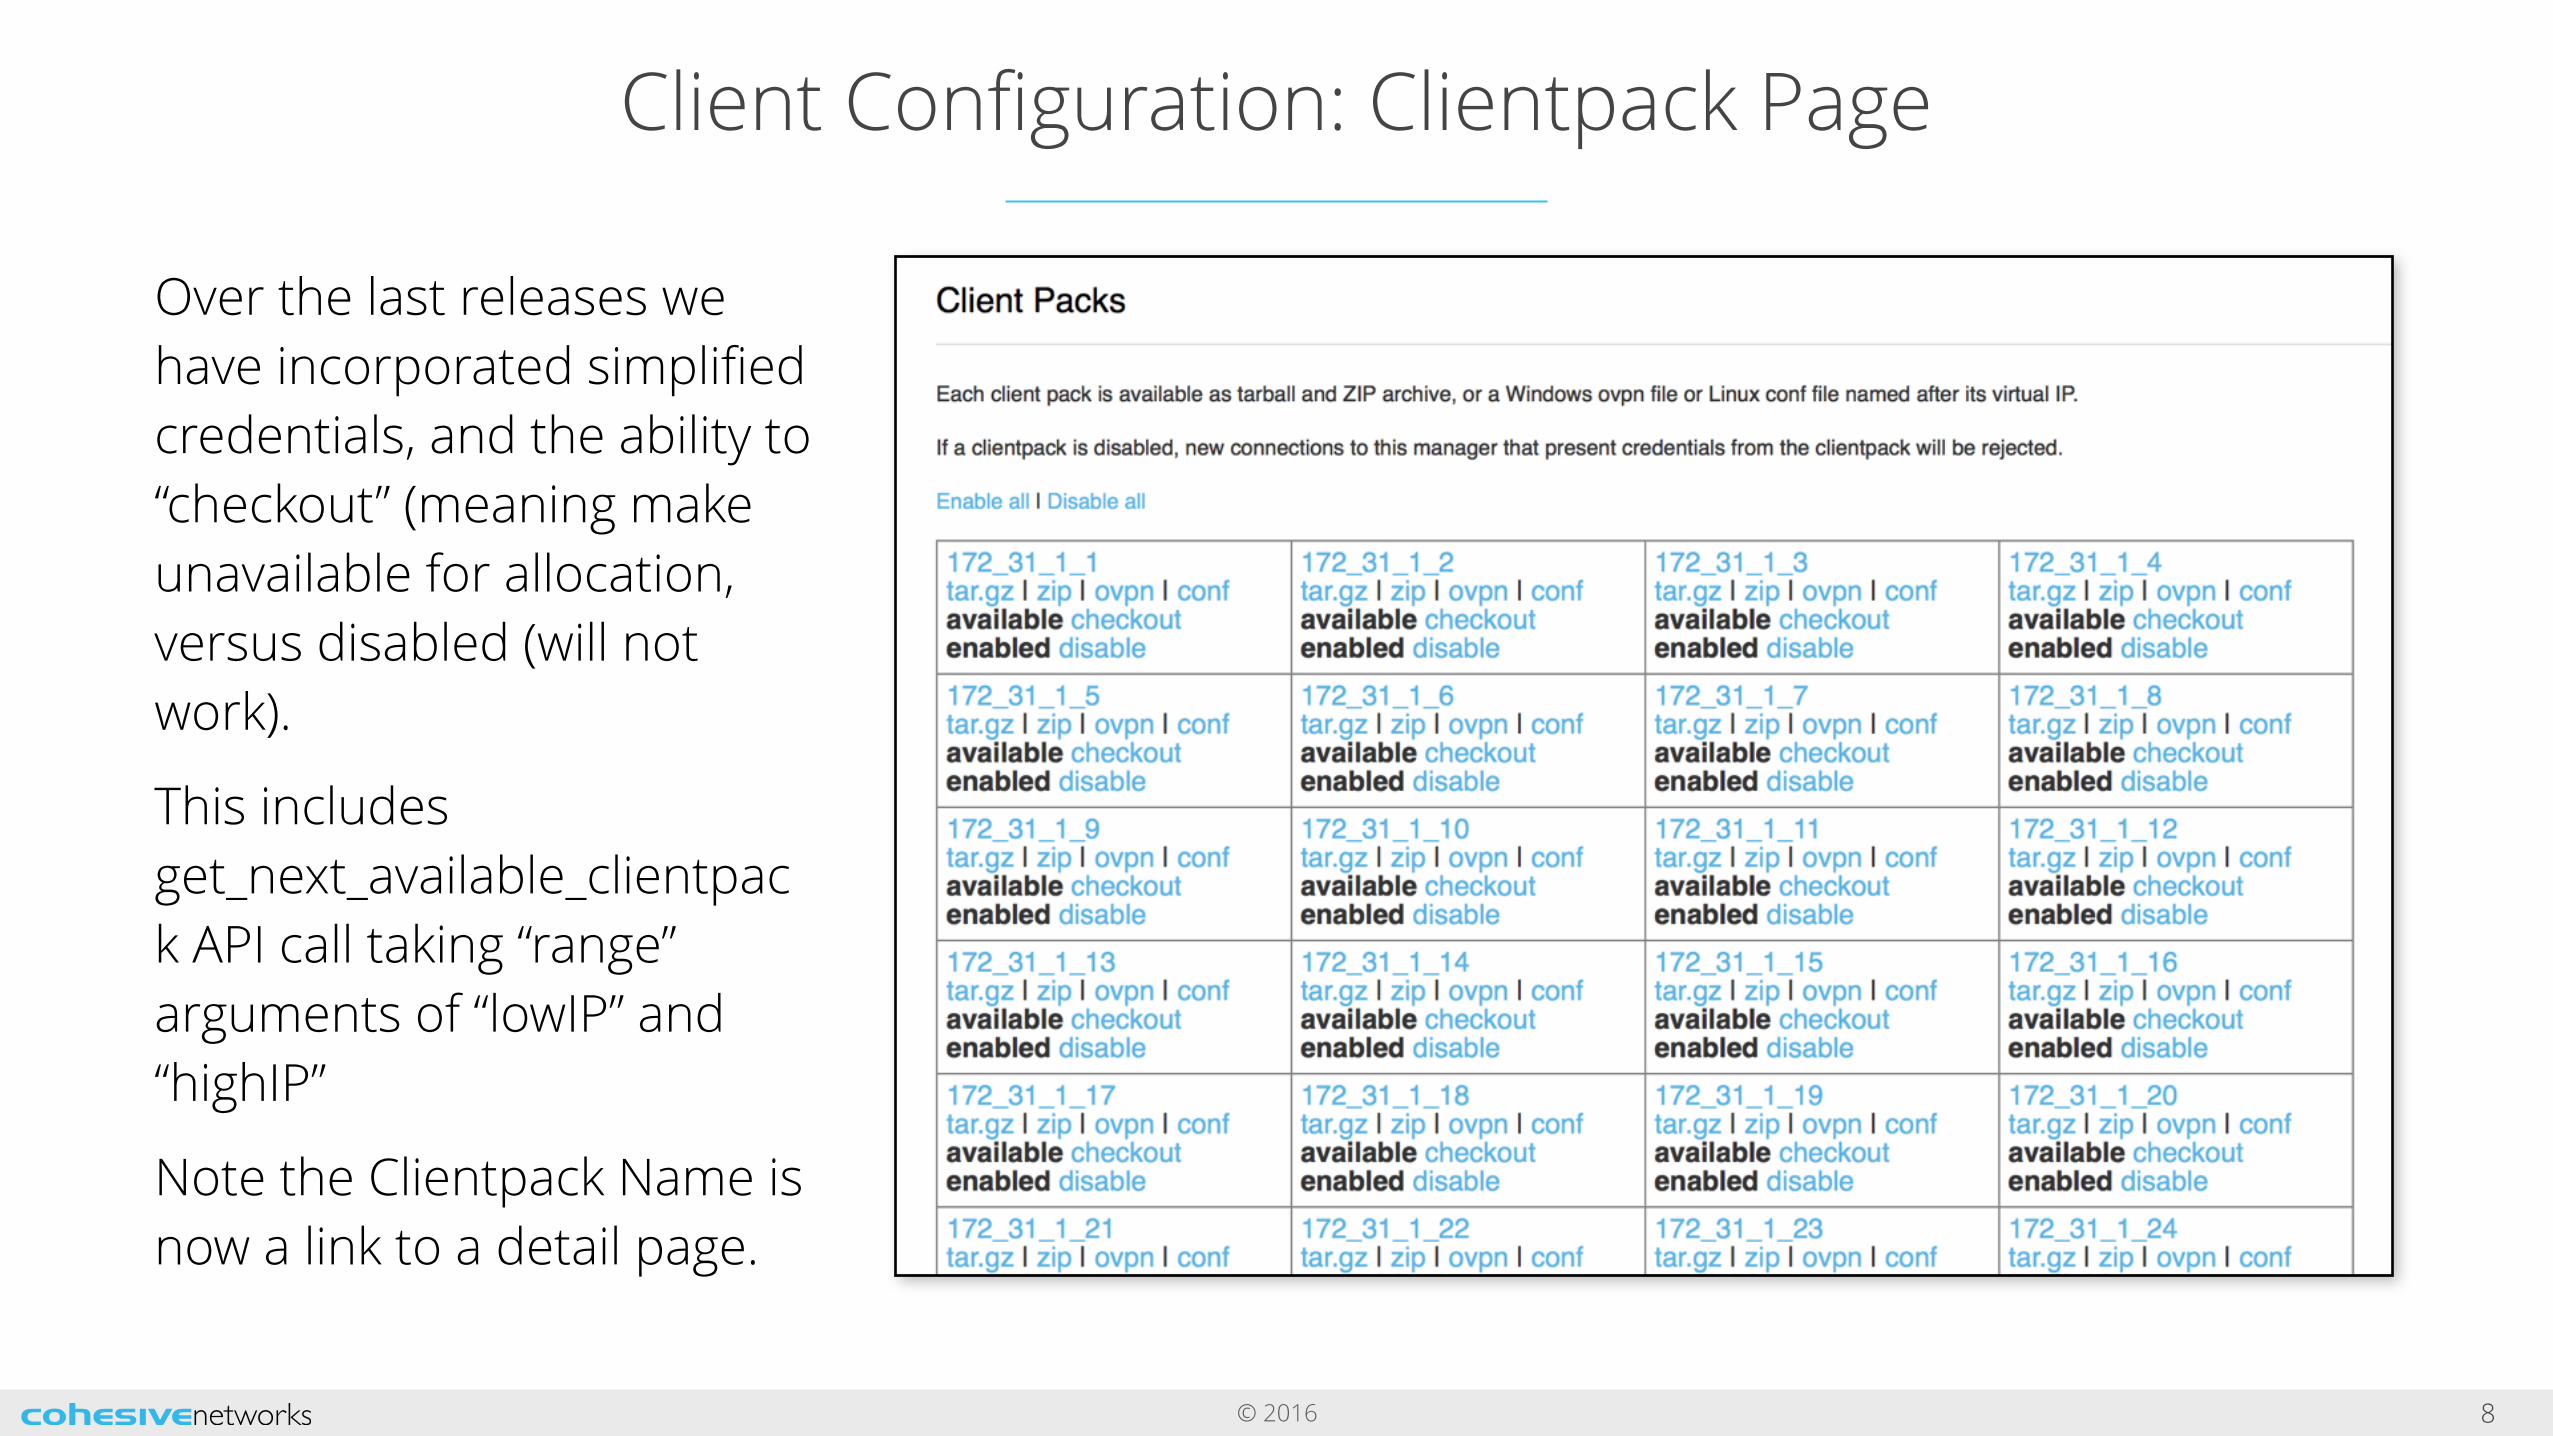
Over the last releases we have incorporated simplified credentials, and the ability to “checkout” (meaning make unavailable for allocation, versus disabled (will not work).
This includes get_next_available_clientpack API call taking “range” arguments of “lowIP” and “highIP”
Note the Clientpack Name is now a link to a detail page.
© 2016
Client Configuration: Clientpack Detail
9
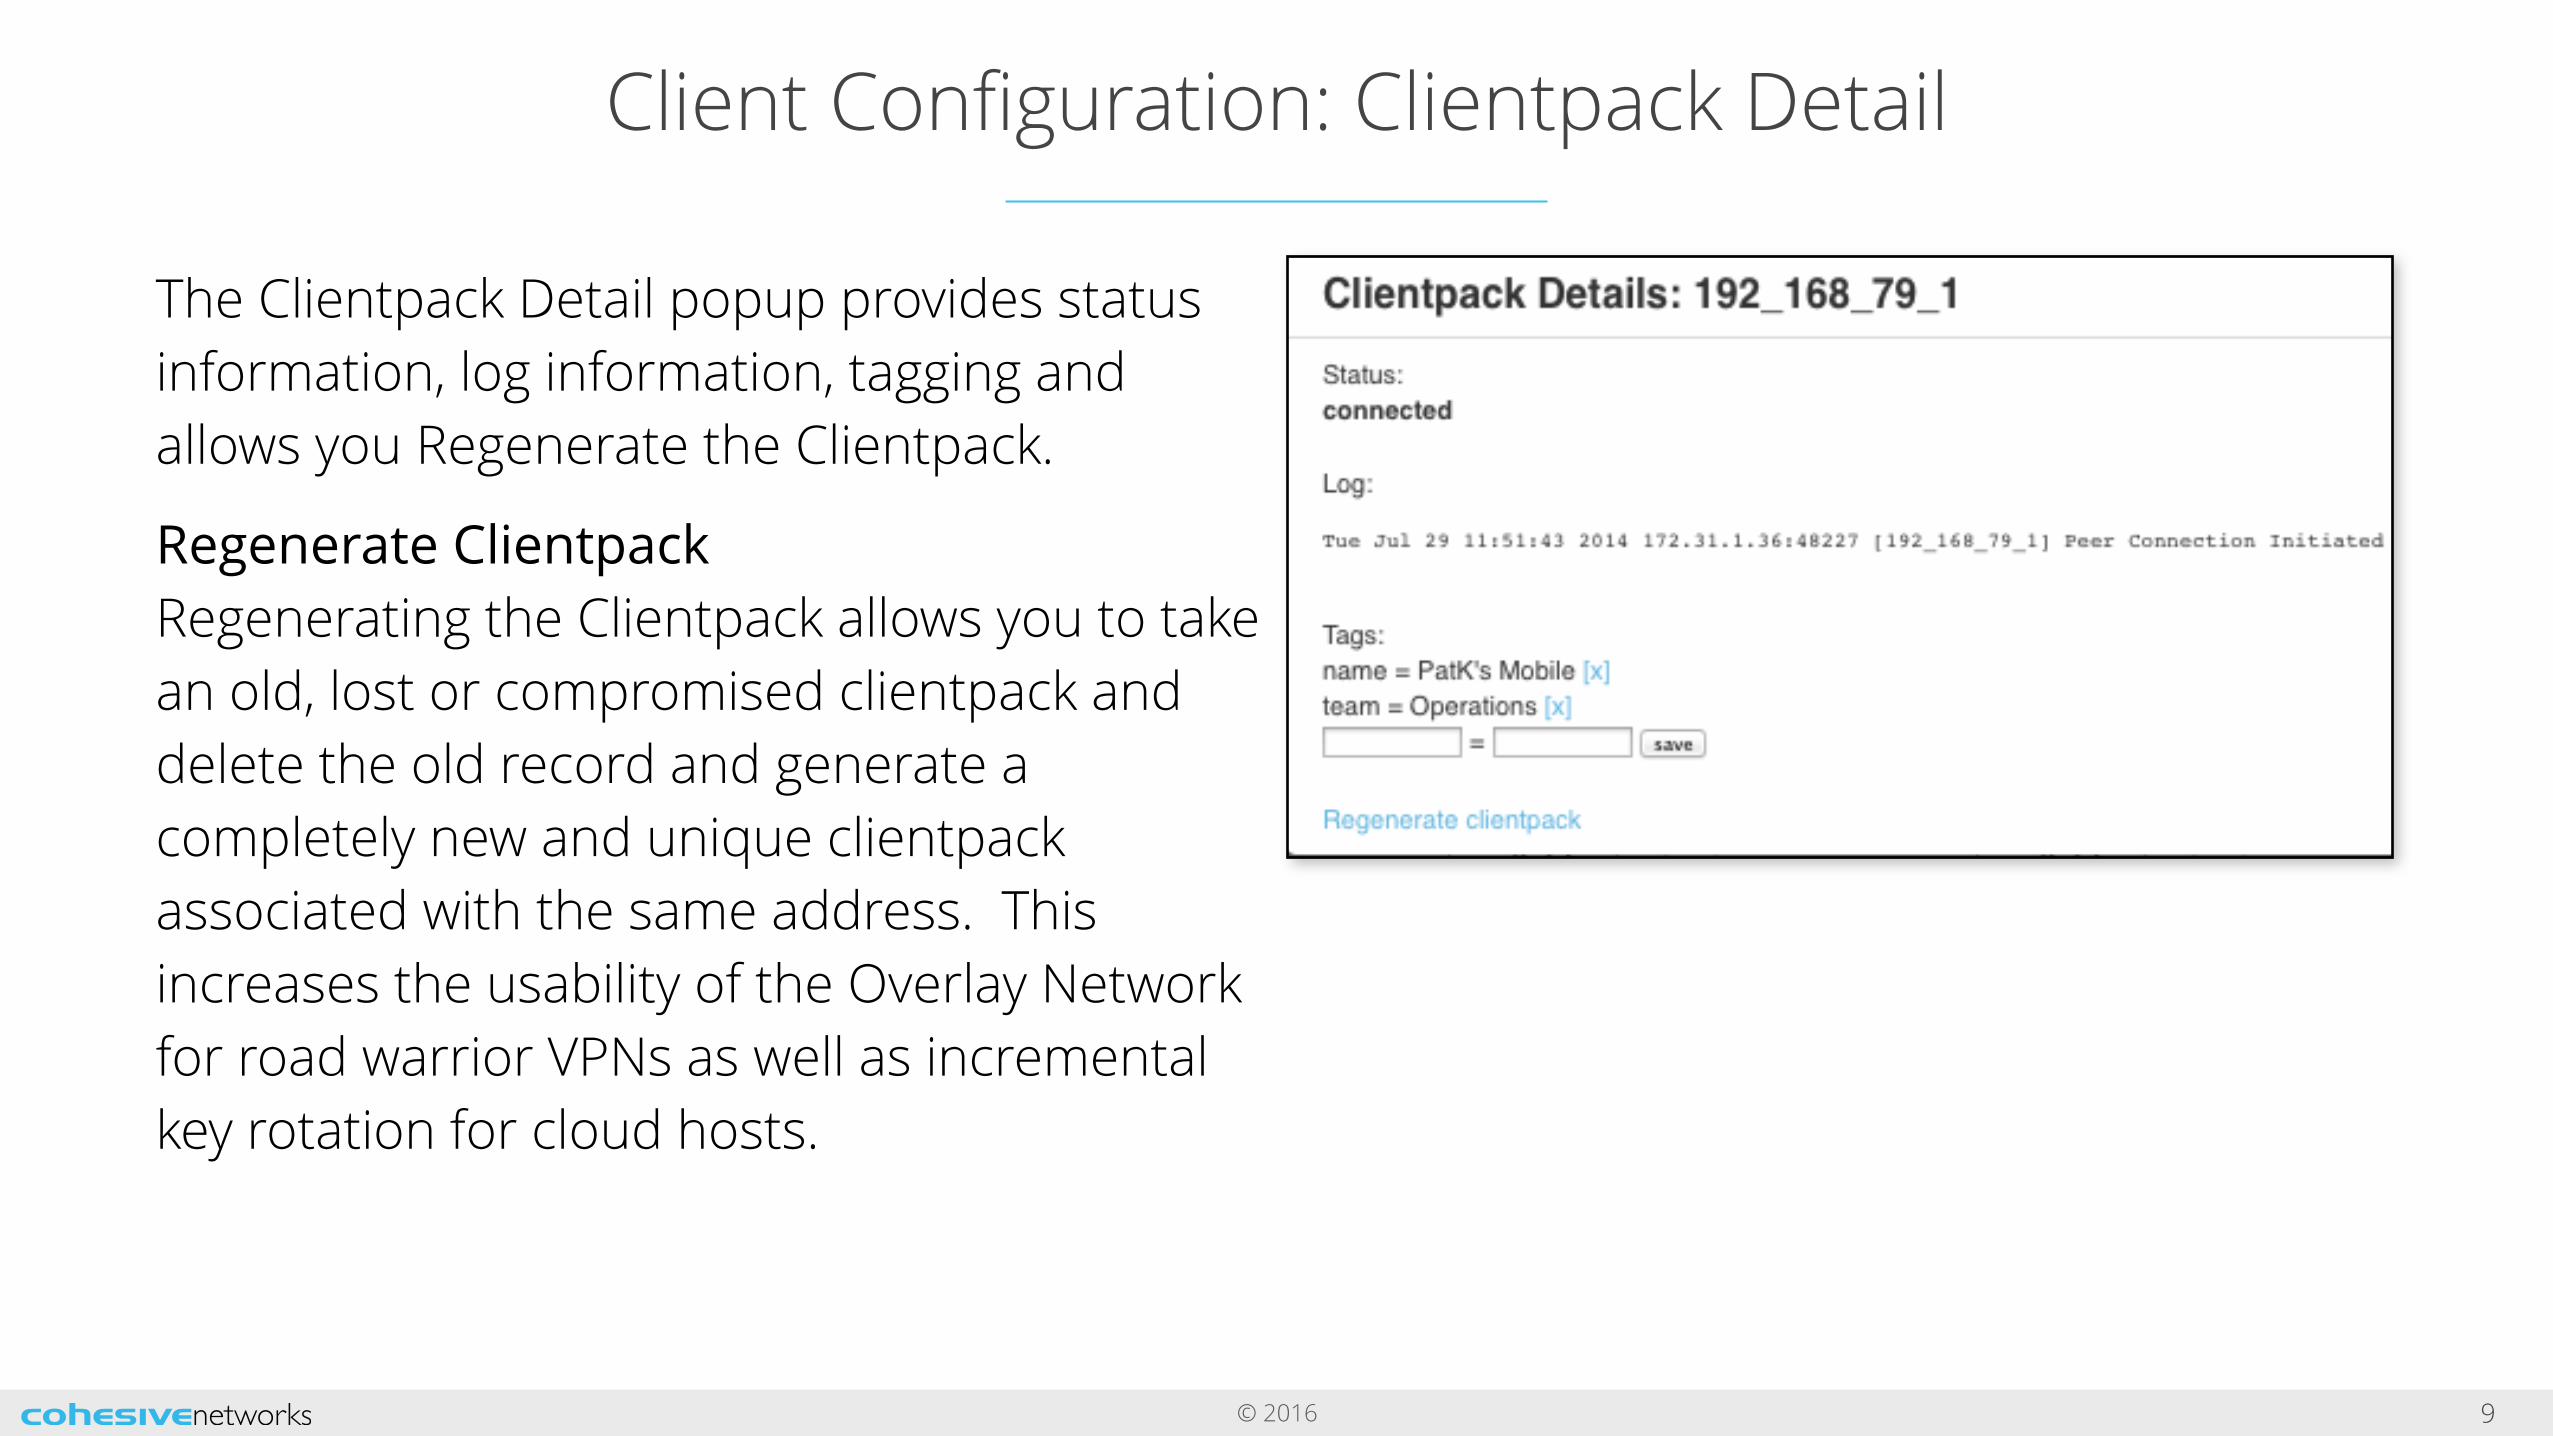
The Clientpack Detail popup provides status information, log information, tagging and allows you Regenerate the Clientpack.
Regenerate ClientpackRegenerating the Clientpack allows you to take an old, lost or compromised clientpack and delete the old record and generate a completely new and unique clientpack associated with the same address. This increases the usability of the Overlay Network for road warrior VPNs as well as incremental key rotation for cloud hosts.

© 2016
Firewall Extensions
10

© 2016
VNS3 Firewall - Overview
11
The VNS3 Firewall adds a layer of security and control for cloud-based deployments.
This means in addition to the standard security and firewall features of VNS3, you can create your own rules to restrict traffic to and through the VNS3 Controller.The order of rules matter - rules are applied from top to bottom until the first match. If no match is found, the packet is allowed to continue on. Important note: If your customer rules don't reject a packet, it will be allowed by default.
However, this “default” is fairly restrictive. Traffic is allowed from “known” VLANS. Known VLANs are VLANS that are listed in IPSec tunnel rules, and the VNS3 virtual VLAN. Allowing traffic from other sources requires adding firewall rules to accept that traffic.

© 2016
VNS3 Firewall - Examples
12
"-j ACCEPT" allows a packet. "-j DROP" drops a packet. "-j REJECT" sends an appropriate notification to sender saying such and such packet was rejected (depends on protocol).
Some Basic examples:
* Drop all packets from 1.1.1.1 to 2.2.2.2 INPUT_CUST -s 1.1.1.1 -d 2.2.2.2 -j DROP
* Drop all traffic from 192.168.3.0/24 (entire subnet) except 192.168.3.11: INPUT_CUST -s 192.168.3.11/32 -j ACCEPT INPUT_CUST -s 192.168.3.0/24 -j DROP
* Drop tcp traffic from 172.31.1.1 on port 8000 (Stop overlay clients from using the overlay IP of 172.31.1.1 with port 8000). INPUT_CUST -p tcp -s 172.31.1.1/32 --dport 8000 -m state --state NEW,ESTABLISHED -j DROP
INPUT_CUST -p tcp --sport 8000 -m state --state ESTABLISHED -j DROP

© 2016
VNS3 Firewall - Netmapping
13
Netmapping allows you to create IPsec tunnels to “imaginary” IPs on the VNS3 side of the connection and use the VNS3 firewall to map all traffic to/from the imaginary IP, to the actual host on your cloud side. This is useful in situations where a connecting party has an address overlap with your Overlay or VLAN subnet.
ExampleRemote subnet 10.10.10.0/24VNS3 Overlay (clientpack network): 172.31.10.0/24Local Server the Remote wants to access: 172.31.10.50Customer will not connect their LAN (10.10.10.0/24) to a private network.Allocate an EIP to your account but DON'T associate: 23.23.23.23.Build an IPsec the tunnel from 23.23.23.23/32 to 10.10.10.0/24
Simple Syntax: PREROUTING_CUST -i eth0 -s 10.10.10.0/24 -d 23.23.23.23/32 -j NETMAP --to 172.31.10.50/32POSTROUTING_CUST -o eth0 -s 172.31.10.50/32 -d 10.10.10.0/24 -j NETMAP --to 23.23.23.23/32

© 2016
VNS3 Firewall - Copy Traffic to a Device
14
With the addition of the Docker-powered application container system there are scenarios where you might want to push a copy of the traffic from the eth0 or tun0 interface to a particular IP. The obvious use-case is copying traffic to the Cohesive Networks’ Network Utilities Container where you can do things like run tcpdump or iftop.
Example:I want to copy all tun0 (Overlay Network) traffic to my Network Utils Container running on the VNS3 Controller on the Docker network at 172.0.10.2.
Simple Syntax: MACRO_CUST -j COPY —from tun0 —to172.0.10.2 —bidirectional

© 2016
Improved Administration: Redesigned Menu System
15

© 2016
Redesigned Menu System
16
StatusRuntime StatusNetwork Sniffer
SSL Certs and KeysFetch KeysetGenerate New
PeeringSet up Manager PeeringIPsec and eBGPFirewallOther Routes
ClientsClient Packs
SnapshotsView and Create
LicensingLicense Upgrade
AdminTopology NameRemote SupportChange UsernameChange PasswordReboot
VNS3 before 3.5 VNS3 3.5

© 2016
Improved Administration: Reset Factory Defaults
17
© 2016
Reset Factory Defaults
18
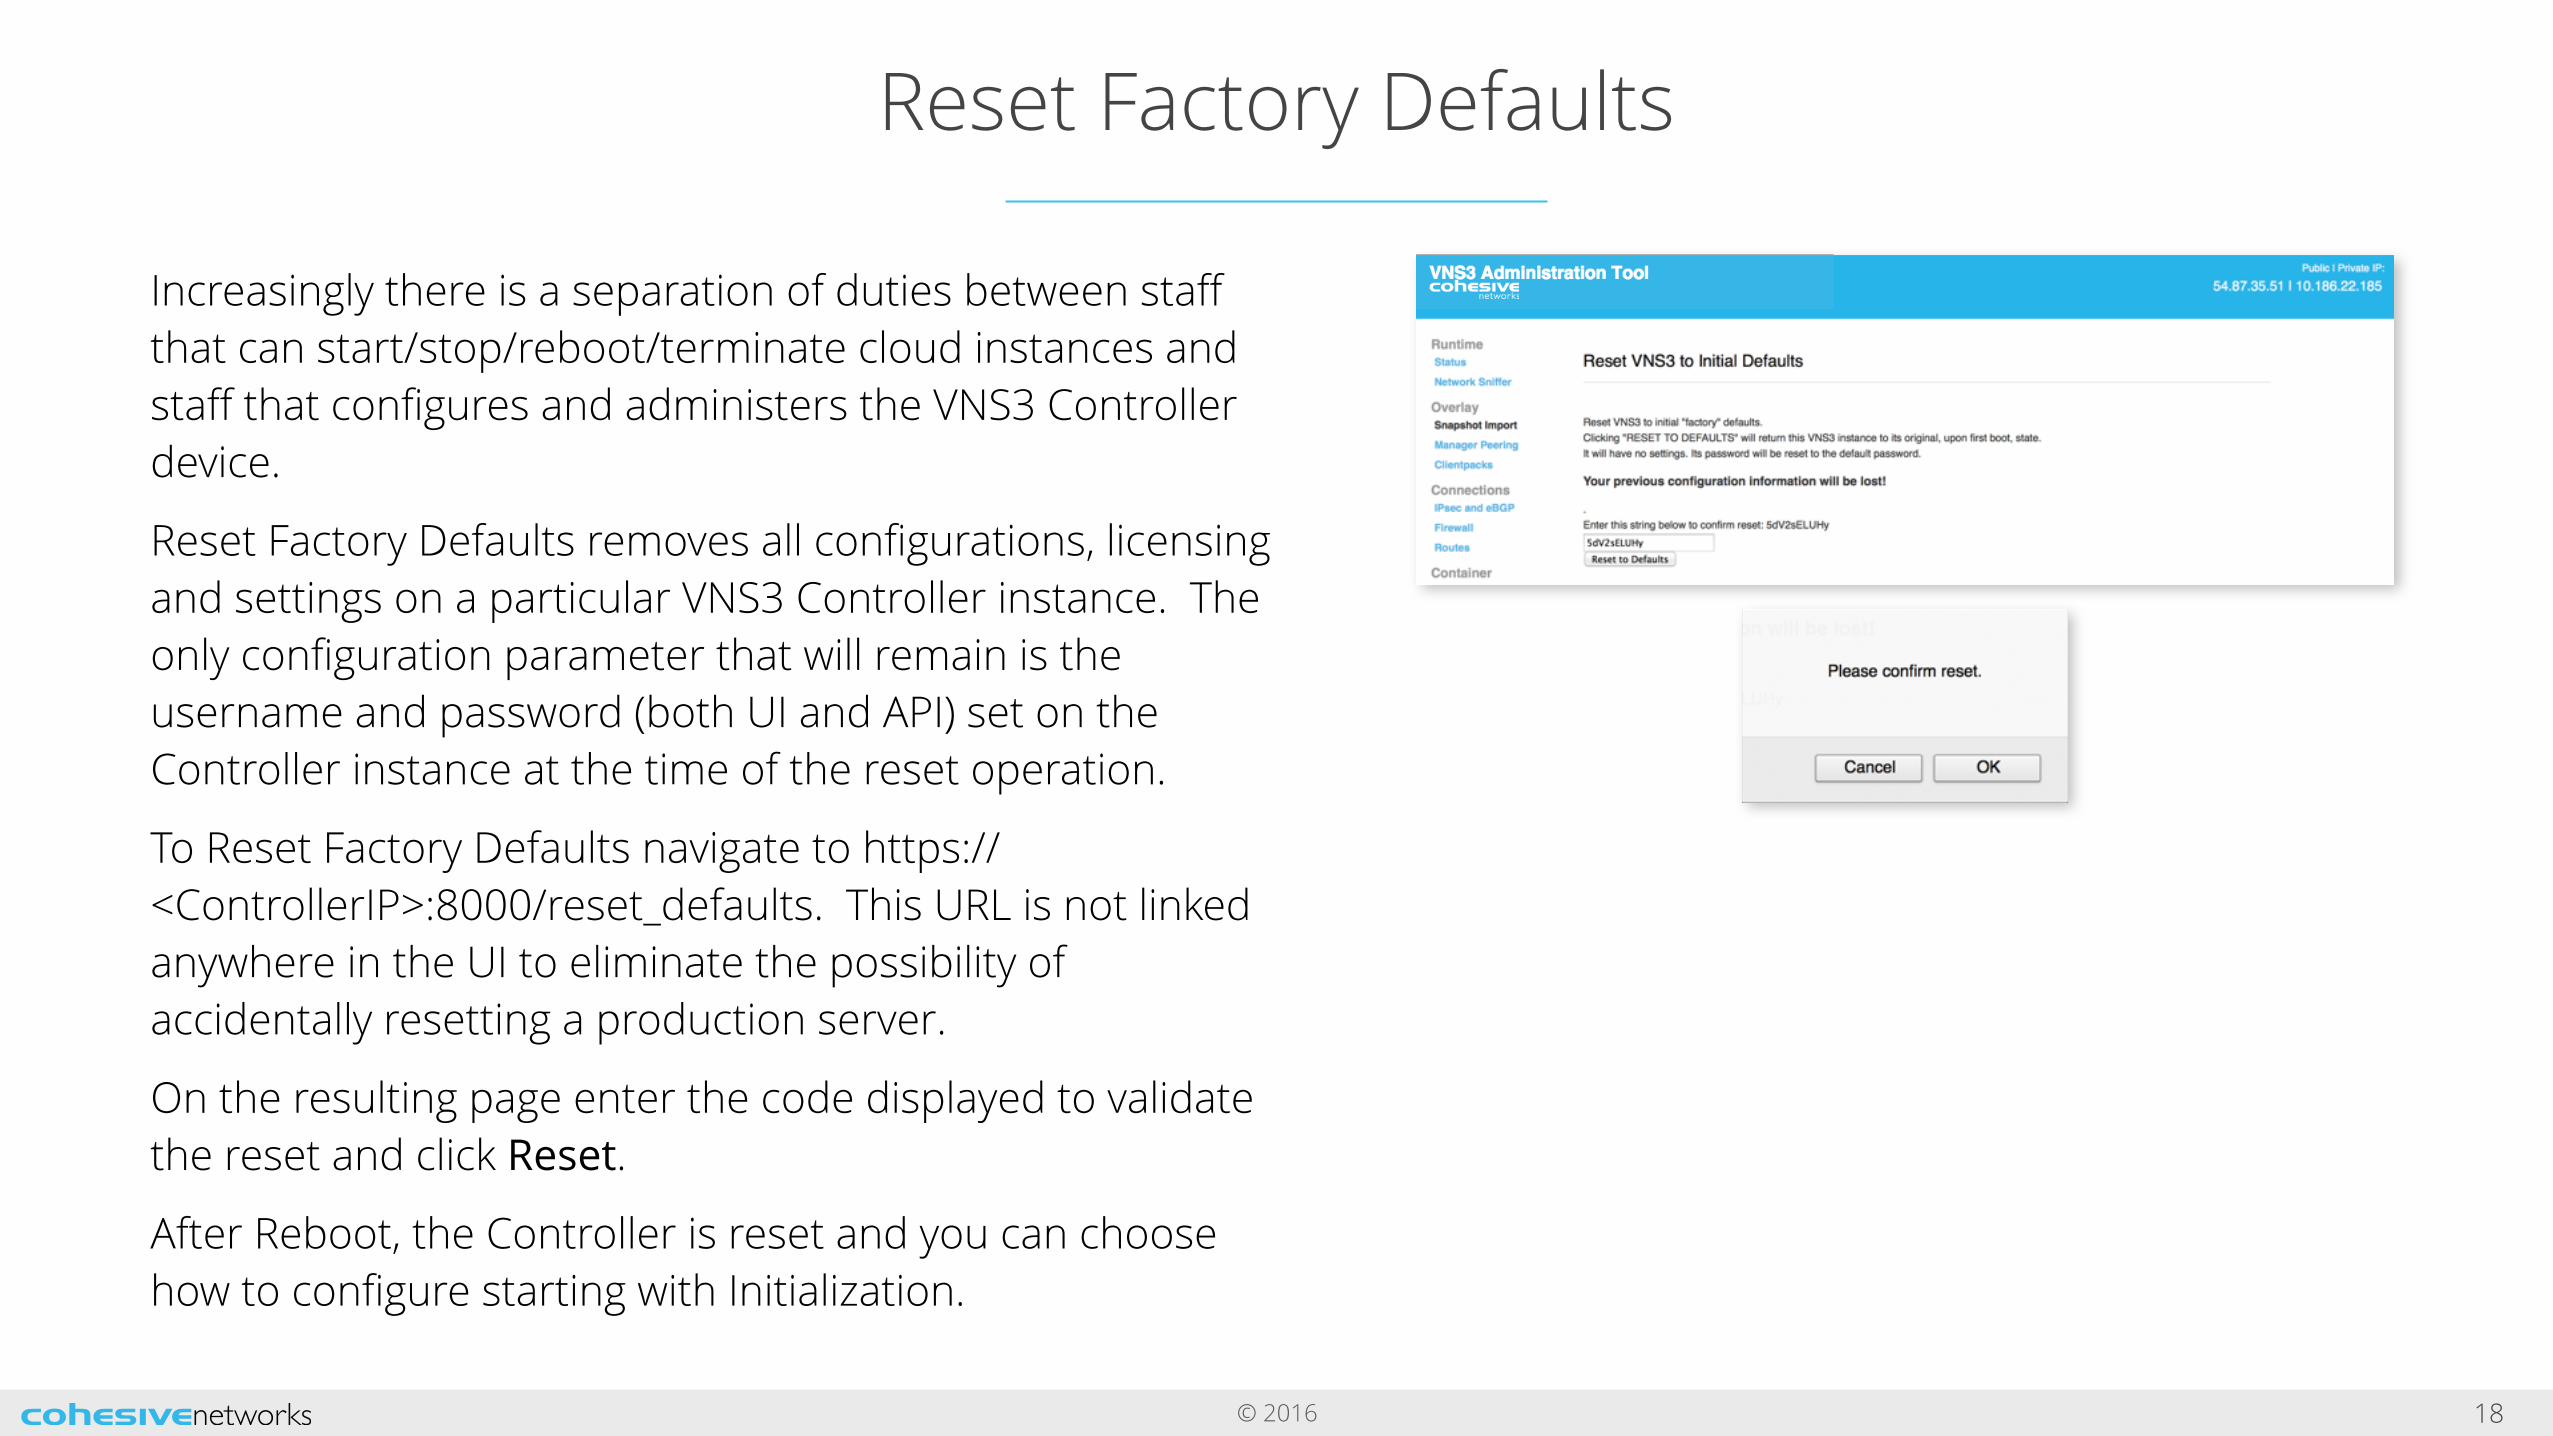
Increasingly there is a separation of duties between staff that can start/stop/reboot/terminate cloud instances and staff that configures and administers the VNS3 Controller device.
Reset Factory Defaults removes all configurations, licensing and settings on a particular VNS3 Controller instance. The only configuration parameter that will remain is the username and password (both UI and API) set on the Controller instance at the time of the reset operation.
To Reset Factory Defaults navigate to https://<ControllerIP>:8000/reset_defaults. This URL is not linked anywhere in the UI to eliminate the possibility of accidentally resetting a production server.
On the resulting page enter the code displayed to validate the reset and click Reset.
After Reboot, the Controller is reset and you can choose how to configure starting with Initialization.

© 2016
Improved Administration: Remote Support
19

© 2016
Remote Support
20
Note that TCP 22 (ssh) is not required for normal operations.
Each VNS3 Controller is running a restricted SSH daemon, with access limited only to Cohesive Networks for debugging purposes controlled by the user via the Remote Support toggle and key exchange generation.
In the event Cohesive Networks needs to observe runtime state of a VNS3 Controller in response to a tech support request, we will ask you to open Security Group access to SSH from our support IP range and Enable Remote Support via the Web UI.
Cohesive Networks will send you an encrypted passphrase to generate a private key used by Cohesive Networks Support staff to access your Controller. Access to the restricted SSH daemon is completely controlled by the user. Once the support ticket has been closed you can disable remote support access and invalidate the access key.

© 2016
Improved Manageability: VNS3:ms
21

© 2016
Single pane of glass for virtual networks
22

© 2016
Improved Manageability: Routing Agent
23

© 2016
Overview
24
The VNS3 routing agent allows machines on a VNS3 network to receive dynamic route pushes in the overlay network. It listens for an encrypted message from the VNS3 Controller announcing route updates. Routes are broadcasted over a set address and port fixed for UDP multicast traffic.

© 2016
Routing Agent Scenario
25
Step 1 - Add extra routes in VNS3 Controller console- Select ‘Other Routes’ from the menu on the left
Step 2 - verify routes picked up by clients- run ‘netstat -nr’ (on Linux or Windows)

© 2016
Container System for L4-L7
26

© 2016
Docker Overview
27
Docker is an open source project released in March 2013 that automates the deployment of applications in Linux Containers (LXC). It is an engine that allows users to encapsulate any application or set of applications as a lightweight, portable, self-sufficient virtual container. These containers can be manipulated using standard operations and run anywhere Docker is installed.
Docker offers a different granularity of virtualization that allows for greater isolation between applications.
Cloud Provider OS/Hypervisor
Server Hardware
VNS3 bins/libs
bins/libs
bins/libs
GuestOS
GuestOS
GuestOS
AppStack
AppStack
AppStack
VM
Cloud Provider OS/Hypervisor
Server Hardware
VNS3
Docker
bins/libs
bins/libs
AppStack
AppStack
AppStack
AppStack
Container

© 2016
Docker and VNS3
28
We have received numerous requests from customers for the ability to add their own layer 4-7 network service applications to the VNS3 layer 3 transport device. To provide that level of customization without compromising VNS3 core functionality, we added an Application Container System to VNS3 powered by Docker. Now you can embed layer 4-7 network service features and functions provided by other vendors - or developed in house, safely and securely into your Cloud Network.
Take a look at the following blog posts for further explanation and an example of how you can use VNS3 the VNS3 Container System:
•An Introduction to Docker in VNS3
•Using Docker.io for SSL termination and load balancing
waf content caching nids proxy load balancing custom
router switch firewall vpn concentrator protocolredistributor
dynamic &srciptable sdn
VNS3 Core Components
firewallvpn
concentratorprotocol
redistributor extensible nfv
VNS3 Core Components
router switch

© 2016
Container Network Setup
29
To start using the Container System you must first setup an internal subnet where your containers will run. The default VNS3 container subnet is 198.51.100.0/28. VNS3 allows you to choose a custom address block. Make sure it will not overlap with the Overlay Subnet or any subnets you plan on connecting to VNS3. The container subnet can be thought of as a VLAN segment bridged to the VNS3 Controller’s public network interface.
The Container Networking Page shows the available container IP addresses for the chosen Container Network. IP addresses listed as reserved are either used by Docker (for routing, bridging, and broadcast) or are being used by a currently running container.
To change the Container Network first enter a new network subnet in CIDR notation.
Click Validate to ensure the subnet accommodates the Container Network requirements.
Click Set once validation is passed.
You will prompted with a popup warning that a Container Network change will require a restart of any running container. Click OK.

© 2016
Container Images: Upload a Container
30
To Upload a Container Image click on the Images left column menu item listed under the Container heading.
Click Upload Image.
On the resulting Upload Container Image Window enter the following:
• Input name
• Description
• Select the Container Url radio button - provide the publicly accessible URL of the archived Container Image file (supported file formats tar, tgz, tar.gz, tar.bz2, and zip)
Click Upload.Once the Container Image has finished the import process, you will be able to use the action button to edit and delete the Image or allocate (launch) a Container.

© 2016
Container Images: Upload from a Dockerfile or Docker Context
31
To Upload a Dockerfile click on the Images left column menu item listed under the Container heading.
Click Upload Image.
On the resulting Upload Container Image Window enter the following;
• Input name
• Description
• Select the Dockerfile Url radio button - provide the publicly accessible URL of the Dockerfile (note the filename is required to be Dockerfile) or URL of an archived Dockerfile Context Directory (supported file formats tar, tgz, tar.gz, tar.bz2, and zip)
Click Upload.Once the Dockerfile has been uploaded and the image has has finished the build process, you will be able to use the action button to edit and delete the Image or allocate (launch) a Container.

© 2016
VNS3 Document Links
32
VNS3 Product Resources - Documentation | Add-ons
VNS3 Configuration Document Instructions and screenshots for configuring a VNS3 Controller in a single or multiple Controller topology. Specific steps include, initializing a new Controller, generating clientpack keys, setting up peering, building IPsec tunnels, and connecting client servers to the Overlay Network.
VNS3 Docker InstructionsExplains the value of the VNS3 3.5 Docker integration and covers uploading, allocating and exporting application containers.
VNS3 Troubleshooting Troubleshooting document that provides explanation issues that are more commonly experienced with VNS3.