Cocos2D-x for Windows Store Appsdownload.microsoft.com/download/F/6/1/F614FD49-F232-419F... · Web...
21
Cocos2D-x for Windows Store Apps Overview Cocos2D-X is a popular open source C++ mobile gaming engine adopted by 400,000+ developers to build games such as Castle Clash and other top mobile games. In this hands-on lab, you will learn how to add resources to your game, use those resources in the game, and manage object interactions/collisions. Note: Be sure to complete the required setup instructions (listed below) before you begin the challenge. What You’ll Learn The objectives of this lab are to learn how to: Add resources to a game. Define object in the games. Manage object interactions. Required - Complete the Setup Instructions Some computer setup may be required before starting this challenge. Read through the instructions below and complete any portions that are required for your computer. Note: These setup instructions assume that you have Windows 8.1 and Visual Studio 2013 installed with the most recent updates. If you do not have Windows 8.1 or Visual Studio 2013 installed, please installed them now or use a computer that does have these products installed, and then use Windows Update to ensure that you have the most recent updates.
Transcript of Cocos2D-x for Windows Store Appsdownload.microsoft.com/download/F/6/1/F614FD49-F232-419F... · Web...

Cocos2D-x for Windows Store AppsOverviewCocos2D-X is a popular open source C++ mobile gaming engine adopted by 400,000+ developers to build games such as Castle Clash and other top mobile games. In this hands-on lab, you will learn how to add resources to your game, use those resources in the game, and manage object interactions/collisions.Note: Be sure to complete the required setup instructions (listed below) before you begin the challenge.
What You’ll LearnThe objectives of this lab are to learn how to:
Add resources to a game. Define object in the games. Manage object interactions.
Required - Complete the Setup InstructionsSome computer setup may be required before starting this challenge. Read through the instructions below and complete any portions that are required for your computer.
Note: These setup instructions assume that you have Windows 8.1 and Visual Studio 2013 installed with the most recent updates. If you do not have Windows 8.1 or Visual Studio 2013 installed, please installed them now or use a computer that does have these products installed, and then use Windows Update to ensure that you have the most recent updates.
First off, ensure that you have Git for Windows is installed. You can find Git for Windows at http://msysgit.github.io/. You can accept the default settings during installation.
Next, you will need to install and configure Python 2.7.5 for Windows on your computer.
1. Download Python from this location: http://www.python.org/ftp/python/2.7.5/python-2.7.5.msi (Python 2.7.5 for Windows).
2. Prepare to make a note of path location where Python is installed. You will need this later in the Setup Instructions.
3. Run the install package for Python for Windows and accept the default setting during the installation. Be sure to record the install path location.
4. Configure Windows to include Python on the Path System Environment Variable. Complete the following steps to configure this for Windows 8.1:
a. Open Control Panel
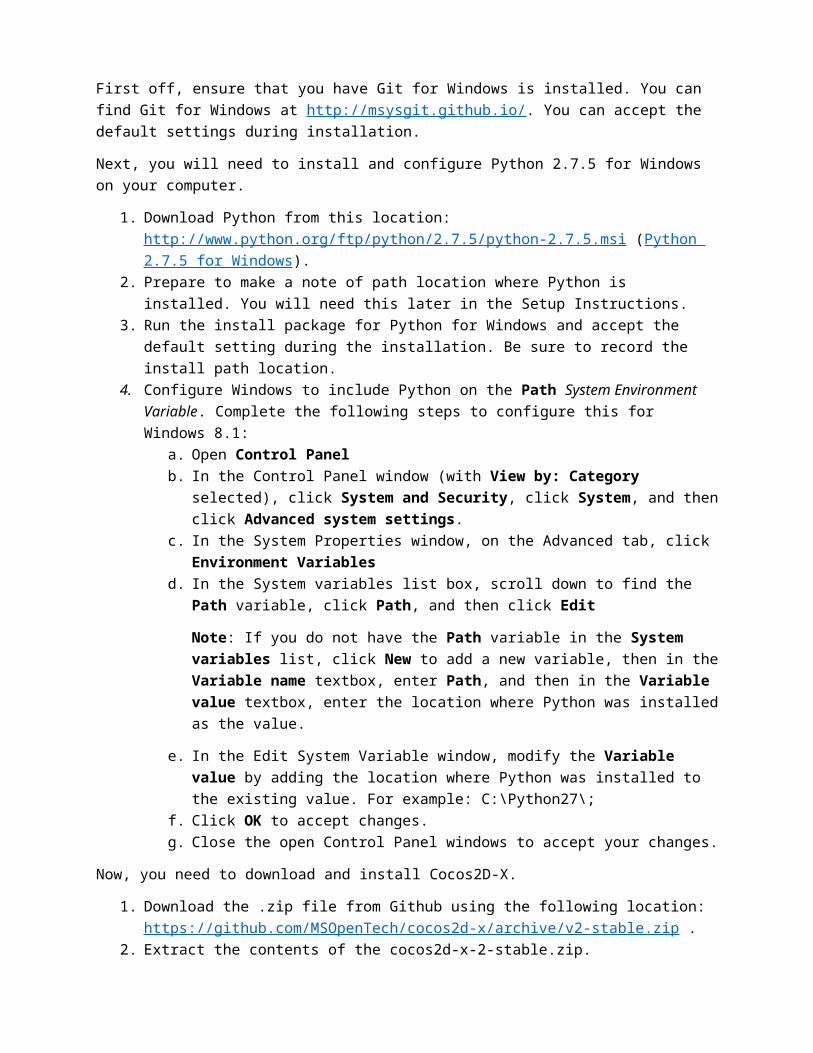
b. In the Control Panel window (with View by: Category selected), click System and Security, click System, and then click Advanced system settings.
c. In the System Properties window, on the Advanced tab, click Environment Variablesd. In the System variables list box, scroll down to find the Path variable, click Path, and
then click Edit
Note: If you do not have the Path variable in the System variables list, click New to add a new variable, then in the Variable name textbox, enter Path, and then in the Variable value textbox, enter the location where Python was installed as the value.
e. In the Edit System Variable window, modify the Variable value by adding the location where Python was installed to the existing value. For example: C:\Python27\;
f. Click OK to accept changes.g. Close the open Control Panel windows to accept your changes.
Now, you need to download and install Cocos2D-X.
1. Download the .zip file from Github using the following location: https://github.com/MSOpenTech/cocos2d-x/archive/v2-stable.zip .
2. Extract the contents of the cocos2d-x-2-stable.zip. 3. Create a folder named C:\Labs\cocos2dlab. 4. Copy the extracted folder named cocos2d-x-2-stable and paste it into the folder named C:\Labs\
cocos2dlab5. Right-click the folder named cocos2d-x-2-stable and rename it cocos2d-x
And finally, to install dependencies for Cocos2D-x, open a Command Prompt and run the following commands
cd C:\Labs\cocos2dlab\cocos2d-x python download-deps.py install
The ChallengeIn this challenge, you will learn the basics of creating a Cocos2D-X project, how to interact with the screen and objects in the game. The following are tasks you will complete:
1. Create a stub project 2. Add assets to project 3. Add a background image 4. Add the hero of the game 5. Enable touch control in the game 6. Create Projectiles and enable actions for the hero 7. Create targets 8. Manage object interactions
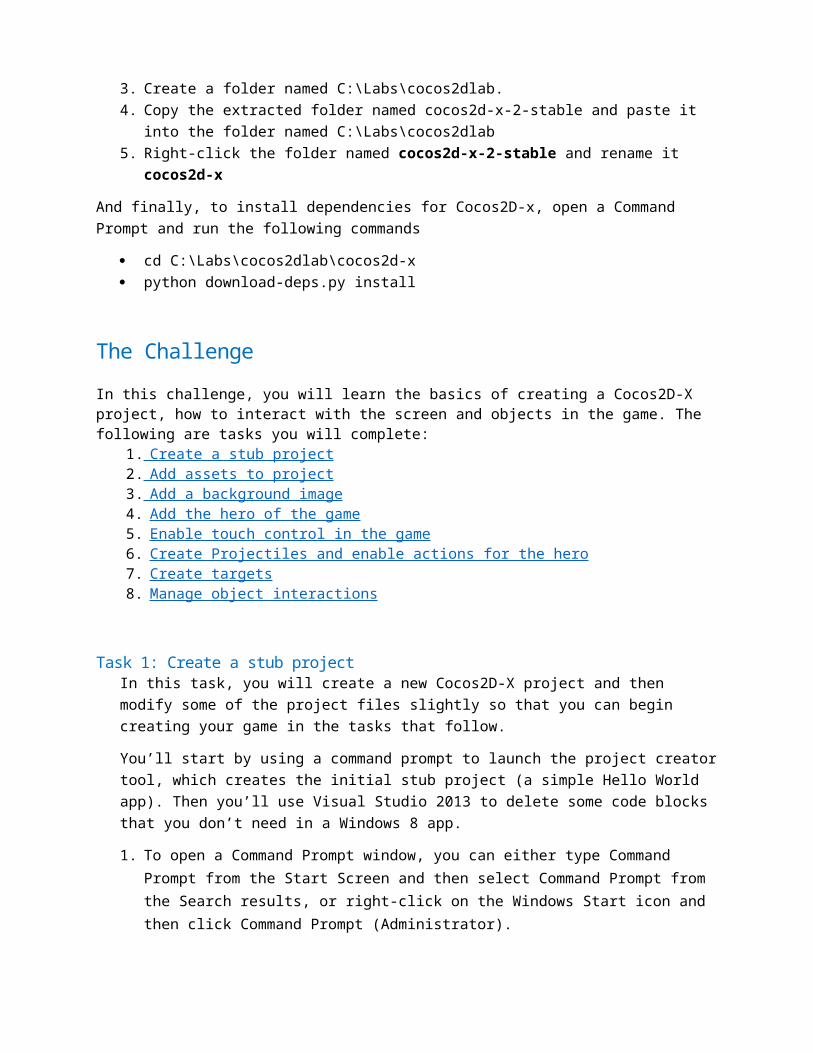
Task 1: Create a stub projectIn this task, you will create a new Cocos2D-X project and then modify some of the project files slightly so that you can begin creating your game in the tasks that follow. You’ll start by using a command prompt to launch the project creator tool, which creates the initial stub project (a simple Hello World app). Then you’ll use Visual Studio 2013 to delete some code blocks that you don’t need in a Windows 8 app.1. To open a Command Prompt window, you can either type Command Prompt
from the Start Screen and then select Command Prompt from the Search results, or right-click on the Windows Start icon and then click Command Prompt (Administrator).
2. With the command prompt open, you need to either enter the commands manually or copy the commands from this instruction document into the Command Prompt window. If you choose to copy the commands, you need to copy them one at a time. You can right-click inside the Command Prompt window to display a Paste option.
3. To change the directory to the desired folder location, copy the following command into the Command Prompt window and press Enter run the command.
cd c:\labs\cocos2dlab\cocos2D-X\tools\project-creator
4. Use the command below to run the Project Creator utility. create_project.py -project MyGame -package com.MyCompany.AwesomeGame -language cpp
5. To change directories to the folder containing your new project, run the following command.
cd ..\..\projects\MyGame\proj.winrt
6. To open Windows File Explorer from the Command Prompt window, run the following command.
explorer .
7. In the Windows File Explorer window, you will see a MyGame solution file and a MyGame_2013 solution file. You want the MyGame_2013 solution.
8. To open the solution in Visual Studio 2013, double-click MyGame_2013.sln.
9. Respond to any on-screen prompts that may appear to allow the project to open in Visual Studio.
10.Once the project is open in Visual Studio, locate the Solution Explorer window, and then expand the myGame_2013 (Windows 8.1) project and expand the Classes folder. Expanding the folders displays the files that you
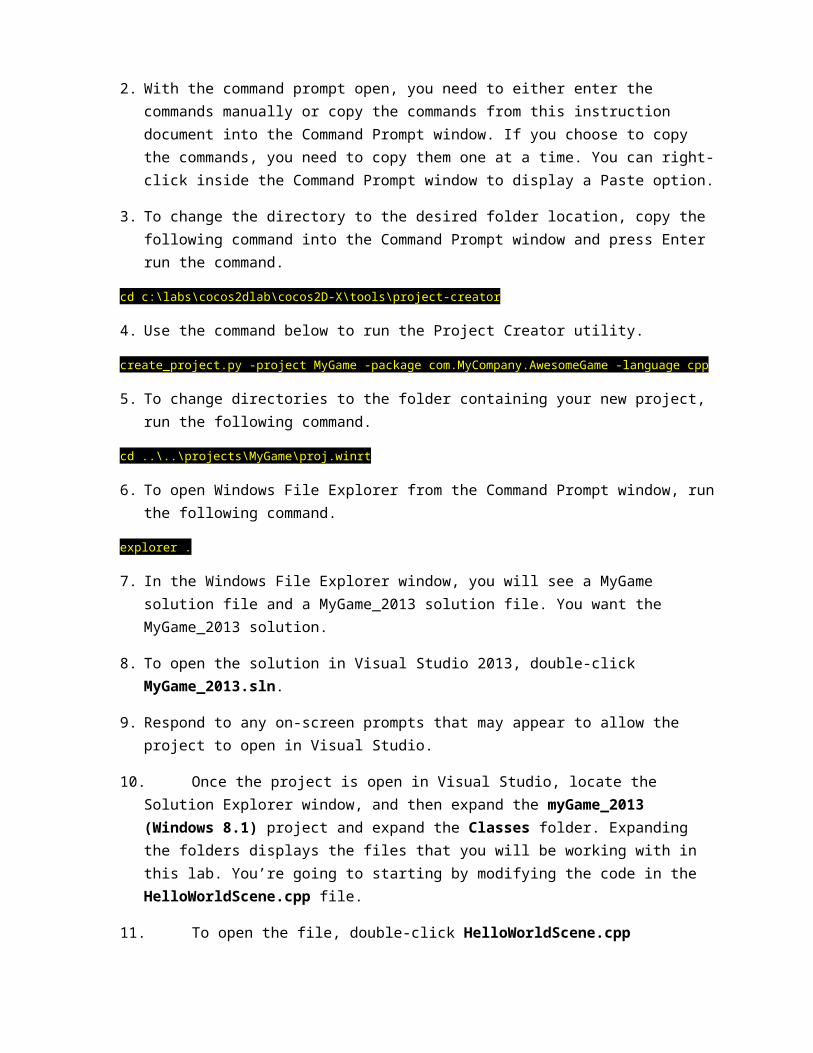
will be working with in this lab. You’re going to starting by modifying the code in the HelloWorldScene.cpp file.
11.To open the file, double-click HelloWorldScene.cpp
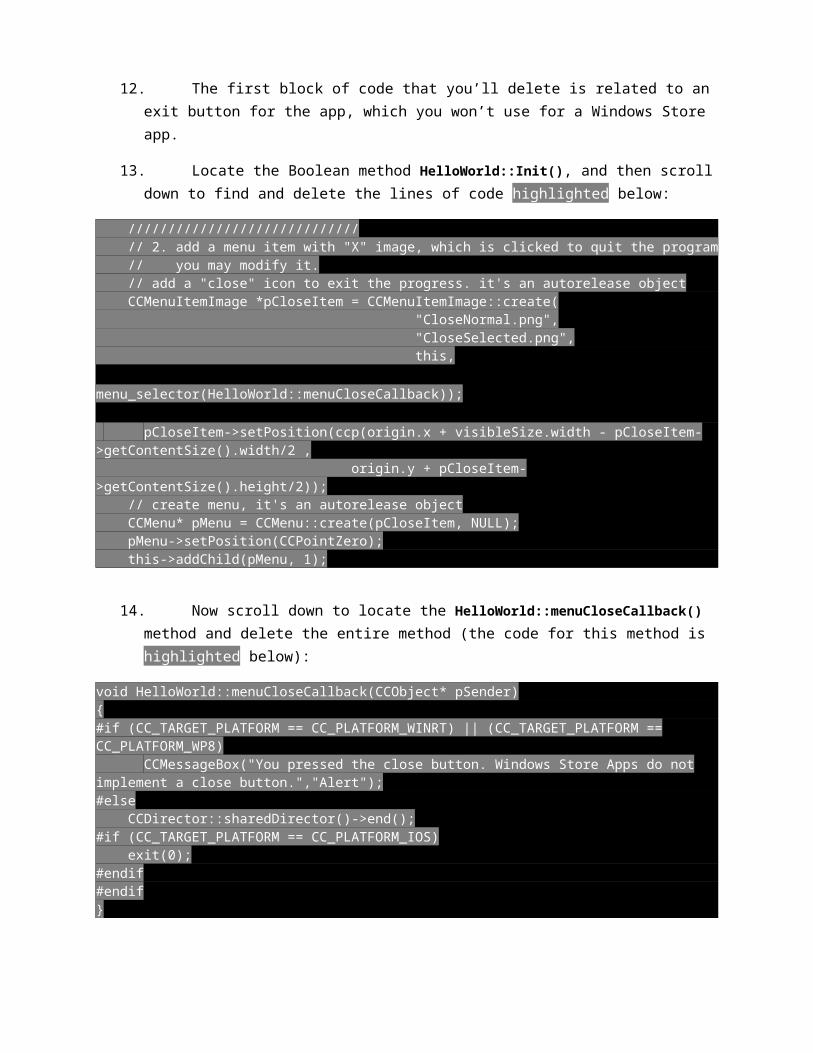
12.The first block of code that you’ll delete is related to an exit button for the app, which you won’t use for a Windows Store app.
13.Locate the Boolean method HelloWorld::Init(), and then scroll down to find and delete the lines of code highlighted below:
///////////////////////////// // 2. add a menu item with "X" image, which is clicked to quit the program // you may modify it. // add a "close" icon to exit the progress. it's an autorelease object CCMenuItemImage *pCloseItem = CCMenuItemImage::create( "CloseNormal.png", "CloseSelected.png", this, menu_selector(HelloWorld::menuCloseCallback)); pCloseItem->setPosition(ccp(origin.x + visibleSize.width - pCloseItem->getContentSize().width/2 , origin.y + pCloseItem->getContentSize().height/2)); // create menu, it's an autorelease object CCMenu* pMenu = CCMenu::create(pCloseItem, NULL); pMenu->setPosition(CCPointZero); this->addChild(pMenu, 1);
14.Now scroll down to locate the HelloWorld::menuCloseCallback() method and delete the entire method (the code for this method is highlighted below):
void HelloWorld::menuCloseCallback(CCObject* pSender){#if (CC_TARGET_PLATFORM == CC_PLATFORM_WINRT) || (CC_TARGET_PLATFORM == CC_PLATFORM_WP8)
CCMessageBox("You pressed the close button. Windows Store Apps do not implement a close button.","Alert");#else CCDirector::sharedDirector()->end();#if (CC_TARGET_PLATFORM == CC_PLATFORM_IOS) exit(0);#endif#endif}
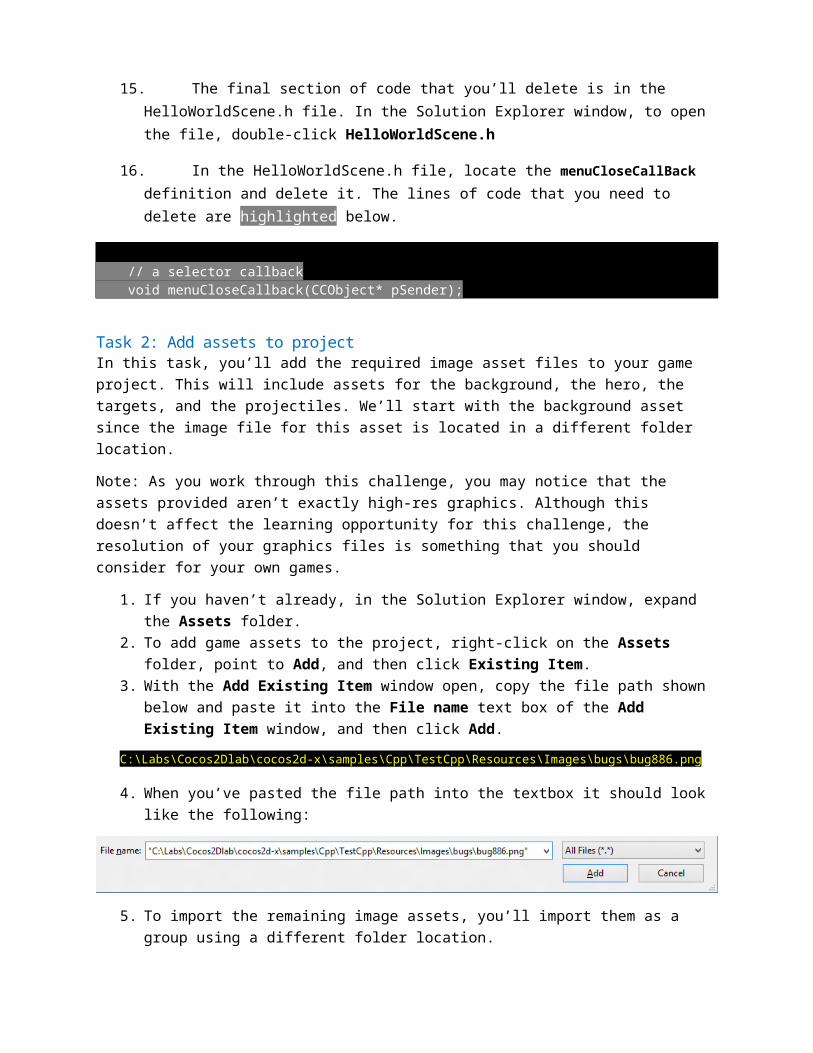
15.The final section of code that you’ll delete is in the HelloWorldScene.h file. In the Solution Explorer window, to open the file, double-click HelloWorldScene.h
16.In the HelloWorldScene.h file, locate the menuCloseCallBack definition and delete it. The lines of code that you need to delete are highlighted below.
// a selector callback void menuCloseCallback(CCObject* pSender);
Task 2: Add assets to projectIn this task, you’ll add the required image asset files to your game project. This will include assets for the background, the hero, the targets, and the projectiles. We’ll start with the background asset since the image file for this asset is located in a different folder location. Note: As you work through this challenge, you may notice that the assets provided aren’t exactly high-res graphics. Although this doesn’t affect the learning opportunity for this challenge, the resolution of your graphics files is something that you should consider for your own games.
1. If you haven’t already, in the Solution Explorer window, expand the Assets folder.
2. To add game assets to the project, right-click on the Assets folder, point to Add, and then click Existing Item.
3. With the Add Existing Item window open, copy the file path shown below and paste it into the File name text box of the Add Existing Item window, and then click Add.
C:\Labs\Cocos2Dlab\cocos2d-x\samples\Cpp\TestCpp\Resources\Images\bugs\bug886.png
4. When you’ve pasted the file path into the textbox it should look like the following:
5. To import the remaining image assets, you’ll import them as a group using a different folder location.
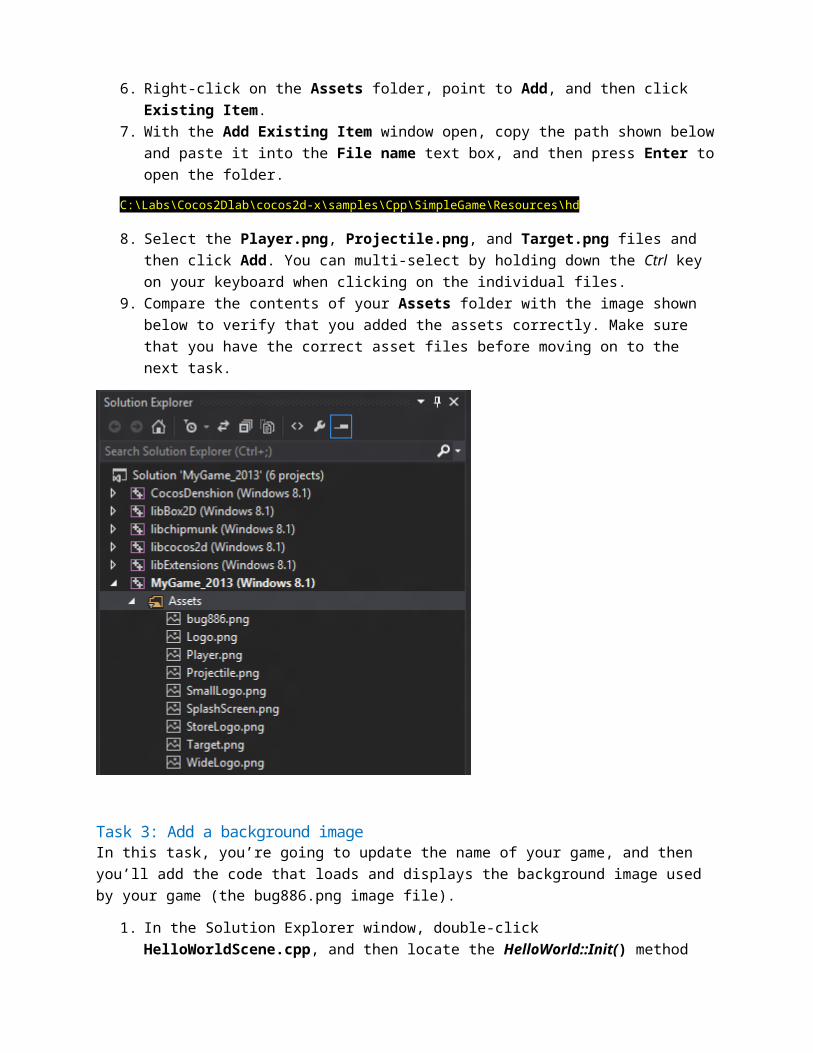
6. Right-click on the Assets folder, point to Add, and then click Existing Item. 7. With the Add Existing Item window open, copy the path shown below and
paste it into the File name text box, and then press Enter to open the folder.
C:\Labs\Cocos2Dlab\cocos2d-x\samples\Cpp\SimpleGame\Resources\hd
8. Select the Player.png, Projectile.png, and Target.png files and then click Add. You can multi-select by holding down the Ctrl key on your keyboard when clicking on the individual files.
9. Compare the contents of your Assets folder with the image shown below to verify that you added the assets correctly. Make sure that you have the correct asset files before moving on to the next task.
Task 3: Add a background imageIn this task, you’re going to update the name of your game, and then you’ll add the code that loads and displays the background image used by your game (the bug886.png image file).
1. In the Solution Explorer window, double-click HelloWorldScene.cpp, and then locate the HelloWorld::Init() method
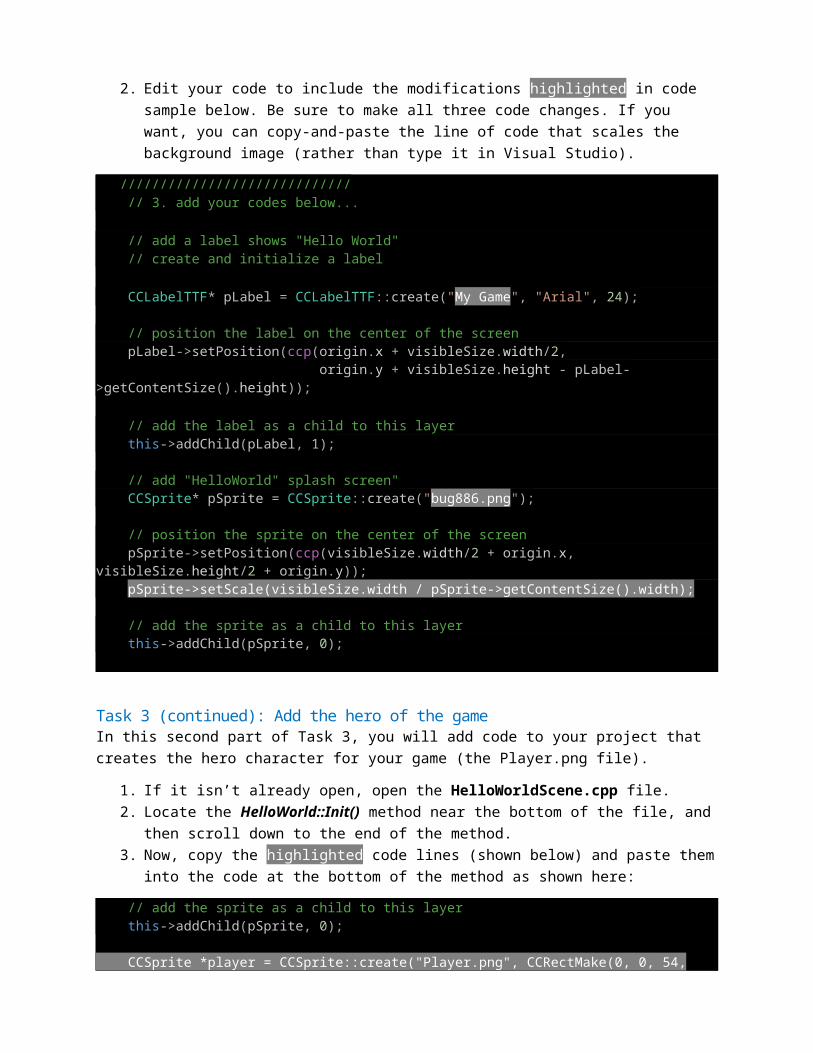
2. Edit your code to include the modifications highlighted in code sample below. Be sure to make all three code changes. If you want, you can copy-and-paste the line of code that scales the background image (rather than type it in Visual Studio).
///////////////////////////// // 3. add your codes below...
// add a label shows "Hello World" // create and initialize a label CCLabelTTF* pLabel = CCLabelTTF::create("My Game", "Arial", 24); // position the label on the center of the screen pLabel->setPosition(ccp(origin.x + visibleSize.width/2, origin.y + visibleSize.height - pLabel->getContentSize().height));
// add the label as a child to this layer
this->addChild(pLabel, 1);
// add "HelloWorld" splash screen" CCSprite* pSprite = CCSprite::create("bug886.png");
// position the sprite on the center of the screen pSprite->setPosition(ccp(visibleSize.width/2 + origin.x, visibleSize.height/2 + origin.y)); pSprite->setScale(visibleSize.width / pSprite->getContentSize().width);
// add the sprite as a child to this layer this->addChild(pSprite, 0);
Task 3 (continued): Add the hero of the gameIn this second part of Task 3, you will add code to your project that creates the hero character for your game (the Player.png file).
1. If it isn’t already open, open the HelloWorldScene.cpp file. 2. Locate the HelloWorld::Init() method near the bottom of the file, and then
scroll down to the end of the method.3. Now, copy the highlighted code lines (shown below) and paste them into the
code at the bottom of the method as shown here: // add the sprite as a child to this layer this->addChild(pSprite, 0);
CCSprite *player = CCSprite::create("Player.png", CCRectMake(0, 0, 54, 80));
player->setScale(2); player->setPosition(ccp(origin.x + player->getContentSize().width,
origin.y + visibleSize.height / 2));
this->addChild(player);
return true;
4. If you run your game now, you should see both a game background and a main character displayed.
5. To build and run your game, in Visual Studio, press F5. If you see a dialog box asking if you want to build a list of projects that are “out of date”, click Yes.
6. It could take a while to build the projects. Don’t worry, you’ll get an error message if you made any big mistakes.
7. Once the build process is complete, the game will be displayed in a separate window. There isn’t anything to do yet, but you should see your Player image displayed on the left side of the screen with the background image showing in the background (of course).
8. Close the game instance by stopping the debugger in Visual Studio.
Task 4: Enable touch control in the gameIn this task, you will add touch control to the app so that the user can interact with your game. To do this, you will add code to register the application with the touch dispatcher of the game engine, and a callback to handle touch/mouse events.
1. Open the HelloWorldScene.h file. 2. Scroll to the top of the file, and then, at the end of the public declarations
section, add the code lines highlighted below to your file.
class HelloWorld : public cocos2d::CCLayer{public:
// Here's a difference. Method 'init' in cocos2d-x returns bool, instead of returning 'id' in cocos2d-iphone virtual bool init();
// there's no 'id' in cpp, so we recommend returning the class instance pointer static cocos2d::CCScene* scene(); // implement the "static node()" method manually CREATE_FUNC(HelloWorld);
void registerWithTouchDispatcher(); void ccTouchesEnded(cocos2d::CCSet* touches, cocos2d::CCEvent* event);
};
3. Open the HelloWorldScene.cpp file and scroll to the bottom of the file. This is where you’ll be adding the method definitions that correspond to the declarations that you just added in the previous step.
4. Copy the highlighted method definitions below and paste them into the file at the bottom of the file.
void HelloWorld::ccTouchesEnded(CCSet* touches, CCEvent* event){
// Choose one of the touches to work withCCTouch* touch = (CCTouch*) (touches->anyObject());CCPoint location = touch->getLocation();
CCLog("++++++++after x:%f, y:%f", location.x, location.y);}
void HelloWorld::registerWithTouchDispatcher(){
CCDirector::sharedDirector()->getTouchDispatcher()->addStandardDelegate(this, 0);}

5. Your code still needs to call the registration method during initialization, so scroll up a bit to see where the HelloWorld::Init() method begins, and then scroll down to the bottom of the method.
6. Near the bottom of the method, copy the code line highlighted below and paste it into the code file just before the return statement.
this->addChild(player);
this->setTouchEnabled(true);
return true}
7. Your game can now respond to touch. 8. To test your game, place breakpoint anywhere inside the ccTouchesEnded
method (this is one of the methods that you just added), and then press F5.9. In the game window, touch or click on the background image to trigger the
breakpoint. 10.In the Visual Studio window, you will see arrow appear inside the breakpoint
marker to show that the breakpoint has been triggered.11.As before, stop the debugger in Visual Studio to close the game app. 12.Remember to clear the break point in Visual Studio before continuing.
Task 5: Create Projectiles and enable actions for the heroIn this task, you will add code that enables the hero to shoot projectiles. To do this, you’ll need to define constructor and destructor methods for the projectiles, and you will need to add member variables to the HelloWorld class to initialize the collection of projectiles.
1. To start, open the HelloWorldScene.h file.2. Add the code lines highlighted below to the HelloWorldScene.h file.
class HelloWorld : public cocos2d::CCLayer{public:
HelloWorld();~HelloWorld();
// Here's a difference. Method 'init' in cocos2d-x returns bool, instead of returning 'id' in cocos2d-iphone virtual bool init();
// there's no 'id' in cpp, so we recommend returning the class instance pointer static cocos2d::CCScene* scene(); // implement the "static node()" method manually CREATE_FUNC(HelloWorld);
protected:cocos2d::CCArray *_projectiles;

int _projectilesDestroyed;
3. Now open the HelloWorldScene.cpp file and scroll up to the top of the file.4. At the beginning of the file, just after the line that defines using the Cocos2D-
X namespace, copy the code lines highlighted below and paste them into the file as shown.
USING_NS_CC;
HelloWorld::~HelloWorld(){
if (_projectiles){
_projectiles->release();_projectiles = NULL;
}}
HelloWorld::HelloWorld(): _projectiles(NULL), _projectilesDestroyed(0){}
5. Scroll down to locate the HelloWorld:Init() method, and then scroll down to the bottom of the method. You will instantiate the collection of projectiles here in the Init method.
6. Copy the code lines highlighted below and paste them into the file just before the return statement as shown.
this->setTouchEnabled(true);
_projectiles = new CCArray;
return true;}
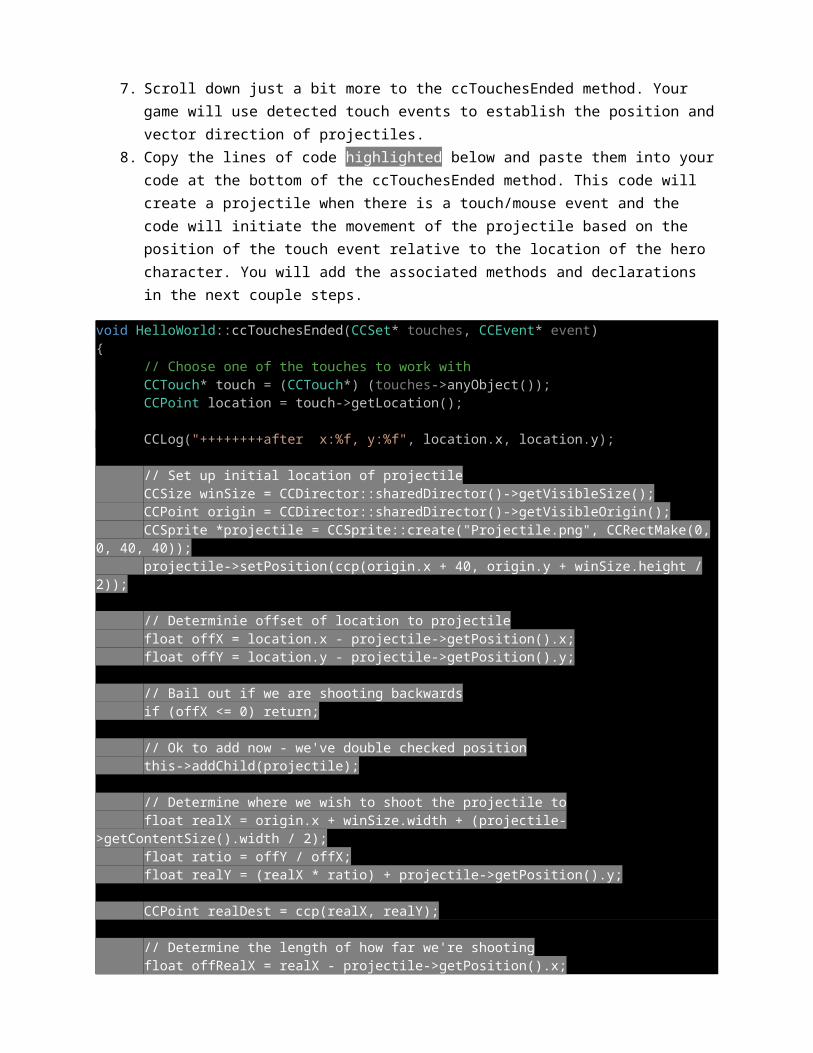
7. Scroll down just a bit more to the ccTouchesEnded method. Your game will use detected touch events to establish the position and vector direction of projectiles.
8. Copy the lines of code highlighted below and paste them into your code at the bottom of the ccTouchesEnded method. This code will create a projectile when there is a touch/mouse event and the code will initiate the movement of the projectile based on the position of the touch event relative to the location of the hero character. You will add the associated methods and declarations in the next couple steps.
void HelloWorld::ccTouchesEnded(CCSet* touches, CCEvent* event){
// Choose one of the touches to work with

CCTouch* touch = (CCTouch*) (touches->anyObject());CCPoint location = touch->getLocation();
CCLog("++++++++after x:%f, y:%f", location.x, location.y);
// Set up initial location of projectileCCSize winSize = CCDirector::sharedDirector()->getVisibleSize();CCPoint origin = CCDirector::sharedDirector()->getVisibleOrigin();CCSprite *projectile = CCSprite::create("Projectile.png", CCRectMake(0,
0, 40, 40));projectile->setPosition(ccp(origin.x + 40, origin.y + winSize.height /
2));
// Determinie offset of location to projectilefloat offX = location.x - projectile->getPosition().x;float offY = location.y - projectile->getPosition().y;
// Bail out if we are shooting backwardsif (offX <= 0) return;
// Ok to add now - we've double checked positionthis->addChild(projectile);
// Determine where we wish to shoot the projectile tofloat realX = origin.x + winSize.width + (projectile-
>getContentSize().width / 2);float ratio = offY / offX;float realY = (realX * ratio) + projectile->getPosition().y;
CCPoint realDest = ccp(realX, realY);
// Determine the length of how far we're shootingfloat offRealX = realX - projectile->getPosition().x;float offRealY = realY - projectile->getPosition().y;float length = sqrtf((offRealX * offRealX) + (offRealY*offRealY));float velocity = 480 / 1; // 480pixels/1secfloat realMoveDuration = length / velocity;
// Move projectile to actual endpointprojectile->runAction(CCSequence::create(
CCMoveTo::create(realMoveDuration, realDest),CCCallFuncN::create(this,callfuncN_selector(HelloWorld::spriteMoveFinished)),NULL));
// Add to projectiles arrayprojectile->setTag(2);_projectiles->addObject(projectile);
}
9. Still in the HelloWorldScene.cpp file, scroll down to the bottom of the file, and then copy the spriteMoveFinished() method highlighted below and paste it into the code file.

void HelloWorld::spriteMoveFinished(CCNode* sender){
CCSprite *sprite = (CCSprite *) sender;this->removeChild(sprite, true);
_projectiles->removeObject(sprite);}
10.In the Solution Explorer window, open the HelloWorldScene.h file, so that you can add the declaration for the spriteMoveFinished() method. Copy the declaration code highlighted below and paste it into the location shown.
void spriteMoveFinished(cocos2d::CCNode* sender); void registerWithTouchDispatcher(); void ccTouchesEnded(cocos2d::CCSet* touches, cocos2d::CCEvent* event);
11.Now your app has a hero that shoots projectiles, but you still need targets to shoot at, which is the next task.
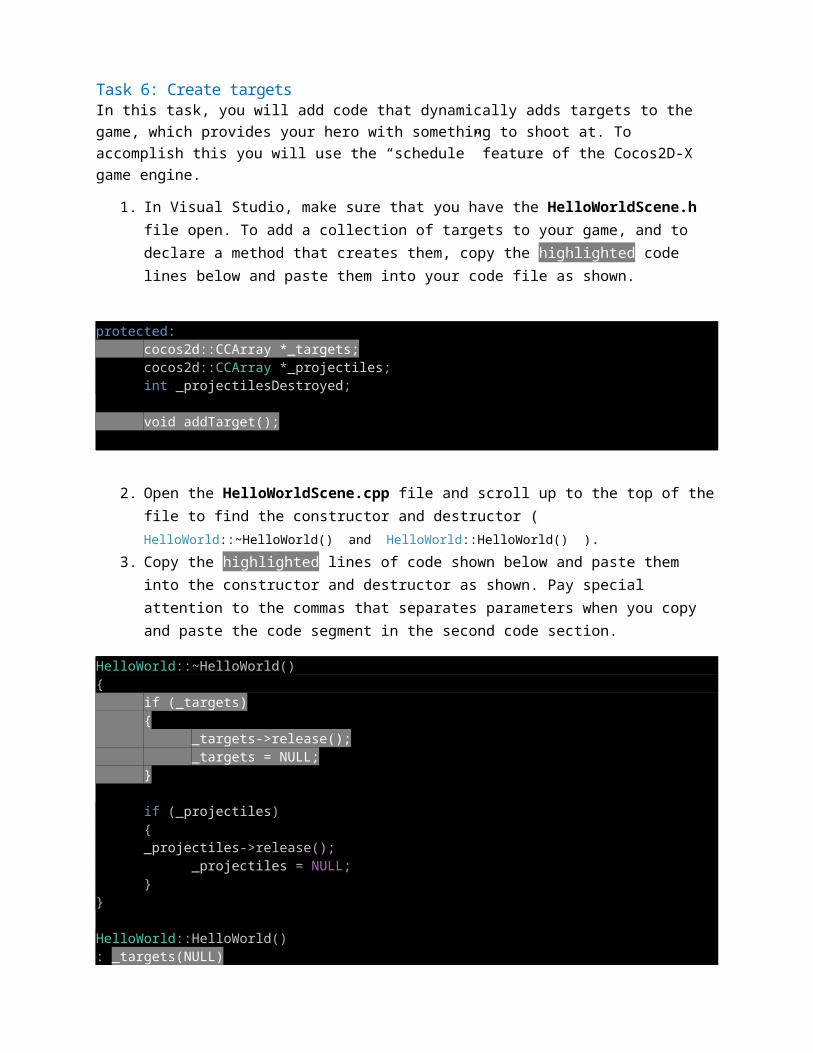
Task 6: Create targetsIn this task, you will add code that dynamically adds targets to the game, which provides your hero with something to shoot at. To accomplish this you will use the “schedule” feature of the Cocos2D-X game engine.
1. In Visual Studio, make sure that you have the HelloWorldScene.h file open. To add a collection of targets to your game, and to declare a method that creates them, copy the highlighted code lines below and paste them into your code file as shown.
protected:cocos2d::CCArray *_targets;cocos2d::CCArray *_projectiles;int _projectilesDestroyed;
void addTarget();
2. Open the HelloWorldScene.cpp file and scroll up to the top of the file to find the constructor and destructor ( HelloWorld::~HelloWorld() and HelloWorld::HelloWorld() ).
3. Copy the highlighted lines of code shown below and paste them into the constructor and destructor as shown. Pay special attention to the commas that separates parameters when you copy and paste the code segment in the second code section.
HelloWorld::~HelloWorld()
{if (_targets){
_targets->release();_targets = NULL;
}
if (_projectiles){_projectiles->release();
_projectiles = NULL;}
}
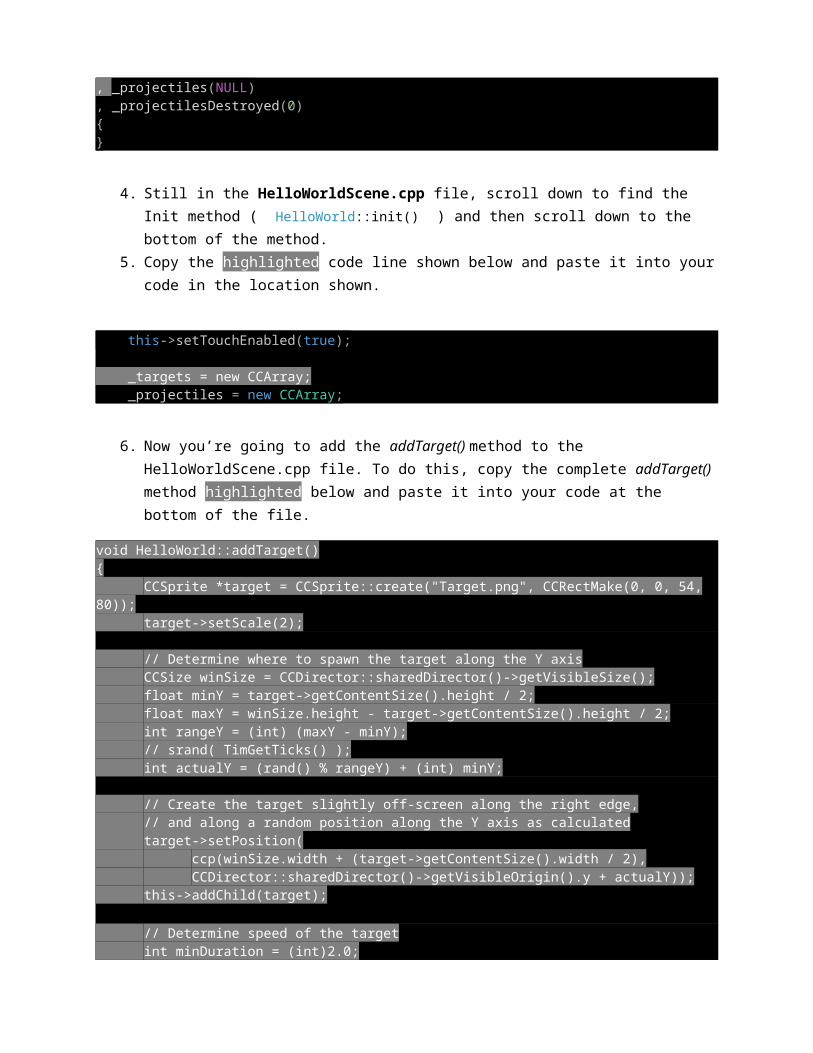
HelloWorld::HelloWorld(): _targets(NULL), _projectiles(NULL), _projectilesDestroyed(0){}
4. Still in the HelloWorldScene.cpp file, scroll down to find the Init method ( HelloWorld::init() ) and then scroll down to the bottom of the method.
5. Copy the highlighted code line shown below and paste it into your code in the location shown.
this->setTouchEnabled(true);
_targets = new CCArray; _projectiles = new CCArray;
6. Now you’re going to add the addTarget() method to the HelloWorldScene.cpp file. To do this, copy the complete addTarget() method highlighted below and paste it into your code at the bottom of the file.
void HelloWorld::addTarget(){
CCSprite *target = CCSprite::create("Target.png", CCRectMake(0, 0, 54, 80));
target->setScale(2);
// Determine where to spawn the target along the Y axisCCSize winSize = CCDirector::sharedDirector()->getVisibleSize();float minY = target->getContentSize().height / 2;float maxY = winSize.height - target->getContentSize().height / 2;int rangeY = (int) (maxY - minY);// srand( TimGetTicks() );int actualY = (rand() % rangeY) + (int) minY;
// Create the target slightly off-screen along the right edge,// and along a random position along the Y axis as calculatedtarget->setPosition(

ccp(winSize.width + (target->getContentSize().width / 2),CCDirector::sharedDirector()->getVisibleOrigin().y + actualY));
this->addChild(target);
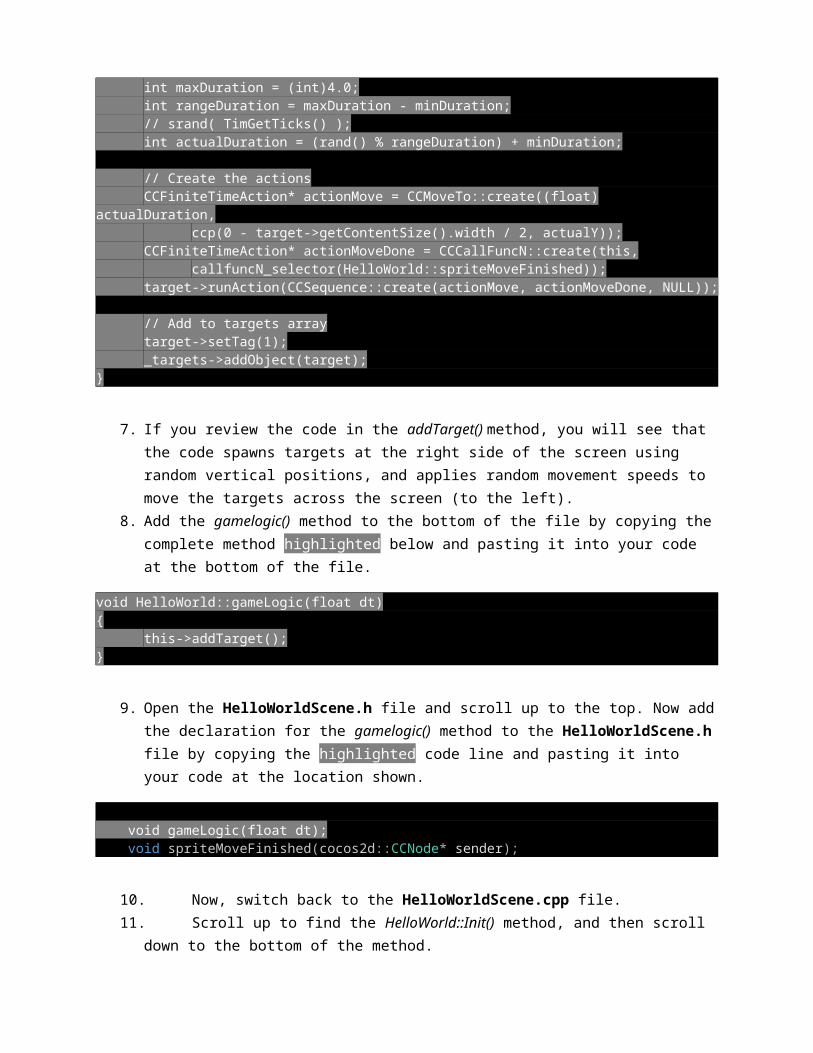
// Determine speed of the targetint minDuration = (int)2.0;int maxDuration = (int)4.0;int rangeDuration = maxDuration - minDuration;// srand( TimGetTicks() );int actualDuration = (rand() % rangeDuration) + minDuration;
// Create the actionsCCFiniteTimeAction* actionMove = CCMoveTo::create((float)
actualDuration,ccp(0 - target->getContentSize().width / 2, actualY));
CCFiniteTimeAction* actionMoveDone = CCCallFuncN::create(this,callfuncN_selector(HelloWorld::spriteMoveFinished));
target->runAction(CCSequence::create(actionMove, actionMoveDone, NULL));
// Add to targets arraytarget->setTag(1);_targets->addObject(target);
}
7. If you review the code in the addTarget() method, you will see that the code spawns targets at the right side of the screen using random vertical positions, and applies random movement speeds to move the targets across the screen (to the left).
8. Add the gamelogic() method to the bottom of the file by copying the complete method highlighted below and pasting it into your code at the bottom of the file.
void HelloWorld::gameLogic(float dt){
this->addTarget();}
9. Open the HelloWorldScene.h file and scroll up to the top. Now add the declaration for the gamelogic() method to the HelloWorldScene.h file by copying the highlighted code line and pasting it into your code at the location shown.
void gameLogic(float dt); void spriteMoveFinished(cocos2d::CCNode* sender);
10.Now, switch back to the HelloWorldScene.cpp file.11.Scroll up to find the HelloWorld::Init() method, and then scroll down to the
bottom of the method.
12.To schedule the AddTarget task in your code, copy the highlighted code line below and paste it into your code at the location shown.
this->addChild(player);
this->schedule(schedule_selector(HelloWorld::gameLogic), 1.0);
this->setTouchEnabled(true);
13.Run your game to see enemy targets flying across the screen. You can shoot projectiles at them, but sadly, your projectiles go right through the targets. You will fix this in your final task.
Task 7: Manage object interactionsIn this task, you will add code to manage the collisions between targets and projectiles.
1. Open the HelloWorldScene.h file.2. To add the code that declares the game update method (which will be used
to detect and manage collision events during gameplay) copy the highlighted code line below and paste it into your code at the location shown.
void gameLogic(float dt);void updateGame(float dt);void spriteMoveFinished(cocos2d::CCNode* sender);
3. Now open the HelloWorldScene.cpp file. You should still be located somewhere near the bottom of the HelloWorld::Init() method.
4. To add the code that schedules the occurrence of game updates, copy the highlighted code line below and paste it into your code at the location shown.
_projectiles = new CCArray;
this->schedule(schedule_selector(HelloWorld::updateGame));
return true;}
5. Scroll to the bottom of the HelloWorldScene.cpp file. This is where you’ll be adding the updateGame() method, which includes the code that will detect and manage the collisions between targets and projectiles.
6. To add the updateGame() method to your app, copy the highlighted code below and paste it into your code at the bottom of the file.
void HelloWorld::updateGame(float dt){
CCArray *projectilesToDelete = new CCArray;CCObject* it = NULL;CCObject* jt = NULL;
CCARRAY_FOREACH(_projectiles, it){
CCSprite *projectile = dynamic_cast<CCSprite*>(it);CCRect projectileRect = CCRectMake(
projectile->getPosition().x - (projectile->getContentSize().width / 2),
projectile->getPosition().y - (projectile->getContentSize().height / 2),
projectile->getContentSize().width,projectile->getContentSize().height);
CCArray* targetsToDelete = new CCArray;
CCARRAY_FOREACH(_targets, jt){
CCSprite *target = dynamic_cast<CCSprite*>(jt);CCRect targetRect = CCRectMake(
target->getPosition().x - (target->getContentSize().width / 2),
target->getPosition().y - (target->getContentSize().height / 2),
target->getContentSize().width,target->getContentSize().height);
if (projectileRect.intersectsRect(targetRect)){
targetsToDelete->addObject(target);}
}
CCARRAY_FOREACH(targetsToDelete, jt){
CCSprite *target = dynamic_cast<CCSprite*>(jt);_targets->removeObject(target);this->removeChild(target, true);
_projectilesDestroyed++;}
if (targetsToDelete->count() > 0){
projectilesToDelete->addObject(projectile);}targetsToDelete->release();
}
CCARRAY_FOREACH(projectilesToDelete, it){
CCSprite* projectile = dynamic_cast<CCSprite*>(it);_projectiles->removeObject(projectile);this->removeChild(projectile, true);
}projectilesToDelete->release();
}
7. Review the code in updateGame() method. Notice that the code loops through the projectiles (outer loop) and targets (inner loop) to determine when the rectangles that contain the objects intersect each other, and when this occurs, marks the objects for destruction.
8. Now scroll up to find the spriteMoveFinished() method. 9. To update the existing code in the spriteMoveFinished() method, so that it
will remove all of the target and projectile sprites that are marked for destruction, copy the highlighted code lines below and paste them over the top of the code line ( _projectiles->removeObject(sprite); ) that was being used to remove projectiles.
void HelloWorld::spriteMoveFinished(CCNode* sender){
CCSprite *sprite = (CCSprite *) sender;this->removeChild(sprite, true);
if (sprite->getTag() == 1) // target{
_targets->removeObject(sprite);}else if (sprite->getTag() == 2) // projectile{
_projectiles->removeObject(sprite);}
}
10.To test your finished game, press F5. You should see something similar to the following screen shot, and you should be able to shoot and destroy enemy targets as they move across the screen.
Wrap UpCongratulations on completing this challenge. If you want to further challenge your Cocos2d-x skills, follow this link to the online Cocos2d documentation and try adding sound to your game!

Want more? Visit www.microsoftvirtualacademy.com and check out our full collection of Quick Start Challenges.