Coconut2D Manual.pdf · Coconut2D is software, which lets you create your own game fast and easy....
80
Coconut2D User Manual 0 MOBILEFX Coconut2D User Guide All the technical details that will help you understand what makes Coconut2D tick; everything you need to know to get you started. This is your guide to all things Coconut2D!
Transcript of Coconut2D Manual.pdf · Coconut2D is software, which lets you create your own game fast and easy....

Coconut2D User Manual
0
MOBILEFX
Coconut2D User Guide
All the technical details that will help you understand what makes Coconut2D tick; everything you need to know to get you started. This is your guide to all things Coconut2D!

Coconut2D User Manual
1
Table of Contents Chapter 1: Introduction .......................................................................................................................................................... 3
The Coconut 2D Project idea .............................................................................................................................................. 3
Coconut2D SDK Architecture .............................................................................................................................................. 5
Coconut2D Frameworks ...................................................................................................................................................... 6
Coconut2D Layering ........................................................................................................................................................ 7
2D Game Engine .............................................................................................................................................................. 7
Technologies ....................................................................................................................................................................... 8
Renderering Engines ....................................................................................................................................................... 8
Integrating with Emscripten............................................................................................................................................ 8
Compiling iOS Apps on Windows .................................................................................................................................... 8
Object Oriented JavaScript ............................................................................................................................................. 9
Chapter 2: Install ................................................................................................................................................................... 10
Chapter 3: Getting started .................................................................................................................................................... 10
Interface ............................................................................................................................................................................ 10
Toolbars ............................................................................................................................................................................ 12
Panels ................................................................................................................................................................................ 15
Project ............................................................................................................................................................................... 20
Create a scene ................................................................................................................................................................... 20
Import ............................................................................................................................................................................... 21
Compile ............................................................................................................................................................................. 21
Chapter 4: Basic Animation ................................................................................................................................................... 22
Preparing for animation .................................................................................................................................................... 22
Key-frames ........................................................................................................................................................................ 23
Move Animation ............................................................................................................................................................... 24
Rotate Animation .............................................................................................................................................................. 24
Stretch / Scale Animation ................................................................................................................................................. 26
Opacity Animation ............................................................................................................................................................ 27
Adding frames ................................................................................................................................................................... 28
Deleting frames ................................................................................................................................................................. 28
Combining Animations ...................................................................................................................................................... 28
Chapter 5: Advanced Animation ........................................................................................................................................... 30
Symbols ............................................................................................................................................................................. 30

Coconut2D User Manual Chapter 1: Introduction
2
Create a Symbol ............................................................................................................................................................ 30
Symbol Animation ......................................................................................................................................................... 30
Layers ................................................................................................................................................................................ 30
Sprite-sheet Animation ..................................................................................................................................................... 30
Interpolation ..................................................................................................................................................................... 32
Chapter 6: UI ......................................................................................................................................................................... 33
UI ....................................................................................................................................................................................... 33
Create a button ............................................................................................................................................................. 33
Actions........................................................................................................................................................................... 38
Labels ............................................................................................................................................................................ 38
Chapter 7: Create a game ..................................................................................................................................................... 39
Create a new project ......................................................................................................................................................... 39
Initial Setup ....................................................................................................................................................................... 39
project.json ................................................................................................................................................................... 39
Animation Scene ........................................................................................................................................................... 40
Source Code .................................................................................................................................................................. 40
Import files ........................................................................................................................................................................ 41
Sprite-sheets ..................................................................................................................................................................... 43
Define the viewport .......................................................................................................................................................... 46
Placing the assets .............................................................................................................................................................. 47
TitleScreen .................................................................................................................................................................... 47
GameScreen .................................................................................................................................................................. 49
CocoScript ......................................................................................................................................................................... 53
STATE_START_GAME .................................................................................................................................................... 54
STATE_TITLE_SCREEN ................................................................................................................................................... 55
STATE_INITIALIZE_SCENE .............................................................................................................................................. 56
STATE_GAME_SCREEN .................................................................................................................................................. 58
GameEngine.jspp .......................................................................................................................................................... 60
Finishing Touches .............................................................................................................................................................. 63
Chapter 8: Programming Language ...................................................................................................................................... 63

Coconut2D User Manual Chapter 1: Introduction
3
Chapter 1: Introduction Coconut2D is software, which lets you create your own game fast and easy. Coconut2D is a design and
development application, with an easy environment and simple tools.
This guide will help you understand everything you need to know about this program. It isn’t necessary for you
to have previous experience in other game development programs, as it explains the basics of animation and
coding.
The Coconut 2D Project idea
Coconut2D is a software project for creating HTML5 games that you really design and code once, and play
everywhere!
Visit the Marketplace for extensions that will allow you to export your games for iOS, Android and PC, as well!

Coconut2D User Manual Chapter 1: Introduction
4
This GitHub Repository contains the Open Source Coconut2D SDK, which is the Toolchain and Core
Frameworks of Coconut2D project. Please note that this repository does not contain Coconut2D Studio IDE,
which is a commercial product.

Coconut2D User Manual Chapter 1: Introduction
5
Coconut2D SDK Architecture
Coconut2D virtualizes the HTML5 Canvas and uses Object Oriented JavaScript as the single code-base
language. Developers can write and debug their games in Object Oriented JavaScript against the virtual HTML5
Canvas using Coconut2D Studio IDE.
Once a games is ready for release, it can be compiled to HTML5 and ECMA JavaScript code (as well as Native
C++11 code for iOS, Android and x86 apps with the proper extensions). We developed a state of the art open
source compiler, that generates cross-browser ECMA JavaScript and portable C++11 code from Object
Oriented JavaScript source code.

Coconut2D User Manual Chapter 1: Introduction
6
Coconut2D Frameworks
We encapsulated all Core Frameworks, such as Animations, 2D Game Engine, User Interface, Networking,
etc. inside a Common Runtime Layer (CRL) also written in Object Oriented JavaScript.
Framework Description
org.coconut2d.sdk.anim Core Animations Framework, implements Game Engine.
org.coconut2d.sdk.ui User Interface Framework, implements Controls, Buttons, Forms, etc.
org.coconut2d.sdk.game2d 2D Games Framework, implements Sprite, TiledLayer, Parallax Layers, etc.
org.coconut2d.sdk.html5 HTML5 Emulation Framework (Window, Document, Elements, Events)
org.coconut2d.sdk.webgl HTML5 WebGL Emulation Framework, implements WebGL Context.
org.coconut2d.sdk.net Networking Framework (XMLHttp, Facebook, Twitter, etc.)
org.coconut2d.sdk.server node.js Server Side Framework, implements basic HTTP Server.
org.coconut2d.sdk.tests General Purpose Testing Framework.
org.emscripten.box2d Emscripten derived Box2D Physics Framework (compiled from C++)

Coconut2D User Manual Chapter 1: Introduction
7
Coconut2D Layering
2D Game Engine
Coconut2D Game Engine is a Finite State Machine Automaton controlled by a new programming entity
called State. States define a singularity in the execution context of Game Loop, they have
explicit enter and exit points and they offer distinction between tick and paint.

Coconut2D User Manual Chapter 1: Introduction
8
To unify Native and HTML5 worlds under a single API while getting the best performance every time, we
designed a set of Native Device Wrappers that virtualize the HTML5 Canvas across desktop, tablet, mobile
and other devices.
Technologies Renderering Engines
Coconut2D core rendering engine is OpenGL ES2 but we have implemented special renderers for WebGL for
supporting Mobile HTML5 Browsers.
Integrating with Emscripten
Especially for HTML5, a game can also be compiled to C++ and post-compiled with Emscripten to JavaScript
byte code. Compiled JavaScript can be up to x10 times faster than "regular" handwritten JavaScript and runs
on all browsers.
Emscripten is a C++ to JavaScript compiler developed by Alon Zakai (Kripken). Coconut2D uses Emscripten
both for binding 3rd party C++ libraries with generated ECMA JavaScript code, and also for post-compiling and
optimizing a game for HTML5 Browsers.
Compiling iOS Apps on Windows Coconut2D Studio IDE is capable of compiling C++11 code directly into a native iOS, Android and x86
applications. Especially for iOS apps, they are truly compiled on Windows, using a special port of the LLVM
compiler developed by Pierre-Marie Baty; that is the same compiler Apple uses in XCode. iOS compilation
process of Coconut2D Studio also code signs your apps with your official developer certificate.

Coconut2D User Manual Chapter 1: Introduction
9
Object Oriented JavaScript
Language Features:
Real Classes as first-class citizens
Constructor with constructor arguments and inline base class initialization
Destructor (invoked on delete)
Public, Private, Protected Access Modifiers
Published Access Modifiers for Design-Time binding
Abstract Functions
Static Functions and Fields
Virtual Functions and base class access with super keyword
Function Overloads
Constants and Enums

Coconut2D User Manual Chapter 2: Install
10
Properties (setter, getter)
Events Registration and Notification System
Interfaces and implements keyword
Structs (with super-fast instantiation)
States (for Game Loop FSM)
Class and Interface Inheritance Model
Class Delegation Model
Strong Type System
Explicit Integer, Float, Time, String, Boolean and Date datatypes
Stream and DataStream datatype
Typed Arrays and Arrays of Objects
Conditional Compilation and Compiler Directives (e.g. #ifdef BOX_2D )
Export of Debug Symbol Tables for real Debugging
Export of Code Symbols for IntelliSyntax Editing
Export of State Machine and Class Diagrams
Compiles to ECMA JavaScript cross-browser code
Compiles to C++11 Portable Code
We also developed CocoPlayer, a Simulator powered by Google V8 JavaScript VM Engine where developers
can test, debug and profile their games and apps. CocoPlayer is capable of simulating various screen
resolutions taking into account the different dpi of numerous iOS and Android devices. The full-fledged Object
Oriented JavaScript Debugger is one of Coconut2D Studio's unique features!
Chapter 2: Install
Please visit http://www.mobilefx.com/coconut2d/mobileFX%20Coconut2D%20Studio%20IDE.asp
Chapter 3: Getting started
Interface Before you start making your first game, you must get acquainted with Coconut2D. The program is divided
into three categories.
Toolbars contain basic tools. Panels have parameters and organize your project and Editors are viewers of
your project.

Coconut2D User Manual Chapter 3: Getting started
11
TOOLBARS NAME DESCRIPTION
Standard Contains basic tools for your project
Build Settings for exporting your project
Run Preview and player options
Device Settings for defining the final format
Animation Contains tools for the project’s assets
PANELS NAME DESCRIPTION
Timeline The timeline is essential to keep track and edit your stages and assets. It is a frame and time indicator in which you can create animations and organize your assets.
Project explorer The directory of your files. You can easily access your files and select the scenes of your project.
Assets Your library. It contains all the elements of your project. The Assets panel consists of categories. Animations, Sprites, Images, Skins, Controls.
Properties Advanced settings of your game elements.
Expression The panel where you can work on your expressions
Breakpoints A list of your breakpoints
Call Stack A list of your functions
Compiler Errors Shows errors of the compilations
Profiler Time indicator of the functions
Output Output console and messages

Coconut2D User Manual Chapter 3: Getting started
12
EDITORS NAME DESCRIPTION
Scene Editor Primary Editor. It is where you see and edit your project.
Image Editor Selected image viewer
Sprite-sheet Editor Sprite-sheet image viewer
Code Editor Project code viewer
Toolbars STANDARD
TOOLS DESCRIPTION
Open project Opens an existing project
Save Saves the progress of your current project
Save All Saves all projects
Close All Closes all projects
Print Prints existing project
Undo Moves to a previous state
Redo Returns to the last state
Find in Files Searches and replaces a file of your choice
Clean Project Cleans the contents of the project’s .targets folder
BUILD
TOOLS DESCRIPTION
Build Defines player of project
Configuration Sets the method of compiling
Build Project Prepares the project for preview
Cancel Build Cancels the progress when you have already pressed the build project button
Project Configurations Defines the project details

Coconut2D User Manual Chapter 3: Getting started
13
RUN
TOOLS DESCRIPTION Device Sets the device the project will be played
Install CocoViewer Installs QR code-reader for the game to a device
Run Application Launches the application
Debug Application Launches the application after debugging
Step Over Step over a statement
Step Into Step into a statement
Step Out Step out of a statement
Show Next Statement Show next statement to be executed
Clear Breakpoints Removes any breakpoints from the code
DEVICE
TOOLS DESCRIPTION
Orientation Choose between Landscape or Portrait orientation
Device Preset Defines the project’s final destination
Device Width Defines the project’s width
Device Height Defines the project’s height
Pixel Ratio Sets the pixel ratio of the project
Zoom Zooms in or out the editor by percentage
Device Zoom In Zooms in the editor
Device Zoom Out Zooms out the editor
Device Zoom 1:1 Shows all the project

Coconut2D User Manual Chapter 3: Getting started
14
ANIMATION
TOOLS DESCRIPTION
Play Animation begins preview of the animation
Stop Animation stops preview of animation
Go to Start Moves the cursor to the start of the timeline
First KeyFrame Moves the cursor to the first key-frame of the timeline
Previous KeyFrame Moves the cursor to the previous key-frame
Next KeyFrame Moves the cursor to the next key-frame
Last KeyFrame Moves the cursor to the last key-frame of the timeline
Go to End Moves the cursor to the end of the timeline
Insert Label Inserts a label on the timeline
Delete Label Removes label from the timeline
New Layer Creates a layer on the timeline
Duplicate Layer Makes a copy of the selected layer
Graphically Merge Layers Merges two image layers
Delete Layer Removes a layer
Group Layers Moves two or more layers inside another layer
Ungroup Layers Moves the layers residing inside another layer out of that layer
Edit Instance Edits a non-symbol object
Edit Symbol Edits a symbol
Convert to Symbol Converts a layer into a symbol
Convert to Layer Converts a symbol into a layer
Flip Horizontal Mirrors an object horizontally
Flip Vertical Mirrors an object vertically
Rotate Left Rotates the object to the left
Rotate Right Rotates the object to the right
Bring Forward Moves the layer one step above
Send Backward Moves the layer one step below
Bring to Front Moves the layer to the top
Send to Back Moves the layer to the bottom
Make Same Size Makes the selected assets the same size
Make Same Width Makes the selected assets have the same width

Coconut2D User Manual Chapter 3: Getting started
15
TOOLS DESCRIPTION
Make Same Height Makes the selected assets have the same height
Align Middles Aligns in the middle the selected objects
Align Centers Aligns the centers of selected objects
Distribute Horizontal Distribute selected objects horizontally
Distribute Vertical Distribute selected objects vertically
Arrange Lefts Arrange objects from their left edge
Arrange Rights Arrange objects from their right edge
Arrange Tops Arrange objects from their top edge
Arrange Bottoms Arrange objects from their bottom edge
Defines Project View Lock current view and create a layout reference for screens with different size
Reset Project View Reset Project View
Panels TIMELINE
TOOLS / ELEMENTS DESCRIPTION
Layers Shows the assets in the form of layers
Eye icon Shows / hides a layer
Lock icon Locks a layer
Frame indicator Shows the number of the frames
Keyframe Shows on a key-frame on the timeline
Cursor Helps define the current frame
PROJECT EXPLORER
TOOLS DESCRIPTION
Refresh Project Explorer Refreshes and updates the project directory
Go to Frameworks Opens up Coconut2D Frameworks Folder
Go to Compiler Opens up Coconut2D Compiler Folder

Coconut2D User Manual Chapter 3: Getting started
16
Search Module Searches the project
ASSETS
TOOLS DESCRIPTION
Animations The animations you created on the project
Sprites The symbols of your project
Images All the images used in the project. These images may be contained in sprites and animations
Skins Buttons and backgrounds
Controls All the actions your assets take
SCENE EXPLORER
TOOLS / ELEMENTS DESCRIPTION
Refresh Layout Refresh Designer Layout

Coconut2D User Manual Chapter 3: Getting started
17
PROPERTIES SCENE PROPERTIES
PROPERTIES DESCRIPTION
SceneName Sets the name of the scene
FPS Defines the frame rate of your project
ViewWidth Defines the width of the project
ViewHeight Defines the height of the project
ViewPixelRatio Defines the pixel ratio of the project
DrawHints Show Hints while Drawing (e.g. Bounding Rectangles)
OriginX Defines the Origin X of a Layer
OriginY Defines the Origin Y of a Layer
FileName Displays the directory of the scene
CLIP PROPERTIES
PROPERTIES DESCRIPTION
ClassName Name of class
InstanceName Name of instance
SymbolReference Defines the symbol it has
ImageResourceName Defines the image it has
Text Defines what the text is
TextFontName Sets the font
TextFontSize Sets the font size
TextMultiline Defines if text is single or multiline
TextColor Defines the color of the text
TextWidth Defines the width of the text
TextHeight Defines the height of the text
TextHAlign Aligns the text horizontally
TextVAlign Aligns the text vertically
BoxTopLeftX Information: the bounding box top – left X
BoxTopLeftY Information: the bounding box top – left Y
BoxTopRightX Information: the bounding box top – right X
BoxTopRightY Information: the bounding box top – right Y
BoxBottomLeftX Information: the bounding box bottom – left X
BoxBottomLeftY Information: the bounding box bottom – left Y
BoxBottomRightX Information: the bounding box bottom – right X

Coconut2D User Manual Chapter 3: Getting started
18
CLIP PROPERTIES
PROPERTIES DESCRIPTION
BoxBottomRightY Information: the bounding box bottom – right Y
BoxWidth Information: the bounding box width
BoxHeight Information: the bounding box height
FRAME PROPERTIES
PROPERTIES DESCRIPTION
FrameIndex The number of the frame you are in
Interpolation What kind of animation it makes
Filter What kind of blending it makes with the rest of the project
Red,Green,blue Extended parameters for the blending
Alpha adjust the opacity of the object
Visible make the object visible or invisible
X object’s position on the x axis
Y object’s position on the y axis
PivotX object’s pivot position on the x axis
PivotY object’s pivot position on the y axis
ScaleX scales the object based on the x axis
ScaleY scales the object based on the y axis
Rotation rotates the object
FlipH flips the object horizontally
FlipV flips the object vertically
Action defines the action it will make when pressed
State defines the state it is in
HandleEvents Allows the object to be handled
AudioResourceName defines the sound of the object
AudioAutoPlay makes the sound to be played automatically
AudioLoops how many times the sound will be played
Sprite Sequence Name defines the sprite sequence of the object
Width Defines the width of a button
Height Defines the width of a button

Coconut2D User Manual Chapter 3: Getting started
19
EXPRESSION
Provides debug time evaluation of code with nested expression evaluation for all supported programming languages.
BREAKPOINTS
TOOLS DESCRIPTION Module The name of the module where breakpoint is.
Line The line within the module where breakpoint is.
Enabled Defines if breakpoint is enabled.
CALL STACK
TOOLS DESCRIPTION Module Module of frame in call stack
Function Function of frame in call stack
Line Line of frame in call stack

Coconut2D User Manual Chapter 3: Getting started
20
SCENE
Project Now that we learned the interface, we will learn how to create a new file. Coconut2D works with projects. A
project consists of all the elements needed to create a game. It is basically a raw depiction of your game.
1. Go to File > New Project...
2. A window will appear that will ask you to set the directory of your new project. Set the directory and
press OK.
3. Pressing OK will make the new project to appear on the editor. At first, it is a white canvas.
Create a scene You can’t see your project because there are no scenes. Scenes are the canvases of your project. It is the
visible area of your game.
1. To create a new scene, go to the Project Explorer and right-click on the animations folder.
2. Go to New Item… > New Animation Scene...
3. In the window that will appear, name your scene.
4. Press OK and you will see a white canvas on your project.
Useful Tip! #1
You can zoom in/out a scene by using the mouse wheel. By holding the Ctrl button and mouse wheel you
can scroll up/down. By holding the Shift button and mouse wheel, you can scroll left/right. You can also
move the scene around just by holding the mouse wheel.

Coconut2D User Manual Chapter 3: Getting started
21
Import Now that the project is created, we will import the file that will be used.
1. Go to your computer’s file system and find the file you want to import.
2. Drag-and-drop it on the top of Coconut2D’s window.
3. A window will pop up asking you to choose a locale. At first, you will see only two choices: (None) and
en-GB, which is the Default locale. This value is set inside the project’s project.json file. If you like, you
can set more locales to your game. Choosing a specific locale in the Please Choose Locale window will
create a folder named after that locale inside your assets > images folder where all images related to
that locale will be stored. If you choose (None), the images will be stored directly inside the images
folder.
4. Right-click inside the Project Explorer and select Refresh Project Explorer.
5. Go to the Assets panel and click on the Images tab. Select your file and drag-and-drop it inside the
canvas. If you can’t see the file press right click on the Assets panel and select Refresh Assets on the
menu that will appear.
Compile Compiling is the process we do to view our project in its final form.
1. Press the Build Project button in the Build toolbar. In the Output panel, you will see the compilation
process.
2. When the last line in the output panel is the word “Done”, press the Run Application button on the
Device toolbar. You will see a preview of your project in its device settings.
Useful Tip! #2
The files must be:
PNG-24.
All files must have, at least, two resolutions: Base and Medium.
The two versions must have the same name.
Each resolution must be placed inside a different folder named accordingly, e.g. Base and Medium.

Coconut2D User Manual Chapter 4: Basic Animation
22
Chapter 4: Basic Animation
Animation is a key element to a game. Not only it is an essential part for running a game, but also it creates an
interesting and fun environment for the player. Coconut2D uses two different kinds of animations. Tween and
Sprite sheet. Tween animation automatically creates frames between two different “base” frames (or key-
frames). Sprite sheet animation is a method, which can create an animation by combining a series of images.
These two different methods can be combined to create an endless array of different animations.
Preparing for animation To begin the animation, you must first place the file that will be animated. For tutorial purposes, we will use as
an example this image of a warrior girl. You can use whatever image you want.
Import the image as we explained in the previous chapter. Go to Assets > Images, locate the file you wish to
animate and drag and drop it on stage.
You will notice that a new layer has been created in the timeline. The layer is named after the file. You can
rename the layer by double-clicking on its title. Right-click on the layer and select Convert to Layer. This will turn
the image into a layer of the timeline.
In addition, a red key-frame has been created where the cursor of the timeline is. If you click on the key-frame
inside the timeline, the Properties of that key-frame will appear on the left-hand side of the window. Notice that

Coconut2D User Manual Chapter 4: Basic Animation
23
the property Interpolation has a value of Motion Tween (more on Interpolation on page 34). This is the
property used for animating objects.
The image on the editor has a bounding box around it, with a red dot on its bottom left corner and a white pivot
on its center. Selecting inside the area of the image you can move the whole image. Selecting the red dot, you
can rotate it. Selecting the black dots, you can stretch it. If you select one of the black dots in the corners and
hold shift you can scale the image proportional. The white dot is the pivot of the image. By moving it, you can
change the position of the center.
Key-frames Now that you have placed the file, you can begin the animation.
1. Move the cursor of the timeline to the frame that you want the animation to end.
2. Right click on the key-frame and a menu will appear. Select Insert KeyFrame and a new key-frame will be
placed in the timeline. Notice that between the first and the last key-frame a red arrow has been
created. This is to show that in-between frames have been created between the first and the last key-
frame. Also, notice that the first keyframe has turned black, while the last keyframe is red. The arrow
connecting the two keyframes is red is because currently both keyframes hold the same properties, so
no animation takes place between them. As for the last keyframe, the reason is that altough its
Interpolation is set as Motion Tween, no animation starts from it.
About key-frames
Key-frames are a basic element of tween animation. The timeline is consisted of frames. Each frame
represents a piece of a time-period. The exact amount of time this frame represents depends on the
animation we do. For example, if our project runs on 30 fps (frames per second), means that each second
of our project consists of 30 frames.
In tween animation, the frames are divided into two categories. Key and Tween frames. Key-frames are
basic frames, which define the basic states of an animation. Tween frames are the frames between two
key-frames.
About Timeline
Timeline is also a basic element of making a game. It is the panel where we can adjust our game assets and
combine our screens. The timeline consists of frames that each of them depicts a time-period. A red cursor
shows us the frame we are currently on. There are also layers that separate the assets of the game. On the
bottom side of the bar, we can see information about our project. Name of the scene, duration etc.

Coconut2D User Manual Chapter 4: Basic Animation
24
Move Animation When on the last key-frame, select the image and move it. If you move the red cursor you will notice that new
frames were created based on the positions of the two key-frames. We now have a moving animation, with the
image moving from left to right. Now, if you move your mouse over the last keyframe you will see the following
warning: CPU expensive Motion Tween interpolation on last keyframe. It is recommended to change
Interpolation to ‘Echo’. Let’s do that. Click on the last keyframe and change its Interpolation property to Echo.
You will notice that the last keyframe has turned black.
Rotate Animation Select the last key-frame, and a bounding box will appear around it. If you select and move the red dot at the
bottom left corner of the bounding box, the image will be rotated. With that way, we can make a rotation
animation.

Coconut2D User Manual Chapter 4: Basic Animation
25
Useful Tip! #3
By moving the white dot in the center of the bounding box, you can arrange the center of the image.
The rotation of the image is based on this white dot (or else pivot). You can also change the position
of the pivot on the properties panel. The options are PivotX and PivotY.

Coconut2D User Manual Chapter 4: Basic Animation
26
Stretch / Scale Animation
If you select and drag any of the black dots of the bounding box, you can stretch the image. By holding the shift
key while stretching one of the black dots on the corners, you can make the image scale. Another way to stretch
/ scale is on the properties panel. Having selected the image you want to stretch or scale a properties panel will
appear. By changing the numbers in ScaleX or ScaleY option, you can stretch the image accurately.

Coconut2D User Manual Chapter 4: Basic Animation
27
Opacity Animation
Click on the last key-frame and in the Properties panel under Shaders and Filters change the value of Shader
from Default to Default with Alpha. When you do that, a new DefaultWithAlpha.Alpha property will appear.
Change its value from 1 to 0. You will notice that an animation has been created, in which the image fades out
gradually.
Useful Tip! #4
Visible is an option for making an object visible or invisible. This option cannot create a tween animation, if
you create an animation where the first key-frame is Visible: True and the last Visible: False, the object will
be visible until the last key-frame. The moment it reaches the last key-frame, it becomes invisible.

Coconut2D User Manual Chapter 4: Basic Animation
28
Adding frames
Select a frame on the arrow and press right click on it. Select Insert Keyframe. Notice that we have two arrows
now, because of the new key-frame. This means that we have two animations now. The first starts from the first
key-frame and ends in the middle key-frame. The other begins at the middle key-frame and ends in the last key-
frame. In that way, we can create a more complex animation.
Deleting frames To delete a key-frame select it and press the Delete KeyFrame button by pressing right click on the key-frame.
You can also delete more than one frame. To select them, click on a blank frame and drag the cursor by holding
shift. Then, press the Delete Frames button on the animation toolbar.
Combining Animations Now that you have learned the basics, it is time to see how these animations can be combined.
1. Create a moving animation.
2. Select a frame in the middle of the animation and insert a key-frame
3. Select the image in the middle key-frame, move it up and rotate it 180o.
4. Go to the last key-frame and change the rotation of the image to 360o in the properties panel.
5. Finally, in the same key-frame change Default with Alpha shader’s DefaultWithAlpha.Alpha from 1 to 0.
Now we have an animation of a woman making a jump, doing a spin in the air and disappearing after landing.
Useful Tip! #5
You can change the speed and duration of an animation anytime you want, by holding the key-frame you
want and moving it left or right. By moving it left you have a faster animation and by moving it right you can
make it last longer.

Coconut2D User Manual Chapter 4: Basic Animation
29

Coconut2D User Manual Chapter 5: Advanced Animation
30
Chapter 5: Advanced Animation
Symbols Symbols are images with animation. Unlike simple images, they are images making an animation. This is useful
when we want to create detailed animations.
Create a Symbol To create a symbol, choose the image file and right click on it. On the menu that appears, choose Convert to
Symbol. A window will appear which asks the symbol name. After you name it, the symbol is created. Notice
that the layer has been renamed based on the symbol name you gave. If you double click the symbol or press
Edit Symbol, you will be transferred inside the symbol. In this area, any changes you make do not affect the
scene. Only the symbol itself is affected.
Symbol Animation Create a new key-frame. On the last key-frame change the rotation from 0 to 360. This results to an animation
of an object making a rotation around itself. Now go back to the project by clicking its name on the directory
on top of the editor panel. Create a moving animation from left to right. When you play the animation, there
will be two different animations. The image will move from one area of the project to another, and
simultaneously will rotate around itself.
Layers If you want to edit a specific symbol, without making changes to the other symbols, you have to convert it to a
layer. Turning it into a layer will ensure that any changes you make will only affect the symbol you are working
on.
To create a layer, select the symbol and press the Convert to Layer button. To edit it, double-click on it or
press the Edit Instance button.
Sprite-sheet Animation A Sprite-sheet is another kind of animation for games; it consists of a series of different images that, when put
together, create an animation. It is usually a loop, the end of the animation returning to its beginning.

Coconut2D User Manual Chapter 5: Advanced Animation
31
To create a Sprite-sheet animation, you must already have a series of images, which form an animation
sequence.
To understand this better we will use our example. We have a character, which consists of two different game
states. These are Idle and Attack. It is important to organize the folders correctly so that there is no problem
with the creation of the Sprite-sheet.
1. Both states must have, at least, two resolutions: Base and Medium.
2. The two versions must have the same name.
3. Each resolution must be placed inside a different folder named accordingly, e.g. Base and Medium.
In the end we will have two folders each of which contains a specific resolution. Note that all sprites that
belong to the same sequence of a specific resolution must have the same dimensions. In our case, each sprite
of the Base resolution is 190x190, while the same sprite in the Medium resolution is 425x425.

Coconut2D User Manual Chapter 5: Advanced Animation
32
To create the actual Sprite-sheet, Coconut2D offers you a handy tool, the Sprite Generator, which handles
importing and generating the Sprite-sheet for you. The Sprite Generator can be purchased in Coconut2D’s
Marketplace, by clicking on the top menu bar on Tools and selecting Extensions and Updates…
Interpolation Interpolation is the kind of animation the object will make on screen. Interpolation is an option in the
properties panel. If you click on the first key-frame of an object, you can see it. We have 4 different options for
interpolation.
None used is when there are no frames between two key-frames.
Echo is used when we have frames between two key-frames but there is no animation. The frames
between them are the first key-frame repeated.
Motion Tween is used when the frames are created automatically between two key-frames.

Coconut2D User Manual Chapter 6: UI
33
Physics is used when an image can be manipulated by other objects.
Chapter 6: UI
UI The UI, or User Interface, is the environment of an application where a user can navigate. The UI is used in
many media, such as websites, applications and videogames. In videogames, the UI is consisted of various
buttons and indicators, such as the play / stop button, life bar, money collected etc.
Create a button The most common control in a User Interface is the button. Apart from the functionality controlled by it,
usually, a button has certain distinct states that serve as an indication of the user’s current interaction with it,
as well as give a more realistic view to the button’s appearance. In Coconut2D, buttons are implemented
through two classes: CocoComplexUIClip and CocoComplexUIControl.
1. The first thing we need is prepare the sprites which will correspond to our button’s states. In this
example, we will be using a button with four states: active, inactive, hover and pressed. As usual, these
will come in two resolutions, Base and Medium.
Useful Tip! #6
When the arrow between two key-frames is red, it means that the two key-frames have the exact same
settings, so there are not involved in any animation. Therefore, there is no need to have Motion Tween
animation between them. Echo animation is the correct value in this case.
Useful Tip! #7
CocoComplexUIClip and CocoComplexUIControl are used when the button we need has a specific
functionality. Later on, we will go over a way to create a button that has two distinct functionalities.
Useful Tip! #8
When preparing your sprites, it is advisable to increase the final dimensions of each sprite by one
transparent pixel. That way you can avoid unwanted overlapping between two adjacent frames in the final
Sprite-sheet, which could affect the way your animation will be displayed on screen. For example, in the
case of our buttons, the actual dimensions were 56x23 and 123x51, but after increasing these by one
transparent pixel, we got the final dimensions as 57x24 and 124x52 respectively.

Coconut2D User Manual Chapter 6: UI
34
2. Next, we will need the Sprite Generator we mentioned above, in order to generate the button’s Sprite-
sheet inside Coconut2D. You can read in Chapter 7’s Sprite-sheets section how to get the Sprite
Generator and instructions on how to use it. After the Sprite-sheets have been generated inside
Coconut2D you can find them in Application > assets > images. Since we will be using two resolutions,
we need a way to distinguish between the two. So, after generating each resolution’s Sprite-sheet,
make sure to rename them by adding “@1x” and “@2x” to Base and Medium’s Sprite-sheet names
respectively. For example, if the Sprite-sheets were generated under the name Continue.png, the Base
Sprite-sheet should be renamed to [email protected] and the Medium one to [email protected].
3. Now, it’s time to use our newly-created button. Open your scene and look for the button in the Asset’s
panel under the Sprites tab. When you find it, drag-and-drop it in the scene.

Coconut2D User Manual Chapter 6: UI
35
4. Click twice on the auto-generated layer in the Timeline and rename Continue1 to Continue. Then right-
click it and select Convert to Layer. After it has been converted, go to its Properties’ panel and under
CocoClip give the ClassName field a value of CocoComplexUIClip. This will add a General section in the
Properties’ panel.
5. The General section is where we set the sequences of our button. If you open the button’s Sprite-sheet
in the Image Editor you will see that it has four sequences: CONTINUE_ACTIVE, CONTINUE_INACTIVE,
CONTINUE_OVER and CONTINUE_PRESSED. Set these to their respective fields and change the value of
ControlState to COCO_COMPLEX_UI_ACTIVE. That way, when the button first appears on screen it will
assume the CONTINUE_ACTIVE state. The reason we have left the FocusedSequence field empty is
because we do not have such a sequence.
6. Now, click on the red key-frame in the Timeline in order to open its Properties’ panel. First, under
CocoKeyFrame change its Interpolation to Echo. If you want, you can change it X and Y values to place

Coconut2D User Manual Chapter 6: UI
36
it exactly where you want in the scene. Last, under Execution change the value of HandleEvents to
True; as a button we want it to be able to receive the user’s input.
7. When you are done, double-click on Continue to get inside it. In the Timeline’s toolbar, click on the
Rectangle Mask Tool button and draw a rectangle which covers the whole button. You will notice that
the layer has turned into a mask under the name Mask1; rename it to Button. While its Properties’
panel is open, change its ClassName from CocoMaskClip to CocoComplexUIControl. This time, the
contents of the Properties’ panel will change radically.
8. We don’t have to change much, however, for this example’s needs. Under Explicit Size, it’s good
practice to change the values of Width and Height to those of the image’s actual dimensions. To get

Coconut2D User Manual Chapter 6: UI
37
these, go to Application > assets > images and open [email protected]. Look in the Properties’ panel
under SpriteSheet for the values of TextureCellWidth and TextureCellHeigh. Go back to your scene,
click on the Button layer and give these values to Width and Height respectively.
9. Next, under General change ControlState to COCO_COMPLEX_UI_ACTIVE and RenderState to True.
The first value will make sure that the button will assume the CONTINUE_ACTIVE sequence when it
first appears on the screen, while the second one indicates that this control will be assuming various
states that need to be rendered on the screen. Currently, the button itself is hidden beneath the mask
so, if you like, you could make the mask a bit transparent by clicking on the colored-palette of FillColor.
10. Lastly, click on the red key-frame in the Timeline and change its Interpolation to Echo. At this point, we
are done working in the scene and our button is almost ready to work; what remains is a bit of code.
11. Since we will usually be dealing with more than one controls, it’s best to gather these in an array of
CocoClips. This could be named UIControls. The detection of which control was activated by the user is
made through the isClicked function, which should be used inside the tick function of the current state
(more details about states and their functions can be found in the next chapter). If the user clicks on a
control, this function will return the control’s index inside the UIControls array; if no control was
activated a value of -1 is returned. The isClicked function is used in conjunction with a switch-block.
The cases of the switch are expecting integer values returned by the isClicked function. For that
reason, it’s best practice to use an enumeration to represent each control. In our example, we only
have one control, the Continue button, so in our CONTROLS_ENUM enumeration, the BUTTON has a
value of 0. So, in this case, we are expecting either a value of -1 or of 0.
12. With our code written, our button is good to go. Now, go press some buttons!

Coconut2D User Manual Chapter 6: UI
38
Actions Actions are orders that we give to our objects to complete under certain circumstances. These orders are
given by using code. For example, we can tell a button that when we click it, the game will jump to another
scene.
Labels Labels are some king of markers. They are inscriptions on the frame indicator of the timeline. They are useful
for organizing your scene and creating “states” to move the game from one place to another.

Coconut2D User Manual Chapter 7: Create a game
39
Chapter 7: Create a game A game consists of all the elements we learned in the previous chapters. Scenes, symbols and buttons are
essential to make a game. To understand how these elements can be combined, we will create a simple game.
The game will be a character alternating between two states, Idle and Attack. We will control this character
with an Idle/Attack button.
Create a new project 1. Go to File > New Project...
2. A Create New Project… window will appear that will ask you to set the directory of your new project.
Set the directory, create a new folder for your project and give it a name of your choosing. Make sure
that the folder’s name ends with “.project”, e.g. GettingStarted.project. When you are done, press OK.
3. Pressing OK will make the new project appear on the editor’s Project Explorer.
Initial Setup Currently, your project consists an “empty shell”, so, before you start working on it, you have to set up a few
things first.
project.json You will notice that the last file in the Project Explorer is project.json. This file holds information necessary to
run your project. For now, all you have to do is change the values of three fields:
PROJECT_NAME: The name by which your project is identified insided Coconut2D. Change that to
GettingStarted and make sure there are not spaces.

Coconut2D User Manual Chapter 7: Create a game
40
PROJECT_DISPLAY_NAME: The name that will be displayed, e.g. on the window’s tab, when the user
opens the game on a browser. Change that to Getting Started. This time you can use spaces.
PROJECT_PACKAGE: Your game’s unique ID. Change that to com.mobilefx.coconut2d.GettingStarted.
Note that you can also change the com.mobilefx.coconut2d part to correspond your own details. The
convention used is the following mydomain.mycompany.myapp.
Animation Scene All the world’s a stage, as the Bard would say and that also applies to games. So, let’s create a stage for your
game to unfold.
1. Go to the Project Explorer and expand Application > assets > animations.
2. Right-click on animations and select New Item… > New Animation Scene…
3. In the New Animation Scene window that appears, write what you want to call your scene. Let’s call it
TitleScreen. When you press OK your scene will appear in the editor.
4. Go to the Properties panel. There, your will see a field called FPS (Frames Per Second). Currently it is
set at 30; if you like, you can change that value. The more the frames the faster your game will run, so
change that to 60.
Source Code As every story needs a good script, so does a game. It is time to create the code that will drive your game.
1. Go to the Project Explorer and expand Application > src.
2. Right-click on src and select New Item… > New CocoScript Class…

Coconut2D User Manual Chapter 7: Create a game
41
3. In the New Module window that appears, write what you want to call your source code file. How about
GameEngine? This is how the initial file will look:
4. Now, you have to change a few things so the above file looks like the one below:
Import files Currently, your empty scene looks too boring, don’t you think? You need to liven it up a bit and in order to do
that you have to give Coconut2D some images to work with.
1. You will need at least two sets of images, Base and Medium. You will built your game using the Base
resolution; this resolution will most probably never be used when the game is actually running, since at
that point a higher resolution will be needed; and here comes the Medium resolution. For this
example, we are using a Base resolution of 569x360 and a Medium one of 1280x809. Both resolutions
should have their corresponding images named the same way, e.g. a Lab.png of 569x360 should also
be named Lab.png in 1280x809. To distinguish these, keep them in two separate folders.

Coconut2D User Manual Chapter 7: Create a game
42
2. To place the files you will use in Coconut2D, you must first place it in the project’s file system. Start
with your Base resolution. Drag-and-drop your images on the top of Coconut2D’s window. In the
Please Choose Locale window choose (None) and press OK. Right-click inside the Project Explorer and
select Refresh Project Explorer on the menu that will appear.
3. The imported images can now be found inside the Application > assets > images folder of your project.
Notice that these have assumed power-of-two dimensions.
4. In order to distinguish these from the Medium resolution’s images, however, you will have to rename
them. Go to Application > assets > images, right-click on an image and select Rename Item… Since this
is the Base resolution, add “@1x” at the end of the image’s name. Do the same for the remaining
images.
For example, Btn_Action_Attack.png will become [email protected].
5. Follow the same instructions to import the Medium resolution into your project. When you are done,
rename these images as well, but this time add “@2x”. For example, Btn_Action_Attack.png will
become [email protected].

Coconut2D User Manual Chapter 7: Create a game
43
Sprite-sheets For your character’s actions, you will need something more than a still image; that would be a Sprite-sheet.
1. Create two .png sequences. In one of those, your character is standing idle while in the other that
same character is attacking.
2. If you haven’t done so already, visit Coconut2D’s Marketplace in order to purchase the Sprite
Generator, which will handle importing and generating the final Sprite-sheet.
3. When you are done, open the Sprite Generator by going to Coconut2D’s top menu bar and expanding
the Tools menu.

Coconut2D User Manual Chapter 7: Create a game
44
4. In Output File Name write the name you want your Sprite-sheet to have when it is imported in
Coconut2D. In this case, it’s Irida.
5. The Regular Expression handles the naming of each sequence included in a Sprite-sheet and depends
on the way you have named your sprites. For example, in our case, we have named our sprites as
Irida_Attack_00 and Irida_Idle_00. As you can see, the names we have chosen do not include an img_
part, so we can safely remove this from the field. Irida, which corresponds to the first ([^_]+) part will
be our Symbol’s name; Attack and Idle correspond to the second ([^_]+) part and will be each
sequence’s name. The last part of the Regular Expression corresponds to a sequence’s frame index; for
example, the Attack sequence’s frame indices occupy the range 00 to 26, while those of Idle the range
00 to 08. Having these in mind, the names of our sequences inside Coconut2D will be IRIDA_ATTACK
and IRIDA_IDLE.
6. If your sprites’ transparent area occupies an unnecessarily large part of the image’s surface, you can
remove it by leaving Trim Whitespace ticked. This will trim the transparent parts around the edges of
your sprites.
7. It is advisable that each sprite has, at least, one trasparent pixel around its perimeter, in order to avoid
overlapping between a sequence’s frames. You can include that pixel either when you are making your

Coconut2D User Manual Chapter 7: Create a game
45
sprites or you can let Coconut2d do that for you by ticking Pad each Sequence Frame with 1
transparent pixels and selecting the desired number of pixels.
8. Now, let’s give Sprite Generator something to work with. Let’s start with the Base resolution; drag-
and-drop all our character’s sprites of that resolution inside Sprite Generator’s Symbol Frame: box.
When you are done, you will see something like this:
9. Click Create Sprite Atlas and your Sprite-sheet will be generated inside Coconut2D and open in the
Image Editor. There you can preview each sequence by selecting it in the Spritesheet Sequences: drop-
down menu.

Coconut2D User Manual Chapter 7: Create a game
46
10. Before you repeat the same process for importing the Medium resolution’s sprites, make sure you
have renamed the Base resolution’s Sprite-sheet in order to distinguish between the two. Similarly to
what we did before, rename Irida.png to [email protected]. Accordingly, the Medium resolution’s Sprite-
sheet will be renamed [email protected].
Define the viewport Anxious to start working on your scenes? Be patient! One more thing remains and you will be all set; that is to
define your viewport. That way your project will be viewed in many devices without having to make further
adjustments.
1. Select the smallest device size that you need your project to run on. You can do so by clicking on
Device Preset on the Device toolbar and selecting the device you want, e.g. iPhone3G/S (480x320).
2. Expand Application > assets > animations and click on TitleScreen to open it in the editor. As you can
see, it is currently empty.
3. On the right-hand side of the scene, you can see the Assets panel. While working on the scene, you will
be handling all your images through that panel. Click on the Images tab; all your still images can be
found there. Select TitleScreen and drag-and-drop it on the scene. To ensure that it is perfectly aligned
in the scene, click on the red key-frame that has appeared and check its position on the x-and y-axis. If
the X and Y are not zero, set them to zero. Then, lock the layer so that it does not interfere with the
other objects that will be placed later.
4. If the background you have chosen doesn’t already fit inside the white rectangle, change its ScaleY and
ScaleX properties in the Properties panel so that it does.

Coconut2D User Manual Chapter 7: Create a game
47
5. Click on the Defines project view… button on the timeline toolbar to lock the viewport size and ratio.
6. Follow the same instruction for GameScreen; just use the GameScreen image this time.
That way, you can design the game once and make it available for many devices. Remember that the basic assets of your game (hero, UI, etc.) must be placed inside the black rectangle or else they will not be visible in other devices.
Placing the assets Having fun already? Brace yourself for more! It’s time to start working on your scenes!
TitleScreen 1. Expand Application > assets > animations and click on TitleScreen. As you probably remember, after
you placed TitleScreen in the scene the Timeline looked like this:
Useful Tip! #9
Performance-wise, it is advised to have prepared the appropriate image before importing in it
Coconut2D in order to avoid unnecessary scaling.

Coconut2D User Manual Chapter 7: Create a game
48
2. The image being an image has remained, well, an image. Right-click on TitleScreen1 and select Convert
to Layer. If you want to rename it to something more indicative of its use, click it one more time and
write a new name, e.g. Background.
3. As for the red key-frame, if you move your mouse over it you will notice a floating warning; CPU
expensive Motion Tween interpolation on last keyframe. It is recommended to change Interpolation
to ‘Echo’. Now, click on that key-frame and have a look in the Properties panel. Under
CocoKeyFrameIndex there is a property Interpolation with the value Motion Tween. What that
floating message is trying to warn us about is that, while this key-frame is set to be used in an
animation sequence, thus the Motion Tween value, it is not. There is no point in wasting resources, is
there? So, let’s change that value to something more appropriate, like Echo.
4. Next, click on frame 60, right-click it and select Insert KeyFrame. Notice that a dotted line now
connects the first key-frame with the newly inserted key-frame. Click on that key-frame once again in
order to open its Properties panel. Under Execution there is a property Action; write stop as its value
and notice that it has turned fuchsia. The stop value will prevent the game from returning at the
beginning (frame 0) after it has reached the end (frame 60).
5. We need one more layer for this screen. Go to the Assets panel, click on the Images tab and drag-and-
drop Logo in the scene. Click on the key-frame and under Transformation in the Properties panel
change its X and Y to zero. Then, repeat Step 2 to convert it to a layer and give it a name of Logo. In
this case, you can leave its Interpolation value to Motion Tween. Can you guess the reason? You
guessed it right! This key-frame will be the first one in an animation sequence, one that will alter the
image’s scale to be more precise. Excited? Let’s do this.
6. If it’s not already selected, select the Logo layer. Click on the key-frame and under Transformation in
the Properties panel change ScaleX and ScaleY to zero. Now, for the conclusion of the animation. Click
on frame 60, right-click it and select Insert KeyFrame. Notice that an arrow now connects the first key-
frame with the newly inserted key-frame. Click on that key-frame once again and change its ScaleX and
ScaleY to one. As you might have guessed, the concept is to have the Logo grow steadily as the
TitleScreen moves towards its end.
7. We are done for the time being with TitleScreen, so… congratulations! You have just finished setting
your first scene in Coconut2D!
Useful Tip! #10
Keep in mind that you have to repeat the same procedure every time you place a new asset on the
screen, at least as far as converting it to a layer is concerned. If that asset is to take part in an
animation sequence that starts from the key-frame created at its entrance on the scene, you should
leave its Interpolation property to Motion Tween.

Coconut2D User Manual Chapter 7: Create a game
49
GameScreen 1. When we had left GameScreen, its Timeline looked like this:
2. Repeat Steps 2 and 3 of TitleScreen in order to convert Lab1 to a layer, rename it to Lab and change its
Interpolation property to Echo.
Character Animation
Finally, time to bring our character into the stage.
1. Expand Application > assets > images and select [email protected]. When this image opens in the editor,
you will notice that it’s a Sprite-sheet with two sequences that correspond to our character’s two
states: IRIDA_ATTACK and IRIDA_IDLE. In order to preview the animation sequences, you can select
Useful Tip! #11
It’s a good idea to always “lock” you layers. That way there is no danger to accidentaly moving any
of these and messing up your scene. To do that, just click on the dot under the icon on the layer
you are interested to lock.
Coconut2D User Manual Chapter 7: Create a game
50
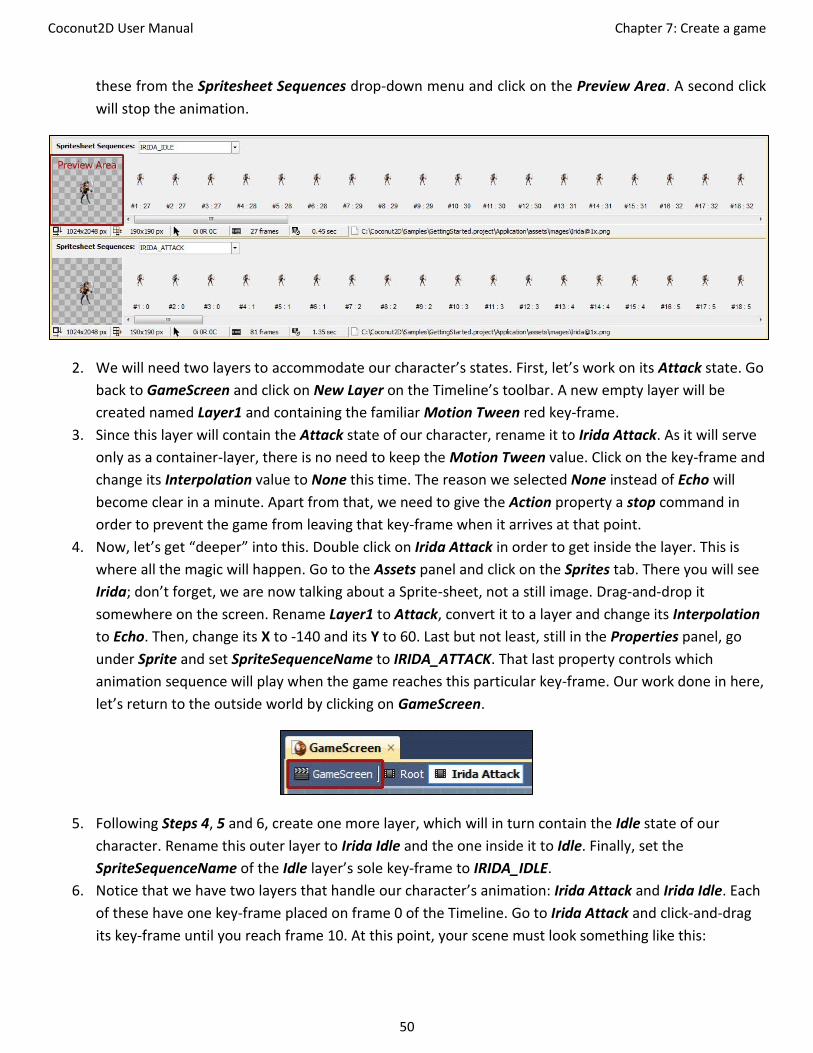
these from the Spritesheet Sequences drop-down menu and click on the Preview Area. A second click
will stop the animation.
2. We will need two layers to accommodate our character’s states. First, let’s work on its Attack state. Go
back to GameScreen and click on New Layer on the Timeline’s toolbar. A new empty layer will be
created named Layer1 and containing the familiar Motion Tween red key-frame.
3. Since this layer will contain the Attack state of our character, rename it to Irida Attack. As it will serve
only as a container-layer, there is no need to keep the Motion Tween value. Click on the key-frame and
change its Interpolation value to None this time. The reason we selected None instead of Echo will
become clear in a minute. Apart from that, we need to give the Action property a stop command in
order to prevent the game from leaving that key-frame when it arrives at that point.
4. Now, let’s get “deeper” into this. Double click on Irida Attack in order to get inside the layer. This is
where all the magic will happen. Go to the Assets panel and click on the Sprites tab. There you will see
Irida; don’t forget, we are now talking about a Sprite-sheet, not a still image. Drag-and-drop it
somewhere on the screen. Rename Layer1 to Attack, convert it to a layer and change its Interpolation
to Echo. Then, change its X to -140 and its Y to 60. Last but not least, still in the Properties panel, go
under Sprite and set SpriteSequenceName to IRIDA_ATTACK. That last property controls which
animation sequence will play when the game reaches this particular key-frame. Our work done in here,
let’s return to the outside world by clicking on GameScreen.
5. Following Steps 4, 5 and 6, create one more layer, which will in turn contain the Idle state of our
character. Rename this outer layer to Irida Idle and the one inside it to Idle. Finally, set the
SpriteSequenceName of the Idle layer’s sole key-frame to IRIDA_IDLE.
6. Notice that we have two layers that handle our character’s animation: Irida Attack and Irida Idle. Each
of these have one key-frame placed on frame 0 of the Timeline. Go to Irida Attack and click-and-drag
its key-frame until you reach frame 10. At this point, your scene must look something like this:

Coconut2D User Manual Chapter 7: Create a game
51
7. So, what did we do that? As mentioned at the beginning, we want our character to alternate between
two states. If we were to leave both key-frames on the same position, the Idle state, being assigned to
a layer above the one that handles the Attack state, would cover the last one. By moving Irida Attack’s
key-frame to frame 10 we make that each animation sequence plays unhindered by the other.
8. Now, let’s go back a little. If you remember, we changed the Interpolation property of Irida Attack’s
and Irida Idle’s key-frame to None. Why not Echo? Again, our character is supposed to alternate
between two states. If we were to change, for example, Irida Idle’s key-frame Interpolation property
to Echo, then, when the game would move to frame 10 where Irida Attack’s key-frame is placed, Irida
Idle’s sprite would still be visible. By selecting None we make sure that this particular sprite is displayed
on screen only when the game reaches that particular key-frame and it is hidden when the game
moves on.
Useful Tip! #12
The order in which each layer is placed in the Timeline is important. Notice how the Lab layer is at
the bottom. That’s because Lab being the background of our game we want it to be displayed
behind the other assets that we might place on the screen. In the context of the Timeline “behind”
translates as “below”. Try to move the Lab layer above Irida Idle and see what happens. Irida
Attack and Irida Idle are below Lab, so they are hidden from sight.

Coconut2D User Manual Chapter 7: Create a game
52
User Interface
Now that we have placed our character on the stage, we need a way to control her actions. That’s where the
User Interface comes in.
1. Open GameScreen and click on the Images tab of the Assets panel. You’ll see there are two buttons
with Attack and Idle written on them. Drag-and-drop Btn_Action_Attack in the scene. Convert
Btn_Action_Attack1 to a layer and rename it to Attack Button.
2. Click on its key-frame to open the Properties panel and change its Interpolation value to None; the
reason is the same as explained above. Then, change its X to -140 and its Y to 120. Lastly, under
Execution set HandleEvents to True. Notice the small icon that has appeared above the key-frame.
Now, that key-frame can detect any user interaction with it, such as a click, which is what you would
expect from a button.
3. Using Btn_Action_Idle, repeat Step 2 to place another layer in the scene and rename it to Idle Button.
4. Now, click-and-drag Idle Button’s key-frame until you reach frame 10, the same where Irida Attack’s
button lies. I believe you can see the connection. At this point, your scene should look like this:
Labels
We are almost done with GameScreen, except one thing. Currently the Attack state is handled in frame 0
while the Idle state in frame 10. How will our game know which key-frame we want it to move to? One way,
would be to ask it explicitly to move to either frame 0 or frame 10. However, there is a more self-explanatory
way to do this. Use labels!
1. Click anywhere on frame 0 in order to move the Timeline’s cursor on that frame. Then, click on Insert
Label in the Timeline’s toolbar. In the Insert TimeLabel window that pops up write the name of the

Coconut2D User Manual Chapter 7: Create a game
53
label. In this case, it’s Idle. When you click OK you will notice that a has appeared under the frame’s
number. If you want to remove the label you can do so by clicking on Delete Label in the Timeline’s
toolbar.
2. Repeat Step 1 to insert another label on frame 10. Name this one Attack.
3. That was it! We are all done with GameScreen, which should like this now:
CocoScript It’s time for the fun part. Let’s write some code!
1. Expand Application > src and click on GameEngine.jspp.
2. When we first created GameEngine.jspp it looked like this:
#pragma export_native; #pragma export_web; #include "CocoEngine.jspp" state class GameEngine : CocoEngine { public function Constructor() { } public function Destructor() { } }

Coconut2D User Manual Chapter 7: Create a game
54
3. First, we need to declare two variables that will hold our two scenes. Add these before the Constructor
function and name them title and game.
4. Inside the Constructor we need to call setNextState in order for the game to proceed to the next State.
setNextState takes as an argument the name of the state to which we want to enter. In this case, it’s
STATE_START_GAME.
5. As the Destructor will be called at the end of the game, we do not want to leave any dangling
references that might cause memory leaks. For that reason, in the Destructor we have to delete the
reference to game. Now, GameEngine.jspp looks like this:
#pragma export_native; #pragma export_web; #include "CocoEngine.jspp" state class GameEngine : CocoEngine { private reference var title:CocoScene; private reference var game:CocoScene; public function Constructor() { // Start the game. setNextState(STATE_START_GAME); } public function Destructor() { // Make sure we avoid any memory leaks after the end of the game. delete game; } }
STATE_START_GAME Let’s add our first state.
1. Click on the Add Code button in the Code Editor’s toolbar. The code which will be generated will look
like this:
//////////////////////////////////////////////////////////////////////////////////////////////////// public state STATE_XXX { //-------------------------------------------------------------------------------- function enter() { } //-------------------------------------------------------------------------------- function exit() { } //-------------------------------------------------------------------------------- function tick(time:Float) { scene.tick(time); }

Coconut2D User Manual Chapter 7: Create a game
55
//-------------------------------------------------------------------------------- function paint(ctx:ICocoRenderContext, time:Time) { scene.paint(ctx, time); } }
2. Before we start working on the state, we have to make a couple of changes. These have to be made
every time we create a new state. Rename the state to STATE_START_GAME and add a ; at the closing
bracket of the state.
3. Since our games will run on WebGL, we need to create a rendering context. We do that by calling
createRenderingContext inside enter.
4. After that, all we have to do is call setNextState to proceed to the next state, which is
STATE_TITLE_SCREEN.
5. Before we move on, remove the calls to scene.tick and scene.paint. This state will not display anything
on the screen, so we do not need these. Here’s how our state should look in the end:
//////////////////////////////////////////////////////////////////////////////////////////////////// public state STATE_START_GAME { //-------------------------------------------------------------------------------- function enter() { // Create a WebGL Rendering Context. createRenderingContext(); // Proceed to the next state. setNextState(STATE_TITLE_SCREEN); } //-------------------------------------------------------------------------------- function exit() { } //-------------------------------------------------------------------------------- function tick(time:Float) { } //-------------------------------------------------------------------------------- function paint(ctx:ICocoRenderContext, time:Time) { } };
STATE_TITLE_SCREEN Here’s where we will initialize the first scene of the game, TitleScreen.
1. Inside enter initialize TitleScreen using the new operator. As it is written, new giveth and delete
taketh. So, why haven’t we deleted title inside the Destructor as we did with game? You’ll find out
soon.

Coconut2D User Manual Chapter 7: Create a game
56
2. Since our current scene is title, change scene.tick and scene.paint to title.tick and title.paint inside tick
and paint respectively.
3. We’ll make no call to setNextState in this state, because the passage to the next state is handled by
TitleScreen’s Timeline. Expand Apllication > assets > animations and click on TitleScreen. Then, click
on the last key-frame of the Background layer to open its Properties and under Execution, change the
value of State to STATE_INITIALIZE_SCENE. Yes, you guessed correctly. This will be the next state of
our game.
//////////////////////////////////////////////////////////////////////////////////////////////////// public state STATE_TITLE_SCREEN { //-------------------------------------------------------------------------------- function enter() { // Load the TitleScreen. title = new TitleScreen(); } //-------------------------------------------------------------------------------- function exit() { // The game moves to the next state through the Timeline of TitleScreen (frame 60 of "Background" layer). } //-------------------------------------------------------------------------------- function tick(time:Float) { title.tick(time); } //-------------------------------------------------------------------------------- function paint(ctx:ICocoRenderContext, time:Time) { title.paint(ctx, time); } };
STATE_INITIALIZE_SCENE This is where we will start loading our game’s assets.
1. In this state, we will need a new variable. This one, however, unlike the global variables title and scene
that can be accessed anywhere inside our class, will be local, meaning it will be visible only inside the
state in which it has been declared. Furthermore, this local variable will be “short-lived”; after we have
exited the state, any reference to it will be deleted. So, add an Integer variable called Delay above
enter.
2. Inside enter, the first thing we have to do is call title’s stop. Remember that it was the last key-frame of
TitleScreen’s Timeline which handled the passage to this state. By calling stop, we make sure that the
scene will stay on that last key-frame and it will not return at the beginning (on the first key-frame).
Then, we initialize Delay to 0 and assign a reference of GameScreen to game. GameScreen being the
main scene of our game will stay with us as long as the game lasts. For that reason, it only made sense
to delete it inside the Destructor, as you might recall.

Coconut2D User Manual Chapter 7: Create a game
57
3. Inside tick, change the call to tick to title. tick. Even though we have initialized GameScreen, the scene
displayed is still that of TitleScreen.
4. Now, let’s go inside paint to handle the loading of our game’s assets. First, we need to call game’s
resourcesLoaded to load the assets of that scene and then title’s paint as this is the scene currently
displayed.
5. When all the GameScreen’s assets have been loaded, the game is ready to move to its next state.
However, in order to have a smoother transition between the two scenes, title and game, it’s a good
idea to wait for a while. That’s were Delay comes in. Before leaving this state and TitleScreen, we wait
for Delay to reach 1000. When this number has been reached, we can leave this state by calling
setNextState and remove TitleScreen by deleting it. Final destination: STATE_GAME_SCREEN.
//////////////////////////////////////////////////////////////////////////////////////////////////// public state STATE_INITIALIZE_SCENE { var Delay:Integer; //-------------------------------------------------------------------------------- function enter() { // Stop the TitleScreen from looping. title.stop();
// The delay variable will be used to make the transition between the TitleScreen and the GameScreen smoother. Delay = 0; // Load the GameScreen. game = new GameScreen(); } //-------------------------------------------------------------------------------- function exit() { } //-------------------------------------------------------------------------------- function tick(time:Float) { title.tick(time); } //-------------------------------------------------------------------------------- function paint(ctx:ICocoRenderContext, time:Time) { // Load the game's assets. game.resourcesLoaded(ctx); // Keep showing the TitleScreen until all the game's assets have been loaded. title.paint(ctx, time); // When the game is ready to start, wait a while before deleting the TitleScreen in order to achieve a smoother transition.
if(game.__ready) { if(Delay < 1000) { Delay += engine.TICK_TIME; } else { delete title;

Coconut2D User Manual Chapter 7: Create a game
58
setNextState(STATE_GAME_SCREEN); } } } };
STATE_GAME_SCREEN This is the main screen of our game. Time to play, then!
1. We will need some variables in this state that will hold references to the objects in our scene, so, let’s
declare these.
2. Scene is a CocoClip which will hold a reference to the game’s root layer, which is the “container” or
“parent” of all our game’s layers. BtnAttack and BtnIdle are also CocoClips that will hold references to
the button that will trigger the Attack animation and the one that will trigger the Idle animation
respectively. KeyframeAttack is a CocoKeyFrame which will hold a reference to the first and only key-
frame of the Attack Button layer. Now that we have declared our variables, it’s time to initialize them.
3. Scene will be initialized to with game’s __root, which is a variable of CocoScene and as you might
remember, game is a CocoScene. The reason we are using Scene is for performance issues. As we will
be using a reference to the game’s root layer in quite a few places in our code, it’s much more efficient
to get it in a variable than calling game.__root. It’s always a good idea to avoid too many nested calls
in your code.
4. BtnAttack and BtnIdle are a good example of the previous step’s point. Both are initialized using
game.__root’s function getChildByName. Instead of using game.__root.getChildByName we can now
use Scene. getChildByName. By the way, getChildByName takes as an argument the name of the layer
we want to get. In the case of BtnAttack it’s “Attack Button”, while in the case of BtnIdle it’s “Idle
Button”.
5. Lastly, we need to get the sole key-frame of the Attack Button layer. To do that, we have to go through
__timeline, which is an array that holds all the key-frames of a specific layer. The call to firstKeyFrame
returns the, you guessed it, first key-frame in that array.
6. Let’s move to tick. There we have to change the call to tick from scene.tick to game.tick since it’s game
that is ticking.
7. Next, we will use a switch -block to handle the user’s input. The switch’s control variable will be the
value returned by a call to isClicked. We can access isClicked because it is a public function of
CocoEngine which is inherited by GameEngine. isClicked takes as arguments an array that contains the
objects we are expecting to get input from and a Boolean which controls whether that array will
preserved or not. Since the array we will be using is a dynamic one, we want it to be preserved in order
to avoid creating it repeatedly; keep in mind that tick is called in every tick of the game, which
translates to milliseconds. The value returned by isClicked will be either -1 if no input was received or
the index of the element in the array which received some input. If the user clicks on BtnAttack the
value returned will be 0, if he/she clicks on BtnIdle that value will be 1.
8. When the user clicks on BtnAttack, gotoFrameByName will move the Timeline to the key-frame under
the “Attack” label, which is frame 10 and there it will stop while the Attack animation is playing. In

Coconut2D User Manual Chapter 7: Create a game
59
order to make sure, that BtnAttack won’t accidentally receive any input meant for BtnIdle, we use
KeyframeAttack to change handleEvents’s value to false.
9. At this point, while the Attack animation is playing, the focus is on BtnIdle. If the user clicks on it, the
Timeline moves back to frame 0 which is labeled “Idle” and stops there while the Idle animation is
playing. At the same time, it’s BtnAttack’s turn to be displayed on the screen once more and be ready
to accept the user’s input.
//////////////////////////////////////////////////////////////////////////////////////////////////// public state STATE_GAME_SCREEN { var Scene:CocoClip; var BtnAttack:CocoClip; var BtnIdle:CocoClip; var KeyframeAttack:CocoKeyFrame; //-------------------------------------------------------------------------------- function enter() { // We need to get references to the buttons and the key-frame of Attack Button. Scene = game.__root; BtnAttack = Scene.getChildByName("Attack Button"); BtnIdle = Scene.getChildByName("Idle Button"); KeyframeAttack = BtnAttack.__timeline.firstKeyFrame(); } //-------------------------------------------------------------------------------- function exit() { } //-------------------------------------------------------------------------------- function tick(time:Float) { game.tick(time);
// If the user clicks on one of the buttons go to the appropriate keyframe to play the specified animation. // We also need to activate/deactivate the Attack Button's event-handling mechanism in order to avoid receiving a wrong event.
switch(isClicked([BtnAttack, BtnIdle], true)) { case 0: Scene.gotoFrameByName("Attack", true); KeyframeAttack.handleEvents = false; break; case 1: Scene.gotoFrameByName("Idle", true); KeyframeAttack.handleEvents = true; break; } } //-------------------------------------------------------------------------------- function paint(ctx:ICocoRenderContext, time:Time) { game.paint(ctx, time); } };

Coconut2D User Manual Chapter 7: Create a game
60
GameEngine.jspp That’s all the code we will be needing for this example. And here’s all of GameEngine’s code put together.
#pragma export_native; #pragma export_web; #include "CocoEngine.jspp" state class GameEngine : CocoEngine { private reference var title:CocoScene; private reference var game:CocoScene; public function Constructor() { // Start the game. setNextState(STATE_START_GAME); } public function Destructor() { // Make sure we avoid any memory leaks after the end of the game. delete game; } //////////////////////////////////////////////////////////////////////////////////////////////////// public state STATE_START_GAME { //-------------------------------------------------------------------------------- function enter() { // Create a WebGL Rendering Context. createRenderingContext(); // Proceed to the next state. setNextState(STATE_TITLE_SCREEN); } //-------------------------------------------------------------------------------- function exit() { } //-------------------------------------------------------------------------------- function tick(time:Float) { } //-------------------------------------------------------------------------------- function paint(ctx:ICocoRenderContext, time:Time) { } }; //////////////////////////////////////////////////////////////////////////////////////////////////// public state STATE_TITLE_SCREEN { //-------------------------------------------------------------------------------- function enter()

Coconut2D User Manual Chapter 7: Create a game
61
{ // Load the TitleScreen. title = new TitleScreen(); } //-------------------------------------------------------------------------------- function exit() { // The game moves to the next state through the Timeline of TitleScreen (frame 60 of "Background" layer). } //-------------------------------------------------------------------------------- function tick(time:Float) { title.tick(time); } //-------------------------------------------------------------------------------- function paint(ctx:ICocoRenderContext, time:Time) { title.paint(ctx, time); } }; //////////////////////////////////////////////////////////////////////////////////////////////////// public state STATE_INITIALIZE_SCENE { var Delay:Integer; //-------------------------------------------------------------------------------- function enter() { // Stop the TitleScreen from looping. title.stop();
// The delay variable will be used to make the transition between the TitleScreen and the GameScreen smoother. Delay = 0; // Load the GameScreen. game = new GameScreen(); } //-------------------------------------------------------------------------------- function exit() { } //-------------------------------------------------------------------------------- function tick(time:Float) { title.tick(time); } //-------------------------------------------------------------------------------- function paint(ctx:ICocoRenderContext, time:Time) { // Load the game's assets. game.resourcesLoaded(ctx); // Keep showing the TitleScreen until all the game's assets have been loaded. title.paint(ctx, time); // When the game is ready to start, wait a while before deleting the TitleScreen in order to achieve a smoother transition.
if(game.__ready)

Coconut2D User Manual Chapter 7: Create a game
62
{ if(Delay < 1000) { Delay += engine.TICK_TIME; } else { delete title; setNextState(STATE_GAME_SCREEN); } } } }; //////////////////////////////////////////////////////////////////////////////////////////////////// public state STATE_GAME_SCREEN { var Scene:CocoClip; var BtnAttack:CocoClip; var BtnIdle:CocoClip; var KeyframeAttack:CocoKeyFrame; //-------------------------------------------------------------------------------- function enter() { // We need to get references to the buttons and the Keyframe of Attack Button. Scene = game.__root; BtnAttack = Scene.getChildByName("Attack Button"); BtnIdle = Scene.getChildByName("Idle Button"); KeyframeAttack = BtnAttack.__timeline.firstKeyFrame(); } //-------------------------------------------------------------------------------- function exit() { } //-------------------------------------------------------------------------------- function tick(time:Float) { game.tick(time);
// If the user clicks on one of the buttons go to the appropriate keyframe to play the specified animation. // We also need to activate/deactivate the Attack Button's event-handling mechanism in order to avoid receiving a wrong event.
switch(isClicked([BtnAttack, BtnIdle], true)) { case 0: Scene.gotoFrameByName("Attack", true); KeyframeAttack.handleEvents = false; break; case 1: Scene.gotoFrameByName("Idle", true); KeyframeAttack.handleEvents = true; break; } } //-------------------------------------------------------------------------------- function paint(ctx:ICocoRenderContext, time:Time) { game.paint(ctx, time); }

Coconut2D User Manual Chapter 8: Programming Language
63
}; }
Finishing Touches So, I guess we are ready to see our work in action, right? Wrong! There’s one more thing left to do. If we try to
build our project now, we‘ll get the following error: Missing image template. That missing image is the icon
that will be displayed either on a browser’s window tab or on a mobile device’s screen as a shortcut to our
game. Since Coconut2D will use that as a template in order to generate quite a few versions of it, we need
that to be in a rather high resolution, e.g. 4096x4096. After you have created such an image, name it icon.png
and include it in the root folder of your project; that would be the GettingStarted.project folder.
When you are ready, select the build Configuration you want -either Debug or Release- and build your project
by clicking on Build Project on the Build toolbar; this time the process will conclude without errors. Select the
desired device through the Device Preset drop-down menu on the Device toolbar. If you chose the Debug
configuration, you can run your project by clicking either on Run Application or Debug Application on the Run
toolbar. Finally, the moment you have been waiting for has arrived... Go ahead, make some magic.
Chapter 8: Programming Language grammar CocoScript < MATCHCASE, FILE_EXT_LIST=".jspp", REPARSE_PATTERN="\b(var|const)\s+.*?;" > { //---------------------------------------------------------------------- // Compilation Unit //---------------------------------------------------------------------- compilation_unit ::= [ { pragma_statement } ] [ module_statement ] [ { code_unit } ];
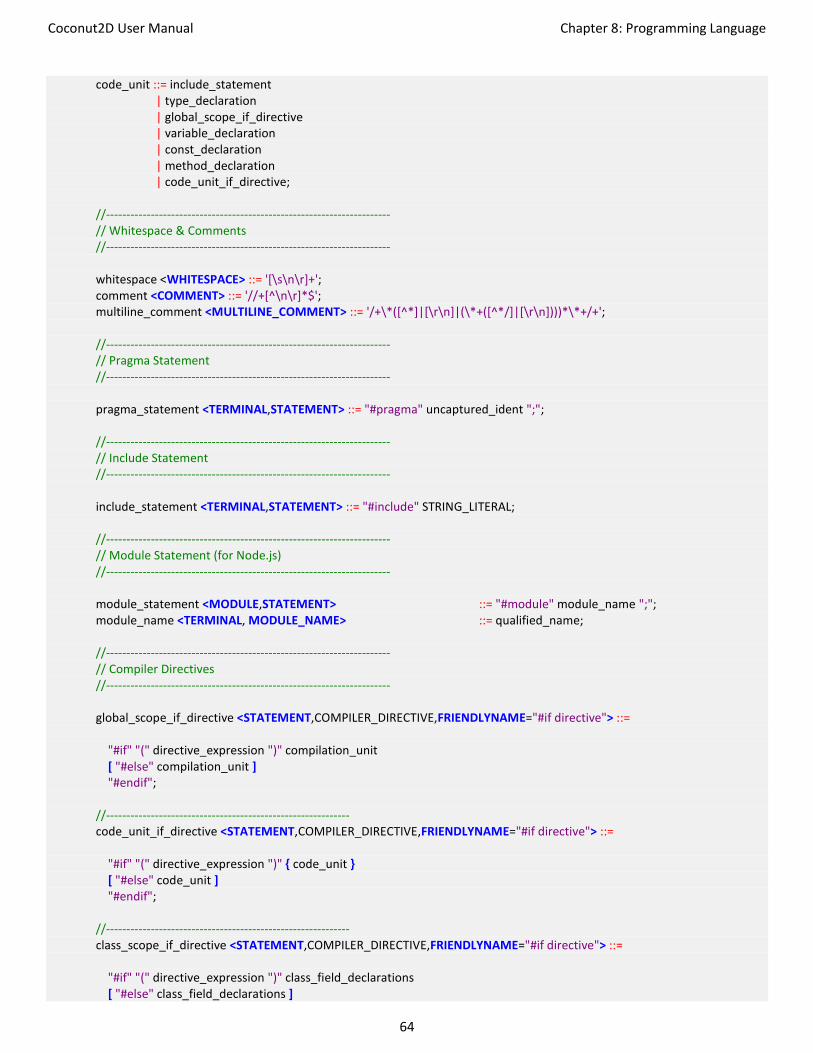
Coconut2D User Manual Chapter 8: Programming Language
64
code_unit ::= include_statement | type_declaration | global_scope_if_directive | variable_declaration | const_declaration | method_declaration | code_unit_if_directive; //---------------------------------------------------------------------- // Whitespace & Comments //---------------------------------------------------------------------- whitespace <WHITESPACE> ::= '[\s\n\r]+'; comment <COMMENT> ::= '//+[^\n\r]*$'; multiline_comment <MULTILINE_COMMENT> ::= '/+\*([^*]|[\r\n]|(\*+([^*/]|[\r\n])))*\*+/+'; //---------------------------------------------------------------------- // Pragma Statement //---------------------------------------------------------------------- pragma_statement <TERMINAL,STATEMENT> ::= "#pragma" uncaptured_ident ";"; //---------------------------------------------------------------------- // Include Statement //---------------------------------------------------------------------- include_statement <TERMINAL,STATEMENT> ::= "#include" STRING_LITERAL; //---------------------------------------------------------------------- // Module Statement (for Node.js) //---------------------------------------------------------------------- module_statement <MODULE,STATEMENT> ::= "#module" module_name ";"; module_name <TERMINAL, MODULE_NAME> ::= qualified_name; //---------------------------------------------------------------------- // Compiler Directives //---------------------------------------------------------------------- global_scope_if_directive <STATEMENT,COMPILER_DIRECTIVE,FRIENDLYNAME="#if directive"> ::= "#if" "(" directive_expression ")" compilation_unit [ "#else" compilation_unit ] "#endif"; //------------------------------------------------------------ code_unit_if_directive <STATEMENT,COMPILER_DIRECTIVE,FRIENDLYNAME="#if directive"> ::= "#if" "(" directive_expression ")" { code_unit } [ "#else" code_unit ] "#endif"; //------------------------------------------------------------ class_scope_if_directive <STATEMENT,COMPILER_DIRECTIVE,FRIENDLYNAME="#if directive"> ::= "#if" "(" directive_expression ")" class_field_declarations [ "#else" class_field_declarations ]

Coconut2D User Manual Chapter 8: Programming Language
65
"#endif"; //------------------------------------------------------------ scope_if_directive <STATEMENT,COMPILER_DIRECTIVE,FRIENDLYNAME="#if directive"> ::= "#if" "(" directive_expression ")" { statement } [ "#else" { statement } ] "#endif"; //------------------------------------------------------------ switch_if_directive <STATEMENT,COMPILER_DIRECTIVE,FRIENDLYNAME="#if directive"> ::= "#if" "(" directive_expression ")" {case} [ "#else" {case} ] "#endif"; //------------------------------------------------------------ directive_expression <COMPILER_DIRECTIVE_EXPRESSION> ::= expression; //------------------------------------------------------------ // Embedded Code (does not work with #pragma export_native) //------------------------------------------------------------ embedded_javascript ::= '__javascript\s*\{\s*[\w\W]*?\s*\}\s*__end'; embedded_cpp ::= '__cpp\s*\{\s*[\w\W]*?\s*\}\s*__end'; embedded_java ::= '__java\s*\{\s*[\w\W]*?\s*\}\s*__end'; embedded_html ::= '__html\s*\{\s*[\w\W]*?\s*\}\s*__end'; //============================================================================================================================ // // Type Declarations // //============================================================================================================================ type_declaration ::= ( class_declaration | interface_declaration | struct_declaration | enum_declaration | callback_declaration ) [";"] ; //---------------------------------------------------------------------- // CLASS //---------------------------------------------------------------------- class_declaration <CLASS,SCOPE,STATEMENT> ::= [ { class_modifier } ] "class" class_name [ COLON class_base ] [ "implements" { class_interface, ","} ] "{" [ class_field_declarations ] "}";

Coconut2D User Manual Chapter 8: Programming Language
66
class_modifier <TERMINAL,CLASS_MODIFIER> ::= "control" | "emscripten" | "export" | "state" | "export"; class_name <TERMINAL,CLASS_NAME> ::= ident; class_base <TERMINAL,CLASS_BASE> ::= qualified_name | typed_array | dictionary | ARRAY; class_interface <TERMINAL,CLASS_INTERFACE> ::= qualified_name; class_field_declarations ::= { class_field_declaration }; class_field_declaration ::= constructor_declaration | destructon_declaration | variable_declaration | const_declaration | property_declaration | method_declaration | enum_declaration | event_declaration | state_declaration | struct_declaration | class_declaration | class_scope_if_directive | ";" ; constructor_declaration <STATEMENT,METHOD,CONSTRUCTOR> ::= public_modifier "function" constructor_name "(" [parameter_list] ")" [ base_class_initializer ] STATEMENTS; destructon_declaration <STATEMENT,METHOD,DESTRUCTOR> ::= public_modifier "function" destructor_name "(" ")" STATEMENTS; constructor_name <TERMINAL,METHOD_NAME> ::= "Constructor"; destructor_name <TERMINAL,METHOD_NAME> ::= "Destructor"; public_modifier <METHOD_MODIFIER> ::= "public"; base_class_initializer ::= COLON ident "(" expression_list ")"; //---------------------------------------------------------------------- // EVENT //---------------------------------------------------------------------- event_declaration <EVENT,SCOPE,STATEMENT> ::= event_modifier "event" event_name "(" [ event_parameter_list ] ")"; event_modifier <TERMINAL,EVENT_MODIFIER> ::= "public"; event_name <TERMINAL,EVENT_NAME> ::= ident; event_parameter_list ::= { event_parameter, ","} ; event_parameter <EVENT_ARG> ::= event_param_name COLON event_param_type; event_param_type <TERMINAL,EVENT_ARG_TYPE> ::= type; event_param_name <TERMINAL,EVENT_ARG_NAME> ::= ident; //---------------------------------------------------------------------- // STRUCT //----------------------------------------------------------------------

Coconut2D User Manual Chapter 8: Programming Language
67
struct_declaration <STRUCT,SCOPE,STATEMENT> ::= [ struct_modifier ] "struct" struct_name "{" { (struct_item | struct_union) } "}"; struct_modifier <TERMINAL,STRUCT_MODIFIER> ::= "export"; struct_name <TERMINAL,STRUCT_NAME> ::= ident; struct_item <STRUCT_ITEM> ::= struct_item_name COLON struct_item_type ";"; struct_item_name <TERMINAL,STRUCT_ITEM_NAME> ::= ident; struct_item_type <TERMINAL,STRUCT_ITEM_TYPE> ::= type; struct_union ::= "union" ident "{" { (struct_item | struct_union) } "}" ";"; //---------------------------------------------------------------------- // ENUM //---------------------------------------------------------------------- enum_declaration <ENUM,ENUM_ITEMS_AS_CONSTANTS,SCOPE,STATEMENT> ::= [enum_modifier] "enum" enum_name "{" { enum_item, "," } "}"; enum_modifier <TERMINAL,ENUM_MODIFIER> ::= "export"; enum_name <TERMINAL,ENUM_NAME> ::= ident; enum_item <ENUM_ITEM> ::= enum_item_name "=" enum_item_value; enum_item_name <TERMINAL,ENUM_ITEM_NAME> ::= ident; enum_item_value <TERMINAL,ENUM_ITEM_VALUE> ::= expression; //---------------------------------------------------------------------- // STATE //---------------------------------------------------------------------- state_declaration <STATE,SCOPE,STATEMENT> ::= state_modifier "state" state_name "{" { state_field_declarations } "}" ";" ; state_field_declarations ::= variable_declaration | const_declaration | state_method_declaration; state_method_declaration <METHOD,STATE_METHOD,SCOPE,STATEMENT> ::= "function" state_method_name "(" [parameter_list] ")"

Coconut2D User Manual Chapter 8: Programming Language
68
[ STATEMENTS ]; state_method_name <TERMINAL,METHOD_NAME> ::= "enter" | "exit" | "tick" | "paint"; state_modifier <TERMINAL,STATE_MODIFIER> ::= access_modifiers; state_name <TERMINAL,STATE_NAME> ::= ident; //---------------------------------------------------------------------- // INTERFACE //---------------------------------------------------------------------- interface_declaration <INTERFACE,SCOPE,STATEMENT> ::= "interface" interface_name [ COLON { interface_base, ","} ] "{" [ interface_field_declarations ] "}" ; interface_field_declarations ::= { interface_field_declaration }; interface_field_declaration ::= variable_declaration | const_declaration | method_declaration | ";"; interface_name <TERMINAL,INTERFACE_NAME> ::= ident; interface_base <TERMINAL,INTERFACE_BASE> ::= qualified_name; //---------------------------------------------------------------------- // FUNCTION //---------------------------------------------------------------------- method_declaration <METHOD,SCOPE,STATEMENT> ::= [{ method_modifier }] "function" method_name "(" [parameter_list] ")" [ COLON method_type ] [ STATEMENTS ]; method_modifier <TERMINAL,METHOD_MODIFIER> ::= "public" | "private" | "protected" | "static" | "abstract" | "virtual"; method_name <TERMINAL,METHOD_NAME> ::= ident; method_type <TERMINAL,METHOD_TYPE> ::= type; parameter_list ::= { parameter, ","} ; parameter <METHOD_ARG> ::= optional_parameter | required_parameter | rest_arguments; required_parameter ::= param_name COLON param_type;

Coconut2D User Manual Chapter 8: Programming Language
69
optional_parameter ::= "optional" ["missing"] required_parameter [ "=" expression ]; param_type <TERMINAL,METHOD_ARG_TYPE> ::= type; param_name <TERMINAL,METHOD_ARG_NAME> ::= ident; rest_arguments ::= "..." [COLON scalar_type]; //---------------------------------------------------------------------- // LAMBDA //---------------------------------------------------------------------- lambda_declaration <METHOD,SCOPE,STATEMENT> ::= "function" [method_name] "(" [parameter_list] ")" [ COLON method_type ] [ STATEMENTS ]; //---------------------------------------------------------------------- // CALLBACK //---------------------------------------------------------------------- callback_declaration <CALLBACK,STATEMENT> ::= "callback" callback_name "(" [callback_parameter_list] ")" [ COLON callback_result ]; callback_name <TERMINAL,CALLBACK_NAME> ::= ident; callback_result <TERMINAL,CALLBACK_TYPE> ::= type; callback_parameter_list ::= { callback_parameter, ","} ; callback_parameter <CALLBACK_ARG> ::= callback_param_name COLON callback_param_type; callback_param_name <TERMINAL,CALLBACK_ARG_NAME> ::= ident; callback_param_type <TERMINAL,CALLBACK_ARG_TYPE> ::= type; //---------------------------------------------------------------------- // VAR //---------------------------------------------------------------------- variable_declaration <STATEMENT,VAR> ::= [{ var_modifier }] "var" variable_declarators ";"; const_declaration <STATEMENT,VAR,CONST> ::= [{ var_modifier }] "const" variable_declarators ";"; variable_declarators ::= { variable_declarator, var_separator } ; variable_declarator ::= var_name COLON var_type [ "=" var_init ]; var_modifier <VAR_MODIFIER> ::= "static" | "public" | "private" | "protected" | "published" | "reference" | "delegate" | "optional" | "missing" | "databound"; var_type <TERMINAL,VAR_TYPE> ::= type; var_name <VAR_NAME> ::= ident; var_init <VAR_INITIALIZER> ::= expression; var_separator <VAR_NEXT> ::= ","; context_var <VAR> ::= var_name COLON var_type;

Coconut2D User Manual Chapter 8: Programming Language
70
//---------------------------------------------------------------------- // PROPERTY //---------------------------------------------------------------------- property_declaration <STATEMENT,SCOPE,PROPERTY> ::= { property_modifier } "property" property_name "{" property_getter [ property_setter ] "}"; property_modifier <PROPERTY_MODIFIER> ::= "static" | "public" | "private" | "protected" | "published"; property_name <PROPERTY_NAME> ::= ident; property_getter <METHOD,PROPERTY_GETTER> ::= "function" "get" "(" ")" COLON method_type STATEMENTS; property_setter <METHOD,PROPERTY_SETTER> ::= "function" "set" "(" parameter_list ")" STATEMENTS; //---------------------------------------------------------------------- // (type declaration related productions) //---------------------------------------------------------------------- access_modifiers ::= "public" | "private" | "protected"; //============================================================================================================================ // // Statements // //============================================================================================================================ STATEMENTS ::= EMPTY_BLOCK | STATEMENTS_BLOCK; STATEMENTS_BLOCK<SCOPE> ::= "{" { STATEMENT } "}"; STATEMENT ::= STATEMENTS | statement | scope_if_directive | embedded_javascript | embedded_java | embedded_cpp | embedded_html ; statement ::= break | continue | delete | do | for | for_in | if_else | return

Coconut2D User Manual Chapter 8: Programming Language
71
| switch | while | try | throw | label | variable_declaration | const_declaration | EXPRESSION; //------------------------------------------------------------ EXPRESSION <STATEMENT,ERROR="Invalid Expression"> ::= expression ";"; //------------------------------------------------------------ try <STATEMENT,SCOPE,FRIENDLYNAME="try statement"> ::= "try" STATEMENT [ catch ] [ finally ]; catch <SCOPE> ::= "catch" "(" context_var ")" STATEMENT; finally <SCOPE> ::= "finally" STATEMENT; //------------------------------------------------------------ throw <STATEMENT,FRIENDLYNAME="throw statement"> ::= "throw" expression ";"; //------------------------------------------------------------ break <STATEMENT, FRIENDLYNAME="break statement"> ::= "break" [ident] ";"; //------------------------------------------------------------ continue <STATEMENT, FRIENDLYNAME="continue statement"> ::= "continue" [ident] ";"; //------------------------------------------------------------ delete <STATEMENT, FRIENDLYNAME="delete statement"> ::= "delete" ["[" "]"] reference ";"; //------------------------------------------------------------ for <STATEMENT, FRIENDLYNAME="for statement"> ::= "for" "(" [for_init] ";" [expression] ";" [expression_list] ")" STATEMENT; for_init ::= for_var | expression_list; for_var <STATEMENT,VAR> ::= "var" variable_declarators; //------------------------------------------------------------ for_in <STATEMENT, SCOPE, FRIENDLYNAME="for in statement"> ::= "for" "(" for_var "in" expression ")" STATEMENT;

Coconut2D User Manual Chapter 8: Programming Language
72
//------------------------------------------------------------ if_else <STATEMENT, FRIENDLYNAME="if statement"> ::= "if" "(" expression ")" STATEMENT [ "else" STATEMENT ]; //------------------------------------------------------------ label <STATEMENT, FRIENDLYNAME="label statement"> ::= ident ":" STATEMENT ; //------------------------------------------------------------ return <STATEMENT, FRIENDLYNAME="return statement"> ::= "return" [expression] ";"; //------------------------------------------------------------ switch <STATEMENT, FRIENDLYNAME="switch statement"> ::= "switch" "(" expression ")" "{" [{ (case | switch_if_directive) }] [default] "}"; case <STATEMENT,SCOPE> ::= "case" expression ":" [ { STATEMENT } ]; default <STATEMENT,SCOPE> ::= "default" ":" [ { STATEMENT } ]; //------------------------------------------------------------ do <STATEMENT, FRIENDLYNAME="do-while loop statement"> ::= "do" STATEMENT "while" "(" expression ")" ";"; //------------------------------------------------------------ while <STATEMENT, FRIENDLYNAME="while loop statement"> ::= "while" "(" expression ")" [ STATEMENT ] [";"]; //============================================================================================================================ // // Expressions // //============================================================================================================================ // // The following rules establish operator precedence but make Parser slow // // Useful for producing valid AST for feeding compilers // // (increasing precedence for each successive rule) // // expression <SHOWDELIMITERS> ::= assign_term;

Coconut2D User Manual Chapter 8: Programming Language
73
// // //---------------------------------------------------------------------- // // Operator Precedence // //---------------------------------------------------------------------- // // assign_term ::= { ternary_term, assign_level_op }; // assignment is lowest precedence // // ternary_term ::= or_term ["?" expression ":" expression]; // // or_term ::= { and_term, or_level_op }; // and_term ::= { bit_term, and_level_op }; // bit_term ::= { cmp_term, bit_level_op }; // cmp_term ::= { shift_term, cmp_level_op }; // shift_term ::= { add_term, shift_level_op }; // add_term ::= { mult_term, add_level_op }; // mult_term ::= { factor, mult_level_op }; // // // Operators // assign_level_op <OPERATOR> ::= "=" | "*=" | "/=" | "%=" | "+=" | "-=" | "<<=" | ">>=" | ">>>=" | "&=" | "^=" | "|="; // or_level_op <OPERATOR> ::= "||"; // and_level_op <OPERATOR> ::= "&&" ; // bit_level_op <OPERATOR> ::= "|" | "^" | "&"; // cmp_level_op <OPERATOR> ::= "==" | "!=" | "<" | ">" | ">=" | "<="; // shift_level_op <OPERATOR> ::= ">>>" | ">>" | "<<"; // add_level_op <OPERATOR> ::= "+" | "-"; // mult_level_op <OPERATOR> ::= "/" | "*" | "%"; // unary_op <OPERATOR> ::= "-" | "~" | "+"; // prefix_op <OPERATOR> ::= "++" | "--"; // postfix_op <OPERATOR> ::= "++" | "--"; //---------------------------------------------------------------------- // Operators //---------------------------------------------------------------------- OPERATOR <OPERATOR> ::= "=" | "*=" | "/=" | "%=" | "+=" | "-=" | "<<=" | ">>=" | ">>>=" | "&=" | "^=" | "|=" | "||" | "&&" | "|" | "^" | "&" | "==" | "!=" | "<" | ">" | ">=" | "<=" | "===" | "!==" | ">>>" | ">>" | "<<" | "+" | "-" | "/" | "*" | "%" | "~" ; unary_op <OPERATOR> ::= "-" | "~" | "+"; prefix_op <OPERATOR> ::= "++" | "--" | "typeof"; postfix_op <OPERATOR> ::= "++" | "--"; expression<SHOWDELIMITERS> ::= { ternary_expr, OPERATOR }; ternary_expr ::= { factor, "." } [ "?" expression ":" expression ]; //---------------------------------------------------------------------- // Expression Factors //----------------------------------------------------------------------

Coconut2D User Manual Chapter 8: Programming Language
74
factor ::= TRUE | FALSE | UNDEFINED | NULL | NUMERIC_LITERAL | STRING_LITERAL | new_array_expr | new_expr | ("!" expression) | ("(" expression ")" [ ("." reference) ] ) | (unary_op expression) | ([prefix_op] reference [postfix_op]) | lambda_declaration | JSON ; expression_list ::= { expression, ","}; EMPTY_CALL ::= "(" ")"; // Optimize for parsing speed by using empty call EMPTY_SUBSCRIPT ::= "[" "]"; // Optimize for parsing speed by using empty array EMPTY_BLOCK ::= "{" "}"; // Optimize for parsing speed by using empty block //---------------------------------------------------------------------- // Reference (DOT, CALL, SUBSCRIPT) //---------------------------------------------------------------------- // reference term must NOT begin with keyword but may end with keyword (eg. a.default) reference <DOT> ::= reference_term [ "." { reference_term_kwrd, "." } ]; reference_term ::= ident [ { (subscript_expr | call_expr) } ]; reference_term_kwrd ::= ident_kwrd [ { (subscript_expr | call_expr) } ]; call_expr <CALL> ::= EMPTY_CALL | ( "(" expression_list ")" ); subscript_expr <SUBSCRIPT> ::= "[" expression "]"; //---------------------------------------------------------------------- // "new" //---------------------------------------------------------------------- // Creating expression must push existing DOT eg. a.b( new C() ) new_expr <SCOPE> ::= "new" (typed_array | dictionary | expression) [expression]; new_array_expr ::= EMPTY_SUBSCRIPT | ( "[" expression_list "]" ); //============================================================================================================================ // JSON (Allowed only with #pragma json) //============================================================================================================================ JSON ::= [ JSON_OBJECT ]; JSON_OBJECT ::= "{" [ { JSON_MEMBER, "," } ] "}"; JSON_ARRAY ::= "[" { JSON_VALUE, "," } "]";

Coconut2D User Manual Chapter 8: Programming Language
75
JSON_MEMBER ::= STRING_LITERAL ":" JSON_VALUE; JSON_VALUE ::= FALSE | TRUE | NULL | JSON_OBJECT | JSON_ARRAY | NUMERIC_LITERAL | STRING_LITERAL | expression; //============================================================================================================================ // // Terminals // //============================================================================================================================ ident <TERMINAL, IDENTIFIER> ::= ^keyword identifier; ident_kwrd <TERMINAL, IDENTIFIER> ::= identifier; uncaptured_ident <TERMINAL> ::= ^keyword identifier; type <TERMINAL> ::= typed_array | dictionary | ident; typed_array <TERMINAL> ::= ARRAY "<" type ">"; dictionary <TERMINAL> ::= DICTIONARY "<" type "," type ">"; qualified_name <TERMINAL> ::= ^ARRAY ^DICTIONARY { ident, "." }; //============================================================================================================================ // // Literals // //============================================================================================================================ NUMERIC_LITERAL <TERMINAL> ::= '(?:\d+e(?:\+|\-)?\d+)|(?:0[xX][0-9a-fA-F]+)|(?:\d+(?:\.\d+){0,1}[fd]{0,1})'; STRING_LITERAL <TERMINAL,STRING> ::= '\x22(?!\x22)(?:\\.|[^\x22])*\x22|\x27(?!\x27)(?:\\.|[^\x27])*\x27|([\x27\x22]{3})((?:(?!\1)[\s\S])*)\1|\x22\x22|\x27\x27'; identifier ::= '[a-zA-Z_\$][a-zA-Z0-9_\$]*'; GLOBAL <TERMINAL, CLASS_GLOBAL> ::= "Global"; // The name of the Global Scope or Global Class VOID <TERMINAL, CLASS_VOID> ::= "void"; // The name of the void VarType EVENT_BASE <TERMINAL, CLASS_EVENT_BASE> ::= "CocoEvent"; // The name of Events base Class ARRAY <TERMINAL, CLASS_ARRAY> ::= "Array"; // The name of the typed array / vector Class Template DICTIONARY <TERMINAL, CLASS_DICTIONARY> ::= "Dictionary"; // The name of the typed dictionary / map Class Template THIS <TERMINAL, IDENTIFIER_THIS> ::= "this"; // The "this" identifier SUPER <TERMINAL, IDENTIFIER_SUPER> ::= "super"; // The "supper" identifier ARGUMENTS <TERMINAL, IDENTIFIER_ARGUMENTS> ::= "arguments"; // The "arguments" identifier UNDEFINED <TERMINAL, IDENTIFIER_VOID> ::= "undefined"; // The "undefined" identifier NULL <TERMINAL, IDENTIFIER_NULL> ::= "null"; // The "null" identifier

Coconut2D User Manual Chapter 8: Programming Language
76
BOOLEAN <TERMINAL, CLASS_BOOLEAN> ::= "Boolean"; // The name of the Boolean Class TRUE <TERMINAL, IDENTIFIER_TRUE> ::= "true"; // The "true" identifier FALSE <TERMINAL, IDENTIFIER_FALSE> ::= "false"; // The "false" identifier COMMIT_REPARSE <COMMIT_STATEMENT> ::= ";"; // Commit statement punctuation //============================================================================================================================ // MemberList Directives //============================================================================================================================ COLON <MEMBERLIST_VARTYPES> ::= ":"; IMPLEMENTS <MEMBERLIST_VARTYPES="INTERFACE"> ::= "implements"; NEW <MEMBERLIST_VARTYPES="MODULE NAMESPACE PACKAGE CLASS STRUCT"> ::= "new"; DELETE <MEMBERLIST_SCOPE="VAR"> ::= "delete"; //============================================================================================================================ // // VarTypes // //============================================================================================================================ // NOTE: keep string literals in the following productions because // disjunctions of string literals are optimized for speed. // Scalars scalar_type <SCALARS> ::= "Boolean" | "Color" | "Date" | "Float" | "Integer" | "Number" | "String" | "Time" ; // Classes (internally defined) vartypes <VARTYPES> ::= "Array" | "Dictionary" | "Boolean" | "Date"
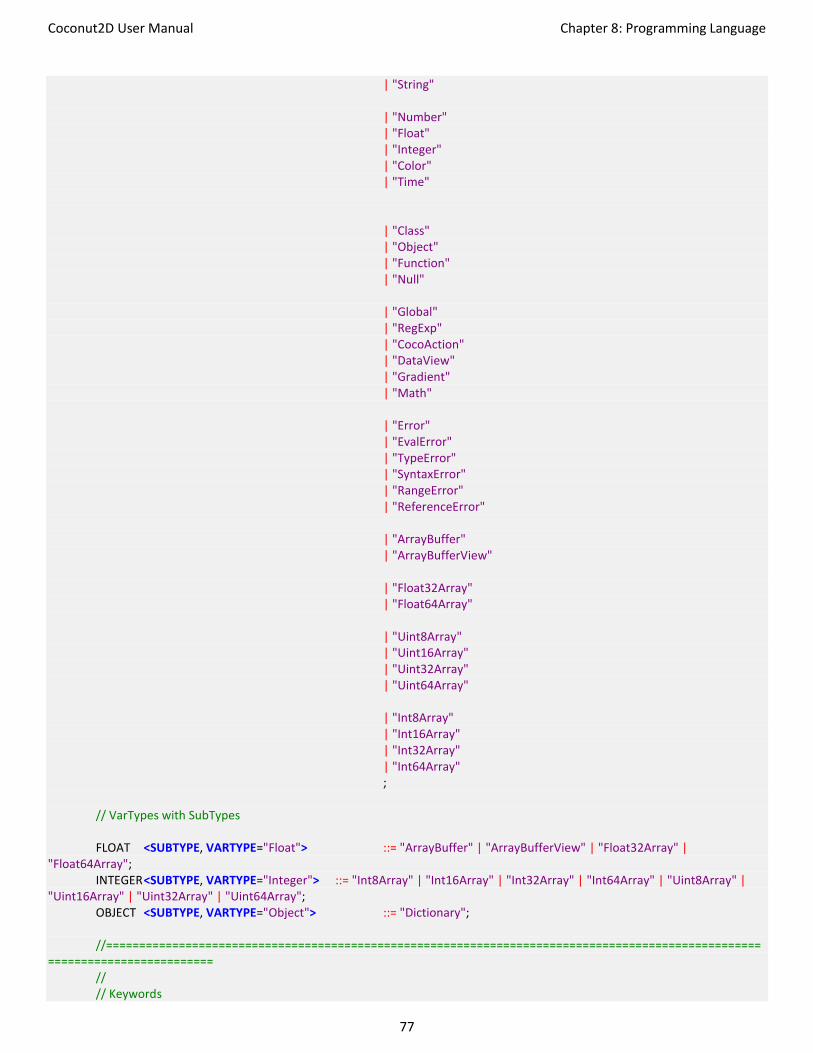
Coconut2D User Manual Chapter 8: Programming Language
77
| "String" | "Number" | "Float" | "Integer" | "Color" | "Time" | "Class" | "Object" | "Function" | "Null" | "Global" | "RegExp" | "CocoAction" | "DataView" | "Gradient" | "Math" | "Error" | "EvalError" | "TypeError" | "SyntaxError" | "RangeError" | "ReferenceError" | "ArrayBuffer" | "ArrayBufferView" | "Float32Array" | "Float64Array" | "Uint8Array" | "Uint16Array" | "Uint32Array" | "Uint64Array" | "Int8Array" | "Int16Array" | "Int32Array" | "Int64Array" ; // VarTypes with SubTypes FLOAT <SUBTYPE, VARTYPE="Float"> ::= "ArrayBuffer" | "ArrayBufferView" | "Float32Array" | "Float64Array"; INTEGER <SUBTYPE, VARTYPE="Integer"> ::= "Int8Array" | "Int16Array" | "Int32Array" | "Int64Array" | "Uint8Array" | "Uint16Array" | "Uint32Array" | "Uint64Array"; OBJECT <SUBTYPE, VARTYPE="Object"> ::= "Dictionary"; //============================================================================================================================ // // Keywords

Coconut2D User Manual Chapter 8: Programming Language
78
// //============================================================================================================================ keyword <KEYWORDS> ::= "abstract" | "break" | "callback" | "case" | "catch" | "class" | "compiler_break" | "const" | "continue" | "control" | "debugger" | "default" | "delegate" | "delete" | "do" | "else" | "emscripten" | "enum" | "event" | "export" | "finally" | "for" | "function" | "if" | "implements" | "import" | "in" | "inline" | "interface" | "let" | "namespace" | "new" | "optional" | "missing" | "private" | "property" | "protected" | "public" | "published" | "reference" | "return" | "state" | "static" | "struct" | "switch" | "thread" | "throw" | "try" | "typeof" | "union" | "use" | "var" | "virtual"

Coconut2D User Manual Chapter 8: Programming Language
79
| "void" | "volatile" | "while" | "with" ; };