CMS 101 v7 - MoneyGramcorporate.moneygram.com/documents/CMS101_v90.pdfCMS 101 Introduction to...
114
CMS 101 Introduction to Ingeniux CMS One-day course CMS 9.0 v2.0-20141216 Ingeniux Customer Support is available Monday through Friday 8:00 a.m. to 5:00 p.m. Support tools and issue tracking are also available through the customer support site. Call (877) 299-8900 Email [email protected] Visit support.ingeniux.com
Transcript of CMS 101 v7 - MoneyGramcorporate.moneygram.com/documents/CMS101_v90.pdfCMS 101 Introduction to...

CMS 101
Introduction to Ingeniux CMS
One-day course CMS 9.0 v2.0-20141216
Ingeniux Customer Support is available Monday through Friday 8:00 a.m. to 5:00 p.m. Support tools and issue tracking are also available through the customer support site.
Call (877) 299-8900 Email [email protected] Visit support.ingeniux.com

What’s New in Ingeniux CMS
2 Ingeniux Corporation
Introduction to Ingeniux CMS
Ingeniux Corporation 3
Table of Contents
Table of Contents ........................................................................................................................................ 3
Notice .............................................................................................................................................................. 6 Course Prerequisites .................................................................................................................. 6
Legal Notice ............................................................................................................................... 6
COURSE OBJECTIVES ........................................................................................................................ 7
AUTHORING FUNDAMENTALS ..................................................................................................... 9
Getting Started with Ingeniux CMS ...................................................................................................10 Accessing Ingeniux CMS .........................................................................................................10
Working in Different Languages .........................................................................................10
Examining the Dashboard Tab .............................................................................................11
Creating Pages ............................................................................................................................12
Creating a New Page on the Dashboard Tab ..................................................................12
Identifying Elements on a Page............................................................................................13 Accessing Element Help Text ................................................................................................16
Completing Page Elements ...................................................................................................................16 Completing Text Elements .....................................................................................................16
Working with List Groups ......................................................................................................17
Completing Link Elements .....................................................................................................17 Working with Image Elements.............................................................................................20
Working in the XHTML Editor ..............................................................................................24
Using Predefined Content .....................................................................................................................33 Working with LinkSet Elements ..........................................................................................33
Working with Multi-Select Elements .................................................................................35
Using Components ....................................................................................................................35
Embedded Components ..........................................................................................................37
Finishing a Page ........................................................................................................................................39
Checking Spelling ......................................................................................................................39
Saving a Page 40
Previewing a Page .....................................................................................................................40
Advancing Pages in Workflow.............................................................................................................40
Advancing a Page .......................................................................................................................41
Viewing Page Properties ........................................................................................................41
Editing Existing Pages ............................................................................................................................43
Locating Pages by xID ..............................................................................................................43
Using Search 43
Using Advanced Search Features ........................................................................................44
Assigning a Page ........................................................................................................................45
Renaming a Page ........................................................................................................................46
Using In-Context Editing........................................................................................................................47

What’s New in Ingeniux CMS
4 Ingeniux Corporation
Editing Text in ICE Mode ....................................................................................................... 48
Using the XHTML Editor in ICE Mode ............................................................................... 48
Changing Components in ICE Mode .................................................................................. 49
Picking a Date in ICE Mode ................................................................................................... 50
Working with Static Files in ICE Mode ............................................................................. 50
ADVANCED AUTHORING TASKS ............................................................................................... 52
Working with Hidden Elements ......................................................................................................... 53
Reverting to a Previous Version of a Page ..................................................................................... 54
Using Rollback ............................................................................................................................ 54
Using the History Tab .............................................................................................................. 54
Deleting and Restoring Pages ............................................................................................................. 55
Deleting a Page ........................................................................................................................... 55
Restoring a Deleted Page ....................................................................................................... 55
Accessing Help for the CMS .................................................................................................................. 56 Exploring Help Options .......................................................................................................... 56
Using the Ingeniux Support Site .......................................................................................... 56
Creating Page Layouts in Page Builder ........................................................................................... 57 Setting Presentation Properties .......................................................................................... 58
Configuring Layout and Adding Content ......................................................................... 60
ORGANIZING CONTENT ................................................................................................................ 62
Working in the Site Tree ....................................................................................................................... 63 Structuring Navigations ......................................................................................................... 64
Organizing the Site Tree ......................................................................................................... 65
Managing Pages in the Site Tree ........................................................................................................ 67
Moving a Page in the Site Tree ............................................................................................. 67
Copying a Page in the Site Tree ........................................................................................... 69
Renaming a Page in the Site Tree ....................................................................................... 69
Selecting Multiple Nodes ....................................................................................................... 70
Creating Pages, Components, and Folders ..................................................................................... 71
Creating Pages Outside of Page Creation Rules ............................................................ 71 Creating Components .............................................................................................................. 72
Creating Folders ........................................................................................................................ 73
Working with Taxonomy ...................................................................................................................... 74 Categorizing Pages and Components ................................................................................ 74
Using the Taxonomy Manager ............................................................................................. 75
Associating Categories from the Taxonomy Tab .......................................................... 76 Using Taxonomy to Generate Page Content ................................................................... 78
WORKING AS AN ADMINISTRATOR ........................................................................................ 80
Exploring the Administration Pane .................................................................................................. 81
Accessing System Options ..................................................................................................... 81
Introduction to Ingeniux CMS
Ingeniux Corporation 5
Communicating in the CMS ..................................................................................................................83
Sending Email in the CMS .......................................................................................................83
Examining the Publishing Paradigm.................................................................................................84
CMS (design-time).....................................................................................................................84
Dynamic Site Server (runtime) ............................................................................................84
Checking Pages In and Out....................................................................................................................85
Checking Pages Out...................................................................................................................85
Checking Pages In ......................................................................................................................85 Undoing Check Out ...................................................................................................................86
Marking and Unmarking for Publish ................................................................................................86
Marking a Page for Publish ....................................................................................................86
Unmarking a Page for Publish ..............................................................................................87
Publishing Pages .......................................................................................................................................88
Performing a Publish ...............................................................................................................88
Viewing Results with the Publish Monitor ......................................................................90
Adding and Removing Pages from Workflow ...............................................................................91
Adding Pages to Workflow ....................................................................................................92
Removing Pages from Workflow ........................................................................................92
Viewing Workflow History ....................................................................................................93
Viewing Workflow Reports ...................................................................................................93
Working with URL Settings ..................................................................................................................95
Setting up URL Redirects ........................................................................................................95
Configuring Structured URLs ................................................................................................95
Configuring Custom URLs ......................................................................................................97
Customizing In-Context Editing ...........................................................................................98
Localizing Site Definitions ................................................................................................................. 100 Page and Component Schemas ......................................................................................... 101
PCRs, Workflows, and Workflow States ........................................................................ 101 Page Language ......................................................................................................................... 102
USING REPORTS AND ANALYTICS ......................................................................................... 104
Running Internal Reports .................................................................................................................. 105
Viewing Results ....................................................................................................................... 106
Configuring Reports .............................................................................................................. 106
Scheduling Reports ................................................................................................................ 107
Understanding Report Types ............................................................................................ 108
Tracking Content with Google Analytics ...................................................................................... 112
Enabling the Publishing Target ........................................................................................ 112 Linking the Site ........................................................................................................................ 113
Revoking Access to the Site ................................................................................................ 113
Viewing Reports ...................................................................................................................... 113
What’s New in Ingeniux CMS
6 Ingeniux Corporation
Notice
20141216
Course Prerequisites
This course is designed for those who are new to the Ingeniux environment. To complete this course, you need a working knowledge of the following:
Navigating on a PC or Mac
Using a web browser
Legal Notice
These materials are the property of Ingeniux Corporation and may only be reproduced with explicit permission.
Introduction to Ingeniux CMS
Ingeniux Corporation 7
Course Objectives
In this course, you'll learn to:
Access Ingeniux CMS and navigate the environment.
Create, edit, and design web pages in the CMS.
Manage the basics of site administration.
Organize pages within the website.
Publish pages inside and outside workflow.
Use reports and analytics.

What’s New in Ingeniux CMS
8 Ingeniux Corporation
Introduction to Ingeniux CMS
Ingeniux Corporation 9
Authoring Fundamentals
In this chapter, you'll learn to:
Access the CMS and navigate the environment.
Create pages and work with elements in the Edit Form.
Perform common tasks in the XHTML Editor.
Upload documents and images to the CMS.
Edit, preview, and save changes to pages.
Advance pages in workflow.
What’s New in Ingeniux CMS
10 Ingeniux Corporation
Getting Started with Ingeniux CMS
Ingeniux CMS 9.0 provides the tools needed to create, update, publish, and manage web pages. Users access the CMS via the CMS client, which can display all options and commands available in the CMS or a predefined subset of options. The options and commands displayed depend upon the permissions that have been set for the user accessing the client.
The CMS client works on both PC and Mac operating systems and runs on Internet Explorer, Firefox, Chrome, and Safari.
Refer to online product documentation for supported platform and browser versions.
Accessing Ingeniux CMS
The CMS is installed on a server. Once it’s installed and configured, users can access the CMS as a web application, without installing any software.
To access Ingeniux CMS:
1. Open a web browser. 2. Navigate to the URL provided by the web server administrator. 3. Enter your network credentials at the login screen and click Login.
Working in Different Languages
The CMS provides translation packs for Spanish, French Canadian, German, Simplified Chinese, and Japanese. All content that is part of the CMS Client user interface (UI) and is not provided by administrators or content contributors is translated. The multilingual UI is designed so that content contributors can interact with the CMS in the language in which they provide content. New language packs may be added in future releases.
To change the UI language:
1. Click Language above the toolbar in the CMS Client. A drop-down menu displays available language choices.
2. Select the language in which you’d like to work in the CMS.
The language setting is saved for future sessions on the same computer. The login screen adapts to your browser or OS locale and appears in the correct language automatically.
Using the language feature doesn't affect user-entered content. Page content appears on the site in the language in which it was written. Administrative text like workflow and page creation labels isn't translated, either. Other features are available for localizing administrator-provided content.
Introduction to Ingeniux CMS
Ingeniux Corporation 11
Examining the Dashboard Tab
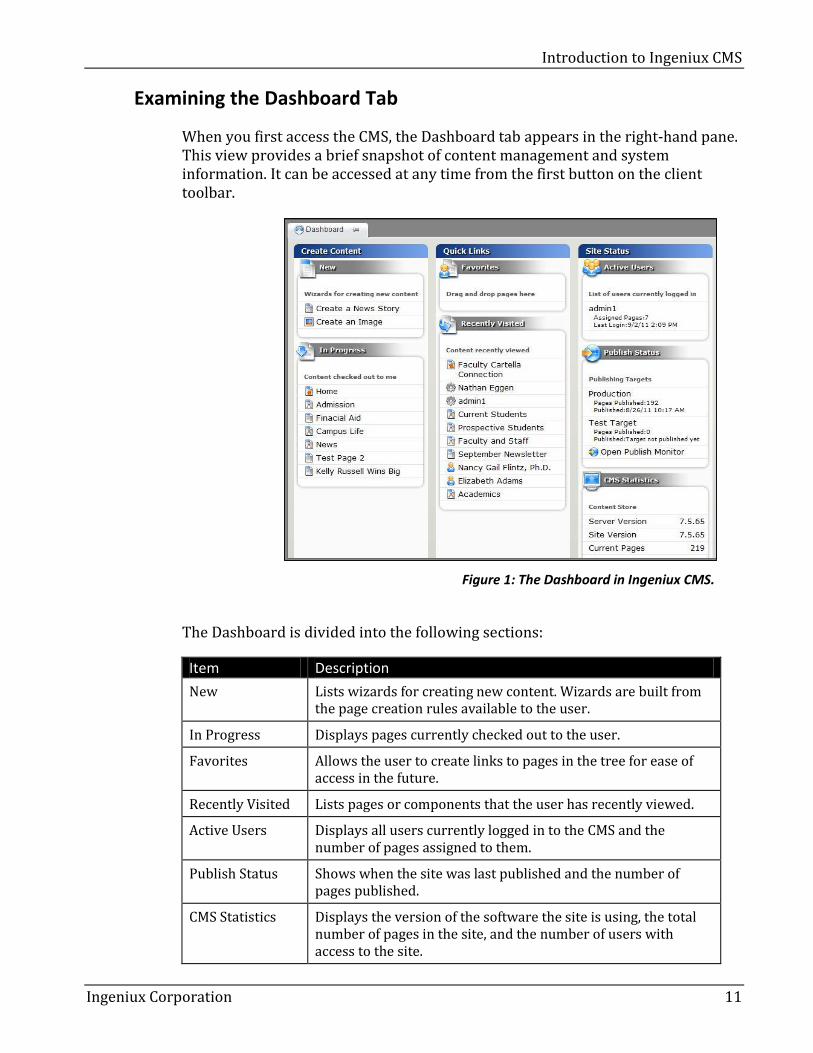
When you first access the CMS, the Dashboard tab appears in the right-hand pane. This view provides a brief snapshot of content management and system information. It can be accessed at any time from the first button on the client toolbar.
Figure 1: The Dashboard in Ingeniux CMS.
The Dashboard is divided into the following sections:
Item Description
New Lists wizards for creating new content. Wizards are built from the page creation rules available to the user.
In Progress Displays pages currently checked out to the user.
Favorites Allows the user to create links to pages in the tree for ease of access in the future.
Recently Visited Lists pages or components that the user has recently viewed.
Active Users Displays all users currently logged in to the CMS and the number of pages assigned to them.
Publish Status Shows when the site was last published and the number of pages published.
CMS Statistics Displays the version of the software the site is using, the total number of pages in the site, and the number of users with access to the site.
What’s New in Ingeniux CMS
12 Ingeniux Corporation
Creating Pages
By default, new web pages can be created anywhere in the site tree. However, it’s a good idea to keep the site’s information architecture in mind when you place a new page. By placing pages logically and consistently, you’ll help site visitors find the content they’re looking for.
To help preserve the integrity of the site, website administrators can define page creation rules that restrict where users can create new pages. The page creation rules available to the logged-in user are listed as “Wizards” on the Dashboard tab. Because these rules are permission-based, different groups of users may see different lists of rules.
Creating a New Page on the Dashboard Tab
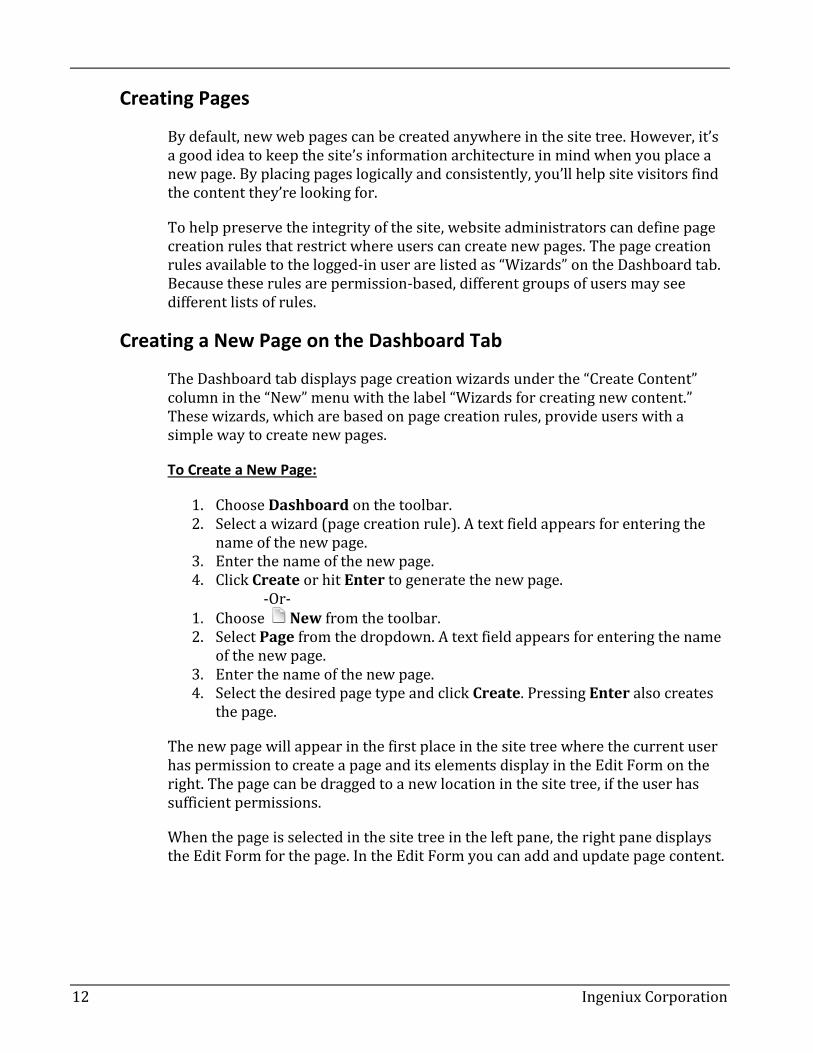
The Dashboard tab displays page creation wizards under the “Create Content” column in the “New” menu with the label “Wizards for creating new content.” These wizards, which are based on page creation rules, provide users with a simple way to create new pages.
To Create a New Page:
1. Choose Dashboard on the toolbar. 2. Select a wizard (page creation rule). A text field appears for entering the
name of the new page. 3. Enter the name of the new page. 4. Click Create or hit Enter to generate the new page.
-Or- 1. Choose New from the toolbar. 2. Select Page from the dropdown. A text field appears for entering the name
of the new page. 3. Enter the name of the new page. 4. Select the desired page type and click Create. Pressing Enter also creates
the page.
The new page will appear in the first place in the site tree where the current user has permission to create a page and its elements display in the Edit Form on the right. The page can be dragged to a new location in the site tree, if the user has sufficient permissions.
When the page is selected in the site tree in the left pane, the right pane displays the Edit Form for the page. In the Edit Form you can add and update page content.

Introduction to Ingeniux CMS
Ingeniux Corporation 13
Identifying Elements on a Page
The Edit Form displays possible content available for use on the page.
Figure 2: The Edit Form in Ingeniux CMS.
In general, the elements available vary according to the purpose of the page. For example, an Event Page might contain an event location element, whereas a generic Detail Page would probably not.
Even though the specific elements vary by page type, there are a fixed number of element types. Different element types take different forms of input (e.g. text, image, media). The icon next to an element provides a visual clue about the input needed to complete the element.

What’s New in Ingeniux CMS
14 Ingeniux Corporation
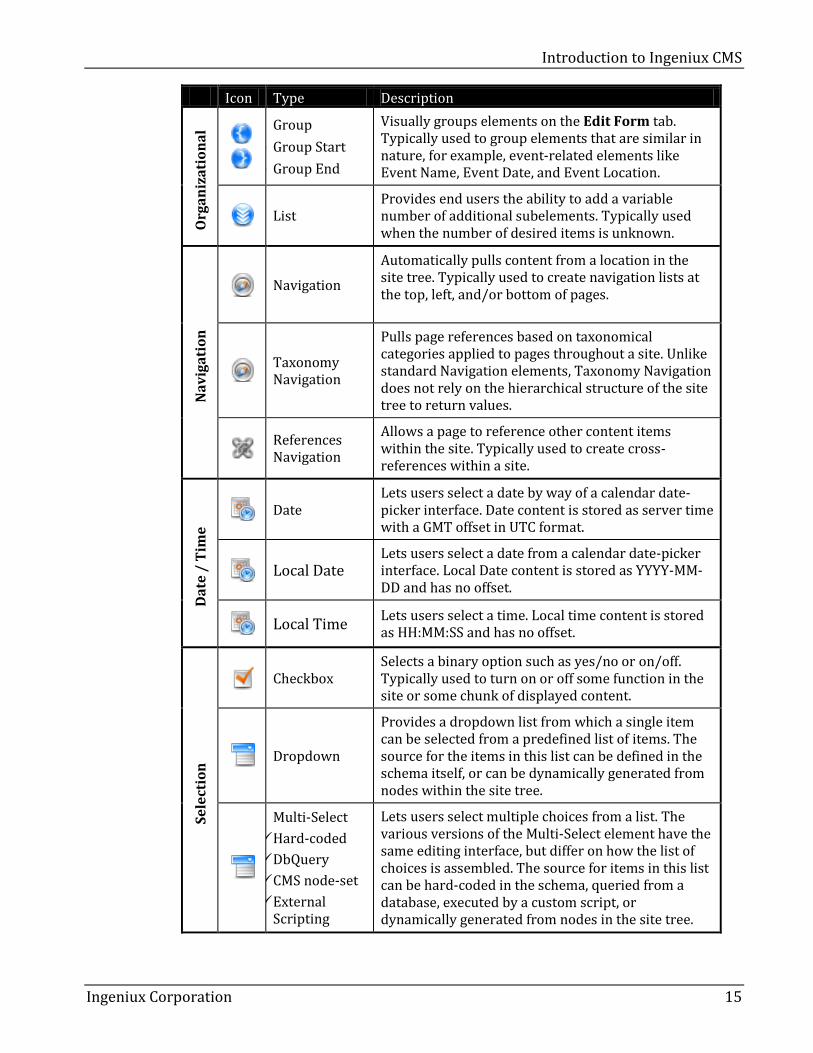
The table below provides a list of elements that are currently available for use in the CMS.
Icon Type Description
Te
xt
Plain Text Contains only unformatted text. The Plain Text element is often used for titles, abstracts, captions, or contact information.
XHTML Editor Contains text that accepts formatting , hyperlinks,
images, tables, and more. Typically used for the main body of a page to create formatted content.
Ass
ets
Image Selects an image from the xml\images folder on the server to display on the current page.
Media Selects a media file from the xml\media folder on the server to display on the current page. Typically used to link to media such as a sound or video file.
Document Links directly to a document from the xml\documents folder on the server. Typically used to link to a PDF or Word document.
Lin
ks
Link
Links to either an internal page in the site tree, an external web site, or a document in the xml\documents folder. Typically used to create hyperlinks to other locations.
Link Set
Selects a series of links in re-orderable lists as well as a text title for the set of links. This element generates content in a typical navigation-page node format and supports structured URLs. Content will update automatically when linked pages are checked in.
Fu
nct
ion
al
Component Creates a relationship between two nodes in the site tree. This element is a slot into which a chunk of content can be dropped for other pages to use.
Insert Pulls content from either an outside source, such as a webpage, or from an internal source. Typically used to pull in content from a webpage outside the site.
Com Execute Connects to a .dll file such as for a DbQuery, SMTP connector, or SOAP connector. Typically used to retrieve records from external data.
Java Execute
Calls a Java Execute object to import data into a page. Typically, the information originates from a database
ComExecute and JavaExecute Elements are recommended for advanced users.
Password Encrypts information used by JavaExecute and ComExecute components. Typically used to encrypt a database connection string.
Introduction to Ingeniux CMS
Ingeniux Corporation 15
Icon Type Description
Org
an
iza
tio
na
l
Group
Group Start
Group End
Visually groups elements on the Edit Form tab. Typically used to group elements that are similar in nature, for example, event-related elements like Event Name, Event Date, and Event Location.
List Provides end users the ability to add a variable number of additional subelements. Typically used when the number of desired items is unknown.
Na
vig
ati
on
Navigation
Automatically pulls content from a location in the site tree. Typically used to create navigation lists at the top, left, and/or bottom of pages.
Taxonomy Navigation
Pulls page references based on taxonomical categories applied to pages throughout a site. Unlike standard Navigation elements, Taxonomy Navigation does not rely on the hierarchical structure of the site tree to return values.
References Navigation
Allows a page to reference other content items within the site. Typically used to create cross-references within a site.
Da
te /
Tim
e Date
Lets users select a date by way of a calendar date-picker interface. Date content is stored as server time with a GMT offset in UTC format.
Local Date Lets users select a date from a calendar date-picker interface. Local Date content is stored as YYYY-MM-DD and has no offset.
Local Time Lets users select a time. Local time content is stored as HH:MM:SS and has no offset.
Se
lect
ion
Checkbox Selects a binary option such as yes/no or on/off. Typically used to turn on or off some function in the site or some chunk of displayed content.
Dropdown
Provides a dropdown list from which a single item can be selected from a predefined list of items. The source for the items in this list can be defined in the schema itself, or can be dynamically generated from nodes within the site tree.
Multi-Select
Hard-coded
DbQuery
CMS node-set
External Scripting
Lets users select multiple choices from a list. The various versions of the Multi-Select element have the same editing interface, but differ on how the list of choices is assembled. The source for items in this list can be hard-coded in the schema, queried from a database, executed by a custom script, or dynamically generated from nodes in the site tree.
What’s New in Ingeniux CMS
16 Ingeniux Corporation
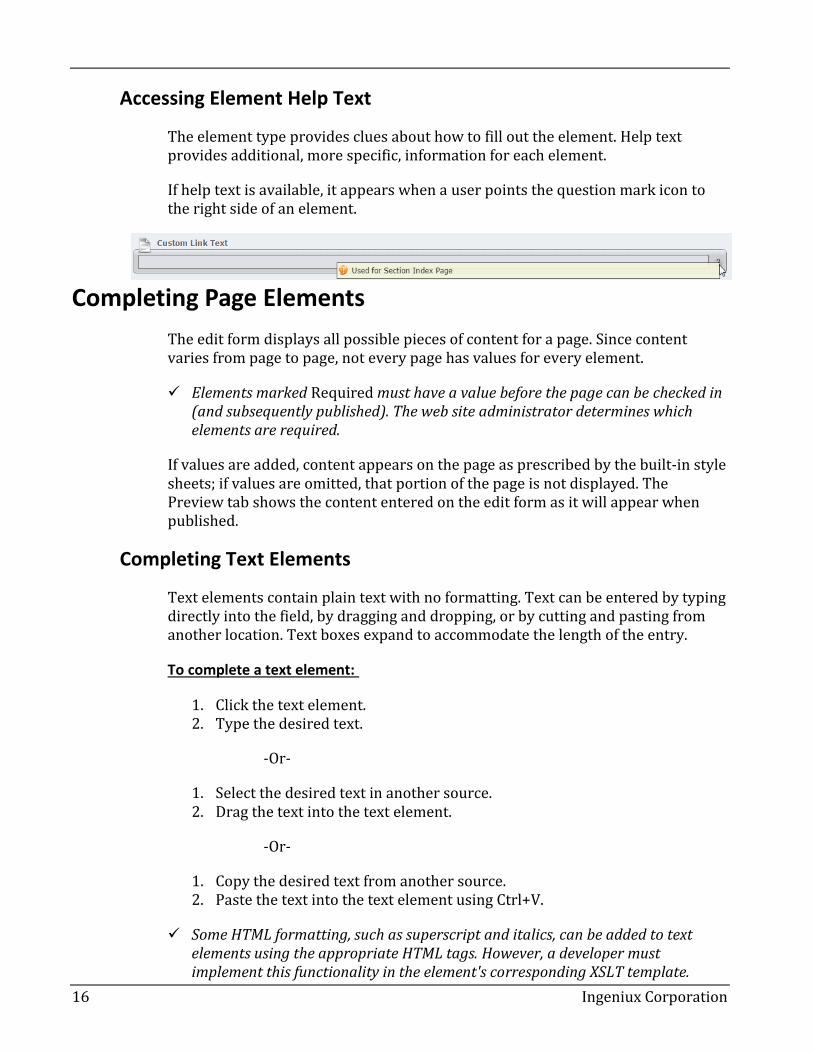
Accessing Element Help Text
The element type provides clues about how to fill out the element. Help text provides additional, more specific, information for each element.
If help text is available, it appears when a user points the question mark icon to the right side of an element.
Completing Page Elements
The edit form displays all possible pieces of content for a page. Since content varies from page to page, not every page has values for every element.
Elements marked Required must have a value before the page can be checked in (and subsequently published). The web site administrator determines which elements are required.
If values are added, content appears on the page as prescribed by the built-in style sheets; if values are omitted, that portion of the page is not displayed. The Preview tab shows the content entered on the edit form as it will appear when published.
Completing Text Elements
Text elements contain plain text with no formatting. Text can be entered by typing directly into the field, by dragging and dropping, or by cutting and pasting from another location. Text boxes expand to accommodate the length of the entry.
To complete a text element:
1. Click the text element. 2. Type the desired text.
-Or-
1. Select the desired text in another source. 2. Drag the text into the text element.
-Or-
1. Copy the desired text from another source. 2. Paste the text into the text element using Ctrl+V.
Some HTML formatting, such as superscript and italics, can be added to text elements using the appropriate HTML tags. However, a developer must implement this functionality in the element's corresponding XSLT template.

Introduction to Ingeniux CMS
Ingeniux Corporation 17
Working with List Groups
List groups provide a way to add multiple pieces of similar content. For example, a list group could be used to generate a list of links, with the author entering each link separately.
Each list group element displays an arrow at the top right that collapses or expands the group. When the element is expanded, you can see the individual items in the list. Each item in the list can be modified in the same way as a regular element.
The number of items in a list group is flexible. Items can be added or removed to meet content needs.
To Add Items to a List Group:
1. Expand the list group, if necessary. 2. Locate the list item to appear immediately above the new item. 3. Click Add Item . A new element appears in the list.
Removing elements from a list also removes the content stored in the item.
To Remove Items from a List Group:
1. Locate the list item to remove. 2. Click Remove Item
Completing Link Elements
Link elements can create links to internal pages, external pages, and documents uploaded to the web server. The process for completing a link element varies depending on the type of link it contains.
Creating Internal Links
You can create an internal link by searching for the name of the page, by entering the xID for the page, or by dragging the desired page from the site tree into the link element.
To create an internal link:
1. Select Internal, if necessary. 2. Enter the first three letters of the name of the page to which the link will
point, or enter the xID, for a list of pages with matching names. 3. Select the desired page from the list.
-Or-
What’s New in Ingeniux CMS
18 Ingeniux Corporation
1. Select Internal, if necessary. 2. Locate the page to which the link will point in the site tree.
(Do not select the page; just ensure it is visible in the tree.) 3. Drag the page from the site tree to the link element.
For links to internal pages, the text that displays on the published page comes from the page to which the link points. If you want to display different text, you’ll need to create the link as an external link rather than an internal link.
Creating External Links
External links point to pages that live outside of the Ingeniux site. To create an external link, you need to provide the address that the link will point to and the text to be used for the link itself.
To create an external link:
1. Select External. 2. Enter the URL of the page to which the link points.
(Clicking Browse lets you proof the link without leaving the CMS.) 3. Expand the link element so that the Link Name field appears. 4. Enter a link name. 5. [Optional] Check Display in new window to display the page in a new
browser window. 6. Click Preview and test the link.
Creating Document Links
Document links point to files stored on the web server. These files have to be uploaded to the server before links can point to them.
To create a document link:
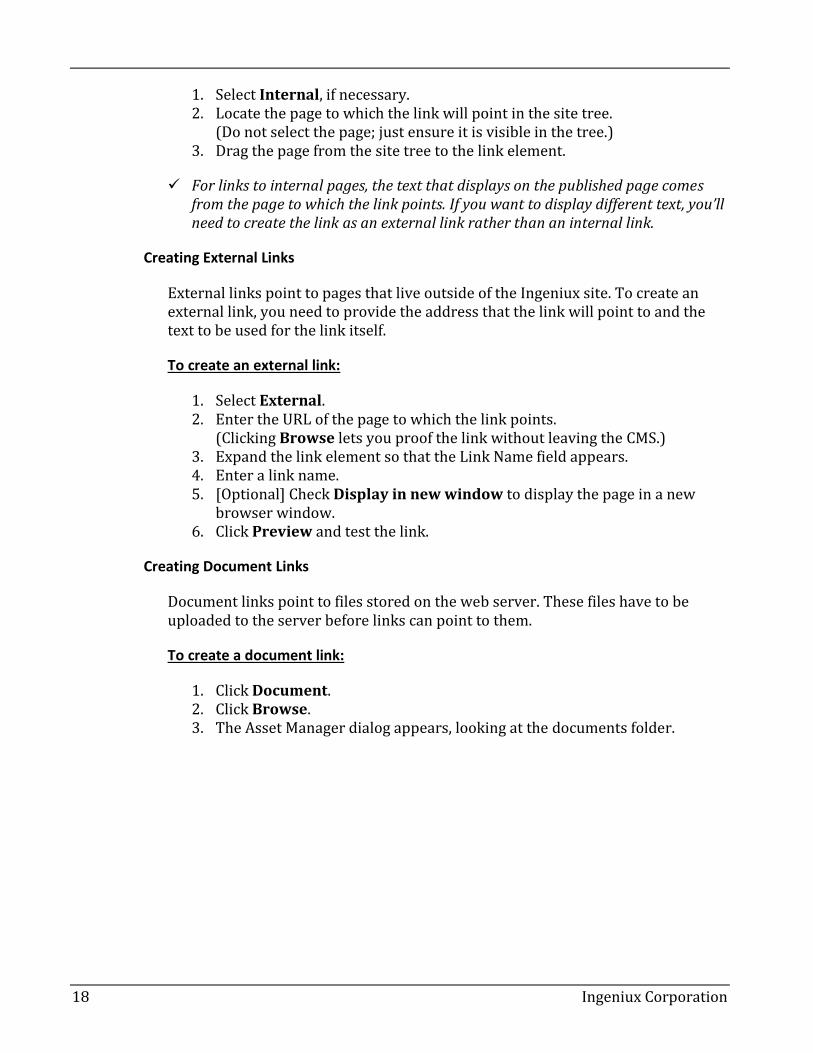
1. Click Document. 2. Click Browse. 3. The Asset Manager dialog appears, looking at the documents folder.
Introduction to Ingeniux CMS
Ingeniux Corporation 19
Figure 3: The documents folder in the Asset Manager.
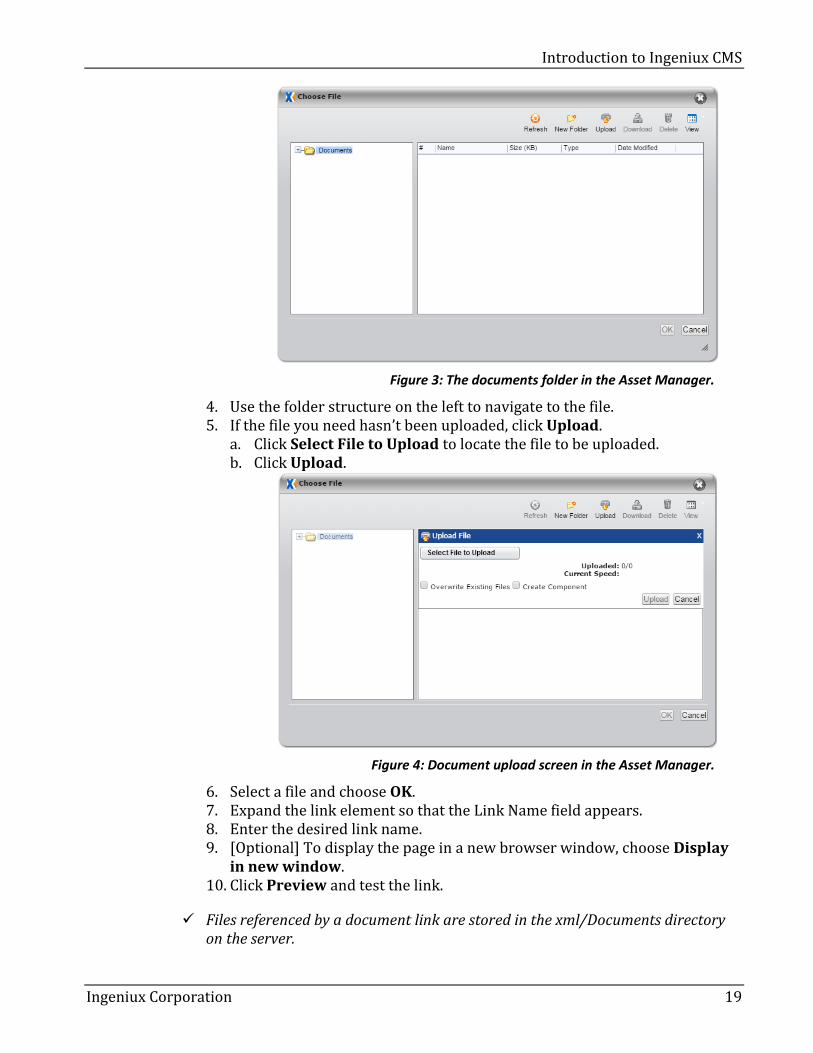
4. Use the folder structure on the left to navigate to the file. 5. If the file you need hasn’t been uploaded, click Upload.
a. Click Select File to Upload to locate the file to be uploaded. b. Click Upload.
Figure 4: Document upload screen in the Asset Manager.
6. Select a file and choose OK. 7. Expand the link element so that the Link Name field appears. 8. Enter the desired link name. 9. [Optional] To display the page in a new browser window, choose Display
in new window. 10. Click Preview and test the link.
Files referenced by a document link are stored in the xml/Documents directory on the server.
What’s New in Ingeniux CMS
20 Ingeniux Corporation
Working with Image Elements
In the Image element you can choose an image to display on a page. You can also edit the image and, depending on the site implementation, alter an image’s layout, spacing, and size.
Adding an Image to a Page
Image elements point to files stored on the web server. These files have to be uploaded to the server before they can be included in an image element.
To add an image to an Image element:
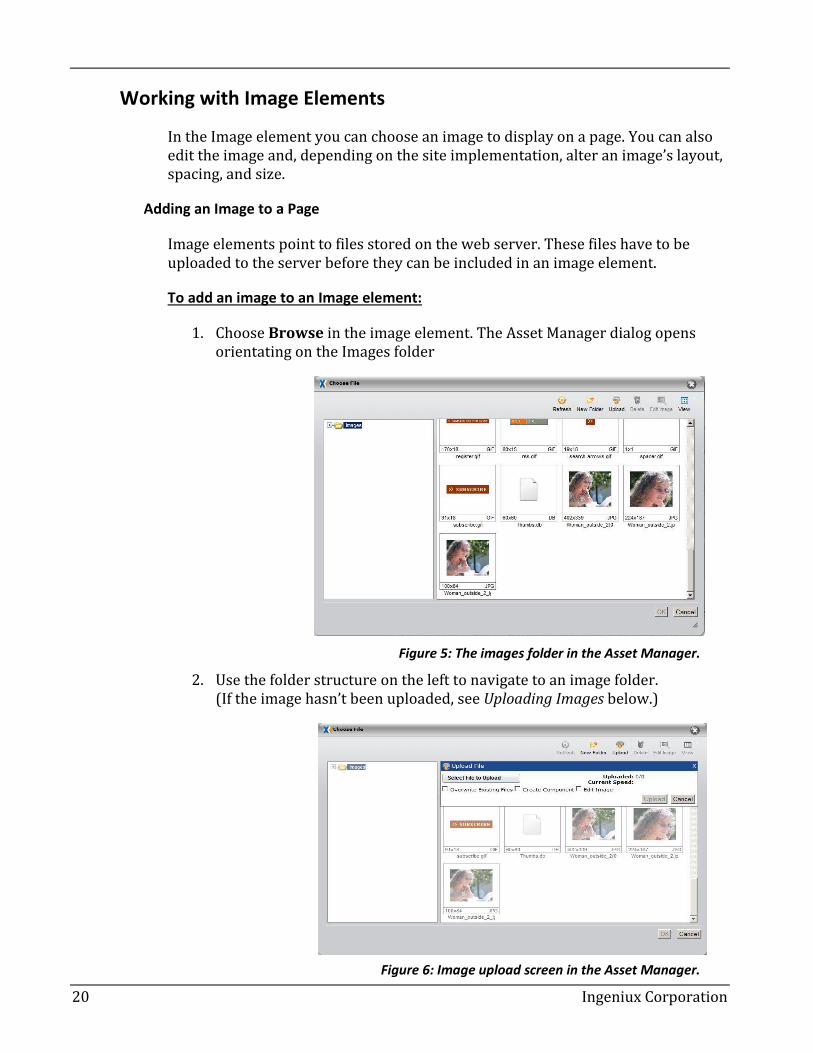
1. Choose Browse in the image element. The Asset Manager dialog opens orientating on the Images folder
Figure 5: The images folder in the Asset Manager.
2. Use the folder structure on the left to navigate to an image folder. (If the image hasn’t been uploaded, see Uploading Images below.)
Figure 6: Image upload screen in the Asset Manager.
Introduction to Ingeniux CMS
Ingeniux Corporation 21
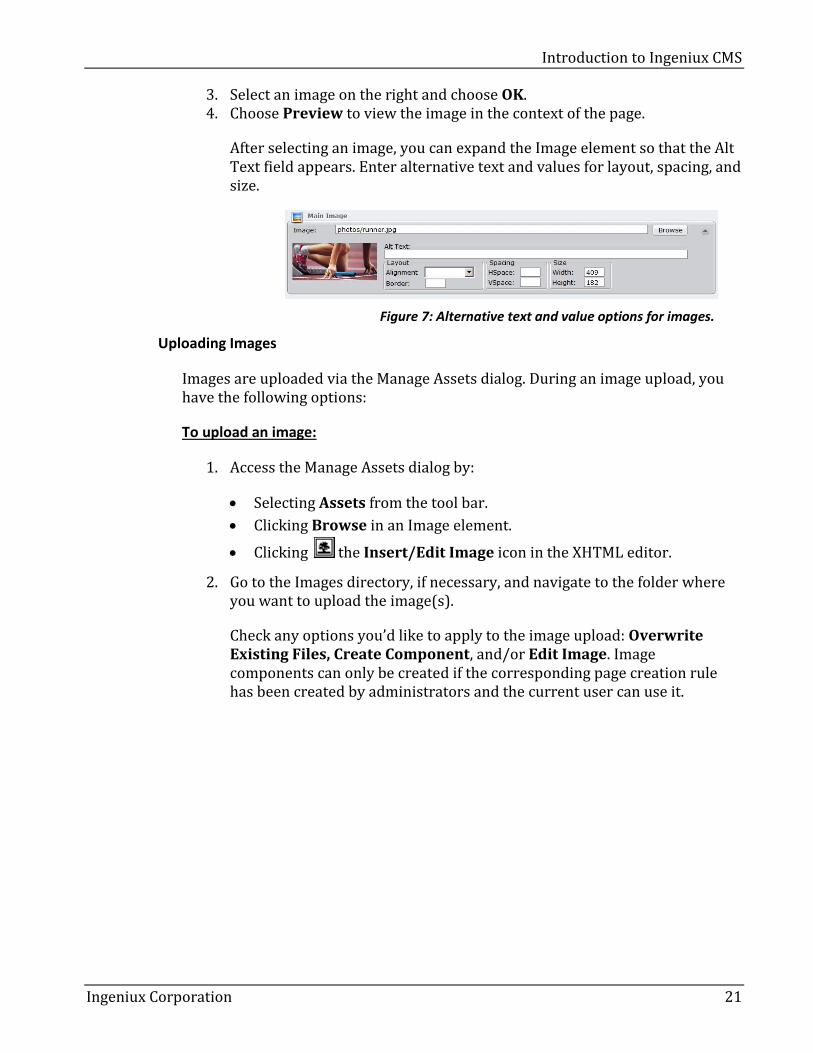
3. Select an image on the right and choose OK. 4. Choose Preview to view the image in the context of the page.
After selecting an image, you can expand the Image element so that the Alt Text field appears. Enter alternative text and values for layout, spacing, and size.
Figure 7: Alternative text and value options for images.
Uploading Images
Images are uploaded via the Manage Assets dialog. During an image upload, you have the following options:
To upload an image:
1. Access the Manage Assets dialog by:
Selecting Assets from the tool bar.
Clicking Browse in an Image element.
Clicking the Insert/Edit Image icon in the XHTML editor.
2. Go to the Images directory, if necessary, and navigate to the folder where you want to upload the image(s).
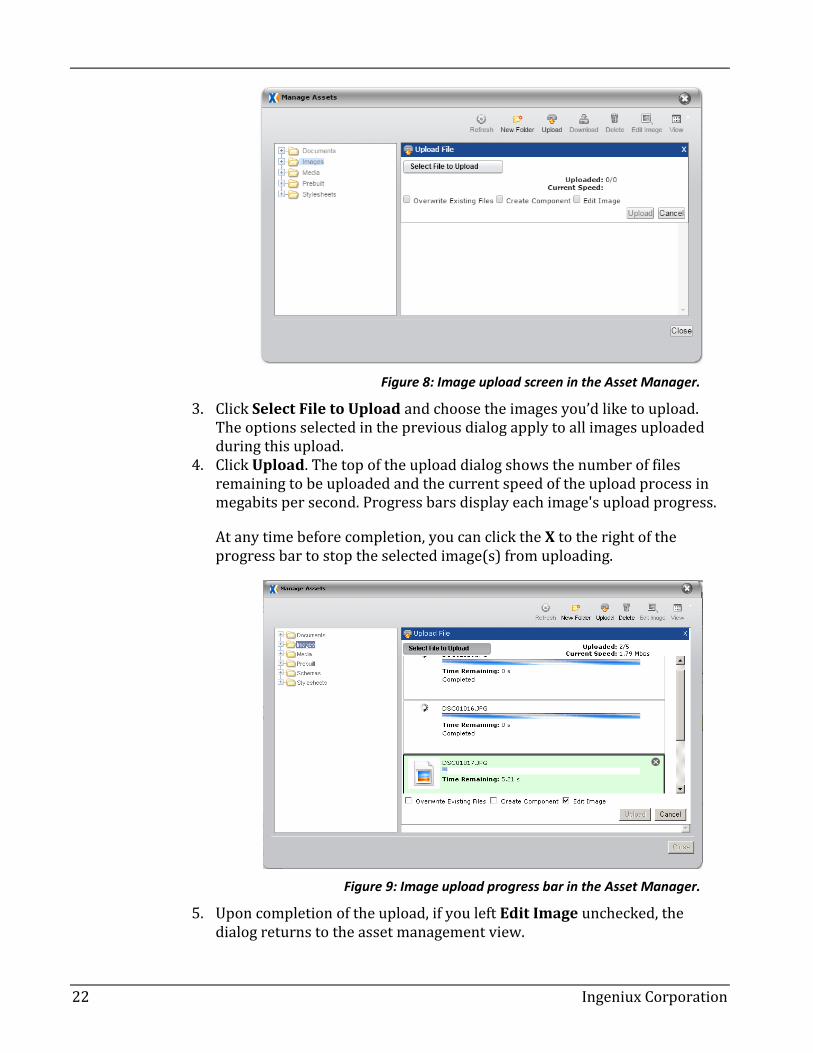
Check any options you’d like to apply to the image upload: Overwrite Existing Files, Create Component, and/or Edit Image. Image components can only be created if the corresponding page creation rule has been created by administrators and the current user can use it.
What’s New in Ingeniux CMS
22 Ingeniux Corporation
Figure 8: Image upload screen in the Asset Manager.
3. Click Select File to Upload and choose the images you’d like to upload. The options selected in the previous dialog apply to all images uploaded during this upload.
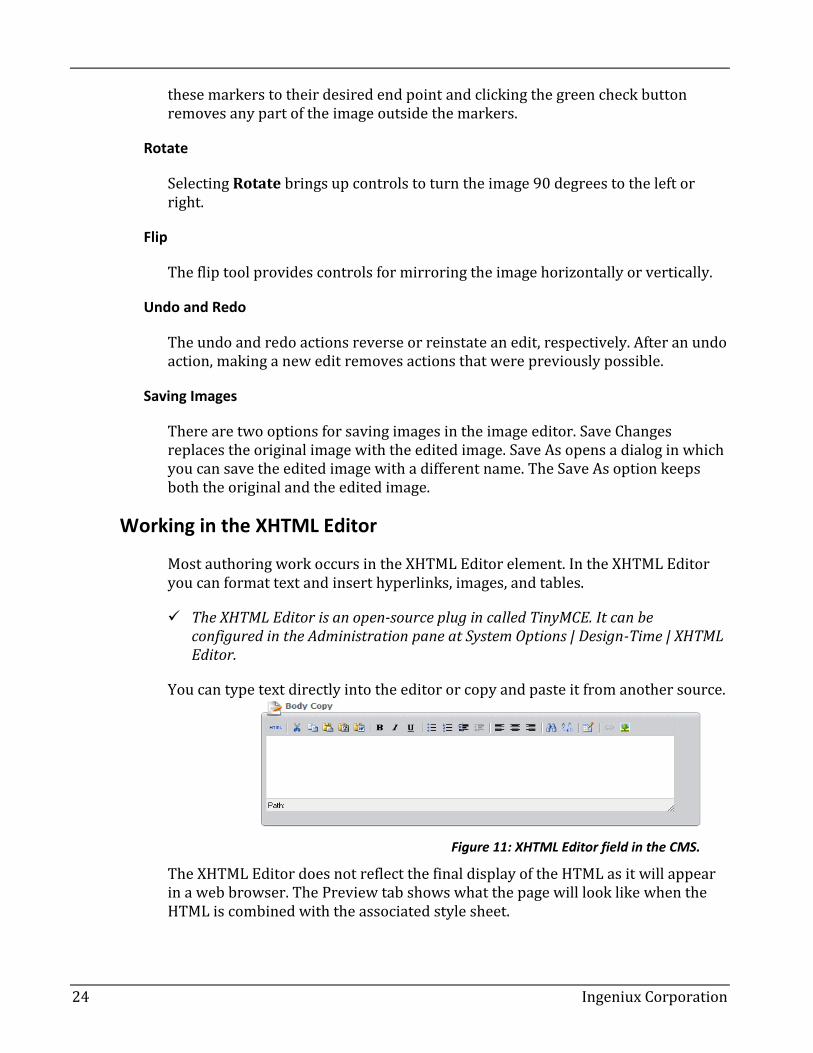
4. Click Upload. The top of the upload dialog shows the number of files remaining to be uploaded and the current speed of the upload process in megabits per second. Progress bars display each image's upload progress.
At any time before completion, you can click the X to the right of the progress bar to stop the selected image(s) from uploading.
Figure 9: Image upload progress bar in the Asset Manager.
5. Upon completion of the upload, if you left Edit Image unchecked, the dialog returns to the asset management view.

Introduction to Ingeniux CMS
Ingeniux Corporation 23
Editing an Image
In the image editor, users can manipulate images before they're displayed on the page. Images can be resized, cropped, rotated, or flipped.
If you check the Edit Image box before uploading images, an Edit Image button appears next to each uploaded image. Clicking the button opens the image editor. All images uploaded during this process will be queued in the editor.
You can also open the image editor by selecting an image (or multiple images) in the Manage Assets dialog and clicking Edit Image.
Figure 10: Image editing tools in the Asset Manager.
Resize
To change the dimensions of an image, click Resize.
Width and height attributes are measured in pixels. Selecting Keep Aspect Ratio constricts changes to width and height so that both values change proportionally. With this box checked, you will only be able to enter a new value for width, and the value for height changes automatically.
In general, it’s not a good idea to increase the size of an image by more than a few pixels. Size increases of more than 5 percent result in a blurry picture. Images with text overlays should never be enlarged this way.
Crop
The crop feature removes part of an image along one or more edges. When selected, the crop tool places edge and corner markers on the image. Dragging
What’s New in Ingeniux CMS
24 Ingeniux Corporation
these markers to their desired end point and clicking the green check button removes any part of the image outside the markers.
Rotate
Selecting Rotate brings up controls to turn the image 90 degrees to the left or right.
Flip
The flip tool provides controls for mirroring the image horizontally or vertically.
Undo and Redo
The undo and redo actions reverse or reinstate an edit, respectively. After an undo action, making a new edit removes actions that were previously possible.
Saving Images
There are two options for saving images in the image editor. Save Changes replaces the original image with the edited image. Save As opens a dialog in which you can save the edited image with a different name. The Save As option keeps both the original and the edited image.
Working in the XHTML Editor
Most authoring work occurs in the XHTML Editor element. In the XHTML Editor you can format text and insert hyperlinks, images, and tables.
The XHTML Editor is an open-source plug in called TinyMCE. It can be configured in the Administration pane at System Options | Design-Time | XHTML Editor.
You can type text directly into the editor or copy and paste it from another source.
Figure 11: XHTML Editor field in the CMS.
The XHTML Editor does not reflect the final display of the HTML as it will appear in a web browser. The Preview tab shows what the page will look like when the HTML is combined with the associated style sheet.
Introduction to Ingeniux CMS
Ingeniux Corporation 25
At the bottom of the XHTML editor is the element path. This feature displays the current depth and path in the HTML markup. It can be useful for building HTML literacy and for troubleshooting.
To the right of the element path is a resize handle. Resizing makes it easier to work with long blocks of content.
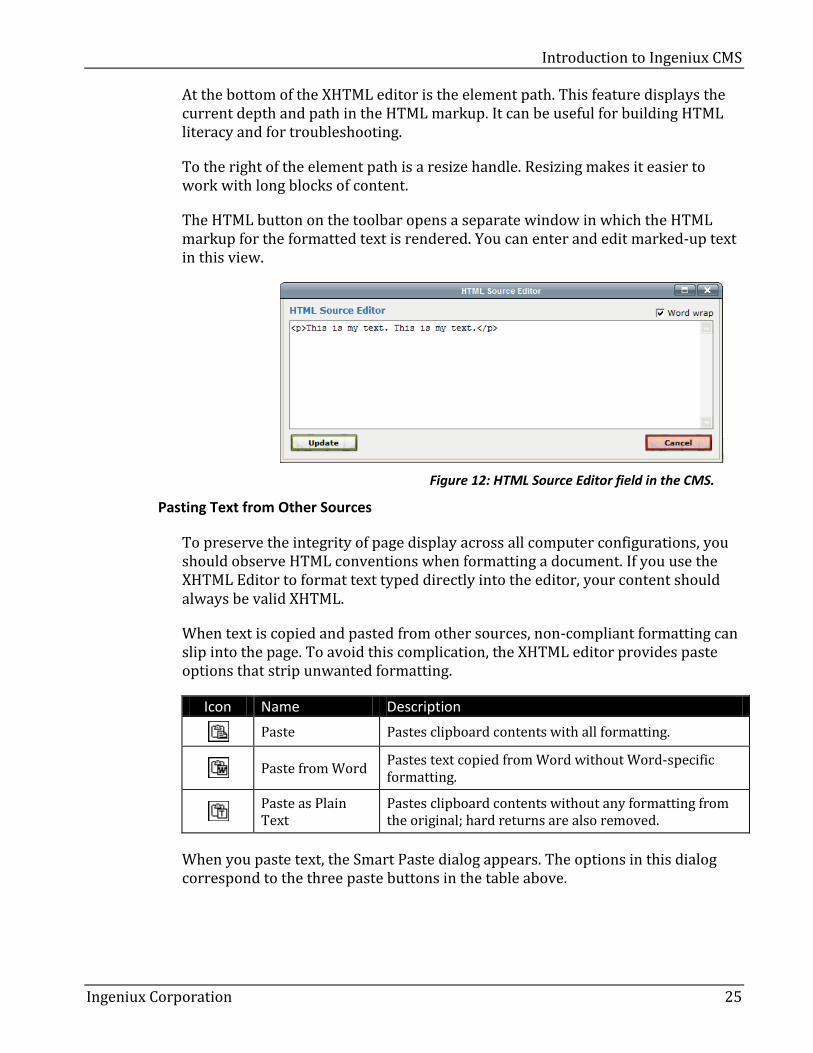
The HTML button on the toolbar opens a separate window in which the HTML markup for the formatted text is rendered. You can enter and edit marked-up text in this view.
Figure 12: HTML Source Editor field in the CMS.
Pasting Text from Other Sources
To preserve the integrity of page display across all computer configurations, you should observe HTML conventions when formatting a document. If you use the XHTML Editor to format text typed directly into the editor, your content should always be valid XHTML.
When text is copied and pasted from other sources, non-compliant formatting can slip into the page. To avoid this complication, the XHTML editor provides paste options that strip unwanted formatting.
Icon Name Description
Paste Pastes clipboard contents with all formatting.
Paste from Word Pastes text copied from Word without Word-specific formatting.
Paste as Plain Text
Pastes clipboard contents without any formatting from the original; hard returns are also removed.
When you paste text, the Smart Paste dialog appears. The options in this dialog correspond to the three paste buttons in the table above.
What’s New in Ingeniux CMS
26 Ingeniux Corporation
Figure 13: Pasting text from other sources in the XHTML Editor field.
Adding a Hyperlink to an Internal Page
In the Ingeniux CMS environment, links to other pages in the site are considered internal links. Internal links rely on the xID of the page to which the link points. By relying on this unique page identifier, the link will retain its integrity even if the page is moved elsewhere in the site.
To link to an internal page:
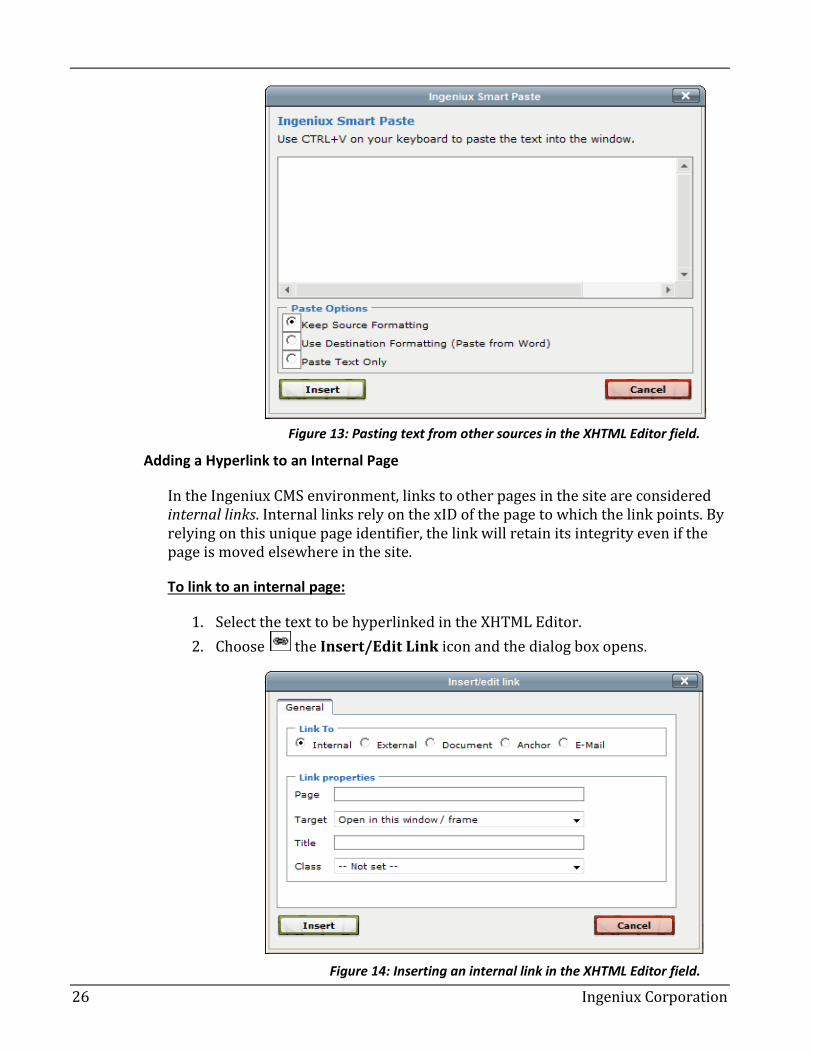
1. Select the text to be hyperlinked in the XHTML Editor.
2. Choose the Insert/Edit Link icon and the dialog box opens.
Figure 14: Inserting an internal link in the XHTML Editor field.

Introduction to Ingeniux CMS
Ingeniux Corporation 27
3. Type the first few letters of the desired page name in the Page field and select the desired page from the list.
-Or-
Enter the xID for the page to which the link will point.
4. Specify a target, title, and class, if desired. 5. Choose Insert.
Adding a Hyperlink to an External Page
In the Ingeniux environment, links to pages outside the site are considered external links. When you create an external link, it’s important to test the link to ensure accuracy.
To link to an external page:
1. Select the text to be hyperlinked in the XHTML Editor.
2. Select the Insert/Edit Link icon and the dialog box opens. 3. Choose External.
Figure 15: Inserting an external link in the XHTML Editor field.
4. Choose the Browse icon. 5. Type the URL for the desired page in the address line and click Go.
(Pressing Enter also locates the page.) 6. Verify that the expected page appears and click Save Address. 7. [Optional] Specify a target, title, and class. 8. Choose Insert.

What’s New in Ingeniux CMS
28 Ingeniux Corporation
Adding a Hyperlink to a Document or File
Links to files stored on the web server are called document links. Files referenced by document links must be uploaded to the xml/documents directory on the Design-Time server.
To link to a document or file:
1. Select the text to be hyperlinked in the XHTML Editor. (Select from right to left to avoid selecting the blank space at the end of the word or phrase.)
2. Click the Insert/Edit Link icon and the dialog box opens. 3. Select Document.
Figure 16: Inserting a document link in the XHTML Editor field.
4. Click the Browse icon. The Asset Manager dialog opens orientating on the Documents folder.

Introduction to Ingeniux CMS
Ingeniux Corporation 29
Figure 17: Selecting a document in the Asset Manager.
5. Use the folder structure on the left to navigate to the file you want to link. 6. If the file hasn’t been uploaded, choose Upload.
a. Choose Select File to Upload and locate the file. b. Click Upload.
Figure 18: Uploading a document in the Asset Manager.
7. Select the file and click OK. 8. [Optional] Specify a target, title, and class. 9. Choose Insert.
What’s New in Ingeniux CMS
30 Ingeniux Corporation
Removing a Hyperlink
Links that are no longer valid can be removed without deleting the underlying text.
To remove a hyperlink:
1. Right-click the hyperlinked text in the XHTML Editor.
2. Choose the Unlink icon.
Working with Images
Some pages may have predefined image elements; an image element controls the position of the image on the page. When more flexible positioning is called for, or when there’s no predefined image element for the image you want to include, you can add an image via the XHTML Editor.
Images have to be uploaded to the Images directory on the web server before they are available through the XHTML Editor. (For a full discussion of uploading options, see Uploading Images above.)
Once an image is uploaded and selected, you can configure attributes to control the display of the image on the page.
Introduction to Ingeniux CMS
Ingeniux Corporation 31
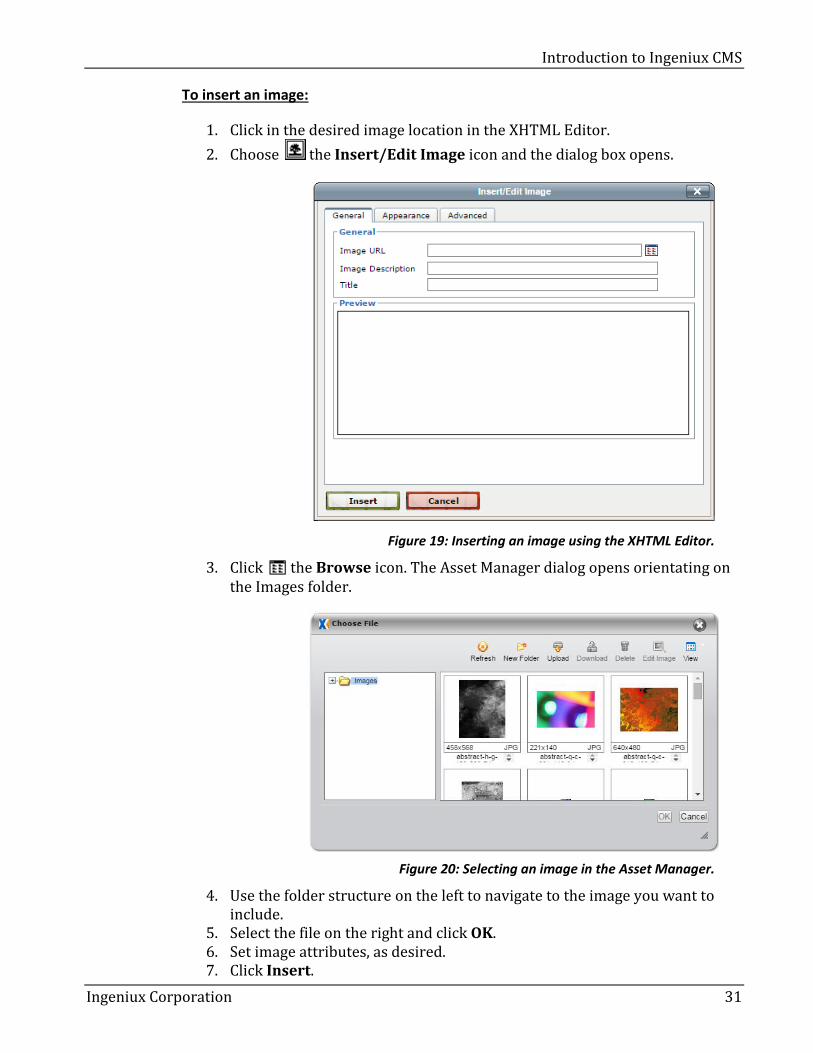
To insert an image:
1. Click in the desired image location in the XHTML Editor.
2. Choose the Insert/Edit Image icon and the dialog box opens.
Figure 19: Inserting an image using the XHTML Editor.
3. Click the Browse icon. The Asset Manager dialog opens orientating on the Images folder.
Figure 20: Selecting an image in the Asset Manager.
4. Use the folder structure on the left to navigate to the image you want to include.
5. Select the file on the right and click OK. 6. Set image attributes, as desired. 7. Click Insert.
What’s New in Ingeniux CMS
32 Ingeniux Corporation
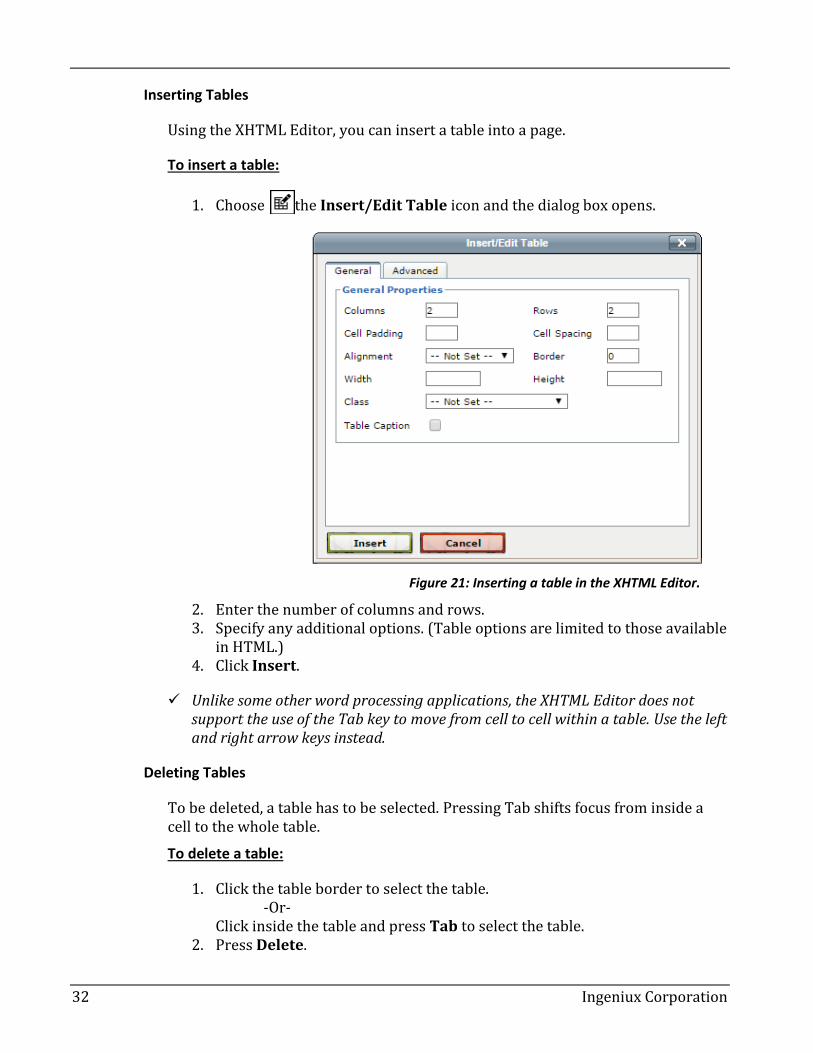
Inserting Tables
Using the XHTML Editor, you can insert a table into a page.
To insert a table:
1. Choose the Insert/Edit Table icon and the dialog box opens.
Figure 21: Inserting a table in the XHTML Editor.
2. Enter the number of columns and rows. 3. Specify any additional options. (Table options are limited to those available
in HTML.) 4. Click Insert.
Unlike some other word processing applications, the XHTML Editor does not support the use of the Tab key to move from cell to cell within a table. Use the left and right arrow keys instead.
Deleting Tables
To be deleted, a table has to be selected. Pressing Tab shifts focus from inside a cell to the whole table.
To delete a table:
1. Click the table border to select the table. -Or-
Click inside the table and press Tab to select the table. 2. Press Delete.
Introduction to Ingeniux CMS
Ingeniux Corporation 33
Using Predefined Content
The Ingeniux CMS makes it easy to reuse content. A single news story abstract may appear in several places throughout the site, even though the news story only exists in one place. Or contact information for an office may appear on multiple pages but only exist in a single component.
This section explores three CMS tools for reusing content: the LinkSet element, the multi-select element, and the component.
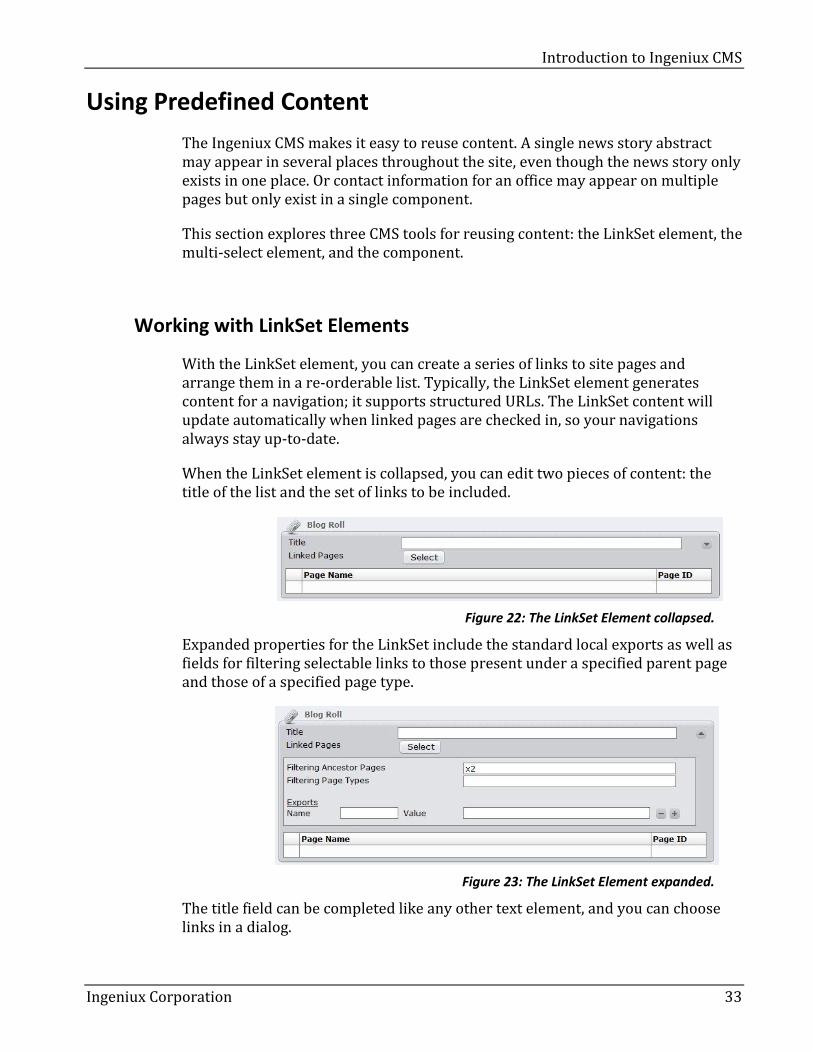
Working with LinkSet Elements
With the LinkSet element, you can create a series of links to site pages and arrange them in a re-orderable list. Typically, the LinkSet element generates content for a navigation; it supports structured URLs. The LinkSet content will update automatically when linked pages are checked in, so your navigations always stay up-to-date.
When the LinkSet element is collapsed, you can edit two pieces of content: the title of the list and the set of links to be included.
Figure 22: The LinkSet Element collapsed.
Expanded properties for the LinkSet include the standard local exports as well as fields for filtering selectable links to those present under a specified parent page and those of a specified page type.
Figure 23: The LinkSet Element expanded.
The title field can be completed like any other text element, and you can choose links in a dialog.
What’s New in Ingeniux CMS
34 Ingeniux Corporation
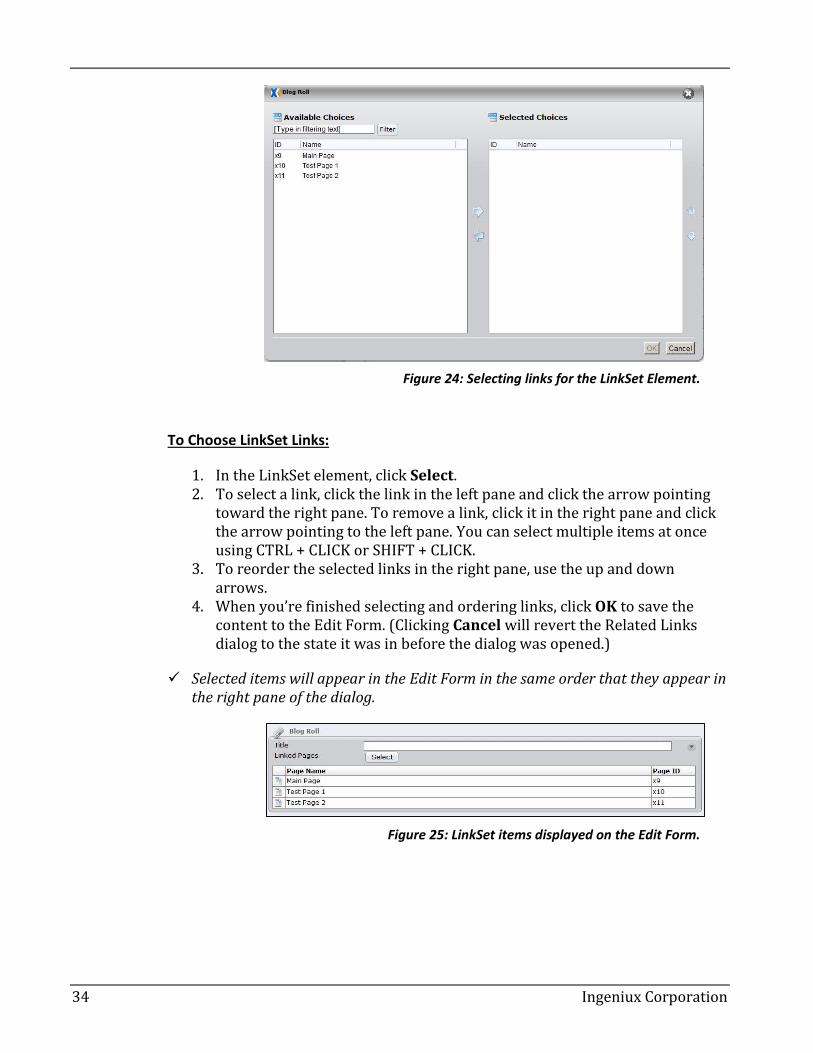
Figure 24: Selecting links for the LinkSet Element.
To Choose LinkSet Links:
1. In the LinkSet element, click Select. 2. To select a link, click the link in the left pane and click the arrow pointing
toward the right pane. To remove a link, click it in the right pane and click the arrow pointing to the left pane. You can select multiple items at once using CTRL + CLICK or SHIFT + CLICK.
3. To reorder the selected links in the right pane, use the up and down arrows.
4. When you’re finished selecting and ordering links, click OK to save the content to the Edit Form. (Clicking Cancel will revert the Related Links dialog to the state it was in before the dialog was opened.)
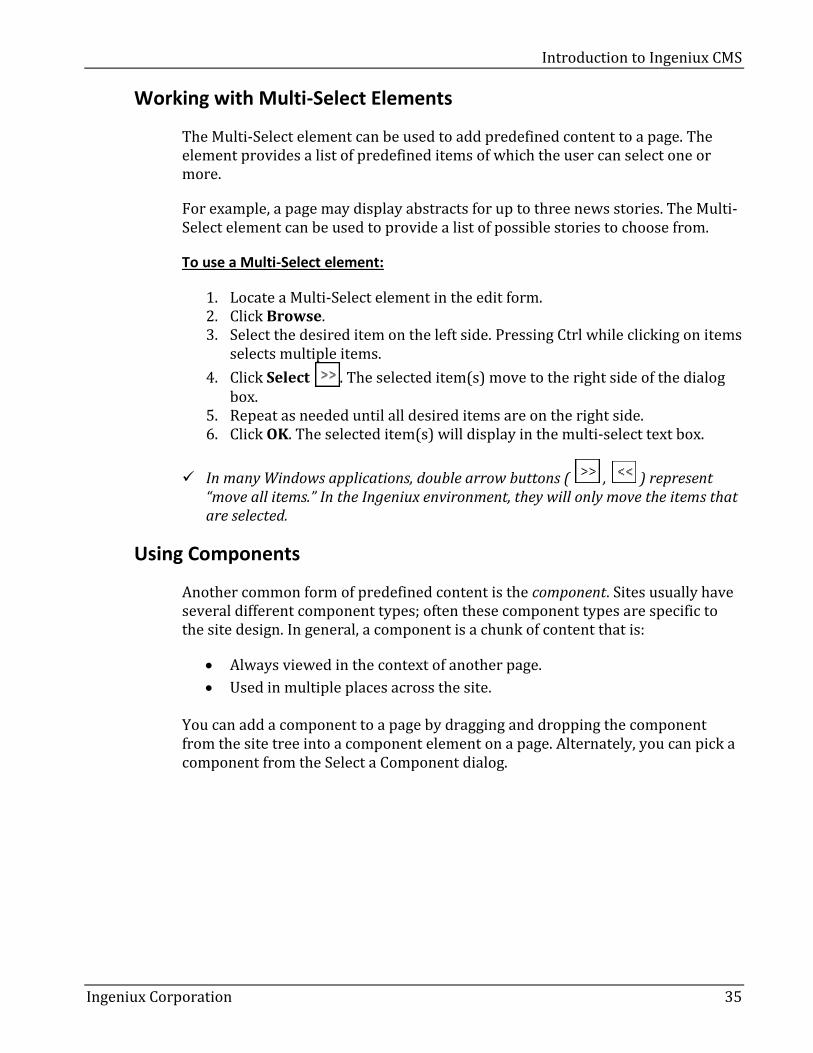
Selected items will appear in the Edit Form in the same order that they appear in the right pane of the dialog.
Figure 25: LinkSet items displayed on the Edit Form.
Introduction to Ingeniux CMS
Ingeniux Corporation 35
Working with Multi-Select Elements
The Multi-Select element can be used to add predefined content to a page. The element provides a list of predefined items of which the user can select one or more.
For example, a page may display abstracts for up to three news stories. The Multi-Select element can be used to provide a list of possible stories to choose from.
To use a Multi-Select element:
1. Locate a Multi-Select element in the edit form. 2. Click Browse. 3. Select the desired item on the left side. Pressing Ctrl while clicking on items
selects multiple items.
4. Click Select . The selected item(s) move to the right side of the dialog box.
5. Repeat as needed until all desired items are on the right side. 6. Click OK. The selected item(s) will display in the multi-select text box.
In many Windows applications, double arrow buttons ( , ) represent “move all items.” In the Ingeniux environment, they will only move the items that are selected.
Using Components
Another common form of predefined content is the component. Sites usually have several different component types; often these component types are specific to the site design. In general, a component is a chunk of content that is:
Always viewed in the context of another page.
Used in multiple places across the site.
You can add a component to a page by dragging and dropping the component from the site tree into a component element on a page. Alternately, you can pick a component from the Select a Component dialog.

What’s New in Ingeniux CMS
36 Ingeniux Corporation
Figure 26: Choosing a component from the Select a Component dialog.
The Select a Component dialog provides several options for finding components.
Option Description
Component Type Filter
Located in the upper left, this drop-down list displays all component types. Selecting a single type restricts the component list to only those of the selected component type.
Component Name Filter
Located in the upper right, this text box restricts the component list to only those whose names contain the typed text.
Component List Located in the middle of the page, this list shows potential components. If you type a letter while the list is selected, the list will jump to components whose names begin with the typed letter.
The preview area in the lower half of the Select a Component dialog displays the content contained within the component selected in the component list. This makes it easier to verify that the component selected is in fact the one you want.

Introduction to Ingeniux CMS
Ingeniux Corporation 37
To use a component:
1. Locate a Component element on the Edit Form. 2. Click Pick. The Select a Component dialog appears. 3. Filter for the desired component, if necessary. 4. Preview the values for the selected component. 5. Choose Select.
If a component element is no longer needed on a page, you can use the Clear button to remove any component data from the element.
A Note on Image Components
The UI for the Image Component schema includes the Image Editor within the edit form. Image properties appear in a right side bar. Clicking on the image or the Browse button will bring up the image selection dialog.
Figure 27: The Image Editor within an image component.
A thumbnail-size image can be created directly from the UI. Default dimensions are 100 x 75 pixels, but this can be changed. This dialog creates an asset in the images directory.
Embedded Components
In Ingeniux CMS 9.0, components can be embedded, or edited within the pages where they're used. Content can also be edited directly in place without being created as an individual component.
Figure 28: A component with the Embed option.
What’s New in Ingeniux CMS
38 Ingeniux Corporation
To create local content:
1. On a Component element, click Embed. 2. This creates a local instance (that is, specific to the page on which it's being
used) of the component, which can then be edited. Review the component's content, and, if necessary, make changes to it.
3. Click Save.
After embedding a component, you can choose to share it. This means either updating the original component or creating a new component that can be used in pages across the site.
To share an embedded component:
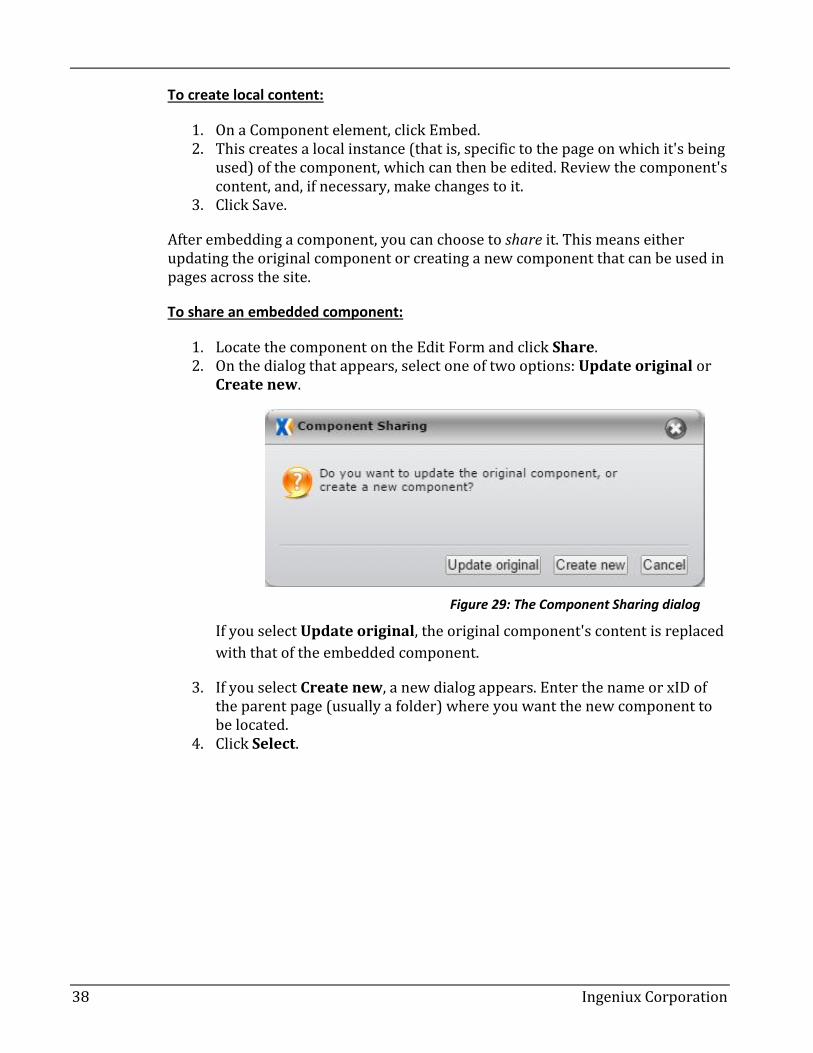
1. Locate the component on the Edit Form and click Share. 2. On the dialog that appears, select one of two options: Update original or
Create new.
Figure 29: The Component Sharing dialog
If you select Update original, the original component's content is replaced
with that of the embedded component.
3. If you select Create new, a new dialog appears. Enter the name or xID of the parent page (usually a folder) where you want the new component to be located.
4. Click Select.
Introduction to Ingeniux CMS
Ingeniux Corporation 39
Finishing a Page
Once you have finished editing content, it’s usually a good idea to spell-check, then save the page. It’s also a good idea to preview the page to see how the HTML will display in a browser.
Checking Spelling
The Ingeniux CMS employs an open-source spell-check system called NHunspell. It features customizable OpenOffice dictionaries, and many specialty dictionaries (such as medical and legal dictionaries) are also available for free in a variety of languages.
To spell-check a page:
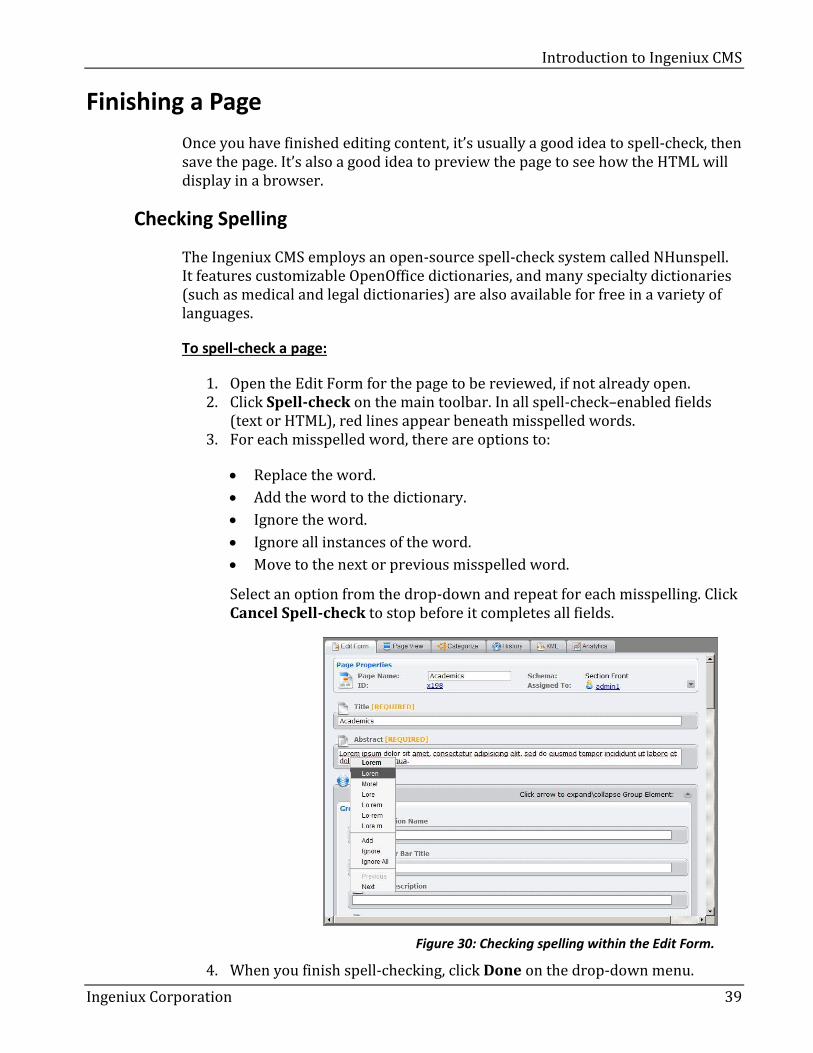
1. Open the Edit Form for the page to be reviewed, if not already open. 2. Click Spell-check on the main toolbar. In all spell-check–enabled fields
(text or HTML), red lines appear beneath misspelled words. 3. For each misspelled word, there are options to:
Replace the word.
Add the word to the dictionary.
Ignore the word.
Ignore all instances of the word.
Move to the next or previous misspelled word.
Select an option from the drop-down and repeat for each misspelling. Click Cancel Spell-check to stop before it completes all fields.
Figure 30: Checking spelling within the Edit Form.
4. When you finish spell-checking, click Done on the drop-down menu.

What’s New in Ingeniux CMS
40 Ingeniux Corporation
Saving a Page
A page can be saved at any time. Saving changes does not cause the changes to appear on the published site. Rather, the changes are saved to a version of the page on the site's database.
If there are pending changes that have not been saved, an asterisk appears in the title bar next to the page name. The Save button on the toolbar is only available when there are pending changes yet unsaved.
To save a page, click Save. Pressing CTRL + S also saves the page.
Previewing a Page
The Page View tab provides a rendering of the current page as it will look when published. This view is completely functional, with all navigation and links appearing and working as they will when the page and its dependencies are published to the live site.
Clicking the Page View tab automatically saves the page.
In addition to the Page View tab, there is a separate preview window. This window provides additional options for configuring the preview to reflect realistic content that doesn't execute in a runtime environment..
To access external preview, click Preview on the Page View tab. Pressing Ctrl + Shift + P also displays the external preview.
Advancing Pages in Workflow
The last step in authoring is to advance the page. This means sending a page to the next workstate, or stage in a workflow, and the user or group associated with that workstate.
In an institution where pages are sent for approval, advancing the page might mean sending it to a web editor. In a situation where the author has permission to publish, advancing the page may mean publishing the page. In any case, it moves the page forward in the review or publishing process.
Workflows must be configured by the web site administrator and pages added to workflow (manually or through page creation rules) before a page can be advanced.
Introduction to Ingeniux CMS
Ingeniux Corporation 41
Advancing a Page
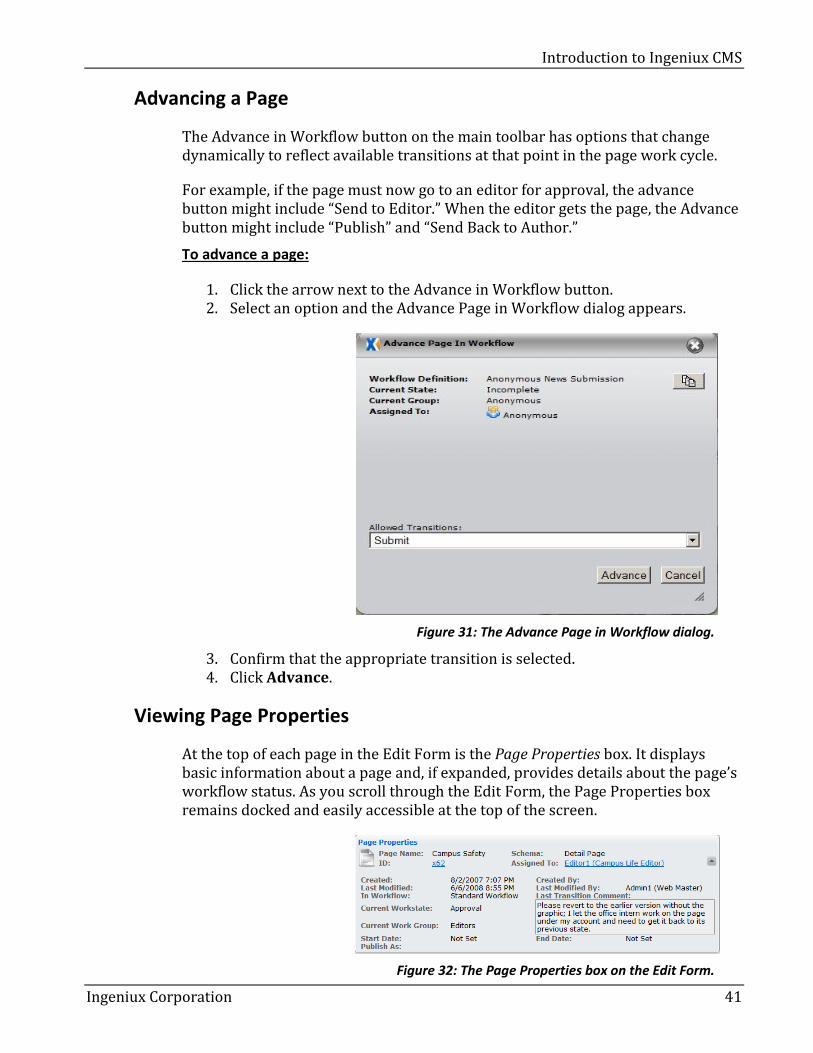
The Advance in Workflow button on the main toolbar has options that change dynamically to reflect available transitions at that point in the page work cycle.
For example, if the page must now go to an editor for approval, the advance button might include “Send to Editor.” When the editor gets the page, the Advance button might include “Publish” and “Send Back to Author.”
To advance a page:
1. Click the arrow next to the Advance in Workflow button. 2. Select an option and the Advance Page in Workflow dialog appears.
Figure 31: The Advance Page in Workflow dialog.
3. Confirm that the appropriate transition is selected. 4. Click Advance.
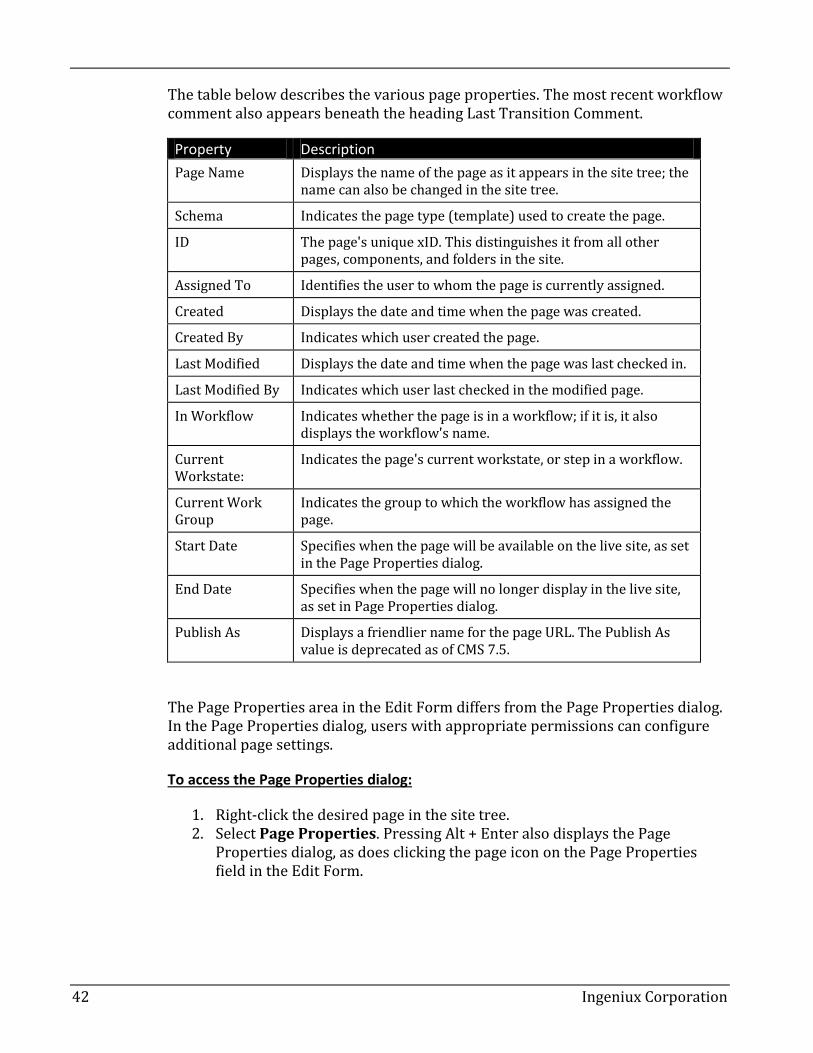
Viewing Page Properties
At the top of each page in the Edit Form is the Page Properties box. It displays basic information about a page and, if expanded, provides details about the page’s workflow status. As you scroll through the Edit Form, the Page Properties box remains docked and easily accessible at the top of the screen.
Figure 32: The Page Properties box on the Edit Form.
What’s New in Ingeniux CMS
42 Ingeniux Corporation
The table below describes the various page properties. The most recent workflow comment also appears beneath the heading Last Transition Comment.
Property Description
Page Name Displays the name of the page as it appears in the site tree; the name can also be changed in the site tree.
Schema Indicates the page type (template) used to create the page.
ID The page's unique xID. This distinguishes it from all other pages, components, and folders in the site.
Assigned To Identifies the user to whom the page is currently assigned.
Created Displays the date and time when the page was created.
Created By Indicates which user created the page.
Last Modified Displays the date and time when the page was last checked in.
Last Modified By Indicates which user last checked in the modified page.
In Workflow Indicates whether the page is in a workflow; if it is, it also displays the workflow's name.
Current Workstate:
Indicates the page's current workstate, or step in a workflow.
Current Work Group
Indicates the group to which the workflow has assigned the page.
Start Date Specifies when the page will be available on the live site, as set in the Page Properties dialog.
End Date Specifies when the page will no longer display in the live site, as set in Page Properties dialog.
Publish As Displays a friendlier name for the page URL. The Publish As value is deprecated as of CMS 7.5.
The Page Properties area in the Edit Form differs from the Page Properties dialog. In the Page Properties dialog, users with appropriate permissions can configure additional page settings.
To access the Page Properties dialog:
1. Right-click the desired page in the site tree. 2. Select Page Properties. Pressing Alt + Enter also displays the Page
Properties dialog, as does clicking the page icon on the Page Properties field in the Edit Form.
Introduction to Ingeniux CMS
Ingeniux Corporation 43
Editing Existing Pages
Creating new pages is an important part of the authoring process, but most work in a website involves editing existing pages. Before a page can be edited, it must be located and assigned to the person who will make the changes. When an existing page is edited, the published version of the page remains intact until the revised version of the page is published.
Locating Pages by xID
In the CMS, each page and component has a unique identifier known as an xID. Each xID is composed of the letter x followed by a number. These numbers are assigned incrementally as each new page or component is created.
The xID for a page is displayed in the Page Properties area of the Edit Form. It also appears when you hover over a page in the site tree.
If you know the xID for a page, you can search for it by entering the xID into the Go To field on the toolbar.
To locate a page by xID:
1. Click in the Go To field. 2. Enter the xID of the page. (You can also search by page name.) 3. Select the page from the drop-down list that appears under the Go To field.
Using Search
If you don’t know a page’s xID or name, but you know a little bit about the page content, you can locate the page using the Search feature.
Accessed via Search in the accordion pane, the search engine indexes individual text fields on the Design-Time site and can be configured to search for recycled pages and previous versions of pages.
There are a few details to keep in mind about search functionality:
Search is not case sensitive.
Only whole and hyphenated words are searchable. The strings “academics”
and “academic-s” will return pages with the word “academics” in them. But
“aca” or “academic” will not return “academics.”
Depending on the size of the site, there may be up to a ten-second delay
between content updates and indexing.
A search will only return the 200 highest-ranked matches.
The search results table can be sorted by column, in ascending or
descending order.

What’s New in Ingeniux CMS
44 Ingeniux Corporation
You can enter keywords or queries in the search field. Queries follow the syntax field:value and can be joined with and or or. For example, the following string returns pages with “academics” in either the title field or the abstract field:
title:academics or abstract:academics
To search for a page or component:
1. Click the Search pane. 2. Enter the search term(s) or query in the search field. 3. Click the search button. Search results appear beneath the text field.
Using Advanced Search Features
With advanced searching enabled, you can choose to search checked-out pages, recycled pages, and previous versions of pages.
Use checked-out page content is selected by default. With this setting selected, a search returns content from checked-out pages if a) the pages are checked out to the user or b) the user is an administrator. Also, the Checked out column appears in the search table results.
When Include recycled pages is selected, searches include pages that have been deleted to the recycle bin, and the “Deleted” column appears in the search results table.
If you select Include content from page’s previous versions, searches will include content from older versions of pages, and the “Version” column will appear in the search results table.
You can also narrow your search using the Page Type and Field drop-down menus. The field values available are dependent upon the page type selected.
To perform an advanced search:
1. Check the Advanced option beneath the search field. 2. Configure the search using the available checkboxes and dropdown menus. 3. Perform a search as described above. The results of the search will show
below the Advanced area.
Introduction to Ingeniux CMS
Ingeniux Corporation 45
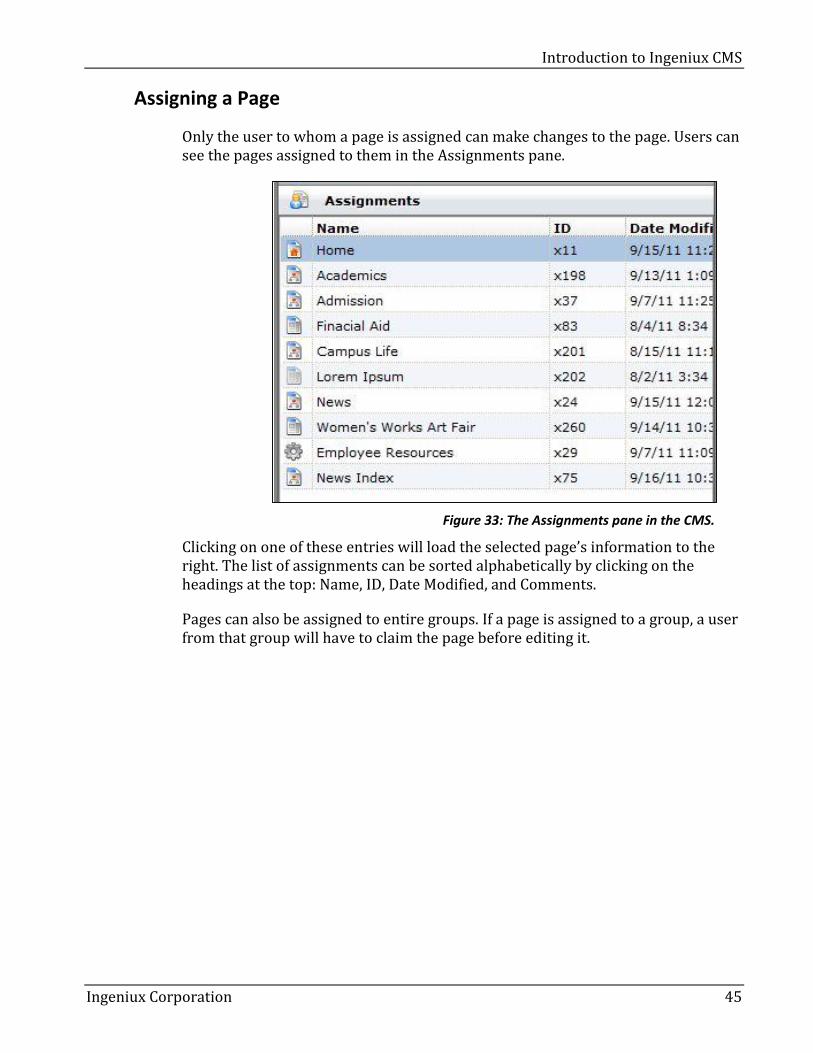
Assigning a Page
Only the user to whom a page is assigned can make changes to the page. Users can see the pages assigned to them in the Assignments pane.
Figure 33: The Assignments pane in the CMS.
Clicking on one of these entries will load the selected page’s information to the right. The list of assignments can be sorted alphabetically by clicking on the headings at the top: Name, ID, Date Modified, and Comments.
Pages can also be assigned to entire groups. If a page is assigned to a group, a user from that group will have to claim the page before editing it.
What’s New in Ingeniux CMS
46 Ingeniux Corporation
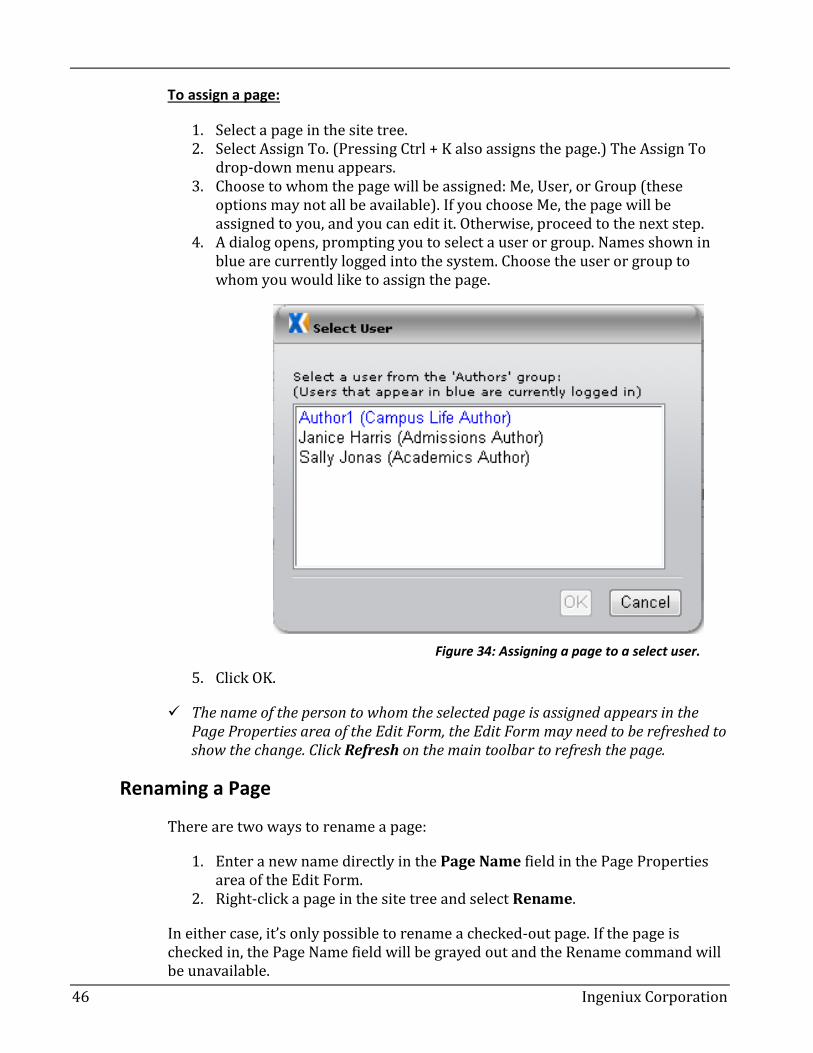
To assign a page:
1. Select a page in the site tree. 2. Select Assign To. (Pressing Ctrl + K also assigns the page.) The Assign To
drop-down menu appears. 3. Choose to whom the page will be assigned: Me, User, or Group (these
options may not all be available). If you choose Me, the page will be assigned to you, and you can edit it. Otherwise, proceed to the next step.
4. A dialog opens, prompting you to select a user or group. Names shown in blue are currently logged into the system. Choose the user or group to whom you would like to assign the page.
Figure 34: Assigning a page to a select user.
5. Click OK.
The name of the person to whom the selected page is assigned appears in the Page Properties area of the Edit Form, the Edit Form may need to be refreshed to show the change. Click Refresh on the main toolbar to refresh the page.
Renaming a Page
There are two ways to rename a page:
1. Enter a new name directly in the Page Name field in the Page Properties area of the Edit Form.
2. Right-click a page in the site tree and select Rename.
In either case, it’s only possible to rename a checked-out page. If the page is checked in, the Page Name field will be grayed out and the Rename command will be unavailable.
Introduction to Ingeniux CMS
Ingeniux Corporation 47
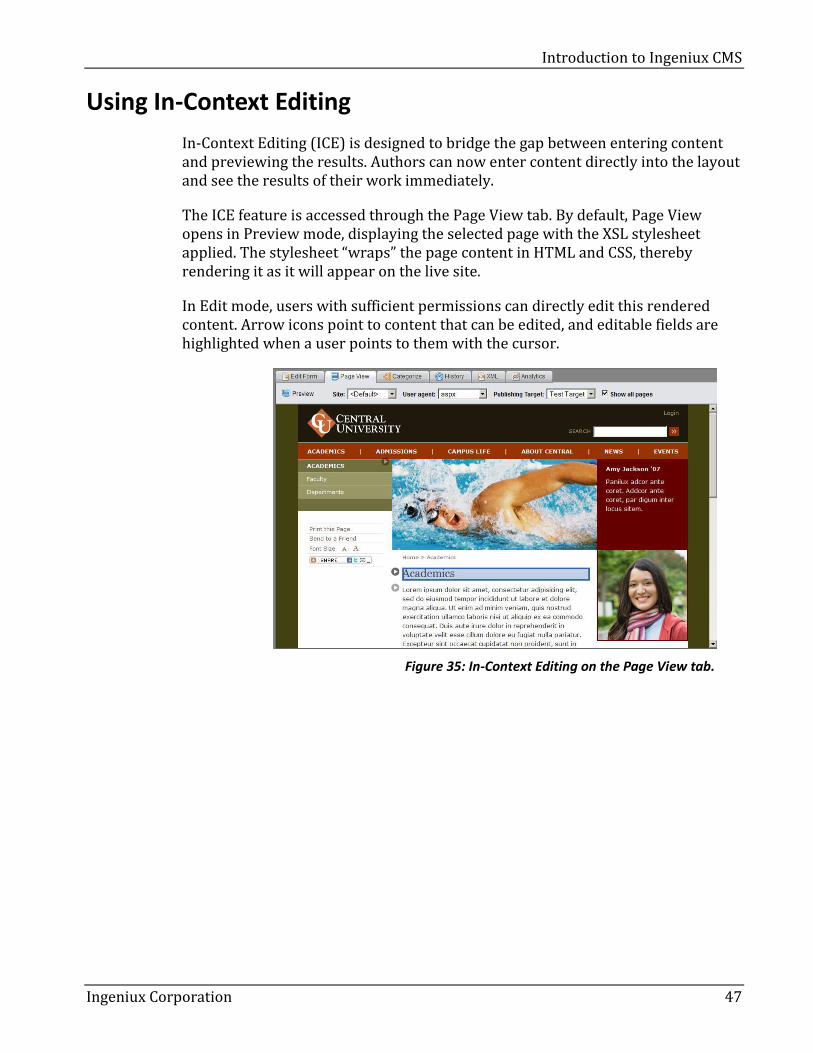
Using In-Context Editing
In-Context Editing (ICE) is designed to bridge the gap between entering content and previewing the results. Authors can now enter content directly into the layout and see the results of their work immediately.
The ICE feature is accessed through the Page View tab. By default, Page View opens in Preview mode, displaying the selected page with the XSL stylesheet applied. The stylesheet “wraps” the page content in HTML and CSS, thereby rendering it as it will appear on the live site.
In Edit mode, users with sufficient permissions can directly edit this rendered content. Arrow icons point to content that can be edited, and editable fields are highlighted when a user points to them with the cursor.
Figure 35: In-Context Editing on the Page View tab.
What’s New in Ingeniux CMS
48 Ingeniux Corporation
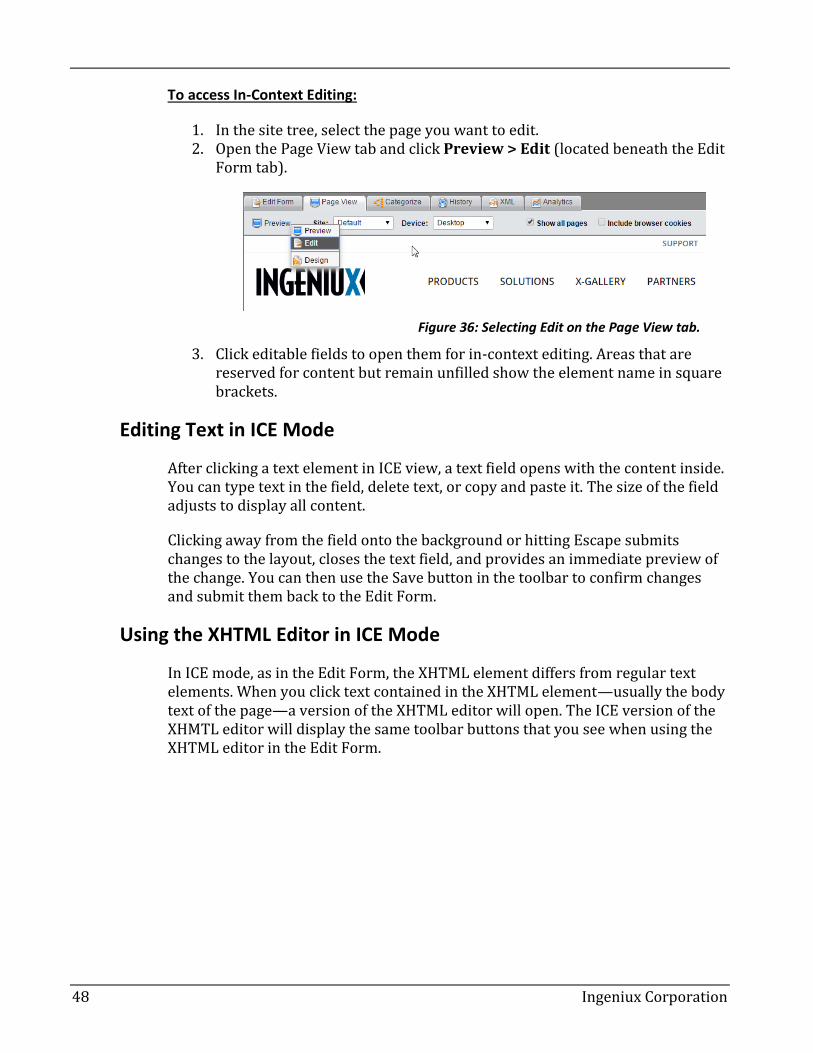
To access In-Context Editing:
1. In the site tree, select the page you want to edit. 2. Open the Page View tab and click Preview > Edit (located beneath the Edit
Form tab).
Figure 36: Selecting Edit on the Page View tab.
3. Click editable fields to open them for in-context editing. Areas that are reserved for content but remain unfilled show the element name in square brackets.
Editing Text in ICE Mode
After clicking a text element in ICE view, a text field opens with the content inside. You can type text in the field, delete text, or copy and paste it. The size of the field adjusts to display all content.
Clicking away from the field onto the background or hitting Escape submits changes to the layout, closes the text field, and provides an immediate preview of the change. You can then use the Save button in the toolbar to confirm changes and submit them back to the Edit Form.
Using the XHTML Editor in ICE Mode
In ICE mode, as in the Edit Form, the XHTML element differs from regular text elements. When you click text contained in the XHTML element—usually the body text of the page—a version of the XHTML editor will open. The ICE version of the XHMTL editor will display the same toolbar buttons that you see when using the XHTML editor in the Edit Form.

Introduction to Ingeniux CMS
Ingeniux Corporation 49
Use the magnifying glass button in the upper-right corner to expand and contract the editor.
Figure 37: Expanded ICE Edit Form on the Page View tab.
Changing Components in ICE Mode
When you click a content area that takes a component, the Select a Component dialog opens, just as it does when you click Pick in a Component element on the Edit Form.
Figure 38: The Select a Component dialog in the CMS.

What’s New in Ingeniux CMS
50 Ingeniux Corporation
Picking a Date in ICE Mode
Date and time elements can also be edited in ICE mode. When you click on this content, depending on the element type, the date picker or time picker opens.
Figure 39: The date picker in ICE mode.
Working with Static Files in ICE Mode
When you click on an editable image, document, or media element, the Choose File dialog appears. In this dialog, depending on your permissions, you can select, upload, and edit files.
Figure 40: The Choose File dialog in ICE mode.
Introduction to Ingeniux CMS
Ingeniux Corporation 51
What’s New in Ingeniux CMS
52 Ingeniux Corporation
Advanced Authoring Tasks
In this chapter, you'll learn to:
Work with hidden and read-only element levels.
Revert to earlier versions of a page.
Delete pages and restore pages from the Recycle Folder.
Access help through the Ingeniux Support Site.
Create page layouts in Page Builder.
Introduction to Ingeniux CMS
Ingeniux Corporation 53
Working with Hidden Elements
Elements on the edit form can be marked as hidden. Only groups with permission to view hidden elements can work with them. There is no indication on the edit form that elements are hidden; they simply don’t appear for users without permission to view them.
An element may also be marked as read only. In this case, only users who are in the administrators group can modify them. Many navigation elements, for example, are marked as hidden and read only.
Hidden and read-only attributes are set within the schema by the site developer.
What’s New in Ingeniux CMS
54 Ingeniux Corporation
Reverting to a Previous Version of a Page
During the content editing process, there may be times when an author or editor would like to reinstate a previous version of a page. With the rollback feature, this is possible, as long as the user has sufficient permissions.
Each time a page is modified and checked in, the CMS creates a new version of the page. In a typical workflow scenario, a page is checked in each time it’s advanced in workflow. Thus, the rollback feature can be used to undo undesirable changes made during the previous workstate.
Using Rollback
Rollback undoes any changes to the previously checked-in version of a page.
To roll back changes:
1. Display the Edit Form for the desired page. Ensure that the page is assigned to you and ready for changes to be made.
2. Right-click the page in the site tree and select Rollback. 3. Click OK to confirm.
Using the History Tab
The History tab provides a list of all versions of a page. Using this list, you can review and reinstate different versions of a page.
To revert to an earlier page version:
1. Ensure the desired page is assigned to you and ready for changes to be made.
2. Click the History tab. 3. Select the desired version from the list. 4. Verify the desired version displays in the lower portion of the tab. 5. Click Revert to selected version.
Introduction to Ingeniux CMS
Ingeniux Corporation 55
Deleting and Restoring Pages
When a page is deleted, it moves to the Recycle Folder in the site tree. Pages can also be moved from the Recycle Folder back into the site tree, as long as the Recycle Folder hasn’t been emptied. Permission to delete pages is granted at the group level by the site administrator.
Deleting a Page
When a page is deleted, several things happen to it:
If the page is checked out, the checkout is cancelled, and any saved or
unsaved changes made since the last checkout are dropped.
The page is unmarked for publish.
The page is removed from workflow and no longer assigned to a user.
The page moves to the Recycle Folder.
Pages can be dragged and dropped to the Recycle Folder as well; this also causes the above actions to occur.
To delete a page:
1. In the site tree, select the page to be deleted. 2. Right-click on the page and choose Delete. 3. Choose Delete to confirm.
Deleting a node in the tree deletes not just the page, but any descendants it has as well.
Restoring a Deleted Page
To restore an item from the Recycle Folder, drag it back to the desired location in the site tree. To completely restore the page, you also have to reverse the actions that occur when a page is deleted. It may be necessary to check the page back in, add it back to workflow, mark it for publish, and recreate content (if content was lost from a checked-out page).
What’s New in Ingeniux CMS
56 Ingeniux Corporation
Accessing Help for the CMS
As a rule, it’s a good idea for site administrators to create site-specific documentation for their end users. Users can also access general help features in the CMS.
To access CMS help, click Help above the toolbar and make a selection from the drop-down menu.
Exploring Help Options
The Ingeniux Help menu provides the following options:
Ingeniux CMS Help: Online CMS documentation tailored to the installed
version of the CMS.
Online Support: Links to the Ingeniux Support site, where you can find
Knowledge Base articles about the CMS and contact information for the
support team.
Custom Helper: Site-specific help created by the site administrator.
Using the Ingeniux Support Site
The Ingeniux support site (http://support.ingeniux.com) is the most up-to-date source of information for Ingeniux products. In order to use this site, the user must have credentials provided by Ingeniux at the request of the site administrator.
The Ingeniux support site includes:
Troubleshooting
Forums
How To
FAQs
Downloads

Introduction to Ingeniux CMS
Ingeniux Corporation 57
Creating Page Layouts in Page Builder
Ingeniux Page Builder offers experienced users and administrators a simple way to build and edit page layouts without making changes to page schemas. It does this through an intuitive graphical interface, requiring no knowledge of web-development techniques.
There are three steps to configuring a page layout in Page Builder.
Select a presentation container, defined by the page's schema, on the page.
Add layout units to the selected container.
Add content units—predefined, modular placeholders for content—to the
selected layout.
To open Page Builder:
1. Select a page in the site tree. 2. Click the Page View tab. 3. Select Preview > Design > New Presentation
Figure 41: Opening Page Builder on the Page View tab

What’s New in Ingeniux CMS
58 Ingeniux Corporation
Setting Presentation Properties
Before configuring a page's layout, you must select the container to be modified.
To select a container:
1. On the Design Presentation tab, enter a name for the presentation and click the target icon.
2. Then, on the page generated in the Page View tab, click the area where you want to edit the layout. The container is outlined on the page, and the container's ID populates the Container field.
Introduction to Ingeniux CMS
Ingeniux Corporation 59
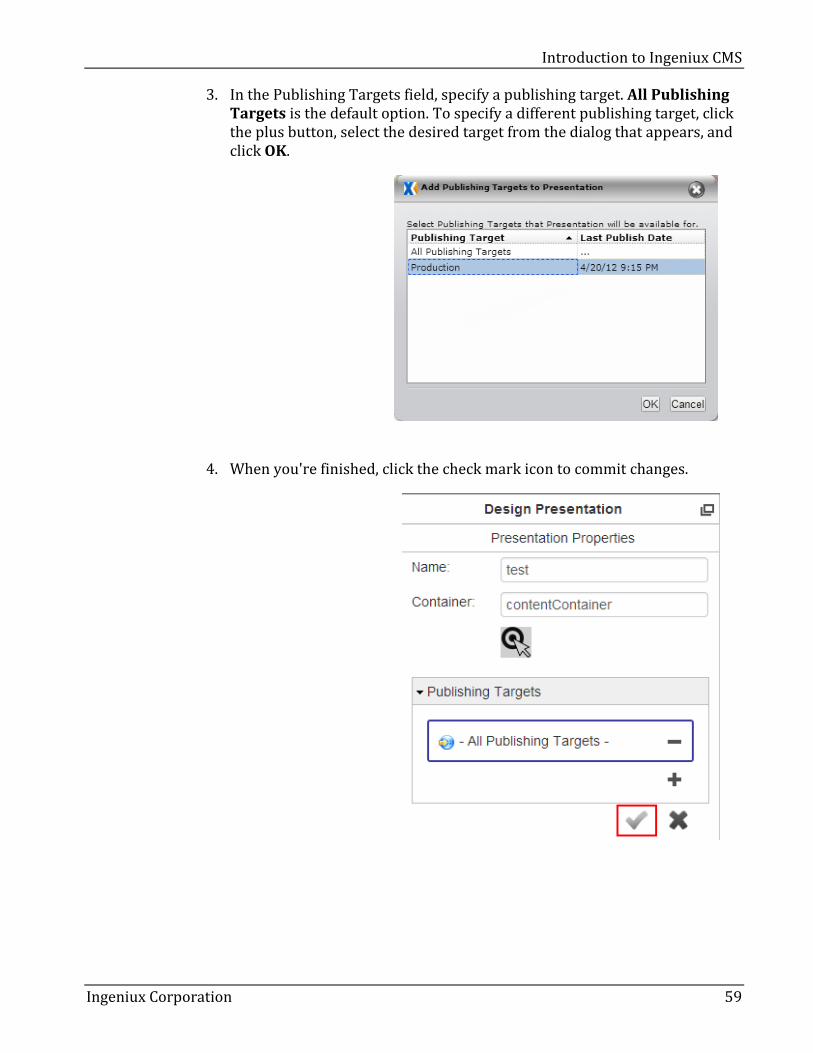
3. In the Publishing Targets field, specify a publishing target. All Publishing Targets is the default option. To specify a different publishing target, click the plus button, select the desired target from the dialog that appears, and click OK.
4. When you're finished, click the check mark icon to commit changes.

What’s New in Ingeniux CMS
60 Ingeniux Corporation
Configuring Layout and Adding Content
The Layout tab contains a selection of page layouts organized by columns and sidebars.
To apply a layout to a page presentation:
1. Select a page layout from the Layout pane.
2. Drag it to the selected container. It's also possible to insert layout units within other layout units.
To remove a layout from a page, click, drag & drop it in the Layout pane.
The final step is to add content units. These bits of content make a page presentation functional.
To add content units:
1. Click the Content Units pane. 2. A list of content units appears. Select a content unit, drag it to the page
presentation, and drop it in the desired layout unit.
To see how the content will appear on the rendered page, navigate to Design > Preview.

Introduction to Ingeniux CMS
Ingeniux Corporation 61
What’s New in Ingeniux CMS
62 Ingeniux Corporation
Organizing Content
In this chapter, you'll learn to:
Organize pages in the site tree.
Create new pages and components in the site tree.
Organize pages using folders.
Categorize pages using taxonomy.
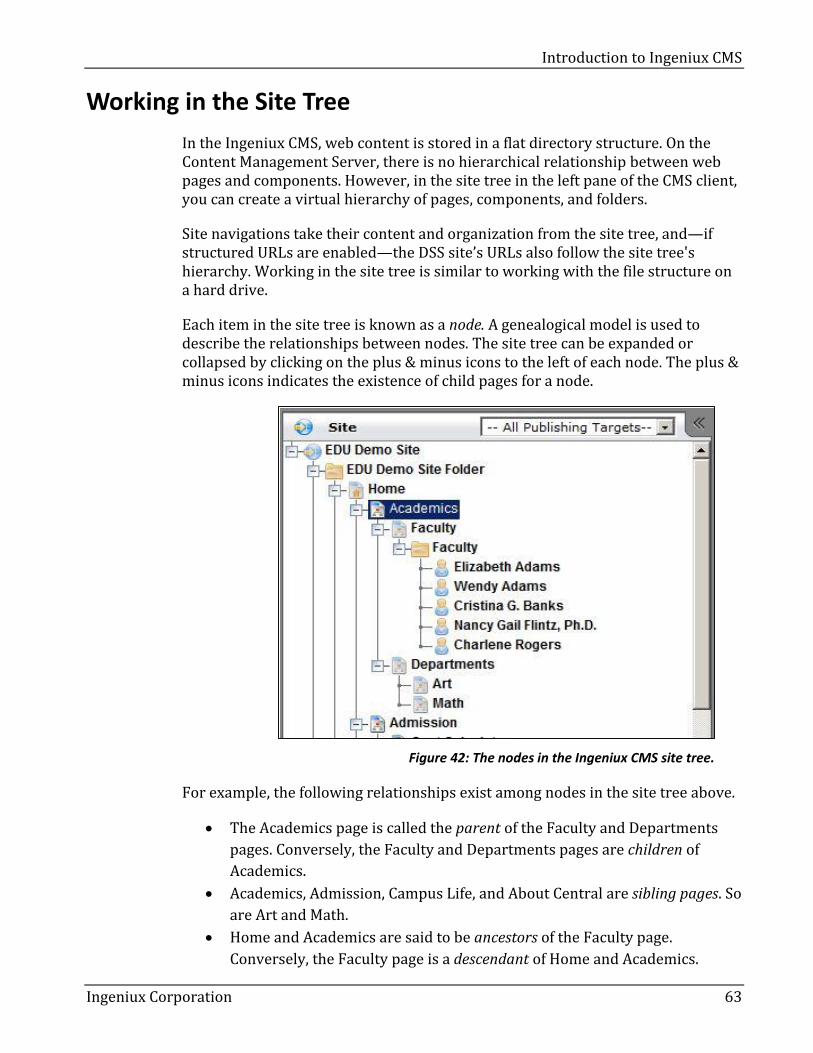
Introduction to Ingeniux CMS
Ingeniux Corporation 63
Working in the Site Tree
In the Ingeniux CMS, web content is stored in a flat directory structure. On the Content Management Server, there is no hierarchical relationship between web pages and components. However, in the site tree in the left pane of the CMS client, you can create a virtual hierarchy of pages, components, and folders.
Site navigations take their content and organization from the site tree, and—if structured URLs are enabled—the DSS site’s URLs also follow the site tree's hierarchy. Working in the site tree is similar to working with the file structure on a hard drive.
Each item in the site tree is known as a node. A genealogical model is used to describe the relationships between nodes. The site tree can be expanded or collapsed by clicking on the plus & minus icons to the left of each node. The plus & minus icons indicates the existence of child pages for a node.
Figure 42: The nodes in the Ingeniux CMS site tree.
For example, the following relationships exist among nodes in the site tree above.
The Academics page is called the parent of the Faculty and Departments
pages. Conversely, the Faculty and Departments pages are children of
Academics.
Academics, Admission, Campus Life, and About Central are sibling pages. So
are Art and Math.
Home and Academics are said to be ancestors of the Faculty page.
Conversely, the Faculty page is a descendant of Home and Academics.

What’s New in Ingeniux CMS
64 Ingeniux Corporation
Structuring Navigations
The structure of content as it is displayed in the site tree defines the structure and navigation of the website. A navigation displayed on a page pulls dynamically from the relationships defined in the site tree.
For example, consider a page with the following left navigation.
Figure 43: The navigation of the site is defined by the site tree.
The links to Academics, Faculty, Departments, Art, and Math are pulled from the site tree shown below.
Figure 44: The navigation is determined by the page order in the site tree.
When the pages are reordered in the site tree, the left navigation displayed on the page typically reflects the change as well. That is, switching Art and Math in the site tree would also reverse Art and Math in the page navigation.
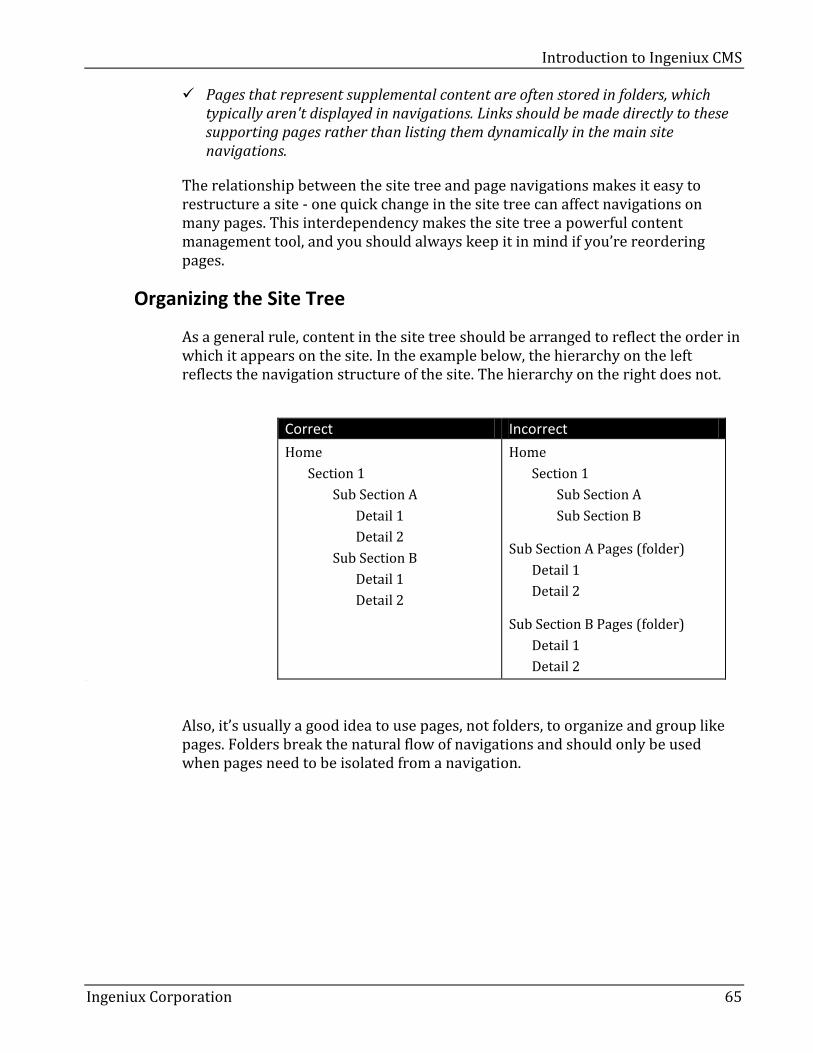
Introduction to Ingeniux CMS
Ingeniux Corporation 65
Pages that represent supplemental content are often stored in folders, which typically aren't displayed in navigations. Links should be made directly to these supporting pages rather than listing them dynamically in the main site navigations.
The relationship between the site tree and page navigations makes it easy to restructure a site - one quick change in the site tree can affect navigations on many pages. This interdependency makes the site tree a powerful content management tool, and you should always keep it in mind if you’re reordering pages.
Organizing the Site Tree
As a general rule, content in the site tree should be arranged to reflect the order in which it appears on the site. In the example below, the hierarchy on the left reflects the navigation structure of the site. The hierarchy on the right does not.
Correct Incorrect
Home
Section 1
Sub Section A
Detail 1
Detail 2
Sub Section B
Detail 1
Detail 2
Home
Section 1
Sub Section A
Sub Section B
Sub Section A Pages (folder)
Detail 1
Detail 2
Sub Section B Pages (folder)
Detail 1
Detail 2 1.
Also, it’s usually a good idea to use pages, not folders, to organize and group like pages. Folders break the natural flow of navigations and should only be used when pages need to be isolated from a navigation.
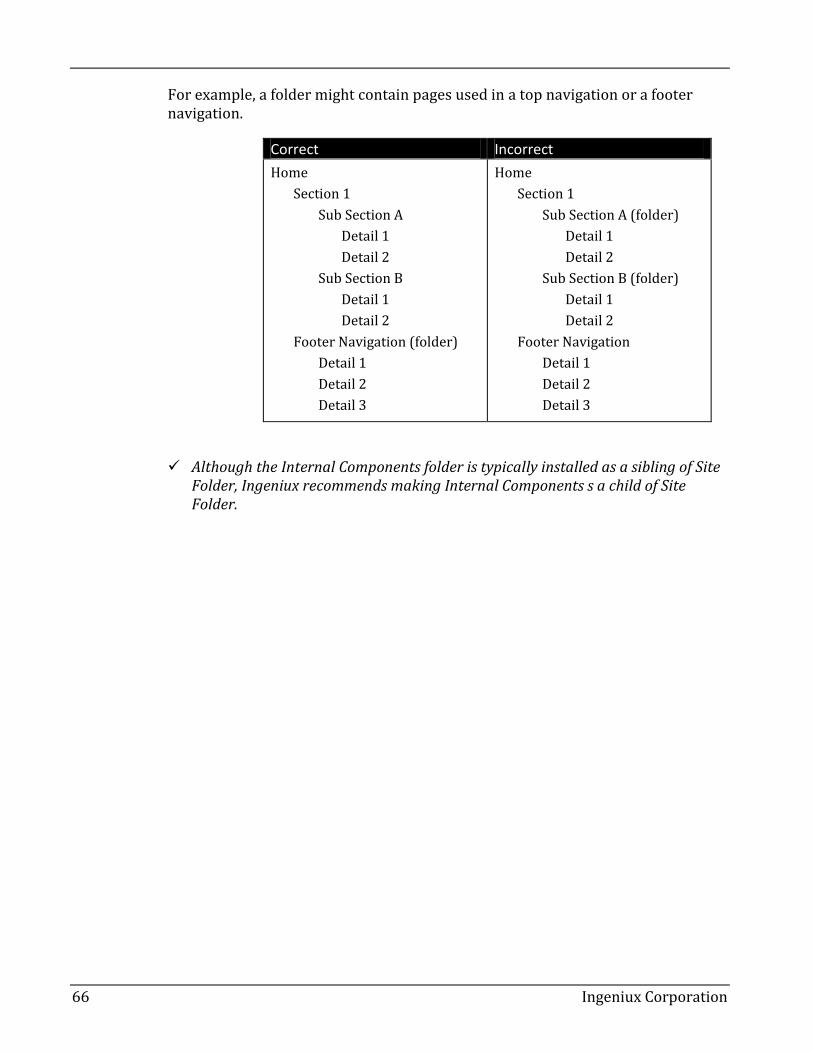
What’s New in Ingeniux CMS
66 Ingeniux Corporation
For example, a folder might contain pages used in a top navigation or a footer navigation.
Correct Incorrect
Home
Section 1
Sub Section A
Detail 1
Detail 2
Sub Section B
Detail 1
Detail 2
Footer Navigation (folder)
Detail 1
Detail 2
Detail 3
Home
Section 1
Sub Section A (folder)
Detail 1
Detail 2
Sub Section B (folder)
Detail 1
Detail 2
Footer Navigation
Detail 1
Detail 2
Detail 3
Although the Internal Components folder is typically installed as a sibling of Site Folder, Ingeniux recommends making Internal Components s a child of Site Folder.
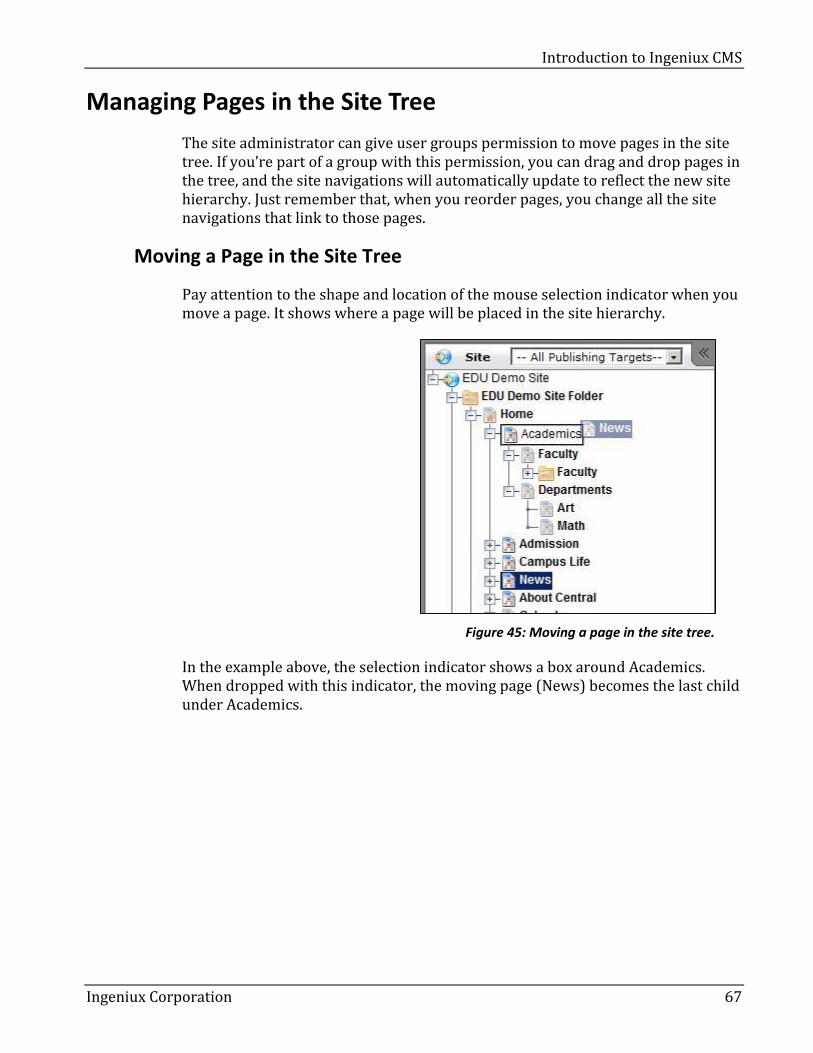
Introduction to Ingeniux CMS
Ingeniux Corporation 67
Managing Pages in the Site Tree
The site administrator can give user groups permission to move pages in the site tree. If you’re part of a group with this permission, you can drag and drop pages in the tree, and the site navigations will automatically update to reflect the new site hierarchy. Just remember that, when you reorder pages, you change all the site navigations that link to those pages.
Moving a Page in the Site Tree
Pay attention to the shape and location of the mouse selection indicator when you move a page. It shows where a page will be placed in the site hierarchy.
Figure 45: Moving a page in the site tree.
In the example above, the selection indicator shows a box around Academics. When dropped with this indicator, the moving page (News) becomes the last child under Academics.
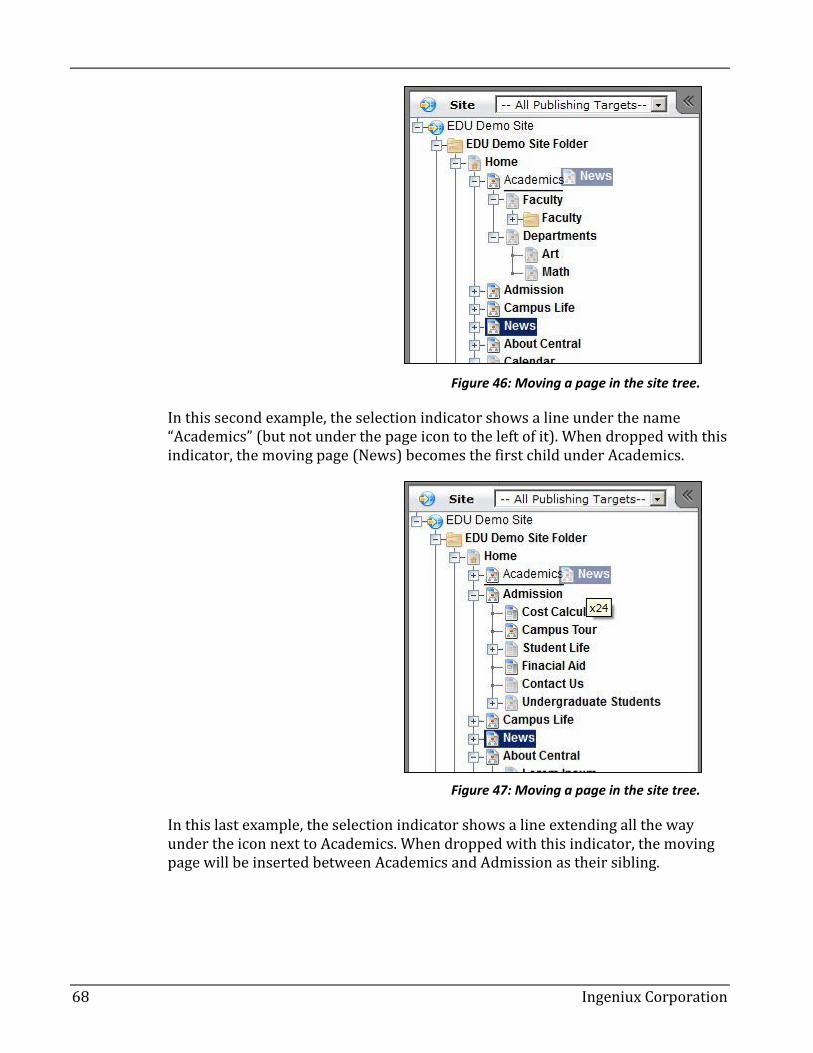
What’s New in Ingeniux CMS
68 Ingeniux Corporation
Figure 46: Moving a page in the site tree.
In this second example, the selection indicator shows a line under the name “Academics” (but not under the page icon to the left of it). When dropped with this indicator, the moving page (News) becomes the first child under Academics.
Figure 47: Moving a page in the site tree.
In this last example, the selection indicator shows a line extending all the way under the icon next to Academics. When dropped with this indicator, the moving page will be inserted between Academics and Admission as their sibling.
Introduction to Ingeniux CMS
Ingeniux Corporation 69
To move a page:
1. Select a page in the site tree. 2. Drag and drop the page to the desired location.
Refer to CMS 201 or online documentation for more information on restricting where different page types may live in the site tree.
Copying a Page in the Site Tree
Pressing Ctrl while dragging and dropping a page changes the move action to a copy action. Pages can also be moved by copying the page and pasting it to the desired location.
To copy a page:
1. Select the page in the site tree so that it displays in the Edit Form.
2. Drag the page icon in the Page Properties area at the top of the Edit Form and drop it in the desired location in the site tree.
-Or-
1. Select the page in the site tree. 2. With Ctrl pressed, drag and drop the page to the desired location.
-Or-
1. Right-click the page and select Copy. 2. Right-click the parent page of the new copy; select Paste.
Two aspects of the copied page differ from the original. First, the new page isn't marked for publish, even if the original is. This ensures that the new page isn't prematurely published. Second, the xID for the new page is different from that of the original. The new page needs a unique identifier to distinguish it from the original, since the pages have the same name.
Renaming a Page in the Site Tree
Depending on site design, a page's name is used in various ways throughout a site. In some cases, the name is included in the browser bar title; in other situations, it is used when creating a breadcrumb navigation. Within the CMS, the page name is used to label content in the site tree and to identify internal links.
You can rename a page at any time, provided that the page is assigned to you. Keep in mind that, if a site uses structured URLs, renaming the page changes it’s URL. This could affect external links to the page.
To rename a page:

What’s New in Ingeniux CMS
70 Ingeniux Corporation
1. Select a page. Ensure that the page is assigned to you and ready for changes to be made.
2. Right-click the page and select Rename. Pressing Ctrl + Shift + R also opens the Rename Page dialog.
3. Enter the new name for the page and click Rename.
Selecting Multiple Nodes
By pressing Ctrl or Shift while clicking, you can simultaneously select multiple pages in the site tree. You can also select multiple nodes by clicking in the white background area and dragging a box around a set of pages. Once you’ve selected multiple pages, you can move them by left-clicking a destination or by dragging the pages to a new destination. You can also right-click to bring up the context menu and perform an action on multiple pages at once.
When multiple pages are selected, the following options will be enabled on the context menu:
Cut
Copy
Delete
Assign To…
Check Out
Check In
Mark/Unmark for Publish
You can only perform these actions on multiple pages via the context menu. Toolbar buttons perform the action on the first selected page only.
When multiple pages are selected, the item with the most restrictions will determine the actions that can be performed. Thus, it wouldn’t possible to move a selection of pages if the selection included one immobile page.

Introduction to Ingeniux CMS
Ingeniux Corporation 71
Creating Pages, Components, and Folders
Three kinds of nodes can be created in the site tree: pages, components, and folders. This section explains how to create all three. For more-detailed information on creating and completing new pages, review the "Authoring Fundamentals" section of this manual.
Creating Pages Outside of Page Creation Rules
For most content contributors, the easiest way to create a new page is with a page creation rule (PCR). Configured by site administrators, PCRs help users create the correct page types in the correct areas of the site.
But pages can also be created outside page creation rules, most commonly by power users and administrators. If you’re going to create a page outside of page creation rules, you need to know what type of page you want to create and where you want to put it.
Pages created outside page creation rules are not automatically placed in workflow; they must be added manually.
To Create a New Page:
1. Select the parent page for the new page.
2. Select New > Page .
-Or-
Right-click the parent page for the new page and select New > Page. Pressing Ctrl + N also creates a new page.
The Create New Page dialog box appears.
Figure 48: The Create New Page dialog in the CMS.
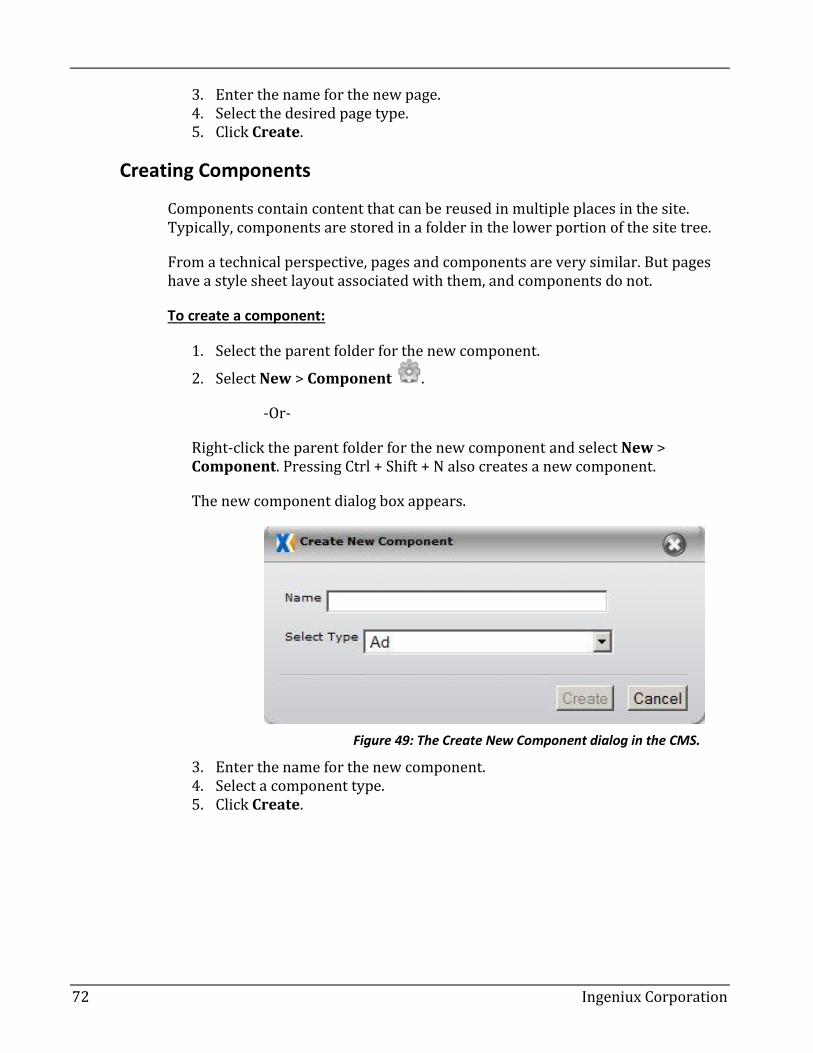
What’s New in Ingeniux CMS
72 Ingeniux Corporation
3. Enter the name for the new page. 4. Select the desired page type. 5. Click Create.
Creating Components
Components contain content that can be reused in multiple places in the site. Typically, components are stored in a folder in the lower portion of the site tree.
From a technical perspective, pages and components are very similar. But pages have a style sheet layout associated with them, and components do not.
To create a component:
1. Select the parent folder for the new component.
2. Select New > Component .
-Or-
Right-click the parent folder for the new component and select New > Component. Pressing Ctrl + Shift + N also creates a new component.
The new component dialog box appears.
Figure 49: The Create New Component dialog in the CMS.
3. Enter the name for the new component. 4. Select a component type. 5. Click Create.
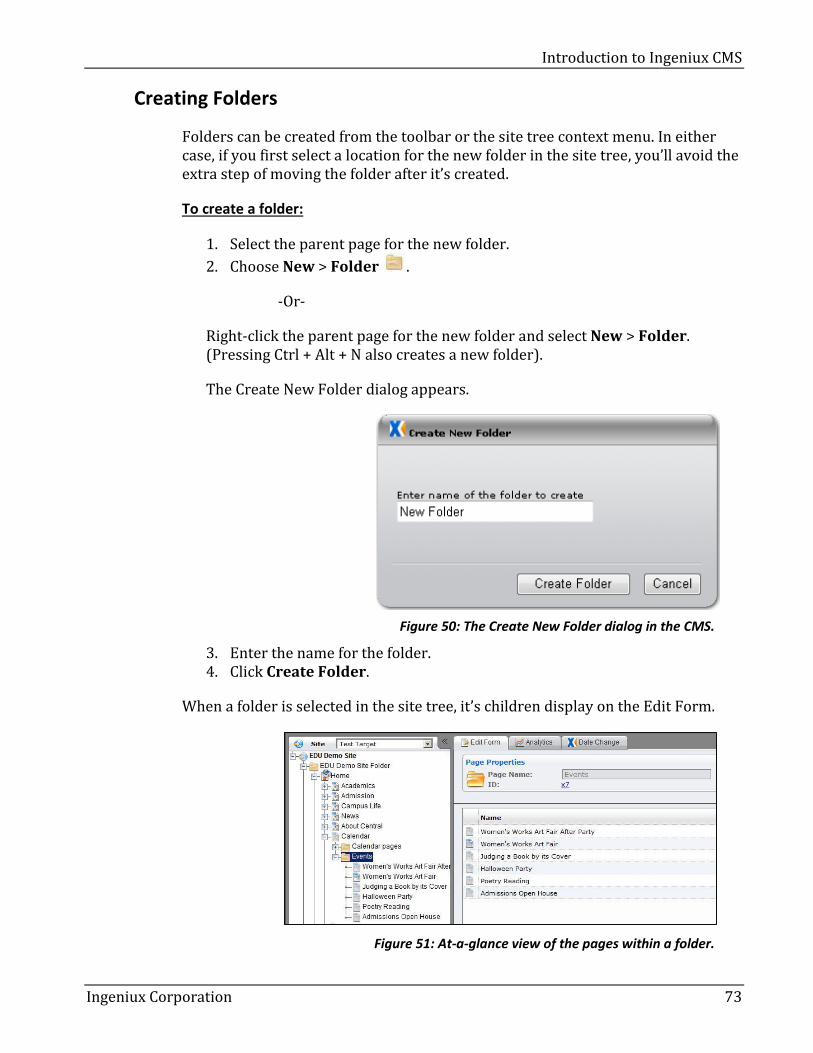
Introduction to Ingeniux CMS
Ingeniux Corporation 73
Creating Folders
Folders can be created from the toolbar or the site tree context menu. In either case, if you first select a location for the new folder in the site tree, you’ll avoid the extra step of moving the folder after it’s created.
To create a folder:
1. Select the parent page for the new folder.
2. Choose New > Folder .
-Or-
Right-click the parent page for the new folder and select New > Folder. (Pressing Ctrl + Alt + N also creates a new folder).
The Create New Folder dialog appears.
Figure 50: The Create New Folder dialog in the CMS.
3. Enter the name for the folder. 4. Click Create Folder.
When a folder is selected in the site tree, it’s children display on the Edit Form.
Figure 51: At-a-glance view of the pages within a folder.
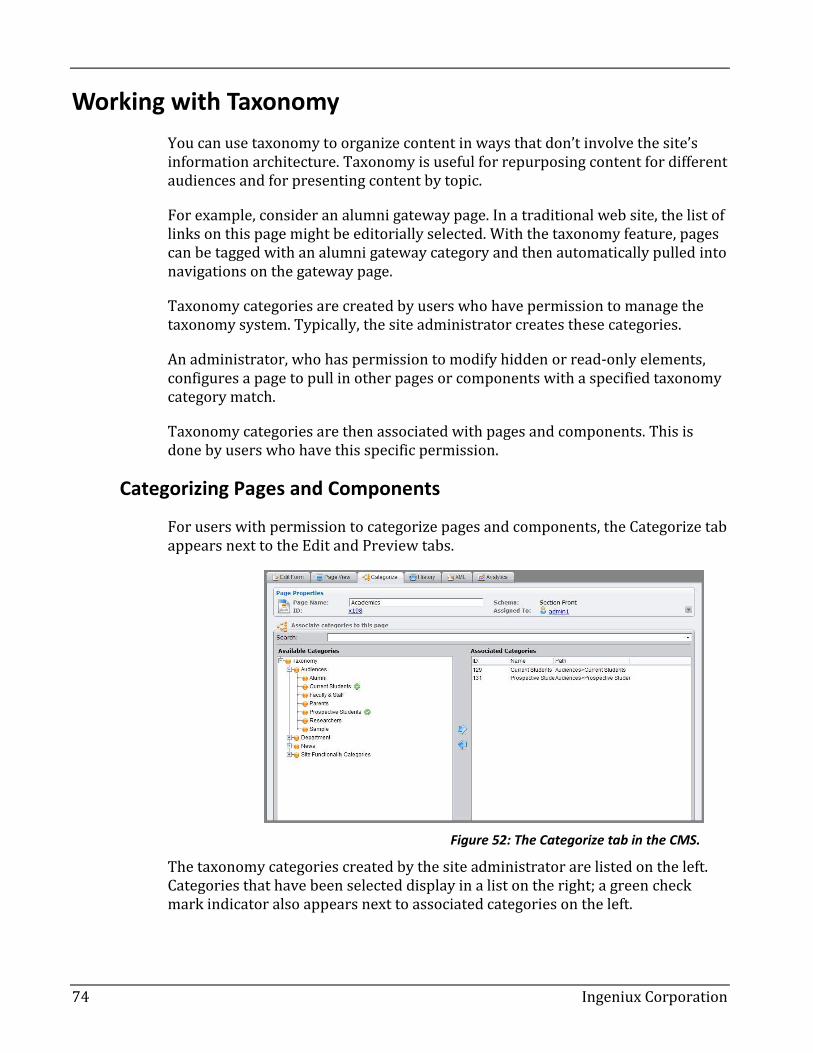
What’s New in Ingeniux CMS
74 Ingeniux Corporation
Working with Taxonomy
You can use taxonomy to organize content in ways that don’t involve the site’s information architecture. Taxonomy is useful for repurposing content for different audiences and for presenting content by topic.
For example, consider an alumni gateway page. In a traditional web site, the list of links on this page might be editorially selected. With the taxonomy feature, pages can be tagged with an alumni gateway category and then automatically pulled into navigations on the gateway page.
Taxonomy categories are created by users who have permission to manage the taxonomy system. Typically, the site administrator creates these categories.
An administrator, who has permission to modify hidden or read-only elements, configures a page to pull in other pages or components with a specified taxonomy category match.
Taxonomy categories are then associated with pages and components. This is done by users who have this specific permission.
Categorizing Pages and Components
For users with permission to categorize pages and components, the Categorize tab appears next to the Edit and Preview tabs.
Figure 52: The Categorize tab in the CMS.
The taxonomy categories created by the site administrator are listed on the left. Categories that have been selected display in a list on the right; a green check mark indicator also appears next to associated categories on the left.

Introduction to Ingeniux CMS
Ingeniux Corporation 75
To categorize a page or component:
1. Select a page or component & ensure the item is assigned to you. 2. Open the Categorize tab. 3. Use the taxonomy tree on the left to locate a category.
-Or-
Type the first few letters of a category into the Search field.
4. Select a category and click the right-facing blue arrow.
-Or-
Double-click the desired category on the taxonomy list.
5. Click Save.
Categories can be removed by selecting them in the right pane and clicking the left-facing blue arrow.
Using the Taxonomy Manager
Users with permission to manage taxonomy categories can access the taxonomy manager in the Administration pane.
On the taxonomy manger, users can create categories, associate them with pages, set security, and add synonyms. It also displays a hierarchical category tree similar to the site tree.
Figure 53: The Taxonomy Manager pane in the CMS.

What’s New in Ingeniux CMS
76 Ingeniux Corporation
To create a taxonomy category:
1. On the CMS client's left pane, navigate to Administration > Taxonomy. 2. Expand the existing categories and point to the node under which you’d
like to place the new category. 3. Click the button that appears. 4. Enter the name of the new category in the Title field. 5. Add additional details, if necessary. (Only the Title field is required.) 6. Click Save.
Changes to taxonomy categories do not save automatically. Navigating away from a category loses unsaved changes.
Deleting a taxonomy category removes the category, its children, and any associations with specific pages or components.
To delete a taxonomy category:
1. Navigate to Administration > Taxonomy. 2. Expand the existing categories to locate the category to be deleted.
-Or-
Use the search field to enter the name of the category.
3. Position the mouse over the category. 4. Click the button that appears. 5. Choose OK to confirm the delete.
Associating Categories from the Taxonomy Tab
On the Categorize tab, you can apply category associations to an individual page or component. In the taxonomy manager, you can make these associations in the opposite direction: you can associate multiple pages and components with an individual category. This is especially useful if you need to make many associations at once.
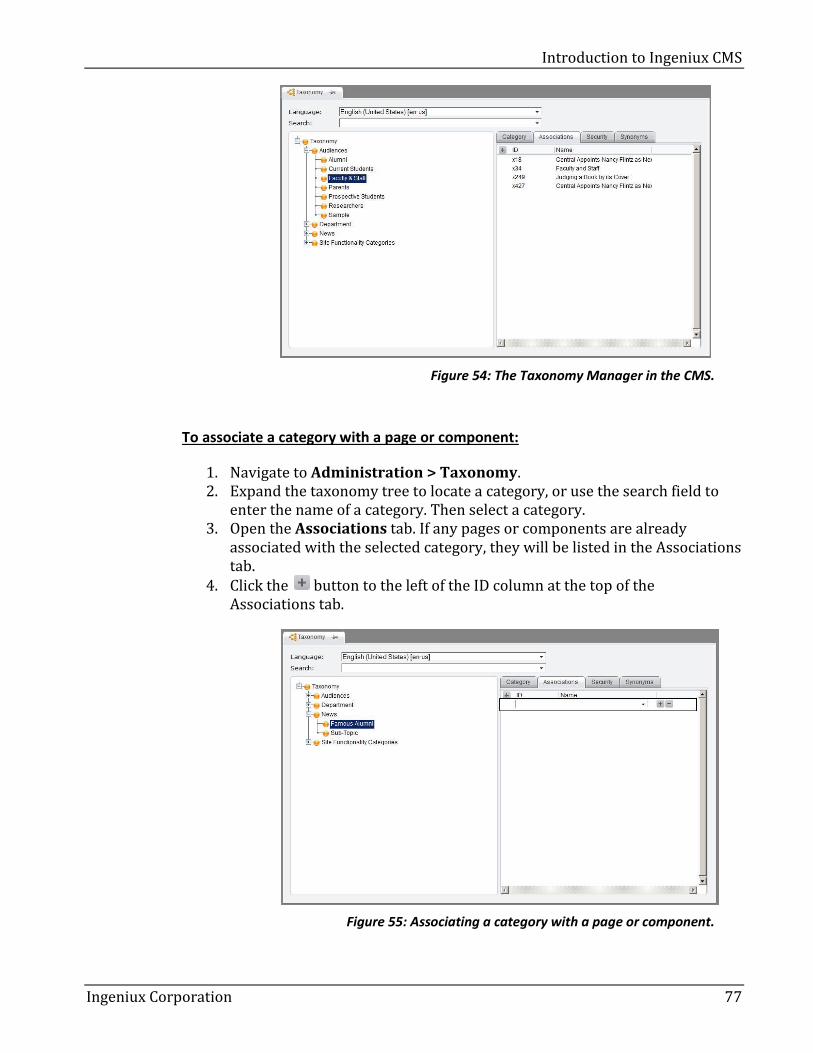
Introduction to Ingeniux CMS
Ingeniux Corporation 77
Figure 54: The Taxonomy Manager in the CMS.
To associate a category with a page or component:
1. Navigate to Administration > Taxonomy. 2. Expand the taxonomy tree to locate a category, or use the search field to
enter the name of a category. Then select a category. 3. Open the Associations tab. If any pages or components are already
associated with the selected category, they will be listed in the Associations tab.
4. Click the button to the left of the ID column at the top of the Associations tab.
Figure 55: Associating a category with a page or component.
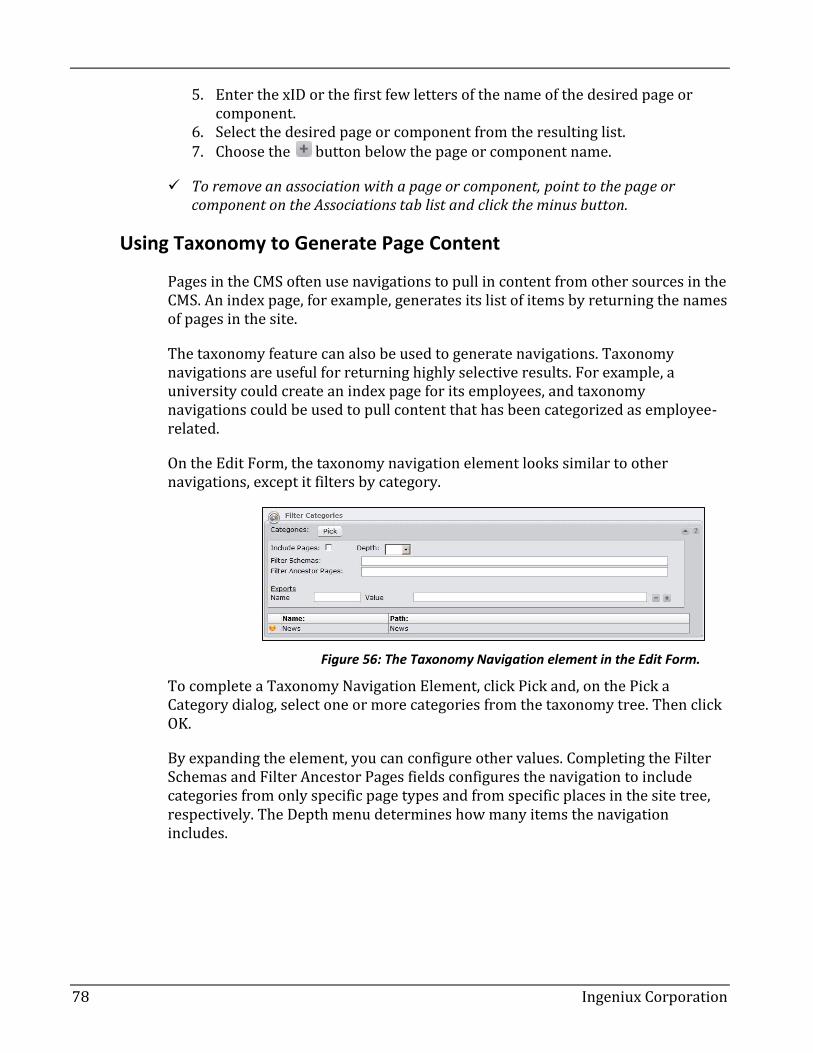
What’s New in Ingeniux CMS
78 Ingeniux Corporation
5. Enter the xID or the first few letters of the name of the desired page or component.
6. Select the desired page or component from the resulting list. 7. Choose the button below the page or component name.
To remove an association with a page or component, point to the page or component on the Associations tab list and click the minus button.
Using Taxonomy to Generate Page Content
Pages in the CMS often use navigations to pull in content from other sources in the CMS. An index page, for example, generates its list of items by returning the names of pages in the site.
The taxonomy feature can also be used to generate navigations. Taxonomy navigations are useful for returning highly selective results. For example, a university could create an index page for its employees, and taxonomy navigations could be used to pull content that has been categorized as employee-related.
On the Edit Form, the taxonomy navigation element looks similar to other navigations, except it filters by category.
Figure 56: The Taxonomy Navigation element in the Edit Form.
To complete a Taxonomy Navigation Element, click Pick and, on the Pick a Category dialog, select one or more categories from the taxonomy tree. Then click OK.
By expanding the element, you can configure other values. Completing the Filter Schemas and Filter Ancestor Pages fields configures the navigation to include categories from only specific page types and from specific places in the site tree, respectively. The Depth menu determines how many items the navigation includes.

Introduction to Ingeniux CMS
Ingeniux Corporation 79
What’s New in Ingeniux CMS
80 Ingeniux Corporation
Working as an Administrator
In this chapter, you'll learn to:
Access the Administration pane.
Send mail within the CMS.
Check pages in and out.
Mark and unmark pages for publish.
Publish pages.
Move pages in and out of workflow.

Introduction to Ingeniux CMS
Ingeniux Corporation 81
Exploring the Administration Pane
Most of the tools and features used for configuring the CMS can be found in the Administration pane.
Figure 57: The Administration pane in the CMS.
For site administrators, the System Options manager is particularly important. System Options exposes many crucial site configurations, and you can configure them from the CMS.
Accessing System Options
In System Options, administrators can access and configure many of the settings that govern site management, user experience, and content publication.
To access the System Options settings, navigate to Administration > System Options.

What’s New in Ingeniux CMS
82 Ingeniux Corporation
Figure 58: System Options on the Administration pane.
The main division in the System Options hierarchy is between CMS and DSS settings. The various CMS and DSS settings are discussed in the online documentation. As a general rule, site administrators working in the Ingeniux environment should become familiar with the organization of the System Options pane.
Introduction to Ingeniux CMS
Ingeniux Corporation 83
Communicating in the CMS
Collaboration is an important part of the web authoring process. To facilitate collaborative workflow, the CMS offers several options for communicating about site pages. When you advance a page in workflow, you can leave a comment for the person to whom you’re advancing the page. You can also send email from within the CMS.
Sending Email in the CMS
The email feature in the CMS is designed to make it easy to communicate about site content. When you email other users about a given page or component, the email will automatically include the name and xID of the page in the subject line and a link to the page in the body of the email. You can send messages to individual users and to groups.
Refer to CMS 201 for more on configuring the site to set up SMTP and email addresses.
To send an email about a page:
1. Right-click a page in the site tree and select Send Mail from the context menu. The Send Mail dialog opens.
2. Select users and groups from the list on the left and click the To, Cc, and Bcc buttons to populate the address fields.
3. Enter a subject or leave the default, which is the name and xID of the page from which you initiated the email.
4. Type the body of the message. 5. Click Send.
In the Page Properties area on the edit form, the name of the person to whom the page is assigned is hyperlinked. Clicking this link opens a new email message to the assignee in the computer’s default email client.
What’s New in Ingeniux CMS
84 Ingeniux Corporation
Examining the Publishing Paradigm
In the Ingeniux CMS, the publishing process is multi-faceted. In most CMS implementations, the publishing process can be divided into two stages:
In the Ingeniux CMS, the publishing process is multifaceted. In most CMS implementations, the publishing process can be divided into two stages.
CMS (design-time)
All content creation occurs on the CMS sofware, which is an IIS environment. When content is published from the CMS, it is sent to a folder in the App_Data\xml\pub directory before being replicated to the DSS.
In the CMS environment (i.e., within the Ingeniux CMS application), a page has to go through three steps to be published:
Check In
To modify a page, a user has to check it out. Before the page can be published, it has to be checked in again, either by the user or by a workflow action.
Mark for Publish
A page has to be marked for publish in order to be included when the rest of the site is published. Unmarking a page for publish pulls the page out of the publish loop, and changes to the page won’t be sent to the live site.
Publish
This action makes pages available to be replicated to the DSS server, where it will be available to site visitors.
Dynamic Site Server (runtime)
The Dynamic Site Server (DSS) delivers the content viewed by site visitors. It’s a web server environment, but not necessarily IIS. Content only becomes available to the viewing public when it is replicated to the DSS.
It’s important not to confuse a publish on the CMS site with a replication of content to DSS. A CMS publish only sends content to a directory on the DSS.
Introduction to Ingeniux CMS
Ingeniux Corporation 85
Checking Pages In and Out
Pages that are checked in cannot be edited until they are checked out. Conversely, changes made to pages that are checked out do not take effect until the page is checked in.
The site tree reflects check-in status. If a page is checked in, the icon next to the page is grayed out; if it’s checked out, the icon is brighter.
New pages are automatically checked out and assigned to the creator.
It’s also possible to check in a page toward a specific publishing target. By checking in a page only toward a specific target, you limit the environment(s) to which you’ll publish content. For example, you could check in an updated page toward a test environment without sending it to production.
Checking Pages Out
The check out action enables the page to be modified and assigns the page to the person performing the action. Only the person who checks out the page can make changes to it.
To check out a page:
1. Select a page in the site tree. 2. Click the Check Out button on the tool bar, or right-click the page and
select Check Out. Pressing Ctrl + Shift + O also checks out the page.
If the page has children, an option to check out the page and all its children will be available in the context menu.
On the server side of things, when a page is checked out, a reference is created in the site's Raven database between the page and the user who checked it out.
Checking Pages In
The check-in action creates a new version of the page that includes the changes made since the page was checked out. If the page is marked for publish, these changes will take effect with the next publish that includes the page in its scope.
When a page is checked in outside workflow, it is no longer assigned to anyone.
To check in a page:
1. Select a page in the site tree. 2. Click the Check In button on the tool bar, or right-click the page and select
Check In. Pressing Ctrl + Shift + I also checks in the page.
What’s New in Ingeniux CMS
86 Ingeniux Corporation
If the page has children, an option to check in the page and all its children are available in the context menu.
Undoing Check Out
In some situations, changes are inadvertently made to a page. Rather than check in the page, which would save these changes as a new version, the check out that began the changes can be undone. When you undo a check out, the page reverts to the state it was in before it was last checked out.
Taxonomy categories assigned between checking out and undoing a check out will remain intact and be unaffected by the intended undo action.
To undo a check out:
1. Right-click the page in question. 2. Select Undo Check Out.
If the page has children, an option to undo check out for the page and all its children will be available.
Marking and Unmarking for Publish
The mark-for-publish action tells the CMS that the changes made to a checked-in page are ready to be published. Like the check-in action, this action helps ensure that pages are not published prematurely.
The site tree reflects marked-for-publish status. If marked for publish, the page name appears as bold text; if unmarked for publish, the name appears in plain text.
New pages are unmarked for publish by default.
Marking a Page for Publish
Marking a page for publish indicates to the CMS that the page is ready to be published. This, in conjunction with the appropriate check-in and publish actions, makes the page available for publishing to the web.
When marking a page for publish, you can choose to mark only the page itself, or to mark the page and all of its children. These two options (page or page and children) make it easy to configure site-wide publishing options while making exceptions for individual pages. For instance, if you mark the home page and its children for publish, you are effectively telling the CMS to send the whole site to the publishing folder on the next full publish. Having taken this site-wide action, you can then unmark individual pages that are not ready to be published.

Introduction to Ingeniux CMS
Ingeniux Corporation 87
Having chosen to publish either a page or a page and its children, you will see the Mark/Unmark pages for publish dialog.
Figure 59: Marking a page for publish.
In this dialog you can choose to publish different versions of pages to different publishing targets. This functionality is particularly useful for sites that employ test environments, because you can test new content in one environment while an older version of the content remains marked for publish to the live environment.
To mark a page for publish:
1. Right-click the page in the site tree. 2. Select Mark/Unmark for Publish > Page or Mark/Unmark for Publish >
Page and Children. The Mark/Unmark pages for publish dialog appear. 3. Choose which version of the page (or page and children) will be marked for
publish to which publishing target(s). Click OK.
You can also initiate a mark-for-publish action outside workflow by right-clicking the page in the site tree, selecting Page Properties, and configuring the action at the Mark for Publish tab.
Unmarking a Page for Publish
The unmark-for-publish action tells the CMS that the page is not to be published. While the page is unmarked for publish, changes to it will not be published, even if the page has been checked in and a publish performed.
To unmark a page for publish:
1. Right-click the page in the site tree. 2. Select Mark/Unmark for Publish > Page or Mark/Unmark for Publish
> Page and Children. 3. Uncheck the Marked for Publish checkbox for the page(s) to be unmarked
for publish. Click OK.
What’s New in Ingeniux CMS
88 Ingeniux Corporation
Publishing Pages
In the CMS environment, publishing content entails copying all content that is checked in and marked for publish to the publishing target folder. From there, content is replicated to the DSS web server.
In order for a page or component to be published, the page must be checked in and marked for publish.
If there is ever a discrepancy between content on the live site and previews in the CMS environment, check to be sure the content has been both checked in and marked for publish.
Performing a Publish
When performing a publish, you have to determine three important variables: the scope of the publish, the publishing target, and the type of publish.
Scope of Publish
Pages may be selected for publish within three different scopes:
Page: Publishes the selected page.
Page and Children: Publishes the page and all its descendants in the site
tree.
Site: Publishes the site to one or more publishing targets.
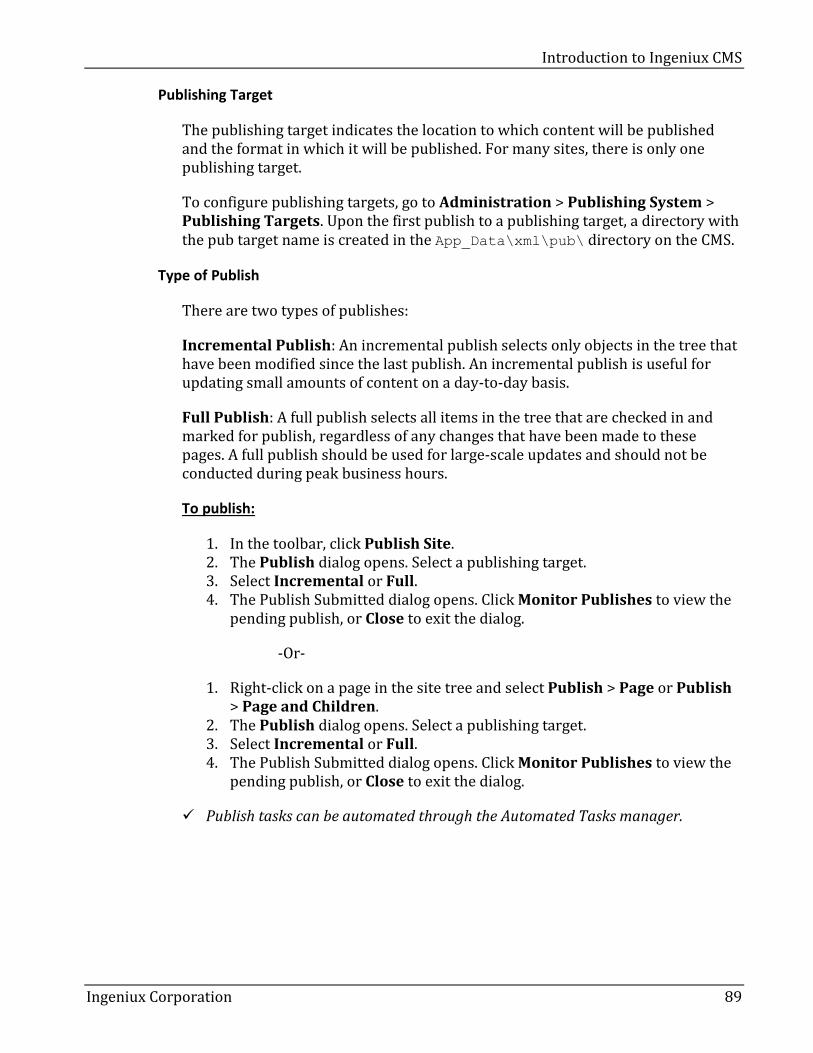
Introduction to Ingeniux CMS
Ingeniux Corporation 89
Publishing Target
The publishing target indicates the location to which content will be published and the format in which it will be published. For many sites, there is only one publishing target.
To configure publishing targets, go to Administration > Publishing System > Publishing Targets. Upon the first publish to a publishing target, a directory with the pub target name is created in the App_Data\xml\pub\ directory on the CMS.
Type of Publish
There are two types of publishes:
Incremental Publish: An incremental publish selects only objects in the tree that have been modified since the last publish. An incremental publish is useful for updating small amounts of content on a day-to-day basis.
Full Publish: A full publish selects all items in the tree that are checked in and marked for publish, regardless of any changes that have been made to these pages. A full publish should be used for large-scale updates and should not be conducted during peak business hours.
To publish:
1. In the toolbar, click Publish Site. 2. The Publish dialog opens. Select a publishing target. 3. Select Incremental or Full. 4. The Publish Submitted dialog opens. Click Monitor Publishes to view the
pending publish, or Close to exit the dialog.
-Or-
1. Right-click on a page in the site tree and select Publish > Page or Publish > Page and Children.
2. The Publish dialog opens. Select a publishing target. 3. Select Incremental or Full. 4. The Publish Submitted dialog opens. Click Monitor Publishes to view the
pending publish, or Close to exit the dialog.
Publish tasks can be automated through the Automated Tasks manager.

What’s New in Ingeniux CMS
90 Ingeniux Corporation
Viewing Results with the Publish Monitor
In the Publish Monitor, you can view the real-time status of pending publishes and the results of completed publishes.
When no publishing jobs are currently underway or pending, the Publish Monitor displays the message “No Ongoing Publish,” and the Pending Publishes view is empty. If a job is currently underway, the Publish Monitor will display the message “Publishing to” and the name of the publishing target. If other publishing jobs are queued behind the current job, the details of the queued jobs display in the Pending Publishes view.
Figure 60: The Publish Monitor in the CMS.
To access the pending publish view:
1. Go to Administration > Monitor Publishes. 2. The ongoing publish will be listed in blue at the top of the page. Pending
publishes will be listed below. Selecting Show IDs of pages to be published opens a list of xIDs of pages to be published by a given publishing action.
All CMS users can view ongoing and pending publishing jobs, and users can remove pending publishing jobs that they’ve submitted. Administrators have the additional ability to remove any pending publishes and to reorder jobs by dragging and dropping in the Pending Publishes view.
On the Publish Monitor, you can also view publishing logs, which list the pages that have been sent to a given pub target on the CMS.
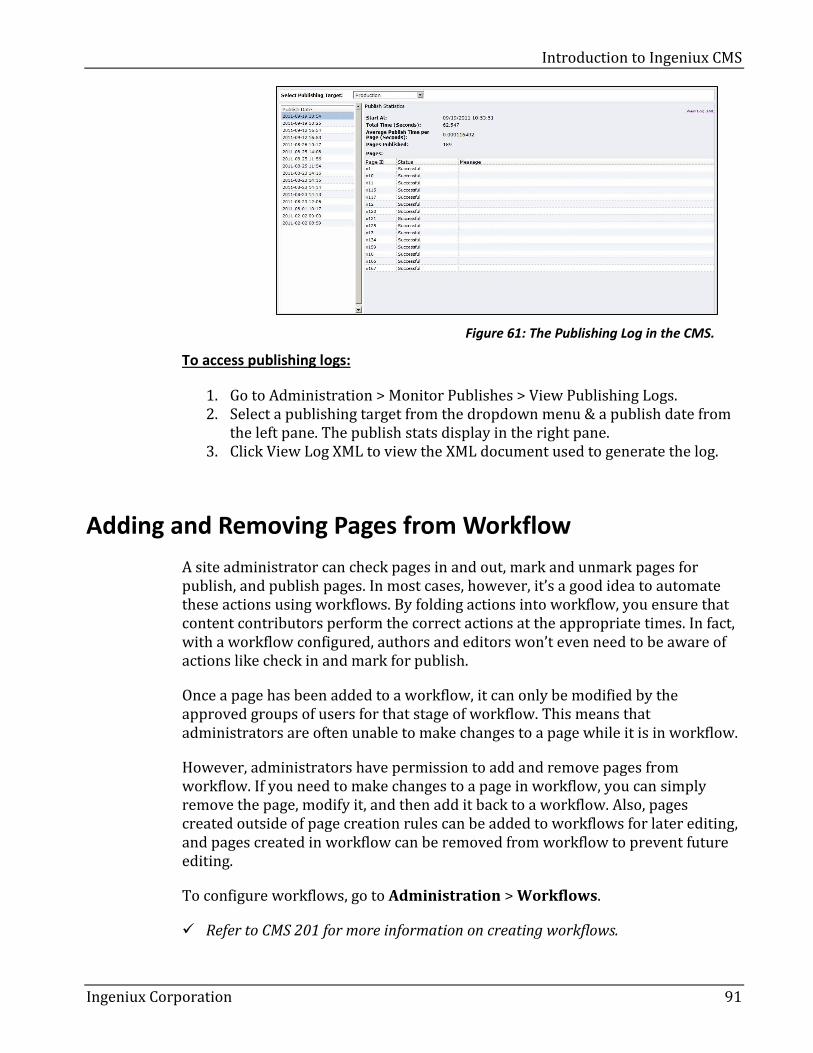
Introduction to Ingeniux CMS
Ingeniux Corporation 91
Figure 61: The Publishing Log in the CMS.
To access publishing logs:
1. Go to Administration > Monitor Publishes > View Publishing Logs. 2. Select a publishing target from the dropdown menu & a publish date from
the left pane. The publish stats display in the right pane. 3. Click View Log XML to view the XML document used to generate the log.
Adding and Removing Pages from Workflow
A site administrator can check pages in and out, mark and unmark pages for publish, and publish pages. In most cases, however, it’s a good idea to automate these actions using workflows. By folding actions into workflow, you ensure that content contributors perform the correct actions at the appropriate times. In fact, with a workflow configured, authors and editors won’t even need to be aware of actions like check in and mark for publish.
Once a page has been added to a workflow, it can only be modified by the approved groups of users for that stage of workflow. This means that administrators are often unable to make changes to a page while it is in workflow.
However, administrators have permission to add and remove pages from workflow. If you need to make changes to a page in workflow, you can simply remove the page, modify it, and then add it back to a workflow. Also, pages created outside of page creation rules can be added to workflows for later editing, and pages created in workflow can be removed from workflow to prevent future editing.
To configure workflows, go to Administration > Workflows.
Refer to CMS 201 for more information on creating workflows.
What’s New in Ingeniux CMS
92 Ingeniux Corporation
Adding Pages to Workflow
A page creation rule (PCR) can automatically put a new page into workflow. A page created without a PCR can only be manually entered into workflow.
To add a page to workflow:
1. Right-click the page in the site tree and select Add to Workflow. 2. Choose a workflow in the Select Workflow dialog and click OK.
To view a page’s workflow values (workstate, work group, etc.) expand the Page Properties area. The edit form must be refreshed to see recent changes to page properties. Refresh the edit form by clicking the Refresh button in the toolbar.
Removing Pages from Workflow
When a page is removed from workflow, an administrator can intervene in the content-creation process. This can be useful if you need to make immediate changes to the page or add the page to a different workflow. Page assignment doesn’t automatically change when the page is removed from workflow, so you’ll need to check the page out to yourself if you want to modify.
To remove a page from workflow:
1. Right-click the page in the site tree. 2. In the context menu, select Remove from Workflow and click OK.
Pages outside workflow cannot be modified by authors who have restricted permissions. If a page is removed from workflow, ensure it is assigned to a user with permission to perform the necessary actions outside of workflow.

Introduction to Ingeniux CMS
Ingeniux Corporation 93
Viewing Workflow History
Workflow history shows all assignments and transitions for the selected page as it has moved through workflow. Workflow history is only available for pages that are in workflow.
Figure 63: The workflow history display in the CMS.
To view workflow history:
1. Right-click a page in the site tree. 2. Choose Workflow, Show History. Pressing Ctrl+Shift+H also displays
workflow history.
Viewing Workflow Reports
In the Workflow pane, you can view reports on all pages currently in workflow. The default workflow report displays the name, xID, workflow, workstate, group, and assignee for each page in workflow. You can view a report for each workflow and sort the results table by column in ascending or descending order.

What’s New in Ingeniux CMS
94 Ingeniux Corporation
Figure 64: Viewing workflow reports in the CMS.
To view workflow reports, navigate to Administration > Workflows and click the Reports tab. The default workflow report opens.
By default, the report displays all workflows. To see results for a specific workflow, click Select and choose a workflow from the drop-down menu.
Click Export and follow the instructions in the dialog to export the report as a Microsoft Excel file. Reorder results by clicking in the table headers. Results can be displayed in ascending or descending order.
Introduction to Ingeniux CMS
Ingeniux Corporation 95
Working with URL Settings
Setting up URL Redirects
Redirects automatically take site visitors from one URL to another. As a general rule, using the structured URL feature is the best way to redirect visitors to an internal URL. However, the Redirects manager in the CMS can be useful for forwarding browser requests to a new domain name. In the Redirects manager, you can add, edit, and remove custom 301 redirects. The “301” identifier indicates that the redirect is permanent.
To access URL redirects, navigate to the Administration > Redirects.
A redirect consists of a From value and a To value.
Figure 65: Setting up URL redirects in the CMS.
In the From field, enter the entry point for the redirect; in the To field, enter the redirect's destination. These values can be fully qualified URLs, xIDs, or values that would appear after the base URL.
Changes to redirect settings will take effect on the live site after a publish is performed. Redirects that are set on IIS always take precedence over those set within the CMS.
Configuring Structured URLs
In order to give site visitors a user-friendly browsing experience, the CMS provides a structured URL feature. This feature generates semantic URLs for all pages in the site tree and for all site navigations and link elements. As of CMS 9.0, Structured URLs are enabled for all publishing targets.
Structured URLs can be configured on a per-publishing-target basis at Administration > Publishing System > Publishing Targets.
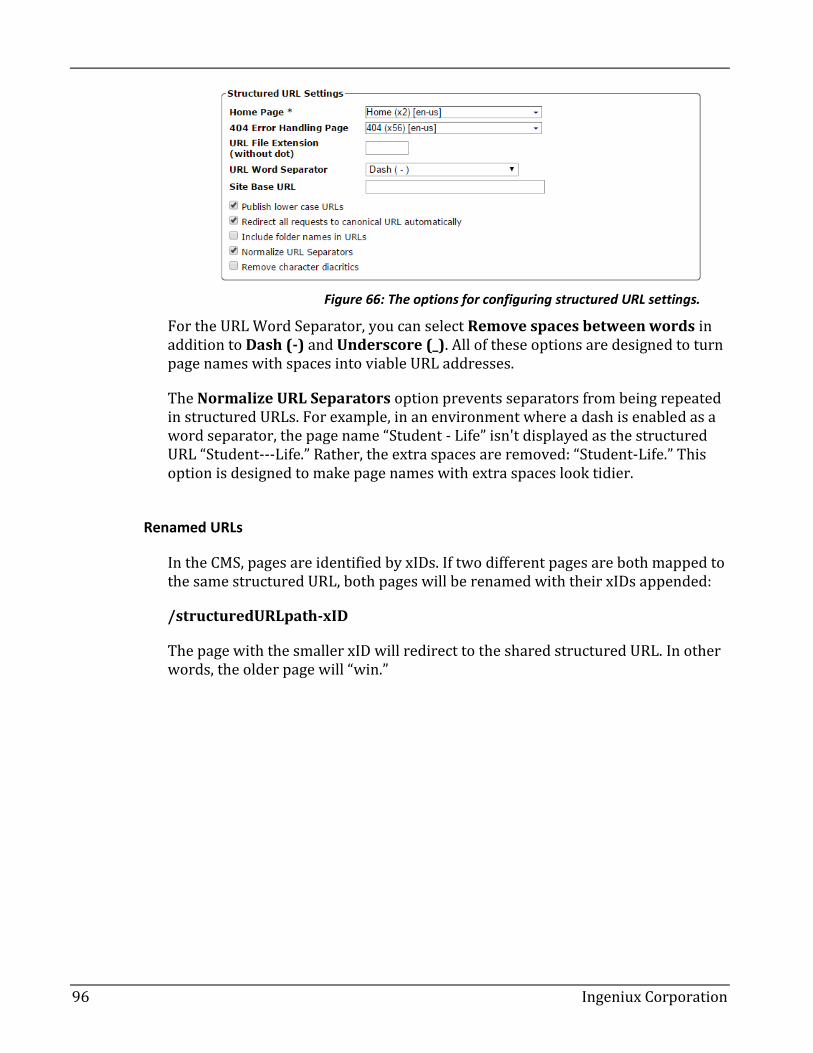
What’s New in Ingeniux CMS
96 Ingeniux Corporation
Figure 66: The options for configuring structured URL settings.
For the URL Word Separator, you can select Remove spaces between words in addition to Dash (-) and Underscore (_). All of these options are designed to turn page names with spaces into viable URL addresses.
The Normalize URL Separators option prevents separators from being repeated in structured URLs. For example, in an environment where a dash is enabled as a word separator, the page name “Student - Life” isn't displayed as the structured URL “Student---Life.” Rather, the extra spaces are removed: “Student-Life.” This option is designed to make page names with extra spaces look tidier.
Renamed URLs
In the CMS, pages are identified by xIDs. If two different pages are both mapped to the same structured URL, both pages will be renamed with their xIDs appended:
/structuredURLpath-xID
The page with the smaller xID will redirect to the shared structured URL. In other words, the older page will “win.”
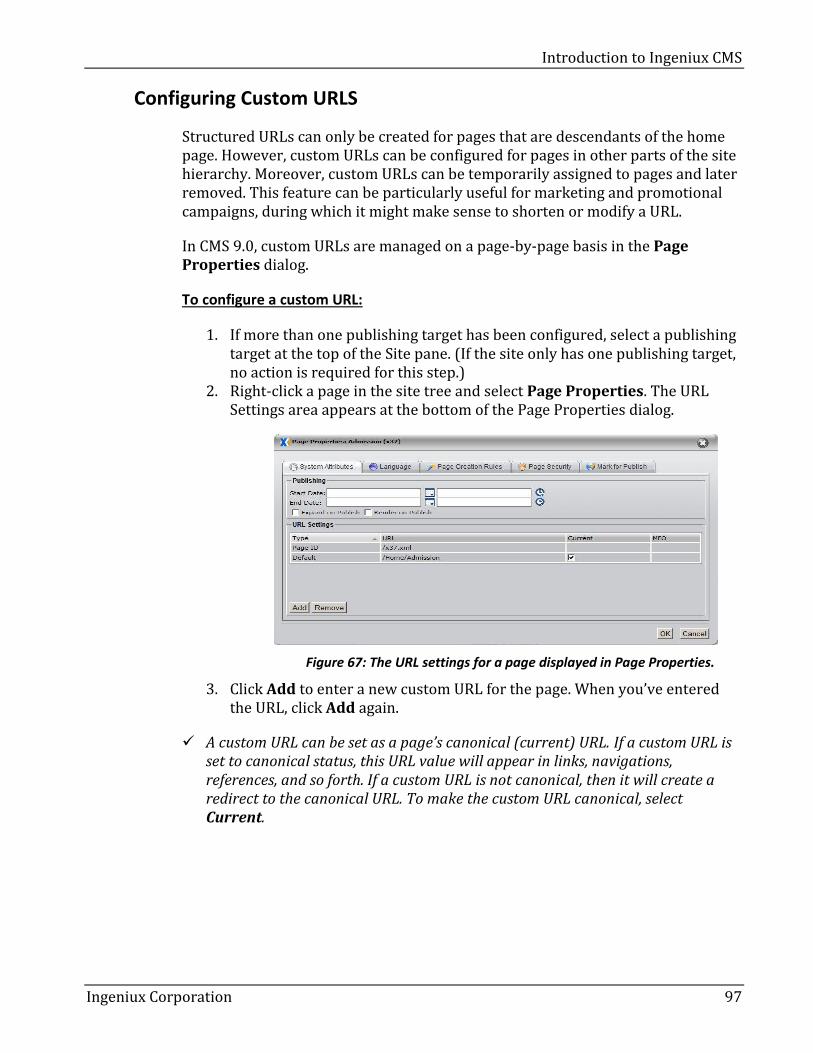
Introduction to Ingeniux CMS
Ingeniux Corporation 97
Configuring Custom URLS
Structured URLs can only be created for pages that are descendants of the home page. However, custom URLs can be configured for pages in other parts of the site hierarchy. Moreover, custom URLs can be temporarily assigned to pages and later removed. This feature can be particularly useful for marketing and promotional campaigns, during which it might make sense to shorten or modify a URL.
In CMS 9.0, custom URLs are managed on a page-by-page basis in the Page Properties dialog.
To configure a custom URL:
1. If more than one publishing target has been configured, select a publishing target at the top of the Site pane. (If the site only has one publishing target, no action is required for this step.)
2. Right-click a page in the site tree and select Page Properties. The URL Settings area appears at the bottom of the Page Properties dialog.
Figure 67: The URL settings for a page displayed in Page Properties.
3. Click Add to enter a new custom URL for the page. When you’ve entered the URL, click Add again.
A custom URL can be set as a page’s canonical (current) URL. If a custom URL is set to canonical status, this URL value will appear in links, navigations, references, and so forth. If a custom URL is not canonical, then it will create a redirect to the canonical URL. To make the custom URL canonical, select Current.

What’s New in Ingeniux CMS
98 Ingeniux Corporation
Custom URLs and Multi-Format Output
A page’s custom URL can be marked for Multi-Format Output (MFO) without altering the rest of the pages designated for a given publishing target. Using this feature, you can configure a few pages for MFO (as ASP.NET or PHP files, for instance) while the rest of the site still publishes XML.
This functionality differs from that of MFO configured per publishing target. When MFO is configured for an entire publishing target, all published pages will be rendered in the nonstandard format (a mobile site format, for example). For the custom-MFO feature to work, a run-time server has to be implemented and each MFO page has to contain a file extension (for example, .aspx, .php).
To enable MFO for a single page:
1. Configure a custom URL as described above, but add the appropriate file extension as part of the URL.
2. In URL Settings, select MFO (this will automatically make the page canonical).
For instructions on enabling MFO, refer to the documentation at support.ingeniux.com.
Customizing In-Context Editing
You can customize the in-context editing feature to meet site-specific needs. In addition to modifying default settings, you can configure ICE to support Multi-Format Output. Settings in System Options > CMS > In-Context Editing can be changed to affect how in-context editing works.
Figure 62: ICE customization options.
Introduction to Ingeniux CMS
Ingeniux Corporation 99
The following settings can be configured:
Enable In-Context Editing: Turns on the ICE feature. ICE is enabled by
default.
HTML Editor to match the look and field of page Preview HTML:
Causes the XHTML editor to apply the CSS from the preview page in order
to match the look of the preview field. This feature doesn't work with
HTML that employs CSS filters. If the styling in the HTML editor appears
unusual, this feature should be disabled.
Field Marker Color: Determines the highlight color used to indicate an
editable field on mouse-over. Values must be either standard CSS color
names or else conform to the #xxxxxx or #xxx hexadecimal color code.
Invoked Field Marker Color: Specifies the color used to outline an
editable field once it has been selected with a mouse click. Values must be
either standard CSS color names or else conform to the #xxxxxx or #xxx
hexadecimal color code.
The Base Z-Index of the Field Marker: Can be configured to make field
markers visible when an HTML template depends on Z-Index for layout.

What’s New in Ingeniux CMS
100 Ingeniux Corporation
Localizing Site Definitions
During the planning stage of a CMS implementation, administrators usually provide labels (also called site definitions) for parts of the user interface. For example, an administrator might work with a project manager to determine site definitions for workflows, schemas, and fields in the Edit Form.
For various reasons, you may want to change some of these site definitions after the implementation process is finished. The Localization feature makes it easy to revise custom site definitions. (For instructions on translating the standard CMS text provided by Ingeniux, see “Working in Different Languages” above). Using Localization, you can change labels that users find confusing; you can even translate all of your custom labels and text into another language.
Permissions determine who can localize content. To facilitate translation, it may be necessary to give certain content contributors access to the Site Definition Localization feature.
The intro screen for the Localization feature provides an overview of the localization process.
Figure 63: Localization options in the Administration Pane.
A flag icon indicates the language selected for the CMS, while the Site Definitions Localization Summary shows the percentage of localization that has been completed and the last time that localization was updated.
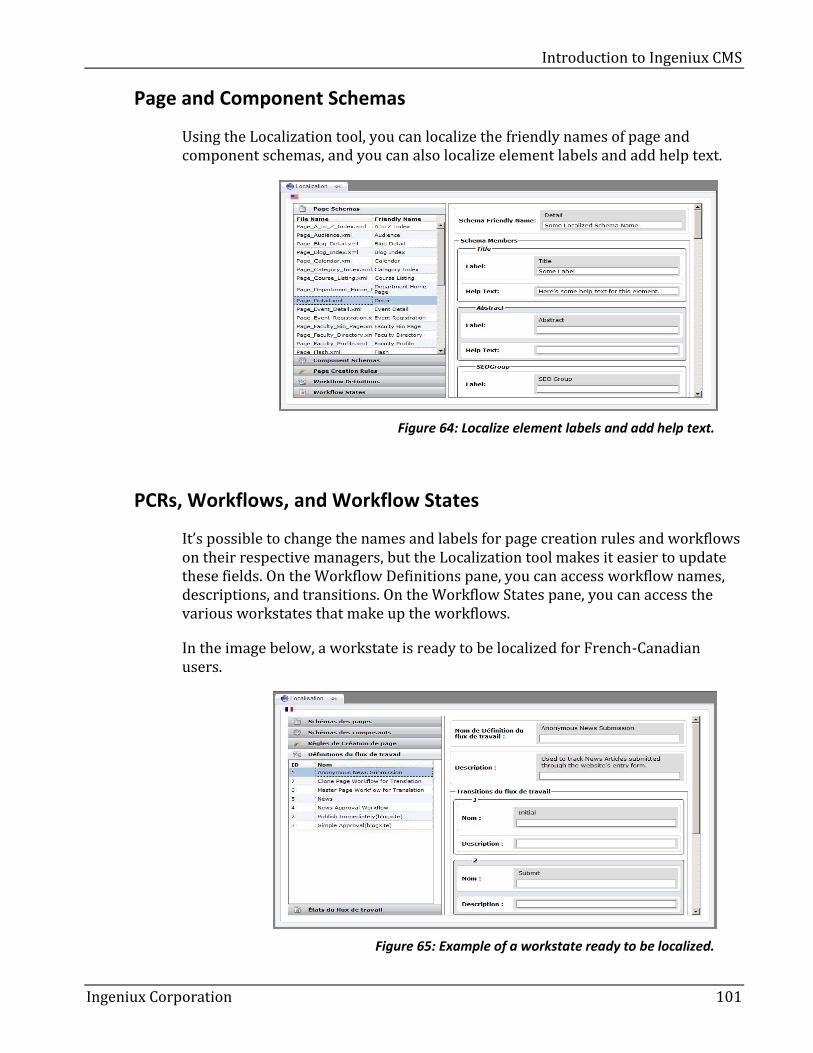
Introduction to Ingeniux CMS
Ingeniux Corporation 101
Page and Component Schemas
Using the Localization tool, you can localize the friendly names of page and component schemas, and you can also localize element labels and add help text.
Figure 64: Localize element labels and add help text.
PCRs, Workflows, and Workflow States
It’s possible to change the names and labels for page creation rules and workflows on their respective managers, but the Localization tool makes it easier to update these fields. On the Workflow Definitions pane, you can access workflow names, descriptions, and transitions. On the Workflow States pane, you can access the various workstates that make up the workflows.
In the image below, a workstate is ready to be localized for French-Canadian users.
Figure 65: Example of a workstate ready to be localized.

What’s New in Ingeniux CMS
102 Ingeniux Corporation
To localize site definitions:
1. Go to Administration > Site Definitions Localization. 2. Choose the type of content you want to localize: Page Schemas, Component
Schemas, Page Creation Rules, Workflow Definitions, or Workflow States. 3. Select an item to localize and enter new text in the text fields on the right.
Figure 66: Localizing site definitions in the CMS.
When you’re finished localizing an item, navigate away and the new definition(s) save automatically. A green check icon will appear next to each item that has been localized.
Page Language
For sites that display multilingual content, it can be useful to indicate page language within a page’s XML. Developers can then use this information to display different pages in different formats.
To set page language:
1. Right-click a page in the site tree and select Page Properties. 2. Open the Language tab and select a language from the drop-down menu.
The available languages are configured at System Options > CMS > Worldview.
Introduction to Ingeniux CMS
Ingeniux Corporation 103
What’s New in Ingeniux CMS
104 Ingeniux Corporation
Using Reports and Analytics
In this chapter, you'll learn to:
Configure and run internal reports.
Configure and run site analytics.
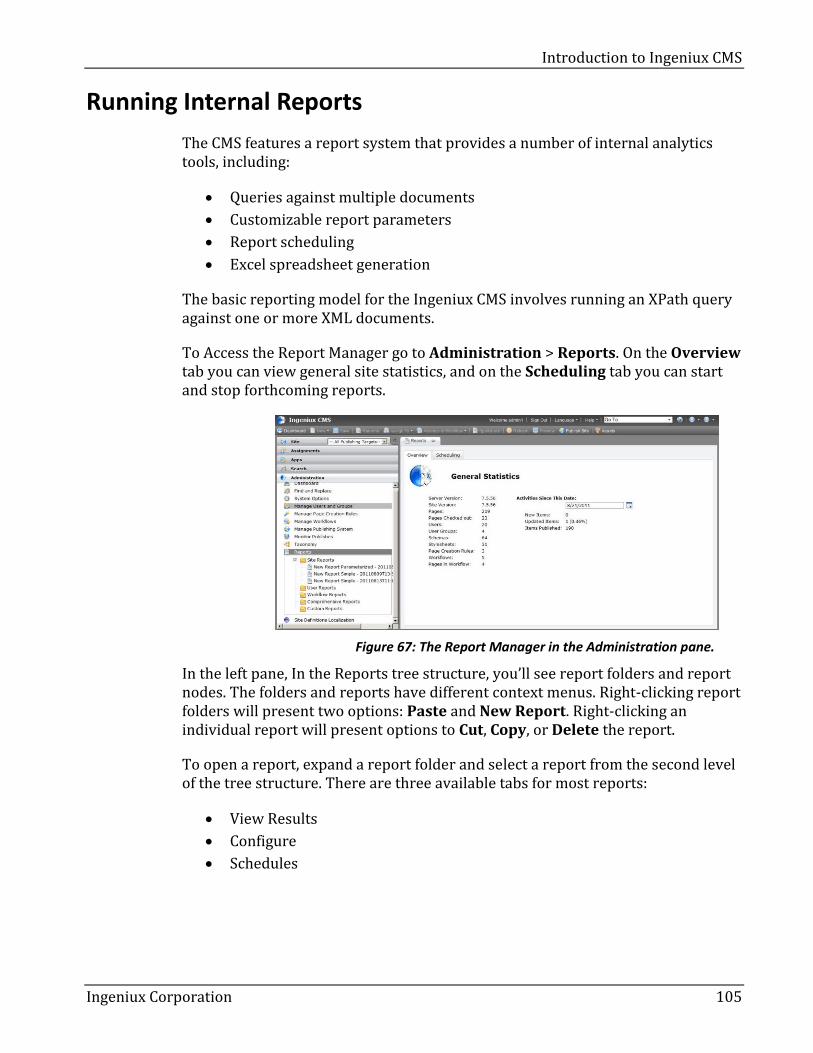
Introduction to Ingeniux CMS
Ingeniux Corporation 105
Running Internal Reports
The CMS features a report system that provides a number of internal analytics tools, including:
Queries against multiple documents
Customizable report parameters
Report scheduling
Excel spreadsheet generation
The basic reporting model for the Ingeniux CMS involves running an XPath query against one or more XML documents.
To Access the Report Manager go to Administration > Reports. On the Overview tab you can view general site statistics, and on the Scheduling tab you can start and stop forthcoming reports.
Figure 67: The Report Manager in the Administration pane.
In the left pane, In the Reports tree structure, you’ll see report folders and report nodes. The folders and reports have different context menus. Right-clicking report folders will present two options: Paste and New Report. Right-clicking an individual report will present options to Cut, Copy, or Delete the report.
To open a report, expand a report folder and select a report from the second level of the tree structure. There are three available tabs for most reports:
View Results
Configure
Schedules
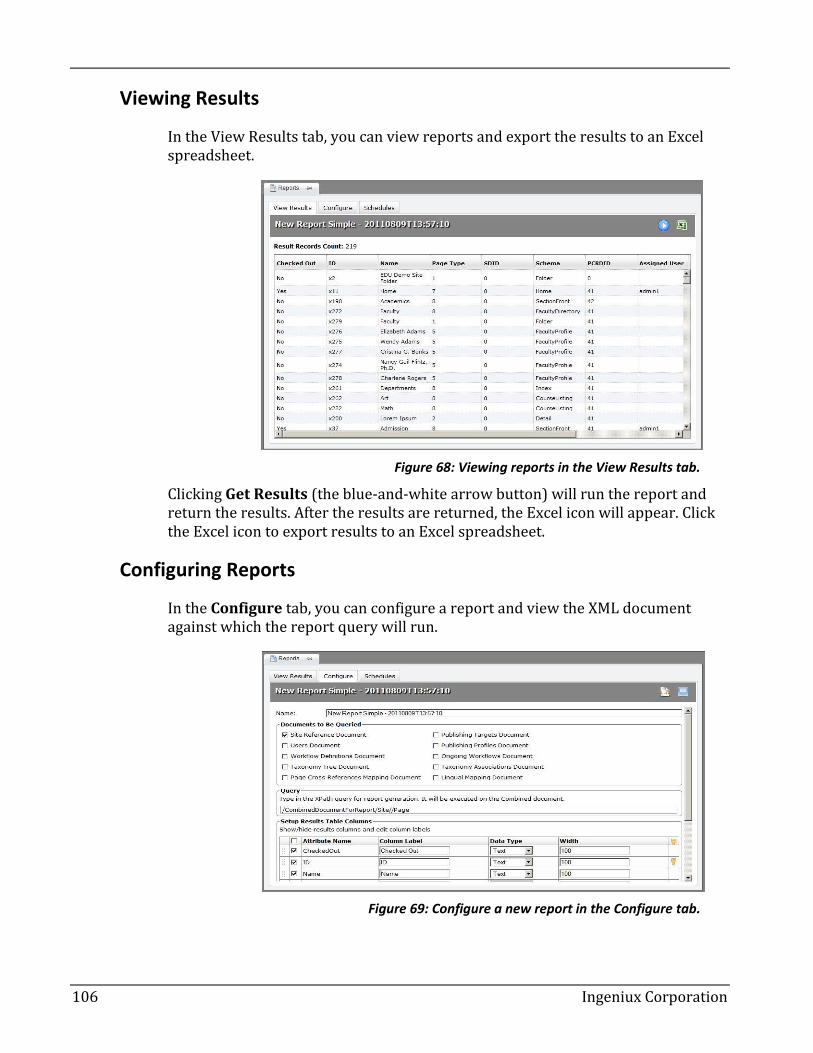
What’s New in Ingeniux CMS
106 Ingeniux Corporation
Viewing Results
In the View Results tab, you can view reports and export the results to an Excel spreadsheet.
Figure 68: Viewing reports in the View Results tab.
Clicking Get Results (the blue-and-white arrow button) will run the report and return the results. After the results are returned, the Excel icon will appear. Click the Excel icon to export results to an Excel spreadsheet.
Configuring Reports
In the Configure tab, you can configure a report and view the XML document against which the report query will run.
Figure 69: Configure a new report in the Configure tab.
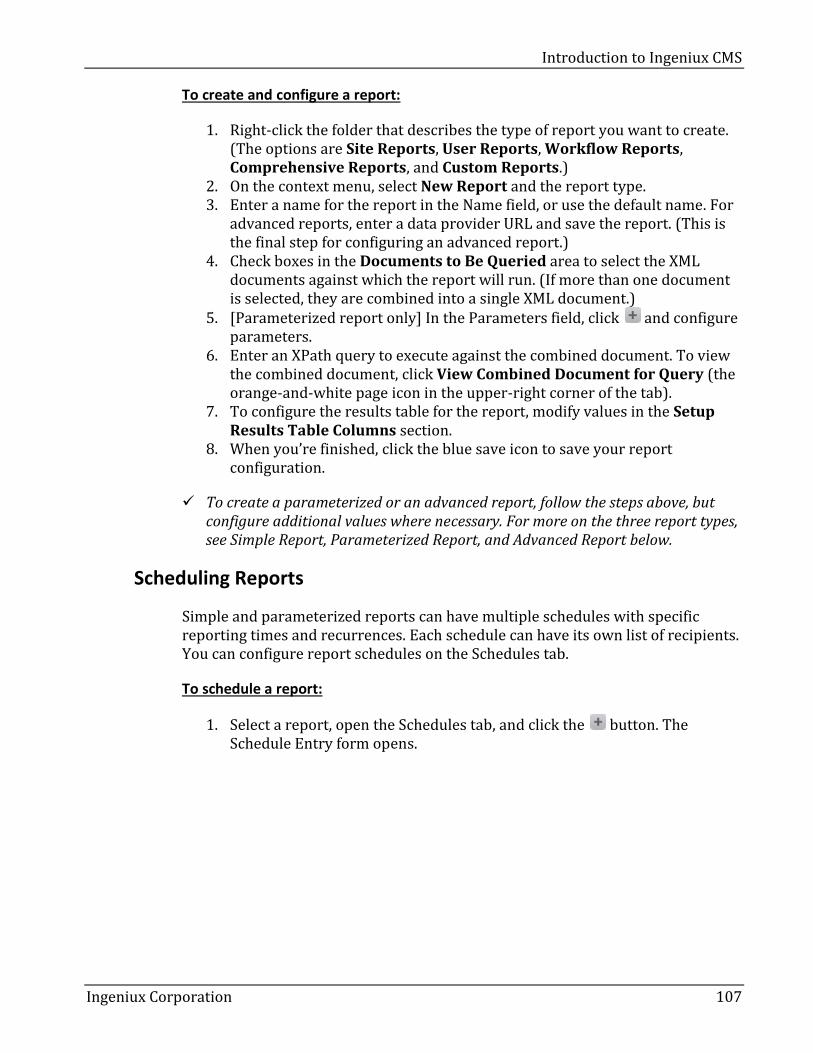
Introduction to Ingeniux CMS
Ingeniux Corporation 107
To create and configure a report:
1. Right-click the folder that describes the type of report you want to create. (The options are Site Reports, User Reports, Workflow Reports, Comprehensive Reports, and Custom Reports.)
2. On the context menu, select New Report and the report type. 3. Enter a name for the report in the Name field, or use the default name. For
advanced reports, enter a data provider URL and save the report. (This is the final step for configuring an advanced report.)
4. Check boxes in the Documents to Be Queried area to select the XML documents against which the report will run. (If more than one document is selected, they are combined into a single XML document.)
5. [Parameterized report only] In the Parameters field, click and configure parameters.
6. Enter an XPath query to execute against the combined document. To view the combined document, click View Combined Document for Query (the orange-and-white page icon in the upper-right corner of the tab).
7. To configure the results table for the report, modify values in the Setup Results Table Columns section.
8. When you’re finished, click the blue save icon to save your report configuration.
To create a parameterized or an advanced report, follow the steps above, but configure additional values where necessary. For more on the three report types, see Simple Report, Parameterized Report, and Advanced Report below.
Scheduling Reports
Simple and parameterized reports can have multiple schedules with specific reporting times and recurrences. Each schedule can have its own list of recipients. You can configure report schedules on the Schedules tab.
To schedule a report:
1. Select a report, open the Schedules tab, and click the button. The Schedule Entry form opens.
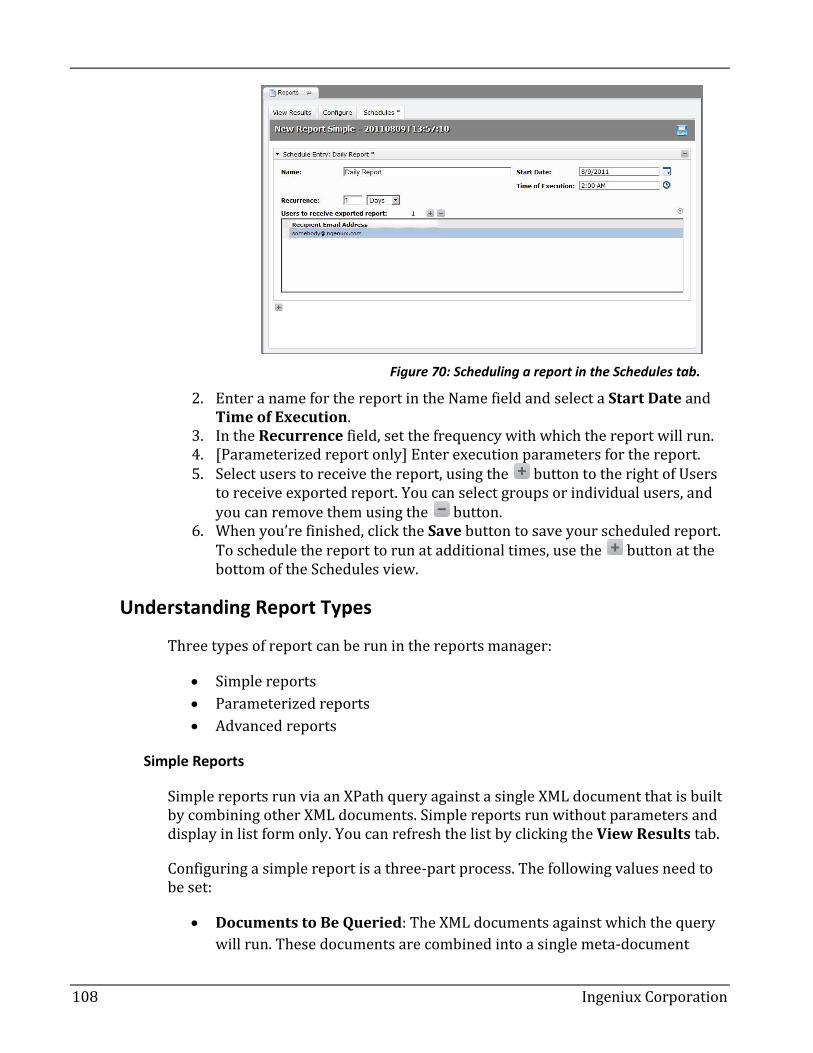
What’s New in Ingeniux CMS
108 Ingeniux Corporation
Figure 70: Scheduling a report in the Schedules tab.
2. Enter a name for the report in the Name field and select a Start Date and Time of Execution.
3. In the Recurrence field, set the frequency with which the report will run. 4. [Parameterized report only] Enter execution parameters for the report. 5. Select users to receive the report, using the button to the right of Users
to receive exported report. You can select groups or individual users, and you can remove them using the button.
6. When you’re finished, click the Save button to save your scheduled report. To schedule the report to run at additional times, use the button at the bottom of the Schedules view.
Understanding Report Types
Three types of report can be run in the reports manager:
Simple reports
Parameterized reports
Advanced reports
Simple Reports
Simple reports run via an XPath query against a single XML document that is built by combining other XML documents. Simple reports run without parameters and display in list form only. You can refresh the list by clicking the View Results tab.
Configuring a simple report is a three-part process. The following values need to be set:
Documents to Be Queried: The XML documents against which the query
will run. These documents are combined into a single meta-document
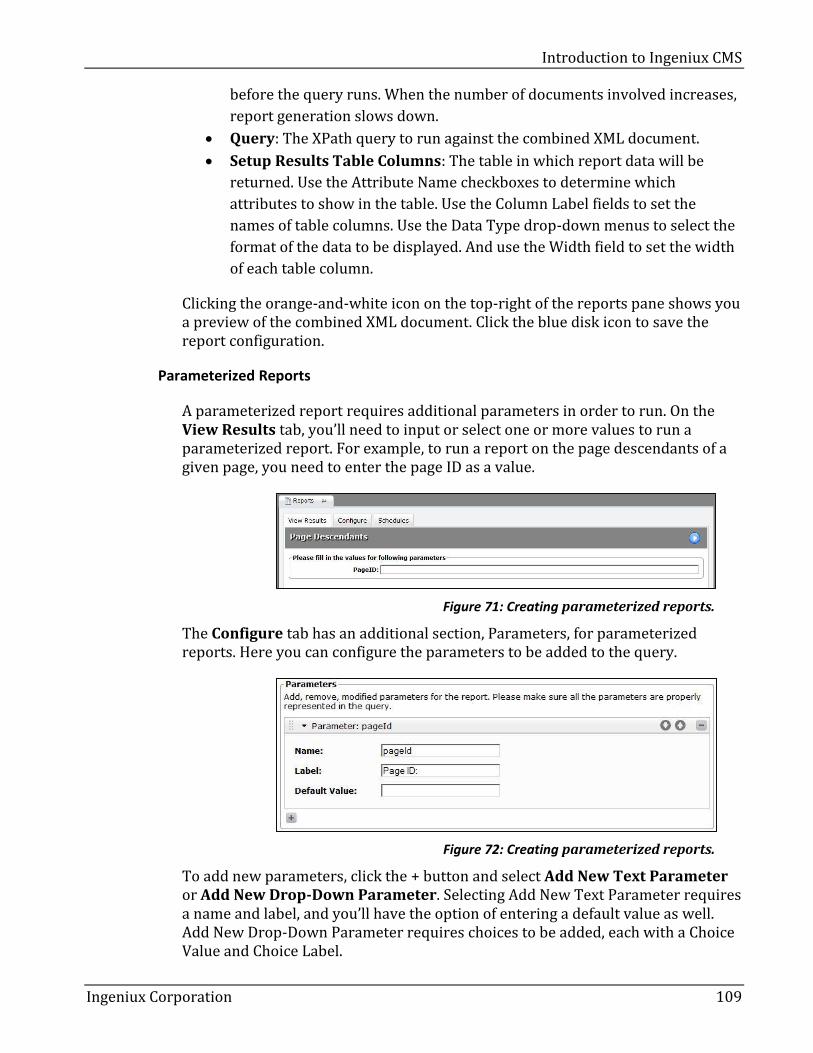
Introduction to Ingeniux CMS
Ingeniux Corporation 109
before the query runs. When the number of documents involved increases,
report generation slows down.
Query: The XPath query to run against the combined XML document.
Setup Results Table Columns: The table in which report data will be
returned. Use the Attribute Name checkboxes to determine which
attributes to show in the table. Use the Column Label fields to set the
names of table columns. Use the Data Type drop-down menus to select the
format of the data to be displayed. And use the Width field to set the width
of each table column.
Clicking the orange-and-white icon on the top-right of the reports pane shows you a preview of the combined XML document. Click the blue disk icon to save the report configuration.
Parameterized Reports
A parameterized report requires additional parameters in order to run. On the View Results tab, you’ll need to input or select one or more values to run a parameterized report. For example, to run a report on the page descendants of a given page, you need to enter the page ID as a value.
Figure 71: Creating parameterized reports.
The Configure tab has an additional section, Parameters, for parameterized reports. Here you can configure the parameters to be added to the query.
Figure 72: Creating parameterized reports.
To add new parameters, click the + button and select Add New Text Parameter or Add New Drop-Down Parameter. Selecting Add New Text Parameter requires a name and label, and you’ll have the option of entering a default value as well. Add New Drop-Down Parameter requires choices to be added, each with a Choice Value and Choice Label.

What’s New in Ingeniux CMS
110 Ingeniux Corporation
Figure 73: Creating parameterized reports.
To schedule a parameterized report also involves an additional step. At the Schedules tab, you’ll need to complete the Execution Parameters section.
Figure 74: Creating parameterized reports.
Advanced Reports
Advanced reports don’t leverage the XPath-based technology of XML meta-documents. Instead, an advanced report looks for a URL to define its parameters.
To configure an advanced report, go to the Configure tab and enter its URL (e.g. asp/reports/workflowUsageReport.asp) in the Data Provider URL field. This URL provides parameter definitions and report results. The provider URL only receives form posts. Each advanced report has to reference a specific URL.
Because advanced reports require special authentication and remote access, they cannot be scheduled.
XPath Queries
The reports feature uses XPath queries to find data in the combined XML page. XPath is an XSLT syntax used to search page elements and attributes. The following table describes common XPath operators, expressions, and functions.
Symbol Description
[ ] Contains a filter string.
@ Indicates an attribute instead of an element.
* Wildcard returns all values.
= Equal to
//siteSchema:Page[@AssignedUser='author1']
!= Not equal to
//siteSchema:Page[@AssignedUser!='author1']
and Both conditions must be true
//siteSchema:Page[@AssignedUser='author1' and
@MarkedForPublish='false']
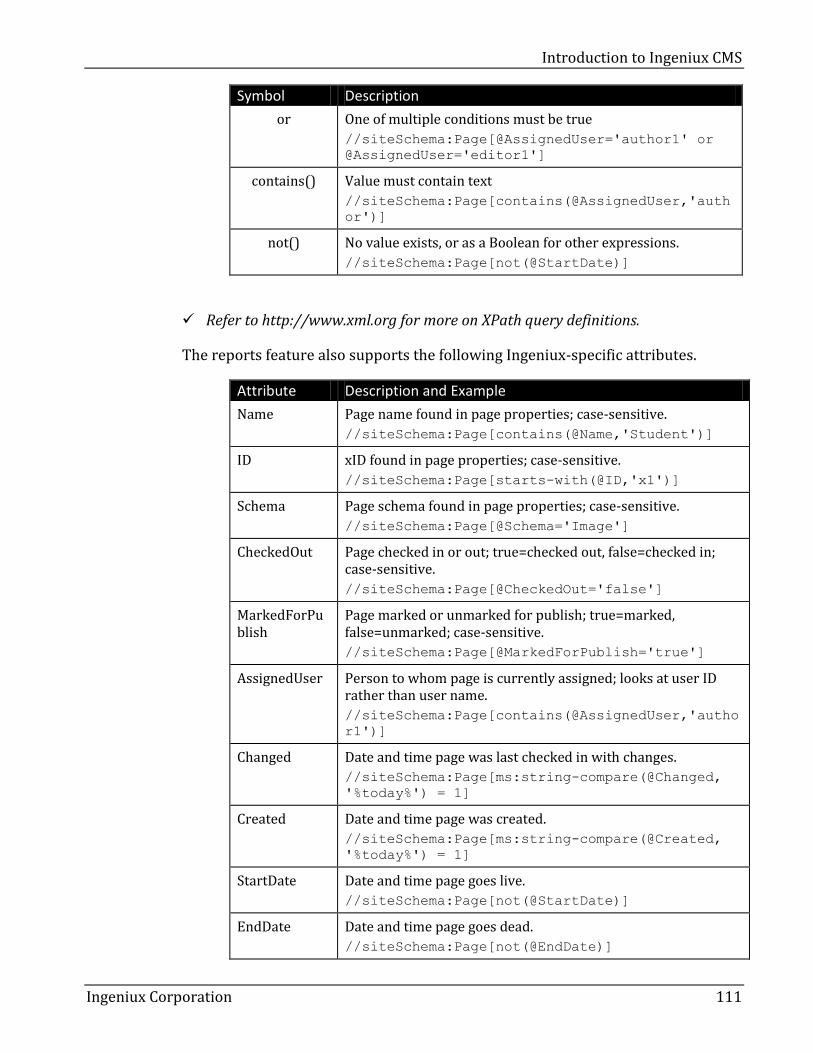
Introduction to Ingeniux CMS
Ingeniux Corporation 111
Symbol Description
or One of multiple conditions must be true
//siteSchema:Page[@AssignedUser='author1' or
@AssignedUser='editor1']
contains() Value must contain text
//siteSchema:Page[contains(@AssignedUser,'auth
or')]
not() No value exists, or as a Boolean for other expressions.
//siteSchema:Page[not(@StartDate)]
Refer to http://www.xml.org for more on XPath query definitions.
The reports feature also supports the following Ingeniux-specific attributes.
Attribute Description and Example
Name Page name found in page properties; case-sensitive.
//siteSchema:Page[contains(@Name,'Student')]
ID xID found in page properties; case-sensitive.
//siteSchema:Page[starts-with(@ID,'x1')]
Schema Page schema found in page properties; case-sensitive.
//siteSchema:Page[@Schema='Image']
CheckedOut Page checked in or out; true=checked out, false=checked in; case-sensitive.
//siteSchema:Page[@CheckedOut='false']
MarkedForPublish
Page marked or unmarked for publish; true=marked, false=unmarked; case-sensitive.
//siteSchema:Page[@MarkedForPublish='true']
AssignedUser Person to whom page is currently assigned; looks at user ID rather than user name.
//siteSchema:Page[contains(@AssignedUser,'autho
r1')]
Changed Date and time page was last checked in with changes.
//siteSchema:Page[ms:string-compare(@Changed,
'%today%') = 1]
Created Date and time page was created.
//siteSchema:Page[ms:string-compare(@Created,
'%today%') = 1]
StartDate Date and time page goes live.
//siteSchema:Page[not(@StartDate)]
EndDate Date and time page goes dead.
//siteSchema:Page[not(@EndDate)]

What’s New in Ingeniux CMS
112 Ingeniux Corporation
Variables
The following variables are also supported in the CMS:
%TODAY%
%NOW%
%THIS_WEEK%
%THIS_MONTH%
%THIS_YEAR%
Tracking Content with Google Analytics
The Ingeniux CMS can be configured to display data from Google Analytics, an enterprise-class application that measures web traffic and provides customizable reports. When Analytics is configured, you can access it by selecting a page in the site-tree and opening the Analytics tab in the edit pane.
Figure 75: The Analytics tab in the CMS.
Alternately, you can view a site-wide Analytics report at Apps > Analytics.
Enabling the Publishing Target
To track live site traffic, the Analytics feature has to be enabled for the site’s publishing target. If no publishing targets have Analytics enabled, Analytics will display the following message in the edit pane:
Figure 76: Analytics must be enabled for the site’s publishing target.
To enable analytics for a publishing target:
1. Go to Administration > Manage Publishing System and select the publishing target that you want to monitor with Google Analytics.
2. On the Info tab, check Enable Analytics for Publishing Target and leave Google Analytics Provider as the selected data provider. (The other option, Sample Provider, is for demonstration purposes.)
3. Click Save.
Introduction to Ingeniux CMS
Ingeniux Corporation 113
Linking the Site
To connect a Google Analytics account:
1. On the Apps pane, select Analytics. 2. Click Connect Analytics Account. If necessary, log in to the Google
account that has access to the Analytics profile the site is configured to use. 3. Approve access, allowing communication between the site and GA. 4. Select the profile that corresponds to the CMS content and click Save
Profile. Analytics now monitors and displays GA site data.
A single user of Google Analytics may have multiple profiles for different sites or subsites. Only one Google Analytics account is necessary; once the account is attached, anyone with access to the Analytics App has the ability to view reports.
Revoking Access to the Site
If you want to disconnect Google Analytics from the Ingeniux CMS, you’ll need to revoke GA’s access.
To revoke Google Analytics access to the CMS:
1. Go to Apps > Analytics and select the Profile link. 2. In Google Analytics Setup, click Revoke Access Token.
Viewing Reports
You can access reports for an individual page, or for the entire site.
To view analytics:
1. To view analytics for the entire site, go to Apps > Analytics.
-Or-
To view analytics for a single page, select a page in the site tree and click the Analytics tab.
2. Configure dates in the Report Range fields and click Apply.
The Site/Page Summary report shows overlapping tracks for page views and visits through the range specified. If the total number of days in the range is less than 40, the report will track per day. If more than 40 days are selected, points will be placed on the graph at regular intervals.

What’s New in Ingeniux CMS
114 Ingeniux Corporation