
CLUB CALENDAR - WordPress.com€¢ 6 HP Air Compressor, ... 125 - 155 psi, 7.7 cfm @ 40 psi, 6.0 cfm...
23
1 JULY 22, 2013 VOLUME 23, NUMBER 7 2013 CLUB OFFICERS President - Steve Fulgoni 631-421-8664 Vice-President - John Kowalchuk 631-234-1999 Secretary - Les Hoffman 516-889-0843 Treasurer - Joe DeMaio 516-766-5189 Program Chairmen - Joel Rakower 631-462-1186 Pete Richichi 631-218-2481 Librarian - Richard Barth 631-667-6430 Webmaster - Marty Mandelbaum 631-331-3607 Newsletter Editor - Brian Roth 602-663-1523 [email protected] CLUB CALENDAR Our next meeting will be on Saturday, August 10, 2013 at Steve Fulgoni’s house. CLUB MEETINGS Long Island Wood turners Association, Inc. is a member of the American Association of Wood turners. We usually meet on the 3 rd Saturday of each month at 9AM at the BOCES, Wilson Tech Campus in Dix Hills. Please check our calendar for 2013 meeting dates. Directions- LIE to exit 51 (Deer Park Avenue). Go east one block on the service road to Westminster Ave.. Turn right and proceed to the BOCES entrance. Turn left and proceed to Bldg “D”. OUR MEETINGS Our meetings consist of a brief business meeting followed by a “Show & Tell” of member’s recent work and a demonstration by members or guest turners. All of our activities promote woodturning and opportunities for members to improve their skills. A wood and/or tool raffle is held at each meeting. A free video and text library is available for member’s use. Workshops are also held at member’s shops. See the Club Calendar for dates and times. Our club website is www.liwoodturners.org . It is maintained by Marty Mandelbaum whose e-mail address is martymande@gmail Table of Contents 2 – Party at Bob’s 4 – Chapter Challenge 5 –July Meeting / Personal Ads 6 – Make a Cone Sander 23 - Puzzle
Transcript of CLUB CALENDAR - WordPress.com€¢ 6 HP Air Compressor, ... 125 - 155 psi, 7.7 cfm @ 40 psi, 6.0 cfm...

1
JULY 22, 2013 VOLUME 23, NUMBER 7
2013 CLUB OFFICERS
President - Steve Fulgoni 631-421-8664
Vice-President - John Kowalchuk 631-234-1999
Secretary - Les Hoffman 516-889-0843
Treasurer - Joe DeMaio 516-766-5189
Program Chairmen - Joel Rakower 631-462-1186 Pete Richichi 631-218-2481
Librarian - Richard Barth 631-667-6430
Webmaster - Marty Mandelbaum 631-331-3607
Newsletter Editor - Brian Roth 602-663-1523 [email protected]
CLUB CALENDAR Our next meeting will be on Saturday, August 10, 2013 at Steve Fulgoni’s house.
CLUB MEETINGS Long Island Wood turners Association, Inc. is a member of the American Association of Wood turners. We usually meet on the 3rd Saturday of each month at 9AM at the BOCES, Wilson Tech Campus in Dix Hills. Please check our calendar for 2013 meeting dates.
Directions- LIE to exit 51 (Deer Park Avenue). Go east one block on the service road to Westminster Ave.. Turn right and proceed to the BOCES entrance. Turn left and proceed to Bldg “D”.
OUR MEETINGS Our meetings consist of a brief business meeting followed by a “Show & Tell” of member’s recent work and a demonstration by members or guest turners. All of our activities promote woodturning and opportunities for members to improve their skills. A wood and/or tool raffle is held at each meeting. A free video and text library is available for member’s use. Workshops are also held at member’s shops. See the Club Calendar for dates and times. Our club website is www.liwoodturners.org . It is maintained by Marty Mandelbaum whose e-mail address is martymande@gmail
Table of Contents
2 – Party at Bob’s
4 – Chapter Challenge
5 –July Meeting / Personal Ads
6 – Make a Cone Sander
23 - Puzzle

2
“Summer Fun” - Party at Bob and PAM Urso’s house We want to thank Bob and Pam for their hospatality and being such great
hosts.

3

4
Chapter Challenge The Chapter Challenge forJuly was to turn a small object 2” – 4”

5
July Meeting This meeting was all about having fun and socializing. There was a lot of talking and eating, not too much wood turning.
Personal Ads
For Sale
Drew Diaz 917.971.1577 - Make an offer call to arrange a visit.
• Porter Cable Omni-Jig 16 – Dove Tail Never Used • Hand Screws – Various Sizes • Bench vise a couple of machinist vices, hand saws, molding planes, a stick
welder, C-Clamps, plumbing tools. • 12 pairs of Pony Pipe Clamp
Frank Gaizo: Phone: (631) 581- 7054 Cash or Bank Check Please
• JDS Shop Air Filter , Air Tech 2000, 3 Speeds, with washable Electrostatic prefilter and charcoal Filter, extra set of filters – $175 or best offer Laguna Heavy Duty 16” Band Saw with 1/8” thru 1 3/8” Blade width capacity, 12” resaw capacity , 16 ½” by 22 ¾” Table, Ceramic Guides, Foot Brake & Mobility Kit, & Extra Blade, - 3HP, 220v - $1500 or best offer
• Powermatic Left Tilting 10” Cabinet Saw, Model 66, 3 HP, single phase 220 v, 50” cutting capacity to right of Blade, Exaktor Swing Arm Blade Guard/Dust Pickup, Miter Gauge, Accufence, Biesmeyer Snap In Anti-Kickback Riving Knife, Powermatic Tenoning Fixture, Mobile Base - $2500 or best offer
• Two Duby Cutoff Fixtures (Right & Left Adjustable Miter Sleds) -- $200 or best offer
• 6 HP Air Compressor, Oil less, Single Stage, Direct Drive, working Pressure 125 - 155 psi, 7.7 cfm @ 40 psi, 6.0 cfm @ 90 psi, with a wheeled 27 Gallon Tank – $250 or best offer
• Duracraft 17” Drill Press , Floor Standing, 16 Speed, 3/4 ” Chuck, with Mortising Attachment & 1/4, 3/8, 1/2, 5/8, & ¾” Bits & Chisels - $150 or best offer
• Delta/ Rockwell 8 inch Jointer with a 60” bed, Cast Iron Base, and HTC Mobile Base -- $300 or best offer
• Delta Boss Oscillating Spindle Sander, Model 31.780 - $150 or best offer • Craftsman 10” Radial Arm Saw 2 1/2HP, 120v, 3450RPM, with a mobile, steel
4 drawer Base Cabinet equipped with 2 (Right & Left) 36” folding Table Extensions and Saw Dust Collection Hood/container - $250 or best offer
• Delta DC-380 15” Thickness Planer Model 22-675 with Steel Stand, Shaving Hood, folding Extension Tables , and HTC Mobile Base, extra set of knives, Single Phase, 230V, 20 amp circuit. - $1250 or best offer
• Vacuum Press – Vacuum Pressing Systems Model 408ST, 1/3 HP, 6 cfm, Dual Chamber, Rocking Piston Vacuum Pump with 49” x 97” Vacuum Bag and platen, includes ½ Gallon Unibond 800 Glue, New in box- $650 or best offer
• Delta / Milwaukee 14” Band Saw with 6 ‘ Riser Block, Rockler table/ circle cutting jig, Fence, Task Light, extra set of tires, cool blocks and Miter Gauge - $225 or best offer
6
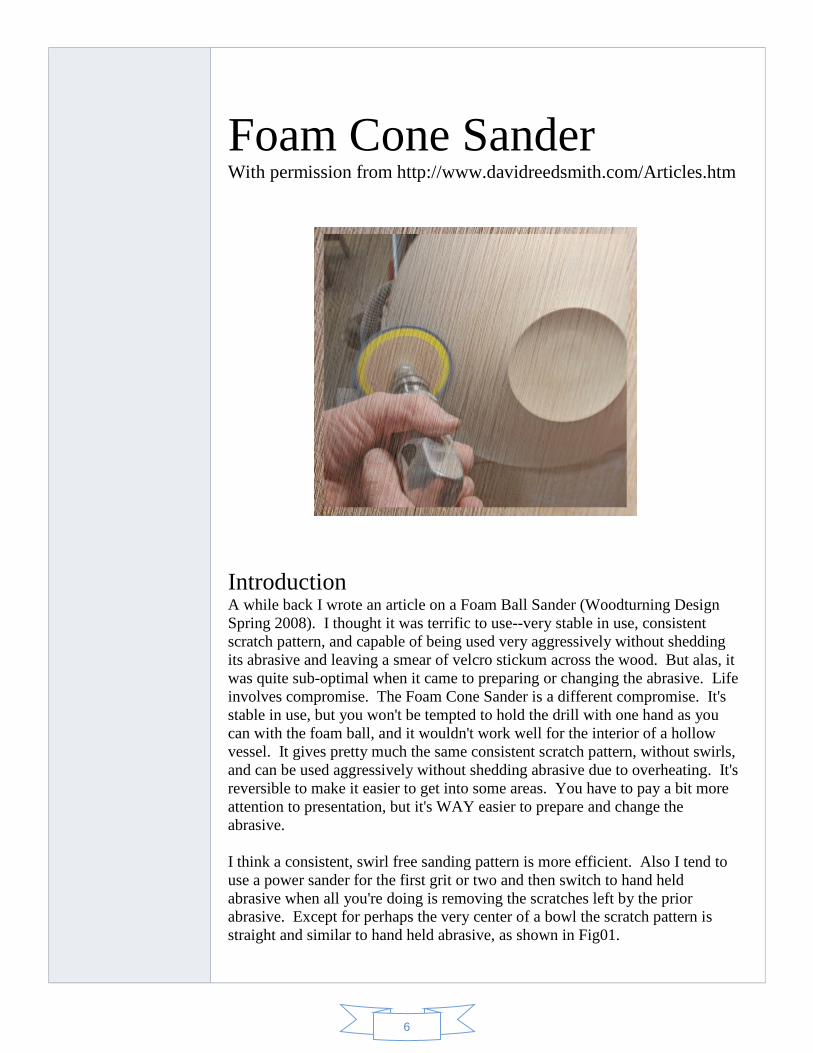
Foam Cone Sander With permission from http://www.davidreedsmith.com/Articles.htm
Introduction A while back I wrote an article on a Foam Ball Sander (Woodturning Design Spring 2008). I thought it was terrific to use--very stable in use, consistent scratch pattern, and capable of being used very aggressively without shedding its abrasive and leaving a smear of velcro stickum across the wood. But alas, it was quite sub-optimal when it came to preparing or changing the abrasive. Life involves compromise. The Foam Cone Sander is a different compromise. It's stable in use, but you won't be tempted to hold the drill with one hand as you can with the foam ball, and it wouldn't work well for the interior of a hollow vessel. It gives pretty much the same consistent scratch pattern, without swirls, and can be used aggressively without shedding abrasive due to overheating. It's reversible to make it easier to get into some areas. You have to pay a bit more attention to presentation, but it's WAY easier to prepare and change the abrasive. I think a consistent, swirl free sanding pattern is more efficient. Also I tend to use a power sander for the first grit or two and then switch to hand held abrasive when all you're doing is removing the scratches left by the prior abrasive. Except for perhaps the very center of a bowl the scratch pattern is straight and similar to hand held abrasive, as shown in Fig01.

7
Fig01: The scratch pattern on the outside of a bowl. I tend to drop my hand to see what I'm doing so it's not perfectly vertical.
First the article will discuss preparing and turning the cone blank. Then the cone will be covered in foam, tape, and velcro. The abrasive will be prepared and applied, and then the using the foam cone sander in various bowl situations will be discussed. Making the Cone Begin the blank by bandsawing a disc, 2-3/4" in diameter, out of wood about 1-1/8" thick as in Fig02. The next step is to drill and tap the center of the disc for 3/8x16 threads. Fig03 shows a mini-tap guide, on top, which enables you to easily tap threads perpendicular to the blank because of its spring loaded point that follows the tap, and two slightly different styles of taps. The tap in the middle has a shank that is the diameter of the outer threads. This style limits the depth you can tap. In this case, it will tap deeply enough. If you made the cone of thicker wood it would have trouble sanding more concave surfaces (or you would have to use a lot more foam layers). The bottom tap, a cheaper one with a reduced shank, could tap more deeply.

8
Fig02: The cone blank, a 2-3/4" disc of wood about 1-1/8" thick.
Fig03: The mini-tap guide and a couple of styles of taps.
Mount the blank on your lathe using a 4-jawed chuck (or faceplate, etc). Mount a combined drill and countersink or spotting drill in your tailstock mounted drill chuck as in Fig04 and drill a small dimple to aid in getting the tap drill started straight. Then mount a 5/16” drill bit in the chuck as in Fig05 and drill through the blank.

9
Fig04: Using a combined drill and countersink to drill a starter hole.
Fig05: Drilling through the cone blank with the tap drill.
Now mount the mini-tap guide in your drill chuck. Place the nose of the tap in the drilled hole and bring up the tailstock so that the point of the mini-tap guide engages the dimple in the back of the tap (or the tap handle if you're using one). Advance the tailstock ram to compress the spring of the mini-tap guide. Lock the lathe spindle and turn the tap so that it cuts the threads. The spring loaded mini-tap guide will follow the tap in (at least for the critical first half inch), keeping it aligned with the axis of the lathe and preventing skewed threads.

10
Fig06: Tapping threads with the aid of a mini-tap guide.
Now prepare a drive stud for the cone. Use either 2-1/4” of 3/8 x 16 all-thread or cut the head off of a 3/8 x 2-1/2” bolt. Thread on two nuts and lock them against one another about 1/2" from one end as in Fig07. Then remove the blank from the chuck and thread the short end of the stud into the cone blank.
Fig07: The completed drive stud.
Mount your drill chuck in the headstock, and then mount the cone blank, via the drive stud, in the drill chuck. Bring up your tailstock so that you won't have worry about the drill chuck vibrating loose as in Fig08. Using a small bowl gouge, reduce the diameter of the blank to 2-1/2" as in Fig09.

11
Fig08: The cone blank mounted on the lathe.
Fig09: After reducing the blank diameter to 2-1/2".
Then use the bowl gouge to taper the nose of the blank so that the shape becomes a truncated cone. A good general purpose slope to aim for is 45°, or measured as in Fig10, 135 degrees. This angle works fairly well both inside and outside of bowls unless they have very concave surfaces. Another tactic would be to use a pair of cone sanders, one flatter, maybe 155 degrees for bowl insides and one steeper, perhaps 125 degrees, for the outside.

12
Fig10: Checking that the Cone is 135°.
Covering the Cone The wooden cone needs to be covered with 3 layers of 2mm craft foam to allow it to conform to the bowl surface and sand efficiently. It is possible to calculate the exact size and shape of foam needed (it will be on my website if you're into the math) but it's easier to start bigger than necessary and trim, as craft foam isn't very expensive (unless you splurge on the new sparkly foam). Start by making a template out of poster board or cereal box cardboard. Begin by making a 5" circle, then a smaller 1-1/2” circle with the same center. Draw two radial lines starting at the center at right angles to another. The result is three quarters of a ring as sown in Fig 11. Use the template to trace out 3 of the foam shapes on the craft foam using a fine lined sharpie or pencil. Now cut out the foam pieces.
Fig11: After tracing out three foam pieces.

13
Lay the foam pieces out on newspaper or another disposable surface and spray one side of the foam pieces with 3M 77 spray adhesive as in Fig12. Wait for the glue to set up following the directions on the can. Then apply the first piece of foam to the cone blank as in Fig13. The foam will overhang top and bottom and overlap. First trim away the overlap with a knife or scissors. Then trim the overhang at top and bottom as in Fig14. Repeat the foam application for the two additional layers, being sure to put the overlap in a different place for each layer. The result is shown in Fig15.
Fig12: After applying spray adhesive to the foam pieces.
Fig13: After applying the first foam layer and removing the overlap.

14
Fig14: After trimming excess foam from the first layer.
Fig15: After applying and trimming all three layers of foam.
The foam is somewhat fragile—if you had to change the Velcro it would likely take some foam with it so protect the foam with a layer of duct tape. I've not discovered a terribly efficient way to cover a cone with duct tape...so just get it done, a couple of layers worth, and trim away any overlap as in Fig16. Now apply the hook layer of “Industrial Strength sticky back” Velcro. Again, there is no magic way, just apply and trim. The result is shown in Fig17.

15
Fig16: After applying duct tape to protect the foam.
Fig17: After applying velcro.
Using the Foam Cone Sander The first step in using the Foam Cone Sander is to size and attach abrasive. Use 5" discs. Unperforated discs would be best, but perforated discs from Home Improvement big box stores will work fine. Lay a disc abrasive side down on a work surface and find the center. Draw two radial lines at right angles from one another. Then measure the side of your cone. Add 1/4" to that (this lets a little abrasive fold over the nose if you need use just the nose for bowl bottoms). Subtract the total from 2-1/2" and draw a circle with that radius as in Fig. 18. Cut the abrasive on the lines as in Fig19.

16
Fig18: The layout for cutting out the abrasive.
Fig19: After cutting out the abrasive.
Now apply the abrasive to the foam cone, trying to match at the widest diameter, and overlap it on the side as in Fig20. Trim the overlap as in Fig21, leaving about 1/4" of overlap. You can now use the trimmed abrasive as a template for any future ones.

17
Fig20: After applying the abrasive.
Fig21: After trimming the abrasive to a 1/4" overlap.

18
Mount the foam cone with abrasive in a power drill. You can use any drill you like, but if you have an air compressor, I recommend using air powered drills. An environment of sawdust and abrasive is not good for electric drills that suck in outside air to cool themselves (I ruined a really nice close quarter drill this way). Air drills, however, use the clean air from your compressor for cooling and will be none the worse for sanding duty provided you remember to oil them occasionally. You can mount the cone with the large end close to the drill for most uses as in Fig22, or unscrew the mounting stud and screw it in the other end to mount the cone with the large end out as in Fig 23 for hard to reach areas. Reverse the overlap when you do this.
Fig22: The foam cone mounted on an air powered drill.
Fig23: The foam cone mounted reversed (with overlap reversed as well) on a drill.

19
To maximize sanding efficiency when using the Foam Cone Sander ensure that the bowl surface and the abrasive surface are moving in opposite directions at the point of contact. Depending on your lathe and drill you can reverse either if necessary. Also make sure the overlap is trailing. Try to do most of the work with the side of the cone, not the rim or nose. The following figures show several applications in sanding a bowl. Fig24 shows sanding the foot of a bowl in close to the chuck. The cone is in the reversed position, and a right-angled drill is being used.
Fig24: Sanding the foot of a bowl with the cone reversed.
Fig 25 and Fig26 show sanding the inside of a bowl. The cone is in the regular position and the side of the cone is in contact with the work. The foam gives enough to allow the abrasive to adapt to the curve and make contact over most of its side.

20
Fig25: Sanding near the rim of the inside of a bowl.
Fig26: Sanding in towards the bottom inside of a bowl.
Fig27 shows sanding the foot of a bowl. In this case, little but the rim is making contact and some swirling is present in the pattern. In Fig 28, which shows sanding on the outside of the bowl, the whole side of the bowl is again making contact and the abrasive pattern is straight.

21
Fig27: Sanding the foot of a bowl.
Fig28: Sanding the outside of a bowl.
Tools and Materials 3/8" x 16 tap Mini-tap guide 5/16" drill drill chuck 2-3/4"D x 1-1/8" wood disc 2-1/4” of 3/8 x 16 all-thread or 2-1/2” 3/8” bolt 2 each 3/8" x 16 nuts Adjustable bevel 2mm craft foam 3M Super 77 or other spray adhesive Duct tape Industrial Strength Sticky Back Velco 5" hook and loop abrasive discs Power drill

22
Author David Reed Smith lives to turn and tinker in Hampstead, Maryland. Regular readers may be surprised (or relieved) there was no blue tape visible in this article, but be assured there was some behind the scenes when the bowl was reversed. This article, along with perhaps a supplementary video will be available at www.DavidReedSmith.com along with 60 or so other articles. He welcomes comments and questions at [email protected].

23