Clone VX V1 web
15
Owners Manual
Transcript of Clone VX V1 web

OWNERS MANUALVX Model
Owners Manual
Clone VX Model Owners ManualV1.00
Copyright Mac Developments Pty. Ltd. 2010All rights reserved
No part of this document may be copied or reproduced in any form or by any means without the prior written consent of Mac Developments Pty. Ltd.
Notice is hereby given that this manual is part of the article owned in whole by Mac Developments Pty. Ltd., known as indicated in this manual and drawings. All rights of manufacture and reproduction of such articles or any part thereof are reserved by Mac Developments Pty Ltd. Neither said article nor any part thereof may be manufactured or reproduced without the written authorization from Mac Developments Pty. Ltd. All proprietary rights and information are the sole property of Mac Developments Pty. Ltd.MacDev, Clone, Conquest, Gladiator, MatchStick, Cyborg, Shift and Drone are all trademarks of Mac Devel-opments Pty Ltd.
Statement of LiabilityMac Developments Pty. Ltd. makes no warranties with respect to this documentation and disclaims any implied warranties of merchantability or fitness for a particular purpose. The information in this document is subject to change without notice. Mac Developments Pty. Ltd. assumes no responsibility for its resale or safe handling. Mac Developments Pty. Ltd. assumes no responsibility for physical injury or property damage resulting from its use.
MacDev 2 Year WarrantyYour marker is covered by the MacDev 2 year warranty against manufacturing defects. Your marker is guaranteed free of manufacturing defects for a period of two (2) consecutive years beginning from the product release date. If a manufac-turing defect is detected, the defective part will be either repaired or replaced at no cost to the owner. Your warranty does not cover damage due to theft, misad-venture or operator error/abuse.
Caution!
This is not a toy. Misuse may cause serious injury or death. Eye protection designed specifically for paintball must be worn by user and persons within range. Recommend 18 years or older
to purchase. Persons under 18 must have adult supervision. READ OWNER’S MANUAL BEFORE USING.
2
ContentsKnow your CloneQuick SetupUsing your CloneAdvanced SetupMaintenanceParts ListTroubleshooting

CONTENTSKnow your Clone (Page 5)All users should read this section to learn the parts of your Clone and their names.
Quick Setup (page 7)Learn how to set your Clone up for use the first time.
Switching your Clone on and off Firing your Clone Understanding the beam sensor Disabling the beam sensor Installing a preset air system Turning the air on and off Using a loader with your Clone Installing a loader onto your Clone Removing your loaderUsing your Clone (Page 10)Essential reading on how to use your Clone marker. Adjusting the velocity Adjusting the trigger Replacing the batteryAdvanced Setup (Page 11)A section for those who are comfortable with making fine adjustments to the Clone marker. About the tourney lock Programming the software Debounce Cycle mode Cycle speed Cycle speed fine Ramp start Ramp degree
Mechanical debounce Anti bolt stick (ABS) Cycle filter Ball settle delay Solenoid on time (dwell) Eye function Auto power off Game timer Brightness User profiles Reset to default Using an RF transmitter Using the USB connectorMaintenance (Page 18)Maintaining your purchase is essential to long term product satisfaction. Basic cleaning Maintaining the drivetrain Maintaining the inline regulatorParts List (Page 19-21) An exploded view of your Clone with parts labelled.
Troubleshooting (Page 23)Solving common difficulties. Common problems and solutions Technical assistanceClone VX Specifications (Page 26)
4
ContentsKnow your CloneQuick SetupUsing your CloneAdvanced SetupMaintenanceParts ListTroubleshooting

KNOW YOUR CLONE®
21
34
5
7
8
10
6
12 11
9
Your Clone marker represents the pinnacle of premium grade paintball markers avail-able today.
Please take the time to learn the parts of your Clone, it will help you when reading this manual.
Numbered basic parts as shown in the figure on the left:
1. Shift® 3 piece barrel2. Feed clamp lever (used to affix your loader)3. Drivetrain, unscrew to remove (note: marker must be degassed first)4. Eye covers and screws5. Gladiator VX Inline (High Pressure Regulator)6. Velocity adjustment screw (anti clockwise to increase velocity)7. Trigger with screw adjustments8. OLED display used to view gun status/settings9. Membrane pad with power and programming buttons10. Air hose11. Venting ASA, screw your air system in here12. Venting ASA on/off cap (used to turn the air on or off)
6
ContentsKnow your CloneQuick SetupUsing your CloneAdvanced SetupMaintenanceParts ListTroubleshooting

QUICK SETUPSwitching your marker on and offThe on/off button is located on a membrane pad on the rear of the frame. Push the button with the power symbol ( ), when done correctly, your OLED will display the MacDev logo and the marker will be set with the beam sensor system on and ready to fire. Turn your marker off by holding the power button down until the OLED system goes blank.
Firing your markerIf a paintball is loaded in your marker, and the power is switched on, you may fire the marker by pulling the trigger. If a paintball is not loaded, then you need to either load one, or read the section below on disabling the beam sensor.
Understanding the beam sensorYour Clone is equipped with a visible light sensor to determine if a paintball is correctly loaded. This system is used to prevent accidental ball breakage due to misloaded paint-balls. The OLED indicator on the side of your grip will show you the status of the beam sensor:
Disabling the beam sensorTo disable the sensor (for dry firing), hold the scroll button on the membrane pad ( )until the beam sensor disabled icon appears on the OLED display. You can re-enable the beam sensor the same way.
Ball loaded Sensor disabled
No ball loaded Sensor fault
Power button (for power on/off)
Scroll button (for eyes on/off and programming)
OLED Display
Membrane Pad
Battery meter
Sensor status
Cycle mode
Cycle speed (max)
Lock status
Game timer/ROF meter
Installing a preset air systemYour Clone comes equipped with a high quality venting ASA (Air System Adaptor) that is designed for use with commercially available air/nitrogen systems.
The venting ASA included with your Clone uses a screw cap to turn the air from your preset system on or off. Before installing your preset air system, you must unscrew the ASA cap by approximately 3 turns (do not unscrew it further, as the cap can come off completely).
Once this is done, carefully screw your air system into the ASA until it stops.
Turning the air on and offTo pressurise your marker, screw the ASA cap down until it stops. This will depress the pin on the end of your air system and pressurise the marker (provided you have sufficient air in your air system).
To depressurise your Clone, unscrew the ASA cap until you hear the air being vented from the cap. Your air system is now turned off and safe to remove.
WHEN SCREWING YOUR AIR SYSTEM INTO THE ASA, THE THREADS SHOULD BE LOOSE. IF AT ANY POINT THEY BECOME TIGHT, DO NOT FORCE THE THREADS, THIS MAY CAUSE DAMAGE TO YOUR AIR SYSTEM OR YOUR MARKER!
NOTE: WHEN YOU UNSCREW THE ASA CAP, YOUR MARKER MAY STORE ONE SHOT. POINT THE MARKER IN A SAFE DIRECTION AND FIRE OFF THAT SHOT BEFORE ENTERING A SAFE AREA. 8
ContentsKnow your CloneQuick SetupUsing your CloneAdvanced SetupMaintenanceParts ListTroubleshooting
Turn air off
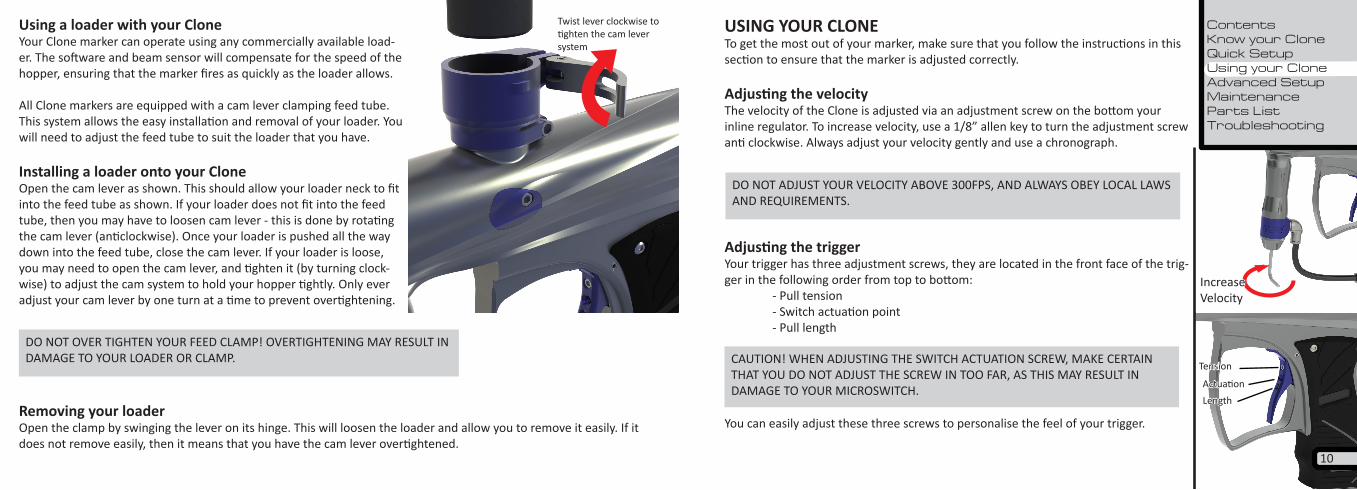
USING YOUR CLONETo get the most out of your marker, make sure that you follow the instructions in this section to ensure that the marker is adjusted correctly.
Adjusting the velocityThe velocity of the Clone is adjusted via an adjustment screw on the bottom your inline regulator. To increase velocity, use a 1/8” allen key to turn the adjustment screw anti clockwise. Always adjust your velocity gently and use a chronograph.
Adjusting the triggerYour trigger has three adjustment screws, they are located in the front face of the trig-ger in the following order from top to bottom: - Pull tension - Switch actuation point - Pull length
You can easily adjust these three screws to personalise the feel of your trigger.
Using a loader with your CloneYour Clone marker can operate using any commercially available load-er. The software and beam sensor will compensate for the speed of the hopper, ensuring that the marker fires as quickly as the loader allows.
All Clone markers are equipped with a cam lever clamping feed tube. This system allows the easy installation and removal of your loader. You will need to adjust the feed tube to suit the loader that you have.
Installing a loader onto your CloneOpen the cam lever as shown. This should allow your loader neck to fit into the feed tube as shown. If your loader does not fit into the feed tube, then you may have to loosen cam lever - this is done by rotating the cam lever (anticlockwise). Once your loader is pushed all the way down into the feed tube, close the cam lever. If your loader is loose, you may need to open the cam lever, and tighten it (by turning clock-wise) to adjust the cam system to hold your hopper tightly. Only ever adjust your cam lever by one turn at a time to prevent overtightening.
Removing your loaderOpen the clamp by swinging the lever on its hinge. This will loosen the loader and allow you to remove it easily. If it does not remove easily, then it means that you have the cam lever overtightened.
DO NOT OVER TIGHTEN YOUR FEED CLAMP! OVERTIGHTENING MAY RESULT IN DAMAGE TO YOUR LOADER OR CLAMP.
DO NOT ADJUST YOUR VELOCITY ABOVE 300FPS, AND ALWAYS OBEY LOCAL LAWS AND REQUIREMENTS.
CAUTION! WHEN ADJUSTING THE SWITCH ACTUATION SCREW, MAKE CERTAIN THAT YOU DO NOT ADJUST THE SCREW IN TOO FAR, AS THIS MAY RESULT IN DAMAGE TO YOUR MICROSWITCH.
ContentsKnow your CloneQuick SetupUsing your CloneAdvanced SetupMaintenanceParts ListTroubleshooting
Tension
ActuationLength
10
IncreaseVelocity
Twist lever clockwise to tighten the cam lever system

Replacing the batteryRemove the three screws holding the wrap around grip onto the left hand side of your grip frame. Gently lever the battery out of the frame from the bottom. Take care that the terminals are not caught on the battery.
Place the replacement battery into the marker, NOTE: make sure you put the bottom of the battery in first then push it onto the terminals. Only use high quality alkaline 9V batteries, the best possible choice is to use a MacDev Militia PowerPack (type 6LR61).
ADVANCED SETUPAbout the tourney lockThe Clone board is equipped with a tourney lock system. When the tourney lock system is activated, the gun cannot be reprogrammed on the field - making it tournament legal.
Your marker has a tourney lock status indicator:
When in unlocked mode, settings on the board my be changed, when in the locked mode settings cannot be changed.
The lock status can be changed by opening the right hand side of the marker wrap around grip to gain access to the back of your circuit board. The tournament lock is a black button. Hold the button until you see the tournament lock status change.
unlocked locked
Fit bottom firstthen press top down to replace
Programming the Clone softwareTo program the board, first ensure that the tournament lock is off, then turn the marker off. Hold down the trigger whilst turning the marker on. When done correctly, you will see a message on your display screen indicating that programming mode is loading.
When in the programming mode, settings will be displayed ready to be adjusted. If you would like to adjust the setting displayed, hold the trigger until the word “Set” appears before the setting value. Press the scroll button ( ) to increase the set value, and the power button ( ) if you would like to decrease the set value. When you are satisfied with the new setting, hold the trigger until the word “Set” is removed.
If you would like to advance to the next setting, press the scroll button. If you would like to go backwards, press the power button.
When you are finished with the program mode, hold the power button until the display goes blank (marker is pow-ered down).
Each setting is described in detail below:
Debounce The debounce setting of your marker is used to control the amount of ”bounce” in your trigger. A very low debounce setting will result in a lot of bounce. In some tournaments or fields, it will be necessary to reduce the amount of bounce by increasing the debounce setting. Always increase the debounce slowly, because settings higher than 15 may result in your marker feeling unresponsive.
12
ContentsKnow your CloneQuick SetupUsing your CloneAdvanced SetupMaintenanceParts ListTroubleshooting
Lever battery from the bottom

Cycle modeYour Clone is equipped with 10 different cycle modes. These cycle modes will allow you to use your Clone in many different situations - tournament play, recreational and scenario. Always follow the rules and local regulations when selecting your cycle mode.
Semi-auto unlimited - one pull, one shot as fast as your loader can feed.Semi-auto adj - one pull, one shot as fast as the cycle speed setting.PSP ramping - ramping mode legal in the PSP league limited by the cycle speed setting.PSP burst - more aggressive ramping mode legal in the PSP league limited by the cycle speed setting.NXL full auto - full auto mode legal in the NXL league limited by the cycle speed setting.Millennium - ramping mode legal in the Millennium league limited by the cycle speed setting.Ramping - standard ramping mode limited by the cycle speed setting.Response - fires both when the trigger is pulled and released limited by the cycle speed setting.Burst - a burst is fired for each individual trigger pull, limited by the cycle speed setting.Full auto - marker is cycled continuously when trigger is held, limited by the cycle speed setting.
Cycle speedThis setting is measured in Balls Per Second (BPS). If you are using a cycle mode that is limited by the cycle speed setting, then your marker will not cycle faster than this setting (plus the fine adjustment in the next setting).
Cycle speed fineThe fine adjustment allows the addition of 0.1bps increments for the very precise adjustment of your cycle speed.
Ramp startIn ramping modes, the software requires you to achieve a given cycle speed before ramping shots are added. This may be adjusted in this ramp start setting. This parameter is measured in trigger pulls per second (PPS). A low PPS
NOTE: SOME VERSIONS MAY HAVE SOME MODES REMOVED TO COMPLY WITH LOCAL LAWS. FOR EXAMPLE, ALL MARKERS SOLD IN AUSTRALIA OFFER ONLY SEMI AUTO MODES.
setting will begin ramping more easily than a high PPS setting.
Ramp degreeOnce ramping is achieved (by exceeding the PPS setting above), the software will add shots. The ramp degree setting allows you to set the amount of shots added and is specified as a multiple of the actual trigger pulls. For example a setting of 2.0 will add double the actual trigger pulls - if the trigger pulls are 5 pulls per second, it will add 2X5=10, giving you a total speed of 5+10=15bps.
Mechanical debounceMost difficulties experienced with bounce in your marker can be rectified by increasing the debounce setting at the start of your settings list. However, the mechanical debounce system is an alternative method for electroni-cally removing bounce, and its setting can be increased to help remove bounce if the standard debounce setting is ineffective.
Anti bolt stick (ABS)When your marker is idle for long periods, friction and settling effects can cause your bolt or other moving parts to be sticky. The ABS system is used to overcome this on the first shot by temporarily increasing the dwell setting. The ABS is adjustable in increments of 1ms.
Cycle filterYour software allows the buffering of a single shot in case you pull the trigger during a cycle. This filter can be used to reduce the time allowed to buffer this shot. Adjustable from off (0%)-100%. Higher settings will reduce the amount of mechanical bounce in the marker, whilst low settings will make the marker feel aggressive and responsive.
14
ContentsKnow your CloneQuick SetupUsing your CloneAdvanced SetupMaintenanceParts ListTroubleshooting

Ball settle delayMost paintball loaders will bounce the paintball in the breech. The ball settle delay allows some time (measured in milliseconds) for the ball to settle in place before firing. If you experience excessive paint chopping, you should try increasing your ball settle delay.
Solenoid on time (dwell)When your marker is cycled, the solenoid valve is held open for the solenoid on time. If this setting is too low, the marker cannot cycle. If this setting is too high, the marker will use too much air. The correct setting for a Clone is 12ms.
Eye functionYour Clone can utilise the beam sensor (eye) in different ways. This setting can be used to select which way you would like to have the sensor used. The system can use a delayed mode, where if a ball is not detected in the breech, a shot will be fired after a half second delay. This mode is useful if you are using a sound activated loader, or if you would like your gun to indicate to you when you are out of paintballs. Another option is the forced mode. In this mode, the marker will only fire if a ball is detected. However, the user can force a shot to be fired by holding the trigger until the marker fires.
Auto power offYour display system and other software uses power when switched on. To conserve power, the system can power off after a given period of time, this may be adjusted here.
Game timerYour display system can display either a rate of fire indicator or a game timer. If the game timer is switched off, the rate of fire indicator will be displayed. The game timer will be started when the user presses and releases (not hold) the power button ( ).
BrightnessYour OLED display system has an adjustable brightness setting. Lower brightness set-tings conserve battery power.
User profilesUsers who make changes to the default settings can save these settings as profiles so that they can be reloaded at a later time. There are three different profile slots avail-able.
To save a profile, enter the save profile setting by holding the trigger. Once inside the setting, you can use the scroll button to select the profile slot number you would like to save to. Once the desired slot is displayed, hold the trigger again, and the software will ask you to confirm (with the power button) or cancel (with the scroll but-ton).
To load a profile, follow the same steps after entering the load profile setting. Please note that when loading a profile, the current settings will be replaced by the loaded profile.
Reset to defaultThe default settings on your software are preset by the factory to give good all round performance from your Clone. If you have made changes to your software, and would like to return your software to factory default set-tings, you can use this reset feature.
To reset your software, enter the reset setting by holding the trigger. Once inside the setting, you can use the scroll button to select the word “yes”, hold the trigger again, and the software will ask you to confirm (with the power button) or cancel (with the scroll button).
16
ContentsKnow your CloneQuick SetupUsing your CloneAdvanced SetupMaintenanceParts ListTroubleshooting

Using an RF transmitterYour stock board has provision for an RF transmitter attachment. To use the RF transmitter function, you must plug a compatible RF transmitter module into the RF transmitter plug (directly under the eye plugs on your board), and it will be activated automatically.
Using the USB connectorYour stock board has a mini USB connector on the bottom of the board to the right of the 9V battery. The USB connec-tivity may be used to update your software via a standard USB/mini USB cable.
Never operate the USB connection while the board is powered on. Never update your board with software unless it has been downloaded directly from the MacDev website (www.macdev.net), the use of non genuine software on your stock board will immediately void your entire marker warranty.
MAINTENANCE
If you take 10 minutes after every day of play to maintain your marker, you will be rewarded with consistent reliable performance.
You should perform basic cleaning after every day of play, and you should perform drivetrain and inline regulator maintenance after at least every 2 days of play. You can clean and maintain your Clone more often, it is up to you.
When maintaining your Clone, use only MacDev accessories. Your Clone is packaged with an allen key set and a small tub of MacDev Militia Lube, only use Militia Lube to lubricate your Clone.
Basic cleaningAfter using your Clone, always clean old paint from the outside. Always clean your barrel using a barrel swab to remove traces of dirt and paint. Use your barrel swab to clean the breech and feed tube in a similar way.Your Clone internal parts are quite well protected and sealed. However, when not in use, dirt can get into the marker and cause problems - so storage of your marker is just as important as cleaning. When storing your marker, ensure that it is stored in the Clone bag that is free of dirt, otherwise dirt may get into the venting ASA or breech.
ContentsKnow your CloneQuick SetupUsing your CloneAdvanced SetupMaintenanceParts ListTroubleshooting
18

Maintaining the drivetrainYour drivetrain should be maintained after every 10,000 shots or so. You may maintain your drivetrain more frequently if you wish.
Before working on your drivetrain, ensure that your marker is degassed, then unscrew the back cap, and pull the drivetrain out of your marker. Set aside your marker so that you can focus on the drivetrain.
The disassembled drivetrain is shown below. To maintain your drivetrain, clean and relubricate the following o-rings; bolt switch, keg inner, valve, spacer inner, powertube tip and mid. Also clean and relubricate the bolt keg bore, valve keg bore, as well as the bolt and valve themselves.
20
ContentsKnow your CloneQuick SetupUsing your CloneAdvanced SetupMaintenanceParts ListTroubleshooting
Bolt keg
Bolt
Spacer
Valve
Valve keg PowertubePowertube cap
End cap
Bolt keginner o-ring(017)
Bolt kegouter o-rings x4 (020)
Bolt tipo-ring (014)
Bolt bumper(15x1)
Bolt switcho-ring (016)
Spacer innero-ring (017)
Spacer outer o-ring (017)
Valve front o-rings x2 (17x1)
Valve keg outer o-ringx4 (020)
Powertube tipo-ring (011)
Powertube mido-ring (10x1)
Powertube cap inside o-ring (020)
Powertube cap outside o-ring (020)
Shift barrel insert
Shift barrel tip
Shift barrel back eye cover
screw
eye cover
Gladiator VXinline reg
Drivetrain
Hose ASA pin
ASA wheel
ASA body
ASA cap
Eyes
Wrap around grip
OLED display
Solenoid
Detent
Solenoidscrews
Subplate
Subplatescrews
trigger pin
Feed clamp assembly
20
Valve rear o-ring (15x1)
22
ContentsKnow your CloneQuick SetupUsing your CloneAdvanced SetupMaintenanceParts ListTroubleshooting
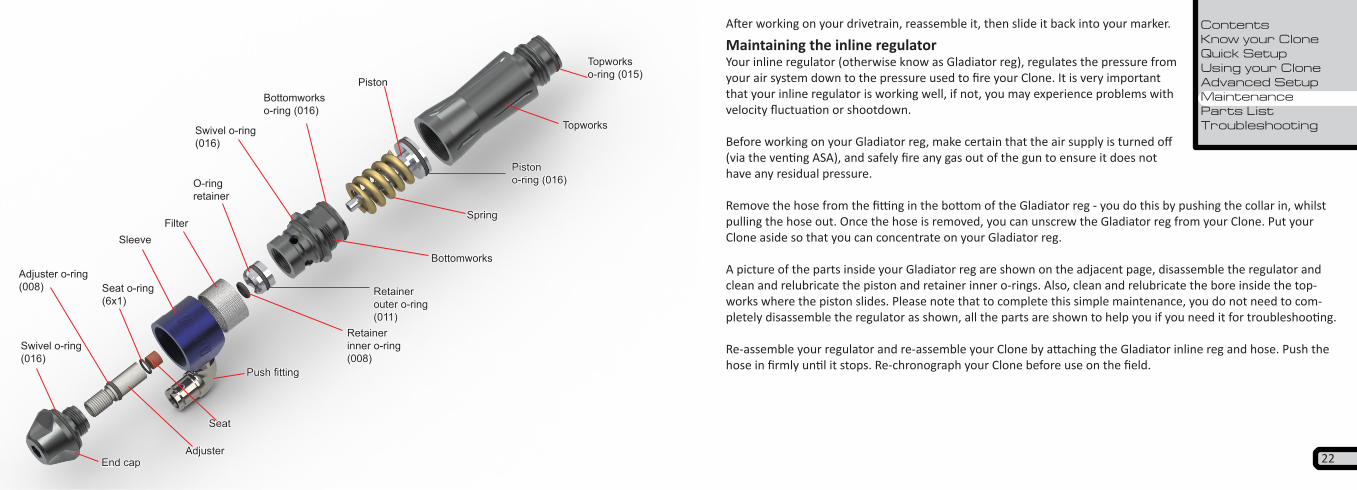
After working on your drivetrain, reassemble it, then slide it back into your marker.
Maintaining the inline regulatorYour inline regulator (otherwise know as Gladiator reg), regulates the pressure from your air system down to the pressure used to fire your Clone. It is very important that your inline regulator is working well, if not, you may experience problems with velocity fluctuation or shootdown.
Before working on your Gladiator reg, make certain that the air supply is turned off (via the venting ASA), and safely fire any gas out of the gun to ensure it does not have any residual pressure.
Remove the hose from the fitting in the bottom of the Gladiator reg - you do this by pushing the collar in, whilst pulling the hose out. Once the hose is removed, you can unscrew the Gladiator reg from your Clone. Put your Clone aside so that you can concentrate on your Gladiator reg.
A picture of the parts inside your Gladiator reg are shown on the adjacent page, disassemble the regulator and clean and relubricate the piston and retainer inner o-rings. Also, clean and relubricate the bore inside the top-works where the piston slides. Please note that to complete this simple maintenance, you do not need to com-pletely disassemble the regulator as shown, all the parts are shown to help you if you need it for troubleshooting.
Re-assemble your regulator and re-assemble your Clone by attaching the Gladiator inline reg and hose. Push the hose in firmly until it stops. Re-chronograph your Clone before use on the field.
End cap
SleeveFilter
Bottomworks
Adjuster
Seat
O-ring retainer
Spring
Piston
Topworks
Topworkso-ring (015)
Pistono-ring (016)
Retainer inner o-ring (008)
Retainer outer o-ring(011)
Adjuster o-ring (008)
Swivel o-ring (016)
Swivel o-ring (016)
Bottomworks o-ring (016)
Push fitting
Seat o-ring(6x1)

TROUBLESHOOTINGIf you are experiencing difficulties with your marker, please check this table first to see if there is an easy solution listed. If at any time you are unsure about how to work on your marker, please contact a certified MacDev technician or service centre.
Symptom Possible Cause SolutionAlthough a fresh battery has been fitted, your Clone will not turn on
The battery has not been fitted cor-rectly
Ensure that the battery is firmly connected to both terminals. Ensure that the positive (+) terminal is connected to the positive terminal on your battery.
Your Clone leaks from the solenoid
Leaking bolt switch o-ring Clean and relubricate the drivetrain with particular attention to the bolt switch o-ring. Replace if necessary.
Leaking manifold o-rings Check that the 3 manifold o-rings are in place between the solenoid and subplate. If they are damaged or missing, then replace them.
Your Clone uses excessive air
Valve is leaking Check that the valve o-rings are clean and well lubricated, replace if worn.
General leak Make certain that there are no leaks from your fittings or air system wasting your air supply.
Symptom Possible Cause SolutionYour Clone is chopping paintballs
Beam sensor is turned off Always play with the beam sensor enabled.
Beam sensor is dirty or blocked Clean the breach, bolt and sensor.Loader is set on a force setting too high for your paintballs
Some force fed loaders can apply enough force to break a fragile paintball. If this is the case, consult your loader manual to reduce the force setting.
Detents are missing or incorrectly installed
Replace or re-install your detents.
Ball settle delay too low Increase the ball settle delay (pg 15)Your Clone will not fire The trigger is set up incorrectly Ensure that the trigger actuates the micro-
switch by adjusting the actuator screw.The beam sensor is on, and there are no paintballs loaded
Load some paintballs.
The solenoid is not plugged in Plug the solenoid into the board.Your Clone fires high on the first shot or inconsistently.
Creeping inline regulator Clean and lubricate the inline regulator, ensure that the seat and piston are in good condition.
Your Clone fires low on the first shot
Sticking drivetrain Clean and relubricate the drivetrain. If you continue to have problems:-increase the dwell by 1-2 ms.-increase the ABS parameter on your board.
24

Symptom Possible Cause SolutionThe beam sensor is not reading correctly
Eyes are connected incorrectly Red/white wire eye is the left hand plugYellow/black wire eye is the centre plug.
Eyes are faulty Replace the eye pair.
28
MACDEV TECHNICAL ASSISTANCE
If you require technical assistance, please contact your local MacDev service centre. You can also find assistance on the MacDev support website www.macdev.net/support.
Alternatively, you can contact MacDev directly. MacDev Australia (Sydney, Australia) Ph: +612 9668 9099 Fax: +612 9668 9055 Visit: www.macdev.net Mail: [email protected]
CLONE VX SPECIFICATIONS
PhysicalLength 216mm (524mm with barrel)Width 35mmHeight 205mmWeight 880g with barrel and batteryBarrel Threads Autococker
PerformanceOperating pressure 90psiRate of Fire 30 BPS
ElectronicsSoftware Militia Soft Version 2.0Hardware Militia Version 2.0 (Lead Free)Display OLED high visibility low power usage 96x16pxPower 9V standard battery 6LR61Fire modes Semi, NXL, PSP, Response, Burst, Full AutoConnectivity Mini USBSolenoid 5V 1W 26

Owners Manual
www.macdev.net
(c) Copyright 2010-11 Mac Developments Pty Ltd (MacDev).MacDev - Proudly Australian
The Clone paintball marker is covered by the following granted patents as well as international pending patents: U.S. Patent Nos. 5,228,427; 5,755,213; 5,957,119; 6,260,821; 6,349,711; 6,494,195; 6,644,295; 6,644,296; 6,823,857;
6,694,963; 6,810,871; 7,017,497; 7,044,119.Clone, MacDev, Shift, MacDev Militia, Drone and Gladiator are all Trademarks of MacDev.