Clerk's POS Workbook - Epicor1).pdfClerk’s POS Workbook ... Using This Workbook ..... 1-1 Overview...
42
H ▼ a ▼ r ▼ d ▼ L ▼ I ▼ N ▼ E ▼ s & L ▼ U ▼ M ▼ B ▼ E ▼ R Clerk’s POS Workbook TRIAD R
Transcript of Clerk's POS Workbook - Epicor1).pdfClerk’s POS Workbook ... Using This Workbook ..... 1-1 Overview...

HHHH
▼
aaaa
▼
rrrr
▼
dddd
▼
LLLL
▼
IIII
▼
NNNN
▼
EEEE
▼
ssss &&&& LLLL
▼
UUUU
▼
MMMM
▼
BBBB
▼
EEEE
▼
RRRR
Clerk’s POS Workbook
TRIADR

Foreword
This manual contains reference information about Triad’s hardgoods retail software products. The software described in this manual, as well as the manual itself, are furnished under the terms and conditions of a license agreement. The software consists of software options which are separately licensed. It is against the law to copy the software on any medium, or to enable any software options, except as specifically permitted under the license agreement. In addition, no part of this manual may be copied or transmitted in any form or by any means without the prior written permission of Triad.
From time to time, Triad makes changes to its software products. Therefore, information in this manual is subject to change and the illustrations and screens which appear in the manual may differ somewhat from the version of the software provided to you.
Created by
Learning Products Development
Copyright © 1994 by Triad Systems Corporation. All rights reserved.
Printed in the United States of America.
Hardgoods Division3055 Triad DriveLivermore, CA 94550-9559
Publication No. 1075158
Revision No. 4614

i
Contents
Using This Workbook ......... 1-1
Overview...................................... 1-1
The Purpose of This Workbook.................................. 1-2
Who Should Use This Workbook.................................. 1-2
How This Workbook is Organized .................................. 1-2
Conventions Used in This Workbook.................................. 1-2
Using the Training Mode ............ 1-3
Entering the Training Mode................. 1-3
Exiting the Training Mode................... 1-4
How To Learn POS ...................... 1-5
Where to Get Help....................... 1-5
POS Packages and Transactions..................... 2-1
Overview...................................... 2-1
Introduction ................................ 2-2
Software Packages ....................... 2-2
POS Transactions......................... 2-4
Sale ........................................................ 2-4
Credit Memo ......................................... 2-4
Estimate................................................. 2-5
Bid ......................................................... 2-5
Order...................................................... 2-5
Open Quote ........................................... 2-6
Quote..................................................... 2-6
Special Order......................................... 2-6
ROA ....................................................... 2-7
Voiding Information ................... 2-7
What You Should Do Now .......... 2-7
POS Basics........................... 3-1
Overview ...................................... 3-1
Introduction................................. 3-2
Which POS Package? ................... 3-2
About the Training Mode............ 3-2
Entering and Exiting POS ........... 3-3
Looking At the POS Screens ........ 3-5
Practicing Transactions ............... 3-7
Using Bar Code Scanners........... 3-17
Scanning Items At POS....................... 3-17
Reviewing This Chapter ............ 3-18
What You Should Do Now ........ 3-19


Overview 1-1
1111
Using This Workbook
Overview
You will practice the following procedures.
The purpose of this workbook—page 1-2
Who should use this workbook—page 1-2
How this workbook is organized—page 1-2
Conventions used in this workbook—page 1-2
Using the Training Mode—page 1-3
How to learn POS—page 1-5
Where to get help—page 1-5

1-2 The Purpose of This Workbook
1111
The Purpose of This Workbook
The purpose of the workbook is to get you started with learning the point-of-sale (POS) transactions you can complete on your Triad system. We have created a series of exercises that walk you through the transactions, and we have provided some tips along the way.
The workbook does not contain all the information about each transaction and therefore does not replace the other manuals you received.
When you have completed this workbook, you will have the basic information you need to complete POS transactions on your Triad system. The workbook is purposely short on detail to get you up and running faster.
Who Should Use This Workbook
Anyone involved with completing POS transactions should complete this workbook.
How This Workbook is Organized
This workbook includes the following chapters:
➥
1—Using This Workbook—describes the workbook, its structure, and the conventions that help you find the information you need.
➥
2—POS Packages and Transactions—looks at the different software packages available and POS transaction types.
➥
3—POS Basics—presents the POS procedures, how to enter and exit POS, and bar code scanning.
Conventions Used in This Workbook
The following style conventions will to help you use the workbook and the inventory and purchasing applications more effectively.
Convention Description
Entries Actual entries you type at the terminal key-board appear in boldface type. For example, type
POS
.
Keys The keys you press to perform a function at the terminal appear in boldface type inside angle brackets. For example,
<Enter>
.

Using the Training Mode 1-3
1111
Using the Training Mode
It is important that you complete the exercises while in the Training Mode. If you are not in the Training Mode, you risk changing or losing permanent information that may be set up in the Live Mode.
Live Mode data is the real information on your Triad system, such as customer names, customer balances, inventory numbers, sales histories, and purchase orders.
Entering the Training Mode
To enter the Training Mode do the following:
1.
At the login prompt, type
TRAIN
.
2.
Press
<Enter>
.
3.
Enter your name and password on the Signon Screen.
If you do not know what name and password to use, check with your manager or the person who manages the Triad system at your store.
A screen will display asking you if you want to initialize the training files. You have two options:
1.
Type
YES
to initialize.
2.
Press <
Enter
> to ignore.
Type
YES
if you want to initialize the Training Mode. Initializing will erase any work that you may have done in the Training Mode. It will refresh the information in the Training Mode back to the original data needed to complete the workbook.
Messages The messages and prompts you receive from the Triad system are presented in special type. For example:
PLEASE PRESS INVOICE
.
Exercises You will practice POS procedures using the Training Mode. Each exercise begins with this symbol:
❖
.
Footer At the bottom of every page is a footer. Use this as a guide when looking up information. Look at the bottom of this page to see an example of a footer.
Convention Description

1-4 Using the Training Mode
1111
For example, you would type
YES
if you have completed the workbook and now one of your co-workers is about to the start the workbook exercises.
Press <
Enter
> to ignore if you do not want to initialize the Training Mode. Ignore initialization if you do not want to erase any of the work you may have done in the Training Mode.
For example, you would ignore initialization if you were in the middle of a chapter and had to exit the Training Mode to go to the Live Mode. When you enter the Training Mode to complete the chapter you do not want to erase any work you have done so far, so you would ignore initialization.
Then you will see a screen that looks like this:
On your screen you will see the banner at the top:
APPLICATION TRAINING MODE.
If you do not see that banner, follow the preceding steps for entering the Training Mode.
Exiting the Training Mode
To exit the Training Mode and return to the Live Mode, do the following:
1.
At the Main Menu, type
QUIT
.
2.
Press
<Enter>
.
3.
At the login prompt type,
M
.
4.
Press
<Enter>
.

How To Learn POS 1-5
1111
How To Learn POS
This workbook is an introduction to POS on your Triad system. It does not include exercises for all the different types of transactions. In order to learn POS procedures, you need to do the following:
➥
Complete this workbook.
➥
Practice POS procedures using the
Point-of-Sale
Quick Reference
.
If, after completing the workbook and guide you would like additional training exercises, do the following:
➥
Practice POS procedures using the
Clerk’s POS Procedure’s Manual.
➥
Practice POS procedures by entering copies of transactions that you actually completed at POS.
You
must
complete all POS practice in the Training Mode. We have provided a list of SKUs and customers in the last chapter of this workbook. You can use this list when you practice POS using the
Point-of-Sale Quick Reference
.
Where to Get Help
Use the following chart to help you turn to the right source when you have questions.
For questions about Do the following
Security Check the
Manager’s POS Procedures Man-ual, Security Guide Manual, Functions Manual,
or
Reports Manual.
Point-of-Sale Check the
Manager’s POS Procedures Man-ual, Clerk’s POS Procedures Manual, Point-of-Sale Quick Reference, Functions Manual
, or
Reports Manual.
Troubleshooting Call Hardgoods Central Support at 1-800-67-TRIAD.
Hardwar
e Call your Field Engineer at 1-800-67-TRIAD.
Installation and training Call your Marketing Representative at 1-800-67-TRIAD.

1-6 Where to Get Help
1111
Overview 2-1
2222
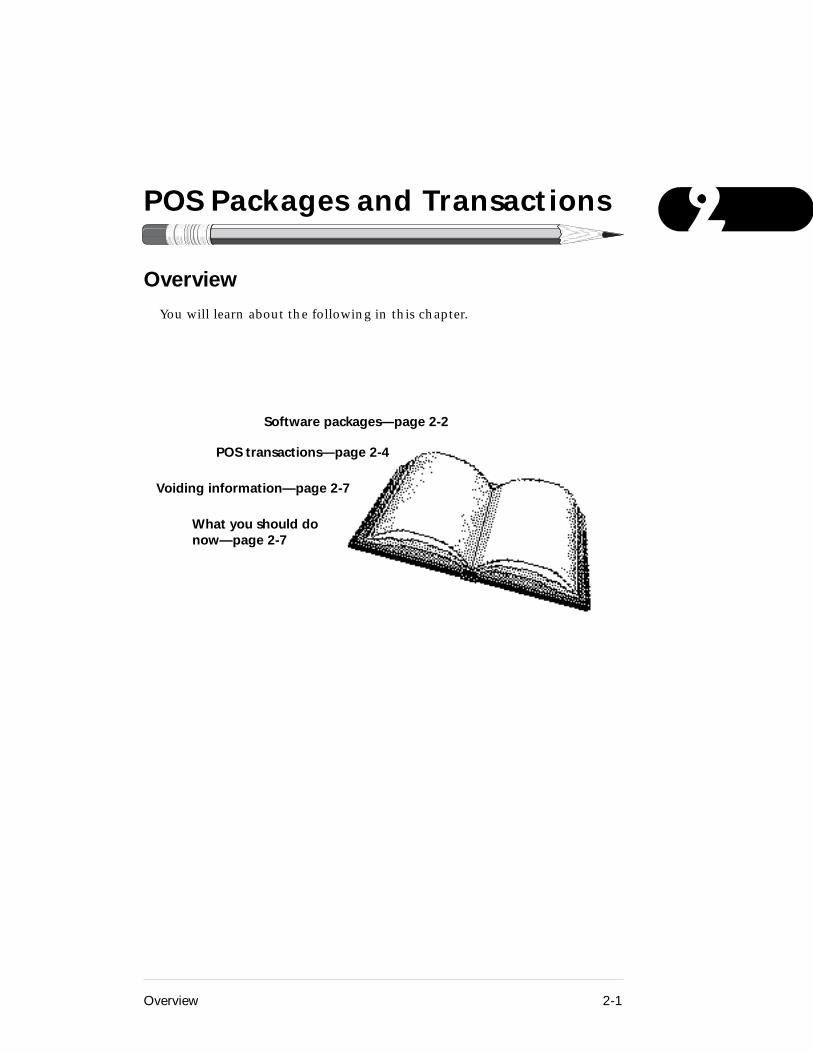
POS Packages and Transactions
Overview
You will learn about the following in this chapter.
POS transactions—page 2-4
Voiding information—page 2-7
What you should do now—page 2-7
Software packages—page 2-2

2-2 Introduction
2222
IntroductionThis chapter presents information about point-of-sale (POS) software packages and POS transaction types. The information in this chapter is background information that will help you better understand POS.
Software PackagesThere are four POS software packages that are available for your Triad system. These packages are:
➥ 1–Point-of-Sale
➥ 2–Classic Point-of-Sale
➥ 3–Decorating/Specialty POS
➥ 4–Lumber/Contractor POS
The POS software package you have on your Triad system will determine which transactions you can do at POS.
❖ Determining Which POS Package
In this exercise you will determine which POS software package is on your Triad system. You need to know this to complete your POS training.
1. Ask your manager or the person who manages the Triad system at your store which POS software package you have.
2. Write the number and name of the POS software package for your system here:
________________________________________________________
Use the table that follows to see which procedures and transaction types are available with your POS package.
Procedure 1–POS 2–Classic 3–Decor 4–Lumber
Sale X X X X
Estimate X X
Quote X X X
Open Quote X X X
Bid X X
Order X X X
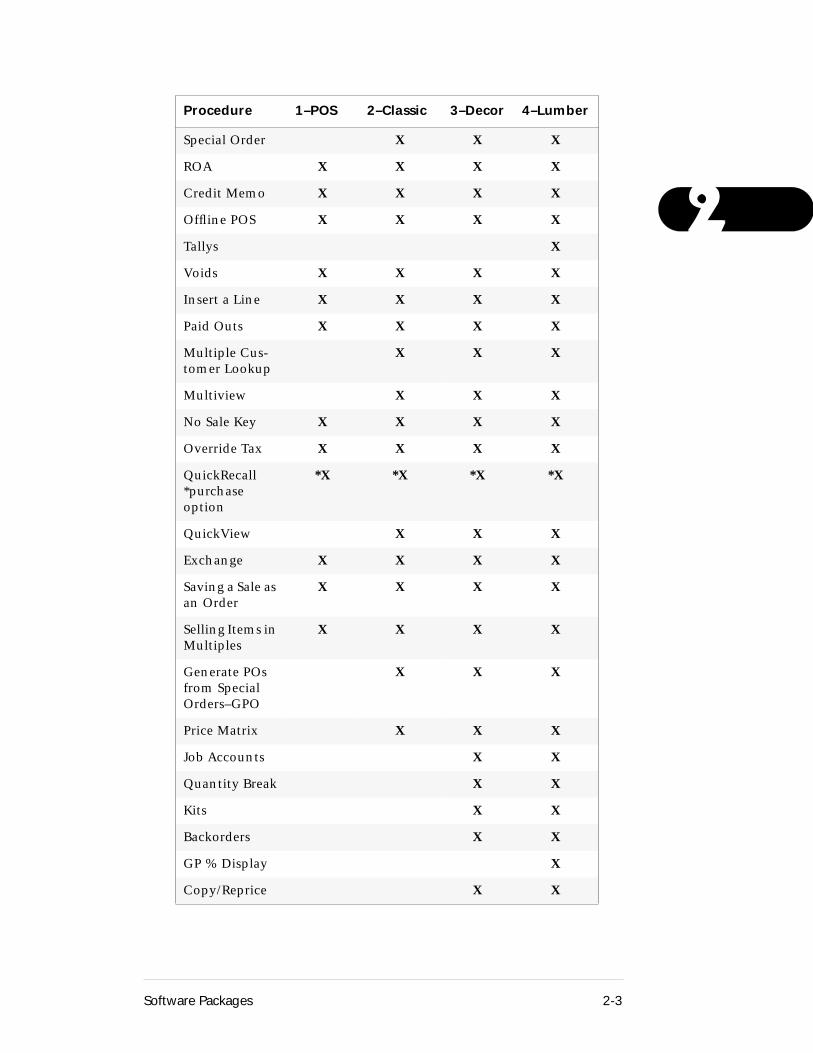
Software Packages 2-3
2222Special Order X X X
ROA X X X X
Credit Memo X X X X
Offline POS X X X X
Tallys X
Voids X X X X
Insert a Line X X X X
Paid Outs X X X X
Multiple Cus-tomer Lookup
X X X
Multiview X X X
No Sale Key X X X X
Override Tax X X X X
QuickRecall*purchase option
*X *X *X *X
QuickView X X X
Exchange X X X X
Saving a Sale as an Order
X X X X
Selling Items in Multiples
X X X X
Generate POs from Special Orders–GPO
X X X
Price Matrix X X X
Job Accounts X X
Quantity Break X X
Kits X X
Backorders X X
GP % Display X
Copy/Reprice X X
Procedure 1–POS 2–Classic 3–Decor 4–Lumber

2-4 POS Transactions
2222
Later, when practicing POS procedures you can use this table to determine what is available on your system and what you need to practice.
POS TransactionsThere are nine basic types of POS transactions that you can complete on your Triad system. They are:
➥ Sale
➥ Credit Memo
➥ Estimate
➥ Bid
➥ Order
➥ Open Quote
➥ Quote
➥ Special Order
➥ ROA
The transactions and their life cycles are explained in the following sections. Understanding a transaction’s life cycle is useful when you need to void, cancel, or delete the transaction.
Sale
A sale is the basic retail transaction. A customer selects merchandise from your store, pays for it or charges it, and takes immediate delivery.
You cannot recall and void a sale once it has been completed and totaled. If you need to undo a completed sale, ring in the sale again as a credit memo. This reverses the transaction and properly updates the customer and inventory information.
Credit Memo
Use a credit memo whenever you need to give a credit or refund to a customer.
You cannot recall a credit memo to void it once it has been completed and totaled. If you need to undo a completed credit memo, ring in the credit memo again as a sale. This reverses the transaction and properly updates the customer and inventory information.

POS Transactions 2-5
2222
Estimate
You create an estimate when a customer asks you for a list of prices for merchandise or materials. An estimate is stored on your Triad system in the Open Order File. You can recall and maintain it (add or change items) at any time.
You attach an expiration date to an estimate when it is created. After the expiration date passes, the estimate is expired. You can change the expiration date on an estimate, even after it has expired. Use Report ROO (Open Order File Report) to purge expired estimates from your system.
If you want to delete an estimate that has not yet expired, recall the estimate, and press <Delete> twice. This will change the status of the estimate to deleted. Use Report ROO with Option X to purge deleted estimates from your system.
You can prevent an estimate from being deleted or purged (even if it has expired) by setting the Delete Protect field on the transaction to yes.
Bid
If a customer accepts an estimate, you change the estimate to a bid. A bid is an estimate that has been accepted and both you and the customer agree on the quantities and prices.
You attach an expiration date to a bid when it is created. After the expiration date passes, the bid is expired. You can change the expiration date on a bid, even after it has expired. Use Report ROO with Option X to purge expired bids from your system.
If you want to delete a bid that has not yet expired, recall the bid and press <Delete> twice. This will change the status of the bid to deleted. Use Report ROO with Option X to purge deleted bids from your system.
You can prevent a bid from being deleted or purged (even if it has expired) by setting the Delete Protect field on the transaction to yes.
Order
You can create an order from some or all of the items on a bid, or you can create an order from scratch. An order is a list of items saved by the system that a customer has agreed to purchase. With an order, you have flexibility as to when to ship the merchandise and when to invoice the order and charge the customer. You can take deposits on orders.
To delete an order, recall the order and press <Delete> twice. Use Report ROO with Option X to purge deleted orders from your system.
2-6 POS Transactions
2222
Prior to deleting the order, you need to refund any outstanding deposits, and delete any purchase orders which were generated by Function GPO from the order.
Open Quote
An open quote is a custom price list. You can give a certain customer or an account a special price on a particular list of items for a specific period of time. An open quote is stored in your system. Open quotes are allowed only for designated accounts (set by the *Open Quote field in Function MCR), and only one at a time per account.
When a customer purchases an item, the system automatically checks to see if the account has an open quote. If the item is on the open quote, your Triad system automatically sells it at the open quote price. The open quote prices are effective on all transactions for the customer.
You attach an expiration date to an open quote when it is created. Once the expiration date passes, the open quote expires. You can change the expiration date on an open quote, even after it has expired. Use Report ROO with Option X to purge expired open quotes from your system.
If you want to delete an open quote that has not yet expired, recall the open quote, and press <Delete> twice. This will change the status of the open quote to deleted. Use Report ROO with Option X to purge deleted open quotes from your system.
You can prevent an open quote from being deleted or purged (even if it has expired) by setting the Delete Protect field on the transaction to yes.
Quote
A quote is the same as an estimate, except it is not stored in your system.
Because quotes are not stored, there is no procedure for deleting them after you create them. If you made a mistake on the quote, just re-enter it.
Special Order
A special order is just like an order. If you want, you can use special orders for merchandise that you do not usually stock. You can take deposits on special orders.
To delete a special order, recall the special order and press <Delete> twice. Use Report ROO with Option X to purge deleted special orders from your system.

Voiding Information 2-7
2222
Prior to deleting the special order, you need to refund any outstanding deposits, and delete any purchase orders which were generated by Function GPO from the special order.
ROA
An ROA is a receipt on account. Use ROA when a customer makes a payment against his accounts receivable balance.
You cannot recall an ROA to void it once it has been completed and totaled. You cannot undo an ROA at POS. You need to recall it through the Main Menu Function ROA, display and delete it.
Voiding InformationWhen completing a transaction at POS, you may make a mistake or the customer might change his mind. You then need to void an item or the entire transaction.
There are two void situations:
➥ Voiding an item—when you need to void selected items in the transaction you are currently working on.
➥ Voiding a transaction—when you need to void the entire transaction before you finish it.
Each item on a transaction has a line number. You void an item by pressing the <Void> key, then by typing the line number of the item.
You void an entire transaction by pressing the <Void> key twice if the cursor is at the SKU field, or by pressing the <Void> key once if the transaction has been totaled.
What You Should Do NowCongratulations! You have completed this chapter and now are familiar with the basic transaction types and their POS life cycles.
The next step is to continue with the workbook. Complete the next chapter, POS Basics.

2-8 What You Should Do Now
2222
Overview 3-1
3333POS Basics
OverviewYou will practice the following procedures.
Which POS package?—page 3-2
Entering and exiting POS—page 3-3
Looking at the POS screens—page 3-5
Practicing transactions—page 3-7
Using bar code scanners—page 3-17
Reviewing this chapter—page 3-18
What you should do now—page 3-19
About the Training Mode—page 3-2

3-2 Introduction
3333
IntroductionThis chapter presents basic point-of-sale (POS) procedures. First, you will complete a set of exercises designed to show you the basic operation of POS on your Triad system.
You will do the following:
➥ Practice entering and exiting POS.
➥ Display the various POS screens.
➥ Practice a cash sale.
➥ Practice a charge sale.
➥ Practice a credit transaction and how to use <Void>.
➥ Practice a sale with various item types.
➥ Learn about bar code scanning.
When you complete the exercises, you will know how to get around the various POS screens, how to complete a cash and charge sale, and how to post various item types. From there, you can continue to practice POS and learn about other procedures and transaction types.
Which POS Package?There are four POS software packages that are available for your Triad system. They are:
➥ 1–Point-of-Sale
➥ 2–Classic Point-of-Sale
➥ 3–Decorating/Speciality POS
➥ 4–Lumber/Contractor POS
In order to complete the exercises in this chapter, you must know which POS software package you are using on your Triad system. If you are not sure, refer back to the exercise in chapter 2, the section, “Software Packages.”
About the Training ModeIt is important that you complete the exercises while in the Training Mode. If you are not in the Training Mode you risk changing or losing permanent information that may be set up in the Live Mode.

Entering and Exiting POS 3-3
3333
Live Mode data is the real information on your Triad system, such as customer names, customer balances, inventory numbers, sales histories, and purchase orders.
❖ Entering the Training Mode
To enter the Training Mode do the following:
1. At the login prompt, type TRAIN.
2. Press <Enter>.
3. Enter your name and password on the Signon Screen.
4. Type YES to initialize the Training Mode or press <Enter> to ignore initialization.
Your screen looks like this:
On your screen you must see the banner at the top: APPLICATION TRAINING MODE.
Entering and Exiting POSIn this section you will learn how to get into and get out of POS.
❖ Entering and Exiting POS
In this exercise you will practice getting into and out of POS.
1. At any menu, type POS or CPOS and press <ENTER>.
Type POS if you have any of these POS software packages:
➥ 1–Point-of-Sale
➥ 2–Classic Point-of-Sale
➥ 3–Decorating/Speciality POS

3-4 Entering and Exiting POS
3333
Type CPOS if you have the 4–Lumber/Contractor POS software package.
For the remainder of the exercises, keep in mind that POS also includes CPOS. For example, if a section is titled “Displaying the POS Screens”, it also applies to systems with CPOS.
You are now in POS, with your cursor blinking at CLERK.
Your screen looks like this:
2. Type your assigned clerk code and press <Enter>.
If you are not sure, check with your manager or the person at your store who manages your Triad system.
Your cursor is now blinking at ITEM (SKU). At this point you are ready to start a transaction.
If your clerk name disappears and your cursor does not go to ITEM (SKU), do the following:
➥ enter your password–if you are not sure what it is, check with your manager or the person at your store who manages your Triad system.
➥ press <Enter>–your clerk name displays again on the screen and your cursor is now at ITEM (SKU).
3. Press <No Sale>.
A group of options display at the bottom of your screen. Notice that the second option is END POINT OF SALE.
4. Type 2 at PLEASE ENTER #. Type Y at ARE YOU SURE?
Your screen exits POS and returns to the Main Menu.
You can also exit POS by typing ENDPOS at the CLERK field.
For more information about entering and exiting POS, refer to your Clerk’s POS Procedures Manual, the tabbed section, “Using Point-of-Sale.”

Looking At the POS Screens 3-5
3333
Looking At the POS ScreensPOS has three screens. They are:
➥ the Posting Screen
➥ the Big Header Screen
➥ the Mini-Header Screen
When you first enter POS and type your clerk name, either the Posting Screen or the Big Header Screen displays. Which screen displays is determined by the Return to Header field in Function MTR (Modify Terminal Record).
❖ Displaying the POS Screens
In this exercise you will display all three POS screens.
1. At any menu, type POS or CPOS and press <Enter>.
2. Type your assigned clerk name and press <Enter>.
If your screen looks like this, you are on the Posting Screen:
If you are not on the Posting Screen, press <Next Screen> to get to the Posting Screen.
Use the Posting Screen to enter the items and quantities that your customer is purchasing.

3-6 Looking At the POS Screens
3333
3. Press <Next Screen> to display the Big Header Screen.
Your screen looks like this:
Use the Big Header Screen to:
➥ start estimates, quotes, and orders
➥ enter a customer job account number
➥ enter a ship-to address
➥ note special instructions
➥ fill in other POS fields
4. Press <Next Screen> to again display the Posting Screen.
5. Press <Charge>.
The lower half of your screen changes and the Mini-Header Screen displays.
Your screen looks like this:

Practicing Transactions 3-7
3333
The Mini-Header Screen is a small version of the Big Header Screen. The Mini-Header Screen is faster for standard retail transactions such as sales, credit memos, and ROAs.
6. Press <Clear>.
The Mini-Header Screen clears and the Posting Screen displays.
For more information about the POS screens, refer to your Clerk’s POS Procedures Manual, the tabbed section, “Using Point-of-Sale.”
7. Exit POS.
➥ Press <No Sale>
➥ Type 2
➥ Type Y
➥ Press <Enter>
Practicing TransactionsNow that you are familiar with the POS screens, you will practice a cash sale and a charge sale to learn the basic steps of a POS transaction.
❖ Practicing a Cash Sale
In this exercise you will practice a cash sale transaction.
1. At any menu, type POS or CPOS and press <Enter>.
2. Type your assigned clerk code and press <Enter>.
If the Posting Screen is not displayed, press <Next Screen>.
Notice the CUST/JOB field in the upper-right corner of your screen. The *5 is the default cash customer number. Your Triad system assumes that a transaction is a cash sale to this customer number, unless you indicate otherwise.
3. Type 10090 at ITEM (SKU) and press <Display>.
Information about the item displays.

3-8 Practicing Transactions
3333
Your screen looks like this:
You do not have to display an item before entering the quantity. But it is a good idea to do this when you are first learning POS so you can check the item description and pricing before posting.
4. Press <Tab>.
5. Type 5 at QTY.
6. Press <Enter>.
Notice that the item information clears and the SKU is posted to the upper portion of your screen.
7. Press <Total>.
The lower portion of your screen changes, and the screen title is now *PAYMENT*.
Your screen looks like this:

Practicing Transactions 3-9
3333
8. Type 20.00 at CASH AMT and press <Enter>.
The cash drawer opens, and the change amount displays at the bottom of your screen.
You can enter the payment amount in a few ways:
➥ Type the exact amount the customer is giving you, such as 4.25 including the decimal.
➥ Type 425 without the decimal and the system will insert the decimal and convert 425 to 4.25.
If the customer is giving you currency, such as a twenty-dollar bill, you can enter it as:
➥ 20.
➥ 20.00
➥ 2000
9. To complete the transaction, press the key indicated by the message at the bottom of your screen.
How the terminal record is set up in Function MTR will determine the message that displays.
For more information about POS transactions, refer to your Point-of-Sale Quick Reference, and Clerk’s POS Procedures Manual.
❖ Practicing a Charge Sale
In this exercise you will practice a charge sale transaction. Keep in mind that you always want to ask a customer if they have an account with your store. If they do, you always want to enter their account number as you begin the transaction. The customer can still pay for the merchandise in any way when you total the transaction. Entering the account number at the beginning of the sale will ensure that the customer receives the correct pricing and payment terms.
1. Press <Charge> when your cursor is at ITEM (SKU).
The Mini-Header Screen displays.
2. Type 125 at Customer # and press <Enter>.
The account information for this customer displays.
There are other ways to display customer account information if you do not know the customer account number. You will practice those procedures later with the Point-of-Sale Quick Reference.
3. Press <Enter>.
The account information clears. Notice that the customer number displays in the upper-right corner of your screen.

3-10 Practicing Transactions
3333
You continue the transaction now, entering and posting items, just like you did with the cash transaction.
4. Type 13336 at ITEM (SKU) and press <Display>.
The item information for this SKU displays.
5. Press <Tab>.
6. Type 2 at QTY.
7. Press <Enter>.
The SKU is posted to the upper portion of the screen.
8. Press <Total>.
The bottom portion of your screen changes so you can enter payment information.
9. Press <Total>.
Notice that the system fills in the amount of the transaction in the CHARGE AMT field.
The screen then clears, or you may get another message at the bottom of your screen. The message is determined by how the terminal has been set up in Function MTR.
When you press <Total>, the system assumes you are charging the entire amount to the customer’s account.
For more information about POS transactions, refer to your Point-of-Sale Quick Reference, and Clerk’s POS Procedures Manual.
❖ Practicing a Credit Memo
In this transaction you will practice a credit memo and how to use the <Void> key.
1. With your cursor at ITEM (SKU), press <Credit Memo>.
The Mini-Header Screen displays with information about the *5 Cash Customer. Assume that this credit is for a cash customer.
2. Press <Enter>.
The Mini-Header Screen clears, and you are now ready to start entering the items that are being returned.
3. Type 10090 at ITEM (SKU) and press <Display>.
Information about the item displays.
4. Press <Tab>.
5. Type 2 at QTY.
6. Press <Enter>.

Practicing Transactions 3-11
3333
Your screen looks like this:
7. Type R at CREDIT REASON and press <Enter>.
The item posts to the top of the screen with the message **RETURN** printed under the description.
8. Type 13336 at ITEM (SKU) and press <Display>.
9. Press <Tab>.
10. Type 2 at QTY.
11. Press <Enter>.
12. Type R at CREDIT REASON and press <Enter>.
The item posts to the top of the screen with the message **RETURN** printed under the description.
Assume you need to void the first item you posted.
13. Press <Void>.
14. Type 1 at Ln# to VOID and press <Enter>.
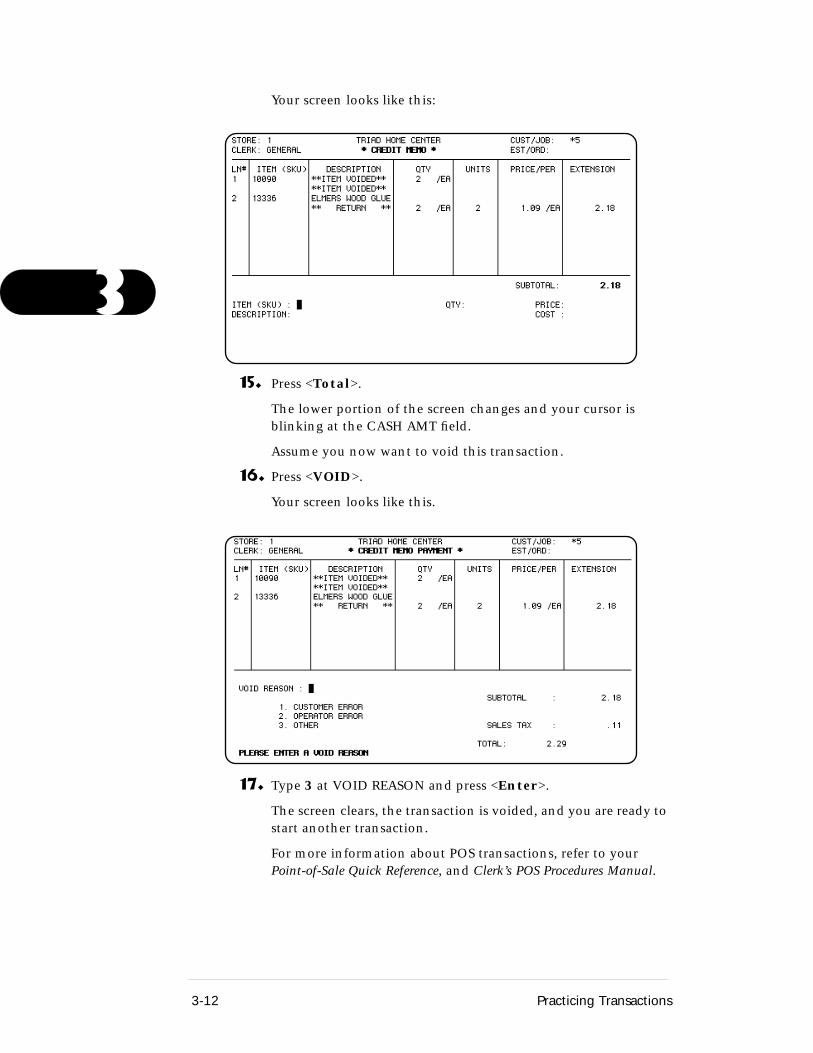
3-12 Practicing Transactions
3333
Your screen looks like this:
15. Press <Total>.
The lower portion of the screen changes and your cursor is blinking at the CASH AMT field.
Assume you now want to void this transaction.
16. Press <VOID>.
Your screen looks like this.
17. Type 3 at VOID REASON and press <Enter>.
The screen clears, the transaction is voided, and you are ready to start another transaction.
For more information about POS transactions, refer to your Point-of-Sale Quick Reference, and Clerk’s POS Procedures Manual.

Practicing Transactions 3-13
3333
❖ Practicing a Sale With Various Item Types
In this exercise you will practice a sale and post various item types to the transaction. During a POS sale, you probably would not post all of the various item types in one transaction. In this transaction you will practice posting the following item types:
➥ special SKUs–departmental and freight
➥ message SKU
➥ promotion SKU
➥ non-tax SKU
➥ adding a line of text to a transaction
➥ tally SKU
1. With your cursor at ITEM (SKU), type 01 and press <Display>.
SKU 01 is a departmental SKU. This type of SKU is used when an item’s SKU number is not in the Inventory File. Notice the message at the bottom of the screen, Stock information not kept.
2. Press <Tab> and type 6 at QTY.
When posting a departmental SKU, you need to also enter the price and a description for the item.
3. Press <Tab> and type 1.95 at PRICE.
4. Press <Tab> and type SHELF BRACKETS at DESCRIPTION.
The description, HARDWARE, is the general description for this departmental SKU. You want to enter the actual description of the item you are selling so it prints on the customer’s receipt.
5. Press <Enter>.
The item is posted to the upper portion of your screen.
6. Type FREIGHT at ITEM (SKU) and press <Display>.
The SKU FREIGHT is an example of a special, non-merchandise SKU. Like departmental SKUs, stock information is not kept for this item and you have to enter a price.
7. Press <Tab> and type 1 at QTY.
8. Press <Tab> and type 10.00 at PRICE.
9. Press <Enter>.
The item is posted to upper portion of your screen.

3-14 Practicing Transactions
3333
10. Type 88136 at ITEM (SKU) and press <Display>.
11. Press <Tab> and type 6 at QTY.
12. Press <Enter>.
This SKU is a message SKU and is coded in Function IMU to prompt for a message to be entered when you sell it at POS. After posting the item a message displays, ENTER A TOXIC WARNING, and your cursor is blinking at the description field.
13. Type CAUTION: HIGHLY FLAMMABLE at DESCRIPTION.
14. Press <Enter>.
The message posts to the upper portion of your screen. You could continue to enter more message lines if needed.
15. Press <Clear>.
Your cursor is blinking at ITEM (SKU) ready for you to enter another item.
16. Type 30103 at ITEM (SKU) and press <Display>.
This item is on promotion. Notice the regular price above the price field.
Your screen looks like this:
17. Press <Tab> and type 3 at QTY.
18. Press <Enter>.
The item posts to the upper portion of your screen. Notice the letter “S” next to the price in the Extension column. This tells you that the item is on promotion.
19. Type 50998 at ITEM (SKU) and press <Display>.
Assume you need to override the tax status for this item. This is a taxable item and you need to sell it without taxing it.

Practicing Transactions 3-15
3333
20.Press <Tab> and type 2 at QTY.
21. Press <No Tax/Trans>.
Use this key when you need to post an item without taxing it. The item will post with the letter “N” next to the price to indicate that it is not taxable.
Your screen looks like this:
22. Type 139881 at ITEM (SKU).
23. Press <Tab> and type 2 at QTY.
24. Press <Enter>.
The item posts to the upper portion of your screen. Assume that you need to add a line of text to the customer’s receipt about this item.
25. Press <Add>.
Your cursor moves to the Description field.
26. Type SOLD AS IS, NOT RETURNABLE and press <Enter>.
The line posts to the upper portion of your screen under the description.
Enter the next item only if you have the Lumber/Contractor Point-of-Sale software package and you typed CPOS when you entered point-of-sale. If you did not, skip to step 32.
27. Type DF26 at ITEM (SKU). Press <Display> and press <Enter>.
This is a lumber Tally 2 item. Your screen is prompting you for the quantity and length of each piece you are selling.
3-16 Practicing Transactions
3333
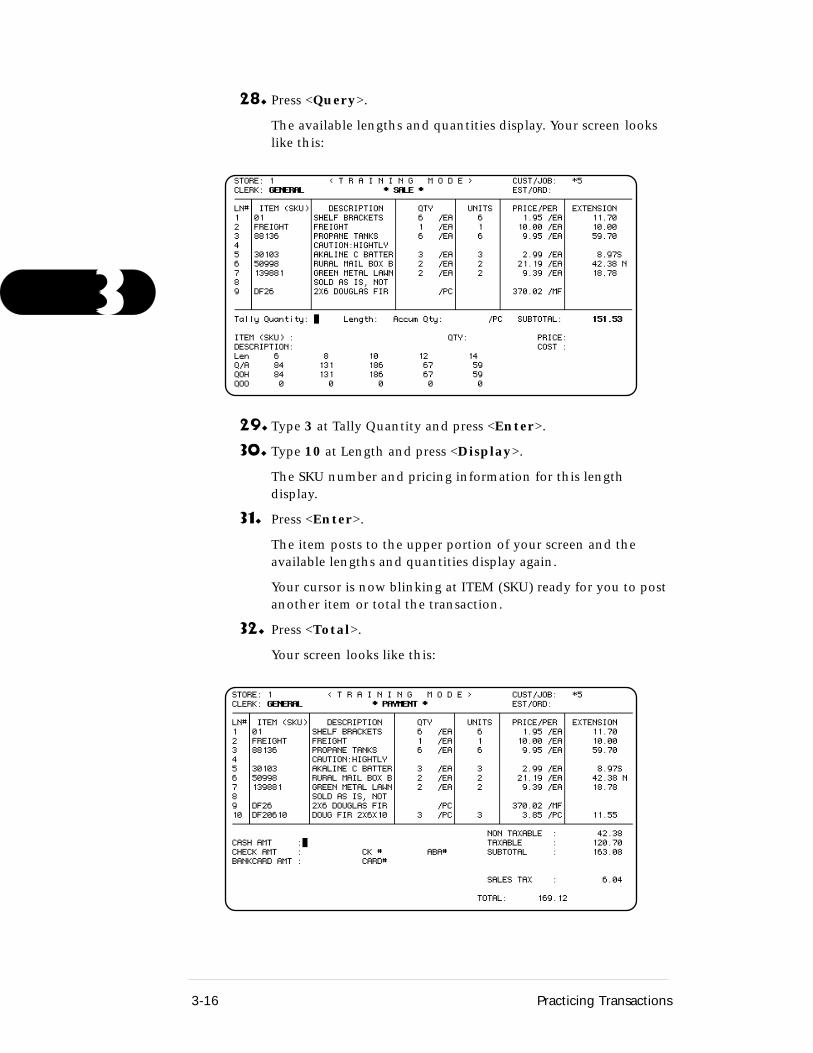
28. Press <Query>.
The available lengths and quantities display. Your screen looks like this:
29. Type 3 at Tally Quantity and press <Enter>.
30. Type 10 at Length and press <Display>.
The SKU number and pricing information for this length display.
31. Press <Enter>.
The item posts to the upper portion of your screen and the available lengths and quantities display again.
Your cursor is now blinking at ITEM (SKU) ready for you to post another item or total the transaction.
32. Press <Total>.
Your screen looks like this:

Using Bar Code Scanners 3-17
3333
33. Type 200.00 at CASH AMT and press <Enter>.
Follow the instructions at the bottom of your screen to complete the transaction.
For more information about POS transactions, refer to your Point-of-Sale Quick Reference, and Clerk’s POS Procedures Manual.
Using Bar Code ScannersThe bar code scanner is one way to enter SKUs at POS. The basic procedures for POS do not change, only the way you enter the SKU.
Read this section only if you have bar code scanning available on your Triad system. If you do not have bar code scanning, skip to the next section of the workbook, “Reviewing This Chapter.”
Scanning Items At POS
To scan an item:
1. Display the POS Posting Screen.
2. Position your cursor at ITEM (SKU).
3. Scan the item.
The SKU number and description for the item display on the screen. Verify that the description fits the item you are selling.
If there is no item with that bar code assigned to it in your Triad system, the screen displays a message, UPC XXXXXXXXXX NOT FOUND. ENTER THE SKU OR PRESS <CLEAR>.
4. Type the SKU number and press <ENTER>.
If your terminal is set up in Function MTR (Modify Terminal Record) to capture bar codes, then the bar code is added to the system. The next transaction that scans that item would find the UPC and not display the NOT FOUND message.
If your terminal is set up in Function MTR to not capture bar codes, then the bar code is not added to the system. The next transaction that scans this item will again display the NOT FOUND message.
5. Enter the quantity you are selling.
You can <Tab> to the quantity field and type the quantity. Or, keep scanning the item until you scan it the number of times equal to the quantity.

3-18 Reviewing This Chapter
3333
6. If no price displays, or if it is not the correct price, press <Tab> and type the correct price. Press <Clear Field> if any of the old price remains.
7. Post the item.
There are three ways to post the item. You can:
➥ press <Enter>
or
➥ scan a different item
or
➥ press one of the other POS keys that post an item: <Total>, <Run>, <Discount>, <Promo>, <No Tax/Transfer>.
8. Repeat steps 3 through 7 to continue scanning items.
If you want to practice these steps in the Training Mode, you need to do the following:
➥ locate an item with a bar code printed on it
➥ enter the item as an SKU in Function LOD
➥ enter the UPC code for the SKU in Function MAP
For more information about bar code scanning, refer to your Bar Code Procedures Guide, the tabbed section, “POS/Off-Line POS Procedures,” and Clerk’s POS Procedures Manual, the tabbed section, “Using Point-of-Sale.”
Reviewing This ChapterNow review what you have learned. A quiz follows to help you review what you have learned and help you identify any areas that need more practice.
Once you complete the quiz and review your answers, you can complete basic POS transactions in the Live Mode. Be sure you look up any questions you may have, using your Functions Manual and Reports Manual.
✍ POS Basics Quiz
On a separate piece of paper, write your answers to these questions. Check your answers against those at the end of this chapter.
1. When the cursor is blinking at SKU, how do you exit POS back to the Main Menu?
2. What are the three screens in POS?

What You Should Do Now 3-19
3333
3. Which key do you press to display the Mini-Header Screen?
4. What does the *5 represent in the CUST/JOB field?
5. A cash sale totals $4.59 and your customer gives you a five-dollar bill. List the three ways you can enter the five dollars to total the transaction.
What You Should Do NowCongratulations! You have now completed the exercises for POS basics. You have reviewed transaction types and their life cycles, practiced a cash and charge transaction, posted various item types, and learned about bar code scanning.
Now that you have completed the exercises in this workbook and reviewed your work with the quiz, you are ready to continue POS training. Use the Point-of-Sale Quick Reference to practice all the various transaction types and procedures you can do at POS on your Triad system.
The following is a table listing the four POS software packages and the transactions and procedures that are available with each package. Since you know which software package is on your Triad system, use the table as a guide to determine what you need to practice.
Use the Point-of-Sale Quick Reference to learn the steps for each transaction and procedure. Just start on page 1 of the quick reference and practice each procedure in the order they are presented. Refer to the table if you are not sure if the procedure is available on your system.
After the table you will find a list of SKUs that you can use during your practice with the quick reference.
After completing the quick reference, if you want additional practice, refer to the Clerk’s POS Procedures Manual.
To recap, do the following:
➥ Use the following table to determine what you need to practice.
➥ Using the Point-of-Sale Quick Reference, practice all the POS procedures.
➥ Use the list of SKUs to practice the POS procedures.
➥ For additional practice, refer to the Clerk’s POS Procedures Manual.
Remember to complete all of your POS practice in the Training Mode.

3-20 What You Should Do Now
3333
Procedure 1–POS 2–Classic 3–Decor 4–Lumber
Sale X X X X
Estimate X X
Quote X X X
Open Quote X X X
Bid X X
Order X X X
Special Order X X X
ROA X X X X
Credit Memo X X X X
Offline POS X X X X
Tallys X
Voids X X X X
Insert a Line X X X X
Paid Outs X X X X
Multiple Cus-tomer Lookup
X X X
Multiview X X X
No Sale Key X X X X
Override Tax X X X X
QuickRecall*purchase option
*X *X *X *X
QuickView X X X
Exchange X X X X
Saving a Sale as an Order
X X X X
Selling Items in Multiples
X X X X
Generate POs from Special Orders–GPO
X X X
Price Matrix X X X
Job Accounts X X

What You Should Do Now 3-21
3333Use the following customer numbers and SKU numbers when completing POS practice transactions in the Training Mode.
Quantity Break X X
Kits X X
Backorders X X
GP % Display X
Copy/Reprice X X
Customer Number Customer Name
125 Smith Bros. Contractors
126 Acme Industries
127 AJ Construction
127Job 10
AJ ConstructionPark Ridge Project
SKU Number SKU Number SKU Number
01Department SKU
02Department SKU
03Department SKU
33299 MUL20 234BC
10090 139881 258BC
13336 E56 DF20606
30102 70307 DF20608
30103 7535 DF20610
50140 70638 DF20612
50503 G1191 DF20614
50998 G1393 DF26
51028 G1395 2408DFPT
55718 G2122 2410DFPT
70736 G3136 2412DFPT
SMOKE ALARM G4522
Procedure 1–POS 2–Classic 3–Decor 4–Lumber

3-22 What You Should Do Now
3333
❖ Exiting Training Mode
If you are done working in the Training Mode for now, and need to return to Live Mode, do the following.
1. At the Main Menu, type QUIT.
2. Press <Enter>.
3. At the login prompt, type M.
4. Press <Enter>.

What You Should Do Now 3-23
3333
✍ Answers for the POS Basics Quiz
1. When the cursor is blinking at SKU, how do you exit POS back to the Main Menu?
Press <No Sale>
Type 2
Type Y
2. What are the three screens in POS?
Posting Screen
Big Header Screen
Mini-Header Screen
3. Which key do you press to display the Mini-Header Screen?
<Charge>
4. What does the *5 represent in the CUST/JOB field?
*5 is the default cash customer. Your Triad system assumes that a transaction is a cash sale to this customer number, unless you indicate otherwise.
5. A cash sale totals $4.59 and your customer gives you a five-dollar bill. List the three ways you can enter the five dollars to total the transaction.
5.
5.00
500

3-24 What You Should Do Now
3333