
CLAY PUZZLING - img1.wsimg.com
16
CLAY PUZZLING Lesson Plans & Product Guide Techniques Methods Molds Leaf Forms Tools Glazes & More! • • • • • • •
Transcript of CLAY PUZZLING - img1.wsimg.com

CLAY PUZZLINGLesson Plans & Product Guide
Techniques MethodsMolds Leaf FormsToolsGlazes& More!
•••••••
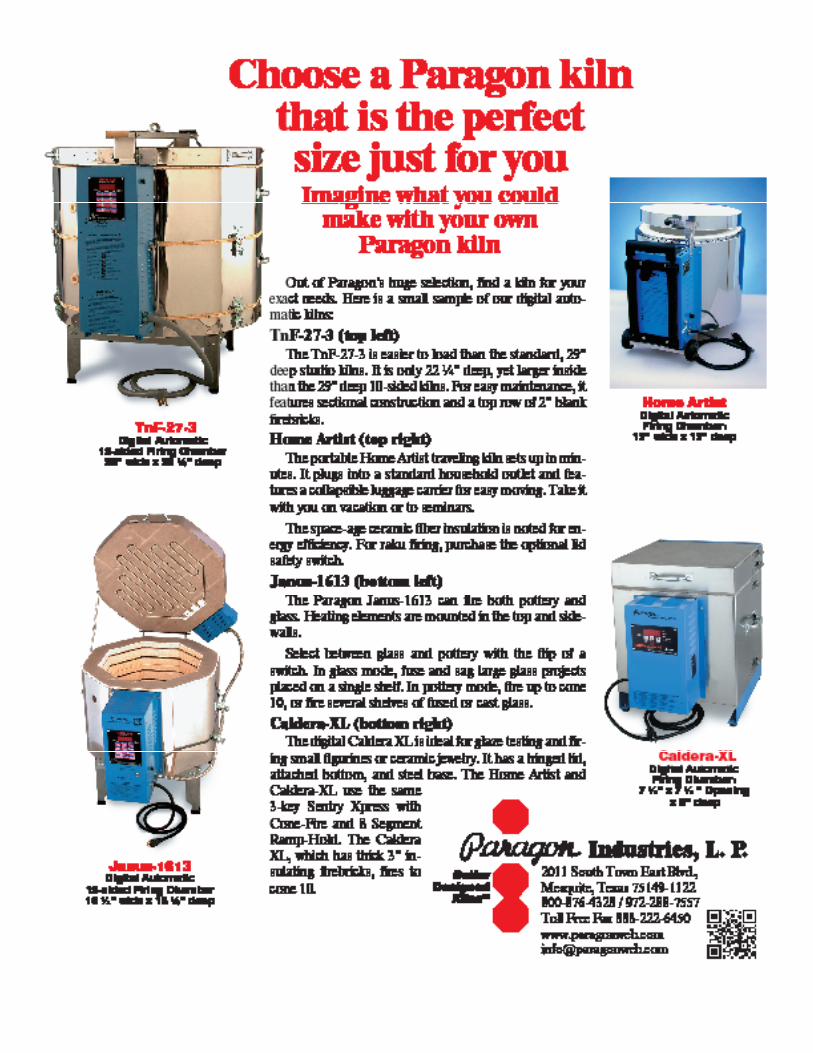
Welcome to Clay Puzzling!About 10 years ago I started playing around with moist clay. Since I had owned a traditional ceramic studio for 15 years prior, I wanted to incorporate molds because that’s what I was used to working with. It made it easier to achieve successful shapes without the frustration of trying to get clay centered on a wheel or form objects using traditional hand-building methods. The term clay puzzling came about because the first shapes were all construct-ed with small chunks of clay, and from the outside, they looked like puzzle pieces locked together. Clay puzzling has certainly caught on, and it has evolved from shapes to coiled wonders of raku. Now
we’re taking vases, turning them on their sides, and transforming them into fish and other creatures. We can easily combine multiple shapes to make mushrooms for the garden and stack up garden globes to make snow-men. Add unique textures and designs with natural materials and tools. The possibilities are endless, and the
techniques and methods will continue to evolve for the next 10 years and beyond. Our website has also grown, adding how-to videos and everything needed for clay puzzling. The fired-arts industry has offerings no other art form can deliver. The magic that happens in the kiln cannot be matched! As clay bodies by companies like Conti-
nental Clay are perfected, colors by my friends at Mayco and other manufacturers are expanded, and kilns by the experts at kiln companies like Paragon offer more creative options, we can continue to move forward and expand our abilities. Share the magic of fired arts with friends and family, Discover all the exciting things you can create with clay and other forms of fired arts. Enjoy all the lessons and develop some of your own!
Michael HarbridgeOwner, ClayPuzzling.com
[email protected](715) 281-6450
Solid Puzzling MethodSolid puzzling is the basic foundation behind the clay puzzling technique. Follow these basic steps when you want a solid design. You can also leave spaces between chunks of clay for a more open design or combine solid clay with coils or chunky looks explained on the next page. (Free how-to video at ClayPuzzling.com)Step 1) Flatten chunks of moist clay between your fingers. Generally, about a quarter of an inch in thickness is sufficient. However, thicker clay may be needed on larger items, shapes which will have textures added, or items where parts are adhered . Step 2) Place the pieces of clay inside one half of the mold, making certain to slightly overlap adjacent chunks. Compress clay with your fingers or a towel periodically. The clay should not pull apart if compressed properly. The harder you press, the less texture will be noticeable on the outside. Go right up to the edge of the mold. Step 3) Complete Steps 1 and 2 to fill the second half of the mold. Step 4) Once both halves have been filled with clay, run your fingers over the surface to make certain all of the clay parts are attached well. Make a long coil about a half inch thick and attach it around one half of the mold, just below the edge, not above. This coil will be used to join the two halves. Remove any clay above the edge of the mold.Step 5) Pick up the other half of the mold and wrap your fingers around the edge to pre-vent the clay from falling out as you turn it over and place both mold halves together. Step 6) Band the mold with a Velcro strap and use a PPT2 Press Tool with Light to press the coil from one side of the mold so it attaches to the other. Once the clay is dry enough to stand on its own, carefully remove it from the mold. Step 7) Once it’s removed from the mold, clean up seam lines by using the metal rib and wooden tools from the Royal RSetPot1 Pottery Set. Add clay to fill in any gaps or openings along the seam line. Do not use water to smooth at this point; getting too much water on the item will cause it to collapse. Use water after completely dry.
CLAY PUZZLINGBasics
Clay Puzzling Lesson Plans & Product Guide 3
CLAY PUZZLINGBasics
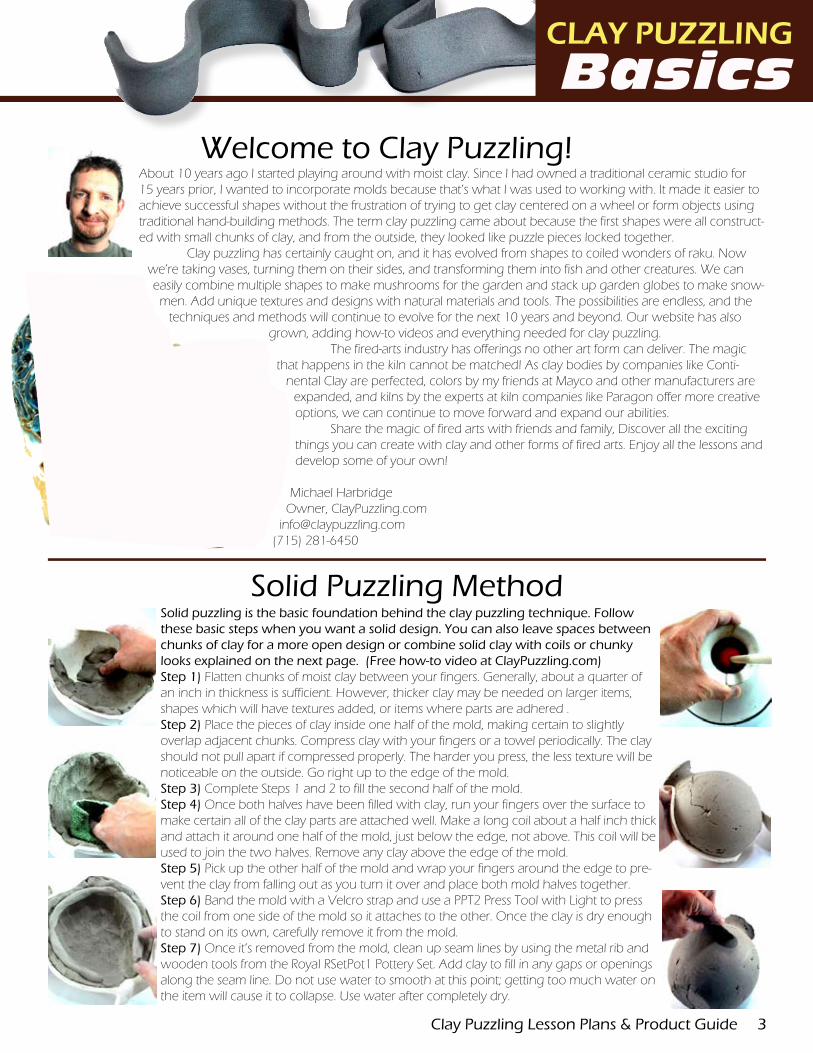
Chunky Puzzling MethodCreate a fun, textured clay surface by embedding dry chunks into moist clay with
the chunky puzzling method. The vase shown at left was constructed using mold BP314 with Continental CCLFR Low-Fire Red Clay and dry chunks of CCLFW Low-Fire White Clay. After firing to cone 04, one coat of Mayco EL119 Burnished Steel was applied to the outside and wiped back prior to an 06 fir-ing. But this method can be used with nearly any compatible clay bodies. Step 1) Flatten pieces of moist clay the same way as done in solid puzzling shown on prior page. Step 2) Break up chunks of dry clay and place them on canvas or craft foam. Step 3) Lay the moist clay over the top of the dry chunks and press to embed. Step 4) Lift the clay with embedded chunks and place it face down inside the mold (embedded chunks against the mold).
Step 5 Continue steps 1 through 4 to puzzle both mold halves. Create coil and attach in the same manner as the solid method shown on previous page. Step 6) Once the piece is removed from the mold, clean up seam lines by using the
metal rib and wooden tools from the Royal RSetPot1 Pottery Set. Add clay to fill in any gaps or openings along the seam line. Do not use water because it will cause the two
clays used to dirty one another. Step 7) Reach a hand or press tool inside the shape and work it along the seam line for
support while pressing small chunks of dry clay into the moist exterior to disguise the seam area. This area usually does not have enough chunks and needs a few added. Step 8) Follow firing and finishing instructions for the clay body selected.
Extruder Puzzling MethodDesign your ware with open areas for use with lights, candles or just a cool look with extruder
puzzling. The sphere to the left was constructed using mold BP316 with Continental CCLFR Low-Fire Red Clay. After firing to cone 04, single coats of various colors of Mayco Stroke
& Coat colors were applied to the outside and wiped back prior to an 06 firing. This method can be used with nearly any clay bodies.
Step 1) Extrude strands of clay onto canvas or craft foam. Don’t extrude more than you will use in a short period. Depending on conditions, thin coils can dry quickly. Step 2) Place the coils of clay randomly inside one half of the mold, making certain to overlap and cross them over one another. Make sure the start and end of the coil is attached to another coil to avoid sharp points on the final shape. Compress coils with fingers or towel periodically. The coils should not pull apart if com-pressed properly. Don’t press so hard that the coils are completely flattened. Coils should not go above the top edge of the mold, and openings between clay loops should not allow your thumb to fit inside. Openings that are to big can create fragile, weak areas. Watch for long narrow openings as well. Make certain coils cross over those areas. Step 3) Complete Steps 1 and 2 to finish the second half of the mold.
Step 4) Using one long coil and one half of the puzzled mold, create loops about one inch high all the way the top edge. Do not make loops around the opening of
the mold. These loops will connect the two halves. Do not go higher than an inch or the coils will break off in the next step.
Step 5) Bend the loops inward so that, when the mold halves are placed together, they won’t get crushed. Pick up the other half of the mold and wrap your fingers around the edge to prevent the
clay from falling out as you turn it and place the mold halves together. Step 6) Band the mold with a Velcro strap and use a PPT2 Press Tool with Light to press the loops from one side of
the mold so it attaches to the other. Once the clay is dry enough to stand on its own, carefully remove from mold.
Free how-to video at ClayPuzzling.com!
Free how-to video at ClayPuzzling.com!
4 www.ClayPuzzling.com
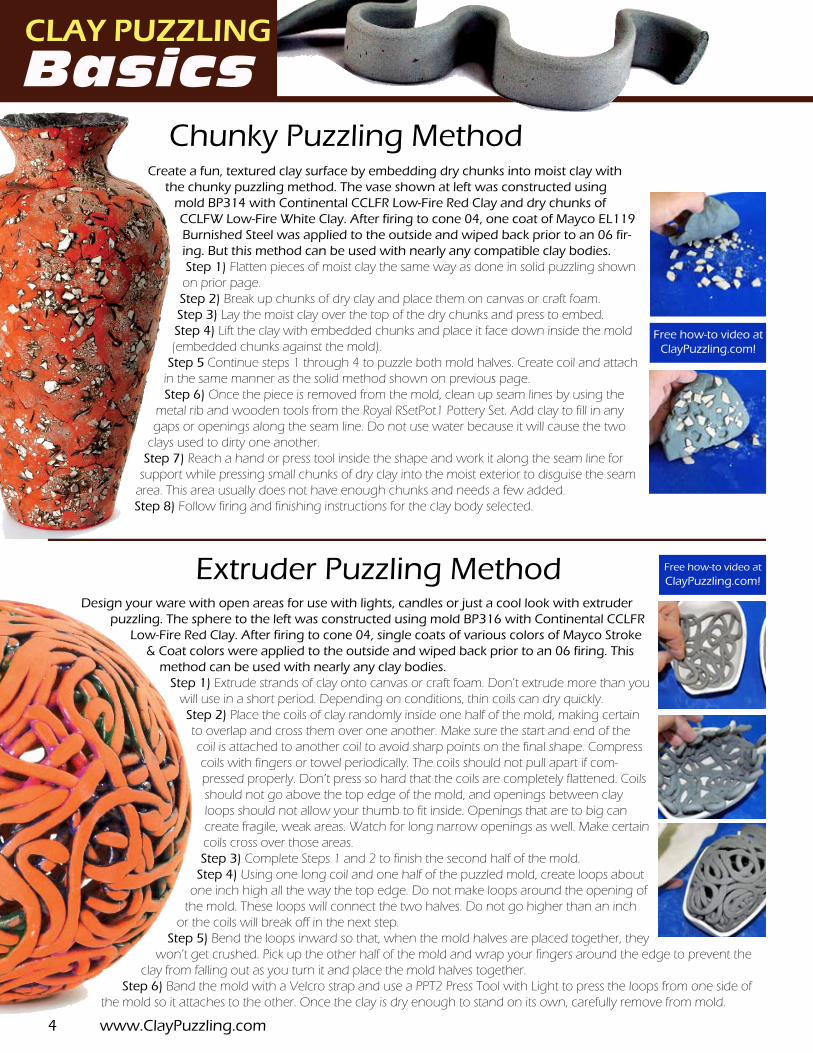
Puzzled Mushrooms Lesson PlanMolds: BP348, 349, 354, 520, 352 & 362Colors: MaycoBrushes: Royal & LangnickelClay: Continental ClayRecorded webinar video available at ifiredarts.com
Step 1) Open the two-part mold and remove any dust. Step 2) Follow the steps for solid clay puzzling to puzzle each half of the egg mold. Do not put the mold halves together. In this technique, the mushroom caps are created using only half of the mold. Step 3) Follow the steps for solid clay puzzling to puzzle the pedestal molds to create the mushroom stems. Step 4) Once the mushroom caps are out of the mold, pinch the edges to flare them out slightly. Place them on a board covered with paper to dry. Step 5) If the mushroom cap covers too much of the pedestal, you may need to form a clay plate inside the mushroom. Determine this by placing the mushroom cap on the chosen stem. If the cap covers too much of the stem, roll out or press a flat round shape that will fit inside the mushroom cap and prevent the stem from going up inside all the way. Do not attach the round shape in this clay stage. Step 6) Allow sufficient drying time before firing all the parts to the appro-priate cone for the clay body se-lected. CCLFW Low-Fire White from Continental Clay was used with these samples, and they were fired to cone 04. Step 7) Apply two coats of Mayco Magic Metallic MM106 Steel to the mushroom caps using a Royal SG825 Stiff Fan brush. While the second coat is still damp, spray, drip, or drizzle MM305 Rapid Rust ran-domly over the Steel. Allow to dry 24 hours.Step 8) Apply two coats of Mayco Magic Metallic MM102 Copper to the mushroom stems using a Royal SG825 Stiff Fan brush. While the second coat is still damp, spray, drip or drizzle a com-bination of MM201, MM202, and MM204 Patina tints randomly over the Copper. Allow to dry 24 hours.Step 9) Optional sealers for Magic Metallics are available, but not required.
Garden globes made from the round sphere series of puzzler molds also look great done in Magic Metallics!
Save up to 60% every day at www.ArtistPaintBrush.com! (301) 249-0846
Learn how to use and care for brushes with our NEW videos! They are all free and show you how to properly
load, use and care for brushes. New videos added weekly.
NEW! FREE! How-To Videos
CLAY PUZZLINGLesson
Clay Puzzling Lesson Plans & Product Guide 5
www.ArtistPaintBrush.com
CLAY PUZZLINGLesson
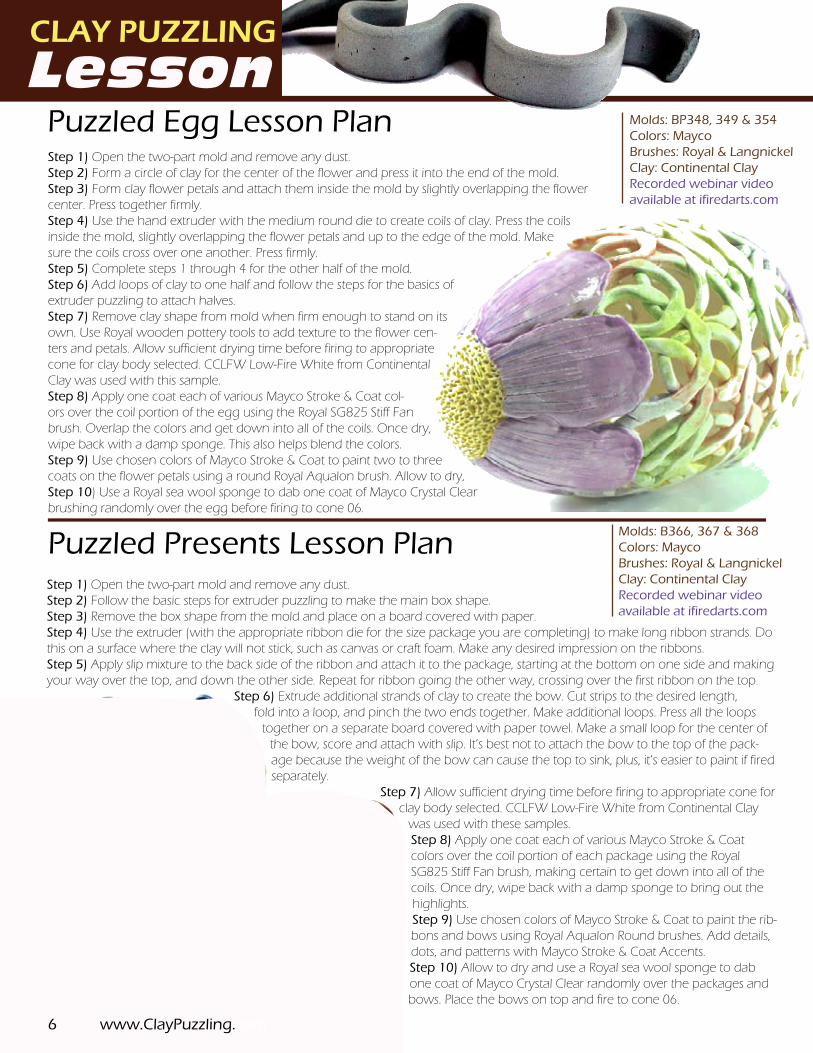
Puzzled Egg Lesson Plan
Puzzled Presents Lesson Plan
Step 1) Open the two-part mold and remove any dust. Step 2) Form a circle of clay for the center of the flower and press it into the end of the mold. Step 3) Form clay flower petals and attach them inside the mold by slightly overlapping the flower center. Press together firmly. Step 4) Use the hand extruder with the medium round die to create coils of clay. Press the coils inside the mold, slightly overlapping the flower petals and up to the edge of the mold. Make sure the coils cross over one another. Press firmly. Step 5) Complete steps 1 through 4 for the other half of the mold. Step 6) Add loops of clay to one half and follow the steps for the basics of extruder puzzling to attach halves. Step 7) Remove clay shape from mold when firm enough to stand on its own. Use Royal wooden pottery tools to add texture to the flower cen-ters and petals. Allow sufficient drying time before firing to appropriate cone for clay body selected. CCLFW Low-Fire White from Continental Clay was used with this sample. Step 8) Apply one coat each of various Mayco Stroke & Coat col-ors over the coil portion of the egg using the Royal SG825 Stiff Fan brush. Overlap the colors and get down into all of the coils. Once dry, wipe back with a damp sponge. This also helps blend the colors. Step 9) Use chosen colors of Mayco Stroke & Coat to paint two to three coats on the flower petals using a round Royal Aqualon brush. Allow to dry,Step 10) Use a Royal sea wool sponge to dab one coat of Mayco Crystal Clear brushing randomly over the egg before firing to cone 06.
Molds: BP348, 349 & 354Colors: MaycoBrushes: Royal & LangnickelClay: Continental ClayRecorded webinar video available at ifiredarts.com
Molds: B366, 367 & 368Colors: MaycoBrushes: Royal & LangnickelClay: Continental Clay Recorded webinar video available at ifiredarts.com
Step 1) Open the two-part mold and remove any dust. Step 2) Follow the basic steps for extruder puzzling to make the main box shape.Step 3) Remove the box shape from the mold and place on a board covered with paper. Step 4) Use the extruder (with the appropriate ribbon die for the size package you are completing) to make long ribbon strands. Do this on a surface where the clay will not stick, such as canvas or craft foam. Make any desired impression on the ribbons. Step 5) Apply slip mixture to the back side of the ribbon and attach it to the package, starting at the bottom on one side and making your way over the top, and down the other side. Repeat for ribbon going the other way, crossing over the first ribbon on the top.
Step 6) Extrude additional strands of clay to create the bow. Cut strips to the desired length, fold into a loop, and pinch the two ends together. Make additional loops. Press all the loops
together on a separate board covered with paper towel. Make a small loop for the center of the bow, score and attach with slip. It’s best not to attach the bow to the top of the pack-age because the weight of the bow can cause the top to sink, plus, it’s easier to paint if fired separately.
Step 7) Allow sufficient drying time before firing to appropriate cone for clay body selected. CCLFW Low-Fire White from Continental Clay
was used with these samples. Step 8) Apply one coat each of various Mayco Stroke & Coat colors over the coil portion of each package using the Royal SG825 Stiff Fan brush, making certain to get down into all of the coils. Once dry, wipe back with a damp sponge to bring out the highlights. Step 9) Use chosen colors of Mayco Stroke & Coat to paint the rib-bons and bows using Royal Aqualon Round brushes. Add details, dots, and patterns with Mayco Stroke & Coat Accents. Step 10) Allow to dry and use a Royal sea wool sponge to dab one coat of Mayco Crystal Clear randomly over the packages and bows. Place the bows on top and fire to cone 06.
6 www.ClayPuzzling.com
CLAY PUZZLINGLesson
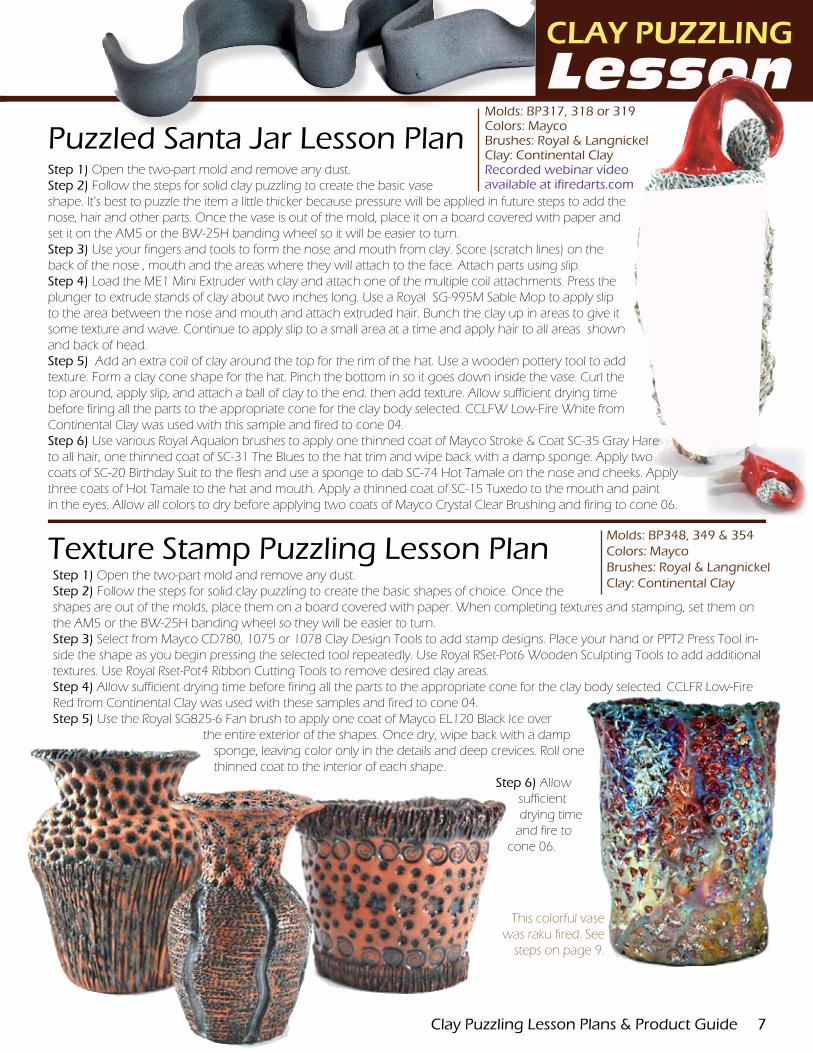
This colorful vase was raku fired. See
steps on page 9.
Texture Stamp Puzzling Lesson Plan
Puzzled Santa Jar Lesson PlanMolds: BP317, 318 or 319Colors: MaycoBrushes: Royal & LangnickelClay: Continental Clay Recorded webinar video available at ifiredarts.com
Molds: BP348, 349 & 354Colors: MaycoBrushes: Royal & LangnickelClay: Continental Clay
Step 1) Open the two-part mold and remove any dust. Step 2) Follow the steps for solid clay puzzling to create the basic vase shape. It’s best to puzzle the item a little thicker because pressure will be applied in future steps to add the nose, hair and other parts. Once the vase is out of the mold, place it on a board covered with paper and set it on the AM5 or the BW-25H banding wheel so it will be easier to turn. Step 3) Use your fingers and tools to form the nose and mouth from clay. Score (scratch lines) on the back of the nose , mouth and the areas where they will attach to the face. Attach parts using slip. Step 4) Load the ME1 Mini Extruder with clay and attach one of the multiple coil attachments. Press the plunger to extrude stands of clay about two inches long. Use a Royal SG-995M Sable Mop to apply slip to the area between the nose and mouth and attach extruded hair. Bunch the clay up in areas to give it some texture and wave. Continue to apply slip to a small area at a time and apply hair to all areas shown and back of head. Step 5) Add an extra coil of clay around the top for the rim of the hat. Use a wooden pottery tool to add texture. Form a clay cone shape for the hat. Pinch the bottom in so it goes down inside the vase. Curl the top around, apply slip, and attach a ball of clay to the end. then add texture. Allow sufficient drying time before firing all the parts to the appropriate cone for the clay body selected. CCLFW Low-Fire White from Continental Clay was used with this sample and fired to cone 04. Step 6) Use various Royal Aqualon brushes to apply one thinned coat of Mayco Stroke & Coat SC-35 Gray Hare to all hair, one thinned coat of SC-31 The Blues to the hat trim and wipe back with a damp sponge. Apply two coats of SC-20 Birthday Suit to the flesh and use a sponge to dab SC-74 Hot Tamale on the nose and cheeks. Apply three coats of Hot Tamale to the hat and mouth. Apply a thinned coat of SC-15 Tuxedo to the mouth and paint in the eyes. Allow all colors to dry before applying two coats of Mayco Crystal Clear Brushing and firing to cone 06.
Step 1) Open the two-part mold and remove any dust. Step 2) Follow the steps for solid clay puzzling to create the basic shapes of choice. Once the shapes are out of the molds, place them on a board covered with paper. When completing textures and stamping, set them on the AM5 or the BW-25H banding wheel so they will be easier to turn. Step 3) Select from Mayco CD780, 1075 or 1078 Clay Design Tools to add stamp designs. Place your hand or PPT2 Press Tool in-side the shape as you begin pressing the selected tool repeatedly. Use Royal RSet-Pot6 Wooden Sculpting Tools to add additional textures. Use Royal Rset-Pot4 Ribbon Cutting Tools to remove desired clay areas. Step 4) Allow sufficient drying time before firing all the parts to the appropriate cone for the clay body selected. CCLFR Low-Fire Red from Continental Clay was used with these samples and fired to cone 04. Step 5) Use the Royal SG825-6 Fan brush to apply one coat of Mayco EL120 Black Ice over
the entire exterior of the shapes. Once dry, wipe back with a damp sponge, leaving color only in the details and deep crevices. Roll one thinned coat to the interior of each shape.
Step 6) Allow sufficient drying time
and fire to cone 06.
Clay Puzzling Lesson Plans & Product Guide 7
CLAY PUZZLINGLesson
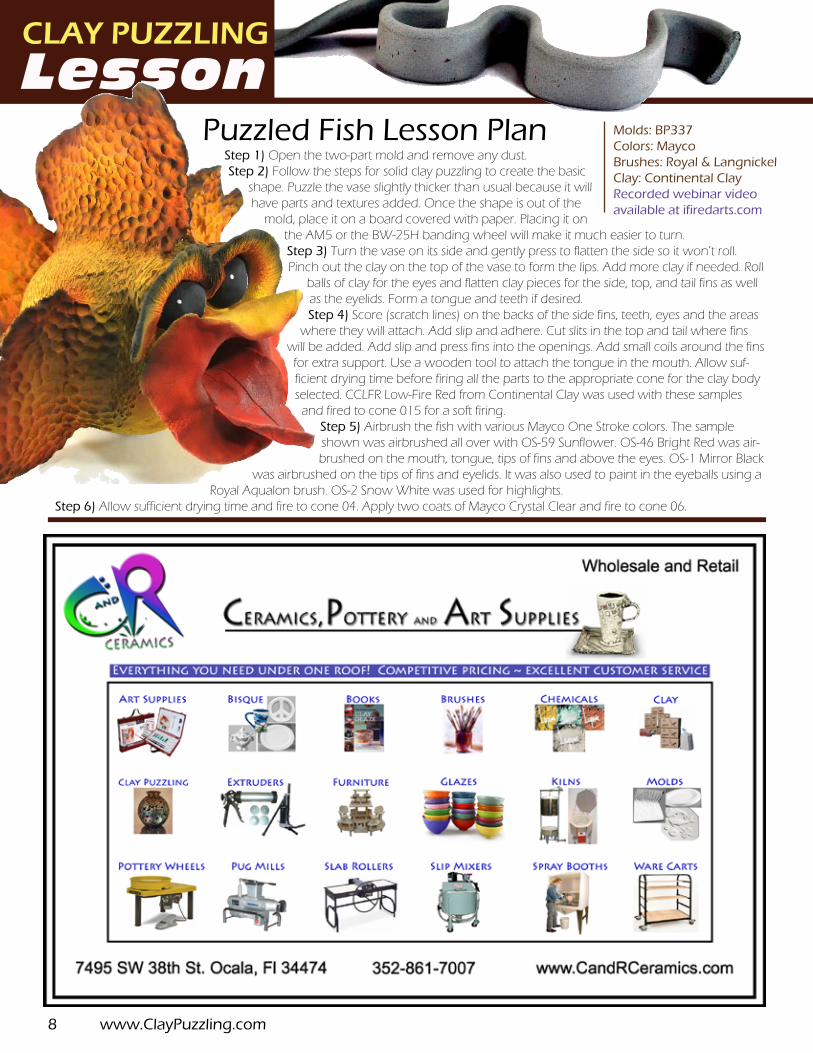
Puzzled Fish Lesson Plan Molds: BP337Colors: MaycoBrushes: Royal & LangnickelClay: Continental ClayRecorded webinar video available at ifiredarts.com
8 www.ClayPuzzling.com
Step 1) Open the two-part mold and remove any dust. Step 2) Follow the steps for solid clay puzzling to create the basic
shape. Puzzle the vase slightly thicker than usual because it will have parts and textures added. Once the shape is out of the
mold, place it on a board covered with paper. Placing it on the AM5 or the BW-25H banding wheel will make it much easier to turn. Step 3) Turn the vase on its side and gently press to flatten the side so it won’t roll. Pinch out the clay on the top of the vase to form the lips. Add more clay if needed. Roll
balls of clay for the eyes and flatten clay pieces for the side, top, and tail fins as well as the eyelids. Form a tongue and teeth if desired. Step 4) Score (scratch lines) on the backs of the side fins, teeth, eyes and the areas
where they will attach. Add slip and adhere. Cut slits in the top and tail where fins will be added. Add slip and press fins into the openings. Add small coils around the fins for extra support. Use a wooden tool to attach the tongue in the mouth. Allow suf-ficient drying time before firing all the parts to the appropriate cone for the clay body selected. CCLFR Low-Fire Red from Continental Clay was used with these samples and fired to cone 015 for a soft firing.
Step 5) Airbrush the fish with various Mayco One Stroke colors. The sample shown was airbrushed all over with OS-59 Sunflower. OS-46 Bright Red was air-brushed on the mouth, tongue, tips of fins and above the eyes. OS-1 Mirror Black
was airbrushed on the tips of fins and eyelids. It was also used to paint in the eyeballs using a Royal Aqualon brush. OS-2 Snow White was used for highlights.
Step 6) Allow sufficient drying time and fire to cone 04. Apply two coats of Mayco Crystal Clear and fire to cone 06.
CLAY PUZZLINGLesson
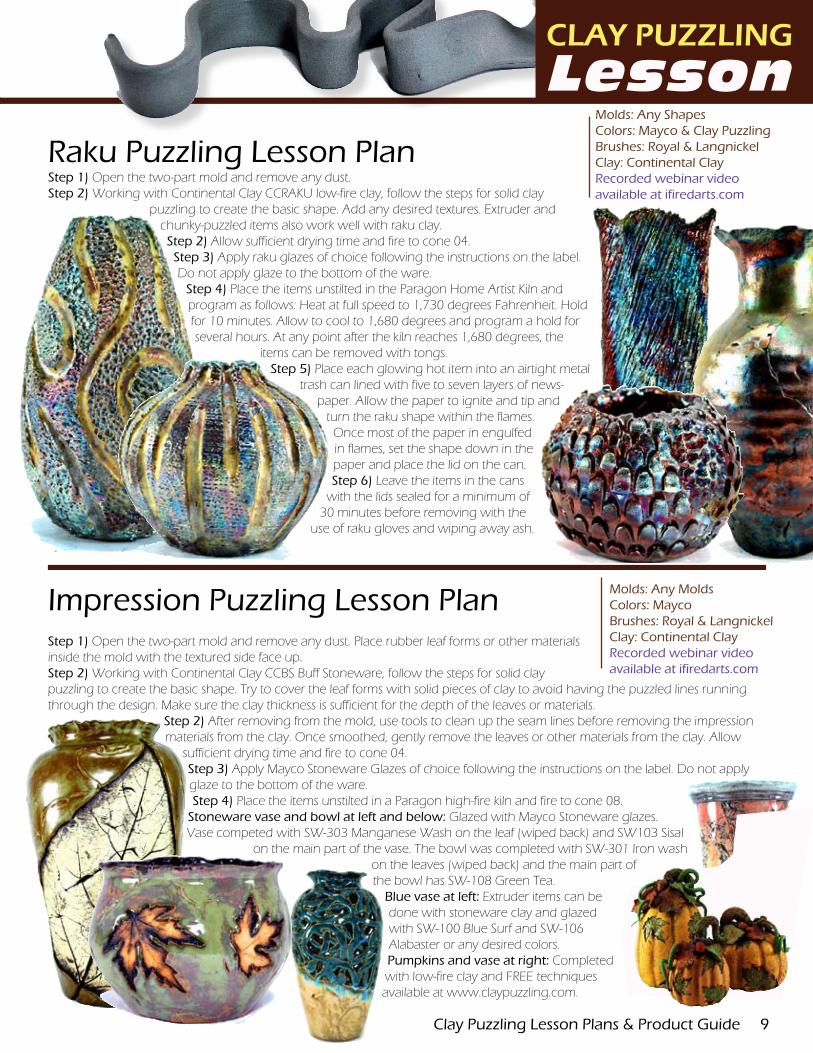
Raku Puzzling Lesson Plan
Impression Puzzling Lesson Plan
Molds: Any ShapesColors: Mayco & Clay PuzzlingBrushes: Royal & LangnickelClay: Continental ClayRecorded webinar video available at ifiredarts.com
Molds: Any MoldsColors: MaycoBrushes: Royal & LangnickelClay: Continental Clay Recorded webinar video available at ifiredarts.com
Clay Puzzling Lesson Plans & Product Guide 9
Step 1) Open the two-part mold and remove any dust. Step 2) Working with Continental Clay CCRAKU low-fire clay, follow the steps for solid clay
puzzling to create the basic shape. Add any desired textures. Extruder and chunky-puzzled items also work well with raku clay. Step 2) Allow sufficient drying time and fire to cone 04.Step 3) Apply raku glazes of choice following the instructions on the label. Do not apply glaze to the bottom of the ware. Step 4) Place the items unstilted in the Paragon Home Artist Kiln and program as follows: Heat at full speed to 1,730 degrees Fahrenheit. Hold for 10 minutes. Allow to cool to 1,680 degrees and program a hold for several hours. At any point after the kiln reaches 1,680 degrees, the
items can be removed with tongs. Step 5) Place each glowing hot item into an airtight metal
trash can lined with five to seven layers of news-paper. Allow the paper to ignite and tip and
turn the raku shape within the flames. Once most of the paper in engulfed in flames, set the shape down in the paper and place the lid on the can. Step 6) Leave the items in the cans
with the lids sealed for a minimum of 30 minutes before removing with the
use of raku gloves and wiping away ash.
Step 1) Open the two-part mold and remove any dust. Place rubber leaf forms or other materials inside the mold with the textured side face up. Step 2) Working with Continental Clay CCBS Buff Stoneware, follow the steps for solid clay puzzling to create the basic shape. Try to cover the leaf forms with solid pieces of clay to avoid having the puzzled lines running through the design. Make sure the clay thickness is sufficient for the depth of the leaves or materials.
Step 2) After removing from the mold, use tools to clean up the seam lines before removing the impression materials from the clay. Once smoothed, gently remove the leaves or other materials from the clay. Allow
sufficient drying time and fire to cone 04.Step 3) Apply Mayco Stoneware Glazes of choice following the instructions on the label. Do not apply glaze to the bottom of the ware. Step 4) Place the items unstilted in a Paragon high-fire kiln and fire to cone 08. Stoneware vase and bowl at left and below: Glazed with Mayco Stoneware glazes. Vase competed with SW-303 Manganese Wash on the leaf (wiped back) and SW103 Sisal
on the main part of the vase. The bowl was completed with SW-301 Iron wash on the leaves (wiped back) and the main part of the bowl has SW-108 Green Tea.
Blue vase at left: Extruder items can be done with stoneware clay and glazed with SW-100 Blue Surf and SW-106 Alabaster or any desired colors. Pumpkins and vase at right: Completed with low-fire clay and FREE techniques available at www.claypuzzling.com.
CLAY PUZZLINGMolds
BP315 Large Vase Puzzler Mold
$150 18” H x 13” W
BP360 Round Vase Puzzler Mold
$306” H x 7” W
BP522 Hour Glass Puzzler Mold
$207.5” H x 4” W
BP300 Tall Slender Vase Puzzler Mold
$4514” H x 7” W
BP314 Lg. Slender Vase Puzzler Mold
$7517” H x 10” W
BP301 Short Wide Vase Puzzler Mold
$458” H x 8” W
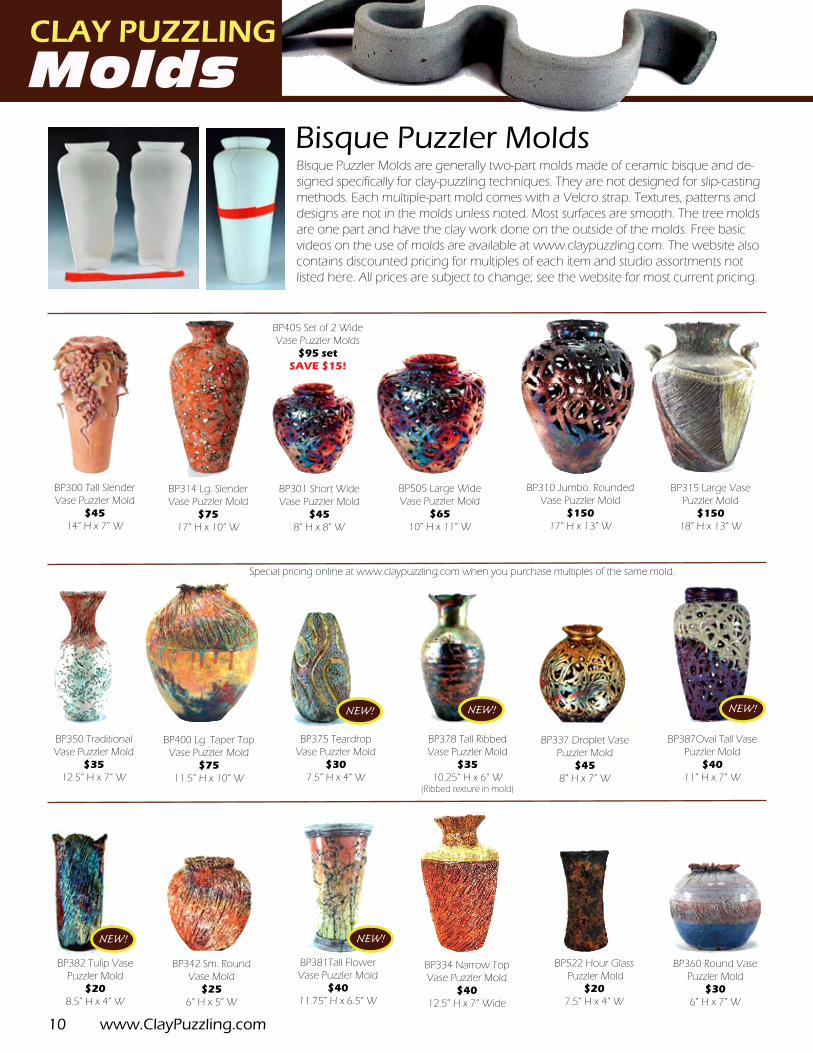
Bisque Puzzler MoldsBisque Puzzler Molds are generally two-part molds made of ceramic bisque and de-signed specifically for clay-puzzling techniques. They are not designed for slip-casting methods. Each multiple-part mold comes with a Velcro strap. Textures, patterns and designs are not in the molds unless noted. Most surfaces are smooth. The tree molds are one part and have the clay work done on the outside of the molds. Free basic videos on the use of molds are available at www.claypuzzling.com. The website also contains discounted pricing for multiples of each item and studio assortments not listed here. All prices are subject to change; see the website for most current pricing.
BP350 Traditional Vase Puzzler Mold
$3512.5” H x 7” W
BP400 Lg. Taper Top Vase Puzzler Mold
$7511.5” H x 10” W
BP334 Narrow Top Vase Puzzler Mold
$4012.5” H x 7” Wide
BP505 Large Wide Vase Puzzler Mold
$6510” H x 11” W
BP310 Jumbo. Rounded Vase Puzzler Mold
$15017” H x 13” W
NEW!
NEW! NEW! NEW!
10 www.ClayPuzzling.com
NEW!
BP375 Teardrop Vase Puzzler Mold
$307.5” H x 4” W
BP378 Tall Ribbed Vase Puzzler Mold
$3510.25” H x 6” W
(Ribbed texture in mold)
BP387Oval Tall Vase Puzzler Mold
$4011” H x 7” W
BP382 Tulip Vase Puzzler Mold
$208.5” H x 4” W
BP381Tall Flower Vase Puzzler Mold
$4011.75” H x 6.5” W
BP405 Set of 2 Wide Vase Puzzler Molds
$95 setSAVE $15!
BP337 Droplet Vase Puzzler Mold
$458” H x 7” W
BP342 Sm. Round Vase Mold
$25 6” H x 5” W
Special pricing online at www.claypuzzling.com when you purchase multiples of the same mold.
CLAY PUZZLINGMolds
BP313 Fluted Top Vase Puzzler Mold
$257” H x 6” W
BP383 Large Round Pot Puzzler Mold
$407” H x 9” W
BP324 Small Pot Puzzler Mold
$256” H x 7” W
BP523 Sm. Traditional Vase Puzzler Mold
$206.25” H x 5” W
BP338 Octagon Vase Puzzler Mold
$4513” H x 8” W
BP317 Sm. Trio Vase Puzzler Mold
$208.5” H x 3.5” W
BP318 Med Trio Vase Puzzler Mold
$3011” H x 5” W
BP319 Lg. Trio Vase Puzzler Mold
$4013” H x 6” W
BP320 Set of 3 Trio Vase Puzzler Molds $75 set
SAVE $15!
NEW! NEW! NEW!
NEW! NEW! NEW!
NEW! NEW! NEW!
NEW! NEW! NEW! NEW!
Clay Puzzling Lesson Plans & Product Guide 11
NEW!
NEW!
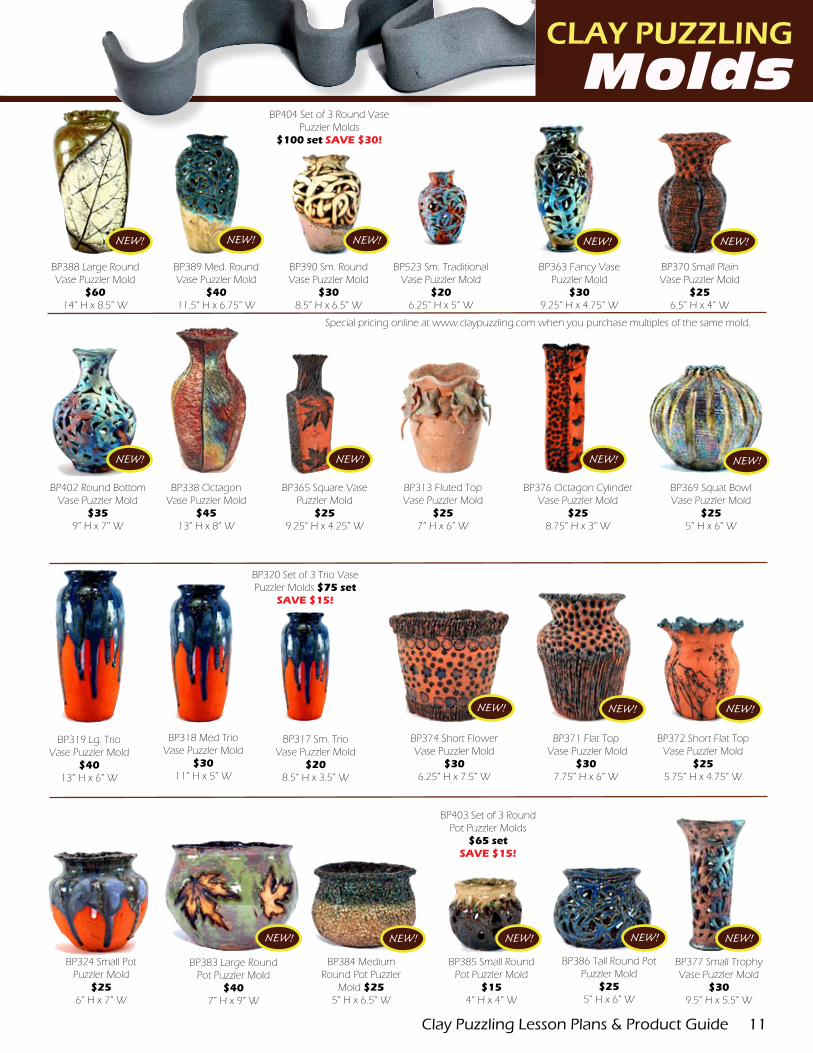
BP388 Large Round Vase Puzzler Mold
$6014” H x 8.5” W
BP389 Med. Round Vase Puzzler Mold
$4011.5” H x 6.75” W
BP390 Sm. Round Vase Puzzler Mold
$308.5” H x 6.5” W
BP363 Fancy Vase Puzzler Mold
$309.25” H x 4.75” W
BP370 Small Plain Vase Puzzler Mold
$256.5” H x 4” W
BP402 Round Bottom Vase Puzzler Mold
$359” H x 7” W
BP365 Square Vase Puzzler Mold
$259.25” H x 4.25” W
BP376 Octagon Cylinder Vase Puzzler Mold
$258.75” H x 3” W
BP369 Squat Bowl Vase Puzzler Mold
$255” H x 6” W
BP374 Short Flower Vase Puzzler Mold
$306.25” H x 7.5” W
BP371 Flat Top Vase Puzzler Mold
$307.75” H x 6” W
BP372 Short Flat Top Vase Puzzler Mold
$255.75” H x 4.75” W
BP384 Medium Round Pot Puzzler
Mold $255” H x 6.5” W
NEW!BP386 Tall Round Pot
Puzzler Mold $25
5” H x 6” W
NEW!BP385 Small Round
Pot Puzzler Mold $15
4” H x 4” W
BP377 Small Trophy Vase Puzzler Mold
$309.5” H x 5.5” W
BP403 Set of 3 Round Pot Puzzler Molds
$65 setSAVE $15!
BP404 Set of 3 Round Vase Puzzler Molds
$100 set SAVE $30!
Special pricing online at www.claypuzzling.com when you purchase multiples of the same mold.
CLAY PUZZLINGMolds
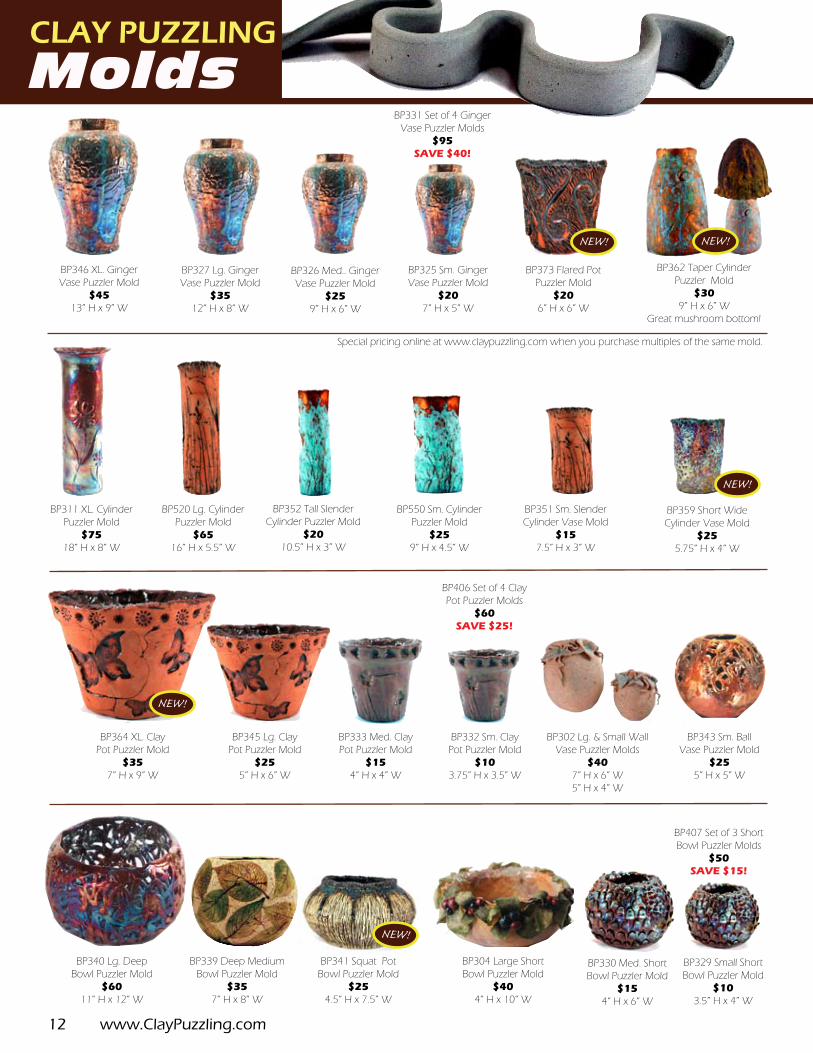
BP327 Lg. Ginger Vase Puzzler Mold
$3512” H x 8” W
BP326 Med.. Ginger Vase Puzzler Mold
$259” H x 6” W
BP325 Sm. Ginger Vase Puzzler Mold
$207” H x 5” W
BP346 XL. Ginger Vase Puzzler Mold
$4513” H x 9” W
BP331 Set of 4 Ginger Vase Puzzler Molds
$95SAVE $40!
BP302 Lg. & Small Wall Vase Puzzler Molds
$407” H x 6” W 5” H x 4” W
BP330 Med. Short Bowl Puzzler Mold
$154” H x 6” W
BP351 Sm. Slender Cylinder Vase Mold
$15 7.5” H x 3” W
BP333 Med. Clay Pot Puzzler Mold
$154” H x 4” W
BP352 Tall Slender Cylinder Puzzler Mold
$2010.5” H x 3” W
BP332 Sm. Clay Pot Puzzler Mold
$103.75” H x 3.5” W
BP550 Sm. Cylinder Puzzler Mold
$25 9” H x 4.5” W
BP311 XL. Cylinder Puzzler Mold
$75 18” H x 8” W
BP520 Lg. Cylinder Puzzler Mold
$6516” H x 5.5” W
BP339 Deep Medium Bowl Puzzler Mold
$357” H x 8” W
BP329 Small Short Bowl Puzzler Mold
$103.5” H x 4” W
BP340 Lg. Deep Bowl Puzzler Mold
$6011” H x 12” W
BP345 Lg. Clay Pot Puzzler Mold
$255” H x 6” W
NEW!
12 www.ClayPuzzling.com
NEW!
BP373 Flared Pot Puzzler Mold
$206” H x 6” W
NEW!
BP359 Short Wide Cylinder Vase Mold
$25 5.75” H x 4” W
BP364 XL. Clay Pot Puzzler Mold
$357” H x 9” W
BP406 Set of 4 Clay Pot Puzzler Molds
$60SAVE $25!
BP407 Set of 3 Short Bowl Puzzler Molds
$50SAVE $15!
BP341 Squat Pot Bowl Puzzler Mold
$254.5” H x 7.5” W
NEW!
BP362 Taper Cylinder Puzzler Mold
$309” H x 6” W
Great mushroom bottom!
BP343 Sm. Ball Vase Puzzler Mold
$255” H x 5” W
BP304 Large Short Bowl Puzzler Mold
$404” H x 10” W
NEW!
Special pricing online at www.claypuzzling.com when you purchase multiples of the same mold.
CLAY PUZZLINGMolds
BP307 Large Globe Puzzler Mold $40
7” H x 7” W
BP309 Small Globe Puzzler Mold $203.75” H x 3.75” W
BP308 Med. Globe Puzzler Mold $30
5” H x 5” W
BP316 Jumbo Globe Puzzler Mold $7510.5” H x 10.5” W
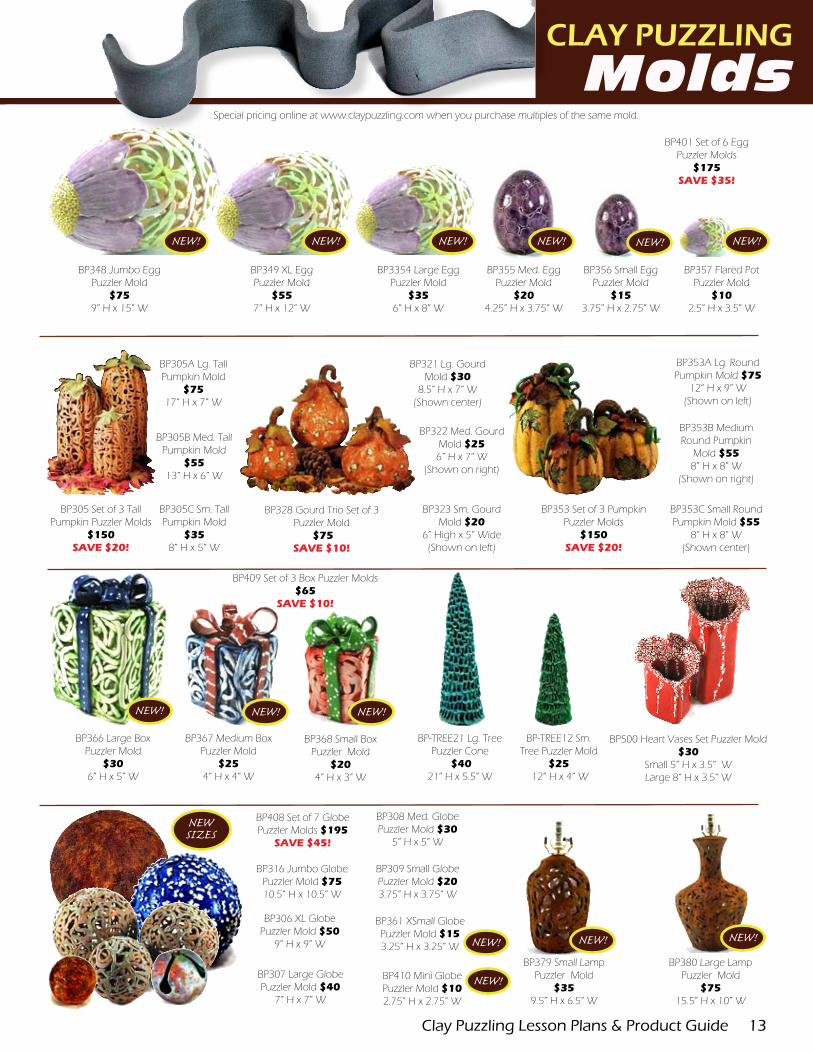
BP305A Lg. Tall Pumpkin Mold
$7517” H x 7” W
BP305B Med. Tall Pumpkin Mold
$5513” H x 6” W
BP305C Sm. Tall Pumpkin Mold
$358” H x 5” W
BP305 Set of 3 Tall Pumpkin Puzzler Molds
$150SAVE $20!
BP321 Lg. Gourd Mold $30
8.5” H x 7” W(Shown center)
BP322 Med. Gourd Mold $256” H x 7” W
(Shown on right)
BP323 Sm. Gourd Mold $20
6” High x 5” Wide(Shown on left)
BP328 Gourd Trio Set of 3 Puzzler Mold
$75SAVE $10!
BP353A Lg. Round Pumpkin Mold $75
12” H x 9” W(Shown on left)
BP353B Medium Round Pumpkin
Mold $558” H x 8” W
(Shown on right)
BP500 Heart Vases Set Puzzler Mold $30
Small 5” H x 3.5” W Large 8” H x 3.5” W
BP-TREE21 Lg. Tree Puzzler Cone
$4021” H x 5.5” W
BP-TREE12 Sm. Tree Puzzler Mold
$25 12” H x 4” W
BP306 XL Globe Puzzler Mold $50
9” H x 9” W
BP353 Set of 3 Pumpkin Puzzler Molds
$150SAVE $20!
NEW!
Clay Puzzling Lesson Plans & Product Guide 13
NEW!
BP349 XL Egg Puzzler Mold
$557” H x 12” W
BP348 Jumbo Egg Puzzler Mold
$759” H x 15” W
BP3354 Large Egg Puzzler Mold
$356” H x 8” W
BP355 Med. Egg Puzzler Mold
$204.25” H x 3.75” W
BP356 Small Egg Puzzler Mold
$153.75” H x 2.75” W
BP357 Flared Pot Puzzler Mold
$102.5” H x 3.5” W
NEW! NEW! NEW! NEW! NEW!
BP401 Set of 6 Egg Puzzler Molds
$175SAVE $35!
BP353C Small Round Pumpkin Mold $55
8” H x 8” W(Shown center)
BP367 Medium Box Puzzler Mold
$254” H x 4” W
BP366 Large Box Puzzler Mold
$306” H x 5” W
NEW! NEW!
BP368 Small Box Puzzler Mold
$204” H x 3” W
BP361 XSmall Globe Puzzler Mold $153.25” H x 3.25” W
BP410 Mini Globe Puzzler Mold $102.75” H x 2.75” W
BP408 Set of 7 Globe Puzzler Molds $195
SAVE $45!
NEW!
BP409 Set of 3 Box Puzzler Molds $65
SAVE $10!
NEW!BP379 Small Lamp
Puzzler Mold$35
9.5” H x 6.5” W
BP380 Large Lamp Puzzler Mold
$7515.5” H x 10” W
NEWSIZES
NEW!NEW!
Special pricing online at www.claypuzzling.com when you purchase multiples of the same mold.
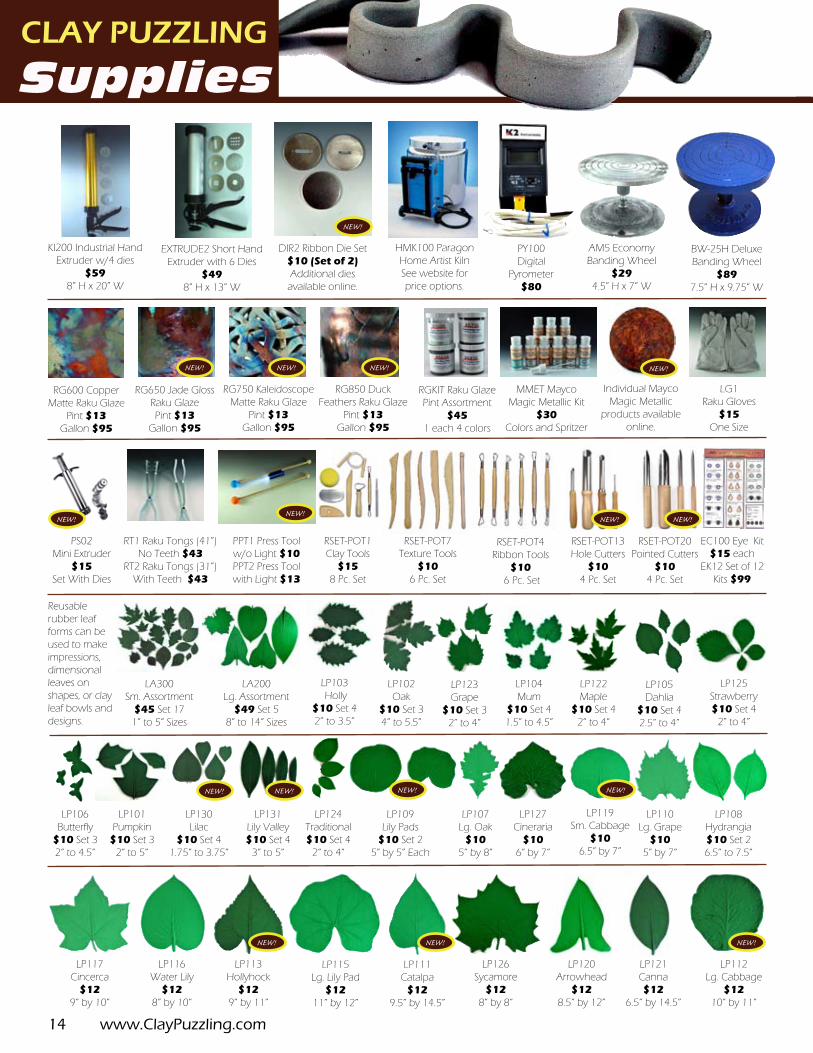
CLAY PUZZLING
Supplies
14 www.ClayPuzzling.com
LP117 Cincerca
$129” by 10”
PY100 Digital
Pyrometer$80
LG1Raku Gloves
$15One Size
RT1 Raku Tongs (41”) No Teeth $43
RT2 Raku Tongs (31”) With Teeth $43
HMK100 Paragon Home Artist KilnSee website for price options.
RG600 Copper Matte Raku Glaze
Pint $13Gallon $95
RG650 Jade Gloss Raku Glaze Pint $13
Gallon $95
RSET-POT13Hole Cutters
$104 Pc. Set
RSET-POT20Pointed Cutters
$10 4 Pc. Set
RSET-POT7Texture Tools
$106 Pc. Set
RSET-POT4Ribbon Tools
$10 6 Pc. Set
EC100 Eye Kit $15 each
EK12 Set of 12 Kits $99
RSET-POT1 Clay Tools
$158 Pc. Set
Individual Mayco Magic Metallic
products available online.
MMET Mayco Magic Metallic Kit
$30Colors and Spritzer
AM5 Economy Banding Wheel
$294.5” H x 7” W
BW-25H Deluxe Banding Wheel
$897.5” H x 9.75” W
PS02Mini Extruder
$15Set With Dies
PPT1 Press Tool w/o Light $10PPT2 Press Tool with Light $13
DIR2 Ribbon Die Set $10 (Set of 2)Additional dies available online.
KI200 Industrial Hand Extruder w/4 dies
$59 8” H x 20” W
EXTRUDE2 Short Hand Extruder with 6 Dies
$498” H x 13” W
LA300 Sm. Assortment
$45 Set 171” to 5” Sizes
LA200 Lg. Assortment
$49 Set 58” to 14” Sizes
LP104 Mum
$10 Set 4 1.5” to 4.5”
LP105 Dahlia
$10 Set 4 2.5” to 4”
LP106 Butterfly
$10 Set 32” to 4.5”
LP107 Lg. Oak
$105” by 8”
LP108 Hydrangia $10 Set 26.5” to 7.5”
LP109 Lily Pads
$10 Set 25” by 5” Each
LP110 Lg. Grape
$10 5” by 7”
LP111Catalpa
$129.5” by 14.5”
LP112 Lg. Cabbage
$1210” by 11”
LP113 Hollyhock
$12 9” by 11”
LP119 Sm. Cabbage
$106.5” by 7”
LP127 Cineraria
$106” by 7”
LP126 Sycamore
$128” by 8”
LP115 Lg. Lily Pad
$1211” by 12”
LP120 Arrowhead
$128.5” by 12”
LP121 Canna $12
6.5” by 14.5”
LP125 Strawberry $10 Set 4
2” to 4”
LP122 Maple
$10 Set 42” to 4”
LP123 Grape
$10 Set 3 2” to 4”
LP124 Traditional $10 Set 4
2” to 4”
LP102 Oak
$10 Set 34” to 5.5”
LP103 Holly
$10 Set 42” to 3.5”
LP101 Pumpkin
$10 Set 32” to 5”
LP116 Water Lily
$128” by 10”
LP130 Lilac
$10 Set 41.75” to 3.75”
LP131 Lily Valley $10 Set 4
3” to 5”
RG750 Kaleidoscope Matte Raku Glaze
Pint $13Gallon $95
RG850 Duck Feathers Raku Glaze
Pint $13Gallon $95
RGKIT Raku Glaze Pint Assortment
$451 each 4 colors
NEW!NEW!
NEW! NEW!
NEW! NEW!
NEW!
NEW!
NEW!NEW!NEW!
NEW! NEW! NEW!
NEW!
NEW!
Reusable rubber leaf forms can be used to make impressions, dimensional leaves on shapes, or clay leaf bowls and designs.
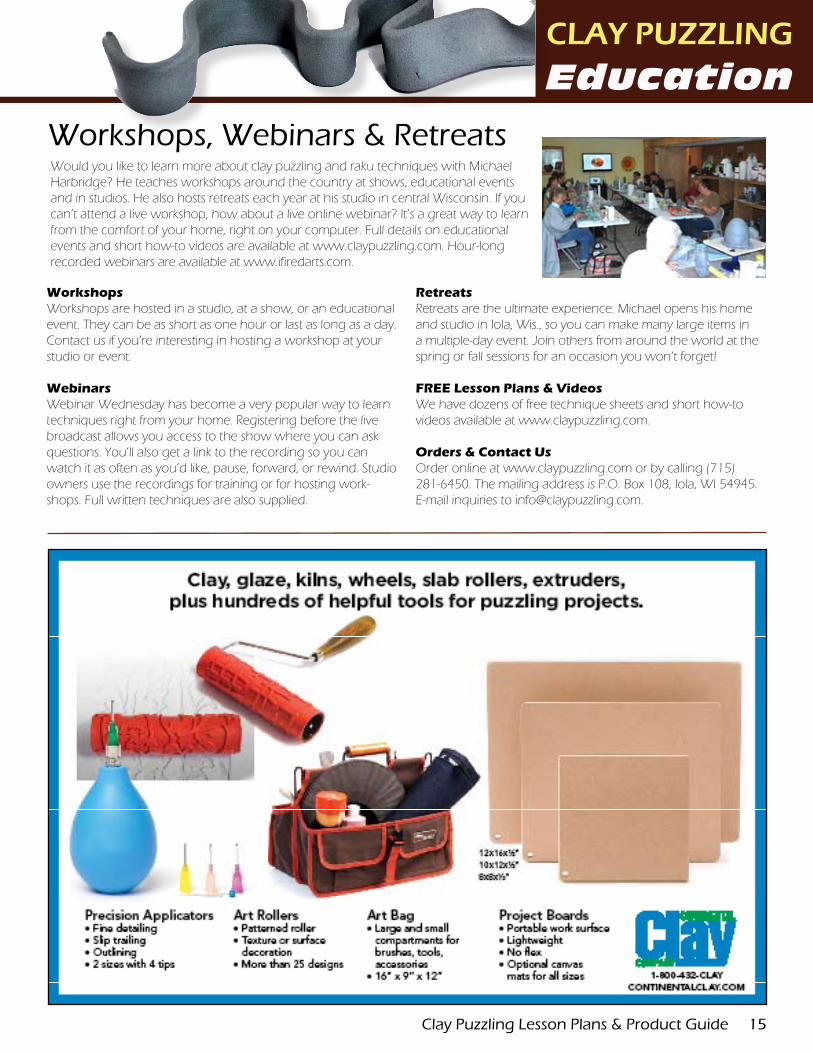
Workshops, Webinars & RetreatsWould you like to learn more about clay puzzling and raku techniques with Michael Harbridge? He teaches workshops around the country at shows, educational events and in studios. He also hosts retreats each year at his studio in central Wisconsin. If you can’t attend a live workshop, how about a live online webinar? It’s a great way to learn from the comfort of your home, right on your computer. Full details on educational events and short how-to videos are available at www.claypuzzling.com. Hour-long recorded webinars are available at www.ifiredarts.com.
Clay Puzzling Lesson Plans & Product Guide 15
CLAY PUZZLINGEducation
WorkshopsWorkshops are hosted in a studio, at a show, or an educational event. They can be as short as one hour or last as long as a day. Contact us if you’re interesting in hosting a workshop at your studio or event.
WebinarsWebinar Wednesday has become a very popular way to learn techniques right from your home. Registering before the live broadcast allows you access to the show where you can ask questions. You’ll also get a link to the recording so you can watch it as often as you’d like, pause, forward, or rewind. Studio owners use the recordings for training or for hosting work-shops. Full written techniques are also supplied.
RetreatsRetreats are the ultimate experience. Michael opens his home and studio in Iola, Wis., so you can make many large items in a multiple-day event. Join others from around the world at the spring or fall sessions for an occasion you won’t forget!
FREE Lesson Plans & VideosWe have dozens of free technique sheets and short how-to videos available at www.claypuzzling.com.
Orders & Contact UsOrder online at www.claypuzzling.com or by calling (715) 281-6450. The mailing address is P.O. Box 108, Iola, WI 54945. E-mail inquiries to [email protected].


![Welcome! [img1.wsimg.com]](https://static.fdocuments.us/doc/165x107/61c2672f292750045c443af0/welcome-img1wsimgcom.jpg)


