Classic Controls Trần Anh Tuấn A. Week 1 How to create a MFC project in VS 6.0 How to create a...
46
Classic Controls Classic Controls Trần Anh Tuấn A Trần Anh Tuấn A
-
Upload
sabrina-whitehead -
Category
Documents
-
view
220 -
download
0
Transcript of Classic Controls Trần Anh Tuấn A. Week 1 How to create a MFC project in VS 6.0 How to create a...

Classic ControlsClassic Controls
Trần Anh Tuấn ATrần Anh Tuấn A

Week 1Week 1
How to create a MFC project in VS How to create a MFC project in VS 6.06.0
Introduction to Classic ControlsIntroduction to Classic Controls

Initial Step : New a project with specific Initial Step : New a project with specific ProjectName , Location , and kind of ProjectProjectName , Location , and kind of Project
File > New File > New

Step 1 : Based on your purpose.This step will ask users type of Application (MDI , SDI , Dialog Based
Here are some example of MDI, SDI , Dialog Based
Step 2 & 3 : Some feature and support for user to include. (Recommend for default)

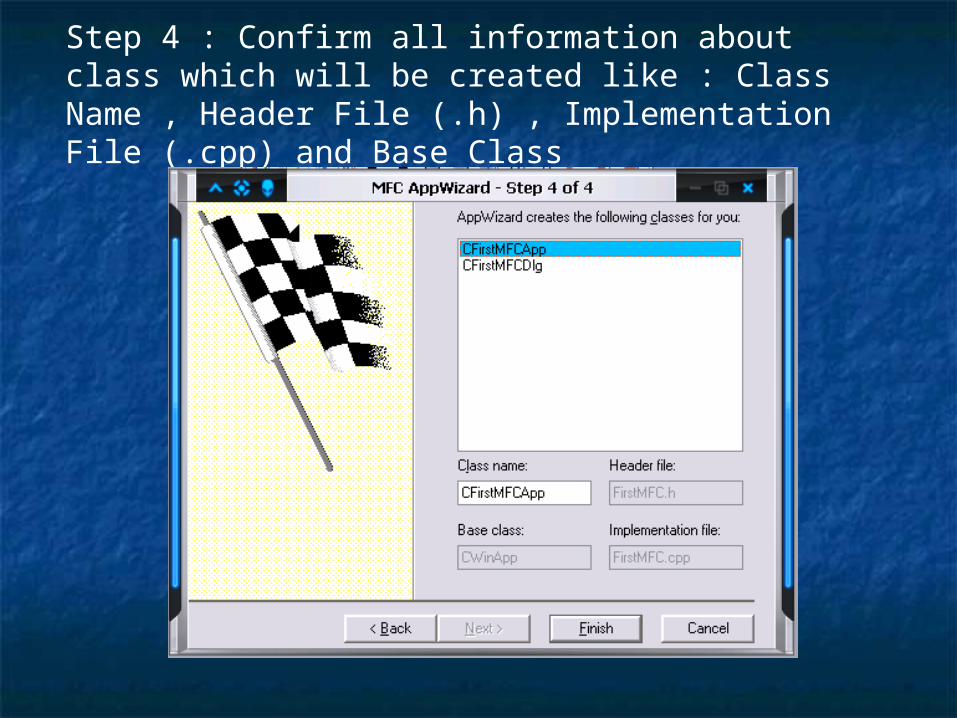
Step 4 : Confirm all information about class which will be created like : Class Name , Header File (.h) , Implementation File (.cpp) and Base Class
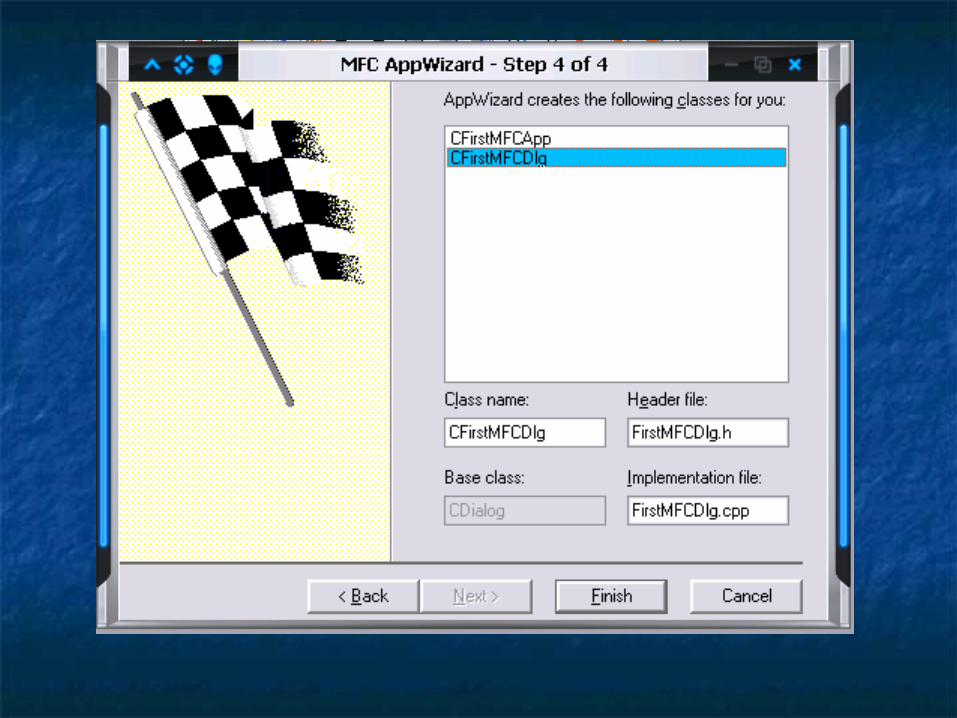

When you finish, all your specifications will be When you finish, all your specifications will be showed. showed.

Now we glance at something in our projectNow we glance at something in our project

In Workspace Window we have three tabs to view In Workspace Window we have three tabs to view project componentsproject componentsClass ViewClass View : List all Classes and corresponding : List all Classes and corresponding Functions that are present in our Project.Functions that are present in our Project.

You can insert new Class into your project by Right You can insert new Class into your project by Right Mouse and New ClassMouse and New Class

There are three class type. There are three class type. MFC Class (a new class derived from any MFC Classes) , MFC Class (a new class derived from any MFC Classes) , Generic Class ( any new classes from user view) Generic Class ( any new classes from user view) Form Class (a new class derived from Dialog Class)Form Class (a new class derived from Dialog Class)
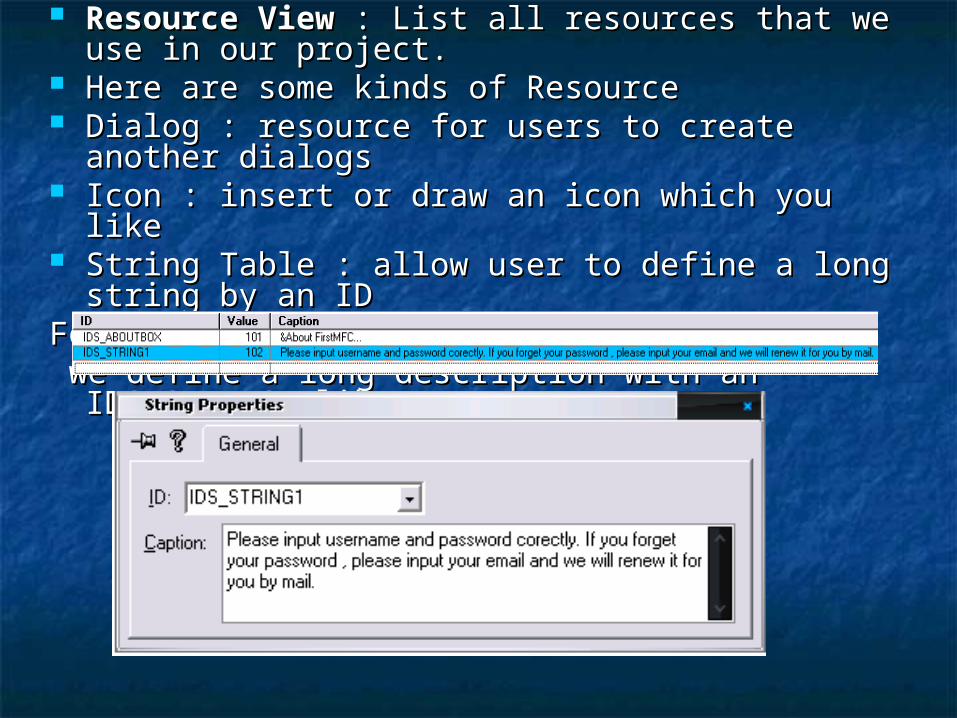
Resource ViewResource View : List all resources that we use in : List all resources that we use in our project.our project.
Here are some kinds of ResourceHere are some kinds of Resource Dialog : resource for users to create another Dialog : resource for users to create another
dialogs dialogs Icon : insert or draw an icon which you likeIcon : insert or draw an icon which you like String Table : allow user to define a long string by String Table : allow user to define a long string by
an ID an ID For example:For example: we define a long description with an IDS_STRING1 we define a long description with an IDS_STRING1
like :like :
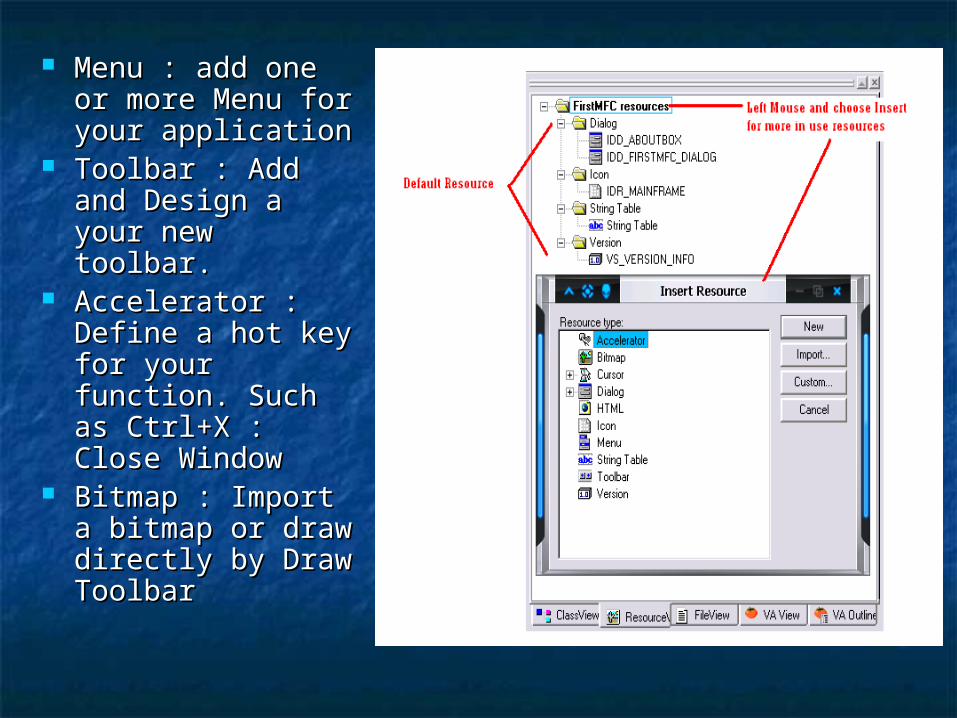
Menu : add one Menu : add one or more Menu for or more Menu for your applicationyour application
Toolbar : Add and Toolbar : Add and Design a your Design a your new toolbar.new toolbar.
Accelerator : Accelerator : Define a hot key Define a hot key for your function. for your function. Such as Ctrl+X : Such as Ctrl+X : Close WindowClose Window
Bitmap : Import a Bitmap : Import a bitmap or draw bitmap or draw directly by Draw directly by Draw ToolbarToolbar
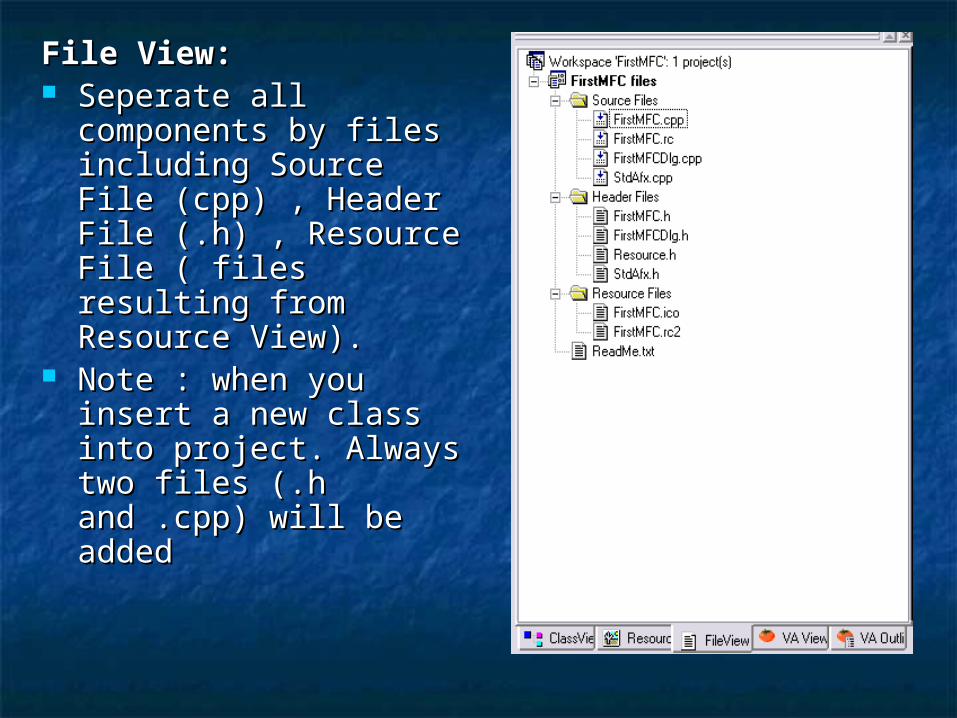
File View: File View: Seperate all components Seperate all components
by files including Source by files including Source File (cpp) , Header File File (cpp) , Header File (.h) , Resource File ( files (.h) , Resource File ( files resulting from Resource resulting from Resource View).View).
Note : when you insert a Note : when you insert a new class into project. new class into project. Always two files (.h Always two files (.h and .cpp) will be added and .cpp) will be added
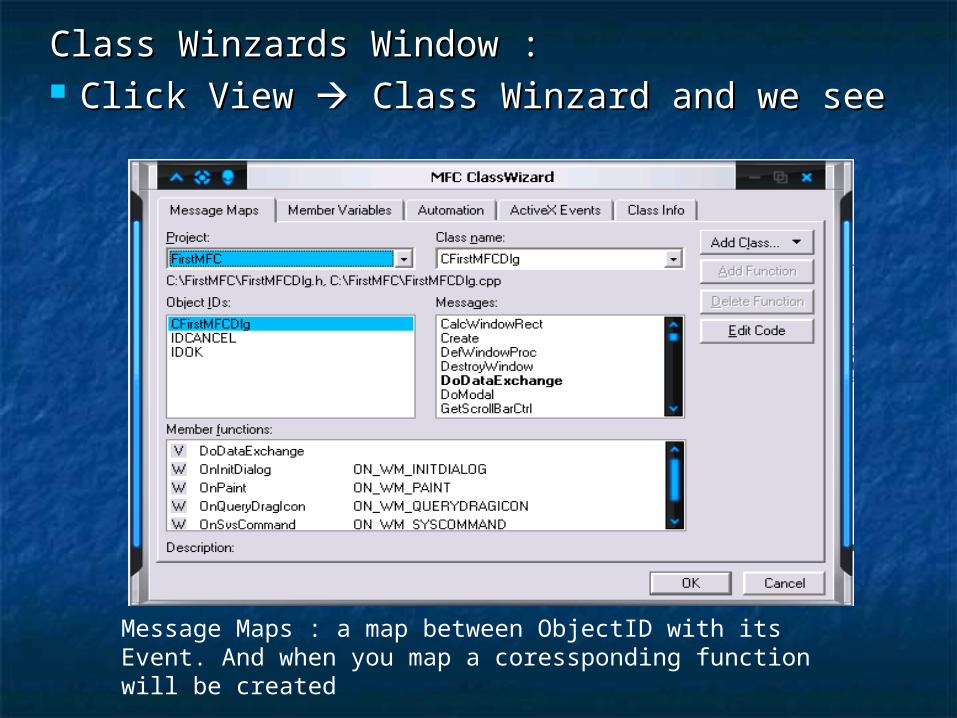
Class Winzards Window :Class Winzards Window : Click View Click View Class Winzard and we see Class Winzard and we see
Message Maps : a map between ObjectID with its Event. And when you map a coressponding function will be created
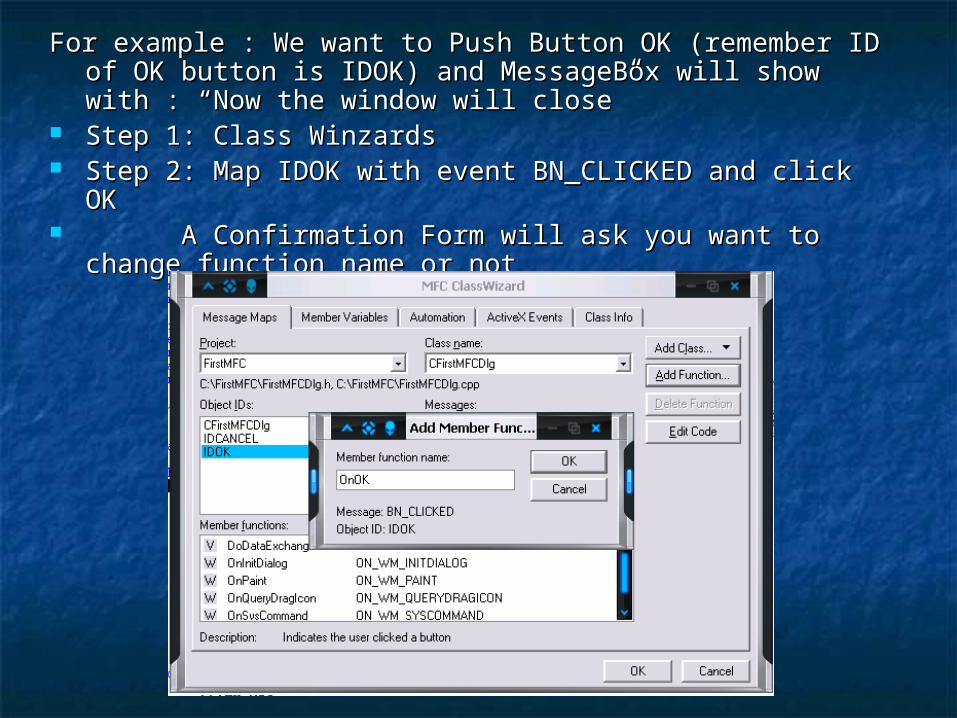
For example : We want to Push Button OK (remember ID of OK For example : We want to Push Button OK (remember ID of OK button is IDOK) and MessageBox will show with : “Now the button is IDOK) and MessageBox will show with : “Now the window will close”window will close”
Step 1: Class WinzardsStep 1: Class Winzards Step 2: Map IDOK with event BN_CLICKED and click OKStep 2: Map IDOK with event BN_CLICKED and click OK A Confirmation Form will ask you want to change A Confirmation Form will ask you want to change
function name or not function name or not

The function will be generated in Class Dialog and you input your code below comment // TODO: ......
From left to right : Compile (Ctrl + F7) , Build (F7) , Stop Build (Ctrl + Break ), Execute (Ctrl + F5) , Go (F5) , Insert Breakpoint (F9)
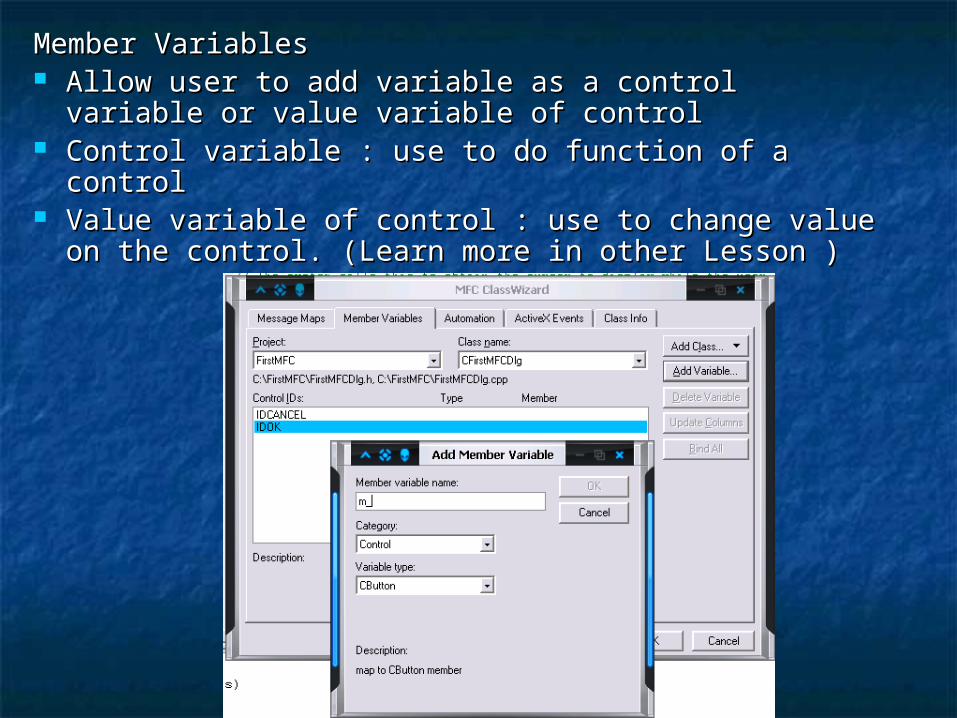
Member VariablesMember Variables Allow user to add variable as a control variable or Allow user to add variable as a control variable or
value variable of controlvalue variable of control Control variable : use to do function of a controlControl variable : use to do function of a control Value variable of control : use to change value on Value variable of control : use to change value on
the control. (Learn more in other Lesson ) the control. (Learn more in other Lesson )

Batch Build : to create release the Batch Build : to create release the project (with exe file and all classes )project (with exe file and all classes )
Click Build Click Build Batch Build and see Batch Build and see


Classic ControlsClassic Controls Windows makes the classic controls available to Windows makes the classic controls available to
the application programs that it hosts by the application programs that it hosts by registering six predefined WNDCLASSes. registering six predefined WNDCLASSes.
The control types, their WNDCLASSes, and the The control types, their WNDCLASSes, and the corresponding MFC classes are shown in the corresponding MFC classes are shown in the following table.following table.
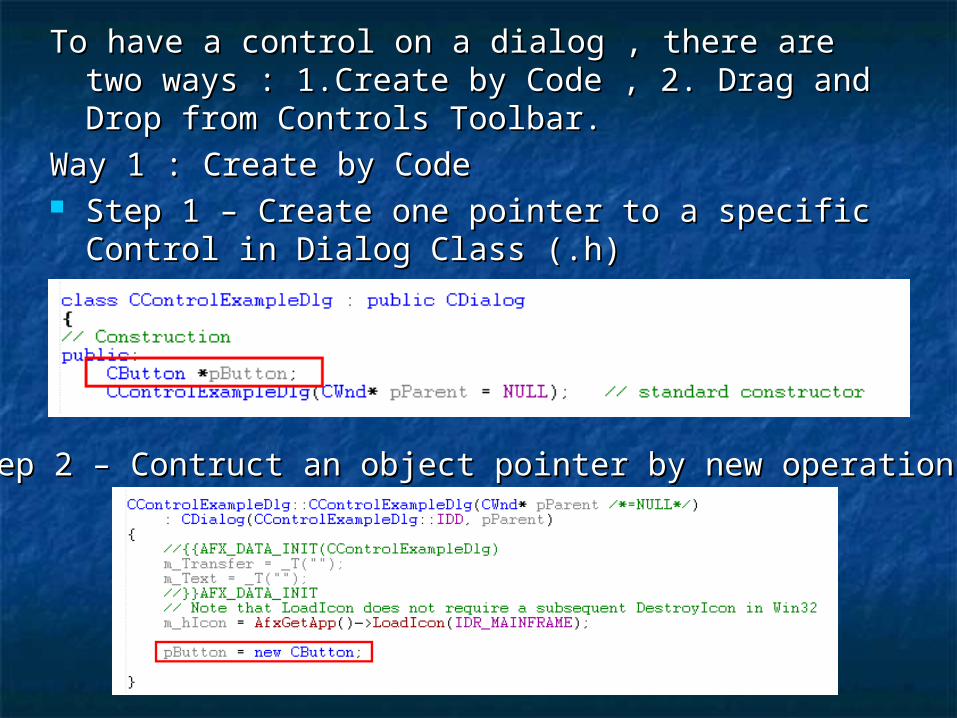
To have a control on a dialog , there are two ways : To have a control on a dialog , there are two ways : 1.Create by Code , 2. Drag and Drop from 1.Create by Code , 2. Drag and Drop from Controls Toolbar.Controls Toolbar.
Way 1 : Create by CodeWay 1 : Create by Code Step 1 – Create one pointer to a specific Control Step 1 – Create one pointer to a specific Control
in Dialog Class (.h)in Dialog Class (.h)
Step 2 – Contruct an object pointer by new operationStep 2 – Contruct an object pointer by new operation

Step 3 – Define an ID for the object that will be Step 3 – Define an ID for the object that will be create. (with ID you can do anything with the object )create. (with ID you can do anything with the object )
Click View > Resource Symbols and seeClick View > Resource Symbols and see
In this example IDC_BUTTON will be ID for the object we will create. Note : Remember each ID will have an integer value to distinguish , so input a new value that have not defined before in the range of integer.

Step 4 – Define all properties of the object Step 4 – Define all properties of the object (usually put in InitDialog function)(usually put in InitDialog function)

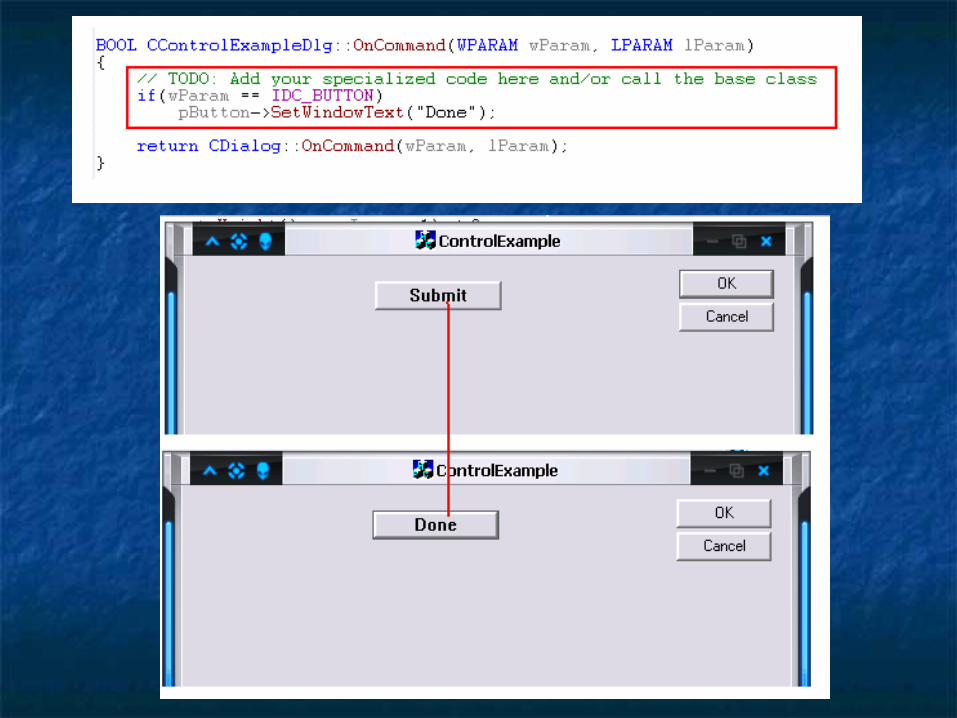
More Step : More Step : Although Button is Showed in dialog. But it not Although Button is Showed in dialog. But it not
has any effects so you must do more.has any effects so you must do more.Example: Change label of the button when click Example: Change label of the button when click
button. Add WM_COMMAND into Dialog and check button. Add WM_COMMAND into Dialog and check wParam by ID of the objectwParam by ID of the object
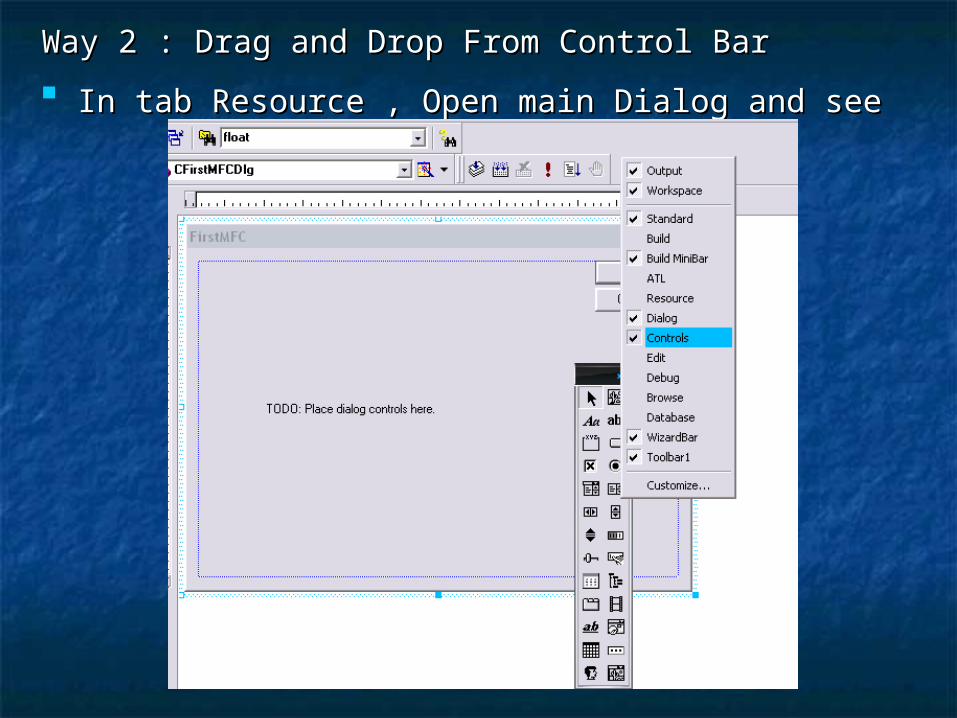
Way 2 : Drag and Drop From Control BarWay 2 : Drag and Drop From Control Bar
In tab Resource , Open main Dialog and seeIn tab Resource , Open main Dialog and see


Example : Example : Step 1 : Drag and Drop Button Object and put in Step 1 : Drag and Drop Button Object and put in
the desired position the desired position

Step 2 : In property , we change ID , Step 2 : In property , we change ID , Caption and OthersCaption and Others
Close Property Sheet and Save all then IDC_BUTTON1 will be automatically created.

Step 3 :Step 3 : In ClassWinzards , Map Event BN_CLICKED and In ClassWinzards , Map Event BN_CLICKED and
Object IDC_BUTTON1 to create function OnButton.Object IDC_BUTTON1 to create function OnButton.

Step 4 : Create Control Varible for Step 4 : Create Control Varible for button object button object


Some of common commands Some of common commands for classic controls.for classic controls.
Static Text :Static Text :Example : We have control variable : m_ctltext and value String variable m_vartext
To change the caption of label :
Updatedata(TRUE); m_vartext = “Hello
VN”; Updatedata(FALSE);Or m_ctltext.SetWindowText(“Hello
VN”);
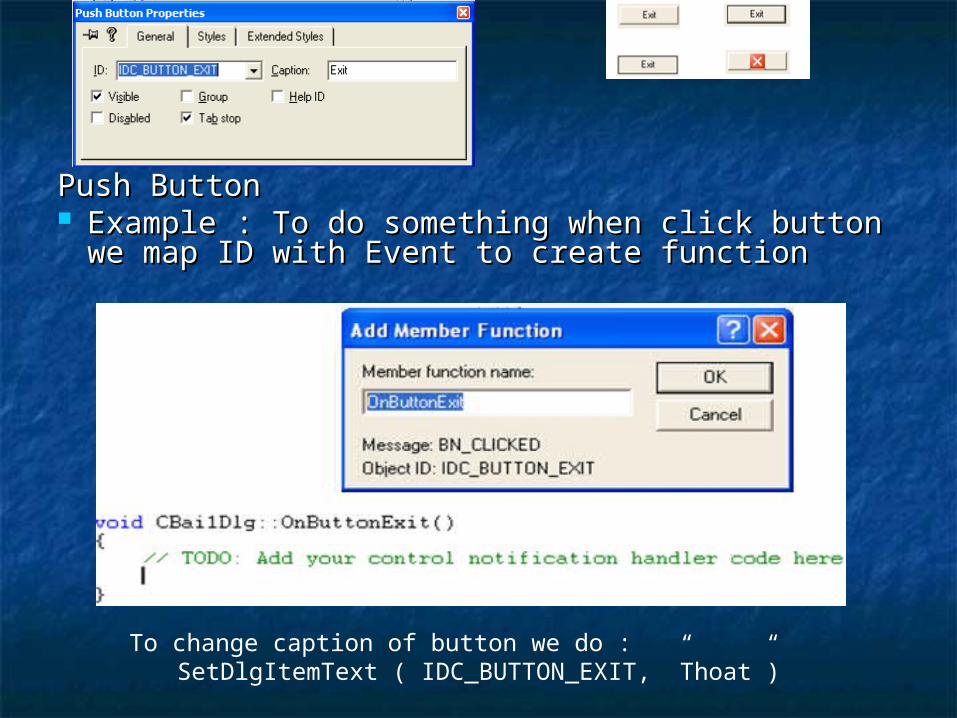
Push Button Push Button Example : To do something when click button Example : To do something when click button
we map ID with Event to create functionwe map ID with Event to create function
To change caption of button we do :SetDlgItemText ( IDC_BUTTON_EXIT, ”Thoat”)

Edit BoxEdit Box Example : To set value for edit box we create Example : To set value for edit box we create
value variable m_varedit andvalue variable m_varedit and Updatedata(TRUE)Updatedata(TRUE) m_edit = 10;m_edit = 10; Updatedata(FALSE);Updatedata(FALSE);
To do something when user input edit box. We To do something when user input edit box. We map with event EN_CHANGE map with event EN_CHANGE

Radio ButtonRadio Button
Example :Example : Step 1 : Drag and Drop radio Step 1 : Drag and Drop radio
button into dialog in orderbutton into dialog in order

In Property of Radio1 and Radio4 we In Property of Radio1 and Radio4 we check property Groupcheck property Group

And Now we have two group of Radio Button. And Now we have two group of Radio Button. Group1 : Radio1,2,3 Group2 : Radio4,5,6Group1 : Radio1,2,3 Group2 : Radio4,5,6
Create value variabe for object Radio1 and Radio4.
- Now m_varsel1 is the value for group
radio 1 ,2 ,3 - m_varsel4 is the value for group
radio 4 ,5 ,6
Which radio is checked ?

Check Box :
Example : When check a checkbox the message BN_CLICKED will send.So we map object with this message
Group Box :Only used to group objects which have the same functions
With a control variable of checkbox. To see whether checkbox is checked or not :m_English.GetCheck()
1 : checked0 : not checked

Combo Box :
Example : To know which item is chosen. Create a Cstring variable m_varCombo.
UpdateDate(TRUE);MessageBox(varCombo);
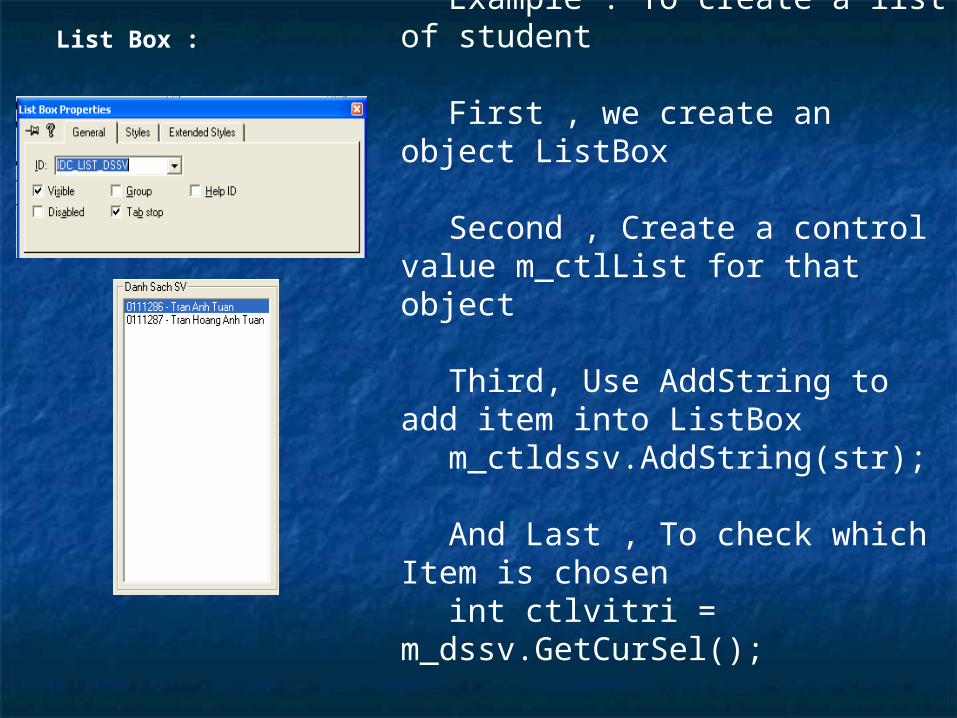
List Box :Example : To create a list of
student
First , we create an object ListBox
Second , Create a control value m_ctlList for that object
Third, Use AddString to add item into ListBox
m_ctldssv.AddString(str);
And Last , To check which Item is chosen
int ctlvitri = m_dssv.GetCurSel();

End Of Week 1End Of Week 1


![Reference Guide MFC-J6947DW MFC-J6945DW MFC-J6545DW · MFC-J6545DW MFC-J6945DW MFC-J6947DW ... [Message from Brother] and [Firmware Auto Check] are set to [On]. (Internet connection](https://static.fdocuments.us/doc/165x107/5fe53fa6fe9ed37e6d21c94e/reference-guide-mfc-j6947dw-mfc-j6945dw-mfc-j6545dw-mfc-j6545dw-mfc-j6945dw-mfc-j6947dw.jpg)