CitiDirect Online Banking · PDF fileOnline Banking navigation bar from September 2003 to...
49
Citigroup® Global Transaction Services CitiDirect ® Online Banking File Delivery Guide: Addendum August 2005 Proprietary and Confidential These materials are proprietary and confidential to Citibank, N.A., and are intended for the exclusive use of CitiDirect® Online Banking customers. The foregoing statement shall appear on all copies of these materials made by you in whatever form and by whatever means, electronic or mechanical, including photocopying or in any information storage system. In addition, no copy of these materials shall be disclosed to third parties without express written authorization of Citibank, N.A. Proprietary and Confidential These materials are proprietary and confidential to Citibank, N.A., and are intended for the exclusive use of CitiDirect® Online Banking customers. The foregoing statement shall appear on all copies of these materials made by you in whatever form and by whatever means, electronic or mechanical, including photocopying or in any information storage system. In addition, no copy of these materials shall be disclosed to third parties without express written authorization of Citibank, N.A.
Transcript of CitiDirect Online Banking · PDF fileOnline Banking navigation bar from September 2003 to...

Citigroup® Global Transaction Services
CitiDirect® Online Banking File Delivery Guide: Addendum August 2005
Proprietary and Confidential These materials are proprietary and confidential to Citibank, N.A., and are intended for the exclusive use of CitiDirect® Online Banking customers. The foregoing statement shall appearon all copies of these materials made by you in whatever form and by whatever means, electronic or mechanical, including photocopying or in any information storage system. In addition, no copy of these materials shall be disclosed to third parties without express written authorization of Citibank, N.A.Proprietary and Confidential These materials are proprietary and confidential to Citibank, N.A., and are intended for the exclusive use of CitiDirect® Online Banking customers. The foregoing statement shall appearon all copies of these materials made by you in whatever form and by whatever means, electronic or mechanical, including photocopying or in any information storage system. In addition, no copy of these materials shall be disclosed to third parties without express written authorization of Citibank, N.A.

Table of Contents Overview .......................................................................................................................................1 Online Help ...................................................................................................................................1
Additional Resources ................................................................................................................1 File Delivery ..................................................................................................................................2 File Export.....................................................................................................................................4
Secure Password Access..........................................................................................................4 Export Profile.............................................................................................................................4 Export Custom Format ............................................................................................................10 Additional CitiDirect Data Elements ........................................................................................11 Subsidiary Information.............................................................................................................10 Export Data .............................................................................................................................12
File Export Libraries ....................................................................................................................13 Library Maintenance................................................................................................................13 Modifying Records in the Export Branch Library .....................................................................14 Adding Records to the BAI Type Code Library .......................................................................16 Specifying Decimal Places in the BAI Currency Code Library ................................................18 Adding Records to the BAI 88 Record Library ........................................................................20 Using Copy to Create New Library Records ...........................................................................23 Authorizing Library Records ....................................................................................................26 Modifying, Repairing, or Deleting Library Records..................................................................30
File Import ...................................................................................................................................34 Increased Capacity..................................................................................................................34 Import Profile ...........................................................................................................................34 Authorization Req’d and Release Req’d Tabs ........................................................................40 Transaction Initiation Summary Report ...................................................................................42
Automated File and Report Delivery ...........................................................................................46 Delivery Options Library ..........................................................................................................46
Disclaimer ...................................................................................................................................47

Overview This Addendum supplements the current File Delivery Guide available in the Learning Center at www.citidirect.com, in the CitiDirect Services Guides section under the File Delivery tab. The information in this Addendum follows the order in which each service is presented in the File Delivery Guide. File Export libraries are new and are presented at the end of the File Export section. All enhancements made to the File Export and File Import services in the Transact, Report, and Maintenance categories on the CitiDirect® Online Banking navigation bar from September 2003 to August 2005 are presented in this document.
Online Help For general questions while working in CitiDirect Online Banking, you can use Online Help. A comprehensive self-service capability, Online Help contains detailed information and descriptions of terms for all functionality and services offered through CitiDirect.
You can access Online Help by clicking the icon in the lower left corner of your CitiDirect navigation bar or by pressing the F1 key on your keyboard.
Additional Resources
Basics Guides You are encouraged to read the CitiDirect Basics Guides, available in the CitiDirect Basics section of the Learning Center at www.citidirect.com. The CitiDirect Basics Guides provide an overview of CitiDirect, including installation, sign-on procedures, basic navigation, and procedures for customizing the CitiDirect navigation bar and summary forms, specifying your global user preferences, running reports, and submitting inquiries.
CitiDirect Customer Support In addition to Online Help, the CitiDirect Customer Support resources described below are available to you. www.citidirect.com Our Web site contains FAQs, which address both the use of the application and the Web site. The Web site also offers the Learning Center, referenced in this Addendum, where you can access training support materials at anytime – 24 hours a day, 7 days a week. Customer Service You can contact our CitiDirect Online Banking Service Representatives who are available to support your technical needs, as well as to assist you with general CitiDirect questions. For a list of representatives in your area, go to the Contacts section of www.citidirect.com.
CitiDirect® Online Banking: File Delivery Guide: Addendum Page 1

File Delivery File Delivery is a term used to describe the File Import and File Export capabilities available in CitiDirect® Online Banking. The information presented in this Addendum covers the File Delivery services listed below. • Automated File and Report Delivery (AFRD) • Export Custom Format • Export Data • Export Profile • File Export Libraries • Import Profile
File Security Cyclical Redundancy Check (CRC) is available for selection as a Security Method on the Import Profile and Export Profile detail forms. When you run a profile with CRC as the selected security method, you are required to enter a password used to secure the file. Select CRC as the security method for your import and export files by following the steps below.
1. On the CitiDirect Online Banking navigation bar click Maintenance, and then click Import Profile or Export Profile. Export Profile is shown in this example.
The Export Profile Summary form appears.
2. Click New.
CitiDirect® Online Banking: File Delivery Guide: Addendum Page 2

The Export Profile Detail form appears.
3. In the Security Method field, click the drop-down arrow and select CRC.
4. Ensure that all required and optional fields are complete and accurate and proceed with one of the following steps:
• Click Submit to submit the profile for processing. • Click Save to save the profile details and complete it at a later time.
CitiDirect® Online Banking: File Delivery Guide: Addendum Page 3

File Export The File Export services available through CitiDirect®
Online Banking allow you to export data
from CitiDirect in a specified output format, and then download that data as a file to store on your system.
Secure Password Access If you are a Secured Password user, you can access the following File Export services: • Export Custom Format Definition (Input/Modify and View Tabs); • Export Data (Run, View and Run History Tabs); • Export Profile (Input/Modify, Authorization Req'd, Repair Req'd, and View Tabs); • Library Services (View Access Only).
Export Profile Export Profile, available in the Maintenance category on the CitiDirect Online Banking navigation bar, enables you to specify the data that is exported from CitiDirect, the way in which it is formatted, the security method used to secure the data, and where the file containing the exported data is stored on your system. You must create an Export Profile before actually exporting data. Please refer to the Export Profiles section of the File Delivery Guide for information on creating Export Profiles. The enhancements listed below have been made to Export Profile.
Authorization Requirement Removed Your company can remove the requirement that all new or modified Export Profiles be authorized before they are available to run. If your company removes the authorization requirement, the status of a new or modified export profile is updated to “active” as soon as the profile is submitted. Entitled users, such as Security Managers, specify authorization requirements.
Transactions Initiated Outside of CitiDirect For customers in Latin America, export profiles can include all payments transactions, regardless of how they were created.
New Business Services and Data Elements • Asia Transactions and Asia Billing Advice business services have been added to
facilitate the export of Asia PayLink® Check and ACH/GIRO transaction data. • Payments – Statement Data and Payments – Transactions Initiation Details business
services have replaced the Payments business service.
CitiDirect® Online Banking: File Delivery Guide: Addendum Page 4

Retrieve Balance Details You can export the data you need independent of whether or not there has been transactional activity. To use this functionality, select the Retrieve Balance Details check box on the Export Profile Detail form.
Note: The Retrieve Balance Details check box is available when Payments - Statement Data
is the business service and a custom output format with balance data elements indicated is selected. This check box is not available for standard exports.
CitiDirect® Online Banking: File Delivery Guide: Addendum Page 5

Suppress Empty Sub-fields A Suppress Empty Sub-fields check box appears when Payment – Statement Data is the business service and SAPTM MT940, SAPTM MT942, SWIFT® MT940, or SWIFT® MT942 is the selected output format. To use this functionality, select the Suppress Empty Sub-fields check box on the Export Profile Detail form.
Output Formats When creating Export Profiles, you must select an output format for your exported data. The Business Service selected on the Export Profile Detail form determines the Output Format Names available for selection. To allow you to export your data in the format used in CitibankingSM (NCB), the following output formats are available for the Payments Statement – Data business service: • DDL–BACS and DDL–CHQS to support the export of BACS and Cheque transactions; • SWIFT™ MT942 and SAP® MT942 to support the processing of intraday, incremental
SWIFTTM MT942 movements.
GTM Output Format When a date range is specified as part of the export profile criteria, GTM output formats contain a single bank record for non-Infopool accounts for the date range specified. Infopool accounts continue to show a bank record for each day within the range.
CitiDirect® Online Banking: File Delivery Guide: Addendum Page 6

DDL Output Format The DDL Infopool output format has been removed. The format was specific to Infopool accounts (Branch 152) as it returned data for that branch only. The removal of this format has no impact on Infopool accounts.
Flat File Output Format To enhance integration with other formats, 01 records exported in flat file format are now sorted on Branch Number, Account Number, and Statement Date. To enhance the usability of flat files in conjunction with other formats, the Beneficiary and By Order of Fields were updated. Now, if these fields are NULL or only one line is present, the field will be terminated by the following notation: ##@. Previously, only the @ symbol was generated to terminate one-line or NULL fields.
MT940 Output Format The sort order of the MT940 output format has been enhanced. The primary sort is on the Branch field, the secondary sort is on the Account field, and the last sort is on the Day field. Data exported using the MT940 output format appears in the following order: • Branch 1 Account 1 for Day 1 • Branch 1 Account 1 for Day 2 • Branch 1 Account 2 for Day 1
Business Administration Institute (BAI) Output Formats Enhancements made to various BAI output formats are described below. • The As-of-Time field has been updated to include a timestamp. • Opening Available Balance (Tag 040) has been added to prior-day MT940 Closing
Available Balance (except United States and Puerto Rico). • The BAI codes listed below are now included in the data export file for the CitiDirect Online
Banking BAI Flat File output format.
o 1 Day Float o 2 Day Float o 2 or more days Float o Average Closing Ledger o Average Closing Available o Total Float
• For the United States and Puerto Rico, Opening Available Balance has been added from prior-day MT940 Forward Available Balance.
• New options are available to allow you to specify that your exported data reflect Citibanking
(NCB) labels. You can also specify that NCB labels are used for Standard Exports, Check Summary, or Check Summary with Checks exports.
CitiDirect® Online Banking: File Delivery Guide: Addendum Page 7

Specify Citibanking (NCB) labels for your exported data by following the steps below.
1. In the Business Service field on the Export Profile Detail form, click the drop-down arrow and select Payments – Statement Data.
2. In the Output Format Name field, click the Library Look Up button, select BAI 1 or BAI 2, and then click the Configure BAI link. The BAI Record Configuration dialog box appears.
3. The Output Option field automatically displays Standard Export. If you want to use NCB
labels for other output, click the drop-down arrow and select Check Summary or Check Summary with checks.
4. The BAI Record Length Indicator field automatically displays Variable for Standard Export output. If necessary, click the drop-down arrow and select Fixed.
Note: If you select Fixed for the BAI Record Length Indicator, enter a record length (between 39 and 999) in the BAI Record Length field.
5. The BAI Labels field automatically displays CitiDirect. Click the drop-down arrow, select NCB, and then click OK.
6. Review the Export Profile Detail form for accuracy, and click Submit. When this profile is run, the exported data will reflect NCB field labels.
CitiDirect® Online Banking: File Delivery Guide: Addendum Page 8

BAI v 1.3 Output Format This new output format allows U.S. Checking customers to delete duplicate numbers in Customer Reference and Bank Reference fields. Select this option by following the steps below.
1. On the Export Profile Detail form, click the Configure BAI link. The BAI Record Configuration dialog box appears.
2. Select the Remove Duplicate Number check box and click OK.
Note: The BAI 88 Record Configuration Library field allows you to select information from a new library that stores label sequencing customers which have configured for BAI 88 records. For more information on this new library, refer to the File Export Libraries section of this Addendum.
BAI 2 Output Format A change made to the BAI2 output format enables the additional tags associated with low value transactions in Germany (DTA transactions) to be exported. All details related to DTA transactions are exported, allowing for auto reconciliation.
CitiDirect® Online Banking: File Delivery Guide: Addendum Page 9

Export Custom Format Definition Export Custom Format Definition, available in the Maintenance category on the CitiDirect® Online Banking navigation bar, allows you to build and save customized output formats for specific business services. Once a custom format is authorized, if required, it is available for selection on the Export Profile Detail form for the associated business service. For more information about Export Custom Format, please refer to the Export Custom Formats section of the File Delivery Guide Use the Export Custom Format Details form to select specific data elements, modify their field size, and select characteristics to be applied to the data you export from CitiDirect and save as a file on your system. The Export Custom Format Details form offers two tabs: • The Element Definition tab enables you to view previously defined export custom formats,
create new export custom formats, or modify existing custom formats. • The Settings tab enables you to define delimiters for the export file.
Additional Subsidiary Information Subsidiary Identifier and Subsidiary Name are available as optional export data elements when you are creating a custom format to export Payment Transaction data.
CitiDirect® Online Banking: File Delivery Guide: Addendum Page 10

Additional CitiDirect Data Elements A total of 27 additional CitiDirect Data Elements are now available in the Export Custom Format Detail form when you are creating a custom format for the Payments Transaction Initiation business service. These additional elements, which are listed below, are available for selection from the CitiDirect Data Elements list box on the Element Definition tab. Use the scroll bars to see all available data elements. • Beneficiary Bank Account/ID • Beneficiary Bank Name • Commission Amount • Commission Currency • Confirmation Reference Number • Currency • Currency Bought from Bank • Currency Sold to Bank • Customer Name • Debit or Credit only indicator • Intermediary Bank Account/ID • Legal Text • Maturity Date • Net Next Day Total • Order Party Account/ID • Order Party Address 2 • Order Party Address 3 • Ordering Customer Info • Payment Status (Invalid, Processed) • Preformat Reference • Time Posted - transactions posted to
the account • Totals (Debits, Credits) • Transaction (Input) related details • Transaction Type • US Tax Code • User Info (Maker, Authorizer) • Withhold Tax Rate
CitiDirect® Online Banking: File Delivery Guide: Addendum Page 11

Export Data Export Data, available in the Report category on the CitiDirect® Online Banking navigation bar, is the service that enables you to run a selected “active” Export Profile and export data from CitiDirect and save it as a file on your system. Enhancements to this service and the data exported are described below. For more information about Export Data, refer to the Exporting Files section of the File Delivery Guide.
Account Number Entitlements When you run an Export Profile, your exported data (in the downloaded file) is based on your account entitlements, not on the entitlements of the person who created the Export Profile. Users of the File Export capability have the ability to perform a variety of actions, as determined by their assigned Access Profiles.
Additional Data Elements For Latin America, Book Debits data elements are included in the export file for the output formats listed below. • PayLink Payment • PayLink Standardized Payment • PayLink Standardized Beneficiary For the DDL–Account Details Citibanking2 output format, the payment details listed below are included. • Money Market transactions • Securities transactions • Foreign Exchange transactions
Forward Available Balance Field Additional data is included in the export file for several output formats to further facilitate statement reconcilement. When you run an Export Profile that specifies one of the output formats listed below, the Forward Available Balance is now exported whenever the data is available. • SWIFT™ MT940 - tag65 • SAP® MT940 - tag65 • GTM/MCM - tag FA • CitibankingSM Flat File - Record type 01 • DDL CBII - Record 02 • DDL Infopool - Record 02
CitiDirect® Online Banking: File Delivery Guide: Addendum Page 12
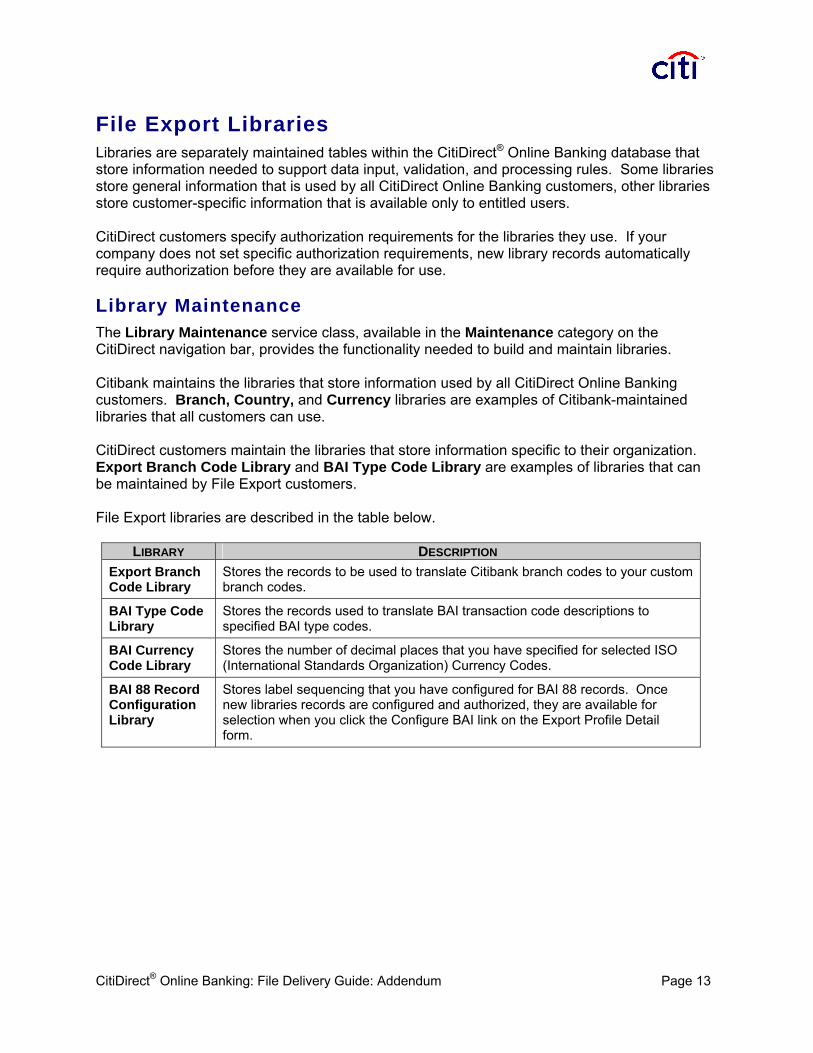
File Export Libraries Libraries are separately maintained tables within the CitiDirect® Online Banking database that store information needed to support data input, validation, and processing rules. Some libraries store general information that is used by all CitiDirect Online Banking customers, other libraries store customer-specific information that is available only to entitled users. CitiDirect customers specify authorization requirements for the libraries they use. If your company does not set specific authorization requirements, new library records automatically require authorization before they are available for use.
Library Maintenance The Library Maintenance service class, available in the Maintenance category on the CitiDirect navigation bar, provides the functionality needed to build and maintain libraries. Citibank maintains the libraries that store information used by all CitiDirect Online Banking customers. Branch, Country, and Currency libraries are examples of Citibank-maintained libraries that all customers can use. CitiDirect customers maintain the libraries that store information specific to their organization. Export Branch Code Library and BAI Type Code Library are examples of libraries that can be maintained by File Export customers. File Export libraries are described in the table below.
LIBRARY DESCRIPTION Export Branch Code Library
Stores the records to be used to translate Citibank branch codes to your custom branch codes.
BAI Type Code Library
Stores the records used to translate BAI transaction code descriptions to specified BAI type codes.
BAI Currency Code Library
Stores the number of decimal places that you have specified for selected ISO (International Standards Organization) Currency Codes.
BAI 88 Record Configuration Library
Stores label sequencing that you have configured for BAI 88 records. Once new libraries records are configured and authorized, they are available for selection when you click the Configure BAI link on the Export Profile Detail form.
CitiDirect® Online Banking: File Delivery Guide: Addendum Page 13

Customizing Records in the Export Branch Library You can map your exported data to a customized bank branch number (up to 12 digits). Once exported, the branch number in the exported file will reflect the custom branch number. Customize your Export Branch Library by following the steps below.
1. Sign on to CitiDirect® Online Banking with your SafeWord™ card.
2. On the CitiDirect navigation bar, click Maintenance, and then click Library Maintenance.
The Library Maintenance form appears.
3. Click Export Branch Code Library, and then click OK.
CitiDirect® Online Banking: File Delivery Guide: Addendum Page 14

The Export Branch Code Summary form appears.
4. Select the Branch Name that you want to map to your custom branch number and click Go to Details. The Export Branch Code Detail form appears.
5. In the Map to BAI or the Map to DDL field enter the custom code that you want to use and
click Submit. 6. The new library record moves to the next step in your workflow process, as defined by your
authorization requirements.
• If authorization is not required, the new record is available for selection from the library.
• If authorization is required, the new record moves to the Authorization Req’d tab.
CitiDirect® Online Banking: File Delivery Guide: Addendum Page 15

Adding Records to the BAI Type Code Library Add records to the BAI Type Code Library by following the steps below.
1. Sign on to CitiDirect® Online Banking with your SafeWord™ card.
2. On the CitiDirect navigation bar, click Maintenance, and then click Library Maintenance.
The Library Maintenance form appears.
3. Click File Export BAI Type Code, and then click OK.
CitiDirect® Online Banking: File Delivery Guide: Addendum Page 16

The BAI Type Code Summary form appears.
4. Click New. The BAI Type Code Detail form appears.
5. In the Transaction Code Description field, type a brief description for this new BAI code.
6. In the BAI Type Code CR field type a 3-digit debit code, if applicable.
7. In the BAI Type Code DR field type a 3-digit credit code, if applicable.
8. Click Submit. The form clears to allow you to add additional BAI Type Codes.
9. When you have finished adding all records, click Return to Summary or select another service on the navigation bar.
10. The new library record moves to the next step in your workflow process, as defined by your authorization requirements.
• If authorization is not required, the record is available for selection from the library.
• If authorization is required, the new record moves to the Authorization Req’d tab.
CitiDirect® Online Banking: File Delivery Guide: Addendum Page 17

Specifying Decimal Places in the BAI Currency Code Library Specify the number of decimal places you want allocated in BAI output formats for a specific currency by following the steps below.
1. Sign on to CitiDirect® Online Banking with your SafeWord™ card.
2. On the CitiDirect navigation bar, click Maintenance, and then click Library Maintenance.
The Library Maintenance form appears.
3. Click BAI Currency Code Library, and then click OK.
CitiDirect® Online Banking: File Delivery Guide: Addendum Page 18

The BAI Currency Code Summary form appears.
4. Select the ISO Currency Code you want to modify, and then click Go to Details. The BAI Currency Code Detail form appears.
5. In the Number of Decimals field enter a value and click Submit. 6. The new library record moves to the next step in your workflow process, as defined by your
authorization requirements.
• If authorization is not required, the record is available for selection from the library. • If authorization is required, the new record moves to the Authorization Req’d tab.
CitiDirect® Online Banking: File Delivery Guide: Addendum Page 19

Adding Records to the BAI 88 Record Library Add records to the BAI 88 Record Library by following the steps below.
1. Sign on to CitiDirect® Online Banking with your SafeWord™ card.
2. On the CitiDirect navigation bar, click Maintenance, and then click Library Maintenance.
The Library Maintenance form appears.
3. Click File Export BAI 88 Record Configuration Library, and then click OK.
CitiDirect® Online Banking: File Delivery Guide: Addendum Page 20

The BAI 88 Record Configuration Library Summary form appears.
4. Click New. The BAI 88 Record Configuration Library Detail form appears.
5. In the Library Name field enter a unique name for this record.
6. In the Library Description field enter a description for this library record.
7. The Product Type field is automatically populated with “Common to all transactions.” To specify a specific transaction type, click the drop-down arrow and select one of the available transaction types.
CitiDirect® Online Banking: File Delivery Guide: Addendum Page 21

8. The BAI Label Type automatically displays CitiDirect. Click the drop-down arrow and select NCB if you want to use CitibankingSM labels.
9. Click Submit. The form clears to allow you to create additional entries. When you are finished creating all new entries, click Return to Summary.
10. The new library record moves to the next step in your workflow process, as defined by your authorization requirements.
• If authorization is not required, the record is available for selection from the library. • If authorization is required, the new record moves to the Authorization Req’d tab.
CitiDirect® Online Banking: File Delivery Guide: Addendum Page 22

Using Copy to Create New Library Records To save time and eliminate errors when creating new library records that are similar to existing records, use the Copy feature. Copy enables you to copy the details of existing library records and then modify them to create new records. Copy is available in the following Export Profile libraries: • BAI Type Code Library • BAI 88 Record Configuration Library
Copy Feature Copy records to create new library records by following the steps below.
1. Sign on to CitiDirect® Online Banking with your SafeWord™ card.
2. On the CitiDirect navigation bar, click Maintenance, and then click Library Maintenance.
The Library Maintenance form appears.
CitiDirect® Online Banking: File Delivery Guide: Addendum Page 23

3. Select the library containing the records you want to copy and click OK. The File Export BAI Type Code Library is selected in this example.
The summary form for the selected library appears. BAI Type Code Summary is shown in this example.
4. On the Input tab, select one or more records to copy, and then click Copy. Only library records with a Processed status are available to copy.
The detail form for the selected library appears. The details of the selected record are displayed. BAI Type Code Detail form is shown in this example.
CitiDirect® Online Banking: File Delivery Guide: Addendum Page 24

5. Make any changes to the library record and click Submit. A new library record is created, and the original remains unchanged. The new record you created moves to the next state, as defined by your authorization requirements.
• If authorization is not required, the record is available for use in the library. • If authorization is required, the new library record moves to the Authorization Req’d tab.
Note: To avoid creating duplicate library records, review the information displayed in all required fields (identified by a red asterisk) and make any changes to ensure that the new library record is unique.
6. If you selected multiple records on the Input tab, the details of the next selected record appear. Repeat step 5 until all selected library records are copied and submitted.
Note: • If you do not want to copy the record currently displayed on the detail form, click Next.
If you made any changes to that record, a Save? dialog box appears.
• Proceed with one of the following steps:
Click Yes to save the current data and proceed to the next record.
Click No to clear the screen and proceed to the next record.
Click Cancel to return to the current record and continue editing.
CitiDirect® Online Banking: File Delivery Guide: Addendum Page 25

Authorizing Library Records CitiDirect® Online Banking supports three levels of authorization for libraries. CitiDirect customers specify authorization requirements for each library they use. During the authorization process, library records can be authorized, rejected (deleted), or sent for repair. You can authorize library records from the Authorization Req’d tab or the detail form for a selected library record. Notes: • New library records are not available for selection until they meet all authorization
requirements. • If more than one authorization is required, new library records remain accessible on the
Authorization Req’d tab until they are fully authorized. • If you submitted a library record, you cannot authorize it.
Authorizing Library Records from the Authorization Req’d Tab Authorize a library record from the Authorization Req’d tab by following the steps below.
1. Sign on to CitiDirect Online Banking with your SafeWord™ card.
2. On the CitiDirect navigation bar, click Maintenance, and then click Library Maintenance.
The Library Maintenance form appears. All CitiDirect Libraries that you are entitled to see are listed by service class name.
CitiDirect® Online Banking: File Delivery Guide: Addendum Page 26

3. Select the library containing the records you want to authorize and click OK. The summary form for the selected library appears.
4. Click the Authorization Req’d tab. If your Access Profile does not include entitlement rights to authorize library profiles, this tab does not appear.
The BAI Type Code Library is shown in this example.
5. Select one or more records and p
• Click Authorize. If this is the finand is available for use.
• Click Send to Repair if the recodialog box appears.
Enter the reason for the repair astatus and is listed on the Input
• Click Reject if you want to delet
Enter a reason for rejecting (delfrom the system.
CitiDirect® Online Banking: File Delivery Gu
All profiles for the selected library with an Authorization Required status that you are entitled to authorize are listed.
roceed with one of the following steps:
al authorization, the library record is stored in the library
rd contains errors and cannot be authorized. A Reason
nd click OK. The record is assigned a Repair Required /Modify tab, where it can be selected and repaired.
e this library record. A Reason dialog box appears.
eting) the record and click OK. The record is removed
ide: Addendum Page 27

Authorizing Library Records from the Library Detail Form 1. Follow steps 1 through 3 in Authorizing Library Records from the Authorization Required
Tab section of this Addendum to access the summary form for the library containing the records to be authorized. The BAI Type Code Library is selected in this example
2. Click the Authorization Req’d tab, seleGo to Details. The detail form for the fi
3. Proceed with one of the following steps:
• Click Authorize to authorize the librlibrary record is added to the library
• Click Send to Repair to send the lib
CitiDirect® Online Banking: File Delivery Guide: A
All profiles for the selected library with an Authorization Required status that you are entitled to authorize are listed.
ct the library records to authorize, and click rst selected record appears.
ary record. If this is the final authorization, the and is available for use. rary record for repair.
ddendum Page 28

A Reason dialog box appears.
Enter the reason for repair and click OK. The status of the library record is changed to Repair Required and it is listed on the Input tab, where it can be selected and repaired.
• Click Reject if you want to delete the library record. A Reason dialog box appears.
Enter the reason for rejecting (deleting) the library record and click OK. The record is removed from the system.
CitiDirect® Online Banking: File Delivery Guide: Addendum Page 29

Modifying, Repairing, or Deleting Library Records CitiDirect® Online Banking allows you to modify, repair, or delete records stored in libraries that you maintain. Notes: • You can delete library records from the library summary or detail form. • You can modify, repair, or delete records from the library detail form. • All library records with a status of Repair Required or Invalid must be repaired before they
can be processed.
Deleting Library Records from the Summary Form Delete records from the library summary form by following the steps below.
1. Sign on to CitiDirect Online Banking with your SafeWord™ card.
2. On the CitiDirect navigation bar, click Maintenance, and then click Library Maintenance.
The Library Maintenance form appears.
3. Select the library containing the records you want to moclick OK. In this example, the File Export BAI Type Co
CitiDirect® Online Banking: File Delivery Guide: Addendum
All the Libraries that you are entitled to see are displayed. To find a library quickly, click Search.
dify, repair, or delete, and then de Library is selected.
Page 30

The summary form for the selected library appears. The BAI Type Code Summary form is shown in this example.
4. Click Delete to delete the selected records. A Reason dialog box appears.
5. Enter a reason for deleting the records and click OK. If the same reason does not apply to all selected records, delete each record individually or click Go to Details and delete the record from the library detail form.
Note: • If authorization is required for the selected library, the record status changes to
Authorization Required for Delete, and it is not deleted until its deletion is authorized. The Processed library record remains available.
• The person who deleted the record cannot authorize its deletion.
CitiDirect® Online Banking: File Delivery Guide: Addendum Page 31

Modifying, Repairing, or Deleting Library Records from the Detail Form Records with an Invalid or Repaired Required status must be repaired before they can continue through your workflow process. Modify, repair, or delete library records from a library detail form by following the steps below.
1. Follow steps 1 through 3 in the Deleting Library Records from the Summary Form section of this Addendum to access the library containing the records you want to modify, repair, or delete. The summary form for the selected library appears. The BAI 88 Record Configuration Library Summary form is shown in this example.
2. Select one or more records to modify, delete, or repair, and click Go to Details. The library detail form appears. The details of the first selected library record are displayed.
A red asterisk indicates a required field.
CitiDirect® Online Banking: File Delivery Guide: Addendum Page 32

3. Proceed with one of the following steps:
• Make changes and click Submit to modify a record. • Click Delete to delete the record. A Reason dialog box appears.
Enter the reason for deleting the library record and click OK.
• Click View Error Messages to repair a record with a Repair Required status. The Errors dialog box appears.
Review any errors listed and click OK to close the dialog box. You return to the detail form. Make any necessary repairs in the appropriate fields and click Submit.
5. If you selected multiple library records on the summary form, the details of the next selected library record appear. When the Details form contains the details of the last selected record, clicking Submit returns you to the Input tab.
6. If you do not want to modify the library record that is currently displayed, click Next.
CitiDirect® Online Banking: File Delivery Guide: Addendum Page 33

File Import The File Import services available through CitiDirect® Online Banking allow you to import data from your system in a format that works with CitiDirect. The information provided in this section covers enhancements to File Import services. The File Import services available in CitiDirect allow you to import the following data: • ACH Credits and Debits Import for Puerto Rico • ACH and Cheque Payments for Portugal • ACH and Cheques Payments for Italy and Spain • Administrative Messages for Central and Eastern Europe, Middle East, and Africa • CBFT Import for Latin America • DFT Social Security and Internal Revenue Payments for Poland • Payments Import with Additional Intermediary Banks • Payments Import with Confidential Indicator • Payments Import with MT103 • Payments Import with Italy IBAN • Payments Import with Poland NRB/IBAN • PayLink Post Office Mass Payment Import for Japan • Purchase Orders/Invoices to the Trade Details Data Pool Library • SAP IDoc files for Europe, the Middle East, Africa, Asia and WorldLink transactions • Trade Transactions
Increased Capacity File Import capacity has been increased to 20,000 transactions for single local currencies.
Import Profile You must create an Import Profile before actually importing data from your system into CitiDirect Online Banking. Import Profile, available in the Maintenance category on the CitiDirect navigation bar, allows you to create Import Profiles. An Import Profile delineates specific file parameters, such as the method used to secure the data, where the file containing the data to be imported is stored on your system, the maps that are applied to the data so it can be used in CitiDirect, and file error processing instructions. The following enhancements have been made to Import Profile.
Language Selection When you are creating a new Import Profile, you can select from a list of supported languages to specify an encoding set to ensure that your data is imported correctly.
CitiDirect® Online Banking: File Delivery Guide: Addendum Page 34

Select an “Encoding Set” language when defining an Import Profile by following the steps below.
1. On the CitiDirect Online Banking navigation bar, click Maintenance, and then click Import Profile.
The Import Profile Summary form appears.
2. Click New.
CitiDirect® Online Banking: File Delivery Guide: Addendum Page 35
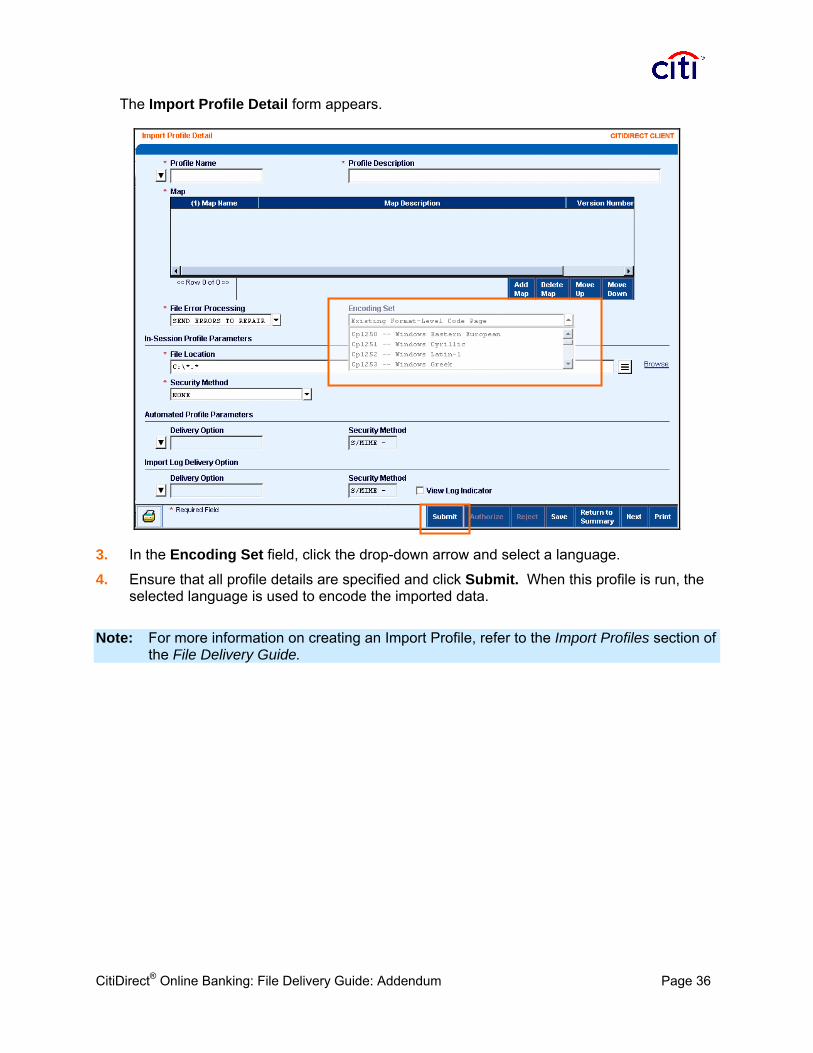
The Import Profile Detail form appears.
3. In the Encoding Set field, click the drop-down arrow and select a language.
4. Ensure that all profile details are specified and click Submit. When this profile is run, the selected language is used to encode the imported data.
Note: For more information on creating an Import Profile, refer to the Import Profiles section of the File Delivery Guide.
CitiDirect® Online Banking: File Delivery Guide: Addendum Page 36

View Log Indicator You can automatically generate an import log each time an Import Profile is run. This log provides specific details related to each running of the Import Profile, which include the Run ID, Run Date/Time, and the number of files processed, the number of valid transactions, the number of rejected transactions, and the number of invalid transactions. Indicate that an import log is to be generated each time you run a specific Import Profile by following the steps below.
1. Sign on to CitiDirect® Online Banking with your SafeWord™ card.
2. On the CitiDirect navigation bar, click Maintenance, and then click Import Profile.
The Import Profile Summary appears.
3. Click New.
CitiDirect® Online Banking: File Delivery Guide: Addendum Page 37

The Import Profile Detail form appears.
4. Complete all required fields and enter any optional information. For procedures on creating Import Profiles, please refer to the Import Profiles section of the File Delivery Guide.
5. Select the View Log Indicator check box and then click Submit. The new Import Profile moves to the next step as defined by your flow control requirements. You can run it when its status is Available.
6. Run the Import Profile using the Import Transactions service class available in the Transact category on the CitiDirect navigation bar. For procedures on running an Import Profile, please refer to the Importing Files section of the File Delivery Guide.
7. On the Run History tab, select the Import Profile, and then click View Run Details.
.
CitiDirect® Online Banking: File Delivery Guide: Addendum Page 38

The Import Run Detail form appears.
7. Click View Import Log. The Import Log dialog box appears.
8. Review the log details and proceed with one of the following steps:
• Click OK to close the dialog box. • Click Download to download the imported file and store it on your system. You must
specify the file name and path for the downloaded file. • Click Print to print the log details
CitiDirect® Online Banking: File Delivery Guide: Addendum Page 39

Authorization Req’d and Release Req’d Tabs Two new process tabs have been added to the Import Transactions Summary form: Authorization Req’d and Release Req’d. Once an Import Profile has been run and the transactions have been successfully imported into CitiDirect Online Banking, you can authorize or release all transactions included in that imported file directly on the Import Transactions Summary form, without having to go to the Payments Summary form. For details on running import transactions refer to the Importing Files section of the File Delivery Guide.
Authorizing Imported Transactions Authorize imported transactions by following the steps below.
1. On the Import Transactions Summary form, click the Authorization Req’d tab.
2. Select the Import Profile containing the imported transactions to authorize.
3. Proceed with one of the following steps:
• Click Authorize. The imported transactions move to the next step in your flow control process. If authorization is the final step, all imported transactions are sent to Citibank for processing.
• Click Reject to reject the imported transactions in the selected Import Profile. A Reason dialog appears. Enter a reason for the rejection, and click OK to close the dialog box.
• Click View Run Details to see the details of the run before authorizing. • Click View Profile Details to see view the Import Profile details before authorizing.
CitiDirect® Online Banking: File Delivery Guide: Addendum Page 40
Notes: • Rejected transactions are listed on the Input/Modify tab on the Payments Summary form
with an “Invalid” status. • Payments with a special flow control within the service class (e.g., a WorldLink payment
requiring foreign exchange before release) are routed to the appropriate tab on the Payments Summary form.
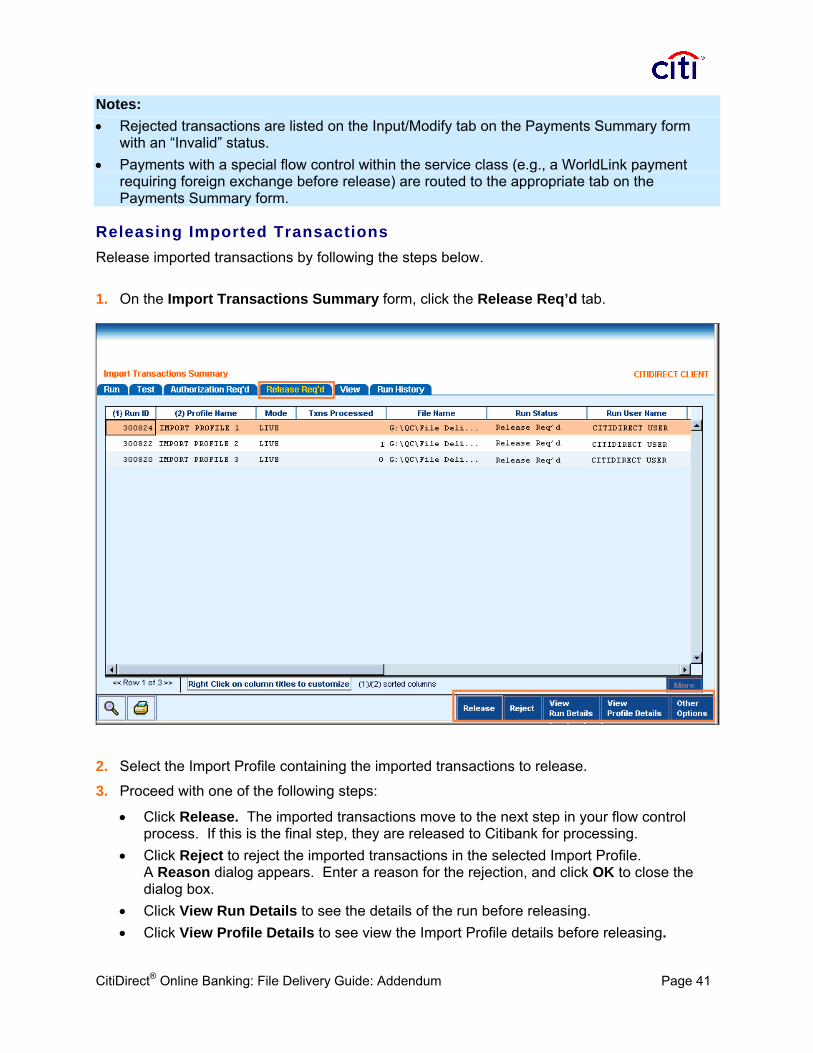
Releasing Imported Transactions Release imported transactions by following the steps below.
1. On the Import Transactions Summary form, click the Release Req’d tab.
2. Select the Import Profile containing the imported transactions to release.
3. Proceed with one of the following steps:
• Click Release. The imported transactions move to the next step in your flow control process. If this is the final step, they are released to Citibank for processing.
• Click Reject to reject the imported transactions in the selected Import Profile. A Reason dialog appears. Enter a reason for the rejection, and click OK to close the dialog box.
• Click View Run Details to see the details of the run before releasing. • Click View Profile Details to see view the Import Profile details before releasing.
CitiDirect® Online Banking: File Delivery Guide: Addendum Page 41

Notes: • Payments that have been released successfully are listed on the View tab of the Payments
Summary form. • Rejected transactions are listed on the Input/Modify tab on the Payments Summary form
with an “Invalid” status.
Run History Tab To provide more information about your File Imports, a Txns Processed column has been added to the Run History tab of the Import Transactions Summary form.
Shortcut Menu A shortcut menu has also been added to allow you to customize the way information is to be displayed on the Run History tab to meet your specific business needs. Use the shortcut menu by following the steps below.
1. Position your mouse pointer on a column heading on the Run History tab and right-click. The shortcut menu appears.
2. Select one of the following options:
Sort (ascending)
• Click Sort (ascending) to sort the information by that column title, in ascending order (A-Z).
CitiDirect® Online Banking: File Delivery Guide: Addendum Page 42

Sort (descending)
• Click Sort (descending) to sort the information by that column title, in descending order (Z-A).
Hide Column
• Click Hide Column to hide the selected column.
Unhide All Columns
• Click Unhide All Columns to see all of the CitiDirect-defined columns.
Change Column Titles
• Click Change Column Titles to change the current column heading titles.
A Change Column Titles Dialog box appears.
Enter new column titles and click Save to save the new column titles. A Message dialog box appears.
Click OK to close the Message dialog box.
CitiDirect® Online Banking: File Delivery Guide: Addendum Page 43

Change Default Sort
• Click Change Default Sort to specify a different sort order for the summary list. A Change Default Sort Dialog box appears.
Click the drop-down arrows in the Primary Sort and Secondary Sort fields and select the elements by which the information displayed on the tab is to be sorted, specify the sort order for each field (ascending or descending), and then click Save. The Message dialog box shown above appears. Click OK to close the Message.
Save settings
• Click Save settings to save the changes you have made for future work sessions. If you do not save your settings, the changes you have made will not appear the next time you use this functionality.
Reset to default settings
• Click Reset to default settings to reset all changes to their CitiDirect-defined settings.
CitiDirect® Online Banking: File Delivery Guide: Addendum Page 44

Transaction Initiation Summary Report You can run a Transaction Initiation Summary Report from the Import Transactions Summary form immediately after running an Import Profile, without having to run this report separately. Once run, use the Report Assistant to view and print the report. Follow the steps below to run the File Import Transaction Initiation Summary Report.
1. On the CitiDirect® Online Banking navigation bar, click Transact, and then click Import Transactions. The Import Transactions Summary form appears.
2. Click the Run History tab and select an Import Profile run from the summary list.
3. Click Other Options and then click Run TI Summary Report. The summary form remains on your screen.
4. To view or print the report, press Alt + R on your keyboard to open the Report Assistant.
5. Click the Active Reports tab, select the report, and then click View Report. The selected
report appears in a separate browser window.
Notes: • The Run TI Summary Report option is not available for imports run in the “Test” mode. • Only one Import Profile can be selected when you use the Run TI Summary Report option. • This Run TI Summary Report option is only available for imported runs with one of the
following: Run Status assignments: “Completed,” “Completed with Errors,” “Authorization Req’d (Level X),” or “Release Req’d.”
CitiDirect® Online Banking: File Delivery Guide: Addendum Page 45

Automated File and Report Delivery Automated File and Report Delivery (AFRD) through CitiDirect® Online Banking enables you to schedule the delivery of files and reports to and from the central servers of Citibank. Since you do not have to be signed on to CitiDirect for a scheduled event to take place, File Import, File Export, and the running of your reports can take place at any time. Please see the Learning Center at www.citidirect.com for more information on AFRD.
Delivery Options Library Before you run an Import Profile to retrieve data from your system and import it into CitiDirect, a file containing that data must be stored on your Web server. To allow you to specify what you want done once this data file is successfully imported into CitiDirect. The following two new options are available on the Delivery Options Library detail form:
• Delete Customer Import File (After Successful Retrieval): Select this check box to delete your Import File from your Web server once the files have been successfully uploaded to CitiDirect.
• Create Customer Acknowledgement File (After Successful Retrieval): Select this check box to have CitiDirect place an acknowledgement file on your Web server for every file that has been uploaded to CitiDirect. Acknowledgement files have an .ack extension.
Notes: • The acknowledgement file is stored in the same folder from which the system retrieved the
imported file. • The acknowledgement file includes the original file name and a time stamp. • This is not an acknowledgement that the file has been successfully decrypted and/or
verified. It is only an acknowledgement that the file has been successfully uploaded.
CitiDirect® Online Banking: File Delivery Guide: Addendum Page 46

Disclaimer The authoritative and official text of this CitiDirect® Online Banking documentation shall be in the English language as used in the United States of America. Any translation of any CitiDirect documentation from English to another language is done solely for the convenience of the reader, and any inconsistencies, or inaccuracies between the English text and that translation shall be resolved in favor of the English text. These materials are proprietary and confidential to Citibank, N.A., and are intended for the exclusive use of CitiDirect Online Banking customers. The foregoing statement shall appear on all copies of these materials made by you in whatever form and by whatever means, electronic or mechanical, including photocopying or in any information storage system. In addition, no copy of these materials shall be disclosed to third parties without express written authorization of Citibank, N.A. Customer shall be solely responsible for the use of any User identifications, passwords and authentication codes that may be provided to it, from time to time, in connection with CitiDirect Online Banking (collectively, "User IDs"). Customer agrees to keep all User IDs strictly confidential at all times. Customer shall immediately cease use of CitiDirect Online Banking if it receives notification from Citibank, or otherwise becomes aware of, or suspects, a technical failure or security breach. Customer shall immediately notify Citibank if it becomes aware of, or suspects, a technical failure or security breach. © 2012 Citibank, N.A. All rights reserved. Citi and Arc Design are registered service marks of Citigroup Inc. All other trademarks are the property of their respective owners. SWIFT is a trademark of Society for Worldwide Interbank Financial Telecommunications (S.W.I.F.T.) SCRL. All other brands, products, and service names mentioned are trademarks or registered trademarks of their respective owners.
CitiDirect® Online Banking: File Delivery Guide: Addendum Page 47