Cisco WebEx Connect · PDF file1 1 Getting Started The Cisco WebEx Connect Admin Console...
98
Cisco WebEx Connect Administrator’s Guide
-
Upload
truongtuyen -
Category
Documents
-
view
256 -
download
2
Transcript of Cisco WebEx Connect · PDF file1 1 Getting Started The Cisco WebEx Connect Admin Console...

Cisco WebExConnectAdministrator’s Guide

Copyright
WebEx Communications, Inc. reserves the right to make changes in the information contained in this publication without prior notice. The reader should in all cases consult WebEx Communications, Inc. to determine whether any such changes have been made.
© 1997-2009. WebEx Communications, Inc. All Rights Reserved. WEBEX and the WEBEX LOGO are trademarks or registered trademarks of WebEx Communications, Inc. in the United States and other countries. Other product or brand names are trademarks or registered trademarks of their respective owners.
U.S. Government End User Purchasers. The Documentation and related Services qualify as "commercial items," as that term is defined at Federal Acquisition Regulation ("FAR") (48 C.F.R.) 2.101. Consistent with FAR 12.212 and DoD FAR Supp. 227.7202-1 through 227.7202-4, and notwithstanding any other FAR or other contractual clause to the contrary in any agreement into which the Agreement may be incorporated, Customer may provide to Government end user or, if the Agreement is direct, Government end user will acquire, the Services and Documentation with only those rights set forth in the Agreement. Use of either the Services or Documentation or both constitutes agreement by the Government that the Services and Documentation are commercial items and constitutes acceptance of the rights and restrictions herein.
UNPUBLISHED - RIGHTS RESERVED UNDER THE COPYRIGHTS LAW OF THE UNITED STATES. USE OF A COPYRIGHT NOTICE IS PRECAUTIONARY ONLY AND DOES NOT IMPLY PUBLICATION OR DISCLOSURE.
OTHER BRANDS AND PRODUCTS ARE TRADEMARKS OR REGISTERED TRADEMARKS OF THEIR RESPECTIVE HOLDERS.
RESTRICTED RIGHTS LEGEND. USE, DUPLICATION, OR DISCLOSURE BY THE GOVERNMENT IS SUBJECT TO RESTRICTIONS AS SET FORTH IN SUBPARAGRAPH (C) (1) (ii) OF THE RIGHTS IN TECHNICAL DATA AND COMPUTER SOFTWARE CLAUSE AT DFARS 252.227-7013, RIGHTS IN TECHNICAL DATA AND COMPUTER SOFTWARE (OCTOBER 1988).
Version: 6/8/09
WebEx Communications, Inc.3979 Freedom CircleSanta Clara, CA 95054
URL: www.webex.com

Chapter 1 Getting Started . . . . . . . . . . . . . . . . . . . . . . . . . . . . . . . . . . . . . . . . . . . . . . . . . . . . .1
Client Site and Desktop Requirements . . . . . . . . . . . . . . . . . . . . . . . . . . . . . . . . . . . . . . . . . . . . .1
Network Requirements . . . . . . . . . . . . . . . . . . . . . . . . . . . . . . . . . . . . . . . . . . . . . . . . . . . . . . . . . . . .2
Capacity and Bandwidth Requirements . . . . . . . . . . . . . . . . . . . . . . . . . . . . . . . . . . . . . . . . . . . .3
Bandwidth Requirement —P2P . . . . . . . . . . . . . . . . . . . . . . . . . . . . . . . . . . . . . . . . . . . . . . . 3
Bandwidth Requirement —With Server Proxy . . . . . . . . . . . . . . . . . . . . . . . . . . . . . . . . . 3
WebEx Connect Settings. . . . . . . . . . . . . . . . . . . . . . . . . . . . . . . . . . . . . . . . . . . . . . . . . . . . . . 3
Advanced Auditor Options . . . . . . . . . . . . . . . . . . . . . . . . . . . . . . . . . . . . . . . . . . . . . . . . . . . 4
IM Client Proxy Addresses . . . . . . . . . . . . . . . . . . . . . . . . . . . . . . . . . . . . . . . . . . . . . . . . . . . . 5
Public IM Domain Names and URLs . . . . . . . . . . . . . . . . . . . . . . . . . . . . . . . . . . . . . . . . . . . 5
Cisco WebEx Connect Integration with Other Instant Messagers . . . . . . . . . . . . . . . 6
Communicating with LCS and Sametime Users . . . . . . . . . . . . . . . . . . . . . . . . . . . . . . . . 6
DNS Entry Format for Federating with Microsoft LCS . . . . . . . . . . . . . . . . . . . . . . .7
DNS Entry Format for all other Instant Messengers . . . . . . . . . . . . . . . . . . . . . . . . .7
Cisco WebEx Connect Admin Console Setup . . . . . . . . . . . . . . . . . . . . . . . . . . . . . . . . . . . . . . .8
Logging in with Spaces Enabled . . . . . . . . . . . . . . . . . . . . . . . . . . . . . . . . . . . . . . . . . . .8
Logging in with Spaces Disabled . . . . . . . . . . . . . . . . . . . . . . . . . . . . . . . . . . . . . . . . 10
Administrative Tools. . . . . . . . . . . . . . . . . . . . . . . . . . . . . . . . . . . . . . . . . . . . . . . . . . . . . . . . . 10
Chapter 2 Adding Users . . . . . . . . . . . . . . . . . . . . . . . . . . . . . . . . . . . . . . . . . . . . . . . . . . . . . 11
Adding Users . . . . . . . . . . . . . . . . . . . . . . . . . . . . . . . . . . . . . . . . . . . . . . . . . . . . . . . . . . . . . . . . . . . 11
Searching Users . . . . . . . . . . . . . . . . . . . . . . . . . . . . . . . . . . . . . . . . . . . . . . . . . . . . . . . . . . . . . . . . . 12
Adding individual users. . . . . . . . . . . . . . . . . . . . . . . . . . . . . . . . . . . . . . . . . . . . . . . . . . . . . . 13
Importing multiple users from a CSV file. . . . . . . . . . . . . . . . . . . . . . . . . . . . . . . . . . . . . . 14
Editing users . . . . . . . . . . . . . . . . . . . . . . . . . . . . . . . . . . . . . . . . . . . . . . . . . . . . . . . . . . . . . . . . 15
Adding Users with Single Sign-on and Directory Integration Enabled . . . . . . . . . . . . . 16
i

Assigning Spaces . . . . . . . . . . . . . . . . . . . . . . . . . . . . . . . . . . . . . . . . . . . . . . . . . . . . . . . . . . . . . . . .16
Adding Groups . . . . . . . . . . . . . . . . . . . . . . . . . . . . . . . . . . . . . . . . . . . . . . . . . . . . . . . . . . . . . . . . . .17
Assigning the Org Administrator Role . . . . . . . . . . . . . . . . . . . . . . . . . . . . . . . . . . . .17
Group Administrator Role . . . . . . . . . . . . . . . . . . . . . . . . . . . . . . . . . . . . . . . . . . . . . . .18
Adding groups. . . . . . . . . . . . . . . . . . . . . . . . . . . . . . . . . . . . . . . . . . . . . . . . . . . . . . . . . . . . . . 18
Editing groups . . . . . . . . . . . . . . . . . . . . . . . . . . . . . . . . . . . . . . . . . . . . . . . . . . . . . . . . . . . . . . 19
Deleting groups . . . . . . . . . . . . . . . . . . . . . . . . . . . . . . . . . . . . . . . . . . . . . . . . . . . . . . . . . . . . 20
Cisco WebEx Connect Roles . . . . . . . . . . . . . . . . . . . . . . . . . . . . . . . . . . . . . . . . . . . . . . . . . . . . . .21
Default Roles . . . . . . . . . . . . . . . . . . . . . . . . . . . . . . . . . . . . . . . . . . . . . . . . . . . . . . . . . . . . . . . 21
Chapter 3 Configuring Cisco WebEx Connect . . . . . . . . . . . . . . . . . . . . . . . . . . . . . . . . . . 23
Configuring Cisco WebEx Connect . . . . . . . . . . . . . . . . . . . . . . . . . . . . . . . . . . . . . . . . . . . . . . .23
Notifications, Emails, and Alert Templates . . . . . . . . . . . . . . . . . . . . . . . . . . . . . . . . . . . . . . . .27
Email Templates . . . . . . . . . . . . . . . . . . . . . . . . . . . . . . . . . . . . . . . . . . . . . . . . . . . . . . . . . . . . 28
Premium Services Configuration . . . . . . . . . . . . . . . . . . . . . . . . . . . . . . . . . . . . . . . . . . . . . . . . .30
Calendar Application Configuration . . . . . . . . . . . . . . . . . . . . . . . . . . . . . . . . . . . . . . . . . . . . . .31
Migrating Cisco WebEx Connect . . . . . . . . . . . . . . . . . . . . . . . . . . . . . . . . . . . . . . . . . . . . . . . . . .32
Chapter 4 Getting started with Cisco Unified Communications Manager for Click to Call . . . . . . . . . . . . . . . . . . . . . . . . . . . . . . . . . . . . . . . . . . . . . . . . . . . . . . . . . . . . . . . 35
Overview . . . . . . . . . . . . . . . . . . . . . . . . . . . . . . . . . . . . . . . . . . . . . . . . . . . . . . . . . . . . . . . . . . . . . . . .35
Cisco Unified Communications Manager . . . . . . . . . . . . . . . . . . . . . . . . . . . . . . . . . . . . . . . . .36
Setup tasks . . . . . . . . . . . . . . . . . . . . . . . . . . . . . . . . . . . . . . . . . . . . . . . . . . . . . . . . . . . . . . . . . . . . . .36
Configuring Cisco Unified IP Phones . . . . . . . . . . . . . . . . . . . . . . . . . . . . . . . . . . . . . . . . . 36
Adding a directory number to the phone . . . . . . . . . . . . . . . . . . . . . . . . . . . . . . . .37
Configuring Cisco Unified Communications Manager for Click to Call . . . . . . . . . . . . . .38
ii

Activating Cisco WebDialer on Cisco Unified Communications Manager. . . . . . . 39
Verifying the CTI Manager is running on Cisco Unified Communications Manager 39
Verifying the CCMCIP Service is running on Cisco Unified Communications Manager . . . . . . . . . . . . . . . . . . . . . . . . . . . . . . . . . . . . . 40
Verifying the correct phone devices are associated with the user. . . . . . . . . . . . . . 40
How to configure application dial rules. . . . . . . . . . . . . . . . . . . . . . . . . . . . . . . . . . . . . . . 41
Sample Application Dial Plan . . . . . . . . . . . . . . . . . . . . . . . . . . . . . . . . . . . . . . . . . . . . . . . . 42
Configuring Cisco WebDialer to automatically use application dial rules on Cisco Unified Communications Manager . . . . . . . . . . . . . . . . . . . . . . . . . . . . . . . . . . . . . 43
Troubleshooting . . . . . . . . . . . . . . . . . . . . . . . . . . . . . . . . . . . . . . . . . . . . . . . . . . . . . . . . . . . . . . . . 44
Click to Call log files and configuration files. . . . . . . . . . . . . . . . . . . . . . . . . . . . . . . . . . . 44
Click to Call Log Files . . . . . . . . . . . . . . . . . . . . . . . . . . . . . . . . . . . . . . . . . . . . . . . . . . . . . . . . 44
Error Messages . . . . . . . . . . . . . . . . . . . . . . . . . . . . . . . . . . . . . . . . . . . . . . . . . . . . . . . . . . . . . . 44
Known Issues. . . . . . . . . . . . . . . . . . . . . . . . . . . . . . . . . . . . . . . . . . . . . . . . . . . . . . . . . . . . . . . . 46
Chapter 5 Using the Policy Editor to Define and Apply Policies . . . . . . . . . . . . . . . . . 49
Understanding policies and policy actions . . . . . . . . . . . . . . . . . . . . . . . . . . . . . . . . . . . . . . . 49
Defining & applying policies . . . . . . . . . . . . . . . . . . . . . . . . . . . . . . . . . . . . . . . . . . . . . . . . . 50
About the Policy Editor . . . . . . . . . . . . . . . . . . . . . . . . . . . . . . . . . . . . . . . . . . . . . . . . . . . . . . . . . . 51
Adding Policies. . . . . . . . . . . . . . . . . . . . . . . . . . . . . . . . . . . . . . . . . . . . . . . . . . . . . . . . . . . . . . 51
Using Policy Actions Available in Cisco WebEx Connect . . . . . . . . . . . . . . . . . . . . . . . 52
About Encryption Levels . . . . . . . . . . . . . . . . . . . . . . . . . . . . . . . . . . . . . . . . . . . . . . . . 57
Adding actions to a policy . . . . . . . . . . . . . . . . . . . . . . . . . . . . . . . . . . . . . . . . . . . . . . . . . . . 59
Applying policies to groups. . . . . . . . . . . . . . . . . . . . . . . . . . . . . . . . . . . . . . . . . . . . . . . . . . 60
Chapter 6 Single Sign On and Directory Integration . . . . . . . . . . . . . . . . . . . . . . . . . . . 63
Single Sign-on . . . . . . . . . . . . . . . . . . . . . . . . . . . . . . . . . . . . . . . . . . . . . . . . . . . . . . . . . . . . . . . . . . 63
iii

Single Sign-On Requirements . . . . . . . . . . . . . . . . . . . . . . . . . . . . . . . . . . . . . . . . . . . . . . . 64
Single Sign-On Configuration of the Admin Console . . . . . . . . . . . . . . . . . . . . . . . . . 64
Example for Installing Cisco WebEx Connect Client for SSO . . . . . . . . . . . . . . . . . . . 66
Using Single Sign-on integrated with Meeting Center . . . . . . . . . . . . . . . . . . . . . . . . 66
System Requirements for SSO and Meeting Center integration . . . . . . . . . . .67
Directory Integration . . . . . . . . . . . . . . . . . . . . . . . . . . . . . . . . . . . . . . . . . . . . . . . . . . . . . . . . . . . . .68
Directory Integration Import Process and File Formats . . . . . . . . . . . . . . . . . . . . . . . . . . . .69
User File Formats . . . . . . . . . . . . . . . . . . . . . . . . . . . . . . . . . . . . . . . . . . . . . . . . . . . . . . . . . . . 69
User file name format . . . . . . . . . . . . . . . . . . . . . . . . . . . . . . . . . . . . . . . . . . . . . . . . . . .69
User file format . . . . . . . . . . . . . . . . . . . . . . . . . . . . . . . . . . . . . . . . . . . . . . . . . . . . . . . . . .69
Group File Formats. . . . . . . . . . . . . . . . . . . . . . . . . . . . . . . . . . . . . . . . . . . . . . . . . . . . . . . . . . 70
Group file name format . . . . . . . . . . . . . . . . . . . . . . . . . . . . . . . . . . . . . . . . . . . . . . . . . .70
Group file format . . . . . . . . . . . . . . . . . . . . . . . . . . . . . . . . . . . . . . . . . . . . . . . . . . . . . . . .70
Group Records . . . . . . . . . . . . . . . . . . . . . . . . . . . . . . . . . . . . . . . . . . . . . . . . . . . . . . . . . .71
Child Group Records . . . . . . . . . . . . . . . . . . . . . . . . . . . . . . . . . . . . . . . . . . . . . . . . . . . .71
Group Member Records . . . . . . . . . . . . . . . . . . . . . . . . . . . . . . . . . . . . . . . . . . . . . . . . .71
User Inactivation . . . . . . . . . . . . . . . . . . . . . . . . . . . . . . . . . . . . . . . . . . . . . . . . . . . . . . . . . . . . 72
User inactivation file name format . . . . . . . . . . . . . . . . . . . . . . . . . . . . . . . . . . . . . . .72
Group Deletion . . . . . . . . . . . . . . . . . . . . . . . . . . . . . . . . . . . . . . . . . . . . . . . . . . . . . . . . . . . . . 72
Group Deletion file name format . . . . . . . . . . . . . . . . . . . . . . . . . . . . . . . . . . . . . . . . .72
Group Deletion file format . . . . . . . . . . . . . . . . . . . . . . . . . . . . . . . . . . . . . . . . . . . . . . .72
Chapter 7 Reports . . . . . . . . . . . . . . . . . . . . . . . . . . . . . . . . . . . . . . . . . . . . . . . . . . . . . . . . . . . 73
Cisco WebEx Connect Reports . . . . . . . . . . . . . . . . . . . . . . . . . . . . . . . . . . . . . . . . . . . . . . . . . . . .73
Usage Report . . . . . . . . . . . . . . . . . . . . . . . . . . . . . . . . . . . . . . . . . . . . . . . . . . . . . . . . . . . . . . . 74
User Report . . . . . . . . . . . . . . . . . . . . . . . . . . . . . . . . . . . . . . . . . . . . . . . . . . . . . . . . . . . . . . . . . 74
iv

Storage Consumption Report . . . . . . . . . . . . . . . . . . . . . . . . . . . . . . . . . . . . . . . . . . . . . . . . 75
Generating Reports . . . . . . . . . . . . . . . . . . . . . . . . . . . . . . . . . . . . . . . . . . . . . . . . . . . . . . . . . . . . . 75
Chapter 8 CSV File Format . . . . . . . . . . . . . . . . . . . . . . . . . . . . . . . . . . . . . . . . . . . . . . . . . . . 77
CSV Fields . . . . . . . . . . . . . . . . . . . . . . . . . . . . . . . . . . . . . . . . . . . . . . . . . . . . . . . . . . . . . . . . . . . . . . . 77
CSV File Import Process . . . . . . . . . . . . . . . . . . . . . . . . . . . . . . . . . . . . . . . . . . . . . . . . . . . . . . . . . . 78
Sample CSV file . . . . . . . . . . . . . . . . . . . . . . . . . . . . . . . . . . . . . . . . . . . . . . . . . . . . . . . . . . . . . . . . . 78
Chapter 9 Library Management . . . . . . . . . . . . . . . . . . . . . . . . . . . . . . . . . . . . . . . . . . . . . . 79
Adding Applications . . . . . . . . . . . . . . . . . . . . . . . . . . . . . . . . . . . . . . . . . . . . . . . . . . . . . . . . . . . . 79
Copying applications to a library . . . . . . . . . . . . . . . . . . . . . . . . . . . . . . . . . . . . . . . . . . . . . 80
Approving request to add application to public library . . . . . . . . . . . . . . . . . . . . . . . 81
Removing applications from a library . . . . . . . . . . . . . . . . . . . . . . . . . . . . . . . . . . . . . . . . 81
Restoring applications to a library . . . . . . . . . . . . . . . . . . . . . . . . . . . . . . . . . . . . . . . . . . . . 82
Chapter 10 Cisco WebEx Connect Command-line Parameters . . . . . . . . . . . . . . . . . . 85
Command-line Parameters . . . . . . . . . . . . . . . . . . . . . . . . . . . . . . . . . . . . . . . . . . . . . . . . . . . . . . 85
v

vi

1Getting Started
The Cisco WebEx Connect Admin Console enables administrators to monitor, manage, control, and enhance user access to Cisco WebEx Connect.
This section includes a summary of tasks to quickly get started using the Cisco WebEx Connect Admin Console. For more detailed instructions, refer to the chapters in the rest of the document.
For more information on using the Cisco WebEx Connect product, refer to the Cisco WebEx Connect Help.
A Cisco WebEx Connect organization administrator can perform the following functions using the Cisco WebEx Connect Admin Console:
Create new users
Edit user properties
Configure Cisco WebEx Connect settings for users
Client Site and Desktop RequirementsThe following are the minimum and recommended desktop requirements to install and run the Cisco WebEx Connect Client.
Platform Windows: Pentium processor running Windows XP Professional Service Pack 2 or Vista
Hardware Intel Celeron CPU 2.40 GHz, 512 MB Memory
Disk Space 60 MB free hard drive space (100 MB of temporary space for the installation)
Browser Internet Explorer 7.0 or later, Mozilla Firefox 2.0 or later
Internet Connection Internet connection that allows full Internet usage (not just a free email service). Minimum requirement: Dial-up 56 kbps. Recommended: Broadband connection.
1

Chapter 1: Getting Started
Network RequirementsThe following are the Network requirements to access the Cisco WebEx Connect Service. The Client PC must have Internet connectivity and be able to connect to the following hosts and ports:
Note Cisco WebEx Connect Client uses the Web Proxy information configured in Internet Explorer to access the client configuration service. If the proxy in the customer network is an authenticated proxy, the proxy will be appropriately configured to allow access to this URL without requiring any authentication. Additionally, ensure that you allow access to all URLs that have webexconnect.com and webex.com in them.
Email Program Microsoft Outlook 2000 SP4 or later, Microsoft Outlook Express, or Microsoft Outlook 2007
Audio Full duplex sound card and a headset
Video At least 1.8 GHz CPU, 800x600 resolution, 256 colors or more, and a webcam
Platform Windows: Pentium processor running Windows XP Professional Service Pack 2 or Vista
Hardware Intel Celeron CPU 2.40 GHz, 512 MB Memory
Type of Connection Host Name Port
Cisco WebEx Connect IM—Secure SSL connection
slogin.oscar.aol.com 443
Cisco WebEx Connect Client configuration service (see note)
https://aimpro.premiumservices.aol.com/cc/ClientConfigurationWS.jws
80 or 443
Cisco WebEx Connect VoIP/Video avsglobal.webex.com 80 or 443
Cisco WebEx Connect Desktop Sharing
aimprods01.webex.com 80 or 443
Cisco WebEx Connect Premium service
components.premiumservices.aol.com
aimpro.premiumservices.aol.com
radaol-prod-web-rr.streamops.aol.com
80 or 443
2

Chapter 1: Getting Started
Capacity and Bandwidth RequirementsThe following are the recommended bandwidth requirements for the Video sessions initiated from the Cisco WebEx Connect Client:
Bandwidth Requirement —P2P
Bandwidth Requirement —With Server Proxy
Note The bandwidth matrix is intended as a guideline. Additional bandwidth might be required based on your usage.
WebEx Connect Settings
The following settings are required for Cisco WebEx Connect, including the type of connection, host name, port, and IP addresses.
ResolutionMaximum Frame Rate (fps)
Minimum Bandwidth (kbps)
Maximum Bandwidth (kbps)
QVGA(320X240) 15 35-80 250-300
QCIF(176X144) 15 30-60 150-200
ResolutionMaximum Frame Rate (fps)
Minimum Bandwidth (kbps)
Maximum Bandwidth (kbps)
QVGA(320X240) 10 25-70 160
QCIF(176X144) 10 20-50 90
3

Chapter 1: Getting Started
Advanced Auditor Options
The following settings are required for Advanced Auditor, including the type of connection, host name, and port
The Advanced Auditor Solution can also be used to manage and audit the traffic from/to public IM clients (Yahoo, MSN and/or GoogleTalk). IMA can be set to monitor/manage the public IM traffic in one of the two ways:
Configuring the public IM clients with the proxy address provided by WebEx Communications Inc.
Configuring the DNS server to redirect the URLs used by public IM clients to WebEx IM A servers.
Type of Connection Host name Port
IM Service slogin.oscar.aol.com 443
VoIP/Video avsglobal.webex.com 80 and 443
Desktop Sharing aimprods01.webex.com 80 and 443
Premium service components.premiumservices.aol.com
aimpro.premiumservices.aol.com
radaol-prod-web-rr.streamops.aol.com
80 and 443
Connect Platform Swapi.webexconnect.comdms.webexconnect.com
80 and 443
User Registration and Market Place
Marketplace.webex.com 80 and 443
Shortcut Redirect URLs, Downloads & Documentation URLs WebEx services
www.webex.com 80 and 443
Incoming E-mails To receive automatic Username & Passwords, set your SPAM Filter to allow emails from mda.webex.com.
Connect IP Addresses 66.163.32.0 – 66.163.63.255
209.197.192.0 - 209.197.223.255
AOL Network Range 205.188.0.0 – 205.188.255.255
64.12.0.0 – 64.12.255.255
80, 443, and 5190
Type of Connection Host name Port
IM Service with Auditor Option slogin.webexaimpro.com 5191
Advanced Auditor admin Console
https://<companyid>.webexaimpro.com 8443
WebEx AIM Pro - Secure SSL connections
slogin.webexaimpro.com 5191
WebEx AIM Pro - Non-secure connections
login.webexaimpro.com 5190
4

Chapter 1: Getting Started
IM Client Proxy Addresses
Following table lists the proxy addresses for different IM clients. The firewalls need to be setup appropriately to allow public IM clients to access the proxy addresses.
Public IM Domain Names and URLs
Following table lists the public IM domain names and the corresponding WebEx URLs. The DNS should be configured to redirect the public IM domain names to the URLs specified. The firewalls need to be setup appropriately to allow connectivity to the WebEx IMA addresses.
Note Public IM clients such as Yahoo! Messenger and MSN are designed to evade the common firewall and proxy controls used by enterprises. For Advanced Auditor solution to monitor the traffic from/to public IM clients, it is required that any direct connectivity between the public IM clients and the public IM cloud be prevented.
Type of Connection Host name Port
Yahoo IM proxy.webexaimpro.com 1080
MSN Messenger proxy.webexaimpro.com 1080
GoogleTalk proxy.webexaimpro.com 1080
AIM
(Note: AIM 6.1 does not allow proxy to be configured)
proxy.webexaimpro.com 1080
Public IM Domain Name WebEx IMA domain names Port
scs.msg.yahoo.com
relay.msg.yahoo.com
scsa.msg.yahoo.com
scsb.msg.yahoo.com
scsc.msg.yahoo.com
scsd.msg.yahoo.com
proxy.webexaimpro.com 5050
messenger.hotmail.com
messenger.msn.com
gateway.messenger.hotmail.com
proxy.webexaimpro.com 1863
talk.google.com proxy.webexaimpro.com 5222, 5223
login.oscar.aol.com
Note AIM 6.1 is not supported.
login.webexaimpro.com 5190
5

Chapter 1: Getting Started
Refer to the Facetime documentation on the latest information on IP addresses, URLs, and Ports that need to be denied access to block direct communication between public IM clients and the public IM cloud.
Cisco WebEx Connect Integration with Other Instant Messagers
Cisco WebEx Connect can federate with users of many leading Instant Messengers, including Jabber, IBM Lotus Sametime, and Microsoft Live Communications Server (LCS).
Communicating with LCS and Sametime Users
The following prerequisites are necessary so that third party Instant Messaging solutions, such as Microsoft Live Communications Server (LCS), Office Communications Server (OCS), and IBM Lotus Sametime work properly with Cisco WebEx Connect:
The third party Instant Messaging solution must have federation with AIM network enabled.
Connectivity between the third party Instant Messaging solution and AIM network has to be established through respective vendors of the third party solution.
Intra-Company Federation (users who want to use the third party Instant Messaging solution and Cisco WebEx Connect) requires the use of different domain names for the two Instant Messaging solutions.
Cisco WebEx Connect administrators need to make the following DNS changes in their domain to enable federation with the third party Instant Messaging solutions.
Note IBM Lotus Sametime does not use any DNS / SRV capabilities to enable or disable instant messaging services for AIM connectivity. The federation with AOL is managed through local Sametime configuration. For more information about configuring Sametime, refer to IBM Sametime documentation.
6

Chapter 1: Getting Started
DNS Entry Format for Federating with Microsoft LCS
The federation between Microsoft LCS/OCS and AOL can be enabled through DNS or through local LCS/OCS configuration. For more information on configuring LCS/OCS, refer to Microsoft LCS/OCS documentation. If the LCS/OCS deployment has AOL federation enabled through DNS, create the DNS entry in the following format:
_SIPFederationTLS._TCP.connectcustomer.com. 3600 IN SRV 0 1 5061 sip.oscar.aol.com (replace connectcustomer with your organization’s domain name).
DNS Entry Format for all other Instant Messengers
The format for all other supported third party solutions is:
_sips._tcp.connectcustomer.com. 3600 IN SRV 0 1 5061 sip.oscar.aol.com (replace connectcustomer with your organization’s domain name).
After the prerequisites are complete, Cisco WebEx Connect users can add the LCS or Sametime contacts with their screen name, just like any other contact and can begin exchanging IM conversations.
Note Due to the DNS caching in the internet, changes to DNS settings can take a few hours (in some cases, up to 72 hours) to take effect.
Note The domain name used by the enterprise system and the domain name used by Cisco WebEx Connect cannot be the same.
7

Chapter 1: Getting Started
Cisco WebEx Connect Admin Console SetupYou can access Cisco WebEx Connect administrative functionality the first time using the steps below. If you have Spaces disabled, see “Logging in with Spaces Disabled” on page 10.
Logging in with Spaces Enabled
To access to Cisco WebEx Connect administrative functionality the first time you log in, follow these steps:
1 Check your inbox for email from WebEx. The email is sent to the email address designated as the implementation contact when ordering the service. If you do not see the email from webex.com check your spam filter or contact WebEx Support.
2 Click on the URL in the email to reset the password.
3 Click on the URL in the email to download the latest Cisco WebEx Connect client.
4 Install and start Cisco WebEx Connect.
5 Log in using the email address and password from the initial account setup.
6 Click on the Spaces icon and then click on MyWebEx.
8

Chapter 1: Getting Started
7 Click on the Administrative Tools tab to enter the Cisco WebEx Connect Admin Console. For more information on using Cisco WebEx Connect, refer to the Cisco WebEx Connect Help.
The following buttons appear on the User tab:
From the Administrative Tools tab, you can then:
Customize emails you send to new Cisco WebEx Connect users and when users invite others to join Cisco WebEx Connect Team Spaces.
For more information on customizing email templates, see “Notifications, Emails, and Alert Templates” on page 27.
Add new Cisco WebEx Connect users from the User tab. Assign Roles and Groups to users.
For more information on adding users, see “Adding individual users” on page 13.
Configure Cisco WebEx Connect for users from the Configuration tab.
For more information on configuring Cisco WebEx Connect, see “Configur-ing Cisco WebEx Connect” on page 23.
Button Description
Add User Add users on the User tab, one at a time.
Edit User Open the Edit User dialog box to edit users.
Import Users Import users from a CSV file.
9

Chapter 1: Getting Started
Use the Import Users button on the User tab to importing user information from a CSV (comma separated value) file. For more information on importing users, guidelines for formatting CSV files, and a sample CSV, see “CSV File Format” on page 77.
For more information on importing users, see “CSV File Format” on page 77.
Note For additional information and documentation, click on the About tab.
Logging in with Spaces Disabled
If you have Spaces disabled, you can access the Cisco WebEx Connect Admin Console by accessing this URL:
http://www.webex.com/go/connectadmin
Note Customers with Single Sign-On or Directory Integration enabled need to contact Cisco WebEx representative for assistance in getting started with launching Cisco WebEx Connect Admin Console.
Administrative Tools
The following tabs are available in the Cisco WebEx Connect Administrative Tools:
Tab Description
User Add user information.
Configuration Configure settings for users.
Policy Editor Set policies and rules for users.
Group Assign users to groups and assign group policies.
Report View usage reports on users.
About View Cisco WebEx Connect documentation and version.
10

2Adding Users
The User tab enables you to view, edit, and create, groups, users, and roles for any applications running on the Cisco WebEx Connect users. From the User tab, you can:
Add users
Import users from a CSV file
Assign users to Groups
Add new Groups
Assign Roles to users
Adding UsersYou can search for, create, and edit users, and assign groups and roles to users. The Org Administrator role can only be assigned to users who are members of the top level group. A top level group, with the name of the organization provided at the time of provisioning. The name of the top level group begins with the name of the organization.
In addition to manually adding and editing users and groups, the process is different for adding and editing users when SSO and directory integration is enabled. For more information on configuration, see “Single Sign On and Directory Integration” on page 63. For more information on adding users with SSO and Directory Integration enabled, see “Adding Users with Single Sign-on and Directory Integration Enabled” on page 16.
Note When you add a new user, it is mandatory to type a Screen Name for the user. In addition, the user’s Screen Name must be the user’s email address.
11
Chapter 2: Adding Users
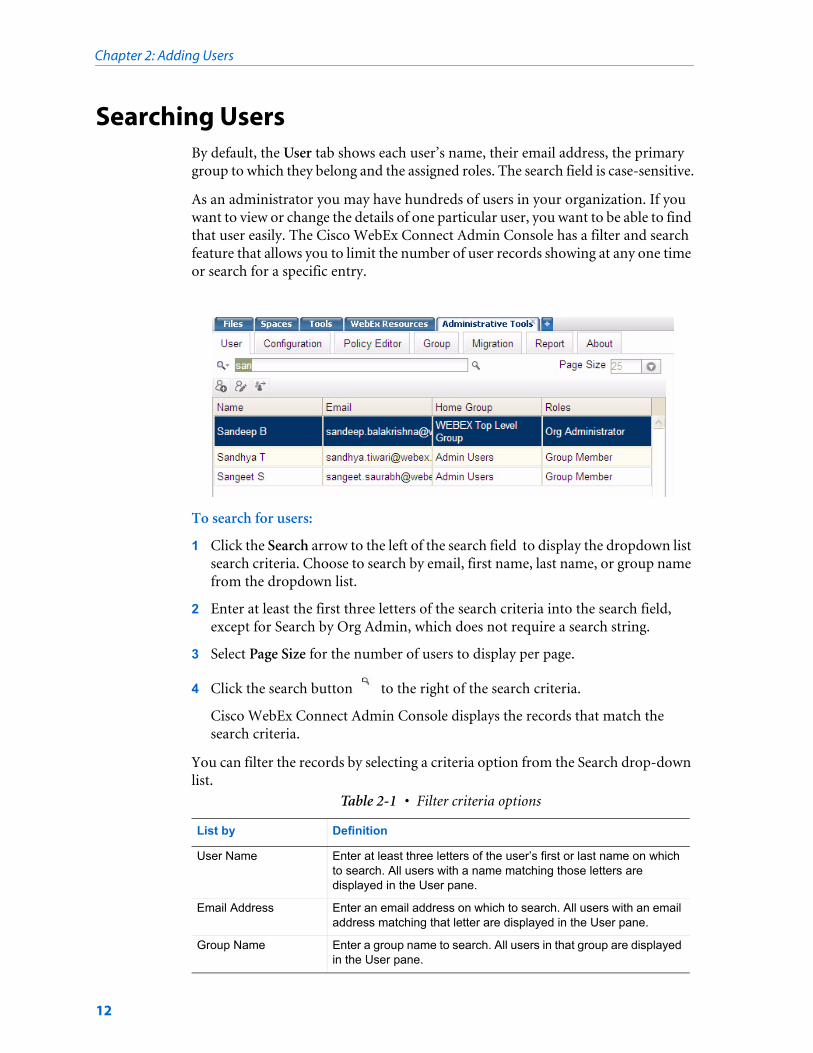
Searching UsersBy default, the User tab shows each user’s name, their email address, the primary group to which they belong and the assigned roles. The search field is case-sensitive.
As an administrator you may have hundreds of users in your organization. If you want to view or change the details of one particular user, you want to be able to find that user easily. The Cisco WebEx Connect Admin Console has a filter and search feature that allows you to limit the number of user records showing at any one time or search for a specific entry.
To search for users:
1 Click the Search arrow to the left of the search field to display the dropdown list search criteria. Choose to search by email, first name, last name, or group name from the dropdown list.
2 Enter at least the first three letters of the search criteria into the search field, except for Search by Org Admin, which does not require a search string.
3 Select Page Size for the number of users to display per page.
4 Click the search button to the right of the search criteria.
Cisco WebEx Connect Admin Console displays the records that match the search criteria.
You can filter the records by selecting a criteria option from the Search drop-down list.
Table 2-1 • Filter criteria options
List by Definition
User Name Enter at least three letters of the user’s first or last name on which to search. All users with a name matching those letters are displayed in the User pane.
Email Address Enter an email address on which to search. All users with an email address matching that letter are displayed in the User pane.
Group Name Enter a group name to search. All users in that group are displayed in the User pane.
12

Chapter 2: Adding Users
You can also limit the number of records displayed in the User pane. From the Page Size drop-down list, choose how many records to display per page. In addition, you can click First, Prev, Next, and Last buttons (shown below) to go to scroll through the list of records.
Adding individual users
Only an Org Administrator can add new users, one at a time from the User tab. A newly-created user doesn’t necessarily belong to any group unless the administrator explicitly assigns the user to a specific group. A new user’s default role is Group Member.
To create a new user:
1 From the Cisco WebEx Connect Admin Console, select the User tab.
2 Click on the Add User icon to insert a new row.
3 Click in the Name field and enter the user’s name.
4 Click in the Email field and enter an email address.
5 Double-click the Home Group field to select a group. The User Group and Role Management screen appears.
6 Click on a Group Name to associate with this user and click Select. To create new groups, see “Adding Groups” on page 17.
7 Click on the Roles link to select a role. The User Group and Role Management screen appears.
8 Select the Role check box to assign to the user. You can select more than one role to assign to the user.
Inactive User Enter the inactive user’s first or last name.
Org Admin Select this option to display all Org Admin users. You do not need to enter any search criteria. To find a specific Org Admin, enter the user’s first or last name.
Table 2-1 • Filter criteria options
List by Definition
13

Chapter 2: Adding Users
9 Click Save. User records are automatically saved.
10 Continue adding users by clicking the Add User icon and repeating the previous steps.
New users receive a welcome email based on the Welcome Email template in the Cisco WebEx Connect Admin Console. For details on email templates, see “Notifications, Emails, and Alert Templates” on page 27.
Note If there is missing information or errors when you add new users, the errors are highlighted in yellow and a message is displayed.
Importing multiple users from a CSV file
To import users from a CSV file:
1 From the Cisco WebEx Connect Admin Console, select the User tab.
2 To import multiple users click the Import User button.
The Import User dialog box appears above the user list.
3 Click Select File to select the CSV file you want to import and click Import.
After the import is complete, the administrator who initiated the import, receives an email with the status of the import. The email states whether the import was a success, failure, or terminated.
14

Chapter 2: Adding Users
The CSV file is imported and the users appear in the User tab. For more information on CSV file format and a sample file, see “CSV File Format” on page 77.
Editing users
As an administrator, you have permission to edit all the properties of an existing user. You can change the groups a user is assigned to and change the roles associated with that user.
To edit a user:
1 Select the user you want to edit in the User tab.
2 Click the Edit User icon.
The Edit User dialog box appears. All the current properties of the user are displayed.
3 Edit any properties in the Edit User dialog box. In addition, you can use this screen to reset the user password.
Note The Screen Name format must match the Business Email format and must comply with the domain list. By default, this value is automatically populated.
4 Click Save.
15

Chapter 2: Adding Users
Adding Users with Single Sign-on and Directory Integration Enabled
In addition to manually adding and editing users and groups, the process is different for adding and editing users when SSO and directory integration is enabled. For more information on Single Sign-on (SSO) and Directory Integration, see “Single Sign On and Directory Integration” on page 63.
When Directory Integration is implemented with Cisco WebEx Connect:
Users and groups are created from corporate directory files provided by the company or organization.
Org Administrators cannot directly edit the user and group data. When the user and group data needs updating, the company provides an updated corporate directory file that can be imported into Cisco WebEx Connect.
The CSV file import function is not available.
When Single Sign-On is implemented with Cisco WebEx Connect.
New user accounts are automatically created when the user logs into Cisco WebEx Connect for the first time.
When SSO is implemented, user accounts are automatically provisioned the first time the user logs into Cisco WebEx Connect.
Assigning SpacesThe Cisco WebEx Connect Administrator can reassign Spaces owned by a user to any other user. Once assigned the user to which the Space is assigned becomes the Space administrator for all the Spaces. For example, if an employee leaves a company, the Administrator can reassign this user’s Spaces to another user. You can turn off the Spaces feature by creating a policy. For more information, see “Using Policy Actions Available in Cisco WebEx Connect” on page 52.
To reassign a Space to another user:
1 Right-click the name of a user from the User tab and select Assign User.
2 Enter the name of the user you want to be the Space owner for all the Spaces that belong to this user.
3 Click Assign.
16
Chapter 2: Adding Users
Adding GroupsThe Cisco WebEx Connect Administrator organizes users into groups. The groups are assigned group policies to determine what actions should be taken when users belong to a particular group. Users can be members of one or more groups. However, policies applied to users’ home group overrides any other policies.
The first time you open the Cisco WebEx Connect Admin Console there will be a default list of groups available. These groups cannot be edited or deleted at this time, however you can create new groups or edit or delete these new groups at any time. You can assign users to a group to which you apply a specific policy.
When Cisco WebEx Connect is provisioned, an Organization is created the top level group:
A top level group, with the name of the organization provided at the time of provisioning. The Org Administrator role can only be assigned to users who are members of the top level group. The name of the top level group begins with the name of the organization.
Note Cisco WebEx Connect sees a personal library appear as a group associated with a user, but this group cannot be modified.
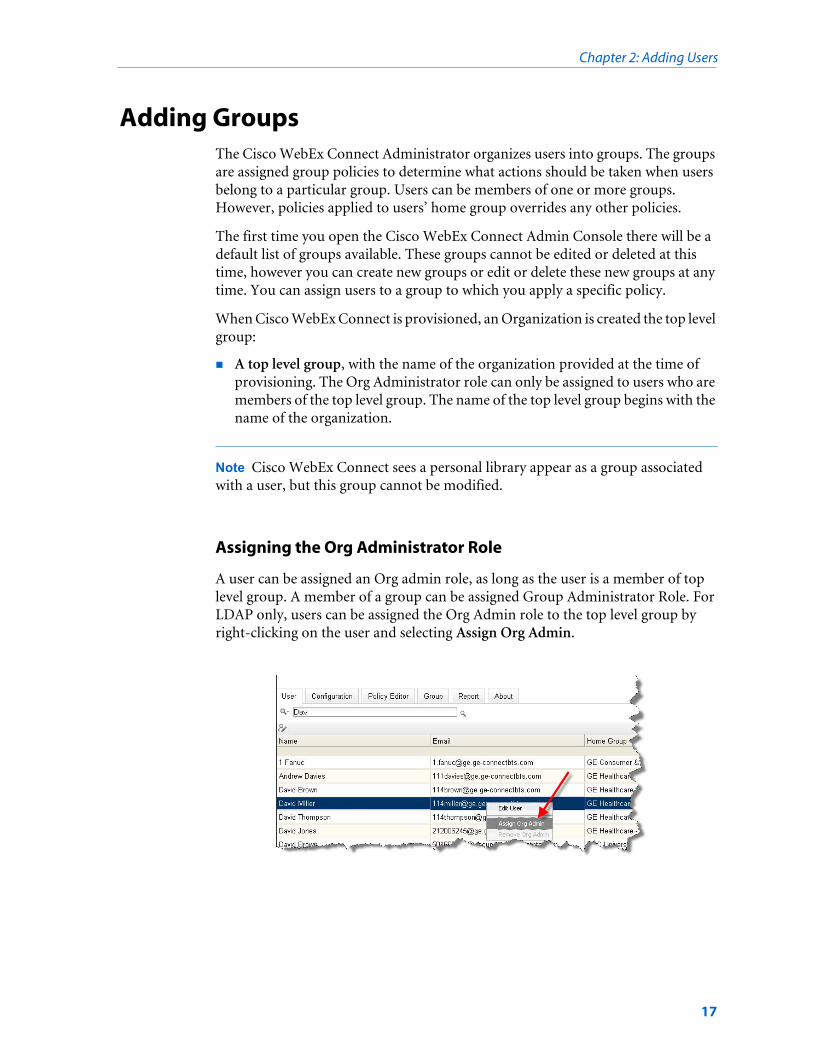
Assigning the Org Administrator Role
A user can be assigned an Org admin role, as long as the user is a member of top level group. A member of a group can be assigned Group Administrator Role. For LDAP only, users can be assigned the Org Admin role to the top level group by right-clicking on the user and selecting Assign Org Admin.
17

Chapter 2: Adding Users
Group Administrator Role
Group Administrator role allows a user to:
View a list of users in the group, and in the sub-groups
Search for users by group, and move users between the groups managed
Apply policies to groups managed
Be an administrator of only one group (home-group and its sub-groups)
Create sub-groups
A Group Administrator cannot:
Create new users
No migration tab, therefore cannot migrate users
Create policies
Note Users can only be a group administrators for their home group.
Adding groups
If you are an org or group administrator, you can create new groups.
To create a new group:
1 From the User tab, double-click to select a group.
18

Chapter 2: Adding Users
2 From the User Group and Role Management dialog box, double-click to open the Select Group box.
3 Right click to Add a group. The default name New Group is assigned.
4 Enter the name of the group at the top of the dialog.
5 Select the group and click Select to save the group and close the Select Group dialog.
6 Click Save on the User Group and Role Management dialog box.
Editing groups
As an administrator, you can rename groups.
To edit an existing group:
1 Select the group you want to edit in the User tab.
2 Double click the group name. The User Group and Role Management dialog box appears.
3 Double click the group name to open the Select Group dialog box. Edit any properties in the User Group and Role Management dialog box.
19
Chapter 2: Adding Users
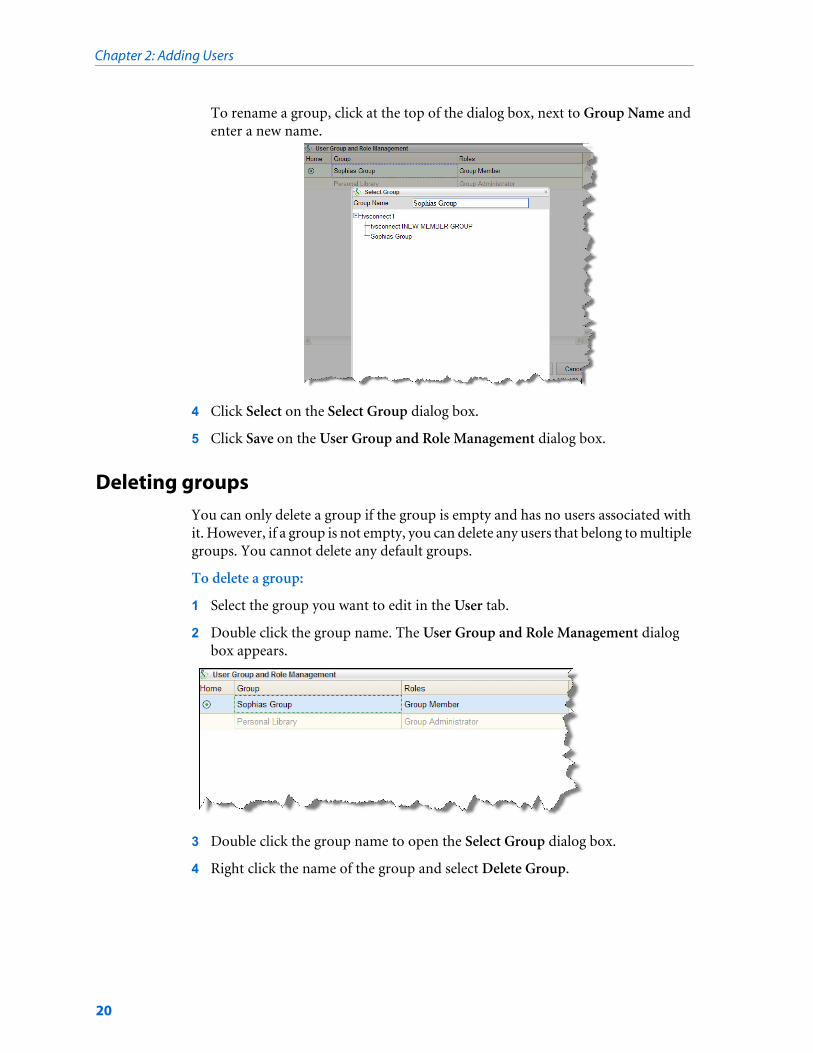
To rename a group, click at the top of the dialog box, next to Group Name and enter a new name.
4 Click Select on the Select Group dialog box.
5 Click Save on the User Group and Role Management dialog box.
Deleting groups
You can only delete a group if the group is empty and has no users associated with it. However, if a group is not empty, you can delete any users that belong to multiple groups. You cannot delete any default groups.
To delete a group:
1 Select the group you want to edit in the User tab.
2 Double click the group name. The User Group and Role Management dialog box appears.
3 Double click the group name to open the Select Group dialog box.
4 Right click the name of the group and select Delete Group.
20

Chapter 2: Adding Users
5 Click Select on the Select Group dialog box.
6 Click Save on the User Group and Role Management dialog box.
Cisco WebEx Connect Roles Roles grant specific privileges to individual users or groups and allow them to perform specific actions. There are some default roles and privileges.
Each default role in the Cisco WebEx Connect Admin Console includes one or more privileges, which determines the level of access a user has to applications running on the Cisco WebEx Connect platform.
Note A role can have one or more privileges, but the available privileges are determined by the choice and category already selected for that particular role.
Default Roles
The default roles are displayed on the User Group and Role Management screen. For a regular organization, the Org Administrator can assign Group Admin, Group Member, or Org Admin roles to users. The Group Administrator can assign only Group Admin and Group Member roles to users.
The default roles in the Cisco WebEx Connect Admin Console are:
Group Administrator—Role assigned to the person who has responsibility for all the actions and tasks relating to the group.
Group Member—Role assigned to person who is a member of a group.
Org Administrator—Role assigned to the user who manages the Cisco WebEx Connect organization. This role can only be assigned to a user who belongs to the top level group.
21

Chapter 2: Adding Users
Note Currently, the ability to create and modify roles and privileges are limited. All roles except the Org Administrator’s role are limited in terms of the scope of activities they can perform and the privileges they have.
22

3Configuring Cisco WebEx Connect
As an administrator you can set a default user level storage allocation for the an organization or modify storage allocation on a user-by-user basis. You can also configure notification alerts that are sent to a user or an organization when a certain event occurs.
Configuring Cisco WebEx ConnectThe Configuration tab allows you to set and control default settings Cisco WebEx Connect users.
To configure Cisco WebEx Connect settings:
1 Click the Configuration tab.
The Configuration screen appears.
23

Chapter 3: Configuring Cisco WebEx Connect
2 Enter the information in the settings fields.
Field Definition
SuperAdmin Settings
Domain Name The list of domain names associated with the organization. This list determines the domain names that can be used as part of user screen names. The organization needs to own the domain names associated with the organization. The domain name list cannot be changed by the Org admin. To add new domain names into this list, contact support.
Domain White List The Org Administrator can add domains to the white list. The list of domain names used for defining the trusted domains and companies for communication and collaboration. For example, Organizations can define the partner domain names and enforce communication policies using the domains specified in the white list. Domains that are added to the white list receive the same privileges as internal users.
Resource Allocation
Storage Purchased The amount of storage purchased by the company. (Read only field. Contact Cisco WebEx to make changes).
Storage Used The storage amount used by the company. (Read only field).
Number of users The number of company licensed Cisco WebEx Connect users. (Read only field. Contact Cisco WebEx to make changes).
Enable storage enforcement of each user
Check this box to limit the maximum allowed storage per user. Disabling this option allows the user to use the storage up to the org or department storage limit.
Default Storage Allocation per User
The maximum storage amount allowed for each user. Enter the storage amount to be allocated to all users. The Administrator can specify a unique amount for individual users on a case by case basis. When the default value is changed for all users, the unique allocations for the individual users is not affected.
Default Settings
Enable User Self-Registration
Select Yes or No to allow users to register on www.webex.com/go/wc and become part of the organization without manual provisioning by the administrator. When this is disabled, users will get a message to contact their administrator.
Display contact pictures in contact list
Select Yes or No to allow users to display a picture with their name on the contact list.
Configure URL
User Registration URL Specify custom messages with contact information and expose this page to any user attempting to register for a Guest Edition user with the domains owned by the Company. This URL is only effective is self-registration is disabled.
Forgot Password URL This URL is used in rare customer-specific scenarios where Cisco WebEx Connect cannot support self-managed user password reset.
24

Chapter 3: Configuring Cisco WebEx Connect
Connect Support URL The URL that is shown to users from Cisco WebEx Connect Help>Support menu. Leave this field blank to use default functionality.
Center Site URL The URL for the center site.
Connect Telephony
Click-to-Call Select to enable Click-to-Call functionality. If enabled, enter the CUCM (Cisco Unified Communication Manager) IP address or URL. For more information about Click-to-Call, see
Allow user to enter manual setting
Select to allow manual setting.
IM Settings
User IM visibility Select Yes to enable the Invisible menu option for Instant Messaging users. Select No to disable the Invisible menu option.
Disable offline messages Select Yes to disable sending IM messages to Cisco WebEx Connect users who are offline.
Blocked URLs (Separate multiple values with semicolon)
Enter the URLs that are not allowed to send instant messages to users. If you need to block multiple URLs, separate each URL with a semicolon. For example, http://www.example.com;http://www.example1.com; http://www.myurl.com;
Blocked file extensions (Separate multiple values with semicolon)
Enter the file extensions that are not allowed to be transferred on IM conversations. If you need to block more than one file extension, separate each file extension with a semicolon. For example, exe;pdf;doc;zip;
User Profile Override and View Settings
User Profile Override Select Yes or No to allow users to override the default setting that the org administrator set for users to set their profile.
User Profile View Setting Select from the dropdown menu who can view the user’s profile.
Directory Input Scheduling
Job Scheduling This is only used with Directory Integration. Enter the date and time you want the directory files to import into Cisco WebEx Connect. Use UNIX cron job format for this field. For details on cron format, see http://www.opensymphony.com/quartz/api/org/quartz/CronExpression.html.
Notification Emails This is only used with Directory Integration. Enter the email addresses for those you want to receive status of the import of directory files.
Integrated Center Site
Field Definition
25

Chapter 3: Configuring Cisco WebEx Connect
3 To enable Click-to-Call feature, you also need to enable settings for the CUCM Account. From the Edit menu in Cisco WebEx Connect, select Settings. Select Click-to-Call, then Set Up Account.
Site URL This is required when you have enabled the integration between Meeting Center and SSO. Enter the Meeting Center Site URL that enables meeting hosts to schedule meetings.
For more information about SSO-enabled Meeting Center sites and Cisco WebEx Connect, see “Using Single Sign-on integrated with Meeting Center” on page 66.
Brief Description Enter a brief description for the Meeting Center Site.
Security Settings
Org, WebEx, and Federated Web SSO Certificate management
Select one of the certificates to import. For more information, see “Directory Integration” on page 68. The Super Admin must give the Org Administrator permissions to update these settings.
Calendar Application Configuration
Locations Select conference room locations to appear in Calendar. Click Add to add locations. For more information, see “Calendar Application Configuration” on page 31.
Notifications, Emails, and Alert Templates
Emails and Notifications The notifications and alerts that are emailed to users when a certain event occurs. To edit Email templates, see “Notifications, Emails, and Alert Templates” on page 27.
Premium Services Configuration
Add/Delete Services Add premium services to Cisco WebEx Connect. For more information, see “Premium Services Configuration” on page 30.
Field Definition
26

Chapter 3: Configuring Cisco WebEx Connect
Note The Cisco Unified Communications Manager Click-to-Call functionality is not available in Cisco WebEx Connect by default. You need to purchase it separately. Contact your Cisco sales representative for more information.
4 Select Use default server and click OK.
5 Click Save.
Notifications, Emails, and Alert TemplatesCisco WebEx Connect Admin Console provides templates for email notifications and alerts that Cisco WebEx Connect users receive. You can easily modify these templates. See “Email Templates” on page 28 for details on the templates and their macros.
To modify email templates:
1 Click the Configuration tab.
The Configuration screen appears where you can enter settings for users.
2 Scroll down to Notifications, Email & Alert Templates section of the Configuration tab.
3 Select the template that you want to modify and click Edit Mail Template.
27

Chapter 3: Configuring Cisco WebEx Connect
The Edit Email Template dialog box appears.
4 Enter the appropriate information in each field starting with Email Name.
5 From the Format drop down list, select the format to send the email in: HTML or Text.
Note If you change the email format from HTML to Text, you need to manually remove the HTML tags in the body of the email template.
6 In the Message box, enter the text of the email template.
Note Every email template contains pre-existing message text in the Message box. You can customize or change it according to your requirements.
7 Click Save.
Email Templates
The Cisco WebEx Connect Admin Console provides templates for email notifications and alerts Cisco WebEx Connect users receive. You can easily modify these templates.
28

Chapter 3: Configuring Cisco WebEx Connect
Note Cisco WebEx Connect email templates are pre-populated with appropriate templates for out of the box use.
Email Variables and Macros
Welcome Message—Default email contains links to reset password, download the client, documentation, and community links.
%USERNAME%—The name of the user.
%CLIENTDOWNLOADURL%—The URL that takes the user to the welcome message.
%NEWPASSWORDURL%—The new password variable.
Space Invitation Message—Connect User—Default template includes information on how to get to the Space and link to the community.
%SPACEOWNER%—Name of the Space owner
%SPACENAME%—Name of the Space
%USERDEFINEDMESSAGE%—Text entered by the Space owner at the time of creating the Space
Space Invitation Message Non-Connect User—Default template includes information on where to get a Cisco WebEx Connect account, how to open a new Space, and link to the community.
%SPACEOWNER%—The name of the Space owner.
%SPACENAME%—The name of the user.
%USERDEFINEDMESSAGE%—
%REGISTERURL%—URL where the user can register as a Space user
Get or Reset Password Email—Email is sent when Cisco WebEx Connect Administrator resets password.
%NEWPASSWORDURL%—URL that will take the user to reset password.
Notify Space Members Email—Default template for manual notifications sent from within Spaces.
%UserMessage%—The message the user writes.
%ObjectLink%—The URL that takes the Space member to a particular location specified by the user.
%SpaceName%—The name of the user’s Space.
IT purchase notification to Guest Edition Users—Email to notify Guest Edition users that their account will be deactivated.
%USERNAME%—The name of the user.
Add to Public Library Request—A request to copy an application to the public library.
%USERNAME%—The name of the user.
%APPNAME%—The name of the application to copy to the library.
Deny Add to Public Library Request—A denied request to add to an application to the public library.
%APPNAME%—The name of the application to copy to the library.
Invitation to Guest Edition Users— Email to invite Guest Edition users to upgrade to Business Edition.
%LINKTOINVITATION%—URL where the user can register as a Business Edition user.
Department purchase Notification to Guest Edition—Email to Guest Edition users to change their password.
%NEWPASSWORDURL%—URL where the user to reset password.
29

Chapter 3: Configuring Cisco WebEx Connect
The following is an example of the Welcome email template that a new user receives:
Premium Services ConfigurationThe Cisco WebEx Connect Admin Console allows the administrator to add and configure premium services to Cisco WebEx Connect.
Storage Limit Exceeded—Notify user that their storage limit has been exceeded.
%LIMIT%—maximum amount of storage allowed.
%ADMINEMAIL%—Cisco WebEx Connect Administrator’s email.
Email Sent when user provision job completes, is interrupted, or fails—Email to notify user that the user import job completed, interrupted, or failed.
%USERNAME%—The name of the user.
Email sent when directory integration (group provisioning) job fails— Email to notify user that the batch import job failed.
User is instructed to contact support for help.
Email sent when directory integration (group deletion) job fails— Email to notify user that the batch group deletion job failed.
User is instructed to contact support for help.
Email sent when directory integration (user inactivation) job fails— Email to notify user that the batch user inactivation job failed.
User is instructed to contact support for help.
Email Variables and Macros
30

Chapter 3: Configuring Cisco WebEx Connect
To configure premium services:
1 Click the Configuration tab.
The Configuration screen appears where you can enter settings for users.
2 Scroll down to the Premium Services Configuration part of the Configuration screen.
3 Check the box for each service you want to include. Use the buttons to the right of each service, to add, modify, or delete the service.
4 Click Save.
Calendar Application ConfigurationThe Cisco WebEx Connect Admin Console allows the administrator to add and configure premium services to Cisco WebEx Connect.
To configure premium services:
1 Click the Configuration tab.
2 Scroll down to the Calendar Application Configuration section of Configuration.
3 Click the Add icon to add a calendar location.
4 Click Save.
31

Chapter 3: Configuring Cisco WebEx Connect
Migrating Cisco WebEx ConnectThe Migration tab allows organizations using the Guest Edition of Cisco WebEx Connect to migrate their Guest Edition users to the licensed edition upon purchasing Cisco WebEx Connect for their organization. This eliminates the effort of the Cisco WebEx Connect administrator to manually add each individual Guest Edition user to the licensed edition.
Migration is a simple, three-step process where the Org Administrator:
identifies the Guest Edition users that need to be migrated to the licensed edition
sends an email invitation to these users that contains a link that enables the migration
when Guest Edition users accept the invitation and click the link, they are migrated to the licensed edition of Cisco WebEx Connect.
When Guest Edition users click the link that enables migration, their account information including all Space and other collaboration information is carried over to the licensed edition. However, users who do not receive or accept the email invitation, are denied access to the licensed edition of Cisco WebEx Connect.
The list of Guest Edition users appears in the Migration tab as long as they are not invited or have not clicked the migration link in the invitation email. The following graphic shows this list of users.
Notice that the status of different users. A Pending status means the user has not received the invitation email. An Invited status means the user has not clicked the migration link in the invitation email. When a user with the Invited status clicks the migration link in the invitation email, the user’s name is removed from this list indicating that the migration was successful.
Note Org Administrators can also (optionally) resend email invitations to users.
32

Chapter 3: Configuring Cisco WebEx Connect
The following graphic shows a sample of the invitation email.
The administrator has exclusive control over the domain names used in Cisco WebEx Connect, configuration, and migration of users. Without administrator provisioning, users cannot use Cisco WebEx Connect team collaboration features.
To configure Cisco WebEx Connect migration:
1 Click the Migration tab.
The Migration screen appears.
2 To invite a user to migrate to the licensed edition of Cisco WebEx Connect, select the appropriate user and click the Invite icon.
33

Chapter 3: Configuring Cisco WebEx Connect
34

4Getting started with Cisco Unified Communications Manager for Click to Call
Overview
Cisco's call-processing software, telephones, and endpoint devices allow your organization to efficiently run voice, data, and video communications over a single, converged network.
Cisco provides call-processing solutions for organizations of all sizes and types. These industry-leading IP private-branch-exchange (PBX) solutions manage voice, video, mobility, and presence services between IP phones, media processing devices, voice-over-IP (VoIP) gateways, mobile devices, and multimedia applications. Cisco call-processing solutions includes:
Cisco Unified Communications Manager: This enterprise call-processing system is the core of Cisco Unified Communications. It provides voice, video, mobility, and presence services to IP phones, media-processing devices, VoIP gateways, mobile devices, and multimedia applications. A single system can support up to 30,000 users and scale to support up to 1 million users at up to 1000 sites.
The Cisco Unified Communications Manager Click-to-Call functionality is an optional feature and not available in Cisco WebEx Connect by default. You need to purchase it separately. Contact your Cisco sales representative for more information.
35

Chapter 4: Getting started with Cisco Unified Communications Manager for Click to Call
Cisco Unified Communications ManagerCisco Unified Communications Manager is an enterprise-class IP telephony call-processing system that provides traditional telephony features as well as advanced capabilities, such as mobility, presence, preference, and rich conferencing services. This powerful call processing solution can help:
Build productivity with feature-rich unified communications that help workers spend less time chasing people, and more time being productive.
Enable mobility with software that has embedded unified mobility capabilities so mobile workers can remain productive wherever they are.
Cisco Unified Communications Manager creates a unified workspace that supports a full range of communications features and applications with a solution that is highly:
Scalable: Each Cisco Unified Communications Manager cluster can support up to 30,000 users.
Distributable: For scalability, redundancy, and load balancing.
Available: Support business continuity and improve collaboration with high availability that provides a foundation for multiple levels of server redundancy and survivability.
Setup tasksTo get started, open the Cisco Unified CM Administration tool. Tasks for setting up Cisco Unified Communications Manager include:
Configuring phones More...
Configuring the Cisco Unified Communications Manager for Click to Call More...
Configuring Cisco Unified IP Phones
Before a Cisco Unified IP Phone can be used, you must use this procedure to add the phone to Cisco Unified Communications Manager. You can also use this procedure to configure third-party phones that are running SIP, H.323 clients, CTI ports, the Cisco ATA 186 Telephone Adaptor, or the Cisco IP Communicator.
To configure the phone
1 Select Device > Phone.
2 Select the Add New button.
3 From the Phone Type drop-down list, select the appropriate phone type or device and click Next. After you choose a phone type, you cannot modify it.
36

Chapter 4: Getting started with Cisco Unified Communications Manager for Click to Call
4 If the Select the device protocol drop-down list displays, choose the appropriate protocol of the device and click Next.
The Find and List Phones window appears.
5 Enter the appropriate settings.
Note To see the list of all phone configuration settings, go to the “Cisco Unified IP Phone Configuration” section of the Cisco Unified Communications Administration Guide
6 Select Save.
Adding a directory number to the phone
If you are adding a phone, a message is displayed, confirming that the phone has been added to the database. To add a directory number to this phone, click one of the line links, such as Line [1] - Add a new DN, in the Association Information pane that displays on the left side of the window.
MAC Address Enter the Media Access Control (MAC) address that identifies Cisco Unified IP Phones (hardware phones only).
The Media Access Control (MAC) address is a unique, 12-character hexadecimal number that identifies a Cisco Unified IP Phone or other hardware device. Locate the number on a label on the bottom of the phone (for example, 000B6A409C405 for Cisco Unified IP Phone 7900 family of phones or SS-00-0B-64-09-C4-05 for Cisco IP Phone SP 12+ and 30 VIP).
Do not enter spaces or dashes and do not include the “SS” that may precede the MAC address on the label.
For information on how to access the MAC address for your phone, refer to the Cisco Unified IP Phone Administration Guide for Cisco Unified Communications Manager that supports your phone model.
Cisco Unified Communications Manager converts the MAC address for each device by
Dropping the first two digits of the MAC address
Shifting the MAC address two places to the left
Adding the two-digit port number to the end of the MAC address (to the right of the number)
EXAMPLEMAC Address for the Cisco VG248 is000039A44218the MAC address for registered port 12 in theCisco Unified Communications Manager is0039A4421812
Device NameEnter a name to identify software-based telephones, H.323 clients, and CTI ports. The value can include 1 to 15 characters, including alphanumeric characters, dot, dash, and underscores.
37

Chapter 4: Getting started with Cisco Unified Communications Manager for Click to Call
To add a directory number:
1 Enter a dialable phone number.
Values can include route pattern wildcards and numeric characters (0 through 9). Special characters such as a question mark (?), exclamation mark (!), backslash (\), brackets ([ ,] ), plus sign (+), dash (-), asterisk (*), caret (^), pound sign (#), and an X are also allowable. Special characters that are not allowed are a period (.), at sign (@), dollar sign ($), and percent sign (%).
At the beginning of the pattern, enter \+ if you want to use the international escape character +. For this field, \+ does not represent a wildcard; instead, entering \+ represents a dialable digit.
Note When a pattern is used as a directory number, the display on the phone and the caller ID that displays on the dialed phone will both contain characters other than digits. To avoid this, Cisco recommends that you provide a value for Display (Internal Caller ID), Line text label, and External phone number mask.
The directory number that you enter can appear in more than one partition.
2 Select Save.
3 Select Reset Phone.
For more information, see “Resetting a phone” in the Cisco Unified Communications Administration Guide.
Note Restart devices as soon as possible. During this process, the system may drop calls on gateways.
Configuring Cisco Unified Communications Manager for Click to Call
Now that you have set up phones and users, you need to complete these tasks in the Cisco Unified Communications Manager:
Activate Cisco WebDialer on Cisco Unified Communications Manager More...
Verify the CTI Manager is running on Cisco Unified Communications Manager More...
Verify the CCMCIP Service is running on Cisco Unified Communications Manager More...
Verify the correct phone devices are associated with the user More...
38

Chapter 4: Getting started with Cisco Unified Communications Manager for Click to Call
Activating Cisco WebDialer on Cisco Unified Communications Manager
Note Click to Call uses the SOAP interface to interact with the WebDialer servlet on Cisco Unified Communications Manager. Because Click to Call does not use the HTTP interface, the application does not interact with the Redirector servlet.
To activate the Cisco WebDialer
1 Select Cisco Unified Communications Manager Serviceability > Tools > Service Activation.
2 Select the Cisco Unified Communications Manager server from the server drop-down list.
3 In CTI Services, check Cisco WebDialer Web Service.
4 Click Save.
Verifying the CTI Manager is running on Cisco Unified Communications Manager
The CTI Manager must be running on Cisco Unified Communications Manager for Click to Call to function properly.
1 Select Cisco Unified Communications Manager Serviceability > Tools > Control Center - Feature Services.
2 Select the Cisco Unified Communications Manager server from the server drop-down list.
3 In CM Services, verify that Cisco CTIManager is running.
Select the server from this list
39
Chapter 4: Getting started with Cisco Unified Communications Manager for Click to Call
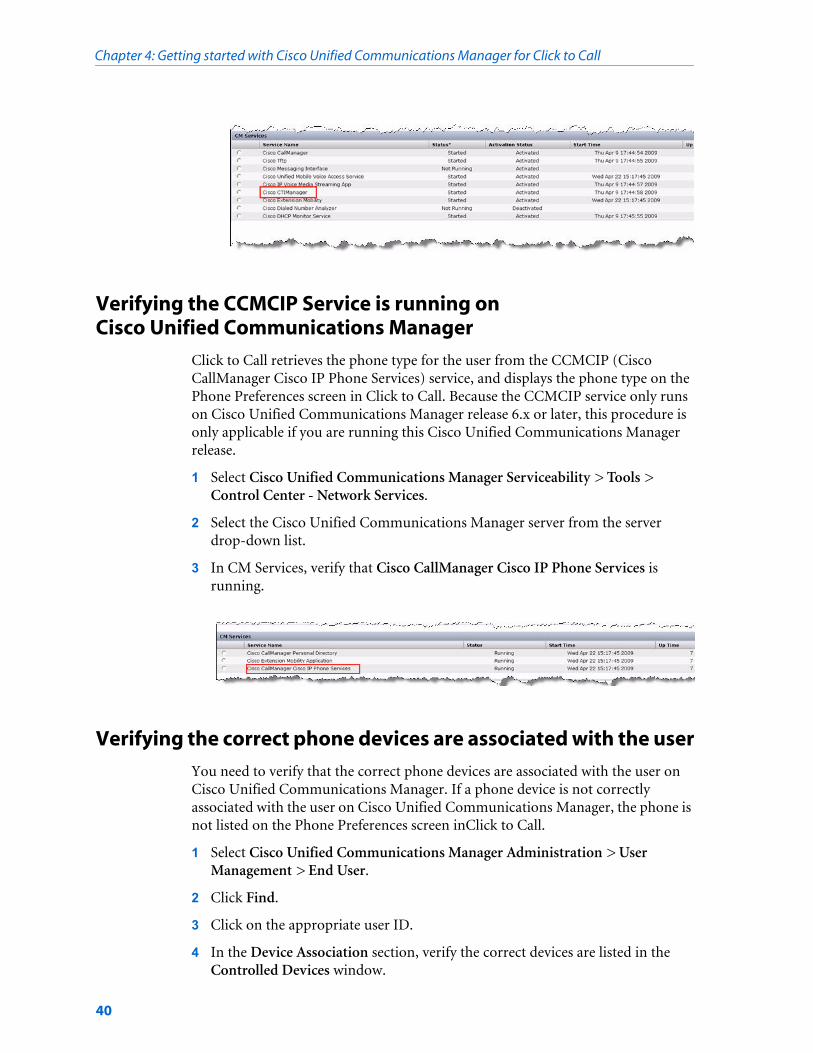
Verifying the CCMCIP Service is running on Cisco Unified Communications Manager
Click to Call retrieves the phone type for the user from the CCMCIP (Cisco CallManager Cisco IP Phone Services) service, and displays the phone type on the Phone Preferences screen in Click to Call. Because the CCMCIP service only runs on Cisco Unified Communications Manager release 6.x or later, this procedure is only applicable if you are running this Cisco Unified Communications Manager release.
1 Select Cisco Unified Communications Manager Serviceability > Tools > Control Center - Network Services.
2 Select the Cisco Unified Communications Manager server from the server drop-down list.
3 In CM Services, verify that Cisco CallManager Cisco IP Phone Services is running.
Verifying the correct phone devices are associated with the user
You need to verify that the correct phone devices are associated with the user on Cisco Unified Communications Manager. If a phone device is not correctly associated with the user on Cisco Unified Communications Manager, the phone is not listed on the Phone Preferences screen inClick to Call.
1 Select Cisco Unified Communications Manager Administration > User Management > End User.
2 Click Find.
3 Click on the appropriate user ID.
4 In the Device Association section, verify the correct devices are listed in the Controlled Devices window.
40

Chapter 4: Getting started with Cisco Unified Communications Manager for Click to Call
Note If you need to associate a phone device with the user, click Device Association. Consult the Cisco Unified Communications Manager online help for further information.
How to configure application dial rules
You can configure dial rules for applications, such as Cisco WebDialer, that automatically strip numbers from, or add numbers to, a telephone number that a user dials. For example, you can use dial rules to automatically prefix a digit to a telephone number to provide access to an outside line.
You configure application dial rules on Cisco Unified Communications Manager from Cisco Unified Communications Manager Administration > Call Routing > Dial Rules > Application Dial Rules.
This section provides a brief description of application dial rules. For detailed information on configuring the application dial rules on Cisco Unified Communications Manager, refer to these documents:
The “Application Dial Rules Configuration” section in the Cisco Unified Communications Manager Administration Guide
The “Dial Plans” section in the Cisco Unified Communications Manager Administration Guide
Sample Application Dial Plan on page 42
Configuring Cisco WebDialer to automatically use application dial rules on Cisco Unified Communications Manager on page 43
41

Chapter 4: Getting started with Cisco Unified Communications Manager for Click to Call
Sample Application Dial Plan
In the sample application dial plan above, 9 represents the off-net access code for outside dialing. For domestic calls, you append the appropriate quantity of digits to the off-net access code to call either a local number or a national (long-distance) number. In each international dial rule, you replace the “+” with the off-net access code and the appropriate international dialing access code.
These application dial rules are configured in the sample dial plan above:
Any international number, the application dial rule removes “+” from the number, and prepends the off-net access code 9 and the international dialing access code 011 to the remaining digits.
Any local seven digit number, the application dial rule prepends the off-net access code 9.
Any local ten digit number that begins with 510, the application dial rule removes 510 from the number and prepends the off-net access code 9 to the remaining digits.
Any national ten digit number, the application dial rule prepends the digits 91.
Any national eleven digit number beginning with 1, the application dial rule prepends the off-net access code 9.
If the Number Begins With field is blank, you leave the number of initial digits open that you wish to apply to the dial rule. For example, the initial digits 1, 1408, or 1408526 will each match the dialed number 14085264000.
Name/DescriptionNumber Begins With
Number of Digits
Total Digits to be Removed
Prefix with Pattern
International 12 Digit + 12 1 9011International 13 Digit + 13 1 9011International 14 Digit + 14 1 9011International 15 Digit + 15 1 9011Local 7 Digit
XXX-XXXX
7 9
Local 10 Digit
(510) XXX-XXXX
510 10 3 9
National 10 Digit
(XXX) XXX-XXXX
10 0 91
National 11 Digit
1(XXX) XXX-XXXX
11 9
42

Chapter 4: Getting started with Cisco Unified Communications Manager for Click to Call
You must configure the application dial rule list in order of priority. Cisco Unified Communications Manager applies the first dial rule match that it finds for the dialed number in the dial rule list; it does not attempt to find the best match in the list. For example, if you configure the dial rule conditions listed below, on receipt of the dialled number 14085264000, Cisco Unified Communications Manager will ignore dial rule 1, and apply dial rule 2 because it is the first match. Although dial rule 3 is the best match, Cisco Unified Communications Manager ignores any subsequent rules in the list after finding the first match.
Note You can also configure directory lookup rules on Cisco Unified Communications Manager. Directory lookup rules transform the number the user dials into a directory number. For further information, refer to the “Directory Lookup dial Rules Configuration” in the Cisco Unified Communications Manager Administration Guide
Configuring Cisco WebDialer to automatically use application dial rules on Cisco Unified Communications Manager
You can configure the Cisco WebDialer service to automatically apply the application dial rules that are configured on
1 Select Cisco Unified Communications Manager Administration > System > Service Parameters.
2 Select the Cisco Unified Communications Manager server from the Server menu.
3 Select Cisco WebDialer Web Service from the Service menu.
4 Click True for the Apply Application Dial Rules on Dial parameter.
5 If you are running Cisco Unified Communications Manager release 6.x or 7.x, click True for the Apply Application Dial Rules on SOAP Dial parameter.
6 Restart the Cisco WebDialer service.
1 Begins with 9 and is 8 digits long, then do X.
2 Begins with 1 and is 11 digits long, then do Y.
3 Begins with 1408 and is 11 digits long, then do Z.
43

Chapter 4: Getting started with Cisco Unified Communications Manager for Click to Call
Troubleshooting
Click to Call log files and configuration files
The Click to Call configuration files are located here:
Windows XP – C:\Documents and Settings\[Windows User Account Name]\Application Data\Cisco\Click to Call
Windows Vista - C:\Users\[Windows User Account Name]\AppData\Roaming\Cisco\Click to Call
Click to Call file descriptions:
Click to Call Log Files
The Click to Call configuration files are located here:
Windows XP – C:\Documents and Settings\[Windows User Account Name]\Application Data\Cisco\Click to Call
Windows Vista - C:\Users\[Windows User Account Name]\AppData\Roaming\Cisco\Click to Call
The folders contain these log files:
clicktocall.log - Contains the application log
MSclicktocall.log - Contains the Microsoft Office log
OCclicktocall.log - Contains the Microsoft Outlook Contacts log
PMclicktocall.log - Contains the Microsoft Outlook Persona Menu log
Each log file rolls over when the maximum file size is reached, for example, clicktocall.log.1, clicktocall.log.2 and so on. The maximum number of log files is ten. Each log file stores up to 100KB of logged data.
The Click to Call installer log file is called install.log and is also located in the C:\Program Files\Cisco Systems\Click to Call folder.
Error Messages
This table provides a list of error messages can appear in the Click to Call application and describes a recommended action for each error message.
Configuration Files and Folders Description\Data\Outbound folder Outbound call log for the end user\Log folder Application log filesclicktocall.xml file Application settings for the userClickToCallPhones.xml file List of unsupported phone models
44

Chapter 4: Getting started with Cisco Unified Communications Manager for Click to Call
Error message Problem and recommended action A connection error occurred. Please ensure Click to Call is running
A call was attempted using the Click to Call functionality when the Click to Call application is not running.
Ask the end user to restart the Click to Call application. A directory error occurred. Please contact your phone administrator
The Cisco Unified Communications Manager directory service may be down.
Allow a short time lapse and retry your connection. If the error occurs again, contact your Cisco Unified Communications Manager system administrator.
A service error occurred. Retry the call. If the problem persists, please contact your phone administrator
An internal error occurred in the WebDialer application.
Contact your Cisco Unified Communications Manager system administrator.
Cannot make call. Please ensure Click to Call is running
Ask the end user to restart the Click to Call application.
Click to Call cannot find Cisco IP Communicator. Please ensure it is running or select another phone
Ask the end user to verify that their Cisco IP Communicator soft phone is running properly, or to select a phone to use with the Click to Call application.
Click to Call is not fully configured One or more mandatory fields in the sign-in screen have been left blank.
Ask the end user to enter the missing information in the sign-in screen, and retry the login.
Destination cannot be reached The end user dialed the wrong number, or you have not applied the correct dial rules.
Check that the Cisco WebDialer service is configured to use the application dial rules on Cisco Unified Communications Manager.
Login failed. Please make sure your user name and password are correct
Provide the end user with the correct username and password for the Cisco Unified Communications Manager server.
Ask the end user to enter this username and password in the Login screen, and retry the login.
No phone is available. Please contact your phone administrator
Ask the end user to verify and refresh the phone preferences in the Phones screen of the Click to Call Preferences.
No phone has been selected for use with Click to Call. Please select a phone
The end user has no phone selected to use with the Click to Call application.
Ask the end user to select a phone to use with the application from the Click to Call.
Proxy authentication rights could not be found. Please contact your phone administrator
Cisco WebDialer service sends this error. Contact your Cisco Unified Communications Manager system administrator.
Service is temporarily unavailable. Retry the call. If the problem persists, please contact your phone administrator
The Cisco Unified Communications Manager service is overloaded. It has reached its throttling limit of two concurrent sessions.
Allow a short time lapse and retry your connection. If the error occurs again, contact your Cisco Unified Communications Manager system administrator.
45

Chapter 4: Getting started with Cisco Unified Communications Manager for Click to Call
Known Issues
Problem: After the user installs Click to Call, the application fails to launch and an error appears.
Solution: Provide the appropriate workaround to your end users:
For Microsoft Windows XP
1 Under the Start menu, select Regional and Language Options in the Control Panel.
2 Change the locale from your locale to a different locale. For example, if your locale is English (United States), change to a different locale, such as English (United Kingdom).
3 Click OK.
4 Change the locale back to your locale, for example, English (United States).
5 Click OK.
The service is overloaded. Retry the call. If the problem persists, please contact your phone administrator
The Cisco Unified Communications Manager service is overloaded. It has reached its throttling limit of two concurrent sessions.
Allow a short time lapse and retry your connection. If the error occurs again, contact your Cisco Unified Communications Manager system administrator.
The URL you requested is not available. Please contact your phone administrator
Provide the end user with the correct Cisco Web Dialer and/or Device Query service IP address.
Ask the end users to enter this information in the sign-in screen, and retry the login.
The XML command is not available in the request. Please contact your phone administrator
This is an error sent from the Cisco WebDialer service. Contact your Cisco Unified Communications Manager system administrator.
<Number> cannot be converted to a valid phone number
The phone number the end user has entered is invalid.
Ask the end user to edit the phone number and try again. The maximum phone number length is 32 digits
The phone number the end user has entered is too long.
Ask the end user to edit the phone number and try to make the call.
Invalid XML command. Please contact your phone administrator
Cisco WebDialer service sends this error. Contact your Cisco Unified Communications Manager system administrator.
Cisco WebDialer service cannot be found. Please ensure you entered the correct address
Provide the end user with the correct Webdialer server address.
Ask the end user to enter this server address in the Login screen, and retry the login.
The call failed. Please ensure you are logged into your Extension Mobility device. If the problem persists contact your phone administrator
A call request is already in progress or the Cisco WebDialer service could not get a line on the phone device from the CTI.
Wait a few moments and then retry your connection. If the error occurs again, contact your Cisco Unified Communications Manager system administrator.
Error message Problem and recommended action
46

Chapter 4: Getting started with Cisco Unified Communications Manager for Click to Call
For Microsoft Windows Vista:
1 Under the Start menu, select Regional and Language Options in the Control Panel.
2 Select the Formats tab.
3 Change the locale from your locale to a different locale in the Current Format menu. For example, if your locale is English (United States), change to a different locale, such as English (United Kingdom).
4 Click OK.
5 Change the locale back to your locale, for example, English (United States).
6 Click OK.
47

Chapter 4: Getting started with Cisco Unified Communications Manager for Click to Call
48

5Using the Policy Editor to Define and Apply Policies
You can define and apply policies for your groups in Cisco WebEx Connect. Policies can be used to enable or disable features such as file transfer, desktop sharing, archiving IM sessions, and automatically upgrading Cisco WebEx Connect. You can apply policies for all Cisco WebEx Connect users within the organization or to specific groups of users. You cannot apply policies for an individual user. For more information about how policies and policy actions work, see “Understanding policies and policy actions” on page 49.
Cisco WebEx Connect provides a Policy Editor to define and apply policies for your groups.
Understanding policies and policy actionsA policy is a set of rules that include actions, which determine what Cisco WebEx Connect features are available to groups of users or to the entire Connect Organization. Thus, a policy can include one or more actions enabled or disabled. For example, a customer who wants to restrict certain Cisco WebEx Connect capabilities for Contractors can create a policy named Contractor Policy. This policy can restrict the capabilities that need to be disabled by setting specific actions to FALSE. For instance, Contractor Policy may disable External File Transfer and External IM for Contractors as shown in the following graphic.
49

Chapter 5: Using the Policy Editor to Define and Apply Policies
An action is a Cisco WebEx Connect capability that can be controlled through policies. For example, the External File Transfer action corresponds to the capability of exchanging files with users outside the organization.
Defining & applying policies
When you create new users in your Connect Organization, they do not belong to any groups by default. All default policy actions will therefore apply across your Connect Organization. This is because the top-level group, typically created by the Super Admin includes all the users of the Connect Organization. For more information about users and groups, see “Adding Users” on page 11
However, when the Org Administrator creates groups and applies specific policies to these groups, these group-level policies will override the organization-level policies. Users belonging to these groups will now be governed by these policies instead of the organization-level policies. For example, if the Org Administrator applies a policy that prohibits external VOIP communications for particular group, users of that group will be unable to communicate using VOIP. However, external VOIP communications may still be enabled for all other users in the organization.
You can apply policies at the Organization level or to specific groups. However, if there is a conflict in policy settings between the Organization level and group level (or between a parent group and its sub-groups), the most restrictive actions will take effect. For example, if VOIP capability is turned on (set to TRUE) at the Organization level, but turned off (set to FALSE) at the group level, VOIP capability for all users within the group will be disabled. However, if VOIP capability is turned off at the Organization level but the group has enabled it, VOIP capability will still be disabled for the users of the group. The following graphic illustrates how policies are applied at the Organization and group levels.
50

Chapter 5: Using the Policy Editor to Define and Apply Policies
Note that this restriction overrides the policy hierarchy described earlier.
About the Policy EditorUse the Cisco WebEx Connect Admin Console to set policies. You can set different policies for each group and make changes to your policies at any time.
Note If you have modified or updated any policy, you need to first sign out of Cisco WebEx Connect and then sign in again for the updated policy to take effect.
To learn how to apply policies to your groups, see “Applying policies to groups” on page 60.
Adding Policies
To add or edit policies:
1 Click the Policy Editor tab. The Policy List appears to the left and the Actions List appears at the right of the Policy Editor screen.
2 Click the Add button (+) to add a new policy. New Policy appears as the policy name. Enter a unique name for the policy.
51

Chapter 5: Using the Policy Editor to Define and Apply Policies
3 To add Actions for this policy, see “Adding actions to a policy” on page 59.
4 Check the Applied box for the policy you want to apply. To complete applying the policy to the appropriate groups, see “Applying policies to groups” on page 60.
Using Policy Actions Available in Cisco WebEx Connect
This section describes the policy actions available in Cisco WebEx Connect. The description also includes information about the impact a policy action has on the features that it controls. This in turn enables you to set the most appropriate policies on the groups that you administer. For information on how to view and set policy actions, see “Adding actions to a policy” on page 59.
By default, a newly provisioned Connect Organization has all the capabilities granted to all the users. This means all Cisco WebEx Connect features are available to all users by this default policy action.
Note Only the AES Encryption policy is not enabled by default. The Org administrator needs to explicitly enable this policy. Administrators then need to create policies only if specific capabilities for all the users or specific groups of users need to be disabled.
External users are users who do not belong to the Cisco WebEx Connect organization but can still user Cisco WebEx Connect to communicate with users who belong to the Cisco WebEx Connect organization.
Table 5-1 • Policy Actions in Cisco WebEx Connect
Policy Action Description Impact Default Value
External File Transfer
Controls file transfer in an IM session between Connect Organization users and users outside the Organization.
Setting this policy action to FALSE will stop all file transfers between the Connect Organization users and external users, including multi-party IM sessions with at least one external user.
TRUE
Internal File Transfer
Controls file transfer in an IM session between Connect users within the Organization.
Setting this policy action to FALSE will stop all internal file transfers.
When this policy action is not explicitly set to FALSE, all the users within the Connect Organization will have the ability to exchange files with the internal users.
TRUE
52

Chapter 5: Using the Policy Editor to Define and Apply Policies
External IM Controls IM sessions between users in the Connect Organization and users outside the Organization.
Setting this policy action to FALSE will stop all IM sessions between users in the Connect Organization and users outside the Organization. This will also stop all dependent services like voice, video, and VOIP.
TRUE
External VOIP Controls VOIP communications in IM sessions between users in the Connect Organization and users outside the Organization
Setting this policy action to FALSE will stop all VOIP communications in IM sessions between users in the Connect Organization and users outside the Organization. However, other services like text-based IM sessions and file transfers will be available.
TRUE
Internal VOIP Controls VOIP communications in IM sessions between users within the Connect Organization.
Setting this policy action to FALSE will stop all VOIP communications in IM sessions between users within the Connect Organization. However, other services like text-based IM sessions and file transfers will be available.
When this policy action is not explicitly set to FALSE, all the users within the Connect Organization will have the ability to use VOIP communications in IM sessions.
TRUE
External Video Controls video services in IM sessions between users in the Connect Organization and users outside the Organization
Setting this policy action to FALSE will stop all video services in IM sessions between users within the Connect Organization and users outside the Organization. However, other services like text-based IM sessions and file transfers will be available.
TRUE
Internal Video Controls video services in IM sessions between users within the Connect Organization.
Setting this policy action to FALSE will stop all video services in IM sessions between users within the Connect Organization. However, other services like text-based IM sessions and file transfers will be available.
When this policy action is not explicitly set to FALSE, all the users within the Connect Organization will have the ability to use video communications in IM sessions.
TRUE
Table 5-1 • Policy Actions in Cisco WebEx Connect
Policy Action Description Impact Default Value
53

Chapter 5: Using the Policy Editor to Define and Apply Policies
Disable IM Catcher for External Communications
Controls the behavior of IMCatcher with regard to text messages from users outside the Connect Organization who are not added to the Connect Organization user's contact list.
Setting this policy action to FALSE allows users to change IMCatcher settings in the Cisco WebEx Connect client.
When this policy action is not explicitly set to FALSE, users will not be able to change IMCatcher settings.
FALSE
Disable IM Catcher For Internal
Controls the behavior of IMCatcher with regard to text messages between users within the Connect Organization.
Setting this policy action to FALSE allows users to change IMCatcher settings in the Cisco WebEx Connect client.
When this policy action is not explicitly set to FALSE, users will not be able to change IMCatcher settings.
FALSE
Local Archive Controls the ability of the user to locally archive IM text messages.
Setting this policy action to FALSE prevents users from locally archiving IM text messages.
In the Cisco WebEx Connect client, the following option is disabled: Edit >Settings>General IM>Message Archive.
TRUE
Join Workspace
Controls the ability of users to join a Workspace within the Connect Organization.
Setting this policy action to FALSE prevents users from joining a Space within the Connect Organization.
When this policy action is not explicitly set to FALSE, users can accept an invitation to join a Space within the Connect Organization.
TRUE
Join External Workspace
Controls the ability of users within the Connect Organization to accept an invitation to join a Space external to the Connect Organization. In addition, this policy action controls the ability of these users to become a member of Spaces outside the Connect Organization.
Setting this policy action to FALSE prevents users within the Connect Organization from accepting an invitation to join a Space external to the Connect Organization. Users can only view and delete the invitation. Additionally, the Org Administrator is not notified of such invitations to take a decision.
TRUE
Table 5-1 • Policy Actions in Cisco WebEx Connect
Policy Action Description Impact Default Value
54

Chapter 5: Using the Policy Editor to Define and Apply Policies
External Desktop Share
Controls the ability of users within the Connect Organization to share their desktop with users outside the Connect Organization.
Setting this policy action to FALSE prevents users within the Connect Organization from sharing their (local) desktop with users outside the Connect Organization.
When this policy action is not explicitly set to FALSE, users can share their (local) desktop with users outside the Connect Organization.
TRUE
Internal Desktopshare
Controls the ability of users within the Connect Organization to share their desktop with other users within the Connect Organization.
Setting this policy action to FALSE prevents users within the Connect Organization from sharing their desktop with other users within the Connect Organization.
When this policy action is not explicitly set to FALSE, users can share their desktop with other users inside the Connect Organization.
TRUE
Workspace Feature
Controls the ability of users (inside or outside the Organization) to view Spaces.
Enables/Disables Space related features. When this policy is disabled, the user does not see any Space related information in the client
Setting this policy action to FALSE prevents users from viewing Space-related features. Typically, the Spaces feature including the list of Spaces, and invitation to join Spaces will be disabled.
When this policy action is not explicitly set to FALSE, users can view and work with all Space features.
Note If this policy action is set to FALSE, the Join Workspace and Join External Workspace policy actions will be disabled by default.
TRUE
Automatic Updates
Controls the behavior of sending notifications to users whenever a new upgrade is available for the Cisco WebEx Connect client.
Setting this policy action to FALSE does not send notifications to users whenever a new upgrade is available for the Cisco WebEx Connect client.
However, it is recommended to set this policy action to TRUE so that users will be notified when an upgrade is available. This makes the upgrade process simple and ensures that users always use the latest version of Cisco WebEx Connect.
TRUE
Table 5-1 • Policy Actions in Cisco WebEx Connect
Policy Action Description Impact Default Value
55

Chapter 5: Using the Policy Editor to Define and Apply Policies
Invite Users To Workspace
Controls the ability of users belonging to a Space in the Connect Organization to invite other users to join the Space.
Setting this policy action to FALSE will not allow users belonging to a Space in the Connect Organization to invite other users to join the Space.
When this policy action is not explicitly set to FALSE, users belonging to a Space in the Connect Organization can invite other users to join the Space.
Note This policy action will not work if Workspace Feature policy action is set to FALSE.
TRUE
Invite External Users To Workspace
Controls the ability of users within the Connect Organization belonging to a Space to invite contacts outside the Organization to join that Space.
Setting this policy action to FALSE will not allow users belonging to a Space in the Connect Organization to invite contacts outside the Organization to join that Space.
Note This policy action will not work if Workspace Feature policy action is set to FALSE.
TRUE
Support AES Encoding For IM
Enables you to specify whether you want to turn on support for AES Encryption for IM sessions.
Setting this policy action to FALSE will disable support for AES Encryption for IM sessions.
Note To apply this policy exclusively, the Support SSL Encoding For IM, and Support No Encoding For IM policies should be set to FALSE. If they are set to TRUE, the encryption level negotiated will be the highest level that the other party supports.This policy action is set to FALSE by default.
For more information about encryption levels, see “About Encryption Levels” on page 57.
FALSE
Support SSL Encoding For IM
Enables you to specify whether you want to turn on support for SSL Encryption for IM sessions.
Setting this policy action to FALSE will disable support for SSL Encryption for IM sessions.
Note To apply this policy exclusively, the Support AES Encoding For IM, and Support No Encoding For IM policies should be set to FALSE. If they are set to TRUE, the encryption level negotiated will be the highest level that the other party supports.For more information about encryption levels, see “About Encryption Levels” on page 57.
TRUE
Table 5-1 • Policy Actions in Cisco WebEx Connect
Policy Action Description Impact Default Value
56

Chapter 5: Using the Policy Editor to Define and Apply Policies
About Encryption Levels
Typically, all IM communication between Cisco WebEx Connect clients will be encrypted both within the Connect Organization and outside of it. The IM communication will be encrypted at the originating Cisco WebEx Connect client and decrypted at the destination client. This encryption applies to all forms of IM communication including text, desktop (and application) sharing, file transfer, VOIP, and video.
Cisco WebEx Connect provides three levels of encryption:
256-bit Advanced Encryption Standard (AES): The highest level, where IM communication is encrypted end-to-end.
128-bit Secure Sockets Layer (SSL): Medium level of security, where IM
Support NO Encoding For IM
Enables you to specify whether you want to turn off support for any kind of Encryption for IM sessions.
To apply this policy exclusively, the Support AES Encoding For IM and Support SSL Encoding For IM policies should be set to FALSE.
Note If you set this policy action to FALSE, you need to set one or both of the Support AES Encoding For IM and Support SSL Encoding For IM policies to TRUE.
For more information about encryption levels, see “About Encryption Levels” on page 57.
FALSE
Allows IM within org or from domains in white list
Controls IM communication between users within the Connect Organization and specific type of contacts.
Setting this policy action to FALSE will stop users within the Connect Organization in a different domain name and specific domains(added to the white list), from using IM sessions with each other. However, this does not apply to users within the Connect Organization in the same domain. This will also disable other dependent services such as VOIP, Video and FileTransfer.
TRUE
Upload Widgets
Controls the ability of Space members within a Connect Organization to upload widgets to the Spaces they belong to.
Setting this policy action to FALSE prevents Space members within a Connect Organization to upload widgets to the Spaces they belong to.
When this policy action is not explicitly to FALSE, Space members can upload widgets to the Spaces they belong to.
TRUE
Table 5-1 • Policy Actions in Cisco WebEx Connect
Policy Action Description Impact Default Value
57

Chapter 5: Using the Policy Editor to Define and Apply Policies
communication is encrypted only between a client and AOL.
No encryption: All IM communications are not encrypted.
The level of encryption depends on the policy set by the Org Administrator. The Org Administrator can apply the encryption policy either across the organization or to specific groups.
The Cisco WebEx Connect client automatically determines its encryption level from the policy applicable to the user logged into the client. Therefore, if an organization’s policy settings do not allow a particular encryption level, the IM session will be disallowed, and an appropriate error message will be displayed to all the clients in the IM session.
Note In a group IM scenario, the encryption level will be negotiated between all the users when the initial invite is sent out. After the IM session is established, subsequent attendees will need to support the negotiated encryption level to be able to participate.
The following example explains a typical encryption policy for IM sessions.
An organization that chooses to adopt a 256-bit AES Encryption level can choose from these policy options:
Allow only 256-bit AES encryption.
Allow both 256-bit AES encryption and SSL encryption.
Allow 256-bit AES encryption, SSL encryption, and no encryption.
The following table illustrates the impact of these policy options.
In the Action Editor, you need to set TRUE or FALSE for each of these security levels based on the policy option you choose.
Table 5-2 • Impact of Encryption Policy Options
Client A PoliciesClient B Encryption Level
256-bit AES SSL No Encryption
Only 256-bit AES 256-bit AES Don’t allow Don’t allow
256-bit AES or SSL 256-bit AES SSL Don’t allow
256-bit AES or SSL or no encryption
256-bit AES SSL No encryption
58

Chapter 5: Using the Policy Editor to Define and Apply Policies
Adding actions to a policy
To add actions to a policy:
1 Click the Policy Editor tab. The Policy List appears to the left and the Actions List appears at the right of the Policy Editor screen.
2 Select the Policy Name to which you want to add actions.
3 To add actions, click on the Add Action button under the Action List. The Action Editor screen appears.
4 Select an action from the Action Tag Name dropdown list. The list of available action tags appears.
59

Chapter 5: Using the Policy Editor to Define and Apply Policies
Note For more information on these actions, see “Understanding policies and policy actions” on page 49.
5 Select options to configure actions from the dropdown lists under the Action Details Configuration section.
6 Set the Element Description Type for each action as True or False. The Element Description Type determines the behavior the policy action, that is, whether the policy action will be turned on or off or under what conditions the policy action will be turned on or off.
7 Click Save.
8 Check the Applied box for the policy you want to apply. This applies to the entire organization.
Applying policies to groupsTo apply policies to a group:
1 Click the Group tab. The Policy List appears.
2 Enter the group name to find in the Group Name field.
60

Chapter 5: Using the Policy Editor to Define and Apply Policies
3 Select the group name in the Search Results.
4 Click the Applied checkbox for the policies you want to apply to this group.
61

Chapter 5: Using the Policy Editor to Define and Apply Policies
62

6Single Sign On and Directory Integration
This chapter includes information on the following:
Single Sign-On (SSO)
Directory Integration
Single Sign-onIn the standard configuration of Cisco WebEx Connect, the user’s log in name and password are independent from the authentication credentials used by their organization. This requires users to remember another set of log in credentials. Org Administrators also need to manage a separate set of user accounts.
Single Sign-On (SSO) allows companies to use their on-premise SSO system to simplify the management of Cisco WebEx Connect. With SSO, users securely log in to Cisco WebEx Connect using their corporate log on credentials. The user’s log on credentials are not sent to Cisco, which protects the user’s corporate log on information.
As an SSO configuration option, user accounts can be automatically created the first time a user logs into Cisco WebEx Connect. SSO also prevents users from accessing Cisco WebEx Connect if their corporate log in account is deactivated.
Cisco WebEx Connect supports SSO systems based on the industry standard SAML protocol.
Note Contact your Customer Success Manager for more information on which SSO systems are supported and to determine the steps for setting up your company’s SSO system to work with Cisco WebEx Connect.
63

Chapter 6: Single Sign On and Directory Integration
Single Sign-On Requirements
The following items are required when implementing SSO with Cisco WebEx Connect:
Your company must have a Single Sign-On system that is SAML 2.0 compliant or meets the WS Federation 1.0 standard.
You must provide a corporate X.509 public key certificate to be imported into the Cisco WebEx Connect Admin Console. SAML assertions sent to the Cisco WebEx Connect system are signed with the certificate’s private key.
Your SSO system needs to be configured to provide a SAML assertion with the user account information and SAML system IDs needed by the Cisco WebEx Connect system.
Provide the URL for the corporate SSO service to be entered in the Cisco WebEx Connect Admin Console.
Users must install the Cisco WebEx Connect client with a command to configure the client for SSO and identify the name of your organization.
Single Sign-On Configuration of the Admin Console
The Cisco WebEx Connect Admin Console allows the administrator to configure single sign-on settings modify the security settings and certificates for Cisco WebEx Connect.
Note Any changes to the single sign-on configuration will take up to one hour to take effect.
1 Click the Configuration tab. The Configuration screen appears.
2 Scroll down to Security Settings.
3 Click the Org Certificate Management link.
This page is used to import your company’s X.509 certificate. Complete these steps:
a In the Alias field, enter the company’s Connect org name.
64

Chapter 6: Single Sign On and Directory Integration
b Click Select File to select the certificate to import and click Import Certificate.
4 Click the WebEx Certificate Management link.
This page is used to generate a WebEx certificate to export to your SSO system. Complete these steps:
a In the Alias field, enter your company’s Connect org name.
b Enter a Valid for time in days.
c Click Generate WebEx Certificate.
d Export the certificate and import it to your corporate SSO system.
5 Click Federated Web SSO Configuration
This page is used to configure SSO for Cisco WebEx Connect. Enter the following:
a WebEx SAML Issuer: ID that identifies Cisco to the SSO server. The ID is returned in the SAML assertion.
b Issuer for SAML: ID that identifies the issuer of the SAML assertion. The ID is returned in the SAML assertion.
c Customer SSO Service Login URL: URL for your company’s SSO service.
65
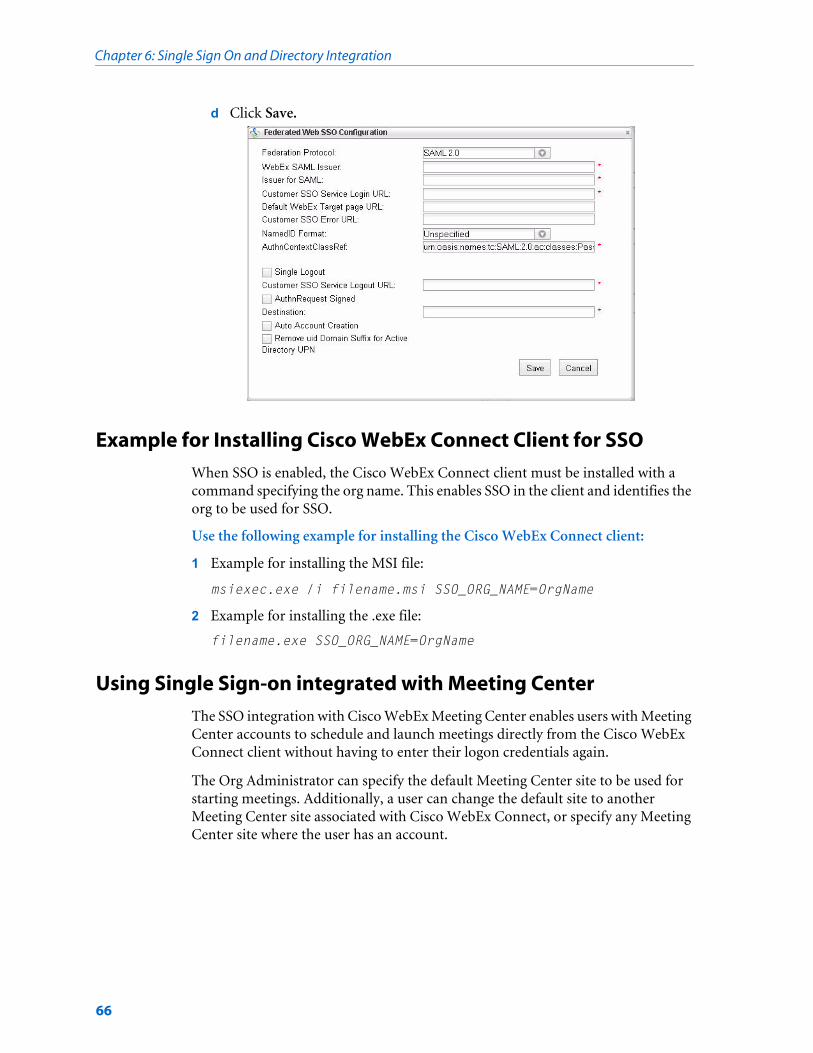
Chapter 6: Single Sign On and Directory Integration
d Click Save.
Example for Installing Cisco WebEx Connect Client for SSO
When SSO is enabled, the Cisco WebEx Connect client must be installed with a command specifying the org name. This enables SSO in the client and identifies the org to be used for SSO.
Use the following example for installing the Cisco WebEx Connect client:
1 Example for installing the MSI file:
msiexec.exe /i filename.msi SSO_ORG_NAME=OrgName
2 Example for installing the .exe file:
filename.exe SSO_ORG_NAME=OrgName
Using Single Sign-on integrated with Meeting Center
The SSO integration with Cisco WebEx Meeting Center enables users with Meeting Center accounts to schedule and launch meetings directly from the Cisco WebEx Connect client without having to enter their logon credentials again.
The Org Administrator can specify the default Meeting Center site to be used for starting meetings. Additionally, a user can change the default site to another Meeting Center site associated with Cisco WebEx Connect, or specify any Meeting Center site where the user has an account.
66

Chapter 6: Single Sign On and Directory Integration
System Requirements for SSO and Meeting Center integration
.
To enable SSO integration with Meeting Center:
1 Make sure you’ve correctly entered the security settings as described in “Single Sign-On Configuration of the Admin Console” on page 64.
2 Under Integrated Center Site in the Configuration tab, enter the following information:
Site URL: The Meeting Center site URL that’s integrated with Cisco WebEx Connect. When a meeting is scheduled, this site will be launched.
Brief Description: A brief description of the Meeting Center site.
Item Requirement Notes
IDP CA SiteMinder For enabling SSO, authentication management, policy-based authorization, identity federation and so on.
Cisco WebEx Connect Org Admin domain
gmail.com
Cisco WebEx Connect hosting
OPIS
SSO standard for Cisco WebEx Connect
SAML version 2.0
SSO standard for Meeting Center
SAML versions 1.1, 2.0
This depends on the Meeting Center site version. At a minimum, you must be running Meeting Center site version T26 or T27.
User Accounts Cisco WebEx Connect and Meeting Center
Users should have an account in Meeting Center to use the SSO and Meeting Center integration feature.
Note If no user account is detected in Meeting Center, an error message is displayed as shown in the graphic below this table.
67

Chapter 6: Single Sign On and Directory Integration
Note This Site URL must first be configured in the Super Admin interface. The Org Administrator can add more than one Meeting Center site and specify one site as default as shown in the following graphic.
Directory Integration In the standard configuration of Cisco WebEx Connect, user information comes from multiple sources. The Org Administrator manages user accounts, users add their own information to their user profile and the Microsoft Outlook Address Book is used to add IM contacts and invite users to Spaces.
Directory integration allows companies to integrate their corporate directory with Cisco WebEx Connect. This integration provides a single source of user data across the Cisco WebEx Connect system, providing several benefits:
Accounts are automatically provisioned and updated from the corporate directory data
The corporate directory data is used to add IM contacts and invite members to Spaces.
A friendly display name can be specified for users. The user’s display name appears in the contact list and Space instead of their screen name.
Users can easily add groups and group members to their IM contact list.
Groups from the directory can be used for policy enforcement
The directory data is used to automatically populate the profile information displayed in the business card. Users cannot edit the directory information in their profile.
Note Implementing Directory Integration requires Single Sign-On (SSO). Contact your Customer Success Manager for implementation information.
68

Chapter 6: Single Sign On and Directory Integration
Directory Integration Import Process and File Formats
The corporate directory information is imported into the Cisco WebEx Connect system via a secure FTP server. The schedule for the import interval is set in the Configuration section of the Cisco WebEx Connect Admin Console.
Note Contact your WebEx Customer Success Manager for information on importing directory data into Cisco WebEx Connect.
User File Formats
The directory information for users and groups is imported using files with the following formats. User and group data is imported in different files.
User file name format
User file name format: userFile_yyyy-mm-dd_n.csv
Example: If the job is scheduled to run four times a day, and the job was running on 28th July 2008, the files would be named
userFile_2008-07-28_1.csv, userFile_2008-07-28_2.csv, userFile_2008-07-28_3.csv, userFile_2008-07-28_4.csv
User file format
A header record should NOT be present in the file.The file format is:
userSSOId,displayName,firstName,lastName,email,jobTitle,address1,city,state,zip,country,phoneOffice,phoneCell,homeGroupSSOId,homeGroupName,businessUnit,userProfilePhotoURL
Format Description
yyyy-mm-dd The date on which the job is run. The date is based on the GMT timezone.
n The job instance number for that particular day.
69

Chapter 6: Single Sign On and Directory Integration
Group File Formats
The directory information for users and groups is imported using files with the following formats. User and group data is imported in different files.
Group file name format
Group file name format: groupFile_yyyy-mm-dd_n.csv
Group file format
A header record should NOT be present in the file.
The group file contains 3 different types of records—Group Information, Child group information and Member information. Each of these types of records are differentiated by providing a recIndicator (Record Indicator).
Group Information record the record indicator— g
Child group record the record indicator is — gg
Group members record the record indicator is — gu
Format Description
userSSOID The SSO ID used internally by the organization. This is the main field which is used to determine the record to be updated. If a user is found with the same userSSOID already in the connect database, then his/her details are updated. If not, a new user is provisioned for the organization with all the details.
homeGroupSSOID (optional) If a value is present, the user will be associated with that group.
homeGroupSSOName The name for the group. If a name is not provided, the homeGroupSSOID itself will be used.
businessUnit (optional) If present will be placed in the user’s profile area.
userProfilePhotoURL A URL where the user’s profile photo is provided. This URL will be used as-is by the client to display the photo.
Format Description
yyyy-mm-dd The date on which the job is run. The date is based on the GMT timezone.
n The job instance number for that particular day.
70

Chapter 6: Single Sign On and Directory Integration
Group Records
The following table lists the group information records.
recIndicator,ssoGroupId,groupName,groupType
Child Group Records
The child group record fields are:
recIndicator,ssoGroupId,RECURRING_subGroupSSOID
For example, the subgroupSSOIDs are provided in a comma separated fashion after the parent record indicator and parent group id to which they belong to.
Group Member Records
The group member record fields are:
recIndicator,ssoGroupId,RECURRING_memberSSOID
The member SSOIDs are provided after the record indicator and group ID to which they belong.
The group file can have many types of records, in any order. This example contains records of all three types in any order.
g, groupSSOID1, Group SSO Name1g, groupSSOID2, Group SSO Name2g, groupSSOID3, Group SSO Name3gu,groupSSOID2,userSSOId6, userSSOId7g, groupSSOID4, Group SSO Name4g, groupSSOID5, Group SSO Name5gg, groupSSOID3, groupSSOID10gu,groupSSOID1,userSSOId1,userSSOId2,userSSOId3, userSSOId4gg, groupSSOID1, groupSSOID2, groupSSOID3, groupSSOID4, groupSSOID5gg, groupSSOID2, groupSSOID3, groupSSOID4
Format Description
SSOGroupID The field used to determine if a group has been created in Connect or not. If already created, the group information is updated. Otherwise, a new group is created.
groupType (optional) If present it has to have a numeric value. If the value is 4, only then the group will be available for searching on the client.
71

Chapter 6: Single Sign On and Directory Integration
User Inactivation
User inactivation file name format
User inactivation file name format: userInactivation_yyyy-mm-dd_n.csv
A header record should NOT be present in the file.
The file format is: userSSOID
This file contains only userSSOIDs whose record must be inactivated.
Group Deletion
Group Deletion file name format
Group deletion file name format: groupDeletion_yyyy-mm-dd_n.csv
Group Deletion file format
A header record should NOT be present in the file.
Group deletion file format: SSOGroupID
This file contains only SSOGroupIDs whose record must be inactivated.
Format Description
yyyy-mm-dd The date on which the job is run. The date is based on the GMT timezone.
n The job instance number for that particular day.
Format Description
yyyy-mm-dd The date on which the job is run. The date is based on the GMT timezone.
n The job instance number for that particular day.
72

7Reports
Cisco WebEx Connect Administrators can generate the following reports:
Usage Report
User Report
Storage Consumption Report
Cisco WebEx Connect ReportsThe Org Administrator can generate and save the following types of reports:
Usage Report
User Report
Storage Consumption Report
You can run one report at a time. When the report is complete, a Completed message appears under the status column. Then, you can display or save the report. The reports are saved for 7 days from the date the report is generated.
73

Chapter 7: Reports
Usage Report
The Usage Report includes summaries of the number and type of activities that are occurring in Connect based on a specific periodical frequency: monthly, hourly, weekly, and daily. The Usage Report includes the following columns (listed below in the order they appear from left to right in the report):
User Report
The User Report covers information on what users are doing with Connect during a specific month. The User Report includes the following columns (listed below in the order they appear from left to right in the report):
Column Description
Date and Time The specified period interval for the aggregated data.
Connect Logins The number of Connect logins in the specified period.
Number of IM Sessions The number of IM sessions in the specified period.
Number of Meetings The number of Connect meetings hosted in the specified period.
Number of Desktop Sessions
The number of Desktop sessions initiated in the specified period.
Number of Calls The number of Telephony calls initiated in the specified period.
Column Description
User Name The user’s name.
Number of Logins The number of Connect logins in the specified month.
Number of New Spaces Owned
The number of new Spaces created by this user in the specified month.
Number of New Spaces as Member
The number of new Spaces to which this user belongs in the specified month. This includes the number of new Spaces this user created in the specified period.
Number of Meetings Hosted
The number of meetings this user hosted in the specified month.
Number of IM Sessions The number of IM sessions for this user in the specified month.
Number of Calls The number of Telephony calls this user initiated in the specified month.
Number of Desktop Share Sessions
The number of Desktop Share sessions this user had in the specified month.
Additional Storage Used (MB)
The amount of additional storage this user used in the specified month. This includes all data that was saved in Connect Spaces. A negative value means that the user freed up more storage than was used during the month.
74

Chapter 7: Reports
Storage Consumption Report
The Storage Consumption Report covers how much storage a Space is using in a particular month. The Storage Consumption Report includes the following columns (listed below in the order they appear from left to right in the report):
Generating ReportsFor details on each report, see “Usage Report” on page 74, “User Report” on page 74, and “Storage Consumption Report” on page 75.
Note The time zone used in reports is always Greenwich Mean Time (GMT).
To generate a report:
1 Click the Report tab.
2 Select a Report Type from the dropdown list.
3 Select the Bucket Size from the dropdown list (hour, day, week, month). This is only applicable for the Usage Report.
4 Select the Month and Year for the report.
5 Click Generate Report. After a few minutes, the report appears in the list under the Report Name column in .CSV format.
6 Click the name of the report link to open or save the report.
Report generation can be called while it is in progress
Column Description
Space Name The name of the Connect Space.
Space Owner The user name for the Space owner.
Additional Storage Used (MB) The amount of additional storage this Space used in the specified month. This includes all data that was saved in Connect Spaces. A negative value means that the Space freed up more storage than the user used in this month.
75

Chapter 7: Reports
Note Only one report can be generated at a time. You must wait until the status of the generated report is Completed, before generating another report.
76

8CSV File Format
This section includes guidelines for creating a CSV (comma separated value) file to import users into Cisco WebEx Connect. In addition, the required fields and a sample file is included.
CSV FieldsThe following fields should be included in the CSV file before you import users into Cisco WebEx Connect. They should appear in the following order.
Field name Definition
Screen Name Optional. Enter the user’s screen name. If empty, email is used as screen name.
First Name Required. Enter the user’s first name.
Last Name Required. Enter the user’s last name.
Email Required. Enter the user’s email address.
Address 1 Enter the first line of the user’s address.
Address 2 Enter the second line of the user’s address.
CIty Enter the city in which the user lives.
State Enter the state in which the user lives.
Country Enter the country in which the user lives.
Zip Code Enter the user’s zip code.
Office Phone Enter the user’s office phone number.
Cell Phone Enter the user’s mobile/cell phone number.
Account Status Default is Active. This field is populated in the output file if there is an error processing the record.
An Inactive user cannot use Cisco WebEx Connect.
PrimaryGroup Optional. This field is not required in the CSV file. If the field is included, the user is added to the group with this name, otherwise the user is added to the default group.
77

Chapter 8: CSV File Format
CSV File Import ProcessThe Cisco WebEx Connect Administrator or Group Administrator can log into the Cisco WebEx Connect Admin Console and upload a CSV file of users in the appropriate format. After the CSV is successfully imported, new users have the same process as manually creating users. For example, the Welcome e-mail is sent to the new users. The following occurs when importing the CSV file into Cisco WebEx Connect:
Users are loaded into groups specified in the CSV file, if the group owner has the privilege to administer the groups.
All the valid entries are imported even if one or more entries are not valid.
Τhe status of the import is reported in the CSV file that replicates all the information from the input file, with a specific column indicating the status.
If a user with the same email address is already in Cisco WebEx Connect, the existing record in the database is overwritten with the value in the CSV file.
Updates will replace the previous settings. For example, if new roles are specified for the user, the previous roles are replaced.
The import process runs in the background. You can continue other Cisco WebEx Connect Admin Console tasks, such as configuration, while the import process runs.
After the import is complete, a confirmation email is sent to the person who initiated the CSV Import. The notification includes a summary of the import results.
The Administrator can terminate an import operation that is in progress.
Sample CSV fileThe following shows how a CSV file should appear, with all appropriate fields populated before importing into Cisco WebEx Connect.
You can copy and paste the following text into a file to use as a template for your CSV file, or you can import into a spreadsheet program, like Microsoft Excel. The following sample includes the appropriate fields in a CSV format:
[email protected],Mike,Demetri,[email protected],1234 Orchid Way,apt. 3,Santa Clara,CA,95051,USA,408-555-1212,408-555-2121,Active,MyGroup
78

9Library Management
The Library (Application) Management application allows users to manage applications (widgets and templates) for an organization, such as uploading applications to a library, moving applications between libraries, and deleting applications.
Users can upload applications to any library for which they have permission. In addition, users can copy applications from one library to another, and delete applications from a library. The user must have write permissions to the library in order to copy applications. If the user does not have permissions to a library, the user can send a notification to the Org Administrator to copy the application.
For more information on using the Cisco WebEx Connect product and the Library Management widget, refer to the Cisco WebEx Connect Help and search for Library Management.
Adding ApplicationsA regular Cisco WebEx Connect user and the Org Administrator can add applications using the Library Management Widget. Regular users can only add or manage applications to their own personal libraries. The Org Administrator can manage applications in the public library, as well.
79

Chapter 9: Library Management
Note For more details on adding applications (widgets) to a library, refer to the Cisco WebEx Connect Help.
Copying applications to a library
This is for regular Cisco WebEx Connect users and Org Administrators.
To copy application from one library to another:
1 Navigate to the applications in your personal or public library.
2 Select an application from the list of applications and select Copy widget to ….
3 Select Public or Personal from the dropdown list and click on OK.
If the user does not have permission to a library, an error message appears asking whether the user wants to send a request to the Org Administrator to complete this step. The user can click Yes or No. If the user selects Yes, a notification email is sent to the Org Administrator.
When the Org Administrator logs onto Cisco WebEx Connect and opens the Library Management widget, the list of applications under the Pending Approval. The Org Administrator can use the mouse to hover over the widget to see details and Approve or Deny the request. For more information on approving requests to add applications, see “Approving request to add application to public library” on page 81.
80

Chapter 9: Library Management
If the request is approved, it appears in the public library. If the request is denied, it is removed from the Pending Approval list and a notification is sent to the user.
Approving request to add application to public library
This is for users with Org Administrator privileges only.
1 The Org Administrator receives an email notification each time a user requests a widget/template to be copied to the public library. The email has a title such as, Request to copy application to the Public Library.
2 The Org Administrator needs to log into MyWebEx and navigate to the library management widget.
3 The Org Administrator will see a list of applications in the Pending Approval list. The Org Administrator can hover over the widget to see details (pop-up similar to the “Get More Apps” pop-up), and Accept or Deny the request.
4 If the request is approved, it appears in the public library.
5 If the request is denied, it is removed from the Pending Approval list and a notification is sent to the user.
Removing applications from a library
This is for regular Cisco WebEx Connect users and Org Administrators.
1 Navigate to the applications in the personal library (personal and public for org administrator user)
81

Chapter 9: Library Management
2 Select an application from the list of applications and select Remove The Widget....
3 To confirm deleting the widget, click OK. The application is removed from the user’s personal library, and added to the Recycle Bin.
Restoring applications to a libraryThis is for Cisco WebEx Connect users and Org Administrators.
1 Navigate to the Recycle Bin list.
2 Select an application from the list of applications and select Restore.
82

Chapter 9: Library Management
3 The application is restored to the library it was originally removed from and is removed from the Recycle Bin.
83

Chapter 9: Library Management
84

10Cisco WebEx Connect
Command-line Parameters
This section includes command-line parameters used in the Cisco WebEx Connect installer. The command-line parameters are passed into the Installer executable WebExConnect.exe or the MSI package apSetup.msi, or directly added into the MSI package.
Command-line ParametersThe following command-line parameters are listed with their values and descriptions. The default value is listed in bold text.
The support URL can be set to organization's first level support page (for example, http://firstlevelsupport.mycompany.com, at the time of installation by installing the client software with the following command line parameter:
msiexec /i “C:\apsetup.msi” SUPPORT_URL=http://firstlevelsupport.mycompany.com GET_SCREEN_NAME_URL=http://register.mycompany.com
Note If the registry value can not be decrypted (for example, it was manually modified), an error is reported and the user cannot log in.
Auto Update always runs WebExConnect.exe /m, so it saves the current settings, which are in system registry.
For installation over an existing version, the command line parameters or the corresponding public properties in the MSI package overwrite the current settings. If not specified, the current settings, NOT DEFAULT, will be used.
85

Chapter 10: Cisco WebEx Connect Command-line Parameters
Parameter Values Description
ARCHIVE
YES Archive IMs.
NO Do not archive IMs.
ARCHIVEDAYS
<integer> The number of days to save archived IMs. This parameter works only when ARCHIVE is set to YES. Maximum is 9999.
HOMEPAGEAll values for this parameter are case-insensitive.
AOL AOL is the homepage.
MyWebEx MyWebEx is the homepage.
None No homepage.
LANGUAGE
French Support for French (FR)
Japanese Support for Japanese (JP)
English The default value of this parameter is English.
RUNATONCE
YES Start Cisco WebEx Connect when Windows starts.
NO Do not start Cisco WebEx Connect when Windows starts.
The default value of this parameter is NO.
CONNECT_OUTLOOK
YES Connect to Microsoft Outlook when Cisco WebEx Connect starts.
NO Do not Connect to Microsoft Outlook when Cisco WebEx Connect starts.
DISPLAY_PRESENCE
YES Display my Cisco WebEx Connect presence status in Microsoft Outlook. This parameter works only when CONNECT_OUTLOOK is YES.
NO Do not display my Cisco WebEx Connect presence status in Microsoft Outlook.
SIGN_ME_OUT
86

Chapter 10: Cisco WebEx Connect Command-line Parameters
YES Sign me out of Cisco WebEx Connect when I close my Contacts List window.
NO Do not sign me out of Cisco WebEx Connect when I close my Contacts List window.
SUPPORT_URL
<SupportURL> Support URL specified by <SupportURL> value.
The value overrides the default URLs provided by Cisco WebEx Connect.
FORGOT_PASSWORD_URL
<ForgotPasswordURL>
URL for “forgot password” hyperlink, specified by <ForgotPasswordURL> value.
The value overrides the default URLs provided by Cisco WebEx Connect.
Note In organizations where Single Sign On is implemented, the Forgot Password? link on the Connect client opens the URL the Org Admin has specified for this parameter. However, if no URL is provided for this parameter, the forgot password page displays an error when you enter the user name and click Submit.
GET_SCREEN_NAME_URL
<GetScreenNameURL>
URL for “Get Screen Name” hyperlink, specified by <GetScreenNameURL> value.
The value overrides the default URLs provided by Cisco WebEx Connect.
HOST_NAME
<HostName> Host name in Connection Settings. The string is encrypted and stored in system registry. The default value is slogin.oscar.aol.com.
To enforce auditing by the Advanced Auditor service, this must be set to slogin.webexaimpro.com.
HOST_PORT
<HostPort> Host port number in Connection Settings. The string is encrypted and stored in system registry.
The default value is 443.
Parameter Values Description
87

Chapter 10: Cisco WebEx Connect Command-line Parameters
SECURE_CONNECTION
Secure Use secure connection. The entire string is encrypted and stored in system registry.
CONNECTION_SETTINGS_READONLY
Read-Only Connection Settings are read-only.The entire string is encrypted and stored in system registry.
If the registry value cannot be decrypted (for example, was manually modified), the default value “Read-Only” is used.
If <Permission> is read-only, all fields in Connection Settings are disabled, including the proxy settings. The username and password fields should be enabled if “Connect using proxy” checkbox is selected.
Read-Write Connection Settings are read-write.
USE_PROXY
UseProxy Use proxy. The entire string is encrypted and stored in system registry.
NotUseProxy Do not use proxy.
PROXY_NAME
<ProxyName> Proxy name in Connection Settings. The value string is encrypted and stored in system registry.
The default value is a special GUID to indicate no proxy server to be used. If no proxy server is used, this value is ignored.
PROXY_PORT
HTTPS=443
HTTP=80
SOCKS4=1080
SOCKS5 =1080
Proxy port in Connection Settings. The value string is encrypted and stored in system registry.
The default value depends on proxy protocol value.
If no proxy server is used, this value is ignored.
PROXY_PROTOCOL
Parameter Values Description
88

Chapter 10: Cisco WebEx Connect Command-line Parameters
When SSO is enabled, the Cisco WebEx Connect client must be installed with a command specifying the org name. This enables SSO in the client and identifies the org to be used for SSO.
Use the following example for installing the Cisco WebEx Connect client:
1 Example for installing the MSI file:
msiexec.exe /i filename.msi SSO_ORG_NAME=OrgName
2 Example for installing the .exe file:
filename.exe SSO_ORG_NAME=OrgName
HTTPSHTTP
SOCKS4
SOCKS5
Protocol in Connection Settings. The value string is encrypted and stored in system registry.
The default value depends on proxy protocol value:
HTTPS – 443, HTTP – 80, SOCKS4 -- 1080, SOCKS5 -- 1080
If no proxy server is used, this value is ignored.
USE_FACETIME_FOR_FILEXFER
YES Required field to enable File Transfer through Advanced Auditor.
NO Not required if Advanced Auditor is not enabled.
AOL_ARS_FILEXFER_URL
login.webexaimpro.com
This is a required parameter to enable file transfer through Advanced Auditor Service.
SSO_ORG_NAME <OrgName> Required when SSO is implemented for the Org. The parameter enables SSO in the client and identifies the Org to be used for SSO.
Parameter Values Description
89

Chapter 10: Cisco WebEx Connect Command-line Parameters
90