Cisco Unity Express 2.1/2.2 CLI Administrator Guide for ... · PDF fileCisco Unity Express...
256
Corporate Headquarters Cisco Systems, Inc. 170 West Tasman Drive San Jose, CA 95134-1706 USA http://www.cisco.com Tel: 408 526-4000 800 553-NETS (6387) Fax: 408 526-4100 Cisco Unity Express 2.1/2.2 CLI Administrator Guide for Cisco CallManager
Transcript of Cisco Unity Express 2.1/2.2 CLI Administrator Guide for ... · PDF fileCisco Unity Express...

Corporate HeadquartersCisco Systems, Inc.170 West Tasman DriveSan Jose, CA 95134-1706 USAhttp://www.cisco.comTel: 408 526-4000
800 553-NETS (6387)Fax: 408 526-4100
Cisco Unity Express 2.1/2.2CLI Administrator Guide for Cisco CallManager

THE SPECIFICATIONS AND INFORMATION REGARDING THE PRODUCTS IN THIS MANUAL ARE SUBJECT TO CHANGE WITHOUT NOTICE. ALL STATEMENTS, INFORMATION, AND RECOMMENDATIONS IN THIS MANUAL ARE BELIEVED TO BE ACCURATE BUT ARE PRESENTED WITHOUT WARRANTY OF ANY KIND, EXPRESS OR IMPLIED. USERS MUST TAKE FULL RESPONSIBILITY FOR THEIR APPLICATION OF ANY PRODUCTS.
THE SOFTWARE LICENSE AND LIMITED WARRANTY FOR THE ACCOMPANYING PRODUCT ARE SET FORTH IN THE INFORMATION PACKET THAT SHIPPED WITH THE PRODUCT AND ARE INCORPORATED HEREIN BY THIS REFERENCE. IF YOU ARE UNABLE TO LOCATE THE SOFTWARE LICENSE OR LIMITED WARRANTY, CONTACT YOUR CISCO REPRESENTATIVE FOR A COPY.
The Cisco implementation of TCP header compression is an adaptation of a program developed by the University of California, Berkeley (UCB) as part of UCB’s public domain version of the UNIX operating system. All rights reserved. Copyright © 1981, Regents of the University of California.
NOTWITHSTANDING ANY OTHER WARRANTY HEREIN, ALL DOCUMENT FILES AND SOFTWARE OF THESE SUPPLIERS ARE PROVIDED “AS IS” WITH ALL FAULTS. CISCO AND THE ABOVE-NAMED SUPPLIERS DISCLAIM ALL WARRANTIES, EXPRESSED OR IMPLIED, INCLUDING, WITHOUT LIMITATION, THOSE OF MERCHANTABILITY, FITNESS FOR A PARTICULAR PURPOSE AND NONINFRINGEMENT OR ARISING FROM A COURSE OF DEALING, USAGE, OR TRADE PRACTICE.
IN NO EVENT SHALL CISCO OR ITS SUPPLIERS BE LIABLE FOR ANY INDIRECT, SPECIAL, CONSEQUENTIAL, OR INCIDENTAL DAMAGES, INCLUDING, WITHOUT LIMITATION, LOST PROFITS OR LOSS OR DAMAGE TO DATA ARISING OUT OF THE USE OR INABILITY TO USE THIS MANUAL, EVEN IF CISCO OR ITS SUPPLIERS HAVE BEEN ADVISED OF THE POSSIBILITY OF SUCH DAMAGES.
CCSP, CCVP, the Cisco Square Bridge logo, Follow Me Browsing, and StackWise are trademarks of Cisco Systems, Inc.; Changing the Way We Work, Live, Play, and Learn, and iQuick Study are service marks of Cisco Systems, Inc.; and Access Registrar, Aironet, ASIST, BPX, Catalyst, CCDA, CCDP, CCIE, CCIP, CCNA, CCNP, Cisco, the Cisco Certified Internetwork Expert logo, Cisco IOS, Cisco Press, Cisco Systems, Cisco Systems Capital, the Cisco Systems logo, Cisco Unity, Empowering the Internet Generation, Enterprise/Solver, EtherChannel, EtherFast, EtherSwitch, Fast Step, FormShare, GigaDrive, GigaStack, HomeLink, Internet Quotient, IOS, IP/TV, iQ Expertise, the iQ logo, iQ Net Readiness Scorecard, LightStream, Linksys, MeetingPlace, MGX, the Networkers logo, Networking Academy, Network Registrar, Packet, PIX, Post-Routing, Pre-Routing, ProConnect, RateMUX, ScriptShare, SlideCast, SMARTnet, StrataView Plus, TeleRouter, The Fastest Way to Increase Your Internet Quotient, and TransPath are registered trademarks of Cisco Systems, Inc. and/or its affiliates in the United States and certain other countries.
All other trademarks mentioned in this document or Website are the property of their respective owners. The use of the word partner does not imply a partnership relationship between Cisco and any other company. (0502R)
Cisco Unity Express 2.1/2.2 CLI Administrator Guide for Cisco CallManagerCopyright © 2005, Cisco Systems, Inc.All rights reserved.
Cisco Unity ExpressCisco Unity Express 2.1/2.2
C O N T E N T S
Cisco Unity Express Feature Roadmap 1
Platforms and Cisco IOS Software Images 1
Cisco Unity Express Feature List 2
Overview of Cisco Unity Express Voice Mail and Auto Attendant 9
Contents 9
Prerequisites for Implementing Cisco Unity Express on Cisco CallManager 10
Restrictions for Implementing Cisco Unity Express 12
Recording an Auto-Attendant Greeting or Prompt File 14
Configuring Auto-Attendant Scripts 14
Differences Between the AIM and NM 14
Software Licenses and Factory-Set Limits 15
Networking Cisco Unity Express with Other Voice-Mail Systems 16
Administration Interfaces 17
Differences Between Cisco Unity Express and Cisco Unity 17
Interactions Between Cisco Unity Express and Cisco CallManager 18
Differences Between Cisco Unity Express and Cisco CallManager 18
Additional References 20
Documents Related to Cisco Unity Express 20
Related Cisco IOS Documents 23
MIBs 23
RFCs 23
Technical Assistance 23
Setting Up Cisco Unity Express Software 25
Prerequisites 25
Configuring a New Cisco Unity Express Software Package 29
Activating IP Connectivity to Cisco Unity Express Software 29
EXEC and Configuration Modes 31
Entering the Command Environment 31
Exiting the Command Environment 32
Configuration Tasks 35
Configuring the System Using the CLI Commands 35
iii 2.1/2.2 CLI Administrator Guide for Cisco CallManager
Contents
Configuring the System Using the GUI and the Initialization Wizard 35
Initial Tasks 36
Ongoing Tasks 41
As-Needed Tasks 42
Installing and Upgrading Cisco Unity Express Software 43
Software Upgrade Overview 43
Upgrading to a New License 44
Sequence of Tasks 44
Downloading the License Files 45
Installing a New Software License File 45
Installing a New Software Image 47
Prerequisites 48
Sequence of Tasks 48
Downloading and Installing a New Software Image 48
What to Do Next 52
Upgrading the Previous Software Image 53
Prerequisites 53
Sequence of Tasks 53
Downloading and Installing an Upgrade Image 54
What to Do Next 56
Installing a Software Image Using Boot Helper 57
Prerequisites 57
Sequence of Tasks 57
Downloading the Software Files 57
Entering Configuration Parameter Values 58
Installing the Software Image Files 59
Configuring System Components 63
Configuring JTAPI Parameters 64
Prerequisites 64
Examples 66
Configuring the Voice-Mail Application 66
Sharing Ports Among Applications and Triggers 66
Prerequisites 67
Examples 68
Configuring the Administration via Telephone Application 69
Configuring and Managing the Auto-Attendant Application 69
Default Welcome Prompt 69
ivCisco Unity Express 2.1/2.2 CLI Administrator Guide for Cisco CallManager
Cisco Unity Express 2.1/2.2
Contents
Default Auto-Attendant Script aa.aef 70
Simple Auto-Attendant Script aa_simple.aef 70
Other Auto-Attendant Parameters 71
Prerequisites 71
Examples 74
Configuring Auto-Attendant Prompts 74
Configuring Auto-Attendant Scripts 76
Creating an Auto-Attendant Script File 76
Uploading the Auto-Attendant Script File 77
Downloading an Auto-Attendant Script File 77
Deleting an Auto-Attendant Script File 77
Configuring JTAPI Triggers for the Applications 78
Prerequisites 78
Examples 80
Deleting a JTAPI Application Trigger 81
Prerequisites 81
Examples 82
Deleting an Application 83
Prerequisites 83
Examples 84
Configuring System-Wide Mailbox Default Values 86
Checking AIM Flash Memory Wear Activity 88
Configuring the System Language 89
Configuring Password and PIN Parameters 89
Configuring Password and PIN Length and Expiry Time 89
Setting the Password and PIN to the System Default Values 91
Displaying Password and PIN System Settings 92
Configuring Business Hours 93
Configuring a Business-Hours Schedule 93
Displaying Business-Hours Schedules 96
Modifying Business Schedules 97
Deleting a Business Schedule 99
Configuring a Holiday List 99
Configuring a Holiday List 99
Displaying the Holiday List 100
Deleting Holidays from the List 102
Configuring Users, Groups, and Mailboxes 105
Prerequisites 105
vCisco Unity Express 2.1/2.2 CLI Administrator Guide for Cisco CallManager
Cisco Unity Express 2.1/2.2
Contents
Adding and Modifying a User 106
Privilege Levels for Users 106
Users and Mailboxes 106
Prerequisites 106
Adding and Modifying a Group 112
Prerequisites 112
Creating and Modifying a Voice Mailbox 117
Types of Mailboxes 117
Mailbox Limitations 117
Prerequisites 117
Examples 120
Unlocking a Voice Mailbox 123
Refreshing Message Waiting Indicators 124
Monitoring Active Calls 125
Displaying Active Calls by Application 125
Displaying Active Calls by Route 127
Terminating an Active Call 129
Backing Up and Restoring Data 131
Restrictions 132
Setting Backup Parameters 133
Prerequisites 133
Examples 134
Backing Up Files 135
Numbering Scheme for Backup Files 135
Examples 136
Restoring Files 138
Examples 139
Copying Configurations 141
Copying from Flash Memory to Another Location 141
Copying from the Network FTP Server to Another Location 141
Copying the Flash Running Configuration to Another Location 142
Copying the Network TFTP Configuration to Another Location 143
Restoring Factory Default Values 143
Troubleshooting 145
Troubleshooting Guidelines 145
System Reports 145
viCisco Unity Express 2.1/2.2 CLI Administrator Guide for Cisco CallManager
Cisco Unity Express 2.1/2.2
Contents
Log Files 146
Users and Groups 146
Hardware and Software 146
Voice Mail 149
Auto Attendant Prompts 149
Troubleshooting Commands 149
Advanced Configuration 151
Configuring System Engine Parameters 152
Prerequisites 152
Examples 153
Configuring Application Parameters 154
Prerequisites 154
Examples 156
Configuring Multiple Triggers for an Application 158
Port Sharing Among Multiple Triggers 158
Prerequisites 158
Examples 161
Configuring the Hostname 162
Examples 162
Configuring the DNS Server 164
Examples 165
Configuring NTP Servers 166
Adding NTP Servers 166
Removing an NTP Server 168
Displaying NTP Server Information 169
Configuring an External Syslog Server 170
Prerequisites 170
Examples 171
Configuring the Clock Time Zone 172
Examples 172
Networking Cisco Unity Express 175
Cisco Unity Express Networking Overview 175
Components 176
Prerequisites 176
Restrictions 177
Configuring Network Locations 177
Prerequisites 177
viiCisco Unity Express 2.1/2.2 CLI Administrator Guide for Cisco CallManager
Cisco Unity Express 2.1/2.2
Contents
Examples 181
Troubleshooting Commands 183
Downloading and Uploading Network Location Spoken Names 184
Prerequisites 184
Downloading the Location Spoken Name 184
Uploading the Location Spoken Name 185
Disabling a Network Location 185
Prerequisites 185
Examples 186
Adding Remote Users to the Local Directory 187
Impact of Remote Messages on the Local User 188
Configuring the Local Directory with Remote Users 188
Displaying Remote Users 192
Deleting Remote User Information 193
Downloading and Uploading Remote User Spoken Names 194
Prerequisites 194
Downloading the Remote User Spoken Name 194
Uploading the Remote User Spoken Name 195
Configuring Caller ID for Incoming Messages 195
Enabling Caller ID on the Local System 196
Disabling Caller ID on the Local System 196
Configuring a Location with vCard Information 196
Enabling a Location to Receive vCard Information 197
Displaying vCard Status 198
Disabling Receipt of vCard Information 199
Configuring the LRU Cache 200
Enabling the LRU Cache 200
Disabling the LRU Cache 200
Displaying LRU Cache Data 201
Configuring Network Broadcast Messages 201
Configuring Broadcast Messages 202
Configuring the Broadcast Message VPIM ID for a Network Location 203
Enabling the MWI Lights for Broadcast Messages 205
Displaying Broadcast Messages 205
Deleting a Broadcast Message 206
Changing the Broadcast Message Start and End Times 206
Disabling the Broadcast Privileges for a Group 207
Disabling the MWI Lights for Broadcast Messages 207
Configuring Distribution Lists 207
viiiCisco Unity Express 2.1/2.2 CLI Administrator Guide for Cisco CallManager
Cisco Unity Express 2.1/2.2
Contents
Members of a Distribution List 208
Public Distribution Lists 208
Private Distribution Lists 209
Properties of Distribution Lists 210
Differences Between Cisco Unity Express and Cisco Unity Distribution Lists 211
Configuring Public Distribution Lists 212
Displaying Distribution Lists 215
Deleting Distribution Lists 217
Appendix A: Software Copyrights and Licenses 219
ixCisco Unity Express 2.1/2.2 CLI Administrator Guide for Cisco CallManager
Cisco Unity Express 2.1/2.2

Contents
xCisco Unity Express 2.1/2.2 CLI Administrator Guide for Cisco CallManager
Cisco Unity Express 2.1/2.2
Cisco Unity Express Feature Roadmap
The Cisco Unity Express CLI Administrator Guide for Cisco CallManager describes the set of Cisco Unity Express (CUE) command-line interface (CLI) commands and tasks for installing, configuring, managing, and maintaining Cisco Unity Express applications, such as voice mail.
This guide parallels the graphical user interface (GUI) administration tasks described in the Cisco Unity Express GUI Administrator Guide for Cisco CallManager.
The focus of this guide is the Cisco Unity Express application. It does not provide information on installation of Cisco routers, Cisco network modules, or the Cisco CallManager server. For more information about those topics, see “Additional References” on page 20.
This chapter contains the following sections:
• Platforms and Cisco IOS Software Images, page 1
• Cisco Unity Express Feature List, page 2
Platforms and Cisco IOS Software ImagesCisco Unity Express applications use a set of commands that are similar in structure to Cisco IOS software commands. However, Cisco Unity Express commands do not affect the Cisco IOS configuration.
Cisco Unity Express hardware modules and platforms use the Cisco IOS command-line interface (CLI) commands for their operation.
See the Release Notes for Cisco Unity Express Release 2.1.1 for detailed information about the Cisco Unity Express hardware and software platforms.
Note We highly recommend attaching an uninterruptible power supply (UPS) to the router housing the Cisco Unity Express module. Any reliable UPS unit provides continuous power to maintain the operation of the router and the Cisco Unity Express module. Consider the unit’s capacity and run time because power consumption differs among Cisco platforms. Ideally, a UPS should include a signaling mechanism that directs the router to shut down Cisco Unity Express properly and then powers off the router.
1Cisco Unity Express 2.1/2.2 CLI Administrator Guide for Cisco CallManager
Cisco Unity Express 2.1/2.2
Cisco Unity Express Feature RoadmapCisco Unity Express Feature List
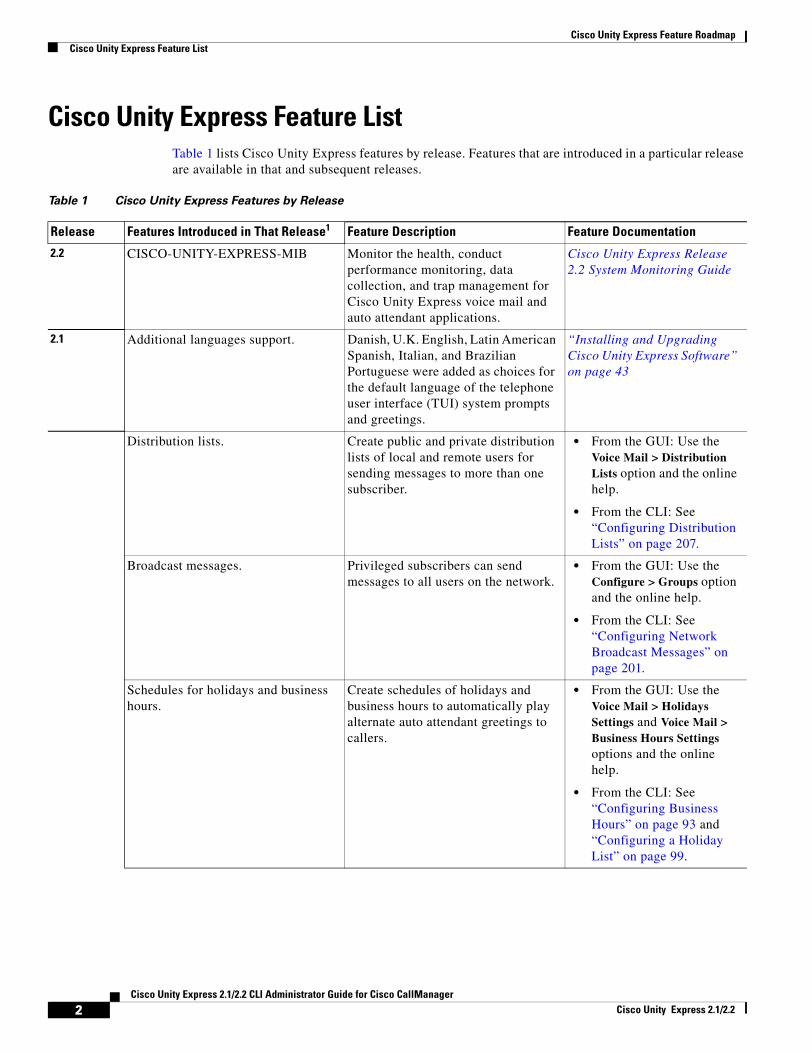
Cisco Unity Express Feature ListTable 1 lists Cisco Unity Express features by release. Features that are introduced in a particular release are available in that and subsequent releases.
Table 1 Cisco Unity Express Features by Release
Release Features Introduced in That Release1 Feature Description Feature Documentation
2.2 CISCO-UNITY-EXPRESS-MIB Monitor the health, conduct performance monitoring, data collection, and trap management for Cisco Unity Express voice mail and auto attendant applications.
Cisco Unity Express Release 2.2 System Monitoring Guide
2.1 Additional languages support. Danish, U.K. English, Latin American Spanish, Italian, and Brazilian Portuguese were added as choices for the default language of the telephone user interface (TUI) system prompts and greetings.
“Installing and Upgrading Cisco Unity Express Software” on page 43
Distribution lists. Create public and private distribution lists of local and remote users for sending messages to more than one subscriber.
• From the GUI: Use the Voice Mail > Distribution Lists option and the online help.
• From the CLI: See “Configuring Distribution Lists” on page 207.
Broadcast messages. Privileged subscribers can send messages to all users on the network.
• From the GUI: Use the Configure > Groups option and the online help.
• From the CLI: See “Configuring Network Broadcast Messages” on page 201.
Schedules for holidays and business hours.
Create schedules of holidays and business hours to automatically play alternate auto attendant greetings to callers.
• From the GUI: Use the Voice Mail > Holidays Settings and Voice Mail > Business Hours Settings options and the online help.
• From the CLI: See “Configuring Business Hours” on page 93 and “Configuring a Holiday List” on page 99.
2Cisco Unity Express 2.1/2.2 CLI Administrator Guide for Cisco CallManager
Cisco Unity Express 2.1/2.2
Cisco Unity Express Feature RoadmapCisco Unity Express Feature List
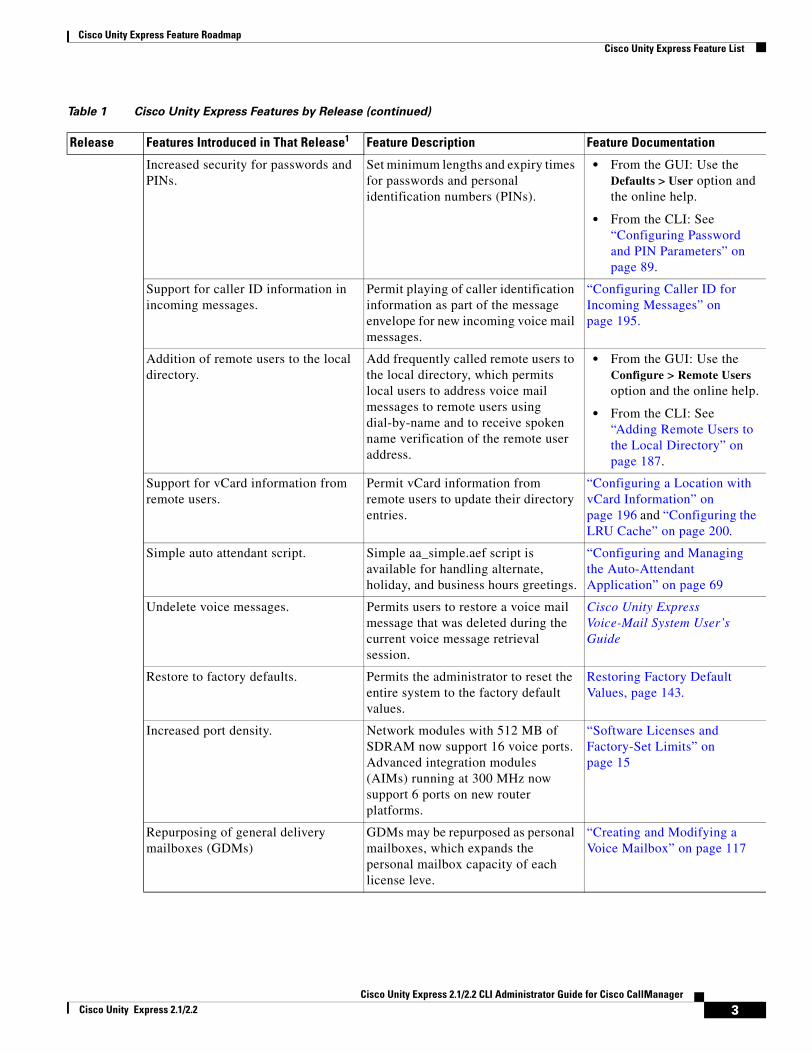
Increased security for passwords and PINs.
Set minimum lengths and expiry times for passwords and personal identification numbers (PINs).
• From the GUI: Use the Defaults > User option and the online help.
• From the CLI: See “Configuring Password and PIN Parameters” on page 89.
Support for caller ID information in incoming messages.
Permit playing of caller identification information as part of the message envelope for new incoming voice mail messages.
“Configuring Caller ID for Incoming Messages” on page 195.
Addition of remote users to the local directory.
Add frequently called remote users to the local directory, which permits local users to address voice mail messages to remote users using dial-by-name and to receive spoken name verification of the remote user address.
• From the GUI: Use the Configure > Remote Users option and the online help.
• From the CLI: See “Adding Remote Users to the Local Directory” on page 187.
Support for vCard information from remote users.
Permit vCard information from remote users to update their directory entries.
“Configuring a Location with vCard Information” on page 196 and “Configuring the LRU Cache” on page 200.
Simple auto attendant script. Simple aa_simple.aef script is available for handling alternate, holiday, and business hours greetings.
“Configuring and Managing the Auto-Attendant Application” on page 69
Undelete voice messages. Permits users to restore a voice mail message that was deleted during the current voice message retrieval session.
Cisco Unity Express Voice-Mail System User’s Guide
Restore to factory defaults. Permits the administrator to reset the entire system to the factory default values.
Restoring Factory Default Values, page 143.
Increased port density. Network modules with 512 MB of SDRAM now support 16 voice ports. Advanced integration modules (AIMs) running at 300 MHz now support 6 ports on new router platforms.
“Software Licenses and Factory-Set Limits” on page 15
Repurposing of general delivery mailboxes (GDMs)
GDMs may be repurposed as personal mailboxes, which expands the personal mailbox capacity of each license leve.
“Creating and Modifying a Voice Mailbox” on page 117
Table 1 Cisco Unity Express Features by Release (continued)
Release Features Introduced in That Release1 Feature Description Feature Documentation
3Cisco Unity Express 2.1/2.2 CLI Administrator Guide for Cisco CallManager
Cisco Unity Express 2.1/2.2
Cisco Unity Express Feature RoadmapCisco Unity Express Feature List
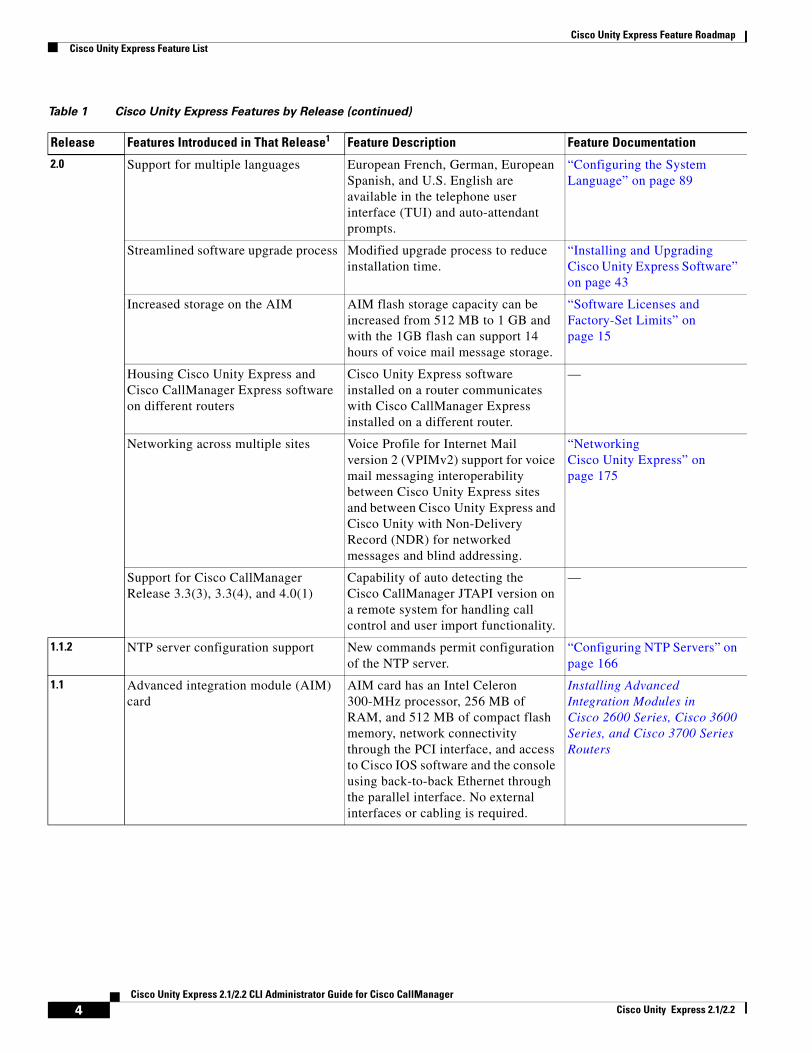
2.0 Support for multiple languages European French, German, European Spanish, and U.S. English are available in the telephone user interface (TUI) and auto-attendant prompts.
“Configuring the System Language” on page 89
Streamlined software upgrade process Modified upgrade process to reduce installation time.
“Installing and Upgrading Cisco Unity Express Software” on page 43
Increased storage on the AIM AIM flash storage capacity can be increased from 512 MB to 1 GB and with the 1GB flash can support 14 hours of voice mail message storage.
“Software Licenses and Factory-Set Limits” on page 15
Housing Cisco Unity Express and Cisco CallManager Express software on different routers
Cisco Unity Express software installed on a router communicates with Cisco CallManager Express installed on a different router.
—
Networking across multiple sites Voice Profile for Internet Mail version 2 (VPIMv2) support for voice mail messaging interoperability between Cisco Unity Express sites and between Cisco Unity Express and Cisco Unity with Non-Delivery Record (NDR) for networked messages and blind addressing.
“Networking Cisco Unity Express” on page 175
Support for Cisco CallManager Release 3.3(3), 3.3(4), and 4.0(1)
Capability of auto detecting the Cisco CallManager JTAPI version on a remote system for handling call control and user import functionality.
—
1.1.2 NTP server configuration support New commands permit configuration of the NTP server.
“Configuring NTP Servers” on page 166
1.1 Advanced integration module (AIM) card
AIM card has an Intel Celeron 300-MHz processor, 256 MB of RAM, and 512 MB of compact flash memory, network connectivity through the PCI interface, and access to Cisco IOS software and the console using back-to-back Ethernet through the parallel interface. No external interfaces or cabling is required.
Installing Advanced Integration Modules in Cisco 2600 Series, Cisco 3600 Series, and Cisco 3700 Series Routers
Table 1 Cisco Unity Express Features by Release (continued)
Release Features Introduced in That Release1 Feature Description Feature Documentation
4Cisco Unity Express 2.1/2.2 CLI Administrator Guide for Cisco CallManager
Cisco Unity Express 2.1/2.2
Cisco Unity Express Feature RoadmapCisco Unity Express Feature List
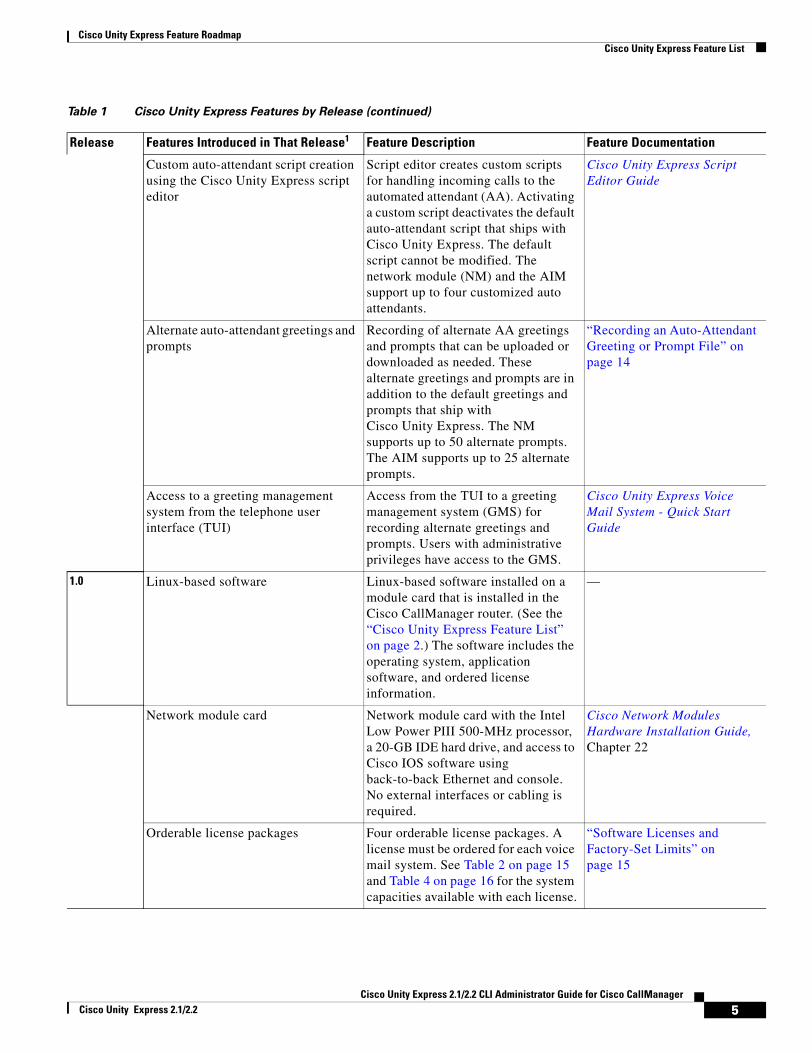
Custom auto-attendant script creation using the Cisco Unity Express script editor
Script editor creates custom scripts for handling incoming calls to the automated attendant (AA). Activating a custom script deactivates the default auto-attendant script that ships with Cisco Unity Express. The default script cannot be modified. The network module (NM) and the AIM support up to four customized auto attendants.
Cisco Unity Express Script Editor Guide
Alternate auto-attendant greetings and prompts
Recording of alternate AA greetings and prompts that can be uploaded or downloaded as needed. These alternate greetings and prompts are in addition to the default greetings and prompts that ship with Cisco Unity Express. The NM supports up to 50 alternate prompts. The AIM supports up to 25 alternate prompts.
“Recording an Auto-Attendant Greeting or Prompt File” on page 14
Access to a greeting management system from the telephone user interface (TUI)
Access from the TUI to a greeting management system (GMS) for recording alternate greetings and prompts. Users with administrative privileges have access to the GMS.
Cisco Unity Express Voice Mail System - Quick Start Guide
1.0 Linux-based software Linux-based software installed on a module card that is installed in the Cisco CallManager router. (See the “Cisco Unity Express Feature List” on page 2.) The software includes the operating system, application software, and ordered license information.
—
Network module card Network module card with the Intel Low Power PIII 500-MHz processor, a 20-GB IDE hard drive, and access to Cisco IOS software using back-to-back Ethernet and console. No external interfaces or cabling is required.
Cisco Network Modules Hardware Installation Guide, Chapter 22
Orderable license packages Four orderable license packages. A license must be ordered for each voice mail system. See Table 2 on page 15 and Table 4 on page 16 for the system capacities available with each license.
“Software Licenses and Factory-Set Limits” on page 15
Table 1 Cisco Unity Express Features by Release (continued)
Release Features Introduced in That Release1 Feature Description Feature Documentation
5Cisco Unity Express 2.1/2.2 CLI Administrator Guide for Cisco CallManager
Cisco Unity Express 2.1/2.2

Cisco Unity Express Feature RoadmapCisco Unity Express Feature List
Spare modules Spare modules with factory installed software and license. Upgrades to larger capacity require purchase of a license and download of the license file.
“Software Licenses and Factory-Set Limits” on page 15
License upgrades and downgrades Upgrades or downgrades from one license size to another.
“Software Licenses and Factory-Set Limits” on page 15
Two administrative interfaces Two administrative interfaces. “Administration Interfaces” on page 17
Integrated GUI with Cisco CallManager Express
An integrated administration GUI for both Cisco Unity Express and Cisco CME. The integrated interface permits configuration of some Cisco CME parameters, such as telephones and extensions.
Cisco Unity Express GUI Administrator Guide for Cisco CallManager, Release 2.0
Bulk provisioning of multiple sites Bulk provisioning of multiple sites using CLI scripts is not provided by Cisco Unity Express. Systems are administered individually.
Cisco Unity Express Script Editor Guide
System access anywhere in the IP network
Systems accessible anywhere on the IP network. If the Cisco Unity Express installer uses TFTP, the site running the installer must be closely located to the TFTP server. All other functions use FTP, which allows the servers to be anywhere in the IP network.
—
Manual backup and restore Manual backup and restore using an FTP server located anywhere in the customer network.
• From the GUI: Use the Administration menu and the online help.
• From the CLI: Cisco Unity Express CLI Administrator Guide for Cisco CallManager, Release 2.0
System reports and log files for troubleshooting.
Reports are available from the Cisco Unity Express GUI screens. All troubleshooting reports and files are available using the Cisco Unity Express CLI commands.
• From the GUI: Use the Reports menu and the online help.
• From the CLI: Cisco Unity Express CLI Administrator Guide for Cisco CallManager, Release 2.0
1. Features that are introduced in a particular release are available in that and subsequent releases.
Table 1 Cisco Unity Express Features by Release (continued)
Release Features Introduced in That Release1 Feature Description Feature Documentation
6Cisco Unity Express 2.1/2.2 CLI Administrator Guide for Cisco CallManager
Cisco Unity Express 2.1/2.2

Cisco Unity Express Feature RoadmapCisco Unity Express Feature List
7Cisco Unity Express 2.1/2.2 CLI Administrator Guide for Cisco CallManager
Cisco Unity Express 2.1/2.2

Cisco Unity Express Feature RoadmapCisco Unity Express Feature List
8Cisco Unity Express 2.1/2.2 CLI Administrator Guide for Cisco CallManager
Cisco Unity Express 2.1/2.2
Overview of Cisco Unity Express Voice Mail and Auto Attendant
The Cisco Unity Express voice-mail and auto-attendant applications work with Cisco CallManager to provide small- and medium-sized companies with the capability to:
• Create and maintain voice mailboxes for onsite or remote telephone users. Releases 2.1 and 2.2 support up to 100 mailboxes. The maximum number of mailboxes depends on the hardware module and license agreement purchased for Cisco Unity Express.
• Record and upload messages for callers to hear when they dial the company’s telephone number, and prompts to guide the callers to specific extensions or employees.
Contents• Prerequisites for Implementing Cisco Unity Express on Cisco CallManager, page 10
• Restrictions for Implementing Cisco Unity Express, page 12
• Recording an Auto-Attendant Greeting or Prompt File, page 14
• Configuring Auto-Attendant Scripts, page 14
• Differences Between the AIM and NM, page 14
• Software Licenses and Factory-Set Limits, page 15
• Networking Cisco Unity Express with Other Voice-Mail Systems, page 16
• Administration Interfaces, page 17
• Differences Between Cisco Unity Express and Cisco Unity, page 17
• Interactions Between Cisco Unity Express and Cisco CallManager, page 18
• Differences Between Cisco Unity Express and Cisco CallManager, page 18
• Additional References, page 20
9Cisco Unity Express 2.1/2.2 CLI Administrator Guide for Cisco CallManager
Cisco Unity Express 2.1/2.2
Overview of Cisco Unity Express Voice Mail and Auto Attendant Prerequisites for Implementing Cisco Unity Express on Cisco CallManager
Prerequisites for Implementing Cisco Unity Express on Cisco CallManager
Before starting Cisco Unity Express configuration, the Cisco CallManager system must be installed. If you did not or are not performing the Cisco CallManager installation, please contact the installer or other support personnel to ensure that the following procedures are completed:
1. Install all Cisco CallManager and Cisco Unity Express hardware and verify functionality.
• Attach the telephones so that they register with the Cisco CallManager server.
• Verify that the Cisco Unity Express router is configured with Cisco IOS Release 12.3(4)T or a later release for the network module (NM) or with Cisco IOS Release 12.3(7)T or a later release for the advanced integration module (AIM).
• For the NM, verify that the enable LED is lit.
Caution If you are installing an AIM-CUE in your Cisco 3745 router, you must install it in the AIM slot labeled AIM1. Installing this AIM in the AIM slot labeled AIM0 of Cisco 3745 routers can damage the AIM.
Note We highly recommend attaching an uninterruptible power supply (UPS) to the router housing the Cisco Unity Express module. Any reliable UPS unit provides continuous power to maintain the operation of the router and the Cisco Unity Express module. Consider the unit’s capacity and run time because power consumption differs among Cisco platforms. Ideally, a UPS should include a signaling mechanism that directs the router to shut down Cisco Unity Express properly and then powers off the router.
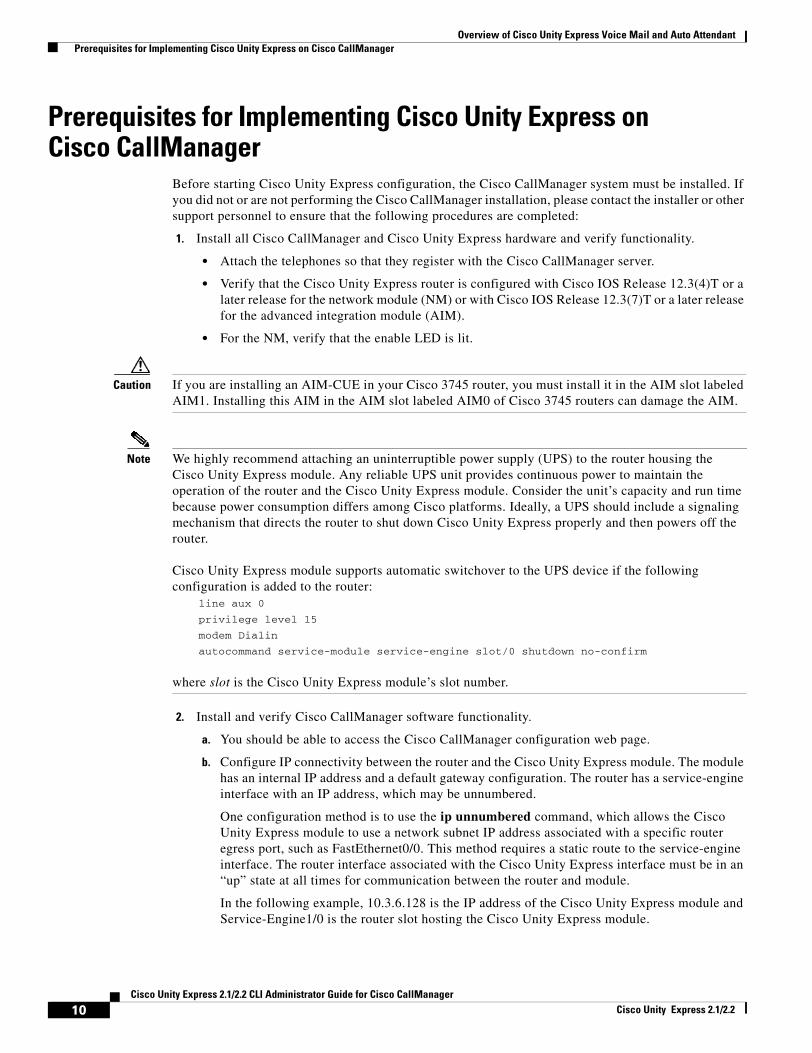
Cisco Unity Express module supports automatic switchover to the UPS device if the following configuration is added to the router:
line aux 0
privilege level 15
modem Dialin
autocommand service-module service-engine slot/0 shutdown no-confirm
where slot is the Cisco Unity Express module’s slot number.
2. Install and verify Cisco CallManager software functionality.
a. You should be able to access the Cisco CallManager configuration web page.
b. Configure IP connectivity between the router and the Cisco Unity Express module. The module has an internal IP address and a default gateway configuration. The router has a service-engine interface with an IP address, which may be unnumbered.
One configuration method is to use the ip unnumbered command, which allows the Cisco Unity Express module to use a network subnet IP address associated with a specific router egress port, such as FastEthernet0/0. This method requires a static route to the service-engine interface. The router interface associated with the Cisco Unity Express interface must be in an “up” state at all times for communication between the router and module.
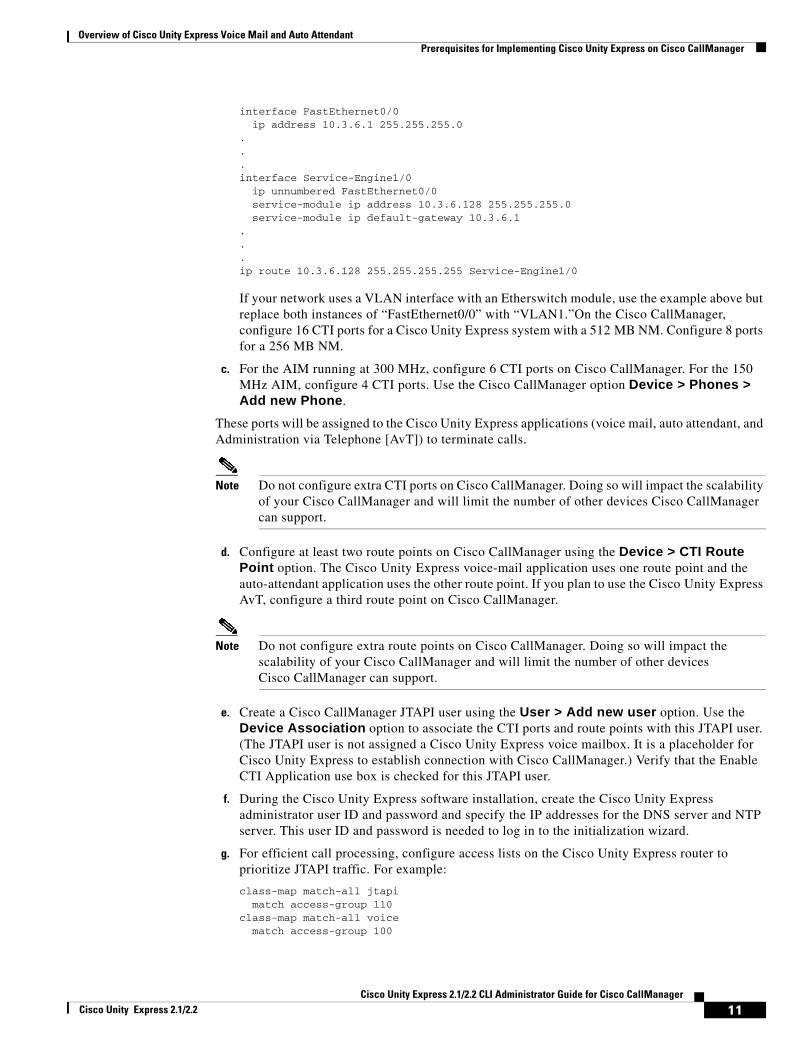
In the following example, 10.3.6.128 is the IP address of the Cisco Unity Express module and Service-Engine1/0 is the router slot hosting the Cisco Unity Express module.
10Cisco Unity Express 2.1/2.2 CLI Administrator Guide for Cisco CallManager
Cisco Unity Express 2.1/2.2
Overview of Cisco Unity Express Voice Mail and Auto Attendant Prerequisites for Implementing Cisco Unity Express on Cisco CallManager
interface FastEthernet0/0ip address 10.3.6.1 255.255.255.0
.
.
.interface Service-Engine1/0
ip unnumbered FastEthernet0/0service-module ip address 10.3.6.128 255.255.255.0service-module ip default-gateway 10.3.6.1
.
.
.ip route 10.3.6.128 255.255.255.255 Service-Engine1/0
If your network uses a VLAN interface with an Etherswitch module, use the example above but replace both instances of “FastEthernet0/0” with “VLAN1.”On the Cisco CallManager, configure 16 CTI ports for a Cisco Unity Express system with a 512 MB NM. Configure 8 ports for a 256 MB NM.
c. For the AIM running at 300 MHz, configure 6 CTI ports on Cisco CallManager. For the 150 MHz AIM, configure 4 CTI ports. Use the Cisco CallManager option Device > Phones > Add new Phone.
These ports will be assigned to the Cisco Unity Express applications (voice mail, auto attendant, and Administration via Telephone [AvT]) to terminate calls.
Note Do not configure extra CTI ports on Cisco CallManager. Doing so will impact the scalability of your Cisco CallManager and will limit the number of other devices Cisco CallManager can support.
d. Configure at least two route points on Cisco CallManager using the Device > CTI Route Point option. The Cisco Unity Express voice-mail application uses one route point and the auto-attendant application uses the other route point. If you plan to use the Cisco Unity Express AvT, configure a third route point on Cisco CallManager.
Note Do not configure extra route points on Cisco CallManager. Doing so will impact the scalability of your Cisco CallManager and will limit the number of other devices Cisco CallManager can support.
e. Create a Cisco CallManager JTAPI user using the User > Add new user option. Use the Device Association option to associate the CTI ports and route points with this JTAPI user. (The JTAPI user is not assigned a Cisco Unity Express voice mailbox. It is a placeholder for Cisco Unity Express to establish connection with Cisco CallManager.) Verify that the Enable CTI Application use box is checked for this JTAPI user.
f. During the Cisco Unity Express software installation, create the Cisco Unity Express administrator user ID and password and specify the IP addresses for the DNS server and NTP server. This user ID and password is needed to log in to the initialization wizard.
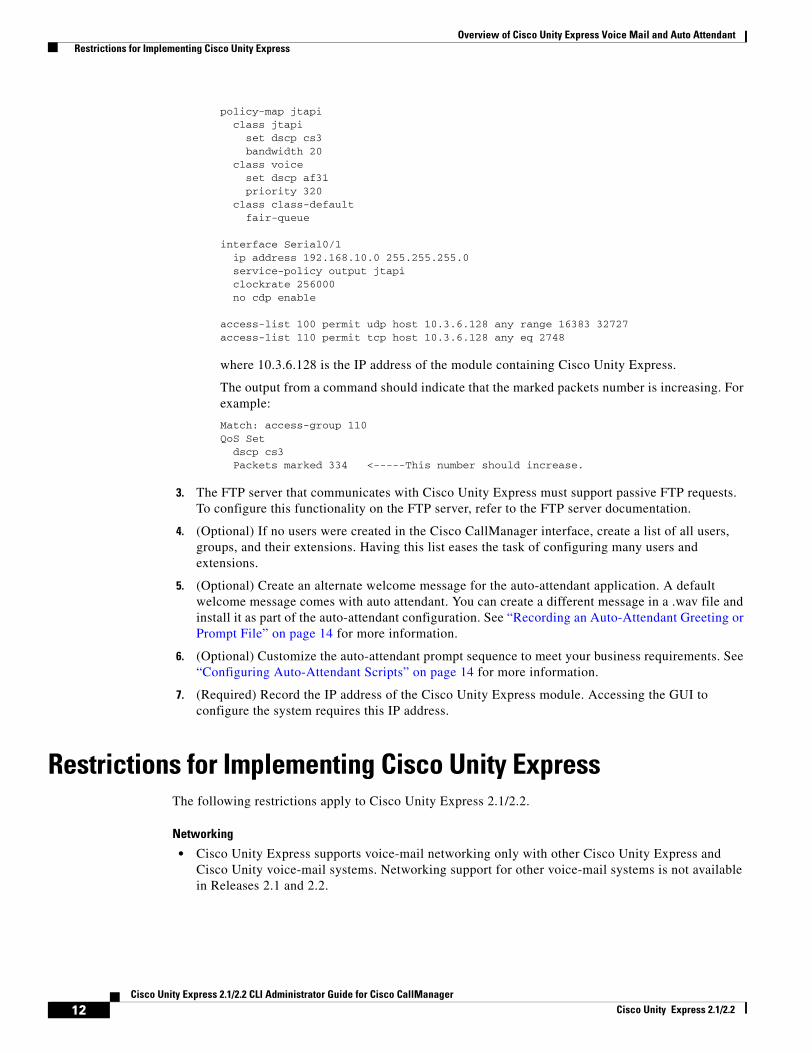
g. For efficient call processing, configure access lists on the Cisco Unity Express router to prioritize JTAPI traffic. For example:
class-map match-all jtapimatch access-group 110
class-map match-all voicematch access-group 100
11Cisco Unity Express 2.1/2.2 CLI Administrator Guide for Cisco CallManager
Cisco Unity Express 2.1/2.2
Overview of Cisco Unity Express Voice Mail and Auto Attendant Restrictions for Implementing Cisco Unity Express
policy-map jtapiclass jtapi
set dscp cs3bandwidth 20
class voiceset dscp af31priority 320
class class-defaultfair-queue
interface Serial0/1ip address 192.168.10.0 255.255.255.0service-policy output jtapiclockrate 256000no cdp enable
access-list 100 permit udp host 10.3.6.128 any range 16383 32727access-list 110 permit tcp host 10.3.6.128 any eq 2748
where 10.3.6.128 is the IP address of the module containing Cisco Unity Express.
The output from a command should indicate that the marked packets number is increasing. For example:
Match: access-group 110QoS Set
dscp cs3Packets marked 334 <-----This number should increase.
3. The FTP server that communicates with Cisco Unity Express must support passive FTP requests. To configure this functionality on the FTP server, refer to the FTP server documentation.
4. (Optional) If no users were created in the Cisco CallManager interface, create a list of all users, groups, and their extensions. Having this list eases the task of configuring many users and extensions.
5. (Optional) Create an alternate welcome message for the auto-attendant application. A default welcome message comes with auto attendant. You can create a different message in a .wav file and install it as part of the auto-attendant configuration. See “Recording an Auto-Attendant Greeting or Prompt File” on page 14 for more information.
6. (Optional) Customize the auto-attendant prompt sequence to meet your business requirements. See “Configuring Auto-Attendant Scripts” on page 14 for more information.
7. (Required) Record the IP address of the Cisco Unity Express module. Accessing the GUI to configure the system requires this IP address.
Restrictions for Implementing Cisco Unity ExpressThe following restrictions apply to Cisco Unity Express 2.1/2.2.
Networking
• Cisco Unity Express supports voice-mail networking only with other Cisco Unity Express and Cisco Unity voice-mail systems. Networking support for other voice-mail systems is not available in Releases 2.1 and 2.2.
12Cisco Unity Express 2.1/2.2 CLI Administrator Guide for Cisco CallManager
Cisco Unity Express 2.1/2.2
Overview of Cisco Unity Express Voice Mail and Auto Attendant Restrictions for Implementing Cisco Unity Express
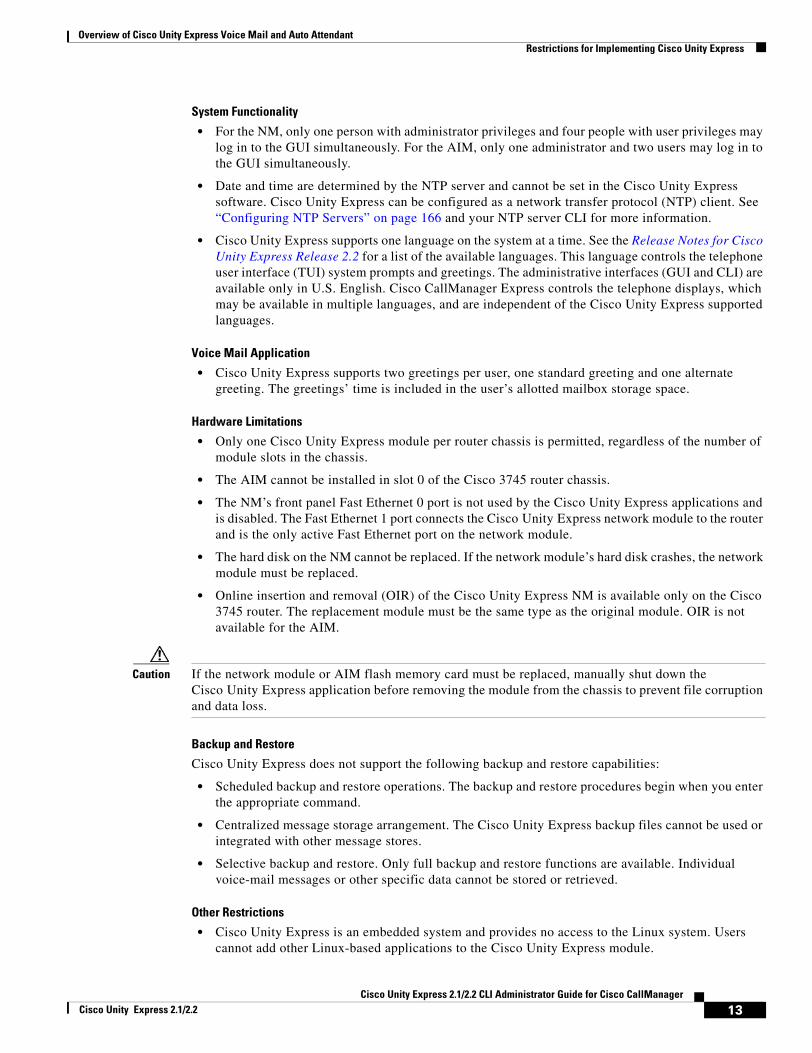
System Functionality
• For the NM, only one person with administrator privileges and four people with user privileges may log in to the GUI simultaneously. For the AIM, only one administrator and two users may log in to the GUI simultaneously.
• Date and time are determined by the NTP server and cannot be set in the Cisco Unity Express software. Cisco Unity Express can be configured as a network transfer protocol (NTP) client. See “Configuring NTP Servers” on page 166 and your NTP server CLI for more information.
• Cisco Unity Express supports one language on the system at a time. See the Release Notes for Cisco Unity Express Release 2.2 for a list of the available languages. This language controls the telephone user interface (TUI) system prompts and greetings. The administrative interfaces (GUI and CLI) are available only in U.S. English. Cisco CallManager Express controls the telephone displays, which may be available in multiple languages, and are independent of the Cisco Unity Express supported languages.
Voice Mail Application
• Cisco Unity Express supports two greetings per user, one standard greeting and one alternate greeting. The greetings’ time is included in the user’s allotted mailbox storage space.
Hardware Limitations
• Only one Cisco Unity Express module per router chassis is permitted, regardless of the number of module slots in the chassis.
• The AIM cannot be installed in slot 0 of the Cisco 3745 router chassis.
• The NM’s front panel Fast Ethernet 0 port is not used by the Cisco Unity Express applications and is disabled. The Fast Ethernet 1 port connects the Cisco Unity Express network module to the router and is the only active Fast Ethernet port on the network module.
• The hard disk on the NM cannot be replaced. If the network module’s hard disk crashes, the network module must be replaced.
• Online insertion and removal (OIR) of the Cisco Unity Express NM is available only on the Cisco 3745 router. The replacement module must be the same type as the original module. OIR is not available for the AIM.
Caution If the network module or AIM flash memory card must be replaced, manually shut down the Cisco Unity Express application before removing the module from the chassis to prevent file corruption and data loss.
Backup and Restore
Cisco Unity Express does not support the following backup and restore capabilities:
• Scheduled backup and restore operations. The backup and restore procedures begin when you enter the appropriate command.
• Centralized message storage arrangement. The Cisco Unity Express backup files cannot be used or integrated with other message stores.
• Selective backup and restore. Only full backup and restore functions are available. Individual voice-mail messages or other specific data cannot be stored or retrieved.
Other Restrictions
• Cisco Unity Express is an embedded system and provides no access to the Linux system. Users cannot add other Linux-based applications to the Cisco Unity Express module.
13Cisco Unity Express 2.1/2.2 CLI Administrator Guide for Cisco CallManager
Cisco Unity Express 2.1/2.2
Overview of Cisco Unity Express Voice Mail and Auto Attendant Recording an Auto-Attendant Greeting or Prompt File
• Cisco Unity Express does not support managing and configuring using Simple Network Management Protocol (SNMP) except for hardware inventory.
• Cisco Unity Express does not support Cisco Networking Services (CNS) or Subnetwork Access Protocol (SNAP) autoprovisioning.
• Cisco Unity Express does not support CiscoWorks configmaker.
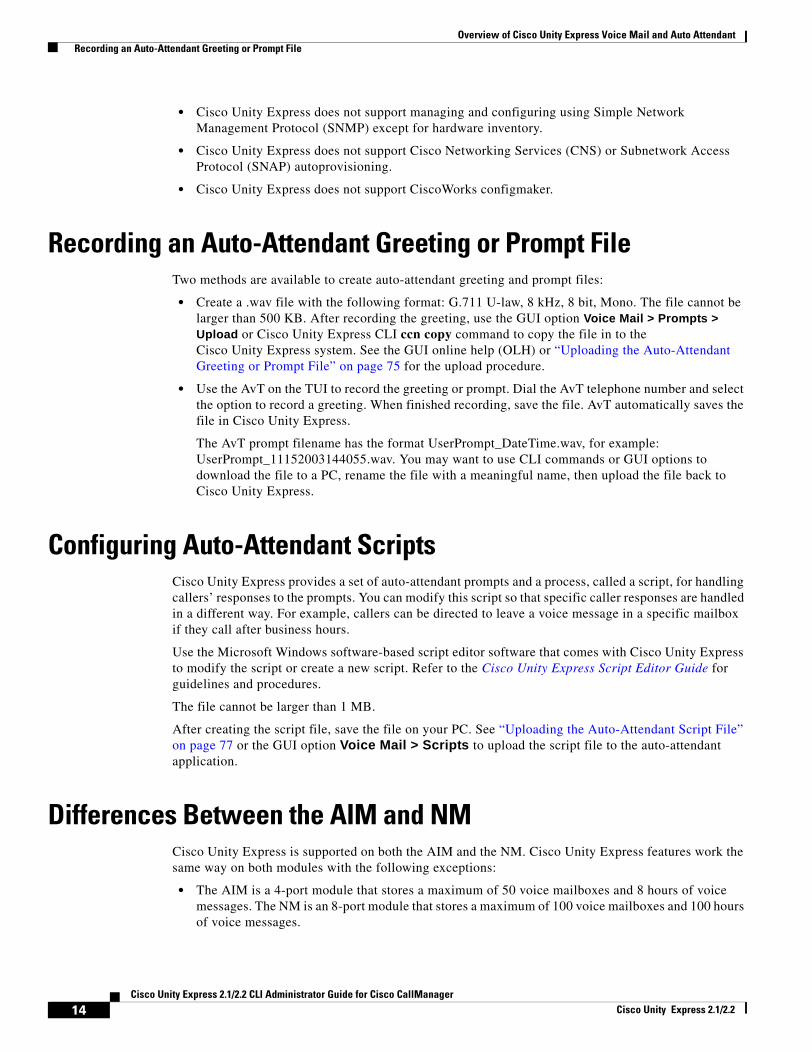
Recording an Auto-Attendant Greeting or Prompt FileTwo methods are available to create auto-attendant greeting and prompt files:
• Create a .wav file with the following format: G.711 U-law, 8 kHz, 8 bit, Mono. The file cannot be larger than 500 KB. After recording the greeting, use the GUI option Voice Mail > Prompts > Upload or Cisco Unity Express CLI ccn copy command to copy the file in to the Cisco Unity Express system. See the GUI online help (OLH) or “Uploading the Auto-Attendant Greeting or Prompt File” on page 75 for the upload procedure.
• Use the AvT on the TUI to record the greeting or prompt. Dial the AvT telephone number and select the option to record a greeting. When finished recording, save the file. AvT automatically saves the file in Cisco Unity Express.
The AvT prompt filename has the format UserPrompt_DateTime.wav, for example: UserPrompt_11152003144055.wav. You may want to use CLI commands or GUI options to download the file to a PC, rename the file with a meaningful name, then upload the file back to Cisco Unity Express.
Configuring Auto-Attendant ScriptsCisco Unity Express provides a set of auto-attendant prompts and a process, called a script, for handling callers’ responses to the prompts. You can modify this script so that specific caller responses are handled in a different way. For example, callers can be directed to leave a voice message in a specific mailbox if they call after business hours.
Use the Microsoft Windows software-based script editor software that comes with Cisco Unity Express to modify the script or create a new script. Refer to the Cisco Unity Express Script Editor Guide for guidelines and procedures.
The file cannot be larger than 1 MB.
After creating the script file, save the file on your PC. See “Uploading the Auto-Attendant Script File” on page 77 or the GUI option Voice Mail > Scripts to upload the script file to the auto-attendant application.
Differences Between the AIM and NMCisco Unity Express is supported on both the AIM and the NM. Cisco Unity Express features work the same way on both modules with the following exceptions:
• The AIM is a 4-port module that stores a maximum of 50 voice mailboxes and 8 hours of voice messages. The NM is an 8-port module that stores a maximum of 100 voice mailboxes and 100 hours of voice messages.
14Cisco Unity Express 2.1/2.2 CLI Administrator Guide for Cisco CallManager
Cisco Unity Express 2.1/2.2
Overview of Cisco Unity Express Voice Mail and Auto Attendant Software Licenses and Factory-Set Limits
• A trace or log command issued on the NM automatically saves the data to the disk. On the AIM, the trace and log data are not saved to flash memory. A Cisco Unity Express CLI command is available to save the data to the AIM flash memory.
• Cisco Unity Express tracks the use and wear activity of the AIM flash memory. This tracking is not necessary for the NM. The CLI command show interface ide 0 and the GUI option Reports > System displays the flash memory wear data.
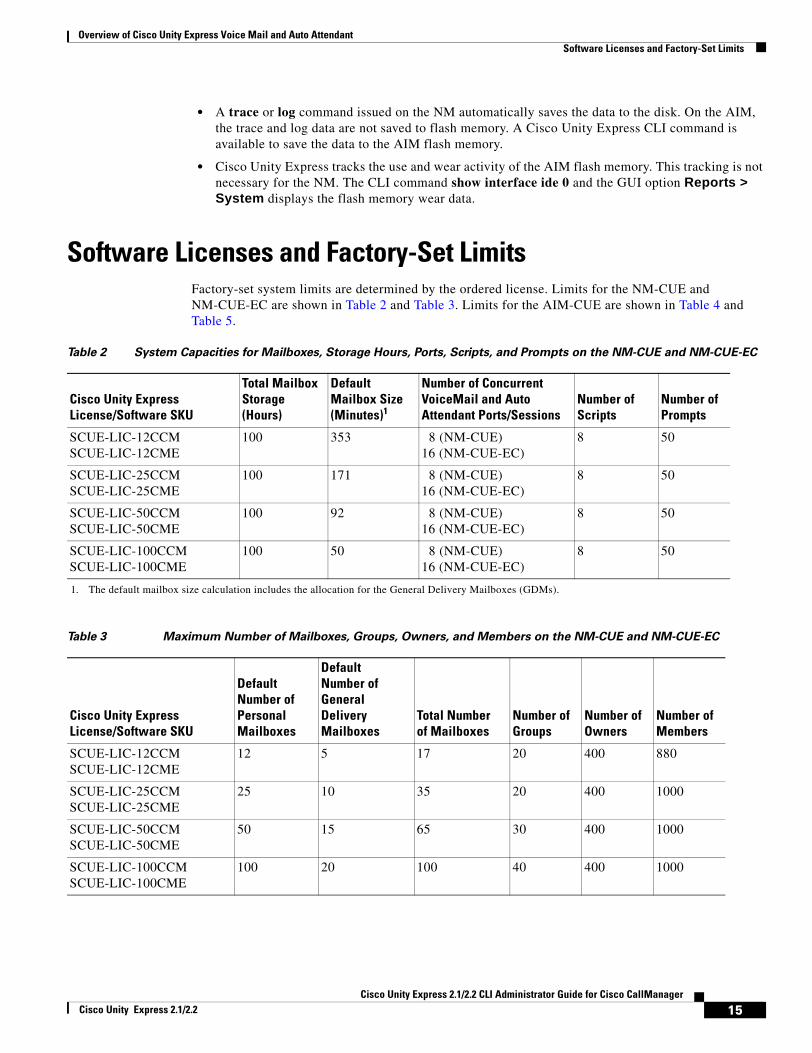
Software Licenses and Factory-Set LimitsFactory-set system limits are determined by the ordered license. Limits for the NM-CUE and NM-CUE-EC are shown in Table 2 and Table 3. Limits for the AIM-CUE are shown in Table 4 and Table 5.
Table 2 System Capacities for Mailboxes, Storage Hours, Ports, Scripts, and Prompts on the NM-CUE and NM-CUE-EC
Cisco Unity Express License/Software SKU
Total Mailbox Storage (Hours)
Default Mailbox Size (Minutes)1
1. The default mailbox size calculation includes the allocation for the General Delivery Mailboxes (GDMs).
Number of Concurrent VoiceMail and Auto Attendant Ports/Sessions
Number of Scripts
Number of Prompts
SCUE-LIC-12CCMSCUE-LIC-12CME
100 353 8 (NM-CUE)16 (NM-CUE-EC)
8 50
SCUE-LIC-25CCMSCUE-LIC-25CME
100 171 8 (NM-CUE)16 (NM-CUE-EC)
8 50
SCUE-LIC-50CCMSCUE-LIC-50CME
100 92 8 (NM-CUE)16 (NM-CUE-EC)
8 50
SCUE-LIC-100CCMSCUE-LIC-100CME
100 50 8 (NM-CUE)16 (NM-CUE-EC)
8 50
Table 3 Maximum Number of Mailboxes, Groups, Owners, and Members on the NM-CUE and NM-CUE-EC
Cisco Unity Express License/Software SKU
Default Number of Personal Mailboxes
Default Number of General Delivery Mailboxes
Total Number of Mailboxes
Number of Groups
Number of Owners
Number of Members
SCUE-LIC-12CCMSCUE-LIC-12CME
12 5 17 20 400 880
SCUE-LIC-25CCMSCUE-LIC-25CME
25 10 35 20 400 1000
SCUE-LIC-50CCMSCUE-LIC-50CME
50 15 65 30 400 1000
SCUE-LIC-100CCMSCUE-LIC-100CME
100 20 100 40 400 1000
15Cisco Unity Express 2.1/2.2 CLI Administrator Guide for Cisco CallManager
Cisco Unity Express 2.1/2.2

Overview of Cisco Unity Express Voice Mail and Auto Attendant Networking Cisco Unity Express with Other Voice-Mail Systems
Cisco Unity Express supports a maximum of 8 SIP triggers and 8 JTAPI triggers for all applications combined. This applies to both the NM and the AIM.
Networking Cisco Unity Express with Other Voice-Mail SystemsCisco Unity Express supports the capability to network Cisco Unity Express with a voice-mail system located at a different site. Users can send and receive messages from subscribers on remotely located, compatible voice-mail systems configured on Cisco CallManager or Cisco CallManager Express call control platforms. Supported configurations include:
• Cisco Unity Express to Cisco Unity Express
• Cisco Unity to Cisco Unity Express
• Cisco Unity Express to Cisco Unity
Table 4 System Capacities for Mailboxes, Storage Hours, Ports, Scripts, and Prompts on the AIM-CUE
Cisco Unity Express License/Software SKU
Total Mailbox Storage (Hours)1
1. The storage value shown is for the AIM-CUE with the 1 GB compact flash. The earlier AIM-CUE version with the 512 MB compact flash supports 4.5 hours (270 minutes) of mailbox storage. To use Cisco Unity Express 2.1, Cisco recommends that older AIM-CUE modules with 512 MB compact be replaced with the 1 GB compact flash AIM-CUE module.
Default Mailbox Size (Minutes)2
2. The default mailbox size calculation includes the allocation for the General Delivery Mailboxes (GDMs).
Number of Concurrent VoiceMail and Auto Attendant Ports/Sessions
Number of Scripts
Number of Prompts
SCUE-LIC-12CCMSCUE-LIC-12CME
14 28 4 (Cisco 2600XM, Cisco 2691)6 (Cisco 2800 series, Cisco 3700 series,
Cisco 3800 series)
4 25
SCUE-LIC-25CCMSCUE-LIC-25CME
14 13 4 (Cisco 2600XM, Cisco 2691)6 (Cisco 2800 series, Cisco 3700 series,
Cisco 3800 series)
4 25
SCUE-LIC-50CCMSCUE-LIC-50CME
14 7 4 (Cisco 2600XM, Cisco 2691)6 (Cisco 2800 series, Cisco 3700 series,
Cisco 3800 series)
4 25
Table 5 Maximum Number of Mailboxes, Groups, Owners, and Members on the AIM-CUE
Cisco Unity Express License/Software SKU
Default Number of Personal Mailboxes
Default Number of General Delivery Mailboxes
Total Number of Mailboxes
Number of Groups
Number of Owners
Number of Members
SCUE-LIC-12CCMSCUE-LIC-12CME
12 5 17 20 100 200
SCUE-LIC-25CCMSCUE-LIC-25CME
25 10 35 20 100 200
SCUE-LIC-50CCMSCUE-LIC-50CME
50 15 65 20 100 200
16Cisco Unity Express 2.1/2.2 CLI Administrator Guide for Cisco CallManager
Cisco Unity Express 2.1/2.2
Overview of Cisco Unity Express Voice Mail and Auto Attendant Administration Interfaces
For more information about configuring the networking capability, see the chapter “Networking Cisco Unity Express” on page 175.
Administration InterfacesCisco Unity Express offers two administration interfaces:
• Graphical user interface (GUI)—This user-friendly, web-based interface permits administration of all voice-mail and auto-attendant functions.
The GUI is targeted for administrators familiar with web-based applications and who have little or no experience with Cisco IOS command structure. See the Cisco Unity Express 2.1/2.2 GUI Administrator Guide for Cisco CallManager for the configuration procedures using the GUI menus and windows.
• Command-line interface (CLI)—This text-based interface has the same administration and configuration capabilities as the GUI. Installation, upgrade, and troubleshooting functions are available only through the CLI commands. The administrator accesses this interface through a Telnet session to the router.
The CLI is targeted for installers, resellers, support personnel, and others familiar with Cisco IOS command structure and routers. For them, accessing the system using the CLI may be easier than using the GUI, especially for troubleshooting, scripting, and bulk provisioning of many sites. See “Entering the Command Environment” on page 31 for the instructions to enter the CLI environment.
The Cisco Unity Express CLI commands have a structure very similar to Cisco IOS CLI commands. However, the Cisco Unity Express CLI commands do not affect Cisco IOS configurations. After you have logged in to the Cisco Unity Express module, the command environment is no longer the Cisco IOS environment.
Error messages in Cisco Unity Express are not always the same as error messages in the Cisco IOS environment.
The GUI and CLI are accessible from a PC or server anywhere in the IP network. To access the GUI, use Microsoft Internet Explorer Version 6.0 or a later release. Cisco Unity Express does not support the Netscape browser. To access the CLI, Telnet to the router, then use the service-module command.
Differences Between Cisco Unity Express and Cisco UnityCisco Unity Express is not the same application as Cisco Unity, although both of them are in the Cisco family of voice messaging products, and the differences are:
• Cisco Unity is a Microsoft Windows-based application and uses the Microsoft Windows operating system’s messaging infrastructure. Cisco Unity Express is a Linux-based application.
• Cisco Unity is usually deployed in a central location that can be networked with multiple sites. Cisco Unity Express 2.1/2.2 can be deployed in standalone locations that serve the local users.
However, a Cisco Unity Express system can be administered from any location that has IP connectivity with the router housing the Cisco Unity Express application. If several sites in a network use Cisco Unity Express, they can be administered individually from a single PC or server. The administrator opens a browser on a PC or server to the GUI at each site or opens a Telnet session to the CLI at each site.
• Cisco Unity supports 100 or more mailboxes and Cisco Unity Express supports 100 or fewer mailboxes.
17Cisco Unity Express 2.1/2.2 CLI Administrator Guide for Cisco CallManager
Cisco Unity Express 2.1/2.2

Overview of Cisco Unity Express Voice Mail and Auto Attendant Interactions Between Cisco Unity Express and Cisco CallManager
• Cisco Unity has a larger set of features than does Cisco Unity Express 2.1/2.2.
Cisco Unity Express uses Cisco Unity Release 3.1 voice-mail prompt recordings and prompt flow, which provides the end user with the same voice-mail look-and-feel.
Interactions Between Cisco Unity Express and Cisco CallManager
Cisco CallManager is the software that controls the telephony functions. Cisco CallManager accepts incoming and outgoing calls to your network and decides where an incoming or outgoing call should be sent. Cisco Unity Express accepts calls sent from Cisco CallManager over JTAPI and can accept H.323 and Media Gateway Control Protocol (MGCP) calls if Cisco CallManager routes them over the JTAPI interface.
Cisco Unity Express is an application that enhances Cisco CallManager by providing the voice messaging and automated attendant capabilities. The Cisco Unity Express module contains the voice-mail and auto-attendant software.
Cisco CallManager has a database that contains the telephone hardware identifications, extension numbers associated with the telephones, users on the system, logins, routing destinations, call handling features, and other system-wide parameters.
The Cisco Unity Express database contains information about the voice mailboxes, auto-attendant prompts, and voice messages. As you go through the initialization and configuration procedures, be sure to save your data so that both databases have current information.
The Cisco Unity Express GUI software allows you to configure the voice-mail and auto-attendant parameters and to specify some of the Cisco CallManager parameters, such as servers, JTAPI user, and computer telephony integration (CTI) ports. The GUI accepts up to three Cisco CallManager servers: a primary server and two backup servers in the event the primary server is not available.
If the WAN link goes down between Cisco CallManager and Cisco Unity Express, Cisco Unity Express will not be able to accept calls from Cisco CallManager. However, the Session Initiation Protocol (SIP) subsystem on the Cisco Unity Express module can accept calls from the Cisco Survivable Remote Site Telephony (SRST) engine in the router containing the Cisco Unity Express module. Voice-mail and auto-attendant applications will function properly. Message waiting indicator (MWI) lights will not be updated. Once the WAN link becomes active, Cisco Unity Express will detect it and register back with the Cisco CallManager server.
Differences Between Cisco Unity Express and Cisco CallManager
Although Cisco Unity Express works closely with Cisco CallManager, Cisco Unity Express and Cisco CallManager define users and administrators differently:
• Cisco CallManager requires a web administrator to configure Cisco CallManager parameters and other system components. Cisco CallManager users and administrators are stored in the Cisco CallManager database. Cisco CallManager does not treat the web administrator as a telephone user.
Cisco Unity Express permits configured Cisco CallManager users to be copied to the Cisco Unity Express database. The Cisco CallManager administrator ID cannot be copied to the Cisco Unity Express database and, therefore, cannot be assigned as the administrator ID for Cisco Unity Express.
18Cisco Unity Express 2.1/2.2 CLI Administrator Guide for Cisco CallManager
Cisco Unity Express 2.1/2.2
Overview of Cisco Unity Express Voice Mail and Auto Attendant Differences Between Cisco Unity Express and Cisco CallManager
• Cisco Unity Express allows only uppercase letters A to Z, lowercase letters a to z, digits 0 to 9, underscore (_), dot (.), and dash (-) in user IDs. User IDs must start with a letter. Any Cisco CallManager user IDs that contain other characters cannot be copied into the Cisco Unity Express database.
• Spaces are not allowed in passwords. Acceptable password characters are lowercase letters a to z, uppercase letters A to Z, digits 0 to 9, and the following symbols: - , . + = _ ! @ # $ ^ * ( ) ? / ~ < > & %
• User IDs and passwords are case sensitive.
19Cisco Unity Express 2.1/2.2 CLI Administrator Guide for Cisco CallManager
Cisco Unity Express 2.1/2.2
Overview of Cisco Unity Express Voice Mail and Auto Attendant Additional References
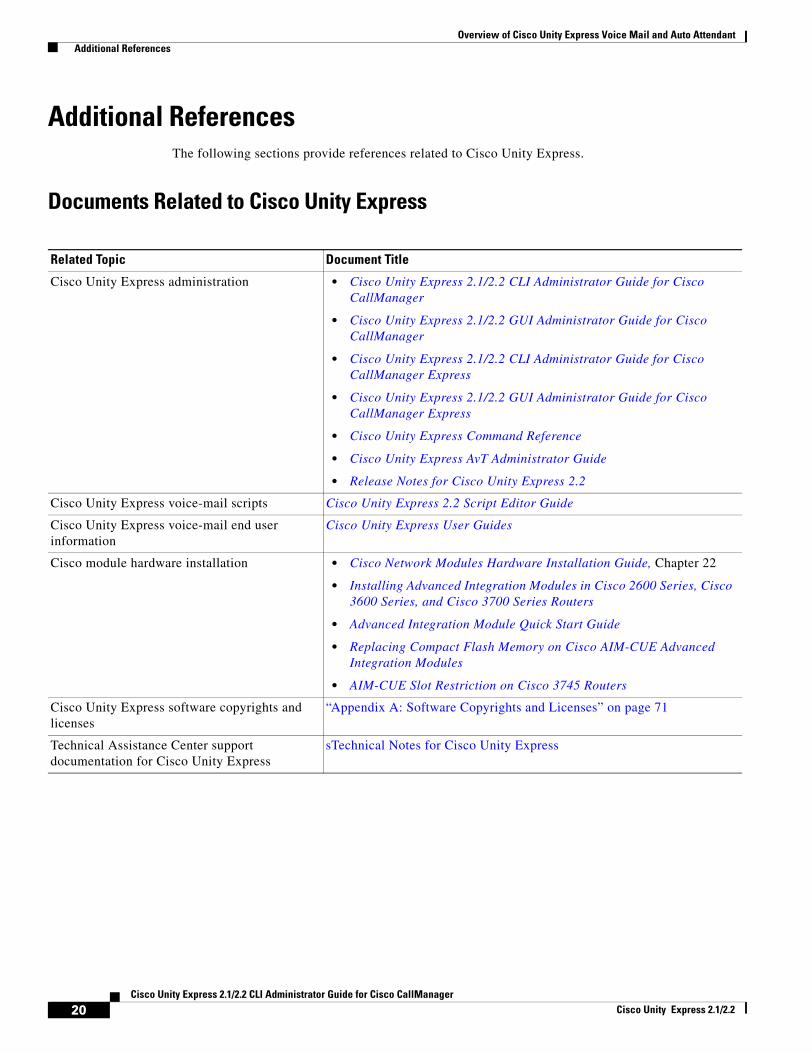
Additional ReferencesThe following sections provide references related to Cisco Unity Express.
Documents Related to Cisco Unity Express
Related Topic Document Title
Cisco Unity Express administration • Cisco Unity Express 2.1/2.2 CLI Administrator Guide for Cisco CallManager
• Cisco Unity Express 2.1/2.2 GUI Administrator Guide for Cisco CallManager
• Cisco Unity Express 2.1/2.2 CLI Administrator Guide for Cisco CallManager Express
• Cisco Unity Express 2.1/2.2 GUI Administrator Guide for Cisco CallManager Express
• Cisco Unity Express Command Reference
• Cisco Unity Express AvT Administrator Guide
• Release Notes for Cisco Unity Express 2.2
Cisco Unity Express voice-mail scripts Cisco Unity Express 2.2 Script Editor Guide
Cisco Unity Express voice-mail end user information
Cisco Unity Express User Guides
Cisco module hardware installation • Cisco Network Modules Hardware Installation Guide, Chapter 22
• Installing Advanced Integration Modules in Cisco 2600 Series, Cisco 3600 Series, and Cisco 3700 Series Routers
• Advanced Integration Module Quick Start Guide
• Replacing Compact Flash Memory on Cisco AIM-CUE Advanced Integration Modules
• AIM-CUE Slot Restriction on Cisco 3745 Routers
Cisco Unity Express software copyrights and licenses
“Appendix A: Software Copyrights and Licenses” on page 71
Technical Assistance Center support documentation for Cisco Unity Express
sTechnical Notes for Cisco Unity Express
20Cisco Unity Express 2.1/2.2 CLI Administrator Guide for Cisco CallManager
Cisco Unity Express 2.1/2.2

Overview of Cisco Unity Express Voice Mail and Auto Attendant Additional References
Cisco CallManager Release 4.1(3)
• Cisco CallManager Administration Guide, Release 4.1(3)
• Cisco CallManager System Guide, Release 4.1(3)
• Cisco CallManager Features and Services Guide, Release 4.1(3)
Release 4.1(2)
• Cisco CallManager Administration Guide, Release 4.1(2)
• Cisco CallManager System Guide, Release 4.1(2)
• Cisco CallManager Features and Services Guide, Release 4.1(2)
Release 4.0(1):
• Cisco CallManager Administration Guide, Release 4.0(1)
• Cisco CallManager System Guide, Release 4.0(1)
• Cisco CallManager Features and Services Guide, Release 4.0(1)
Release 3.3(4)
• Cisco CallManager Administration Guide, Release 3.3(4)
• Cisco CallManager System Guide, Release 3.3(4)
• Cisco CallManager Features and Services Guide, Release 3.3(4)
Release 3.3(3):
• Cisco CallManager Administration Guide, Release 3.3(3)
• Cisco CallManager System Guide, Release 3.3(3)
• Cisco CallManager Features and Services Guide, Release 3.3(3)
Related Topic Document Title
21Cisco Unity Express 2.1/2.2 CLI Administrator Guide for Cisco CallManager
Cisco Unity Express 2.1/2.2

Overview of Cisco Unity Express Voice Mail and Auto Attendant Additional References
Cisco CallManager Express Release 3.4:
• Cisco CallManager Express 3.4 Configuration Guide
• Cisco CallManager Express 3.4 Command Reference
Release 3.3:
• Cisco CallManager Express 3.3 System Administrator Guide
• Cisco CallManager Express 3.3 Command Reference
Release 3.2:
• Cisco CallManager Express 3.2 System Administrator Guide
• Cisco CallManager Express 3.2 Command Reference
• TAPI Developer Guide for Cisco CME/SRST
• XML Developer Guide for Cisco CME/SRST
• Integrating Cisco CallManager Express and Cisco Unity Express
Release 3.0:
• Cisco CallManager Express System Administrator Guide 3.0
• Cisco CallManager Express Command Reference 3.0
• Cisco SRST System Administrator’s Guide Version 3.0
• Integrating Cisco CallManager Express Versions 3.0 and 3.1 with Cisco Unity Express
Cisco Unity • Networking in Cisco Unity Guide
Cisco hardware platforms • Cisco 2600 Series Hardware Installation Guide
• Cisco 2600 series hardware configuration notes
• Voice features on Cisco 2600 series routers
• Cisco 2800 Series Hardware Installation
• Cisco 3700 Series Hardware Installation Guide
• Cisco 3700 series hardware configuration notes
• Software Configuration Guide
• Cisco 3800 Series Hardware Installation
Related Topic Document Title
22Cisco Unity Express 2.1/2.2 CLI Administrator Guide for Cisco CallManager
Cisco Unity Express 2.1/2.2
Overview of Cisco Unity Express Voice Mail and Auto Attendant Additional References
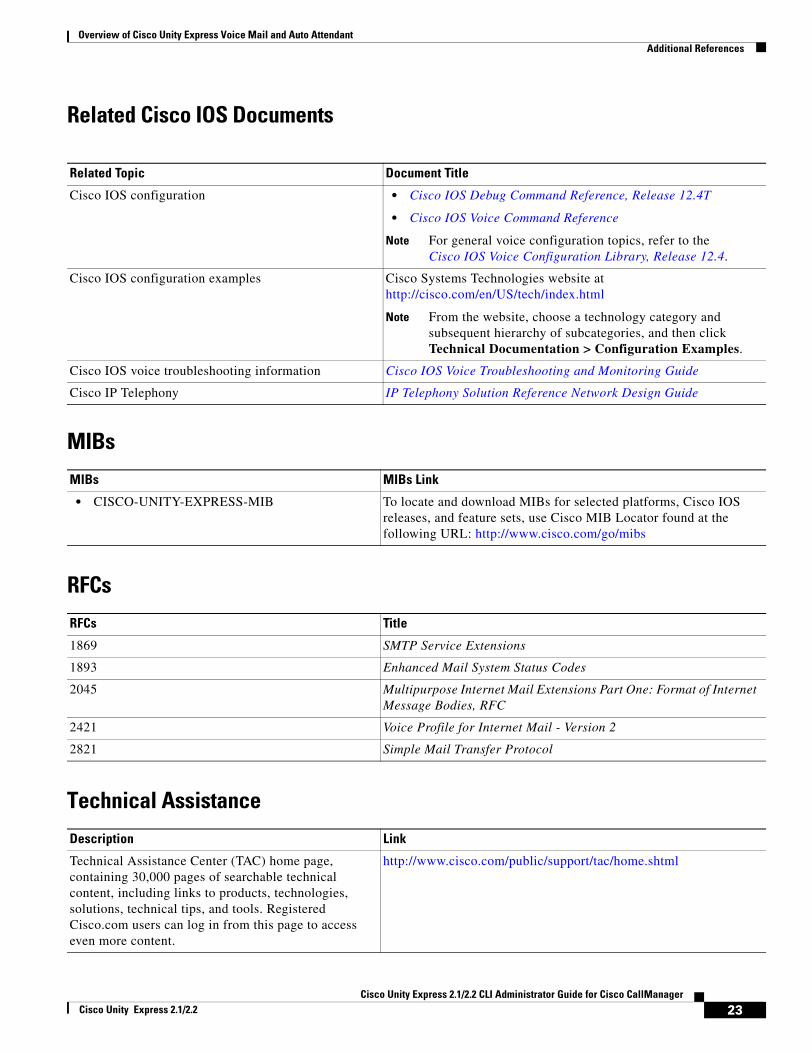
Related Cisco IOS Documents
MIBs
RFCs
Technical Assistance
Related Topic Document Title
Cisco IOS configuration • Cisco IOS Debug Command Reference, Release 12.4T
• Cisco IOS Voice Command Reference
Note For general voice configuration topics, refer to the Cisco IOS Voice Configuration Library, Release 12.4.
Cisco IOS configuration examples Cisco Systems Technologies website at http://cisco.com/en/US/tech/index.html
Note From the website, choose a technology category and subsequent hierarchy of subcategories, and then click Technical Documentation > Configuration Examples.
Cisco IOS voice troubleshooting information Cisco IOS Voice Troubleshooting and Monitoring Guide
Cisco IP Telephony IP Telephony Solution Reference Network Design Guide
MIBs MIBs Link
• CISCO-UNITY-EXPRESS-MIB To locate and download MIBs for selected platforms, Cisco IOS releases, and feature sets, use Cisco MIB Locator found at the following URL: http://www.cisco.com/go/mibs
RFCs Title
1869 SMTP Service Extensions
1893 Enhanced Mail System Status Codes
2045 Multipurpose Internet Mail Extensions Part One: Format of Internet Message Bodies, RFC
2421 Voice Profile for Internet Mail - Version 2
2821 Simple Mail Transfer Protocol
Description Link
Technical Assistance Center (TAC) home page, containing 30,000 pages of searchable technical content, including links to products, technologies, solutions, technical tips, and tools. Registered Cisco.com users can log in from this page to access even more content.
http://www.cisco.com/public/support/tac/home.shtml
23Cisco Unity Express 2.1/2.2 CLI Administrator Guide for Cisco CallManager
Cisco Unity Express 2.1/2.2

Overview of Cisco Unity Express Voice Mail and Auto Attendant Additional References
24Cisco Unity Express 2.1/2.2 CLI Administrator Guide for Cisco CallManager
Cisco Unity Express 2.1/2.2
Setting Up Cisco Unity Express Software
Set up Cisco Unity Express software after all Cisco CallManager and Cisco Unity Express hardware and Cisco CallManager software installations are complete. This chapter contains the following installation information and procedures:
• Prerequisites, page 25
• Configuring a New Cisco Unity Express Software Package, page 29
– Activating IP Connectivity to Cisco Unity Express Software, page 29
– EXEC and Configuration Modes, page 31
– Entering the Command Environment, page 31
– Exiting the Command Environment, page 32
PrerequisitesBefore Cisco Unity Express configuration can be started, the Cisco CallManager system must be installed. If you did not or are not performing the Cisco CallManager installation, contact the installer or other support personnel to ensure that the following procedures are completed:
1. (Required) Install all Cisco CallManager and Cisco Unity Express hardware and verify functionality.
a. Attach the telephones so that they register with the Cisco CallManager server.
b. Verify that the Cisco CallManager server is configured with a Cisco IOS release that supports the Cisco Unity Express network module (NM) or advanced integration module (AIM). For information on the minimum Cisco IOS release required to support these modules, see the Release Notes for Cisco Unity Express Release 2.2.
c. For the NM, verify that the enable LED is lit.
Note We highly recommend attaching an uninterruptible power supply (UPS) to the router that houses the Cisco Unity Express module. Any reliable UPS unit provides continuous power to maintain the operation of the router and the Cisco Unity Express module. Consider the unit’s capacity and run time because power consumption differs among Cisco platforms. Ideally, a UPS should include a signaling mechanism that directs the router to shut down Cisco Unity Express properly and then powers off the router.
Cisco IOS Release 12.3(4)T supports automatic switchover to the UPS device if the following
25Cisco Unity Express 2.1/2.2 CLI Administrator Guide for Cisco CallManager
Cisco Unity Express 2.1/2.2
Setting Up Cisco Unity Express Software Prerequisites
configuration is added to the router:
line aux 0privilege level 15modem Dialinautocommand service-module service-engine slot/0 shutdown no-confirm
where slot is the Cisco Unity Express module’s slot number.
2. (Required) Install and verify Cisco CallManager software functionality.
a. You should be able to access the Cisco CallManager configuration web page.
b. Configure IP connectivity between the router and the Cisco Unity Express module. The module has an internal IP address and a default gateway configuration. The router has a service-engine interface with an IP address, which may be unnumbered.
One configuration method is to use the ip unnumbered command, which allows the Cisco Unity Express module to use a network subnet IP address associated with a specific router egress port, such as FastEthernet0/0. This method requires a static route to the service-engine interface. The router interface associated with the Cisco Unity Express interface must be in an “up” state at all times for communication between the router and module.
In the following example, 10.3.6.128 is the IP address of the Cisco Unity Express module and Service-Engine1/0 is the router slot hosting the Cisco Unity Express module.
interface FastEthernet0/0ip address 10.3.6.1 255.255.255.0
.
.
.interface Service-Engine1/0
ip unnumbered FastEthernet0/0service-module ip address 10.3.6.128 255.255.255.0service-module ip default-gateway 10.3.6.1
.
.
.ip route 10.3.6.128 255.255.255.255 Service-Engine1/0
If your network uses a VLAN interface with an Etherswitch module, use the example above but replace both instances of “FastEthernet0/0” with “VLAN1.”On the Cisco CallManager, configure 16 CTI ports for a Cisco Unity Express system with a 512 MB NM. Configure 8 ports for a 256 MB NM.
c. For the NM, configure eight CTI ports on Cisco CallManager. For the AIM, configure four CTI ports on Cisco CallManager. Use the Cisco CallManager option Device > Phones > Add new Phone. These ports will be assigned to the Cisco Unity Express applications (voice mail, auto attendant, and Administration via Telephone [AvT]) to terminate calls.
Note Do not configure extra CTI ports on Cisco CallManager. Doing so will impact the scalability of your Cisco CallManager and will limit the number of other devices Cisco CallManager can support.
26Cisco Unity Express 2.1/2.2 CLI Administrator Guide for Cisco CallManager
Cisco Unity Express 2.1/2.2
Setting Up Cisco Unity Express Software Prerequisites
d. Configure at least two route points on Cisco CallManager using the Device > CTI Route Point option. The Cisco Unity Express voice-mail application uses one route point, and the auto-attendant application uses the other route point. If you plan to use the Cisco Unity Express AvT, configure a third route point on Cisco CallManager.
Note Do not configure extra route points on Cisco CallManager. Doing so will impact the scalability of your Cisco CallManager and will limit the number of other devices that Cisco CallManager can support.
e. Create a Cisco CallManager JTAPI user using the User > Add new user option. Use the Device Association option to associate the CTI ports and route points with this JTAPI user. (The JTAPI user is not assigned a Cisco Unity Express voice mailbox. It is a placeholder for Cisco Unity Express to establish a connection with Cisco CallManager.) Verify that the Enable CTI Application use box is checked for this JTAPI user.
f. During the Cisco Unity Express software installation, create the Cisco Unity Express administrator user ID and password and specify the IP addresses for the DNS server and NTP server. This user ID and password is needed to log in to the initialization wizard.
g. For efficient call processing, configure access lists on the Cisco Unity Express router to prioritize JTAPI traffic. For example:
class-map match-all jtapimatch access-group 110
class-map match-all voicematch access-group 100
policy-map jtapiclass jtapiset dscp cs3bandwidth 20
class voiceset dscp af31priority 320
class class-defaultfair-queue
interface Serial0/1ip address 192.168.10.0 255.255.255.0service-policy output jtapiclockrate 256000no cdp enable
access-list 100 permit udp host 10.3.6.128 any range 16383 32727access-list 110 permit tcp host 10.3.6.128 any eq 2748
where 10.3.6.128 is the IP address of the module that contains Cisco Unity Express.
The output from the show policy-map interface command should indicate that the marked packets number is increasing. For example:
Match: access-group 110QoS Setdscp cs3Packets marked 334 <-----This number should increase.
3. (Required) The FTP server that communicates with Cisco Unity Express must support passive FTP requests. To configure this functionality on the FTP server, refer to the FTP server documentation.
27Cisco Unity Express 2.1/2.2 CLI Administrator Guide for Cisco CallManager
Cisco Unity Express 2.1/2.2
Setting Up Cisco Unity Express Software Prerequisites
4. (Optional) If no users were created in the Cisco CallManager interface, create a list of all users, groups, and their extensions. Having this list eases the task of configuring many users and extensions.
5. (Optional) Create an alternate welcome message for the auto-attendant application. A default welcome message comes with auto attendant. You can create a different message in a .wav file and install it as part of the auto-attendant configuration. See “Recording an Auto-Attendant Greeting or Prompt File” on page 75 for more information.
6. (Optional) Customize the auto-attendant prompt sequence to meet your business requirements. See “Configuring Auto-Attendant Scripts” on page 76 for more information.
7. (Required) Record the IP address of the Cisco Unity Express module. Accessing the GUI to configure the system requires this IP address.
28Cisco Unity Express 2.1/2.2 CLI Administrator Guide for Cisco CallManager
Cisco Unity Express 2.1/2.2
Setting Up Cisco Unity Express Software Configuring a New Cisco Unity Express Software Package
Configuring a New Cisco Unity Express Software PackageWhen you order Cisco Unity Express, Cisco Unity Express software and the purchased license are installed on the module at the factory. Spare modules also ship with the software and license installed.
The following procedures are required to configure a new installation of Cisco Unity Express.
1. Configure the IP addressing between the module and the router. See “Activating IP Connectivity to Cisco Unity Express Software” on page 29.
2. Begin configuring the Cisco Unity Express software. See the section “Configuration Tasks” on page 35.
Activating IP Connectivity to Cisco Unity Express SoftwareAfter installing the Cisco Unity Express module, activate the IP communication link between Cisco CallManager and the Cisco Unity Express application.
Prerequisites
The following information is required for activating the software:
• Slot and unit numbers of the Cisco Unity Express module on the Cisco IOS router that hosts Cisco Unity Express.
• IP address and subnet mask of the Cisco IOS router that hosts Cisco Unity Express or the unnumbered interface type and number.
• IP address of the Cisco Unity Express module. This IP address must be on the same subnet as the Cisco IOS router that hosts Cisco Unity Express.
• IP address of the default gateway of the Cisco Unity Express router. This IP address must be the same IP address as the Cisco IOS router that hosts Cisco Unity Express.
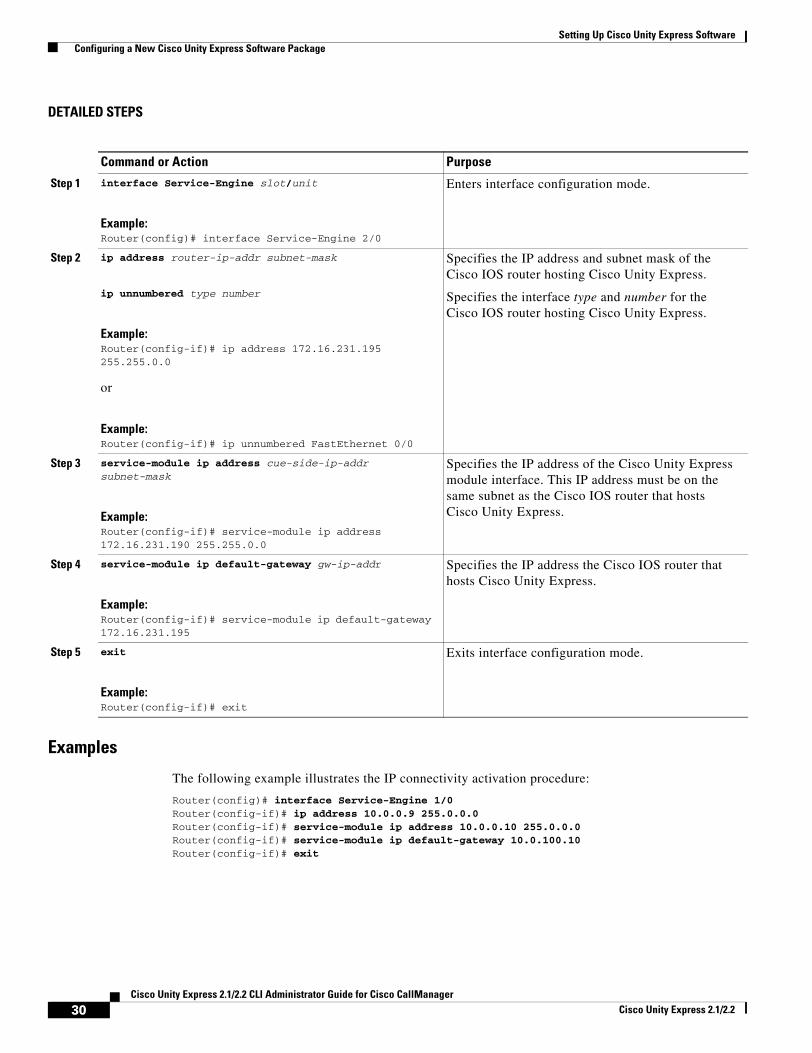
SUMMARY STEPS
1. interface Service-Engine slot/unit
2. ip address router-ip-addr subnet-mask or ip unnumbered type number
3. service-module ip address cue-side-ip-addr subnet-mask
4. service-module ip default-gateway gw-ip-addr
5. exit
29Cisco Unity Express 2.1/2.2 CLI Administrator Guide for Cisco CallManager
Cisco Unity Express 2.1/2.2
Setting Up Cisco Unity Express Software Configuring a New Cisco Unity Express Software Package
DETAILED STEPS
Examples
The following example illustrates the IP connectivity activation procedure:
Router(config)# interface Service-Engine 1/0Router(config-if)# ip address 10.0.0.9 255.0.0.0Router(config-if)# service-module ip address 10.0.0.10 255.0.0.0Router(config-if)# service-module ip default-gateway 10.0.100.10Router(config-if)# exit
Command or Action Purpose
Step 1 interface Service-Engine slot/unit
Example:Router(config)# interface Service-Engine 2/0
Enters interface configuration mode.
Step 2 ip address router-ip-addr subnet-mask
ip unnumbered type number
Example:Router(config-if)# ip address 172.16.231.195 255.255.0.0
or
Example:Router(config-if)# ip unnumbered FastEthernet 0/0
Specifies the IP address and subnet mask of the Cisco IOS router hosting Cisco Unity Express.
Specifies the interface type and number for the Cisco IOS router hosting Cisco Unity Express.
Step 3 service-module ip address cue-side-ip-addr subnet-mask
Example:Router(config-if)# service-module ip address 172.16.231.190 255.255.0.0
Specifies the IP address of the Cisco Unity Express module interface. This IP address must be on the same subnet as the Cisco IOS router that hosts Cisco Unity Express.
Step 4 service-module ip default-gateway gw-ip-addr
Example:Router(config-if)# service-module ip default-gateway 172.16.231.195
Specifies the IP address the Cisco IOS router that hosts Cisco Unity Express.
Step 5 exit
Example:Router(config-if)# exit
Exits interface configuration mode.
30Cisco Unity Express 2.1/2.2 CLI Administrator Guide for Cisco CallManager
Cisco Unity Express 2.1/2.2
Setting Up Cisco Unity Express Software Configuring a New Cisco Unity Express Software Package
What to Do Next
After configuring the connectivity to the Cisco Unity Express module, enter the Cisco Unity Express command environment and start configuring the applications. See “Entering the Command Environment” on page 31.
EXEC and Configuration ModesThe Cisco Unity Express command modes, EXEC and configuration, operate similarly to the EXEC and configuration modes for Cisco IOS CLI commands, however, Cisco Unity Express EXEC mode permits some parameters to be configured or modified, which are not allowed in Cisco IOS EXEC mode. This Cisco Unity Express capability saves the configured parameters to flash memory so that the system has some minimum information available if a catastrophic failure, such as a disk crash, occurs. The description for each command in this guide indicates the command mode.
Entering the Command EnvironmentAfter the Cisco Unity Express software is installed and active, use this procedure to enter the command environment.
Prerequisites
For a new Cisco Unity Express software installation, see “Prerequisites” on page 25 and “Activating IP Connectivity to Cisco Unity Express Software” on page 29 before beginning this procedure.
The following information is required to enter the command environment:
• IP address of the router that contains the Cisco Unity Express module
• Username and password to log in to the router
• Slot number of the module
SUMMARY STEPS
1. Open a Telnet session.
2. telnet ip-address
3. Enter the user ID and password of the router.
4. service-module service-engine slot/port session
5. enable
31Cisco Unity Express 2.1/2.2 CLI Administrator Guide for Cisco CallManager
Cisco Unity Express 2.1/2.2
Setting Up Cisco Unity Express Software Configuring a New Cisco Unity Express Software Package
DETAILED STEPS
What to Do Next
Review the section “Configuration Tasks” on page 35.
Exiting the Command EnvironmentWhen you need to leave the Cisco Unity Express command environment and return to the router command environment, follow the steps below.
SUMMARY STEPS
1. Return to the Cisco Unity Express EXEC mode.
2. Press the CTRL-SHIFT-6 keys simultaneously, followed by a lowercase x.
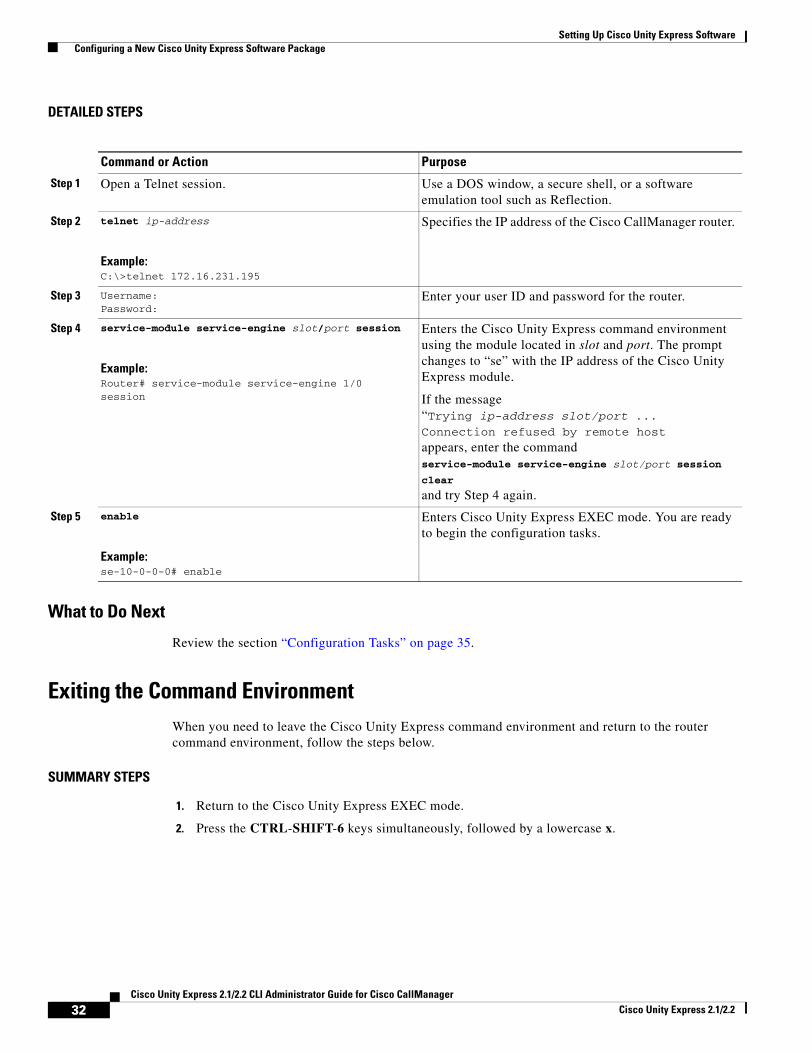
Command or Action Purpose
Step 1 Open a Telnet session. Use a DOS window, a secure shell, or a software emulation tool such as Reflection.
Step 2 telnet ip-address
Example:C:\>telnet 172.16.231.195
Specifies the IP address of the Cisco CallManager router.
Step 3 Username:Password:
Enter your user ID and password for the router.
Step 4 service-module service-engine slot/port session
Example:Router# service-module service-engine 1/0 session
Enters the Cisco Unity Express command environment using the module located in slot and port. The prompt changes to “se” with the IP address of the Cisco Unity Express module.
If the message “Trying ip-address slot/port ...Connection refused by remote host
appears, enter the command service-module service-engine slot/port session
clear
and try Step 4 again.
Step 5 enable
Example:se-10-0-0-0# enable
Enters Cisco Unity Express EXEC mode. You are ready to begin the configuration tasks.
32Cisco Unity Express 2.1/2.2 CLI Administrator Guide for Cisco CallManager
Cisco Unity Express 2.1/2.2
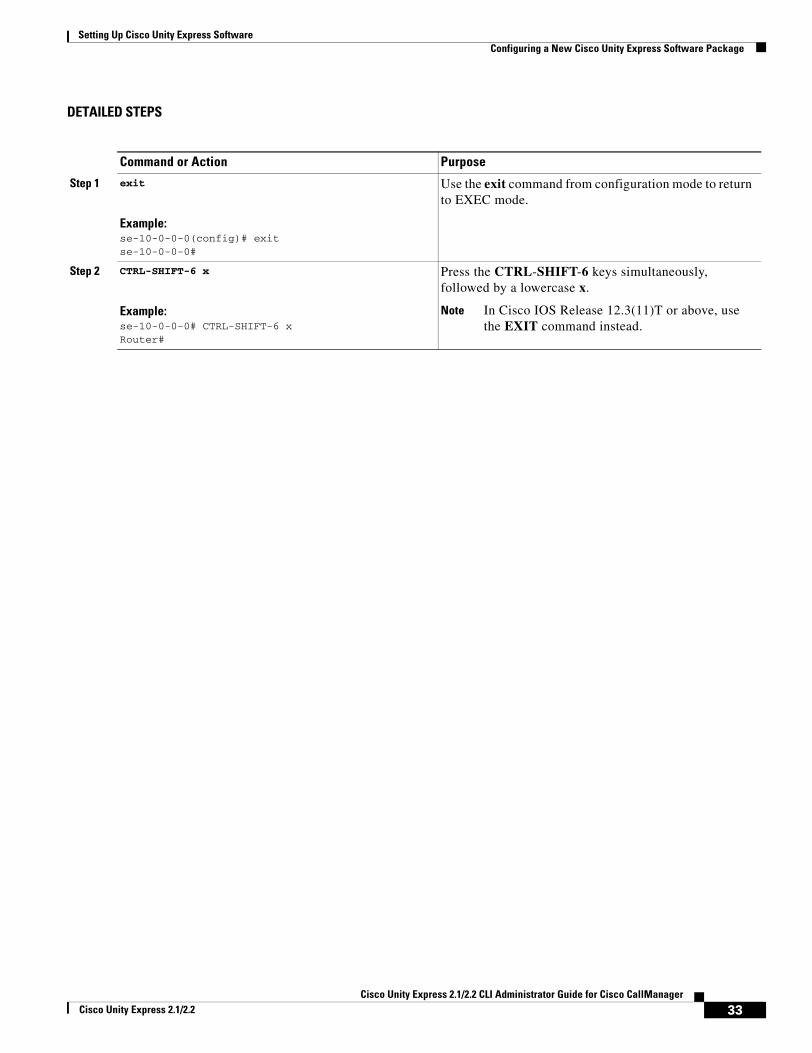
Setting Up Cisco Unity Express Software Configuring a New Cisco Unity Express Software Package
DETAILED STEPS
Command or Action Purpose
Step 1 exit
Example:se-10-0-0-0(config)# exitse-10-0-0-0#
Use the exit command from configuration mode to return to EXEC mode.
Step 2 CTRL-SHIFT-6 x
Example:se-10-0-0-0# CTRL-SHIFT-6 xRouter#
Press the CTRL-SHIFT-6 keys simultaneously, followed by a lowercase x.
Note In Cisco IOS Release 12.3(11)T or above, use the EXIT command instead.
33Cisco Unity Express 2.1/2.2 CLI Administrator Guide for Cisco CallManager
Cisco Unity Express 2.1/2.2

Setting Up Cisco Unity Express Software Configuring a New Cisco Unity Express Software Package
34Cisco Unity Express 2.1/2.2 CLI Administrator Guide for Cisco CallManager
Cisco Unity Express 2.1/2.2
Configuration Tasks
After completing the prerequisite activities, begin the configuration tasks. This chapter lists the recommended tasks for configuring Cisco Unity Express and contains the following sections:
• Configuring the System Using the CLI Commands, page 35
• Configuring the System Using the GUI and the Initialization Wizard, page 35
• Initial Tasks, page 36
• Ongoing Tasks, page 41
• As-Needed Tasks, page 42
Configuring the System Using the CLI CommandsIf you will configure one or more Cisco Unity Express systems exclusively using CLI scripts, enter the command environment as described in “Entering the Command Environment” on page 31. Proceed with the scripts, using the sections in this chapter as a guideline for configuring the system components. When entering the GUI for the first time and the initialization wizard appears, choose the skip option to avoid reconfiguring the system.
Configuring the System Using the GUI and the Initialization Wizard
The Cisco Unity Express GUI provides the initialization wizard software tool to configure the basic system parameters and import any users configured with the Cisco CallManager interface.
If you log in to the GUI web interface after installation, the initialization wizard is the first screen to appear. You cannot activate it again except by reinstalling Cisco Unity Express software. All the parameters configured through the initialization wizard are available through GUI screens and CLI commands. Refer to the Cisco Unity Express 2.1/2.2 GUI Administrator Guide for Cisco CallManager for more information about the initialization wizard.
35Cisco Unity Express 2.1/2.2 CLI Administrator Guide for Cisco CallManager
Cisco Unity Express 2.1/2.2
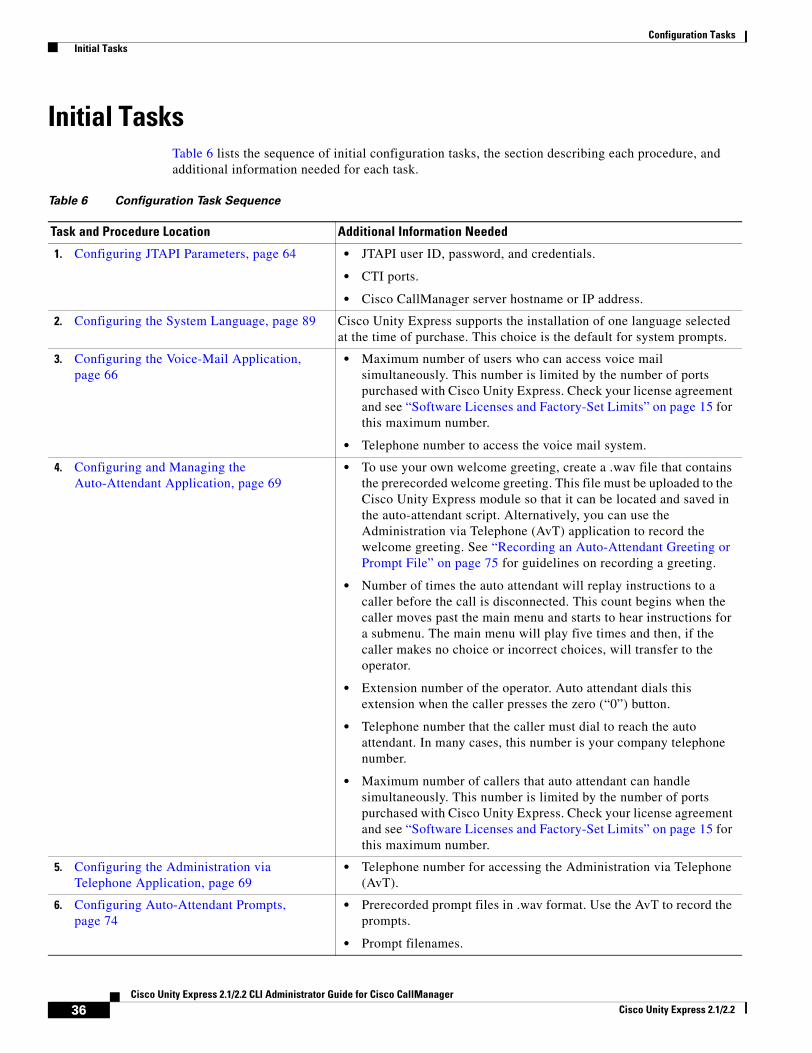
Configuration Tasks Initial Tasks
Initial TasksTable 6 lists the sequence of initial configuration tasks, the section describing each procedure, and additional information needed for each task.
Table 6 Configuration Task Sequence
Task and Procedure Location Additional Information Needed
1. Configuring JTAPI Parameters, page 64 • JTAPI user ID, password, and credentials.
• CTI ports.
• Cisco CallManager server hostname or IP address.
2. Configuring the System Language, page 89 Cisco Unity Express supports the installation of one language selected at the time of purchase. This choice is the default for system prompts.
3. Configuring the Voice-Mail Application, page 66
• Maximum number of users who can access voice mail simultaneously. This number is limited by the number of ports purchased with Cisco Unity Express. Check your license agreement and see “Software Licenses and Factory-Set Limits” on page 15 for this maximum number.
• Telephone number to access the voice mail system.
4. Configuring and Managing the Auto-Attendant Application, page 69
• To use your own welcome greeting, create a .wav file that contains the prerecorded welcome greeting. This file must be uploaded to the Cisco Unity Express module so that it can be located and saved in the auto-attendant script. Alternatively, you can use the Administration via Telephone (AvT) application to record the welcome greeting. See “Recording an Auto-Attendant Greeting or Prompt File” on page 75 for guidelines on recording a greeting.
• Number of times the auto attendant will replay instructions to a caller before the call is disconnected. This count begins when the caller moves past the main menu and starts to hear instructions for a submenu. The main menu will play five times and then, if the caller makes no choice or incorrect choices, will transfer to the operator.
• Extension number of the operator. Auto attendant dials this extension when the caller presses the zero (“0”) button.
• Telephone number that the caller must dial to reach the auto attendant. In many cases, this number is your company telephone number.
• Maximum number of callers that auto attendant can handle simultaneously. This number is limited by the number of ports purchased with Cisco Unity Express. Check your license agreement and see “Software Licenses and Factory-Set Limits” on page 15 for this maximum number.
5. Configuring the Administration via Telephone Application, page 69
• Telephone number for accessing the Administration via Telephone (AvT).
6. Configuring Auto-Attendant Prompts, page 74
• Prerecorded prompt files in .wav format. Use the AvT to record the prompts.
• Prompt filenames.
36Cisco Unity Express 2.1/2.2 CLI Administrator Guide for Cisco CallManager
Cisco Unity Express 2.1/2.2
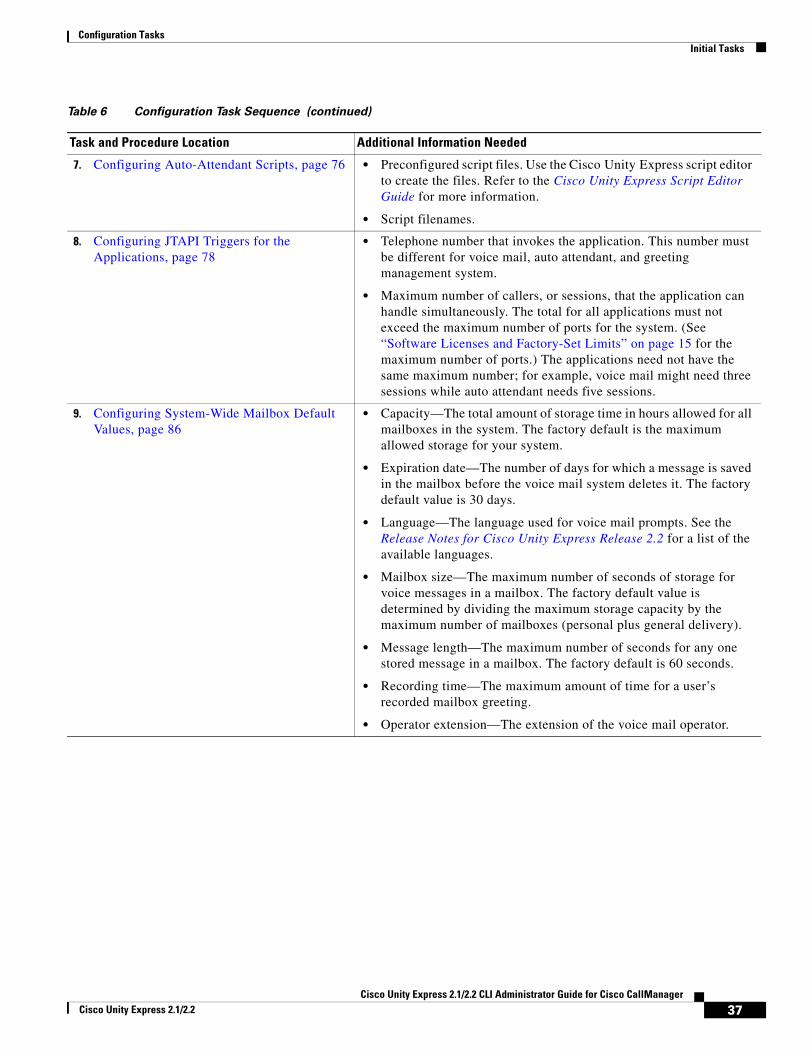
Configuration Tasks Initial Tasks
7. Configuring Auto-Attendant Scripts, page 76 • Preconfigured script files. Use the Cisco Unity Express script editor to create the files. Refer to the Cisco Unity Express Script Editor Guide for more information.
• Script filenames.
8. Configuring JTAPI Triggers for the Applications, page 78
• Telephone number that invokes the application. This number must be different for voice mail, auto attendant, and greeting management system.
• Maximum number of callers, or sessions, that the application can handle simultaneously. The total for all applications must not exceed the maximum number of ports for the system. (See “Software Licenses and Factory-Set Limits” on page 15 for the maximum number of ports.) The applications need not have the same maximum number; for example, voice mail might need three sessions while auto attendant needs five sessions.
9. Configuring System-Wide Mailbox Default Values, page 86
• Capacity—The total amount of storage time in hours allowed for all mailboxes in the system. The factory default is the maximum allowed storage for your system.
• Expiration date—The number of days for which a message is saved in the mailbox before the voice mail system deletes it. The factory default value is 30 days.
• Language—The language used for voice mail prompts. See the Release Notes for Cisco Unity Express Release 2.2 for a list of the available languages.
• Mailbox size—The maximum number of seconds of storage for voice messages in a mailbox. The factory default value is determined by dividing the maximum storage capacity by the maximum number of mailboxes (personal plus general delivery).
• Message length—The maximum number of seconds for any one stored message in a mailbox. The factory default is 60 seconds.
• Recording time—The maximum amount of time for a user’s recorded mailbox greeting.
• Operator extension—The extension of the voice mail operator.
Table 6 Configuration Task Sequence (continued)
Task and Procedure Location Additional Information Needed
37Cisco Unity Express 2.1/2.2 CLI Administrator Guide for Cisco CallManager
Cisco Unity Express 2.1/2.2
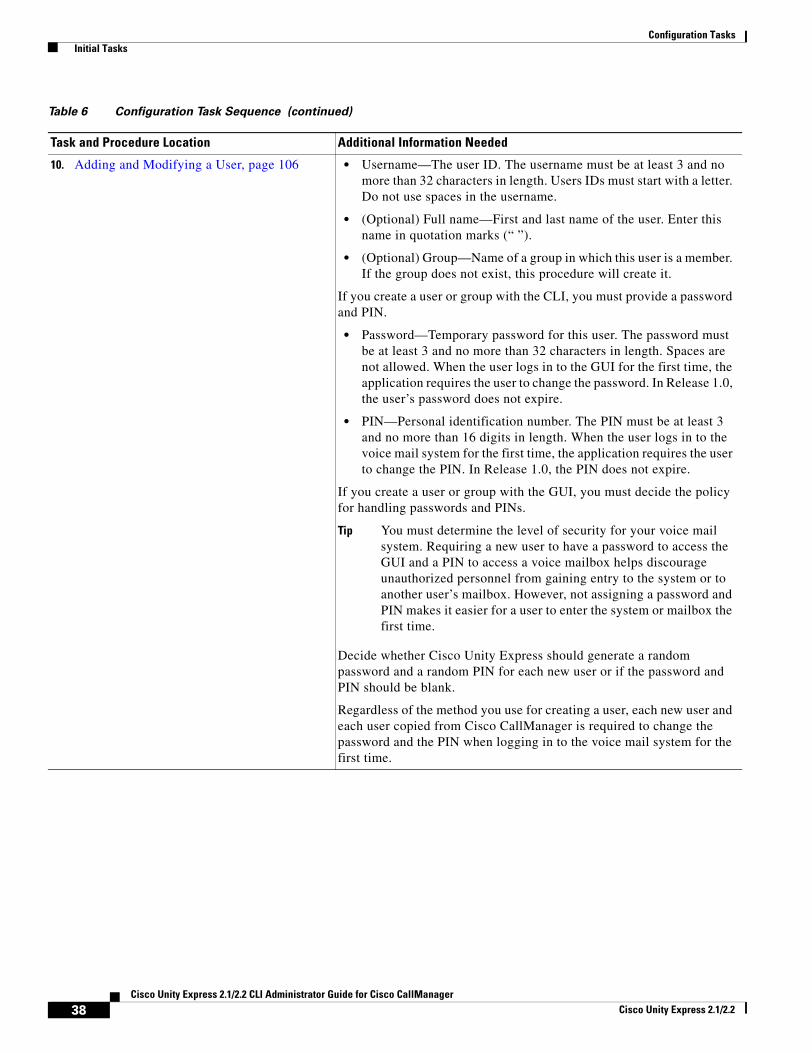
Configuration Tasks Initial Tasks
10. Adding and Modifying a User, page 106 • Username—The user ID. The username must be at least 3 and no more than 32 characters in length. Users IDs must start with a letter. Do not use spaces in the username.
• (Optional) Full name—First and last name of the user. Enter this name in quotation marks (“ ”).
• (Optional) Group—Name of a group in which this user is a member. If the group does not exist, this procedure will create it.
If you create a user or group with the CLI, you must provide a password and PIN.
• Password—Temporary password for this user. The password must be at least 3 and no more than 32 characters in length. Spaces are not allowed. When the user logs in to the GUI for the first time, the application requires the user to change the password. In Release 1.0, the user’s password does not expire.
• PIN—Personal identification number. The PIN must be at least 3 and no more than 16 digits in length. When the user logs in to the voice mail system for the first time, the application requires the user to change the PIN. In Release 1.0, the PIN does not expire.
If you create a user or group with the GUI, you must decide the policy for handling passwords and PINs.
Tip You must determine the level of security for your voice mail system. Requiring a new user to have a password to access the GUI and a PIN to access a voice mailbox helps discourage unauthorized personnel from gaining entry to the system or to another user’s mailbox. However, not assigning a password and PIN makes it easier for a user to enter the system or mailbox the first time.
Decide whether Cisco Unity Express should generate a random password and a random PIN for each new user or if the password and PIN should be blank.
Regardless of the method you use for creating a user, each new user and each user copied from Cisco CallManager is required to change the password and the PIN when logging in to the voice mail system for the first time.
Table 6 Configuration Task Sequence (continued)
Task and Procedure Location Additional Information Needed
38Cisco Unity Express 2.1/2.2 CLI Administrator Guide for Cisco CallManager
Cisco Unity Express 2.1/2.2
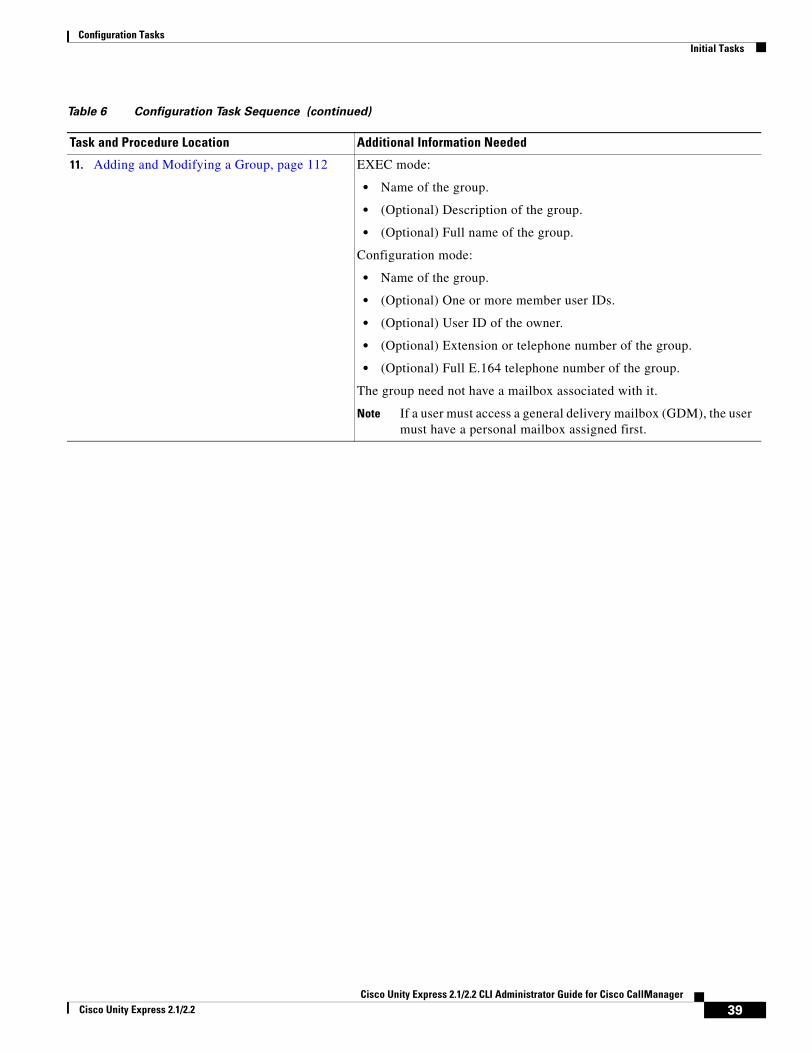
Configuration Tasks Initial Tasks
11. Adding and Modifying a Group, page 112 EXEC mode:
• Name of the group.
• (Optional) Description of the group.
• (Optional) Full name of the group.
Configuration mode:
• Name of the group.
• (Optional) One or more member user IDs.
• (Optional) User ID of the owner.
• (Optional) Extension or telephone number of the group.
• (Optional) Full E.164 telephone number of the group.
The group need not have a mailbox associated with it.
Note If a user must access a general delivery mailbox (GDM), the user must have a personal mailbox assigned first.
Table 6 Configuration Task Sequence (continued)
Task and Procedure Location Additional Information Needed
39Cisco Unity Express 2.1/2.2 CLI Administrator Guide for Cisco CallManager
Cisco Unity Express 2.1/2.2
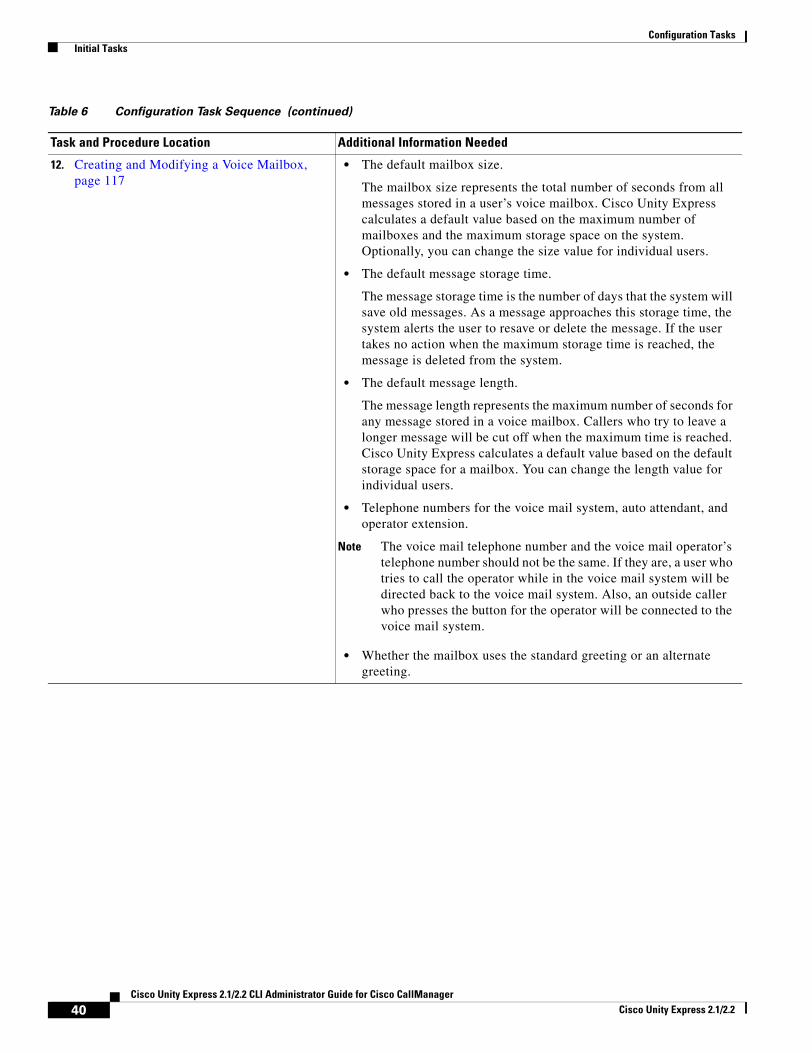
Configuration Tasks Initial Tasks
12. Creating and Modifying a Voice Mailbox, page 117
• The default mailbox size.
The mailbox size represents the total number of seconds from all messages stored in a user’s voice mailbox. Cisco Unity Express calculates a default value based on the maximum number of mailboxes and the maximum storage space on the system. Optionally, you can change the size value for individual users.
• The default message storage time.
The message storage time is the number of days that the system will save old messages. As a message approaches this storage time, the system alerts the user to resave or delete the message. If the user takes no action when the maximum storage time is reached, the message is deleted from the system.
• The default message length.
The message length represents the maximum number of seconds for any message stored in a voice mailbox. Callers who try to leave a longer message will be cut off when the maximum time is reached. Cisco Unity Express calculates a default value based on the default storage space for a mailbox. You can change the length value for individual users.
• Telephone numbers for the voice mail system, auto attendant, and operator extension.
Note The voice mail telephone number and the voice mail operator’s telephone number should not be the same. If they are, a user who tries to call the operator while in the voice mail system will be directed back to the voice mail system. Also, an outside caller who presses the button for the operator will be connected to the voice mail system.
• Whether the mailbox uses the standard greeting or an alternate greeting.
Table 6 Configuration Task Sequence (continued)
Task and Procedure Location Additional Information Needed
40Cisco Unity Express 2.1/2.2 CLI Administrator Guide for Cisco CallManager
Cisco Unity Express 2.1/2.2
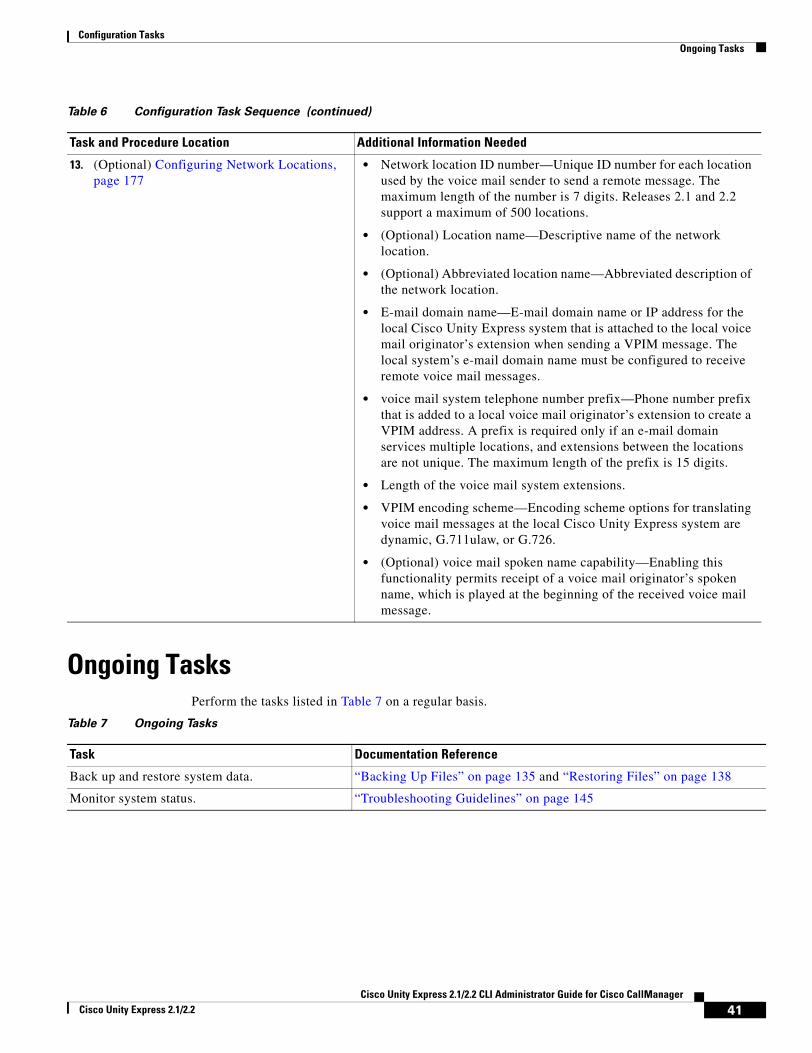
Configuration Tasks Ongoing Tasks
Ongoing TasksPerform the tasks listed in Table 7 on a regular basis.
13. (Optional) Configuring Network Locations, page 177
• Network location ID number—Unique ID number for each location used by the voice mail sender to send a remote message. The maximum length of the number is 7 digits. Releases 2.1 and 2.2 support a maximum of 500 locations.
• (Optional) Location name—Descriptive name of the network location.
• (Optional) Abbreviated location name—Abbreviated description of the network location.
• E-mail domain name—E-mail domain name or IP address for the local Cisco Unity Express system that is attached to the local voice mail originator’s extension when sending a VPIM message. The local system’s e-mail domain name must be configured to receive remote voice mail messages.
• voice mail system telephone number prefix—Phone number prefix that is added to a local voice mail originator’s extension to create a VPIM address. A prefix is required only if an e-mail domain services multiple locations, and extensions between the locations are not unique. The maximum length of the prefix is 15 digits.
• Length of the voice mail system extensions.
• VPIM encoding scheme—Encoding scheme options for translating voice mail messages at the local Cisco Unity Express system are dynamic, G.711ulaw, or G.726.
• (Optional) voice mail spoken name capability—Enabling this functionality permits receipt of a voice mail originator’s spoken name, which is played at the beginning of the received voice mail message.
Table 6 Configuration Task Sequence (continued)
Task and Procedure Location Additional Information Needed
Table 7 Ongoing Tasks
Task Documentation Reference
Back up and restore system data. “Backing Up Files” on page 135 and “Restoring Files” on page 138
Monitor system status. “Troubleshooting Guidelines” on page 145
41Cisco Unity Express 2.1/2.2 CLI Administrator Guide for Cisco CallManager
Cisco Unity Express 2.1/2.2
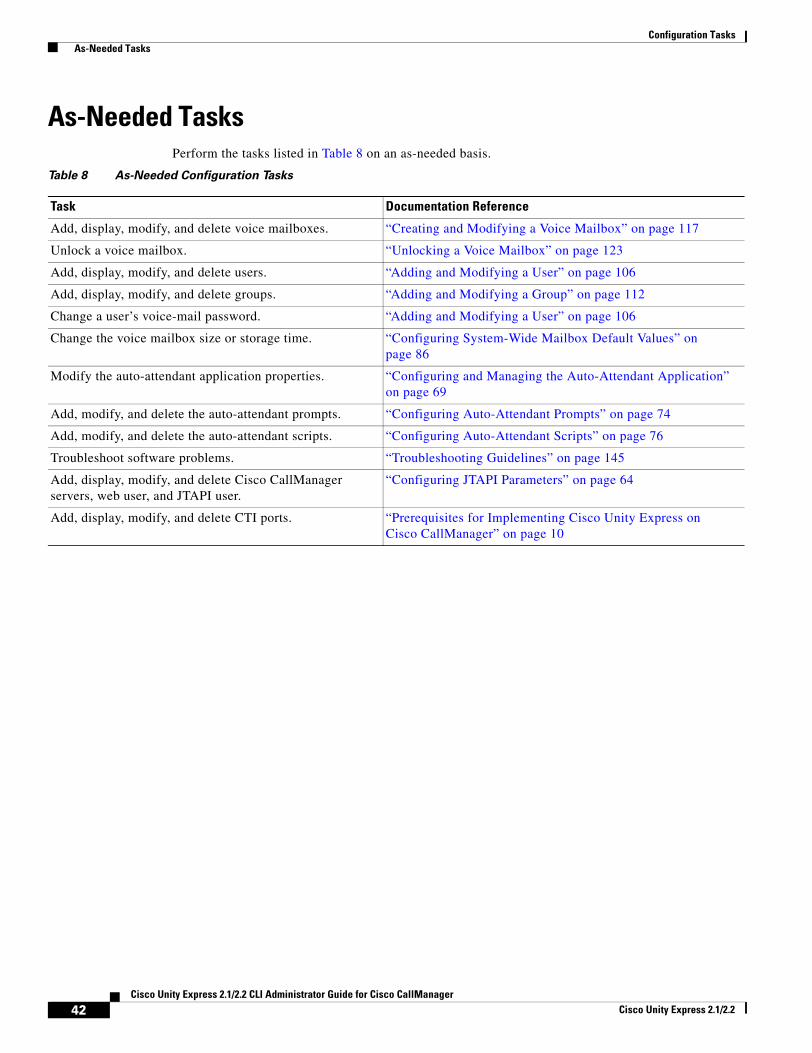
Configuration Tasks As-Needed Tasks
As-Needed TasksPerform the tasks listed in Table 8 on an as-needed basis.
Table 8 As-Needed Configuration Tasks
Task Documentation Reference
Add, display, modify, and delete voice mailboxes. “Creating and Modifying a Voice Mailbox” on page 117
Unlock a voice mailbox. “Unlocking a Voice Mailbox” on page 123
Add, display, modify, and delete users. “Adding and Modifying a User” on page 106
Add, display, modify, and delete groups. “Adding and Modifying a Group” on page 112
Change a user’s voice-mail password. “Adding and Modifying a User” on page 106
Change the voice mailbox size or storage time. “Configuring System-Wide Mailbox Default Values” on page 86
Modify the auto-attendant application properties. “Configuring and Managing the Auto-Attendant Application” on page 69
Add, modify, and delete the auto-attendant prompts. “Configuring Auto-Attendant Prompts” on page 74
Add, modify, and delete the auto-attendant scripts. “Configuring Auto-Attendant Scripts” on page 76
Troubleshoot software problems. “Troubleshooting Guidelines” on page 145
Add, display, modify, and delete Cisco CallManager servers, web user, and JTAPI user.
“Configuring JTAPI Parameters” on page 64
Add, display, modify, and delete CTI ports. “Prerequisites for Implementing Cisco Unity Express on Cisco CallManager” on page 10
42Cisco Unity Express 2.1/2.2 CLI Administrator Guide for Cisco CallManager
Cisco Unity Express 2.1/2.2
Installing and Upgrading Cisco Unity Express Software
This chapter describes the procedures to upgrade the license size or software release for existing Cisco Unity Express systems and contains the following sections:
• Software Upgrade Overview, page 43
• Upgrading to a New License, page 44
• Installing a New Software Image, page 47
• Upgrading the Previous Software Image, page 53
• Installing a Software Image Using Boot Helper, page 57
Software Upgrade OverviewSeveral processes are available for upgrading Cisco Unity Express software. Choosing a process depends on the type of upgrade required.
• Upgrade installation—Upgrade using the online installer with the software install upgrade command. This process is available for upgrading from the previous software release to the current one, such as upgrading from 2.1.3 to 2.2.
Using this process, the system remains operational while the new software files are downloaded in the background. Only an FTP server is required. See “Upgrading the Previous Software Image” on page 53 for more details.
• Clean installation—Upgrade using the online installer with the software install clean command. This installation process is available for upgrading licenses and for upgrading software releases later than 2.0 to the current one.
Using this process, the system remains operational while the new software files are downloaded in the background. For a new license, you must back up and restore configuration files; for a new software image, you must back up and restore both configuration and data files. Only an FTP server is required. See “Upgrading to a New License” on page 44 or “Installing a New Software Image” on page 47 for more details.
• Clean installation with the boot helper—Upgrade using the boot helper with the software install clean command. This clean installation process is available for upgrading licenses, upgrading software releases prior to 2.0.1 to the current release, and when the other upgrade processes are unsuccessful.
43Cisco Unity Express 2.1/2.2 CLI Administrator Guide for Cisco CallManager
Cisco Unity Express 2.1/2.2
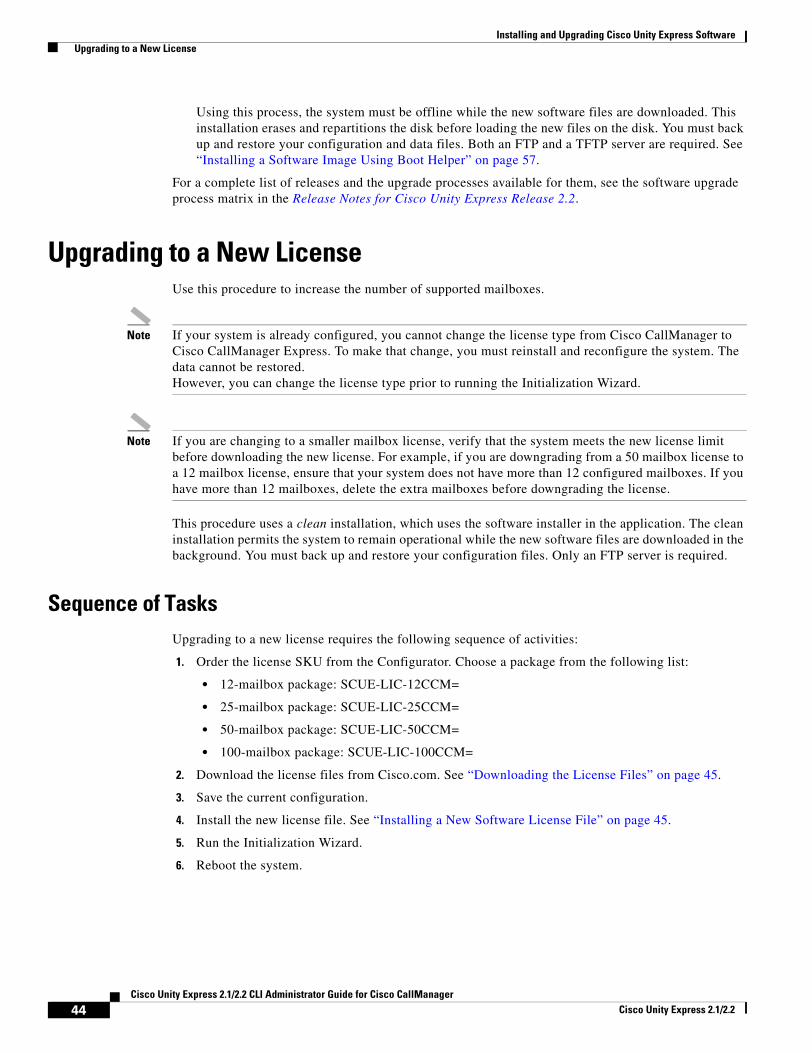
Installing and Upgrading Cisco Unity Express Software Upgrading to a New License
Using this process, the system must be offline while the new software files are downloaded. This installation erases and repartitions the disk before loading the new files on the disk. You must back up and restore your configuration and data files. Both an FTP and a TFTP server are required. See “Installing a Software Image Using Boot Helper” on page 57.
For a complete list of releases and the upgrade processes available for them, see the software upgrade process matrix in the Release Notes for Cisco Unity Express Release 2.2.
Upgrading to a New LicenseUse this procedure to increase the number of supported mailboxes.
Note If your system is already configured, you cannot change the license type from Cisco CallManager to Cisco CallManager Express. To make that change, you must reinstall and reconfigure the system. The data cannot be restored. However, you can change the license type prior to running the Initialization Wizard.
Note If you are changing to a smaller mailbox license, verify that the system meets the new license limit before downloading the new license. For example, if you are downgrading from a 50 mailbox license to a 12 mailbox license, ensure that your system does not have more than 12 configured mailboxes. If you have more than 12 mailboxes, delete the extra mailboxes before downgrading the license.
This procedure uses a clean installation, which uses the software installer in the application. The clean installation permits the system to remain operational while the new software files are downloaded in the background. You must back up and restore your configuration files. Only an FTP server is required.
Sequence of TasksUpgrading to a new license requires the following sequence of activities:
1. Order the license SKU from the Configurator. Choose a package from the following list:
• 12-mailbox package: SCUE-LIC-12CCM=
• 25-mailbox package: SCUE-LIC-25CCM=
• 50-mailbox package: SCUE-LIC-50CCM=
• 100-mailbox package: SCUE-LIC-100CCM=
2. Download the license files from Cisco.com. See “Downloading the License Files” on page 45.
3. Save the current configuration.
4. Install the new license file. See “Installing a New Software License File” on page 45.
5. Run the Initialization Wizard.
6. Reboot the system.
44Cisco Unity Express 2.1/2.2 CLI Administrator Guide for Cisco CallManager
Cisco Unity Express 2.1/2.2
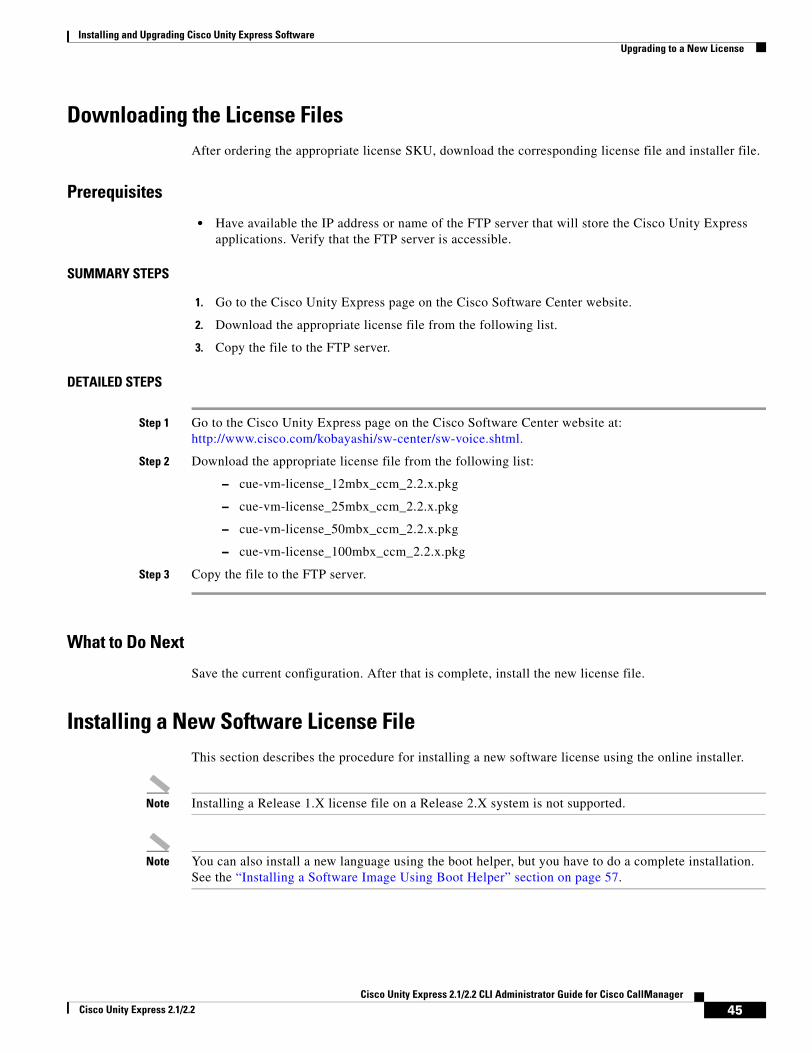
Installing and Upgrading Cisco Unity Express Software Upgrading to a New License
Downloading the License FilesAfter ordering the appropriate license SKU, download the corresponding license file and installer file.
Prerequisites
• Have available the IP address or name of the FTP server that will store the Cisco Unity Express applications. Verify that the FTP server is accessible.
SUMMARY STEPS
1. Go to the Cisco Unity Express page on the Cisco Software Center website.
2. Download the appropriate license file from the following list.
3. Copy the file to the FTP server.
DETAILED STEPS
Step 1 Go to the Cisco Unity Express page on the Cisco Software Center website at: http://www.cisco.com/kobayashi/sw-center/sw-voice.shtml.
Step 2 Download the appropriate license file from the following list:
– cue-vm-license_12mbx_ccm_2.2.x.pkg
– cue-vm-license_25mbx_ccm_2.2.x.pkg
– cue-vm-license_50mbx_ccm_2.2.x.pkg
– cue-vm-license_100mbx_ccm_2.2.x.pkg
Step 3 Copy the file to the FTP server.
What to Do Next
Save the current configuration. After that is complete, install the new license file.
Installing a New Software License FileThis section describes the procedure for installing a new software license using the online installer.
Note Installing a Release 1.X license file on a Release 2.X system is not supported.
Note You can also install a new language using the boot helper, but you have to do a complete installation. See the “Installing a Software Image Using Boot Helper” section on page 57.
45Cisco Unity Express 2.1/2.2 CLI Administrator Guide for Cisco CallManager
Cisco Unity Express 2.1/2.2

Installing and Upgrading Cisco Unity Express Software Upgrading to a New License
Prerequisites
The following information is required to install the software license file using the online installer:
• FTP server user ID
• FTP server password
• License package name (See “Software Licenses and Factory-Set Limits” on page 4 for the list of license packages.)
SUMMARY STEPS
1. Save your current configuration.
2. Enter the software install command to install the new license software.
3. Enter y to continue the installation.
4. Reload the module for the license to take affect.
DETAILED STEPS
Step 1 Save the running configuration to the startup configuration using the write command:
se-172-16-0-0# write
Step 2 Enter the software install command to install the new software:
se-172-16-0-0# software install clean url ftp://ftp-server-ip-address/path/cue-vm-license_25mbx_ccm_2.2.1.pkg url username username password password
or, to install the software when the FTP server has been configured:
se-172-16-0-0# software install clean cue-vm-license_25mbx_ccm_2.2.1.pkg
Note To set the FTP server, see the software download server command in the Cisco Unity Express Command Reference.
Step 3 Enter y to continue the installation:
WARNING:: This command will install the necessary software toWARNING:: complete a clean install. It is recommended that a backup be doneWARNING:: before installing software.
Would you like to continue? [n] y
Step 4 Reload the module for the license to take affect. You may continue with another install or upgrade before you reload the module.
se-172-16-0-0# reload
What to Do Next
• Enter the show software license command to verify the software license type.
46Cisco Unity Express 2.1/2.2 CLI Administrator Guide for Cisco CallManager
Cisco Unity Express 2.1/2.2
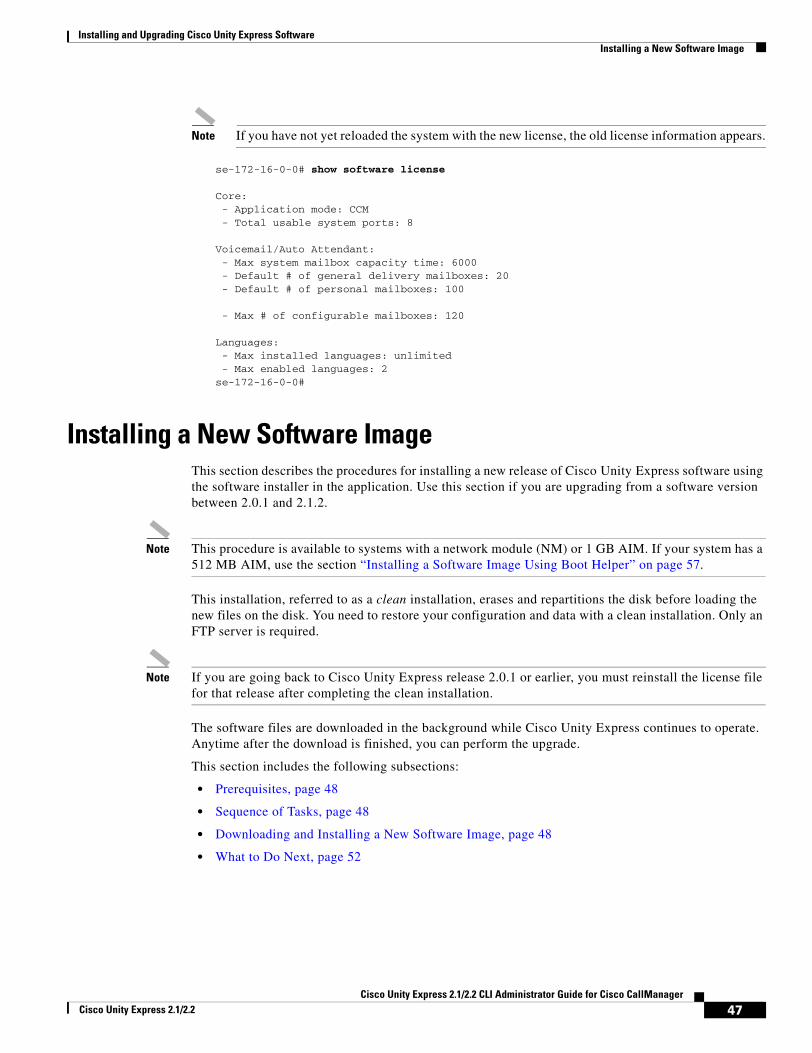
Installing and Upgrading Cisco Unity Express Software Installing a New Software Image
Note If you have not yet reloaded the system with the new license, the old license information appears.
se-172-16-0-0# show software license
Core: - Application mode: CCM - Total usable system ports: 8
Voicemail/Auto Attendant: - Max system mailbox capacity time: 6000 - Default # of general delivery mailboxes: 20 - Default # of personal mailboxes: 100
- Max # of configurable mailboxes: 120
Languages: - Max installed languages: unlimited - Max enabled languages: 2se-172-16-0-0#
Installing a New Software ImageThis section describes the procedures for installing a new release of Cisco Unity Express software using the software installer in the application. Use this section if you are upgrading from a software version between 2.0.1 and 2.1.2.
Note This procedure is available to systems with a network module (NM) or 1 GB AIM. If your system has a 512 MB AIM, use the section “Installing a Software Image Using Boot Helper” on page 57.
This installation, referred to as a clean installation, erases and repartitions the disk before loading the new files on the disk. You need to restore your configuration and data with a clean installation. Only an FTP server is required.
Note If you are going back to Cisco Unity Express release 2.0.1 or earlier, you must reinstall the license file for that release after completing the clean installation.
The software files are downloaded in the background while Cisco Unity Express continues to operate. Anytime after the download is finished, you can perform the upgrade.
This section includes the following subsections:
• Prerequisites, page 48
• Sequence of Tasks, page 48
• Downloading and Installing a New Software Image, page 48
• What to Do Next, page 52
47Cisco Unity Express 2.1/2.2 CLI Administrator Guide for Cisco CallManager
Cisco Unity Express 2.1/2.2
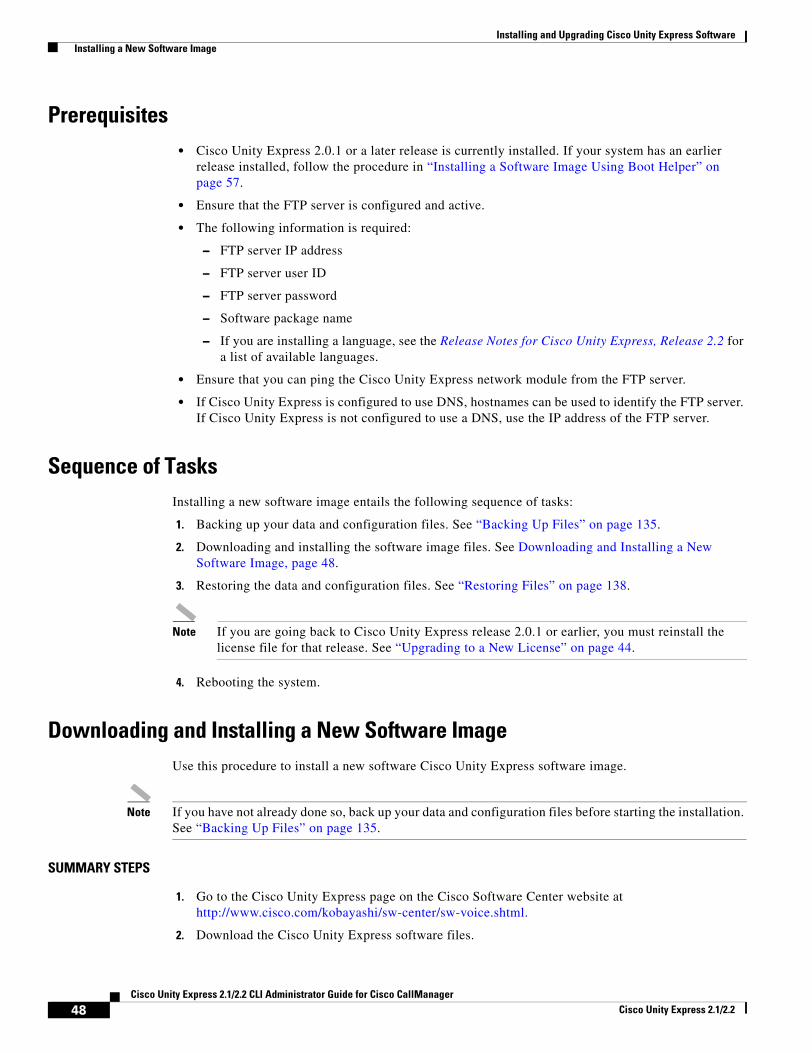
Installing and Upgrading Cisco Unity Express Software Installing a New Software Image
Prerequisites• Cisco Unity Express 2.0.1 or a later release is currently installed. If your system has an earlier
release installed, follow the procedure in “Installing a Software Image Using Boot Helper” on page 57.
• Ensure that the FTP server is configured and active.
• The following information is required:
– FTP server IP address
– FTP server user ID
– FTP server password
– Software package name
– If you are installing a language, see the Release Notes for Cisco Unity Express, Release 2.2 for a list of available languages.
• Ensure that you can ping the Cisco Unity Express network module from the FTP server.
• If Cisco Unity Express is configured to use DNS, hostnames can be used to identify the FTP server. If Cisco Unity Express is not configured to use a DNS, use the IP address of the FTP server.
Sequence of TasksInstalling a new software image entails the following sequence of tasks:
1. Backing up your data and configuration files. See “Backing Up Files” on page 135.
2. Downloading and installing the software image files. See Downloading and Installing a New Software Image, page 48.
3. Restoring the data and configuration files. See “Restoring Files” on page 138.
Note If you are going back to Cisco Unity Express release 2.0.1 or earlier, you must reinstall the license file for that release. See “Upgrading to a New License” on page 44.
4. Rebooting the system.
Downloading and Installing a New Software ImageUse this procedure to install a new software Cisco Unity Express software image.
Note If you have not already done so, back up your data and configuration files before starting the installation. See “Backing Up Files” on page 135.
SUMMARY STEPS
1. Go to the Cisco Unity Express page on the Cisco Software Center website at http://www.cisco.com/kobayashi/sw-center/sw-voice.shtml.
2. Download the Cisco Unity Express software files.
48Cisco Unity Express 2.1/2.2 CLI Administrator Guide for Cisco CallManager
Cisco Unity Express 2.1/2.2
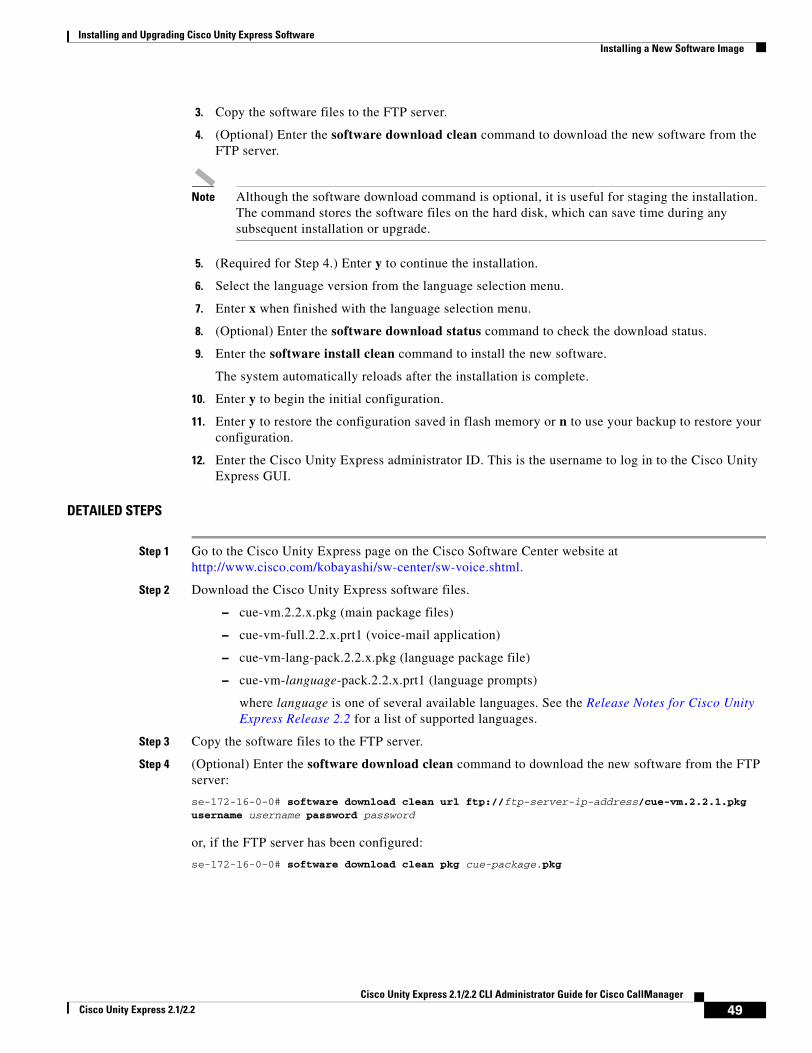
Installing and Upgrading Cisco Unity Express Software Installing a New Software Image
3. Copy the software files to the FTP server.
4. (Optional) Enter the software download clean command to download the new software from the FTP server.
Note Although the software download command is optional, it is useful for staging the installation. The command stores the software files on the hard disk, which can save time during any subsequent installation or upgrade.
5. (Required for Step 4.) Enter y to continue the installation.
6. Select the language version from the language selection menu.
7. Enter x when finished with the language selection menu.
8. (Optional) Enter the software download status command to check the download status.
9. Enter the software install clean command to install the new software.
The system automatically reloads after the installation is complete.
10. Enter y to begin the initial configuration.
11. Enter y to restore the configuration saved in flash memory or n to use your backup to restore your configuration.
12. Enter the Cisco Unity Express administrator ID. This is the username to log in to the Cisco Unity Express GUI.
DETAILED STEPS
Step 1 Go to the Cisco Unity Express page on the Cisco Software Center website at http://www.cisco.com/kobayashi/sw-center/sw-voice.shtml.
Step 2 Download the Cisco Unity Express software files.
– cue-vm.2.2.x.pkg (main package files)
– cue-vm-full.2.2.x.prt1 (voice-mail application)
– cue-vm-lang-pack.2.2.x.pkg (language package file)
– cue-vm-language-pack.2.2.x.prt1 (language prompts)
where language is one of several available languages. See the Release Notes for Cisco Unity Express Release 2.2 for a list of supported languages.
Step 3 Copy the software files to the FTP server.
Step 4 (Optional) Enter the software download clean command to download the new software from the FTP server:
se-172-16-0-0# software download clean url ftp://ftp-server-ip-address/cue-vm.2.2.1.pkg username username password password
or, if the FTP server has been configured:
se-172-16-0-0# software download clean pkg cue-package.pkg
49Cisco Unity Express 2.1/2.2 CLI Administrator Guide for Cisco CallManager
Cisco Unity Express 2.1/2.2

Installing and Upgrading Cisco Unity Express Software Installing a New Software Image
Note If the FTP server has been set in configuration mode, you do not need to use the FTP parameters. To set the FTP server, see the software download server command in the Cisco Unity Express Command Reference
Step 5 (Required for Step 4.) Enter y to continue the download:
WARNING:: This command will download the necessary software toWARNING:: complete a clean install. It is recommended that a backup be doneWARNING:: before installing software.
Would you like to continue? [n] y
Step 6 Select the language version from the language selection menu:
Language Selection Menu:
Num. Selected Installed Language Name-------------------------------------------1 PTB CUE Voicemail Brazilian Portuguese (2.1.3)
2 ENG CUE Voicemail British English (2.1.3)3 DAN CUE Voicemail Danish (2.1.3)4 FRA CUE Voicemail European French (2.1.3)
5 ESP CUE Voicemail European Spanish (2.1.3) 6 DEU CUE Voicemail German (2.1.3) 7 ITA CUE Voicemail Italian (2.1.3) 8 ESO CUE Voicemail Latin American Spanish (2.1.3) 9 ENG CUE Voicemail US English (2.1.3)
Available commands are:# - enter the number for the language to select oner # - remove the language for given #si # - more information about the language for given #x - Done with language selection
>9
Step 7 Your choice will appear as a “*” in the language selection menu. Use the menu to add, remove, or get information about languages. Enter x when finished.
Language Selection Menu:
Num. Selected Installed Language Name-------------------------------------------1 PTB CUE Voicemail Brazilian Portuguese (2.1.3)
2 ENG CUE Voicemail British English (2.1.3)3 DAN CUE Voicemail Danish (2.1.3)4 FRA CUE Voicemail European French (2.1.3)
5 ESP CUE Voicemail European Spanish (2.1.3) 6 DEU CUE Voicemail German (2.1.3) 7 ITA CUE Voicemail Italian (2.1.3) 8 ESO CUE Voicemail Latin American Spanish (2.1.3) 9 * ENG CUE Voicemail US English (2.1.3)
Available commands are:# - enter the number for the language to select oner # - remove the language for given #i # - more information about the language for given #x - Done with language selection
>x
At this point the new software will load from the FTP server and the system will restart.
50Cisco Unity Express 2.1/2.2 CLI Administrator Guide for Cisco CallManager
Cisco Unity Express 2.1/2.2
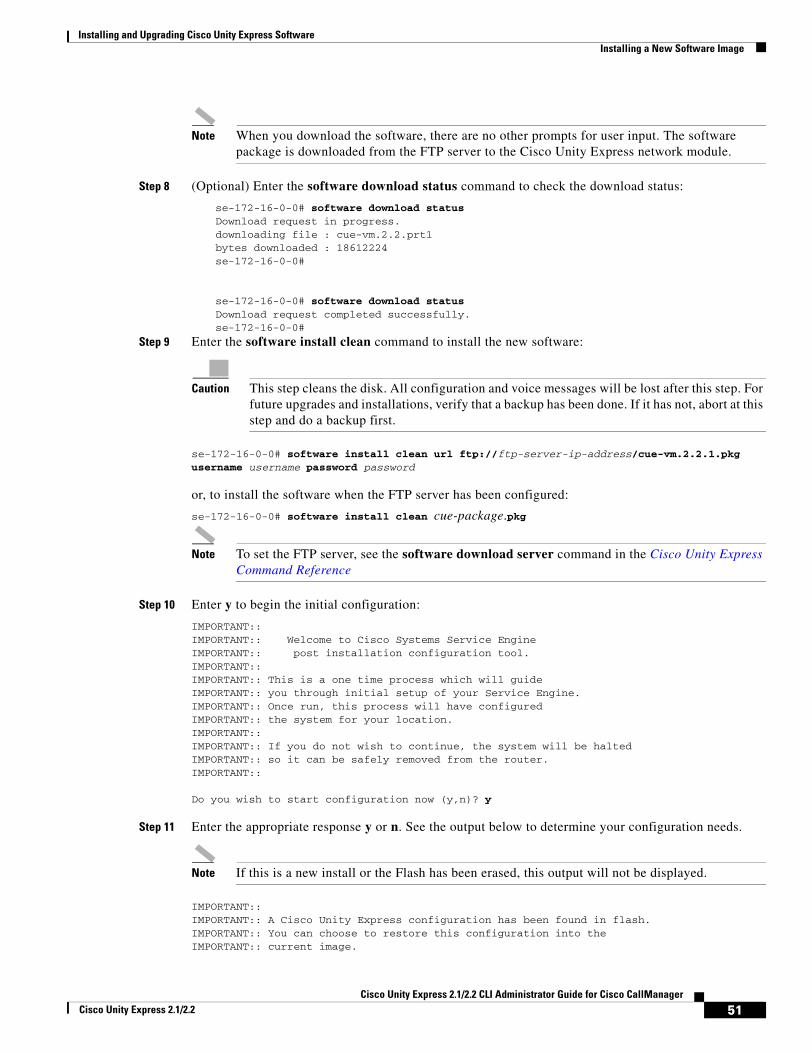
Installing and Upgrading Cisco Unity Express Software Installing a New Software Image
Note When you download the software, there are no other prompts for user input. The software package is downloaded from the FTP server to the Cisco Unity Express network module.
Step 8 (Optional) Enter the software download status command to check the download status:
se-172-16-0-0# software download status Download request in progress.downloading file : cue-vm.2.2.prt1bytes downloaded : 18612224se-172-16-0-0#
se-172-16-0-0# software download statusDownload request completed successfully.se-172-16-0-0#
Step 9 Enter the software install clean command to install the new software:
Caution This step cleans the disk. All configuration and voice messages will be lost after this step. For future upgrades and installations, verify that a backup has been done. If it has not, abort at this step and do a backup first.
se-172-16-0-0# software install clean url ftp://ftp-server-ip-address/cue-vm.2.2.1.pkg username username password password
or, to install the software when the FTP server has been configured:
se-172-16-0-0# software install clean cue-package.pkg
Note To set the FTP server, see the software download server command in the Cisco Unity Express Command Reference
Step 10 Enter y to begin the initial configuration:
IMPORTANT::IMPORTANT:: Welcome to Cisco Systems Service EngineIMPORTANT:: post installation configuration tool.IMPORTANT::IMPORTANT:: This is a one time process which will guideIMPORTANT:: you through initial setup of your Service Engine.IMPORTANT:: Once run, this process will have configuredIMPORTANT:: the system for your location.IMPORTANT::IMPORTANT:: If you do not wish to continue, the system will be haltedIMPORTANT:: so it can be safely removed from the router.IMPORTANT::
Do you wish to start configuration now (y,n)? y
Step 11 Enter the appropriate response y or n. See the output below to determine your configuration needs.
Note If this is a new install or the Flash has been erased, this output will not be displayed.
IMPORTANT::IMPORTANT:: A Cisco Unity Express configuration has been found in flash.IMPORTANT:: You can choose to restore this configuration into theIMPORTANT:: current image.
51Cisco Unity Express 2.1/2.2 CLI Administrator Guide for Cisco CallManager
Cisco Unity Express 2.1/2.2
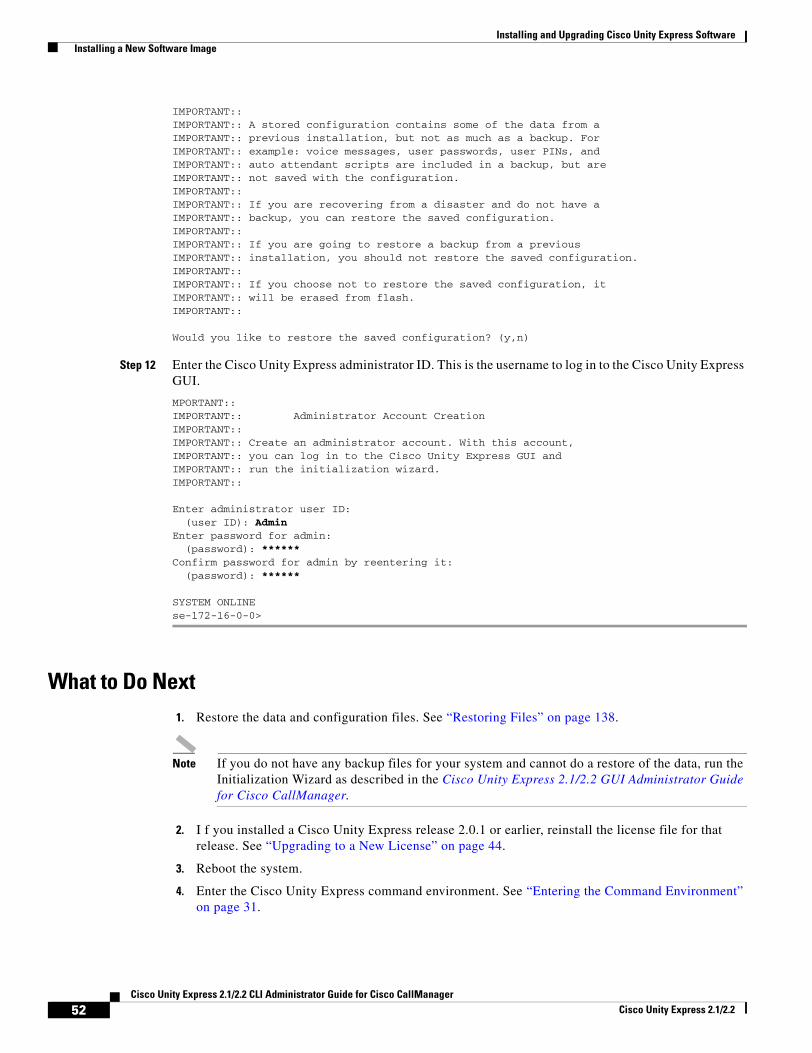
Installing and Upgrading Cisco Unity Express Software Installing a New Software Image
IMPORTANT::IMPORTANT:: A stored configuration contains some of the data from aIMPORTANT:: previous installation, but not as much as a backup. ForIMPORTANT:: example: voice messages, user passwords, user PINs, andIMPORTANT:: auto attendant scripts are included in a backup, but areIMPORTANT:: not saved with the configuration.IMPORTANT::IMPORTANT:: If you are recovering from a disaster and do not have aIMPORTANT:: backup, you can restore the saved configuration.IMPORTANT::IMPORTANT:: If you are going to restore a backup from a previousIMPORTANT:: installation, you should not restore the saved configuration.IMPORTANT::IMPORTANT:: If you choose not to restore the saved configuration, itIMPORTANT:: will be erased from flash.IMPORTANT::
Would you like to restore the saved configuration? (y,n)
Step 12 Enter the Cisco Unity Express administrator ID. This is the username to log in to the Cisco Unity Express GUI.
MPORTANT::IMPORTANT:: Administrator Account CreationIMPORTANT::IMPORTANT:: Create an administrator account. With this account,IMPORTANT:: you can log in to the Cisco Unity Express GUI andIMPORTANT:: run the initialization wizard.IMPORTANT::
Enter administrator user ID: (user ID): AdminEnter password for admin: (password): ******Confirm password for admin by reentering it: (password): ******
SYSTEM ONLINEse-172-16-0-0>
What to Do Next1. Restore the data and configuration files. See “Restoring Files” on page 138.
Note If you do not have any backup files for your system and cannot do a restore of the data, run the Initialization Wizard as described in the Cisco Unity Express 2.1/2.2 GUI Administrator Guide for Cisco CallManager.
2. I f you installed a Cisco Unity Express release 2.0.1 or earlier, reinstall the license file for that release. See “Upgrading to a New License” on page 44.
3. Reboot the system.
4. Enter the Cisco Unity Express command environment. See “Entering the Command Environment” on page 31.
52Cisco Unity Express 2.1/2.2 CLI Administrator Guide for Cisco CallManager
Cisco Unity Express 2.1/2.2
Installing and Upgrading Cisco Unity Express Software Upgrading the Previous Software Image
Upgrading the Previous Software ImageThis section describes the procedures for upgrading the previous release of Cisco Unity Express software to the newest release using the software installer in the application.
An upgrade installation replaces only those files on the disk necessary to create the new software image. Your existing configuration and voicemail will not be erased.
Note When upgrading the Cisco Unity Express software, you are not prompted for a language. The language will stay as configured.
With this procedure, you download the software files in the background while Cisco Unity Express continues to operate. Anytime after the download is finished, you can perform the upgrade. Only an FTP server is required.
This section includes the following subsections:
• Prerequisites, page 53
• Sequence of Tasks, page 53
• Downloading and Installing an Upgrade Image, page 54
• What to Do Next, page 56
Prerequisites• Cisco Unity Express 2.0.1 is currently installed.
• Ensure that the FTP server is configured and active.
• The following information is required:
– FTP server IP address
– FTP server user ID
– FTP server password
– Software package name
• Ensure that you can ping the Cisco Unity Express network module from the FTP server.
• If Cisco Unity Express is configured to use DNS, hostnames can be used to identify the FTP server. If Cisco Unity Express is not configured to use a DNS, use the IP address of the FTP server.
Sequence of TasksUpgrading to a new software image entails the following sequence of tasks:
1. (Recommended) Backing up your data and configuration files. See “Backing Up Files” on page 135.
2. Downloading and installing the software image files. See “Downloading and Installing an Upgrade Image” on page 54
3. (Optional) Restoring the data and configuration files. See “Restoring Files” on page 138.
4. Rebooting the system.
53Cisco Unity Express 2.1/2.2 CLI Administrator Guide for Cisco CallManager
Cisco Unity Express 2.1/2.2

Installing and Upgrading Cisco Unity Express Software Upgrading the Previous Software Image
Downloading and Installing an Upgrade ImageUse this procedure to upgrade an existing Cisco Unity Express release.
Note If you have not already done so, back up your data and configuration files before starting the upgrade. See “Backing Up Files” on page 135.
SUMMARY STEPS
1. Go to the Cisco Unity Express page on the Cisco Software Center website at http://www.cisco.com/kobayashi/sw-center/sw-voice.shtml.
2. Download the Cisco Unity Express software files.
3. Copy the other software files to the FTP server.
4. (Optional) Enter the software download upgrade command to download the new software.
Note Although the software download command is optional, it is useful for staging the installation. The command stores the software files on the hard disk, which can save time during any subsequent installation or upgrade.
5. (Required for Step 4.) Enter y to continue the download.
6. (Optional) Enter the software download status command to verify the download.
7. Enter the software install upgrade command to install the new software.
8. Enter y to install the upgrade or n to stop the installation procedure.
The system automatically reloads after the upgrade is complete.
9. Enter the show software versions command to verify the upgrade.
DETAILED STEPS
Step 1 Go to the Cisco Unity Express page on the Cisco Software Center website at http://www.cisco.com/kobayashi/sw-center/sw-voice.shtml.
Step 2 Download the Cisco Unity Express software files.
– cue-vm.2.2.x.pkg (main package files)
– cue-vm-full.2.2.x.prt1 (voice-mail application)
– cue-vm-lang-pack.2.2.x.pkg (language package file)
– cue-vm-language-pack.2.2.x.prt1 (language prompts)
where language is one of several available languages. See the Release Notes for Cisco Unity Express Release 2.2 for a list of supported languages.
– cue-vm-upgrade.2.1.3_2.2.1.prt1
Note If you are upgrading from Cisco Unity Express 2.1.2 to Cisco Unity Express 2.1.3, download the additional file cue-vm-language-upg-lang-pack.2.1.x.prt1, where language is one of the supported languages.
54Cisco Unity Express 2.1/2.2 CLI Administrator Guide for Cisco CallManager
Cisco Unity Express 2.1/2.2

Installing and Upgrading Cisco Unity Express Software Upgrading the Previous Software Image
Step 3 Copy the software files to the FTP server.
Step 4 (Optional) Enter the software download upgrade command to download the software from the FTP server:
se-172-16-0-0# software download upgrade url ftp://ftp-server-ip-address/cue-package.pkg
Note This example uses the default anonymous FTP user.
or, if the FTP server has been configured:
se-172-16-0-0# software download upgrade pkg cue-package.pkg
Note If the FTP server has been set in configuration mode, you do not need to use the FTP parameters.
Step 5 (Required for Step 4.) Enter y to begin the download:
WARNING:: This command will download the necessary software to WARNING:: complete an upgrade. It is recommended that a backup be done WARNING:: before installing software.
Would you like to continue? [n] yDownloading cue-vm.2.2.pkgBytes downloaded : 63648
Validating package signature ... doneValidating installed manifests ..........complete.
Note When you download the software, there are no other prompts for user input. The software package is downloaded from the FTP server to the Cisco Unity Express network module.
At this point the new software will load from the FTP server and the system will restart.
Step 6 (Optional) Enter the software download status command to check the download status:
se-172-16-0-0# software download status Download request in progress.downloading file : cue-vm.2.2.prt1bytes downloaded : 18612224se-172-16-0-0#
se-172-16-0-0# software download statusDownload request completed successfully.se-172-16-0-0#
Step 7 Enter the software install upgrade command to install the new software:
se-172-16-0-0# software install upgrade url ftp://ftp-server-ip-address/cue-package.pkg
Note This example uses the default anonymous FTP user.
se-172-16-0-0# software install upgrade pkg cue-package.pkg
55Cisco Unity Express 2.1/2.2 CLI Administrator Guide for Cisco CallManager
Cisco Unity Express 2.1/2.2
Installing and Upgrading Cisco Unity Express Software Upgrading the Previous Software Image
Note In this example, the files were previously downloaded using the software download command or the FTP server has been configured.
Step 8 Enter y to begin the upgrade:
WARNING:: This command will install the necessary software toWARNING:: complete an upgrade. It is recommended that a backup be doneWARNING:: before installing software.
Would you like to continue? [n] y
Caution An upgrade does not replace everything on the disk, just the files necessary to make the upgrade. It is recommended that you do a backup before any software installation.
Note When upgrading the Cisco Unity Express software, you are not prompted for a language. The language will stay as configured.
The system reloads after the upgrade is complete.
Step 9 Use the show software versions command to verify an upgrade. The following shows the versions after an upgrade.
se-172-16-0-0# show software versions
Installed Packages: - Bootloader (Primary) 2.1.2 - Global 2.2.0- GPL Infrastructure 2.1.2
- Voice Mail 2.1.2 - Bootloader (Secondary) 2.1.2- Installer 2.1.1- Core 2.1.2- Auto Attendant 2.1.2
Installed Languages:- US English 2.1.0se-172-16-0-0#
What to Do NextReboot the system.
56Cisco Unity Express 2.1/2.2 CLI Administrator Guide for Cisco CallManager
Cisco Unity Express 2.1/2.2
Installing and Upgrading Cisco Unity Express Software Installing a Software Image Using Boot Helper
Installing a Software Image Using Boot HelperThis section describes the procedures for installing a new release of Cisco Unity Express software using the boot helper.
Note The boot helper is intended for emergency use or ''first time'' installations, such as going from 1.1(2) to 2.1. The helper supports only installations of licenses and full images. The helper mode does not support upgrades or language-only installations.
Using this clean installation process, the system must be offline while you download the new software files. The clean installation erases and repartitions the disk before loading the new files on the disk. You must back up and restore your configuration and data files. Both FTP and TFTP servers are required.
Prerequisites• Ensure that the TFTP and FTP servers are configured and active. If the TFTP and FTP servers reside
on the same computer, ensure that the TFTP and FTP programs are activated.
• Ensure that you can ping the Cisco Unity Express module from the TFTP and FTP servers.
• If you are installing a language, see the Release Notes for Cisco Unity Express, Release 2.2 for a list of available languages.
Sequence of TasksInstalling a new software image entails the following sequence of tasks:
1. Downloading the software image files. See “Downloading the Software Files” on page 57.
2. Backing up your data and configuration files. See “Backing Up Files” on page 135.
3. Entering configuration parameter values. See “Entering Configuration Parameter Values” on page 58.
4. Installing the software files. See “Installing the Software Image Files” on page 59.
5. Restoring the data and configuration files. See “Restoring Files” on page 138.
6. Rebooting the system.
Downloading the Software FilesDownloading the Cisco Unity Express software files is the first software installation task. Review the prerequisites listed above to ensure that all servers and modules are active and available.
SUMMARY STEPS
1. Go to the Cisco Unity Express page on the Cisco Software Center website.
2. Download the Cisco Unity Express software files.
3. Copy the cue-installer.2.2.x file to the TFTP server.
4. Copy the other software files to the FTP server.
57Cisco Unity Express 2.1/2.2 CLI Administrator Guide for Cisco CallManager
Cisco Unity Express 2.1/2.2
Installing and Upgrading Cisco Unity Express Software Installing a Software Image Using Boot Helper
DETAILED STEPS
Step 1 Go to the Cisco Unity Express page on the Cisco Software Center website at http://www.cisco.com/kobayashi/sw-center/sw-voice.shtml.
Step 2 Download the Cisco Unity Express software files.
– cue-installer.2.2.x (Helper installer)
– cue-vm-installer.2.2.x.prt1 (installer payload file)
– cue-vm.2.2.x.pkg (main software package file)
– cue-vm-full.2.2.x.prt1 (voice-mail application)
– cue-vm-lang-pack.2.2.x.pkg (language package file)
– cue-vm-language-pack.2.2.x.prt1 (language prompts)
where language is one of several available languages. See the Release Notes for Cisco Unity Express Release 2.2 for a list of supported languages.
Step 3 Copy the cue-installer.2.2.x file to the TFTP server.
Step 4 Copy the other software files to the FTP server.
What to Do Next
• Back up your data and configuration files. See “Backing Up Files” on page 135.
• After backing up the files, configure several parameter values. See “Entering Configuration Parameter Values” on page 58.
Entering Configuration Parameter ValuesYou must configure several parameters in the Cisco Unity Express server to be able to download the Cisco Unity Express software files.
SUMMARY STEPS
1. reload
2. Type “***” to go into the boot loader mode.
3. config
4. Enter the values for the following parameters:
– Network module’s IP address
– Subnet mask
– TFTP server address
– Gateway router address
– Ethernet interface is internal
– Default helper image is cue-installer.2.2.x
– Default boot setting
58Cisco Unity Express 2.1/2.2 CLI Administrator Guide for Cisco CallManager
Cisco Unity Express 2.1/2.2
Installing and Upgrading Cisco Unity Express Software Installing a Software Image Using Boot Helper
– Default bootloader
5. Boot the NM with the boot helper.
DETAILED STEPS
Step 1 Type reload to restart the system.
Step 2 Type “***” to go into the boot loader mode.
Step 3 Type config to go into configuration mode.
Step 4 Enter the values for the following parameters:
• Network module’s IP address
• Subnet mask
• TFTP server address
• Gateway router address
• Ethernet interface: internal
• Default helper image: cue-installer.2.2.1
• Default boot: disk
• Default bootloader: press Enter
Note Cisco recommends that you use the primary bootloader as the default when upgrading.
Step 5 Type boot helper to begin the installation. This will load the installer
What to Do Next
Install the software files. See “Installing the Software Image Files” on page 59.
Installing the Software Image FilesAfter downloading the software files and backing up your data, you are ready to install the software image files.
Prerequisites
Installing the software image files requires the following information:
• TFTP server IP address
• FTP server IP address
• FTP server user ID
• FTP server password
• Software package name
59Cisco Unity Express 2.1/2.2 CLI Administrator Guide for Cisco CallManager
Cisco Unity Express 2.1/2.2
Installing and Upgrading Cisco Unity Express Software Installing a Software Image Using Boot Helper
Note Back up current system configurations and data before installing new software.
SUMMARY STEPS
Starting from NM EXEC mode:
1. Select the first choice, Install Software, from the install menu.
2. Enter the package name, FTP server address, username, and password.
3. Select the language version from the language selection menu.
4. Enter x when finished with the language selection menu.
5. Enter y to begin the initial configuration in the post installation configuration menu.
6. Enter y to restore the configuration saved in flash memory or n to use your backup to restore your configuration.
7. Enter the Cisco Unity Express administrator ID. This is the username to log in to the Cisco Unity Express GUI.
DETAILED STEPS
Step 1 Select the first choice, Install Software, from the install menu:
Welcome to Cisco Systems Service Engine Helper SoftwarePlease select from the following1 Install software2 Reload module(Type '?' at any time for help)Choice: 1
Step 2 Enter the package name, FTP server address, username, and password:
Package name: cue-vm.2.2.1.pkgServer url: ftp://10.33.162.120/Username: cuePassword: ******Software installation will clear disk contentsContinue [y/n]? y
Caution This step cleans the disk. All configuration and voice messages will be lost after this step. For future upgrades and installations, verify that a backup has been done. If it has not, abort at this step and do a backup first.
Step 3 Select the language version from the language selection menu:
Language Selection Menu:
Num. Selected Installed Language Name-------------------------------------------1 PTB CUE Voicemail Brazilian Portuguese (2.1.3)
2 ENG CUE Voicemail British English (2.1.3)3 DAN CUE Voicemail Danish (2.1.3)4 FRA CUE Voicemail European French (2.1.3)
5 ESP CUE Voicemail European Spanish (2.1.3) 6 DEU CUE Voicemail German (2.1.3) 7 ITA CUE Voicemail Italian (2.1.3)
60Cisco Unity Express 2.1/2.2 CLI Administrator Guide for Cisco CallManager
Cisco Unity Express 2.1/2.2
Installing and Upgrading Cisco Unity Express Software Installing a Software Image Using Boot Helper
8 ESO CUE Voicemail Latin American Spanish (2.1.3) 9 ENG CUE Voicemail US English (2.1.3)
Available commands are:# - enter the number for the language to select oner # - remove the language for given #i # - more information about the language for given #x - Done with language selection
>9
Step 4 Your choice will appear as a “*” in the language selection menu. Use the menu to add, remove, or get information about languages. Enter x when finished.
Language Selection Menu:
Num. Selected Installed Language Name-------------------------------------------1 PTB CUE Voicemail Brazilian Portuguese (2.1.3)
2 ENG CUE Voicemail British English (2.1.3)3 DAN CUE Voicemail Danish (2.1.3)4 FRA CUE Voicemail European French (2.1.3)
5 ESP CUE Voicemail European Spanish (2.1.3) 6 DEU CUE Voicemail German (2.1.3) 7 ITA CUE Voicemail Italian (2.1.3) 8 ESO CUE Voicemail Latin American Spanish (2.1.3) 9 * ENG CUE Voicemail US English (2.1.3)
Available commands are:# - enter the number for the language to select oner # - remove the language for given #i # - more information about the language for given #x - Done with language selection
>x
The system installs the software. After the installation is complete, the system reloads.
Step 5 Enter y to begin the initial configuration:
IMPORTANT::IMPORTANT:: Welcome to Cisco Systems Service EngineIMPORTANT:: post installation configuration tool.IMPORTANT::IMPORTANT:: This is a one time process which will guideIMPORTANT:: you through initial setup of your Service Engine.IMPORTANT:: Once run, this process will have configuredIMPORTANT:: the system for your location.IMPORTANT::IMPORTANT:: If you do not wish to continue, the system will be haltedIMPORTANT:: so it can be safely removed from the router.IMPORTANT::
Do you wish to start configuration now (y,n)? y
Step 6 Enter the appropriate response y or n. See the output below to determine your configuration needs.
IMPORTANT::IMPORTANT:: A Cisco Unity Express configuration has been found in flash.IMPORTANT:: You can choose to restore this configuration into theIMPORTANT:: current image.IMPORTANT::IMPORTANT:: A stored configuration contains some of the data from aIMPORTANT:: previous installation, but not as much as a backup. For
61Cisco Unity Express 2.1/2.2 CLI Administrator Guide for Cisco CallManager
Cisco Unity Express 2.1/2.2
Installing and Upgrading Cisco Unity Express Software Installing a Software Image Using Boot Helper
IMPORTANT:: example: voice messages, user passwords, user PINs, andIMPORTANT:: auto attendant scripts are included in a backup, but areIMPORTANT:: not saved with the configuration.IMPORTANT::IMPORTANT:: If you are recovering from a disaster and do not have aIMPORTANT:: backup, you can restore the saved configuration.IMPORTANT::IMPORTANT:: If you are going to restore a backup from a previousIMPORTANT:: installation, you should not restore the saved configuration.IMPORTANT::IMPORTANT:: If you choose not to restore the saved configuration, itIMPORTANT:: will be erased from flash.IMPORTANT::
Would you like to restore the saved configuration? (y,n)
Step 7 Enter the Cisco Unity Express administrator ID. This is the username to log in to the Cisco Unity Express GUI.
IMPORTANT:: Administrator Account CreationIMPORTANT::IMPORTANT:: Create an administrator account. With this account,IMPORTANT:: you can log in to the Cisco Unity Express GUI andIMPORTANT:: run the initialization wizard.IMPORTANT::
Enter administrator user ID: (user ID): AdminEnter password for admin: (password): ******Confirm password for admin by reentering it: (password): ******
se-172-16-0-0#
What to Do Next
1. Restore the data and configuration files. See “Restoring Files” on page 138.
2. Reboot the system.
62Cisco Unity Express 2.1/2.2 CLI Administrator Guide for Cisco CallManager
Cisco Unity Express 2.1/2.2
Configuring System Components
Command-line interface (CLI) commands are available to configure Cisco Unity Express system components. Some commands are entered in EXEC mode and others in configuration mode.
This chapter describes how to configure the following basic Cisco Unity Express components:
• JTAPI parameters that Cisco Unity Express needs to communicate with Cisco CallManager.
• voice-mail, auto-attendant, and prompt management system applications that ship with Cisco Unity Express.
Additional procedures for configuring optional or advanced system components, such as servers and custom auto-attendant scripts, are described in the section “Advanced Configuration” on page 151.
All the procedures in this chapter can be implemented using either CLI commands or the graphical user interface (GUI) options. Use the CLI procedures for bulk provisioning, scripting, upgrading, and troubleshooting systems.
This chapter contains the following procedures for configuring Cisco Unity Express system components:
• Configuring JTAPI Parameters, page 64
• Configuring the Voice-Mail Application, page 66
• Configuring the Administration via Telephone Application, page 69
• Configuring and Managing the Auto-Attendant Application, page 69
• Configuring Auto-Attendant Scripts, page 76
• Configuring JTAPI Triggers for the Applications, page 78
• Deleting a JTAPI Application Trigger, page 81
• Deleting an Application, page 83
• Configuring System-Wide Mailbox Default Values, page 86
• Checking AIM Flash Memory Wear Activity, page 88
• Configuring the System Language, page 89
• Configuring Password and PIN Parameters, page 89
• Configuring Business Hours, page 93
• Configuring a Holiday List, page 99
63Cisco Unity Express 2.1/2.2 CLI Administrator Guide for Cisco CallManager
Cisco Unity Express 2.1/2.2
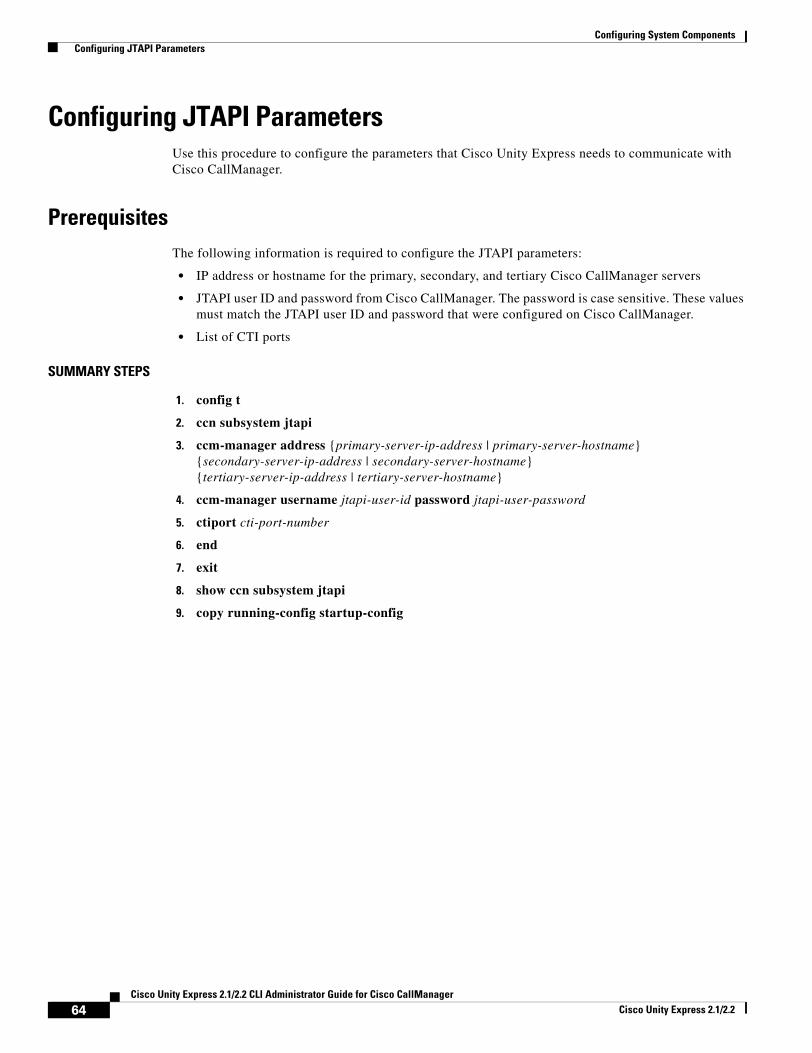
Configuring System Components Configuring JTAPI Parameters
Configuring JTAPI ParametersUse this procedure to configure the parameters that Cisco Unity Express needs to communicate with Cisco CallManager.
PrerequisitesThe following information is required to configure the JTAPI parameters:
• IP address or hostname for the primary, secondary, and tertiary Cisco CallManager servers
• JTAPI user ID and password from Cisco CallManager. The password is case sensitive. These values must match the JTAPI user ID and password that were configured on Cisco CallManager.
• List of CTI ports
SUMMARY STEPS
1. config t
2. ccn subsystem jtapi
3. ccm-manager address {primary-server-ip-address | primary-server-hostname} {secondary-server-ip-address | secondary-server-hostname} {tertiary-server-ip-address | tertiary-server-hostname}
4. ccm-manager username jtapi-user-id password jtapi-user-password
5. ctiport cti-port-number
6. end
7. exit
8. show ccn subsystem jtapi
9. copy running-config startup-config
64Cisco Unity Express 2.1/2.2 CLI Administrator Guide for Cisco CallManager
Cisco Unity Express 2.1/2.2
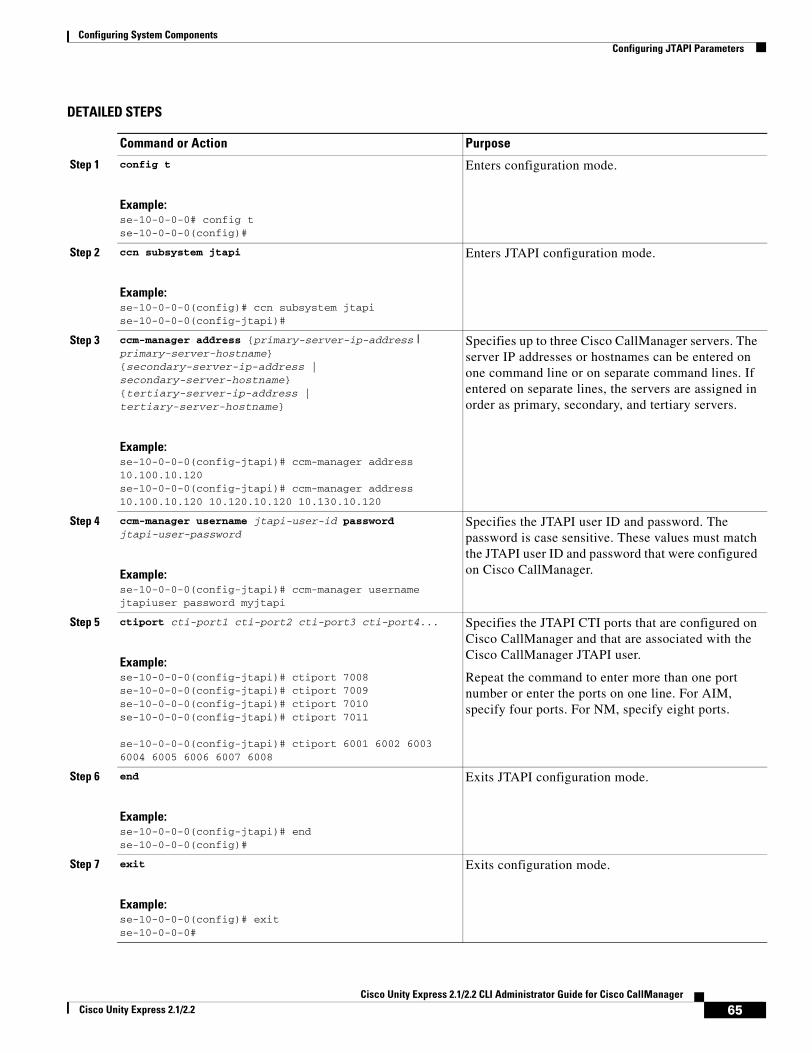
Configuring System Components Configuring JTAPI Parameters
DETAILED STEPS
Command or Action Purpose
Step 1 config t
Example:se-10-0-0-0# config tse-10-0-0-0(config)#
Enters configuration mode.
Step 2 ccn subsystem jtapi
Example:se-10-0-0-0(config)# ccn subsystem jtapise-10-0-0-0(config-jtapi)#
Enters JTAPI configuration mode.
Step 3 ccm-manager address {primary-server-ip-address | primary-server-hostname} {secondary-server-ip-address | secondary-server-hostname} {tertiary-server-ip-address | tertiary-server-hostname}
Example:se-10-0-0-0(config-jtapi)# ccm-manager address 10.100.10.120se-10-0-0-0(config-jtapi)# ccm-manager address 10.100.10.120 10.120.10.120 10.130.10.120
Specifies up to three Cisco CallManager servers. The server IP addresses or hostnames can be entered on one command line or on separate command lines. If entered on separate lines, the servers are assigned in order as primary, secondary, and tertiary servers.
Step 4 ccm-manager username jtapi-user-id password jtapi-user-password
Example:se-10-0-0-0(config-jtapi)# ccm-manager username jtapiuser password myjtapi
Specifies the JTAPI user ID and password. The password is case sensitive. These values must match the JTAPI user ID and password that were configured on Cisco CallManager.
Step 5 ctiport cti-port1 cti-port2 cti-port3 cti-port4...
Example:se-10-0-0-0(config-jtapi)# ctiport 7008se-10-0-0-0(config-jtapi)# ctiport 7009se-10-0-0-0(config-jtapi)# ctiport 7010se-10-0-0-0(config-jtapi)# ctiport 7011
se-10-0-0-0(config-jtapi)# ctiport 6001 6002 6003 6004 6005 6006 6007 6008
Specifies the JTAPI CTI ports that are configured on Cisco CallManager and that are associated with the Cisco CallManager JTAPI user.
Repeat the command to enter more than one port number or enter the ports on one line. For AIM, specify four ports. For NM, specify eight ports.
Step 6 end
Example:se-10-0-0-0(config-jtapi)# endse-10-0-0-0(config)#
Exits JTAPI configuration mode.
Step 7 exit
Example:se-10-0-0-0(config)# exitse-10-0-0-0#
Exits configuration mode.
65Cisco Unity Express 2.1/2.2 CLI Administrator Guide for Cisco CallManager
Cisco Unity Express 2.1/2.2
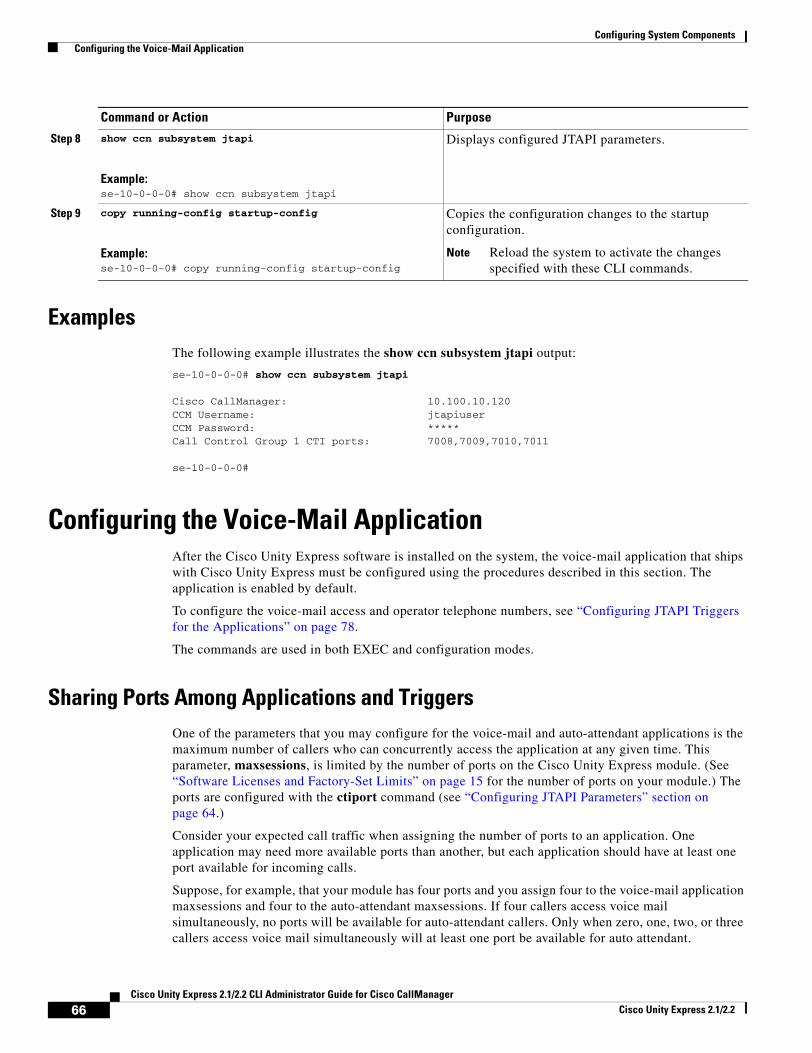
Configuring System Components Configuring the Voice-Mail Application
ExamplesThe following example illustrates the show ccn subsystem jtapi output:
se-10-0-0-0# show ccn subsystem jtapi
Cisco CallManager: 10.100.10.120CCM Username: jtapiuserCCM Password: *****Call Control Group 1 CTI ports: 7008,7009,7010,7011
se-10-0-0-0#
Configuring the Voice-Mail ApplicationAfter the Cisco Unity Express software is installed on the system, the voice-mail application that ships with Cisco Unity Express must be configured using the procedures described in this section. The application is enabled by default.
To configure the voice-mail access and operator telephone numbers, see “Configuring JTAPI Triggers for the Applications” on page 78.
The commands are used in both EXEC and configuration modes.
Sharing Ports Among Applications and TriggersOne of the parameters that you may configure for the voice-mail and auto-attendant applications is the maximum number of callers who can concurrently access the application at any given time. This parameter, maxsessions, is limited by the number of ports on the Cisco Unity Express module. (See “Software Licenses and Factory-Set Limits” on page 15 for the number of ports on your module.) The ports are configured with the ctiport command (see “Configuring JTAPI Parameters” section on page 64.)
Consider your expected call traffic when assigning the number of ports to an application. One application may need more available ports than another, but each application should have at least one port available for incoming calls.
Suppose, for example, that your module has four ports and you assign four to the voice-mail application maxsessions and four to the auto-attendant maxsessions. If four callers access voice mail simultaneously, no ports will be available for auto-attendant callers. Only when zero, one, two, or three callers access voice mail simultaneously will at least one port be available for auto attendant.
Step 8 show ccn subsystem jtapi
Example:se-10-0-0-0# show ccn subsystem jtapi
Displays configured JTAPI parameters.
Step 9 copy running-config startup-config
Example:se-10-0-0-0# copy running-config startup-config
Copies the configuration changes to the startup configuration.
Note Reload the system to activate the changes specified with these CLI commands.
Command or Action Purpose
66Cisco Unity Express 2.1/2.2 CLI Administrator Guide for Cisco CallManager
Cisco Unity Express 2.1/2.2
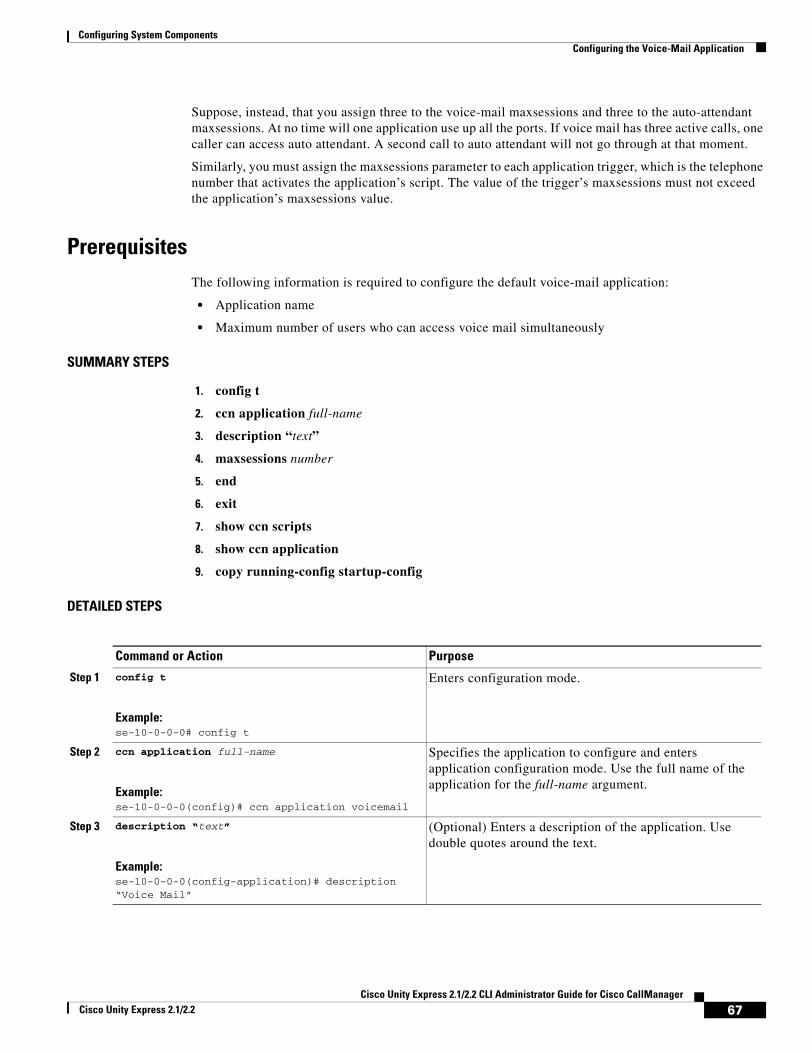
Configuring System Components Configuring the Voice-Mail Application
Suppose, instead, that you assign three to the voice-mail maxsessions and three to the auto-attendant maxsessions. At no time will one application use up all the ports. If voice mail has three active calls, one caller can access auto attendant. A second call to auto attendant will not go through at that moment.
Similarly, you must assign the maxsessions parameter to each application trigger, which is the telephone number that activates the application’s script. The value of the trigger’s maxsessions must not exceed the application’s maxsessions value.
PrerequisitesThe following information is required to configure the default voice-mail application:
• Application name
• Maximum number of users who can access voice mail simultaneously
SUMMARY STEPS
1. config t
2. ccn application full-name
3. description “text”
4. maxsessions number
5. end
6. exit
7. show ccn scripts
8. show ccn application
9. copy running-config startup-config
DETAILED STEPS
Command or Action Purpose
Step 1 config t
Example:se-10-0-0-0# config t
Enters configuration mode.
Step 2 ccn application full-name
Example:se-10-0-0-0(config)# ccn application voicemail
Specifies the application to configure and enters application configuration mode. Use the full name of the application for the full-name argument.
Step 3 description “text”
Example:se-10-0-0-0(config-application)# description “Voice Mail”
(Optional) Enters a description of the application. Use double quotes around the text.
67Cisco Unity Express 2.1/2.2 CLI Administrator Guide for Cisco CallManager
Cisco Unity Express 2.1/2.2
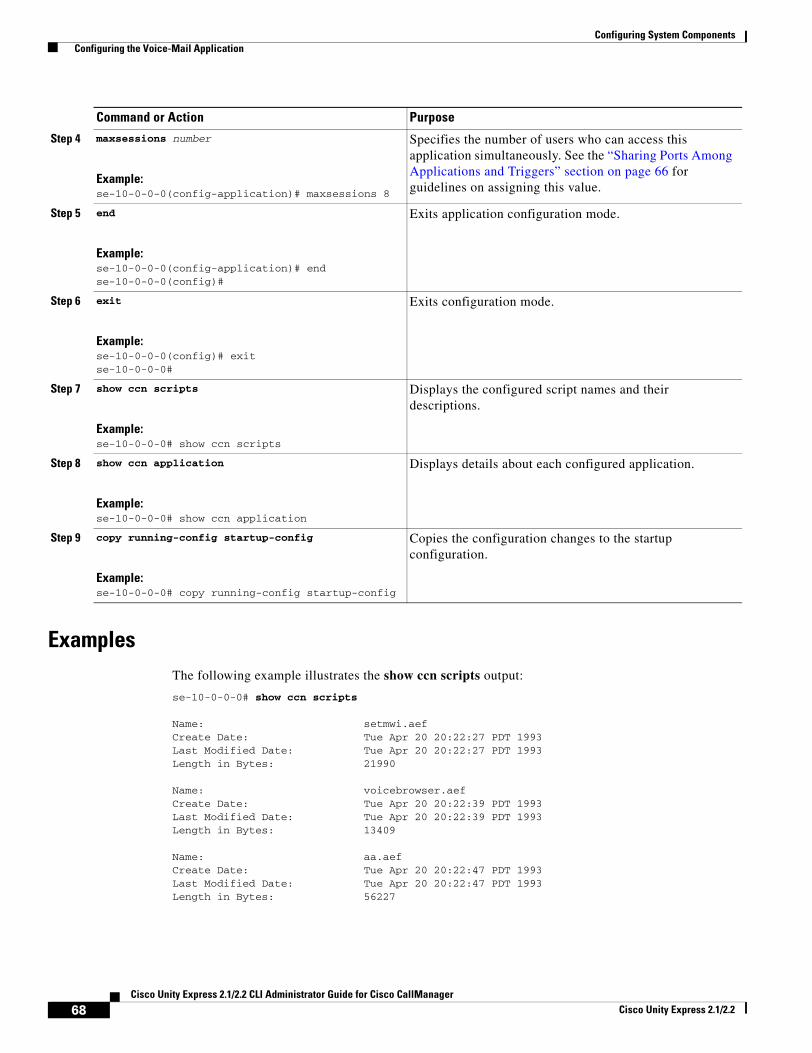
Configuring System Components Configuring the Voice-Mail Application
ExamplesThe following example illustrates the show ccn scripts output:
se-10-0-0-0# show ccn scripts
Name: setmwi.aefCreate Date: Tue Apr 20 20:22:27 PDT 1993Last Modified Date: Tue Apr 20 20:22:27 PDT 1993Length in Bytes: 21990
Name: voicebrowser.aefCreate Date: Tue Apr 20 20:22:39 PDT 1993Last Modified Date: Tue Apr 20 20:22:39 PDT 1993Length in Bytes: 13409
Name: aa.aefCreate Date: Tue Apr 20 20:22:47 PDT 1993Last Modified Date: Tue Apr 20 20:22:47 PDT 1993Length in Bytes: 56227
Step 4 maxsessions number
Example:se-10-0-0-0(config-application)# maxsessions 8
Specifies the number of users who can access this application simultaneously. See the “Sharing Ports Among Applications and Triggers” section on page 66 for guidelines on assigning this value.
Step 5 end
Example:se-10-0-0-0(config-application)# endse-10-0-0-0(config)#
Exits application configuration mode.
Step 6 exit
Example:se-10-0-0-0(config)# exitse-10-0-0-0#
Exits configuration mode.
Step 7 show ccn scripts
Example:se-10-0-0-0# show ccn scripts
Displays the configured script names and their descriptions.
Step 8 show ccn application
Example:se-10-0-0-0# show ccn application
Displays details about each configured application.
Step 9 copy running-config startup-config
Example:se-10-0-0-0# copy running-config startup-config
Copies the configuration changes to the startup configuration.
Command or Action Purpose
68Cisco Unity Express 2.1/2.2 CLI Administrator Guide for Cisco CallManager
Cisco Unity Express 2.1/2.2

Configuring System Components Configuring the Administration via Telephone Application
The following example illustrates the show ccn application output:
se-10-0-0-0# show ccn application
Name: voicemailDescription: Voice MailScript: voicebrowser.aefID number: 1Enabled: yesMaximum number of sessions: 8logoutUri: http://localhost/voicemail/vxmlscripts/m bxLogout.jspuri: http://localhost/voicemail/vxmlscripts/login.vxml
se-10-0-0-0#
Configuring the Administration via Telephone ApplicationThe Administration via Telephone (AvT) application is a telephony-based interface that allows Cisco Unity Express administrators to record new audio prompts or delete existing custom audio prompts without using a PC or sound-editing software. These prompts can then be used in various Cisco Unity Express Automated Attendant (AA) scripts, such as the Welcome prompt in the default auto-attendant. The Emergency Alternate Greeting (EAG) is an option within the AvT that allows users to record, modify, and enable or disable a special prompt to be played prior to the regular prompt, notifying callers of some temporary event or message.
The Cisco Unity Express module installation automatically configures the AvT application. This application permits recording and administration of auto-attendant prompts using the telephone user interface (TUI).
Only users with administrative (superuser) privileges or prompt management (ManagePrompt) privileges have access to the AvT. (See “Adding and Modifying a Group” on page 112 for information about assigning privileges.) When a caller dials the AvT number, the AvT authenticates the caller by requesting the caller’s extension and PIN. The AvT disconnects the caller if the caller does not have administrative authority.
To configure the AvT access telephone number, see “Configuring JTAPI Triggers for the Applications” on page 78.
Configuring and Managing the Auto-Attendant ApplicationAfter the Cisco Unity Express software is installed on the system, the auto-attendant application that ships with Cisco Unity Express must be configured using the procedures described in this section.
Default Welcome PromptThe only component of the default auto-attendant which resides in the user directory is an audio prompt file called AAWelcome.wav. This is the default welcome prompt. All other audio prompt files used by the auto-attendant reside in the system directory and cannot be downloaded, copied, or uploaded by users.
To customize the default welcome prompt, see “Customizing the Default Auto-Attendant Welcome Prompt” on page 75.
69Cisco Unity Express 2.1/2.2 CLI Administrator Guide for Cisco CallManager
Cisco Unity Express 2.1/2.2
Configuring System Components Configuring and Managing the Auto-Attendant Application
Default Auto-Attendant Script aa.aefThe default auto-attendant script provided with Cisco Unity Express is named aa.aef. This file resides in the system directory, and cannot be downloaded, copied, or uploaded by users. This default auto-attendant application is also known as the “system script”, or “system AA”. This default script supports basic functions such as dial-by-extension, dial-by-spelling username, and call operator functions. If additional functionality is required, then you must create a customized auto-attendant script.
Starting with Release 2.1, the aa.aef script supports holiday lists and business-hours schedules. When a call reaches the auto attendant, the system checks if the current day is a holiday. If it is, the system plays a holiday prompt called AAHolidayPrompt.wav, which states “We are closed today. Please call back later.” The script then executes the next operation in the script.
If the current day is not a holiday, the system checks if the business is open or not. If the business is open, the system plays the AABusinessOpen.wav prompt, which is an empty file. If the business is closed, the system plays the AABusinessClosed.wav prompt, which states “We are currently closed. Please call back later.”
Following are the parameters that may be configured for the aa.aef script:
• welcomePrompt—default: AAWelcome.wav
• operExtn—default: none
• holidayPrompt—default: AAHolidayPrompt.wav
• businessOpenPrompt—default: AABusinessOpen.wav
• businessClosedPrompt—default: AABusinessClosed.wav
• businessSchedule—default: SystemSchedule
To modify any of these prompts, see “Configuring Auto-Attendant Prompts” on page 74.
To create customized script files, see “Creating an Auto-Attendant Script File” on page 76.
To create a business-hours schedule, see “Configuring Business Hours” on page 93.
To create a holiday list, see “Configuring a Holiday List” on page 99.
Simple Auto-Attendant Script aa_simple.aefStarting with Release 2.1, another simple script aa_simple.aef is available for the auto-attendant application. This script is another system script that can be associated with an auto-attendant application and cannot be deleted or downloaded.
This script makes the same checks for an alternate greeting, holiday hours, and business schedule as does the aa.aef script.
After determining the initial greeting to play to the customer, the aa_simple.aef script plays a prompt (AASPlayExtensions.wav) with the message “For operator, press 0.” This prompt is a configurable parameter. Use the GUI options or CLI commands to replace the prompt with your message file that has the names and extensions of the people who can be reached with the auto-attendant application. For example, the prompt may play “For Al, press 10. For Bob, press 20. For the operator, press 0.”
The caller can enter an extension without pressing the pound key (#). After the caller enters the extension, the script attempts to transfer to that extension. The script does not attempt to validate the extension before the transfer.
70Cisco Unity Express 2.1/2.2 CLI Administrator Guide for Cisco CallManager
Cisco Unity Express 2.1/2.2
Configuring System Components Configuring and Managing the Auto-Attendant Application
The script has another parameter (extensionLength) that specifies the length of the extension used by the Cisco Unity Express system. This parameter must be configured correctly for the script to be able to do a successul transfer.
Following are the parameters that may be configured for the aa_simple.aef script:
• welcomePrompt—default: AAWelcome.wav
• holidayPrompt—default: AAHolidayPrompt.wav
• businessOpenPrompt—default: AABusinessOpen.wav
• businessClosedPrompt—default: AABusinessClosed.wav
• playExtensionsPrompt—default: AASPlayExtensions.wav
• extensionLength—default: 1
• businessSchedule—default: SystemSchedule
To modify any of these prompts, see “Configuring Auto-Attendant Prompts” on page 74.
To create customized script files, see “Creating an Auto-Attendant Script File” on page 76.
To create a business-hours schedule, see “Configuring Business Hours” on page 93.
To create a holiday list, see “Configuring a Holiday List” on page 99.
Other Auto-Attendant ParametersTo configure the auto-attendant access telephone number, see “Configuring JTAPI Triggers for the Applications” on page 78.
The commands are used in both EXEC and configuration modes.
See “Configuring Application Parameters” on page 154 for procedures to configure user-defined parameters.
PrerequisitesThe following information is required to configure auto attendant:
• To use your own welcome prompt, create a .wav file containing the prerecorded welcome prompt. This file must be uploaded to the Cisco Unity Express module so that it can be located and saved in the auto-attendant script. Alternatively, you can use the Administration via Telephone (AvT) to record the welcome prompt. See “Recording an Auto-Attendant Greeting or Prompt File” on page 75 for guidelines on recording a prompt. See “Uploading the Auto-Attendant Greeting or Prompt File” on page 75 for the procedure to upload the prompt to Cisco Unity Express.
• Application name.
• Number of times the auto attendant will replay instructions to a caller before the call is disconnected. This count begins when the caller moves past the main menu and starts to hear instructions for a submenu. The main menu will play five times and then, if the caller makes no choice or incorrect choices, will transfer to the operator.
• Extension number of the operator. Auto attendant dials this extension when the caller presses the zero (“0”) button.
• The customized WAV filename if you change the default auto attendant welcome prompt.
71Cisco Unity Express 2.1/2.2 CLI Administrator Guide for Cisco CallManager
Cisco Unity Express 2.1/2.2
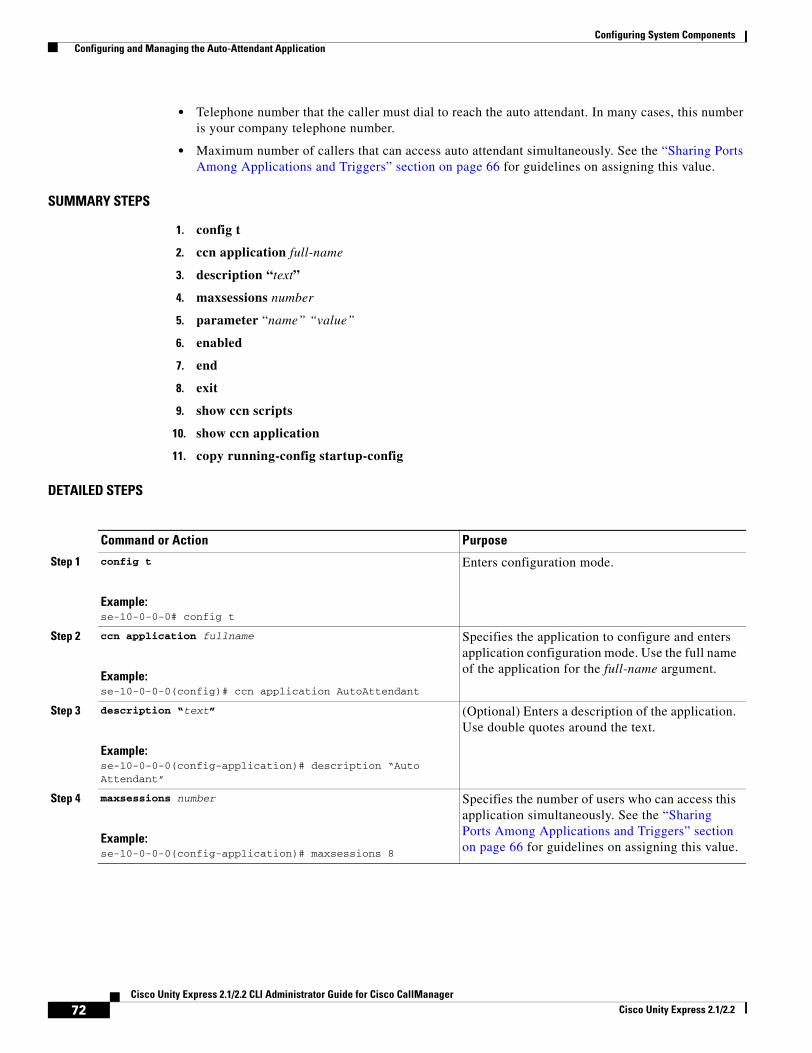
Configuring System Components Configuring and Managing the Auto-Attendant Application
• Telephone number that the caller must dial to reach the auto attendant. In many cases, this number is your company telephone number.
• Maximum number of callers that can access auto attendant simultaneously. See the “Sharing Ports Among Applications and Triggers” section on page 66 for guidelines on assigning this value.
SUMMARY STEPS
1. config t
2. ccn application full-name
3. description “text”
4. maxsessions number
5. parameter “name” “value”
6. enabled
7. end
8. exit
9. show ccn scripts
10. show ccn application
11. copy running-config startup-config
DETAILED STEPS
Command or Action Purpose
Step 1 config t
Example:se-10-0-0-0# config t
Enters configuration mode.
Step 2 ccn application fullname
Example:se-10-0-0-0(config)# ccn application AutoAttendant
Specifies the application to configure and enters application configuration mode. Use the full name of the application for the full-name argument.
Step 3 description “text”
Example:se-10-0-0-0(config-application)# description “Auto Attendant”
(Optional) Enters a description of the application. Use double quotes around the text.
Step 4 maxsessions number
Example:se-10-0-0-0(config-application)# maxsessions 8
Specifies the number of users who can access this application simultaneously. See the “Sharing Ports Among Applications and Triggers” section on page 66 for guidelines on assigning this value.
72Cisco Unity Express 2.1/2.2 CLI Administrator Guide for Cisco CallManager
Cisco Unity Express 2.1/2.2
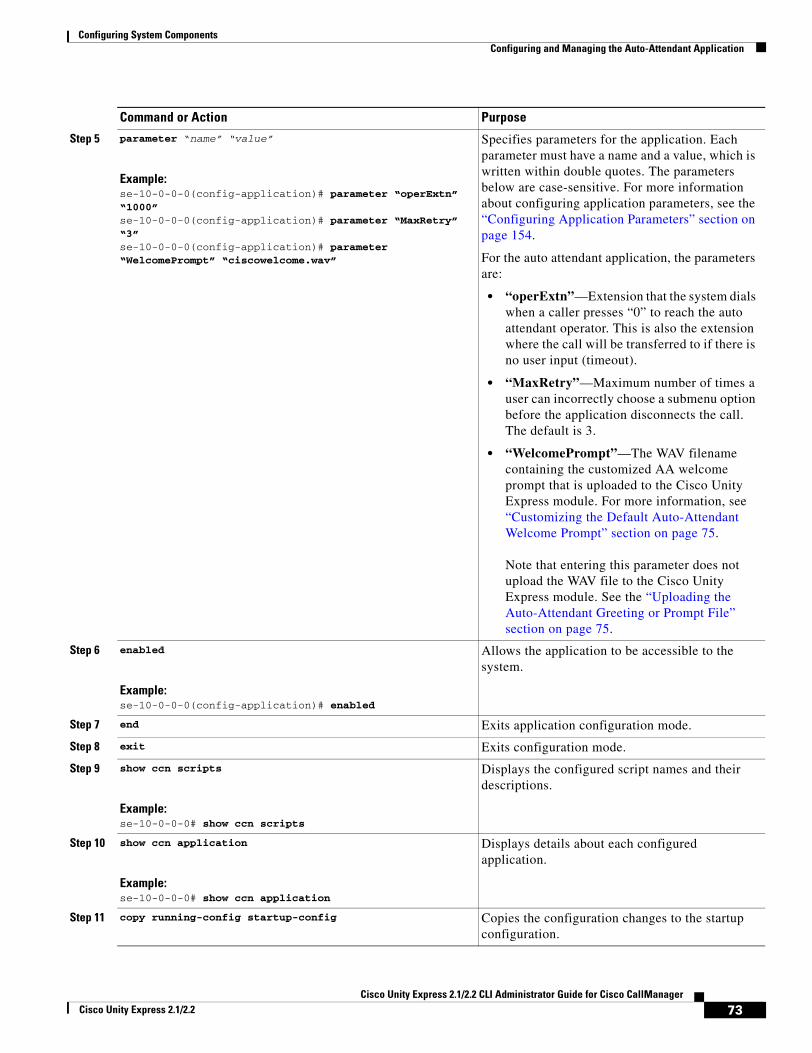
Configuring System Components Configuring and Managing the Auto-Attendant Application
Step 5 parameter “name” “value”
Example:se-10-0-0-0(config-application)# parameter “operExtn” “1000”se-10-0-0-0(config-application)# parameter “MaxRetry” “3”se-10-0-0-0(config-application)# parameter “WelcomePrompt” “ciscowelcome.wav”
Specifies parameters for the application. Each parameter must have a name and a value, which is written within double quotes. The parameters below are case-sensitive. For more information about configuring application parameters, see the “Configuring Application Parameters” section on page 154.
For the auto attendant application, the parameters are:
• “operExtn”—Extension that the system dials when a caller presses “0” to reach the auto attendant operator. This is also the extension where the call will be transferred to if there is no user input (timeout).
• “MaxRetry”—Maximum number of times a user can incorrectly choose a submenu option before the application disconnects the call. The default is 3.
• “WelcomePrompt”—The WAV filename containing the customized AA welcome prompt that is uploaded to the Cisco Unity Express module. For more information, see “Customizing the Default Auto-Attendant Welcome Prompt” section on page 75.
Note that entering this parameter does not upload the WAV file to the Cisco Unity Express module. See the “Uploading the Auto-Attendant Greeting or Prompt File” section on page 75.
Step 6 enabled
Example:se-10-0-0-0(config-application)# enabled
Allows the application to be accessible to the system.
Step 7 end Exits application configuration mode.
Step 8 exit Exits configuration mode.
Step 9 show ccn scripts
Example:se-10-0-0-0# show ccn scripts
Displays the configured script names and their descriptions.
Step 10 show ccn application
Example:se-10-0-0-0# show ccn application
Displays details about each configured application.
Step 11 copy running-config startup-config Copies the configuration changes to the startup configuration.
Command or Action Purpose
73Cisco Unity Express 2.1/2.2 CLI Administrator Guide for Cisco CallManager
Cisco Unity Express 2.1/2.2

Configuring System Components Configuring and Managing the Auto-Attendant Application
ExamplesThe following example illustrates the show ccn scripts output:
se-10-0-0-0# show ccn scripts
Name: setmwi.aefCreate Date: Tue Apr 20 20:22:27 PDT 1993Last Modified Date: Tue Apr 20 20:22:27 PDT 1993Length in Bytes: 21990
Name: voicebrowser.aefCreate Date: Tue Apr 20 20:22:39 PDT 1993Last Modified Date: Tue Apr 20 20:22:39 PDT 1993Length in Bytes: 13409
Name: aa.aefCreate Date: Tue Apr 20 20:22:47 PDT 1993Last Modified Date: Tue Apr 20 20:22:47 PDT 1993Length in Bytes: 56227
Name: promptmgmt.aefCreate Date: Tue Apr 20 20:22:59 PDT 1993Last Modified Date: Tue Apr 20 20:22:59 PDT 1993Length in Bytes: 80781se-10-0-0-0#
The following example illustrates the show ccn application output:
se-10-0-0-0# show ccn application
Name: AutoAttendantDescription: Auto AttendantScript: aa.aefID number: 2Enabled: yesMaximum number of sessions: 8MaxRetry: 3operExtn: 1000welcomePrompt: AAWelcome.wavse-10-0-0-0#
Configuring Auto-Attendant PromptsCisco Unity Express supports customized greeting and prompt files. The NM supports up to 50 prompts; the AIM supports up to 25 prompts.
Customizing prompts requires the following procedures:
• Recording an Auto-Attendant Greeting or Prompt File, page 75
• Customizing the Default Auto-Attendant Welcome Prompt, page 75
• Uploading the Auto-Attendant Greeting or Prompt File, page 75
• (Optional) Downloading an Auto-Attendant Greeting or Prompt File, page 76
• (Optional) Deleting an Auto-Attendant Greeting or Prompt File, page 76
74Cisco Unity Express 2.1/2.2 CLI Administrator Guide for Cisco CallManager
Cisco Unity Express 2.1/2.2
Configuring System Components Configuring and Managing the Auto-Attendant Application
Recording an Auto-Attendant Greeting or Prompt File
Two methods are available to create auto-attendant greeting and prompt files:
• Create a.wav file with the following format: G.711 U-law, 8 kHz, 8 bit, Mono. The file cannot be larger than 1 MB, which corresponds to a greeting length of approximately 120 seconds. After recording the greeting, use the GUI or Cisco Unity Express CLI ccn copy command to copy the file in to the Cisco Unity Express system. See the next section, “Uploading the Auto-Attendant Greeting or Prompt File,” for the upload procedure.
• Use the AvT on the TUI to record the greeting or prompt. Dial the AvT telephone number and select the option to record a greeting. When finished recording, save the file. AvT automatically saves the file in Cisco Unity Express.
The AvT prompt filename has the format UserPrompt_DateTime.wav, for example: UserPrompt_11152003144055.wav. You may want to use CLI commands or GUI options to download the file to a PC, rename the file with a meaningful name, then upload the file back to Cisco Unity Express.
Cisco recommends using the AvT on the TUI to record greetings and prompts because the AvT provides higher sound quality compared to .wav files recorded using other methods.
Customizing the Default Auto-Attendant Welcome Prompt
The default AA greeting included with the system lasts two seconds and plays the prompt “Welcome to the AutoAttendant” You can record a custom welcome prompt specifically for your system to welcome callers.The default WAV filename is AAwelcome.wav. While the default welcome prompt in the WAV file lasts two seconds long, you can record a new welcome prompt up to 120 seconds long. The welcome prompt WAV file can be up to 1 MB in G.711 U-law format.
If you create a customized welcome prompt, use a different WAV filename and upload the new WAV file to the Cisco Unity Express module. Do not overwrite the default AAwelcome.wav filename. For information about uploading the welcome prompt WAV file, see the “Uploading the Auto-Attendant Greeting or Prompt File” section on page 75.
Note The WAV file for the welcome prompt is not interruptible, meaning that the longer the recorded welcome prompt is, the longer callers must wait before being able to enter digits to reach other extensions. Cisco recommends you record a short welcome prompt so that callers can access the voicemail system quickly.
Following this welcome prompt, the default script plays the menu announcement listing the menu options for callers. These are not customizable prompts within the default auto-attendant provided with the system. Note that if a caller uses the dial-by-extension option, the system will attempt to transfer to any extension, including extensions not defined using Cisco Unity Express. To prevent callers from transferring to extensions not defined using Cisco Unity Express, configure class of restrictions (COR) on the dial-peer, or develop a custom script to prevent the option.
Uploading the Auto-Attendant Greeting or Prompt File
After recording the .wav greeting or prompt file, upload the file using the ccn copy url command in Cisco Unity Express EXEC mode:
ccn copy url source-ip-address prompt prompt-filename
75Cisco Unity Express 2.1/2.2 CLI Administrator Guide for Cisco CallManager
Cisco Unity Express 2.1/2.2
Configuring System Components Configuring Auto-Attendant Scripts
Example:se-10-0-0-0# ccn copy url ftp://10.100.10.123/AAprompt1.wav prompt AAprompt1.wavse-10-0-0-0# ccn copy url http://www.server.com/AAgreeting.wav prompt AAgreeting.wav
This command is equivalent to using the GUI option Voice Mail > Prompts and selecting Upload.
An error message appears if you try to upload more than the maximum number of prompts allowed on your Cisco Unity Express module.
Downloading an Auto-Attendant Greeting or Prompt File
Greetings and prompts can be copied from the auto attendant and stored to another server or PC.
To copy a greeting or prompt file, use the ccn copy prompt command in Cisco Unity Express EXEC mode:
ccn copy prompt prompt-file-name url destination-ip-address
Example:se-10-0-0-0# ccn copy prompt AAprompt2.wav url ftp://10.100.10.123/AAprompt2.wav
Deleting an Auto-Attendant Greeting or Prompt File
To delete an auto-attendant greeting or prompt file from Cisco Unity Express, use the ccn delete command in Cisco Unity Express EXEC mode:
ccn delete prompt prompt-filename
Example:se-10-0-0-0# ccn delete prompt AAgreeting.wav
Configuring Auto-Attendant ScriptsCisco Unity Express supports customized script files. The NM supports up to eight scripts; the AIM supports up to four scripts.
Customizing scripts involves the following procedures:
• Creating an Auto-Attendant Script File, page 76
• Uploading the Auto-Attendant Script File, page 77
• (Optional) Downloading an Auto-Attendant Script File, page 77
• (Optional) Deleting an Auto-Attendant Script File, page 77
Creating an Auto-Attendant Script FileThe auto-attendant script file is created using the script editor program. Refer to the Cisco Unity Express Script Editor Guide for guidelines and procedures for creating a script file.
The file cannot be larger than 256 KB.
76Cisco Unity Express 2.1/2.2 CLI Administrator Guide for Cisco CallManager
Cisco Unity Express 2.1/2.2

Configuring System Components Configuring Auto-Attendant Scripts
After creating the script, use the GUI or Cisco Unity Express ccn copy command to copy the file to the Cisco Unity Express system. See the next section, “Uploading the Auto-Attendant Script File,” for the upload procedure.
Uploading the Auto-Attendant Script FileAfter recording the .wav greeting or prompt file, upload the file using the ccn copy url command in Cisco Unity Express EXEC mode:
ccn copy url source-ip-address script script-filename
Example:se-10-0-0-0# ccn copy url ftp://10.100.10.123/AVTscript.aef script AVTscript.aefse-10-0-0-0# ccn copy url http://www.server.com/AVTscript.aef script AVTscript.aef
This command is equivalent to using the GUI option Voice Mail > Scripts and selecting Upload.
An error message appears if you try to upload more than the maximum number of scripts allowed on your Cisco Unity Express module.
Downloading an Auto-Attendant Script FileScripts scan be copied from the auto attendant and stored on another server or PC.
To copy a script file, use the ccn copy script command in Cisco Unity Express EXEC mode:
ccn copy script prompt-file-name url destination-ip-address
Example:se-10-0-0-0# ccn copy script AVTscript.aef url ftp://10.100.10.123/AVTscript.aef
Deleting an Auto-Attendant Script FileTo delete an auto-attendant script file from Cisco Unity Express, use the ccn delete command in Cisco Unity Express EXEC mode:
ccn delete script script-filename
Example:se-10-0-0-0# ccn delete script AVTscript.aefAre you sure you want to delete this script? (y/n)
77Cisco Unity Express 2.1/2.2 CLI Administrator Guide for Cisco CallManager
Cisco Unity Express 2.1/2.2
Configuring System Components Configuring JTAPI Triggers for the Applications
Configuring JTAPI Triggers for the ApplicationsAfter the voice-mail, auto attendant and AvT applications are configured, Cisco Unity Express must be configured to start the voice-mail, auto attendant, and AvT applications when a specific signal, or trigger, is invoked. The trigger is a telephone number. When a caller dials a specified telephone number, Cisco Unity Express starts the voice-mail, auto-attendant, or AvT application.
Cisco Unity Express supports a maximum of 8 SIP triggers and 8 JTAPI triggers for all applications combined. This applies to both the NM and the AIM. See the section “Advanced Configuration” on page 151 for procedures to configure multiple triggers for an application.
PrerequisitesThe following information is required to configure the JTAPI triggers:
• Telephone number that invokes the application. The number must not be the same for both voice mail and auto attendant.
• Number of seconds the system must wait for a caller response before it times out and drops the call.
• Language to use for the prompts.
• Maximum number of callers that can access the trigger simultaneously. See the “Sharing Ports Among Applications and Triggers” section on page 66 for guidelines on assigning this value.
SUMMARY STEPS
Starting from EXEC mode:
1. config t
2. ccn trigger jtapi phonenumber number
3. application string
4. enabled
5. maxsessions number
6. end
7. exit
8. show ccn trigger
9. copy running-config startup-config
Note Reload the system to activate the changes specified with these CLI commands.
78Cisco Unity Express 2.1/2.2 CLI Administrator Guide for Cisco CallManager
Cisco Unity Express 2.1/2.2
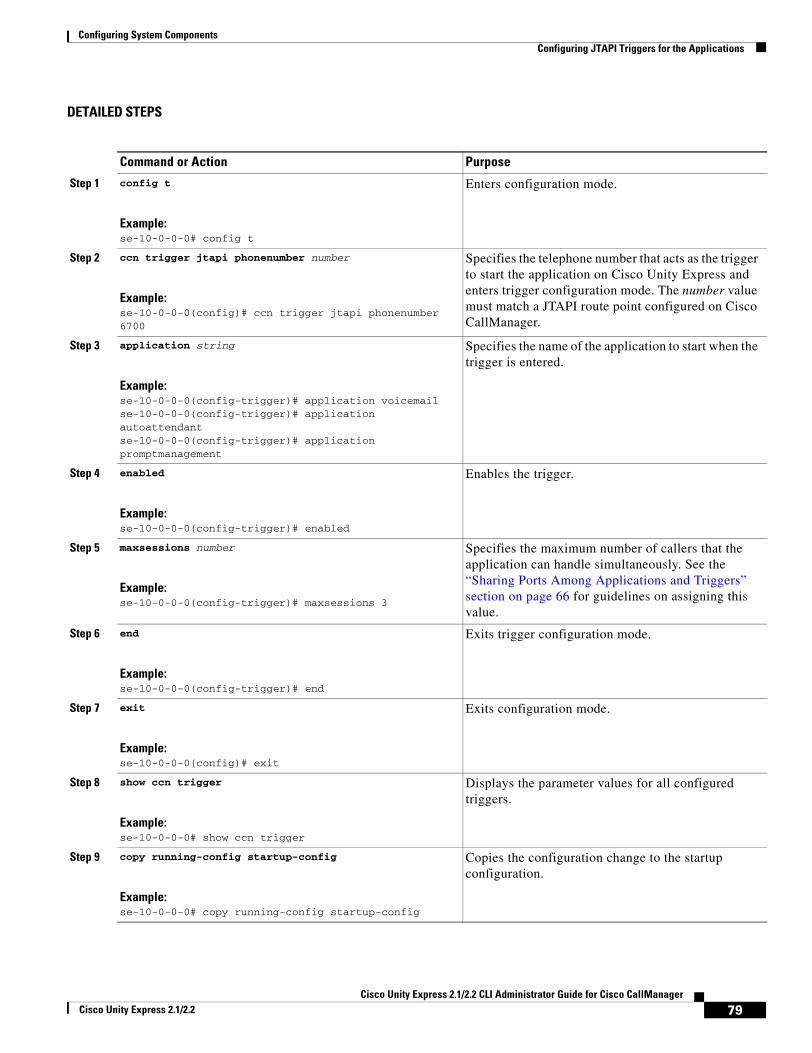
Configuring System Components Configuring JTAPI Triggers for the Applications
DETAILED STEPS
Command or Action Purpose
Step 1 config t
Example:se-10-0-0-0# config t
Enters configuration mode.
Step 2 ccn trigger jtapi phonenumber number
Example:se-10-0-0-0(config)# ccn trigger jtapi phonenumber 6700
Specifies the telephone number that acts as the trigger to start the application on Cisco Unity Express and enters trigger configuration mode. The number value must match a JTAPI route point configured on Cisco CallManager.
Step 3 application string
Example:se-10-0-0-0(config-trigger)# application voicemailse-10-0-0-0(config-trigger)# application autoattendantse-10-0-0-0(config-trigger)# application promptmanagement
Specifies the name of the application to start when the trigger is entered.
Step 4 enabled
Example:se-10-0-0-0(config-trigger)# enabled
Enables the trigger.
Step 5 maxsessions number
Example:se-10-0-0-0(config-trigger)# maxsessions 3
Specifies the maximum number of callers that the application can handle simultaneously. See the “Sharing Ports Among Applications and Triggers” section on page 66 for guidelines on assigning this value.
Step 6 end
Example:se-10-0-0-0(config-trigger)# end
Exits trigger configuration mode.
Step 7 exit
Example:se-10-0-0-0(config)# exit
Exits configuration mode.
Step 8 show ccn trigger
Example:se-10-0-0-0# show ccn trigger
Displays the parameter values for all configured triggers.
Step 9 copy running-config startup-config
Example:se-10-0-0-0# copy running-config startup-config
Copies the configuration change to the startup configuration.
79Cisco Unity Express 2.1/2.2 CLI Administrator Guide for Cisco CallManager
Cisco Unity Express 2.1/2.2
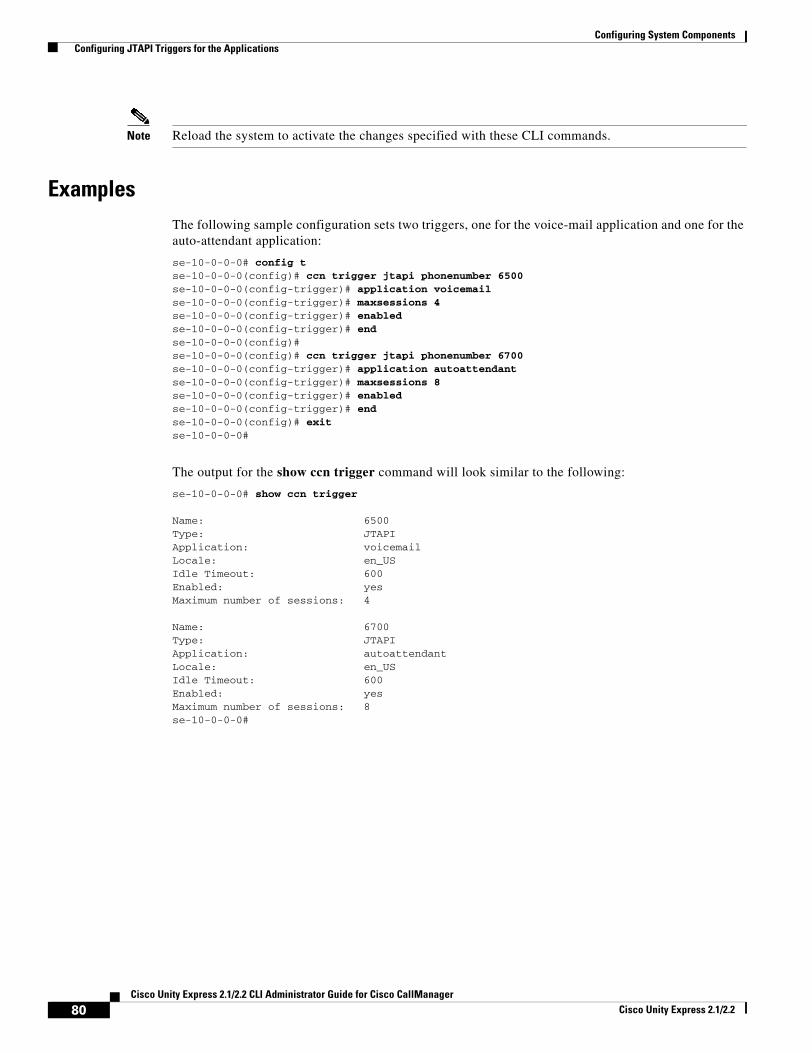
Configuring System Components Configuring JTAPI Triggers for the Applications
Note Reload the system to activate the changes specified with these CLI commands.
ExamplesThe following sample configuration sets two triggers, one for the voice-mail application and one for the auto-attendant application:
se-10-0-0-0# config tse-10-0-0-0(config)# ccn trigger jtapi phonenumber 6500se-10-0-0-0(config-trigger)# application voicemailse-10-0-0-0(config-trigger)# maxsessions 4se-10-0-0-0(config-trigger)# enabledse-10-0-0-0(config-trigger)# endse-10-0-0-0(config)#se-10-0-0-0(config)# ccn trigger jtapi phonenumber 6700se-10-0-0-0(config-trigger)# application autoattendantse-10-0-0-0(config-trigger)# maxsessions 8se-10-0-0-0(config-trigger)# enabledse-10-0-0-0(config-trigger)# endse-10-0-0-0(config)# exitse-10-0-0-0#
The output for the show ccn trigger command will look similar to the following:
se-10-0-0-0# show ccn trigger
Name: 6500Type: JTAPIApplication: voicemailLocale: en_USIdle Timeout: 600Enabled: yesMaximum number of sessions: 4
Name: 6700Type: JTAPIApplication: autoattendantLocale: en_USIdle Timeout: 600Enabled: yesMaximum number of sessions: 8se-10-0-0-0#
80Cisco Unity Express 2.1/2.2 CLI Administrator Guide for Cisco CallManager
Cisco Unity Express 2.1/2.2
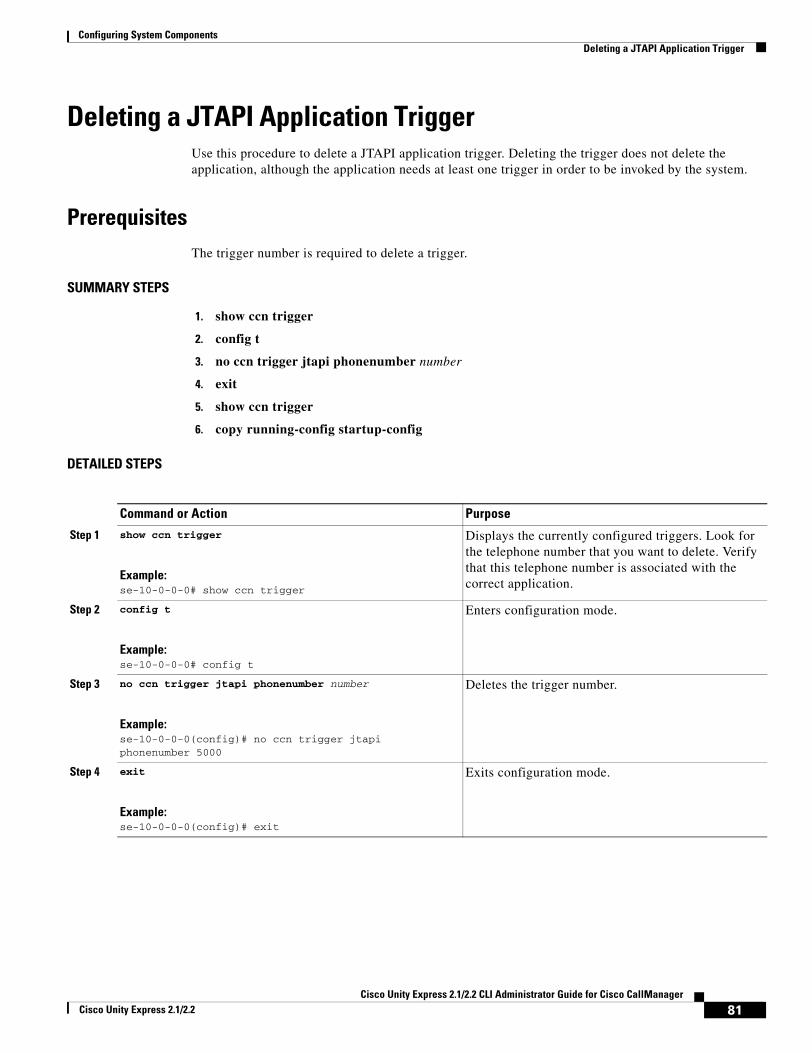
Configuring System Components Deleting a JTAPI Application Trigger
Deleting a JTAPI Application TriggerUse this procedure to delete a JTAPI application trigger. Deleting the trigger does not delete the application, although the application needs at least one trigger in order to be invoked by the system.
PrerequisitesThe trigger number is required to delete a trigger.
SUMMARY STEPS
1. show ccn trigger
2. config t
3. no ccn trigger jtapi phonenumber number
4. exit
5. show ccn trigger
6. copy running-config startup-config
DETAILED STEPS
Command or Action Purpose
Step 1 show ccn trigger
Example:se-10-0-0-0# show ccn trigger
Displays the currently configured triggers. Look for the telephone number that you want to delete. Verify that this telephone number is associated with the correct application.
Step 2 config t
Example:se-10-0-0-0# config t
Enters configuration mode.
Step 3 no ccn trigger jtapi phonenumber number
Example:se-10-0-0-0(config)# no ccn trigger jtapi phonenumber 5000
Deletes the trigger number.
Step 4 exit
Example:se-10-0-0-0(config)# exit
Exits configuration mode.
81Cisco Unity Express 2.1/2.2 CLI Administrator Guide for Cisco CallManager
Cisco Unity Express 2.1/2.2
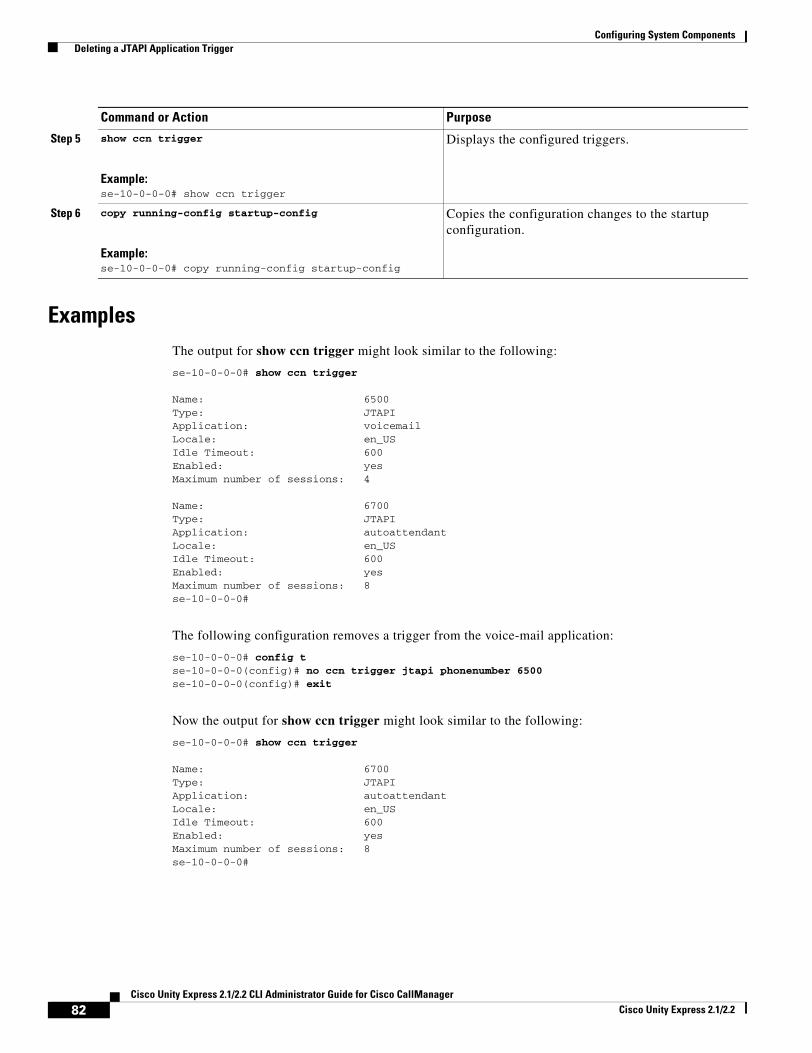
Configuring System Components Deleting a JTAPI Application Trigger
ExamplesThe output for show ccn trigger might look similar to the following:
se-10-0-0-0# show ccn trigger
Name: 6500Type: JTAPIApplication: voicemailLocale: en_USIdle Timeout: 600Enabled: yesMaximum number of sessions: 4
Name: 6700Type: JTAPIApplication: autoattendantLocale: en_USIdle Timeout: 600Enabled: yesMaximum number of sessions: 8se-10-0-0-0#
The following configuration removes a trigger from the voice-mail application:
se-10-0-0-0# config tse-10-0-0-0(config)# no ccn trigger jtapi phonenumber 6500se-10-0-0-0(config)# exit
Now the output for show ccn trigger might look similar to the following:
se-10-0-0-0# show ccn trigger
Name: 6700Type: JTAPIApplication: autoattendantLocale: en_USIdle Timeout: 600Enabled: yesMaximum number of sessions: 8se-10-0-0-0#
Step 5 show ccn trigger
Example:se-10-0-0-0# show ccn trigger
Displays the configured triggers.
Step 6 copy running-config startup-config
Example:se-10-0-0-0# copy running-config startup-config
Copies the configuration changes to the startup configuration.
Command or Action Purpose
82Cisco Unity Express 2.1/2.2 CLI Administrator Guide for Cisco CallManager
Cisco Unity Express 2.1/2.2
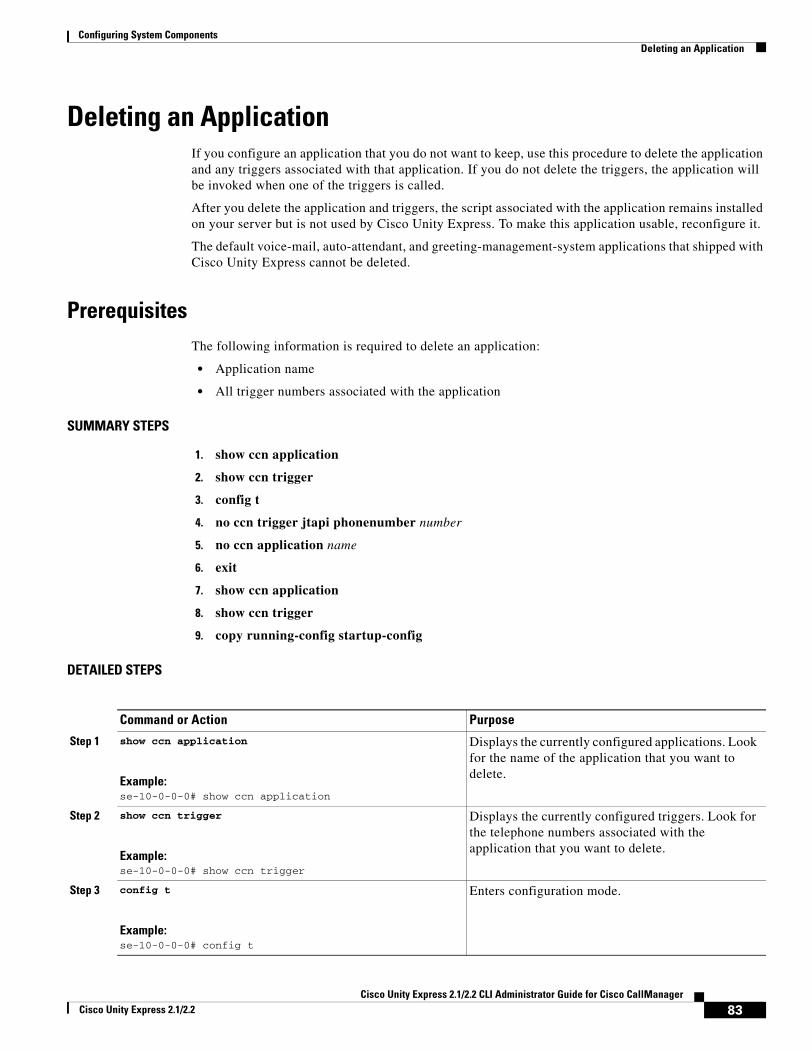
Configuring System Components Deleting an Application
Deleting an ApplicationIf you configure an application that you do not want to keep, use this procedure to delete the application and any triggers associated with that application. If you do not delete the triggers, the application will be invoked when one of the triggers is called.
After you delete the application and triggers, the script associated with the application remains installed on your server but is not used by Cisco Unity Express. To make this application usable, reconfigure it.
The default voice-mail, auto-attendant, and greeting-management-system applications that shipped with Cisco Unity Express cannot be deleted.
PrerequisitesThe following information is required to delete an application:
• Application name
• All trigger numbers associated with the application
SUMMARY STEPS
1. show ccn application
2. show ccn trigger
3. config t
4. no ccn trigger jtapi phonenumber number
5. no ccn application name
6. exit
7. show ccn application
8. show ccn trigger
9. copy running-config startup-config
DETAILED STEPS
Command or Action Purpose
Step 1 show ccn application
Example:se-10-0-0-0# show ccn application
Displays the currently configured applications. Look for the name of the application that you want to delete.
Step 2 show ccn trigger
Example:se-10-0-0-0# show ccn trigger
Displays the currently configured triggers. Look for the telephone numbers associated with the application that you want to delete.
Step 3 config t
Example:se-10-0-0-0# config t
Enters configuration mode.
83Cisco Unity Express 2.1/2.2 CLI Administrator Guide for Cisco CallManager
Cisco Unity Express 2.1/2.2
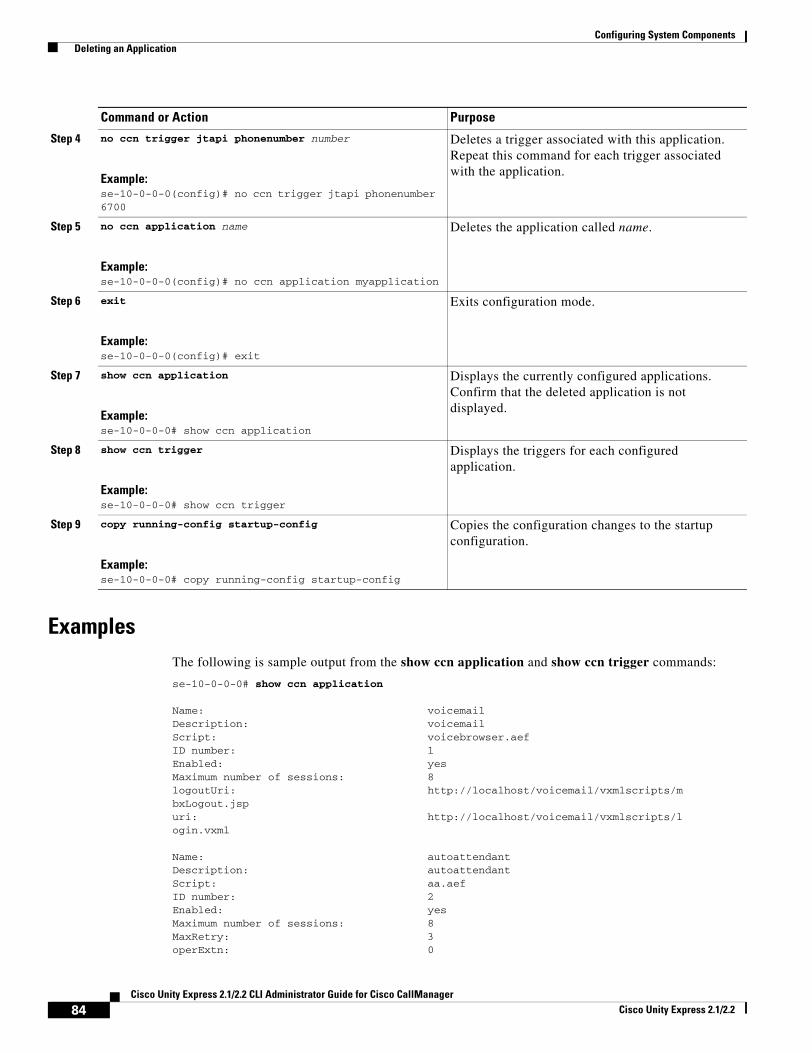
Configuring System Components Deleting an Application
ExamplesThe following is sample output from the show ccn application and show ccn trigger commands:
se-10-0-0-0# show ccn application
Name: voicemailDescription: voicemailScript: voicebrowser.aefID number: 1Enabled: yesMaximum number of sessions: 8logoutUri: http://localhost/voicemail/vxmlscripts/mbxLogout.jspuri: http://localhost/voicemail/vxmlscripts/login.vxml
Name: autoattendantDescription: autoattendantScript: aa.aefID number: 2Enabled: yesMaximum number of sessions: 8MaxRetry: 3operExtn: 0
Step 4 no ccn trigger jtapi phonenumber number
Example:se-10-0-0-0(config)# no ccn trigger jtapi phonenumber 6700
Deletes a trigger associated with this application. Repeat this command for each trigger associated with the application.
Step 5 no ccn application name
Example:se-10-0-0-0(config)# no ccn application myapplication
Deletes the application called name.
Step 6 exit
Example:se-10-0-0-0(config)# exit
Exits configuration mode.
Step 7 show ccn application
Example:se-10-0-0-0# show ccn application
Displays the currently configured applications. Confirm that the deleted application is not displayed.
Step 8 show ccn trigger
Example:se-10-0-0-0# show ccn trigger
Displays the triggers for each configured application.
Step 9 copy running-config startup-config
Example:se-10-0-0-0# copy running-config startup-config
Copies the configuration changes to the startup configuration.
Command or Action Purpose
84Cisco Unity Express 2.1/2.2 CLI Administrator Guide for Cisco CallManager
Cisco Unity Express 2.1/2.2
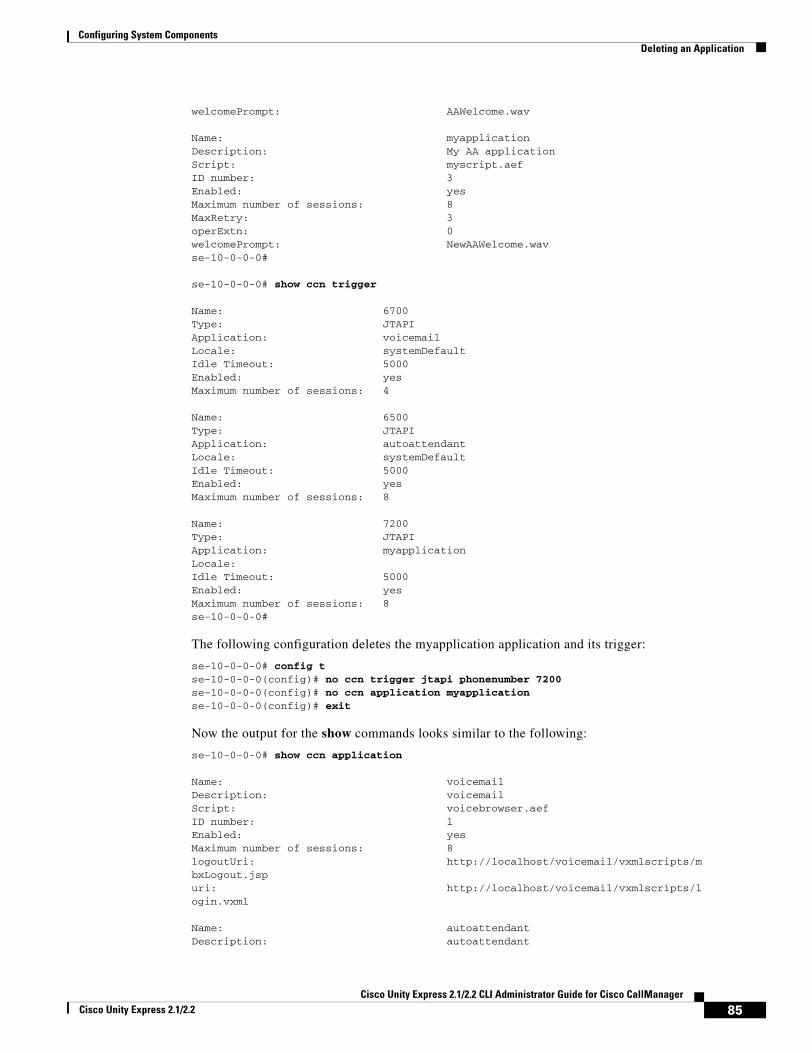
Configuring System Components Deleting an Application
welcomePrompt: AAWelcome.wav
Name: myapplicationDescription: My AA applicationScript: myscript.aefID number: 3Enabled: yesMaximum number of sessions: 8MaxRetry: 3operExtn: 0welcomePrompt: NewAAWelcome.wavse-10-0-0-0#
se-10-0-0-0# show ccn trigger
Name: 6700Type: JTAPIApplication: voicemailLocale: systemDefaultIdle Timeout: 5000Enabled: yesMaximum number of sessions: 4
Name: 6500Type: JTAPIApplication: autoattendantLocale: systemDefaultIdle Timeout: 5000Enabled: yesMaximum number of sessions: 8
Name: 7200Type: JTAPIApplication: myapplicationLocale: Idle Timeout: 5000Enabled: yesMaximum number of sessions: 8se-10-0-0-0#
The following configuration deletes the myapplication application and its trigger:
se-10-0-0-0# config tse-10-0-0-0(config)# no ccn trigger jtapi phonenumber 7200se-10-0-0-0(config)# no ccn application myapplicationse-10-0-0-0(config)# exit
Now the output for the show commands looks similar to the following:
se-10-0-0-0# show ccn application
Name: voicemailDescription: voicemailScript: voicebrowser.aefID number: 1Enabled: yesMaximum number of sessions: 8logoutUri: http://localhost/voicemail/vxmlscripts/mbxLogout.jspuri: http://localhost/voicemail/vxmlscripts/login.vxml
Name: autoattendantDescription: autoattendant
85Cisco Unity Express 2.1/2.2 CLI Administrator Guide for Cisco CallManager
Cisco Unity Express 2.1/2.2
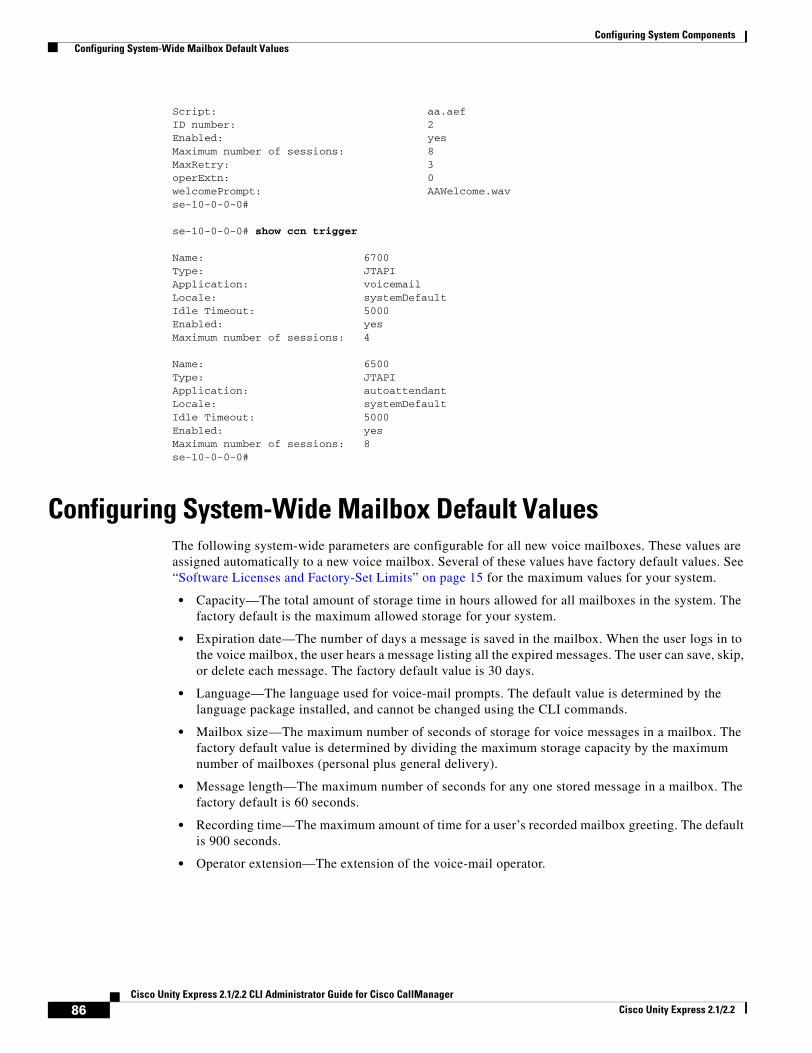
Configuring System Components Configuring System-Wide Mailbox Default Values
Script: aa.aefID number: 2Enabled: yesMaximum number of sessions: 8MaxRetry: 3operExtn: 0welcomePrompt: AAWelcome.wavse-10-0-0-0#
se-10-0-0-0# show ccn trigger
Name: 6700Type: JTAPIApplication: voicemailLocale: systemDefaultIdle Timeout: 5000Enabled: yesMaximum number of sessions: 4
Name: 6500Type: JTAPIApplication: autoattendantLocale: systemDefaultIdle Timeout: 5000Enabled: yesMaximum number of sessions: 8se-10-0-0-0#
Configuring System-Wide Mailbox Default ValuesThe following system-wide parameters are configurable for all new voice mailboxes. These values are assigned automatically to a new voice mailbox. Several of these values have factory default values. See “Software Licenses and Factory-Set Limits” on page 15 for the maximum values for your system.
• Capacity—The total amount of storage time in hours allowed for all mailboxes in the system. The factory default is the maximum allowed storage for your system.
• Expiration date—The number of days a message is saved in the mailbox. When the user logs in to the voice mailbox, the user hears a message listing all the expired messages. The user can save, skip, or delete each message. The factory default value is 30 days.
• Language—The language used for voice-mail prompts. The default value is determined by the language package installed, and cannot be changed using the CLI commands.
• Mailbox size—The maximum number of seconds of storage for voice messages in a mailbox. The factory default value is determined by dividing the maximum storage capacity by the maximum number of mailboxes (personal plus general delivery).
• Message length—The maximum number of seconds for any one stored message in a mailbox. The factory default is 60 seconds.
• Recording time—The maximum amount of time for a user’s recorded mailbox greeting. The default is 900 seconds.
• Operator extension—The extension of the voice-mail operator.
86Cisco Unity Express 2.1/2.2 CLI Administrator Guide for Cisco CallManager
Cisco Unity Express 2.1/2.2
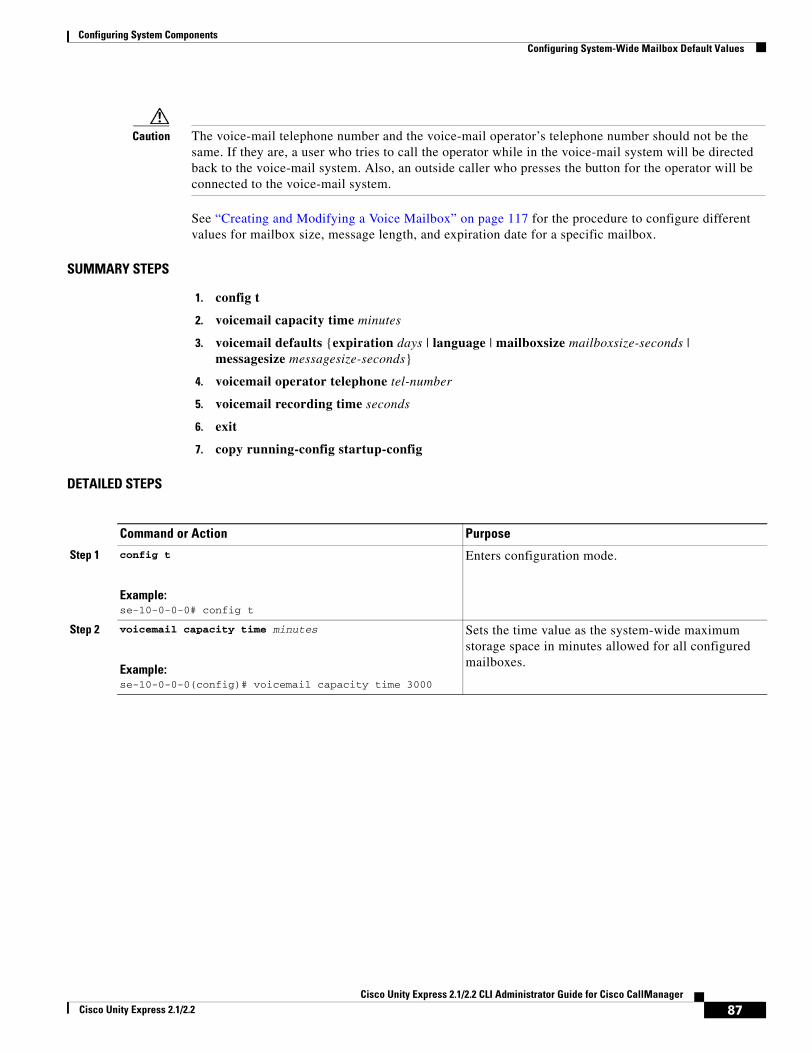
Configuring System Components Configuring System-Wide Mailbox Default Values
Caution The voice-mail telephone number and the voice-mail operator’s telephone number should not be the same. If they are, a user who tries to call the operator while in the voice-mail system will be directed back to the voice-mail system. Also, an outside caller who presses the button for the operator will be connected to the voice-mail system.
See “Creating and Modifying a Voice Mailbox” on page 117 for the procedure to configure different values for mailbox size, message length, and expiration date for a specific mailbox.
SUMMARY STEPS
1. config t
2. voicemail capacity time minutes
3. voicemail defaults {expiration days | language | mailboxsize mailboxsize-seconds | messagesize messagesize-seconds}
4. voicemail operator telephone tel-number
5. voicemail recording time seconds
6. exit
7. copy running-config startup-config
DETAILED STEPS
Command or Action Purpose
Step 1 config t
Example:se-10-0-0-0# config t
Enters configuration mode.
Step 2 voicemail capacity time minutes
Example:se-10-0-0-0(config)# voicemail capacity time 3000
Sets the time value as the system-wide maximum storage space in minutes allowed for all configured mailboxes.
87Cisco Unity Express 2.1/2.2 CLI Administrator Guide for Cisco CallManager
Cisco Unity Express 2.1/2.2
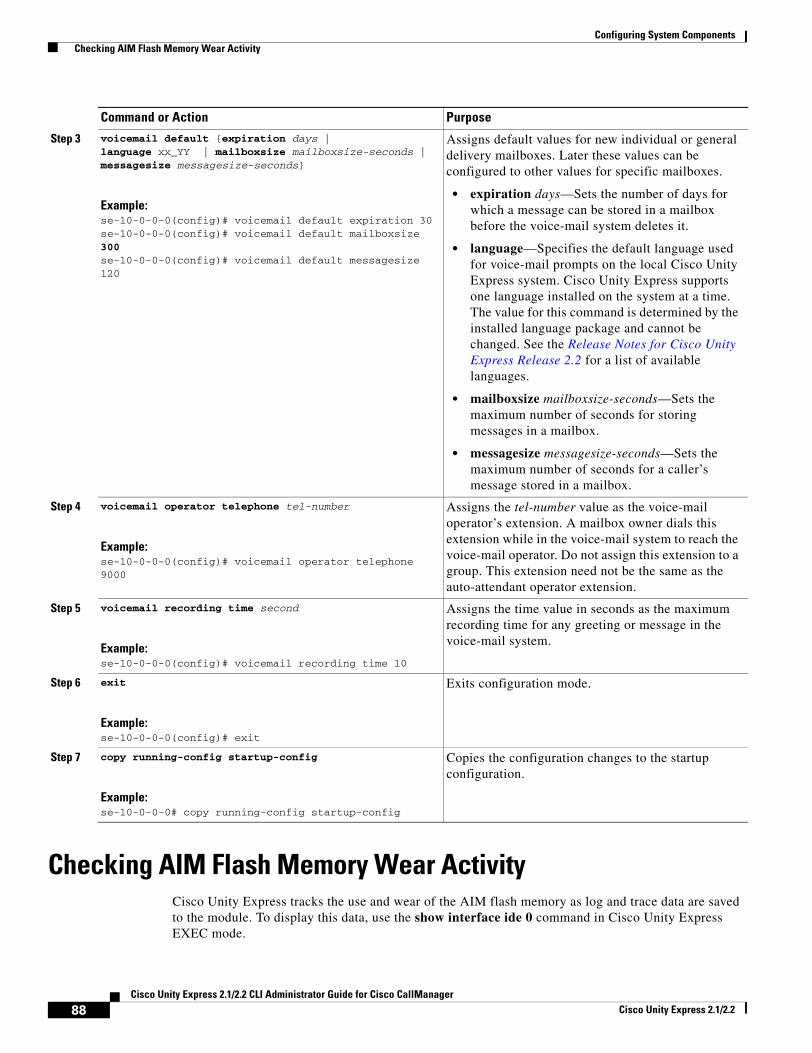
Configuring System Components Checking AIM Flash Memory Wear Activity
Checking AIM Flash Memory Wear ActivityCisco Unity Express tracks the use and wear of the AIM flash memory as log and trace data are saved to the module. To display this data, use the show interface ide 0 command in Cisco Unity Express EXEC mode.
Step 3 voicemail default {expiration days | language xx_YY | mailboxsize mailboxsize-seconds | messagesize messagesize-seconds}
Example:se-10-0-0-0(config)# voicemail default expiration 30se-10-0-0-0(config)# voicemail default mailboxsize 300se-10-0-0-0(config)# voicemail default messagesize 120
Assigns default values for new individual or general delivery mailboxes. Later these values can be configured to other values for specific mailboxes.
• expiration days—Sets the number of days for which a message can be stored in a mailbox before the voice-mail system deletes it.
• language—Specifies the default language used for voice-mail prompts on the local Cisco Unity Express system. Cisco Unity Express supports one language installed on the system at a time. The value for this command is determined by the installed language package and cannot be changed. See the Release Notes for Cisco Unity Express Release 2.2 for a list of available languages.
• mailboxsize mailboxsize-seconds—Sets the maximum number of seconds for storing messages in a mailbox.
• messagesize messagesize-seconds—Sets the maximum number of seconds for a caller’s message stored in a mailbox.
Step 4 voicemail operator telephone tel-number
Example:se-10-0-0-0(config)# voicemail operator telephone 9000
Assigns the tel-number value as the voice-mail operator’s extension. A mailbox owner dials this extension while in the voice-mail system to reach the voice-mail operator. Do not assign this extension to a group. This extension need not be the same as the auto-attendant operator extension.
Step 5 voicemail recording time second
Example:se-10-0-0-0(config)# voicemail recording time 10
Assigns the time value in seconds as the maximum recording time for any greeting or message in the voice-mail system.
Step 6 exit
Example:se-10-0-0-0(config)# exit
Exits configuration mode.
Step 7 copy running-config startup-config
Example:se-10-0-0-0# copy running-config startup-config
Copies the configuration changes to the startup configuration.
Command or Action Purpose
88Cisco Unity Express 2.1/2.2 CLI Administrator Guide for Cisco CallManager
Cisco Unity Express 2.1/2.2
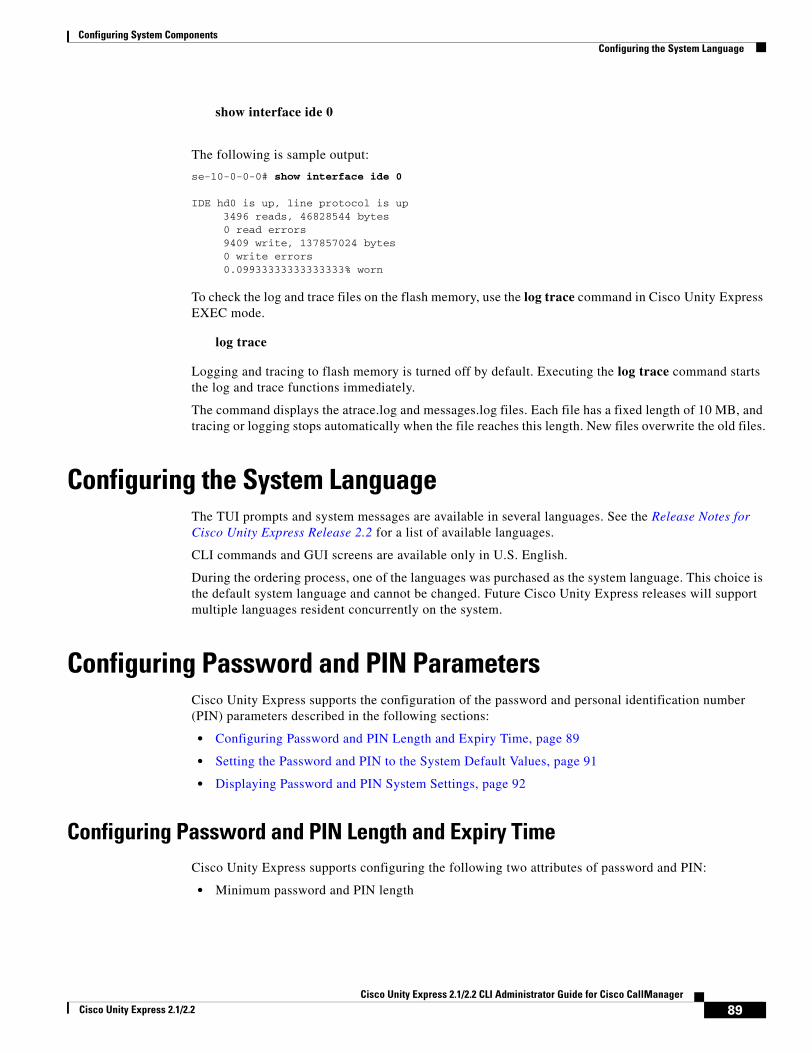
Configuring System Components Configuring the System Language
show interface ide 0
The following is sample output:
se-10-0-0-0# show interface ide 0
IDE hd0 is up, line protocol is up 3496 reads, 46828544 bytes 0 read errors 9409 write, 137857024 bytes 0 write errors
0.09933333333333333% worn
To check the log and trace files on the flash memory, use the log trace command in Cisco Unity Express EXEC mode.
log trace
Logging and tracing to flash memory is turned off by default. Executing the log trace command starts the log and trace functions immediately.
The command displays the atrace.log and messages.log files. Each file has a fixed length of 10 MB, and tracing or logging stops automatically when the file reaches this length. New files overwrite the old files.
Configuring the System LanguageThe TUI prompts and system messages are available in several languages. See the Release Notes for Cisco Unity Express Release 2.2 for a list of available languages.
CLI commands and GUI screens are available only in U.S. English.
During the ordering process, one of the languages was purchased as the system language. This choice is the default system language and cannot be changed. Future Cisco Unity Express releases will support multiple languages resident concurrently on the system.
Configuring Password and PIN ParametersCisco Unity Express supports the configuration of the password and personal identification number (PIN) parameters described in the following sections:
• Configuring Password and PIN Length and Expiry Time, page 89
• Setting the Password and PIN to the System Default Values, page 91
• Displaying Password and PIN System Settings, page 92
Configuring Password and PIN Length and Expiry TimeCisco Unity Express supports configuring the following two attributes of password and PIN:
• Minimum password and PIN length
89Cisco Unity Express 2.1/2.2 CLI Administrator Guide for Cisco CallManager
Cisco Unity Express 2.1/2.2

Configuring System Components Configuring Password and PIN Parameters
To support enhanced security procedures, Cisco Unity Express has made the password and PIN length configurable. The administrator can configure the length to a value greater than or equal to 3 alphanumeric characters. This is a system-wide value, so that all users must have passwords and PINs of at least that many characters. Use the GUI Defaults > User option or the procedure described below to configure this length.
The password length does not have to equal the PIN length.
The default length is 3 alphanumeric characters. The maximum password length is 32 alphanumeric characters. The maximum PIN length is 16 alphanumeric characters.
• Minimum password and PIN expiry time
Cisco Unity Express permits the administrator to configure the password and PIN expiry time on a system-wide basis. The expiry time is the time, in days, for which the password and PIN are valid. When this time is reached, the user must enter a new password or PIN.
If this option is not configured, passwords and PINs do not expire.
Use the GUI Defaults > User option or the procedure described below to configure this time.
The password expiry time does not have to equal the PIN expiry time.
The minimum time is 3 days. The maximum time is 365 days.
Prerequisites
The following information is required to configure the password and PIN lengths and expiry times:
• Password length and expiry time
• PIN length and expiry time
SUMMARY STEPS
• config t
• security password length min password-length
• security pin length min pin-length
• security password expiry days password-days
• security pin expiry days pin-days
• exit
DETAILED STEPS
Command or Action Purpose
Step 1 config t
Example:se-10-0-0-0# config tse-10-0-0-0(config)#
Enters configuration mode.
Step 2 security password length min password-length
Example:se-10-0-0-0(config)# security password length min 5
Specifies the length of all users’ passwords. The default minimum value is 3; the maximum value is 32.
90Cisco Unity Express 2.1/2.2 CLI Administrator Guide for Cisco CallManager
Cisco Unity Express 2.1/2.2
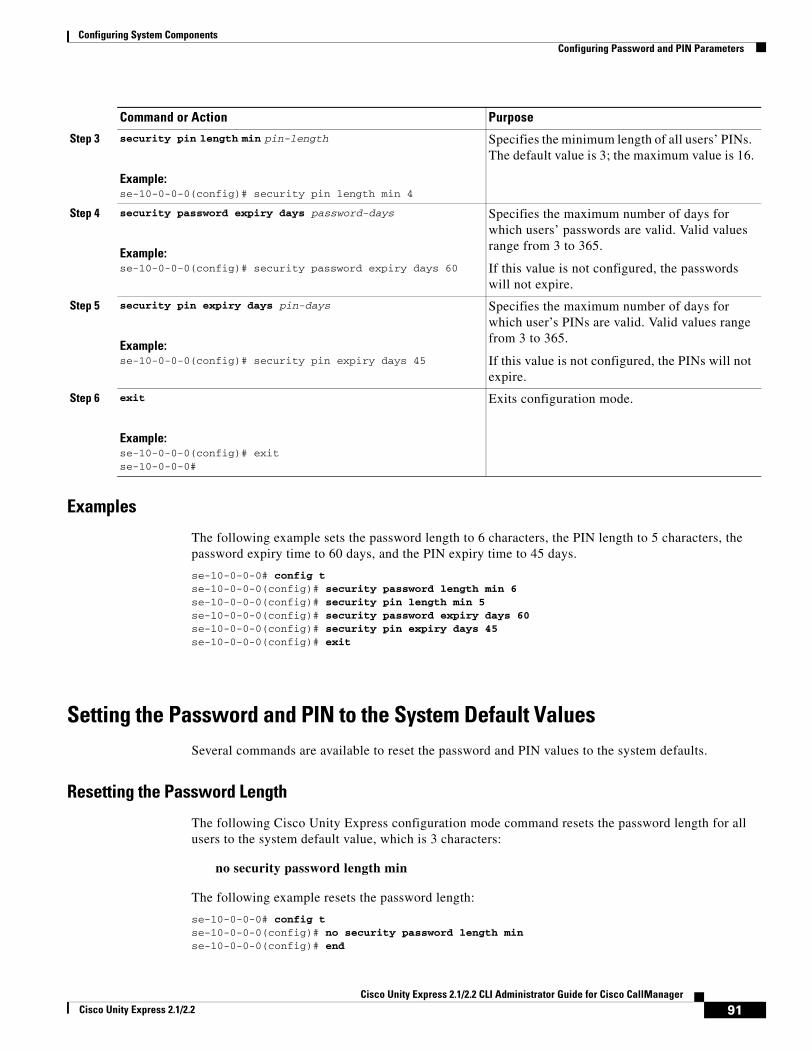
Configuring System Components Configuring Password and PIN Parameters
Examples
The following example sets the password length to 6 characters, the PIN length to 5 characters, the password expiry time to 60 days, and the PIN expiry time to 45 days.
se-10-0-0-0# config tse-10-0-0-0(config)# security password length min 6se-10-0-0-0(config)# security pin length min 5se-10-0-0-0(config)# security password expiry days 60se-10-0-0-0(config)# security pin expiry days 45se-10-0-0-0(config)# exit
Setting the Password and PIN to the System Default ValuesSeveral commands are available to reset the password and PIN values to the system defaults.
Resetting the Password Length
The following Cisco Unity Express configuration mode command resets the password length for all users to the system default value, which is 3 characters:
no security password length min
The following example resets the password length:
se-10-0-0-0# config tse-10-0-0-0(config)# no security password length minse-10-0-0-0(config)# end
Step 3 security pin length min pin-length
Example:se-10-0-0-0(config)# security pin length min 4
Specifies the minimum length of all users’ PINs. The default value is 3; the maximum value is 16.
Step 4 security password expiry days password-days
Example:se-10-0-0-0(config)# security password expiry days 60
Specifies the maximum number of days for which users’ passwords are valid. Valid values range from 3 to 365.
If this value is not configured, the passwords will not expire.
Step 5 security pin expiry days pin-days
Example:se-10-0-0-0(config)# security pin expiry days 45
Specifies the maximum number of days for which user’s PINs are valid. Valid values range from 3 to 365.
If this value is not configured, the PINs will not expire.
Step 6 exit
Example:se-10-0-0-0(config)# exitse-10-0-0-0#
Exits configuration mode.
Command or Action Purpose
91Cisco Unity Express 2.1/2.2 CLI Administrator Guide for Cisco CallManager
Cisco Unity Express 2.1/2.2
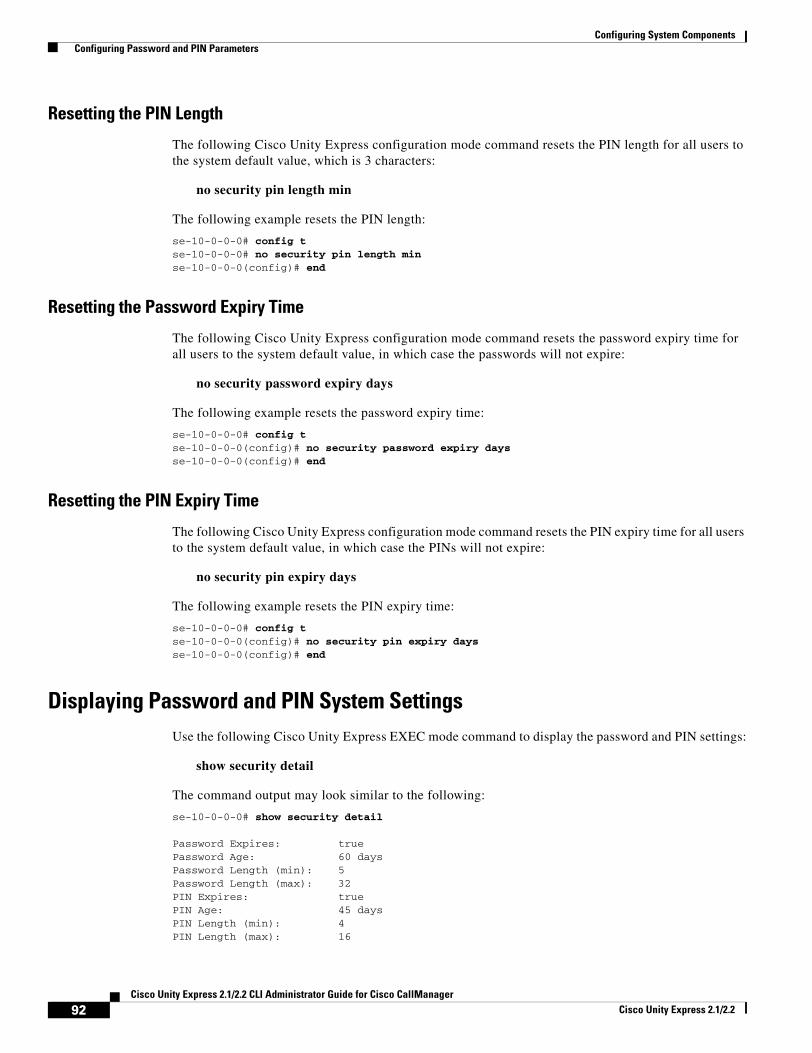
Configuring System Components Configuring Password and PIN Parameters
Resetting the PIN Length
The following Cisco Unity Express configuration mode command resets the PIN length for all users to the system default value, which is 3 characters:
no security pin length min
The following example resets the PIN length:
se-10-0-0-0# config tse-10-0-0-0# no security pin length minse-10-0-0-0(config)# end
Resetting the Password Expiry Time
The following Cisco Unity Express configuration mode command resets the password expiry time for all users to the system default value, in which case the passwords will not expire:
no security password expiry days
The following example resets the password expiry time:
se-10-0-0-0# config tse-10-0-0-0(config)# no security password expiry daysse-10-0-0-0(config)# end
Resetting the PIN Expiry Time
The following Cisco Unity Express configuration mode command resets the PIN expiry time for all users to the system default value, in which case the PINs will not expire:
no security pin expiry days
The following example resets the PIN expiry time:
se-10-0-0-0# config tse-10-0-0-0(config)# no security pin expiry daysse-10-0-0-0(config)# end
Displaying Password and PIN System SettingsUse the following Cisco Unity Express EXEC mode command to display the password and PIN settings:
show security detail
The command output may look similar to the following:
se-10-0-0-0# show security detail
Password Expires: truePassword Age: 60 daysPassword Length (min): 5Password Length (max): 32PIN Expires: truePIN Age: 45 daysPIN Length (min): 4PIN Length (max): 16
92Cisco Unity Express 2.1/2.2 CLI Administrator Guide for Cisco CallManager
Cisco Unity Express 2.1/2.2
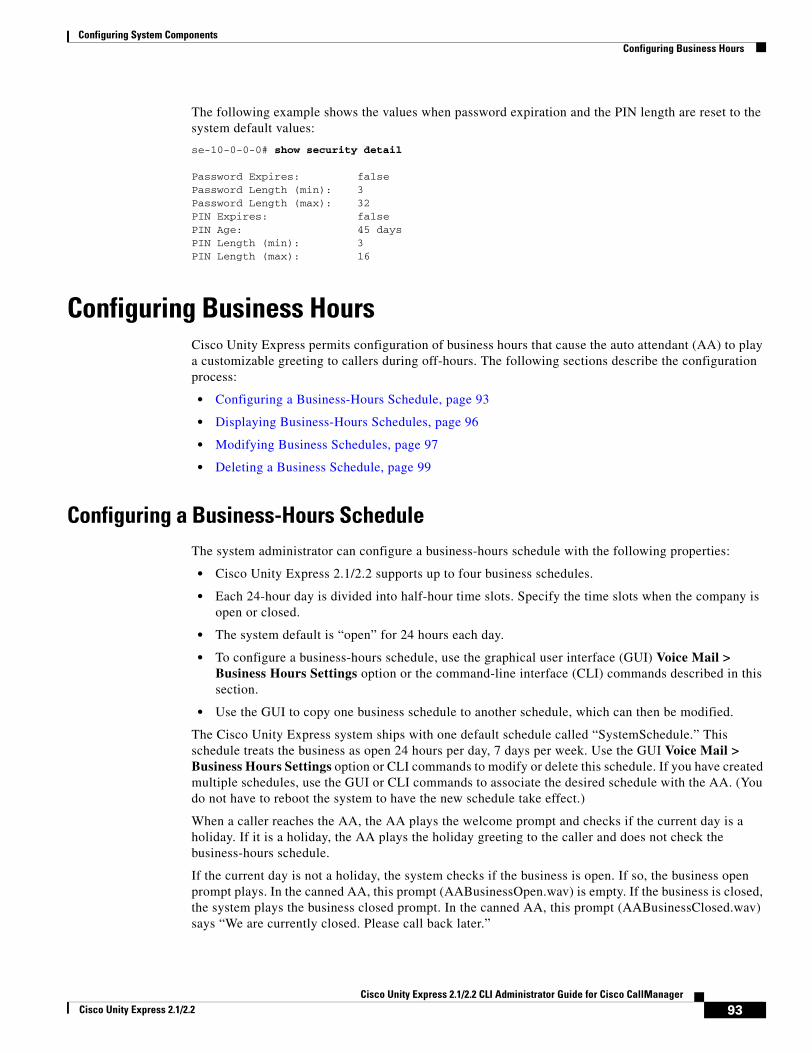
Configuring System Components Configuring Business Hours
The following example shows the values when password expiration and the PIN length are reset to the system default values:
se-10-0-0-0# show security detail
Password Expires: falsePassword Length (min): 3Password Length (max): 32PIN Expires: falsePIN Age: 45 daysPIN Length (min): 3PIN Length (max): 16
Configuring Business HoursCisco Unity Express permits configuration of business hours that cause the auto attendant (AA) to play a customizable greeting to callers during off-hours. The following sections describe the configuration process:
• Configuring a Business-Hours Schedule, page 93
• Displaying Business-Hours Schedules, page 96
• Modifying Business Schedules, page 97
• Deleting a Business Schedule, page 99
Configuring a Business-Hours ScheduleThe system administrator can configure a business-hours schedule with the following properties:
• Cisco Unity Express 2.1/2.2 supports up to four business schedules.
• Each 24-hour day is divided into half-hour time slots. Specify the time slots when the company is open or closed.
• The system default is “open” for 24 hours each day.
• To configure a business-hours schedule, use the graphical user interface (GUI) Voice Mail > Business Hours Settings option or the command-line interface (CLI) commands described in this section.
• Use the GUI to copy one business schedule to another schedule, which can then be modified.
The Cisco Unity Express system ships with one default schedule called “SystemSchedule.” This schedule treats the business as open 24 hours per day, 7 days per week. Use the GUI Voice Mail > Business Hours Settings option or CLI commands to modify or delete this schedule. If you have created multiple schedules, use the GUI or CLI commands to associate the desired schedule with the AA. (You do not have to reboot the system to have the new schedule take effect.)
When a caller reaches the AA, the AA plays the welcome prompt and checks if the current day is a holiday. If it is a holiday, the AA plays the holiday greeting to the caller and does not check the business-hours schedule.
If the current day is not a holiday, the system checks if the business is open. If so, the business open prompt plays. In the canned AA, this prompt (AABusinessOpen.wav) is empty. If the business is closed, the system plays the business closed prompt. In the canned AA, this prompt (AABusinessClosed.wav) says “We are currently closed. Please call back later.”
93Cisco Unity Express 2.1/2.2 CLI Administrator Guide for Cisco CallManager
Cisco Unity Express 2.1/2.2
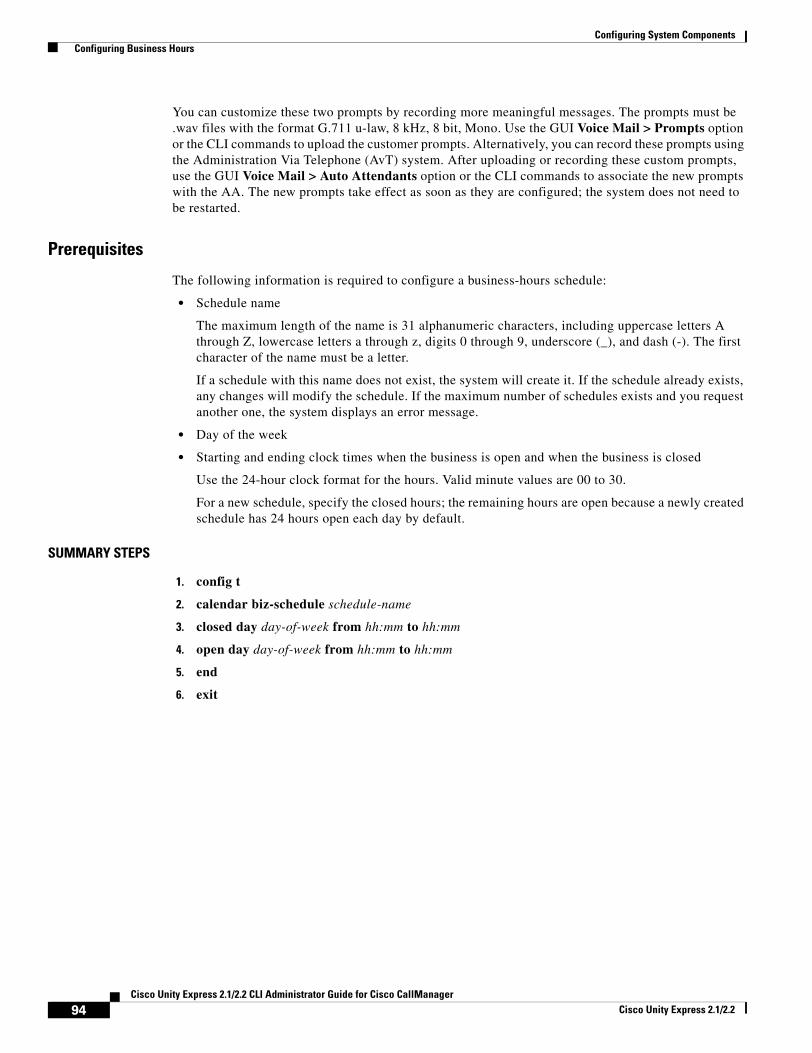
Configuring System Components Configuring Business Hours
You can customize these two prompts by recording more meaningful messages. The prompts must be .wav files with the format G.711 u-law, 8 kHz, 8 bit, Mono. Use the GUI Voice Mail > Prompts option or the CLI commands to upload the customer prompts. Alternatively, you can record these prompts using the Administration Via Telephone (AvT) system. After uploading or recording these custom prompts, use the GUI Voice Mail > Auto Attendants option or the CLI commands to associate the new prompts with the AA. The new prompts take effect as soon as they are configured; the system does not need to be restarted.
Prerequisites
The following information is required to configure a business-hours schedule:
• Schedule name
The maximum length of the name is 31 alphanumeric characters, including uppercase letters A through Z, lowercase letters a through z, digits 0 through 9, underscore (_), and dash (-). The first character of the name must be a letter.
If a schedule with this name does not exist, the system will create it. If the schedule already exists, any changes will modify the schedule. If the maximum number of schedules exists and you request another one, the system displays an error message.
• Day of the week
• Starting and ending clock times when the business is open and when the business is closed
Use the 24-hour clock format for the hours. Valid minute values are 00 to 30.
For a new schedule, specify the closed hours; the remaining hours are open because a newly created schedule has 24 hours open each day by default.
SUMMARY STEPS
1. config t
2. calendar biz-schedule schedule-name
3. closed day day-of-week from hh:mm to hh:mm
4. open day day-of-week from hh:mm to hh:mm
5. end
6. exit
94Cisco Unity Express 2.1/2.2 CLI Administrator Guide for Cisco CallManager
Cisco Unity Express 2.1/2.2
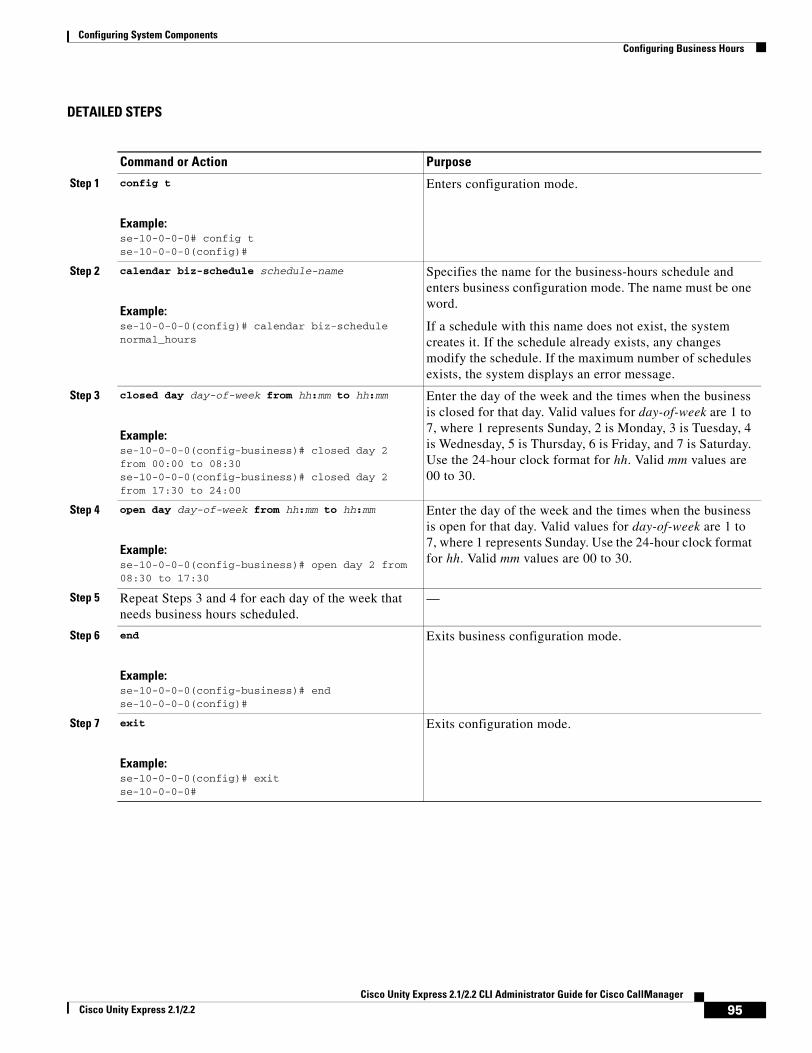
Configuring System Components Configuring Business Hours
DETAILED STEPS
Command or Action Purpose
Step 1 config t
Example:se-10-0-0-0# config tse-10-0-0-0(config)#
Enters configuration mode.
Step 2 calendar biz-schedule schedule-name
Example:se-10-0-0-0(config)# calendar biz-schedule normal_hours
Specifies the name for the business-hours schedule and enters business configuration mode. The name must be one word.
If a schedule with this name does not exist, the system creates it. If the schedule already exists, any changes modify the schedule. If the maximum number of schedules exists, the system displays an error message.
Step 3 closed day day-of-week from hh:mm to hh:mm
Example:se-10-0-0-0(config-business)# closed day 2 from 00:00 to 08:30se-10-0-0-0(config-business)# closed day 2 from 17:30 to 24:00
Enter the day of the week and the times when the business is closed for that day. Valid values for day-of-week are 1 to 7, where 1 represents Sunday, 2 is Monday, 3 is Tuesday, 4 is Wednesday, 5 is Thursday, 6 is Friday, and 7 is Saturday. Use the 24-hour clock format for hh. Valid mm values are 00 to 30.
Step 4 open day day-of-week from hh:mm to hh:mm
Example:se-10-0-0-0(config-business)# open day 2 from 08:30 to 17:30
Enter the day of the week and the times when the business is open for that day. Valid values for day-of-week are 1 to 7, where 1 represents Sunday. Use the 24-hour clock format for hh. Valid mm values are 00 to 30.
Step 5 Repeat Steps 3 and 4 for each day of the week that needs business hours scheduled.
—
Step 6 end
Example:se-10-0-0-0(config-business)# endse-10-0-0-0(config)#
Exits business configuration mode.
Step 7 exit
Example:se-10-0-0-0(config)# exitse-10-0-0-0#
Exits configuration mode.
95Cisco Unity Express 2.1/2.2 CLI Administrator Guide for Cisco CallManager
Cisco Unity Express 2.1/2.2
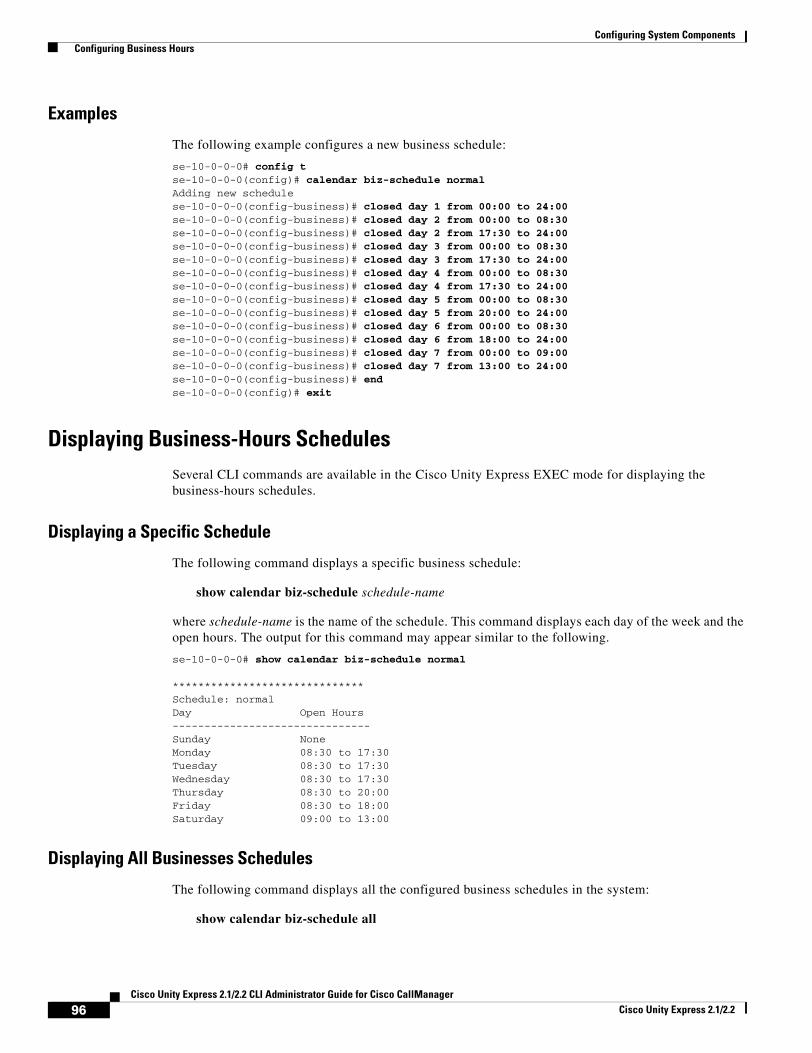
Configuring System Components Configuring Business Hours
Examples
The following example configures a new business schedule:
se-10-0-0-0# config tse-10-0-0-0(config)# calendar biz-schedule normalAdding new schedulese-10-0-0-0(config-business)# closed day 1 from 00:00 to 24:00se-10-0-0-0(config-business)# closed day 2 from 00:00 to 08:30se-10-0-0-0(config-business)# closed day 2 from 17:30 to 24:00se-10-0-0-0(config-business)# closed day 3 from 00:00 to 08:30se-10-0-0-0(config-business)# closed day 3 from 17:30 to 24:00se-10-0-0-0(config-business)# closed day 4 from 00:00 to 08:30se-10-0-0-0(config-business)# closed day 4 from 17:30 to 24:00se-10-0-0-0(config-business)# closed day 5 from 00:00 to 08:30se-10-0-0-0(config-business)# closed day 5 from 20:00 to 24:00se-10-0-0-0(config-business)# closed day 6 from 00:00 to 08:30se-10-0-0-0(config-business)# closed day 6 from 18:00 to 24:00se-10-0-0-0(config-business)# closed day 7 from 00:00 to 09:00se-10-0-0-0(config-business)# closed day 7 from 13:00 to 24:00se-10-0-0-0(config-business)# endse-10-0-0-0(config)# exit
Displaying Business-Hours SchedulesSeveral CLI commands are available in the Cisco Unity Express EXEC mode for displaying the business-hours schedules.
Displaying a Specific Schedule
The following command displays a specific business schedule:
show calendar biz-schedule schedule-name
where schedule-name is the name of the schedule. This command displays each day of the week and the open hours. The output for this command may appear similar to the following.
se-10-0-0-0# show calendar biz-schedule normal
******************************Schedule: normalDay Open Hours-------------------------------Sunday NoneMonday 08:30 to 17:30Tuesday 08:30 to 17:30Wednesday 08:30 to 17:30Thursday 08:30 to 20:00Friday 08:30 to 18:00Saturday 09:00 to 13:00
Displaying All Businesses Schedules
The following command displays all the configured business schedules in the system:
show calendar biz-schedule all
96Cisco Unity Express 2.1/2.2 CLI Administrator Guide for Cisco CallManager
Cisco Unity Express 2.1/2.2
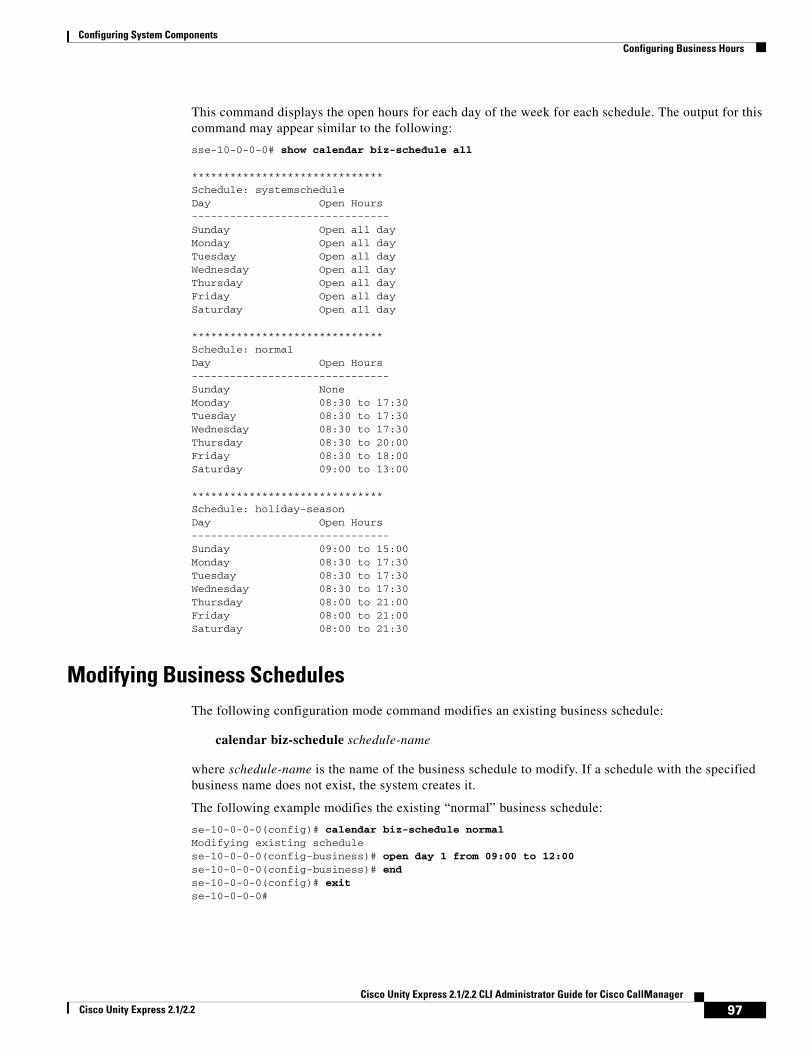
Configuring System Components Configuring Business Hours
This command displays the open hours for each day of the week for each schedule. The output for this command may appear similar to the following:
sse-10-0-0-0# show calendar biz-schedule all
******************************Schedule: systemscheduleDay Open Hours-------------------------------Sunday Open all dayMonday Open all dayTuesday Open all dayWednesday Open all dayThursday Open all dayFriday Open all daySaturday Open all day
******************************Schedule: normalDay Open Hours-------------------------------Sunday NoneMonday 08:30 to 17:30Tuesday 08:30 to 17:30Wednesday 08:30 to 17:30Thursday 08:30 to 20:00Friday 08:30 to 18:00Saturday 09:00 to 13:00
******************************Schedule: holiday-seasonDay Open Hours-------------------------------Sunday 09:00 to 15:00Monday 08:30 to 17:30Tuesday 08:30 to 17:30Wednesday 08:30 to 17:30Thursday 08:00 to 21:00Friday 08:00 to 21:00Saturday 08:00 to 21:30
Modifying Business SchedulesThe following configuration mode command modifies an existing business schedule:
calendar biz-schedule schedule-name
where schedule-name is the name of the business schedule to modify. If a schedule with the specified business name does not exist, the system creates it.
The following example modifies the existing “normal” business schedule:
se-10-0-0-0(config)# calendar biz-schedule normalModifying existing schedulese-10-0-0-0(config-business)# open day 1 from 09:00 to 12:00se-10-0-0-0(config-business)# endse-10-0-0-0(config)# exitse-10-0-0-0#
97Cisco Unity Express 2.1/2.2 CLI Administrator Guide for Cisco CallManager
Cisco Unity Express 2.1/2.2
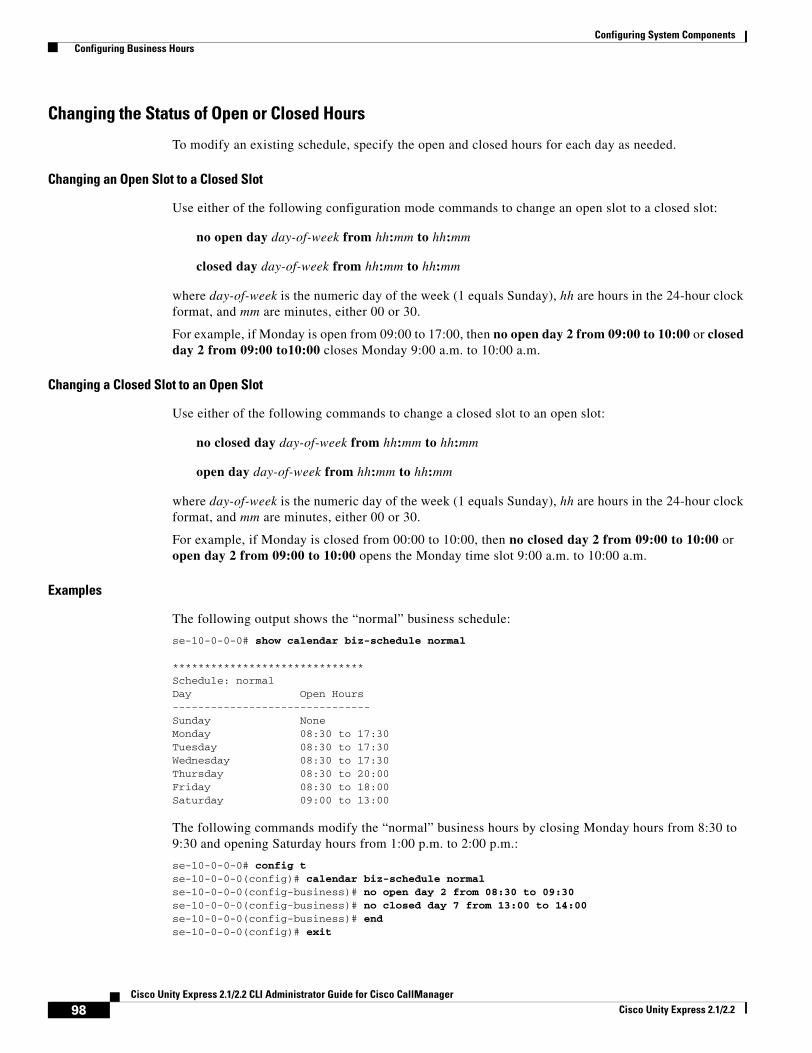
Configuring System Components Configuring Business Hours
Changing the Status of Open or Closed Hours
To modify an existing schedule, specify the open and closed hours for each day as needed.
Changing an Open Slot to a Closed Slot
Use either of the following configuration mode commands to change an open slot to a closed slot:
no open day day-of-week from hh:mm to hh:mm
closed day day-of-week from hh:mm to hh:mm
where day-of-week is the numeric day of the week (1 equals Sunday), hh are hours in the 24-hour clock format, and mm are minutes, either 00 or 30.
For example, if Monday is open from 09:00 to 17:00, then no open day 2 from 09:00 to 10:00 or closed day 2 from 09:00 to10:00 closes Monday 9:00 a.m. to 10:00 a.m.
Changing a Closed Slot to an Open Slot
Use either of the following commands to change a closed slot to an open slot:
no closed day day-of-week from hh:mm to hh:mm
open day day-of-week from hh:mm to hh:mm
where day-of-week is the numeric day of the week (1 equals Sunday), hh are hours in the 24-hour clock format, and mm are minutes, either 00 or 30.
For example, if Monday is closed from 00:00 to 10:00, then no closed day 2 from 09:00 to 10:00 or open day 2 from 09:00 to 10:00 opens the Monday time slot 9:00 a.m. to 10:00 a.m.
Examples
The following output shows the “normal” business schedule:
se-10-0-0-0# show calendar biz-schedule normal
******************************Schedule: normalDay Open Hours-------------------------------Sunday NoneMonday 08:30 to 17:30Tuesday 08:30 to 17:30Wednesday 08:30 to 17:30Thursday 08:30 to 20:00Friday 08:30 to 18:00Saturday 09:00 to 13:00
The following commands modify the “normal” business hours by closing Monday hours from 8:30 to 9:30 and opening Saturday hours from 1:00 p.m. to 2:00 p.m.:
se-10-0-0-0# config tse-10-0-0-0(config)# calendar biz-schedule normalse-10-0-0-0(config-business)# no open day 2 from 08:30 to 09:30se-10-0-0-0(config-business)# no closed day 7 from 13:00 to 14:00se-10-0-0-0(config-business)# endse-10-0-0-0(config)# exit
98Cisco Unity Express 2.1/2.2 CLI Administrator Guide for Cisco CallManager
Cisco Unity Express 2.1/2.2
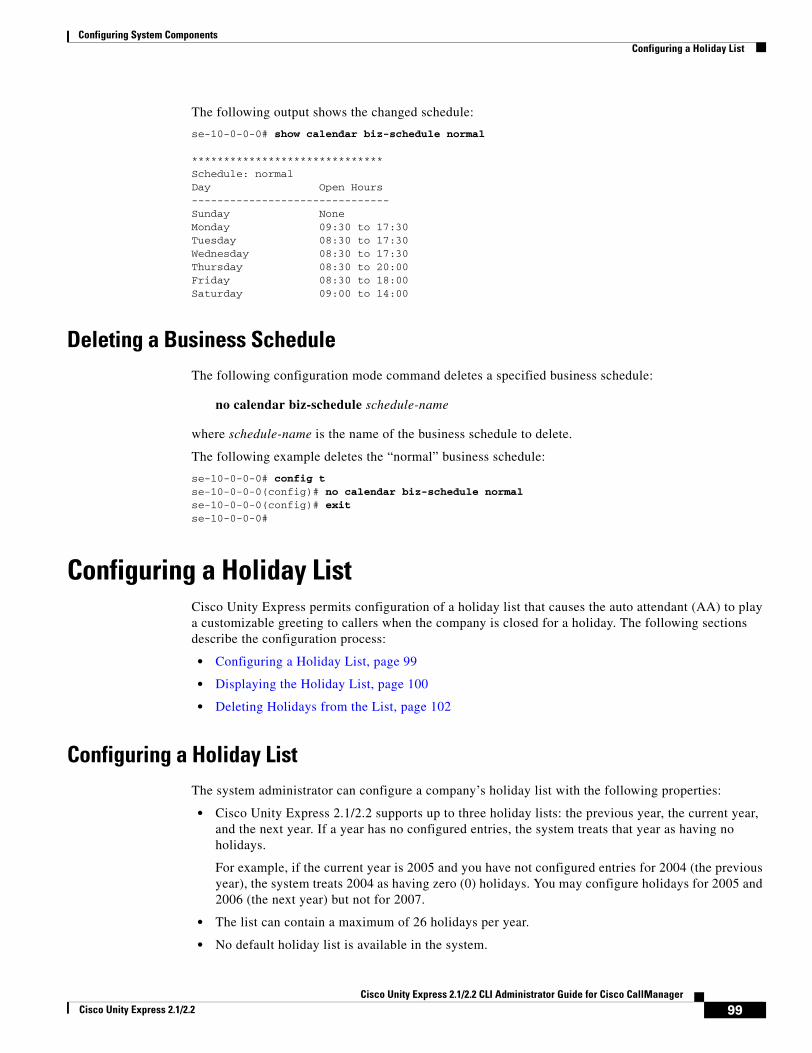
Configuring System Components Configuring a Holiday List
The following output shows the changed schedule:
se-10-0-0-0# show calendar biz-schedule normal
******************************Schedule: normalDay Open Hours-------------------------------Sunday NoneMonday 09:30 to 17:30Tuesday 08:30 to 17:30Wednesday 08:30 to 17:30Thursday 08:30 to 20:00Friday 08:30 to 18:00Saturday 09:00 to 14:00
Deleting a Business ScheduleThe following configuration mode command deletes a specified business schedule:
no calendar biz-schedule schedule-name
where schedule-name is the name of the business schedule to delete.
The following example deletes the “normal” business schedule:
se-10-0-0-0# config tse-10-0-0-0(config)# no calendar biz-schedule normalse-10-0-0-0(config)# exitse-10-0-0-0#
Configuring a Holiday ListCisco Unity Express permits configuration of a holiday list that causes the auto attendant (AA) to play a customizable greeting to callers when the company is closed for a holiday. The following sections describe the configuration process:
• Configuring a Holiday List, page 99
• Displaying the Holiday List, page 100
• Deleting Holidays from the List, page 102
Configuring a Holiday ListThe system administrator can configure a company’s holiday list with the following properties:
• Cisco Unity Express 2.1/2.2 supports up to three holiday lists: the previous year, the current year, and the next year. If a year has no configured entries, the system treats that year as having no holidays.
For example, if the current year is 2005 and you have not configured entries for 2004 (the previous year), the system treats 2004 as having zero (0) holidays. You may configure holidays for 2005 and 2006 (the next year) but not for 2007.
• The list can contain a maximum of 26 holidays per year.
• No default holiday list is available in the system.
99Cisco Unity Express 2.1/2.2 CLI Administrator Guide for Cisco CallManager
Cisco Unity Express 2.1/2.2
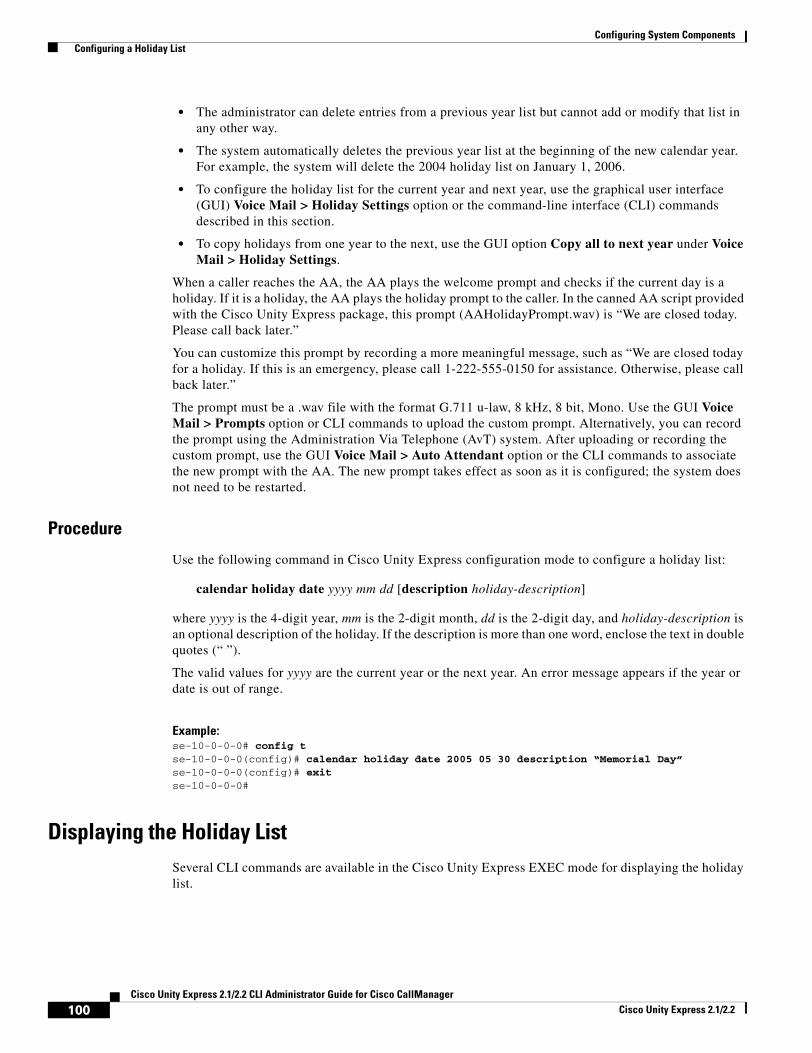
Configuring System Components Configuring a Holiday List
• The administrator can delete entries from a previous year list but cannot add or modify that list in any other way.
• The system automatically deletes the previous year list at the beginning of the new calendar year. For example, the system will delete the 2004 holiday list on January 1, 2006.
• To configure the holiday list for the current year and next year, use the graphical user interface (GUI) Voice Mail > Holiday Settings option or the command-line interface (CLI) commands described in this section.
• To copy holidays from one year to the next, use the GUI option Copy all to next year under Voice Mail > Holiday Settings.
When a caller reaches the AA, the AA plays the welcome prompt and checks if the current day is a holiday. If it is a holiday, the AA plays the holiday prompt to the caller. In the canned AA script provided with the Cisco Unity Express package, this prompt (AAHolidayPrompt.wav) is “We are closed today. Please call back later.”
You can customize this prompt by recording a more meaningful message, such as “We are closed today for a holiday. If this is an emergency, please call 1-222-555-0150 for assistance. Otherwise, please call back later.”
The prompt must be a .wav file with the format G.711 u-law, 8 kHz, 8 bit, Mono. Use the GUI Voice Mail > Prompts option or CLI commands to upload the custom prompt. Alternatively, you can record the prompt using the Administration Via Telephone (AvT) system. After uploading or recording the custom prompt, use the GUI Voice Mail > Auto Attendant option or the CLI commands to associate the new prompt with the AA. The new prompt takes effect as soon as it is configured; the system does not need to be restarted.
Procedure
Use the following command in Cisco Unity Express configuration mode to configure a holiday list:
calendar holiday date yyyy mm dd [description holiday-description]
where yyyy is the 4-digit year, mm is the 2-digit month, dd is the 2-digit day, and holiday-description is an optional description of the holiday. If the description is more than one word, enclose the text in double quotes (“ ”).
The valid values for yyyy are the current year or the next year. An error message appears if the year or date is out of range.
Example:se-10-0-0-0# config tse-10-0-0-0(config)# calendar holiday date 2005 05 30 description “Memorial Day”se-10-0-0-0(config)# exitse-10-0-0-0#
Displaying the Holiday ListSeveral CLI commands are available in the Cisco Unity Express EXEC mode for displaying the holiday list.
100Cisco Unity Express 2.1/2.2 CLI Administrator Guide for Cisco CallManager
Cisco Unity Express 2.1/2.2
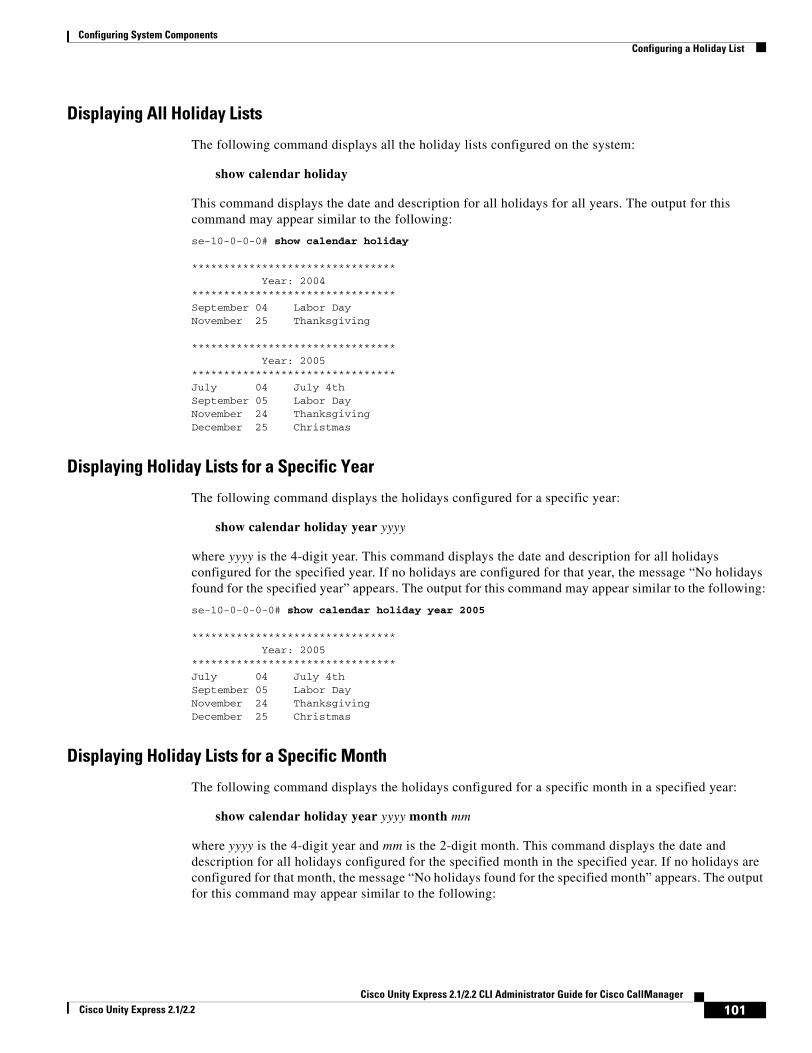
Configuring System Components Configuring a Holiday List
Displaying All Holiday Lists
The following command displays all the holiday lists configured on the system:
show calendar holiday
This command displays the date and description for all holidays for all years. The output for this command may appear similar to the following:
se-10-0-0-0# show calendar holiday
******************************** Year: 2004********************************September 04 Labor DayNovember 25 Thanksgiving
******************************** Year: 2005********************************July 04 July 4thSeptember 05 Labor DayNovember 24 ThanksgivingDecember 25 Christmas
Displaying Holiday Lists for a Specific Year
The following command displays the holidays configured for a specific year:
show calendar holiday year yyyy
where yyyy is the 4-digit year. This command displays the date and description for all holidays configured for the specified year. If no holidays are configured for that year, the message “No holidays found for the specified year” appears. The output for this command may appear similar to the following:
se-10-0-0-0-0# show calendar holiday year 2005
******************************** Year: 2005********************************July 04 July 4thSeptember 05 Labor DayNovember 24 ThanksgivingDecember 25 Christmas
Displaying Holiday Lists for a Specific Month
The following command displays the holidays configured for a specific month in a specified year:
show calendar holiday year yyyy month mm
where yyyy is the 4-digit year and mm is the 2-digit month. This command displays the date and description for all holidays configured for the specified month in the specified year. If no holidays are configured for that month, the message “No holidays found for the specified month” appears. The output for this command may appear similar to the following:
101Cisco Unity Express 2.1/2.2 CLI Administrator Guide for Cisco CallManager
Cisco Unity Express 2.1/2.2
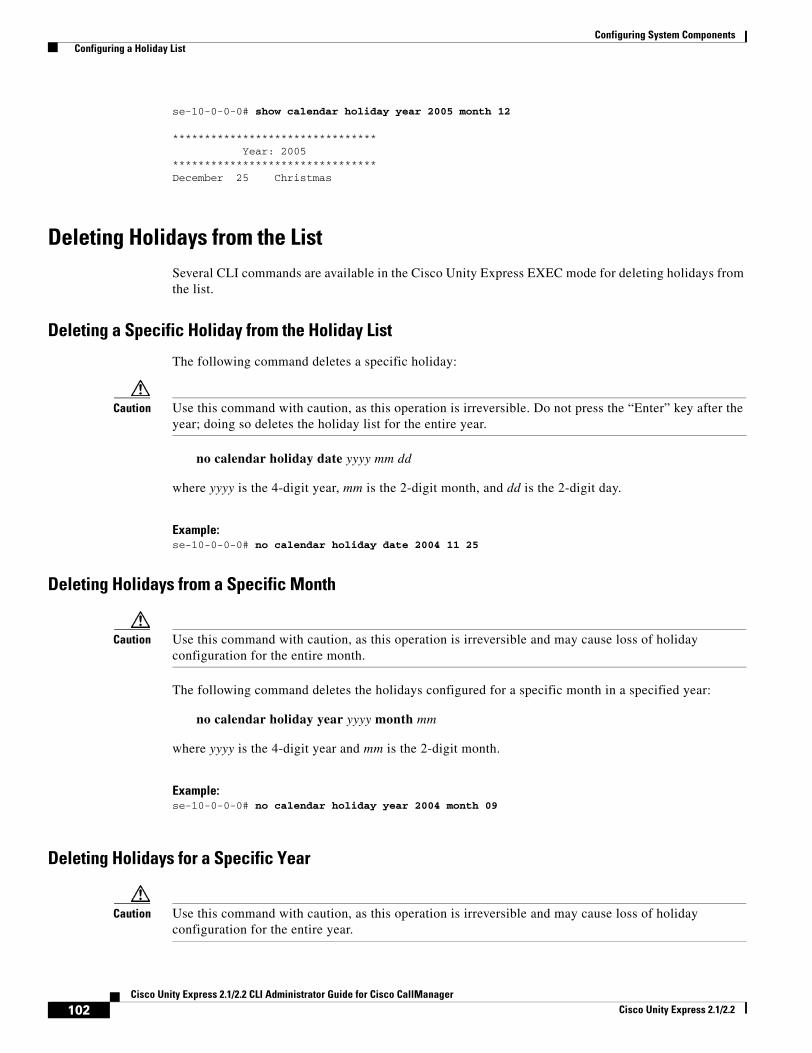
Configuring System Components Configuring a Holiday List
se-10-0-0-0# show calendar holiday year 2005 month 12
******************************** Year: 2005********************************December 25 Christmas
Deleting Holidays from the ListSeveral CLI commands are available in the Cisco Unity Express EXEC mode for deleting holidays from the list.
Deleting a Specific Holiday from the Holiday List
The following command deletes a specific holiday:
Caution Use this command with caution, as this operation is irreversible. Do not press the “Enter” key after the year; doing so deletes the holiday list for the entire year.
no calendar holiday date yyyy mm dd
where yyyy is the 4-digit year, mm is the 2-digit month, and dd is the 2-digit day.
Example:se-10-0-0-0# no calendar holiday date 2004 11 25
Deleting Holidays from a Specific Month
Caution Use this command with caution, as this operation is irreversible and may cause loss of holiday configuration for the entire month.
The following command deletes the holidays configured for a specific month in a specified year:
no calendar holiday year yyyy month mm
where yyyy is the 4-digit year and mm is the 2-digit month.
Example:se-10-0-0-0# no calendar holiday year 2004 month 09
Deleting Holidays for a Specific Year
Caution Use this command with caution, as this operation is irreversible and may cause loss of holiday configuration for the entire year.
102Cisco Unity Express 2.1/2.2 CLI Administrator Guide for Cisco CallManager
Cisco Unity Express 2.1/2.2

Configuring System Components Configuring a Holiday List
The following command deletes all the holidays configured for a specific year:
no calendar holiday year yyyy
where yyyy is the 4-digit year.
Example:se-10-0-0-0# no calendar holiday year 2004
103Cisco Unity Express 2.1/2.2 CLI Administrator Guide for Cisco CallManager
Cisco Unity Express 2.1/2.2

Configuring System Components Configuring a Holiday List
104Cisco Unity Express 2.1/2.2 CLI Administrator Guide for Cisco CallManager
Cisco Unity Express 2.1/2.2
Configuring Users, Groups, and Mailboxes
All configuration and administration functions for Cisco Unity Express are available through the graphical user interface (GUI). However, you may find that using the command-line interface (CLI) is more efficient than using the GUI. For example, you may want to create a script to configure a large number of users or mailboxes for a specific system. In this case, the CLI may be more useful.
This chapter describes the commands that emulate the following tasks available on the GUI and contains the following sections:
• Prerequisites, page 105
• Adding and Modifying a User, page 106
• Adding and Modifying a Group, page 112
• Creating and Modifying a Voice Mailbox, page 117
• Unlocking a Voice Mailbox, page 123
• Refreshing Message Waiting Indicators, page 124
PrerequisitesVerify that the telephones and extensions connected to the Cisco CallManager server are configured. If you have not completed the configuration, refer to the Cisco CallManager Administration Guide, Release 3.3(3).
105Cisco Unity Express 2.1/2.2 CLI Administrator Guide for Cisco CallManager
Cisco Unity Express 2.1/2.2
Configuring Users, Groups, and Mailboxes Adding and Modifying a User
Adding and Modifying a UserUsers configured with the Cisco CallManager GUI may be imported to the Cisco Unity Express database. Users configured with the Cisco Unity Express GUI or CLI are not copied to the Cisco CallManager database. If a user needs to be in the Cisco CallManager database but is configured in Cisco Unity Express, go back to Cisco CallManager later and configure the user there.
The procedure described in this section allows you to create a new user in the system. Use the same commands to modify an existing user’s properties.
Note To associate a telephone number with a user, you must configure the telephone before using this procedure. If you have not configured the telephone, refer to the Cisco CallManager documentation or the Cisco Unity Express GUI for the procedures.
Privilege Levels for UsersThe Cisco Unity Express software recognizes several privileges for users:
• Superuser—An administrator, also called a superuser, has the capability, or privilege, of accessing all the configuration and maintenance functions, including the Administration via Telephone (AvT).
• ManagePrompts—The prompt management user has access to the AvT but not to any other administrative functions.
• Broadcast—The broadcast privilege permits the user to send broadcast messages across the network.
• ManagePublicList—The ManagePublicList privilege permits the user to create and modify public distribution lists.
• ViewPrivateList—The ViewPrivateList privilege allows the user to view another user’s private distribution lists. The user can not modify or delete the private lists.
These privilege levels are assigned to a group, and any member of the group is granted the privilege rights. The software initialization process created an Administrator group from the imported users designated as administrators. Other groups can be created with these privileges. Assign users to an existing group using the CLI commands or the GUI option Configuration > Users.
To display the current list of privileges, use the show privileges command in Cisco Unity Express EXEC mode.
Users and MailboxesCisco Unity Express supports twice as many users as mailboxes. Some users, such as system administrators, may not be assigned a voice mailbox. The maximum number of mailboxes is determined by the license of the module. See “Software Licenses and Factory-Set Limits” on page 15 for the maximum number of mailboxes permitted for your module.
PrerequisitesThe following information is required for adding or modifying a user:
106Cisco Unity Express 2.1/2.2 CLI Administrator Guide for Cisco CallManager
Cisco Unity Express 2.1/2.2
Configuring Users, Groups, and Mailboxes Adding and Modifying a User
• Username—The user ID. The username must be at least 3 and no more than 32 characters in length. Cisco Unity Express allows only letters, numbers, and the characters underscore (_), dot (.), and dash (-) in user IDs. User IDs must start with a letter. Do not use spaces in the username.
• (Optional) Full name—First and last name of the user. Enter this name in quotation marks (“ ”).
• (Optional) Group—Name of an existing group in which this user is a member.
• Password—Temporary password for this user. The password must be at least 3 and no more than 32 characters in length. Spaces are not allowed. When the user logs in to the GUI for the first time, the application requires the user to change the password. The user’s password does not expire.
• PIN—Personal identification number. The PIN must be at least 3 and no more than 16 digits in length. When the user logs in to the voice-mail system for the first time, the application requires the user to change the PIN. The PIN does not expire.
SUMMARY STEPS
EXEC Mode:
1. username name [create | delete | fullname [first first-name | last last-name | display full-name] | group group-name | language | password “password” | pin number]
2. show users or show user detail username name
3. copy running-config startup-config
Configuration Mode:
1. config t
2. username name [create | phonenumber phone-number | phonenumberE164 full-number]
3. exit
4. show usersor show user detail username name
5. copy running-config startup-config
107Cisco Unity Express 2.1/2.2 CLI Administrator Guide for Cisco CallManager
Cisco Unity Express 2.1/2.2
Configuring Users, Groups, and Mailboxes Adding and Modifying a User
DETAILED STEPS
EXEC mode:
Command or Action Purpose
Step 1 username name [create | delete | fullname [first first-name | last last-name | display full-name] | group group-name | language | password “password” | pin number]
Example:se-10-0-0-0# username user1 createse-10-0-0-0# username user2 fullname display “User 2”se-10-0-0-0# username user2 group salesse-10-0-0-0# username user2 password “green”se-10-0-0-0# username user2 pin 4444se-10-0-0-0# username user2 delete
Creates the user with user ID name value. The optional parameters configure more information for the user:
• name—User ID of the user. The user ID must be at least 3 and no more than 32 characters in length. Cisco Unity Express allows only letters, numbers, and the characters underscore (_), dot (.), and dash (-) in user IDs. User IDs must start with a letter. Do not use spaces in the username.
• create—Creates the user with no other information.
• delete—Deletes an existing user.
• fullname—Specifies a full name for this user. This full name appears on telephone displays.
• group—Associates this user with an existing group.
• language—Specifies a language for this user. Cisco Unity Express supports only one language installed on the system. This option cannot be changed.
• password—Specifies a password for this user. The password value must be entered within quotation marks (“ ”). Spaces are not allowed. Acceptable password characters are lowercase letters a through z, uppercase letters A through Z, digits 0 through 9, and the following symbols: - , . + = _ ! @ # $ ^ * ( ) ? / ~ < > & %.
• pin—Specifies a personal identification number (PIN) for this user. The user enters this number from the telephone when accessing the voice-mail system. The PIN may contain a maximum number of 16 digits. The asterisk (*) and pound sign (#) may not be used.
108Cisco Unity Express 2.1/2.2 CLI Administrator Guide for Cisco CallManager
Cisco Unity Express 2.1/2.2
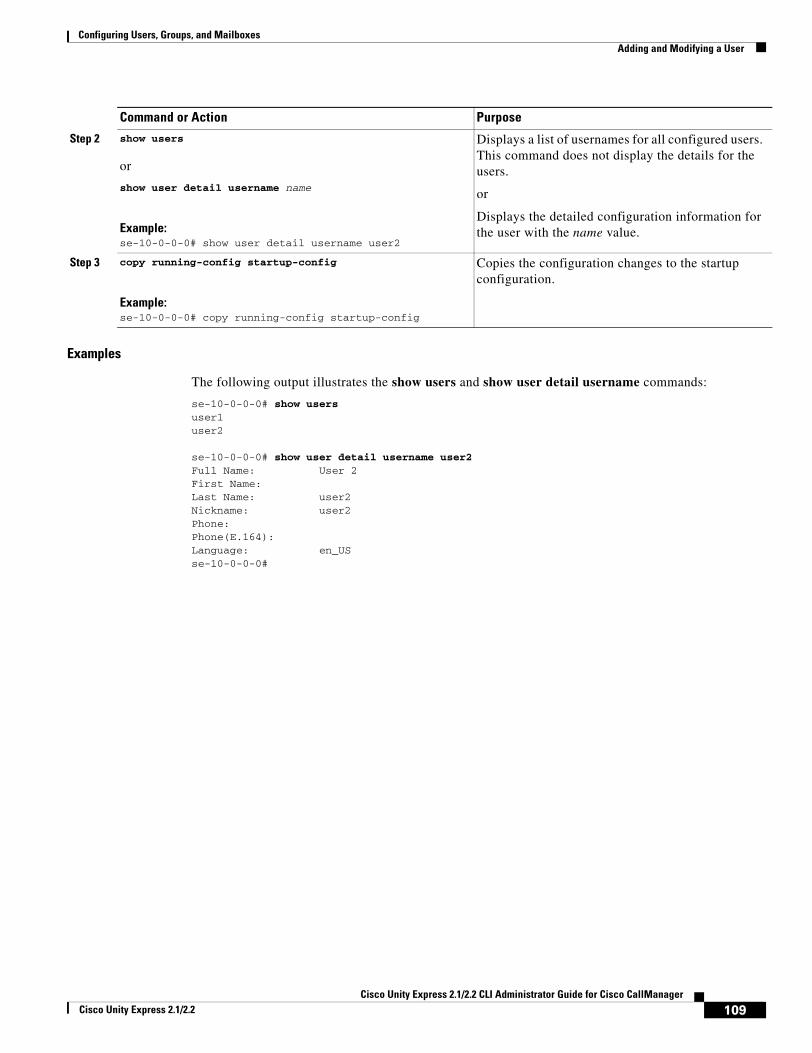
Configuring Users, Groups, and Mailboxes Adding and Modifying a User
Examples
The following output illustrates the show users and show user detail username commands:
se-10-0-0-0# show usersuser1user2
se-10-0-0-0# show user detail username user2Full Name: User 2First Name:Last Name: user2Nickname: user2Phone:Phone(E.164):Language: en_USse-10-0-0-0#
Step 2 show users
or
show user detail username name
Example:se-10-0-0-0# show user detail username user2
Displays a list of usernames for all configured users. This command does not display the details for the users.
or
Displays the detailed configuration information for the user with the name value.
Step 3 copy running-config startup-config
Example:se-10-0-0-0# copy running-config startup-config
Copies the configuration changes to the startup configuration.
Command or Action Purpose
109Cisco Unity Express 2.1/2.2 CLI Administrator Guide for Cisco CallManager
Cisco Unity Express 2.1/2.2
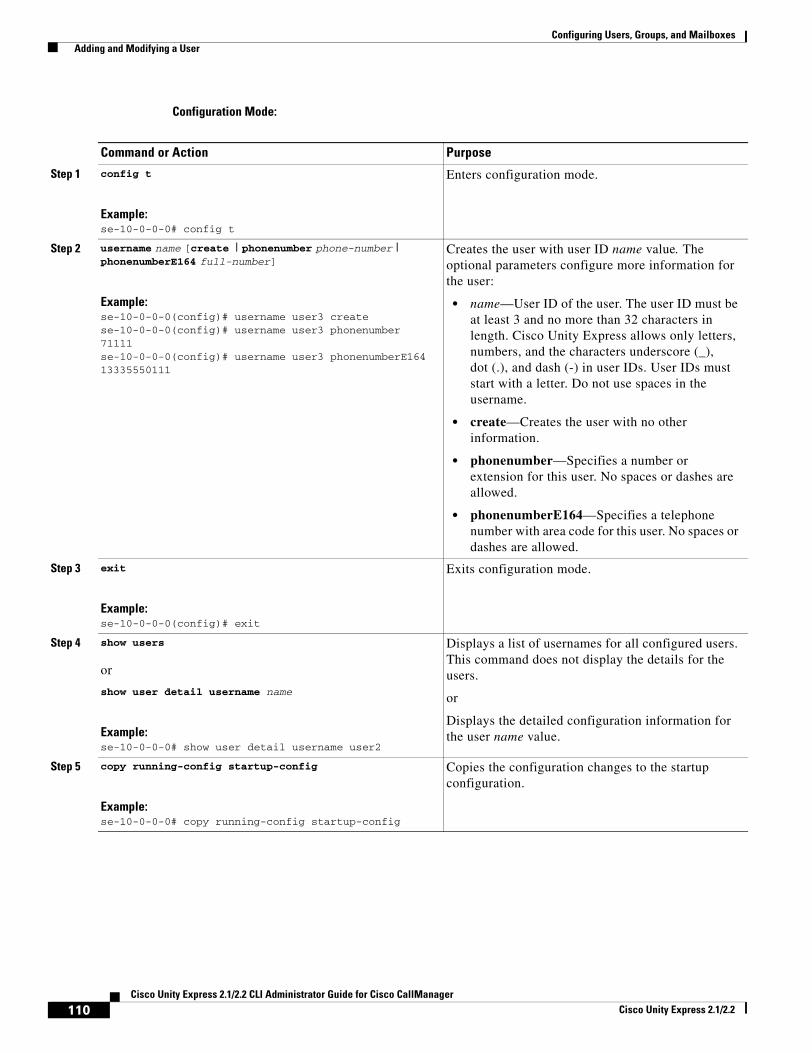
Configuring Users, Groups, and Mailboxes Adding and Modifying a User
Configuration Mode:
Command or Action Purpose
Step 1 config t
Example:se-10-0-0-0# config t
Enters configuration mode.
Step 2 username name [create | phonenumber phone-number | phonenumberE164 full-number]
Example:se-10-0-0-0(config)# username user3 createse-10-0-0-0(config)# username user3 phonenumber 71111se-10-0-0-0(config)# username user3 phonenumberE164 13335550111
Creates the user with user ID name value. The optional parameters configure more information for the user:
• name—User ID of the user. The user ID must be at least 3 and no more than 32 characters in length. Cisco Unity Express allows only letters, numbers, and the characters underscore (_), dot (.), and dash (-) in user IDs. User IDs must start with a letter. Do not use spaces in the username.
• create—Creates the user with no other information.
• phonenumber—Specifies a number or extension for this user. No spaces or dashes are allowed.
• phonenumberE164—Specifies a telephone number with area code for this user. No spaces or dashes are allowed.
Step 3 exit
Example:se-10-0-0-0(config)# exit
Exits configuration mode.
Step 4 show users
or
show user detail username name
Example:se-10-0-0-0# show user detail username user2
Displays a list of usernames for all configured users. This command does not display the details for the users.
or
Displays the detailed configuration information for the user name value.
Step 5 copy running-config startup-config
Example:se-10-0-0-0# copy running-config startup-config
Copies the configuration changes to the startup configuration.
110Cisco Unity Express 2.1/2.2 CLI Administrator Guide for Cisco CallManager
Cisco Unity Express 2.1/2.2

Configuring Users, Groups, and Mailboxes Adding and Modifying a User
Examples
The following example illustrates configuring a user and the output from the show commands:
se-10-0-0-0(config)# username user3 createse-10-0-0-0(config)# username user3 phonenumber 7654se-10-0-0-0(config)# exitse-10-0-0-0# show usersuser1user2user3se-10-0-0-0# show user detail username user3Full Name: User 3First Name:Last Name: user3Nickname: user3Phone: 7654Phone(E.164): Language: en_US
111Cisco Unity Express 2.1/2.2 CLI Administrator Guide for Cisco CallManager
Cisco Unity Express 2.1/2.2
Configuring Users, Groups, and Mailboxes Adding and Modifying a Group
Adding and Modifying a GroupA group is a collection of users, usually with a common function or purpose, such as sales, main office, customer service, or technicians. A group has the following characteristics:
• Members of the group can be individual users or other groups.
• The group is assigned an extension. If the members of the group are configured with the extension as a shared line, then anyone who calls this extension reaches a member of the group.
• The group usually has a mailbox assigned to it. This mailbox is called a general delivery mailbox. All members of the group access the mailbox to retrieve messages stored there. See “Types of Mailboxes” on page 117 for more information about general delivery mailboxes.
• At least one user must be designated as the owner of the group. The owner adds and deletes users from the group.
• Members may belong to more than one group.
• Members can be added to the group using the configuration mode groupname command or using the EXEC mode username command. See “Adding and Modifying a User” on page 106 for details about the username command.
Note Users must exist before being added to a group. See “Adding and Modifying a User” on page 106 to configure the user’s detailed information.
• Only members have access to the messages in a group’s voice mailbox. The owner is not considered a member of the group. If the owner needs to access the group’s mailbox, add the owner as a member of the group. (The owner’s name appears twice in the group, once as a member and once as the owner.)
• A group may be assigned a privilege level. The privilege level permits the members of the group to access all or a restricted set of administrative functions. Use the show privileges command to display the privilege levels installed on your system. Use the show groups privileges command to display the privileges assigned to each group. See “Privilege Levels for Users” on page 106 for more information about privilege levels.
See “Software Licenses and Factory-Set Limits” on page 15 for the maximum number of groups, owners, and members permitted on your system.
The procedure described in this section allows you to create a new group in the system. Use the same commands to modify an existing group’s properties.
PrerequisitesThe following information is required to define a group:
• EXEC mode:
– Name of the group
– (Optional) Description of the group
– (Optional) Full name of the group
• Configuration mode:
– Name of the group
112Cisco Unity Express 2.1/2.2 CLI Administrator Guide for Cisco CallManager
Cisco Unity Express 2.1/2.2
Configuring Users, Groups, and Mailboxes Adding and Modifying a Group
– (Optional) One or more member user IDs
– (Optional) User ID of the owner
– (Optional) Extension or telephone number of the group
– (Optional) Full E.164 telephone number of the group
– (Optional) Privilege level for the group
SUMMARY STEPS
EXEC Mode:
1. groupname name [create | delete | description “description” | fullname “full-name”]
2. show groups orshow group detail groupname name
3. copy running-config startup-config
Configuration Mode:
1. config t
2. groupname name [member username | owner ownername| phonenumber phone-number | phonenumberE164 full-number | privilege privilege-id]
3. exit
4. show groups or show group detail groupname name
5. copy running-config startup-config
113Cisco Unity Express 2.1/2.2 CLI Administrator Guide for Cisco CallManager
Cisco Unity Express 2.1/2.2
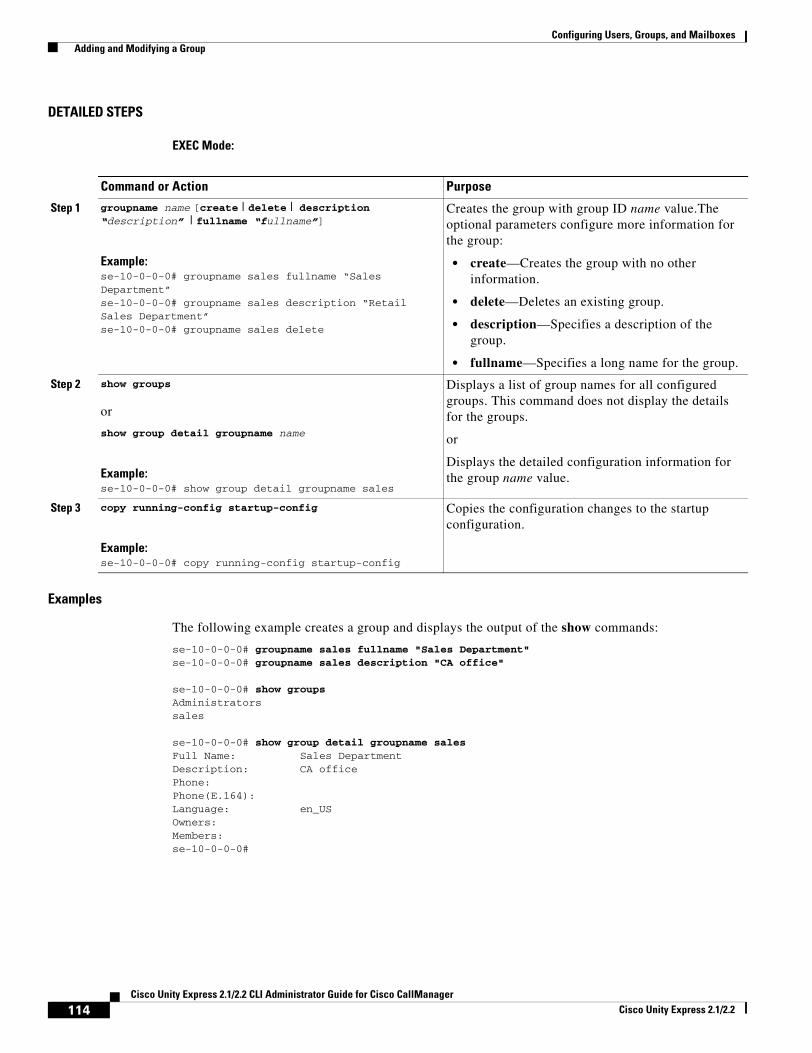
Configuring Users, Groups, and Mailboxes Adding and Modifying a Group
DETAILED STEPS
EXEC Mode:
Examples
The following example creates a group and displays the output of the show commands:
se-10-0-0-0# groupname sales fullname "Sales Department"se-10-0-0-0# groupname sales description "CA office"
se-10-0-0-0# show groupsAdministratorssales
se-10-0-0-0# show group detail groupname salesFull Name: Sales DepartmentDescription: CA officePhone:Phone(E.164):Language: en_USOwners:Members:se-10-0-0-0#
Command or Action Purpose
Step 1 groupname name [create | delete | description “description” | fullname “fullname”]
Example:se-10-0-0-0# groupname sales fullname “Sales Department”se-10-0-0-0# groupname sales description “Retail Sales Department”se-10-0-0-0# groupname sales delete
Creates the group with group ID name value.The optional parameters configure more information for the group:
• create—Creates the group with no other information.
• delete—Deletes an existing group.
• description—Specifies a description of the group.
• fullname—Specifies a long name for the group.
Step 2 show groups
or
show group detail groupname name
Example:se-10-0-0-0# show group detail groupname sales
Displays a list of group names for all configured groups. This command does not display the details for the groups.
or
Displays the detailed configuration information for the group name value.
Step 3 copy running-config startup-config
Example:se-10-0-0-0# copy running-config startup-config
Copies the configuration changes to the startup configuration.
114Cisco Unity Express 2.1/2.2 CLI Administrator Guide for Cisco CallManager
Cisco Unity Express 2.1/2.2
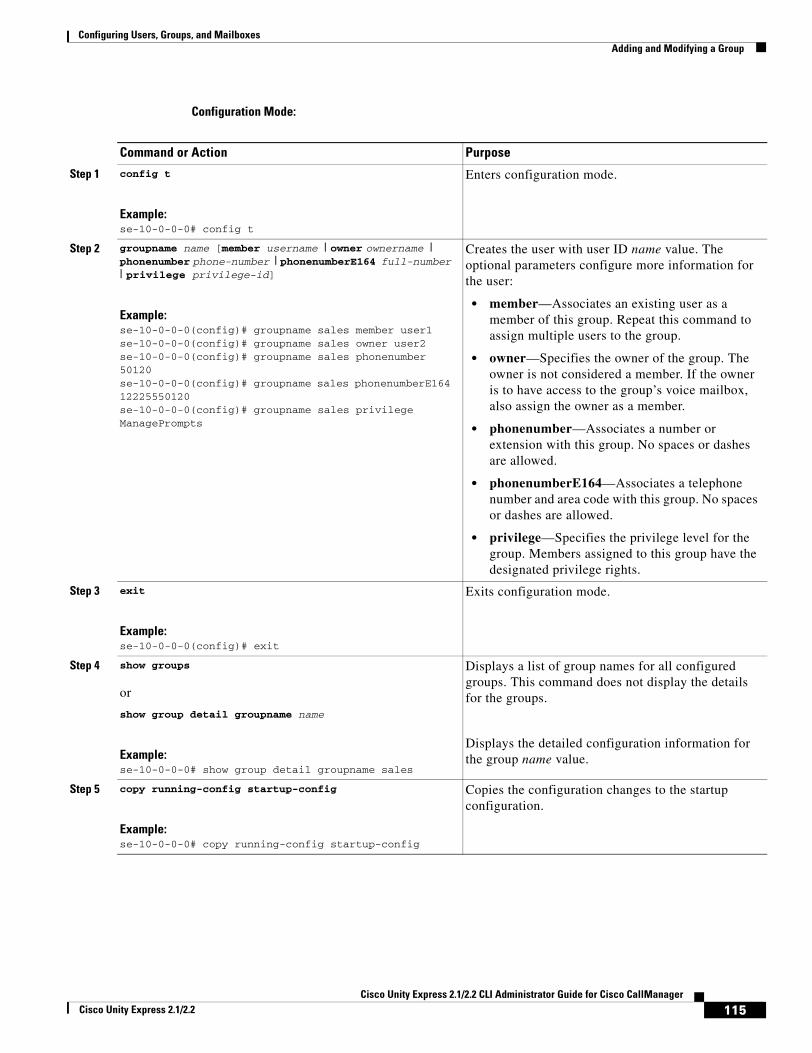
Configuring Users, Groups, and Mailboxes Adding and Modifying a Group
Configuration Mode:
Command or Action Purpose
Step 1 config t
Example:se-10-0-0-0# config t
Enters configuration mode.
Step 2 groupname name [member username | owner ownername | phonenumber phone-number | phonenumberE164 full-number | privilege privilege-id]
Example:se-10-0-0-0(config)# groupname sales member user1se-10-0-0-0(config)# groupname sales owner user2se-10-0-0-0(config)# groupname sales phonenumber 50120se-10-0-0-0(config)# groupname sales phonenumberE164 12225550120se-10-0-0-0(config)# groupname sales privilege ManagePrompts
Creates the user with user ID name value. The optional parameters configure more information for the user:
• member—Associates an existing user as a member of this group. Repeat this command to assign multiple users to the group.
• owner—Specifies the owner of the group. The owner is not considered a member. If the owner is to have access to the group’s voice mailbox, also assign the owner as a member.
• phonenumber—Associates a number or extension with this group. No spaces or dashes are allowed.
• phonenumberE164—Associates a telephone number and area code with this group. No spaces or dashes are allowed.
• privilege—Specifies the privilege level for the group. Members assigned to this group have the designated privilege rights.
Step 3 exit
Example:se-10-0-0-0(config)# exit
Exits configuration mode.
Step 4 show groups
or
show group detail groupname name
Example:se-10-0-0-0# show group detail groupname sales
Displays a list of group names for all configured groups. This command does not display the details for the groups.
Displays the detailed configuration information for the group name value.
Step 5 copy running-config startup-config
Example:se-10-0-0-0# copy running-config startup-config
Copies the configuration changes to the startup configuration.
115Cisco Unity Express 2.1/2.2 CLI Administrator Guide for Cisco CallManager
Cisco Unity Express 2.1/2.2
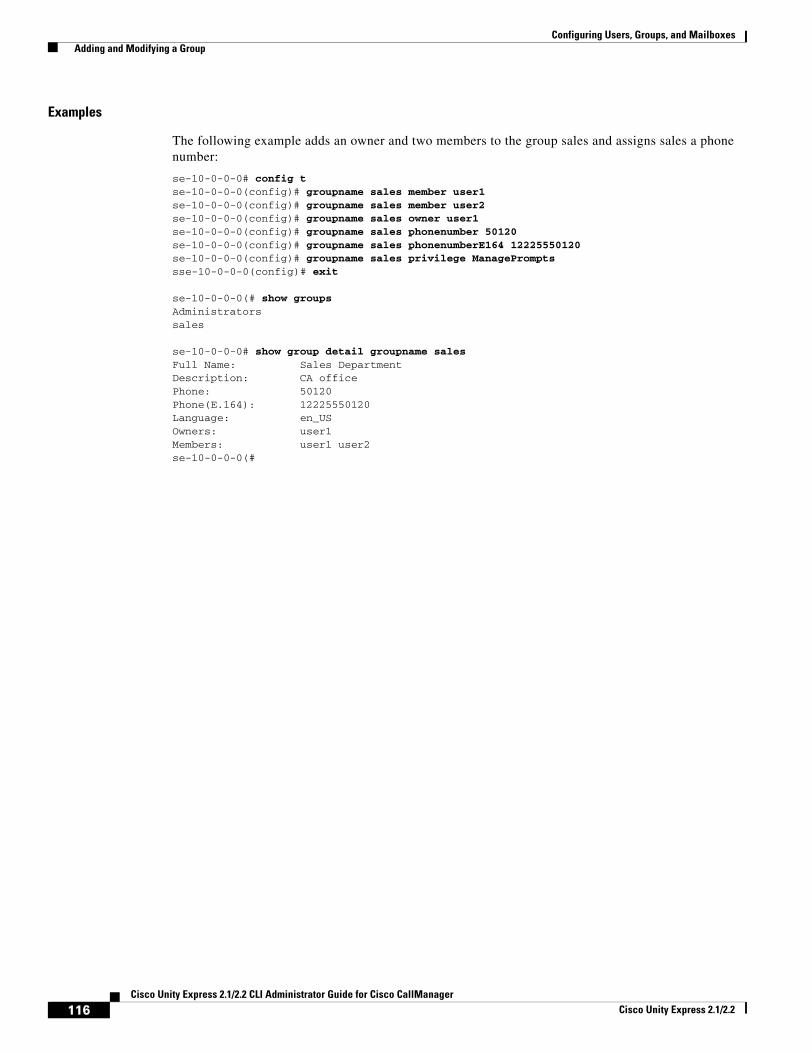
Configuring Users, Groups, and Mailboxes Adding and Modifying a Group
Examples
The following example adds an owner and two members to the group sales and assigns sales a phone number:
se-10-0-0-0# config tse-10-0-0-0(config)# groupname sales member user1se-10-0-0-0(config)# groupname sales member user2se-10-0-0-0(config)# groupname sales owner user1se-10-0-0-0(config)# groupname sales phonenumber 50120se-10-0-0-0(config)# groupname sales phonenumberE164 12225550120se-10-0-0-0(config)# groupname sales privilege ManagePromptssse-10-0-0-0(config)# exit
se-10-0-0-0(# show groupsAdministratorssales
se-10-0-0-0# show group detail groupname salesFull Name: Sales DepartmentDescription: CA officePhone: 50120Phone(E.164): 12225550120Language: en_USOwners: user1Members: user1 user2se-10-0-0-0(#
116Cisco Unity Express 2.1/2.2 CLI Administrator Guide for Cisco CallManager
Cisco Unity Express 2.1/2.2
Configuring Users, Groups, and Mailboxes Creating and Modifying a Voice Mailbox
Creating and Modifying a Voice MailboxAssign a voice mailbox to a user configured in the Cisco Unity Express database. A mailbox user is either an individual or the owner of a user group. The user must have an assigned extension.
Not all users or extensions require a voice mailbox. To use mailboxes efficiently, consider the function or purpose of the user or extension before assigning the mailbox.
The commands to create or modify a voice mailbox are the same.
Types of MailboxesCisco Unity Express supports two types of mailboxes:
• Personal mailbox—This mailbox is assigned to a specific user and is accessible only by this user. When a caller leaves a message in this mailbox, the message waiting indicator (MWI) light turns on.
• General delivery mailbox (GDM)—This mailbox is assigned to a group of users. (See “Adding and Modifying a Group” on page 112 for the definition of group members.) All members in the group have access to the mailbox. When a caller leaves a message in this mailbox, no MWI is turned on. Instead, when a member logs in to the personal mailbox, the mailbox menu allows the member to access the messages in each GDM to which the member belongs. Only one person can access the GDM at a time. After the first person saves or deletes a message in the GDM, the message is no longer played as “new” for any subsequent members.
Mailbox Limitations• Mailboxes are assigned to an IP telephone under the control of the Cisco CallManager system that
resides on the same router as the Cisco Unity Express module. IP telephones under the control of Cisco CallManager on another router need their own on-site Cisco Unity Express application.
• Only the owner of a personal mailbox can delete messages in the mailbox. Members of a GDM can delete messages in the mailbox. The administrator cannot delete messages or display the length of time for which messages are stored in the system. When the mailbox owner logs in to the voice mailbox, the application notifies the owner of any expired messages. The owner can delete or save each message. If a message is saved from the expired messages menu, the expiry timer is restarted for that message.
• Mailboxes can have different storage sizes. Consider the purpose of the mailbox when assigning a smaller or larger size than the default. The aggregate of all mailboxes cannot exceed the maximum storage allowed on your system. See “Cisco Unity Express Feature List” on page 2 for the mailbox storage capacity for your system, and use the show voicemail usage command to display the amount of storage already configured.
Prerequisites• Verify that the users and groups that will have voice mailboxes are configured before using this
procedure. If you have not created the users and groups, see “Adding and Modifying a User” on page 106 or “Adding and Modifying a Group” on page 112 or return to the Cisco Unity Express GUI for the procedures.
117Cisco Unity Express 2.1/2.2 CLI Administrator Guide for Cisco CallManager
Cisco Unity Express 2.1/2.2
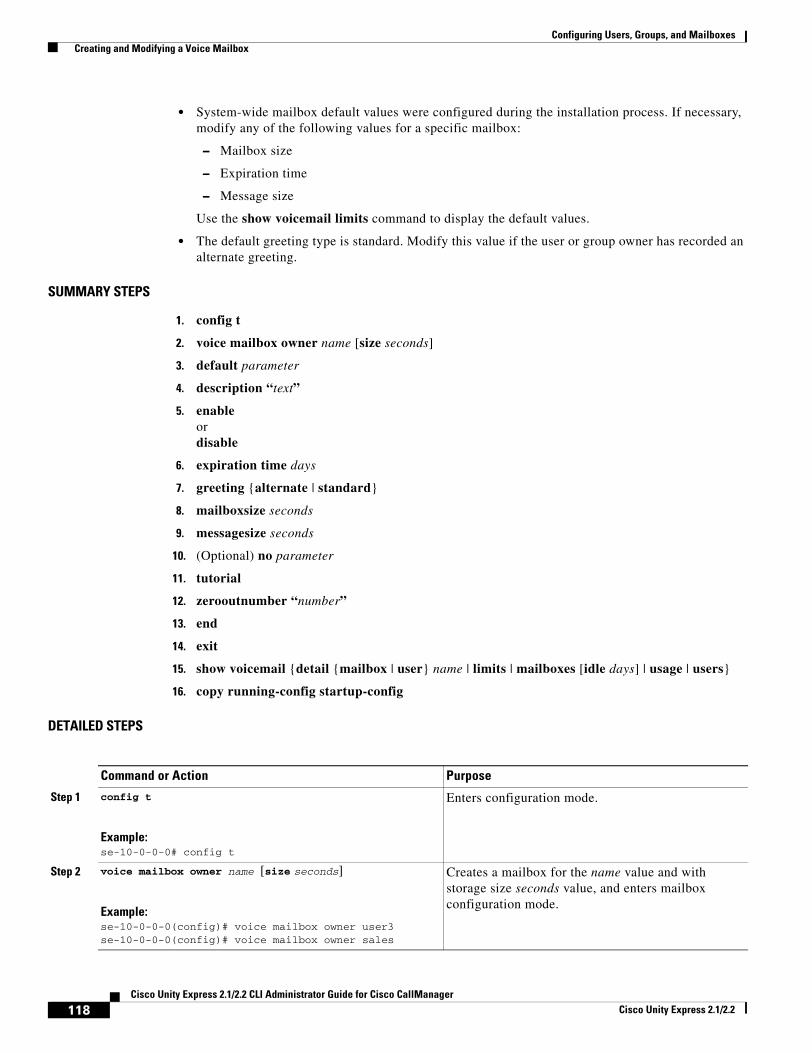
Configuring Users, Groups, and Mailboxes Creating and Modifying a Voice Mailbox
• System-wide mailbox default values were configured during the installation process. If necessary, modify any of the following values for a specific mailbox:
– Mailbox size
– Expiration time
– Message size
Use the show voicemail limits command to display the default values.
• The default greeting type is standard. Modify this value if the user or group owner has recorded an alternate greeting.
SUMMARY STEPS
1. config t
2. voice mailbox owner name [size seconds]
3. default parameter
4. description “text”
5. enable or disable
6. expiration time days
7. greeting {alternate | standard}
8. mailboxsize seconds
9. messagesize seconds
10. (Optional) no parameter
11. tutorial
12. zerooutnumber “number”
13. end
14. exit
15. show voicemail {detail {mailbox | user} name | limits | mailboxes [idle days] | usage | users}
16. copy running-config startup-config
DETAILED STEPS
Command or Action Purpose
Step 1 config t
Example:se-10-0-0-0# config t
Enters configuration mode.
Step 2 voice mailbox owner name [size seconds]
Example:se-10-0-0-0(config)# voice mailbox owner user3se-10-0-0-0(config)# voice mailbox owner sales
Creates a mailbox for the name value and with storage size seconds value, and enters mailbox configuration mode.
118Cisco Unity Express 2.1/2.2 CLI Administrator Guide for Cisco CallManager
Cisco Unity Express 2.1/2.2
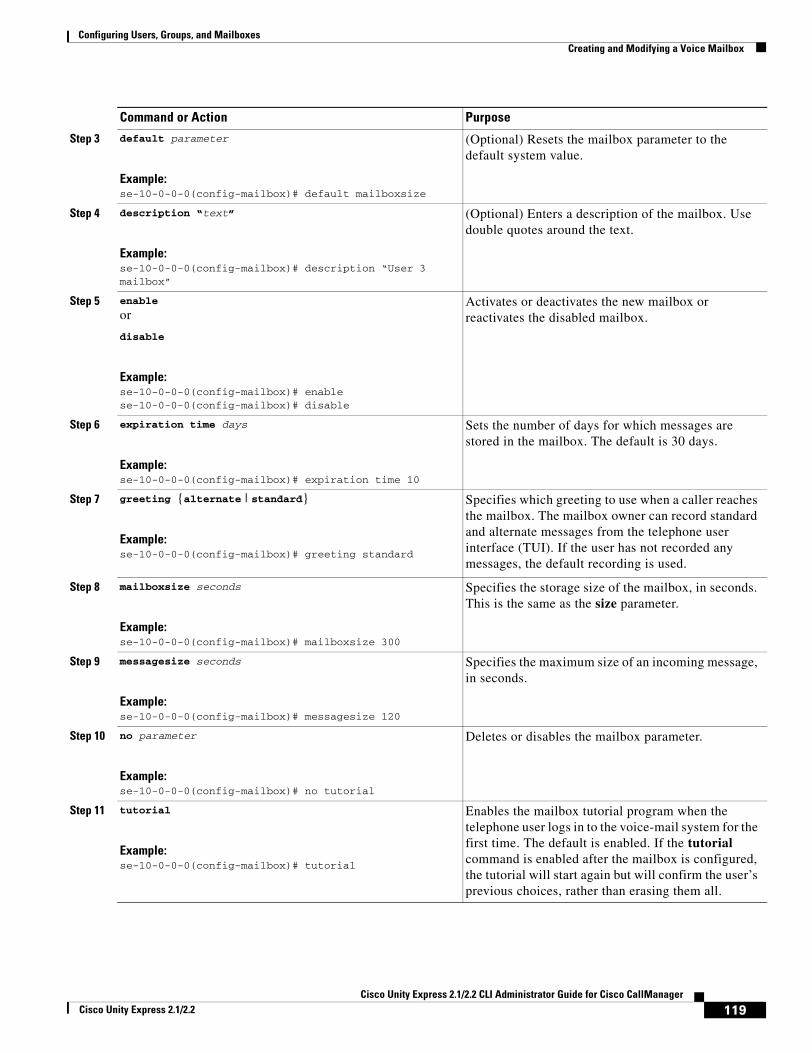
Configuring Users, Groups, and Mailboxes Creating and Modifying a Voice Mailbox
Step 3 default parameter
Example:se-10-0-0-0(config-mailbox)# default mailboxsize
(Optional) Resets the mailbox parameter to the default system value.
Step 4 description “text”
Example:se-10-0-0-0(config-mailbox)# description “User 3 mailbox”
(Optional) Enters a description of the mailbox. Use double quotes around the text.
Step 5 enable
or
disable
Example:se-10-0-0-0(config-mailbox)# enablese-10-0-0-0(config-mailbox)# disable
Activates or deactivates the new mailbox or reactivates the disabled mailbox.
Step 6 expiration time days
Example:se-10-0-0-0(config-mailbox)# expiration time 10
Sets the number of days for which messages are stored in the mailbox. The default is 30 days.
Step 7 greeting {alternate | standard}
Example:se-10-0-0-0(config-mailbox)# greeting standard
Specifies which greeting to use when a caller reaches the mailbox. The mailbox owner can record standard and alternate messages from the telephone user interface (TUI). If the user has not recorded any messages, the default recording is used.
Step 8 mailboxsize seconds
Example:se-10-0-0-0(config-mailbox)# mailboxsize 300
Specifies the storage size of the mailbox, in seconds. This is the same as the size parameter.
Step 9 messagesize seconds
Example:se-10-0-0-0(config-mailbox)# messagesize 120
Specifies the maximum size of an incoming message, in seconds.
Step 10 no parameter
Example:se-10-0-0-0(config-mailbox)# no tutorial
Deletes or disables the mailbox parameter.
Step 11 tutorial
Example:se-10-0-0-0(config-mailbox)# tutorial
Enables the mailbox tutorial program when the telephone user logs in to the voice-mail system for the first time. The default is enabled. If the tutorial command is enabled after the mailbox is configured, the tutorial will start again but will confirm the user’s previous choices, rather than erasing them all.
Command or Action Purpose
119Cisco Unity Express 2.1/2.2 CLI Administrator Guide for Cisco CallManager
Cisco Unity Express 2.1/2.2
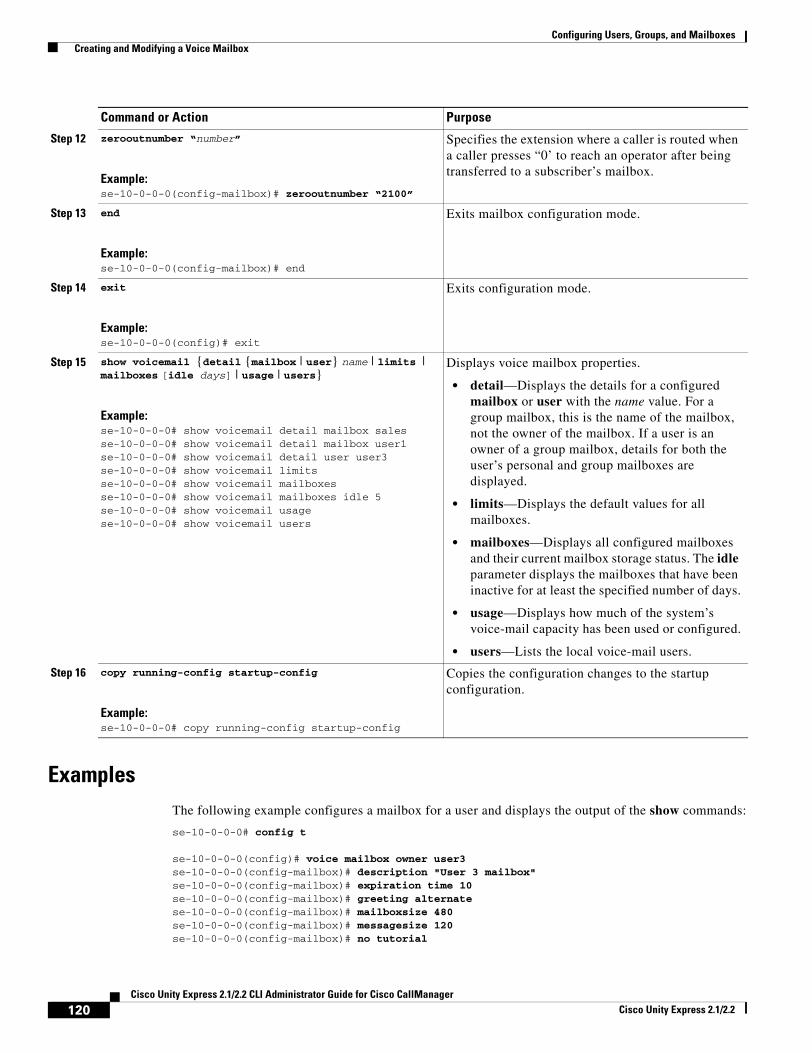
Configuring Users, Groups, and Mailboxes Creating and Modifying a Voice Mailbox
ExamplesThe following example configures a mailbox for a user and displays the output of the show commands:
se-10-0-0-0# config t
se-10-0-0-0(config)# voice mailbox owner user3se-10-0-0-0(config-mailbox)# description "User 3 mailbox"se-10-0-0-0(config-mailbox)# expiration time 10se-10-0-0-0(config-mailbox)# greeting alternatese-10-0-0-0(config-mailbox)# mailboxsize 480se-10-0-0-0(config-mailbox)# messagesize 120se-10-0-0-0(config-mailbox)# no tutorial
Step 12 zerooutnumber “number”
Example:se-10-0-0-0(config-mailbox)# zerooutnumber “2100”
Specifies the extension where a caller is routed when a caller presses “0’ to reach an operator after being transferred to a subscriber’s mailbox.
Step 13 end
Example:se-10-0-0-0(config-mailbox)# end
Exits mailbox configuration mode.
Step 14 exit
Example:se-10-0-0-0(config)# exit
Exits configuration mode.
Step 15 show voicemail {detail {mailbox | user} name | limits | mailboxes [idle days] | usage | users}
Example:se-10-0-0-0# show voicemail detail mailbox salesse-10-0-0-0# show voicemail detail mailbox user1se-10-0-0-0# show voicemail detail user user3se-10-0-0-0# show voicemail limitsse-10-0-0-0# show voicemail mailboxesse-10-0-0-0# show voicemail mailboxes idle 5se-10-0-0-0# show voicemail usagese-10-0-0-0# show voicemail users
Displays voice mailbox properties.
• detail—Displays the details for a configured mailbox or user with the name value. For a group mailbox, this is the name of the mailbox, not the owner of the mailbox. If a user is an owner of a group mailbox, details for both the user’s personal and group mailboxes are displayed.
• limits—Displays the default values for all mailboxes.
• mailboxes—Displays all configured mailboxes and their current mailbox storage status. The idle parameter displays the mailboxes that have been inactive for at least the specified number of days.
• usage—Displays how much of the system’s voice-mail capacity has been used or configured.
• users—Lists the local voice-mail users.
Step 16 copy running-config startup-config
Example:se-10-0-0-0# copy running-config startup-config
Copies the configuration changes to the startup configuration.
Command or Action Purpose
120Cisco Unity Express 2.1/2.2 CLI Administrator Guide for Cisco CallManager
Cisco Unity Express 2.1/2.2
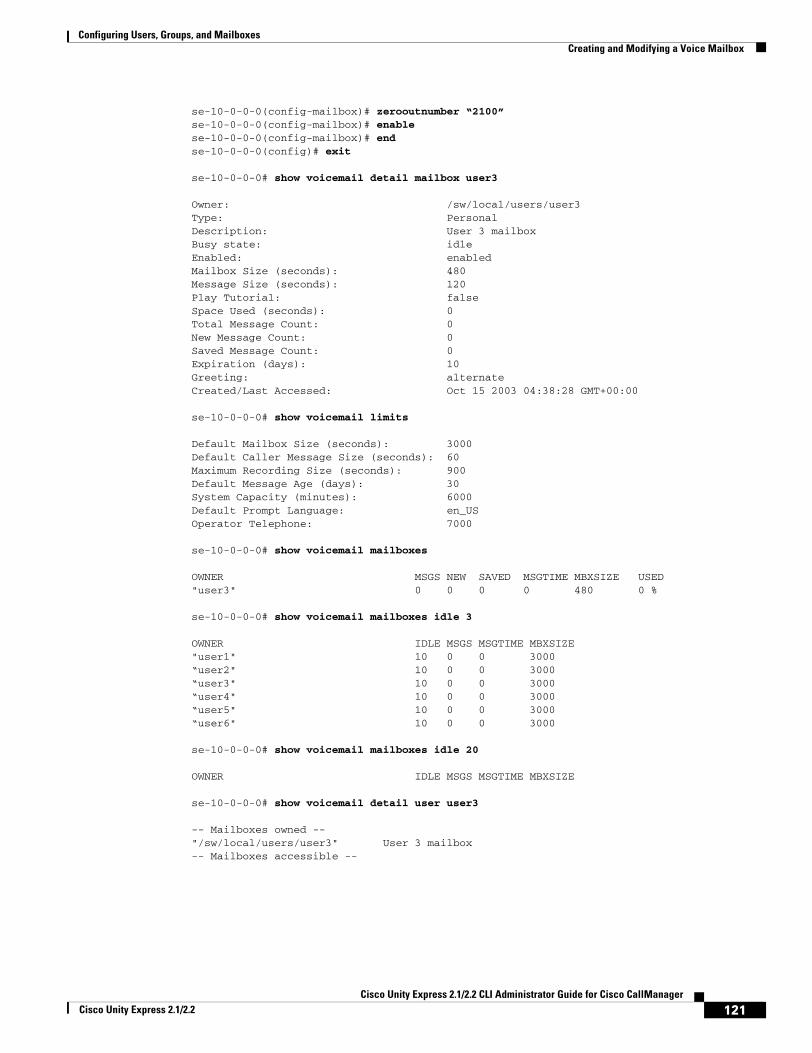
Configuring Users, Groups, and Mailboxes Creating and Modifying a Voice Mailbox
se-10-0-0-0(config-mailbox)# zerooutnumber “2100”se-10-0-0-0(config-mailbox)# enablese-10-0-0-0(config-mailbox)# endse-10-0-0-0(config)# exit
se-10-0-0-0# show voicemail detail mailbox user3
Owner: /sw/local/users/user3Type: PersonalDescription: User 3 mailboxBusy state: idleEnabled: enabledMailbox Size (seconds): 480Message Size (seconds): 120Play Tutorial: falseSpace Used (seconds): 0Total Message Count: 0New Message Count: 0Saved Message Count: 0Expiration (days): 10Greeting: alternateCreated/Last Accessed: Oct 15 2003 04:38:28 GMT+00:00
se-10-0-0-0# show voicemail limits
Default Mailbox Size (seconds): 3000Default Caller Message Size (seconds): 60Maximum Recording Size (seconds): 900Default Message Age (days): 30System Capacity (minutes): 6000Default Prompt Language: en_USOperator Telephone: 7000
se-10-0-0-0# show voicemail mailboxes
OWNER MSGS NEW SAVED MSGTIME MBXSIZE USED"user3" 0 0 0 0 480 0 %
se-10-0-0-0# show voicemail mailboxes idle 3
OWNER IDLE MSGS MSGTIME MBXSIZE"user1" 10 0 0 3000“user2" 10 0 0 3000“user3" 10 0 0 3000“user4" 10 0 0 3000“user5" 10 0 0 3000“user6" 10 0 0 3000
se-10-0-0-0# show voicemail mailboxes idle 20
OWNER IDLE MSGS MSGTIME MBXSIZE
se-10-0-0-0# show voicemail detail user user3
-- Mailboxes owned --"/sw/local/users/user3" User 3 mailbox-- Mailboxes accessible --
121Cisco Unity Express 2.1/2.2 CLI Administrator Guide for Cisco CallManager
Cisco Unity Express 2.1/2.2
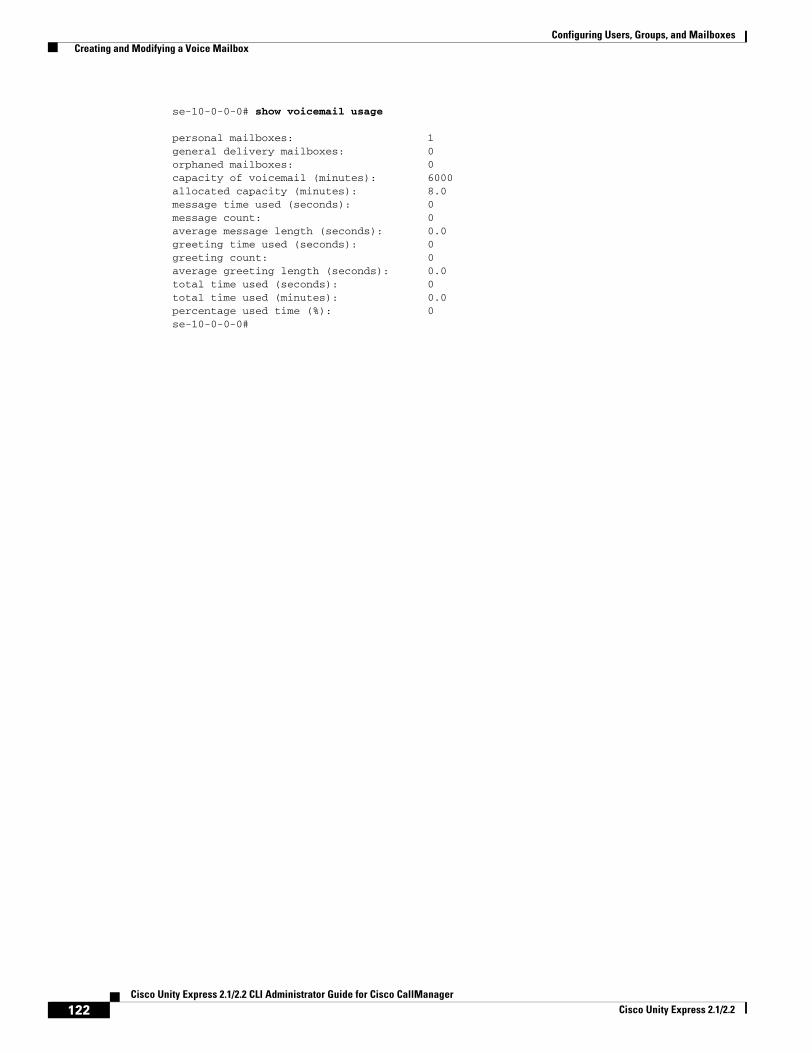
Configuring Users, Groups, and Mailboxes Creating and Modifying a Voice Mailbox
se-10-0-0-0# show voicemail usage
personal mailboxes: 1general delivery mailboxes: 0orphaned mailboxes: 0capacity of voicemail (minutes): 6000allocated capacity (minutes): 8.0message time used (seconds): 0message count: 0average message length (seconds): 0.0greeting time used (seconds): 0greeting count: 0average greeting length (seconds): 0.0total time used (seconds): 0total time used (minutes): 0.0percentage used time (%): 0se-10-0-0-0#
122Cisco Unity Express 2.1/2.2 CLI Administrator Guide for Cisco CallManager
Cisco Unity Express 2.1/2.2
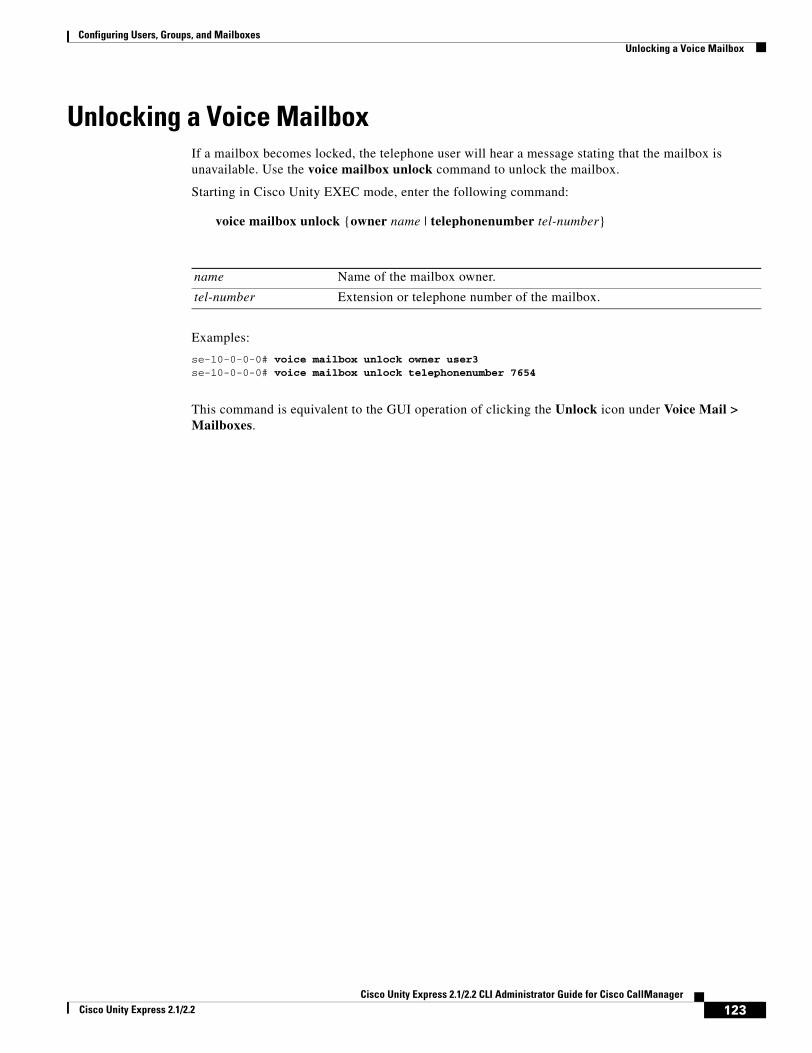
Configuring Users, Groups, and Mailboxes Unlocking a Voice Mailbox
Unlocking a Voice MailboxIf a mailbox becomes locked, the telephone user will hear a message stating that the mailbox is unavailable. Use the voice mailbox unlock command to unlock the mailbox.
Starting in Cisco Unity EXEC mode, enter the following command:
voice mailbox unlock {owner name | telephonenumber tel-number}
Examples:
se-10-0-0-0# voice mailbox unlock owner user3se-10-0-0-0# voice mailbox unlock telephonenumber 7654
This command is equivalent to the GUI operation of clicking the Unlock icon under Voice Mail > Mailboxes.
name Name of the mailbox owner.
tel-number Extension or telephone number of the mailbox.
123Cisco Unity Express 2.1/2.2 CLI Administrator Guide for Cisco CallManager
Cisco Unity Express 2.1/2.2
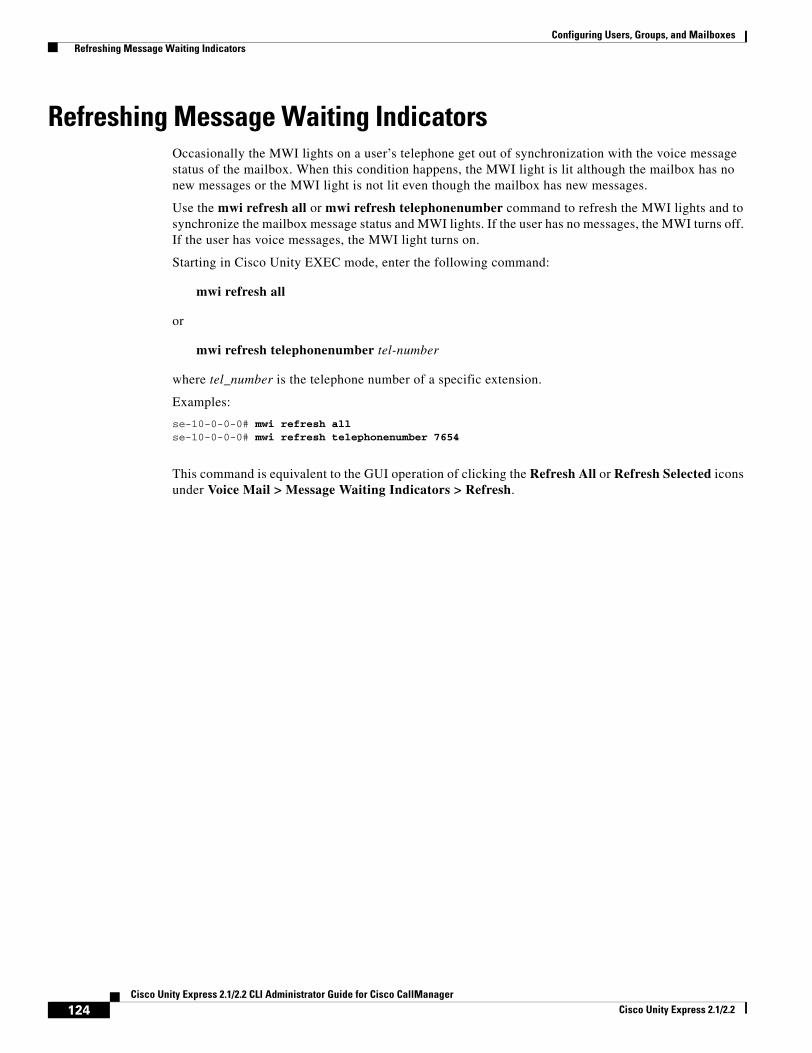
Configuring Users, Groups, and Mailboxes Refreshing Message Waiting Indicators
Refreshing Message Waiting IndicatorsOccasionally the MWI lights on a user’s telephone get out of synchronization with the voice message status of the mailbox. When this condition happens, the MWI light is lit although the mailbox has no new messages or the MWI light is not lit even though the mailbox has new messages.
Use the mwi refresh all or mwi refresh telephonenumber command to refresh the MWI lights and to synchronize the mailbox message status and MWI lights. If the user has no messages, the MWI turns off. If the user has voice messages, the MWI light turns on.
Starting in Cisco Unity EXEC mode, enter the following command:
mwi refresh all
or
mwi refresh telephonenumber tel-number
where tel_number is the telephone number of a specific extension.
Examples:
se-10-0-0-0# mwi refresh allse-10-0-0-0# mwi refresh telephonenumber 7654
This command is equivalent to the GUI operation of clicking the Refresh All or Refresh Selected icons under Voice Mail > Message Waiting Indicators > Refresh.
124Cisco Unity Express 2.1/2.2 CLI Administrator Guide for Cisco CallManager
Cisco Unity Express 2.1/2.2
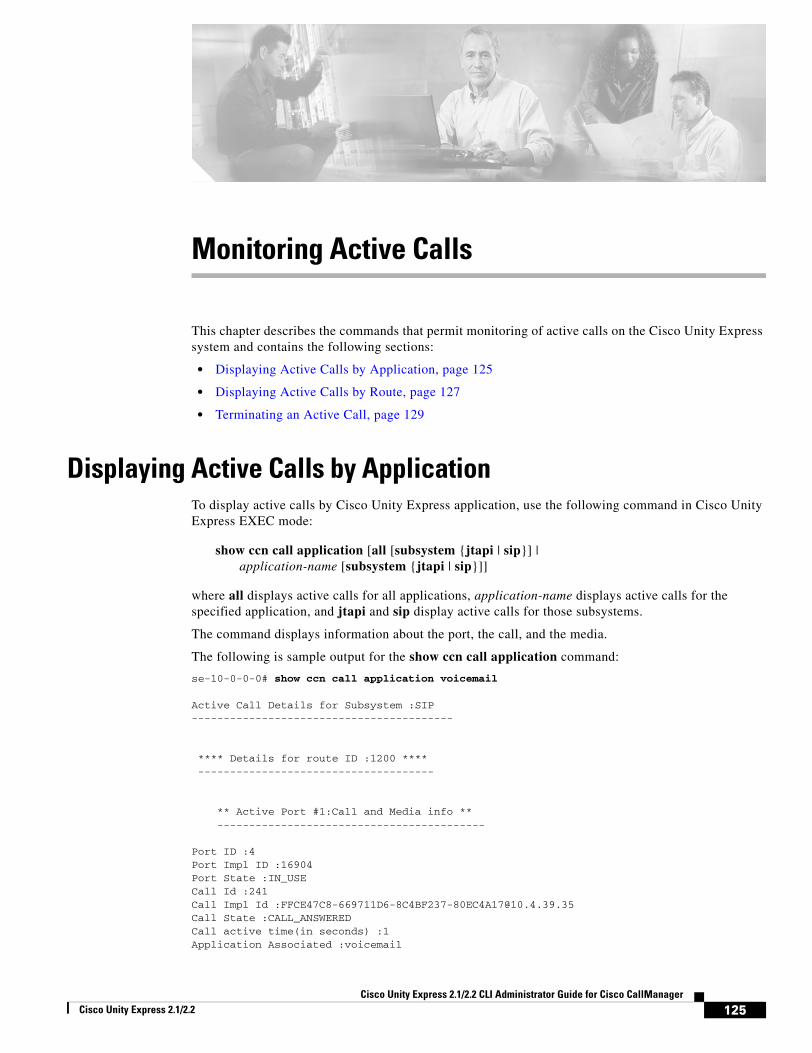
Monitoring Active Calls
This chapter describes the commands that permit monitoring of active calls on the Cisco Unity Express system and contains the following sections:
• Displaying Active Calls by Application, page 125
• Displaying Active Calls by Route, page 127
• Terminating an Active Call, page 129
Displaying Active Calls by ApplicationTo display active calls by Cisco Unity Express application, use the following command in Cisco Unity Express EXEC mode:
show ccn call application [all [subsystem {jtapi | sip}] | application-name [subsystem {jtapi | sip}]]
where all displays active calls for all applications, application-name displays active calls for the specified application, and jtapi and sip display active calls for those subsystems.
The command displays information about the port, the call, and the media.
The following is sample output for the show ccn call application command:
se-10-0-0-0# show ccn call application voicemail
Active Call Details for Subsystem :SIP -----------------------------------------
**** Details for route ID :1200 **** -------------------------------------
** Active Port #1:Call and Media info ** ------------------------------------------ Port ID :4Port Impl ID :16904Port State :IN_USECall Id :241Call Impl Id :[email protected] State :CALL_ANSWEREDCall active time(in seconds) :1Application Associated :voicemail
125Cisco Unity Express 2.1/2.2 CLI Administrator Guide for Cisco CallManager
Cisco Unity Express 2.1/2.2
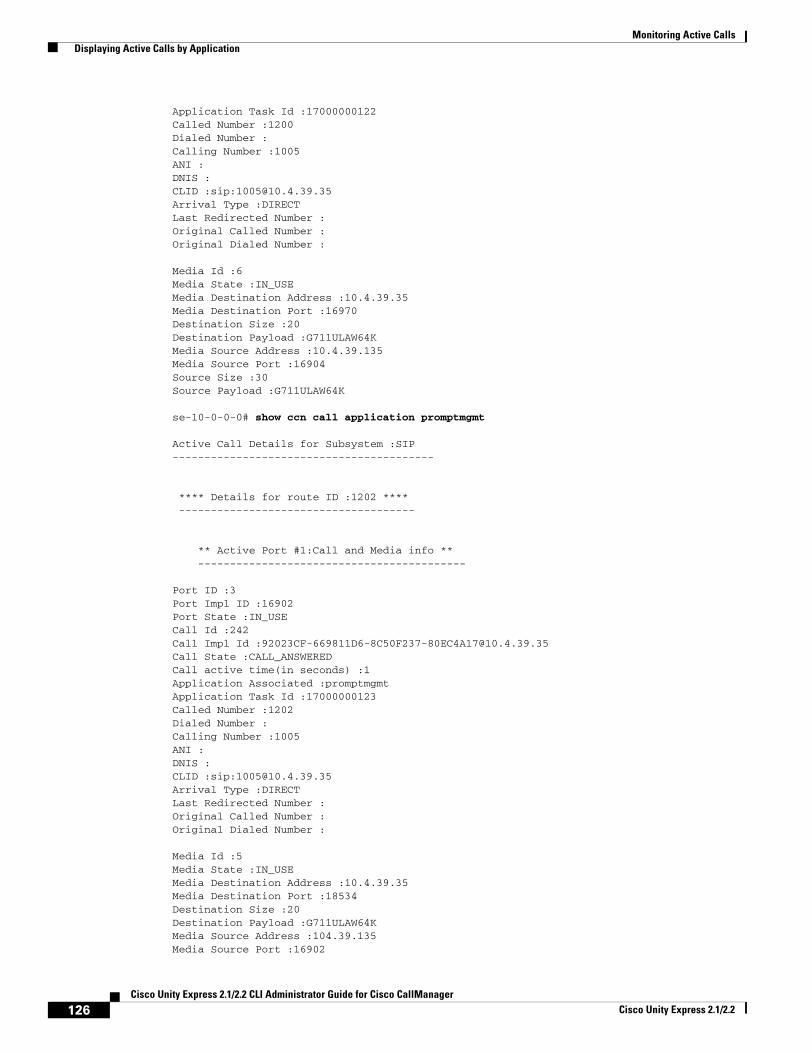
Monitoring Active Calls Displaying Active Calls by Application
Application Task Id :17000000122Called Number :1200Dialed Number :Calling Number :1005ANI :DNIS :CLID :sip:[email protected] Type :DIRECTLast Redirected Number :Original Called Number :Original Dialed Number :
Media Id :6Media State :IN_USEMedia Destination Address :10.4.39.35Media Destination Port :16970Destination Size :20Destination Payload :G711ULAW64KMedia Source Address :10.4.39.135Media Source Port :16904Source Size :30Source Payload :G711ULAW64K
se-10-0-0-0# show ccn call application promptmgmt
Active Call Details for Subsystem :SIP -----------------------------------------
**** Details for route ID :1202 **** -------------------------------------
** Active Port #1:Call and Media info ** ------------------------------------------ Port ID :3Port Impl ID :16902Port State :IN_USECall Id :242Call Impl Id :[email protected] State :CALL_ANSWEREDCall active time(in seconds) :1Application Associated :promptmgmtApplication Task Id :17000000123Called Number :1202Dialed Number :Calling Number :1005ANI :DNIS :CLID :sip:[email protected] Type :DIRECTLast Redirected Number :Original Called Number :Original Dialed Number :
Media Id :5Media State :IN_USEMedia Destination Address :10.4.39.35Media Destination Port :18534Destination Size :20Destination Payload :G711ULAW64KMedia Source Address :104.39.135Media Source Port :16902
126Cisco Unity Express 2.1/2.2 CLI Administrator Guide for Cisco CallManager
Cisco Unity Express 2.1/2.2
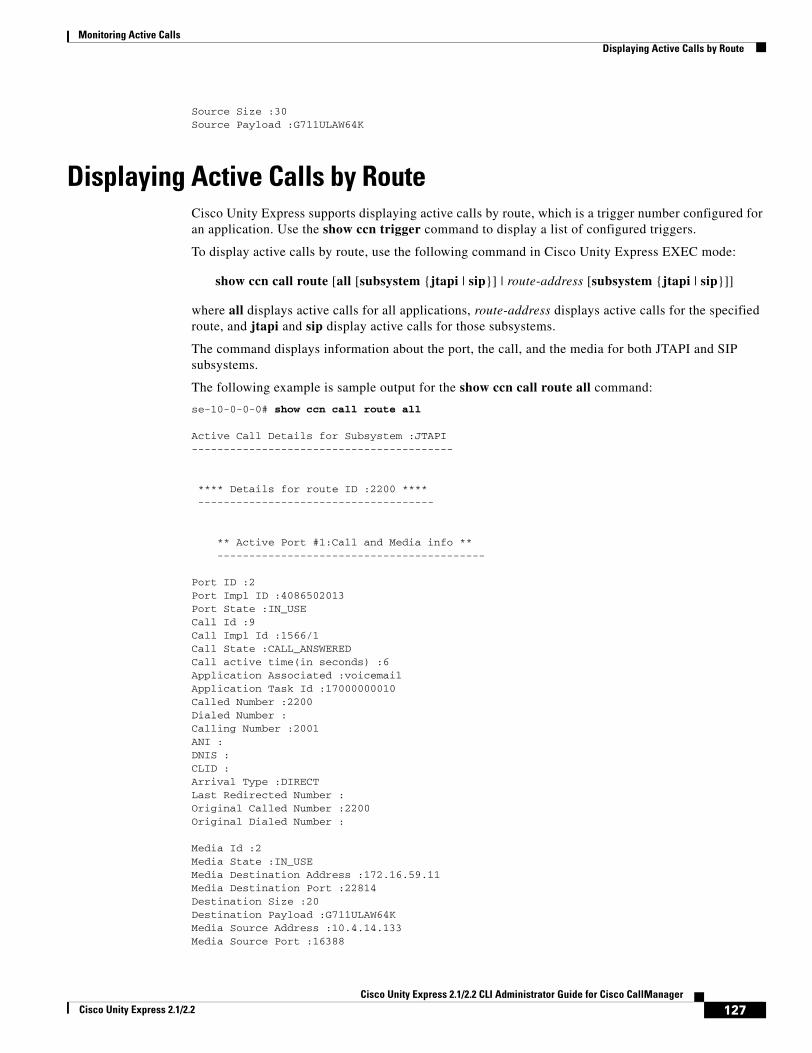
Monitoring Active Calls Displaying Active Calls by Route
Source Size :30Source Payload :G711ULAW64K
Displaying Active Calls by RouteCisco Unity Express supports displaying active calls by route, which is a trigger number configured for an application. Use the show ccn trigger command to display a list of configured triggers.
To display active calls by route, use the following command in Cisco Unity Express EXEC mode:
show ccn call route [all [subsystem {jtapi | sip}] | route-address [subsystem {jtapi | sip}]]
where all displays active calls for all applications, route-address displays active calls for the specified route, and jtapi and sip display active calls for those subsystems.
The command displays information about the port, the call, and the media for both JTAPI and SIP subsystems.
The following example is sample output for the show ccn call route all command:
se-10-0-0-0# show ccn call route all
Active Call Details for Subsystem :JTAPI -----------------------------------------
**** Details for route ID :2200 **** -------------------------------------
** Active Port #1:Call and Media info ** ------------------------------------------ Port ID :2Port Impl ID :4086502013Port State :IN_USECall Id :9Call Impl Id :1566/1Call State :CALL_ANSWEREDCall active time(in seconds) :6Application Associated :voicemailApplication Task Id :17000000010Called Number :2200Dialed Number :Calling Number :2001ANI :DNIS :CLID :Arrival Type :DIRECTLast Redirected Number :Original Called Number :2200Original Dialed Number :
Media Id :2Media State :IN_USEMedia Destination Address :172.16.59.11Media Destination Port :22814Destination Size :20Destination Payload :G711ULAW64KMedia Source Address :10.4.14.133Media Source Port :16388
127Cisco Unity Express 2.1/2.2 CLI Administrator Guide for Cisco CallManager
Cisco Unity Express 2.1/2.2
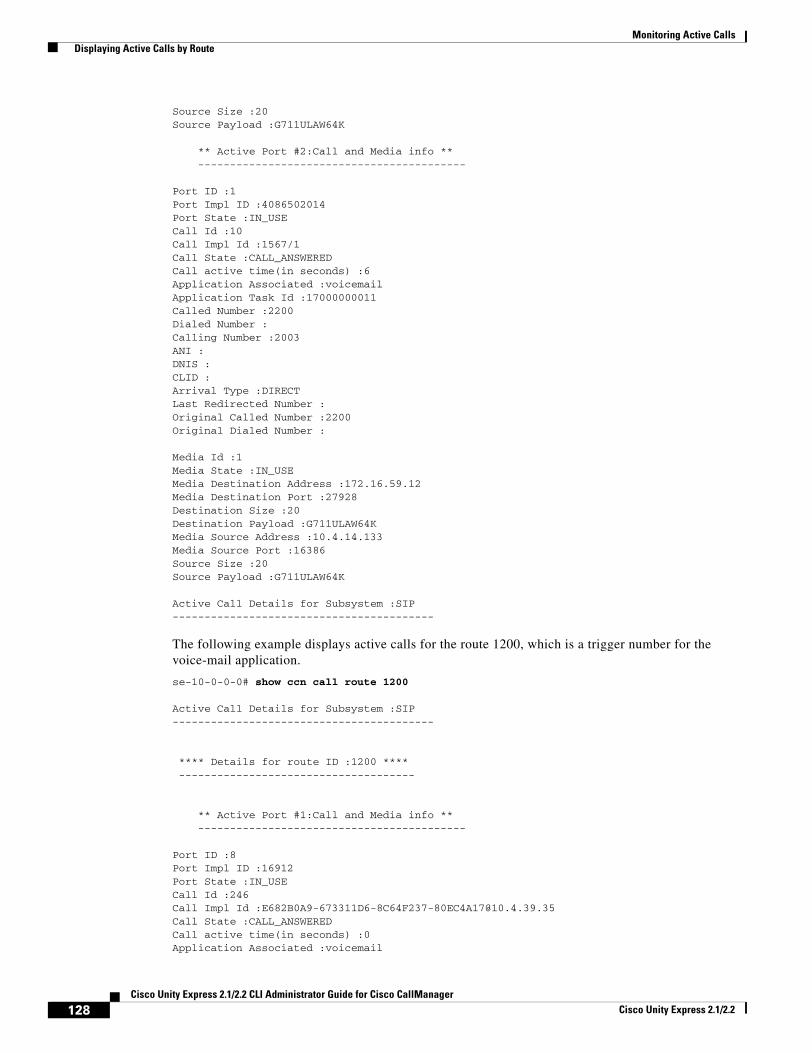
Monitoring Active Calls Displaying Active Calls by Route
Source Size :20Source Payload :G711ULAW64K
** Active Port #2:Call and Media info ** ------------------------------------------ Port ID :1Port Impl ID :4086502014Port State :IN_USECall Id :10Call Impl Id :1567/1Call State :CALL_ANSWEREDCall active time(in seconds) :6Application Associated :voicemailApplication Task Id :17000000011Called Number :2200Dialed Number :Calling Number :2003ANI :DNIS :CLID :Arrival Type :DIRECTLast Redirected Number :Original Called Number :2200Original Dialed Number :
Media Id :1Media State :IN_USEMedia Destination Address :172.16.59.12Media Destination Port :27928Destination Size :20Destination Payload :G711ULAW64KMedia Source Address :10.4.14.133Media Source Port :16386Source Size :20Source Payload :G711ULAW64K
Active Call Details for Subsystem :SIP -----------------------------------------
The following example displays active calls for the route 1200, which is a trigger number for the voice-mail application.
se-10-0-0-0# show ccn call route 1200
Active Call Details for Subsystem :SIP -----------------------------------------
**** Details for route ID :1200 **** -------------------------------------
** Active Port #1:Call and Media info ** ------------------------------------------ Port ID :8Port Impl ID :16912Port State :IN_USECall Id :246Call Impl Id :[email protected] State :CALL_ANSWEREDCall active time(in seconds) :0Application Associated :voicemail
128Cisco Unity Express 2.1/2.2 CLI Administrator Guide for Cisco CallManager
Cisco Unity Express 2.1/2.2
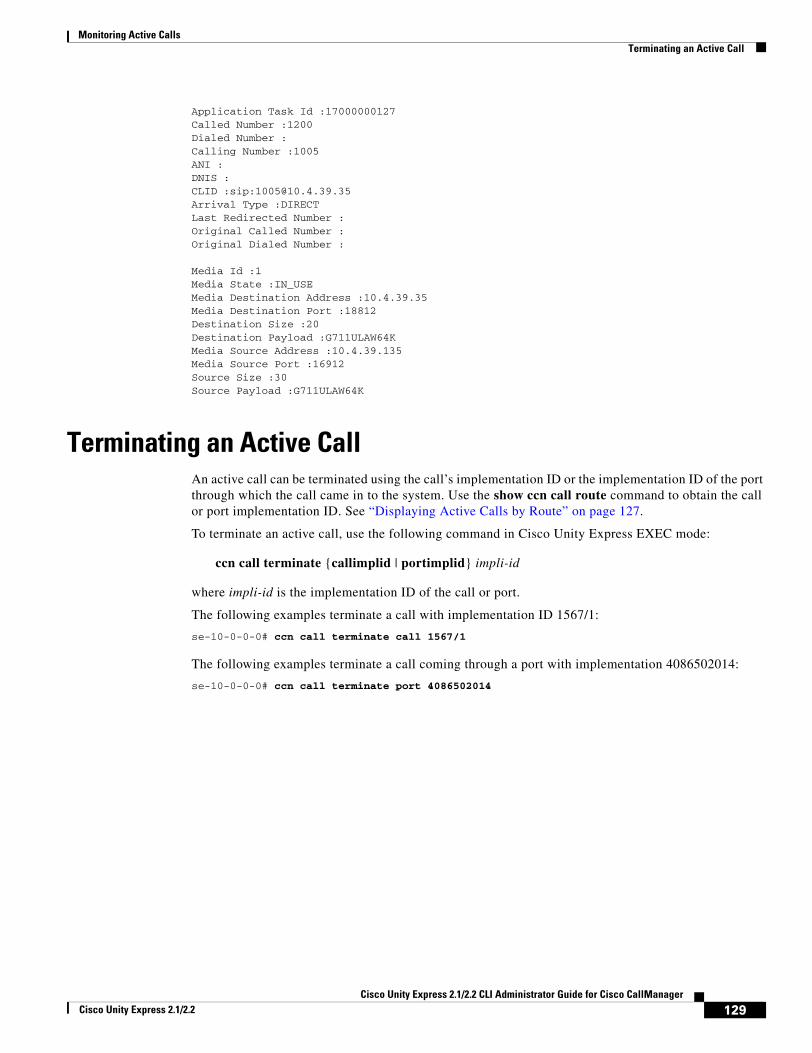
Monitoring Active Calls Terminating an Active Call
Application Task Id :17000000127Called Number :1200Dialed Number :Calling Number :1005ANI :DNIS :CLID :sip:[email protected] Type :DIRECTLast Redirected Number :Original Called Number :Original Dialed Number :
Media Id :1Media State :IN_USEMedia Destination Address :10.4.39.35Media Destination Port :18812Destination Size :20Destination Payload :G711ULAW64KMedia Source Address :10.4.39.135Media Source Port :16912Source Size :30Source Payload :G711ULAW64K
Terminating an Active CallAn active call can be terminated using the call’s implementation ID or the implementation ID of the port through which the call came in to the system. Use the show ccn call route command to obtain the call or port implementation ID. See “Displaying Active Calls by Route” on page 127.
To terminate an active call, use the following command in Cisco Unity Express EXEC mode:
ccn call terminate {callimplid | portimplid} impli-id
where impli-id is the implementation ID of the call or port.
The following examples terminate a call with implementation ID 1567/1:
se-10-0-0-0# ccn call terminate call 1567/1
The following examples terminate a call coming through a port with implementation 4086502014:
se-10-0-0-0# ccn call terminate port 4086502014
129Cisco Unity Express 2.1/2.2 CLI Administrator Guide for Cisco CallManager
Cisco Unity Express 2.1/2.2

Monitoring Active Calls Terminating an Active Call
130Cisco Unity Express 2.1/2.2 CLI Administrator Guide for Cisco CallManager
Cisco Unity Express 2.1/2.2
Backing Up and Restoring Data
Cisco Unity Express backup and restore functions use an FTP server to store and retrieve data. The backup function copies the files from the Cisco Unity Express application to the FTP server and the restore function copies the files from the FTP server to the Cisco Unity Express application. The FTP server can reside anywhere in the network if the backup and restore functions can access it with an IP address.
We recommend that backups be done daily to preserve voice-mail messages and configuration data.
Backup and restore commands are available in configuration mode and in offline mode.
• In configuration mode, set the following parameters:
– Number of backup files to keep (the oldest file is deleted).
– URL of the FTP server where the files will be stored.
• In offline mode, perform the backup or restore procedure. Decide the following:
– Type of files to be backed up: all files (configuration and data), only configuration files, or only data files. Data files consist of voice-mail messages. Configuration files consist of all other system and application parameters.
– Backup filename (used for restore procedure).
– URL of the FTP server where the files will be stored.
Caution Offline mode terminates all existing voice-mail calls, and no new voice-mail calls are allowed. Calls to auto attendant are allowed. We recommend doing a backup when telephone users are not active on calls.
In Cisco Unity Express EXEC mode, the startup configuration and running configuration can be saved to various locations, such as the network FTP server, the network TFTP server, and flash memory.
This chapter contains the following sections:
• Restrictions, page 132
• Setting Backup Parameters, page 133
• Backing Up Files, page 135
• Restoring Files, page 138
• Copying Configurations, page 141
• Restoring Factory Default Values, page 143
131Cisco Unity Express 2.1/2.2 CLI Administrator Guide for Cisco CallManager
Cisco Unity Express 2.1/2.2
Backing Up and Restoring Data Restrictions
RestrictionsCisco Unity Express does not support the following backup and restore capabilities:
• Scheduled backup and restore operations. The backup and restore procedures begin when the appropriate command is entered.
• Centralized message storage arrangement. Cisco Unity Express backup files cannot be used or integrated with other message stores.
• Selective backup and restore. Only full backup and restore functions are available. Individual voice-mail messages or other specific data cannot be stored or retrieved.
132Cisco Unity Express 2.1/2.2 CLI Administrator Guide for Cisco CallManager
Cisco Unity Express 2.1/2.2
Backing Up and Restoring Data Setting Backup Parameters
Setting Backup ParametersThe backup parameters define the FTP server to use for storing Cisco Unity Express backup files and the number of files that are stored before the system deletes the oldest one.
All Cisco Unity Express backup files are stored on the specified server. You can copy the backup files to other locations or servers, if necessary.
Cisco Unity Express automatically assigns a backup ID to the backup file. Use the backup ID to restore the file.
PrerequisitesThe following information is required for setting the backup parameters:
• Number of revisions to save before the oldest file is written over
• FTP server URL
• User ID of the FTP server login
• Password of the FTP server login
SUMMARY STEPS
1. config t
2. backup {revisions number | server url ftp-url username ftp-username password ftp-password}
3. exit
4. show backup
133Cisco Unity Express 2.1/2.2 CLI Administrator Guide for Cisco CallManager
Cisco Unity Express 2.1/2.2
Backing Up and Restoring Data Setting Backup Parameters
DETAILED STEPS
ExamplesThe following example configures a backup server and displays the show backup output:
se-10-0-0-0# config tse-10-0-0-0#(config)# backup server url ftp://172.16.0.0/backups username “admin” password “voice”se-10-0-0-0#(config)# backup revisions 10se-10-0-0-0#(config)# exit
se-10-0-0-0# show backupServer URL: ftp://172.16.0.0/backupsUser Account on Server: adminNumber of Backups to Retain: 10se-10-0-0-0#
Command or Action Purpose
Step 1 config t
Example:se-10-0-0-0# config t
Enters configuration mode.
Step 2 backup {revisions number | server url ftp-url username ftp-username password ftp-password}
Example:
se-10-0-0-0(config)# backup server url ftp://main/backups username “admin” password “wxyz”se-10-0-0-0(config)# backup server url ftp://172.168.10.10/backups username “admin” password “wxyz”se-10-0-0-0(config)# backup revisions 5
Sets the backup parameters.
• server url—The ftp-url value is the URL to the network FTP server where the backup files will be stored. The ftp-username and ftp-password values are the user ID and password for the network FTP server.
Note The backup server must be configured before the backup revisions can be configured.
• revisions—The number of backup files that will be stored. When this number is reached, the system deletes the oldest stored file.
In the example, main is the hostname of the FTP server and backups is the directory where backup files are stored.
Step 3 exit
Example:se-10-0-0-0(config)# exit
Exits configuration mode.
Step 4 show backup
Example:se-10-0-0-0# show backup
Displays the backup server configuration information, including the FTP server URL and the number of revisions.
134Cisco Unity Express 2.1/2.2 CLI Administrator Guide for Cisco CallManager
Cisco Unity Express 2.1/2.2

Backing Up and Restoring Data Backing Up Files
Backing Up FilesBackup commands must be entered in EXEC mode while the system is in offline mode. Active calls are terminated, and no new calls are accepted. Consider doing the backup procedure at a time when telephone users are least likely to be on the telephone.
Note We recommend that you back up your configuration files whenever changes are made to the system or application files. Data files, which contain voice messages, should be backed up daily to minimize data loss, such as from a hardware failure.
Numbering Scheme for Backup FilesThree types of backup requests are available: data only, configuration only, or all.
• Data—Backs up greetings, voice-mail messages, recorded names, and custom scripts and prompts.
• Configuration—Backs up only the running configuration. Use the show run command to display the current running configuration.
• All—Backs up all data and configuration information.
Cisco Unity Express automatically numbers and dates the backup files and identifies the revision number in a backupid field.
Performing different backup types at various times causes different backup IDs for data backups and configuration backups. For example, the last data backup ID might be 3, and the last configuration backup might be 4. Performing an “all” backup might result in a backup ID of 5 for both data and configuration.
When restoring the files, refer to the backup ID for the backup file that you want to use. Use the show backup server command for a list of backup IDs.
Caution Offline mode terminates all existing voice-mail calls, and no new voice-mail calls are allowed. Calls to auto attendant are allowed. We recommend doing a backup when telephone users are not active on calls.
SUMMARY STEPS
1. offline
2. backup category {all | configuration | data}
3. continue
4. show backup history
5. show backup server
135Cisco Unity Express 2.1/2.2 CLI Administrator Guide for Cisco CallManager
Cisco Unity Express 2.1/2.2
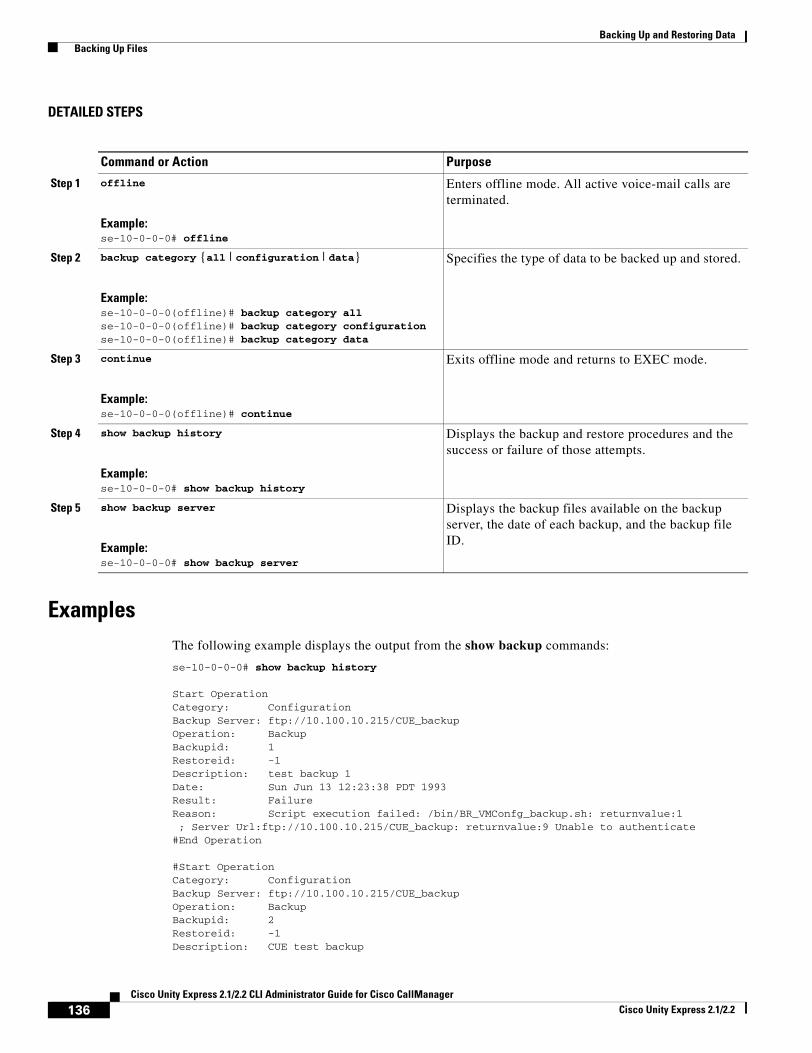
Backing Up and Restoring Data Backing Up Files
DETAILED STEPS
ExamplesThe following example displays the output from the show backup commands:
se-10-0-0-0# show backup history
Start OperationCategory: ConfigurationBackup Server: ftp://10.100.10.215/CUE_backupOperation: BackupBackupid: 1Restoreid: -1Description: test backup 1Date: Sun Jun 13 12:23:38 PDT 1993Result: FailureReason: Script execution failed: /bin/BR_VMConfg_backup.sh: returnvalue:1 ; Server Url:ftp://10.100.10.215/CUE_backup: returnvalue:9 Unable to authenticate#End Operation
#Start OperationCategory: ConfigurationBackup Server: ftp://10.100.10.215/CUE_backupOperation: BackupBackupid: 2Restoreid: -1Description: CUE test backup
Command or Action Purpose
Step 1 offline
Example:se-10-0-0-0# offline
Enters offline mode. All active voice-mail calls are terminated.
Step 2 backup category {all | configuration | data}
Example:se-10-0-0-0(offline)# backup category allse-10-0-0-0(offline)# backup category configurationse-10-0-0-0(offline)# backup category data
Specifies the type of data to be backed up and stored.
Step 3 continue
Example:se-10-0-0-0(offline)# continue
Exits offline mode and returns to EXEC mode.
Step 4 show backup history
Example:se-10-0-0-0# show backup history
Displays the backup and restore procedures and the success or failure of those attempts.
Step 5 show backup server
Example:se-10-0-0-0# show backup server
Displays the backup files available on the backup server, the date of each backup, and the backup file ID.
136Cisco Unity Express 2.1/2.2 CLI Administrator Guide for Cisco CallManager
Cisco Unity Express 2.1/2.2
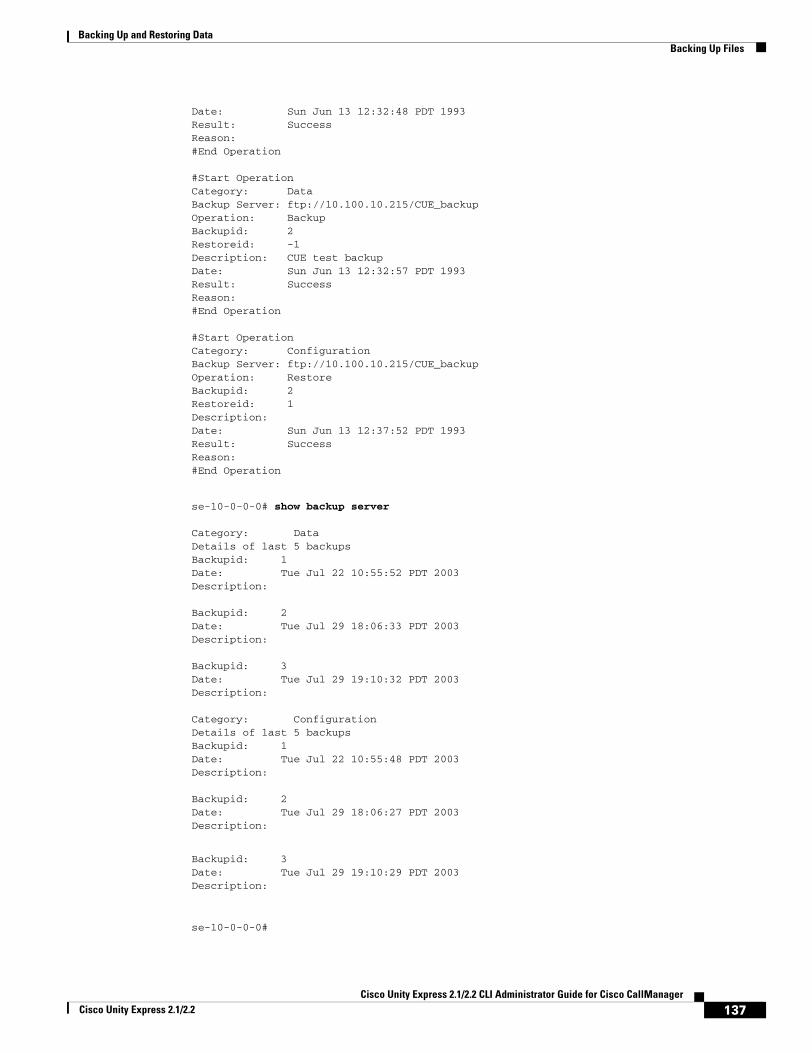
Backing Up and Restoring Data Backing Up Files
Date: Sun Jun 13 12:32:48 PDT 1993Result: SuccessReason:#End Operation
#Start OperationCategory: DataBackup Server: ftp://10.100.10.215/CUE_backupOperation: BackupBackupid: 2Restoreid: -1Description: CUE test backupDate: Sun Jun 13 12:32:57 PDT 1993Result: SuccessReason:#End Operation
#Start OperationCategory: ConfigurationBackup Server: ftp://10.100.10.215/CUE_backupOperation: RestoreBackupid: 2Restoreid: 1Description:Date: Sun Jun 13 12:37:52 PDT 1993Result: SuccessReason:#End Operation
se-10-0-0-0# show backup server
Category: DataDetails of last 5 backupsBackupid: 1Date: Tue Jul 22 10:55:52 PDT 2003Description: Backupid: 2Date: Tue Jul 29 18:06:33 PDT 2003Description: Backupid: 3Date: Tue Jul 29 19:10:32 PDT 2003Description:
Category: ConfigurationDetails of last 5 backupsBackupid: 1Date: Tue Jul 22 10:55:48 PDT 2003Description: Backupid: 2Date: Tue Jul 29 18:06:27 PDT 2003Description:
Backupid: 3Date: Tue Jul 29 19:10:29 PDT 2003Description:
se-10-0-0-0#
137Cisco Unity Express 2.1/2.2 CLI Administrator Guide for Cisco CallManager
Cisco Unity Express 2.1/2.2
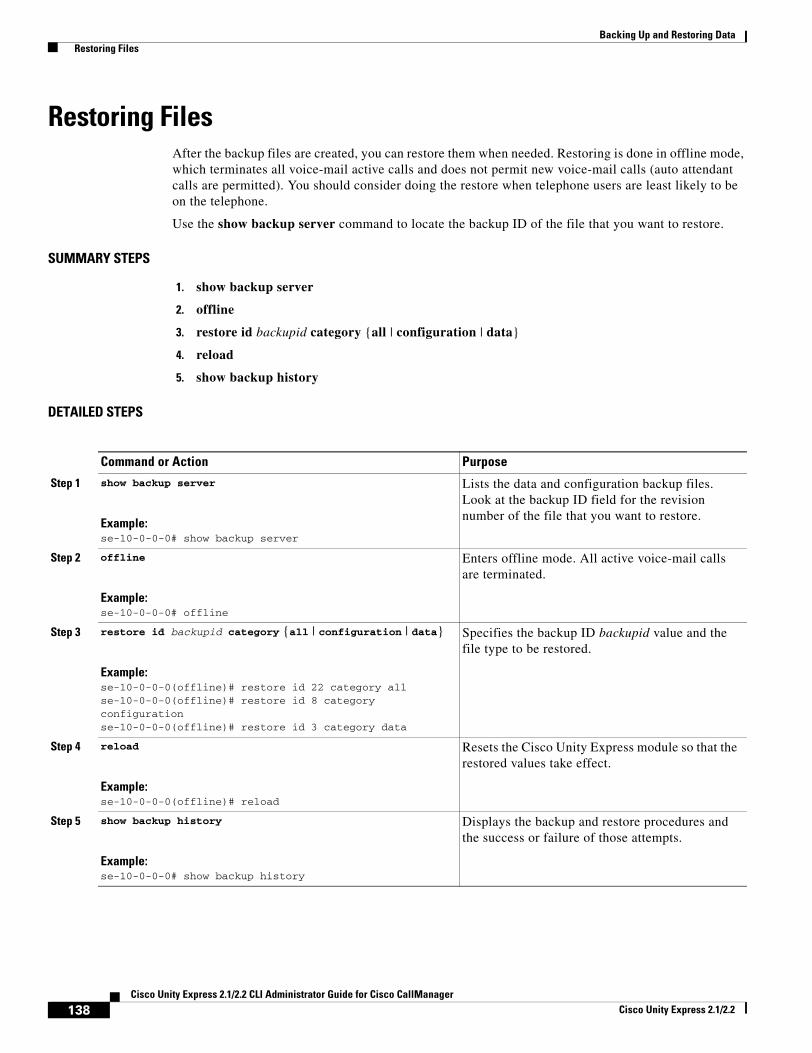
Backing Up and Restoring Data Restoring Files
Restoring FilesAfter the backup files are created, you can restore them when needed. Restoring is done in offline mode, which terminates all voice-mail active calls and does not permit new voice-mail calls (auto attendant calls are permitted). You should consider doing the restore when telephone users are least likely to be on the telephone.
Use the show backup server command to locate the backup ID of the file that you want to restore.
SUMMARY STEPS
1. show backup server
2. offline
3. restore id backupid category {all | configuration | data}
4. reload
5. show backup history
DETAILED STEPS
Command or Action Purpose
Step 1 show backup server
Example:se-10-0-0-0# show backup server
Lists the data and configuration backup files. Look at the backup ID field for the revision number of the file that you want to restore.
Step 2 offline
Example:se-10-0-0-0# offline
Enters offline mode. All active voice-mail calls are terminated.
Step 3 restore id backupid category {all | configuration | data}
Example:se-10-0-0-0(offline)# restore id 22 category allse-10-0-0-0(offline)# restore id 8 category configurationse-10-0-0-0(offline)# restore id 3 category data
Specifies the backup ID backupid value and the file type to be restored.
Step 4 reload
Example:se-10-0-0-0(offline)# reload
Resets the Cisco Unity Express module so that the restored values take effect.
Step 5 show backup history
Example:se-10-0-0-0# show backup history
Displays the backup and restore procedures and the success or failure of those attempts.
138Cisco Unity Express 2.1/2.2 CLI Administrator Guide for Cisco CallManager
Cisco Unity Express 2.1/2.2
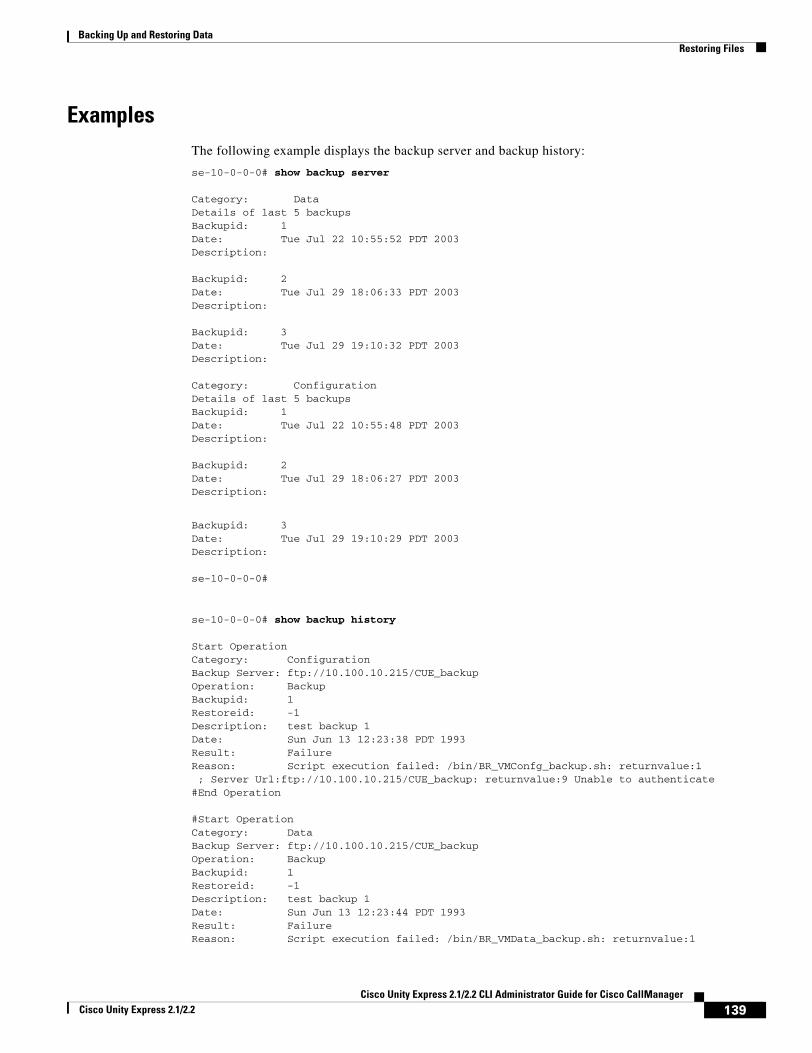
Backing Up and Restoring Data Restoring Files
ExamplesThe following example displays the backup server and backup history:
se-10-0-0-0# show backup server
Category: DataDetails of last 5 backupsBackupid: 1Date: Tue Jul 22 10:55:52 PDT 2003Description: Backupid: 2Date: Tue Jul 29 18:06:33 PDT 2003Description: Backupid: 3Date: Tue Jul 29 19:10:32 PDT 2003Description:
Category: ConfigurationDetails of last 5 backupsBackupid: 1Date: Tue Jul 22 10:55:48 PDT 2003Description: Backupid: 2Date: Tue Jul 29 18:06:27 PDT 2003Description:
Backupid: 3Date: Tue Jul 29 19:10:29 PDT 2003Description:
se-10-0-0-0#
se-10-0-0-0# show backup history
Start OperationCategory: ConfigurationBackup Server: ftp://10.100.10.215/CUE_backupOperation: BackupBackupid: 1Restoreid: -1Description: test backup 1Date: Sun Jun 13 12:23:38 PDT 1993Result: FailureReason: Script execution failed: /bin/BR_VMConfg_backup.sh: returnvalue:1 ; Server Url:ftp://10.100.10.215/CUE_backup: returnvalue:9 Unable to authenticate#End Operation
#Start OperationCategory: DataBackup Server: ftp://10.100.10.215/CUE_backupOperation: BackupBackupid: 1Restoreid: -1Description: test backup 1Date: Sun Jun 13 12:23:44 PDT 1993Result: FailureReason: Script execution failed: /bin/BR_VMData_backup.sh: returnvalue:1
139Cisco Unity Express 2.1/2.2 CLI Administrator Guide for Cisco CallManager
Cisco Unity Express 2.1/2.2

Backing Up and Restoring Data Restoring Files
Voicemail Backup failed; Server Url:ftp://10.100.10.215/CUE_backup: returnvalue:9 Unable to authenticate#End Operation
#Start OperationCategory: ConfigurationBackup Server: ftp://10.100.10.215/CUE_backupOperation: BackupBackupid: 2Restoreid: -1Description: CUE test backupDate: Sun Jun 13 12:32:48 PDT 1993Result: SuccessReason:#End Operation
#Start OperationCategory: DataBackup Server: ftp://10.100.10.215/CUE_backupOperation: BackupBackupid: 2Restoreid: -1Description: CUE test backupDate: Sun Jun 13 12:32:57 PDT 1993Result: SuccessReason:#End Operation
#Start OperationCategory: ConfigurationBackup Server: ftp://10.100.10.215/CUE_backupOperation: RestoreBackupid: 2Restoreid: 1Description:Date: Sun Jun 13 12:37:52 PDT 1993Result: SuccessReason:#End Operation
#Start OperationCategory: DataBackup Server: ftp://10.100.10.215/CUE_backupOperation: RestoreBackupid: 2Restoreid: 1Description:Date: Sun Jun 13 12:38:00 PDT 1993Result: SuccessReason:#End Operation
140Cisco Unity Express 2.1/2.2 CLI Administrator Guide for Cisco CallManager
Cisco Unity Express 2.1/2.2
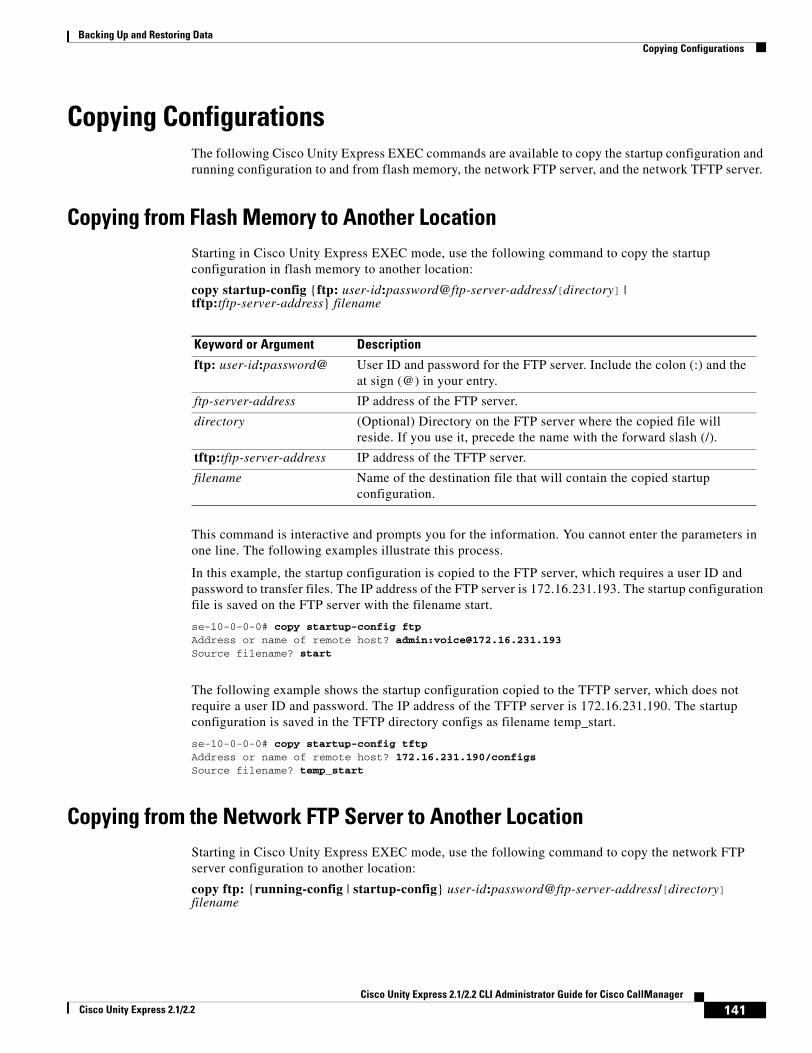
Backing Up and Restoring Data Copying Configurations
Copying ConfigurationsThe following Cisco Unity Express EXEC commands are available to copy the startup configuration and running configuration to and from flash memory, the network FTP server, and the network TFTP server.
Copying from Flash Memory to Another LocationStarting in Cisco Unity Express EXEC mode, use the following command to copy the startup configuration in flash memory to another location:
copy startup-config {ftp: user-id:password@ftp-server-address/[directory] | tftp:tftp-server-address} filename
This command is interactive and prompts you for the information. You cannot enter the parameters in one line. The following examples illustrate this process.
In this example, the startup configuration is copied to the FTP server, which requires a user ID and password to transfer files. The IP address of the FTP server is 172.16.231.193. The startup configuration file is saved on the FTP server with the filename start.
se-10-0-0-0# copy startup-config ftpAddress or name of remote host? admin:[email protected] filename? start
The following example shows the startup configuration copied to the TFTP server, which does not require a user ID and password. The IP address of the TFTP server is 172.16.231.190. The startup configuration is saved in the TFTP directory configs as filename temp_start.
se-10-0-0-0# copy startup-config tftpAddress or name of remote host? 172.16.231.190/configsSource filename? temp_start
Copying from the Network FTP Server to Another LocationStarting in Cisco Unity Express EXEC mode, use the following command to copy the network FTP server configuration to another location:
copy ftp: {running-config | startup-config} user-id:password@ftp-server-address/[directory] filename
Keyword or Argument Description
ftp: user-id:password@ User ID and password for the FTP server. Include the colon (:) and the at sign (@) in your entry.
ftp-server-address IP address of the FTP server.
directory (Optional) Directory on the FTP server where the copied file will reside. If you use it, precede the name with the forward slash (/).
tftp:tftp-server-address IP address of the TFTP server.
filename Name of the destination file that will contain the copied startup configuration.
141Cisco Unity Express 2.1/2.2 CLI Administrator Guide for Cisco CallManager
Cisco Unity Express 2.1/2.2
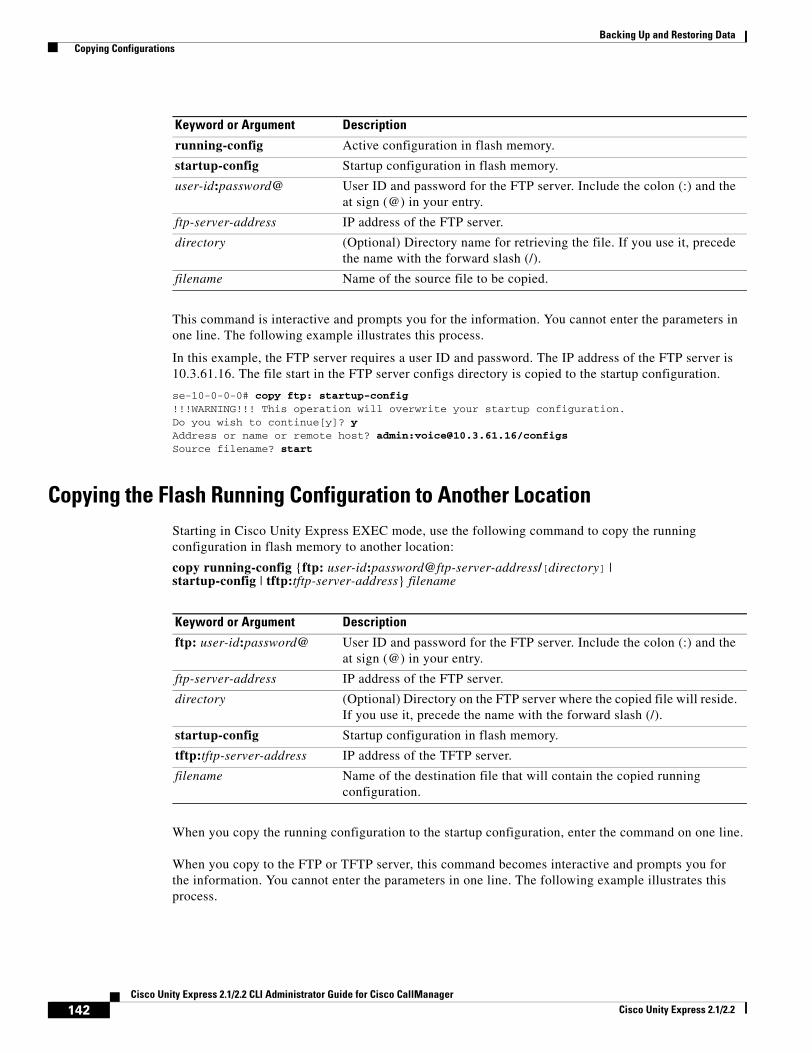
Backing Up and Restoring Data Copying Configurations
This command is interactive and prompts you for the information. You cannot enter the parameters in one line. The following example illustrates this process.
In this example, the FTP server requires a user ID and password. The IP address of the FTP server is 10.3.61.16. The file start in the FTP server configs directory is copied to the startup configuration.
se-10-0-0-0# copy ftp: startup-config !!!WARNING!!! This operation will overwrite your startup configuration.Do you wish to continue[y]? yAddress or name or remote host? admin:[email protected]/configs Source filename? start
Copying the Flash Running Configuration to Another LocationStarting in Cisco Unity Express EXEC mode, use the following command to copy the running configuration in flash memory to another location:
copy running-config {ftp: user-id:password@ftp-server-address/[directory] |startup-config | tftp:tftp-server-address} filename
When you copy the running configuration to the startup configuration, enter the command on one line.
When you copy to the FTP or TFTP server, this command becomes interactive and prompts you for the information. You cannot enter the parameters in one line. The following example illustrates this process.
Keyword or Argument Description
running-config Active configuration in flash memory.
startup-config Startup configuration in flash memory.
user-id:password@ User ID and password for the FTP server. Include the colon (:) and the at sign (@) in your entry.
ftp-server-address IP address of the FTP server.
directory (Optional) Directory name for retrieving the file. If you use it, precede the name with the forward slash (/).
filename Name of the source file to be copied.
Keyword or Argument Description
ftp: user-id:password@ User ID and password for the FTP server. Include the colon (:) and the at sign (@) in your entry.
ftp-server-address IP address of the FTP server.
directory (Optional) Directory on the FTP server where the copied file will reside. If you use it, precede the name with the forward slash (/).
startup-config Startup configuration in flash memory.
tftp:tftp-server-address IP address of the TFTP server.
filename Name of the destination file that will contain the copied running configuration.
142Cisco Unity Express 2.1/2.2 CLI Administrator Guide for Cisco CallManager
Cisco Unity Express 2.1/2.2
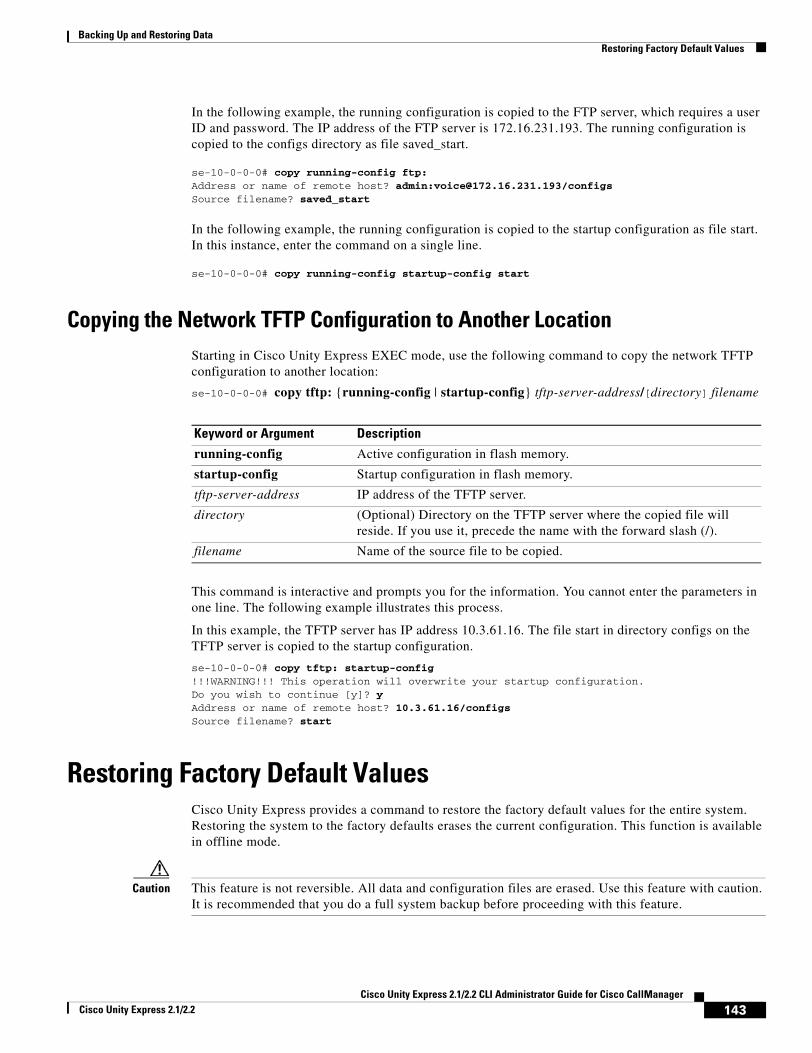
Backing Up and Restoring Data Restoring Factory Default Values
In the following example, the running configuration is copied to the FTP server, which requires a user ID and password. The IP address of the FTP server is 172.16.231.193. The running configuration is copied to the configs directory as file saved_start.
se-10-0-0-0# copy running-config ftp:Address or name of remote host? admin:[email protected]/configsSource filename? saved_start
In the following example, the running configuration is copied to the startup configuration as file start. In this instance, enter the command on a single line.
se-10-0-0-0# copy running-config startup-config start
Copying the Network TFTP Configuration to Another LocationStarting in Cisco Unity Express EXEC mode, use the following command to copy the network TFTP configuration to another location:
se-10-0-0-0# copy tftp: {running-config | startup-config} tftp-server-address/[directory] filename
This command is interactive and prompts you for the information. You cannot enter the parameters in one line. The following example illustrates this process.
In this example, the TFTP server has IP address 10.3.61.16. The file start in directory configs on the TFTP server is copied to the startup configuration.
se-10-0-0-0# copy tftp: startup-config!!!WARNING!!! This operation will overwrite your startup configuration.Do you wish to continue [y]? yAddress or name of remote host? 10.3.61.16/configsSource filename? start
Restoring Factory Default ValuesCisco Unity Express provides a command to restore the factory default values for the entire system. Restoring the system to the factory defaults erases the current configuration. This function is available in offline mode.
Caution This feature is not reversible. All data and configuration files are erased. Use this feature with caution. It is recommended that you do a full system backup before proceeding with this feature.
Keyword or Argument Description
running-config Active configuration in flash memory.
startup-config Startup configuration in flash memory.
tftp-server-address IP address of the TFTP server.
directory (Optional) Directory on the TFTP server where the copied file will reside. If you use it, precede the name with the forward slash (/).
filename Name of the source file to be copied.
143Cisco Unity Express 2.1/2.2 CLI Administrator Guide for Cisco CallManager
Cisco Unity Express 2.1/2.2
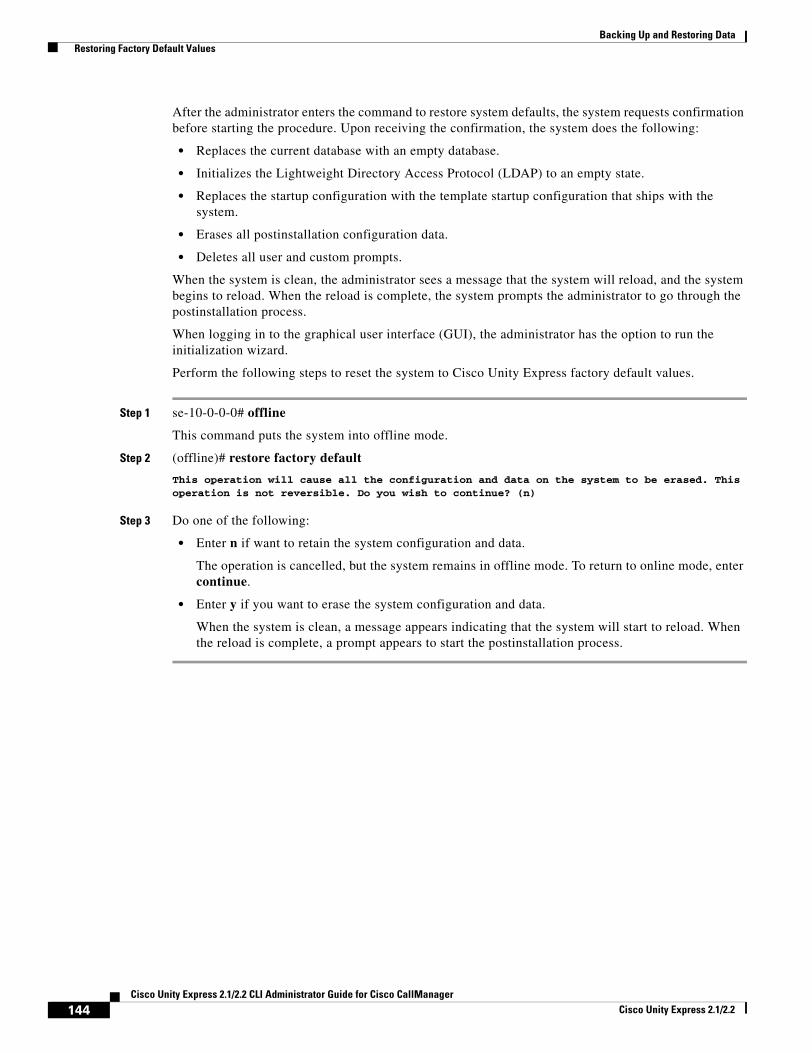
Backing Up and Restoring Data Restoring Factory Default Values
After the administrator enters the command to restore system defaults, the system requests confirmation before starting the procedure. Upon receiving the confirmation, the system does the following:
• Replaces the current database with an empty database.
• Initializes the Lightweight Directory Access Protocol (LDAP) to an empty state.
• Replaces the startup configuration with the template startup configuration that ships with the system.
• Erases all postinstallation configuration data.
• Deletes all user and custom prompts.
When the system is clean, the administrator sees a message that the system will reload, and the system begins to reload. When the reload is complete, the system prompts the administrator to go through the postinstallation process.
When logging in to the graphical user interface (GUI), the administrator has the option to run the initialization wizard.
Perform the following steps to reset the system to Cisco Unity Express factory default values.
Step 1 se-10-0-0-0# offline
This command puts the system into offline mode.
Step 2 (offline)# restore factory default
This operation will cause all the configuration and data on the system to be erased. This operation is not reversible. Do you wish to continue? (n)
Step 3 Do one of the following:
• Enter n if want to retain the system configuration and data.
The operation is cancelled, but the system remains in offline mode. To return to online mode, enter continue.
• Enter y if you want to erase the system configuration and data.
When the system is clean, a message appears indicating that the system will start to reload. When the reload is complete, a prompt appears to start the postinstallation process.
144Cisco Unity Express 2.1/2.2 CLI Administrator Guide for Cisco CallManager
Cisco Unity Express 2.1/2.2
Troubleshooting
This chapter provides information on troubleshooting some Cisco Unity Express problems and contains the following sections:
• Troubleshooting Guidelines, page 145
• Troubleshooting Commands, page 149
Also check “Restrictions for Implementing Cisco Unity Express” on page 12 in case system limitations are involved in the problem under consideration.
Troubleshooting GuidelinesThe following sections provide information and suggestions for resolving some problems with the Cisco Unity Express configuration and applications:
• System Reports, page 145
• Log Files, page 146
• Users and Groups, page 146
• Hardware and Software, page 146
• Voice Mail, page 149
• Auto Attendant Prompts, page 149
System ReportsCisco Unity Express provides the following system reports in both the graphical user interface (GUI) and the command-line interface (CLI):
• Mailbox and message statistics
• Mailbox size monitoring
• Backup and restore history
• System hardware parameters
• Memory and CPU usage (CLI only)
• Call history
145Cisco Unity Express 2.1/2.2 CLI Administrator Guide for Cisco CallManager
Cisco Unity Express 2.1/2.2
Troubleshooting Troubleshooting Guidelines
Log FilesProblem: I cannot display log files in the GUI.
Explanation Log files are kept for error reporting and troubleshooting. The GUI does not have access to system error messages.
Recommended Action Use the CLI to display log files.
Users and GroupsProblem: I cannot get in to the GUI.
Explanation You forgot to enter a system administrator during the initialization wizard.
Recommended Action Use the administrator login ID created during the post-installation procedure or create an administrator login ID using the following CLI commands, starting in Cisco Unity Express EXEC mode, where name is the user ID and password is the user’s password:
a. cue-10-0-0-0# username name create
b. cue-10-0-0-0# username name password password
c. cue-10-0-0-0# config t
d. cue-10-0-0-0(config)# groupname Administrators member name
Problem: I need to recover a user’s password or personal identification number (PIN).
Explanation The user has forgotten the password or PIN.
Recommended Action For security reasons, passwords and PINs are not displayed on the screen or printed out. You must create a new password or PIN and give that new code to the user. See “Adding and Modifying a User” on page 106 for the commands to create a new password or PIN.
Hardware and Software
Rebooting the System
Problem: I am not sure if I need to reboot the router when I reboot the Cisco Unity Express module.
Explanation A reboot of the Cisco Unity Express module does not require a reboot of the router. The Cisco Unity Express module and the router can be rebooted independently of each other. However, if you reboot the router, no calls will reach the module until IP connectivity is reestablished between the router and the module.
Caution Always do a shutdown of the module before power-cycling the router to avoid data loss or file corruption.
146Cisco Unity Express 2.1/2.2 CLI Administrator Guide for Cisco CallManager
Cisco Unity Express 2.1/2.2
Troubleshooting Troubleshooting Guidelines
Setting Daylight Savings Time
Problem: I need to set daylight savings time.
Explanation Cisco Unity Express sets daylight savings time automatically on the basis of the time zone, which is selected during the installation procedure or with the Administration > Network Time & Time Zone Settings GUI screen.
Communicating Between Components
Problem: I cannot open a session in to the Cisco Unity Express module.
Explanation The TTY line associated with the module is occupied.
Recommended Action Use the service-module service-engine slot/port session clear command to clear the TTY line.
Problem: I cannot change or remove the IP address or IP default-gateway configurations with the Cisco Unity Express CLI.
Explanation The IP address and IP default-gateway configurations are controlled from the Cisco IOS software.
Recommended Action Make the required changes from the service-engine interface.
Problem: Service-module commands do not seem to take effect.
Explanation The service-module status might not be steady state. RBCP configuration messages go through only when the service-module is in steady state.
Recommended Action Use the service-module service-engine slot/port reload command to reload the Cisco Unity Express module.
Problem: I cannot ping the internal address when using the IP unnumbered scheme.
Explanation The IP route table is not correct.
Recommended Action When using IP unnumbered, add a static route that points to the service-engine interface.
Problem: I cannot set the speed of the terminal line from the router side or the Cisco Unity Express side.
Explanation Cisco Unity Express does not have a CLI command to set the speed. The speed is set to 9600, 8-N-1 on both the Cisco CallManager and Cisco Unity Express sides. Although Cisco IOS software allows you to change the speed settings, the changes do not take effect.
Online Insertion and Removal (OIR)
Problem: I did an OIR of the Cisco Unity Express AIM-CUE on my router but it does not seem to be working.
Explanation Only the Cisco 3745 and 3845 routers support OIR. OIR is not available on the AIM.
147Cisco Unity Express 2.1/2.2 CLI Administrator Guide for Cisco CallManager
Cisco Unity Express 2.1/2.2
Troubleshooting Troubleshooting Guidelines
Problem: I did an OIR on the Cisco 3745. Now the Cisco Unity Express network module is not working.
Explanation The Cisco Unity Express network module must be shutdown before OIR.
Recommended Action OIR requires the following steps:
a. Shut down the service-engine interface.
b. Issue the service-module service-engine slot/port shutdown command.
c. Wait for confirmation that the network module has been shut down.
d. Proceed with the OIR.
Saving and Viewing Log Files
Problem: I need to be able to store log files to a remote location.
Recommended Action Log files are stored on the disk, which is the default location. You can configure Cisco Unity Express to store the log files to a separate server. Also, you can copy log files on the disk to a separate server if they need to be kept for history purposes, for example:
copy log filename.log url ftp://ftp-user-id:ftp-user-passwd@ftp-ip-address/directory
se-10-0-0-0# copy log messages.log url ftp://admin:[email protected]/log_history
Problem: I cannot display the contents of log files on the GUI.
Explanation The GUI cannot display log files. Troubleshooting commands and files are available only through the CLI.
Recommended Action Copy the log files from Cisco Unity Express to an external server and use a text editor, such as vi, to display the content.
Saving Configuration Changes
Problem: I lost some configuration data when the GUI timer expired.
Explanation You did not save the data while you were entering it.
Recommended Action While making some configuration changes in the GUI, use the Apply icon to save your changes to the running configuration before the timer logs you out of the system. If the timer logs you out and you did not use the Apply icon, your changes are not saved.
Note The timer affects only the GUI, not the CLI.
Problem: I lost configuration data when I rebooted the system.
Explanation You did not save the data before the reboot.
Recommended Action Perform a Save Configuration operation in the GUI or enter a copy running-config startup-config command in the CLI to copy your changes from the running configuration to the startup configuration. When Cisco Unity Express reboots, it reloads the startup configuration.
148Cisco Unity Express 2.1/2.2 CLI Administrator Guide for Cisco CallManager
Cisco Unity Express 2.1/2.2
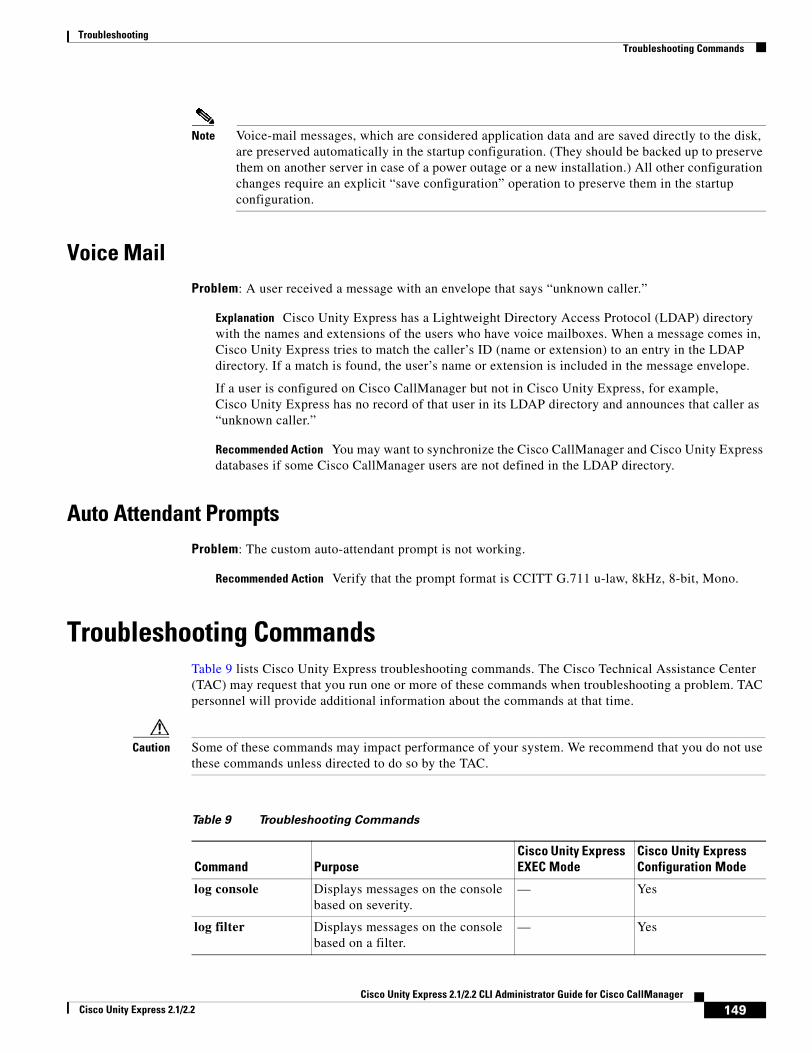
Troubleshooting Troubleshooting Commands
Note Voice-mail messages, which are considered application data and are saved directly to the disk, are preserved automatically in the startup configuration. (They should be backed up to preserve them on another server in case of a power outage or a new installation.) All other configuration changes require an explicit “save configuration” operation to preserve them in the startup configuration.
Voice MailProblem: A user received a message with an envelope that says “unknown caller.”
Explanation Cisco Unity Express has a Lightweight Directory Access Protocol (LDAP) directory with the names and extensions of the users who have voice mailboxes. When a message comes in, Cisco Unity Express tries to match the caller’s ID (name or extension) to an entry in the LDAP directory. If a match is found, the user’s name or extension is included in the message envelope.
If a user is configured on Cisco CallManager but not in Cisco Unity Express, for example, Cisco Unity Express has no record of that user in its LDAP directory and announces that caller as “unknown caller.”
Recommended Action You may want to synchronize the Cisco CallManager and Cisco Unity Express databases if some Cisco CallManager users are not defined in the LDAP directory.
Auto Attendant PromptsProblem: The custom auto-attendant prompt is not working.
Recommended Action Verify that the prompt format is CCITT G.711 u-law, 8kHz, 8-bit, Mono.
Troubleshooting CommandsTable 9 lists Cisco Unity Express troubleshooting commands. The Cisco Technical Assistance Center (TAC) may request that you run one or more of these commands when troubleshooting a problem. TAC personnel will provide additional information about the commands at that time.
Caution Some of these commands may impact performance of your system. We recommend that you do not use these commands unless directed to do so by the TAC.
Table 9 Troubleshooting Commands
Command PurposeCisco Unity Express EXEC Mode
Cisco Unity Express Configuration Mode
log console Displays messages on the console based on severity.
— Yes
log filter Displays messages on the console based on a filter.
— Yes
149Cisco Unity Express 2.1/2.2 CLI Administrator Guide for Cisco CallManager
Cisco Unity Express 2.1/2.2
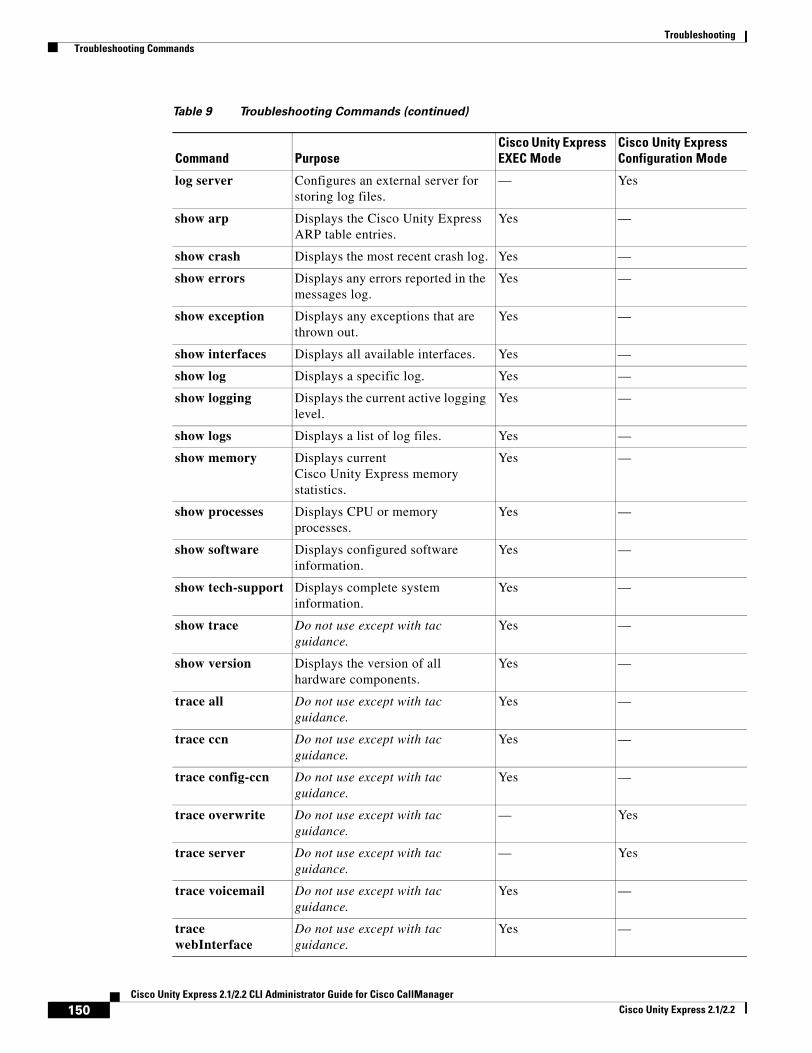
Troubleshooting Troubleshooting Commands
log server Configures an external server for storing log files.
— Yes
show arp Displays the Cisco Unity Express ARP table entries.
Yes —
show crash Displays the most recent crash log. Yes —
show errors Displays any errors reported in the messages log.
Yes —
show exception Displays any exceptions that are thrown out.
Yes —
show interfaces Displays all available interfaces. Yes —
show log Displays a specific log. Yes —
show logging Displays the current active logging level.
Yes —
show logs Displays a list of log files. Yes —
show memory Displays current Cisco Unity Express memory statistics.
Yes —
show processes Displays CPU or memory processes.
Yes —
show software Displays configured software information.
Yes —
show tech-support Displays complete system information.
Yes —
show trace Do not use except with tac guidance.
Yes —
show version Displays the version of all hardware components.
Yes —
trace all Do not use except with tac guidance.
Yes —
trace ccn Do not use except with tac guidance.
Yes —
trace config-ccn Do not use except with tac guidance.
Yes —
trace overwrite Do not use except with tac guidance.
— Yes
trace server Do not use except with tac guidance.
— Yes
trace voicemail Do not use except with tac guidance.
Yes —
trace webInterface
Do not use except with tac guidance.
Yes —
Table 9 Troubleshooting Commands (continued)
Command PurposeCisco Unity Express EXEC Mode
Cisco Unity Express Configuration Mode
150Cisco Unity Express 2.1/2.2 CLI Administrator Guide for Cisco CallManager
Cisco Unity Express 2.1/2.2
Advanced Configuration
This chapter describes advanced configuration procedures for modifying application parameters after the initial installation and configuration process described in the section “Configuring System Components” on page 63. That earlier chapter includes commands not described in this chapter.
The advanced configuration procedures include:
• Configuring System Engine Parameters, page 152
• Configuring Application Parameters, page 154
• Configuring Multiple Triggers for an Application, page 158
• Configuring the Hostname, page 162
• Configuring the DNS Server, page 164
• Configuring NTP Servers, page 166
• Configuring an External Syslog Server, page 170
• Configuring the Clock Time Zone, page 172
151Cisco Unity Express 2.1/2.2 CLI Administrator Guide for Cisco CallManager
Cisco Unity Express 2.1/2.2
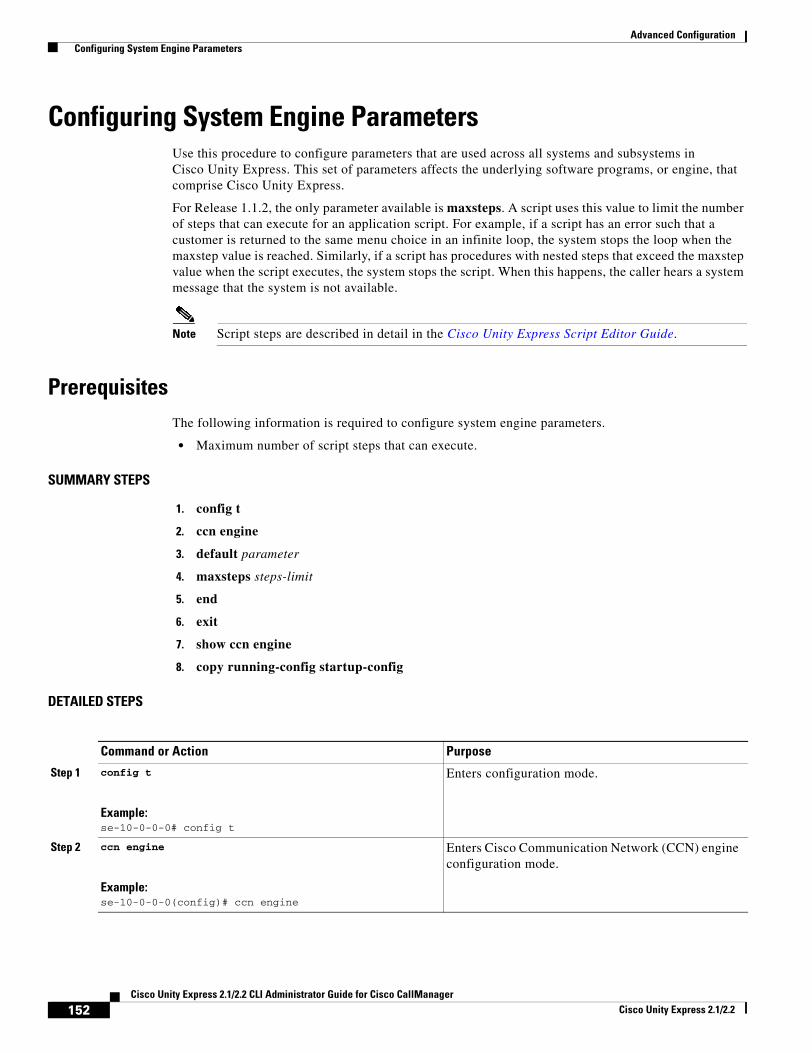
Advanced Configuration Configuring System Engine Parameters
Configuring System Engine ParametersUse this procedure to configure parameters that are used across all systems and subsystems in Cisco Unity Express. This set of parameters affects the underlying software programs, or engine, that comprise Cisco Unity Express.
For Release 1.1.2, the only parameter available is maxsteps. A script uses this value to limit the number of steps that can execute for an application script. For example, if a script has an error such that a customer is returned to the same menu choice in an infinite loop, the system stops the loop when the maxstep value is reached. Similarly, if a script has procedures with nested steps that exceed the maxstep value when the script executes, the system stops the script. When this happens, the caller hears a system message that the system is not available.
Note Script steps are described in detail in the Cisco Unity Express Script Editor Guide.
PrerequisitesThe following information is required to configure system engine parameters.
• Maximum number of script steps that can execute.
SUMMARY STEPS
1. config t
2. ccn engine
3. default parameter
4. maxsteps steps-limit
5. end
6. exit
7. show ccn engine
8. copy running-config startup-config
DETAILED STEPS
Command or Action Purpose
Step 1 config t
Example:se-10-0-0-0# config t
Enters configuration mode.
Step 2 ccn engine
Example:se-10-0-0-0(config)# ccn engine
Enters Cisco Communication Network (CCN) engine configuration mode.
152Cisco Unity Express 2.1/2.2 CLI Administrator Guide for Cisco CallManager
Cisco Unity Express 2.1/2.2
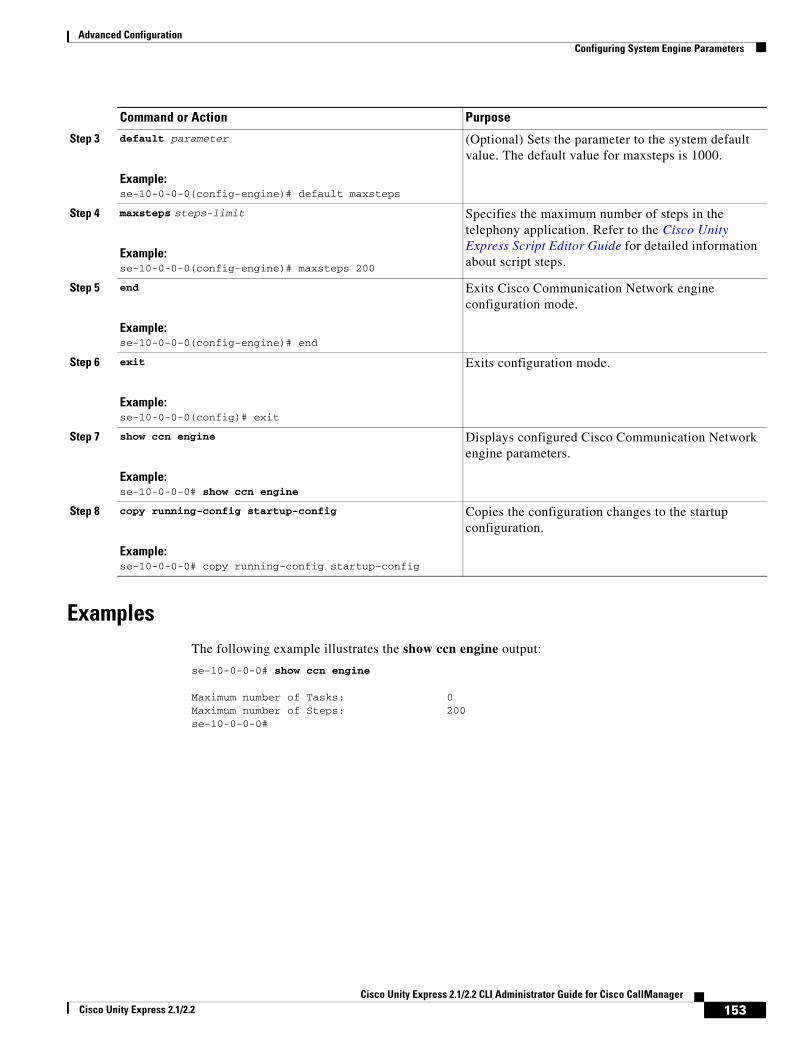
Advanced Configuration Configuring System Engine Parameters
ExamplesThe following example illustrates the show ccn engine output:
se-10-0-0-0# show ccn engine
Maximum number of Tasks: 0Maximum number of Steps: 200se-10-0-0-0#
Step 3 default parameter
Example:se-10-0-0-0(config-engine)# default maxsteps
(Optional) Sets the parameter to the system default value. The default value for maxsteps is 1000.
Step 4 maxsteps steps-limit
Example:se-10-0-0-0(config-engine)# maxsteps 200
Specifies the maximum number of steps in the telephony application. Refer to the Cisco Unity Express Script Editor Guide for detailed information about script steps.
Step 5 end
Example:se-10-0-0-0(config-engine)# end
Exits Cisco Communication Network engine configuration mode.
Step 6 exit
Example:se-10-0-0-0(config)# exit
Exits configuration mode.
Step 7 show ccn engine
Example:se-10-0-0-0# show ccn engine
Displays configured Cisco Communication Network engine parameters.
Step 8 copy running-config startup-config
Example:se-10-0-0-0# copy running-config startup-config
Copies the configuration changes to the startup configuration.
Command or Action Purpose
153Cisco Unity Express 2.1/2.2 CLI Administrator Guide for Cisco CallManager
Cisco Unity Express 2.1/2.2
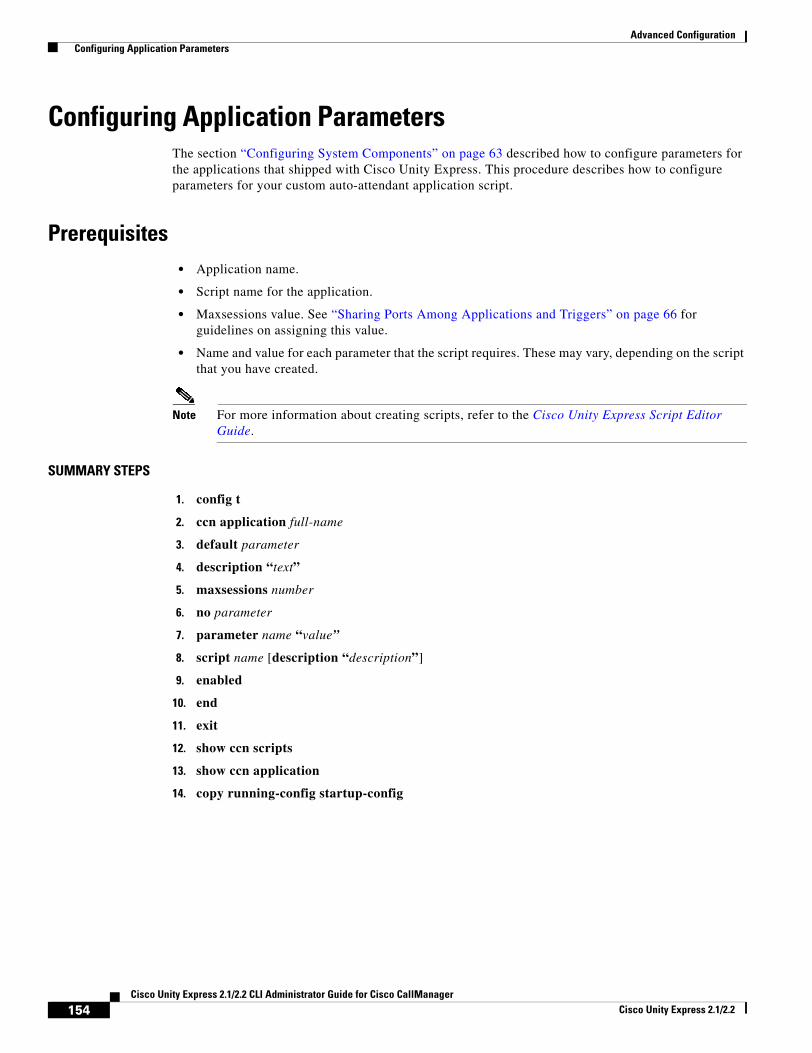
Advanced Configuration Configuring Application Parameters
Configuring Application ParametersThe section “Configuring System Components” on page 63 described how to configure parameters for the applications that shipped with Cisco Unity Express. This procedure describes how to configure parameters for your custom auto-attendant application script.
Prerequisites• Application name.
• Script name for the application.
• Maxsessions value. See “Sharing Ports Among Applications and Triggers” on page 66 for guidelines on assigning this value.
• Name and value for each parameter that the script requires. These may vary, depending on the script that you have created.
Note For more information about creating scripts, refer to the Cisco Unity Express Script Editor Guide.
SUMMARY STEPS
1. config t
2. ccn application full-name
3. default parameter
4. description “text”
5. maxsessions number
6. no parameter
7. parameter name “value”
8. script name [description “description”]
9. enabled
10. end
11. exit
12. show ccn scripts
13. show ccn application
14. copy running-config startup-config
154Cisco Unity Express 2.1/2.2 CLI Administrator Guide for Cisco CallManager
Cisco Unity Express 2.1/2.2
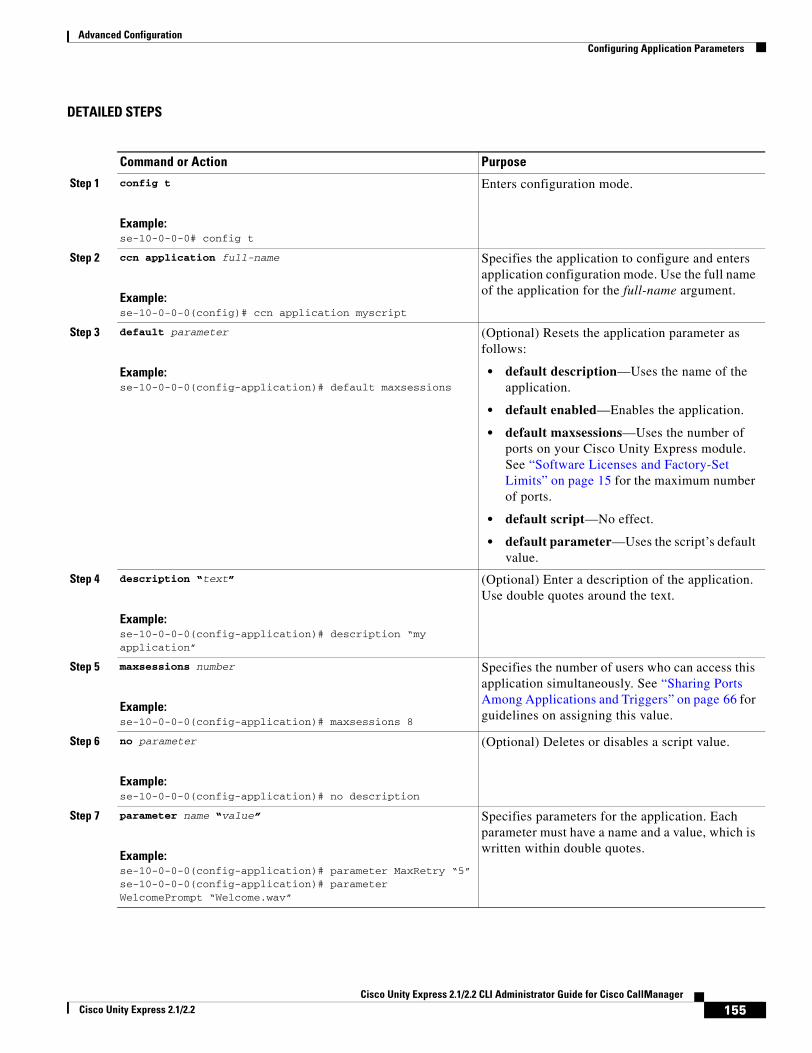
Advanced Configuration Configuring Application Parameters
DETAILED STEPS
Command or Action Purpose
Step 1 config t
Example:se-10-0-0-0# config t
Enters configuration mode.
Step 2 ccn application full-name
Example:se-10-0-0-0(config)# ccn application myscript
Specifies the application to configure and enters application configuration mode. Use the full name of the application for the full-name argument.
Step 3 default parameter
Example:se-10-0-0-0(config-application)# default maxsessions
(Optional) Resets the application parameter as follows:
• default description—Uses the name of the application.
• default enabled—Enables the application.
• default maxsessions—Uses the number of ports on your Cisco Unity Express module. See “Software Licenses and Factory-Set Limits” on page 15 for the maximum number of ports.
• default script—No effect.
• default parameter—Uses the script’s default value.
Step 4 description “text”
Example:se-10-0-0-0(config-application)# description “my application”
(Optional) Enter a description of the application. Use double quotes around the text.
Step 5 maxsessions number
Example:se-10-0-0-0(config-application)# maxsessions 8
Specifies the number of users who can access this application simultaneously. See “Sharing Ports Among Applications and Triggers” on page 66 for guidelines on assigning this value.
Step 6 no parameter
Example:se-10-0-0-0(config-application)# no description
(Optional) Deletes or disables a script value.
Step 7 parameter name “value”
Example:se-10-0-0-0(config-application)# parameter MaxRetry “5”se-10-0-0-0(config-application)# parameter WelcomePrompt “Welcome.wav”
Specifies parameters for the application. Each parameter must have a name and a value, which is written within double quotes.
155Cisco Unity Express 2.1/2.2 CLI Administrator Guide for Cisco CallManager
Cisco Unity Express 2.1/2.2
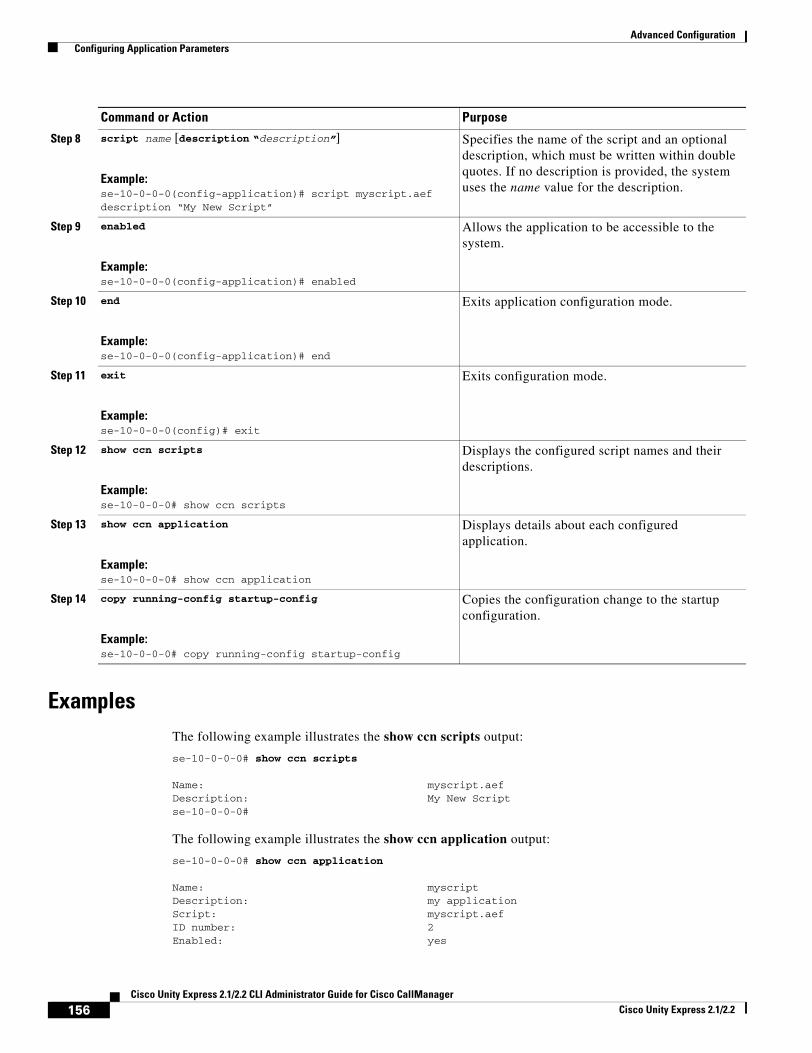
Advanced Configuration Configuring Application Parameters
ExamplesThe following example illustrates the show ccn scripts output:
se-10-0-0-0# show ccn scripts
Name: myscript.aefDescription: My New Scriptse-10-0-0-0#
The following example illustrates the show ccn application output:
se-10-0-0-0# show ccn application
Name: myscriptDescription: my applicationScript: myscript.aefID number: 2Enabled: yes
Step 8 script name [description “description”]
Example:se-10-0-0-0(config-application)# script myscript.aef description “My New Script”
Specifies the name of the script and an optional description, which must be written within double quotes. If no description is provided, the system uses the name value for the description.
Step 9 enabled
Example:se-10-0-0-0(config-application)# enabled
Allows the application to be accessible to the system.
Step 10 end
Example:se-10-0-0-0(config-application)# end
Exits application configuration mode.
Step 11 exit
Example:se-10-0-0-0(config)# exit
Exits configuration mode.
Step 12 show ccn scripts
Example:se-10-0-0-0# show ccn scripts
Displays the configured script names and their descriptions.
Step 13 show ccn application
Example:se-10-0-0-0# show ccn application
Displays details about each configured application.
Step 14 copy running-config startup-config
Example:se-10-0-0-0# copy running-config startup-config
Copies the configuration change to the startup configuration.
Command or Action Purpose
156Cisco Unity Express 2.1/2.2 CLI Administrator Guide for Cisco CallManager
Cisco Unity Express 2.1/2.2
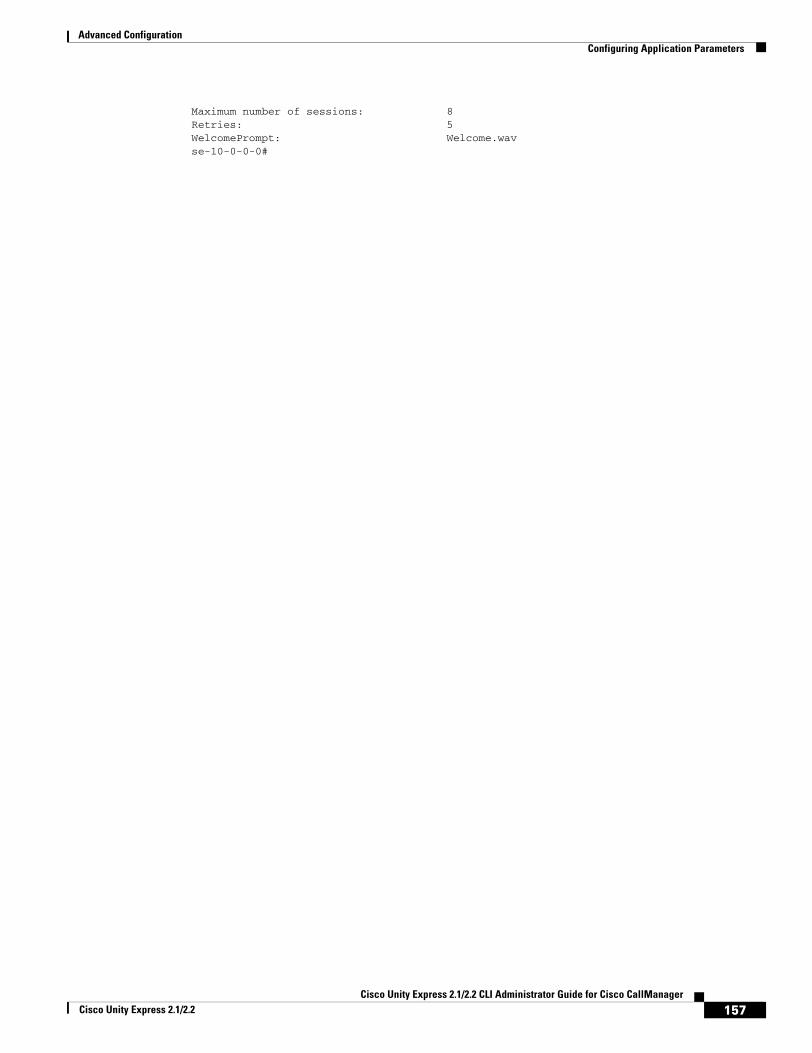
Advanced Configuration Configuring Application Parameters
Maximum number of sessions: 8Retries: 5WelcomePrompt: Welcome.wavse-10-0-0-0#
157Cisco Unity Express 2.1/2.2 CLI Administrator Guide for Cisco CallManager
Cisco Unity Express 2.1/2.2
Advanced Configuration Configuring Multiple Triggers for an Application
Configuring Multiple Triggers for an ApplicationYour network may require additional triggers for one or more Cisco Unity Express applications. For example, customers may be able to dial more than one telephone number to contact your company. These telephone numbers would activate the auto-attendant application.
Use this procedure to configure the additional triggers. Each trigger must match a JTAPI route point. If you configure a trigger on Cisco Unity Express, verify that the route point exists in Cisco CallManager.
Cisco Unity Express supports a maximum of 8 SIP triggers and 8 JTAPI triggers for all applications combined. This applies to both the NM and the AIM.
Port Sharing Among Multiple TriggersEach trigger is assigned a maxsessions value. In addition to the guidelines described in “Sharing Ports Among Applications and Triggers” on page 66, one other consideration is needed.
The maximum number of callers that can access an application concurrently is determined by the application’s maxsession value if the total maxsessions values from all its triggers exceed the application’s maxsessions value.
For example, suppose your module has 8 ports and you assigned the auto-attendant application a maxsessions value of 5. Your auto-attendant application has 2 triggers. You configure one trigger with a maxsessions value of 2 and the other trigger with a maxsessions value of 4. The maximum number of callers that can access the auto-attendant application simultaneously is 5, not 6.
Suppose, instead, that you configure one trigger with a maxsessions value of 2 and the other trigger with a maxsessions value of 2. The maximum number of simultaneous callers to the application is 4, not 5.
PrerequisitesThe following information is required to configure the triggers:
• Telephone number that invokes the application. The number must not be the same for voice mail, auto attendant, and the greeting management system.
• Number of milliseconds that the system must wait for a caller response before it times out and drops the call.
• Language to use for the prompts. Cisco Unity Express supports only one language installed on the system. This option cannot be changed.
• Maximum number of callers, or sessions, that can access the trigger simultaneously.
SUMMARY STEPS
1. config t
2. ccn trigger {sip | jtapi} phonenumber number
3. application string
4. default parameter
5. idletimeout time
6. locale language
7. maxsessions number
158Cisco Unity Express 2.1/2.2 CLI Administrator Guide for Cisco CallManager
Cisco Unity Express 2.1/2.2
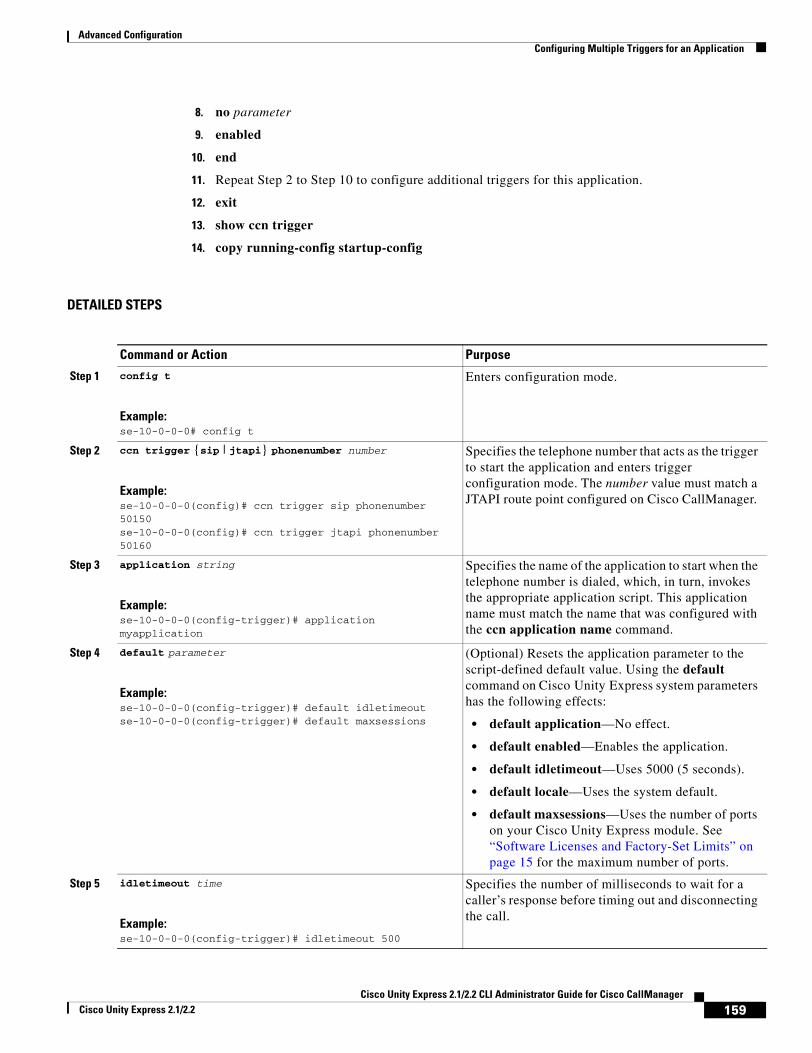
Advanced Configuration Configuring Multiple Triggers for an Application
8. no parameter
9. enabled
10. end
11. Repeat Step 2 to Step 10 to configure additional triggers for this application.
12. exit
13. show ccn trigger
14. copy running-config startup-config
DETAILED STEPS
Command or Action Purpose
Step 1 config t
Example:se-10-0-0-0# config t
Enters configuration mode.
Step 2 ccn trigger {sip | jtapi} phonenumber number
Example:se-10-0-0-0(config)# ccn trigger sip phonenumber 50150se-10-0-0-0(config)# ccn trigger jtapi phonenumber 50160
Specifies the telephone number that acts as the trigger to start the application and enters trigger configuration mode. The number value must match a JTAPI route point configured on Cisco CallManager.
Step 3 application string
Example:se-10-0-0-0(config-trigger)# application myapplication
Specifies the name of the application to start when the telephone number is dialed, which, in turn, invokes the appropriate application script. This application name must match the name that was configured with the ccn application name command.
Step 4 default parameter
Example:se-10-0-0-0(config-trigger)# default idletimeoutse-10-0-0-0(config-trigger)# default maxsessions
(Optional) Resets the application parameter to the script-defined default value. Using the default command on Cisco Unity Express system parameters has the following effects:
• default application—No effect.
• default enabled—Enables the application.
• default idletimeout—Uses 5000 (5 seconds).
• default locale—Uses the system default.
• default maxsessions—Uses the number of ports on your Cisco Unity Express module. See “Software Licenses and Factory-Set Limits” on page 15 for the maximum number of ports.
Step 5 idletimeout time
Example:se-10-0-0-0(config-trigger)# idletimeout 500
Specifies the number of milliseconds to wait for a caller’s response before timing out and disconnecting the call.
159Cisco Unity Express 2.1/2.2 CLI Administrator Guide for Cisco CallManager
Cisco Unity Express 2.1/2.2

Advanced Configuration Configuring Multiple Triggers for an Application
Step 6 locale language
Example:se-10-0-0-0(config-trigger)# locale en_US
Specifies the language to use for the prompts heard by the caller. Cisco Unity Express supports only one language installed on the system. This option cannot be changed.
Step 7 maxsessions number
Example:se-10-0-0-0(config-trigger)# maxsessions 3
Specifies the maximum number of callers that can access the trigger simultaneously. See the “Port Sharing Among Multiple Triggers” section on page 158 for guidelines on assigning this value.
Step 8 no parameter
Example:se-10-0-0-0(config-trigger)# no maxsessionsse-10-0-0-0(config-trigger)# no maxsessions
(Optional) Deletes or disables the parameter value. Using the no command on Cisco Unity Express system parameters has the following effects:
• no application—No effect.
• no enabled—Disables the application.
• no idletimeout—No effect.
• no locale—Uses the system default.
• no maxsessions—Sets the value to 0.
Step 9 enabled
Example:se-10-0-0-0(config-trigger)# enabled
Enables the trigger.
Step 10 end
Example:se-10-0-0-0(config-trigger)# end
Exits trigger configuration mode.
Step 11 Repeat Step 2 to Step 10 to configure additional triggers for this application.
—
Step 12 exit
Example:se-10-0-0-0(config)# exit
Exits configuration mode.
Step 13 show ccn trigger
Example:se-10-0-0-0# show ccn trigger
Displays the parameter values for all configured triggers.
Step 14 copy running-config startup-config
Example:se-10-0-0-0# copy running-config startup-config
Copies the configuration changes to the startup configuration.
Command or Action Purpose
160Cisco Unity Express 2.1/2.2 CLI Administrator Guide for Cisco CallManager
Cisco Unity Express 2.1/2.2
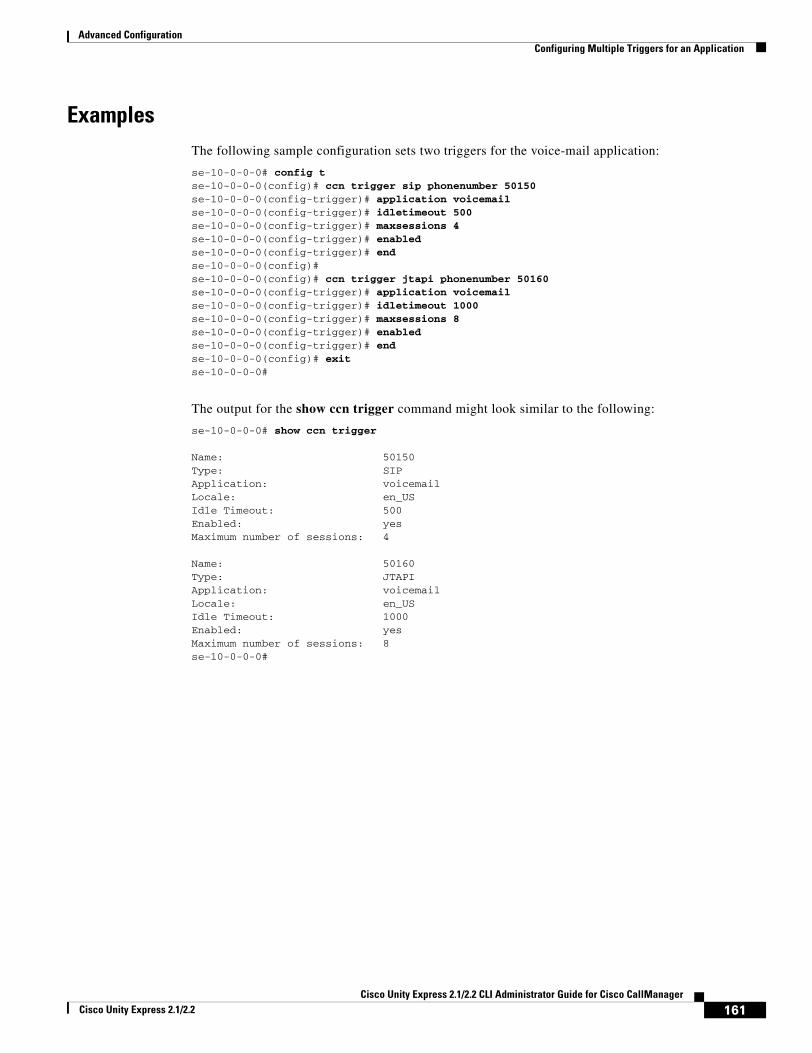
Advanced Configuration Configuring Multiple Triggers for an Application
ExamplesThe following sample configuration sets two triggers for the voice-mail application:
se-10-0-0-0# config tse-10-0-0-0(config)# ccn trigger sip phonenumber 50150se-10-0-0-0(config-trigger)# application voicemailse-10-0-0-0(config-trigger)# idletimeout 500se-10-0-0-0(config-trigger)# maxsessions 4se-10-0-0-0(config-trigger)# enabledse-10-0-0-0(config-trigger)# endse-10-0-0-0(config)#se-10-0-0-0(config)# ccn trigger jtapi phonenumber 50160se-10-0-0-0(config-trigger)# application voicemailse-10-0-0-0(config-trigger)# idletimeout 1000se-10-0-0-0(config-trigger)# maxsessions 8se-10-0-0-0(config-trigger)# enabledse-10-0-0-0(config-trigger)# endse-10-0-0-0(config)# exitse-10-0-0-0#
The output for the show ccn trigger command might look similar to the following:
se-10-0-0-0# show ccn trigger
Name: 50150Type: SIPApplication: voicemailLocale: en_USIdle Timeout: 500Enabled: yesMaximum number of sessions: 4
Name: 50160Type: JTAPIApplication: voicemailLocale: en_USIdle Timeout: 1000Enabled: yesMaximum number of sessions: 8se-10-0-0-0#
161Cisco Unity Express 2.1/2.2 CLI Administrator Guide for Cisco CallManager
Cisco Unity Express 2.1/2.2
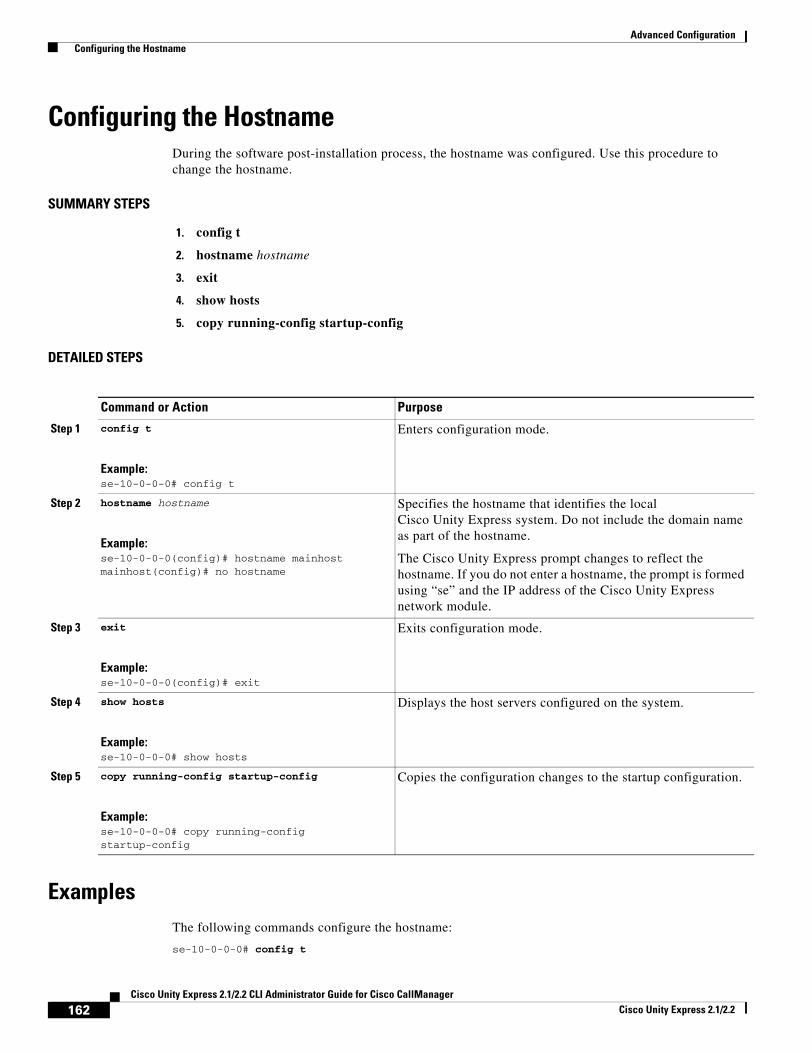
Advanced Configuration Configuring the Hostname
Configuring the HostnameDuring the software post-installation process, the hostname was configured. Use this procedure to change the hostname.
SUMMARY STEPS
1. config t
2. hostname hostname
3. exit
4. show hosts
5. copy running-config startup-config
DETAILED STEPS
ExamplesThe following commands configure the hostname:
se-10-0-0-0# config t
Command or Action Purpose
Step 1 config t
Example:se-10-0-0-0# config t
Enters configuration mode.
Step 2 hostname hostname
Example:se-10-0-0-0(config)# hostname mainhostmainhost(config)# no hostname
Specifies the hostname that identifies the local Cisco Unity Express system. Do not include the domain name as part of the hostname.
The Cisco Unity Express prompt changes to reflect the hostname. If you do not enter a hostname, the prompt is formed using “se” and the IP address of the Cisco Unity Express network module.
Step 3 exit
Example:se-10-0-0-0(config)# exit
Exits configuration mode.
Step 4 show hosts
Example:se-10-0-0-0# show hosts
Displays the host servers configured on the system.
Step 5 copy running-config startup-config
Example:se-10-0-0-0# copy running-config startup-config
Copies the configuration changes to the startup configuration.
162Cisco Unity Express 2.1/2.2 CLI Administrator Guide for Cisco CallManager
Cisco Unity Express 2.1/2.2
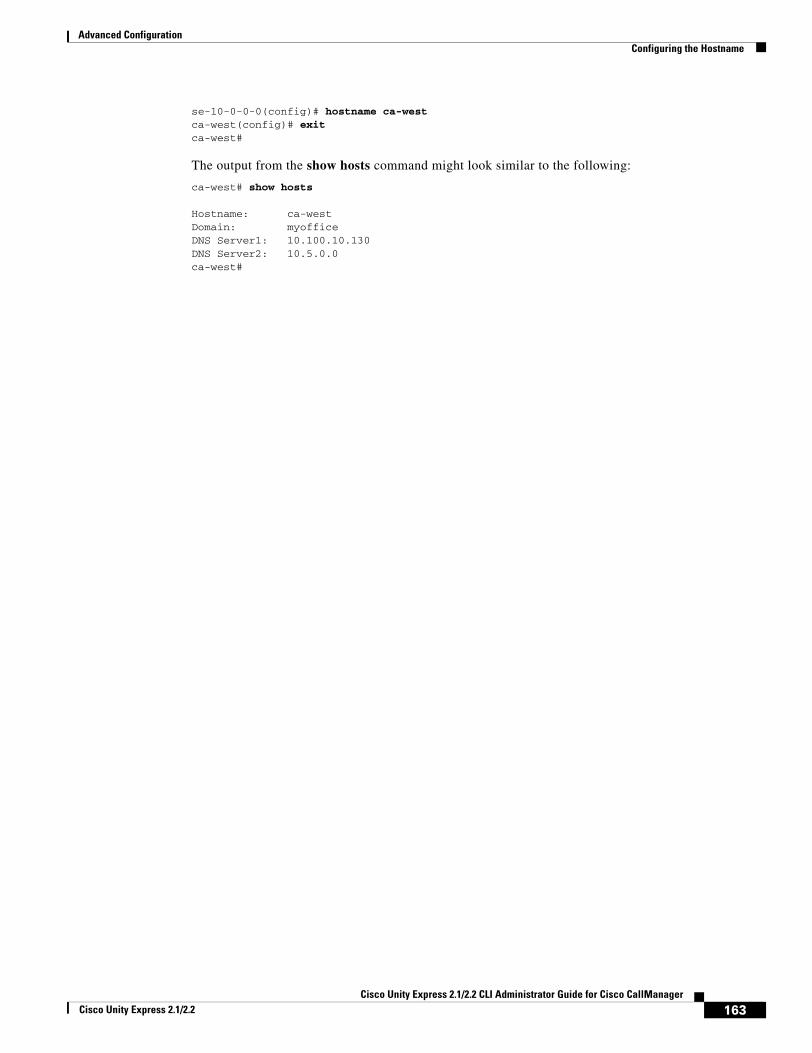
Advanced Configuration Configuring the Hostname
se-10-0-0-0(config)# hostname ca-westca-west(config)# exitca-west#
The output from the show hosts command might look similar to the following:
ca-west# show hosts
Hostname: ca-westDomain: myofficeDNS Server1: 10.100.10.130DNS Server2: 10.5.0.0ca-west#
163Cisco Unity Express 2.1/2.2 CLI Administrator Guide for Cisco CallManager
Cisco Unity Express 2.1/2.2
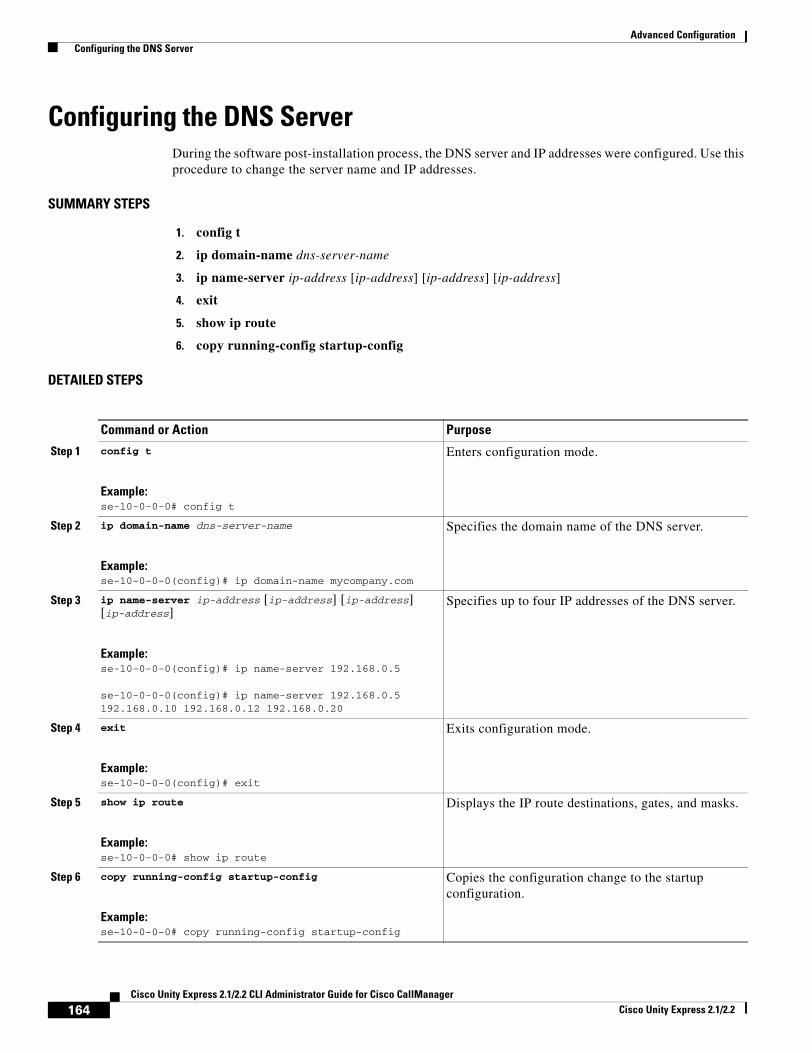
Advanced Configuration Configuring the DNS Server
Configuring the DNS ServerDuring the software post-installation process, the DNS server and IP addresses were configured. Use this procedure to change the server name and IP addresses.
SUMMARY STEPS
1. config t
2. ip domain-name dns-server-name
3. ip name-server ip-address [ip-address] [ip-address] [ip-address]
4. exit
5. show ip route
6. copy running-config startup-config
DETAILED STEPS
Command or Action Purpose
Step 1 config t
Example:se-10-0-0-0# config t
Enters configuration mode.
Step 2 ip domain-name dns-server-name
Example:se-10-0-0-0(config)# ip domain-name mycompany.com
Specifies the domain name of the DNS server.
Step 3 ip name-server ip-address [ip-address] [ip-address] [ip-address]
Example:se-10-0-0-0(config)# ip name-server 192.168.0.5
se-10-0-0-0(config)# ip name-server 192.168.0.5 192.168.0.10 192.168.0.12 192.168.0.20
Specifies up to four IP addresses of the DNS server.
Step 4 exit
Example:se-10-0-0-0(config)# exit
Exits configuration mode.
Step 5 show ip route
Example:se-10-0-0-0# show ip route
Displays the IP route destinations, gates, and masks.
Step 6 copy running-config startup-config
Example:se-10-0-0-0# copy running-config startup-config
Copies the configuration change to the startup configuration.
164Cisco Unity Express 2.1/2.2 CLI Administrator Guide for Cisco CallManager
Cisco Unity Express 2.1/2.2
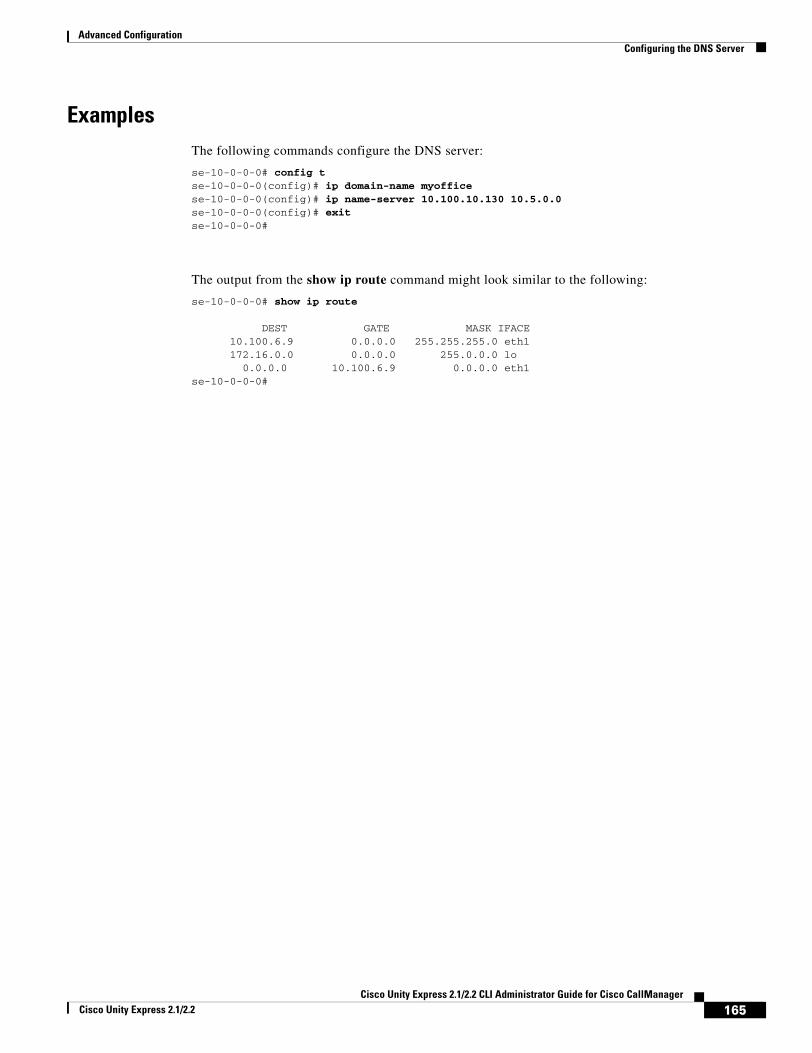
Advanced Configuration Configuring the DNS Server
ExamplesThe following commands configure the DNS server:
se-10-0-0-0# config tse-10-0-0-0(config)# ip domain-name myofficese-10-0-0-0(config)# ip name-server 10.100.10.130 10.5.0.0se-10-0-0-0(config)# exitse-10-0-0-0#
The output from the show ip route command might look similar to the following:
se-10-0-0-0# show ip route
DEST GATE MASK IFACE 10.100.6.9 0.0.0.0 255.255.255.0 eth1 172.16.0.0 0.0.0.0 255.0.0.0 lo 0.0.0.0 10.100.6.9 0.0.0.0 eth1se-10-0-0-0#
165Cisco Unity Express 2.1/2.2 CLI Administrator Guide for Cisco CallManager
Cisco Unity Express 2.1/2.2
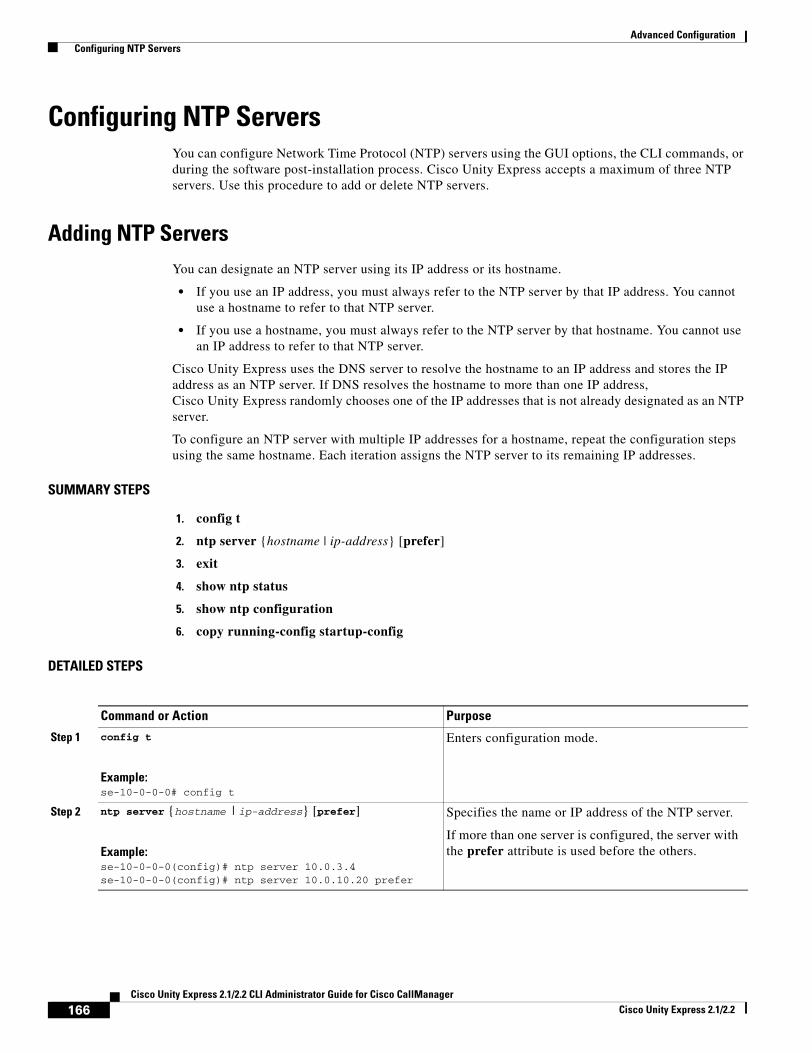
Advanced Configuration Configuring NTP Servers
Configuring NTP ServersYou can configure Network Time Protocol (NTP) servers using the GUI options, the CLI commands, or during the software post-installation process. Cisco Unity Express accepts a maximum of three NTP servers. Use this procedure to add or delete NTP servers.
Adding NTP ServersYou can designate an NTP server using its IP address or its hostname.
• If you use an IP address, you must always refer to the NTP server by that IP address. You cannot use a hostname to refer to that NTP server.
• If you use a hostname, you must always refer to the NTP server by that hostname. You cannot use an IP address to refer to that NTP server.
Cisco Unity Express uses the DNS server to resolve the hostname to an IP address and stores the IP address as an NTP server. If DNS resolves the hostname to more than one IP address, Cisco Unity Express randomly chooses one of the IP addresses that is not already designated as an NTP server.
To configure an NTP server with multiple IP addresses for a hostname, repeat the configuration steps using the same hostname. Each iteration assigns the NTP server to its remaining IP addresses.
SUMMARY STEPS
1. config t
2. ntp server {hostname | ip-address} [prefer]
3. exit
4. show ntp status
5. show ntp configuration
6. copy running-config startup-config
DETAILED STEPS
Command or Action Purpose
Step 1 config t
Example:se-10-0-0-0# config t
Enters configuration mode.
Step 2 ntp server {hostname | ip-address} [prefer]
Example:se-10-0-0-0(config)# ntp server 10.0.3.4se-10-0-0-0(config)# ntp server 10.0.10.20 prefer
Specifies the name or IP address of the NTP server.
If more than one server is configured, the server with the prefer attribute is used before the others.
166Cisco Unity Express 2.1/2.2 CLI Administrator Guide for Cisco CallManager
Cisco Unity Express 2.1/2.2
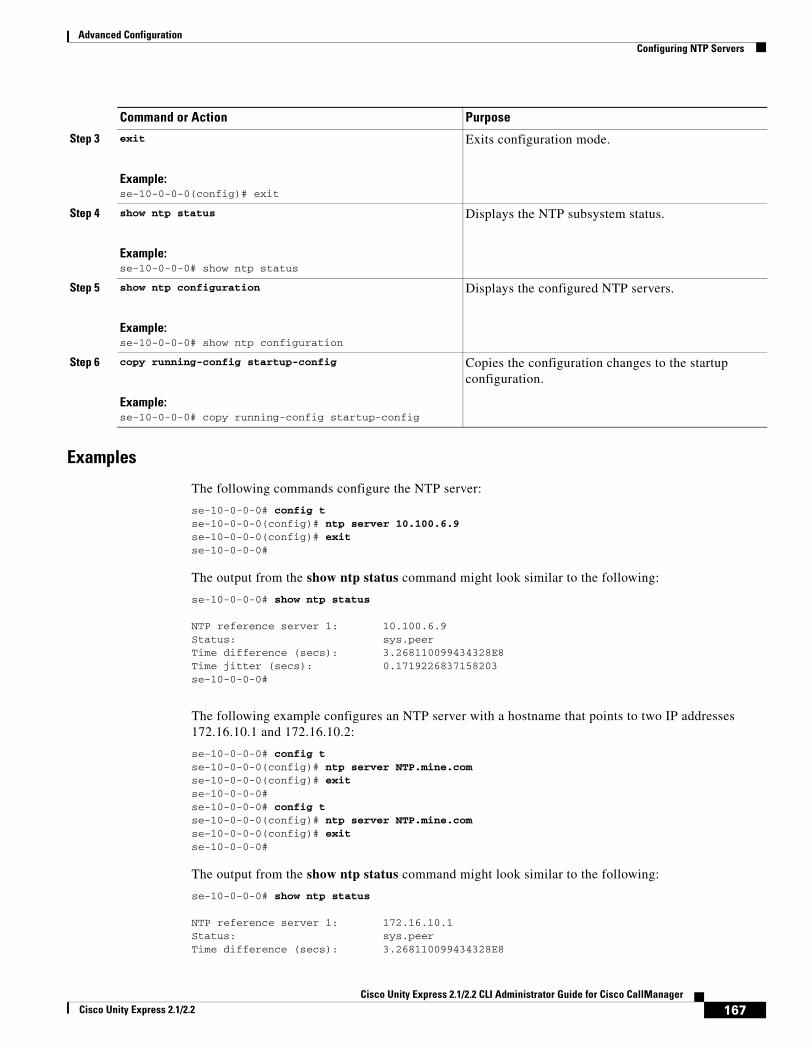
Advanced Configuration Configuring NTP Servers
Examples
The following commands configure the NTP server:
se-10-0-0-0# config tse-10-0-0-0(config)# ntp server 10.100.6.9se-10-0-0-0(config)# exitse-10-0-0-0#
The output from the show ntp status command might look similar to the following:
se-10-0-0-0# show ntp status
NTP reference server 1: 10.100.6.9Status: sys.peerTime difference (secs): 3.268110099434328E8Time jitter (secs): 0.1719226837158203se-10-0-0-0#
The following example configures an NTP server with a hostname that points to two IP addresses 172.16.10.1 and 172.16.10.2:
se-10-0-0-0# config tse-10-0-0-0(config)# ntp server NTP.mine.comse-10-0-0-0(config)# exitse-10-0-0-0#se-10-0-0-0# config tse-10-0-0-0(config)# ntp server NTP.mine.comse-10-0-0-0(config)# exitse-10-0-0-0#
The output from the show ntp status command might look similar to the following:
se-10-0-0-0# show ntp status
NTP reference server 1: 172.16.10.1Status: sys.peerTime difference (secs): 3.268110099434328E8
Step 3 exit
Example:se-10-0-0-0(config)# exit
Exits configuration mode.
Step 4 show ntp status
Example:se-10-0-0-0# show ntp status
Displays the NTP subsystem status.
Step 5 show ntp configuration
Example:se-10-0-0-0# show ntp configuration
Displays the configured NTP servers.
Step 6 copy running-config startup-config
Example:se-10-0-0-0# copy running-config startup-config
Copies the configuration changes to the startup configuration.
Command or Action Purpose
167Cisco Unity Express 2.1/2.2 CLI Administrator Guide for Cisco CallManager
Cisco Unity Express 2.1/2.2
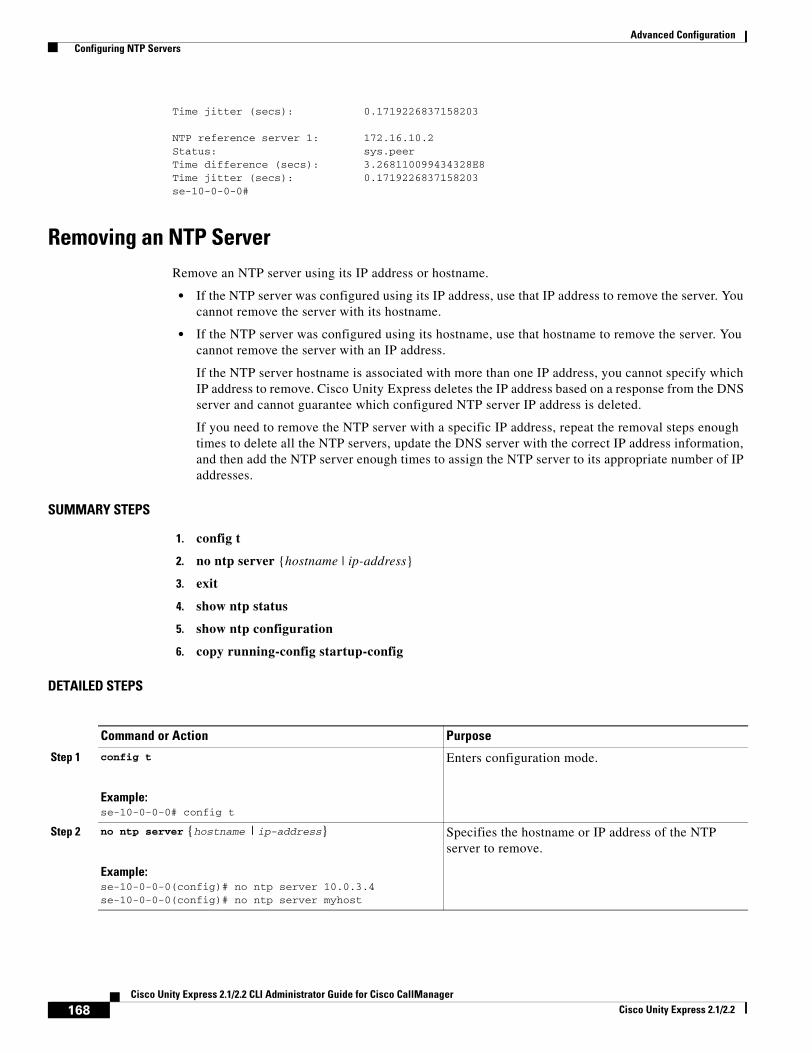
Advanced Configuration Configuring NTP Servers
Time jitter (secs): 0.1719226837158203
NTP reference server 1: 172.16.10.2Status: sys.peerTime difference (secs): 3.268110099434328E8Time jitter (secs): 0.1719226837158203se-10-0-0-0#
Removing an NTP ServerRemove an NTP server using its IP address or hostname.
• If the NTP server was configured using its IP address, use that IP address to remove the server. You cannot remove the server with its hostname.
• If the NTP server was configured using its hostname, use that hostname to remove the server. You cannot remove the server with an IP address.
If the NTP server hostname is associated with more than one IP address, you cannot specify which IP address to remove. Cisco Unity Express deletes the IP address based on a response from the DNS server and cannot guarantee which configured NTP server IP address is deleted.
If you need to remove the NTP server with a specific IP address, repeat the removal steps enough times to delete all the NTP servers, update the DNS server with the correct IP address information, and then add the NTP server enough times to assign the NTP server to its appropriate number of IP addresses.
SUMMARY STEPS
1. config t
2. no ntp server {hostname | ip-address}
3. exit
4. show ntp status
5. show ntp configuration
6. copy running-config startup-config
DETAILED STEPS
Command or Action Purpose
Step 1 config t
Example:se-10-0-0-0# config t
Enters configuration mode.
Step 2 no ntp server {hostname | ip-address}
Example:se-10-0-0-0(config)# no ntp server 10.0.3.4se-10-0-0-0(config)# no ntp server myhost
Specifies the hostname or IP address of the NTP server to remove.
168Cisco Unity Express 2.1/2.2 CLI Administrator Guide for Cisco CallManager
Cisco Unity Express 2.1/2.2
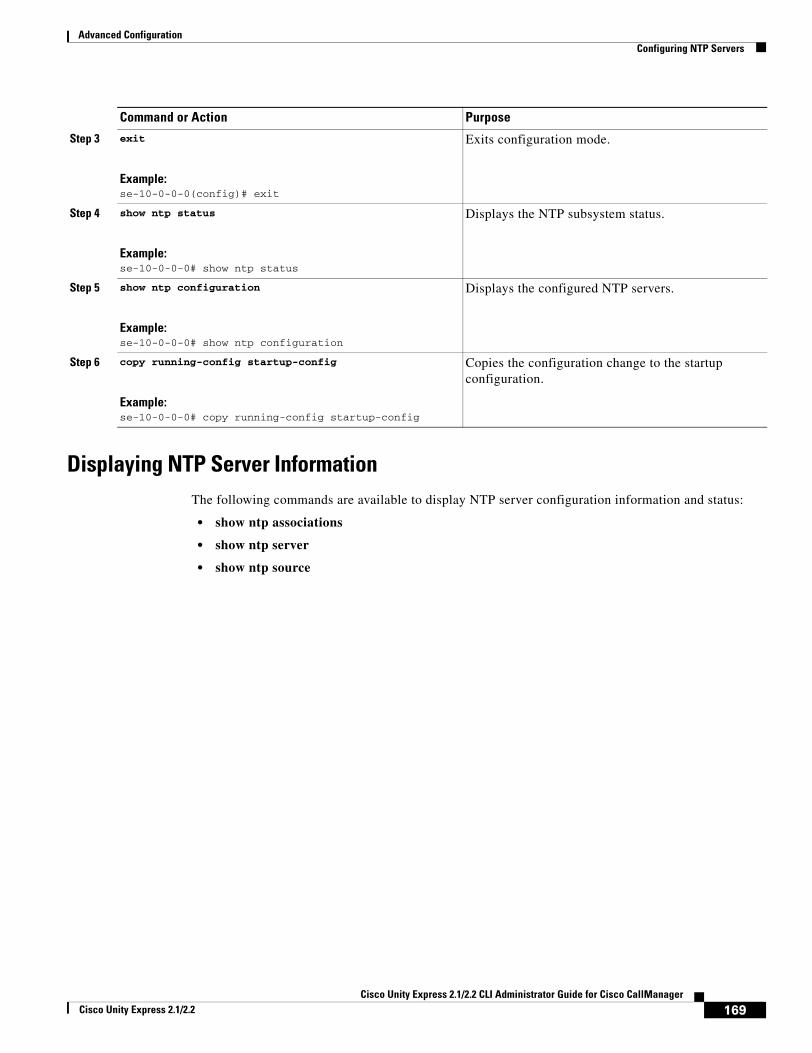
Advanced Configuration Configuring NTP Servers
Displaying NTP Server InformationThe following commands are available to display NTP server configuration information and status:
• show ntp associations
• show ntp server
• show ntp source
Step 3 exit
Example:se-10-0-0-0(config)# exit
Exits configuration mode.
Step 4 show ntp status
Example:se-10-0-0-0# show ntp status
Displays the NTP subsystem status.
Step 5 show ntp configuration
Example:se-10-0-0-0# show ntp configuration
Displays the configured NTP servers.
Step 6 copy running-config startup-config
Example:se-10-0-0-0# copy running-config startup-config
Copies the configuration change to the startup configuration.
Command or Action Purpose
169Cisco Unity Express 2.1/2.2 CLI Administrator Guide for Cisco CallManager
Cisco Unity Express 2.1/2.2
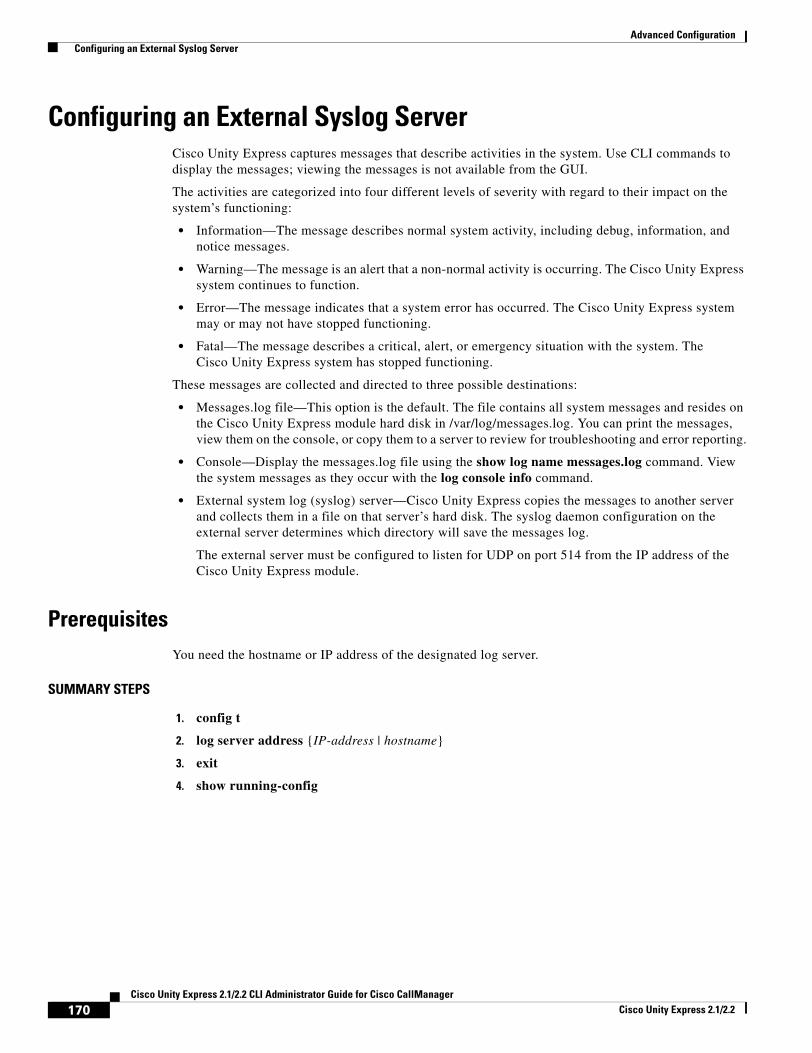
Advanced Configuration Configuring an External Syslog Server
Configuring an External Syslog ServerCisco Unity Express captures messages that describe activities in the system. Use CLI commands to display the messages; viewing the messages is not available from the GUI.
The activities are categorized into four different levels of severity with regard to their impact on the system’s functioning:
• Information—The message describes normal system activity, including debug, information, and notice messages.
• Warning—The message is an alert that a non-normal activity is occurring. The Cisco Unity Express system continues to function.
• Error—The message indicates that a system error has occurred. The Cisco Unity Express system may or may not have stopped functioning.
• Fatal—The message describes a critical, alert, or emergency situation with the system. The Cisco Unity Express system has stopped functioning.
These messages are collected and directed to three possible destinations:
• Messages.log file—This option is the default. The file contains all system messages and resides on the Cisco Unity Express module hard disk in /var/log/messages.log. You can print the messages, view them on the console, or copy them to a server to review for troubleshooting and error reporting.
• Console—Display the messages.log file using the show log name messages.log command. View the system messages as they occur with the log console info command.
• External system log (syslog) server—Cisco Unity Express copies the messages to another server and collects them in a file on that server’s hard disk. The syslog daemon configuration on the external server determines which directory will save the messages log.
The external server must be configured to listen for UDP on port 514 from the IP address of the Cisco Unity Express module.
PrerequisitesYou need the hostname or IP address of the designated log server.
SUMMARY STEPS
1. config t
2. log server address {IP-address | hostname}
3. exit
4. show running-config
170Cisco Unity Express 2.1/2.2 CLI Administrator Guide for Cisco CallManager
Cisco Unity Express 2.1/2.2

Advanced Configuration Configuring an External Syslog Server
DETAILED STEPS
ExamplesThe output from the show running-config command might look similar to the following:
se-10-0-0-0# show running-config
clock timezone America/Los_Angeles
hostname se-10-0-0-0
ip domain-name localdomain
ntp server 10.100.60.1...log server address 10.100.10.210
voicemail default mailboxsize 3000voicemail capacity time 6000
end
Command or Action Purpose
Step 1 config t
Example:se-10-0-0-0# config t
Enters configuration mode.
Step 2 log server address {IP-address | hostname}
Example:se-10-0-0-0(config)# log server address 10.187.240.31se-10-0-0-0(config)# log server address logpc
Specifies the hostname or IP address of the NTP server designated as the log server.
Step 3 exit
Example:se-10-0-0-0(config)# exit
Exits configuration mode.
Step 4 show running-config
Example:se-10-0-0-0# show running-config
Displays the system configuration, which includes the configured log server.
171Cisco Unity Express 2.1/2.2 CLI Administrator Guide for Cisco CallManager
Cisco Unity Express 2.1/2.2
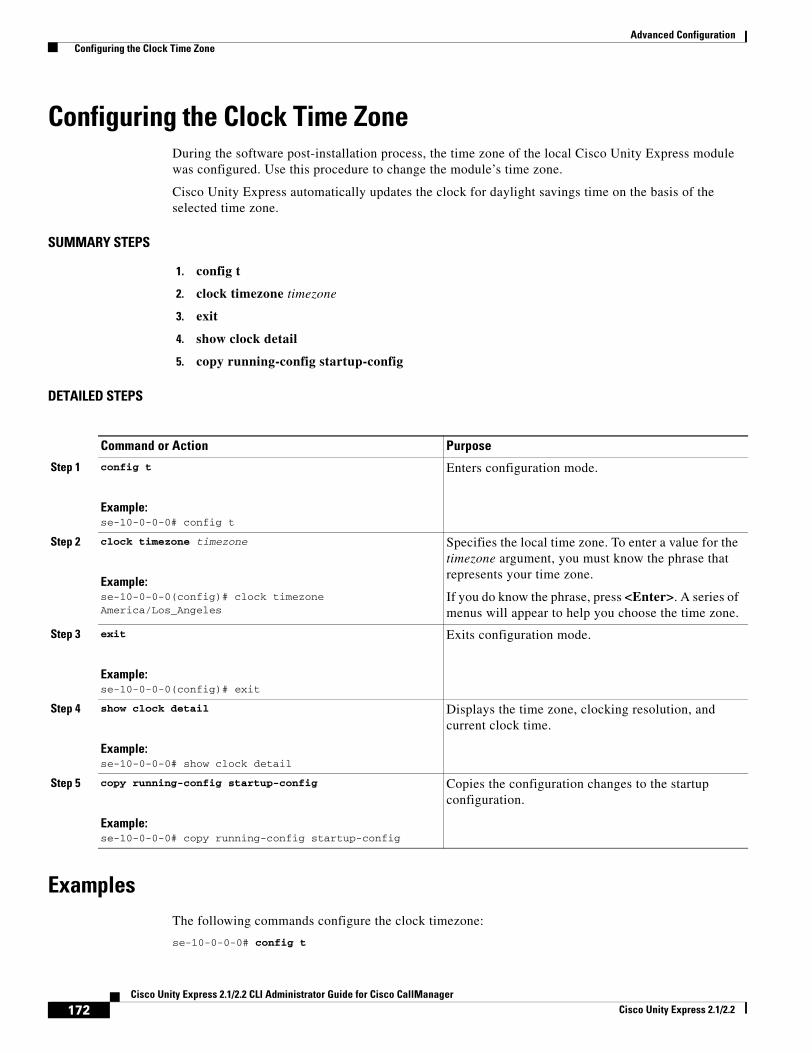
Advanced Configuration Configuring the Clock Time Zone
Configuring the Clock Time ZoneDuring the software post-installation process, the time zone of the local Cisco Unity Express module was configured. Use this procedure to change the module’s time zone.
Cisco Unity Express automatically updates the clock for daylight savings time on the basis of the selected time zone.
SUMMARY STEPS
1. config t
2. clock timezone timezone
3. exit
4. show clock detail
5. copy running-config startup-config
DETAILED STEPS
Examples The following commands configure the clock timezone:
se-10-0-0-0# config t
Command or Action Purpose
Step 1 config t
Example:se-10-0-0-0# config t
Enters configuration mode.
Step 2 clock timezone timezone
Example:se-10-0-0-0(config)# clock timezone America/Los_Angeles
Specifies the local time zone. To enter a value for the timezone argument, you must know the phrase that represents your time zone.
If you do know the phrase, press <Enter>. A series of menus will appear to help you choose the time zone.
Step 3 exit
Example:se-10-0-0-0(config)# exit
Exits configuration mode.
Step 4 show clock detail
Example:se-10-0-0-0# show clock detail
Displays the time zone, clocking resolution, and current clock time.
Step 5 copy running-config startup-config
Example:se-10-0-0-0# copy running-config startup-config
Copies the configuration changes to the startup configuration.
172Cisco Unity Express 2.1/2.2 CLI Administrator Guide for Cisco CallManager
Cisco Unity Express 2.1/2.2
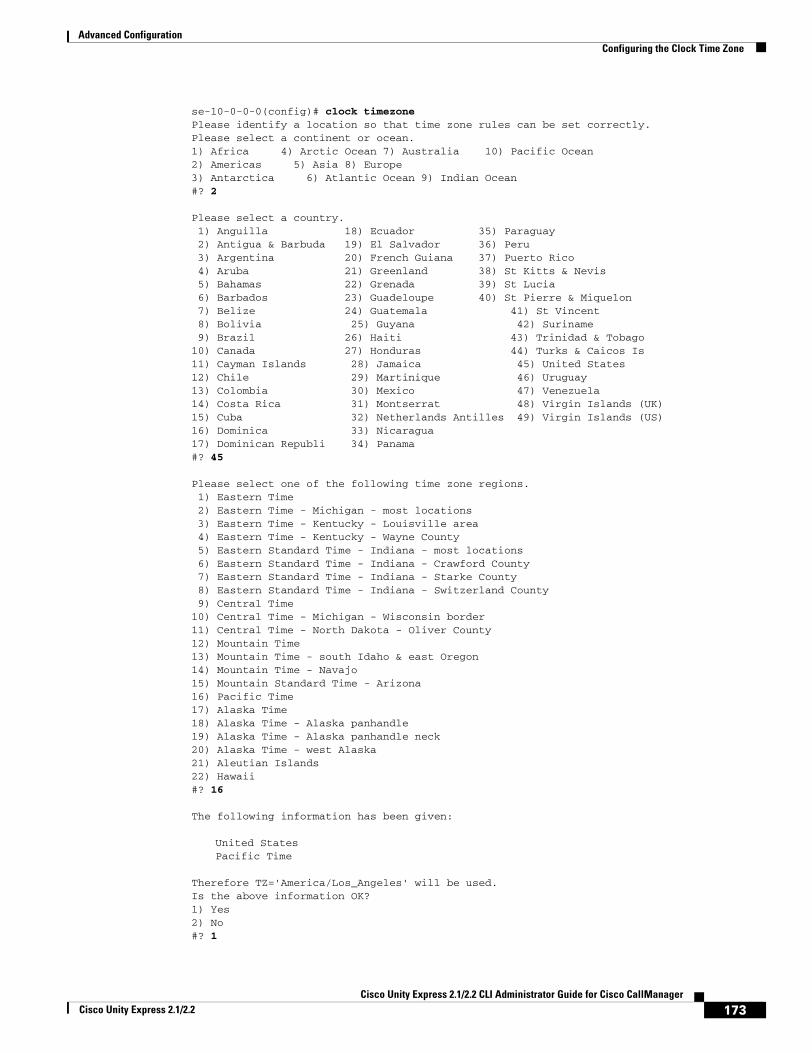
Advanced Configuration Configuring the Clock Time Zone
se-10-0-0-0(config)# clock timezonePlease identify a location so that time zone rules can be set correctly.Please select a continent or ocean.1) Africa 4) Arctic Ocean 7) Australia 10) Pacific Ocean2) Americas 5) Asia 8) Europe3) Antarctica 6) Atlantic Ocean 9) Indian Ocean#? 2
Please select a country. 1) Anguilla 18) Ecuador 35) Paraguay 2) Antigua & Barbuda 19) El Salvador 36) Peru 3) Argentina 20) French Guiana 37) Puerto Rico 4) Aruba 21) Greenland 38) St Kitts & Nevis 5) Bahamas 22) Grenada 39) St Lucia 6) Barbados 23) Guadeloupe 40) St Pierre & Miquelon 7) Belize 24) Guatemala 41) St Vincent 8) Bolivia 25) Guyana 42) Suriname 9) Brazil 26) Haiti 43) Trinidad & Tobago10) Canada 27) Honduras 44) Turks & Caicos Is11) Cayman Islands 28) Jamaica 45) United States12) Chile 29) Martinique 46) Uruguay13) Colombia 30) Mexico 47) Venezuela14) Costa Rica 31) Montserrat 48) Virgin Islands (UK)15) Cuba 32) Netherlands Antilles 49) Virgin Islands (US)16) Dominica 33) Nicaragua17) Dominican Republi 34) Panama#? 45
Please select one of the following time zone regions. 1) Eastern Time 2) Eastern Time - Michigan - most locations 3) Eastern Time - Kentucky - Louisville area 4) Eastern Time - Kentucky - Wayne County 5) Eastern Standard Time - Indiana - most locations 6) Eastern Standard Time - Indiana - Crawford County 7) Eastern Standard Time - Indiana - Starke County 8) Eastern Standard Time - Indiana - Switzerland County 9) Central Time10) Central Time - Michigan - Wisconsin border11) Central Time - North Dakota - Oliver County12) Mountain Time13) Mountain Time - south Idaho & east Oregon14) Mountain Time - Navajo15) Mountain Standard Time - Arizona16) Pacific Time17) Alaska Time18) Alaska Time - Alaska panhandle19) Alaska Time - Alaska panhandle neck20) Alaska Time - west Alaska21) Aleutian Islands22) Hawaii#? 16
The following information has been given:
United StatesPacific Time
Therefore TZ='America/Los_Angeles' will be used.Is the above information OK?1) Yes2) No#? 1
173Cisco Unity Express 2.1/2.2 CLI Administrator Guide for Cisco CallManager
Cisco Unity Express 2.1/2.2
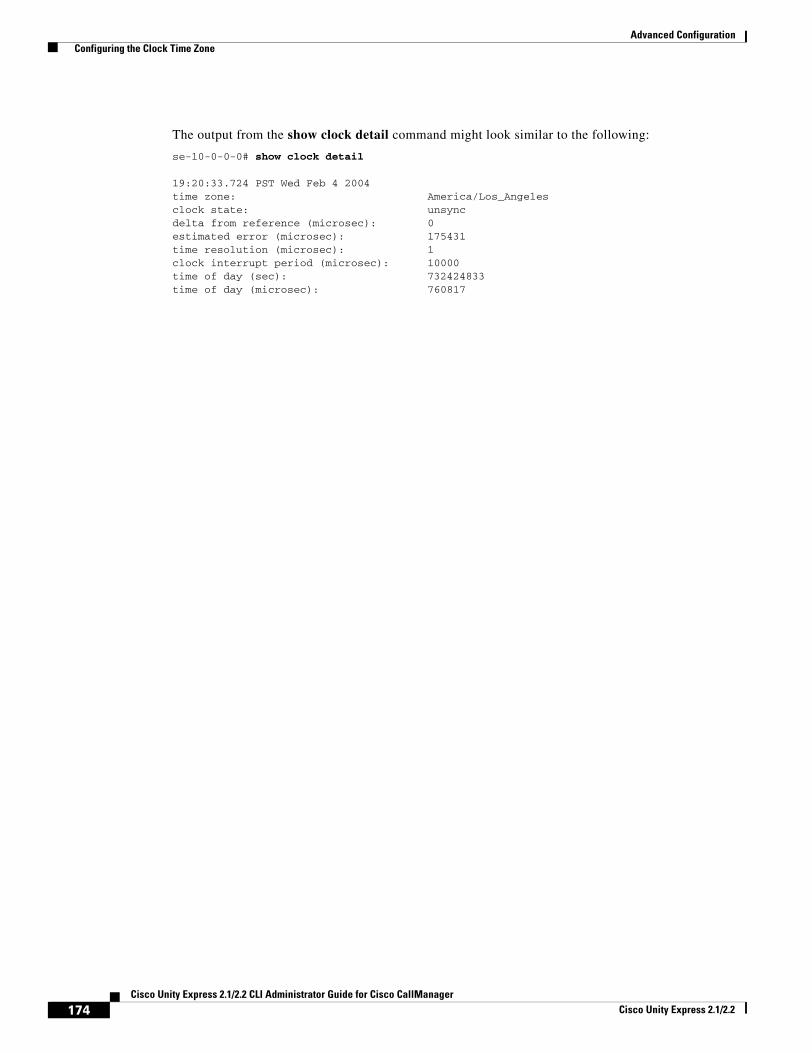
Advanced Configuration Configuring the Clock Time Zone
The output from the show clock detail command might look similar to the following:
se-10-0-0-0# show clock detail
19:20:33.724 PST Wed Feb 4 2004time zone: America/Los_Angelesclock state: unsyncdelta from reference (microsec): 0estimated error (microsec): 175431time resolution (microsec): 1clock interrupt period (microsec): 10000time of day (sec): 732424833time of day (microsec): 760817
174Cisco Unity Express 2.1/2.2 CLI Administrator Guide for Cisco CallManager
Cisco Unity Express 2.1/2.2
Networking Cisco Unity Express
This chapter describes the procedures for configuring the networking capability on the local Cisco Unity Express voice-mail system and contains the following sections:
• Cisco Unity Express Networking Overview, page 175
• Configuring Network Locations, page 177
• Downloading and Uploading Network Location Spoken Names, page 184
• Disabling a Network Location, page 185
• Adding Remote Users to the Local Directory, page 187
• Downloading and Uploading Remote User Spoken Names, page 194
• Configuring Caller ID for Incoming Messages, page 195
• Configuring a Location with vCard Information, page 196
• Configuring the LRU Cache, page 200
• Configuring Network Broadcast Messages, page 201
• Configuring Distribution Lists, page 207
Cisco Unity Express Networking OverviewCisco Unity Express supports the Voice Profile for Internet Mail (VPIM) version 2 protocol to permit voice-mail message networking between Cisco Unity Express and Cisco Unity voice-mail systems that are not co-located on the same router or server. The voice-mail systems can reside on Cisco CallManager or Cisco CallManager Express call control platforms. Supported networked voice-mail configurations include:
• Cisco Unity Express to Cisco Unity Express
• Cisco Unity Express to Cisco Unity
• Cisco Unity to Cisco Unity Express
Non-Delivery Record (NDR)
Voice-mail message networking uses Non-Delivery Records (NDRs) for handling undelivered messages. Currently, when a message cannot be delivered to a local subscriber, the sender receives an immediate notification of the reason. However, when sending to a remote subscriber, immediate feedback may not be possible due to repeated attempts to contact the remote location or to deliver the message.
175Cisco Unity Express 2.1/2.2 CLI Administrator Guide for Cisco CallManager
Cisco Unity Express 2.1/2.2
Networking Cisco Unity Express Cisco Unity Express Networking Overview
After a specified amount of time, the sender receives a new voice-mail message indicating the reason for non-delivery. If non-delivery is due to the recipient’s mailbox being full, nonexistent, or disabled, the non-delivery message includes the sender’s original message. When the sender plays the NDR, the sender can readdress and resend the original message or delete the message.
Blind Addressing
When a subscriber sends a message to another subscriber on the same (local) Cisco Unity Express voice-mail system, the sender can address the recipient using spell-by-name or an extension number. The sender hears a confirmation of the recipient’s spoken name, if it is recorded, or the recipient’s extension number.
When a subscriber sends a message to a remote subscriber, the sender will not hear a confirmation of the recipient’s name or extension. This is blind addressing. The address of the remote recipient is the location ID of the remote system plus the recipient’s extension number at the remote location.
Spoken Name Confirmation for Remote Users
Beginning with Release 2.1, administrators or other privileged users can add remote users to the local directory using the Administration via Telephone (AvT) feature, which is part of the Telephone User Interface (TUI). Administrators can record spoken names for these remote users. The Cisco Unity Express network module (NM) supports up to 50 remote users; the Advanced Integration Module (AIM) supports up to 20 remote users.
This directory permits local voice-mail senders to address messages to the remote users using dial-by-name and to receive spoken name confirmation of the recipients. If a recipient is not in the directory, the sender receives the recipient’s location ID and extension.
If the local system has vCard information enabled, incoming vCard information updates the remote user directory. The vCard information also updates a dynamic cache of remote users. This cache contains the first names, last names, and spoken names of remote users and is updated on a least recently used (LRU) basis. If a local sender addresses a voice message to a remote user who is not in the local directory but is in the LRU cache, the sender hears a spoken name for the remote user. If the remote user is not in the directory or the cache, the sender does not receive spoken name confirmation.
Components• Cisco Unity Express—Configure the Cisco Unity Express system at each location for networking
between the systems.
• Cisco CallManager—Releases 3.3(3), 3.3(4), 4.0(1), 4.0(2), and 4.1(2) are supported.
• Cisco Unity—Releases 4.03 and 4.04 are supported. You must configure VPIM networking on Cisco Unity, including the primary location for Cisco Unity and the delivery locations for remote Cisco Unity Express locations. See the documentation in the “Additional References” section on page 20 for more information.
Prerequisites• Cisco Unity Express must be installed at each remote location.
• Network connectivity between all Cisco Unity Express and Cisco call control system sites must be established.
176Cisco Unity Express 2.1/2.2 CLI Administrator Guide for Cisco CallManager
Cisco Unity Express 2.1/2.2

Networking Cisco Unity Express Configuring Network Locations
Cisco CallManager and Cisco Unity Express Version Compatibility
Cisco Unity Express is shipped configured for interoperability with Cisco CallManager 3.3(3) and above. The following scenarios apply when installing Cisco Unity Express with a different version of Cisco CallManager, or upgrading the Cisco CallManager version:
• If Cisco Unity Express is installed with Cisco CallManager 4.0, Cisco Unity Express will reload once after the reload that you initiate at the completion of the initialization wizard procedure.
• If Cisco Unity Express is installed with Cisco CallManager 3.3, and Cisco CallManager is upgraded to version 4.0, then Cisco Unity Express reloads and updates its system files to work with the new version of Cisco CallManager. No further action from you is required.
• If the Cisco CallManager version has changed due to a Cisco CallManager configuration, or a different version of Cisco CallManager is restored, you must perform a manual reload. Cisco Unity Express will then perform one additional reload after the user-initiated reload.
Restrictions• The VPIM version 2 protocol is supported only between Cisco Unity Express and Cisco Unity 4.0.3.
Interworking with other voice-mail systems that use the VPIM version 2 protocol is not supported.
• For Cisco Unity Express Release 2.0, network configuration is available only with the command-line interface (CLI). Network tracing is available using the CLI or the Cisco Unity Express graphical user interface (GUI). From the GUI, choose Administration > Traces. See the “Troubleshooting Commands” section on page 183 for more information on trace options.
Configuring Network LocationsTo configure network locations in Cisco Unity Express, perform the following tasks at each network location.
PrerequisitesThe following information is required to configure networking on Cisco Unity Express:
• Network location ID number—Unique ID number for each location used by the voice-mail sender to send a remote message. The maximum length of the number is 7 digits. Release 2.0 supports a maximum of 500 locations.
• (Optional) Location name—Descriptive name of the network location.
• (Optional) Abbreviated location name—Abbreviated description of the network location.
• E-mail domain name—E-mail domain name or IP address for the remote voice-mail system. The domain name is attached to the local voice-mail originator’s extension when sending a VPIM message. The local system’s e-mail domain name must be configured to receive remote voice-mail messages.
• Voice-mail system telephone number prefix—Phone number prefix that is added to a local voice-mail originator’s extension to create a VPIM address. A prefix is required only if an e-mail domain services multiple locations, and extensions between the locations are not unique. The maximum length of the prefix is 15 digits.
• Length of the local voice-mail system extensions.
177Cisco Unity Express 2.1/2.2 CLI Administrator Guide for Cisco CallManager
Cisco Unity Express 2.1/2.2
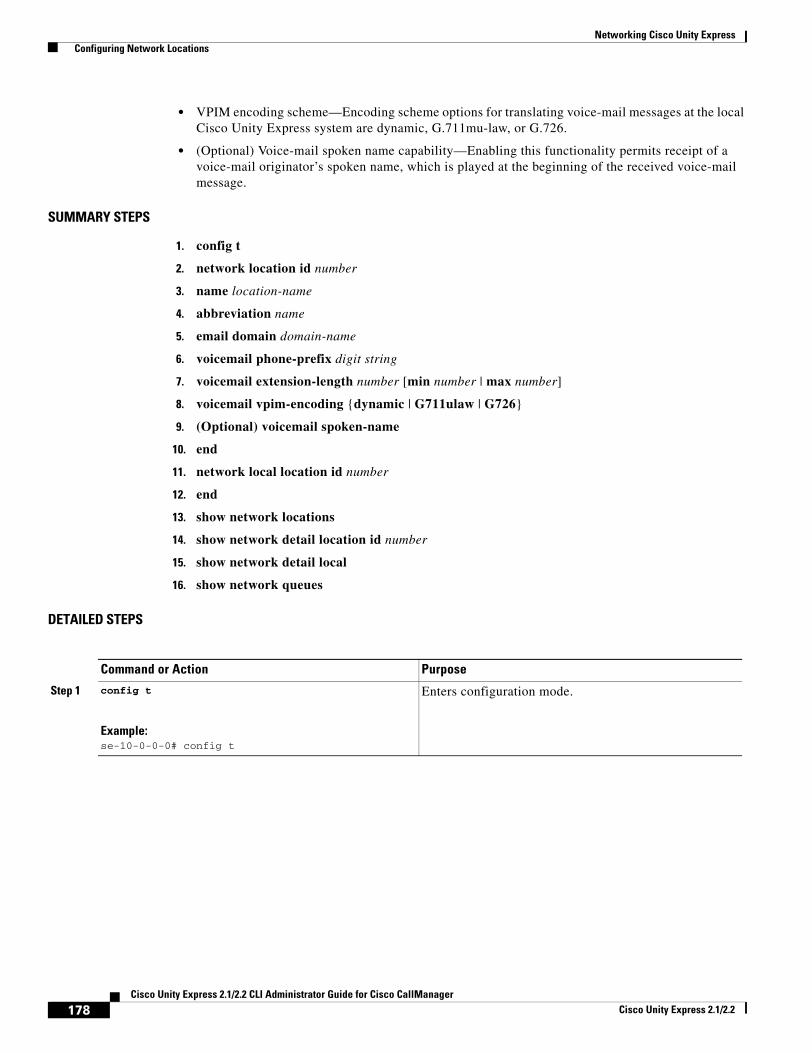
Networking Cisco Unity Express Configuring Network Locations
• VPIM encoding scheme—Encoding scheme options for translating voice-mail messages at the local Cisco Unity Express system are dynamic, G.711mu-law, or G.726.
• (Optional) Voice-mail spoken name capability—Enabling this functionality permits receipt of a voice-mail originator’s spoken name, which is played at the beginning of the received voice-mail message.
SUMMARY STEPS
1. config t
2. network location id number
3. name location-name
4. abbreviation name
5. email domain domain-name
6. voicemail phone-prefix digit string
7. voicemail extension-length number [min number | max number]
8. voicemail vpim-encoding {dynamic | G711ulaw | G726}
9. (Optional) voicemail spoken-name
10. end
11. network local location id number
12. end
13. show network locations
14. show network detail location id number
15. show network detail local
16. show network queues
DETAILED STEPS
Command or Action Purpose
Step 1 config t
Example:se-10-0-0-0# config t
Enters configuration mode.
178Cisco Unity Express 2.1/2.2 CLI Administrator Guide for Cisco CallManager
Cisco Unity Express 2.1/2.2
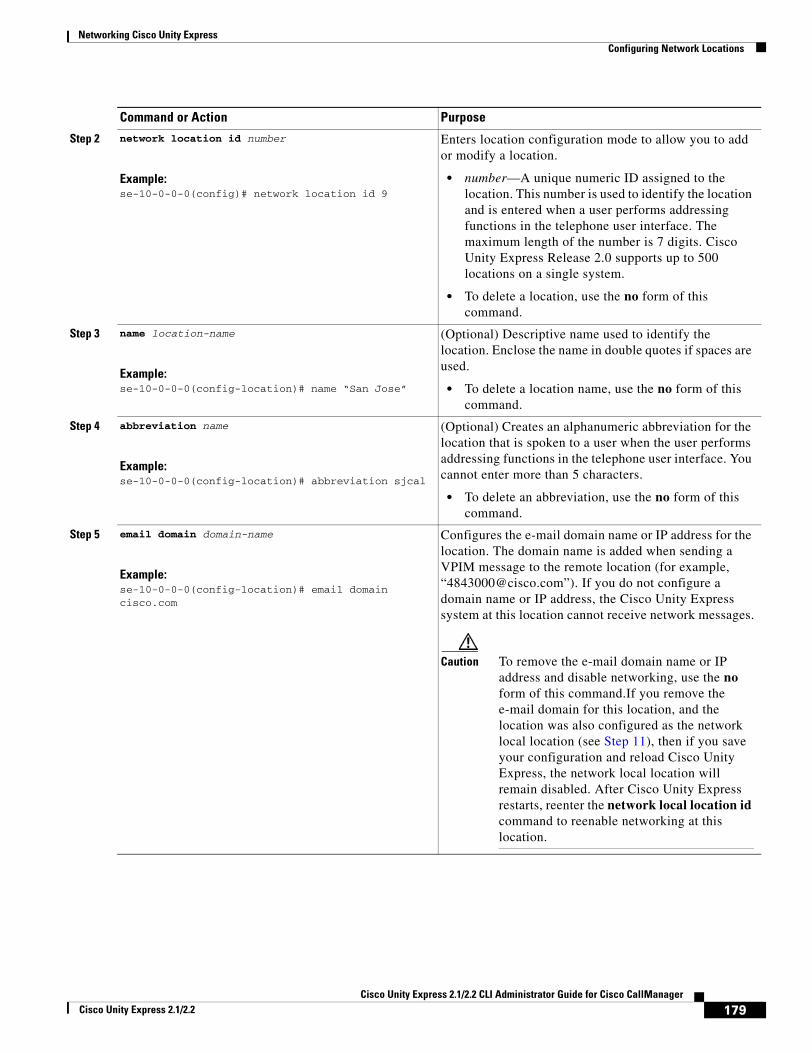
Networking Cisco Unity Express Configuring Network Locations
Step 2 network location id number
Example:se-10-0-0-0(config)# network location id 9
Enters location configuration mode to allow you to add or modify a location.
• number—A unique numeric ID assigned to the location. This number is used to identify the location and is entered when a user performs addressing functions in the telephone user interface. The maximum length of the number is 7 digits. Cisco Unity Express Release 2.0 supports up to 500 locations on a single system.
• To delete a location, use the no form of this command.
Step 3 name location-name
Example:se-10-0-0-0(config-location)# name “San Jose”
(Optional) Descriptive name used to identify the location. Enclose the name in double quotes if spaces are used.
• To delete a location name, use the no form of this command.
Step 4 abbreviation name
Example:se-10-0-0-0(config-location)# abbreviation sjcal
(Optional) Creates an alphanumeric abbreviation for the location that is spoken to a user when the user performs addressing functions in the telephone user interface. You cannot enter more than 5 characters.
• To delete an abbreviation, use the no form of this command.
Step 5 email domain domain-name
Example:se-10-0-0-0(config-location)# email domain cisco.com
Configures the e-mail domain name or IP address for the location. The domain name is added when sending a VPIM message to the remote location (for example, “[email protected]”). If you do not configure a domain name or IP address, the Cisco Unity Express system at this location cannot receive network messages.
Caution To remove the e-mail domain name or IP address and disable networking, use the no form of this command.If you remove the e-mail domain for this location, and the location was also configured as the network local location (see Step 11), then if you save your configuration and reload Cisco Unity Express, the network local location will remain disabled. After Cisco Unity Express restarts, reenter the network local location id command to reenable networking at this location.
Command or Action Purpose
179Cisco Unity Express 2.1/2.2 CLI Administrator Guide for Cisco CallManager
Cisco Unity Express 2.1/2.2
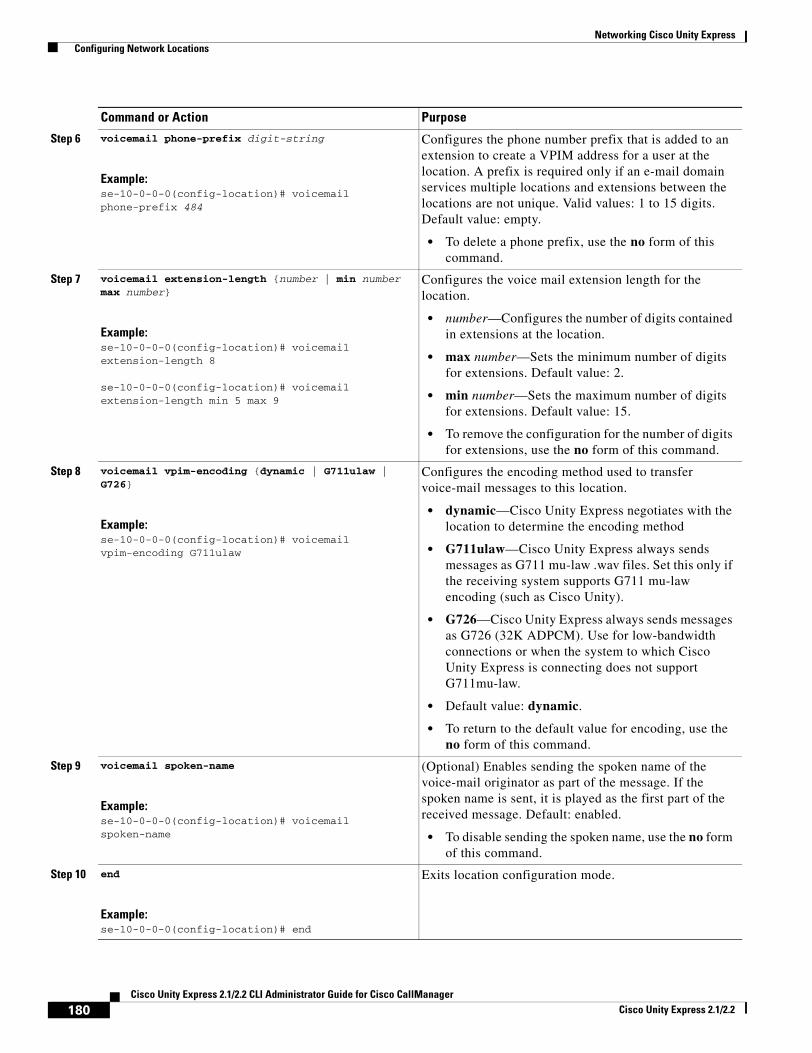
Networking Cisco Unity Express Configuring Network Locations
Step 6 voicemail phone-prefix digit-string
Example:se-10-0-0-0(config-location)# voicemail phone-prefix 484
Configures the phone number prefix that is added to an extension to create a VPIM address for a user at the location. A prefix is required only if an e-mail domain services multiple locations and extensions between the locations are not unique. Valid values: 1 to 15 digits. Default value: empty.
• To delete a phone prefix, use the no form of this command.
Step 7 voicemail extension-length {number | min number max number}
Example:se-10-0-0-0(config-location)# voicemail extension-length 8
se-10-0-0-0(config-location)# voicemail extension-length min 5 max 9
Configures the voice mail extension length for the location.
• number—Configures the number of digits contained in extensions at the location.
• max number—Sets the minimum number of digits for extensions. Default value: 2.
• min number—Sets the maximum number of digits for extensions. Default value: 15.
• To remove the configuration for the number of digits for extensions, use the no form of this command.
Step 8 voicemail vpim-encoding {dynamic | G711ulaw | G726}
Example:se-10-0-0-0(config-location)# voicemail vpim-encoding G711ulaw
Configures the encoding method used to transfer voice-mail messages to this location.
• dynamic—Cisco Unity Express negotiates with the location to determine the encoding method
• G711ulaw—Cisco Unity Express always sends messages as G711 mu-law .wav files. Set this only if the receiving system supports G711 mu-law encoding (such as Cisco Unity).
• G726—Cisco Unity Express always sends messages as G726 (32K ADPCM). Use for low-bandwidth connections or when the system to which Cisco Unity Express is connecting does not support G711mu-law.
• Default value: dynamic.
• To return to the default value for encoding, use the no form of this command.
Step 9 voicemail spoken-name
Example:se-10-0-0-0(config-location)# voicemail spoken-name
(Optional) Enables sending the spoken name of the voice-mail originator as part of the message. If the spoken name is sent, it is played as the first part of the received message. Default: enabled.
• To disable sending the spoken name, use the no form of this command.
Step 10 end
Example:se-10-0-0-0(config-location)# end
Exits location configuration mode.
Command or Action Purpose
180Cisco Unity Express 2.1/2.2 CLI Administrator Guide for Cisco CallManager
Cisco Unity Express 2.1/2.2
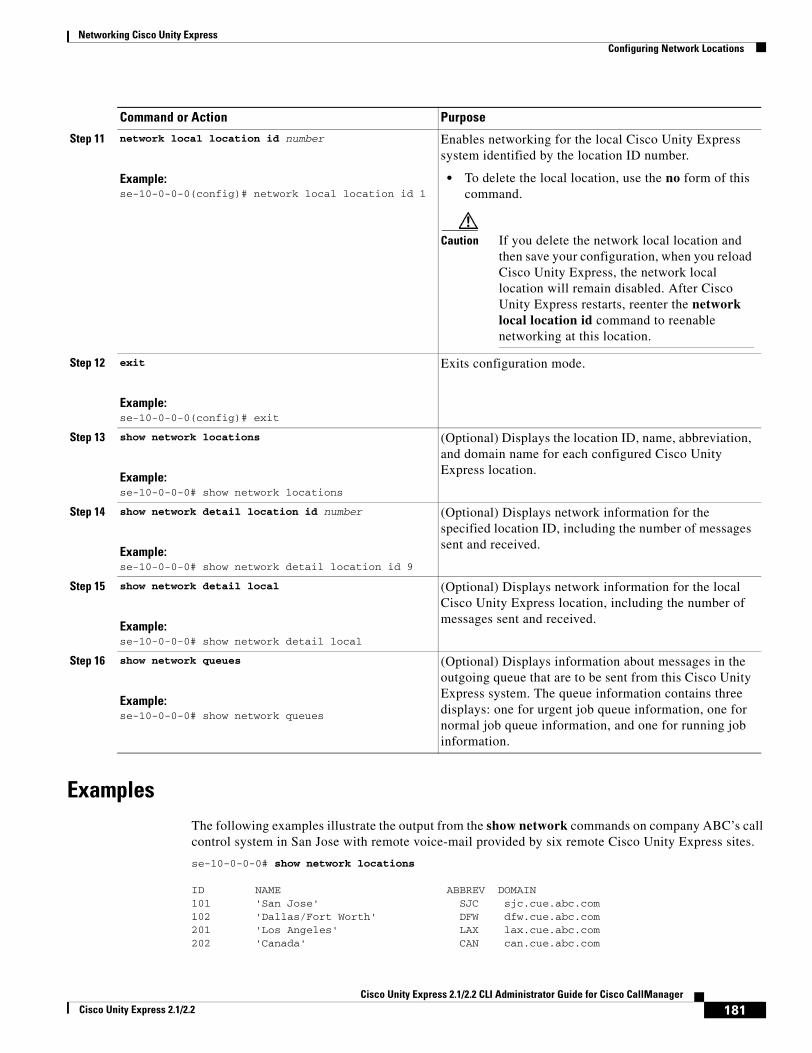
Networking Cisco Unity Express Configuring Network Locations
ExamplesThe following examples illustrate the output from the show network commands on company ABC’s call control system in San Jose with remote voice-mail provided by six remote Cisco Unity Express sites.
se-10-0-0-0# show network locations
ID NAME ABBREV DOMAIN101 'San Jose' SJC sjc.cue.abc.com102 'Dallas/Fort Worth' DFW dfw.cue.abc.com201 'Los Angeles' LAX lax.cue.abc.com202 'Canada' CAN can.cue.abc.com
Step 11 network local location id number
Example:se-10-0-0-0(config)# network local location id 1
Enables networking for the local Cisco Unity Express system identified by the location ID number.
• To delete the local location, use the no form of this command.
Caution If you delete the network local location and then save your configuration, when you reload Cisco Unity Express, the network local location will remain disabled. After Cisco Unity Express restarts, reenter the network local location id command to reenable networking at this location.
Step 12 exit
Example:se-10-0-0-0(config)# exit
Exits configuration mode.
Step 13 show network locations
Example:se-10-0-0-0# show network locations
(Optional) Displays the location ID, name, abbreviation, and domain name for each configured Cisco Unity Express location.
Step 14 show network detail location id number
Example:se-10-0-0-0# show network detail location id 9
(Optional) Displays network information for the specified location ID, including the number of messages sent and received.
Step 15 show network detail local
Example:se-10-0-0-0# show network detail local
(Optional) Displays network information for the local Cisco Unity Express location, including the number of messages sent and received.
Step 16 show network queues
Example:se-10-0-0-0# show network queues
(Optional) Displays information about messages in the outgoing queue that are to be sent from this Cisco Unity Express system. The queue information contains three displays: one for urgent job queue information, one for normal job queue information, and one for running job information.
Command or Action Purpose
181Cisco Unity Express 2.1/2.2 CLI Administrator Guide for Cisco CallManager
Cisco Unity Express 2.1/2.2
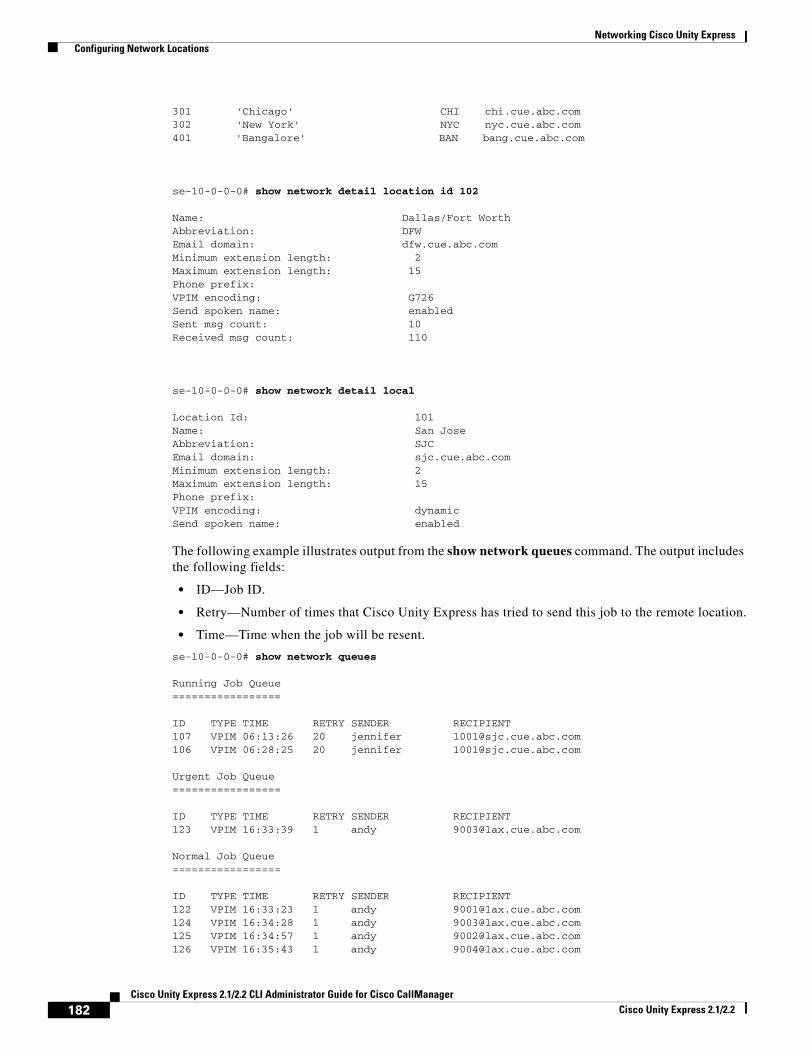
Networking Cisco Unity Express Configuring Network Locations
301 'Chicago' CHI chi.cue.abc.com302 'New York' NYC nyc.cue.abc.com401 'Bangalore' BAN bang.cue.abc.com
se-10-0-0-0# show network detail location id 102
Name: Dallas/Fort WorthAbbreviation: DFWEmail domain: dfw.cue.abc.comMinimum extension length: 2Maximum extension length: 15Phone prefix: VPIM encoding: G726Send spoken name: enabledSent msg count: 10Received msg count: 110
se-10-0-0-0# show network detail local
Location Id: 101Name: San JoseAbbreviation: SJCEmail domain: sjc.cue.abc.comMinimum extension length: 2Maximum extension length: 15Phone prefix: VPIM encoding: dynamicSend spoken name: enabled
The following example illustrates output from the show network queues command. The output includes the following fields:
• ID—Job ID.
• Retry—Number of times that Cisco Unity Express has tried to send this job to the remote location.
• Time—Time when the job will be resent.
se-10-0-0-0# show network queues
Running Job Queue=================
ID TYPE TIME RETRY SENDER RECIPIENT107 VPIM 06:13:26 20 jennifer [email protected] VPIM 06:28:25 20 jennifer [email protected]
Urgent Job Queue=================
ID TYPE TIME RETRY SENDER RECIPIENT123 VPIM 16:33:39 1 andy [email protected]
Normal Job Queue=================
ID TYPE TIME RETRY SENDER RECIPIENT122 VPIM 16:33:23 1 andy [email protected] VPIM 16:34:28 1 andy [email protected] VPIM 16:34:57 1 andy [email protected] VPIM 16:35:43 1 andy [email protected]
182Cisco Unity Express 2.1/2.2 CLI Administrator Guide for Cisco CallManager
Cisco Unity Express 2.1/2.2
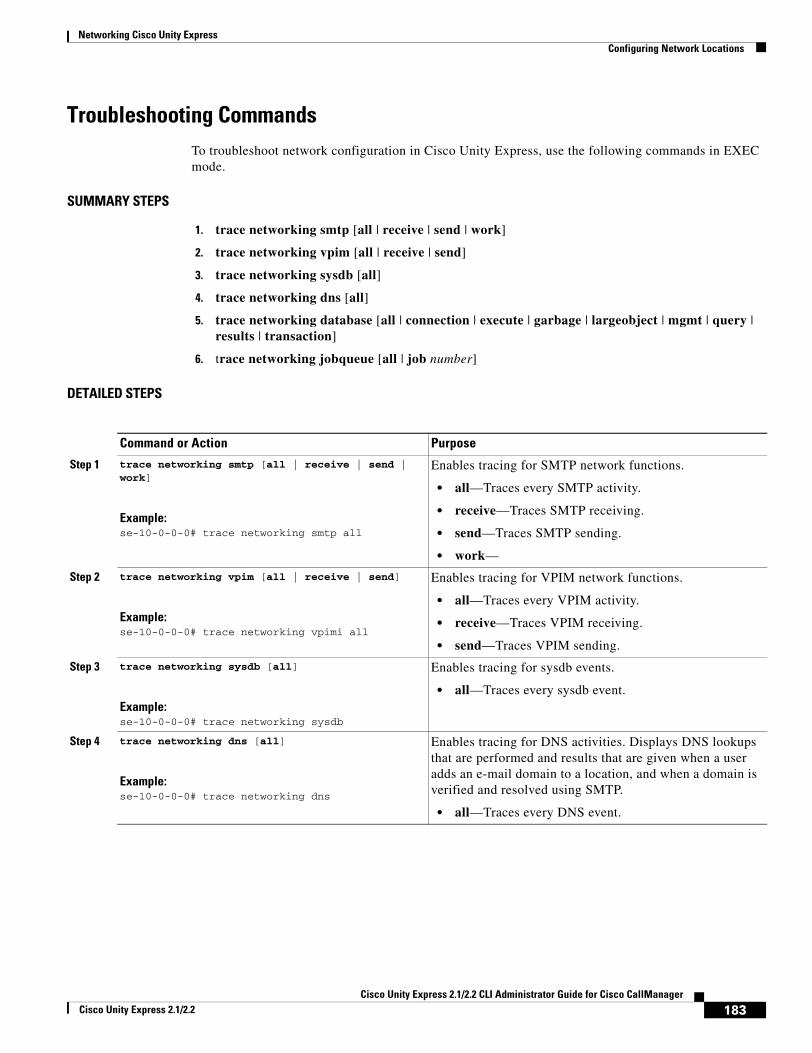
Networking Cisco Unity Express Configuring Network Locations
Troubleshooting CommandsTo troubleshoot network configuration in Cisco Unity Express, use the following commands in EXEC mode.
SUMMARY STEPS
1. trace networking smtp [all | receive | send | work]
2. trace networking vpim [all | receive | send]
3. trace networking sysdb [all]
4. trace networking dns [all]
5. trace networking database [all | connection | execute | garbage | largeobject | mgmt | query | results | transaction]
6. trace networking jobqueue [all | job number]
DETAILED STEPS
Command or Action Purpose
Step 1 trace networking smtp [all | receive | send | work]
Example:se-10-0-0-0# trace networking smtp all
Enables tracing for SMTP network functions.
• all—Traces every SMTP activity.
• receive—Traces SMTP receiving.
• send—Traces SMTP sending.
• work—
Step 2 trace networking vpim [all | receive | send]
Example:se-10-0-0-0# trace networking vpimi all
Enables tracing for VPIM network functions.
• all—Traces every VPIM activity.
• receive—Traces VPIM receiving.
• send—Traces VPIM sending.
Step 3 trace networking sysdb [all]
Example:se-10-0-0-0# trace networking sysdb
Enables tracing for sysdb events.
• all—Traces every sysdb event.
Step 4 trace networking dns [all]
Example:se-10-0-0-0# trace networking dns
Enables tracing for DNS activities. Displays DNS lookups that are performed and results that are given when a user adds an e-mail domain to a location, and when a domain is verified and resolved using SMTP.
• all—Traces every DNS event.
183Cisco Unity Express 2.1/2.2 CLI Administrator Guide for Cisco CallManager
Cisco Unity Express 2.1/2.2
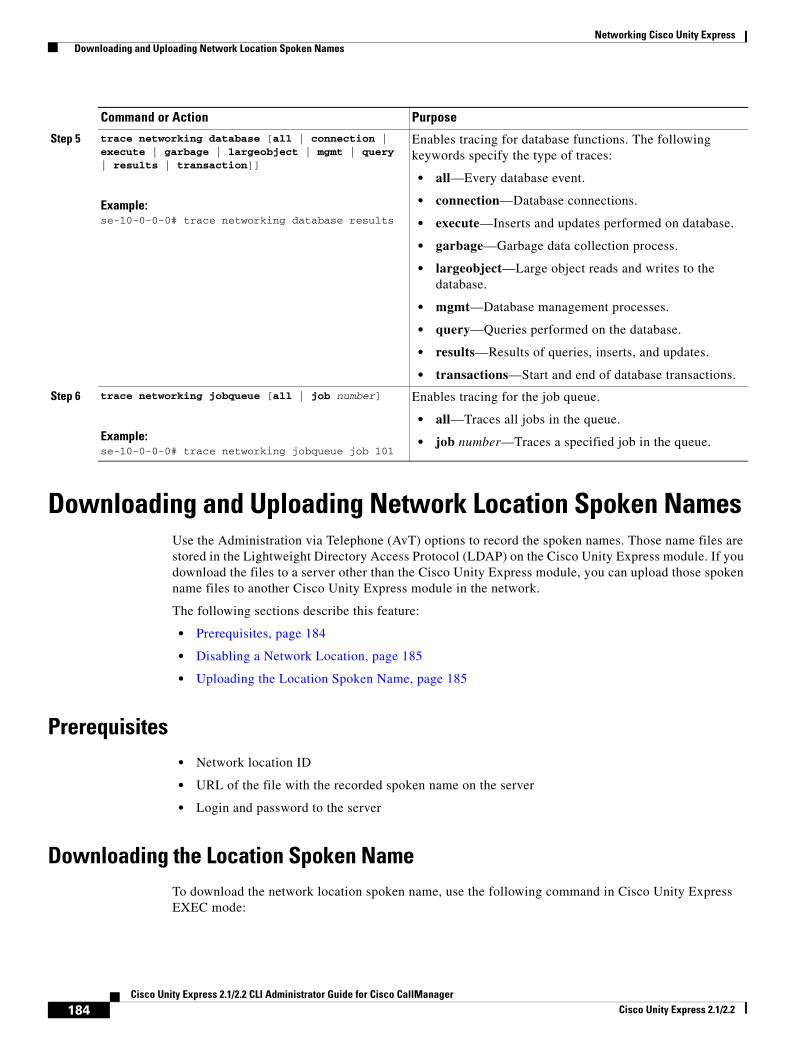
Networking Cisco Unity Express Downloading and Uploading Network Location Spoken Names
Downloading and Uploading Network Location Spoken NamesUse the Administration via Telephone (AvT) options to record the spoken names. Those name files are stored in the Lightweight Directory Access Protocol (LDAP) on the Cisco Unity Express module. If you download the files to a server other than the Cisco Unity Express module, you can upload those spoken name files to another Cisco Unity Express module in the network.
The following sections describe this feature:
• Prerequisites, page 184
• Disabling a Network Location, page 185
• Uploading the Location Spoken Name, page 185
Prerequisites• Network location ID
• URL of the file with the recorded spoken name on the server
• Login and password to the server
Downloading the Location Spoken NameTo download the network location spoken name, use the following command in Cisco Unity Express EXEC mode:
Step 5 trace networking database [all | connection | execute | garbage | largeobject | mgmt | query | results | transaction]]
Example:se-10-0-0-0# trace networking database results
Enables tracing for database functions. The following keywords specify the type of traces:
• all—Every database event.
• connection—Database connections.
• execute—Inserts and updates performed on database.
• garbage—Garbage data collection process.
• largeobject—Large object reads and writes to the database.
• mgmt—Database management processes.
• query—Queries performed on the database.
• results—Results of queries, inserts, and updates.
• transactions—Start and end of database transactions.
Step 6 trace networking jobqueue [all | job number]
Example:se-10-0-0-0# trace networking jobqueue job 101
Enables tracing for the job queue.
• all—Traces all jobs in the queue.
• job number—Traces a specified job in the queue.
Command or Action Purpose
184Cisco Unity Express 2.1/2.2 CLI Administrator Guide for Cisco CallManager
Cisco Unity Express 2.1/2.2
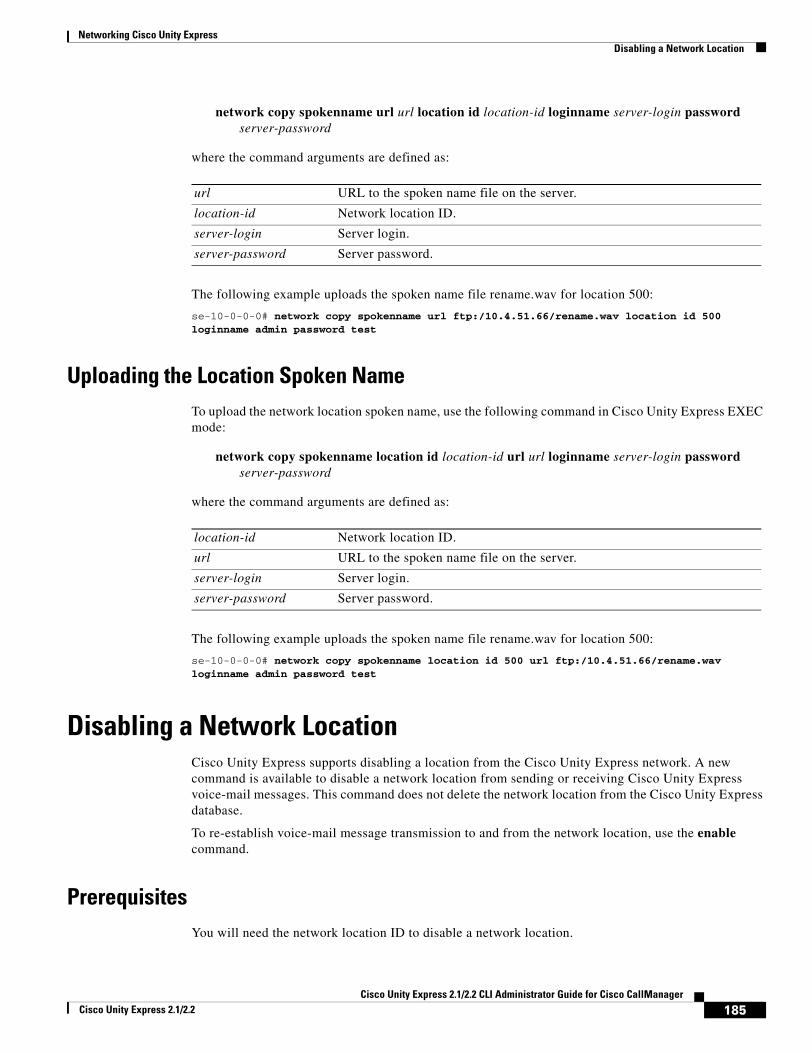
Networking Cisco Unity Express Disabling a Network Location
network copy spokenname url url location id location-id loginname server-login password server-password
where the command arguments are defined as:
The following example uploads the spoken name file rename.wav for location 500:
se-10-0-0-0# network copy spokenname url ftp:/10.4.51.66/rename.wav location id 500 loginname admin password test
Uploading the Location Spoken NameTo upload the network location spoken name, use the following command in Cisco Unity Express EXEC mode:
network copy spokenname location id location-id url url loginname server-login password server-password
where the command arguments are defined as:
The following example uploads the spoken name file rename.wav for location 500:
se-10-0-0-0# network copy spokenname location id 500 url ftp:/10.4.51.66/rename.wav loginname admin password test
Disabling a Network LocationCisco Unity Express supports disabling a location from the Cisco Unity Express network. A new command is available to disable a network location from sending or receiving Cisco Unity Express voice-mail messages. This command does not delete the network location from the Cisco Unity Express database.
To re-establish voice-mail message transmission to and from the network location, use the enable command.
PrerequisitesYou will need the network location ID to disable a network location.
url URL to the spoken name file on the server.
location-id Network location ID.
server-login Server login.
server-password Server password.
location-id Network location ID.
url URL to the spoken name file on the server.
server-login Server login.
server-password Server password.
185Cisco Unity Express 2.1/2.2 CLI Administrator Guide for Cisco CallManager
Cisco Unity Express 2.1/2.2
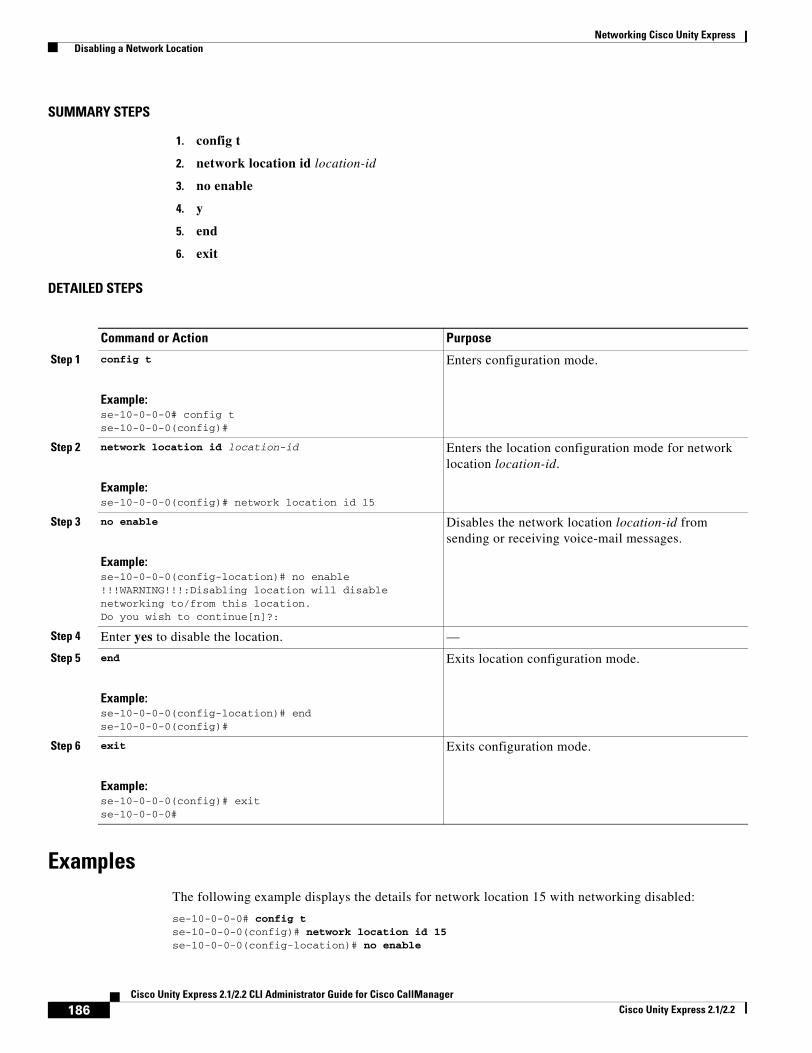
Networking Cisco Unity Express Disabling a Network Location
SUMMARY STEPS
1. config t
2. network location id location-id
3. no enable
4. y
5. end
6. exit
DETAILED STEPS
ExamplesThe following example displays the details for network location 15 with networking disabled:
se-10-0-0-0# config tse-10-0-0-0(config)# network location id 15se-10-0-0-0(config-location)# no enable
Command or Action Purpose
Step 1 config t
Example:se-10-0-0-0# config tse-10-0-0-0(config)#
Enters configuration mode.
Step 2 network location id location-id
Example:se-10-0-0-0(config)# network location id 15
Enters the location configuration mode for network location location-id.
Step 3 no enable
Example:se-10-0-0-0(config-location)# no enable!!!WARNING!!!:Disabling location will disable networking to/from this location.Do you wish to continue[n]?:
Disables the network location location-id from sending or receiving voice-mail messages.
Step 4 Enter yes to disable the location. —
Step 5 end
Example:se-10-0-0-0(config-location)# endse-10-0-0-0(config)#
Exits location configuration mode.
Step 6 exit
Example:se-10-0-0-0(config)# exitse-10-0-0-0#
Exits configuration mode.
186Cisco Unity Express 2.1/2.2 CLI Administrator Guide for Cisco CallManager
Cisco Unity Express 2.1/2.2

Networking Cisco Unity Express Adding Remote Users to the Local Directory
!!!WARNING!!!:Disabling location will disable networking to/from this location.Do you wish to continue[n]?:yse-10-0-0-0(config-location)# endse-10-0-0-0(config)# exitse-10-0-0-0#se-10-0-0-0# show network detail location id 15
Name: houstonAbbreviation: houEmail domain: how.cue.abcdef.comMinimum extension length: 2Maximum extension length: 15Phone prefix: 4VPIM encoding: dynamicSend spoken name: enabledSend vCard: enabledState: disabledVPIM broadcast ID: vpim-broadcastSent msg count: 1Received msg count: 1
The following example re-establishes voice-mail transmission to and from network location 15.
se-10-0-0-0# config tse-10-0-0-0(config)# network location id 15se-10-0-0-0(config-location)# enablese-10-0-0-0(config-location)# endse-10-0-0-0(config)# exit
Adding Remote Users to the Local DirectoryCisco Unity Express permits the addition of remote users to the local voice- mail directory.
The local Cisco Unity Express directory allows inclusion of frequently addressed remote users. This capability allows a local voice-mail sender to address a remote recipient using dial-by-name. Additionally, the system provides the sender with a spoken name confirmation of the remote recipient so that the sender can verify that the name and location are correct.
Regardless of the license level, the network module (NM) supports a maximum of 50 remote users and the advanced integration module (AIM) supports a maximum of 20 remote users.
System administrators have a new menu option available on the Cisco Unity Express telephone user interface (TUI) to record the spoken name for the remote users. If a remote user does not have a spoken name recorded, the system uses the remote extension number and location as confirmation to the local sender.
If the vCard option is configured, the remote user’s vCard updates the local system with the remote user’s first name, last name, or extension.
The following sections describe this feature:
• Impact of Remote Messages on the Local User, page 188
• Configuring the Local Directory with Remote Users, page 188
• Displaying Remote Users, page 192
• Prerequisites, page 185
187Cisco Unity Express 2.1/2.2 CLI Administrator Guide for Cisco CallManager
Cisco Unity Express 2.1/2.2
Networking Cisco Unity Express Adding Remote Users to the Local Directory
Impact of Remote Messages on the Local UserPrior to Release 2.1, the local sender had to use blind addressing to send a message to a remote recipient. Now the local sender can use dial-by-name for the remote recipient’s address. If a name or number conflicts with another, the system presents the sender with all conflicting addresses to make a selection.
The local sender hears the remote user’s spoken name if it is configured by one of the following methods:
• The spoken name is recorded on the local system.
• The local system receives a message from the remote user, whose spoken name is recorded on the remote system, and the remote system is configured to send the spoken name to the local system.
If the remote sender’s spoken name is not configured either locally or remotely, the local user hears the remote extension number and remote location name.
When a local user plays back a message from a remote user, the local user hears the remote sender’s spoken name or remote phone number, spoken name of the remote office, the date, and the time that the message was sent. If the local system received the message more than 30 minutes after the message was sent, the local user also hears the time when the message was received. If the local user replies to this message, the local system automatically sets up the appropriate remote address information.
If the system cannot deliver a message to a remote site after 6 hours, the local user receives a non-delivery record (NDR) indicating that the message was not sent or that the message was not delivered to the recipient’s mailbox. Beginning with Release 2.1, Cisco Unity Express adds a delayed delivery record (DDR), which is a notification left in the sender’s mailbox after 60 minutes of trying to deliver the original message. Unlike the NDR, the DDR does not contain the original message as an attachment and does not count against the sender’s mailbox capacity. Additionally, the DDR cannot be saved, only deleted. The system stores only one copy of a DDR for a particular message in the sender’s mailbox. The user must delete the existing DDR in order to receive an updated DDR for the same message.
Configuring the Local Directory with Remote UsersConfiguring remote users requires the following procedures:
• Configuring the local system for networking.
CLI commands exist to configure the local and remote sites in the system. GUI screens are available to configure the location parameters.
• Configuring vCard information on the local system.
See the chapter “Configuring a Location with vCard Information” on page 196 for that procedure.
• Adding the remote user information to the local directory.
This section describes this procedure.
• Adding a spoken name and location for the remote user.
The administrator uses the TUI to record a spoken name for the remote user and a spoken name for the remote location.
Configuring the remote user can be done in the Cisco Unity Express configuration mode and the EXEC mode. Both modes permit adding the remote user to the local directory but have different capabilities for other user information. Use the remote username location command once, in either mode, to associate the remote user with a network location.
188Cisco Unity Express 2.1/2.2 CLI Administrator Guide for Cisco CallManager
Cisco Unity Express 2.1/2.2
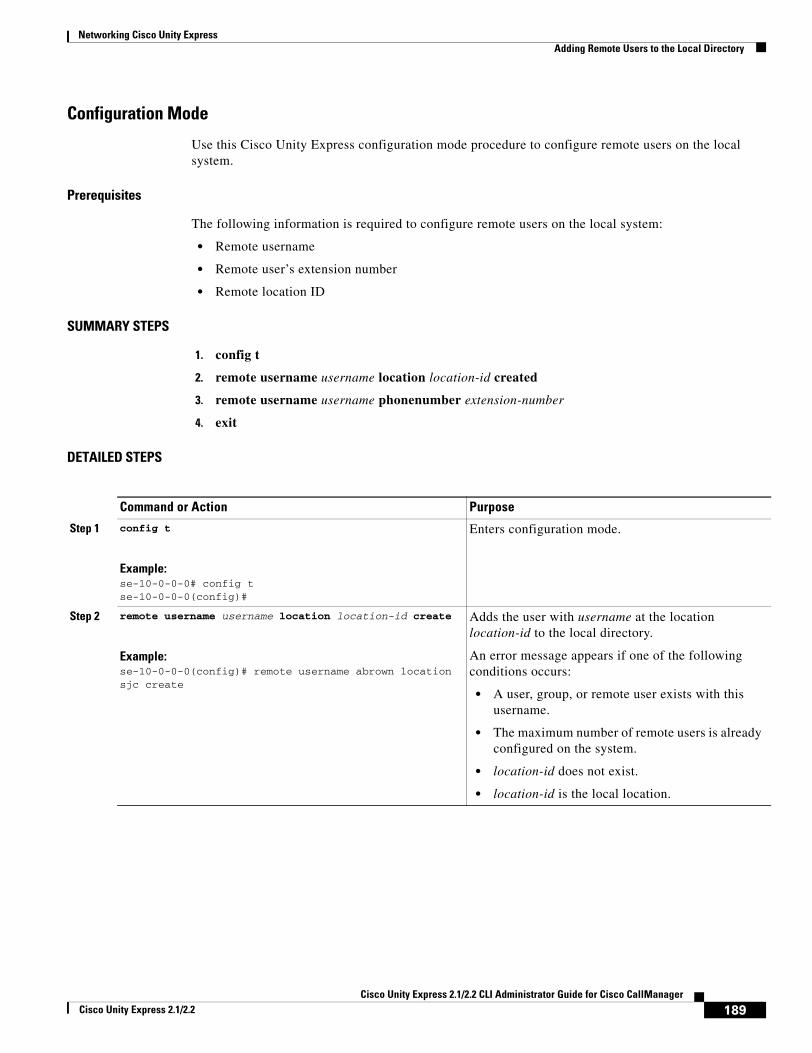
Networking Cisco Unity Express Adding Remote Users to the Local Directory
Configuration Mode
Use this Cisco Unity Express configuration mode procedure to configure remote users on the local system.
Prerequisites
The following information is required to configure remote users on the local system:
• Remote username
• Remote user’s extension number
• Remote location ID
SUMMARY STEPS
1. config t
2. remote username username location location-id created
3. remote username username phonenumber extension-number
4. exit
DETAILED STEPS
Command or Action Purpose
Step 1 config t
Example:se-10-0-0-0# config tse-10-0-0-0(config)#
Enters configuration mode.
Step 2 remote username username location location-id create
Example:se-10-0-0-0(config)# remote username abrown location sjc create
Adds the user with username at the location location-id to the local directory.
An error message appears if one of the following conditions occurs:
• A user, group, or remote user exists with this username.
• The maximum number of remote users is already configured on the system.
• location-id does not exist.
• location-id is the local location.
189Cisco Unity Express 2.1/2.2 CLI Administrator Guide for Cisco CallManager
Cisco Unity Express 2.1/2.2
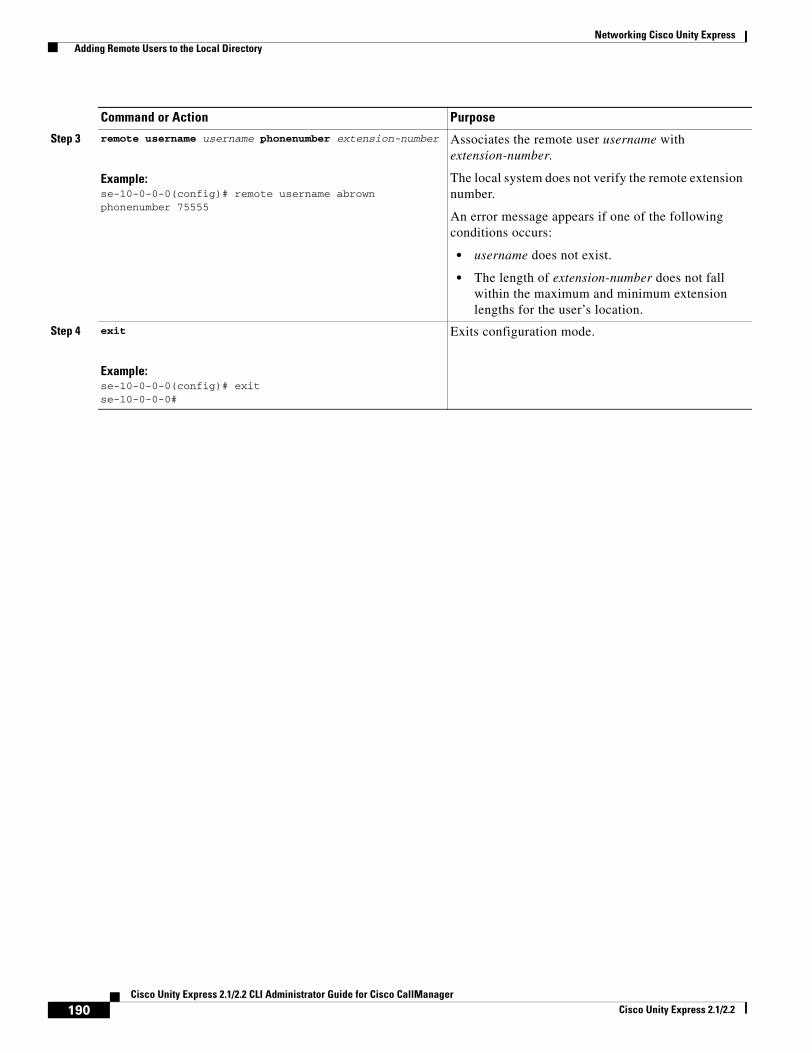
Networking Cisco Unity Express Adding Remote Users to the Local Directory
Step 3 remote username username phonenumber extension-number
Example:se-10-0-0-0(config)# remote username abrown phonenumber 75555
Associates the remote user username with extension-number.
The local system does not verify the remote extension number.
An error message appears if one of the following conditions occurs:
• username does not exist.
• The length of extension-number does not fall within the maximum and minimum extension lengths for the user’s location.
Step 4 exit
Example:se-10-0-0-0(config)# exitse-10-0-0-0#
Exits configuration mode.
Command or Action Purpose
190Cisco Unity Express 2.1/2.2 CLI Administrator Guide for Cisco CallManager
Cisco Unity Express 2.1/2.2
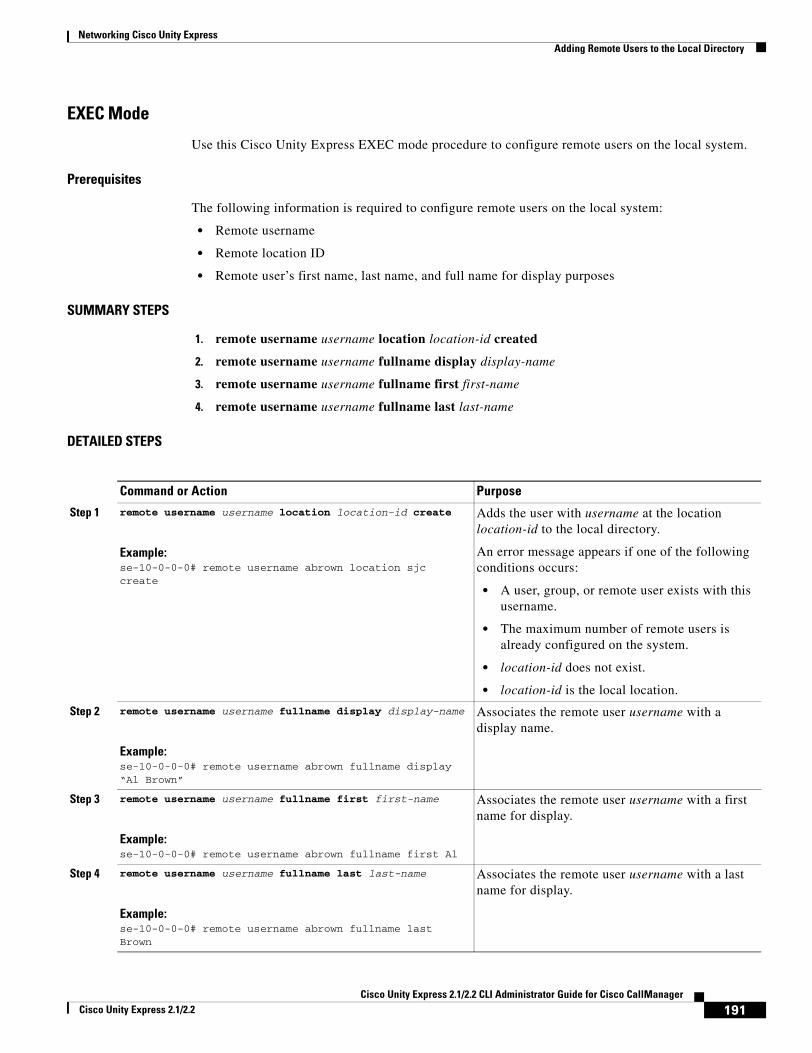
Networking Cisco Unity Express Adding Remote Users to the Local Directory
EXEC Mode
Use this Cisco Unity Express EXEC mode procedure to configure remote users on the local system.
Prerequisites
The following information is required to configure remote users on the local system:
• Remote username
• Remote location ID
• Remote user’s first name, last name, and full name for display purposes
SUMMARY STEPS
1. remote username username location location-id created
2. remote username username fullname display display-name
3. remote username username fullname first first-name
4. remote username username fullname last last-name
DETAILED STEPS
Command or Action Purpose
Step 1 remote username username location location-id create
Example:se-10-0-0-0# remote username abrown location sjc create
Adds the user with username at the location location-id to the local directory.
An error message appears if one of the following conditions occurs:
• A user, group, or remote user exists with this username.
• The maximum number of remote users is already configured on the system.
• location-id does not exist.
• location-id is the local location.
Step 2 remote username username fullname display display-name
Example:se-10-0-0-0# remote username abrown fullname display “Al Brown”
Associates the remote user username with a display name.
Step 3 remote username username fullname first first-name
Example:se-10-0-0-0# remote username abrown fullname first Al
Associates the remote user username with a first name for display.
Step 4 remote username username fullname last last-name
Example:se-10-0-0-0# remote username abrown fullname last Brown
Associates the remote user username with a last name for display.
191Cisco Unity Express 2.1/2.2 CLI Administrator Guide for Cisco CallManager
Cisco Unity Express 2.1/2.2
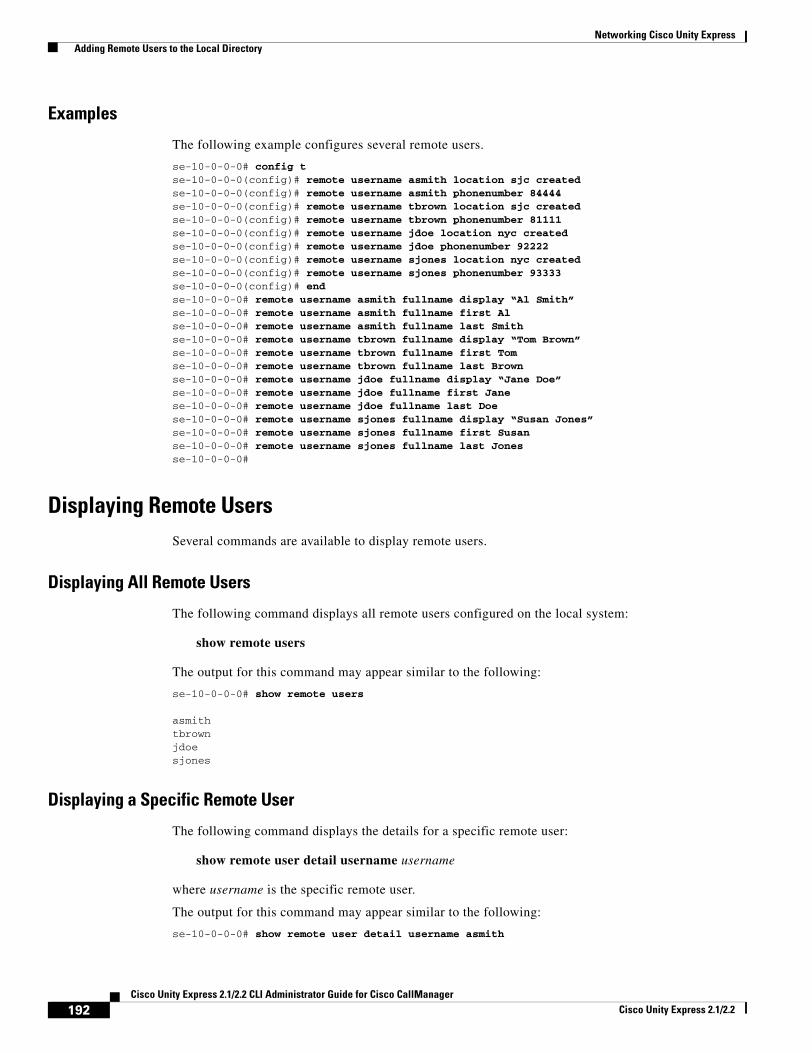
Networking Cisco Unity Express Adding Remote Users to the Local Directory
Examples
The following example configures several remote users.
se-10-0-0-0# config tse-10-0-0-0(config)# remote username asmith location sjc createdse-10-0-0-0(config)# remote username asmith phonenumber 84444se-10-0-0-0(config)# remote username tbrown location sjc createdse-10-0-0-0(config)# remote username tbrown phonenumber 81111se-10-0-0-0(config)# remote username jdoe location nyc createdse-10-0-0-0(config)# remote username jdoe phonenumber 92222se-10-0-0-0(config)# remote username sjones location nyc createdse-10-0-0-0(config)# remote username sjones phonenumber 93333se-10-0-0-0(config)# endse-10-0-0-0# remote username asmith fullname display “Al Smith”se-10-0-0-0# remote username asmith fullname first Alse-10-0-0-0# remote username asmith fullname last Smithse-10-0-0-0# remote username tbrown fullname display “Tom Brown”se-10-0-0-0# remote username tbrown fullname first Tomse-10-0-0-0# remote username tbrown fullname last Brownse-10-0-0-0# remote username jdoe fullname display “Jane Doe”se-10-0-0-0# remote username jdoe fullname first Janese-10-0-0-0# remote username jdoe fullname last Doese-10-0-0-0# remote username sjones fullname display “Susan Jones”se-10-0-0-0# remote username sjones fullname first Susanse-10-0-0-0# remote username sjones fullname last Jonesse-10-0-0-0#
Displaying Remote UsersSeveral commands are available to display remote users.
Displaying All Remote Users
The following command displays all remote users configured on the local system:
show remote users
The output for this command may appear similar to the following:
se-10-0-0-0# show remote users
asmithtbrownjdoesjones
Displaying a Specific Remote User
The following command displays the details for a specific remote user:
show remote user detail username username
where username is the specific remote user.
The output for this command may appear similar to the following:
se-10-0-0-0# show remote user detail username asmith
192Cisco Unity Express 2.1/2.2 CLI Administrator Guide for Cisco CallManager
Cisco Unity Express 2.1/2.2
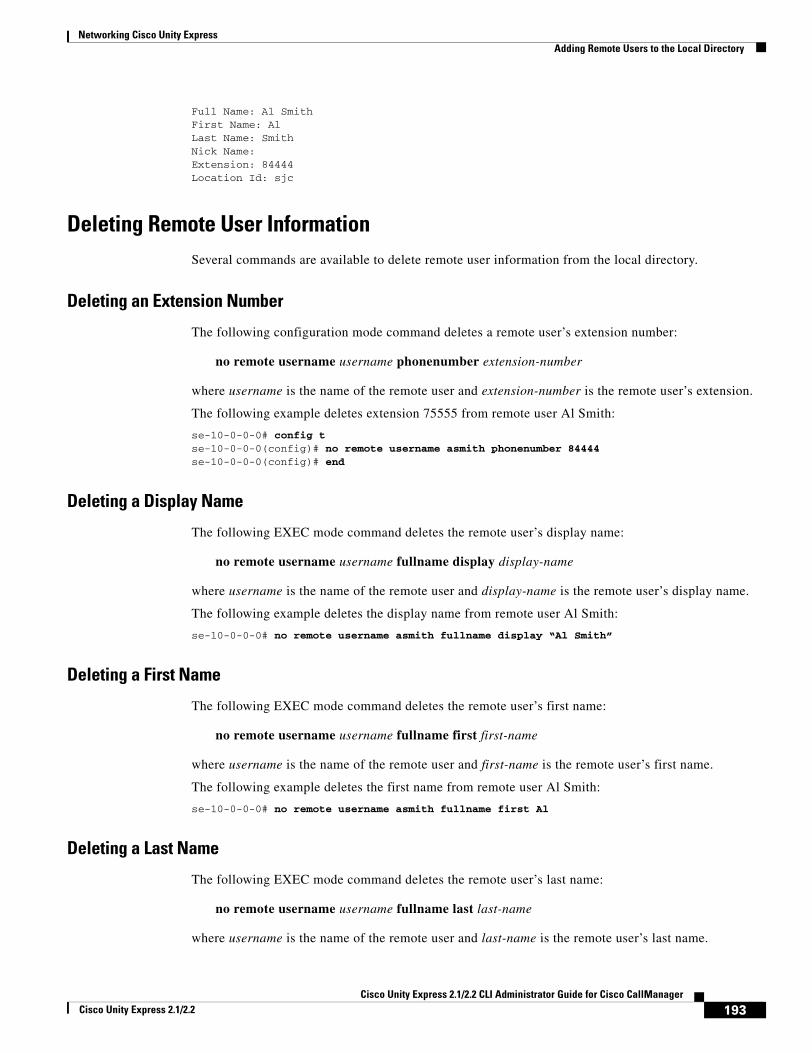
Networking Cisco Unity Express Adding Remote Users to the Local Directory
Full Name: Al SmithFirst Name: AlLast Name: SmithNick Name: Extension: 84444Location Id: sjc
Deleting Remote User InformationSeveral commands are available to delete remote user information from the local directory.
Deleting an Extension Number
The following configuration mode command deletes a remote user’s extension number:
no remote username username phonenumber extension-number
where username is the name of the remote user and extension-number is the remote user’s extension.
The following example deletes extension 75555 from remote user Al Smith:
se-10-0-0-0# config tse-10-0-0-0(config)# no remote username asmith phonenumber 84444se-10-0-0-0(config)# end
Deleting a Display Name
The following EXEC mode command deletes the remote user’s display name:
no remote username username fullname display display-name
where username is the name of the remote user and display-name is the remote user’s display name.
The following example deletes the display name from remote user Al Smith:
se-10-0-0-0# no remote username asmith fullname display “Al Smith”
Deleting a First Name
The following EXEC mode command deletes the remote user’s first name:
no remote username username fullname first first-name
where username is the name of the remote user and first-name is the remote user’s first name.
The following example deletes the first name from remote user Al Smith:
se-10-0-0-0# no remote username asmith fullname first Al
Deleting a Last Name
The following EXEC mode command deletes the remote user’s last name:
no remote username username fullname last last-name
where username is the name of the remote user and last-name is the remote user’s last name.
193Cisco Unity Express 2.1/2.2 CLI Administrator Guide for Cisco CallManager
Cisco Unity Express 2.1/2.2
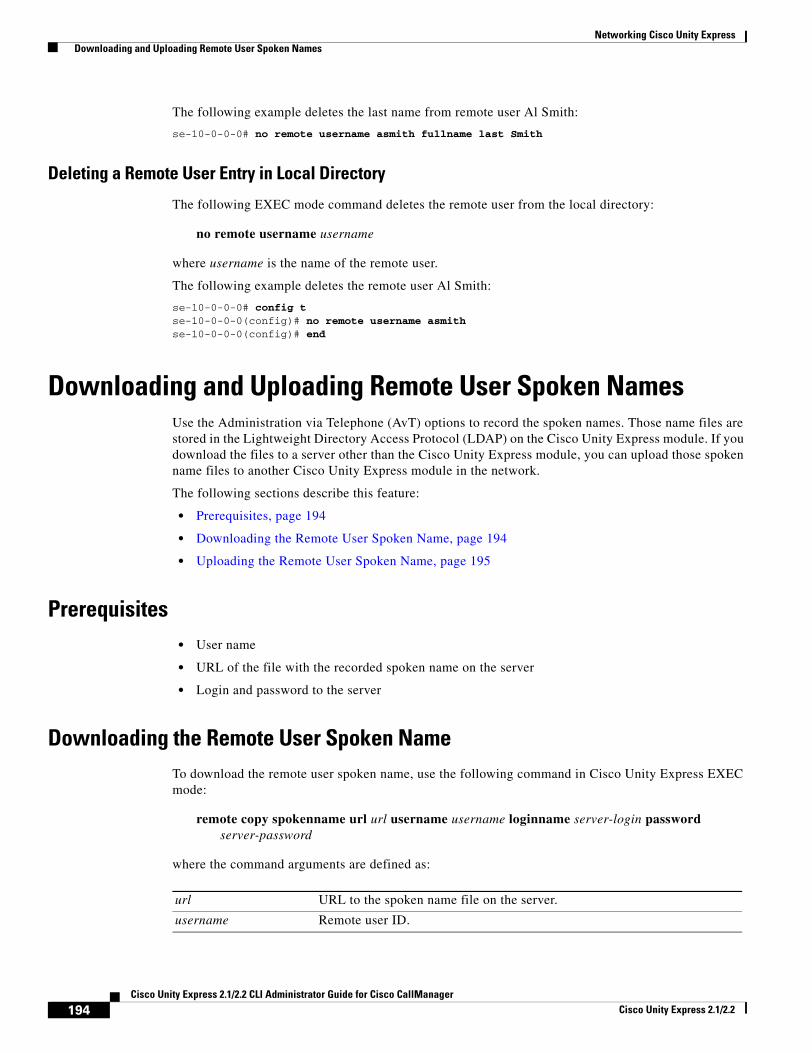
Networking Cisco Unity Express Downloading and Uploading Remote User Spoken Names
The following example deletes the last name from remote user Al Smith:
se-10-0-0-0# no remote username asmith fullname last Smith
Deleting a Remote User Entry in Local Directory
The following EXEC mode command deletes the remote user from the local directory:
no remote username username
where username is the name of the remote user.
The following example deletes the remote user Al Smith:
se-10-0-0-0# config tse-10-0-0-0(config)# no remote username asmithse-10-0-0-0(config)# end
Downloading and Uploading Remote User Spoken NamesUse the Administration via Telephone (AvT) options to record the spoken names. Those name files are stored in the Lightweight Directory Access Protocol (LDAP) on the Cisco Unity Express module. If you download the files to a server other than the Cisco Unity Express module, you can upload those spoken name files to another Cisco Unity Express module in the network.
The following sections describe this feature:
• Prerequisites, page 194
• Downloading the Remote User Spoken Name, page 194
• Uploading the Remote User Spoken Name, page 195
Prerequisites• User name
• URL of the file with the recorded spoken name on the server
• Login and password to the server
Downloading the Remote User Spoken NameTo download the remote user spoken name, use the following command in Cisco Unity Express EXEC mode:
remote copy spokenname url url username username loginname server-login password server-password
where the command arguments are defined as:
url URL to the spoken name file on the server.
username Remote user ID.
194Cisco Unity Express 2.1/2.2 CLI Administrator Guide for Cisco CallManager
Cisco Unity Express 2.1/2.2
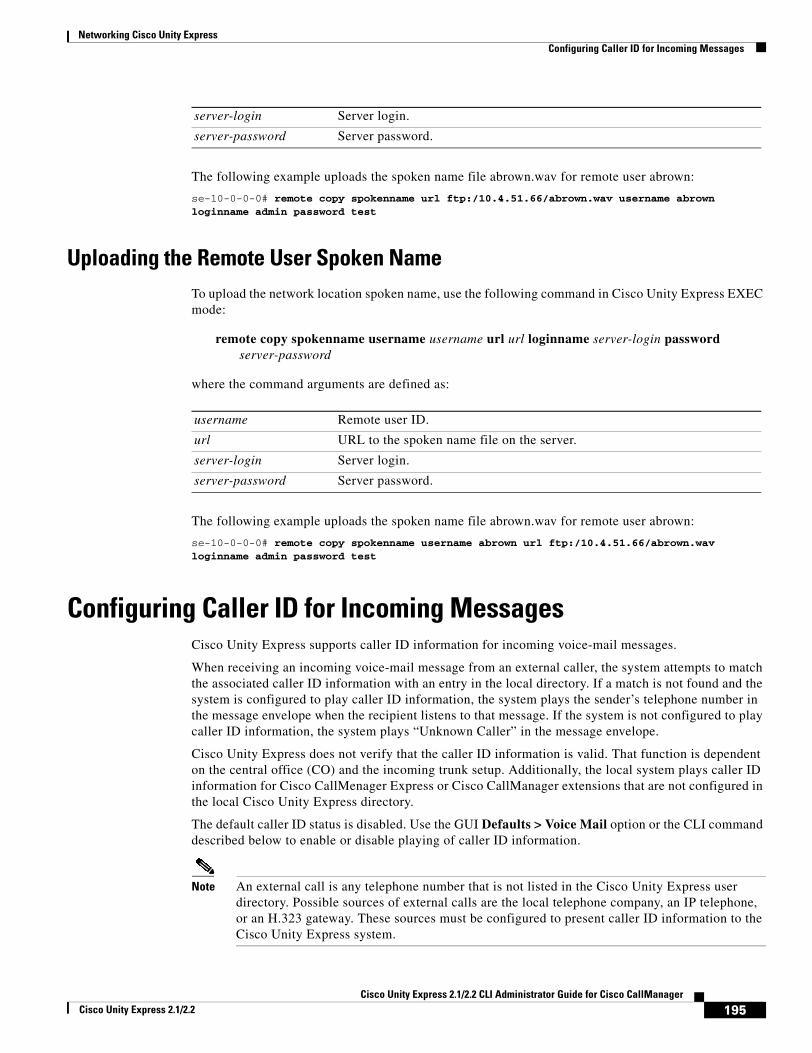
Networking Cisco Unity Express Configuring Caller ID for Incoming Messages
The following example uploads the spoken name file abrown.wav for remote user abrown:
se-10-0-0-0# remote copy spokenname url ftp:/10.4.51.66/abrown.wav username abrown loginname admin password test
Uploading the Remote User Spoken NameTo upload the network location spoken name, use the following command in Cisco Unity Express EXEC mode:
remote copy spokenname username username url url loginname server-login password server-password
where the command arguments are defined as:
The following example uploads the spoken name file abrown.wav for remote user abrown:
se-10-0-0-0# remote copy spokenname username abrown url ftp:/10.4.51.66/abrown.wav loginname admin password test
Configuring Caller ID for Incoming MessagesCisco Unity Express supports caller ID information for incoming voice-mail messages.
When receiving an incoming voice-mail message from an external caller, the system attempts to match the associated caller ID information with an entry in the local directory. If a match is not found and the system is configured to play caller ID information, the system plays the sender’s telephone number in the message envelope when the recipient listens to that message. If the system is not configured to play caller ID information, the system plays “Unknown Caller” in the message envelope.
Cisco Unity Express does not verify that the caller ID information is valid. That function is dependent on the central office (CO) and the incoming trunk setup. Additionally, the local system plays caller ID information for Cisco CallMenager Express or Cisco CallManager extensions that are not configured in the local Cisco Unity Express directory.
The default caller ID status is disabled. Use the GUI Defaults > Voice Mail option or the CLI command described below to enable or disable playing of caller ID information.
Note An external call is any telephone number that is not listed in the Cisco Unity Express user directory. Possible sources of external calls are the local telephone company, an IP telephone, or an H.323 gateway. These sources must be configured to present caller ID information to the Cisco Unity Express system.
server-login Server login.
server-password Server password.
username Remote user ID.
url URL to the spoken name file on the server.
server-login Server login.
server-password Server password.
195Cisco Unity Express 2.1/2.2 CLI Administrator Guide for Cisco CallManager
Cisco Unity Express 2.1/2.2
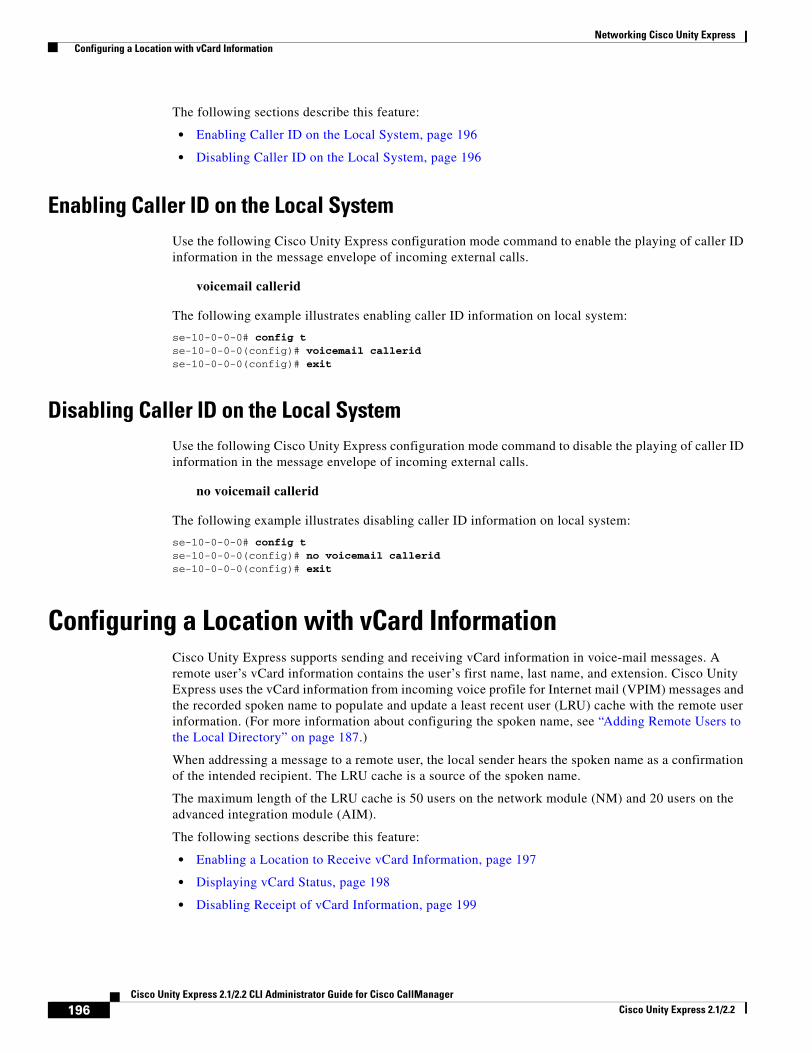
Networking Cisco Unity Express Configuring a Location with vCard Information
The following sections describe this feature:
• Enabling Caller ID on the Local System, page 196
• Disabling Caller ID on the Local System, page 196
Enabling Caller ID on the Local SystemUse the following Cisco Unity Express configuration mode command to enable the playing of caller ID information in the message envelope of incoming external calls.
voicemail callerid
The following example illustrates enabling caller ID information on local system:
se-10-0-0-0# config tse-10-0-0-0(config)# voicemail calleridse-10-0-0-0(config)# exit
Disabling Caller ID on the Local SystemUse the following Cisco Unity Express configuration mode command to disable the playing of caller ID information in the message envelope of incoming external calls.
no voicemail callerid
The following example illustrates disabling caller ID information on local system:
se-10-0-0-0# config tse-10-0-0-0(config)# no voicemail calleridse-10-0-0-0(config)# exit
Configuring a Location with vCard InformationCisco Unity Express supports sending and receiving vCard information in voice-mail messages. A remote user’s vCard information contains the user’s first name, last name, and extension. Cisco Unity Express uses the vCard information from incoming voice profile for Internet mail (VPIM) messages and the recorded spoken name to populate and update a least recent user (LRU) cache with the remote user information. (For more information about configuring the spoken name, see “Adding Remote Users to the Local Directory” on page 187.)
When addressing a message to a remote user, the local sender hears the spoken name as a confirmation of the intended recipient. The LRU cache is a source of the spoken name.
The maximum length of the LRU cache is 50 users on the network module (NM) and 20 users on the advanced integration module (AIM).
The following sections describe this feature:
• Enabling a Location to Receive vCard Information, page 197
• Displaying vCard Status, page 198
• Disabling Receipt of vCard Information, page 199
196Cisco Unity Express 2.1/2.2 CLI Administrator Guide for Cisco CallManager
Cisco Unity Express 2.1/2.2
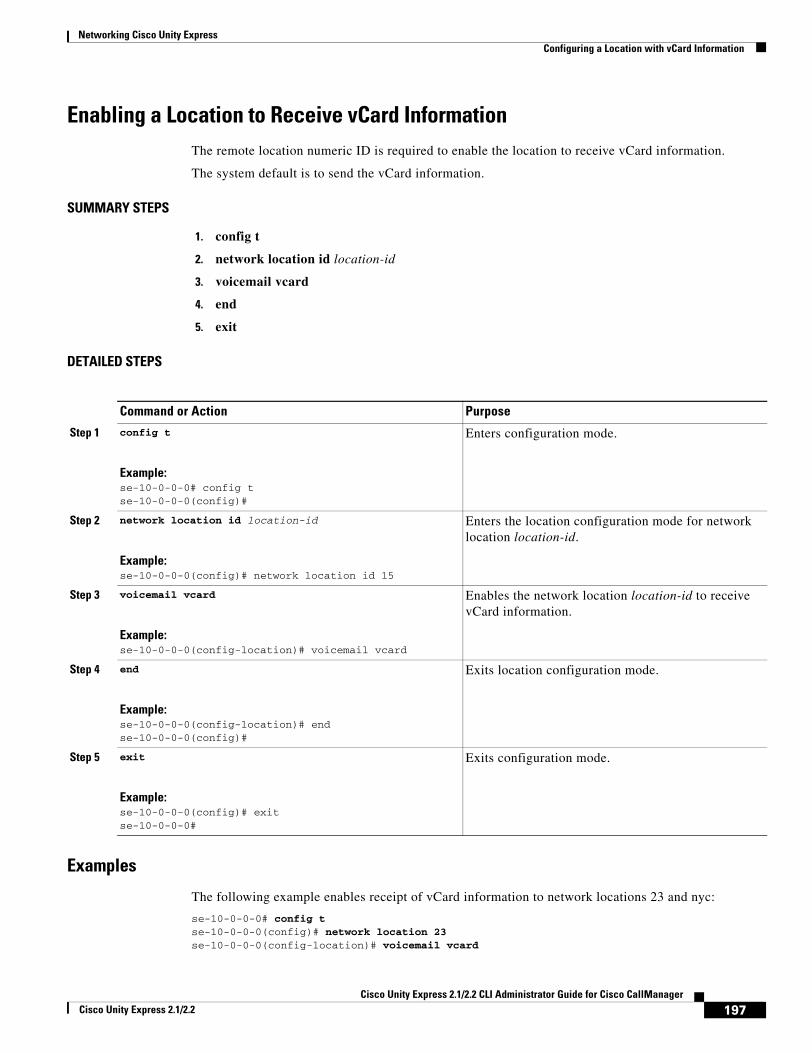
Networking Cisco Unity Express Configuring a Location with vCard Information
Enabling a Location to Receive vCard InformationThe remote location numeric ID is required to enable the location to receive vCard information.
The system default is to send the vCard information.
SUMMARY STEPS
1. config t
2. network location id location-id
3. voicemail vcard
4. end
5. exit
DETAILED STEPS
Examples
The following example enables receipt of vCard information to network locations 23 and nyc:
se-10-0-0-0# config tse-10-0-0-0(config)# network location 23se-10-0-0-0(config-location)# voicemail vcard
Command or Action Purpose
Step 1 config t
Example:se-10-0-0-0# config tse-10-0-0-0(config)#
Enters configuration mode.
Step 2 network location id location-id
Example:se-10-0-0-0(config)# network location id 15
Enters the location configuration mode for network location location-id.
Step 3 voicemail vcard
Example:se-10-0-0-0(config-location)# voicemail vcard
Enables the network location location-id to receive vCard information.
Step 4 end
Example:se-10-0-0-0(config-location)# endse-10-0-0-0(config)#
Exits location configuration mode.
Step 5 exit
Example:se-10-0-0-0(config)# exitse-10-0-0-0#
Exits configuration mode.
197Cisco Unity Express 2.1/2.2 CLI Administrator Guide for Cisco CallManager
Cisco Unity Express 2.1/2.2
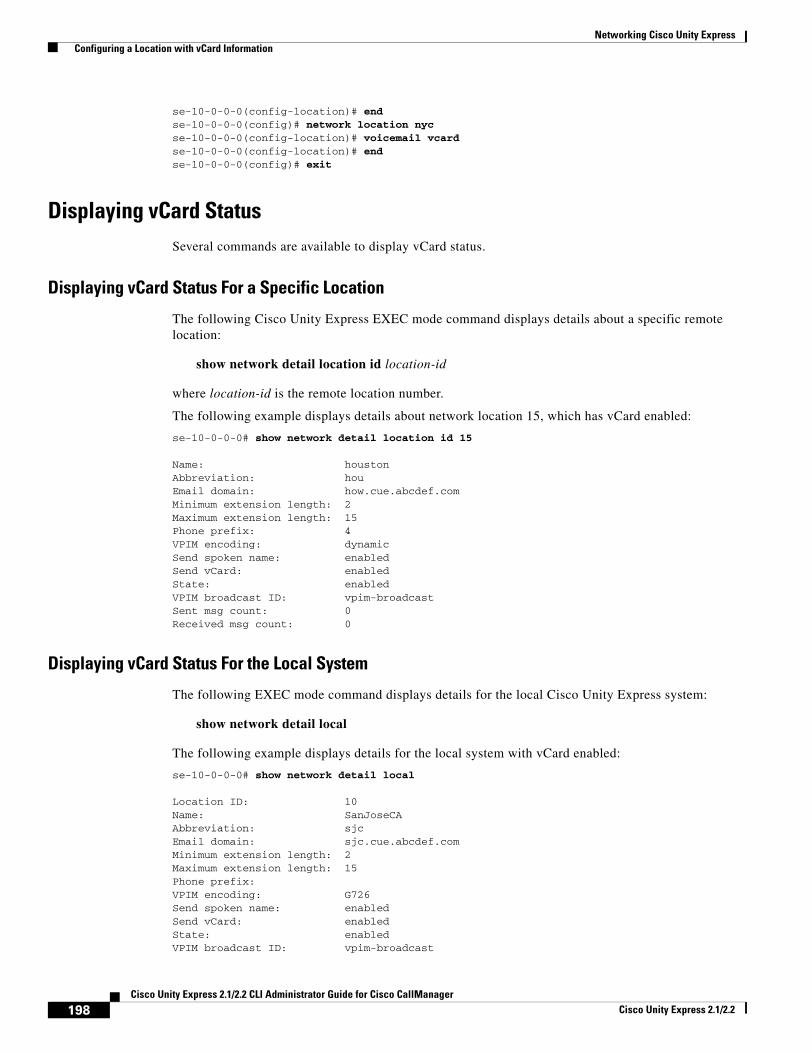
Networking Cisco Unity Express Configuring a Location with vCard Information
se-10-0-0-0(config-location)# endse-10-0-0-0(config)# network location nycse-10-0-0-0(config-location)# voicemail vcardse-10-0-0-0(config-location)# endse-10-0-0-0(config)# exit
Displaying vCard StatusSeveral commands are available to display vCard status.
Displaying vCard Status For a Specific Location
The following Cisco Unity Express EXEC mode command displays details about a specific remote location:
show network detail location id location-id
where location-id is the remote location number.
The following example displays details about network location 15, which has vCard enabled:
se-10-0-0-0# show network detail location id 15
Name: houstonAbbreviation: houEmail domain: how.cue.abcdef.comMinimum extension length: 2Maximum extension length: 15Phone prefix: 4VPIM encoding: dynamicSend spoken name: enabledSend vCard: enabledState: enabledVPIM broadcast ID: vpim-broadcastSent msg count: 0Received msg count: 0
Displaying vCard Status For the Local System
The following EXEC mode command displays details for the local Cisco Unity Express system:
show network detail local
The following example displays details for the local system with vCard enabled:
se-10-0-0-0# show network detail local
Location ID: 10Name: SanJoseCAAbbreviation: sjcEmail domain: sjc.cue.abcdef.comMinimum extension length: 2Maximum extension length: 15Phone prefix:VPIM encoding: G726Send spoken name: enabledSend vCard: enabledState: enabledVPIM broadcast ID: vpim-broadcast
198Cisco Unity Express 2.1/2.2 CLI Administrator Guide for Cisco CallManager
Cisco Unity Express 2.1/2.2
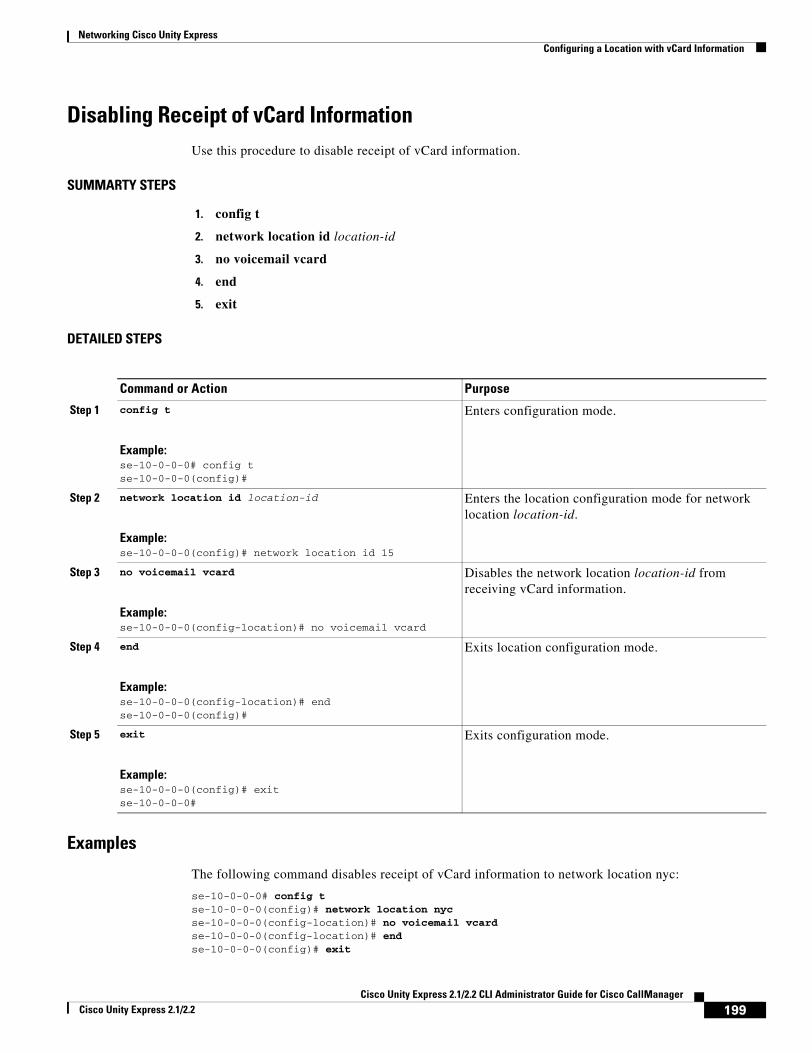
Networking Cisco Unity Express Configuring a Location with vCard Information
Disabling Receipt of vCard InformationUse this procedure to disable receipt of vCard information.
SUMMARTY STEPS
1. config t
2. network location id location-id
3. no voicemail vcard
4. end
5. exit
DETAILED STEPS
Examples
The following command disables receipt of vCard information to network location nyc:
se-10-0-0-0# config tse-10-0-0-0(config)# network location nycse-10-0-0-0(config-location)# no voicemail vcardse-10-0-0-0(config-location)# endse-10-0-0-0(config)# exit
Command or Action Purpose
Step 1 config t
Example:se-10-0-0-0# config tse-10-0-0-0(config)#
Enters configuration mode.
Step 2 network location id location-id
Example:se-10-0-0-0(config)# network location id 15
Enters the location configuration mode for network location location-id.
Step 3 no voicemail vcard
Example:se-10-0-0-0(config-location)# no voicemail vcard
Disables the network location location-id from receiving vCard information.
Step 4 end
Example:se-10-0-0-0(config-location)# endse-10-0-0-0(config)#
Exits location configuration mode.
Step 5 exit
Example:se-10-0-0-0(config)# exitse-10-0-0-0#
Exits configuration mode.
199Cisco Unity Express 2.1/2.2 CLI Administrator Guide for Cisco CallManager
Cisco Unity Express 2.1/2.2

Networking Cisco Unity Express Configuring the LRU Cache
Configuring the LRU CacheCisco Unity Express supports a least recent user (LRU) cache that contains vCard information about remote users. An LRU cache is a database of remote users’ first names, last names, and spoken names. These remote users are not configured in the Remote User Directory. The users contained in the cache are referred to as cached users.
Network messages update the contents of the LRU cache. When a local sender addresses a voice-mail message to a remote user, the system accesses this information to send a spoken name confirmation about the remote user to the local sender. Each time a network message arrives from a cached user or each time a local sender sends a voice message to a cached user, the system updates the timestamp of the cached user’s entry in the LRU cache.
The maximum capacity of the LRU cache is 50 users on the network module (NM) and 20 users on the advanced integration module (AIM). When the LRU cache reaches its maximum capacity, a new entry erases the existing entry with the oldest timestamp. This means that the next time a local sender calls a remote user, the sender will not receive a spoken name confirmation if the remote user is no longer in the LRU cache.
Do one or both of the following to avoid the inconsistent confirmation response:
• To ensure that a sender always receives a spoken name confirmation for a remote user, configure the remote user in to the Remote User Directory.
• Disable the LRU cache.
The LRU cache contents are saved after system reloads.
By default, the LRU cache is enabled on the local system. Use the GUI Defaults > Voice Mail option or the CLI commands described below to change the status of the LRU cache.
The following sections describe this feature:
• Enabling the LRU Cache, page 200
• Disabling the LRU Cache, page 200
• Displaying LRU Cache Data, page 201
Enabling the LRU CacheUse the following Cisco Unity Express configuration mode command to enable the LRU cache on the local system:
remote cache enable
The following example illustrates enabling the LRU cache on the local system:
se-10-0-0-0# config tse-10-0-0-0(config)# remote cache enablese-10-0-0-0(config)# exit
Disabling the LRU CacheDisabling the cache clears all cache entries and prevents new user entries from being stored in the cache.
Use the following Cisco Unity Express configuration mode command to disable the LRU cache on the local system.
200Cisco Unity Express 2.1/2.2 CLI Administrator Guide for Cisco CallManager
Cisco Unity Express 2.1/2.2
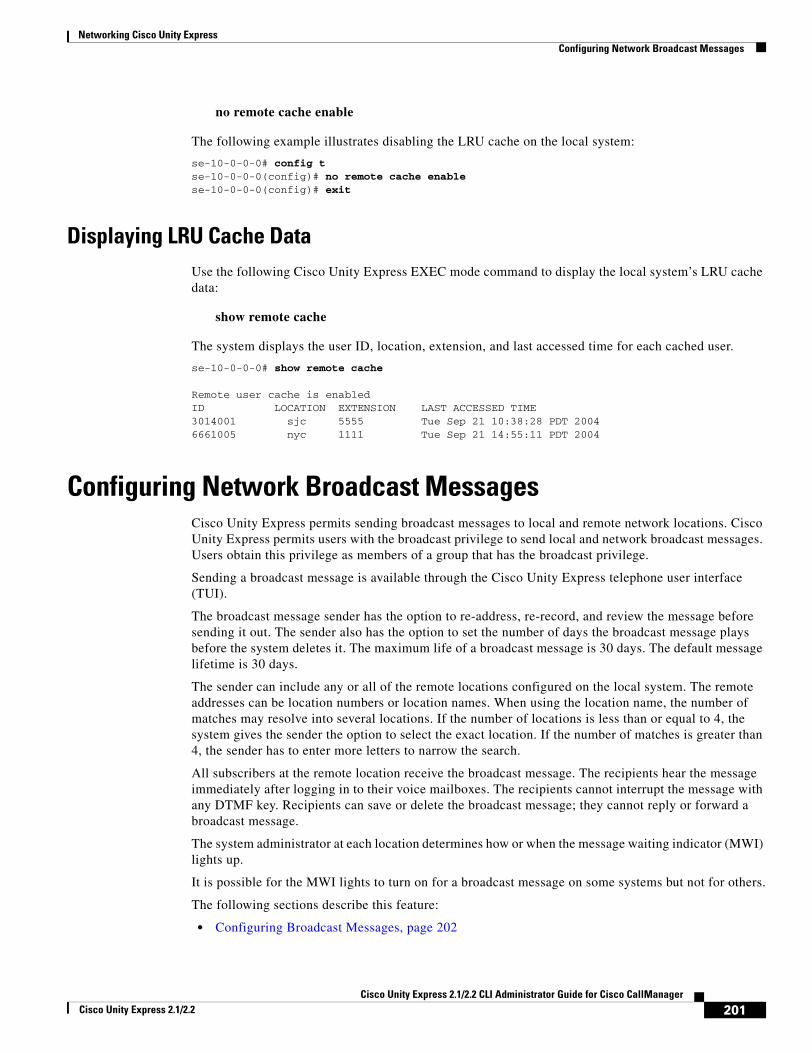
Networking Cisco Unity Express Configuring Network Broadcast Messages
no remote cache enable
The following example illustrates disabling the LRU cache on the local system:
se-10-0-0-0# config tse-10-0-0-0(config)# no remote cache enablese-10-0-0-0(config)# exit
Displaying LRU Cache DataUse the following Cisco Unity Express EXEC mode command to display the local system’s LRU cache data:
show remote cache
The system displays the user ID, location, extension, and last accessed time for each cached user.
se-10-0-0-0# show remote cache
Remote user cache is enabledID LOCATION EXTENSION LAST ACCESSED TIME3014001 sjc 5555 Tue Sep 21 10:38:28 PDT 20046661005 nyc 1111 Tue Sep 21 14:55:11 PDT 2004
Configuring Network Broadcast MessagesCisco Unity Express permits sending broadcast messages to local and remote network locations. Cisco Unity Express permits users with the broadcast privilege to send local and network broadcast messages. Users obtain this privilege as members of a group that has the broadcast privilege.
Sending a broadcast message is available through the Cisco Unity Express telephone user interface (TUI).
The broadcast message sender has the option to re-address, re-record, and review the message before sending it out. The sender also has the option to set the number of days the broadcast message plays before the system deletes it. The maximum life of a broadcast message is 30 days. The default message lifetime is 30 days.
The sender can include any or all of the remote locations configured on the local system. The remote addresses can be location numbers or location names. When using the location name, the number of matches may resolve into several locations. If the number of locations is less than or equal to 4, the system gives the sender the option to select the exact location. If the number of matches is greater than 4, the sender has to enter more letters to narrow the search.
All subscribers at the remote location receive the broadcast message. The recipients hear the message immediately after logging in to their voice mailboxes. The recipients cannot interrupt the message with any DTMF key. Recipients can save or delete the broadcast message; they cannot reply or forward a broadcast message.
The system administrator at each location determines how or when the message waiting indicator (MWI) lights up.
It is possible for the MWI lights to turn on for a broadcast message on some systems but not for others.
The following sections describe this feature:
• Configuring Broadcast Messages, page 202
201Cisco Unity Express 2.1/2.2 CLI Administrator Guide for Cisco CallManager
Cisco Unity Express 2.1/2.2
Networking Cisco Unity Express Configuring Network Broadcast Messages
• Configuring the Broadcast Message VPIM ID for a Network Location, page 203
• Enabling the MWI Lights for Broadcast Messages, page 205
• Displaying Broadcast Messages, page 205
• Deleting a Broadcast Message, page 206
• Changing the Broadcast Message Start and End Times, page 206
• Disabling the Broadcast Privileges for a Group, page 207
• Disabling the MWI Lights for Broadcast Messages, page 207
Configuring Broadcast MessagesPerform the following procedures to configure broadcast messages:
• Configuring a Group with Broadcast Privileges, page 202.
• Configuring the Broadcast Message Length and Expiration Time, page 202
Configuring a Group with Broadcast Privileges
Use the following EXEC mode command to configure a group with broadcast privileges:
group group-name privilege broadcast
where group-name is the set of users who will have the capability of creating and sending broadcast messages.
The following example assigns the broadcast privilege to a group named managers:
se-10-0-0-0# group managers privilege broadcast
Configuring the Broadcast Message Length and Expiration Time
Use the following procedure to configure the local system for broadcast messages.
Prerequisites
The following information is required to configure the broadcast message length and expiry time:
• Broadcast message length, in seconds
• Broadcast message expiry time, in days
SUMMARY STEPS
1. config t
2. voicemail broadcast recording time broadcast-length
3. voicemail default broadcast expiration time broadcast-days
4. exit
202Cisco Unity Express 2.1/2.2 CLI Administrator Guide for Cisco CallManager
Cisco Unity Express 2.1/2.2
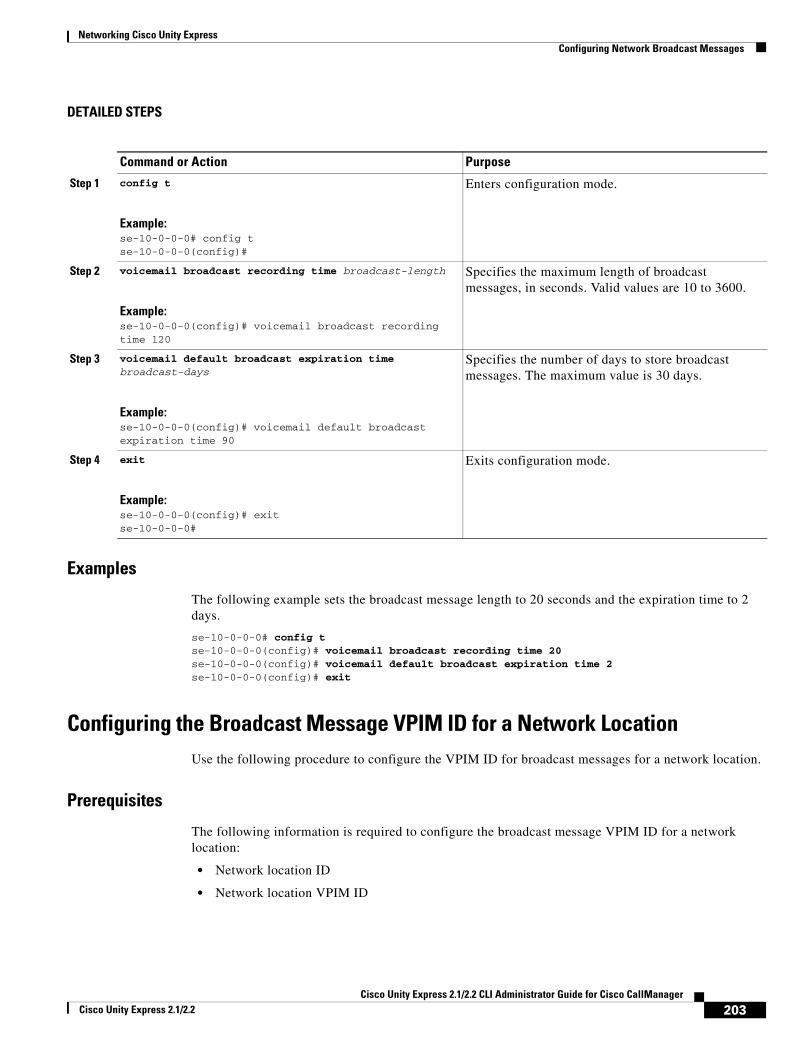
Networking Cisco Unity Express Configuring Network Broadcast Messages
DETAILED STEPS
Examples
The following example sets the broadcast message length to 20 seconds and the expiration time to 2 days.
se-10-0-0-0# config tse-10-0-0-0(config)# voicemail broadcast recording time 20se-10-0-0-0(config)# voicemail default broadcast expiration time 2se-10-0-0-0(config)# exit
Configuring the Broadcast Message VPIM ID for a Network LocationUse the following procedure to configure the VPIM ID for broadcast messages for a network location.
Prerequisites
The following information is required to configure the broadcast message VPIM ID for a network location:
• Network location ID
• Network location VPIM ID
Command or Action Purpose
Step 1 config t
Example:se-10-0-0-0# config tse-10-0-0-0(config)#
Enters configuration mode.
Step 2 voicemail broadcast recording time broadcast-length
Example:se-10-0-0-0(config)# voicemail broadcast recording time 120
Specifies the maximum length of broadcast messages, in seconds. Valid values are 10 to 3600.
Step 3 voicemail default broadcast expiration time broadcast-days
Example:se-10-0-0-0(config)# voicemail default broadcast expiration time 90
Specifies the number of days to store broadcast messages. The maximum value is 30 days.
Step 4 exit
Example:se-10-0-0-0(config)# exitse-10-0-0-0#
Exits configuration mode.
203Cisco Unity Express 2.1/2.2 CLI Administrator Guide for Cisco CallManager
Cisco Unity Express 2.1/2.2
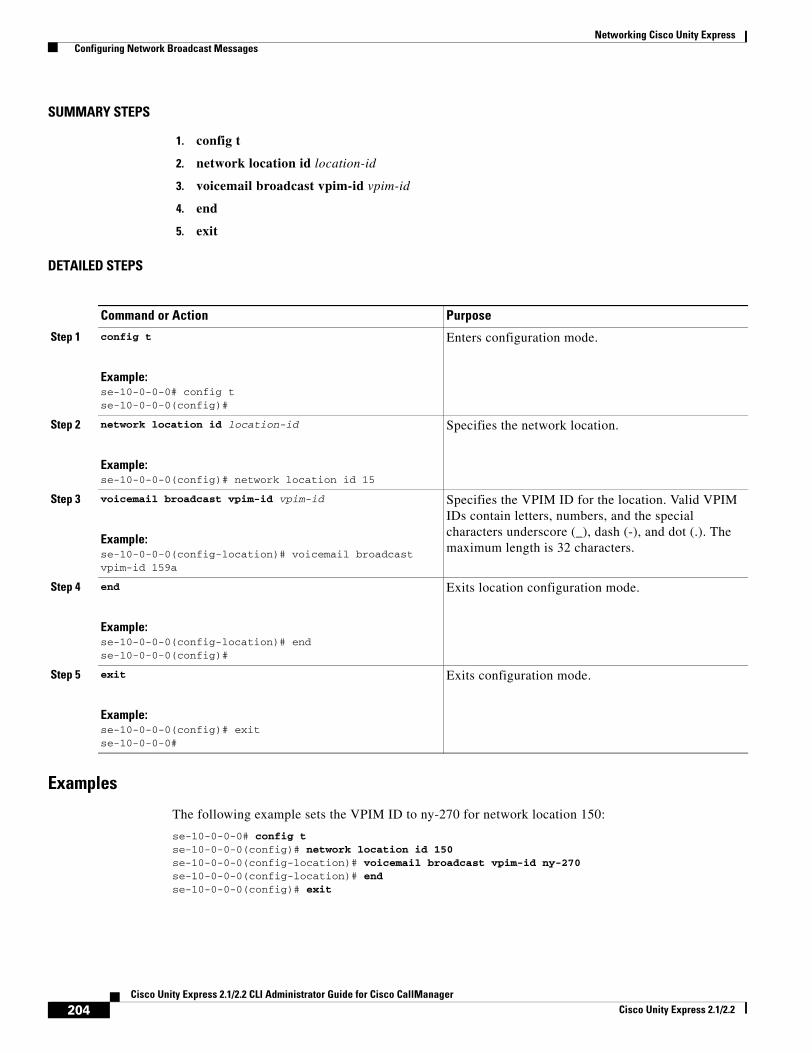
Networking Cisco Unity Express Configuring Network Broadcast Messages
SUMMARY STEPS
1. config t
2. network location id location-id
3. voicemail broadcast vpim-id vpim-id
4. end
5. exit
DETAILED STEPS
Examples
The following example sets the VPIM ID to ny-270 for network location 150:
se-10-0-0-0# config tse-10-0-0-0(config)# network location id 150se-10-0-0-0(config-location)# voicemail broadcast vpim-id ny-270se-10-0-0-0(config-location)# endse-10-0-0-0(config)# exit
Command or Action Purpose
Step 1 config t
Example:se-10-0-0-0# config tse-10-0-0-0(config)#
Enters configuration mode.
Step 2 network location id location-id
Example:se-10-0-0-0(config)# network location id 15
Specifies the network location.
Step 3 voicemail broadcast vpim-id vpim-id
Example:se-10-0-0-0(config-location)# voicemail broadcast vpim-id 159a
Specifies the VPIM ID for the location. Valid VPIM IDs contain letters, numbers, and the special characters underscore (_), dash (-), and dot (.). The maximum length is 32 characters.
Step 4 end
Example:se-10-0-0-0(config-location)# endse-10-0-0-0(config)#
Exits location configuration mode.
Step 5 exit
Example:se-10-0-0-0(config)# exitse-10-0-0-0#
Exits configuration mode.
204Cisco Unity Express 2.1/2.2 CLI Administrator Guide for Cisco CallManager
Cisco Unity Express 2.1/2.2
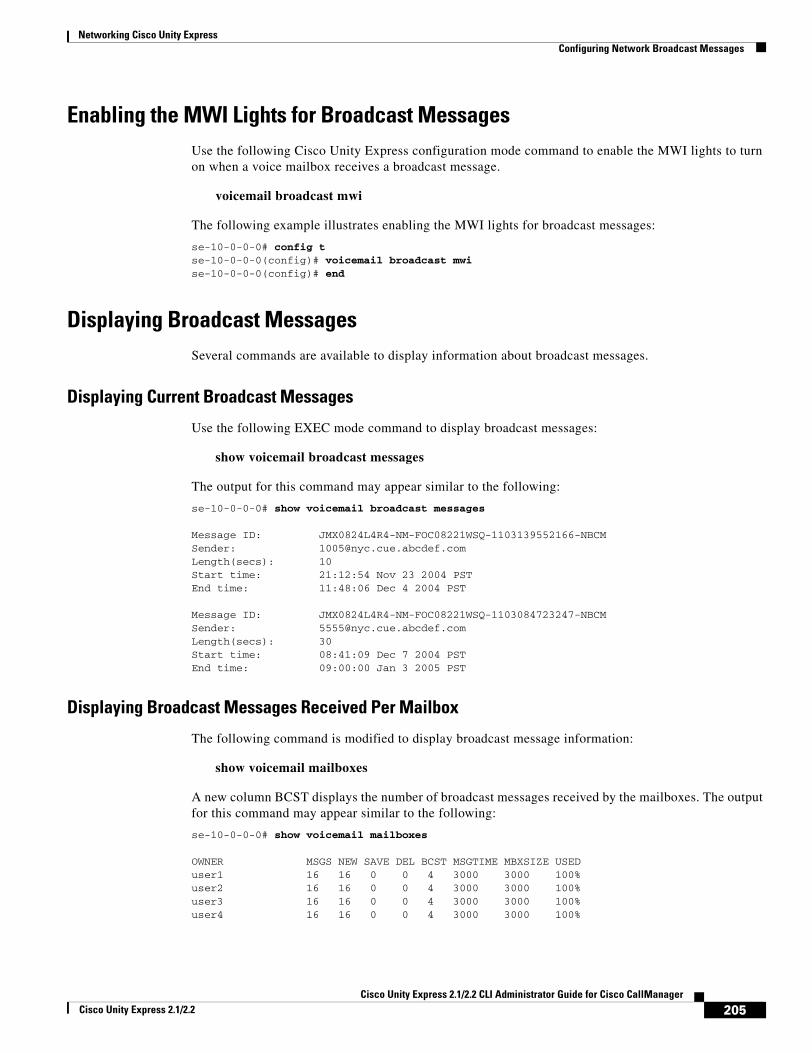
Networking Cisco Unity Express Configuring Network Broadcast Messages
Enabling the MWI Lights for Broadcast MessagesUse the following Cisco Unity Express configuration mode command to enable the MWI lights to turn on when a voice mailbox receives a broadcast message.
voicemail broadcast mwi
The following example illustrates enabling the MWI lights for broadcast messages:
se-10-0-0-0# config tse-10-0-0-0(config)# voicemail broadcast mwise-10-0-0-0(config)# end
Displaying Broadcast MessagesSeveral commands are available to display information about broadcast messages.
Displaying Current Broadcast Messages
Use the following EXEC mode command to display broadcast messages:
show voicemail broadcast messages
The output for this command may appear similar to the following:
se-10-0-0-0# show voicemail broadcast messages
Message ID: JMX0824L4R4-NM-FOC08221WSQ-1103139552166-NBCMSender: [email protected](secs): 10Start time: 21:12:54 Nov 23 2004 PSTEnd time: 11:48:06 Dec 4 2004 PST
Message ID: JMX0824L4R4-NM-FOC08221WSQ-1103084723247-NBCMSender: [email protected](secs): 30Start time: 08:41:09 Dec 7 2004 PSTEnd time: 09:00:00 Jan 3 2005 PST
Displaying Broadcast Messages Received Per Mailbox
The following command is modified to display broadcast message information:
show voicemail mailboxes
A new column BCST displays the number of broadcast messages received by the mailboxes. The output for this command may appear similar to the following:
se-10-0-0-0# show voicemail mailboxes
OWNER MSGS NEW SAVE DEL BCST MSGTIME MBXSIZE USEDuser1 16 16 0 0 4 3000 3000 100%user2 16 16 0 0 4 3000 3000 100%user3 16 16 0 0 4 3000 3000 100%user4 16 16 0 0 4 3000 3000 100%
205Cisco Unity Express 2.1/2.2 CLI Administrator Guide for Cisco CallManager
Cisco Unity Express 2.1/2.2
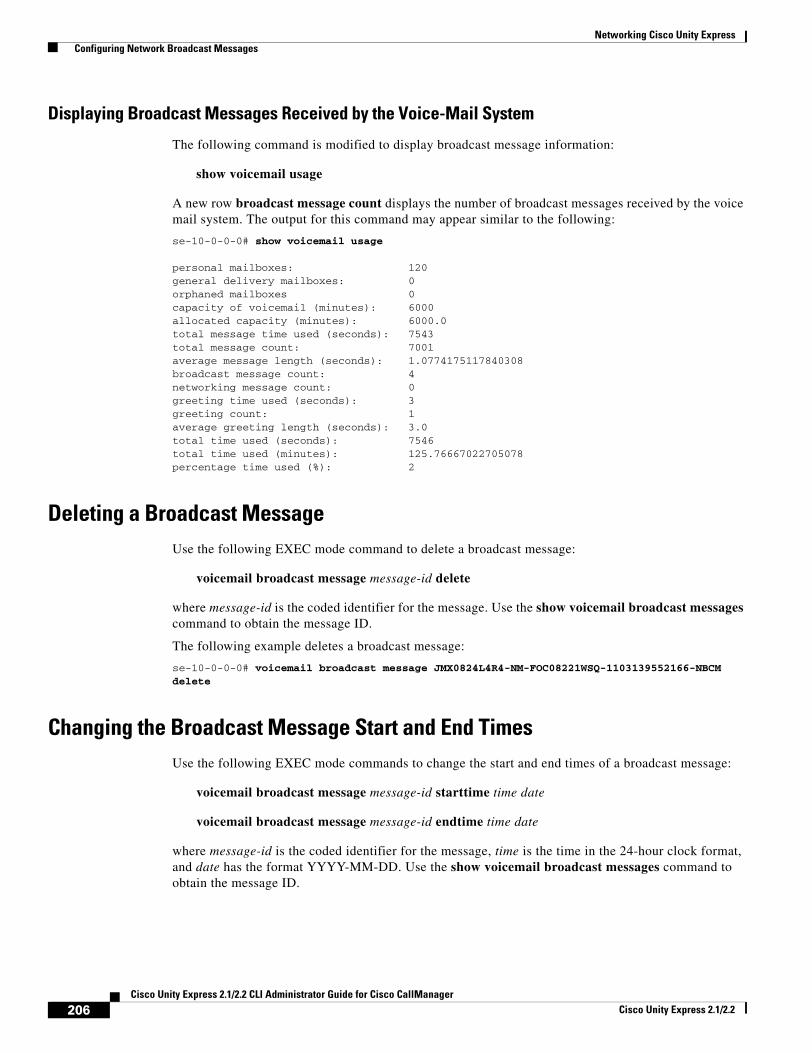
Networking Cisco Unity Express Configuring Network Broadcast Messages
Displaying Broadcast Messages Received by the Voice-Mail System
The following command is modified to display broadcast message information:
show voicemail usage
A new row broadcast message count displays the number of broadcast messages received by the voice mail system. The output for this command may appear similar to the following:
se-10-0-0-0# show voicemail usage
personal mailboxes: 120general delivery mailboxes: 0orphaned mailboxes 0capacity of voicemail (minutes): 6000allocated capacity (minutes): 6000.0total message time used (seconds): 7543total message count: 7001average message length (seconds): 1.0774175117840308broadcast message count: 4networking message count: 0greeting time used (seconds): 3greeting count: 1average greeting length (seconds): 3.0total time used (seconds): 7546total time used (minutes): 125.76667022705078percentage time used (%): 2
Deleting a Broadcast MessageUse the following EXEC mode command to delete a broadcast message:
voicemail broadcast message message-id delete
where message-id is the coded identifier for the message. Use the show voicemail broadcast messages command to obtain the message ID.
The following example deletes a broadcast message:
se-10-0-0-0# voicemail broadcast message JMX0824L4R4-NM-FOC08221WSQ-1103139552166-NBCM delete
Changing the Broadcast Message Start and End TimesUse the following EXEC mode commands to change the start and end times of a broadcast message:
voicemail broadcast message message-id starttime time date
voicemail broadcast message message-id endtime time date
where message-id is the coded identifier for the message, time is the time in the 24-hour clock format, and date has the format YYYY-MM-DD. Use the show voicemail broadcast messages command to obtain the message ID.
206Cisco Unity Express 2.1/2.2 CLI Administrator Guide for Cisco CallManager
Cisco Unity Express 2.1/2.2

Networking Cisco Unity Express Configuring Distribution Lists
The following examples change the start and end times for a broadcast message:
se-10-0-0-0# voicemail broadcast message JMX0824L4R4-NM-FOC08221WSQ-1103139552166-NBCM
starttime 10:00 2004-09-15
se-10-0-0-0# voicemail broadcast message JMX0824L4R4-NM-FOC08221WSQ-1103139552166-NBCM
endtime 15:30 2004-09-16
Disabling the Broadcast Privileges for a GroupUse the following EXEC mode command to remove the broadcast privileges from a group:
no group groupname privilege broadcast
where groupname is the group to have the broadcast privileges removed.
The following example disables the broadcast privilege for the group named managers:
se-10-0-0-0# no group managers privilege broadcast
Disabling the MWI Lights for Broadcast MessagesUse the following Cisco Unity Express configuration mode command to turn off the MWI lights for broadcast messages.
no voicemail broadcast mwi
The following example illustrates disabling the MWI lights for broadcast messages:
se-10-0-0-0# config tse-10-0-0-0(config)# no voicemail broadcast mwise-10-0-0-0(config)# end
Configuring Distribution ListsCisco Unity Express permits configuration of distribution lists that allow users to send a voice-mail message to multiple recipients at one time. This section describes distribution lists and contains the following sections:
• Members of a Distribution List, page 208
• Public Distribution Lists, page 208
• Private Distribution Lists, page 209
• Properties of Distribution Lists, page 210
• Differences Between Cisco Unity Express and Cisco Unity Distribution Lists, page 211
• Configuring Public Distribution Lists, page 212
• Displaying Distribution Lists, page 215
• Deleting Distribution Lists, page 217
207Cisco Unity Express 2.1/2.2 CLI Administrator Guide for Cisco CallManager
Cisco Unity Express 2.1/2.2
Networking Cisco Unity Express Configuring Distribution Lists
Members of a Distribution ListMembers of a distribution list can be any combination of the following:
• Local and remote users
A remote user that is statically configured on the local system can be a member of a distribution list. However, that remote user cannot own a distribution list on the local system.
• General delivery mailboxes (GDMs)
• Groups
• Other distribution lists
Recursive distribution lists are permitted; for example, list A can be a member of list B, and list B can be a member of list A.
• Blind addresses
Specify the location ID and extension of the blind address. The system verifies the location ID and the extension length.
Public Distribution ListsAll local users of the system can use a public distribution list in the address of a voice-mail message. Table 10 describes the features of a public distribution list.
208Cisco Unity Express 2.1/2.2 CLI Administrator Guide for Cisco CallManager
Cisco Unity Express 2.1/2.2

Networking Cisco Unity Express Configuring Distribution Lists
Use the Cisco Unity Express graphical user interface (GUI), telephone user interface (TUI), or command-line interface (CLI) to create and manage public distribution lists.
Private Distribution ListsAny local user can create private distribution lists that are visible and accessible only to the user. Table 11 describes the features of private distribution lists.
Table 10 Features of Public Distribution Lists
Feature Number Permitted Description
Maximum number of lists on the system
15 Cisco Unity Express supports up to 15 user-defined public lists. Local users who belong to the Administrators group or to any group that has the ManagePublicList privilege can create these lists.
The system generates a special list, the everyone list, which contains all the local users but no groups, GDMs, or other lists. The system automatically creates this list when the system receives a request for it. A user cannot manually add or delete members of this list.
Number of owners of a list
0 to 50 The 15 public lists can have owners. The everyone list cannot have an owner.
The owner can be any local user or group. If the owner is a group, all the members of the group are owners of the list.
The owners can edit or delete members of the list and can assign other owners to the list.
Members of the Administrators group are implicit owners of all public distribution lists and can edit any public list at any time. If all the owners of a list are deleted, the Administrator group continues to have ownership of the list.
Maximum number of list members on the local system
1000 This total is the sum of all members in all public lists on the system, excluding the everyone list.
This maximum applies to all voice mailbox license levels.
Maximum number of list owners on the local system
50 This total is the sum of all owners of all public lists on the system, excluding the everyone list.
This maximum applies to all voice mailbox license levels.
209Cisco Unity Express 2.1/2.2 CLI Administrator Guide for Cisco CallManager
Cisco Unity Express 2.1/2.2
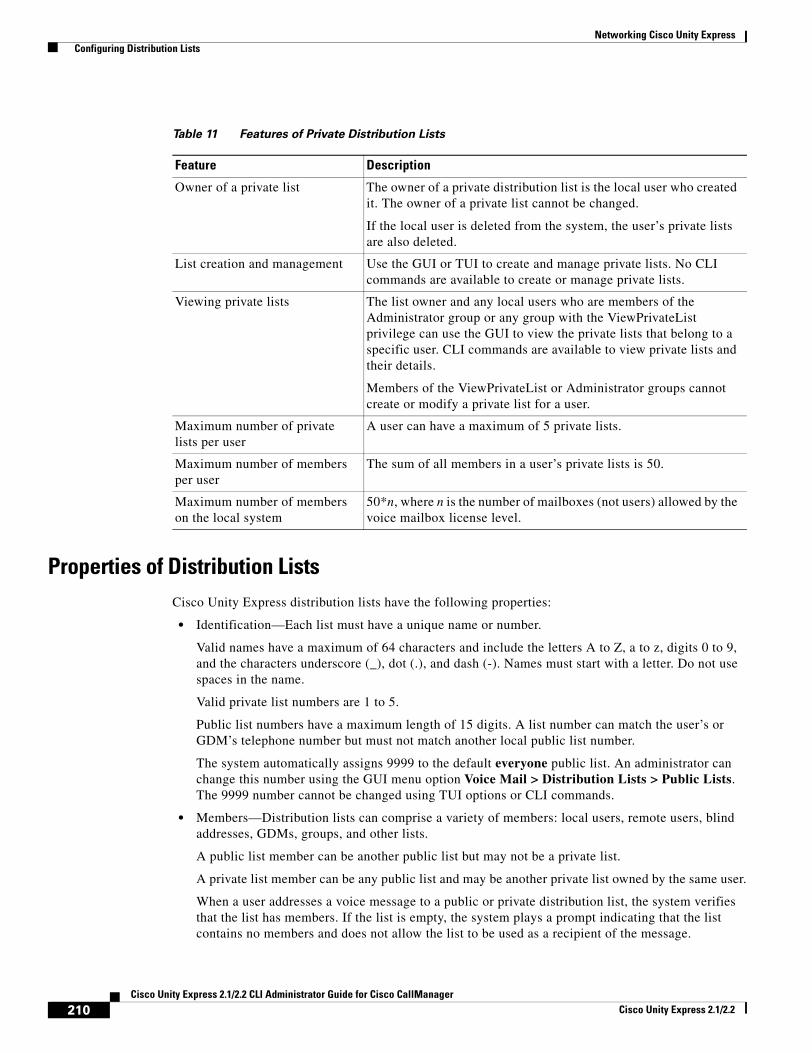
Networking Cisco Unity Express Configuring Distribution Lists
Properties of Distribution ListsCisco Unity Express distribution lists have the following properties:
• Identification—Each list must have a unique name or number.
Valid names have a maximum of 64 characters and include the letters A to Z, a to z, digits 0 to 9, and the characters underscore (_), dot (.), and dash (-). Names must start with a letter. Do not use spaces in the name.
Valid private list numbers are 1 to 5.
Public list numbers have a maximum length of 15 digits. A list number can match the user’s or GDM’s telephone number but must not match another local public list number.
The system automatically assigns 9999 to the default everyone public list. An administrator can change this number using the GUI menu option Voice Mail > Distribution Lists > Public Lists. The 9999 number cannot be changed using TUI options or CLI commands.
• Members—Distribution lists can comprise a variety of members: local users, remote users, blind addresses, GDMs, groups, and other lists.
A public list member can be another public list but may not be a private list.
A private list member can be any public list and may be another private list owned by the same user.
When a user addresses a voice message to a public or private distribution list, the system verifies that the list has members. If the list is empty, the system plays a prompt indicating that the list contains no members and does not allow the list to be used as a recipient of the message.
Table 11 Features of Private Distribution Lists
Feature Description
Owner of a private list The owner of a private distribution list is the local user who created it. The owner of a private list cannot be changed.
If the local user is deleted from the system, the user’s private lists are also deleted.
List creation and management Use the GUI or TUI to create and manage private lists. No CLI commands are available to create or manage private lists.
Viewing private lists The list owner and any local users who are members of the Administrator group or any group with the ViewPrivateList privilege can use the GUI to view the private lists that belong to a specific user. CLI commands are available to view private lists and their details.
Members of the ViewPrivateList or Administrator groups cannot create or modify a private list for a user.
Maximum number of private lists per user
A user can have a maximum of 5 private lists.
Maximum number of members per user
The sum of all members in a user’s private lists is 50.
Maximum number of members on the local system
50*n, where n is the number of mailboxes (not users) allowed by the voice mailbox license level.
210Cisco Unity Express 2.1/2.2 CLI Administrator Guide for Cisco CallManager
Cisco Unity Express 2.1/2.2

Networking Cisco Unity Express Configuring Distribution Lists
• Spoken name—The owner of a public or private distribution list can record a spoken name for the list using the TUI. Recording or uploading the spoken name cannot be done through the GUI or CLI.
The default everyone public list has a spoken name by default. An administrator can change this name using the TUI.
• Removal of a list member—If a local or remote user is removed from the system, the user is removed from all public and private distribution lists on the system. The user’s private distribution lists are removed from the system and the user is removed as owner of any public distribution list. If the user was the sole owner of a public distribution list, the Administrator group assumes ownership of that list.
This same series of actions applies to the removal of a group, except for private lists (a group cannot own a private list).
• Access to remote distribution lists—A local user cannot modify a remote distribution list and cannot use a remote distribution list as the recipient of a voice message.
Differences Between Cisco Unity Express and Cisco Unity Distribution ListsTable 12 describes important differences between the Cisco Unity Express and Cisco Unity distribution lists.
Table 12 Differences Between Cisco Unity Express and Cisco Unity Distribution Lists
Feature Cisco Unity Implementation Cisco Unity Express Implementation
Managing distribution lists through the TUI
Not permitted for public distribution lists.
Permitted for private distribution lists.
Permitted for public and private distribution lists.
Extra TUI menu options are available for managing public lists.
Key presses for private distribution lists are the same as for Cisco Unity.
Creating distribution lists Created by the system.
No TUI options are available for users to create or delete distribution lists.
Created and deleted by the user using TUI menus.
Implicit list creation is available for both public and private lists. If a user tries to add a member to a nonexistent list, the system creates the list and adds the member to it. If a user tries to record the spoken name for a nonexistent list, the system creates the list and records the spoken name. In both cases, the user hears a prompt stating that a new list was created.
211Cisco Unity Express 2.1/2.2 CLI Administrator Guide for Cisco CallManager
Cisco Unity Express 2.1/2.2
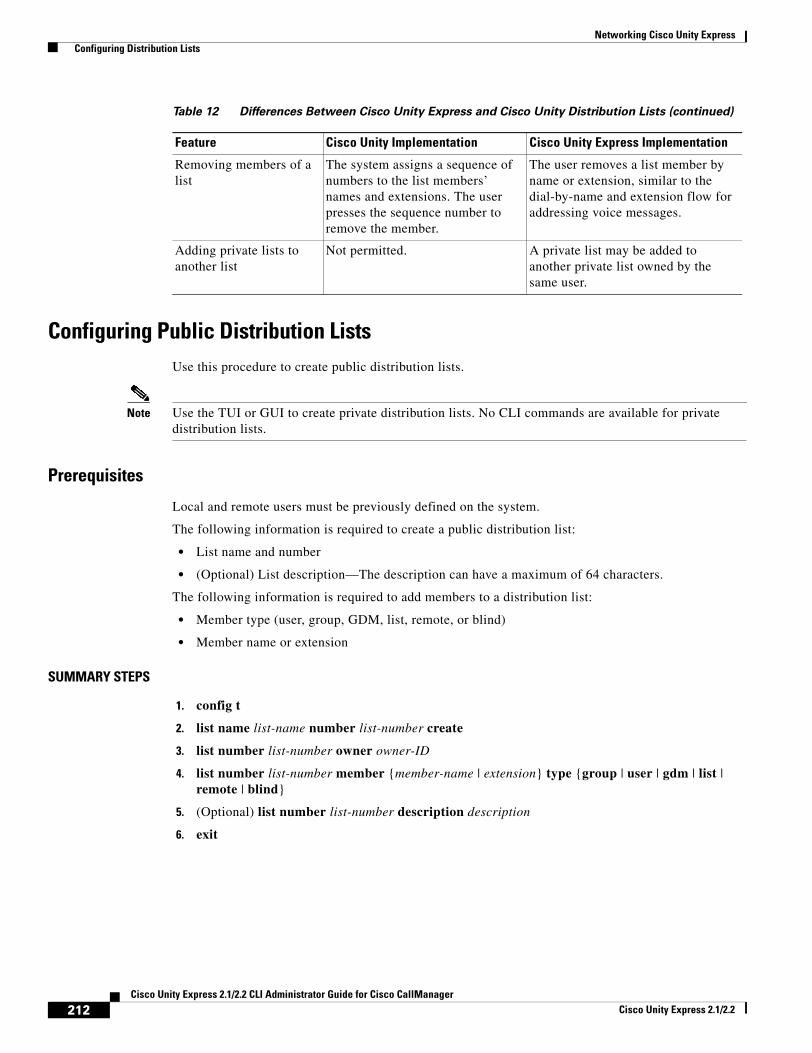
Networking Cisco Unity Express Configuring Distribution Lists
Configuring Public Distribution ListsUse this procedure to create public distribution lists.
Note Use the TUI or GUI to create private distribution lists. No CLI commands are available for private distribution lists.
Prerequisites
Local and remote users must be previously defined on the system.
The following information is required to create a public distribution list:
• List name and number
• (Optional) List description—The description can have a maximum of 64 characters.
The following information is required to add members to a distribution list:
• Member type (user, group, GDM, list, remote, or blind)
• Member name or extension
SUMMARY STEPS
1. config t
2. list name list-name number list-number create
3. list number list-number owner owner-ID
4. list number list-number member {member-name | extension} type {group | user | gdm | list | remote | blind}
5. (Optional) list number list-number description description
6. exit
Removing members of a list
The system assigns a sequence of numbers to the list members’ names and extensions. The user presses the sequence number to remove the member.
The user removes a list member by name or extension, similar to the dial-by-name and extension flow for addressing voice messages.
Adding private lists to another list
Not permitted. A private list may be added to another private list owned by the same user.
Table 12 Differences Between Cisco Unity Express and Cisco Unity Distribution Lists (continued)
Feature Cisco Unity Implementation Cisco Unity Express Implementation
212Cisco Unity Express 2.1/2.2 CLI Administrator Guide for Cisco CallManager
Cisco Unity Express 2.1/2.2
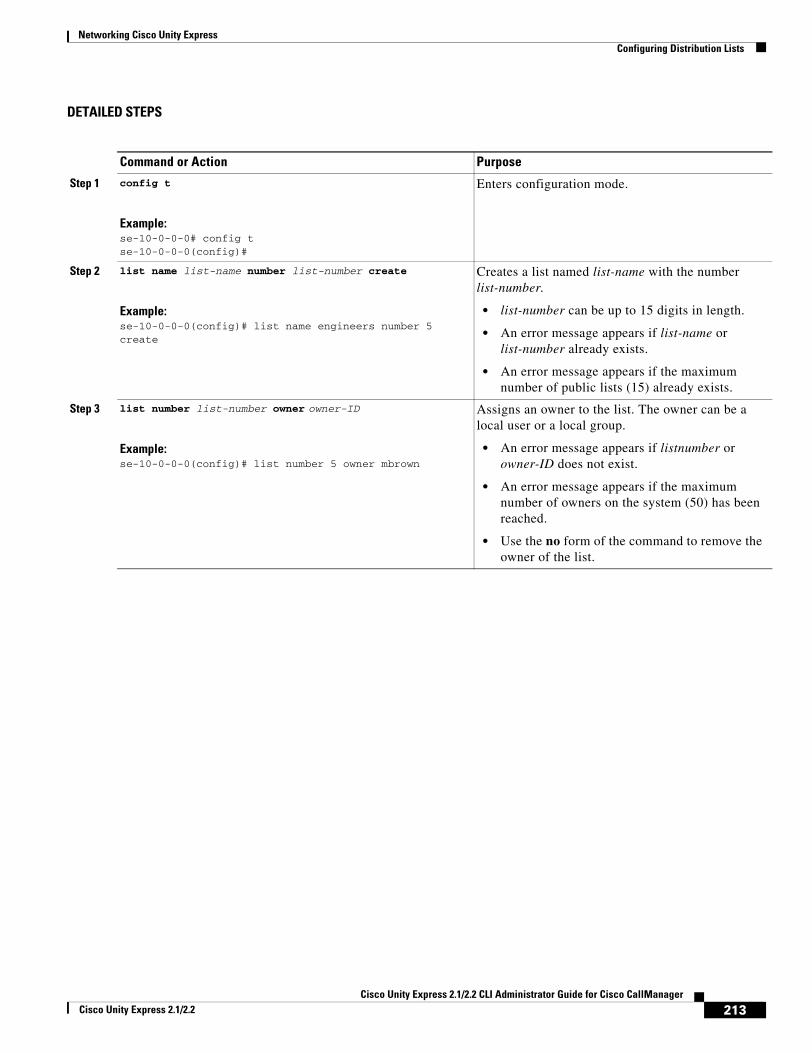
Networking Cisco Unity Express Configuring Distribution Lists
DETAILED STEPS
Command or Action Purpose
Step 1 config t
Example:se-10-0-0-0# config tse-10-0-0-0(config)#
Enters configuration mode.
Step 2 list name list-name number list-number create
Example:se-10-0-0-0(config)# list name engineers number 5 create
Creates a list named list-name with the number list-number.
• list-number can be up to 15 digits in length.
• An error message appears if list-name or list-number already exists.
• An error message appears if the maximum number of public lists (15) already exists.
Step 3 list number list-number owner owner-ID
Example:se-10-0-0-0(config)# list number 5 owner mbrown
Assigns an owner to the list. The owner can be a local user or a local group.
• An error message appears if listnumber or owner-ID does not exist.
• An error message appears if the maximum number of owners on the system (50) has been reached.
• Use the no form of the command to remove the owner of the list.
213Cisco Unity Express 2.1/2.2 CLI Administrator Guide for Cisco CallManager
Cisco Unity Express 2.1/2.2
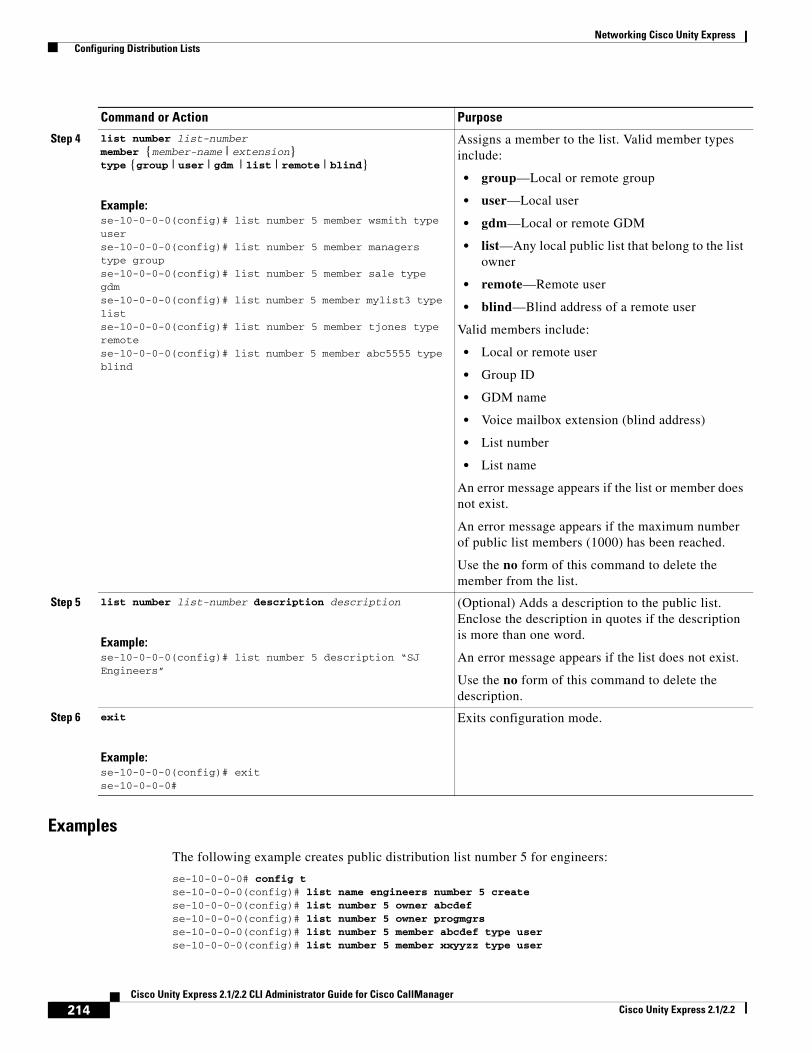
Networking Cisco Unity Express Configuring Distribution Lists
Examples
The following example creates public distribution list number 5 for engineers:
se-10-0-0-0# config tse-10-0-0-0(config)# list name engineers number 5 createse-10-0-0-0(config)# list number 5 owner abcdefse-10-0-0-0(config)# list number 5 owner progmgrsse-10-0-0-0(config)# list number 5 member abcdef type userse-10-0-0-0(config)# list number 5 member xxyyzz type user
Step 4 list number list-number member {member-name | extension} type {group | user | gdm | list | remote | blind}
Example:se-10-0-0-0(config)# list number 5 member wsmith type userse-10-0-0-0(config)# list number 5 member managers type groupse-10-0-0-0(config)# list number 5 member sale type gdmse-10-0-0-0(config)# list number 5 member mylist3 type listse-10-0-0-0(config)# list number 5 member tjones type remotese-10-0-0-0(config)# list number 5 member abc5555 type blind
Assigns a member to the list. Valid member types include:
• group—Local or remote group
• user—Local user
• gdm—Local or remote GDM
• list—Any local public list that belong to the list owner
• remote—Remote user
• blind—Blind address of a remote user
Valid members include:
• Local or remote user
• Group ID
• GDM name
• Voice mailbox extension (blind address)
• List number
• List name
An error message appears if the list or member does not exist.
An error message appears if the maximum number of public list members (1000) has been reached.
Use the no form of this command to delete the member from the list.
Step 5 list number list-number description description
Example:se-10-0-0-0(config)# list number 5 description “SJ Engineers”
(Optional) Adds a description to the public list. Enclose the description in quotes if the description is more than one word.
An error message appears if the list does not exist.
Use the no form of this command to delete the description.
Step 6 exit
Example:se-10-0-0-0(config)# exitse-10-0-0-0#
Exits configuration mode.
Command or Action Purpose
214Cisco Unity Express 2.1/2.2 CLI Administrator Guide for Cisco CallManager
Cisco Unity Express 2.1/2.2
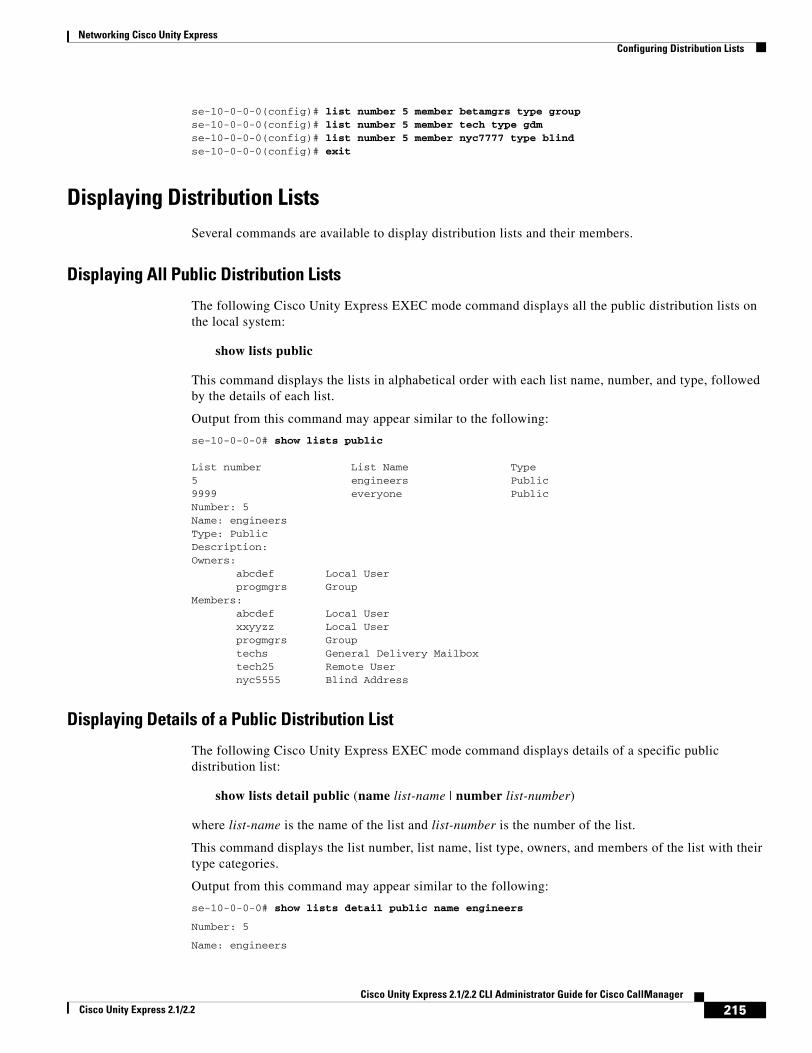
Networking Cisco Unity Express Configuring Distribution Lists
se-10-0-0-0(config)# list number 5 member betamgrs type groupse-10-0-0-0(config)# list number 5 member tech type gdmse-10-0-0-0(config)# list number 5 member nyc7777 type blindse-10-0-0-0(config)# exit
Displaying Distribution ListsSeveral commands are available to display distribution lists and their members.
Displaying All Public Distribution Lists
The following Cisco Unity Express EXEC mode command displays all the public distribution lists on the local system:
show lists public
This command displays the lists in alphabetical order with each list name, number, and type, followed by the details of each list.
Output from this command may appear similar to the following:
se-10-0-0-0# show lists public
List number List Name Type5 engineers Public9999 everyone PublicNumber: 5Name: engineersType: PublicDescription:Owners:
abcdef Local Userprogmgrs Group
Members:abcdef Local Userxxyyzz Local Userprogmgrs Grouptechs General Delivery Mailboxtech25 Remote Usernyc5555 Blind Address
Displaying Details of a Public Distribution List
The following Cisco Unity Express EXEC mode command displays details of a specific public distribution list:
show lists detail public (name list-name | number list-number)
where list-name is the name of the list and list-number is the number of the list.
This command displays the list number, list name, list type, owners, and members of the list with their type categories.
Output from this command may appear similar to the following:
se-10-0-0-0# show lists detail public name engineers
Number: 5
Name: engineers
215Cisco Unity Express 2.1/2.2 CLI Administrator Guide for Cisco CallManager
Cisco Unity Express 2.1/2.2
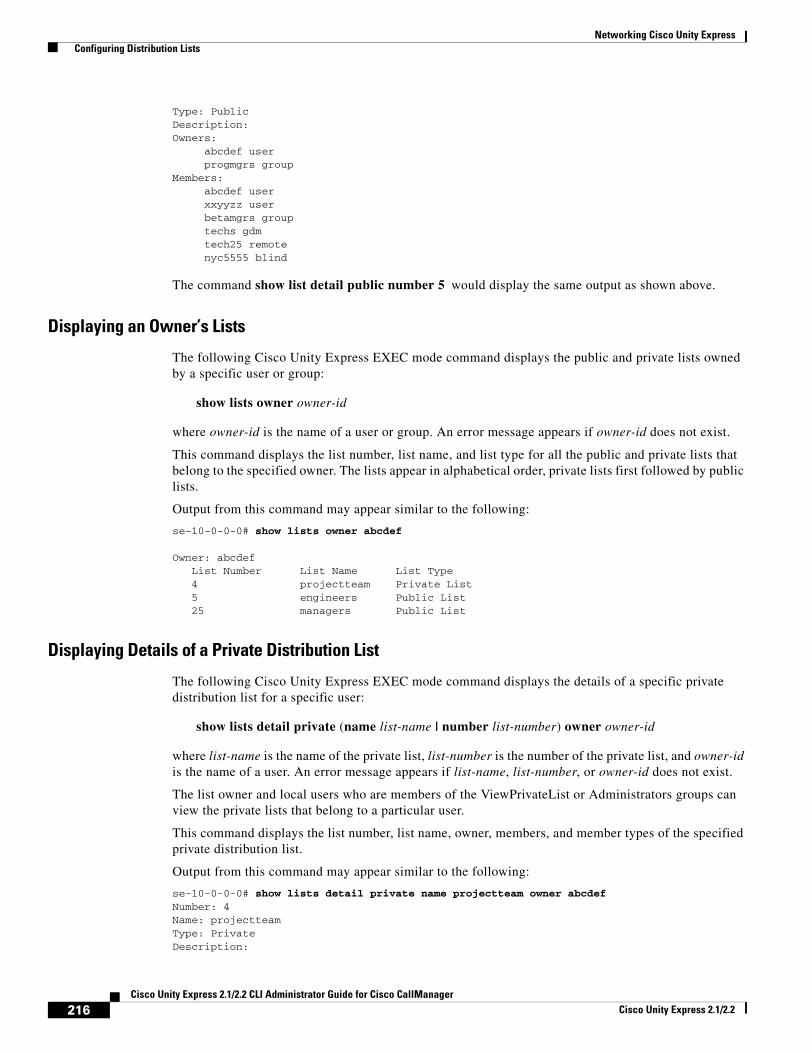
Networking Cisco Unity Express Configuring Distribution Lists
Type: PublicDescription: Owners:
abcdef userprogmgrs group
Members:abcdef userxxyyzz userbetamgrs grouptechs gdmtech25 remotenyc5555 blind
The command show list detail public number 5 would display the same output as shown above.
Displaying an Owner’s Lists
The following Cisco Unity Express EXEC mode command displays the public and private lists owned by a specific user or group:
show lists owner owner-id
where owner-id is the name of a user or group. An error message appears if owner-id does not exist.
This command displays the list number, list name, and list type for all the public and private lists that belong to the specified owner. The lists appear in alphabetical order, private lists first followed by public lists.
Output from this command may appear similar to the following:
se-10-0-0-0# show lists owner abcdef
Owner: abcdefList Number List Name List Type4 projectteam Private List5 engineers Public List25 managers Public List
Displaying Details of a Private Distribution List
The following Cisco Unity Express EXEC mode command displays the details of a specific private distribution list for a specific user:
show lists detail private (name list-name | number list-number) owner owner-id
where list-name is the name of the private list, list-number is the number of the private list, and owner-id is the name of a user. An error message appears if list-name, list-number, or owner-id does not exist.
The list owner and local users who are members of the ViewPrivateList or Administrators groups can view the private lists that belong to a particular user.
This command displays the list number, list name, owner, members, and member types of the specified private distribution list.
Output from this command may appear similar to the following:
se-10-0-0-0# show lists detail private name projectteam owner abcdefNumber: 4Name: projectteamType: PrivateDescription:
216Cisco Unity Express 2.1/2.2 CLI Administrator Guide for Cisco CallManager
Cisco Unity Express 2.1/2.2
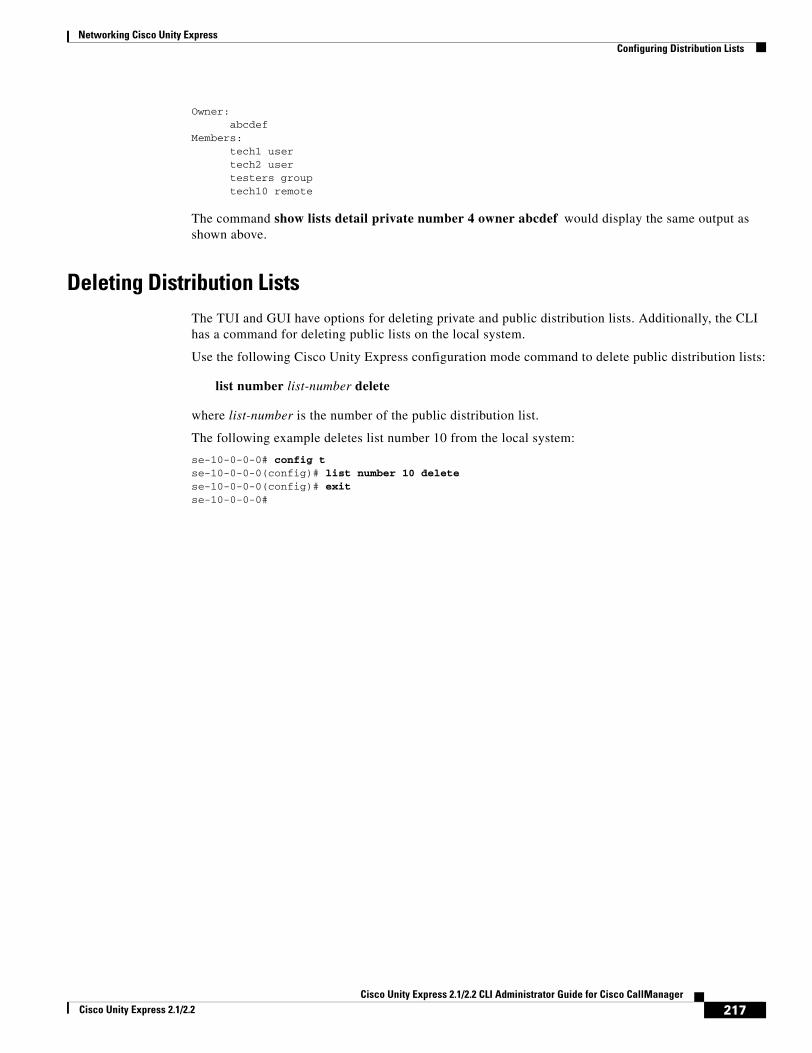
Networking Cisco Unity Express Configuring Distribution Lists
Owner:abcdef
Members:tech1 usertech2 usertesters grouptech10 remote
The command show lists detail private number 4 owner abcdef would display the same output as shown above.
Deleting Distribution ListsThe TUI and GUI have options for deleting private and public distribution lists. Additionally, the CLI has a command for deleting public lists on the local system.
Use the following Cisco Unity Express configuration mode command to delete public distribution lists:
list number list-number delete
where list-number is the number of the public distribution list.
The following example deletes list number 10 from the local system:
se-10-0-0-0# config tse-10-0-0-0(config)# list number 10 deletese-10-0-0-0(config)# exitse-10-0-0-0#
217Cisco Unity Express 2.1/2.2 CLI Administrator Guide for Cisco CallManager
Cisco Unity Express 2.1/2.2

Networking Cisco Unity Express Configuring Distribution Lists
218Cisco Unity Express 2.1/2.2 CLI Administrator Guide for Cisco CallManager
Cisco Unity Express 2.1/2.2
Appendix A: Software Copyrights and Licenses
The following software packages are distributed under the terms of the General Public License version 2 :
bash
devfsd
e2fsprogs
fileutils
findutils
gawk
grep
hrtimers
kernel2.4.18
mingetty
modutils
ncurses
net-tools
procps
sh-utils
sysklogd
syslog-ng
sysvinit
tar
textutils
utils-linux
GNU SOFTWARECopyright Notice:
GNU GENERAL PUBLIC LICENSE
Version 2, June 1991
Copyright (C) 1989, 1991 Free Software Foundation, Inc. 59 Temple Place, Suite 330, Boston, MA 02111-1307 USA
Everyone is permitted to copy and distribute verbatim copies of this license document, but changing it is not allowed.
Preamble
The licenses for most software are designed to take away your freedom to share and change it. By contrast, the GNU General Public License is intended to guarantee your freedom to share and change free software--to make sure the software is free for all its users. This General Public License applies to most of the Free Software Foundation's software and to any other program whose authors commit to using it. (Some other Free Software Foundation software is covered by the GNU Library General Public License instead.) You can apply it to your programs, too.
219Cisco Unity Express 2.1/2.2 CLI Administrator Guide for Cisco CallManager
Cisco Unity Express 2.1/2.2
Appendix A: Software Copyrights and Licenses
When we speak of free software, we are referring to freedom, not price. Our General Public Licenses are designed to make sure that you have the freedom to distribute copies of free software (and charge for this service if you wish), that you receive source code or can get it if you want it, that you can change the software or use pieces of it in new free programs; and that you know you can do these things.
To protect your rights, we need to make restrictions that forbid anyone to deny you these rights or to ask you to surrender the rights. These restrictions translate to certain responsibilities for you if you distribute copies of the software, or if you modify it.
For example, if you distribute copies of such a program, whether gratis or for a fee, you must give the recipients all the rights that you have. You must make sure that they, too, receive or can get the source code. And you must show them these terms so they know their rights.
We protect your rights with two steps: (1) copyright the software, and (2) offer you this license which gives you legal permission to copy, distribute and/or modify the software.
Also, for each author's protection and ours, we want to make certain that everyone understands that there is no warranty for this free software. If the software is modified by someone else and passed on, we want its recipients to know that what they have is not the original, so that any problems introduced by others will not reflect on the original authors' reputations.
Finally, any free program is threatened constantly by software patents. We wish to avoid the danger that redistributors of a free program will individually obtain patent licenses, in effect making the program proprietary. To prevent this, we have made it clear that any patent must be licensed for everyone's free use or not licensed at all.
The precise terms and conditions for copying, distribution andmodification follow.
GNU GENERAL PUBLIC LICENSE
TERMS AND CONDITIONS FOR COPYING, DISTRIBUTION AND MODIFICATION
0. This License applies to any program or other work which contains a notice placed by the copyright holder saying it may be distributed under the terms of this General Public License. The "Program", below, refers to any such program or work, and a "work based on the Program" means either the Program or any derivative work under copyright law: that is to say, a work containing the Program or a portion of it, either verbatim or with modifications and/or translated into another language. (Hereinafter, translation is included without limitation in the term "modification".) Each licensee is addressed as "you".
Activities other than copying, distribution and modification are not covered by this License; they are outside its scope. The act of running the Program is not restricted, and the output from the Program is covered only if its contents constitute a work based on the Program (independent of having been made by running the Program). Whether that is true depends on what the Program does.
1. You may copy and distribute verbatim copies of the Program's source code as you receive it, in any medium, provided that you conspicuously and appropriately publish on each copy an appropriate copyright notice and disclaimer of warranty; keep intact all the notices that refer to this License and to the absence of any warranty; and give any other recipients of the Program a copy of this License along with the Program.
You may charge a fee for the physical act of transferring a copy, and you may at your option offer warranty protection in exchange for a fee.
2. You may modify your copy or copies of the Program or any portion of it, thus forming a work based on the Program, and copy and distribute such modifications or work under the terms of Section 1 above, provided that you also meet all of these conditions:
a) You must cause the modified files to carry prominent notices stating that you changed the files and the date of any change.
b) You must cause any work that you distribute or publish, that inwhole or in part contains or is derived from the Program or any part thereof, to be licensed as a whole at no charge to all third parties under the terms of this License.
c) If the modified program normally reads commands interactivelywhen run, you must cause it, when started running for such interactive use in the most ordinary way, to print or display an announcement including an appropriate copyright notice and a notice that there is no warranty (or else, saying that you provide a warranty) and that users may redistribute the program under these conditions, and telling the user how to view a copy of this License. (Exception: if the Program itself is interactive but does not normally print such an announcement, your work based on the Program is not required to print an announcement.)
These requirements apply to the modified work as a whole. If identifiable sections of that work are not derived from the Program, and can be reasonably considered independent and separate works in themselves, then this License, and its terms, do not apply to those sections when you distribute them as separate works. But when you distribute the same sections as part of a whole which is a work based on the Program, the distribution of the whole must be on the terms of this License, whose permissions for other licensees extend to the entire whole, and thus to each and every part regardless of who wrote it.
Thus, it is not the intent of this section to claim rights or contest your rights to work written entirely by you; rather, the intent is to exercise the right to control the distribution of derivative or collective works based on the Program.
In addition, mere aggregation of another work not based on the Program with the Program (or with a work based on the Program) on a volume of a storage or distribution medium does not bring the other work underthe scope of this License.
3. You may copy and distribute the Program (or a work based on it, under Section 2) in object code or executable form under the terms of Sections 1 and 2 above provided that you also do one of the following:
a) Accompany it with the complete corresponding machine-readable source code, which must be distributed under the terms of Sections 1 and 2 above on a medium customarily used for software interchange; or,
220Cisco Unity Express 2.1/2.2 CLI Administrator Guide for Cisco CallManager
Cisco Unity Express 2.1/2.2
Appendix A: Software Copyrights and Licenses
b) Accompany it with a written offer, valid for at least three years, to give any third party, for a charge no more than your cost of physically performing source distribution, a complete machine-readable copy of the corresponding source code, to be distributed under the terms of Sections 1 and 2 above on a medium customarily used for software interchange; or,
c) Accompany it with the information you received as to the offer to distribute corresponding source code. (This alternative is allowed only for noncommercial distribution and only if you received the program in object code or executable form with such an offer, in accord with Subsection b above.)
The source code for a work means the preferred form of the work for making modifications to it. For an executable work, complete source code means all the source code for all modules it contains, plus any associated interface definition files, plus the scripts used to control compilation and installation of the executable. However, as a special exception, the source code distributed need not include anything that is normally distributed (in either source or binary form) with the major components (compiler, kernel, and so on) of the operating system on which the executable runs, unless that component itself accompanies the executable.
If distribution of executable or object code is made by offering access to copy from a designated place, then offering equivalent access to copy the source code from the same place counts as distribution of the source code, even though third parties are not compelled to copy the source along with the object code.
4. You may not copy, modify, sublicense, or distribute the Programexcept as expressly provided under this License. Any attempt otherwise to copy, modify, sublicense or distribute the Program is void, and will automatically terminate your rights under this License. However, parties who have received copies, or rights, from you under this License will not have their licenses terminated so long as such parties remain in full compliance.
5. You are not required to accept this License, since you have not signed it. However, nothing else grants you permission to modify or distribute the Program or its derivative works. These actions are prohibited by law if you do not accept this License. Therefore, by modifying or distributing the Program (or any work based on the Program), you indicate your acceptance of this License to do so, and all its terms and conditions for copying, distributing or modifying the Program or works based on it.
6. Each time you redistribute the Program (or any work based on the Program), the recipient automatically receives a license from the original licensor to copy, distribute or modify the Program subject to these terms and conditions. You may not impose any further restrictions on the recipients' exercise of the rights granted herein. You are not responsible for enforcing compliance by third parties to this License.
7. If, as a consequence of a court judgment or allegation of patent infringement or for any other reason (not limited to patent issues), conditions are imposed on you (whether by court order, agreement or otherwise) that contradict the conditions of this License, they do not excuse you from the conditions of this License. If you cannot distribute so as to satisfy simultaneously your obligations under this License and any other pertinent obligations, then as a consequence you may not distribute the Program at all. For example, if a patent license would not permit royalty-free redistribution of the Program by all those who receive copies directly or indirectly through you, then the only way you could satisfy both it and this License would be to refrain entirely from distribution of the Program. If any portion of this section is held invalid or unenforceable under any particular circumstance, the balance of the section is intended to apply and the section as a whole is intended to apply in other circumstances.
It is not the purpose of this section to induce you to infringe any patents or other property right claims or to contest validity of any such claims; this section has the sole purpose of protecting the integrity of the free software distribution system, which is implemented by public license practices. Many people have made generous contributions to the wide range of software distributed through that system in reliance on consistent application of that system; it is up to the author/donor to decide if he or she is willing to distribute software through any other system and a licensee cannot impose that choice.
This section is intended to make thoroughly clear what is believed to be a consequence of the rest of this License.
8. If the distribution and/or use of the Program is restricted in certain countries either by patents or by copyrighted interfaces, the original copyright holder who places the Program under this License may add an explicit geographical distribution limitation excluding those countries, so that distribution is permitted only in or among countries not thus excluded. In such case, this License incorporates the limitation as if written in the body of this License.
9. The Free Software Foundation may publish revised and/or new versions of the General Public License from time to time. Such new versions will be similar in spirit to the present version, but may differ in detail to address new problems or concerns.
Each version is given a distinguishing version number. If the Program specifies a version number of this License which applies to it and "any later version", you have the option of following the terms and conditions either of that version or of any later version published by the Free Software Foundation. If the Program does not specify a version number of this License, you may choose any version ever published by the Free Software Foundation.
10. If you wish to incorporate parts of the Program into other freeprograms whose distribution conditions are different, write to the author to ask for permission. For software which is copyrighted by the Free Software Foundation, write to the Free Software Foundation; we sometimes make exceptions for this. Our decision will be guided by the two goals of preserving the free status of all derivatives of our free software and of promoting the sharing and reuse of software generally.
NO WARRANTY
11. BECAUSE THE PROGRAM IS LICENSED FREE OF CHARGE, THERE IS NO WARRANTY FOR THE PROGRAM, TO THE EXTENT PERMITTED BY APPLICABLE LAW. EXCEPT WHEN OTHERWISE STATED IN WRITING THE COPYRIGHT HOLDERS AND/OR OTHER PARTIES PROVIDE THE PROGRAM "AS IS" WITHOUT WARRANTY OF ANY KIND, EITHER EXPRESSED OR IMPLIED, INCLUDING, BUT NOT LIMITED TO, THE IMPLIED WARRANTIES OF
221Cisco Unity Express 2.1/2.2 CLI Administrator Guide for Cisco CallManager
Cisco Unity Express 2.1/2.2
Appendix A: Software Copyrights and Licenses
MERCHANTABILITY AND FITNESS FOR A PARTICULAR PURPOSE. THE ENTIRE RISK AS TO THE QUALITY AND PERFORMANCE OF THE PROGRAM IS WITH YOU. SHOULD THE PROGRAM PROVE DEFECTIVE, YOU ASSUME THE COST OF ALL NECESSARY SERVICING, REPAIR OR CORRECTION.
12. IN NO EVENT UNLESS REQUIRED BY APPLICABLE LAW OR AGREED TO IN WRITING WILL ANY COPYRIGHT HOLDER, OR ANY OTHER PARTY WHO MAY MODIFY AND/OR REDISTRIBUTE THE PROGRAM AS PERMITTED ABOVE, BE LIABLE TO YOU FOR DAMAGES, INCLUDING ANY GENERAL, SPECIAL, INCIDENTAL OR CONSEQUENTIAL DAMAGES ARISING OUT OF THE USE OR INABILITY TO USE THE PROGRAM (INCLUDING BUT NOT LIMITED TO LOSS OF DATA OR DATA BEING RENDERED INACCURATE OR LOSSES SUSTAINED BY YOU OR THIRD PARTIES OR A FAILURE OF THE PROGRAM TO OPERATE WITH ANY OTHER PROGRAMS), EVEN IF SUCH HOLDER OR OTHER PARTY HAS BEEN ADVISED OF THE POSSIBILITY OF SUCH DAMAGES.
END OF TERMS AND CONDITIONS
How to Apply These Terms to Your New Programs
If you develop a new program, and you want it to be of the greatest possible use to the public, the best way to achieve this is to make it free software which everyone can redistribute and change under these terms.
To do so, attach the following notices to the program. It is safest to attach them to the start of each source file to most effectively convey the exclusion of warranty; and each file should have at lease the "copyright" line and a pointer to where the full notice is found.
<one line to give the program's name and a brief idea of what it does.> Copyright (C) <year> <name of author>
This program is free software; you can redistribute it and/or modify it under the terms of the GNU General Public License as published by the Free Software Foundation; either version 2 of the License, or (at your option) any later version.
This program is distributed in the hope that it will be useful, but WITHOUT ANY WARRANTY; without even the implied warranty of MERCHANTABILITY or FITNESS FOR A PARTICULAR PURPOSE. See the GNU General Public License for more details.
You should have received a copy of the GNU General Public License along with this program; if not, write to the Free Software Foundation, Inc., 59 Temple Place, Suite 330, Boston, MA 02111-1307 USA
Also add information on how to contact you by electronic and paper mail. If the program is interactive, make it output a short notice like this when it starts in an interactive mode:
Gnomovision version 69, Copyright (C) year name of author Gnomovision comes with ABSOLUTELY NO WARRANTY; for details type `show w'. This is free software, and you are welcome to redistribute it under certain conditions; type `show c' for details.
The hypothetical commands `show w' and `show c' should show the appropriate parts of the General Public License. Of course, the commands you use may be called something other than `show w' and `show c'; they could even be mouse-clicks or menu items--whatever suits your program. You should also get your employer (if you work as a programmer) or your school, if any, to sign a "copyright disclaimer" for the program, if necessary. Here is a sample; alter the names:
Yoyodyne, Inc., hereby disclaims all copyright interest in the program Gnomovision' (which makes passes at compilers) written by James Hacker.
<signature of Ty Coon>, 1 April 1989 Ty Coon, President of Vice
This General Public License does not permit incorporating your program into proprietary programs. If your program is a subroutine library, you may consider it more useful to permit linking proprietary applications with the library. If this is what you want to do, use the GNU Library General Public License instead of this License.
CURL SOFTWARECurl software is distributed under the terms of the copyright andpermission notice below:
COPYRIGHT AND PERMISSION NOTICE
Copyright (c) 1996 - 2002, Daniel Stenberg, <[email protected]>. All rights reserved.
Permission to use, copy, modify, and distribute this software for any purpose with or without fee is hereby granted, provided that the above copyright notice and this permission notice appear in all copies.
THE SOFTWARE IS PROVIDED "AS IS", WITHOUT WARRANTY OF ANY KIND, EXPRESS OR IMPLIED, INCLUDING BUT NOT LIMITED TO THE WARRANTIES OF MERCHANTABILITY, FITNESS FOR A PARTICULAR PURPOSE AND NONINFRINGEMENT OF THIRD PARTY RIGHTS. IN NO EVENT SHALL THE AUTHORS OR COPYRIGHT HOLDERS BE LIABLE FOR ANY CLAIM, DAMAGES OR OTHER LIABILITY, WHETHER IN AN ACTION OF CONTRACT, TORT OR OTHERWISE, ARISING FROM, OUT OF OR IN CONNECTION WITH THE SOFTWARE OR THE USE OR OTHER DEALINGS IN THE SOFTWARE.
Except as contained in this notice, the name of a copyright holder shall not be used in advertising or otherwise to promote the sale, use or other dealings in this Software without prior written authorization of the copyright holder.
222Cisco Unity Express 2.1/2.2 CLI Administrator Guide for Cisco CallManager
Cisco Unity Express 2.1/2.2
Appendix A: Software Copyrights and Licenses
EXPAT SOFTWAREexpat software is distributed under the terms of the copyright and permission notice below:
Copyright (c) 1998, 1999, 2000 Thai Open Source Software Center Ltd and Clark Cooper
Permission is hereby granted, free of charge, to any person obtaining a copy of this software and associated documentation files (the "Software"), to deal in the Software without restriction, including without limitation the rights to use, copy, modify, merge, publish, distribute, sublicense, and/or sell copies of the Software, and to permit persons to whom the Software is furnished to do so, subject to the following conditions:
The above copyright notice and this permission notice shall be included in all copies or substantial portions of the Software.
THE SOFTWARE IS PROVIDED "AS IS", WITHOUT WARRANTY OF ANY KIND, EXPRESS OR IMPLIED, INCLUDING BUT NOT LIMITED TO THE WARRANTIES OF MERCHANTABILITY, FITNESS FOR A PARTICULAR PURPOSE AND NONINFRINGEMENT. IN NO EVENT SHALL THE AUTHORS OR COPYRIGHT HOLDERS BE LIABLE FOR ANY CLAIM, DAMAGES OR OTHER LIABILITY, WHETHER IN AN ACTION OF CONTRACT, TORT OR OTHERWISE, ARISING FROM, OUT OF OR IN CONNECTION WITH THE SOFTWARE OR THE USE OR OTHER DEALINGS IN THE SOFTWARE.
ZLIB SOFTWAREzlib software is distributed under the terms of the copyright and permission notice below:
Copyright notice: (C) 1995-2002 Jean-loup Gailly and Mark Adler
This software is provided 'as-is', without any express or implied warranty. In no event will the authors be held liable for any damages arising from the use of this software.
Permission is granted to anyone to use this software for any purpose, including commercial applications, and to alter it and redistribute it freely, subject to the following restrictions:
1. The origin of this software must not be misrepresented; you must not claim that you wrote the original software. If you use this software in a product, an acknowledgment in the product documentation would be appreciated but is not required.
2. Altered source versions must be plainly marked as such, and must not be misrepresented as being the original software.
3. This notice may not be removed or altered from any source distribution.
Jean-loup Gailly Mark Adler
[email protected] [email protected]
If you use the zlib library in a product, we would appreciate *not* receiving lengthy legal documents to sign. The sources are provided for free but without warranty of any kind. The library has been entirely written by Jean-loup Gailly and Mark Adler; it does not include third-party code.
APACHE SOFTWAREThe following software packages are distributed under APACHE software foundation license.
xerces
jakarta-oro
jakarta-tomcat
Copyright Notice:
====================================================================
The Apache Software License, Version 1.1 Copyright (c) 1999 The Apache Software Foundation. All rights reserved.
Redistribution and use in source and binary forms, with or without modification, are permitted provided that the following conditions are met:
1. Redistributions of source code must retain the above copyright notice, this list of conditions and the following disclaimer.
2. Redistributions in binary form must reproduce the above copyright notice, this list of conditions and the following disclaimer in the documentation and/or other materials provided with the distribution.
3. The end-user documentation included with the redistribution, if any, must include the following acknowlegement: "This product includes software developed by the Apache Software Foundation (http://www.apache.org/)." Alternately, this acknowlegement may appear in the software itself, if and wherever such third-party acknowlegements normally appear.
223Cisco Unity Express 2.1/2.2 CLI Administrator Guide for Cisco CallManager
Cisco Unity Express 2.1/2.2
Appendix A: Software Copyrights and Licenses
4. The names "The Jakarta Project", "Tomcat", and "Apache Software Foundation" must not be used to endorse or promote products derived from this software without prior written permission. For written permission, please contact [email protected].
5. Products derived from this software may not be called "Apache" nor may "Apache" appear in their names without prior written permission of the Apache Group.
THIS SOFTWARE IS PROVIDED ``AS IS'' AND ANY EXPRESSED OR IMPLIED WARRANTIES, INCLUDING, BUT NOT LIMITED TO, THE IMPLIED WARRANTIES OF MERCHANTABILITY AND FITNESS FOR A PARTICULAR PURPOSE ARE DISCLAIMED. IN NO EVENT SHALL THE APACHE SOFTWARE FOUNDATION OR ITS CONTRIBUTORS BE LIABLE FOR ANY DIRECT, INDIRECT, INCIDENTAL, SPECIAL, EXEMPLARY, OR CONSEQUENTIAL DAMAGES (INCLUDING, BUT NOT LIMITED TO, PROCUREMENT OF SUBSTITUTE GOODS OR SERVICES; LOSS OF USE, DATA, OR PROFITS; OR BUSINESS INTERRUPTION) HOWEVER CAUSED AND ON ANY THEORY OF LIABILITY, WHETHER IN CONTRACT, STRICT LIABILITY, OR TORT (INCLUDING NEGLIGENCE OR OTHERWISE) ARISING IN ANY WAY OUT OF THE USE OF THIS SOFTWARE, EVEN IF ADVISED OF THE POSSIBILITY OF SUCH DAMAGE.
====================================================================
This software consists of voluntary contributions made by many individuals on behalf of the Apache Software Foundation. For more information on the Apache Software Foundation, please see <http://www.apache.org/>.
LDAP SOFTWAREldap software is distributed under the terms of the copyright and permission notice below:
Copyright 1998-2003 The OpenLDAP Foundation
All rights reserved.
Redistribution and use in source and binary forms, with or without modification, are permitted only as authorized by the OpenLDAP Public License. A copy of this license is available at http://www.OpenLDAP.org/license.html or in file LICENSE in the top-level directory of the distribution.
OpenLDAP is a registered trademark of the OpenLDAP Foundation.
Individual files and/or contributed packages may be copyright by other parties and subject to additional restrictions.
This work is derived from the University of Michigan LDAP v3.3 distribution. Information concerning this software is available at: http://www.umich.edu/~dirsvcs/ldap/
This work also contains materials derived from public sources. Additional information about OpenLDAP can be obtained at: http://www.openldap.org/
Portions Copyright (c) 1992-1996 Regents of the University of Michigan.
All rights reserved.
Redistribution and use in source and binary forms are permitted provided that this notice is preserved and that due credit is given to the University of Michigan at Ann Arbor. The name of the University may not be used to endorse or promote products derived from this software without specific prior written permission. This software is provided ``as is'' without express or implied warranty.
GLIBC SOFTWAREglibc software is distributed under the terms of the Lesser General Public License version 2.1 Copyright Notice:
GNU LESSER GENERAL PUBLIC LICENSE
Version 2.1, February 1999
Copyright (C) 1991, 1999 Free Software Foundation, Inc. 59 Temple Place, Suite 330, Boston, MA 02111-1307 USA
Everyone is permitted to copy and distribute verbatim copies of this license document, but changing it is not allowed.
[This is the first released version of the Lesser GPL. It also counts as the successor of the GNU Library Public License, version 2, hence the version number 2.1.]
Preamble
The licenses for most software are designed to take away your
freedom to share and change it. By contrast, the GNU General Public Licenses are intended to guarantee your freedom to share and change free software--to make sure the software is free for all its users.
This license, the Lesser General Public License, applies to some specially designated software packages--typically libraries--of the Free Software Foundation and other authors who decide to use it. You can use it too, but we suggest you first think carefully about whether this license or the ordinary General Public License is the better strategy to use in any particular case, based on the explanations below.
224Cisco Unity Express 2.1/2.2 CLI Administrator Guide for Cisco CallManager
Cisco Unity Express 2.1/2.2
Appendix A: Software Copyrights and Licenses
When we speak of free software, we are referring to freedom of use, not price. Our General Public Licenses are designed to make sure that you have the freedom to distribute copies of free software (and charge for this service if you wish); that you receive source code or can get it if you want it; that you can change the software and use pieces of it in new free programs; and that you are informed that you can do these things.
To protect your rights, we need to make restrictions that forbid distributors to deny you these rights or to ask you to surrender these rights. These restrictions translate to certain responsibilities for you if you distribute copies of the library or if you modify it.
For example, if you distribute copies of the library, whether gratis or for a fee, you must give the recipients all the rights that we gave you. You must make sure that they, too, receive or can get the source code. If you link other code with the library, you must provide complete object files to the recipients, so that they can relink them with the library after making changes to the library and recompiling it. And you must show them these terms so they know their rights.
We protect your rights with a two-step method: (1) we copyright the library, and (2) we offer you this license, which gives you legal permission to copy, distribute and/or modify the library.
To protect each distributor, we want to make it very clear that there is no warranty for the free library. Also, if the library is modified by someone else and passed on, the recipients should know that what they have is not the original version, so that the original author's reputation will not be affected by problems that might be introduced by others.
Finally, software patents pose a constant threat to the existence of any free program. We wish to make sure that a company cannot effectively restrict the users of a free program by obtaining a restrictive license from a patent holder. Therefore, we insist that any patent license obtained for a version of the library must be consistent with the full freedom of use specified in this license.
Most GNU software, including some libraries, is covered by the ordinary GNU General Public License. This license, the GNU Lesser General Public License, applies to certain designated libraries, and is quite different from the ordinary General Public License. We use this license for certain libraries in order to permit linking those libraries into non-free programs.
When a program is linked with a library, whether statically or using a shared library, the combination of the two is legally speaking a combined work, a derivative of the original library. The ordinary General Public License therefore permits such linking only if the entire combination fits its criteria of freedom. The Lesser General Public License permits more lax criteria for linking other code with the library.
We call this license the "Lesser" General Public License because it does Less to protect the user's freedom than the ordinary General Public License. It also provides other free software developers Less of an advantage over competing non-free programs. These disadvantages are the reason we use the ordinary General Public License for many libraries. However, the Lesser license provides advantages in certain special circumstances.
For example, on rare occasions, there may be a special need to encourage the widest possible use of a certain library, so that it becomes a de-facto standard. To achieve this, non-free programs must be allowed to use the library. A more frequent case is that a free library does the same job as widely used non-free libraries. In this case, there is little to gain by limiting the free library to free software only, so we use the Lesser General Public License.
In other cases, permission to use a particular library in non-free programs enables a greater number of people to use a large body of free software. For example, permission to use the GNU C Library in non-free programs enables many more people to use the whole GNU operating system, as well as its variant, the GNU/Linux operating system.
Although the Lesser General Public License is Less protective of the users' freedom, it does ensure that the user of a program that is linked with the Library has the freedom and the wherewithal to run that program using a modified version of the Library.
The precise terms and conditions for copying, distribution and modification follow. Pay close attention to the difference between a "work based on the library" and a "work that uses the library". The former contains code derived from the library, whereas the latter must be combined with the library in order to run.
GNU LESSER GENERAL PUBLIC LICENSE
TERMS AND CONDITIONS FOR COPYING, DISTRIBUTION AND MODIFICATION
0. This License Agreement applies to any software library or other program which contains a notice placed by the copyright holder or other authorized party saying it may be distributed under the terms of this Lesser General Public License (also called "this License"). Each licensee is addressed as "you".
A "library" means a collection of software functions and/or data prepared so as to be conveniently linked with application programs (which use some of those functions and data) to form executables.
The "Library", below, refers to any such software library or work which has been distributed under these terms. A "work based on the Library" means either the Library or any derivative work under copyright law: that is to say, a work containing the Library or a portion of it, either verbatim or with modifications and/or translated straightforwardly into another language. (Hereinafter, translation is included without limitation in the term "modification".)
"Source code" for a work means the preferred form of the work for making modifications to it. For a library, complete source code means all the source code for all modules it contains, plus any associated interface definition files, plus the scripts used to control compilation and installation of the library.
225Cisco Unity Express 2.1/2.2 CLI Administrator Guide for Cisco CallManager
Cisco Unity Express 2.1/2.2
Appendix A: Software Copyrights and Licenses
Activities other than copying, distribution and modification are not covered by this License; they are outside its scope. The act of running a program using the Library is not restricted, and output from such a program is covered only if its contents constitute a work based on the Library (independent of the use of the Library in a tool for writing it). Whether that is true depends on what the Library doesand what the program that uses the Library does.
1. You may copy and distribute verbatim copies of the Library's complete source code as you receive it, in any medium, provided that you conspicuously and appropriately publish on each copy an appropriate copyright notice and disclaimer of warranty; keep intact all the notices that refer to this License and to the absence of any warranty; and distribute a copy of this License along with the Library.
You may charge a fee for the physical act of transferring a copy, and you may at your option offer warranty protection in exchange for a fee.
2. You may modify your copy or copies of the Library or any portion of it, thus forming a work based on the Library, and copy and distribute such modifications or work under the terms of Section 1 above, provided that you also meet all of these conditions:
a) The modified work must itself be a software library.
b) You must cause the files modified to carry prominent notices stating that you changed the files and the date of any change.
c) You must cause the whole of the work to be licensed at no charge to all third parties under the terms of this License.
d) If a facility in the modified Library refers to a function or a table of data to be supplied by an application program that uses the facility, other than as an argument passed when the facility is invoked, then you must make a good faith effort to ensure that, in the event an application does not supply such function or table, the facility still operates, and performs whatever part of its purpose remains meaningful.
(For example, a function in a library to compute square roots has a purpose that is entirely well-defined independent of the application. Therefore, Subsection 2d requires that any application-supplied function or table used by this function must be optional: if the application does not supply it, the square root function must still compute square roots.)
These requirements apply to the modified work as a whole. If identifiable sections of that work are not derived from the Library, and can be reasonably considered independent and separate works in themselves, then this License, and its terms, do not apply to those sections when you distribute them as separate works. But when you distribute the same sections as part of a whole which is a work based on the Library, the distribution of the whole must be on the terms of this License, whose permissions for other licensees extend to the entire whole, and thus to each and every part regardless of who wrote it.
Thus, it is not the intent of this section to claim rights or contest your rights to work written entirely by you; rather, the intent is to exercise the right to control the distribution of derivative or collective works based on the Library.
In addition, mere aggregation of another work not based on the Library with the Library (or with a work based on the Library) on a volume of a storage or distribution medium does not bring the other work under the scope of this License.
3. You may opt to apply the terms of the ordinary GNU General Public License instead of this License to a given copy of the Library. To do this, you must alter all the notices that refer to this License, so that they refer to the ordinary GNU General Public License, version 2, instead of to this License. (If a newer version than version 2 of the ordinary GNU General Public License has appeared, then you can specify that version instead if you wish.) Do not make any other change in these notices.
Once this change is made in a given copy, it is irreversible for that copy, so the ordinary GNU General Public License applies to all subsequent copies and derivative works made from that copy.
This option is useful when you wish to copy part of the code of the Library into a program that is not a library.
4. You may copy and distribute the Library (or a portion or derivative of it, under Section 2) in object code or executable form under the terms of Sections 1 and 2 above provided that you accompany it with the complete corresponding machine-readable source code, which must be distributed under the terms of Sections 1 and 2 above on a medium customarily used for software interchange.
If distribution of object code is made by offering access to copy from a designated place, then offering equivalent access to copy the source code from the same place satisfies the requirement to distribute the source code, even though third parties are not compelled to copy the source along with the object code.
5. A program that contains no derivative of any portion of the Library, but is designed to work with the Library by being compiled or linked with it, is called a "work that uses the Library". Such a work, in isolation, is not a derivative work of the Library, and therefore falls outside the scope of this License.
However, linking a "work that uses the Library" with the Library creates an executable that is a derivative of the Library (because it contains portions of the Library), rather than a "work that uses the library". The executable is therefore covered by this License. Section 6 states terms for distribution of such executables.
When a "work that uses the Library" uses material from a header file that is part of the Library, the object code for the work may be a derivative work of the Library even though the source code is not. Whether this is true is especially significant if the work can be linked without the Library, or if the work is itself a library. The threshold for this to be true is not precisely defined by law.
If such an object file uses only numerical parameters, data structure layouts and accessors, and small macros and small inline functions (ten lines or less in length), then the use of the object file is unrestricted, regardless of whether it is legally a derivative work. (Executables containing this object code plus portions of the Library will still fall under Section 6.)
226Cisco Unity Express 2.1/2.2 CLI Administrator Guide for Cisco CallManager
Cisco Unity Express 2.1/2.2
Appendix A: Software Copyrights and Licenses
Otherwise, if the work is a derivative of the Library, you may distribute the object code for the work under the terms of Section 6. Any executables containing that work also fall under Section 6, whether or not they are linked directly with the Library itself.
6. As an exception to the Sections above, you may also combine or link a "work that uses the Library" with the Library to produce a work containing portions of the Library, and distribute that work under terms of your choice, provided that the terms permit modification of the work for the customer's own use and reverse engineering for debugging such modifications.
You must give prominent notice with each copy of the work that the Library is used in it and that the Library and its use are covered by this License. You must supply a copy of this License. If the work during execution displays copyright notices, you must include the copyright notice for the Library among them, as well as a reference directing the user to the copy of this License. Also, you must do one of these things:
a) Accompany the work with the complete corresponding machine-readable source code for the Library including whatever changes were used in the work (which must be distributed under Sections 1 and 2 above); and, if the work is an executable linked with the Library, with the complete machine-readable "work that uses the Library", as object code and/or source code, so that the user can modify the Library and then relink to produce a modified executable containing the modified Library. (It is understood that the user who changes the contents of definitions files in the Library will not necessarily be able to recompile the application to use the modified definitions.)
b) Use a suitable shared library mechanism for linking with the Library. A suitable mechanism is one that (1) uses at run time a copy of the library already present on the user's computer system rather than copying library functions into the executable, and (2) will operate properly with a modified version of the library, if the user installs one, as long as the modified version is interface-compatible with the version that the work was made with.
c) Accompany the work with a written offer, valid for at least three years, to give the same user the materials specified in Subsection 6a, above, for a charge no more than the cost of performing this distribution.
d) If distribution of the work is made by offering access to copy from a designated place, offer equivalent access to copy the above specified materials from the same place.
e) Verify that the user has already received a copy of these materials or that you have already sent this user a copy.
For an executable, the required form of the "work that uses the Library" must include any data and utility programs needed for reproducing the executable from it. However, as a special exception, the materials to be distributed need not include anything that is normally distributed (in either source or binary form) with the major components (compiler, kernel, and so on) of the operating system on which the executable runs, unless that component itself accompanies the executable.
It may happen that this requirement contradicts the license restrictions of other proprietary libraries that do not normally accompany the operating system. Such a contradiction means you cannot use both them and the Library together in an executable that you distribute.
7. You may place library facilities that are a work based on the Library side-by-side in a single library together with other library facilities not covered by this License, and distribute such a combined library, provided that the separate distribution of the work based on the Library and of the other library facilities is otherwise permitted, and provided that you do these two things:
a) Accompany the combined library with a copy of the same work based on the Library, uncombined with any other library facilities. This must be distributed under the terms of the Sections above.
b) Give prominent notice with the combined library of the fact that part of it is a work based on the Library, and explaining where to find the accompanying uncombined form of the same work.
8. You may not copy, modify, sublicense, link with, or distribute the Library except as expressly provided under this License. Any attempt otherwise to copy, modify, sublicense, link with, or distribute the Library is void, and will automatically terminate your rights under this License. However, parties who have received copies, or rights, from you under this License will not have their licenses terminated so long as such parties remain in full compliance.
9. You are not required to accept this License, since you have not signed it. However, nothing else grants you permission to modify or distribute the Library or its derivative works. These actions are prohibited by law if you do not accept this License. Therefore, by modifying or distributing the Library (or any work based on the Library), you indicate your acceptance of this License to do so, and all its terms and conditions for copying, distributing or modifying the Library or works based on it.
10. Each time you redistribute the Library (or any work based on the Library), the recipient automatically receives a license from the original licensor to copy, distribute, link with or modify the Library subject to these terms and conditions. You may not impose any further restrictions on the recipients' exercise of the rights granted herein. You are not responsible for enforcing compliance by third parties with this License.
11. If, as a consequence of a court judgment or allegation of patent infringement or for any other reason (not limited to patent issues), conditions are imposed on you (whether by court order, agreement or otherwise) that contradict the conditions of this License, they do not excuse you from the conditions of this License. If you cannot distribute so as to satisfy simultaneously your obligations under this License and any other pertinent obligations, then as a consequence you may not distribute the Library at all. For example, if a patent license would not permit royalty-free redistribution of the Library by all those who receive copies directly or indirectly through you, then the only way you could satisfy both it and this License would be to refrain entirely from distribution of the Library.
If any portion of this section is held invalid or unenforceable under any particular circumstance, the balance of the section is intended to apply, and the section as a whole is intended to apply in other circumstances.
227Cisco Unity Express 2.1/2.2 CLI Administrator Guide for Cisco CallManager
Cisco Unity Express 2.1/2.2
Appendix A: Software Copyrights and Licenses
It is not the purpose of this section to induce you to infringe any patents or other property right claims or to contest validity of any such claims; this section has the sole purpose of protecting the integrity of the free software distribution system which is implemented by public license practices. Many people have made generous contributions to the wide range of software distributed through that system in reliance on consistent application of that system; it is up to the author/donor to decide if he or she is willing to distribute software through any other system and a licensee cannot impose that choice.
This section is intended to make thoroughly clear what is believed to be a consequence of the rest of this License.
12. If the distribution and/or use of the Library is restricted in certain countries either by patents or by copyrighted interfaces, the original copyright holder who places the Library under this License may add an explicit geographical distribution limitation excluding those countries, so that distribution is permitted only in or among countries not thus excluded. In such case, this License incorporates the limitation as if written in the body of this License.
13. The Free Software Foundation may publish revised and/or new versions of the Lesser General Public License from time to time. Such new versions will be similar in spirit to the present version, but may differ in detail to address new problems or concerns. Each version is given a distinguishing version number. If the Library specifies a version number of this License which applies to it and "any later version", you have the option of following the terms and conditions either of that version or of any later version published by the Free Software Foundation. If the Library does not specify a license version number, you may choose any version ever published by the Free Software Foundation.
14. If you wish to incorporate parts of the Library into other free programs whose distribution conditions are incompatible with these, write to the author to ask for permission. For software which is copyrighted by the Free Software Foundation, write to the Free Software Foundation; we sometimes make exceptions for this. Our decision will be guided by the two goals of preserving the free status of all derivatives of our free software and of promoting the sharing and reuse of software generally. NO WARRANTY
15. BECAUSE THE LIBRARY IS LICENSED FREE OF CHARGE, THERE IS NO WARRANTY FOR THE LIBRARY, TO THE EXTENT PERMITTED BY APPLICABLE LAW. EXCEPT WHEN OTHERWISE STATED IN WRITING THE COPYRIGHT HOLDERS AND/OR OTHER PARTIES PROVIDE THE LIBRARY "AS IS" WITHOUT WARRANTY OF ANY KIND, EITHER EXPRESSED OR IMPLIED, INCLUDING, BUT NOT LIMITED TO, THE IMPLIED WARRANTIES OF MERCHANTABILITY AND FITNESS FOR A PARTICULAR PURPOSE. THE ENTIRE RISK AS TO THE QUALITY AND PERFORMANCE OF THE LIBRARY IS WITH YOU. SHOULD THE LIBRARY PROVE DEFECTIVE, YOU ASSUME THE COST OF ALL NECESSARY SERVICING, REPAIR OR CORRECTION.
16. IN NO EVENT UNLESS REQUIRED BY APPLICABLE LAW OR AGREED TO IN WRITING WILL ANY COPYRIGHT HOLDER, OR ANY OTHER PARTY WHO MAY MODIFY AND/OR REDISTRIBUTE THE LIBRARY AS PERMITTED ABOVE, BE LIABLE TO YOU FOR DAMAGES, INCLUDING ANY GENERAL, SPECIAL, INCIDENTAL OR CONSEQUENTIAL DAMAGES ARISING OUT OF THE USE OR INABILITY TO USE THE LIBRARY (INCLUDING BUT NOT LIMITED TO LOSS OF DATA OR DATA BEING RENDERED INACCURATE OR LOSSES SUSTAINED BY YOU OR THIRD PARTIES OR A FAILURE OF THE LIBRARY TO OPERATE WITH ANY OTHER SOFTWARE), EVEN IF SUCH HOLDER OR OTHER PARTY HAS BEEN ADVISED OF THE POSSIBILITY OF SUCH DAMAGES.
END OF TERMS AND CONDITIONS
How to Apply These Terms to Your New Libraries
If you develop a new library, and you want it to be of the greatest possible use to the public, we recommend making it free software that everyone can redistribute and change. You can do so by permitting redistribution under these terms (or, alternatively, under the terms of the ordinary General Public License).
To apply these terms, attach the following notices to the library. It is safest to attach them to the start of each source file to most effectively convey the exclusion of warranty; and each file should have at least the "copyright" line and a pointer to where the full notice is found.
<one line to give the library's name and a brief idea of what it does.> Copyright (C) <year> <name of author>
This library is free software; you can redistribute it and/or modify it under the terms of the GNU Lesser General Public License as published by the Free Software Foundation; either version 2 of the License, or (at your option) any later version.
This library is distributed in the hope that it will be useful, but WITHOUT ANY WARRANTY; without even the implied warranty of MERCHANTABILITY or FITNESS FOR A PARTICULAR PURPOSE. See the GNU Lesser General Public License for more details.
You should have received a copy of the GNU Lesser General Public License along with this library; if not, write to the Free Software Foundation, Inc., 59 Temple Place, Suite 330, Boston, MA 02111-1307 USA
Also add information on how to contact you by electronic and paper mail.
You should also get your employer (if you work as a programmer) or
your school, if any, to sign a "copyright disclaimer" for the library, if necessary. Here is a sample; alter the names:
Yoyodyne, Inc., hereby disclaims all copyright interest in the library `Frob' (a library for tweaking knobs) written by James Random Hacker.
<signature of Ty Coon>, 1 April 1990 Ty Coon, President of Vice
That's all there is to it!
228Cisco Unity Express 2.1/2.2 CLI Administrator Guide for Cisco CallManager
Cisco Unity Express 2.1/2.2
Appendix A: Software Copyrights and Licenses
BSD LICENSEThe following software packages are distributed under BSD license:
libpcap
tcpdump
tftp-hpa
Copyright Notice:
License: BSD
Redistribution and use in source and binary forms, with or without modification, are permitted provided that the following conditions are met:
1. Redistributions of source code must retain the above copyright notice, this list of conditions and the following disclaimer.
2. Redistributions in binary form must reproduce the above copyright notice, this list of conditions and the following disclaimer in the documentation and/or other materials provided with the distribution.
3. The names of the authors may not be used to endorse or promote products derived from this software without specific prior written permission.
THIS SOFTWARE IS PROVIDED ``AS IS'' AND WITHOUT ANY EXPRESS OR IMPLIED WARRANTIES, INCLUDING, WITHOUT LIMITATION, THE IMPLIED WARRANTIES OF MERCHANTABILITY AND FITNESS FOR A PARTICULAR PURPOSE.
NTP SOFTWAREntp software is distributed under the terms of the copyright and permission notice below:
Copyright Notice [sheepb.jpg] "Clone me," says Dolly sheepishly
_________________________________________________________________
The following copyright notice applies to all files collectively called the Network Time Protocol Version 4 Distribution. Unless specifically declared otherwise in an individual file, this notice applies as if the text was explicitly included in the file.
***********************************************************************
Copyright (c) David L. Mills 1992-2001 Permission to use, copy, modify, and distribute this software and its documentation for any purpose and without fee is hereby granted, provided that the above copyright notice appears in all copies and that both the copyright notice and this permission notice appear in supporting documentation, and that the name University of Delaware not be used in advertising or publicity pertaining to distribution of the software without specific, written prior permission. The University of Delaware makes no representations about the suitability this software for any purpose. It is provided "as is" without express or implied warranty.
***********************************************************************
The following individuals contributed in part to the Network Time Protocol Distribution Version 4 and are acknowledged as authors of this work.
1. [1]Mark Andrews <[email protected]> Leitch atomic clock controller
2. [2]Bernd Altmeier <[email protected]> hopf Elektronik serial line and PCI-bus devices
3. [3]Viraj Bais <[email protected]> and [4]Clayton Kirkwood <[email protected]> port to WindowsNT 3.5
4. [5]Michael Barone <michael,[email protected]> GPSVME fixes
5. [6]Karl Berry <[email protected]> syslog to file option
6. [7]Greg Brackley <[email protected]> Major rework of WINNT port. Clean up recvbuf and iosignal code into separate modules.
7. [8]Marc Brett <[email protected]> Magnavox GPS clock driver
8. [9]Piete Brooks <[email protected]> MSF clock driver, Trimble PARSE support
9. [10]Reg Clemens <[email protected]> Oncore driver (Current maintainer)
10. [11]Steve Clift <[email protected]> OMEGA clock driver
11. [12]Casey Crellin <[email protected]> vxWorks (Tornado) port and help with target configuration
12. [13]Sven Dietrich <[email protected]> Palisade reference clock driver, NT adj. residuals, integrated Greg's Winnt port.
13. [14]John A. Dundas III <[email protected]> Apple A/UX port
229Cisco Unity Express 2.1/2.2 CLI Administrator Guide for Cisco CallManager
Cisco Unity Express 2.1/2.2

Appendix A: Software Copyrights and Licenses
14. [15]Torsten Duwe <[email protected]> Linux port
15. [16]Dennis Ferguson <[email protected]> foundation code for NTP Version 2 as specified in RFC-1119
16. [17]Glenn Hollinger <[email protected]> GOES clock driver
17. [18]Mike Iglesias <[email protected]> DEC Alpha port
18. [19]Jim Jagielski <[email protected]> A/UX port
19. [20]Jeff Johnson <[email protected]> massive prototyping overhaul
20. [21]Hans Lambermont <[email protected]> or [22]<[email protected]> ntpsweep
21. [23]Poul-Henning Kamp <[email protected]> Oncore driver (Original author)
22. [24]Frank Kardel [25]<[email protected]> PARSE <GENERIC> driver (14 reference clocks), STREAMS modules for PARSE, support scripts, syslog cleanup
23. [26]William L. Jones <[email protected]> RS/6000 AIX modifications, HPUX modifications
24. [27]Dave Katz <[email protected]> RS/6000 AIX port
25. [28]Craig Leres <[email protected]> 4.4BSD port, ppsclock, Magnavox GPS clock driver
26. [29]George Lindholm <[email protected]> SunOS 5.1 port
27. [30]Louis A. Mamakos <[email protected]> MD5-based authentication
28. [31]Lars H. Mathiesen <[email protected]> adaptation of foundation code for Version 3 as specified in RFC-1305
29. [32]David L. Mills <[email protected]> Version 4 foundation: clock discipline, authentication, precision kernel; clock drivers: Spectracom, Austron, Arbiter, Heath, ATOM, ACTS, KSI/Odetics; audio clock drivers: CHU, WWV/H, IRIG
30. [33]Wolfgang Moeller <[email protected]> VMS port
31. [34]Jeffrey Mogul <[email protected]> ntptrace utility
32. [35]Tom Moore <[email protected]> i386 svr4 port
33. [36]Kamal A Mostafa <[email protected]> SCO OpenServer port
34. [37]Derek Mulcahy <[email protected]> and [38]Damon Hart-Davis <[email protected]> ARCRON MSF clock driver
35. [39]Rainer Pruy <[email protected]> monitoring/trap scripts, statistics file handling
36. [40]Dirce Richards <[email protected]> Digital UNIX V4.0 port
37. [41]Wilfredo Sánchez <[email protected]> added support for NetInfo
38. [42]Nick Sayer <[email protected]> SunOS streams modules
39. [43]Jack Sasportas <[email protected]> Saved a Lot of space on the stuff in the html/pic/ subdirectory
40. [44]Ray Schnitzler <[email protected]> Unixware1 port
41. [45]Michael Shields <[email protected]> USNO clock driver
42. [46]Jeff Steinman <[email protected]> Datum PTS clock driver
43. [47]Harlan Stenn <[email protected]> GNU automake/autoconfigure makeover, various other bits (see the ChangeLog)
44. [48]Kenneth Stone <[email protected]> HP-UX port
45. [49]Ajit Thyagarajan <[email protected]>IP multicast/anycast support
46. [50]Tomoaki TSURUOKA <[email protected]>TRAK clock driver
47. [51]Paul A Vixie <[email protected]> TrueTime GPS driver, generic TrueTime clock driver
48. [52]Ulrich Windl <[email protected]> corrected and validated HTML documents according to the HTML DTD
_________________________________________________________________
[53]gif
[54]David L. Mills <[email protected]>
References
1. mailto:[email protected]
2. mailto:[email protected]
3. mailto:[email protected]
4. mailto:[email protected]
5. mailto:[email protected]
6. mailto:[email protected]
7. mailto:[email protected]
8. mailto:[email protected]
230Cisco Unity Express 2.1/2.2 CLI Administrator Guide for Cisco CallManager
Cisco Unity Express 2.1/2.2
Appendix A: Software Copyrights and Licenses
9. mailto:[email protected]
10. mailto:[email protected]
11. mailto:[email protected]
12. mailto:[email protected]
13. mailto:[email protected]
14. mailto:[email protected]
15. mailto:[email protected]
16. mailto:[email protected]
17. mailto:[email protected]
18. mailto:[email protected]
19. mailto:jagubox.gsfc.nasa.gov
20. mailto:[email protected]
21. mailto:[email protected]
22. mailto:[email protected]
23. mailto:[email protected]
24. http://www4.informatik.uni-erlangen.de/~kardel
25. mailto:[email protected]
26. mailto:[email protected]
27. mailto:[email protected]
28. mailto:[email protected]
29. mailto:[email protected]
30. mailto:[email protected]
31. mailto:[email protected]
32. mailto:[email protected]
33. mailto:[email protected]
34. mailto:[email protected]
35. mailto:[email protected]
36. mailto:[email protected]
37. mailto:[email protected]
38. mailto:[email protected]
39. mailto:[email protected]
40. mailto:[email protected]
41. mailto:[email protected]
42. mailto:[email protected]
43. mailto:[email protected]
44. mailto:[email protected]
45. mailto:[email protected]
46. mailto:pebbles.jpl.nasa.gov
47. mailto:[email protected]
48. mailto:[email protected]
49. mailto:[email protected]
50. mailto:[email protected]
51. mailto:[email protected]
52. mailto:[email protected]
53. file://localhost/backroom/ntp-stable/html/index.htm
54. mailto:[email protected]
231Cisco Unity Express 2.1/2.2 CLI Administrator Guide for Cisco CallManager
Cisco Unity Express 2.1/2.2
Appendix A: Software Copyrights and Licenses
OPENSS1 SOFTWAREopenssl software is distributed under the terms of the licenses from the OpenSSL Project and Eric Young ([email protected]). Both licenses are included below:
OpenSSL License
---------------
====================================================================
Copyright (c) 1998-2002 The OpenSSL Project. All rights reserved.
Redistribution and use in source and binary forms, with or without modification, are permitted provided that the following conditions are met:
1. Redistributions of source code must retain the above copyright notice, this list of conditions and the following disclaimer.
2. Redistributions in binary form must reproduce the above copyright notice, this list of conditions and the following disclaimer in the documentation and/or other materials provided with the distribution.
3. All advertising materials mentioning features or use of this software must display the following acknowledgment: "This product includes software developed by the OpenSSL Project for use in the OpenSSL Toolkit. (http://www.openssl.org/)"
4. The names "OpenSSL Toolkit" and "OpenSSL Project" must not be used to endorse or promote products derived from this software without prior written permission. For written permission, please contact [email protected].
5. Products derived from this software may not be called "OpenSSL" nor may "OpenSSL" appear in their names without prior written permission of the OpenSSL Project.
6. Redistributions of any form whatsoever must retain the following acknowledgment: "This product includes software developed by the OpenSSL Project for use in the OpenSSL Toolkit (http://www.openssl.org/)"
THIS SOFTWARE IS PROVIDED BY THE OpenSSL PROJECT ``AS IS'' AND ANY EXPRESSED OR IMPLIED WARRANTIES, INCLUDING, BUT NOT LIMITED TO, THE IMPLIED WARRANTIES OF MERCHANTABILITY AND FITNESS FOR A PARTICULAR PURPOSE ARE DISCLAIMED. IN NO EVENT SHALL THE OpenSSL PROJECT OR ITS CONTRIBUTORS BE LIABLE FOR ANY DIRECT, INDIRECT, INCIDENTAL, SPECIAL, EXEMPLARY, OR CONSEQUENTIAL DAMAGES (INCLUDING, BUT NOT LIMITED TO, PROCUREMENT OF SUBSTITUTE GOODS OR SERVICES; LOSS OF USE, DATA, OR PROFITS; OR BUSINESS INTERRUPTION) HOWEVER CAUSED AND ON ANY THEORY OF LIABILITY, WHETHER IN CONTRACT, STRICT LIABILITY, OR TORT (INCLUDING NEGLIGENCE OR OTHERWISE) ARISING IN ANY WAY OUT OF THE USE OF THIS SOFTWARE, EVEN IF ADVISED OF THE POSSIBILITY OF SUCH DAMAGE.
* ====================================================================
This product includes cryptographic software written by Eric Young ([email protected]). This product includes software written by Tim Hudson ([email protected]).
Original SSLeay License
-----------------------
Copyright (C) 1995-1998 Eric Young ([email protected]) All rights reserved.
This package is an SSL implementation written by Eric Young ([email protected]). The implementation was written so as to conform with Netscapes SSL.
This library is free for commercial and non-commercial use as long as the following conditions are aheared to. The following conditions apply to all code found in this distribution, be it the RC4, RSA, lhash, DES, etc., code; not just the SSL code. The SSL documentation included with this distribution is covered by the same copyright terms except that the holder is Tim Hudson ([email protected]).
Copyright remains Eric Young's, and as such any Copyright notices in the code are not to be removed. If this package is used in a product, Eric Young should be given attribution as the author of the parts of the library used. This can be in the form of a textual message at program startup or in documentation (online or textual) provided with the package. Redistribution and use in source and binary forms, with or without modification, are permitted provided that the following conditions are met:
1. Redistributions of source code must retain the copyright notice, this list of conditions and the following disclaimer.
2. Redistributions in binary form must reproduce the above copyright notice, this list of conditions and the following disclaimer in the documentation and/or other materials provided with the distribution.
3. All advertising materials mentioning features or use of this software must display the following acknowledgement: "This product includes cryptographic software written by Eric Young ([email protected])" The word 'cryptographic' can be left out if the rouines from the library being used are not cryptographic related :-).
4. If you include any Windows specific code (or a derivative thereof) from the apps directory (application code) you must include an acknowledgement: "This product includes software written by Tim Hudson ([email protected])"
THIS SOFTWARE IS PROVIDED BY ERIC YOUNG ``AS IS'' AND ANY EXPRESS OR IMPLIED WARRANTIES, INCLUDING, BUT NOT LIMITED TO, THE IMPLIED WARRANTIES OF MERCHANTABILITY AND FITNESS FOR A PARTICULAR PURPOSE ARE DISCLAIMED. IN NO EVENT SHALL THE AUTHOR OR CONTRIBUTORS BE LIABLE
232Cisco Unity Express 2.1/2.2 CLI Administrator Guide for Cisco CallManager
Cisco Unity Express 2.1/2.2
Appendix A: Software Copyrights and Licenses
FOR ANY DIRECT, INDIRECT, INCIDENTAL, SPECIAL, EXEMPLARY, OR CONSEQUENTIAL DAMAGES (INCLUDING, BUT NOT LIMITED TO, PROCUREMENT OF SUBSTITUTE GOODS OR SERVICES; LOSS OF USE, DATA, OR PROFITS; OR BUSINESS INTERRUPTION) HOWEVER CAUSED AND ON ANY THEORY OF LIABILITY, WHETHER IN CONTRACT, STRICT LIABILITY, OR TORT (INCLUDING NEGLIGENCE OR OTHERWISE) ARISING IN ANY WAY OUT OF THE USE OF THIS SOFTWARE, EVEN IF ADVISED OF THE POSSIBILITY OF SUCH DAMAGE.
The licence and distribution terms for any publically available version or derivative of this code cannot be changed. i.e. this code cannot simply be copied and put under another distribution licence [including the GNU Public Licence.]
PCRE LICENSEPCRE is a library of functions to support regular expressions whose syntax and semantics are as close as possible to those of the Perl 5 language.
Written by: Philip Hazel <[email protected]>
University of Cambridge Computing Service,
Cambridge, England. Phone: +44 1223 334714.
Copyright (c) 1997-2001 University of Cambridge
Permission is granted to anyone to use this software for any purpose on any computer system, and to redistribute it freely, subject to the following restrictions:
1. This software is distributed in the hope that it will be useful, but WITHOUT ANY WARRANTY; without even the implied warranty of MERCHANTABILITY or FITNESS FOR A PARTICULAR PURPOSE.
2. The origin of this software must not be misrepresented, either by explicit claim or by omission. In practice, this means that if you use PCRE in software which you distribute to others, commercially or otherwise, you must put a sentence like this
Regular expression support is provided by the PCRE library package, which is open source software, written by Philip Hazel, and copyright by the University of Cambridge, England. somewhere reasonably visible in your documentation and in any relevant files or online help data or similar. A reference to the ftp site for the source, that is, to ftp://ftp.csx.cam.ac.uk/pub/software/programming/pcre/ should also be given in the documentation.
3. Altered versions must be plainly marked as such, and must not be misrepresented as being the original software.
4. If PCRE is embedded in any software that is released under the GNU General Purpose Licence (GPL), or Lesser General Purpose Licence (LGPL), then the terms of that licence shall supersede any condition above with which it is incompatible.
The documentation for PCRE, supplied in the "doc" directory, is distributed under the same terms as the software itself.
End
POSTGRESQL SOFTWAREPostgreSQL software is distributed under the terms of the copyright and permission notice below:
COPYRIGHT NOTICE: PostgreSQL Database Management System (formerly known as Postgres, then as Postgres95)
Portions Copyright (c) 1996-2001, The PostgreSQL Global Development Group
Portions Copyright (c) 1994, The Regents of the University of California
Permission to use, copy, modify, and distribute this software and its documentation for any purpose, without fee, and without a written agreement is hereby granted, provided that the above copyright notice and this paragraph and the following two paragraphs appear in all copies.
IN NO EVENT SHALL THE UNIVERSITY OF CALIFORNIA BE LIABLE TO ANY PARTY FOR DIRECT, INDIRECT, SPECIAL, INCIDENTAL, OR CONSEQUENTIAL DAMAGES, INCLUDING LOST PROFITS, ARISING OUT OF THE USE OF THIS SOFTWARE AND ITS DOCUMENTATION, EVEN IF THE UNIVERSITY OF CALIFORNIA HAS BEEN ADVISED OF THE POSSIBILITY OF SUCH DAMAGE.
THE UNIVERSITY OF CALIFORNIA SPECIFICALLY DISCLAIMS ANY WARRANTIES, INCLUDING, BUT NOT LIMITED TO, THE IMPLIED WARRANTIES OF MERCHANTABILITY AND FITNESS FOR A PARTICULAR PURPOSE. THE SOFTWARE PROVIDED HEREUNDER IS ON AN "AS IS" BASIS, AND THE UNIVERSITY OF CALIFORNIA HAS NO OBLIGATIONS TO PROVIDE MAINTENANCE, SUPPORT, UPDATES, ENHANCEMENTS, OR MODIFICATIONS.
TCL SOFTWAREtcl software is distributed under the terms of the copyright and permission notice below:
COPYRIGHT NOTICE: This software is copyrighted by the Regents of the University of California, Sun Microsystems, Inc., Scriptics Corporation, ActiveState Corporation and other parties. The following terms apply to all files associated with the software unless explicitly disclaimed in individual files.
233Cisco Unity Express 2.1/2.2 CLI Administrator Guide for Cisco CallManager
Cisco Unity Express 2.1/2.2
Appendix A: Software Copyrights and Licenses
The authors hereby grant permission to use, copy, modify, distribute, and license this software and its documentation for any purpose, provided that existing copyright notices are retained in all copies and that this notice is included verbatim in any distributions. No written agreement, license, or royalty fee is required for any of the authorized uses. Modifications to this software may be copyrighted by their authors and need not follow the licensing terms described here, provided that the new terms are clearly indicated on the first page of each file where they apply.
IN NO EVENT SHALL THE AUTHORS OR DISTRIBUTORS BE LIABLE TO ANY PARTY FOR DIRECT, INDIRECT, SPECIAL, INCIDENTAL, OR CONSEQUENTIAL DAMAGES ARISING OUT OF THE USE OF THIS SOFTWARE, ITS DOCUMENTATION, OR ANY DERIVATIVES THEREOF, EVEN IF THE AUTHORS HAVE BEEN ADVISED OF THE POSSIBILITY OF SUCH DAMAGE.
THE AUTHORS AND DISTRIBUTORS SPECIFICALLY DISCLAIM ANY WARRANTIES, INCLUDING, BUT NOT LIMITED TO, THE IMPLIED WARRANTIES OF MERCHANTABILITY, FITNESS FOR A PARTICULAR PURPOSE, AND NON-INFRINGEMENT. THIS SOFTWARE IS PROVIDED ON AN "AS IS" BASIS, AND THE AUTHORS AND DISTRIBUTORS HAVE NO OBLIGATION TO PROVIDE MAINTENANCE, SUPPORT, UPDATES, ENHANCEMENTS, OR MODIFICATIONS.
GOVERNMENT USE: If you are acquiring this software on behalf of the U.S. government, the Government shall have only "Restricted Rights" in the software and related documentation as defined in the Federal Acquisition Regulations (FARs) in Clause 52.227.19 (c) (2). If you are acquiring the software on behalf of the Department of Defense, the software shall be classified as "Commercial Computer Software" and the Government shall have only "Restricted Rights" as defined in Clause 252.227-7013 (c) (1) of DFARs. Notwithstanding the foregoing, the authors grant the U.S. Government and others acting in its behalf permission to use and distribute the software in accordance with the terms specified in this license.
234Cisco Unity Express 2.1/2.2 CLI Administrator Guide for Cisco CallManager
Cisco Unity Express 2.1/2.2
Cisco Unity Express 2.1/2.2 CLI AdministCisco Unity Express 2.1/2.2
I N D E X
A
access lists 11, 27
active calls
backup 135
restore 138
addressing remote messages 176
administration
differences 18
GU and CLI 35
GUI 17
Administration via Telephone 106
Administration via Telephone application
configuring 69
administrative privilege 106
administrator
Cisco CallManager 18
Cisco Unity Express 18
password 11, 27
user ID 11, 27
web 18
AIM module
usage 88
wear 88
alternate welcome greeting 12, 28
application command 158
applications
deleting 83
atrace.log file 89
auto attendant
AvT 14, 75
configuring 69
creating a script 76
deleting a greeting 76
deleting a prompt 76
deleting a script 77
maximum retries 71
maximum sessions 72
operator extension 71
recording a greeting 14, 71, 75
telephone number 71, 72
uploading greeting file 75
uploading script file 77
autoprovisioning 14
AvT 106
recording a greeting 75
AvT, configuring 69
AvT, recording a greeting 14
B
backup
active calls 135
command 133
FTP server 131
numbering scheme 135
offline mode 131
parameters 133
procedure 135
restrictions 13, 131, 132
revision number 131
selective 13
backup category command 135
backup history report 145
blind addressing 176
boot helper installation 43
235rator Guide for Cisco CallManager
Index
broadcast privilege 106
bulk provisioning 6
C
call
displaying by application 125
displaying by route 127
implementation ID 129
call processing 11, 27
capacity, configuring 86
ccn application command 67, 72, 154
ccn call terminate command 129
ccn copy script command 77
ccn copy url command 75, 77
ccn delete command 76, 77
ccn engine command 152
ccn trigger command 78, 158
centralized message storage 13
Cisco CallManager
CTI ports 11, 26
database 18
description 18
JTAPI user 11, 27
route point 11, 27
Cisco Unity Express
database 18
description 18
software files 48, 54, 57
Cisco Unity Express prompt 162
Cisco Unity Express software website 45, 48, 49, 54, 57, 58
CiscoWorks configmaker 14
clean installation, definition 43, 47
CLI 17
CLI administration 35
clock timezone command 172
CNS/SNAP 14
command
application 158
236Cisco Unity Express 2.1/2.2 CLI Administrator Guide for Cisco Cal
backup 133
backup category 135
ccn application 67, 72, 154
ccn call terminate 129
ccn copy script 77
ccn copy url 75, 77
ccn delete 76, 77
ccn engine 152
ccn trigger 78, 158
clock timezone 172
continue 135
copy ftp 141
copy running-config 107, 113, 142
copy startup-config 141
copy tftp 143
default 152, 154, 158
description 72, 118, 154
enable 185
enabled
enabled command 72
expiration 118
greeting 118
groupname
config mode 113
EXEC mode 113
hostname 162
idletimeout 158
interface Service-Engine 30
ip address 30
ip domain-name 164
ip name-server 164
ip unnumbered 30
locale 158
log trace 89
mailbox size 118
maxsessions 67, 72, 78, 154, 158
maxsteps 152
message size 118
mwi refresh 124
lManagerCisco Unity Express 2.1/2.2
Index
no ccn application 83
no ccn trigger 81, 83
no parameter 159
ntp server 166, 168
offline 135, 138
parameter 154
parameters, auto attendant 72
parameters, voicemail 67
reload 138
restore id 138
script 154
service-module 30, 32
session 32
show backup 133
show backup history 135, 138
show backup server 135, 138
show ccn application 67, 72, 83, 154
show ccn call application 125
show ccn call route 127
show ccn engine 152
show ccn scripts 67, 72, 154
show ccn trigger 78, 81, 83, 159
show clock detail 172
show group detail groupname 113
show groups 113
show hosts 162
show interface ide 0 88
show ip route 164
show ntp configuration 166, 168
show ntp status 166, 168
show user detail username 107
show users 107
show voicemail 118
telnet 32
troubleshooting
log 149
show 149
trace 149
username
Cisco Unity ExpCisco Unity Express 2.1/2.2
config mode 107
EXEC mode 107
voice mailbox 118
voice mailbox unlock 123
voicemail capacity time 87
voicemail default 87
voicemail operator telephone 87
voicemail recording time 87
command environment 31
command-line interface 17
commands 147
communication link to Cisco CallManager 29
configuration 148
running 142
startup, copying 141
TFTP 143
configuration mode
backup commands 131
definition 31
configurations, copying 141
configuring
Administration via Telephone (AvT) 69
auto attendant 69
capacity 86
DNS server 164
expiration date 86
hostname 162
IP addresses 29
language 86
mailbox size 86
message length 86
multiple triggers 158
NTP server 166
operator extension 86
recording time 86
script steps 152
system parameters 152
voice mail 66
configuring time zone 172
237ress 2.1/2.2 CLI Administrator Guide for Cisco CallManager
Index
connectivity to Cisco CallManager 29
console display, system messages 170
continue command 135
copy ftp command 141
copy running-config command 107, 113, 142
copy startup-config command 141
copy tftp command 143
copying log files, troubleshooting 148
copying, configurations 141
CTI ports 11, 26
D
database
Cisco CallManager 18
Cisco Unity Express 18
date and time
restrictions 13
daylight savings time 147
default command 152, 154, 158
default gateway 29
default mailbox size 15, 16
default values
system-wide 86
deleting
applications 83
greetings 76
messages 117
prompts 76
scripts 77
triggers 81, 83
deployment
Cisco Unity 17
Cisco Unity Express 17
description command 72, 118, 154
Device option 11, 26
differences
administration 18
administrators 18
238Cisco Unity Express 2.1/2.2 CLI Administrator Guide for Cisco Cal
passwords 19, 107, 108, 110
user IDs 19, 107, 108, 110
users 18
DNS server 11, 27
resolving host name to IP address 166
DNS server, configuring 164
downloading license files 45
E
editor for scripts 14
enable command 185
Etherswitch module 11, 26
EXEC mode, definition 31
expiration command 118
expiration date, configuring 86
expired messages 117
expiry timer 117
extension, group 112
external syslog server 170
F
factory-set system limits 15
Fast Ethernet ports 13
file
atrace.log 89
messages.log 89, 170
file size
messages.log 89
prompt 75
script 76
flash memory 31, 142
log and trace 89
module
wear 88
FTP
backup and restore 131
lManagerCisco Unity Express 2.1/2.2
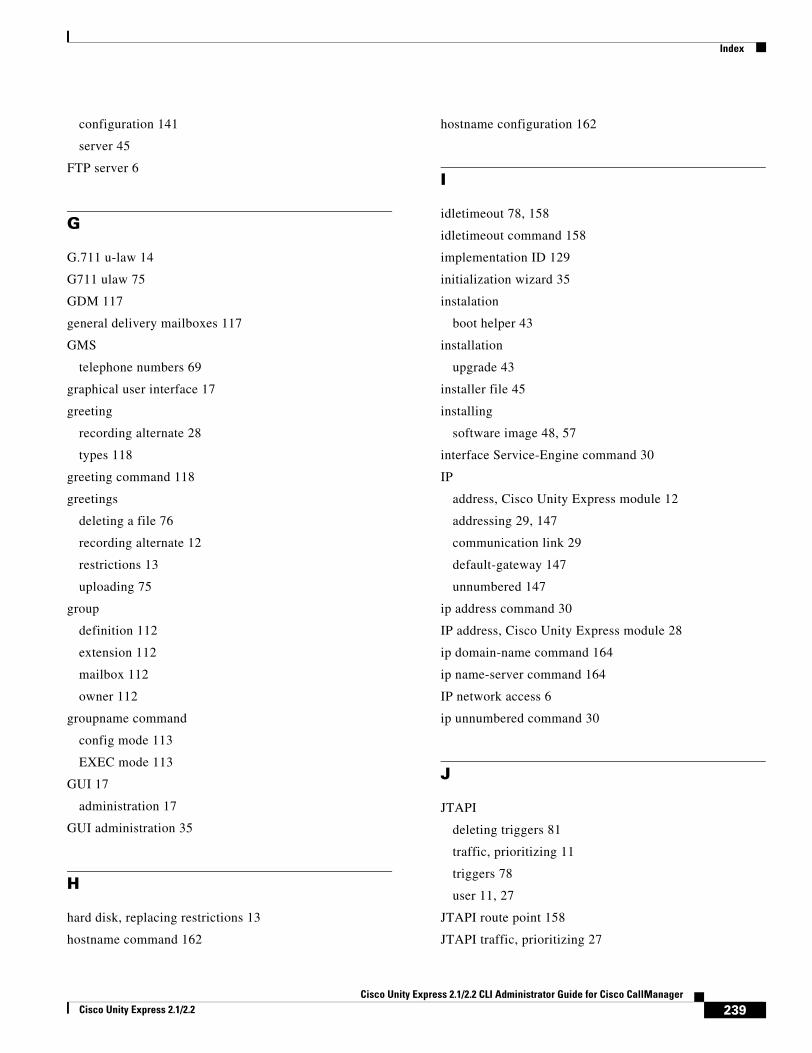
Index
configuration 141
server 45
FTP server 6
G
G.711 u-law 14
G711 ulaw 75
GDM 117
general delivery mailboxes 117
GMS
telephone numbers 69
graphical user interface 17
greeting
recording alternate 28
types 118
greeting command 118
greetings
deleting a file 76
recording alternate 12
restrictions 13
uploading 75
group
definition 112
extension 112
mailbox 112
owner 112
groupname command
config mode 113
EXEC mode 113
GUI 17
administration 17
GUI administration 35
H
hard disk, replacing restrictions 13
hostname command 162
Cisco Unity ExpCisco Unity Express 2.1/2.2
hostname configuration 162
I
idletimeout 78, 158
idletimeout command 158
implementation ID 129
initialization wizard 35
instalation
boot helper 43
installation
upgrade 43
installer file 45
installing
software image 48, 57
interface Service-Engine command 30
IP
address, Cisco Unity Express module 12
addressing 29, 147
communication link 29
default-gateway 147
unnumbered 147
ip address command 30
IP address, Cisco Unity Express module 28
ip domain-name command 164
ip name-server command 164
IP network access 6
ip unnumbered command 30
J
JTAPI
deleting triggers 81
traffic, prioritizing 11
triggers 78
user 11, 27
JTAPI route point 158
JTAPI traffic, prioritizing 27
239ress 2.1/2.2 CLI Administrator Guide for Cisco CallManager
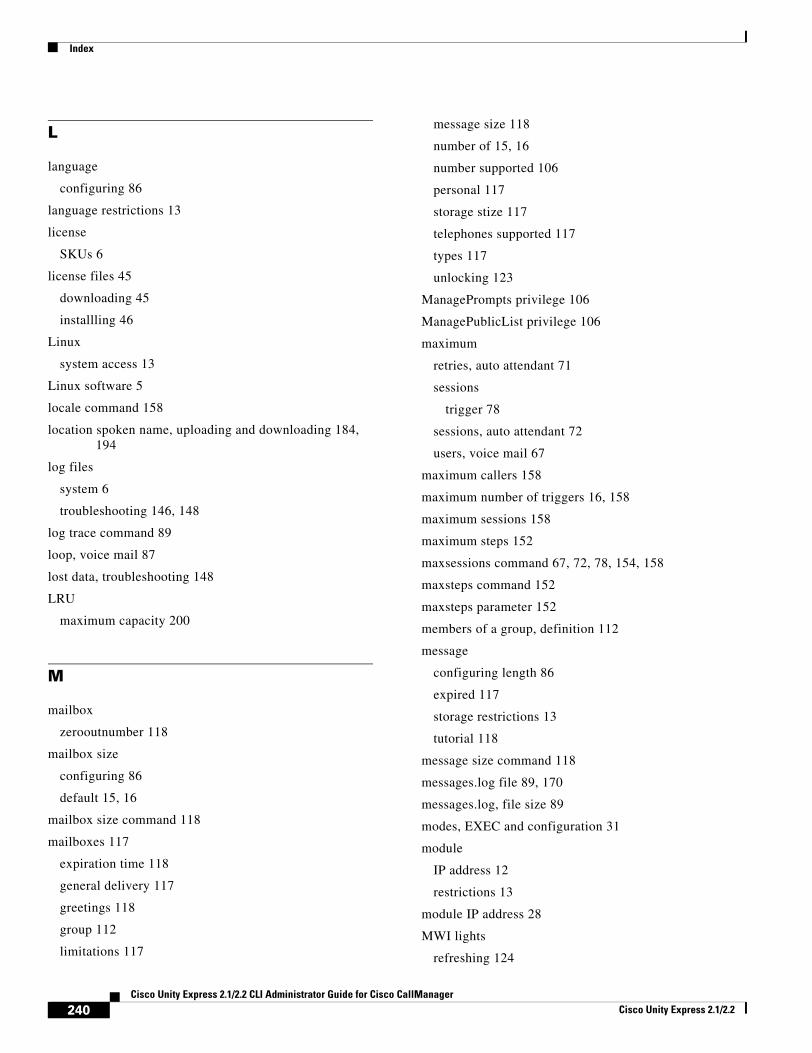
Index
L
language
configuring 86
language restrictions 13
license
SKUs 6
license files 45
downloading 45
installling 46
Linux
system access 13
Linux software 5
locale command 158
location spoken name, uploading and downloading 184, 194
log files
system 6
troubleshooting 146, 148
log trace command 89
loop, voice mail 87
lost data, troubleshooting 148
LRU
maximum capacity 200
M
mailbox
zerooutnumber 118
mailbox size
configuring 86
default 15, 16
mailbox size command 118
mailboxes 117
expiration time 118
general delivery 117
greetings 118
group 112
limitations 117
240Cisco Unity Express 2.1/2.2 CLI Administrator Guide for Cisco Cal
message size 118
number of 15, 16
number supported 106
personal 117
storage stize 117
telephones supported 117
types 117
unlocking 123
ManagePrompts privilege 106
ManagePublicList privilege 106
maximum
retries, auto attendant 71
sessions
trigger 78
sessions, auto attendant 72
users, voice mail 67
maximum callers 158
maximum number of triggers 16, 158
maximum sessions 158
maximum steps 152
maxsessions command 67, 72, 78, 154, 158
maxsteps command 152
maxsteps parameter 152
members of a group, definition 112
message
configuring length 86
expired 117
storage restrictions 13
tutorial 118
message size command 118
messages.log file 89, 170
messages.log, file size 89
modes, EXEC and configuration 31
module
IP address 12
restrictions 13
module IP address 28
MWI lights
refreshing 124
lManagerCisco Unity Express 2.1/2.2
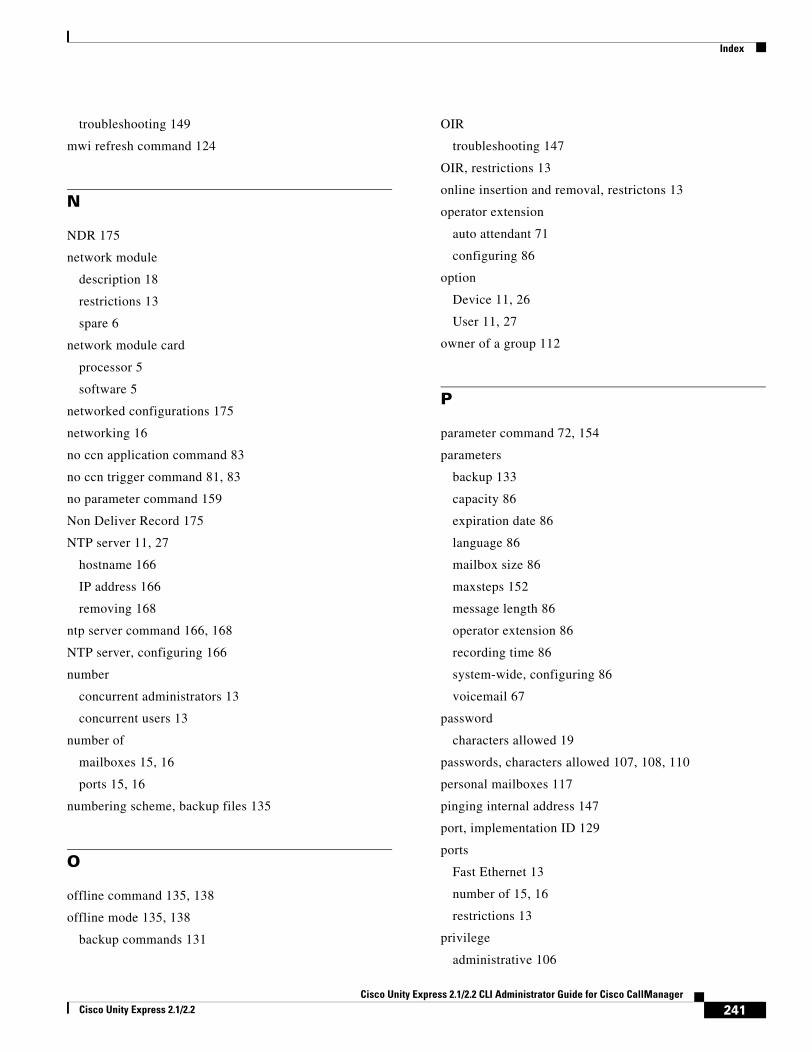
Index
troubleshooting 149
mwi refresh command 124
N
NDR 175
network module
description 18
restrictions 13
spare 6
network module card
processor 5
software 5
networked configurations 175
networking 16
no ccn application command 83
no ccn trigger command 81, 83
no parameter command 159
Non Deliver Record 175
NTP server 11, 27
hostname 166
IP address 166
removing 168
ntp server command 166, 168
NTP server, configuring 166
number
concurrent administrators 13
concurrent users 13
number of
mailboxes 15, 16
ports 15, 16
numbering scheme, backup files 135
O
offline command 135, 138
offline mode 135, 138
backup commands 131
Cisco Unity ExpCisco Unity Express 2.1/2.2
OIR
troubleshooting 147
OIR, restrictions 13
online insertion and removal, restrictons 13
operator extension
auto attendant 71
configuring 86
option
Device 11, 26
User 11, 27
owner of a group 112
P
parameter command 72, 154
parameters
backup 133
capacity 86
expiration date 86
language 86
mailbox size 86
maxsteps 152
message length 86
operator extension 86
recording time 86
system-wide, configuring 86
voicemail 67
password
characters allowed 19
passwords, characters allowed 107, 108, 110
personal mailboxes 117
pinging internal address 147
port, implementation ID 129
ports
Fast Ethernet 13
number of 15, 16
restrictions 13
privilege
administrative 106
241ress 2.1/2.2 CLI Administrator Guide for Cisco CallManager
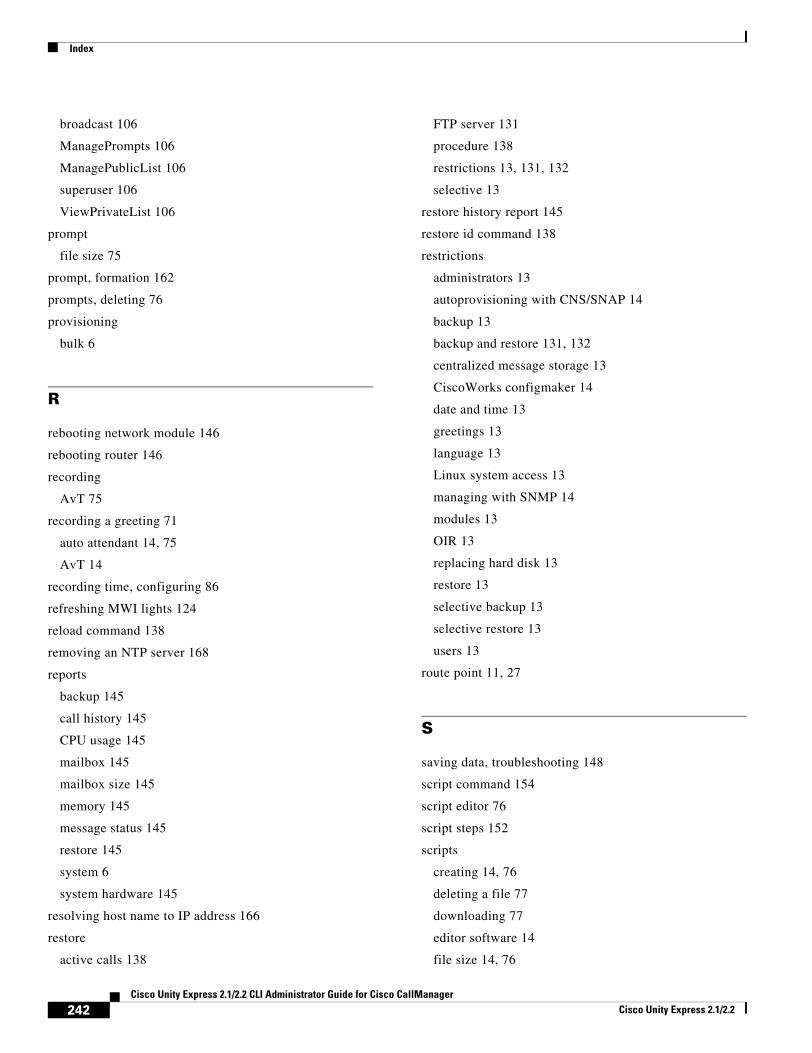
Index
broadcast 106
ManagePrompts 106
ManagePublicList 106
superuser 106
ViewPrivateList 106
prompt
file size 75
prompt, formation 162
prompts, deleting 76
provisioning
bulk 6
R
rebooting network module 146
rebooting router 146
recording
AvT 75
recording a greeting 71
auto attendant 14, 75
AvT 14
recording time, configuring 86
refreshing MWI lights 124
reload command 138
removing an NTP server 168
reports
backup 145
call history 145
CPU usage 145
mailbox 145
mailbox size 145
memory 145
message status 145
restore 145
system 6
system hardware 145
resolving host name to IP address 166
restore
active calls 138
242Cisco Unity Express 2.1/2.2 CLI Administrator Guide for Cisco Cal
FTP server 131
procedure 138
restrictions 13, 131, 132
selective 13
restore history report 145
restore id command 138
restrictions
administrators 13
autoprovisioning with CNS/SNAP 14
backup 13
backup and restore 131, 132
centralized message storage 13
CiscoWorks configmaker 14
date and time 13
greetings 13
language 13
Linux system access 13
managing with SNMP 14
modules 13
OIR 13
replacing hard disk 13
restore 13
selective backup 13
selective restore 13
users 13
route point 11, 27
S
saving data, troubleshooting 148
script command 154
script editor 76
script steps 152
scripts
creating 14, 76
deleting a file 77
downloading 77
editor software 14
file size 14, 76
lManagerCisco Unity Express 2.1/2.2

Index
uploading 77
selective backup restrictions 13
selective restore restrictions 13
server
syslog 170
servers
DNS 11, 27
NTP 11, 27
service-module command 30, 32
service-module, troubleshooting 147
session command 32
sessions 158
setting daylight savings time 147
severity level, system messages 170
show backup command 133
show backup history command 135, 138
show backup server command 135, 138
show ccn application 67
show ccn application command 72, 83, 154
show ccn call application command 125
show ccn call route command 127
show ccn engine command 152
show ccn scripts command 67, 72, 154
show ccn trigger command 78, 81, 83, 159
show clock detail command 172
show group detail groupname command 113
show groups command 113
show hosts command 162
show interface ide 0 command 88
show ip route command 164
show ntp configuration command 166, 168
show ntp status command 166, 168
show user detail username command 107
show users command 107
show voicemail command 118
SKUs 15, 16, 44
SNMP 14
software files 48, 54, 57
installer 45
Cisco Unity ExpCisco Unity Express 2.1/2.2
license 45
software image, installing 48, 57
software image, upgrading 53
software install clean command 43
software install upgrade command 43
spare network modules 6
speed of internal line 147
spoken name
confirmation 188
enabling 178, 180
network location 184, 194
recording 187
remote user 188
vCard 196
startup configuration, copying 141
steps
configuring 152
maximum number 152
storage hours 15, 16
superuser privilege 106
syslog server 170
system access using IP network 6
system capacities 15, 16
system limits
factory set 15
system log files 6
system messages
console display 170
severity 170
system parameters
configuring 152
system reports 6, 145
system-wide
default values 86
parameters, configuring 86
T
Table
243ress 2.1/2.2 CLI Administrator Guide for Cisco CallManager
Index
Table 4 Configuration Task Sequence 36
Table 5 Troubleshooting Commands 149
telephone number
auto attendant 71, 72
triggers 78, 158
telephone numbers
auto attendant 71
GMS 69
voice mail 66
telephones supported for voice mail 117
telnet command 32
Telnet session 31
terminating a call 129
TFTP
configuration 143
time zone
configuring 172
timeout 78, 158
total storage hours 15, 16
trigger
maximum sessions 78
triggers
auto attendant 78
configuring multiple 158
deleting 81, 83
maximum number 16, 158
sessions 158
telephone number 78, 158
timeout 78, 158
voice mail 78
troubleshooting
access to GUI 146
copying log files 148
IP address 147
IP unnumbered 147
IP, default-gateway 147
log files 146
lost data 148
MWI lights 149
244Cisco Unity Express 2.1/2.2 CLI Administrator Guide for Cisco Cal
OIR 147
opening a session 147
pinging internal address 147
rebooting network module 146
rebooting router 146
saving data 148
service-module status 147
speed of terminal line 147
unknown caller 149
user password 146
user PIN 146
users and groups 146
voice mail 149
TUI
recording a greeting 75
TUI, recording a greeting 14
tutorial command 118
U
unknown caller
troubleshooting 149
unlocking a mailbox 123
upgrade installation, definition 43
upgrading
software image 53
usage, flash memory 88
user IDs
characters allowed 19
user IDs, characters allowed 107, 108, 110
User option 11, 27
user password, troubleshooting 146
user PIN, troubleshooting 146
username command
config mode 107
EXEC mode 107
users
adding 106
modifying 106
lManagerCisco Unity Express 2.1/2.2
Index
number supported 106
V
vCard
spoken name 196
ViewPrivateList privilege 106
VLAN interface 11, 26
voice mail
configuring 66
conflicting extensions 87
loop 87
maximum users 67
networking 16
telephone numbers 66
telephones supported 117
troubleshooting 149
voice mailbox command 118
voice mailbox unlock command 123
Voice Profile for Internet Mail protocol 175
voicemail capacity time command 87
voicemail default command 87
voicemail operator telephone command 87
voicemail recording time command 87
VPIM 175
W
wav file 14, 75
wear, flash memory 88
web
administrator 18
Z
zerooutnumber command 118
Cisco Unity ExpCisco Unity Express 2.1/2.2
245ress 2.1/2.2 CLI Administrator Guide for Cisco CallManager

Index
246Cisco Unity Express 2.1/2.2 CLI Administrator Guide for Cisco Cal
lManagerCisco Unity Express 2.1/2.2