Cisco Tidal Enterprise Scheduler 6.2 Tutorial Guide for Unix€¦ · 1 Cisco Tidal Enterprise...
94
Cisco Systems, Inc. www.cisco.com Cisco has more than 200 offices worldwide. Addresses, phone numbers, and fax numbers are listed on the Cisco website at www.cisco.com/go/offices. Cisco Tidal Enterprise Scheduler Tutorial for Unix June 6, 2014 Text Part Number:
Transcript of Cisco Tidal Enterprise Scheduler 6.2 Tutorial Guide for Unix€¦ · 1 Cisco Tidal Enterprise...

Cisco Systems, Inc.www.cisco.com
Cisco has more than 200 offices worldwide. Addresses, phone numbers, and fax numbers are listed on the Cisco website at www.cisco.com/go/offices.
Cisco Tidal Enterprise Scheduler Tutorial for UnixJune 6, 2014
Text Part Number:

THE SPECIFICATIONS AND INFORMATION REGARDING THE PRODUCTS IN THIS MANUAL ARE SUBJECT TO CHANGE WITHOUT NOTICE. ALL STATEMENTS, INFORMATION, AND RECOMMENDATIONS IN THIS MANUAL ARE BELIEVED TO BE ACCURATE BUT ARE PRESENTED WITHOUT WARRANTY OF ANY KIND, EXPRESS OR IMPLIED. USERS MUST TAKE FULL RESPONSIBILITY FOR THEIR APPLICATION OF ANY PRODUCTS.
THE SOFTWARE LICENSE AND LIMITED WARRANTY FOR THE ACCOMPANYING PRODUCT ARE SET FORTH IN THE INFORMATION PACKET THAT SHIPPED WITH THE PRODUCT AND ARE INCORPORATED HEREIN BY THIS REFERENCE. IF YOU ARE UNABLE TO LOCATE THE SOFTWARE LICENSE OR LIMITED WARRANTY, CONTACT YOUR CISCO REPRESENTATIVE FOR A COPY.
The Cisco implementation of TCP header compression is an adaptation of a program developed by the University of California, Berkeley (UCB) as part of UCB’s public domain version of the UNIX operating system. All rights reserved. Copyright © 1981, Regents of the University of California.
NOTWITHSTANDING ANY OTHER WARRANTY HEREIN, ALL DOCUMENT FILES AND SOFTWARE OF THESE SUPPLIERS ARE PROVIDED “AS IS” WITH ALL FAULTS. CISCO AND THE ABOVE-NAMED SUPPLIERS DISCLAIM ALL WARRANTIES, EXPRESSED OR IMPLIED, INCLUDING, WITHOUT LIMITATION, THOSE OF MERCHANTABILITY, FITNESS FOR A PARTICULAR PURPOSE AND NONINFRINGEMENT OR ARISING FROM A COURSE OF DEALING, USAGE, OR TRADE PRACTICE.
IN NO EVENT SHALL CISCO OR ITS SUPPLIERS BE LIABLE FOR ANY INDIRECT, SPECIAL, CONSEQUENTIAL, OR INCIDENTAL DAMAGES, INCLUDING, WITHOUT LIMITATION, LOST PROFITS OR LOSS OR DAMAGE TO DATA ARISING OUT OF THE USE OR INABILITY TO USE THIS MANUAL, EVEN IF CISCO OR ITS SUPPLIERS HAVE BEEN ADVISED OF THE POSSIBILITY OF SUCH DAMAGES.
Cisco and the Cisco logo are trademarks or registered trademarks of Cisco and/or its affiliates in the U.S. and other countries. To view a list of Cisco trademarks, go to this URL: www.cisco.com/go/trademarks. Third-party trademarks mentioned are the property of their respective owners. The use of the word partner does not imply a partnership relationship between Cisco and any other company. (1110R)
Any Internet Protocol (IP) addresses and phone numbers used in this document are not intended to be actual addresses and phone numbers. Any examples, command display output, network topology diagrams, and other figures included in the document are shown for illustrative purposes only. Any use of actual IP addresses or phone numbers in illustrative content is unintentional and coincidental.
Cisco Tidal Enterprise Scheduler© 2014 Cisco Systems, Inc. All rights reserved.

OL-32204-01
C O N T E N T S
Preface 7
Audience 7
Related Documentation 7
Obtaining Documentation and Submitting a Service Request 7
Scheduler Concepts 1-1
Overview 1-1
Prerequisites 1-1
System Configurations 1-2
Masters 1-2
Client Manager 1-3
Agents 1-3
Job Definition 1-3
Job Hierarchy 1-4
Dependencies 1-4
Date and Time Dependencies 1-4
Job Dependencies 1-4
File Dependencies 1-5
Variable Dependencies 1-5
Calendars 1-5
Job Instances 1-5
Production Schedule 1-6
Master Status Display 1-6
Events and Actions 1-6
Queues 1-7
Queue Filters 1-8
Agent Lists 1-8
Security Policies 1-8
Logs and Reports 1-9
Understanding Offset Concepts 2-1
Overview 2-1
Defining a Production Day 2-2
Positive Offset (Late Start) 2-2
1Cisco Tidal Enterprise Scheduler 6.2 Tutorial Guide for Unix

Contents
Negative Offset (Early Start) 2-2
Scheduling Based on Agent Time Zone 2-3
Using a Positive Production Day Offset 2-4
Agent Running Ahead of the Master 2-4
Agent Running Behind the Master 2-6
Using a Negative Production Day Offset 2-6
Agent Running Ahead of the Master 2-6
Agent Running Behind the Master 2-7
Defining a Compile Offset 2-7
Sysval 150 2-8
Creating Your First Job 3-1
Overview 3-1
Launching the Tidal Web client 3-1
Setting Default Job Parameters 3-1
Creating the Report Job Definition 3-2
Adding Your Job to the Production Schedule 3-3
Monitoring Your Job 3-4
Job Output Options 3-4
Specifying the Disposition of Job Output 3-4
Viewing Job Output 3-5
Setting Up a Unix Job Dependency 4-1
Overview 4-1
Defining a Job for Operator Release 4-2
Setting the Require Operator Release Option 4-2
Adding a Job with a Dependency 4-3
Monitoring Your Jobs 4-4
Viewing Dependencies from the Job Activity Pane 4-4
Releasing the Jobs 4-5
Scheduling Jobs in a Group 5-1
Overview 5-1
Job Group Hierarchy 5-3
Job Group Scheduling 5-3
Adding a Job Group 5-3
Creating Jobs that Belong to a Job Group 5-4
Creating the Unix Test 4 Child Job 5-4
2Cisco Tidal Enterprise Scheduler 6.2 Tutorial Guide for Unix
OL-32204-01

Contents
Creating the Unix Test 5 Child Job with a Dependency 5-5
Scheduling the Job Group 5-5
Scheduling a Job that Depends on a Group 5-6
Adding a Job Group Dependency 5-6
Releasing a Job Group 5-7
Creating a Unix File Dependency 6-1
Overview 6-1
Creating a Job with a File Dependency 6-2
Viewing the Job in Production 6-3
Creating a File to Satisfy the Dependency 6-4
Monitoring the Job in Production 6-4
Detecting Job Event Conditions 7-1
Overview 7-1
Understanding Actions 7-1
Creating an Alert Action 7-1
Creating a Job to Trigger an Event with an Alert Action 7-2
Associating the Action to the Job 7-3
Insert Unix Test Event 7-4
Changing the Status of the Alert 7 7-4
Creating Variable Dependencies 8-1
Overview 8-1
Creating a Variable 8-2
Creating the Variable Update Action 8-3
Creating a Job Event for the Unix Variable Test Job 8-3
Creating the Unix Variable Test Job Group 8-4
Creating a Repeating Job and Associating the Job Event 8-4
Creating a Job Dependent on the Gather Orders Variable 8-6
Scheduling and Monitoring the Gather Orders Jobs 8-6
Managing Jobs in the Production Schedule 9-1
Overview 9-1
Creating the Parent Job Group 9-2
Creating Three Child Jobs 9-3
Job Sorting 9-4
Removing a Job from the Production Schedule 9-4
Inserting a Job Into the Production Schedule 9-5
Cancelling a Job in the Production Schedule 9-6
3Cisco Tidal Enterprise Scheduler 6.2 Tutorial Guide for Unix
OL-32204-01

Contents
Putting a Job on Hold 9-6
Taking the Job Out of Held Status 9-6
Overriding a Dependency 9-7
Estimated and Excessive Durations 9-7
Managing Command Parameters 10-1
Overview 10-1
Passing Command Parameters 10-1
Tracking Methods 10-2
Using the Exit Code 10-2
Creating the Reporting Job Group 10-2
Setting the Report Writer 1 Job to Succeed 10-3
Setting the Report Writer 2 Job to Fail 10-3
Adding the Reporting Job Group to the Production Schedule 10-4
Setting Report Writer 2 to Complete Normally 10-4
Setting Up Queues 11-1
Overview 11-1
Setting Up the Inventory Weekly Job Group 11-2
Creating Jobs for the Inventory Weekly Job Group 11-3
Duplicating a Job Definition 11-3
Setting Up a Queue 11-4
Adding the Inventory Weekly Job Group to Production 11-5
Monitoring the Job Group in Production 11-5
Changing the Queue Limit 11-6
Using Scheduler Agents 12-1
Overview 12-1
Defining An Agent Connection 12-2
Adding a Job that Requires Operator Release 12-2
Adding an Agent Job Dependency 12-3
Releasing the Agent Jobs 12-3
Summary 12-4
Using Scheduler Calendars 13-1
Overview 13-1
Building the First Workday Calendar 13-2
Building the Work Day Calendar 13-2
Building the Fiscal Week End Calendar 13-3
4Cisco Tidal Enterprise Scheduler 6.2 Tutorial Guide for Unix
OL-32204-01

Contents
Alternate Method of Creating a Calendar 13-5
Building the Quarter End Calendars 13-6
Fiscal Quarter End 13-6
Calendar Quarter End 13-7
Scheduling the Unix Test 1 Job with a Calendar 13-8
5Cisco Tidal Enterprise Scheduler 6.2 Tutorial Guide for Unix
OL-32204-01

Contents
6Cisco Tidal Enterprise Scheduler 6.2 Tutorial Guide for Unix
OL-32204-01

Preface
This guide provides step-by-step instructions on Unix-specific tasks for Cisco Tidal Enterprise Scheduler (TES) 6.2.
AudienceThis guide is for administrators who configure, monitor, and maintain TES, and who troubleshoot TES issues.
Related DocumentationSee the Cisco Tidal Enterprise Scheduler 6.2 Documentation Overview for a list of all TES guides.
Note We sometimes update the documentation after original publication. Therefore, you should also review the documentation on Cisco.com for any updates.
Obtaining Documentation and Submitting a Service RequestFor information on obtaining documentation, submitting a service request, and gathering additional information, see What’s New in Cisco Product Documentation at:
http://www.cisco.com/en/US/docs/general/whatsnew/whatsnew.html.
Subscribe to What’s New in Cisco Product Documentation, which lists all new and revised Cisco technical documentation, as an RSS feed and deliver content directly to your desktop using a reader application. The RSS feeds are a free service.
-7Cisco Tidal Enterprise Scheduler 6.2 Tutorial Guide for Unix
OL-32204-01

-8Cisco Tidal Enterprise Scheduler 6.2 Tutorial Guide for Unix
OL-32204-01

Cisco TiOL-32204-01
C H A P T E R 1
Scheduler ConceptsOverviewWelcome to Enterprise Scheduler! This tutorial will introduce and guide you through the features and functions of the world’s premier network scheduling solution, Enteprise Scheduler.
Each chapter in this guide builds upon the foundation of previous lessons. If this is your first time working with production scheduling software, or your first time using Enteprise Scheduler, you should work through each chapter consecutively. More experienced users might want to move directly to the lesson in which they are interested; however, many exercises utilize the results of previous exercises.
As you progress through the tutorial, more advanced and detailed topics are covered. By the end of this manual, you will be familiar with most of the major features of Enteprise Scheduler, and you will have the knowledge to create and maintain your own production schedules.
PrerequisitesBefore using this tutorial, you must copy the sample files that are used in the tutorial to your machine. These files are in a .tar file on the Scheduler installation DVD.
To copy the files to your machine, follow these steps:
Step 1 Install the agent as root as described in the Installation and Configuration Guide before installing the tutorial sample files.
Step 2 The .tar file with the tutorial sample files is found on the DVD at \agent\Unix\tutorial.tar. Copy this file onto the agent machine to the / (root level) directory of the Unix agent you will run jobs from.
Step 3 Change the directory permissions:
chmod 777 * Step 4 Unpack the .tar file with the following command:
tar -xvf tutorial.tar
The following sample files should be unpacked:
• UNIX_log.txt
• UNIX_Log2.txt
• UNIX_TEST_1.sh
• UNIX_TEST_2.sh
• UNIX_TEST_3.sh
1-1dal Enterprise Scheduler 6.2 Tutorial Guide for Unix

Chapter 1 Scheduler Concepts System Configurations
• UNIX_TEST_4.sh
• UNIX_TEST_5.sh
• UNIX_TEST_JEVENT.sh
Step 5 Change the permissions for the unpacked tutorial sample files with the following command:
chmod 777 *
Step 6 Change the ownership of the files to group:
chgrp -R <name of group> *
Note You can identify which group you are a member of by entering: idThis returns the name of the group you belong to.
Step 7 Change the ownership of the files to a owner:
chown -R <name of owner> *
Note The files can now be used with the lessons provided in this tutorial.To complete the exercises in this tutorial, you need to:Install Enteprise Scheduler in the default directory Scheduler (or the examples in this tutorial will not work properly.Select the Super User option in your User definition.Configure a default agent Create and have available the work day calendar
System ConfigurationsEnteprise Scheduler is used to schedule and manage jobs on several different systems — even different operating systems — through a single operator station. This single point-of-control means that you have only one Tidal Web client running on your PC to manage jobs across multiple systems. Masters are the central point for scheduling jobs on associated agents. Enteprise Scheduler jobs can only run on licensed agents.
MastersThe master is the UNIX system on which you install the “brains” of your Enteprise Scheduler network. You interact with the master using the Tidal Web client. The master performs the requested service on a local or remote agent, and then returns updated information to the Tidal Web client which displays the results.
The master launches jobs on machines licensed as agents. An agent is software on another machine in the same network as the master, and runs jobs on behalf of the master. The Tidal Web clilent does not connect directly to the agent, but schedules and manages its jobs through the master.
1-2Cisco Tidal Enterprise Scheduler 6.2 Tutorial Guide for Unix
OL-32204-01

Chapter 1 Scheduler Concepts Job Definition
Client ManagerTwo main components of the Enterprise Scheduler architecture are the Master and Client Manager. Client Manager allows Enterprise Scheduler to achieve higher performance and scalability needs. The purpose of the Client Manager is to service requests from user initiated activities, such as through the Tidal Web Client, Tidal Transporter and from other external sources that utilize the Command Line Interface (CLI) or published Enterprise Scheduler Web services. Client Manager allows the Scheduler Master to focus more capacity on core scheduling needs related to job execution and job compilations, while the Client Manager addresses demands from such activities as RSS feeds and users viewing/configuring scheduling data and output. A single Client Manager is mandatory and additional Client Managers can be deployed to address additional performance needs.
AgentsThe agent is any machine that runs jobs on behalf of a Enterprise Scheduler master. The master and the agent communicate with each other to execute jobs remotely. Multiple Enterprise Scheduler agents provide greater production reliability should the master become unavailable for some reason.
Job commands that run on the agent should be accessible to the agent machine on your network. They are scheduled on the master, and initiated on the agent by the master when schedule dependencies are satisfied.
Agents operate independently from the master. This allows continued processing of any work that is already sent by the master if either the master schedule or the common shared network becomes unavailable. The agent relays the results of the job it continued processing when either the network connection or the master is available again.
Job DefinitionThe job definition is central to job scheduling. It is a set of job rules that defines:
• Which command to run
• Where the command runs
• When to run the job
• How to handle dependencies
• Whether to issue actions based on pre-defined job events
• The job priority relative to other jobs
When you want to schedule a command to be executed, you use a job. Once a job is defined, you can keep the definition and run the job repetitively according to its specified calendar, or as needed.
Each job is assigned to only one command. The command can be an executable, a batch file (Windows only), a shell script, a command file or any other executable process. You can specify parameters to be passed to the command. This enables you to use one command in different ways, based upon the parameters that you pass to it.
For example, a job can back up files to tape, run a program to post transactions to a database or run a set of reports. In Enterprise Scheduler, you give each job a name, and, if the job is repetitive, a calendar by which it runs. You can also define dependencies that must be met before the command is executed. Using the calendar, Enterprise Scheduler automatically launches jobs each time they are scheduled to run, but only after all of their dependencies have been met.
1-3Cisco Tidal Enterprise Scheduler 6.2 Tutorial Guide for Unix
OL-32204-01

Chapter 1 Scheduler Concepts Job Hierarchy
Job HierarchyJobs are built on a hierarchy of job and job group ownership. A job group is a container for a set of jobs, usually part of a common application or department. The job group has its own name and set of runtime instructions.
You can use job groups to submit jobs that either depend on each other, or should run together. For example, all the jobs in payroll can belong to a group called Payroll. The job group can provide default settings to all the child jobs that belong to it. Jobs and job groups are displayed in the Jobs pane. Job groups can save you the time it takes to set up job definitions because each job in the job group can inherit the characteristics of that job group. When you want to create several jobs with similar scheduling characteristics, you can define those jobs within a job group and set the scheduling characteristics in the job group definition. It is also possible to change scheduling characteristics at the job level even though the job belongs to a group.
For example, if a job group is defined to run every Friday, then every job in that job group is automatically defined to run on Friday. If one job in the job group must run on Saturday, then that one job can be changed to the proper run day without affecting the other jobs — as long as you disinherit the job group calendar and change the calendar from within that job.
The ultimate ownership of a job or job group belongs to either the user or a workgroup. A workgroup is a collection of users who can share access to the same jobs. Workgroups are displayed in the Workgroups pane.
DependenciesDependencies are prerequisite conditions that must be met before a job can run.
Date and Time Dependencies
The most common dependency is the date and time when Enteprise Scheduler executes a job.
For example, you can schedule a job to run every Tuesday after 6:00 pm, except on holidays when it is not to run. Date dependencies are built using calendars. Time dependencies are specified within a job’s definition.
Job Dependencies
Jobs can also depend on other jobs reaching a particular status.
For example, you can run Job51 after Job101 and Job207 have reached the status of Completed Normally. During the job’s life cycle, Enteprise Scheduler recognizes the current status of a job, such as:
Table 1-1 Job Status
Status Description
Waiting on Dependencies The job is waiting on Date, Time, Job, and/or File dependencies.
Waiting on Resources The job is waiting for an execution slot. All Dependencies have been met.
Waiting on Operator All the job’s dependencies are met and the job is waiting for the operator to release it.
1-4Cisco Tidal Enterprise Scheduler 6.2 Tutorial Guide for Unix
OL-32204-01

Chapter 1 Scheduler Concepts Job Hierarchy
File Dependencies
A job can also depend on the status of a file. The state, size, creation or modification date of the file can all be taken into consideration.
For example, you can run Job101 if the Unix file /payroll/data/trandata:
• Has been modified in the last twelve hours
• Has a file size greater than 1024KB
Variable Dependencies
A job can also depend on the value of a user-defined variable. Enteprise Scheduler has a repository of user-defined variables that can be updated or incremented either manually or through an action associated with a job event or system event.
For example, you can set a job to run when:
• Variable Printer Online is set to Yes. The Printer Online variable could be set by a job that changes printer settings and then issues an action changing the variable from No to Yes.
• Variable Payroll Jobs is incremented to 15 by another job that increments the variable each time it runs.
CalendarsCalendars are used to determine what days to run jobs. Calendars let you schedule jobs to run on a periodic yet intelligent basis.
For example, Labor Day in the United States is celebrated on the first Monday in September which falls on a different date each year. By defining Labor Day as the first Monday in September, you avoid the need to manually redefine it every year.
You can also define calendar groups which combine individual calendars.
For example, the 1st Half Holidays calendar group can include the New Year’s Day, President’s Day, and Memorial Day calendars.
Job InstancesA job instance is a specific, scheduled run of a job definition (job) by Enteprise Scheduler. One job can create many instances.
Active The job is actively running in the Production Schedule.
Completed Normally The job completed normally.
Completed Abnormally The job completed abnormally.
Error Occurred An internal error occurred which prevented the job from running.
Table 1-1 Job Status
Status Description
1-5Cisco Tidal Enterprise Scheduler 6.2 Tutorial Guide for Unix
OL-32204-01

Chapter 1 Scheduler Concepts Job Hierarchy
For example, if a job is defined to run every Monday, Wednesday and Friday, then Enteprise Scheduler creates one instance for Monday, one for Wednesday, one for Friday, one for next instance of Monday and so on. These instances can be viewed in the Job Activity pane.
Jobs can enter the production schedule on a scheduled or unscheduled basis. For example, you may have some jobs you expect to run at the end of each month, and other jobs which you run only on demand.
Production ScheduleThe production schedule is the timeline Enteprise Scheduler uses to manage instances. You control the span of time covered by the production schedule, typically between a few days and several weeks. Job instances are displayed in the Job Activity pane.
• Past job instances remain available for a user-defined period of time.
• Present job instances and their statuses (i.e. Waiting, Active, Completed Normally, etc.) are displayed in the Job Activity pane default view.
• Future job instances defined in the production span appear on the future dates in the Job Activity pane.
As time progresses, the production schedule is recorded, and automatically updates job instances for the defined number of days for the past, current and future runs. The concepts of time offsets and basing the production schedule times on agent time zones are explored in Chapter 2: Understanding Offset Concepts in Production Scheduling.
Master Status DisplayDouble-clicking the master status light at the bottom of the console brings up the master status display. Here are continually updated statistics related to Enteprise Scheduler components, such as connections and the master’s status.
Events and ActionsEnteprise Scheduler monitors jobs throughout their life cycle for predefined events — such as when the job launches, when it completes, if it fails and many others. You configure an exception condition called an event to automatically respond when the event is detected by triggering an action.
When you configure a event, you specify:
• System conditions that will trigger the event
• One or more actions to take in response
• Jobs to which the event applies (for job events)
• A schedule of time intervals when the event is active (file, email and variable events)
Events can be internally generated by conditions within the system (job and system events) or they can be generated by conditions that are outside the system (file, email and variable events). To detect external conditions, you must create an event monitor to watch for those defined conditions.
Job events combine event triggers with actions such as stopping or restarting a job while in production.
Common event triggers include abnormal termination, excessive run time and failure to complete by a specific time. You can take the following types of actions:
1-6Cisco Tidal Enterprise Scheduler 6.2 Tutorial Guide for Unix
OL-32204-01

Chapter 1 Scheduler Concepts Job Hierarchy
• Send email messages
• Control a job instance in the Job Activity window
• Alert an operator to a job condition
• Send SNMP messages
• Launch an unscheduled job (new job action)
• Issue a log message
• Update a user defined variable
For example, you can define a job event that is triggered every time a job is cancelled by an operator. When a job cancellation occurs, you can have an email sent to you and a message sent to your SNMP management software noting this event.
A system event operates identically to a job event, except that the master originates the event rather than a job. System events define global conditions versus a job event defining conditions that affect jobs. For example, if an agent shuts down, a system event can be triggered to notify users of the problem.
An email event is the detection of a specified text string in an email that arrives at a designated email account on an designated Exchange server. An email monitor is created to watch for the specified email.
A file event is the detection of a file on an agent reaching a specified state. A file monitor is created to watch for a file the matches the specified conditions.
A variable event is the detection of a variable reaching a specified value, whether the variable is on a local or remote master. A variable monitor is created to watch for the variable to reach the desired value.
QueuesQueues let you optimize throughput and allocate system resources for scheduled and unscheduled jobs. The Enteprise Scheduler queue manager assigns jobs to queues when all their dependencies have been met, and decides when to launch jobs based upon the available system resource slots. The maximum number of slots available is determined either by the limit that you set in the system queue, the sum of each queue’s limit or the sum of each licensed agent’s job limit.
Queues can limit the number of jobs running on a computer or a network of computers at a given time.
• If the system is not running at its capacity, a job can run immediately provided that all of its dependencies are met.
• If the system is running at its capacity, the Enteprise Scheduler Queue Manager decides which jobs launch based on a priority structure that includes the following in order of importance:
Table 1-2 Queue Priorities
Status Description
Queue priority levels Jobs in active and open queues at higher priority levels run first.
Queue limits Only jobs in queues not running at their allowable limit can be launched.
Agent job limits Only jobs assigned to agents not running at their allowable limit can be launched.
Job priority levels Jobs with the highest priority (assigned in the job definition) in the queue are run first.
1-7Cisco Tidal Enterprise Scheduler 6.2 Tutorial Guide for Unix
OL-32204-01

Chapter 1 Scheduler Concepts Job Hierarchy
• Queues are displayed in a hierarchy. Each item in the hierarchy is a queue and can contain jobs. You define the queue limit to set the number of jobs that can launch from any individual queue. You also define a priority for each queue.
Queue Filters
Jobs are directed to a queue based on the queue filters that you define. These filters describe the job properties that must exist for the queue manager to assign a job to a particular queue. Some examples of the queue filters that direct jobs to queues are:
• Job class
• Job name
• Job owner
• Job estimated runtime
Agent ListsEnteprise Scheduler extends its capability for automatic job management through agent lists. An agent list describes a set of nodes on your network available to run jobs. Agent lists designate nodes as primary or alternate nodes for job submission, and allow jobs to be broadcast across all available nodes. Workload balancing algorithms can distribute jobs evenly among all available nodes.
Security PoliciesSecurity policies restrict access to certain Enteprise Scheduler functions. The defined access rights can be saved as a security policy, and then assigned to one user or multiple users.
For example, there might be different sets of users who:
• Administer Enteprise Scheduler
• Create and schedule jobs for themselves and others
• Operate the job schedule
Using security policies, the users that create and schedule jobs can be restricted from modifying the schedules. Likewise, the operators can be restricted from creating jobs.
Enteprise Scheduler includes default security policy templates that can be modified to create your own security policies. Each user within the supplied working model has a defined set of Enteprise Scheduler functions. When all the default security policies are in use, all aspects of scheduling are covered and available.
The following table lists the system features available for each of the default security template:
Table 1-3 Scheduler Security Policies
Default Security Policy Available System Features
Scheduler_Admin The default for new installations. This includes all available functions.
Administrator Configures users.
User Creates, edits, and submits jobs. Creates workgroups and user-defined variables.
1-8Cisco Tidal Enterprise Scheduler 6.2 Tutorial Guide for Unix
OL-32204-01

Chapter 1 Scheduler Concepts Job Hierarchy
Logs and ReportsEnteprise Scheduler includes a logging mechanism that keeps track of all user edits, job status information, and error messages. In the Logs pane, you can view, filter and search all messages for a specific time frame.
For example, if you want to see who modified Job A recently, you can go to the Logs pane, search on Job A and view all instances when the job was edited.
Enteprise Scheduler also supports numerous reports, such as
• Data displayed in every window
• Operator alerts and responses
• Job statuses
• Event history
• Dependency cross-references
• Production schedule summary
Note For troubleshooting issues deeper than those gathered in the operations logs, gather the logs located in the Log directory of the installation of each TES component (Master, ClientManager, FaultMonitor, and so on). The .out file is the output of the process, while the.log files are the logs generated.
Scheduler Edits and tests job schedules.
Operator Runs and controls jobs. Responds to alerts that jobs may issue.
Inquiry Views jobs and resources. Cannot perform modification.
Table 1-3 Scheduler Security Policies
Default Security Policy Available System Features
1-9Cisco Tidal Enterprise Scheduler 6.2 Tutorial Guide for Unix
OL-32204-01

Chapter 1 Scheduler Concepts Job Hierarchy
1-10Cisco Tidal Enterprise Scheduler 6.2 Tutorial Guide for Unix
OL-32204-01

Cisco TiOL-32204-01
C H A P T E R 2
Understanding Offset ConceptsOverviewEnterprise Scheduler follows certain concepts when it compiles a production schedule. The concepts are basic but can result in complicated timing scenarios with date shifts that cause confusion among users when put into practice. The most complex timing issues arise from the shifting of the start of the production day through a series of time offsets as scheduled jobs run.
Enterprise Scheduler compiles a production schedule from your job rules for each master. This production schedule covers at least the current day but may extend to multiple days. You determine the duration of each schedule by specifying the number of days to include. Each master in your network has its own production schedule, so schedule durations can vary. The active production schedule for a master includes history data (for dates past), the current date and any remaining days in the schedule (future).
Figure 2-1 Example of a Normal Schedule Length
The production day contains all of the job rules that are scheduled to run during the production day. A production day always contains 24 hours and by default starts at midnight and ends at 23:59:59 PM. (For simplicity’s sake, we will use the 24-hour time format in this discussion so 11:59 PM is 2359.) To accommodate all of the processing needs of a business, a production day often differs from the calendar day. You can designate that the production day start at any time. For instance, you might specify that the production day starts at 0500 instead of starting at midnight to allow for the completion of the previous day's jobs. This is called a production day offset.
If the offset is positive, the fiscal day begins at some time after midnight and continues into the next calendar day. If the offset is negative, the fiscal day begins at some time before midnight. The maximum offset that you can define is 23 hours and 55 minutes. Scheduler uses the designated start of the production day to determine when the production day starts, and to select and launch jobs accordingly.
2-1dal Enterprise Scheduler 6.2 Tutorial Guide for Unix

Chapter 2 Understanding Offset Concepts Defining a Production Day
Defining a Production Day
Positive Offset (Late Start)
If you want your production day to begin at 1200 noon and continue until 1200 noon the following day, you define the start of the production day as 1200 (+1200). When offsetting the start time, it is important to remember that no time is lost, the hours between the start of the calendar day and the start of the production day are merely shifted from the beginning of the production day to its end. There are still 24 hours in the day.
The following figure compares the calendar day to a production day with an offset of +1200. Using this production offset, a job scheduled to launch at 0800 (8:00 A.M.) on June 10th (production date) will not actually launch until 0800 on June 11th (calendar date).
Figure 2-2 Production Offset Defined As +1200 (Master/Agent in Same Time Zone)
Negative Offset (Early Start)
If you want your production day to begin at 2045 (8:45 P.M.), and continue until 2045 the following day, define the production day offset as -0315.
The following figure illustrates the calendar and production days with an offset of -0315. Using this production day offset, a job scheduled to launch at 2115 on June 12th (production date) launches at 2115 on June 11th (calendar date).
2-2Cisco Tidal Enterprise Scheduler 6.2 Tutorial Guide for Unix
OL-32204-01

Chapter 2 Understanding Offset Concepts Scheduling Based on Agent Time Zone
Figure 2-3 Production Offset Defined As -0315 (Master and Agent in Same Time Zone)
Scheduling Based on Agent Time Zone While jobs normally run from the master’s time reference, you can launch jobs according to what time it is in the agent’s time zone. Selecting the Use Agent Time Zone option on the Master tab of the System Configuration dialog will launch jobs according to the time where the agent resides. This change will take effect the next time any schedule is compiled. While the jobs will launch at the intended times in the agent’s time zone, the master’s viewpoint will be compiled in for the job time windows and start time. Since the master will compensate for the offset, users should not think about the difference between the different master and agent time zones when defining jobs rules. In a nutshell, using the master time zone imposes an absolute time reference while using the individual agent time zones imposes a relative time reference.
Caution The master will be unable to predict shifts in times when compiling future schedules. Times will be calculated as an offset to the master time based on the timezone of the agent. If the agent shifts times, the master will not be able to predict this shift, as international daylight savings time laws constantly change, country to country. The schedule must be compiled under the influence of the new agent times.
The following example illustrates the differences to be accounted for when the master and the agent reside in different time zones. The master in this example is three time zones ahead of the agent. A job defined to run at 2300 on the production day of August 10th will actually be launched by the master at 0200 on the production day of August 11th to account for the difference in time zones.
2-3Cisco Tidal Enterprise Scheduler 6.2 Tutorial Guide for Unix
OL-32204-01

Chapter 2 Understanding Offset Concepts Using a Positive Production Day Offset
Figure 2-4 Agent Residing Three Time Zones Behind Master (No Production Date Offset)
Figure 2-5 is another example of the master and agent in different time zones without a production offset. This example shows a master that is seven hours behind the agent. A job defined to run at 0500 on the production day of August 11th is actually launched by the master at 2200 on the production day of August 10th to account for the difference in time zones.
Figure 2-5 Agent Residing Seven Time Zones Ahead of Master (No Production Date Offset)
Using a Positive Production Day Offset
Agent Running Ahead of the Master
Setting a positive production day offset moves the start of the production day forward. In the example below, the difference between time zones is shown in a solid line and the production day offset is shown in a dotted line.
2-4Cisco Tidal Enterprise Scheduler 6.2 Tutorial Guide for Unix
OL-32204-01

Chapter 2 Understanding Offset Concepts Using a Positive Production Day Offset
Figure 2-6 Positive Production Day Offset With the Agent Running Ahead of the Master
This example shows an agent that is five hours ahead of the master. A production day offset of positive three (+3) shifts the start of the production day (0000) three hours ahead in calendar time for both master and agent. A job defined to run at 0500 on the production day of August 11th launches at 0000 on August 10th on the master’s production day.
2-5Cisco Tidal Enterprise Scheduler 6.2 Tutorial Guide for Unix
OL-32204-01

Chapter 2 Understanding Offset Concepts Using a Negative Production Day Offset
Agent Running Behind the Master
Setting a positive production day offset moves the start of the production day forward. In the example below, the difference between time zones is shown with a solid arrow and the production day offset is shown with a dotted arrow. This example has a positive production day offset of two hours ahead with the agent running eight hours behind the master. Thus a job defined to run at 2200 on the production day of August 10th is launched at 0600 on August 11th due to the difference in time zones.
Figure 2-7 Positive Production Day Offset With Agent Running Behind Master
Using a Negative Production Day Offset
Agent Running Ahead of the Master
Setting a negative production day offset moves the start of the production day back from midnight. In the example below, the difference between time zones is shown with a solid arrow and the production day offset is shown in a dotted arrow. The example shown below has a negative 4 offset so the start of the production day is moved back four hours behind the start of the calendar day. A job defined to run at 2200 on the production day of August 11th is launched at 1600 on August 10th on the master due to the time difference.
2-6Cisco Tidal Enterprise Scheduler 6.2 Tutorial Guide for Unix
OL-32204-01

Chapter 2 Understanding Offset Concepts Defining a Compile Offset
Figure 2-8 Negative Production Day Offset With Agent Running Ahead of Master
Agent Running Behind the Master
Setting a negative production day offset moves the start of the production day back from midnight. In the following example, there is a negative four hour production offset moving the start of the production day four hours behind the start of the calendar day. In the example below, the difference between time zones is shown with a solid arrow and the production day offset is shown with a dotted arrow.
Figure 2-9 Negative Production Day Offset With Agent Running Behind Master
This configuration has an agent that is running five hours behind the master. A job defined to run at 2300 on the production day of August 10th is launched by the master at 0300 on August 11th.
Defining a Compile OffsetCompiling the production schedule may consume enough CPU resources to seriously affect your system’s performance and hinder other work that may be going on concurrently. It may be better to schedule such a resource-intensive operation like compiling your schedule, at a more convenient time
2-7Cisco Tidal Enterprise Scheduler 6.2 Tutorial Guide for Unix
OL-32204-01

Chapter 2 Understanding Offset Concepts Sysval 150
when your system has a lighter workload. Once the schedule is compiled, it is saved until needed when the new production day starts. You can manually compile a new schedule at any time by selecting the Create Schedule option in the Activities main menu.
Figure 2-10 Create Schedule Dialog
The compile offset is calculated from the start of the production day. The schedule will be compiled for the current day and all days that belong to the future days to include in the schedule. Any future day that was already scheduled (not forecast) will not get recompiled to reflect any job modifications or additions that were not committed to the schedule after the operation. To include any modifications that were not committed to the schedule, we must either recompile the already scheduled days or revert these schedules to a forecast type to force a compile before the day rolls into production.
There are differences between 6.x and 5.3.x as to how offsets are interpreted. If you want to preserve 5.3.x behavior, use the following.
Sysval 150Sysval 150 provides a way to retain 5.3.1 calendar logic for offset end date calculation in 6.x. Sysval with id 150 and value 'Y should be created during database upgrade otherwise it can also be manually created using the below SQL query.
Sysval with id 150 and value 'Y enforces 5.3.1 calendar logic for offset enddate calculation.
Use the following queries to update sysvals for Oracle DB:
delete from sysval where sysval_id in (150);
insert into sysval (sysval_id, sysval_string, sysval_integer, sysval_lstchgtm) values (150, 'Y', 0, sysdate);
commit;
/
Use the following queries to do so for MSSQL DB
delete from sysval where sysval_id in (150)
go
insert into sysval (sysval_id, sysval_string, sysval_integer, sysval_lstchgtm) values (150, 'Y', 0, getdate())
go
No sysval entry with id 150 or value 'N' enforces 6.x calendar logic for offset enddate calculation.
2-8Cisco Tidal Enterprise Scheduler 6.2 Tutorial Guide for Unix
OL-32204-01

Cisco TiOL-32204-01
C H A P T E R 3
Creating Your First JobOverviewThis chapter describes how to use the Tidal Web client to create, run and view the results of a job.
To complete the exercises in this tutorial, you need to:
• Select the Super User option in your User definition
• Configure a default agent
• Create and have available the work day calendar
You must also copy and configure all six Unix sample scripts ending with .sh from the installation DVD.
Launching the Tidal Web clientTo launch the Tidal Web client you must go to http://<servername>:8080, where <servername> is network name or address of Client Manager host, and log on using valid user credentials. For a list of browsers that are supported, see your Enterprise Scheduler Reference Guide.
Setting Default Job Parameters
Many parameters can be set from the System Configuration dialog. We will use the Enteprise Scheduler defaults throughout most of this tutorial.
To check, and if necessary, to change the default agent:
Step 1 From the Activities menu, select System Configuration to display the System Configuration dialog.
Step 2 Click the Defaults tab.
Step 3 To change the default agent, select a valid agent from the Agent Name list.
Step 4 Click OK.
3-1dal Enterprise Scheduler 6.2 Tutorial Guide for Unix

Chapter 3 Creating Your First Job Creating the Report Job Definition
Creating the Report Job Definition
To create the Report job definition:
Step 1 From the Navigator pane, select Definitions>Jobs to display the Jobs pane.
Unless other users have already created job definitions, the display does not show any data at this time.
Step 2 Right-click in the Jobs pane of the console and select Add Job from the context menu, or click the Add button on the toolbar.
The Job Definition dialog displays.
Figure 3-1 Job Definition Dialog
Step 3 In the Job Name field, enter Unix Test 1 as the name of your new job.
Step 4 In the Command field, enter the full path to the file:
/UNIX_TEST_1.sh
Step 5 Click the Run tab.
Step 6 From the Runtime Users list, select a runtime user with access to the Unix agent.
The runtime user is the user under whose account the program or script needs to run. Since Unix Test 1 is a system command, any user with access to the Unix agent can run this command.
Step 7 Click OK.
A confirmation dialog displays.
Note The command /UNIX_TEST_1.sh lists all files in the current directory on the agent machine.
3-2Cisco Tidal Enterprise Scheduler 6.2 Tutorial Guide for Unix
OL-32204-01

Chapter 3 Creating Your First Job Adding Your Job to the Production Schedule
This confirmation dialog reminds you that since a calendar is not associated with the job, it will not be scheduled to run automatically. We did not select a calendar because we are going to submit the job manually.
Step 8 Click Yes.
The Unix Test 1 job appears in the Jobs pane with your user name as the owner.
Figure 3-2 UNIX Test 1 Job Displayed on the Console
Adding Your Job to the Production Schedule
To add the job to the production schedule:.
Step 1 Right-click the Unix Test 1 job and select Insert Job Into Schedule from the context menu.
The Insert Job Into Schedule dialog displays.
Step 2 Click OK.
Step 3 When the Information dialog confirming that the job was added to the current production schedule displays, click OK.
Step 4 In the Navigator pane, select Operations>Job Activity to monitor your job.
3-3Cisco Tidal Enterprise Scheduler 6.2 Tutorial Guide for Unix
OL-32204-01

Chapter 3 Creating Your First Job Monitoring Your Job
Monitoring Your Job
The Job Activity pane is a key component in monitoring your production schedule with Enteprise Scheduler. All crucial job scheduling information is available at a glance from the Job Activity pane. The easy-to-read layout allows you to focus on the area of the display that is of interest to you. The columns and panes are resizable. Scrollbars facilitate access to the data you need.
From the Job Activity pane, you can:
• see when jobs are added or scheduled
• remove jobs (if you have sufficient security privileges)
• monitor the progress of a job from a scheduled state through execution of the job
• control job execution
Some of the job statistics available from the Job Activity pane are:
• the job owner
• the Enteprise Scheduler agent assigned to run the job
• estimated duration of the job
• the exit code of the completed job
• the actual command that the job represents
• the next date on which the job will run
• the calendar associated with the job (if any)
• the queue associated with the job (if any)
• the job’s priority level
• the job group associated with the job (if any)
When jobs are scheduled, the Jobs pane in the center of the console shows one job per line, plus the job number, job name, job status, etc.
Job Output Options
There are three job output options:
• Discard – Discards all job outputs. There will be no output log available for review.
• Append – Saves job outputs by appending the current output to a single log.
• Replace – Creates a new output file each time the job runs, replacing the previous log.
Specifying the Disposition of Job Output
To specify the disposition of job output:
Step 1 From the Activities main menu, select System Configuration.
Note Enteprise Scheduler’s default is to discard output.
3-4Cisco Tidal Enterprise Scheduler 6.2 Tutorial Guide for Unix
OL-32204-01

Chapter 3 Creating Your First Job Job Output Options
Step 2 Click the Defaults tab.
Step 3 In the Save Output Option section, select Discard, Append or Replace. For the exercises in this tutorial, select Replace.
Step 4 Click OK
Viewing Job Output
You can view the output of a job at any time if you selected the Append or Replace option for job output prior to running the job.
To view job output:
Step 1 Go to the Job Activity pane.
Step 2 To display the Job Detail dialog, either double-click the Unix Test 1 job or right-click the Unix Test 1 job and select Details from the context menu.
Step 3 Click the Output tab. If you do not select the Save Output option before running a job, you will see a Enteprise Scheduler message rather than actual job output.
Figure 3-3 Job Detail Dialog, Output Tab
Step 4 Click OK.
Note To be able to view the output of a job, the Append or Replace option for job output must be selected prior to running the job.
3-5Cisco Tidal Enterprise Scheduler 6.2 Tutorial Guide for Unix
OL-32204-01

Chapter 3 Creating Your First Job Job Output Options
3-6Cisco Tidal Enterprise Scheduler 6.2 Tutorial Guide for Unix
OL-32204-01

Cisco TiOL-32204-01
C H A P T E R 4
Setting Up a Unix Job DependencyOverviewIn many cases, a job should run only after some external requirements are satisfied. For example, a job may need data generated by another job, or it can run only after another job has completed successfully.
Enteprise Scheduler has the flexibility to encompass the different scheduling needs encountered in a business environment. You use job dependencies to prevent a job from running until the preceding job completes or enters a predefined status. You can also set jobs to run only when manually released.
In this chapter, we are going to define (add) a job called Unix Test 2. We will assign a calendar to this job, but we will also make it Require operator release. Even if according to its calendar, the job is due to run, it does not run until it is released from Waiting on Operator status. We will define a second job, Unix Test 3, which depends on Unix Test 2. Unix Test 3 does not run until Unix Test 2 completes normally. Finally, we release Unix Test 2, and both jobs end with a Completed Normally status.
Figure 4-1 Interdependence of Unix Test 2, Unix Test 3, and the Operator
4-1dal Enterprise Scheduler 6.2 Tutorial Guide for Unix

Chapter 4 Setting Up a Unix Job Dependency Defining a Job for Operator Release
This chapter describes how to:
• Define a job that waits for an operator to release it
• Define a job that depends on the completion of another job
• Monitor jobs and job dependencies
• Release a job that requires operator intervention
Note To complete the exercises in this tutorial, you need to:Install Enteprise Scheduler in the default directory Scheduler (or the examples in this tutorial will not work properly)Select the Super User option in your User definitionConfigure a default agent Create and have available the work day calendar
Defining a Job for Operator ReleaseYou can define a job requiring an operator to release it manually before running, after all its other dependencies are satisfied. Before the job is released, it enters the Waiting on Operator status. The job definition can include instructions for the operator.
Requiring an operator release is a good technique when testing a job or a set of sequential jobs for the first time. This is also good for jobs requiring operators to verify an event, or perform a related operation external to Enteprise Scheduler.
Setting the Require Operator Release Option
Step 1 From the Navigator pane, select Definitions>Jobs to display the Jobs pane.
Step 2 Right-click in the Jobs pane of the console and select Add Job from the context menu, or click the Add Job button on the Enterprise Scheduler toolbar.
The Job Definition dialog displays.
Step 3 Set the following options:
a. In the Job Name field, enter the name Unix Test 2.
b. In the Command field, enter the full path to the file:
/UNIX_TEST_2.sh
Note Although the command executable has the same name as the job in this case, this is not required. The Job Name is any logical name that is meaningful to you. However, the command name refers to the physical file and must match the actual command.
Step 4 Click the Schedule tab.
Step 5 From the Calendar Name list, select work day.
Step 6 Click the Run tab.
4-2Cisco Tidal Enterprise Scheduler 6.2 Tutorial Guide for Unix
OL-32204-01

Chapter 4 Setting Up a Unix Job Dependency Defining a Job for Operator Release
Step 7 From the Runtime User list, select a runtime user who can use the Unix agent being used.
Step 8 Click the Options tab.
Figure 4-2 Job Definition Dialog, Options Tab
Step 9 Select the Require operator release option.
Step 10 Click OK to save the job definition.
Step 11 Click OK in the Effective Date dialog to submit the job into today’s schedule.
Step 12 From the Navigator pane, select Operations>Job Activity to display the Job Activity pane.
Unix Test 2 displays a Waiting On Operator status.
We will leave this job for now, and release it to the Production Schedule later after creating a second job with a dependency on Unix Test 2 completing normally.
Adding a Job with a DependencyWe will now create the Unix Test 3 job definition with a dependency on the Unix Test 2 job already in the production schedule.
To create the Unix Test 3 job definition with a dependency on the Unix Test 2 job:
Step 1 From the Navigator pane, select Definitions>Jobs to display the Jobs pane.
Step 2 Right-click in the Jobs pane of the console and select Add Job from the context menu, or click the Add Job button on the toolbar.
The Job Definition dialog displays.
Step 3 Set the following options:
a. In the Job Name field, type the name Unix Test 3.
4-3Cisco Tidal Enterprise Scheduler 6.2 Tutorial Guide for Unix
OL-32204-01

Chapter 4 Setting Up a Unix Job Dependency Monitoring Your Jobs
b. In the Command field, enter the full path to the file:
/UNIX_TEST_3.sh
Step 4 Click the Schedule tab.
Step 5 In the Calendar Name list, select the work day calendar.
Step 6 Click the Run tab and in the Runtime User list, select a user that can access the Unix agent.
Step 7 Display the Dependencies tab, by clicking its tab on the Job Definition dialog.
Step 8 Click the Add button to display the list.
Step 9 Select the Add Job Dependency option to display the Job Dependency Definition dialog.
Step 10 Go to the Job/Group list, click the down arrow button and select Unix Test 2. It will display in the Job/Group field.
Step 11 Accept the defaults and click OK. The defaults are preset to satisfy the dependency when Unix Test 2 completes normally.
Now Unix Test 2 shows as a dependency for Unix Test 3. The Unix Test 2 dependency is part of the job definition of Unix Test 3.
Step 12 Click OK in the Job Definition dialog to close it.
Step 13 Click OK in the Effective Date dialog.
The Unix Test 3 job is added to the production schedule.
Monitoring Your JobsBoth jobs are now scheduled and ready to run. Use the Job Activity pane to monitor them.
From the Navigator pane, select Operations>Job Activity to display your scheduled jobs.
Notice that both jobs are in waiting mode. Unix Test 2 needs manual intervention before it can run (Waiting On Operator) and Unix Test 3 is waiting for Unix Test 2 to complete normally (Waiting On Dependencies).
Viewing Dependencies from the Job Activity PaneTo view the dependence Unix Test 3 has on Unix Test 2:
Step 1 Double-click the Unix Test 2 job in the Job Activity pane to display its Job Detail dialog.
Step 2 Click the Dependencies tab.
The dependency appears in the Predecessors field.
This shows that Unix Test 3 is waiting for Unix Test 2 to complete normally. Currently Unix Test 2 is in Waiting on Operator status. Unix Test 3 cannot run until Unix Test 2 goes to Completed Normally status.
Step 3 Click OK.
4-4Cisco Tidal Enterprise Scheduler 6.2 Tutorial Guide for Unix
OL-32204-01

Chapter 4 Setting Up a Unix Job Dependency Releasing the Jobs
Releasing the JobsTo release the jobs:
Step 1 Click the Unix Test 2 job in the Job Activity pane.
Step 2 Right-click the job to display the context menu.
Step 3 Select the Job Control option and then choose the Release/Resume option to release the job.
Figure 4-3 Selecting the Release/Resume Menu Option
The Confirm dialog displays.
Step 4 Click Yes.
Now Unix Test 2 is free to run. Once complete, Unix Test 2 enters a Completed Normally status. The color of Unix Test 2 changes to green and then to blue (if using the default status colors), and then Unix Test 3 runs. Unix Test 3 displays similar status and color changes.
Step 5 Click OK when the Information dialog displays.
Congratulations! In this chapter, you have defined jobs requiring manual release and a job dependency. You have scheduled and monitored your jobs through the various states until completion.
4-5Cisco Tidal Enterprise Scheduler 6.2 Tutorial Guide for Unix
OL-32204-01

Chapter 4 Setting Up a Unix Job Dependency Releasing the Jobs
4-6Cisco Tidal Enterprise Scheduler 6.2 Tutorial Guide for Unix
OL-32204-01

Cisco TiOL-32204-01
C H A P T E R 5
Scheduling Jobs in a GroupOverviewEnteprise Scheduler lets you organize your jobs into job groups to make it easier to manage and control jobs, and to make it more efficient to set job attributes. Jobs can inherit characteristics such as dependencies and calendars from their associated job group, eliminating the need to specify common job details for each job.
When a job group is added to the schedule manually, all of its member jobs (called child jobs) are added as well, saving you additional work and reducing the potential for mistakes. A job group can be configured the way a single job can be to depend on another job or job group.
In this exercise, we will create a job group called Unix Test Group 1. Unix Test Group 1 will consist of two jobs, Unix Test Group 4 and Unix Test Group 5. We will make the Unix Test Group 5 job dependent on the Unix Test Group 4 job completing successfully. Once the Unix Test Group 1 job group has completed normally, a Unix Test 1 job will run.
5-1dal Enterprise Scheduler 6.2 Tutorial Guide for Unix

Chapter 5 Scheduling Jobs in a Group Overview
Figure 5-1 Interdependency of Unix Test 1, Unix Test Group 1, Unix Test Group 4 and Unix Test
Group 5
This chapter describes how to:
• Define a job group
• Create jobs that belong to the group
• Schedule the job group
• Create a job that depends on a group
• Release the job group
Caution To complete the exercises in this tutorial, you need to:Install Enteprise Scheduler in the default directory Scheduler (or the examples in this tutorial will not work properly)Select the Super User option in your User DefinitionConfigure a default agentCreate and have available the work day calendar
5-2Cisco Tidal Enterprise Scheduler 6.2 Tutorial Guide for Unix
OL-32204-01

Chapter 5 Scheduling Jobs in a Group Job Group Hierarchy
Job Group HierarchyA job group is represented with a colored background. All of a group’s child jobs are indented underneath the group name. Each job group can include jobs and other job groups, which in turn can include other jobs and job groups. The window helps you visualize and navigate through the hierarchy of job groups. When you click the symbol to the left of a job group name, the display expands to show all of the jobs and job groups within the selected job group.
Job Group SchedulingIn this chapter we will develop a set of jobs under a job group, then schedule the jobs by submitting the job group only. We will do this by initially setting up the job group and its jobs as unscheduled (without an assigned calendar). This will prevent the jobs from entering the schedule before all the definitions are complete. We will then give the job group a calendar. We will set the child jobs to inherit the calendar so that all the jobs in the job group will be scheduled in one step.
Adding a Job GroupTo add a job group:
Step 1 From the Navigator pane, select Definitions>Jobs to display the Jobs pane.
Step 2 Right-click in the Jobs pane of the console and select Add Job Group from the context menu.
The Job Group Definition dialog displays.
The Job Group Definition dialog is similar, but not the same, as the Job Definition dialog. The Job Group Definition dialog does not have a field for specifying the command to execute, because a job group is a container for jobs.
Step 3 In the Job Group Name field, enter Unix Test Group 1.
Step 4 Click the Run tab and from the Runtime Users list, select a user that can access the Unix agent. This runtime user will now be inherited by default by all of the child jobs within the job group. If needed you can always change the default runtime user in individual job definitions.
Step 5 Click the Options tab, and select the Require operator release option. This causes the group to wait for a manual release before it will launch.
Step 6 Click OK.
A Confirm dialog displays.
Step 7 Click Yes. The Unix Test Group 1 job group is added to the Jobs pane.
5-3Cisco Tidal Enterprise Scheduler 6.2 Tutorial Guide for Unix
OL-32204-01

Chapter 5 Scheduling Jobs in a Group Creating Jobs that Belong to a Job Group
Figure 5-2 UNIX Test Group 1 Job Group on the Jobs Pane
Creating Jobs that Belong to a Job GroupNow, you will add child jobs within the job group that you just created. Because you are adding jobs within the job group, inheritable properties will be set for the jobs from the job group, such as the agent that the jobs will run on.
Creating the Unix Test 4 Child JobTo create the Unix Test 4 child job belonging to the Unix Test Group 1 job group:
Step 1 From the Navigator pane, select Definitions>Jobs to display the Jobs pane.
Step 2 Select the Unix Test Group 1 job group.
Step 3 Click the Add Job button on the Enteprise Scheduler toolbar or right-click the Jobs pane and select Add Job from the context menu to display the Job Definition dialog.
Step 4 Enter Unix Test 4 in the Job Name field.
Step 5 Notice that the Unix Test Group 1 job group is displayed in the Parent Group field. You can also specify Unix Test Group 1 as the job group by selecting \Unix Test Group 1 from the Parent Group list.
Step 6 In the Command field, enter the full path to the file:
/UNIX_TEST_4.sh
Step 7 Click OK.
A Confirm dialog displays.
Step 8 Click Yes.
5-4Cisco Tidal Enterprise Scheduler 6.2 Tutorial Guide for Unix
OL-32204-01

Chapter 5 Scheduling Jobs in a Group Scheduling the Job Group
Now, when the Unix Test Group 1 job group is displayed in the Jobs pane, it will have a icon to the left of it. This icon indicates there are jobs and/or more job groups underneath it that are not currently visible. Clicking the icon expands the selected job group, showing the child jobs and/or job groups belong to it. Clicking the icon again collapses the job group. Jobs do not have the icon next to them because a job is singular and cannot have child jobs.
Note Unix Test 4 is identified as a Level 2 job, meaning it is nested on the next level below Unix Test Group 1. The indentation of the job name also serves as a visual cue of the hierarchy. Unix Test Group 1 is at Level 1 (or root) level.
Creating the Unix Test 5 Child Job with a DependencyNow, we will create the Unix Test 5 child job that depends on the Unix Test 4 job. This job also belongs to the Unix Test Group 1 job group.
To create the Unix Test 5 child job with a dependency:
Step 1 From the Navigator pane, select Definitions>Jobs to display the Jobs pane.
Step 2 Select the Unix Test Group 1 job group.
Step 3 Click the Add Job button on the Enteprise Scheduler toolbar or right-click the Jobs pane and select Add Job from the context menu to display the Job Definition dialog.
Step 4 In the Job Name field, enter the job name Unix Test 5. The Unix Test Group 1 job group should be displayed in the Parent Group field. If it does not appear, select \Unix Test Group 1 from the Parent Group list.
Step 5 In the Command field, enter the full path to the file:
/UNIX_TEST_5.sh
Step 6 Click the Dependencies tab.
Step 7 Click Add and select Add Job Dependency to display the Job Dependency Definition dialog.
Step 8 Click the down-arrow button in the Job/Group list and select the Unix Test 4 job.
Step 9 Click OK.
Unix Test 4 is now displayed on the Dependencies tab of the Job Definition dialog. Notice that the Type of dependency is identified as JOB.
Step 10 Click OK.
The Confirm dialog displays, reminding you that a calendar has not been specified.
Step 11 Click Yes to accept the job definition without assigning it a calendar.
The Unix Test 5 job displays along with Unix Test 4 in the hierarchy under the Unix Test Group 1 job group.
Scheduling the Job GroupWe have created two child jobs under the job group called Unix Test Group 1, but no jobs have been scheduled. We will now assign a calendar to the job group, and when closed, the job group and all its child jobs will enter the schedule to run based on the calendar.
5-5Cisco Tidal Enterprise Scheduler 6.2 Tutorial Guide for Unix
OL-32204-01

Chapter 5 Scheduling Jobs in a Group Scheduling a Job that Depends on a Group
To schedule the job group:
Step 1 Double-click the Unix Test Group 1 job group to open its definition.
Step 2 In the Calendar Name list, select the Daily calendar.
Since child jobs default to inheriting the parent group’s attributes, by setting this option for the group, you are effectively assigning a Daily calendar to each child job.
Step 3 Click OK. The Effective Date dialog displays.
Step 4 Accept the defaults and click OK.
The job group and jobs are submitted and displayed in the Job Activity pane.
Scheduling a Job that Depends on a GroupOne of the benefits of using job groups is that you can work with multiple jobs as though they were one big job. You can schedule jobs that depend on the status of the job group. You don’t have to determine the order in which the jobs will complete, or set a dependency on each individual job.
The status of the job group is determined by its child jobs. For example, a job group cannot reach completed status until every job in the job group has completed.
To schedule a job that depends o a group:
Step 1 From the Navigator pane, select Definitions>Jobs to display the Jobs pane.
Step 2 Verify that no job group (such as Unix Test Group 1) is highlighted, click the Add button on the Enteprise Scheduler toolbar or right-click in the Jobs pane and select Add Job from the context menu.
The Job Definition dialog displays.
Step 3 In the Job Name field, enter UNIX_TEST_1.
Leave the Parent Group field empty.
Step 4 In the Command field, enter the full path to the file:
/UNIX_TEST1.sh
Step 5 Click the Schedule tab.
Step 6 Select the Daily calendar from the Calendar Name list.
Step 7 Click the Run tab and from the Runtime Users list, select a user that can access the Unix agent. (Since this job is not part of a job group it does not inherit the agent it will run on.
Adding a Job Group DependencyNow, you can add the dependency that causes job Unix_Test_1 to wait until the Unix Test Group 1 job group completes normally.
To add a job group dependency:
5-6Cisco Tidal Enterprise Scheduler 6.2 Tutorial Guide for Unix
OL-32204-01

Chapter 5 Scheduling Jobs in a Group Releasing a Job Group
Step 1 Click the Dependencies tab in the Job Definition dialog.
Step 2 Click Add, and select Add Job Dependency to display the Job Dependency dialog.
Step 3 Go to the Job/Group field, and click the down-arrow button.
Step 4 Select the Unix Test Group 1 job group.
The dependency will be met when the Unix Test Group 1 job group reaches Completed Normally status. Each job in the group must complete normally for Unix Test Group 1 to complete normally.
Step 5 Click OK to return to the Job Definition dialog.
Notice that, to the right of Unix Test Group 1, the Type of dependency is identified as JOB.
Step 6 Click OK, then click OK again in the Effective Date dialog to accept the current production schedule.
The UNIX_TEST_1 job now displays in the hierarchy.
Figure 5-3 Unix Test Group 1 Job Group
Releasing a Job GroupTo release a job group:
Step 1 From the Navigator pane, select Operations>Job Activity to display the Job Activity pane.
The Unix Test Group 1 job group and the Unix_Test_1 job are now in the production schedule. Unix Test Group 1 is Waiting on Operator, and the Unix_Test_1 job is waiting for the normal completion of all the jobs in the Unix Test Group 1 group.
Step 2 Highlight and then right-click the Unix Test Group 1 job group to display the context menu.
Step 3 Select the Job Control option, then select the Release/Resume option to release the job group.
The Confirm dialog displays.
5-7Cisco Tidal Enterprise Scheduler 6.2 Tutorial Guide for Unix
OL-32204-01

Chapter 5 Scheduling Jobs in a Group Releasing a Job Group
Step 4 Click Yes.
The Information dialog displays.
Step 5 Click OK in the Information dialog.
Unix Test Group 1 will enter Active status. Then, the Unix Test 4 job runs, and Unix Test 5 follows after Unix Test 4 completes normally. When Unix Test 5 completes, the Unix Test Group 1 job group shows a Completed Normally status. Then the Unix Test Group 1 job runs. The total process should take a few minutes.
5-8Cisco Tidal Enterprise Scheduler 6.2 Tutorial Guide for Unix
OL-32204-01

Cisco TiOL-32204-01
C H A P T E R 6
Creating a Unix File DependencyOverviewJob dependencies mean that jobs depend on the status (such as Completed Normally) of other jobs to run. Using file dependencies, you can have jobs depend on the availability and status of files as a condition of execution. File dependencies are set up using the File Dependency dialog which is accessible when you create or edit a job definition.
In this chapter, we will create a job (Unix_Download) that is dependent on the existence of the UNIX_log.txt file.
Figure 6-1 Unix_Download Job Depends on the Existence of the Unix_log File
To properly complete this exercise, you need to have a solid understanding of the following concepts:
• How to add and create a new job definition
• How to navigate to and between the Jobs pane and the Job Activity pane
This chapter describes how to:
• Create a job with a file dependency
• Create a file to satisfy the dependency
6-1dal Enterprise Scheduler 6.2 Tutorial Guide for Unix

Chapter 6 Creating a Unix File Dependency Creating a Job with a File Dependency
Note To complete the exercises in this tutorial, you need to:Install Enteprise Scheduler in the default directory Scheduler (or the examples in this tutorial will not work properly)Select the Super User option in your User definitionConfigure a default agent Create and have available the work day calendar
Creating a Job with a File DependencyTo create a job with a File dependency:
Step 1 From the Navigator pane, select Definitions>Jobs to display the Jobs pane.
Step 2 Right-click in the Jobs pane of the console and select Add Job from the context menu, or click the Add Job button on the Scheduler toolbar.
The Job Definition dialog displays.
Step 3 In the Job Name field, type Unix_Download.
Step 4 In the Command field, enter the full path to the file:
/Unix_Test_5.sh
Step 5 Click the Schedule tab and from the Calendar Name list select the work day calendar.
Step 6 Click the Run tab and from the Runtime User list, select a user who can access the Unix agent.
Step 7 Click the Dependencies tab.
Step 8 Display the File Dependency dialog by clicking the Add button and selecting Add File Dependency field.
a. Enter /Unix_log.txt in the File Name field. The full path to this file must be typed in because the file does not yet exist. We will create Unix_log.txt later, in the section “Creating a File to Satisfy the Dependency” on page 4.
b. The Agent Name field should already have a Unix agent listed–the agent you selected as your default agent at the beginning of this tutorial. If there is no agent listed or an agent other than the Unix agent is selected, then select your local Unix agent from the Agent Name list.
Note The Unix_log.txt file must reside in the / (root level) of the machine where the Unix agent is installed so this tutorial works properly.Click OK to accept the default settings. Enteprise Scheduler’s default is that the dependency is met after the file is created.
Step 9 Click the Dependencies tab.
The full path to Unix_log.txt displays in the Dependency Name column. The Type of dependency is listed as FILE to indicate that it is a file dependency.
Step 10 Click OK to save the job definition for Unix_Download.
Step 11 Click OK in the Effective Date dialog to add the job to the schedule.
6-2Cisco Tidal Enterprise Scheduler 6.2 Tutorial Guide for Unix
OL-32204-01

Chapter 6 Creating a Unix File Dependency Creating a Job with a File Dependency
Viewing the Job in ProductionTo view the job in production:
Step 1 Open the Job Activity pane.
Step 2 The Unix_Download job first appears with a Waiting on Dependencies status. It goes through different stages and ends in a Scheduled status.
Figure 6-2 Unix_Download Job Scheduled to Run
Step 3 Select the Unix_Download job occurrence.
Step 4 Right-click the Unix_Download occurrence and select Details from the context menu to see its Job Detail dialog.
Step 5 Click the Dependencies tab to view the file dependency status.
The Job Detail dialog displays the file dependency for this job.
Step 6 Click OK to close the dialog.
6-3Cisco Tidal Enterprise Scheduler 6.2 Tutorial Guide for Unix
OL-32204-01

Chapter 6 Creating a Unix File Dependency Creating a Job with a File Dependency
Creating a File to Satisfy the DependencyIn this example, the dependency only requires that the file exists and does not require any specific data. For this exercise, we just create an empty file since the job does not require any data from the file. Normally, however, this kind of dependency is set up because the job uses the data from the file’s input.
To create a file to satisfy the dependency:
Step 1 Open a new document in a text editor or word processing program, such as vi, joe or pico.
Step 2 Go to the directory where you copied the tutorial files. For your file to satisfy the dependency, the name must match exactly. File names are case-sensitive in Unix so even if a file has the same spelling, if some of the letters in the name are not the same case, the name is not recognized.
Step 3 Rename the Unix_log.txt file to Unix_Log.txt:
mv Unix_log.txt Unix_Log.txt
Monitoring the Job in ProductionOpen the Job Activity pane.
You can see that the file dependency for the Unix_Download job is met and the job goes from a Waiting on Dependencies state into an Active state.
Congratulations! In this chapter, you have created a job with a file dependency, and fulfilled that dependency requirement by creating the file. By this time, you should also feel comfortable with moving between the Job Activity pane and Jobs pane, and with the basic procedure for adding a job.
6-4Cisco Tidal Enterprise Scheduler 6.2 Tutorial Guide for Unix
OL-32204-01

Cisco TiOL-32204-01
C H A P T E R 7
Detecting Job Event ConditionsOverviewUsing Enteprise Scheduler job events allows you to automatically trigger actions whenever certain event triggers (job conditions) arise. Actions include user notification via email, console alert messages, launching new jobs, job control commands, variable updates, log message posting and SNMP traps to HP OpenView or other network managers. This chapter describes how to:
• Define an operator alert action
• Add the action to the job by using the Job Events dialog
• Submit the job to production and watch the operator alert action occur
Caution To complete the exercises in this tutorial, you need to:Install Enteprise Scheduler in the default directory Scheduler (or the examples in this tutorial will not work properly)Select the Super User option in your User definitionConfigure a default agent Create and have available the work day calendar
Understanding ActionsAn action is a predefined response to a job event that is triggered by a job in the production schedule. You define event triggers for jobs in the Job Events dialog and associate them to actions. Actions can be linked to multiple jobs and job groups.
There are different types of actions that can be defined within Enteprise Scheduler. Some of these actions Each type of action can be triggered based on any job’s status, job control by an operator and/or an event triggered by the system. Furthermore, you can personalize actions from a set of included variables such as system, job, job event, action and user-defined information.
Creating an Alert Action
In the following exercise, you define an action that sends an alert to the Job Activity pane when the job Unix_Download (created in the previous chapter) ends with a Completed Abnormally status.
7-1dal Enterprise Scheduler 6.2 Tutorial Guide for Unix

Chapter 7 Detecting Job Event Conditions Understanding Actions
To create an Alert action:
Step 1 From the Navigator pane, select Definitions>Actions>Alert to display the Alert Actions pane.
Step 2 Click the Add Action button on the Scheduler toolbar or right-click the Alert Actions pane and select Add Action from the context menu to display the Action Definition: Alert dialog.
Step 3 In the Action Name field, enter Job Failed.
Step 4 In the Severity Level section, check Error.
Step 5 Type the following message and select the variables shown in angle brackets from the Variables list. The variables appear between the brackets as <variable>.
Note This dialog does not accept carriage returns. Text automatically wraps to the next line.
The Job <Jobname>, owned by <JobOwner> went to <JobStatus> status on <SysDate.M/d/yy>. <JobOwner>’s pager number is <JobPager>
Step 6 This action is triggered, and an alert record is sent to the Job Activity pane for the operator to take action. Click OK to accept the action. The action is displayed in the Actions pane.
Creating a Job to Trigger an Event with an Alert Action
To create a job to trigger an event with an Alert action:
Step 1 From the Navigator pane, select Definitions>Jobs to display the Jobs pane.
Step 2 Click the Add Job button or right-click and select Add Job from the context menu to display the Job Definition dialog.
Step 3 In the Job Name field, enter Unix Test JEVENT.
Step 4 In the Command field, enter the full path to the file:
/UNIX_TEST_JEVENT.sh
Table 7-1 Variables Used in Step 7
Variable Path Description
<JobName> Job Variables\JobNAME The name of the job that triggered the action.
<JobOwner> Job Variables\JobOWNER The name of the user that owns the job.
<JobStatus> Job variable\JobSTATUS The status the Job is in at the time of the message.
<SysDate.M/d/yy>
System Variables\System Date\M/d/yy
The day, month, date, year action was triggered
<Job Pager> Job Variables\Owner’s Pager Number
The pager number of the owner
7-2Cisco Tidal Enterprise Scheduler 6.2 Tutorial Guide for Unix
OL-32204-01
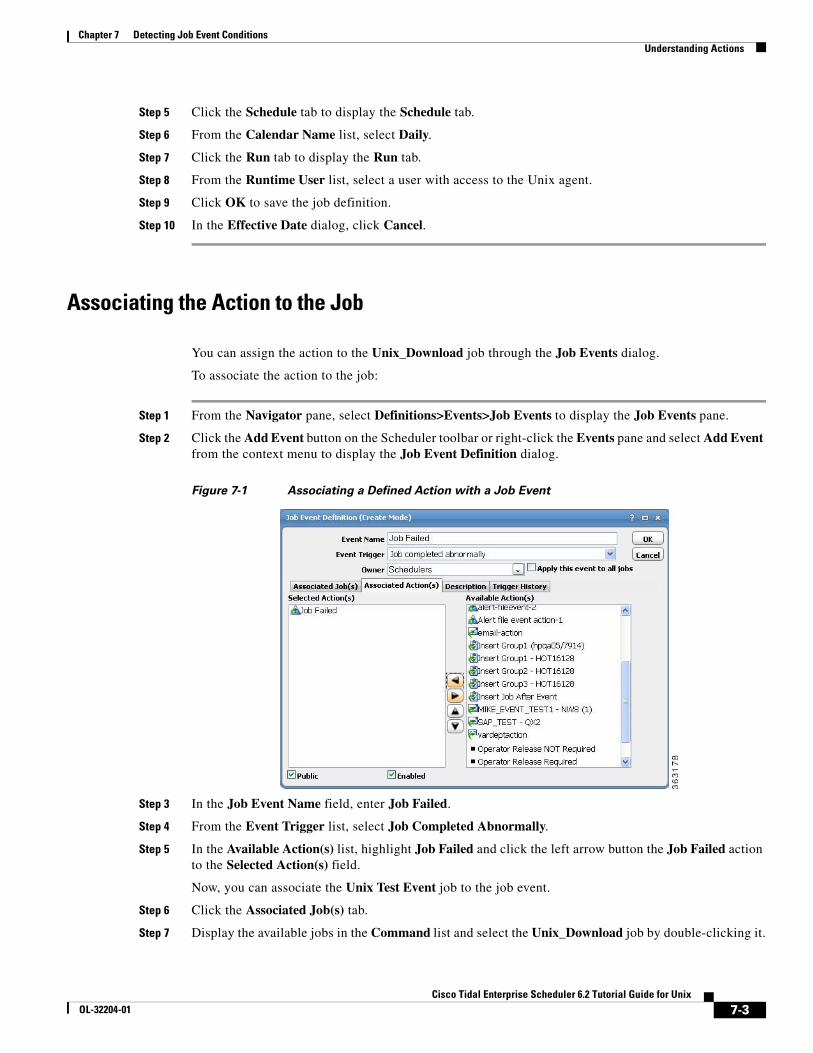
Chapter 7 Detecting Job Event Conditions Understanding Actions
Step 5 Click the Schedule tab to display the Schedule tab.
Step 6 From the Calendar Name list, select Daily.
Step 7 Click the Run tab to display the Run tab.
Step 8 From the Runtime User list, select a user with access to the Unix agent.
Step 9 Click OK to save the job definition.
Step 10 In the Effective Date dialog, click Cancel.
Associating the Action to the Job
You can assign the action to the Unix_Download job through the Job Events dialog.
To associate the action to the job:
Step 1 From the Navigator pane, select Definitions>Events>Job Events to display the Job Events pane.
Step 2 Click the Add Event button on the Scheduler toolbar or right-click the Events pane and select Add Event from the context menu to display the Job Event Definition dialog.
Figure 7-1 Associating a Defined Action with a Job Event
Step 3 In the Job Event Name field, enter Job Failed.
Step 4 From the Event Trigger list, select Job Completed Abnormally.
Step 5 In the Available Action(s) list, highlight Job Failed and click the left arrow button the Job Failed action to the Selected Action(s) field.
Now, you can associate the Unix Test Event job to the job event.
Step 6 Click the Associated Job(s) tab.
Step 7 Display the available jobs in the Command list and select the Unix_Download job by double-clicking it.
7-3Cisco Tidal Enterprise Scheduler 6.2 Tutorial Guide for Unix
OL-32204-01

Chapter 7 Detecting Job Event Conditions Understanding Actions
Step 8 Select the Public option, if not already selected. This makes your event available to other Enteprise Scheduler users.
Step 9 Click Add and then click OK.
The Unix Test Event job is now linked to the Job Failed alert action through the Job Failed job event.
Insert Unix Test Event
To insert the Unix Test Event job:
Step 1 In the Jobs pane, right-click the Unix Test Event job and select Insert Job Into Schedule.
Step 2 Click OK in the Insert Job Into Schedule dialog.
Step 3 Click OK in the Information dialog.
Step 4 From the Navigator pane, select Operations>Job Activity to display the Job Activity pane.
The job goes into the Active state and runs. Then the job terminates with an Completed Abnormally status, initiating the action and changing the Alerts light to red.
Changing the Status of the Alert 7
To change the status of the alert:
Step 1 On the Navigator pane, select Operations>Alerts to display the Alerts pane.
Step 2 Double-click the alert to display its Alert Detail dialog.
Step 3 Select the Acknowledged option.
Step 4 You can enter a response or comment in the Response field.
Step 5 Click OK to close the dialog.
The Alerts light at the bottom of the Scheduler window changes to yellow.
7-4Cisco Tidal Enterprise Scheduler 6.2 Tutorial Guide for Unix
OL-32204-01
Cisco TiOL-32204-01
C H A P T E R 8
Creating Variable DependenciesOverviewIn the previous chapter, we created an alert message that used system variables. In this chapter, we will create a job that depends on the value of a user-defined variable. A user-defined variable is a variable you create manually. A job can change the value of a variable you have assigned to it by using a variable update action. A job can be dependent upon the value of a variable. Using user-defined variables, you are given unlimited control over the conditional structuring of jobs.
For example, a job can run, and set a variable to a specific date. Another job can be triggered to run based on that variable’s date. When the specific date arises, the second job runs.
In this chapter, you will increment a variable with the action of “Job A” and make “Job B” dependent on that variable reaching a specific value. The variable will start with a value of 0 and increment by 1 each time Job A runs. Job B will depend on the variable equalling 3. After Job A repeats 3 times, Job B will start. You could set up a job to start after any defined number of previous dependency jobs complete.
8-1dal Enterprise Scheduler 6.2 Tutorial Guide for Unix

Chapter 8 Creating Variable Dependencies Creating a Variable
The following figure illustrates how this process works:
Figure 8-1 Scheduling a Job
Caution To complete the exercises in this tutorial, you need to:Install Enteprise Scheduler in the default directory Scheduler (or the examples in this tutorial will not work properly)Select the Super User option in your User definitionConfigure a default agent Create and have available the work day calendar
Creating a VariableTo create a variable:
Step 1 In the Navigator pane, select Definitions>Variables to display the Variables pane.
Step 2 Display the Variable Definition dialog by either clicking the Add Variable button or by right-clicking in the Variable pane and selecting Add Variable from the context menu.
Step 3 In the Name field, enter Gather Orders Var.
Step 4 From the Type list, select Number.
8-2Cisco Tidal Enterprise Scheduler 6.2 Tutorial Guide for Unix
OL-32204-01

Chapter 8 Creating Variable Dependencies Creating the Variable Update Action
Step 5 In the Value field, enter the number 0.
Step 6 In the Description field, enter The value will be incremented by 1 for each successful run of the Gather Job.
Step 7 Select the Public field, if it is not already selected.
Step 8 Click OK.
The newly-created variable now appears in the Variables pane.
Creating the Variable Update ActionTo create the variable update action:
Step 1 From the Navigator pane select Definitions>Actions>Variable to display the Variable Actions pane.
Step 2 Select the Add Action button or right-click the Variable Actions pane and select Add Action from the context menu to display the Action Definition: Variable dialog.
Step 3 In the Action Name field, enter Set Gather Var.
Step 4 From the Variable Name list, select Gather Orders Var: Number.
Step 5 In the Type of Update list, select Increment variable value by.
Step 6 In the Value field, enter 1 if it is not already set at 1 by default.
Step 7 Click OK.
The Set Gather Var action now displays in the Variable Actions pane.
Creating a Job Event for the Unix Variable Test JobTo create a job event for the Unix Variable Test job:
Step 1 From the Navigator pane, select Actions>Job Events to display the Job Events pane.
Step 2 Click the Add Event button or right-click in the Job Events pane and choose Add Event from the context menu to display the Job Event Definition dialog.
Step 3 In the Job Event Name field, type Event Action Gather.
Step 4 In the Event Trigger list, select Job completed normally.
Step 5 On the Associated Action(s) tab, highlight Set Gather Var and click the left arrow button to move it to the Selected Action(s) section.
Step 6 Click OK to save the job event and close the dialog.
8-3Cisco Tidal Enterprise Scheduler 6.2 Tutorial Guide for Unix
OL-32204-01

Chapter 8 Creating Variable Dependencies Creating a Job Event for the Unix Variable Test Job
Creating the Unix Variable Test Job Group
To create the Unix Variable Test Job Group:
Step 1 From the Navigator pane, select Definitions>Jobs to display the Jobs pane.
Step 2 Click the Add Job Group button on the Enteprise Scheduler toolbar or right-click in the Jobs pane and select Add Job Group from the context menu to display the Job Group Definition dialog.
Step 3 In the Job Group Name field, enter Unix Var Group.
Step 4 From the Calendar Name list, select the work day calendar.
Step 5 Click the Run tab and from the Runtime User list, select a user with access to the Unix agent.
Step 6 Click OK.
Step 7 Click OK at the Effective Date dialog.
Note When you click OK at this dialog, the job group enters the production schedule, but nothing will run because there are no jobs associated with the job group yet. Since you can manually add the job group to the schedule later, clicking Cancel at this dialog is also acceptable.
Creating a Repeating Job and Associating the Job EventTo create a repeating job and associating the Job event:
Step 1 In the Jobs pane, select the job group Unix Var Group and click the Add Job button or right-click in the Jobs pane and choose Add Job from the context menu to display the Job Definition dialog.
Step 2 In the Job Name field, enter Unix Var Test 1.
Step 3 In the Command field, enter the full path to the file:
/UNIX_TEST_1.sh
Step 4 Click the Schedule tab.
Step 5 In the Repeats section, select the Run new occurrence option. Use the up and down arrows to select values or click in the minutes field and enter 2, and click in the up to ___ times field and enter 5.
Step 6 Click OK.
Step 7 Click Cancel in the Effective Date dialog.
If the Unix Var Test 1 job is not visible in the Jobs pane, expand the Unix Var Group job group by clicking the plus sign ( ) to its left.
When scheduled the Unix Var Test 1 job will run every two minutes, five times, activating the Event Action Gather job event each time. Set Gather Var is tied to Event Action Gather, and so will increment by 1 each time Unix Var Test 1 runs. When Set Gather Var reaches 3, it will have fulfilled the conditions necessary to trigger the next job, which we will define as Unix Var Test 2 in “Creating a Job Dependent on the Gather Orders Variable” on page 6.
The “Overview” on page 1 for this chapter explains in general terms the interdependence of Unix Var Test 1 (Job A), Set Gather Var (a user-defined variable) and Unix Var Test 2 (Job B).
8-4Cisco Tidal Enterprise Scheduler 6.2 Tutorial Guide for Unix
OL-32204-01

Chapter 8 Creating Variable Dependencies Creating a Job Event for the Unix Variable Test Job
Step 8 Right-click Unix Var Test 1 and from the context menu, select Edit Job/Group to display the job’s definition dialog.
Step 9 Click the Job Events tab.
Step 10 Click Insert to display the Select Job Event dialog.
Figure 8-2 Select Job Event Dialog
Step 11 Select the Event Action Gather event.
Step 12 Click OK to close the Select Job Event dialog and to add the job event to the Events field.
Step 13 Click OK to close the Job Definition dialog.
Step 14 Click Cancel in the Effective Date dialog.
Every time the Unix Var Test 1 job completes normally, the variable Gather Orders will be incremented by 1.
8-5Cisco Tidal Enterprise Scheduler 6.2 Tutorial Guide for Unix
OL-32204-01

Chapter 8 Creating Variable Dependencies Creating a Job Event for the Unix Variable Test Job
Creating a Job Dependent on the Gather Orders Variable
To create a job dependent on the Gather Orders variable:
Step 1 Select the job group Unix Var Group and click the Add Job button or right-click and select Add Job from the context menu to display the Job Definition dialog.
Step 2 In the Job Name field, enter Unix Var Test 2.
Step 3 In the Command field, enter the full path to the file:
/UNIX_TEST_5.sh
Step 4 Click the Dependencies tab.
Step 5 Click the Add button and select Add Variable Dependency to display the Variable Dependency Definition dialog.
Step 6 In the Variable Name list, select Gather Orders Var: Number.
Step 7 In the Operator list, if Equals (=) is not already displayed, select it.
Step 8 In the Variable Value field, enter the number 3.
Step 9 Click OK to accept the variable dependency.
The Job Definition dialog now displays the new dependency.
Step 10 Click OK.
Step 11 Click Cancel in the Effective Date dialog.
Scheduling and Monitoring the Gather Orders Jobs
Now that all the components are defined and configured, we will run the jobs and monitor them in the Job Activity pane.
To schedule and monitor the Gather Orders jobs:
Step 1 On the Jobs pane, double-click the Unix Var Test 1 job to display its Job Definition dialog.
Step 2 Click the Schedule tab to display the Schedule tab.
Step 3 In the Repeats section, change the frequency in minutes that the job will run from 2 to 1.
Step 4 Click OK to save the change to the job.
Step 5 In the Jobs pane, right-click the Unix Var Test 2 job, select Insert Job into Schedule from the context menu and click OK.
Step 6 Click OK in the Information dialog.
Step 7 From the Navigator pane, select Operations> Job Activity to display the Job Activity pane.
Step 8 Double-click the Unix Var Test 2 job occurrence.
Step 9 Click the Dependencies tab.
8-6Cisco Tidal Enterprise Scheduler 6.2 Tutorial Guide for Unix
OL-32204-01

Chapter 8 Creating Variable Dependencies Creating a Job Event for the Unix Variable Test Job
Figure 8-3 Job Detail Dialog Displaying Defined Dependency
The variable dependency is displayed showing the present value of the variable and the value it needs for the dependency to be met.
Step 10 Click Cancel to return to the Job Activity pane.
The three occurrences of the Unix Var Test 1 job run before the Unix Var Test 2 job runs.
8-7Cisco Tidal Enterprise Scheduler 6.2 Tutorial Guide for Unix
OL-32204-01

Chapter 8 Creating Variable Dependencies Creating a Job Event for the Unix Variable Test Job
8-8Cisco Tidal Enterprise Scheduler 6.2 Tutorial Guide for Unix
OL-32204-01

Cisco TiOL-32204-01
C H A P T E R 9
Managing Jobs in the Production ScheduleOverview
In this chapter you learn to use job control, typically performed by an operator, to manage the current production schedule. Job control consists of releasing, stopping, restarting and aborting jobs. You can also rerun jobs, override their dependencies and change their completion status.
This chapter describes how to:
• Cancel a job
• Remove a job
• Release a job group in the Waiting on Operator status
• Place a job on Hold
• Override a job dependency
• Rerun a job that fails
Note To complete the exercises in this tutorial, you need to:Install Enteprise Scheduler in the default directory Scheduler (or the examples in this tutorial will not work properly)Select the Super User option in your User DefinitionConfigure a default agentCreate and have available the work day calendar
9-1dal Enterprise Scheduler 6.2 Tutorial Guide for Unix
Chapter 9 Managing Jobs in the Production Schedule Creating the Parent Job Group
Creating the Parent Job Group
To create the parent job group:
Step 1 From the Navigator pane, select Definitions>Jobs to display the Jobs pane.
Step 2 Right-click in the Jobs pane and select Add Job Group from the context menu to display the Job Group Definition dialog.
Step 3 In the Job Group Name field, enter Production Jobs. The Parent Group field should be empty.
Step 4 In the Calendar Name list, select work day.
Step 5 Click the Run tab and in the Runtime Users list, select a user who can access the Unix agent.
Step 6 Click OK.
Step 7 Click OK in the Effective Date dialog.
9-2Cisco Tidal Enterprise Scheduler 6.2 Tutorial Guide for Unix
OL-32204-01

Chapter 9 Managing Jobs in the Production Schedule Creating Three Child Jobs
Creating Three Child Jobs
To create three child jobs:
Step 1 To create a child job of a job group, select the Production Jobs job group on the Jobs pane.
Step 2 Click the Add Job button or right-click and select Add Job from the context menu to display a Job Definition dialog.
Step 3 In the Job Name field, type Unix Prod Job 1.
Step 4 In the Command field, enter the full path to the file:
/UNIX_TEST_1.sh
Step 5 Click the Options tab.
Step 6 Select the Require operator release option.
Step 7 Click OK to save the job definition and then click OK again in the Effective Date dialog and the first job has been created.
Step 8 In the Jobs pane, select the Unix Prod Job 1 job if not selected.
Step 9 Click the Copy Job/Group button on the Enteprise Scheduler toolbar or right-click Unix Prod Job 1 and select Copy Job/Group from the context menu.
A confirmation message displays.
Step 10 Click Yes.
A job called Copy of Unix Prod Job 1 displays in the Jobs pane.
Step 11 While Copy of Unix Prod Job 1 is selected, click the Edit Job\Group button or right-click and select Edit Job\Group from the context menu.
Step 12 Change the Job Name field to Unix Prod Job 2.
Step 13 Click OK to save the job definition and then click OK again in the Effective Date dialog.
The second job has been created.
Step 14 Create a third job, called Unix Prod Job 3, the same way we created Unix Prod Job 2.
For this job, though we will add an unreasonable time dependency to show how we can override this dependency in the Job Activity pane.
Step 15 Double-click Unix Prod Job 3.
Step 16 Click the Schedule tab of the Unix Prod Job 3 definition.
Step 17 eselect the Inherited option in the Time Window section.
Step 18 Enter a time window of 11:45 PM to 12:00 AM
Note .If you set a time window that is before the present time, e.g., 12:00 AM to 12:15AM, the job will enter today’s schedule with a Timed Out status.
Step 19 Click the Options tab.
Step 20 Verify the Require operator release option is cleared. This job will wait based on its time window. (We are assuming that you are not running this tutorial at midnight.)
Step 21 Click OK to close the Job Definition dialog and then click OK again in the Effective Date dialog.
9-3Cisco Tidal Enterprise Scheduler 6.2 Tutorial Guide for Unix
OL-32204-01

Chapter 9 Managing Jobs in the Production Schedule Creating Three Child Jobs
Step 22 Right-click the new job group that you defined and then select Insert Job into Schedule and click OK in the resulting dialog.
Step 23 Click OK in the Information dialog.
Job Sorting
Jobs can be sorted and filtered by most columns in the Job Activity pane. In this exercise, we will set the default sort column to be the Estimated Start Time.
Click the Current Est Start column header. The jobs are sorted by the estimated start time.
Removing a Job from the Production Schedule
If a job has not launched, you can remove it from the production schedule.
To remove a job from the Production Schedule:
Step 1 On the Job Activity pane, right-click the Unix Prod Job 1 job.
Step 2 Select Remove Job(s) from Schedule from the context menu.
The Confirm dialog displays.
Step 3 Click Yes in the Information dialog.
Note You can also remove a job by clearing the Enabled options in the job definition, or by deleting the job from the Jobs pane. You can only remove a job from the production schedule if it is not currently running or has not yet run.
9-4Cisco Tidal Enterprise Scheduler 6.2 Tutorial Guide for Unix
OL-32204-01

Chapter 9 Managing Jobs in the Production Schedule Creating Three Child Jobs
Inserting a Job Into the Production Schedule
To insert a job into the production schedule:
Step 1 From the Activities main menu, select Insert Job into Schedule to display the Insert Job Into Schedule dialog.
There are several ways to enter a job in this dialog. For this exercise, we will use Enteprise Scheduler’s sophisticated search function.
Step 2 Click the ellipsis button to display the Job Search dialog.
Step 3 In the Name field, type Unix*. Leave the other options blank.
The asterisk (*) is a wildcard character, so this search will match all jobs that start with Unix. (The asterisk matches any character or combination of characters.)
Step 4 Click the Find button.
The Job Search Results field should include the three Unix Prod Jobs.
Step 5 Select Unix Prod Job 1.
Step 6 Click OK in the Job Search dialog.
Step 7 Click OK in the Insert Job Into Schedule dialog.
The job is added to the schedule outside its job group. Note that jobs outside of a job group are not indented under the group.
Step 8 Select the Unix Prod Job 1 (1) job.
Step 9 Right-click the Unix Prod Job 1 (1) and select the Job Control submenu and then select the Release/Resume option.
Figure 9-1 Releasing a Job
Step 10 Click Yes in the Confirmation dialog.
9-5Cisco Tidal Enterprise Scheduler 6.2 Tutorial Guide for Unix
OL-32204-01
Chapter 9 Managing Jobs in the Production Schedule Creating Three Child Jobs
The job begins to run.
Cancelling a Job in the Production Schedule
You can cancel a job using the Cancel/Abort command when it is in the Held state. You can abort a job using the Cancel/Abort command when it is in the Active state. In the next procedure, we will cancel a job that is in the Held state.
To cancel a job in the production schedule:
Step 1 From the Navigator pane, select Operations>Job Activity to display the Job Activity pane.
Step 2 Select the Unix Prod Job 2 job.
Step 3 Right-click the Unix Prod Job 2, select the Job Control submenu and then select the Cancel/Abort option.
Step 4 Click Yes at the Confirmation dialog.
The status of the job changes to Cancelled.
Putting a Job on Hold
You can put any job that is waiting on dependencies on hold. Even if the dependencies are met, the job will not run.
To put a job on hold:
Step 1 In the Job Activity pane, select the Unix Prod Job 3 job.
Step 2 Right-click the Unix Prod Job 3 job, select the Job Control submenu and then select the Hold/Stop option.
Step 3 Click Yes in the Confirmation dialog.
Step 4 Click OK in the Information dialog.
The job enters Held status.
Taking the Job Out of Held Status
To take the job out of Held status:
Step 1 Right-click the Unix Prod Job 3 job, select the Job Control submenu and then select the Release/Resume option.
9-6Cisco Tidal Enterprise Scheduler 6.2 Tutorial Guide for Unix
OL-32204-01

Chapter 9 Managing Jobs in the Production Schedule Creating Three Child Jobs
Step 2 Click Yes in the Confirmation dialog and then click OK at the Information dialog.
The job re-enters the Waiting On Dependencies status. If the job’s dependencies were met, the job would launch.
Overriding a Dependency
You can also override job, file, time and variable dependencies with the Override command. For this exercise, we will override the time dependency.
To override a dependency:
Step 1 Right-click the Unix Prod Job 3 job, select the Job Control submenu and select the Override option.
Step 2 Click Yes in the Confirmation dialog and then click OK at the Information dialog.
The job launches even though the dependencies have not been met.
Note When a dependency is overridden, the Job Detail dialog for the job whose definition includes the dependency will show which dependency was overridden.
Estimated and Excessive Durations
Two of the most common questions asked of system operators and schedulers are “How long is this job going to run?” and “Which job is going to run next?” To help answer these questions, Enteprise Scheduler provides the Estimated Duration feature.
When a job enters the production schedule for the first time, if an estimated duration time is specified in the Job Definition dialog, that time will be displayed in the Job Activity pane. The Estimated Duration Time value is automatically updated after each job occurrence runs, creating a historical average that is used for subsequent submissions. Of course, you can override this value in the job definition at any time.
For unattended operations, you might want a job to terminate if it runs over its maximum time, notify an operator if it completes under its minimum time, or performs other actions automatically.
9-7Cisco Tidal Enterprise Scheduler 6.2 Tutorial Guide for Unix
OL-32204-01

Chapter 9 Managing Jobs in the Production Schedule Creating Three Child Jobs
9-8Cisco Tidal Enterprise Scheduler 6.2 Tutorial Guide for Unix
OL-32204-01

Cisco TiOL-32204-01
C H A P T E R 10
Managing Command ParametersOverviewThis chapter describes how to:
• Pass command parameters to an executable
• Determine the job completion status based on the jobs output
• Define command parameters and enable alternative tracking methods
In this chapter, you will create two jobs (Report Writer 1 and Report Writer 2) that use the same batch file but with different command parameters. The command is coded to echo the command parameters to the output. You use the echoed value to determine the success or failure of the job. This example serves to demonstrate two important features: passing input and determining the jobs success by examining the output.
Note To complete the exercises in this tutorial, you need to:1. Select the Super User option in your User definition2. Configure a default agent3. Create and have available work day calendar
Passing Command ParametersThe command parameters feature allows you to pass information to a command when it is launched by Enteprise Scheduler. You can alter parameters such as dates or other data at runtime, rather than hard-coding the command file itself. You can also use parameters to add flexibility to the same command.
For example, you may have a batch file that can process several files. By specifying its file name as a command parameter, the batch file knows which file to process at any given time.
Enteprise Scheduler uses the standard MS-DOS or command prompt syntax for command parameters. The command parameters are substituted into a command file containing the variable names %1, %2, etc. Through the DOS prompt, parameters are passed as a list of values separated by spaces after the command. In Enteprise Scheduler, the command parameters are displayed in a list below the command. The first value replaces %1, the second value replaces %2, and so on, when the batch file is executed.
10-1dal Enterprise Scheduler 6.2 Tutorial Guide for Unix

Chapter 10 Managing Command Parameters Tracking Methods
Tracking MethodsA job’s completion status is determined by its exit code. The exit code can be set by using the ocsexit command at the end of a batch file. Using ocsexit to facilitate job tracking, the completion status of a job can be:
• Completed Normally indicated by an exit code of 0 to notify that the job succeeded
• Completed Abnormally indicated by an exit code 0 to notify that the job ran, but failed.
Note Completion statuses of Skipped, Orphaned, Error Occurred and Externally Defined are also possible but are not determined by the exit code.
The completion status is frequently used to control dependencies. For example, you can set up jobs that run if its predecessor completes with a Completed Normally status.
Enteprise Scheduler supports four other tracking methods:
• External – You can use this option if you need to inspect the job before determining how the job completed. Enteprise Scheduler sets the status to Set Externally when the job completes.
• Exit Code of cmd pipe – You can use this option to pipe the output of your job as an input to a command or other output analysis tool. Enteprise Scheduler then uses that command’s exit code as the job’s exit code. You must type the command that invokes the associated tool.
• Scan Output: Normal String – Select this option to use a particular text string in the job output to determine if the job completed normally. Enter the exact text that determines “normal” in the text box below.
• Scan Output: Abnormal String – Select this option to use a particular text string in the job output to determine if the job completed abnormally. Enter the exact text that determines “abnormal” in the text box below.
The tracking selections are located in the Tracking section of the Run tab in the Job Definition dialog.
Using the Exit CodeIn this section, you will create a Reporting job group with two jobs, Report Writer 1 and Report Writer 2. Each job will use the same command, but will pass a different command parameter. The command parameter is then echoed in the output of both jobs after they complete.
To determine whether the jobs completed successfully or not, both jobs will use the Exit code of cmd pipe tracking method using the Windows Find command to search for the saved output. The result of the Find command will determine the job’s final status.
You will set up Report Writer 1 to succeed, and Report Writer 2 to fail. You do this by setting the command parameter for job Report Writer 1 to OK and the parameter for Report Writer 2 to FAILED.
Creating the Reporting Job GroupTo create the reporting job group:
Step 1 From the Navigator pane, select Definitions>Jobs to display the Jobs pane.
Step 2 Right-click and select Add Job Group from the context menu.
10-2Cisco Tidal Enterprise Scheduler 6.2 Tutorial Guide for Unix
OL-32204-01

Chapter 10 Managing Command Parameters Tracking Methods
Step 3 In the Job Group Name field, enter Reporting.
Step 4 Click the Schedule tab, if not already selected.
Step 5 From the Calendar Name list, select work day.
Step 6 Click OK to save the job group.
Step 7 Click Cancel at the Effective Date dialog.
Note If you click OK at this dialog, the job group enters the production schedule, but nothing will run because there are no jobs associated with the job group yet. Clicking Cancel means the job group will be added to the schedule manually.
Setting the Report Writer 1 Job to SucceedTo set the Report Writer 1 job to succeed:
Step 1 Right-click the Reporting job group and select Add>Job from the context menu.
Step 2 In the Job Name field, enter Report Writer 1.
Step 3 In the Command field, enter the full path to the Argdemo batch file.
Step 4 Enter OK in the Command Parameters field. This passes as Argument 1 (%1) to the batch file.
Step 5 Click the Run tab.
Step 6 In the Tracking section, select the Exit code of cmd pipe option.
Step 7 In the text field below, type grep “OK”. This tells Enteprise Scheduler to search through the output of the job for the string “OK”. Since “OK” is passed as a command parameter, it will appear in the output.
Step 8 Click OK.
Step 9 Click Cancel in the Effective Date dialog. This job will enter the schedule when manually submit its job group.
Setting the Report Writer 2 Job to FailTo set the Report Writer 2 job to fail:
Step 1 Right-click the Report Writer 1 job in the jobs view.
Step 2 Select Copy Job/Group from the context menu.
Step 3 Double-click the Copy of Report Writer 1 job to open its definition for editing.
Step 4 In the Job Name field, change Copy of Report Writer 1 to Report Writer 2.
Step 5 In the Command Parameters field, change OK to FAILED.
The Run tab should contain grep “OK” in the Tracking section. This was inherited when you copied the job.
10-3Cisco Tidal Enterprise Scheduler 6.2 Tutorial Guide for Unix
OL-32204-01

Chapter 10 Managing Command Parameters Tracking Methods
Step 6 Click OK.
Step 7 Click Cancel at the Effective Date dialog.
Adding the Reporting Job Group to the Production ScheduleTo add the Reporting job group to the production schedule:
Step 1 Right-click the Reporting job group.
Step 2 Select Insert Job into Schedule from the context menu.
Step 3 Click OK in the Insert Job Into Schedule dialog.
Step 4 Click OK in the Information dialog.
The jobs start with one completing normally and the other completing abnormally. The job group results in a Completed Abnormally status because one of its jobs completed abnormally.
Setting Report Writer 2 to Complete NormallyTo set Report Writer 2 to Complete Normally:
Step 1 In the Job Definition dialog, double-click the Report Writer 2 job.
Step 2 In the Job Definition dialog, change the Command Parameter value from FAILED to OK.
Step 3 Click OK.
Step 4 Click OK at the Effective Date dialog.
Step 5 Re-submit the jobs by adding the Reporting job group using the Insert into Schedule option, from the right-click context menu or selecting the option from the Actions main menu.
Step 6 Click OK when the Insert Job Into Schedule dialog displays.
Step 7 Click OK in the Information dialog.
Both Report Writer 1 and Report Writer 2 complete successfully.
10-4Cisco Tidal Enterprise Scheduler 6.2 Tutorial Guide for Unix
OL-32204-01

Cisco TiOL-32204-01
C H A P T E R 11
Setting Up QueuesOverviewThis chapter explains how to set up queues so that your jobs run efficiently on your network. Jobs enter queues when their dependencies are met and are released from a queue by the master. In the previous chapters, the jobs you created ran from the default queues.
Queues are most effective when more jobs are scheduled than you have resources to handle them. Each queue has a job limit and a priority that helps to determine from which queue jobs are launched. When a queue’s limit is reached, Enteprise Scheduler selects the next queue to run jobs on according to queue priorities. Within a queue, a job’s individual priority determines which job in the queue is launched first.
Queues are defined in a hierarchy, with the System Queue at the top.
To view TES’s predefined job queues, select Scheduling>Queues in the Navigator pane.
Figure 11-1 Queues Pane
11-1dal Enterprise Scheduler 6.2 Tutorial Guide for Unix

Chapter 11 Setting Up Queues Setting Up the Inventory Weekly Job Group
Each queue contains a set of queue filters. Queue filters are designed to accept or reject jobs based on their properties.
In order for a job to match a queue, all categories defined in a queue must be met, and each one must be met at least once. All parent queue categories will also have to be met, and no queue with a higher priority must match the job at all.
For example, a queue defined as jobs starting with TEST* on agent Example Agent will match a job named TEST JOB run on Example Agent, but will not match job TEST JOB 1 run on Example Agent 2. Also, all parent queues must also be matched before this queue can be considered for a match.
Besides prioritizing the execution of large quantities of jobs, queues can be used for a number of other purposes:
• To limit the number of jobs of a particular type or group running concurrently
• To control the flow of jobs executed, overall or by an individual queue, so that system resources are used more evenly and peak demands are reduced
• To single-thread jobs requiring a particular resource, such as exclusive access to a database
• To restrict the hours when jobs run to a time window defined by the queue, for example, to allow batch processing to occur overnight
• To launch jobs immediately for special cases where it is required
This chapter covers:
• Setting up the Inventory Weekly job group
• Creating three jobs for the Inventory Weekly job group
• Setting up a queue
• Adding the Inventory Weekly job group to production
• Monitoring the job group in production
• Changing the queue limit
• Re-submitting the Inventory Weekly job group
Note To complete the exercises in this tutorial, you need to:Install Enteprise Scheduler in the default directory Scheduler (or the examples in this tutorial will not work properly)
• Select the Super User option in your User definition
• Configure a default agent
• Create and have available the work day calendar
Setting Up the Inventory Weekly Job GroupIn this example, we will design a queue to accept jobs of a particular job group. Otherwise, there will be no job group to choose from when the queue is created.
To set up the Inventory Weekly job group:
Step 1 From the Navigator pane, select Definitions>Jobs to display the Jobs pane.
Step 2 Right-click in the Jobs pane and select Add Job Group from the context menu.
11-2Cisco Tidal Enterprise Scheduler 6.2 Tutorial Guide for Unix
OL-32204-01
Chapter 11 Setting Up Queues Setting Up the Inventory Weekly Job Group
Step 3 In the Job Group Name field, enter Inventory Weekly. Make sure the Parent Group field is empty.
Step 4 Click the Schedule tab, if not selected.
Step 5 In the Calendar Name list, select the work day calendar.
Step 6 Click the Options tab.
Step 7 Select the Require operator release option.
Step 8 Click OK.
Step 9 Click Cancel at the Effective Date dialog. (The job group should not enter the schedule yet.)
Creating Jobs for the Inventory Weekly Job GroupNow, we will create three jobs (Inventory_10, Inventory_11 and Inventory_12) that belong to the Inventory Weekly job group, with no dependencies.
To create jobs for the Inventory Weekly job group:
Step 1 In the Jobs pane, select the Inventory Weekly job group.
Step 2 Click the Add Job button or right-click and select Add Job from the context menu to display the Job Definition dialog.
Step 3 In the Job Name field, enter Inventory_10.
Step 4 Verify that Inventory Weekly is displayed in the Parent Group list. If not, select it.
Step 5 In the Command field, enter the full path to the file:
Step 6 /UNIX_TEST_5.sh
Step 7 Click the Notes tab. We will use the Notes tab to enter a short description of the job.
Step 8 The Notes tab is a good place to add special instructions or explanatory comments without affecting the job’s execution.
Step 9 In the Other Notes field, enter Inventory Processing Program.
Step 10 Click OK.
Step 11 Click Cancel at the Effective Date dialog.
Duplicating a Job DefinitionTo duplicate a job definition:
Step 1 Select the Inventory_10 job in the Jobs pane if not already selected, and either click the Copy Job/Group button or right-click and select Copy Job/Group from the context menu.
A job displays in the Jobs pane named Copy of Inventory_10.
Step 2 Double-click Copy of Inventory_10 and rename it to Inventory_11.
Step 3 In the Command field, change /UNIX_TEST_5.sh to /UNIX_TEST_4.sh.
11-3Cisco Tidal Enterprise Scheduler 6.2 Tutorial Guide for Unix
OL-32204-01

Chapter 11 Setting Up Queues Setting Up a Queue
Step 4 Click OK.
Step 5 Click Cancel to prevent the job from being scheduled.
Step 6 Repeat the steps above to create a third job called Inventory 12 and enter /UNIX_TEST_3.sh in the Command field.
Setting Up a QueueWe will set up a queue named Inv_Weekly and give it a queue limit of three. The jobs in the Inventory Weekly group will run in this queue. The queue configuration parameters will single-thread (run one at a time) the jobs in the group.
To set up a queue:
Step 1 From the Navigator pane, select Scheduling>Queues to display the Queues pane.
Step 2 Right-click the System Queue and select Add Queue from the context menu to display the Queue Definition dialog.
Figure 11-2 Queue Definition Dialog
Step 3 In the Queue Name field, enter the name Inv_Weekly.
Step 4 Leave System Queue in the Parent field.
We defined Inv_Weekly as a direct sub-queue of the system queue in the queue hierarchy. This means there are no intermediate queues to impose their own restrictions and affect job execution.
Step 5 Change the Limit value to 3. This allows a maximum of three jobs from this queue to run concurrently.
Step 6 Change the Priority value to 60.
Default queues have a priority setting of 50. Since default queues can accept the jobs that you created, this higher priority value will ensure that the jobs enter this queue. When the queue manager sees two or more queues that can accept a job, it always assigns the job to the queue with the highest priority.
Step 7 On the Filters tab, click the Add button to display a list and select Job Group.
11-4Cisco Tidal Enterprise Scheduler 6.2 Tutorial Guide for Unix
OL-32204-01

Chapter 11 Setting Up Queues Setting Up a Queue
The Queue Filter Condition dialog displays.
Step 8 Select the Inventory Weekly job group.
Step 9 Click OK. The filter is entered into the Filters tab.
The Always option in the Hours Available section should be selected by default. This means that the Inv_Weekly queue can run at any time. If you de-select the Always option, you can restrict the queue to operate within a specific time window. Jobs assigned to the queue would then run only if the current time were within that time window.
Step 10 Click OK. Inv_Weekly is added to the list of queues on your system.
Adding the Inventory Weekly Job Group to ProductionNow, submit the group Inventory Weekly into the production schedule.
To submit the group into the production schedule:
Step 1 In the Jobs pane, right-click the Inventory Weekly job group and select Insert into Schedule from the context menu.
Step 2 Click OK in the Insert Job Into Schedule dialog.
Step 3 Click OK in the Information dialog.
Monitoring the Job Group in ProductionTo monitor the job group in production:
Step 1 From the Navigator pane, select Operations>Job Activity to display the Job Activity pane.
Your job group is listed in bold showing the Waiting On Operator status.
Step 2 Right-click the Inventory Weekly job group and from the Job Control submenu select Release/Resume to start the job group.
Step 3 Click Yes in the Confirm dialog.
Step 4 Click OK in the Information dialog.
The Inventory Weekly job group goes active, along with the three jobs: Inventory_10, Inventory_11, and Inventory_12. Because the limit on the Inv_ Weekly queue is set to 3, all three jobs in the group Inventory Weekly are launched at once, and now run to completion.
Step 5 Scroll to the right in the Jobs pane to view the Queue column.
Note that the Inventory_10, Inventory_11 and Inventory_12 jobs are running from the Inv_Weekly queue.
11-5Cisco Tidal Enterprise Scheduler 6.2 Tutorial Guide for Unix
OL-32204-01

Chapter 11 Setting Up Queues Setting Up a Queue
Changing the Queue LimitChanging the queue limit from any number to 1 changes the queue from multiple to single-threaded processing.
To change the queue limit:
Step 1 From the Navigator pane, select Definitions>Queues to display the Queues pane.
Step 2 Double-click the Inv_Weekly queue to display its definition dialog.
Step 3 Lower the Limit from 3 to 1.
Step 4 Click OK to save the changes.
The limit change is displayed in the Queues pane.
11-6Cisco Tidal Enterprise Scheduler 6.2 Tutorial Guide for Unix
OL-32204-01

Cisco TiOL-32204-01
C H A P T E R 12
Using Scheduler AgentsOverview
If you have installed two or more Tidal Agents for Unix on separate machines, you can perform the procedures in this chapter. If you have only one agent, you may still want to read this chapter to understand how other agents are integrated in Enteprise Scheduler.
In previous exercises, you scheduled jobs to run on the Enteprise Scheduler master system which included an agent of its own. You can also run jobs on multiple external agents. Agents let you expand your computing power and flexibility, helping you get jobs done more quickly and efficiently.
For a Enteprise Scheduler master to recognize an agent, the Enteprise Scheduler agent software must be installed on that agent machine, and a valid license file must exist for it on the master. Refer to the installation guide for more information on licensing and registering agents.
The Enteprise Scheduler master provides centralized control over scheduling in a distributed computing environment. There is no limit on how many agents you can attach to a master, if your license contains the unlimited (floating) provision for agents. You can also schedule a job to run on any agent in your network.
Enteprise Scheduler lets you group multiple agents into sets called agent lists. When you associate one of these lists with a job, Enteprise Scheduler launches that job depending on the type of list:
• Ordered List – Runs on the first agent available in the list, chosen sequentially from the top of the list
• Balanced List – Runs on the agent with the lightest load at the time the job is ready to run.
• Random List – Runs on an agent picked at random from the list
• Rotation List – Runs on the agent following the last agent used for execution
• Broadcast List – Runs on all agents in the list
In this chapter, you learn how to run a job on an external agent. You will also learn how to create an inter-agent dependency, that is, a dependency on a job that runs on a different machine. We will add an agent and run a job that is located on it.
Note To complete the exercises in this tutorial, you need to:Install Enteprise Scheduler in the default directory Scheduler (or the examples in this tutorial will not work properly)
12-1dal Enterprise Scheduler 6.2 Tutorial Guide for Unix
Chapter 12 Using Scheduler Agents Defining An Agent Connection
Select the Super User option in your User definition Configure a default agent Create and have available the work day calendar
Defining An Agent ConnectionTo define an agent connection:
Step 1 From the Navigator pane, select Administration>Connections to display the Connections pane.
Step 2 Double-click the Unix agent connection to display the Connection Definition dialog.
Step 3 Select the Connection tab to display the Connection tab.
Step 4 In the Machine Name field, enter the machine with the Enteprise Scheduler agent installed on it.
Step 5 In the Master-to-Agent Communication Port field, enter the agent’s listener port number used during agent installation. The default port number for the first agent is 5912 but subsequent agent installations use an incremented port number (e.g., 5913 for the second agent, etc.).
Step 6 Select the Enabled options, if it is not already selected.
Step 7 Click OK.
The agent will begin the connection process. The agent status light at the bottom of the client is yellow until the agent is connected. It then turns green. This normally takes about 45 seconds or less.
Adding a Job that Requires Operator Release
To add a job that requires operator release:
Step 1 From the Navigator pane, select Definitions>Jobs to display the Jobs pane.
Step 2 Click the Add Job button to display a Job Definition dialog.
Step 3 In the Job Name field, enter Agent_Job1.
Step 4 In the Command field, enter the full path to the file:
/UNIX_TEST_1.sh
Step 5 Click the Schedule tab and select work day from the Calendar Name list.
Step 6 Click the Run tab, and from the Agent Name list, select the remote agent you are going to use.
Step 7 Click the Options tab and select the Require operator release option.
Step 8 Click OK.
Step 9 Click OK to display the Effective Date dialog.
The job is placed in the production schedule with a Waiting on Operator status. We will release this job, but first let’s create a job with a dependency on this job to demonstrate the agent dependency feature.
12-2Cisco Tidal Enterprise Scheduler 6.2 Tutorial Guide for Unix
OL-32204-01

Chapter 12 Using Scheduler Agents Adding an Agent Job Dependency
Adding an Agent Job Dependency
In this section, you will define a remote agent job dependency. You will use Agent_Job1, created in the previous exercise, in the dependency condition for the new job. Defining a job that depends on a job run by a remote agent is the same as defining any other job dependency.
Adding an agent job dependency:
Step 1 In the Job Name field of the Job Definition dialog, enter Agent_Job2.
Step 2 In the Command field, enter the full path to the file:
/UNIX_TEST_1.sh
Step 3 Click the Schedule tab and select work day from the Calendar Name list.
Step 4 Click the Run tab and from the Agent Name list, select the agent that exists on the master.
Step 5 Click the Dependencies tab to display the Dependencies tab.
Step 6 Click Add and select the Add Job Dependency option to display the Job Dependency Definition dialog.
Step 7 From the Job/Group list, select the Agent_Job1 job.
Note Only jobs that have already been defined will appear in the menu. If you have not defined any jobs, none will appear.
Step 8 Click OK to close the Job Dependency Definition dialog. This accepts the default dependency condition.
The Agent_Job1 job dependency appears in the Dependency section.
Step 9 Click OK to close the Job Definition dialog.
Step 10 Click OK again in the Effective Date dialog.
When the dialog closes, the Agent_Job2 job appears in the Jobs pane.
Releasing the Agent Jobs
To release the Agent jobs:
Step 1 From the Navigator pane, select Operations>Job Activity to display the Job Activity pane.
Step 2 Select the Agent_Job1 job.
Step 3 Right-click the job, and then select Job Control>Release/Resume from the context menu to release Agent_Job1 from the Waiting on Operator status.
Step 4 Click Yes in the Confirm dialog.
Step 5 Click OK in the Information dialog.
12-3Cisco Tidal Enterprise Scheduler 6.2 Tutorial Guide for Unix
OL-32204-01

Chapter 12 Using Scheduler Agents Summary
Step 6 The Agent_Job1 runs on the external agent. When it completes successfully, the Agent_Job2 runs on the local agent.
Summary
Congratulations! With the completion of this chapter, you have built a good foundation of knowledge about Enteprise Scheduler. You are ready for Enteprise Scheduler to increase and complement your productivity.
If you need any further information or training, contact [email protected].
12-4Cisco Tidal Enterprise Scheduler 6.2 Tutorial Guide for Unix
OL-32204-01

Cisco TiOL-32204-01
C H A P T E R 13
Using Scheduler CalendarsOverviewIn the previous exercise, you created an unscheduled job. In this chapter you will create a scheduled job by creating a calendar, and adding it to the job. Scheduled jobs run on a regular basis according to the dates in their calendar. Some schedules are simple with jobs running every day from Monday through Friday, or on the first day of every month. Others are more involved, with jobs running on irregular accounting periods, holidays or fiscal period offsets.
Enteprise Scheduler uses calendars to define the set of dates on which jobs run. Enteprise Scheduler contains five different methods for creating calendars, depending on the period in which you need your job to repeat. For example, you may need your job to run as needed on a, daily, weekly or monthly basis. Each method addresses a particular period.
This chapter describes how to build four calendars:
• first wkdy – A list calendar (as needed) representing the first workday of each week.
• work day – A daily calendar representing Monday through Friday.
• Fiscal Week End – A calendar to use when your work week ends on a Thursday.
• Fiscal Quarter End – A calendar for scheduling on the last business day of a quarter.
You will then schedule a job using the work day calendar, and confirm that it is scheduled properly.
Note To complete the exercises in this tutorial, you need to:Install Enteprise Scheduler in the default directory Scheduler (or the examples in this tutorial will not work properly).Select the Super User option in your User definition.Configure a default agent .Create and have available the work day calendar
13-1dal Enterprise Scheduler 6.2 Tutorial Guide for Unix

Chapter 13 Using Scheduler Calendars Building the First Workday Calendar
Building the First Workday CalendarIn this exercise, you will build a list calendar called first wkdy which refers to the first workday in every week. In the List Calendar dialog, you choose each day that the job is to be scheduled.
To build a List calendar:
Step 1 From the Navigator pane, select Definitions>Calendars to display the Calendars pane.
Step 2 Click the Add button on the Scheduler toolbar or right-click a calendar and select Add Calendar>List from the context menu to display the List Calendar Definition dialog.
Step 3 In the Calendar Name field, type first wkdy.
Step 4 In the calendar view, double-click the dates that represent Monday of each week for the current month.
All selected dates appear under the Selected Dates section to the right of the calendar.
Note To add scheduling dates to other months, use the inner right arrow buttons. To add scheduling dates to other years, use the outer right arrow buttons.
Step 5 Click OK after you have completed your selections.
Figure 13-1 Calendars View Showing First Wkdy
Congratulations, you just created your first list calendar! You can create a calendar for any dates you specify. This calendar can be associated with a job from within the Job Definition dialog, but will not be used in any future tutorial exercises.
Building the Work Day CalendarNow you will create the work day daily calendar to use for scheduling a job. The work day daily calendar schedules your job to run on each weekday.
To build a Work Day calendar:
13-2Cisco Tidal Enterprise Scheduler 6.2 Tutorial Guide for Unix
OL-32204-01

Chapter 13 Using Scheduler Calendars Building the Fiscal Week End Calendar
Step 1 From the Navigator pane, select Definitions>Calendars to display the Calendars pane.
Step 2 Click the Add button on the Enterprise Scheduler toolbar or right-click a calendar and select Add Calendar>Daily from the context menu to display the List Calendar Definition dialog.
Step 3 In the Calendar Name field, type Work Day.
Notice the Public option in the lower left corner of the dialog. Selecting this option makes the calendar available to all Enteprise Scheduler users.
We will be accepting the defaults in the Details tab. The defaults automatically set the calendar to generate dates for Monday through Friday of each week.
Step 4 Click the Forecast tab to generate the calendar.
This tab displays all the dates calculated from the Details tab. The Forecast tab is viewed the same way as in the List Calendar dialog, when the calendar first wkday was entered. You can add individual dates from this tab by double-clicking in the calendar view on the dates you want to change. You can delete dates by selecting the date in Selected Dates and either right-clicking the date to select Delete or clicking the Delete button. The forecast displays a four-year time window, but the calendar extends indefinitely.
Note This step can take from a few seconds to a minute, depending on your system’s configuration.
Step 5 Click OK.
The Calendars view displays the two calendars you created. By default, the rows of the display are sorted alphabetically according to calendar name (the Name column). You can also sort by other columns by clicking the column name. For example, if you click the Owner name at the top of the Owner column, calendars are grouped by their creator. If you click the Modified label at the top of the Modified column, your newest calendars are grouped together.
Building the Fiscal Week End CalendarWe will create the Fiscal Week End calendar to use for scheduling a job to run when your fiscal week ends on Thursday evening. If Thursday is a holiday, the job will execute on Wednesday evening, through the use of a condition definition.
To build a Fiscal Week End calendar:
Step 1 From the Activities menu, select the System Configuration option.
13-3Cisco Tidal Enterprise Scheduler 6.2 Tutorial Guide for Unix
OL-32204-01

Chapter 13 Using Scheduler Calendars Building the Fiscal Week End Calendar
Figure 13-2 System Configuration Dialog, Master Tab
Step 2 In the Week Begins list, select Friday. This sets your fiscal week to start on Friday and end on Thursday.
Step 3 Click OK.
Step 4 Click OK when the Warning dialog displays. This warning displays whenever you change the calendar week starting day.
Step 5 From the Navigator pane, select Definitions>Calendars to display the Calendars pane.
Step 6 Click the Add button on the Enterprise Scheduler toolbar or right-click a calendar and select Add Calendar>Subset from the context menu to display the Calendar Subset Definition dialog.
Step 7 In the Calendar Name field, enter Fiscal Week End.
Step 8 In the Occurrence list, select Every.
Step 9 In the Calendar list, select Friday.
Step 10 In the Time Frame list, select Week.
Step 11 (Optional) Multiple fiscal calendars can be defined for Enteprise Scheduler. You can choose to base a calendar definition on a fiscal year, rather than a standard January- through-December calendar year.
Making no selection in the Based on Fiscal list results in the use of a standard calendar. For this exercise, leave the field empty.
Step 12 Now, we need to set a condition to let Enteprise Scheduler know what to do if a holiday occurs on Thursday. Click the Conditions tab.
Step 13 Click Add to display the Condition dialog.
Figure 13-3 Condition Dialog
13-4Cisco Tidal Enterprise Scheduler 6.2 Tutorial Guide for Unix
OL-32204-01

Chapter 13 Using Scheduler Calendars Alternate Method of Creating a Calendar
Step 14 From the If conflicts with calendar list, select the Holidays calendar.
Step 15 From the Take action list, select Previous Calendar.
Step 16 The Calendar field defines which calendar to use and how many days in the past to go. The default is 0 days. Select a value of 1, and in the adjacent list, select Workdays.
Step 17 Click OK.
The condition now displays in the Conditions view.
Figure 13-4 Calendar Subset Definition Dialog, Conditions Tab
Now if a holiday falls on Friday of the Fiscal Week End, Enteprise Scheduler will schedule the Fiscal Week End calendar for Wednesday.
Step 18 Click the Forecast tab (Figure 13-1) to verify the dates Enteprise Scheduler has set.
Step 19 Click OK. The Fiscal Week End calendar now appears in the Calendars view.
Alternate Method of Creating a CalendarIn most cases, there is more than one way to define a calendar such as our Fiscal Week End. The following is an example of another way to create the Fiscal Week End calendar. We will call this calendar Fiscal Week Ending, so that the results of both exercises will be visible.
To create a calendar:
Step 1 From the Navigator pane, select Definitions>Calendars to display the Calendars pane.
Step 2 Click the Add button on the Enterprise Scheduler toolbar or right-click a calendar and select Add Calendar>Weekly from the context menu to display the Weekly Calendar Definition dialog.
Step 3 In the Calendar Name field, enter Fiscal Week Ending.
Step 4 Click the Details tab. In the Include the following days section, de-select Monday, Tuesday, Wednesday and Thursday options.
13-5Cisco Tidal Enterprise Scheduler 6.2 Tutorial Guide for Unix
OL-32204-01

Chapter 13 Using Scheduler Calendars Building the Quarter End Calendars
Figure 13-5 Weekly Calendar Definition Dialog
Step 5 Click the Conditions tab, and then click Add.
Step 6 In the If conflicts with calendar list, select the Holidays US calendar.
Step 7 In the Take action list, select Previous Calendar.
Step 8 The Calendar field defines which calendar to use and how many days in the past to go. The default is 0 days. Select a value of 1, and in the adjacent list, select Workdays.
Step 9 Click OK.
Step 10 Click Forecast to verify the dates that Enteprise Scheduler has chosen.
Step 11 Click OK in the Weekly Calendar Definition dialog.
Step 12 Now, both the Fiscal Week End and the Fiscal Week Ending calendars are visible in the Calendars view.
Building the Quarter End CalendarsWe will create the Fiscal Quarter End and Calendar Quarter End calendars to use for scheduling jobs to run when your fiscal quarter ends on the last work day of the quarter. If the quarter ends on a holiday, the calendar should execute on the previous work day. For this exercise, we will consider the fiscal year to run from November to October.
Fiscal Quarter EndWe first have to define a fiscal calendar period, to be used in documenting the Fiscal Quarter End calendar. Many companies run production from more than one fiscal calendar period.
To define a Fiscal calendar period:
Step 1 From the Navigator pane, select Definitions>Fiscal Calendars to display the Fiscal Calendars pane.
Step 2 Click the Add button on the Enterprise Scheduler toolbar or right-click a calendar and select Add Fiscal Calendar from the context menu to display the Fiscal Calendar Definition dialog.
13-6Cisco Tidal Enterprise Scheduler 6.2 Tutorial Guide for Unix
OL-32204-01

Chapter 13 Using Scheduler Calendars Building the Quarter End Calendars
Figure 13-6 Fiscal Calendar Definition Dialog
Step 3 In the Fiscal Calendar Name field, enter Corporate Fiscal Year.
Step 4 In the Starting Month list, select November. Keep the default values for the remaining text fields.
Step 5 Click OK.
Step 6 From the Navigator pane, select Definitions>Calendars to display the Calendars pane.
Step 7 Click the Add button on the Enterprise Scheduler toolbar or right-click a calendar and select Add Calendar>Subset from the context menu to display the Calendar Subset Definition dialog.
Step 8 In the Calendar Name field, enter Fiscal Quarter End.
Step 9 If not already selected, click the Details tab.
Step 10 From the Occurrence list, select Last.
Step 11 From the Calendar list, select Workdays US.
Step 12 From the Time Frame list, select Quarter.
Step 13 In the Based on Fiscal list, select Corporate Fiscal Year. Leave the Adjust by ... days field at 0.
Step 14 We have completed the definition for the Fiscal Quarter End calendar. Click the Forecast tab to verify the dates that will be selected for production execution and then click OK.
The calendar definitions are ready to be used in production.
Calendar Quarter EndTo create a quarter end calendar that will work on the last business day of the calendar quarter, where the fiscal year starts in January, just repeat Steps 6 through 12 above with the following exceptions:
• In Step 8, change the Calendar Name to Calendar Quarter End.
• In Step 12, leave the Based on Fiscal field blank.
You have created two quarterly calendars, one based on a fiscal year calendar and one based on a standard calendar year starting in January.
13-7Cisco Tidal Enterprise Scheduler 6.2 Tutorial Guide for Unix
OL-32204-01

Chapter 13 Using Scheduler Calendars Scheduling the Unix Test 1 Job with a Calendar
Scheduling the Unix Test 1 Job with a CalendarNow, return to the Unix Test 1 job and schedule it using the work day calendar.
To schedule the Report job using the word day calendar:
Step 1 From the Navigator pane, select Definitions>Jobs to display the Jobs pane.
Step 2 Right-click the Unix Test 1 job and select Edit Job/Group from the context menu to display the Job Definition dialog.
Step 3 Click the Schedule tab on the Job Definition dialog.
Step 4 In the Calendar Name list, select work day.
Step 5 To view the dates in the calendar, click the Forecast button and then click OK.
Step 6 Click OK again on the Job Definition dialog to display the Effective Date dialog.
The Effective Date dialog displays asking you when the job should enter the production schedule. The dates represent the current span of the production schedule.
Step 7 Click OK to accept the default (today).
Another occurrence of the Unix Test 1 job enters the production schedule.
Step 8 From the Navigator pane, select Operations>Job Activity to display the Job Activity pane.
The job runs according to the work day calendar. It will run today (unless you are running this tutorial on a weekend). Your window may appear slightly different.
You will also see the previous occurrence of the Unix Test 1 job that was added to the schedule manually in the previous chapter. The job occurrence has been renamed Unix Test 1(2) to reflect the first occurrence of the same job (Unix Test 1(1)) ran earlier.
13-8Cisco Tidal Enterprise Scheduler 6.2 Tutorial Guide for Unix
OL-32204-01