
Cisco Finesse - agent & supervisor setup - McGill...
17
Cisco Finesse - agent & supervisor setup Last Updated: November 16, 2015
Transcript of Cisco Finesse - agent & supervisor setup - McGill...

Cisco Finesse - agent & supervisor setup Last Updated: November 16, 2015

McGill IT Services - Training Table of Contents Last Updated: November 16, 2015 Page 1 of 16
Table of Contents
Finesse Agent Setup Procedure ................................................................................................... 2
Logging into Cisco IP Communicator (“Soft phone”) .................................................................. 3
Logging into Cisco IP Phone (“hard phone”) ............................................................................. 11
Logging into Finesse .................................................................................................................. 13
Resetting your Cisco “hard phone” ........................................................................................... 14
Additional Resources ................................................................................................................. 16

McGill IT Services - Training Finesse Agent Setup Procedure Last Updated: November 16, 2015 Page 2 of 16
Finesse Agent Setup Procedure
Before logging into Finesse (https://ccxpub1.campus.mcgill.ca:8445), the following conditions must be met. For Cisco hard phone installations (Cisco IP Phone):
1- Cisco IP Phone has been installed at your workstation by a McGill NCS technician.
2- Agent has been logged into the Cisco IP Phone using his/her McGill Short Username
For Cisco soft phone installations (Cisco IP Communicator): 1- Jabra BIZ 2300 USB headset is connected to your PC.
2- Cisco IP Communicator is installed and properly configured.
3- Agent has been logged into IP Communicator using his/her McGill Short Username.
Note: You can only be logged into one Cisco phone, be it a hard phone or a soft phone, at any given time.

McGill IT Services - Training Logging into Cisco IP Communicator (“Soft phone”) Last Updated: November 16, 2015 Page 3 of 16
Logging into Cisco IP Communicator (“Soft phone”)
STEPS:
1. Double-click Cisco IP Communicator short-cut on the Desktop
IP Communicator will now launch.
Notice the “4846XXX” extension in the upper right-hand corner (screen-shot below):
This means no one has logged into this phone yet.

McGill IT Services - Training Logging into Cisco IP Communicator (“Soft phone”) Last Updated: November 16, 2015 Page 4 of 16
Note:
Before continuing, verify IP Communicator settings.
Right-click and select Preferences..
McGill IT Services - Training Logging into Cisco IP Communicator (“Soft phone”) Last Updated: November 16, 2015 Page 5 of 16
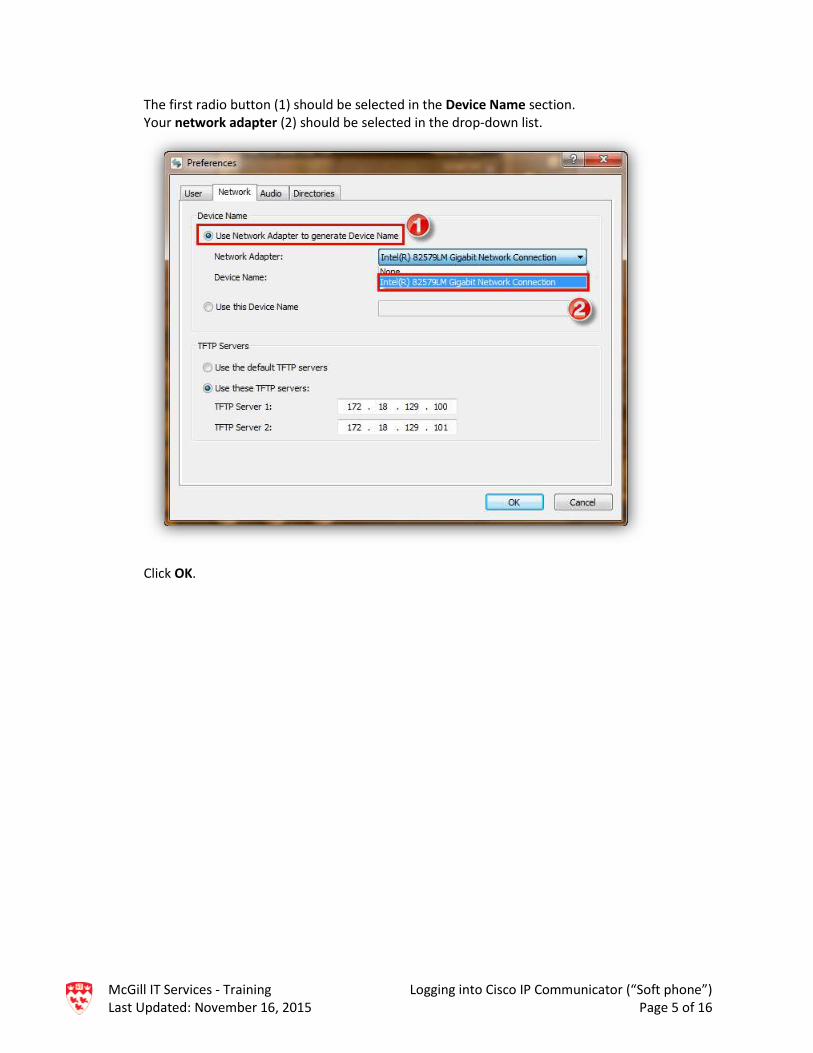
The first radio button (1) should be selected in the Device Name section. Your network adapter (2) should be selected in the drop-down list.
Click OK.

McGill IT Services - Training Logging into Cisco IP Communicator (“Soft phone”) Last Updated: November 16, 2015 Page 6 of 16
2. To sign-in, click on the second round button on the top-right.

McGill IT Services - Training Logging into Cisco IP Communicator (“Soft phone”) Last Updated: November 16, 2015 Page 7 of 16
3. Now enter your McGill short username and your temporary password (12345).
Click Submit. Note: Use the Tab key to go to the next line.

McGill IT Services - Training Logging into Cisco IP Communicator (“Soft phone”) Last Updated: November 16, 2015 Page 8 of 16
You have successfully logged yourself into IP Communicator. Notice the “4848XXX” extension on the top-right.
Important: You must now change your temporary password.

McGill IT Services - Training Logging into Cisco IP Communicator (“Soft phone”) Last Updated: November 16, 2015 Page 9 of 16
4. To change your password, once again click the second round button on the top-right. The following screen will appear:
To change your password (PIN), click Set PIN.

McGill IT Services - Training Logging into Cisco IP Communicator (“Soft phone”) Last Updated: November 16, 2015 Page 10 of 16
The following screen will appear:
5. Enter your Current PIN (12345). Now enter your new PIN (pick a secure password) and confirm your PIN once again. Click Change. Your software is now well configured and you can log into Finesse.

McGill IT Services - Training Logging into Cisco IP Phone (“hard phone”) Last Updated: November 16, 2015 Page 11 of 16
Logging into Cisco IP Phone (“hard phone”)
Pre-requisite:
IP phone has been setup at your desktop by an NCS technician.
The phone displays a 4846XXX extension number in the upper-right hand corner of the screen.
STEPS:
1- Click on the button located to the left of the “Sign In/Out” text.
2- Enter your McGill short username and default temporary password (12345) and click Submit.
Note:
Use the “circle” navigation button to go to the next line.
The screen should display “login successful” and the phone will now re-boot.

McGill IT Services - Training Logging into Cisco IP Phone (“hard phone”) Last Updated: November 16, 2015 Page 12 of 16
Your real extension number should now appear in the upper-right quadrant (4848XXX).
3- To change your default password,
once again click on the button located to the left of the “Sign In/Out” text.
The following screen will appear:
Click on Set PIN
Note:
In some instances, you can be prompted to reset your PIN right after your initial login.
4- Enter your old PIN (12345) and new password twice.
Click on Change
Your hard phone is now well configured and you can log into Finesse.

McGill IT Services - Training Logging into Finesse Last Updated: November 16, 2015 Page 13 of 16
Logging into Finesse
STEPS:
Access Finesse URL
1. Open Internet Explorer and type the address of the McGill Finesse website: https://ccxpub1.campus.mcgill.ca:8445
Typing in login credentials
2. Follow instructions below
Legend:
ID*: Enter McGill short username
Password*: Enter your McGill password
Extension*: Enter your phone extension number
3. Click Sign In.

McGill IT Services - Training Resetting your Cisco “hard phone” Last Updated: November 16, 2015 Page 14 of 16
Resetting your Cisco “hard phone”
If for some reason, your Cisco IP phone will not load up i.e. your phone is “turned-on” but never actually displays the regular main screen which should display a 4846XXX number (user is not logged into the phone) or 4848XXX number (user is logged into the phone), try resetting the phone manually. STEPS:
1. Locate the Configure button and click on it
2. Scroll down to the “5 Admin Settings” section (use “circle” navigation button) and select it by pressing the “inner circle” area of the “circle” navigation button.

McGill IT Services - Training Resetting your Cisco “hard phone” Last Updated: November 16, 2015 Page 15 of 16
3. Scroll down the list and select the “4 – Reset Settings” option by once again pressing the “inner circle” area of the “circle” navigation button.
4. Select the “All” option
5. The phone will now reboot and re-initialize.
The phone should now display the default main screen once again.

McGill IT Services - Training Additional Resources Last Updated: November 16, 2015 Page 16 of 16
Additional Resources
CISCO IP COMMUNICATOR USER GUIDE
CISCO IP PHONE QUICK START GUIDE