Cisco 7965G Basic Handset User Guide
27
Cisco 7965G Basic Handset User Guide
Transcript of Cisco 7965G Basic Handset User Guide

Cisco 7965G Basic Handset User Guide

Cisco 7965 Handset User Guide
ii
H:\DMS\Telephony\IP Telephony\Cisco\User Guides and Procedures\Cisco IP Phone Documentation\7965G Handset User
Guide.doc
Table of Contents
1 Getting Started: ........................................................................................................ 2
2 An Overview of your Phone:................................................................................. 3
3 Understanding Lines and Calls: ........................................................................... 6
4 Understanding Phone Screen Features: .......................................................... 7
5 Basic Features: .......................................................................................................... 8
6 Basic Call Handling: ............................................................................................... 10
7 Shared Lines: ........................................................................................................... 11
8 Soft keys: ................................................................................................................... 12
9 Information Features: .......................................................................................... 15
10 Browser Features: .................................................................................................. 20
11 Voicemail: .................................................................................................................. 24

Cisco 7965 Handset User Guide
2
H:\DMS\Telephony\IP Telephony\Cisco\User Guides and Procedures\Cisco IP Phone Documentation\7965G Handset User Guide.doc
1 Getting Started:
Using this Guide:
This guide provides you with an overview of the basic features available on your phone.
Customizing Your Phone on the Web
Your Cisco Unified IP Phone is a network device that can share information with other network
devices in your company, including your computer. You can use your Cisco Unified Call
Manager User Options web pages to establish and customize phone services and to control
phone features and settings from your computer. This guide provides a brief overview of these
capabilities.
http://fladlccm1.iptel.flinders.edu.au/ccmuser
Cisco 7965 Handset User Guide
3
H:\DMS\Telephony\IP Telephony\Cisco\User Guides and Procedures\Cisco IP Phone Documentation\7965G Handset User Guide.doc
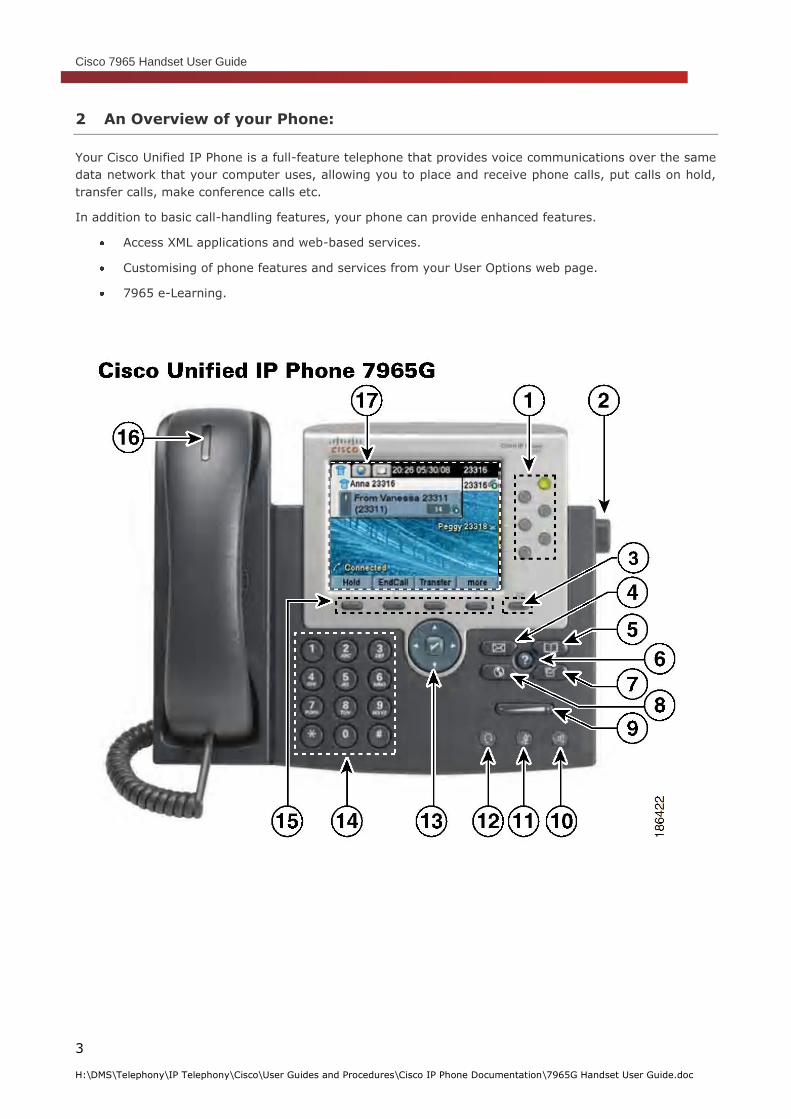
2 An Overview of your Phone:
Your Cisco Unified IP Phone is a full-feature telephone that provides voice communications over the same
data network that your computer uses, allowing you to place and receive phone calls, put calls on hold,
transfer calls, make conference calls etc.
In addition to basic call-handling features, your phone can provide enhanced features.
Access XML applications and web-based services.
Customising of phone features and services from your User Options web page.
7965 e-Learning.

Cisco 7965 Handset User Guide
4
H:\DMS\Telephony\IP Telephony\Cisco\User Guides and Procedures\Cisco IP Phone Documentation\7965G Handset User Guide.doc
Item Description
1 Programmable buttons Extension Number
Directory
Extension Button illuminate to indicate status:
2 Foot stand button Allows you to adjust the angle of the phone base.
3 Display button
Awakens the phone from sleep mode.
4 Messages button
Auto-dials your voice mail.
5 Directories button Opens/closes the Directories menu. Use it to access call
logs and directories.
6 Help button
Activates the help menu.
7 Settings button
Opens/closes the Settings menu. Use it to Change phone
screen and ring settings.
8 Service button
Opens/closes the Services menu.
9 Volume button Controls the handset, headset, and speakerphone volume
(off-hook) and the ringer volume (on-hook).
10 Speaker button Toggles the speakerphone on or off. When the
speakerphone is on, the button is lit.
11 Mute button Toggles the microphone on or off. When the microphone is
muted, the button is lit.
12 Headset button Toggles the headset on or off. When the headset is on, the
button is lit.
13 4-way navigation
pad and Select
button (centre)
Allows you to scroll through menus and highlight items.
Use the Select button to select an item that is highlighted
on the screen.
Navigation button
Scroll up and down to see menus and highlight
items
Scroll right and left in multi-column displays
Select button
Scroll to highlight a line using Navigation button
then press
Note – the Select button does not take action
14 Keypad Allows you to dial phone numbers, enter letters, and
choose menu items.

Cisco 7965 Handset User Guide
5
H:\DMS\Telephony\IP Telephony\Cisco\User Guides and Procedures\Cisco IP Phone Documentation\7965G Handset User Guide.doc
15 Softkey buttons
Each activates a softkey option (displayed on your phone
screen.)
16 Handset light strip Indicates an incoming call or new voice message.
17 Phone screen Shows phone features.

Cisco 7965 Handset User Guide
6
H:\DMS\Telephony\IP Telephony\Cisco\User Guides and Procedures\Cisco IP Phone Documentation\7965G Handset User Guide.doc
3 Understanding Lines and Calls:
To avoid confusion about lines and calls, refer to these descriptions:
Lines – Corresponds to a directory number (Extension number) that others can use to call you. To
see your phone line, look at the right side of your phone screen.
Calls – Your line (Extension number) can support two connected calls. Only one call can be active
at any time; other calls are automatically placed on hold.
Understanding Line and Call Icons:
Icon Line or call state Description
On-hook line No call activity on this line.
Off-hook line You are dialing a number or an
outgoing call is ringing.
Connected call You are connected to the other
party.
Ringing call A call is ringing on your line.
Call on hold You have put the call on hold.
Reverting call A holding call is reverting to your
phone.
BLF – monitored line is idle
BLF – monitored line is busy
BLF – monitored line is ringing
Line in Do Not Disturb (BLF)

Cisco 7965 Handset User Guide
7
H:\DMS\Telephony\IP Telephony\Cisco\User Guides and Procedures\Cisco IP Phone Documentation\7965G Handset User Guide.doc
4 Understanding Phone Screen Features:
This is what your main phone screen may look like with active calls and several feature menus open.
1 Primary Phone Line Displays your directory number (extension number) for your
primary phone line
2 Programmable button Programmable buttons, speed-dial buttons, phone service buttons
or phone feature buttons. Icons and labels indicated how these
buttons are configured.
3 Softkey labels Each displays a softkey function.
4 Status line Displays audio mode icons, status information, and prompts.
5 Call activity area Displays current calls per line, including caller ID, call duration,
and call state for the highlighted line.
6 Phone tab Indicates call activity.
7 Feature tabs Each indicates an open feature menu.

Cisco 7965 Handset User Guide
8
H:\DMS\Telephony\IP Telephony\Cisco\User Guides and Procedures\Cisco IP Phone Documentation\7965G Handset User Guide.doc
5 Basic Features:
Feature: Adjusting the foot Stand:
To change the angle of the phone base, adjust the Footstand while pressing the Footstand button.

Cisco 7965 Handset User Guide
9
H:\DMS\Telephony\IP Telephony\Cisco\User Guides and Procedures\Cisco IP Phone Documentation\7965G Handset User Guide.doc
Understanding Feature Buttons and Menus:
Press a feature button to open or close a feature menu.
Accessing the Help System on Your Phone:
Your phone provides a comprehensive online help system. Help topics appear on the phone screen.
Cleaning and Maintaining the Phone Screen:
Use only a soft, dry cloth to wipe the phone screen. Do not use any liquids or powders on the phone, as
they can contaminate phone components and cause failures.

Cisco 7965 Handset User Guide
10
H:\DMS\Telephony\IP Telephony\Cisco\User Guides and Procedures\Cisco IP Phone Documentation\7965G Handset User Guide.doc
6 Basic Call Handling:
Placing a call – Basic Options:
There are six options for placing a new call.
1. Lift the Handset and dial the number.
2. Press a Line button and dial the number.
3. Press the speaker button and dial the number.
4. Press the Headset button and dial the number.
5. Press the NewCall soft key and dial the number.
6. Press the Speed Dial button and dial the number.
Tips:
You can dial on-hook, without a dial tone (pre-dial). To pre-dial, enter a number, then go off-
hook by lifting the handset or by pressing Speaker or Headset.
When you pre-dial, your phone tries to anticipate the number you are dialling by displaying
matching numbers from your Placed Calls log. This is called Auto Dial.
If you make a mistake while dialling, press << to erase digits.
Answering a Call – Basic Options:
You can answer a call by simply lifting the handset, or you can use other options.
1. Lift the Handset.
2. Press a Line button.
3. Press the Speaker button.
4. Press the Headset button.
5. Press the Answer soft key.
Ending a Call – Basic Options:
To end a call, simply hang up.
1. Return the Handset to its Cradle.
2. Press the Speaker button.
3. Press the Headset button.
4. Press the EndCall soft key.

Cisco 7965 Handset User Guide
11
H:\DMS\Telephony\IP Telephony\Cisco\User Guides and Procedures\Cisco IP Phone Documentation\7965G Handset User Guide.doc
7 Shared Lines:
Understanding Shared Lines:
Your handset has a shared Line on button 3. You may not be using this feature.
Handle calls on behalf of a manager
Share call-handling tasks with co-workers
Remote-in-use Icon:
The remote in-use icon appears when another phone that shares your line has a connected call. You can
place and receive calls as usual on the shared line, even when the remote-in-use icon appears.
Shared Call Information:
Phones that share a line each display information about calls that are placed and received on the shared
line. This information might include caller ID and call duration.
If your shared line has voicemail each phone this line appears on can access the shared line voicemail
box by pressing into the shared line and the message button.

Cisco 7965 Handset User Guide
12
H:\DMS\Telephony\IP Telephony\Cisco\User Guides and Procedures\Cisco IP Phone Documentation\7965G Handset User Guide.doc
8 Soft keys:
Understanding Features Available:
You can access many features by using the most commonly used softkey.
Feature Softkey
Call Back CallBack
Call Forward CFwdALL
Call Park Park
Call PickUp PickUp
Conference Confrn
Do Not Disturb DND
End Call EndCall
Hold Hold
New Call NewCall
Redial Redial
Transfer Transfer
Abbreviate Dialing AbbrDial

Cisco 7965 Handset User Guide
13
H:\DMS\Telephony\IP Telephony\Cisco\User Guides and Procedures\Cisco IP Phone Documentation\7965G Handset User Guide.doc
Using Call Back:
1. Receive notification when a busy extension becomes available.
. Using Call Forward All:
You can use the call forward feature to redirect incoming calls from your phone to another number.
1. Press CFwdAll and enter target phone number.
2. To Cancel press CFwdAll.
3. To verify that Call Forward All is enabled on your primary line, look for the call forward icon above
the primary phone number. The call forward number will be in the status line.
Tips:
Enter the call forward target number exactly as you would dial it from your phone. For example
enter 0 for and outside line.
Using Call Park:
You can park a call when you want to store the call so that you or someone else can retrieve it from
another phone.
1. Call Park – Use the Park softkey to store the call. Your phone displays the call park number in
the status line.
2. Hang Up.
3. Retrieve Park Call – Enter call park number from any phone.
Tips:
You have a limited time to retrieve a parked call before it reverts to ringing at the original
number.
Using Pick Up:
Call PickUp allows you to answer a call that is ringing on a co-worker‟s phone by redirecting the call to
your phone.
1. Press PickUp soft key button available.
2. If your phone supports auto-pickup, you are now connected to the call.
3. If the call rings, press Answer to connect to the call.
Making Conference Calls:
Your phone allows you to talk simultaneously with multiple parties in a conference call.
1. Conference – Allows you to create a standard (ad hoc) conference by calling each participant.
Use the Confrn softkey.
2. Join – Allows you to create a standard (ad hoc conference by combining existing calls. Use the
Join softkey.
Using Do Not Disturb:
You can use the Do Not Disturb (DND) feature to block incoming calls from ringing your phone.

Cisco 7965 Handset User Guide
14
H:\DMS\Telephony\IP Telephony\Cisco\User Guides and Procedures\Cisco IP Phone Documentation\7965G Handset User Guide.doc
Using New Call and End Call:
1. To make a new call, either lift the handset or press NewCall softkey.
2. To end a call either hand up the handset or press EndCall softkey.
Using Hold and Resume:
You can hold and resume calls. When you put a call on hold, the hold icon appears next to the caller ID
and the corresponding line button flashes green.
If the Hold Reversion feature is enabled for your phone, a call that you put on hold reverts back to
ringing after a certain period of time. The call remains on hold until you resume it.
To resume a call make sure the appropriate call is highlighted. Press the Resume softkey.
Tips:
Engaging the Hold feature typically generates music for the held caller.
Your system administrator determines the duration between Hold and Reversion alerts.
Using Mute:
With Mute enabled, you can hear other parties on a call but they cannot hear you. You can use Mute with
the handset, speakerphone, or a headset.
Using Redial:
1. To redial the most recently dialed number.
Using Transfer:
Transfer redirects a connected call. The target is the number to which you want to transfer the call.
1. Transfer a call without talking to the transferred recipient press Transfer, enter target number,
and press Transfer to complete the transfer.
2. Talk to the transfer recipient before transferring the call press Transfer, enter target number,
and wait for transfer recipient to answer, press Transfer to complete transfer.
Tips:
You cannot use Transfer to redirect a call on hold. Press Resume removing the call from hold
before transferring it.
Using Abbreviated Dialing:
1. To place a call, enter the Abbreviated Dialing Code and press AbbrDial.

Cisco 7965 Handset User Guide
15
H:\DMS\Telephony\IP Telephony\Cisco\User Guides and Procedures\Cisco IP Phone Documentation\7965G Handset User Guide.doc
9 Information Features:
Directory
Settings
Messages
Services
Directory:
You can access call logs and directories via the Directory button.
Call Logs:
Your phone maintains call logs. Call logs contain records of your missed, places and received calls.
Directory Dialing:
Your phone can provide corporate and personal directory features.
o Corporate Directory – Corporate contacts that you can access on your phone.
o Personal Directory – Associated speed-dial codes that you can configure and access from
your phone and user options web pages. Personal Directory is comprised of Personal
Address Book (PAB) and Fast Dials:
PAB is a directory of your personal contacts.
Fast Dials allows you to assign codes to PAB entries for quick dialing.

Cisco 7965 Handset User Guide
16
H:\DMS\Telephony\IP Telephony\Cisco\User Guides and Procedures\Cisco IP Phone Documentation\7965G Handset User Guide.doc

Cisco 7965 Handset User Guide
17
H:\DMS\Telephony\IP Telephony\Cisco\User Guides and Procedures\Cisco IP Phone Documentation\7965G Handset User Guide.doc
Settings:
You can personalise your Phone by adjusting the ring tone and other settings.

Cisco 7965 Handset User Guide
18
H:\DMS\Telephony\IP Telephony\Cisco\User Guides and Procedures\Cisco IP Phone Documentation\7965G Handset User Guide.doc
Messages:
To access voice messages, use the Message button.

Cisco 7965 Handset User Guide
19
H:\DMS\Telephony\IP Telephony\Cisco\User Guides and Procedures\Cisco IP Phone Documentation\7965G Handset User Guide.doc
Services:
To access services features, use the service button.

Cisco 7965 Handset User Guide
20
H:\DMS\Telephony\IP Telephony\Cisco\User Guides and Procedures\Cisco IP Phone Documentation\7965G Handset User Guide.doc
10 Browser Features:
Accessing your User Options Web Pages:
1. Log in to your User Options Web Page –
http://fladlccm1.iptel.flinders.edu.au/ccmuser
2. If prompted to accept security settings, click yes or Install Certificate.
Changing your Line Setting:
1. Select User Options.
2. Device
3. Select the device name.
a. SEPXXXXX = The handset on your desk
b. EM_XXXXX = Your Extension Mobility Profile
c. If you are unsure leave as default setting.

Cisco 7965 Handset User Guide
21
H:\DMS\Telephony\IP Telephony\Cisco\User Guides and Procedures\Cisco IP Phone Documentation\7965G Handset User Guide.doc
3. Leave the device name as default to change your handset settings.
4. Select Line Settings to access Call Forward Options, Message Wait Lamp & Ring Settings.
Changing your Line Settings:
1. Leave as default if you do not have a shared line.
2. Here you can configure message waiting lamp, ring settings and Call Forward Destinations. If
you are unsure leave as default.

Cisco 7965 Handset User Guide
22
H:\DMS\Telephony\IP Telephony\Cisco\User Guides and Procedures\Cisco IP Phone Documentation\7965G Handset User Guide.doc
3. Save any changes. Changes will be made immediately to your phone.
Setting Up Speed Dials:
Speed-Dialing
Abbreviated Dialing
1. Enter a number and Speed Dial Label for your phone.
2. Click Save.
Note: Your phone uses the ASCII Label field.
Tips:
You can set up a speed-dial button for each programmable button on your phone that is not
reserved as line buttons.

Cisco 7965 Handset User Guide
23
H:\DMS\Telephony\IP Telephony\Cisco\User Guides and Procedures\Cisco IP Phone Documentation\7965G Handset User Guide.doc
Setting up Abbreviated Dialing:
1. Enter a number and Label.
2. Access Abbreviated Dialing from your handset by dialing the abbreviated number on your keypad.
See example above the abbreviated number is 07.
3. Then press the Abbreviated Dial Soft key.
Tips:
Remember to add a 0 for external numbers.

Cisco 7965 Handset User Guide
24
H:\DMS\Telephony\IP Telephony\Cisco\User Guides and Procedures\Cisco IP Phone Documentation\7965G Handset User Guide.doc
11 Voicemail:
SETTING UP YOUR NEW VOICEMAIL
Dial 13100 or press Enter the security code provided by the CSC #12345 option 3
You will be asked to setup your mailbox Change your Security Code
Enter a new security code followed by the hash (#) key. To confirm, enter your new security code again followed by the hash (#) key
Name Recording Record your name only e.g. Mary Smith or Professor Smith
Press 2 to start recording your name only
Press 2 to stop recording Press 6 to review your name recording Press 4 to discard your name recording and start over Press 5 to save
Personal Greeting Record your personal greeting; e.g. Hello, you have reached the voicemail box for Mary Smith, please leave a message after the
tone Press 2 to start recording Press 2 to stop recording Press 6 to review your greeting Press 4 to discard your greeting and start over Press 5 to save your greeting
You will be congratulated because you have successfully completed the initial set up for your mailbox.
Press star (*) 3 times to Exit
ACCESSING MESSAGES
Dial 13100 or press
Enter your security code Press 1 – to listen to new messages Follow prompts to save, discard or forward these messages. Press star (*) 3 times to Exit
TO CHANGE YOUR PERSONAL GREETING
Dial 13100 or press
Enter your security code Press 3 (Not prompted) - Phone Manager Press 1 – Personal Options
Press 3 – Record a Personal Greeting Press 2 – Standard Greeting
CallXpress will play your current personal greeting Press 4 to discard your personal greeting and start over Press 2 to start recording your personal greeting Press 2 to stop recording Press 6 to review your personal greeting
Press 5 to save Press star (*) 3 times to Exit

Cisco 7965 Handset User Guide
25
H:\DMS\Telephony\IP Telephony\Cisco\User Guides and Procedures\Cisco IP Phone Documentation\7965G Handset User Guide.doc
RECORD AND SET YOUR “OUT OF OFFICE” GREETING
**Extended absence only e.g. Recreation Leave, Long Service Leave
Dial 13100 or press
Enter your security code Press 3 (Not prompted) – Phone Manager Press 1 – Personal Options Press 3 – Record a Personal Greeting Press 3 – To record and set your “Out of Office” Greeting
“Nothing is currently recorded”……… Press 2 to start recording Press 2 to stop recording Press 6 to review your „out of office‟ greeting
Press 5 to save
NOTE – Once the “Out of Office” greeting is recorded and „set‟, it is on the voicemail immediately.
When you access your voicemail, you will hear “your out of office greeting is on - to turn off, press 4”
REMOVE “OUT OF OFFICE” GREETING
Dial 13100 or press
Enter your security code You will be notified an “Out of Office” greeting is activated Press 4 to remove
TO CHANGE YOUR SECURITY CODE
Dial 13100 or press
Enter your security code Press 3 (Not prompted) - Phone Manager Press 1 – Personal Options Press 4 – Change Security Code Enter a new security code followed by the hash (#) key
To confirm, enter your new security code again followed by the hash (#) key Press star (*) 3 times to Exit
TO CHANGE YOUR NAME
Dial 13100 or press
Enter your security code Press 3 (Not prompted) - Phone Manager
Press 1 – Personal Options Press 5 – To Record your Name CallXpress will play your current name recording Press 2 to start recording your name only Press 2 to stop recording Press 6 to review your name recording
Press 4 to discard your name recording and start over Press 5 to save
Press star (*) 3 times to Exit
ACCESS YOUR MAILBOX FROM ANOTHER EXTENSION (On Campus)

Cisco 7965 Handset User Guide
26
H:\DMS\Telephony\IP Telephony\Cisco\User Guides and Procedures\Cisco IP Phone Documentation\7965G Handset User Guide.doc
Dial 13100 or press
You will be prompted to enter your security code - instead - press star (*) hash (#) Enter your extension number as your mailbox number Then enter your security code when prompted Proceed as normal
ACCESS YOUR MAILBOX FROM YOUR HOME TELEPHONE
Dial 8201 3100 Enter your extension number as your mailbox number Then enter your security code when prompted
Proceed as normal.
RETRIEVE SENDERS NAME AND DELIVERY INFORMATION
Dial 13100 or press
Enter your security code Press 1 to listen to message Press 0 (not prompted) after listening to message Press 0 again
The sender information including time, date and caller ID (internal only) will be given If external call, CallXpress will tell you