CIC Scheduled Reports - Genesys Reports is a reporting tool that schedules Crystal Reports to run...
27
CIC Scheduled Reports Installation and Configuration Guide 2018 R2 Last updated 2018-02-02 (See Change Log for summary of changes.) Abstract Scheduled Reports is a reporting tool that schedules Crystal Reports to run and distributes the generated reports to multiple locations. Reports are scheduled to run automatically and can be generated and distributed in several formats. Use this tool if your business requires specific reports on a regular basis and if you distribute reports to multiple locations. This documentation covers the CIC Scheduled Reports Installation and Configuration Guide.
Transcript of CIC Scheduled Reports - Genesys Reports is a reporting tool that schedules Crystal Reports to run...

CIC Scheduled Reports
Installation and Configuration Guide
2018 R2
Last updated 2018-02-02 (See Change Log for summary of changes.)
Abstract
Scheduled Reports is a reporting tool that schedules Crystal Reports to run and distributes the generated reports to multiple locations. Reports are scheduled to run automatically and can be generated and distributed in several formats. Use this tool if your business requires specific reports on a regular basis and if you distribute reports to multiple locations. This documentation covers the CIC Scheduled Reports Installation and Configuration Guide.


Table of Contents Scheduled Reports Installation and Configuration ....................................................................................... 5
Introduction .............................................................................................................................................. 5
About this information.............................................................................................................................. 5
About this information .......................................................................................................................... 5
Reference information .......................................................................................................................... 5
Overview ................................................................................................................................................... 6
Architecture .............................................................................................................................................. 6
Architecture .......................................................................................................................................... 6
IC Database ........................................................................................................................................... 6
IC Handlers ............................................................................................................................................ 6
Monitoring Service ................................................................................................................................ 7
Scheduled Reports Client application ................................................................................................... 7
System requirements ................................................................................................................................ 8
System requirements ............................................................................................................................ 8
CIC server .............................................................................................................................................. 9
CIC server software requirements ...................................................................................................... 10
IC Database Server .............................................................................................................................. 10
Scheduled Reports Monitoring Server ................................................................................................ 11
Scheduled Reports Administrator Desktop......................................................................................... 11
Installation tasks ..................................................................................................................................... 12
Installation tasks ................................................................................................................................. 12
Install Scheduled Reports installation files ......................................................................................... 12
Install the Scheduled Reports Monitoring Server (SRMS) .................................................................. 13
Verify the Custom Passthrough Log is active .......................................................................................... 13
Verify the Custom Passthrough Log is active ...................................................................................... 13
Install the Scheduled Reports Client (SRC).......................................................................................... 14
Configure the Scheduled Reports installation ........................................................................................ 14
Configure the Scheduled Reports installation .................................................................................... 14
Configure the Scheduled Reports Monitoring Service........................................................................ 15
Work with the PureConnect Scheduled Reports Configurator Tool ................................................... 15

IC Connection tab ................................................................................................................................ 15
DB (Database) Connection tab ............................................................................................................ 16
Error Notifications tab ........................................................................................................................ 17
Scheduling tab ..................................................................................................................................... 17
Reporting tab ...................................................................................................................................... 18
Complete the configuration .................................................................................................................... 19
Complete the configuration ................................................................................................................ 20
Start the Scheduled Reports Service ................................................................................................... 20
Configure CIC server Parameters ........................................................................................................ 20
Install the Scheduled Report Results Custom Report ......................................................................... 22
Provide View Report Access Rights ..................................................................................................... 23
Create reports and define filters ............................................................................................................. 23
Appendix A: Server setup ........................................................................................................................ 24
Appendix A: Server setup .................................................................................................................... 24
Scheduled Report Handlers ................................................................................................................ 24
Install Scheduled Reports .................................................................................................................... 24
Appendix B: Change Custom Reports ..................................................................................................... 25
Appendix B: Change Custom Reports ................................................................................................. 25
Date and Time Input Parameters ........................................................................................................ 25
Input Parameters ................................................................................................................................ 25
Appendix C: Run an Interaction Reporter report or a Report Assistant report using command line .... 25
Appendix C: Run an Interaction Reporter report or a Report Assistant report using command line parameters .......................................................................................................................................... 25
Windows shortcut examples ............................................................................................................... 26
Change Log .............................................................................................................................................. 27

Scheduled Reports Installation and Configuration
Introduction
Scheduled Reports is a reporting tool that schedules reports to run and distributes the generated reports to multiple locations. Reports are scheduled to run automatically and can be generated and distributed in several formats. This scheduling tool allows businesses to generate specific reports on a regular basis to create a schedule to run the reports and distribute them to multiple locations. Reports can be scheduled to run during periods of low-call volumes, resulting in a more efficient server use.
This document includes:
• An overview description of the Scheduled Reports application, the Scheduled Reports architecture, and the Scheduled Reports database setup
• Installation instructions for the Scheduled Reports Monitor Server (SRMS)
• Instructions on how to verify that the Custom Passthrough Log is active
• Installation instructions for the Scheduled Reports Client (SRC)
• An overview description of the Scheduled Reports Monitoring Service
• Steps to show how to work with the ININ Scheduled Reports Configurator Tool and the Configuration Checklist Tool
• Configuration instructions for the SR_UpdateUserAccessTable IC Handler
• Steps to show how to start the Scheduled Reports service
• An overview description of the CIC server parameters
• Instructions on how to install Scheduled Report Results Custom Reports and provide View Report Access Rights
About this information
About this information
The information in this guide is for CIC Administrators, Scheduled Reports Administrators, business managers, and users responsible for generating and managing reports. Users also include partners, planners, installers, administrators, and end users who plan to use the Scheduled Reports Client application to generate and distribute business reports regularly.
Reference information
Because Scheduled Reports is integrated with CIC, additional technical references, online Help, and links are referred in this document. These documents are available in the Documentation Library on your CIC server.
The latest versions of these documents can also be accessed from the PureConnect Documentation Library on the PureConnect website at: http://help.genesys.com/cic

The following technical references, online Help, and links can provide additional information for reporting in CIC.
• CIC Scheduled Reports User Guide
• PureConnect Reporting Technical Reference
• Interaction Reporter Help
Overview
The Scheduled Reports Client application lets Customer Interaction Center users schedule reports (to run daily, weekly, monthly, or yearly basis) and distribute them to multiple locations. The reports can be generated in different formats, such as Adobe Acrobat® (PDF), Microsoft® Excel (CSV), Microsoft® Word, and many other Crystal support export formats. Reports can be automatically distributed through an e-mail message, saved to a file, or printed.
The Scheduled Reports Client application consists of four main components:
• The Database contains configuration information for each scheduled report.
• The IC Handlers receive the notification from the Monitoring Service at the time a scheduled report is ready for distribution.
• The Monitoring Service sends a notification to the IC Handlers to run a scheduled report, and monitors for updates to the database.
• TheScheduled Reports Client application is the user interface for CIC and Scheduled Report administrators to schedule the running and distributing of reports.
Architecture
Architecture
The architecture of the Scheduled Reports application can handle all types of CIC Platform deployment. Do you have one central logging database server with numerous CIC servers logging data to it? Do you have one CIC server with one logging database server? Do you have a one to one relationship between your CIC servers to your logging database servers? Use the answers to these questions to determine the best way to implement Scheduled Reports for your environment.
The four main components to the Scheduled Reports implementation are: (1) Database, (2) IC Handlers, (3) Monitoring Service, and (4) Scheduled Reports Client.
IC Database
The database tables are scheduled reports-specific tables added to the IC Data Repository, typically called the i3_ic database. These tables hold the configuration data for the Scheduled Reports Client application. The tables (SR_*) are automatically deployed to the IC Database during the update.
IC Handlers
The handlers installed on the CIC server run the scheduled reports and deliver them to the proper location. The IC Handlers receive notifications from the Monitoring Service when a scheduled report is

designated to run. From the notification, the IC Handler queries the Database to get the correct output destinations for the scheduled report.
Monitoring Service
The main function of the Monitoring Service is to send a notification to the IC Handlers when a scheduled report is queued to run. It also monitors the Database tables, in five-minute intervals, for changes to the current scheduled reports. Changes to scheduled reports, using the Scheduled Reports Client application, take effect within five minutes. This Windows-based service is installed on machines that are always turned on. The Monitoring Service is low maintenance and requires minimal processor speed to run.
Scheduled Reports Client application
The Scheduled Reports Client application allows CIC and Scheduled Reports administrators to schedule when reports run, configure report parameters, and to setup report destinations. The client application stores the configuration to the Scheduled Reports Database.
The following table details each environment type and the components installation locations:
Environment Type
Database (DB) Tables Handlers Monitoring
Service Client Application
1 IC*, 1 DB* Install on 1 DB* Server
Install on 1 IC* Server
Install on one machine
Install on each report Administrator desktop
N* IC*, 1 DB* Install on 1 DB* Server
Install on all IC* Servers
Install on one machine
Install on each report Administrator desktop
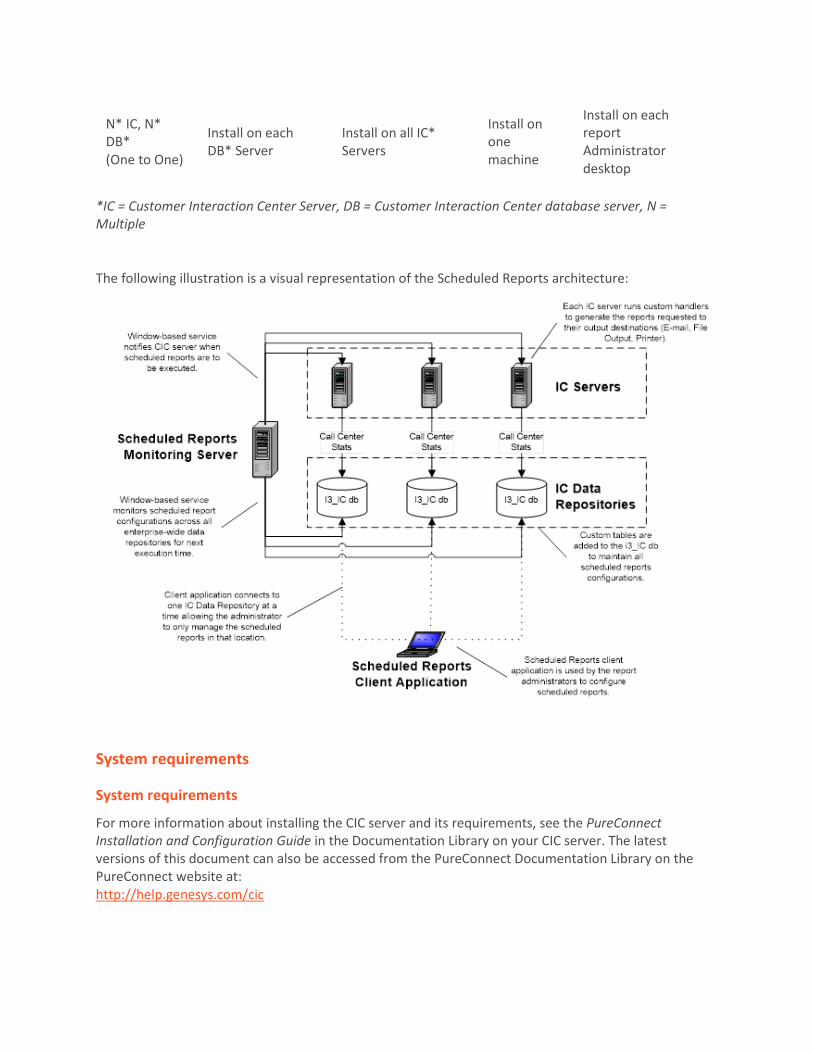
N* IC, N* DB* (One to One)
Install on each DB* Server
Install on all IC* Servers
Install on one machine
Install on each report Administrator desktop
*IC = Customer Interaction Center Server, DB = Customer Interaction Center database server, N = Multiple
The following illustration is a visual representation of the Scheduled Reports architecture:
System requirements
System requirements
For more information about installing the CIC server and its requirements, see the PureConnect Installation and Configuration Guide in the Documentation Library on your CIC server. The latest versions of this document can also be accessed from the PureConnect Documentation Library on the PureConnect website at: http://help.genesys.com/cic

CIC server
CIC server
Genesys requires that the CIC server hardware is verified as “acceptable” for the CIC installation process.
The Genesys Test Lab site (http://testlab.inin.com/) contains a list of servers verified to work with PureConnect products. If you have a server that you would like to be verified, contact the server verification team. Interaction Server verification provides official Genesys verification to partners with specific server and hardware configuration needs. Verification is based on vendor and predetermined configuration.
For comprehensive requirement information, see Chapter 3: CIC server in the PureConnect Installation and Configuration Guide. The CIC server topic discusses the following requirements and pre-installation procedures:
• CIC server minimum hardware requirements
• Recommendations for typical large-scale CIC implementations
• Virtualization
• CIC server software requirements
• CIC server configuration recommendations – pre- and post- Windows OS installation
• Recommended third party tools
• Anti-virus requirements and Best Practices
• PureConnect QoS driver
• Security-related settings
• Create and configure the CIC administrator account
• Install and configure the email client
• Plan license assignment and allocation
• Order and generate the CIC license
• Set up your CIC installation media
• (Optional) Install SNMP
• (Optional) IC Survey System
• For CIC server installation instructions, see Chapter 11: CIC server Installation and Chapter 12: IC Setup Assistant in the PureConnect Installation and Configuration Guide.
Supported server versions
• Microsoft Windows Server 2016
• Microsoft Windows Server 2012 R2 (64-bit) Supported in CIC 2015 R1 and later Download and apply Microsoft KB article 2919355

• Microsoft Windows Server 2008 R2 SP1 (64-bit)
Note: CIC 2015 R1 and later does not support Windows XP. See the PureConnect Product Information website at https://my.inin.com/products/cic/Pages/Software-Requirements.aspx for database support updates.
CIC server software requirements
CIC server software requirements
This section describes software requirements for the CIC server.
Microsoft .NET Framework
Microsoft .NET Framework 4.6.2
• Windows Server 2016 (all editions): Includes the .NET Framework 4.6.2 as an operating system component installed by default, except in the Server Core configuration.
Microsoft .NET Framework 4.5.2 or later
• Required for CIC 2016 R1 or later
• Windows Server 2012 R2: If not installed via Windows Update, install .NET Framework 4.5.2 or later from \Third Party Installs on the CIC 2016 R1 or later .iso
• Windows Server 2008 R2: Install .NET Framework 4.5.2 or later from \Third Party Installs on the CIC 2016 R1 or later .iso
Microsoft .NET Framework 4.0
• Required for CIC 2015 R1 through CIC 2015 R4
• Windows 8 and Windows 8.1: .NET Framework 4.x included. Required for Windows 8 only: Download and apply Microsoft KB article 2750149.
• Windows 7: Install the full framework profile of Microsoft .NET Framework 4 from IC_WorkstationPreReqs share
Microsoft .NET Framework 3.5
• Windows Server 2012 R2: Install in Server Manager->Add roles and features. Note: See Microsoft KB article 2734782 for known issue.
• Windows Server 2008 R2: Install in Server Manager->Features
IC Database Server
Complete the database requirements to configure the IC database by running IC Setup Assistant as part of a new CIC installation. These tables are preceded by SR_* in the IC Database, where * is the name of the table.
Refer to "Database Server" in the PureConnect Installation and Configuration Guide for comprehensive requirement information.
The Database Server topic discusses the databases supported in CIC and provides database server requirements, planning, installation, and maintenance issues, including:

• IC database configuration
• IC database configuration options
• Reporting tables
• Interaction Recorder tables
• Interaction Tracker tables
• Interaction Optimizer tables
• Interaction Feedback tables
• Interaction Process Automation tables
• SQL Server
• Oracle
• Data retention
• Required database information
Scheduled Reports Monitoring Server
Microsoft Windows 8.1 (32-bit and 64-bit)
• Supported in CIC 2015 R2 and later
• IC User Applications, IC Business Manager Applications, IC Server Manager Applications supported
Microsoft Windows 8 (32-bit 64-bit)
• Supported in IC 4.0 SU 3 to SU 6, CIC 2015 R2 and later
• IC User Applications, IC Business Manager Applications, IC Server Manager Applications supported
Microsoft Windows 7 SP1 (32-bit and 64-bit)
• IC User Applications, IC Business Manager Applications, and IC Server Manager Applications supported
• Microsoft .NET Framework 4.0
• Scheduled Reports Configurator
• Oracle 11.2.0.2.0 administrator client or instant client with SQLPlus. SQLPlus is required. (only necessary if using Oracle for database)
Note: CIC 2015 R1 and later does not support Windows XP.
Scheduled Reports Administrator Desktop
Microsoft Windows 8.1 (32-bit and 64-bit)
• Supported in CIC 2015 R2 and later

• IC User Applications, IC Business Manager Applications, IC Server Manager Applications supported
Microsoft Windows 8 (32-bit and 64-bit)
• Supported in IC 4.0 SU 3 to SU 6, CIC 2015 R2 and later
• IC User Applications, IC Business Manager Applications, IC Server Manager Applications supported
Microsoft Windows 7 SP1 (32-bit and 64-bit)
• IC User Applications, IC Business Manager Applications, and IC Server Manager Applications supported
• Microsoft .NET Framework 4.0
• Scheduled Reports Client Application
• Oracle 11.2.0.2.0 administrator client or instant client with SQLPlus. SQLPlus is required. (only necessary if using Oracle for database)
Note: CIC 2015 R1 and later does not support Windows XP.
Installation tasks
Installation tasks
CIC and Scheduled Reports administrators have three core tasks when installing Scheduled Reports: (1) Scheduled Reports Monitor Server (SRMS) Installation, (2) Verifying that the Custom Passthrough Log is Active, and (3) Scheduled Reports Client (SRC) Installation.
Note: Before starting the Scheduled Reports Monitor server (SRMS) installation, review the following topics:
• Overview
• Architecture
• System Requirements
• Database Setup
Install Scheduled Reports installation files
The CIC Scheduled Reports installs and related files are available to install from the PureConnect Customer Interaction Center (CIC) .iso file. The install is located under \Installs\Off-ServerComponents.
1. If you have not done so already:
a. Download the CIC 2015 R1 or later .iso file from the PureConnect Product Information site at https://my.inin.com/products/Pages/Downloads.aspx.
b. Copy the .iso file to a file server (non-IC server) with a high bandwidth connection to the server(s) on which you will be running the CIC installs.

c. Mount the .iso file and share the contents to make them accessible to the server(s) on which you will be running the CIC installs.
2. Navigate to the \Installs\Off-ServerComponents directory on the file server.
3. Copy the Scheduled Reports .msi for 2015 R2 or later file to the 64-bit Windows Server server operating system machine on which you plan to run this install.
Install the Scheduled Reports Monitoring Server (SRMS)
The main function of the Scheduled Reports Monitoring Service is to send notifications to the IC Handlers when a scheduled report is ready to run. It also monitors the Scheduled Reports Database tables on five-minute intervals for changes to current scheduled reports.
Note: Before you install the Scheduled Reports Monitor Server application, first install Microsoft .NET Framework 4.0. This installation is a requirement for monitoring servers running Scheduled Reports. For more information, see CIC server software requirements in the System requirements section.
To install the Scheduled Reports Monitor Server:
1. From the shared location, double-click ScheduledReportsServer.msi. The Scheduled Reports Monitor Server Setup Wizard for CIC dialog opens.
2. Click Next. The Custom Setup dialog opens.
3. Optionally click the Scheduled Reports Monitor Server icon to access the custom installation features.
4. Optionally select the way features are installed by clicking the appropriate feature icon.
5. Click Next. The IC Server Name dialog opens.
6. In the IC Server Name field, enter the CIC server to which you want to connect.
Note: If you have multiple CIC servers to which Scheduled Reports communicates, enter only one IC Server name now. Additional IC Server names are defined with the PureConnect Scheduled Reports Configurator Tool later in the implementation.
7. Click Next. The Ready to install Scheduled Reports Monitor Server dialog opens.
8. Click Install to begin the installation process. The Installing Scheduled Reports Monitor Serverdialog opens. It displays a Status bar and messages as the installation progresses.
9. When the installation is complete, click Finish in the Completed the Scheduled Reports Monitor Server Setup Wizard.
10. The You Must Restart Your System dialog displays when a restart is required to finish the configuration changes made to Scheduled Reports Monitor Server. Click Yes to restart your system.
Verify the Custom Passthrough Log is active
Verify the Custom Passthrough Log is active

An important post-installation task is required when the Scheduled Reports Monitor Server (SRMS) installation is complete. The CIC and Scheduled Reports Administrator must verify that the Custom Passthrough Log is active.
Scheduled Reports handlers insert data into the SQL Server or Oracle database using the LoggingCustomPassthrough tool step. Microsoft Message Queuing (MSMQ) lets users reliably send data to custom logging tables with the same reliability as IC data. Since this tool step is being used, Custom Passthough is required on the Customer Interaction Center (CIC) server.
To verify that the Custom Passthrough Log is active:
1. Open Interaction Administrator.
2. Click the System Configuration node and then click the Report Logs container.
3. Double-click Custom Passthrough Log. The Report Log Configuration dialog opens.
4. On the Basic tab, ensure the Active check box is selected.
Note: This dialog is the only location where Custom Passthrough is established for a CIC server.
5. Click OK to save your changes and close the Custom Passthrough Log.
Install the Scheduled Reports Client (SRC)
The Scheduled Reports Client allows CIC and Scheduled Reports administrators to schedule when a report runs, configure report parameters, and setup report destinations. The client application stores the configuration to the Scheduled Reports database.
To install the Scheduled Reports Client:
1. From the shared location, run the Scheduled Reports .msi for 2015 R2 or later. The Scheduled Reports for CIC Setup dialog opens.
2. Click Next. The Custom Setup dialog opens.
3. Optionally click the Scheduled Reports Client icon to access the custom installation features.
4. Optionally select the way features are installed by clicking the appropriate feature icon.
5. Click Next. The IC Server Name dialog opens.
6. Enter the CIC server to which you want to connect.
7. Click Next. The Ready to Install Scheduled Reports dialog opens.
8. Click Install. The Installing Scheduled Reports dialog opens. It displays a Status bar and messages as the installation progresses.
9. When the installation is complete, click Finish in the Completed the Scheduled Reports Setup Wizard.
Configure the Scheduled Reports installation
Configure the Scheduled Reports installation

Perform the following required configuration tasks before you run the Scheduled Reports Client application:
1. Configure the Scheduled Reports Monitoring Service.
2. Work with the PureConnect Scheduled Reports Configuration Tool.
3. Work with the Configuration Checklist Tool.
4. Configure the SR_UpdateUserAccessTable IC Handler.
5. Start the Scheduled Reports Service.
6. Configure the CIC server parameters.
7. Install the Results Custom Report.
8. Provide View Report Access Rights.
Configure the Scheduled Reports Monitoring Service
The Scheduled Reports Monitoring Service has numerous functions. Its main objective is to send notifications to a Customer Interaction Center (CIC) server when a Scheduled Report is ready to run.
The Schedule Reports Monitoring Service functions include:
• Maintaining internal listing of active Scheduled Reports across all CIC servers.
• Connecting to multiple CIC Data Repositories by the Database Connection String stored on each CIC server.
• Polling Scheduled Reports database for changes to internal listing of scheduled reports.
• Sending notification to CIC server to run a Scheduled Report configuration.
Note: The monitoring service is integral to the Scheduled Reports Client application. Without this service, Scheduled Reports cannot run.
Work with the PureConnect Scheduled Reports Configurator Tool
The PureConnect Scheduled Reports Configurator Tool is used during the initial configuration process. This tool allows CIC and Scheduled Reports administrators to set up the Customer Interaction Center (CIC) server IC data repository. This tool is packaged in the Scheduled Reports Monitoring Service installation.
To work with the PureConnect Scheduled Reports Configurator Tool:
1. Open the Start Menu, select All Programs, and then choose PureConnect.
2. Select Scheduled Reports Configurator. The PureConnect Scheduled Reports Configurator Tooldialog opens.
IC Connection tab
The IC Connection tab allows CIC and Scheduled Reports administrators to complete the IC connection parameters for the Customer Interaction Center (CIC) server.
To work with the IC Connection tab:

1. Open the File menu and select New Server. The IC Connection tab opens and the curser flashes in the Server Name field.
2. In the Server Name field, enter the name of the CIC server.
Note: If you are configuring Scheduled Reports to connect to a CIC server that is configured as a switchover pair, enter the name of the current primary server. Do not enter the name of the backup server in the Server Name box. Do not create another server instance for the current backup server.
3. In the User Name field, enter your CIC user name.
4. In the Password field, enter your CIC password.
Note: Use your CIC username and password, not your Windows-based credentials.
5. Click Connect to Server. The PureConnect Scheduled Reports Configurator Tool confirms a successful connection to the CIC server.
DB (Database) Connection tab
The DB Connection tab allows CIC and Scheduled Reports administrators to complete the database connection parameters for the Customer Interaction Center (CIC) server.
To work with the DB Connection tab:
1. Click the DB Connection tab.
2. In the DB Type field, select the type of database (SQL or Oracle) for the database connection. The selected database displays in the Provider field.
3. In the Data Source field, enter the date source for the database connection.
Note: For SQL, this data source is the database server name—not the OBDC DSN. For Oracle, this is the Service Name as configured when installing the Oracle client.
4. In the DB Username field, enter the username for the database connection.
5. In the DB Password field, enter the password for the database connection.
6. In the DB Name field, enter the name of the database for the Scheduled Reports tables.
7. To modify the keywords of the connection string manually, select the Manual Override check box.
8. Click the Test Connection button. The Scheduled Reports Configurator Tool dialog confirms a successful connection to the SQL/Oracle database.
The Test button checks the database connection string. If the connection string is invalid, a message displays with the details of the connection failure. If you use Oracle DBMS, the Oracle Client installation is a prerequisite. You can download the client which includes the "Oracle Database Utilities" from: http://www.oracle.com/technetwork/database/enterprise-edition/downloads/112010-win32soft-098987.html under "Oracle Database 11g Release 2 Client (11.2.0.1.0) for Microsoft Windows (32-bit)".

Note: Storing the database connection string is crucial to the Scheduled Reports Client application. The client application uses the SR_DBConnectionString server parameter to communicate with the database. Also, the Scheduled Reports Monitoring Service uses the same connection string to monitor configured Scheduled Reports. If the connect string is not set properly, neither application works.
This server parameter is stored as ENCRYPTED. Do not modify it for any reason. Any modification breaks the connection.
For detailed information about the Oracle Client, including installation and configuration, database maintenance, table space planning, and more, see the Oracle section in Chapter 8 Database Server of the CIC Installation and Configuration Guide in the PureConnect Documentation Library.
The latest versions of this document can also be accessed from the PureConnect Documentation Library on the PureConnect website at: https://help.genesys.com/cic.
Error Notifications tab
Use the Error Notifications dialog to allow e-mail error notifications to be sent to the CIC administrator and to create a customized list of e-mail addresses for error notification.
Receive Error Notifications
Select this box to allow error notifications to be sent to the CIC system administrator. The default value for this box does not contain a check mark in the check box.
Use Custom E-mail Address
Select this box to send error notifications to a customized list of e-mail addresses. Add or delete e-mail addresses in the E-mail Addresses box.
E-mail Addresses
Use this box to add custom e-mail addresses for error notifications. Add, Edit, or Delete e-mail addresses using the buttons below the box.
Scheduling tab
The Scheduling tab allows CIC and Scheduled Reports administrators to set file overwrite frequency values, valid time and interval settings, and available scheduling times for users when they generate scheduled reports.
To work with the Scheduling tab:
1. Click the Scheduling tab.
2. In the File Overwrite Frequency field, select the appropriate overwrite frequency check boxes.
Note: The File Overwrite Frequency is the value that determines when reports saved to a file share can be overwritten.

3. In the Scheduling Interval (minutes) field, enter a scheduling interval or click the up/down arrows to make a selection.
Note: This parameter identifies the number of minutes between which scheduled reports can be scheduled and is used with Valid Time field. Using the Valid Time and Interval settings, the application fills the scheduled Run Time field in the client with numerous times the scheduled report can be run.
4. In the Available Scheduling Times field, click Add Range to set the valid times that users can select to Scheduled Reports. The Add Range dialog displays.
Note: This parameter controls the valid times that users can select to Scheduled Reports. It is used with the Scheduling Interval field. The parameter contains numerous ranges of values. There are two fields for each range of time, the Begin and End time. Specify times in a Military format (HH:SS) where “HH” is hours and “SS” is seconds.
5. Click OK. The Add Range dialog closes and returns to the Reporting tab.
Reporting tab
The Reporting tab allows CIC and Scheduled Reports administrators to control the valid export formats, available printers, available file locations, and report categories for users when they generate scheduled reports.
To work with the Reporting tab:
1. Click the Reporting tab.
2. At the end of the Valid Formats field, click the button. The Report Formats dialog opens.
3. Optionally select additional valid export formats by clicking the appropriate check boxes.
Note: You can select several report export formats for scheduled reports. The default formats are Acrobat Format (PDF) and Excel 8.0 (Microsoft).
4. Click OK. The Report Formats dialog closes and returns to the Reporting tab.

5. In the Available Printers field, click the plus (+) sign. The Add Printer dialog opens.
6. In the Printer Name field, enter the printer name as a UNC path for the printer.
Note: The path must be a UNC path and cannot contain spaces (for example, \\CompanyPrinters\Marketing). Also, on both the primary and backup CIC server, make sure the CIC Admin account (running IC Service) has access to the UNC printer. The report is sent to the printer from the CIC server using the CIC Admin account for access to the printer.
7. In the Description field, enter a description for the network printer.
Note: A detailed description makes it easier for users to determine which network printer to select.
8. Click OK. The Add Printer dialog closes and you are returned to the Reporting tab.
9. In the Available File Locations field, click the plus (+) sign. The Add File Location dialogopens.
10. In the File Path field, enter a file path to the location you want to make available for users to access scheduled reports.
Note: The path must be a UNC path and cannot contain spaces (for example, \\ICServer\ScheduledReports). The CIC Admin account the IC Service runs must have access to this share, granted by the CIC server. To confirm the CIC Admin account has write and create folder permissions on the share, attempt to access it using Windows Explorer from the CIC server.
11. In the Description field, enter the description of the Scheduled Reports network folder.
Note: A detailed description makes it easier for users to determine which network folder to select.
12. Click OK. The Add File Locationdialog closes and returns to the Reporting tab.
13. In the Report Categories field, click the button. The Configure Report Categoriesdialog opens.
14. Review the Inactive Categories and Available Categories sections.
a. To make a category available, in the Inactive Categories field select an item and click Add.
b. To make a category inactive In the Available Categories field, select an item and click Remove.
Note: It is not recommended to remove Report Categories from this parameter to restrict what reports users can schedule since users can only schedule the reports for which they have View access to in the Interaction Administrator.
15. Click OK. The Configure Report Categoriesdialog closes and returns you to the Reporting tab.
Complete the configuration

Complete the configuration
1. On the maintoolbar, click Save.
2. Open the File menu and click Exit to close the PureConnect Scheduled Reports Configurator Tool.
Start the Scheduled Reports Service
Now that the Customer Interaction Center (CIC) server configuration is complete, the ININ Scheduled Reports service can be started on the Monitoring Server.
To start the Scheduled Reports Service:
1. From the Monitoring Server, open the Start Menu, select All Programs, select Administrative Tools, and then choose Services. The Services dialog opens.
2. Locate the ININ Scheduled Reports service.
3. Open the File menu, select Action, and then choose Start. As an option, click the Start the Service link. The service is started and displays in the Status column.
4. Check the Startup Type column to verify that the startup type is set to Automatic.
5. Optionally, if the service property is set to Manual, double-click the ININ Scheduled Reports service. The ININ Scheduled reports Properties dialog opens.
6. Optionally, in the Startup Type field, click the drop-down list and select Automatic.
7. Click OK to save your changes.
Configure CIC server Parameters
The Scheduled Reports install adds a number of server parameters in the Server Parameters container in the Interaction Administrator. Default values are added to these parameters so you can Scheduled Reports immediately and have them e-mailed to the appropriate recipients. However, configure the Printer and File Locations Server Parameters if you want users to be able to use these options. Review all server parameters listed in the following table to determine your users’ options.
Server Parameter Description
SR_DBConnectionString
This server parameter contains an encrypted version of the database connection string for the i3_IC database. DO NOT MODIFY THIS PARAMETER THROUGH INTERACTION ADMINISTRATOR. Use the PureConnect Scheduled Reports Configurator Tool installed on the Monitoring Server to set the database connection string. This application is cover in detail in the Monitoring Service section.
ScheduledReportsDB Scheduled Reports handlers use this structured parameter to connect to the Scheduled Reports tables. This database

“account” and “password” connects the user to the database.
Server Parameter Description
SR_ErrorNotificationOptions
This server parameter allows the CIC administrator to start e-mail notifications for database error logging.
Default value: “NO”
Available values: “YES” and “NO”
Value Description
“YES” Sends an error e-mail notification t Administrator e-mail account
“N0” Does not send an error e-mail notif
“YES|[email protected]”
This value sends an error e-mail no delimited by the pipe character (|)
YES|[email protected]| [email protected]|email@ address3.com
Note In order for the CIC System A receive error e-mails with this para administrator’s e-mail address to t
Note This value, YES|address@com
is only valid for IC release 4.0, or la
Server Parameter Description
SR_ReportCategories
This server parameter restricts the Report Categories that are available in the Scheduled Reports application. By default all categories are included except User categories (User reports can only be run through the Interaction Client because they run for the User currently logged onto the local machine). It is not recommended that you remove Report Categories from this server parameter to restrict what reports users can

schedule since the users can only schedule the reports for which they have View access as set-up in Interaction Administrator (see the MAKING REPORTS AVAILABLE TO USERS section of this document).
Default value: Account Code - Supervisor;Agent - Supervisor;Agent Performance;Call - Supervisor;Custom;Custom - Scheduled Reports;DNIS;Fax;General Administrative;Line Activity;Line Group;Queue
SR_SiteName This server parameter identifies the site name. If you are installing Scheduled Reports on multiple CIC servers, the site name for each Server must be different.es-pureconnect-public
Install the Scheduled Report Results Custom Report
The Scheduled Report Results custom report displays the results of all Scheduled Reports that run within the selected date and time range.
To install the Scheduled Report Results custom report:
1. Navigate to the existing installation share on the CIC server and locate the appropriate .rpt report template. Refer to the following table to match your database with the correct template.
Database Report Template
MSSQL SR_Results_MSSQL.rpt
Oracle SR_Results_Oracle.rpt
2. Copy the .rpt file to the Reports folder on your CIC server.
Oracle = D:\I3\IC\Server\Reports\Oracle SQL Server = D:\I3\IC\Server\Reports\SQL
3. From the CIC server, open the Start Menu, select Run, and type DSEditU. Click OK to run the application. The DSEdit dialog opens.
4. On the DSEditdialog, expand the tree by clicking the following: <Root Entry>, <SiteName>, Production, Configuration, and Reports.
Note: Ensure that the Reports container is highlighted before continuing. Do not click any of the reports.
5. Open the File menu, select Import, and locate the XML file in the Reports folder.
Database Report Template

MSSQL Scheduled Reports_Results_MSSQL.xml
Oracle Scheduled Reports_Results_Oracle.xml
6. Select the appropriate XML file and click Open to import the file.
7. Close the DSEditU dialog.
Provide View Report Access Rights
The Scheduled Reports Handlers, Scheduled Reports Monitoring Service, and Scheduled Reports Client application are installed on the CIC administrator’s and Scheduled Reports Administrator’s desktop. One remaining task is required.
Note: Users must have View access rights to the custom report through the Interaction Administrator.
To provide View Report access rights:
1. Open the Start Menu, select All Programs, choose PureConnect, and select Interaction Administrator. The Interaction Administrator dialog opens.
2. Click the + next to the People container to expand it, and then click the Users container. The CIC users appear in the right pane.
3. Double-click the user you want to grant permission to view reports. The User Configuration dialog opens.
4. Click the Security tab.
5. Click the Access Control button. The Access Control dialog opens.
6. Scroll down to Interaction Reporter Reports and in the View column, select the check box for each report the user requires. Or select the *[All] check box to allow the user to view all reports.
7. Click Close and in the User Configuration dialog, click OK.
Note: The next time the user logs on to Scheduled Reports Client, he or she can schedule these reports.
8. Exit Interaction Administrator.
Create reports and define filters
Administrators create reports and use filters to refine displayed report data in the Interaction Reporter workspace in IC Business Manager. You must have the appropriate Interaction Reporter and Interaction Report Assistant licensing to work with reports.
Filters must be assigned before users can select reports to run in the Scheduled Reports client. For more information, see the Interaction Report Assistant help in IC Business Manager or in the PureConnect Documentation Library at http://help.genesys.com/cic.

Appendix A: Server setup
Appendix A: Server setup
In Interaction Administrator, ensure that the SR_SiteName server parameter is using the site ID of the server.
Scheduled Report Handlers
The following is a list of Scheduled Report Handlers. These handlers are automatically deployed and published with the CIC server.
• Custom_GetServerParameter.ihd
• Custom_LogErrorMessage.ihd
• SR_BuildEmailBody.ihd
• SR_CheckAccess.ihd
• SR_DataProcessor.ihd
• SR_DBQuery.ihd
• SR_FillValuesTable.ihd
• SR_GetDsAttribute.ihd
• SR_GetSiteId.ihd
• SR_IAChangeNotification.ihd
• SR_ModifyDateTimeParameters.ihd
• SR_ReportChangeNotification.ihd
• SR_RolesChangeNotification.ihd
• SR_RunScheduledReport.ihd
• SR_SendEmailErrorNotification.ihd
• SR_ServerParameterChangeNotification.ihd
• SR_UpdateReportParametersTable.ihd
• SR_UpdateReportsTables.ihd
• SR_UpdateUserAccessTable.ihd
• SR_UserChangeNotification.ihd
• SR_WorkgroupsChangeNotification.ihd
• Strings_SR.ihd
Install Scheduled Reports
For this next step, follow the usual installation process documented in Installation tasks.

Appendix B: Change Custom Reports
Appendix B: Change Custom Reports
This section describes additional considerations and tasks to perform when changing custom report input parameters.
Date and Time Input Parameters
Some custom reports use date/time input parameters. These parameters are configured to be used in Scheduled Reports. To function properly, date/Time parameters configured for Scheduled reports must include at least one of the following words:
• 'begin'
• 'start'
• 'end'
Input Parameters
If you change custom report input parameters, and make any corresponding changes in Interaction Administrator, you must:
• Delete and recreate all existing scheduled reports based on the custom report you modified.
Appendix C: Run an Interaction Reporter report or a Report Assistant report using command line
Appendix C: Run an Interaction Reporter report or a Report Assistant report using command line parameters
This section describes command-line parameters you can use to modify how to run an Interaction Reporter report or a Report Assistant report when run from a Command-Line Interface or from a Windows shortcut.
Parameter Abbreviation Description
Notifier -n Specify the CIC server to connect to. For example:
-n=Clay
User -u Specify the CIC User logon name. For example:
-u=devlab_user
Password -p Password for CIC User’s password. Add the -decrypt parameter if it's an encrypted password). For example:
Unencrypted password: -p=1234

Encrypted password: -p=1234 –decrypt=1
Decrypt -decrypt (optional) Use this parameter with an encrypted password and use the value of 1. For example:
–decrypt=1
Printer -printer Use this parameter to specify the printer to which you want to connect. For example:
-printer=”\\clayserver\HQBusinessCenter\PrinterB”
Report Type -reporttype
Select 0 to run an Interaction Reporter report or select 1 to run a Report Assistant Report. For example:
To run an Interaction Reporter report, type: -reporttype=0
To run a Report Assistant report, type: -reporttype=1
Scheduled Report ID -schedreportid
Specify the report id in database record. For example:
-schedreportid=3324
Input file unc\filename -inputfile
The location of the input file. For example:
-inputfile=”\\unc\file\path\reportassistantfilter.i3rpt”
Export file unc\filename -exportfile
The location to which to export the file. For example:
-exportfile=”\\unc\file\path\rareport.pdf"
Export file type -exporttype
Specify the format to which you want to export data. For example:
-exporttype=PDF
Metadata source
-metadatasource
Metadata source in the IC Data Sources in Interaction Administrator. The default is “IC Report Logs”. For example:
-metadatasource=IC Report Logs
Windows shortcut examples
Interaction Reporter:
In this example, an Interaction Reporter scheduled report exists in the database. The reporting executable would appear as follows:
• "C:\Program Files (x86)\Interactive Intelligence\ICUserApps\ReportingExecutable.exe" n=clay -
u=devlab_user -p=1234 -reporttype=0 -schedreportid=999 -exporttype=pdf "-exportfile=\\unc\file\path\iareport.pdf"
Report Assistant:
In this example, the reporting executable for a Report Assistant report with a report configuration provided by a local file would appear as follows:
• "C:\Program Files (x86)\Interactive Intelligence\ICUserApps\ICBusinessManager.exe" ReportingExecutable -n=clay -u=devlab_user -p=1234 -reporttype=1 -inputfile="\\unc\file\path\reportassistantfilter.i3rpt" -exporttype=pdf "-exportfile=\\unc\file\path\rareport.pdf"
Change Log
Change Log Date Changed
12/2/2015 Updated Install the Scheduled Report Results Custom Report instructions for copying custom reports.
10/12/2015 Updated Microsoft .NET Framework requirements.
7/6/2015 Made versioning reference modifications. Updated copyright and trademark. Updated supported server versions and software requirements.
8/30/2017 Updated valid export formats
8/30/2017 Updated Copyright and Trademark information for 2016
7/11/17 Updated Microsoft .NET Framework 4.5.2 requirement to Microsoft .NET Framework 4.5.2 or later. Updated copyright and trademark information.
9/7/2017 Updated for Genesys rebranding 2018 R1
11/2/2017 Updated for Windows Server 2016
2/2/2018 Converted source files to HTML5 and reviewed for 2018 R2