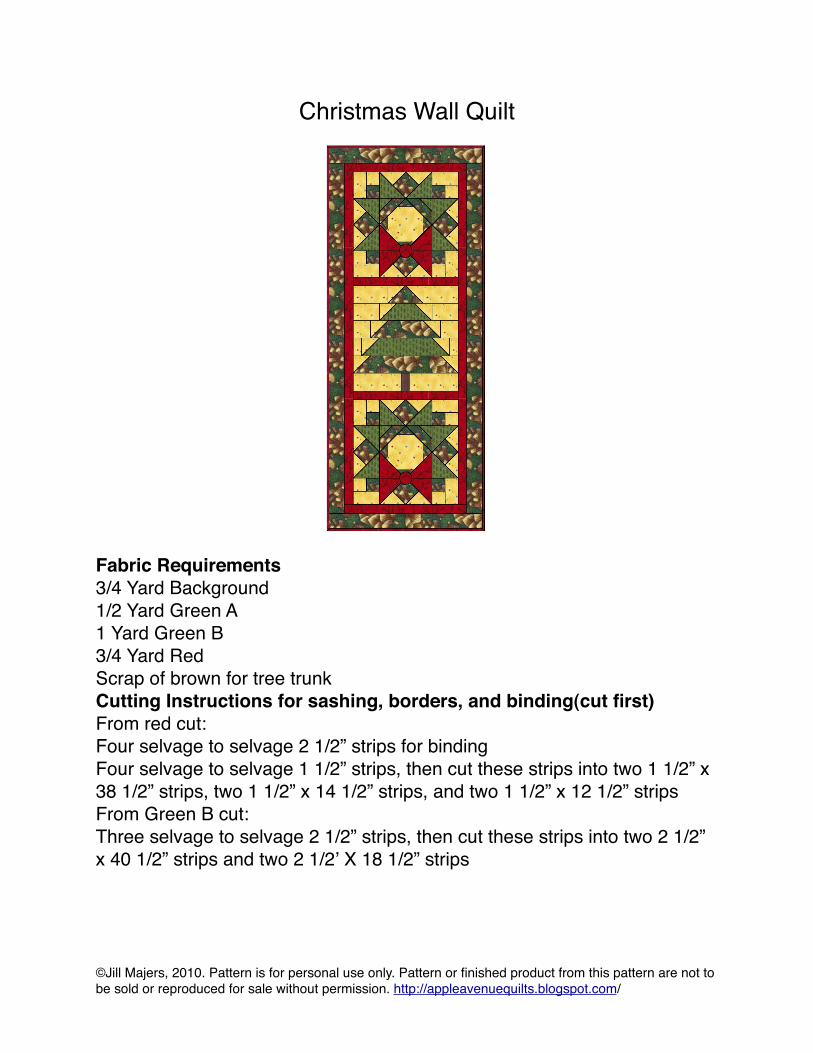
Christmas Wall Quilt
13
Christmas Wall Quilt Fabric Requirements 3/4 Yard Background 1/2 Yard Green A 1 Yard Green B 3/4 Yard Red Scrap of brown for tree trunk Cutting Instructions for sashing, borders, and binding(cut first) From red cut: Four selvage to selvage 2 1/2” strips for binding Four selvage to selvage 1 1/2” strips, then cut these strips into two 1 1/2” x 38 1/2” strips, two 1 1/2” x 14 1/2” strips, and two 1 1/2” x 12 1/2” strips From Green B cut: Three selvage to selvage 2 1/2” strips, then cut these strips into two 2 1/2” x 40 1/2” strips and two 2 1/2ʼ X 18 1/2” strips ©Jill Majers, 2010. Pattern is for personal use only. Pattern or finished product from this pattern are not to be sold or reproduced for sale without permission. http://appleavenuequilts.blogspot.com /
-
Upload
mgrodrigues -
Category
Documents
-
view
14 -
download
2
Transcript of Christmas Wall Quilt
Christmas Wall Quilt
Fabric Requirements3/4 Yard Background1/2 Yard Green A1 Yard Green B3/4 Yard RedScrap of brown for tree trunkCutting Instructions for sashing, borders, and binding(cut first)From red cut: Four selvage to selvage 2 1/2” strips for bindingFour selvage to selvage 1 1/2” strips, then cut these strips into two 1 1/2” x 38 1/2” strips, two 1 1/2” x 14 1/2” strips, and two 1 1/2” x 12 1/2” stripsFrom Green B cut:Three selvage to selvage 2 1/2” strips, then cut these strips into two 2 1/2” x 40 1/2” strips and two 2 1/2ʼ X 18 1/2” strips
©Jill Majers, 2010. Pattern is for personal use only. Pattern or finished product from this pattern are not to be sold or reproduced for sale without permission. http://appleavenuequilts.blogspot.com/
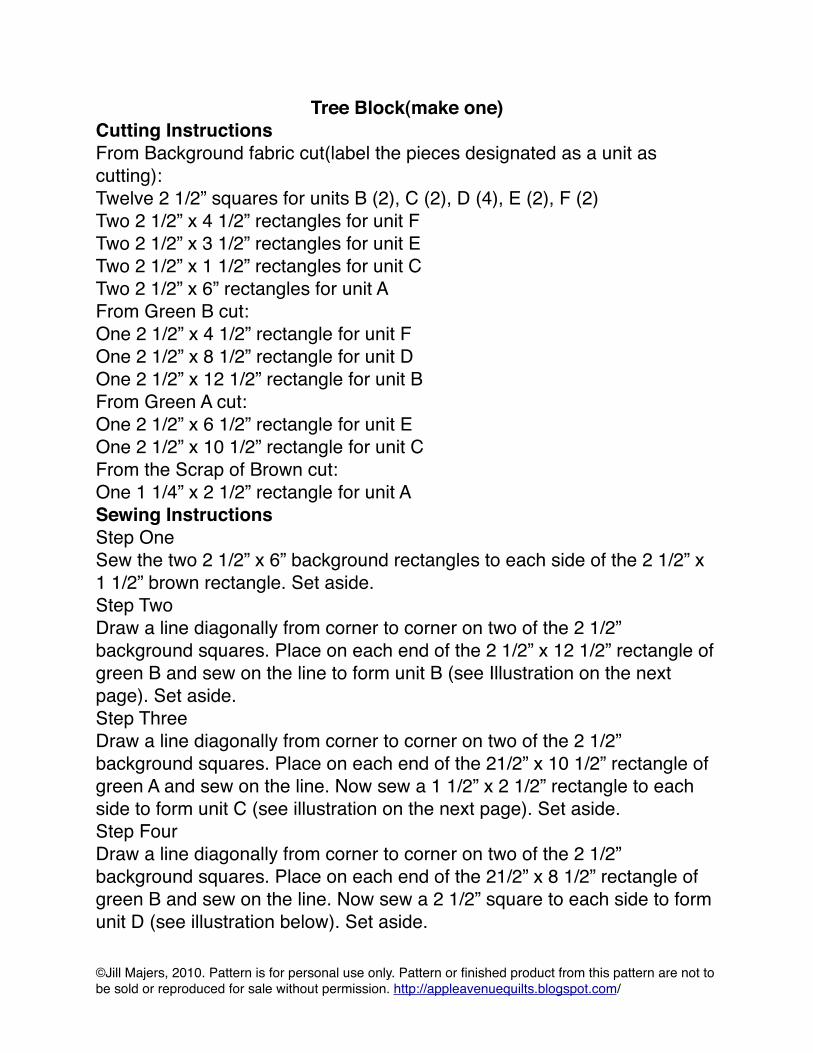
Tree Block(make one)Cutting InstructionsFrom Background fabric cut(label the pieces designated as a unit as cutting):Twelve 2 1/2” squares for units B (2), C (2), D (4), E (2), F (2)Two 2 1/2” x 4 1/2” rectangles for unit FTwo 2 1/2” x 3 1/2” rectangles for unit E Two 2 1/2” x 1 1/2” rectangles for unit CTwo 2 1/2” x 6” rectangles for unit AFrom Green B cut: One 2 1/2” x 4 1/2” rectangle for unit FOne 2 1/2” x 8 1/2” rectangle for unit DOne 2 1/2” x 12 1/2” rectangle for unit BFrom Green A cut:One 2 1/2” x 6 1/2” rectangle for unit EOne 2 1/2” x 10 1/2” rectangle for unit CFrom the Scrap of Brown cut:One 1 1/4” x 2 1/2” rectangle for unit ASewing InstructionsStep OneSew the two 2 1/2” x 6” background rectangles to each side of the 2 1/2” x 1 1/2” brown rectangle. Set aside.Step TwoDraw a line diagonally from corner to corner on two of the 2 1/2” background squares. Place on each end of the 2 1/2” x 12 1/2” rectangle of green B and sew on the line to form unit B (see Illustration on the next page). Set aside.Step ThreeDraw a line diagonally from corner to corner on two of the 2 1/2” background squares. Place on each end of the 21/2” x 10 1/2” rectangle of green A and sew on the line. Now sew a 1 1/2” x 2 1/2” rectangle to each side to form unit C (see illustration on the next page). Set aside.Step FourDraw a line diagonally from corner to corner on two of the 2 1/2” background squares. Place on each end of the 21/2” x 8 1/2” rectangle of green B and sew on the line. Now sew a 2 1/2” square to each side to form unit D (see illustration below). Set aside.
©Jill Majers, 2010. Pattern is for personal use only. Pattern or finished product from this pattern are not to be sold or reproduced for sale without permission. http://appleavenuequilts.blogspot.com/
Step FiveDraw a line diagonally from corner to corner on two of the 2 1/2” background squares. Place on each end of the 21/2” x 6 1/2” rectangle of green A and sew on the line. Now sew a 3 1/2” x 2 1/2” rectangle to each side to form unit E (see illustration below). Set aside.Step SixDraw a line diagonally from corner to corner on tow of the 2 1/2” background squares. Place on each end of the 21/2” x 4 1/2” rectangle of green B and sew on the line. Now sew a 4 1/2” x 2 1/2” rectangle to each side to form unit f (see illustration below). Set aside.Step SevenSew all units together as shown below, starting with A and working in order though N.
©Jill Majers, 2010. Pattern is for personal use only. Pattern or finished product from this pattern are not to be sold or reproduced for sale without permission. http://appleavenuequilts.blogspot.com/
Section A
Section B
Section C
Section D
Section E
Section F

Wreath Blocks(make two, foundation pieced)
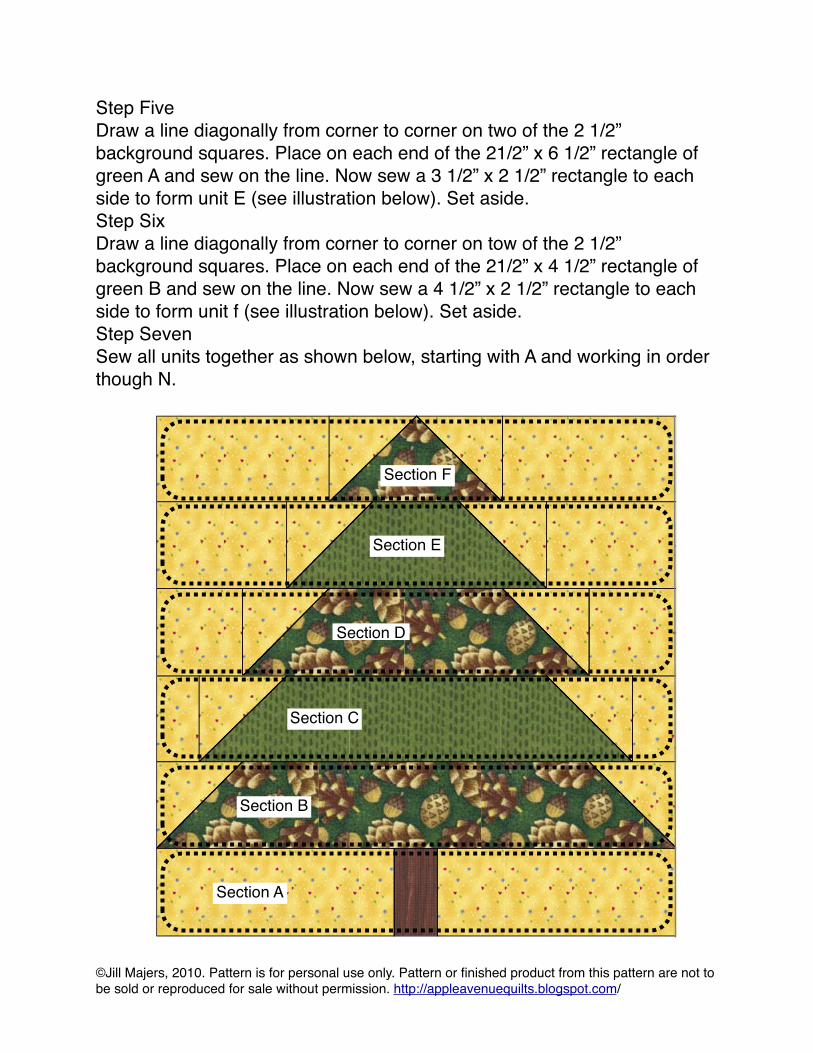
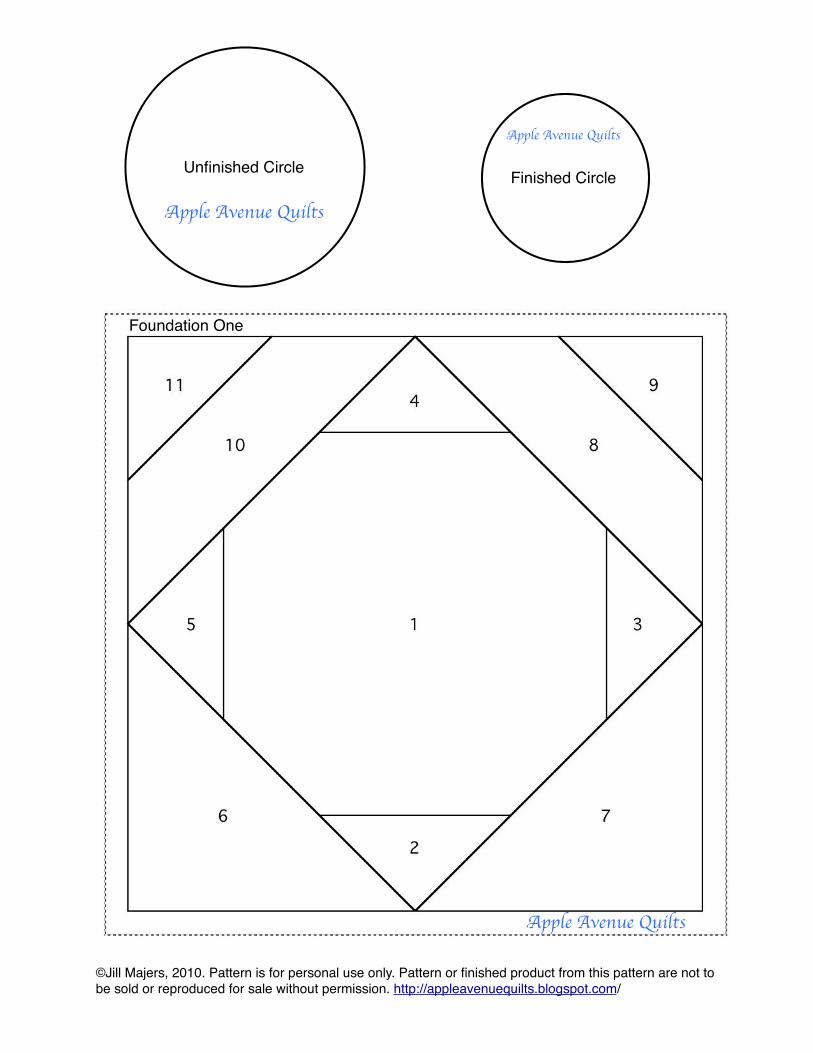
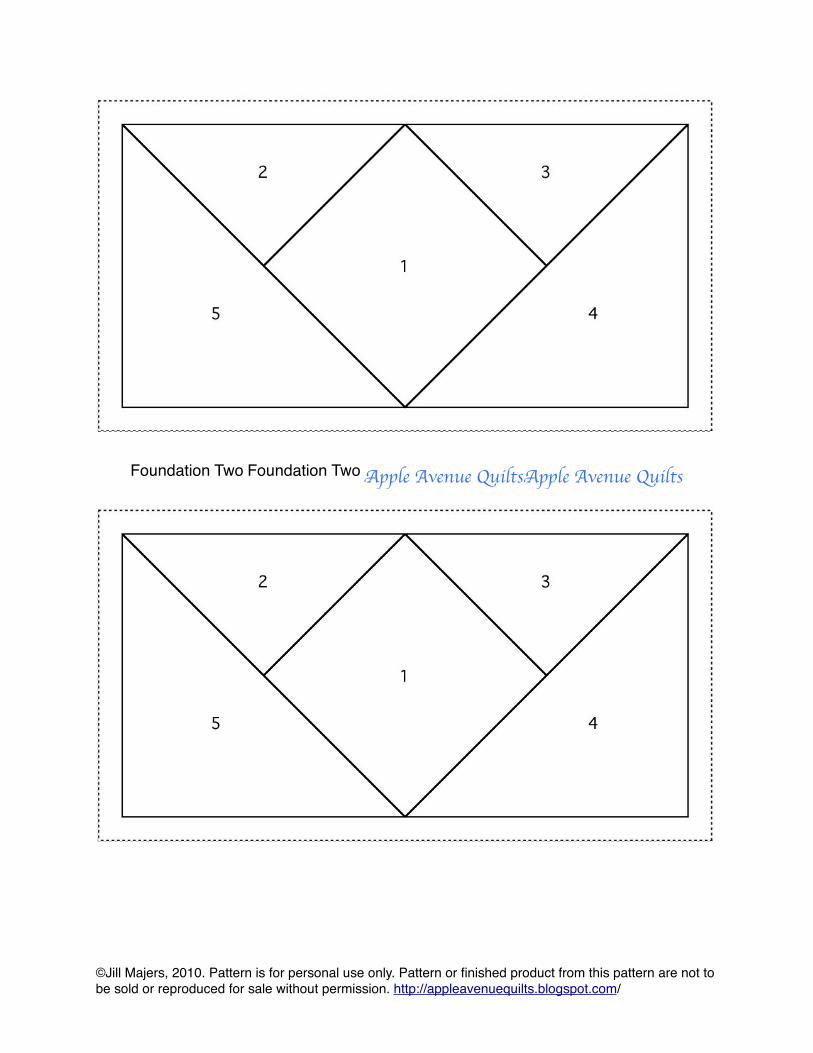
Cutting Instructions(Numbers correspond to numbers on foundation pieced blocks.)Foundation One (Make Two)(1) Two 5” square, background(2,3,4,5) Four 3” squares, green B, cut in half diagonally once (6,7) Two 5” square, red, cut in half diagonally once(8,10) Four 5 1/2” x 1 3/4” rectangles, green B(9,11) Two 3” square, green A, cut in half diagonally onceFoundation Two (Make Six)(1) Six 3” squares, green B(2,3) Three 5 1/2” squares, background, cut in half diagonally twice (this will equal 12 triangles)(4,5) Six 5” squares, green A, cut in half diagonally onceFoundation Three (Make Two same as foundation two except for color placement)(1) Two 3” square, green B(2,3) One 5 1/2” squares, background, cut in half diagonally twice (this will equal 4 triangles) (4,5) Two 5” square, red, cut in half diagonally onceFoundation Four (Make Eight)(1) Eight 2 1/4” squares, green B(2) Eight 2 1/4” squares, background(3) Eight 2 1/4” x 4” rectangles, backgroundBow KnotTwo 2 1/2” circle, red(to finish at 1 3/4”)Sewing InstructionsPiece foundation blocks and trim. Do not remove the paper yet. Sew foundation four to the bottom of foundation one, red edges together. Sew one of foundation two to the opposite side. Now sew foundations four to each end of the remaining foundations two(see illustration on the next page for placement). Finally sew the narrow block units to each side of the wide block unit.Sew the 1 1/4” x 12 1/2” rectangles of background to opposite sides of the block. Then sew the 1 1/4” x 14” rectangles to the top and the bottom. You can now remove the papers. Prepare the circle of red and applique over the center of the bow.
©Jill Majers, 2010. Pattern is for personal use only. Pattern or finished product from this pattern are not to be sold or reproduced for sale without permission. http://appleavenuequilts.blogspot.com/
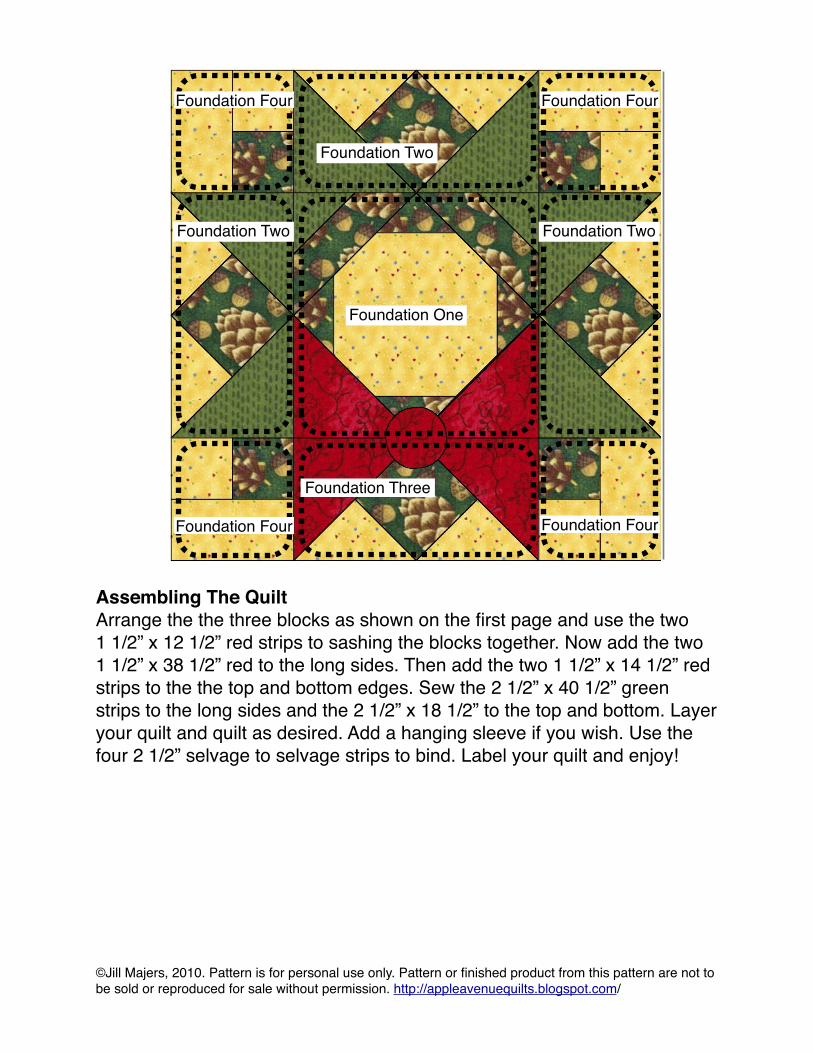
Assembling The QuiltArrange the the three blocks as shown on the first page and use the two 1 1/2” x 12 1/2” red strips to sashing the blocks together. Now add the two1 1/2” x 38 1/2” red to the long sides. Then add the two 1 1/2” x 14 1/2” red strips to the the top and bottom edges. Sew the 2 1/2” x 40 1/2” green strips to the long sides and the 2 1/2” x 18 1/2” to the top and bottom. Layer your quilt and quilt as desired. Add a hanging sleeve if you wish. Use the four 2 1/2” selvage to selvage strips to bind. Label your quilt and enjoy!
©Jill Majers, 2010. Pattern is for personal use only. Pattern or finished product from this pattern are not to be sold or reproduced for sale without permission. http://appleavenuequilts.blogspot.com/
Foundation One
Foundation Two
Foundation Two Foundation Two
Foundation Three
Foundation Four Foundation Four
Foundation FourFoundation Four

©Jill Majers, 2010. Pattern is for personal use only. Pattern or finished product from this pattern are not to be sold or reproduced for sale without permission. http://appleavenuequilts.blogspot.com/
Unfinished Circle Finished Circle
Foundation One
Apple Avenue Quilts
Apple Avenue Quilts
Apple Avenue Quilts

Foundation Two Foundation TwoApple Avenue QuiltsApple Avenue Quilts
©Jill Majers, 2010. Pattern is for personal use only. Pattern or finished product from this pattern are not to be sold or reproduced for sale without permission. http://appleavenuequilts.blogspot.com/

Foundation Two Foundation ThreeApple Avenue QuiltsApple Avenue Quilts
©Jill Majers, 2010. Pattern is for personal use only. Pattern or finished product from this pattern are not to be sold or reproduced for sale without permission. http://appleavenuequilts.blogspot.com/

©Jill Majers, 2010. Pattern is for personal use only. Pattern or finished product from this pattern are not to be sold or reproduced for sale without permission. http://appleavenuequilts.blogspot.com/
Foundation Four Foundation Four
Foundation Four Foundation Four
Apple Avenue QuiltsApple Avenue Quilts
Apple Avenue Quilts Apple Avenue Quilts
©Jill Majers, 2010. Pattern is for personal use only. Pattern or finished product from this pattern are not to be sold or reproduced for sale without permission. http://appleavenuequilts.blogspot.com/
Unfinished Circle Finished Circle
Foundation One
Apple Avenue Quilts
Apple Avenue Quilts
Apple Avenue Quilts
Foundation Two Foundation TwoApple Avenue QuiltsApple Avenue Quilts
©Jill Majers, 2010. Pattern is for personal use only. Pattern or finished product from this pattern are not to be sold or reproduced for sale without permission. http://appleavenuequilts.blogspot.com/

Foundation Two Foundation ThreeApple Avenue QuiltsApple Avenue Quilts
©Jill Majers, 2010. Pattern is for personal use only. Pattern or finished product from this pattern are not to be sold or reproduced for sale without permission. http://appleavenuequilts.blogspot.com/

©Jill Majers, 2010. Pattern is for personal use only. Pattern or finished product from this pattern are not to be sold or reproduced for sale without permission. http://appleavenuequilts.blogspot.com/
Foundation Four Foundation Four
Foundation Four Foundation Four
Apple Avenue QuiltsApple Avenue Quilts
Apple Avenue Quilts Apple Avenue Quilts