Chord Workshop Ebook - EZ Strummerezstrummer.com/chord_workshop/ebook/CW_Ebook.pdffound. Also...
300
1 Introduction to Chord Workshop The Chord Workshop program is designed for beginner and intermediate guitarists interested in learning the fundamentals of chord structure, finger placement, and positions in which these chords can be found. Also included in this program are mini-exercises in arpeggios and basic fingerstyle usage. This guide serves as a handbook for the online material found in this member-only course. In this handbook you’ll find blank spaces offered. These blank spaces are available for you to write down notes and paraphrase some of the information that is offered. Because this guide is taken directly from the online area of Chord Workshop, you might run into a few areas that refer to material that is found online. Feel free to visit the online section at any time if you run into a confusing topic. There are videos online that will help you understand much easier. The reference link for the information provided here is found at: http://chordworkshop.com/members I hope you enjoy this in-depth study into a variety of chords, scales, arpeggios, fingerstyle, and more. Because this guide is organized into daily and weekly chunks of information, you’ll have ample time to research the information I offer at your leisure. Be sure to move slowly, even if you think you know the chords being studied because I touch base on progressive topics often. Don’t forget to go online to learn 50 songs that feature the chords, scales, arpeggios, and fingerstyle that is being discussed in each weekly session. Sincerely, Nathan Wilson Course Instructor Chord Workshop
Transcript of Chord Workshop Ebook - EZ Strummerezstrummer.com/chord_workshop/ebook/CW_Ebook.pdffound. Also...

1
Introduction to Chord Workshop
The Chord Workshop program is designed for beginner and intermediate guitarists interested in learning
the fundamentals of chord structure, finger placement, and positions in which these chords can be
found. Also included in this program are mini-exercises in arpeggios and basic fingerstyle usage.
This guide serves as a handbook for the online material found in this member-only course. In this
handbook you’ll find blank spaces offered. These blank spaces are available for you to write down notes
and paraphrase some of the information that is offered. Because this guide is taken directly from the
online area of Chord Workshop, you might run into a few areas that refer to material that is found
online. Feel free to visit the online section at any time if you run into a confusing topic.
There are videos online that will help you understand much easier.
The reference link for the information provided here is found at:
http://chordworkshop.com/members
I hope you enjoy this in-depth study into a variety of chords, scales, arpeggios, fingerstyle, and more.
Because this guide is organized into daily and weekly chunks of information, you’ll have ample time to
research the information I offer at your leisure. Be sure to move slowly, even if you think you know the
chords being studied because I touch base on progressive topics often.
Don’t forget to go online to learn 50 songs that feature the chords, scales, arpeggios, and fingerstyle
that is being discussed in each weekly session.
Sincerely,
Nathan Wilson
Course Instructor
Chord Workshop

2
“Getting Started” Reference Material
The 12 Notes In Western Music
You might already know this, but I want to touch base on it anyway. There are 12 notes in Western Music - and these 12 notes are based on the alphabet. By imagining the notes in music as you would the alphabet, you can assign these alphabetical letters as blocks, starting with the first letter of the alphabet- A.
Of these 12 notes, there are 7 primary notes and 5 secondary notes.
Here are the primary notes:
1 2 3 4 5 6 7
A B C D E F G
The 5 notes that remain are called secondary notes. ALL secondary notes can be called either sharps or flats, because in the world of guitar sharps and flats basically mean the same thing. Secondary notes can be found BETWEEN primary notes. Since secondary notes follow the alphabetical listing in the same way as the primary notes, there are only two terms you need to know about secondary notes.
Sharp = this means to go HIGHER in pitch. Flat = this means to go LOWER in pitch.
The good news is that secondary notes have dual names, so they can be called either sharp OR flat. When you see an A sharp (A#) you can also call it a B flat (Bb).
Often you'll see these 'dual' notes like this: A#/Bb, C#/Db, D#/Eb, F#/Gb, G#/Ab
As already mentioned, the secondary notes follow the same series of numbers as do the primary notes - with two differences. In guitar there is no such thing as a B#(Cb) or E sharp (Fb). This is because of the way in which intervals work.
What are intervals you say?
Intervals are just the distance between notes in music - and VERY important for learning scales because scales are built upon them. The easiest way to understand this is by focusing on the primary notes. A whole step means you skip one WHOLE step, leaving a SPACE between the two notes. A half step means you skip HALF of a step, leaving NO space between the two notes. There isn't much more to it than that. Because we are working with the alphabet, we'll choose the A string on our guitar as an example. After all, it follows the note order perfectly.

3
Here's a chart that will help you understand:
HS = Half Step WS = Whole Step
The A String (primary notes ONLY)
Fret 0 2 3 5 7 8 10 12
Note A B C D E F G A
Interval (WS) WS WS WS
Interval (HS) HS HS
The open A string rings as an A note. The second fret is the next primary note, which is a B. This continues based on the interval steps. There are a few other options that could be considered, because above is just a few of the steps I selected to use.
For example (WS intervals):
In this case, the following notes are WS intervals:
0 - 2 (we skipped 1), 3 - 5 (we skipped 4), 5 - 7 (we skipped 6), 8 - 10 (we skipped 9), and 10 - 12 (we skipped 11)
For example (HS intervals):
In this case, the following notes are HS intervals:
2 - 3 (no skip), 7 - 8 (no skip)
In other words, there is NO SPACE between B and C, or E and F (and there never will be.)
Understanding intervals means a great deal when working with scales as well as chords, so I wanted to touch base on them. Doing this allows you to understand why scales work as they do.
Back To Secondary Notes...
It DOES NOT matter which you call the secondary notes. It's just a good idea to decide on one or the other for consistency while learning. I throw these dual names intentionally on you at times for a refresher.
Where do we place the secondary notes?
4
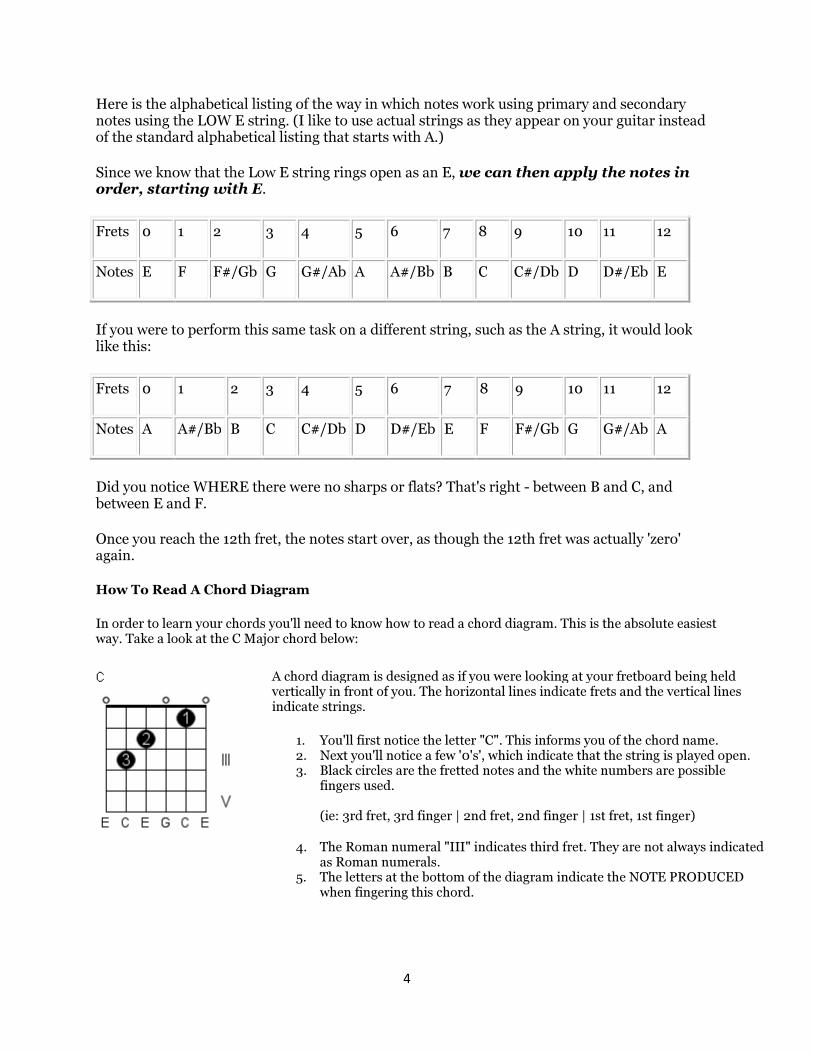
Here is the alphabetical listing of the way in which notes work using primary and secondary notes using the LOW E string. (I like to use actual strings as they appear on your guitar instead of the standard alphabetical listing that starts with A.)
Since we know that the Low E string rings open as an E, we can then apply the notes in order, starting with E.
Frets 0 1 2 3 4 5 6 7 8 9 10 11 12
Notes E F F#/Gb G G#/Ab A A#/Bb B C C#/Db D D#/Eb E
If you were to perform this same task on a different string, such as the A string, it would look like this:
Frets 0 1 2 3 4 5 6 7 8 9 10 11 12
Notes A A#/Bb B C C#/Db D D#/Eb E F F#/Gb G G#/Ab A
Did you notice WHERE there were no sharps or flats? That's right - between B and C, and between E and F.
Once you reach the 12th fret, the notes start over, as though the 12th fret was actually 'zero' again.
How To Read A Chord Diagram
In order to learn your chords you'll need to know how to read a chord diagram. This is the absolute easiest way. Take a look at the C Major chord below:
A chord diagram is designed as if you were looking at your fretboard being held vertically in front of you. The horizontal lines indicate frets and the vertical lines indicate strings.
1. You'll first notice the letter "C". This informs you of the chord name. 2. Next you'll notice a few '0's', which indicate that the string is played open. 3. Black circles are the fretted notes and the white numbers are possible
fingers used. (ie: 3rd fret, 3rd finger | 2nd fret, 2nd finger | 1st fret, 1st finger)
4. The Roman numeral "III" indicates third fret. They are not always indicated as Roman numerals.
5. The letters at the bottom of the diagram indicate the NOTE PRODUCED when fingering this chord.
5
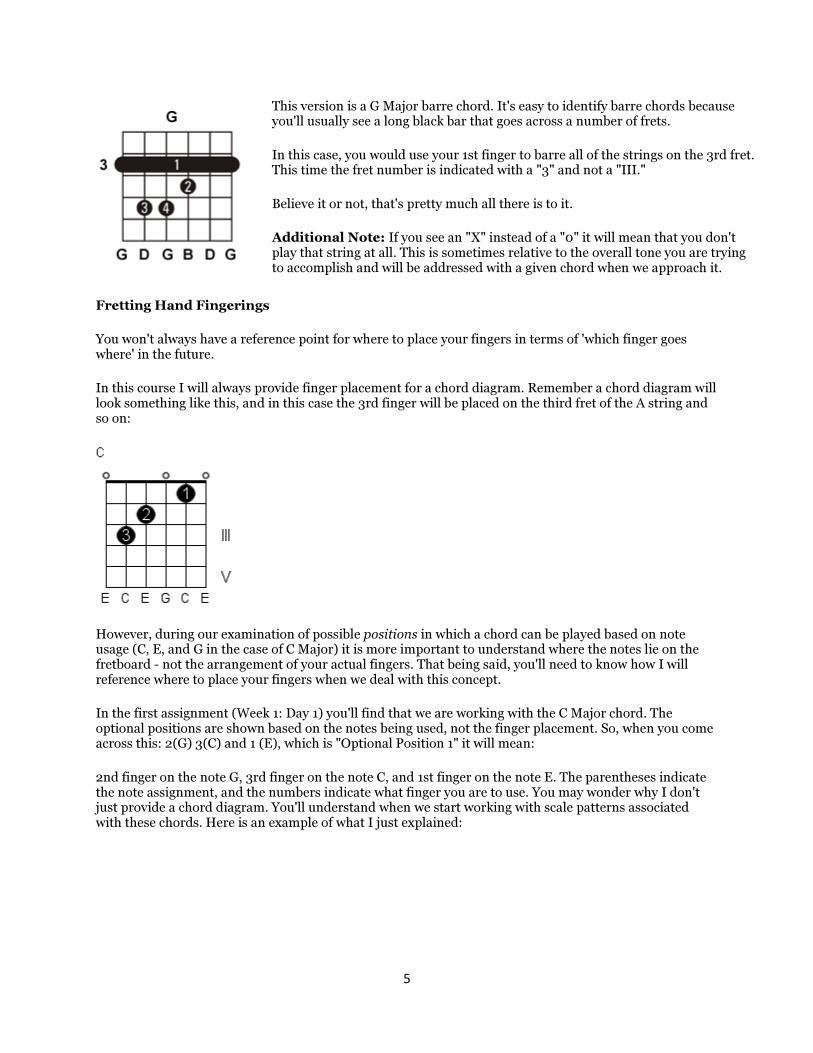
This version is a G Major barre chord. It's easy to identify barre chords because you'll usually see a long black bar that goes across a number of frets.
In this case, you would use your 1st finger to barre all of the strings on the 3rd fret. This time the fret number is indicated with a "3" and not a "III."
Believe it or not, that's pretty much all there is to it.
Additional Note: If you see an "X" instead of a "0" it will mean that you don't play that string at all. This is sometimes relative to the overall tone you are trying to accomplish and will be addressed with a given chord when we approach it.
Fretting Hand Fingerings
You won't always have a reference point for where to place your fingers in terms of 'which finger goes where' in the future.
In this course I will always provide finger placement for a chord diagram. Remember a chord diagram will look something like this, and in this case the 3rd finger will be placed on the third fret of the A string and so on:
However, during our examination of possible positions in which a chord can be played based on note usage (C, E, and G in the case of C Major) it is more important to understand where the notes lie on the fretboard - not the arrangement of your actual fingers. That being said, you'll need to know how I will reference where to place your fingers when we deal with this concept.
In the first assignment (Week 1: Day 1) you'll find that we are working with the C Major chord. The optional positions are shown based on the notes being used, not the finger placement. So, when you come across this: 2(G) 3(C) and 1 (E), which is "Optional Position 1" it will mean:
2nd finger on the note G, 3rd finger on the note C, and 1st finger on the note E. The parentheses indicate the note assignment, and the numbers indicate what finger you are to use. You may wonder why I don't just provide a chord diagram. You'll understand when we start working with scale patterns associated with these chords. Here is an example of what I just explained:
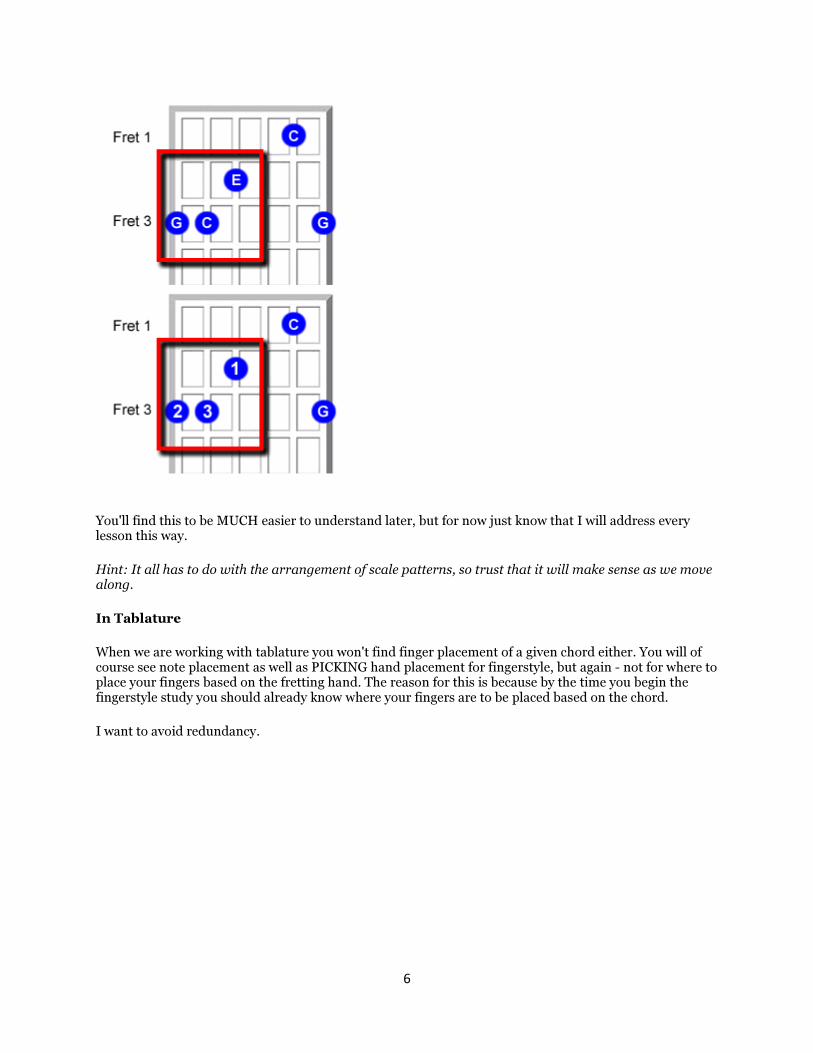
6
You'll find this to be MUCH easier to understand later, but for now just know that I will address every lesson this way.
Hint: It all has to do with the arrangement of scale patterns, so trust that it will make sense as we move along.
In Tablature
When we are working with tablature you won't find finger placement of a given chord either. You will of course see note placement as well as PICKING hand placement for fingerstyle, but again - not for where to place your fingers based on the fretting hand. The reason for this is because by the time you begin the fingerstyle study you should already know where your fingers are to be placed based on the chord.
I want to avoid redundancy.

7
Guide To EZ Fingerstyle
There are only three melodies available in fingerstyle.
1. Low Melody – This melody usually focuses on the Low E string and A string, but depends on the chord being played. If a song calls for a D Major chord, the lowest ‘technical’ note that you can play without altering the D Major chord’s need for three notes. In the case of D Major, the low melody would be the open A string. The low melody is not ALWAYS the root note of the chord, but can be thought of as such for ease of playing.
2. Mid Melody – This melody really goes back to the concept of the ‘middle C’ on a piano. The mid melody is the space filler found within a chord. It can be on a variety of strings, but usually it involves the A and D strings. Again, this depends on the chord. In the case of D Major, the mid melody would be the D string, even though it is the root. In the case of C Major, the mid melody could be ANY of the notes on the D and G strings.
3. High Melody – This melody is much easier to understand, because generally a high melody note falls in on the B and High E strings. Since in standard tuning both E strings are tuned to “E” (with the high E string being an octave of the low E) anything you EVER play on the Low E string can be duplicated on the High E string in unison – or in other words – together.
There are three melodies, and there are six strings on a standard guitar (assuming we are also tuned to standard tuning). Let’s do the math:
You can assign these three melodies as a TEMPLATE (but it’s not always necessary to follow this 100%) like this:
• Low Melody Notes – Low E string and A string
• Mid Melody Notes – D string and G string • High Melody Notes – B string and High E string
It’s almost always a good idea to think of fingerstyle as being a roller coaster. You might have heard me mention this before. We want the low melody to set the tone, but we don’t want to make it sound boring, so include the high melody for color.
To give the song a sense of flow, we assign the mid melody notes within each chord. Here’s the formula:
• Low + High Melody together
• Mid Melody (filler) • Low and/or High Melody
This gives a nice and comfortable feel to the song. Notice though that I showed at the end “Low and/or High Melody” as an option.
Here’s why: It all depends on the type of song you are performing. Often you’ll find that if a song feels ‘bright’ or ‘happy’ then a high melody series of notes would sound good. However, if you have a song that seems ‘dim’ or ‘sad’ you might want to revert back to the low melody before moving back into the next progression. Because it is logical to ALWAYS start with both low and high melody at the beginning of each chord progression, you’ll never need to worry whether or not the song is going to be dull. Odds are it won’t. If it does start to feel dull, then you can easily change the last “Low and/or High Melody” to the opposite of what the next chord will be.

8
Fingers Used To Pick
Unless you are classically trained, there is absolutely no reason to worry about which fingers to use. The easiest way to think of how to use your fingers to pick a song out is by thinking of the arrangement of your hand itself.
You can almost always get by with your thumb playing the low melody notes and your 1st and/or 2nd fingers playing EVERY OTHER NOTE on the guitar. It might seem strange at first, but it will start making sense as you practice. Sometimes adding your 3rd finger just creates problems, not to mention adding your 4th finger. Since we are picking out the chords in the easiest way possible, you can honestly play every single song from this collection with your thumb, 1st, and 2nd fingers. If you CHOOSE to add more depth to a chord, begin working with your 3rd finger, but only after you are very comfortable.
For this quick tutorial we will take the first four exercises using the C Major chord. The first measure of each exercise below starts with a different 'areas' in which you can play a C Major chord. The measure begins with a full chord strum and then transitions into an arpeggio. Arpeggios are a great way to listen to how each note rings, which allows you to decide on the notes of 'emphasis' - or the different melodies in which you can employ.
After the first measure we have an EZ fingerstyle version of the chord using all three low, mid, and high melodies.
Picking Finger Placement
While theorists and classically trained musicians might frown on this, I don't feel that what I am about to show you is really a big deal at all. Because we are working with the absolute basics I think this might be the easiest way to understand how your picking fingers need to cooperate with almost any passage you play.
Below each exercise is a fingerstyle approach that covers the second measure.
Exercise 1
The only thing that should be noticed in the first measure of the exercise is that we are ending the passage with the third fret note on the A string. This provides a deep enough tone so that the listener feels as if the chord has 'rounded' out the measure. Remember, it's just like a roller coaster, when you go up (higher in pitch) you must go back down (lower in pitch). In the second measure we have a full fingerstyle pattern. Most of the additional exercises follow roughly the same format. We have our low and high(er) melody notes being played together. We then follow up with a 'mid' melody, which takes place on the D string at the second fret. This repeats over and over until you reach the last note in the measure. Notice it is also a mid-melody. Again the idea here is to keep the song moving, but allowing a bit of tension in the mid-range so that the song carries forward with virtually any additional chord that is added.

9
Fingerstyle (C Major open)
The "T" stands for thumb. Since this is fingerstyle we won't be using a pick. Remember that the red numbers/letters indicate the picking pattern for your picking fingers, not the way in which the chord should be fingered on your fretting hand. You'll see that the "T" or thumb shows you playing the notes on the A string and the D string. These are your low melody notes. The "1" and "2" indicate your first (1) and second (2) fingers.
Exercise 2
The same concept applies here, but because this is technically a C/G chord (because the G NOTE is added to the C Major chord) we want to avoid making the G note our last note in the measure. The chord needs to reflect that it is still a C Major chord. I have purposely tripped you up a little because you'll see that in the first measure a full C Major isn't played because there is no sign of the first fret note on the G string. Or is there? Remember we simply need the notes C, E, and G to create a C Major chord. Do we have those three notes? We do! The third fret note on the Low E string is a G (and of course if we opened up the open G string note itself it would also produce a G note) so we have our formula.
So, WHY is this chord not just called a C Major chord? Why is it called a C/G? The reason for this is due to adding the bass note. The G is the bass note that has been added to the C Major chord. Anytime you see a "/" in a CHORD you'll assume this. Whatever note follows a "/" will indicate that this note should be added into the original chord shape itself. Throughout the course you will run into many of these, such as D/F#, G/B, A/G, Am/F, and so on. Always remember to form the first chord, which preceeds the "/" and then ADD the note that follows it to the chord.

10
Fingerstyle (C Major open with added G note)
You'll see that even though the third fret note has been added on the Low E string the arrangement is still the same. We still want our thumb, or "T" to play the low melody notes.
Exercise 3
This one is easy, and follows the same idea as the previous two. The chord is a C Major used as a barre chord. Because this version will result in a bit of a higher pitch than the open C Major, I stopped the arpeggio (first measure) at the fifth fret to avoid the C note root on the third fret. It allows the chord more of a brighter sound. This is optional, but I recommend doing this so that the chord doesn't sound so boring. In the second measure I changed up the melody order. Here I stuck with the low melody but worked more with mid-range notes (basically just avoiding the High E string) so that the high melody could come in and create a gallop or boom-chuck concept. The high melody comes in on the third fret of the High E string at the end of every four note run.
Fingerstyle (C Major Barre Chord #1)
While theorists and classically trained musicians will tell you that your 3rd finger should play the High E string third fretted note, I don't feel as though this is truly necessary - at least in this case. Your 2nd finger is already in position to play the fifth fret note on the B string, so a quick move to the High E string isn't

11
really a big issue. This MAY become a problem in certain passages down the road, so if it does we will approach it when we get to it. I've yet to have an issue with this in the past, but there IS a first time for everything. For now, we can keep it simple.
Exercise 4
This is yet another barre chord version of the C Major chord. However, this time it features the root on the eighth fret of the Low E string. Remember this arrangement, because if you are playing ANY E style (E style refers to the root note being on the Low E string) barre chord this is how your arrangement would be. Playing an E style A Major barre chord? Move the root note to the fifth fret on the Low E string (because this fret is an A note) and keep your fingers arranged in the same way. Boom! It's an A Major barre chord. In the second measure I worked with mid/high (note series 1) to low (note series 2), high (note series 3) and then mid again (note series 4). Doing this really tugs at the notes and keeps the listener in suspense.
Fingerstyle (C Major Barre Chord #2)
You DO have an option here, but for purpose of continuity I will show you the logical idea behind this particular fingerstyle pattern for your picking finger. Everything you see here is the same idea as before, but you'll notice that I've called for a "1" on the D string to strike the ninth fret note. If you have trouble doing this you may most certainly use your thumb. In the C Major Barre chord I showed you previously, the 2nd finger played the eighth fret on the High E string. Using your 1st finger to strike the ninth fret note on the D string here follows the same logics. However, the 1st finger tends to be a bit confusing to move at times, so if you aren't comfortable with this you may most certainly use your thumb.
In A Nutshell...
When it comes to playing fingerstyle it doesn't NEED to be as difficult as some instructors make it. Play what feels natural. You are always free to experiment with an assortment of finger arrangements, but undoubtedly you'll find that low, mid, and high melody is the easiest way to think of it.
12
Why the High, Mid, and Low Melody concept works...
No matter what chord or pattern you are playing there will ALWAYS be these three elements. Period. All you have to do is find out where the root note of the chord or pattern is and consider that your low melody. The low melody can and should be played using your thumb. The thumb can then play ANY note or notes on the string or strings adjacent to the low melody root note. If the low melody is on the A string, then the thumb can play the Low E, A, and even D string if needed. All you have to do then is use your 1st and/or 2nd fingers (or even 3rd fingers if you find it easy enough) to fill up the rest of the mid and high melodies.
Exception: If you run into a series of fingerstyle exercises that call for two notes (played simultaneously) that are both low melody, you obviously cannot play both of these notes with just the thumb. This is when you need to adjust accordingly and more than likely use your 1st finger to fret the higher of the two low melody notes. When we approach this issue I will expand upon it. (By the way, there IS a way to do this using just the thumb, but it's rather tricky so we'll wait until we come across it.)
Using Your Thumb
Perception...
• You've heard it's a big 'no no.'
• It's difficult to use your thumb. • You must have long fingers.
Reality...
• It's NOT a big 'no no.'
• It's NOT necessarily difficult. • Finger size DOES NOT matter.
I am sure you will argue a few of these points, but before you do please read what I have to say.
Why I Use My Thumb
There are a variety of reasons, but the most important reason is that I have carpal tunnel syndrome. I no longer wear a brace (though I did in school) because the brace is so uncomfortable. When I was young my family talked with a doctor about my problem. The funny thing is - he recommended pushing through the pain using hand exercises to keep my fingers from 'stiffening up.' I was diagnosed at age 13 and didn't start playing guitar until age 15. This wasn't the prime reason I started playing guitar though. It just so happened that guitar would take the place of the exercises that the doctor gave me. The weird thing is, they were quite similiar. Anyway...
I never had trouble with open chords. However, when I started playing barre chords my 1st finger was in constant pain. The pain was bad enough that I actually stopped playing for a while. I'm not a wuss, but too much is sometimes just....well...too much.
So, as I watched musicians like Jimi Hendrix, Stevie Ray Vaughan, Mark Knopfler, Dave Matthews, James Taylor (all my favorites of course) I noticed a variety of strange chord arrangements that to me didn't make much sense. Or did it?
I began using my thumb in place of my 1st finger to see if it helped. It did - tremendously. Of course, as I read through the many guitar instruction books (it was EXTREMELY rare to find a lesson online at the time - and it was only around 16 years ago!) all signs pointed to...

13
"DO NOT USE YOUR THUMB BECAUSE IT WILL CAUSE YOU PROBLEMS IN THE FUTURE!"
I waited for this day to come, ignoring the word of caution. I'm still waiting for that day.
Let's Get A Few Things Straight...
When you use your thumb there ARE issues, but these issues are few and far between. More important, it is easier to address these issues and fix them than it is to forget playing barre chords all together. Again, I am NOT telling you to use your thumb. However, if you experience prolonged pain in trying to play a barre chord (almost always due to the 1st finger barring so many strings at once) then you might consider this.
How It Works...
The thumb can take the place of the barre that you create with your 1st finger. Your hand positioning will need to change a tiny bit. Instead of keeping the palm of your hand parallel with the fretboard, you need to angle it a bit inward, toward your hip. The easiest way to practice this is by first forming an F barre chord on the first fret, like this:
Notice where your elbow is. In theory, when you use your 1st finger to barre all of the first fret notes on all strings, your elbow should be parallel with your hip. However, if you use your thumb, your elbow should almost touch your hip. It is no longer parallel, but angled inward to your body. This will almost always be the case whether or not you are sitting or standing. Arm length of course is relative, but as long as you keep your elbow pointing in toward your hip, your hand will naturally angle itself to allow a full range of movement.
What Will The Thumb Cover?
Generally speaking the thumb can fret the notes on the Low E string and A string. In some instances, you may find that your thumb can even cover the D string. I mentioned that finger length doesn't matter, and while this is still true, you might not be able to fret the A string - and more than likely NOT the D string. But you shouldn't have much trouble fretting the Low E string. Once you practice playing E Style barre chords and find that it becomes rather easy, you can then try out the A string.

14
The Tricks
There are a few tricks to using your thumb.
Trick 1 : position your fretting hand as if you are picking up a shovel or a broom. Trick 2: when moving to another chord lift your thumb off the fretboard at the knuckle and mute the string(s). Trick 3: if you are playing a full barre chord be sure your 1st finger still covers the additional notes.
Practice Practice Practice
I know you are already practicing a ton of stuff, but I cannot stress how much easier it has made my life as a musician by using my thumb. It allows for a variety of added techniques as well. Again, there MAY be times that it won't work - but I have yet to find a time.
As we proceed through the lessons I provide often you WILL find me using my thumb in place of my 1st finger. If you aren't the kind of musician that chooses to do this, just realize that my thumb simply takes the place of the 1st finger barre. It does not affect any other finger, and does not affect the overall arrangement of a chord in any way.
Now it’s time to get into the actual course.

15
Week 1 -Day 1: The C Major Chord
The C Major chord looks like this:
In this chord, the fretted notes include the notes C, E, and G. In other words, we need these three notes to form the triad (three) or chord of C Major.
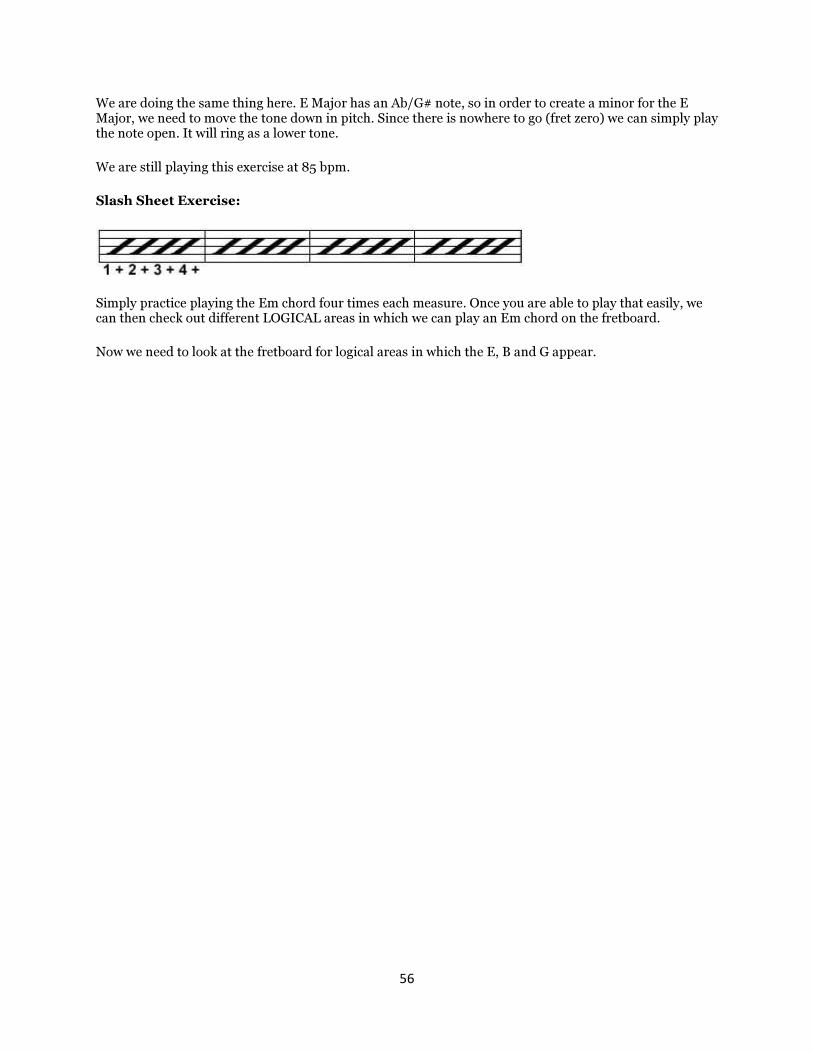
Since this is the first chord we are learning, we need to first discover how to strum this chord using a slash sheet. A slash sheet is a very simple way of getting familiar with a chord in question, because there's nothing confusing about it. All you have to do is strum the chord being investigated four times per measure. This lesson is performed at 85 BPM.
Slash Sheet Exercise:
Simply practice playing the C Major chord four times each measure.
Once you are able to play that easily, we can then check out different LOGICAL areas in which we can play a C Major chord on the fretboard. Notice I said logical.
Just because we can find the three notes of C, E, and G on the fretboard, it doesn't mean that we should just do so. Instead, we need to create a grouping of three notes (triad) that make sense in practical usage. Now we need to look at the fretboard for logical areas in which the C, E, and G appear:

16
This diagram shows every note associated with the C Major chord, including the open string notes.
Because we ONLY need C, E, and G in order to produce a C Major chord, we can look at this chart to determine possible positions for fingering the C Major chord.
Notes: At Fret 12 the entire pattern starts over as if 12 were the open strings of the guitar. We also have an upper case E and a lower case e.
You'll often find chord diagrams and charts that show this letter like this, which allows you to differentiate between Low (upper case) and High (lower case).
In standard tuning (E-A-D-G-B-e) The Low E string (E) and the High E string (e) are both tuned to the same tuning, but the High E string rings at a different octave. The notes are still the same in terms of order.
Now we need to look at any logical positions that can be used instead of just our open C Major chord position.
The chart below will 'box in' all logical positions of the C Major chord.
Remember, we JUST need the notes C, E, and G in order to produce a C Major chord.
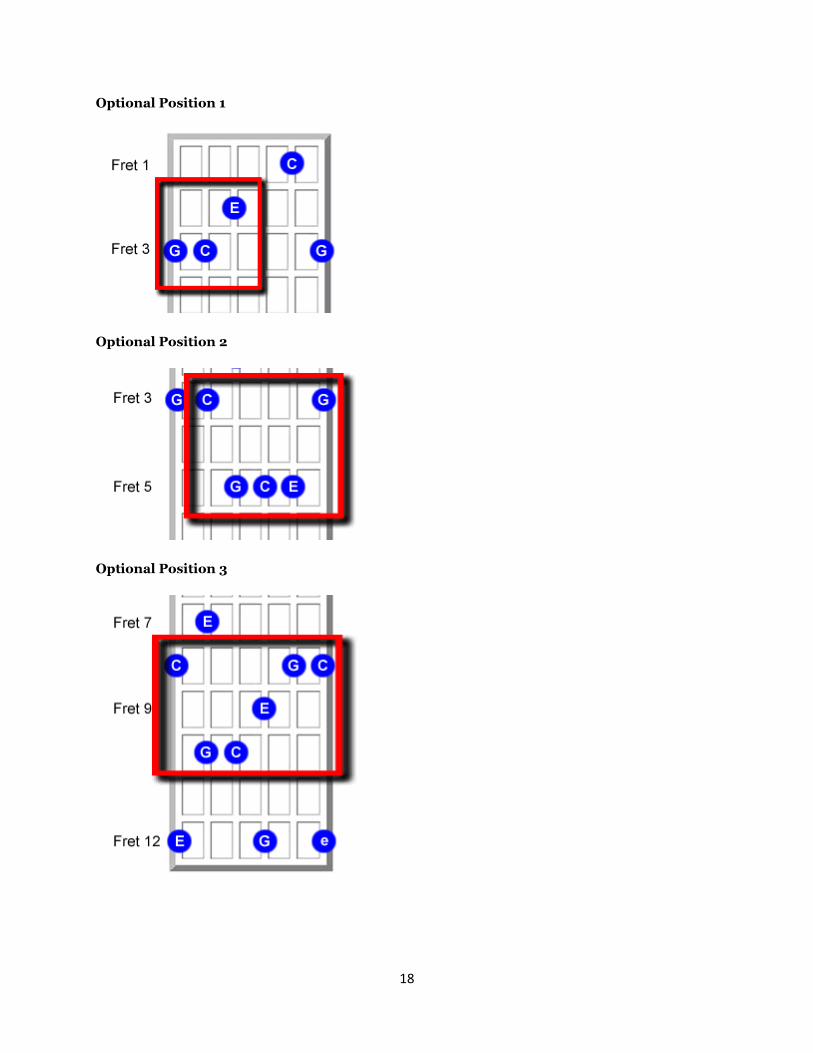
Optional Position #1
This position might not seem too common, but in all technicality it is a C Major chord. We have all three notes of C, E, and G as fretted notes.
Often you'll find this chord as the starting phase of what is called a C/G chord. Don't worry, I'll get into that chord later. However, you can - and actually might enjoy playing a C Major chord like this as a change of pace.
The fingerings here are: 2(G) 3(C) and 1 (E)

17
Optional Position #2
This position is a standard C Major barre chord located with the root (C) on the third fret.
There is also a power chord version of this where you remove the C note on the G string*, the E note on the B string, and the G note on the high E string, resulting in what is called a C5.
The "5" denotes that you are only playing the root note (C) and the 5th of that root note (G).
*While theory varies, the C note on the G string is technically a doubled octave of the root, and since there is already a C note as required in the root itself, there is no need to necessarily play that note. However, you'll find that a majority of musicians still tend to use this doubled octave of the root C to produce a power chord because it adds a large amount of emphasis to the C5 as a power chord.
If you were to play the 'full' C the fingerings would be like this: 1(C) 2(G) 3(C) 4(E) and 1(G). If you choose to play the C5 version (with or without the doubled octave) you would finger this chord like this: 1(C) 3(G) and (if including octave) 4(C).
Optional Position #3
Again, here we have a barre chord version of the C Major, but this time it starts out on the Low E string at the eighth fret.
The advantage of a barre chord is that it allows you to produce a fuller, much more colorful tone with a chord.
As you can see, there are multiple notes being played here.
The fingerings are: 1(C) 3(G) 4(C) 2(E) 1(G) and 1(C)
The disadvantage of this particular barre chord is the location on the neck of the guitar as it's a big jump to the eighth fret root of C.
Before We Apply Fingerstyle...
We need to practice these possible positions, so we need to revisit the slash sheet. This time, I'd like you to practice through an entire bar (all four measures) playing each possible OPTIONAL position.
18
Optional Position 1
Optional Position 2
Optional Position 3

19
Once you've done that, try switching position options after each measure.
Open C Major Optional 1 Optional 2 Optional 3
Optional 1 Optional 2 Optional 3 Open C Major
Optional 2 Optional 3 Open C Major Optional 1
Applying Fingerstyle
Each exercise first begins with a fully strummed chord followed by an arpeggio of the chord. An arpeggio is really just a chord that is picked out (usually in ascending and descending order) instead of simply strummed. There is more to it than that, but for now that is all we need to focus on. If you see a series of notes spread out instead of 'on top of each other' that usually means it is an arpeggio.
The next step is applying some basic fingerstyle to the chord.
Exercise 1
Fingerings

20
Exercise 2
Fingerings
Exercise 3
Fingerings

21
Exercise 4
Fingerings
Week 1 - Day 2: The Am Chord
The Am chord looks like this:
In this chord, the fretted notes include the notes E, A, and C. In other words, we need these three notes to form the triad (three) or chord of Am.
Note: You'll notice that the "m" is lower case. This lets you know that it is a "minor." All lower case letters will be minors.
Before we attach this chord from the previous lesson (C Major) we need to practice strumming the Am chord using our slash sheet.
22
We are still playing at 85 bpm.
Slash Sheet Exercise:
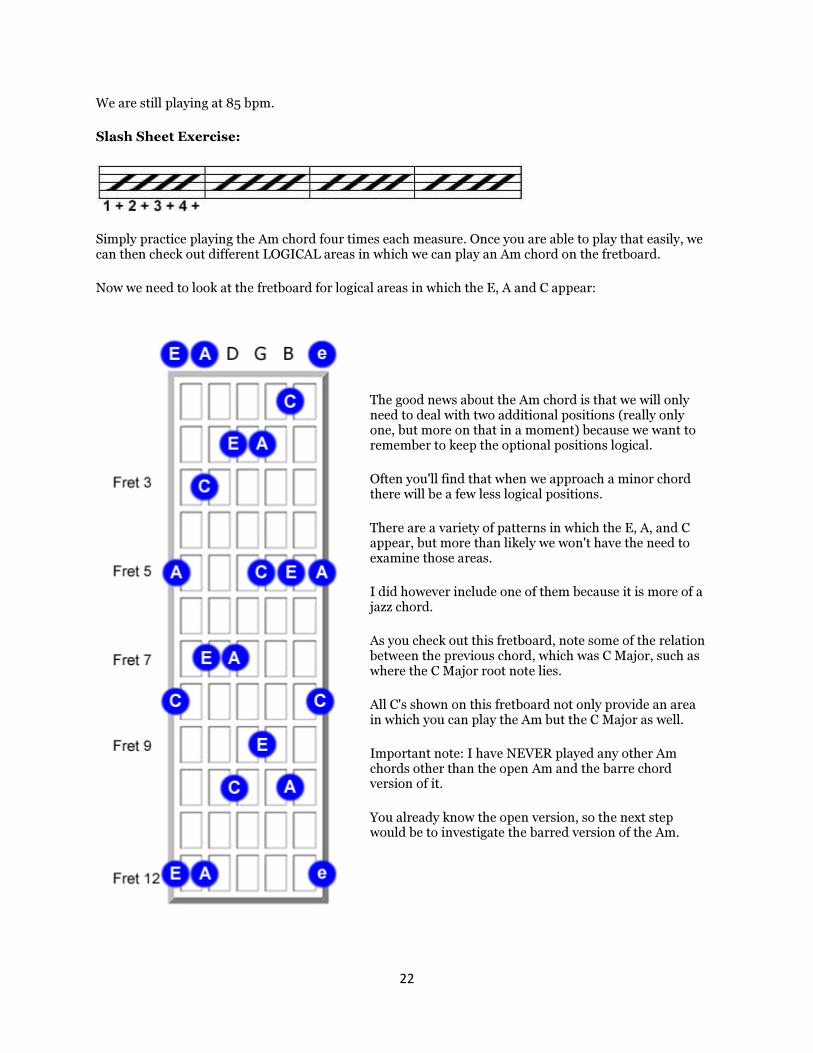
Simply practice playing the Am chord four times each measure. Once you are able to play that easily, we can then check out different LOGICAL areas in which we can play an Am chord on the fretboard.
Now we need to look at the fretboard for logical areas in which the E, A and C appear:
The good news about the Am chord is that we will only need to deal with two additional positions (really only one, but more on that in a moment) because we want to remember to keep the optional positions logical.
Often you'll find that when we approach a minor chord there will be a few less logical positions.
There are a variety of patterns in which the E, A, and C appear, but more than likely we won't have the need to examine those areas.
I did however include one of them because it is more of a jazz chord.
As you check out this fretboard, note some of the relation between the previous chord, which was C Major, such as where the C Major root note lies.
All C's shown on this fretboard not only provide an area in which you can play the Am but the C Major as well.
Important note: I have NEVER played any other Am chords other than the open Am and the barre chord version of it.
You already know the open version, so the next step would be to investigate the barred version of the Am.

23
Optional Position #1
This position is the Am barre chord position using the E Style concept. You'll recall from the Major examination that the term 'style' only refers to the string in which the root lies on. In this case the root of A (to form the Am) shows up on the fifth fret of the Low E string. This means that it is an E Style barre chord - even though it is an Am barre chord.
When playing an Am barre chord using the E Style concept, your 2nd finger note is removed and instead played one fret lower. This appears on the G string with the note C. It's not on the sixth fret, but rather on the fifth fret.
Fingerings are: 1(A) 3(E) 4 (A) 1 (C, E, A)
Optional Position #2
I included this 'jazzy' position even though I don't ever recall intentionally using it.
The main reason I am showing it to you is to help you remember that in order to form a triad/chord (3 notes) you only need the notes that are necessary to form it.
As you remember, we need the notes E, A, and C to form an Am chord. We have them on frets D, G, and B.
It might note be the 'friendliest' of chords, but the positioning is super easy to finger.
Before We Apply Fingerstyle...
We need to practice these possible positions, so we need to revisit the slash sheet. This time, I'd like you to practice through an entire bar (all four measures) playing each possible position.

24
Optional Position 1 - Am Barre
Optional Position 2 - Am (Jazzy)
Once you've done that, try switching position options after each measure, starting with the open Am.
Position Options 1 (open 1 - option 1 - option 2 - open 1)
Position Options 2 (option 2 - open 1 - option 1 - open 1)
Now that we have worked with a few position options we need to refresh ourselves by playing the C to Am using the slash sheet. Play the C for two measures and then the Am for two measures. Both of these chords will be open.

25
Applying Fingerstyle
Exercise 1
Fingerstyle Legend:
Exercise 2
Fingerstyle Legend:

26
Exercise 3
Fingerstyle Legend:
Connecting C - Am
Now we need to connect our previous chord to our new chord. However, we need to do this in a way that feels appropriate.
Open C to Open Am:
to

27
Barred C (root on third fret) to Barred Am:
to
Barred C (root on eighth fret) to Jazzy Am:
to
28
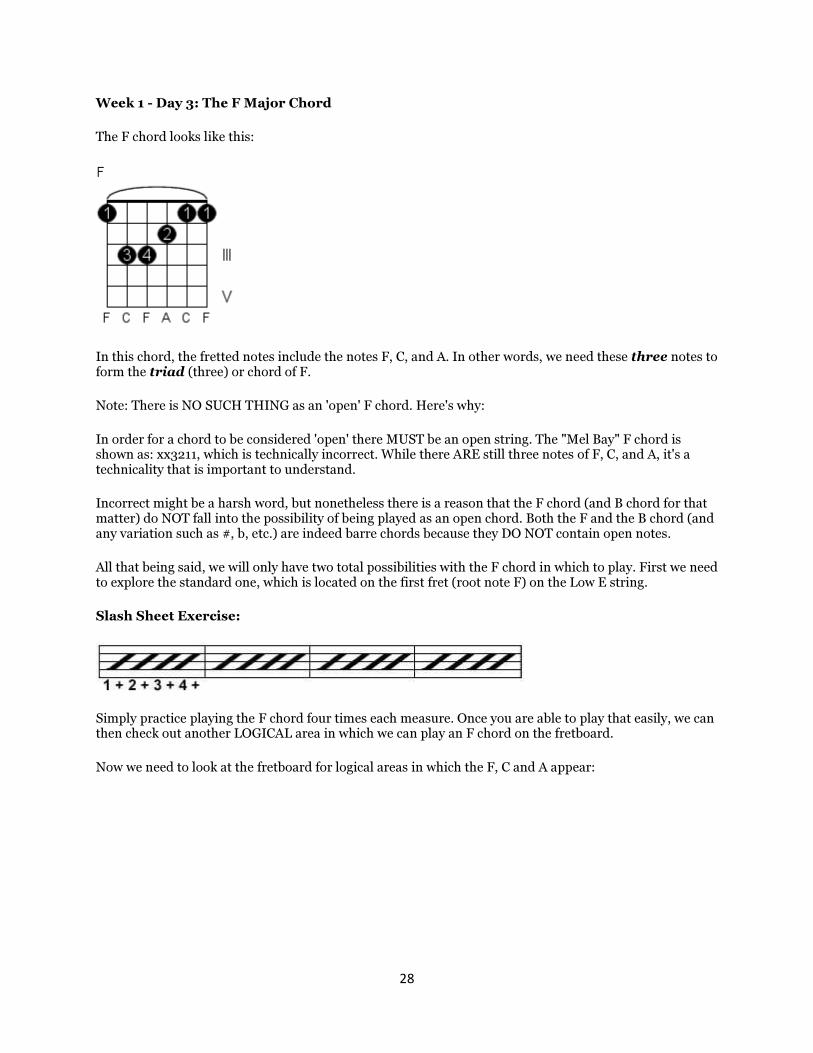
Week 1 - Day 3: The F Major Chord
The F chord looks like this:
In this chord, the fretted notes include the notes F, C, and A. In other words, we need these three notes to form the triad (three) or chord of F.
Note: There is NO SUCH THING as an 'open' F chord. Here's why:
In order for a chord to be considered 'open' there MUST be an open string. The "Mel Bay" F chord is shown as: xx3211, which is technically incorrect. While there ARE still three notes of F, C, and A, it's a technicality that is important to understand.
Incorrect might be a harsh word, but nonetheless there is a reason that the F chord (and B chord for that matter) do NOT fall into the possibility of being played as an open chord. Both the F and the B chord (and any variation such as #, b, etc.) are indeed barre chords because they DO NOT contain open notes.
All that being said, we will only have two total possibilities with the F chord in which to play. First we need to explore the standard one, which is located on the first fret (root note F) on the Low E string.
Slash Sheet Exercise:
Simply practice playing the F chord four times each measure. Once you are able to play that easily, we can then check out another LOGICAL area in which we can play an F chord on the fretboard.
Now we need to look at the fretboard for logical areas in which the F, C and A appear:

29
This one is pretty easy because you've already dealt with the A and C notes. All that is left is to examine the F notes.
There are a TON of possible options to play the F chord, but again I've only used two of them in my entire lifetime.
To me it seems rather ridiculous to navigate all over the fretboard when two will suffice just fine for us. Of course, the optional position I will show you below DOES contain a jazzy version of the F chord in the same way I showed you a jazzy version of the Am chord.
Odds are you will find it rather quickly, but if not here's a hint:
Check out the notes on the tenth fret of the D, G, and B strings.
This arrangement is much like the arrangement of the Am chord you previously learned.
Again, there are a bunch of possible options, but we need to find the ones that are most logical in terms of what we are focusing on.
When we get to the idea of using scales and working with songs you'll see a few other ideas that are pretty cool.
30
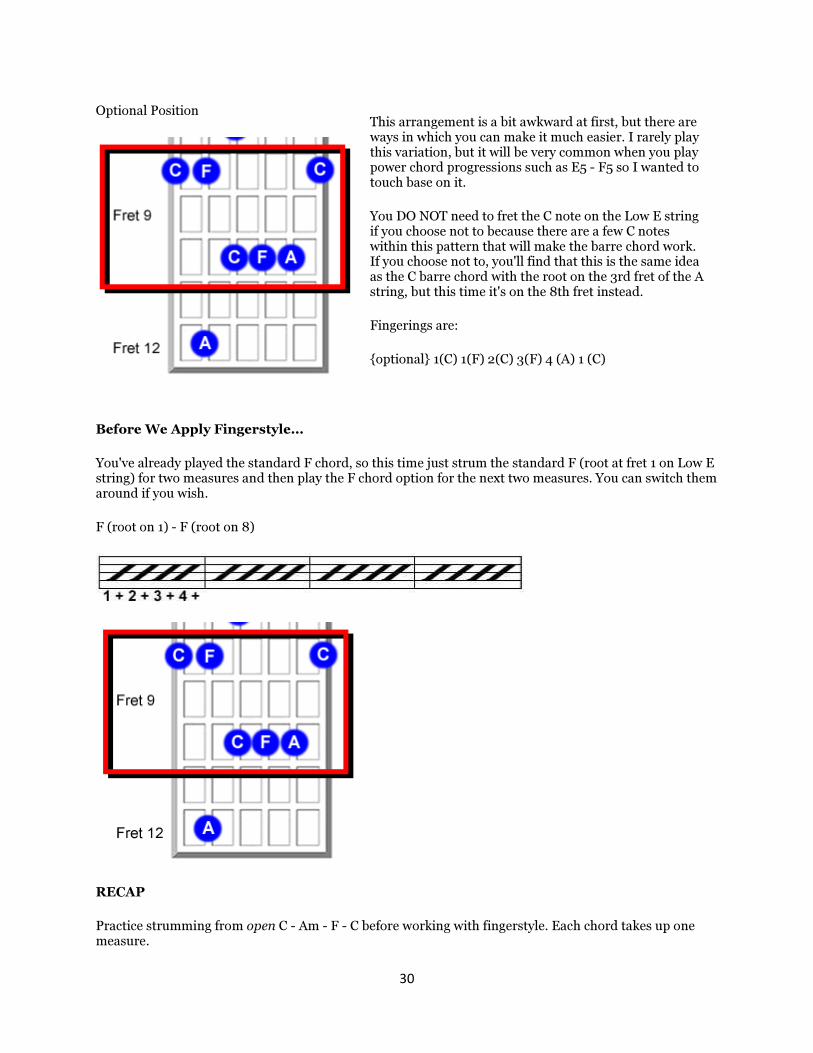
Optional Position
This arrangement is a bit awkward at first, but there are ways in which you can make it much easier. I rarely play this variation, but it will be very common when you play power chord progressions such as E5 - F5 so I wanted to touch base on it.
You DO NOT need to fret the C note on the Low E string if you choose not to because there are a few C notes within this pattern that will make the barre chord work. If you choose not to, you'll find that this is the same idea as the C barre chord with the root on the 3rd fret of the A string, but this time it's on the 8th fret instead.
Fingerings are:
{optional} 1(C) 1(F) 2(C) 3(F) 4 (A) 1 (C)
Before We Apply Fingerstyle...
You've already played the standard F chord, so this time just strum the standard F (root at fret 1 on Low E string) for two measures and then play the F chord option for the next two measures. You can switch them around if you wish.
F (root on 1) - F (root on 8)
RECAP
Practice strumming from open C - Am - F - C before working with fingerstyle. Each chord takes up one measure.
31
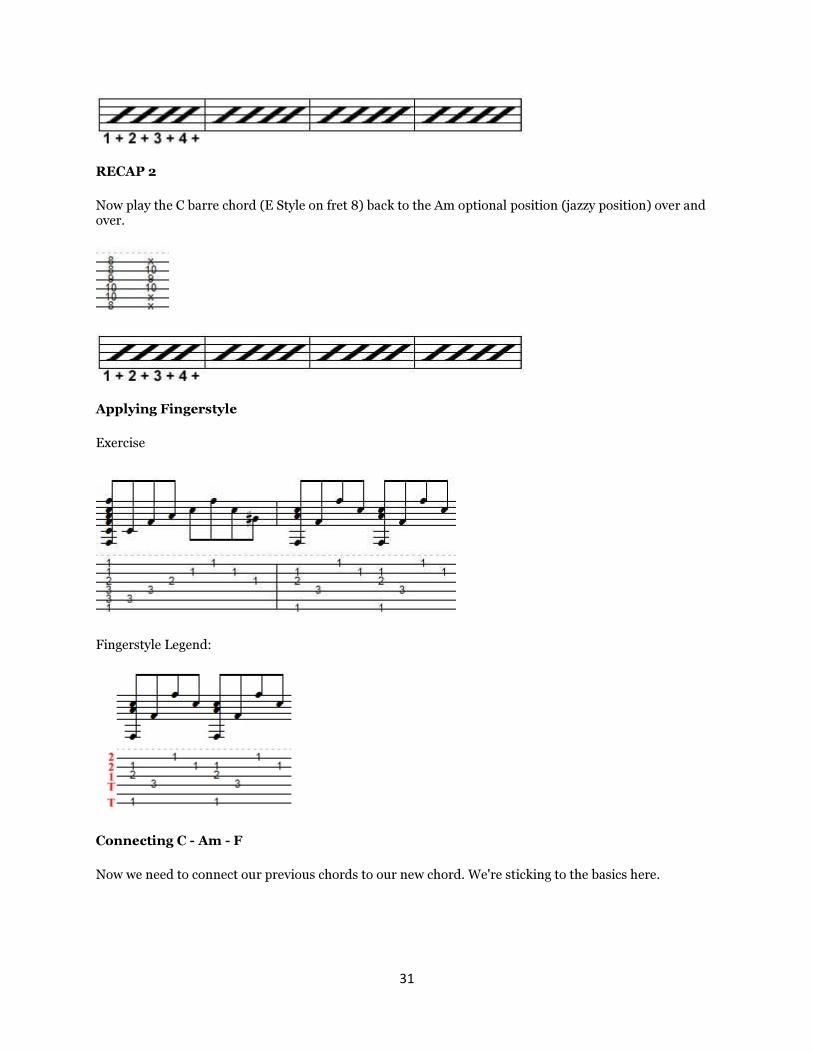
RECAP 2
Now play the C barre chord (E Style on fret 8) back to the Am optional position (jazzy position) over and over.
Applying Fingerstyle
Exercise
Fingerstyle Legend:
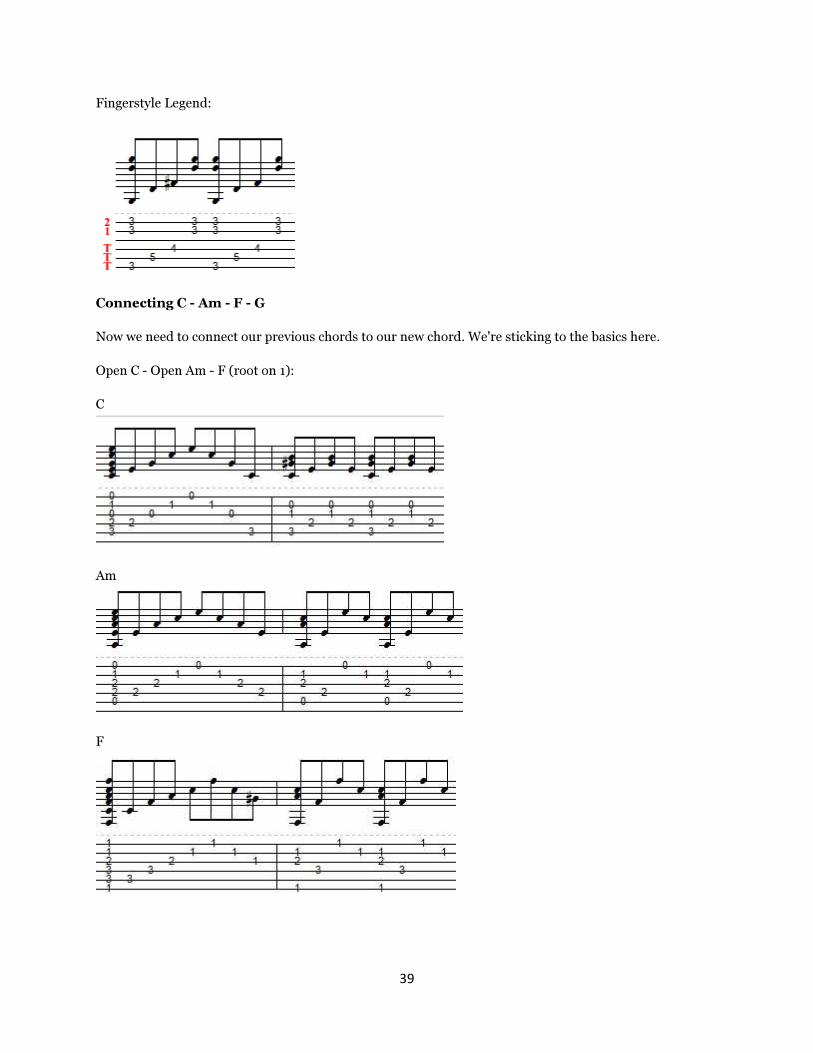
Connecting C - Am - F
Now we need to connect our previous chords to our new chord. We're sticking to the basics here.
32
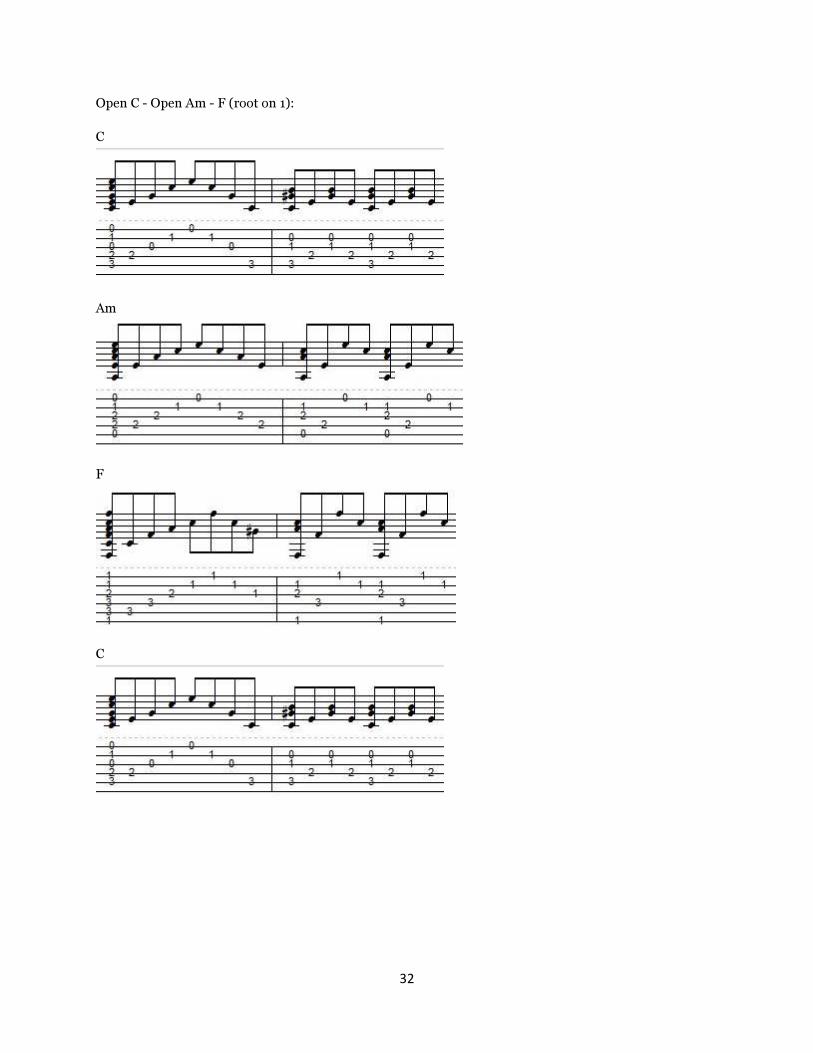
Open C - Open Am - F (root on 1):
C
Am
F
C

33
Barred C (root on third fret) - Barred Am - F (root on 1):
(This time play the F at the end twice)
C
Am
F
F
Note: I didn't include the optional position here because it really doesn't make sense to play the F in that area. However, feel free to play around with it if you wish. I don't want to throw too many weird chords on

34
you - especially if they aren't real common. If and when we get to the idea of playing an F5 (other than root on 1) I will address it.
Week 1 - Day 4: The G Major Chord
The G chord offers a few open position varieties right off the bat. Here are a few possible examples of the open G Major chord:
In this chord, the notes include the notes G, B, and D. In other words, we need these three notes to form the triad (three) or chord of G.
None of these open G Major chords are really all that different. More than anything you'll notice that the fingerings for the chords just change up a little. When we reach the point of changing chords you'll understand why I am showing you all of these finger variations.
The final open G Major chord is different than the other three only because we've added an additional fretted D note on the B string. This is the 'true' form of the G Major chord because in order to create a triad/chord, we technically need three FRETTED notes.
However, this is when it's not always necessary to worry too much about the official definition of a chord. All of the other chords I am showing you (besides the 'true' form) are simplified versions of the same chord. When a chord becomes simplified we sometimes lose track with what a real chord is.
So, unless otherwise noted, we need to try our best to always play the 'truest' G Major chord available, which is:
Again, if this chord is troublesome for you to finger or play in general, you may practice with the other variations until you get it down.
I did want to make mention of one more thing before we proceed.

35
Did you notice that there are TWO fretted G notes on the Low E string and High E string? This could be the one time you would have an exception in terms of a triad/chord. The only reason there are four fretted notes instead of three fretted notes is because both the Low E string and High E string are tuned to the same "E" - where the high E string is tuned an octave higher.
You CAN omit the High E string note if you wish since we already have the three notes we need (G, B, D) in the true form, but it's also just as easy to include it.
For our lesson we WILL be including it, but I actually play a G Major chord using my 4th finger on the B string and High E string. That is up to you.
Slash Sheet Exercise:
Simply practice playing the G chord four times each measure. Once you are able to play that easily, we can then check out another LOGICAL area in which we can play a G chord on the fretboard.
Now we need to look at the fretboard for logical areas in which the G, B and D appear:

36
There is a variety of possible options when examining the fretboard for places in which to play a G Major chord. Remember that all we need are the notes G, B, and D in order to do so.
However, you'll also notice that many of these positions, while they work great when playing scales and/or solos based on the notes, they aren't logical when searching for chord positions in which to play a G Major.
This all goes back to thinking logically on whether you want to struggle to find a 'special' area to play a chord, or if you just want to play a simple G chord. The optional position I will be showing you next is just a standard barre chord version.
There's no need to get all crazy when looking for a G chord. After all, we'll be applying the chords we have learned in songs, so we need to keep everything simple so that we may do so.
37
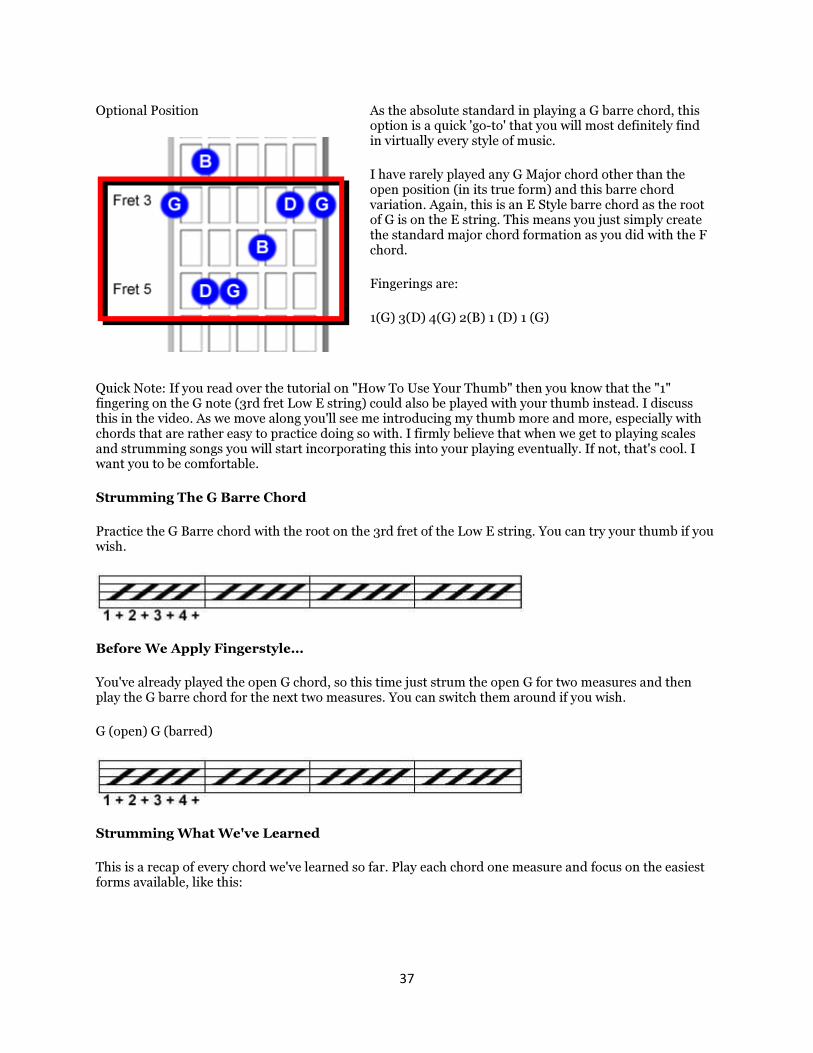
Optional Position
As the absolute standard in playing a G barre chord, this option is a quick 'go-to' that you will most definitely find in virtually every style of music.
I have rarely played any G Major chord other than the open position (in its true form) and this barre chord variation. Again, this is an E Style barre chord as the root of G is on the E string. This means you just simply create the standard major chord formation as you did with the F chord.
Fingerings are:
1(G) 3(D) 4(G) 2(B) 1 (D) 1 (G)
Quick Note: If you read over the tutorial on "How To Use Your Thumb" then you know that the "1" fingering on the G note (3rd fret Low E string) could also be played with your thumb instead. I discuss this in the video. As we move along you'll see me introducing my thumb more and more, especially with chords that are rather easy to practice doing so with. I firmly believe that when we get to playing scales and strumming songs you will start incorporating this into your playing eventually. If not, that's cool. I want you to be comfortable.
Strumming The G Barre Chord
Practice the G Barre chord with the root on the 3rd fret of the Low E string. You can try your thumb if you wish.
Before We Apply Fingerstyle...
You've already played the open G chord, so this time just strum the open G for two measures and then play the G barre chord for the next two measures. You can switch them around if you wish.
G (open) G (barred)
Strumming What We've Learned
This is a recap of every chord we've learned so far. Play each chord one measure and focus on the easiest forms available, like this:

38
Open C Major - Open A minor - F Major (1) - Open G Major
Applying Fingerstyle
The following exercises allow you to first strum the chord, pick out an EZ arpeggio (which allows you to hear the notes you might want to use) and then a simple fingerstyle pattern. Once we've done this we will attach this G Major chord to the previous chords.
Exercise 1
Fingerstyle Legend:
Exercise 2
39
Fingerstyle Legend:
Connecting C - Am - F - G
Now we need to connect our previous chords to our new chord. We're sticking to the basics here.
Open C - Open Am - F (root on 1):
C
Am
F

40
G
Week 1 - Day 5: The D Major Chord
Today I'm going to let you in on a little secret immediately. If you've ever seen me play a D chord, you'll notice that it looks QUITE different than what you've probably seen before. When I first learned my chords, I had a chord book that didn't include fingerings. While it was frustrating, I found that through my investigation (and after a lot of trial and error) I was able to choose my own method of placing my fingers on the fretboard to form a given chord.
The D Major chord was one of them. Before I show you 'my way' I want to show you the standard way:
I have always played a D Major like this:
The only difference is that I choose to barre my first finger over the G, B, and High E strings.
Since my 1st finger is placed on the third fret of the B string, I am still forming a D Major chord. This might be an easy way for you to play the D Major instead of the traditional way.
41
Word of Caution: This is one of those times that you MIGHT run into an issue playing the D Major this way. When we run into an issue I will address it. I have become so accustomed to playing the D Major chord this way that when an issue does appear I have a few tricks that will help you with it. Again, this is just an option, but you will always see me playing a D Major chord using my 1st finger as a barre.
In this chord, the notes include the notes D, A, and F#. In other words, we need these three notes to form the triad (three) or chord of D.
Introduction to Sharps and Flats
In our previous lessons we never ran across a sharp/flat. While I expect you've already read over the "12 Notes In Western Music" tutorial it is important to touch base on this quickly.
Sharps and flats have dual names. If you see an F# you can also call it a Gb. You basically take the next letter in the alphabet (G) and FLATTEN it (b) so that it becomes the same thing. I'm not going into detail about it, but just know that this can be done. For our purposes, and as mentioned before, it is easier to show you a sharp (#) on the fretboard rather than a flat (b) so always assume that every sharp has a dual name counterpart. Again, just focus on the name of the sharp itself. When you run into a sharp/flat it just means that you have the original note (from the original position) that has either been moved up in pitch on the fretboard (sharp/#) or down in pitch on the fretboard (flat/b).
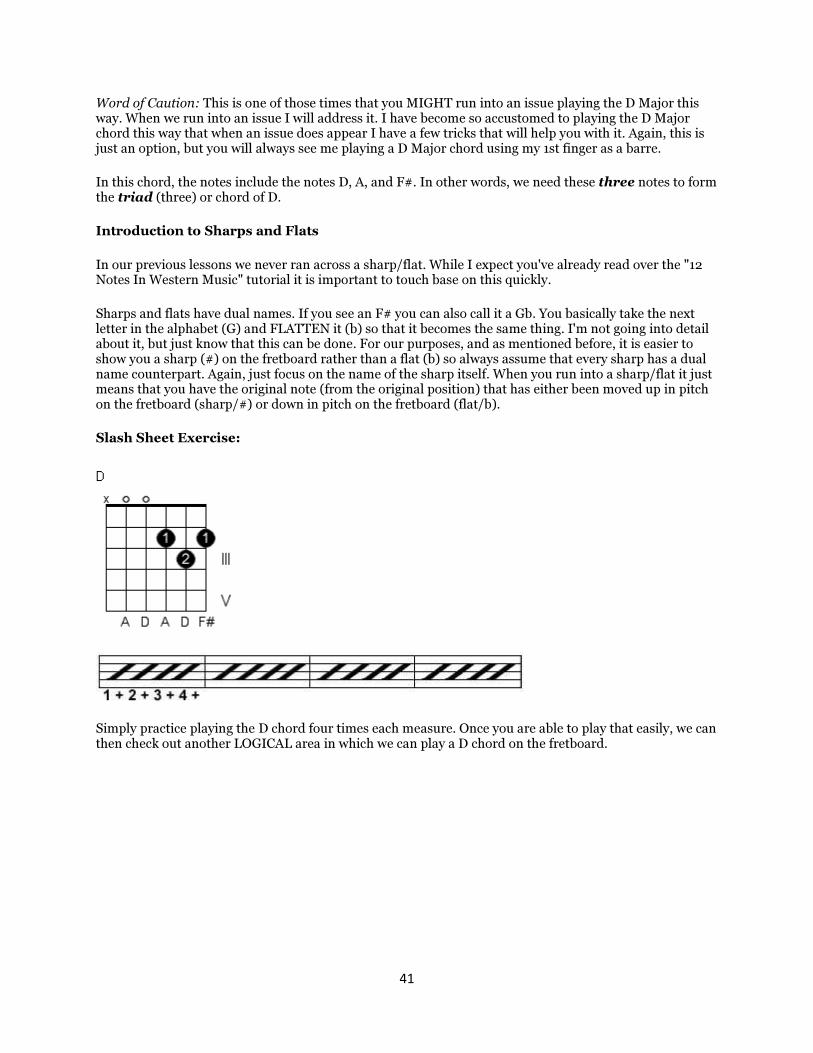
Slash Sheet Exercise:
Simply practice playing the D chord four times each measure. Once you are able to play that easily, we can then check out another LOGICAL area in which we can play a D chord on the fretboard.

42
Now we need to look at the fretboard for logical areas in which the D, A, and F# appear:
As with any of the possible locations we've discussed so far, we need to find logical uses of the D Major chord. In the case of D Major, there are two options I want to present to you other than the open D Major.
The reason I am only choosing to show you a few of the possible options is due to difficulty level.
Many times you'll find chords that are inverted, extensions, or modified chords that tend to get way too confusing to grasp.
In the event of the D Major chord, there are really only three logical options. The open D Major of course is the standard, but there are two barre chord variations that are actually rather common as well.
Both of these barre chord variations are explained below.
43
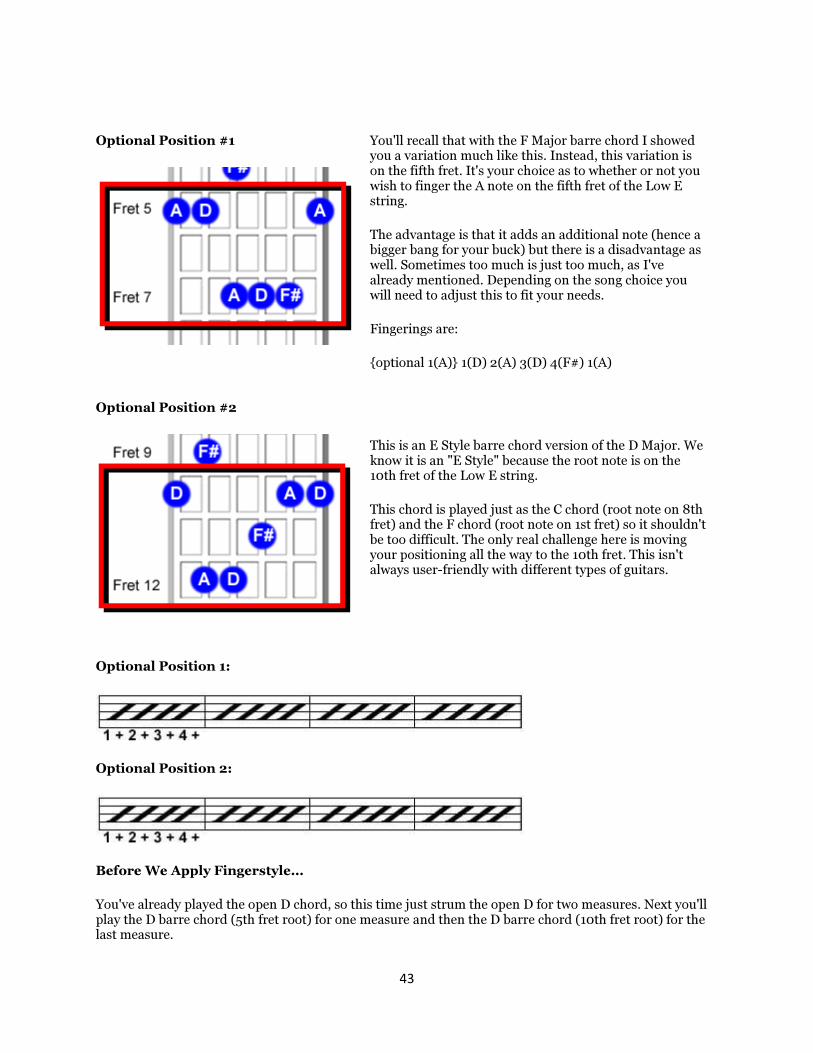
Optional Position #1
You'll recall that with the F Major barre chord I showed you a variation much like this. Instead, this variation is on the fifth fret. It's your choice as to whether or not you wish to finger the A note on the fifth fret of the Low E string.
The advantage is that it adds an additional note (hence a bigger bang for your buck) but there is a disadvantage as well. Sometimes too much is just too much, as I've already mentioned. Depending on the song choice you will need to adjust this to fit your needs.
Fingerings are:
{optional 1(A)} 1(D) 2(A) 3(D) 4(F#) 1(A)
Optional Position #2
This is an E Style barre chord version of the D Major. We know it is an "E Style" because the root note is on the 10th fret of the Low E string.
This chord is played just as the C chord (root note on 8th fret) and the F chord (root note on 1st fret) so it shouldn't be too difficult. The only real challenge here is moving your positioning all the way to the 10th fret. This isn't always user-friendly with different types of guitars.
Optional Position 1:
Optional Position 2:
Before We Apply Fingerstyle...
You've already played the open D chord, so this time just strum the open D for two measures. Next you'll play the D barre chord (5th fret root) for one measure and then the D barre chord (10th fret root) for the last measure.

44
Open D Major (2 measures) - D barre (5th root) - D barre (1oth root)
Strumming What We've Learned
It's time for a change! Since we now have five chords to play, we'll need to 'shorten' one of these chords. I want to keep this simple, so this time we need to play the open C Major for TWO BEATS (half of one measure) and then immediately play the open Am for the next two beats. That will equal the first measure. The C, Am, G, and D are all open. The F is the only barre chord.
---C -----Am----F--------------G-------------D
Now we can switch it up a little:
---C --------------Am---F------G-------------D
And again:
---C -------------Am------------F-----G-------D
One last time:
---C -------------Am------------F-------------G-----D
Applying Fingerstyle
The following exercises allow you to first strum the chord, pick out an EZ arpeggio (which allows you to hear the notes you might want to use) and then a simple fingerstyle pattern. Once we've done this we will attach this D Major chord to the previous chords.
NOTE: The open A string note for the D Major is really optional. Personally I don't like using it because at times it sounds a little strange. Instead, focus on the exercises as you see them.

45
Exercise 1
Fingerstyle Legend:
Exercise 2
Fingerstyle Legend:

46
Exercise 3
Fingerstyle Legend:
Connecting C - Am - F - G - D
Now we need to connect our previous chords to our new chord. We're sticking to the basics here. Here is the full progression. Be sure to pay close attention because now that we have five chords we need to adjust so that we remain in 4/4 time. Play through this progression as you see it.
47
You'll see a full measure of C, a full measure of Am, a full measure of F, and then ONE measure of G to D. I refer to this many times as a quick change. I chose to make the quick change here because the fingerings aren't too difficult, and G to D (or D to G) is VERY common.
As you can see we are starting to flesh out a (1) song (2) a fingerstyle passage (3) a full progression. As we move through the course this will all start coming naturally.
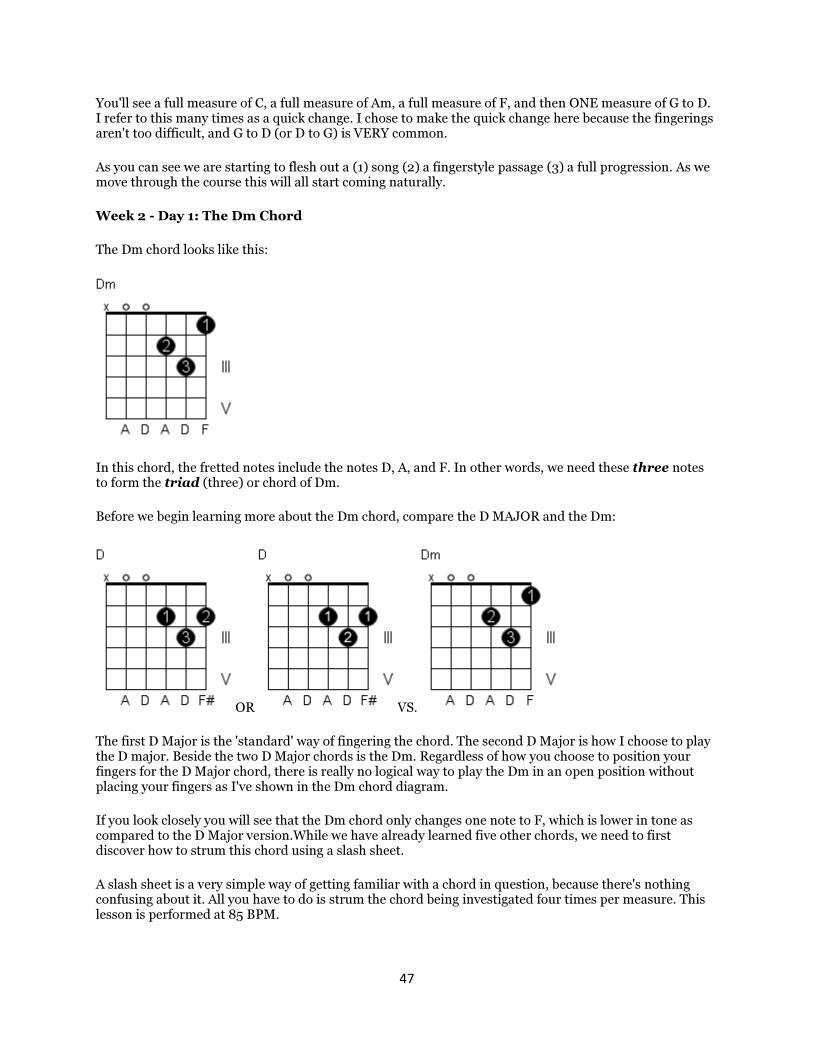
Week 2 - Day 1: The Dm Chord
The Dm chord looks like this:
In this chord, the fretted notes include the notes D, A, and F. In other words, we need these three notes to form the triad (three) or chord of Dm.
Before we begin learning more about the Dm chord, compare the D MAJOR and the Dm:
OR VS.
The first D Major is the 'standard' way of fingering the chord. The second D Major is how I choose to play the D major. Beside the two D Major chords is the Dm. Regardless of how you choose to position your fingers for the D Major chord, there is really no logical way to play the Dm in an open position without placing your fingers as I've shown in the Dm chord diagram.
If you look closely you will see that the Dm chord only changes one note to F, which is lower in tone as compared to the D Major version.While we have already learned five other chords, we need to first discover how to strum this chord using a slash sheet.
A slash sheet is a very simple way of getting familiar with a chord in question, because there's nothing confusing about it. All you have to do is strum the chord being investigated four times per measure. This lesson is performed at 85 BPM.
48
Slash Sheet Exercise:
Simply practice playing the Dm chord four times each measure.
Once you are able to play that easily, we can then check out different LOGICAL areas in which we can play a Dm chord on the fretboard. Notice I said logical.
Just because we can find the three notes of D, A, and F on the fretboard, it doesn't mean that we should just do so. Instead, we need to create a grouping of three notes (triad) that make sense in practical usage.
Now we need to look at the fretboard for logical areas in which the D, A, and F appear:

49
The notes that make up the Dm chord can be found in a variety of positions on the fretboard.
Viewing the fretboard over and over might seem like a complete waste of time, but you'll find that as you examine each series of notes within each chord - without seeing the other notes - it makes it much easier to separate how chords work.
When we first started the course, you'll recall that I talked about the C Major chord being played as a "fifth," or in other words - a C5.
The same applies in EVERY chord you ever run across. If you are more of a 'rocker' you'll find yourself omitting a full barre chord and playing a "5" instead, which displays a given chord as a power chord. In the case of C5 or D5, there is no such thing as a minor!
In other words, because you are only playing the fifth of the chord (and optionally the note above the octave of the root) you will never come into contact with what makes a minor chord a minor chord.
Parentheses indicate the octave and is optional.
C5 = x35(5)xx D5 = x57(7)xx
50
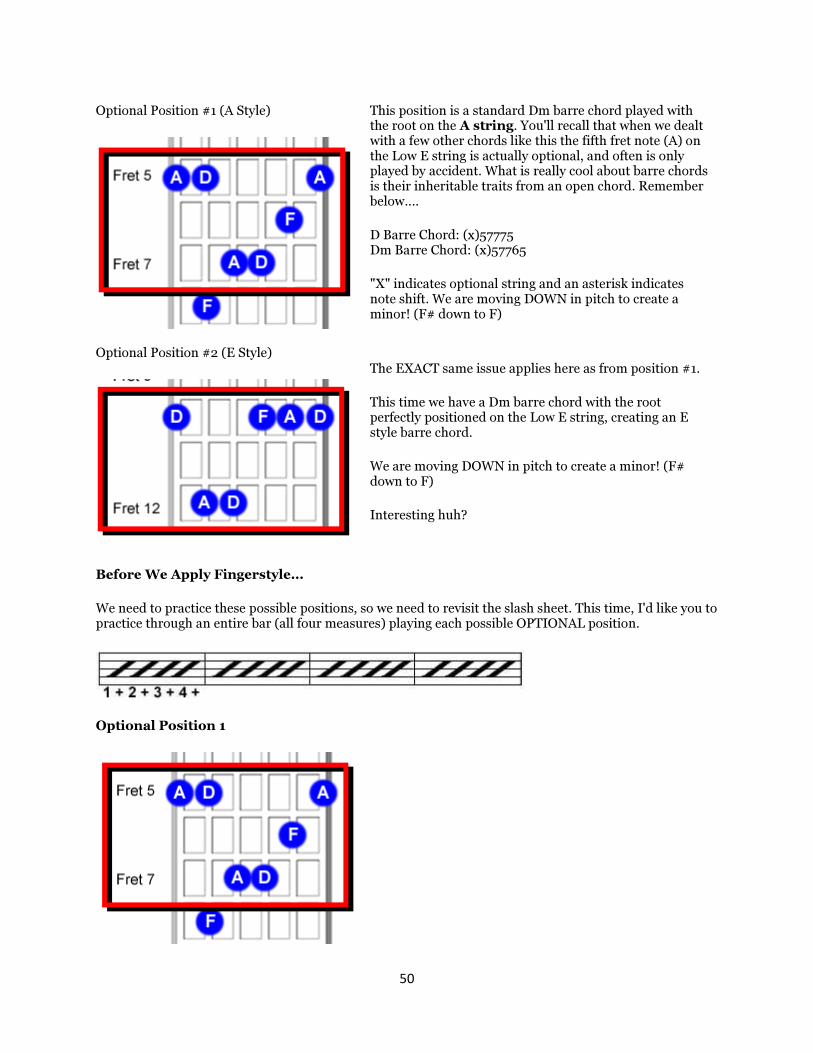
Optional Position #1 (A Style)
This position is a standard Dm barre chord played with the root on the A string. You'll recall that when we dealt with a few other chords like this the fifth fret note (A) on the Low E string is actually optional, and often is only played by accident. What is really cool about barre chords is their inheritable traits from an open chord. Remember below....
D Barre Chord: (x)57775 Dm Barre Chord: (x)57765
"X" indicates optional string and an asterisk indicates note shift. We are moving DOWN in pitch to create a minor! (F# down to F)
Optional Position #2 (E Style)
The EXACT same issue applies here as from position #1.
This time we have a Dm barre chord with the root perfectly positioned on the Low E string, creating an E style barre chord.
We are moving DOWN in pitch to create a minor! (F# down to F)
Interesting huh?
Before We Apply Fingerstyle...
We need to practice these possible positions, so we need to revisit the slash sheet. This time, I'd like you to practice through an entire bar (all four measures) playing each possible OPTIONAL position.
Optional Position 1

51
Optional Position 2
Expanding On What We've Learned
Last week we learned five chords: C, Am, F, G, and D. We are going to play part of a song TODAY using C, Dm, Em, F, and G and practice 'real-world' strumming to "Like A Rolling Stone" by Bob Dylan.
While the actual song doesn't stick to the same exact strumming pattern over and over (a song rarely does unless it's super boring) we are going to focus on ONE pattern for now.
Strumming Pattern: DDD, DU
While I simply cannot go into the same detail you are about to see with every song (the goal here is to help you investigate this concept so that you don't need me to do this every time) I will go into some serious detail here.
See how well you do. Don't worry, if you have trouble at the end of the week you will have the full guide to practice with.
To Begin The Song...
This is the tab I want you to use for the intro:
Fingerings:

52
Chords Used:
If you aren't able to include the vocals yet with this segment that is fine. The prime focus is practicing strumming this progression with more than just a boring slash sheet.
After you play the intro begin playing what you see below. The first image is just the chord names and lyrics.
The second image includes where to strum (highlighted in yellow with red letters) and was VERY time consuming.
Basic Passage:

53
Strumming Legend:
Is the whole concept of DDD, DU starting to make sense now? I realize the highlighted one is much smaller, but that was as big as I could make it due to the spacing issues in my Word program. (This is another reason I don't create legends like this.)
I feel as though that was a great recap for many of the chords you've learned. Before today's lesson is over, we need to practice playing the Dm as a fingerstyle passage. I'm not asking you to perform a strumming exercise on the Dm barre chord variations because I feel as though by now you can do this on your own.
Simply strum the barre chords in any order, but be sure to use the slash sheet so that you don't confuse yourself. Since there are two variations on the Dm barre chord, maybe separate those into two measures each.
Applying Fingerstyle To The Dm Chord
Exercise 1

54
Fingerings
Exercise 2
Fingerings
Exercise 3
55
Fingerings
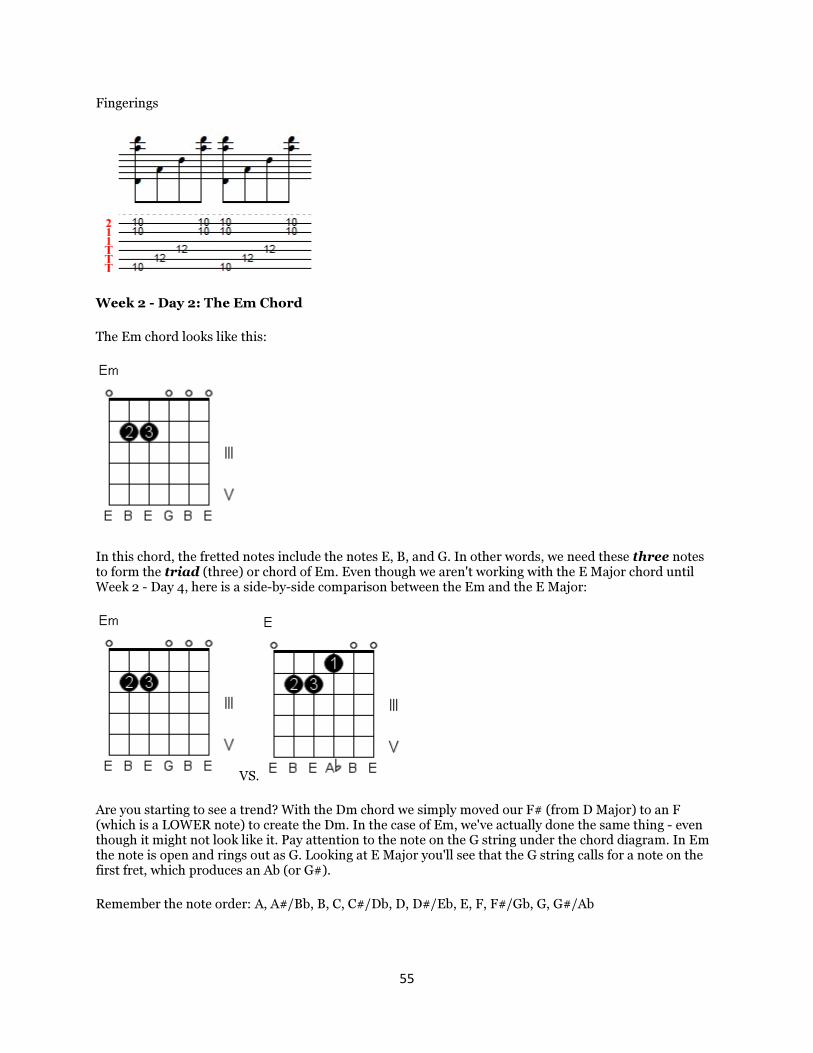
Week 2 - Day 2: The Em Chord
The Em chord looks like this:
In this chord, the fretted notes include the notes E, B, and G. In other words, we need these three notes to form the triad (three) or chord of Em. Even though we aren't working with the E Major chord until Week 2 - Day 4, here is a side-by-side comparison between the Em and the E Major:
VS.
Are you starting to see a trend? With the Dm chord we simply moved our F# (from D Major) to an F (which is a LOWER note) to create the Dm. In the case of Em, we've actually done the same thing - even though it might not look like it. Pay attention to the note on the G string under the chord diagram. In Em the note is open and rings out as G. Looking at E Major you'll see that the G string calls for a note on the first fret, which produces an Ab (or G#).
Remember the note order: A, A#/Bb, B, C, C#/Db, D, D#/Eb, E, F, F#/Gb, G, G#/Ab
56
We are doing the same thing here. E Major has an Ab/G# note, so in order to create a minor for the E Major, we need to move the tone down in pitch. Since there is nowhere to go (fret zero) we can simply play the note open. It will ring as a lower tone.
We are still playing this exercise at 85 bpm.
Slash Sheet Exercise:
Simply practice playing the Em chord four times each measure. Once you are able to play that easily, we can then check out different LOGICAL areas in which we can play an Em chord on the fretboard.
Now we need to look at the fretboard for logical areas in which the E, B and G appear.

57
There's only one very important thing I'd like to show you as you examine the fretboard. Pay close attention to all of the 'open' string notes (fret zero) and you'll see something very interesting.
If you REALLY wanted to you could actually play the G, B, and High E strings completely open. No notes need to be fretted at all!
While I don't feel as though you should do this because we are beyond this idea, often guitar instructors like to show this as an option and call it a "little" Em.
You may have heard of the "little" G as well where you finger the third fret on the Low E string and the second fret on the A string.
I thought I would touch base on this concept in case you ever hear someone mention it, but again - we are beyond that.
Optional Position (A Style)
This position is a standard Em barre chord played with the root on the A string. You'll recall that when we dealt with a few other chords like this the seventh fret note (B) on the Low E string is actually optional, and often is only played by accident.

58
CHECK THIS OUT!
This is NOT an optional position. Well, actually it IS, but I wanted to show you something instead. As you know by now, once you reach the 12th fret the notes and patterns begin repeating. The bonus question would be....
"How do we form an Em barre (E Style) on the 12th fret?" Add the 14th fret notes to the A and D string!
In terms of basic strumming there is absolutely NO need to move this high on the fretboard.
Before We Apply Fingerstyle...
We need to practice these possible positions, so we need to revisit the slash sheet. This time, I'd like you to practice through an entire bar (all four measures) playing the possible OPTIONAL position.
Optional Position
Applying Fingerstyle To The Em Chord
Exercise 1

59
Fingerings
Exercise 2
Fingerings
60
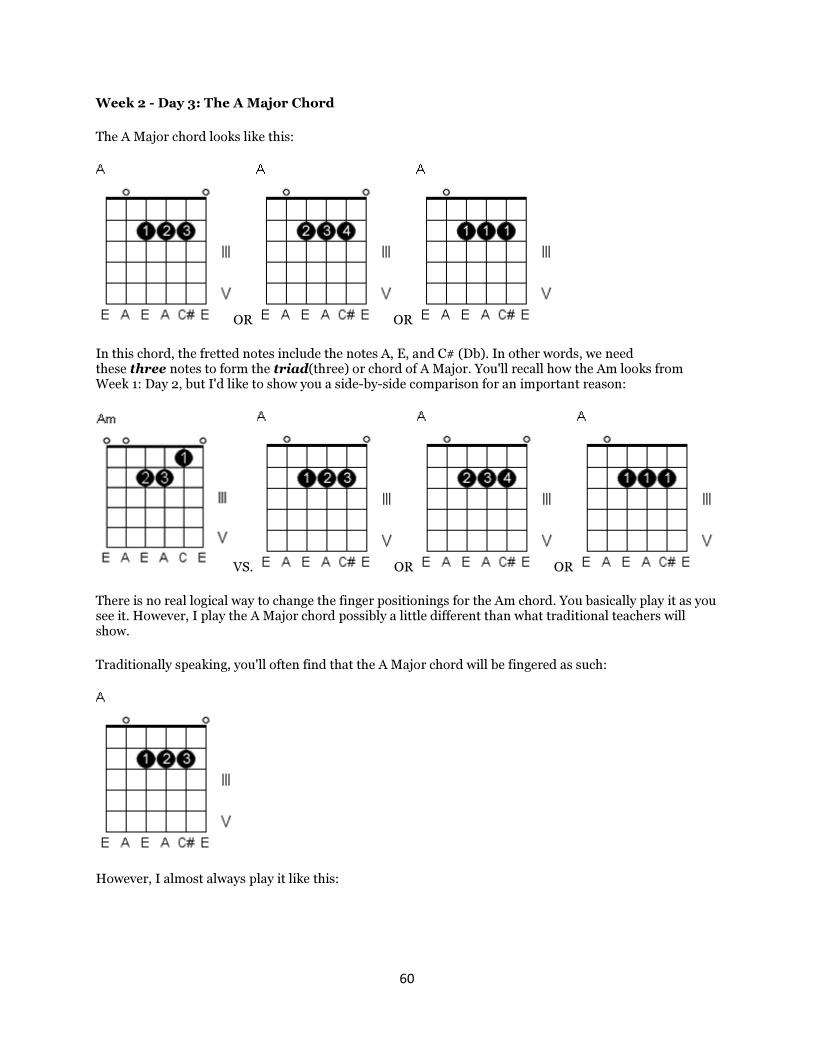
Week 2 - Day 3: The A Major Chord
The A Major chord looks like this:
OR OR
In this chord, the fretted notes include the notes A, E, and C# (Db). In other words, we need these three notes to form the triad(three) or chord of A Major. You'll recall how the Am looks from Week 1: Day 2, but I'd like to show you a side-by-side comparison for an important reason:
VS. OR OR
There is no real logical way to change the finger positionings for the Am chord. You basically play it as you see it. However, I play the A Major chord possibly a little different than what traditional teachers will show.
Traditionally speaking, you'll often find that the A Major chord will be fingered as such:
However, I almost always play it like this:
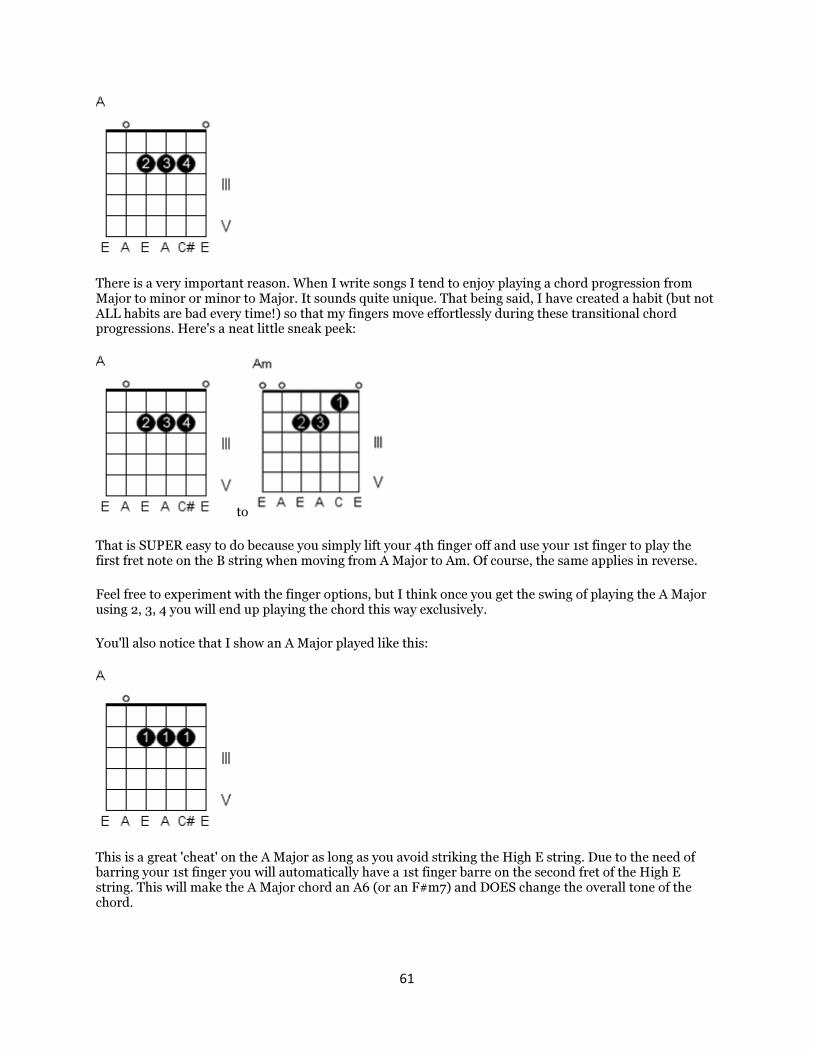
61
There is a very important reason. When I write songs I tend to enjoy playing a chord progression from Major to minor or minor to Major. It sounds quite unique. That being said, I have created a habit (but not ALL habits are bad every time!) so that my fingers move effortlessly during these transitional chord progressions. Here's a neat little sneak peek:
to
That is SUPER easy to do because you simply lift your 4th finger off and use your 1st finger to play the first fret note on the B string when moving from A Major to Am. Of course, the same applies in reverse.
Feel free to experiment with the finger options, but I think once you get the swing of playing the A Major using 2, 3, 4 you will end up playing the chord this way exclusively.
You'll also notice that I show an A Major played like this:
This is a great 'cheat' on the A Major as long as you avoid striking the High E string. Due to the need of barring your 1st finger you will automatically have a 1st finger barre on the second fret of the High E string. This will make the A Major chord an A6 (or an F#m7) and DOES change the overall tone of the chord.

62
Slash Sheet Exercise:
We are now playing this exercise at 95 bpm.
Simply practice playing the A Major chord four times each measure. Once you are able to play that easily, we can then check out different LOGICAL areas in which we can play an A Major chord on the fretboard.
Now we need to look at the fretboard for logical areas in which the A, E, and C# (Db) appear.

63
Optional Position
This position is a standard A Major barre chord played as an E Style barre chord.
You could create a power chord from this by simply playing just the E string A note on the fifth fret, the A string E note on the seventh fret, and if you would like to double the octave of the root, play the A note on the D string at the seventh fret as well. This would be an A5 power chord.
Remember that with power chords there is no such thing as a minor.
Before We Apply Fingerstyle...
We need to practice this possible position, so we need to revisit the slash sheet. This time, I'd like you to practice through an entire bar (all four measures) playing the possible OPTIONAL position.
Optional Position
RECAP!
This exercise deals with (1) a refresher on a few of the chords we've learned as well as (2) an introduction from Major to minor.

64
Strumming Exercise 1:
Here just play the chords as you see them. I played through this twice.
Dm.......................Em.....................Am...................F.....................
Strumming Exercise 2:
Here is the Major to minor strumming practice, which continues through TWO slash sheets. Note: You will run into an E Major chord even though we haven't addressed it yet. If you are unfamiliar with the E Major chord, just add your 1st finger to the first fret of the A string upon prompting.
Dm.......................Em.....................A........................Am.................
D..........................Dm.....................Em.....................E......................
Applying Fingerstyle To The A Major Chord
CHALLENGE! No fingerings are provided for the picking hand this time. We need to see how well you can decide for yourself how to use your picking hand. Since these two exercises are rather easy you should be able to do it. If not, let me know and I will give you the fingerings.
Exercise 1

65
Exercise 2
Week 2 - Day 4: The E Major Chord
The E Major chord looks like this:
In this chord, the fretted notes include the notes E, B, and Ab (G#). In other words, we need these three notes to form the triad(three) or chord of E Major.
There is no real logical way to change the finger positionings for the E chord. You basically play it as you see it.
Slash Sheet Exercise:
We are now playing this exercise at 95 bpm.
Simply practice playing the E Major chord four times each measure. Once you are able to play that easily, we can then check out different LOGICAL areas in which we can play an E Major chord on the fretboard.
Now we need to look at the fretboard for logical areas in which the E, B and Ab (G#) appear.
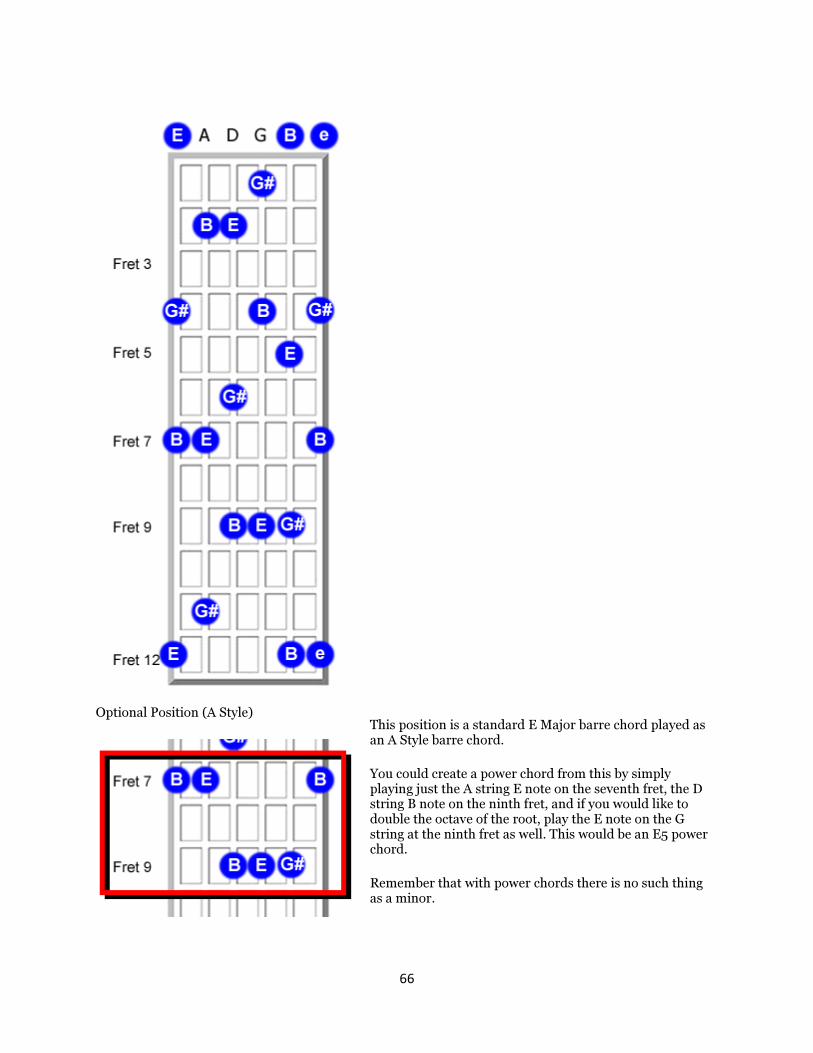
66
Optional Position (A Style)
This position is a standard E Major barre chord played as an A Style barre chord.
You could create a power chord from this by simply playing just the A string E note on the seventh fret, the D string B note on the ninth fret, and if you would like to double the octave of the root, play the E note on the G string at the ninth fret as well. This would be an E5 power chord.
Remember that with power chords there is no such thing as a minor.

67
Before We Apply Fingerstyle...
We need to practice this possible position, so we need to revisit the slash sheet. This time, I'd like you to practice through an entire bar (all four measures) playing the possible OPTIONAL position.
Optional Position
Since we've already strummed the E Major chord in a progression (Week 2 - Day 3) we just need to address the fingerstyle idea.
Applying Fingerstyle To The E Major Chord
CHALLENGE! No fingerings are provided for the picking hand this time. We need to see how well you can decide for yourself how to use your picking hand. Since these two exercises are rather easy you should be able to do it. If not, let me know and I will give you the fingerings.
Exercise 1

68
Exercise 2
Fingerpicking hint: D and G string "9's" use thumb and 1st finger!
Week 2 - Day 5: The B Flat (Bb) Chord
The Bb chord looks like this:
In this chord, the fretted notes include the notes Bb, F and D. In other words, we need these three notes to form the triad (three) or chord of Bb. As you already know, sharps and flats have dual names. That means that the Bb chord is also called an A# chord.
While the chord you see above is one of the most common versions of the Bb chord, there are additional ways to play this chord. You have probably gathered by now that I am not a fan of playing A Style barre chords using the 1, 2, 3, 4, 1 method of fingering. For me it is ultra uncomfortable, so I almost always create partials of the A Style barre chords. I will touch base on what we have learned so far and the way I choose to play these chords. I must warn you - what you are about to see is 100% easier to do, but unfortunately is frowned upon in a 'traditional' teaching sense.
Basically I play virtually every A Style barre chord as a barre chord without playing the High E string. Here's what I mean:

69
These are just a few examples of the chords we've seen based on the A Style barre chord so far. Remember that when I refer to an A Style barre chord, it means that the ROOT note of said chord is on the A string. These chords are still named according to their root note. It just so happens that the root falls on the A string. I choose to finger every one of these chords with either my 1st finger or thumb on the root note - which are all on the A strings.
I then follow up with the rest of the notes with (1) either my 3rd finger on the D string and my 4th finger on the G and B strings or (2) my 1st finger/thumb playing the A string notes and my 4th finger barring all additional notes - omitting the high E string all together.
Do I lose any notes doing so? No actually I don't. The chord itself isn't quite as 'bright' as one may like, but the note that is found on the D string (in the case of Bb it is an F note) is the same note that is found on the high E string, which again I omit. For me it makes everything much easier, and allows me to quickly play a given A Style barre chord without finger acrobatics. However, a traditional teacher will say this is incorrect. For me, it's just right.
All of that being said - I am NOT trying to lead you astray. I just want you to understand that there are 'cheats' that you can use to work with right now. If you want to be technical you can go back and learn it the right way. I think the term 'right' is relative here.
Slash Sheet Exercise:
We are now playing this exercise at 95 bpm.
Simply practice playing the Bb chord four times each measure. Once you are able to play that easily, we can then check out different LOGICAL areas in which we can play a Bb chord on the fretboard.

70
Now we need to look at the fretboard for logical areas in which the Bb (A#), F, and D appear.
71
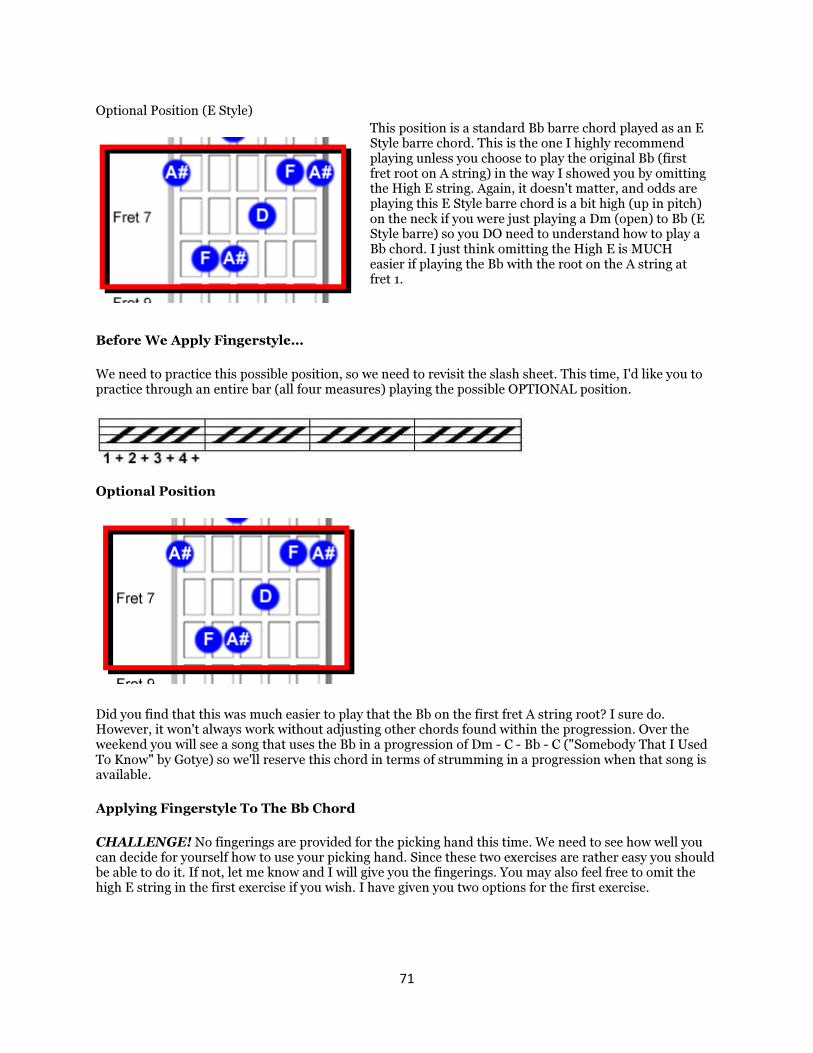
Optional Position (E Style)
This position is a standard Bb barre chord played as an E Style barre chord. This is the one I highly recommend playing unless you choose to play the original Bb (first fret root on A string) in the way I showed you by omitting the High E string. Again, it doesn't matter, and odds are playing this E Style barre chord is a bit high (up in pitch) on the neck if you were just playing a Dm (open) to Bb (E Style barre) so you DO need to understand how to play a Bb chord. I just think omitting the High E is MUCH easier if playing the Bb with the root on the A string at fret 1.
Before We Apply Fingerstyle...
We need to practice this possible position, so we need to revisit the slash sheet. This time, I'd like you to practice through an entire bar (all four measures) playing the possible OPTIONAL position.
Optional Position
Did you find that this was much easier to play that the Bb on the first fret A string root? I sure do. However, it won't always work without adjusting other chords found within the progression. Over the weekend you will see a song that uses the Bb in a progression of Dm - C - Bb - C ("Somebody That I Used To Know" by Gotye) so we'll reserve this chord in terms of strumming in a progression when that song is available.
Applying Fingerstyle To The Bb Chord
CHALLENGE! No fingerings are provided for the picking hand this time. We need to see how well you can decide for yourself how to use your picking hand. Since these two exercises are rather easy you should be able to do it. If not, let me know and I will give you the fingerings. You may also feel free to omit the high E string in the first exercise if you wish. I have given you two options for the first exercise.

72
Exercise 1
OR
Exercise 2
Fingerpicking hint: Thumb picks D string and 1st finger picks G string. The same applies with A string and B string.
73
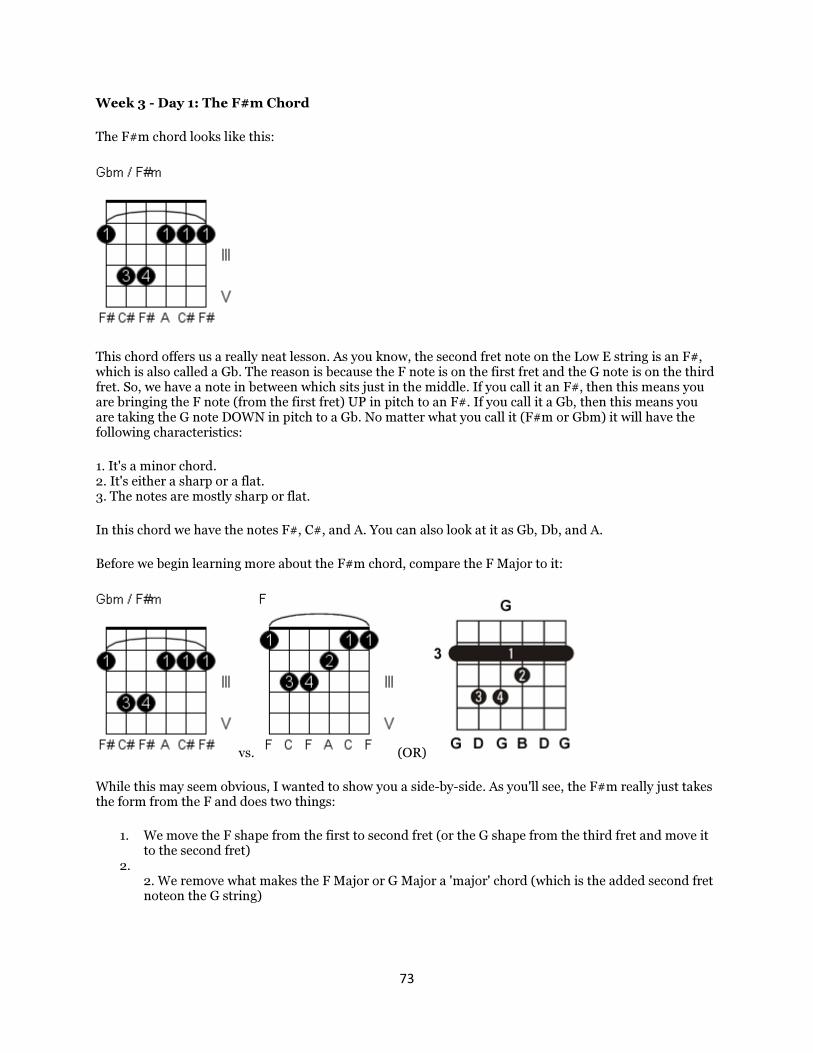
Week 3 - Day 1: The F#m Chord
The F#m chord looks like this:
This chord offers us a really neat lesson. As you know, the second fret note on the Low E string is an F#, which is also called a Gb. The reason is because the F note is on the first fret and the G note is on the third fret. So, we have a note in between which sits just in the middle. If you call it an F#, then this means you are bringing the F note (from the first fret) UP in pitch to an F#. If you call it a Gb, then this means you are taking the G note DOWN in pitch to a Gb. No matter what you call it (F#m or Gbm) it will have the following characteristics:
1. It's a minor chord. 2. It's either a sharp or a flat. 3. The notes are mostly sharp or flat.
In this chord we have the notes F#, C#, and A. You can also look at it as Gb, Db, and A.
Before we begin learning more about the F#m chord, compare the F Major to it:
vs. (OR)
While this may seem obvious, I wanted to show you a side-by-side. As you'll see, the F#m really just takes the form from the F and does two things:
1. We move the F shape from the first to second fret (or the G shape from the third fret and move it to the second fret)
2. 2. We remove what makes the F Major or G Major a 'major' chord (which is the added second fret noteon the G string)

74
Slash Sheet Exercise (95 BPM):
Simply practice playing the F#m chord four times each measure.
Important: We will only focus on the second fret version of this chord because I've never seen an instance that requires you to play an F#m anywhere else on the neck. However, we do need to examine the notes found in the F#m.
Now we need to look at the fretboard for logical areas in which the F#, C#, and A appear:
We're going to do things a little differently with this chord. Instead of showing you the optional position, I want to see if you can find it.
Here are a few hints:
1. It's an A Style barre chord. 2. You'll need the root note F#(Gb.) 3. It's a standard chord.*
* What I mean is that this is a chord you've already learned in terms of positioning. The notes are just different.
Did you find it?
If you found it easily, now try to figure out how you would create a power chord out of it.
Remember that in theory we only need the root note and the 5th. It is up to you whether or not you wish to include the octave above the root.
If you are turning an F#m chord into a power chord, remember that the power chord DOES NOT contain the minor.
In other words, and F#m power chord turns into an F#5. Just remove the minor.

75
Before We Apply Fingerstyle...
What I want you to do is strum the following progression using our slash sheet at 95 bpm:
D...........................Em....................F#m....................G
I want you to play the D and Em open. Then play the F#m and then the G chord barred. Remember that the G barre chord is just a simple: 355433 (low E left to high E right)
Applying Fingerstyle To The F#m Chord
Exercise 1
This is different than previous fingerstyle arrangements. Here you have sixteenth notes being played. These appear on the "4's and 2's" being picked in between. The easiest way to think of this is by playing only eighth notes at the beginning and very end of the second measure. Everything else is sixteenth notes.
Fingerings
I have purposely set you up here to play the E, A, and D strings with your thumb.

76
Week 3 - Day 2: The Bm Chord
The Bm chord looks like this:
To me there aren't many 'other' chords that are as beautiful (and haunting) as this chord. In this chord we need the notes B, F#, and D to create the triad. The Bm is a barre chord no matter how you look at it. However, often you'll find the option to play a Bm as an easier version, such as the "little" Bm, which looks like this:
All you really do is eliminate the need to play the second fret note on the A string, which is a B. It is much easier for many to play, but for me (since I use my thumb) I actually have more trouble playing the Bm in this fashion. I've yet to figure out why.
Slash Sheet Exercise (95 BPM):
Simply practice playing the Bm chord four times each measure. I played all three variations of the Bm, such as (1) the original barre with your 1st finger and (2) the 'little' Bm and finally (3) the thumb version.
Now we need to look at the fretboard for logical areas in which the B, F#, and D appear:

77
Can you find the optional position based solely off the notes provided here?
Here are a few hints:
1. It's an E Style barre chord. 2. You'll need the root note B. 3. It's a standard chord.*
* What I mean is that this is a chord you've already learned in terms of positioning. The notes are just different. You learned this exact same pattern on Week 3: Day 1 (F#m).
Did you find it?
If you found it easily, now try to figure out how you would create a power chord out of it.
Remember that in theory we only need the root note and the 5th. It is up to you whether or not you wish to include the octave above the root.
If you are turning an Bm chord into a power chord, remember that the power chord DOES NOT contain the minor.
In other words, and Bm power chord turns into an B5. Just remove the minor.
Optional Position
This is an exact duplicate of the F#m chord that you learned in Week 3: Day 1 of this course. Notice that all you have done is moved the root down to the seventh fret on the Low E string.
In order to create a B5 you simply don't play the notes on the G, B, and High E string.
This chord MUST be learned as it is actually quite common.

78
Applying Fingerstyle To The Bm Chord
Exercise 1
This is different than previous fingerstyle arrangements. Here you have sixteenth notes being played. These appear on the "4's and 3's" being picked in between. The easiest way to think of this is by playing only eighth notes at the beginning and very end of the second measure. Everything else is sixteenth notes.
Fingerings
I have purposely set you up here to play the D, G, and B strings with your thumb and 1st finger.
Exercise 2
This exercise follows the same format as exercise 1, but of course it's played on the seventh fret root.
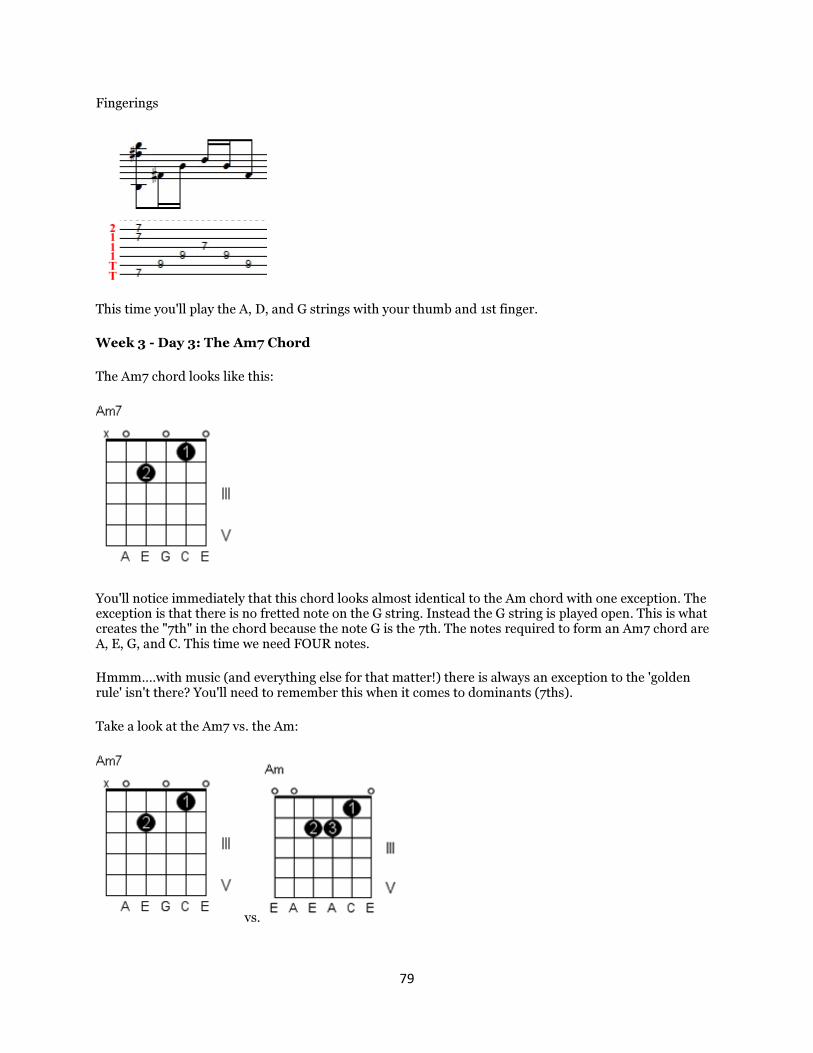
79
Fingerings
This time you'll play the A, D, and G strings with your thumb and 1st finger.
Week 3 - Day 3: The Am7 Chord
The Am7 chord looks like this:
You'll notice immediately that this chord looks almost identical to the Am chord with one exception. The exception is that there is no fretted note on the G string. Instead the G string is played open. This is what creates the "7th" in the chord because the note G is the 7th. The notes required to form an Am7 chord are A, E, G, and C. This time we need FOUR notes.
Hmmm....with music (and everything else for that matter!) there is always an exception to the 'golden rule' isn't there? You'll need to remember this when it comes to dominants (7ths).
Take a look at the Am7 vs. the Am:
vs.
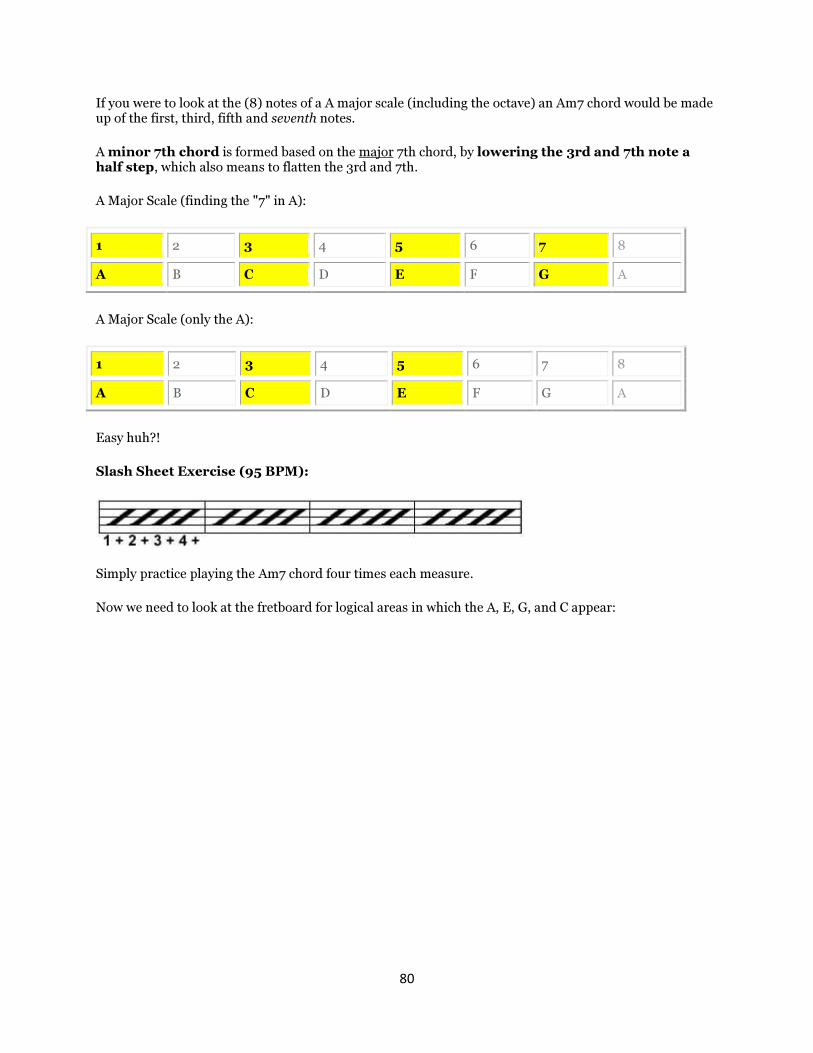
80
If you were to look at the (8) notes of a A major scale (including the octave) an Am7 chord would be made up of the first, third, fifth and seventh notes.
A minor 7th chord is formed based on the major 7th chord, by lowering the 3rd and 7th note a half step, which also means to flatten the 3rd and 7th.
A Major Scale (finding the "7" in A):
1 2 3 4 5 6 7 8
A B C D E F G A
A Major Scale (only the A):
1 2 3 4 5 6 7 8
A B C D E F G A
Easy huh?!
Slash Sheet Exercise (95 BPM):
Simply practice playing the Am7 chord four times each measure.
Now we need to look at the fretboard for logical areas in which the A, E, G, and C appear:
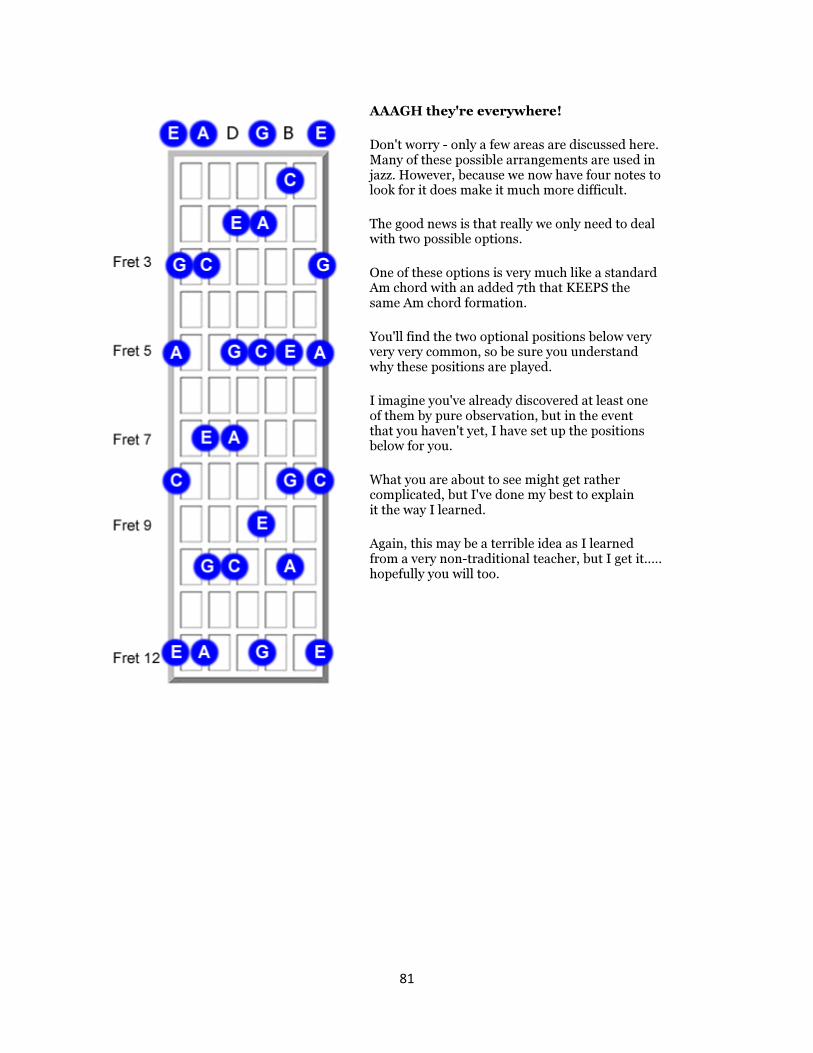
81
AAAGH they're everywhere!
Don't worry - only a few areas are discussed here. Many of these possible arrangements are used in jazz. However, because we now have four notes to look for it does make it much more difficult.
The good news is that really we only need to deal with two possible options.
One of these options is very much like a standard Am chord with an added 7th that KEEPS the same Am chord formation.
You'll find the two optional positions below very very very common, so be sure you understand why these positions are played.
I imagine you've already discovered at least one of them by pure observation, but in the event that you haven't yet, I have set up the positions below for you.
What you are about to see might get rather complicated, but I've done my best to explain it the way I learned.
Again, this may be a terrible idea as I learned from a very non-traditional teacher, but I get it..... hopefully you will too.

82
Optional Position #1 (all notes)
Only the necessary notes:
Ok. This position is rather easy because it is just an Am that ADDS the seventh (7th) to the original chord. Remember: we ONLY need the notes A, E, G, and C to appear.
Here's the kicker: in an OPEN chord (even though we actually have four notes here) we only want each of these notes to appear one or two times. The ONLY time we want one note to appear twice is if it is part of the original root of the chord.
The old saying "less is more" most definitely applies here. The chord root is an A. That means we CAN allow the A note to be duplicated. However, we don't want to duplicate any other notes. As you will see in the "only the necessary notes" diagram I have done just that.
Based on the chord diagram I have provided (below) you will see the Am7 in the most 'open' form possible. Beside that chord we have the optional Am7 position. We still have the notes A, E, G, and C being played.
vs.
You will recall that I said with an "open" chord we only want the root note duplicated. As you already know, when we create a barre chord we want to apply as many notes as possible, based on your preference.
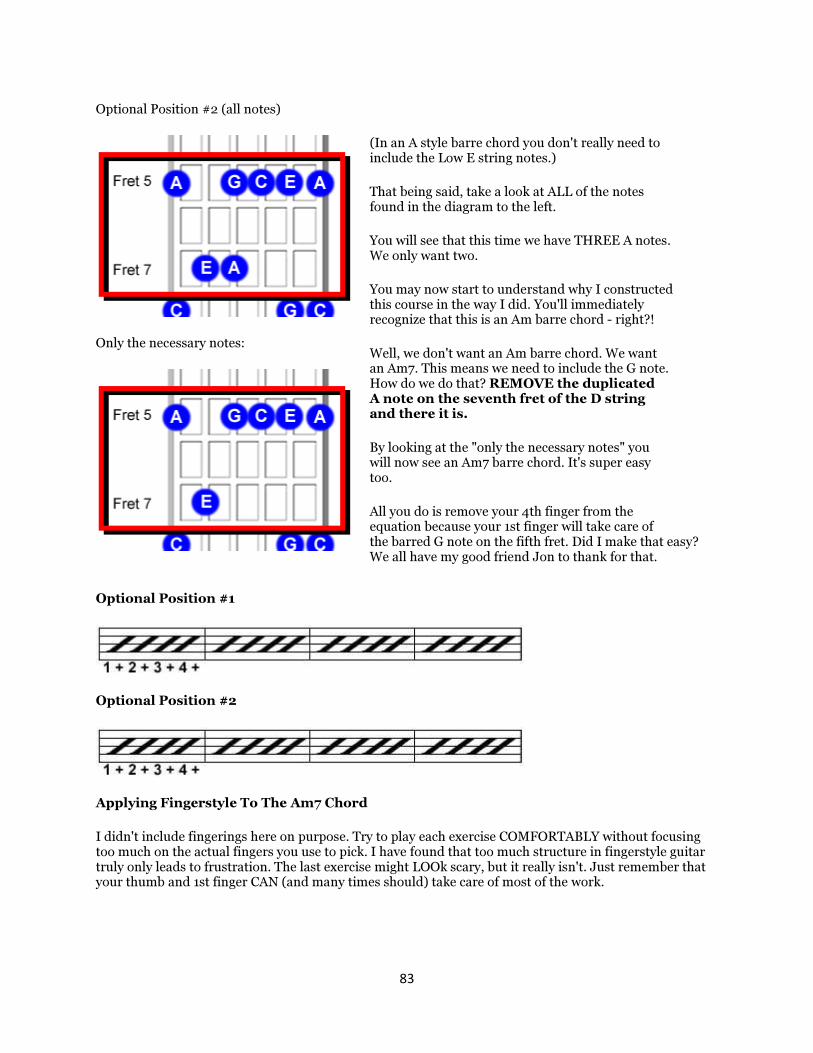
83
Optional Position #2 (all notes)
Only the necessary notes:
(In an A style barre chord you don't really need to include the Low E string notes.)
That being said, take a look at ALL of the notes found in the diagram to the left.
You will see that this time we have THREE A notes. We only want two.
You may now start to understand why I constructed this course in the way I did. You'll immediately recognize that this is an Am barre chord - right?!
Well, we don't want an Am barre chord. We want an Am7. This means we need to include the G note. How do we do that? REMOVE the duplicated A note on the seventh fret of the D string and there it is.
By looking at the "only the necessary notes" you will now see an Am7 barre chord. It's super easy too.
All you do is remove your 4th finger from the equation because your 1st finger will take care of the barred G note on the fifth fret. Did I make that easy? We all have my good friend Jon to thank for that.
Optional Position #1
Optional Position #2
Applying Fingerstyle To The Am7 Chord
I didn't include fingerings here on purpose. Try to play each exercise COMFORTABLY without focusing too much on the actual fingers you use to pick. I have found that too much structure in fingerstyle guitar truly only leads to frustration. The last exercise might LOOk scary, but it really isn't. Just remember that your thumb and 1st finger CAN (and many times should) take care of most of the work.
84
Exercise 1
Exercise 2
Exercise 3
Week 3 - Day 4: The A7 Chord
The A7 chord looks like this:

85
So yesterday we talked about the concept of 7ths in the form of a minor. The good news is that this is EASIER to understand, because there is no need to 'remove' any additional notes.
As you'll see the A7 chord (aka "A Dominant 7th") is basically just an A Major chord that has been made 'dominant' - or in other words - we've just added a 'seventh' instead.
Take a look at the A Major vs. the A7
vs.
Since we already went over how to find the "7th" the same rule applies here. The notes for the A7 chord are A, E, G, and C#.
All you need to do is add the G (the 7th) to make the A chord basically morph into an A7. Again additional notes are irrelevant.
(You'll notice that the A7 chord shows an open E string played. It's not necessary.)
Slash Sheet Exercise (95 BPM):
Simply practice playing the A7 chord four times each measure.

86
Now we need to look at the fretboard for logical areas in which the A, E, G, and C# appear:
Optional Position #1 (all notes)
As you will remember from yesterday, we don't want TOO many notes to be played for this chord. Again, the A7 has a root on "A" so we need to only allow two of these notes to come through. When you look at the "all notes" you will see that we need to remove the A note on the seventh fret of the D string.
Doing so will allow us to play the G note on the fifth fret that comes before it in the note spectrum.
Take a look at "only the necessary notes" to see what I have done.
Only the necessary notes:
Easy huh?! Believe it or not this happens with ALL m7 or 7 chords. Of course, the root note is where all the 'action' happens, but the general idea is still the same.

87
Optional Position
Applying Fingerstyle To The A7 Chord
Exercise 1
Exercise 2
Week 3 - Day 5: The E7 Chord
The E7 chord looks like this and contains the notes E, B, D, and Ab (G#):
OR

88
This time I want to show you both 'open' options for the E7 chord right up front. The reason is that the first E7 (only two fretted notes) is a common chord to play for folk or rock. The second E7 is VERY common in blues, because the added "D" note to the original standard E Major chord really adds that 7th feel to it. (Also, practically any 7th is common in blues/jazz)
Take a look at the E Major vs. the E7 (version 1)
vs.
Here you've just removed the E note from the E Major and created a D note, which is the 7th of E.
vs.
The same thing applies here, but instead we've got the D note added to the E Major chord. You'll remember that with the A7/Am7 we wanted to focus only on two of the root notes for the most part. Here it doesn't matter. Why?
Because (in standard tuning) the guitar automatically plays an 'open' E when strummed, you really can't avoid this all that well unless you choose to avoid striking the Low E (or high E) string. This isn't necessary. The E chord, regardless of its form, sounds great because of the original tone in which the guitar is tuned.
Slash Sheet Exercise (95 BPM):
Now we need to look at the fretboard for logical areas in which the E, B, D, and Ab (G#) appear:

89
Optional Position (all notes)
Again, here are all the notes that are associated with the E7 barre chord.
Take a look at "only the necessary notes" to see what I have done.
Only the necessary notes:
Again, this is nothing you haven't seen already. There's no need to play the seventh fret note on the Low E string (B). This is played as an A style barre chord.
Optional Position

90
Applying Fingerstyle To The E7 Chord
Exercise 1
Exercise 2
Exercise 3
Week 4 - Day 1: The B Major Chord
The B Major chord looks like this:

91
I threw a few 'trick' notes in this chord to help you remember the sharps and flats. The B Major chord contains the notes B, F#(Gb), and Eb (D#). In other words, you can look at this chord in all sharps like: B, F#, D#. You can look at this chord in all flats as: B, Gb, Eb. Either way the notes are still the same. As always, we will focus on the sharps because they are easier to plot (see) on a fretboard diagram.
Important: As with any chord that appears as a barre you'll often find additional notes that aren't needed. In this case, the Low E string F# note just duplicates the High E string F# note. There is no need to fret the actual note on the Low E string. You can completely avoid it.
This would make sense because if you avoided this string completely, the first root note of "B" will appear on the A string.
Slash Sheet Exercise (95 BPM):
Simply practice playing the B Major chord four times each measure.
Now we need to look at the fretboard for logical areas in which the B, F#, and D# appear:

92
To the left is the fretboard featuring the full spectrum of notes used to create the B Major chord. You've already learned the one that is featured with the root on the second fret of the A string.
Optional Position
This is a rather standard E Style barre chord with the root on the seventh fret of the Low E string. I play this one quite often in more brisk passages.
This full barre chord can also be converted to a simple B5 power chord by playing only the notes "7-9-9" on the Low E, A, and D strings.
Of course, including the additional "9" on the D string would mean you were playing the octave above the original root (B) as always.
Optional Position

93
Before We Apply Fingerstyle...
What I want you to do is strum the following progression using our slash sheet at 95 bpm.
Exercise 1:
G...........................F.........................A........................B
These are ALL E style barre chords. I'm not showing you the chord diagrams. Just remember the notes on the fretboard and try to follow along with me.
Hint: root notes are 3 - 1 - 5 - 7
Exercise 2:
C...........................B.........................G........................A
These are ALL E style barre chords. I'm not showing you the chord diagrams. Just remember the notes on the fretboard and try to follow along with me.
Applying Fingerstyle To The B Major Chord
The fingerings for the picking hand should be common knowledge by now. As you've seen from Day 1, I use my thumb, 1st, and 2nd finger (sometimes) almost exclusively. We aren't playing any crazy fingerstyle so there's no need to focus too much on technicalities.
Note: I got an email the other day.....
"I am loving Chord Workshop but I have a question. Why do you start the finger picking exercises like that? Am I missing something?"
This is a good question. You might recall a while back I mentioned that the fingerstyle (fingerpicking) exercises will start with the full chord as a strum and then you'll play the notes of said chord using any finger. I am asking you to do this because I want you to hear each note. The picking part of that isn't important. What you are doing is: {strum ---> arpeggio ---> fingerstyle} all in one exercise.
This is intentional, and I imagine you have a few issues at first after playing the strum ---> arpeggio part. I am attempting to trick your picking fingers by taking you up and down the note spectrum without getting you back to an 'origin' of the chord. What I mean by origin is the root note. If you'll notice in most of the fingerstyle exercises you never actually 'resolve' the chord during the arpeggio part. You actually resolve it at the BEGINNING of the fingerstyle part.

94
Over my years of teaching I have found students understand and perform better when given exercises that are a bit awkward to play. There's something about the 'weirdness' of them that somehow makes it easier to absorb in the long run.
Exercise 1
Exercise 2
Week 4 - Day 2: The B7 Chord
The B7 chord looks like this:

95
You'll recall that in Week 4: Day 1 we discussed the B Major chord. Here it is again in a side-by-side:
VS.
Because you can already assume that we are taking the B Major chord and making it "dominant (7)" we need to add the actual seventh note to the chord. The B Major consists of, using sharps: B, F#, D#. Now what is the seventh of B? (Remember that sharps and flats aren't important to find the seventh note needed.)
1 2 3 4 5 6 7 8
B C D E F G A B
In this case the seventh would be the "A" note. The chart is super easy to understand isn't it? Now look at the B7 chord again and you will see this fits perfectly:
I have a confession: I tend to forget the F# note on the second fret of the High E string quite often. I don't actually strum the High E string though. So, what chord am I playing if I forget the F# note on the second fret of the High E string? Again, I'm NOT playing the High E open. I don't play it at all. Instead I play the B, D#, A, and the B (open).
The answer is: nothing. It's not a chord at all. Even if I chose to play the Low E string AND the High E string I still don't produce a complimentary chord of any kind. Believe me I've looked at every possible option. It's simply NOT a chord.
It WILL still sound mostly as a B7 chord when played with other musicians. Kenny (from GuitarAlliance.com) and I frequently play together at gigs as well as writing our own songs and he nor I have run into any real issues with me playing the B7 as I do.
However, the way I usually play it in a song is NOT actually a B7. (Man I really need to remember that!) Just always remember that a musician will take their own artistic liberties - however subtle - and that's

96
absolutely fine. You are the musician. You have the choice. A great many songs have been written with these liberties in mind.
Slash Sheet Exercise (95 BPM):
Simply practice playing the B7 chord four times each measure.
Now we need to look at the fretboard for logical areas in which the B, D#, A, and F# appear:
Again, there are a lot of notes on the fretboard, but this is what happens when you add the seventh to a chord.
All Notes:
The diagram above shows ALL of the notes, but remember we don't need every note. We really just need the B notes to duplicate. Also remember that the Low E string open note is NOT played.

97
We also need to examine the additional position of the B7. Basically we need to make a B Major a B7, aka dominant.
All notes:
Forming the B7 barre chord:
Again the same concept applies. Here we have kept the two B notes (because it is a B chord). By simply removing the additional B note on the ninth fret of the D string, and adding the A note on the seventh fret of the D string (the seventh is A) we can create the B7 barre chord. This would be considered an E Style barre chord.
Optional Position
Applying Fingerstyle To The B7 Chord
Exercise 1

98
Exercise 2
QUIZ: Please visit the Chord Workshop Member Interface for the Week 4 – Day 3 Quiz.
Week 4 - Day 4: The Gm Chord
The Gm chord looks like this:
Before we move any further, there is a Gm chord that can be played open. However, it might be considered a pain to play. I find the barre version much more user-friendly. Here is the open Gm for reference though:
Again the same concept on open vs. barre applies. The same notes are used, but simply at different spots on the neck. Our focus will be on the Gm barre chord though because I think you'll find it a little easier to play. However, if barre chords are a struggle for you, just know that you can always play this open version if you wish.

99
The Gm chord, open or barred, contains the notes G, A#(Bb), and D.
Take a look at the barred version of G Major vs. the Gm
VS.
Remember that when we want to form a minor version of a Major chord (in the case of an E Style barre chord) we will need to move one of our fingers DOWN in pitch. You can see here tht by moving our 2nd finger down one fret (down = lower in pitch) our B note becomes a Bb note, or an A#. That creates the minor of the Major.
Slash Sheet Exercise (95 BPM):
Simply practice playing the Gm barre chord four times each measure. I have included all of the variations here, including the one further below.
Now we need to look at the fretboard for logical areas in which the G, A#(Bb) and D appear:

100
Optional Position
This is the absolute 'standard' when it comes to playing the Gm barre chord.
There are a few other ways in which you can play the Gm but this is the only one I've ever used - and more than likely the only one you'll ever need to use.
As I have already explained, there is no such thing as a minor chord when playing a power chord, so both the G Major and the Gm chords will simply use the Low E, A, and D strings (D string if you want to use the root above the octave) to form the G5 power chord.
By omitting any additional notes you create the G5 power chord.

101
Applying Fingerstyle To The Gm Chord
Exercise 1
Note: For the purpose of playing a Gm open, I did include this fingerstyle option here.
Exercise 2
Week 4 - Day 5: The G7 Chord
The G7 chord looks like this and contains the notes G, B, D, and F:
Remember that this is a dominant chord, so we need to 'add the seventh' to the original G. It might seem strange that I keep saying to 'add' the seventh instead of just 'change a note to the seventh' but I say this because we need to know where the original note comes from and then realize that we are making a given chord a dominant. A chord is never dominant until you 'add' the seventh.

102
You probably already know which note is the seventh of G, but just in case:
1 2 3 4 5 6 7 8
G A B C D E F G
As you can see, the F is the seventh. This is getting REALLY easy huh?
G7 Fingerings:
Take a look again at the chord diagram. You'll see that THIS form of the G chord isn't fingered in the same way as SOME of the other G Major chords I showed you (in the open position).
G Major Chords (Open)
1: 2: 3:
4:
The "1:" that I have labeled is most like the G7 fingerings in the open position. Often you'll see musicians playing the G Major open in the same way that you see "1:" labeled here. This is totally fine, because it DOES make it easier to move from G Major to G7. I try to play the G Major to G7 this way when I know a

103
song contains the G7. Sometimes out of habit I forget. Either way, I wanted you to see the relation between the two as well as WHY the G7 should be fingered as it is. Take a look again:
This is the only way to play the G7 due to the notes that are needed in order to form the G7. Ultimately what I am saying is this:
If you know a song contains a PROGRESSION of G Major to G7 (even C to G7 or G7 to C) you will want to finger the open G Major chord in the same style as the G7 on the Low E and A strings to make the movement easier.

104
Now we need to look at the fretboard for logical areas in which the G, B, D, and F appear:
Optional Position (all notes)
Again, here are all the notes that are associated with the G7 barre chord. Remember that we don't need three G notes. We need to find the seventh, which is F.
Take a look at "only the necessary notes" to see what I have done.
Only the necessary notes:
Again, this is nothing you haven't seen already. There's no need to play the fifth fret note on the D string (G). This is played as an E style barre chord.
Slash Sheet Exercise (95 BPM)
This video includes all forms of the G7 chord. After I play the first G7 (open) notice that I show you how easy the movement from G7 to G Major is if you play the G Major using the G7 formation.

105
Applying Fingerstyle To The G7 Chord
Exercise 1
Exercise 2
Week 5 - Day 1: The Em7 Chord
The Em7 chord looks like this:
OR
The Em7 chord contains the notes E, B, D, and G. The first Em7 is a very basic open position chord. The second Em7 is just a full Em with an 'added' seventh.
By now you should know how to calculate what the seventh is. It is a D.
It doesn't matter which of the two chords you select to play because they both produce the same tones.

106
The only thing that is different is in the way that they are fingered.
Slash Sheet Exercise (95 BPM):
Simply practice playing the Em7 chord four times each measure.
Now we need to look at the fretboard for logical areas in which the E, B, D, and G appear:
To the left is the fretboard featuring the full spectrum of notes used to create the Em7 chord. You've already learned the open forms.
Just remember that you don't need ALL of the notes from this diagram. You just need a few.
Optional Position
This is the one you will find most often (other than the open forms). I've removed the E note on the G string so that we may get to the D note to create this Em7 as a seventh chord.

107
Optional Position
Applying Fingerstyle To The Em7 Chord
Exercise 1:
Exercise 2:
Exercise 3:
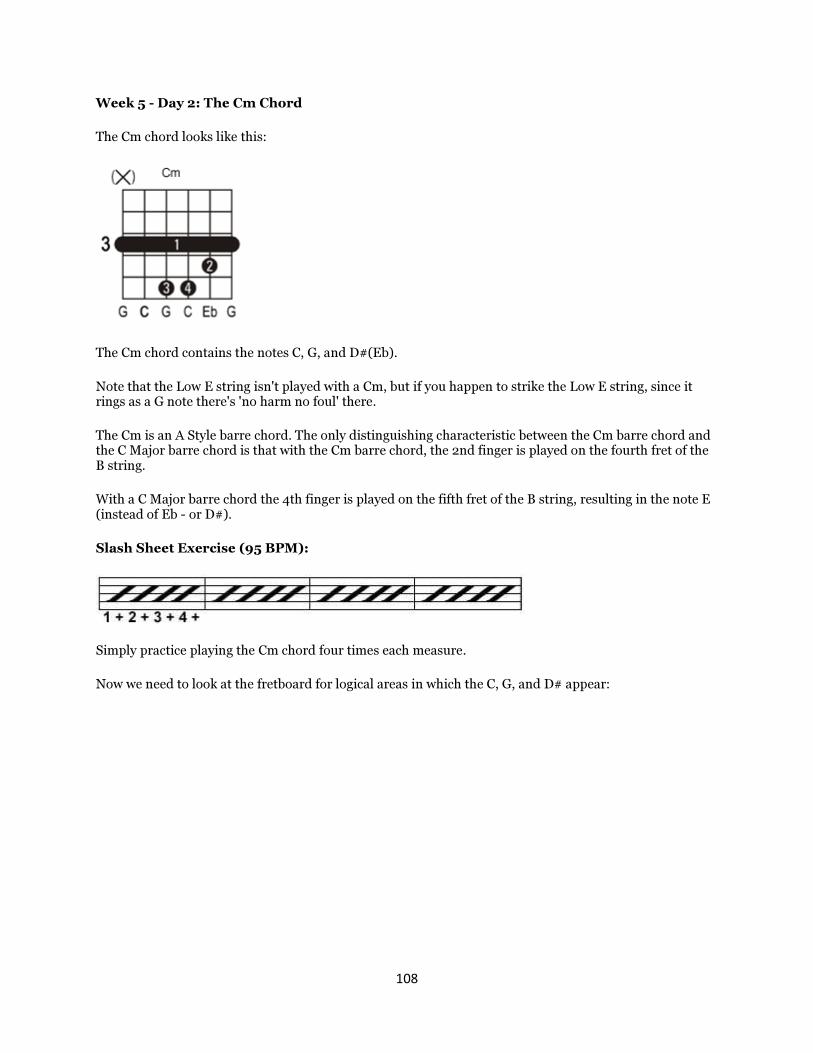
108
Week 5 - Day 2: The Cm Chord
The Cm chord looks like this:
The Cm chord contains the notes C, G, and D#(Eb).
Note that the Low E string isn't played with a Cm, but if you happen to strike the Low E string, since it rings as a G note there's 'no harm no foul' there.
The Cm is an A Style barre chord. The only distinguishing characteristic between the Cm barre chord and the C Major barre chord is that with the Cm barre chord, the 2nd finger is played on the fourth fret of the B string.
With a C Major barre chord the 4th finger is played on the fifth fret of the B string, resulting in the note E (instead of Eb - or D#).
Slash Sheet Exercise (95 BPM):
Simply practice playing the Cm chord four times each measure.
Now we need to look at the fretboard for logical areas in which the C, G, and D# appear:

109
Position of Cm Barre Chord:
Just for clarification purposes I've boxed in the Cm barre chord as it appears on the fretboard to the left. This one is an A Style barre chord.
Optional Position:
Nothing special here. You've seen this with the Gm and Am barre chords. The root is just on the seventh fret, so THIS one would be an E Style barre chord.
Optional Position

110
Applying Fingerstyle To The Cm Chord
Exercise 1
Exercise 2
Week 5 - Day 3: The F# Chord
The F# chord looks like this:
Before we move any further, notice that this chord can also be called a Gb. You can already guess that this is an E Style barre chord due to the root note being on the E string. The F# chord contains the notes F#, C#, and A# (Bb).
You'll notice it is the same as an F Major, but of course the F has been 'sharped.'

111
VS.
Slash Sheet Exercise (95 BPM):
Simply practice playing the F# barre chord four times each measure. I have included both first finger fretting and thumb.
Now we need to look at the fretboard for logical areas in which the F#, C#, and A# appear:

112
Here is the basic position:
No Optional Position?
Technically there IS an optional position, but I've never used it before and I can't see a logical reason that you would either. However, if you ever choose to play an F# in a different position the location should be easy to find.
Can you guess where based on the fretboard to the left? Again we aren't going to focus on it, because I don't know of a single time that I've used it. But of course, there IS a first time for everything.
It's here:

113
Applying Fingerstyle To The F# Chord
Exercise
Week 5 - Day 4: The Asus2 Chord
The Asus2 chord looks like this and contains the notes A, E, and B:
OR (I recommend 2, 3)
What does "sus" mean? It's a shortened term for 'suspended.' Often guitarists will slip a little and say 'sustained' but this isn't correct. There is a difference between the two. The important thing to realize is that in THIS case we are talking about a "sus2" chord, where the number "2" is VERY important.
A sus2 chord is where you take the 3rd and move it FROM the 3rd to the 2nd. Remember that we need to plot the notes without considering a sharp or flat. This is only applied after the chord is plotted. The A scale is:
1 2 3 4 5 6 7 8
A B C D E F G A
Look at the A Major vs. the Asus2 chord:

114
vs. OR
A normal major chord is made of the 1, 3 & 5 notes of the major scale. In the case of A Major, it's A, E, and C#. "A" is the 1. "C#" is the "3" and "E" is the "5." (If you wonder why I arranged it as A, E, and C# instead of the 'correct' way of A, C#, and E it is only because of the way you are looking at the chord from low to high strings. Just a quick point.)
So, to play an Asus2 (instead of an A Major) we need to make the A Major 'turn into' an Asus2. Instead of the 3rd we want the 2nd. Look at the chart again:
1 2 3 4 5 6 7 8
A B C D E F G A
We already know that we want the "1" because it is the root.
Instead of the "3" we want the "2" to make it suspended. The "2" would then form a B instead of a C. (Remember sharps and flats are irrelevant right now.)
To make this a 'full' chord we need the "5" now. That would be an E note.
That's why it's called 'suspended' - it's like it's suspended until you resolve it back to a major chord. In the case of Asus2 we need the notes A, B, and E.
(You might already know how to form a "sus4" now too - but let's not get too far ahead.)
Slash Sheet Exercise (95 BPM):
Simply practice playing the Asus2 chord four times each measure.

115
Now we need to look at the fretboard for logical areas in which the A, B, and E appear:
While I have no optional positions to show you for this chord (mainly because the only one that there really is to me is ridiculous to play for the purpose of Chord Workshop) we do once again have this multiple note issue.
Check this out:
Because we don't need a whole bunch of notes to form the Asus2 we need to look logically at what notes we could remove to brighten up the chord. The diagram below will show the change.
I omitted one of the multiple E notes (Low E string) as well as the B note on the 2nd fret of the A string. Remember in theory we only need one B note as it isn't a root. We also eliminated an E note because it isn't the root either.

116
Applying Fingerstyle To The Asus2 Chord
Exercise
Week 5 - Day 5: The Dsus2 Chord
The Dsus2 chord looks like this and contains the notes D, A, and E:
You'll remember from the the lesson on Asus2 that we need to find the 1, 2, and 5 instead of the 1, 3, and 5. The D scale is:
1 2 3 4 5 6 7 8
D E F G A B C D
Here you'll see the notes that are needed in order to form the Dsus2 chord.
Slash Sheet Exercise (95 BPM):
Simply practice playing the Dsus2 chord four times each measure.
Now we need to look at the fretboard for logical areas in which the D, A, and E appear:
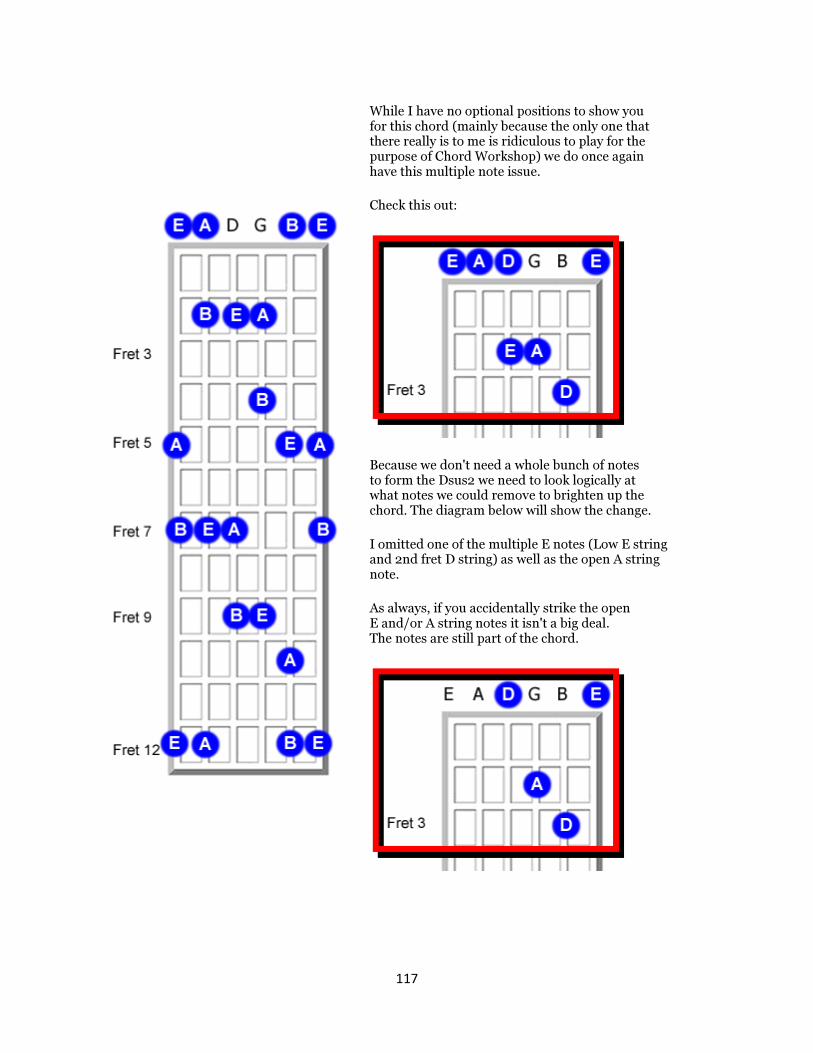
117
While I have no optional positions to show you for this chord (mainly because the only one that there really is to me is ridiculous to play for the purpose of Chord Workshop) we do once again have this multiple note issue.
Check this out:
Because we don't need a whole bunch of notes to form the Dsus2 we need to look logically at what notes we could remove to brighten up the chord. The diagram below will show the change.
I omitted one of the multiple E notes (Low E string and 2nd fret D string) as well as the open A string note.
As always, if you accidentally strike the open E and/or A string notes it isn't a big deal. The notes are still part of the chord.
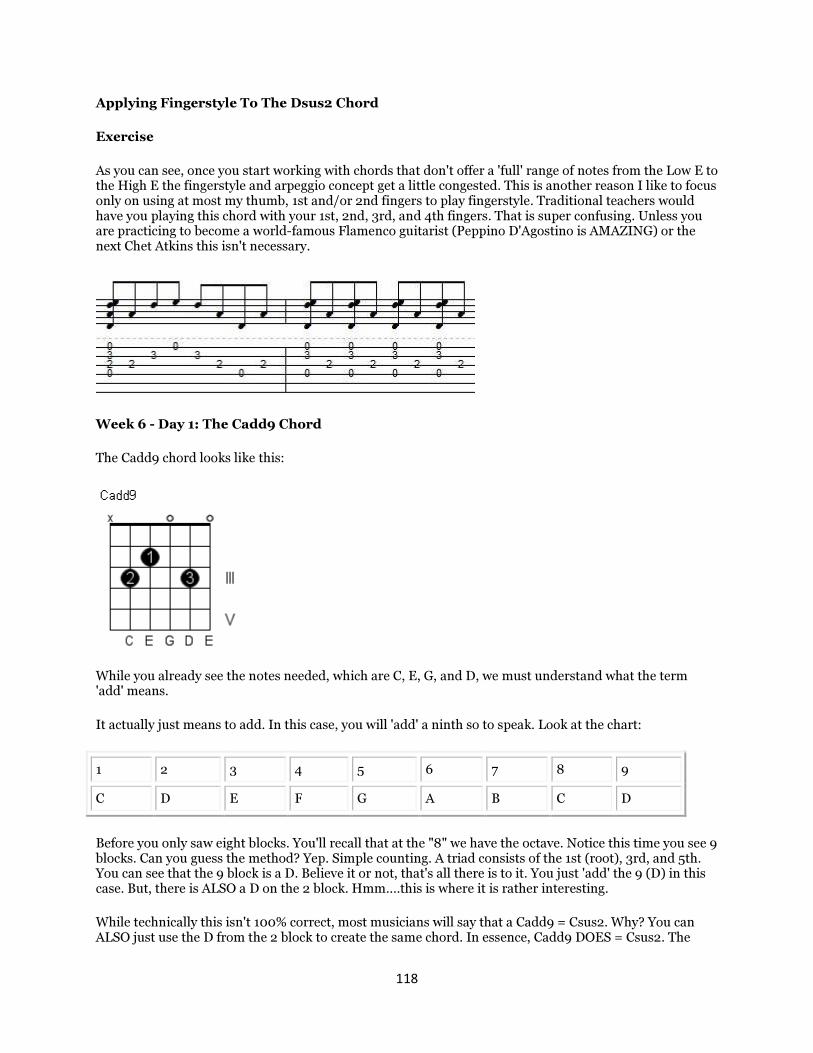
118
Applying Fingerstyle To The Dsus2 Chord
Exercise
As you can see, once you start working with chords that don't offer a 'full' range of notes from the Low E to the High E the fingerstyle and arpeggio concept get a little congested. This is another reason I like to focus only on using at most my thumb, 1st and/or 2nd fingers to play fingerstyle. Traditional teachers would have you playing this chord with your 1st, 2nd, 3rd, and 4th fingers. That is super confusing. Unless you are practicing to become a world-famous Flamenco guitarist (Peppino D'Agostino is AMAZING) or the next Chet Atkins this isn't necessary.
Week 6 - Day 1: The Cadd9 Chord
The Cadd9 chord looks like this:
While you already see the notes needed, which are C, E, G, and D, we must understand what the term 'add' means.
It actually just means to add. In this case, you will 'add' a ninth so to speak. Look at the chart:
1 2 3 4 5 6 7 8 9
C D E F G A B C D
Before you only saw eight blocks. You'll recall that at the "8" we have the octave. Notice this time you see 9 blocks. Can you guess the method? Yep. Simple counting. A triad consists of the 1st (root), 3rd, and 5th. You can see that the 9 block is a D. Believe it or not, that's all there is to it. You just 'add' the 9 (D) in this case. But, there is ALSO a D on the 2 block. Hmm....this is where it is rather interesting.
While technically this isn't 100% correct, most musicians will say that a Cadd9 = Csus2. Why? You can ALSO just use the D from the 2 block to create the same chord. In essence, Cadd9 DOES = Csus2. The

119
method is the same. The theory is not. Because in the case of 'add' you are literally adding, Add9 is a major chord with the 9th scale degree added (which is the same note as the 2nd) Sus2 is neither a major or minor chord. It's neutral. In this chord, the vital 3rd note of the scale (the note that determines whether a chord is major or minor) is replaced by the 2nd note of the scale.
All this aside, you CAN call a Cadd9 chord a Csus2 chord when simply playing music. Most musicians will call it an 'add9' - that is, at least the folks I play with.
Slash Sheet Exercise (95 BPM):
Simply practice playing the Cadd9 (Csus2) chord four times each measure. I also note at the end the transition to G Major and how easy it is.
Now we need to look at the fretboard for logical areas in which the C, E, G, and D appear:

120
Just remember that you don't need ALL of the notes from this diagram. You just need a few.
Here is the full spectrum:
Here is the corrected entry:
What did I do? We don't need multiple G notes. We only really need 1. I've also removed the C note on the B string because the D note on the third fret takes the place anyway. There are no logical positions to play the Cadd9 (Csus2) anywhere else on the fretboard.
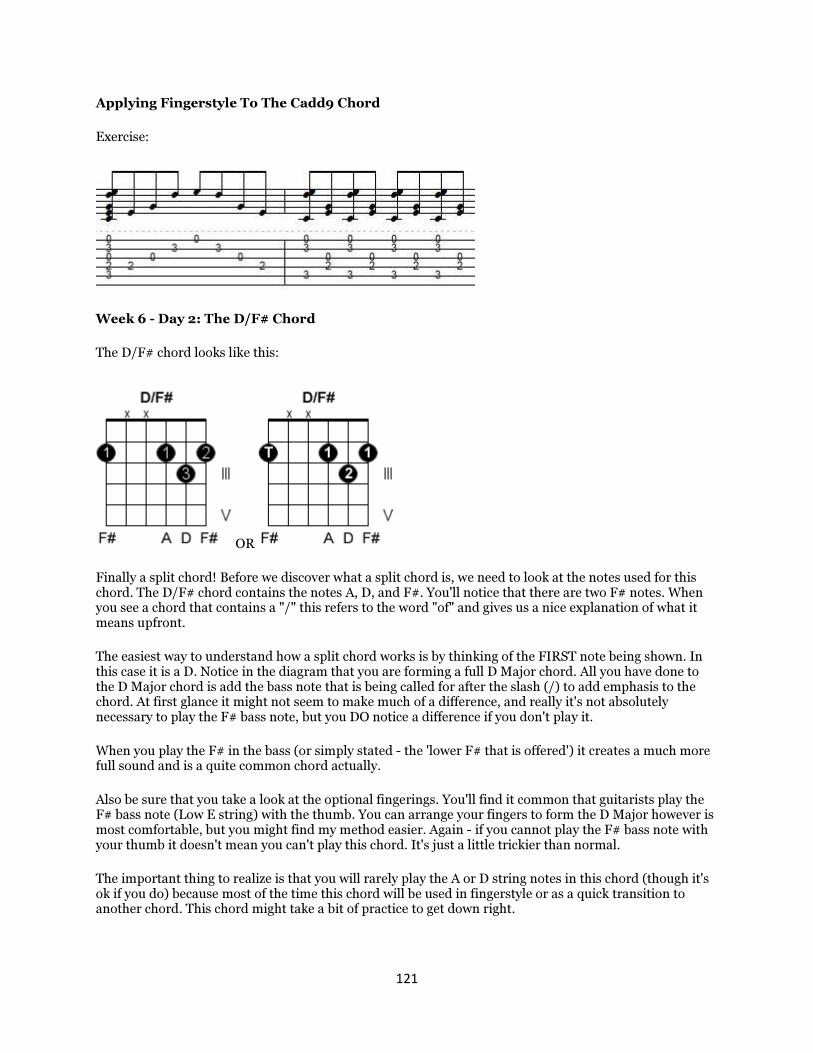
121
Applying Fingerstyle To The Cadd9 Chord
Exercise:
Week 6 - Day 2: The D/F# Chord
The D/F# chord looks like this:
OR
Finally a split chord! Before we discover what a split chord is, we need to look at the notes used for this chord. The D/F# chord contains the notes A, D, and F#. You'll notice that there are two F# notes. When you see a chord that contains a "/" this refers to the word "of" and gives us a nice explanation of what it means upfront.
The easiest way to understand how a split chord works is by thinking of the FIRST note being shown. In this case it is a D. Notice in the diagram that you are forming a full D Major chord. All you have done to the D Major chord is add the bass note that is being called for after the slash (/) to add emphasis to the chord. At first glance it might not seem to make much of a difference, and really it's not absolutely necessary to play the F# bass note, but you DO notice a difference if you don't play it.
When you play the F# in the bass (or simply stated - the 'lower F# that is offered') it creates a much more full sound and is a quite common chord actually.
Also be sure that you take a look at the optional fingerings. You'll find it common that guitarists play the F# bass note (Low E string) with the thumb. You can arrange your fingers to form the D Major however is most comfortable, but you might find my method easier. Again - if you cannot play the F# bass note with your thumb it doesn't mean you can't play this chord. It's just a little trickier than normal.
The important thing to realize is that you will rarely play the A or D string notes in this chord (though it's ok if you do) because most of the time this chord will be used in fingerstyle or as a quick transition to another chord. This chord might take a bit of practice to get down right.

122
Slash Sheet Exercise (95 BPM):
Simply practice playing the D/F# chord four times each measure. In the video I first pick out ONLY the fretted notes. At the end I strum them all. I love the way this chord sounds when played fully, but often this won't be the case. Usually it's all about a picking pattern. I address this with the fingerstyle version further below.
Now we need to look at the fretboard for logical areas in which the A, D, and F# appear:
If you've been wondering this whole time why I keep presenting the same chords basically in the same way over and over your question is more than likely about to be answered.
While this chart shows all of the possible notes that are arranged to find a D/F# chord, you'll see that there aren't too many options in creating this chord in a logical way.
What about....?
This is basically a D Major barre chord, even if you decided to include the Low E note. But....
It is not a D/F# chord because we don't have the BASS note of F#.
The only F# that appears in a logical formation (there's no way to finger the fourth fret D string note of F#) is NOT the bass of the chord - so it wouldn't be a D/F#.

123
What about....?
This won't work either. It's also a standard D Major barre chord (E Style this time) but it isn't a D/F# because there is no BASS note of F# that can be played logically. Again, the F# note on the eighth fret of the A string isn't playable in a logical way with this position.
There IS an optional position in which you can play the D/F# - but I DO NOT recommend it. I'm not even covering it in this lesson because it is a pain to play. However, I will show it to you:
Ummm....no. There's no need for all that. It's much easier just to play the original form and it will take less time to master.
Applying Fingerstyle To The D/F# Chord
Exercise
This one is completely different so I included the finger arrangement for the picking hand. Here you will begin with an open strum of all of the notes that can be played with the D/F# chord. I then provide you with a different fingerstyle arrangement where the A and D string notes are not played.

124
Fingerings:
This time I'd like you to try to follow the pattern I provide. If you just can't get it down it's ok. Just try.
Week 6 - Day 3: The D7 Chord
The D7 chord looks like this:
You'll know up front that it's a 'dominant 7th' chord by the name, so you can already assume what we need to do: find the 7 in the D Major.
1 2 3 4 5 6 7 8
D E F G A B C D
So we know that in a D Major chord we need the notes D, F#, and A. In the D7 chord we want the C to be added. In other words, to form the D7 chord we need the notes D, F#, A, and C.
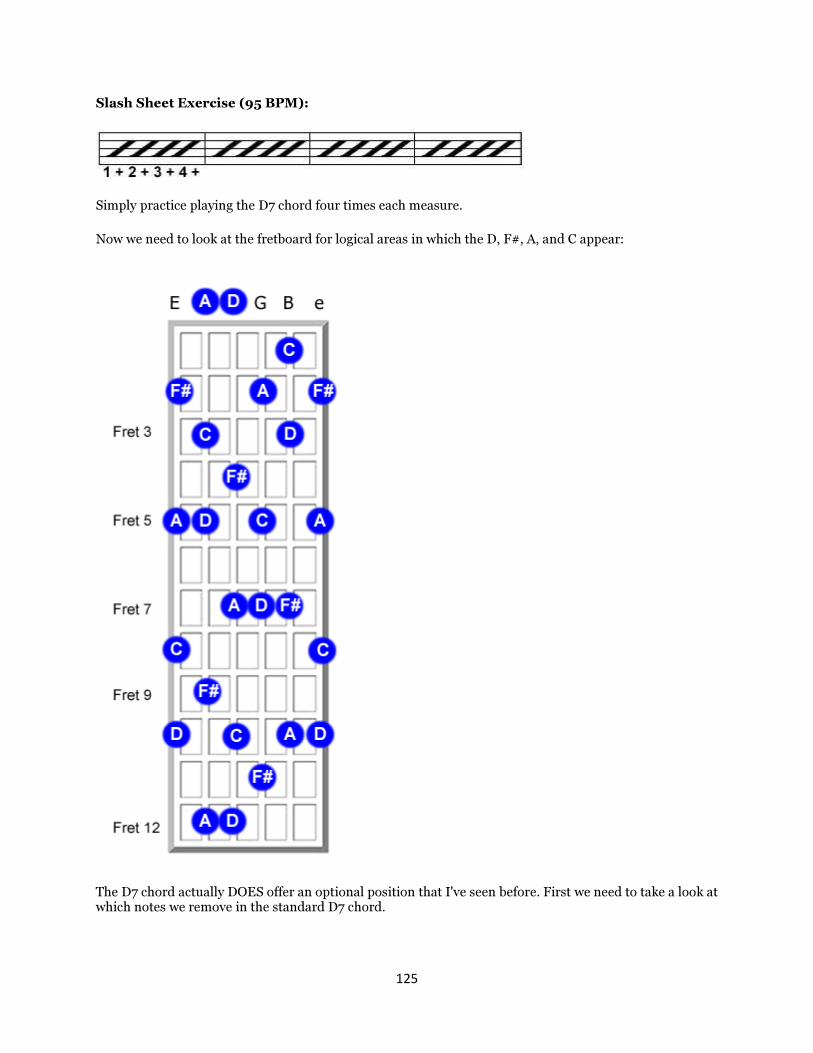
125
Slash Sheet Exercise (95 BPM):
Simply practice playing the D7 chord four times each measure.
Now we need to look at the fretboard for logical areas in which the D, F#, A, and C appear:
The D7 chord actually DOES offer an optional position that I've seen before. First we need to take a look at which notes we remove in the standard D7 chord.

126
All Notes in D7:
We don't need all these notes. We've already got an F# note on the High E string so we don't need it on the Low E string. We've already got a C note on the B string so we don't need one on the A string. Also remember that in order to make the D Major a dominant seventh we need to use the C note - not the D note. (We've already got the open D string note)
Correct Notes in D7:
We have our D root (open) as well as the other necessary notes to make this D7 correct. Because there are two A notes left, you can already recognize that the open A string is completely optional. We don't NEED to play this string, but no harm no foul.

127
Optional Position:
Here we have a rather different (but occasionally used) D7 chord. We just need to see what notes to remove. By removing the C note on the E string and the F# note on the A string we have the following results:
This one is rather interesting because the D root is actually NOT on the lowest string. This is technically an inversion, but I don't want to go all crazy with inversions because it gets rather complicated. The easiest way to think of an inversion in this case is that the root is not the lowest note in the chord. However, we do have all of the notes we need in this diagram to play the D7 chord.
Optional Position
Here is the D7 in the new position:
Now try to switch between playing the open D7 and the D7 in the new position.

128
Applying Fingerstyle To The D7 Chord
Exercise 1
Exercise 2
Week 6 - Day 4: The G/B Chord
The G/B chord contains the notes B, D, and G.
VS.
We already know that this is a 'split' chord because we have the "/." However, you'll also notice something from this chord diagram that might contradict the concept of 'splitting' a chord. In all technicality we really just have a G chord. What makes this chord a G/B chord and not just a G chord is that the root "B" rings as the bass note on the A string instead of the G on the Low E string. The easiest way to think of the G/B chord is that it is JUST a G Major chord without the usage of the Low E string G note.
Fingerings are rather relative here. I find myself using my 2nd finger often when playing this chord instead of my 1st finger on the A string's B note. This is often because like with the D/F# this chord sometimes serves as a transition chord.

129
Slash Sheet Exercise (95 BPM):
Simply practice playing the G/B chord four times each measure.
Now we need to look at the fretboard for logical areas in which the B, D, and G appear:
Check this out:
Here are all the notes found in a G/B (or a G Major). We need "B" as our bass note, so we remove the low E string G note and don't play it.

130
Optional Position:
Odds are you won't be playing this formation, but it's a good idea to show you the way in which we create it. Again, we need the "B" to become our bass note so we remove the "D" note from the Low E string:
Is this getting super easy yet? I hope so.
Optional Position
Simply practice playing the seventh fret G/B chord four times each measure.
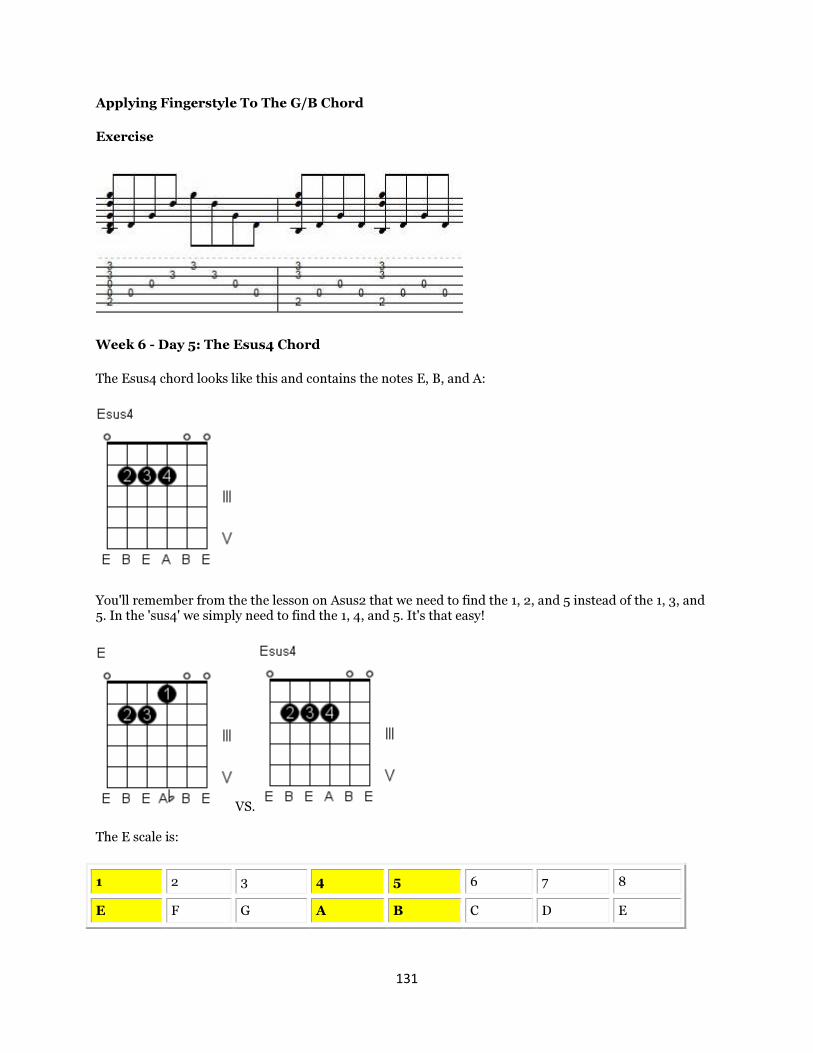
131
Applying Fingerstyle To The G/B Chord
Exercise
Week 6 - Day 5: The Esus4 Chord
The Esus4 chord looks like this and contains the notes E, B, and A:
You'll remember from the the lesson on Asus2 that we need to find the 1, 2, and 5 instead of the 1, 3, and 5. In the 'sus4' we simply need to find the 1, 4, and 5. It's that easy!
VS. The E scale is:
1 2 3 4 5 6 7 8
E F G A B C D E
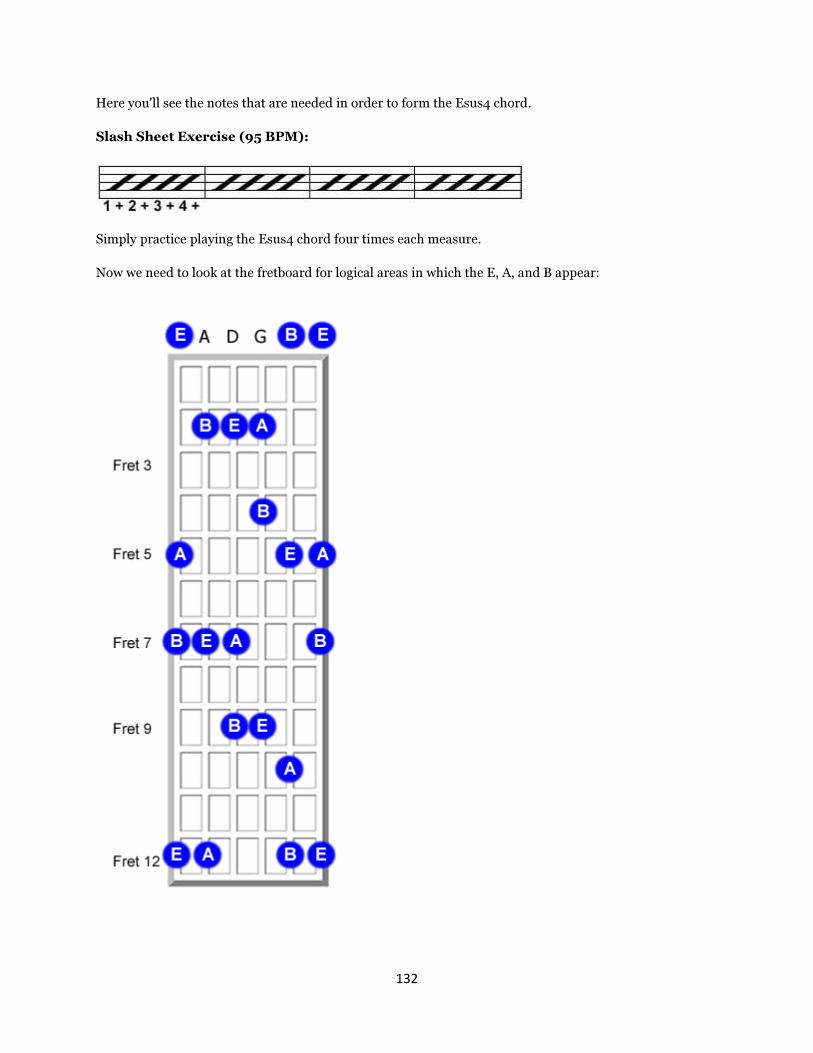
132
Here you'll see the notes that are needed in order to form the Esus4 chord.
Slash Sheet Exercise (95 BPM):
Simply practice playing the Esus4 chord four times each measure.
Now we need to look at the fretboard for logical areas in which the E, A, and B appear:
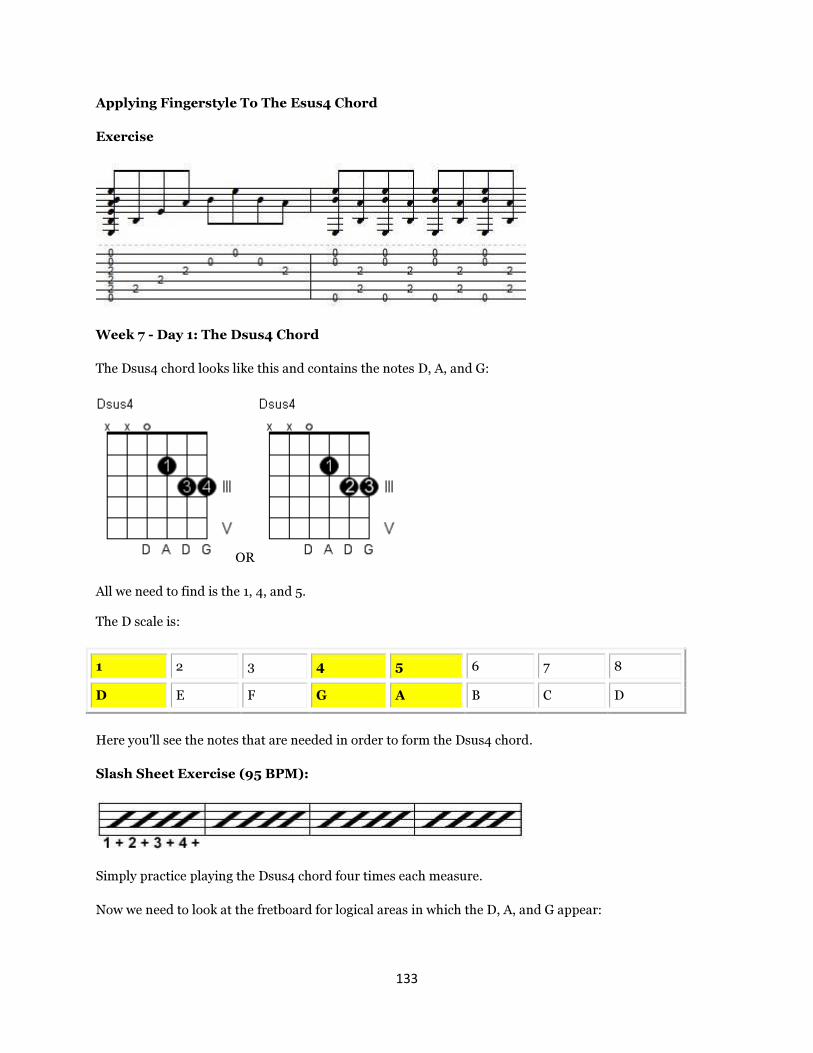
133
Applying Fingerstyle To The Esus4 Chord
Exercise
Week 7 - Day 1: The Dsus4 Chord
The Dsus4 chord looks like this and contains the notes D, A, and G:
OR
All we need to find is the 1, 4, and 5. The D scale is:
1 2 3 4 5 6 7 8
D E F G A B C D
Here you'll see the notes that are needed in order to form the Dsus4 chord.
Slash Sheet Exercise (95 BPM):
Simply practice playing the Dsus4 chord four times each measure.
Now we need to look at the fretboard for logical areas in which the D, A, and G appear:
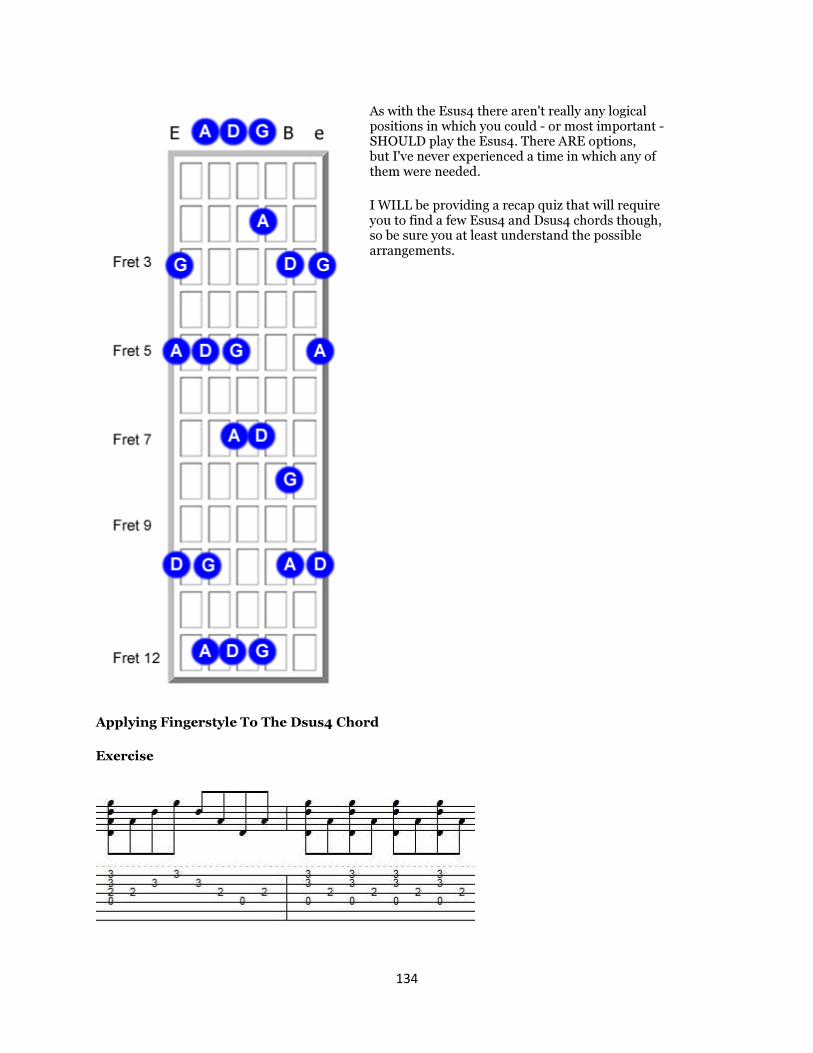
134
As with the Esus4 there aren't really any logical positions in which you could - or most important - SHOULD play the Esus4. There ARE options, but I've never experienced a time in which any of them were needed.
I WILL be providing a recap quiz that will require you to find a few Esus4 and Dsus4 chords though, so be sure you at least understand the possible arrangements.
Applying Fingerstyle To The Dsus4 Chord
Exercise

135
Week 7 - Day 2: The Dsus4/F# Chord
The Dsus4/F# chord looks like this and contains the notes D, A, G....and you guessed it - F#.
OR
Basically you are just adding the F# note to the already formed Dsus4 chord. The F# note MUST be the bass note, as per the "/" noted in the chord in question. In the case of the Dsus4/F# you will need to use this Dsus4 chord diagram:
VS.
The big question is: Why does this chord appear to have changed so much by simply adding the F# bass note? Well, it really hasn't changed all that much. However, because we've included the F# bass note we want to fill this chord out as much as possible. When we reach the song that features this chord you'll understand why. Notice here that you WILL need to use your thumb to play the F# bass note. It's not as hard as it might seem.
Slash Sheet Exercise (95 BPM):
Simply practice transitioning FROM the Dsus4 to the Dsus4/F# chord. I also included the 1st finger approach to the F# note. In this approach, you alter your fingers as accordingly. Here they are for reference:

136
TO OR
Now we need to look at the fretboard for logical areas in which the D, A, G, and F# appear:
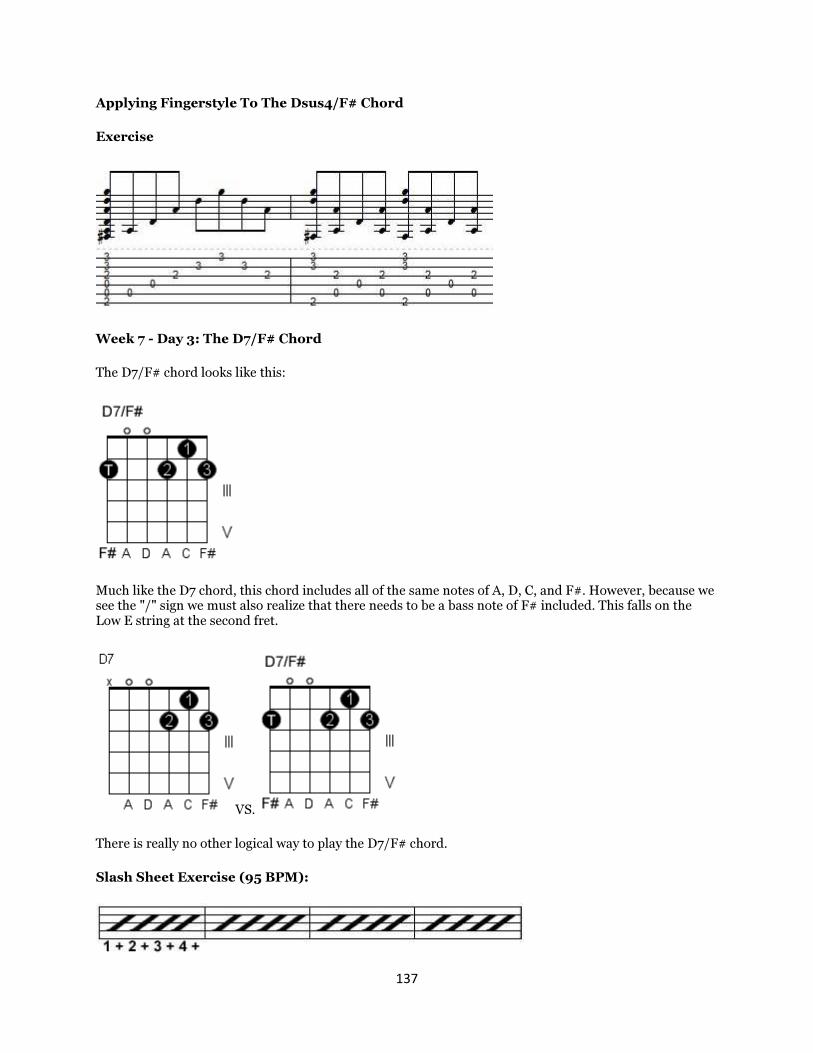
137
Applying Fingerstyle To The Dsus4/F# Chord
Exercise
Week 7 - Day 3: The D7/F# Chord
The D7/F# chord looks like this:
Much like the D7 chord, this chord includes all of the same notes of A, D, C, and F#. However, because we see the "/" sign we must also realize that there needs to be a bass note of F# included. This falls on the Low E string at the second fret.
VS.
There is really no other logical way to play the D7/F# chord.
Slash Sheet Exercise (95 BPM):

138
Simply practice playing the D7/F# chord four times each measure. I alternate between the D7 and D7/F# in this video to help you see the change that takes place.
Now we need to look at the fretboard for logical areas in which the D, F#, A, and C appear:
The D7/F# chord is just like the D7 chord, but we need the bass note included.

139
All Notes in D7/F#:
Correct Notes in D7/F#:
D7 VS. D7/F#
Unlike the traditional D7 as shown above, to form the D7/F# we NEED the bass note of F# on the Low E string.
Applying Fingerstyle To The D7/F# Chord
Exercise

140
Week 7 - Day 4: The C7 Chord
The C7 chord contains the notes C, E, and A#(Bb)
As you already know, we are forming a dominant 7 from the original C Major chord.
VS.
To make a C Major a C7 we simply need to create a seventh using 1, 3, and 7:
1 2 3 4 5 6 7 8
C D E F G A B C
Where's the 5th?
NOTE: You CANNOT LOGICALLY add the fifth in an 'open' C7 chord. So this C7 isn't quite a complete chord, but even though it's 'fifth-less', it still sounds like and functions as a C7 chord.
As always, the sharps and flats do not matter when it comes to the actual note we are looking for. We just need to use the overall formula.
The formula for EVERY dominant 7th chord (with the exception of a C7) is simply: 1, 3, 5, and flatted (b) 7 - or 1, 3, 5, b7
The formula for EVERY minor 7th chord is simply: 1, b3, 5, and b7

141
Slash Sheet Exercise (95 BPM):
Simply practice playing the C7 chord four times each measure.
Now we need to look at the fretboard for logical areas in which the C, E, and Bb(A#) appear:
As always we need to 'remove' the notes that we don't need, and/or that are hidden behind the fretted notes.
By playing the C note instead you can't hit the A# note on the A string. As always remember that the Low E string is really optional to play.

142
This Is Interesting!
So, how do we play a barre chord version of the C7 chord? This is a little tricky to understand, and isn't traditionally taught very often. You might recall a while back that I said I liked saying to "add" the seventh instead of substitute it? This is dangerous to say in a musical setting, because when you hear 'add' you automatically think of a chord like Cadd9, where 'add' literally means what it states. However, there is a trick to finding the C7 in barre chord (and partial chord) format. You need the 1-3-5-b7. In other words, you DO add a seventh to the already formed C Major chord in BARRE (and/or partial chord) format.
The following diagrams show barre chord/partial versions of the C7 chord. I won't go into detail with these chords because they are rarely played unless you CHOOSE to play them, but here they are, with the G note included. If you wonder what a 'partial' chord is the name says it all. It's just a partial chord. The notes are there but the fundamentals are a bit 'off' so to speak. This goes back to the theory that all you really need are three notes (triad) to form a chord.
Barre Chord Format Option
remove duplicate notes to make =

143
Partial Chord Format Option
remove duplicate notes to make =
Barre Chord Format Option

144
remove duplicate notes to make =
Partial Chord Format Option
remove duplicate notes to make =
Applying Fingerstyle To The C7 Chord
Exercise

145
Week 7 - Day 5: The C#m Chord
The C#m chord looks like this and contains the notes C#, G#, and E:
There is no open C#m chord. Every C#m chord is a barre chord. As always the C#m Low E string note need not be played, but is an acceptable note.
Slash Sheet Exercise (95 BPM):
Simply practice playing the C#m chord four times each measure.
Now we need to look at the fretboard for logical areas in which the C#, G#, and E appear:

146
At A Glance...
Even if you included the G# note (which you really shouldn't) on the Low E string this would be an A Style barre chord because the C# root falls on the A string.
Optional Position:
Here we have an E Style barre chord because the root of C# is on the Low E string. Super simple!
Optional Position

147
Applying Fingerstyle To The C#m Chord
Exercise 1
Exercise 2
Week 8 - Day 1: The Gm7 Chord
The Gm7 chord looks like this and contains the notes G, D, F, and Bb(A#):
All we need to find is the 1, b3, 5, and b7.
Remember that this is a minor chord, so we must use the formula 1, b3, 5, and b7.
If this were a Major chord we would use the formula 1, 3, 5, and b7 instead.
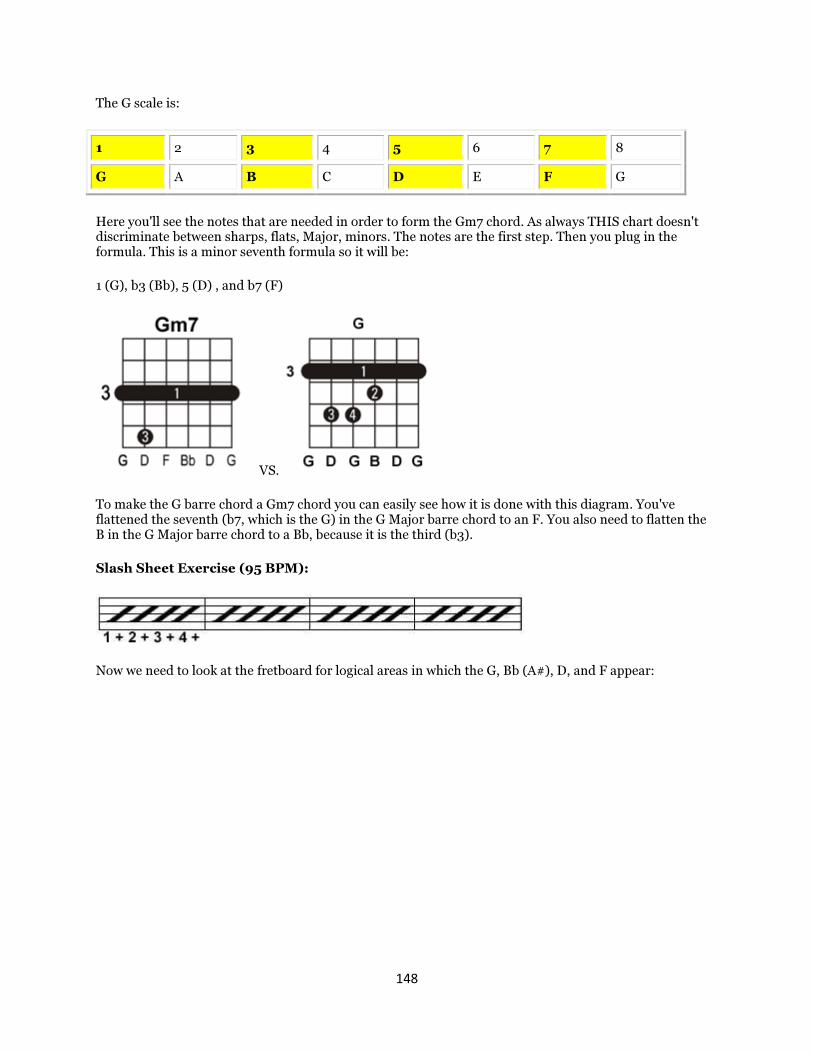
148
The G scale is:
1 2 3 4 5 6 7 8
G A B C D E F G
Here you'll see the notes that are needed in order to form the Gm7 chord. As always THIS chart doesn't discriminate between sharps, flats, Major, minors. The notes are the first step. Then you plug in the formula. This is a minor seventh formula so it will be:
1 (G), b3 (Bb), 5 (D) , and b7 (F)
VS.
To make the G barre chord a Gm7 chord you can easily see how it is done with this diagram. You've flattened the seventh (b7, which is the G) in the G Major barre chord to an F. You also need to flatten the B in the G Major barre chord to a Bb, because it is the third (b3).
Slash Sheet Exercise (95 BPM):
Now we need to look at the fretboard for logical areas in which the G, Bb (A#), D, and F appear:

149
As with all of our seventh and m7 chords we need to take a look at what notes we would remove (or alter) in order to create the chord desired.
We need to fix this:
As it stands now it is just a Gm barre chord (if you placed all of your fingers on the fretboard as it appears). We need to remove the G note on the fifth fret of the D string in order to find the F that is needed.
Bam! There's a Gm7 chord.
Applying Fingerstyle To The Gm7 Chord
Exercise

150
Week 8 - Day 2: The Am/G Chord
The Am/G chord looks like this and contains the notes A, E, and C....and you guessed it - G.
Basically you are just adding the G note to the already formed Am chord. The G note MUST be the bass note, as per the "/" noted in the chord in question. In the case of the Am/G you will need to use this Am chord diagram:
Adding G Bass =
It's a little tricky to get that 4th finger wrapped over the strings without accidentally muting them, but by forming an arc with your 4th finger right at the knuckle it is possible.
Slash Sheet Exercise (95 BPM):
Simply practice transitioning FROM the Am to the Am/G chord.
Now we need to look at the fretboard for logical areas in which the A, E, C, and G appear:

151
Applying Fingerstyle To The Am/G Chord
Exercise

152
Week 8 - Day 3: The Amaj7 Chord
The Amaj7 chord looks like this:
Here we have the notes A, E, Ab(G#), and C#.
Check out the A Major vs. the Amaj7:
VS.
There's no major difference other than the A note on the G string is dropped to Ab(G#).
Slash Sheet Exercise (95 BPM):
Simply practice playing the Amaj7 chord four times each measure. I alternate between the A Major and the Amaj7. In the first series you will see the A Major to Amaj7 using the fingerings above. The second series shows the A Major to Amaj7 using alternate fingerings for the Amaj7 (214) which is MUCH easier in some respects.
Now we need to look at the fretboard for logical areas in which the A, E, Ab(G#), and C# appear:

153
Applying Fingerstyle To The Amaj7 Chord
Exercise

154
Week 8 - Day 4: The Abm (G#m) Chord
The Abm (aka G#m) chord looks like this:
I am including the dual names of this chord this time because I've seen this chord called both a lot. The notes shown are in 'all flats' but you could also look at them as: G# - D# - G# - B - D# - G#.
In other words, you have the notes G#, D#, and B OR Ab - Eb - B
Slash Sheet Exercise (95 BPM):
Simply practice playing the Abm (G#m) chord four times each measure.
Now we need to look at the fretboard for logical areas in which the G#, D#, and B appear:

155
Applying Fingerstyle To The Abm (G#m) Chord
Exercise

156
Week 8 - Day 5: The Am/F# Chord
The Am/F# chord looks like this and contains the notes A, E, and C....and you guessed it - F#.
You'll recall that the Am/G worked in the same way:
VS.
Basically you are just adding the F# note to the already formed Am chord. The F# note MUST be the bass note, as per the "/" noted in the chord in question.
There is really only one logical way to play the F# note on the Low E string - and that is by using your thumb.
Slash Sheet Exercise (95 BPM):
Simply practice transitioning FROM the Am to the Am/F# and use your thumb as I show in the video.
Now we need to look at the fretboard for logical areas in which the A, E, C, and F# appear:
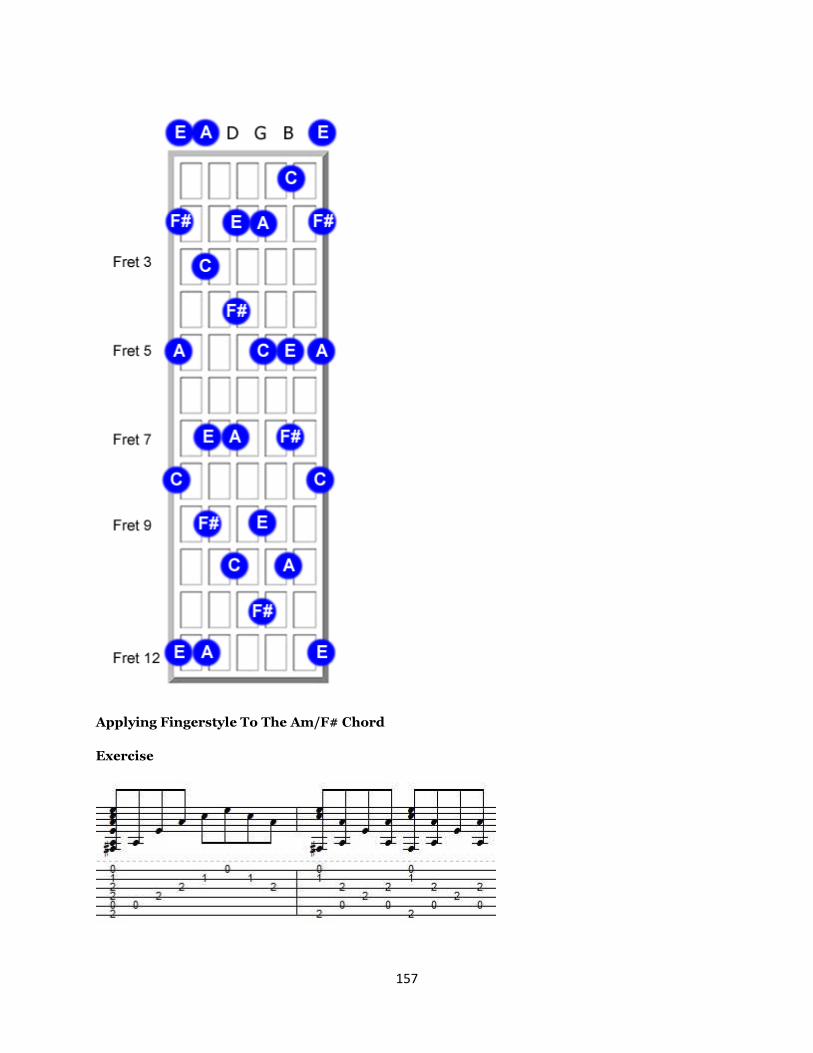
157
Applying Fingerstyle To The Am/F# Chord
Exercise
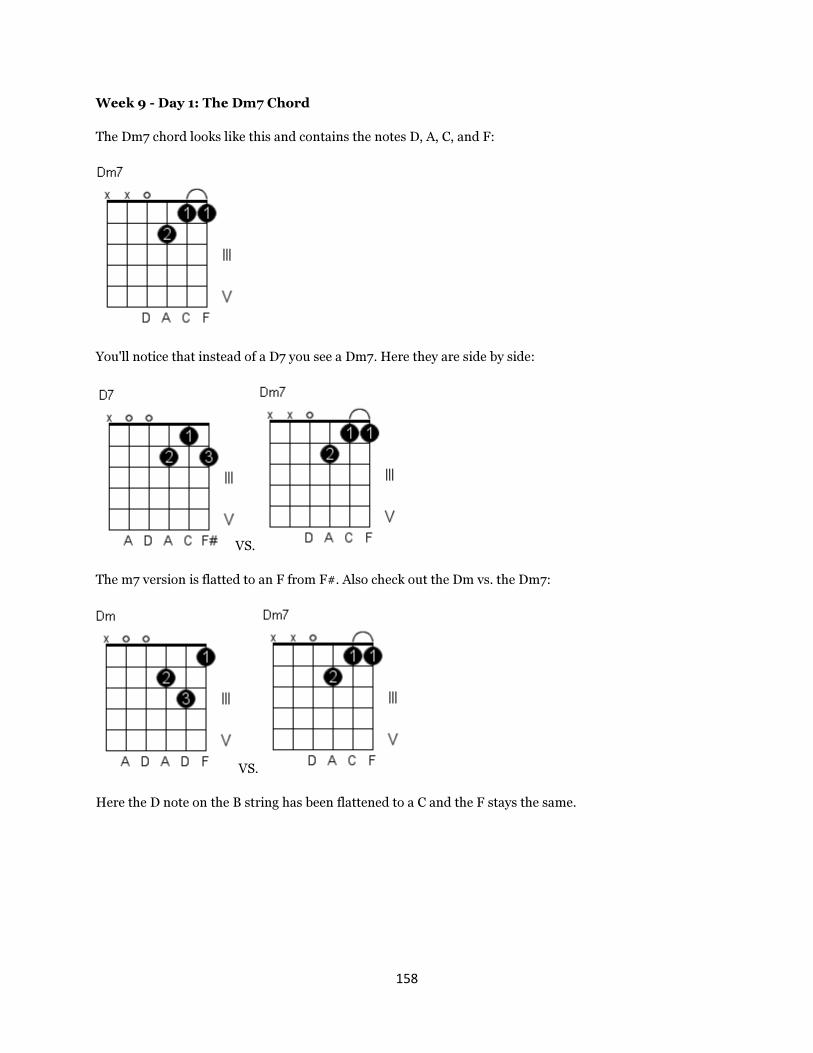
158
Week 9 - Day 1: The Dm7 Chord
The Dm7 chord looks like this and contains the notes D, A, C, and F:
You'll notice that instead of a D7 you see a Dm7. Here they are side by side:
VS.
The m7 version is flatted to an F from F#. Also check out the Dm vs. the Dm7:
VS.
Here the D note on the B string has been flattened to a C and the F stays the same.
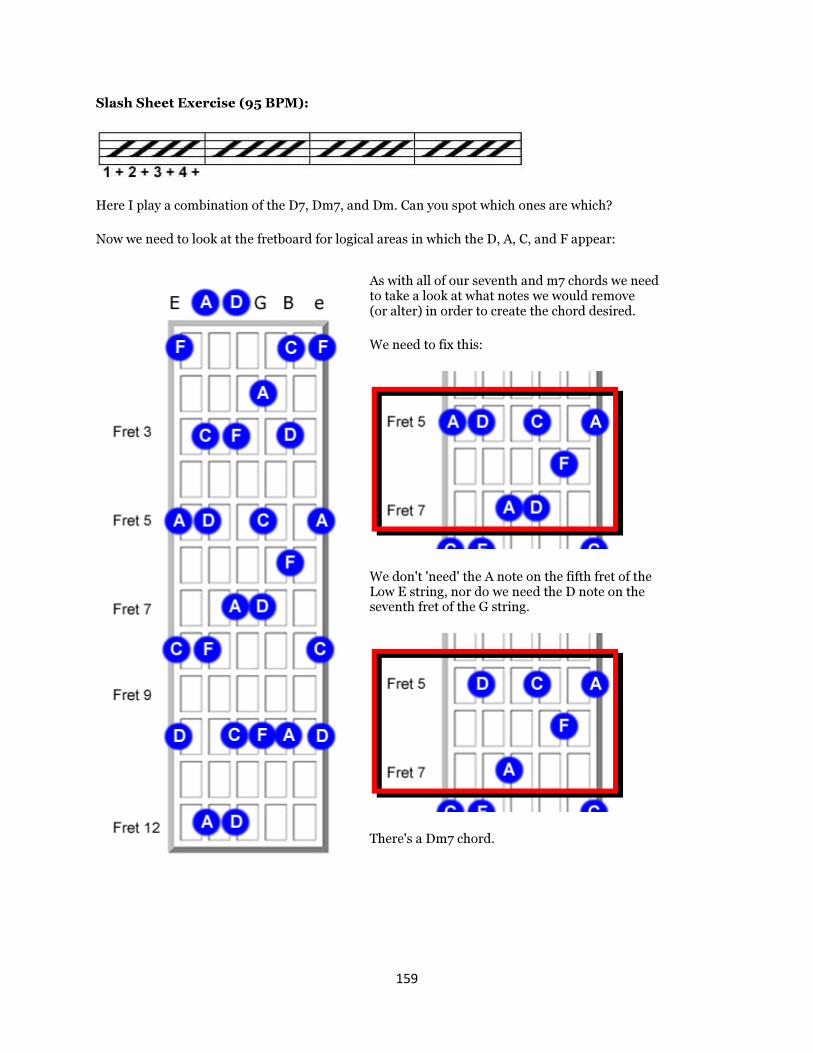
159
Slash Sheet Exercise (95 BPM):
Here I play a combination of the D7, Dm7, and Dm. Can you spot which ones are which?
Now we need to look at the fretboard for logical areas in which the D, A, C, and F appear:
As with all of our seventh and m7 chords we need to take a look at what notes we would remove (or alter) in order to create the chord desired.
We need to fix this:
We don't 'need' the A note on the fifth fret of the Low E string, nor do we need the D note on the seventh fret of the G string.
There's a Dm7 chord.

160
Additional Option #1 (from above):
Additional Option #2:
As you see this barre chord now it is simply a Dm barre chord (E Style) because the D note on the D string at the twelfth fret takes the place of the C note on the tenth fret of the same string. However, to make this barre chord a Dm7, we need to remove the D note on the twelfth fret on the D string to create this:

161
Applying Fingerstyle To The Dm7 Chord
Exercise 1
Exercise 2
Exercise 3

162
Week 9 - Day 2: The Fm Chord
The Fm chord looks like this and contains the notes F, C, and Ab(G#)
There is hardly any difference between the F Major and the Fm chord except for one finger:
VS.
You simply don't use your 2nd finger and instead barre the first fret.
Slash Sheet Exercise (95 BPM):
Simply practice transitioning FROM the F Major to the Fm chord:
Now we need to look at the fretboard for logical areas in which the F, C, and G# (Ab) appear:

163

164
Applying Fingerstyle To The Fm Chord
Exercise
Week 9 - Day 3: The Fmaj7 Chord
The Fmaj7 chord looks like this:
Here we have the notes F, A, C, and E
Slash Sheet Exercise (95 BPM):
Simply practice playing the Fmaj7 in this exercise.
Now we need to look at the fretboard for logical areas in which the F, A, C, and E appear:

165
Applying Fingerstyle To The Fmaj7 Chord
Exercise

166
Week 9 - Day 4: The C/B Chord
The C/B chord looks like this:
Here we have the notes B, E, G, and C. As you can already assume, the B is our bass note.
Slash Sheet Exercise (95 BPM):
Simply practice playing the C/B chord four times each measure.
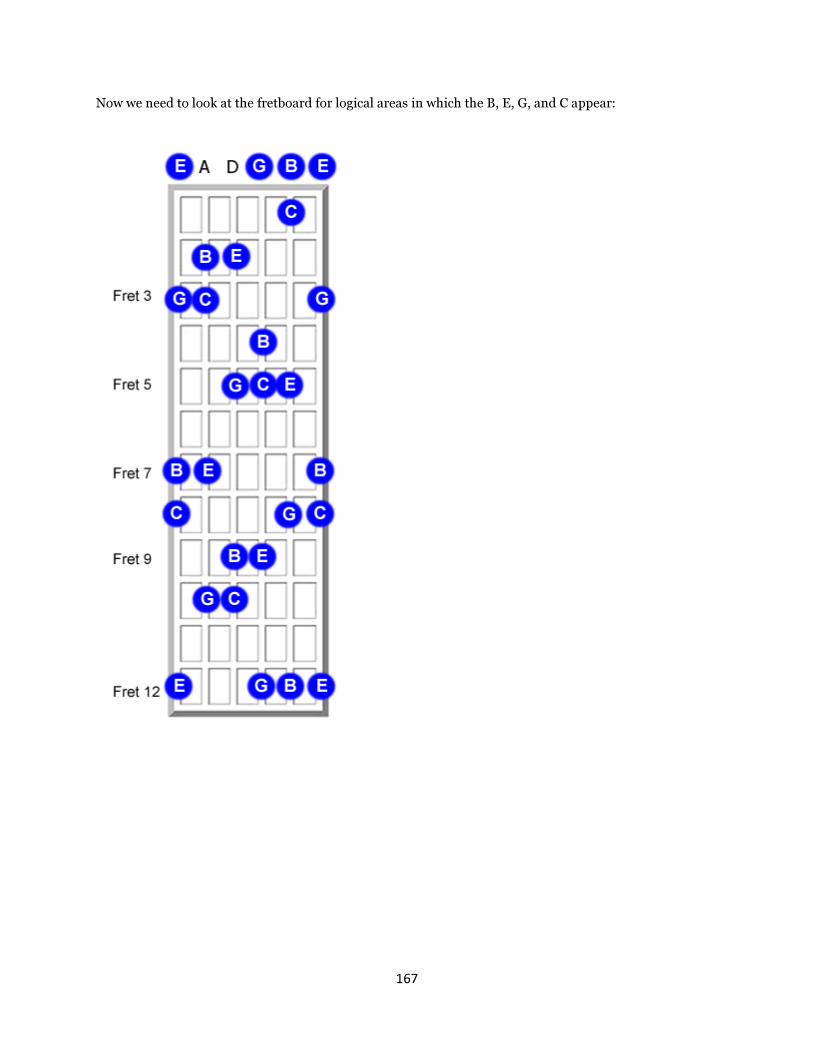
167
Now we need to look at the fretboard for logical areas in which the B, E, G, and C appear:

168
Applying Fingerstyle To The C/B Chord
Exercise
Week 9 - Day 5: The Ebmaj7 Chord
What the heck is THIS? An Ebmaj7? First we need to realize that this chord can also be called a D#maj7, which sounds much less creepy.
Remember that sharps and flats have dual names, and for fretboard purposes below we will be using those due to their ease of viewing.
Bb = A# Eb = D#
In order to form the chord Ebmaj7 we need: Bb, Eb, D, and G. In order to form the chord D#maj7 we need: A#, D#, D, and G.
(I just repeated the notes for understanding. We can call this chord either. Just remember to either flatten or sharpen.)
Slash Sheet Exercise (95 BPM):
Simply practice playing the Ebmaj7 (D#maj7) four times each measure:
Now we need to look at the fretboard for logical areas in which the A#, D#, D, and G appear:
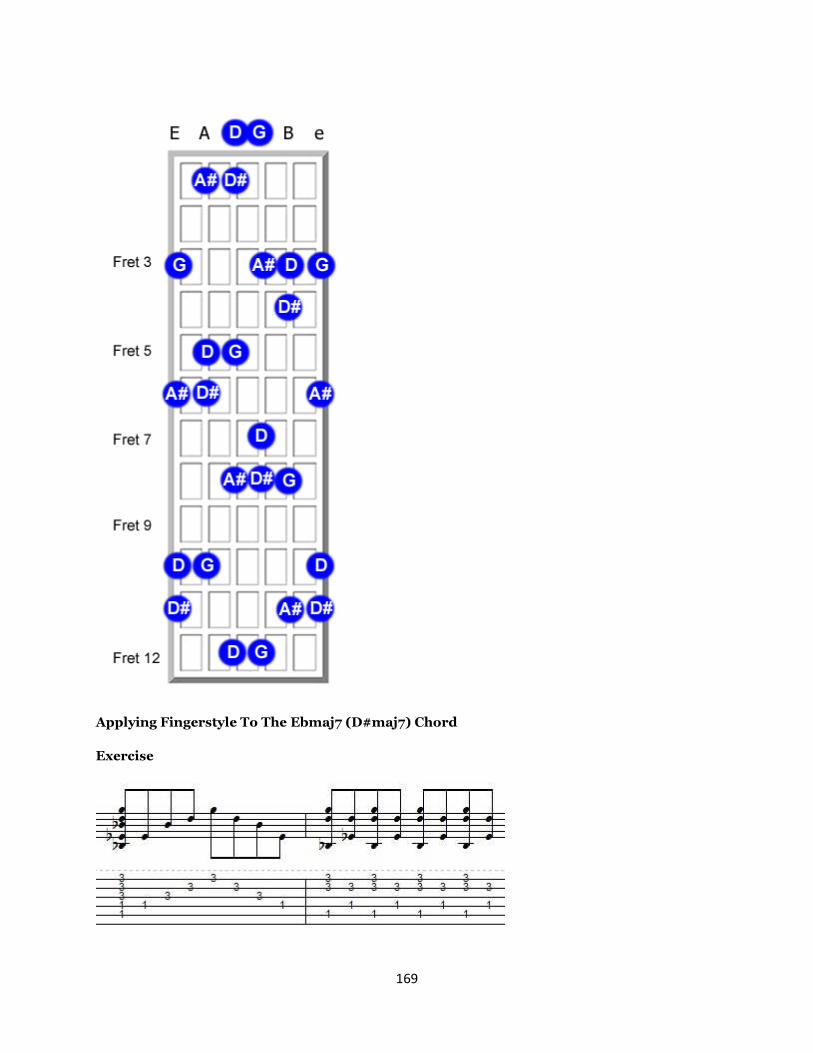
169
Applying Fingerstyle To The Ebmaj7 (D#maj7) Chord
Exercise

170
Week 10 - Day 1: The Dmaj7 Chord
The Dm7 chord looks like this and contains the notes D, A, C#, and F#:
You'll notice that there is only one difference between the Dmaj7 and the D Major chord - and that is the note on the second fret of the B string instead of the third fret. That creates the 'seventh' you have become extremely familiar with.
Slash Sheet Exercise (95 BPM):

171
Now we need to look at the fretboard for logical areas in which the D, A, C#, and F# appear:
As always with a seventh we need to fix the notes to create the seventh. I wanted to do this for you as a recap:
We need to reflect the notes of D, A, C#, and F#:
We removed the duplicate A note on the fifth fret of the Low E string as well as the D note on the G string at the seventh fret. We now have a Dmaj7 barre chord. This is an A style barre chord.
Additional Option #1 (from above):

172
Applying Fingerstyle To The Dmaj7 Chord
Exercise 1
Exercise 2
Week 10 - Day 2: The D/C# Chord
The D/C# chord looks like this and contains the notes D, A, F# - and of course the bass note C#.
Now you already know that I play a D Major different (fingerings of 121), so this can be adjusted to how you prefer to form the D Major. The chord diagram above shows one of the most traditional methods. Basically all you do is add the C# BASS note.
This is on the A string at the fourth fret. You will most definitely need to use your 4th finger to strike it no matter what, so that aspect isn't really optional. Sorry.

173
It's important to note that this chord will almost NEVER be strummed fully.
Usually it will be a fingerstyle-based type of chord where the bass note plucks OVER the chord tone of D Major.
When we get to the songs you'll know what I mean.
However, I did include this chord as a strummed chord for reference.
Slash Sheet Exercise (95 BPM):
Simply practice transitioning FROM the D Major to the D/C#
Now we need to look at the fretboard for logical areas in which the D, A, F#, and C# appear:

174
There isn't much to really show you when it comes to this chord, but looking at the fretboard helps you realize where the bass notes of C# need to come from.
This is really the only LOGICAL place where the C# is the bass note AND can be fingered in a reasonable way. All we need to do is form the actual chord:
You can see the notes I removed easily. While the open D string isn't technically needed to play, you CAN play it if you have trouble with the picking for it - which would most likely be your fingers instead of a pick.

175
Applying Fingerstyle To The D/C# Chord
Exercise
Week 10 - Day 3: The F#m7 Chord
The F#m7 chord looks like this:
Here we have the notes F#, C#, E, and A.
Slash Sheet Exercise (95 BPM):
Simply practice playing the F#m7 to the F#m in this exercise.
Now we need to look at the fretboard for logical areas in which the F#, C#, E, and A appear:
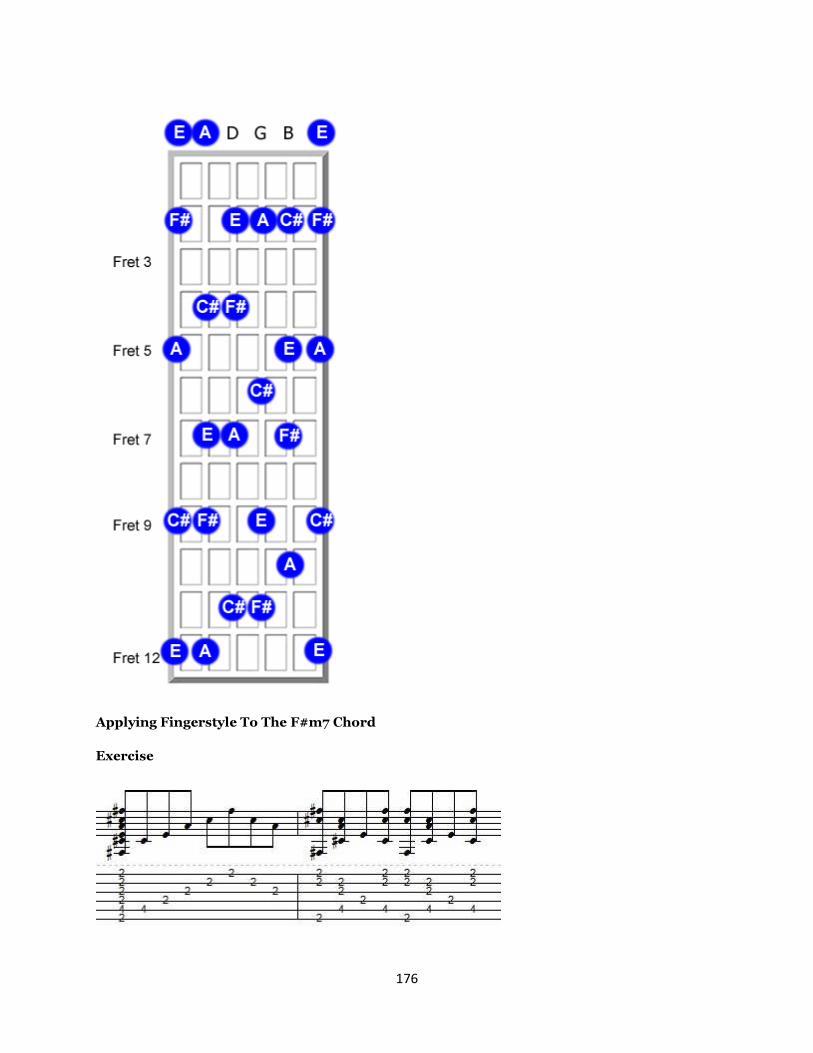
176
Applying Fingerstyle To The F#m7 Chord
Exercise

177
Week 10 - Day 4: The G/F# Chord
The G/F# chord looks like this:
In order to play a G/F# chord we must have the notes: F#,G, D and B. Basically we have the same notes from the G Major chord (G, B, and D) but we need the F# bass note INSTEAD of the bass note G.
I have seen a few variations of the G/F# chord and most of them are nonsense. Remember - ALL WE NEED are the correct notes. Of course, in this case we DO need the F# to be the bass note, so that is important. Anyway, the above chord diagram is the easiest way to play a G/F#.
In theory...you could remove your 3rd finger from the B string and let that ring open. Then you wouldn't need to play the second fret note on the A string - but you'd have to mute it - because it would produce an open A string note. Why not just stick to the G Major formation and simply add the F# note? You can choose to use your 1st finger or even your thumb if the progression ends up being tricky, but odds are you'll do fine with the 1st finger arrangement. This is another chord that isn't usually strummed out as much but moreso the bass note is picked out over the chord.
Slash Sheet Exercise (95 BPM):
Simply practice playing the G Major to G/F# chord four times each measure.
Now we need to look at the fretboard for logical areas in which the F#, G, D, and B appear:

178
Applying Fingerstyle To The G/F# Chord
Exercise

179
Week 10 - Day 5: The A7sus4 Chord
So you're familiar with the A7....
You know that when we 'suspend' a chord we need to find the 1, 4, and 5 - or in a "sus2" we need the 1, 2, and 5. You also know that when we create a 'seventh' we must flatten it.
So - in the A7sus4 we must find the: 1, 4, 5, and b7. Here it is:
1 2 3 4 5 6 7 8
A B C D E F G A
Note: You can also play the A7sus4 (as if there were a progression of A7 to A7sus4) like this, because it is much easier to finger:

180
Slash Sheet Exercise (95 BPM):
Simply practice playing from the A7 to the A7sus4 four times each measure:
Now we need to look at the fretboard for logical areas in which the A, D, E, and G appear:

181
Applying Fingerstyle To The A7sus4 Chord
Exercise
Week 11 - Day 1: The C/G Chord
The C/G chord looks like this:
While the fingerings have changed a little, once again you are just playing a C Major chord with a bass note of G. The bass note - as always - must be the lowest note possible (so it can't be the High E string G note) which appears on the third fret of the Low E string.
The notes in a C/G chord are: G, C, and E. The notes in a C Major chord are: C, G, and E.
Hmmm...why not just call the C/G a C Major?
By noting the slash (/) we can determine that this isn't just a C Major, but a C Major with a bass note of G. Simply striking the G string open in a C Major, while producing the correct note, simply doesn't correct the right TONE of note - which is what we need here. We need the 'lowest' G we can use.
Slash Sheet Exercise (95 BPM):
Now we need to look at the fretboard for logical areas in which the G, C, and E notes appear:

182
Side Note: While I don't feel it is necessary to go into detail about this, you CAN play the C/G chord in a barre format using the 3rd fret G note on the Low E string. Then follow the C Major barre chord format (x35553 where x NOW = 3) so that the G becomes the bass note of the C Major chord. Interesting huh? The most logical way to make this sound as a bass note would be to first pluck the G note on the third fret and then strum the full chord.

183
Applying Fingerstyle To The C/G Chord
Exercise
Notice here the change from the second fret note on the G string and the second fret note on the D string.
Week 11 - Day 2: The E/A Chord
The E/A chord looks like this and contains the notes E, Ab (G#), B - and of course the bass note A.
The E/A chord is also sometimes called the Amaj9 (no 3rd). However, calling this chord an Amaj9 (no 3rd) doesn't actually tell us that the A is the bass note. Instead, calling it E/A makes much more sense.
If you will notice, the E/A chord is actually just in the form of an E Major chord - without the second fret note on the A string. Instead, we play it open to provide the A bass note.
Important: You DO NOT necessarily need to finger this chord in the way the diagram is presented. I just used the form of E Major to alter the E/A chord. The fingering for E Major is 2, 3, 1 and is reflected in this diagram. You can finger this chord in whatever way you would like.
Slash Sheet Exercise (95 BPM):
Simply practice transitioning FROM the E Major to the E/A. Try to use the A bass note as a plucked note that rings over the strummed chord.
Now we need to look at the fretboard for logical areas in which the E, G#, B, and A appear:
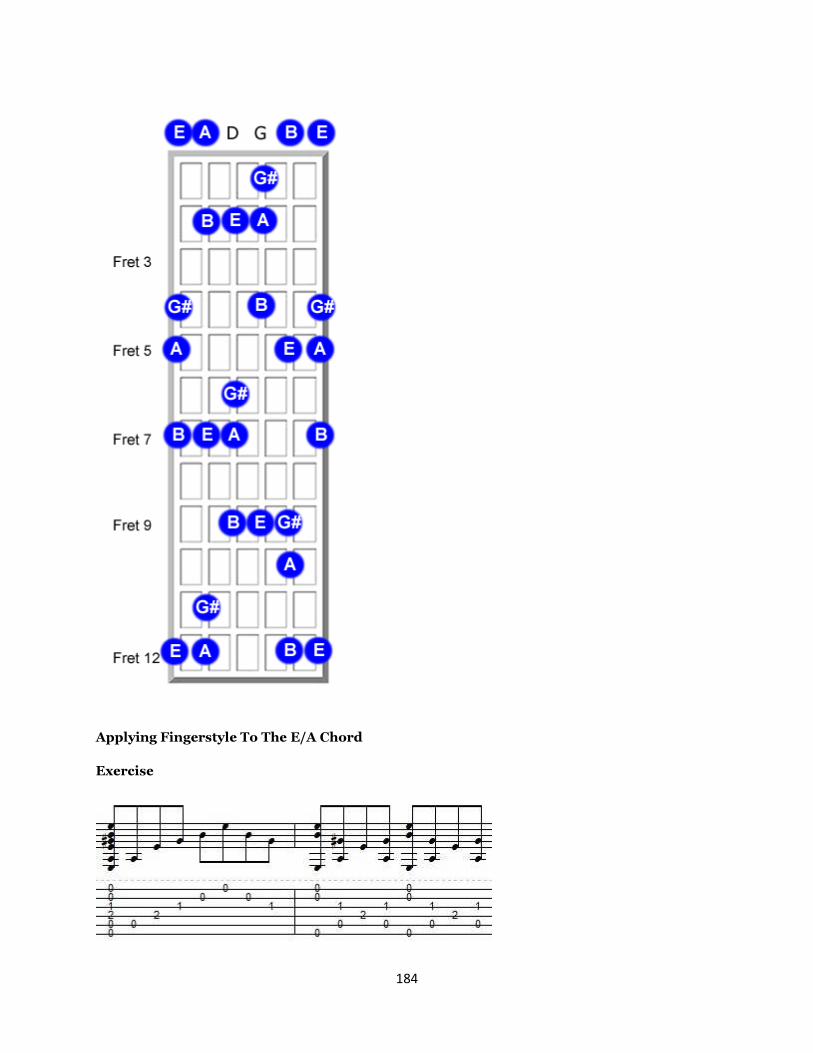
184
Applying Fingerstyle To The E/A Chord
Exercise

185
Week 11 - Day 3: The E/D Chord
The E/D chord looks like this:
Here we have the notes E, B, Ab (G#) and D.
Just like with the E/A chord, this chord can also be called an E7 chord! Weird huh? Again, the only reason we might not want to call this chord an E7 is that it doesn't distinguish the bass note of D coming out.
So, what about the 'other' E7? Could that be considered an E/D also?
No. Actually it isn't the same as the other E7. While both E7's are basically the same thing, the E7 with the fretted D note cannot be called an E/D because the D is NOT the bass. :)
This E7 CAN be called an E/D:
The bass note is the D played open.

186
This E7 CANNOT be called an E/D:
The D note here is NOT the bass note.
Now - does any of this really matter in terms of what you call this chord?
Well, it depends. If you are playing a progression and tell a fellow musician (or bass player - hint: the bass player ALWAYS plays the bass note in these types of chords - meaning the D) that you have an E/D in your series, he or she could technically play either E7's, but in technical terms the point here is that the D must be the bass note.
Again - this is no big deal, but it's neat to understand why chords are named as they are. If it were a solo fingerstyle piece, playing the first E7 would work. The second E7 would not provide the low tone bass note in the D that you need.
Slash Sheet Exercise (95 BPM):
Simply practice playing from the E Major to the E/D (or easy E7):
Now we need to look at the fretboard for logical areas in which the E, B, G#, and D appear:
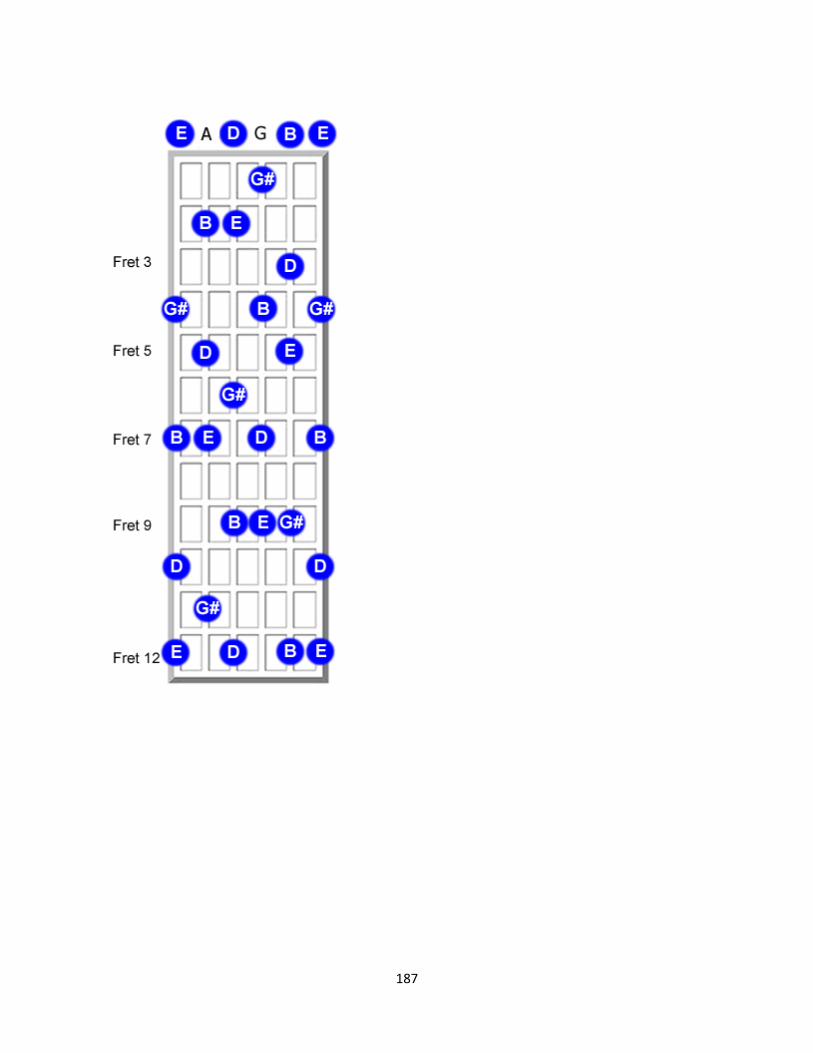
187

188
Applying Fingerstyle To The E/D Chord
Exercise
(This is just the E7 fingerstyle exercise repeated)
Week 11 - Day 4: The F#7 Chord
The F#7 chord looks like this:
Here we have the notes F#, C#, E, and A#
Slash Sheet Exercise (95 BPM):
Simply practice playing from the F# to F#7 chords four times each measure. Notice only one finger needs to be removed. Also note that the Roman Numerals for the frets are the same but are shown differently in the diagram. (There is no "first fret" shown in F#7 but it's at the same location as F#)

189
to
Now we need to look at the fretboard for logical areas in which the F#, C#, E, and A# appear:

190
Applying Fingerstyle To The F#7 Chord
Exercise
Week 11 - Day 5: The F#7sus4 Chord
The F#7sus4 chord looks like this:
Here we have the notes F#, C#, E, and B
You'll notice that there isn't much difference between F#7 and F#7sus4 other than one thing:
VS.
All that has changed is the note on the G string. Instead of an A# it is a B. We've 'suspended' the A# a 'fourth' to a B.
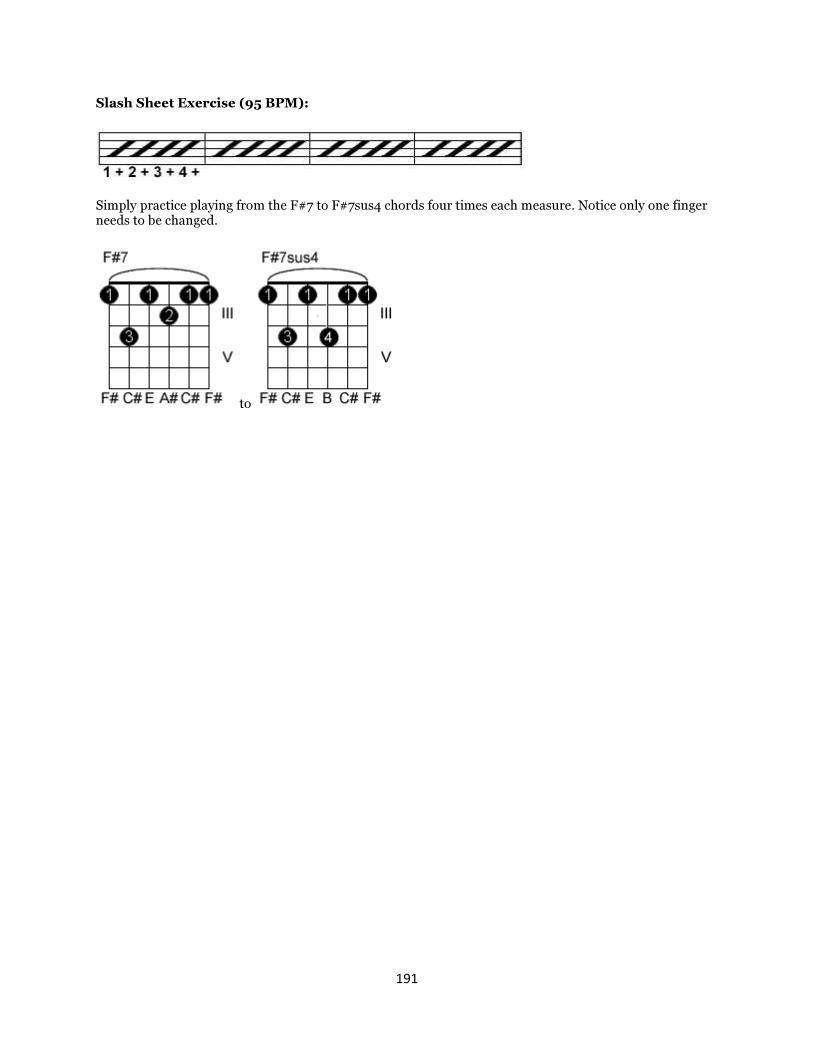
191
Slash Sheet Exercise (95 BPM):
Simply practice playing from the F#7 to F#7sus4 chords four times each measure. Notice only one finger needs to be changed.
to

192
Now we need to look at the fretboard for logical areas in which the F#, C#, E, and B appear:

193
Applying Fingerstyle To The F#7sus4 Chord
Exercise
Week 12 - Day 1: The A/G Chord
The A/G chord looks like this:
Notice here that I chose the A Major arrangement of 1, 2, 3 instead of the usual 2, 3, 4 that I like to play. This is due to the G bass note on the Low E string.
It's practically impossible to play this any other way. You CAN use your thumb to play the G note on the Low E string though.
This chord contains the same notes as an A Major (A, E, and C#) with an added G in the bass.
Slash Sheet Exercise (95 BPM):
Practice playing from the A Major (1, 2, 3) and then add the G note to form the A/G.
Now we need to look at the fretboard for logical areas in which the G, A, E, and C# notes appear:

194
Oops. I left a D on fret 12. Disregard that.
Applying Fingerstyle To The A/G Chord
Exercise

195
Week 12 - Day 2: The A/F Chord
The A/F chord looks like this:
OR OR
I gave you plenty of choices here. You can see that the formation is the same, but that the fingerings are different in each case.
It doesn't matter which way you choose to play this chord - because the truth is it's not used all that much as a 'strummed' chord at all.
Again, since this is an A Major chord with the added F bass note, the F bass note usually just comes out on top over the other notes.
We have the same notes as an A Major (A, E, and C#) but we've added the F note.
Slash Sheet Exercise (95 BPM):
Simply practice transitioning FROM the A Major to the A/F.
Try to use the F bass note as a plucked note that rings over the strummed chord.
Now we need to look at the fretboard for logical areas in which the A, E, C#, and F appear:
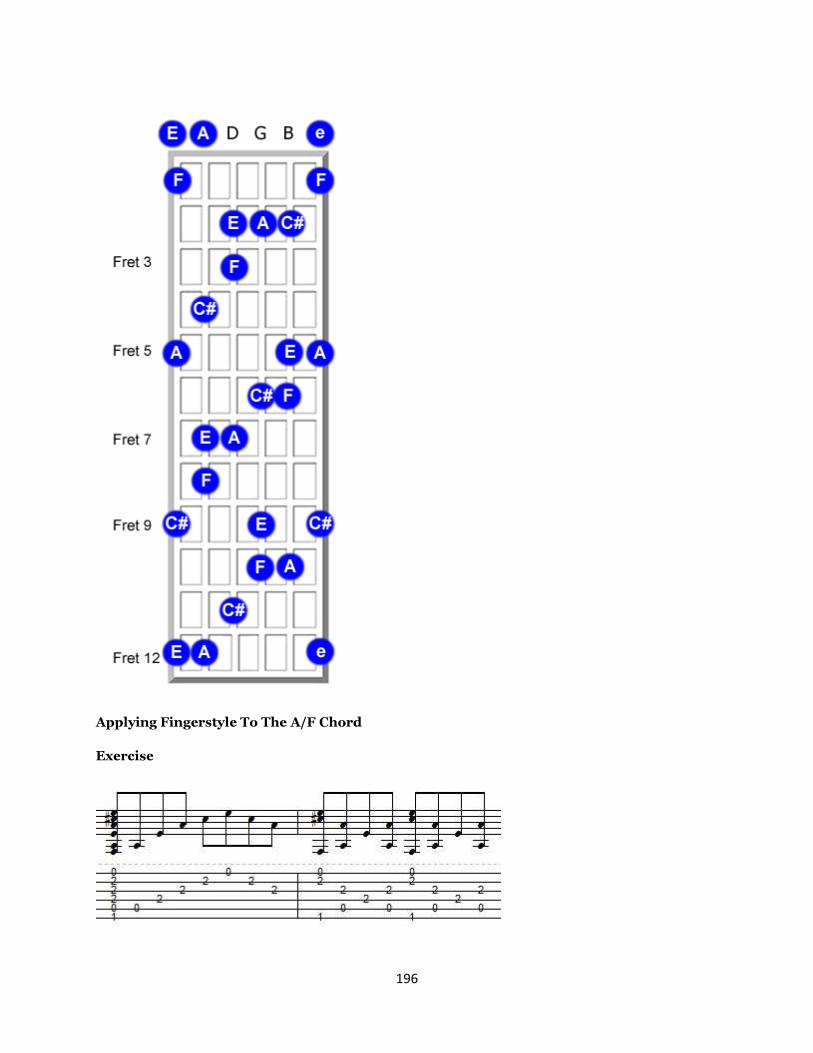
196
Applying Fingerstyle To The A/F Chord
Exercise

197
Week 12 - Day 3: The A/E Chord
The A/E chord looks like this:
Guess what? I threw a curveball because the A/E is absolutely the same thing as an A Major, except for the fact that the Low E is played (usually you try to avoid that with an A Major) along with.
The notes are all the same. Boom!
Important: You can't consider this an A/E if you are just playing the High E string open because it isn't the bass note. ;)
Slash Sheet Exercise (95 BPM):
Practice playing the A Major and then striking the E bass note in between as heard in the video:
Now we need to look at the fretboard for logical areas in which the E, A, and C# appear:

198
Applying Fingerstyle To The A/E Chord
Exercise
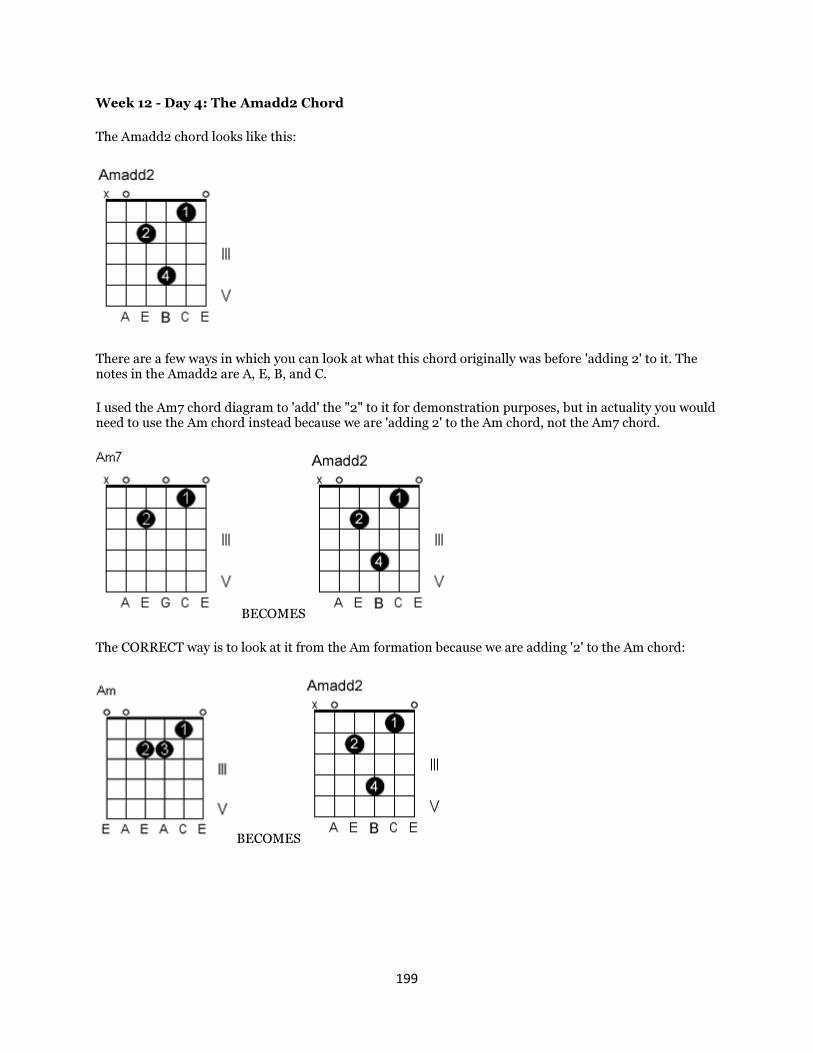
199
Week 12 - Day 4: The Amadd2 Chord
The Amadd2 chord looks like this:
There are a few ways in which you can look at what this chord originally was before 'adding 2' to it. The notes in the Amadd2 are A, E, B, and C.
I used the Am7 chord diagram to 'add' the "2" to it for demonstration purposes, but in actuality you would need to use the Am chord instead because we are 'adding 2' to the Am chord, not the Am7 chord.
BECOMES
The CORRECT way is to look at it from the Am formation because we are adding '2' to the Am chord:
BECOMES

200
In this case you've simply moved the second fret note on the G string to the fourth fret. So, you've 'added 2' to the A note.
A - A#/Bb - B
This is why it's important to understand the language of a chord.
By the way, I LOVE playing an Am to Amadd2 chord in a progression. It's really a mysterious change.
Slash Sheet Exercise (95 BPM):
Play the Am to Amadd2 in a progression below:
Now we need to look at the fretboard for logical areas in which the A, E, B, and C appear:

201
Just to refresh, I went ahead and removed the notes we don't need to find the Amadd2 chord. Remember we need the notes A, E, B, and C, but we don't need ALL of the notes:
Again, I have removed the notes that aren't needed so that we have a logical chord formation.
Applying Fingerstyle To The Amadd2 Chord
Exercise
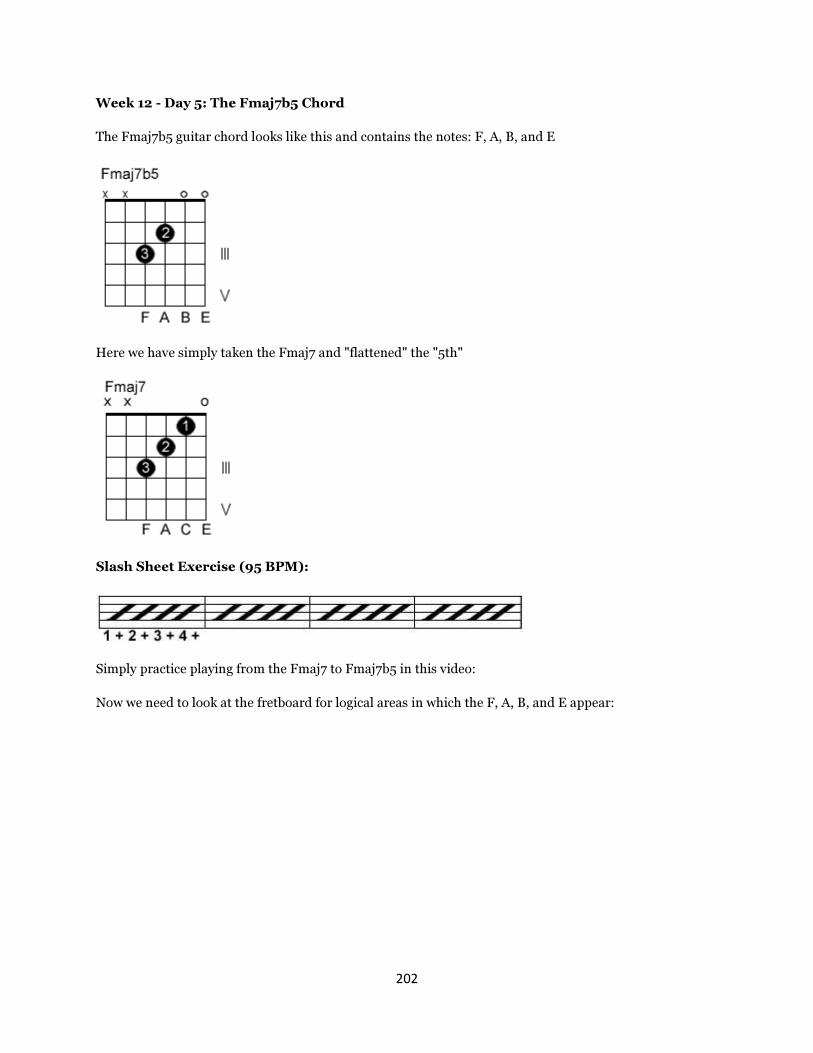
202
Week 12 - Day 5: The Fmaj7b5 Chord
The Fmaj7b5 guitar chord looks like this and contains the notes: F, A, B, and E
Here we have simply taken the Fmaj7 and "flattened" the "5th"
Slash Sheet Exercise (95 BPM):
Simply practice playing from the Fmaj7 to Fmaj7b5 in this video:
Now we need to look at the fretboard for logical areas in which the F, A, B, and E appear:

203

204
Applying Fingerstyle To The Fmaj7b5 Chord
Exercise
*Note: In the exercise below you will see that I've added the open A string. This is allowed because the A note is part of the chord spectrum. The reason I added it here (and not above) is because when you strum or finger pick a chord, sometimes adding 'allowed' notes help the chord come through a bit better. Notice that the A note (open) is in parenthesis.
Week 13 - Day 1: The G6 Chord
The G6 chord looks like this:
Basically you have a G Major chord with no fretting on the B or E. The notes used are G, B, D, and E.
In order to find the G6 you must use the formula 1 - 3 - 5 - 6 like this:
1 2 3 4 5 6 7 8
G A B C D E F G
Slash Sheet Exercise (95 BPM):
Practice playing from the G Major and then the G6 chord. Be sure to strum all the strings.
Now we need to look at the fretboard for logical areas in which the G, B, D, and E notes appear:
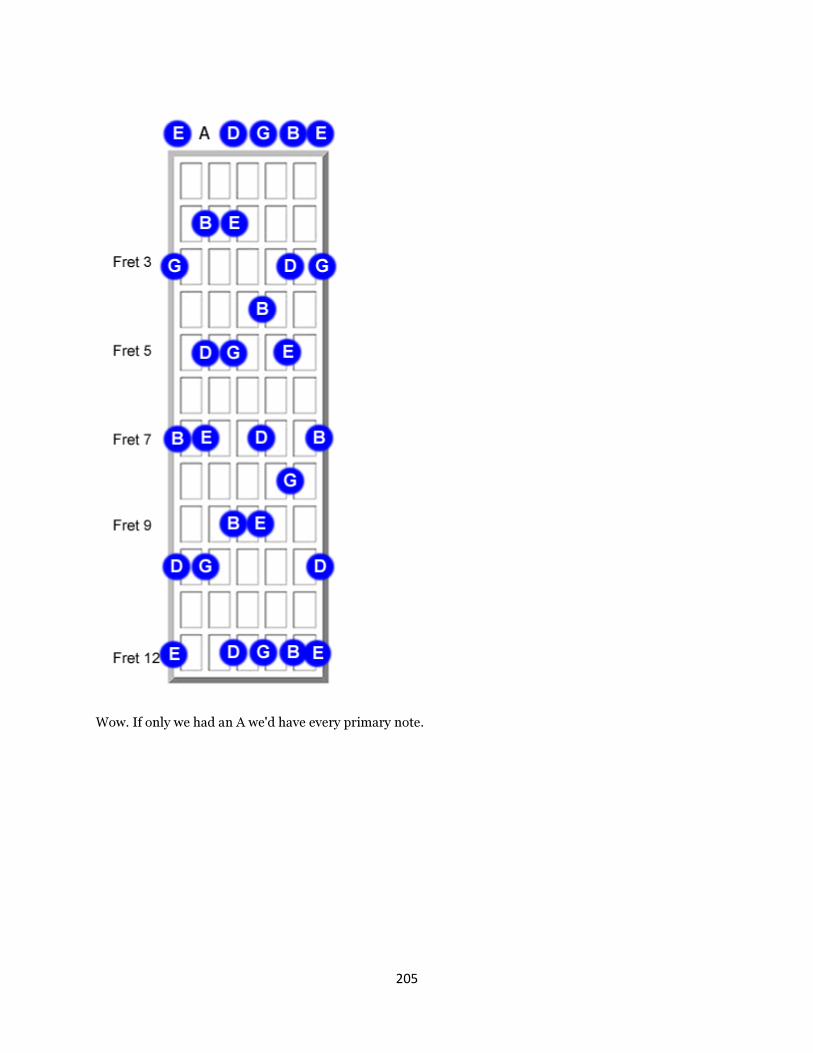
205
Wow. If only we had an A we'd have every primary note.

206
Applying Fingerstyle To The G6 Chord
Exercise
Week 13 - Day 2: The A/C# Chord
The A/C# chord looks like this:
Truthfully I am cheating on this chord a little, but only because this is the way I've always played this chord. Basically you just avoid the High E string completely and use the Low E string note (open) to add some depth to the chord. You can also completely omit the Low E string if you want. We really only need the notes C# (bass) E, and A. This fingering to me is the easiest as long as you be sure NOT to play the High E string when you barre the second frets of the D, G and B strings. If you accidentally strike the High E string note at the second fret you will be playing an A6/C# chord.
Slash Sheet Exercise (95 BPM):
Simply practice transitioning FROM the A Major to the A/C#. Try to use the C# bass note as a plucked note that rings over the strummed chord.

207
Now we need to look at the fretboard for logical areas in which the A, C#, and E appear:

208
Applying Fingerstyle To The A/C# Chord
Exercise
Week 13 - Day 3: The Bm7 Chord
The Bm7 chord looks like this:
The notes needed in the Bm7 chord are: B, D, A, and F#. This would be your open position Bm7.
Slash Sheet Exercise (95 BPM):
Practice playing from the B7 to the Bm7.
Now we need to look at the fretboard for logical areas in which the B, D, A, and F# appear:

209
Optional Position 1:
Here is the A style barre chord of the Bm7. I have removed the duplicate F# note on the Low E string (2nd fret) as well as the B note on the G string (4th fret) to form the Bm7.
Optional Position 2:
This is the E style barre chord of the Bm7. Here I only needed to remove the duplicate B note on the 9th fret of the D string.

210
Applying Fingerstyle To The Bm7 Chord
Exercise 1
Exercise 2
Exercise 3

211
Week 13 - Day 4: The Bm6 Chord
The Bm6 chord looks like this:
Here you have the notes, B, D, G#, and F#.
Slash Sheet Exercise (95 BPM):
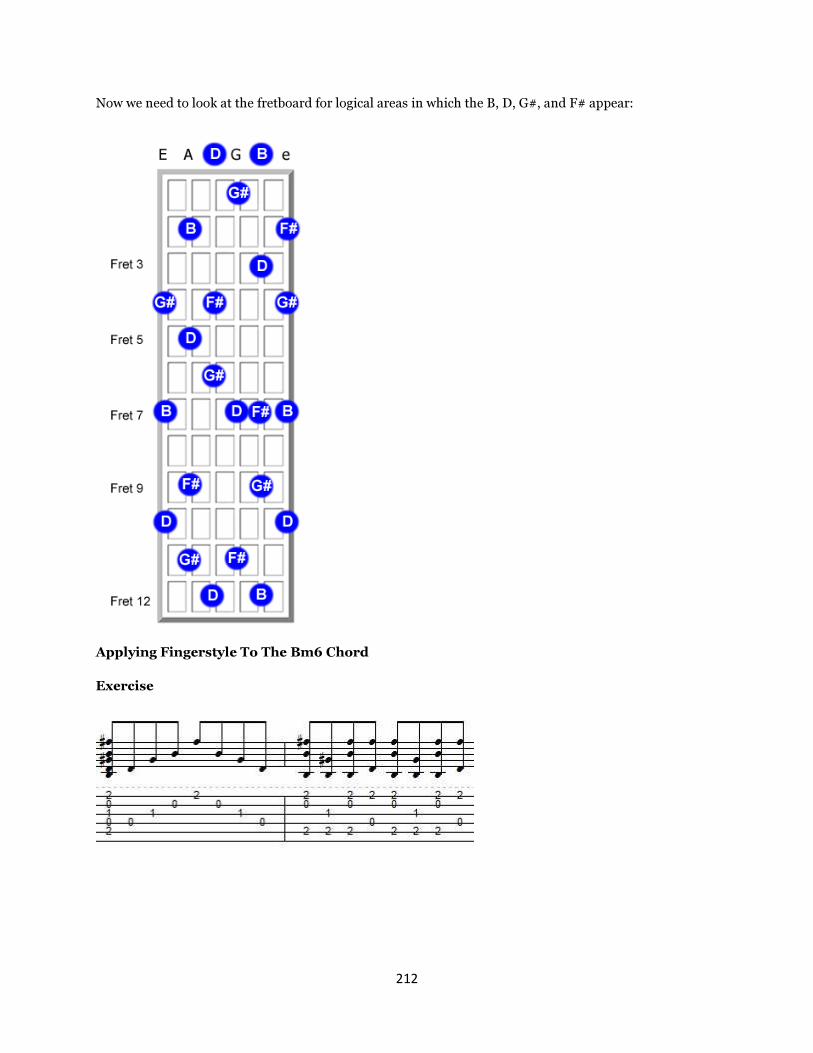
212
Now we need to look at the fretboard for logical areas in which the B, D, G#, and F# appear:
Applying Fingerstyle To The Bm6 Chord
Exercise

213
Week 13 - Day 5: The B/D# Chord
The B/D# chord looks like this:
Don't let this confuse you. All you are doing is taking the B chord and adding a D# bass to it. I changed the fingerings a bit for this B Major chord, so pay close attention to that. Basically all you do is use your 1st finger to barre the FOURTH frets of the D, G, and B strings. You use the D# note on the sixth fret as your bass note. Usually you would finger the second fret on the High E string, which would ring as an F# note, but since you have it on the D string I removed it completely making this chord much easier to play.
You simply have the notes B, D#, and F#.
Slash Sheet Exercise (95 BPM):
Simply practice playing the B/D# chord.
Now we need to look at the fretboard for logical areas in which the B, D#, and F# appear:

214
Applying Fingerstyle To The B/D# Chord
Exercise

215
Week 14 - Day 1A: The Gmaj7 Chord
The Gmaj7 chord looks like this:
Here we have the notes G, B, D, and F#.
Basically this chord is just like a G7 with the first fingered note on the High E string at the second fret instead of the first fret.
Slash Sheet Exercise (95 BPM):
Practice playing from the G7 to the Gmaj7:
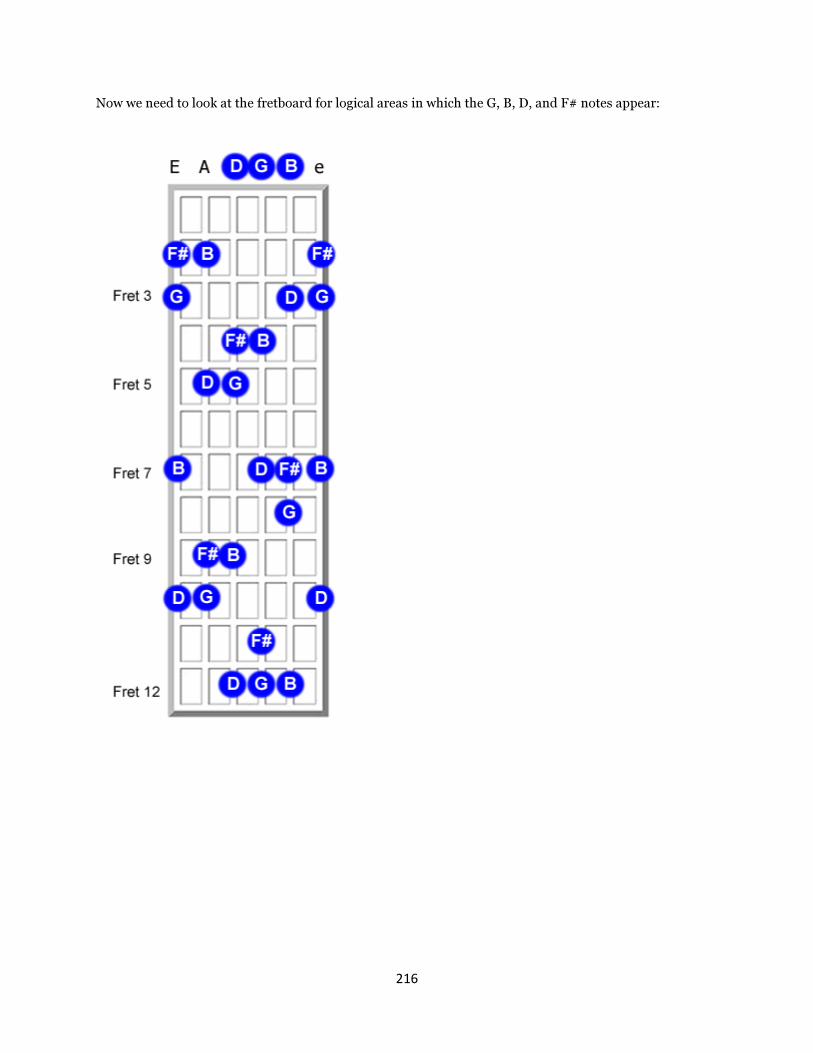
216
Now we need to look at the fretboard for logical areas in which the G, B, D, and F# notes appear:

217
Applying Fingerstyle To The Gmaj7 Chord
Exercise
Week 14 - Day 1B: The Adim Chord
The Adim chord looks like this and contains the notes A, D#(Eb), and C:
What IS a 'diminished' (dim) chord?
In music, a diminished triad is a triad consisting of two minor thirds above the root — if built on C, a
diminished triad would have a C, an E♭(D#) and a G♭(F#).
A - A#/Bb - B - C - C#/Db - D - D#/Eb - E - F - F#/Gb - G - G#/Ab
It resembles a minor triad with a lowered (flattened) fifth. In the common practice period, the diminished triad is considered dissonant, or unstable. It lacks tonal center or drive because the diminished fifth symmetrically divides the octave. A diminished triad occurs in a major scale only on the seventh scale degree; in the key of C, this is a B diminished triad (B, D, F). Since the triad is built on the seventh scale degree, it is also called the leading-tone triad. The leading-tone triad also occurs in the seventh chord built on the fifth degree; in C, this is G dominant seventh (G, B, D, F). For this reason, it has dominant function. Unlike the dominant triad or dominant seventh, the leading-tone triad functions as a prolongational chord rather than a structural chord since the strong root motion by fifth is now absent.
The formula is basically: 1 - b3 - b5
1 2 3 4 5 6 7 8
A B C D E F G A

218
Remember when we COUNT we don't worry about the sharps or flats.
Slash Sheet Exercise (95 BPM):
Practice playing the Adim chord (many of these chords should be unfamiliar, so let's not switch around)
Now we need to look at the fretboard for logical areas in which the A, D#, and C notes appear:
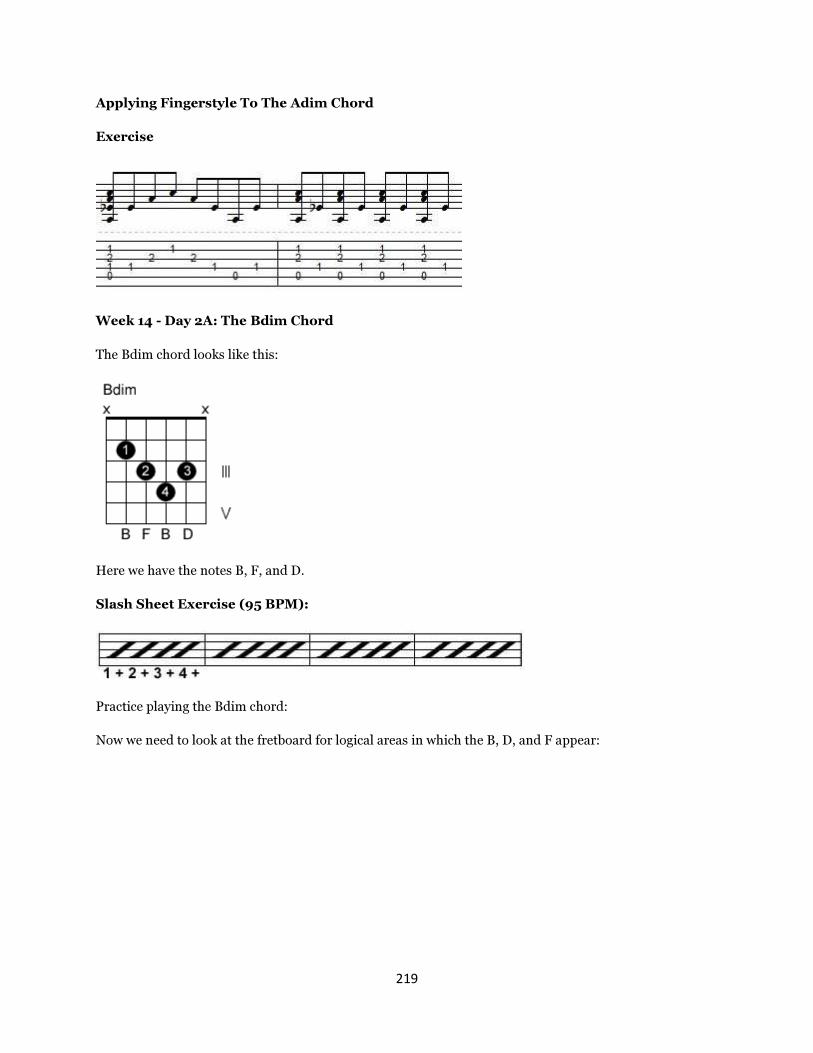
219
Applying Fingerstyle To The Adim Chord
Exercise
Week 14 - Day 2A: The Bdim Chord
The Bdim chord looks like this:
Here we have the notes B, F, and D.
Slash Sheet Exercise (95 BPM):
Practice playing the Bdim chord:
Now we need to look at the fretboard for logical areas in which the B, D, and F appear:

220
Applying Fingerstyle To The Bdim Chord
Exercise

221
Week 14 - Day 2B: The Cdim Chord
The Cdim chord looks like this:
Here we have the notes C, F#, and D#. Notice that you are just moving the Bdim one fret higher in pitch (B - C = no space)
Slash Sheet Exercise (95 BPM):
Practice playing the Cdim chord:
Now we need to look at the fretboard for logical areas in which the C, D#, and F# appear:

222
Applying Fingerstyle To The Cdim Chord
Exercise

223
Week 14 - Day 3A: The Ddim Chord
The Ddim chord looks like this:
Here we have the notes D, G#, and F. Notice the Roman Numerals. We are on the fifth (V) fret as our starting point.
Slash Sheet Exercise (95 BPM):
Practice playing the Ddim chord
Now we need to look at the fretboard for logical areas in which the D, F, and G# appear:

224
Applying Fingerstyle To The Ddim Chord
Exercise

225
Week 14 - Day 3B: The Edim Chord
The Edim chord looks like this:
Here we have the notes E, A#, and G.
We are back to our open position (noted by the Roman Numeral "III")
Slash Sheet Exercise (95 BPM):
Practice playing the Edim chord:
Now we need to look at the fretboard for logical areas in which the E, G, and A# appear:

226
Applying Fingerstyle To The Edim Chord
Exercise

227
Week 14 - Day 4A: The Fdim Chord
The Fdim chord looks like this:
Here we have the notes F, B, and G#.
Slash Sheet Exercise (95 BPM):
Practice playing the Fdim chord:
Now we need to look at the fretboard for logical areas in which the F, G#, and B appear:
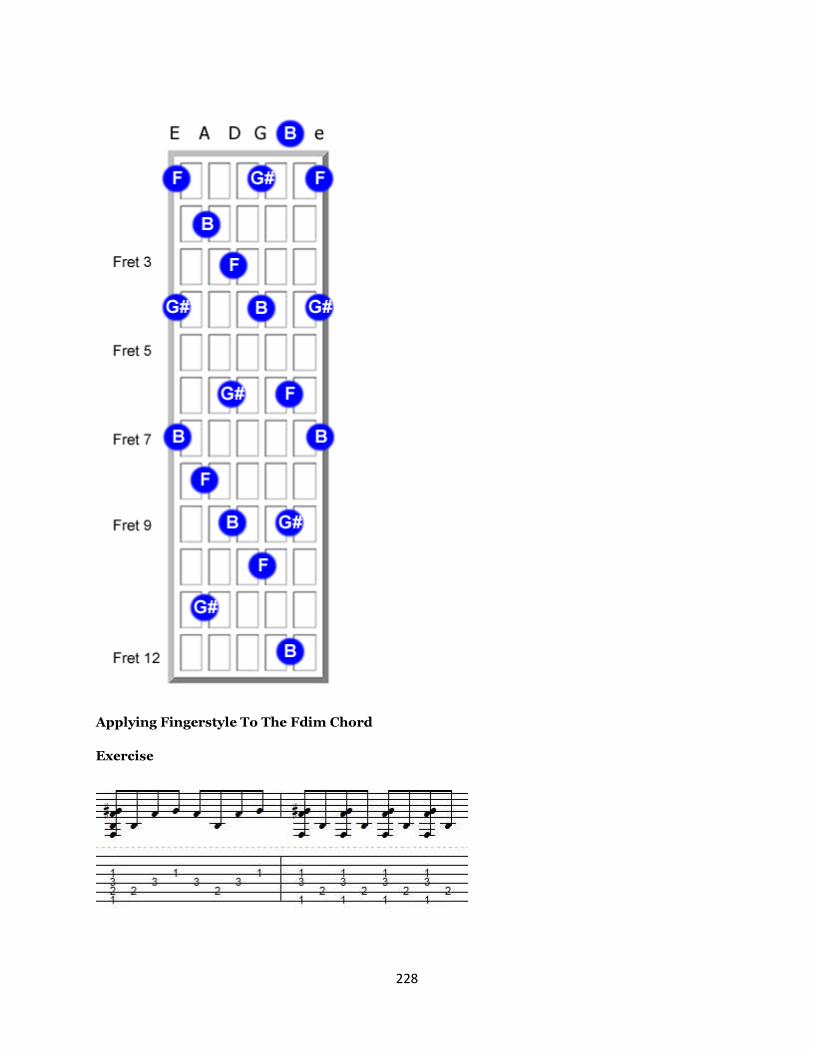
228
Applying Fingerstyle To The Fdim Chord
Exercise
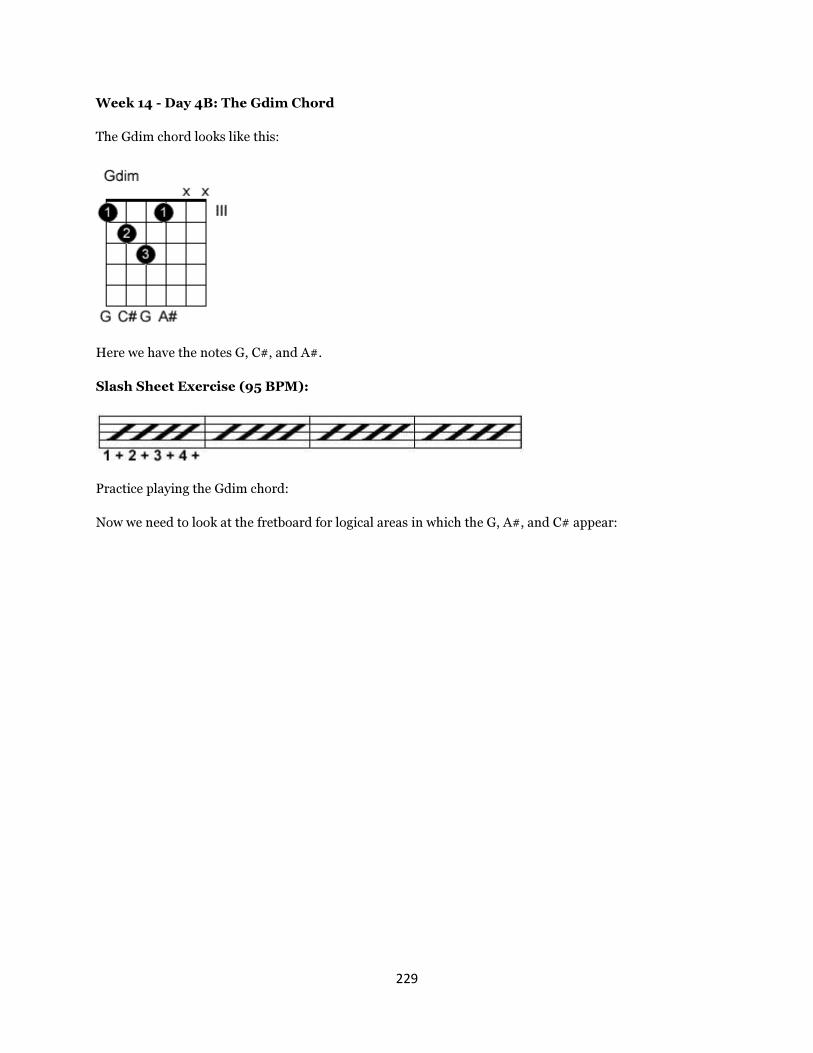
229
Week 14 - Day 4B: The Gdim Chord
The Gdim chord looks like this:
Here we have the notes G, C#, and A#.
Slash Sheet Exercise (95 BPM):
Practice playing the Gdim chord:
Now we need to look at the fretboard for logical areas in which the G, A#, and C# appear:

230
Applying Fingerstyle To The Gdim Chord
Exercise

231
Week 14 - Day 5: Half-Diminished/Diminished 7ths
By now you already understand the diminished chords. However, there are also half-diminished and diminished 7th chords as well.
We will be focusing on these in the same fashion as we did using the A, B, C, D, E, F, and G format. You already understand how to apply any sharps, flats, minors, etc. so we can just focus on the Primary letters.
Here's how to find those.
Half-Diminished
A half-diminished chord is also called a Minor 7 flat 5 (m7b5). For example: A "C half-diminished" is also a Cm7b5 or a Cmin7b5.
Interval positions with respect to the C major scale, notes in the chord and name variations:
• Scale intervals: 1 - b3 - b5 - b7
• Notes in the chord: C - Eb - Gb - Bb • Various names: Cmin7b5 - C Half Diminished
It will be VERY rare to find these types of chords in basic song studies. Basically you can 'plug' any note in to form the same conclusion for each.
• A = A half-diminished/Am7b5
• B = B half-diminished/Bm7b5
• C = C half-diminished/Cm7b5
• D = D half-diminished/Dm7b5
• E = E half-diminished/Em7b5
• F = F half-diminished/Fm7b5 • G = G half-diminished/Fm7b5

232
Diminished 7ths
A diminished 7th chord isn't too tricky. A diminished seventh chord is a four note chord that comprises a diminished triad plus the interval of a diminished seventh (alternatively regarded enharmonically as a major sixth) above the root.
Thus it is (1, ♭3, ♭5, 7), or enharmonically (1, ♭3, ♭5, 6), of any minor scale; for example, C
diminished-seventh would be (C, E♭, G♭, B), or enharmonically (C, E♭, G♭, A). It occurs as a leading-tone seventh chord in harmonic minor and can be represented by the integer notation {0, 3, 6, 9}.
• Scale intervals: 1-b3-b5-6(bb7) • Various names: dim7, o, o7, 7dim
Adim7 (aka Cdim7, D#dim7, F#dim7)
Important! The Adim7 chord is ALSO a Cdim7, D#dim7, and an F#dim7 because the notes needed are the same! Creepy huh?
Bdim7 (aka Ddim7, Fdim7, G#dim7)

233
Edim7 (aka Gdim7, A#dim7, C#dim7)
Wait - WHAT?
I know, it's weird to think that these chords can also be given other names. How is an Edim7 also a Gdim7? Well, this should be reserved for serious theory, but the idea is: it all has to do with root note inversions. If I try to explain every bit of inversions to you it would be a course in itself. It's confusing. However, this chart will help you a little. Basically you just need to know that some of these root notes have been inverted, so that the 'root' isn't actually the lowest note. It breaks a ton of rules, but an inversion is in a class by itself. Think of it like 'string theory' or 'M-Theory' where all of the theory is there, but it is still confusing and turned around in circles a bit. (Because you'll rarely encounter any of this unless you are getting into some SERIOUS music, this is all just really food for thought)

234
Week 15 - Day 1A: The A Augmented (A+) Chord
The A Augmented (A+) chord looks like this:
Here we have the notes A, F, and C#.
The "+" sign you see is a common expression on how to play an 'augmented' chord.
• Augmented chords are unstable, or tense sounding chords.
• They are typically written as “+” or “aug”.
• They are usually used as a passing chord between to other chords because of the tension in their sound.
• They also tend to be led by that sharp 5th to the next half step up.
The augmented chord formula is: 1-3-#5 (or +5)
This is 1 note different than playing a major triad (which is just a major chord)
When to use the Augmented Chord?
The simplest answer to this is… “sparingly.” Not because it doesn’t sound good but because it’s a tension chord. To my ears, the augmented chord really wants to go either directly to the 1 chord or get their shortly.
The reason for this is called chord leading.
1. Let’s take a D augmented chord. D (1) – F# (3) – A# (#5) 2. Now let’s take a G major chord. G (1) – B (3) – D (5) 3. Now here’s a little fact in chord theory… if you build a chord on every note of a major scale (7
chords in all)… 2 of those chords in particular really want to get back to the root chord (the chord built on the 1st note of the major scale)
o Those 2 chords are the 5 chord (the chord built on the 5th note of the major scale) and the 7 chord.
o Now why is that? well because of physics and stuff that’s too complicated for me to understand, the 5th note and the 7th note just want to resolve to the 1 note.
4. So let’s compare the D augmented triad and the G major triads 5. All the notes of the D augmented triad are leading notes to the G major
o the D is the 5th of G so it naturally want to go to G o the F# is the 7th of G so it naturally wants to go to G o and the A# is the 7th of B so it really wants to land on B o ALL the notes want to move to their landing notes in G
6. This pretty much works for all Aug chords… the 5th aug resolves to the 1 major chord

235
Augmented Chord Notes
• A = A – C# – E#
• B = B – D# – F##
• C = C – E – G#
• D = D – F# – A#
• E = E – G# – B#
• F = F – A – C# • G = G – B – D#
Before You Begin....
Just like with the dim7 chords, these augmented chords share some additional names.
The A+ chord is also a C#+ and an F+ (or "A aug. = C# aug. and F aug.)
Slash Sheet Exercise (95 BPM):
Practice playing the A+ (C#+ and F+)
Now we need to look at the fretboard for logical areas in which the A, F, and C# notes appear:
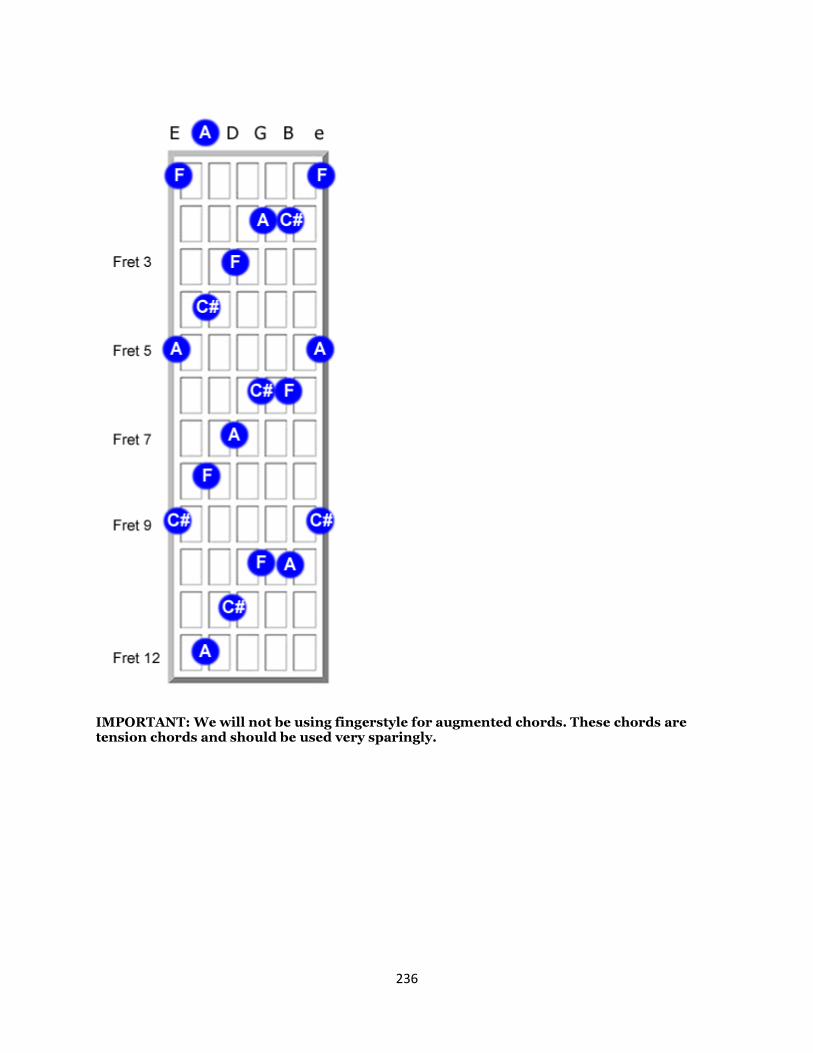
236
IMPORTANT: We will not be using fingerstyle for augmented chords. These chords are tension chords and should be used very sparingly.

237
Week 15 - Day 1B: The B Augmented (B+) Chord
The B Augmented (B+) chord looks like this:
Here we have the notes B, G, and D#.
Before You Begin....
Just like with the dim7 chords, these augmented chords share some additional names.
The B+ chord is also a D#+ and G+ (or B aug. = D# aug. and G aug.)
Slash Sheet Exercise (95 BPM):
Practice playing the B+ (D#+ and G+)
Now we need to look at the fretboard for logical areas in which the notes B, G, and D# appear:

238

239
Week 15 - Day 1C: The C Augmented (C+) Chord
The C Augmented (C+) chord looks like this:
Here we have the notes C, G#, and E
Before You Begin....
Just like with the dim7 chords, these augmented chords share some additional names.
The C+ chord is also a G#+ and E+ (or C aug. = G# aug. and E aug.)
Slash Sheet Exercise (95 BPM):
Practice playing the C+ (G#+ and E+)
Now we need to look at the fretboard for logical areas in which the notes C, G#, and E appear:

240

241
Week 15 - Day 2A: The D Augmented (D+) Chord
The D Augmented (D+) chord looks like this:
Here we have the notes D, A#, and F#
Before You Begin....
Just like with the dim7 chords, these augmented chords share some additional names.
The D+ chord is also a F#+ and A#+ (or D aug. = F# aug. and A# aug.)
Slash Sheet Exercise (95 BPM):
Practice playing the D+ (F#+ and A#+)
Now we need to look at the fretboard for logical areas in which the notes D, A#, and F# appear:
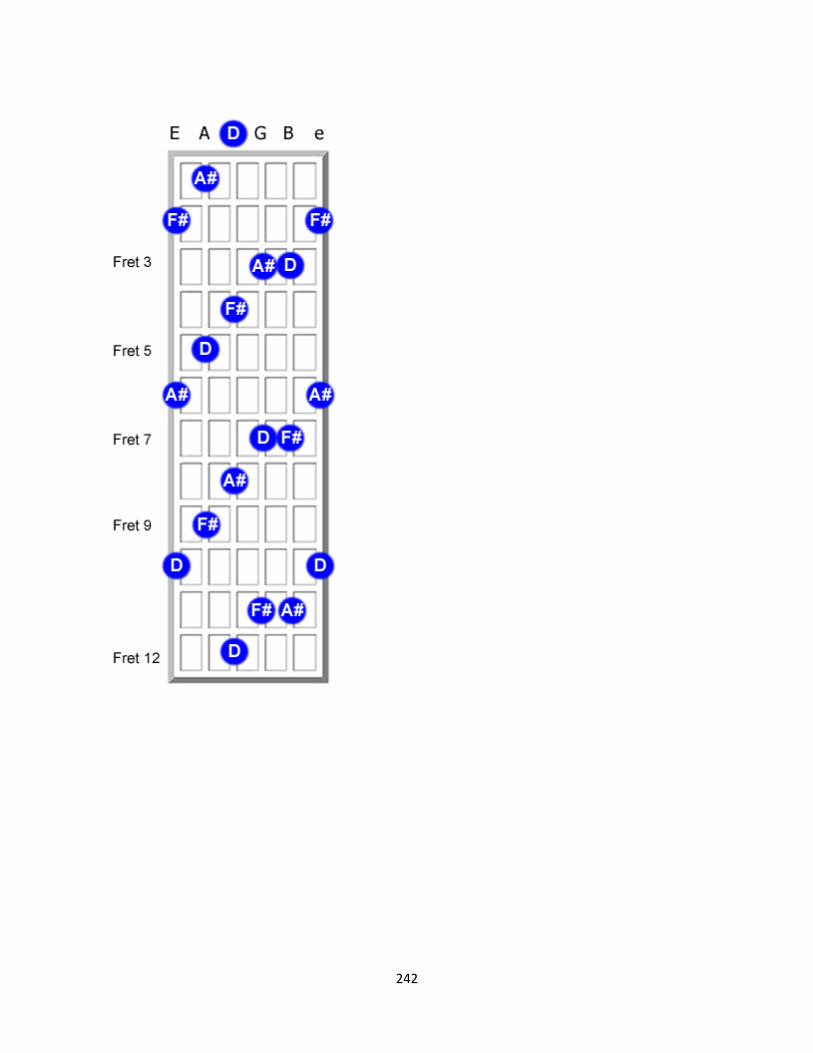
242

243
Week 15 - Day 3A: The A Augmented 7 (A7+) Chord
The A7+ chord looks like this and contains the notes A, F, G, and C#
The augmented 7th chord
Formula: 1 3 5# 7b
Common
Abbreviations: +7, 7#5, 7(#5), 7(+5), 7/5+, 7+, 7+5, 7aug5, aug7
Most popular root: G, A, Ab, Bb, B
7+5 is a 7th chord with a raised or sharpened 5th, hence the +5 or #5. They are often used as Chord V in either a major or minor key and are commonly found in Jazz progressions.
Slash Sheet Exercise (95 BPM):
Practice playing the A7+ chord.

244
Week 15 - Day 3B: The B Augmented 7 (B7+) Chord
The B7+ chord looks like this and contains the notes A, D#, G, and B (the B is the root on the B string open)
Slash Sheet Exercise (95 BPM):
Practice playing the B7+ chord.
Week 15 - Day 4A: The C Augmented 7 (C7+) Chord
The C7+ chord looks like this and contains the notes A#, E, G#, and C (C is the root on the first fret of the B string)
Slash Sheet Exercise (95 BPM):
Practice playing the C7+ chord.

245
Week 15 - Day 4B: The D Augmented 7 (D7+) Chord
The D7+ chord looks like this and contains the notes C, F#, A#, and D (D is the root on the first fret of the B string)
Slash Sheet Exercise (95 BPM):
Practice playing the D7+ chord.
Week 15 - Day 4C: The E Augmented 7 (E7+) Chord
The E7+ chord looks like this and contains the notes D, G#, C, and E (E is the root on the open HIGH E string)
Slash Sheet Exercise (95 BPM):
Practice playing the E7+ chord.

246
Week 15 - Day 5A: The F Augmented 7 (F7+) Chord
The F7+ chord looks like this and contains the notes D#, A, C#, and F (F is the root on the 1st fret of the HIGH E string)
Slash Sheet Exercise (95 BPM):
Practice playing the F7+ chord.
Week 15 - Day 5B: The G Augmented 7 (G7+) Chord
The G7+ chord looks like this and contains the notes F, B, D#, and G (G is the root on the 3rd fret of the HIGH E string)
Slash Sheet Exercise (95 BPM):
Practice playing the G7+ chord.

247
Understanding Scales
Before We Begin...
It's very important to realize that each song we are working with is in the "Key of..." something.
A key signature is not the same as a key; key signatures are merely notational devices. The key of a piece usually refers to the tonic note and chord, which gives a subjective sense of arrival and rest. Other notes and chords in the piece create varying degrees of tension, resolved when the tonic note and/or chord returns. The key may be major or minor, although major is assumed in a phrase like "this piece is in C."
The key signature is not a reliable guide to the key of a written piece. It does not discriminate between a major key and its relative minor; the piece may modulate to a different key; if the modulation is brief, it may not involve a change of key signature, being indicated instead with accidentals. Ok, enough of the technicalities.
For purposes of simplicity and familiarity, we'll be focusing on the "Key of C."
Regardless of the scale we use, the key is still C.
Speaking of Scales....
I've already provided the key for this lesson, which is C. That means that if you start with the note C you'll need to change up the order to reflect the 'key' of the lesson.
1 2 3 4 5 6 7
C D E F G A B
The Diatonic (Major) Scale
Always remember that the "Major Scale" involves all 'Major' notes of the fretboard (A, B, C, D, E, F, and G). While it is technically correct to always refer to the Major Scale as a Diatonic Scale, I will be referring to it as the Major Scale from now on. It's easier to remember that way because you'll always have 'Major' notes to choose from.
C Major Scale:
The C Major scale as seen below includes all primary note letters. The formula is VERY easy for the Major Scale. Here it is:

248
Notice that every note included is framed on the fretboard: C, D, E, F, G, A, B and C (octave).
The Formula is: Root, WS, WS, HS, WS, WS, WS, HS
Root WS WS HS WS WS WS HS
1 2 3 4 5 6 7 8*
C D E F G A B C
* denotes octave note of the scale
How in the WORLD did we know that? It's called the Chromatic Cycle (Circle):
The Chromatic Cycle (Circle) has a few important rules:
• Rule No. 1: always move CLOCKWISE.
• Rule No. 2: the first note you start out with is the key/name of the scale.
• Rule No. 3: don't count from the note you're on. Count your steps from the next note - clockwise.
• Rule No. 4: every interval step you take is a note that you arrive on, and will be a note in the scale.
How It Works:
1. Find the ROOT (key) you're playing, which is C. 2. Move a WS (skipping C#/Db) and you'll arrive at D. 3. Move a WS from D (skipping D#/Eb) and you'll arrive at E. 4. Move a HS from E (no skipping) and you'll arrive at F. 5. Move a WS from F (skipping F#/Gb) and you'll arrive at G. 6. Move a WS from G (skipping F#/Ab) and you'll arrive at A. 7. Move a WS from A (skipping A#/Bb) and you'll arrive at B. 8. Move a HS from B (no skipping) and you'll arrive at C.*
Root WS WS HS WS WS WS HS
1 2 3 4 5 6 7 8
C D E F G A B C
* denotes octave

249
No matter WHERE you start, all you need is the formula for a given scale. You have that already.
(Root, WS, WS, HS, WS, WS, WS, HS)
What About Pentatonics?
For the pentatonic scales (both major and minor) there are only 5 different patterns. By learning these 5 patterns (and realizing where the root note lies in the major and minor patterns) you are in fact learning 24 scales. The word "penta" means five, so that should be easy to remember.
All you have to do to play pentatonics in any key is to play them so as the root note matches the key.
Playing in the key of Am? Play any of the minor pentatonic patterns so as the root note is on A.
Playing in the key of C? Play the any of the major pentatonic patterns so that the root note is on C.
In effect you don't have to learn them in every key. You just have to learn the patterns. It's still a good idea to practice them in as many keys as possible, but at least you're not learning additional patterns.
The 5 patterns run the entire scale of the fretboad, so mastering all five will give you the means to play them anywhere on the neck. They are the same 5 notes over and over.

250
C Pentatonic Major:
Interval Steps for the Pentatonic Major Scale: Root, WS, WS + HS, WS, WS, WS + HS
Root WS WS WS + HS WS WS + HS
1 2 3 5 6 8
C D E G A C
How It Works:
1. Find the key you are playing, which is C in this example. 2. Move a WS (skipping C#/Db) and you'll find D. 3. From D move a WS (skipping D#/Eb) and you'll find E. 4. From E move a WS (skipping F#/Gb) + a HS and you'll find G. 5. From G move a WS (skipping G#/Ab) and you'll find A. 6. From A move a WS (skipping A#/Bb) + a HS and you'll find C.*
Root WS WS WS + HS WS WS + HS
1 2 3 5 6 8
C D E G A C
* denotes octave
Notice that every note included is framed on the fretboard: C, D, E, G, A, and C (octave).
Easier than you thought? Good. I had hoped so.

251
What about Pentatonic Minors?
Interval Steps for the Pentatonic Minor Scale: Root, WS + HS, WS, WS, WS + HS, WS
Root WS + HS WS WS WS + HS WS
1 b3 4 5 b7 8
C D#/Eb F G A#/Bb C
How It Works:
1. Find the key you are playing, which is C in this example. 2. Move a WS (skipping C#/Db) + a HS, which is D#/Eb. 3. From D#/Eb move a WS (skipping E) to arrive at F. 4. From F move a WS (skipping F#/Gb) to arrive at G. 5. From G move a WS (skipping G#/Ab) + a HS, which is A#/Bb. 6. From A#/Bb, move a WS (skipping B) to arrive at C.*
Root WS + HS WS WS WS + HS WS
1 b3 4 5 b7 8
C D#/Eb F G A#/Bb C
* denotes octave
Notice that every note included is framed on the fretboard: C, D#/Eb, F, G, A#/Bb, C (octave).
Because it is much easier to see sharps on the fretboard, all diagrams in this course will
employ sharps.
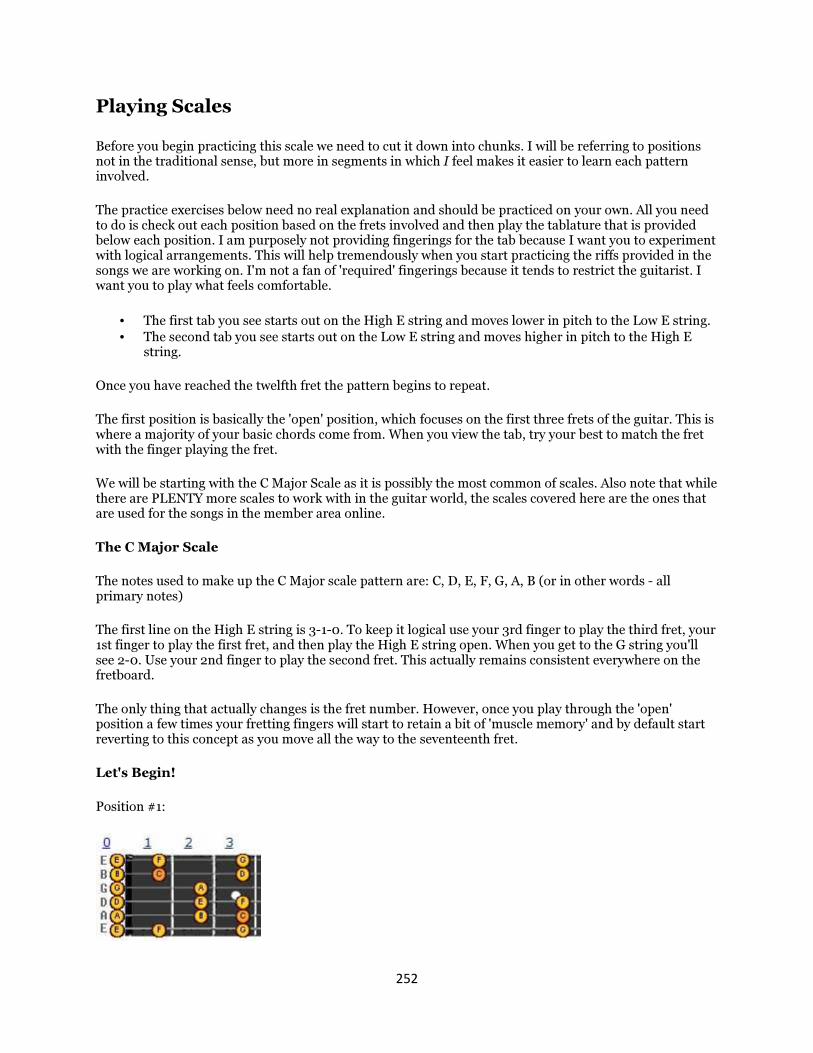
252
Playing Scales
Before you begin practicing this scale we need to cut it down into chunks. I will be referring to positions not in the traditional sense, but more in segments in which I feel makes it easier to learn each pattern involved.
The practice exercises below need no real explanation and should be practiced on your own. All you need to do is check out each position based on the frets involved and then play the tablature that is provided below each position. I am purposely not providing fingerings for the tab because I want you to experiment with logical arrangements. This will help tremendously when you start practicing the riffs provided in the songs we are working on. I'm not a fan of 'required' fingerings because it tends to restrict the guitarist. I want you to play what feels comfortable.
• The first tab you see starts out on the High E string and moves lower in pitch to the Low E string.
• The second tab you see starts out on the Low E string and moves higher in pitch to the High E string.
Once you have reached the twelfth fret the pattern begins to repeat.
The first position is basically the 'open' position, which focuses on the first three frets of the guitar. This is where a majority of your basic chords come from. When you view the tab, try your best to match the fret with the finger playing the fret.
We will be starting with the C Major Scale as it is possibly the most common of scales. Also note that while there are PLENTY more scales to work with in the guitar world, the scales covered here are the ones that are used for the songs in the member area online.
The C Major Scale
The notes used to make up the C Major scale pattern are: C, D, E, F, G, A, B (or in other words - all primary notes)
The first line on the High E string is 3-1-0. To keep it logical use your 3rd finger to play the third fret, your 1st finger to play the first fret, and then play the High E string open. When you get to the G string you'll see 2-0. Use your 2nd finger to play the second fret. This actually remains consistent everywhere on the fretboard.
The only thing that actually changes is the fret number. However, once you play through the 'open' position a few times your fretting fingers will start to retain a bit of 'muscle memory' and by default start reverting to this concept as you move all the way to the seventeenth fret.
Let's Begin!
Position #1:

253
Position #2:
Position #3:

254
Position #4:
Position #5:

255
The D Major Scale
The notes used to make up the D Major scale pattern are: D, E, F#, G, A, B, C#
Let's Begin!
Position #1:
Position #2:

256
Position #3:
Position #4:
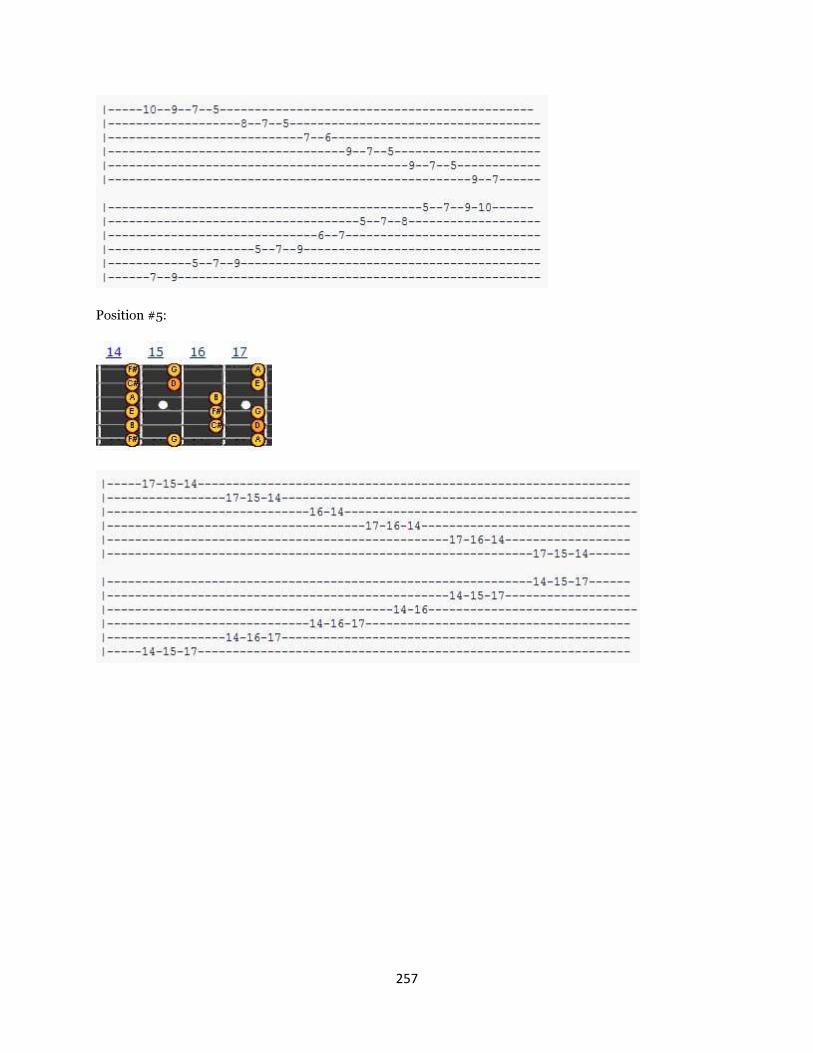
257
Position #5:
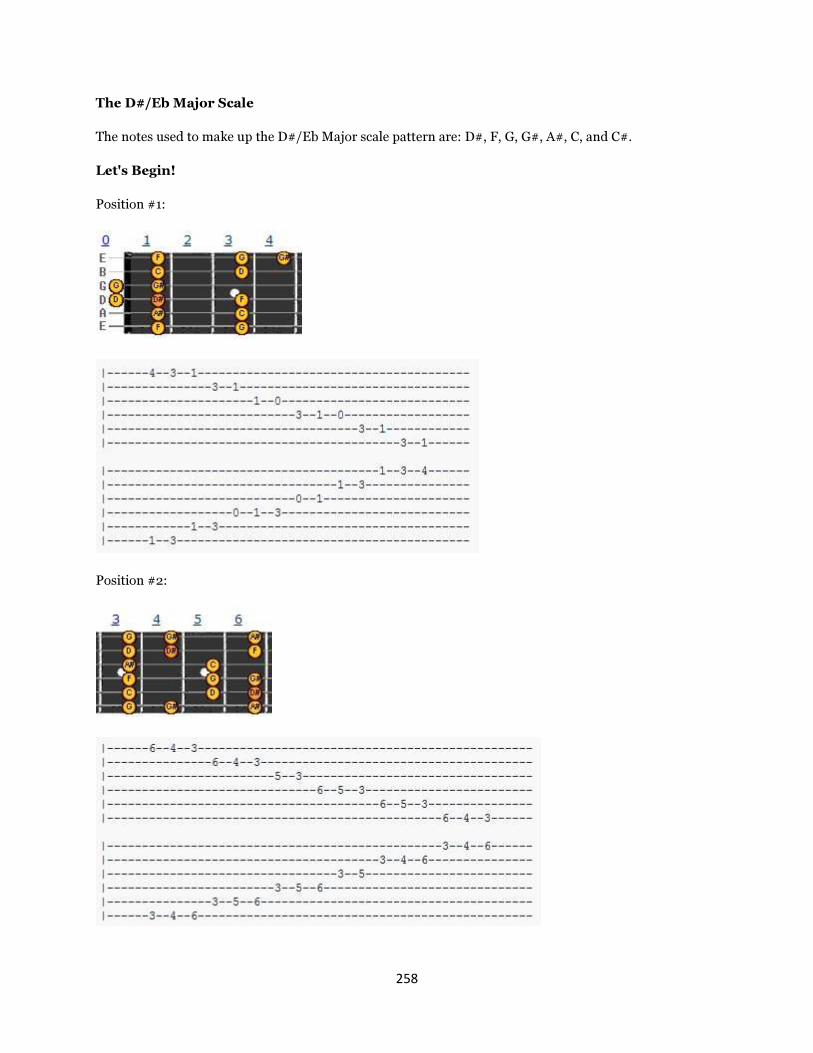
258
The D#/Eb Major Scale
The notes used to make up the D#/Eb Major scale pattern are: D#, F, G, G#, A#, C, and C#.
Let's Begin!
Position #1:
Position #2:

259
Position #3:
Position #4:
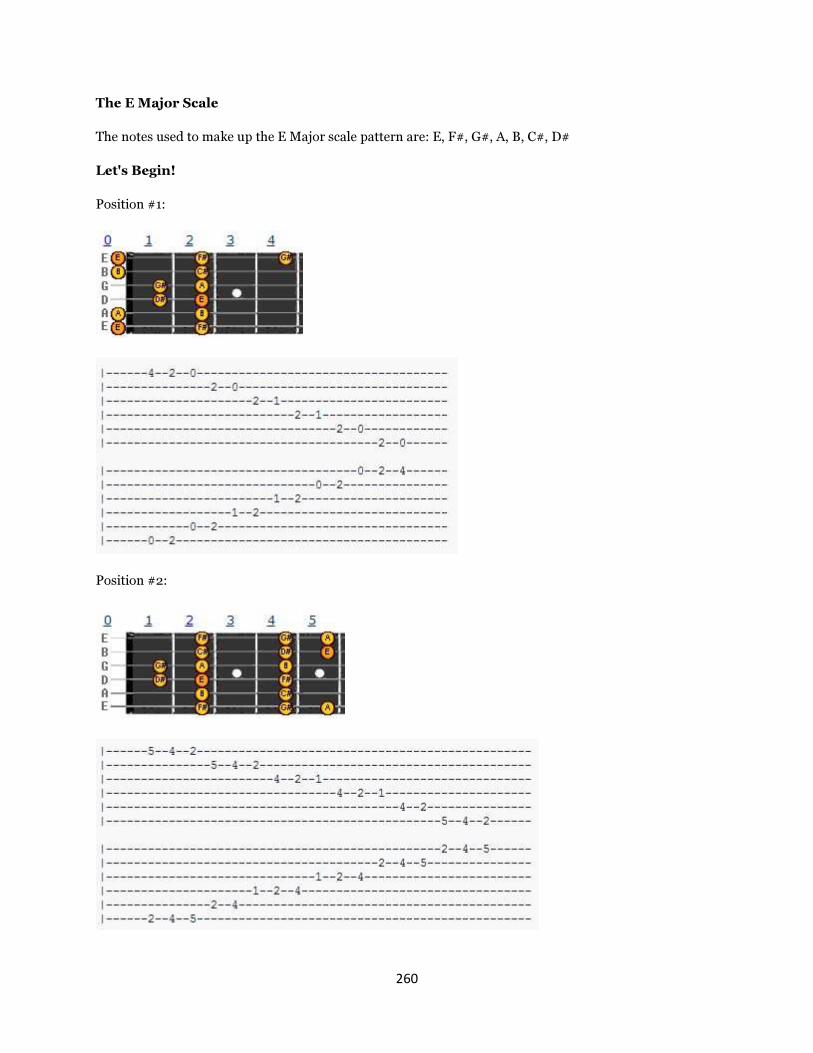
260
The E Major Scale
The notes used to make up the E Major scale pattern are: E, F#, G#, A, B, C#, D#
Let's Begin!
Position #1:
Position #2:

261
Position #3:
Position #4:
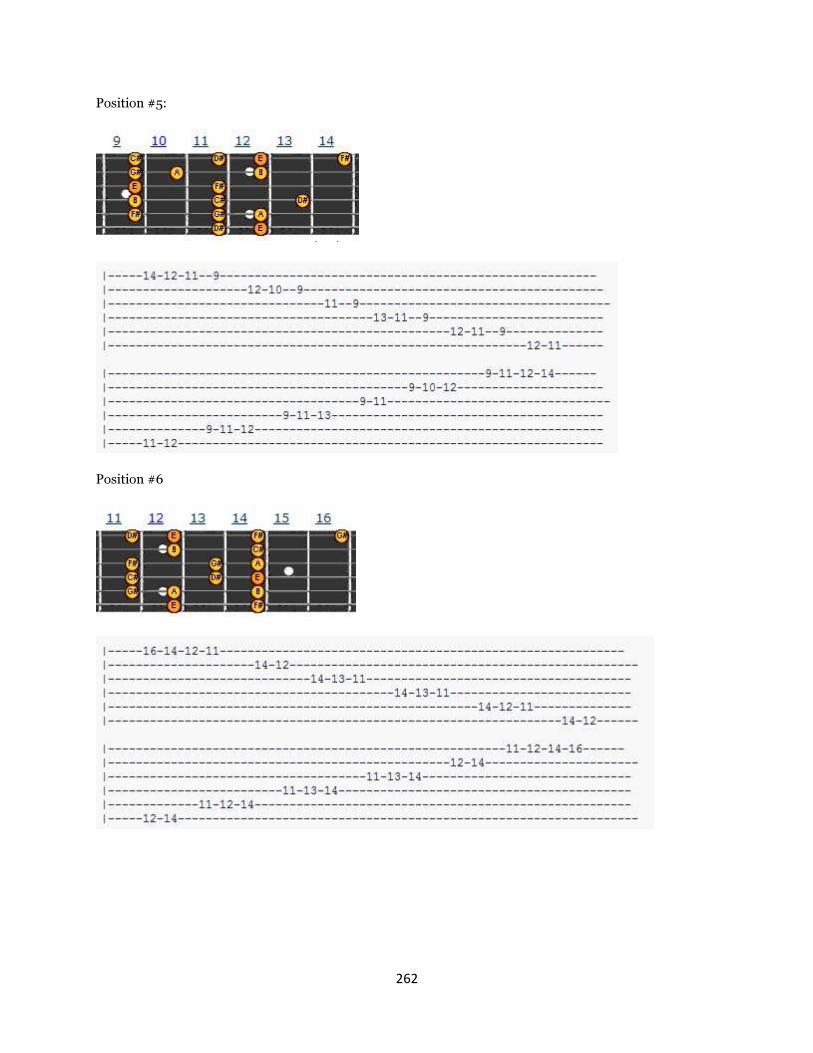
262
Position #5:
Position #6

263
The F Major Scale
The notes used to make up the F Major scale pattern are: F, G, A, A#, C, D, and E
Let's Begin!
Position #1:
Position #2:

264
Position #3:
Position #4:

265
Position #5:
Position #6

266
The G Major Scale
The notes used to make up the G Major scale pattern are: G, A, B, C, D, E, and F#. This time we have an F# note included. Remember that F# is also = Gb.
Let's Begin!
Position #1:
Position #2:

267
Position #3:
Position #4:

268
Position #5:
The A Major Scale
The notes used to make up the A Major scale pattern are: A, B, C#, D, E, F#, G#
Let's Begin!
Position #1:

269
Position #2:
Position #3:

270
Position #4:
Position #5:

271
The B Major Scale
The notes used to make up the B Major scale pattern are: B, C#, D#, E, F#, G#, and A#
Let's Begin!
Position #1:
Position #2:

272
Position #3:
Position #4:

273
Position #5:
The A Minor (Natural/Pure) Scale
The notes used to make up the A Minor scale pattern are: A, B, C, D, E, F, and G
Let's Begin!
Position #1:

274
Position #2:
Position #3:

275
Position #4:
The A# Minor (Natural/Pure) Scale
The notes used to make up the A# Minor scale pattern are: A#, C, C#, D#, F, F#, G#
Note that there is no B# or E# (because there's no such thing)
Let's Begin!
Position #1:
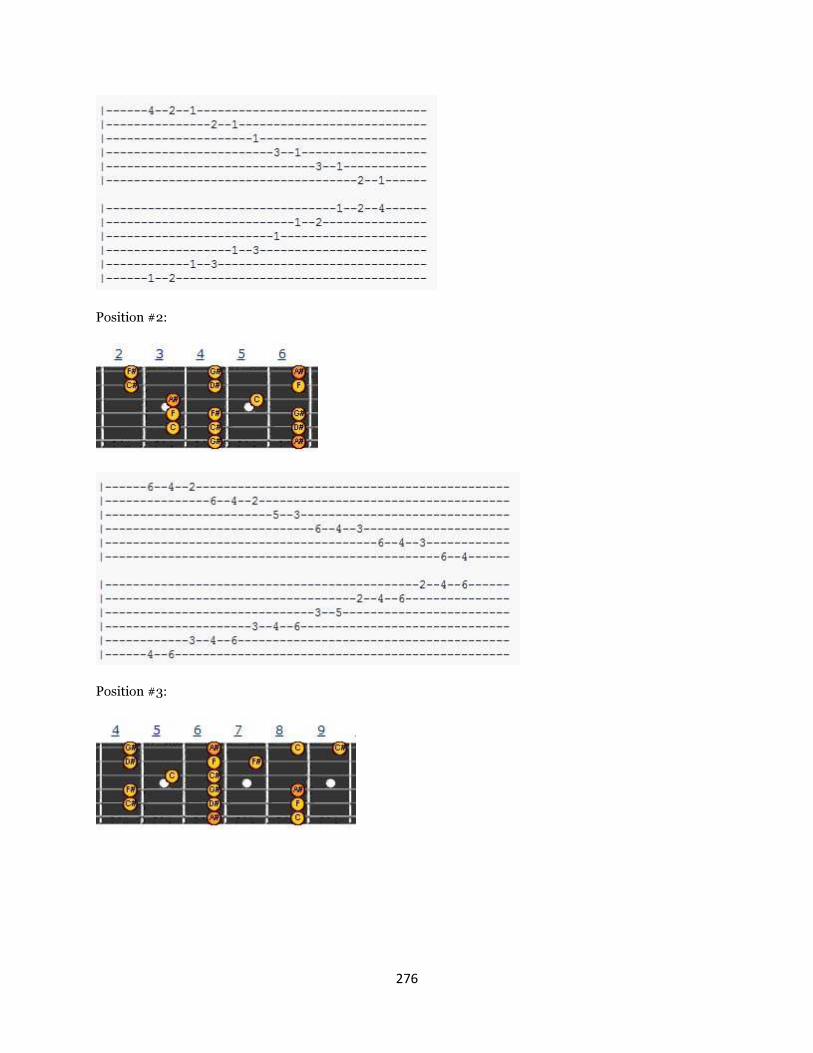
276
Position #2:
Position #3:

277
Position #4:
Position #5:
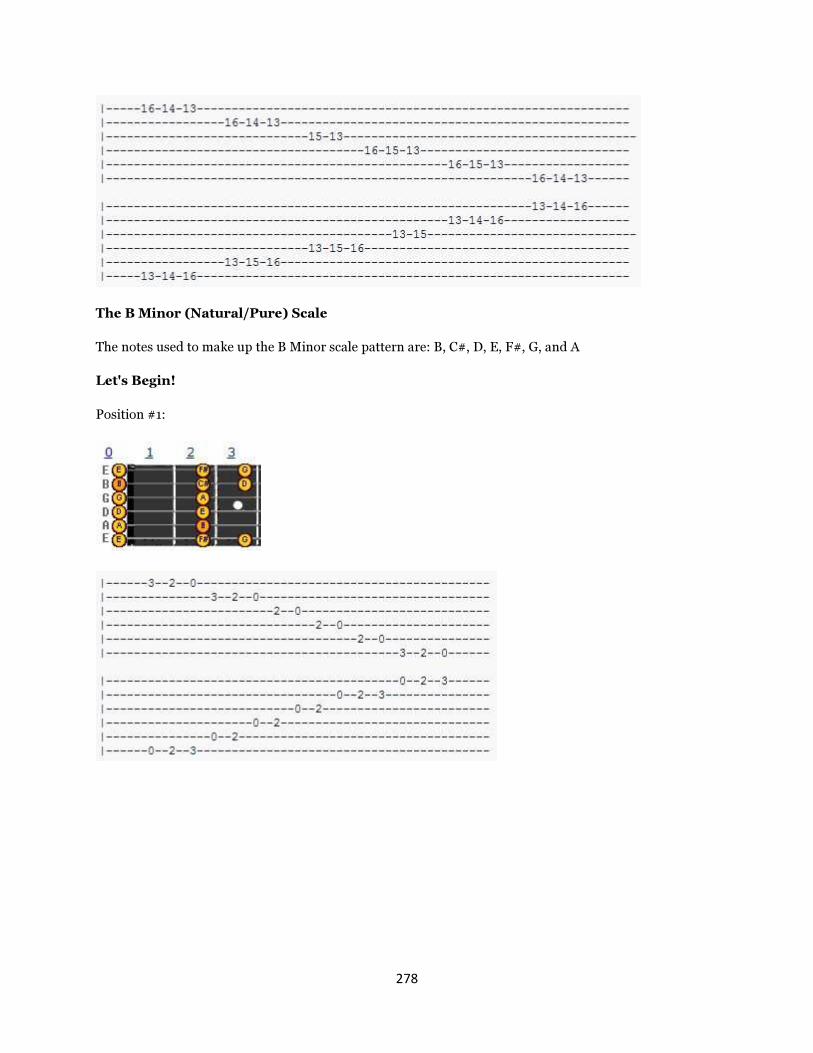
278
The B Minor (Natural/Pure) Scale
The notes used to make up the B Minor scale pattern are: B, C#, D, E, F#, G, and A
Let's Begin!
Position #1:

279
Position #2:
Position #3:
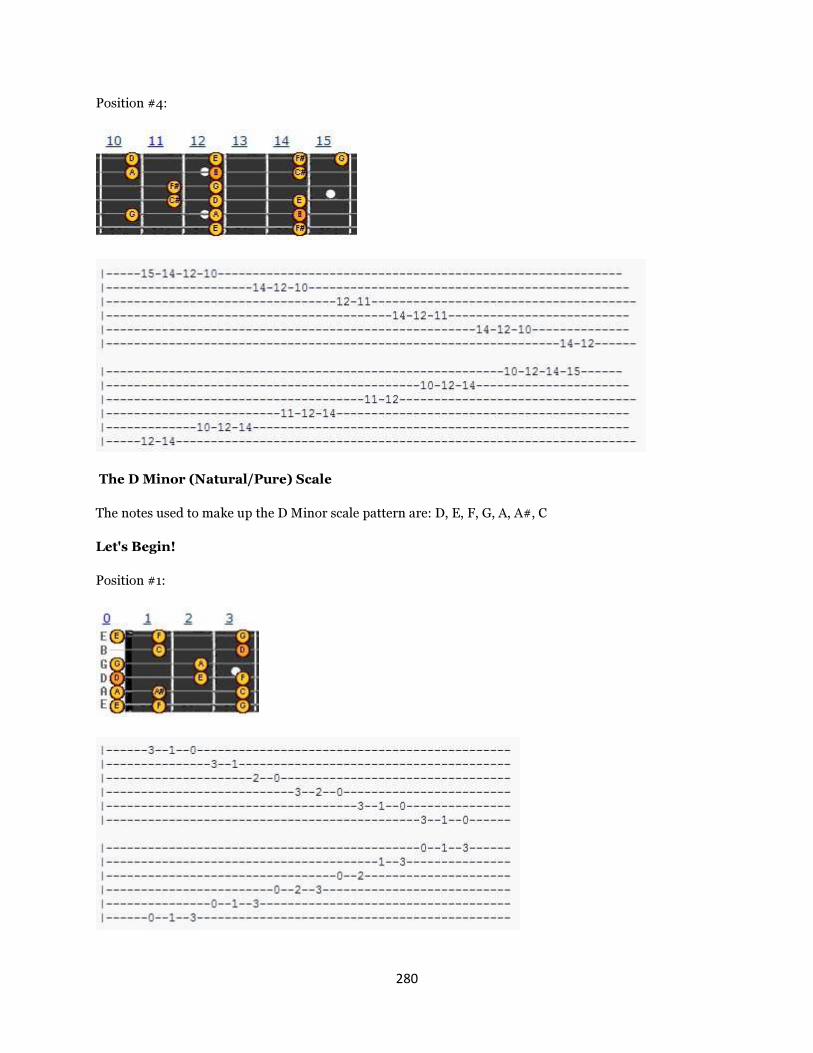
280
Position #4:
The D Minor (Natural/Pure) Scale
The notes used to make up the D Minor scale pattern are: D, E, F, G, A, A#, C
Let's Begin!
Position #1:

281
Position #2:
Position #3:

282
Position #4:
Position #5:

283
The E Minor (Natural/Pure) Scale
The notes used to make up the E Minor scale pattern are: E, F#, G, A, B, C, D
Let's Begin!
Position #1:
Position #2:

284
Position #3:
Position #4:

285
Position #5
Position #6:

286
The C Pentatonic Major Scale
The notes used to make up the C Pentatonic Major scale pattern are: C, D, E, G, A
Did you notice something? In the C Major scale we had seven notes of C, D, E, F, G, A, and B. In the C Pentatonic Major scale we DO NOT have the F or B notes available. In other words, you technically can't use them and call it a C Pentatonic Major scale. The word "penta" means "five" so that will help you remember that with ANY Pentatonic scale we can ONLY use five notes.
Let's Begin!
Position #1:
Position #2:
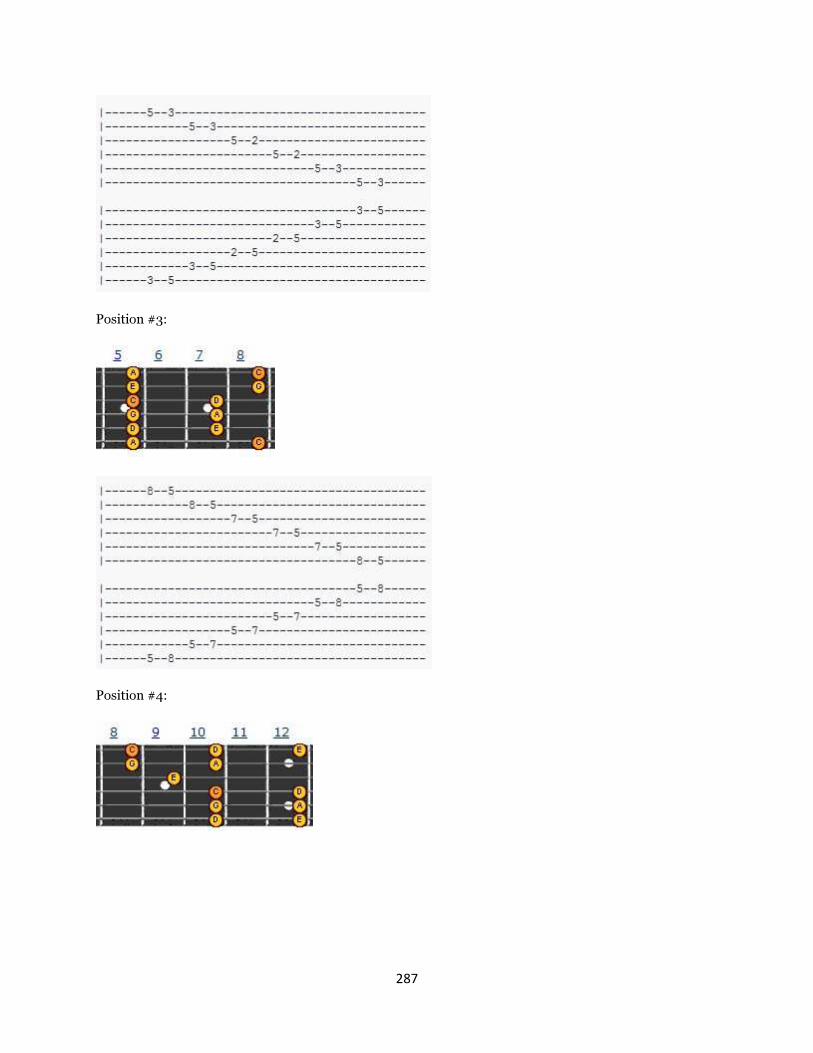
287
Position #3:
Position #4:

288
Position #5:
The G Pentatonic Major Scale
The notes used to make up the G Pentatonic Major scale pattern are: G, A, B, D, and E. There are no C or F notes (in any form whatsoever) in the case of the G Pentatonic Major scale.
Let's Begin!
Position #1:
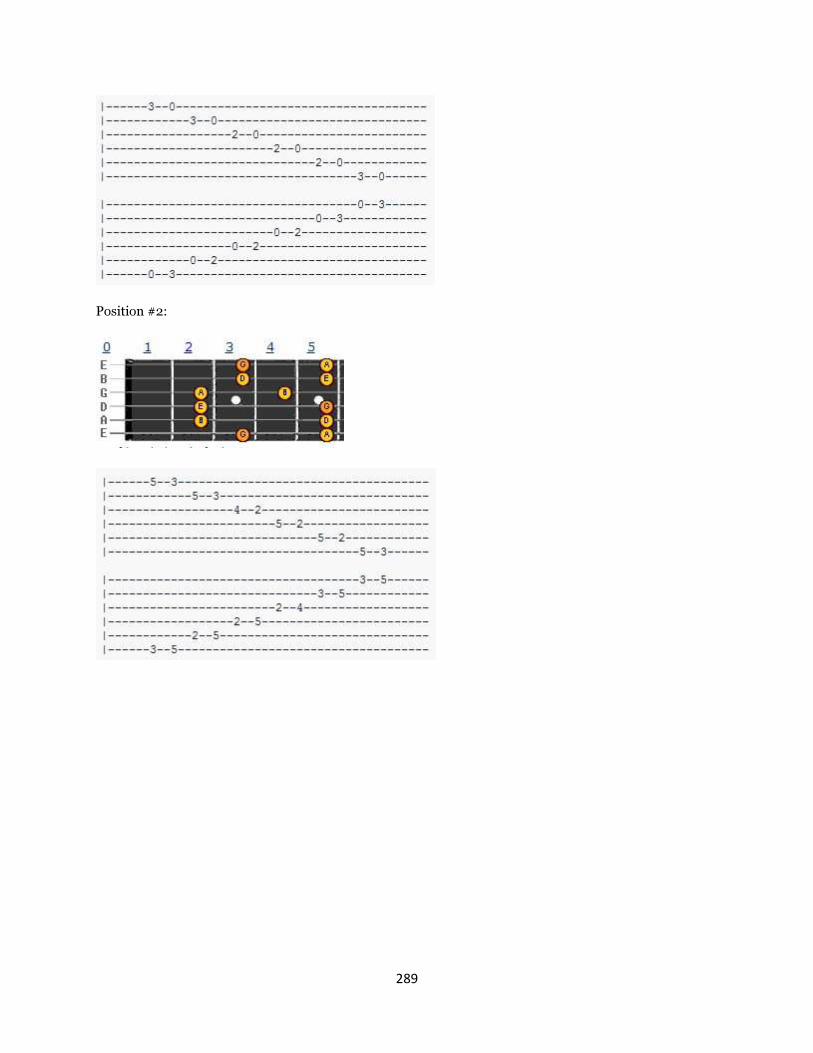
289
Position #2:
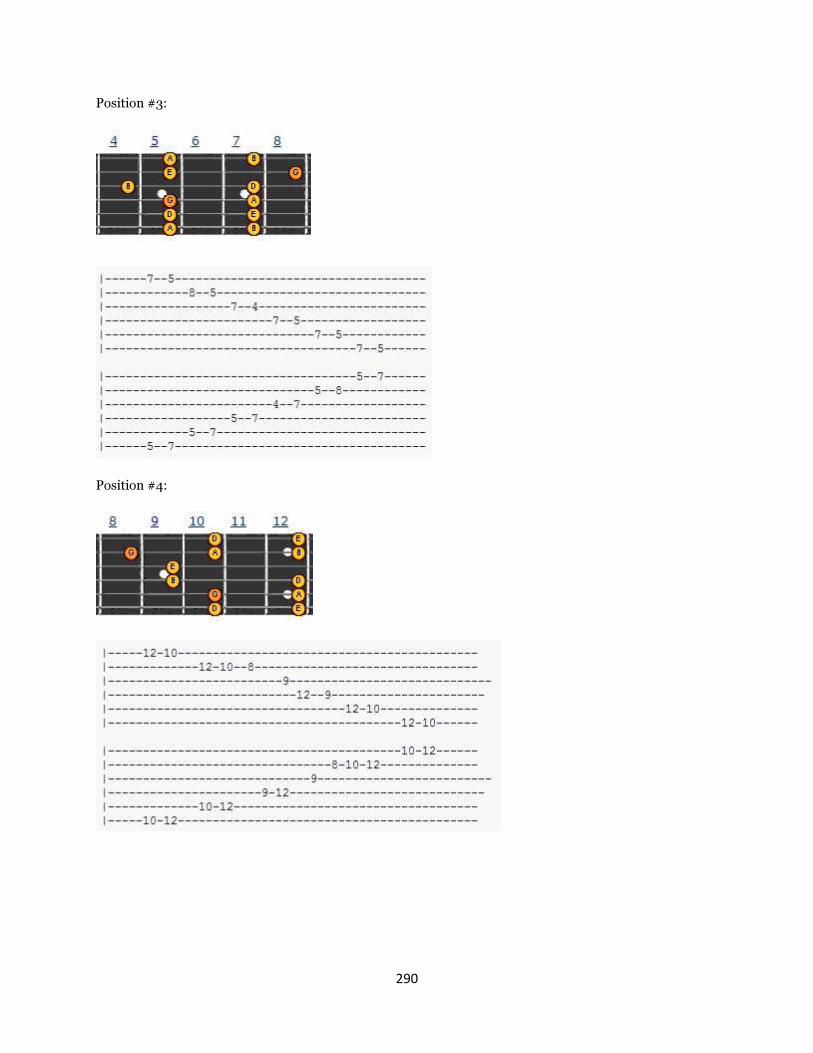
290
Position #3:
Position #4:

291
Position #5:
Position #6:
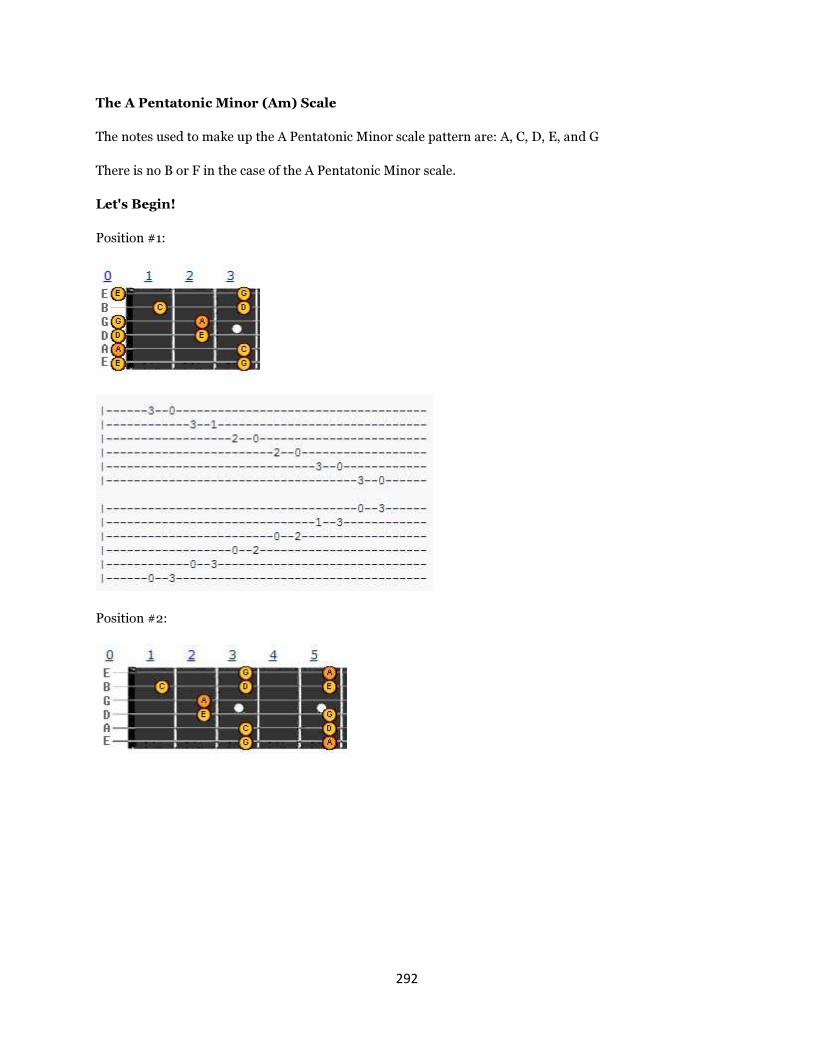
292
The A Pentatonic Minor (Am) Scale
The notes used to make up the A Pentatonic Minor scale pattern are: A, C, D, E, and G
There is no B or F in the case of the A Pentatonic Minor scale.
Let's Begin!
Position #1:
Position #2:

293
Position #3:
Position #4:

294
Position #5:
Position #6:

295
The A# Pentatonic Minor (A#m) Scale
The notes used to make up the A# Pentatonic Minor scale pattern are: A#, C#, D#, F, G#
Let's Begin!
Position #1:
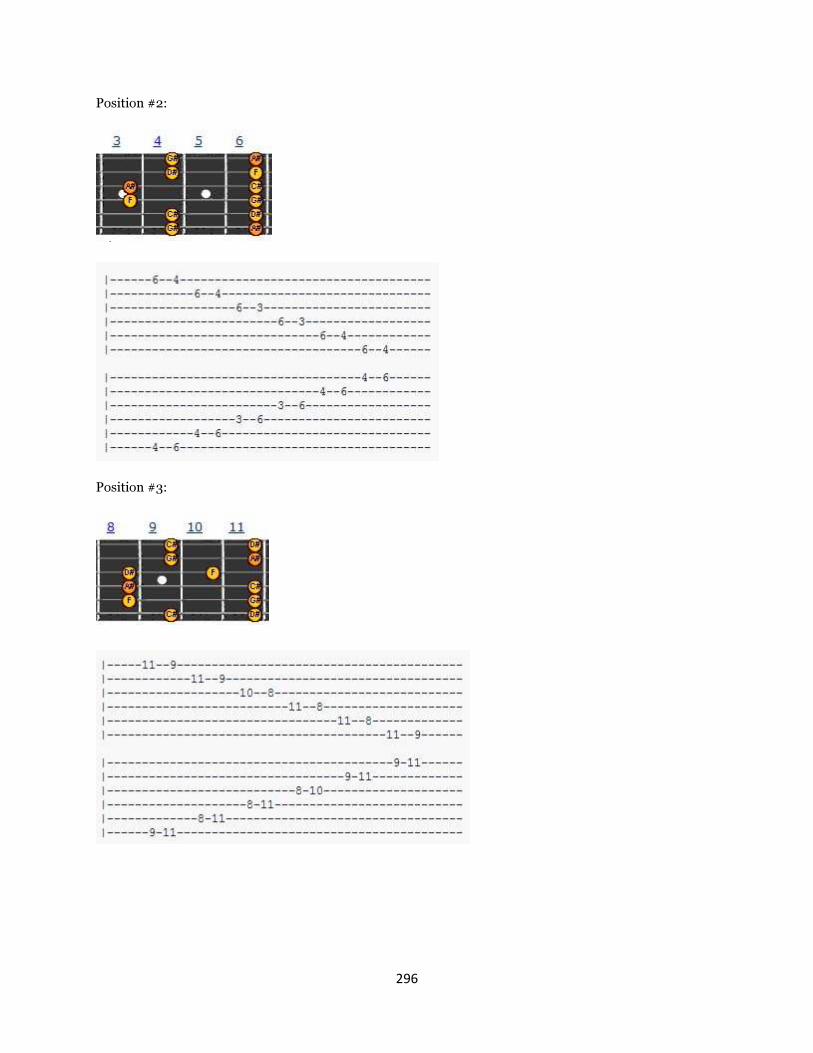
296
Position #2:
Position #3:

297
Position #4:
Position #5:

298
Techniques Used @ Chord Workshop
Throughout the course we will employ the usage of these techniques. These techniques are in no particular order and will be addressed as we proceed through the course.
"Pull-Off"
A pull-off (P) is performed by striking the FIRST note, but NOT striking the note that follows it. The note that follows the pull-off will ring without the need to pick it. In this case, there is a pull-off from 8 to 5 on the B string. A pull-off will cause a note to ring from a higher pitch to a lower pitch.
Example:
"Wide Vibrato"
Wide Vibrato ( ) is performed by rapidly shaking the string on which the technique is applied. You don't want to shake it to the point that it begins bending. In this case, the wide vibrato appears on the 3rd note on the high E string.
Example:

299
"Legato/Slide In (Above)"
A legato slide ( ) is where you pick, slide and then DON'T pick at your target note; most of what people call 'slides' are the legato version.
A slide in - from above ( ) is where you basically slide in from 'nowhere.' The video will explain this a little easier. There is also a slide in - from below, which will show the slide labeling in a downward position. We'll cross that bridge when we get there.
Example:
"Hammer-On/Triplets"
A hammer-on (H) is the opposite of a pull-off. By striking the FIRST note, but NOT striking the next note that follows it, a guitarist is able to make a series of notes go up in pitch. The note that follows the hammer-on will ring without the need to pick it. In this case, there is a hammer-on from 7 to 8 on the high E string and a 5 to 7 on the same string.
A triplet (3) shows up in the notation staff. It will be bracketed together with a series of 3 notes. A triplet is performed by thinking of the notes as "trip(1) - uh (1) - let (1)" producing three notes that sound grouped together. This appears throughout riff #4.
Example:

300
Conclusion
I hope this guide helped you further your knowledge in the world of chord structure, scales, arpeggios, formations, fingerstyle – the list goes on and on. Always keep in mind that this guide is to be used in conjunction with the online material. You’ll find plenty of practice songs online.
If you have any questions or concerns please feel free to email me at: [email protected] at any time!
Sincerely, Nathan Wilson
Course Instructor Chord Workshop