CHNIUNI - Aerpro
4
www.aerpro.com CHNIUNI Nissan Steering Wheel Control Interface INSTRUCTION MANUAL
Transcript of CHNIUNI - Aerpro

www.aerpro.com
CHNIUNI Nissan Steering Wheel Control Interface
INSTRUCTION MANUAL

www.aerpro.com2
ABOUT THIS PRODUCT...
CHNIUNINissan steering wheel control interface with program switching, for analogue vehicles.
Product ContentsInterface, Harness, Bluetooth Bypass Adapter, Instructions
Applications
Prior to installation
Read the manual prior to installation. Technical knowledge is necessary for installa-tion. The place of installation must be free of moisture and away from heat sources. Please ensure you use the correct tools to avoid damage to the vehicle or product.Aerpro can not be held responsible for the installation of this product.
Technical Support
Aerpro want to provide a fast and suitable resolution should you encounter any technical issues. With this in mind, when contacting Aerpro, try to provide as much Information as possible. This will speed up the process and help us to help you.
Please use our dedicated online technical support centre: intranet.tdj.com.au/support/
Dualis J10 2007-2013Micra 2007-2014Navara D40 2007-2015Pathfinder(Terrano) 2007-2013Tiida 2007-2013X-Trail 2007-2013
Varients in HeadunitsThis unit has been developed for certain Nissan Vehicles that were using several different headunit varinants and differed in the required steering wheel codes even though the plugs were the same.
www.aerpro.com 3
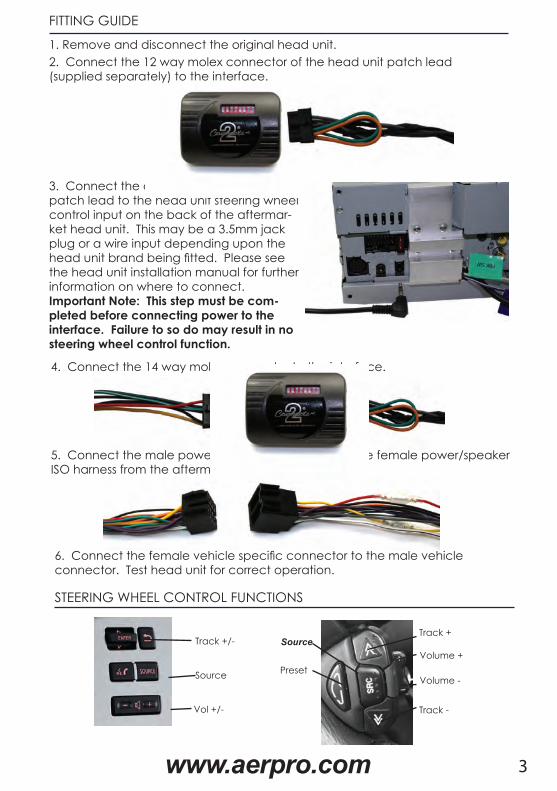
FITTING GUIDE
1. Remove and disconnect the original head unit.2. Connect the 12 way molex connector of the head unit patch lead(supplied separately) to the interface.
3. Connect the opposite end of head unitpatch lead to the head unit steering wheelcontrol input on the back of the aftermar-ket head unit. This may be a 3.5mm jackplug or a wire input depending upon the
the head unit installation manual for further information on where to connect.Important Note: This step must be com-pleted before connecting power to the interface. Failure to so do may result in no steering wheel control function.
4. Connect the 14 way molex connector to the interface.
5. Connect the male power/speaker ISO harness to the female power/speakerISO harness from the aftermarket head unit.
connector. Test head unit for correct operation.
STEERING WHEEL CONTROL FUNCTIONS
Vol +/-
Track +/-
Source Volume -
Volume +
Track +
Track -
Source
Preset
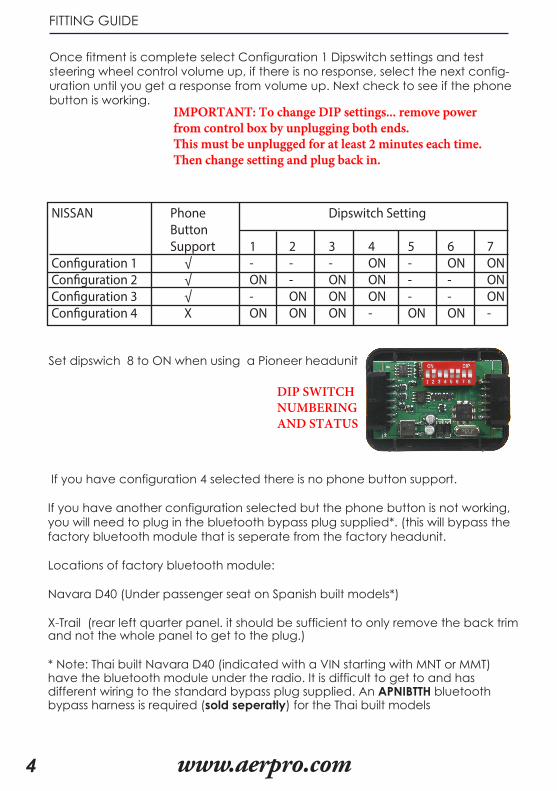
NISSAN Phone Dipswitch Setting Button Support 1 2 3 4 5 6 7
Con�guration 1 √ - - - ON - ON ONCon�guration 2 √ ON - ON ON - - ONCon�guration 3 √ - ON ON ON - - ONCon�guration 4 X ON ON ON - ON ON -
www.aerpro.com4
Once fitment is complete select Configuration 1 Dipswitch settings and test steering wheel control volume up, if there is no response, select the next config-uration until you get a response from volume up. Next check to see if the phone button is working.
FITTING GUIDE
Set dipswich 8 to ON when using a Pioneer headunit
If you have configuration 4 selected there is no phone button support.
If you have another configuration selected but the phone button is not working, you will need to plug in the bluetooth bypass plug supplied*. (this will bypass the factory bluetooth module that is seperate from the factory headunit.
Locations of factory bluetooth module:
Navara D40 (Under passenger seat on Spanish built models*)
X-Trail (rear left quarter panel. it should be sufficient to only remove the back trim and not the whole panel to get to the plug.)
* Note: Thai built Navara D40 (indicated with a VIN starting with MNT or MMT) have the bluetooth module under the radio. It is difficult to get to and has different wiring to the standard bypass plug supplied. An APNIBTTH bluetooth bypass harness is required (sold seperatly) for the Thai built models
DIP SWITCH NUMBERING AND STATUS
IMPORTANT: To change DIP settings... remove power from control box by unplugging both ends. This must be unplugged for at least 2 minutes each time. Then change setting and plug back in.


![Index [data.wescomponents.com]data.wescomponents.com/aerpro/Aerpro.2010.a.V.Index.pdf · l300 express van sa-sj lancer ca, cb, cc lancer lancer magna tm, tn, tp magna tr, ts magna](https://static.fdocuments.us/doc/165x107/6069c7ff2cff1f7a7d52223e/index-data-data-l300-express-van-sa-sj-lancer-ca-cb-cc-lancer-lancer-magna.jpg)