Chip Flooring Install - Epoxy.com Chemical Resistant ... · Epoxy.com Chip Flooring 4 Mixing is by...
21
Epoxy.com Chip Flooring Epoxy.com Chip Flooring Installation Guide Includes Mixing This Guide Starts after Surface Prep Copyright 2003-2014 Epoxy.com
Transcript of Chip Flooring Install - Epoxy.com Chemical Resistant ... · Epoxy.com Chip Flooring 4 Mixing is by...
Epoxy.com Chip Flooring
Epoxy.com Chip Flooring
Installation Guide
Includes Mixing
This Guide Starts after Surface Prep
Copyright 2003-2014 Epoxy.com

Epoxy.com Chip Flooring 2
Before You Start
• Have you read the information at
www.epoxy.com/chips.htm yet?
• Have you read the basics
Epoxy.com Tech Bulletins yet?
They are:
1. Concrete Preparation
2. Do With Epoxy
3. Don’t Do With Epoxy. 4. Epoxy Cove Installation

Epoxy.com Chip Flooring 3
Cracks & Floor Joint Prep
• Repair non-moving joints and cracks with Epoxy.com Product #315 Top Coating mixed with Epoxy.com Product #71 fumed silica. Minor holes and depressions can be filled with this mix as well.
• Moving Joints can be filled with Product #11 Joint Filler.
• Structural cracks should be repaired by epoxy injection or Methyl Methacrylate Crack Healer.
• Substrate should be clean and sound, before you start.
• Major resurfacing of very rough floors can be done with either Product 10 low viscosity epoxy mortar or Product #315 Top Coating. Mix the #10 Epoxy Mortar Resin or #315 Top Coating and then use with Product #78 Self-Leveling filler Product #82 Mortar Blend Aggregate.

Epoxy.com Chip Flooring 4
Mixing is by far the most important part of installation.
One method to insure accurate mix ratios is to put measurements on sticks with the appropriate mix ratio. In the case of the 315BC and 315TOP this is 2 Parts A to 1 Part B, so you might do 2 inches “A” to 1 inch of “B”
Epoxy.com Chip Flooring 5
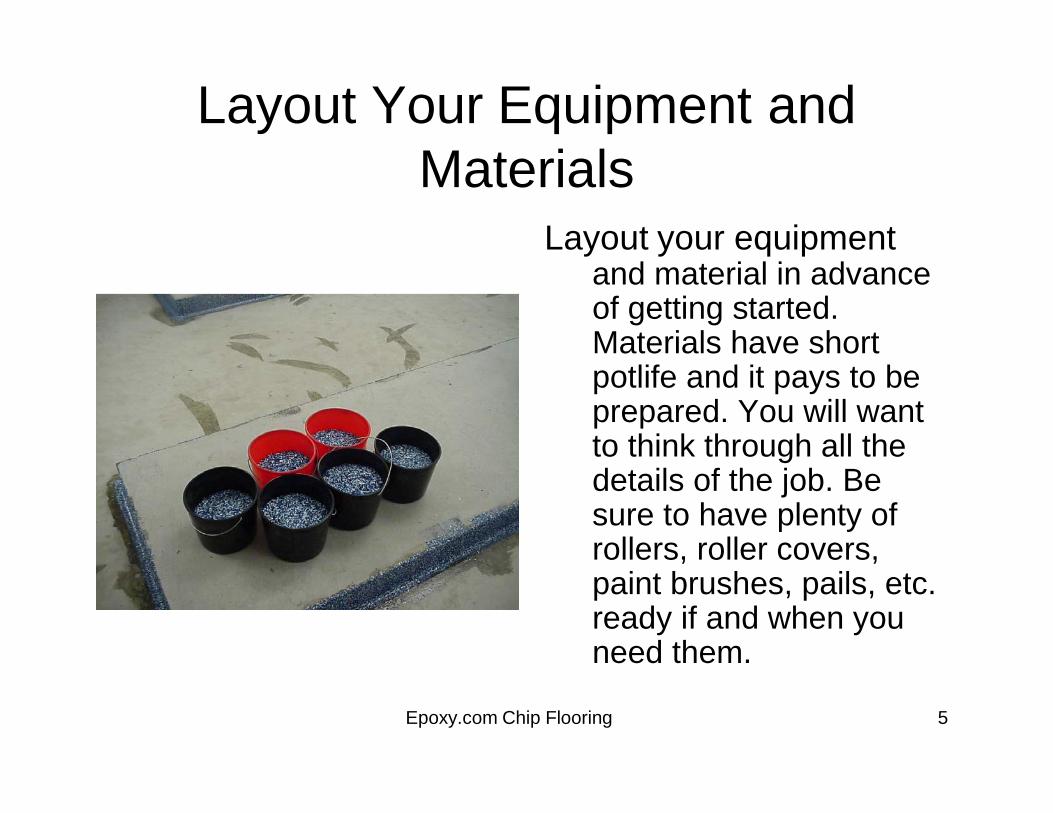
Layout Your Equipment and
Materials
Layout your equipment and material in advance of getting started. Materials have short potlife and it pays to be prepared. You will want to think through all the details of the job. Be sure to have plenty of rollers, roller covers, paint brushes, pails, etc. ready if and when you need them.

Epoxy.com Chip Flooring 6
Mixing Preparations
• It is sometimes helpful to put some duct tape on the A stick. It will help you to see your line when using the pigmented “A” side
• Be sure to properly protect the floor where you will be doing your mixing.

Epoxy.com Chip Flooring 7
Stir Each Component Separately
Stir the Resin “A” and
the Hardener “B”
each separately in
there original
container before
measuring and mixing
the two together. Be
careful to use
separate stir sticks so
not to cross
contaminate.

Epoxy.com Chip Flooring 8
Preparing to Mix Resin and
Hardener Together
• A 5 gallon metal pail or 5 gallon plastic pail makes a great mixing bucket.
• Always be sure that your mix bucket is clean and is not contaminated with anything before you mix.
• Some people like to use the two bucket method. That allows your person mixing to be mixing while your install people are installing the last bucket.
• If you start to show signs of your material hardening in the mix bucket, start using a new one.

Epoxy.com Chip Flooring 9
Mixing Tools
• Typically you will want to use a paddle mixer, that goes into a low speed drill.
• Your drill mixer should be large enough to stir the entire batch at once. A mixer that only moves only the partial contents of the pail, may result in inadequate mixing.
• Be sure that you use a clean mixing paddle. A dirty mixing paddle can result in poor mixing or contamination of the batch.
• When mixing try not to whip any unnecessary air into your mix.
Epoxy.com Chip Flooring 10
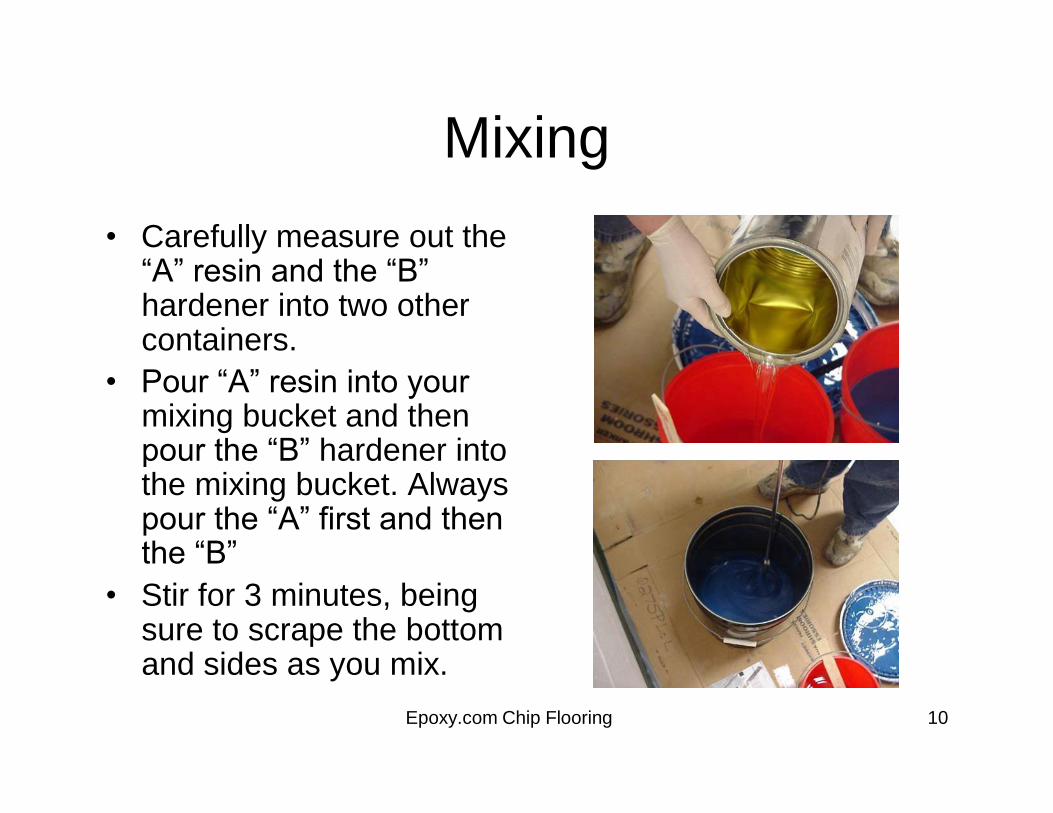
Mixing
• Carefully measure out the “A” resin and the “B” hardener into two other containers.
• Pour “A” resin into your mixing bucket and then pour the “B” hardener into the mixing bucket. Always pour the “A” first and then the “B”
• Stir for 3 minutes, being sure to scrape the bottom and sides as you mix.

Epoxy.com Chip Flooring 11
Optional Cove
– Cove (optional) is
installed first.
– Duct tape makes the
best masking tape but
be sure to remove it as
you go.
– You will need to trim
as you go.

Epoxy.com Chip Flooring 12
Doing the Trim
• Trim around all the areas that are difficult to roll.
• Remember not to get two far ahead, you don’t want the material to set up before it is broadcast.
• Also remember to pull the duct tape while the material is still wet

Epoxy.com Chip Flooring 13
Applying the Base Coat
• Pour the mixture into the Roller pans.
• Roll resin on the floor in an area large enough so you can broadcast the chips into it.
• Be careful not to get foreign material into you mix or onto your floor.

Epoxy.com Chip Flooring 14
Spreading the Base Coat
• Darker colored
backgrounds are
more forgiving of
differences in
colors and texture
in the substrate.
• Be sure to apply
at an even spread
rate of 220-230
SF per gallon.

Epoxy.com Chip Flooring 15
Broadcasting the Chips
– For the most
uniformed
appearance many
contractors like the
“Total Broadcast”.
This is done by
taking small hands
full of the chips and
broadcasting them
into the floor.

Epoxy.com Chip Flooring 16
Broadcast to Saturation
• As you work your way
across the floor you will
see the shine of the
base coat disappear. • If you broadcast too
much it just won’t stick
and you can sweep it
up the next day. Be
careful not to broadcast
so much your run short.
Epoxy.com Chip Flooring 17
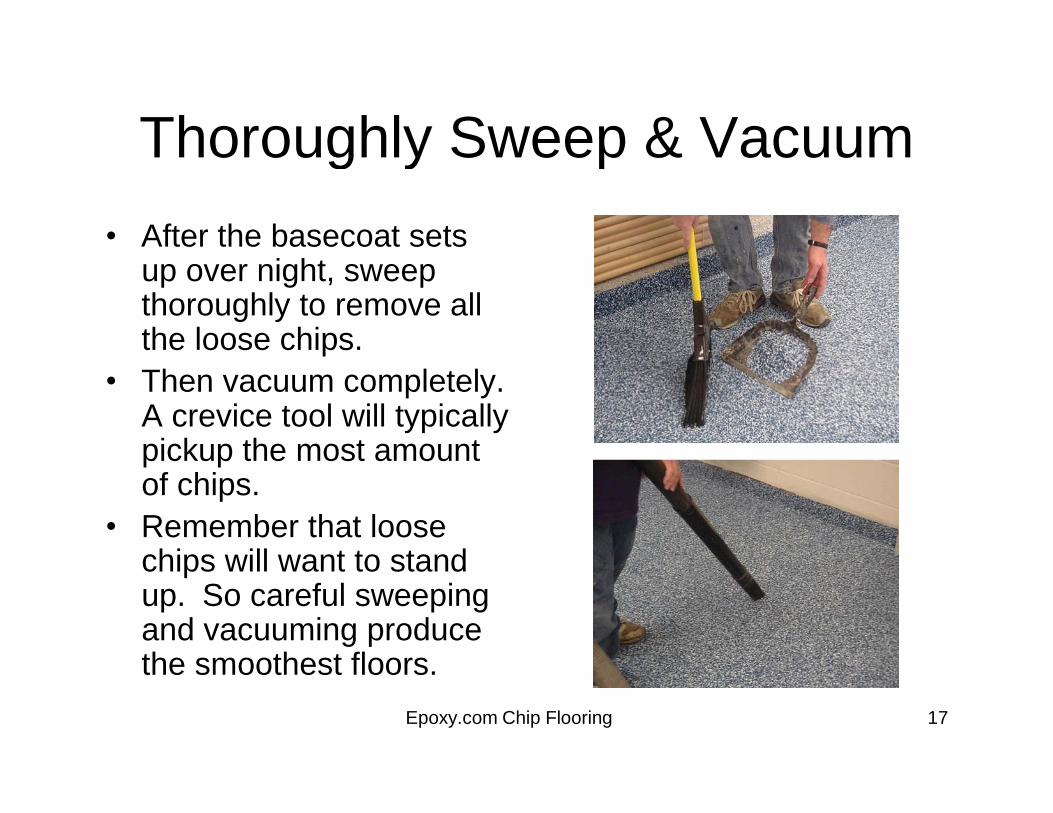
Thoroughly Sweep & Vacuum
• After the basecoat sets up over night, sweep thoroughly to remove all the loose chips.
• Then vacuum completely. A crevice tool will typically pickup the most amount of chips.
• Remember that loose chips will want to stand up. So careful sweeping and vacuuming produce the smoothest floors.

Epoxy.com Chip Flooring 18
Preparing to Glaze
• Setting up to mix your
glaze is basically the
same as setting up to
mix your base.
• As with the base
careful measuring
and thorough mixing
is critical to the
success of your
installation.
Epoxy.com Chip Flooring 19
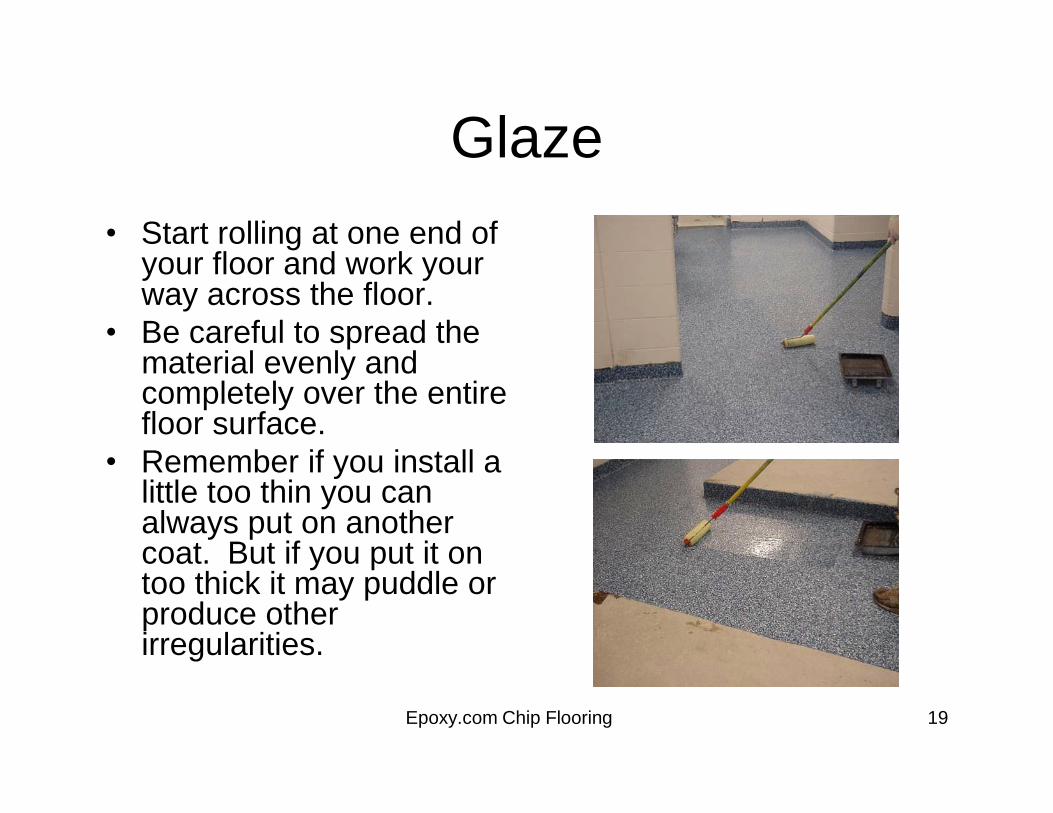
Glaze
• Start rolling at one end of your floor and work your way across the floor.
• Be careful to spread the material evenly and completely over the entire floor surface.
• Remember if you install a little too thin you can always put on another coat. But if you put it on too thick it may puddle or produce other irregularities.
1 coat of Glaze or 2 or more?
Epoxy.com Chip Flooring 20
• With one coat of glaze the floors have
the most aggressive anti-skid but is harder to clean. • Two coats of glaze brings up a bright shine and for
most applications will retain enough anti-skid. Two
coats is recommended for most applications • Three coats gives maximum smoothness and
shine, but is only recommended where little or no
anti-skid is required. Not typically recommended.
• Apply all coats with 24 hours of the previous coat.
Epoxy.com Chip Flooring 21
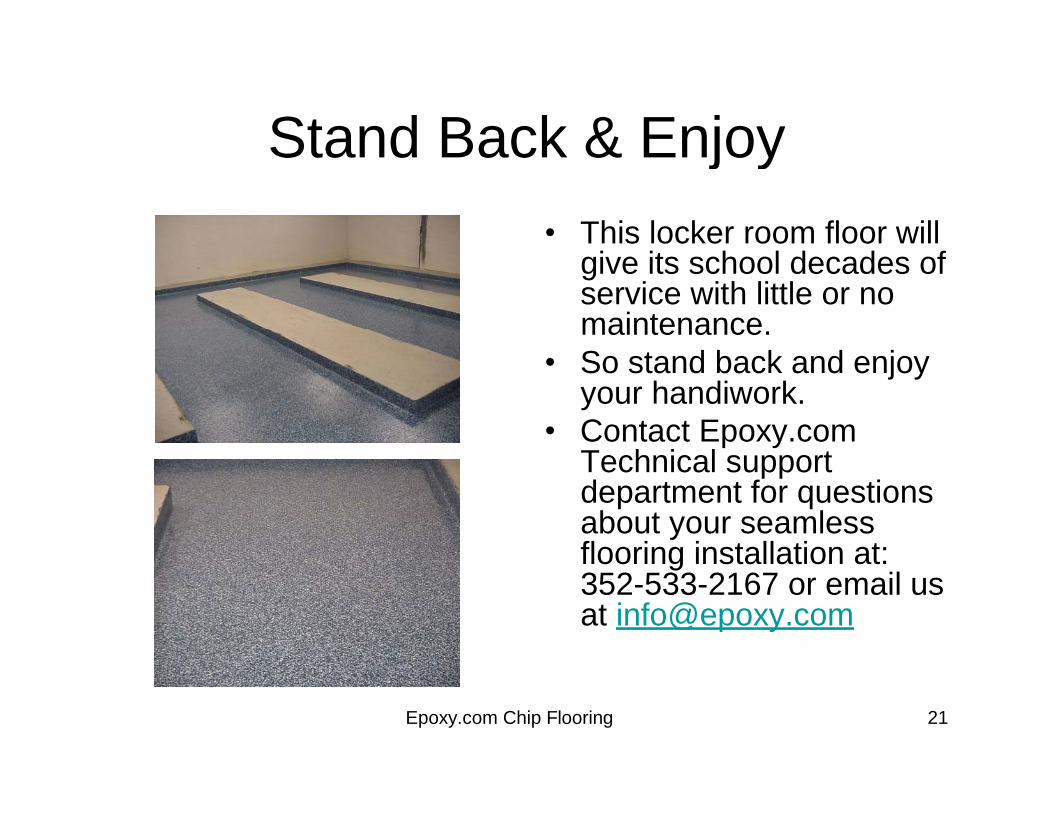
Stand Back & Enjoy
• This locker room floor will give its school decades of service with little or no maintenance.
• So stand back and enjoy your handiwork.
• Contact Epoxy.com Technical support department for questions about your seamless flooring installation at: 352-533-2167 or email us at [email protected]