Child & Adolescent Health Centers · 2018. 10. 16. · 3 Getting Started Welcome Page To begin...
24
Child & Adolescent Health Centers Clinical Reporting Tool A quick-start guide to using the CRT to enter, edit and view quarterly reports
Transcript of Child & Adolescent Health Centers · 2018. 10. 16. · 3 Getting Started Welcome Page To begin...

Child & Adolescent
Health Centers
Clinical Reporting Tool A quick-start guide to using the CRT to enter, edit and view quarterly reports

2
Table of Contents
Getting Started
Welcome Page ................................................................................................................................. 3
Access Page ..................................................................................................................................... 3
Tips and Reminders……………………………………………………………………………………………………………5
Report Due Dates ............................................................................................................................. 5
Entering and Editing Data ................................................................................................................. 6
Data Entry Process: Example: Unduplicated Users .............................................................................. 6
Budgets and Expenditures (Financial Status Report/FSR) ................................................................... .9
Data Entry Process for the Budget .................................................................................................... .9
Data Entry Process for Expenditures (Financial Status Report/FSR) .....................................................10
Budget and Financial Status Report (FSR) Reminders……………………………………………………….13
Annual/Year-End Only Reports……………………………………………………………………………………………14
Annual Billing Report…………………………………………………………………………………………………….…14
Top Diagnoses (Top Five Diagnoses and CPT Codes) ......................................................................... 18
Data Entry Process: Example: Top Five Primary Diagnoses ................................................................ 18
Viewing Reports……………..………………………………………………………………………………….20
Viewing the Quarterly Data Report .................................................................................................. 20
Viewing the Budget and Expenditures Report (Financial Status Report/FSR)……………………………..22
Viewing the Annual Billing Report……………………………………………………………………………………….23
Changing your Password ................................................................................................................. 24

3
Getting Started
Welcome Page
To begin reporting data for your Child and Adolescent Center (CAHC), click on this link: CAHC Clinical Reporting Tool . This link will
take you to the Welcome Page for the Clinical Reporting Tool (CRT) as shown in the screenshot above. As a CAHC provider or other
staff member who uses the CRT to enter, edit or view data, select the radio button “CAHC Providers and Staff” to begin the log-in
process. This will take you to the log-in page where you will enter your email address and password. The first time you log in, you
will be prompted to change your password. Once your password is changed, you are ready to use the CRT. (For more information
on changing your password, see p. 24.)
Access Page
After logging in, you will be directed to your access page. This page will show you a table listing all CAHCs to which you have
access, along with the assigned CAHC Agency Consultant. Select a health center to begin working with by clicking on “view” in the
far right column (see screenshot below). Dummy data for one CAHC will be used to display examples in this guide.

4
You will be directed to that health center’s main page. This page will list CAHC details such as CAHC name, model and linkage type,
fiduciary organization (sponsoring agency), assigned CAHC Agency Consultant and location (either county or city of Detroit) (see
screenshot below). If any of this information appears incorrect or should happen to change, contact your assigned CAHC Agency
Consultant to request an update. As you scroll down the page, you will see two series of radio buttons: a series for viewing reports
(View Reports) and a series for entering and/or editing report data (Enter or Edit Data). You will begin by entering data, as reports
will not populate until data has been entered.
Please note that as the CRT is updated to accommodate reporting for other models within the CAHC program umbrella, you may
see report radio buttons which have been added for reports specific to other program models. If you click on a radio button that
links to a report that CAHCs are not required to complete (e.g., RN Services, Referrals), you will receive instructions to ignore the
report.

5
Tips and Reminders
Navigating to your CAHC Main Page or between Report Sections
If, at any time, you want to go to the CAHC’s main page or view a report (quarterly data, annual billing or Financial Status
Report/FSR), click on the “View Clinic Details” hyperlink located at the top of the page.
Navigating between CAHCs
If you work with multiple health centers and, at any time, you want to work with or view another site, select the “CAHC List –
Provider View” radio button or hyperlink located at the top of the page.
Navigating between Fields
When entering or editing data, use the “Tab” key or mouse click to move between fields.
Required Data
You must enter a “0” (zero) when you have no data to report in any of the required data fields. You will receive an error message
and will be prompted to make corrections if any required fields are left blank.
Data Validation
Data validation has been built into the system for certain data fields. You will receive an error message and will be prompted to
make corrections if any fields contain errors that violate the data validation rules.
Fiscal Years
Fiscal years begin on October 1 and end on September 30 e.g., Fiscal Year 2018: October 1, 2017 – September 30, 2018.
Quarters and Quarterly Report Due Dates
Reporting FAQ
If you have a question on a reporting element, note there is a link to a reporting FAQ, that may have the answer you’re looking for,
at the top of each page. You can also visit the CAHC website at www.michigan.gov/cahc for the most up-to-date CAHC Report
Definitions.
Quarter Reports Due by CRT Locks for Quarter on
Quarter 1: October 1 – December 31 January 30 March 1
Quarter 2: January 1 – March 31 April 30 June 1
Quarter 3: April 1 – June 30 July 30 September 1
Quarter 4: July 1 – September 30
(includes annual/year-end only reports)
October 30
December 1

6
Entering or Editing Data
Process for Entering and Editing Data
The process for entering and editing data is the same across multiple subsections of the reports e.g., unduplicated users (including
users by race and by ethnicity), visits, physical exams and immunizations, medical tests (pregnancy, chlamydia, gonorrhea and HIV
testing), Medicaid outreach, health education and quality measures. Therefore, the process for entering and editing data will be
described once, using data entry for unduplicated users as an example. Separate instructions are highlighted where there are
variations to the process or where specific instructions pertain to a single report.
Data Entry Process: Example: Unduplicated Users
Select the “Unduplicated Users” radio button from the “Enter and Edit Data” section on your health center’s main page (see
screenshot below).
7
You will now see an option to enter new data by selecting the “Add Unduplicated Users” radio button, as well as a table that
displays any data that has previously been entered (see screenshot below).
A data entry form will display. Select the current fiscal year. Select the current quarter. Select the gender for which you will be
entering data first (male or female). Enter the number of users for the selected gender by the appointed age ranges. When all data
is entered, click the “Submit” radio button at the bottom of the form (see screenshot below).
8
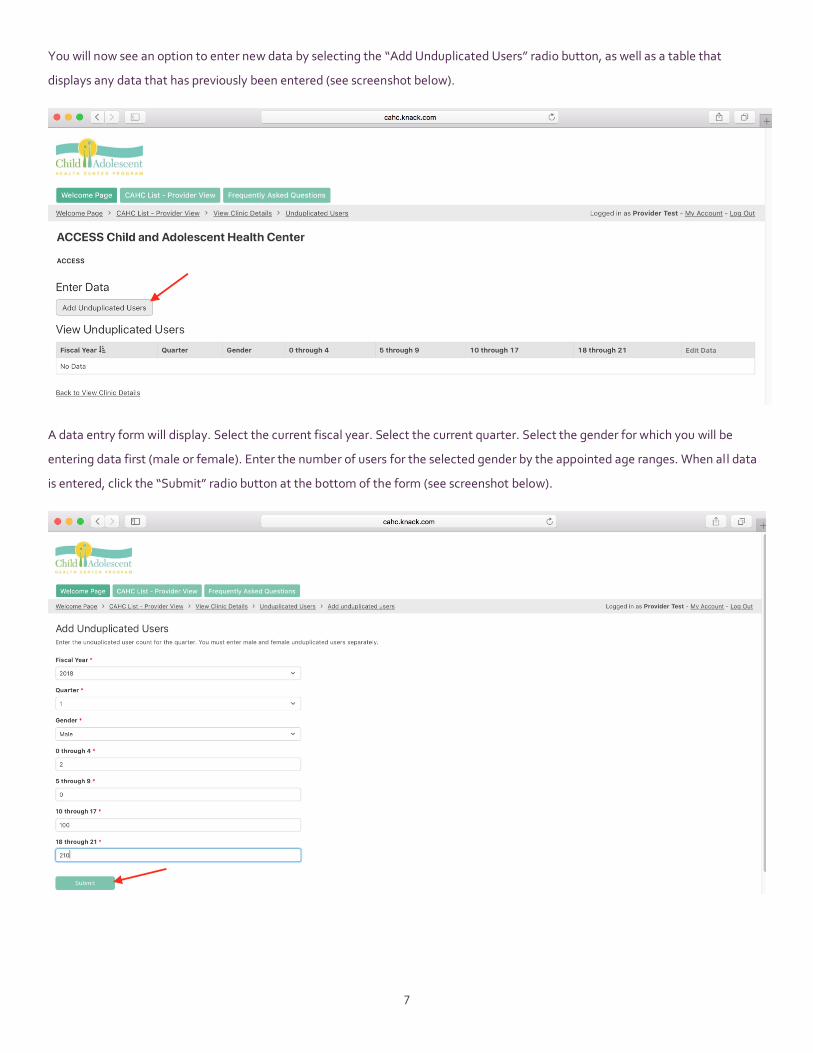
You will receive a message indicating your form has been successfully submitted. You will see a hyperlink near the bottom of the
page that will allow you to “Reload the Form” and enter data for the other gender. You can also select the “Add Unduplicated
Users” hyperlink at the top of the page to reload the form and enter data for the other gender (see screenshot below).
After data is entered and submitted, you can click on one of the “Unduplicated Users” hyperlinks (there is one located at both the
top and bottom of the page). This action will take you back to the “Unduplicated Users” main page where you can view a table with
unduplicated user data. If you see an error as you double-check your data entry, simply select the “edit” hyperlink in the far right
column of the data for the row (quarter/gender) that you wish to correct. The form will display and you can make necessary edits in
this form. You can also opt to go back to viewing clinic details if you don’t wish to review your data at this time; and/or to move to
the next section of the report. You can also select the “CAHC List – Provider View” radio button or hyperlink at the top of the page
to move to another health center (see screenshot below).

9
Budgets and Expenditures (Financial Status Report/FSR)
Data Entry Process for the Budget
From your health center’s main page, select the “Budget and Expenditures” radio button under the “Enter and Edit Data” section.
The top half of the “Budget and Expenditures” main page displays budget information. The bottom half of the page displays
“Expenditures” information. You will see tables that display any data that has previously been entered according to budget
categories (View Categorical Budgets) and funding source (View Fund Source Budgets), as well as a table with links to view and edit
Quarterly Expenditures. Under the section marked “Enter Budget Data,” select the “Add Budget” radio button. (see screenshot
below).

10
A data entry form will display. Each year in quarter 1, you will select the current fiscal year from the drop down menu and enter the
budgeted dollar amounts both by category and by funding source; per the approved budget agreement that was submitted and
approved as part of the NCAP (non-competitive application) process, and was subsequently included in the CAHC grant contract.
Double-check your budget data prior to submitting the form. When all budget data is entered and verified for accuracy, click the
“Submit” radio button at the bottom of the form (see screenshot below).
You will receive a message indicating your form has been successfully submitted. You will see a hyperlink at the bottom of the page
that will allow you to go “Back to Budget;” or you can select the “Budget” hyperlink at the top of the page. Either action will take
you back to the “Budget and Expenditures” main page where you can now view your budget and enter first quarter expenditures.
Note there is no “edit” hyperlink for the budget in this table as there is for other report data. This feature prevents budgets from
being amended without prior approval. If you made a data entry error, contact your assigned CAHC Agency Consultant.
You can also opt to go back to viewing clinic details if you want to move to the next section of the report portal; or select the “CAHC
List – Provider View” radio button or hyperlink to move to another health center (see screenshot on following page).
Data Entry Process for Expenditures (Financial Status Report/FSR)
On the bottom half of the “Budget and Expenditures” main page, you will see a section marked “Expenditures” with a table titled
“Add Quarterly Expenditures.” In this table, select the “view and edit” hyperlink for the current fiscal year for which you are
reporting (see screenshot on following page). (Note that this is the same page and process you will use to enter subsequent
quarterly expenditures to the FSR.)

11
At the top of the “Expenditures” page, you will see a section marked “Add Quarterly Expenditures” as well as tables that display
expenditures according to category (Quarterly Expenditures by Category) and funding source (Quarterly Expenditures by Fund
Source). This page also includes a “Certification” section which displays at the bottom of the page. At the top of the page, under the
section marked “Add Quarterly Expenditures,” select the “Add Expenditures” radio button (see screenshot below).
A data entry form will display. Select the current quarter for which you are reporting from the drop down menu, and enter the dollar
amounts for expenditures by category (e.g., salaries and wages, fringe benefits, etc.) and by funding source (e.g., state agreement,
local funds, etc.) for the quarter. At the bottom of the form, you will see the “Add Certification” section. Select the current date
(which should be the default date) from the calendar in the “Certification Date” field. Using your mouse, sign the “Certification
Signature” box and click on the “Submit” radio button. (Note you have options to undo key strokes or reset the signature if your
signature is not legible.) See screenshot on next page.

12
You will receive a message that the form has been successfully submitted. You will see a hyperlink at the bottom of the page that
will allow you to go back to the “Quarterly Expenditures” page. You can also select the “Budget” hyperlink at the top of the page to
go back to the “Budget and Expenditures” main page (see screenshot below).
Navigating to “Quarterly Expenditures” will take you back to the “Expenditures” page where you can now view your quarterly
expenditures.
If you see an error and need to edit expenditures, click on the “edit” hyperlink in the far right column of the table titled “Add
Quarterly Expenditures” (see screenshot on following page). Two tables will display; one showing “Quarterly Expenditures by
Category” and one showing “Quarterly Expenditures by Fund Source.” In the far right column of the table that corresponds to the
edit you wish to make (category or fund source and quarter), select the “edit” hyperlink (see screenshot on following page). The
form will reload and you will then be able to edit data.

13
To view the complete FSR, navigate back to the health center’s main page by selecting the “View Clinic Details” hyperlink at the top
of the page and click the “Financial Status Report” radio button under the “View Reports” section. See p. 22 for further information
on the Financial Status Report.
Budget and FSR Reminders
New budget line items cannot be added during the fiscal year without first having an approved budget amendment on record. As a
result, you will not be able to enter expenditures for any line items that are not included on the original approved budget, regardless
of the source of funds.
A cost deviation allowance of 15% or $10,000 per line item (whichever is greater) is permitted. Any deviations over this amount will
be flagged on the Financial Status Report in bold red font. If you anticipate exceeding the cost deviation allowance on any line
item, a budget amendment must be requested and approved in advance.
Any and all budget amendments must be requested and approved by July 1. No exceptions can be made to that deadline.
Budgets will be unlocked for editing (and/or only until July 15) so that any approved changes can be made to the budget by your
assigned CAHC Agency Consultant.

14
Annual (Year-End) Only Reports
Annual Billing Report
From your health center’s main page, select the “Billing Report” radio button under the “Enter or Edit Data” section. You will now
see an “Enter Data” section with radio buttons providing options to “Add Billing Data” and “Add Claims Denial Information.” You
will also see tables that displays any previously-entered billing data and claims denial information. To begin, select the “Add Billing
Data” radio button (see screenshot below).
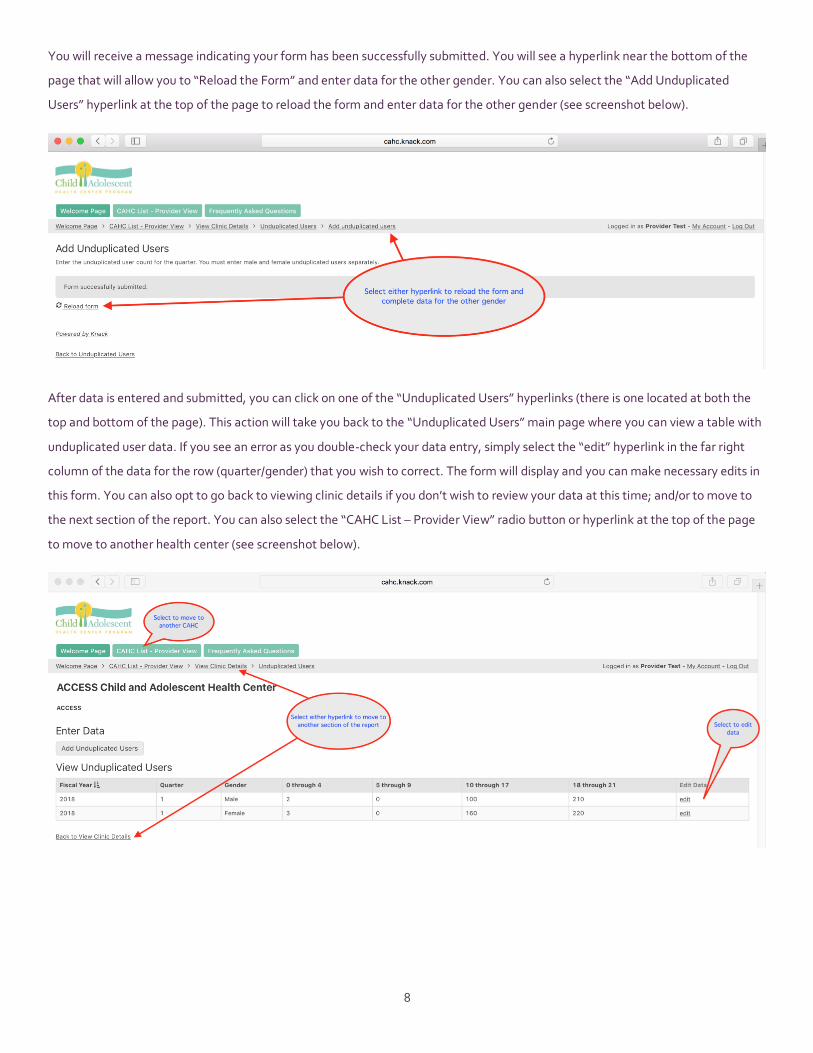
A data entry form will display. Select the current fiscal year for which you are reporting from the drop down menu. Under the
“Insurance Category” field, select a Medicaid Health Plan, Medicaid Fee for Service, Commercial, Self-Pay or Other from the
dropdown menu. Enter the dollar amount in claims submitted during the fiscal year regardless of whether or not claims were paid
during the fiscal year, per the selected payor. Enter the dollar amount in claims received during the fiscal year regardless of whether
or not the revenue resulted from claims filed during the fiscal year, per the selected payor. Click on the “Submit” button (see
screenshot on following page).
15
You will receive a message that the form was successfully submitted. Select the “Reload the Form” hyperlink to enter information
for another payor, repeating the process until data for all payors are reported. After all data is reported, select the “Back to Billing”
hyperlink at either the top or bottom of the page (see screenshot below) to return to the “Billing Report” main page.
On the “Billing Report” main page, under the “View Billing Data” section, you will see a table displaying the reported claims and
revenue information by payor. As you review data, if you see an error, select the “edit” hyperlink in the far right column that
corresponds to the data (row) which requires editing (see screenshot on following page). The form will reload and you can make the
necessary edits e.g., correcting the payor name and/or dollar amount(s). (Note: if you inadvertently entered data for a health plan
for which you did not submit claims or receive reimbursement, you can zero out the dollar amounts.) When billing data entry is
complete, you can select the “Add Claims Denial Information” radio button to continue with the next section of the Billing Report.
16
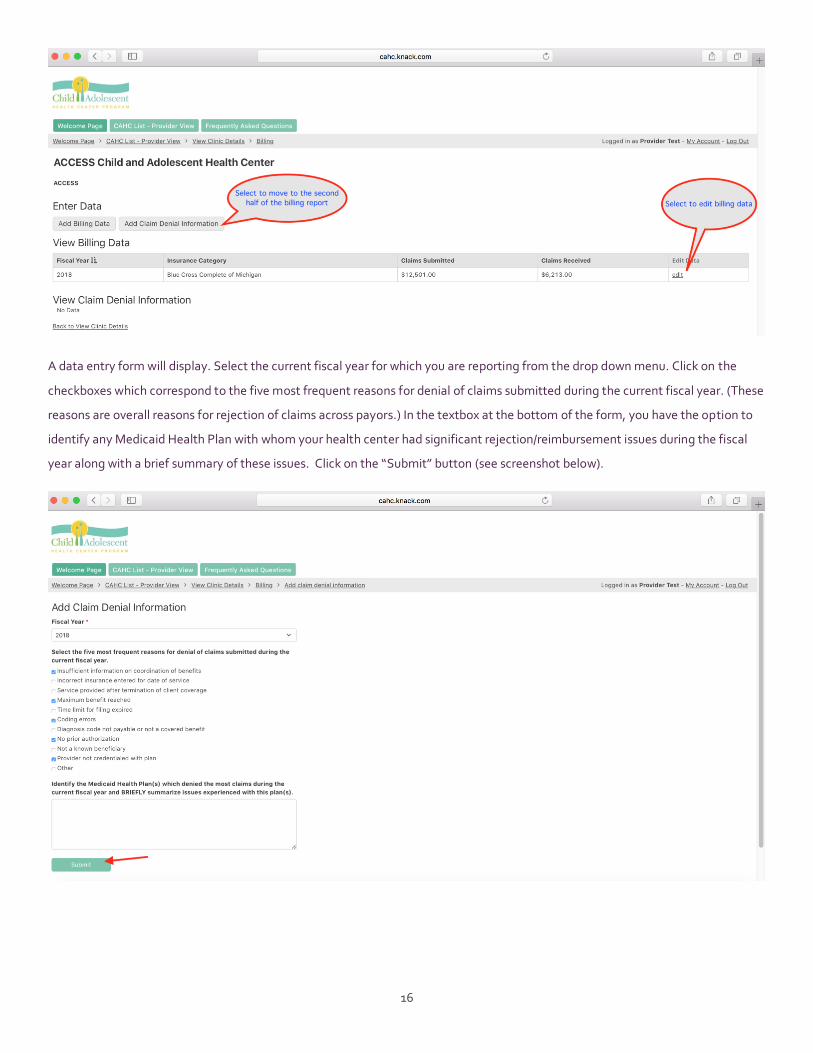
A data entry form will display. Select the current fiscal year for which you are reporting from the drop down menu. Click on the
checkboxes which correspond to the five most frequent reasons for denial of claims submitted during the current fiscal year. (These
reasons are overall reasons for rejection of claims across payors.) In the textbox at the bottom of the form, you have the option to
identify any Medicaid Health Plan with whom your health center had significant rejection/reimbursement issues during the fiscal
year along with a brief summary of these issues. Click on the “Submit” button (see screenshot below).

17
You will receive a message that the form was successfully submitted. Select the “Back to Billing” hyperlink at the bottom of the
page or the “Billing” hyperlink at the top of the page to return to the “Billing Report” main page (see screenshot below).
On the “Billing Report” main page, under the “View Claim Denial Information” section, you will see a summary of the claims denial
information. As you review data, if you see an error, select the “edit” hyperlink that corresponds to the data which requires editing
(see screenshot below). The form will reload and you can then edit the data.
To view the complete annual billing report, navigate back to the health center’s main page by selecting the CAHC/clinic details
hyperlink at either the top or bottom of the page. From the health center’s main page, click the “Annual Billing Report” radio button
under the “View Reports” section. See p. 23 for further information on the Annual Billing Report.

18
Top Diagnoses (Top Five Diagnoses and CPT Codes)
The process for entering and editing data is the same for each of the diagnoses and CPT codes. Therefore, the process for entering
and editing data will be described once, using data entry for top five primary diagnoses as an example.
From the health center’s main page, select the “Top Diagnoses” radio button under the “Enter or Edit Data” section. You will now
see a series of radio buttons allowing you to enter new data for top primary diagnoses, medical problem diagnoses, mental health
problem diagnoses and CPT codes; followed by a series of tables which will display data once entered (see screenshot below).
Data Entry Process: Example: Top Five Primary Diagnoses
Select the “Add Top Primary Diagnoses” radio button from the “Add Data” section on the “Top Diagnoses” main page. A data entry
form will display (see screenshot on following page). Select the current fiscal year from the dropdown menu. There are five fields
for entering the codes, the descriptions (names/titles of the diagnoses or procedures) and the frequencies. Begin by starting with
the most frequent code in form field 1. Tabbing will move you through the form vertically, therefore you will complete all codes
first, followed by descriptions, and finishing with frequencies. When you are finished entering data, select the “Submit” radio
button.

19
You will receive a message indicating your form has been successfully submitted. You will see a “Return to Top Diagnoses”
hyperlink at the bottom of the page and a “Top Diagnoses” hyperlink at the top of the page. Click on either link to return to the “Top
Diagnoses” main page where you can continue data entry for other diagnoses/CPT codes by selecting the corresponding radio
buttons; and also to view data entries.
When reviewing your data, use the scroll bar to scroll to the far right, to the end of the table. If you see data that requires editing,
click on the “edit” hyperlink in the far right column (see screenshot below). The form will reload and you will then be able to edit
data. After editing data, click the “Submit” radio button.

20
Viewing Reports
On your health center’s main page, you will also see two series of radio buttons: a series for viewing reports (View Reports) and a
series for entering and/or editing report data (Enter or Edit Data). Reports will populate after data has been entered.
To print any report, click on the “Print” hyperlink in the top right corner of the report’s page.
You can navigate back to the health center’s main page by selecting the “View Clinic Details” hyperlink (located at the top and
bottom of each report); or, select the “CAHC List – Provider View” radio button or hyperlink at the top of the page to navigate back
to your main access page.
Viewing the Quarterly Data Report
Navigate to the health center’s main page by selecting the “View Clinic Details” hyperlink at the top of the page and click the
“Quarterly Report” radio button under the “View Reports” section (see screenshot below).

21
The report will populate with a combination of graphs, charts and tables displaying reporting elements, including quality measures.
(see screenshot below for example). The billing report and FSR are separate reports which are accessed from the health center’s
main page.
22
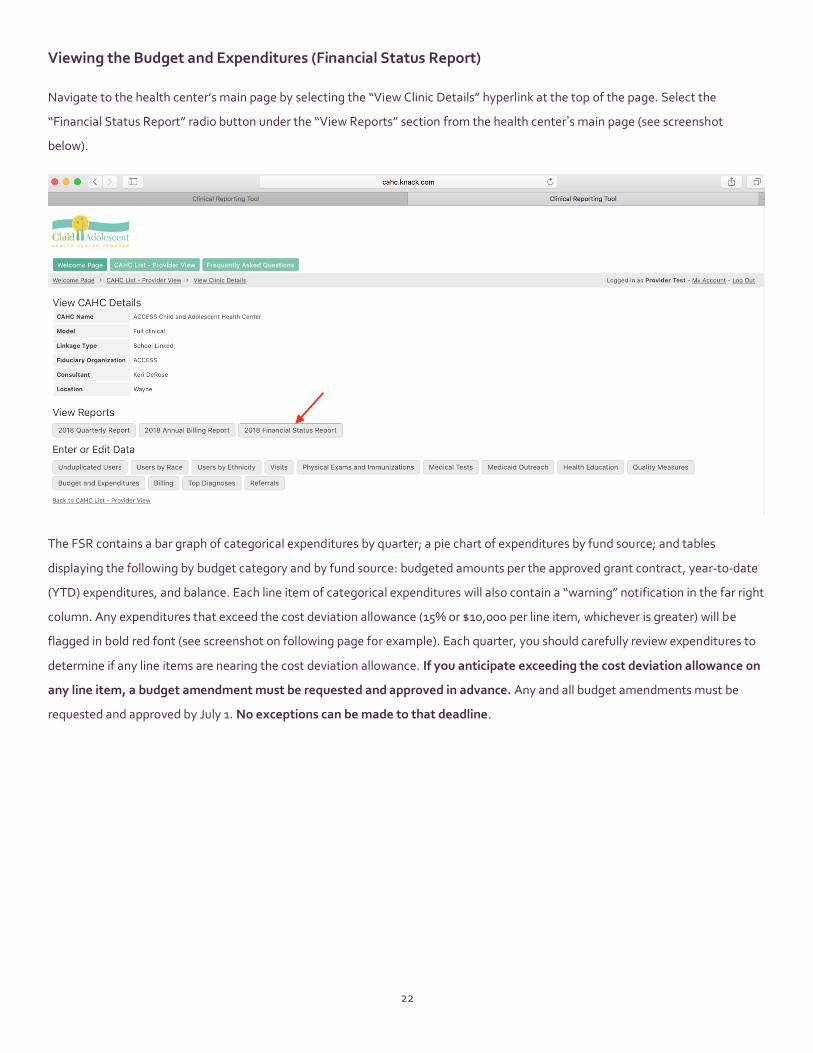
Viewing the Budget and Expenditures (Financial Status Report)
Navigate to the health center’s main page by selecting the “View Clinic Details” hyperlink at the top of the page. Select the
“Financial Status Report” radio button under the “View Reports” section from the health center’s main page (see screenshot
below).
The FSR contains a bar graph of categorical expenditures by quarter; a pie chart of expenditures by fund source; and tables
displaying the following by budget category and by fund source: budgeted amounts per the approved grant contract, year-to-date
(YTD) expenditures, and balance. Each line item of categorical expenditures will also contain a “warning” notification in the far right
column. Any expenditures that exceed the cost deviation allowance (15% or $10,000 per line item, whichever is greater) will be
flagged in bold red font (see screenshot on following page for example). Each quarter, you should carefully review expenditures to
determine if any line items are nearing the cost deviation allowance. If you anticipate exceeding the cost deviation allowance on
any line item, a budget amendment must be requested and approved in advance. Any and all budget amendments must be
requested and approved by July 1. No exceptions can be made to that deadline.

23
Viewing the Annual Billing Report
Navigate to the health center’s main page by selecting the “View Clinic Details” hyperlink at the top of the page. Select the “Annual
Billing Report” radio button under the “View Reports” section (see screenshot below).
The Annual Billing Report contains a table displaying the dollar amounts of claims submitted and reimbursement by individual
payor, as well as pie charts displaying the (estimated) percent of claims paid by major payor categories (e.g., all Medicaid Health
Plans, Commercial, Self-Pay and Other). There is also a bar graph depicting (an estimated) percent of claims paid by individual
Medicaid Health Plan. A pie chart displaying payor mix is also included, displaying percentage of revenue received by major payor
categories.

24
Changing your Password
Changing your Password
As a system security and user maintenance feature, you may be prompted to change your password at regular intervals (e.g. every
six months). If your password is not changed by the deadline set forth in the reminder, further system access will be denied and you
will need to contact a system administrator for assistance.
You can also change your password at any time by clicking on the My Account hyperlink in the top right hand corner (see
screenshot below).
rev 10_2018