CHASSIS SET-UP FOR ENGINE ... - Voodoo Hot Rods Voodoo 32R Chassis Set-Up.pdf · IMPORTANT NOTE The...
6
VOODOO EVOLUTION ™ 32R ASSEMBLY GUIDELINE #1 CHASSIS SET-UP FOR ENGINE, TRANSMISSION & SUSPENSION INSTALLATION SPECIAL NOTE All Voodoo Hot Rods™ chassis components require fabrication and welding prior to installation. Due to the unique design of the Voodoo Evolution™ 32R Chassis, common over-the-counter suspension components may not bolt into the chassis without modification. Voodoo Hot Rods™ suspension kits are designed for the experienced chassis builder, our products do not provide a bolt-together assembly. Voodoo Evolution™ 32R Assembly Guidelines are numbered and should be implemented in sequence. . Fabrication is relatively simple and provides experienced hot rodders and professional builders with the potential to incorporate their own subtle changes in chassis assembly with the convenience of a pre- designed component that can be tailored to a unique installation. As chassis and suspension components provide critical functions it is imperative that in the interests of safety the very highest quality welding be undertaken by fully qualified technicians. STEP 1 – position chassis for suspension installation To ensure correct suspension geometry and function the Voodoo Evolution™ 32R Chassis should be positioned on a flat work surface that represents the road, ideally a chassis jig or work bench. The work surface should be level side-to-side and front-to-rear. The chassis should have the carbon fiber chassis rail covers removed. © Copyright Voodoo Hot Rods™ 2011. PAGE 1/6
Transcript of CHASSIS SET-UP FOR ENGINE ... - Voodoo Hot Rods Voodoo 32R Chassis Set-Up.pdf · IMPORTANT NOTE The...

VOODOO EVOLUTION™ 32R ASSEMBLY GUIDELINE #1
CHASSIS SET-UP FOR ENGINE, TRANSMISSION & SUSPENSION INSTALLATION
SPECIAL NOTE
All Voodoo Hot Rods™ chassis components require fabrication and welding prior to installation. Due to the unique design of the Voodoo Evolution™ 32R Chassis, common over-the-counter suspension components may not bolt into the chassis without modification. Voodoo Hot Rods™ suspension kits are designed for the experienced chassis builder, our products do not provide a bolt-together assembly. Voodoo Evolution™ 32R Assembly Guidelines are numbered and should be implemented in sequence.. Fabrication is relatively simple and provides experienced hot rodders and professional builders with the potential to incorporate their own subtle changes in chassis assembly with the convenience of a pre-designed component that can be tailored to a unique installation. As chassis and suspension components provide critical functions it is imperative that in the interests of safety the very highest quality welding be undertaken by fully qualified technicians.
STEP 1 – position chassis for suspension installation
To ensure correct suspension geometry and function the Voodoo Evolution™ 32R Chassis should be positioned on a flat work surface that represents the road, ideally a chassis jig or work bench. The work surface should be level side-to-side and front-to-rear. The chassis should have the carbon fiber chassis rail covers removed.
© Copyright Voodoo Hot Rods™ 2011.
PAGE 1/6
IMPORTANT NOTEThe Voodoo Evolution™ 32R Chassis has been designed with a lower ride height than conventional hot rod chassis based on stamped reproduction rails. The ride height and suspension components have been designed for the fender-less 'hiboy' configuration, which is considerably lower than a full-fendered Deuce roadster. If fenders are to be fitted, the ride height may need to be raised for tire clearance with suspension & steering components installed and checked to confirm correct geometry and function.
The Voodoo Evolution™ 32R Chassis achieves a lower ride height using conventional suspension components such as a 4” dropped front axle and 'de-arched' and/or reverse-eye transverse front spring, without the front suspension travel being limited by a stock chassis profile or commonly used short-stroke shock absorbers. Both typically compromise ride quality due to the need for a stiff front spring to prevent the axle hitting the underside of the chassis, or by short shock absorbers limiting suspension travel.
If a higher front ride height is preferred there are several methods to achieve this. A spacer up to 1/2” thick can be used between the top of the transverse front spring and its mounting pad. A standard arch front spring with reverse-eyes will raise ride height by 1”-2”. A standard arch spring with non-reversed eyes will raise ride height by 2”-3”. An original style, 'non-dropped' front axle can also be be used to raise front ride height by 3”- 4”. Any combination of these components can be utilized to achieve a variety of front ride heights, however if employed the front radius rod chassis mounting points and front Watts link chassis mounting points may need to be modified to ensure they are horizontal to the road surface at ride height. If you wish to raise the designed ride height this must be done when installing the front and rear suspension to ensure correct geometry and function of all components.
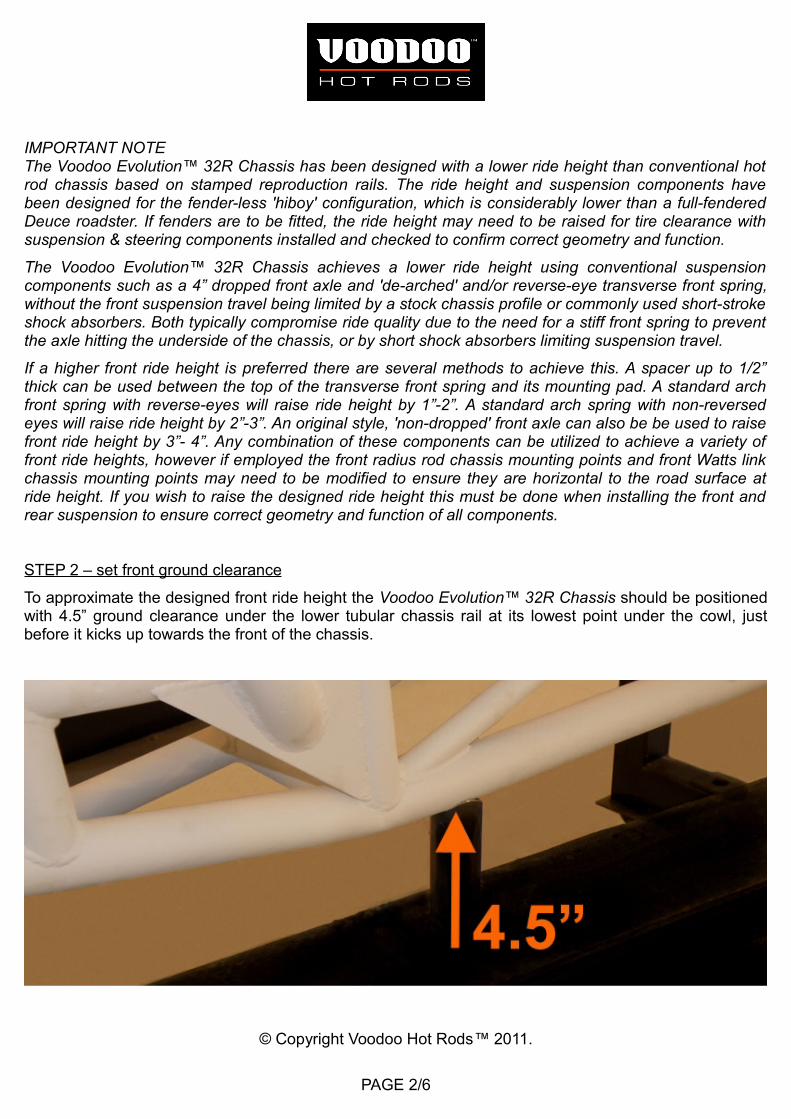
STEP 2 – set front ground clearance
To approximate the designed front ride height the Voodoo Evolution™ 32R Chassis should be positioned with 4.5” ground clearance under the lower tubular chassis rail at its lowest point under the cowl, just before it kicks up towards the front of the chassis.
© Copyright Voodoo Hot Rods™ 2011.
PAGE 2/6

STEP 3 – set rear ground clearance
At the rear, the Voodoo Evolution™ 32R Chassis should have 8” ground clearance under the lower tubular steel chassis rail just ahead of the rear wheel well, before the rail kicks up over the rear axle.
Rear ride height can be confirmed by fitting the Voodoo Evolution™ 32R Body to the chassis and positioning a rear tire with the same diameter to be used on the finished roadster against the rear wheel well. Raise or lower the rear of the chassis to the desired level and note the distance from work surface to the underside of chassis at the point shown.
While body is fitted to chassis index chassis at center of rear wheel well indicating rear axle location.
© Copyright Voodoo Hot Rods™ 2011.
PAGE 3/6

STEP 4 – confirm front ground clearance
When the Voodoo Evolution™ 32R Chassis is positioned at designed ride height and rake as explained in STEPS 2 & 3, the distance from the flat work surface to the base of the front tip of the Upper Steel Chassis Rail should be approximately 13-1/8”.
© Copyright Voodoo Hot Rods™ 2011.
PAGE 4/6

STEP 5 – confirm rear ground clearance
When the Voodoo Evolution™ 32R Chassis is positioned at designed ride height and rake as explained in STEPS 2 & 3, the distance from the flat work surface to the base of the rear tip of the Upper Steel Chassis Rail should be approximately 13-3/8”.
© Copyright Voodoo Hot Rods™ 2011.
PAGE 5/6

STEP 6 – confirm chassis rake
With the Voodoo Evolution™ 32R Chassis set up as described in STEPS 2, 3 & 4 the flat section of the the top chassis rail where the door sill is located should have a forward, downward rake of approximately five degrees.
STEP 7 – proceed to #2 Assembly Guideline: Universal Engine & Transmission Mount Installation
© Copyright Voodoo Hot Rods™ 2011.
PAGE 6/6