ChargeSwitch-Pro Filter Plasmid Midiprep and - Life Technologies

Instruction Manual
ChargeSwitch® Forensic DNA Purification KitsFor purification of genomic DNA from
Catalog nos. CS11200 and CS11200-10
forensic samples
Version A
3 January 2005
25-0825

ii

Table of Contents
Table of Contents.................................................................................................. iii Kit Contents and Storage ..................................................................................... v Accessory Products.............................................................................................. vi
Introduction ........................................................................................ 1 Overview .................................................................................................................1 Experimental Outline ............................................................................................4
Methods............................................................................................... 5 General Information – Individual Samples .......................................................5 Isolating Genomic DNA from Individual Samples..........................................8 General Information – Automated Sample Processing .................................14 Automated Genomic DNA Isolation ................................................................18 Troubleshooting ...................................................................................................23
Appendix ........................................................................................... 25 Technical Service ..................................................................................................25 Purchaser Notification and Product Qualification .........................................27
iii

iv

Kit Contents and Storage
Types of Kits This manual is supplied with the following products.
Product Number of Purifications
Catalog no.
ChargeSwitch® Forensic DNA Purification Kit 100
960
CS11200
CS11200-10
Shipping and Storage
All components of the ChargeSwitch® Forensic DNA Purification Kits are shipped at room temperature. Upon receipt, store the Proteinase K at 4°C. Store all other components at room temperature.
All components are guaranteed stable for 6 months, if stored properly.
Contents The components supplied in the ChargeSwitch® Forensic
DNA Purification Kits are listed below.
Note: Some reagents in the kit may be provided in excess of the amount needed.
Components Amt/100 preps Amt/960 preps
ChargeSwitch® Lysis Buffer (L13) 100 ml 2 x 800 ml
ChargeSwitch ® Magnetic Beads 2 x 1 ml 2 x 10 ml
Proteinase K (20 mg/ml in 50 mM Tris-HCl, pH 8.5, 5 mM CaCl2, 50% glycerol)
1 ml 9.6 ml
ChargeSwitch® Purification Buffer (N5) 20 ml 300 ml
ChargeSwitch® Wash Buffer (W12) 100 ml 960 ml
ChargeSwitch® Elution Buffer (E5; 10 mM Tris-HCl, pH 8.5)
15 ml 2 x 125 ml
v

Accessory Products
Additional Products
The table below lists additional products available from Invitrogen that may be used with the ChargeSwitch® Forensic DNA Purification Kits. In addition, the table lists a selection of ChargeSwitch® gDNA Kits that are available for purification of genomic DNA from other sources. For more information about these and other ChargeSwitch® gDNA Kits, refer to our Web site at www.invitrogen.com or call Technical Service (see page 25).
Product Amount Catalog no.
MagnaRack™ 1 rack CS15000
96-Well Magnetic Separator 1 rack CS15096
ChargeSwitch® gDNA Micro Tissue Kit 50 purifications CS11203
ChargeSwitch® gDNA Mini Tissue Kit 25 purifications CS11204
ChargeSwitch® gDNA 20 µl Blood Kit 96 purifications CS11010
ChargeSwitch® gDNA 100 µl Blood Kit 50 purifications CS11000
ChargeSwitch® gDNA 1 ml Blood Kit 20 purifications CS11001
ChargeSwitch® gDNA 1 ml Serum Kit 50 purifications CS11040
ChargeSwitch® gDNA 50 µl Sheep Blood Kit
50 purifications CS11300
ChargeSwitch® gDNA Mini Bacteria Kit 50 purifications CS11301
ChargeSwitch® gDNA Normalized Buccal Cell Kit
50 purifications CS11020
ChargeSwitch® gDNA Buccal Cell Kit 50 purifications CS11021
Quant-iT™ PicoGreen® dsDNA Quantitation Kit
200-2000 assays P7589
Quant-iT™ PicoGreen® dsDNA Quantitaiton Reagent
200-2000 assays (1 ml) P7581
vi

Introduction
Overview
Introduction The ChargeSwitch® Forensic DNA Purification Kits allow
rapid and efficient purification of genomic DNA from forensic samples. After preparing the lysates, you may purify DNA in less than 15 minutes using the ChargeSwitch® Technology. Depending on the kit used, samples may be handled individually or in an automated system using a liquid handling robot. For more information about the ChargeSwitch® Technology, see page 3.
Intended Use for the Kits
The ChargeSwitch® Forensic DNA Purification Kits are designed to allow isolation of genomic DNA from the following types of forensic samples. The purified genomic DNA is suitable for use in short tandem repeat (STR) analysis.
• Dried blood spots on paper and clothing
• Hair follicles and hair shafts
• Cigarette butts
• Cigarette paper
• Envelopes
• Drinking vessel swabs
• Chewing gum
• Sperm head cells
• Vaginal epithelial cells
• Door handle swabs
• Strip removed cells (e.g. hats, coats, and gloves)
• “Touch DNA” (e.g. tools, mobile phones, and microscopes)
• Dyed denim
Note: These kits are also suitable for mitochondrial DNA (mtDNA) extraction from hair follicles for single nucleotide polymorphism (SNP) analysis.
continued on next page
1
Overview, continued
Advantages Use of the ChargeSwitch® Forensic DNA Purification Kits to
isolate genomic DNA provides the following advantages:
• Uses a magnetic bead-based technology to isolate genomic DNA without the need for hazardous chemicals, centrifugation, or vacuum manifolds
• Rapid and efficient purification of genomic DNA from forensic samples in less than 15 minutes following sample preparation and lysis
• Simple lysis with Proteinase K without the need for any mechanical lysis
• Minimal contamination with RNA
• The purified genomic DNA demonstrates improved downstream performance in STR analysis
• Allows isolation of mtDNA from hair follicles for use in SNP analysis
• Includes a flexible protocol to facilitate genomic DNA isolation from a large variety of forensic sample types
• Includes a kit designed for automated processing of large numbers of samples in 96-well plates using a liquid handling robot
System Specifications
Starting Material: Varies; optimized for small sample volumes
Elution Volume: 150 µl
DNA Yield: Varies (depends on sample size and type)
DNA Size: Varies (depends on quality of starting material
continued on next page
2
Overview, continued
The ChargeSwitch® Technology
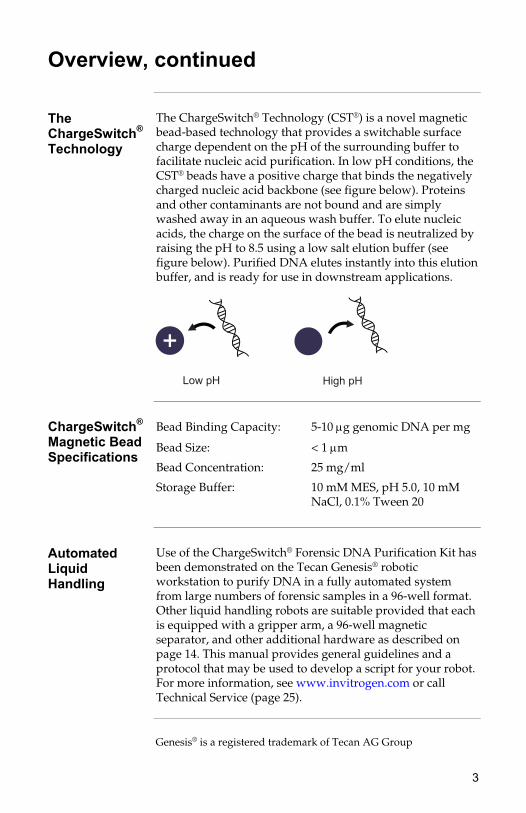
The ChargeSwitch® Technology (CST®) is a novel magnetic bead-based technology that provides a switchable surface charge dependent on the pH of the surrounding buffer to facilitate nucleic acid purification. In low pH conditions, the CST® beads have a positive charge that binds the negatively charged nucleic acid backbone (see figure below). Proteins and other contaminants are not bound and are simply washed away in an aqueous wash buffer. To elute nucleic acids, the charge on the surface of the bead is neutralized by raising the pH to 8.5 using a low salt elution buffer (see figure below). Purified DNA elutes instantly into this elution buffer, and is ready for use in downstream applications.
������ ������
ChargeSwitch® Magnetic Bead Specifications
Bead Binding Capacity: 5-10 µg genomic DNA per mg
Bead Size: < 1 µm
Bead Concentration: 25 mg/ml
Storage Buffer: 10 mM MES, pH 5.0, 10 mM NaCl, 0.1% Tween 20
Automated Liquid Handling
Use of the ChargeSwitch® Forensic DNA Purification Kit has been demonstrated on the Tecan Genesis® robotic workstation to purify DNA in a fully automated system from large numbers of forensic samples in a 96-well format. Other liquid handling robots are suitable provided that each is equipped with a gripper arm, a 96-well magnetic separator, and other additional hardware as described on page 14. This manual provides general guidelines and a protocol that may be used to develop a script for your robot. For more information, see www.invitrogen.com or call Technical Service (page 25).
Genesis® is a registered trademark of Tecan AG Group
3

Experimental Outline
Introduction The figure below illustrates the basic steps necessary to
purify genomic DNA from your forensic sample using the ChargeSwitch® Forensic DNA Purification Kit.
������������ ��
���������������
�����������������
����������
�� ���������������������
������������ �
�������� ��������������������������������������
��������� ������� �
�����������
4

Methods
General Information – Individual Samples
Introduction This section provides general information needed to use the
ChargeSwitch® Forensic DNA Purification Kit (Catalog no. CS11200) to process individual samples. If you are using a liquid handling robot to process large numbers of samples, see General Information – Automated Sample Processing, page 14.
User Supplied Materials
In addition to the reagents supplied with the kit, you need to have the following materials on hand before beginning:
• A magnetic separation rack suitable for use with 1.5 ml microcentrifuge tubes (see below)
• Sterile, 1.5 ml microcentrifuge tubes
• Vortex mixer • 20 µl, 200 µl, and 1 ml sterile, pipette tips
• Water bath at 55°C
MagnaRack™ The MagnaRack™ available from Invitrogen (Catalog no.
CS15000) is a two-piece magnetic separation rack for use in protocols with magnetic beads. The MagnaRack™ consists of a magnetic base station and a removable tube rack. The tube rack can hold up to 24 microcentrifuge tubes. The tube rack fits onto the magnetic base station in two different positions associating the row of 12 neodymium magnets with a single row of 12 tubes for simple ‘on the magnet’ and ‘off the magnet’ sample processing (see figure below). For more information, see www.invitrogen.com or call Technical Service (page 25).
continued on next page
5

General Information – Individual Samples, continued
Safety Information
Follow the safety guidelines below when using the ChargeSwitch® Forensic DNA Purification Kit.
• Treat all reagents supplied in the kit as potential irritants.
• Always wear a suitable lab coat, disposable gloves, and protective goggles.
• If a spill of the buffers occurs, clean with a suitable laboratory detergent and water. If the liquid spill contains potentially infectious agents, clean the affected area first with laboratory detergent and water, then with 1% (v/v) sodium hypochlorite or a suitable laboratory disinfectant.
• Dispose of biological samples and all liquid waste generated during the purification procedure as biohazardous waste.
Handling the ChargeSwitch® Magnetic Beads
Follow the guidelines below when handling the ChargeSwitch® magnetic beads.
• Do not freeze the beads as this irreparably damages them. Store the beads at room temperature.
• Always keep the beads in solution. Do not allow them to dry out as this renders them non-functional.
• When using the beads, resuspend thoroughly in the storage buffer by vortexing before removal.
• Discard beads after use. Do not reuse.
continued on next page
6

General Information – Individual Samples, continued
Elution Buffer ChargeSwitch® Elution Buffer (E5; 10 mM Tris-HCl, pH 8.5)
is supplied with the kit for eluting the DNA from the ChargeSwitch® Magnetic Beads. For best results, use Elution Buffer (E5) to elute the DNA. Alternatively, TE Buffer, pH 8.5-9.0 is acceptable. Note that the pH must be between 8.5-9.0 otherwise the DNA will not elute. Do not use water for elution.
The protocol suggests eluting the genomic DNA in 150 µl of ChargeSwitch® Elution Buffer (E5). You may vary the amount of ChargeSwitch® Elution Buffer (E5) used to obtain genomic DNA in the desired final concentration. For best results, always use a volume of ChargeSwitch® Elution Buffer (E5) that is equal to or greater than the volume of ChargeSwitch® Magnetic Beads used in the protocol. If the volume of ChargeSwitch® Elution Buffer (E5) is lower than the volume of beads used, DNA elution is incomplete. You may need to perform a second elution to recover all DNA.
7
Isolating Genomic DNA from Individual Samples
Introduction This section provides guidelines and instructions to isolate
genomic DNA from forensic samples (see page 1 for a list of sample types) using the reagents supplied in the ChargeSwitch® Forensic DNA Purification Kit (Catalog no. CS11200). The protocol is optimized for efficient purification of DNA from small sample volumes. Depending on the volume and type of your sample, some further optimization of the protocol may be required.
Handling Samples
Follow these general guidelines when handling forensic samples:
• Where possible and appropriate, cut up the sample into small pieces (i.e. ~ 0.5 cm2 or 0.25 cm3) to facilitate processing.
• Avoid overloading the sample tube to allow efficient mixing of Lysis Mix with the sample.
• When dealing with blood-stained items, take care to ensure that the amount of blood processed is kept to a minimum (≤ 20 µl blood spot). Processing of larger heavily blood-stained items may result in contamination of the purified DNA with heme.
Starting Material - Common Sample Types
Use this procedure to isolate genomic DNA from any of the forensic sample types listed on page 1. When processing the following common sample types, we recommend using these amounts of starting material:
• Dried blood spots: Process 1-5 punched-out circles from the dried blood spot (paper hole punch, ~ 5 mm diameter)
• Hair follicles: Process the root of the end of the human hair
• Cigarette butts: Cut ~ 8 mm from the end of the cigarette butt, and place end down in the tube
continued on next page
8

Isolating Genomic DNA from Individual Samples, continued
Materials Needed
Have the following materials on hand before beginning:
• Forensic sample(s)
• MagnaRack™ (Catalog no. CS15000) or other magnetic separation rack
• Sterile 1.5 ml microcentrifuge tubes
• Vortex mixer
• Sterile pipette tips (20 µl, 200 µl, and 1 ml)
• Water bath
Components Supplied with the Kit
• ChargeSwitch® Lysis Buffer (L13)
• Proteinase K
• ChargeSwitch® Magnetic Beads
• ChargeSwitch® Purification Buffer (N5)
• ChargeSwitch® Wash Buffer (W12)
• ChargeSwitch® Elution Buffer (E5) or TE Buffer (not supplied; 10 mM Tris-HCl, 1 mM EDTA, pH 8.5)
Before Starting
Perform the following before beginning:
• Set a water bath at 55°C.
• For each sample, mix 1 ml of ChargeSwitch® Lysis Buffer (L13) and 10 µl of Proteinase K to prepare the Lysis Mix. If you are isolating DNA from multiple samples, you may scale up the volume of reagents used and prepare a master Lysis Mix.
continued on next page
9
Isolating Genomic DNA from Individual Samples, continued
Preparing the Lysate
Follow the procedure below to prepare a lysate from the sample.
1. Add 1 ml of Lysis Mix (see previous page) to the tube.
2. Add the forensic sample to the tube, making sure that the sample is completely immersed in the Lysis Mix.
3. Vortex or invert the tube for 10-15 seconds to mix.
4. Incubate the sample for 1 hour at 55°C until lysis is complete.
Note: The length of the incubation step can be shortened to 30 minutes by vortexing or inverting the tube during this period.
5. Remove the sample with disposable tweezers or transfer the lysate (supernatant) to a new sterile, microcentrifuge tube.
6. Proceed to Binding DNA, next page.
continued on next page
10

Isolating Genomic DNA from Individual Samples, continued
Binding DNA Follow the procedure below to bind the DNA to the
ChargeSwitch® Magnetic Beads.
1. Vortex the tube containing the ChargeSwitch® Magnetic Beads to fully resuspend and evenly distribute the beads in the storage buffer. Make sure that all of the solution containing the beads is at the bottom of the tube.
2. Add 200 µl of ChargeSwitch® Purification Buffer (N5) to the sample (from Step 5, previous page) and pipet up and down gently twice to mix.
Note: Adding the ChargeSwitch® Purification Buffer lowers the pH of the sample, and optimizes the binding conditions.
3. Add 20 µl of ChargeSwitch® Magnetic Beads (from Step 1) to the sample and pipet up and down gently 5 times to mix.
Important: Use a 1 ml pipette tip set to 900 µl to mix the sample. Make sure that the tip is submerged, and pipet up and down gently to avoid forming bubbles.
4. Incubate at room temperature for 1-5 minutes to allow the DNA to bind to the ChargeSwitch® Magnetic Beads.
5. Place the sample in the MagnaRack™ for 1 minute or until the beads have formed a tight pellet.
6. Without removing the tube from the MagnaRack™, carefully remove the supernatant and discard. Take care not to disturb the pellet of beads by angling the pipette such that the tip is pointed away from the pellet (see figure below).
����������
��������������
7. Proceed immediately to Washing DNA, next page.
continued on next page
11

Isolating Genomic DNA from Individual Samples, continued
Washing DNA 1. Remove the tube containing the pelleted magnetic beads
from the MagnaRack™ (Step 6, previous page). There should be no supernatant in the tube.
2. Add 500 µl of ChargeSwitch® Wash Buffer (W12) to the tube and pipet up and down gently twice to resuspend the magnetic beads.
Important: Use a 1 ml pipette tip set to 900 µl to mix the sample. Make sure that the tip is submerged, and pipet up and down gently to avoid forming bubbles.
3. Place the sample in the MagnaRack™ for 1 minute or until the beads have formed a tight pellet.
4. Without removing the tube from the MagnaRack™, carefully remove the supernatant and discard. Take care not to disturb the pellet of beads by angling the pipette such that the tip is pointed away from the pellet (see figure on page 11).
5. Repeat Steps 1-4.
6. Proceed to Eluting DNA, next page.
continued on next page
12

Isolating Genomic DNA from Individual Samples, continued
Eluting DNA 1. Remove the tube containing the pelleted magnetic beads
from the MagnaRack™ (Step 5, previous page). There should be no supernatant in the tube.
2. Add 150 µl of ChargeSwitch® Elution Buffer (E5) (or TE Buffer, pH 8.5) to the tube and pipet up and down gently 10 times to resuspend the magnetic beads.
Important: Do not use water for elution. The DNA will not elute due to the poor buffering capacity of water.
3. Incubate at room temperature for 1-5 minutes.
4. Pipet up and down gently 10 times to resuspend the magnetic beads.
5. Place the sample in the MagnaRack™ for 1 minute or until the beads have formed a tight pellet.
6. Without removing the tube from the MagnaRack™, carefully remove the supernatant containing the DNA to a sterile microcentrifuge tube. Take care not to disturb the pellet of beads by angling the pipette such that the tip is pointed away from the pellet (see figure on page 11).
Note: If the eluate containing the DNA is discolored, repeat Steps 5-6.
7. Discard the used magnetic beads. Do not reuse the beads.
Storing DNA Store the purified DNA at -20°C or use immediately for STR
analysis. Avoid repeatedly freezing and thawing DNA.
Quantitating DNA Yield
To quantitate the yield of your DNA, we recommend using the Quant-iT™ PicoGreen® dsDNA Quantitation Kit (Catalog no. P7589) available from Invitrogen. This kit contains the reagents necessary to allow sensitive and accurate fluorescence-based detection of as little as 25 pg/ml of dsDNA using the Quant-iT™ PicoGreen® dsDNA Quantitation Reagent. For more information about the Quant-iT™ PicoGreen® dsDNA Quantitation Kit, see www.invitrogen.com or call Technical Service (page 25).
13

General Information – Automated Sample Processing
Introduction This section provides general information to use the
ChargeSwitch® Forensic DNA Purification Kit (Catalog no. CS11200-10) to process large numbers of samples in 96-well format using an automated liquid handling robot. If you wish to process small numbers of samples individually, see General Information – Individual Samples, page 5.
Hardware Requirements
The ChargeSwitch® chemistry is ideal for purification of DNA using liquid handling robots, avoiding the need for centrifugation steps or the use of ethanol or chaotropic salts. You will need to have the following hardware to perform automated processing of forensic samples using the ChargeSwitch® Forensic DNA Purification Kit:
• Any liquid handling robotic workstation with a gripper arm
• Appropriate tips for liquid dispensing and aspiration (see below for factors to consider)
• 96-well Magnetic Separator (see the next page)
• Shaker
• Incubator, heat block, or water bath for heating samples
• 96 x 2 ml deep well plate(s) (Greiner, Catalog no. 780270 or Abgene, Catalog no. AB-0932)
• 96 x 300 µl U-Bottomed microtiter plate (Greiner, Catalog no. 650201)
For an example of how to set up the deck, see page 16.
Tip Selection You may use any tips of choice to dispense and aspirate
liquid during the purification procedure. Consider the following factors when choosing an appropriate tip to use.
• Fixed vs. disposable tips
• Tip size vs. head size
• Conductive or non-conductive
• Sterile or non-sterile
• Filtered or non-filtered
continued on next page
14

General Information – Automated Sample Processing, continued
96-Well Magnetic Separator
The 96-Well Magnetic Separator available from Invitrogen (Catalog no. CS15096) is a magnetic separation rack suitable for use in protocols with magnetic beads. The rack can hold up to 96 samples in a deep well plate. The deep well plate fits onto the magnetic base station, associating the array of 24 neodymium magnets with the samples for simple ‘on the magnet’ and ‘off the magnet’ sample processing (see figures below). For more information, see www.invitrogen.com or call Technical Service (page 25).
continued on next page
15

General Information – Automated Sample Processing, continued
Deck Set Up Once you have the required hardware, you will need to
configure the deck of your liquid handling robot appropriately to process samples. You may use any suitable configuration of your choice. An example is provided below.
Location Trough Contents Plate
1 96-well sample tray start position
2 Purification Mix (i.e. ChargeSwitch® Purification Buffer (N5) + ChargeSwitch® Magnetic Beads)
3
4
5
6 ChargeSwitch® Wash Buffer (W12)
7 ChargeSwitch® Elution Buffer (E5)
8 Waste
9 Magnetic Separator
10 Shaker
13 96-well U-bottomed microtiter plate (for final elution)
continued on next page
16

General Information – Automated Sample Processing, continued
Primary Liquid Handling Parameters
The table below lists the primary liquid handling parameters required to isolate DNA using the automated protocol. Use the parameters and guidelines provided, as well as the protocol on pages 20-21 to program your robot.
Parameter Aim Guidelines
[Magnetic Bead Preparation]
To resuspend beads prior to mixing with solution
• Only required once
• Beads stay in suspension for up to 45 minutes
[Mixing #1] Used to mix beads or bead/DNA pellet with buffer
• Aspirate/dispense at 400-500 µl
• Aspirate/dispense position fixed 1-2 mm above the well bottom
• Use tips/volume setting at 80 µl volume
[Dispense liquid] Normal liquid parameters for adding a reagent to each well
• Aspirate/dispense at 300-400 µl
• Use multi-dispense if appropriate to save time
[Transfer supernatant to waste]
To remove and discard supernatant
• Aspirate slowly at 50-100 µl/second
• Aspirate off the entire liquid volume using liquid detect and tracking or setting fixed height 1 mm above the well bottom
• Do not disturb pellet
• Dispense to waste
[Transfer supernatant to another plate]
To transfer supernatant to another plate
• Aspirate slowly at 50-100 µl/second
• Aspirate off the entire liquid volume using liquid detect and tracking or setting fixed height 1 mm above the well bottom
• Do not disturb pellet
• Dispense slowly at 50-100 µl/second
• Avoid splashing
[Final DNA Elution]
To dispense the eluate containing DNA
• Dispense at 10 µl/second
• Aspirate from position fixed 1 mm above the well bottom
• Avoid bead carry-over
• Dispense into new plate at 2 mm above the well bottom
17

Automated Genomic DNA Isolation
Introduction This section provides a general protocol for automated
isolation of genomic DNA from forensic samples in a 96-well format. Use this general protocol to develop the script for your liquid handling robot. To optimize the protocol for your sample types, we recommend following the protocol to isolate genomic DNA from individual samples (see pages 8-13) and varying conditions appropriately.
Materials Needed
Have the following materials on hand before beginning:
• Liquid handling robot configured to process samples in 96-well plates
• Forensic samples (follow the guidelines on page 8 to handle samples)
• 96 x 2 ml deep well plate(s)
• 96 x 200 µl U-bottomed microtiter plate
• Optional: 96 x 2 ml glass-filled, polypropylene, Unifilter® Microplate (Whatman, Catalog no. 7720-7235; see the next page)
Components Supplied with the Kit
• ChargeSwitch® Lysis Buffer (L13)
• Proteinase K
• RNase A
• ChargeSwitch® Magnetic Beads
• ChargeSwitch® Purification Buffer (N5)
• ChargeSwitch® Wash Buffer (W12)
• ChargeSwitch® Elution Buffer (E5) or TE Buffer (not supplied; 10 mM Tris-HCl, 1 mM EDTA, pH 8.5)
continued on next page Unifilter® is a registered trademark of Whatman
18

Automated Genomic DNA Isolation, continued
Important Guidelines
To maximize DNA yield, follow these recommendations when processing your samples:
• Ensure that the robotic tips enter the wells of the plates without interfering with the pellet of beads.
• When removing supernatant, leave samples on the 96-Well Magnetic Separator and aspirate slowly to ensure that the pellet of beads is not disturbed.
• When resuspending pelleted ChargeSwitch® Magnetic Beads, make sure that all beads are fully resuspended to maximize DNA recovery.
• To maximize DNA yield, make sure that all Wash Buffer is removed before elution.
• To maximize DNA yield, make sure that the beads are fully resuspended during the elution step.
Lysate Volume
The first step of the genomic DNA isolation protocol requires addition of Lysis Mix to the sample. You may add either 1 ml or 1.4 ml of Lysis Mix to the sample. Note that some of the Lysis Mix may be absorbed by the sample, resulting in a lower volume of lysate being available for purification. To maximize DNA yield, we recommend using 1.4 ml of Lysis Mix (Step 2, page 20). To prepare Lysis Mix, see the next page.
Using a Filter Plate
To maximize recovery volume and minimize contaminant transfer during lysate preparation, you may prepare lysates in a 96 x 2 ml filter plate (see Steps 1-2, next page), then directly filter the supernatant into a 96 x 2 ml deep well plate to perform the remainder of the purification procedure. We recommend using the 96 x 2 ml glass-filled polypropylene Unifilter® Microplate from Whatman (Catalog no. 7720-7235). Other 96 x 2 ml filter plates are suitable.
continued on next page
19

Automated Genomic DNA Isolation, continued
Before Starting
Perform the following before beginning:
• Prepare Lysis Mix: For each sample, mix 1 ml of ChargeSwitch® Lysis Buffer (L13) and 10 µl of Proteinase K to prepare the Lysis Mix. If lysing in 1.4 ml volume, mix 1.4 ml of ChargeSwitch® Lysis Buffer (L13) and 10 µl of Proteinase K for each sample. Scale up volume of reagents (based on number of samples) to prepare a master mix.
• Prepare Purification Mix: For each sample, mix 200 µl of ChargeSwitch® Purification Buffer (N5) and 20 µl of ChargeSwitch® Magnetic Beads (make sure that the beads are thoroughly resuspended). If lysing in 1.4 ml volume, mix 280 µl of ChargeSwitch® Purification Buffer (N5) and 20 µl of ChargeSwitch® Magnetic Beads for each sample. Scale up volume of reagents (based on number of samples) to prepare a master mix.
Automated Protocol
Follow this protocol to isolate genomic DNA from forensic samples. The volumes given are on a per sample basis.
1. Start with 96 samples in a 96 x 2 ml deep well plate or 96 x 2 ml filter plate.
2. Add 1 ml (or 1.4 ml) of Lysis Mix (see above) and incubate at 37°C for 1-2 hours (use a heating block).
Note: Alternatively, incubate at 55°C for 1 hour. Optimal incubation parameters (i.e. time and temperature) vary depending on the sample and automation plasticware, and should be determined empirically.
3. After incubation, transfer or filter as appropriate, as much of the lysate as possible to a 96 x 2 ml deep well plate, without interfering with the samples.
4. Add 220 µl (or 300 µl if 1.4 ml of Lysis Mix used) of Purification Mix (see above; make sure that the beads are thoroughly resuspended). Proceed to the next page.
continued on next page
20

Automated Genomic DNA Isolation, continued
Automated Protocol, continued
5. Shake at medium fast speed (e.g. pulse, 10 seconds) to evenly distribute the magnetic beads within the solution.
6. Wait for 10 seconds.
7. Move samples to the 96-well Magnetic Separator.
8. Wait for 60-90 seconds.
9. Slowly aspirate all of the supernatant and discard, leaving behind the pellet of beads.
10. Remove samples from the 96-well Magnetic Separator.
11. Add 500 µl of ChargeSwitch® Wash Buffer (W12).
12. Shake at medium fast speed (e.g. pulse, 10 seconds) to evenly distribute the magnetic beads within the solution.
13. Move samples to the 96-well Magnetic Separator.
14. Wait for 60-90 seconds.
15. Slowly aspirate all of the supernatant and discard, leaving behind the pellet of beads.
16. Leave samples on the 96-well Magnetic Separator for the second wash.
17. Add 500 µl of ChargeSwitch® Wash Buffer (W12).
18. Wait for 30-60 seconds.
19. Slowly aspirate all of the supernatant and discard, leaving behind the pellet of beads.
20. Move samples to the shaker.
21. Add 150 µl of ChargeSwitch® Elution Buffer (E5). Note: You may vary elution volume depending on your needs. Do not elute in volumes < 60 µl as the DNA may not completely elute from the beads.
22. Shake rapidly for 1 minute. Note: To improve DNA yield, mix samples by pipetting up and down.
23. Move samples to the 96-well Magnetic Separator.
24. Wait for 1 minute.
25. Slowly aspirate supernatant containing the DNA to a 96 x 300 µl U-bottomed microtiter plate.
continued on next page
21

Automated Genomic DNA Isolation, continued
Storing DNA Store the purified DNA at -20°C or use immediately for STR
analysis. Avoid repeatedly freezing and thawing DNA.
Quantitating DNA Yield
To quantitate yield of your DNA, use the Quant-iT™ PicoGreen® dsDNA Quantitation Kit (Catalog no. P7589). For more information, see page 13.
22

Troubleshooting
Introduction Refer to the table below to troubleshoot problems that you
may encounter when purifying genomic DNA with the kit.
Problem Cause Solution
Low DNA yield Incomplete lysis • Decrease the amount of starting material used.
• Be sure to add Proteinase K during lysis.
• Make sure that the sample is completely immersed in the Lysis Buffer.
• Increase the length of incubation at 55°C.
Poor quality of starting material
Be sure to use fresh sample and process immediately after collection or freeze the sample at -80°C or in liquid nitrogen. The yield and quality of DNA isolated depends on the type and age of the starting material.
Insufficient amount of ChargeSwitch® Magnetic Beads added
Vortex the tube containing the ChargeSwitch® Magnetic Beads to fully resuspend the beads in solution before adding them to your sample.
Pellet of beads disturbed or lost during binding or washing steps
• Keep the sample in the MagnaRack™ when removing supernatant during the binding or washing steps.
• Remove the supernatant without disturbing the pellet of beads by angling the pipette tip away from the pellet.
Bubbles formed during mixing steps
Make sure that the pipette tip is submerged in the solution during mixing.
continued on next page
23

Troubleshooting, continued
Problem Cause Solution
Low DNA yield, continued
Incorrect elution conditions
• After adding ChargeSwitch® Elution Buffer (E5) to the sample, pipet up and down to resuspend the magnetic beads before incubation.
• Incubate the sample at 55°C to improve the yield.
• Do not use water to elute DNA. Use Elution Buffer (E5) or TE, pH 8.5.
Incomplete dissociation of DNA from the ChargeSwitch® Magnetic Beads
Perform additional mixing of the suspension of beads (by pipetting up and down).
Lysate mixed too vigorously or small pipette tips used during mixing
• Use a 1 ml pipette tip set to 900 µl to mix the sample.
• Pipet up and down gently to mix.
No DNA recovered Water used for elution Do not use water for elution. The elution buffer must have a pH = 8.5-9.0 or the DNA will remain bound to the ChargeSwitch® Magnetic Beads. Use ChargeSwitch® Elution Buffer (E5) or TE, pH 8.5.
ChargeSwitch® Magnetic Beads stored or handled improperly
• Store beads at room temperature. Do not freeze the beads as they will become irreparably damaged.
• Make sure that the beads are in solution at all times and do not become dried. Dried beads are non-functional.
Eluate containing DNA is discolored
DNA contaminated with heme
Minimize the amount of blood or blood-stained sample being processed (≤ 20 µl blood spot).
24

Appendix
Technical Service
World Wide Web
Visit the Invitrogen Web Resource using your World Wide Web browser. At the site, you can:
• Get the scoop on our hot new products and special product offers
• View and download vector maps and sequences
• Download manuals in Adobe® Acrobat® (PDF) format
• Explore our catalog with full color graphics
• Obtain citations for Invitrogen products
• Request catalog and product literature
Once connected to the Internet, launch your Web browser (Internet Explorer 5.0 or newer or Netscape 4.0 or newer), then enter the following location (or URL):
http://www.invitrogen.com
...and the program will connect directly. Click on underlined text or outlined graphics to explore. Don't forget to put a bookmark at our site for easy reference!
Contact Us For more information or technical assistance, call, write, fax,
or email. Additional international offices are listed on our Web page (www.invitrogen.com).
Corporate Headquarters: European Headquarters:
Invitrogen Corporation Invitrogen Ltd 1600 Faraday Avenue Inchinnan Business Park Carlsbad, CA 92008 USA 3 Fountain Drive Tel: 1 760 603 7200 Paisley PA4 9RF, UK Tel (Toll Free): 1 800 955 6288 Tel: +44 (0) 141 814 6100 Fax: 1 760 602 6500 Tech Fax: +44 (0) 141 814 6117 E-mail: [email protected]
E-mail: [email protected]
continued on next page
25

Technical Service, continued
MSDS Requests
To request an MSDS, visit our Web site at www.invitrogen.com. On the home page, go to ‘Technical Resources’, select ‘MSDS’, and follow instructions on the page.
Limited Warranty
Invitrogen is committed to providing our customers with high-quality goods and services. Our goal is to ensure that every customer is 100% satisfied with our products and our service. If you should have any questions or concerns about an Invitrogen product or service, contact our Technical Service Representatives.
Invitrogen warrants that all of its products will perform according to specifications stated on the certificate of analysis. The company will replace, free of charge, any product that does not meet those specifications. This warranty limits Invitrogen Corporation’s liability only to the cost of the product. No warranty is granted for products beyond their listed expiration date. No warranty is applicable unless all product components are stored in accordance with instructions. Invitrogen reserves the right to select the method(s) used to analyze a product unless Invitrogen agrees to a specified method in writing prior to acceptance of the order.
Invitrogen makes every effort to ensure the accuracy of its publications, but realizes that the occasional typographical or other error is inevitable. Therefore Invitrogen makes no warranty of any kind regarding the contents of any publications or documentation. If you discover an error in any of our publications, please report it to our Technical Service Representatives.
Invitrogen assumes no responsibility or liability for any special, incidental, indirect or consequential loss or damage whatsoever. The above limited warranty is sole and exclusive. No other warranty is made, whether expressed or implied, including any warranty of merchantability or fitness for a particular purpose.
26
Purchaser Notification and Product Qualification
Purchaser Notification
Limited Use Label License No. 265: ChargeSwitch® Technology
The use of this product may be covered by European Patent No. EP1036082B1 and foreign equivalents.
Product Qualification
Each kit is functionally tested to ensure conformance with the most current approved product specifications. Current specifications consist of tests for:
• Bead size, charge, and binding capacity
• Nucleic acid quality and quantity
• Buffer turbidity, volume, and absence of RNases and DNases
• Kit packaging and labeling accuracy
For individual lot test results and more information, visit www.invitrogen.com to download the Certificate of Analysis.
©2005 Invitrogen Corporation. All rights reserved.
For research use only. Not intended for any animal or human therapeutic or diagnostic use.
27

Notes
28

Corporate Headquarters:Invitrogen Corporation1600 Faraday AvenueCarlsbad, California 92008Tel: 1 760 603 7200Tel (Toll Free): 1 800 955 6288Fax: 1 760 603 7229Email: [email protected]
European Headquarters:Invitrogen Ltd3 Fountain DriveInchinnan Business ParkPaisley PA4 9RF, UKTel (Free Phone Orders): 0800 269 210Tel (General Enquiries): 0800 5345 5345Fax: +44 (0) 141 814 6287Email: [email protected]
International Offices:Argentina 5411 4556 0844Australia 1 800 331 627Austria 0800 20 1087Belgium 0800 14894Brazil 0800 11 0575Canada 800 263 6236China 10 6849 2578Denmark 80 30 17 40
France 0800 23 20 79Germany 0800 083 0902Hong Kong 2407 8450India 11 577 3282Italy 02 98 22 201Japan 03 3663 7974The Netherlands 0800 099 3310New Zealand 0800 600 200Norway 00800 5456 5456
Spain & Portugal 900 181 461Sweden 020 26 34 52Switzerland 0800 848 800Taiwan 2 2651 6156UK 0800 838 380For other countries see our Web site
www.invitrogen.com