CHAPTER16 Fixing Windows Problems - CoffeeCup...
36
811 Fixing Windows Problems • What to do when a hardware device, applica- tion, or Windows component gives a problem • What to do when Windows Vista won’t boot or boots with errors • Strategies that you can use to solve problems with Windows 2000/XP startup In this chapter, you will learn: CHAPTER 16 I n the last chapter, you learned about the several Windows Vista and XP tools that can help you solve Windows problems. Those tools can help when problems arise with a hardware device, application, or Windows components. In addition, some Windows tools are specifically designed to help you solve startup problems with Windows Vista, XP, or 2000. In this chapter, we focus on the techniques and methods to use when all these types of problems occur. You will learn how to put to good use the tools you learned about in Chapter 15. In short, this chapter is the practical application of the tools in Chapter 15. When a computer gives problems, refuses to boot, or the Windows desktop refuses to load, it takes a cool head to handle the situation gracefully. What helps more than anything else is to have a good plan so you don’t feel so helpless. This chapter is designed to give you just that—a plan with all the necessary details so that you can determine just what has gone wrong and what to do about it. Knowledge is power. When you know what to do, the situation doesn’t seem nearly as hopeless. In the chapter, you’ll first learn what to do when problems occur after the boot with hardware or software. Then we’ll turn to how to solve problems that occur during the boot. Because solving boot problems with Windows Vista is done differently than when solving boot problems with Windows XP/2000, we’ll cover Vista boot problems separately from XP/2000 boot problems. A+ Exam Tip All the content in this chapter applies to the A+ 220-702 Practical Application exam objectives that focus on solving Windows problems.
Transcript of CHAPTER16 Fixing Windows Problems - CoffeeCup...

811
Fixing Windows Problems
• What to do whena hardwaredevice, applica-tion, or Windowscomponent givesa problem
• What to do whenWindows Vistawon’t boot orboots with errors
• Strategies thatyou can use tosolve problemswith Windows2000/XP startup
In this chapter,you will learn:
CHAPTER
16
In the last chapter, you learned about the several Windows Vista andXP tools that can help you solve Windows problems. Those tools
can help when problems arise with a hardware device, application, orWindows components. In addition, some Windows tools are specificallydesigned to help you solve startup problems with Windows Vista, XP,or 2000. In this chapter, we focus on the techniques and methods to usewhen all these types of problems occur. You will learn how to put togood use the tools you learned about in Chapter 15. In short, thischapter is the practical application of the tools in Chapter 15.
When a computer gives problems, refuses to boot, or the Windowsdesktop refuses to load, it takes a cool head to handle the situationgracefully. What helps more than anything else is to have a good planso you don’t feel so helpless. This chapter is designed to give you justthat—a plan with all the necessary details so that you can determinejust what has gone wrong and what to do about it. Knowledge ispower. When you know what to do, the situation doesn’t seem nearlyas hopeless.
In the chapter, you’ll first learn what to do when problems occurafter the boot with hardware or software. Then we’ll turn to how tosolve problems that occur during the boot. Because solving bootproblems with Windows Vista is done differently than when solvingboot problems with Windows XP/2000, we’ll cover Vista bootproblems separately from XP/2000 boot problems.
A+ Exam Tip All the content in this chapter applies to the A+ 220-702 PracticalApplication exam objectives that focus on solving Windows problems.

CHAPTER 16812 Fixing Windows Problems
FIXING PROBLEMS CAUSED BY HARDWARE
Now let’s look at some general steps to use when solving a problem caused by a hardwaredevice or its drivers. These general steps assume you know how to use the tools discussed inChapter 15. As you read, you can refer back to Chapter 15 to see the details of how to usea tool mentioned here.
If you don’t know which device is causing a problem, follow these steps to find out:
Research an error message. If you see an error message that appears during or afterthe boot, investigate the message. The Internet is a great source. Enter the messagein a Google.com search string. Recall that an error message might appear during theboot if a missing program file is referenced in the registry. Also, if you get an errormessage about a service or driver that has failed to start, search on the filename ofthe service or driver to find out which component, application, or device uses theservice or driver. The System Information utility (msinfo32.exe) can help.Use the Vista Problem Reports and Solutions window or the XP Error Reporting window. These tools can help identify and resolve blue screen errors, errors that causethe system to lock up, and errors caused by device drivers, and services and applica-tions that fail to start. The description of the problem should include clues that canhelp you identify the device, Windows component, or application causing the problem.For example, Figure 16-1 shows a message that appeared after a Vista system encoun-tered a blue screen error. When you click Check for solution, a solution window (seeFigure 16-2) appears. For Vista, even if time has passed since the error occurred or theerror caused the system to hang resulting in a restart, you can open the Vista ProblemReports and Solutions window to see past problems listed with suggestions for a solution. To open the window, click Start, All Programs, Maintenance, and ProblemReports and Solutions.Check logs in Event Viewer. In Event Viewer, the Administrative Events log underCustom Views shows only warnings and error events (see Figure 16-3). Click the labelat the top of a column to sort the events to help you search through them as you look
Figure 16-1 Message that appeared after a Vista blue screen errorCourtesy: Course Technology/Cengage Learning
A+220-7022.12.32.4

813Fixing Problems Caused By Hardware
16
A+ 220-702
Figure 16-2 Windows suggests Windows update might solve a blue screen problemCourtesy: Course Technology/Cengage Learning
Figure 16-3 Administrative Events log shows error and warning eventsCourtesy: Course Technology/Cengage Learning
A+220-7022.12.32.4

for useful information. Notice in Figure 16-3, a service used by audio failed to start.The problem happened when Windows could not find the specified file. Updating orreinstalling the audio drivers would fix this problem of no audio. Errors that cause thesystem to lock up might also be recorded here.Check the Reliability and Performance Monitor. In this window, click the ReliabilityMonitor. Look for error events that occurred about the time the problem started. Howto use the Reliability and Performance Monitor is covered in Chapter 14.Consider recent changes. What hardware or software changes have you or someoneelse recently made? Maybe the change affected something that you have not yet considered. Once I installed a hard drive, turned on the system, and got beep codeerrors during the power-on self test (POST). I opened the case and checked the drive and connections. It all looked fine, so I tried to boot again with the same results.The second time I opened the case I discovered that I had bumped a memory modulewhile closing the case. Reseating the module solved my problem.
When you know which device is causing a problem, do the following to investigate thedevice and its drivers to discover the source of the problem:
1. Check the simple things first. Most computer problems are simple and easy to solve.Check the simple things: Is the external device plugged in and turned on? Are the datacable connections solid at both ends? For sound, is the volume knob turned up? Isthere a wall light switch controlling the power, and is it turned on? Is the power stripyou’re using plugged in and turned on? For expansion cards and memory modules, arethey seated solidly in their slots?
2. Check that Device Manager recognizes the device with no errors or warnings. CheckDevice Manager to verify that the device is enabled and Windows thinks the deviceshould be working. If you see errors or warnings in Device Manager (displayed as ayellow triangle or question mark, as shown in Figure 16-4), these issues must beresolved before you continue. If you’re not sure which device is giving the problem, disable a suspected device to see if the problem goes away. For devices that don’tappear in Device Manager—such as a scanner, printer, or some USB or FireWiredevices—use the utility program that came bundled with the device to check for errors.You should find the program on the Start, All Programs menus. For printers, also usethe Printers window to check for problems.
CHAPTER 16814 Fixing Windows Problems
3. Check that BIOS setup recognizes the device with no errors. For a device that shouldbe recognized by startup BIOS, go into BIOS setup and make sure the device is correctly detected and is enabled.
To solve a problem with a device driver or service, follow these steps. Be sure to reboot thesystem after you make a change and before you move on to the next step:
1. Update the device drivers. For best results, first download the driver files to your harddrive from the device manufacturer’s Web site. Then, in Device Manager, update thedrivers using these downloaded files. If you don’t like the results of the update, youcan roll back the driver to undo the update.
A+ Exam Tip The A+ 220-702 Practical Application exam expects you to know how to use DeviceManager to solve a hardware problem.
A+220-7022.12.32.4

815Fixing Problems Caused By Hardware
16
A+ 220-702
These deviceshave a problem
Figure 16-4 Device Manager indicates a problem with a yellow triangleCourtesy: Course Technology/Cengage Learning
2. Update Windows. Sometimes a Windows update solves a problem with a hardwaredevice. On the other hand, Windows might be the problem. If the device was workingand now does not, consider whether a Windows update might have caused the problem.Check the Microsoft support site (support.microsoft.com) for information and a fix.
3. Try moving the device to a different port or connector. For external USB devices, trya different USB port. For internal devices, try moving the device to a different expan-sion slot or connecting it to a different connector on the motherboard. Perhaps thecurrent connector or port is bad, disabled, or not configured correctly.
4. Try reinstalling the device. To get a clean start with a device, you can uninstall it and start over. In Device Manager, right-click the device and select Uninstall. Thenreboot the PC. When Windows starts, it should detect a new hardware device andlaunch the Found New Hardware Wizard. Then you can install the device driversagain. Did the Found New Hardware Wizard launch? If not, the device might be bador the port it is using might be bad or disabled.
5. Try moving the device to a different computer. If the device works on anothercomputer, move it back to the original computer. If it still does not work on theoriginal computer, the problem might be with the port or expansion slot thedevice is using.
A+220-7022.12.32.4
CHAPTER 16816 Fixing Windows Problems
6. Use System Restore. If you can identify the approximate date the error started andthat date is in the recent past, use System Restore. Select a restore point just beforethe problem started. Reverting to a restore point can solve problems with hardware,applications, and Windows components, but can cause problems of its own, so use itwith caution.
7. Check the manufacturer’s documentation. When installing a device, sometimes thedevice will not work unless you run the setup CD for the device before you physi-cally install the device. (This is sometimes true of internal modem cards, networkadapters, and USB devices.) To know the right order, read the manufacturer’s docu-mentation. You should also find troubleshooting guidelines there for the device andhow to use any diagnostic software the manufacturer offers. Also, the manufacturer’sWeb site should have a support section, including FAQs about the device. When allelse fails, I’ve often found my solution there.
8. Search the Internet for help. Look for forums where others have posted the sameproblem with the same device. Someone else has likely posted a solution. However,be careful and don’t take the advice unless you trust the Web site.
9. Boot into Safe Mode. If the system is caught in an endless loop of restarts, boot into Safe Mode. Then, using the instructions given in Chapter 15, use theStartup and Recovery section of the System Properties box to uncheckAutomatically restart.
10. Use the System File Checker. For essential hardware devices, use the System FileChecker (SFC) to verify and replace system files. Use the command sfc /scannow orsfc /scanonce. Later in the chapter, you will learn other steps to take if WindowsVista or Windows 2000/XP give startup errors.
11. Consider the application using the device. The problem might be with the applica-tion software that is controlling the device. For example, if you are having problemstrying to use a USB scanner, try scanning using a different application.
12. Replace the device. After you’ve tried all this and the problem is still not solved, it’stime to assume the device is just not working. Replace it with a new one.
FIXING PROBLEMS CAUSED BY APPLICATIONS
Problems with applications might be caused by the application, the hardware, theoperating system, the data, other applications in conflict with this one, or the user.Follow these steps to get to the source of the problem. After you have made a change,be sure to restart and check to see if the problem is resolved before you move on to the next step:
Do the following to find the source of the problem and fix it:
1. Interview the user and back up data. Find out as much information as you can fromthe user about the problem, when it started, and what happened to the systemabout the time the problem started. Also ask if valuable data is on the system. If so,back it up.
Notes There’s a lot of detail about troubleshooting in this section. Here’s a shortcut that mighthelp: When you are faced with a hardware problem, do two things: Check the cable connections andcheck the log files. Just remembering these two steps can serve you well.
A+220-7022.12.32.4
A+220-7022.32.4

817Fixing Problems Caused By Applications
16
A+ 220-702
2. Ask the user to reproduce the problem while you watch. Many problems with applications are caused by user error. Watch carefully as the user shows you the problem. If you see him making a mistake, be tactful and don’t accuse. Just explain the problem and its solution. It’s better to explain and teach rather than fix the problem yourself; that way, the user learns from theexperience.
3. Use Task Manager to end a process that is not responding. If an application islocked up, use Task Manager to end it.
4. Try a reboot. Reboot the system and see if that solves the problem.
5. Suspect a virus is causing a problem. Scan for viruses and check Task Manager tomake sure some strange process is not interfering with your applications.
6. Allow Windows to provide a solution. For Vista, use the Problem Reports andSolutions tool to search for the problem and suggested solutions. For XP, if ErrorReporting displays a window (see Figure 16-5), click Send Error Report in thewindow and follow through by applying any recommended solutions.
Figure 16-5 A serious Windows error sometimes generates thisMicrosoft Windows error-reporting boxCourtesy: Course Technology/Cengage Learning
7. Windows update might solve the problem. When Microsoft is aware of applicationproblems caused by Windows, it sometimes releases a patch to solve the problem.Make sure Windows updates are current. Know that these updates include updatesfor other Microsoft products such as Microsoft Office.
8. Download updates or patches for the application. Software manufacturers oftenpublish updates or patches for their software to address known problems. You cango to the software manufacturer’s Web site to download these updates and get infor-mation about known problems.
9. Use the application setup to repair the installation. The application setup might have this option to repair the installation. Look for it in the Vista Programs andFeatures window, the XP Add or Remove Programs window, or on the setup CD forthe application.
10. Consider data corruption. It might appear that the application has a problem whenthe problem is really a corrupted data file. Try creating an entirely new data file. If
A+220-7022.32.4

CHAPTER 16818 Fixing Windows Problems
that works, then suspect that previous errors might be caused by corrupted data. Youmight be able to recover part of a corrupted file by changing its file extension to .txtand importing it into the application as a text file.
11. Try restoring default settings. Maybe a user has made one too many changes to theapplication settings, which can cause a problem with missing toolbars and otherfunctions. Write down each setting the user has changed and then restore all settingsback to their default values. If the problem is solved, restore each setting to the waythe user had it until you find the one causing the problem. The process will takesome time, but users can get upset if you change their application settings withoutjustification.
12. Uninstall and reinstall the application. Sometimes an application gives problemsbecause the installation gets corrupted. You can try uninstalling and reinstallingthe application. However, in doing so you might lose any customized settings,macros, or scripts. Also know this still might not solve a problem with a cor-rupted application because registry entries might not be properly reset during theuninstall process.
13. Use System Restore. If you can identify the approximate date the error started andthat date is in the recent past, use System Restore. Select a restore point just beforethe problem started. Reverting to a restore point can solve problems with registryentries the application uses that have become corrupted.
If the application has never worked, follow these steps:
1. Run the application as an administrator. The application might require that the user have privileges not assigned to the current account. Try running theapplication with administrator privileges, which Windows calls a secondary logon. To do that, right-click the application icon on the desktop or the applica-tion name in the All Programs menu, and select Run as administrator from theshortcut menu (see Figure 16-6). If this fixes the problem, you can make thissetting permanent. To do that, use Windows Explorer: Locate the program file-name (most likely in a subfolder of the Program Files folder), right-click it, andselect Properties from the shortcut menu. Then click the Compatibility tab andcheck Run this program as an administrator (see Figure 16-7). Click Apply andthen close the Properties box.
2. Install the application as an administrator. By default, Windows does not allowstandard or limited accounts to install applications. To install software, first log ontothe system as an administrator.
3. Consider whether an older application is having compatibility problems with Vista.Some older applications cannot run under Vista or run with errors. Here are somesteps you can take to fix the problem:
a. Go to the Windows Vista Compatibility Center site at www.microsoft.com/windows/compatibility and search for the application. The site reports problemsand solutions for known legacy software. For example, when you search on the
A+ Exam Tip A+ 220-702 Practical Application exam expects you to know when and how to useSystem Restore to solve a Windows, hardware, or application problem.
A+220-7022.32.4

819Fixing Problems Caused By Applications
16
A+ 220-702
Figure 16-6 To elevate an application’s privileges, run the application as an administratorCourtesy: Course Technology/Cengage Learning
Set the privilegelevel
Figure 16-7 Permanently change the privilege level of an applicationCourtesy: Course Technology/Cengage Learning
A+220-7022.32.4

CHAPTER 16820 Fixing Windows Problems
application WinPatrol, you find that Version 11 is not compatible with Vista,but Version 14 is compatible (see Figure 16-8). If the application is known tonot be compatible with the OS you are using, try to replace or upgrade the software.
b. Try running the application in compatibility mode. To do that, on the Compatibilitytab of the program file Properties box shown earlier in Figure 16-7, check Run thisprogram in compatibility mode for:. Then, in the drop-down menu, select theoperating system that the application was written to run under. Click Apply and closethe Properties box.
4. Verify that the application is digitally signed. Although applications that are not digi-tally signed can still run on Windows, a digital signature does verify that the applica-tion is not a rogue application and that it is certified as Windows-compatible byMicrosoft. To view the digital signature, in Windows Explorer, find the program filename (most likely in a subfolder of the Program Files folder), right-click the filename, and select Properties from the shortcut menu. Select the Digital Signatures taband click Advanced (see Figure 16-9). If the Digital Signatures tab is missing, the program is not digitally signed.
Figure 16-8 Microsoft tracks software and hardware compatible with VistaCourtesy: Course Technology/Cengage Learning
A+220-7022.32.4

821Fixing Problems Caused By Applications
16
A+ 220-702
The problem might be caused by other applications, services the application uses, Windows,or hardware. Do the following to check these possibilities:
1. Another application might be interfering. Close all other applications. Another appli-cation might be corrupted or have a data file open that this application needs.
2. Use the Services console. Check this console to make sure a service the applicationuses has started. If the service has failed to start, make sure it has an Automatic orManual setting.
3. You might be low on system resources. Close all other applications. Check TaskManager to make sure that unnecessary processes are closed. If you must run morethan one application at a time, you can increase the priority level for an applicationthat is not getting its fair share of resources. To do that, on the Processes tab of TaskManager, right-click the application and select Set Priority. Then increase the prioritylevel. This setting applies to the current session only. Also, consider that your systemmight be running low on memory. For good performance, Windows Vista needs atleast 2 GB of RAM, and XP needs at least 1 GB of RAM. For great performance, usemore than that. See Chapter 14 for more suggestions to optimize Windows.
4. Verify Windows system files. Corrupted Windows system files can cause applicationerrors. To have Windows verify system files and replace a bad one with a good one, usethe System File Checker (sfc.exe) utility. You learned how to use the utility in Chapter 15.
5. The problem might be bad memory. Following the directions given in Chapter 15, usethe Memory Diagnostics tool (mdsched.exe) to test memory. If it finds errors, replacethe memory modules.
6. Use Event Viewer to look for clues. The Event Viewer logs might give clues aboutapplications and the system.
Figure 16-9 This program is digitally signedCourtesy: Course Technology/Cengage Learning
A+220-7022.32.4

CHAPTER 16822 Fixing Windows Problems
7. Use the Reliability Monitor to look for clues. The Reliability Monitor might help youdiscover the source of the problem. Look for errors with other applications or withkey hardware components such as the hard drive. Hard drive errors often appear asan application error.
8. Use the Chkdsk command to check the hard drive. To eliminate the hard drive as thesource of an application error, use the Chkdsk command to check the drive. Recall thecommand is chkdsk C: /r and, for Vista, must be executed from an elevated commandprompt.
9. Run the application in Safe Mode with Networking. Press F8 at startup to displaythe Advanced Boot Options menu and select Safe Mode with Networking from themenu. If the application works in Safe Mode, then you can assume the problem isnot with the application, but with the operating system, device drivers, or otherapplications that load at startup which are conflicting with the application. In thissituation, approach the problem as a Windows problem rather than an applicationproblem. There are several methods and tools to troubleshoot Windows Vista, alldiscussed in the next part of the chapter. As you read, look for ways to repairWindows Vista that require the least amount of work and make the fewest drasticchanges to your system. How to fix Windows XP/2000 problems is covered later inthe chapter.
TROUBLESHOOTING VISTA STARTUP
This section is written as step-by-step instructions for problem-solving, so that you canuse it to solve a boot problem with Windows Vista by following the steps. Each steptakes you sequentially through the boot process and shows you what to do when theboot fails at that point in the process. Therefore, your first decision in troubleshootinga failed boot is to decide at what point in the boot the failure occurred. Next, you haveto decide which tool will be the least invasive to use, yet still will fix the problem. Theidea is to make as few changes to your system as possible in order to solve the problemwithout having to do a lot of work to return the system to normal (such as having toreinstall all your applications). And, as with every computer problem, if user data is atrisk, you need to take steps to back up the data as soon as possible in the troubleshoot-ing process.
To determine where in the boot process the failure occurred, we’ll focus on these threestartup stages of the boot:
Stage 1: Before the progress bar. When you see the Microsoft progress bar appear, youknow the Windows kernel, including all critical services and drivers, has loaded. Anyproblems that occur before the progress bar appears are most likely related to corruptor missing system files or hardware. Your best Vista tools to use for these problemsare Startup Repair and System Restore.Stage 2: After the progress bar and before logon. After the progress bar appears, usermode services and drivers are loaded and then the logon screen appears. Problemswith these components can best be solved using Startup Repair, the Last Known GoodConfiguration, System Restore, Safe Mode, Device Manager, and MSconfig.Stage 3: After logon. After the logon screen appears, problems can be caused bystartup scripts, applications set to launch at startup, and desktop settings. UseMSconfig to temporarily disable startup programs. Other useful tools to solve theproblem are Software Explorer and Safe Mode.
A+220-7022.4
A+220-7022.32.4

823Troubleshooting Vista Startup
16
A+220-7022.4
A+ 220-702
Recall that all three stages of the Vista boot are described in detail in Chapter 15. Also inChapter 15, you’ll find detailed descriptions of the Windows troubleshooting tools usedhere. Now let’s take a closer look at how to address problems at each of the three stages ofVista startup.
PROBLEMS AT STAGE 1: BEFORE THE PROGRESS BAR APPEARSAs always, first check with the user to find out if important data is on the hard drive andnot backed up. Make every effort to copy the data to a safe location before you start trou-bleshooting the original problem. How to recover data from a system that refuses to boot iscovered later in the chapter in the section “How to Recover Lost Data.”
Remember, if the progress bar has not yet appeared, some portions of the Vista kernel andcritical drivers and services to be started by the kernel have not yet started. Therefore, theproblem is with hardware or these startup files. Hardware that might be failing includes thepower supply, motherboard, CPU, memory, hard drive, video, or keyboard. If any one ofthese devices is not working, the error is communicated using beep codes, or using on-screenor voice error messages—and then the computer halts.
As you perform each troubleshooting step, be sure to restart the system to see if theproblem is solved before you apply the next step.
IS THE SCREEN BLANK?If you see absolutely nothing on the screen, check that the system is getting power and themonitor is plugged in and turned on. Can you hear the spinning fan or hard drive inside thecomputer case? Are lights on the front of the case lit? If not, suspect that power is not getting to the system. Check that the system is not in standby mode or hibernation: Trywaking up the system by pressing any key or a special standby key on laptops, or by press-ing the power-on button. Is the monitor totally without lights, or is the screen blank but theLED light on front of the monitor is lit? If the LED light is lit, try rebooting the system. Ifthe LED light is not lit, check that power is getting to the monitor. Is it turned on?
Try trading the monitor for one you know is good. If you can hear a spinning drive andsee lights on the front of the computer case and know the monitor works, the video cardmight be bad or not seated properly in its slot, the memory might be bad, the video cablemight be bad, or a component on the motherboard might have failed.
DOES THE COMPUTER APPEAR TO HAVE POWER?If you can’t hear the spinning drive or see lights on the front of the case, suspect theelectrical system. Check power connections and switches. The power supply might be bad or connections inside the case might be loose.
DOES AN ERROR MESSAGE APPEAR BEFORE VISTA STARTS?Recall that when you first turn on a system, startup BIOS takes control, checks essentialhardware devices, and searches for an OS to load. If it has a problem while doing all thatand the video system is working, it displays an error message on-screen. If video is notworking, it might attempt to communicate an error with a series of beeps (called beepcodes) or speech (for speech-enabled BIOS).
For messages displayed on-screen that apply to nonessential hardware devices such asDVD drives or floppy drives, you might be able to bypass the error by pressing a key andmoving forward in the boot. However, for errors with essential hardware devices such as theone shown in Figure 16-10, focus your attention on the error message, beep code, or voicemessage describing the problem. For example, notice in Figure 16-10 that the system is

CHAPTER 16824 Fixing Windows Problems
A+220-7022.4
attempting to boot from the CD. It should be booting from the hard drive, but moved on tothe CD when it did not find a hard drive present. If you don’t know what the error messageor beep codes mean, you can search the Web site of the motherboard manufacturer or do ageneral search of the Web using a search engine such as Google.
CAN STARTUP BIOS ACCESS THE HARD DRIVE?Error messages generated by startup BIOS that pertain to the hard drive can be caused by avariety of things. Here is a list of text error messages that indicate that BIOS could not finda hard drive:
Hard drive not foundFixed disk errorDisk boot failure, insert system disk and press enterNo boot device available
The problem might be a physical problem with the drive, the data cable, power, or themotherboard. Start with checking BIOS setup to verify that BIOS detected the drive correctly. If the drive was not detected, check the autodetection setting. (Chapter 8 showssample BIOS setup screens for these hard drive settings.) If autodetection is turned off, turnit on and reboot. Your problem might be solved. If startup BIOS still doesn’t find the drive,power down the system, unplug it, and open the case. Physically check the hard drive powerand data cable connections at both ends. Sometimes cables work their way loose. Be carefulnot to touch circuit boards or the processor as you work, and to protect the system againststatic electricity, wear an antistatic bracelet that is clipped to the computer case.
Here is a list of error messages that indicate the BIOS was able to find the hard drive butcouldn’t read what was written on the drive or could not find what it was looking for:
Invalid boot diskInaccessible boot device
Figure 16-10 This error message at POST indicates a hardware problemCourtesy: Course Technology/Cengage Learning
825Troubleshooting Vista Startup
16
A+220-7022.4
A+ 220-702
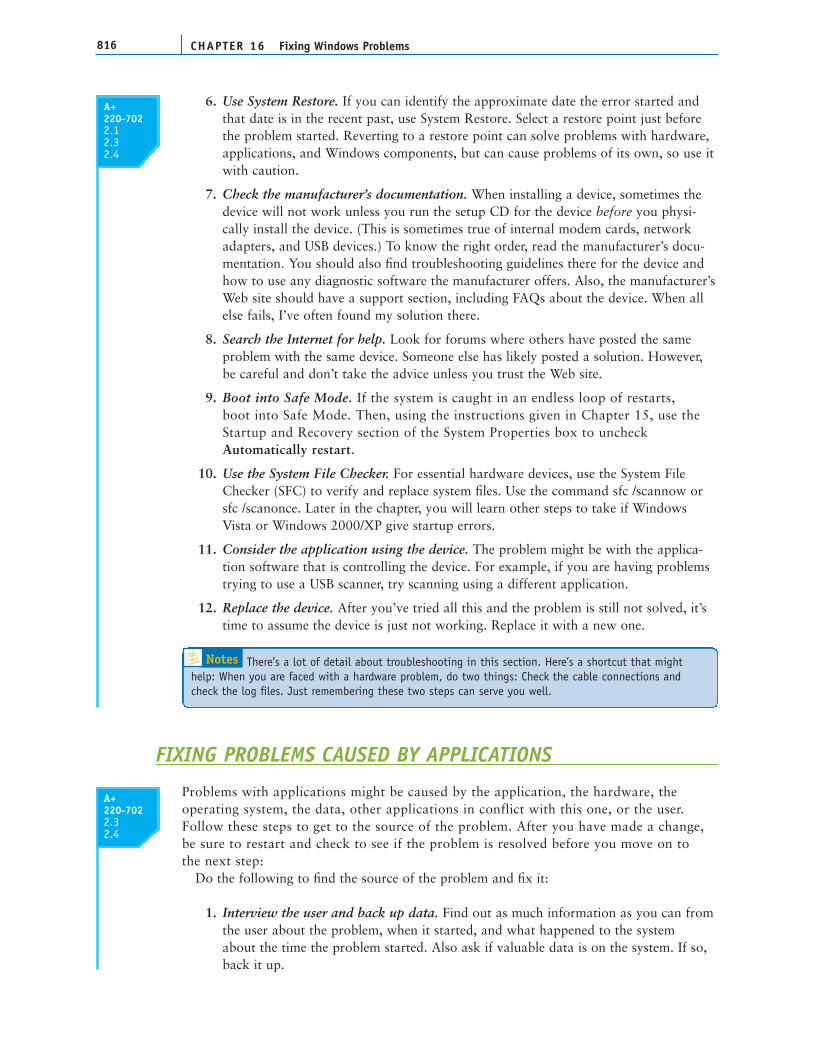
Invalid drive specificationInvalid partition tableNo operating system found, Missing operating system, Error loading operating systemCouldn’t find bootmgr or bootmgr is missing
For these error messages, you need to boot from the Windows Vista setup DVD, but firstcheck BIOS setup to make sure the boot sequence lists the DVD drive before the hard drive.
USE BIOS SETUP TO SET THE BOOT SEQUENCETo access BIOS setup, reboot the PC and look on-screen for a message such as “Press DELfor setup” or “Press F2 for BIOS settings” or something similar. Press that key and the BIOSsetup utility loads. Find the screen, such as the one in Figure 16-11, that lets you set the bootsequence. The boot sequence is the order of devices to which BIOS looks to find an OS toload. Make sure that the DVD drive is listed before the hard drive so that you can force thesystem to boot from the Windows Vista setup DVD. Save your settings and exit BIOS setup.
The next step is to try to boot from the Windows Vista setup DVD.
CAN YOU BOOT FROM THE VISTA SETUP DVD?Now that you have made sure that BIOS setup is configured to boot first from the DVDdrive before it turns to the hard drive, you can try to boot from the Windows Vista setupDVD. If you cannot boot from this disc, the problem is not just the hard drive. Study the
A+ Exam Tip The A+ 220-702 Practical Application exam expects you to be able to resolve aproblem that gives the error messages “Invalid boot disk” or “Inaccessible boot drive.”
Figure 16-11 Verify that the boot sequence looks to the DVD drive before it checks the harddrive for an operating systemCourtesy: Course Technology/Cengage Learning
CHAPTER 16826 Fixing Windows Problems
A+220-7022.4
error message and solve the immediate hardware problem. It’s possible the hard drive andthe optical drive have failed, but the floppy drive might still work. If you have a DOS orWindows 9x startup floppy disk, you can try booting from the floppy. If you can bootfrom the floppy, then you have proven the problem is with both the hard drive and theDVD drive.
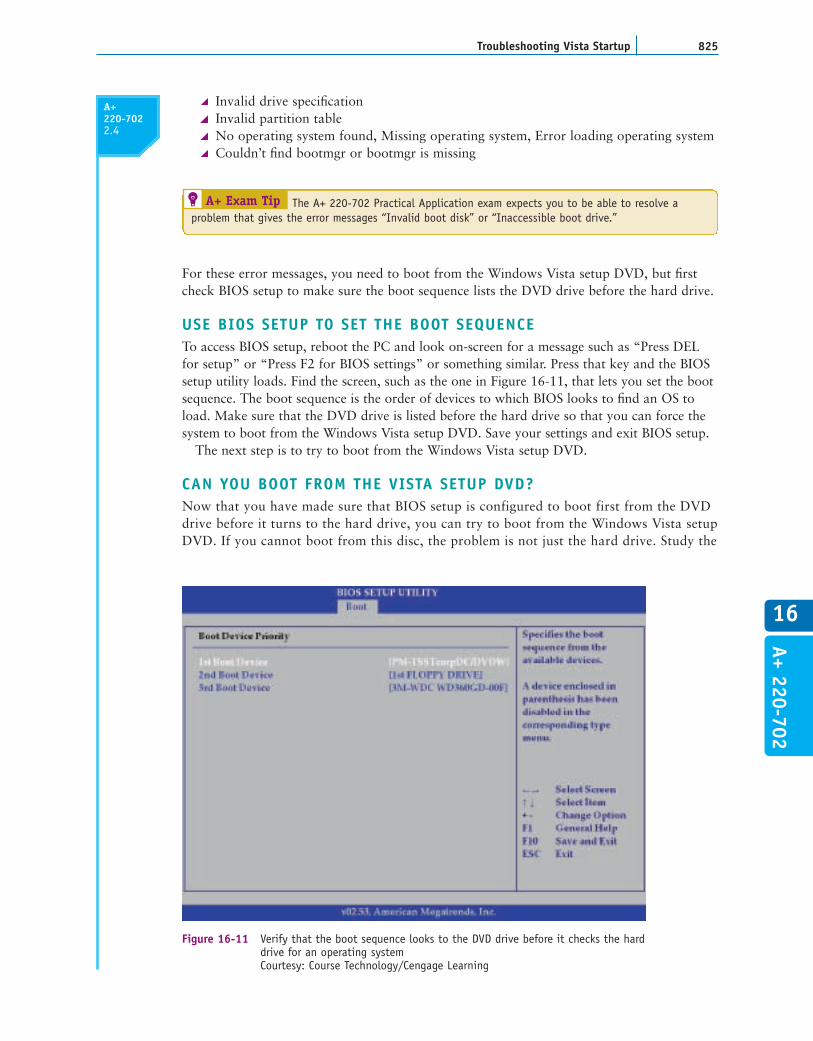
If you are able to boot from the Vista DVD, the window shown in Figure 16-12 appears.If you see this window, you have proven that the problem is isolated to the hard drive. Nowthe trick is to find out exactly what is wrong with the drive and fix it.
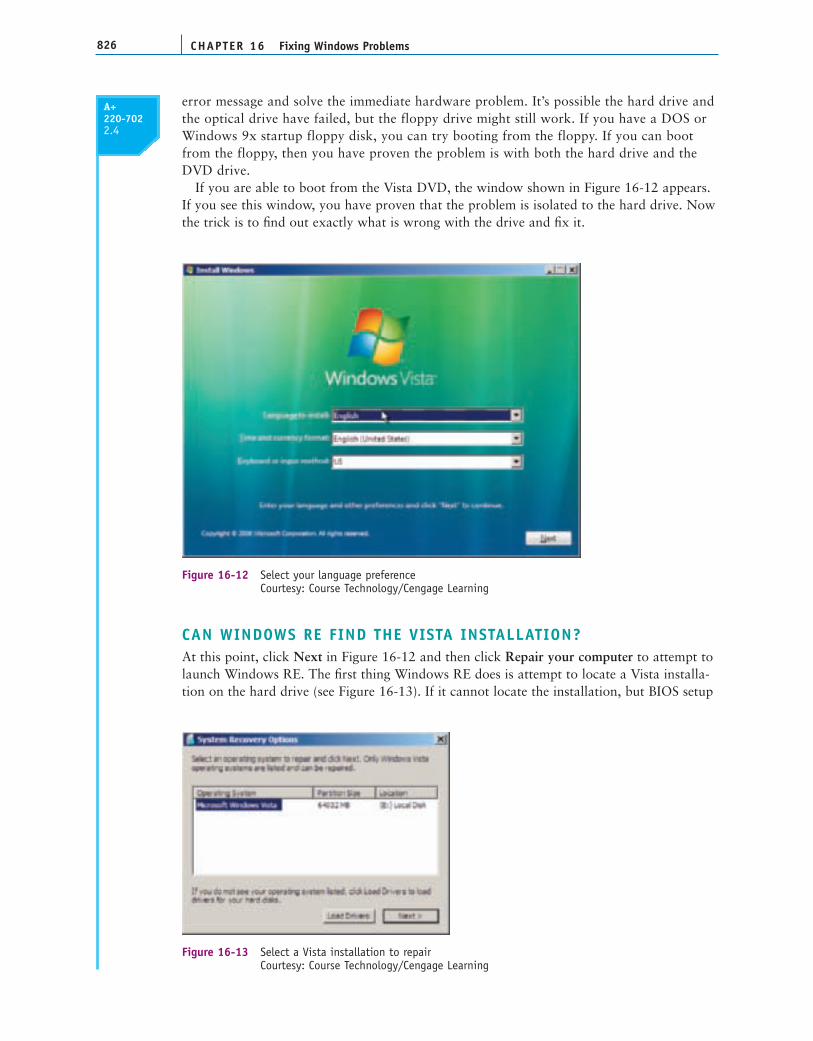
CAN WINDOWS RE FIND THE VISTA INSTALLATION?At this point, click Next in Figure 16-12 and then click Repair your computer to attempt tolaunch Windows RE. The first thing Windows RE does is attempt to locate a Vista installa-tion on the hard drive (see Figure 16-13). If it cannot locate the installation, but BIOS setup
Figure 16-12 Select your language preferenceCourtesy: Course Technology/Cengage Learning
Figure 16-13 Select a Vista installation to repairCourtesy: Course Technology/Cengage Learning

827Troubleshooting Vista Startup
16
A+220-7022.4
A+ 220-702
recognizes the drive, then the drive partitions and file systems might be corrupted. IfWindows RE does locate the installation, the problem is more likely to be limited tocorrupted or missing system files or drivers.
As you attempt each fix in the following list, be sure to restart the system after each stepto find out if the problem still exists or has changed:
1. Run Startup Repair. This process can sometimes fix drastic problems with system filesand boot records.
2. Run System Restore. The process won’t help if the file system is corrupted.
3. Restart the system and press F8 during the boot to launch the Advanced Boot Optionsmenu, as shown in Figure 16-14. If the boot menu does not appear, chances are theproblem is a corrupted boot sector. If the boot menu appears, chances are the BCD fileor other startup files are the problem. If you do see the menu, enable boot logging andreboot. Then check the boot log (\Windows\ntbtlog.txt) for the last entry, which mightindicate which system file is missing or corrupt. (If the hard drive is at all accessible,your best chance of viewing the boot log file is to use the command prompt windowand the Type command.)
4. If the boot menu does not appear, return to Windows RE, launch the commandprompt window, and attempt to repair the boot sector. Try these commands: bootrec /fixmbr and bootrec /fixboot. Also try the Diskpart command followed by the command list volume. Does the OS find the system volume? If not, the entire partitionmight be lost.
5. If the boot menu does appear, return to Windows RE, launch the command prompt window, and attempt to repair the BCD file. Try this command: bootrec/rebuildbcd.
6. Try to repair a corrupted file system by using the command prompt window and thechkdsk c: /r command.
Figure 16-14 Press F8 to see the Advanced Boot Options menuCourtesy: Course Technology/Cengage Learning

CHAPTER 16828 Fixing Windows Problems
A+220-7022.4
7. When startup files are missing or corrupt, sometimes Vista displays an error messagesimilar to the one shown in Figure 16-15, which names the file giving the problem.You can replace the file by going to a healthy Vista computer and copying the file to aremovable media. Then, on the problem computer, boot to Windows RE, open thecommand prompt window, and rename the original file so you will not overwrite itwith the replacement and you can backtrack if necessary. Then copy the replacementfile to the hard drive.
8. Try using the command prompt window to access drive C. If you can get to a Cprompt, use the DIR command to list folders and files. If you see a good list, checkthe log file, C:\Windows\System32\LogFiles\SRT\SRTTrail.txt, for clues. (Recall thislog file is kept by the Startup Repair process of Windows RE.) If you cannot get agood list of contents of drive C, most likely the Vista installation is destroyedbeyond repair. Before you address the problem of a corrupted Vista installation,make every effort to copy data to another media. You can use copy commands inthe Windows RE command prompt window or move the drive to a workingcomputer to copy files.
OPTIONS TO RECOVER FROM A CORRUPTED VISTA INSTALLATIONIf you are not able to repair the corrupted installation using the techniques in the previouslist, your next step is to consider what options are available to restore the system. Youroptions depend on backups available. Here are your choices to restore a corruptedinstallation:
Option 1: If you have a Complete PC backup, use it to restore the system to the lastbackup. If data is on the hard drive that has not been backed up, make every effort tocopy this data to a safe place before you restore the system.
Figure 16-15 Windows Vista might display a screen similar to this onewhen a critical startup file is missing or corruptCourtesy: Course Technology/Cengage Learning

829Troubleshooting Vista Startup
16
A+220-7022.4
A+ 220-702
Option 2: If you don’t have a Complete PC backup but you do have backups of thedata on the hard drive, install Windows Vista on the partition, formatting the harddrive during the installation. You’ll need to install all applications again and thenrestore the data.Option 3: If you don’t have a Complete PC backup and you also don’t have backupsof the data on the drive (worst case scenario), try to copy the data and then perform areinstallation of Windows Vista. Even if you cannot copy the data, you might be ableto recover it after the reinstallation. If you have data on the same partition as Vista,don’t format during the Vista installation.
STEPS TO REINSTALL WINDOWS VISTAFollow these steps to reinstall Vista when the OS refuses to boot and there is important dataon the drive:
1. Boot from the Vista DVD, select the language, and then select Install now from theopening menu. Follow the directions on-screen to install the OS.
2. When given the opportunities, enter the product key and accept the license agreement.For the type of installation, select Custom (advanced).
3. When asked where you want to install the OS, select the partition on which Vista isinstalled.
Vista setup will move all folders of the old installation into the \Windows.Old folder, includ-ing the \Windows, \Users, and \Program Files folders. A fresh, clean installation of Vista willthen be installed in the \Windows folder. If you suspect the hard drive might be failing orneed reformatting, immediately save all important data to a removable media and reinstallWindows Vista a second time, this time reformatting the hard drive. If you believe the harddrive is healthy, then follow these steps to get things back to their original order:
1. Run Chkdsk to fix errors on the drive.
2. Install all applications and device drivers.
3. Create all user accounts and customize Vista settings. Then copy all user data andother folders from the \Windows.Old folder to the new installation. How to createuser accounts is covered in Chapter 17.
4. To free up disk space, delete the \Windows.Old folder. To do that, using the DiskCleanup utility in the Properties box for drive C, select Previous Windows installa-tion(s) (see Figure 16-16). Note that this option will not be available if the\Windows.Old folder does not exist.
REINSTALL VISTA ON A LAPTOP OR BRAND-NAME COMPUTERIf you have a laptop or a brand-name computer such as a Gateway, Dell, or IBM, mostlikely the manufacturer has set up a hidden partition on the hard drive that can be used torecover the Windows installation. During startup, you’ll see a message on-screen such as“Press F2 to recover the system” or “Press F11 to start recovery.” When you press theappropriate key, a menu should appear that gives you two options: one repairs the Windowsinstallation, saving user data, while the other reformats drive C and restores your system tothe way it was when purchased. First, try to save user data before you attempt the destruc-tive recovery. If neither method works, the hidden partition might be corrupted or the harddrive might be physically damaged.

CHAPTER 16830 Fixing Windows Problems
A+220-7022.4
If the recovery process stored on the hard drive doesn’t work, try to use the recovery CDor DVD that came bundled with your computer to repair the installation. If you don’t havethe recovery disc, you might be able to buy one from the computer manufacturer. For note-book computers, you absolutely must have this recovery disc to reinstall Windows becausethe device drivers on the disc are specific to your notebook. If you cannot buy a recoverydisc, you might be able to download the drivers from the notebook manufacturer’s Web site.Download them to another computer and burn them to a DVD or CD that you can use onthe notebook to install drivers.
Deletes theWindows.Old folder
Figure 16-16 Free up disk space by deleting the Windows.Old folderCourtesy: Course Technology/Cengage Learning
Caution When you first become responsible for a laptop computer, it’s extremely importantthat you create or obtain the recovery DVD or CDs that you will need in case the hard drive crashes.Without this recovery media, it’s almost impossible to recover the system using a new hard drive. And,laptop manufacturers don’t make these media available to customers after the laptop is a few years old.Get the recovery media in hand while it is still available! You might be able to create the media from thehard drive while the system is still healthy. See the laptop documentation for instructions.
PROBLEMS AT STAGE 2: AFTER THE PROGRESS BAR APPEARSAND BEFORE LOGONWhen you see the Microsoft progress bar appear during the boot, you know theWindows kernel has loaded successfully and critical drivers and services configured to be started by the kernel are running. You also know the Session Manager (Smss.exe)

831Troubleshooting Vista Startup
16
A+220-7022.4
A+ 220-702
running in user mode has started the Win32 subsystem necessary to provide the graphicsof the progress bar. If the progress bar has appeared and the logon screen has not yetbeen displayed, most likely the problem is caused by a corrupted driver or service that isstarted after the kernel has finished its part of the boot. Your general attack plan to fixthe problem is to isolate and disable the Windows component, service, or applicationcausing trouble. However, if user data on the hard drive is not backed up, do what youcan to copy that data to another media before you focus on the problem at hand.
Follow these steps:
1. Launch Windows RE from the Vista setup DVD and run Startup Repair from theRecovery Environment menu (see Figure 16-17). It can’t do any harm, it’s easy touse, and it might fix the problem.
2. Reboot and press F8 to launch the Advanced Boot Options menu. Then select theLast Known Good Configuration. It’s important to try this option early in thetroubleshooting process, because you might accidentally overwrite a good LastKnown Good with a bad one as you attempt to log on with the problem stillthere.
3. In Windows RE, run System Restore. Select the latest restore point. If that doesn’t fixthe problem, try an earlier one.
4. Try booting into Safe Mode. If you don’t know the source of the problem, hereare some things you can try to discover the source and hopefully solve the problem:
a. Immediately run antivirus software to eliminate a virus as the problem.
b. Run Chkdsk c: /r to check and repair the hard drive.
c. Examine all the logs in Event Viewer for errors that might point to the problem.
Figure 16-17 Recovery tools in Windows RECourtesy: Course Technology/Cengage Learning
Notes The Last Known Good Configuration is updated after you log on normally to Vista. However,logging onto a computer when booting into Safe Mode does not update the Last Known Good.
CHAPTER 16832 Fixing Windows Problems
A+220-7022.4
d. Use Software Explorer and MSconfig to stop any applications just installed. Thenuninstall and reinstall the application.
e. Use Device Manager to check for hardware errors and disable any devices justinstalled. If you have just updated a driver, roll back the driver.
f. Open an elevated command prompt window and use the System File Checker(SFC) tool to search for and replace corrupted system files. The command sfc/scannow searches for and replaces corrupted system files. Be sure to restart thesystem after this command is finished.
g. Rename the \Windows\Ntbtlog.txt file to keep it from being overwritten so youcan view it later.
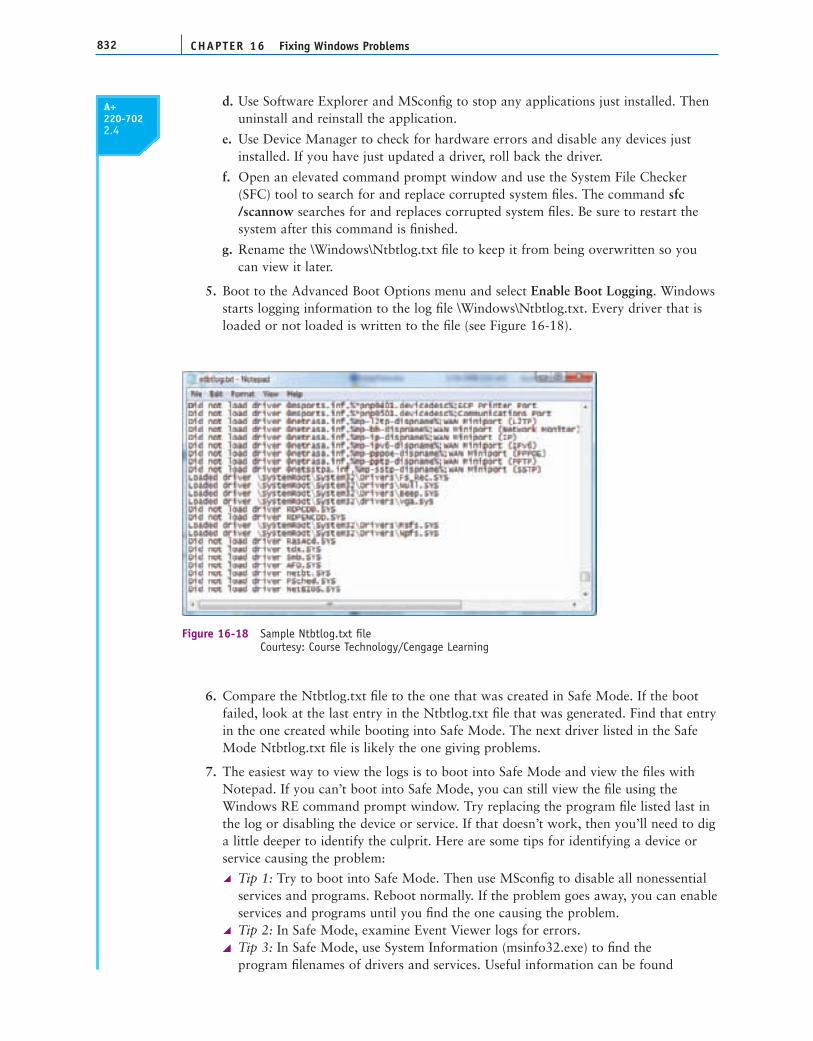
5. Boot to the Advanced Boot Options menu and select Enable Boot Logging. Windowsstarts logging information to the log file \Windows\Ntbtlog.txt. Every driver that isloaded or not loaded is written to the file (see Figure 16-18).
6. Compare the Ntbtlog.txt file to the one that was created in Safe Mode. If the bootfailed, look at the last entry in the Ntbtlog.txt file that was generated. Find that entryin the one created while booting into Safe Mode. The next driver listed in the SafeMode Ntbtlog.txt file is likely the one giving problems.
7. The easiest way to view the logs is to boot into Safe Mode and view the files withNotepad. If you can’t boot into Safe Mode, you can still view the file using theWindows RE command prompt window. Try replacing the program file listed last inthe log or disabling the device or service. If that doesn’t work, then you’ll need to diga little deeper to identify the culprit. Here are some tips for identifying a device orservice causing the problem:
Tip 1: Try to boot into Safe Mode. Then use MSconfig to disable all nonessentialservices and programs. Reboot normally. If the problem goes away, you can enableservices and programs until you find the one causing the problem.Tip 2: In Safe Mode, examine Event Viewer logs for errors.Tip 3: In Safe Mode, use System Information (msinfo32.exe) to find the program filenames of drivers and services. Useful information can be found
Figure 16-18 Sample Ntbtlog.txt fileCourtesy: Course Technology/Cengage Learning
833Troubleshooting Vista Startup
16
A+220-7022.4
A+ 220-702
at these locations: Services in the Software Environment group and ProblemDevices in the Components group.Tip 4: Compare the entries in the Ntbtlog.txt file when booting in Safe Mode tothe entries when booting normally. Consider that the culprit might be any itemthat is loaded for a normal boot but not loaded for Safe Mode. Disable eachdriver one at a time until the problem goes away.Tip 5: If the computer will not boot into Safe Mode, compare the Ntbtlog.txt fileto one created on a similar computer booted into Safe Mode. Look for a service ordriver listed as loaded on the good computer that is not loaded or is missing onthe bad computer.
8. After you believe you’ve identified the problem service or device, if you can boot intoSafe Mode, first use Device Manager to disable the device or use the Services consoleto disable the service. Then reboot, and, if the problem goes away, restore the program file and enable the driver or service.
9. If you cannot boot into Safe Mode, open the command prompt window of theRecovery Environment. Then back up the registry and open the Registry Editor usingthe regedit command. Drill down to the service or device key. The key that loadsservices and drivers can be found in this location:
HKEY__LOCAL__MACHINE\System\CurrentControlSet\Services
10. Disable the service or driver by changing the Start value to 0x4. Close the RegistryEditor and reboot. If the problem goes away, use the Copy command to replace theprogram file, and restart the service or driver.
PROBLEMS AT STAGE 3: AFTER WINDOWS LOGONProblems that occur after the user logs onto Windows are caused by applications or servicesconfigured to launch at startup. Programs can be set to launch at startup by placing theirshortcuts in startup folders, by Scheduled Tasks, or by software installation processes thataffect registry entries. If you see an error message at startup that gives you a clue as towhich service or program is at fault, test your theory by using MSconfig to disable that program. Recall from Chapter 14 that you can also use MSconfig to temporarily disablegroups of startup services and startup programs and then enable a few services and programs until you find the one causing the problem.
Table 16-1 summarizes some error messages including blue screen or STOP errors youmight encounter during the boot and what to do about them. STOP errors occur when theWindows kernel encounters an error in a kernel mode process, which most likely points to ahardware or driver problem.
HOW TO RECOVER LOST DATAWhen data is lost or corrupted, you might be able to recover it using Windows tools, third-party software, or commercial data recovery services. This section discusses your options torecover lost data.
A+ Exam Tip The A+ 220-702 Practical Application exam expects you to know how to use SystemInformation to help you resolve a Windows startup problem.

CHAPTER 16834 Fixing Windows Problems
A+220-7022.4
RECOVER A DELETED OR CORRUPTED DATA FILEHere are some things to try to recover a deleted or corrupted data file:
If you have accidentally deleted a data file, to get it back, look in the Recycle Bin.Drag and drop the file back to where it belongs, or right-click the file and clickRestore on the shortcut menu.
Error or Error Message Description and What to Do
Non-system disk or disk errorReplace and press any key when ready
Startup BIOS could not find a boot device. CheckBIOS setup for the boot sequence and try toboot from another device.
Invalid partition tableError loading operating systemMissing operating system
MBR record is damaged or the active partition iscorrupt or missing. Use the repair commandsfrom the Windows RE command prompt window.
An application launched at startup that gives errors or takes up resources
Use Software Explorer to remove it from the listof startup programs.
Stop 0xc0000034 or The Windows BootConfiguration Data file is missing required information
The C:\Boot\BCD file is corrupted or missing. Use the Startup Repair tool in Windows RE orthe Bootrec command.
Stop 0x0A or IRQL_NOT_LESS_OR_EQUAL Caused by a driver or service making an illegalaccess to memory. Try the Last Known GoodConfiguration. Then look for an incompatibledriver or service.
Stop 0x1E or KMODE_EXCEPTION_NOT-HANDLED
A bad driver or service has performed an illegalaction. Look for corrupted or bad drivers orservices. Try updating firmware.
Stop 0x24 or NTFS_FILE_SYSTEM Suspect a failing hard drive or bad third-partydisk utility tools.
Stop 0x2E or DATA_BUS_ERROR A hardware problem most likely caused by failing memory or a corrupted hard drive.
Stop 0x50 or PAGE_FAULT_IN_NONPAGED_AREA
Caused by failing memory or bad software. Testmemory using the Memory Diagnostic tool.
Stop 0x7B or INACCESSIBLE_BOOT_DEVICE Windows cannot access the hard drive. This isprobably caused by installing bad or incorrecthard drive drivers.
Stop 0xFE or BUGCODE_USB_DRIVER Caused by corrupted USB drivers. Update themotherboard drivers for the USB ports.
Any other Stop error that occurs during startup
Other Stop errors are most likely caused by a corrupted registry, a system file that is missing or damaged, or a device driver that ismissing or damaged. Use the Startup Repair tooland then examine the log file it creates atC:\Windows\System32\LogFiles\Srt\Srttail.txt.
Any Stop error that occurs during a Vista installation
See the Microsoft Knowledge Base article935806 for a list of Stop errors duringinstallation and what to do about them.
Table 16-1 Error messages during the Vista startup and what to do about them
835Troubleshooting Vista Startup
16
A+220-7022.4
A+ 220-702
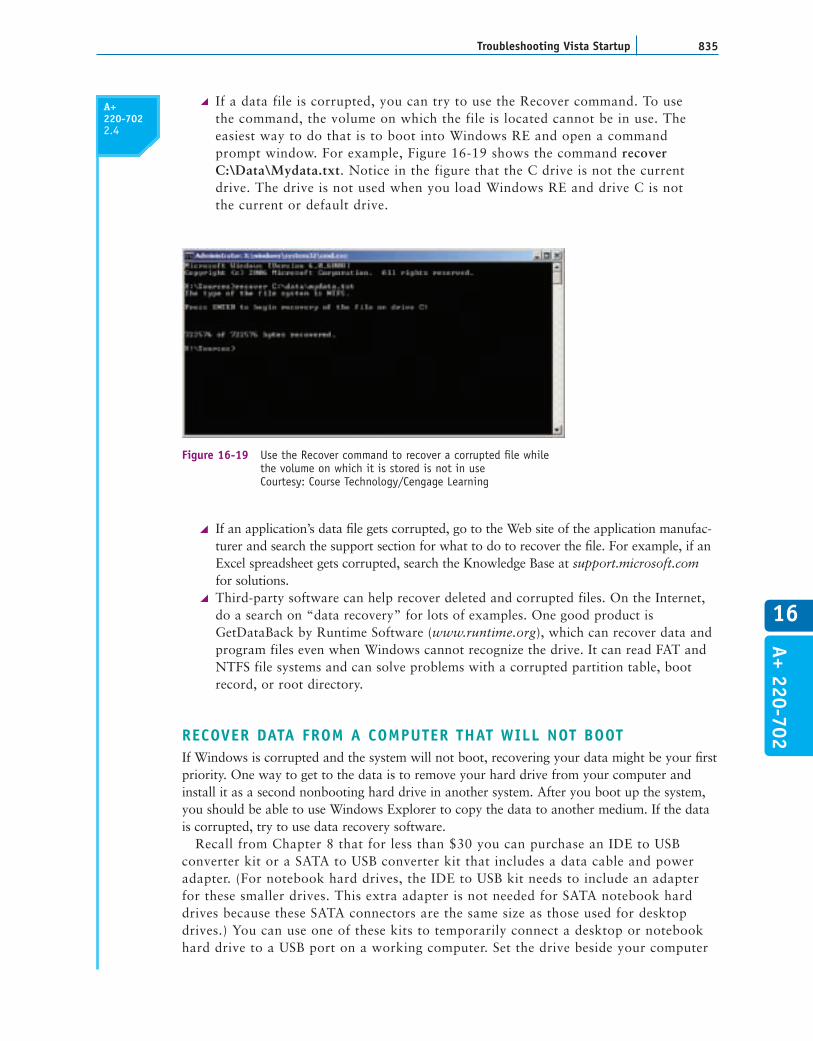
If a data file is corrupted, you can try to use the Recover command. To use the command, the volume on which the file is located cannot be in use. Theeasiest way to do that is to boot into Windows RE and open a command prompt window. For example, Figure 16-19 shows the command recoverC:\Data\Mydata.txt. Notice in the figure that the C drive is not the currentdrive. The drive is not used when you load Windows RE and drive C is not the current or default drive.
Figure 16-19 Use the Recover command to recover a corrupted file whilethe volume on which it is stored is not in useCourtesy: Course Technology/Cengage Learning
If an application’s data file gets corrupted, go to the Web site of the application manufac-turer and search the support section for what to do to recover the file. For example, if anExcel spreadsheet gets corrupted, search the Knowledge Base at support.microsoft.comfor solutions.Third-party software can help recover deleted and corrupted files. On the Internet,do a search on “data recovery” for lots of examples. One good product isGetDataBack by Runtime Software (www.runtime.org), which can recover data andprogram files even when Windows cannot recognize the drive. It can read FAT andNTFS file systems and can solve problems with a corrupted partition table, bootrecord, or root directory.
RECOVER DATA FROM A COMPUTER THAT WILL NOT BOOTIf Windows is corrupted and the system will not boot, recovering your data might be your firstpriority. One way to get to the data is to remove your hard drive from your computer andinstall it as a second nonbooting hard drive in another system. After you boot up the system,you should be able to use Windows Explorer to copy the data to another medium. If the datais corrupted, try to use data recovery software.
Recall from Chapter 8 that for less than $30 you can purchase an IDE to USBconverter kit or a SATA to USB converter kit that includes a data cable and poweradapter. (For notebook hard drives, the IDE to USB kit needs to include an adapterfor these smaller drives. This extra adapter is not needed for SATA notebook harddrives because these SATA connectors are the same size as those used for desktopdrives.) You can use one of these kits to temporarily connect a desktop or notebookhard drive to a USB port on a working computer. Set the drive beside your computer

CHAPTER 16836 Fixing Windows Problems
and plug one end of the data cable into the drive and the other into the USB port.(For an IDE drive, a jumper on the drive must be set to the master setting.) The ACadapter supplies power to the drive. While power is getting to the drive, be careful tonot touch the circuit board on the drive.
Using Windows Explorer, you can browse the drive and copy data to other media. Afteryou have saved the data, use Disk Management to try to repartition and reformat the drive.You can also use diagnostic software from the hard drive manufacturer to examine the driveand possibly repair it.
USE A DATA RECOVERY SERVICEIf your data is extremely valuable and other methods have failed, you might want to con-sider a professional data recovery service. They’re expensive, but getting the data backmight be worth it. To find a service, use Google.com and search on “data recovery.” Beforeselecting a service, be sure to read up on reviews, understand the warranty and guarantees,and perhaps get a recommendation from a satisfied customer.
TROUBLESHOOTING WINDOWS 2000/XP STARTUP
In Chapter 15, you learned how the Windows 2000/XP boot process works and about thedifferent tools you can use to solve boot problems. These tools include the AdvancedOptions menu, the boot disk, the Recovery Console, the Windows XP Automated SystemRecovery process, and the Windows 2000 Emergency Repair process. Before you read thispart of the chapter, you might want to take a few moments to review the steps to loadingWindows 2000/XP outlined in Chapter 15 and also the tools to solve Windows 2000/XPstartup problems. With this knowledge in hand, you’re ready to face Windows 2000/XPstartup problems. Follow these steps:
1. As with every PC problem, begin by interviewing the user to find out what hasrecently changed, what happened just before the problem started, and how toreproduce the problem. Ask what has recently happened. Has new hardware orsoftware been installed? Don’t forget to ask about any important data that is notbacked up.
2. If important data is not backed up, make every effort to copy the data to anothermedia before you try to solve the Windows problem. Don’t risk the data without theuser’s permission. If the system is giving so many errors that you cannot copy data,try booting into Safe Mode (see Figure 16-20). If Safe Mode doesn’t load, you canuse the Recovery Console to access the data. If Recovery Console cannot access thehard drive, you can move the hard drive to another computer and access it as asecond drive in that computer. An IDE to USB or SATA to USB converter kit workswell to make the connection so that you don’t have to install the drive in the othercomputer case.
3. Next, determine at what point in the boot the system fails. Decide if you think theproblem is hardware or software related.
4. If you think the problem is related to hardware, check the simple things first. Turnoff the power and restart the system. Check for loose cables, switches that are noton, stuck keys on the keyboard, a wall outlet switch that has been turned off, andsimilar easy-to-solve problems.
A+220-7022.4

837Troubleshooting Windows 2000/XP Startup
16
A+220-7022.4
5. If an error message is displayed on-screen, start by addressing it. Table 16-2 listsseveral startup errors and what to do about them. As you work to correct theproblem and restore the system, always keep in mind to use the least drastic solutionthat will change as little of the system as possible.
6. If you think the problem is software related and you cannot boot to the Windowsdesktop, try booting to the Advanced Options menu (hold down F8 while Windowsloads) and select the Last Known Good Configuration. If you want to use thisoption, it’s important to use it early in the troubleshooting process before youaccidentally overwrite the Last Known Good Configuration.
Figure 16-20 Windows XP Safe Mode with Task ManagerCourtesy: Course Technology/Cengage Learning
A+ Exam Tip The A+ 220-702 Practical Application exam expects you to be able to select the appro-priate next step in troubleshooting a failed boot when given a specific scenario. As you study the tools andmethods in this part of the chapter, pay attention to how a technique affects the installed OS, applications,and data. The idea is to fix the problem by using the tool that least affects the OS, applications, and data.
7. If you can load the Windows desktop, but the system is giving many errors or isextremely slow, suspect a virus is present. Run antivirus software to scan the entirehard drive for malicious software. If the antivirus software won’t work or is notinstalled, boot into Safe Mode and install and run the software there. You will learnmore about using antivirus software in Chapter 20.
8. If the system has recently been changed, such as installing software or hardware, assumethe installation is the guilty party until it’s proven innocent. Use Device Manager to dis-able or uninstall the device. If this solves the problem, then try to find updated device driv-ers for the device. Search the Microsoft Web site for known problems with the device orsearch the device manufacturer Web site. Try updating or rolling back the device drivers.
A+ 220-702

838
Error Message What It Means and What to Do About It
Errors that occur before the Windows load begins:
Hard drive not found Fixed disk error Disk boot failure, insert system disk and press enterNo boot device available
Startup BIOS cannot find the hard drive. Problemswith the hard drive and its subsystem are coveredin Chapter 8.
Invalid boot diskInaccessible boot deviceInvalid partition tableError loading operating systemMissing operating systemNo operating system foundError loading operating system
The program in the MBR displays these messageswhen it cannot find the active partition on thehard drive or the boot sector on that partition. Usethe Diskpart command from the Recovery Consoleto check the hard drive partition table for errors.Sometimes Fixmbr solves the problem. Third-partyrecovery software such as PartitionMagic mighthelp. If a setup program came bundled with thehard drive (such as Data Lifeguard from WesternDigital or MaxBlast from Maxtor), use it to exam-ine the drive. Check the hard drive manufacturer’sWeb site for other diagnostic software.
Black screen with no error messages This is likely to be a corrupted MBR, partition table,boot sector, or Ntldr file. Boot the PC using aWindows 2000/XP boot disk and then try the fixmbrand fixboot commands from the Recovery Console.You might have to reinstall Windows.
When you first turn on the computer, it continually reboots.
This is most likely a hardware problem. Could bethe CPU, motherboard, or RAM. First disconnect orremove all nonessential devices such as USB orFireWire devices. Inside the case, check all con-nections using safety precautions to protect thesystem against static electricity as you work. Tryreseating RAM. Check for fans that are not work-ing, causing the CPU to quickly overheat.
Windows gives an error and then automatically restarts in an endless loop.
To stop the automatic restarts, press F8 to loadthe Advanced Options Menu. Then select DisableAutomatic Restart on System Failure. You will thenbe able to read the error message and can turnyour attention to addressing this error.
A disk read error occurredMissing NTLDRNTLDR is missingNTLDR is compressed
A disk is probably in the floppy disk drive.Remove the disk and reboot. When booting fromthe hard drive, these errors occur if Ntldr hasbeen moved, renamed, or deleted, or is corrupted,if the boot sector on the active partition iscorrupted, or you have just tried to install anolder version of Windows, such as Windows 98, onthe hard drive. First try replacing Ntldr. Thencheck Boot.ini settings.
When you first turn on a system, it begins the boot process, but then powers down.
The CPU might be quickly overheating. Check forfans not running. Is this a new CPU installation?If so, make sure the cooler assembly on top of theCPU is correctly installed.
STOP errors that cause Windows to lock up:
A text error message appears on a blue screen andthen the system halts.
Stop errors are usually caused by viruses, errors inthe ffile system, a corrupted hard drive, or a hard-ware problem. Search the Microsoft Web site forinformation about an unidentiffied stop error.Several stop errors and their solutions can be foundin Table 16-1 earlier in the chapter.
A+220-7022.4
Table 16-2 Error messages during Windows 2000/XP startup and what to do about them

839Troubleshooting Windows 2000/XP Startup
16
A+220-7022.4
A+ 220-702
Figure 16-21 Windows XP gives you the opportunity to launch System Restore before it loads Safe ModeCourtesy: Course Technology/Cengage Learning
Error Message What It Means and What to Do About It
Startup errors that occur because a program is corrupted or not found:
A device has failed to start Service failed to startProgram not found
A registry entry or startup folder is referencing astartup program it cannot find. Use MSconfig or theServices Console to find the entry and then replacethe missing program. These errors are sometimescaused by uninstall routines that left behind theseorphan entries. Depending on the error, the systemmight or might not halt.
Table 16-2 Error messages during Windows 2000/XP startup and what to do about them (continued)
9. If a new application or utility program has just been installed, go to the Add or RemovePrograms applet in Control Panel and uninstall the software. Reboot the system. If theproblem goes away, then try reinstalling the software. If the problem comes back, go tothe software manufacturer’s Web site and download and install any updates or fixes.
10. If the system will not start normally, try to boot into Safe Mode. If you boot into SafeMode and Windows XP recognizes System Restore has previously been used to createrestore points, Windows XP gives you the opportunity to launch the System RestoreWizard (see Figure 16-21). The wizard gives you the opportunity to choose a restore pointfrom those previously saved. Recall that when Windows is restored to a restore point, allWindows settings are returned to the way they were when the restore point was created.
11. After you boot into Safe Mode, you can use the SFC, Chkdsk, and Defrag commands to verify system files and clean the hard drive. How to do these tasks iscovered in Chapter 13. Use antivirus software to scan for viruses. Restart the system.If the problem is not solved, then use System Restore to restore previous settings. Theidea is to fix the problem while making as few changes to the system as necessary.

CHAPTER 16840 Fixing Windows Problems
A+220-7022.4
12. If you cannot boot into Safe Mode, try Safe Mode with Command Prompt. Then trythese commands, rebooting between commands: Sfc.exe, Chkdsk C: /r, andC:\Windows\system32\restore\rstrui.exe.
13. If you cannot boot from the hard drive, try creating and using a Windows 2000/XPboot disk. If you can boot to the Windows desktop when using this boot disk, youcan assume that the boot files in the root directory of drive C are missing orcorrupted. If necessary, you can restore these files using the Recovery Console. Also use Fixmbr and Fixboot to repair the MBR and boot sector.
14. If you cannot boot from the Windows 2000/XP boot disk, load the RecoveryConsole and do the following to restore system files. After you have made a change,restart the system to find out if the problem is fixed or has changed before youattempt the next fix:
a. Get a directory listing of files in the root directory. If you see garbage on thescreen instead of a clean directory list, most likely the hard drive file system iscorrupted or the hard drive is physically damaged.
b. Use the Chkdsk command to scan the hard drive for errors.
c. Try copying the backup copies of the registry files from the \Windows\repair folderto the \Windows\system32\config folder. Directions are given in Chapter 15.Reboot to see if the problem is solved.
d. If you have previously identified a key Windows service that is causing the prob-lem, you can locate the file in the \Windows folder and replace it with a fresh copyfrom the Windows 2000/XP setup CD.
e. To see a list of all services you can disable, use the Listsvc command. Use theDisable and Enable commands to try disabling each service one by one until youfind the one causing the problem.
f. For Windows XP, try using System Restore to return the system to a previouslysaved restore point.
g. If you have a backup of the system state, use Ntbackup to restore the system stateusing this backup.
15. If the problem is still not solved, it’s time to assume that the Windows installation iscorrupted and you need to restore the Windows installation. However, if there is dataon the hard drive that is not backed up, first look over the section “How to RecoverLost Data” earlier in the chapter. There might be a way to recover the data beforeyou use one of the following methods to restore the Windows installation. Here arethe tools used to restore a Windows installation:
a. For Windows XP, use Automated System Recovery to restore the system to thelast ASR backup. You will then need to restore data from backups.
b. For Windows 2000, use the Emergency Repair Process to restore Windows 2000to its state immediately after it was installed. You can then install applications anddrivers and restore data from backups.
c. Use the Windows 2000/XP setup CD to perform an in-place upgrade of Windows2000/XP. Recall from Chapter 12 that an in-place upgrade installs Windows ontop of the existing installation so that applications and drivers don’t have to bereinstalled. The data might not be disturbed.
d. If the in-place upgrade does not work, use the Windows 2000/XP setup CD toperform a clean install of Windows 2000/XP. You will then need to reinstallapplications and drivers and restore the data from backups.

841Chapter Summary
16
A+220-7022.4
As you work to solve a Windows problem, keep in mind that many tools are at your disposal.As you decide which tool to use to correct a problem, always use the least drastic solution tomake the fewest possible changes to the system. For example, if you know a driver is giving aproblem, even though you can use System Restore to restore the system before the driver wasinstalled, doing so is more drastic than simply rolling back the driver. Always choose themethod that makes as few changes to the system as possible and still solves the problem.
Notes For a laptop or other brand-name computer, don’t forget to reinstall Windows using recoveryCDs provided by the computer manufacturer. Alternately, it might be possible to reinstall Windows from arecovery partition on the hard drive.
Notes When using System Restore and system state backups, you run the risk of undoing desiredchanges to the Windows environment and software installations. Before using one of these fixes, considerwhat desired changes will be lost when you apply the fix.
When you think the problem is solved, be sure to restart the system one last time to makesure all is well. Verify that everything is working and then ask the user to also verify that theproblem is solved and all is working. And don’t forget the paperwork. As you work, keepnotes about the original symptoms, what you’re doing, and the outcome. This paperworkwill be a great help the next time you’re faced with a similar problem.
>> CHAPTER SUMMARY
When solving a problem caused by hardware, first identify the device causing theproblem. Tools that can help are error messages that are displayed on the screen, the VistaProblem Reports and Solutions tool, the XP Error Reporting tool, Event Viewer, andReliability and Performance Monitor.
To fix a problem with a device or its drivers, use Device Manager, Windows update,System Restore, Safe Mode, System File Checker, and possibly use BIOS setup.
To fix a problem with an application, use Task Manager, antivirus software, VistaProblem Reports and Solutions, XP Error Reporting, Windows updates, System Restore,and the Web site of the application developer.
Windows Vista tools and techniques used to troubleshoot a failed boot include LastKnown Good Configuration, Startup Repair, System Restore, Safe Mode, CommandPrompt, in-place upgrade of Windows Vista, Complete PC Restore, and reformatting thehard drive and reinstalling Windows.
Startup Repair in the Windows Recovery Environment can automatically fix manyWindows problems, including those caused by a corrupted BCD file and missing systemfiles. You can’t cause any additional problems by using it and it’s easy to use. Therefore, itshould be your first recovery option when Vista refuses to load.
Last Known Good Configuration can solve problems caused by a bad hardware orsoftware installation by undoing the install.
Use the command prompt window in Windows RE when the other RE tools fail to solvethe problem.

CHAPTER 16842 Fixing Windows Problems
Your first decision in troubleshooting a failed Vista boot is to decide at what point in theboot the failure occurred. Determine if the failure occurred before the progress bar, afterthe progress bar and before logon, or after logon.
If a hard drive contains valuable data but will not boot, you might be able to recover the databy installing the drive in another system as the second, nonbooting hard drive in the system.
If you can boot from the Windows 2000/XP boot disk and load the Windows desktop,you have proven the problem is with the boot files in the root directory of the hard drive.
Access the Recovery Console by first booting from the Windows 2000/XP CD, or the fourWindows 2000 setup disks, or install the console under the boot loader menu and accessit from there.
The Windows 2000 Emergency Repair Process lets you restore the system to its state atthe end of the Windows 2000 installation. Don’t use it unless all other methods fail,because you will lose all changes made to the system since the installation. TheEmergency Repair Process requires the emergency repair disk.
You can use the Windows 2000/XP setup CD to perform an in-place upgrade or cleaninstallation of Windows.
>> KEY TERMS
For explanations of key terms, see the Glossary near the end of the book.
secondary logon
>> REVIEWING THE BASICS
1. When you have a problem with a USB device, what is the simplest way to determine thatthe USB port is good?
2. When you have a problem with a USB device, what is the simplest way to determine thatthe USB device is not causing the problem?
3. How can you determine that device drivers loaded at startup are not interfering with anapplication that is having problems?
4. What is the command used for testing memory?
5. If you are not sure which device is causing a video problem—the monitor or the videocard—which one should you exchange first? Why?
6. What type of device, when installed, is not listed in BIOS setup, Device Manager, or thePrinters window?
7. What is the term used to describe undoing a driver update?
8. What Windows Vista tool can you use to uninstall a USB device?
9. What Windows XP tool can you use to uninstall a FireWire device?
10. What Windows tool can you use to uninstall a network card?
11. What Windows tool can you use to restore the Windows system to a previous point intime before a device was installed?

843Thinking Critically
16
12. What Windows tool can you use to update your video drivers?
13. What symbols might Device Manager use to indicate a device is not working?
14. What level of permission must a user account have to install software?
15. If a computer won’t boot, to figure out if the problem is related to the hard drive or othervital hardware component, what would be the first step?
16. What is another name for a Windows Stop error?
17. What is the name of the folder that is created when files from an old installation aremoved during a reinstall of Vista?
18. What is the purpose of the hidden partition used by many of the brand-name computercompanies?
19. What information is contained in the C:\Windows\System32\LogFiles\SRT\SRTTrail.txt file?
20. What is the name of the log file that Windows uses when booting in Safe Mode?
>> THINKING CRITICALLY
1. Windows Vista refused to start and the error message says something about the WinLoadprogram file being missing. Which action is the best way to fix the problem? Why?
a. Boot from the Vista DVD and use the command prompt window to copy the WinLoadfile from a working PC to this PC.
b. Boot from the Vista DVD and use the Startup Repair tool.
c. Use the latest Complete PC backup to restore the system.
d. Boot into Safe Mode and restore the program from backup.
2. An error message is displayed during Vista startup before the progress bar appeared aboutmissing services program files. You try to boot into Safe Mode, but get the same error message. Next, you use the Vista DVD to boot into the Recovery Environment. Select thebest two tasks to fix the problem and order them correctly.
a. Use System Restore to restore the system to a previous restore point.
b. Use the command prompt to disable and then replace the service.
c. Use Startup Repair.
d. Use Complete PC Restore.
3. You tried to use the Automated System Recovery to restore a failed Windows XP system.The process failed with errors, but there is an extremely important data file on the harddrive that you need to recover. The hard drive is using the NTFS file system. What do you do?
a. Most likely the file is toast. The ASR process probably destroyed the file if it were notalready destroyed.
b. Boot to the Recovery Console using the Windows XP setup CD and attempt to recoverthe file.
c. Reinstall Windows XP and then recover the file.
d. Boot to the Advanced Options menu and use Safe Mode to recover the file.

CHAPTER 16844 Fixing Windows Problems
4. When you start Windows XP, you see an error message about a service that has failed tostart and then the system locks up. You think this service is related to a critical Windowsprocess. What do you try first? Second?
a. Boot into Safe Mode and run System Restore.
b. Select the Last Known Good Configuration on the Advanced Options menu.
c. Perform an in-place upgrade of Windows XP.
d. Use the Recovery Console to restore the system file.
5. Which statement(s) are true about the Windows 2000/XP boot disk?
a. The boot disk can be used to boot the system to the Windows 2000/XP desktop whenNtldr is missing from the hard drive.
b. The boot disk can be used to boot to the desktop even when the C:\Windows folder iscorrupted.
c. The boot disk can be used in place of the boot files in the root directory of the activepartition.
d. The boot disk can be used to boot to the desktop even when the partition table is corrupted.
>> HANDS-ON PROJECTS
PROJECT 16-1: Digging Deeper into System File Checker
The System File Checker tool can be used to find and replace corrupted Vista system files. The toolkeeps a log of its actions, and, if it cannot replace a corrupted file, you can find that informationin the log file. Then you can manually replace the file. Locate the Microsoft Knowledge BaseArticle 929833 at the support.microsoft.com site. Do whatever research is necessary to understandthe steps in the article to manually replace a corrupted file and answer these questions:
1. What are other parameters for the sfc command besides /scannow?
2. Explain the purpose of the findstr command when finding the log file.
3. Can a filename other than sfcdetails.txt be used in the findstr command line? Explainyour answer.
4. What is the purpose of the edit command?
5. Explain the purpose of the takeown command when replacing a system file.
6. Explain why the icacls command is needed in the process.
7. List some ways that you can locate a known good copy of the corrupted system file.
PROJECT 16-2: Practice Using the Recovery Console
To get some practice using the Recovery Console, first boot from your Windows 2000/XPsetup CD and load the Recovery Console. Then do the following:
1. Get a directory listing of C:\. Are files normally hidden in Windows Explorer displayed inthe list?
2. Create a folder on your hard drive named C:\Temp.
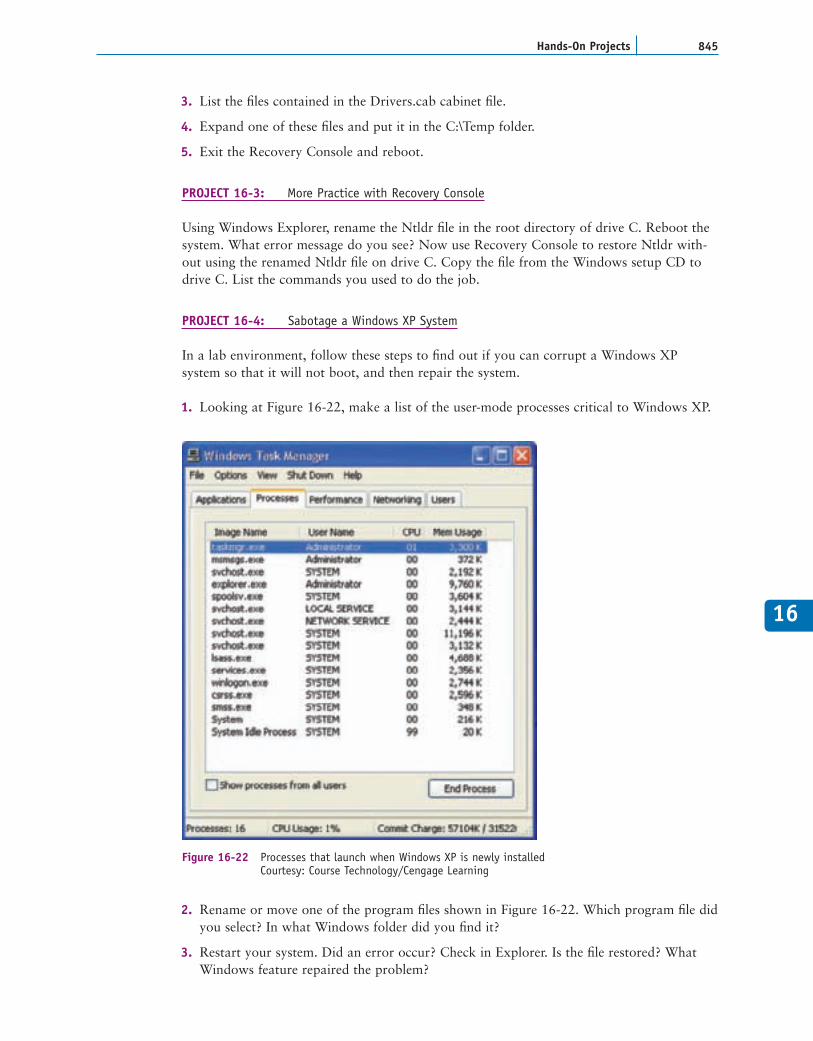
845Hands-On Projects
16
3. List the files contained in the Drivers.cab cabinet file.
4. Expand one of these files and put it in the C:\Temp folder.
5. Exit the Recovery Console and reboot.
PROJECT 16-3: More Practice with Recovery Console
Using Windows Explorer, rename the Ntldr file in the root directory of drive C. Reboot thesystem. What error message do you see? Now use Recovery Console to restore Ntldr with-out using the renamed Ntldr file on drive C. Copy the file from the Windows setup CD todrive C. List the commands you used to do the job.
PROJECT 16-4: Sabotage a Windows XP System
In a lab environment, follow these steps to find out if you can corrupt a Windows XPsystem so that it will not boot, and then repair the system.
1. Looking at Figure 16-22, make a list of the user-mode processes critical to Windows XP.
2. Rename or move one of the program files shown in Figure 16-22. Which program file didyou select? In what Windows folder did you find it?
3. Restart your system. Did an error occur? Check in Explorer. Is the file restored? WhatWindows feature repaired the problem?
Figure 16-22 Processes that launch when Windows XP is newly installedCourtesy: Course Technology/Cengage Learning

CHAPTER 16846 Fixing Windows Problems
4. Try other methods of sabotaging the Windows XP system, but carefully record exactlywhat you did to sabotage the boot. Can you make the boot fail?
5. Now recover the Windows XP system. List the steps you took to get the system back togood working order.
PROJECT 16-5: Using a Windows 2000/XP Boot Disk
Create a Windows 2000/XP boot disk and use it to boot your computer. Describe how theboot worked differently from booting entirely from the hard drive.
>> REAL PROBLEMS, REAL SOLUTIONS
REAL PROBLEM 16-1: Fixing a PC Problem
This project should be fun, extremely useful, and give you an opportunity to find out justhow much you have learned so far from this book. Make yourself available to family andfriends who have problems with their computers. For each problem, don’t forget to followthe procedures for troubleshooting you have learned in this book, especially the one aboutbacking up user data before you make any changes to a system. For the first three problemsyou face, keep a record that includes this information:
1. Describe the problem as the user described it to you.
2. Briefly list the things you did to discover the cause of the problem.
3. What was the final solution?
4. How long did it take you to fix the problem?
5. What would you do differently the next time you encounter this same problem?