CHAPTER 38 · PDF fileCHAPTER 38. POWER TOOLS – SAWS ... Bevel Cutting Angle Adjustment...
18
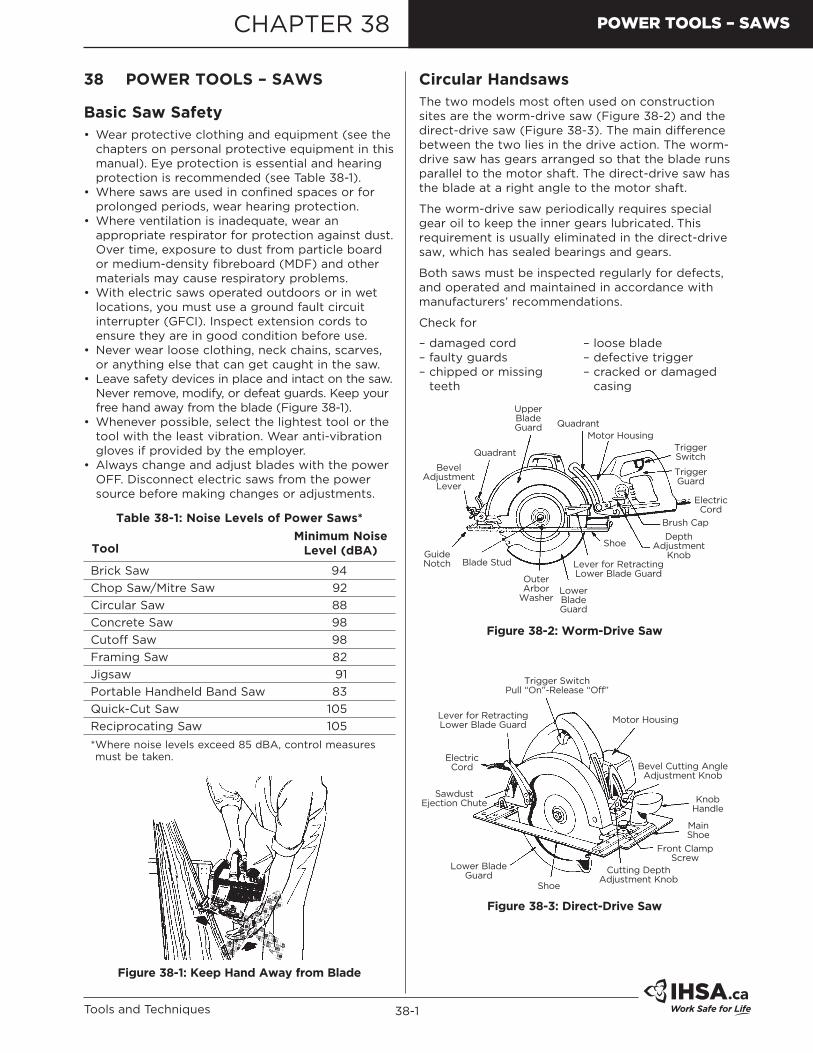
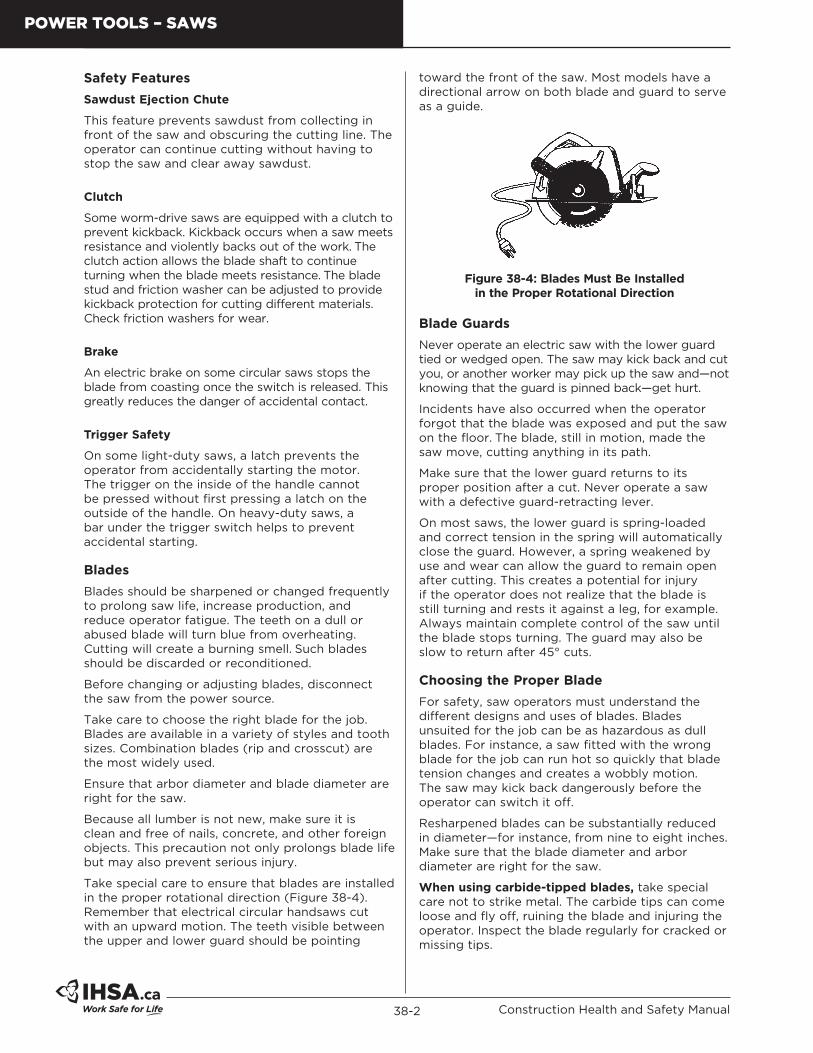
38-1 Tools and Techniques CHAPTER 38 POWER TOOLS – SAWS 38 POWER TOOLS – SAWS Basic Saw Safety • Wear protective clothing and equipment (see the chapters on personal protective equipment in this manual). Eye protection is essential and hearing protection is recommended (see Table 38-1). • Where saws are used in confined spaces or for prolonged periods, wear hearing protection. • Where ventilation is inadequate, wear an appropriate respirator for protection against dust. Over time, exposure to dust from particle board or medium-density fibreboard (MDF) and other materials may cause respiratory problems. • With electric saws operated outdoors or in wet locations, you must use a ground fault circuit interrupter (GFCI). Inspect extension cords to ensure they are in good condition before use. • Never wear loose clothing, neck chains, scarves, or anything else that can get caught in the saw. • Leave safety devices in place and intact on the saw. Never remove, modify, or defeat guards. Keep your free hand away from the blade (Figure 38-1). • Whenever possible, select the lightest tool or the tool with the least vibration. Wear anti-vibration gloves if provided by the employer. • Always change and adjust blades with the power OFF. Disconnect electric saws from the power source before making changes or adjustments. Brick Saw 94 Chop Saw/Mitre Saw 92 Circular Saw 88 Concrete Saw 98 Cutoff Saw 98 Framing Saw 82 Jigsaw 91 Portable Handheld Band Saw 83 Quick-Cut Saw 105 Reciprocating Saw 105 *Where noise levels exceed 85 dBA, control measures must be taken. Tool Minimum Noise Level (dBA) Table 38-1: Noise Levels of Power Saws* Figure 38-1: Keep Hand Away from Blade Circular Handsaws The two models most often used on construction sites are the worm-drive saw (Figure 38-2) and the direct-drive saw (Figure 38-3). The main difference between the two lies in the drive action. The worm- drive saw has gears arranged so that the blade runs parallel to the motor shaft. The direct-drive saw has the blade at a right angle to the motor shaft. The worm-drive saw periodically requires special gear oil to keep the inner gears lubricated. This requirement is usually eliminated in the direct-drive saw, which has sealed bearings and gears. Both saws must be inspected regularly for defects, and operated and maintained in accordance with manufacturers’ recommendations. Check for – damaged cord – loose blade – faulty guards – defective trigger – chipped or missing – cracked or damaged – teeth – casing Upper Blade Guard Quadrant Lever for Retracting Lower Blade Guard Bevel Adjustment Lever Quadrant Motor Housing Trigger Switch Trigger Guard Electric Cord Depth Adjustment Knob Brush Cap Shoe Lower Blade Guard Outer Arbor Washer Blade Stud Guide Notch Figure 38-2: Worm-Drive Saw Trigger Switch Pull “On”-Release “Off” Motor Housing Bevel Cutting Angle Adjustment Knob Knob Handle Main Shoe Front Clamp Screw Cutting Depth Adjustment Knob Shoe Lower Blade Guard Sawdust Ejection Chute Lever for Retracting Lower Blade Guard Electric Cord Figure 38-3: Direct-Drive Saw
Transcript of CHAPTER 38 · PDF fileCHAPTER 38. POWER TOOLS – SAWS ... Bevel Cutting Angle Adjustment...
38-1Tools and Techniques
CHAPTER 38 POWER TOOLS – SAWS
38 POWERTOOLS–SAWS
BasicSawSafety• Wear protective clothing and equipment (see the
chapters on personal protective equipment in this manual). Eye protection is essential and hearing protection is recommended (see Table 38-1).
• Where saws are used in confined spaces or for prolonged periods, wear hearing protection.
• Where ventilation is inadequate, wear an appropriate respirator for protection against dust. Over time, exposure to dust from particle board or medium-density fibreboard (MDF) and other materials may cause respiratory problems.
• With electric saws operated outdoors or in wet locations, you must use a ground fault circuit interrupter (GFCI). Inspect extension cords to ensure they are in good condition before use.
• Never wear loose clothing, neck chains, scarves, or anything else that can get caught in the saw.
• Leave safety devices in place and intact on the saw. Never remove, modify, or defeat guards. Keep your free hand away from the blade (Figure 38-1).
• Whenever possible, select the lightest tool or the tool with the least vibration. Wear anti-vibration gloves if provided by the employer.
• Always change and adjust blades with the power OFF. Disconnect electric saws from the power source before making changes or adjustments.
Brick Saw 94
Chop Saw/Mitre Saw 92
Circular Saw 88
Concrete Saw 98
Cutoff Saw 98
Framing Saw 82
Jigsaw 91
Portable Handheld Band Saw 83
Quick-Cut Saw 105
Reciprocating Saw 105
* Where noise levels exceed 85 dBA, control measures must be taken.
ToolMinimumNoise
Level(dBA)
Table38-1:NoiseLevelsofPowerSaws*
Figure38-1:KeepHandAwayfromBlade
CircularHandsawsThe two models most often used on construction sites are the worm-drive saw (Figure 38-2) and the direct-drive saw (Figure 38-3). The main difference between the two lies in the drive action. The worm-drive saw has gears arranged so that the blade runs parallel to the motor shaft. The direct-drive saw has the blade at a right angle to the motor shaft.
The worm-drive saw periodically requires special gear oil to keep the inner gears lubricated. This requirement is usually eliminated in the direct-drive saw, which has sealed bearings and gears.
Both saws must be inspected regularly for defects, and operated and maintained in accordance with manufacturers’ recommendations.
Check for
– damaged cord – loose blade– faulty guards – defective trigger– chipped or missing – cracked or damaged– teeth – casing
UpperBladeGuard
Quadrant
Lever for RetractingLower Blade Guard
Bevel Adjustment
Lever
QuadrantMotor Housing
Trigger Switch
Trigger Guard
ElectricCord
Depth Adjustment
Knob
Brush Cap
Shoe
Lower Blade Guard
Outer Arbor
Washer
Blade StudGuideNotch
Figure38-2:Worm-DriveSaw
Trigger SwitchPull “On”-Release “Off”
Motor Housing
Bevel Cutting AngleAdjustment Knob
Knob Handle
Main Shoe
Front Clamp Screw
Cutting DepthAdjustment Knob
Shoe
Lower Blade Guard
Sawdust Ejection Chute
Lever for RetractingLower Blade Guard
ElectricCord
Figure38-3:Direct-DriveSaw
38-2 Construction Health and Safety Manual
POWER TOOLS – SAWS
SafetyFeatures
SawdustEjectionChute
This feature prevents sawdust from collecting in front of the saw and obscuring the cutting line. The operator can continue cutting without having to stop the saw and clear away sawdust.
Clutch
Some worm-drive saws are equipped with a clutch to prevent kickback. Kickback occurs when a saw meets resistance and violently backs out of the work. The clutch action allows the blade shaft to continue turning when the blade meets resistance. The blade stud and friction washer can be adjusted to provide kickback protection for cutting different materials. Check friction washers for wear.
Brake
An electric brake on some circular saws stops the blade from coasting once the switch is released. This greatly reduces the danger of accidental contact.
TriggerSafety
On some light-duty saws, a latch prevents the operator from accidentally starting the motor. The trigger on the inside of the handle cannot be pressed without first pressing a latch on the outside of the handle. On heavy-duty saws, a bar under the trigger switch helps to prevent accidental starting.
Blades
Blades should be sharpened or changed frequently to prolong saw life, increase production, and reduce operator fatigue. The teeth on a dull or abused blade will turn blue from overheating. Cutting will create a burning smell. Such blades should be discarded or reconditioned.
Before changing or adjusting blades, disconnect the saw from the power source.
Take care to choose the right blade for the job. Blades are available in a variety of styles and tooth sizes. Combination blades (rip and crosscut) are the most widely used.
Ensure that arbor diameter and blade diameter are right for the saw.
Because all lumber is not new, make sure it is clean and free of nails, concrete, and other foreign objects. This precaution not only prolongs blade life but may also prevent serious injury.
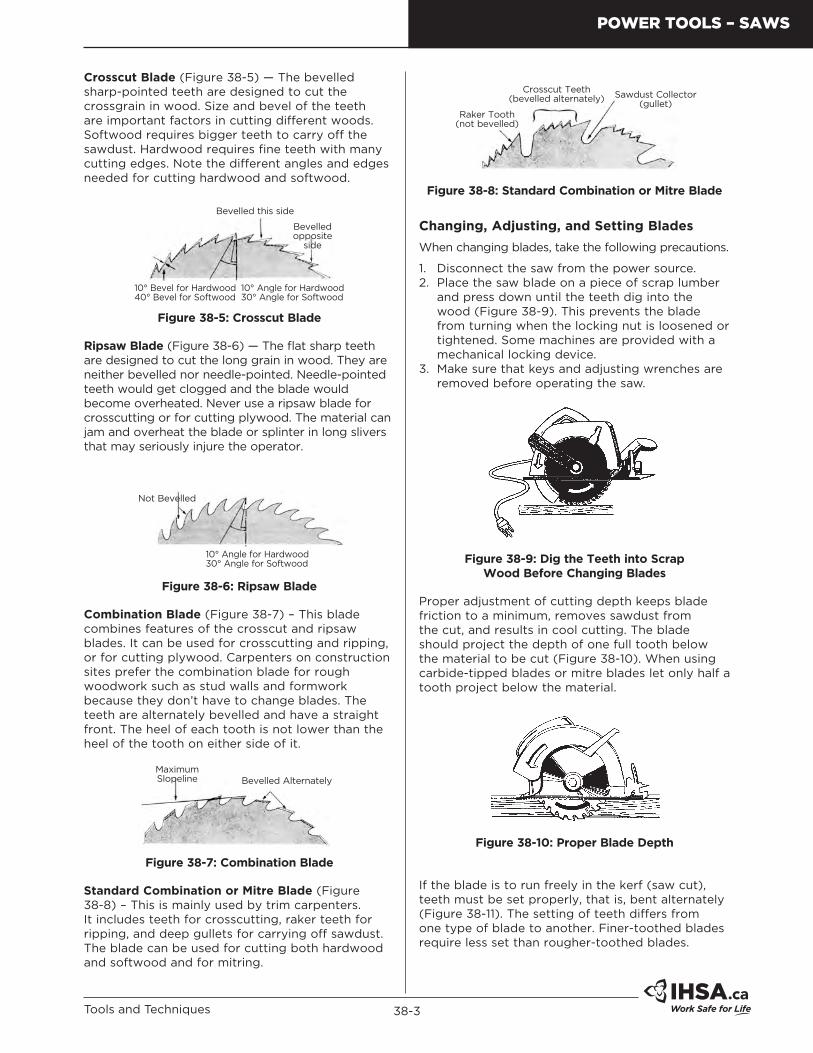
Take special care to ensure that blades are installed in the proper rotational direction (Figure 38-4). Remember that electrical circular handsaws cut with an upward motion. The teeth visible between the upper and lower guard should be pointing
toward the front of the saw. Most models have a directional arrow on both blade and guard to serve as a guide.
Figure38-4:BladesMustBeInstalledintheProperRotationalDirection
BladeGuards
Never operate an electric saw with the lower guard tied or wedged open. The saw may kick back and cut you, or another worker may pick up the saw and—not knowing that the guard is pinned back—get hurt.
Incidents have also occurred when the operator forgot that the blade was exposed and put the saw on the floor. The blade, still in motion, made the saw move, cutting anything in its path.
Make sure that the lower guard returns to its proper position after a cut. Never operate a saw with a defective guard-retracting lever.
On most saws, the lower guard is spring-loaded and correct tension in the spring will automatically close the guard. However, a spring weakened by use and wear can allow the guard to remain open after cutting. This creates a potential for injury if the operator does not realize that the blade is still turning and rests it against a leg, for example. Always maintain complete control of the saw until the blade stops turning. The guard may also be slow to return after 45° cuts.
ChoosingtheProperBlade
For safety, saw operators must understand the different designs and uses of blades. Blades unsuited for the job can be as hazardous as dull blades. For instance, a saw fitted with the wrong blade for the job can run hot so quickly that blade tension changes and creates a wobbly motion. The saw may kick back dangerously before the operator can switch it off.
Resharpened blades can be substantially reduced in diameter—for instance, from nine to eight inches. Make sure that the blade diameter and arbor diameter are right for the saw.
Whenusingcarbide-tippedblades, take special care not to strike metal. The carbide tips can come loose and fly off, ruining the blade and injuring the operator. Inspect the blade regularly for cracked or missing tips.
38-3Tools and Techniques
POWER TOOLS – SAWS
CrosscutBlade(Figure 38-5) — The bevelled sharp-pointed teeth are designed to cut the crossgrain in wood. Size and bevel of the teeth are important factors in cutting different woods. Softwood requires bigger teeth to carry off the sawdust. Hardwood requires fine teeth with many cutting edges. Note the different angles and edges needed for cutting hardwood and softwood.
Bevelled this side
Bevelled opposite
side
10° Angle for Hardwood30° Angle for Softwood
10° Bevel for Hardwood40° Bevel for Softwood
Figure38-5:CrosscutBlade
RipsawBlade (Figure 38-6) — The flat sharp teeth are designed to cut the long grain in wood. They are neither bevelled nor needle-pointed. Needle-pointed teeth would get clogged and the blade would become overheated. Never use a ripsaw blade for crosscutting or for cutting plywood. The material can jam and overheat the blade or splinter in long slivers that may seriously injure the operator.
Not Bevelled
10° Angle for Hardwood30° Angle for Softwood
Figure38-6:RipsawBlade
CombinationBlade (Figure 38-7) – This blade combines features of the crosscut and ripsaw blades. It can be used for crosscutting and ripping, or for cutting plywood. Carpenters on construction sites prefer the combination blade for rough woodwork such as stud walls and formwork because they don’t have to change blades. The teeth are alternately bevelled and have a straight front. The heel of each tooth is not lower than the heel of the tooth on either side of it.
MaximumSlopeline Bevelled Alternately
Figure38-7:CombinationBlade
StandardCombinationorMitreBlade(Figure 38-8) – This is mainly used by trim carpenters. It includes teeth for crosscutting, raker teeth for ripping, and deep gullets for carrying off sawdust. The blade can be used for cutting both hardwood and softwood and for mitring.
Raker Tooth(not bevelled)
Crosscut Teeth(bevelled alternately) Sawdust Collector
(gullet)
Figure38-8:StandardCombinationorMitreBlade
Changing,Adjusting,andSettingBlades
When changing blades, take the following precautions.
1. Disconnect the saw from the power source.2. Place the saw blade on a piece of scrap lumber
and press down until the teeth dig into the wood (Figure 38-9). This prevents the blade from turning when the locking nut is loosened or tightened. Some machines are provided with a mechanical locking device.
3. Make sure that keys and adjusting wrenches are removed before operating the saw.
Figure38-9:DigtheTeethintoScrapWoodBeforeChangingBlades
Proper adjustment of cutting depth keeps blade friction to a minimum, removes sawdust from the cut, and results in cool cutting. The blade should project the depth of one full tooth below the material to be cut (Figure 38-10). When using carbide-tipped blades or mitre blades let only half a tooth project below the material.
Figure38-10:ProperBladeDepth
If the blade is to run freely in the kerf (saw cut), teeth must be set properly, that is, bent alternately (Figure 38-11). The setting of teeth differs from one type of blade to another. Finer-toothed blades require less set than rougher-toothed blades.

38-4 Construction Health and Safety Manual
Figure38-11:EnsureTeethAreSetProperly
In general, teeth should be alternately bent 1/2 times the thickness of the blade. Sharp blades with properly set teeth will reduce the chance of wood binding. They will also prevent the saw from overheating and kicking back.
Cutting
Place the material to be cut on a rigid support such as a bench or two or more sawhorses. Make sure that the blade will clear the supporting surface and the power cord. The wide part of the saw shoe should rest on the supported side of the cut if possible.
Plywood is one of the most difficult materials to cut with any type of saw. The overall size of the sheet and the internal stresses released by cutting are the main causes of difficulty. Large sheets should be supported in at least three places, with one support next to the cut.
Short pieces of material should not be held by hand. Use some form of clamping to hold the material down when cutting it (Figure 38-12).
Figure38-12:UseaClampWhenCuttingShortPiecesofMaterial
NEVER use your foot or leg to support the material being cut. Too many operators have been seriously injured by this careless act.
The material to be cut should be placed with its good side down, if possible. Because the blade cuts upward into the material, any splintering will be on the side that is uppermost.
Use just enough force to let the blade cut without labouring. Hardness and toughness can vary in the same piece of material, and a knotty or wet section can put a heavier load on the saw. When this happens, reduce pressure to keep the speed of the blade constant. Forcing the saw beyond its capacity will result in rough and inaccurate cuts. It will also overheat the motor and the saw blade.
Take the saw to the material. Never place the saw in a fixed, upside-down position and feed material into it. Use a table saw instead.
If the cut gets off line, don’t force the saw back onto line. Withdraw the blade and either start over on the same line or begin on a new line.
If cutting right-handed, keep the cord on that side of your body. Stand to one side of the cutting line. Neverreachunderthematerialbeingcut.
Always keep your free hand on the long side of the lumber and clear of the saw. Maintain a firm grip on the saw and keep a well-balanced stance, particularly when working on uneven footing (Figure 38-13).
Figure38-13:MaintainaFirmGriponSawandKeepFreeHandontheLongSideofMaterial
Plywood, wet lumber, and lumber with a twisted grain tend to tighten around a blade and may cause kickback. Kickback occurs when an electric saw stalls suddenly and jerks back toward the operator. This may cause severe injury.
PocketCutting
Follow these steps with extreme care (see Figure 38-14).
1. Tilt saw forward.2. Rest front of shoe on wood.3. Retract lower guard.4. Lower saw until front teeth almost touch wood.5. Release guard to rest on wood.6. Switch on the saw.7. Keep the saw tilted forward and push it down
and forward with even pressure, gradually lowering it until shoe rests flat on wood.
POWER TOOLS – SAWS
38-5Tools and Techniques
Figure38-14:StepsforMakingaPocketCut
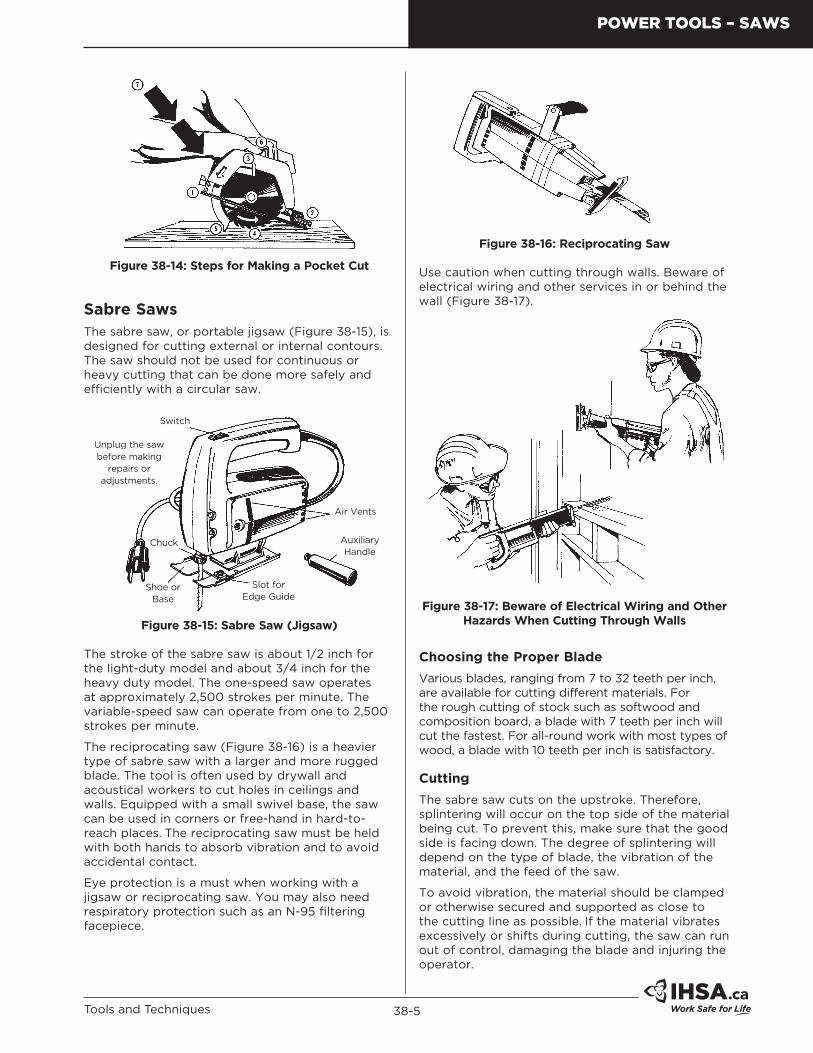
SabreSawsThe sabre saw, or portable jigsaw (Figure 38-15), is designed for cutting external or internal contours. The saw should not be used for continuous or heavy cutting that can be done more safely and efficiently with a circular saw.
Switch
Unplug the sawbefore making
repairs oradjustments.
Air Vents
AuxiliaryHandle
Chuck
Shoe orBase
Slot for Edge Guide
Figure38-15:SabreSaw(Jigsaw)
The stroke of the sabre saw is about 1/2 inch for the light-duty model and about 3/4 inch for the heavy duty model. The one-speed saw operates at approximately 2,500 strokes per minute. The variable-speed saw can operate from one to 2,500 strokes per minute.
The reciprocating saw (Figure 38-16) is a heavier type of sabre saw with a larger and more rugged blade. The tool is often used by drywall and acoustical workers to cut holes in ceilings and walls. Equipped with a small swivel base, the saw can be used in corners or free-hand in hard-to-reach places. The reciprocating saw must be held with both hands to absorb vibration and to avoid accidental contact.
Eye protection is a must when working with a jigsaw or reciprocating saw. You may also need respiratory protection such as an N-95 filtering facepiece.
Figure38-16:ReciprocatingSaw
Use caution when cutting through walls. Beware of electrical wiring and other services in or behind the wall (Figure 38-17).
Figure38-17:BewareofElectricalWiringandOtherHazardsWhenCuttingThroughWalls
ChoosingtheProperBlade
Various blades, ranging from 7 to 32 teeth per inch, are available for cutting different materials. For the rough cutting of stock such as softwood and composition board, a blade with 7 teeth per inch will cut the fastest. For all-round work with most types of wood, a blade with 10 teeth per inch is satisfactory.
Cutting
The sabre saw cuts on the upstroke. Therefore, splintering will occur on the top side of the material being cut. To prevent this, make sure that the good side is facing down. The degree of splintering will depend on the type of blade, the vibration of the material, and the feed of the saw.
To avoid vibration, the material should be clamped or otherwise secured and supported as close to the cutting line as possible. If the material vibrates excessively or shifts during cutting, the saw can run out of control, damaging the blade and injuring the operator.
POWER TOOLS – SAWS
38-6 Construction Health and Safety Manual
• Before starting a cut, make sure that the saw will not contact clamps, the vise, workbench, or other support.
• Never reach under the material being cut.• Never lay down the saw until the motor has
stopped.• Do not try to cut curves so tight that the blade
will twist and break.• Always hold the base or shoe of the saw in firm
contact with the material being cut.
WARNING When sawing into floors, ceiling, or walls, always check for plumbing and wiring.
ExternalCut
To start an external cut (from the outside in), place the front of the shoe on the material (Figure 38-18). Make sure that the blade is not in contact with the material or the saw will stall when the motor starts.
Hold the saw firmly and switch it on. Feed the blade slowly into the material and maintain an even pressure. When the cut is complete, do not lay down the saw until the motor has stopped.
Rest front shoe on material.
Blade should not touch material before saw is switched on.
Make sure that the cut will clear bench or other support.
Clamp or otherwise secure the material firmly in place.
Figure38-18:StartinganExternalCut
InsideCuts
To start an inside cut (pocket cut), first drill a lead hole slightly larger than the saw blade (Figure 38-19). With the saw switched off, insert the blade into the hole until the shoe rests firmly on the material. Do not let the blade touch the material until the saw has been switched on.
It is possible to start an inside cut without drilling a lead hole first — but only when it’s absolutely necessary. To do this, tip the tool forward so that the front edge of the shoe rests on the workpiece and the teeth of the blade face the material. Keep the blade out of contact with the material.
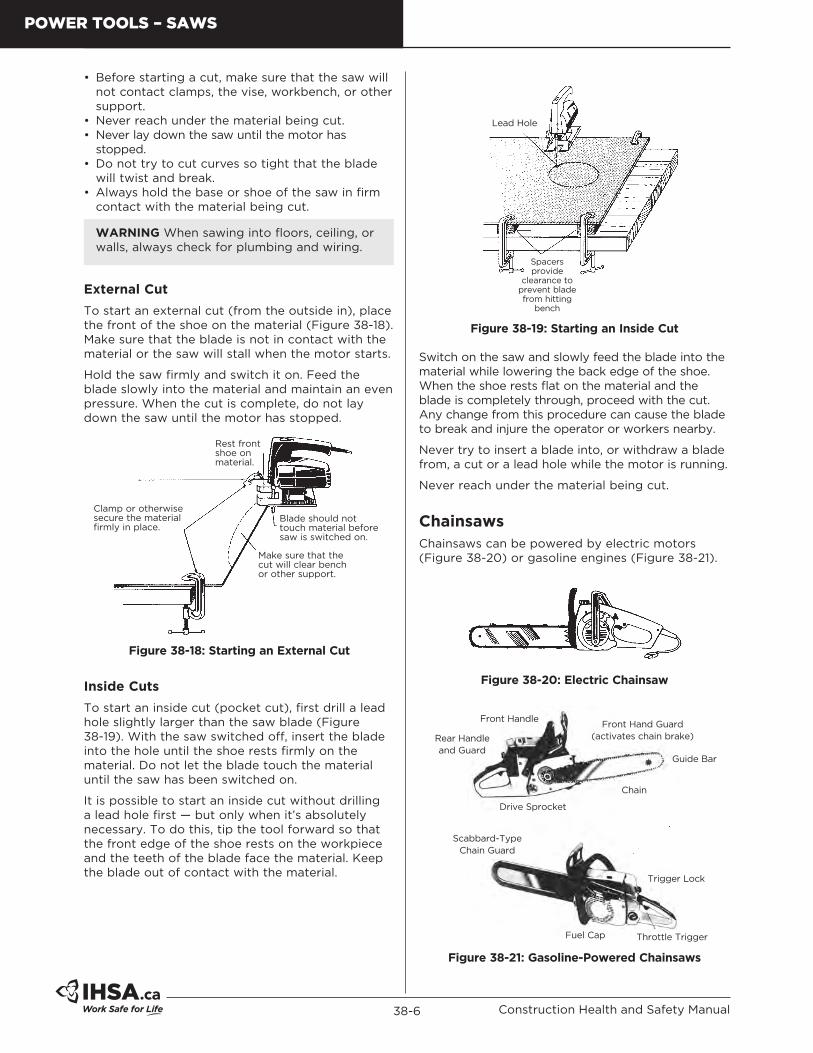
Lead Hole
Spacers provide
clearance to prevent blade from hitting
bench
Figure38-19:StartinganInsideCut
Switch on the saw and slowly feed the blade into the material while lowering the back edge of the shoe. When the shoe rests flat on the material and the blade is completely through, proceed with the cut. Any change from this procedure can cause the blade to break and injure the operator or workers nearby.
Never try to insert a blade into, or withdraw a blade from, a cut or a lead hole while the motor is running.
Never reach under the material being cut.
ChainsawsChainsaws can be powered by electric motors (Figure 38-20) or gasoline engines (Figure 38-21).
Figure38-20:ElectricChainsaw
Front HandleFront Hand Guard
(activates chain brake)
Guide Bar
Chain
Drive Sprocket
Rear Handleand Guard
Scabbard-TypeChain Guard
Trigger Lock
Throttle TriggerFuel Cap
Figure38-21:Gasoline-PoweredChainsaws
POWER TOOLS – SAWS
38-7Tools and Techniques
Both saws are designed to provide fast-cutting action with a minimum of binding in the cut, even though wood may be sap-filled or wet. Both afford about the same performance in terms of horsepower and they are equipped with similar controls and safety devices.
While the chainsaw is relatively easy to operate, it is the cause of many serious injuries in Ontario construction each year. As with all high-speed cutting tools, it demands the full attention of even the trained and experienced operator.
Generally the injuries result from two types of incidents:
1) The operator makes accidental contact with the revolving chain
2) The operator is struck by the object being cut, usually a tree or heavy limb.
Requirements
Regulations require that chainsaws used in construction must be equipped with a chain brake. Make sure that the saw is equipped with a chain brake mechanism, and not simply a hand guard, which is similar in appearance. Also, make sure that the chain brake is operational.
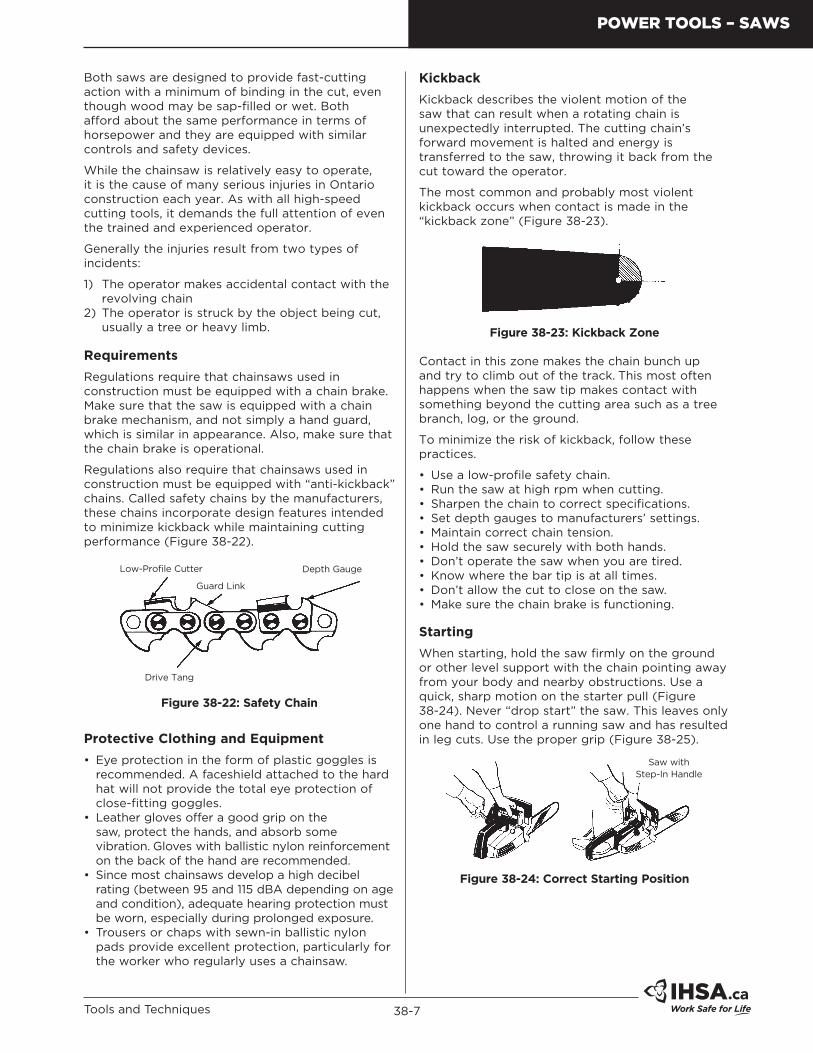
Regulations also require that chainsaws used in construction must be equipped with “anti-kickback” chains. Called safety chains by the manufacturers, these chains incorporate design features intended to minimize kickback while maintaining cutting performance (Figure 38-22).
Drive Tang
Low-Profile Cutter
Guard Link
Depth Gauge
Figure38-22:SafetyChain
ProtectiveClothingandEquipment
• Eye protection in the form of plastic goggles is recommended. A faceshield attached to the hard hat will not provide the total eye protection of close-fitting goggles.
• Leather gloves offer a good grip on the saw, protect the hands, and absorb some vibration. Gloves with ballistic nylon reinforcement on the back of the hand are recommended.
• Since most chainsaws develop a high decibel rating (between 95 and 115 dBA depending on age and condition), adequate hearing protection must be worn, especially during prolonged exposure.
• Trousers or chaps with sewn-in ballistic nylon pads provide excellent protection, particularly for the worker who regularly uses a chainsaw.
Kickback
Kickback describes the violent motion of the saw that can result when a rotating chain is unexpectedly interrupted. The cutting chain’s forward movement is halted and energy is transferred to the saw, throwing it back from the cut toward the operator.
The most common and probably most violent kickback occurs when contact is made in the “kickback zone” (Figure 38-23).
Figure38-23:KickbackZone
Contact in this zone makes the chain bunch up and try to climb out of the track. This most often happens when the saw tip makes contact with something beyond the cutting area such as a tree branch, log, or the ground.
To minimize the risk of kickback, follow these practices.
• Use a low-profile safety chain.• Run the saw at high rpm when cutting.• Sharpen the chain to correct specifications.• Set depth gauges to manufacturers’ settings.• Maintain correct chain tension.• Hold the saw securely with both hands.• Don’t operate the saw when you are tired.• Know where the bar tip is at all times.• Don’t allow the cut to close on the saw.• Make sure the chain brake is functioning.
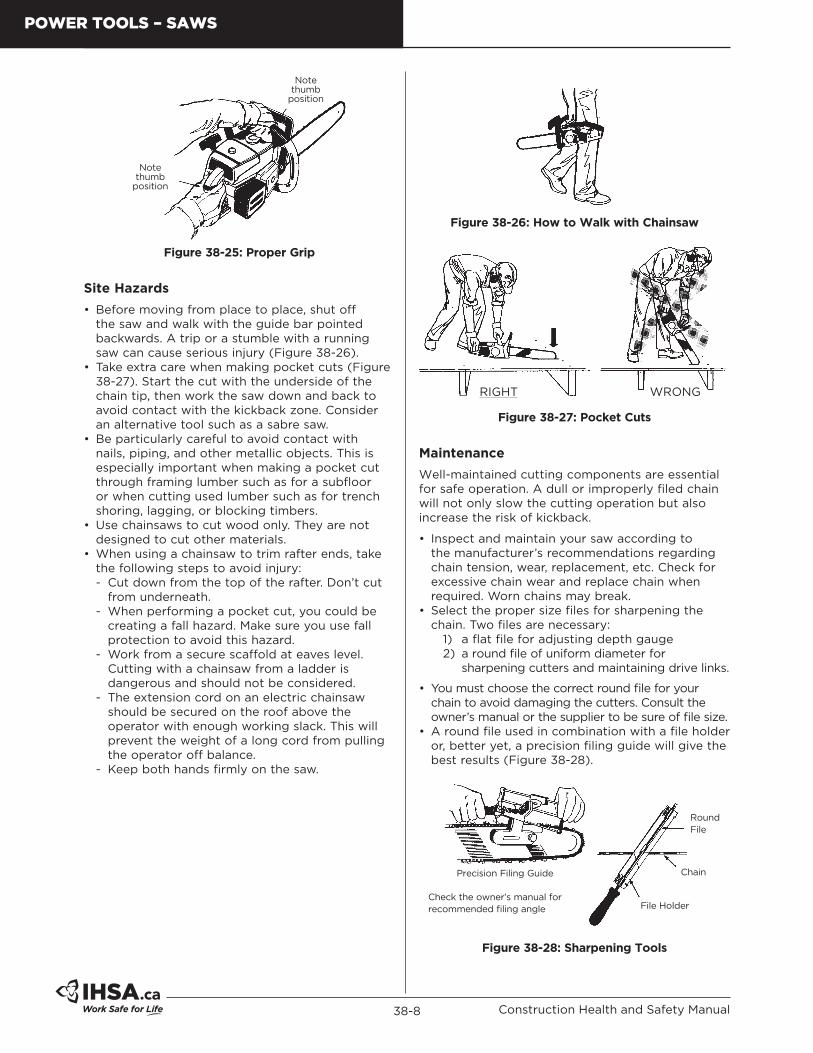
Starting
When starting, hold the saw firmly on the ground or other level support with the chain pointing away from your body and nearby obstructions. Use a quick, sharp motion on the starter pull (Figure 38-24). Never “drop start” the saw. This leaves only one hand to control a running saw and has resulted in leg cuts. Use the proper grip (Figure 38-25).
Saw with Step-In Handle
Figure38-24:CorrectStartingPosition
POWER TOOLS – SAWS
38-8 Construction Health and Safety Manual
Note thumb
position
Note thumb
position
Figure38-25:ProperGrip
SiteHazards
• Before moving from place to place, shut off the saw and walk with the guide bar pointed backwards. A trip or a stumble with a running saw can cause serious injury (Figure 38-26).
• Take extra care when making pocket cuts (Figure 38-27). Start the cut with the underside of the chain tip, then work the saw down and back to avoid contact with the kickback zone. Consider an alternative tool such as a sabre saw.
• Be particularly careful to avoid contact with nails, piping, and other metallic objects. This is especially important when making a pocket cut through framing lumber such as for a subfloor or when cutting used lumber such as for trench shoring, lagging, or blocking timbers.
• Use chainsaws to cut wood only. They are not designed to cut other materials.
• When using a chainsaw to trim rafter ends, take the following steps to avoid injury: - Cut down from the top of the rafter. Don’t cut from underneath.
- When performing a pocket cut, you could be creating a fall hazard. Make sure you use fall protection to avoid this hazard.
- Work from a secure scaffold at eaves level. Cutting with a chainsaw from a ladder is dangerous and should not be considered.
- The extension cord on an electric chainsaw should be secured on the roof above the operator with enough working slack. This will prevent the weight of a long cord from pulling the operator off balance.
- Keep both hands firmly on the saw.
Figure38-26:HowtoWalkwithChainsaw
RIGHT WRONG
Figure38-27:PocketCuts
Maintenance
Well-maintained cutting components are essential for safe operation. A dull or improperly filed chain will not only slow the cutting operation but also increase the risk of kickback.
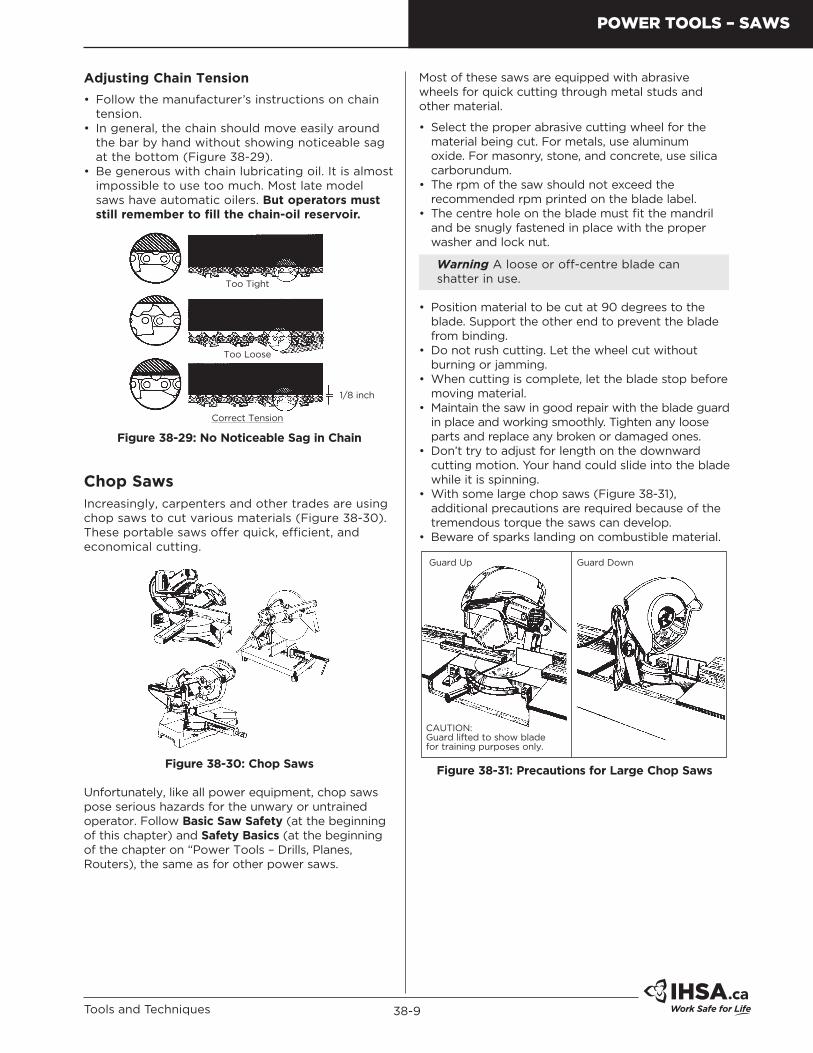
• Inspect and maintain your saw according to the manufacturer’s recommendations regarding chain tension, wear, replacement, etc. Check for excessive chain wear and replace chain when required. Worn chains may break.
• Select the proper size files for sharpening the chain. Two files are necessary:
1) a flat file for adjusting depth gauge 2) a round file of uniform diameter for
sharpening cutters and maintaining drive links.
• You must choose the correct round file for your chain to avoid damaging the cutters. Consult the owner’s manual or the supplier to be sure of file size.
• A round file used in combination with a file holder or, better yet, a precision filing guide will give the best results (Figure 38-28).
Precision Filing Guide Chain
File HolderCheck the owner’s manual for recommended filing angle
Round File
Figure38-28:SharpeningTools
POWER TOOLS – SAWS
38-9Tools and Techniques
AdjustingChainTension
• Follow the manufacturer’s instructions on chain tension.
• In general, the chain should move easily around the bar by hand without showing noticeable sag at the bottom (Figure 38-29).
• Be generous with chain lubricating oil. It is almost impossible to use too much. Most late model saws have automatic oilers. Butoperatorsmuststillremembertofillthechain-oilreservoir.
Too Tight
Too Loose
Correct Tension
1/8 inch
Figure38-29:NoNoticeableSaginChain
ChopSawsIncreasingly, carpenters and other trades are using chop saws to cut various materials (Figure 38-30). These portable saws offer quick, efficient, and economical cutting.
Figure38-30:ChopSaws
Unfortunately, like all power equipment, chop saws pose serious hazards for the unwary or untrained operator. Follow BasicSawSafety (at the beginning of this chapter) and SafetyBasics(at the beginning of the chapter on “Power Tools – Drills, Planes, Routers), the same as for other power saws.
Most of these saws are equipped with abrasive wheels for quick cutting through metal studs and other material.
• Select the proper abrasive cutting wheel for the material being cut. For metals, use aluminum oxide. For masonry, stone, and concrete, use silica carborundum.
• The rpm of the saw should not exceed the recommended rpm printed on the blade label.
• The centre hole on the blade must fit the mandril and be snugly fastened in place with the proper washer and lock nut.
Warning A loose or off-centre blade can shatter in use.
• Position material to be cut at 90 degrees to the blade. Support the other end to prevent the blade from binding.
• Do not rush cutting. Let the wheel cut without burning or jamming.
• When cutting is complete, let the blade stop before moving material.
• Maintain the saw in good repair with the blade guard in place and working smoothly. Tighten any loose parts and replace any broken or damaged ones.
• Don’t try to adjust for length on the downward cutting motion. Your hand could slide into the blade while it is spinning.
• With some large chop saws (Figure 38-31), additional precautions are required because of the tremendous torque the saws can develop.
• Beware of sparks landing on combustible material.
Guard Up Guard Down
CAUTION:Guard lifted to show blade for training purposes only.
Figure38-31:PrecautionsforLargeChopSaws
POWER TOOLS – SAWS
38-10 Construction Health and Safety Manual
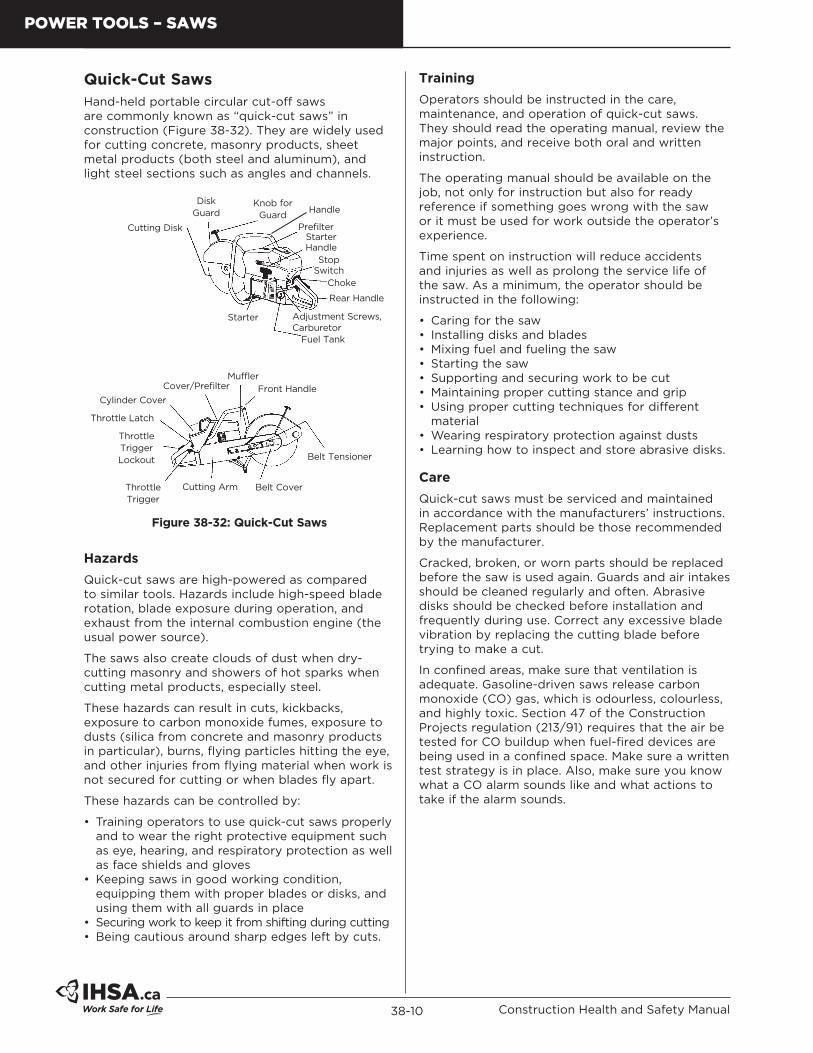
Quick-CutSawsHand-held portable circular cut-off saws are commonly known as “quick-cut saws” in construction (Figure 38-32). They are widely used for cutting concrete, masonry products, sheet metal products (both steel and aluminum), and light steel sections such as angles and channels.
Belt Tensioner
Belt CoverCutting ArmThrottleTrigger
Throttle Trigger Lockout
Throttle Latch
Cylinder Cover
Cover/PrefilterMuffler
Front Handle
Cutting Disk
Disk Guard
Knob for Guard
PrefilterStarter Handle
Stop Switch
Choke
Rear Handle
Adjustment Screws, Carburetor
Fuel Tank
Starter
Handle
Figure38-32:Quick-CutSaws
Hazards
Quick-cut saws are high-powered as compared to similar tools. Hazards include high-speed blade rotation, blade exposure during operation, and exhaust from the internal combustion engine (the usual power source).
The saws also create clouds of dust when dry-cutting masonry and showers of hot sparks when cutting metal products, especially steel.
These hazards can result in cuts, kickbacks, exposure to carbon monoxide fumes, exposure to dusts (silica from concrete and masonry products in particular), burns, flying particles hitting the eye, and other injuries from flying material when work is not secured for cutting or when blades fly apart.
These hazards can be controlled by:
• Training operators to use quick-cut saws properly and to wear the right protective equipment such as eye, hearing, and respiratory protection as well as face shields and gloves
• Keeping saws in good working condition, equipping them with proper blades or disks, and using them with all guards in place
• Securing work to keep it from shifting during cutting• Being cautious around sharp edges left by cuts.
Training
Operators should be instructed in the care, maintenance, and operation of quick-cut saws. They should read the operating manual, review the major points, and receive both oral and written instruction.
The operating manual should be available on the job, not only for instruction but also for ready reference if something goes wrong with the saw or it must be used for work outside the operator’s experience.
Time spent on instruction will reduce accidents and injuries as well as prolong the service life of the saw. As a minimum, the operator should be instructed in the following:
• Caring for the saw• Installing disks and blades• Mixing fuel and fueling the saw• Starting the saw• Supporting and securing work to be cut• Maintaining proper cutting stance and grip• Using proper cutting techniques for different
material• Wearing respiratory protection against dusts• Learning how to inspect and store abrasive disks.
Care
Quick-cut saws must be serviced and maintained in accordance with the manufacturers’ instructions. Replacement parts should be those recommended by the manufacturer.
Cracked, broken, or worn parts should be replaced before the saw is used again. Guards and air intakes should be cleaned regularly and often. Abrasive disks should be checked before installation and frequently during use. Correct any excessive blade vibration by replacing the cutting blade before trying to make a cut.
In confined areas, make sure that ventilation is adequate. Gasoline-driven saws release carbon monoxide (CO) gas, which is odourless, colourless, and highly toxic. Section 47 of the Construction Projects regulation (213/91) requires that the air be tested for CO buildup when fuel-fired devices are being used in a confined space. Make sure a written test strategy is in place. Also, make sure you know what a CO alarm sounds like and what actions to take if the alarm sounds.
POWER TOOLS – SAWS
38-11Tools and Techniques
Starting
Most of the following procedures are for gasoline-powered quick-cut saws—the type most commonly used in construction.
• Use caution when preparing the oil/gasoline mixture and when fuelling the saw. No smoking or ignition sources should be allowed in the area where fuel is mixed or tanks are filled.
• Fill the tank outdoors in a well-ventilated space at least 3 metres from the area where the saw will be used. Spilled fuel should be wiped off the saw.
• Avoid fuelling the saw on or near formwork. Gasoline spills are a fire hazard. Use a funnel to avoid spills.
• Do not overfill the saw or run it without securing the fuel tank cap. Gasoline seeping from the tank can saturate your clothing and be ignited by sparks thrown off from metal cutting. The only cap to use is one supplied by the manufacturer.
• Check the saw for leaks. Sometimes vibration makes gas lines leak.
• Start the saw in an area clear of people and obstacles. Under no circumstances should anyone be standing in front of the saw as it starts or while it’s running.
• Put the saw on a smooth hard surface for starting. The guard should be properly set for the type of cut beforehand.
• Assume a solid well-balanced stance. Do not wrap the starter cord around your hand—this can cause injury.
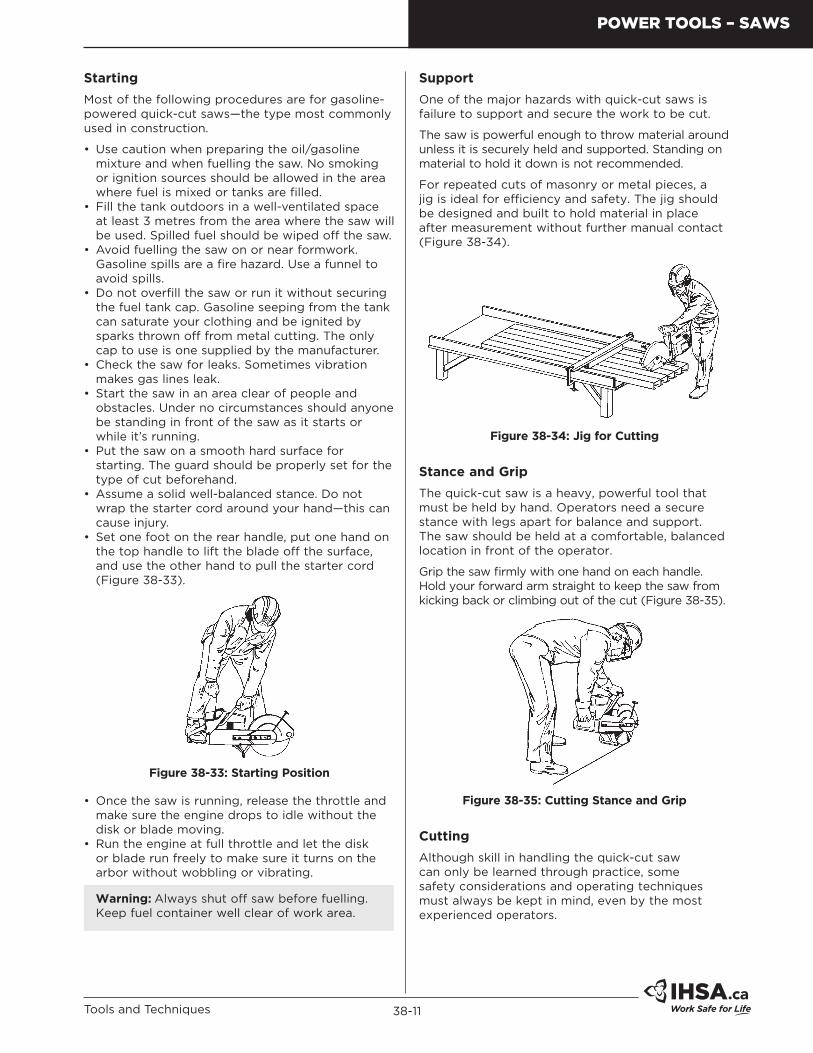
• Set one foot on the rear handle, put one hand on the top handle to lift the blade off the surface, and use the other hand to pull the starter cord (Figure 38-33).
Figure38-33:StartingPosition
• Once the saw is running, release the throttle and make sure the engine drops to idle without the disk or blade moving.
• Run the engine at full throttle and let the disk or blade run freely to make sure it turns on the arbor without wobbling or vibrating.
Warning: Always shut off saw before fuelling. Keep fuel container well clear of work area.
Support
One of the major hazards with quick-cut saws is failure to support and secure the work to be cut.
The saw is powerful enough to throw material around unless it is securely held and supported. Standing on material to hold it down is not recommended.
For repeated cuts of masonry or metal pieces, a jig is ideal for efficiency and safety. The jig should be designed and built to hold material in place after measurement without further manual contact (Figure 38-34).
Figure38-34:JigforCutting
StanceandGrip
The quick-cut saw is a heavy, powerful tool that must be held by hand. Operators need a secure stance with legs apart for balance and support. The saw should be held at a comfortable, balanced location in front of the operator.
Grip the saw firmly with one hand on each handle. Hold your forward arm straight to keep the saw from kicking back or climbing out of the cut (Figure 38-35).
Figure38-35:CuttingStanceandGrip
Cutting
Although skill in handling the quick-cut saw can only be learned through practice, some safety considerations and operating techniques must always be kept in mind, even by the most experienced operators.
POWER TOOLS – SAWS
38-12 Construction Health and Safety Manual
Work should be supported so that the disk or blade will not bind in the cut. Support heavy materials on both sides of the cut so the cut piece will not drop or roll onto the operator’s foot. Light materials can generally be allowed to fall. In all cases, the cut should be as close as possible to the supporting surface (Figure 38-36).
Saw will bind. Heavy MaterialSaw should not bind.
Light Material
Figure38-36:SupportforDifferentCuts
KickbackandPull-In
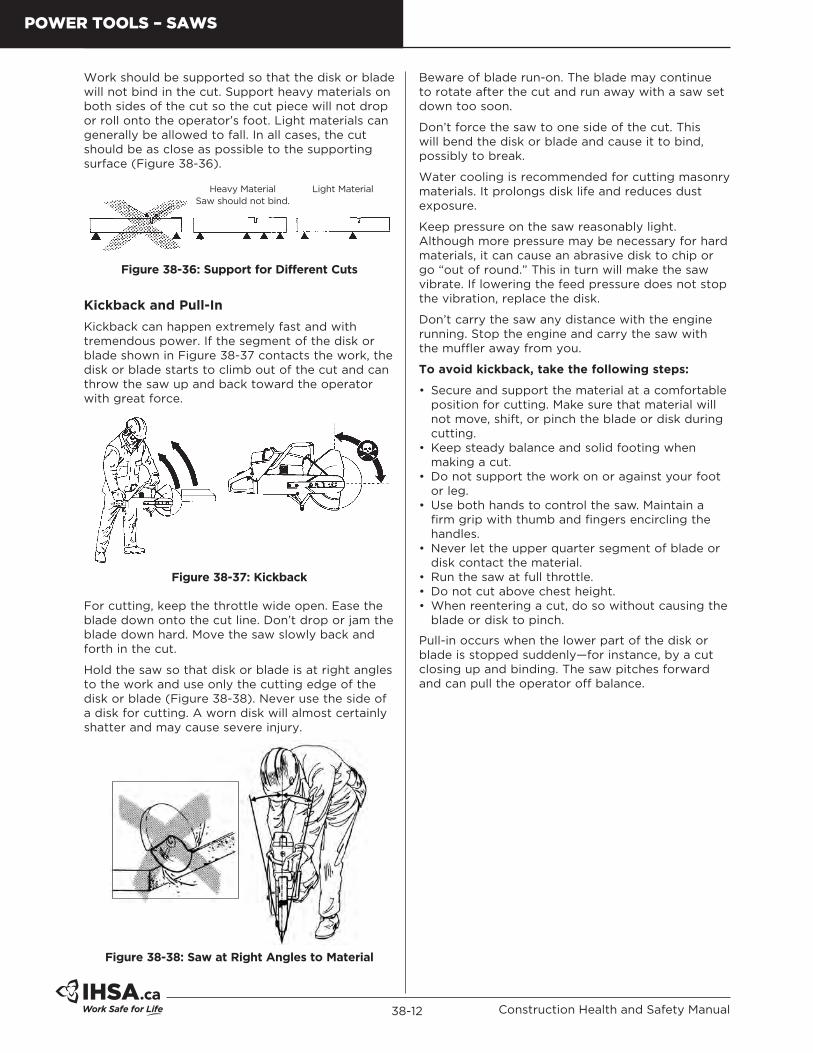
Kickback can happen extremely fast and with tremendous power. If the segment of the disk or blade shown in Figure 38-37 contacts the work, the disk or blade starts to climb out of the cut and can throw the saw up and back toward the operator with great force.
Figure38-37:Kickback
For cutting, keep the throttle wide open. Ease the blade down onto the cut line. Don’t drop or jam the blade down hard. Move the saw slowly back and forth in the cut.
Hold the saw so that disk or blade is at right angles to the work and use only the cutting edge of the disk or blade (Figure 38-38). Never use the side of a disk for cutting. A worn disk will almost certainly shatter and may cause severe injury.
Figure38-38:SawatRightAnglestoMaterial
Beware of blade run-on. The blade may continue to rotate after the cut and run away with a saw set down too soon.
Don’t force the saw to one side of the cut. This will bend the disk or blade and cause it to bind, possibly to break.
Water cooling is recommended for cutting masonry materials. It prolongs disk life and reduces dust exposure.
Keep pressure on the saw reasonably light. Although more pressure may be necessary for hard materials, it can cause an abrasive disk to chip or go “out of round.” This in turn will make the saw vibrate. If lowering the feed pressure does not stop the vibration, replace the disk.
Don’t carry the saw any distance with the engine running. Stop the engine and carry the saw with the muffler away from you.
Toavoidkickback,takethefollowingsteps:
• Secure and support the material at a comfortable position for cutting. Make sure that material will not move, shift, or pinch the blade or disk during cutting.
• Keep steady balance and solid footing when making a cut.
• Do not support the work on or against your foot or leg.
• Use both hands to control the saw. Maintain a firm grip with thumb and fingers encircling the handles.
• Never let the upper quarter segment of blade or disk contact the material.
• Run the saw at full throttle.• Do not cut above chest height.• When reentering a cut, do so without causing the
blade or disk to pinch.
Pull-in occurs when the lower part of the disk or blade is stopped suddenly—for instance, by a cut closing up and binding. The saw pitches forward and can pull the operator off balance.
POWER TOOLS – SAWS
38-13Tools and Techniques
ProtectiveEquipment
In addition to the standard equipment mandatory on construction sites, operators of quick-cut saws should wear snug-fitting clothing, hearing protection, eye and face protection, and heavy-duty leather gloves (Figure 38-39).
Hard Hat
Eye Protection
Hearing Protection
Face Shield
Heavy-Duty Non-Slip Gloves
Leg Protection (for sparks)
Grade 1 Boots with Non-Skid
Soles
Figure38-39:ProtectiveEquipment
The dry cutting of masonry or concrete products calls for respiratory protection as well. (See the chapters on personal protective equipment in this manual.)
For general dust hazards, a half-mask cartridge respirator with NIOSH-approval for dust, mist, and fumes should provide adequate protection when properly test-fitted and worn by a cleanshaven person.
DisksandBlades
Disks and blades are available in three basic types:
1. Abrasive disks2. Diamond-tipped blades3. Carbide-tipped blades.
Use only the disks and blades compatible with your saw and rated for its maximum rpm (Table 38-2). Blades or disks may fly apart if their rpm is not matched to saw rpm. If you have any doubts, consult the operating manual or a reputable supplier.
Table38-2:DiskTypesandUses
Type Uses Materials
Concrete All-around use, most economical for cutting concrete and masonry. Water-coolingrecommendedtoincreasedisklifeandreducedust.
Concrete, stone, masonry products, cast iron, aluminum, copper, brass, cables, hard rubber, plastics.
Metal Primarily for steel, not suited for masonry products. Water-cooling is not recommended with metal abrasive disks.
Steel, steel alloys, other hard metals such as cast iron.
Diamond Abrasive Disk
Cuts faster than other abrasive disks and creates less dust. Water-coolingisabsolutelynecessarytopreventheatbuild-upthatcanmakediskdisintegrate.
Stone, all masonry and concrete products. Not recommended for metals.
Dry-Cut Diamond Blade
Fast cuts, lots of dust, very expensive. Let blade cool for 10–15 seconds every 40–60 seconds. Continuous cutting will damage the blade.
Stone, all masonry and concrete products. Not recommended for metals.
DiamondDisksandBlades
Diamond disks are normally used with water cooling. They are now available for dry cutting, which may be necessary to avoid staining some masonry products.
When dry-cutting with a diamond blade, let the blade cool for 10–15 seconds every 40–60 seconds. This can be done simply by pulling the saw out of the cut.
Carbide-TippedBlades
These blades must be used with care. If a carbide-tipped blade encounters material harder than what it is designed to cut, the tips may fly off.
A carbide-tipped blade used with a quick-cut saw must be designed for that purpose. It must also be used only to cut the materials specified by the manufacturer.
Inspection/Installation
Inspect disks and blades before installing them.
• Make sure that contact surfaces are flat, run true on the arbor, and are free of foreign material.
• Check that flanges are the correct size and not warped or sprung (Figure 38-40).
POWER TOOLS – SAWS
38-14 Construction Health and Safety Manual
• Check the label to make sure that the disk or blade is approved for use on high-speed quick-cut saws and has a rated rpm suitable to the saw being used. A periodic service check may be necessary to ensure that the rpm still meets the manufacturer’s requirement.
• Inspect the disk or blade for damage. Abrasive disks tapped lightly with a piece of wood should ring true. If the sound is dull or flat, the disk is damaged and should be discarded.
• Make sure that diamond or carbide tips are all in place. Do not use diamond or carbide-tipped blades or disks if any tips are missing.
• Do not drop abrasive disks. Discard any disk that has been dropped.
• Use the proper bushing on the arbor so that the disk runs true on the shaft without wobbling or vibrating.
• Discard badly worn disks that are uneven or “out of round.”
Figure38-40:CheckDiskforWarping
TableSawsThe table saw most often used in construction is the 10-inch belt-driven tilting arbor saw. The dimension refers to the diameter of the saw blade recommended by the manufacturer.
Although some saws are direct-drive (Figure 38-41), with the blade mounted right on the motor arbor, most are belt-driven (Figure 38-42).
Figure38-41:Direct-DriveTableSaw
Figure38-42:Belt-DrivenTableSaw
Both types are equipped with a fixed table top and an arbor that can be raised, lowered, or tilted to one side for cutting at different depths and angles.
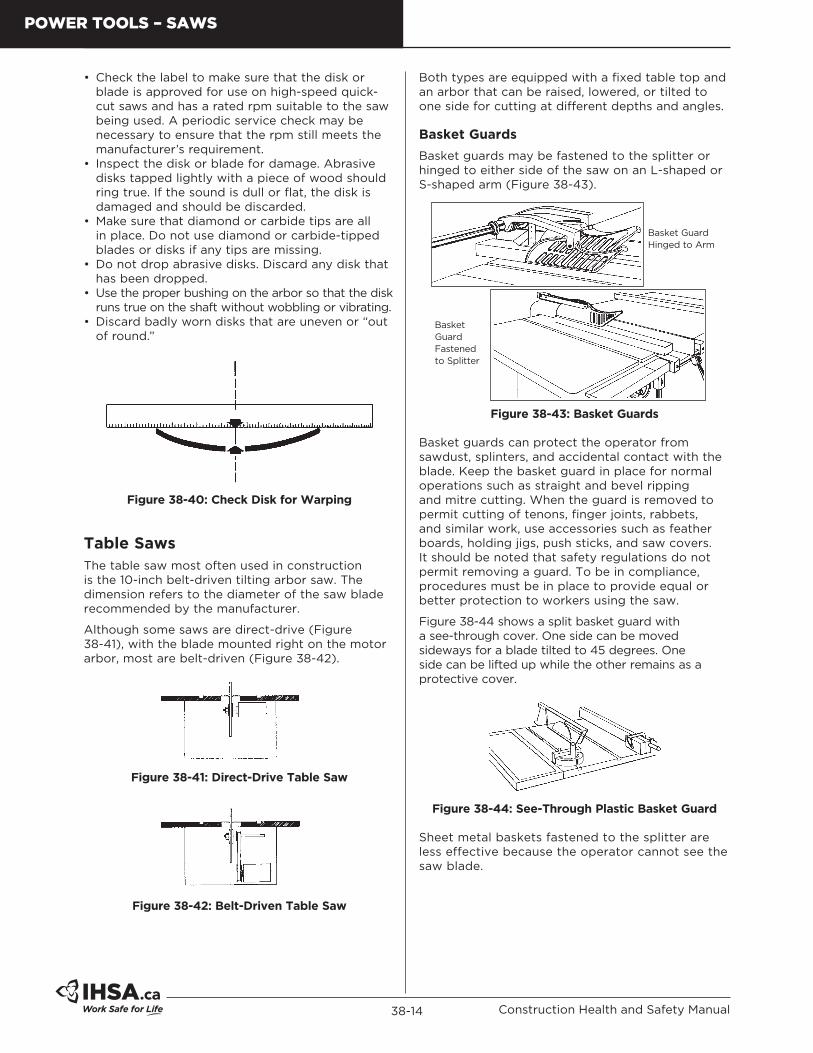
BasketGuards
Basket guards may be fastened to the splitter or hinged to either side of the saw on an L-shaped or S-shaped arm (Figure 38-43).
Basket GuardHinged to Arm
Basket GuardFastened to Splitter
Figure38-43:BasketGuards
Basket guards can protect the operator from sawdust, splinters, and accidental contact with the blade. Keep the basket guard in place for normal operations such as straight and bevel ripping and mitre cutting. When the guard is removed to permit cutting of tenons, finger joints, rabbets, and similar work, use accessories such as feather boards, holding jigs, push sticks, and saw covers. It should be noted that safety regulations do not permit removing a guard. To be in compliance, procedures must be in place to provide equal or better protection to workers using the saw.
Figure 38-44 shows a split basket guard with a see-through cover. One side can be moved sideways for a blade tilted to 45 degrees. One side can be lifted up while the other remains as a protective cover.
Figure38-44:See-ThroughPlasticBasketGuard
Sheet metal baskets fastened to the splitter are less effective because the operator cannot see the saw blade.
POWER TOOLS – SAWS
38-15Tools and Techniques
Kickback
Kickback occurs when stock binds against the saw blade. The blade can fire the wood back at the operator with tremendous force, causing major injuries to abdomen, legs, and hands.
• Never stand directly behind the blade when cutting. Stand to one side. See that other workers stand clear as well.
• Make sure the rip fence is aligned for slightly more clearance behind the blade than in front. This will help prevent binding.
• Use a sharp blade with teeth properly set for the wood being cut. A dull or badly gummed blade will cause friction, overheating, and binding.
• Install a splitter to keep the kerf (cut) open behind the blade. Also effective are anti-kickback fingers attached to the splitter.
Splitters
Splitters prevent the kerf from closing directly behind the blade. Ideally, they should be slightly thinner than the saw blade and manufactured from high tensile steel.
Splitters are not always needed with carbide-tipped saw blades, whose relatively wide kerf may provide the desirable clearance. A wide kerf alone, however, is often not enough to keep some boards from closing behind the cut and binding against the blade.
In general, it is impossible to predict how a board will behave during ripping. It may remain straight, presenting no problems. On the other hand, the release of internal stresses may make the two ripped portions behind the blade either close up or spread apart.
Figure 38-45 shows a disappearing splitter with anti-kickback fingers. It can be pushed down when in the way of a workpiece and pulled up when necessary after the machine has been shut off.
Figure38-45:DisappearingSplitterwithAnti-KickbackFingers
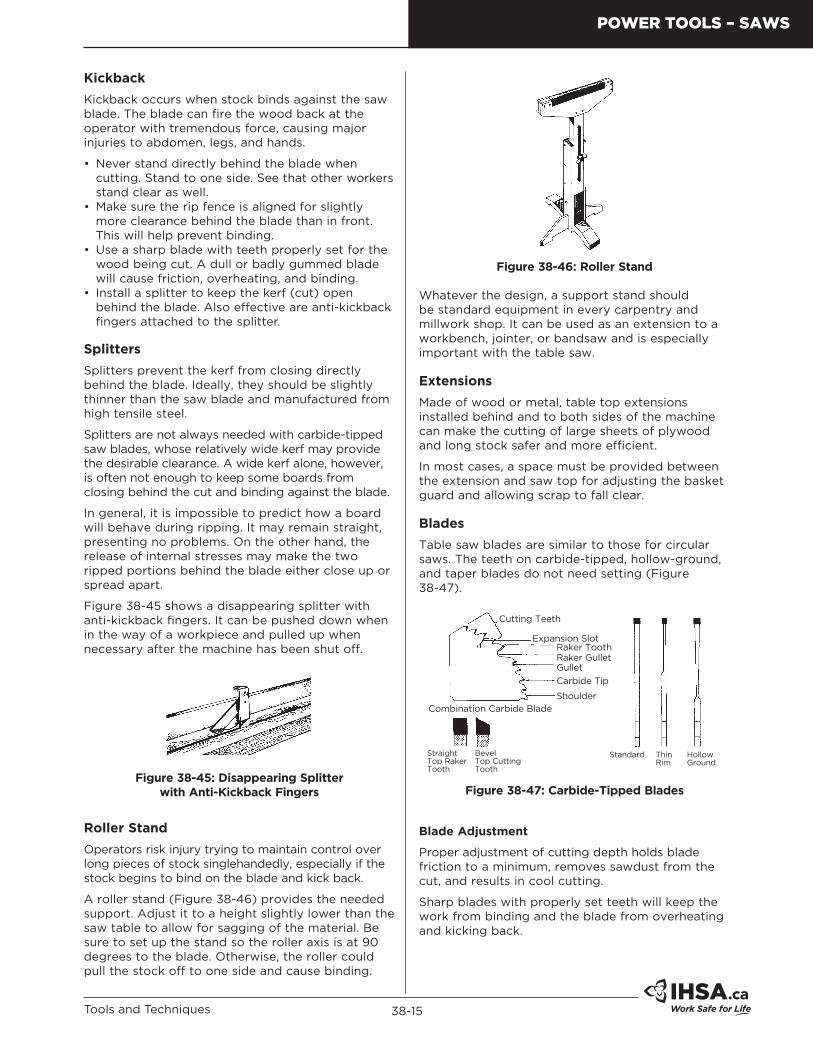
RollerStand
Operators risk injury trying to maintain control over long pieces of stock singlehandedly, especially if the stock begins to bind on the blade and kick back.
A roller stand (Figure 38-46) provides the needed support. Adjust it to a height slightly lower than the saw table to allow for sagging of the material. Be sure to set up the stand so the roller axis is at 90 degrees to the blade. Otherwise, the roller could pull the stock off to one side and cause binding.
Figure38-46:RollerStand
Whatever the design, a support stand should be standard equipment in every carpentry and millwork shop. It can be used as an extension to a workbench, jointer, or bandsaw and is especially important with the table saw.
Extensions
Made of wood or metal, table top extensions installed behind and to both sides of the machine can make the cutting of large sheets of plywood and long stock safer and more efficient.
In most cases, a space must be provided between the extension and saw top for adjusting the basket guard and allowing scrap to fall clear.
Blades
Table saw blades are similar to those for circular saws. The teeth on carbide-tipped, hollow-ground, and taper blades do not need setting (Figure 38-47).
Cutting Teeth
Expansion SlotRaker ToothRaker GulletGullet
Carbide Tip
Shoulder
Combination Carbide Blade
StraightTop RakerTooth
BevelTop CuttingTooth
Standard ThinRim
HollowGround
Figure38-47:Carbide-TippedBlades
BladeAdjustment
Proper adjustment of cutting depth holds blade friction to a minimum, removes sawdust from the cut, and results in cool cutting.
Sharp blades with properly set teeth will keep the work from binding and the blade from overheating and kicking back.
POWER TOOLS – SAWS
38-16 Construction Health and Safety Manual
The blade should project the depth of one full tooth above the material to be cut. When using carbide-tipped blades or mitre blades, let only half a tooth project above the material.
BladeSpeed
The right cutting speed is important. The blade should turn at the correct rpm to yield the recommended cutting speed.
When not in motion, saw blades, especially large blades, are usually not perfectly flat because of internal tensions. At the right operating speeds, however, the blades straighten out as a result of centrifugal force and cut smoothly at full capacity.
Blades running too fast or too slow tend to start wobbling either before or during a cut. If cutting continues, the blade will overheat and may kick back, damaging the equipment, and injuring the operator.
RipFence
The rip fence is used mainly to guide the stock and maintain correct width of cut. The fence on small saws is usually clamped down at both the front and back of the table by pushing down a lever or turning a knob. Adjust the fence slightly wider at the back to let the wood spread out behind the cut and reduce the risk of kickback.
Many carpenters add a piece of hardwood to the rip fence in order to rip thin pieces of wood and make dadoes and rabbets. The auxiliary fence can be set close to the cutters without the risk of contact between the blade and the steel fence.
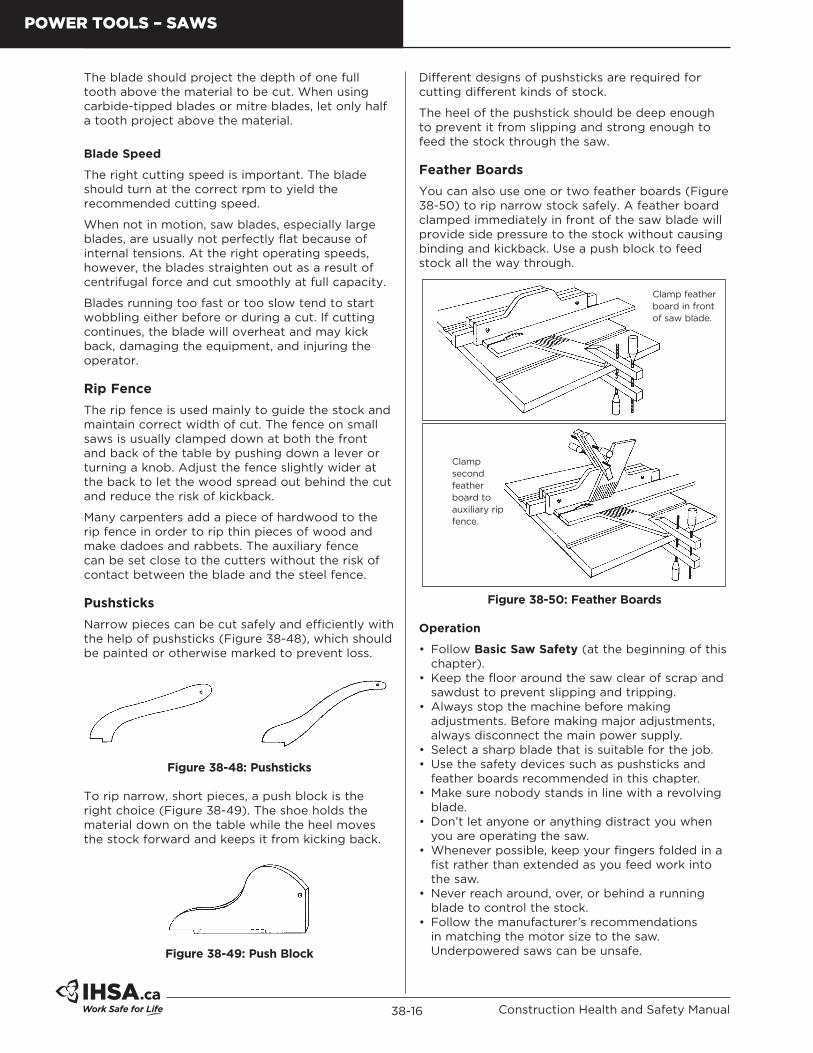
Pushsticks
Narrow pieces can be cut safely and efficiently with the help of pushsticks (Figure 38-48), which should be painted or otherwise marked to prevent loss.
Figure38-48:Pushsticks
To rip narrow, short pieces, a push block is the right choice (Figure 38-49). The shoe holds the material down on the table while the heel moves the stock forward and keeps it from kicking back.
Figure38-49:PushBlock
Different designs of pushsticks are required for cutting different kinds of stock.
The heel of the pushstick should be deep enough to prevent it from slipping and strong enough to feed the stock through the saw.
FeatherBoards
You can also use one or two feather boards (Figure 38-50) to rip narrow stock safely. A feather board clamped immediately in front of the saw blade will provide side pressure to the stock without causing binding and kickback. Use a push block to feed stock all the way through.
Clamp second feather board to auxiliary rip fence.
Clamp feather board in front of saw blade.
Figure38-50:FeatherBoards
Operation
• Follow BasicSawSafety (at the beginning of this chapter).
• Keep the floor around the saw clear of scrap and sawdust to prevent slipping and tripping.
• Always stop the machine before making adjustments. Before making major adjustments, always disconnect the main power supply.
• Select a sharp blade that is suitable for the job.• Use the safety devices such as pushsticks and
feather boards recommended in this chapter.• Make sure nobody stands in line with a revolving
blade.• Don’t let anyone or anything distract you when
you are operating the saw.• Whenever possible, keep your fingers folded in a
fist rather than extended as you feed work into the saw.
• Never reach around, over, or behind a running blade to control the stock.
• Follow the manufacturer’s recommendations in matching the motor size to the saw. Underpowered saws can be unsafe.
POWER TOOLS – SAWS
38-17Tools and Techniques
• Table saws should be properly grounded. Check the power supply for ground and always use a ground fault circuit interrupter. This is mandatory for saws used outdoors or in wet locations.
• Table saws must be equipped with an on/off switch so power can be shut off quickly in an emergency.
• A magnetic starter switch is preferable to a mechanical toggle because it prevents the saw from starting up again unexpectedly after an interruption in power.
• When purchasing a new table saw, try to get one equipped with an electric brake. The brake stops the blade rotation within seconds of the operator turning off the saw. The reduced risk of injury is worth the extra cost.
• Extension cords should be of sufficient wire gauge for the voltage and amperage required by the saw and for the length of the run.
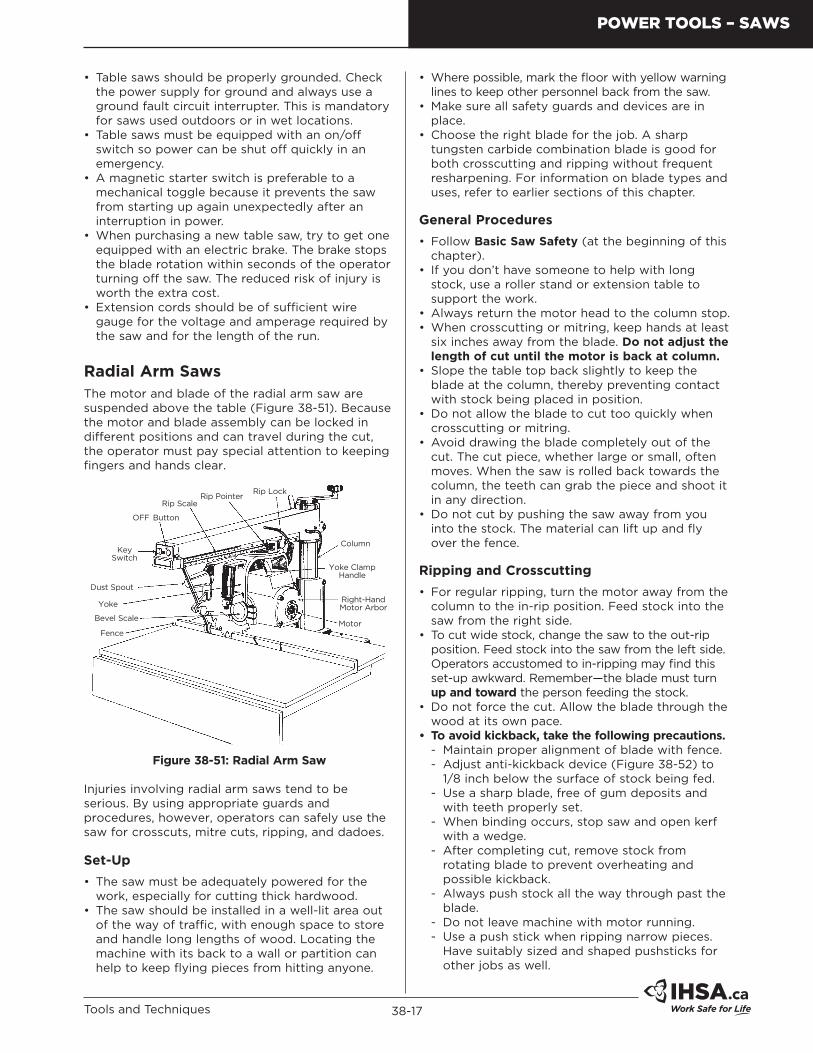
RadialArmSawsThe motor and blade of the radial arm saw are suspended above the table (Figure 38-51). Because the motor and blade assembly can be locked in different positions and can travel during the cut, the operator must pay special attention to keeping fingers and hands clear.
OFF Button
Rip ScaleRip Pointer
Rip Lock
Column
Yoke Clamp Handle
Right-HandMotor Arbor
Motor
Key Switch
Dust Spout
Yoke
Bevel Scale
Fence
Figure38-51:RadialArmSaw
Injuries involving radial arm saws tend to be serious. By using appropriate guards and procedures, however, operators can safely use the saw for crosscuts, mitre cuts, ripping, and dadoes.
Set-Up
• The saw must be adequately powered for the work, especially for cutting thick hardwood.
• The saw should be installed in a well-lit area out of the way of traffic, with enough space to store and handle long lengths of wood. Locating the machine with its back to a wall or partition can help to keep flying pieces from hitting anyone.
• Where possible, mark the floor with yellow warning lines to keep other personnel back from the saw.
• Make sure all safety guards and devices are in place.
• Choose the right blade for the job. A sharp tungsten carbide combination blade is good for both crosscutting and ripping without frequent resharpening. For information on blade types and uses, refer to earlier sections of this chapter.
GeneralProcedures
• Follow BasicSawSafety (at the beginning of this chapter).
• If you don’t have someone to help with long stock, use a roller stand or extension table to support the work.
• Always return the motor head to the column stop.• When crosscutting or mitring, keep hands at least
six inches away from the blade. Donotadjustthelengthofcutuntilthemotorisbackatcolumn.
• Slope the table top back slightly to keep the blade at the column, thereby preventing contact with stock being placed in position.
• Do not allow the blade to cut too quickly when crosscutting or mitring.
• Avoid drawing the blade completely out of the cut. The cut piece, whether large or small, often moves. When the saw is rolled back towards the column, the teeth can grab the piece and shoot it in any direction.
• Do not cut by pushing the saw away from you into the stock. The material can lift up and fly over the fence.
RippingandCrosscutting
• For regular ripping, turn the motor away from the column to the in-rip position. Feed stock into the saw from the right side.
• To cut wide stock, change the saw to the out-rip position. Feed stock into the saw from the left side. Operators accustomed to in-ripping may find this set-up awkward. Remember—the blade must turn upandtoward the person feeding the stock.
• Do not force the cut. Allow the blade through the wood at its own pace.
• Toavoidkickback,takethefollowingprecautions. - Maintain proper alignment of blade with fence. - Adjust anti-kickback device (Figure 38-52) to 1/8 inch below the surface of stock being fed.
- Use a sharp blade, free of gum deposits and with teeth properly set.
- When binding occurs, stop saw and open kerf with a wedge.
- After completing cut, remove stock from rotating blade to prevent overheating and possible kickback.
- Always push stock all the way through past the blade.
- Do not leave machine with motor running. - Use a push stick when ripping narrow pieces. Have suitably sized and shaped pushsticks for other jobs as well.
POWER TOOLS – SAWS
38-18 Construction Health and Safety Manual
See information on pushsticks and feather boards under Table Saws, earlier in this chapter.
Figure38-52:Anti-KickbackDevice
Jigs
The control provided by a well-made jig is essential for making irregular cuts safely and accurately.
Keep commonly used jigs (Figure 38-53) on hand. Jigs such as those for making stair and doorframe wedges and tapers are designed to carry stock past the blade with the saw locked in the rip position.
Taper Jig
Tenoning Jig
Figure38-53:Jigs
When you’re drawing the saw into the stock, clamp or nail jigs to the table to prevent slipping.
Re-SawingwithBladeHorizontal
The rip fence on the radial arm saw is too low for supporting material to be re-sawn on edge. Therefore the material must be laid flat on the table and the motor must be turned so the blade is parallel to the table. The closeness of the arbor requires an auxiliary table top and fence to re-saw thin stock.
Because the kickback fence can’t be used and controlling stock is sometimes difficult, re-sawing on the radial arm saw can be hazardous.
If no other equipment is available, rip the stock halfway through, then turn it around and complete the cut.
On the second cut, be sure to push the two halves well past the blade once they have been cut apart. Pushsticks and featherboards clamped to the table can reduce hazards.
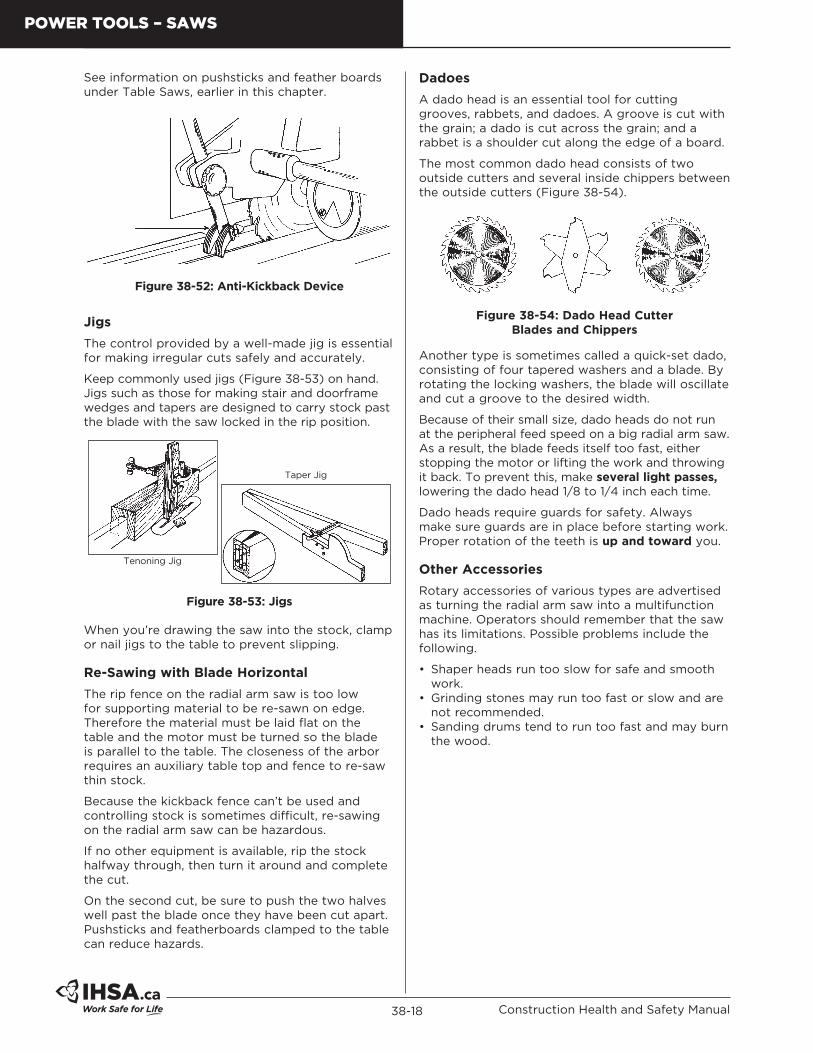
Dadoes
A dado head is an essential tool for cutting grooves, rabbets, and dadoes. A groove is cut with the grain; a dado is cut across the grain; and a rabbet is a shoulder cut along the edge of a board.
The most common dado head consists of two outside cutters and several inside chippers between the outside cutters (Figure 38-54).
Figure38-54:DadoHeadCutterBladesandChippers
Another type is sometimes called a quick-set dado, consisting of four tapered washers and a blade. By rotating the locking washers, the blade will oscillate and cut a groove to the desired width.
Because of their small size, dado heads do not run at the peripheral feed speed on a big radial arm saw. As a result, the blade feeds itself too fast, either stopping the motor or lifting the work and throwing it back. To prevent this, make severallightpasses, lowering the dado head 1/8 to 1/4 inch each time.
Dado heads require guards for safety. Always make sure guards are in place before starting work. Proper rotation of the teeth is upandtoward you.
OtherAccessories
Rotary accessories of various types are advertised as turning the radial arm saw into a multifunction machine. Operators should remember that the saw has its limitations. Possible problems include the following.
• Shaper heads run too slow for safe and smooth work.
• Grinding stones may run too fast or slow and are not recommended.
• Sanding drums tend to run too fast and may burn the wood.
POWER TOOLS – SAWS


![New t New CUBEs with Heavy Attitude t - American Musical Supply · 2013. 11. 26. · METAL ZONE, EXTREME), GAIN Knob, VOLUME Knob, [EQUALIZER] BASS Knob, MIDDLE Knob, TREBLE Knob](https://static.fdocuments.us/doc/165x107/6067859789f730682b1d8a47/new-t-new-cubes-with-heavy-attitude-t-american-musical-supply-2013-11-26.jpg)