Chapter 3 RECORDING A CLASS - Wichita State...
19
Campus 2.0 Instructor’s Guide Recording a Class 6 Chapter 3 RECORDING A CLASS Tegrity enables you to record your class sessions for subsequent review by your students. For each course you teach, you can use Tegrity to: Record every class session. Record supplemental material. Starting Tegrity Recorder Tegrity Recorder can be accessed from the Course Management page. If you are a Mac user, continue with the topic Tegrity Recorder Instructions for Mac Users on page 12. If you are using a computer from which you previously accessed Tegrity Campus, a Tegrity icon appears in your system tray. (The system tray is located at the bottom right corner of your screen.) This icon enables you to easily access the Tegrity Recorder. To start Tegrity Recorder from your course management system: 1. Log into your Course Management System and navigate to the course you would like to access. 2. Click the Tegrity link or button located in your course page. The Class Recordings page appears with the Record a Class button in the upper left corner of the page (Figure 2). 3. Click Record a Class. The Tegrity Recorder window appears (Figure 4). If this is the first time you are recording a class, the Tegrity Recorder icon is added to your system tray. To start Tegrity Recorder using the Tegrity Recorder icon: Double‐click the Tegrity icon in your system tray, located at the bottom right corner of your screen. Depending on your institution’s policies and Tegrity settings, you may be prompted to enter your Tegrity user ID and password.
-
Upload
hoangthuan -
Category
Documents
-
view
216 -
download
0
Transcript of Chapter 3 RECORDING A CLASS - Wichita State...
Campus 2.0 Instructor’s Guide Recording a Class 6
Chapter 3
RECORDING A CLASS Tegrity enables you to record your class sessions for subsequent review by your students. For each course you teach, you can use Tegrity to:
Record every class session.
Record supplemental material.
Starting Tegrity Recorder Tegrity Recorder can be accessed from the Course Management page. If you are a Mac user, continue with the topic Tegrity Recorder Instructions for Mac Users on page 12.
If you are using a computer from which you previously accessed Tegrity Campus, a Tegrity icon appears in your system tray. (The system tray is located at the bottom right corner of your screen.) This icon enables you to easily access the Tegrity Recorder.
To start Tegrity Recorder from your course management system:
1. Log into your Course Management System and navigate to the course you would like to access.
2. Click the Tegrity link or button located in your course page. The Class Recordings page appears with the Record a Class button in the upper left corner of the page (Figure 2).
3. Click Record a Class. The Tegrity Recorder window appears (Figure 4). If this is the first time you are recording a class, the Tegrity Recorder icon is added to your system tray.
To start Tegrity Recorder using the Tegrity Recorder icon:
Double‐click the Tegrity icon in your system tray, located at the bottom right corner of your screen.
Depending on your institution’s policies and Tegrity settings, you may be prompted to enter your Tegrity user ID and password.
Campus 2.0 Instructor’s Guide Recording a Class 7
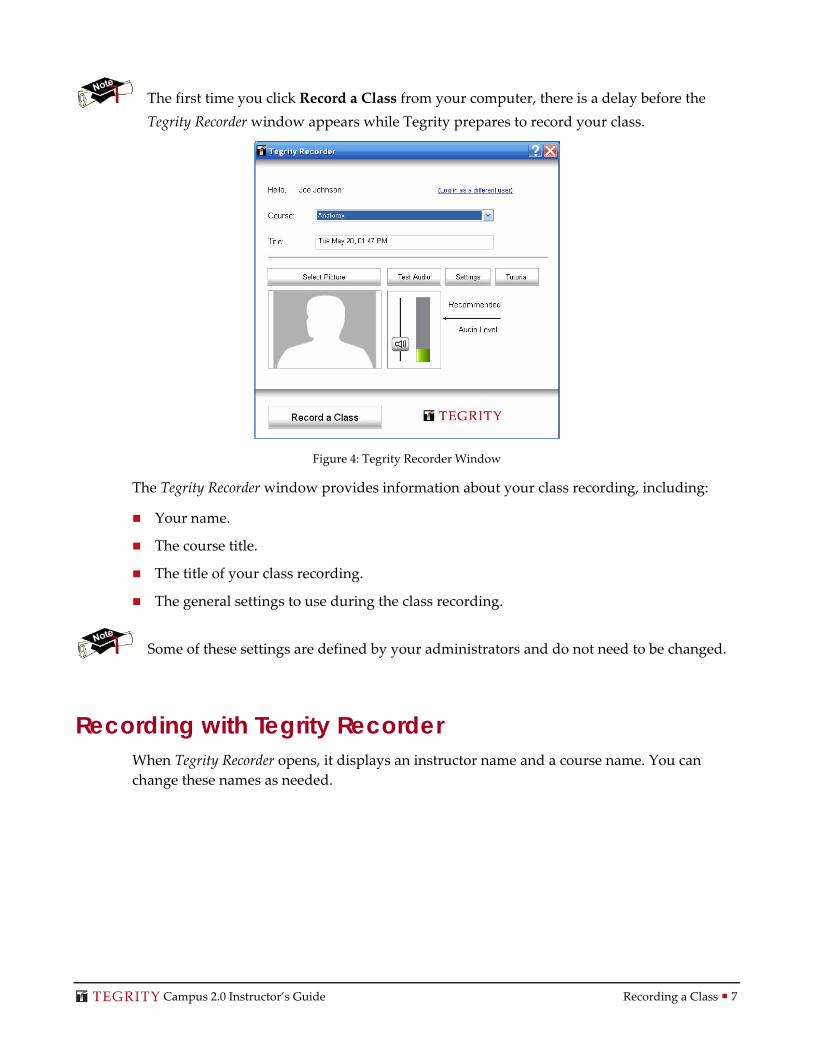
The first time you click Record a Class from your computer, there is a delay before the Tegrity Recorder window appears while Tegrity prepares to record your class.
Figure 4: Tegrity Recorder Window
The Tegrity Recorder window provides information about your class recording, including:
Your name.
The course title.
The title of your class recording.
The general settings to use during the class recording.
Some of these settings are defined by your administrators and do not need to be changed.
Recording with Tegrity Recorder When Tegrity Recorder opens, it displays an instructor name and a course name. You can change these names as needed.
Campus 2.0 Instructor’s Guide Recording a Class 8
Entering the Instructor’s Name The instructor’s name appears in the Hello field of the Tegrity Recorder window. If the name in the Hello field is not correct, you need to change it.
To change the name in the Hello field:
1. Click Log in as a different user. The Tegrity Recorder window displays a Login field.
2. Enter your user ID in the field. If you do not know you user ID, contact your Tegrity support personnel.
Depending on your institution’s policies and Tegrity settings, you may be prompted to enter your Tegrity user ID and password.
3. Click Login. Your user ID is verified and your name appears in the Hello field.
Selecting the Name of your Course The course name for the class you want to record appears in the Course field.
To change the course name:
Click the arrow to the right of the Course field and select the correct name of the course from the drop‐down list.
If you do not see your course in the drop‐down list, make sure that your name appears in the Hello field to ensure you are identified correctly (see Entering the Instructor’s Name on page 8.)
If your course title does not appear in the list, you may still record by selecting your Private Course from the Course drop‐down list. This course is only accessible to you, and has no students are enrolled in it. If your course is missing from the course list, contact your Tegrity support staff to have the list updated. Once the missing course is added you can move the recording from your Private Course to the new course.
Campus 2.0 Instructor’s Guide Recording a Class 9
Naming the Class Recording You can define a recording title for the class, which, by default, is the date and time that the class is recorded (Figure 36).
To change the name of the class recording:
Select the text in the Recording Title field and type the name of the class recording as you want it to appear.
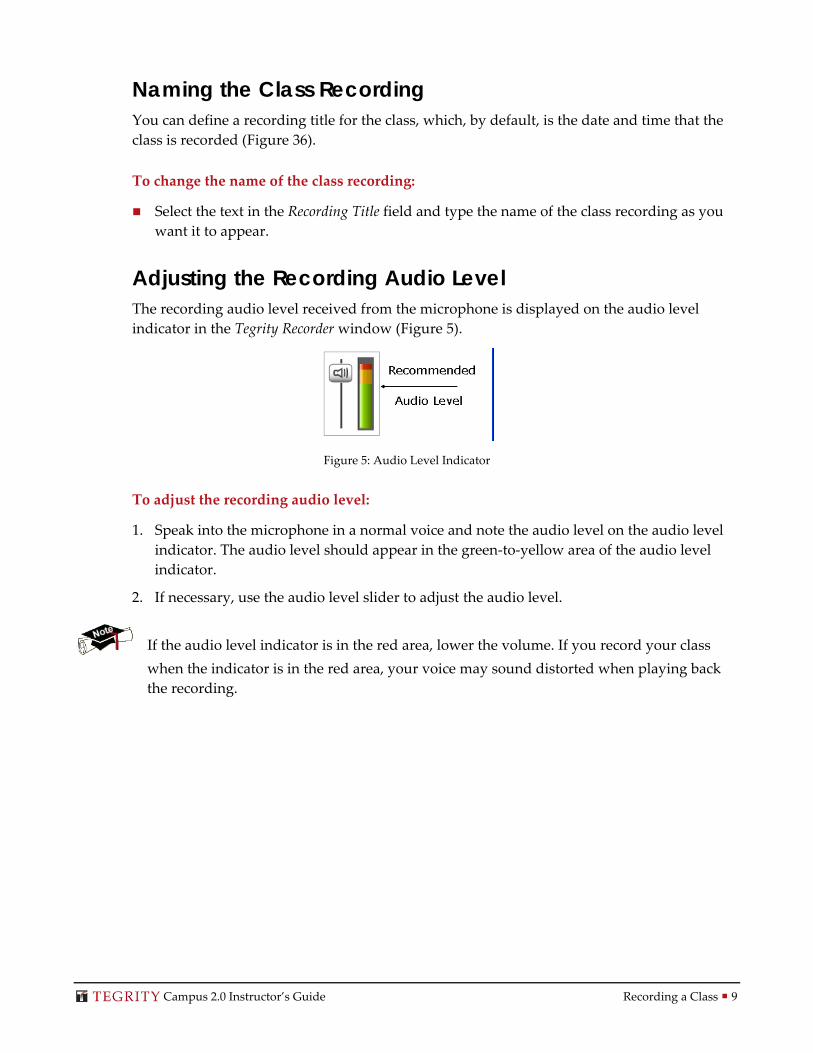
Adjusting the Recording Audio Level The recording audio level received from the microphone is displayed on the audio level indicator in the Tegrity Recorder window (Figure 5).
Figure 5: Audio Level Indicator
To adjust the recording audio level:
1. Speak into the microphone in a normal voice and note the audio level on the audio level indicator. The audio level should appear in the green‐to‐yellow area of the audio level indicator.
2. If necessary, use the audio level slider to adjust the audio level.
If the audio level indicator is in the red area, lower the volume. If you record your class when the indicator is in the red area, your voice may sound distorted when playing back the recording.
Campus 2.0 Instructor’s Guide Recording a Class 10
Recording Classes Tegrity provides easy‐to‐use controls for recording your classes. The following additional features are particularly useful for practice sessions or setup:
Preview of a recording before uploading.
Delete a class recording.
To record your class:
1. Start Tegrity Recorder and click Record a Class (see Starting Tegrity Recorder on page 6). The first time you click Record a Class, a dialog box appears displaying information about the Tegrity Recording toolbar icons.
If you have exclusive use of the computer and don’t need instructions for using the toolbar icons, select the Don’t show this message again checkbox.
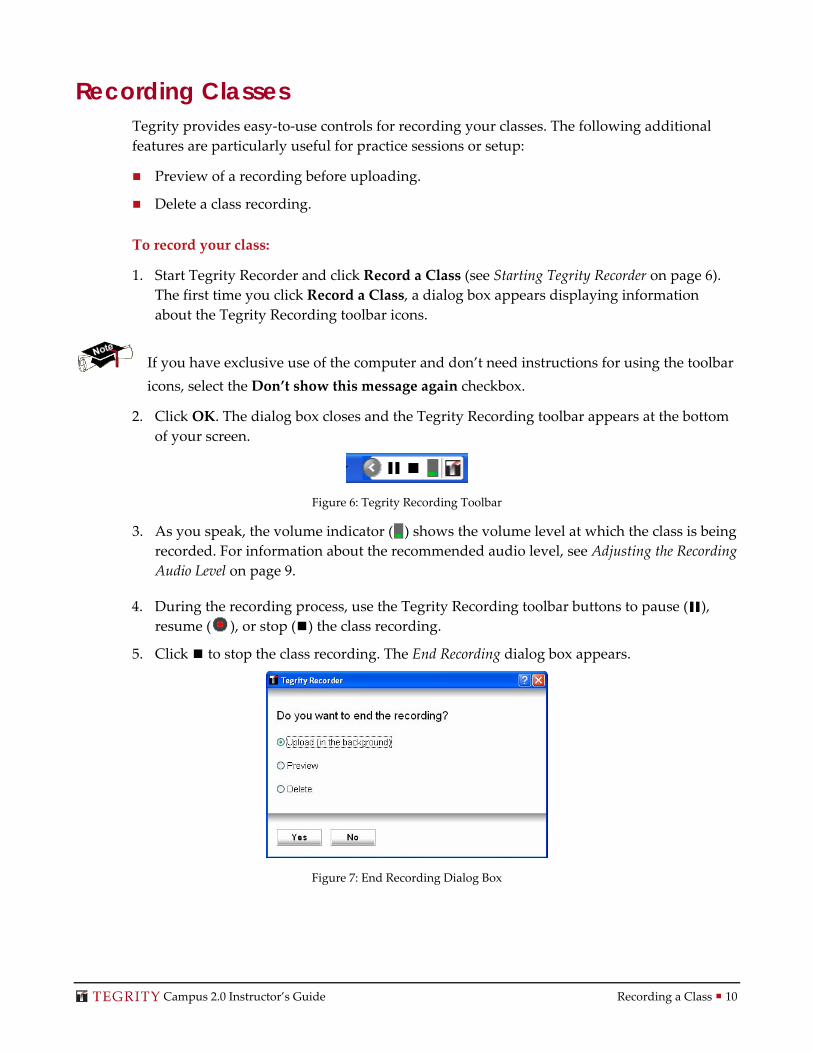
2. Click OK. The dialog box closes and the Tegrity Recording toolbar appears at the bottom of your screen.
Figure 6: Tegrity Recording Toolbar
3. As you speak, the volume indicator ( ) shows the volume level at which the class is being recorded. For information about the recommended audio level, see Adjusting the Recording Audio Level on page 9.
4. During the recording process, use the Tegrity Recording toolbar buttons to pause ( ), resume ( ), or stop ( ) the class recording.
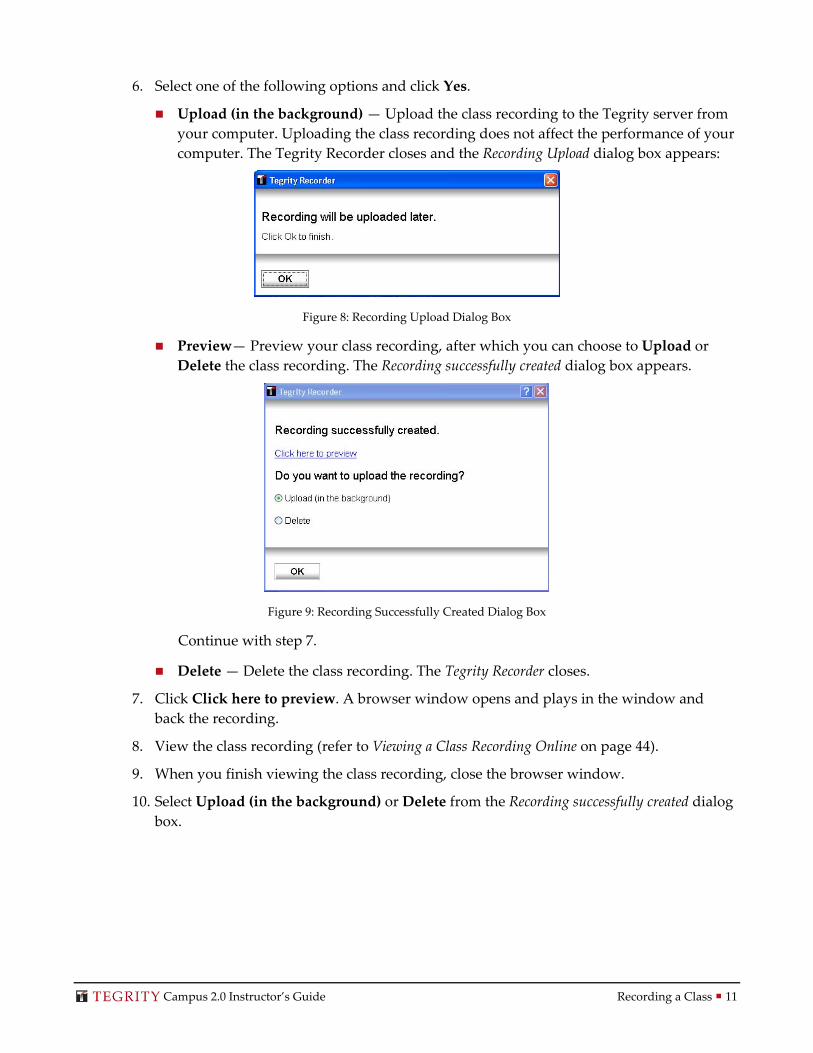
5. Click to stop the class recording. The End Recording dialog box appears.
Figure 7: End Recording Dialog Box
Campus 2.0 Instructor’s Guide Recording a Class 11
6. Select one of the following options and click Yes.
Upload (in the background) — Upload the class recording to the Tegrity server from your computer. Uploading the class recording does not affect the performance of your computer. The Tegrity Recorder closes and the Recording Upload dialog box appears:
Figure 8: Recording Upload Dialog Box
Preview— Preview your class recording, after which you can choose to Upload or Delete the class recording. The Recording successfully created dialog box appears.
Figure 9: Recording Successfully Created Dialog Box
Continue with step 7.
Delete — Delete the class recording. The Tegrity Recorder closes.
7. Click Click here to preview. A browser window opens and plays in the window and back the recording.
8. View the class recording (refer to Viewing a Class Recording Online on page 44).
9. When you finish viewing the class recording, close the browser window.
10. Select Upload (in the background) or Delete from the Recording successfully created dialog box.

Campus 2.0 Instructor’s Guide Recording a Class 12
Tegrity Recorder Instructions for Mac Users Tegrity provides easy‐to‐use setup, installation, and recording options for Mac users.
Installing the Tegrity Recorder Application on Your Mac When you access Tegrity Campus for the first time from your Mac, you must install Tegrity Recorder.
To install Tegrity Recorder on your Mac:
1. Log into Tegrity Campus. The Download Recorder button appears in the upper left corner of the Course Management page.
Figure 10: Course Management Page – Download Recorder Option (Mac)
Campus 2.0 Instructor’s Guide Recording a Class 13
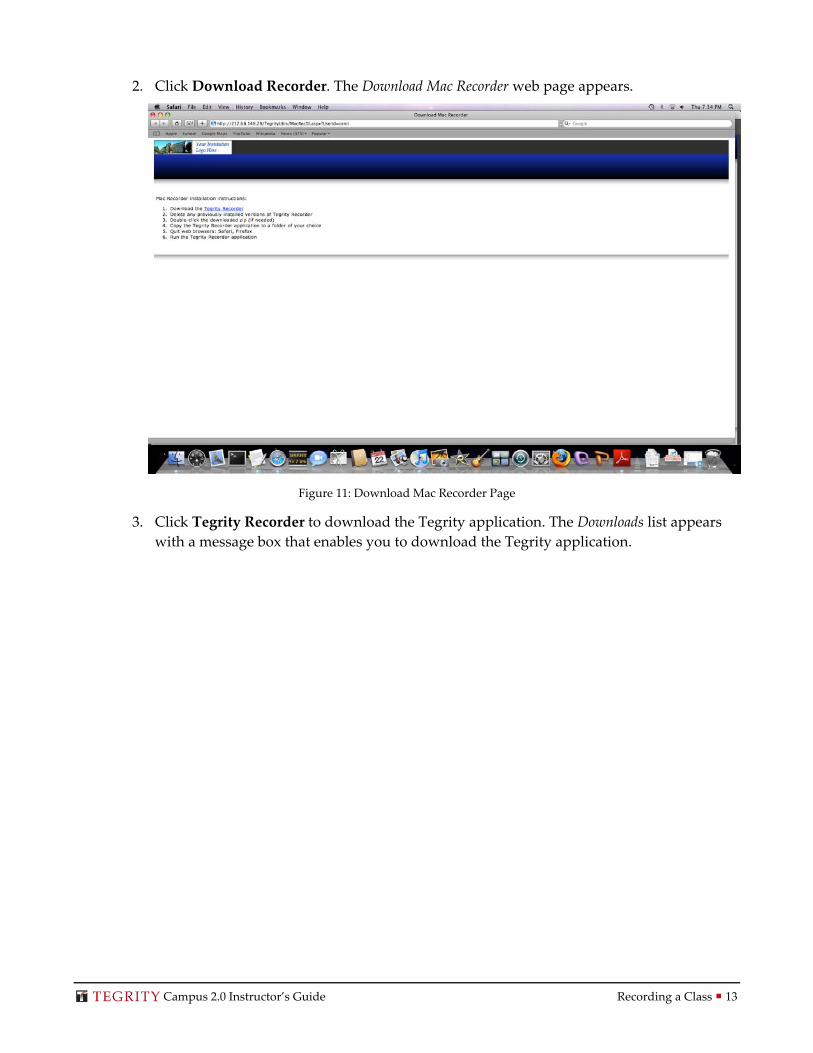
2. Click Download Recorder. The Download Mac Recorder web page appears.
Figure 11: Download Mac Recorder Page
3. Click Tegrity Recorder to download the Tegrity application. The Downloads list appears with a message box that enables you to download the Tegrity application.
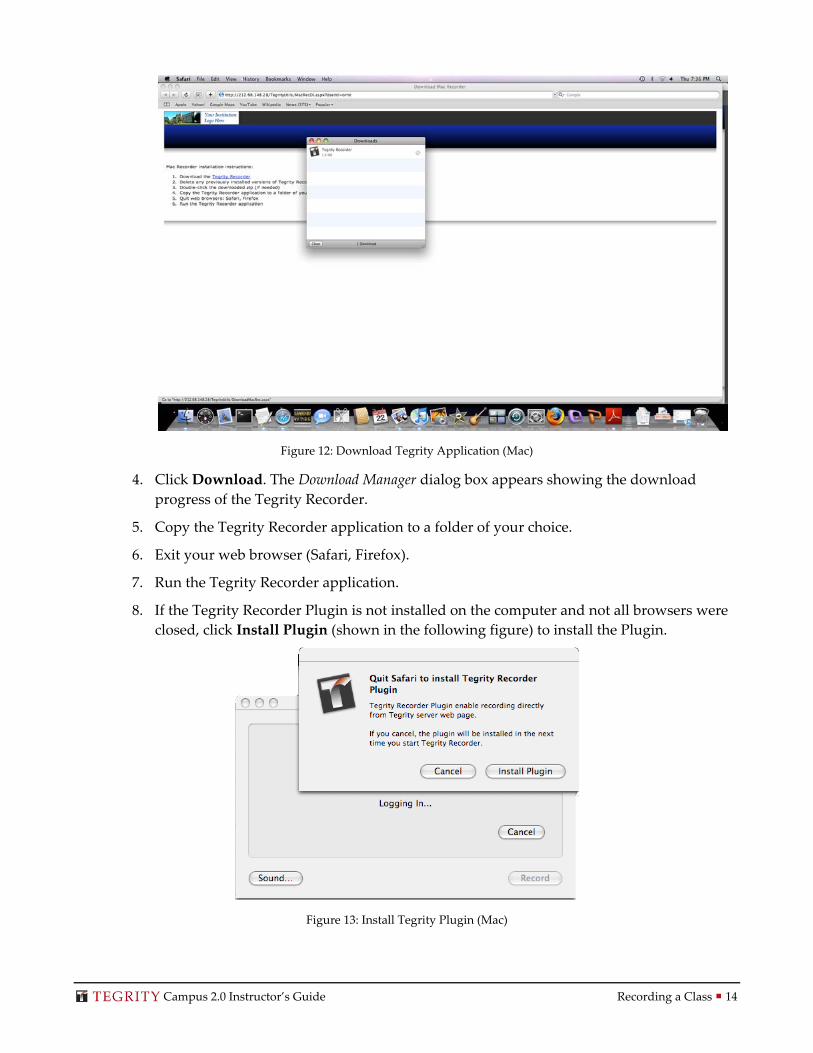
Campus 2.0 Instructor’s Guide Recording a Class 14
Figure 12: Download Tegrity Application (Mac)
4. Click Download. The Download Manager dialog box appears showing the download progress of the Tegrity Recorder.
5. Copy the Tegrity Recorder application to a folder of your choice.
6. Exit your web browser (Safari, Firefox).
7. Run the Tegrity Recorder application.
8. If the Tegrity Recorder Plugin is not installed on the computer and not all browsers were closed, click Install Plugin (shown in the following figure) to install the Plugin.
Figure 13: Install Tegrity Plugin (Mac)

Campus 2.0 Instructor’s Guide Recording a Class 15
Updating the Tegrity Recorder Application on Your Mac Tegrity automatically notifies you when Tegrity Recorder updates are available and whether an update is critical.
To update the Tegrity Recorder application on your Mac:
1. Login to Tegrity Campus Course Management page. When an update is available, the Download Recorder button appears on the page.
2. Click Download Recorder. The Download Mac Recorder page appears (Figure 11).
3. If the update is not critical, a Not Now button appears at the end of the list of instructions. You can bypass the update by clicking Not Now. The Download Mac Recorder page closes.
4. Delete previous versions of the Mac recorder.
5. Follow the instructions for downloading the Mac recorder (refer to Tegrity Recorder Instructions for Mac Users on page 12).
Recording Classes on Your Mac
To record and upload classes on your Mac:
1. Start the Tegrity Recorder Application in one of the following ways:
Run the Tegrity Recorder Application locally.
‐Or‐
Click Record a Class on the Class Recordings page (Figure 2).
The Record dialog box appears.
Figure 14: Record Dialog Box (Mac)
Campus 2.0 Instructor’s Guide Recording a Class 16
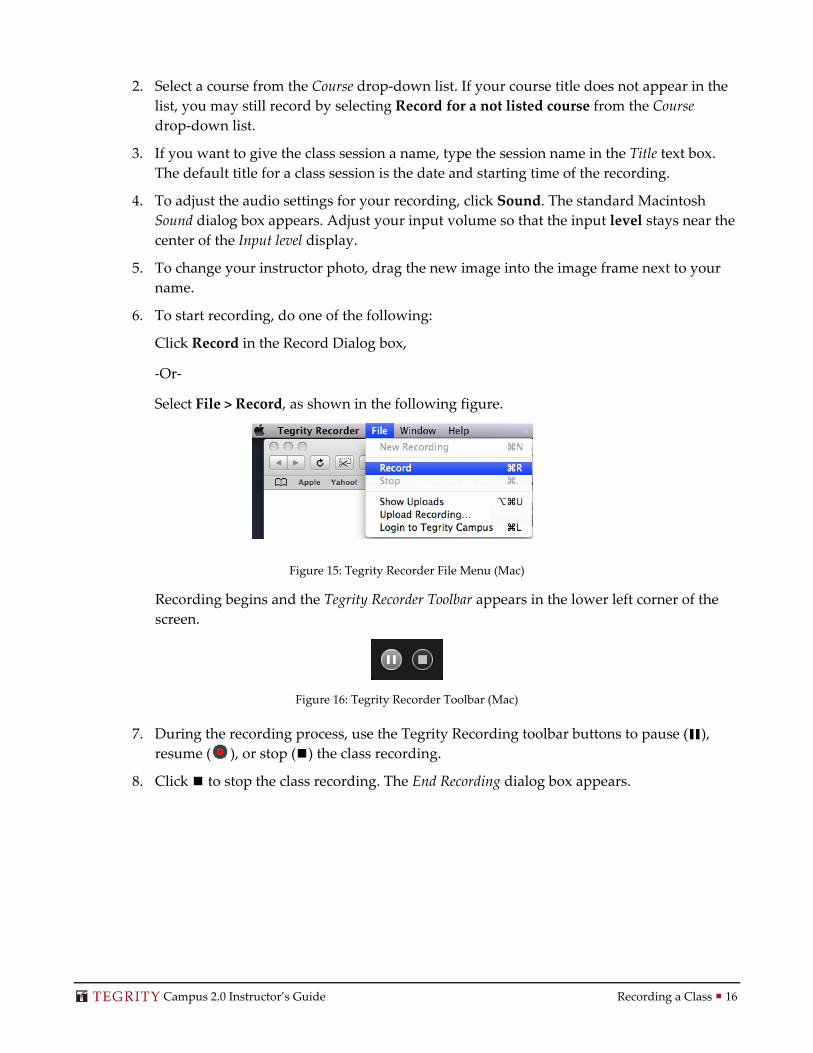
2. Select a course from the Course drop‐down list. If your course title does not appear in the list, you may still record by selecting Record for a not listed course from the Course drop‐down list.
3. If you want to give the class session a name, type the session name in the Title text box. The default title for a class session is the date and starting time of the recording.
4. To adjust the audio settings for your recording, click Sound. The standard Macintosh Sound dialog box appears. Adjust your input volume so that the input level stays near the center of the Input level display.
5. To change your instructor photo, drag the new image into the image frame next to your name.
6. To start recording, do one of the following:
Click Record in the Record Dialog box,
‐Or‐
Select File > Record, as shown in the following figure.
Figure 15: Tegrity Recorder File Menu (Mac)
Recording begins and the Tegrity Recorder Toolbar appears in the lower left corner of the screen.
Figure 16: Tegrity Recorder Toolbar (Mac)
7. During the recording process, use the Tegrity Recording toolbar buttons to pause ( ), resume ( ), or stop ( ) the class recording.
8. Click to stop the class recording. The End Recording dialog box appears.

Campus 2.0 Instructor’s Guide Recording a Class 17
Figure 17: End Recording Dialog Box (Mac)
9. Click one of the following:
Don’t Save – Recording stops and your recording is not saved.
Cancel – Recording resumes.
Save and Upload – The recording is saved and uploading begins. The Uploads dialog box appears, displaying upload progress. Close the window when the upload is complete.
Figure 18: Uploads Dialog Box (Mac)
Campus 2.0 Instructor’s Guide Recording a Class 18
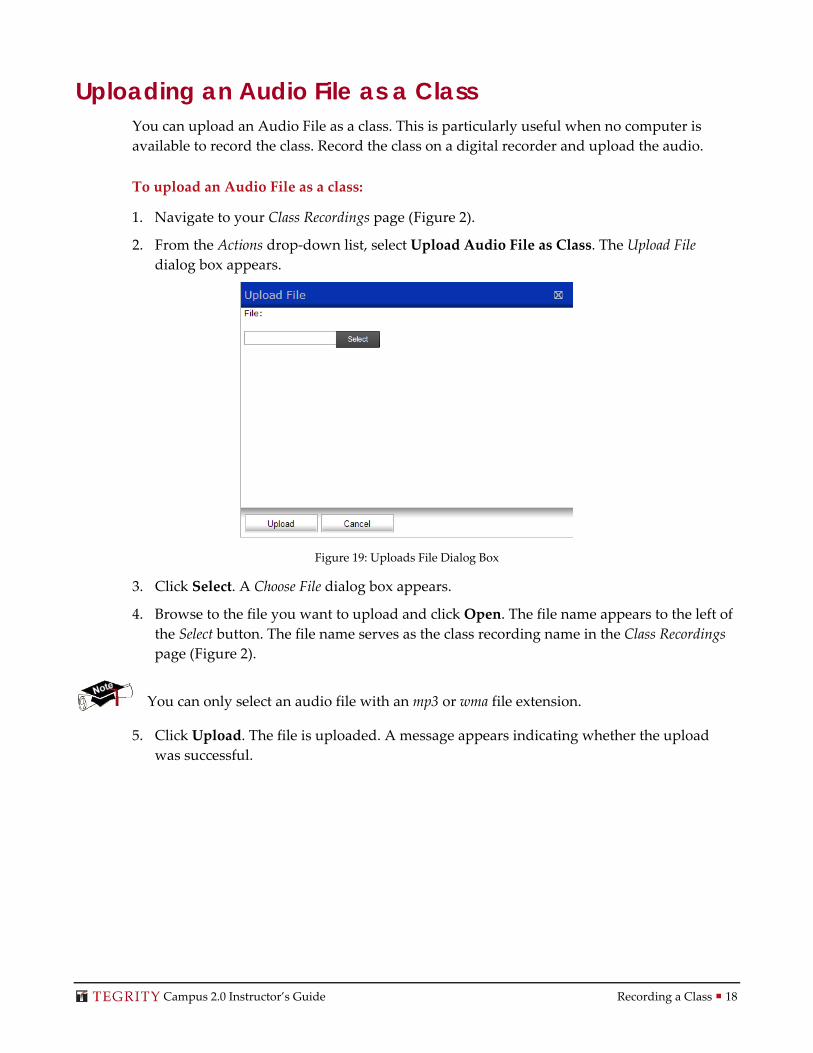
Uploading an Audio File as a Class You can upload an Audio File as a class. This is particularly useful when no computer is available to record the class. Record the class on a digital recorder and upload the audio.
To upload an Audio File as a class:
1. Navigate to your Class Recordings page (Figure 2).
2. From the Actions drop‐down list, select Upload Audio File as Class. The Upload File dialog box appears.
Figure 19: Uploads File Dialog Box
3. Click Select. A Choose File dialog box appears.
4. Browse to the file you want to upload and click Open. The file name appears to the left of the Select button. The file name serves as the class recording name in the Class Recordings page (Figure 2).
You can only select an audio file with an mp3 or wma file extension.
5. Click Upload. The file is uploaded. A message appears indicating whether the upload was successful.
Campus 2.0 Instructor’s Guide Recording a Class 19
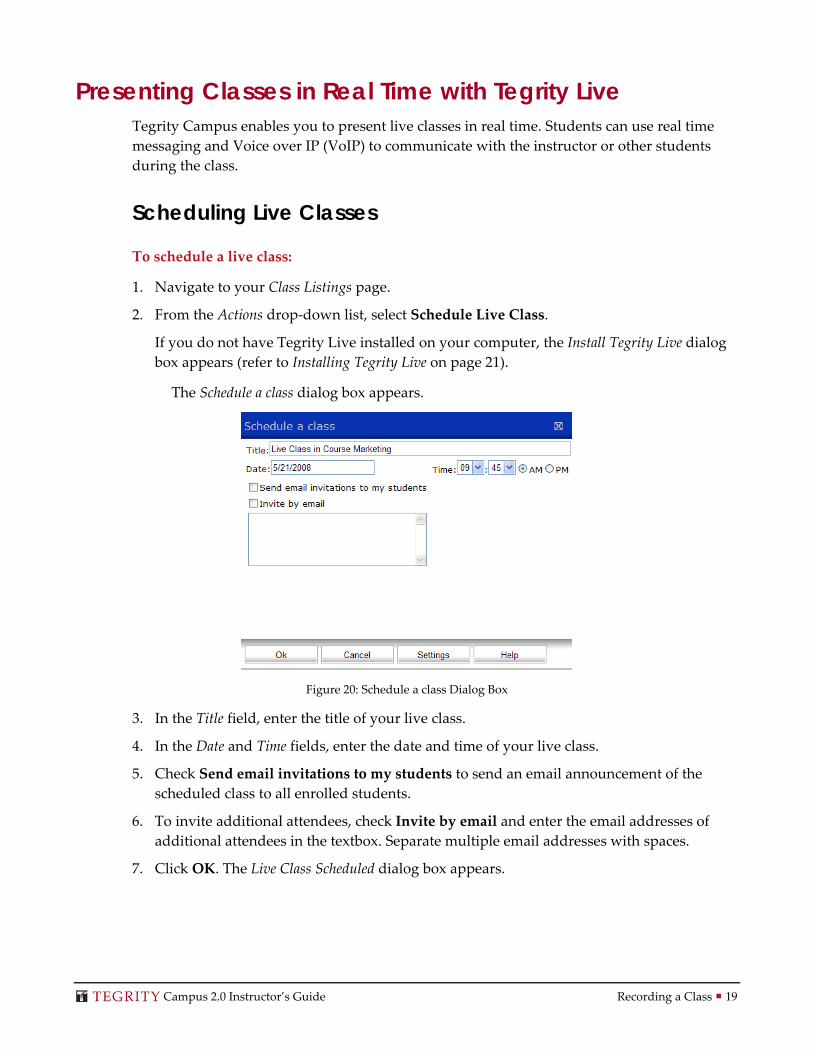
Presenting Classes in Real Time with Tegrity Live Tegrity Campus enables you to present live classes in real time. Students can use real time messaging and Voice over IP (VoIP) to communicate with the instructor or other students during the class.
Scheduling Live Classes
To schedule a live class:
1. Navigate to your Class Listings page.
2. From the Actions drop‐down list, select Schedule Live Class.
If you do not have Tegrity Live installed on your computer, the Install Tegrity Live dialog box appears (refer to Installing Tegrity Live on page 21).
The Schedule a class dialog box appears.
Figure 20: Schedule a class Dialog Box
3. In the Title field, enter the title of your live class.
4. In the Date and Time fields, enter the date and time of your live class.
5. Check Send email invitations to my students to send an email announcement of the scheduled class to all enrolled students.
6. To invite additional attendees, check Invite by email and enter the email addresses of additional attendees in the textbox. Separate multiple email addresses with spaces.
7. Click OK. The Live Class Scheduled dialog box appears.
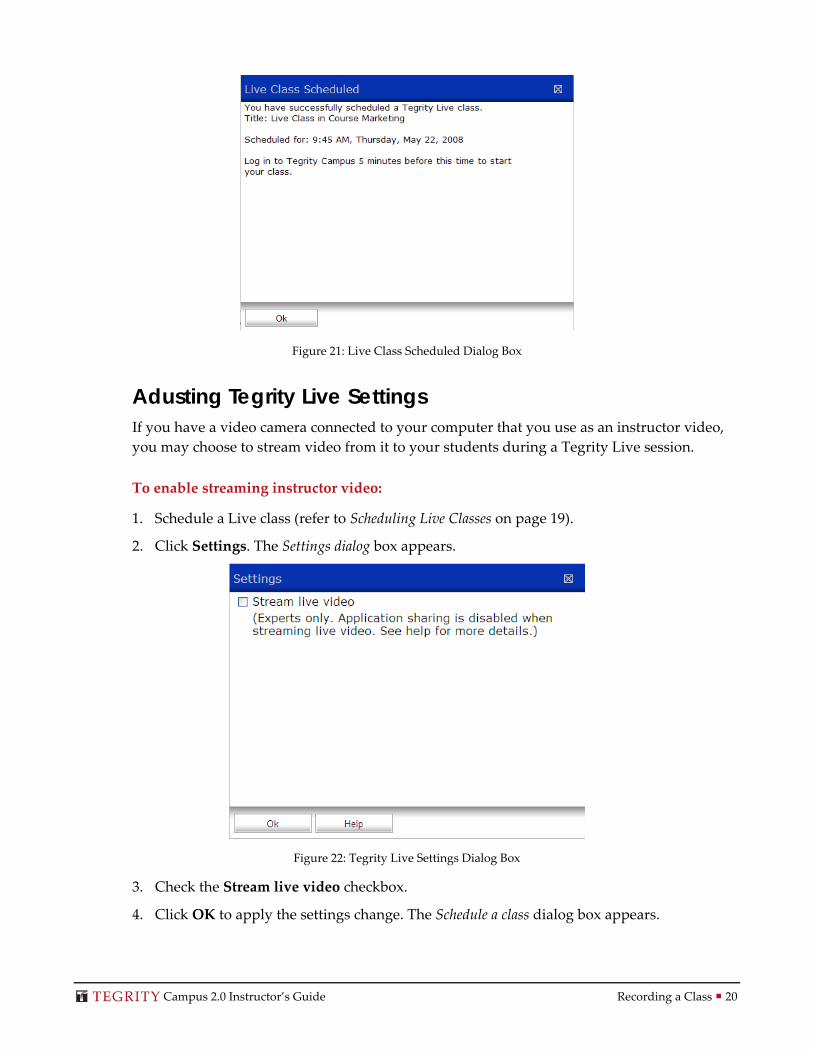
Campus 2.0 Instructor’s Guide Recording a Class 20
Figure 21: Live Class Scheduled Dialog Box
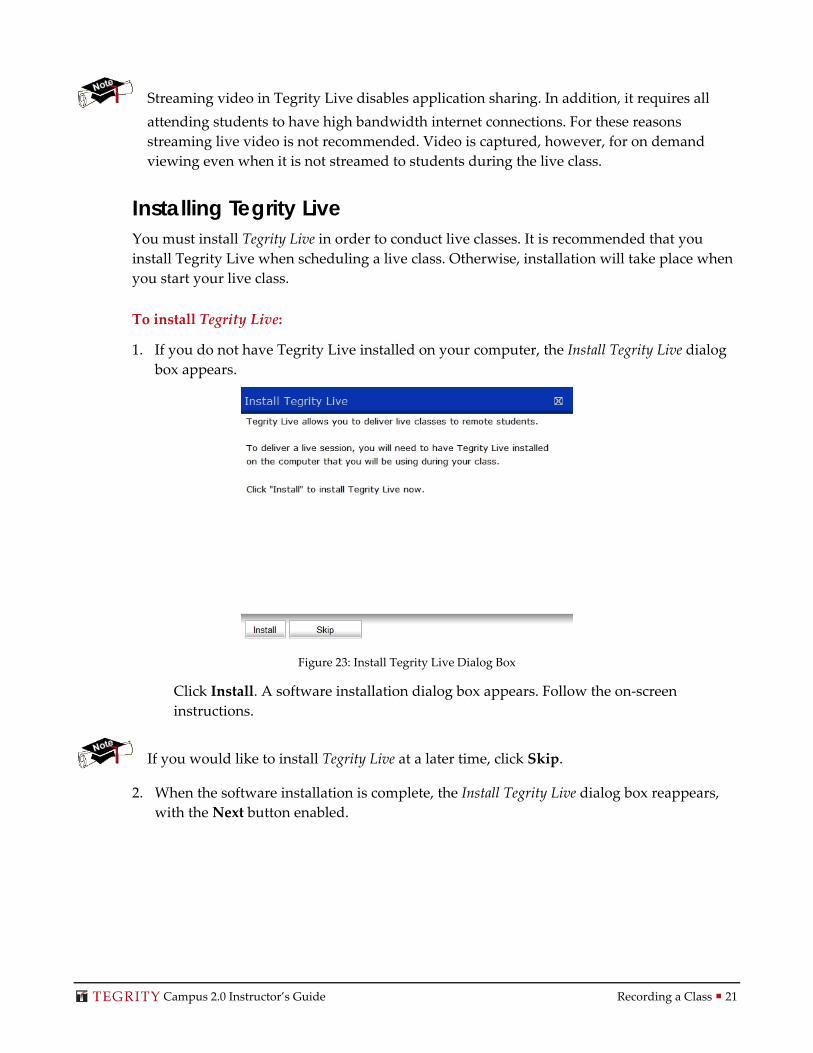
Adusting Tegrity Live Settings If you have a video camera connected to your computer that you use as an instructor video, you may choose to stream video from it to your students during a Tegrity Live session.
To enable streaming instructor video:
1. Schedule a Live class (refer to Scheduling Live Classes on page 19).
2. Click Settings. The Settings dialog box appears.
Figure 22: Tegrity Live Settings Dialog Box
3. Check the Stream live video checkbox.
4. Click OK to apply the settings change. The Schedule a class dialog box appears.
Campus 2.0 Instructor’s Guide Recording a Class 21
Streaming video in Tegrity Live disables application sharing. In addition, it requires all attending students to have high bandwidth internet connections. For these reasons streaming live video is not recommended. Video is captured, however, for on demand viewing even when it is not streamed to students during the live class.
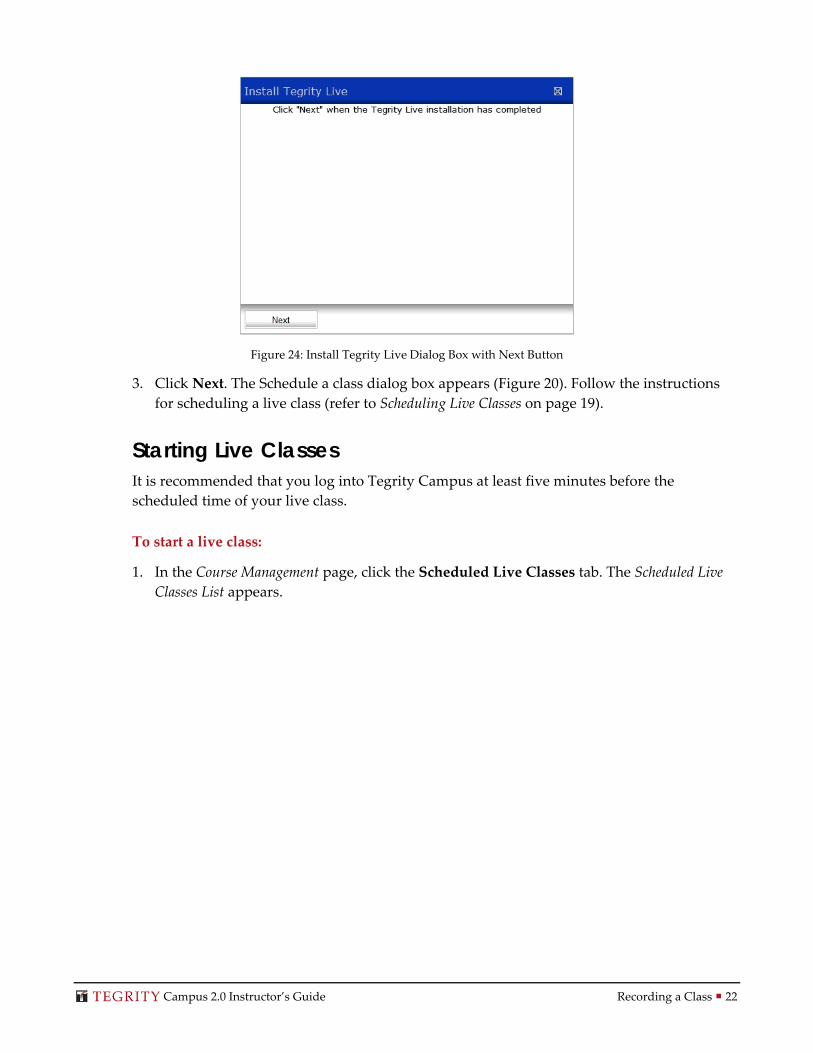
Installing Tegrity Live You must install Tegrity Live in order to conduct live classes. It is recommended that you install Tegrity Live when scheduling a live class. Otherwise, installation will take place when you start your live class.
To install Tegrity Live:
1. If you do not have Tegrity Live installed on your computer, the Install Tegrity Live dialog box appears.
Figure 23: Install Tegrity Live Dialog Box
Click Install. A software installation dialog box appears. Follow the on‐screen instructions.
If you would like to install Tegrity Live at a later time, click Skip.
2. When the software installation is complete, the Install Tegrity Live dialog box reappears, with the Next button enabled.
Campus 2.0 Instructor’s Guide Recording a Class 22
Figure 24: Install Tegrity Live Dialog Box with Next Button
3. Click Next. The Schedule a class dialog box appears (Figure 20). Follow the instructions for scheduling a live class (refer to Scheduling Live Classes on page 19).
Starting Live Classes It is recommended that you log into Tegrity Campus at least five minutes before the scheduled time of your live class.
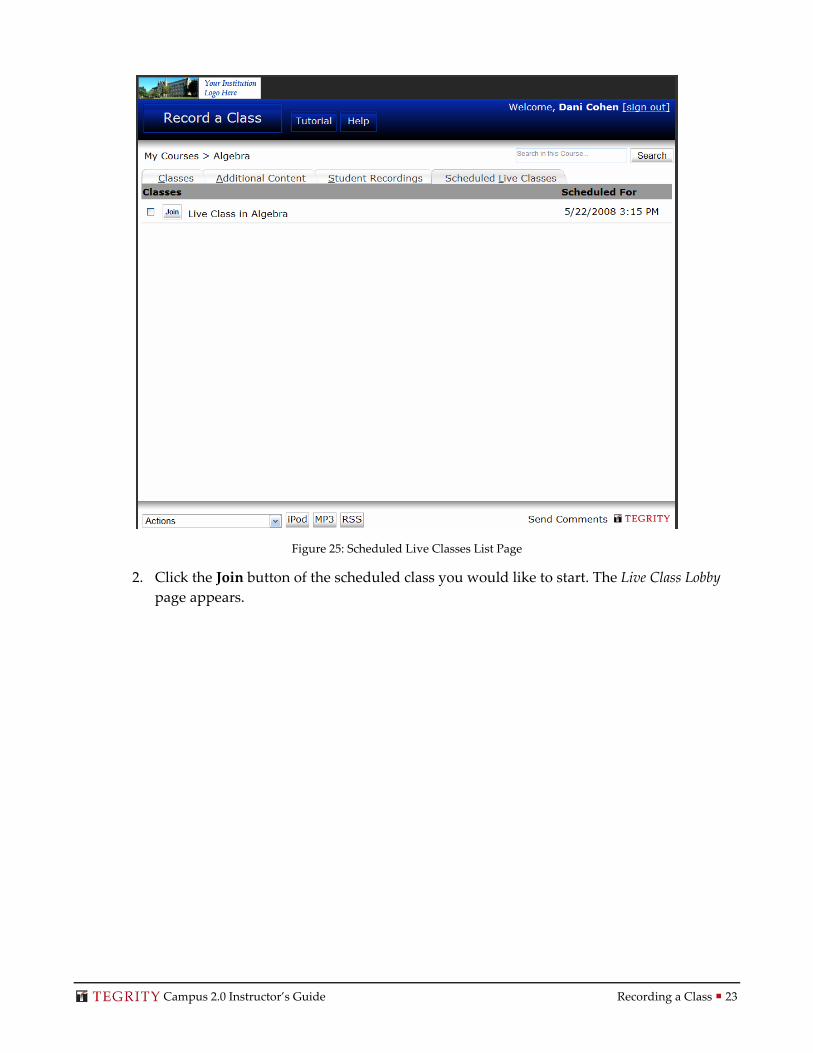
To start a live class:
1. In the Course Management page, click the Scheduled Live Classes tab. The Scheduled Live Classes List appears.
Campus 2.0 Instructor’s Guide Recording a Class 23
Figure 25: Scheduled Live Classes List Page
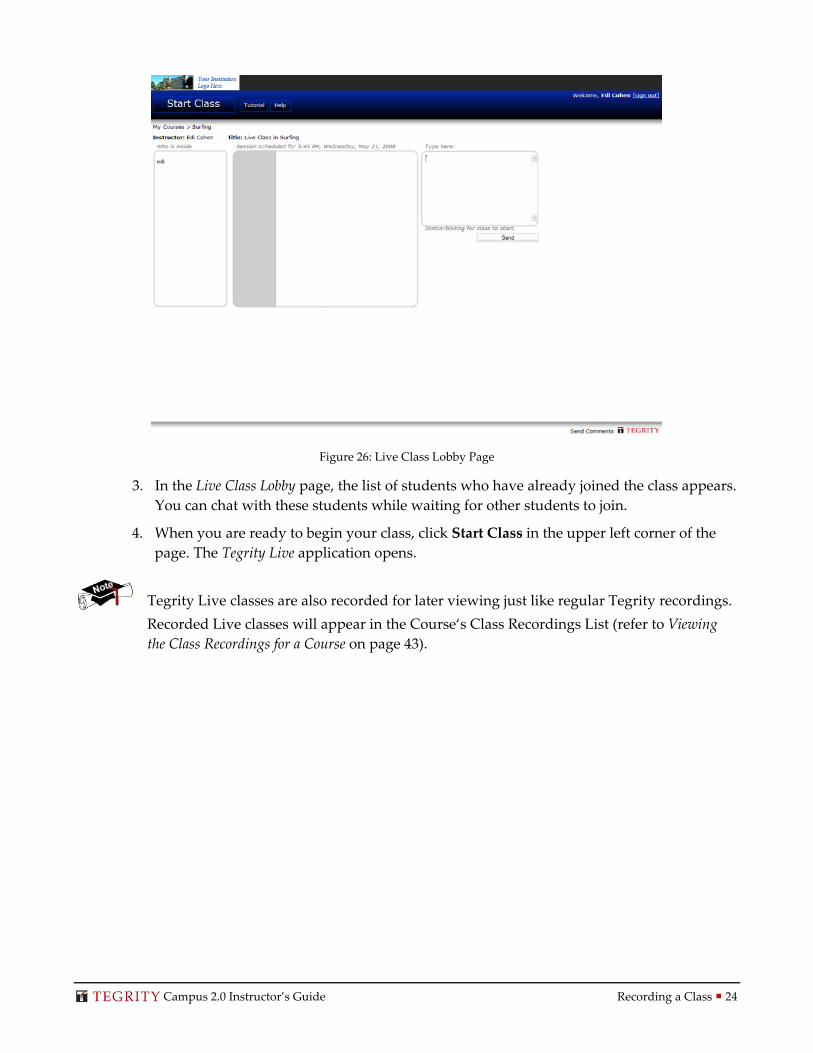
2. Click the Join button of the scheduled class you would like to start. The Live Class Lobby page appears.
Campus 2.0 Instructor’s Guide Recording a Class 24
Figure 26: Live Class Lobby Page
3. In the Live Class Lobby page, the list of students who have already joined the class appears. You can chat with these students while waiting for other students to join.
4. When you are ready to begin your class, click Start Class in the upper left corner of the page. The Tegrity Live application opens.
Tegrity Live classes are also recorded for later viewing just like regular Tegrity recordings. Recorded Live classes will appear in the Course‘s Class Recordings List (refer to Viewing the Class Recordings for a Course on page 43).