Chapter 2017 Revit for Architecture Updates and...
15
Revit 2017 Update | 1 Please visit: www.paulaubin.com Follow: @paulfaubin Chapter 2017 Revit for Architecture Updates and Enhancements INTRODUCTION This document is a companion to the book: The Aubin Academy Revit Architecture: 2016 and beyond. As with previous “beyond” editions, when the 2016 edition was published, the intention was that the book would remain relevant for a few releases after 2016. In this way we would help the reader leverage their book investment longer without being required to purchase a new edition of the book each year. This document represents the 2017 update to the printed book. This document is intended to supplement a printed copy of The Aubin Academy Revit Architecture: 2016 and beyond. If you do not have a copy, please visit www.paulaubin.com for information on how to purchase a copy. This document gives a brief listing of the major new features in the 2017 release of the Revit software. The focus is on those features available to architectural users. So both platform functionality and architectural features will be included. This document does not cover the new structural or MEP features included in Revit. WHAT’S NEW? Let’s start with a list. The easiest place to see what’s new is directly from the product on the help menu. At the top right-hand side of the screen, click the drop-down next to the help icon and you can choose What’s New? from the menu (see Figure 2017.1). This will take you to the Autodesk website where you can see a list of new features. FIGURE 2017.1 Access What’s New from the Help menu Some of the features listed will have little impact on your use of The Aubin Academy Revit Architecture: 2016 and beyond book. Therefore, I will mostly focus on those features that are relevant to the book’s topics.
Transcript of Chapter 2017 Revit for Architecture Updates and...

Revit 2017 Update | 1
Please visit: www.paulaubin.com Follow: @paulfaubin
Chapter 2017
Revit for Architecture Updates and Enhancements
INTRODUCTION This document is a companion to the book: The Aubin Academy Revit Architecture: 2016 and beyond. As with previous “beyond” editions, when the 2016 edition was published, the intention was that the book would remain relevant for a few releases after 2016. In this way we would help the reader leverage their book investment longer without being required to purchase a new edition of the book each year. This document represents the 2017 update to the printed book. This document is intended to supplement a printed copy of The Aubin Academy Revit Architecture: 2016 and beyond. If you do not have a copy, please visit www.paulaubin.com for information on how to purchase a copy.
This document gives a brief listing of the major new features in the 2017 release of the Revit software. The focus is on those features available to architectural users. So both platform functionality and architectural features will be included. This document does not cover the new structural or MEP features included in Revit.
WHAT’S NEW? Let’s start with a list. The easiest place to see what’s new is directly from the product on the help menu. At the top right-hand side of the screen, click the drop-down next to the help icon and you can choose What’s New? from the menu (see Figure 2017.1). This will take you to the Autodesk website where you can see a list of new features.
FIGURE 2017.1
Access What’s New from the Help menu
Some of the features listed will have little impact on your use of The Aubin Academy Revit Architecture: 2016 and beyond book. Therefore, I will mostly focus on those features that are relevant to the book’s topics.

2 | The Aubin Academy Revit Architecture
Copyright © 2016, Paul F. Aubin, please do not reproduce without permission
DATASET FILES The dataset for the book remains unchanged. This means that if you are following along in the lessons using 2017, you will have to wait briefly for the file to upgrade before it opens. This should only take a few moments for most files in the dataset.
PERFORMANCE ENHANCEMENTS In addition to the many tangible features that you can interact with directly in the software, the 2017 release improves performance for a variety of file operations. This is particularly evident in 3D views. There should be a noticeable difference in performance when orbiting a 3D view for example. This is because of the new “occlusion culling” feature and other enhancements that intelligently prevent Revit from calculating and trying to draw elements that would not be ordinarily visible in the view. This includes elements outside the crop region, or hidden behind other elements.
EDITING IN 3D Commands like Move, Copy and Align are now available in 3D perspective views. You can also use the override and hide in view commands and clipboard commands like cut, copy and paste. These enhancements make it easier to work in any view you like by removing restrictions that disrupt your workflow.
REVIT LINKS – NEW POSITIONING OPTIONS There is a new automatic placement option for placing links in a Revit project. You can now use: Auto – Project Base Point to Project Base Point (see Figure 2017.2).
FIGURE 2017.2
Align Project Base Points when linking

Revit 2017 Update | 3
Please visit: www.paulaubin.com Follow: @paulfaubin
This new method offers works well when the Project Base Point is not the same as the project’s Origin and offers an alternative to Shared Coordinates.
UNLOADING REVIT LINKS When you are working in a workshare enabled project, you can now unload Revit links on a per-user basis. Previously, when you unloaded a link and then synchronized with central, the link would unload for all users (the next time they reloaded latest). This could create conflict among team members when some wanted the link loaded and others did not. While it is possible to use worksets to manage this situation, the new feature allows links to be unloaded on a per-user basis without the need for separate worksets, so it offers a compelling alternative to having a workset for each linked file (see Figure 2017.3).
FIGURE 2017.3
Linked files can be unloaded per-user in a workshare enabled project
Revit Links are discussed in Chapter 7.
4 | The Aubin Academy Revit Architecture
Copyright © 2016, Paul F. Aubin, please do not reproduce without permission
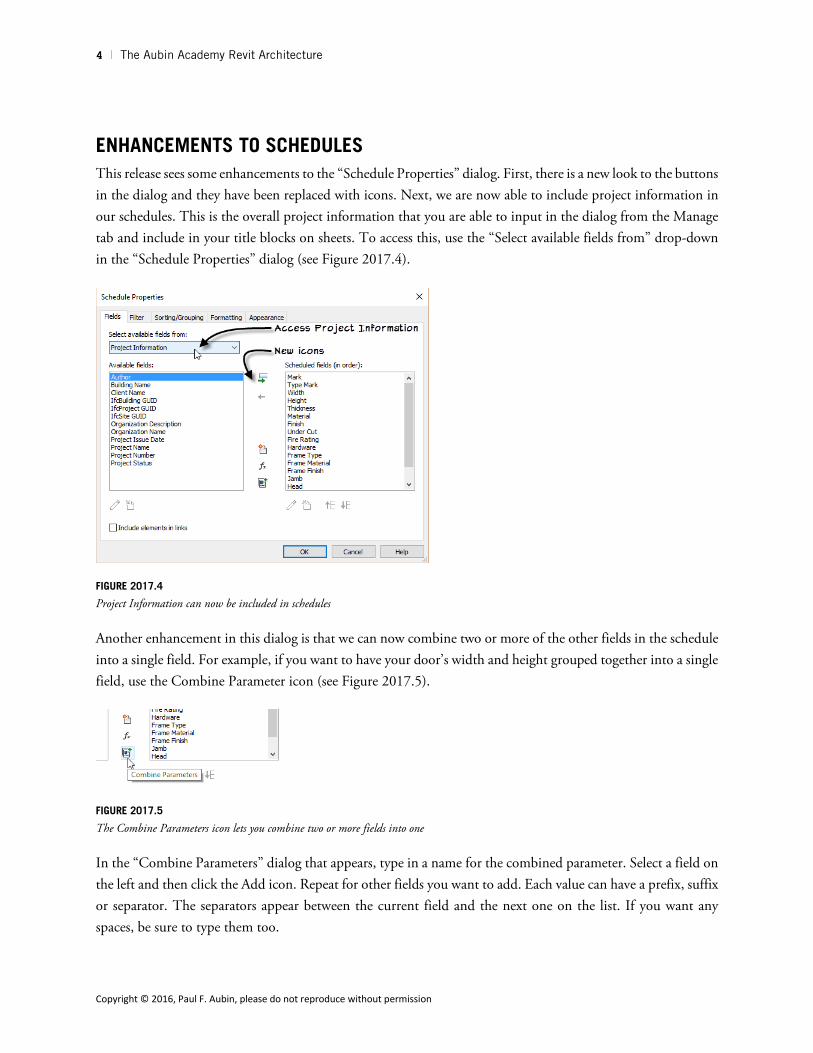
ENHANCEMENTS TO SCHEDULES This release sees some enhancements to the “Schedule Properties” dialog. First, there is a new look to the buttons in the dialog and they have been replaced with icons. Next, we are now able to include project information in our schedules. This is the overall project information that you are able to input in the dialog from the Manage tab and include in your title blocks on sheets. To access this, use the “Select available fields from” drop-down in the “Schedule Properties” dialog (see Figure 2017.4).
FIGURE 2017.4
Project Information can now be included in schedules
Another enhancement in this dialog is that we can now combine two or more of the other fields in the schedule into a single field. For example, if you want to have your door’s width and height grouped together into a single field, use the Combine Parameter icon (see Figure 2017.5).
FIGURE 2017.5
The Combine Parameters icon lets you combine two or more fields into one
In the “Combine Parameters” dialog that appears, type in a name for the combined parameter. Select a field on the left and then click the Add icon. Repeat for other fields you want to add. Each value can have a prefix, suffix or separator. The separators appear between the current field and the next one on the list. If you want any spaces, be sure to type them too.

Revit 2017 Update | 5
Please visit: www.paulaubin.com Follow: @paulfaubin
For example, the separator shown in the Figure 2017.6 is: “ x “ (that is SPACE x SPACE).
FIGURE 2017.6
Adding two fields to the combined parameter
When you click OK, the combined parameter will become a custom field in the schedule. It will include the two values separated by whatever you placed in the separator field. You can now go to the Appearance tab, and hide the original columns (Width and Height in this example) in the schedule.
TAG ENHANCEMENTS Schedules have been able to perform calculations for some time. In 2017, you can now perform calculations in the labels of your tag families. So for example, if you want to perform a calculation on the area of a room and see if it fits the code requirements for the occupancy of the space and report this in the room tag you can now do this directly in the tag.
Schedules and Tags are covered in Chapter 13.
RAILING HOSTING When sketching a railing path, you can now host the railing to nearly any other kind of geometry. This includes floors, roofs and the tops of walls (see Figure 2017.7).

6 | The Aubin Academy Revit Architecture
Copyright © 2016, Paul F. Aubin, please do not reproduce without permission
FIGURE 2017.7
Host a railing to another element
First begin the railing tool by choosing the “Sketch Path” option – not the “Place on Host” option. While this is counterintuitive, the Sketch Path option will have a Pick New Host button within the command on the context ribbon. Click this button to set the host. This is usually easier to do in a 3D view. Finish sketching the path as normal and then finish.
Railings are discussed in Chapter 8.
UNDERLAY PROPERTIES When you want to add an underlay to a floor plan or ceiling plan view, the interface has changed slightly. You now indicate a range to include by indicating a base and top level and then also choose the direction you want to look: up or down (see Figure 2017.8).
FIGURE 2017.8
New interface to setting the underlay property in a plan view
This makes the underlay language a little more consistent to how view range behaves.
Underlay is discussed in Chapters 1 and 6.

Revit 2017 Update | 7
Please visit: www.paulaubin.com Follow: @paulfaubin
VIEW RANGE DIALOG The view range dialog has also received a slight enhancement. Since it can be confusing to understand how each value in the view range is applied, there is now a preview image (from the help file) that can be displayed directly in the dialog (see Figure 2017.9).
FIGURE 2017.9
The “View Range” dialog with the preview image expanded
This is a static image and sadly does not adjust as you change values in the dialog. But for a quick visual reminder of how each value applies to the range, it can be helpful. When you click the Show button, it will change to Hide. There is also a link directly above this to open a more complete version of the image in the help file with a description of all of the settings. Finally, the view range command now has a keyboard shortcut: VR.
View Range is discussed in Chapters 6 and 9.
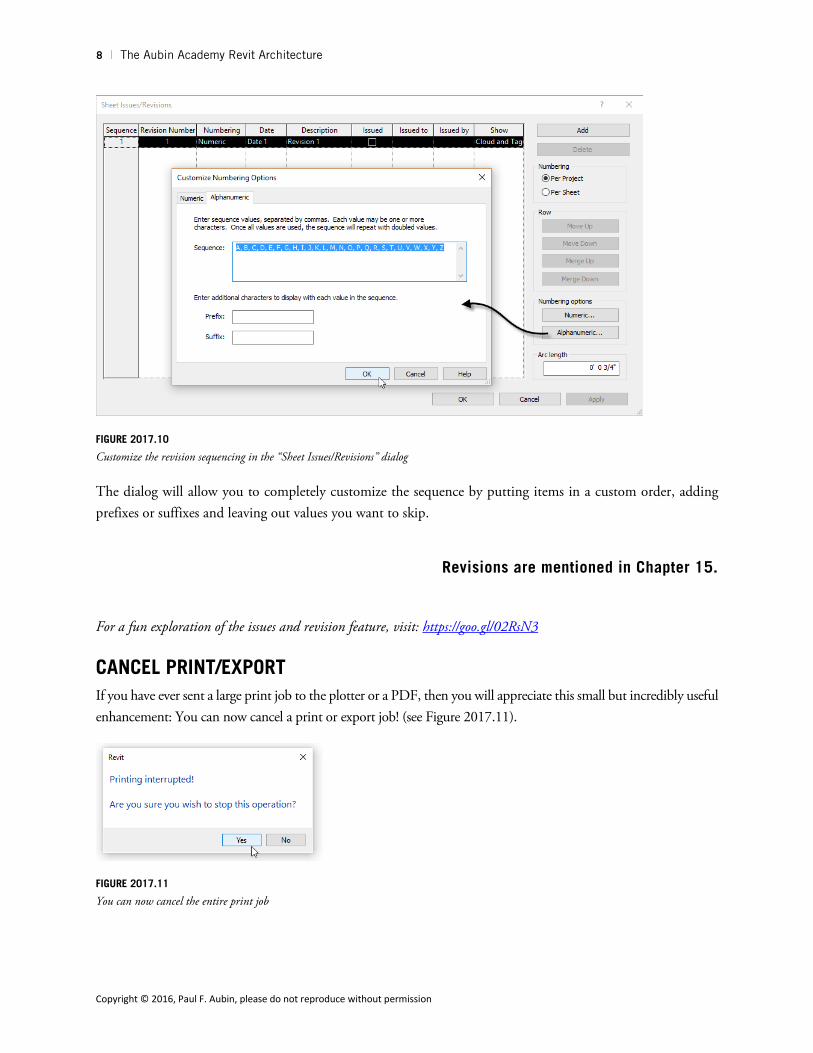
REVISIONS ENHANCEMENTS Revision tracking has been part of Revit for some time. Using this tool, you can create numbered revisions that will be coordinated with delta tags and clouds. This release gives us more control over the revision numbering by adding a dialog to customize both numbered and alphanumeric sequencing (see Figure 2017.10).
8 | The Aubin Academy Revit Architecture
Copyright © 2016, Paul F. Aubin, please do not reproduce without permission
FIGURE 2017.10
Customize the revision sequencing in the “Sheet Issues/Revisions” dialog
The dialog will allow you to completely customize the sequence by putting items in a custom order, adding prefixes or suffixes and leaving out values you want to skip.
Revisions are mentioned in Chapter 15.
For a fun exploration of the issues and revision feature, visit: https://goo.gl/02RsN3
CANCEL PRINT/EXPORT If you have ever sent a large print job to the plotter or a PDF, then you will appreciate this small but incredibly useful enhancement: You can now cancel a print or export job! (see Figure 2017.11).
FIGURE 2017.11
You can now cancel the entire print job

Revit 2017 Update | 9
Please visit: www.paulaubin.com Follow: @paulfaubin
Printing and Exporting is covered in Chapter 15.
RAYTRACE RENDERER In Chapter 18, we discuss rendering from within Revit. In Revit 2016, the rendering engine was in transition and as such, there were two rendering engines available to choose from when rendering: the nVidia and Raytrace renderers. In this release, there is now only one choice: Autodesk Raytrace renderer. Therefore, it is no longer necessary to select the rendering engine to use during rendering. Also note that this only affects internal rendering directly in-product. The Autodesk cloud rendering is also still available as discussed in the book.
Rendering is covered in Chapter 18.
DETACHING A WORKSHARE MODEL When you detach a workshare model from the central model, it will now add the suffix “_detached” to the file name. This is an improvement over what it did before which was to show no file name at all. This helps remind you that you are in a detached copy of your project. Naturally, you can still resave such a file as a new central file, but as before, there is no way to “reattach” a file to the original central model (see Figure 2017.12).
FIGURE 2017.12
It is now easier to tell when you have detached a file from the central model
Worksharing is covered in Chapter 16.
FAMILY VISIBILITY PREVIEW If you build parametric family content, then you know how important it is to flex your content regularly to ensure that it is behaving as expected. One item that has always been very difficult to test in the family editor is anything to do with visibility. In this release, we now have a solution. There is a Preview Visibility pop-up on the View Control bar. Using this, we can preview how the family will look in the project. This includes any visibility parameters, level of detail and other graphical characteristics (see Figure 2017.13).

10 | The Aubin Academy Revit Architecture
Copyright © 2016, Paul F. Aubin, please do not reproduce without permission
FIGURE 2017.13
Preview families in the family editor as they will appear in the project
This new feature will help you fully test your content before loading it into a project.
The family editor is covered in Chapter 11.
FILTER VOIDS AND SOLIDS IN THE FAMILY EDITOR When working in the family editor, it can sometimes be frustrating to make selections of many elements. This is partly because up till this release, it was only possible to manually separate solids from voids during selection. Well, in this release, you can now use the “Filter” dialog to filter solids from voids (see Figure 2017.14).
FIGURE 2017.14
Use the Filter command to filter solids from voids during selection
Simply select several elements and then click the Filter button. Solids will be listed under their parent category (instead of “other”), and voids will now be listed separately.
The family editor is covered in Chapter 11.
Revit 2017 Update | 11
Please visit: www.paulaubin.com Follow: @paulfaubin
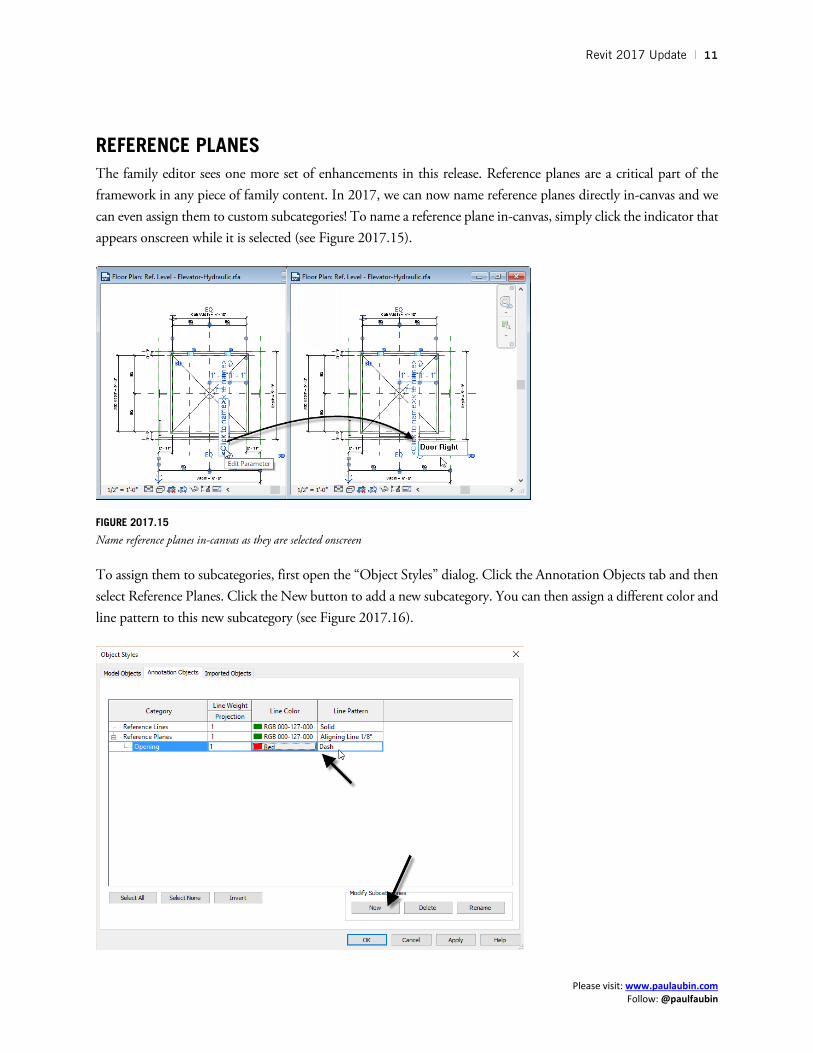
REFERENCE PLANES The family editor sees one more set of enhancements in this release. Reference planes are a critical part of the framework in any piece of family content. In 2017, we can now name reference planes directly in-canvas and we can even assign them to custom subcategories! To name a reference plane in-canvas, simply click the indicator that appears onscreen while it is selected (see Figure 2017.15).
FIGURE 2017.15
Name reference planes in-canvas as they are selected onscreen
To assign them to subcategories, first open the “Object Styles” dialog. Click the Annotation Objects tab and then select Reference Planes. Click the New button to add a new subcategory. You can then assign a different color and line pattern to this new subcategory (see Figure 2017.16).
12 | The Aubin Academy Revit Architecture
Copyright © 2016, Paul F. Aubin, please do not reproduce without permission
FIGURE 2017.16
Create custom reference plane subcategories using the “Object Styles” dialog
Finally, you assign individual reference planes to these new subcategories on the Properties palette. This is a very helpful feature in complex families. By devising a few well named subcategories, you can make it much easier to understand the family’s structure when viewing it in the family editor. Just be careful not to add too many subcategories. As helpful as they may be in the family editor, they will unfortunately carry through to the project environment as well when loading the family.
The family editor is covered in Chapter 11.
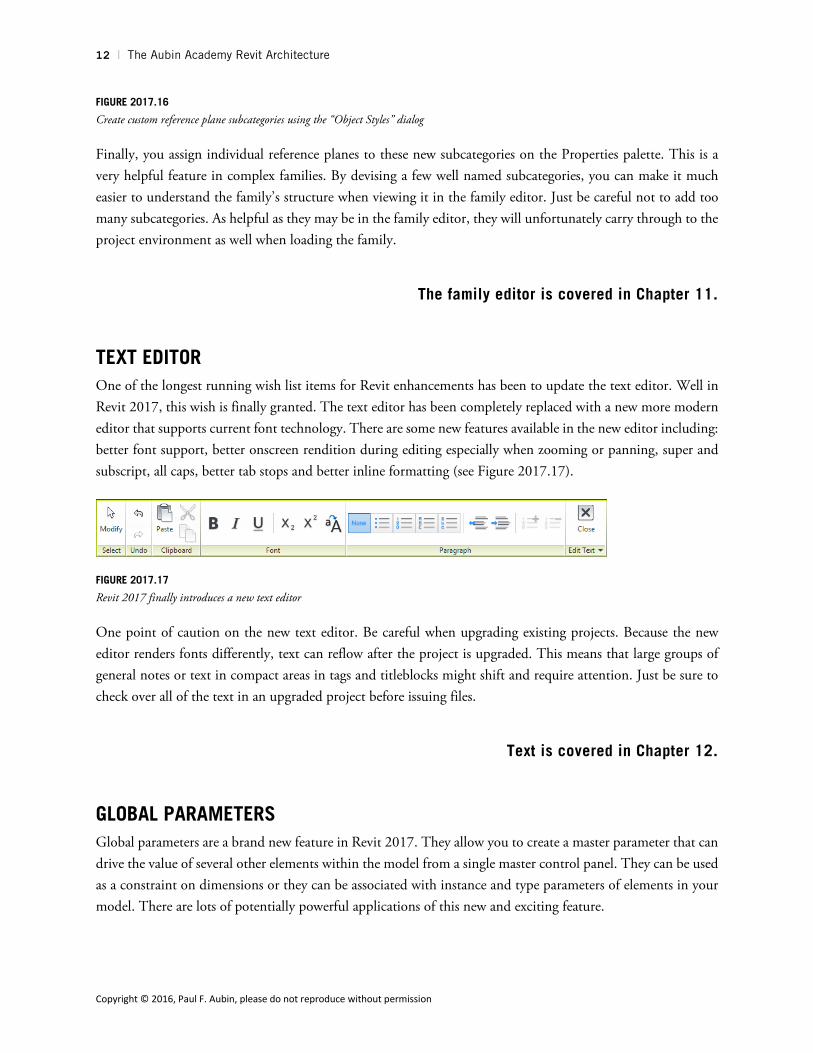
TEXT EDITOR One of the longest running wish list items for Revit enhancements has been to update the text editor. Well in Revit 2017, this wish is finally granted. The text editor has been completely replaced with a new more modern editor that supports current font technology. There are some new features available in the new editor including: better font support, better onscreen rendition during editing especially when zooming or panning, super and subscript, all caps, better tab stops and better inline formatting (see Figure 2017.17).
FIGURE 2017.17
Revit 2017 finally introduces a new text editor
One point of caution on the new text editor. Be careful when upgrading existing projects. Because the new editor renders fonts differently, text can reflow after the project is upgraded. This means that large groups of general notes or text in compact areas in tags and titleblocks might shift and require attention. Just be sure to check over all of the text in an upgraded project before issuing files.
Text is covered in Chapter 12.
GLOBAL PARAMETERS Global parameters are a brand new feature in Revit 2017. They allow you to create a master parameter that can drive the value of several other elements within the model from a single master control panel. They can be used as a constraint on dimensions or they can be associated with instance and type parameters of elements in your model. There are lots of potentially powerful applications of this new and exciting feature.

Revit 2017 Update | 13
Please visit: www.paulaubin.com Follow: @paulfaubin
To use a global parameter to constrain a dimension, add the dimension in the model, then select it. On the ribbon, a Label drop-down will appear. Click the small icon next this and create a new parameter for this dimension. (If you already have one, you can just choose it from the drop-down instead). Select the parameter from the label drop-down (see Figure 2017.18).
FIGURE 2017.18
Apply a global parameter as a labeled dimension value
When you want to flex this value, open the “Global Parameters” dialog on the Manage tab. Edit the value for this parameter and apply it. The dimension will flex and move the associated geometry.
To drive parameter values of loaded families, look for the small “Associate Global Parameter” button in the far right column of the Properties palette or dialog. Click this button to associate or create a global parameter (see Figure 2017.19).
FIGURE 2017.19
Use a global parameter to drive the value of the materials in several loaded families
When you flex this value in the “Global Parameters” dialog, it will drive the value on all instances of this family.

14 | The Aubin Academy Revit Architecture
Copyright © 2016, Paul F. Aubin, please do not reproduce without permission
For a detailed step-by-step look at this exciting new feature, you can download the paper that I wrote for the Revit Technology Conference. The session was called Global Parameters, Global Control! And you can download the handout and dataset from my website here:
http://paulaubin.com/au/#globalparam
DEPTH CUEING We’ll end our inventory of new features in 2017 with depth cueing. This exciting new feature allows you to add depth to your elevations. This is achieved by applying an override in the elevation view to fade the elements that are furthest away from the cut plane (see Figure 2017.20).
FIGURE 2017.20
Depth Cueing fades elements that are farther from the cut plane in the view
Use the pop-up on the View Control bar to access “Graphical Display Options” dialog. In the Depth Cueing area, check the “Show Depth” checkbox and then adjust the two sliders. You will see the elements that are further in the distance begin to fade back.
PLEASE VISIT To learn more about Paul’s other books and services, please visit www.paulaubin.com today!
Revit Video training at lynda.com. Paul F. Aubin has authored several Revit courses at the lynda.com online video training library. This includes Revit Essential Training for Revit 2017 in both imperial and metric units

Revit 2017 Update | 15
Please visit: www.paulaubin.com Follow: @paulfaubin
and a course covering all of the new features in 2017 and many more. Please visit: www.lynda.com/paulaubin to learn more and sign up for a free 10-day trial membership.