
Chapter 2: Programming Microcontrollersfaculty.yu.edu.jo/qasem.q/Lists/Taught...
48
Chapter 2: Programming Microcontrollers You certainly know that it is not enough just to connect the microcontroller to other components and turn the power supply on to make it work, don’t you? There is something else that must be done. The microcontroller needs to be programmed to be capable of performing anything useful. If you think that it is complicated, then you are mistaken. The whole procedure is very simple. Just read the following text and you will change your mind. • 2.1 PROGRAMMING LANGUAGES • 2.2 THE BASICS OF C PROGRAMMING LANGUAGE • 2.3 COMPILER MIKROC PRO FOR PIC 2.1 PROGRAMMING LANGUAGES The microcontroller executes the program loaded in its Flash memory. This is the so called executable code comprised of seemingly meaningless sequence of zeros and ones. It is organized in 12-, 14- or 16- bit wide words, depending on the microcontroller’s architecture. Every word is considered by the CPU as a command being executed during the operation of the microcontroller. For practical reasons, as it is much easier for us to deal with hexadecimal number system, the executable code is often represented as a sequence of hexadecimal numbers called a Hex code. It used to be written by the programmer. All instructions that the microcontroller can recognize are together called the Instruction set. As for PIC microcontrollers the programming words of which are comprised of 14 bits, the instruction set has 35 different instructions in total.
Transcript of Chapter 2: Programming Microcontrollersfaculty.yu.edu.jo/qasem.q/Lists/Taught...

Chapter 2: Programming Microcontrollers
You certainly know that it is not enough just to connect the microcontroller to other components and turn
the power supply on to make it work, don’t you? There is something else that must be done. The
microcontroller needs to be programmed to be capable of performing anything useful. If you think that it
is complicated, then you are mistaken. The whole procedure is very simple. Just read the following text
and you will change your mind.
• 2.1 PROGRAMMING LANGUAGES
• 2.2 THE BASICS OF C PROGRAMMING LANGUAGE
• 2.3 COMPILER MIKROC PRO FOR PIC
2.1 PROGRAMMING LANGUAGES
The microcontroller executes the program loaded in its Flash memory. This is the so called executable
code comprised of seemingly meaningless sequence of zeros and ones. It is organized in 12-, 14- or 16-
bit wide words, depending on the microcontroller’s architecture. Every word is considered by the CPU as
a command being executed during the operation of the microcontroller. For practical reasons, as it is
much easier for us to deal with hexadecimal number system, the executable code is often represented
as a sequence of hexadecimal numbers called a Hex code. It used to be written by the programmer. All
instructions that the microcontroller can recognize are together called the Instruction set. As for PIC
microcontrollers the programming words of which are comprised of 14 bits, the instruction set has 35
different instructions in total.

As the process of writing executable code was endlessly tiring, the first ‘higher’ programming language
called assembly language was created. The truth is that it made the process of programming more
complicated, but on the other hand the process of writing program stopped being a nightmare.
Instructions in assembly language are represented in the form of meaningful abbreviations, and the
process of their compiling into executable code is left over to a special program on a PC called compiler.
The main advantage of this programming language is its simplicity, i.e. each program instruction
corresponds to one memory location in the microcontroller. It enables a complete control of what is
going on within the chip, thus making this language commonly used today.
However, programmers have always needed a programming language close to the language being
used in everyday life. As a result, the higher programming languages have been created. One of them is
C. The main advantageof these languages is simplicity of program writing. It is no longer possible to
know exactly how each command executes, but it is no longer of interest anyway. In case it is, a
sequence written in assembly language can always be inserted in the program, thus enabling it.

Similar to assembly language, a specialized program in a PC called compiler is in charge of compiling
program into machine language. Unlike assembly compilers, these create an executable code which is
not always the shortest possible.
Figures above give a rough illustration of what is going on during the process of compiling the program
from higher to lower programming language.
Here is an example of a simple program written in C language:

ADVANTAGES OF HIGHER PROGRAMMING LANGUAGES
If you have ever written a program for the microcontroller in assembly language, then you probably
know that the RISC architecture lacks instructions. For example, there is no appropriate instruction for
multiplying two numbers, but there is also no reason to be worried about it. Every problem has a solution
and this one makes no exception thanks to mathematics which enable us to perform complex operations

by breaking them into a number of simple ones. Concretely, multiplication can be easily substituted by
successive addition (a x b = a + a + a + ... + a). And here we are, just at the beginning of a very long
story... Don’t worry as far as the higher programming languages, such as C, are concerned because
somebody has already solved this and many other similar problems for you. It will do to write a*b.
PREPROCESSOR
A preprocessor is an integral part of the C compiler and its function is to recognize and execute
preprocessor instructions. These are special instructions which do not belong to C language, but are a
part of software package coming with the compiler. Each preprocessor command starts with ‘#’. Prior to
program compilation, C compiler activates the preprocessor which goes through the program in search
for these signs. If any encountered, the preprocessor will simply replace them by another text which,
depending on the type of command, can be a file contents or just a short sequence of characters. Then,
the process of compilation may start. The preprocessor instructions can be anywhere in the source

program, and refer only to the part of the program following their appearance up to the end of the
program.
PREPROCESSOR DIRECTIVE # include
Many programs often repeat the same set of commands for several times. In order to speed up the
process of writing a program, these commands and declarations are usually grouped in particular files
that can easily be included in the program using this directive. To be more precise, the #include
command imports text from another document, no matter what it is (commands, comments etc.), into the
program.
PREPROCESSOR DIRECTIVE # define
The #define command provides macro expansion by replacing identifiers in the program by their values.
#define symbol sequence_of_characters
Example:
...
#define PI 3.14
...
As the use of any language is not limited to books and magazines only, this programming language is
not closely related to any special type of computers, processors or operating systems. C language is
actually a general-purpose language. However, exactly this fact can cause some problems during

operation as C language slightly varies depending on its application (this could be compared to different
dialects of one language).
2.2 THE BASICS OF C PROGRAMMING LANGUAGE
The main idea of writing program in C language is to break a bigger problem down into several smaller
pieces. Suppose it is necessary to write a program for the microcontroller that is going to measure
temperature and show results on an LCD display. The process of measuring is performed by a sensor
that converts temperature into voltage. The microcontroller uses its A/D converter to convert this voltage
(analogue value) to a number (digital value) which is then sent to the LCD display via several
conductors. Accordingly, the program is divided in four parts that you have to go through as per the
following order:
1. Activate and set built-in A/D converter;
2. Measure analogue value;
3. Calculate temperature; and
4. Send data in the proper form to LCD display.
As seen, the higher programming languages such as C enable you to solve this problem easily by
writing four functions to be executed cyclically and over and over again.
This book describes a very concrete application of C programming language, i.e. C language used for
the mikroC PRO for PIC compiler. In this case, the compiler is used for programming PIC
microcontrollers. Anyway, this note refers to details on the programming language that are intentionally
left out herein because they have no practical application, rather than to variations on the standard C
language (basically, there are no differences).
Figure below illustrates the structure of a simple program, pointing out the parts it consists of.

COMMENTS
Comments are part of the program used to clarify the operation of the program or provide more
information about it. Comments are ignored and not compiled into executable code by the compiler.
Simply put, the compiler can recognize special characters used to designate where comments start and
terminate and completely ignores the text inbetween during compilation. There are two types of such
characters. One designates long comments extending several program lines, while the other designates
short comments taking up a single line. Even though comments cannot affect the program execution,
they are as important as any other part of the program, and here is why... A written program can always

be improved, modified, upgraded, simplified...It is almost always done. Without comments, trying to
understand even the simplest programs is waste of time.
DATA TYPES IN C LANGUAGE
There are several types of data that can be used in C programming language. A table below shows the
range of values which these data can have when used in their basic form.
DATA TYPE
DESCR IPT I ON S I ZE ( NUMBER
OF B I T S ) RANGE OF VALUES
char Character 8 0 to 255
int Integer 16 -32768 to 32767
float Floating point 32 ±1.17549435082 ·10-38 to ±6.80564774407 ·1038
double Double precision floating point
32 from ±1.17549435082 ·10-38 to
±6.80564774407 ·1038
By adding prefix (qualificator) to any data type, the range of its possible values changes as well as the
number of memory bytes needed.
DATA TYPE
DAT A TYPE W I TH PREF I X
S I ZE ( NUMBER OF B I TS )
RANGE
char signed char 8 -128 to 128
int
unsigned int 16 0 to 65535
short int 8 0 to 255
signed short int 8 -128 to 127
long int 32 0 to 4294967295
signed long int 32 -2147483648 to 2147483647
VARIABLES
Any number changing its value during program operation is called a variable. Simply put, if the program
adds two numbers (number1 and number2), it is necessary to have a value to represent what we in
everyday life call the sum. In this case number1, number2 and sum are variables.
Declaring Variables
• Variable name can include any of the alphabetical characters A-Z
(a-z), the digits 0-9 and the underscore character '_'. The
compiler is case sensitive and differentiates between capital and
small letters. Function and variable names usually contain lower

case characters, while constant names contain uppercase
characters.
• Variable names must not start with a digit.
• Some of the names cannot be used as variable names as already
being used by the compiler itself. Such names are called the key
words. The mikroC compiler recognizes in total of 33 such
words:
M IKROC - KEYWORDS
absolute data if return typedef
asm default inline rx typeid
at delete int sfr typename
auto do io short union
bit double long signed unsigned
bool else mutable sizeof using
break enum namespace static virtual
case explicit operator struct void
catch extern org switch volatile
char false pascal template while
class float private this
code for protected throw
const friend public true
continue goto register try
Pointers
A pointer is a special type of variable holding the address of character variables. In other words, the
pointer ‘points to’ another variable. It is declared as follows:
type_of_variable *pointer_name;
In order to assign the address of a variable to a pointer, it is necessary to use the '=' character and write
variable name preceded by the '&' character. In the following example, the pointer ‘multiplex’ is declared
and assigned the address of the first out of eight LED displays:
unsigned int *multiplex; // Declare name and type of pointer multiplex

multiplex = &display1; // Pointer multiplex is assigned the address of
// variable display1
To change the value of the pointed variable, it is sufficient to write the '*' character in front of its pointer
and assign it a new value.
*multiplex = 6; // Variable display1 is assigned the number 6
Similarly, in order to read the value of the pointed variable, it is sufficient to write:
temp = *multiplex; // The value of variable display1 is copied to temp
Changing individual bits
There are a few ways to change only one bit of a variable. The simplest one is to specify the register
name, bit's position or a name and desired state:
(PORTD.F3 = 0) ; // Clear the RD3 bit
...
(PORTC.RELAY = 1) ; // Set the PORTC output bit (previously named RELAY)
// RELAY must be defined as constant
Declarations
Every variable must be declared prior to being used for the first time in the program. Since variables are
stored in RAM memory, it is necessary to reserve space for them (one, two or more bytes). You know
what type of data you write or expect as a result of an operation, while the compiler does not know that.
Don’t forget, the program deals with variables to which you assigned the names gate, sum, minimum
etc. The compiler recognizes them as registers of RAM memory. Variable types are usually assigned at
the beginning of the program.

unsigned int gate1; // Declare name and type of variable gate1
Apart from the name and type, variables are usually assigned initial values at the beginning of the
program as well. It is not a ‘must-do’ step, but a matter of good habits. In this case, it looks as follows:
unsigned int gate1; // Declare type and name of the variable
signed int start, sum; // Declare type and name of other two variables
gate1 = 20; // Assign variable gate1 an initial value
The process of assigning initial value and declaring type can be performed in one step:
unsigned int gate1=20; // Declare type, name and value of variable
If there are several variables being assigned the same initial value, the process can be even simplified:
unsigned int gate1=gate2=gate3=20;
signed int start=sm=0;
• Type of variable is not accompanied by the ‘+’ or ‘-’ sign by
default. For example, char can be written instead of signed char
(variable is a signed byte). In this case the compiler considers
variable positive values.
• If you, by any chance, forget to declare variable type, the
compiler will automatically consider it a signed integer. It
means that such a variable will occupy two memory bytes and
have values in the range of -32768 to +32767.
CONSTANTS
A constant is a number or a character having fixed value that cannot be changed during program
execution. Unlike variables, constants are stored in the flash program memory of the microcontroller for

the purpose of saving valuable space of RAM. The compiler recognizes them by their name and prefix
const.
INTEGER CONSTANTS
Integer constants can be decimal, hexadecimal, octal or binary. The compiler recognizes their format on
the basis of the prefix added. If the number has no prefix, it is considered decimal by default. The type of
a constant is automatically recognized by its size. In the following example, the constant MINIMUM will
be automatically considered a signed integer and stored within two bytes of Flash memory (16 bits):
FORMAT PREF I X EXAMPLE
Decimal const MAX = 100
Hexadecimal 0x or 0X const MAX = 0xFF
Octal 0 const MAX = 016
Binary 0b or 0B const MAX = 0b11011101
const MINIMUM = -100; // Declare constant MINIMUM
FLOATING POINT CONSTANTS
Floating point constants consist of an integer part, a dot, a fractional part and an optional e or E followed
by a signed integer exponent.
const T_MAX = 32.60; // Declare temperature T_MAX
const T_MAX = 3.260E1; // Declare the same constant T_MAX
In both examples, a constant named T_MAX is declared to have the fractional value 32.60. It enables
the program to compare the measured temperature to the meaningful constant instead of numbers
representing it.
CHARACTER CONSTANTS (ASCII CHARACTERS)
A character constant is a character enclosed within single quotation marks. In the following example, a
constant named I_CLASS is declared as A character, while a constant named II_CLASS is declared as
B character.
const I_CLASS = 'A'; // Declare constant I_CLASS

const II_CLASS = 'B'; // Declare constant II_CLASS
When defined this way, the execution of the commands sending the I_CLASS and II_CLASS constants
to an LCD display, will cause the characters A and B to be displayed, respectively.
STRING CONSTANTS
A constant consisting of a sequence of characters is called a string. String constants are enclosed within
double quotation marks.
const Message_1 = "Press the START button"; // Message 1 for LCD
const Message_2 = "Press the RIGHT button"; // Message 2 for LCD
const Message_3 = "Press the LEFT button"; // Message 3 for LCD
In this example, sending the Message_1 constant to an LCD display will cause the message 'press the
START button' to be displayed.
ENUMERATED CONSTANTS
Enumerated constants are a special type of integer constants which make a program more
comprehensive and easier to follow by assigning elements the ordinal numbers. In the following
example, the first element in curly brackets is automatically assigned the value 0, the second one is
assigned the value 1, the third one the value 2 etc.
enum MOTORS {UP, DOWN, LEFT, RIGHT}; // Declare constant MOTORS
On every occurrence of the words 'LEFT', 'RIGHT', 'UP' and 'DOWN' in the program, the compiler will
replace them by the appropriate numbers (0-3). Concretely, if the port B pins 0, 1, 2 and 3 are
connected to motors which make something goes up, down, left and right, the command for running
motor ‘RIGHT’ connected to bit 3 of port B looks as follows:
PORTB.RIGHT = 1; // set the PORTB bit 3 connected to the motor 'RIGHT'

OPERATORS, OPERATIONS AND EXPRESSIONS
An operator is a symbol denoting particular arithmetic, logic or some other operation. There are more
than 40 operations available in C language, but at most 10-15 of them are used in practice. Every
operation is performed upon one or more operands which can be variables or constants. Besides, every
operation features priority execution and associativity as well.
ARITHMETIC OPERATORS
Arithmetic operators are used in arithmetic operations and always return positive results. Unlike unary
operations being performed upon one operand, binary operations are performed upon two operands. In
other words, two numbers are required to execute a binary operation. For example: a+b or a/b.
OPERATOR OPERAT ION
+ Addition
- Subtraction
* Multiplication
/ Division
% Reminder
ASSIGNMENT OPERATORS
There are two types of assignments in C language:
• Simple operators assign values to variables using the common
'=' character. For example: a = 8
• Compound assignments are specific to C language and consist
of two characters as shown in the table. An expression can be
written in a different way as well, but this one provides more
efficient machine code.
OPERATOR
EXAMPLE
Expression Equivalent
+= a += 8 a = a + 8
-= a -= 8 a = a - 8
*= a *= 8 a = a * 8
/= a /= 8 a = a / 8
%= a %= 8 a = a % 8

INCREMENT AND DECREMENT OPERATORS
Increment and decrement by 1 operations are denoted by '++' and '--'. These characters can either
precede or follow a variable. In the first case (++x), the x variable will be first incremented by 1, then
used in expression. Otherwise, the variable will be first used in expression, then incremented by 1. The
same applies to the decrement operation.
OPERATOR EXAMPLE DESCR IPT I ON
++ ++a
Variable "a" is incremented by 1 a++
-- --b
Variable "b" is decremented by 1 b--
RELATIONAL OPERATORS
Relational operators are used in comparisons for the purpose of comparing two variables which can be
integers (int) or floating point numbers (float). If an expression evaluates to true, a 1 is returned.
Otherwise, a 0 is returned. This is used in expressions such as ‘if the expression is true then...’
OPERATOR MEAN I NG EXAMPLE TRUTH COND I T I ON
> is greater than b > a if b is greater than a
>= is greater than or equal to a >= 5 If a is greater than or equal to 5
< is less than a < b if a Is less than b
<= is less than or equal to a <= b if a Is less than or equal to b
== is equal to a == 6 if a Is equal to 6
!= is not equal to a != b if a Is not equal to b
LOGIC OPERATORS
There are three types of logic operations in C language: logic AND, logic OR and negation (NOT). For
the sake of clearness, logic states in tables below are represented as logic zero (0=false) and logic one
(1=true). Logic operators return true (logic 1) if the expression evaluates to non-zero, and false (logic 0)
if the expression evaluates to zero. This is very important because logic operations are commonly used
upon expressions, not upon single variables (numbers) in the program. Therefore, logic operations refer
to the truth of the whole expression.
For example: 1 && 0 is the same as (true expression) && (false expression)

The result is 0, i.e. - False in either case.
OPERATOR LOG I CAL AND
&&
Operand1 Operand2 Result
0 0 0
0 1 0
1 0 0
1 1 1
OPERATOR LOG I CAL OR
||
Operand1 Operand2 Result
0 0 0
0 1 1
1 0 1
1 1 1
OPERATOR LOG I CAL NOT
!
Operand1 Result
0 1
1 0
BITWISE OPERATORS
Unlike logic operations being performed upon variables, the bitwise operations are performed upon
single bits within operands. Bitwise operators are used to modify the bits of a variable. They are listed in
the table below:
OPERAND MEAN I NG EXAMPLE RESULT
~ Bitwise complement a = ~b b = 5 a = -5
<< Shift left a = b << 2 b = 11110011 a = 11001100
>> Shift right a = b >> 2 b = 11110011 a = 00011110
& Bitwise AND c = a & b a = 11100011 b = 11001100
c = 11000000
| Bitwise OR c = a | b a = 11100011
b = 11001100 c = 11101111
^ Bitwise EXOR c = a ^ b a = 11100011 b = 11001100
c = 00101111
HOW TO USE OPERATORS?
• Except for assignment operators, two operators must not be
written next to each other.

x*%12; // such expression will generate an error
• Operators are grouped together using parentheses similar to
arithmetic expressions. The expressions enclosed within
parentheses are calculated first. If necessary, multiple (nested)
parentheses can be used.
• Each operator has its priority and associativity as shown in the
table.
PR IOR I TY OPERATORS ASSOC I AT I V I TY
High () [] -> . from left to right
! ~ ++ -- +(unary) -(unary) *Pointer &Pointer from right to left
* / % from left to right
+ - from left to right
< > from left to right
< <= > >= from left to right
== != from left to right
& from left to right
^ from left to right
| from left to right
&& from left to right
|| from right to left
?: from right to left
Low = += -= *= /= /= &= ^= |= <= >= from left to right
DATA TYPE CONVERSION
The main data types are put in hierarchical order as follows:
If two operands of different type are used in an arithmetic operation, the lower priority operand type is
automatically converted into the higher priority operand type. In expressions free from assignment
operation, the result is obtained in the following way:

• If the highest priority operand is of type double, then types of all
other operands in the expression as well as the result are
automatically converted into type double.
• If the highest priority operand is of type long, then types of all
other operands in the expression as well as the result are
automatically converted into type long.
• If the operands are of long or char type, then types of all other
operands in the expression as well as the result are
automatically converted into type int.
Auto conversion is also performed in assignment operations. The result of the expression right from the
assignment operator is always converted into the type of variable left from the operator. If the result is of
higher-ranked type, it is truncated or rounded in order to match the type of variable. When converting
real data into integer, numbers following the decimal point are always truncated.
int x; // Variable x is declared as integer int
x = 3; // Variable x is assigned value 3
x += 3.14; // Number PI (3.14) is added to variable x by performing
// the assignment operation
/* The result of addition is 6 instead of expected 6.14. To obtain the
expected result without truncating the numbers following the decimal
point, common addition should be performed (x+3.14), . */
CONDITIONAL OPERATORS
A condition is a common ingredient of the program. When met, it is necessary to perform one out of
several operations. In other words 'If the condition is met (...), do (...). Otherwise, if the condition is not
met, do (...)'. Conditional operands if-else and switch are used in conditional operations.
CONDITIONAL OPERATOR if-else
The conditional operator can appear in two forms - as if and if-else operator.
Here is an example of the if operator:

if(expression) operation;
If the result of expression enclosed within brackets is not 0 (true), the operation is performed and the
program proceeds with execution. If the result of expression is 0 (false), the operation is not performed
and the program immediately proceeds with execution.
As mentioned, the other form combines both if and else operators:
if(expression) operation1 else operation2;
If the result of expression is not 0 (true), operation1 is performed, otherwise operation2 is performed.
After performing either operation, the program proceeds with execution.
The syntax of the if-else statement is:
if(expression)
operation1
else
operation2
If either operation1 or operation2 is compound, a group of operations these consist of must be enclosed
within curly brackets. For example:
if(expression) {
... //
... // operation1
...}//
else
operation2

The if-else operator can be written using the conditional operator '?:' as in example below:
(expression1)? expression2 : expression3
If expression1 is not 0 (true), the result of the whole expression will be equal to the result obtained from
expression2. Otherwise, if expression1 is 0 (false), the result of the whole expression will be equal to the
result obtained from expression3.
maximum = (a > b)? a : b // Variable maximum is assigned the value of
// larger variable (a or b)
Switch OPERATION
Unlike the if-else statement which makes selection between two options in the program, the switch
operator enables you to choose between several operations. The syntax of the switch statement is:
switch (selector) // Selector is of char or int type
{
case constant1:
operation1 // Group of operators are executed if
... // selector and constant1 are equal
break;
case constant2:
operation2 // Group of operators are executed if
... // selector and constant2 are equal
break;
...
default:
expected_operation // Group of operators are executed if no

... // constant is equal to selector
break;
}
The switch operation is executed in the following way: selector is executed first and compared to
constant1. If match is found, statements in that case block are executed until the break keyword or the
end of the switch operation is encountered. If no match is found, selector is further compared to
constant2 and if match is found, statements in that case block are executed until the break keyword is
encountered and so on. If the selector doesn’t match any constant, operations following the default
operator are to be executed.
It is also possible to compare an expression with a group of constants. If it matches any of them, the
appropriate operations will be executed:
switch (number) // number represents one day in a week. It is
// necessary to determine whether it is a week-
{ // day or not.
case1:case2:case3:case4:case5: LCD_message = 'Weekday'; break;
case6:case7: LCD_message = 'Weekend'; break;
default:
LCD_message_1 = 'Choose one day in a week'; break;
}
PROGRAM LOOP
It is often necessary to repeat a certain operation for a couple of times in the program. A set of
commands being repeated is called the program loop. How many times it will be executed, i.e. how long
the program will stay in the loop, depends on the conditions to leave the loop.
While LOOP

The while loop looks as follows:
while(expression){
commands
...
}
The commands are executed repeatedly (the program remains in the loop) until the expression
becomes false. If the expression is false on entry to the loop, then the loop will not be executed and the
program will proceed from the end of the while loop.
A special type of program loop is the endless loop. It is formed if the condition remains unchanged
within the loop. The execution is simple in this case as the result in brackets is always true (1=1), which
means that the program remans in the same loop:
while(1){
... // Expressions enclosed within curly brackets will be
... // endlessly executed (endless loop).
}
For LOOP
The for loop looks as follows:
for(initial_expression; condition_expression; change_expression) {
operations
...
}

The execution of such program sequence is similar to the while loop, except that in this case the
process of setting initial value (initialization) is performed within declaration. The initial_expression sets
the initial variable of the loop, which is further compared to the condition_expression before entering the
loop. Operations within the loop are executed repeatedly and after each iteration the value of expression
is changed. The iteration continues until the condition_expression becomes false.
for(k=1; k<5; k++) // Increase variable k 5 times (from 1 to 5) and
operation // repeat expression operation every time
...
Operation is to be performed five times. After that, it will be validated by checking that the expression
k<5 is false (after 5 iterations k=5) and the program will exit the for loop.
Do-while LOOP
The do-while loop looks as follows:
do
operation
while (check_condition);
In this case, the operation is executed at least once regardless of whether the condition is true or false
as the expression check_condition is executed at the end of the loop. If the result is not 0 (true), the
procedure is repeated. In the following example, the program remains in do-while loop until the variable
a reaches 1E06 (a million iterations).
a = 0; // Set initial value
do
a = a+1 // Operation in progress

while (a <= 1E06); // Check condition
WRITING CODE IN ASSEMBLY LANGUAGE
Sometimes the process of writing a program in C language requires parts of the code to be written in
assembly language. This enables complicated parts of the program to be executed in a precisely
defined way for exact period of time. For example, when it is necessary to have very short pulses (a few
microseconds) appearing periodically on a microcontroller pin. In such and similar cases, the simplest
solution is to use assembly code for the part of the program controlling pulse duration.
One or more assembly instructions are inserted in the program written in C language using the asm
command:
asm
{
Assembly language instructions
...
}

Codes written in assembly language can use constants and variables previously defined in C language.
Of course, as the whole program is written in C language, the rules thereof are applied when declaring
these constants and variables.
unsigned char maximum = 100; // Declare variables: maximum = 100
asm
{ // Start of assembly code
MOVF maximum,W // W = maximum = 100
...
} // End of assembly code
ARRAYS
A group of variables of the same type is called an array. Elements of an array are called components,
while their type is called the main type. An array is declared by specifying its name, type and the number
of elements it will comprise:
component_type array_name [number_of_components];
Such a complicated definition for something so simple, isn’t it? An array can be thought of as a shorter
or longer list of variables of the same type where each of these is assigned an ordinal number
(numbering always starts at zero). Such an array is often called a vector. The figure below shows an
array named shelf which consists of 100 elements.
ARRAY " SHELF" E LEMENTS OF ARRAY CONTENTS OF E LEMENT
7 shelf[0] 7
23 shelf[1] 23
34 shelf[2] 34
0 shelf[3] 0
0 shelf[4] 0
12 shelf[5] 12
9 shelf[6] 9
... ... ...

... ... ...
23 shelf [99] 23
In this case, the contents of a variable (an element of the array) represents a number of products the
shelf contains. Elements are accessed by indexing, i.e. by specifying their ordinal number (index):
shelf[4] = 12; // 12 items is ‘placed’ on shelf [4]
temp = shelf [1]; // Variable shelf[1] is copied to
// variable temp
Elements can be assigned contents during array declaration. In the following example, the array named
calendar is declared and each element is assigned specific number of days:
unsigned char calendar [12] = {31,28,31,30,31,30,31,31,30,31,30,31};
TWO-DIMENSIONAL ARRAY
Apart from one-dimensional arrays which could be thought of as a list, there are also multidimensional
arrays in C language. In a few following sentences we are going to describe only two-dimensional arrays
called matrices which can be thought of as tables. A twodimensional array is declared by specifying data
type of the array, the array name and the size of each dimension. Look at the example below:
component_type array_name [number_of_rows] [number_of_columns];
number_of_rows and number_of_columns represent the number of rows and columns of a table,
respectively.
int Table [3][4]; // Table is defined to have 3 rows and 4 columns
This array can be represented in the form of a table.

table[0][0] table[0][1] table[0][2] table[0][3]
table[1][0] table[1][1] table[1][2] table[1][3]
table[2][0] table[2][1] table[2][2] table[2][3]
Similar to vectors, the elements of a matrix can be assigned values during array declaration. In the
following example, the elements of the two-dimensional array Table are assigned values. As seen, this
array has two rows and three columns:
int Table[2][3] = {{3,42,1}, {7,7,19}};
The matrix above can also be represented in the form of a table the elements of which have the
following values:
3 42 1
7 7 19
FUNCTIONS
Every program written in C language consists of larger or smaller number of functions. The main idea is
to divide a program into several parts using these functions in order to solve the actual problem easier.
Besides, functions enable us to use the skills and knowledge of other programmers. For example, if it is
necessary to send a string to an LCD display, it is much easier to use already written part of the
program than to start over.
Functions consist of commands specifying what should be done upon variables. They can be compared
to subroutines. As a rule, it is much better to have a program consisting of large number of simple
functions than of a few large functions. A function body usually consists of several commands being
executed by the order they are specified.
Every function must be properly declared so as to be properly interpreted during the process of
compilation. Declaration contains the following elements:
• Function name
• Function body
• List of parameters
• Declaration of parameters
• Type of function result
This is how a function looks like:

type_of_result function_name (type argument1, type argument2,...)
{
Command;
Command;
...
}
Example:
/* Function computes the result of division of the numerator number by the denominator
denom. The function returns a structure of type div_t. */
div_t div(int number, int denom);
Note that a function does not need to have parameters, but must have brackets to be used for entering
them. Otherwise, the compiler would misinterpret the function.
If the function, after being executed, returns no result to the main program or to the function it is called
by, the program proceeds with execution after encountering a closing curly bracket. Such functions are
used when it is necessary to change the state of the microcontroller output pins, during data transfer via
serial communication, when writing data on an LCD display etc. The compiler recognizes those
functions by the type of their result specified to be void.
void function_name (type argument1, type argument2,...)
{
Commands;

}
Example:
void interrupt() {
cnt++ ; // Interrupt causes cnt to be incremented by 1
PIR1.TMR1IF = 0; // Reset bit TMR1IF
}
The function can be assigned an arbitrary name. The only exception is the name main which has a
special purpose. Namely, the program always starts execution with this function. It means that every
program written in C language must contain one function named 'main' which does not have to be
placed at the beginning of the program.
If it is necessary that called function returns results after being executed, the return command, which
can be followed by any expression, is used:
type_of_result function_name (type argument1, type argument2,...)
{
Commands;
...
return expression;
}
If the function contains the return command without being followed by expression, the function stops its
execution when encounters this command and the program proceeds with execution from the first
command following a closing curly bracket.
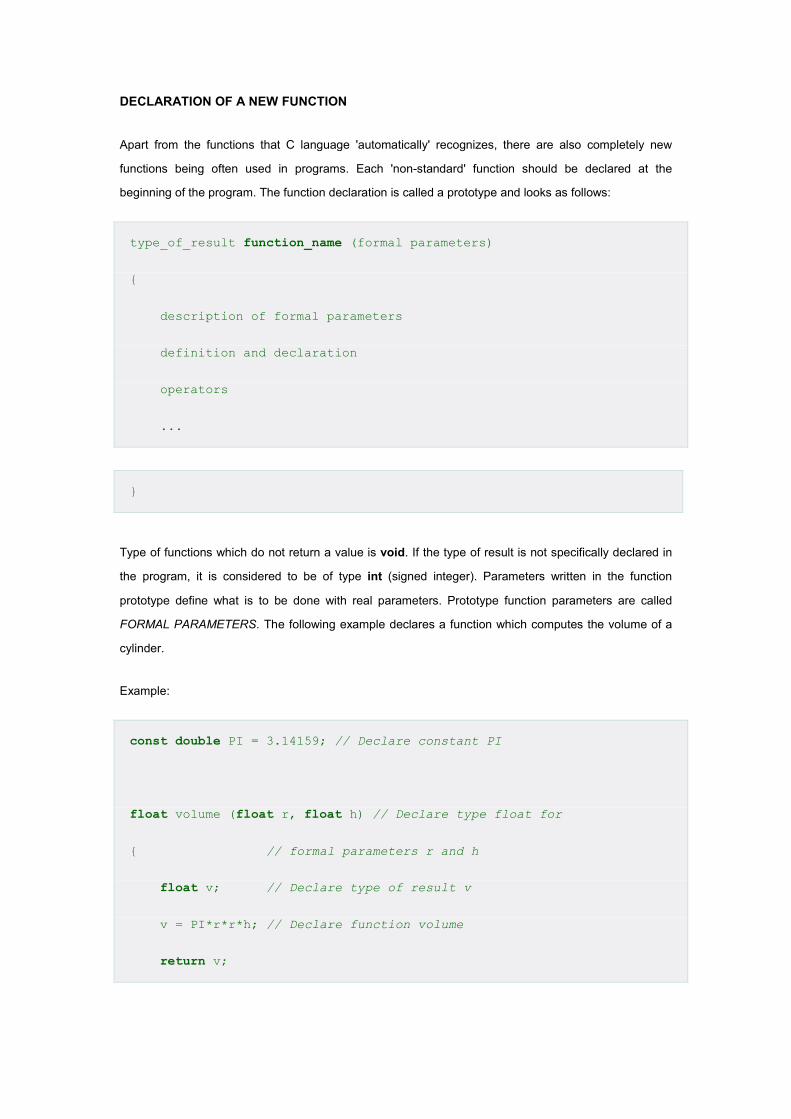
DECLARATION OF A NEW FUNCTION
Apart from the functions that C language 'automatically' recognizes, there are also completely new
functions being often used in programs. Each 'non-standard' function should be declared at the
beginning of the program. The function declaration is called a prototype and looks as follows:
type_of_result function_name (formal parameters)
{
description of formal parameters
definition and declaration
operators
...
}
Type of functions which do not return a value is void. If the type of result is not specifically declared in
the program, it is considered to be of type int (signed integer). Parameters written in the function
prototype define what is to be done with real parameters. Prototype function parameters are called
FORMAL PARAMETERS. The following example declares a function which computes the volume of a
cylinder.
Example:
const double PI = 3.14159; // Declare constant PI
float volume (float r, float h) // Declare type float for
{ // formal parameters r and h
float v; // Declare type of result v
v = PI*r*r*h; // Declare function volume
return v;

}
If such calculation needs to be performed later in the program (it can be the volume of a tank in
practice), it is sufficient to define REAL PARAMETERS and call the function. During the process of
compiling, the compiler is to replace formal parameters by real as shown below:
float radius=5, height=10, tank; // declare type float for
... // real parameters radius,
... // height and tank
tank = volume (radius,height); // calculate the volume of tank
... // by calling the volume function
FUNCTION LIBRARIES
Names of all functions being used in C language are stored in the file called header. These functions
are, depending on their purpose, sorted in smaller files called libraries. Prior to using any of them in the
program, it is necessary to specify the appropriate header file using the #include command at the
beginning of the program. If the compiler encounters an unknown function during program execution, it
will first look for its declaration in the specified libraries.
STANDARD ANSI C LIBRARIES
The functions of C language were not standardized in the beginning and software manufacturers
modified them according to their needs. But C language became very popular soon and it was difficult to
keep everything under control. It was necessary to introduce a sort of standard to put things in order.
The established standard is called ANSI C and contains 24 libraries with functions. These libraries are
usually provided with every C compiler as the most frequent operations are performed using them.
<assert.h> <complex.h> <ctype.h>
<errno.h> <fenv.h> <float.h>
<inttypes.h> <iso646.h> <limits.h>
<locale.h> <math.h> <setjmp.h>
<signal.h> <stdarg.h> <stdbool.h>

<stdint.h> <stddef.h> <stdio.h>
<stdlib.h> <string.h> <tgmath.h>
<time.h> <wchar.h> <wctype.h>
Everything you have read so far about programming in C language is just a theory. It is useful to know,
but don’t forget that this programming language is not much in connection with something concrete and
tangible. You will experience many problems with accurate names of registers, their addresses, names
of particular control bits and many others while writing your first program in C language. The bottom line
is that it is not sufficient to be familiar with the theory of C language to make the microcontroller do
something useful.
2.3 COMPILER MIKROC PRO FOR PIC
The first thing you need to write a program for the microcontroller is a PC program which understands
the programming language you use, C in this case, and provides a window for writing program. Besides,
the software must 'know' the architecture of the microcontroller in use. In this case, you need a compiler
for C language.
There is no compiler to be used for only one concrete microcontroller as there is no compiler to be used
for all microcontrollers. It’s all about software used to program a group of similar microcontrollers of one
manufacturer. This book gives description of the mikroC PRO for PIC compiler. As the name
suggests, the compiler is intended for writing programs for PIC microcontrollers in C language. It is
provided with all data on internal architecture of these microcontrollers, operation of particular circuits,
instruction set, names of registers, their accurate addresses, pinouts etc. When you start up the
compiler, the next thing to do is to select a chip from the list and operating frequency and of course - to
write a program in C language.
The installation of mikroC PRO for PIC is similar to the installation of any Windows program:

Wizard is in charge of the whole procedure, you should just click options Next, OK, Next, Next... All in
all, the same old procedure except for the last option 'Do you want to install PICFLASH v7.11
programmer?'. Why is that? The compiler’s task is to convert a program written in C language into Hex
code. What comes next is to program the microcontroller. It’s the responsibility of hardware and
software, not any software, but PICFLASH v7.11 programmer. Install it! Of course: Next, OK, Next,
Next...
When the installation of this software is complete, you will be prompted for the installation of another
similar program. It is software for programming a special group of PIC microcontrollers which operate in
low consumption mode (3.3 V). Skip it...
The last step - driver installation!

Driver is a program which enables the programmer’s software you have just installed on your PC and
hardware to communicate with each other. If you have followed instructions so far you will definitely
need it. Click Yes.
Type of drivers depends on operating system in use. Select the appropriate folder and start up
installation.

Now you are safe, just keep on clicking Next, OK, Next, Next...
IDE FOR MIKROC PRO FOR PIC
This is what you get when you start up IDE for mikroC PRO for PIC for the very first time:
Unfortunately, a detailed description of all the options available in this compiler would take too much of
our time, so that we are going to skip it. Instead, we are going to describe only the process of writing a
program in C language, simulator checking as well as its loading into the microcontroller memory. For
more information refer to help [F1].
PROJECT MANAGER

A program written in mikroC compiler is not a separate document, but part of a project which includes
Hex code, assembly code, header and other files. Some of them are created during the operation of
compiler, while some are imported from other programs. However, the Project Manager Window
enables you to handle them all. It is sufficient to right click any folder and select the option you need for
your project.
CODE EXPLORER
The Code Explorer window enables you to easily locate functions and procedures within long programs.
For example, if you look for a function used in the program, just double click its name in this window,
and the cursor will be automatically positioned at appropriate point in the program.
PROJECT SETTINGS
In order to enable the compiler to operate successfully, it is necessary to provide it with basic
information on the microcontroller in use as well as with the information on what is expected from it after
the process of compilation:
Device - When you select the microcontroller, the compiler automatically knows which definition file,
containing all SFR registers for specific MCU, their memory addresses and similar, to use.
Oscillator - This option is used to select the operating speed of the microcontroller. On the basis of it,
the compiler makes changes in the configuration word. The operating speed is set so as to enable the
microcontroller’s internal oscillator to operate with selected quartz crystal.

Build type - release After the process of compilation is complete, the compiler has no influence on the
program execution. For the purpose of debugging, a software simulator can be used.
Build type - ICD debug: When the process of compilation is complete and the microcontroller is
programmed, the compiler remains connected to the microcontroller and still can affect its operation.
The connection is established via programmer which is connected to the PC via USB cable. A software
making all this work is called the ICD (In Circuit Debugger). It enables the program to be executed step
by step and provides an access to the current content of all registers of the microcontroller. Simulation is
not carried out, their contents is literally read in true MCU controlling true device.
CODE EDITOR
A Code Editor is a central part of the compiler window used for writing a program. A large number of
options used for setting its function and layout can be found in the Tools/Options menu [F12].
SOFTWARE SIMULATOR
Prior to starting up the simulator, select the appropriate mode in the Project Settings Window (Build type
- release) and click the Run /Start Debugger option.
The compiler will be automatically set in simulation mode. As such, it monitors the state of all register
bits. It also enables you to execute the program step by step while monitoring the operation of the
microcontroller on the screen (i.e. simulation of operation).
A few icons, used only for the operation of this simulator, will be added to the toolbar when setting the
compiler in this mode.

They have the following meanings:
Step Into - Click on this icon executes one program line in which the cursor is positioned.
Step Over - This command is similar to the previous one. If the cursor is positioned in the line which
calls a program routine than it will be executed first and the program proceeds with execution at the first
next program line. It seems as if one program line is skipped even though the whole routine is executed.
As a result, the state of registers change. This command is commonly used when it is necessary to
speed up the execution of long program loops.
Run To Cursor - This command is used to execute a particular part of the program, i.e. from the last
executed line -to the line in which the cursor is placed.
Step out - By clicking this icon, the program exits routine being currently executed.
The simulator and debugger have the same function to monitor the state of registers during program
execution. The difference is that the simulator executes the program on the PC, while the debugger
uses a true microcontroller. Any change of a pin logic state is reflected on appropriate register (port). As
the Watch Window allows you to monitor the state of all registers it is easy to check whether a pin is set

to zero or one. In order to activate this window it is necessary to select View/Windows and click the
Watch Values option. Then you can make a list of registers the state of which you want to monitor.
If you want to find out how long it takes for the microcontroller to execute a part of the program, select
the Run/View Stopwatch option. A window as shown in figure on the right will appear. Do you know
how the stopwatch works? Well, it’s as simple as that.
COMPILER’S TOOLS
This compiler provides special tools which considerably simplify the process of writing a program. All
these tools are available from the Tools menu. In the following text we are going to give a brief
description of all of them.
PICFLASH PROGRAMMER
PICflash programmer is a stand-alone program which can operate independently of the compiler, i.e. it
can be used as a separate program. However, in this case, its operation is closely related to the
operation of the compiler so that it can be activated from within the compiler itself. If installed, the PIC
flash programmer is activated by selecting Tools/me_Programmer or pressing [F11]. A window that
appears contains options to be used for the process of programming microcontrollers.

It’s the right time to explain the operation of the programmer. As you know, the compiler is a software
which compile the program written in a higher programming language into executable code, i.e. Hex
code. That’s the code the microcontroller understands and executes. The programmer, which loads this
code into the chip, is comprised of software and hardware together called - PICflash programmer.
Programmer’s hardware provides all necessary voltage levels and socket for placing the microcontroller
in. Programmer’s software is installed on the PC and is used to pass on the Hex code to hardware over
USB cable. This book provides discussion on the software only.
USART TERMINAL
The USART terminal is a replacement for the standard Windows Hyper Terminal. It can be used for
checking the operation of the microcontroller which uses USART communication. Such a microcontroller
is built in a device and connected to the RS232 connector on PC over serial cable. The USART terminal
window, shown on the right, contains options for setting serial communication and for displaying
sent/received data.
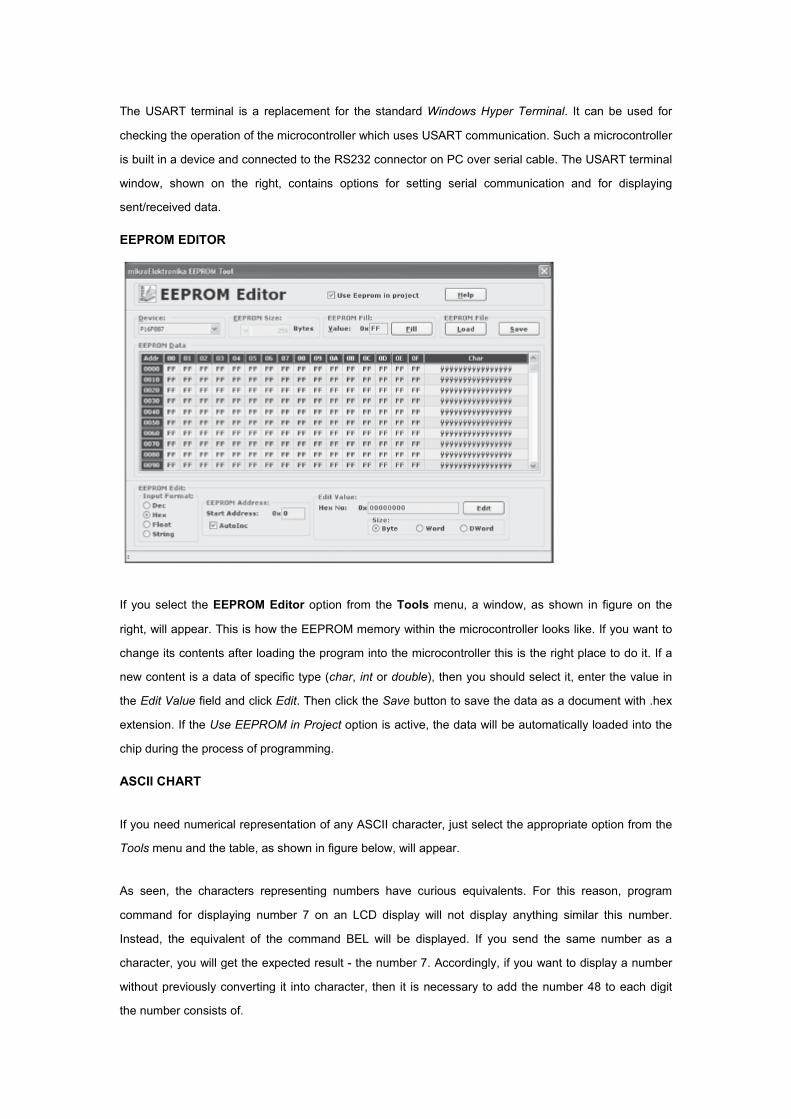
EEPROM EDITOR
If you select the EEPROM Editor option from the Tools menu, a window, as shown in figure on the
right, will appear. This is how the EEPROM memory within the microcontroller looks like. If you want to
change its contents after loading the program into the microcontroller this is the right place to do it. If a
new content is a data of specific type (char, int or double), then you should select it, enter the value in
the Edit Value field and click Edit. Then click the Save button to save the data as a document with .hex
extension. If the Use EEPROM in Project option is active, the data will be automatically loaded into the
chip during the process of programming.
ASCII CHART
If you need numerical representation of any ASCII character, just select the appropriate option from the
Tools menu and the table, as shown in figure below, will appear.
As seen, the characters representing numbers have curious equivalents. For this reason, program
command for displaying number 7 on an LCD display will not display anything similar this number.
Instead, the equivalent of the command BEL will be displayed. If you send the same number as a
character, you will get the expected result - the number 7. Accordingly, if you want to display a number
without previously converting it into character, then it is necessary to add the number 48 to each digit
the number consists of.

SEVEN SEGMENT EDITOR
A seven segment editor enables you to easily find out which number is necessary to be set on an output
port in order to display a desired symbol. Of course, what goes without saying is that port pins must be
connected to display segments properly. You just have to place the cursor on any display segment and
click it. The number that you should copy to the program will be shown immediately. That’s all.
LCD CUSTOM CHARACTER
Apart from the standard characters, the microcontroller can also send characters created on your own to
a display. By selecting the LCD custom character tool you will spare yourself from tedious work on
creating functions for sending appropriate code to a display. Just create a symbol by clicking small

squares in the LCD custom character window, select position and row and click the GENERATE button.
The required code appears in another window. No more clicks are needed. Copy to Clipboard - Paste...
GRAPHIC LCD BITMAP GENERATOR
This is another irreplaceable tool in the event that the microcontroller you are writing program for uses
graphic LCD display (GLCD). This tool enables you to display any bitmap easily. In order to take
advantage of it, select Tools/Glcd Bitmap Editor and appropriate window appears. Select type of
display to be used and load a bitmap. The bitmap must be monochromatic and in resolution specified
(128 x 64 pixels in this example). Further procedure is the same as in the example above Copy to
Clipboard...
A code generated using tools for controlling LCD and GLCD displays contains functions of the Lcd
library. If you use them in the program, don’t forget to check the box next to this library in the Library
Manager window so as to enable the compiler to recognize its functions correctly.

LIBRARIES
One of the most useful options of this program is Library Manager and surely deserves our attention.
It is previously mentioned that the main advantage of the higher programming languages such as C is
that these enable you to use the knowledge and work of other people. Function libraries are the best
example of it. If you need a function to perform certain task while writing a program, you just have to
look for it within some of the libraries which are integrated in the compiler and use it. For example, if you
need a function to generate sound on some of the pins, open the Sound library in the Library Manager
window and double click the appropriate function Sound_Play. A detailed description of this function
appears on the screen. Copy it to your program and set appropriate parameters. If this library is
checked, its functions will be automatically recognized during the process of compiling so that it is not
necessary to use the #include command.
STANDARD ANSI C LIBRARIES
Standard ANSI C libraries includes standard functions of C language:
L I BRARY DESCR IPT I ON
ANSI C Ctype Library Mainly used for testing or data conversion
ANSI C Math Library Used for floating point mathematical operations
ANSI C Stdlib Library Contains standard library functions
ANSI C String Library Used to perform string and memory manipulation operations

MISCELLANEOUS LIBRARIES
Miscellaneous libraries contain some of the general-purpose functions which are not included in
standard ANSI C libraries:
L I BRARY DESCR IPT I ON
Button Library Used for a project development
Conversion Library Used for data type conversion
Sprint Library Used for easy data formatting
PrintOut Library Used for easy data formatting and printing
Time Library Used for time calculations (UNIX time format)
Trigonometry Library Used for fundamental trigonometry functions implementation
Setjmp Library Used for program jumping
HARDWARE SPECIFIC LIBRARIES
Hardware specific libraries include functions intended to be used for controlling the operation of various
hadware modules:
L I BRARY DESCR IPT I ON
ADC Library Used for A/D converter operation
CAN Library Used for operation with CAN module
CANSPI Library Used for operation with external CAN module (MCP2515 or
MCP2510)
Compact Flash Library Used for operation with Compact Flash memory cards
EEPROM Library Used for operation with built-in EEPROM memory
EthernetPIC18FxxJ60 Library Used for operation with built-in Ethernet module
Flash Memory Library Used for operation with built-in Flash memory
Graphic Lcd Library Used for operation with graphic LCD module with 128x64
resolution
I2C Library Used for operation with built-in serial communication module I2C
Keypad Library Used for operation with keyboard (4x4 push buttons)
Lcd Library Used for operation with LCD display (2x16 characters)
Manchester Code Library Used for communication using Manchester code
Multi Media Card Library Used for operation with multimedia MMC flash cards
One Wire Library Used for operation with circuits using One Wire serial
communication
Port Expander Library Used for operation with port expander MCP23S17
PS/2 Library Used for operation with standard keyboard PS/2
PWM Library Used for operation with built-in PWM module

RS-485 Library Used for operation with modules using RS485 serial
communication
Software I2C Library Used for I2C software simulation
Software SPI Library Used for SPI software simulation
Software UART Library Used for UART software simulation
Sound Library Used for audio signal generation
SPI Library Used for operation with built-in SPI module
SPI Ethernet Library Used for SPI communication with ETHERNET module (ENC28J60)
SPI Graphic Lcd Library Used for 4-bit SPI communication with graphic LCD display
SPI Lcd Library Used for 4-bit SPI communication with LCD display (2x16
characters)
SPI Lcd8 Library Used for 8-bit SPI communication with LCD display
SPI 6963C Graphic Lcd Library
Used for SPI communication with graphic LCD display
UART Library Used for operation with built-in UART module
USB Hid Library Used for operation with built-in USB module
ACCESSING INDIVIDUAL BITS
The mikroC PRO for PIC compiler allows you to access individual bits of 8-bit variables by their name or
position in the byte:
INTCON.B0 = 0; // Clear bit 0 of the INTCON register
ADCON0.F5 = 1; // Set bit 5 of the ADCON0 register
INTCON.GIE = 0; // Clear Global Interrupt Bit (GIE)
SBIT TYPE
The mikroC PRO for PIC compiler has an sbit data type which provides access to registers, SFRs,
variables, etc. In order to declare a bit of a variable, it is sufficient to write:
extern sbit Some_Bit; // Some_Bit is defined
char MyVar;
sbit Some_Bit at MyVar.F0; // This is where Some_Bit is declared
...

void main() {
...
}
If you declare an sbit variable in a unit so as to point it to a specific bit of SFR register, it is necessary to
use the keyword sfr in declaration, because you are pointing it to the variable defined as sfr variable:
extern sfr sbit Abit; // Abit is precisely defined
...
sbit Abit at PORTB.F0; // Now, Abit is declared
void main() {
...
}
BIT TYPE
The mikroC PRO for PIC compiler provides a bit data type that may be used for variable declarations. It
cannot be used for argument lists and function-return values.
bit bf; // Valid bit variable
bit *ptr; // Invalid bit variable. There are no pointers to bit variables


