Chapter 1: Getting started with WildFly - Java EE Books...Chapter 1: Getting started with WildFly...
15
Chapter 1: Getting started with WildFly This chapter sets the beginning of our journey through the Java Enterprise Edition 7 (Java EE 7 in short) onboard of the latest release of WildFly application server. Although we will be sailing the WildFly full-rigged ship across this book, with some basic administration and configuration skills you will be also able to leverage this knowledge on other Java EE 7 Enterprise containers. We have lots of miles to run so let’s see more in detail the content of this chapter: We will start with a quick introduction to Java EE 7 and its most significant news Then we will learn how to install WildFly application server In the latter part of this chapter, we will focus on the development tools, specifically the Eclipse and NetBeans IDEs and Maven framework. Java EE 7 at first glance The Java Enterprise Edition (Java EE) is a superset of Java Standard Edition (Java SE) that dictates the basic rules for writing code in Java. The content of Java EE has been reshaped through the years, but especially the focus of it has changed a lot since the beginning. The very first releases of Java EE (1.2, 1.3, 1.4) featured a robust and scalable implementation of industry requirements, yet programming an Enterprise application was not a task for the faint hearts. The EJB specification was the living example of it: lots of interfaces to extend, plenty of boilerplate code and some mandatory XML descriptors to include. To make things worse, the code was hard to test and it was necessary to arrange for a completely new software infrastructure for creating and maintaining functional tests. No surprise that, after broken promises, many programmers turned to new frameworks that started to gain popularity such as Hibernate and Spring. It was in 2006 that we had the first trend reversal, with the arrival of EJB 3.0 and the new POJO based programming standard. The ease of development era was just started; since then Java EE it is finally meeting the initial promises and attracting again developers. The current focus in the current edition of Java EE is on the integration between different technologies, using Context Dependency Injection as glue between them; at the same time, several brand new specifications have been released, including support in some key areas such as HTML5 development, Batch executions and JSON processing that formerly needed a third-party set of API to run on the application server container. Let’s see more in detail what the new specification is going to buy you, starting from the new (1.0) additions:
Transcript of Chapter 1: Getting started with WildFly - Java EE Books...Chapter 1: Getting started with WildFly...

Chapter 1: Getting started with WildFly This chapter sets the beginning of our journey through the Java Enterprise Edition 7 (Java EE 7 in
short) onboard of the latest release of WildFly application server. Although we will be sailing the
WildFly full-rigged ship across this book, with some basic administration and configuration skills
you will be also able to leverage this knowledge on other Java EE 7 Enterprise containers. We have
lots of miles to run so let’s see more in detail the content of this chapter:
We will start with a quick introduction to Java EE 7 and its most significant news
Then we will learn how to install WildFly application server
In the latter part of this chapter, we will focus on the development tools, specifically the
Eclipse and NetBeans IDEs and Maven framework.
Java EE 7 at first glance
The Java Enterprise Edition (Java EE) is a superset of Java Standard Edition (Java SE) that dictates
the basic rules for writing code in Java. The content of Java EE has been reshaped through the years,
but especially the focus of it has changed a lot since the beginning. The very first releases of Java EE
(1.2, 1.3, 1.4) featured a robust and scalable implementation of industry requirements, yet
programming an Enterprise application was not a task for the faint hearts. The EJB specification
was the living example of it: lots of interfaces to extend, plenty of boilerplate code and some
mandatory XML descriptors to include. To make things worse, the code was hard to test and it was
necessary to arrange for a completely new software infrastructure for creating and maintaining
functional tests. No surprise that, after broken promises, many programmers turned to new
frameworks that started to gain popularity such as Hibernate and Spring. It was in 2006 that we
had the first trend reversal, with the arrival of EJB 3.0 and the new POJO based programming
standard. The ease of development era was just started; since then Java EE it is finally meeting the
initial promises and attracting again developers.
The current focus in the current edition of Java EE is on the integration between different
technologies, using Context Dependency Injection as glue between them; at the same time, several
brand new specifications have been released, including support in some key areas such as HTML5
development, Batch executions and JSON processing that formerly needed a third-party set of API
to run on the application server container.
Let’s see more in detail what the new specification is going to buy you, starting from the new (1.0)
additions:

Pag
e2
Java API for WebSocket (JSR 356): this specification defines an API for establishing socket
connections between a web browser and a server. In a nutshell, this API leverages a persistent
connection between the client and the server and both parties can start sending data at any time
over a single TCP connection. Both client and server can be POJOs elected as WebSockets endpoints
using annotations or programmatically.
Batch API for Java applications (JSR 352) outlines an XML based Job Specification Language (JSL)
used to define batch jobs along with a set of interfaces, abstract classes, and field annotations that
embrace the batch programming model and a batch runtime for running batch jobs.
Java API for JSON Processing (JSR 353) provides a portable APIs to parse, generate, transform, and
query JSON (JavaScript Object Notation) data. This API includes an object model API which creates
a tree-like structure that represents the JSON data in memory and a streaming API that provides a
way to parse and generate JSON in a streaming fashion.
Concurrency Utilities for Java EE (JSR 236) provides a standard API for enriching your Java EE
applications with concurrency capabilities without compromising the integrity of your container.
Here is a quick shot of the Java EE 7 API highlighting the new features that we have just
introduced:
The existing specifications have been updated too with different levels of depth. Following here are
the changes in the existing API:

Pag
e3
Context Dependency Injection 1.1 (JSR 346) includes auto-wiring of CDI beans which now feature
a declarative transaction management (CMT) via the @Transactional annotation, plus the addition
of new annotations (such as the @Vetoed annotation that allows programmatic disablement of
Beans ) and a rich set of Interceptors.
Java Server Faces 2.2 (JSF 344) features sensible HTML5 support, Resource Library Contracts
(which are a kind of Multi-Templating feature) and Faces Flows, which can be used to encapsulate
a set of steps guiding the user through the execution of a business tasks.
Java Persistence API 2.1 (JSR 338) which includes now a standard way to execute tasks formerly
delegated to the specific JPA providers such as DDL generation (e.g. automatic table, index and
schema generation) and Stored Procedure invocation. The Unsynchronized persistence context and
a richer set of Criteria APIs (including Bulk update/delete operations) are also some of the most
interesting highlights.
JAX-RS 2.0 (JSR 339) further simplifies the development of applications using RESTful Web
services by including a Client API for async processing, a matching server side asynchronous HTTP
response and the addition of Filters and Interceptors for proxying REST communications.
Bean Validation 1.1 (JSR 349) lets you express constraints on object models via annotations now
allows you to write custom constraints in an extensible way, providing also the APIs to validate
parameters and return values of methods and constructors.
JMS 2.0 (JSR 343) is a new major release of JMS, which features a simplified and much shorter way
for producing and consuming messages by using a single resource (the JMSContext) to wrap JMS
Session and a JMS Connection. Besides this, the core JMS objects now implements the
java.lang.Autocloseable interface to allow them to be used in a Java SE 7 try-with-resources statement.
The inclusion of annotation for creating JMS Administered resources is another major hit of this
new specification.
Servlet 3.1 (JSR 340) revamps the Servlet API by allowing the creation of more scalable Servlets
thanks to its non-blocking I/O features. Another major hit is the inclusion of the Http protocol
Upgrade mechanism, which allows using protocols other than HTTP 1.1 (e.g. the WebSocket
protocol)
EJB 3.2 (JSR345) includes some minor enhancements such as the option to disable Stateful session
bean passivation and the inclusion of Asynchronous session bean invocations and nonpersistent
EJB Timer Service in the EJB Lite, which is a smaller subset of EJB API.
Some minor updates are included also in the Java Mail and Java Connector Architecture mostly to
include annotations to inject administered objects registered in the JNDI tree.

Pag
e4
Installing WildFly application server
Before downloading and installing the application server, you need to check for the availability of
JDK 1.7 or higher on your machine. If you are missing this requirement, or you have an older Java
environment on your machine, you can download it from the following link:
http://www.oracle.com/technetwork/java/javase/downloads/index.html.
Once installed the JDK, you have to set the JAVA_HOME environment variable accordingly. See
the following frame if you don’t know how to do it:
Windows users: Right click on the My Computer icon on your desktop and select properties. Then
select the Advanced Tab contained in the Environment Variables button.
Under System Variable, click New. Enter the variable name as JAVA_HOME and value the Java
install path. Click OK and Click Apply Changes.
Linux users: Enter in your .profile / .bash_profile script the following (substitute with the actual JDK
installation path):
export JAVA_HOME=/usr/java/jdk1.7.0_51
Once you have completed your installation, run java -version to verify that it is correctly installed:
C:\Windows>java –version
java version "1.7.0_51"
Java(TM) SE Runtime Environment (build 1.7.0_51-b11)
Java HotSpot(TM) 64-Bit Server VM (build 23.51-b01, mixed mode)
Done with JDK installation, let’s move to the application server. WildFly 8 can be downloaded from
http://www.wildfly.org by following the Downloads link in the home page, which will take you to
the following screen:
Pag
e5
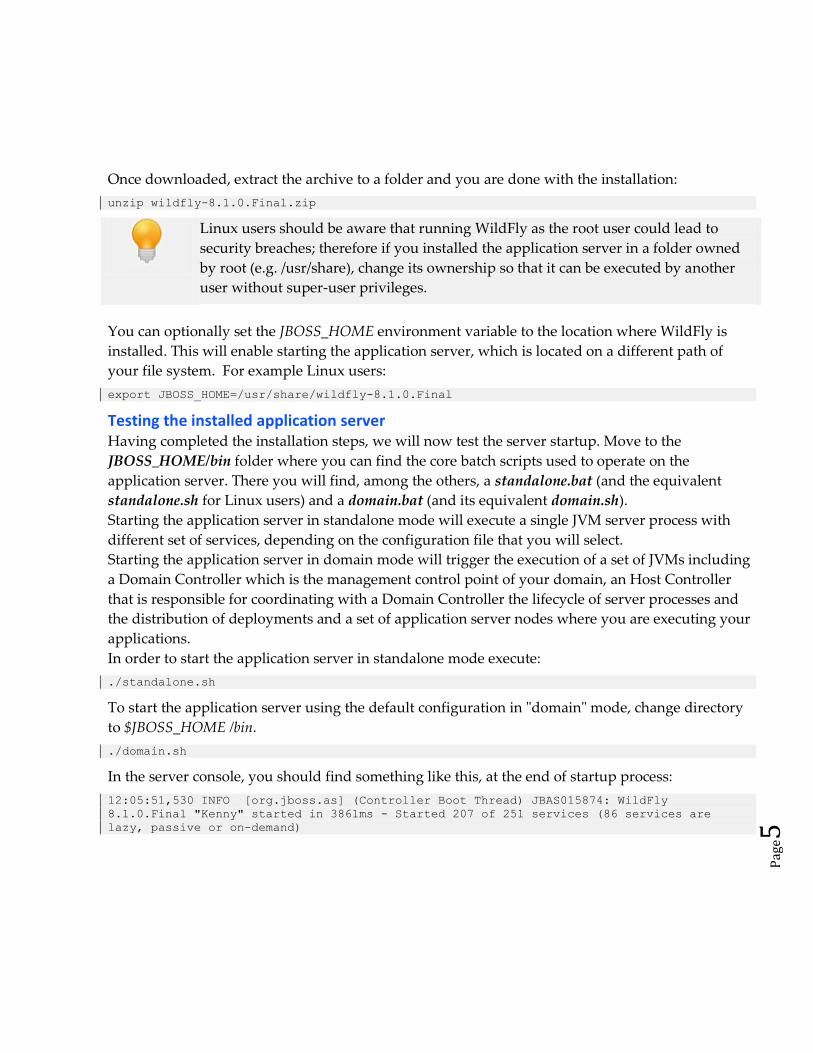
Once downloaded, extract the archive to a folder and you are done with the installation:
unzip wildfly-8.1.0.Final.zip
Linux users should be aware that running WildFly as the root user could lead to
security breaches; therefore if you installed the application server in a folder owned
by root (e.g. /usr/share), change its ownership so that it can be executed by another
user without super-user privileges.
You can optionally set the JBOSS_HOME environment variable to the location where WildFly is
installed. This will enable starting the application server, which is located on a different path of
your file system. For example Linux users:
export JBOSS_HOME=/usr/share/wildfly-8.1.0.Final
Testing the installed application server Having completed the installation steps, we will now test the server startup. Move to the
JBOSS_HOME/bin folder where you can find the core batch scripts used to operate on the
application server. There you will find, among the others, a standalone.bat (and the equivalent
standalone.sh for Linux users) and a domain.bat (and its equivalent domain.sh).
Starting the application server in standalone mode will execute a single JVM server process with
different set of services, depending on the configuration file that you will select.
Starting the application server in domain mode will trigger the execution of a set of JVMs including
a Domain Controller which is the management control point of your domain, an Host Controller
that is responsible for coordinating with a Domain Controller the lifecycle of server processes and
the distribution of deployments and a set of application server nodes where you are executing your
applications.
In order to start the application server in standalone mode execute:
./standalone.sh
To start the application server using the default configuration in "domain" mode, change directory
to $JBOSS_HOME /bin.
./domain.sh
In the server console, you should find something like this, at the end of startup process:
12:05:51,530 INFO [org.jboss.as] (Controller Boot Thread) JBAS015874: WildFly
8.1.0.Final "Kenny" started in 3861ms - Started 207 of 251 services (86 services are
lazy, passive or on-demand)

Pag
e6
You can verify that the server is reachable from the network by simply pointing your browser to
the application server's welcome page, which is reachable by default at the following address:
http://localhost:8080
Stopping WildFly
The simplest way to stop the application server is by sending an interrupt signal with Ctrl+C to the
server console. Linux/Unix users might as well have a look at the process table with the “ps”
command and issue a “kill” to stop the application server.
On the other hand, the recommended approach is to use the Command Line Interface (CLI)
interface to issue an immediate shutdown command. The CLI interface can be started from the
$JBOSS_HOME/bin folder of your installation:
./jboss-cli.sh
Windows user will start the CLI using the equivalent batch file:
jboss-cli.bat
Once there, issue the connect command:
[disconnected /] connect
Connected to localhost:9990
Now issue the shutdown command that will stop the application server:
[localhost:9990 /] shutdown

Pag
e7
If you want to issue a command like shutdown in no-interactive mode, you can use as well the
following syntax:
jboss-cli.bat -c --command=shutdown
What’s new in WildFly 8? Compatibility with Java EE 7 specifications is not the only distinctive feature of the new application
server. As a matter of fact, the major highlights contained in the new release of the application
server include several administration areas such as:
Role Base Access Control: before WildFly 8, every management user acted as a Superuser
with full privileges on the application server. A major area of improvement includes the
definition of Roles, which can be associated with an user or a group of users allowing
selective management of resources depending on the user’s role.
New Web Server: WildFly 8 has turned to a new Web Server implementation named
Undertow, which is an embeddable Web server providing both blocking and non-blocking
API based on NIO. Besides the API enhancements, the Undertow Web server can provide
better flexibility thanks to its composition based architecture that allows you to build a Web
server by combining small single purpose handlers.
Simplified socket management: The new release of the application server uses a reduced
number of ports, multiplexing invocations over the HTTP channel; therefore, administrators
and your security staff will spend less time in setting up firewall policies.
Simplified clustering of applications: Developing clustered EJB or Web applications is now
even easier: in particular, EJB applications have deprecated the older @Clustered annotation
(and as well the jboss-ejb3.xml’s clustered element) which was used for triggering
clustering. Now EJB applications are automatically clustered once they are deployed in a ha
(or full-ha) profile. The only clustering distinctive annotation remains the “distributable”
element, which triggers clustering for web application.
Installing Eclipse environment
The development environment used in this book is Eclipse known by Java developers worldwide
and contains a huge set of plugins to expand its functionalities. Besides this, Eclipse contains a rich
set of plugins that can be used to develop applications with WildFly and JBoss projects.
So, let's move to the downloading page of Eclipse, which is located at: http://www.eclipse.org.

Pag
e8
From there, download the latest Enterprise Edition (at the time of this writing, it’s version 4.3 and is
also known as Kepler). The compressed package contains all the Java EE plugins already installed
and requires about 250MB of disk space:
Once you have unzipped the installation file, you will see a folder named eclipse. Within this
folder, you will find the eclipse application (a big blue dot). We recommend you create a shortcut
on the desktop to simplify the launching of Eclipse. Note that, just like WildFly, Eclipse does not
have an installation process. Once you have unzipped the file, you are done!
Installing JBoss Tools JBoss tools is a wrapper for a set of plugins which have been designed for the JBoss suite of
products. The latest version of JBoss tools includes also a plugin, which can be used to start/stop
WildFly application server and to deploy applications on the top of it. Installing the application
server plugin is pretty simple; you have to follow these steps:
Select the Eclipse Marketplace option that is contained in the “Help” menu. Once in it, enter “jboss
tools” in the upper search box as displayed by the following picture:
Click on the Install button to proceed. You will be taken to the following window where you will
select which plugin to install:

Pag
e9
As you can see from the above picture, you need to check the JBossAS Tools plugin and click
“Confirm” to continue with the installation process. You will be requested to accept the License
Agreement. Once done, the installation will start and you will be prompted to restart Eclipse at the
end of it.
As an alternative step, you can also download JBoss Tools as individual zips for
offline installation. See JBoss Tools Downloads
(http://www.jboss.org/tools/download).
Now, you should be able to see the WildFly server enlisted as a server by choosing New | Server
from the upper menu and expanding the JBoss Community option:

Pag
e10
In your first Server definition, you will have to Add a Runtime environment to your
server by clicking on the Add link and selecting your application server home.
Click on Finish to complete your server installation. Now you should be able to use the Start/Stop
button on the Server tab to trigger the server startup and shutdown. The tiny beetle icon can be
used to Debug your applications, and besides it a watch button that can be used to Tune the
application server.

Pag
e11
Debugging applications using JBoss tools
Remote debugging is a key feature that is necessary to track issues on your server side applications.
In order to activate remote debugging on the application server a set of JVM arguments needs to be
enabled at application server startup:
-agentlib:jdwp=transport=dt_socket,address=8787,server=y,suspend=n
Luckily, if you have installed JBoss Tools or Netbeans plugin for WildFly this happens
automatically provided that you have started the application server in debug mode. Let’s see in a
few simple steps how to do it, using Eclipse:
1) Set up a breakpoint into any of your server side classes:
2) Now start up the application server in debug mode:
3) Target your application on WildFly application server, by choosing the Add and Remove
option available by right-clicking on the WildFly Server
4) Then, as soon as your application hits a breakpoint, you will be notified by Eclipse which
suggests a change of perspective, stopping the execution at the breakpoint:

Pag
e12
Installing NetBeans environment
Eclipse is not your only option for developing your applications. We will mention also the steps for
installing NetBeans, which is a free opensource IDE with a worldwide community of users and
developers.
Start by downloading NetBeans from https://netbeans.org and download the latest release (8.0 at
the time of writing). Once completed the download, you will have an executable file, which needs
to be launched.
For Solaris and Linux platforms, the installer file has the .sh extension. For these
platforms, you need to make the installer files executable by using the following
command: chmod +x <installer-file-name>
Installation of NetBeans is straightforward as it’s a guided wizard process. Once completed, we will
install the WildFly plugins which allows starting/stopping and debugging the application server
from within the IDE.
Since the release 8.0 of Netbeans the plugin can be easily found by selecting the Tools | Plugins
option from the upper menu. Once there, select the “Available Plugins” tab and, in the search box
enter “wildfly” as shown by the following picture:

Pag
e13
Check the “WildFly Application Server” option and click “Install” at the bottom of the dialog. You
will be prompted to restart Netbeans for the changes to take effect. Once done, from the left side of
your GUI, select the Services Tab and right-click on Server, as shown by this picture:
Select Add Server. The server wizard will start: as first option choose “WildFly Application
Server” from the list of available application server. Click on the Next button to move ahead to the
next step:

Pag
e14
In the following window select the location where WildFly is installed and pick up the server
configuration file to be used:
Click on Finish. As you can see from the following picture, now the WildFly application server is
enlisted among the available Services by expanding the Servers option:

Pag
e15
Right-click on the newly added server in order to Start, Stop or Debug the application server. Just
like for Eclipse, if you start the application server in Debug Mode, you will be able to debug your
application with no additional configuration on the application server side.
Installing Maven
Creating applications using the Eclipse/Netbeans environment is the quickest way to provide a
simple Java EE application. Nevertheless, as your application grows in complexity, so does the
amount of libraries to be used (and especially the dependencies between them). For this reason, you
are strongly encouraged to use Maven that is the de facto standard tool for project and release
management. Maven is distributed in several formats and can be downloaded from this link:
http://maven.apache.org/download.html
Once that you have completed the download, unzip the distribution archive (for example, apache-
maven-3.2.1-bin.zip) to the directory where you wish to install Maven.
Next, add the M2_HOME environment variable to your system, so that it will point to the folder
where Maven has been unpacked. Next, update the PATH environment variable by adding the
Maven binaries to your system path. For example, on the Windows platform, you should include
%M2_HOME%/bin, to make Maven available to the command line.
Testing the Installation Once completed with your installation, run mvn --version, to verify that Maven has been correctly
installed:
mvn –-version
Apache Maven 3.2.1 ( 2014-02-14T18:37:52+01:00)
Maven home: C:\apache-maven-3.2.1\bin\..
Java version: 1.7.0_55, vendor: Oracle Corporation
Java home: C:\Java\jdk1.7.0_55\jre


![Chapter 1: Java EE and Modern Architectural Methodologies · Chapter 2: Getting Familiar with WildFly Swarm [ 5 ] Chapter 3: Right-Sizing Your Services [ 6 ] [ 7 ] [ 8 ] Chapter 4:](https://static.fdocuments.us/doc/165x107/5ed3bf46a0e09216242fe0de/chapter-1-java-ee-and-modern-architectural-methodologies-chapter-2-getting-familiar.jpg)