Chapter 1, An Introduction to Linux
42
Chapter 1, An Introduction to Linux John M. Morrison April 9, 2019 Contents 1 Introduction 2 2 In the Beginning ... 3 3 The Anatomy of a UNIX Command 4 4 Managing Directories 5 4.1 Processes and Directories ...................... 9 5 Paths 10 6 A Field Trip 11 7 Making and Listing Regular Files 12 8 Renaming and Deleting Files 15 8.1 Everything is a Computer Program ................. 17 9 Editing Files with vi 20 9.1 A Note for Ubuntu Users ...................... 21 9.2 Launching vi ............................. 21 9.3 vi Modes ............................... 22 9.4 Cut and Paste ............................ 25 9.5 Cutting and Pasting with External Files .............. 26 1
Transcript of Chapter 1, An Introduction to Linux

Chapter 1, An Introduction to Linux
John M. Morrison
April 9, 2019
Contents
1 Introduction 2
2 In the Beginning . . . 3
3 The Anatomy of a UNIX Command 4
4 Managing Directories 5
4.1 Processes and Directories . . . . . . . . . . . . . . . . . . . . . . 9
5 Paths 10
6 A Field Trip 11
7 Making and Listing Regular Files 12
8 Renaming and Deleting Files 15
8.1 Everything is a Computer Program . . . . . . . . . . . . . . . . . 17
9 Editing Files with vi 20
9.1 A Note for Ubuntu Users . . . . . . . . . . . . . . . . . . . . . . 21
9.2 Launching vi . . . . . . . . . . . . . . . . . . . . . . . . . . . . . 21
9.3 vi Modes . . . . . . . . . . . . . . . . . . . . . . . . . . . . . . . 22
9.4 Cut and Paste . . . . . . . . . . . . . . . . . . . . . . . . . . . . 25
9.5 Cutting and Pasting with External Files . . . . . . . . . . . . . . 26
1

9.6 Searching and Substutiing . . . . . . . . . . . . . . . . . . . . . . 26
10 Visual Mode 27
10.1 Replace Mode . . . . . . . . . . . . . . . . . . . . . . . . . . . . . 29
11 Copy Paste from a GUI 29
11.1 Permissions . . . . . . . . . . . . . . . . . . . . . . . . . . . . . . 31
12 The Octal Representation for Permissions 32
13 The Man 34
14 Redirection of Standard Output and Standard Input 37
15 Using Pipes 39
15.1 The sort filter . . . . . . . . . . . . . . . . . . . . . . . . . . . . 39
15.2 The Filters head, tail, and uniq . . . . . . . . . . . . . . . . . . 40
15.3 The grep Command . . . . . . . . . . . . . . . . . . . . . . . . . 40
15.4 And Now to Pipes . . . . . . . . . . . . . . . . . . . . . . . . . . 41
1 Introduction
You are probably used to running a computer with a graphical user interface(GUI). These interfaces feature windows, icons, buttons, toolbars, and othergraphical features you navigate and use with the aid of your keyboard andmouse. You likely run Windoze, MacOSX, or you may be running a LinuxGUI on your machine. The GUI allows you to communicate with the operatingsystem, which is the master program of your computer that manages such thingsas running applications and maintaining your file system.
In this book, we will study the Linux operating system in its command-lineguise. You will control the computer by entering commands into a text windowcalled a terminal window. Typically they look something like this.
2

The name “terminal” name harkens back to the days when you had an actualappliance on your desk consisting of a (heavy) CRT screen and keyboard thatwas connected to a computer elsewhere. Your terminal window is just a softwareversion of this old appliance. You will enter commands into this window to getthe remote machine you are communicating with to perform various tasks.
The text string morrison@odonata appearing in the window is called theprompt. Its presence indicates that the computer is waiting for you type in acommand. Your prompt will likely be different.
2 In the Beginning . . .
As we progress, everything will seem unfamiliar, but actually relate very directlyto some very familiar things you have seen working with a computer having aGUI. We assume you have basic proficiency using some kind of computer suchas a Mac or a Windoze box, and we will relate the things you do in Linux tothose you do in your usual operating system.
Log in to your UNIX account. If you are working in a Linux GUI, or a Mac,just open a terminal session. The first thing you will see after any passwordchallenge will resemble this
[yourUserName}@hostName yourUserName}]$
or this
[yourUserName}@hostName ~]$
On a Mac, it will resemble this
3

John-Morrisons-MacBook-Pro:~ morrison$
The presence of the prompt means that Linux is waiting for you to enter a com-mand. The token yourUserName will show your login name. Your prompt mayhave an appearance different from the ones shown here; this depends on howyour system administrator sets up your host or on the type of Linux distributionyou are using. The appearance of your prompt does not affect the underlyingperformance of UNIX. In fact, the properties of your session are highly config-urable, and you can customize your prompt to have any appearance you wish.
To keep things simple and uniform throughout the book, we will always use$ to represent the UNIX prompt. You will interact with the operating systemby entering commands, instead of using a mouse to push buttons or click inwindows.
When you see this terminal, a program called a shell is running. Theshell takes the commands you type and passes them on to the operating system(kernel) for action. You will type a command, then hit the ENTER key; thiscauses the command to be shipped to the OS by the shell. The shell thenconveys the operating system’s reply to your terminal screen. Think of the shellas a telephone through which you communicate with the operating system. Thisanalogy is only fitting since UNIX was originally developed at AT&T Bell Labs.
We will begin by learning how to interact with the file system. This is whatgive you access to your programs and data, so it is very fundamental.
3 The Anatomy of a UNIX Command
Every UNIX command has three parts: a name, options, and zero or morearguments. They all have the following appearance
commandName -option(s) argument(s)
Notice how the options are preceded by a -. Certain “long–form” options arepreceded by a --. In a Mac terminal, all options are preceded by a simple -.
A command always has a name. Grammatically you should think of a com-mand as an imperative sentence. For example, the command passwd means,“Change my password!” You can type this command at the prompt, hit enter,and follow the instructions to change your password any time you wish.
Arguments are supplementary information that is sometimes required andsometimes optional, depending on the command. Grammatically, argumentsare nouns: they are things that the command acts upon.
Options are always, well, ... optional. Options modify the basic action of thecommand and they behave grammatically as adverbs. We will assume you have
4

used a computer with a GUI before. All familiar features of a graphics-basedmachine are present in Linux, you will just invoke them with a text commandinstead of a mouse click. We will go through some examples so you get familiarwith all the parts of a Linux command.
Two very basic Linux commands are whoami and hostname. Here is a typicalresponse. These commands give, respectively, your user name and the name ofthe host you log in to.
Now we run them. We show the results here; your computer will show yourlogin name and your host name. Here is what they look like on a server.
$ whoami
morrison
$ hostname
carbon.ncssm.edu
$
Here is their appearance on a PC (A Mac in this instance).
$ whoami
morrison
$ hostname
John-Morrisons-MacBook-Pro.local
$
We will next turn to the organization of the file system.
4 Managing Directories
We will do a top–down exploration of the file system. In this spirit, we will firstlearn how to manage directories; this is the UNIX name for folders. You willwant to know how to create and manage folders, ummmm... directories , andhow to navigate through them.
You have been in a directory all along without knowing it. Whenever youstart a UNIX session, you begin in your home directory. Every user on a UNIXsystem owns a home directory. This is where you will keep all of your stuff. Youwill see that ownership of stuff is baked right into a UNIX system.
To see your home directory, type pwd at the UNIX prompt. This commandmeans, “Print working directory!” You will see something like this.
$ pwd
/home/faculty/morrison
5

This directory is your home directory. Whenever you start a new session, youwill begin here. This is the directory where all the stuff that belongs to you iskept.
In this example,morrison is a directory inside of faculty, which is insidea directory home, which is inside the root directory, /. Your home directorywill likely be slightly different. It is very common for UNIX systems to keep alluser directories inside of a directory named home. Often, several different typesof users are organized into sub-directories of home. You will later see that alldirectories live inside of the root directory, /. Enter the pwd command on yourmachine and compare the result to what was shown here. Become familiar withyour home directory’s appearance so you can follow what goes on in the rest ofthis chapter.
If you are using Linux on your PC, your home directory will likely look likethis.
/home/morrison
This directory structure is exactly the same as your hierarchy of folders andfiles on a Mac or a Windoze box. You already know that folders can containfiles and other folders. This is also true in a UNIX environment.
To make a new directory in Mac or Windoze, you right click in the open folderand choose a menu for making a new folder. In UNIX, the mkdir commandmakes a one or more new directories. It requires at least one argument, thename(s) of the director(ies) you are creating. Let us make a directory by typing
$ mkdir Projects
makes a directory called Projects; this directory is now empty. We can alwaysget rid of an empty directory or directories by typing a command like there
$ rmdir garbageDirectory(ies)
where garbageDirector(ies) stands for the directory or directories you wishremoved.
The rmdir command will not remove a directory unless it is empty. Thereis a way to snip off directories with their contents, but we will avoid it for nowbecause it is very dangerous. For now, you can delete the contents of a directory,then remove the directory. Be warned as you proceed: When you remove filesor directories in Linux, they are gone for good! There is no “undelete.”
If you got rid of the Projects directory, re-create it with mkdir. To get intoour new directory Projects, enter this command.
$ cd Projects
6

and type ls. You will see no files. This is because the directory Projects
is empty, and ls by default only shows you the files in the directory you arecurrently occupying. The command cd means, “Change directory!” Havingdone this now type
$ pwd
You will see a directory path now ending in Projects.
There is a command called touch which will create an empty file(s) with aname(s) you specify. Create files named moo and baa with itouch as follows.
$ touch moo baa
Then enter ls at the command line. This command means “list stuff.” Youwill see just the files you created.
As we said before, The command ls displays only files in the directory youare currently occupying. This directory is called your current working directory,or cwd for short. Every terminal session has a working directory. When youfirst log in, your working directory is always your home directory. You will seethat every user on a UNIX system has a home directory that containing all thatuser’s data.
/home/yourUserName/Projects
This directory is the Projects directory you just created.
If you type cd without arguments, you will go straight back to your homedirectory. This should make you will feel like Dorothy going back to Kansas.Now if we use pwd again we see our home directory printed out.
7

You can also see your home directory anywhere you are by typing
$ echo $HOME
The fearsome–looking object $HOME is just a symbol that points to your homedirectory. There are various items like this present in your system. They arecalled environment variables. Another environment variable is $PWD; this is justyour current working directory.
Programming Exercises
1. Navigate to a directory. Then enter this.
$ pushd
Then navigate to anohter directory and repeat this a few times. Nowalternately type
$ popd
$ pwd
What does this do? Think of Hansel and Gretel!
8

2. Crawl aroud in your directory strucutre. Each time you enter a newdirectory type
$ echo $PWD
$ echo $OLDPWD
4.1 Processes and Directories
We know that when we log in, we are starting a program called a shell. Theshell is a process, or running program. Every process has a cwd (current workingdirectory). When you type pwd into your shell, you are asking the OS to tell youyour shell’s current working directory. If you log in to a UNIX server in severalterminal windows, each runs in a separate shell, so each has its own workingdirectory.
Observe that, much of the time, your shell is idle. When you finish typinga command and hit the enter key, that command launches a program, thatprogram runs, and any output is directed to your terminal window.
The command cd is a computer program. What it does is it changes the cwdof the shell that calls it. Now you know what it means to be “in” a directory:it means the cwd of your shell is that directory.
Programming Exercises
1. Enter
$ cd $HOME/Projects
and see what happens.
2. Make these directories inside of Projects labors, feats and chores
3. Type cd labors at the command line then pwd.
4. Type cd .. at the command line then pwd. What happened?
5. Type cd .. at the command line again, then pwd. What happened?
6. What do you think .. is?
7. Type cd . at the command line then pwd. What happened?
8. Type ls . at the command line then pwd. What happened?
9. What do you think . is?
10. Visit a few directories using cd. Then enter echo $OLDPWD. What hap-pens? What does this environment variable do.
11. Type cd -. Figure out what (very useful) thing this does.
9

5 Paths
The location of your home directory is specified by a path that looks somethinglike this /home/morrison. This path is an example of an absolute path, becauseit specifies a location in the file system starting at the root directory.
All absolute paths start with a / or a ~. Here are the three kinds of absolutepaths.
• Paths beginning with a / are specified starting at the root directory.
• The symbol ~ is shorthand for your home directory. It is an absolutepath. Try going anywhere in the file system and type cd ~; it will takeyou straight home, just as cd does by itself.
• A path beginning with ~someUserName specifies the home directory of theuser someUserName.
Absolute paths work exactly the same, no matter where you are in the filesystem.
Relative paths are relative to your cwd. Every directory contains an entryfor its parent and itself. Make an empty directory named ghostTown and do anls -a.
$ rmdir ghostTown/
$ mkdir ghostTown
$ cd ghostTown/
$ ls -a
. ..
If you type cd .., you are taken to the parent directory of your cwd; thispath is relative to your cwd. Any path that is not absolute is relative. Whenyou are navigating in your home directory, you are mostly using relative paths.Note that any relative path can also be represented as an absolute path.
Programming Exercises
1. Try typing cd .. then pwd a few times. What happens.
2. Type cd. Where do you go?
3. Type cd /bin (on a mac /usr/bin) then ls cd* You will see a file namedcd that lives in that directory.
10

6 A Field Trip
To get to our first destination, type cd /. The directory / is the “root” di-rectory; it is an absolute path. If you think of the directory structure as anupside-down (Australian) tree (root at top), the directory / is at the top. Typepwd and see where you are. Type ls; you should see that the directory home
listed with several other directories. Here is what the directory structure lookslike on a PC running Red Hat Fedora Core 9. Yours may have a slightly differentappearance.
$ cd /
$ ls
bin etc lib mnt root srv usr
boot home lib64 opt run sys var
cdrom initrd.img lost+found proc sbin tmp vmlinuz.old
dev initrd.img.old media root selinux vmlinuz
$
Now type if we type cd home then ls, you will see one or more directories. Onthe machine being used here, you would see
$ cd home
$ ls
guest lost+found morrison
This machine has two users, morrison and guest. Since it is a personal com-puter, it does not have many users. You may be working on a server in whichthere could be dozens, or even hundreds of other users who are organized intovarious directories.
Here is an example from a fairly busy server.
$ cd /home
$ ls
2016 2018 2020 gotwals menchini rash
2017 2019 cs keethan.kleiner morrison rex.jeffries
$
The directories with the years are directories full of user’s home directories. Wewill list one here. It has quite a few users in it.
$ ls 2019
allen19m hablutzel19k laney19m mullane19n wang19e
bounds19a hirsch19m lheem19h ou19j wolff19o
carter19d hou19b lin19b overpeck19c yang19j
11

cini19a houston19b liu19c perrin19p zhuang19a
eun19e houston19p manocha19a sakarvadia19m
gupta19a knapp19t mitchell19m villalpando-hernandez19j
$
See if you can follow this all the way down to another user’s home directory.You may be able to list the files there, or even read them, depending on thatuser’s permissions. From this modest demonstration, you see that you can stepdown through the directory structure using cd. Now we will learn how to stepup.
Try typing cd ..; the special symbol .. represents the directory above yourcwd. Now you can climb up and down the directory structure! The .. symbolworks like the up-arrow in a file chooser dialog box in Mac or Windoze. Yousaw this when you did the last group of exercises.
Practice this; go back to your home directory. Make a new directory calledmudpies. Put some files in it. Make new directories in mudpies, got down insidethese and make more directories and files. Practice using cd to navigate thetree you create. When you are done, get rid of the whole mess; remember youhave to go to the bottom, empty out the files using rm and then use rmdir toget rid of the empty directories.
If you type ls in a directory, notice how any directories inside it are indifferently colored type than regular files. This color is often blue. You can usethe -F option in ls to print directory names with a slash (/) after them. Trythis; it was an important option back in the days of monochrome monitors. Ifyou use the -l option in ls, you will see that in the permissions column, thecolumn begins with a d for any directory. Here is a possible sample
-rw-rw-r-- 1 morrison morrison 0 Jun 9 14:54 bar
-rw-rw-r-- 1 morrison morrison 0 Jun 9 14:54 foo
drwxrwxr-x 2 morrison morrison 4096 Jun 9 14:54 junk
You can see there that bar and foo are empty files. Notice the d at thebeginning of the line in junk; this tells you junk is a directory.
7 Making and Listing Regular Files
In Chapter 0, we learned that the operating system is responsible for maintainingthe file system. The file system maintained by a UNIX system consists of ahierarchy of files. Two types of files will be of interest to us: directories(folders) and regular files, i.e. files that are not directories. Regular files mayhold data or programs. They may consist of text or be binary files that are nothuman-readable.
12

You are used to working with regular files and directories in Windoze orMacOSX. Things in UNIX work the same way, but we will use commands tomanage files instead of mouse clicking or dragging.
As we have already seen us now use the UNIX command touch to createnew files. This command creates an empty file for each argument given it. Atyour UNIX prompt, enter
$ touch stuff
This creates the empty file named stuff in your account.
Now let us analyze the anatomy of this command. The name of the commandis touch; its purpose is to create an empty file. Since you do not see a - sign,there are no options being used. The argument is stuff. This is the name ofthe file you created. Create a few more empty files. Enter these commands
$ touch foo
$ touch bar
You may create several files at once by making a space-separated list as we showhere.
$ touch aardvark buffalo cougar dingo elephant
Now you have eight new files in your account. Next we will see how to list thefiles. Enter this command at the UNIX prompt
$ ls
The command ls lists your files. Notice we had neither options nor arguments.If you created the files using touch as instructed, they should appear on yourscreen like this
$ aardvark bar buffalo cougar dingo elephant foo stuff
The command ls has several options. One option is the l option; it list thefiles in long format. To invoke it, type
$ ls -l
You will see a listing like this
-rw-rw-r-- 1 morrison morrison 0 Jun 9 10:50 aardvark
-rw-rw-r-- 1 morrison morrison 0 Jun 9 10:50 bar
13

-rw-rw-r-- 1 morrison morrison 0 Jun 9 10:50 buffalo
-rw-rw-r-- 1 morrison morrison 0 Jun 9 10:50 cougar
-rw-rw-r-- 1 morrison morrison 0 Jun 9 10:50 dingo
-rw-rw-r-- 1 morrison morrison 0 Jun 9 10:50 elephant
-rw-rw-r-- 1 morrison morrison 0 Jun 9 10:49 foo
-rw-rw-r-- 1 morrison morrison 0 Jun 9 10:49 stuff
The first column reflects the permissions for the files. The sequence
-rw-rw-r--
indicates that you and your group have read/write permission and that others(“the world”) has read permission. We will discuss permissions in more detailwhen we discuss the management of directories.
You can see the name here is listed in two columns; on this machine morrisonis in his own group. On another system, you may live in group with several otherpeople; if so you will see the name of that group in one of these columns. Thezero indicates the size of the file; each file we created is empty. Then there is adate, a time and the file name. This is the long format for file listing; it is seenby using the -l option in the ls command.
Another option is the -a option. This lists all files, including “hidden” files.Hidden files have a dot (.) preceding their name. To see them, enter
$ ls -a
at the command line. One thing you are guaranteed to see, no matter whereyou are are are the directories .. (parent) and . (current). If you are in youhome directory, You will see the files you saw using ls and several hidden fileswith mysterious names like bash profile. Do not delete these; they providethe configuration for your account and do things like record preferences forapplications you have used or installed. You can also list all files includinghidden files by entering
$ ls --all
You can use more than one option at once. For example, entering
$ ls -al
or
$ ls -a -l
$ ls --all -l
14

shows all of your files and hidden files in long format. Try this now on yourmachine.
Note to Mac Users Mac users should precede verbose commands with asingle -. So on a Mac, you type
$ ls -all -l
and not
$ ls --all -l
Otherwise, your Mac will respond with a cryptic error message.
Next we will show how to display a file to the screen. UNIX commands thatprocess files are called filters. Let us peek inside your .bash profile file. Enterthe command
$ cat .bash_profile
The command name is cat, short for catalog (the file to the screen). The cat
command is a filter that does not filtering at all; it simply dumps the entirefile to the screen all at once. We are using no options, but the file name is anargument to cat. If a file is long and you want to see it one screenful at a time,use the filter more. The command more takes a file name as an argument andshows it on the screen a screenful at a time. You can hit the space bar to seethe next screenful or use the down-arrow or enter key to scroll down one lineat a time. To exit more at any time, type a q and more quits. You can useseveral arguments in cat or more and the indicated files will be displayed inseriatum.
8 Renaming and Deleting Files
Three commands every beginner should know are: cp,rm and mv. These are,respectively, copy, remove and move(rename). Here are their usages
cp oldFile newFile
rm garbageFile(s)
mv oldFile newFile
Warning! Pay heed before you proceed! To clobber a file means to unlinkit from your file system. When you clobber a file it is lost and there is virtually
15

no chance you will recover its contents. There is no undelete facility as youmight find on other computing systems you have used.
If you remove a file it is clobbered, and there is no way to get it back withoutan infinitude of horrid hassle. If you copy or rename onto an existing file, thatfile is clobbered, and it is gone forever. Always check to see if the file nameyou are copying or moving to is unoccupied! When in doubt, do an ls to lookbefore you leap. All three of these commands have an option -i, which warnsyou before clobbering a file. Using this is a smart precaution.
The first command copies oldFile to newFile. If newFile does not exist, itcreates newFile; otherwise it will overwrite any existing newFile.
Try this at your UNIX prompt: cp .bash profile quack
Notice that the command cp has two arguments: the source file and therecipient file. If you executed the last command successfully, you made a copyof your .bash profile file to a file called quack.
Next, let’s get rid of all the animals in the zoo we had created before. Thecommand rm will accept one or more arguments and remove the named files.We can accomplish this in one blow with
$ rm aardvark buffalo cougar dingo elephant
Now enter
$ ls -l
You will see that quack’s size is nonzero because it has a copy of the contentsof your .bash profile file in it. The file shown here has size 191. The size isthe number of bytes contained in the file; yours may be larger or smaller. Youwill also see that the menagerie has been sent packing.
-rw-rw-r-- 1 morrison morrison 0 Jun 9 10:50 bar
-rw-rw-r-- 1 morrison morrison 0 Jun 9 10:49 foo
-rw-r--r-- 1 morrison morrison 191 Jun 9 11:25 quack
-rw-rw-r-- 1 morrison morrison 0 Jun 9 10:49 stuff
Let us now remove the file stuff. We are going to use the -i option. Enterthis at the UNIX prompt.
$ rm -i stuff
The system will then ask you if you are sure you want to remove the file. Tellit yes by typing the letter y. Be reminded that the -i option is also availablewith cp and mv. You should you use it to avoid costly mistakes.
16

Finally, we shall use mv This “moves” a file to have a new name. Let’s changethe name of quack to honk and back again. To change quack to honk, proceedas follows.
$ mv quack honk
Once you do this, list the files in long format. Then change it back.
Now you know how to copy, move, and create files. You can show them tothe screen and you can list all the files you have. So far, we can create files twoways, we can create an empty file with touch or copy an existing file to a newfile with cp.
8.1 Everything is a Computer Program
Now let us take a little look under the hood. When you log in, a programcalled a shell is launched. You can think of the shell as a telephone; enteringa command at the prompt is how you speak into the phone. The shell acceptscommands you enter at the prompt and sends them to the kernel, or operatingsystem, which runs the program. This can cause output to be put to the screen,as in ls, or happen without comment, as in rm.
Programs that are running in UNIX are called processes. Every processhas an owner and an integer associated with it called a process ID (PID). Theuser who spawns a process will generally be its owner. You are the owner of allprocesses you spawn. Many, such as ls, last such a short time you never noticethem beyond the output they produce; they terminate in a fraction of a secondafter you enter them. When you log into your host, you actually are launchinga program; this is your shell. When the shell terminates, your terminal sessionwill be gone. At the command line, enter ps and you will see something likethis.
$ ps
PID TTY
10355 pts/1
10356 pts/1
$
TIME CMD
00:00:00 bash
00:00:00 ps
The ps command shows all processes currently running spawned by yourshell. On this machine, the shell’s (bash) process ID is 10355. By enteringps aux at the command line, you can see all processes running on your UNIXserver, along with their process IDs and an abundance of other information. Try
17

this at several different times. If you are using a server, you will see processesspawned by other users. You will also see other processes being run by thesystem to support your machine’s operation.
An example of a program that does not finish its work immediately is theprogram bc. We show a sample bc session here; this application is a simplearbitrary-precision calculator.
$ bc
bc 1.06.94
Copyright 1991-1994, 1997, 1998, 2000, 2004, 2006
Free Software Foundation, Inc.
This is free software with ABSOLUTELY NO WARRANTY.
For details type ‘warranty’.
3+4
7
4*5
20
2^20
1048576
2^100
1267650600228229401496703205376
quit
When you type bc at the command prompt, the shell runs the bc program.This program continues to run until you stop it by typing quit. To see bc’sprocess ID, start bc and then type Control-Z. This interrupts the bc process,puts it in the background, and returns you to your shell. Then enter ps at thecommand prompt to see the process ID for your bc session.
$ bc
bc 1.06.94
Copyright 1991-1994, 1997, 1998, 2000, 2004, 2006
Free Software Foundation, Inc.
This is free software with ABSOLUTELY NO WARRANTY.
For details type ‘warranty’.
[1]+
$ ps
PID
14110
14253
14254
$
Stopped
TTY
pts/4
18

pts/4
pts/4
bc
TIME
00:00:00
00:00:00
00:00:00
CMD
bash
bc
ps
Try typing exit to log out; you will see something like this.
$ exit
exit
There are stopped jobs.
$
Now type jobs at the command prompt. You will see this.
$ jobs
[1]+ Stopped
$
bc
You can end the job bc labeled [1] by doing the following
$ kill %1
$ jobs
[1]+ Terminated
$ jobs
$
bc
If several jobs are stopped, each will be listed with a number. You can end anyyou wish to by entering a kill command for each job. When you type jobs
at the command line the first time, it will tell you what jobs it has suspended.After that, you will see a (possibly empty, like here) list of jobs still in thebackground. Do not dismiss a shell with running jobs; end them to preservesystem resources.
You can bring your stopped job into the foreground by entering fg at thecommand prompt.
19

Exercises
1. Start up a session of bc and put it into the background using control-Z.Do this for several sessions. Type in some calculations into some of thesessions and see if they reappear when you bring the bc session containingthat calculation into the foreground.
2. The bc calculator has variables which allow you to store numbers undera name. These play the role of the symbols described in Chapter 0, butthey are limited to storing numbers. Here we show some variables beingcreated and some expressions being evaluated.
morrison@ghent:~$ bc
bc 1.06.94
Copyright 1991-1994, 1997, 1998, 2000, 2004, 2006
Free Software Foundation, Inc.
This is free software with ABSOLUTELY NO WARRANTY.
For details type ‘warranty’.
cow = 5
pig = 2
horse = 7
horse + cow
12
horse/pig
3
pig/horse
0
cow^horse
78125
Replicate this session. Put it into the background and bring it into theforeground. Were your variables saved? Notice that this calculator doesinteger arithmetic. The = sign you see is actually assignment, which wasdiscussed in Chapter 0.
3. Look at one of the algorithms for converting a binary number into a dec-imal number described in Chapter 0. Can you step through the processusing bc and make it work?
9 Editing Files with vi
We can create files with touch and use �cp to copy them. How do we edit textfiles and place information in them? This is the role of the UNIX text editor, vi.The O’Reilly book [2] on it comes highly recommended if you want to become apower user (you do). A second text editor, emacs is also available. It is powerfuland extensible. Like vi it is a serious tool requiring serious learning, and like
20

vi there is an O’Reilly book on it, too. You may use emacs instead of vi if youwish. Both of these are just tools for creating and editing text files, and bothdo a great job. You may create or modify any text file with either program.Ubuntu users can also use gedit or gvim, which have some nice advantages.
9.1 A Note for Ubuntu Users
Ubuntu by default installs the package vi-tiny. We want vi with all bells andwhistles. To get this, make sure you are connected to the Internet, then typethe following command in an terminal window.
$ sudo apt-get install vim
You will be asked to enter your password, then it will install the full vi package.The sudo command tells Ubuntu you are behaving as a system administrator,so you must enter your password to proceed. It will ask you to confirm you wishto install, and then it will download the package from the repositories, install,and configure it for you. Ubuntu has lots of programs and packages that arefreely available, and you use sudo apt-get install to obtain them.
9.2 Launching vi
To create a new file or open an existing file, type
$ vi someFileName
at the UNIX command line. If the file someFileName exists, it will be opened;otherwise, it will be created. Now let us open the file bar we created with touch.You will see this:
~
~
~
~
~
~
~
~
~
~
~
~
~
21

~
~
~
~
~
~
~
~
~
~
~
~
~
~
~
~
"bar" 0L 0C
DO NOT TYPE YET! Read ahead so you avoid having a passel of confusingannoying things plaguing you. The tildes on the side indicate empty lines; theyare just placeholders that are not a part of the actual file. It is fairly standard forthe tildes to be blue. The OL OC ”bar” indicates that file bar has no lines andno characters. If the file bar were not empty, its contents would be displayed,then blue tildes would fill any empty screen lines.
9.3 vi Modes
Before you hit any keys there is something important to know. The vi editoris a moded editor. It has four modes: command mode, visual mode, insertmode, and replace mode. Command mode provides mobility, search/replace,and copy/paste capabilities. Insert mode allows you to insert characters usingthe keyboard. Visual mode provides the ability to select text using the keyboard,and then change or copy it. Replace mode overwrites existing text with newtext. When you first open a file with vi, you will be in command mode.
We will begin by learning how to get into insert mode. You always begin avi session in command mode. There are lots of ways to get into insert mode.Here are a six basic ones that are most often used.
22

keystroke Actioni insert characters before the cursorI insert characters at the beginning of the linea append characters after the cursorA append characters at the end of the lineo open a new line below the cursorO open a new line above the cursor
Here is an easy way to remember. What happens if you accidentally step onyour cat’s tail? He says IAO!!!
There is one way to get out of insert mode. You do this by hitting theescape (ESC) key. Let’s now try this out. Go into your file bar and hit the i
key to enter text. Type some text. Then hit ESC. To save your current efforttype this anywhere:
:w
This will write the file; a message will appear at the bottom of the windowindicating this has happened. Do not panic; that message is not a part of thefile that is saved. To quit, type
:q
this will quit you out of the file. You can type
:wq
to write and quit. The command :qw does not work for obvious reasons. Youhave just done a simple vi session. You can reopen the file bar by typing
23

$ vi bar
at the UNIX command line; the contents you last saved will be re-displayed.You should take a few minutes to try all of the ways of getting into insert mode.Change the file and save it. Quit and display it to the screen with cat andmore. At first, vi will seem clunky and awkward. However, as you ascend thelearning curve, you will see that vi is blazingly fast and very efficient. One ofits great strengths is the ability to search for and replace text. As your skillgrows with it, you will see it is an amazing productivity tool.
A Reassuring Note If you are in command mode and hit ESC, your com-puter will just beep at you. This is its way of letting you know you were alreadyin command mode. Nothing additional happens. If you are unsure what modeyou are in, hit ESC and you will be back in command mode, no matter what.You can hit ESC and relax.
The figure below will help you to remember the structure of vi. When youfirst start editing a file, you enter in in command mode. Typing i, a, o, I, A orO all put you into insert mode. You can also see in the diagram how to get outof insert mode by typing ESC.
|-------------------------------------------------------------
| command mode |
| ---------------i, a, o, I, A, O to get in----------- |
| | insert mode: | |
| | insert characters | |
| | paste in text with GUI | |
| -----------------------------------ESC to get out--- |
| search, replace |
| copy with yy, paste with p |
| delete lines with dd |
| all "colon commands" (commands that start with :) |
|----------------------------------- --------------------------
Let’s go back in our file now and learn some more useful commands. Wewill look at command mode commands now.
Sometimes, line numbers will be helpful; these are especially useful whenyou program. To see them, you get into command mode and type the coloncommand :set number. Do this and watch them appear. Now type :set
nonu or :set nonumber and watch them disappear. Line numbers are not apart of the file; however, they are a helpful convenience.
Here are some useful command mode mobility features. Experiment withthem in a file.
24

Command Action: lineNumber Go to indicated line number.ˆ Go to the beginning of the current line.$ Go to the end of the current line.G Go to the end of the file.gg Go to the beginning of the file; note that :1 also works.
These colon commands in this table will allow you to alter your editingenvironment. The last two are useful editing tricks that are sometimes quiteconvenient. Open a file and try them all.
Command Action:set number display line numbers:set nonu get rid of line numbers:set autoindent This causes vi to autoindent.:set noautoindent This causes vi to turn off autoindent.r (then a character) replace character under cursor~ change case upper → ;lower or lower → upper
9.4 Cut and Paste
The vi editor has a a space of memory called the unstable buffer, which wenickname Mabel. Mabel provides a temporary cache for holding things whilewe are editing and she is very helpful for doing quick copy-paste jobs.
This buffer is unstable because it loses its contents every time new text isplaced in it. Do not use it to store things for a long time; instead write thosethings to files and retrieve them later. You will learn several ways to do this.
We show here a table with some cut, copy, and paste commands you willfind helpful.
dd Yank line to Mabeldd Delete line starting at the cursor; this
cuts to Mabeldw Delete word; this cuts to Mabelcw Delete word, then enter insert
mode(change word) The changedword is cut to Mabel.
p Paste Mabel’s contents at the cursor.D Cut line at cursor; this cuts the stricken
text to MabelC Cut line at cursor and enter insert
mode; this cuts the stricken text to Ma-bel
25

All of these commands can be preceded by a number, and they will happenthat number of times. For example typing 10yy in command mode will yankten lines, starting at the cursor, to Mabel. Since so many of these commandsplace new text in Mabel, you should know that if you copy or cut to Mabeland intend to use the text, paste it right away. You should open a file andexperiment with these. Spend some time fooling around with this mechanism;you will make some delightful discoveries, as well as dolorous ones.
9.5 Cutting and Pasting with External Files
You can select a range of line numbers before each of these commands, or selectin visual mode and use these commands.
:w fileName Write to the file fileName
:w! fileName Write selection to existing file fileName, and clobber it.:w >> fileName Append selection to file fileName.:r fileName Read in file fileName starting at the cursor
For example
:20,25 w foo.txt
will write lines 20-25 to the file foo.txt. If you want to write the entire file,omit the line numbers and that will happen. If you want to write from line 20to the end of the file, the usage is as follows.
:20,$ w foo.txt
Note the use of $ to mean “end of file.” When you learn about visual mode(just ahead), you can use these command to act on things you select in visualmode as well.
Housekeeping Tip If you use this facility, adopt a naming convention forthese files you create on a short-term basis. When you are done editing, get ridof them or they become a choking kudzu and a source of confusion in your filesystem. Use names such as buf, buf1, etc as a signal to yourself that these filesquickly outlive their usefulness and can be chucked.
9.6 Searching and Substutiing
Finally we shall look at search capabilities. These all belong to command mode.Enter
26

/someString
in command mode and vi will seek out the first instance of that string in thefile or tell you it is not found. Type an n to find the next instance. You canenter
?someString
to search for someString backwards from the cursor. Type n to find the previousinstance. Your machine may be configured to highlight every instance of thestring you searched for. If you find this feature annoying, you can deactivate itwith
:set nohlsearch
Now let us look at search and replace. This is done by a command of theform. This, by default, works on the line the cursor is sitting on.
:s/old/new/(g|c|i)
The general ideas is that every instance of old is replaced by new. At the endyou can append any of g, c, or i. These letters at the end are called flags. Hereis a decoder ring.
c Check after each substitution to see if you want ot replace.g Replaces all instances on each line. By default, only the first one is replaced.i Replace old case-insensitive.
By default, substitutions are confined to a single line, but ou can control thescope of a substitution in three ways. Here are two.
Bound Scopea,b s/old/new/(g|c|i) Perform the substitution on lines a through b, inclusive.a, $ Perform the substitution on line a until the bottom of the file.
You will also learn how to do it in visual mode below. That method is extremelynice and quite simple to learn.
10 Visual Mode
The third mode of the vi editor, visual mode is actually three modes in one:line mode, character mode, and block mode. To enter line mode from command
27

mode, hit V; to enter character mode hit v, and to enter block mode, hit Control-v. You can exit any of these by hitting the ESC key; this places you back incommand mode. Visual mode has one purpose: it allows you to select textusing keyboard commands; you may then perform various operations on theseselections. First, let us see the selection mechanism at work.
Go into a file and position your cursor in the middle of a line. Hit v to entervisual character mode. Now use the arrow keys; notice how the selected textchanges in response to arrow key movement. Try entering gg and G and seewhat happens. Hit ESC to finish. Now enter visual mode and use the / searchfacility to search up something on the page. What happens? Search backwardand try that too.
Now enter visual line mode by hitting V; now try the keystrokes we justindicated and see how the selection behaves. This mode only selects wholelines.
Finally if you enter Control-V and you enter visual block mode, you canselect a rectangular block of text from the screen by using the keyboard.
Now let’s see what you can do with these selections. First let us look atcharacter and line mode, as block mode behaves a little differently. You candelete the selected text by hitting d. You can yank it into Mabel by hitting y.Upon typing either command, you will be put back into command mode. Onceany text is yanked into Mabel, you can paste it with p as you would any othertext yanked there. If you hit c, the selection will be deleted and you will be ininsert mode so you can change the text.
In block mode, things are a little different. If you hit d, the selected blockwill be deleted, and the lines containing it shortened. The stricken text is cut toMabel. If you hit y, the block will be yanked just as in any other visual mode,and its line structure will be preserved. If you hit c, and enter text, the samechange will be made on all line selected provided you do not hit the ENTERkey. If you do, the change will only be carried out on the first line. You caninsert text rather than change by hitting I, entering your text, and then hittingESC. If the text you enter has no newline in it, the same text will be added toeach line; if it has a newline, only the first line is changed.
If you hit r then any character in any visual mode, all selected charactersare changed to that character.
Here is a very common use for character or line visual mode. Suppose youare editing a document and the lines end in very jagged fashion. This sort ofthing will commonly happen when maintaining a web or if you are editing aLATEXdocument such as this one, where the page that is subjected to repeatededits. Use visual mode to select the affected paragraphs and hit gq (thinkGentleman’s Quarterly) and your paragraphs will be tidied up.
You can also do search-and-replace using visual mode to select the text tobe acted upon. Simply select the text in visual mode. Then hit
28

: s/outText/inText/g
to perform the substitution in the selected text. For example if you select textin visual mode and change every w to a v, you will see this.
:’<,’>s/w/v/g
The <,’> is a quirky way of indicating you are doing a visual-mode search-replace operation.
10.1 Replace Mode
In vi if you hit r then a character, the character under the cursor is replacedwith the character you it. If you hit R, you are in replace mode, and any testyou type “overruns” existing text. Experiment with this in a file you don’t careabout.
Replace mode is fabulous for making ASCII art such as this.
< Galactophagy >
--------------
\ ^__^
\ (oo)\_______
(__)\ )\/\
||----w |
|| ||
You should play around with this.
11 Copy Paste from a GUI
You can copy and paste with the mouse in a window or between windows. Theway you do it varies by OS so we will quickly discuss each. If you are pastinginto a file you are editing with vi, it is a smart idea to use the colon command:set paste. This will prevent the “mad spraying” of text. For certain typesof files, this turns off automatic indentation or formatting. You can use :set
nopaste to turn off the paste mode.
Windoze If you are copying from a Windoze application into a terminalwindow, select the text you want to copy and use control-C in the usual way.This places the text in your Windoze system clipboard. Now go into yourterminal window and get into insert mode where you want to paste. It is also
29

wise, in command mode, to enter :set paste. Right-click to paste the contentsof your system clipboard into the terminal window. Many of you will say, “Whydid the beginning of the text I copied get cut off or why didn’t it appear atall?” This will occur if you are not in insert mode when you paste. It isimportant to be in insert mode before pasting to avoid unpleasant surprises. Ifthis happens, hit ESC then u in command mode. The u command undoes thelast vi command. Then you can take a fresh run at it.
If you are copying from a terminal window, select the text you wish to copy;PuTTY will place the text in your system clipboard. Then go into the windowin which you wish to paste it. If the window is another terminal, get into insertmode and right-click on the mouse. If it’s a Windoze app, use control-V as youusually do.
Mac Use apple-c to copy and apple-v to paste to or from a terminal window,just as you would with any other mac app. Mac gets this right.
Linux If you use a Linux box, use control-shift-C for copying in terminalwindows and control-shift-V for pasting to terminal windows.
A Reprise: A Warning About autoindent and paste Before pastingwith the mouse make sure you have autoindent turned off. Otherwise, your textwill “go mad and spray everywhere,” especially if you are copying a large blockof text with indents in it. You can turn autoindent on with :set autoindent
and off with extt:set noautoindent. This feature can be convenient when editingcertain types of files. You can use the command :set paste to turn off all smartindentation; when finished use :set nopaste to set things back to their originalstate.
A Warning abut Line Numbers If you copy-paste to a GUI, line numberswill get copied. To prevent this from happening, use the colon command :set
nonu before copying.
Experiment with these new techniques in some files. Deliberately makemistakes and see what happens. Then when you are editing files, you will knowwhat to expect and how to recover.
There are a lot of excellent tutorials on vi on the web; avail yourself of theseto learn more. Remember the most important thing: you never stop learningvi! Here are some useful vi resources on the web.
• The site [1] for is complete, organized and well-written. You can downloadthe whole shebang in a PDF. Read this in little bits and try a few newtricks at a time.
30

• The site [3], vi for Smarties will introduce you to vi with a bit of churlishsneery attitude. It’s pretty cool. And it’s sneery like the author of thisaugust volume.
• The link ftp://ftp.vim.org/pub/vim/doc/book/vimbook-OPL.pdf willdownload The Vim book for you. It is a very comprehensive guide, and ithas excellent coverage on the visual mode.
11.1 Permissions
Now we will see how you can use permissions to control the visibility of yourfiles on the system. You are the owner of your home directory and all directoriesand files it contains. This is your “subtree” of the system’s directories belongingto you. You may grant, revoke or configure permissions for all the files anddirectories you own as you wish. UNIX was designed with the fundamental ideathat your data are your property, and you can control what others see of them.
There are three layers of permission: you, your group, and others. You isletter u, your group is letter g and others is letter o. There are three types ofpermission for each of these: read, write and execute. Read means that level canread the file, write means that level can execute the file, and execute means thatlevel can execute the file. In the example above, the file bar has the permissionstring
-rw-rw-r--
which means the following.
• You can read or write to the file. You cannot execute.
• Your group can read or write but not execute.
• The world can read this file but neither write nor execute.
For the user to execute this file, use the chmod command as follows
$ chmod u+x bar
The u(ser’s, that’s you) permission changed to allow the user to execute the file.
If you do not want the world to see this file you could enter
$ chmod o-r bar
and revoke permission for the world to see the file bar. Since you are the ownerof the file, you have this right. In general you can do
31

$ chmod (u or g or o)(+ or -)(r or w or x) fileName
to manage permissions. You can omit the u, g or o and the permission will beadded or deleted for all three categories. In the next subsection, we discuss theoctal representation of the permissions string. This will allow you to change allthree levels of permissions at once quickly and easily.
12 The Octal Representation for Permissions
There is also a numerical representation for permissions. This representationis a three-digit octal (base 8) number. Each permission has a number value asfollows.
• The permission r has value 4.
• The permission w has value 2.
• The permission x has value 1.
• Lack of any permission has has value 0.
We show how to translate a string in this example.
-rw-r--r--
6 4 4
The only way to get a sum of 6 from 1,2 and 4 is 4 + 2. therefore 6 is read-write permission. The string translates into three digits 0-7; this file has 644permissions. It is a simple exercise to look at all the digits 0-7 and see whatpermissions they convey.
We show some more examples of chmod at work. Look at how the permis-sions change in response to the chmod commands. Suppose we are a directorycontaining one file named empty, which has permission string extt -rw-r–r–, or644. We begin by revoking the read permission from others.
$ chmod o-r empty
We now list the files in the directory
$ ls -l
total 0
-rwxr----- 1 morrison morrison 0 2008-08-26 10:52 empty
$ ls
empty
32

We can now restore the original permissions all at once by using the octalnumber representation for our permissions.
chmod 644 empty
$ ls -l
total 0
-rw-r--r-- 1 morrison morrison 0 2008-08-26 10:52 empty
Notice what happens when we try to use a 9 for a permission string.
$ chmod 955 empty
chmod: invalid mode: ‘955’
Try ‘chmod --help’ for more information.
Try typing the chmod --help command at your prompt and it will show yousome useful information about the chmod command. Almost all UNIX com-mands have this help feature.
Directories must have executable permissions, or they cannot be entered, andtheir contents are invisible. Here we use the -a option on ls. Notice that thecurrent working directory and the directory above it have execute permissionsat all levels. Try revoking execute permissions from one of your directories andattempt to enter it with cd; you will get a extt Permission Denied nastygramfrom the operating system.
$ ls -al
total 20
drwxr-xr-x 2 morrison faculty 4096 2008-10-17 11:51 .
drwx--x--x 9 morrison faculty 4096 2008-10-16 08:39 ..
-rw-r--r-- 1 morrison faculty 0 2008-10-17 11:51 empty
$
Here we shall do this so you can bear witness
$ mkdir fake
$ chmod u-x fake
$ cd fake
bash: cd: fake: Permission denied
$
Assigning 600 permissions to a file is a way to prevent anyone but yourselffrom seeing or modifying that file. It is a quick and useful way of hiding thingsfrom public view. Later, when you create a web page, you can use this commandto hide files in your website that you do not want to be visible.
33

13 The Man
The command man is your friend. Type man then your favorite UNIX commandto have its inner secrets exposed! For example, at the UNIX prompt, enter
$ man cat
This brings up the man(ual) page for the command cat. A complete list ofoptions is furnished. Notice that some of these have the --, or long form.
CAT(1) User Commands CAT(1)
NAME
cat - concatenate files and print on the standard output
SYNOPSIS
cat [OPTION] [FILE]...
DESCRIPTION
Concatenate FILE(s), or standard input, to standard output.
-A, --show-all
equivalent to -vET
-b, --number-nonblank
number nonblank output lines
-e equivalent to -vE
-E, --show-ends
display $ at end of each line
-n, --number
number all output lines
-s, --squeeze-blank
never more than one single blank line
-t equivalent to -vT
-T, --show-tabs
display TAB characters as ^I
-u (ignored)
34

-v, --show-nonprinting
use ^ and M- notation, except for LFD and TAB
--help display this help and exit
--version
output version information and exit
With no FILE, or when FILE is -, read standard input.
EXAMPLES
cat f g
Output f’s contents, then standard input,
then g’s contents.
cat Copy standard input to standard output.
AUTHOR
Written by Torbjorn Granlund and Richard M. Stallman.
REPORTING BUGS
Report bugs to <[email protected]>.
COPYRIGHT
Copyright A c© 2006
Free Software Foundation, Inc.
This is free software. You may redistribute
copies of it under the terms of the GNU General
Public License <http://www.gnu.org/licenses/gpl.html>.
There is NO WARRANTY, to the extent permitted by law.
SEE ALSO
The full documentation for cat is maintained
as a Texinfo manual. If the info and cat
programs are properly installed at your site,
the command info cat should give you access
to the complete manual.
cat 5.97 August 2006 CAT(1)
You can see here that even humble cat has some options to enhance itsusefulness. Here is cat at work on a file named trap.py.
$ cat trap.py
def trap(a, b, n, f):
a = float(a)
b = float(b)
35

h = (b - a)/n
list = map(lambda x: a + h*x, range(0,n+1))
tot = .5*(f(a) + f(b))
tot += sum(map(f, list[1:n]))
tot *= h
return tot
def f(x):
return x*x
print trap(0,1,10,f)
print trap(1,2,100,f)
Using the -n option causes the output to have line numbers.
cat -n trap.py
1 def trap(a, b, n, f):
2 a = float(a)
3 b = float(b)
4 h = (b - a)/n
5 list = map(lambda x: a + h*x, range(0,n+1))
6 tot = .5*(f(a) + f(b))
7 tot += sum(map(f, list[1:n]))
8 tot *= h
9 return tot
10 def f(x):
11 return x*x
12 print trap(0,1,10,f)
13 print trap(1,2,100,f)
$
View the manual pages on commands such as rm, ls chmod and cp to learnmore about each command. Experiment with the options you see there on somejunky files you create and do not care about losing.
Exercises
1. Use the man command to learn about the UNIX commands more and less.You will see here, that in fact, less is more!
2. Use the man command to learn about the UNIX commands head and tail.Can you create a recipe to get the first and last lines of a file?
3. What does the ls -R command do?
36

14 Redirection of Standard Output and Stan-dard Input
UNIX treats everything in your system as a file; this includes all devices suchas printers, mice and the keyboard. Things put to the screen are generally putto one of two files, stdout, or standard output and stderr, or standard error.It is easy to redirect standard output to a another file.
The keyboard, by default, is represented by the file stdin, or standardinput. It is also possible to redirect standard input and take standard inputfrom another file.
Sometimes a UNIX command or a program puts a large quantity of text tothe screen; redirection allows you to capture the results into a file. You canopen this file with vi, search it, or edit it. The examples here are based on thefiles animalNoises.txt
miao
bleat
moo
and physics.txt
snape
benettron
stephan
Create each of these files in a directory so you can follow the examples here.First we show how cat puts files to stdout.
$ cat animalNoises.txt physics.txt
miao
bleat
moo
snape
benettron
stephan
Now let us capture this critical information into the file stuff.txt by redi-recting stdout. We then use cat to display the resulting file to stdout.
$ cat animalNoises.txt physics.txt > stuff.txt
$ cat stuff.txt
miao
bleat
37

moo
snape
benettron
stephan
The cat command has a second guise. It accepts a file name as an argument,but it will also accept standard input; this is no surprise since stdin is treatedas a file. At the UNIX command line enter
$ cat
The cat program is now running and it awaits word from stdin. Enter sometext and then hit the enter key; cat echoes back the text you type in. To finish,hit control-d (end-of-file).
$ cat
me too
me too
ditto
ditto
$
The control-d puts no response to the screen. You can also put a file to thescreen with
$ cat < someFile
Here, the file someFile becomes stdin for the cat command. This phenomenonis shown in the man page for cat. Under the description of the command itsays, “ Concatenate FILE(s), or standard input, to standard output.”
Let us now come back to stdout. Next create a new file named sheck.txt
with these contents.
roach
stag beetle
tachnid wasp
Were we to invoke the command
$ cat animalNoises.txt physics.txt > sheck.txt
we would clobber the file sheck.txt and lose its valuable contents. This maybe our intent; if so very well. If we want to add new information to the end ofthe file we use the >> append operator to append it to the end of the receivingfile. If we do this
38
$ cat animalNoises.txt physics.txt >> sheck.txt
we get the following result if we use the original file sheck.txt.
$ cat sheck.txt
roach
stag beetle
tachnid wasp
miao
bleat
moo
snape
benettron
stephan
The >> redirection operator will automatically create a file for you if the file towhich you are redirecting does not already exist.
15 Using Pipes
It is very common to want to use stdout from one command to be stdin foranother command. This will grant us the ability to chain the actions of theexisting filters we have cat, more and less with some new filters to do a widevariety of tasks To achieve this tie, we use a device called a pipe. Pipes allowyou to chain the action of various UNIX commands. We shall add to our paletteof UNIX commands to give ourselves a larger and more interesting collection ofexamples. These commands are extremely useful for manipulating files of data.
15.1 The sort filter
Bring up the man page for the command sort. This command accepts a file (orstdin) and it sorts the lines in the file.
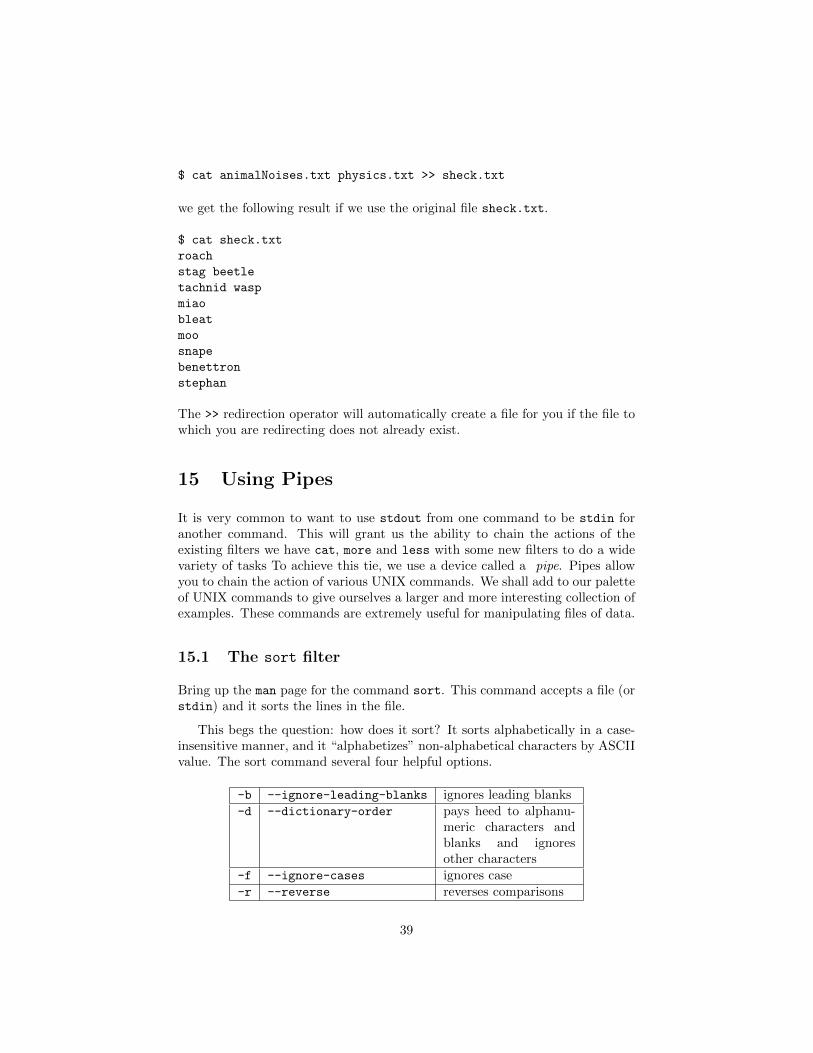
This begs the question: how does it sort? It sorts alphabetically in a case-insensitive manner, and it “alphabetizes” non-alphabetical characters by ASCIIvalue. The sort command several four helpful options.
-b --ignore-leading-blanks ignores leading blanks-d --dictionary-order pays heed to alphanu-
meric characters andblanks and ignoresother characters
-f --ignore-cases ignores case-r --reverse reverses comparisons
39

Here we put the command to work with stdin; use a control-d on its ownline to get the prettiest format. Here we put the items moose, jaguar, catand katydid each on its own line into stdin. Without comment, a sorted listis produced.
$ sort -f
moose
jaguar
cat
katydid (now hit control-d)
cat
jaguar
katydid
moose
$
You should try various lists with different options on the sort command to seehow it works for yourself. You can also run sort on a file and send a sortedcopy of the file to stdout. Of course, you can redirect this result into a fileusing > or >>.
15.2 The Filters head, tail, and uniq
The commands head and tail put the top or bottom of a file to stdout; thedefault amount is 10 lines. To show the first 5 lines of the file foo.txt, enter thefollowing at the UNIX command line.
$ head -5 foo.txt
You can do exactly the same thing with tail with an entirely predictableresult. The command uniq weeds out consecutive duplicate lines in a file, leavingonly the first copy in place. These three commands have many useful options;explore them in the man pages.
15.3 The grep Command
This command is incredibly powerful; here we will just scratch the surface ofits protean powers. You can search and filter files using grep; it can be used tosearch for needles in haystacks. In its most basic form grep will inspect a fileline-by-line and put all lines to stdout containing a specified string. Here is asample session.
$ grep gry /usr/share/dict/words
40

angry
hungry
$
The file /usr/share/dict/words is a dictionary file containing a list of words,one word to a line in (mostly) lower-case characters. Here we are searchingthe dictionary for all lines containing the character sequence gry; the result isthe two words angry and hungry. There is an option -i to ignore the case ofalphabetical characters.
15.4 And Now to Pipes
Pipes allow you to feed stdout from one command into stdin to another with-out creating any temporary files yourself. Pipes can be used along with redirec-tion of stdin and stdout to accomplish a huge array of text-processing chores.
Now let us do a practical example. Suppose we want to print the first 5 linesalphabetically in a file named sampleFile.txt. We know that sort will sort thefile asciicographically; we will use the -f option to ignore case. The commandhead -5 will print the first five lines of a file passed it or the first five lines ofstdin. So, what we want to do is sort the file ignoring case, and pass the resultto head -5 to print out the top five lines. You join two processes with a pipe; itis represented by the symbol | , which is found by hitting the shift key and thekey just above the enter key on a standard keyboard. Our command would be
$ sort -i sampleFile.txt | head -5
The pipe performs two tasks. It redirects the output of sort -f into a tempo-rary buffer and then it feeds the contents of the buffer as standard input to head
-5. The result: the first five lines in the alphabet in the file sampleFile.txt
are put to stdout.
Suppose you wanted to save the results in a file named results.txt. To dothis, redirect stdout as follows
$ (sort -i sampleFile.txt | head -5) > results.txt
Note the use of defensive parentheses to make our intent explicit. We want thefive lines prepared, then stored in the file results.txt.
Programming Exercises Here are some other commands: wc, echo. Youwill use the man pages to determine their action and to use them to solve theproblems below.
1. Tell how to put the text “Cowabunga, Turtle soup!” to stdout.
41

2. Tell how to get the text “This is written in magic ink” into a text filewithout using a text editor of any kind.
3. The ls command has an option -R, for “list files recursively.” This listsall of the sub-directories and all of their contents within the directorybeing listed. Use this command along with grep to find a file containinga specified string in a file path.
4. Put a list of names in a file in lastName, firstName format. Put them inany old order and put in duplicates. Use pipes to eliminate duplicates inthis file and sort the names in alphabetical order.
5. Find the word in the system dictionary occupying line 10000.
6. How do you count all of the words in the system dictionary containing theletter x?
7. Find all words in the system dictionary occupying lines 50000-50500.
8. Tell how, in one line, to take the result of the previous exercise, place itin reverse alphabetical order and store in in a file named myWords.txt.
References
[1] University of Hawai’i at Manoa College of Engineering. Mastering the vi
Editor. http://www.eng.hawaii.edu/Tutor/vi.html.
[2] Arnold Robbins. Learning the vi and vim Editors. O’Reilly Associates,2008.
[3] Jerry Wang. Vi for smarties. http://www.jerrywang.net/vi.
42