CHAMPS Navigation Add Title...Open your web browser (e.g. Internet Explorer, Google Chrome, Mozilla...
153
CHAMPS Navigation
Transcript of CHAMPS Navigation Add Title...Open your web browser (e.g. Internet Explorer, Google Chrome, Mozilla...

Add TitleCHAMPS Navigation

Contents My Inbox functions (slides 8-29 )
Provider tab functions (slides 30-34 )
Claims tab functions Submit Professional (slides 35-47) Submit Institutional (slides 48-58) Submit Dental (slides 59-70) Search Template (slides 71-74) Claim Adjust (slides 75-80) Claim Void (slides 81-86) Claim inquire (slides 87-93)
Member tab functions (slides 94-101)
Prior Authorization tab functions (slides 102-109)
Additional features within CHAMPS (slides 110-140)
Domain Administrator functions (slides 141-153)
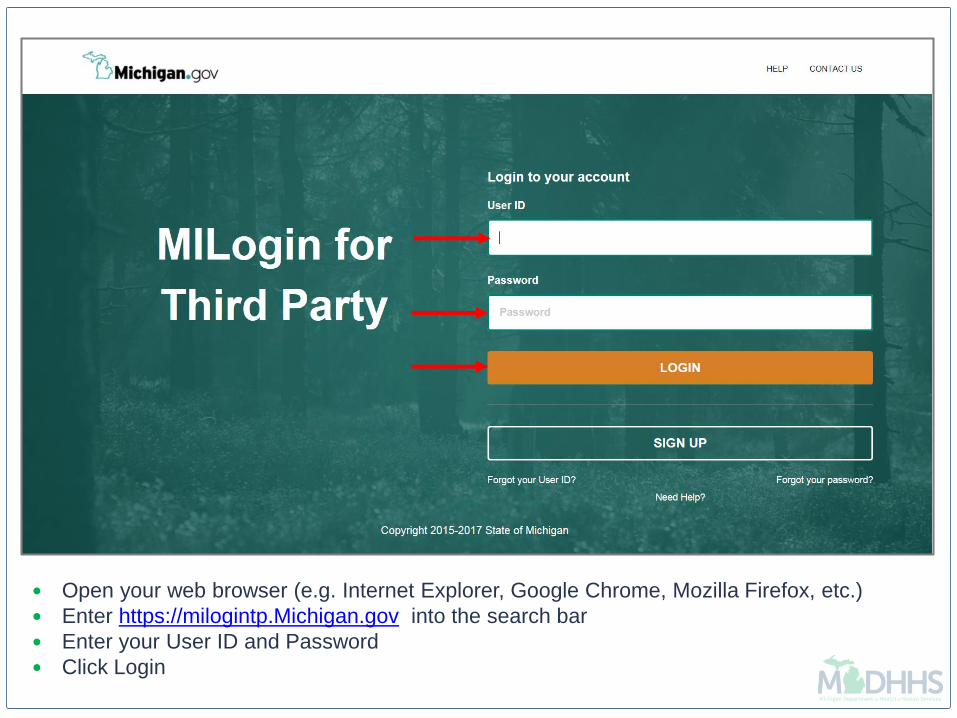
Open your web browser (e.g. Internet Explorer, Google Chrome, Mozilla Firefox, etc.)
Enter https://milogintp.Michigan.gov into the search bar
Enter your User ID and Password
Click Login

You will be directed to your MILogin home page
Click the CHAMPS hyperlink
*MILogin resource links are listed at the bottom of the page

Click Acknowledge/Agree to accept the Terms & Conditions to get into CHAMPS
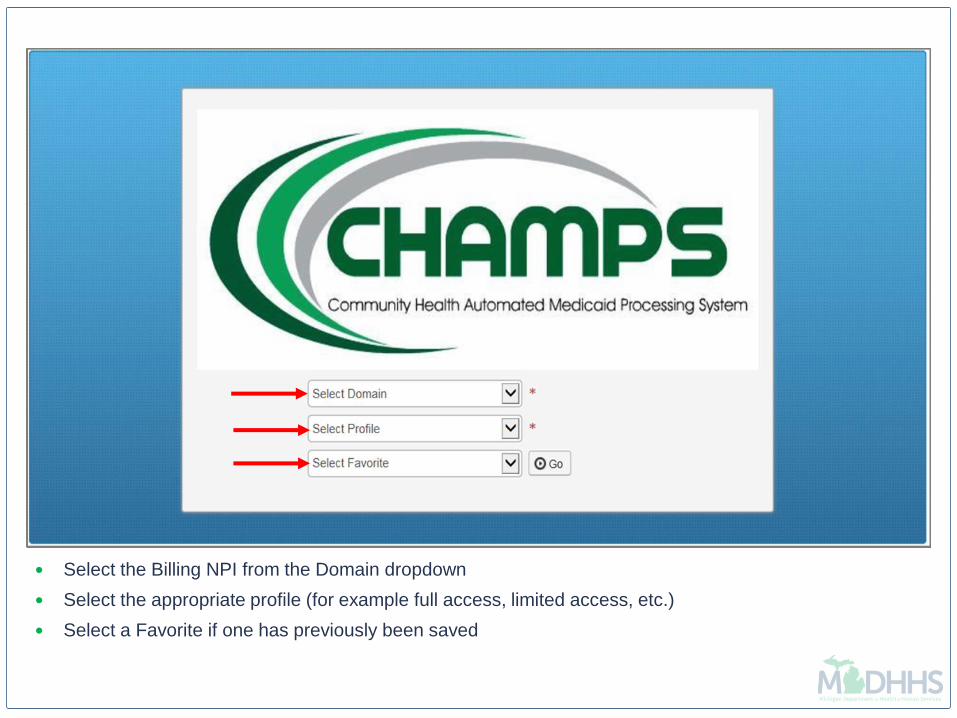
Select the Billing NPI from the Domain dropdown
Select the appropriate profile (for example full access, limited access, etc.)
Select a Favorite if one has previously been saved

Once logged in you will be directed to the Provider Portal page

My Inbox
Change Profile-How to change from being logged in
with one NPI to another NPI

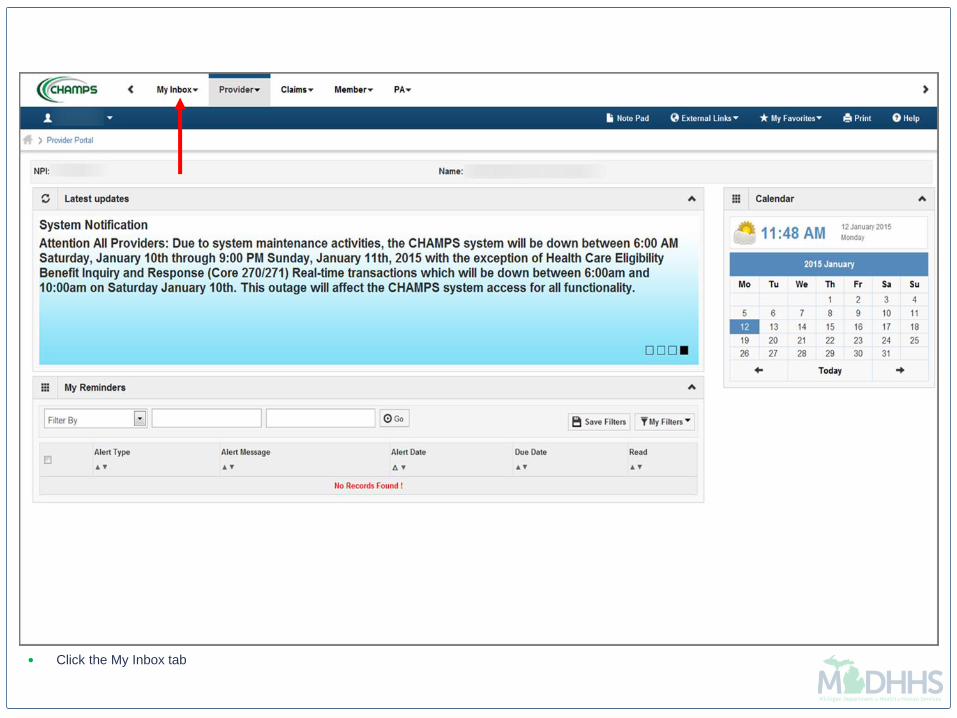
Click the My Inbox tab

Click the Change Profile option

Change to a different Billing NPI by selecting the appropriate NPI from the Domain dropdown

My Inbox
Archived Documents-Stored documents for provider
view

Click the My Inbox tab

Click the Archived Documents option

Select a document type from the dropdown box (this example choose Medicaid Payments Paper RA to access the paper remittance advice)
Click GO
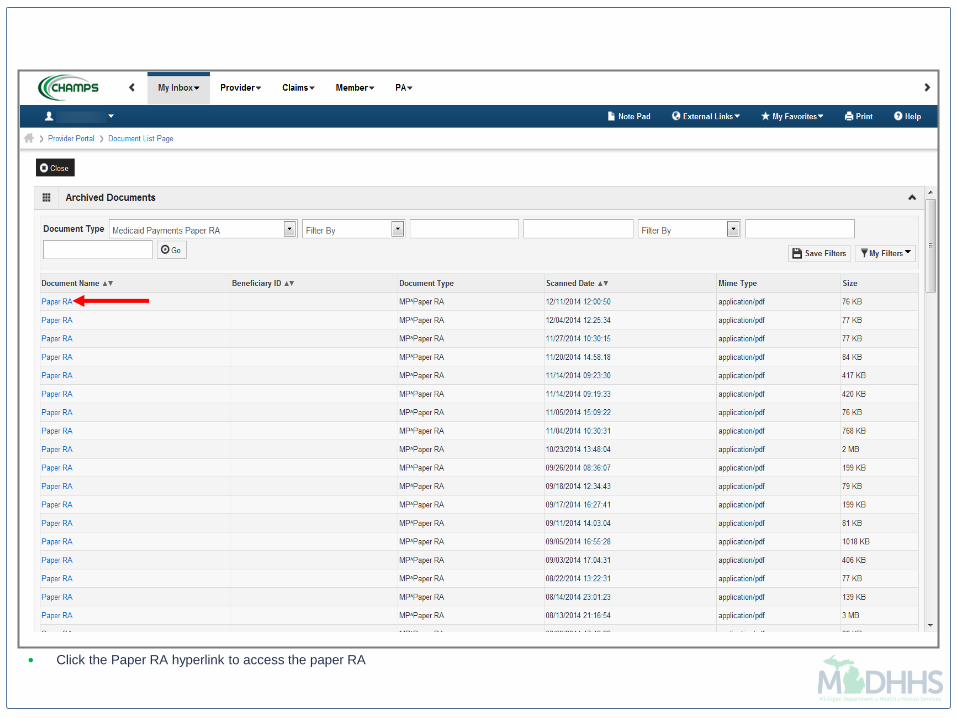
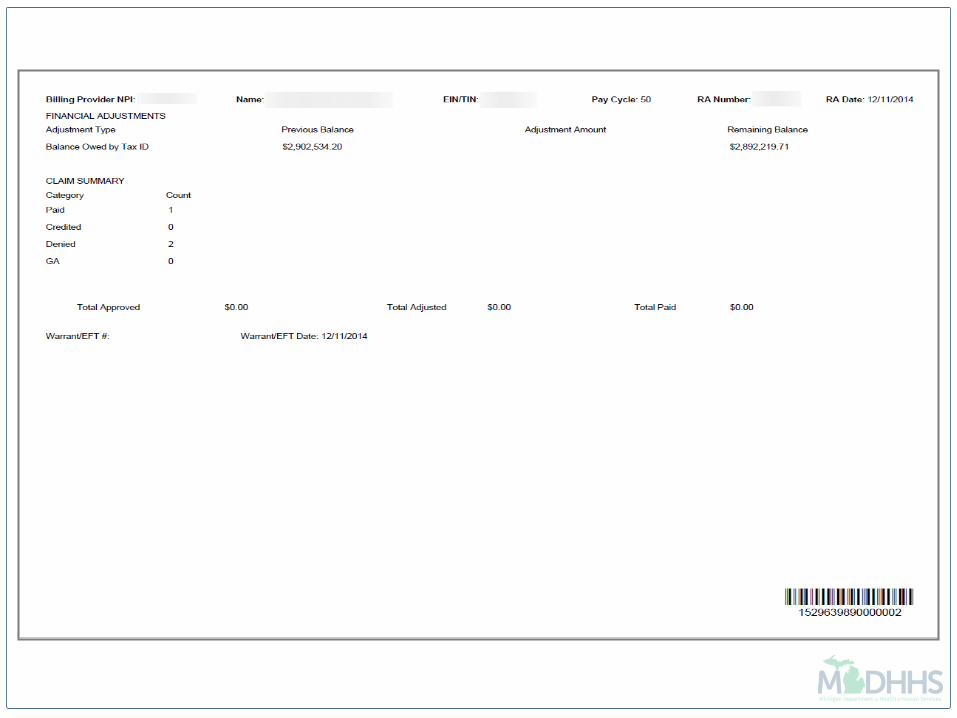
Click the Paper RA hyperlink to access the paper RA

The paper RA will then be displayed in PDF format

My Inbox
Upload File-Uploading an electronic file to MDHHS

Click the My Inbox tab

Click the Upload File option

Click Upload to select the file
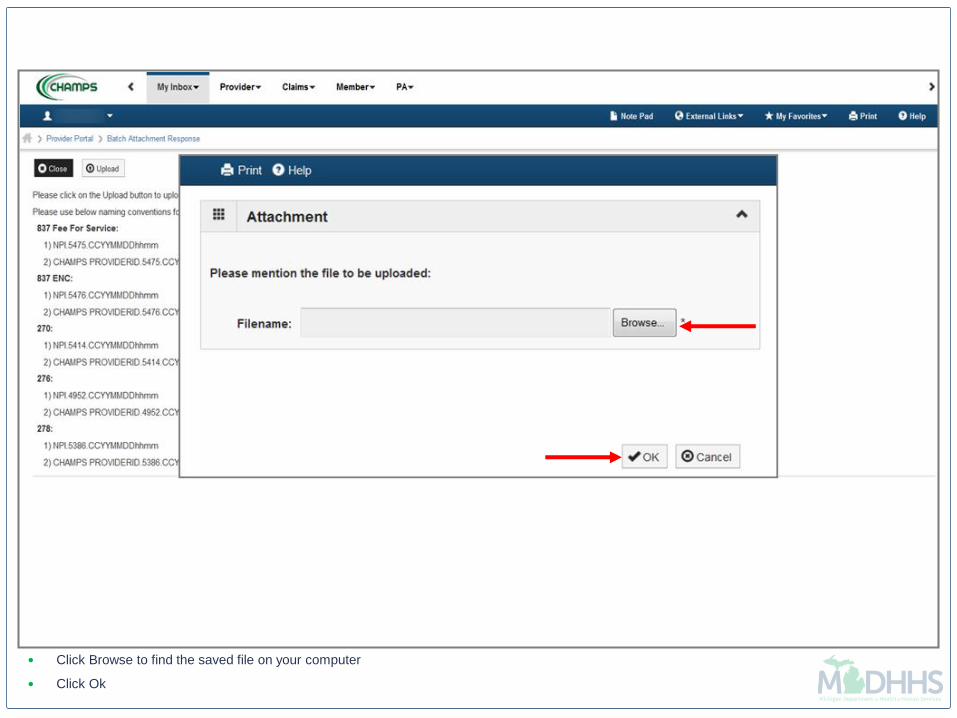
Click Browse to find the saved file on your computer
Click Ok

If the file is successfully uploaded the message will appear

Provider Verification
Tool used to verify a provider NPI is enrolled with
Michigan Medicaid
Click the My Inbox tab

Click the Provider Verification option

Enter the NPI and click Verify to verify if a provider is enrolled with Michigan Medicaid
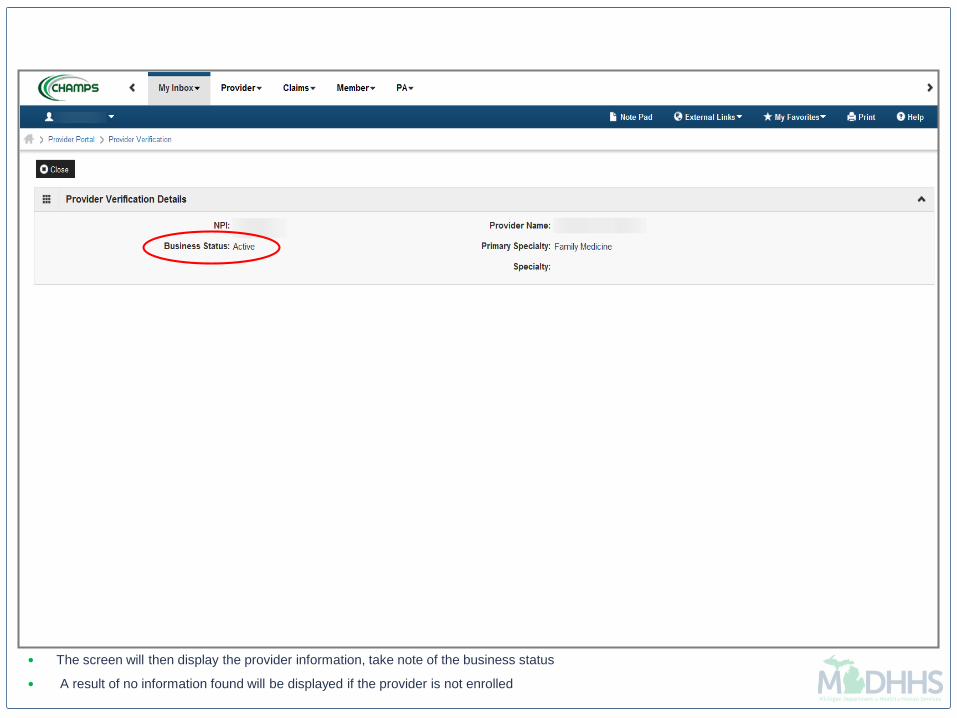
The screen will then display the provider information, take note of the business status
A result of no information found will be displayed if the provider is not enrolled

Provider
Manage Provider Information
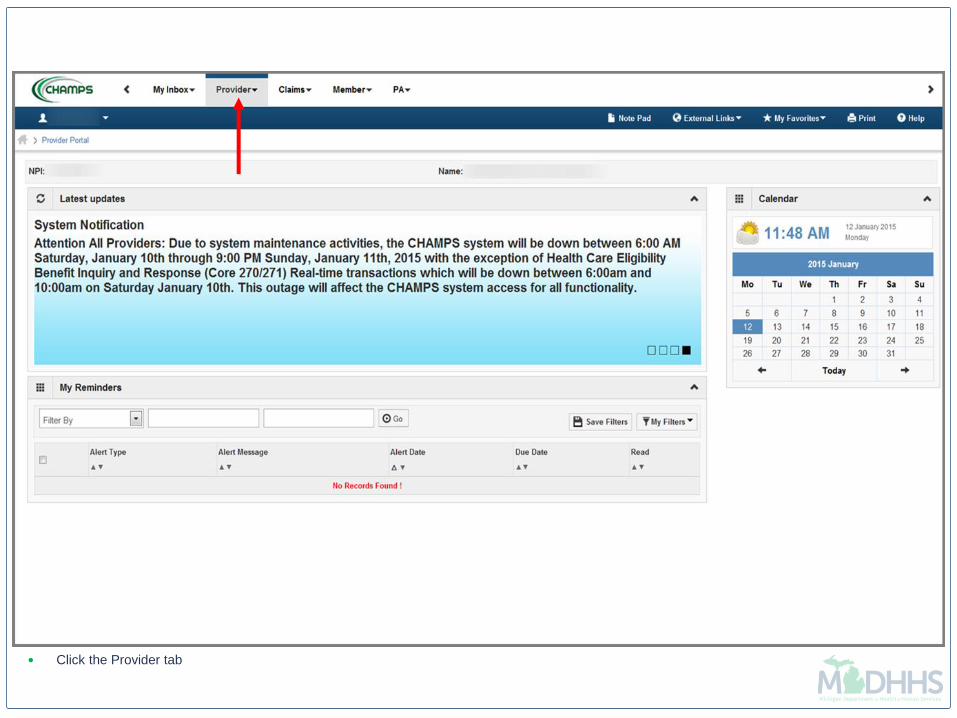
Click the Provider tab

Click the Manage Provider Information option

Make any necessary changes to enrollment information making sure to complete all steps needed
Step 11 must be submitted in order for changes to be reviewed by MDHHS

Claims
Submit Professional-How to use CHAMPS Direct Data
Entry (DDE) option to submit a professional claim.
Providers who bill using the CMS-1500 claim form

Click Claims tab

Click the Submit Professional option
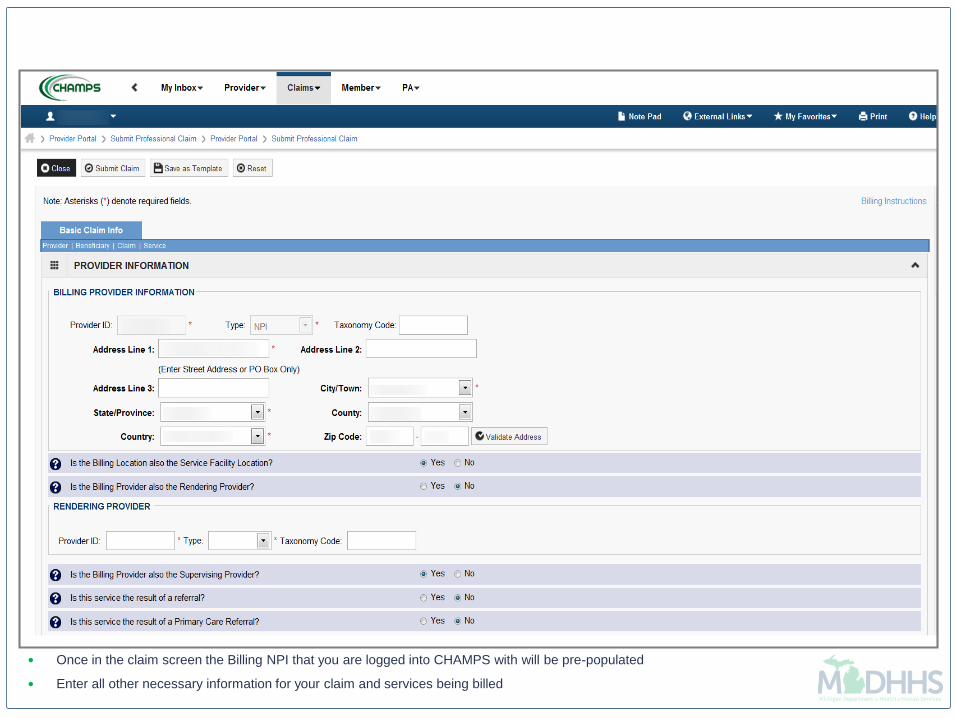
Once in the claim screen the Billing NPI that you are logged into CHAMPS with will be pre-populated
Enter all other necessary information for your claim and services being billed
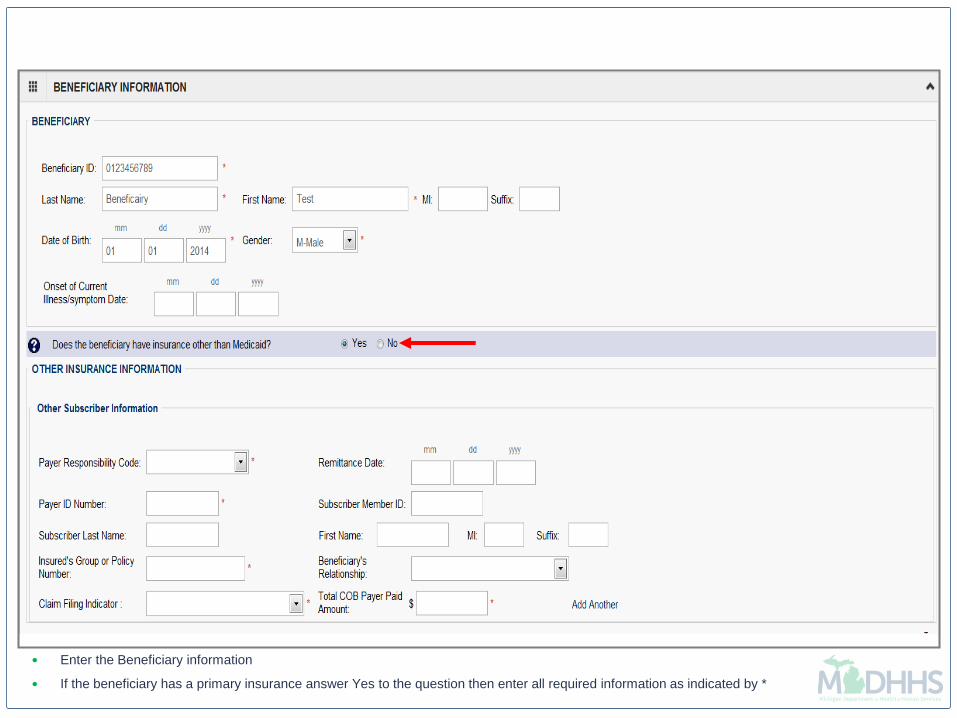
Enter the Beneficiary information
If the beneficiary has a primary insurance answer Yes to the question then enter all required information as indicated by *

Continue to enter claim information as necessary for services being billed
Any red plus sign can be expanded by clicking the red plus sign, once the field is expanded it will require information to be entered. If expanded in
error click the red plus sign to close

Enter the service line information, all asterisked fields are required for all providers
Once all information has been entered click Add Service Line Item to add it to the claim

The service line will then show at the bottom of the screen with it’s corresponding line number
If other payer information was entered in the Beneficiary Information section then click on Insurance Info to enter the other payer information at the
service line level.
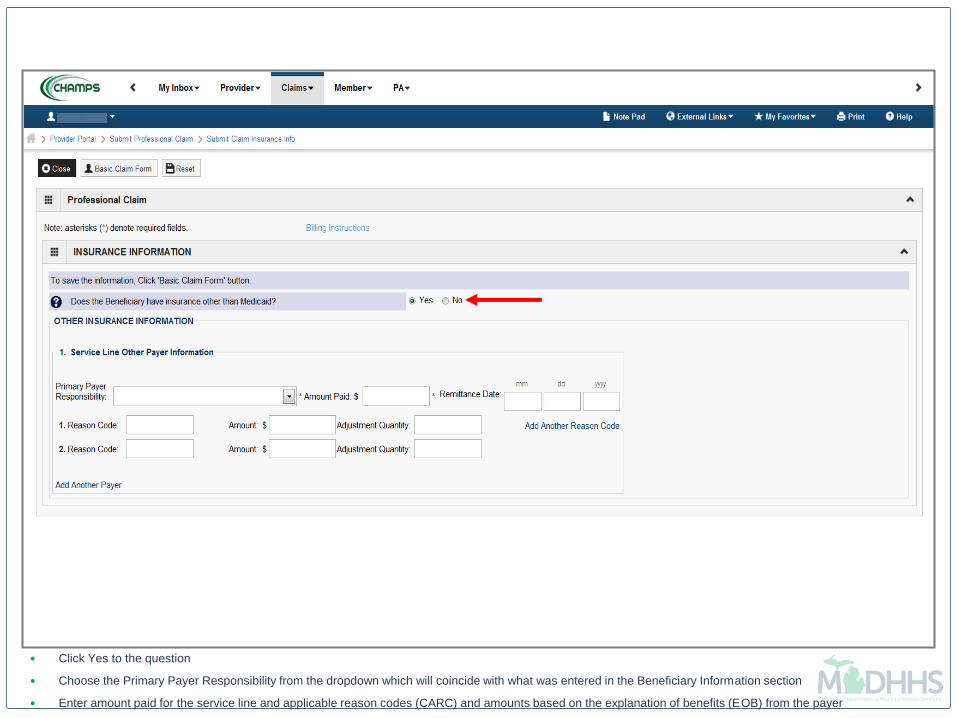
Click Yes to the question
Choose the Primary Payer Responsibility from the dropdown which will coincide with what was entered in the Beneficiary Information section
Enter amount paid for the service line and applicable reason codes (CARC) and amounts based on the explanation of benefits (EOB) from the payer

After completing information click Basic Claim Form to return to the claim information
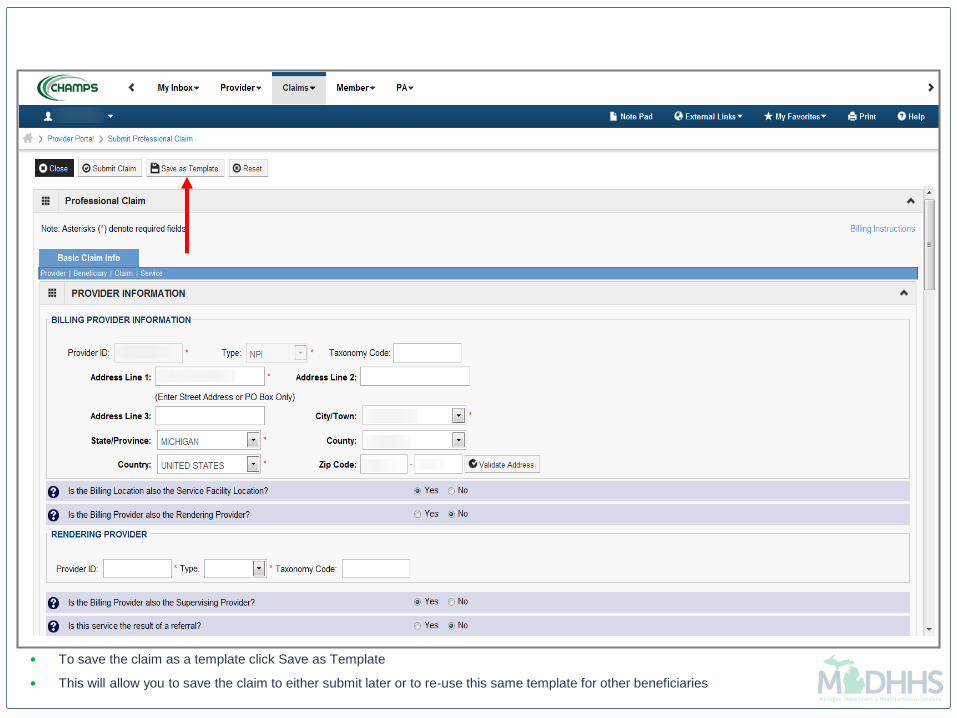
To save the claim as a template click Save as Template
This will allow you to save the claim to either submit later or to re-use this same template for other beneficiaries
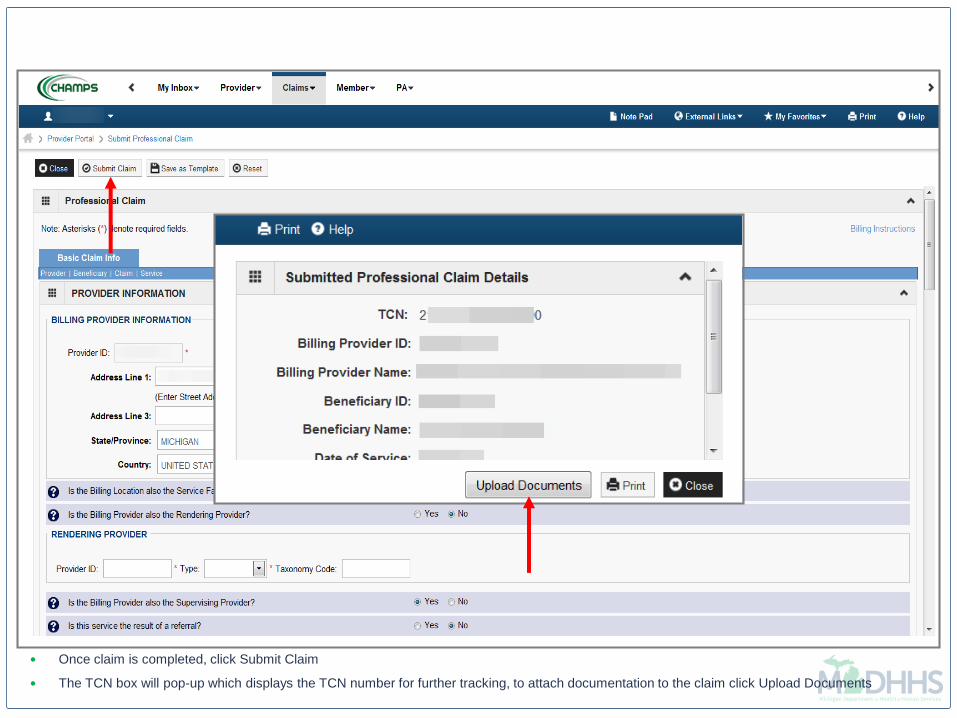
Once claim is completed, click Submit Claim
The TCN box will pop-up which displays the TCN number for further tracking, to attach documentation to the claim click Upload Documents

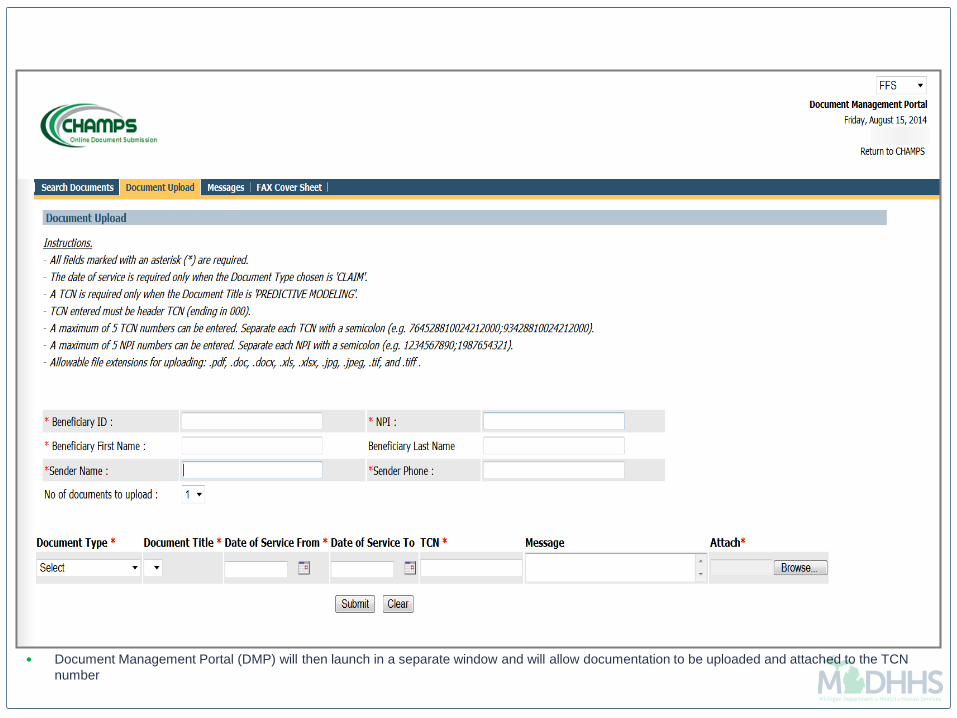
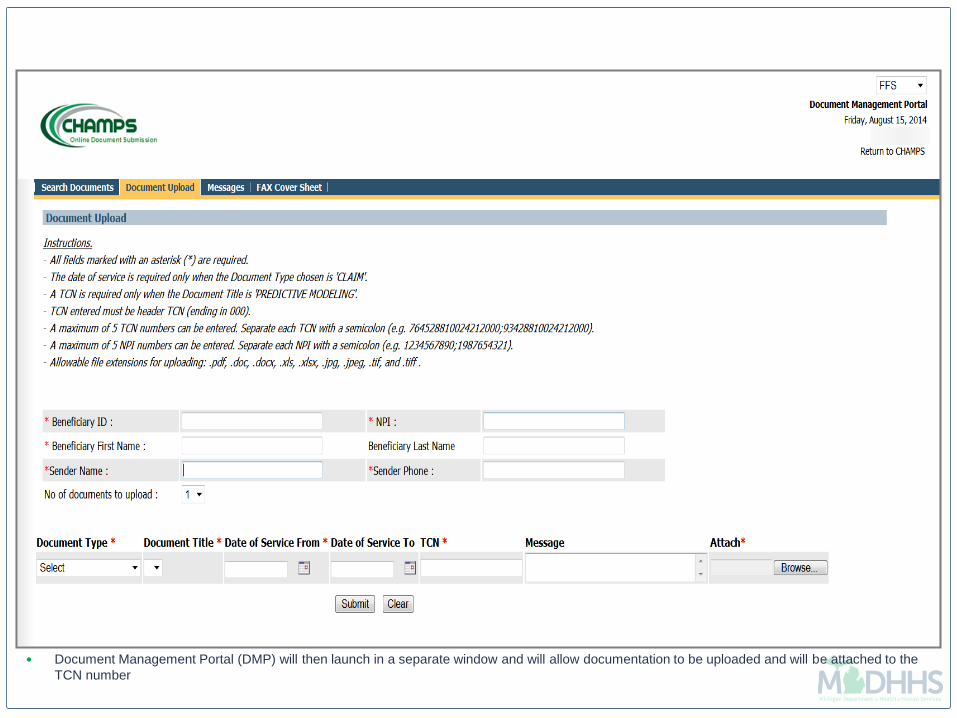
Document Management Portal (DMP) will then launch in a separate window and will allow documentation to be uploaded and attached to the TCN
number
Claims
Submit Institutional-How to use CHAMPS Direct Data
Entry (DDE) option to submit an Institutional claim.
Providers who bill using the UB-04 claim form

Click Claims tab

Click the Submit Institutional option
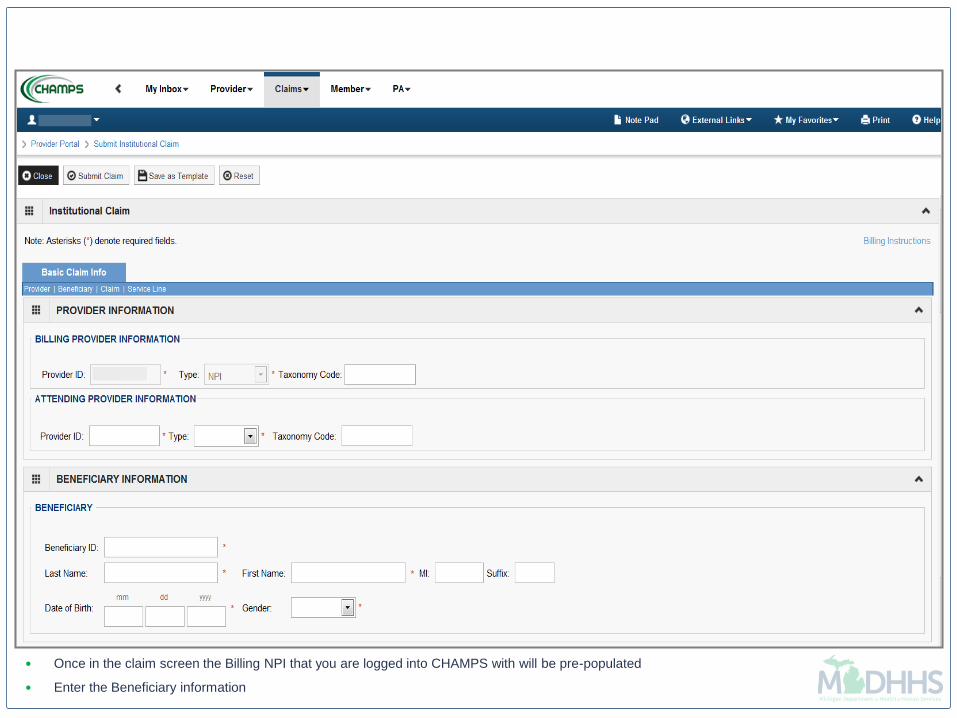
Once in the claim screen the Billing NPI that you are logged into CHAMPS with will be pre-populated
Enter the Beneficiary information

Continue to enter claim information as necessary for services being billed
Any asterisked field is required for all providers

If the beneficiary has a primary payer, expand the Other Insurance Information field and enter all required information as indicated by the asterisk
Any red plus sign can be expanded by clicking the red plus sign, once the field is expanded it will required information to be entered. If expanded in
error click the red plus sign to close.
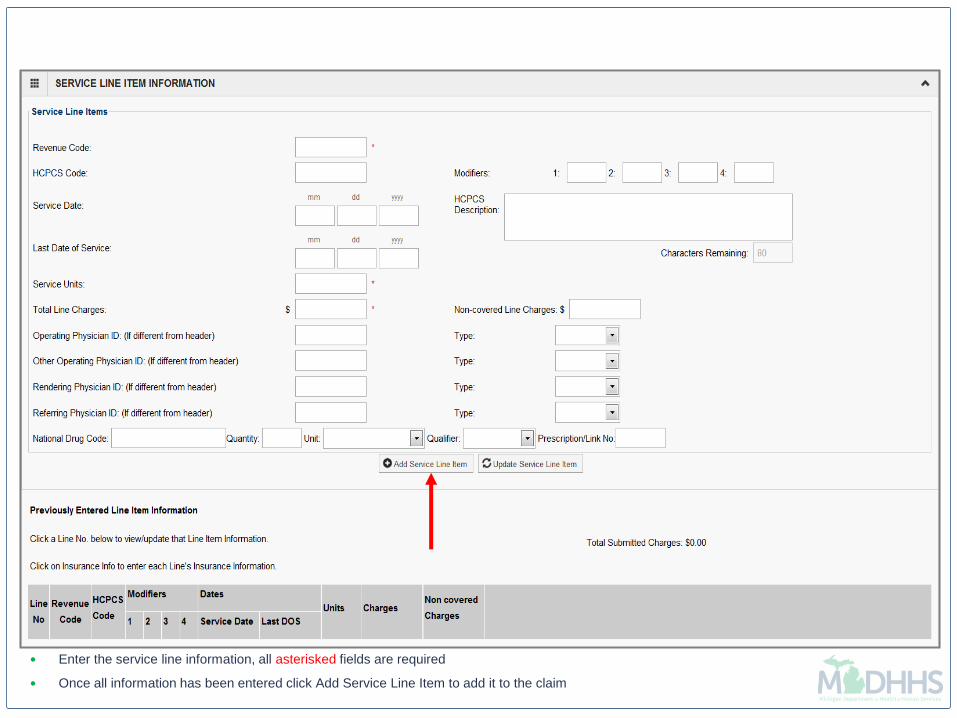
Enter the service line information, all asterisked fields are required
Once all information has been entered click Add Service Line Item to add it to the claim

The service line will then show at the bottom of the screen with its corresponding line number
If there is a primary payer that was reported in the Other Insurance Information section click on Insurance Info to optionally enter the other payer
information at the service line level.

To save the claim as a template click Save as Template
This will allow you to save the claim to either submit later or to re-use this same template for other beneficiaries

Once claim is completed, click Submit Claim
The TCN box will pop-up which displays the TCN number for further tracking, to attach documentation to the claim click Upload Documents
Document Management Portal (DMP) will then launch in a separate window and will allow documentation to be uploaded and attached to the TCN
number
Claims
Submit Dental

Click Claims tab

Click the Submit Dental option

Once in the claim screen the Billing NPI that you are logged into CHAMPS with will be pre-populated
Enter all other necessary information for your claim and services being billed
Enter the beneficiary information and if the beneficiary has primary coverage answer Yes to the question

Click Yes to expand the diagnosis information if necessary for the services being billed
Diagnosis information is required for Anesthesia and Extractions
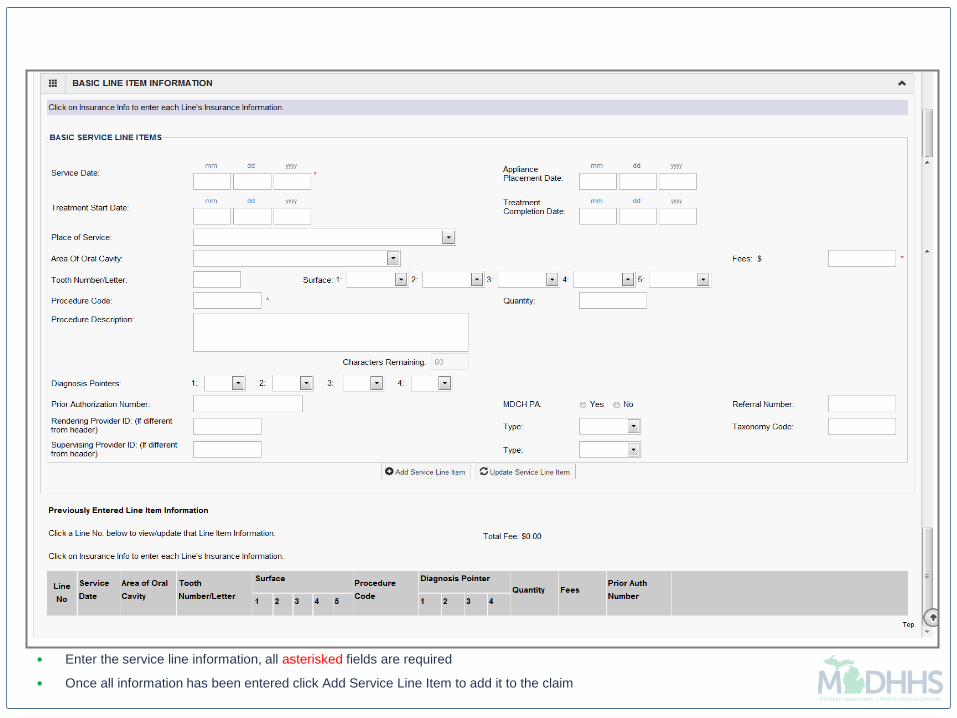
Enter the service line information, all asterisked fields are required
Once all information has been entered click Add Service Line Item to add it to the claim

The service line will then show at the bottom of the screen with it’s corresponding line number
If other payer information was entered in the Beneficiary Information section then click on Insurance Info to enter the other payer information at the
service line level.
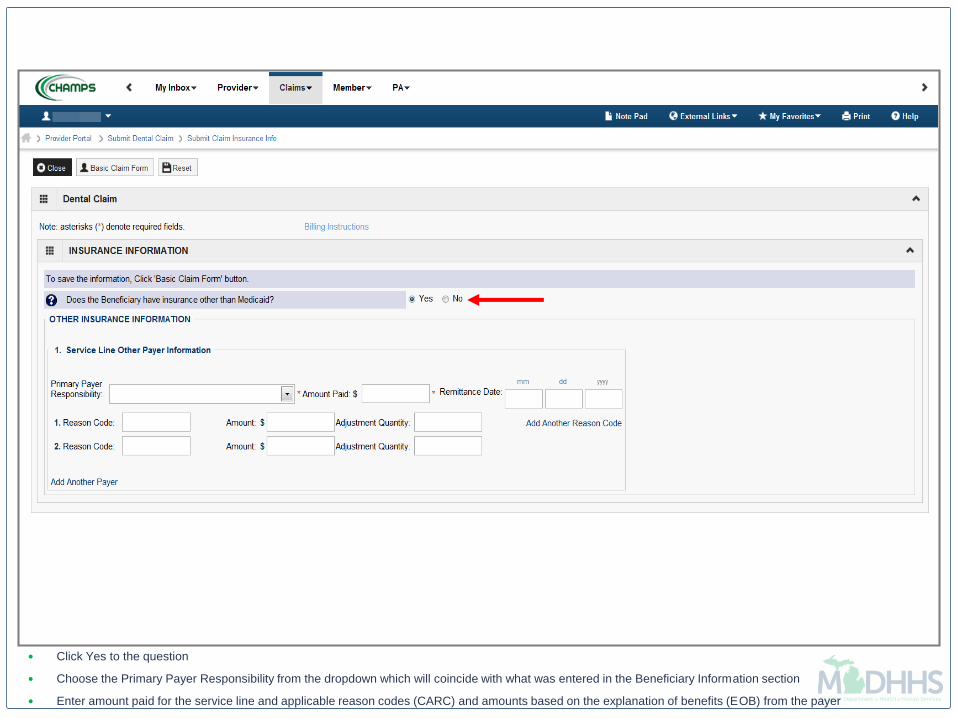
Click Yes to the question
Choose the Primary Payer Responsibility from the dropdown which will coincide with what was entered in the Beneficiary Information section
Enter amount paid for the service line and applicable reason codes (CARC) and amounts based on the explanation of benefits (EOB) from the payer

After completing information click Basic Claim Form to return to the claim information
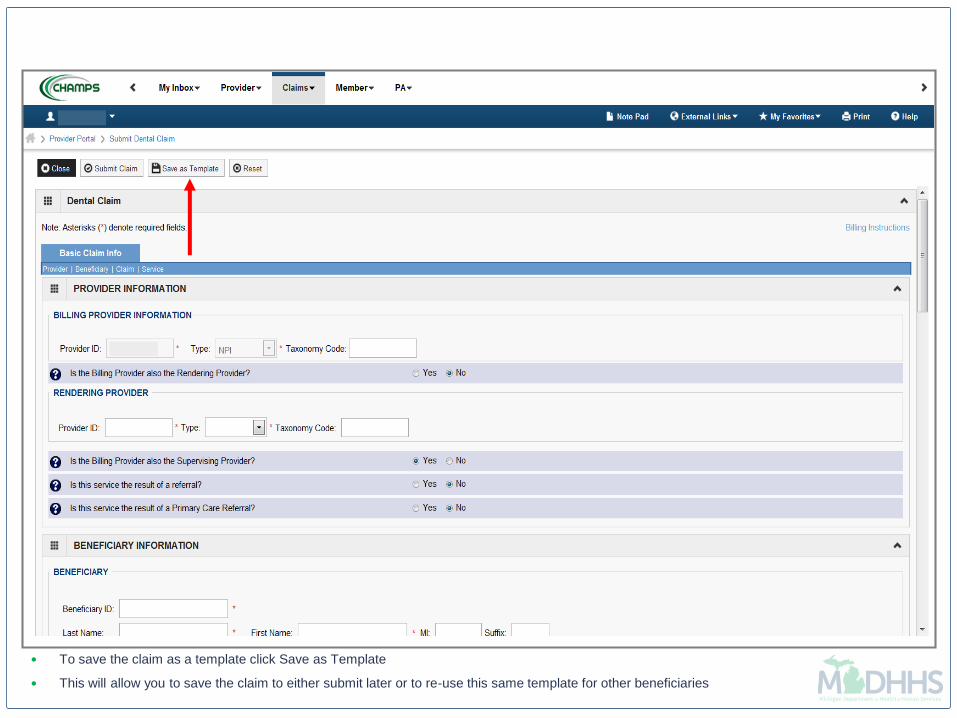
To save the claim as a template click Save as Template
This will allow you to save the claim to either submit later or to re-use this same template for other beneficiaries
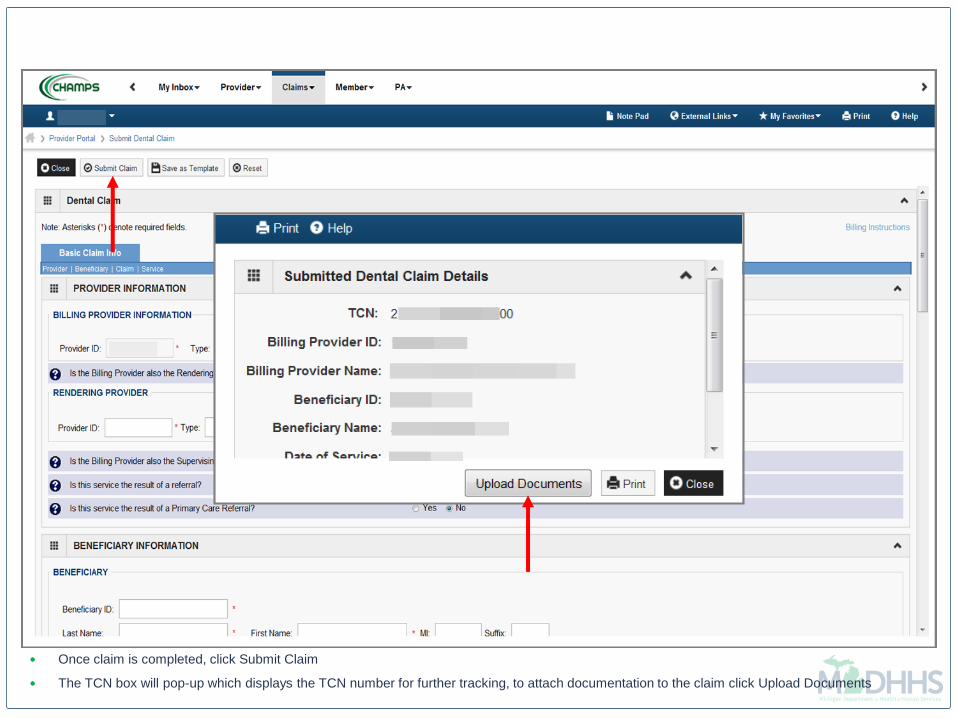
Once claim is completed, click Submit Claim
The TCN box will pop-up which displays the TCN number for further tracking, to attach documentation to the claim click Upload Documents
Document Management Portal (DMP) will then launch in a separate window and will allow documentation to be uploaded and will be attached to the
TCN number

Claims
Search Template-Search previously saved templates for
use
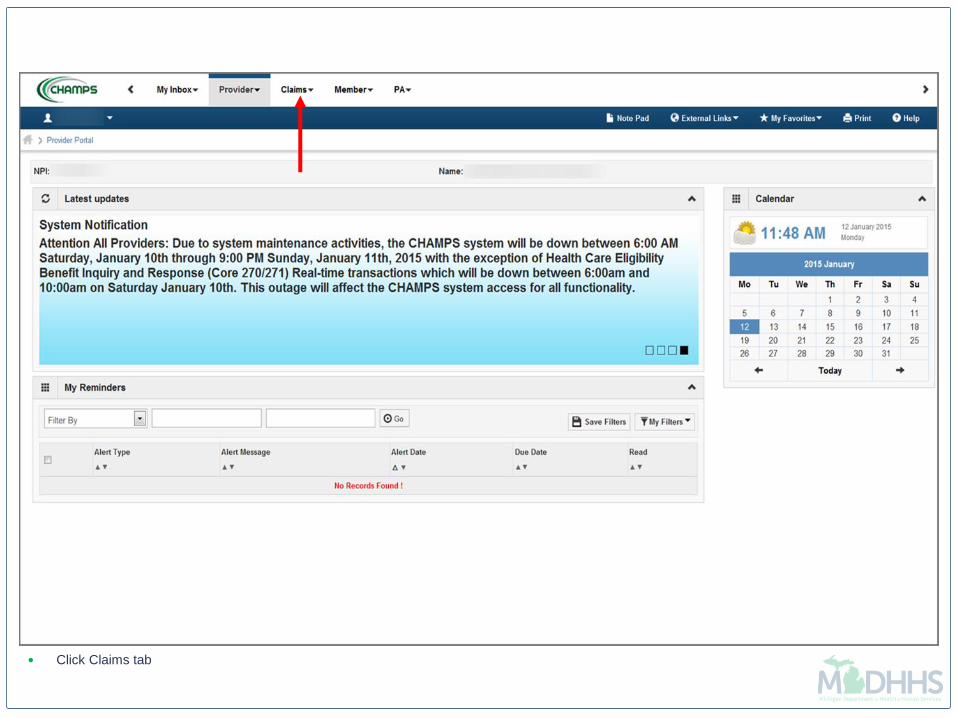
Click Claims tab

Select Search Template option
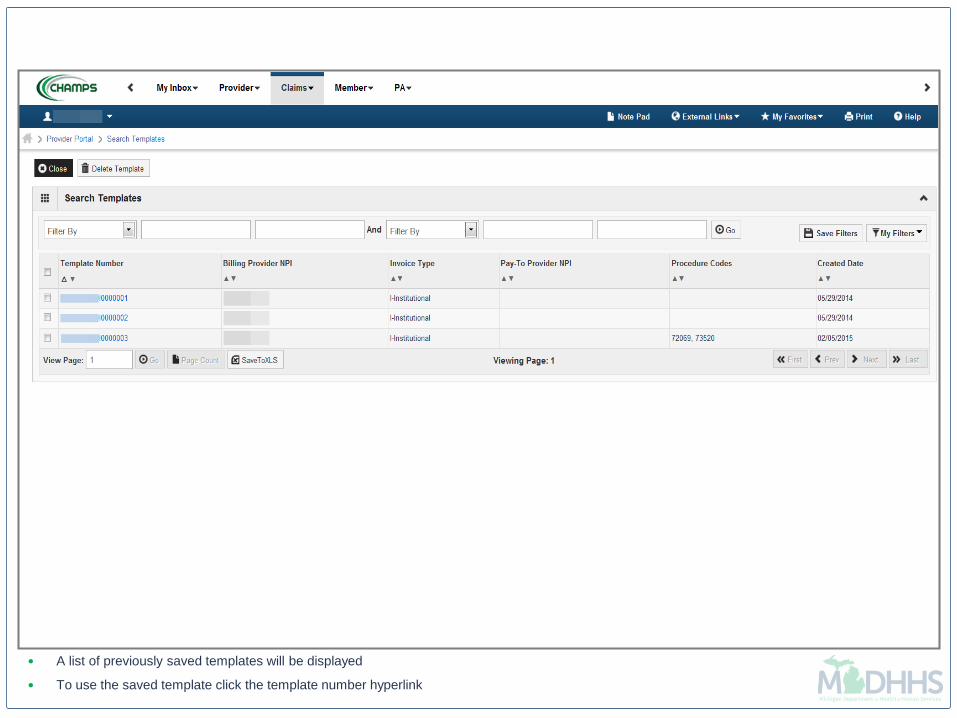
A list of previously saved templates will be displayed
To use the saved template click the template number hyperlink

Claims
Adjust- How to make changes or corrections to a paid
status claim

Click Claims tab

Select Adjust/Void Claim option

Enter the most current paid status TCN and click GO
The TCN must be the header TCN ending in 00
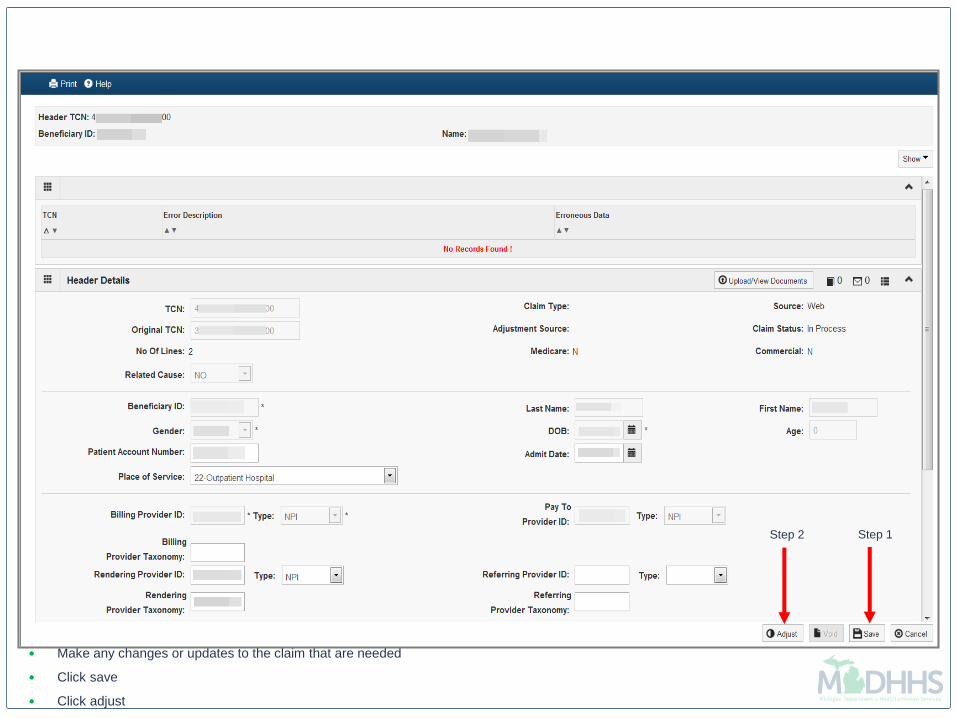
Make any changes or updates to the claim that are needed
Click save
Click adjust
Step 1Step 2
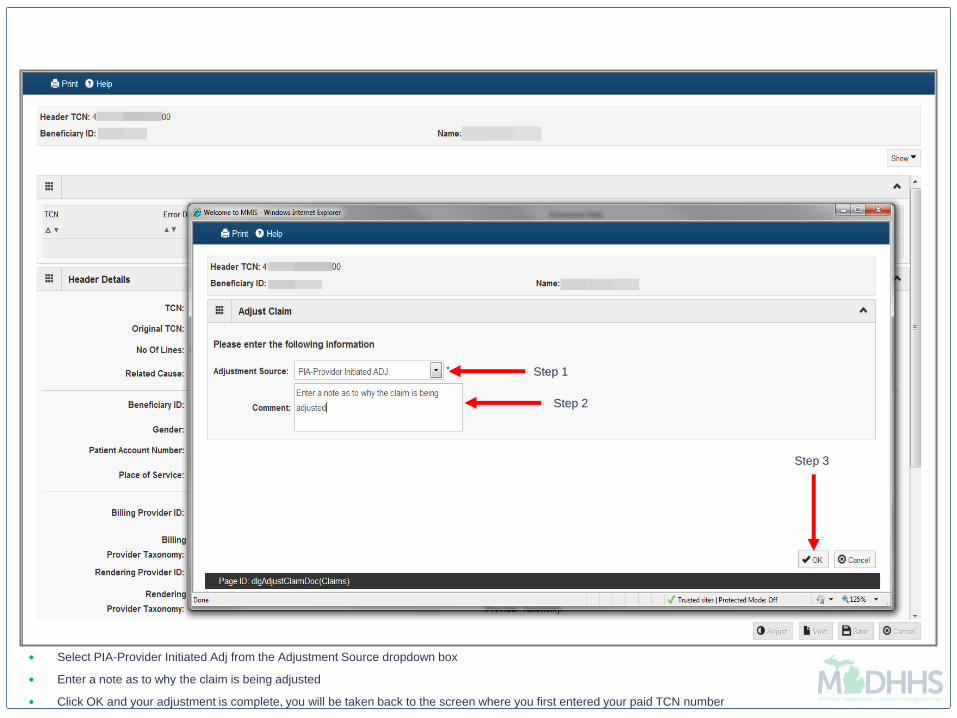
Select PIA-Provider Initiated Adj from the Adjustment Source dropdown box
Enter a note as to why the claim is being adjusted
Click OK and your adjustment is complete, you will be taken back to the screen where you first entered your paid TCN number
Step 1
Step 2
Step 3
Claims
Void-How to void a paid status claim to return money to
MDHHS

Click Claims tab
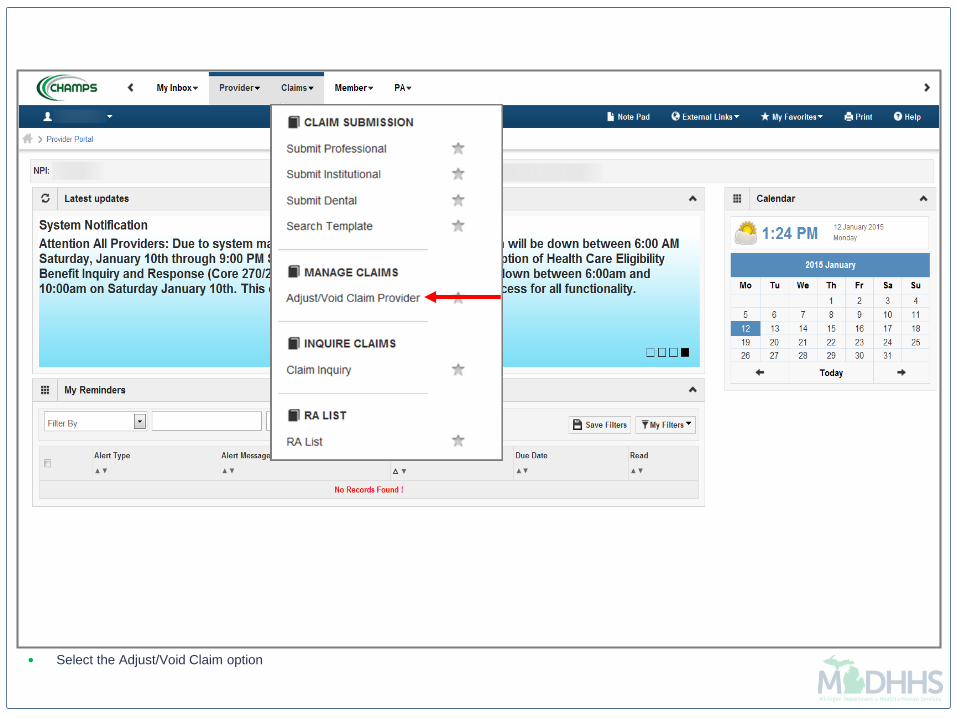
Select the Adjust/Void Claim option
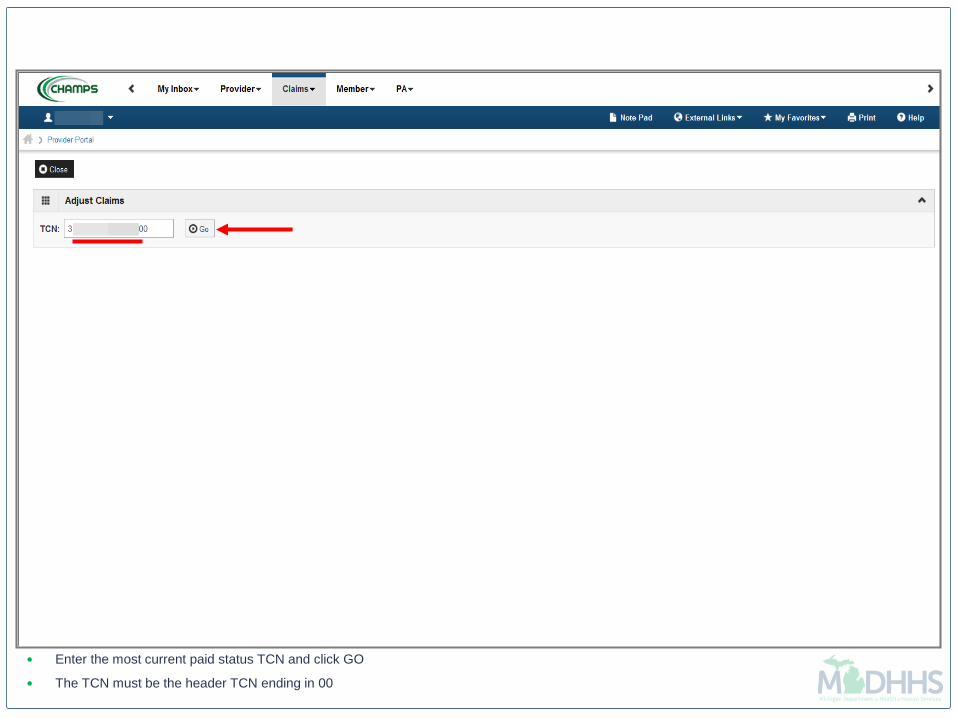
Enter the most current paid status TCN and click GO
The TCN must be the header TCN ending in 00

Click Void
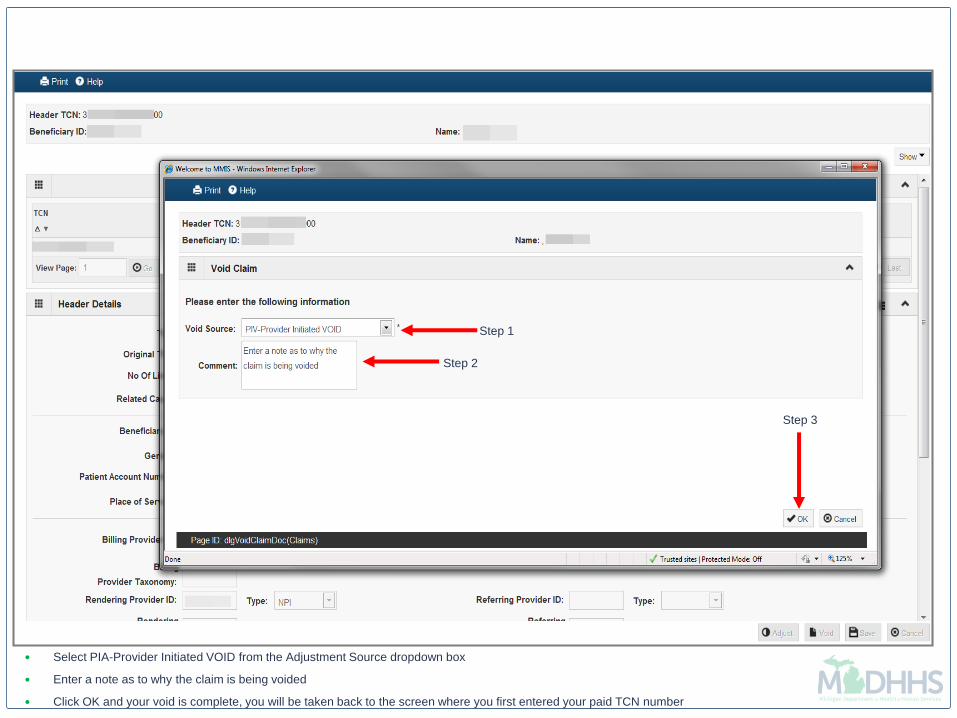
Select PIA-Provider Initiated VOID from the Adjustment Source dropdown box
Enter a note as to why the claim is being voided
Click OK and your void is complete, you will be taken back to the screen where you first entered your paid TCN number
Step 1
Step 2
Step 3

Claims
Inquiry-How to review paid/denied/suspended claims

Click Claims tab
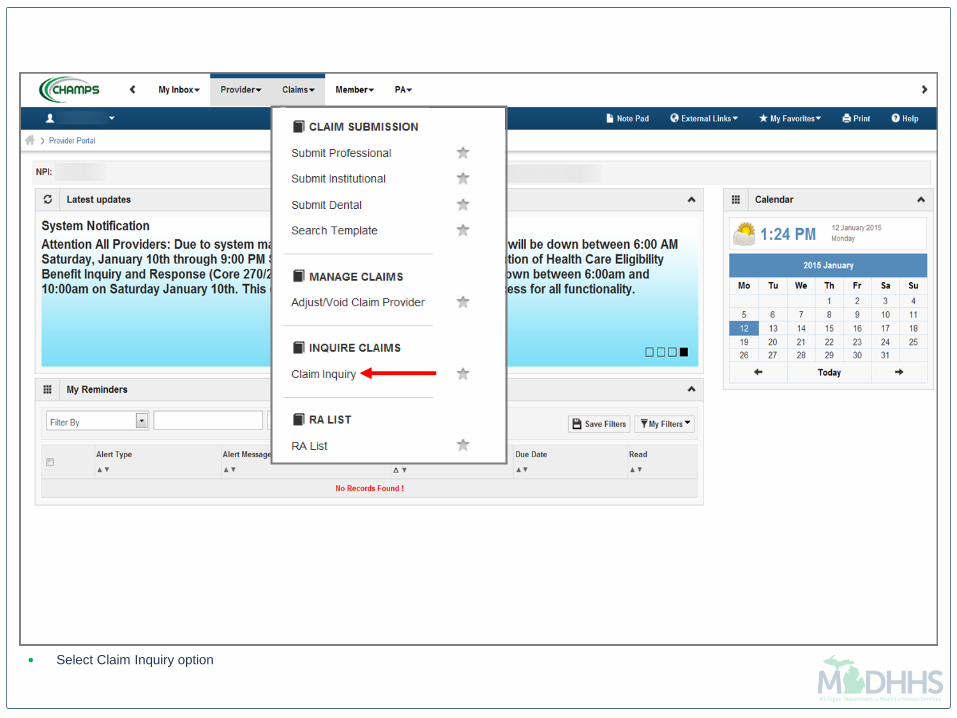
Select Claim Inquiry option
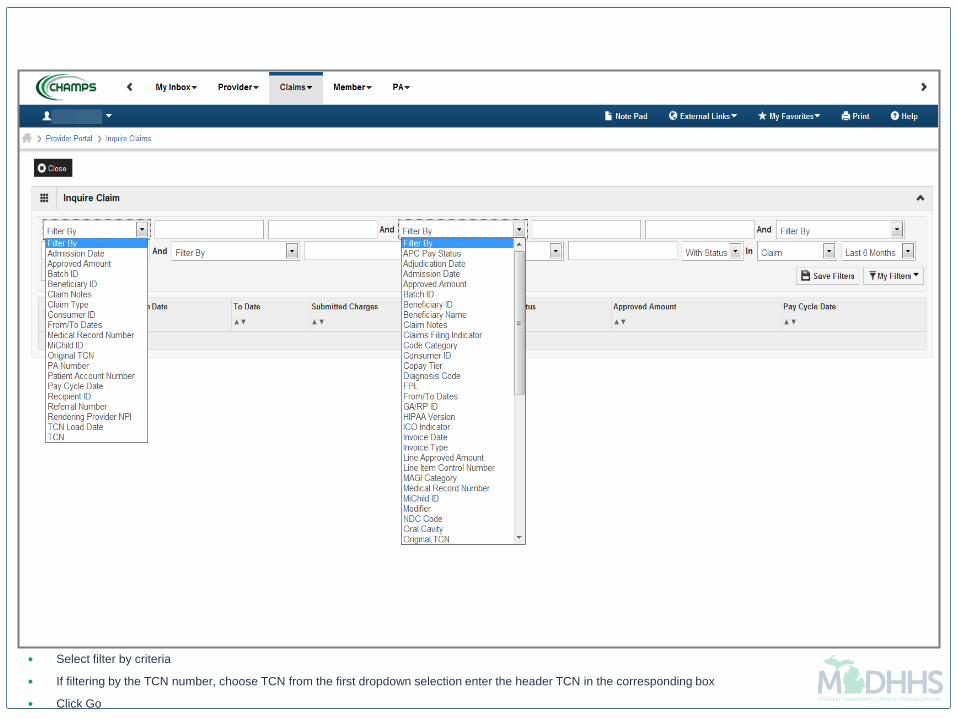
Select filter by criteria
If filtering by the TCN number, choose TCN from the first dropdown selection enter the header TCN in the corresponding box
Click Go
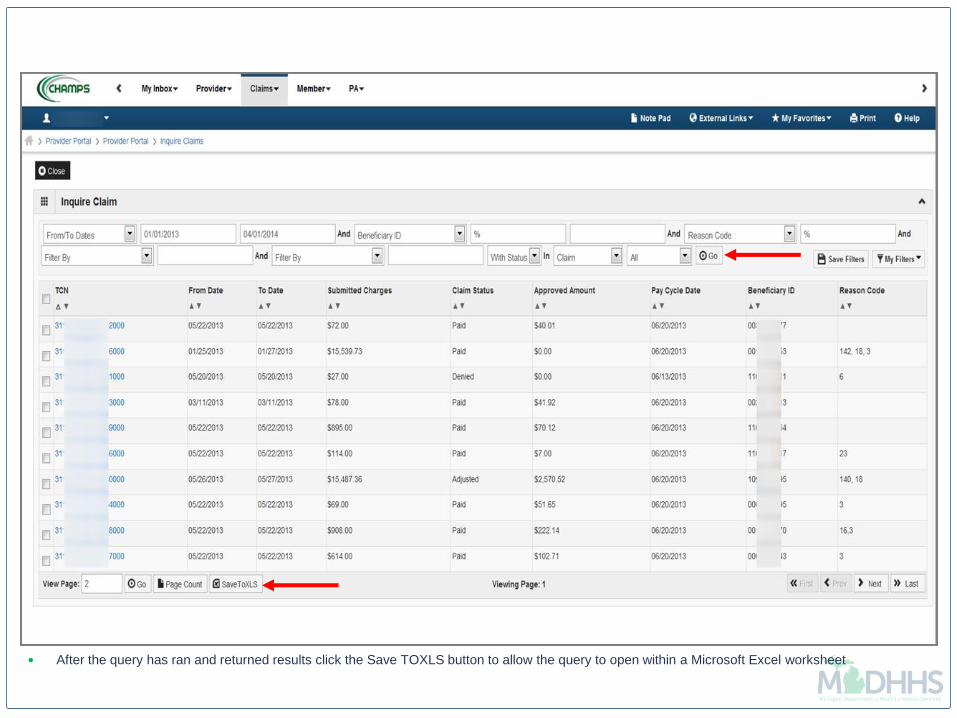
After the query has ran and returned results click the Save TOXLS button to allow the query to open within a Microsoft Excel worksheet

Once the Microsoft Excel window pops up select either open or save
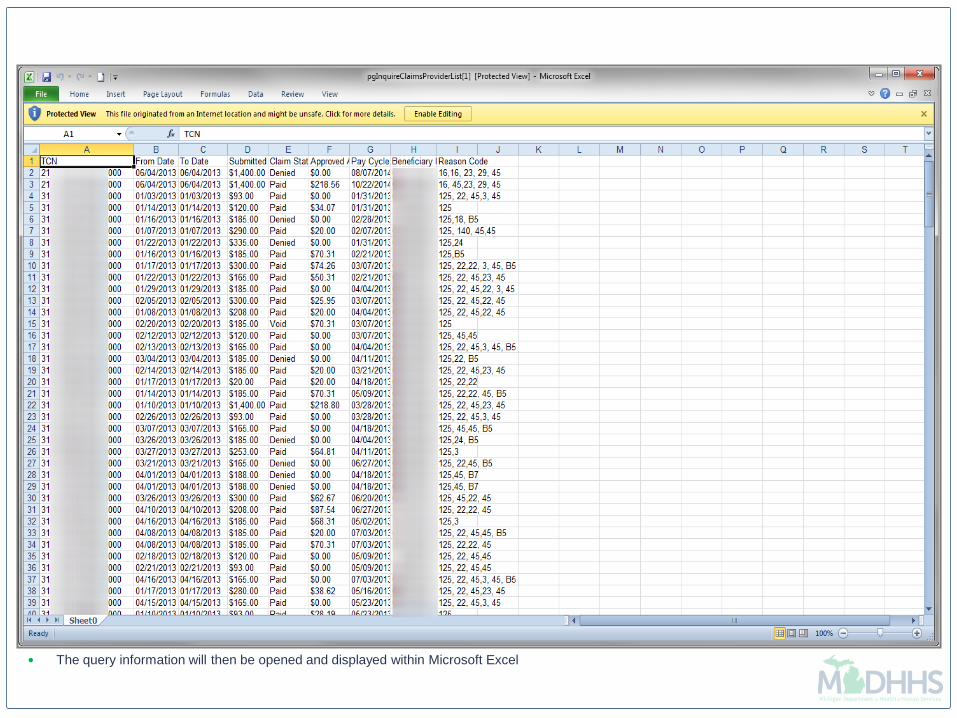
The query information will then be opened and displayed within Microsoft Excel
Member
Eligibility Inquiry-How to verify eligibility for a beneficiary

Click the Member tab
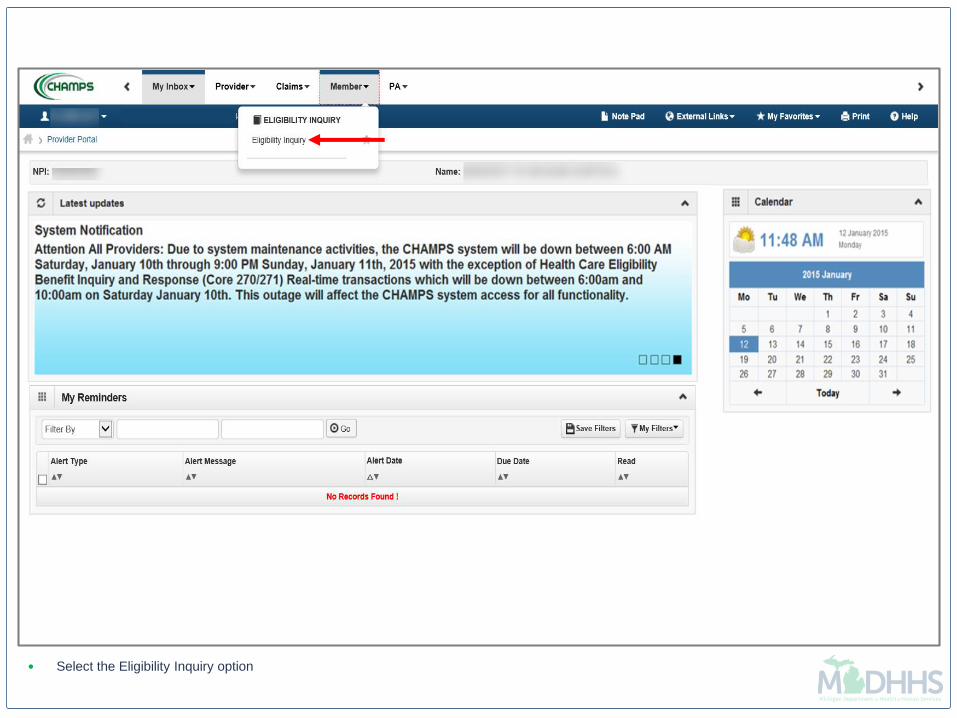
Select the Eligibility Inquiry option
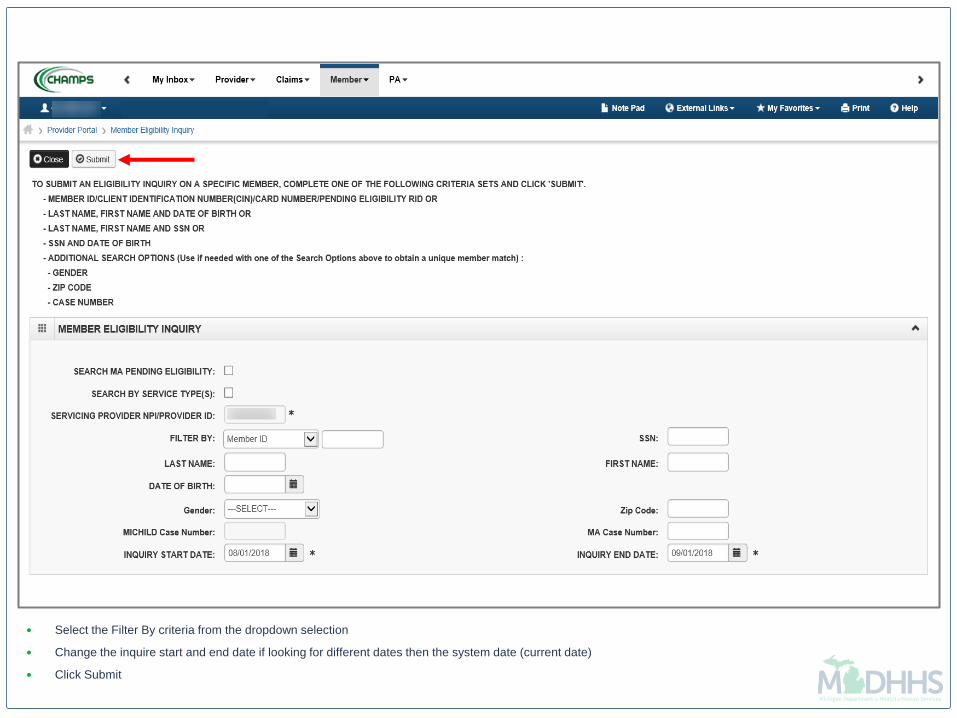
Select the Filter By criteria from the dropdown selection
Change the inquire start and end date if looking for different dates then the system date (current date)
Click Submit

Click the hyperlink for Click to View Service Types to review available benefits under the benefit plan

The available benefits will then be displayed
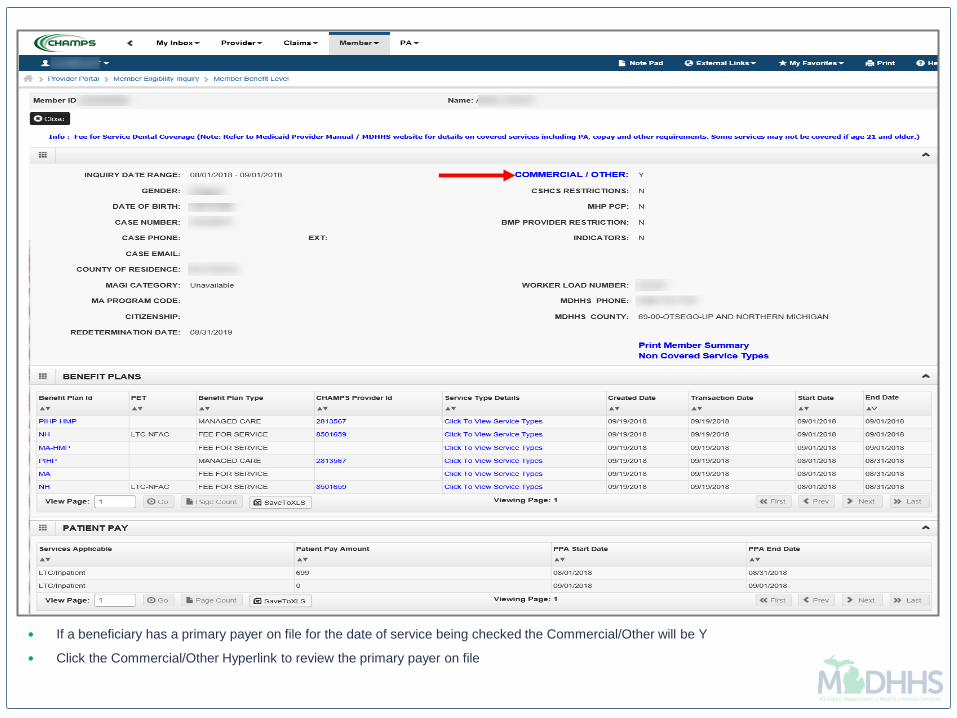
If a beneficiary has a primary payer on file for the date of service being checked the Commercial/Other will be Y
Click the Commercial/Other Hyperlink to review the primary payer on file

The primary payer information will then be displayed
Including the coverage type, group number, policy number, date updated and begin and end dates

Prior Authorization
PA Request list-Review prior authorizations by multiple
filter criteria
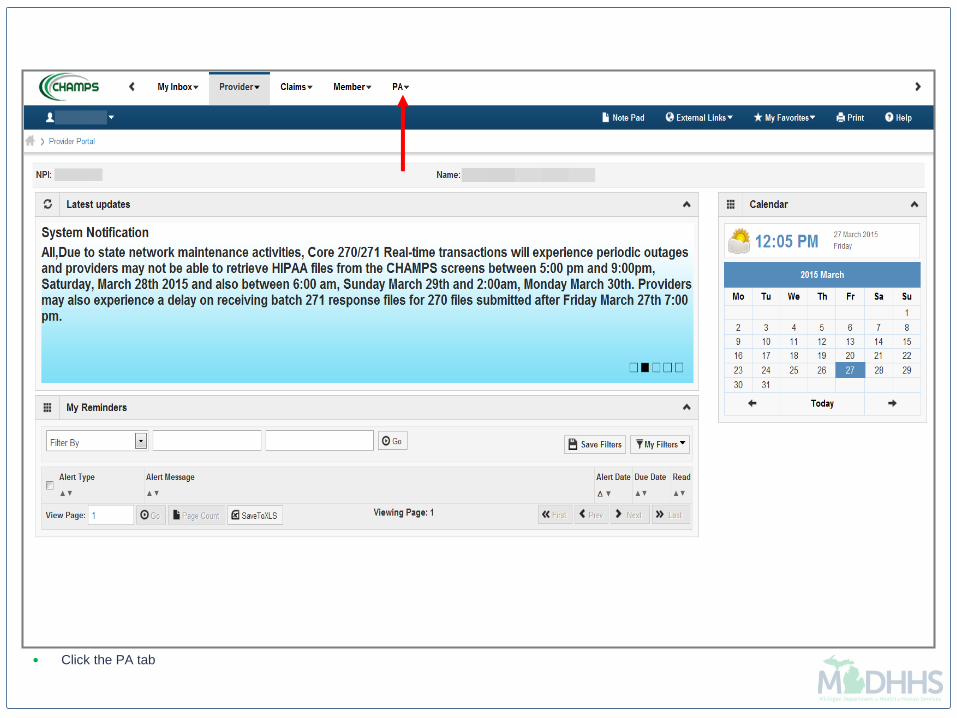
Click the PA tab

Select the PA request list option
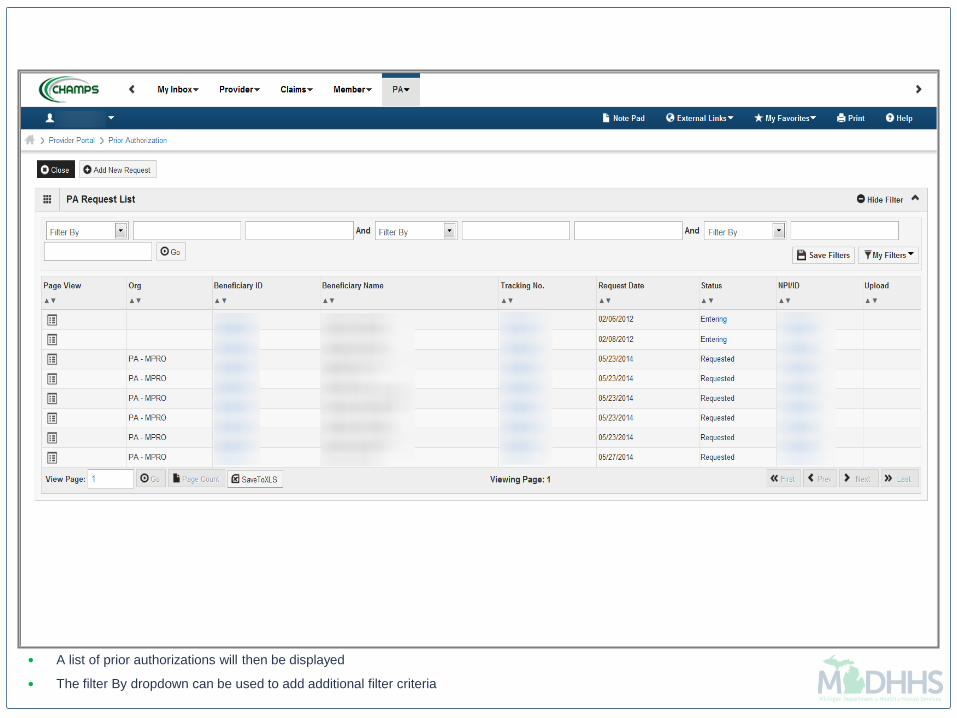
A list of prior authorizations will then be displayed
The filter By dropdown can be used to add additional filter criteria
Prior Authorization
PA Inquire-Look up a specific PA tracking number

Select the PA Inquire Option

Enter the PA Tracking number
Click Submit
Step 1
Step 2
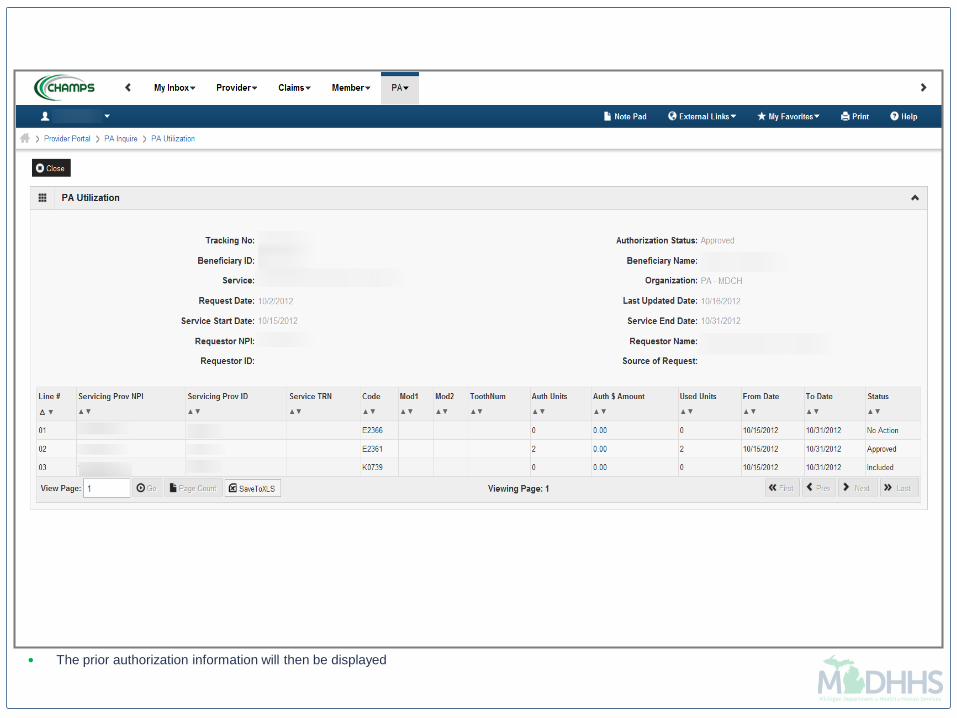
The prior authorization information will then be displayed
Filter
Saving and deleting personal filters
New CHAMPS feature
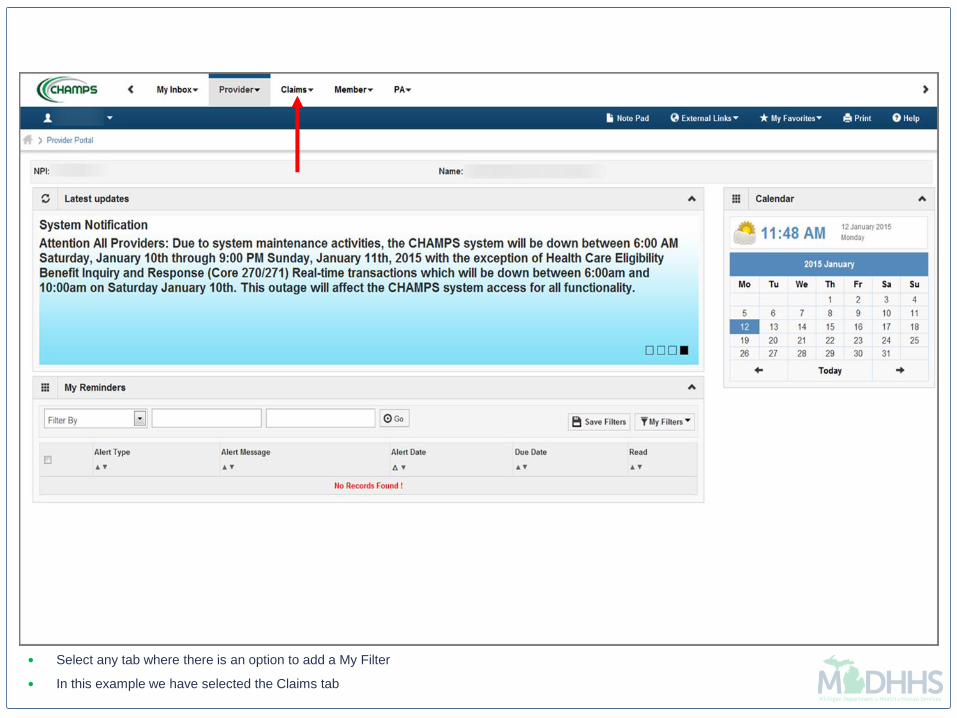
Select any tab where there is an option to add a My Filter
In this example we have selected the Claims tab
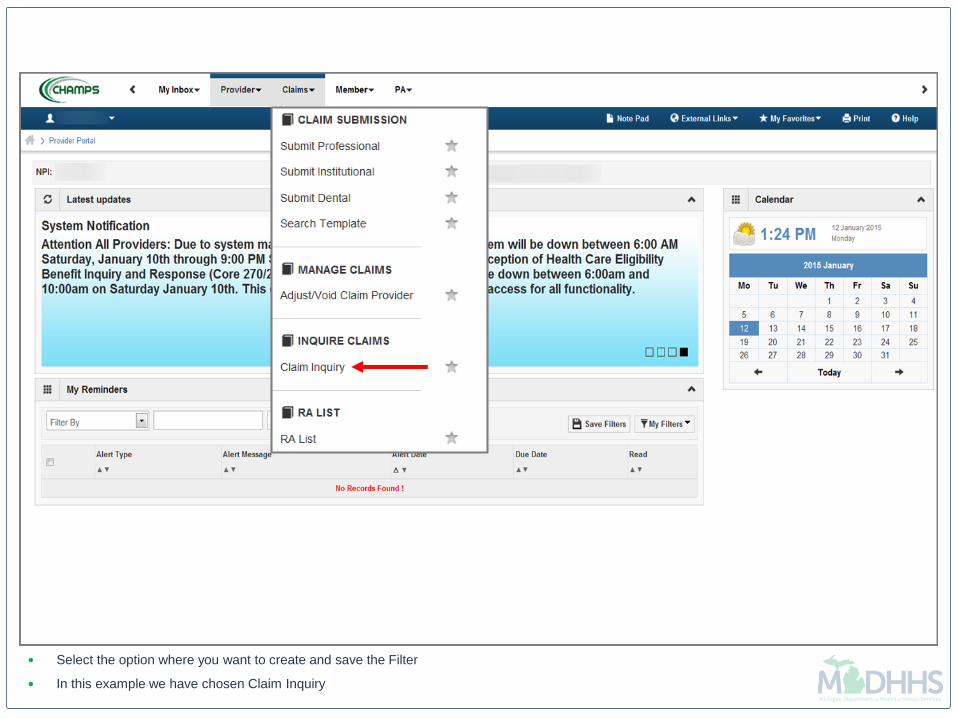
Select the option where you want to create and save the Filter
In this example we have chosen Claim Inquiry

Select the criteria needed for your filter

Once you have selected the criteria click the Save Filters button
In this example we have choose TCN load date, beneficiary ID % and reason code 252 which is for Predictive Modeling
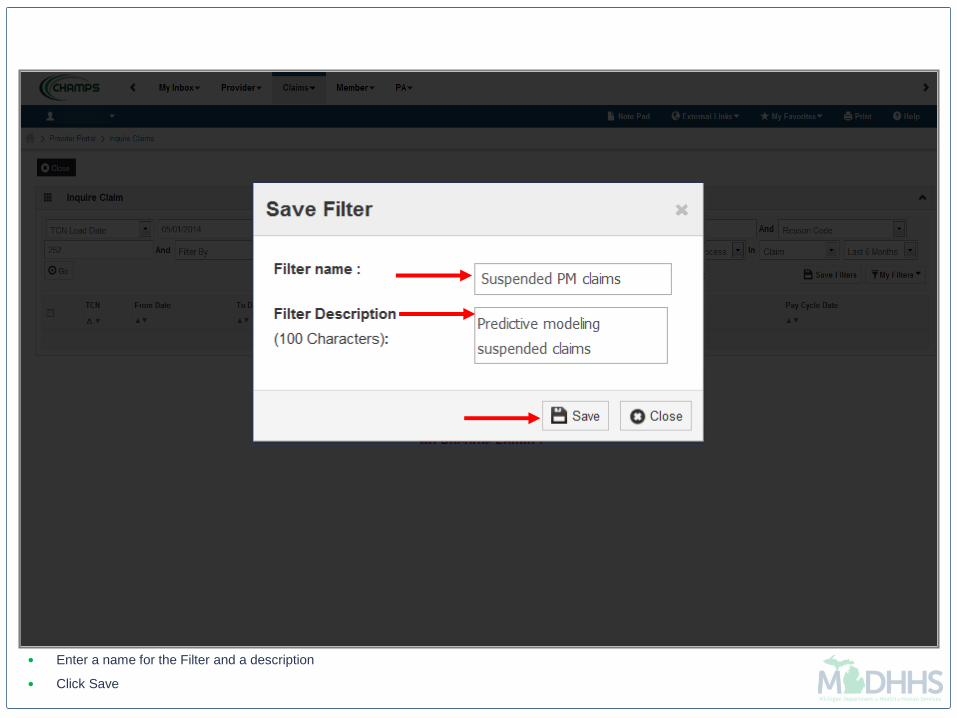
Enter a name for the Filter and a description
Click Save
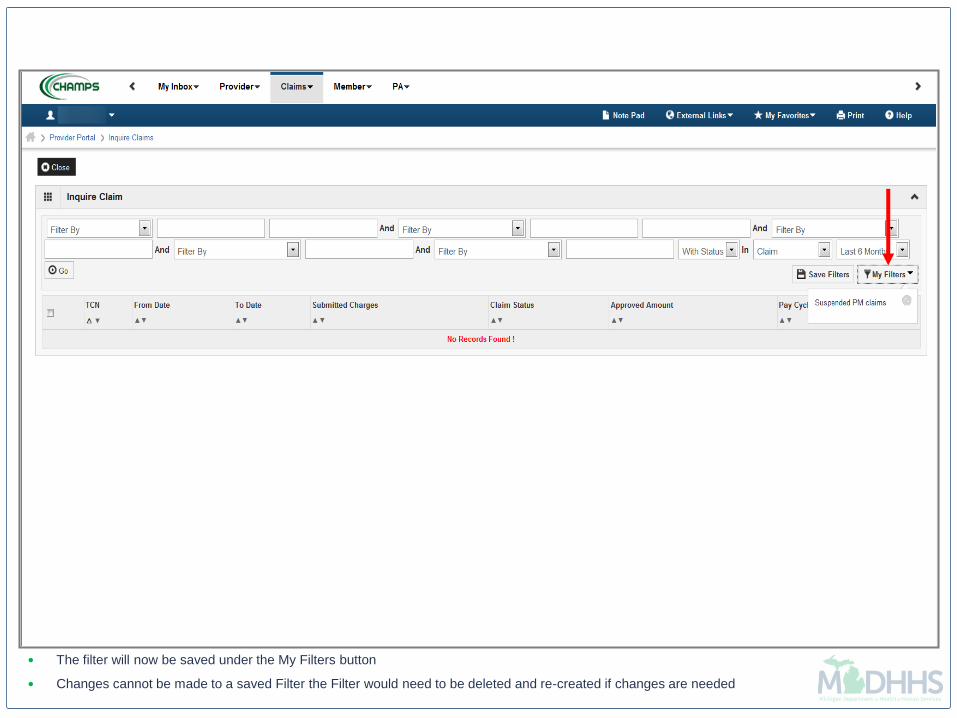
The filter will now be saved under the My Filters button
Changes cannot be made to a saved Filter the Filter would need to be deleted and re-created if changes are needed
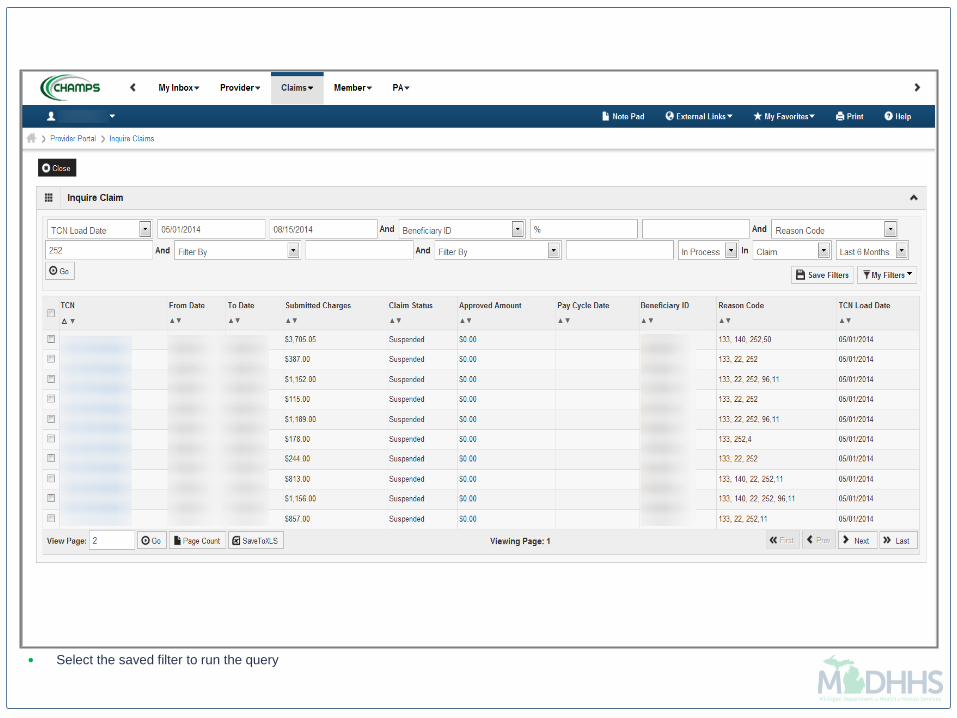
Select the saved filter to run the query
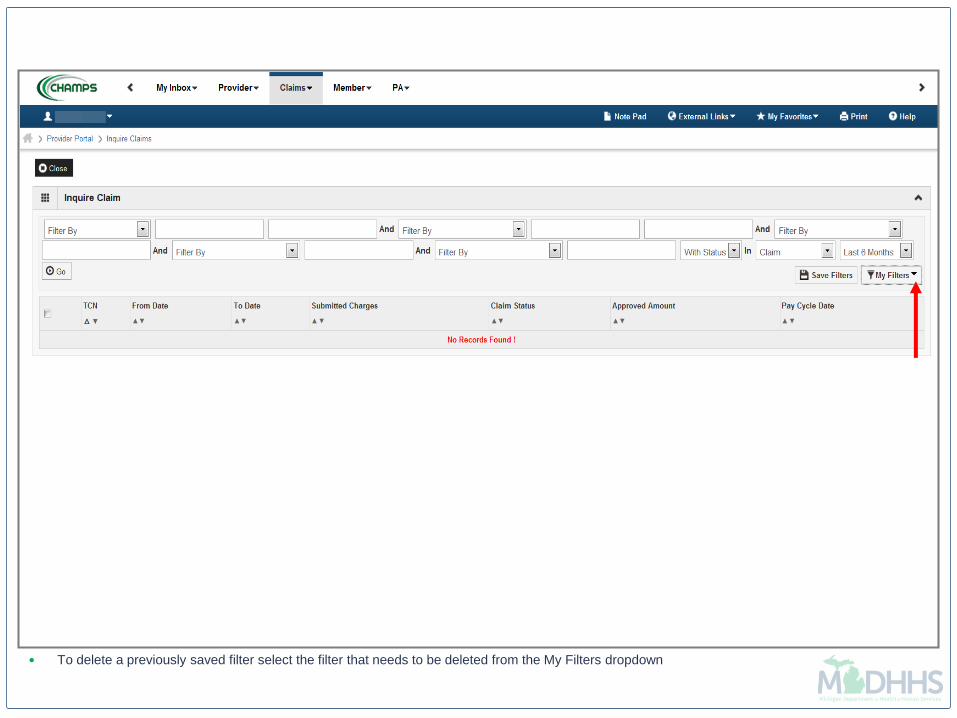
To delete a previously saved filter select the filter that needs to be deleted from the My Filters dropdown

Click the icon next to the saved filter

The filter will then be deleted and no longer display under My Filters
Notepad
Feature that allows an electronic sticky note

Click Note Pad to add an electronic sticky note
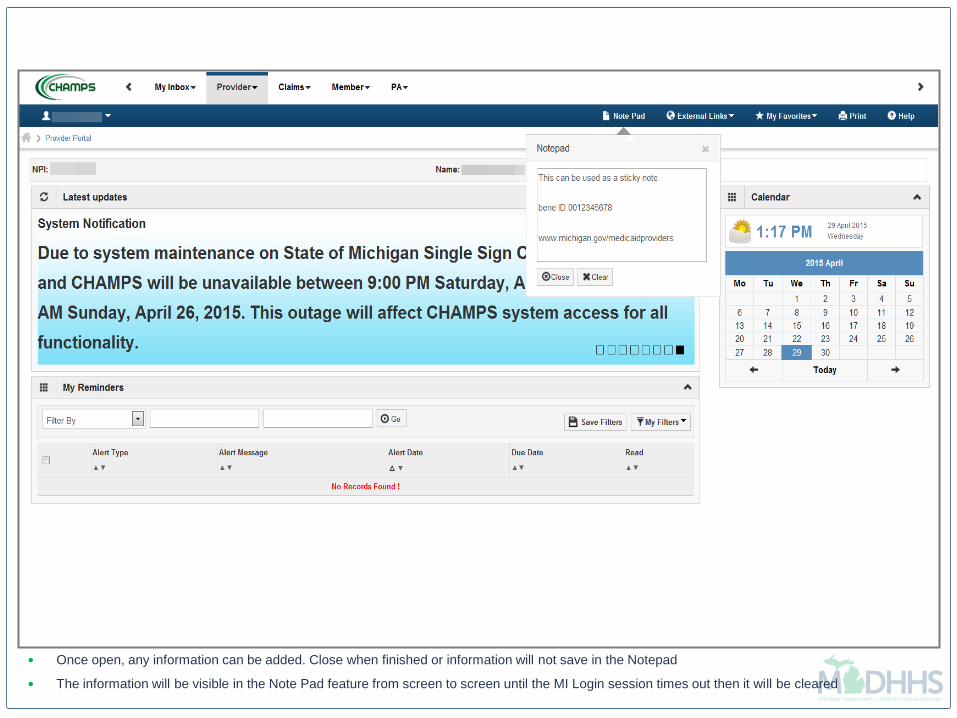
Once open, any information can be added. Close when finished or information will not save in the Notepad
The information will be visible in the Note Pad feature from screen to screen until the MI Login session times out then it will be cleared
External Links
Links to other applications or websites accessible to
providers

Click on the External Links

A list of available links will be displayed
Select one of the available links to open within a separate window from CHAMPS

Favorites ~ Add and Delete
Add
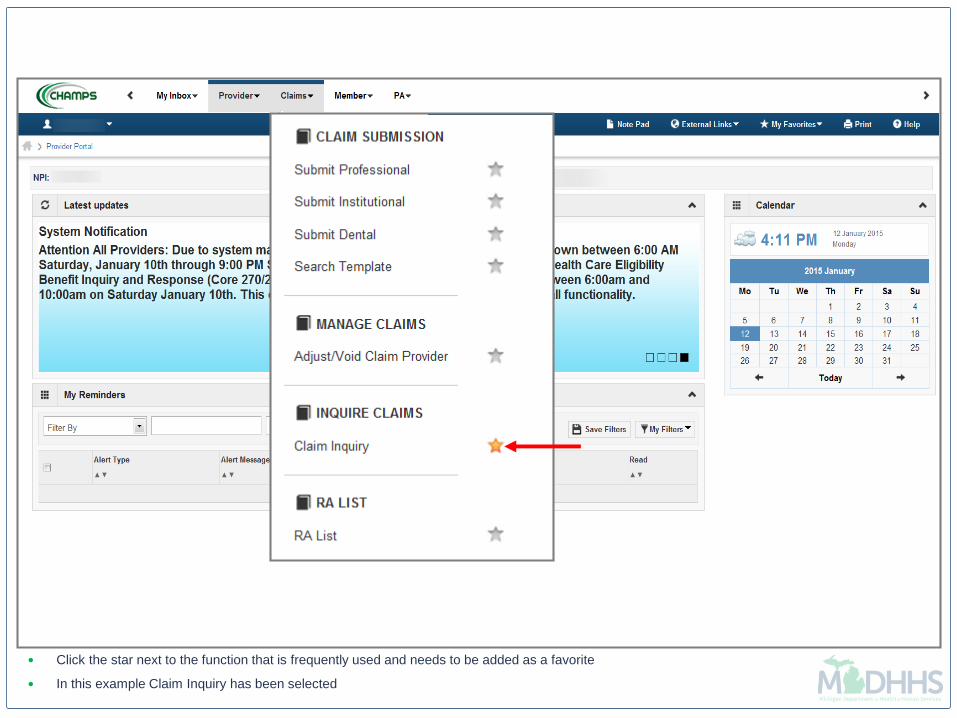
Click the star next to the function that is frequently used and needs to be added as a favorite
In this example Claim Inquiry has been selected

In this example Eligibility Inquiry has been selected to be saved as another Favorite
There is no limit to the number of Favorites that can be saved or added to a user's login

The next time you log into CHAMPS you will have the option to select a previously saved favorite
Select the Favorite option you want to use and click GO

After clicking GO from the login page you will be taken to the selected Favorite option

To view previously saved Favorites click the My Favorites dropdown
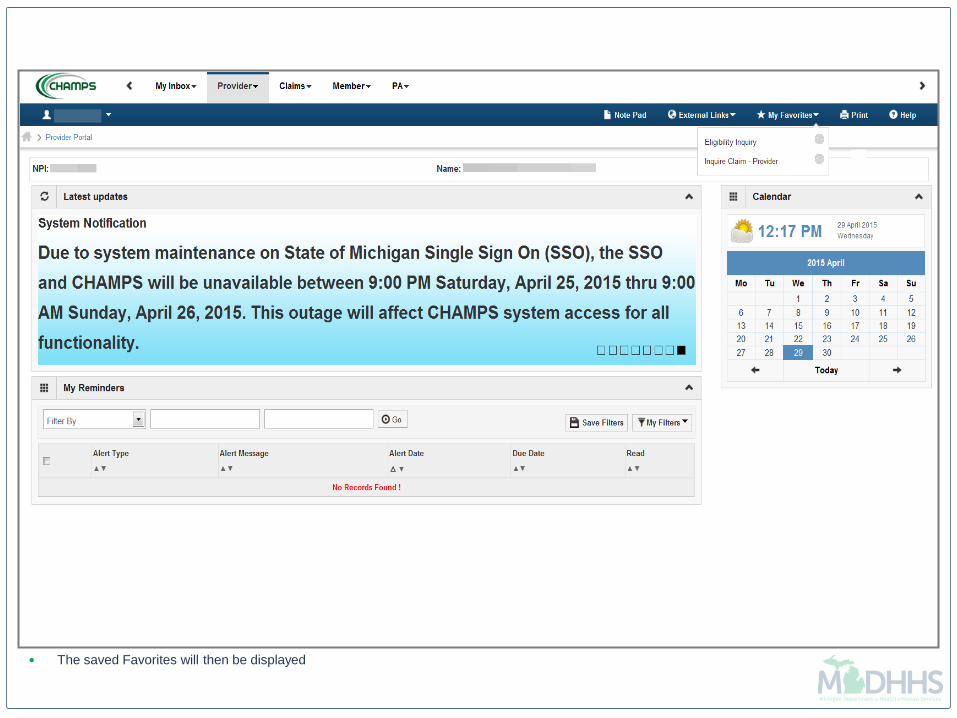
The saved Favorites will then be displayed
Favorites ~ Add and Delete
Delete

To delete a previously saved Favorite click My Favorites

Select the Favorite to be deleted and click the icon next to the Favorite

A message will display to acknowledge the Favorite was deleted

Once deleted will no longer be displayed under My Favorites, in this example Eligibility Inquiry was deleted
A deleted Favorite can be re-added as a Favorite again at any time
Changing Profile

Click the dropdown next to the User ID icon in the blue ribbon
Current profile that the user is logged in with will be displayed as well as all available profiles
Domain Administrator
Adding Users

Login to CHAMPS with the Domain Administrator Profile
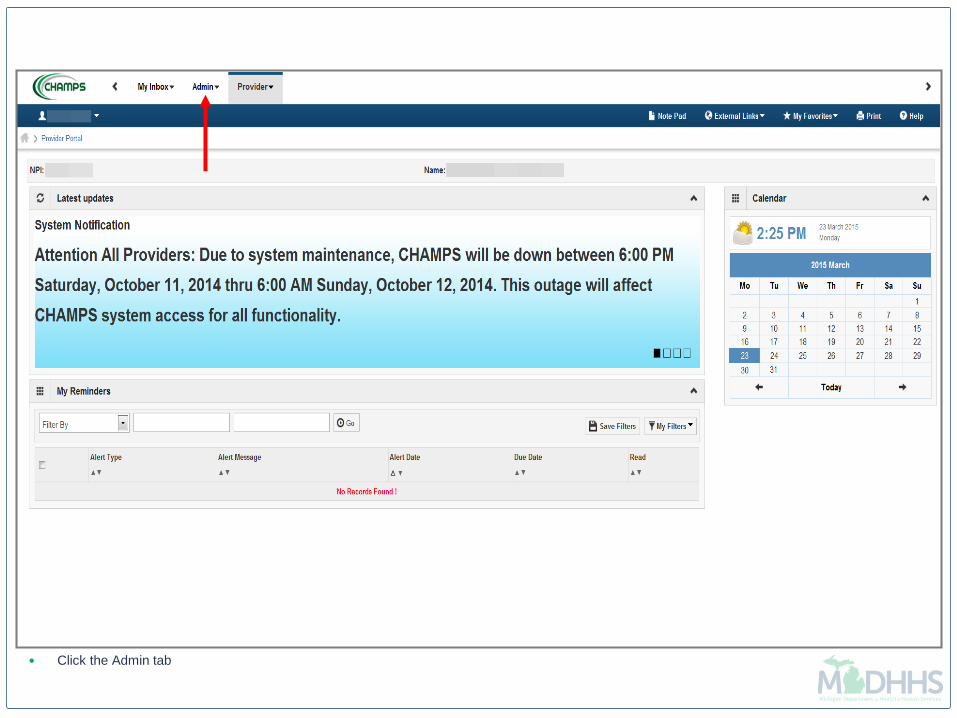
Click the Admin tab
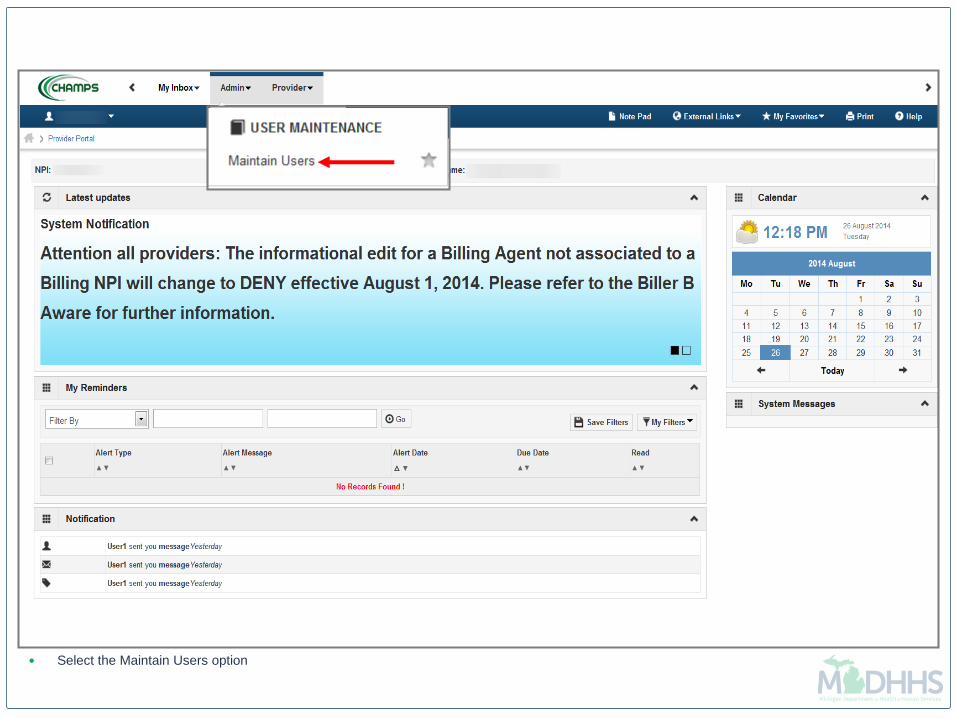
Select the Maintain Users option
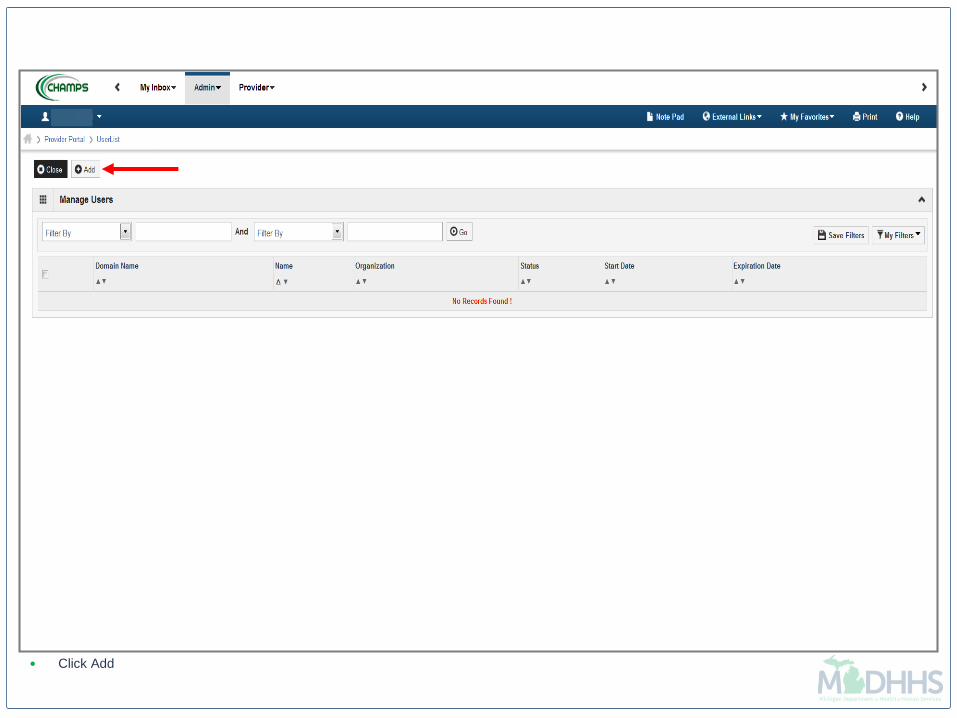
Click Add

Enter the User ID
Choose any of the available profiles listed and click the arrows to add it to the Selected Profiles

Once all desired profiles have been selected for the User ID click Ok

Domain Administrator
Updating Domains

Click the Admin tab

Select the Maintain Users option

Select Domain Name from the dropdown
Enter the wildcard % and click Go
Step 1 Step 2
Step 3

Click the domain name hyperlink that needs to be updated
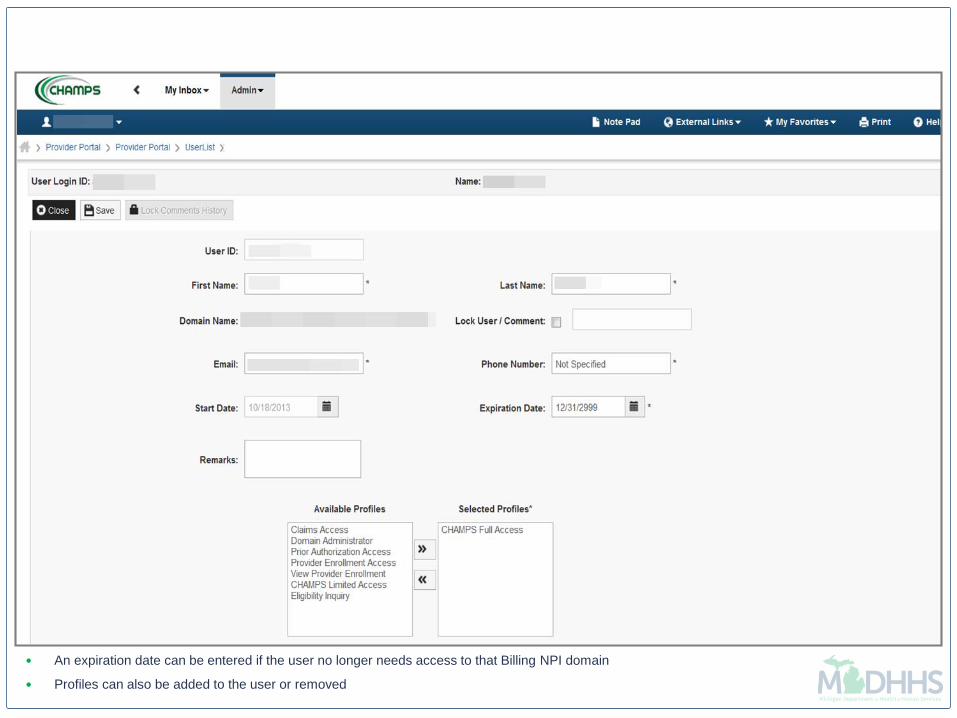
An expiration date can be entered if the user no longer needs access to that Billing NPI domain
Profiles can also be added to the user or removed

Provider Resources
MDHHS website: www.michigan.gov/medicaidproviders
We continue to update our Provider Resources, just click on the links below: Listserv Instructions
Medicaid Alerts and Biller “B” Aware
Quick Reference Guides
Update Other Insurance NOW!
Medicaid Provider Training Sessions
Provider Support: [email protected] or 1-800-292-2550
Thank you for participating in the Michigan Medicaid Program