Chainsaw operation · In all cases, chainsaw operators, trainers and other parties using this ......
26
July 2016 Edition Chainsaw operation Beginner to Advanced
Transcript of Chainsaw operation · In all cases, chainsaw operators, trainers and other parties using this ......

July 2016 Edition
Chainsaw operation
Beginner to
Advanced


Chainsaw Operation – Beginner to advanced
© 2016 Workspace Training
ISBN: 978-1-925087-21-5
Copyright © 2016 McElvenny Ware Pty Ltd trading as Workspace Training.
No part of this publication may be reproduced or stored by any means without the written permission of McElvenny Ware Pty Ltd other than for private study or research, as permitted under the Copyright Act.
All photos were taken by David McElvenny.
All graphics were drawn by Kath Ware. Most of the drawings are based on graphics provided by Husqvarna for the related interactive CD project: Chainsaw operation – beginner to advanced.
Source material This booklet is based on material contained in the interactive CD developed by Workspace Training called Chainsaw operation – beginner to advanced. The original CD resource was developed with funding provided by the Commonwealth Government’s Workplace English Language and Literacy (WELL) Program.
The technical information is drawn from publications made available by Husqvarna and Stihl for the above WELL project, as well as the NSW State Forests Chainsaw Operators Manual (2001).
Copyright in the original interactive CD resource is owned by the Commonwealth Government under a Creative Commons 3.0 Australia Licence. It is still available for purchase from Workspace Training on a cost recovery basis under the original distribution arrangements granted by the WELL Program.
The CD resource has since been revised and updated by Workspace Training to meet changing Training Package requirements. The latest version is the 2016 edition, which is also available for purchase. The new interactive CD package contains a Powerpoint version of the presentation, downloadable assessment tools in a customisable Word format and a hard copy Trainer Guide.
To order the CD, go to: www.workspacetraining.com.au and follow the links.

Chainsaw Operation – Beginner to advanced
© 2016 Workspace Training
Technical Advisory Committee The following chainsaw experts were involved in the development and review of this booklet:
Ben Sparks – Training manager, Savco Vegetation Services
Ray Stone – Principal, Chainsaw Accreditation and Safety Training
Goetz Graf – Director, Tree Management Australia
All three experts were members of the original technical advisory committee involved in the development of the interactive CD resource. They and their students are featured extensively throughout the photos in the interactive CD and this booklet.
Disclaimer Chainsaw use is an inherently dangerous activity. This booklet is designed to provide background information for participants undertaking a face-to-face course in chainsaw operation with a qualified trainer.
It is not designed to be used as a substitute for face-to-face training.
While all care has been taken in the preparation of this resource, McElvenny Ware Pty Ltd (trading as Workspace Training) and all individuals involved in its development do not accept any liability to any person for the information or advice provided in this booklet, the use of such information or advice, or any errors or omissions.
No liability is accepted for any damage or loss, including indirect and consequential loss, incurred by any person as a result of relying on the information or advice contained in this booklet.
The information is provided on the basis that all persons undertake full responsibility for assessing the relevance and accuracy of its content.
In all cases, chainsaw operators, trainers and other parties using this resource should follow the directions provided by the manufacturer of their equipment, and seek further advice from the manufacturer and/or their employer if they believe there are any discrepancies between the different sources of information.

Chainsaw Operation – Beginner to advanced
© 2016 Workspace Training
Contents
1. Introduction ............................................................................................. 1 2. Safety and environment care ..................................................................... 2
Safety features on a chainsaw .............................................................................2 Personal Protective Equipment ...........................................................................5 Other items of equipment ....................................................................................6 Legislation and regulations ..................................................................................7 Risk assessment.................................................................................................9 Handling hazardous liquids ............................................................................... 10
3. Using a chainsaw ..................................................................................................11
Choosing the right sized chainsaw ......................................................................... 11 Fuelling up .............................................................................................................. 12 Tensioning the chain .............................................................................................. 13 Starting a chainsaw ................................................................................................ 14 Kickback ................................................................................................................. 16
4. Maintaining a chainsaw ........................................................................................17
Powerhead ............................................................................................................. 17 Guide bar ............................................................................................................... 20 Chains .................................................................................................................... 21 Chain sharpening ................................................................................................... 24
5. Cutting materials .................................................................................................. 28
Preparing the area ................................................................................................. 28 Cutting packs of timber .......................................................................................... 29
6. Trimming & cutting felled trees ........................................................................... 31
The 3 basic cuts ..................................................................................................... 31 The 2 main stresses ............................................................................................... 33 Bridging cuts .......................................................................................................... 34 Swinging cuts ......................................................................................................... 35 Wedges .................................................................................................................. 36 Step cuts and angle cuts ........................................................................................ 38 Planning your cuts ................................................................................................. 39 Limbing .................................................................................................................. 40 Scrub clearing ........................................................................................................ 42 Ripping ................................................................................................................... 42

Chainsaw Operation – Beginner to advanced
© 2016 Workspace Training
7. Introduction to tree falling ................................................................................... 44
Main hazards .......................................................................................................... 45
8. Preparing to fall a tree .......................................................................................... 48
The tree's natural lean ........................................................................................... 48 Checking for defects .............................................................................................. 50 Deciding on the direction of fall .............................................................................. 51 Preparing the tree .................................................................................................. 51 Escape routes ........................................................................................................ 52
9. Scarf and back cut principles .............................................................................. 54
Scarf cut ................................................................................................................. 54 Back cut ................................................................................................................. 58 Step by step process .............................................................................................. 59
10. Falling away from natural lean .......................................................................... 63
Using wedges ......................................................................................................... 64 Making allowances ................................................................................................. 66 Pierce and wedge method ..................................................................................... 67
11. More advanced techniques ............................................................................... 68
Trees that split ....................................................................................................... 68 Heavy forward leaners ........................................................................................... 69 Large diameter trees .............................................................................................. 70 Double leaders ....................................................................................................... 71 Defective trees ....................................................................................................... 72
12. Knowing your capabilities ................................................................................. 74
Tree falling competencies ...................................................................................... 75 Fell small trees ....................................................................................................... 75 Basic tree falling ..................................................................................................... 76 Intermediate tree falling .......................................................................................... 76 Advanced tree falling .............................................................................................. 77

Chainsaw Operation – Beginner to advanced
© 2016 Workspace Training 1
1. Introduction There are two booklets in the Chainsaw Operation series:
Maintenance and crosscutting Beginner to advanced.
This booklet – Beginner to advanced – includes all of the material contained in Maintenance and cross cutting, plus a coverage of the skills involved in falling trees at the basic, intermediate and advanced levels. It is not designed to take the place of face-to-face instruction with a qualified trainer. But it will help you to learn the fundamental information that every chainsaw operator needs to know in order to work efficiently and safely.
Its purpose is to prepare you for the practical training sessions, so that you’ll have an understanding of why you’re being taught to do things in a certain way and why you need to wear and carry particular items of safety equipment.
The material in this booklet is aligned to the following units of competency:
Forest and Wood Products Training Package (FWP): FWPCOT2237: Maintain chainsaws
FWPCOT2238: Cut materials with a hand-held chainsaw
FWPCOT2239: Trim and cut felled trees
FWPCOT2236: Fall trees manually (basic)
FWPFGM3212: Fall trees manually (intermediate)
FWPFGM3213: Fall trees manually (advanced)
Agriculture, Horticulture and Conservation and Land Management Training Package (AHC): AHCMOM213: Operate and maintain chainsaws
AHCPCM203: Fell small trees
Chainsaw Operation – Beginner to advanced
© 2016 Workspace Training 2
2. Safety and environment care A chainsaw is one of the most efficient cutting machines you’re ever likely to use. But it’s also one of the most dangerous.
In this chapter, we’ll look at the safety features on a chainsaw, personal protective equipment, environmental care procedures, and some basic provisions in the Work Health and Safety (WHS) Act that are designed to protect you and your work mates from injury or mishaps.
Safety features on a chainsaw
Modern saws have the following safety features:
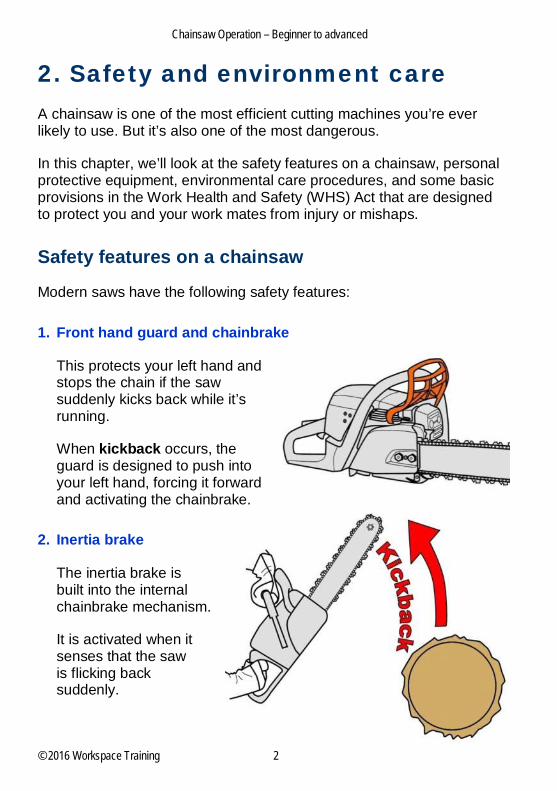
1. Front hand guard and chainbrake
This protects your left hand and stops the chain if the saw suddenly kicks back while it’s running.
When kickback occurs, the guard is designed to push into your left hand, forcing it forward and activating the chainbrake.
2. Inertia brake
The inertia brake is built into the internal chainbrake mechanism.
It is activated when it senses that the saw is flicking back suddenly.
Chainsaw Operation – Beginner to advanced
© 2016 Workspace Training 3
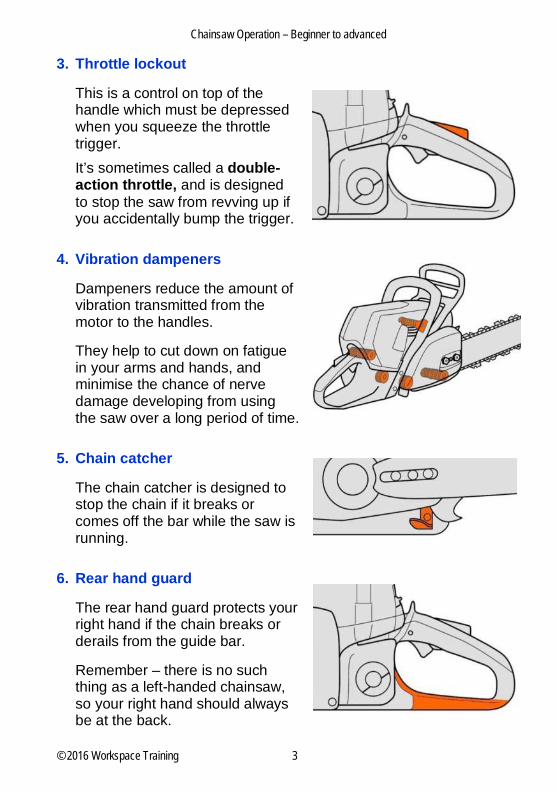
3. Throttle lockout
This is a control on top of the handle which must be depressed when you squeeze the throttle trigger. It’s sometimes called a double-action throttle, and is designed to stop the saw from revving up if you accidentally bump the trigger.
4. Vibration dampeners
Dampeners reduce the amount of vibration transmitted from the motor to the handles.
They help to cut down on fatigue in your arms and hands, and minimise the chance of nerve damage developing from using the saw over a long period of time.
5. Chain catcher
The chain catcher is designed to stop the chain if it breaks or comes off the bar while the saw is running.
6. Rear hand guard
The rear hand guard protects your right hand if the chain breaks or derails from the guide bar.
Remember – there is no such thing as a left-handed chainsaw, so your right hand should always be at the back.

Chainsaw Operation – Beginner to advanced
© 2016 Workspace Training 4
7. Ignition/stop switch
This shuts off the engine and stops the saw. Whatever the model of saw you’re using, it will always be within easy reach of your right thumb.
8. Reduced-kickback chain
A reduced kickback chain has little ramps that help to guide obstacles over the front of the cutters.
This lessens the chance of kickback occurring.
9. Sprocket nose and narrow nose profile on the guide bar
A sprocket nose on the guide bar allows the chain to run more tightly and with less friction than a nose without a sprocket would.
A narrow nose profile also improves safely, because reduces the size of the kickback zone.
10. Muffler and spark arrester
The muffler reduces the noise level and helps to direct exhaust gases away from the operator.
The spark arrester is a small metal screen in the muffler that catches sparks to stop them from causing a fire.

Chainsaw Operation – Beginner to advanced
© 2016 Workspace Training 5
Personal Protective Equipment
The personal protective equipment (PPE) you wear will depend on the type of work you’re doing, and whether you’re in the forest or at an established yard or factory. Below are the main items. Note that there are Australian Standards that govern some of these items.
1. Safety helmet or hard hat – protects your head from falling objects.
2. Face shield or visor – protects your eyes from flying particles. Some operators also wear wrap-around glasses for extra protection.
3. Ear muffs or ear plugs – protects your hearing from the loud noise of chainsaws and nearby equipment.
4. High visibility vest or jacket – helps to make you more visible to other workers in the area.
5. Gloves – keeps your hands warm in cold weather. Also specified in some workplaces as a mandatory protective requirement.
6. Protective trousers or chaps – contain cut-resistant material, which is designed to stall the saw if the spinning chain comes into contact with it.
7. Steel capped safety boots – protect your feet from falling objects. In forest conditions, many employers require high lace-up safety boots with ankle support.

Chainsaw Operation – Beginner to advanced
© 2016 Workspace Training 6
Other items of equipment
There are various other items of equipment that you may need to carry, depending on where you’re working and what sort of work you’re doing.
In the forest, you’ll need:
• hand tools – such as files, spanner, depth gauge, etc
• axe – for removing bark, hammering in a stump vice or wedges, ‘sounding’ a tree
• fuel and oil – sufficient quantity to cover the day’s work
• wedges – for stopping a cut from closing up on the saw
• first aid kit – stocked with suitable supplies.
If you’re working with large logs or fallen trees, you may also need a:
• cant hook – to move or roll the logs.
In remote areas, forest owners generally require all personnel to carry a UHF radio, to stay in contact with other people in the area while they’re working. But generally speaking, the best advice for working in a remote area is:
• don’t work alone
• have a vehicle on hand, so you can get out of the forest in an emergency
• have a system in place for regular checks to be made on you, either by radio or in person.
Chainsaw Operation – Beginner to advanced
© 2016 Workspace Training 7
Legislation and regulations
In general, the policies and procedures you are asked to follow at work will make provision for the laws and regulations that apply to your job.
But it’s worth keeping in mind that some laws go beyond the obligations placed on the company, and extend directly to everyone working on-site. This means that if you do the wrong thing, it’s not just the company that will be in trouble – you might end up being prosecuted personally.
Safety laws
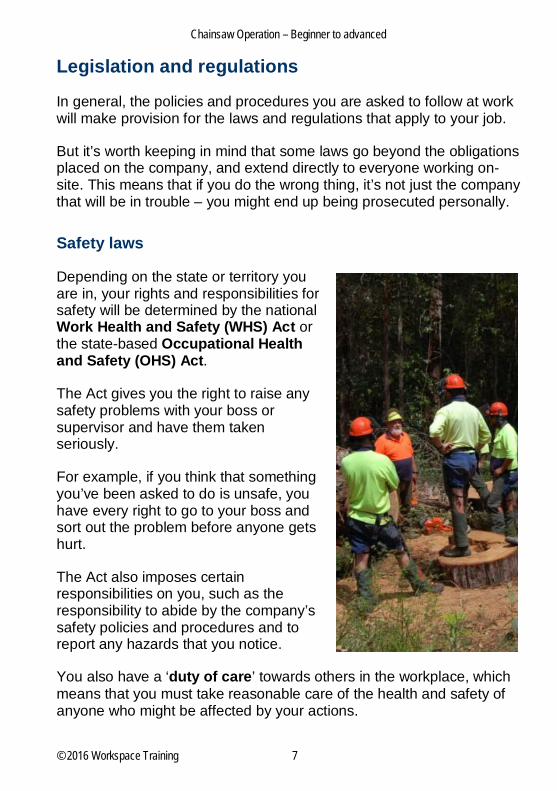
Depending on the state or territory you are in, your rights and responsibilities for safety will be determined by the national Work Health and Safety (WHS) Act or the state-based Occupational Health and Safety (OHS) Act.
The Act gives you the right to raise any safety problems with your boss or supervisor and have them taken seriously.
For example, if you think that something you’ve been asked to do is unsafe, you have every right to go to your boss and sort out the problem before anyone gets hurt.
The Act also imposes certain responsibilities on you, such as the responsibility to abide by the company’s safety policies and procedures and to report any hazards that you notice.
You also have a ‘duty of care’ towards others in the workplace, which means that you must take reasonable care of the health and safety of anyone who might be affected by your actions.

Chainsaw Operation – Beginner to advanced
© 2016 Workspace Training 8
Environmental laws
Each state and territory has its own environmental legislation. These laws and regulations are policed by the Environment Protection Authority (EPA), or its equivalent body.
All businesses have a legal obligation to look after the environment when they carry out their work. Under the law this is called showing ‘due diligence’. Due diligence in environmental care means that you need to:
• prevent pollution from occurring by taking all reasonable steps necessary – such as by disposing of fuel, oil and cleaning fluids properly
• prevent environmental damage by minimising your impact on the surrounding area – such as by following harvesting plans carefully and minimising erosion and other damage caused by vehicles or heavy machinery
• prevent incidents from developing by doing everything that could be reasonably expected of you under the circumstances – such as by cleaning up spills quickly, before they have a chance to run into the local waterway
• implement control measures to minimise risks, and regularly check that they are in place and doing what they are supposed to do – such as by making sure that fuel and other hazardous liquids are stored properly in a secure area.
The law states that if pollution occurs when you're doing something and it threatens or harms the environment, you must tell the EPA or the local council as soon as you can.

Chainsaw Operation – Beginner to advanced
© 2016 Workspace Training 9
Risk assessment
A good way of ensuring that you’ve taken everything into account before you start a job is to carry out a risk assessment of the area you’ll be working in.
The purpose of a risk assessment is to:
• identify any hazards in the area
• assess the risk of each hazard causing an accident or injury
• control the risk, either by removing the hazard or minimising its effect.
Below is a simple example of a risk assessment checklist you might follow before starting your day’s work in the forest.
1. Overhead hazards – are there any overhead hazards, such as dead branches, widow makers or dead-topped trees?
2. Manual handling hazards – are there heavy objects that need to be moved or carried, awkward locations or other manual handling hazards?
3. Slips, trips and falls – are there any holes, wet ground, covered or hidden obstacles, unstable rocks, steep slopes or drop-offs?
4. Cut and lacerations – are the any sharp branches at eye level, rock protrusions or other hazards that might cause cuts or lacerations?
5. Other workers in the area – are there other workers in the area or machines operating nearby that might come close enough to cause a hazard?
6. Weather conditions and fire risk – are the current or predicted weather conditions likely to pose a risk while working (e.g. winds, storms, excessive temperatures, extreme fire danger)?
Chainsaw Operation – Beginner to advanced
© 2016 Workspace Training 10
Handling hazardous liquids
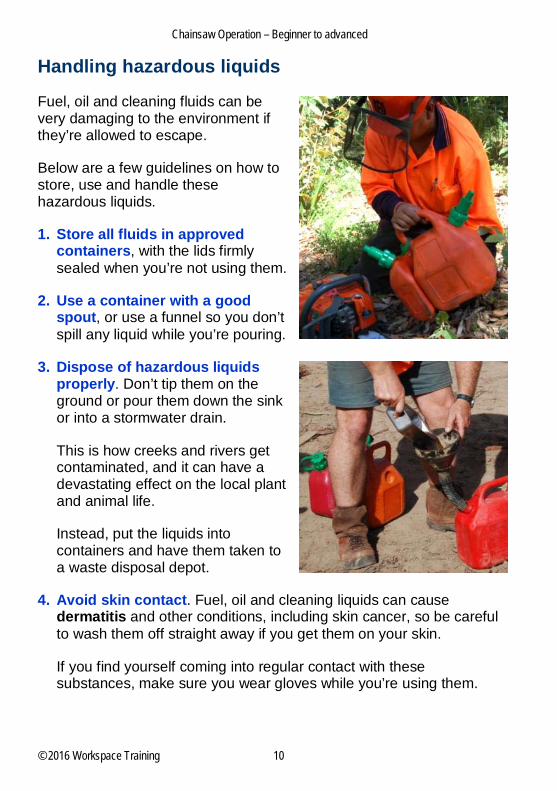
Fuel, oil and cleaning fluids can be very damaging to the environment if they’re allowed to escape.
Below are a few guidelines on how to store, use and handle these hazardous liquids.
1. Store all fluids in approved containers, with the lids firmly sealed when you’re not using them.
2. Use a container with a good spout, or use a funnel so you don’t spill any liquid while you’re pouring.
3. Dispose of hazardous liquids properly. Don’t tip them on the ground or pour them down the sink or into a stormwater drain.
This is how creeks and rivers get contaminated, and it can have a devastating effect on the local plant and animal life.
Instead, put the liquids into containers and have them taken to a waste disposal depot.
4. Avoid skin contact. Fuel, oil and cleaning liquids can cause dermatitis and other conditions, including skin cancer, so be careful to wash them off straight away if you get them on your skin.
If you find yourself coming into regular contact with these substances, make sure you wear gloves while you’re using them.

Chainsaw Operation – Beginner to advanced
© 2016 Workspace Training 11
Sections 2 – 8 in full version of booklet
See below for Section 9 excerpt
Chainsaw Operation – Beginner to advanced
© 2016 Workspace Training 54
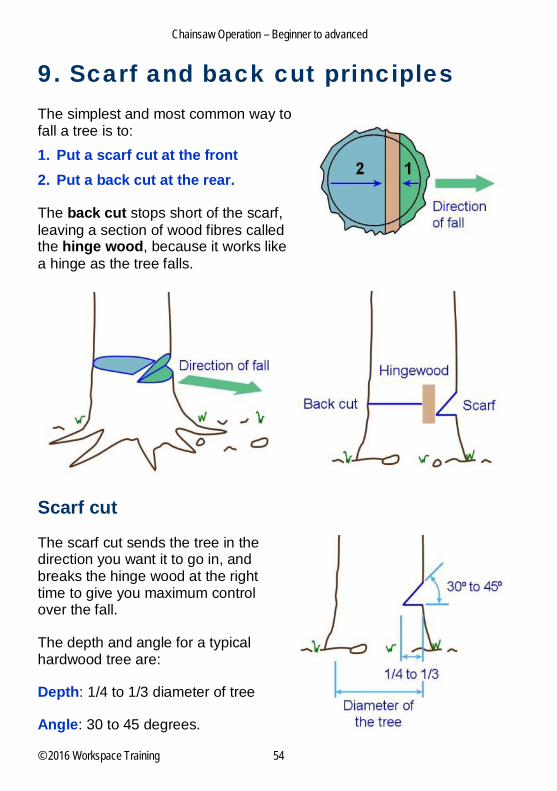
9. Scarf and back cut principles The simplest and most common way to fall a tree is to: 1. Put a scarf cut at the front 2. Put a back cut at the rear.
The back cut stops short of the scarf, leaving a section of wood fibres called the hinge wood, because it works like a hinge as the tree falls.
Scarf cut
The scarf cut sends the tree in the direction you want it to go in, and breaks the hinge wood at the right time to give you maximum control over the fall.
The depth and angle for a typical hardwood tree are:
Depth: 1/4 to 1/3 diameter of tree
Angle: 30 to 45 degrees.
Chainsaw Operation – Beginner to advanced
© 2016 Workspace Training 55
Other species may have different angles and depths that work best for them. So if you’re ever unsure about the optimum scarf size for the tree you’re about to fall, you should check with your trainer or another expert operator.
Getting the scarf right
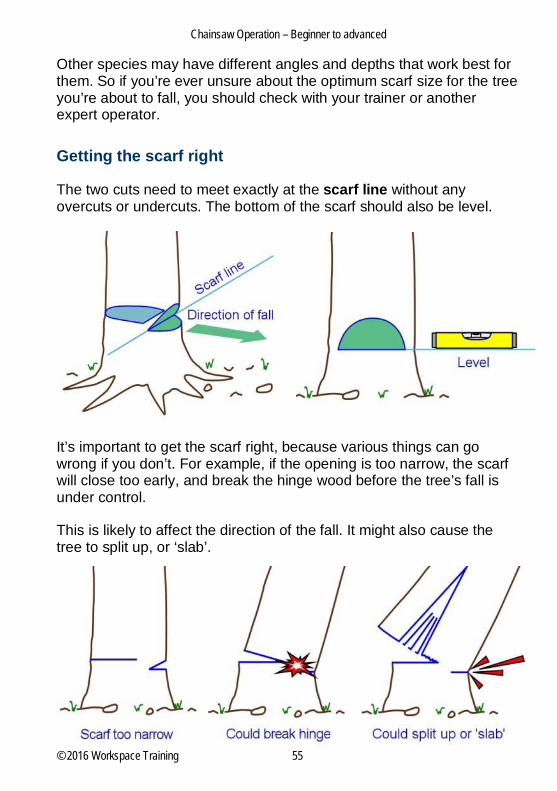
The two cuts need to meet exactly at the scarf line without any overcuts or undercuts. The bottom of the scarf should also be level.
It’s important to get the scarf right, because various things can go wrong if you don’t. For example, if the opening is too narrow, the scarf will close too early, and break the hinge wood before the tree’s fall is under control.
This is likely to affect the direction of the fall. It might also cause the tree to split up, or ‘slab’.
Chainsaw Operation – Beginner to advanced
© 2016 Workspace Training 56
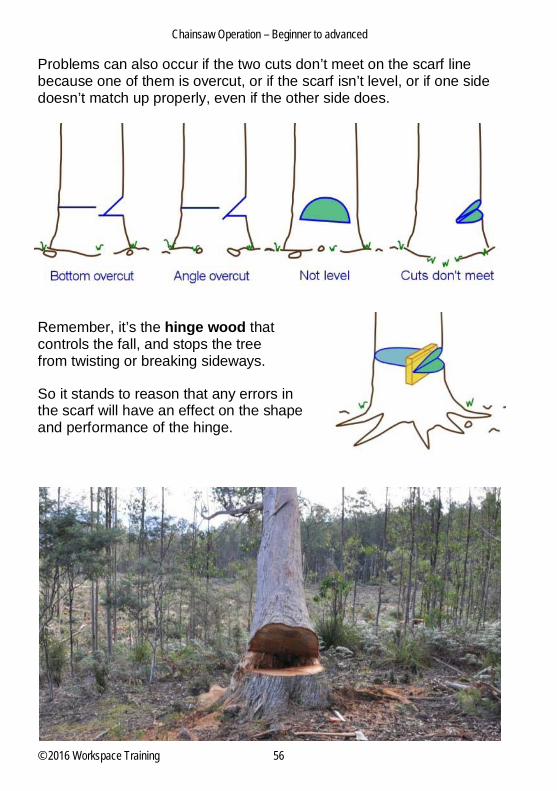
Problems can also occur if the two cuts don’t meet on the scarf line because one of them is overcut, or if the scarf isn’t level, or if one side doesn’t match up properly, even if the other side does.
Remember, it’s the hinge wood that controls the fall, and stops the tree from twisting or breaking sideways.
So it stands to reason that any errors in the scarf will have an effect on the shape and performance of the hinge.

Chainsaw Operation – Beginner to advanced
© 2016 Workspace Training 57
Other types of scarfs
So far we’ve only covered the standard scarf, which is the one you’re likely to use most often. However, there are other types of scarfs that can be used in particular situations. Below are three examples.
1. Humbolt, or reverse scarf – often used for cutting saw logs, because it lets you get a bit more recovery out of the log.
It can also be used when falling a tree uphill, because it helps to ensure that the tree doesn’t slip backwards over the stump.
2. 90 degree scarf – can be used on trees that have a very large butt swell.
The depth is determined by how deep you need to go to cover 2/3 of the diameter of the trunk.
3. V scarf – used on large trees, particularly when the trunk diameter is more than twice the length of the guide bar.
The wide mouth opening enables the hinge wood to control the fall of the tree through a greater arc before the two sides of the scarf meet.
We’ll look in more detail at the V scarf in Chapter 7: More advanced techniques.

Chainsaw Operation – Beginner to advanced
© 2016 Workspace Training 58
Back cut
Once the scarf cut is done, you can put the back cut in. The back cut should be level, and slightly higher than the scarf line.
The proportions and dimensions shown in the diagram at right are typical specifications for a normal tree with a diameter of 500 mm.
Height above scarf line
In most cases, the height of the back cut above the scarf line should be 1/10 of the tree’s diameter.
So on a tree that’s 500 mm in diameter, the back cut’s height will be 50 mm.
This step-up helps to stop the tree from slipping backwards over the stump when it’s released.
Depth
In general, the depth of the back cut should allow the width of the hinge wood to be 1/10 of the tree’s diameter. Again, on a 500 mm tree, this will be 50 mm.
But there are times when the tree may call for the hinge to be cut on a taper, so you can pull the direction of the fall away from the tree’s natural lean. See Chapter 6 for more details on the variations on the 1/10 rule.
Chainsaw Operation – Beginner to advanced
© 2016 Workspace Training 59
Step by step process
Now that we’ve discussed the principles of the scarf cut, back cut and hinge wood, it’s time to look in more detail at the actual process of carrying out the cuts.
Scarf cut
Some people find it easiest to start a scarf with the bottom cut, so you can get it level and running exactly at right angles to the desired direction of fall.
However, other operators prefer to start with the angle cut, particularly under certain conditions.
Your trainer will talk to you about the most appropriate cut to begin with for the conditions that you’re working in.
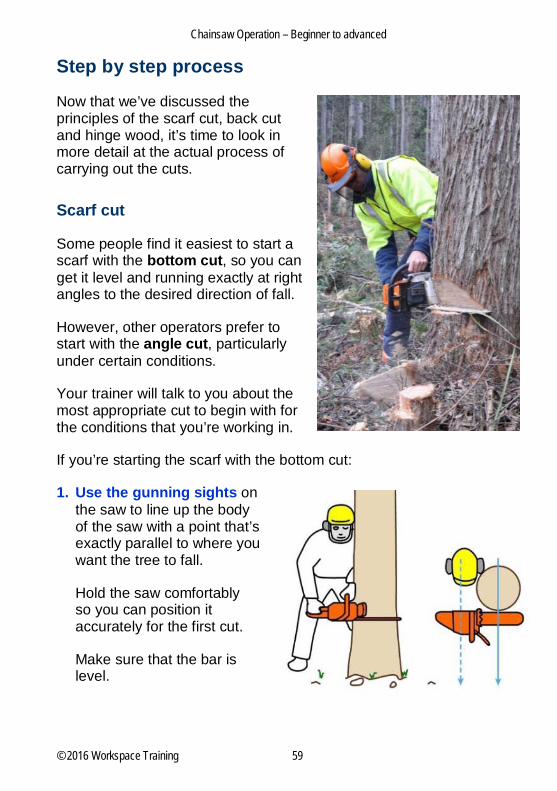
If you’re starting the scarf with the bottom cut:
1. Use the gunning sights on the saw to line up the body of the saw with a point that’s exactly parallel to where you want the tree to fall.
Hold the saw comfortably so you can position it accurately for the first cut.
Make sure that the bar is level.
Chainsaw Operation – Beginner to advanced
© 2016 Workspace Training 60
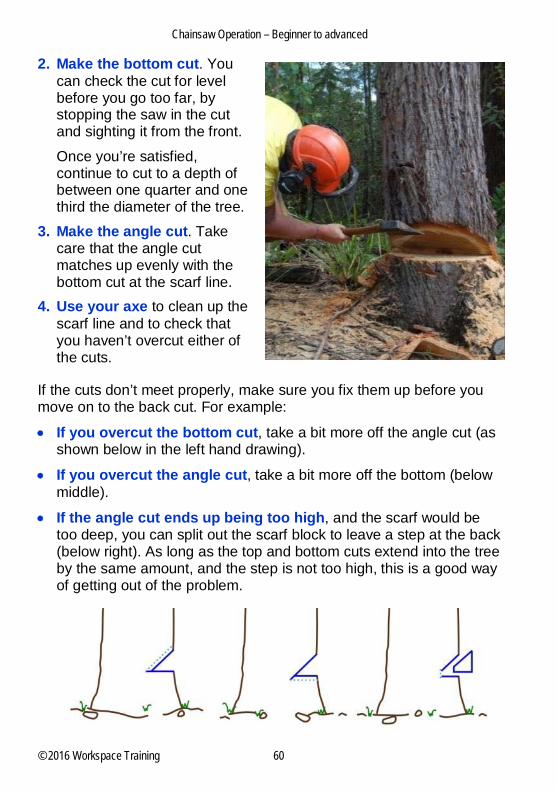
2. Make the bottom cut. You can check the cut for level before you go too far, by stopping the saw in the cut and sighting it from the front.
Once you’re satisfied, continue to cut to a depth of between one quarter and one third the diameter of the tree.
3. Make the angle cut. Take care that the angle cut matches up evenly with the bottom cut at the scarf line.
4. Use your axe to clean up the scarf line and to check that you haven’t overcut either of the cuts.
If the cuts don’t meet properly, make sure you fix them up before you move on to the back cut. For example:
• If you overcut the bottom cut, take a bit more off the angle cut (as shown below in the left hand drawing).
• If you overcut the angle cut, take a bit more off the bottom (below middle).
• If the angle cut ends up being too high, and the scarf would be too deep, you can split out the scarf block to leave a step at the back (below right). As long as the top and bottom cuts extend into the tree by the same amount, and the step is not too high, this is a good way of getting out of the problem.
Chainsaw Operation – Beginner to advanced
© 2016 Workspace Training 61
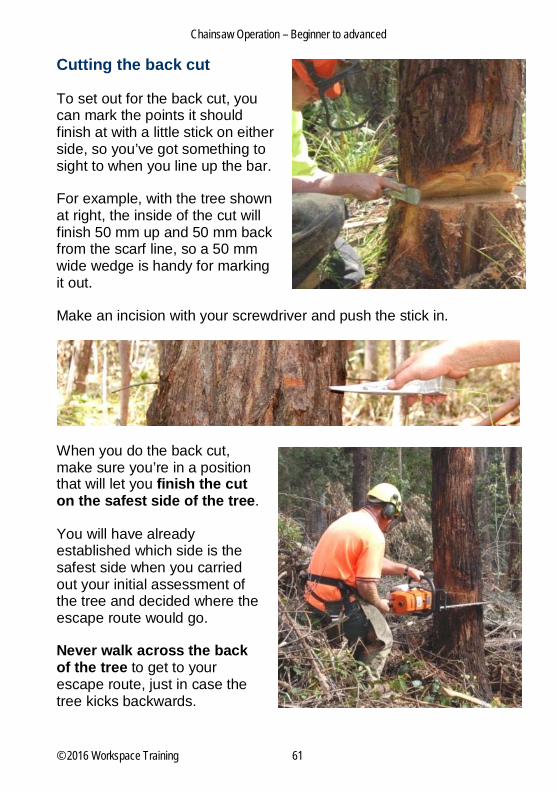
Cutting the back cut
To set out for the back cut, you can mark the points it should finish at with a little stick on either side, so you’ve got something to sight to when you line up the bar.
For example, with the tree shown at right, the inside of the cut will finish 50 mm up and 50 mm back from the scarf line, so a 50 mm wide wedge is handy for marking it out.
Make an incision with your screwdriver and push the stick in.
When you do the back cut, make sure you’re in a position that will let you finish the cut on the safest side of the tree.
You will have already established which side is the safest side when you carried out your initial assessment of the tree and decided where the escape route would go.
Never walk across the back of the tree to get to your escape route, just in case the tree kicks backwards.

Chainsaw Operation – Beginner to advanced
© 2016 Workspace Training 62
When the tree begins to fall – that is, when the fibres in the hinge wood start to snap – pull the saw out and quickly walk down your escape route.
Make sure you regularly look back to check for flying limbs, or ‘hangers’ that might fall from above. Stay well clear until all movement has stopped, and you’re sure there are no loose branches about to fall.
Back cut on large trees
If the diameter of the tree is more than the length of the bar, you can use a circular motion to complete the back cut.
The steps are as follows:
1. Cut the scarf
2. Put a bore cut in behind the hinge wood on the opposite side of the tree from your escape route. Then move the bar forward to set up the hinge wood thickness.
3. Rotate the saw around the back of the tree to finish the back cut, using the nose as a pivot point.
If you need to use wedges, put them in after completing about 2/3 of the back cut.