CHADALAWADA RAMANAMMA ENGINEERING COLLEGE WORKSHOP Lab Manual.pdf · A PC may have CPU-IC such as...
144
IT WORKSHOP LABORATORY MANUAL Subject Code : 17CA03201 Regulations : Autonomous – R17 Class : IISemester ( B. Tech-CSE) CHADALAWADA RAMANAMMA ENGINEERING COLLEGE (AUTONOMOUS) Chadalawada Nagar, Renigunta Road, Tirupati – 517 506 Department of Computer Science and Engineering
Transcript of CHADALAWADA RAMANAMMA ENGINEERING COLLEGE WORKSHOP Lab Manual.pdf · A PC may have CPU-IC such as...

IT WORKSHOP
LABORATORY MANUAL
Subject Code : 17CA03201
Regulations : Autonomous – R17
Class : IISemester ( B. Tech-CSE)
CHADALAWADA RAMANAMMA ENGINEERING COLLEGE (AUTONOMOUS)
Chadalawada Nagar, Renigunta Road, Tirupati – 517 506
Department of Computer Science and Engineering

CHADALAWADA RAMANAMMA ENGINEERING COLLEGE (AUTONOMOUS)
Chadalawada Nagar, Renigunta Road, Tirupati – 517 506
Department of Computer Science and Engineering
INDEX
S. No Name of the Experiment
Task 1 Learn about computer internal parts & Peripherals.
Task 2 Assembling & Disassembling a Computer.
Task 3 Installation of various Operating Systems.
Task 4 Networking two or more computers and document the process
Task 5
Browsing Internet and creating an email account: Studying various
web browsers and their features.
Task 6
Word Processor: Introduction to Word: Importance of word as word
processor, overview of toolbars, saving, accessing file, using help and
resources; Creating project Certificate: Abstract features to be
covered; Formatting Styles: Inserting table, bullets and numbering,
changing text direction, cell alignment, footnote, hyperlink, symbols,
spell check, images from files and clipart, drawing toolbar and Word
Art, formatting images, textboxes and paragraphs
Task 7
Spreadsheet-I: Spreadsheet basics, modifying worksheets,
Task 8
Spreadsheet-II: Sorting and filtering, charts, renaming and inserting
worksheets, hyper linking, count function, sorting, and conditional
formatting.
Task 9
Presentations: creating, opening, saving and running the presentations,
Selecting the style for slides, formatting the slides with different fonts,
colors, creating charts and tables, inserting and deleting text, graphics and
animations, bulleting and numbering, hyperlinking, running the slide
show, setting the timing for slide show.

Optional Tasks:
Task 10 A report on specifications of Laboratory Equipment
Task 11 A report on different Antivirus softwares and their installation, usage.
References:
1. Introduction to Computers, Peter Norton, Mc Graw Hill
2. “MOS study guide for word, Excel, Powerpoint & Outlook Exams”, Joan
Lambert, Joyce Cox, PHI.
3. Networking your computers and devices, Rusen, PHI
4. Trouble shooting, Maintaining & Repairing PCs”, Bigelows, TMH

TASK-1
Aim: Learn about computer internal parts & Peripherals
A computer can process data, pictures, sound and graphics. They can solve highly complicated
problems quickly and accurately.
Input Unit:
Computers need to receive data and instruction in order to solve any problem. Therefore we need to
input the data and instructions into the computers. The input unit consists of one or more input
devices. Keyboard is the one of the most commonly used input device. Other commonly used input
devices are the mouse, floppy disk drive, magnetic tape, etc. All the input devices perform the
following functions.
1. Accept the data and instructions from the outsideworld.
2. Convert it to a form that the computer canunderstand.
3. Supply the converted data to the computer system for furtherprocessing.
Storage Unit:
The storage unit of the computer holds data and instructions that are entered through the input unit,
before they are processed. It preserves the intermediate and final results before these are sent to the
output devices. It also saves the data for the later use. The various storage devices of a computer
system are divided into two categories.
1. Primary Storage: Stores and provides very fast. This memory is generally used to hold the
program being currently executed in the computer, the data being received from the input unit, the
intermediateandfinalresultsoftheprogram.Theprimarymemoryistemporaryinnature.Thedata

is lost, when the computer is switched off. In order to store the data permanently, the data has to be
transferred to the secondary memory. The cost of the primary storage is more compared to the secondary
storage. Therefore most computers have limited primary storage capacity.
2. Secondary Storage: Secondary storage is used like an archive. It stores several programs,
documents, data bases etc. The programs that you run on the computer are first transferred to the
primary memory before it is actually run. Whenever the results are saved, again they get stored in the
secondary memory. The secondary memory is slower and cheaper than the primary memory. Some of
the commonly used secondary memory devices are Hard disk, CD,etc.,
Memory Size:
All digital computers use the binary system, i.e. 0’s and 1’s. Each character or a number is
represented by an 8 bit code.
The set of 8 bits is called a byte. A character occupies 1 byte space.
A numeric occupies 2 byte space.
Byte is the space occupied in the memory.
The size of the primary storage is specified in KB (Kilobytes) or MB (Megabyte). One KB is equal to
1024 bytes and one MB is equal to 1000KB. The size of the primary storage in a typical PC usually
starts at 16MB. PCs having 32 MB, 48MB, 128 MB, 256MB memory are quite common.
Output Unit:
The output unit of a computer provides the information and results of a computation to outside world.
Printers, Visual Display Unit (VDU) are the commonly used output devices. Other commonly used
output devices are floppy disk drive, hard disk drive, and magnetic tape drive.
Arithmetic Logical Unit:
All calculations are performed in the Arithmetic Logic Unit (ALU) of the computer. It also does comparison
and takes decision. The ALU can perform basic operations such as addition, subtraction, multiplication,
division, etc and does logic operations viz, >, <, =, ‘etc. Whenever calculations are required, the control unit
transfers the data from storage unit to ALU once the computations are done, the results are transferred to the
storage unit by the control unit and then it is send to the output unit for displayingresults.
Control Unit:
It controls all other units in the computer. The control unit instructs the input unit, where to store the
data after receiving it from the user. It controls the flow of data and instructions from the storage unit
to ALU. It also controls the flow of results from the ALU to the storage unit. The control unit is
generally referred as the central nervous system of the computer that control and synchronizes its
working.
Central Processing Unit: The control unit and ALU of the computer are together known as the Central Processing Unit (CPU). The
CPU is like brain performs the following functions:

It performs allcalculations.
• It takes alldecisions.
• It controls all units of thecomputer.
A PC may have CPU-IC such as Intel 8088, 80286, 80386, 80486, Celeron, Pentium, Pentium Pro,
Pentium II, Pentium III, Pentium IV, Dual Core, and AMD etc.
Introduction to Computer Hardware:
Hardware is the physical appearance of the devices or tools. It is what which we can touch and feel.
Computer Hardware consists of the Monitor, CPU, Keyboard, Mouse and all other devices connected
to the computer either externally orinternally.
A typical computer (personal computer, PC) consists of a desktop or tower case (chassis) and the
following parts:
1. CPU The central processing unit contains the heart of any computer, the processor. The
processor is fitted on to a Mother Board. The Mother Board contains various components,
which support the functioning of aPC.
2. System board/Motherboard which holds the Processor, Random Access Memory and other
parts, and has slots for expansioncards
3. RAM (Random Access Memory)- For program execution and short term data-storage, so the
computer doesn't have to take the time to access the hard drive to find something. More RAM can
contribute to a fasterPC.
The main memory of the computer is called as Random Access Memory (RAM). The name
derives from the fact that data can be stored in and retrieved at random, from anywhere in the
electronic main memory chips in approximately the same amount of time, no matter where the data is.
Main memory is in an electronic or volatile state. When the computer is off, main memory is empty,
when it is on it is capable of receiving and holding a copy of the software instructions, and data
necessary for processing. Because the main memory is a volatile form of storage that depends on
electric power can go off during processing, users save their work frequently on to non volatile
secondary storage devices such as diskettes or harddisk.
The main memory is used for the following purposes:
1. Storage of the copy of the main software program that controls the general operation of the
computer. This copy is loaded on to the main memory when the computer is turned on, and it
stays there as long as the computer ison.
2. Temporary storage of a copy of application program instruction, to be received by CPU for
interpretation and processing or execution.
3. Temporary storage of data that has been input from the key board, until instructions call for
the data to be transferred in to CPU forprocessing.
Temporary storage of data, which is required for further processing or transferred as output to
output devices such as screen, a printer, a disk storage device.
ROM (Read Only Memory)
Instructions which are critical to the operation of a computer are stored permanently on Read
only Memory. (ROM) chip installed by the manufacturer inside the computer. This ROM chip is also
called firm ware, retains instructions in a permanently accessible nonvolatile form. When the power
in the computer is turned off, the instructions stored in ROM are notlost.
It is necessary and also convenient to have instructions stored in ROM. The more instructions
in ROM, the fewer diskettes you may have to handle. Until recently the process of manufacturing
ROM chips and recording data on them was more expensive than the process of producing RAM
chips. As a result the manufacturers tended to record in ROM only those instructions that were crucial
to the operation of thecomputer.
Today, due to improvements in the manufacturing process of ROM chips have lowered the
cost to the point where manufacturers are beginning to include additional software instructions.

In addition to ROM, three additional categories of non volatile memory are used in some
computer systems. They are PROMs, EPROMs, and EPROMs. PROM stands for programmable read
only memory.
It works similar to that of ROM. PROM chips are custom made for the user by the
manufacturer. The user determines what data and instructions are to be recorded on them. The data on
PROM is permanent and cannot be erased.
Erasable programmable read only memory (EPROM), developed as an improvement over PROM.
The data on the EPROM can be read with the help of a special device that uses ultra violet light. The
data or instructions on the EPROM are erasable and new data can be entered in its place. EPROM
functions exactly same as PROM.
Electronically erasable programmable read only memory (EEPROM) avoids the inconvenience of
having to take chips out of the computer to change data and instructions. Changes can be made
electrically under software control. These are used in point of sale terminals to records price related
data for products. The prices recorded on them can be easily updated as needed. The only
disadvantage of EEPROM is, the regular ROMchips.
Differences between ROM &RAM
ROM (Read only memory)
1. You can only read thedata.
2. Data can’t be written every time, to write the data we need PROM, EPROM, OREEPROM.
3. ROM is non volatile in nature. The data stored in ROM is permanent innature.
4. Size of the ROM has nothing to do withprocessing.
RAM (Random access memory):
1. You can read and write data on thechip.
2. RAM has volatile memory. It looses its contents when the power is switchedoff.
3. Size of the RAM makes difference in the processing i.e., bigger the size of the RAM more is
the speed ofprocessing.
4. The data can be read and written atanytime.
o Dynamic RAM (DRAM)
Synchronous DRAM (SDRAM)

o Static RAM(SRAM)
4. Buses : PCI bus, PCI-E bus, ISA bus (outdated), USB,AGP
5. Power Supply - a case that holds a transformer, voltage control andfan
6. Storage controllers, of IDE, SCSI or other type, that control hard disk, floppy disk, CD-ROM
and other drives; the controllers sit directly on the motherboard (on-board) or on expansion
cards
7. Video display controller that produces the output for the computerdisplay
8. computer bus controllers (parallel, serial, USB, Fire wire) to connect the computer to external
peripheral devices such as printers orscanners
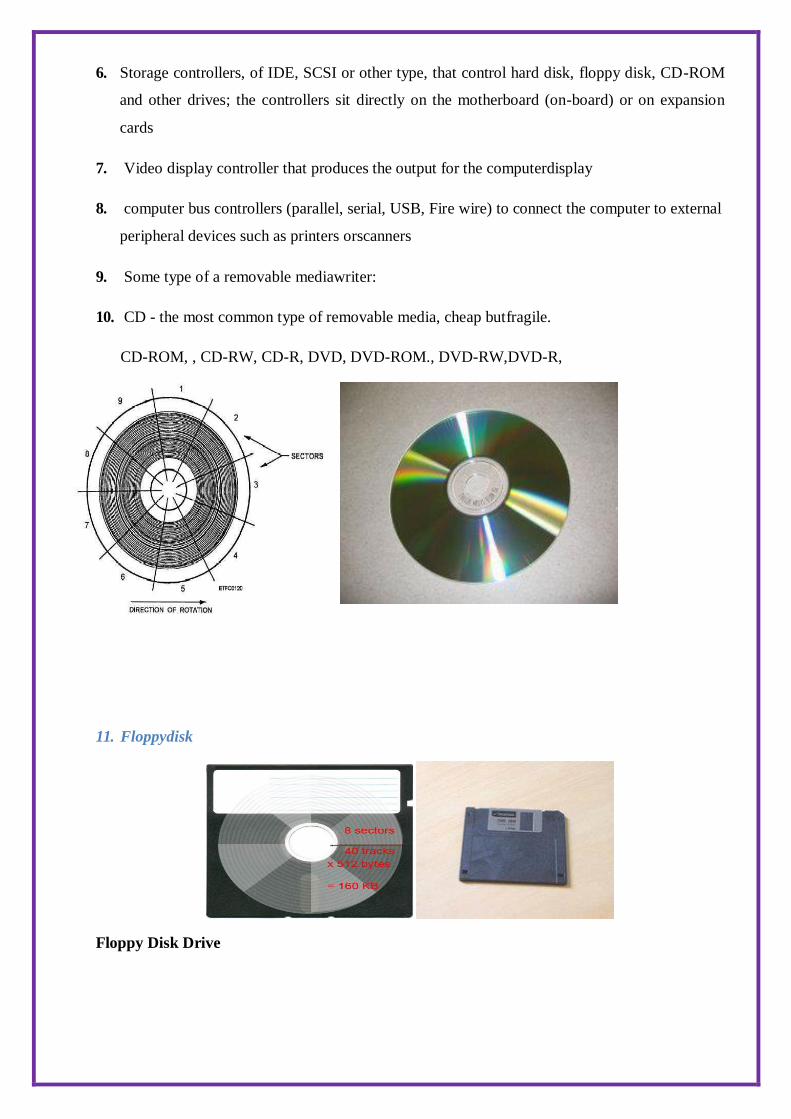
9. Some type of a removable mediawriter:
10. CD - the most common type of removable media, cheap butfragile.
CD-ROM, , CD-RW, CD-R, DVD, DVD-ROM., DVD-RW,DVD-R,
11. Floppydisk
Floppy Disk Drive

12. Tape Drive - mainly for backup and long-termstorage
13. Internal storage - keeps data inside the computer for lateruse.
14. Hard disk - for medium-term storage ofdata.
15. Disk arraycontroller
16. Sound card - translates signals from the system board into analog voltage levels, and has
terminals to plug inspeakers.

17. Networking - to connect the computer to the Internet and/or othercomputers
18. Modem - for dial-upconnections
19. Network card - for DSL(Digital Subscriber Line)/Cable internet, and/or connecting to other
computers.

20. Other peripherals: In addition, hardware can include external components of a computer
system. The following are either standard or verycommon.
Standardinputdevices: Keyboard
Mouse
Alternate input devices:

Pens,Touch screens,Game controllers(joy stick),Touch pad,Trackball.
Optical input devices: Barcode reader, Image scanners.
Audio visual input devices: Microphones, Video input ,Digital cameras
21. Output : The output devicesare:
Standard output devices: Monitor
Types of monitors
CRT(cathode ray tube) monitors
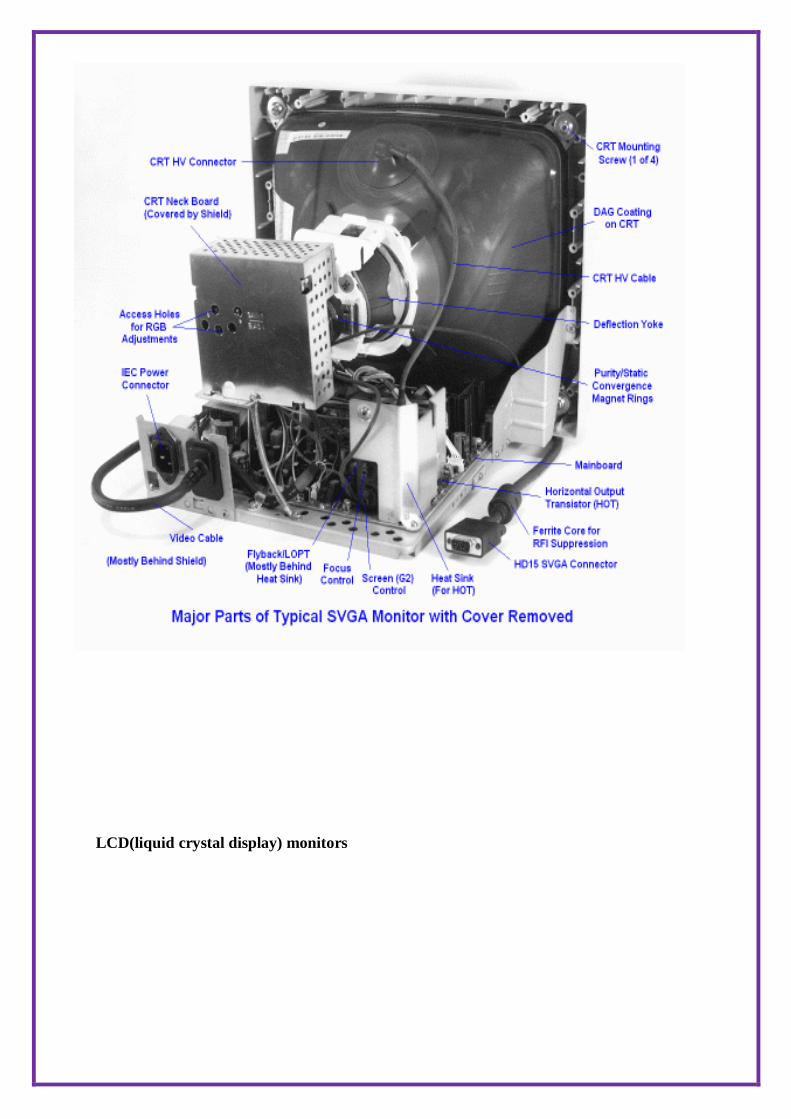
LCD(liquid crystal display) monitors

Printer
Types of printers
Impact printers: An impact printer create an image by using pins or hammers to press an inked
ribbon against the paper.ex. Dot matrix printer.
Non impact printers: This type uses other means to create an image for example in ink jet printers
tiny nozzles are used to spray droplets of ink on the page.ex: Ink jetprinter
Laser Printer
Dot- Matrix printer:

Inkjet printer
Fig: Printer working model
Other output devices:

Speakers, LCD projectors, Networking, Network card
Speakers
LCD Projectors
Fig: Laser working model
Viva Questions:
1) Define acomputer?
2) Define hardware andsoftware?
3) What are the functional units of acomputer?
4) Define the following:RAM,ROM,BIOS,BUS,BIT,PROGRAM.
5) What is the use of a motherboard?
EXPERIMENT – 2
ASSEMBLING AND DISASSEMBLING OF A COMPUTER
Assembling and disassembling the PC back to working condition.
AIM: To assemble and disassemble the system
Safety Precautions:
1. Beware of electrostatic discharge (ESO)
2. Build computer on a hard surface, away fromconcepts.
3. Wear shoes and the short sleeved cottonwear.
4. Use Phillips, head screwdriver.
5. Keep the components away frommoisture.
6. Avoid using pressure whileinstalling.
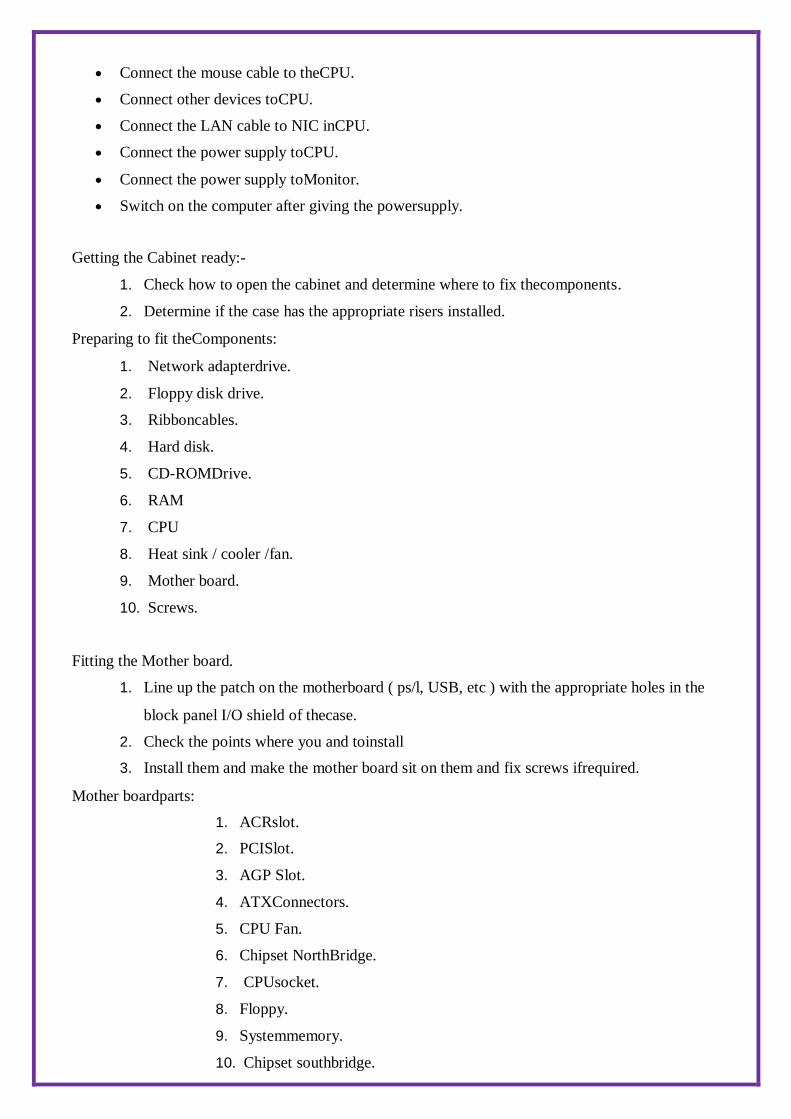
Steps for Assembling
Fix the SMPS on the cabinet of PC using the screwsprovided.
Fix the motherboard on the cabinet of PC using the screwsprovided.
Connect the power cables from SMPS tomotherboard
Insert the preprocessor into the slot provided such that the corner with no pin coincide with
corner without pinhole onmotherboard.
Apply the appropriate adhesive on the processor for fixing the processorfan.
Fix the processor fan on the processor and use clips on it to keep itfirm.
Connect the power cable to the processorfan
Insert the RAM card into the slots provided on themotherboard.
Set the jumpers setting on the hard discdrive.
Fix the hard disc drive in the space provided in the PC cabinet using screwsprovided.
Fix the FDD in the space provided in the PC cabinet using screwsprovided.
Fix the CD-ROM in the space provided in the PC cabinet using screwsprovided.
Connect the FDD,HDD, CD-ROM drive to motherboard using flatribbon.
Connect power supply to the HDD, FDD, CD-ROM drive using the cables from theSMPS.
Connect wires of speakers and lights of cabinet to themotherboard.
Connect the network interface and other cards to motherboard by inserting in right slots and
fix them in cabinet using the screwsprovided.
Place the cabinet in rightposition.
Fix the doors of the cabinet.
Connect the data cable of monitor to the CPU.

Connect the keyboard cable to theCPU.
Connect the mouse cable to theCPU.
Connect other devices toCPU.
Connect the LAN cable to NIC inCPU.
Connect the power supply toCPU.
Connect the power supply toMonitor.
Switch on the computer after giving the powersupply.
Getting the Cabinet ready:-
1. Check how to open the cabinet and determine where to fix thecomponents.
2. Determine if the case has the appropriate risers installed.
Preparing to fit theComponents:
1. Network adapterdrive.
2. Floppy disk drive.
3. Ribboncables.
4. Hard disk.
5. CD-ROMDrive.
6. RAM
7. CPU
8. Heat sink / cooler /fan.
9. Mother board.
10. Screws.
Fitting the Mother board.
1. Line up the patch on the motherboard ( ps/l, USB, etc ) with the appropriate holes in the
block panel I/O shield of thecase.
2. Check the points where you and toinstall
3. Install them and make the mother board sit on them and fix screws ifrequired.
Mother boardparts:
1. ACRslot.
2. PCISlot.
3. AGP Slot.
4. ATXConnectors.
5. CPU Fan.
6. Chipset NorthBridge.
7. CPUsocket.
8. Floppy.
9. Systemmemory.
10. Chipset southbridge.

11. Panelconnector.

ATX Connectors:
12. Power supply.
13. IDEconnectors.
1. PS,Mouse.
2. Keyboard.
3. USB.
4. Parallel ( Prints)
5. SerialCOM1.
6. Serial COM2.
7. Joystick.
8. Sound.
Fitting the processor:
1. Raise the small lever at the side of thesocket.
2. Notice that there is a pin missing at one corner, determine the direction to fit in the
processor.
3. You should not force the CPU. When inserting it. All pins should slide smoothly into the
socket.
4. Lock the lever back down.
5. Install the heat sink over it (Different type for each processor). Heat sink / CPU fan.
Fitting theRAM:
1. The RAM must be suitable formotherboard.
2. There are currently 3 types of RAMavailable.
a) SDRAM.
b) DDR SDRAM.
c) RDRAM.
3. The mother board’s chipset determines which type of RAM may beused.
Installing the PCI Cards:
1. Most of the cards are inbuilt these days.
2. NIL, Sound Cards etc. are fitted into PCI slots.
Fitting the hard disk and Floppydisk:
1. Place the floppy and hard disks in theirslots.
2. Leave some space above HDD to prevent heatbuilding.
3. Check the jumperconfiguration.
4. Fix the screws.
Installing the CD-
ROMDrives:

1. CD-ROM drive is similar to installing a harddisk.
2. 1ST check that the jumper configuration iscorrect.
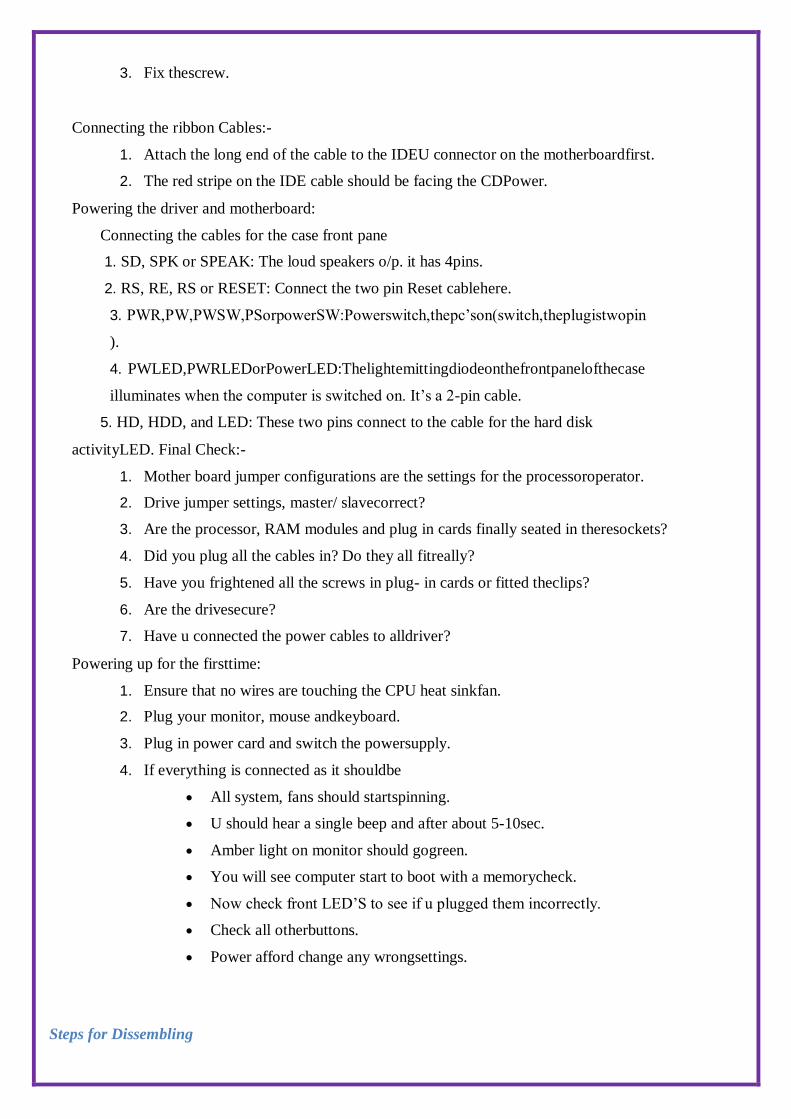
3. Fix thescrew.
Connecting the ribbon Cables:-
1. Attach the long end of the cable to the IDEU connector on the motherboardfirst.
2. The red stripe on the IDE cable should be facing the CDPower.
Powering the driver and motherboard:
Connecting the cables for the case front pane
1. SD, SPK or SPEAK: The loud speakers o/p. it has 4pins.
2. RS, RE, RS or RESET: Connect the two pin Reset cablehere.
3. PWR,PW,PWSW,PSorpowerSW:Powerswitch,thepc’son(switch,theplugistwopin
).
4. PWLED,PWRLEDorPowerLED:Thelightemittingdiodeonthefrontpanelofthecase
illuminates when the computer is switched on. It’s a 2-pin cable.
5. HD, HDD, and LED: These two pins connect to the cable for the hard disk
activityLED. Final Check:-
1. Mother board jumper configurations are the settings for the processoroperator.
2. Drive jumper settings, master/ slavecorrect?
3. Are the processor, RAM modules and plug in cards finally seated in theresockets?
4. Did you plug all the cables in? Do they all fitreally?
5. Have you frightened all the screws in plug- in cards or fitted theclips?
6. Are the drivesecure?
7. Have u connected the power cables to alldriver?
Powering up for the firsttime:
1. Ensure that no wires are touching the CPU heat sinkfan.
2. Plug your monitor, mouse andkeyboard.
3. Plug in power card and switch the powersupply.
4. If everything is connected as it shouldbe
All system, fans should startspinning.
U should hear a single beep and after about 5-10sec.
Amber light on monitor should gogreen.
You will see computer start to boot with a memorycheck.
Now check front LED’S to see if u plugged them incorrectly.
Check all otherbuttons.
Power afford change any wrongsettings.
Steps for Dissembling

Switch of the power supply

Disconnect the power supply cable frommonitor.
Disconnect the power supply cable fromCPU.
Disconnect the LAN cable to NIC inCPU.
Disconnect the other devices in CPU such asprinters.
Disconnect the mouse cable fromCPU.
Disconnect the keyboard cable fromCPU.
Disconnect data cable of monitor fromCPU.
Remove the doors ofcabinet.
Place the cabinet such that motherboard faces theceiling.
Disconnect the NIC and other cards from mother board by removing from slots and
unscrewing fromcabinet.
Disconnect the wires of speakers from motherboard.
Remove power supply cables from HDD, FDD, CD-ROM driveetc.
Disconnect the HDD, FDD, CD-ROM drive from mother board by removing flat ribboncable.
Remove CR-ROM fromcabinet.
Remove the FDD from cabinet by unscrewingit.
Remove the HDD from cabinet by unscrewingit.
Removing RAM cards from slots on motherboard.
Disconnect the power cables from processorfan.
Remove the processor fan by unlocking clips onit.
Disconnect the power cables from SMPS on powercabinet.
Remove mother board from cabinet by unscrewingit.
Remove the SMPS from cabinet of PC by unscrewingit.
Viva Questions:
1) Define assembling of asystem?
2) Explain the steps involved in the installation of the motherboard?
3) What is the use of pin 1 indicated on theprocessor?
4) What is the use of locking level at the processorslot?
5) Define aport?

EXPERIMENT – 3
INSTALLATION OF VARIOUS OPERATING SYSTEMS
Install MS windows on the personal computer.
INSTALLATION OF WINDOWS XP:
AIM: To install Windows XP
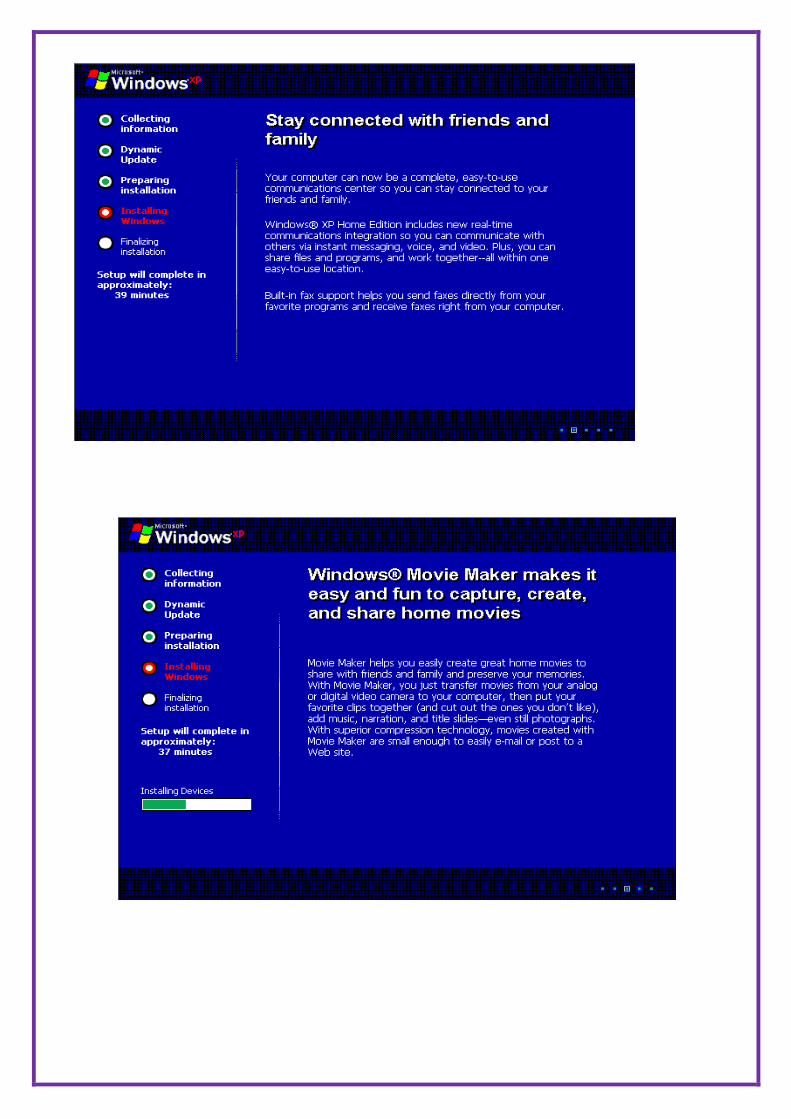
Windows XP (codename Whistler, also known as Windows NT 5.1) is the latest desktop version of
the Microsoft Windows operating system. It was made publicly available on October 25, 2001. Two
editions of Windows XP are most commonly available: Windows XP Home Edition which is targeted
at home users and Windows XP Professional which has additional features such as dual-processor
support and the ability to join a domain, a grouping of centrally managed Windows computers. The
letters "XP" originate from the word "Experience".
Step 1 : Prepare The Boot Sequence
Insert the windows XP cd in your cdrom and than go to the BIOS by hitting “DEL” or “F12″ when
your system in powering on. Go to Boot order and make sure cdrom is on the first place. Save settings
and restart your computer.
Once you have successfully booted from the CD, you will see the Windows XP “Welcome to Setup”
screen. Press ENTER to begin the setup process.
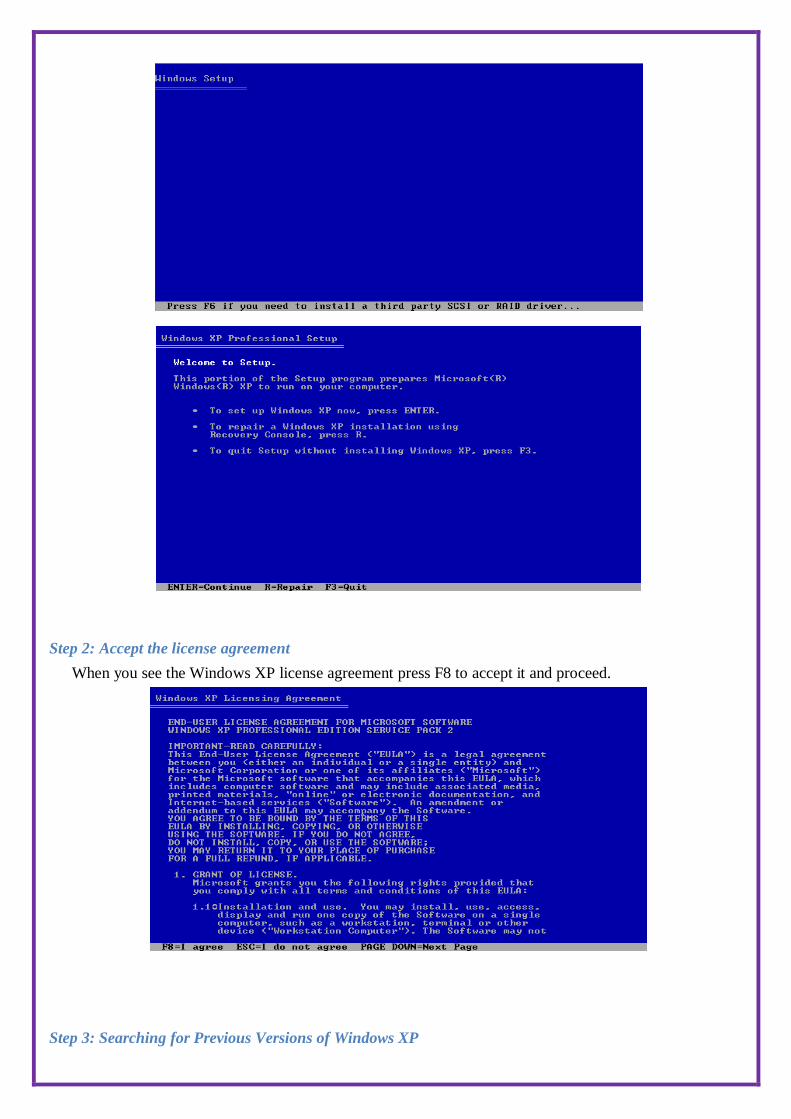
Step 2: Accept the license agreement
When you see the Windows XP license agreement press F8 to accept it and proceed.
Step 3: Searching for Previous Versions of Windows XP

Setup will search for existing Windows installations. You will see the next “repair or install fresh
copy” screen appear only if a Windows installation currently exists on your machine. If you’re
installing on a brand-new hard drive, skip to Step5.
Step 4:Continue Installing a Fresh Copy
Press ESC. You will be given a list of partitions available on your hard drive.
Step 5: Partitions
If there are multiple partitions on your hard drive, or you have multiple hard drives in the computer,
use the UP or DOWN arrow keys to choose your install partition. Please note that your system
partition needs to be a primary partition (usually the first partition that shows up in the list), not a

logical partition. The partition should be at least 10 GB in size. Make sure that all the data you need
from this partition is copied elsewhere, because it will be deleted.
.
Once you have selected the right partition selected, press ENTER. You will see the next “you
already have a system installed” screen only if you already have Windows installed on this partition.
If you are installing on a brand-new hard drive, skip to Step
Step 6: Continue Installing On The Selected Drive
Press C to continue. You will be given a list of install options
Step 7: Format The Selected Partition
Select the option to “Format the partition using the NTFS file system (quick) and press ENTER.You
will receive a warning about formatting the drive unless the drive is brand-new.

Step 8: Continue With The Format
Press F to continue formatting selected partition. If you still haven’t backed up, this is the last change
to backup your important data, after this step you will not to able to go back and restore your data.
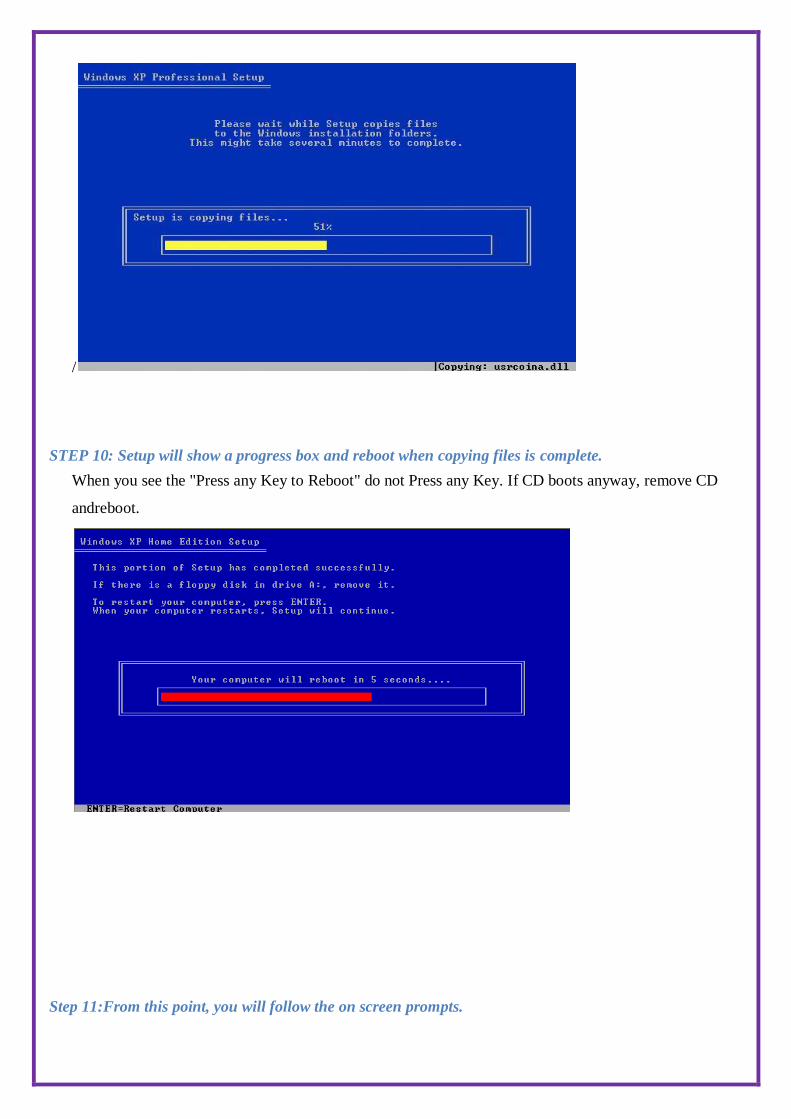
Step 9: Copying Files
After the format setup will automatically copy files and restart your computer. Go to BIOS and
remove cdrom from first boot device. Start yourcomputer.
/
STEP 10: Setup will show a progress box and reboot when copying files is complete.
When you see the "Press any Key to Reboot" do not Press any Key. If CD boots anyway, remove CD
andreboot.
Step 11:From this point, you will follow the on screen prompts.

Step 12:If you live outside the US, you will probably need to modify the default settings.

Step 13: If you live outside the US, you will probably need to modify the default settings.

Step 14:Personalize your XP Enter your Name and Organization.
Step 15:Enter the Product Key. The Key is located on the back of the CD folder in the Retail
versions, and on a holographic label with the OEM versions purchased with a piece of hardware.
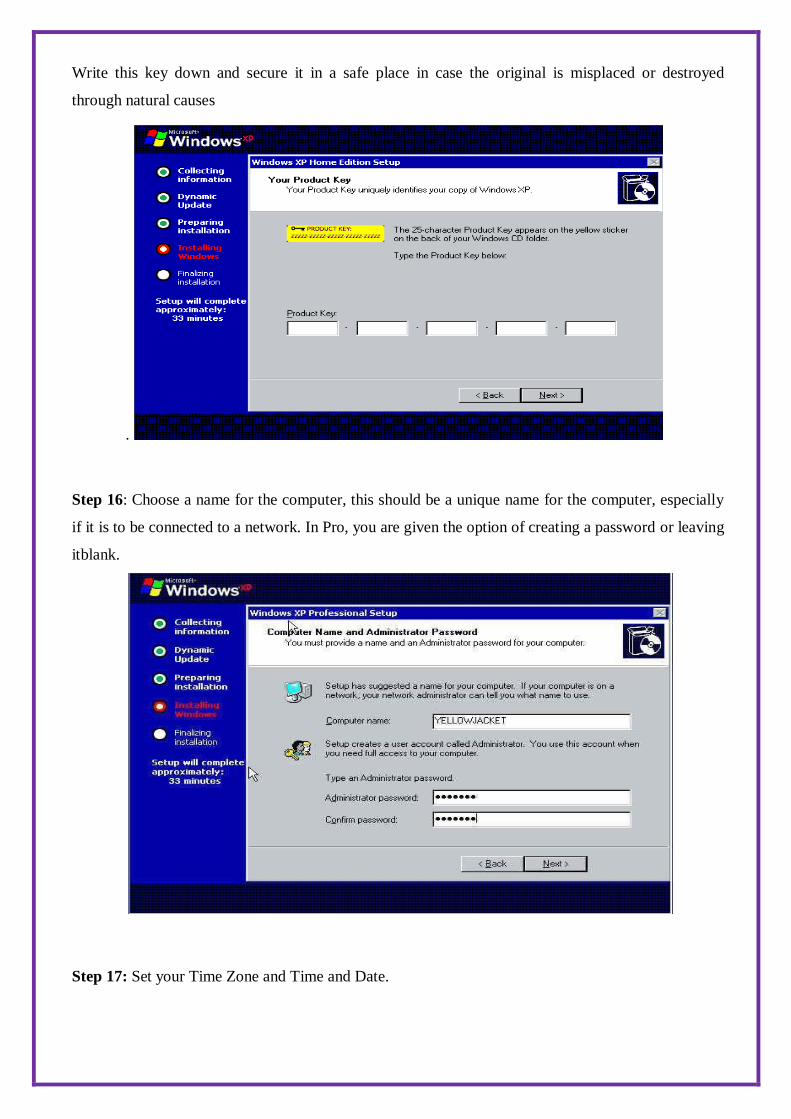
Write this key down and secure it in a safe place in case the original is misplaced or destroyed
through natural causes
.
Step 16: Choose a name for the computer, this should be a unique name for the computer, especially
if it is to be connected to a network. In Pro, you are given the option of creating a password or leaving
itblank.
Step 17: Set your Time Zone and Time and Date.
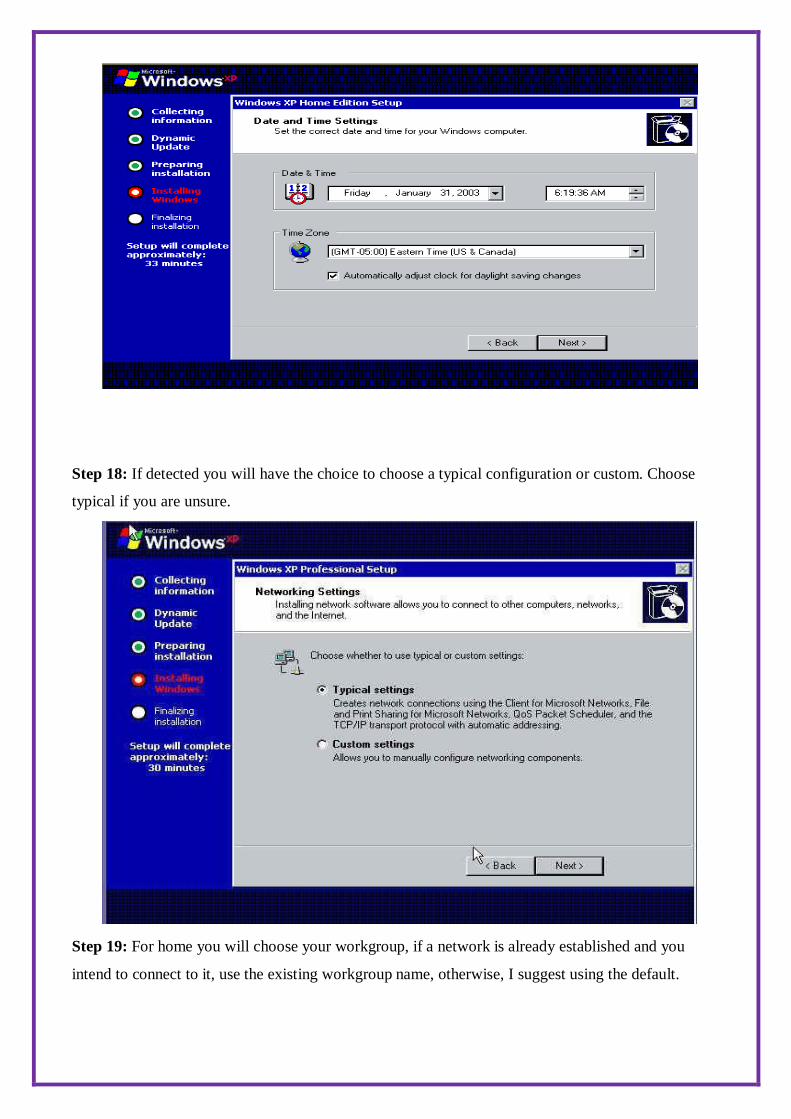
Step 18: If detected you will have the choice to choose a typical configuration or custom. Choose
typical if you are unsure.
Step 19: For home you will choose your workgroup, if a network is already established and you
intend to connect to it, use the existing workgroup name, otherwise, I suggest using the default.

Step 20: For Pro, the same goes for Pro as suggested for Home, but you will have the choice to join a
Domain, if you do not have a Domain or do not know leave blank.
Setup will continue and reboot when completed ignore the "Press Any Key".
The XP loading window will now display after reboot.
Viva Questions:
1) NTFSstandsfor -------- ?
2) What is the use of product key in the installation process of asoftware?
3) How many characters does a product key contain fro windowsXP?
4) Describe different kinds of Microsoft Operatingsystems?
5) What are the pre-arrangements for installing the windowsOS?
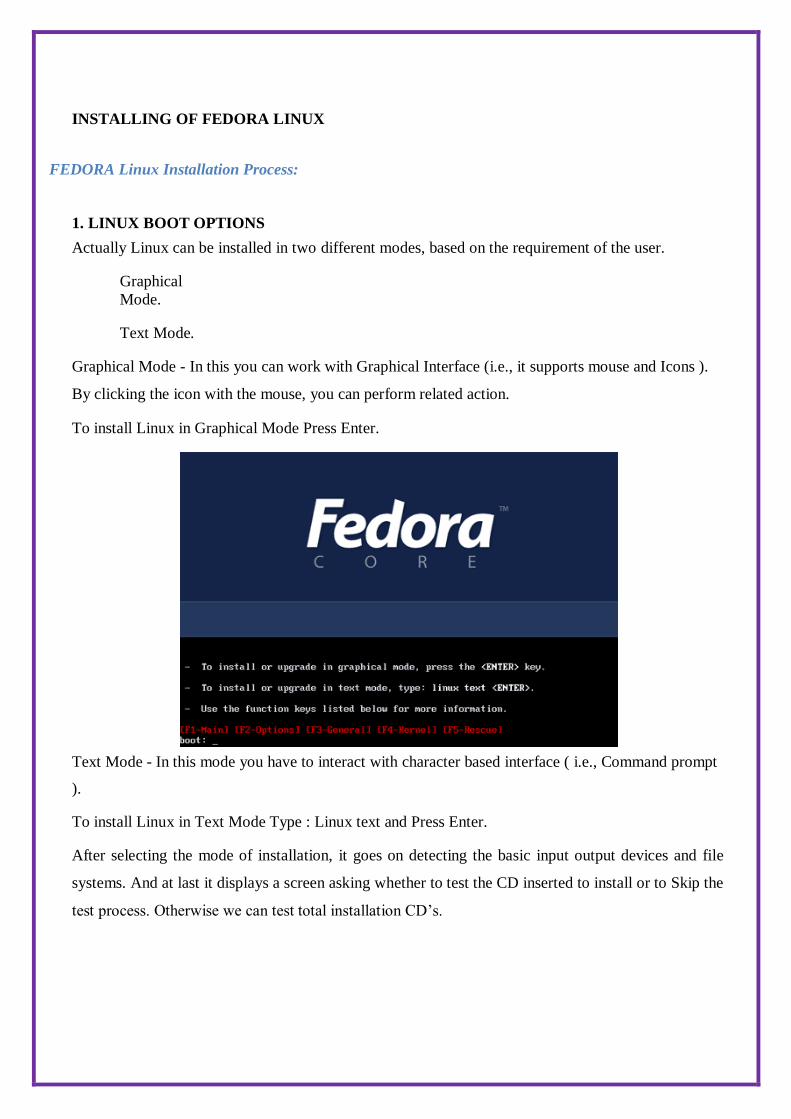
INSTALLING OF FEDORA LINUX
FEDORA Linux Installation Process:
1. LINUX BOOT OPTIONS
Actually Linux can be installed in two different modes, based on the requirement of the user.
Graphical
Mode.
Text Mode.
Graphical Mode - In this you can work with Graphical Interface (i.e., it supports mouse and Icons ).
By clicking the icon with the mouse, you can perform related action.
To install Linux in Graphical Mode Press Enter.
Text Mode - In this mode you have to interact with character based interface ( i.e., Command prompt
).
To install Linux in Text Mode Type : Linux text and Press Enter.
After selecting the mode of installation, it goes on detecting the basic input output devices and file
systems. And at last it displays a screen asking whether to test the CD inserted to install or to Skip the
test process. Otherwise we can test total installation CD’s.
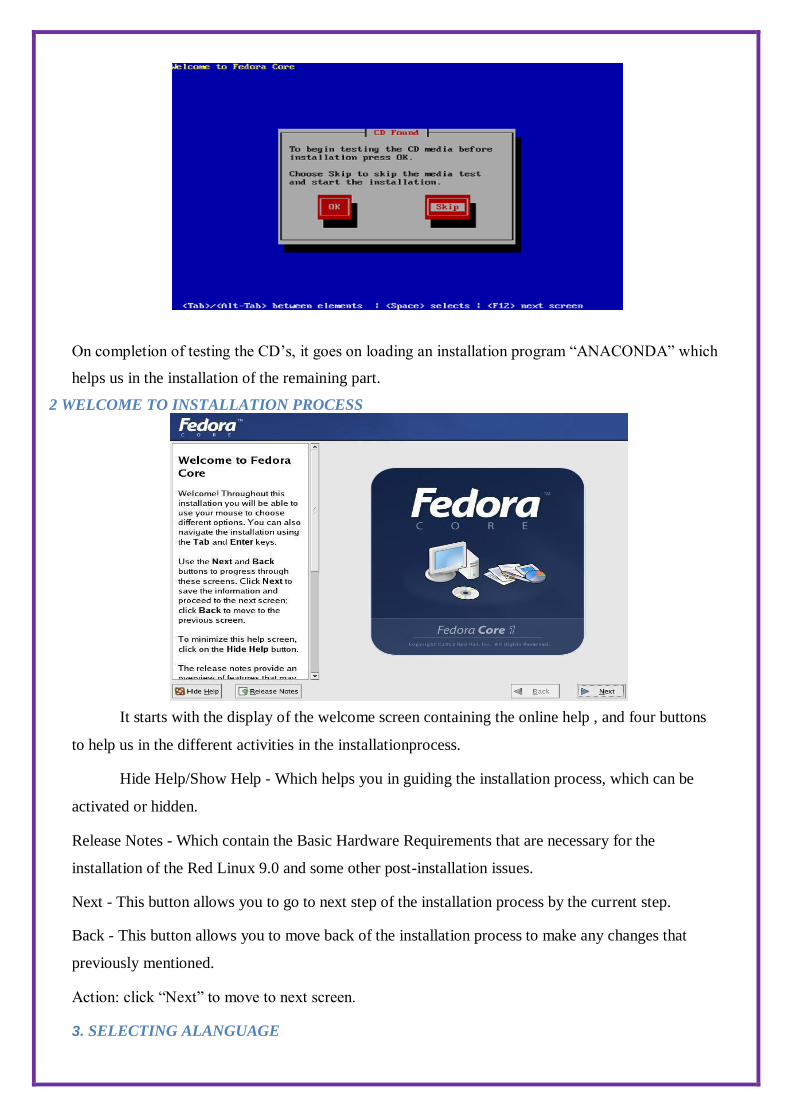
On completion of testing the CD’s, it goes on loading an installation program “ANACONDA” which
helps us in the installation of the remaining part.
2 WELCOME TO INSTALLATION PROCESS
It starts with the display of the welcome screen containing the online help , and four buttons
to help us in the different activities in the installationprocess.
Hide Help/Show Help - Which helps you in guiding the installation process, which can be
activated or hidden.
Release Notes - Which contain the Basic Hardware Requirements that are necessary for the
installation of the Red Linux 9.0 and some other post-installation issues.
Next - This button allows you to go to next step of the installation process by the current step.
Back - This button allows you to move back of the installation process to make any changes that
previously mentioned.
Action: click “Next” to move to next screen.
3. SELECTING ALANGUAGE

It displays a screen containing various languages, to select a language you would like to use during
this installation process.
4. CONFIGURING KEYBOARD ANDMOUSE
Here we need to select our own keyboard and mouse layouts which will help you to interactively
proceed in the installation process.
At this point of time it displays you the different types of keyboard layouts. So that you can select
your desired one that you would like to use for thesystem.
And also choose the appropriate Mouse for the system, based on the following:
Do you have a PS/2, USB, Bus or Serial mouse?
Hint:- If the connector your mouse plugs into is Round - It is a PS/2
If the connector your mouse plugs into is Rectangular - It is a USB mouse
If the connector your mouse plugs into is Trapezoidal - It is a Serial mouse
Select the exact mouse type among the available.
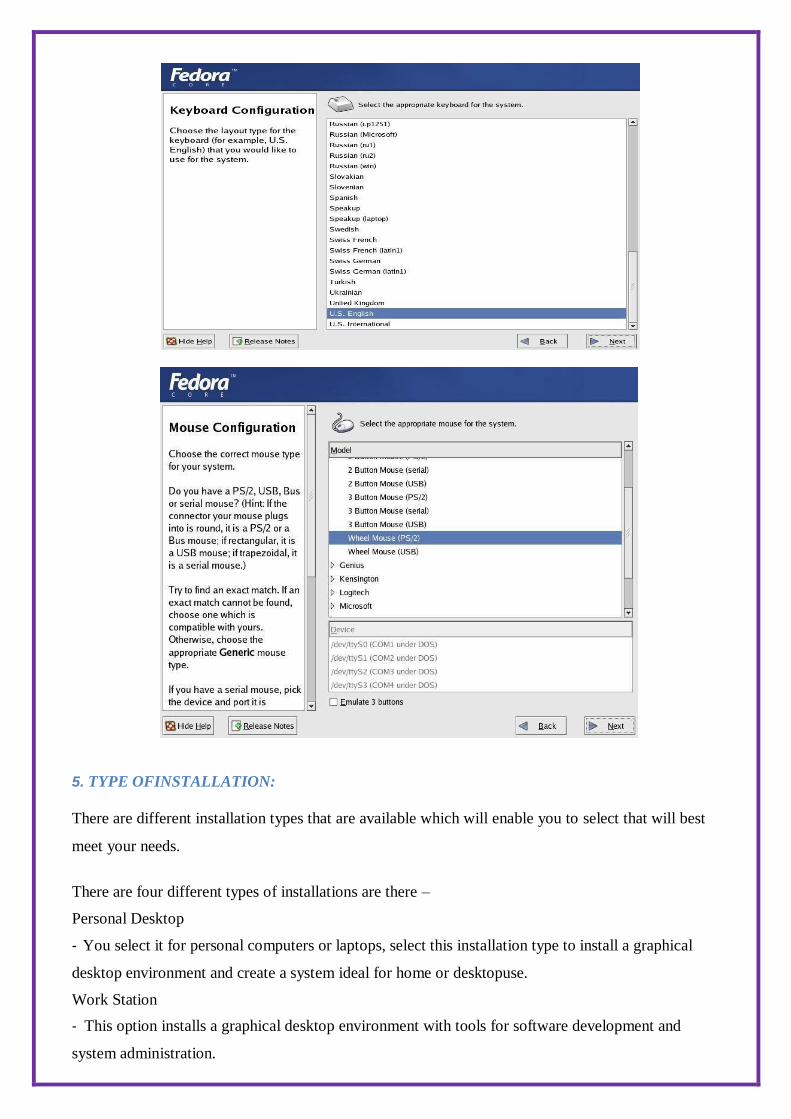
5. TYPE OFINSTALLATION:
There are different installation types that are available which will enable you to select that will best
meet your needs.
There are four different types of installations are there –
Personal Desktop
- You select it for personal computers or laptops, select this installation type to install a graphical
desktop environment and create a system ideal for home or desktopuse.
Work Station
- This option installs a graphical desktop environment with tools for software development and
system administration.

Server
- If you would like to set up file sharing, print sharing, and web services and additionalservices.
Custom
- Select this installation type to gain complete control over the installationprocess,
Including software package selection and authenticationpreferences.:
6. PARTITIONING THEDISK
Partitioning the disk can be done either automatically or manually.
AUTOMATIC PARTITIONING – By selecting automatic portioning, you will not have to use partitioning tools to assign mount
points, create partitions, or allocate space for your installation. Automatic partitioning allows you to
have some control concerning what data is removed from your system.
To remove only Linux partitions remove all Linux partitions on this system.
To remove all partitions on your hard drive, select remove all partitions on this system.
To retain your current data and partitions, assuming you have enough free space available on
your hard disk, select Keep all partitions and use existing freespace.
You can review the partitions that are automatically created using the check box Review (and modify
if needed) the partitions created.
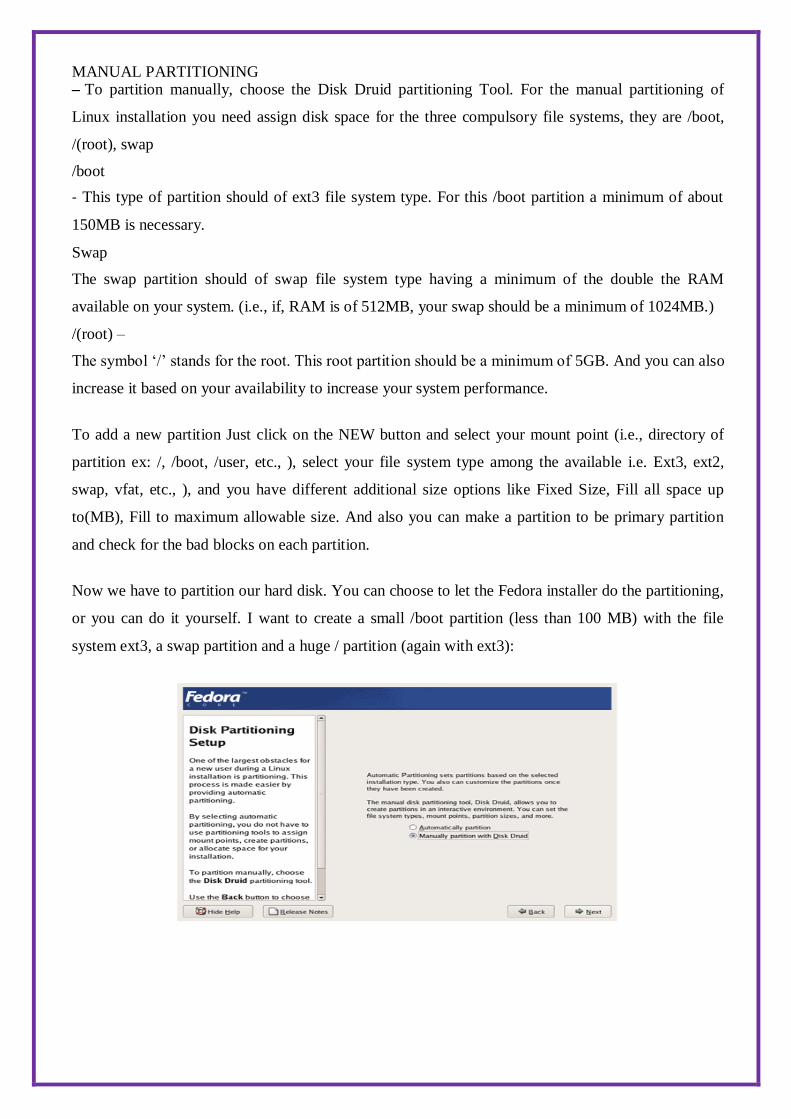
MANUAL PARTITIONING – To partition manually, choose the Disk Druid partitioning Tool. For the manual partitioning of
Linux installation you need assign disk space for the three compulsory file systems, they are /boot,
/(root), swap
/boot
- This type of partition should of ext3 file system type. For this /boot partition a minimum of about
150MB is necessary.
Swap
The swap partition should of swap file system type having a minimum of the double the RAM
available on your system. (i.e., if, RAM is of 512MB, your swap should be a minimum of 1024MB.)
/(root) –
The symbol ‘/’ stands for the root. This root partition should be a minimum of 5GB. And you can also
increase it based on your availability to increase your system performance.
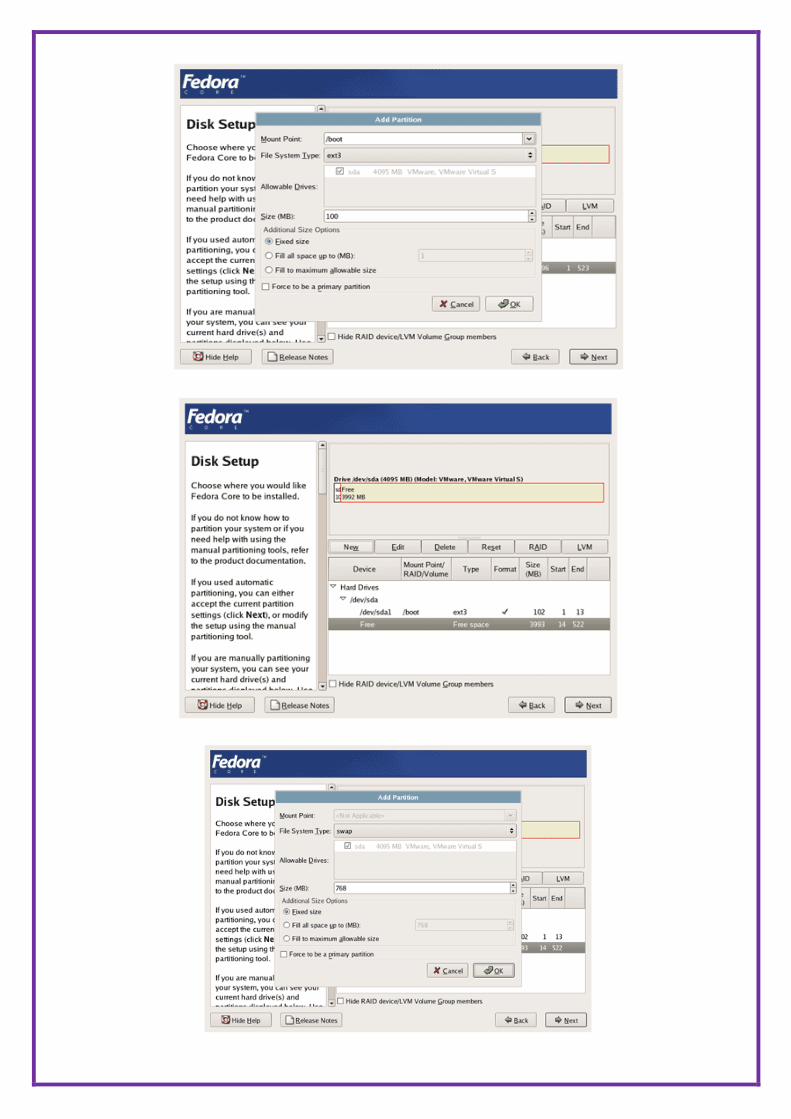
To add a new partition Just click on the NEW button and select your mount point (i.e., directory of
partition ex: /, /boot, /user, etc., ), select your file system type among the available i.e. Ext3, ext2,
swap, vfat, etc., ), and you have different additional size options like Fixed Size, Fill all space up
to(MB), Fill to maximum allowable size. And also you can make a partition to be primary partition
and check for the bad blocks on each partition.
Now we have to partition our hard disk. You can choose to let the Fedora installer do the partitioning,
or you can do it yourself. I want to create a small /boot partition (less than 100 MB) with the file
system ext3, a swap partition and a huge / partition (again with ext3):

Now the boot loader GRUB will be installed. You can leave the default settings unchanged and click
on Next:
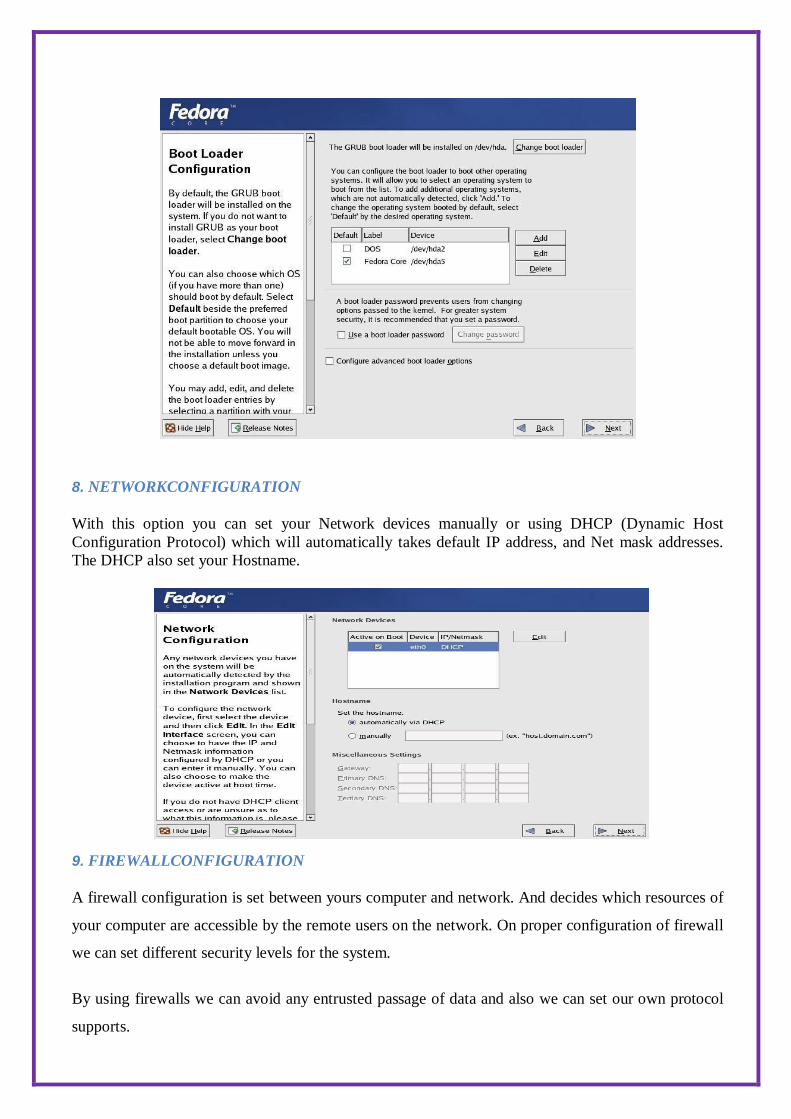
7. BOOT LOADERCONFIGURATION
The GRUB boot loader will allow you to boot other operating systems. It will allow you to
select an operating system to boot from the list. To add another operating system. You can also add
other operating systems that are not detected automatically.
For greater system security, you can set your password for the boot loader. To avoid unauthorized
changes to the system.
You can also change the type of boot loader other than GRUB, among the available like LILO. And
also you can avoid to install boot loader.
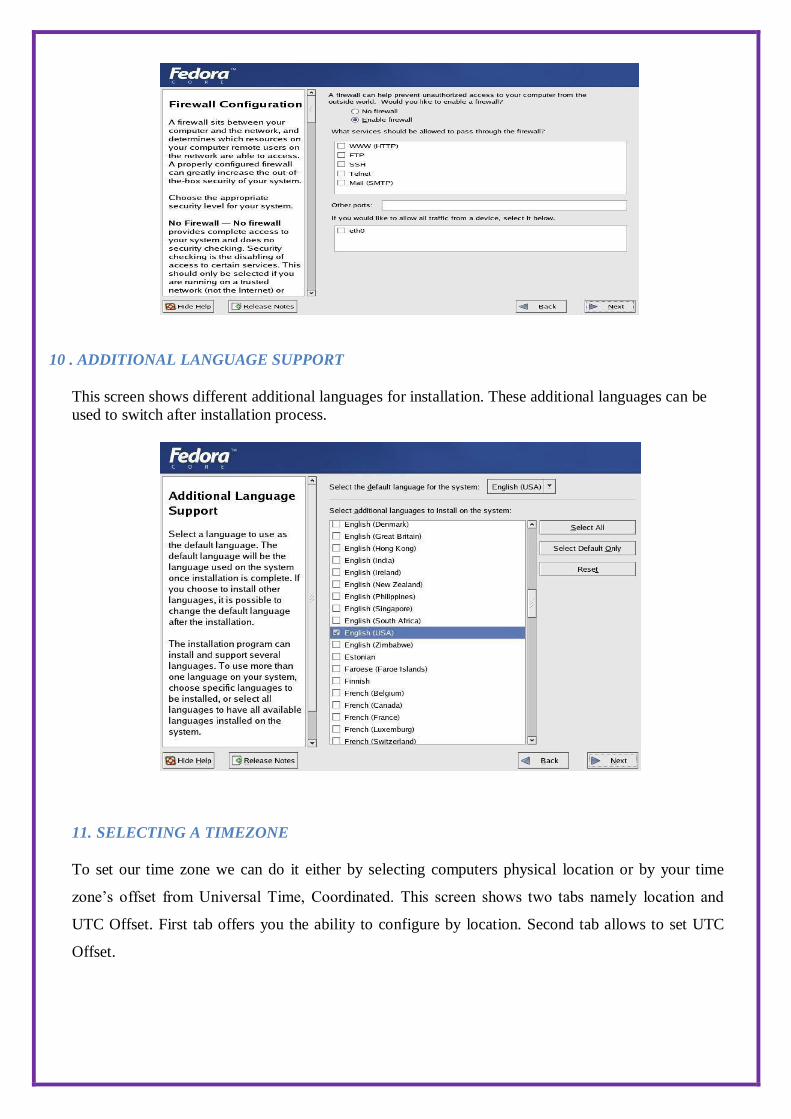
8. NETWORKCONFIGURATION
With this option you can set your Network devices manually or using DHCP (Dynamic Host
Configuration Protocol) which will automatically takes default IP address, and Net mask addresses.
The DHCP also set your Hostname.
9. FIREWALLCONFIGURATION
A firewall configuration is set between yours computer and network. And decides which resources of
your computer are accessible by the remote users on the network. On proper configuration of firewall
we can set different security levels for the system.
By using firewalls we can avoid any entrusted passage of data and also we can set our own protocol
supports.
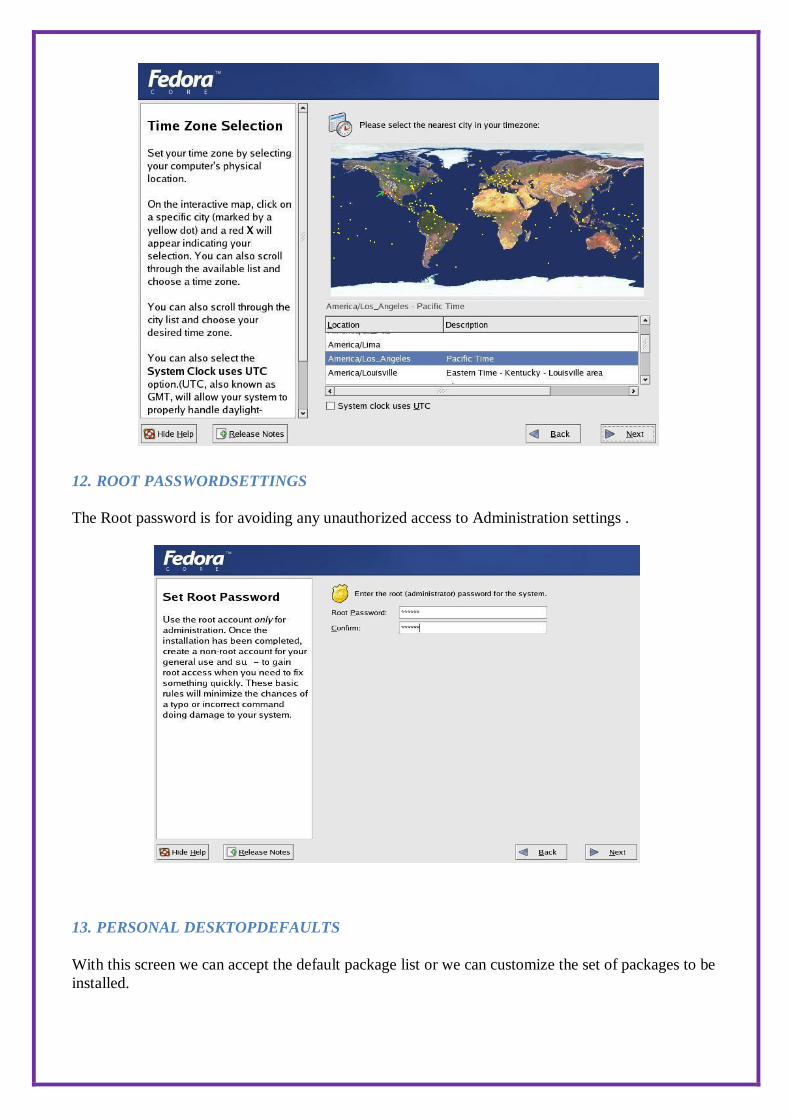
10 . ADDITIONAL LANGUAGE SUPPORT
This screen shows different additional languages for installation. These additional languages can be
used to switch after installation process.
11. SELECTING A TIMEZONE
To set our time zone we can do it either by selecting computers physical location or by your time
zone’s offset from Universal Time, Coordinated. This screen shows two tabs namely location and
UTC Offset. First tab offers you the ability to configure by location. Second tab allows to set UTC
Offset.
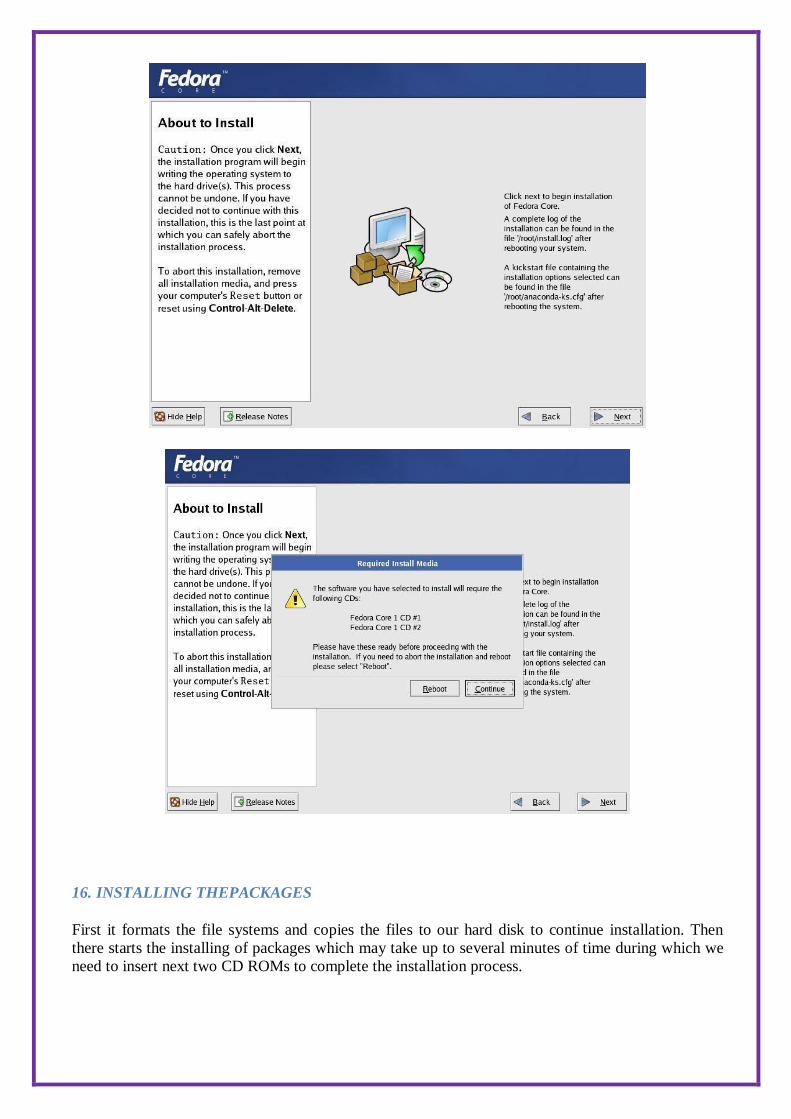
12. ROOT PASSWORDSETTINGS
The Root password is for avoiding any unauthorized access to Administration settings .
13. PERSONAL DESKTOPDEFAULTS
With this screen we can accept the default package list or we can customize the set of packages to be
installed.

14. SELECTION OF PACKAGES TO INSTALL
On selecting the customized set of packages we can select our own selection of desktops,
applications, servers, development tools and system tools to be installed among the available.
And also we have an option to select a minimal set of packages and all the packages that are available
which will install complete set of packages(about 1400) which will require about 4850 MB ofspace.
15. ABOUT TOINSTALL
This is the final step to make any modifications to the installation process. Once you click the next
button you cannot do any modifications.
16. INSTALLING THEPACKAGES
First it formats the file systems and copies the files to our hard disk to continue installation. Then
there starts the installing of packages which may take up to several minutes of time during which we
need to insert next two CD ROMs to complete the installation process.
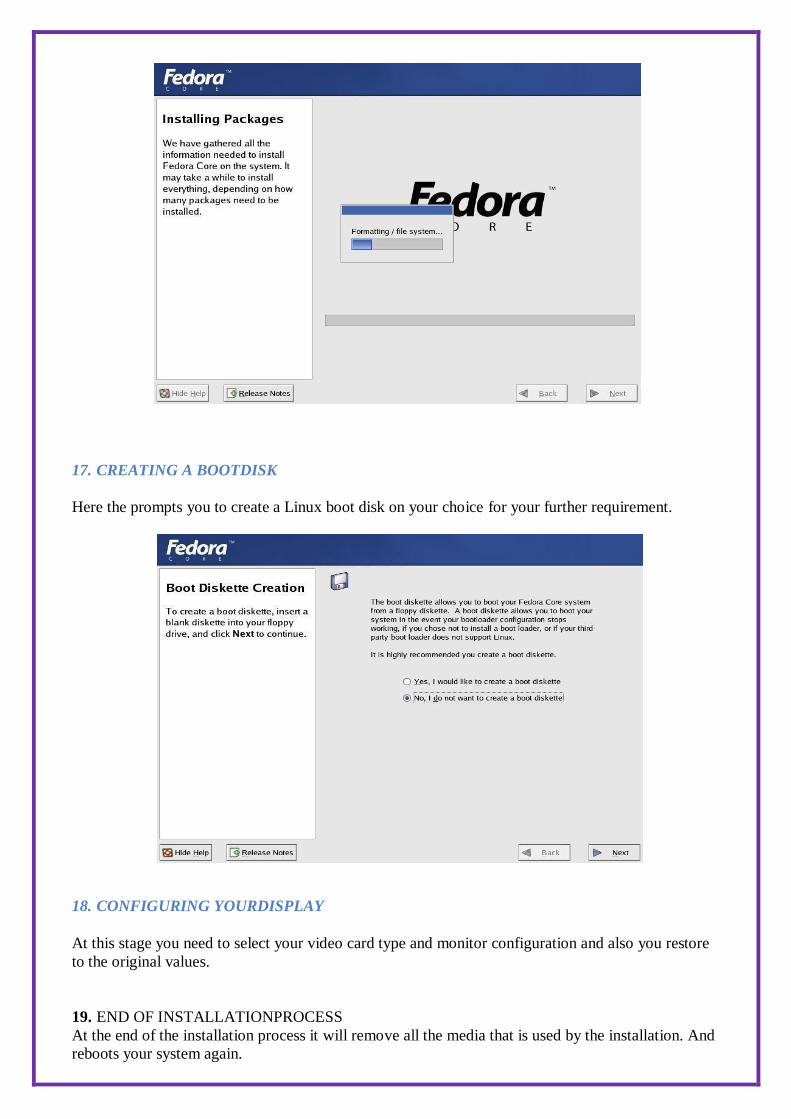
17. CREATING A BOOTDISK
Here the prompts you to create a Linux boot disk on your choice for your further requirement.
18. CONFIGURING YOURDISPLAY
At this stage you need to select your video card type and monitor configuration and also you restore
to the original values.
19. END OF INSTALLATIONPROCESS
At the end of the installation process it will remove all the media that is used by the installation. And
reboots your system again.
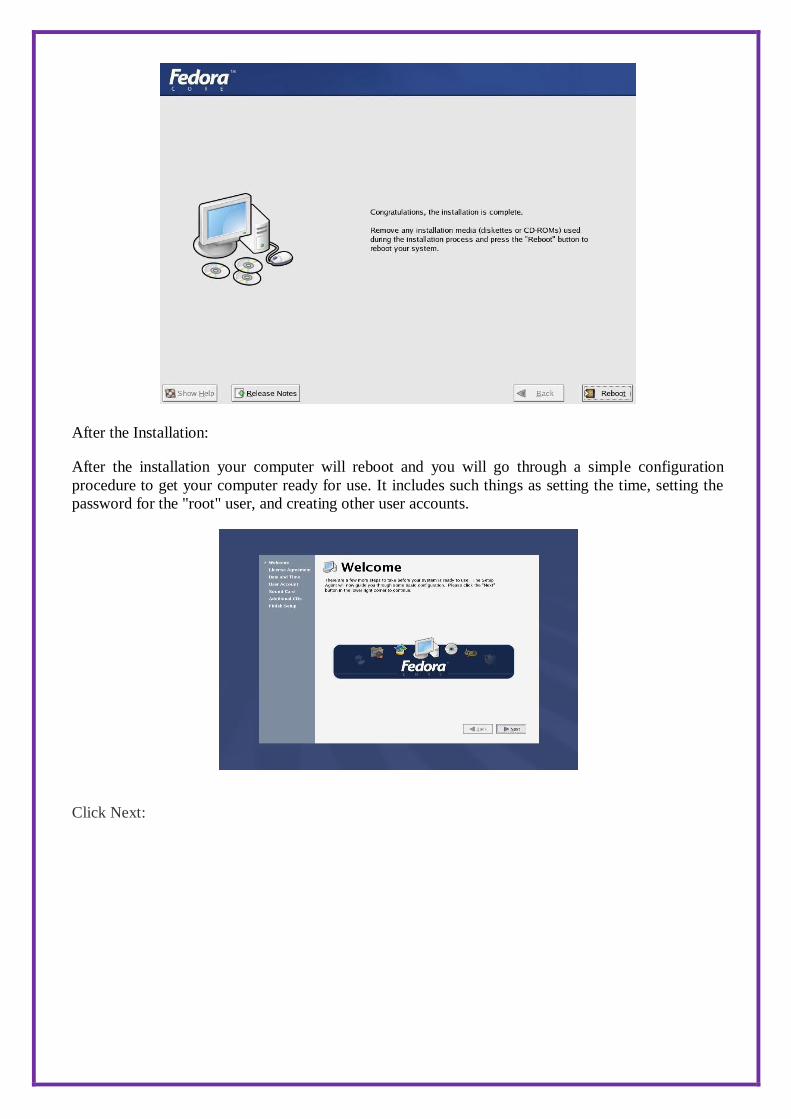
After the Installation:
After the installation your computer will reboot and you will go through a simple configuration
procedure to get your computer ready for use. It includes such things as setting the time, setting the
password for the "root" user, and creating other user accounts.
Click Next:

ClickNext:
ClickNext:
ClickNext:

ClickNext:
ClickNext:
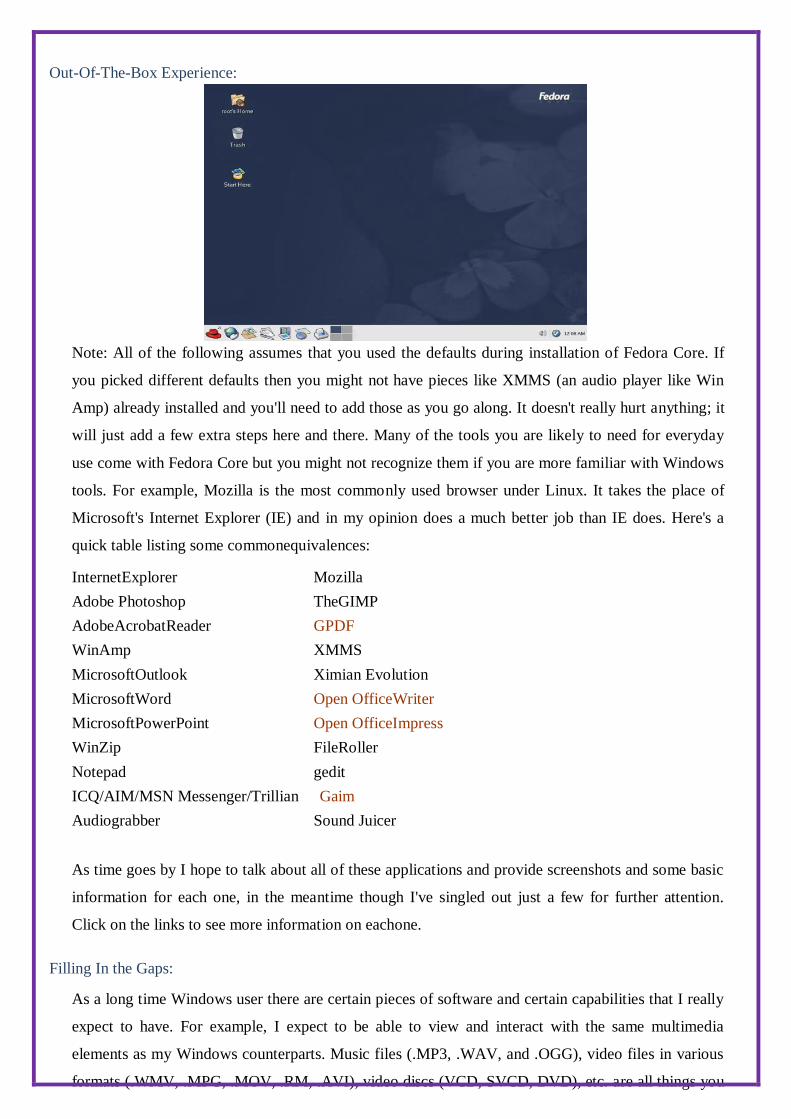
Out-Of-The-Box Experience:
Note: All of the following assumes that you used the defaults during installation of Fedora Core. If
you picked different defaults then you might not have pieces like XMMS (an audio player like Win
Amp) already installed and you'll need to add those as you go along. It doesn't really hurt anything; it
will just add a few extra steps here and there. Many of the tools you are likely to need for everyday
use come with Fedora Core but you might not recognize them if you are more familiar with Windows
tools. For example, Mozilla is the most commonly used browser under Linux. It takes the place of
Microsoft's Internet Explorer (IE) and in my opinion does a much better job than IE does. Here's a
quick table listing some commonequivalences:
InternetExplorer Mozilla
Adobe Photoshop TheGIMP
AdobeAcrobatReader GPDF
WinAmp XMMS
MicrosoftOutlook Ximian Evolution
MicrosoftWord Open OfficeWriter
MicrosoftPowerPoint Open OfficeImpress
WinZip FileRoller
Notepad gedit
ICQ/AIM/MSN Messenger/Trillian Gaim
Audiograbber Sound Juicer
As time goes by I hope to talk about all of these applications and provide screenshots and some basic
information for each one, in the meantime though I've singled out just a few for further attention.
Click on the links to see more information on eachone.
Filling In the Gaps:
As a long time Windows user there are certain pieces of software and certain capabilities that I really
expect to have. For example, I expect to be able to view and interact with the same multimedia
elements as my Windows counterparts. Music files (.MP3, .WAV, and .OGG), video files in various
formats (.WMV, .MPG, .MOV, .RM, .AVI), video discs (VCD, SVCD, DVD), etc. are all things you

can

hardly go three clicks on the Internet without stumbling across. I need to be able to view/listen to all
ofthem.
The following software addresses many of those needs and installation of it is really really simple. In
fact it is easier than installing similar software on Windows usually is. To get to that level of ease
does take a couple of steps though so you will want to read the sections below entitled
A Word About Permissionsand Software Installation Made Easyeventually to add the Apt and
Synaptic software to your machine. In the meantime, first read about some of the software that Apt
and Synaptic can get for you.
Viva Questions:
1) Give the advantages of Linux over otherOS?
2) What do you mean by open sourceOS?
3) What are the commands used to make disk partitioning manually in LinuxOS?
4) What do you mean by dual bootsystems?
5) Which type of file systems are required to install hard disk at the time of installation of Linux
OS?
ADDITIONAL TASK
Several mini tasks would be that covers Basic commands in Linux and Basic syatem administration in
Linux which includes: Basic Linux commands in Bash, create hard and symbolic links, text
processing, using wild cards.
AIM: To learn basic Linux commands.
/ Root directory

/bin Essential commands
/boot Boot loader files , Linux kernel
/dev Device files
/etc System configuration files
/home User home directories
/lib Shared libraries , kernel modules
/mnt Usual mount files for local , remote file system
/opt Ad- on software packages
/proc Kernel information, process control
/root Superuser directory
/sbin System commands directory
/tmp Temporary files
/usr Secondary software file directory
/var Variable data directory
To edit a file-$vi
i-for insert mode, character you type will show up as text
x-for deleting a character
3x-for deleting 3 consecutive characters
a-for appending characters
[esc}-to get into command mode
u-to undo the most recent change
U-to undo all the changes made to the line
p-to put the contents of the recent buffer back to where the cursor is
press [esc]-wq to write the file to disk and quit
press [esc]-q! to quit without writing the file to disk
1 or space bar or right arrow – To move right one character
h or crtl+h or left arrow-To move left one character
j or ctrl+j or ctrl+n or down arrow –To move down one
line k or ctrl+p or up arrow- To move up one line
0- To move to the top of theline
$- To move to the end of the current line
+ or RETURN – To move to the beginning of the next line
. – To move to the beginning of the previous line
CTRL+f – move forward one full screen
Ctrl+d – move forward one half screen
Ctrl+b – move back one full screen
Ctrl+u – move back one half screen
G-move to the end of the file
R b – replace the current character with b
3rd-replace 3 characters with b
/look-search forward for the first occurrence of look
//-repeat search
n-repeat search
N-reverse search direction
?look-search backward for the first occurrence of look
Wild cards:
Wild cards are a shell feature that makes the command line much more powerful than any GUI file
managers.
Wild card Matches
* 0 or more characters
? Exactly one character
[abcde] Exactly one character listed
[a-e] Exactly one character in the given range
[!abcde] Any character that is not listed
[!a-e] Any character that is not in the given range
{debian,linux} Exactly one entire word in the options given
s.no Command name
description example
1 Date Display or set the he linux system time $date
2 Ls Viewing linux file system $ls
3 Tree Show the root or base directory lay out,along sub directories
$tree
4 Man Display the manual pages $man
5 Cat Outputs contents of file name to display $cat
6 Mv Moves specific files/directories to specific
files/directories
$mv file(s)/dir(s)
files(s)?dir(s) 7 Cp Copies one file and creates another file $cp file 1 file 2
8 Rm Deletes file $rm file
9 Grep Searching through file and displays lines
containing matching string
$grey string files(s)
10 Mkdir Creates an empty directory $mkdir dirname
11 Rmdir Deletes directory(if empty) $rm dir dirname
12 Ps Displays quick list of process $ps
13 Pwd Displays the path of current directory $pwd
14 Clear Clears all textand leave you with the and promt at the top of the window
$clear
15 Head Display the first few
Lines of a file
$head-line count
filename 16 Tail Display the last few lines of a file $tail-line count file

name
17 Wc Count number of lines/words /characters in a file
$wc file name
18 Who List users currently loggedin $who
Viva Questions:
1) What are the default directories in the Linux operatingsystems? 2) Is command usedfor? 3) What are the various directory commands inLinux? 4) How can you search a file for key words inLinux? 5) What is the function of ‘cat’ and ‘clear’command?

OS FEATURES & TROUBLE SHOOTING:
Identify the problem in PC which does not boot due to improper assembly or defective peripherals, fix it to
get the computer back to working condition.
AIM: Hardware
troubleshooting Troubleshoot:-
1. If you hit the power button & nothing happened.
Check all powerconnections.
Check for power on motherboard.
2. If the system turns on but does not beep or begin to bootup.
Remove all components except motherboard/ cpu / mother check by giving
power to them
Computer error beeps codes:
No beep: short, no power, bad CPU/ MD, loose peripherals.
One beep: everything is normal & computer posted tax.
Two beeps: post / CMOS error.
One long beep One short beep: Motherboard problem.
One long beep two short beep: video problem.
One long beep 3 short beeps: video problem. 3
long beeps: keyboarderror.
Repeated long beep: memory error.
Continuous high- low beeps: CPU overheating Experiment no: 1
Basic troubleshooting:
Sometimes things do not work exactly as planned at this point. Sometimes the system will not power
on at all. Sometimes it will power on, but you get no video. Sometimes you will get beep codes.
Sometimes you hear the fans, but the rest of the PC just sits there and does nothing. If things didn't go
according to plan, troubleshoot the system. Walk mentally through the boot process and check all
hardware as it goes. Think like the computer thinks, if you know what I mean. Here is a list of some
of the more commonproblems.
1. The power does not even turn on. This sometimes happens on ATX machines and it usually
tracks down to the fact that the power switch is not properly connected to the motherboard or
it is not connected at all. Find the power switch lead and make sure it is connected to the
motherboard.It’sapossibilitythatsimplyreversingtheleadwilldothetrick.Ifthisisthenot
the case, then make sure the motherboard is not grounded somehow. Make sure that the board
is not touching the case (this is what the spacers are for). Make sure that none of the screws
that hold the board in place is touching anything metal or any of the electrical pathways on the
motherboard. If you have any doubt on this, you can remove each screw one at a time and
place a washer on them. You do not need to remove the motherboard to do this.
2. The PC boots, but it is giving beep codes. This is actually better than having to track
everything down on your own, because at least the PC is giving you a hint as to what is
wrong. You can also use the PC Mechanic Beep Codes E-book available on the PC Mechanic
CD to track it down for other BIOS versions. Often, these beep codes will not tell you exactly
what the problem is, but will point you at the trouble device. This information will then get
you pointed in the correctdirection.
3. The fans come on, but you get no video or beeps. Sometimes, this is because some key
component may not be plugged in well or may not be operational. Check the memory modules
and the processor to be sure they are firmly installed. You might want to make sure the
processor is actually working. One way that I have used to see if a processor is working is to
remove or unplug the CPU fan and place your fingers on the CPU to see if it heats up real fast.
If it does, its OK and don’t let it run this way for long. If it remains at room temperature for
awhile, then there is no juice going through the processor and it may need replacing. The
keyboard doesn’t seem to work. This one doesn’t happen too often, but if it does, your two
trouble sources will be the keyboard itself or the keyboard controller on the motherboard.
Hope it isn’t the secondone.
Viva Questions:
1) Define troubleshooting?
2) Mention a few problems associated withModem.
3) What is the function of amodem?
4) What are the different key boardproblems?
5) Give the preventive measures for better computerutilization?

Identify the malfunctioning CPU due to system software problems. Fix the problem to get the computer
back to working condition.
AIM: Software troubleshooting
PROCEDURE:
Error messages encountered during boot before Windows loads
Ensure that your computer BIOS settings are correctly configured to the hardware that is installed in
your computer
Error messages while windows loading
1. If you have recently installed or changed something that could have caused normal windows to stop
loading , try loading the last known goodconfiguration
2. If you are unable to get into Normal windows and believe that removing or uninstalling a program
or changing a setting may help enable you to get into windows , boot the computer into windows XP
safemode
3. If your computer has worked fine in the past but recently has been experiencing the issue you are
encountering run the system restore option to restore the computer to an earlierdate
Other error messages that occur while windows is loading or after windows is loaded
1. If error occur but windows still loads , verify no issues or conflict exits in devicemanager
2. Ensure that if programs are loading automatically that these errors are not associated with these
programs
3. Make sure Windows XP is up to date by checking Microsoft windows updatepage
4. If your computer has virus protection installed make sure that it is up to date and that no virus are
beingdetected
5. Ifyourcomputerhasworkedfineinthepastbutrecently has been experiencing the issue you
are encountering run the system restore option to restore the computer to an earlierdate
Software Troubleshooting:
BIOS SETUP & DISK FORMATTING
What Is BIOS? BIOS is an acronym for Basic Input Output System.

Why BIOS? To run any system, there must be default settings so that the system can load those settings when it is
started or restarted. For a computer system the basic I/O settings and boot process details are
necessary to start a system.
All these default, predefined settings will be loaded in the BIOS and whenever we start the system,
these settings will be loaded.
How to view BIOS?
Whenever we start the system, we can enter into the BIOS Setup Utility by pressing Del Key.
Sometimes an F1 or F8 key has to be instead of DEL key, depending on the type of BIOS.
When we enter in to this utility we get these following menus/services, depending upon our mother
board.
In main Menu, we can view the details such as BIOS Version, Processor Type, and Speed, RAM
Size and the system bus speed and memory speed.
We can change the settings like language system time and date. We can even change the hyper threading
facility if the processor supports this technology.
We must be very careful when we change these settings otherwise it may cause our system to
malfunction.
Here, we can change the settings of PCI devices, Floppy Drives configuration and chipset, USB
peripheral devices and even monitoring the Hardware.
Security
We can set the supervisor password, to restrict unauthorized users to enter the BIOS setup utility.
User password can also be set to restrict the unauthorized persons to boot or use the system.
How to type a Password?
We can even set the Chassis Intrusion to protect the system devices from removing the components of
the system.
Power
The power settings protect the system from power failures by configuring the ACPI.
For example, after power failure we can stay off the system or Power on the system or else we can
even make the system to restore its previous state by selecting the appropriate options.
Boot
Silent boot : If this option is enabled it displays only the OEM logo and in the background
POST(Power on Self Test) completes. If this is disabled, instead of LOGO, we can view POST
messages
Rapid BIOS Boot: By enabling this option it will decrease the time needed to boot the by skipping
some unnecessary tests.
Here, we can also set the boot sequence from the available devices by selecting Boot Device Priority.
We can even view the Hard Drives and any removable devices and attached to the system.
Exit
By selecting the appropriate options we can exit from the BIOS setup like exiting the setup by saving
or discarding the changes or even by loading optimal or default values.
Viva questions:
1) Define asoftware
2) What are the general software problems weencounter?
3) Definevirus
4) What is the minimum free spacerequired?
5) What are the reasons for slow running?

EXPERIMENT – 4
NETWORKING TWO OR MORE COMPUTERS AND DOCUMENT THE PROCESS
Orientation & Connectivity Boot Camp: Students should get connected to their Local Area Network
and access the Internet. In the process they configure the TCP/IP setting. Finally students should
demonstrate, to the instructor, how to access the websites and email. If there is no internet connectivity
preparations need to be made by the instructors to simulate the WWW on theLAN
PURPOSE: To learn Local Area Network and access the Internet. In the process they configure the
TCP/IP setting. Finally students should demonstrate, to the instructor, how to access the websites and
THEORY:
The internet is a world wide, publicly network of interconnected computer
networks LOCAL AREA NETWORK:
LANs are privately owned networks with in a single building or campus of up to few kilometers in
size.
WIDE AREA NETWORK:
A WAN is a network that connects computers across a large geographic area such as a city or country
TCP/IP (Transmission Control Protocol/Internet Protocol):
Collection of methods used to connect servers on the internet and to exchange data.
HTML (Hyper Text Markup Language):
The coding used to control the look of documents on the web
HTTP (Hyper Text Transfer Protocol):
Part of a URL that identifies the location as one that uses HTML
IP(Internet Protocol):
A format for contents and addresses of packets of information sent over the internet
IP ADDRESS:
An identifier for a computer or device on a TCP/IP
network SEARCH ENGINE:
A program that searches documents located on the Internet for keywords or phrases entered by a
person browsing the net.
Internet Connection requirements:
TCP/IPprotocol
ClientSoftware
ISP Account
Means of communication to thenet
telephoneModem
PROCEDUR
E:
Ethernet
ISDN(Integrated Services DigitalNetwork)
DSL(Digital SubscriberLine)
Satellite.
1. Go to start controlPanel
2. open NetworkConnections
3. Click create a new connection and then clicknext
4. The new connection wizard window opens , click next tocontinue
5. Choose one of the options in the next dialogbox
6. Choose one of the three options in the next dialogbox
If you do not have an internet account click choose from a
list of ISPs and then clicknext
If you have an account click Set up my connection
manually
If you have a CD from the ISP click use the CD I got from
an ISP and then clicknext
7. Follow the next steps ad per the option youselected.
Viva Questions:
1) Defineinternet
2) What do you mean bynetwork?
3) Define a webbrowser
4) What are the different types of webbrowsers?
5) What are the advantages and disadvantages of anemail?
EXPERIMENT – 5
BROWSING INTERNET AND CREATING AN EMAIL ACCOUNT:
Studying various web browsers and their features
Web Browsers, Surfing the Web: Students customize their web browsers with the LAN proxy
settings, bookmarks, search toolbars and pop up blockers. Also, plug-ins like Macromedia
Flash and JRE for applets should be configured
PURPOSE: To learn to surf the web
THEORY:
Web browser provides the means to the searching and also helps to download the web
content.
Web browsers support most of the famous Internet Protocols like HTTP,FTP.
Common file formats a browser accepts areHTML
Well known browsers natively support a variety of other formats in addition to HTML such as
JPEG,PNG,GIF imageformats
Different web browsers available in the marketare:
Silversmith
Mosaic
Netscape
Mozilla
Opera
Lynx
Safari
Bookmark:
Each web browser is built-in with the support of Internet Bookmarks which serve as a namedanchor
– primarily to URLs. The primary Purpose of this book mark is to easily catalog and access web
pages that the web browser user has visited or plans to visit, without having to navigate the web to
getthere.
Pop-up Blockers:
Pop-ups are a form of online advertising on the WWW intended to attract the attention of the users.
These pop ups are hosted on the web sites which are frequently visited by the netizens. These pop ups
are activated when these web sites open a new web browser window and there by displaying
theadvertisements.
Plug-ins:
A plug-in is a software component program that interacts with a main application to provide a better

integration of the media. The basic difference between application programs and plug-ins is that
multimedia files are launched in a separate window where as in plug-ins multimedia play in the
browser window.

Few famous plug-INS are:
Apple QuickTime
Macromediaflash
Microsoft MediaPlayer
AdobeShockwave
Sun Microsystems JavaApplet
PROCEDURE:
LAN Proxy Settings:
Select tools menu in InternetExplorer
Select InternetOptions
SelectConnections
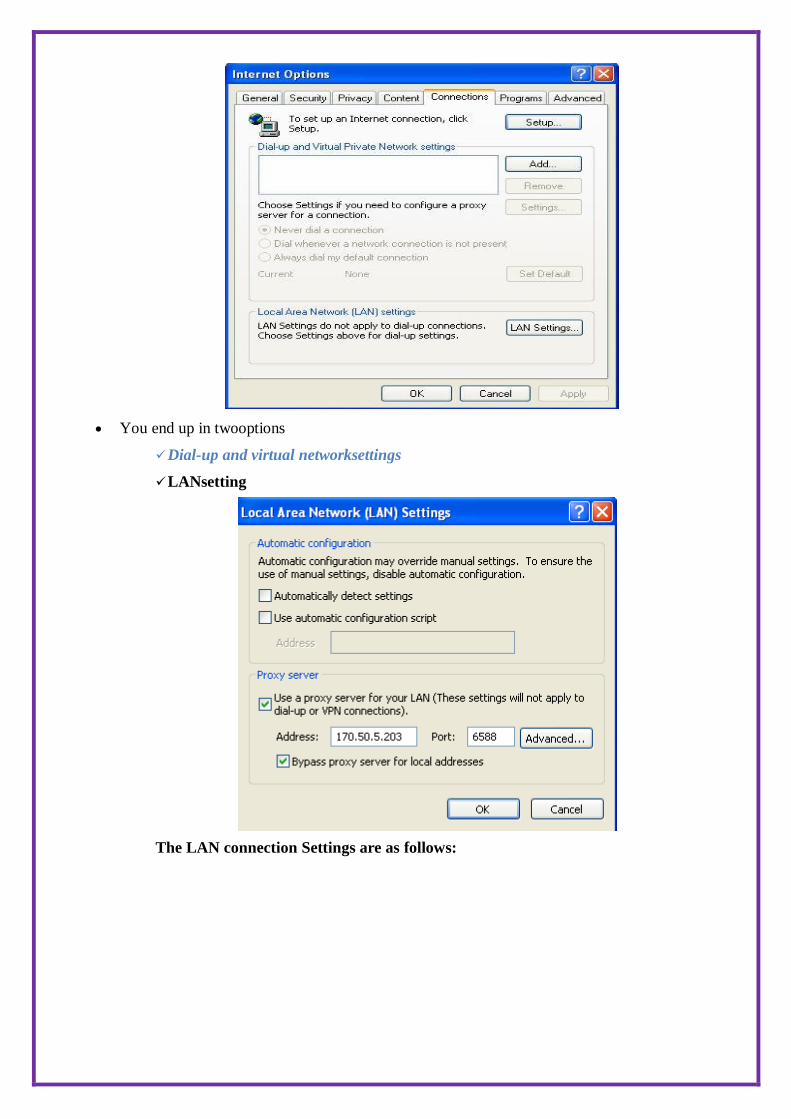
You end up in twooptions
Dial-up and virtual networksettings
LANsetting
The LAN connection Settings are as follows:

Select the properties button. The properties of the ipaddress, default Gateway and the
DNS server details are reflected in the dialog box.
The selection at this step is dependent on the kind of connection you are trying to
configure. Theyare:
Dial-up modemconnection
LANconnection
DSL or Cable
modemVivaQuestions:
1) Definesurfing

2) Abbreviate HTML,WWW
3) What is abookmark?
4) Define aplug-in
5) What are pop-upads?
6) What are pop-upblockers?
CHAPTER:2 SEARCH ENGINES
Search Engines & Netiquette: Students should know what search engines are and how to use the
search engines. A few topics would be given to the students for which they need to search on Google.
This should be demonstrated to theinstructors
PURPOSE: To know what search engines are and how to use the search engines.
THEORY:
Search engine:
A search engine can be defined as a web site with tools which help you to find information on the
internet
Function of a search engine:
You can find anything from a schedule of White house tours to instructions for removing stains from
clothes.
Limitations:
Search engines visit web sites only several weeks. Search engines cannot see information in other
data bases later on.
On the internet a search engine is a coordinated set of programs that includes: A spider (crawler or
bot) that goes to every page or representative pages on every web site that wants to be searchable and
reads it, using hypertext links on each page to discover and read site’s other pages.
Pros:
Cons:
You can select the searchterms
You can use the same search terms with multiple searchengines
You can change search terms as much as youwish
You will normally receive numerous links
Itsfast
There are so many different search engines it may be difficult tochoose
You will normally receive too many links often making it difficult to identify the most
relevantsites.
The vast majority of links may be only marginally relevant or altogetherirrelevant
EX: AltaVista
AskJeeves
Lycos etc.,

Meta Search Engines:
Meta search engines or “metacrawlers” don’t crawl the web themselves. Instead they search the
resources of multiple search engines by sending a search to several search engines at once
aggregating the result.
Pros:
72 | P a g e
You only need to use one search tool which is time-efficient
You only need to learn how to use one search engine reducing learningcurve
You benefit from the difference among several search tools atonce
Meta search services may not be able to leverage each individual search engines full range
of query tools resulting in less refinedsearches
You can not personally select the search engines queried by Meta searchservices.
Create an E-mail Account and Send
E-mails With or Without
Attachments
Have you ever needed an efficient way to communicate? One way of sending and receiving
messages instantly is through the computer using electronic mail or ‘e-mail’ as it is
popularly known. Whether for business or personal use, you can use e-mail to communicate
instantly.
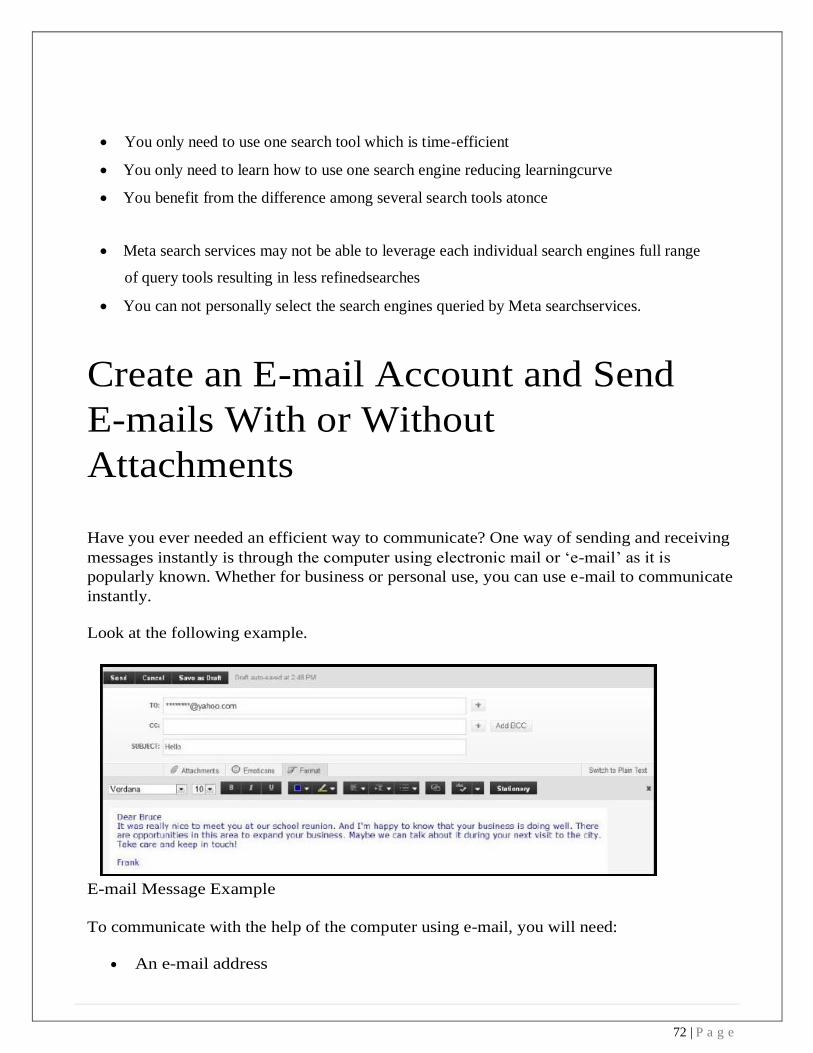
Look at the following example.
E-mail Message Example
To communicate with the help of the computer using e-mail, you will need:
An e-mail address

73 | P a g e
A password
The e-mail address of the person to whom you wish to send the e-mail
Internet connection
Before you begin using the computer to calculate your Start-Up cost, take a moment to get
familiar with the Intel® Education Help Guide. The Help Guide provides handy step-by-
step instructions for common applications as you work
Please refer to the card - How to Use the Help Guide.
To use e-mail, you need to first register for an e-mail account on a web site that offers such
a service.
How to Create an E-mail Account and Send E-mails with or without Attachments
A. Select an E-mail Service
1. Start the web browser.
For help, see:
Web Technologies Skill 1.1: To open a web browser
Or, Web Technologies Skill 3.1: To open a web browser
2. Click to place your cursor in the Address or Location bar. Type e-
mail. For help, see:
Web Technologies Skill 1.4: To go to a page on the Web
Or, Web Technologies Skill 3.4: To go to a page on the Web
3. Press the Enter key on your keyboard. You will notice that a list of popular
web sites offering free e-mail services will appear.
4. Click on a web site that interests you.
Note: If you are unable to decide which Web site to select, you can take
help from others you know who have already created their e-mail
accounts.
Note: To select a web site move your cursor over it. You will notice the
cursor changes to a hand.
B. Create an E-mail Account
1. Read the page and look for Sign Up or Create an Account. Then, click on it.
2. You will be directed to the registration page which appears like a form.
3. Fill in the registration details in the boxes, such as your:
First Name and Last Name
Date of Birth
Country or Location
74 | P a g e
Gender (whether you are male or female)
Zip Code
Note: You will notice that some boxes have the drop-down menu which
allows you to select one option from several choices. Just click on the down
arrow and move your cursor to the option you would like to choose. When itis
highlighted, click on it.
4. Type your desired e-mail ID or login/username.
Note: You can create your e-mail ID or login/username as you wish. You can
have your name, your birthday, favorite place or a combination of these as
your e-mail ID or login name. For e.g. [email protected]
Note: An e-mail address has two parts. The user name, that is, the name by
which you choose to identify your account and the name of the e-mail service
provider. For e.g. [email protected] is an e-mail address in which name is
your e-mail ID or username and example is the e-mail service provider. The
symbol @ differentiates the user from the e-mail service provider. Look at
the following examples:
Note: You will notice that some boxes have the drop-down menu which
allows you to select one option from several choices. Just click on the down
arrow and move your cursor to the option you would like to choose. When it
is highlighted, click on it.
5. Click Check or Check Availability to see if the e-mail ID or
login/username you created is available.
Note: Sometimes an e-mail ID or username may already be taken, so it is
important that the e-mail ID you create is unique. If the e-mail address you
typed already exists, the page provides four alternative e-mail addresses
for you to choose from. You can either click one of the four e-mail
addresses or type a new username.
6. In the box below, type a password for your e-mail ID. Type your password
again. Note: When you type the password, every character in the password
will appear as dots. This is to prevent unauthorized users from viewing and
misusing your password.
7. Choose a question in the Security Question box. Or, if you wish, you can
type your own question. Then, type an answer to your question.
Note: You will notice that some boxes have the drop-down menu which
allows you to choose one option from several choices. Just click on the
down arrow and move your cursor to the option you would like to choose.
75 | P a g e
When it is highlighted, click on it.
This question, in combination with your answer, will be used by the web
site to identify your account information and provide a new password in
case you
forget your current password.
8. Type the characters you see in the box or picture.
9. Click the “I Accept” box to agree to follow the terms of service.
10. Click Create My Account.
11. Your e-mail account is created and you are now registered to send and
receive e-mails on that web site.
Note: Some web sites will directly take you to your account. While for some,
a welcome screen is displayed with your e-mail account details. Click
Continue.
12. You will notice that you are directed to your e-mail account.
C. Read and Compose (Type) an E-mail Message
1. Click Inbox. Then click on the welcome message to read it.
2. To compose a new message, click New or Compose Mail.
Note: Some Web sites will have the drop-down menu which allows
you to choose one option from several choices. Just click on the down
arrow and select E-mail message.
3. Click the “To” box and type the e-mail address of the person you wish to
send your message.
Note: If you want to include more than one address in the To box, type a
semicolon after each address, for e.g., [email protected];
4. If you wish to send a copy of your message to another person, type the e-
mail address of that person in the ‘Cc’ box.
Note: Cc stands for Carbon Copy.
5. Type a short title of your message in the Subject box.
Note: The Subject box usually contains a short title about your message, for
example, “Hello” or “Greetings.”
6. Click on the space below the Subject box. Type your message.
D. Attach a File to Your E-mail
1. If you wish, you can also send a picture, or a file or a document attached
76 | P a g e
along with your message. Click Attach or Attach a file.
Note: Some web sites will have the drop-down menu which allows you
to choose one option from several choices. Just click on the down
arrow and
move your cursor to the option you would like to choose. When it
is highlighted, click on it.
2. You will notice a new window will pop up. Find and click the file you
want to attach. Then, click Open.
Note: In some web sites a new page will open. Click Browse to locate the
file you want to attach. Then, click Attach Files.
3. You will notice that the file you attached is displayed below the Subject box.
E. Send Your E-mail
Click Send to send your message.
F. Check New E-mail Message
1. To check if you have received new messages in your inbox, click Inbox.
Note: A list of e-mail messages will be displayed in the Inbox. The messages
in the list are organized in chronological order. The name of the sender, the
subject, the date and the size of the message are listed along with the
message.
2. Click on a message to open it.
G. Delete E-mail Message
To delete a message or several messages, click Inbox. Select the check box beside
the messages you want to delete, and then click Delete.
H. Reply to an E-mail Message
1. To reply to a message, select the message. Then, click Reply.
Note: Some Web sites will have the drop-down menu which allows you
to choose one option from several choices. Just click on the down arrow
and move your cursor to the option you would like to choose. When it is
highlighted, click on it.
2. You will notice that you will be directed to the compose page. The sender’s
e- mail address and subject will already be filled in.
3. Click on the space below the Subject box. Type your message.
4. If you wish to attach a file to your e-mail, see Section D: Attach a file to
your e- mail.
77 | P a g e
5. If you wish to save the message as a draft, click Save Draft or Save Now.
6. Click Send to send your message.
I. Sign Out of Your E-mail Service
Click Sign Out to exit your e-mail service.
J. Sign In to Your E-mail Service with Your E-mail Account
1. Now that you have registered with an e-mail service provider, you can send
and receive e-mail messages using your own e-mail account.
2. To send an e-mail using your e-mail account, click to place your cursor in
the Address or Location bar. Type the address of the web site where you
have created your e-mail account.
For help, see:
Web Technologies Skill 1.4: To go to a page on the Web
Or, Web Technologies Skill 3.4: To go to a page on the Web
3. Type your e-mail address in the e-mail ID or Username box.
4. Type your password in Password box.
5. Click Sign In.
6. To compose an e-mail, see Section C: Read and Compose (Type) an E-
mail Message.
7. To send an e-mail with an attachment, see Section D: Attach a File to
Your E- mail.
8. To view messages in your Inbox, see Section F: Check New E-mail Message.
9. To delete a message, see Section G: Delete E-mail Message.
10. To reply to a message, see Section H: Reply to an E-mail Message.
11. Click Sign Out to exit your e-mail service.
K. E-mail Challenge (Optional)
1. You can make your words look more attractive by changing the font type
and size. Click to put your cursor in front of the message you typed. Hold
the left mouse button till the end of your message is highlighted.
2. Just below the Subject box, you will notice a toolbar. Click the box with
words or fonts and select one of the font designs.
3. Then, click the box with numbers or sizes and select one of the font sizes.
78 | P a g e
Identify the problem in PC which does not boot due to improper assembly or defective
peripherals, fix it to get the computer back to working condition.
AIM: Hardware troubleshooting
Troubleshoot:-
1. If you hit the power button & nothing happened.
Check all power connections.
Check for power on mother board.
2. If the system turns on but does not beep or begin to boot up.
Remove all components except motherboard/ cpu / mother check by giving
power to them
Computer error beeps codes:
No beep: short, no power, bad CPU/ MD, loose peripherals.
One beep: everything is normal & computer posted tax.
Two beeps: post / CMOS error.
One long beep One short beep: Motherboard problem.
One long beep two short beep: video problem.
One long beep 3 short beeps: video problem.
3 long beeps: keyboard error.
Repeated long beep: memory error.
Continuous high- low beeps: CPU overheating Experiment no: 1
Basic troubleshooting: Sometimes things do not work exactly as planned at this point. Sometimes the system will not power
on at all. Sometimes it will power on, but you get no video. Sometimes you will get beep codes.
Sometimes you hear the fans, but the rest of the PC just sits there and does nothing. If things didn't
go according to plan, troubleshoot the system. Walk mentally through the boot process and check all
hardware as it goes. Think like the computer thinks, if you know what I mean. Here is a list of some of
the more common problems.
1. The power does not even turn on. This sometimes happens on ATX machines and it usually tracks down to the fact that the power switch is not properly connected to the motherboard or it is not connected at all. Find the power switch lead and make sure it is connected to the motherboard. It’s a possibility that simply reversing the lead will do the trick. If this is the not the case, then make sure the motherboard is not grounded somehow. Make sure that the board is not touching the case (this is what the spacers are for). Make sure that none of the screws that hold the board in place is touching anything metal or any of the electrical pathways on the motherboard. If you have any doubt on this, you can remove each screw one at a time and place a washer on them. You do not need to remove the motherboard to do this.

79 | P a g e
2. The PC boots, but it is giving beep codes. This is actually better than having to track
everything down on your own, because at least the PC is giving you a hint as to what is wrong.
You can also use the PC Mechanic Beep Codes E-book available on the PC Mechanic CD to
track it down for other BIOS versions. Often, these beep codes will not tell you exactly what
the problem is, but will point you at the trouble device. This information will then get you
pointed in the correct direction.
3. The fans come on, but you get no video or beeps. Sometimes, this is because some key
component may not be plugged in well or may not be operational. Check the memory modules
and the processor to be sure they are firmly installed. You might want to make sure the
processor is actually working. One way that I have used to see if a processor is working is to
remove or unplug the CPU fan and place your fingers on the CPU to see if it heats up real fast.
If it does, its OK and don’t let it run this way for long. If it remains at room temperature for
awhile, then there is no juice going through the processor and it may need replacing. The
keyboard doesn’t seem to work. This one doesn’t happen too often, but if it does, your two
trouble sources will be the keyboard itself or the keyboard controller on the motherboard. Hope
it isn’t the second one.
Viva Questions:
1) Define trouble shooting?
2) Mention a few problems associated with Modem.
3) What is the function of a modem?
4) What are the different key board problems?
5) Give the preventive measures for better computer utilization?

80 | P a g e
Task 4 : Networking two or more computers and document the process
Orientation & Connectivity Boot Camp: Students should get connected to their Local Area
Network and access the Internet. In the process they configure the TCP/IP setting. Finally
students should demonstrate, to the instructor, how to access the websites and email. If there
is no internet connectivity preparations need to be made by the instructors to simulate the
WWW on the LAN
PURPOSE: To learn Local Area Network and access the Internet. In the process they configure the
TCP/IP setting. Finally students should demonstrate, to the instructor, how to access the websites and
THEORY:
The internet is a world wide, publicly network of interconnected computer networks
LOCAL AREA NETWORK:
LANs are privately owned networks with in a single building or campus of up to few kilometers in size.
WIDE AREA NETWORK:
A WAN is a network that connects computers across a large geographic area such as a city or
country
TCP/IP (Transmission Control Protocol/Internet Protocol):
Collection of methods used to connect servers on the internet and to exchange data.
HTML (Hyper Text Markup Language):
The coding used to control the look of documents on the web
HTTP (Hyper Text Transfer Protocol):
Part of a URL that identifies the location as one that uses HTML
IP(Internet Protocol):
A format for contents and addresses of packets of information sent over the internet
IP ADDRESS:
An identifier for a computer or device on a TCP/IP network
SEARCH ENGINE:
A program that searches documents located on the Internet for keywords or phrases entered by a
person browsing the net.
Internet Connection requirements:
TCP/IP protocol
Client Software
ISP Account
Means of communication to the net
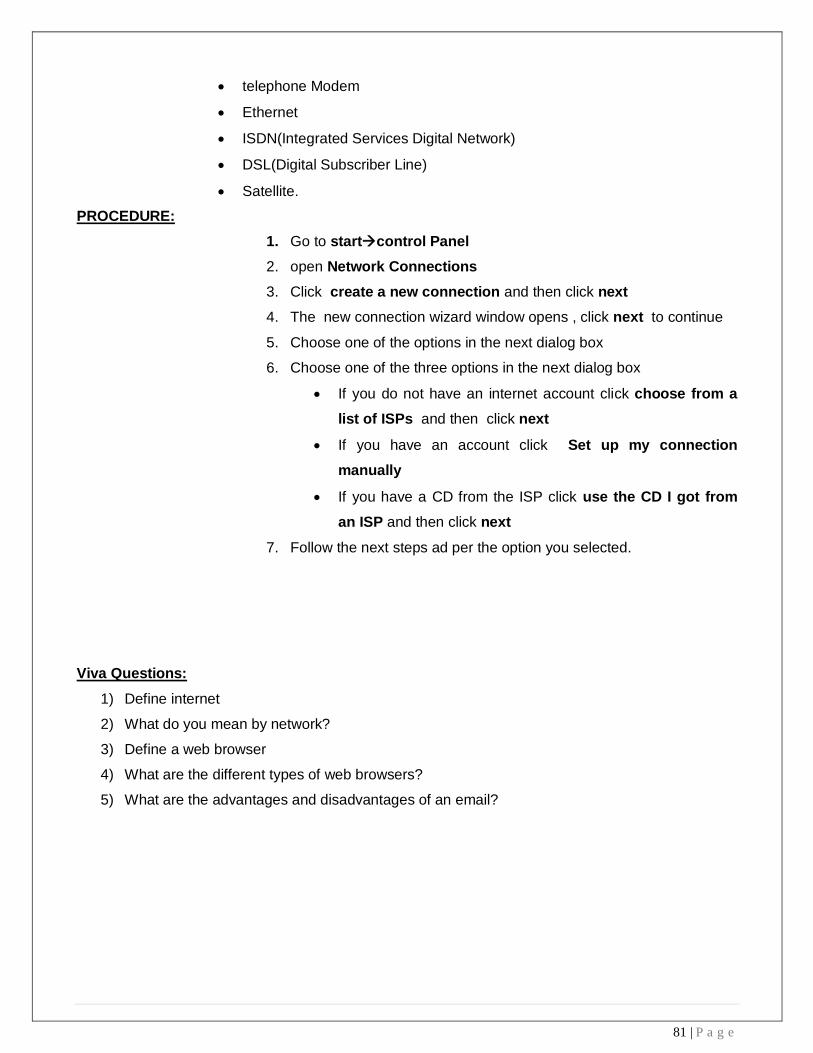
81 | P a g e
telephone Modem
Ethernet
ISDN(Integrated Services Digital Network)
DSL(Digital Subscriber Line)
Satellite.
PROCEDURE:
1. Go to startcontrol Panel
2. open Network Connections
3. Click create a new connection and then click next
4. The new connection wizard window opens , click next to continue
5. Choose one of the options in the next dialog box
6. Choose one of the three options in the next dialog box
If you do not have an internet account click choose from a
list of ISPs and then click next
If you have an account click Set up my connection
manually
If you have a CD from the ISP click use the CD I got from
an ISP and then click next
7. Follow the next steps ad per the option you selected.
Viva Questions:
1) Define internet
2) What do you mean by network?
3) Define a web browser
4) What are the different types of web browsers?
5) What are the advantages and disadvantages of an email?

82 | P a g e
TASK-6
Word Processor: Introduction to Word: Importance of word as word processor, overview of toolbars,
saving, accessing file, using help and resources; Creating project Certificate: Abstract features to be
covered; Formatting Styles: Inserting table, bullets and numbering, changing text direction, cell
alignment, footnote, hyperlink, symbols, spell check, images from files and clipart, drawing toolbar
and Word Art, formatting images, textboxes and paragraphs THEORY:
Header and Footer:
1. To create a header, enter text or graphics in the header area or click button on the
header and footer tool bar.
2. To create footer, click switch between header and footer.
3. Then click exit.
Date and Time:
Insert a date field that automatically updates so that the current date is displayed when you
open or print the file.
Insert a time field that automatically updates so that the current time is displayed when you
open or print the file.
Border:
On the format menu, click borders and shadings.
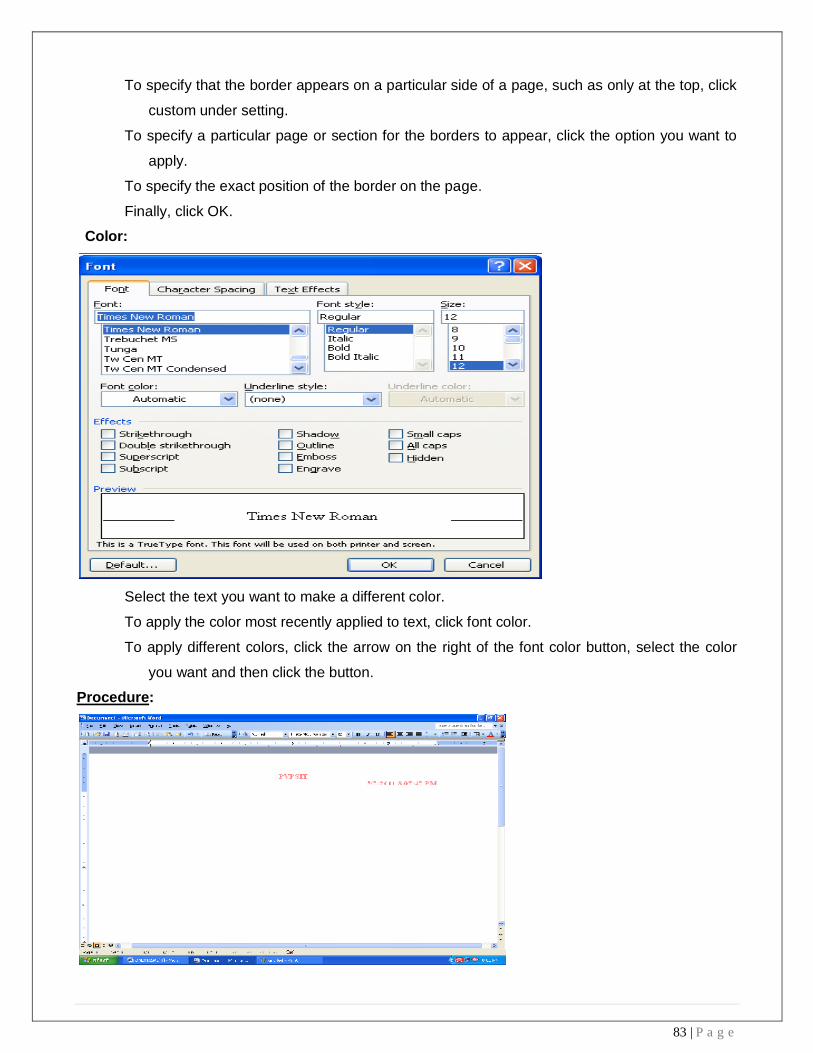
83 | P a g e
To specify that the border appears on a particular side of a page, such as only at the top, click
custom under setting.
To specify a particular page or section for the borders to appear, click the option you want to
apply.
To specify the exact position of the border on the page.
Finally, click OK.
Color:
Select the text you want to make a different color.
To apply the color most recently applied to text, click font color.
To apply different colors, click the arrow on the right of the font color button, select the color
you want and then click the button.
Procedure:

84 | P a g e
First click start button on the status bar.
Then select program and again select Microsoft word. On the menu bar click the file option.
Then again click new. Then enter the text not less than 100 words.
A header appears at the top and the footer appears at the bottom of each page.
On the view menu, click header and footer option. From dialogue box, make the required
changes and then click OK.
On the format menu, click borders and shading s make required changes and the click OK.
Select the text you want and make the different color. Click on right of the font color button,
Then select the color you want and then click on the button.
Viva Questions:
1) What are the benefits of MS-Office?
2) What is a word processor?
3) Explain the basic features of Ms-word
4) How can you save a document?
5) What is the function of tile bar, menu bar, and status bar, tool bar?
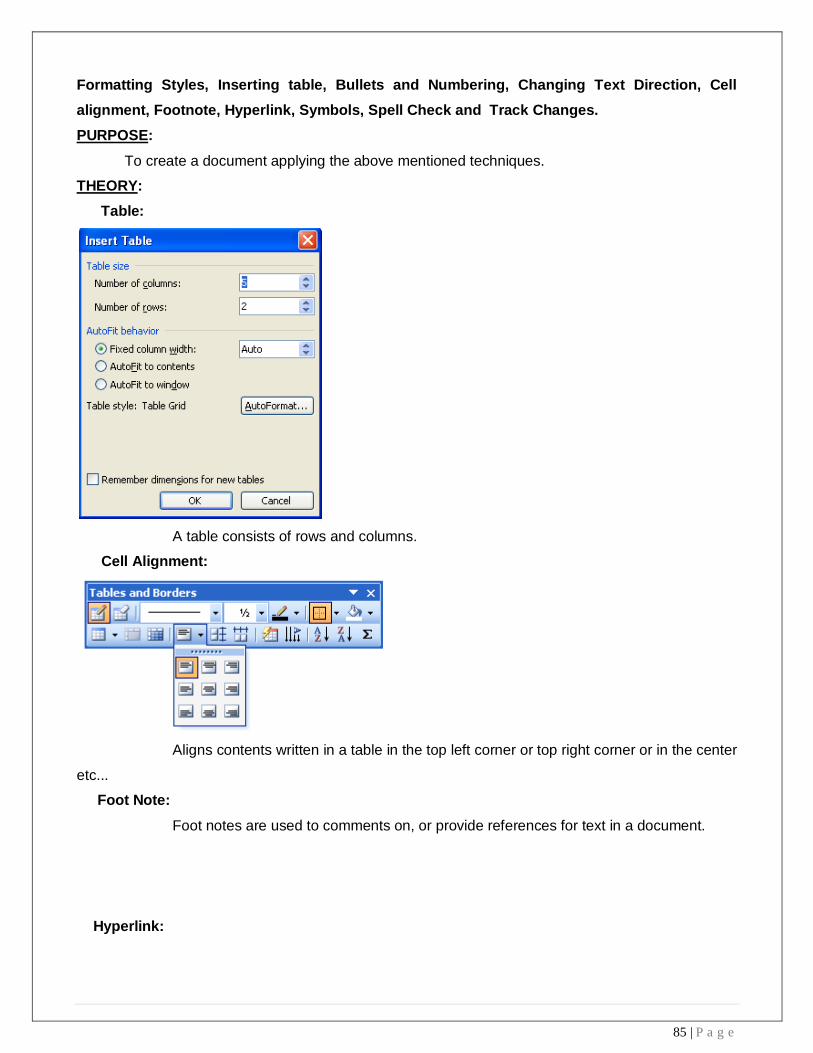
85 | P a g e
Formatting Styles, Inserting table, Bullets and Numbering, Changing Text Direction, Cell
alignment, Footnote, Hyperlink, Symbols, Spell Check and Track Changes.
PURPOSE:
To create a document applying the above mentioned techniques.
THEORY:
Table:
A table consists of rows and columns.
Cell Alignment:
Aligns contents written in a table in the top left corner or top right corner or in the center
etc...
Foot Note:
Foot notes are used to comments on, or provide references for text in a document.
Hyperlink:
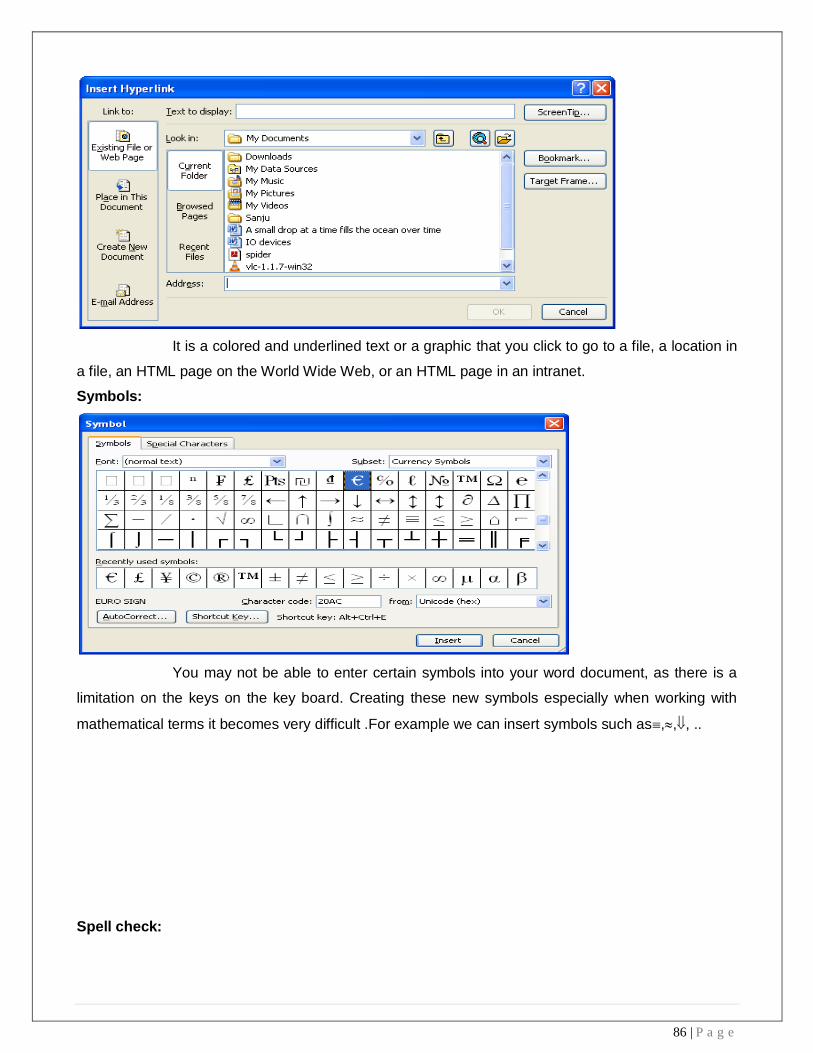
86 | P a g e
It is a colored and underlined text or a graphic that you click to go to a file, a location in
a file, an HTML page on the World Wide Web, or an HTML page in an intranet.
Symbols:
You may not be able to enter certain symbols into your word document, as there is a
limitation on the keys on the key board. Creating these new symbols especially when working with
mathematical terms it becomes very difficult .For example we can insert symbols such as,,, ..
Spell check:
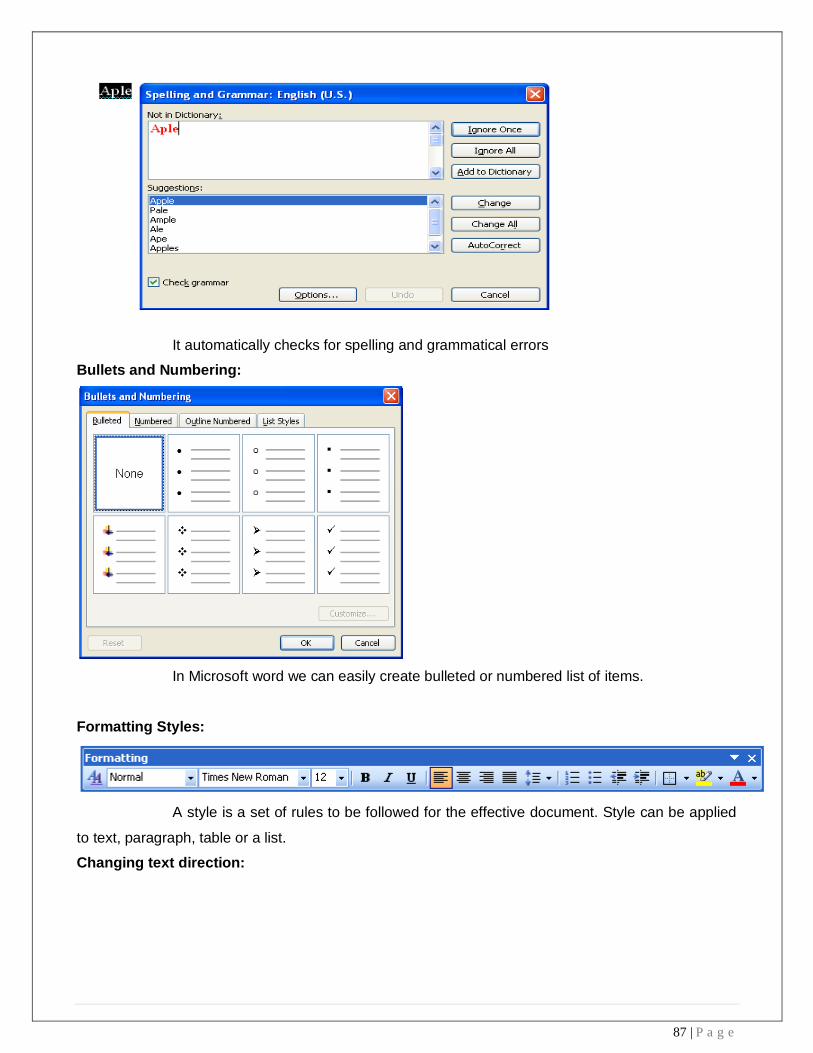
87 | P a g e
It automatically checks for spelling and grammatical errors
Bullets and Numbering:
In Microsoft word we can easily create bulleted or numbered list of items.
Formatting Styles:
A style is a set of rules to be followed for the effective document. Style can be applied
to text, paragraph, table or a list.
Changing text direction:

88 | P a g e
You can change the text orientation in drawing objects, such as text boxes, shapes,
and callouts, or in table cells so that the text is displayed vertically or horizontally.
Track changes:
Track changes are an excellent feature of Microsoft word as it enables a user or
reviewer to keep track of the changes that have taken a period. Changes like insertion, deletion or
formatting changes can be kept track of.
Procedure:
Changing Text direction:
1. Click the drawing object or table cell that contains the text you want to change.
2. On the Format menu, click Text Direction.
3. Click the orientation you want.
Table:
1. Click where you want to create a table.
2. On the Table menu, point to Insert, and then click Table.
3. Under Table size, select the number of columns and rows.

89 | P a g e
4. Under AutoFit behavior, choose options to adjust table size.
5. To use a built-in table format, click AutoFormat.
Select the options you want
Cell Alignment:
1. Click the cell that contains text you want to align.
2. On the Tables and Borders toolbar, select the option for the horizontal and vertical alignment
you want— for example, Align Bottom Center or Align Top Right.
Foot Note:
1. In print layout view, click where you want to insert the note reference mark.
2. On the Insert menu, point to Reference, and then click Footnote.
3. Click Footnotes or Endnotes.
By default, Word places footnotes at the end of each page and endnotes at the end of the
document. You can change the placement of footnotes and endnotes by making a selection in
the Footnotes or Endnotes box.
4. In the Number format box, click the format you want.
5. Click Insert.
Word inserts the note number and places the insertion point next to the note number.
6. Type the note text.
7. Scroll to your place in the document and continue typing.
As you insert additional footnotes or endnotes in the document, Word automatically applies the
correct number format.
Hyper link:

90 | P a g e
Select the text or picture you want to display as the hyperlink, and then click Insert Hyperlink on the
Standard toolbar
Do one of the following:
1. Link to an existing file or web page:
1. Under Link to, click Existing File or Web Page.
2. In the Address box, type the address you want to link to or, in the Look in box, click the
down arrow, and navigate to and select the file.
2. Link to a file you haven’t created yet
Under Link to, click Create New Document.
3. In the Name of new document box, type the name of the new file.
4. Under When to edit, click either Edit the new document later or Edit the new document
now
An e-mail address:
1. Select the text or picture you want to display as the hyperlink, and then click Insert Hyperlink
on the Standard toolbar
2. Under Link to, click E-mail Address.
3. Either type the e-mail address you want in the E-mail address box, or select an e-mail address
in the recently used e-mail addresses box.
4. In the Subject box, type the subject of the e-mail message
A specific location in another document
1. Insert a bookmark in the destination file or Web page.
2. Open the file that you want to link from, and select the text or object you want to display as the
hyperlink. On the Standard toolbar, click Insert Hyperlink.
3. Under Link to, click Existing File or Web Page.
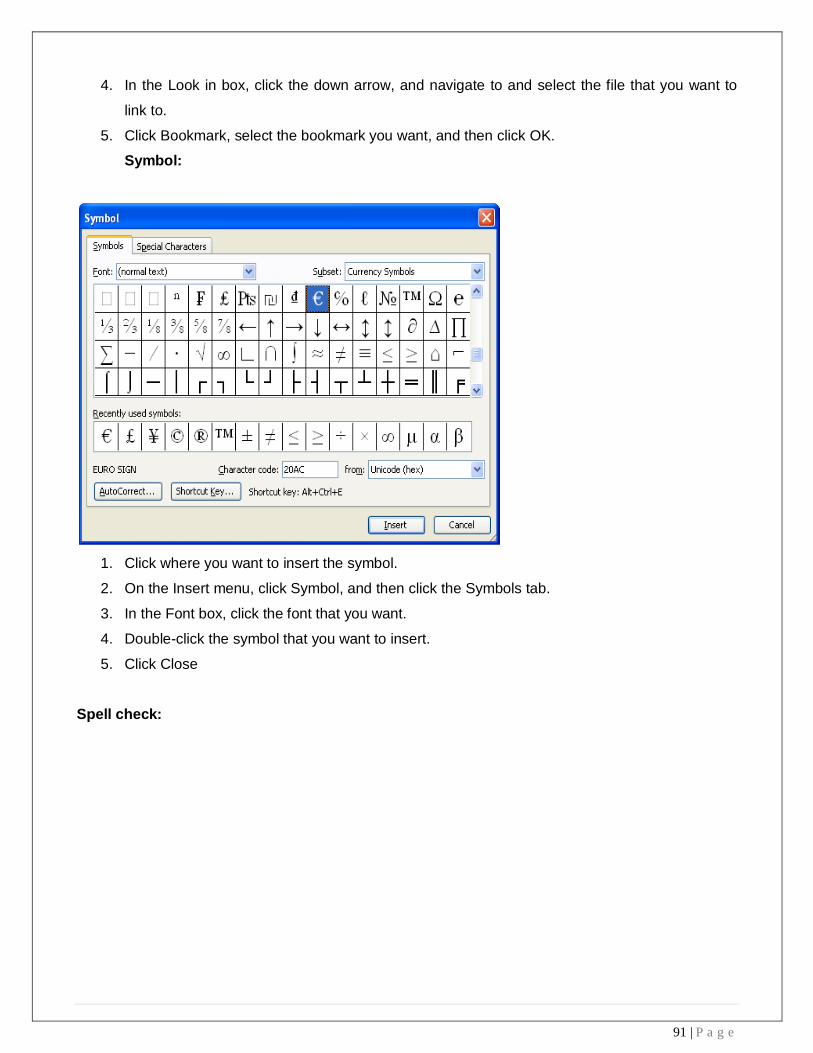
91 | P a g e
4. In the Look in box, click the down arrow, and navigate to and select the file that you want to
link to.
5. Click Bookmark, select the bookmark you want, and then click OK.
Symbol:
1. Click where you want to insert the symbol.
2. On the Insert menu, click Symbol, and then click the Symbols tab.
3. In the Font box, click the font that you want.
4. Double-click the symbol that you want to insert.
5. Click Close
Spell check:
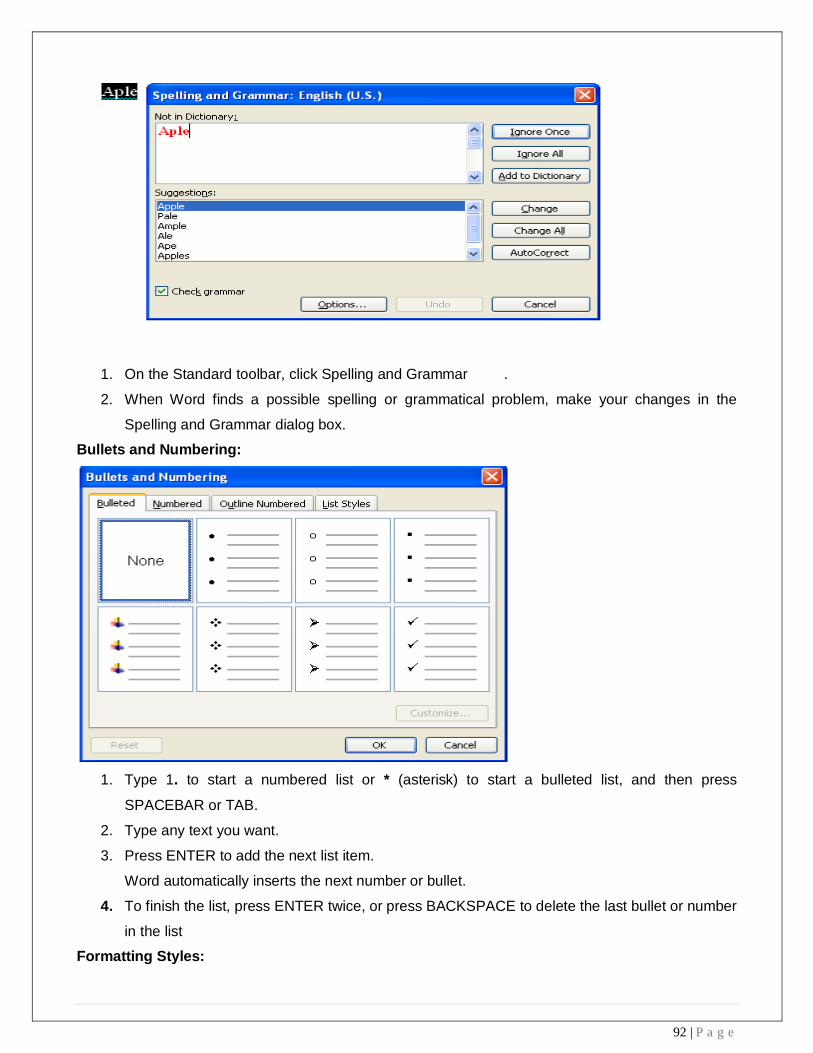
92 | P a g e
1. On the Standard toolbar, click Spelling and Grammar .
2. When Word finds a possible spelling or grammatical problem, make your changes in the
Spelling and Grammar dialog box.
Bullets and Numbering:
1. Type 1. to start a numbered list or * (asterisk) to start a bulleted list, and then press
SPACEBAR or TAB.
2. Type any text you want.
3. Press ENTER to add the next list item.
Word automatically inserts the next number or bullet.
4. To finish the list, press ENTER twice, or press BACKSPACE to delete the last bullet or number
in the list
Formatting Styles:

93 | P a g e
1. Select the words, paragraph, list, or table you want to change.
2. If the Styles and Formatting task pane is not open, click Styles and Formatting on the
Formatting toolbar
3. Click the style you want in the Styles and Formatting task pane.
If the style you want is not listed, click All Styles in the Show box
Track Changes:
1. Open the document you want to revise.
2. On the Tools menu, click Track Changes
Viva questions:
1) What is the function of spell check?
2) How can you insert a table?
3) Define header, footer
4) Explain about clipart
5) How can you create a hyper link?

94 | P a g e
Create a Newsletter. Features to be covered:-Table of content. Newspaper columns, Images from files and clipart, Drawing toolbar and Word Art, Formatting Images, Textboxes and Paragraphs PURPOSE:
To create a news Letter
THEORY:
Table of contents:
Table of contents displays a list of headings in a created document. It basically
provides an outline of the entire document created
Newspaper columns:
One can create a newspaper columns document by specifying the number of new
letter-style column required and then adjust their width, and add vertical lines between columns.
Images from files and clipart:

95 | P a g e
Inserting a picture (graphic) from a file and clipart may be required for a document.
This picture could be a scanned photograph or any other digitally produced one. These pictures can
be modified, resized, cropped and enhanced.
Drawing toolbar and Word Art:
One can create his/her own drawings in Microsoft word.Ms word provides a full fledged
drawing tool bar.
Word Art in Microsoft word enables you to create special and decorative text.
Formatting Images, Textboxes and Paragraphs:
Formatting an image includes selecting appropriate color, size, layout and cropping.
96 | P a g e
Generally the text in a document follows a standard orientation (line after line). A text
box provides a different orientation to the text with in a document. It can arrange the text in any where
and can be resized and moreover moved to any section of the document or even outside.
When you are formatting a paragraph, you do not need to highlight the entire
paragraph. Placing the cursor any where in the paragraph enables you to format it. After you set a
paragraph format, subsequent paragraphs will have the same format unless you change the format
PROCEDURE:
Table of contents:
1. Click where you want to insert the table of contents.
2. On the Insert menu, point to Reference, and click Index and Tables.
3. Click the Table of Contents tab.
4. To use one of the available designs, click a design in the Formats box.
5. Select any other table of contents options you want.
Newspaper columns:
1. Select the entire or part of document to be converted into a newsletter-style
2. Click on format menu, select columns
3. Any desired number of columns are presets-one or two or three or left or right b\can be selected.
4. Width and spacing can be fixed and equal columns width can be checked for uniformity
5. If newspaper columns are to be separated by a line, then check line between
6. Under apply to will be whole document if entire document is selected else we have to select a
selected text.
7. Click ok
Inserting images from files and clip art:
1. Click where you want to insert the picture.
2. On the Insert menu, point to Picture, and then click From File.
3. Locate the picture you want to insert.
4. Double-click the picture you want to insert.
CLIP ART:
1. On the Insert menu, point to Picture, and then click Clip Art.
2. In the Clip Art task pane, in the Search for box, type a word or phrase that describes
the clip you want or type in all or some of the file name of the clip.
3. To narrow your search, do one or both of the following:
To limit search results to a specific collection of clips, in the Search in box, click
the arrow and select the collections you want to search.

97 | P a g e
To limit search results to a specific type of media file, in the Results should be
box, click the arrow and select the check box next to the types of clips you want
to find.
4. Click Go.
5. If you don't know the exact file name, you can substitute wildcard characters for one or more
real characters. Use the asterisk (*) as a substitute for zero or more characters in a file name.
Use the question mark (?) as a substitute for a single character in a file name.
6. In the Results box, click the clip to insert it.
Drawing Toolbar and Word Art:
1. Click in your document where you want to create the drawing.
2. On the Insert menu, point to Picture, and then click New Drawing.
A drawing canvas is inserted into your document.
3. Use the Drawing toolbar to add any shapes or pictures that you want.
WORD ART:
1. On the Drawing toolbar, click Insert WordArt .
2. Click the WordArt effect you want, and then click OK.
3. In the Edit WordArt Text dialog box, type the text you want.
4. Do any of the following:
To change the font type, in the Font list, select a font.
To change the font size, in the Size list, select a size.
To make text bold, click the Bold button.
To make text italic, click the Italic button.
Formatting Images:
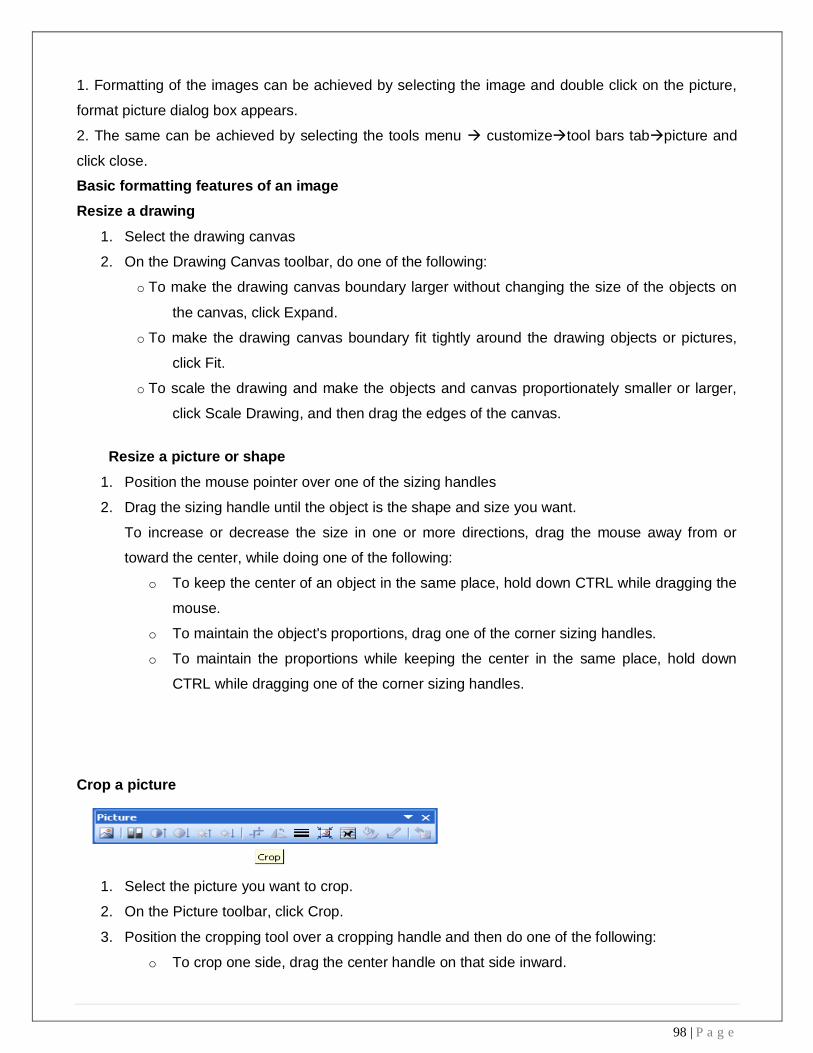
98 | P a g e
1. Formatting of the images can be achieved by selecting the image and double click on the picture,
format picture dialog box appears.
2. The same can be achieved by selecting the tools menu customizetool bars tabpicture and
click close.
Basic formatting features of an image
Resize a drawing
1. Select the drawing canvas
2. On the Drawing Canvas toolbar, do one of the following:
o To make the drawing canvas boundary larger without changing the size of the objects on
the canvas, click Expand.
o To make the drawing canvas boundary fit tightly around the drawing objects or pictures,
click Fit.
o To scale the drawing and make the objects and canvas proportionately smaller or larger,
click Scale Drawing, and then drag the edges of the canvas.
Resize a picture or shape
1. Position the mouse pointer over one of the sizing handles
2. Drag the sizing handle until the object is the shape and size you want.
To increase or decrease the size in one or more directions, drag the mouse away from or
toward the center, while doing one of the following:
o To keep the center of an object in the same place, hold down CTRL while dragging the
mouse.
o To maintain the object's proportions, drag one of the corner sizing handles.
o To maintain the proportions while keeping the center in the same place, hold down
CTRL while dragging one of the corner sizing handles.
Crop a picture
1. Select the picture you want to crop.
2. On the Picture toolbar, click Crop.
3. Position the cropping tool over a cropping handle and then do one of the following:
o To crop one side, drag the center handle on that side inward.
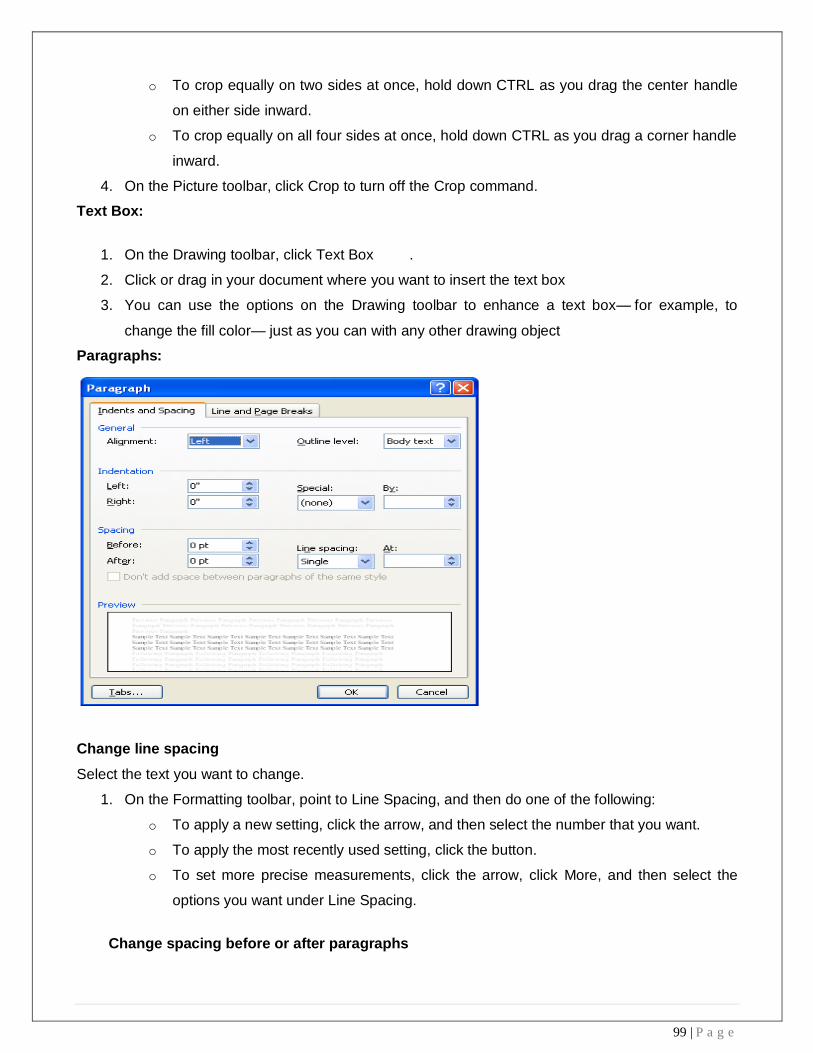
99 | P a g e
o To crop equally on two sides at once, hold down CTRL as you drag the center handle
on either side inward.
o To crop equally on all four sides at once, hold down CTRL as you drag a corner handle
inward.
4. On the Picture toolbar, click Crop to turn off the Crop command.
Text Box:
1. On the Drawing toolbar, click Text Box .
2. Click or drag in your document where you want to insert the text box
3. You can use the options on the Drawing toolbar to enhance a text box— for example, to
change the fill color— just as you can with any other drawing object
Paragraphs:
Change line spacing
Select the text you want to change.
1. On the Formatting toolbar, point to Line Spacing, and then do one of the following:
o To apply a new setting, click the arrow, and then select the number that you want.
o To apply the most recently used setting, click the button.
o To set more precise measurements, click the arrow, click More, and then select the
options you want under Line Spacing.
Change spacing before or after paragraphs

100 | P a g e
1. Select the paragraphs in which you want to change spacing.
2. On the Format menu, click Paragraph, and then click the Indents and Spacing tab.
3. Under Spacing, enter the spacing you want in the Before or After box.
Change paragraph direction
1. Place the insertion point in the paragraph that you want to change, or select several
paragraphs.
2. Do one of the following:
o To have text begin from the left, click Left-to-Right on the Formatting toolbar.
o To have text begin from the right, click Right-to-Left on the Formatting toolbar.
When you change the paragraph direction, Microsoft Word leaves justified and centered text as it is.
In the case of left-aligned or right-aligned text, Word flips the alignment to its opposite. For example, if
you have a left-to-right paragraph that is right aligned, such as the date at the top of a letter, clicking
Right-to-Left results in a right-to-left paragraph that is left aligned.
Viva questions:
1) Define undo, redo
2) What is the main Purpose of a drop cap?
3) What are footnotes and end notes?
4) How can you print a document ?
5) How can you make alignment of text in a table?
TASK 17:
Creating a Feed Back Form:-Features to be covered: Forms, Text Fields, Inserting objects and
Mail Merge in Word.
PURPOSE: To create a Feed Back form, text fields, inserting objects, mail merging,
THEORY:
Forms:
Using Microsoft word one can create an organized and structured document with a provision
to enter the required information into it. A document of such nature is called a form.
Mail Merge:

101 | P a g e
It helps us to produce from letters mailing labels envelopes catalogs and others types of
merged document. It is so found in the tools option on the menu bar. In tools we have letters and
mailing. In letters and mailing we have mail merge mail merge tool box envelopes tables and letters
wizard. In mail merge select the required document you are working on. A window for customizing the
data base structure appears. This file contains the names, address details with contact numbers etc of
people you wish to send the letters.
Inserting objects:
Insert an object such as drawing word art text effects or an equation at the inserting point.
Fields:
It inserts a field at the inserting font fields are used to insert a variety of information
automatically. Select table in table select insert. In that select insert table a box containing number of
rows and columns will appear. Select six colors and four rows and click o.k. Given the first row as
date, problem repeated student’s signature action recommended problem status and councilors sign.
Insert the objects in the feed back form and apply the text fields in the
form.
PROCEDURE:
Mail Merge:
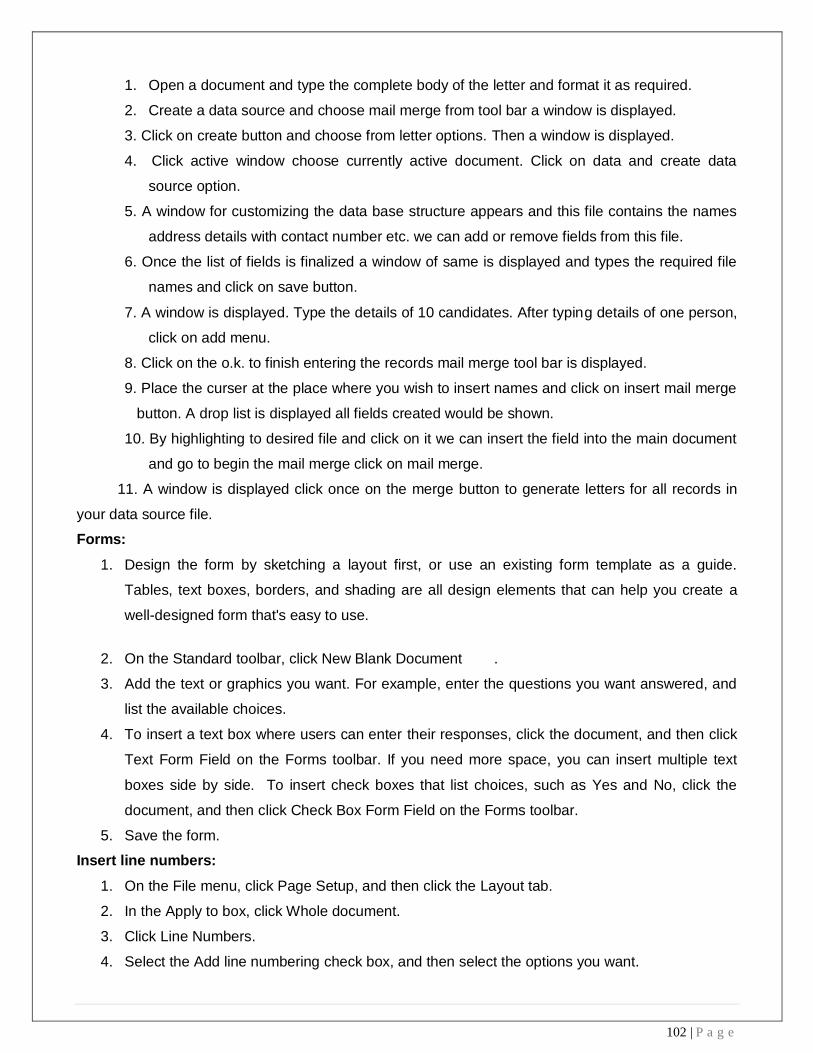
102 | P a g e
1. Open a document and type the complete body of the letter and format it as required.
2. Create a data source and choose mail merge from tool bar a window is displayed.
3. Click on create button and choose from letter options. Then a window is displayed.
4. Click active window choose currently active document. Click on data and create data
source option.
5. A window for customizing the data base structure appears and this file contains the names
address details with contact number etc. we can add or remove fields from this file.
6. Once the list of fields is finalized a window of same is displayed and types the required file
names and click on save button.
7. A window is displayed. Type the details of 10 candidates. After typing details of one person,
click on add menu.
8. Click on the o.k. to finish entering the records mail merge tool bar is displayed.
9. Place the curser at the place where you wish to insert names and click on insert mail merge
button. A drop list is displayed all fields created would be shown.
10. By highlighting to desired file and click on it we can insert the field into the main document
and go to begin the mail merge click on mail merge.
11. A window is displayed click once on the merge button to generate letters for all records in
your data source file.
Forms:
1. Design the form by sketching a layout first, or use an existing form template as a guide.
Tables, text boxes, borders, and shading are all design elements that can help you create a
well-designed form that's easy to use.
2. On the Standard toolbar, click New Blank Document .
3. Add the text or graphics you want. For example, enter the questions you want answered, and
list the available choices.
4. To insert a text box where users can enter their responses, click the document, and then click
Text Form Field on the Forms toolbar. If you need more space, you can insert multiple text
boxes side by side. To insert check boxes that list choices, such as Yes and No, click the
document, and then click Check Box Form Field on the Forms toolbar.
5. Save the form.
Insert line numbers:
1. On the File menu, click Page Setup, and then click the Layout tab.
2. In the Apply to box, click Whole document.
3. Click Line Numbers.
4. Select the Add line numbering check box, and then select the options you want.

103 | P a g e
Viva Questions:
1) What is the functionality of print payout view?
2) How can you insert a picture from another file?
3) How can you start a mail merge?
4) How can you customize a mail merge?
5) What is a mail merge?

104 | P a g e
Creating a Scheduler:-Features to be covered: - Gridlines, Format Cells, Summation, auto fill,
Formatting Text
PURPOSE:
To maintain a shift schedule with specifications
THEORY:
Grid lines:
1. Click the worksheet.
2. On the file menu, click page setup and the click the sheet tab.
3. Click gridlines.
4. Select the sheets on which you want to change the gridlines color.
5. On the Tools menu click options click the color you want in the color box.
6. To use the default gridlines color click automatic.
7. Lines you can add to a chart that make it easier to view and evaluate data. Gridlines extend
from the tick marks on an axis across a plot area.
Format Cell:
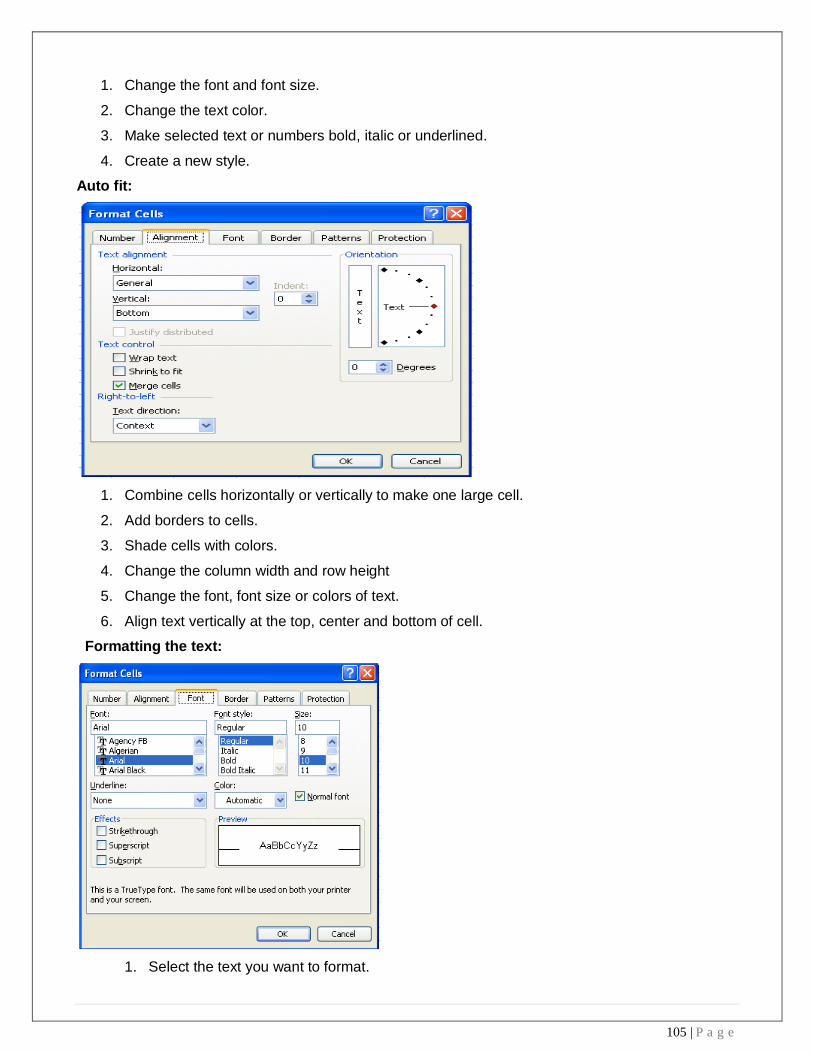
105 | P a g e
1. Change the font and font size.
2. Change the text color.
3. Make selected text or numbers bold, italic or underlined.
4. Create a new style.
Auto fit:
1. Combine cells horizontally or vertically to make one large cell.
2. Add borders to cells.
3. Shade cells with colors.
4. Change the column width and row height
5. Change the font, font size or colors of text.
6. Align text vertically at the top, center and bottom of cell.
Formatting the text:
1. Select the text you want to format.

106 | P a g e
2. On the format menu click cells and then click number tab.
3. In the catalog box click text.
4. Enter the numbers in the formatted cells.
5. Click ok.
6. Then press enter and reenter the data.
PROCEDURE:
First click start button of the screen on status bar. Click on programs and then Microsoft excel.
To get a new blank work sheet go to programs and then click on excel sheet. On the file menu click
page setup and then click sheet tab click gridlines. In this way do the required changes using format
cell, make the required changes using formatting text also make the required changes. Enter the data
in the data in the worksheet consisting of week name person name and timings 7 a.m. to 3 p.m. Make
all the above changes to the text.
Viva Questions:
1) What do you mean by a spread sheet?
2) What are the contents of a spread sheet?
3) Describe different types of toolbars available in ms-excel
4) How can you calculate simple formulas in excel?
5) How can you navigate the spread sheet?
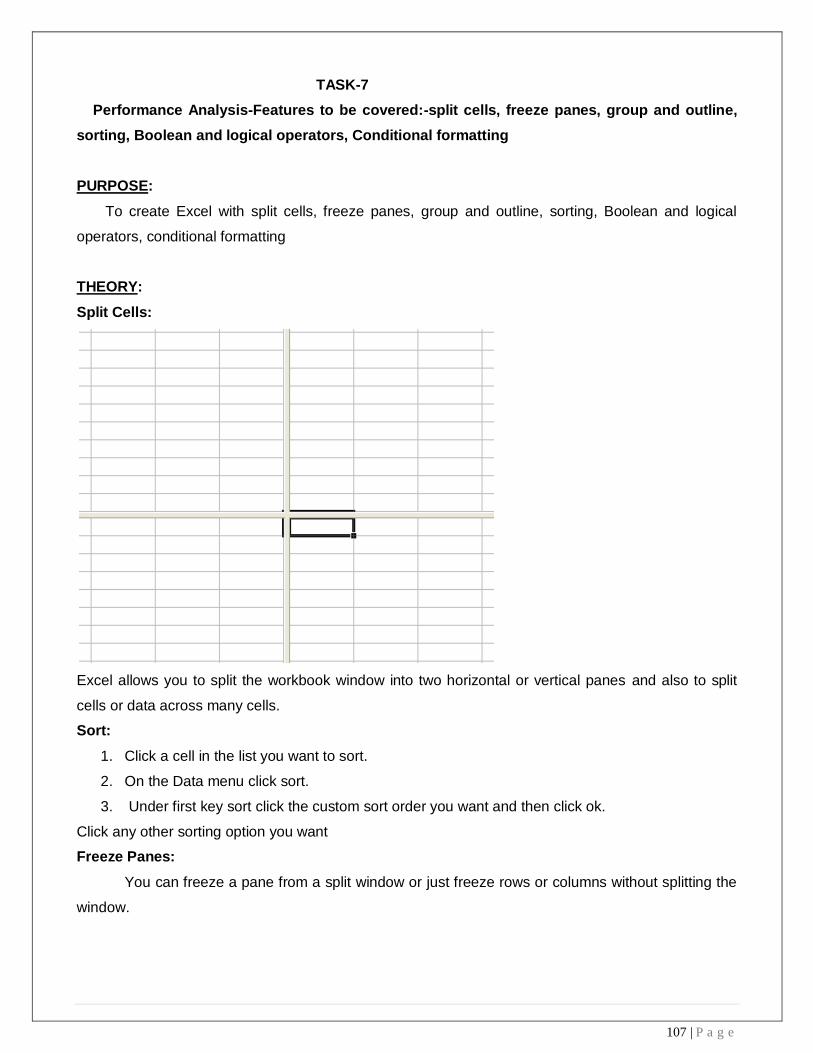
107 | P a g e
TASK-7
Performance Analysis-Features to be covered:-split cells, freeze panes, group and outline,
sorting, Boolean and logical operators, Conditional formatting
PURPOSE:
To create Excel with split cells, freeze panes, group and outline, sorting, Boolean and logical
operators, conditional formatting
THEORY:
Split Cells:
Excel allows you to split the workbook window into two horizontal or vertical panes and also to split
cells or data across many cells.
Sort:
1. Click a cell in the list you want to sort.
2. On the Data menu click sort.
3. Under first key sort click the custom sort order you want and then click ok.
Click any other sorting option you want
Freeze Panes:
You can freeze a pane from a split window or just freeze rows or columns without splitting the
window.

108 | P a g e
PROCEDURE:
Sort:
First click on start button at the bottom of the screen on status bar. Click on programs and then
Ms-excel. Then enter the data as given. Enter the student’s names, Subjective wise marks, total and
avg. Then calculate the total and avg by using formula. Then go to Data menu and click sort. Under
first key sort, click custom sort order needed i.e. ascending order or alphabetical order and then click
o.k. Then the required worksheet is prepared
Split cells:
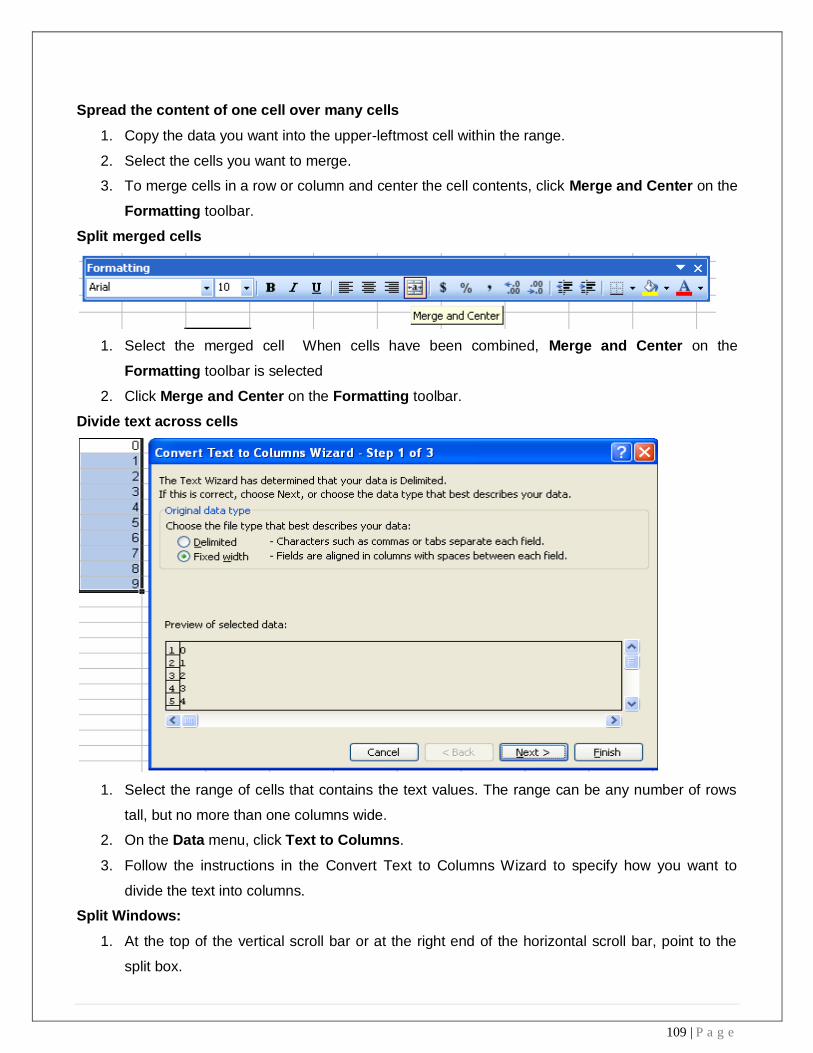
109 | P a g e
Spread the content of one cell over many cells
1. Copy the data you want into the upper-leftmost cell within the range.
2. Select the cells you want to merge.
3. To merge cells in a row or column and center the cell contents, click Merge and Center on the
Formatting toolbar.
Split merged cells
1. Select the merged cell When cells have been combined, Merge and Center on the
Formatting toolbar is selected
2. Click Merge and Center on the Formatting toolbar.
Divide text across cells
1. Select the range of cells that contains the text values. The range can be any number of rows
tall, but no more than one columns wide.
2. On the Data menu, click Text to Columns.
3. Follow the instructions in the Convert Text to Columns Wizard to specify how you want to
divide the text into columns.
Split Windows:
1. At the top of the vertical scroll bar or at the right end of the horizontal scroll bar, point to the
split box.
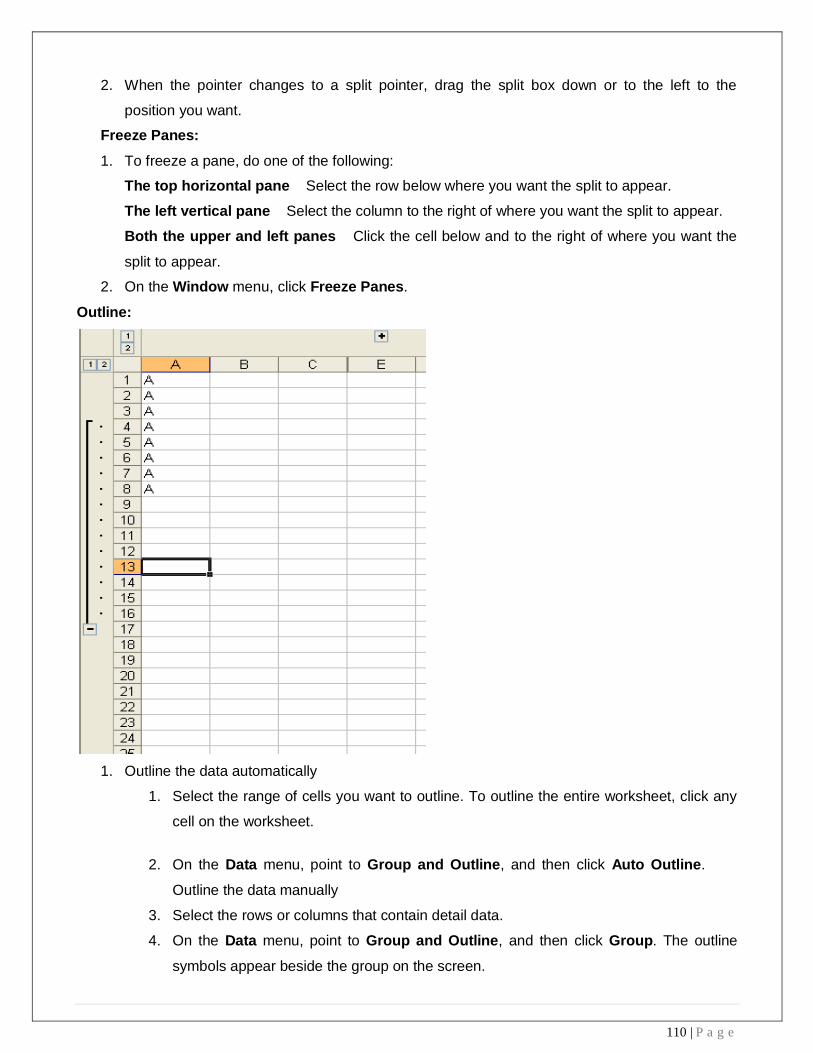
110 | P a g e
2. When the pointer changes to a split pointer, drag the split box down or to the left to the
position you want.
Freeze Panes:
1. To freeze a pane, do one of the following:
The top horizontal pane Select the row below where you want the split to appear.
The left vertical pane Select the column to the right of where you want the split to appear.
Both the upper and left panes Click the cell below and to the right of where you want the
split to appear.
2. On the Window menu, click Freeze Panes.
Outline:
1. Outline the data automatically
1. Select the range of cells you want to outline. To outline the entire worksheet, click any
cell on the worksheet.
2. On the Data menu, point to Group and Outline, and then click Auto Outline.
Outline the data manually
3. Select the rows or columns that contain detail data.
4. On the Data menu, point to Group and Outline, and then click Group. The outline
symbols appear beside the group on the screen.
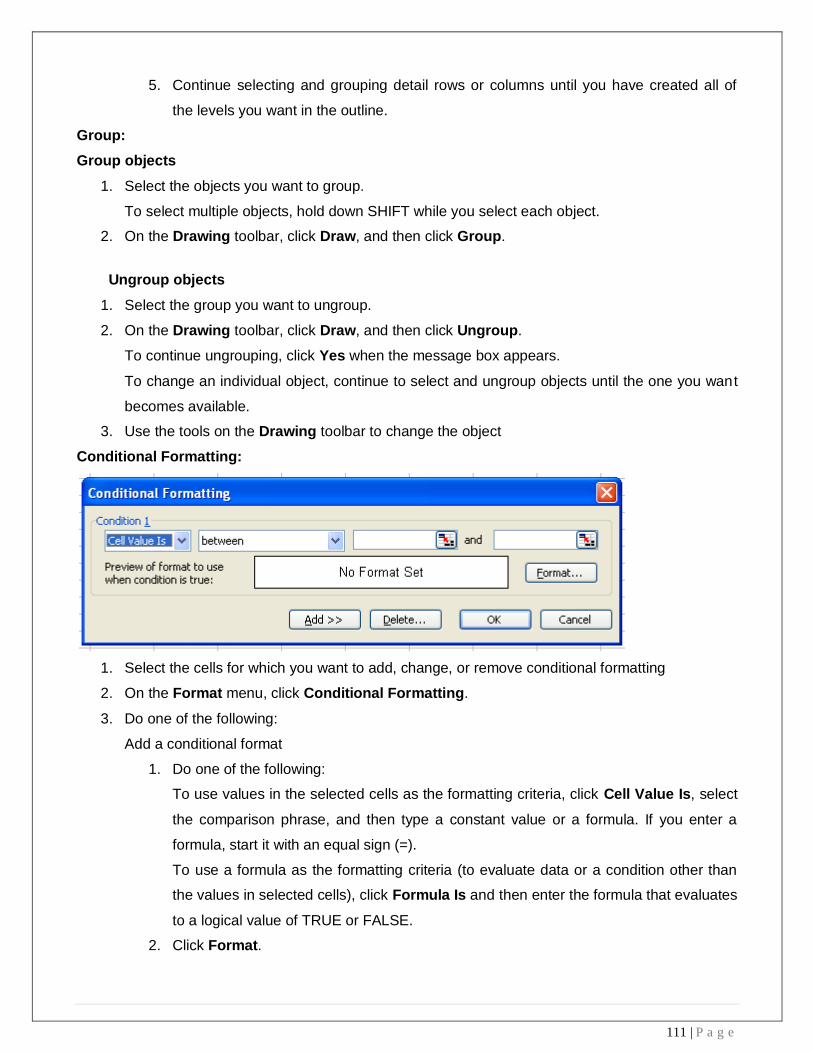
111 | P a g e
5. Continue selecting and grouping detail rows or columns until you have created all of
the levels you want in the outline.
Group:
Group objects
1. Select the objects you want to group.
To select multiple objects, hold down SHIFT while you select each object.
2. On the Drawing toolbar, click Draw, and then click Group.
Ungroup objects
1. Select the group you want to ungroup.
2. On the Drawing toolbar, click Draw, and then click Ungroup.
To continue ungrouping, click Yes when the message box appears.
To change an individual object, continue to select and ungroup objects until the one you want
becomes available.
3. Use the tools on the Drawing toolbar to change the object
Conditional Formatting:
1. Select the cells for which you want to add, change, or remove conditional formatting
2. On the Format menu, click Conditional Formatting.
3. Do one of the following:
Add a conditional format
1. Do one of the following:
To use values in the selected cells as the formatting criteria, click Cell Value Is, select
the comparison phrase, and then type a constant value or a formula. If you enter a
formula, start it with an equal sign (=).
To use a formula as the formatting criteria (to evaluate data or a condition other than
the values in selected cells), click Formula Is and then enter the formula that evaluates
to a logical value of TRUE or FALSE.
2. Click Format.
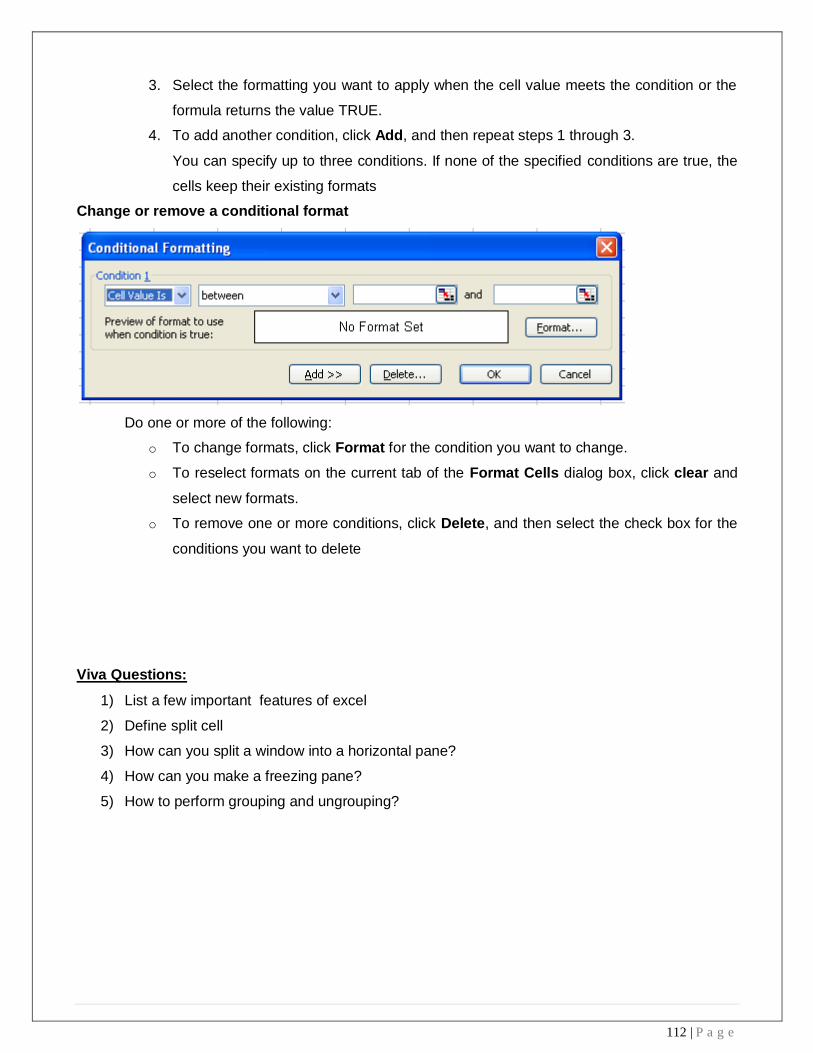
112 | P a g e
3. Select the formatting you want to apply when the cell value meets the condition or the
formula returns the value TRUE.
4. To add another condition, click Add, and then repeat steps 1 through 3.
You can specify up to three conditions. If none of the specified conditions are true, the
cells keep their existing formats
Change or remove a conditional format
Do one or more of the following:
o To change formats, click Format for the condition you want to change.
o To reselect formats on the current tab of the Format Cells dialog box, click clear and
select new formats.
o To remove one or more conditions, click Delete, and then select the check box for the
conditions you want to delete
Viva Questions:
1) List a few important features of excel
2) Define split cell
3) How can you split a window into a horizontal pane?
4) How can you make a freezing pane?
5) How to perform grouping and ungrouping?

113 | P a g e
Cricket Score card-Features to be covered:-pivot tables, Interactive Buttons, Importing data,
Data Protection, Data validation
PURPOSE: To learn about pivot tables, Interactive Buttons, Importing data, Data Protection, Data
validation.
THEORY:
Pivot Tables:
A PivotTable report is an interactive table that quickly combines and compares large amounts of data.
You can rotate its rows and columns to see different summaries of the source data, and you can
display the details for areas of interest.
Interactive Buttons:
MS- Excel allows you to create Interactive Buttons
Data Protection:
Ms excel allows you to protect your work sheet from being added or renamed or deleted or copied by
providing password protection to your worksheets.
Data Validation:
Data validation is a tool that helps you to control the kind of information that is entered in your
worksheet. With data validation you can:
Provide users with a list of choices
Restrict entries to a specific type or size
Create custom settings
PROCEDURE:
Pivot Tables:
1. Open the workbook where you want to create the PivotTable report.
o If you are basing the report on a Web query, parameter query, report template, Office
Data Connection file, or query file, retrieve the data into the workbook, and then click a
cell in the Microsoft Excel list containing the retrieved data.
If the retrieved data is from an OLAP database, or the Office Data Connection returns
the data as a blank PivotTable report, continue with step 6 below.
o If you are basing the report on an Excel list or database, click a cell in the list or
database.
2. On the Data menu, click PivotTable and PivotChart Report.
3. In step 1 of the PivotTable and PivotChart Wizard, follow the instructions, and click PivotTable
under What kind of report do you want to create?
4. Follow the instructions in step 2 of the wizard.

114 | P a g e
5. Follow the instructions in step 3 of the wizard, and then decide whether to lay out the report
onscreen or in the wizard.
Button:
Select the commands tab
Scroll to the bottom of the categories list
Select the custom button
Drag this button to your new toolbar in the location where you want it to be.
You can obtain a description of the command button by selecting the command and
pressing the Description button
Data Protection:
Protect worksheet elements from all users
1. Switch to the worksheet you want to protect.
2. Unlock any cells you want users to be able to change: select each cell or range, click Cells on
the Format menu, click the Protection tab, and then clear the Locked check box.
3. Hide any formulas that you don't want to be visible: select the cells with the formulas, click
Cells on the Format menu, click the Protection tab, and then select the Hidden check box.
4. Unlock any graphic objects you want users to be able to change.
You don't need to unlock buttons or controls for users to be able to click and use them. You can
unlock embedded charts, text boxes, and other objects created with the drawing tools that you want
users to be able to modify. To see which elements on a worksheet are graphic objects, click Go To on
the Edit menu, click Special, and then click Objects.
1. Hold down CTRL and click each object that you want to unlock.
2. On the Format menu, click the command for the object you selected: AutoShape,
Object, Text Box, Picture, Control, or WordArt.
3. Click the Protection tab.
4. Clear the Locked check box, and if present, clear the Lock text check box.
5. On the Tools menu, point to Protection, and then click Protect Sheet.
6. Type a password for the sheet.
7. In the Allow all users of this worksheet to list, select the elements that you want users to be
able to change.
8. Click OK, and if prompted retype the password.
Protect a shared workbook
1. If the workbook is already shared, and you want to assign a password to protect the sharing,
unshare the workbook.

115 | P a g e
1. Have all other users save and close the shared workbook. If other users are editing,
they will lose any unsaved work.
2. Unsharing the workbook deletes the change history. If you want to keep a copy of this
information, print out the History worksheet or copy it to another workbook.
1. On the Tools menu, point to Track Changes, and then click Highlight
Changes.
2. In the When box, click All.
3. Clear the Who and Where check boxes.
4. Select the List changes on a new sheet check box, and then click OK.
5. Do one or more of the following:
To print the History worksheet, click Print .
To copy the history to another workbook, select the cells you want to
copy, click Copy, switch to another workbook, click where you want the
copy to go, and click Paste .
3. On the Tools menu, click Share Workbook, and then click the Editing tab.
4. Make sure that you are the only person listed in the Who has this workbook open
now box.
5. Clear the Allow changes by more than one user at the same time check box.
If this check box is not available, you must unprotect the workbook before clearing the
check box.
1. Click OK, point to Protection on the Tools menu, and then click Unprotect
Shared Workbook.
2. Enter the password if prompted, and then click OK.
3. On the Tools menu, click Share Workbook, and then click the Editing tab.
6. When prompted about the effects on other users, click Yes.
2. Set other types of protection if you want: Give specific users access to ranges, protect
worksheets, protect workbook elements, and set passwords for viewing and editing.
3. On the Tools menu, point to Protection, and then click Protect Shared Workbook or
Protect and Share Workbook.
4. Select the Sharing with track changes check box.
5. If you want to require other users to supply a password to turn off the change history or
remove the workbook from shared use, type the password in the Password box, and then
retype the password when prompted.
6. If prompted, save the workbook

116 | P a g e
Protect a workbook file from viewing or editing
1. On the File menu, click Save As.
2. On the Tools menu, click General Options.
3. Do either or both of the following:
o If you want users to enter a password before they can view the workbook, type a
password in the Password to open box, and then click OK.
o If you want users to enter a password before they can save changes to the workbook,
type a password in the Password to modify box, and then click OK.
4. When prompted, retype your passwords to confirm them.
5. Click Save.
6. If prompted, click Yes to replace the existing workbook.
Data Validation:
Select the cells in which you want to apply data validation
From the Data menu, choose Validation
From the Allow drop-down list choose List
In the source box type an equal to sign and list the name
Click ok
Viva questions:
1) Explain about pivot table reports
2) Define macro
3) Define template
4) How can you open protection tool in excel?
5) How can you check errors in excel?

117 | P a g e
TASK :
Excel module test-replicate the given document inclusive of all features
PURPOSE: Module Test
PROCEDURE:
Move the open toolbar button from its current position to the end of the standard
toolbar
Create a new worksheet containing three columns
Add comments and do data validation that is appropriate for each field
Add informative headers and footers
Create an invoice purchase order ,expense sheet, employee list and other worksheets
necessary for a small business
Format the text so that it has a professional look and is aesthetically pleasing
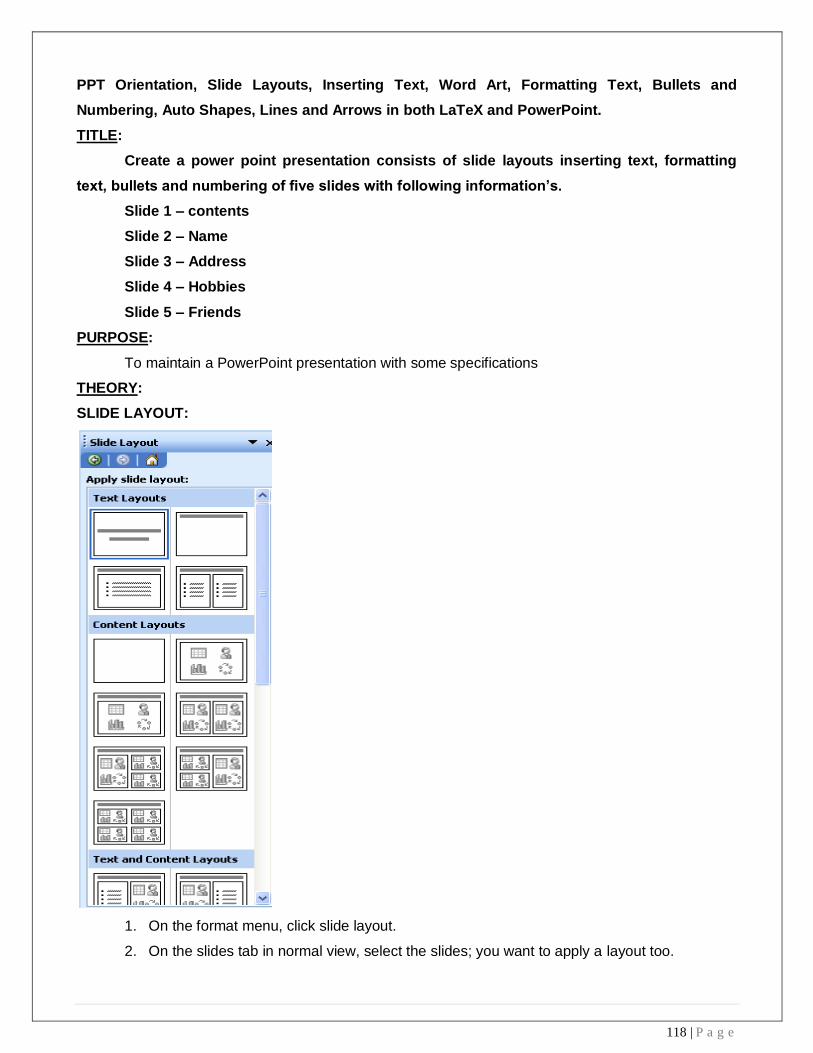
118 | P a g e
PPT Orientation, Slide Layouts, Inserting Text, Word Art, Formatting Text, Bullets and
Numbering, Auto Shapes, Lines and Arrows in both LaTeX and PowerPoint.
TITLE:
Create a power point presentation consists of slide layouts inserting text, formatting
text, bullets and numbering of five slides with following information’s.
Slide 1 – contents
Slide 2 – Name
Slide 3 – Address
Slide 4 – Hobbies
Slide 5 – Friends
PURPOSE:
To maintain a PowerPoint presentation with some specifications
THEORY:
SLIDE LAYOUT:
1. On the format menu, click slide layout.
2. On the slides tab in normal view, select the slides; you want to apply a layout too.

119 | P a g e
3. In the slide layout task pane, point to layout you and then click it.
4. A new slide can also be inserted within the task pane. Point the layout you want the slide
to have, click the arrow and then click the insert new slide.
INSERT TEXT:
1. Text can be added to layout.
2. Align text in the top, middle or bottom of a cell.
3. Align text on the right or left, or in the center of a cell.
4. Change cell margins.
5. Insert a tab in a table.
6. To make the symbol command available, in normal view, place the insertion point on the
outbox tab or in a text place holders on the slide.
7. On the insert menu, click symbol.
8. To change fonts, click a name in the font box.
FORMATTING TEXT:
1. Select the text you want to format as superscript or subscript.
2. On the format menu, click font.
3. To show or hide text formatting, on the standard toolbar, click show formatting.
4.
BULLETS AND NUMBERINGS:

120 | P a g e
1. Select the lines of text that you want to add bullets or numbering to.
2. Click bullets or numbering.
AUTOSHAPES:
1. Select the auto shape that has the text you want to position.
2. Double-click the selection rectangle of the auto shape or text box and then click the text
box tab in the format dialog box.
3. In the text anchor point box, click the position you want the text to start in.
LINES AND ARROWS:
1. In Microsoft power point, double click the chart.
2. Double click the chart item you want to change.
3. On the patterns tab, do one or both of the following.

121 | P a g e
4. To change the colors, patterns or lines, select the options you want.
5. To specify a fill effect, click fill effect and then select the options you want on the gradient,
text patterns or picture tabs.
To return to the slide, click outside the about.
PROCEDURE:
First click on start button at the button of the screen on status bar. Click on programs and then
Microsoft PowerPoint. Go to file and new. Then you find different pattern of slides on right side of your
screen. Then select which is completely empty. Then enter the contents in the first slide as per given
information, name in the second slide, Address in the third slide, Hobbies in the fourth slide and
friends in the fifth slide. Except first slide, all the second, third, fourth, fifth slides should be inserted.
When you select pattern of slide from a new slide, on slide which you selected you will find an arrow
towards its right side, click that arrow and then again click insert slide. Then save it. Then adjust the
layout. Then format the text then give bullets or numbering to the text if required. Go to auto shapes.
Select more auto shapes and insert wherever required. Then again go to insert option and select new
slides. And select chart and a chart with datasheet appear. Give the name, roll no, marks in three
subjects and calculate the total. Then save the file
Viva Questions:
1) Explain about power point
2) What is word art?
3) Explain about slide transition
4) How can you rotate the picture in power point?
5) What are the different auto shapes available in power point?
TASK 25:
Hyperlinks, Inserting –Images, Clip Art, Audio, Video, Objects, Tables and Charts

122 | P a g e
TITLE:
Create a power point presentation consisting of hyperlinks, inserting images, clip art,
audio, video objects of 4 slides with the following information.
Slide 1:- Name of your college in bold letters.
Slide 2:- Address of your college in bold letters.
Slide 3:- List of all available courses.
Slide 4:- Extra co-curricular activities.
And apply the transaction effects and set the time three seconds for each slide and
view it in slide show.
PURPOSE:
To maintain a PowerPoint presentation using some specifications
THEORY:
HYPERLINK:
1. Select the text or object that you want to represent the hyperlink.
2. Click insert hyperlink.
3. Under link to, click place in this document.
INSERT IMAGES:

123 | P a g e
1. Click where you want to insert the picture.
2. On the drawing tool bar, click insert picture.
3. Locate the folder that contains the picture that you want to insert, and then click the picture
file.
CLIP ART:
1. On the insert menu, point to structure and then click clipart.
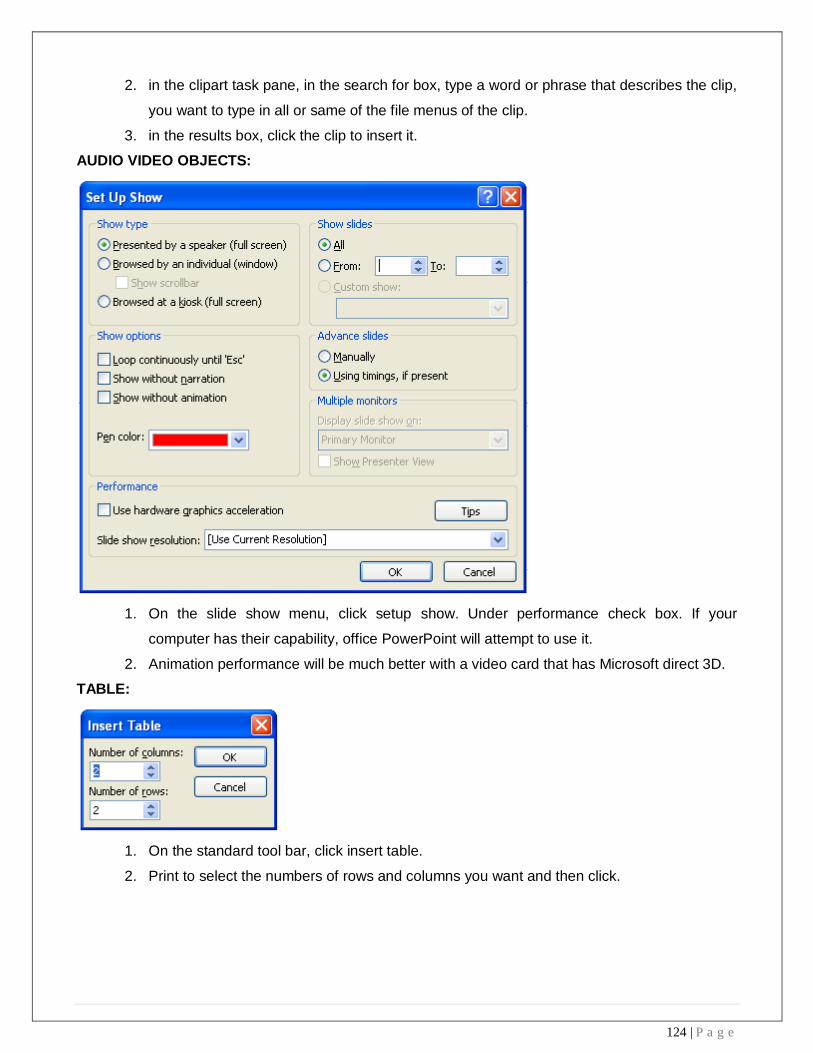
124 | P a g e
2. in the clipart task pane, in the search for box, type a word or phrase that describes the clip,
you want to type in all or same of the file menus of the clip.
3. in the results box, click the clip to insert it.
AUDIO VIDEO OBJECTS:
1. On the slide show menu, click setup show. Under performance check box. If your
computer has their capability, office PowerPoint will attempt to use it.
2. Animation performance will be much better with a video card that has Microsoft direct 3D.
TABLE:
1. On the standard tool bar, click insert table.
2. Print to select the numbers of rows and columns you want and then click.

125 | P a g e
CHART:
1. Click the slide where you want to place the embedded object.
2. On the insert menu, click chart.
3. Click a cell on the data sheet and then type the information you want.
To return to the slide, click outside the chart
PROCEDURE:
First click on start button at the bottom of the screen on status bar. Click on programs and then
Microsoft power point go to file menu. Then you find different pattern of slides on right side of your
screen. Then select which is completely empty. Then enter the name of your college in bold letters.
Address of your college in bold letters in the second slide. List of all the available courses in the third
slide, extra co-curricular activities in the fourth slide except first slide, all the second, third, fourth slide
should be inserted. When you select pattern of slide from a new slide, on slide which you selected,
you will find an arrow towards it right side click that arrow and then again click insert slide. Then save
it the select the slide show and then select the view show option. Then review the presentation in slide
show by selecting next and after completing the slide show then click end show. Click on start button
at the button of the screen on status bar, click on programs and then Microsoft power point. Go to file
menu. On insert menu and select table option and give no. of rows and no. of columns and give the
name, Roll no and marks in three subjects and find the total
Viva Questions:
1) Define hyper link
2) Define slide show
3) Define slide transition

126 | P a g e
4) What is animation
5) How can you insert a table in power point?
TASK 26:
Master Layouts (slide, template, and notes), Types of views (basic, presentation, slide slotted,
notes etc), Inserting – Background, textures, Design Templates, Hidden slides.
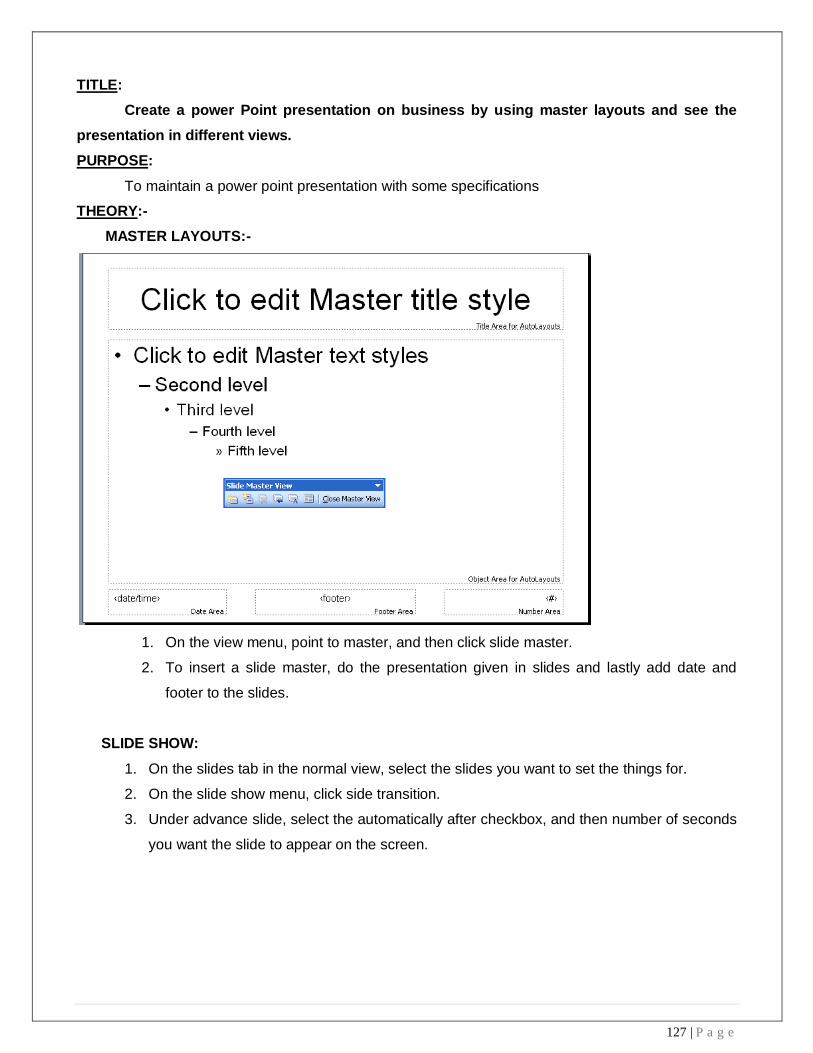
127 | P a g e
TITLE:
Create a power Point presentation on business by using master layouts and see the
presentation in different views.
PURPOSE:
To maintain a power point presentation with some specifications
THEORY:-
MASTER LAYOUTS:-
1. On the view menu, point to master, and then click slide master.
2. To insert a slide master, do the presentation given in slides and lastly add date and
footer to the slides.
SLIDE SHOW:
1. On the slides tab in the normal view, select the slides you want to set the things for.
2. On the slide show menu, click side transition.
3. Under advance slide, select the automatically after checkbox, and then number of seconds
you want the slide to appear on the screen.
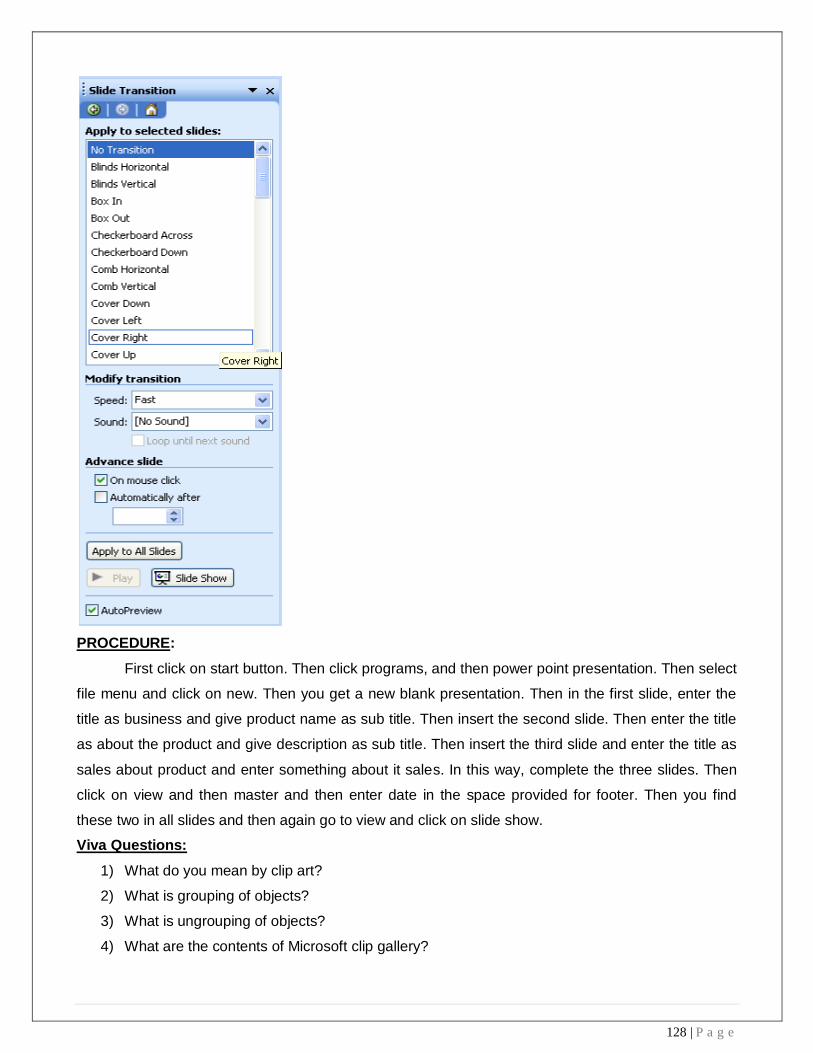
128 | P a g e
PROCEDURE:
First click on start button. Then click programs, and then power point presentation. Then select
file menu and click on new. Then you get a new blank presentation. Then in the first slide, enter the
title as business and give product name as sub title. Then insert the second slide. Then enter the title
as about the product and give description as sub title. Then insert the third slide and enter the title as
sales about product and enter something about it sales. In this way, complete the three slides. Then
click on view and then master and then enter date in the space provided for footer. Then you find
these two in all slides and then again go to view and click on slide show.
Viva Questions:
1) What do you mean by clip art?
2) What is grouping of objects?
3) What is ungrouping of objects?
4) What are the contents of Microsoft clip gallery?
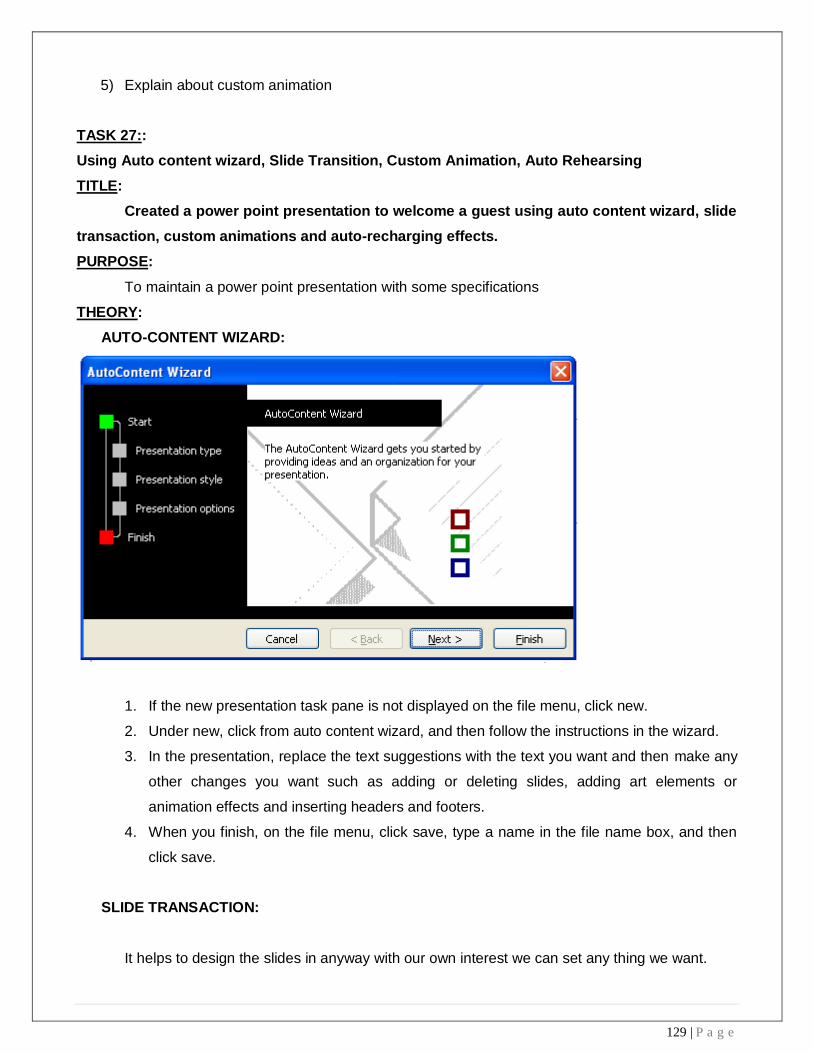
129 | P a g e
5) Explain about custom animation
TASK 27::
Using Auto content wizard, Slide Transition, Custom Animation, Auto Rehearsing
TITLE:
Created a power point presentation to welcome a guest using auto content wizard, slide
transaction, custom animations and auto-recharging effects.
PURPOSE:
To maintain a power point presentation with some specifications
THEORY:
AUTO-CONTENT WIZARD:
1. If the new presentation task pane is not displayed on the file menu, click new.
2. Under new, click from auto content wizard, and then follow the instructions in the wizard.
3. In the presentation, replace the text suggestions with the text you want and then make any
other changes you want such as adding or deleting slides, adding art elements or
animation effects and inserting headers and footers.
4. When you finish, on the file menu, click save, type a name in the file name box, and then
click save.
SLIDE TRANSACTION:
It helps to design the slides in anyway with our own interest we can set any thing we want.
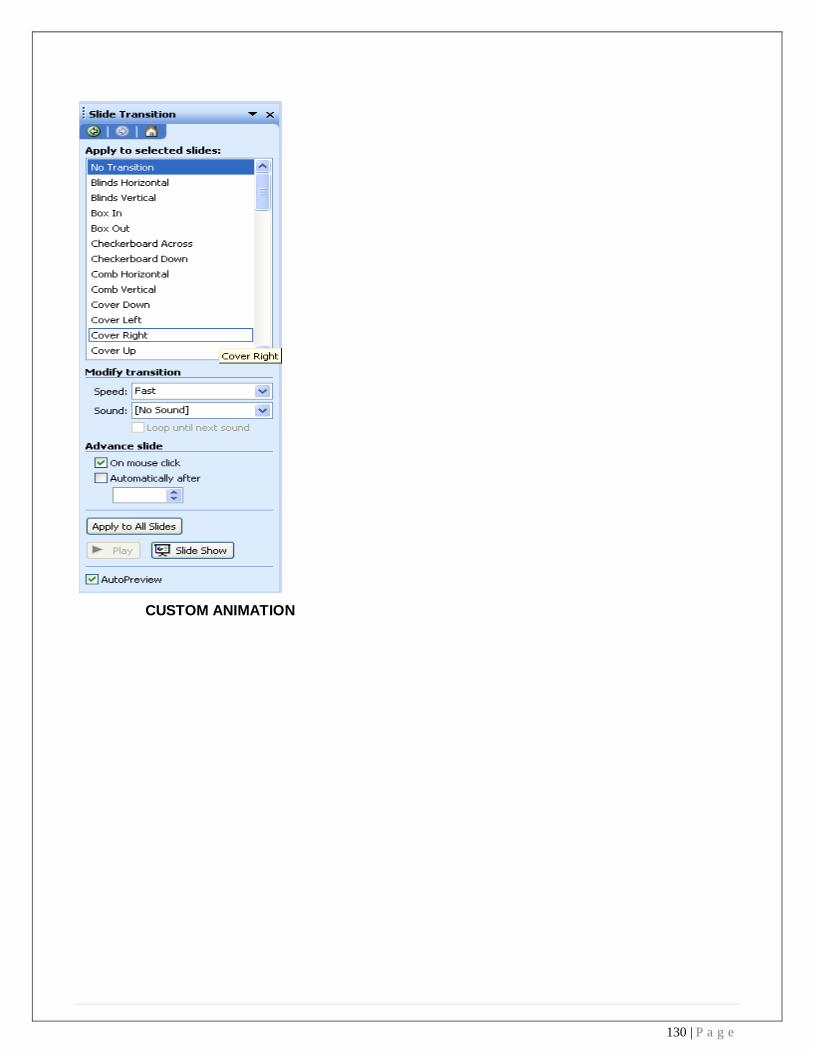
130 | P a g e
CUSTOM ANIMATION

131 | P a g e
It’s used to add animation to the element of the slide.
AUTO RECHARGING:
1. Select the auto shape or text box you want to resize.
2. Double click the selection rectangle of the auto shape or text box, and then click the text
box tab in the format dialog box.
3. Select the resize. Auto shape to fit text check box.
PROCEDURE:
First click on start button at the button of the screen on status bar, click on programs and then
Microsoft power point. Go to file menu. Prepare some slides in which each given the information
about when you are going to welcome and topics to be covered. Now go to ‘Auto content wizard” in
that you are provided with four options. Click text in that dialog box to get them and give the details.
Then go to slide transaction. In that we can set the time, font design by selecting apply to all slides.
Go to customer animation option in ‘slide show’ and there select or required type of presentation.
Viva Questions:

132 | P a g e
1) How can you insert bullets and numbers in power point?
2) Explain about connectors
3) What are the uses of connectors
4) How can you edit word art text?
5) What is navigation?
Power point test would be conducted .Students will be given a model power point presentation
which needs to be replicated.
PURPOSE:
Test on power point
PROCEDURE:
Students will be given a model PowerPoint presentation and they have to create a replica of the
given presentation.

133 | P a g e
Help students in preparing their personal website using Microsoft/ equivalent (FOSS) tool
publisher. Topic covered during this week includes - Publisher Orientation, Using Templates,
Layouts, Inserting text objects, Editing text objects, Inserting Tables, Working with menu
objects, Inserting pages, Hyper linking, Renaming, deleting, modifying pages, Hosting website.
PURPOSE:
To learn Using Templates, Layouts, Inserting text objects, Editing text objects, Inserting Tables,
Working with menu objects, Inserting pages, Hyper linking, Renaming, deleting, modifying pages, and
Hosting website
THEORY:
Layouts:
Layout guides comprise margin, column, row, and baseline guides. They are used to create a grid on
a master page. This grid appears on every page in your publication where that master page is used.
Use layout guides to organize text, pictures, and other objects into columns and rows so that your
publication will have an ordered, consistent look. Set layout guides in the Layout Guides dialog box
(Arrange menu).
Margin guides, column guides, and row guides are represented by blue dotted lines; baseline guides
are represented by gold dotted guides; and ruler guides are represented by green dotted lines
Hyper Link:
hyperlink is a link from a document that, when clicked, opens another page or file. The destination is
frequently another Web page, but it can also be a picture, an e-mail address, or a program. The
hyperlink itself can be text or a picture.
PROCEDURE:
Template:
1. Create the publication you want to use as a template.
2. On the File menu, click Save As.
3. In the File name box, type a name for the template.
4. In the Save as type box, click Publisher Template.
The destination folder changes to Templates. You need to save your template in this folder if
you want it to appear in the Preview Gallery of the New Publication task pane later.
5. Click Save.
Layouts:
On the View menu, click Boundaries and Guides.
Note If the Snap to Guides command is on (On the Arrange menu, point to Snap, and then click To
Guides), objects will continue to snap to the guides even when the guides are hidden
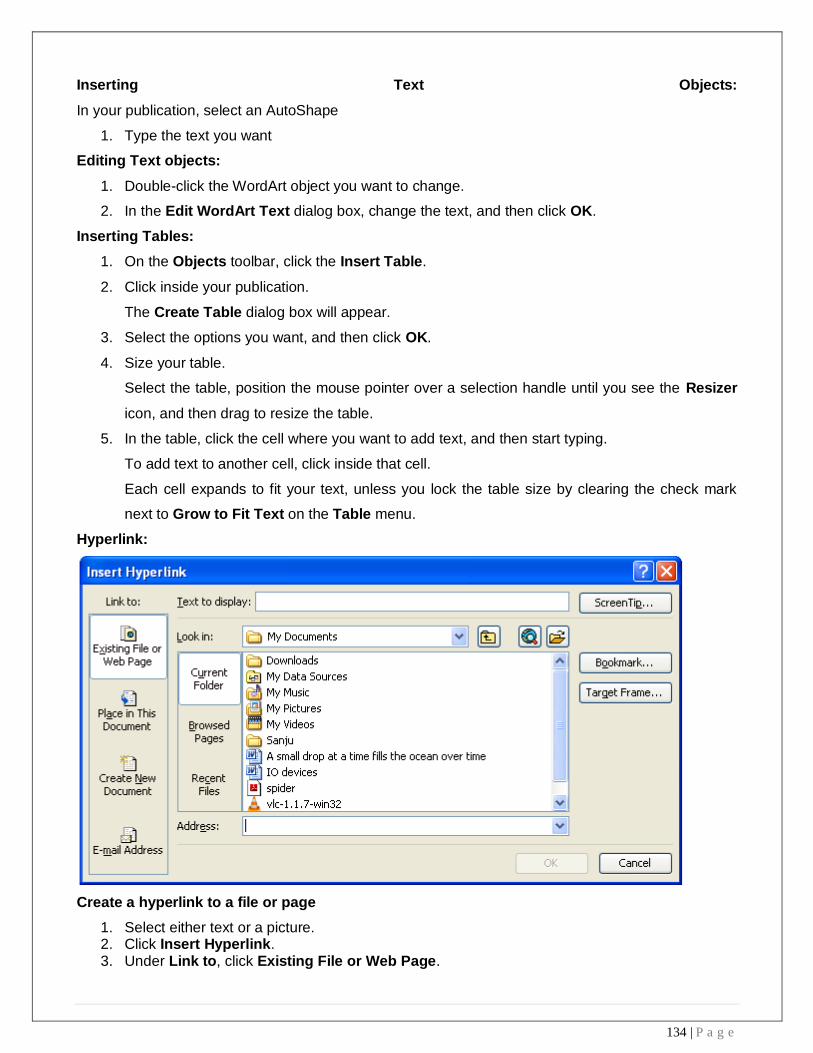
134 | P a g e
Inserting Text Objects:
In your publication, select an AutoShape
1. Type the text you want
Editing Text objects:
1. Double-click the WordArt object you want to change.
2. In the Edit WordArt Text dialog box, change the text, and then click OK.
Inserting Tables:
1. On the Objects toolbar, click the Insert Table.
2. Click inside your publication.
The Create Table dialog box will appear.
3. Select the options you want, and then click OK.
4. Size your table.
Select the table, position the mouse pointer over a selection handle until you see the Resizer
icon, and then drag to resize the table.
5. In the table, click the cell where you want to add text, and then start typing.
To add text to another cell, click inside that cell.
Each cell expands to fit your text, unless you lock the table size by clearing the check mark
next to Grow to Fit Text on the Table menu.
Hyperlink:
Create a hyperlink to a file or page
1. Select either text or a picture. 2. Click Insert Hyperlink. 3. Under Link to, click Existing File or Web Page.
135 | P a g e
4. Do one of the following:
o To select a file from your My Documents folder, click Current Folder.
o To select a file that was recently viewed in your Web browser, click Browsed Pages.
o To select a file that you were recently working in, click Recent Files.
5. Navigate to the file or page you want.
Create a hyperlink to an e-mail address
1. Select either text or a picture.
2. Click Insert Hyperlink.
3. Under Link to, click E-mail Address.
4. Either type the e-mail address you want in the E-mail address box, or select an e-mail
address from the recently used e-mail addresses box.
5. In the Subject box, type the subject of the e-mail message.
Create a hyperlink to another place in your document
1. Select either text or a picture.
2. Click Insert Hyperlink.
3. Under Link to, click Place in This Document.
4. Select the page you want
Create a hyperlink to a new page
1. Select either text or a picture.
2. Click Insert Hyperlink.
3. Under Link to, click Create New Document.
4. Either type the path and name of the new file, or click Change to navigate to a location.
5. Select either Edit the new document later or Edit the new document now.
Pages:

136 | P a g e
Create a master page
1. On the View menu, click Master Page.
2. In the Edit Master Pages task pane, click New Master Page.
3. In the New Master Page dialog box, do any of the following:
o In the Page ID (1 character) box, type a single-character identifier for your new master
page. This can be any single Unicode character.
o In the Description box, type a brief description of your new master page.
o If you want your new master page to be a two-page spread, select Two-page master.
4. Click OK.
Edit a master page
1. On the View menu, click Master Page.
2. In the Edit Master Pages task pane, click the arrow next to the master page you want to edit,
and then click Edit.
3. Edit the page as desired.
4. To see the updated publication pages, click View publication pages, and then navigate to a
page to which the master page is applied
Delete a master page
1. On the View menu, click Master Page.
2. In the Edit Master Pages task pane, click the arrow next to the master page you want to
delete, and then click Delete.
3. In the alert box, click Yes
137 | P a g e
Viva Questions:
1) What are the features provided by Ms Publisher?
2) How can we create accessible web site?
3) Define meta tag
4) What is absolute and relative URL?
5) What is a master page?


![Designingenergyefficient’ microprocessor:Howtofight ... Memory ... [MHz] 8086 80286 386DX 486DX 486DX4 Pentium Pentium Pro Pentium II Pentium MMX Pentium III ... Delay buffers are](https://static.fdocuments.us/doc/165x107/5ac1a5637f8b9ac6688d9ef1/designingenergyecient-microprocessorhowtoght-memory-mhz-8086.jpg)