Certified Yoga Instructor Manual Vinyasa Flow
200
I Certified Yoga Instructor Manual Vinyasa Flow
Transcript of Certified Yoga Instructor Manual Vinyasa Flow
I
Certified Yoga Instructor Manual Vinyasa Flow
II
Certified Yoga Instructor
Certified Yoga Instructor Manual2nd Edition
By: Helen MGee M.A.
No material within this book may becopied for public or commercial use.
© Copyright 2016 NCCPT
v170422
All Rights Reserved. Except for usein a review, the reproduction orutilization of this work in any form ofelectronic, mechanical or other means,now known or hereafter invented,including xerography, photocopying andrecording and, or any informationretrievalsystem, is forbidden withoutthe written permission by the NCCPT.
3481 Old Conejo Road, #102 Newbury Park, CA 91320
Telephone: 800-778-6060
Fax: 805-498-9728
E-mail: [email protected]: NCCPT.com
III
Table of ContentsSafety Procedures.............................................................................................................................VIII
Yoga ...................................................................................................................................................... 1
Definition of yoga����������������������������������������������������������������������������������������������������������������������������������������������������������������������������������2There are four major paths of yoga: ����������������������������������������������������������������������������������������������������������������������������������������������������3Who can practice yoga? ������������������������������������������������������������������������������������������������������������������������������������������������������������������������4Benefits of yoga: �������������������������������������������������������������������������������������������������������������������������������������������������������������������������������������4Ancient Roots of Yoga ��������������������������������������������������������������������������������������������������������������������������������������������������������������������������5Western Yoga �����������������������������������������������������������������������������������������������������������������������������������������������������������������������������������������9Styles of Yoga �������������������������������������������������������������������������������������������������������������������������������������������������������������������������������������� 10What do you need to practice Yoga ������������������������������������������������������������������������������������������������������������������������������������������������ 13Finding a yoga class/teacher ������������������������������������������������������������������������������������������������������������������������������������������������������������� 14
Theory & Philosophy ......................................................................................................................... 16
Eight Limbs of Yoga ��������������������������������������������������������������������������������������������������������������������������������������������������������������������������� 17Yamas & the Niyamas ������������������������������������������������������������������������������������������������������������������������������������������������������������������������ 18Asana ��������������������������������������������������������������������������������������������������������������������������������������������������������������������������������������������������� 19Pranayama ������������������������������������������������������������������������������������������������������������������������������������������������������������������������������������������� 19Pratyahara ������������������������������������������������������������������������������������������������������������������������������������������������������������������������������������������� 20Dharana ����������������������������������������������������������������������������������������������������������������������������������������������������������������������������������������������� 20Dhyana ������������������������������������������������������������������������������������������������������������������������������������������������������������������������������������������������ 20Samadhi ����������������������������������������������������������������������������������������������������������������������������������������������������������������������������������������������� 20Pantajali’s Yoga Sutras ������������������������������������������������������������������������������������������������������������������������������������������������������������������������ 21Chakras ������������������������������������������������������������������������������������������������������������������������������������������������������������������������������������������������ 23Bandhas ����������������������������������������������������������������������������������������������������������������������������������������������������������������������������������������������� 29
Body Structure .................................................................................................................................. 31
The Feet ����������������������������������������������������������������������������������������������������������������������������������������������������������������������������������������������� 32Knees ���������������������������������������������������������������������������������������������������������������������������������������������������������������������������������������������������� 33The Pelvis ��������������������������������������������������������������������������������������������������������������������������������������������������������������������������������������������� 36The Abdominal Core ������������������������������������������������������������������������������������������������������������������������������������������������������������������������� 40The Spinal Column ���������������������������������������������������������������������������������������������������������������������������������������������������������������������������� 41The Shoulders and Arms ������������������������������������������������������������������������������������������������������������������������������������������������������������������� 44The Respiratory System ��������������������������������������������������������������������������������������������������������������������������������������������������������������������� 49The Nervous System �������������������������������������������������������������������������������������������������������������������������������������������������������������������������� 50Definition of Terms and Actions ������������������������������������������������������������������������������������������������������������������������������������������������������ 51Anatomy in Yoga Teaching ��������������������������������������������������������������������������������������������������������������������������������������������������������������� 52
IV
Certified Yoga Instructor
Asanas, Sequencing & Special Population..................................................................................... 55
Principles of Sequencing ������������������������������������������������������������������������������������������������������������������������������������������������������������������� 56Standing Asanas ��������������������������������������������������������������������������������������������������������������������������������������������������������������������������������� 61Balance Poses �������������������������������������������������������������������������������������������������������������������������������������������������������������������������������������� 63Twists ��������������������������������������������������������������������������������������������������������������������������������������������������������������������������������������������������� 63Core Awakening ��������������������������������������������������������������������������������������������������������������������������������������������������������������������������������� 64Backbends ������������������������������������������������������������������������������������������������������������������������������������������������������������������������������������������� 65Forward Folds ������������������������������������������������������������������������������������������������������������������������������������������������������������������������������������� 66Hip Openers ���������������������������������������������������������������������������������������������������������������������������������������������������������������������������������������� 67Inversions �������������������������������������������������������������������������������������������������������������������������������������������������������������������������������������������� 67Savasana ����������������������������������������������������������������������������������������������������������������������������������������������������������������������������������������������� 68Specialized Teaching �������������������������������������������������������������������������������������������������������������������������������������������������������������������������� 69New Students �������������������������������������������������������������������������������������������������������������������������������������������������������������������������������������� 69Students with Injuries ������������������������������������������������������������������������������������������������������������������������������������������������������������������������ 69Prenatal Students �������������������������������������������������������������������������������������������������������������������������������������������������������������������������������� 70Children’s Yoga ����������������������������������������������������������������������������������������������������������������������������������������������������������������������������������� 71Yoga for Seniors ���������������������������������������������������������������������������������������������������������������������������������������������������������������������������������� 72
Teaching Pranayama ......................................................................................................................... 75
Breath Awareness ������������������������������������������������������������������������������������������������������������������������������������������������������������������������������� 76Ujjayi Breathing ���������������������������������������������������������������������������������������������������������������������������������������������������������������������������������� 79Other Breathing Methods ����������������������������������������������������������������������������������������������������������������������������������������������������������������� 80Kumbhaka: Retention Breathing ������������������������������������������������������������������������������������������������������������������������������������������������������ 80Viloma Pranayama ����������������������������������������������������������������������������������������������������������������������������������������������������������������������������� 81Kapalabhati Pranayama ��������������������������������������������������������������������������������������������������������������������������������������������������������������������� 82Bhastrika Pranayama ������������������������������������������������������������������������������������������������������������������������������������������������������������������������� 83Sitali Pranayama ��������������������������������������������������������������������������������������������������������������������������������������������������������������������������������� 83Nadhi Shodhana Pranayama ������������������������������������������������������������������������������������������������������������������������������������������������������������ 84
Techniques and Tools for Teaching Yoga ....................................................................................... 86
Room Setup ����������������������������������������������������������������������������������������������������������������������������������������������������������������������������������������� 87Listening Skills ������������������������������������������������������������������������������������������������������������������������������������������������������������������������������������ 88Nonverbal Communication �������������������������������������������������������������������������������������������������������������������������������������������������������������� 89Vocal Tone and Paralanguaging ������������������������������������������������������������������������������������������������������������������������������������������������������� 90Neurolinguistic Programming ��������������������������������������������������������������������������������������������������������������������������������������������������������� 92Positive Cueing ����������������������������������������������������������������������������������������������������������������������������������������������������������������������������������� 93Linking������������������������������������������������������������������������������������������������������������������������������������������������������������������������������������������������� 93Linguistics ������������������������������������������������������������������������������������������������������������������������������������������������������������������������������������������� 93Humor ������������������������������������������������������������������������������������������������������������������������������������������������������������������������������������������������� 94Sanskrit/English Translation ������������������������������������������������������������������������������������������������������������������������������������������������������������� 95
V
Yoga Profession ................................................................................................................................ 98
Where to teach ������������������������������������������������������������������������������������������������������������������������������������������������������������������������������������ 99Liability Insurance���������������������������������������������������������������������������������������������������������������������������������������������������������������������������� 100Marketing ������������������������������������������������������������������������������������������������������������������������������������������������������������������������������������������ 100Liability waivers� ������������������������������������������������������������������������������������������������������������������������������������������������������������������������������� 101Yoga Client Intake Form ���������������������������������������������������������������������������������������������������������������������������������������������������������������� 103Income ���������������������������������������������������������������������������������������������������������������������������������������������������������������������������������������������� 105
Yoga Poses ...................................................................................................................................... 106
Boat – Navasana ������������������������������������������������������������������������������������������������������������������������������������������������������������������������������ 107Bound Warrior Pose - Baddha Virabhadrasana �������������������������������������������������������������������������������������������������������������������������� 108Bow Pose – Dhanurasana ��������������������������������������������������������������������������������������������������������������������������������������������������������������� 109Bridge Pose – Setu Bhandasana������������������������������������������������������������������������������������������������������������������������������������������������������ 110Camel Pose - Ustrasana ������������������������������������������������������������������������������������������������������������������������������������������������������������������� 111Cat- Marjaryasana �������������������������������������������������������������������������������������������������������������������������������������������������������������������������� 112Chair – Utkatasana �������������������������������������������������������������������������������������������������������������������������������������������������������������������������� 113Childs Pose – Balasana ������������������������������������������������������������������������������������������������������������������������������������������������������������������� 114Cobblers Pose - Baddha Konasana ������������������������������������������������������������������������������������������������������������������������������������������������ 115Cobra – Bhujangasana �������������������������������������������������������������������������������������������������������������������������������������������������������������������� 116Corpse pose - Savasana ������������������������������������������������������������������������������������������������������������������������������������������������������������������� 117Cow- Bitilasana ������������������������������������������������������������������������������������������������������������������������������������������������������������������������������� 118Crane – Bakasana ���������������������������������������������������������������������������������������������������������������������������������������������������������������������������� 119Deep Lunge – Anjaneyasana �������������������������������������������������������������������������������������������������������������������������������������������������������� 120Downward-Facing Dog – Adho Mukha Svanasana ������������������������������������������������������������������������������������������������������������������� 121Eagle - Garudasana �������������������������������������������������������������������������������������������������������������������������������������������������������������������������� 122East Faces West - Purvottanasana �������������������������������������������������������������������������������������������������������������������������������������������������� 123Easy cross leg - Sukhasana �������������������������������������������������������������������������������������������������������������������������������������������������������������� 124Easy Twist in Lunge - Parivrtta Parsvakonasana������������������������������������������������������������������������������������������������������������������������� 125Extended Hand to Foot - Utthita Hasta Padangustasana ����������������������������������������������������������������������������������������������������������� 126Firefly pose – Tittibhasana �������������������������������������������������������������������������������������������������������������������������������������������������������������� 127Firelog Pose - Agnistambhasana ���������������������������������������������������������������������������������������������������������������������������������������������������� 128Fish pose – Matsyasana ������������������������������������������������������������������������������������������������������������������������������������������������������������������ 129Flipped Dog ������������������������������������������������������������������������������������������������������������������������������������������������������������������������������������� 130Forearm Stand - Pincha Mayurasana �������������������������������������������������������������������������������������������������������������������������������������������� 131Forward Standing-Fold – Uttanasana ������������������������������������������������������������������������������������������������������������������������������������������� 132Forward Seated-Fold – Paschimottanasana���������������������������������������������������������������������������������������������������������������������������������� 133Full Backbend (Upward Bow) - Urdhva Dhanurasana ��������������������������������������������������������������������������������������������������������������� 134Gate – Parighasana �������������������������������������������������������������������������������������������������������������������������������������������������������������������������� 136Gorilla - Padangusthasana �������������������������������������������������������������������������������������������������������������������������������������������������������������� 137Half Backbend - Setu Bhandasana ������������������������������������������������������������������������������������������������������������������������������������������������� 138
VI
Certified Yoga Instructor
Half Forward Fold - Ardha Uttanasana ������������������������������������������������������������������������������������������������������������������������������������� 139Half Lotus Pose - Ardha Padmasana ��������������������������������������������������������������������������������������������������������������������������������������������� 140Half Moon - Ardha Chandrasana �������������������������������������������������������������������������������������������������������������������������������������������������� 141Handstand - Adho Mukha Vrksasana ������������������������������������������������������������������������������������������������������������������������������������������� 142Head Stand – Sirsasana ������������������������������������������������������������������������������������������������������������������������������������������������������������������� 144Humble Warrior - Baddha Virabhadrasana ��������������������������������������������������������������������������������������������������������������������������������� 145Heron Pose – Krounchasana ��������������������������������������������������������������������������������������������������������������������������������������������������������� 146King Dancer – Natajarasana ����������������������������������������������������������������������������������������������������������������������������������������������������������� 147King Pigeon- Eka Pada Rajakapotasana ���������������������������������������������������������������������������������������������������������������������������������������� 148Locust Pose – Salabhasana ������������������������������������������������������������������������������������������������������������������������������������������������������������� 149Lotus Pose – Padmasana ����������������������������������������������������������������������������������������������������������������������������������������������������������������� 150Lunge with hands on floor ������������������������������������������������������������������������������������������������������������������������������������������������������������� 151Lying Twist - Supta Matsyendrasana ������������������������������������������������������������������������������������������������������������������������������������������� 152One legged chair - Eka Pada Utkatasana �������������������������������������������������������������������������������������������������������������������������������������� 153One Leg Down Dog - Eka Pada Adho Mukha Svanasana ���������������������������������������������������������������������������������������������������������� 154Plank - Chaturanga Dandasana ����������������������������������������������������������������������������������������������������������������������������������������������������� 155Pyramid – Parsvottanasana������������������������������������������������������������������������������������������������������������������������������������������������������������ 156Reverse Warrior - Viparita Virabhadrasana ��������������������������������������������������������������������������������������������������������������������������������� 157Revolved Half Moon – Parivrtta Ardha Chandrasana ��������������������������������������������������������������������������������������������������������������� 158Revolved Triangle – Parivrtta Trikonasana ���������������������������������������������������������������������������������������������������������������������������������� 159Revolved Twist - Parivrtta Parsvakonasana ���������������������������������������������������������������������������������������������������������������������������������� 160Revolved Twist on Knee – Parivrtta Anjanyasana ��������������������������������������������������������������������������������������������������������������������� 161Seated Twist - Marichyasana III ����������������������������������������������������������������������������������������������������������������������������������������������������� 162Shoulder Stand - Sarvangasana ������������������������������������������������������������������������������������������������������������������������������������������������������ 163Side Angle - Utthita Parsvakonasana �������������������������������������������������������������������������������������������������������������������������������������������� 164Side Plank – Vasisthasana ��������������������������������������������������������������������������������������������������������������������������������������������������������������� 165Squat with Hands in Prayer Posture - Malasana �������������������������������������������������������������������������������������������������������������������������� 166Standing Mountain – Tadasana ���������������������������������������������������������������������������������������������������������������������������������������167Standing Split - Urdhva Prasarita Eka Padasana ������������������������������������������������������������������������������������������������������������������������� 168Tall Mountain – Urdhva Hastasana ����������������������������������������������������������������������������������������������������������������������������������������������� 169Temple / Horse – Vatayanasana ��������������������������������������������������������������������������������������������������������������������������������������������������� 170Tree - Vrksasana ������������������������������������������������������������������������������������������������������������������������������������������������������������������������������� 171Triangle - Utthita Trikonasana ������������������������������������������������������������������������������������������������������������������������������������������������������� 172Up Dog - Urdhva Mukha Svanasana ��������������������������������������������������������������������������������������������������������������������������������������������� 173Warrior 1 - Virabhadrasana I ��������������������������������������������������������������������������������������������������������������������������������������������������������� 174Warrior 2 - Virabhadrasana 2 ��������������������������������������������������������������������������������������������������������������������������������������������������������� 175Warrior 3 - Virabhadrasana 3 �������������������������������������������������������������������������������������������������������������������������������������������������������� 176Wide Angle Forward Fold - Prasarita Padottanasana ���������������������������������������������������������������������������������������������������������������� 177Wide Angle Forward Fold - Upavistha Konasana ����������������������������������������������������������������������������������������������������������������������� 179Wild Thing - Camatkarasana ���������������������������������������������������������������������������������������������������������������������������������������������������������� 180
VII
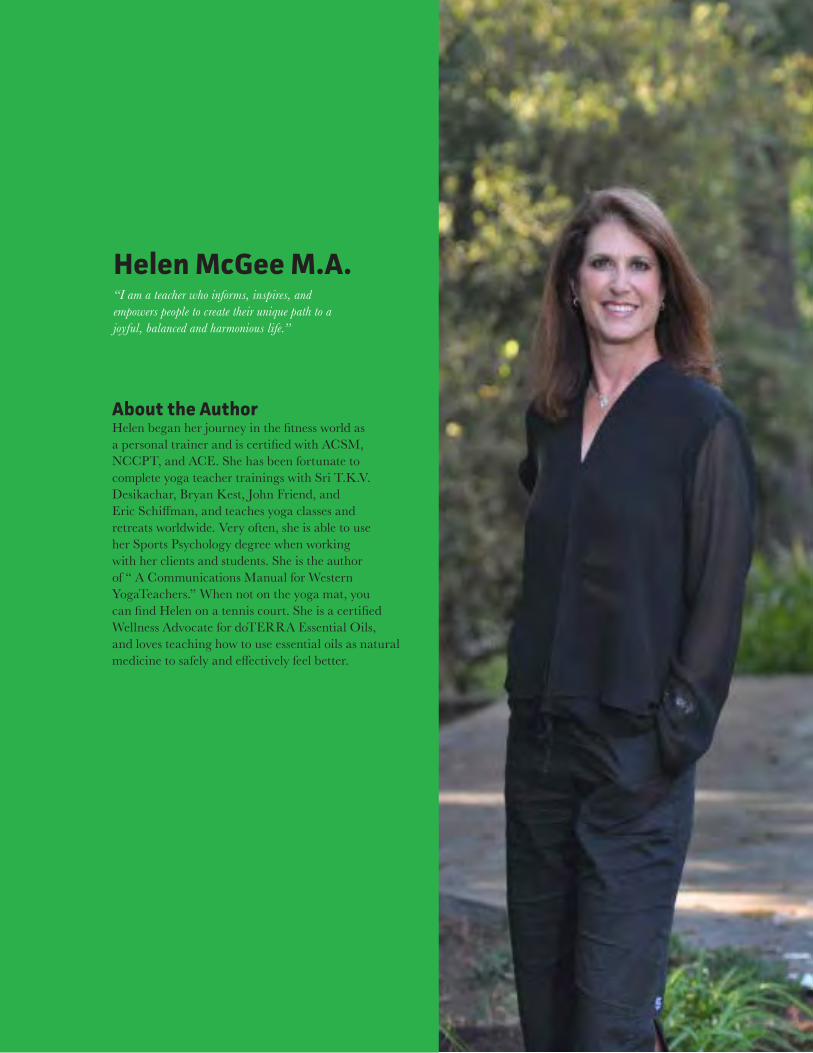
Helen McGee M.A.“I am a teacher who informs, inspires, and empowers people to create their unique path to a joyful, balanced and harmonious life.”
About the AuthorHelen began her journey in the fitness world as a personal trainer and is certified with ACSM, NCCPT, and ACE. She has been fortunate to complete yoga teacher trainings with Sri T.K.V. Desikachar, Bryan Kest, John Friend, and Eric Schiffman, and teaches yoga classes and retreats worldwide. Very often, she is able to use her Sports Psychology degree when working with her clients and students. She is the author of “ A Communications Manual for Western YogaTeachers.” When not on the yoga mat, you can find Helen on a tennis court. She is a certified Wellness Advocate for doTERRA Essential Oils, and loves teaching how to use essential oils as natural medicine to safely and effectively feel better.
VIII
Certified Yoga Instructor
Safety ProceduresEmergency Procedures
There are many individuals with a variety of health conditions that attend health clubs� Try and identify any hazard that could cause an accident� Always replace any equipment or accessories that might be lying around� Be aware of any unusual noises, sights, odors, appearances or behaviors� Chances are, at some point you will be faced with an emergency situation� First, you must be able to recognize an emergency� If something is out of the ordinary or someone reports an incident, then follow these steps:
• Always remain calm�
• Evaluate the situation� Observe and determine the symptoms quickly�
• Send someone to alert the general manager or supervisor for assistance� If necessary, have someone call 911�
• Administer any assistance needed if you are qualified� Personal trainers are usually CPR certified�
• Remain with the individual until assistance arrives� Try to comfort and reassure the individual that help is on the way� If possible, keep crowds away from the victim� When help arrives, give as much detailed information as possible to facilitate their assistance� If you don’t have an incident report, go to the front desk and ask for one� Fill it out, make a copy for yourself, and give the original to the general manager or supervisor in charge�
When to call 911
• If the victim is unconscious�
• If the victim has trouble breathing or is breathing in a strange way�
• If the victim has chest pain or pressure�
• If the victim is bleeding severely�
• If the victim has pressure or pain in the abdomen that won’t go away�
• If the victim is coughing, vomiting, or passing blood�
• If the victim has seizures, a severe headache, or slurred speech�
• If the victim appears to have been poisoned�
• If the victim has injuries to the head, neck, or back�
• If the victim has possible broken bones�
• If there is a fire or explosion�
• If there are downed electrical wires�
• In the presence of poisonous gas�
P.R.I.C.E.
As a fitness professional you are not allowed to diagnose an injury� Your responsibility is to know how to react to an injury as soon as it happens�
IX
For most athletic injuries, the immediate treatment is the same� As soon as a sprain, strain or broken bone occurs, start the following five-part first-aid program, P�R�I�C�E�
Protect any injured body part� If the person is in a dangerous area, try and move them to a safer place�
Rest is necessary to insure no other further activity or exercise can cause further injury� Discontinue any activity that involves that body part�
Ice causes vasoconstriction� Decreasing the blood flow to the injured area results in decreased swelling� Ice can also act as an analgesic, helping to reduce the pain� When applying ice to the injured area, place a towel or cloth over the injured area first� This will prevent the skin from burning� Apply for 15-20 minutes at a time, every 1-2 hours during the first 48-72 hours after the injury�
Compression limits swelling, which can slow down the healing process� Following a traumatic injury, blood and fluid from surrounding tissues leak into the injured area and distend the tissue� If possible, wrap an elastic (ACE) bandage firmly over the ice around the injured part� Be careful not to wrap too tightly or the blood supply will be cut off� If this happens the victim will complain of numbness, cramping, and pain� If this occurs, unwrap the area immediately�
Elevation of the injured part above the level of the heart uses gravity to help drain the excess fluid and decrease swelling�
First Aid Procedures
Stress Fracture
Symptoms: A hairline crack in the bone� Treatment: Call 911 or refer to a physician�
Heat Cramps
Symptoms: Cramps in a localized muscle� Treatment: Rest, gentle stretches, ice, rehydrate�
Heat Exhaustion
Symptoms: Pale, clammy skin, rapid weak pulse, weakness, headache or nausea, cramps in abdomen or limbs�
Treatment: Lie victim down with their head level or lower than the body; move victim to cool place, but protect from chilling� Rehydrate�
Heat Stroke (Very Serious)
Symptoms: Cessation of sweating; rapid, strong pulse; flushed, hot skin� May be unconscious�
Treatment: Call 911� Cool body by sponging with cold water�

X
Certified Yoga Instructor
Lacerations and Abrasions
Symptoms: Cut/Scrape of the skin�
Treatment: Immediately cleanse wound and surrounding skin� Hold sterile pad firmly over wound until bleeding stops� Change pad and bandage loosely�
Contusion
Symptoms: Pain, swelling, discoloration�
Treatment: Apply ice�
Shock
Symptoms: Cold, clammy skin, pale face, nausea or vomiting, shallow breathing� Victim may be chilled or shaky�
Treatment: Correct cause of shock, if possible (e�g�, bleeding)� Keep victim lying down� Keep airway open, elevate legs, keep warm� Give fluids if victim is able to swallow�
Epileptic Seizure
Symptoms: Gazing eyes, blank stare, altered level of consciousness, violent contractions�
Treatment: Do not restrain� Do not slap! Do not douse with water� Do not place a finger or hard object between the teeth� Remove objects that might injure patient (protect their head)� When seizure has ended, remove patient to a comfortable place�
Sprain (Trauma to a Joint Capsule or Ligament)
Symptoms: Swelling, limitation of ROM, discoloration, soreness�
Treatment: P� R� I� C� E�
Strain (Trauma to Muscle or Tendon)
Symptoms: Discoloration, swelling, soreness, limited ROM�
Treatment: P� R� I� C� E�
Cardiac Arrest
Symptoms: Heart stops beating, no pulse, no breathing, myocardial ischemia (lack of oxygen to the heart)�
Treatment: Call 911, CPR�
XI
Blisters
Symptoms: Redness from friction, production of fluid under affected area�
Treatment: If punctured, cleanse blister, protect with pad and dressing�
Fainting
Symptoms: Light headedness, dizziness, paleness, light sweating�
Treatment: Assume anyone found unconscious to have a possible head injury� Do not give victim anything by mouth� Do not move victim unless necessary� Look for emergency medical ID around neck or wrist that could suggest a cause for unconsciousness� Keep victim prone and quiet if they regain consciousness� Check to make sure there is a clear airway, breathing, and circulation�
Hypoglycemia (Insulin Shock, Low Blood Sugar)
Symptoms: Dizziness, weakness, blurred vision, excessive hunger, cool, moist skin� Possible seizure activity, confusion, headache, anxiety�
Treatment: Call 911, rest� Give fluid with sugar (fruit juice) or candy bar, if conscious�
Flu or Fever
Symptoms: Swollen glands, high temperature, fatigue, congestion
Treatment: Go the doctor, rest, medication, DO NOT EXERCISE!
Safety Checklist and Equipment Maintenance for an Exercise Facility
Facility Floor:
• Cleaned and free of loose debris or equipment�
• Wooden floor is free of dust, splinters, or protruding nails or screws�
• Carpets, rubber floors or interlocking mats are secure and free of tears, gaps or bulges�
XII
Certified Yoga Instructor
Walls:
• Electrical outlets or wires are not protruding in activity areas�
• Walls should be cleaned daily�
• Mirrors are not cracked or distorted and are securely fixed�
• Mirrors and windows cleaned daily�
• Mirrors should be at least 20 inches off the floor� Equipment should be placed at least six inches from the mirrors�
Ceiling:
• Maintain all light fixtures and replace any broken or non-functioning bulbs�
• Replace any missing ceiling tiles, cover exposed ducts or pipes�
Exercise Equipment Stretching area:
• Mats should be cleaned and disinfected prior to heavy use times of day�
• No weights or free weight benches should be in this area�
• The floor should be free of loose debris or equipment�
• Restore all equipment to its proper place�
Aerobic or plyometrics area:
• The floor should be free of loose debris or equipment�
• Restore all equipment to its proper place�
• Ensure all the equipment is in working order�
1
Module 1: Yoga
Module 1
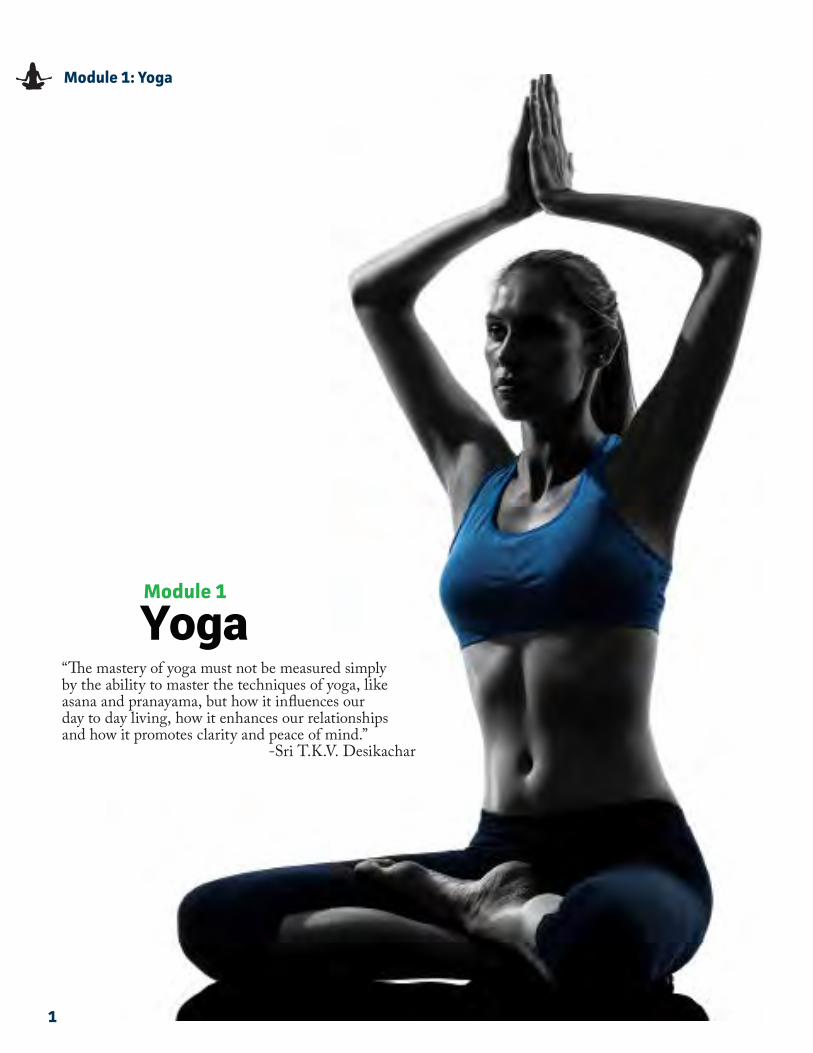
Yoga“The mastery of yoga must not be measured simply by the ability to master the techniques of yoga, like asana and pranayama, but how it influences our day to day living, how it enhances our relationships and how it promotes clarity and peace of mind�” -Sri T�K�V� Desikachar
2
Module 1: Yoga
Definition of yoga
Yoga means to “yoke,” join together� In modern hatha yoga, this is represented by the combination of “ha” – sun (right) and tha – moon (left) sides of the body� Recall the symbol from modern medicine of the two snakes intertwining: This evokes an image of the two sides joining at the seven chakras� Yoga is the combination of body, mind, and spirit through breath, asanas (poses), and meditation� Yoga is also a state of being – being present without distraction in whatever you are doing� Patanjali describes this in The Yoga Sutras: “Yogas Chitta Vritti Nirodha – yoga is the cessation of the fluctuations of the mind�”
Yoga is a philosophy and a science that, through practice, facilitates a connection with the spiritual aspects of the self� It is not a religion, although it is associated with Hinduism and Buddhism�
Yoga is a path to self-discovery, beginning with the acceptance of where you are� The journey of yoga begins at a different place for everyone because each of us is unique� Yoga is not about competition or being perfect – There is a reason it is called a “practice�” It’s about meeting and accepting yourself exactly as you are, and cultivating an awareness of your self – your light and your shadow�
The wisdom of the ancient yogis recognized that we humans have different personalities, and so would benefit from different approaches on the path to self-discovery� Some people are reflective, some are active, some are emotional, and some are systematic in their approach to life�
3
Module 1: Yoga
There are four major paths of yoga:
Jnana yoga – the path of wisdom� Jnana yoga appeals to those who are reflective by nature� It is the path of knowl-edge, but not factual information� Rather, it is about the wisdom that comes from self-study, from the study of the scriptures, and through meditation and detachment�
Karma yoga – the path of selfless service� This is an active path in which the practitioner performs service to others without expectation of receiving anything in return� Mother Teresa and Mahatma Ghandi were Karma yogis�
Bhakti yoga – the yoga of love and devotion� This appeals to those of an emotional nature� The Bhakti yogi is motivated chiefly by the power of love and sees God as the embodiment that love� Through prayer, worship, and ritual, the Bhakti surrenders himself through the repeated chanting and singing of God’s name, which he believes will bring him closer to the god of his own understanding�
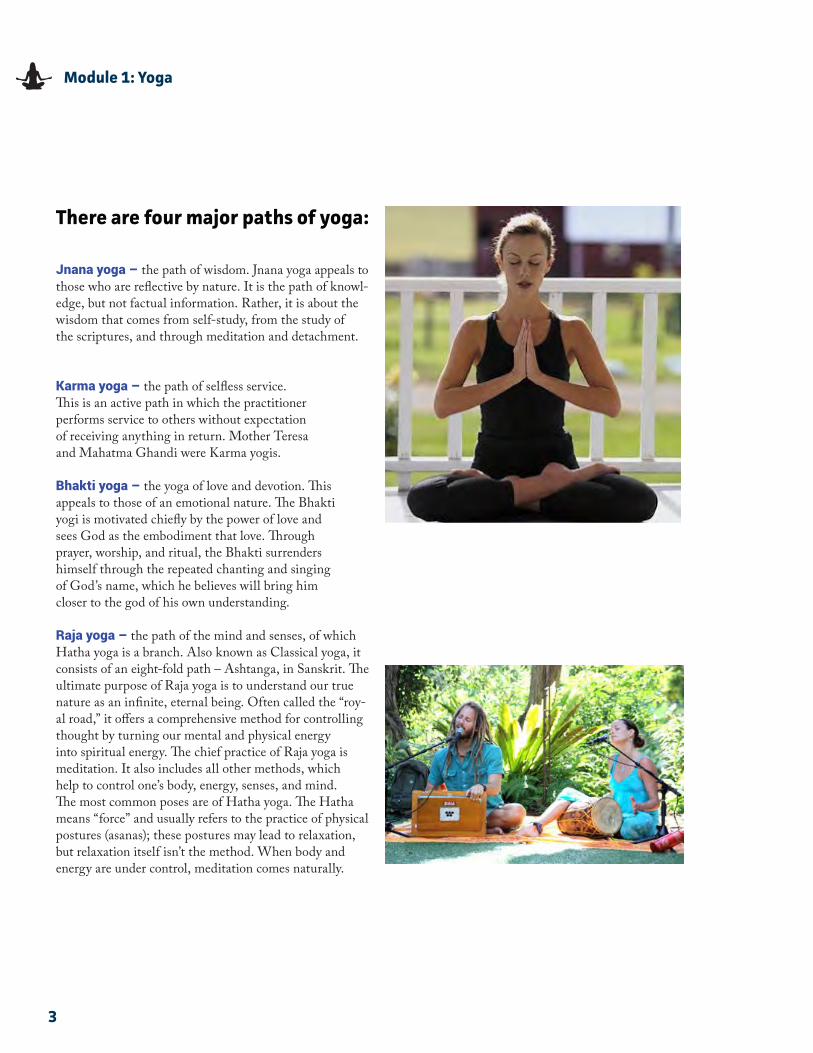
Raja yoga – the path of the mind and senses, of which Hatha yoga is a branch� Also known as Classical yoga, it consists of an eight-fold path – Ashtanga, in Sanskrit� The ultimate purpose of Raja yoga is to understand our true nature as an infinite, eternal being� Often called the “roy-al road,” it offers a comprehensive method for controlling thought by turning our mental and physical energy into spiritual energy� The chief practice of Raja yoga is meditation� It also includes all other methods, which help to control one’s body, energy, senses, and mind� The most common poses are of Hatha yoga� The Hatha means “force” and usually refers to the practice of physical postures (asanas); these postures may lead to relaxation, but relaxation itself isn’t the method� When body and energy are under control, meditation comes naturally�
4
Module 1: Yoga
Who can practice yoga?
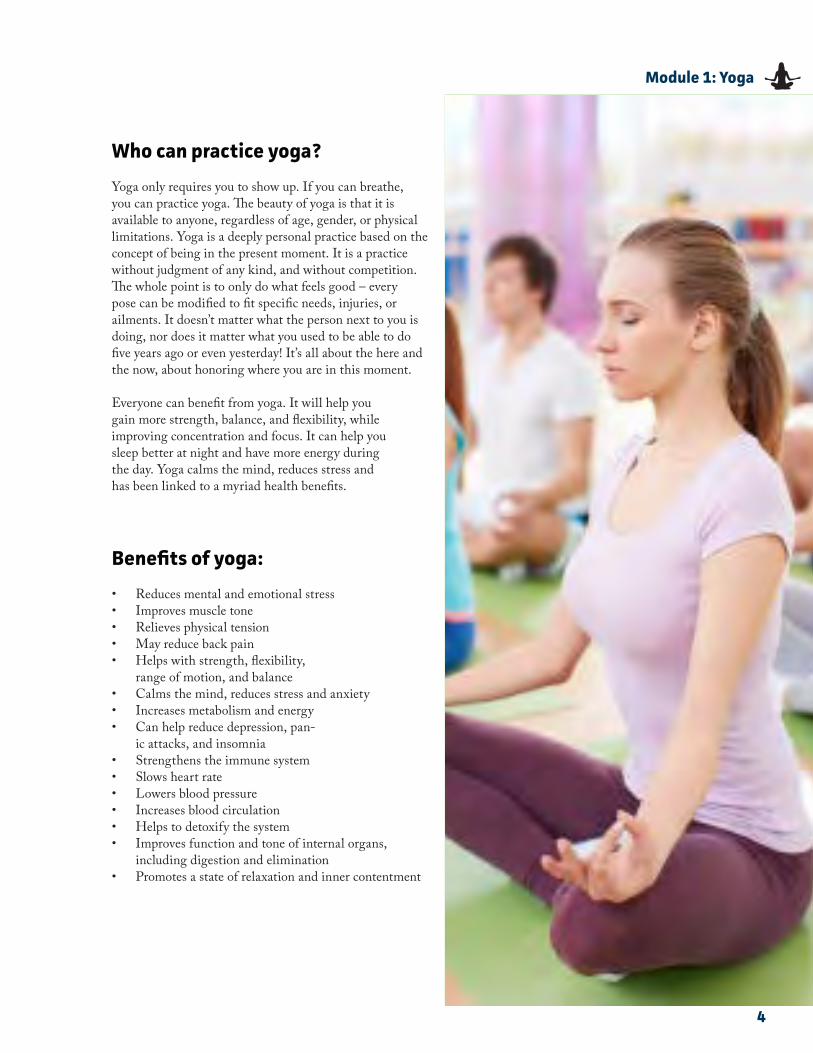
Yoga only requires you to show up� If you can breathe, you can practice yoga� The beauty of yoga is that it is available to anyone, regardless of age, gender, or physical limitations� Yoga is a deeply personal practice based on the concept of being in the present moment� It is a practice without judgment of any kind, and without competition� The whole point is to only do what feels good – every pose can be modified to fit specific needs, injuries, or ailments� It doesn’t matter what the person next to you is doing, nor does it matter what you used to be able to do five years ago or even yesterday! It’s all about the here and the now, about honoring where you are in this moment�
Everyone can benefit from yoga� It will help you gain more strength, balance, and flexibility, while improving concentration and focus� It can help you sleep better at night and have more energy during the day� Yoga calms the mind, reduces stress and has been linked to a myriad health benefits�
Benefits of yoga:
• Reduces mental and emotional stress• Improves muscle tone• Relieves physical tension• May reduce back pain• Helps with strength, flexibility,
range of motion, and balance• Calms the mind, reduces stress and anxiety• Increases metabolism and energy• Can help reduce depression, pan-
ic attacks, and insomnia• Strengthens the immune system• Slows heart rate• Lowers blood pressure• Increases blood circulation• Helps to detoxify the system• Improves function and tone of internal organs,
including digestion and elimination• Promotes a state of relaxation and inner contentment
5
Module 1: Yoga
Ancient Roots of Yoga
Vedic Yoga
Despite over 100 years of research, the exact origins of Yoga are still unknown, as it predates written history� We do know that soapstone seals depicting figures in yoga positions have been found in archeological sites in the Indus Valley dating back to 5,000 BCE (Before Common Era)� These yogic postures resemble Lord Shiva and Paravathi performing various asanas (poses) and practicing meditation� According to mythical lore, Shiva is said to be the founder of yoga, and Paravathi was his first disciple� The Indus-Sarasvati civilization is named after two great rivers that once flowed through northern India; today, only the Indus river remains, in what is now Pakistan� The drying up of the Sarasvati occurred around 1900 BCE (Before Common Era), forcing the population to migrate east toward the Ganges and South into central India and Tamilnadu� This river is referred to throughout the Rig-Veda, which is the oldest text of any Indo-European language, dating to 3,000-2,000 BCE� It is composed in Sanskrit, the language of most of the Yoga scriptures; a language very much alive today� This collection of hymns, known as the Vedas, contains the four spiritual texts of India and is considered the fountainhead of Hinduism� The Vedas touch on yogic themes and practices, ritual, sacrifice, sacred sounds, and devotion to the gods� This is considered the period of Vedic Yoga, according to Georg Feuerstein�1
Pre-Classical Yoga 2,000 BCE to 2nd century CE
This period produced the Upanishads – “wisdom that must be learned at the foot of the guru,” 2 which became a source for yoga tradition as we know it today� There are over 200 of these scriptures, and they contain the best-known and best-loved yogic text in India – the Bhagavad-Gita (Lord’s Song) – in which Krishna teaches selfless action (karma yoga), devotion (bhakti yoga), and wisdom (jnana yoga)�3
Classical Yoga 5th century CE
This phase represents the period of Raja Yoga (eightfold yoga)� Vyasa crafted a very important text, Patanjali’s Yoga Sutras, as early as the 2nd century, though it was not transcribed until the 5th century�
3,000-2,000 BCE
6
Module 1: Yoga
Post Post-Classical Yoga: - Vendanta 900-1800 CE
According to Feuerstein, the core teaching of Vedanta occurred in the postclassical era, and is a philosophical system based on the teachings of the Upanishads� In 900 CE, Swami Swatmarama wrote the Hatha Yoga Pradipika (Light on Yoga) in Sanskrit, describing the various asana (poses) and breathing exercises that form the basis of the modern practice of posture-based hatha yoga� The yogi Matsyendranath taught that before begin-ning the practice of meditation, the body and its elements needed purifying, and he and his student Goraksha are often considered the founders of Hatha yoga�4 This was revolutionary, because prior yogis were concerned solely with contemplation to the point where they could exit the body consciously and leave the world behind to merge with the formless reality, the spirit� Now, this new breed of yoga masters created a system of practices designed to rejuvenate the body and prolong its life, regarding the body as a temple, not merely a container to be discarded at the first opportunity�
Modern Yoga 1893 CE
The last category of Feuerstein’s yoga history began with the Parliament of Religions held in Chicago in 1893, where Swami Vivekananda proclaimed “America is the place, the people, the opportunity for everything new�”5 His first speech began with the words “sisters and brothers of America,”6 and the audience was on their feet, giving him a standing ovation and making him the most popular diplomat – not because he was the only representative from India, but because he was the only one who spoke unreservedly for universal tolerance; an omnist acceptance among all religions� He then traveled extensively and attracted many students to Raja (ashtanga, eight-limbed) and Vedanta (jnana, raja, karma, and bhakti yoga), opening the door for eastern gurus in the west� Vivekananda’s second tour of America in 1899 saw the founding of the New York Vedanta Society (still open), which lay the groundwork for the subsequent openings of ashrams and the Hindu Vedanta on the west coast in the early 1900s�
7
Module 1: Yoga
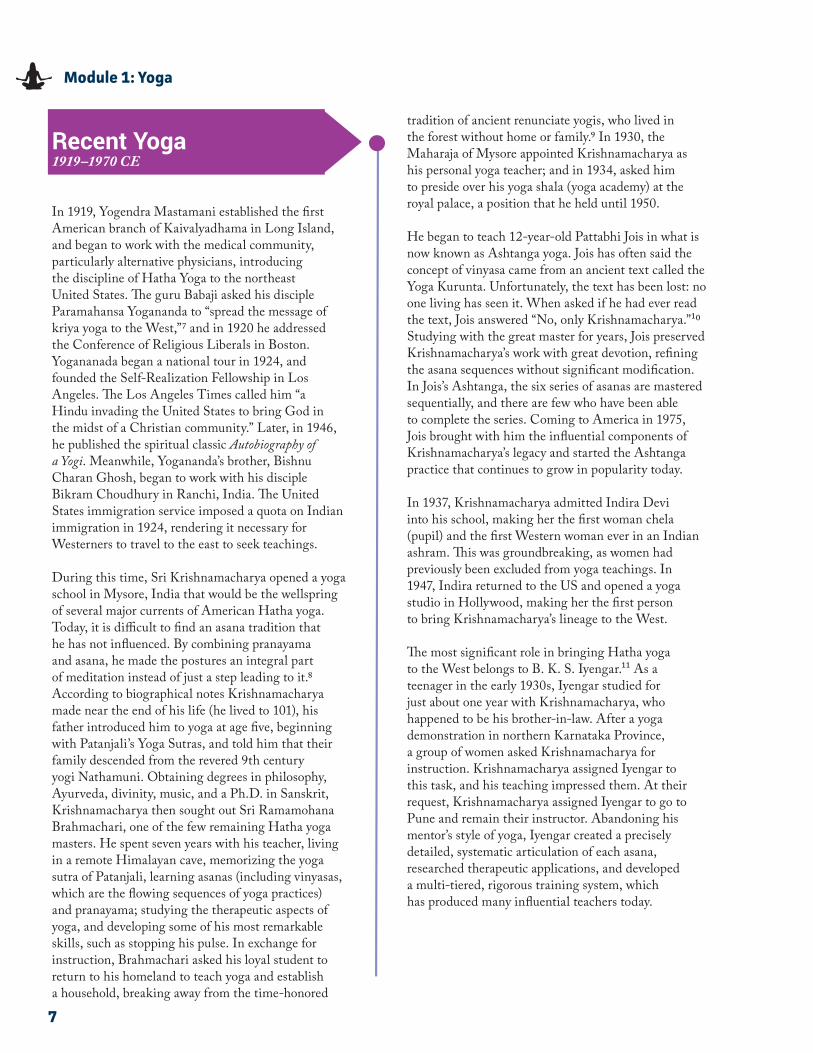
Recent Yoga 1919–1970 CE
In 1919, Yogendra Mastamani established the first American branch of Kaivalyadhama in Long Island, and began to work with the medical community, particularly alternative physicians, introducing the discipline of Hatha Yoga to the northeast United States� The guru Babaji asked his disciple Paramahansa Yogananda to “spread the message of kriya yoga to the West,”7 and in 1920 he addressed the Conference of Religious Liberals in Boston� Yogananada began a national tour in 1924, and founded the Self-Realization Fellowship in Los Angeles� The Los Angeles Times called him “a Hindu invading the United States to bring God in the midst of a Christian community�” Later, in 1946, he published the spiritual classic Autobiography of a Yogi� Meanwhile, Yogananda’s brother, Bishnu Charan Ghosh, began to work with his disciple Bikram Choudhury in Ranchi, India� The United States immigration service imposed a quota on Indian immigration in 1924, rendering it necessary for Westerners to travel to the east to seek teachings�
During this time, Sri Krishnamacharya opened a yoga school in Mysore, India that would be the wellspring of several major currents of American Hatha yoga� Today, it is difficult to find an asana tradition that he has not influenced� By combining pranayama and asana, he made the postures an integral part of meditation instead of just a step leading to it�8 According to biographical notes Krishnamacharya made near the end of his life (he lived to 101), his father introduced him to yoga at age five, beginning with Patanjali’s Yoga Sutras, and told him that their family descended from the revered 9th century yogi Nathamuni� Obtaining degrees in philosophy, Ayurveda, divinity, music, and a Ph�D� in Sanskrit, Krishnamacharya then sought out Sri Ramamohana Brahmachari, one of the few remaining Hatha yoga masters� He spent seven years with his teacher, living in a remote Himalayan cave, memorizing the yoga sutra of Patanjali, learning asanas (including vinyasas, which are the flowing sequences of yoga practices) and pranayama; studying the therapeutic aspects of yoga, and developing some of his most remarkable skills, such as stopping his pulse� In exchange for instruction, Brahmachari asked his loyal student to return to his homeland to teach yoga and establish a household, breaking away from the time-honored
tradition of ancient renunciate yogis, who lived in the forest without home or family�9 In 1930, the Maharaja of Mysore appointed Krishnamacharya as his personal yoga teacher; and in 1934, asked him to preside over his yoga shala (yoga academy) at the royal palace, a position that he held until 1950�
He began to teach 12-year-old Pattabhi Jois in what is now known as Ashtanga yoga� Jois has often said the concept of vinyasa came from an ancient text called the Yoga Kurunta� Unfortunately, the text has been lost: no one living has seen it� When asked if he had ever read the text, Jois answered “No, only Krishnamacharya�”10 Studying with the great master for years, Jois preserved Krishnamacharya’s work with great devotion, refining the asana sequences without significant modification� In Jois’s Ashtanga, the six series of asanas are mastered sequentially, and there are few who have been able to complete the series� Coming to America in 1975, Jois brought with him the influential components of Krishnamacharya’s legacy and started the Ashtanga practice that continues to grow in popularity today�
In 1937, Krishnamacharya admitted Indira Devi into his school, making her the first woman chela (pupil) and the first Western woman ever in an Indian ashram� This was groundbreaking, as women had previously been excluded from yoga teachings� In 1947, Indira returned to the US and opened a yoga studio in Hollywood, making her the first person to bring Krishnamacharya’s lineage to the West�
The most significant role in bringing Hatha yoga to the West belongs to B� K� S� Iyengar�11 As a teenager in the early 1930s, Iyengar studied for just about one year with Krishnamacharya, who happened to be his brother-in-law� After a yoga demonstration in northern Karnataka Province, a group of women asked Krishnamacharya for instruction� Krishnamacharya assigned Iyengar to this task, and his teaching impressed them� At their request, Krishnamacharya assigned Iyengar to go to Pune and remain their instructor� Abandoning his mentor’s style of yoga, Iyengar created a precisely detailed, systematic articulation of each asana, researched therapeutic applications, and developed a multi-tiered, rigorous training system, which has produced many influential teachers today�
8
Module 1: Yoga
In the 1960s, as yoga was becoming a part of world culture, Iyengar was recognized as one of its chief ambassadors� In 1964, he published the “yoga bible,” Light on Yoga� Americans’ love affair with the “lion of Pune”12 began in 1974, when he came to California for the first time� Nearly every Western teacher has been influenced by his emphasis on anatomical precision�
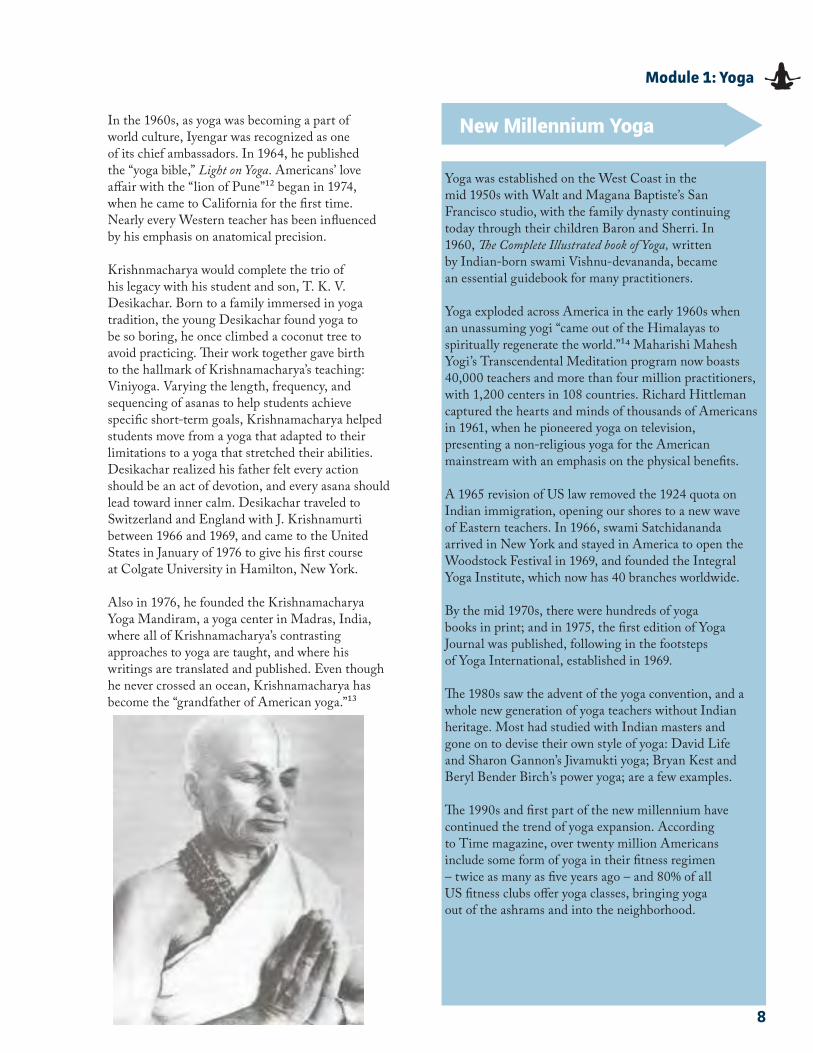
Krishnmacharya would complete the trio of his legacy with his student and son, T� K� V� Desikachar� Born to a family immersed in yoga tradition, the young Desikachar found yoga to be so boring, he once climbed a coconut tree to avoid practicing� Their work together gave birth to the hallmark of Krishnamacharya’s teaching: Viniyoga� Varying the length, frequency, and sequencing of asanas to help students achieve specific short-term goals, Krishnamacharya helped students move from a yoga that adapted to their limitations to a yoga that stretched their abilities� Desikachar realized his father felt every action should be an act of devotion, and every asana should lead toward inner calm� Desikachar traveled to Switzerland and England with J� Krishnamurti between 1966 and 1969, and came to the United States in January of 1976 to give his first course at Colgate University in Hamilton, New York�
Also in 1976, he founded the Krishnamacharya Yoga Mandiram, a yoga center in Madras, India, where all of Krishnamacharya’s contrasting approaches to yoga are taught, and where his writings are translated and published� Even though he never crossed an ocean, Krishnamacharya has become the “grandfather of American yoga�”13
New Millennium Yoga
Yoga was established on the West Coast in the mid 1950s with Walt and Magana Baptiste’s San Francisco studio, with the family dynasty continuing today through their children Baron and Sherri� In 1960, The Complete Illustrated book of Yoga, written by Indian-born swami Vishnu-devananda, became an essential guidebook for many practitioners�
Yoga exploded across America in the early 1960s when an unassuming yogi “came out of the Himalayas to spiritually regenerate the world�”14 Maharishi Mahesh Yogi’s Transcendental Meditation program now boasts 40,000 teachers and more than four million practitioners, with 1,200 centers in 108 countries� Richard Hittleman captured the hearts and minds of thousands of Americans in 1961, when he pioneered yoga on television, presenting a non-religious yoga for the American mainstream with an emphasis on the physical benefits�
A 1965 revision of US law removed the 1924 quota on Indian immigration, opening our shores to a new wave of Eastern teachers� In 1966, swami Satchidananda arrived in New York and stayed in America to open the Woodstock Festival in 1969, and founded the Integral Yoga Institute, which now has 40 branches worldwide�
By the mid 1970s, there were hundreds of yoga books in print; and in 1975, the first edition of Yoga Journal was published, following in the footsteps of Yoga International, established in 1969�
The 1980s saw the advent of the yoga convention, and a whole new generation of yoga teachers without Indian heritage� Most had studied with Indian masters and gone on to devise their own style of yoga: David Life and Sharon Gannon’s Jivamukti yoga; Bryan Kest and Beryl Bender Birch’s power yoga; are a few examples�
The 1990s and first part of the new millennium have continued the trend of yoga expansion� According to Time magazine, over twenty million Americans include some form of yoga in their fitness regimen – twice as many as five years ago – and 80% of all US fitness clubs offer yoga classes, bringing yoga out of the ashrams and into the neighborhood�
9
Module 1: Yoga
Western Yoga
What brings people to Yoga?
Anne Cushman asked the questions, “What are the unique characteristics of yoga’s newest incarnation? What are the perils and promises that sincere practitioners face as yoga surfs on a tsunami of popularity into twenty-first century America?” Her conclusion was an observation of three main characteristics that distinguish the way Americans practice yoga from its traditional history in India: the prominence of asana (postures) practice; the emphasis on lay, nonsectarian practice; and the incorporation of other Eastern contemplative traditions, Western psychology, and mind-body disciplines�15
The vast majority of Americans initially approach yoga as exercise� As a culture that constantly places the attainment of buff bodies on everyone’s to-do list, the recent celebrity endorsement of yoga shines a light on the Hatha yoga path� Many students find their initial quest for physical transformation broadens into the spiritual� Stephen Cope, author of Yoga and the Quest for Self, described two categories of students: “One is the middle-aged 40-60- somethings, dealing with disillusionment about what our culture holds up as the goals of life – money, status, achievement� The other is the younger 20-somethings, looking for something solid to base their lives on�”16 Cushman observed: “If you look closely at the serious yoga practitioner – the person who does it on a regular basis for more than a year or so – you’ll often find that asana has not become just an end to itself, but the medium through which he or she begins to explore other yogic teachings� For us in the West, the body has become the meditation hall in which we first learn to practice the basic contem-plative arts of concentration, insight, and mindfulness�”17
How do they practice?
Most Americans develop their practice as an addition to their lives, which are already full of family and career, and very few have the time or availability to spend many hours a day studying and practicing� As such, instead of influencing the actions of the day, yoga is something many Westerners use as a lay practice to counteract the effects and stresses of modern life�
Instead of devoting oneself to a particular lineage, many American students attend a variety of classes with instruction from a diverse array of yogic paths� Modern
yogis have also inevitably begun to cross-pollinate yoga with Western approaches to spirituality, psychology, bodywork, and mind-body healing� Joel Kramer and Diana Alstad, authors of Playing the Edge of Mind and Body: A New Look at Yoga, offered this advice: “It is necessary for all serious practitioners of yoga to take from other people’s experience that which can be helpful to create a personal expression of yoga�”18 The result is a creation of new forms of yoga that meet the specific spiritual and psychological needs of our Western culture�
Yoga in America
The teaching of American yoga has also evolved much differently than its Indian counterpart� Historically, in India, a person practiced for 20 years, then apprenticed for five more years, before becoming a teacher� In the United States, things are a little different� “Ideally, instructors here have 10 years of practice followed by two to three years of apprenticeship,” said Mark Stephens, author of Teaching Yoga: Essential Foundations and Techniques & Yoga Sequencing – Designing Transformative Yoga Classes�19 Most of the leading instructors of our day have studied with Indian masters, including B� K� S� Iyengar, K� Pattabhi Jois, and Sri T� K� V� Desikachar, and bring those lineages, infused with their own personality, to America� Unfortunately, only Desikachar remains alive today� The current crop of teachers are opting to study by attending teacher training courses, retreats, and workshops, and are developing an increasingly varied blend of yoga styles� Mikel Burley, author of Yoga in the Modern World: Questions of Authenticity and Purpose, said “… it is incumbent upon teachers of the discipline to pay attention to their own particular approach, and to recognize that, while there is nothing inherently wrong with diluting or modifying traditional teachings to better suit the requirements of modern practitioners, we might be in danger of deluding ourselves if we fail to acknowledge that this is indeed what we are doing�”20
“There’s been an inheritance of the yoga by the Americans themselves,” said Kathryn Arnold, former editor of Yoga Journal, “And so we are redefining it�”21
Each course has a unique set of requirements for completion, as there is no present national standard for certification� In 1999, the Yoga Alliance set minimum standards for yoga teacher training, and currently has registrations for 200 and 500 hours, though there is debate as to how beneficial registration is� Instead of telling trainers what should be taught, Yoga Alliance simply requires that a certain number of hours be spent covering each of five areas of study, with no specificity given on
10
Module 1: Yoga
how to fill those hours� As listed on their website, registered 200-hour trainings (the level that 85% of their registered yoga teachers hold) must include 100 hours of practice, 25 hours of teaching methodology, 20 hours of anatomy, 30 hours of philosophy and ethics, and 10 hours of practice teaching� But, the content of each area of study is left up to the school� As there are so many different styles of yoga, it is very difficult to set a standard that covers all schools�
In the article Yoga American Style, the author Prem Prakash stated “My personal opinion is that one becomes a Yoga teacher when his teacher gives him permission to teach� This is how transmission of spiritual authority is generated, and this is how the energy of the teachers is passed down through a lineage�”22
Styles of YogaThere are many, many styles of yoga� Here are some
of the most popular in the United States�
Ananda - For those who aspire to more than simply building a hard body, Ananda Yoga provides a tool for spiritual growth while releasing unwanted tensions� During the 1960s, swami Kriyananda developed the Ananda style on his return to California following a period of intense yoga training under guru Paramahansa Yogananda (author of Autobiography of a Yogi)� “The most unique part of this system is the use of silent affirmations while holding a pose,” said Rich McCord, director of Ananda Yoga’s teacher-training program at the Expanding Light retreat center in Nevada City, California�23 In a typical class, instructors guide their students through a series of gentle Hatha postures designed to move energy upward to the brain, preparing the body for meditation� Classes also focus on proper alignment, easeful posture transitions, and controlled breathing exercises (pranayama)�
Anusara - Anusara means “to step into the current of divine will�” Founded in 1997 by John Friend, Anusara combines a strong emphasis on physical alignment with a positive philosophy expressing the intrinsic goodness of all beings� Classes are usually light-hearted and accessible, often with a focus on heart opening� Anusara is now a teacher-led yoga school, and is often described as Iyengar with a sense of humor� Instead of trying to fit everyone into standard cookie-cutter positions, students are guided to express themselves through the poses to their fullest ability� It can be therapeutically effective and physically transformative� The central philosophy of this yoga is that each person is equally divine in every part – body, mind, and spirit�
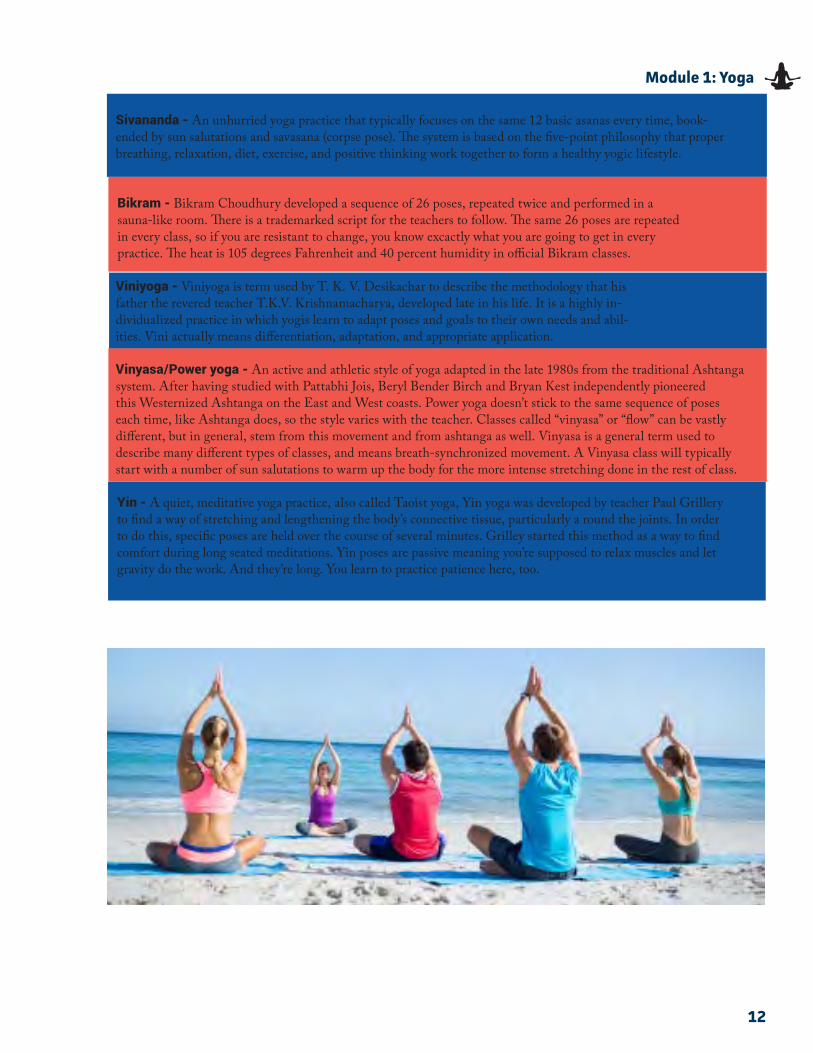
Ashtanga - Ashtanga means “eight limbs” in Sanskrit, and is a fast-paced, intense yoga style� Six established and strenuous pose sequences – the primary series, second series, third series, etc� – are practiced sequentially as progress is made� Ashtangis move rapidly, flowing from one pose to the next with each inhale and exhale� The series of asanas increase in difficulty, allowing students to work at their own pace� In class, you’ll be led nonstop through one or more of the series� There’s no time for adjustments – you’ll be encouraged to breathe as you move from pose to pose� Very often the arrangement of the mats is “Mysore style,” with two rows of mats down the room facing each other�
11
Module 1: Yoga
Forrest - Headquartered in Santa Monica, California, and gaining popularity across the US, Forrest yoga is the method taught by Ana Forrest� These are vigorous asana sequences intended to strengthen and purify the body, and release pent-up emotions and pain to encourage healing of physical and emotional wounds� Expect an intense workout with an emphasis on abdominal strengthening, inversions, and deep breathing�
Hatha - By definition, Hatha is a physical yoga practice, which is pretty much all yoga you’ll find in this hemisphere� One of the six original branches of yoga, “Hatha” encompasses nearly all types of modern yoga� Today, classes described as “Hatha” on studio schedules are typically a basic, classical approach to yogic breathing exercises and postures�
Hot Yoga - Hot yoga can refer to any yoga class in a heated room� The room is usually maintained at a temperature of 95-100 degrees Fahrenheit� Most often, hot yoga tends to be a flowing, Vinyasa-style practice in which the teacher instructs a series of linked poses, and is free to vary the poses used in each class�
Integral - Integral is a gentle yoga style based on the ideas and principles of Sri Swami Satchidananda, who sought to give followers guidelines on how to improve their lives� In an attempt to integrate mind, body, and spirit, classes include pranayama, chanting, and meditation� “Integral Yoga uses classical Hatha postures, which are meant to be performed as a meditation, balancing physical effort and relaxation,” said Swami Ramananda, president of the New York Integral Yoga Institute in Manhattan�
Iyengar - This is a purist style named after founder B� K� S� Iyengar� Akin to “romper room style”this style of yoga uses many props, such as blocks, straps, harnesses, and incline boards, to place the practice more precisely into positions� Appropriate for all ages and abilities, this style is all about precise alignment and deliberate sequencing� Iyengar practice usually emphasizes holding poses over long periods versus moving quickly from one pose to the next (flow)�
Jivamukti - A physical, limit-pushing flow practice that also teaches Western practitioners in yoga’s traditional spiritual elements� There are themes for each class, Sanskrit chants, and references to ancient scripture� Created by Sharon Gannon and David Life in 1984 in New York City, jivamukti translates to “a liberated soul�”
Kripalu - Kripalu is both a yoga style and a retreat center in Stockbridge, Massachusetts� Kripalu adopts a compassionate approach and places emphasis on meditation, physical healing, and spir-itual transformation� It also focuses on looking inward and moving at your own pace, mak-ing it a good practice for people with limited mobility due to age, weight, or injury�
Kundalini - The practice of Kundalini yoga features constantly moving, invigorating poses� The fluidity of the practice is intended to release the kundalini (serpent) energy in your body� Kundalini yoga incorporates postures, dynamic breathing techniques, chanting, and meditating on mantras such as “sat nam” (meaning “I am truth”)� Practitioners concentrate on awakening the energy at the base of the spine and drawing it upward through each of the seven chakras�
Prenatal - Yoga postures carefully adapted for expectant mothers� Prenatal yoga is tailored to help women in all stages of pregnancy, even those getting back in shape post-birth�
Restorative - Less work, more relaxation� You’ll spend as long as 20 minutes each in just four or five simple poses (often they’re modifications of standard asanas), using strategically placed props like blankets, bolsters, and eye pillows to help you sink into deep relaxation� The idea is to stay in each pose long enough to encourage passive stretching and to move into the corrective tissues�
12
Module 1: Yoga
Viniyoga - Viniyoga is term used by T� K� V� Desikachar to describe the methodology that his father the revered teacher T�K�V� Krishnamacharya, developed late in his life� It is a highly in-dividualized practice in which yogis learn to adapt poses and goals to their own needs and abil-ities� Vini actually means differentiation, adaptation, and appropriate application�
Vinyasa/Power yoga - An active and athletic style of yoga adapted in the late 1980s from the traditional Ashtanga system� After having studied with Pattabhi Jois, Beryl Bender Birch and Bryan Kest independently pioneered this Westernized Ashtanga on the East and West coasts� Power yoga doesn’t stick to the same sequence of poses each time, like Ashtanga does, so the style varies with the teacher� Classes called “vinyasa” or “flow” can be vastly different, but in general, stem from this movement and from ashtanga as well� Vinyasa is a general term used to describe many different types of classes, and means breath-synchronized movement� A Vinyasa class will typically start with a number of sun salutations to warm up the body for the more intense stretching done in the rest of class�
Bikram - Bikram Choudhury developed a sequence of 26 poses, repeated twice and performed in a sauna-like room� There is a trademarked script for the teachers to follow� The same 26 poses are repeated in every class, so if you are resistant to change, you know excactly what you are going to get in every practice� The heat is 105 degrees Fahrenheit and 40 percent humidity in official Bikram classes�
Sivananda - An unhurried yoga practice that typically focuses on the same 12 basic asanas every time, book-ended by sun salutations and savasana (corpse pose)� The system is based on the five-point philosophy that proper breathing, relaxation, diet, exercise, and positive thinking work together to form a healthy yogic lifestyle�
Yin - A quiet, meditative yoga practice, also called Taoist yoga, Yin yoga was developed by teacher Paul Grilleryto find a way of stretching and lengthening the body’s connective tissue, particularly a round the joints� In orderto do this, specific poses are held over the course of several minutes� Grilley started this method as a way to findcomfort during long seated meditations� Yin poses are passive meaning you’re supposed to relax muscles and letgravity do the work� And they’re long� You learn to practice patience here, too�
13
Module 1: Yoga
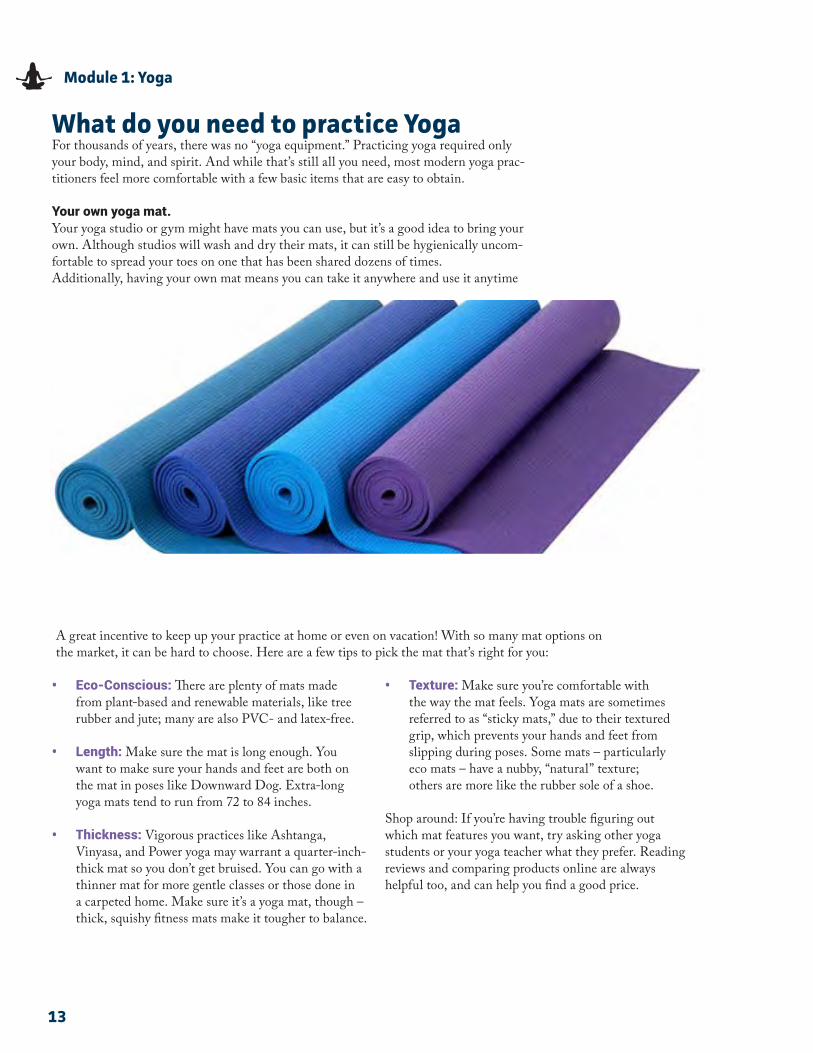
What do you need to practice Yoga For thousands of years, there was no “yoga equipment�” Practicing yoga required only your body, mind, and spirit� And while that’s still all you need, most modern yoga prac-titioners feel more comfortable with a few basic items that are easy to obtain�
Your own yoga mat.Your yoga studio or gym might have mats you can use, but it’s a good idea to bring your own� Although studios will wash and dry their mats, it can still be hygienically uncom-fortable to spread your toes on one that has been shared dozens of times�Additionally, having your own mat means you can take it anywhere and use it anytime
A great incentive to keep up your practice at home or even on vacation! With so many mat options on the market, it can be hard to choose� Here are a few tips to pick the mat that’s right for you:
• Eco-Conscious: There are plenty of mats made from plant-based and renewable materials, like tree rubber and jute; many are also PVC- and latex-free�
• Length: Make sure the mat is long enough� You want to make sure your hands and feet are both on the mat in poses like Downward Dog� Extra-long yoga mats tend to run from 72 to 84 inches�
• Thickness: Vigorous practices like Ashtanga, Vinyasa, and Power yoga may warrant a quarter-inch-thick mat so you don’t get bruised� You can go with a thinner mat for more gentle classes or those done in a carpeted home� Make sure it’s a yoga mat, though – thick, squishy fitness mats make it tougher to balance�
• Texture: Make sure you’re comfortable with the way the mat feels� Yoga mats are sometimes referred to as “sticky mats,” due to their textured grip, which prevents your hands and feet from slipping during poses� Some mats – particularly eco mats – have a nubby, “natural” texture; others are more like the rubber sole of a shoe�
Shop around: If you’re having trouble figuring out which mat features you want, try asking other yoga students or your yoga teacher what they prefer� Reading reviews and comparing products online are always helpful too, and can help you find a good price�
14
Module 1: Yoga
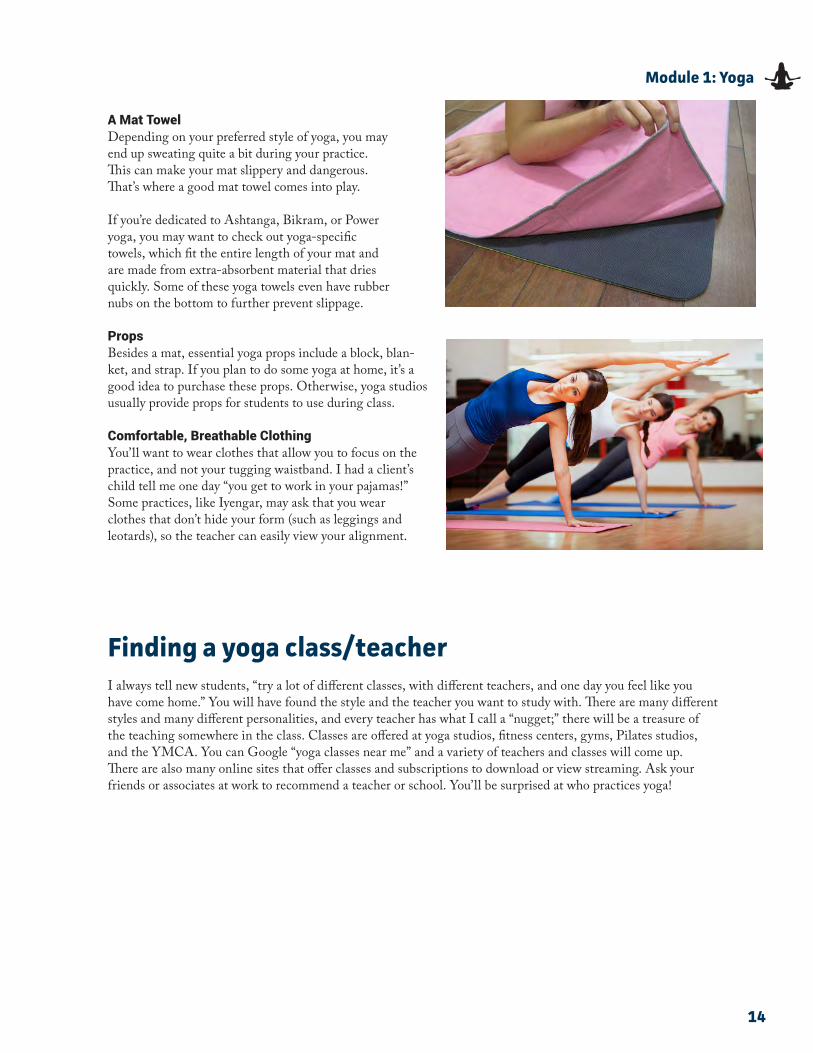
A Mat TowelDepending on your preferred style of yoga, you may end up sweating quite a bit during your practice� This can make your mat slippery and dangerous� That’s where a good mat towel comes into play�
If you’re dedicated to Ashtanga, Bikram, or Power yoga, you may want to check out yoga-specific towels, which fit the entire length of your mat and are made from extra-absorbent material that dries quickly� Some of these yoga towels even have rubber nubs on the bottom to further prevent slippage�
PropsBesides a mat, essential yoga props include a block, blan-ket, and strap� If you plan to do some yoga at home, it’s a good idea to purchase these props� Otherwise, yoga studios usually provide props for students to use during class�
Comfortable, Breathable ClothingYou’ll want to wear clothes that allow you to focus on the practice, and not your tugging waistband� I had a client’s child tell me one day “you get to work in your pajamas!” Some practices, like Iyengar, may ask that you wear clothes that don’t hide your form (such as leggings and leotards), so the teacher can easily view your alignment�
Finding a yoga class/teacherI always tell new students, “try a lot of different classes, with different teachers, and one day you feel like you have come home�” You will have found the style and the teacher you want to study with� There are many different styles and many different personalities, and every teacher has what I call a “nugget;” there will be a treasure of the teaching somewhere in the class� Classes are offered at yoga studios, fitness centers, gyms, Pilates studios, and the YMCA� You can Google “yoga classes near me” and a variety of teachers and classes will come up� There are also many online sites that offer classes and subscriptions to download or view streaming� Ask your friends or associates at work to recommend a teacher or school� You’ll be surprised at who practices yoga!
References
1� Feuerstein, Georg� “A Short History of Yoga�” http:/wwwyrec�org/shorthistory�html (27 November 2001)
2� Jones, Todd� “Hatha Yoga Family Tree�” Yoga Journal, Source 2001, pp� 106-107
3� Ibid�
4� Ibid�
5� Hammond, Holly� “Meet the Innovators!” Yoga Journal September/October 2000, p� 98�
6� Ibid�, 82
7� Ibid�
8� Ruiz, Fernando Pages� “Krishnamacharya’s Legacy�” Yoga Journal September/ October 2001, p� 98
9� Ibid�, 99
10� Ibid�, 101�
11� Ibid�, 162�
12� Leviton, Richard� “Celebrating 100 Years of Yoga in America�” Yoga Journal May/June 1993, p� 69�
13� Ruiz, 98�
14� Hammond, 82
15� Cushman, Anne� “The New Yoga�” Yoga Journal, January/ February 2000, p� 71�
16� Ibid�, 166
17� Ibid�
18� Kramer, Joel� “Playing the Edge of Mind and Body: A New Look at Yoga�” http:/whitelotus�org/library2/articles/Kram-er_alstad/newlook/html December 16,2001�
19� Jameson, Marnell� “In a Bad Position” The Detroit News 5 September 2001 health 6�
20� Burley, Mikel “ Yoga in the Modern World: Questions of Authenticity and Purpose� http://www�spirit-web�org/yoga/studying/yoga-in-the-modern-world-questions-of-authenticity-and-purpose
21� Powers, Anne� “American Influences Help Redefine the Practice of Yoga�” The New York Times 1 August 2001 B1 col 1�
22� Prakesh, Prem� “Yoga American Style�” Wysiyg://23http://www�yrec�org/amstyle�html (Nov 27 2001)
23� McCord, Rich� “Yoga in America�” 2009, p� 111
24� Kelly, Alice� “We’ve got Your Back�” Yoga Journal, September/ October 2002, p� 159�
15
Module 1: Yoga

Module 2: Theory & Philosophy
Module 2
Theory & Philosophy
17
Module 2: Theory & Philosophy
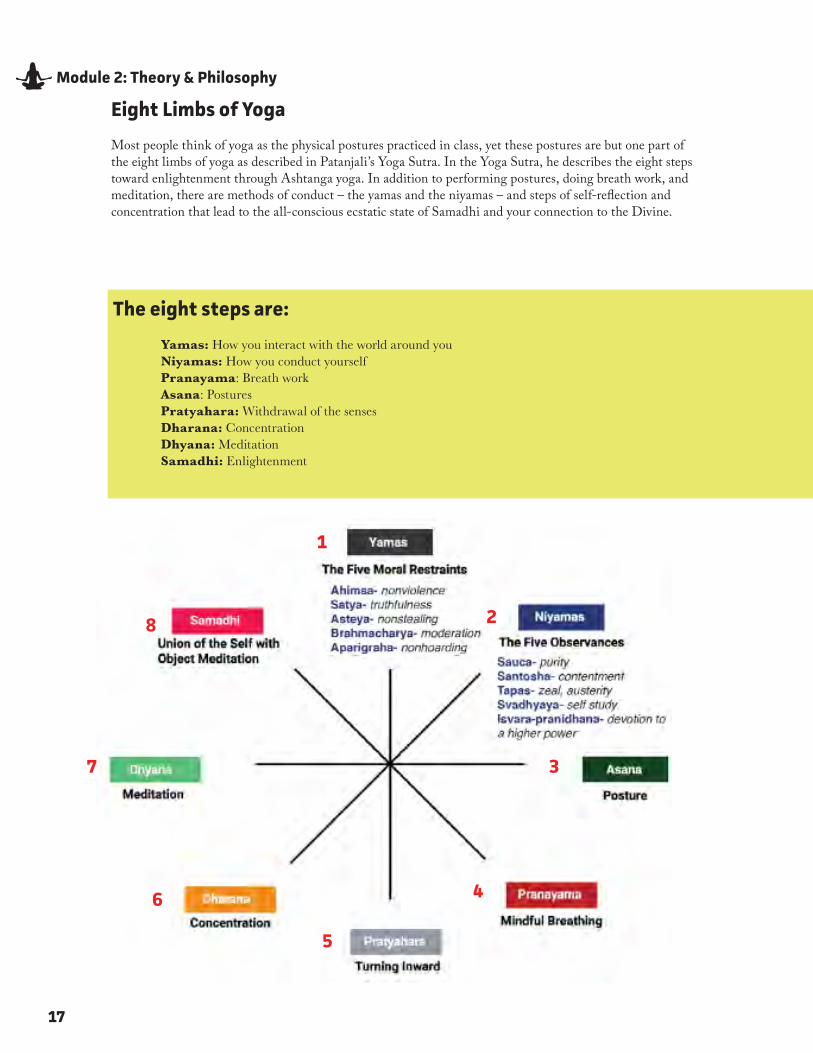
The eight steps are:
Yamas: How you interact with the world around you Niyamas: How you conduct yourself Pranayama: Breath work Asana: Postures Pratyahara: Withdrawal of the senses Dharana: Concentration Dhyana: Meditation Samadhi: Enlightenment
Eight Limbs of Yoga
Most people think of yoga as the physical postures practiced in class, yet these postures are but one part of the eight limbs of yoga as described in Patanjali’s Yoga Sutra� In the Yoga Sutra, he describes the eight steps toward enlightenment through Ashtanga yoga� In addition to performing postures, doing breath work, and meditation, there are methods of conduct – the yamas and the niyamas – and steps of self-reflection and concentration that lead to the all-conscious ecstatic state of Samadhi and your connection to the Divine�
1
2
3
4
5
6
7
8
18
Module 2: Theory & Philosophy
Yamas & the Niyamas
Yamas are disciplines or restraints, and include the methods you use to interact with the world around you� All of the other seven limbs are built around the first yama Ahimsa: non-harming� They are like an etiquette manual for yogis, and can be applied to the yoga practice as well as a larger guideline for how to treat others� Ahimsa literally means non-harming or injuring any creature or person in any way� This yama asks the yogi to practice kindness and compassion in thought, word, and deed� On the mat, it means avoiding getting too deep into a pose or using negative self-talk when a challenging pose is experienced� If you spoke your thoughts aloud, how would they sound? Would you dare to be as unkind to others as you are to yourself? Off the mat, it encourages the practitioner to speak and act kindly in a conscious way� Are your actions or deeds fostering the growth and well-being of others? As a yoga teacher, it would ask that you release judgment of your students and treat all with the same compassion� Words are like a knife that can pare a fruit or stab an enemy – the fault is not in the instrument, but in the user�
The second yama is Satya: speaking the truth� All of the yamas follow the first yama of non-harming, so caution is advised when speaking a truth that could cause hurt or harm in some way� Consideration for how your words might land on the person hearing them is imperative� My teacher, Sri T�K�V� Desikachar told me that Buddha advised laypeople to “speak only if your words are kind, only if they benefit the person hearing them, and then only if they improve upon the silence�” This is right speech� On the mat, this is discovering your truth about where the middle of your own pose is� Off the mat, it is honesty and choosing your words with discernment� It might be better to keep quiet than to hurt someone with the truth� Speaking lies are harmful, even if they are pleasing to the ear� As the teacher, this is selecting a kind and constructive way to give feedback to a student�
The third yama is Asteya: abhor theft� Steya means to steal, and asteya is the opposite – to take nothing that does not belong to us� Do not take anything that has not been freely given� An example is interrupting a conversation, or not asking if the person has time to talk when you call� The Yoga Sutra suggests that a person who is firmly anchored in asteya will “receive all the jewels of the world�”1On the mat, this means staying connected to your every breath, and not letting your thoughts or “monkey mind” distract or detract from your experience of each pose� Off the mat, this means literally not taking something that does not belong to you, but in an intangible sense; it is not stealing someone’s attention when they are in the middle
of a conversation or activity� As a teacher, this means devoting yourself to the class, giving all your attention to your students� When you do your own poses in the class, you are taking your energy away from the students to do so� Demonstrate if needed, and then get back to assisting and teaching from a fully conscious and connected place�
The fourth yama is Brahmacharya: sense control� Traditionally, this was meant in the sense of abstinence from sexual activity, because Brahmins were required to be renunciates, and not engage in sexual relations� This was only for a short period of time before they were asked to be householders and have a family� In today’s interpretation, it is meant to have integrity in relationships, not using or manipulating others for one’s own gratification, but rather seeking the divine in one another and acting accordingly with mutual reverence and respect� On the mat, this is the relationship you have with yourself� Are you constantly criticizing or judging your ability in each pose, or are you accepting what is possible today? Off the mat, this means acting with respect in your external relationships� Are you being truthful, honorable, and respectful? As a teacher, it means recognizing and keeping boundaries of respect with each student, understanding the balance of the teacher/student relationship�
The fifth yama is Aparigraha: non-coveting� Aparigraha means to take only what is necessary, not taking advantage of a situation or acting greedy� If you take more, you are exploiting someone else, and that goes right back to ahimsa – non-harming� On the mat, this can be interpreted as a desire to have a pose like someone else in the class, or a desire to be further along in a pose than the last time you were there, instead of enjoying what is possible in your body at this moment� Everything is impermanent, even our bodies: we must give back� When you hold on too tightly to anything, especially a relationship or youth, you lose it� Off the mat, this is about respecting what is others, enjoying what is yours, and being satisfied with both� If a thought, idea, or attitude has not served you for at least a year, let it go� As a teacher, this is charging a fair rate for your classes or private sessions, and not taking advantage of student/teacher relationships�
19
Module 2: Theory & Philosophy
Niyamas are the way we act in our relationship with ourselves� They are codes or rules that are followed for personal observance�The first niyama is Shaucha: cleanliness� This involves being clean on the outside, but is really about being clean on the inside� This is accomplished by practicing the poses that purify and detoxify, as well as using meditation and pranayama to wash our minds of chaos, watching what we feed our minds, from what we read to what we watch on TV and even to the conversations we have�
The second niyama is Samtosha: contentment� Being at peace with who you are and what you have is the essence of this niyama� It is a bit similar to aparigraha, by being satisfied with what is yours, but it goes to the next level, where who you are and what you have give you a sense of peace and well-being, knowing that you are exactly where you should be at this moment� Gratitude cultivates contentment� The Taoists say, “those who are contented with contentment are always contented�”2
The fourth niyama is Svadhyaya: the study of the self� Sva means self, and adhyaya means inquiry or examination� Through meditation and yoga asana, we learn more about ourselves� Erich Schiffman once said in class: “when you find out who you are, God will show up�” And Geeta Iyengar said, “there is a beginning, but no end to knowledge�”
The third niyama is Tapas: fire� This refers to the discipline of a daily practice that results in toxins inside the body being burned away� It is the mental habit of routine� In the poses, it is the ability to bear the pains of extremes while remaining steady without the mind getting upset�
Asana
Asana are generally known as the yoga poses performed in yoga practice or class, and translates as “to take a quiet seat�” The poses were developed to allow yoga practitioners an ease in their bodies to sit quietly so they could meditate without physical disturbance� There is only one of Pantajalis Yoga Sutra that addresses asana 2�46 “sthira sukam asanam�”3 Sthira is steadfast action, the ability to be conscious of the body’s actions and to feel and notice what it can do� Sukam is ease, in this case the ability to breathe easily and fully – without restriction or struggle� The yogi can then create an awareness of the body’s actions, and the space to relax into what they offer� There are many asanas appropriate for various levels of the practitioner, and it is the teacher’s responsibility to determine what poses to include in the sequencing of the class so the student can find that balance of effort and ease�
Pranayama
Pantajali says pranayama is the “controlled intake and outflow of breath in a firmly established posture�”4 It is the ability to regulate inhalation and exhalation, as well as the pause between breaths� This third limb is what makes yoga, yoga� Connection of the breath to the body and mind is what differentiates asana from stretching or calisthenics� The most commonly used form of pranayama in today’s yoga classes is ujjayi breathing, which reminds some people of Darth Vader or an underwater scuba diver� The sound comes from the vibration in the throat both on the inhale and the exhale, and when the mind is solely focused on each phase of the breath, the breath will grow louder than one’s own thoughts�
The fifth niyama is Ishvara Pranidhana: to surrender to something greater than you� This is knowing that there is a divine presence and that you are part of it� It is also about letting go of anticipation of the outcome of one’s actions, and being open to whatever the moment provides�
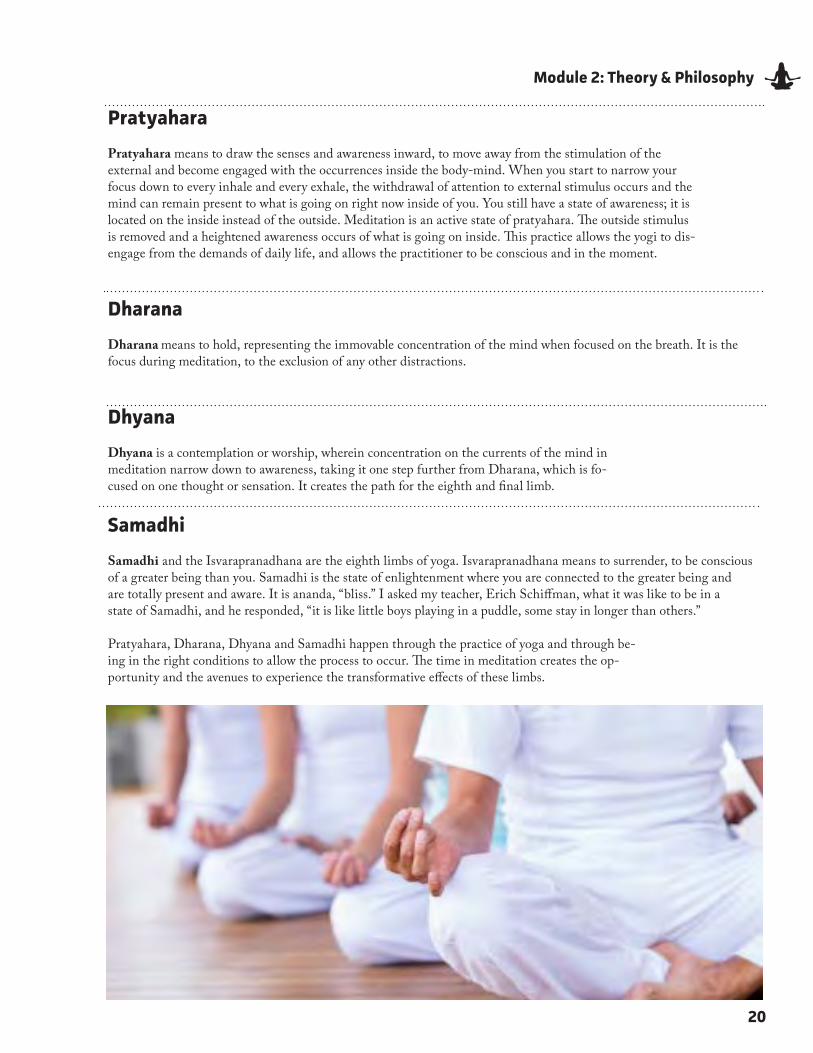
20
Module 2: Theory & Philosophy
Pratyahara
Pratyahara means to draw the senses and awareness inward, to move away from the stimulation of the external and become engaged with the occurrences inside the body-mind� When you start to narrow your focus down to every inhale and every exhale, the withdrawal of attention to external stimulus occurs and the mind can remain present to what is going on right now inside of you� You still have a state of awareness; it is located on the inside instead of the outside� Meditation is an active state of pratyahara� The outside stimulus is removed and a heightened awareness occurs of what is going on inside� This practice allows the yogi to dis-engage from the demands of daily life, and allows the practitioner to be conscious and in the moment�
Dharana
Dharana means to hold, representing the immovable concentration of the mind when focused on the breath� It is the focus during meditation, to the exclusion of any other distractions�
Dhyana
Dhyana is a contemplation or worship, wherein concentration on the currents of the mind in meditation narrow down to awareness, taking it one step further from Dharana, which is fo-cused on one thought or sensation� It creates the path for the eighth and final limb�
Samadhi
Samadhi and the Isvarapranadhana are the eighth limbs of yoga� Isvarapranadhana means to surrender, to be conscious of a greater being than you� Samadhi is the state of enlightenment where you are connected to the greater being and are totally present and aware� It is ananda, “bliss�” I asked my teacher, Erich Schiffman, what it was like to be in a state of Samadhi, and he responded, “it is like little boys playing in a puddle, some stay in longer than others�”
Pratyahara, Dharana, Dhyana and Samadhi happen through the practice of yoga and through be-ing in the right conditions to allow the process to occur� The time in meditation creates the op-portunity and the avenues to experience the transformative effects of these limbs�
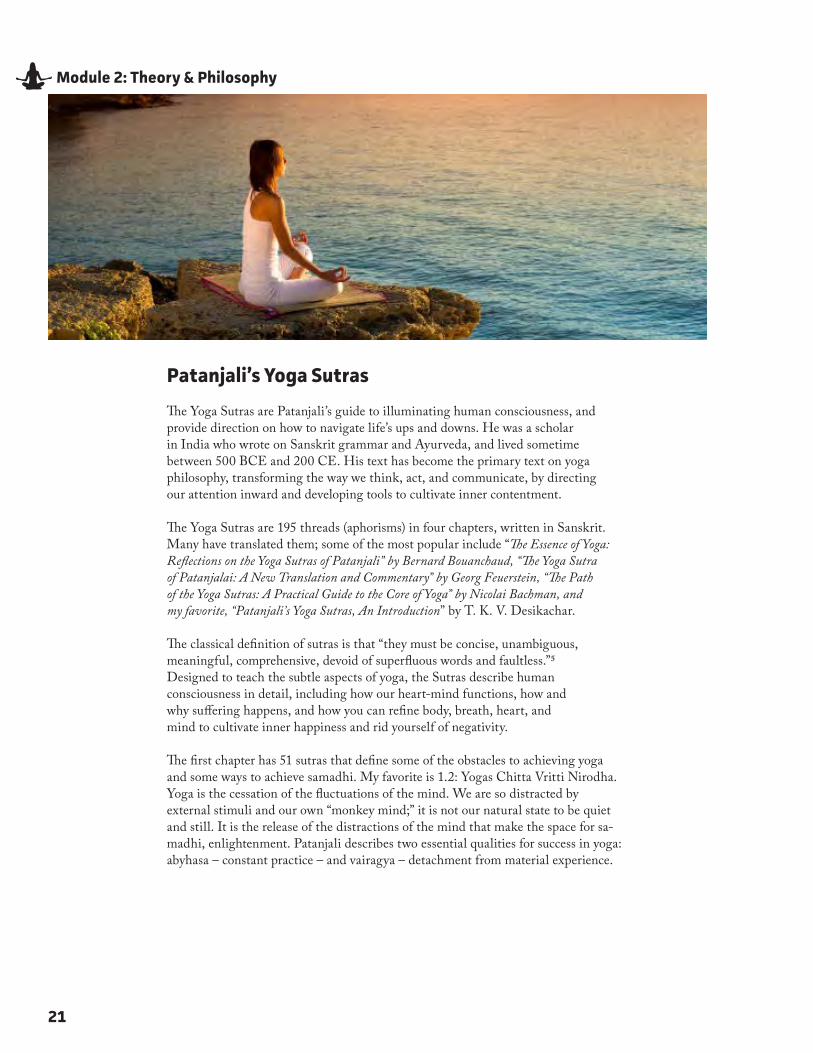
21
Module 2: Theory & Philosophy
Patanjali’s Yoga Sutras
The Yoga Sutras are Patanjali’s guide to illuminating human consciousness, and provide direction on how to navigate life’s ups and downs� He was a scholar in India who wrote on Sanskrit grammar and Ayurveda, and lived sometime between 500 BCE and 200 CE� His text has become the primary text on yoga philosophy, transforming the way we think, act, and communicate, by directing our attention inward and developing tools to cultivate inner contentment�
The Yoga Sutras are 195 threads (aphorisms) in four chapters, written in Sanskrit� Many have translated them; some of the most popular include “The Essence of Yoga: Reflections on the Yoga Sutras of Patanjali” by Bernard Bouanchaud, “The Yoga Sutra of Patanjalai: A New Translation and Commentary” by Georg Feuerstein, “The Path of the Yoga Sutras: A Practical Guide to the Core of Yoga” by Nicolai Bachman, and my favorite, “Patanjali’s Yoga Sutras, An Introduction” by T� K� V� Desikachar�
The classical definition of sutras is that “they must be concise, unambiguous, meaningful, comprehensive, devoid of superfluous words and faultless�”5 Designed to teach the subtle aspects of yoga, the Sutras describe human consciousness in detail, including how our heart-mind functions, how and why suffering happens, and how you can refine body, breath, heart, and mind to cultivate inner happiness and rid yourself of negativity�
The first chapter has 51 sutras that define some of the obstacles to achieving yoga and some ways to achieve samadhi� My favorite is 1�2: Yogas Chitta Vritti Nirodha� Yoga is the cessation of the fluctuations of the mind� We are so distracted by external stimuli and our own “monkey mind;” it is not our natural state to be quiet and still� It is the release of the distractions of the mind that make the space for sa-madhi, enlightenment� Patanjali describes two essential qualities for success in yoga: abyhasa – constant practice – and vairagya – detachment from material experience�
22
Module 2: Theory & Philosophy
The second chapter has 55 sutras and concentrates on the practice (sadhna) and obstacles to the practice (kleshas) and how to remove them, and five of the eight-limbed path steps to enlightenment� The five kleshas are fear-based emotions that cause a negative reaction instead of a positive reaction when we have our buttons pushed�
Avidya: Ignorance and a lack of awareness that prevents us from understanding� Vidya means inner light of knowledge, so kleshas is the opposite: darkness� Yoga offers the path to inner knowing, knowledge, which is why yoga teachers are often called gurus: Ru is light and Gu is darkness, so a guru is an individual who takes a student from dark to light� By clearing out the clutter of the mind, and the toxins from the physical body, there is space for the light to grow brighter�
Asmita: Egotism, a distorted sense of self that does not reflect reality� It can be an overinflated ego or a deep insecurity – either one is a delusion, because it does not represent the truth� Both are fear-based; the feeling that you are better than something or someone comes from a desire to hold power, and when we feel we are less than the other, it causes a sense of powerlessness� We tend to identify with our physical body and external surroundings, and yoga teaches us to look inside and see the light of our nonphysical being�
Raga: Attachment to that which gives us pleasure� The second of Buddhism’s four noble truths is that suffering comes from desire, so this klesha is one of the most powerful� Whenever we experience something pleasurable, we want to have that sensation again� Desire by itself causes little harm; it is the attachment to the outcome that causes pain�
Dvesa: Similar to raga, dvesa is the aversion to pain based on past experience� When we suffer a negative emotion from a past event, our consciousness becomes affected in a negative way� Yoga teaches us to reprogram our heart-mind to change our negative emotions and replace the unconscious reacting to connecting and understanding our divine inner nature, to act with positive awareness�
Abhinivesa: Fear of death� It is natural to want to stay alive, which is an attachment to experiencing life in a physical body� The fear of the unknown and resistance to change is an obstacle to true liberation� Accepting death and its imminence is the key to removing the restraining nature of fear�
The kleshas are the hardest and most challenging aspects of our selves to confront, and yet when we take steps to lessen or remove them, it can be the most liberating part of our yoga practice� By experiencing negative thoughts and emotions, we cloud and darken our heart-mind� Yoga has three practices to reduce these afflictions over time, and offers practices for creating positive change through tapas (discipline), svadhyaya (self-observation), and isvara-pranidhana (surrendering to something greater than you – faith)� By reducing the amount and volume of negative emotions through practice, we can act and react from a clearer, centered place of being� Chapter 3 has 55 sutras and details the last three parts of the eight-limbed yoga path, dharana (focus), dhyana (meditation), and samadhi (awareness)� These three limbs flow together and are known as samyama – flowing together seamlessly – and are used to remove the subtler veils of ignorance� Dharana focuses the mind on an object, dhyana is the uninterrupted flow of the mind toward a chosen object, and samadhi occurs when the mind is transparent and no separate sense of self is felt� An inner experience of tranquility and peace with the reduction of all mental disturbances is the result of samyama� The chapter then lists 25 meditations to accomplish the state of awareness with inner peace and a cleansing of all other distractions of the mind�
The 37 sutras of Chapter 4 discusses kaivalya (liberation) and how to achieve this freedom with the power of the mind, regardless of what is going on in the world or your external situations� Kaivalya means solitude, and is difficult to describe in words� The most commonly attempted are liberation, freedom, permanent oneness, and enlightenment� As our heart-mind clears through the previously described processes, we obtain access to all knowledge, and our perception of time stops, and contentment is the end result�
The Yoga Sutras transcend time, geography, culture, and religion to offer a straightforward guide down the path of enlightenment� Yoga is concerned primarily with turning our attention inward in contrast to the external pull of our daily lives, and following the guidance of Patanjali’s manual for self-exploration gives us the tools to understand who we really are�
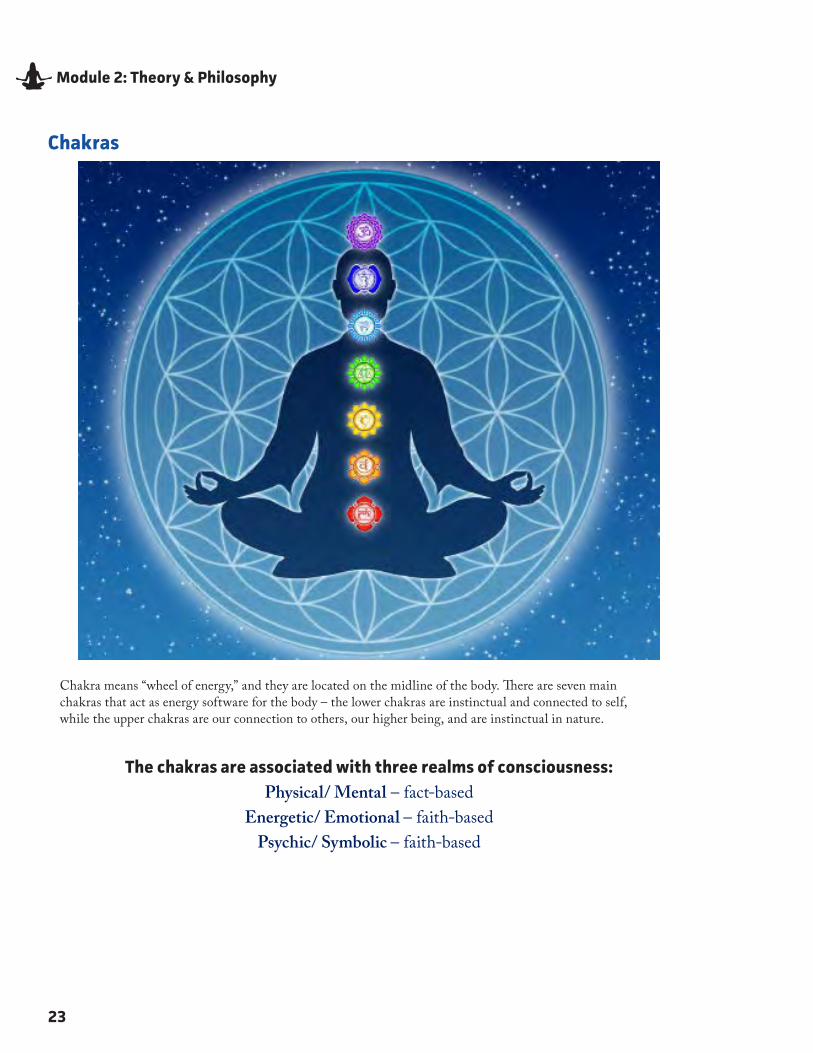
23
Module 2: Theory & Philosophy
Chakras
Chakra means “wheel of energy,” and they are located on the midline of the body� There are seven main chakras that act as energy software for the body – the lower chakras are instinctual and connected to self, while the upper chakras are our connection to others, our higher being, and are instinctual in nature�
The chakras are associated with three realms of consciousness:Physical/ Mental – fact-based
Energetic/ Emotional – faith-basedPsychic/ Symbolic – faith-based
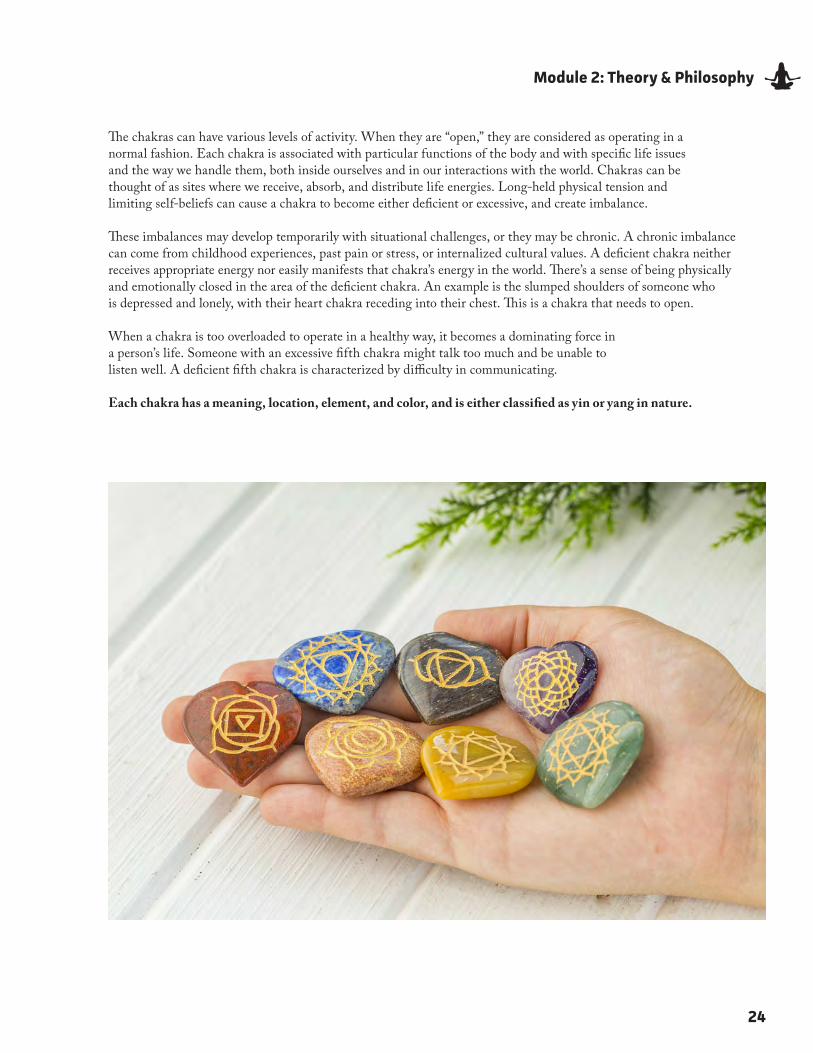
24
Module 2: Theory & Philosophy
Chakras The chakras can have various levels of activity� When they are “open,” they are considered as operating in a normal fashion� Each chakra is associated with particular functions of the body and with specific life issues and the way we handle them, both inside ourselves and in our interactions with the world� Chakras can be thought of as sites where we receive, absorb, and distribute life energies� Long-held physical tension and limiting self-beliefs can cause a chakra to become either deficient or excessive, and create imbalance�
These imbalances may develop temporarily with situational challenges, or they may be chronic� A chronic imbalance can come from childhood experiences, past pain or stress, or internalized cultural values� A deficient chakra neither receives appropriate energy nor easily manifests that chakra’s energy in the world� There’s a sense of being physically and emotionally closed in the area of the deficient chakra� An example is the slumped shoulders of someone who is depressed and lonely, with their heart chakra receding into their chest� This is a chakra that needs to open�
When a chakra is too overloaded to operate in a healthy way, it becomes a dominating force in a person’s life� Someone with an excessive fifth chakra might talk too much and be unable to listen well� A deficient fifth chakra is characterized by difficulty in communicating�
Each chakra has a meaning, location, element, and color, and is either classified as yin or yang in nature.
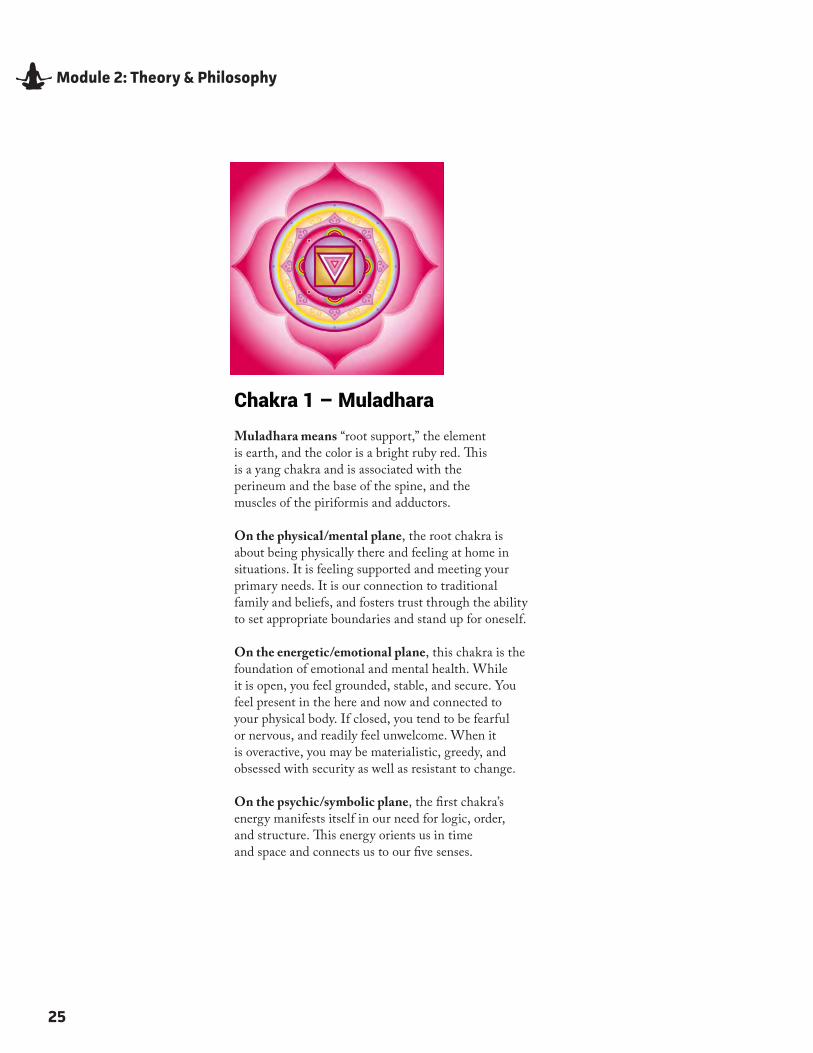
25
Module 2: Theory & Philosophy
Chakra 1 – Muladhara
Muladhara means “root support,” the element is earth, and the color is a bright ruby red� This is a yang chakra and is associated with the perineum and the base of the spine, and the muscles of the piriformis and adductors�
On the physical/mental plane, the root chakra is about being physically there and feeling at home in situations� It is feeling supported and meeting your primary needs� It is our connection to traditional family and beliefs, and fosters trust through the ability to set appropriate boundaries and stand up for oneself�
On the energetic/emotional plane, this chakra is the foundation of emotional and mental health� While it is open, you feel grounded, stable, and secure� You feel present in the here and now and connected to your physical body� If closed, you tend to be fearful or nervous, and readily feel unwelcome� When it is overactive, you may be materialistic, greedy, and obsessed with security as well as resistant to change�
On the psychic/symbolic plane, the first chakra’s energy manifests itself in our need for logic, order, and structure� This energy orients us in time and space and connects us to our five senses�
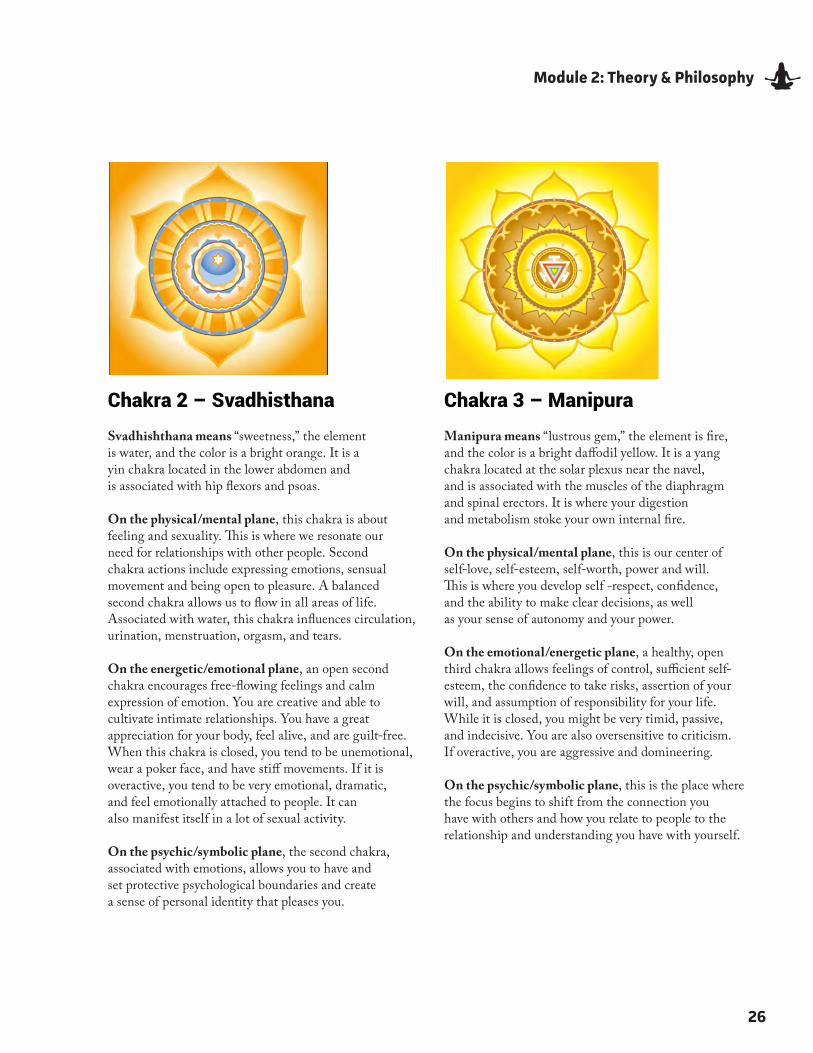
26
Module 2: Theory & Philosophy
Chakra 3 – Manipura
Manipura means “lustrous gem,” the element is fire, and the color is a bright daffodil yellow� It is a yang chakra located at the solar plexus near the navel, and is associated with the muscles of the diaphragm and spinal erectors� It is where your digestion and metabolism stoke your own internal fire�
On the physical/mental plane, this is our center of self-love, self-esteem, self-worth, power and will� This is where you develop self -respect, confidence, and the ability to make clear decisions, as well as your sense of autonomy and your power�
On the emotional/energetic plane, a healthy, open third chakra allows feelings of control, sufficient self-esteem, the confidence to take risks, assertion of your will, and assumption of responsibility for your life� While it is closed, you might be very timid, passive, and indecisive� You are also oversensitive to criticism� If overactive, you are aggressive and domineering�
On the psychic/symbolic plane, this is the place where the focus begins to shift from the connection you have with others and how you relate to people to the relationship and understanding you have with yourself�
Chakra 2 – Svadhisthana
Svadhishthana means “sweetness,” the element is water, and the color is a bright orange� It is a yin chakra located in the lower abdomen and is associated with hip flexors and psoas�
On the physical/mental plane, this chakra is about feeling and sexuality� This is where we resonate our need for relationships with other people� Second chakra actions include expressing emotions, sensual movement and being open to pleasure� A balanced second chakra allows us to flow in all areas of life� Associated with water, this chakra influences circulation, urination, menstruation, orgasm, and tears�
On the energetic/emotional plane, an open second chakra encourages free-flowing feelings and calm expression of emotion� You are creative and able to cultivate intimate relationships� You have a great appreciation for your body, feel alive, and are guilt-free� When this chakra is closed, you tend to be unemotional, wear a poker face, and have stiff movements� If it is overactive, you tend to be very emotional, dramatic, and feel emotionally attached to people� It can also manifest itself in a lot of sexual activity�
On the psychic/symbolic plane, the second chakra, associated with emotions, allows you to have and set protective psychological boundaries and create a sense of personal identity that pleases you�
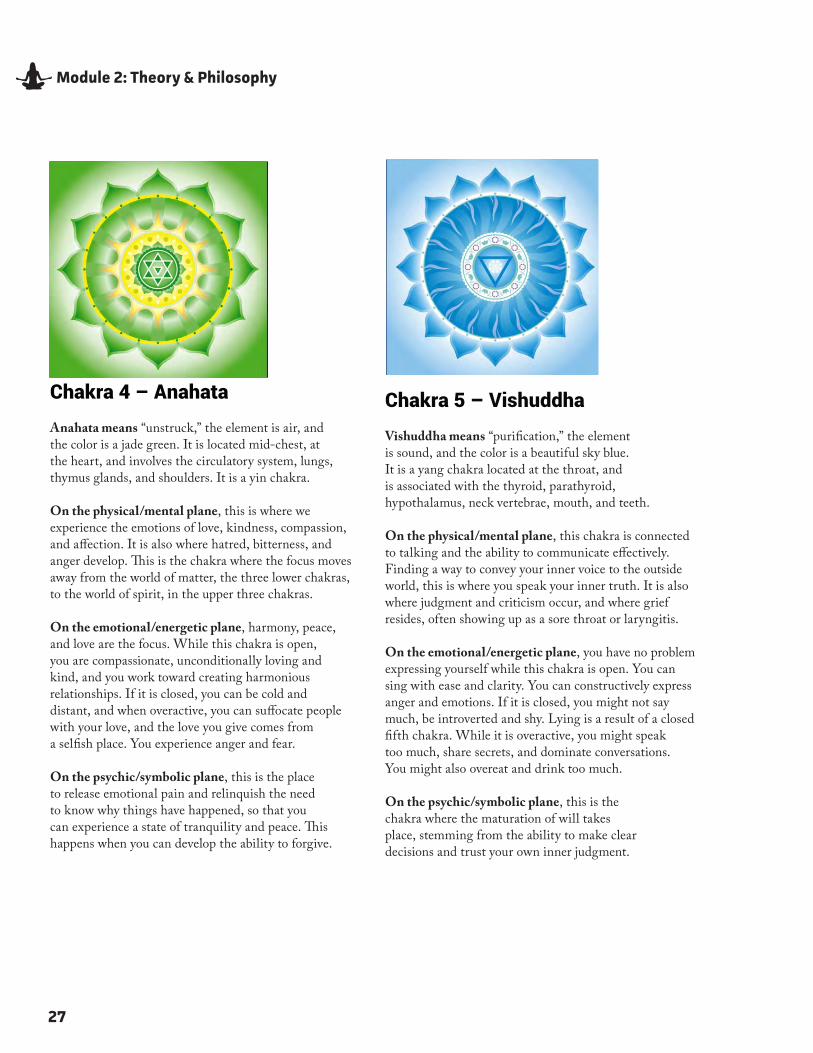
27
Module 2: Theory & Philosophy
Chakra 4 – Anahata
Anahata means “unstruck,” the element is air, and the color is a jade green� It is located mid-chest, at the heart, and involves the circulatory system, lungs, thymus glands, and shoulders� It is a yin chakra�
On the physical/mental plane, this is where we experience the emotions of love, kindness, compassion, and affection� It is also where hatred, bitterness, and anger develop� This is the chakra where the focus moves away from the world of matter, the three lower chakras, to the world of spirit, in the upper three chakras�
On the emotional/energetic plane, harmony, peace, and love are the focus� While this chakra is open, you are compassionate, unconditionally loving and kind, and you work toward creating harmonious relationships� If it is closed, you can be cold and distant, and when overactive, you can suffocate people with your love, and the love you give comes from a selfish place� You experience anger and fear�
On the psychic/symbolic plane, this is the place to release emotional pain and relinquish the need to know why things have happened, so that you can experience a state of tranquility and peace� This happens when you can develop the ability to forgive�
Chakra 5 – Vishuddha
Vishuddha means “purification,” the element is sound, and the color is a beautiful sky blue� It is a yang chakra located at the throat, and is associated with the thyroid, parathyroid, hypothalamus, neck vertebrae, mouth, and teeth�
On the physical/mental plane, this chakra is connected to talking and the ability to communicate effectively� Finding a way to convey your inner voice to the outside world, this is where you speak your inner truth� It is also where judgment and criticism occur, and where grief resides, often showing up as a sore throat or laryngitis�
On the emotional/energetic plane, you have no problem expressing yourself while this chakra is open� You can sing with ease and clarity� You can constructively express anger and emotions� If it is closed, you might not say much, be introverted and shy� Lying is a result of a closed fifth chakra� While it is overactive, you might speak too much, share secrets, and dominate conversations� You might also overeat and drink too much�
On the psychic/symbolic plane, this is the chakra where the maturation of will takes place, stemming from the ability to make clear decisions and trust your own inner judgment�
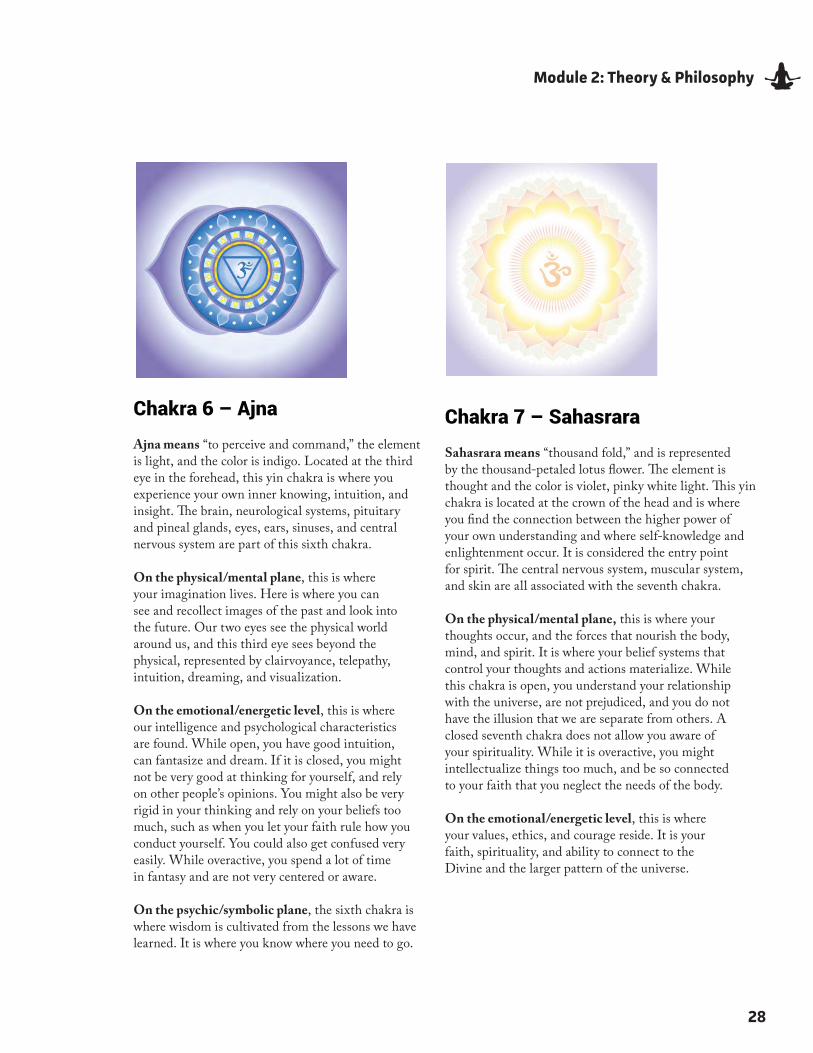
28
Module 2: Theory & Philosophy
Chakra 7 – Sahasrara
Sahasrara means “thousand fold,” and is represented by the thousand-petaled lotus flower� The element is thought and the color is violet, pinky white light� This yin chakra is located at the crown of the head and is where you find the connection between the higher power of your own understanding and where self-knowledge and enlightenment occur� It is considered the entry point for spirit� The central nervous system, muscular system, and skin are all associated with the seventh chakra�
On the physical/mental plane, this is where your thoughts occur, and the forces that nourish the body, mind, and spirit� It is where your belief systems that control your thoughts and actions materialize� While this chakra is open, you understand your relationship with the universe, are not prejudiced, and you do not have the illusion that we are separate from others� A closed seventh chakra does not allow you aware of your spirituality� While it is overactive, you might intellectualize things too much, and be so connected to your faith that you neglect the needs of the body�
On the emotional/energetic level, this is where your values, ethics, and courage reside� It is your faith, spirituality, and ability to connect to the Divine and the larger pattern of the universe�
Chakra 6 – Ajna
Ajna means “to perceive and command,” the element is light, and the color is indigo� Located at the third eye in the forehead, this yin chakra is where you experience your own inner knowing, intuition, and insight� The brain, neurological systems, pituitary and pineal glands, eyes, ears, sinuses, and central nervous system are part of this sixth chakra�
On the physical/mental plane, this is where your imagination lives� Here is where you can see and recollect images of the past and look into the future� Our two eyes see the physical world around us, and this third eye sees beyond the physical, represented by clairvoyance, telepathy, intuition, dreaming, and visualization�
On the emotional/energetic level, this is where our intelligence and psychological characteristics are found� While open, you have good intuition, can fantasize and dream� If it is closed, you might not be very good at thinking for yourself, and rely on other people’s opinions� You might also be very rigid in your thinking and rely on your beliefs too much, such as when you let your faith rule how you conduct yourself� You could also get confused very easily� While overactive, you spend a lot of time in fantasy and are not very centered or aware�
On the psychic/symbolic plane, the sixth chakra is where wisdom is cultivated from the lessons we have learned� It is where you know where you need to go�
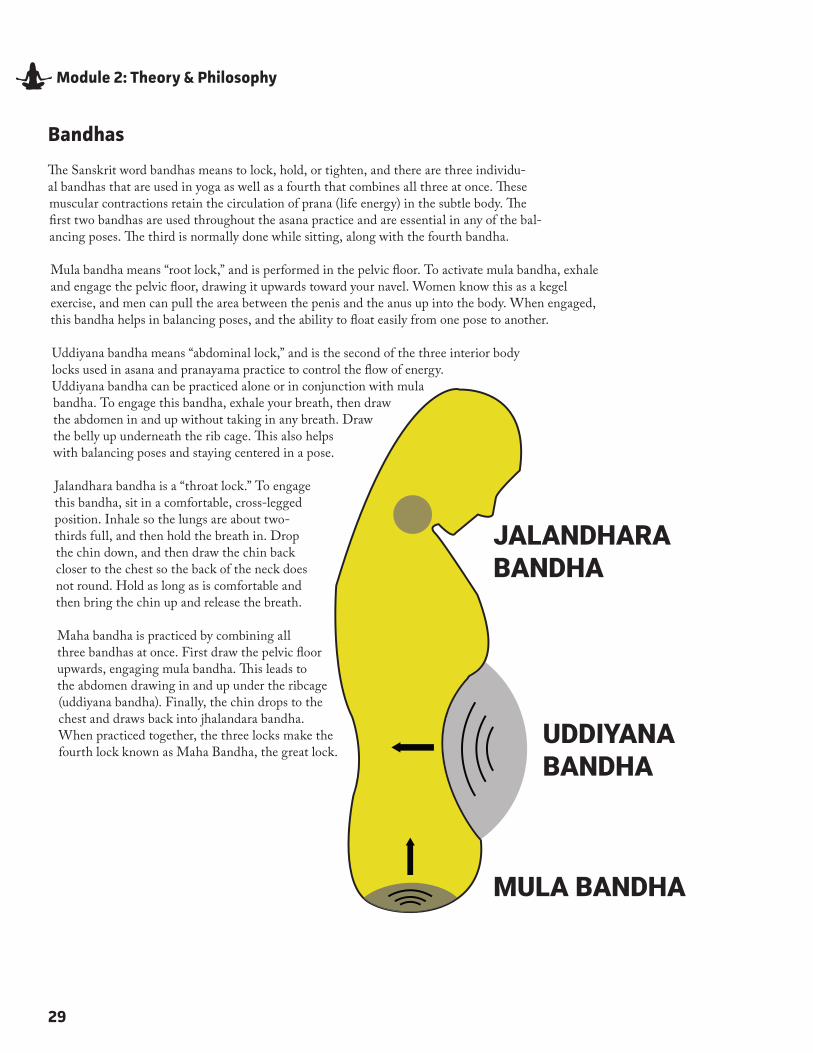
29
Module 2: Theory & Philosophy
Bandhas
The Sanskrit word bandhas means to lock, hold, or tighten, and there are three individu-al bandhas that are used in yoga as well as a fourth that combines all three at once� These muscular contractions retain the circulation of prana (life energy) in the subtle body� The first two bandhas are used throughout the asana practice and are essential in any of the bal-ancing poses� The third is normally done while sitting, along with the fourth bandha�
Mula bandha means “root lock,” and is performed in the pelvic floor� To activate mula bandha, exhale and engage the pelvic floor, drawing it upwards toward your navel� Women know this as a kegel exercise, and men can pull the area between the penis and the anus up into the body� When engaged, this bandha helps in balancing poses, and the ability to float easily from one pose to another�
Uddiyana bandha means “abdominal lock,” and is the second of the three interior body locks used in asana and pranayama practice to control the flow of energy� Uddiyana bandha can be practiced alone or in conjunction with mula bandha� To engage this bandha, exhale your breath, then draw the abdomen in and up without taking in any breath� Draw the belly up underneath the rib cage� This also helps with balancing poses and staying centered in a pose�
Jalandhara bandha is a “throat lock�” To engage this bandha, sit in a comfortable, cross-legged position� Inhale so the lungs are about two-thirds full, and then hold the breath in� Drop the chin down, and then draw the chin back closer to the chest so the back of the neck does not round� Hold as long as is comfortable and then bring the chin up and release the breath�
Maha bandha is practiced by combining all three bandhas at once� First draw the pelvic floor upwards, engaging mula bandha� This leads to the abdomen drawing in and up under the ribcage (uddiyana bandha)� Finally, the chin drops to the chest and draws back into jhalandara bandha� When practiced together, the three locks make the fourth lock known as Maha Bandha, the great lock�
30
Module 2: Theory & Philosophy
1. Heffernan, L. (2012). The jewels of astaya. Aloha yoga staya. Retrieved from
http://www.alohayogashala.com/1/post/2012/07/the-jewels-of-asteya.html
2. Altobello, Robert. (2009). Meditation from Buddhist, Hindu, and Taoist perspectives. p. 80.
3. Bouanchaud, Bernard. (1997). The essence of yoga: Reflections on the yoga sutras of Patanjali. pp. 130-131.
4. Ibid., pp. 135-136
5. Detaljer Kategori. The yoga sutras of Patanjali - An overview. Retrieved December 2010 from http://yoga-portalen.no/index.php/yoga/historie-filosofi/100-yoga-sutra/64-the-yoga-sutras-of-patanjali-an-overview
References
31
Module 3: Body Structure
Module 3
Body Structure

32
Module 3: Body Structure
The FeetAll standing poses begin with the feet – they are the foundation of posture� The feet also play a major role in arm balances, backbends, inversions, forward folds, and hip openers� There are 26 bones, 25 joints, 20 muscles, and a variety of tendons and ligaments that comprise the foot, allowing us to stand, walk, and run� In standing poses, weight is distributed evenly from the base of the big toe to the base of the pinky toe, and from the inner to the outer edge of the heel� The arch is lifted to bring apana energy into the body� When pressing down into the four corners of the foot, the toes should be relaxed and resting lightly on the mat� When you root down through the four corners of the foot and lift the arch, the muscles of the calf and thigh engage� This upward pull on the arch of the foot will create pada bandha, which gives a sense of lightness in the upper body, expansion through the joints, and a feeling of being grounded, so the pose can expand into its fullest capacity�
Most people have a tendency to shift their weight to the outer edge of each foot (supination), creating a less
stable base� A great cue to realign the feet is “press down through your big toe and make it grow longer�” In standing poses, the heel of the front foot is aligned with the back arch (with the exception of warrior 1, where the front heel is aligned with the back heel so the hips can rotate forward)� When the back heel is lifted, as in a crescent pose, the energy should be pressing through the back heel toward the back of the room while the ball of the foot presses firmly down on the mat� Generally, in most seated poses, the toes pull back toward the body and the heels press away� This helps to keep the integrity of the knee and create space from sitting bones to foot� It is very common for students to supinate their heels in backbends because of tightness in the lower back so it is imperative to press down through all four corners of the foot –to open the sacrum and create a stable base for the pose� Standing balance poses are excellent ways to develop strength in the feet� We rarely stand on one foot in real life, and this enables us to strengthen muscles in all parts of the foot, contributing to a greater sense of balance�
Effectively teaching yoga requires guiding students into poses, helping them hold those poses, and guiding them out again in a safe, efficient, and clear way� Knowledge of anatomy and body structure is the foundation for instructions that are accessible to the student� Body structure is unique – no two people have bones, muscles, and ligaments of the same size, and it is important for the teacher to keep this in mind�
The body does not function as a set of isolated parts, so what happens to our feet will affect the action of the hips and spine� Asana are taught from the foundation up, and cued in sequence� State the action first, then the alignment, then the attitude� Help the student to understand the mechanics of the pose so they can enjoy the emotions of the pose�
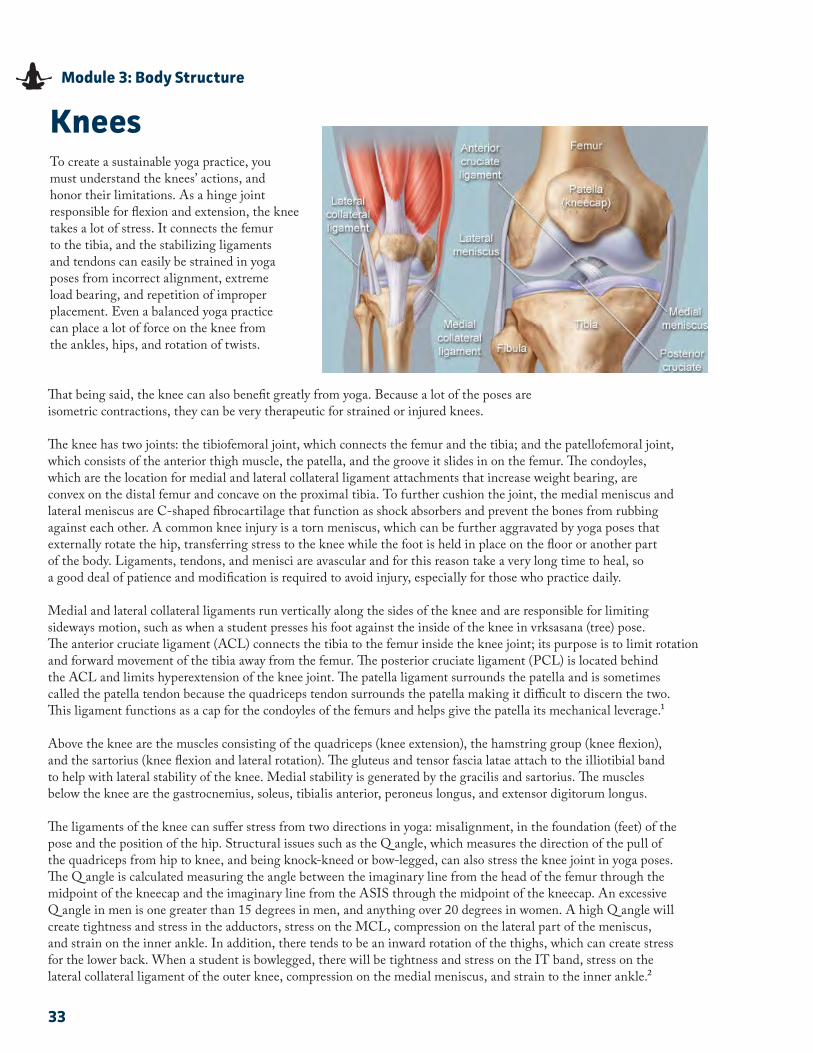
33
Module 3: Body Structure
KneesTo create a sustainable yoga practice, you must understand the knees’ actions, and honor their limitations� As a hinge joint responsible for flexion and extension, the knee takes a lot of stress� It connects the femur to the tibia, and the stabilizing ligaments and tendons can easily be strained in yoga poses from incorrect alignment, extreme load bearing, and repetition of improper placement� Even a balanced yoga practice can place a lot of force on the knee from the ankles, hips, and rotation of twists�
That being said, the knee can also benefit greatly from yoga� Because a lot of the poses are isometric contractions, they can be very therapeutic for strained or injured knees�
The knee has two joints: the tibiofemoral joint, which connects the femur and the tibia; and the patellofemoral joint, which consists of the anterior thigh muscle, the patella, and the groove it slides in on the femur� The condoyles, which are the location for medial and lateral collateral ligament attachments that increase weight bearing, are convex on the distal femur and concave on the proximal tibia� To further cushion the joint, the medial meniscus and lateral meniscus are C-shaped fibrocartilage that function as shock absorbers and prevent the bones from rubbing against each other� A common knee injury is a torn meniscus, which can be further aggravated by yoga poses that externally rotate the hip, transferring stress to the knee while the foot is held in place on the floor or another part of the body� Ligaments, tendons, and menisci are avascular and for this reason take a very long time to heal, so a good deal of patience and modification is required to avoid injury, especially for those who practice daily�
Medial and lateral collateral ligaments run vertically along the sides of the knee and are responsible for limiting sideways motion, such as when a student presses his foot against the inside of the knee in vrksasana (tree) pose�The anterior cruciate ligament (ACL) connects the tibia to the femur inside the knee joint; its purpose is to limit rotation and forward movement of the tibia away from the femur� The posterior cruciate ligament (PCL) is located behind the ACL and limits hyperextension of the knee joint� The patella ligament surrounds the patella and is sometimes called the patella tendon because the quadriceps tendon surrounds the patella making it difficult to discern the two� This ligament functions as a cap for the condoyles of the femurs and helps give the patella its mechanical leverage�1
Above the knee are the muscles consisting of the quadriceps (knee extension), the hamstring group (knee flexion), and the sartorius (knee flexion and lateral rotation)� The gluteus and tensor fascia latae attach to the illiotibial band to help with lateral stability of the knee� Medial stability is generated by the gracilis and sartorius� The muscles below the knee are the gastrocnemius, soleus, tibialis anterior, peroneus longus, and extensor digitorum longus�
The ligaments of the knee can suffer stress from two directions in yoga: misalignment, in the foundation (feet) of the pose and the position of the hip� Structural issues such as the Q angle, which measures the direction of the pull of the quadriceps from hip to knee, and being knock-kneed or bow-legged, can also stress the knee joint in yoga poses� The Q angle is calculated measuring the angle between the imaginary line from the head of the femur through the midpoint of the kneecap and the imaginary line from the ASIS through the midpoint of the kneecap� An excessive Q angle in men is one greater than 15 degrees in men, and anything over 20 degrees in women� A high Q angle will create tightness and stress in the adductors, stress on the MCL, compression on the lateral part of the meniscus, and strain on the inner ankle� In addition, there tends to be an inward rotation of the thighs, which can create stress for the lower back� When a student is bowlegged, there will be tightness and stress on the IT band, stress on the lateral collateral ligament of the outer knee, compression on the medial meniscus, and strain to the inner ankle�2
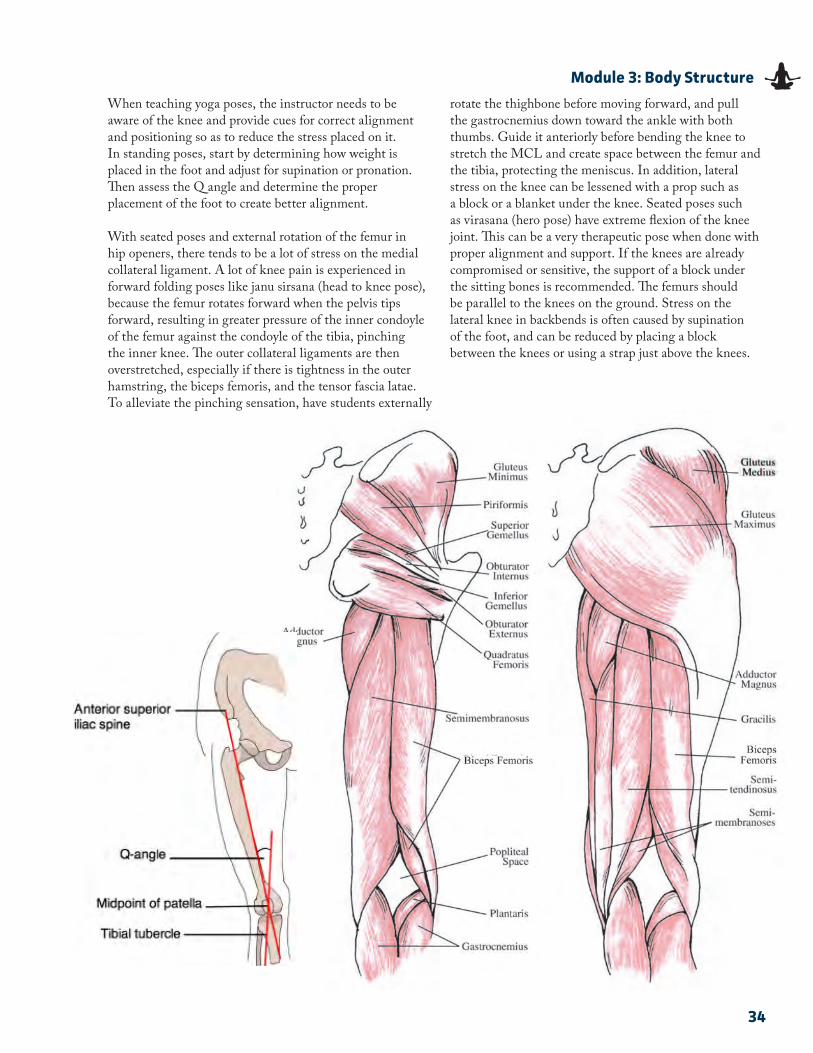
34
Module 3: Body Structure
When teaching yoga poses, the instructor needs to be aware of the knee and provide cues for correct alignment and positioning so as to reduce the stress placed on it� In standing poses, start by determining how weight is placed in the foot and adjust for supination or pronation� Then assess the Q angle and determine the proper placement of the foot to create better alignment�
With seated poses and external rotation of the femur in hip openers, there tends to be a lot of stress on the medial collateral ligament� A lot of knee pain is experienced in forward folding poses like janu sirsana (head to knee pose), because the femur rotates forward when the pelvis tips forward, resulting in greater pressure of the inner condoyle of the femur against the condoyle of the tibia, pinching the inner knee� The outer collateral ligaments are then overstretched, especially if there is tightness in the outer hamstring, the biceps femoris, and the tensor fascia latae� To alleviate the pinching sensation, have students externally
rotate the thighbone before moving forward, and pull the gastrocnemius down toward the ankle with both thumbs� Guide it anteriorly before bending the knee to stretch the MCL and create space between the femur and the tibia, protecting the meniscus� In addition, lateral stress on the knee can be lessened with a prop such as a block or a blanket under the knee� Seated poses such as virasana (hero pose) have extreme flexion of the knee joint� This can be a very therapeutic pose when done with proper alignment and support� If the knees are already compromised or sensitive, the support of a block under the sitting bones is recommended� The femurs should be parallel to the knees on the ground� Stress on the lateral knee in backbends is often caused by supination of the foot, and can be reduced by placing a block between the knees or using a strap just above the knees�
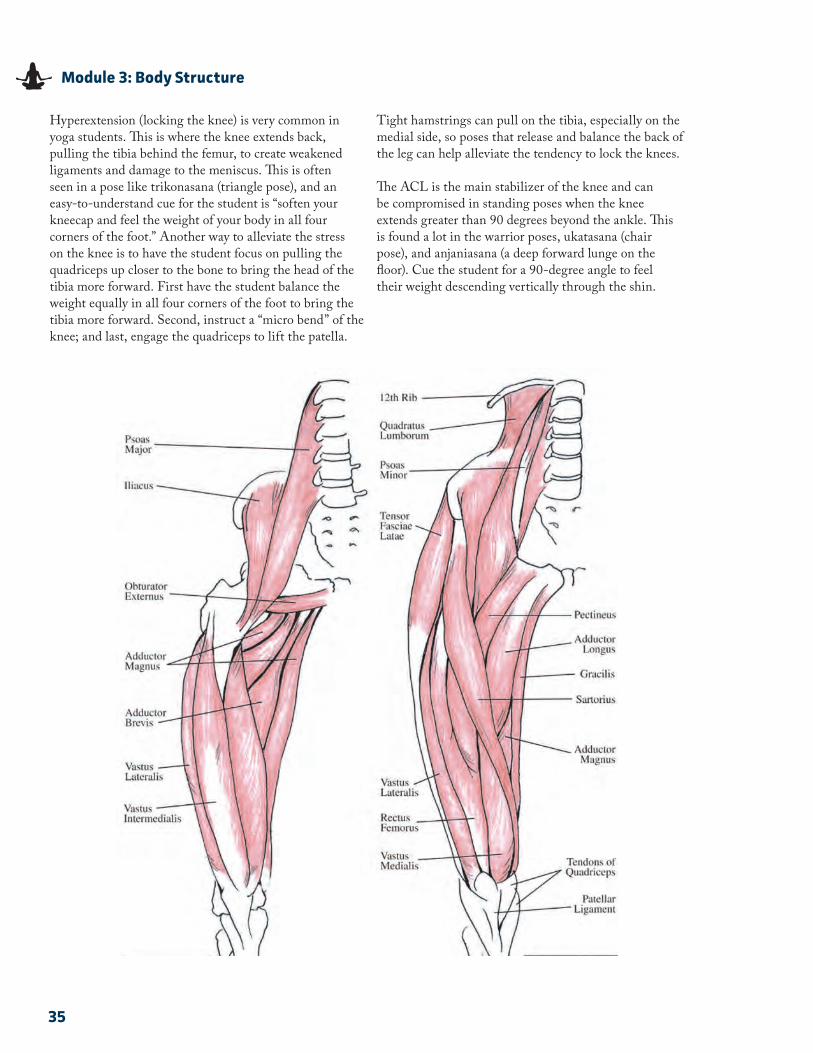
35
Module 3: Body Structure
Hyperextension (locking the knee) is very common in yoga students� This is where the knee extends back, pulling the tibia behind the femur, to create weakened ligaments and damage to the meniscus� This is often seen in a pose like trikonasana (triangle pose), and an easy-to-understand cue for the student is “soften your kneecap and feel the weight of your body in all four corners of the foot�” Another way to alleviate the stress on the knee is to have the student focus on pulling the quadriceps up closer to the bone to bring the head of the tibia more forward� First have the student balance the weight equally in all four corners of the foot to bring the tibia more forward� Second, instruct a “micro bend” of the knee; and last, engage the quadriceps to lift the patella�
Tight hamstrings can pull on the tibia, especially on the medial side, so poses that release and balance the back of the leg can help alleviate the tendency to lock the knees�
The ACL is the main stabilizer of the knee and can be compromised in standing poses when the knee extends greater than 90 degrees beyond the ankle� This is found a lot in the warrior poses, ukatasana (chair pose), and anjaniasana (a deep forward lunge on the floor)� Cue the student for a 90-degree angle to feel their weight descending vertically through the shin�
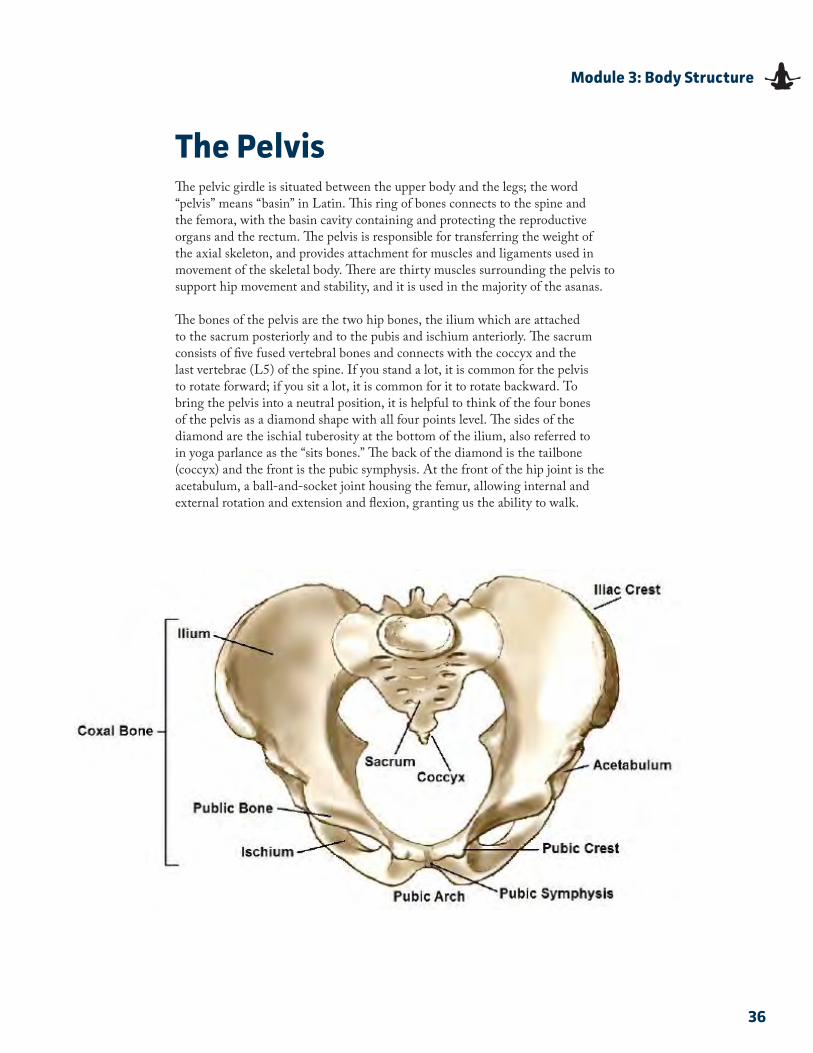
36
Module 3: Body Structure
The PelvisThe pelvic girdle is situated between the upper body and the legs; the word “pelvis” means “basin” in Latin� This ring of bones connects to the spine and the femora, with the basin cavity containing and protecting the reproductive organs and the rectum� The pelvis is responsible for transferring the weight of the axial skeleton, and provides attachment for muscles and ligaments used in movement of the skeletal body� There are thirty muscles surrounding the pelvis to support hip movement and stability, and it is used in the majority of the asanas�
The bones of the pelvis are the two hip bones, the ilium which are attached to the sacrum posteriorly and to the pubis and ischium anteriorly� The sacrum consists of five fused vertebral bones and connects with the coccyx and the last vertebrae (L5) of the spine� If you stand a lot, it is common for the pelvis to rotate forward; if you sit a lot, it is common for it to rotate backward� To bring the pelvis into a neutral position, it is helpful to think of the four bones of the pelvis as a diamond shape with all four points level� The sides of the diamond are the ischial tuberosity at the bottom of the ilium, also referred to in yoga parlance as the “sits bones�” The back of the diamond is the tailbone (coccyx) and the front is the pubic symphysis� At the front of the hip joint is the acetabulum, a ball-and-socket joint housing the femur, allowing internal and external rotation and extension and flexion, granting us the ability to walk�
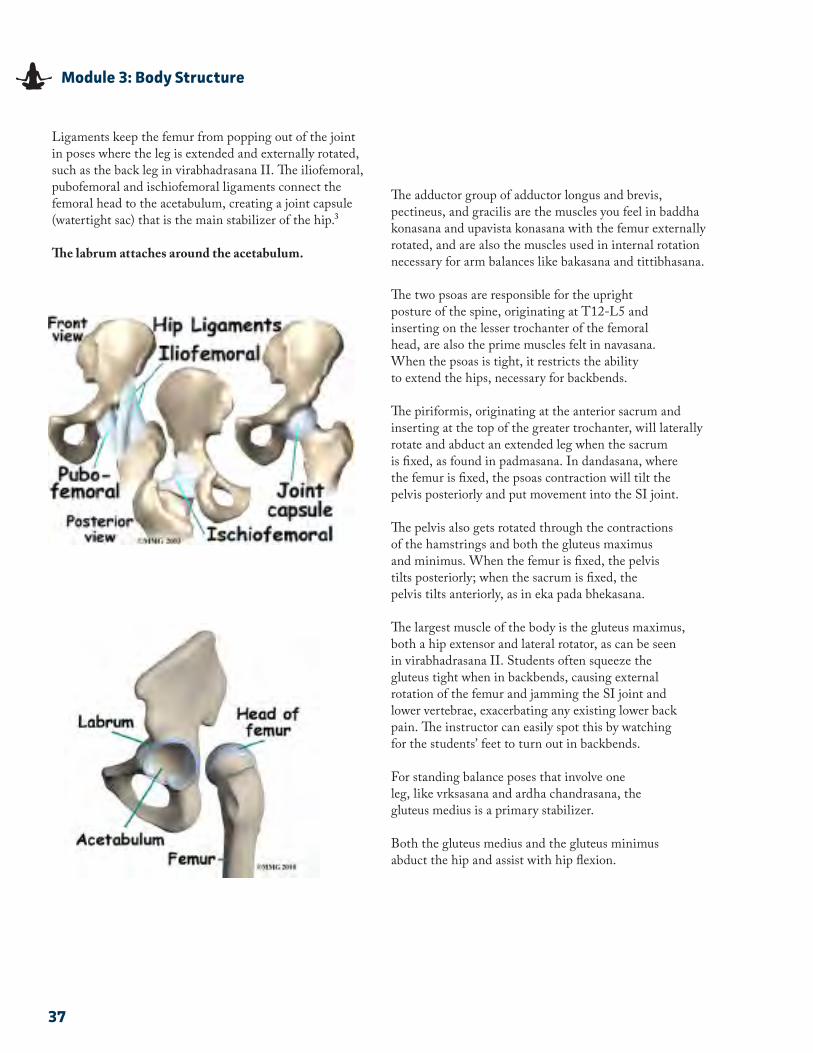
37
Module 3: Body Structure
Ligaments keep the femur from popping out of the joint in poses where the leg is extended and externally rotated, such as the back leg in virabhadrasana II� The iliofemoral, pubofemoral and ischiofemoral ligaments connect the femoral head to the acetabulum, creating a joint capsule (watertight sac) that is the main stabilizer of the hip�3
The labrum attaches around the acetabulum.
The adductor group of adductor longus and brevis, pectineus, and gracilis are the muscles you feel in baddha konasana and upavista konasana with the femur externally rotated, and are also the muscles used in internal rotation necessary for arm balances like bakasana and tittibhasana�
The two psoas are responsible for the upright posture of the spine, originating at T12-L5 and inserting on the lesser trochanter of the femoral head, are also the prime muscles felt in navasana� When the psoas is tight, it restricts the ability to extend the hips, necessary for backbends�
The piriformis, originating at the anterior sacrum and inserting at the top of the greater trochanter, will laterally rotate and abduct an extended leg when the sacrum is fixed, as found in padmasana� In dandasana, where the femur is fixed, the psoas contraction will tilt the pelvis posteriorly and put movement into the SI joint�
The pelvis also gets rotated through the contractions of the hamstrings and both the gluteus maximus and minimus� When the femur is fixed, the pelvis tilts posteriorly; when the sacrum is fixed, the pelvis tilts anteriorly, as in eka pada bhekasana�
The largest muscle of the body is the gluteus maximus, both a hip extensor and lateral rotator, as can be seen in virabhadrasana II� Students often squeeze the gluteus tight when in backbends, causing external rotation of the femur and jamming the SI joint and lower vertebrae, exacerbating any existing lower back pain� The instructor can easily spot this by watching for the students’ feet to turn out in backbends�
For standing balance poses that involve one leg, like vrksasana and ardha chandrasana, the gluteus medius is a primary stabilizer�
Both the gluteus medius and the gluteus minimus abduct the hip and assist with hip flexion�
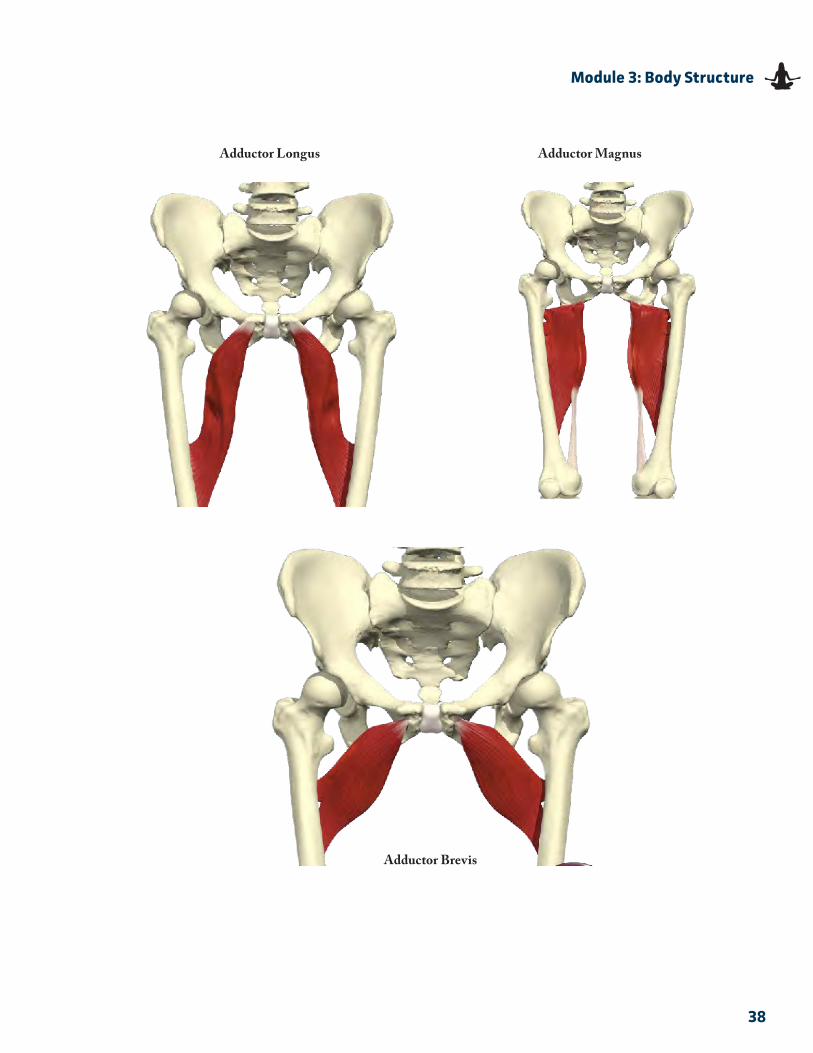
38
Module 3: Body Structure
Adductor Longus Adductor Magnus
Adductor Brevis
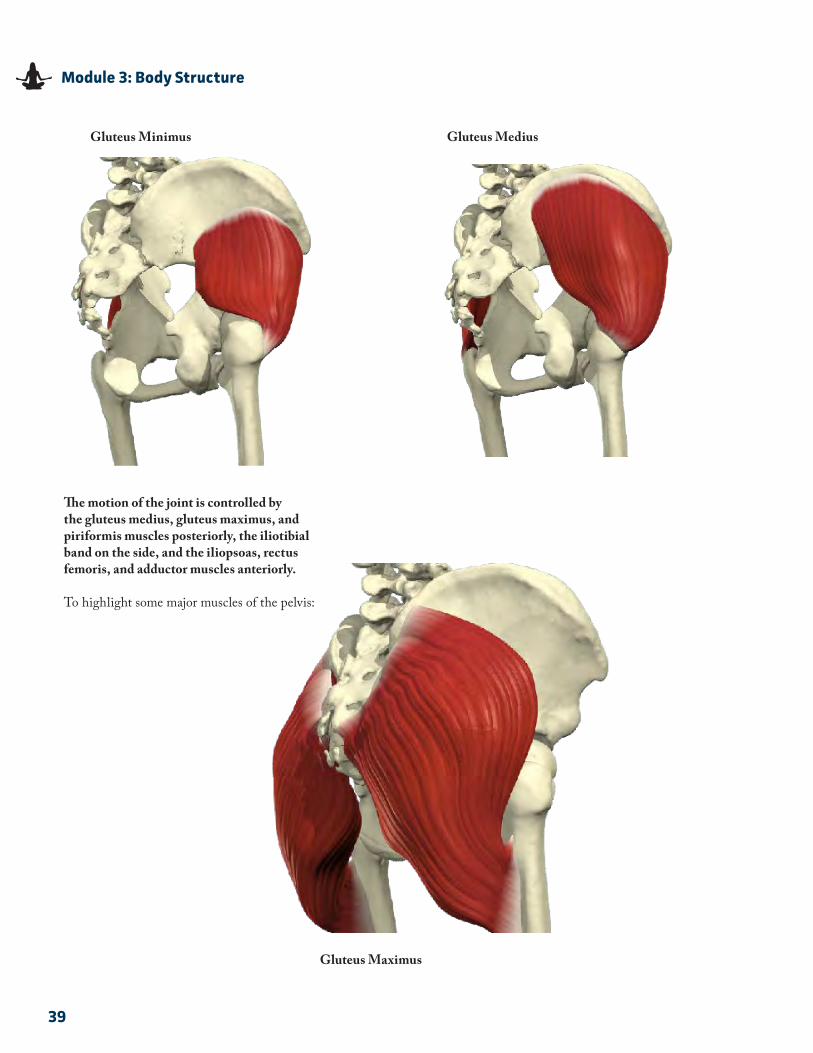
39
Module 3: Body Structure
Gluteus Minimus Gluteus Medius
Gluteus Maximus
The motion of the joint is controlled by the gluteus medius, gluteus maximus, and piriformis muscles posteriorly, the iliotibial band on the side, and the iliopsoas, rectus femoris, and adductor muscles anteriorly.
To highlight some major muscles of the pelvis:
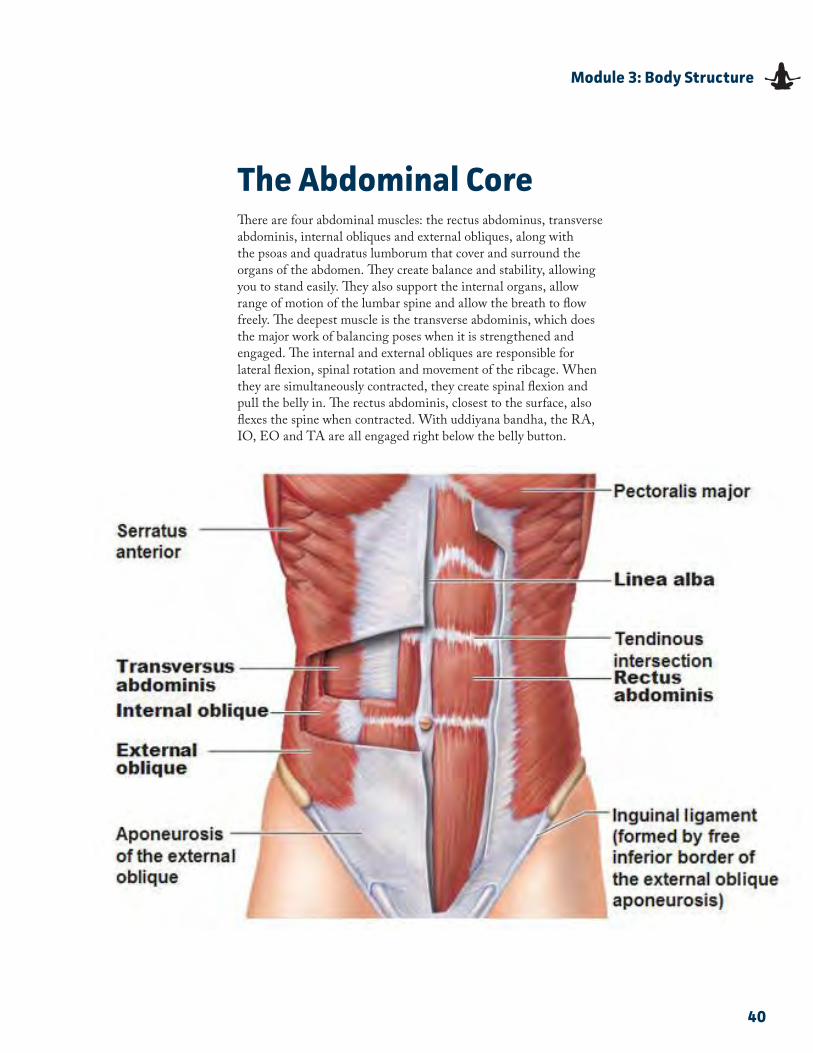
40
Module 3: Body Structure
The Abdominal CoreThere are four abdominal muscles: the rectus abdominus, transverse abdominis, internal obliques and external obliques, along with the psoas and quadratus lumborum that cover and surround the organs of the abdomen� They create balance and stability, allowing you to stand easily� They also support the internal organs, allow range of motion of the lumbar spine and allow the breath to flow freely� The deepest muscle is the transverse abdominis, which does the major work of balancing poses when it is strengthened and engaged� The internal and external obliques are responsible for lateral flexion, spinal rotation and movement of the ribcage� When they are simultaneously contracted, they create spinal flexion and pull the belly in� The rectus abdominis, closest to the surface, also flexes the spine when contracted� With uddiyana bandha, the RA, IO, EO and TA are all engaged right below the belly button�
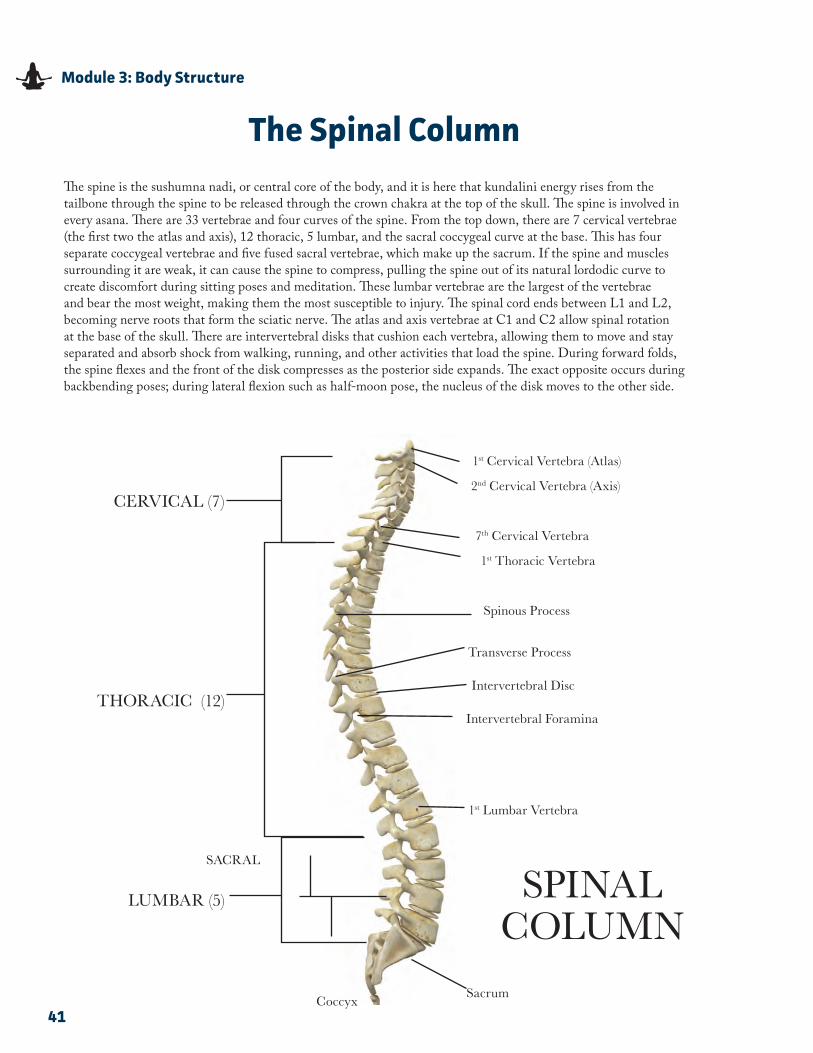
41
Module 3: Body Structure
The Spinal ColumnThe spine is the sushumna nadi, or central core of the body, and it is here that kundalini energy rises from the tailbone through the spine to be released through the crown chakra at the top of the skull� The spine is involved in every asana� There are 33 vertebrae and four curves of the spine� From the top down, there are 7 cervical vertebrae (the first two the atlas and axis), 12 thoracic, 5 lumbar, and the sacral coccygeal curve at the base� This has four separate coccygeal vertebrae and five fused sacral vertebrae, which make up the sacrum� If the spine and muscles surrounding it are weak, it can cause the spine to compress, pulling the spine out of its natural lordodic curve to create discomfort during sitting poses and meditation� These lumbar vertebrae are the largest of the vertebrae and bear the most weight, making them the most susceptible to injury� The spinal cord ends between L1 and L2, becoming nerve roots that form the sciatic nerve� The atlas and axis vertebrae at C1 and C2 allow spinal rotation at the base of the skull� There are intervertebral disks that cushion each vertebra, allowing them to move and stay separated and absorb shock from walking, running, and other activities that load the spine� During forward folds, the spine flexes and the front of the disk compresses as the posterior side expands� The exact opposite occurs during backbending poses; during lateral flexion such as half-moon pose, the nucleus of the disk moves to the other side�
1st Cervical Vertebra (Atlas)
CERVICAL (7)
THORACIC (12)
LUMBAR (5)
2nd Cervical Vertebra (Axis)
7th Cervical Vertebra
1st Thoracic Vertebra
Spinous Process
Transverse Process
Intervertebral Disc
Intervertebral Foramina
1st Lumbar Vertebra
SacrumCoccyx
SACRAL
SPINALCOLUMN
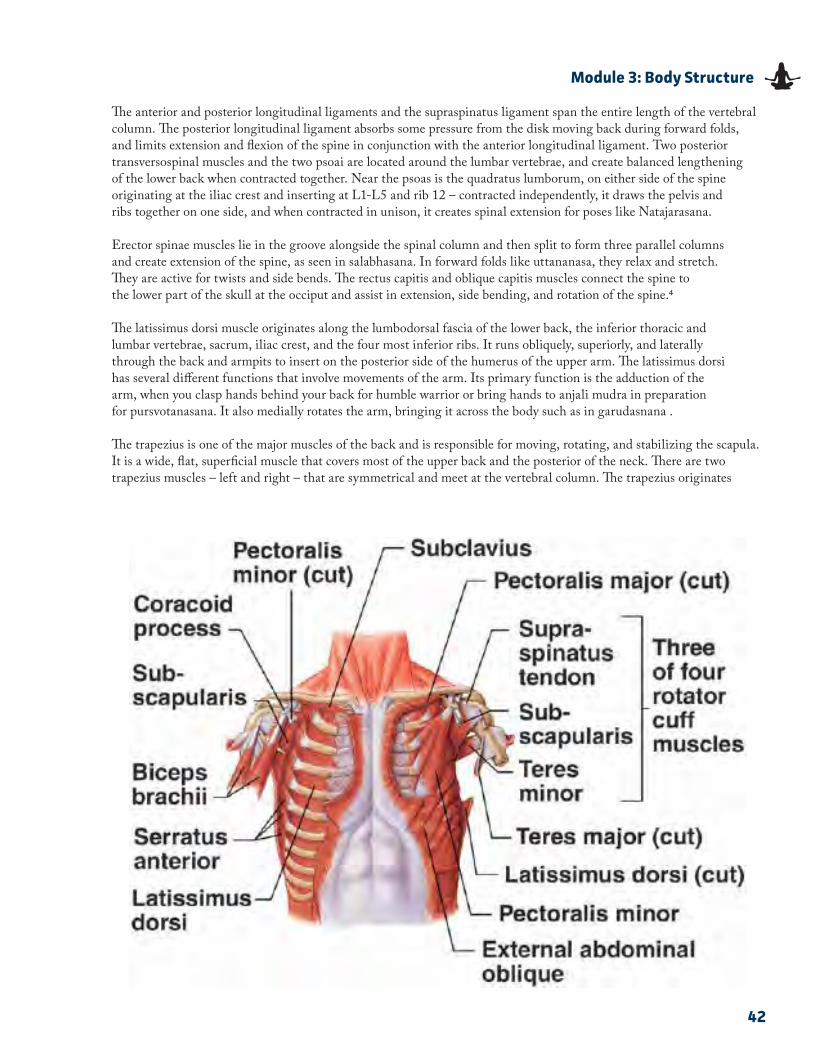
42
Module 3: Body Structure
The anterior and posterior longitudinal ligaments and the supraspinatus ligament span the entire length of the vertebral column� The posterior longitudinal ligament absorbs some pressure from the disk moving back during forward folds, and limits extension and flexion of the spine in conjunction with the anterior longitudinal ligament� Two posterior transversospinal muscles and the two psoai are located around the lumbar vertebrae, and create balanced lengthening of the lower back when contracted together� Near the psoas is the quadratus lumborum, on either side of the spine originating at the iliac crest and inserting at L1-L5 and rib 12 – contracted independently, it draws the pelvis and ribs together on one side, and when contracted in unison, it creates spinal extension for poses like Natajarasana�
Erector spinae muscles lie in the groove alongside the spinal column and then split to form three parallel columns and create extension of the spine, as seen in salabhasana� In forward folds like uttananasa, they relax and stretch� They are active for twists and side bends� The rectus capitis and oblique capitis muscles connect the spine to the lower part of the skull at the occiput and assist in extension, side bending, and rotation of the spine�4
The latissimus dorsi muscle originates along the lumbodorsal fascia of the lower back, the inferior thoracic and lumbar vertebrae, sacrum, iliac crest, and the four most inferior ribs� It runs obliquely, superiorly, and laterally through the back and armpits to insert on the posterior side of the humerus of the upper arm� The latissimus dorsi has several different functions that involve movements of the arm� Its primary function is the adduction of the arm, when you clasp hands behind your back for humble warrior or bring hands to anjali mudra in preparation for pursvotanasana� It also medially rotates the arm, bringing it across the body such as in garudasnana �
The trapezius is one of the major muscles of the back and is responsible for moving, rotating, and stabilizing the scapula� It is a wide, flat, superficial muscle that covers most of the upper back and the posterior of the neck� There are two trapezius muscles – left and right – that are symmetrical and meet at the vertebral column� The trapezius originates
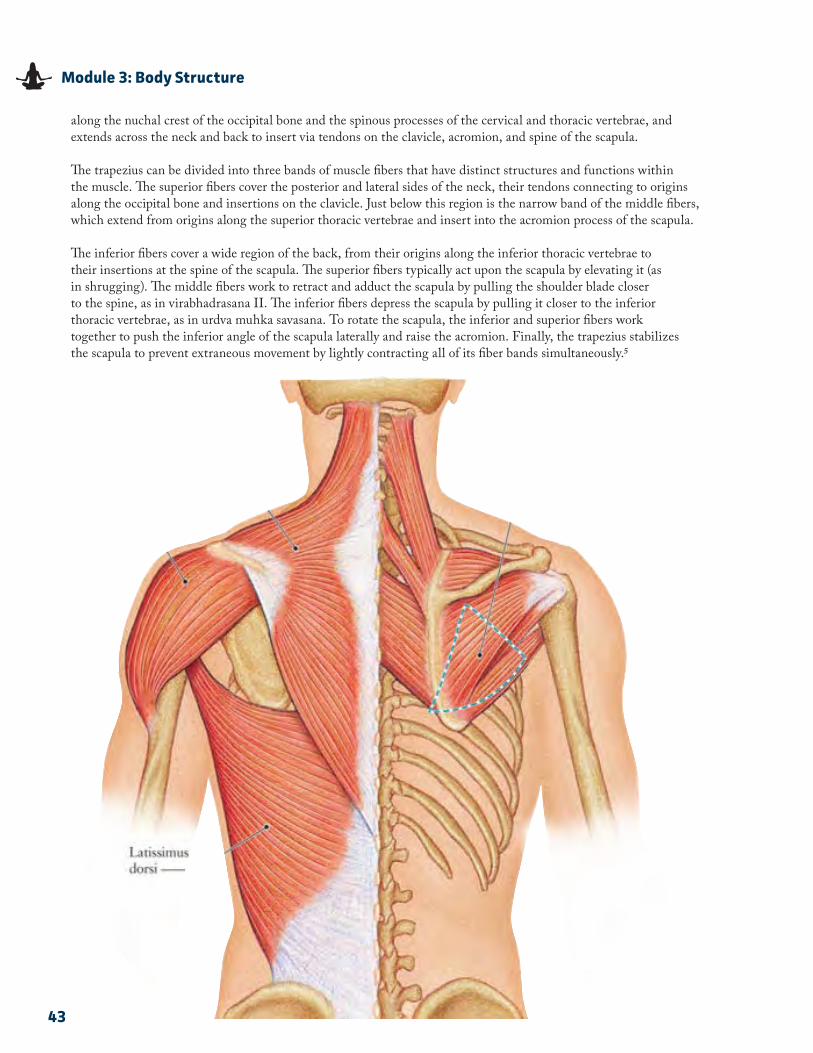
43
Module 3: Body Structure
along the nuchal crest of the occipital bone and the spinous processes of the cervical and thoracic vertebrae, and extends across the neck and back to insert via tendons on the clavicle, acromion, and spine of the scapula�
The trapezius can be divided into three bands of muscle fibers that have distinct structures and functions within the muscle� The superior fibers cover the posterior and lateral sides of the neck, their tendons connecting to origins along the occipital bone and insertions on the clavicle� Just below this region is the narrow band of the middle fibers, which extend from origins along the superior thoracic vertebrae and insert into the acromion process of the scapula�
The inferior fibers cover a wide region of the back, from their origins along the inferior thoracic vertebrae to their insertions at the spine of the scapula� The superior fibers typically act upon the scapula by elevating it (as in shrugging)� The middle fibers work to retract and adduct the scapula by pulling the shoulder blade closer to the spine, as in virabhadrasana II� The inferior fibers depress the scapula by pulling it closer to the inferior thoracic vertebrae, as in urdva muhka savasana� To rotate the scapula, the inferior and superior fibers work together to push the inferior angle of the scapula laterally and raise the acromion� Finally, the trapezius stabilizes the scapula to prevent extraneous movement by lightly contracting all of its fiber bands simultaneously�5
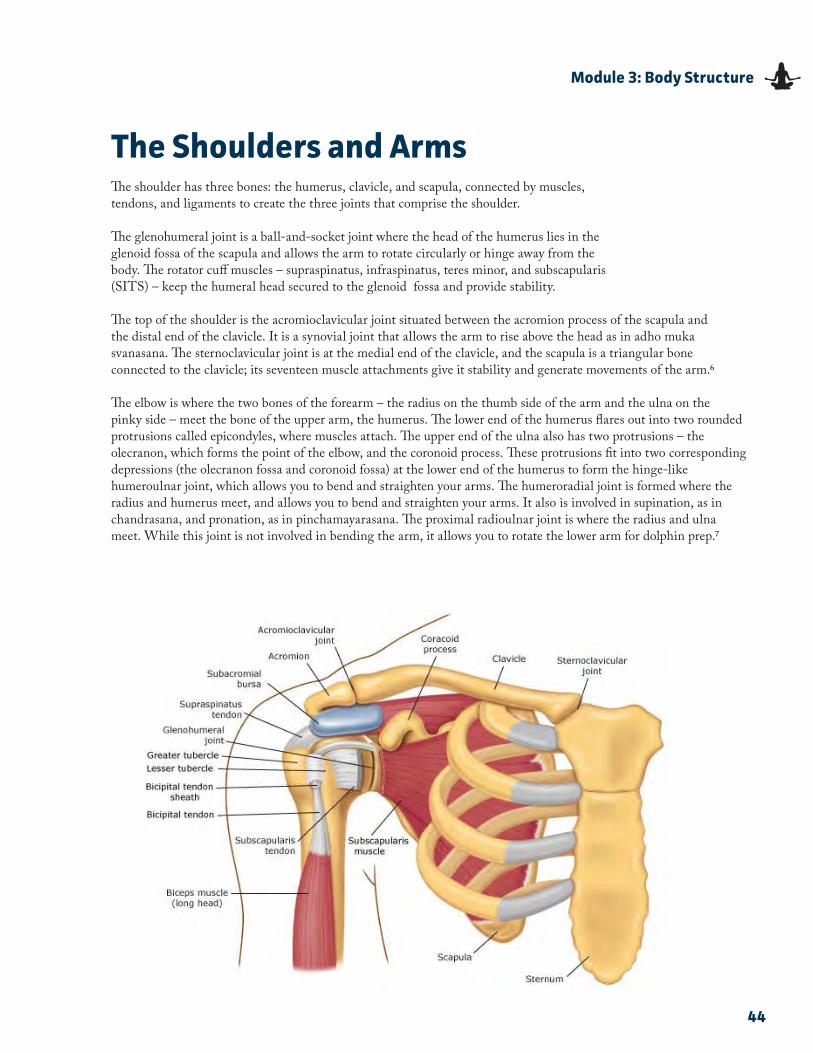
44
Module 3: Body Structure
The Shoulders and ArmsThe shoulder has three bones: the humerus, clavicle, and scapula, connected by muscles, tendons, and ligaments to create the three joints that comprise the shoulder�
The glenohumeral joint is a ball-and-socket joint where the head of the humerus lies in the glenoid fossa of the scapula and allows the arm to rotate circularly or hinge away from the body� The rotator cuff muscles – supraspinatus, infraspinatus, teres minor, and subscapularis (SITS) – keep the humeral head secured to the glenoid fossa and provide stability�
The top of the shoulder is the acromioclavicular joint situated between the acromion process of the scapula and the distal end of the clavicle� It is a synovial joint that allows the arm to rise above the head as in adho muka svanasana� The sternoclavicular joint is at the medial end of the clavicle, and the scapula is a triangular bone connected to the clavicle; its seventeen muscle attachments give it stability and generate movements of the arm�6
The elbow is where the two bones of the forearm – the radius on the thumb side of the arm and the ulna on the pinky side – meet the bone of the upper arm, the humerus� The lower end of the humerus flares out into two rounded protrusions called epicondyles, where muscles attach� The upper end of the ulna also has two protrusions – the olecranon, which forms the point of the elbow, and the coronoid process� These protrusions fit into two corresponding depressions (the olecranon fossa and coronoid fossa) at the lower end of the humerus to form the hinge-like humeroulnar joint, which allows you to bend and straighten your arms� The humeroradial joint is formed where the radius and humerus meet, and allows you to bend and straighten your arms� It also is involved in supination, as in chandrasana, and pronation, as in pinchamayarasana� The proximal radioulnar joint is where the radius and ulna meet� While this joint is not involved in bending the arm, it allows you to rotate the lower arm for dolphin prep�7
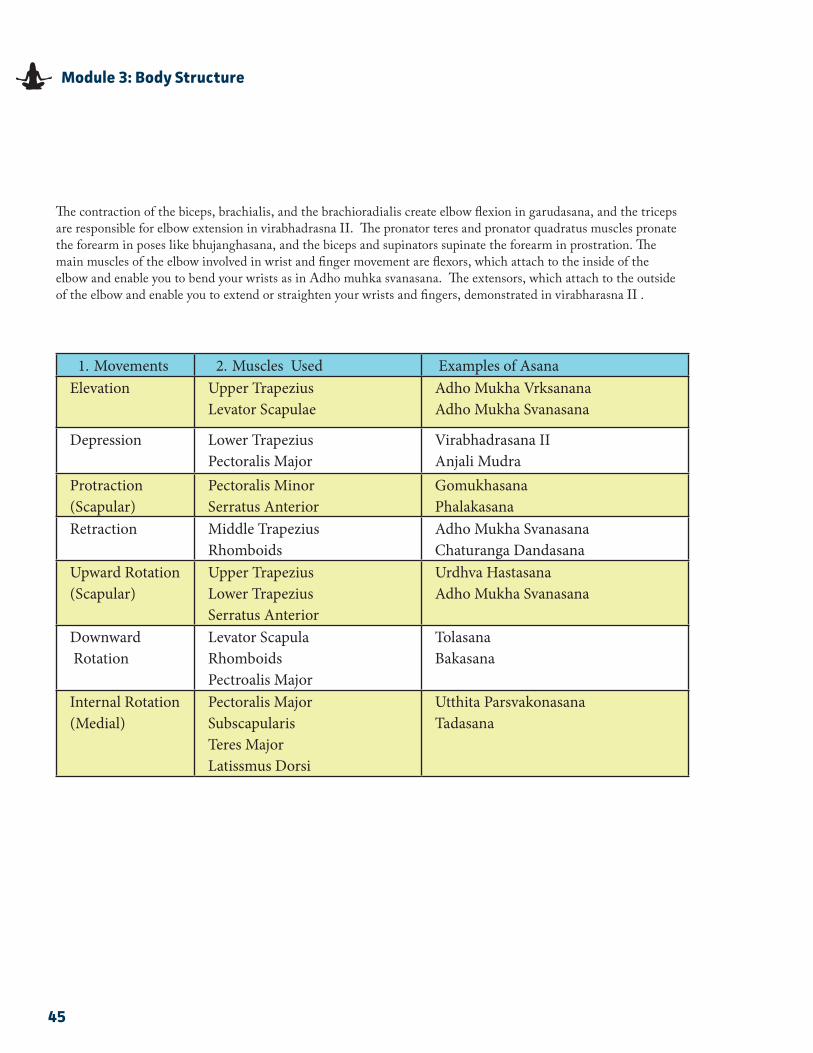
45
Module 3: Body Structure
1� Movements 2� Muscles Used Examples of AsanaElevation Upper Trapezius
Levator ScapulaeAdho Mukha VrksananaAdho Mukha Svanasana
Depression Lower Trapezius Pectoralis Major
Virabhadrasana IIAnjali Mudra
Protraction(Scapular)
Pectoralis MinorSerratus Anterior
GomukhasanaPhalakasana
Retraction Middle TrapeziusRhomboids
Adho Mukha Svanasana Chaturanga Dandasana
Upward Rotation(Scapular)
Upper TrapeziusLower Trapezius Serratus Anterior
Urdhva HastasanaAdho Mukha Svanasana
Downward Rotation
Levator ScapulaRhomboidsPectroalis Major
TolasanaBakasana
Internal Rotation (Medial)
Pectoralis MajorSubscapularisTeres MajorLatissmus Dorsi
Utthita ParsvakonasanaTadasana
The contraction of the biceps, brachialis, and the brachioradialis create elbow flexion in garudasana, and the triceps are responsible for elbow extension in virabhadrasna II� The pronator teres and pronator quadratus muscles pronate the forearm in poses like bhujanghasana, and the biceps and supinators supinate the forearm in prostration� The main muscles of the elbow involved in wrist and finger movement are flexors, which attach to the inside of the elbow and enable you to bend your wrists as in Adho muhka svanasana� The extensors, which attach to the outside of the elbow and enable you to extend or straighten your wrists and fingers, demonstrated in virabharasna II �
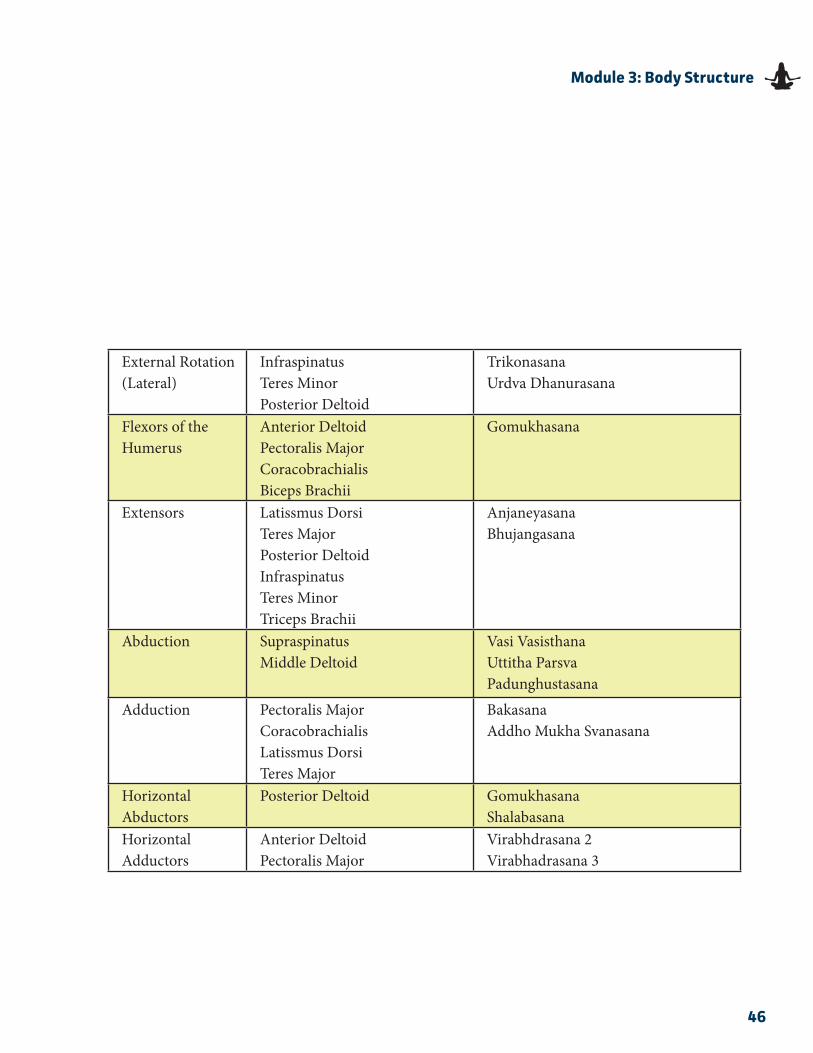
46
Module 3: Body Structure
External Rotation(Lateral)
InfraspinatusTeres MinorPosterior Deltoid
TrikonasanaUrdva Dhanurasana
Flexors of the Humerus
Anterior DeltoidPectoralis MajorCoracobrachialisBiceps Brachii
Gomukhasana
Extensors Latissmus DorsiTeres MajorPosterior DeltoidInfraspinatusTeres MinorTriceps Brachii
AnjaneyasanaBhujangasana
Abduction SupraspinatusMiddle Deltoid
Vasi VasisthanaUttitha ParsvaPadunghustasana
Adduction Pectoralis MajorCoracobrachialisLatissmus DorsiTeres Major
BakasanaAddho Mukha Svanasana
Horizontal Abductors
Posterior Deltoid GomukhasanaShalabasana
Horizontal Adductors
Anterior DeltoidPectoralis Major
Virabhdrasana 2Virabhadrasana 3
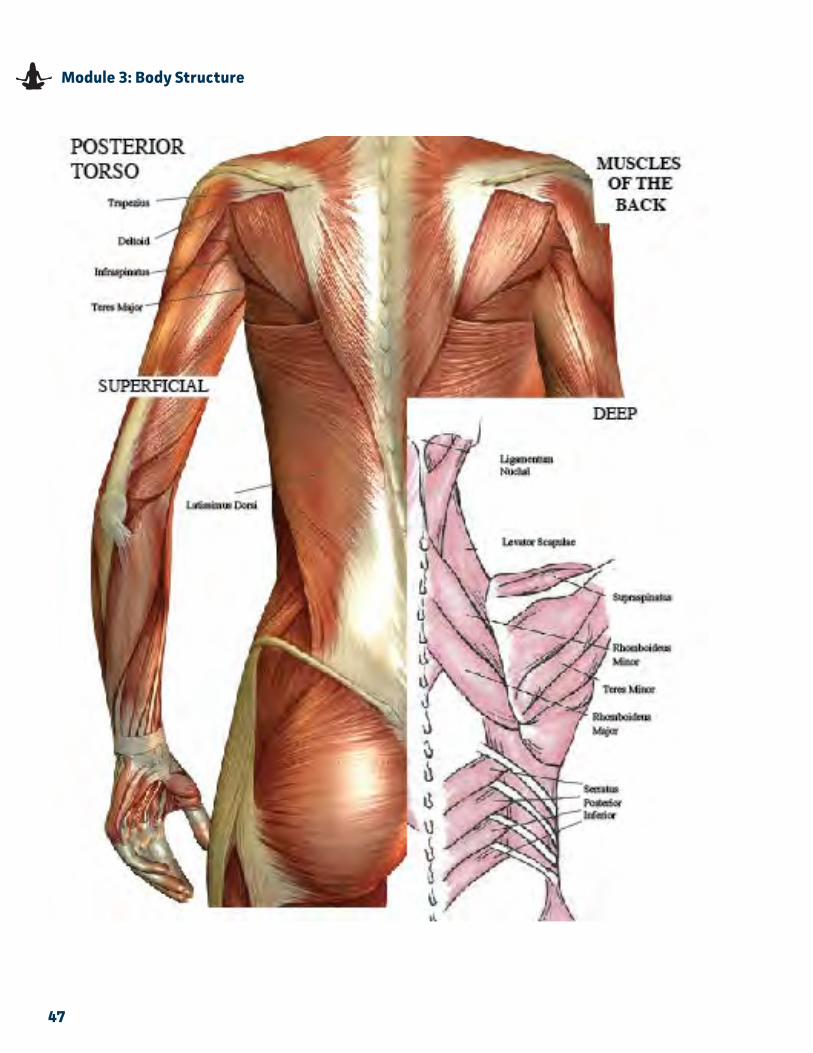
47
Module 3: Body Structure
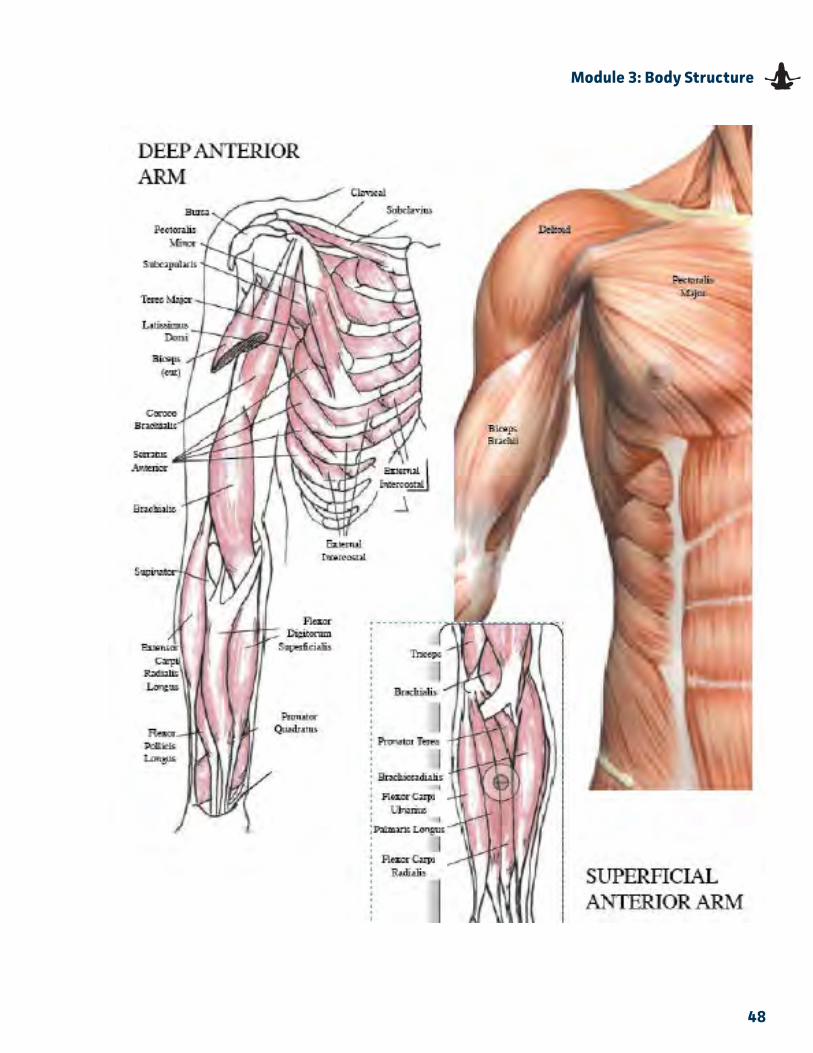
48
Module 3: Body Structure
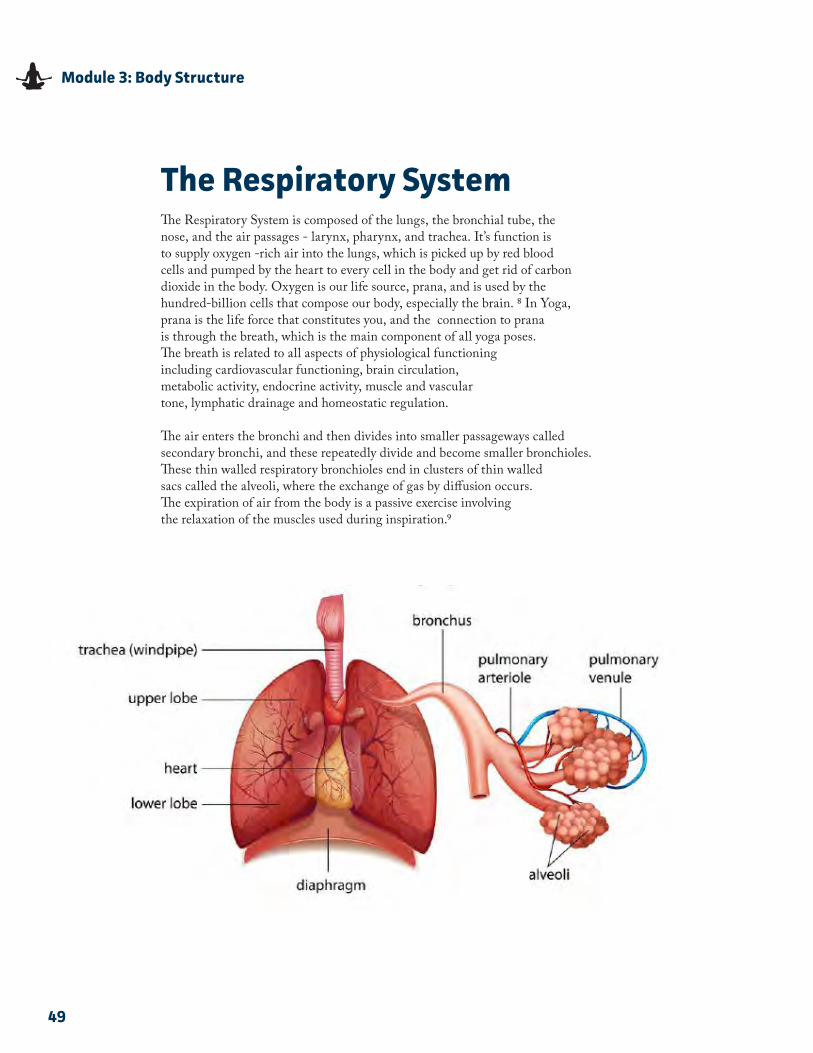
49
Module 3: Body Structure
The Respiratory SystemThe Respiratory System is composed of the lungs, the bronchial tube, the nose, and the air passages - larynx, pharynx, and trachea� It’s function is to supply oxygen -rich air into the lungs, which is picked up by red blood cells and pumped by the heart to every cell in the body and get rid of carbon dioxide in the body� Oxygen is our life source, prana, and is used by the hundred-billion cells that compose our body, especially the brain� 8 In Yoga, prana is the life force that constitutes you, and the connection to prana is through the breath, which is the main component of all yoga poses�The breath is related to all aspects of physiological functioning including cardiovascular functioning, brain circulation, metabolic activity, endocrine activity, muscle and vascular tone, lymphatic drainage and homeostatic regulation�
The air enters the bronchi and then divides into smaller passageways called secondary bronchi, and these repeatedly divide and become smaller bronchioles� These thin walled respiratory bronchioles end in clusters of thin walled sacs called the alveoli, where the exchange of gas by diffusion occurs�The expiration of air from the body is a passive exercise involving the relaxation of the muscles used during inspiration�9

50
Module 3: Body Structure
The Nervous SystemThe nervous system is the control and communication system of the body, and its job is to send and receive messages� It controls all your thoughts and movements� The nervous system consists of the brain, spinal cord, sensory organs, and all of the nerves that connect these organs with the rest of the body� The brain and spinal cord form the control center known as the central nervous system CNS, where information is evaluated and decisions made� The sensory nerves and sense organs of the peripheral nervous system PNS monitor conditions inside and outside of the body and send this information to the CNS� Efferent nerves in the PNS carry signals from the control center to the muscles, glands, and organs to regulate their functions� 10
Yoga asanas stretch and purify the bundles of fibers that form the large nerves� By clearing toxins from the tissues, the asanas benefit neurotransmissions at the fine nerve endings, and at synapses between nerves� Yoga has been shown to stabilize the response of the nervous system to stress, removing the constant muscular tension produced by the repeated alerts from the central nervous system, and calming the involuntary symptoms of threat - racing heart, sweating, anxiety - roused by the sympathetic nervous system�11
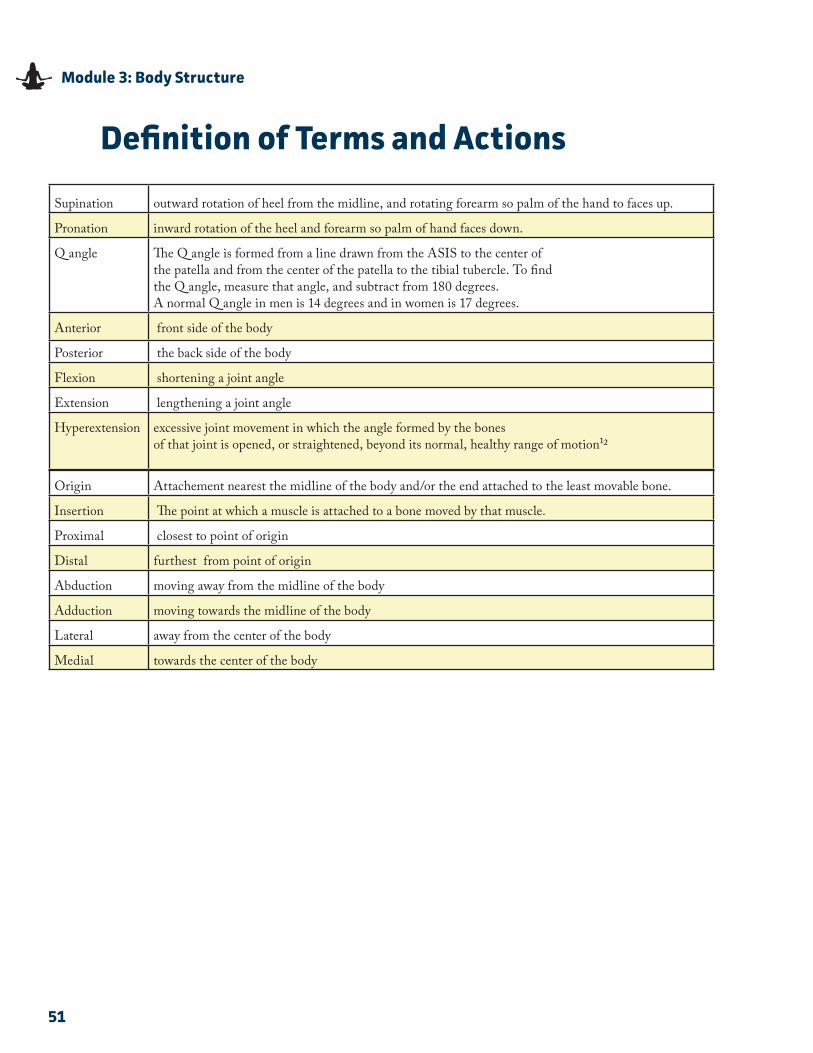
51
Module 3: Body Structure
Definition of Terms and Actions
Supination outward rotation of heel from the midline, and rotating forearm so palm of the hand to faces up�
Pronation inward rotation of the heel and forearm so palm of hand faces down�
Q angle The Q angle is formed from a line drawn from the ASIS to the center of the patella and from the center of the patella to the tibial tubercle� To find the Q angle, measure that angle, and subtract from 180 degrees�A normal Q angle in men is 14 degrees and in women is 17 degrees�
Anterior front side of the body
Posterior the back side of the body
Flexion shortening a joint angle
Extension lengthening a joint angle
Hyperextension excessive joint movement in which the angle formed by the bones of that joint is opened, or straightened, beyond its normal, healthy range of motion12
Origin Attachement nearest the midline of the body and/or the end attached to the least movable bone�
Insertion The point at which a muscle is attached to a bone moved by that muscle�
Proximal closest to point of origin
Distal furthest from point of origin
Abduction moving away from the midline of the body
Adduction moving towards the midline of the body
Lateral away from the center of the body
Medial towards the center of the body
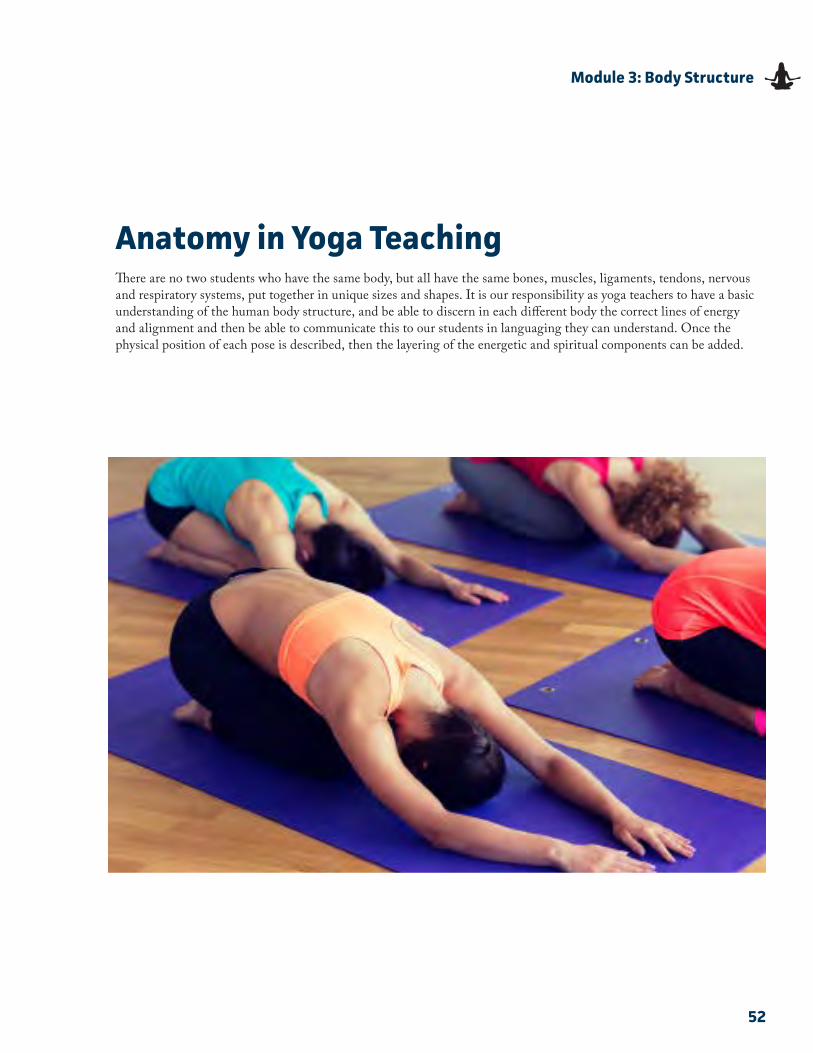
52
Module 3: Body Structure
Anatomy in Yoga TeachingThere are no two students who have the same body, but all have the same bones, muscles, ligaments, tendons, nervous and respiratory systems, put together in unique sizes and shapes� It is our responsibility as yoga teachers to have a basic understanding of the human body structure, and be able to discern in each different body the correct lines of energy and alignment and then be able to communicate this to our students in languaging they can understand� Once the physical position of each pose is described, then the layering of the energetic and spiritual components can be added�
53
Module 3: Body Structure
References
1� Stephens, M� (2010)� Teaching Yoga Essential Foundations and Techniques, p� 66
2� Keller, D� (2006)�Yoga as Therapy, Groundbreaking Insights into the use of Yoga as Therapy pp� 274-275
3� Hip Anatomy A Patients Guide to Hip Anatomy
4� http://clients�mindbodyonline�com/classic/ws?studioid=24858&stype=-8&sTG=23
5� Stephens, Mark� (2010)� Teaching Yoga Essential Foundations and Techniques� p� 78
6� http://www�innerbody�com/image_musfov/musc28-new�html
7� Stephens, Mark� (2010)� Teaching Yoga Essential Foundations and Techniques� p� 84
8� Elbow Anatomy� www�arthritistoday�org/where-it-hurts/elbow-pain/elbow-anatomy�php
9� A Retreat to Your inner Peace Respiratory System www�angkawi-yoga�com/respiratory-system�html
10� The respiratory system and the mechanics of breathing by Phil Aston http://www�yogaatwork�co�uk/respiratory�htm
11� The Nervous System http://www�innerbody�com/image/nervov�html
12� The Brain, the Nervous System and Yoga
13� http://portals�clevelandclinic�org/Portals/113/Yoga/The%20Brain%20The%20Nervous%20System%20and%20Yoga�pdf
14� Hyperextension Definition http://sportsmedicine�about�com/od/glossary/g/Hyperextension-Definition�htm
54
Module 3: Body Structure
Notes
Module 4
Asanas, Sequencing & Special Population
56
Module 4: Asanas, Sequencing, & Special Population
Principles of Sequencing
There is no single perfect yoga sequence� With the multitude of yoga styles and the individuality of each teacher, each class is a unique experience� Take everything you have learned about yoga philosophy, anatomy, pranayama, and asana to construct a class that has structure, meaning, and the potential for transformation on the physical, emotional, and spiritual planes�
Classes that do not follow a set series of poses, like Bikram and Ashtanga, become the creative story of each teacher� Some instructors like to set a sequence or theme before class, and some will tailor the practice to the needs of the students on that day� Either method should follow a progression that makes the physical yoga beneficial and sustainable� You are the guide for the yogic journey and can arrange the class according to several different pathways:1
1� Single-peak class: Warm up, path to the peak pose, the peak exploration, and then a gradual cool-down to Savasana�
2. Dual-peak class: Warm up, path to first peak, first peak pose, integration of peak postures; and path to second peak pose, second peak, and gradual cool-down to Savasana�
3� Multiple-peak class: Follows same path as dual-peak incorporating the additional peaks, then cool-down to Savasana�
Begin your classes by having your students sit comfortably, and offer a method of centering and connecting to the breath� Ask your students to start to notice each breath and allow it grow in duration and the space it occupies in the body� Have them feel and hear the breath in their throats to begin cultivating Ujjayi breath� By narrowing the focus down to each breath, the student is able to transition from the busyness of their days and minds to a more present place for their practice� Some teachers like to set an intention for the practice, or you can invite the students to set their own intentions�
A gradual warm-up can include some gentle hip openers, a cat/cow flow to articulate the spine, Down Dog, and Sun Salutations A & B� This will increase flexibility and mobility in the body and reduce the risk of injury while generating heat to make it easier to move into the poses� The classic warm-up for Hatha yoga is Sun Salutation A, or Surya Namaskar, and consists of five poses linked with the inhale and exhale phases of breathing� Surya Namaskar B includes two more poses and includes every asana family with the exception of twists� Depending on the time for class and student levels, include 3-5 rounds of each to thoroughly prepare the body for the poses to come� Sun Salutations offer a moving meditation with each pose associated with either an inhale or exhale� The inhales open the body, and the exhales close the body� There are many variations on the Sun Salutation sequence, and they can easily be modified to meet special needs and abilities�
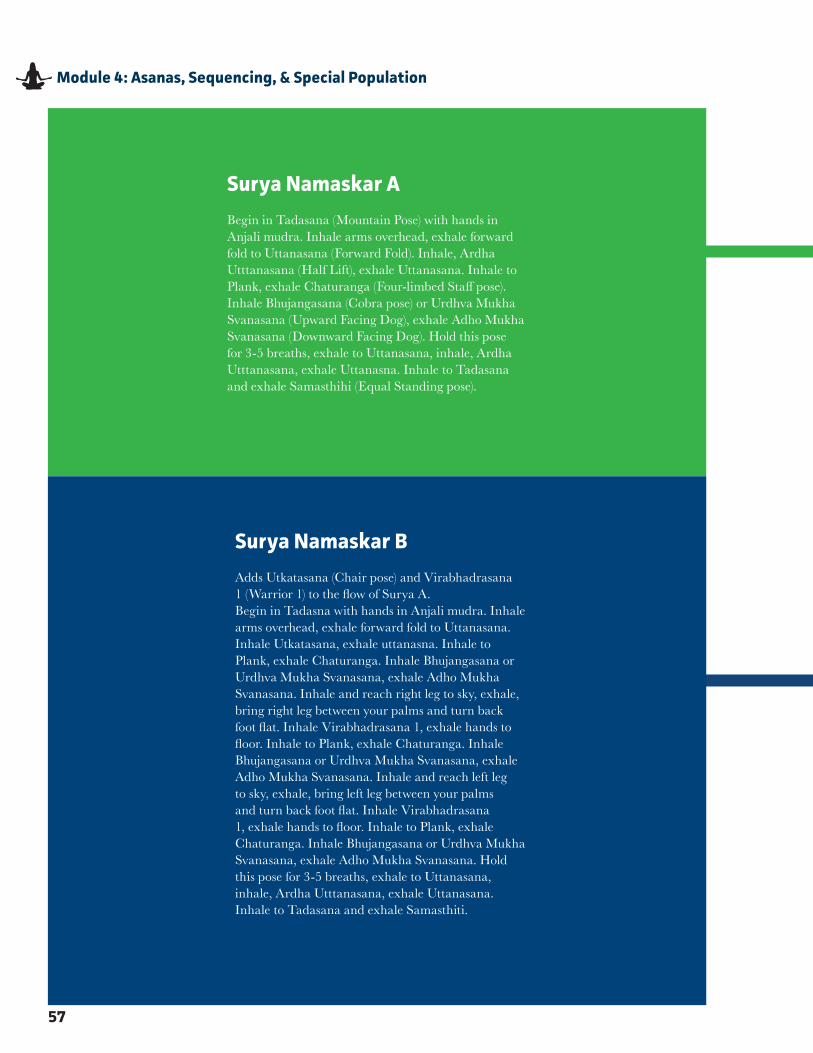
57
Module 4: Asanas, Sequencing, & Special Population
Surya Namaskar A
Begin in Tadasana (Mountain Pose) with hands in Anjali mudra. Inhale arms overhead, exhale forward fold to Uttanasana (Forward Fold). Inhale, Ardha Utttanasana (Half Lift), exhale Uttanasana. Inhale to Plank, exhale Chaturanga (Four-limbed Staff pose). Inhale Bhujangasana (Cobra pose) or Urdhva Mukha Svanasana (Upward Facing Dog), exhale Adho Mukha Svanasana (Downward Facing Dog). Hold this pose for 3-5 breaths, exhale to Uttanasana, inhale, Ardha Utttanasana, exhale Uttanasna. Inhale to Tadasana and exhale Samasthihi (Equal Standing pose).
Surya Namaskar B
Adds Utkatasana (Chair pose) and Virabhadrasana 1 (Warrior 1) to the flow of Surya A. Begin in Tadasna with hands in Anjali mudra. Inhale arms overhead, exhale forward fold to Uttanasana. Inhale Utkatasana, exhale uttanasna. Inhale to Plank, exhale Chaturanga. Inhale Bhujangasana or Urdhva Mukha Svanasana, exhale Adho Mukha Svanasana. Inhale and reach right leg to sky, exhale, bring right leg between your palms and turn back foot flat. Inhale Virabhadrasana 1, exhale hands to floor. Inhale to Plank, exhale Chaturanga. Inhale Bhujangasana or Urdhva Mukha Svanasana, exhale Adho Mukha Svanasana. Inhale and reach left leg to sky, exhale, bring left leg between your palms and turn back foot flat. Inhale Virabhadrasana 1, exhale hands to floor. Inhale to Plank, exhale Chaturanga. Inhale Bhujangasana or Urdhva Mukha Svanasana, exhale Adho Mukha Svanasana. Hold this pose for 3-5 breaths, exhale to Uttanasana, inhale, Ardha Utttanasana, exhale Uttanasana. Inhale to Tadasana and exhale Samasthiti.
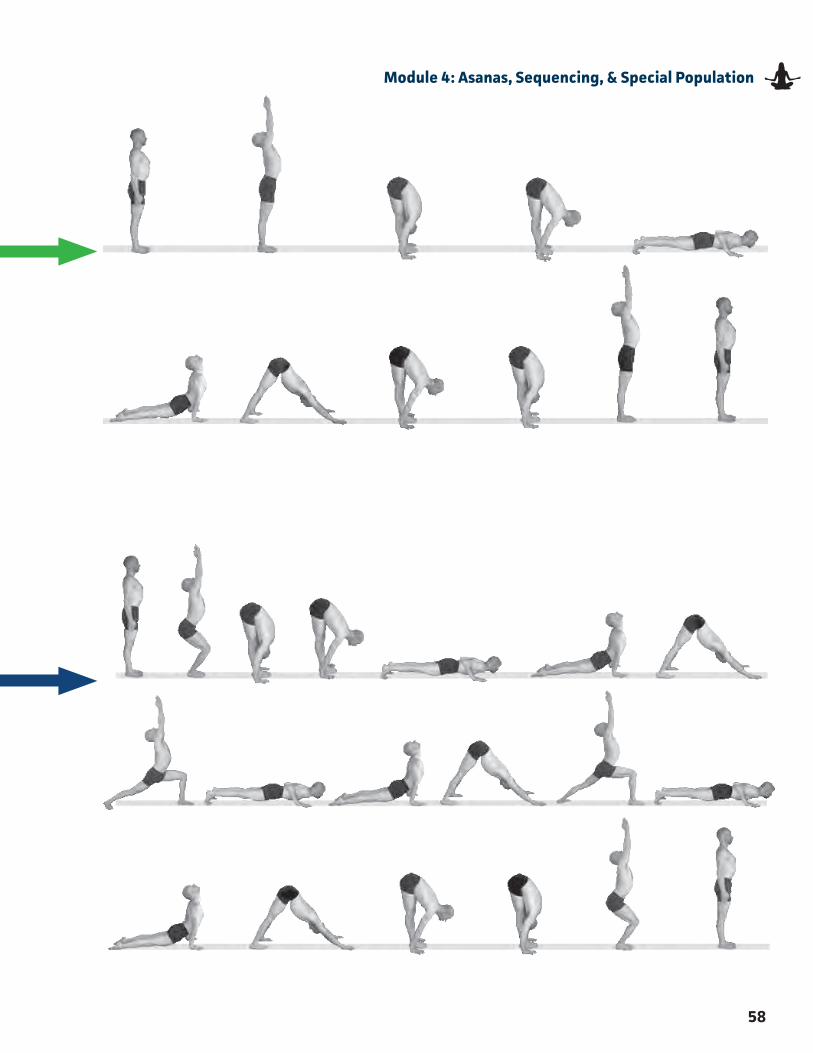
58
Module 4: Asanas, Sequencing, & Special Population
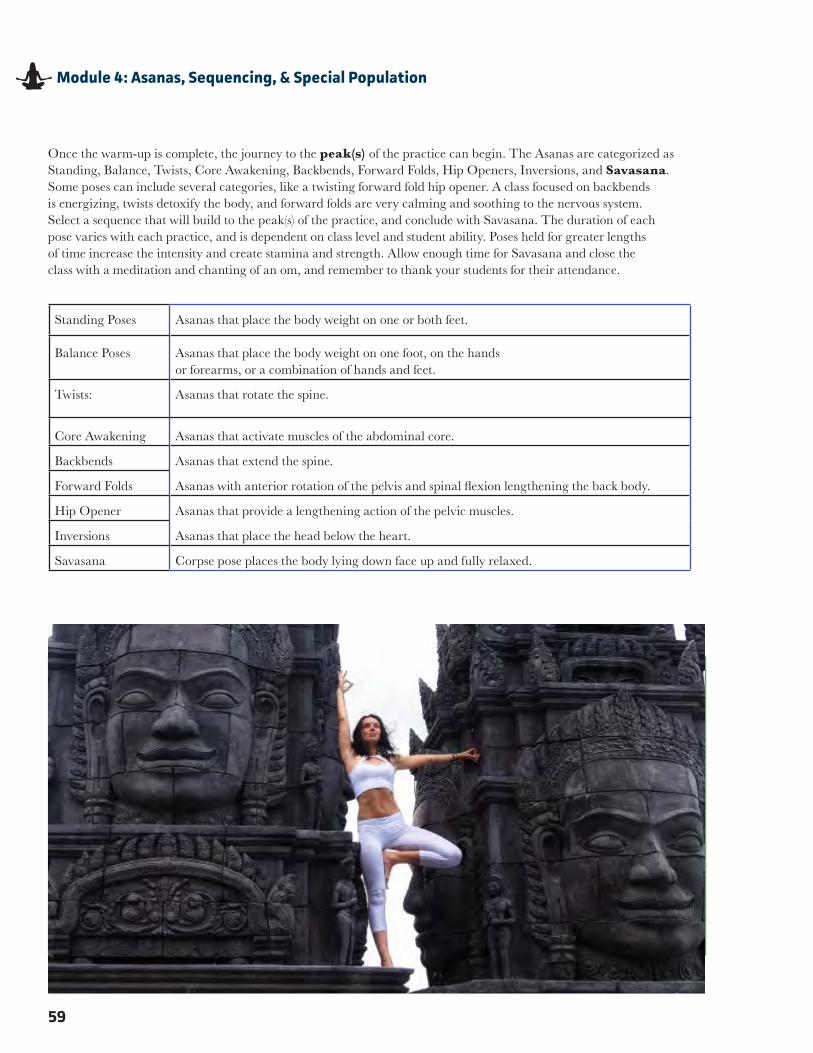
Once the warm-up is complete, the journey to the peak(s) of the practice can begin. The Asanas are categorized as Standing, Balance, Twists, Core Awakening, Backbends, Forward Folds, Hip Openers, Inversions, and Savasana. Some poses can include several categories, like a twisting forward fold hip opener. A class focused on backbends is energizing, twists detoxify the body, and forward folds are very calming and soothing to the nervous system. Select a sequence that will build to the peak(s) of the practice, and conclude with Savasana. The duration of each pose varies with each practice, and is dependent on class level and student ability. Poses held for greater lengths of time increase the intensity and create stamina and strength. Allow enough time for Savasana and close the class with a meditation and chanting of an om, and remember to thank your students for their attendance.
Standing Poses Asanas that place the body weight on one or both feet.
Balance Poses Asanas that place the body weight on one foot, on the hands or forearms, or a combination of hands and feet.
Twists: Asanas that rotate the spine.
Core Awakening Asanas that activate muscles of the abdominal core.
Backbends Asanas that extend the spine.
Forward Folds Asanas with anterior rotation of the pelvis and spinal flexion lengthening the back body.
Hip Opener Asanas that provide a lengthening action of the pelvic muscles.
Inversions Asanas that place the head below the heart.
Savasana Corpse pose places the body lying down face up and fully relaxed.
59
Module 4: Asanas, Sequencing, & Special Population
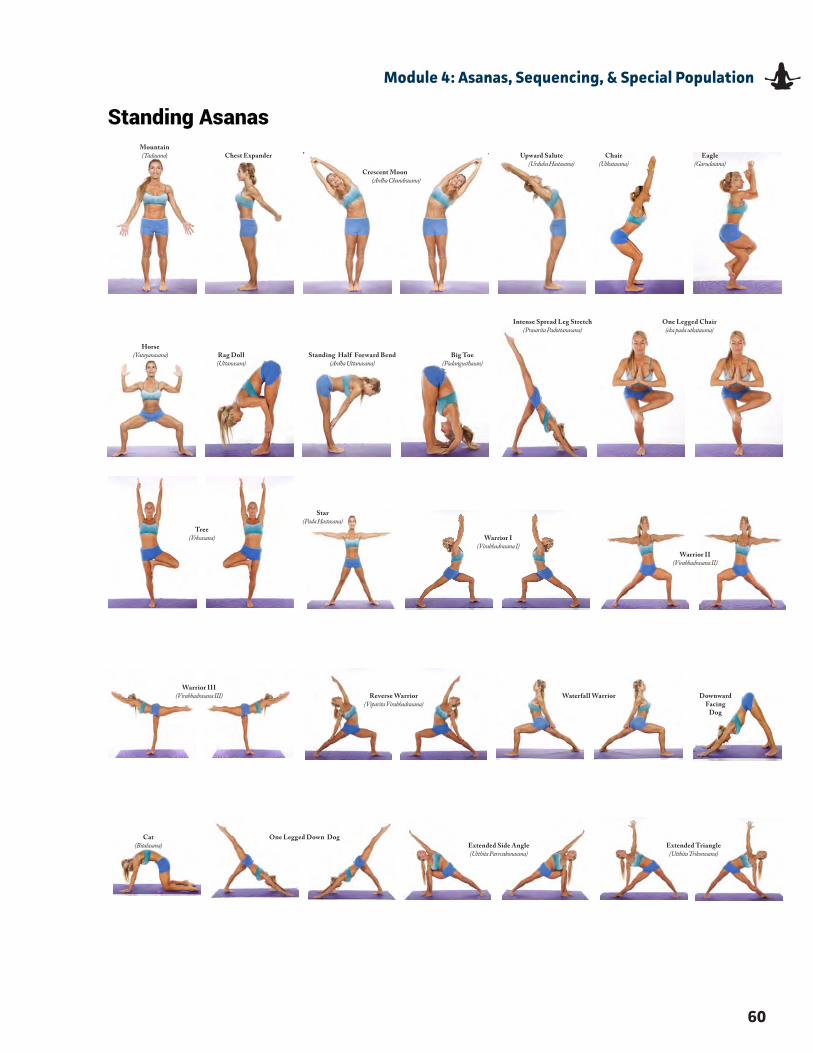
Standing Asanas
60
Module 4: Asanas, Sequencing, & Special Population
Mountain (Tadasana)
Horse(Vatayanasana) Big Toe
(Padangusthasan)
Intense Spread Leg Stretch (Prasarita Padottanasana)
One Legged Chair(eka pada utkatasana)
Standing Half Forward Bend(Ardha Uttanasana)
Chest Expander
Crescent Moon (Ardha Chandrasana)
Upward Salute (Urduha Hastasana)
Chair (Utkatasana)
Eagle (Garudasana)
Rag Doll(Uttanasara)
Tree(Vrksasana)
Star(Pada Hastasana)
Reverse Warrior(Viparita Virabhadrasana)
Waterfall Warrior Downward Facing
Dog
Warrior II(Virabhadrasana II)
Warrior I(Virabhadrasana I)
Warrior III(Virabhadrasana III)
Cat(Bitalasana) Extended Side Angle
(Utthita Parsvakonasana)Extended Triangle (Utthita Trikonosana)
One Legged Down Dog
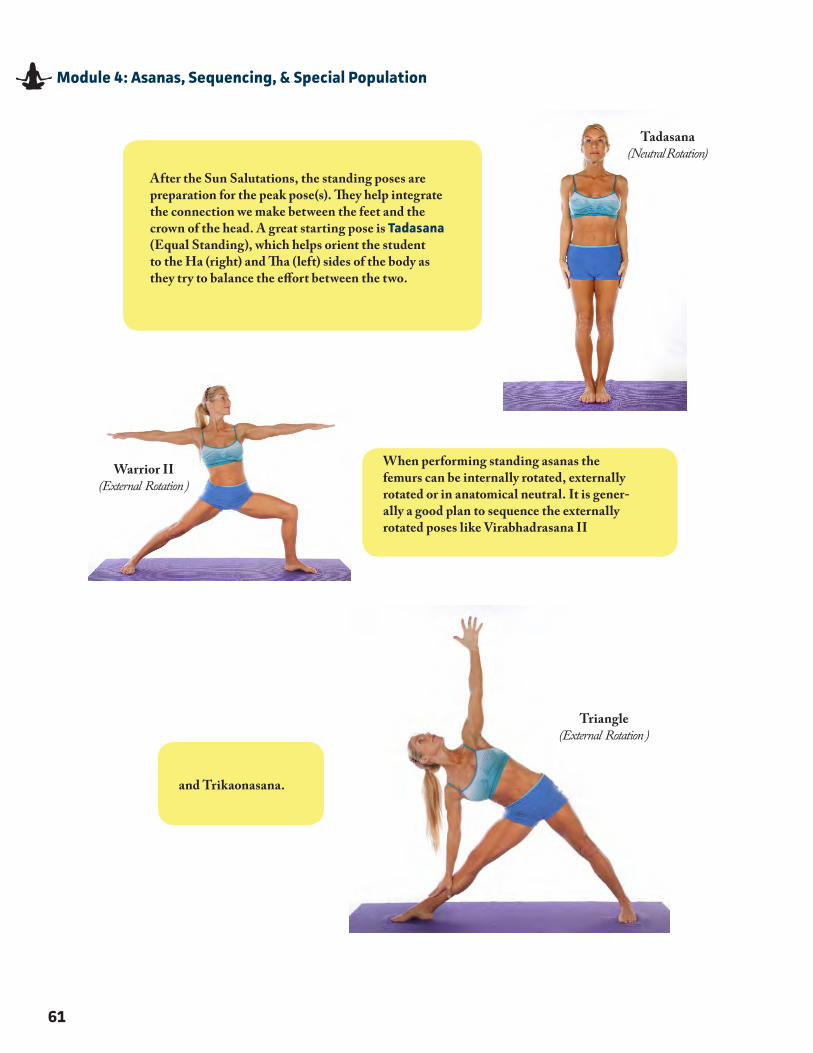
and Trikaonasana.
61
Module 4: Asanas, Sequencing, & Special Population
When performing standing asanas the femurs can be internally rotated, externally rotated or in anatomical neutral. It is gener-ally a good plan to sequence the externally rotated poses like Virabhadrasana II
After the Sun Salutations, the standing poses are preparation for the peak pose(s). They help integrate the connection we make between the feet and the crown of the head. A great starting pose is Tadasana (Equal Standing), which helps orient the student to the Ha (right) and Tha (left) sides of the body as they try to balance the effort between the two.
Tadasana(Neutral Rotation)
Warrior II(External Rotation )
Triangle (External Rotation )
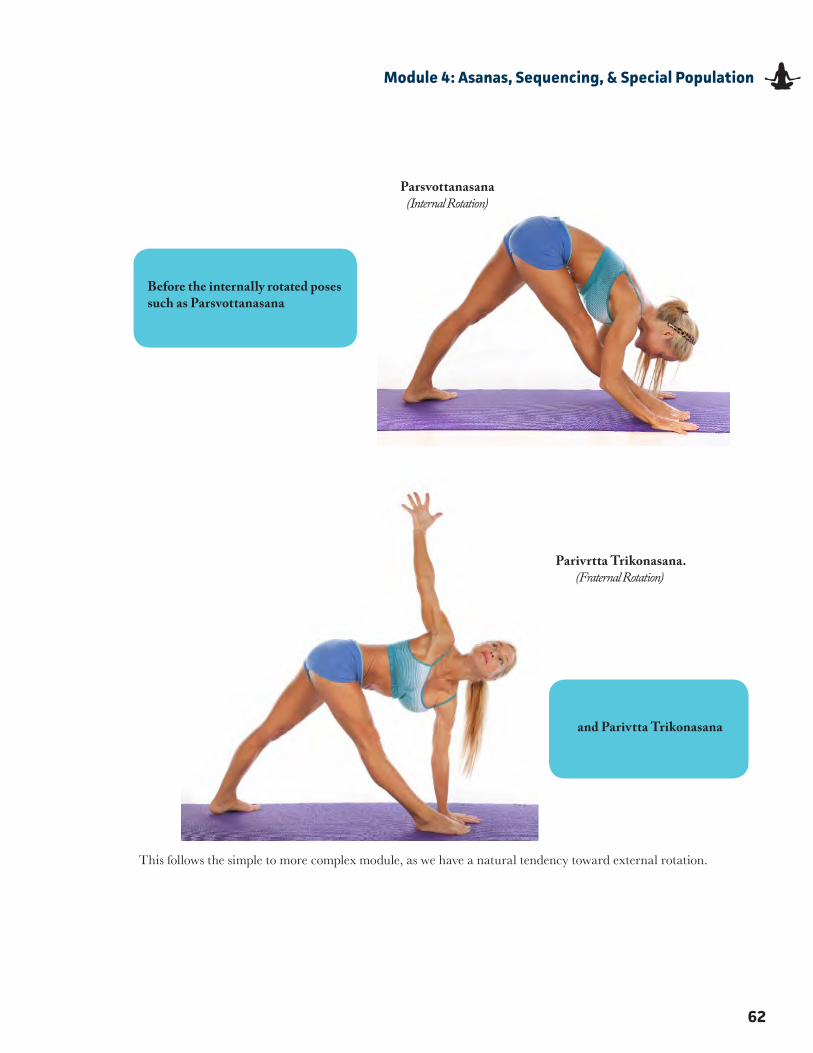
62
Module 4: Asanas, Sequencing, & Special Population
Before the internally rotated posessuch as Parsvottanasana
and Parivtta Trikonasana
This follows the simple to more complex module, as we have a natural tendency toward external rotation.
Parsvottanasana(Internal Rotation)
Parivrtta Trikonasana.(Fraternal Rotation)
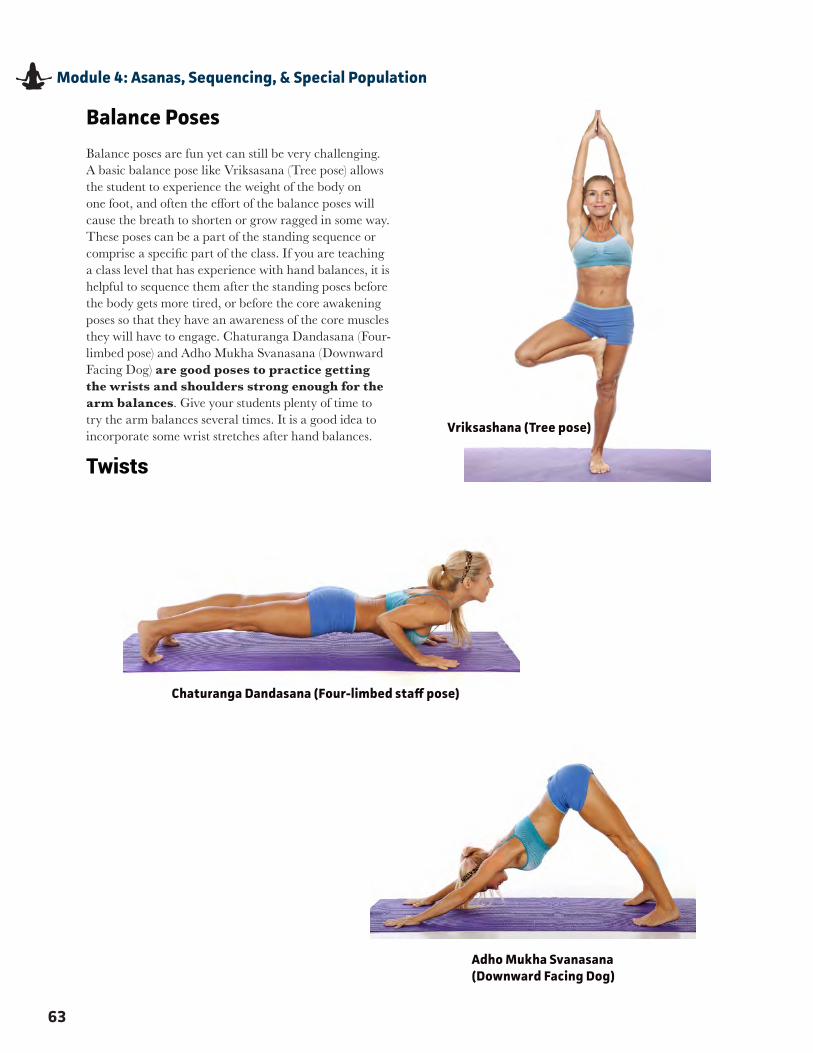
Adho Mukha Svanasana (Downward Facing Dog)
Chaturanga Dandasana (Four-limbed staff pose)
63
Module 4: Asanas, Sequencing, & Special Population
Balance Poses
Balance poses are fun yet can still be very challenging. A basic balance pose like Vriksasana (Tree pose) allows the student to experience the weight of the body on one foot, and often the effort of the balance poses will cause the breath to shorten or grow ragged in some way. These poses can be a part of the standing sequence or comprise a specific part of the class. If you are teaching a class level that has experience with hand balances, it is helpful to sequence them after the standing poses before the body gets more tired, or before the core awakening poses so that they have an awareness of the core muscles they will have to engage. Chaturanga Dandasana (Four-limbed pose) and Adho Mukha Svanasana (Downward Facing Dog) are good poses to practice getting the wrists and shoulders strong enough for the arm balances. Give your students plenty of time to try the arm balances several times. It is a good idea to incorporate some wrist stretches after hand balances.
Twists
Vriksashana (Tree pose)

Ardha matsyendrasana(Seated Twist)
Supta Matsyendrasana(Lying Twist)
64
Module 4: Asanas, Sequencing, & Special Population
Twists can be performed standing or seated, and are a good way to detoxify the organs. When you unwind from the twist, the freshly oxygenated blood from the breathing purifies the liver, gall bladder, kidneys, and spleen. The twisting action also helps to maintain the resilience of the spine’s vertebral discs and soft tissues, allowing for greater mobility of the spine. Twists are also good for reducing anxiety, creating energy, and stimulating the nervous system. They are cooling in nature and can be helpful in neutralizing the spine after backbends and forward folds. Make sure you evenly balance the twisting action on both sides. In standing and seated twists, begin the rotation from the lower spine up; for lying twists, ground shoulder down and follow with upper ribs to lower ribs.
Core AwakeningStrengthening the core helps to create balance and stability as well as to provide relief from lower back pain� Associated with the third chakra, Manipura, the element of fire is expressed through the heat created from core poses� Core poses done before forward folds help to neutralize the cooling effect of the folds, and helps to stabilize the lumbar spine when practiced after backbends�
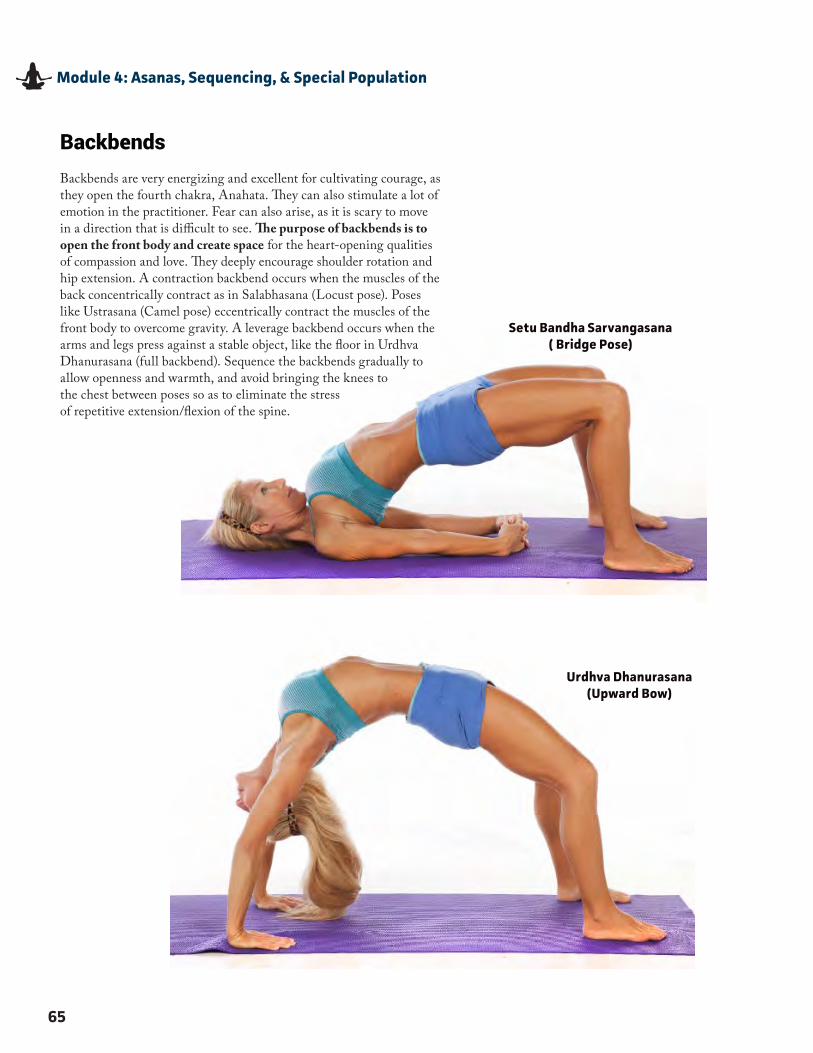
Setu Bandha Sarvangasana( Bridge Pose)
Urdhva Dhanurasana(Upward Bow)
BackbendsBackbends are very energizing and excellent for cultivating courage, as they open the fourth chakra, Anahata� They can also stimulate a lot of emotion in the practitioner� Fear can also arise, as it is scary to move in a direction that is difficult to see� The purpose of backbends is to open the front body and create space for the heart-opening qualities of compassion and love� They deeply encourage shoulder rotation and hip extension� A contraction backbend occurs when the muscles of the back concentrically contract as in Salabhasana (Locust pose)� Poses like Ustrasana (Camel pose) eccentrically contract the muscles of the front body to overcome gravity� A leverage backbend occurs when the arms and legs press against a stable object, like the floor in Urdhva Dhanurasana (full backbend)� Sequence the backbends gradually to allow openness and warmth, and avoid bringing the knees to the chest between poses so as to eliminate the stress of repetitive extension/flexion of the spine�
65
Module 4: Asanas, Sequencing, & Special Population
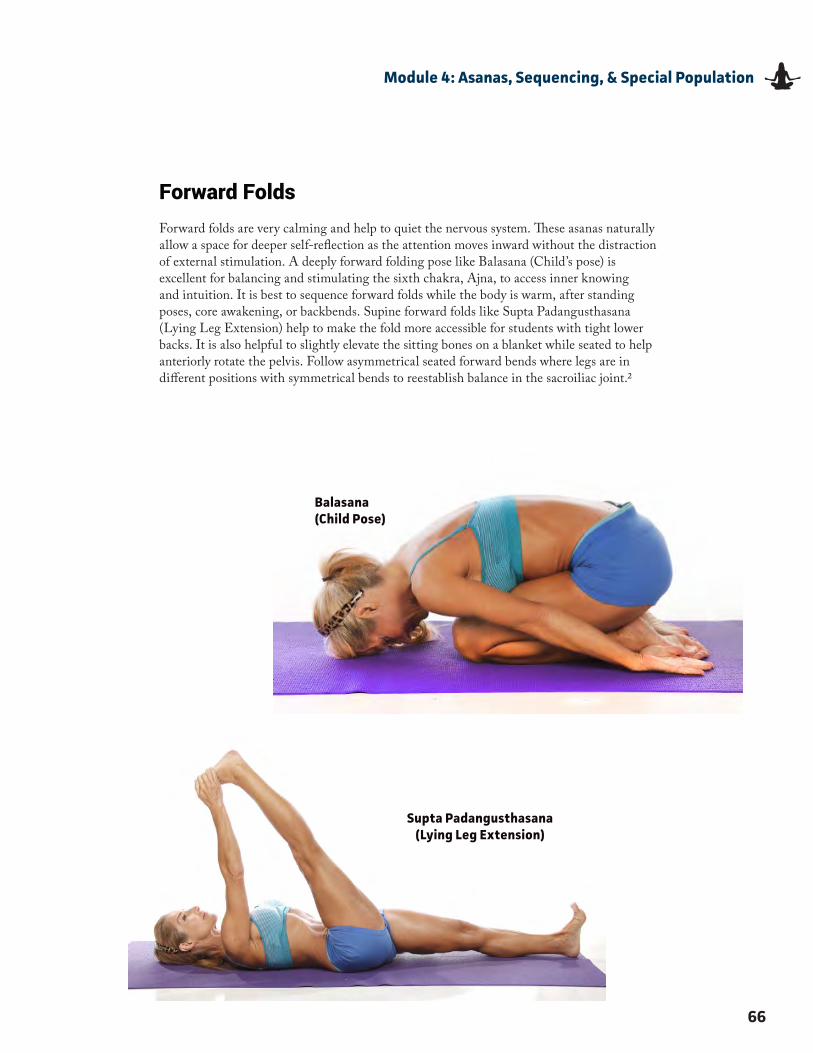
66
Module 4: Asanas, Sequencing, & Special Population
Forward FoldsForward folds are very calming and help to quiet the nervous system� These asanas naturally allow a space for deeper self-reflection as the attention moves inward without the distraction of external stimulation� A deeply forward folding pose like Balasana (Child’s pose) is excellent for balancing and stimulating the sixth chakra, Ajna, to access inner knowing and intuition� It is best to sequence forward folds while the body is warm, after standing poses, core awakening, or backbends� Supine forward folds like Supta Padangusthasana (Lying Leg Extension) help to make the fold more accessible for students with tight lower backs� It is also helpful to slightly elevate the sitting bones on a blanket while seated to help anteriorly rotate the pelvis� Follow asymmetrical seated forward bends where legs are in different positions with symmetrical bends to reestablish balance in the sacroiliac joint�2
Supta Padangusthasana(Lying Leg Extension)
Balasana(Child Pose)
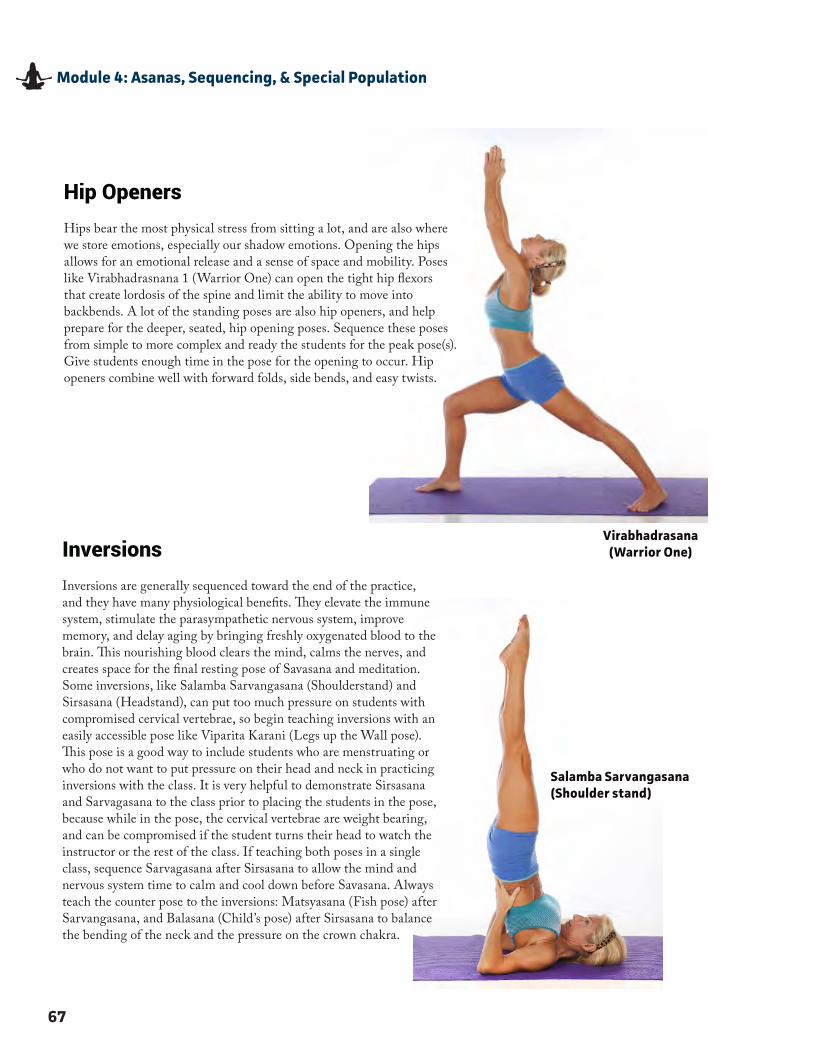
67
Module 4: Asanas, Sequencing, & Special Population
Hip OpenersHips bear the most physical stress from sitting a lot, and are also where we store emotions, especially our shadow emotions� Opening the hips allows for an emotional release and a sense of space and mobility� Poses like Virabhadrasnana 1 (Warrior One) can open the tight hip flexors that create lordosis of the spine and limit the ability to move into backbends� A lot of the standing poses are also hip openers, and help prepare for the deeper, seated, hip opening poses� Sequence these poses from simple to more complex and ready the students for the peak pose(s)� Give students enough time in the pose for the opening to occur� Hip openers combine well with forward folds, side bends, and easy twists�
InversionsInversions are generally sequenced toward the end of the practice, and they have many physiological benefits� They elevate the immune system, stimulate the parasympathetic nervous system, improve memory, and delay aging by bringing freshly oxygenated blood to the brain� This nourishing blood clears the mind, calms the nerves, and creates space for the final resting pose of Savasana and meditation� Some inversions, like Salamba Sarvangasana (Shoulderstand) and Sirsasana (Headstand), can put too much pressure on students with compromised cervical vertebrae, so begin teaching inversions with an easily accessible pose like Viparita Karani (Legs up the Wall pose)� This pose is a good way to include students who are menstruating or who do not want to put pressure on their head and neck in practicing inversions with the class� It is very helpful to demonstrate Sirsasana and Sarvagasana to the class prior to placing the students in the pose, because while in the pose, the cervical vertebrae are weight bearing, and can be compromised if the student turns their head to watch the instructor or the rest of the class� If teaching both poses in a single class, sequence Sarvagasana after Sirsasana to allow the mind and nervous system time to calm and cool down before Savasana� Always teach the counter pose to the inversions: Matsyasana (Fish pose) after Sarvangasana, and Balasana (Child’s pose) after Sirsasana to balance the bending of the neck and the pressure on the crown chakra�
Virabhadrasana(Warrior One)
Salamba Sarvangasana(Shoulder stand)
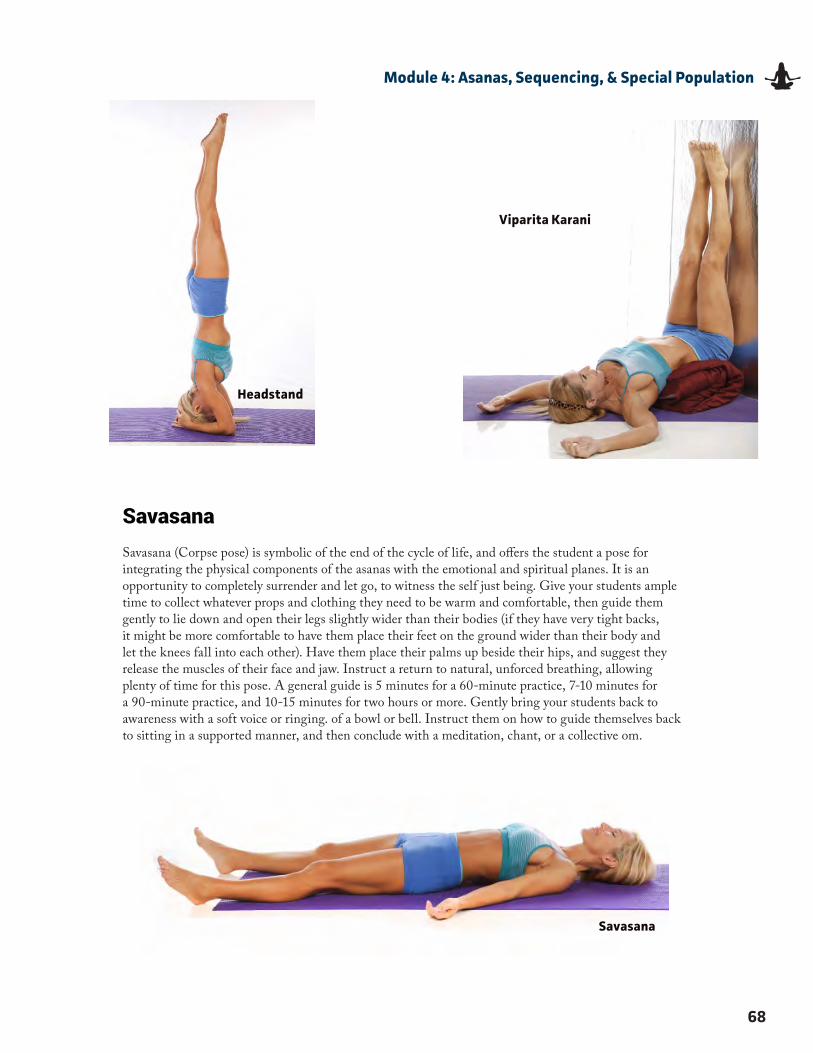
68
Module 4: Asanas, Sequencing, & Special Population
SavasanaSavasana (Corpse pose) is symbolic of the end of the cycle of life, and offers the student a pose for integrating the physical components of the asanas with the emotional and spiritual planes� It is an opportunity to completely surrender and let go, to witness the self just being� Give your students ample time to collect whatever props and clothing they need to be warm and comfortable, then guide them gently to lie down and open their legs slightly wider than their bodies (if they have very tight backs, it might be more comfortable to have them place their feet on the ground wider than their body and let the knees fall into each other)� Have them place their palms up beside their hips, and suggest they release the muscles of their face and jaw� Instruct a return to natural, unforced breathing, allowing plenty of time for this pose� A general guide is 5 minutes for a 60-minute practice, 7-10 minutes for a 90-minute practice, and 10-15 minutes for two hours or more� Gently bring your students back to awareness with a soft voice or ringing� of a bowl or bell� Instruct them on how to guide themselves back to sitting in a supported manner, and then conclude with a meditation, chant, or a collective om�
Savasana
Headstand
Viparita Karani
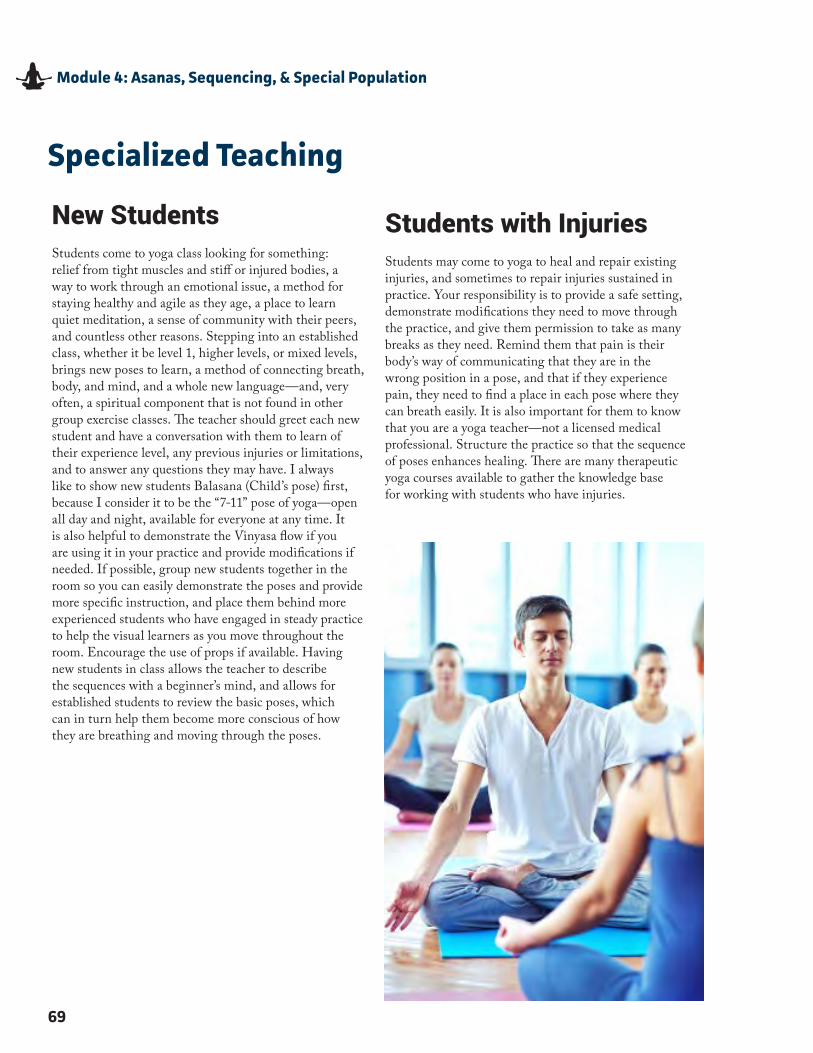
69
Module 4: Asanas, Sequencing, & Special Population
Specialized Teaching
New StudentsStudents come to yoga class looking for something: relief from tight muscles and stiff or injured bodies, a way to work through an emotional issue, a method for staying healthy and agile as they age, a place to learn quiet meditation, a sense of community with their peers, and countless other reasons� Stepping into an established class, whether it be level 1, higher levels, or mixed levels, brings new poses to learn, a method of connecting breath, body, and mind, and a whole new language—and, very often, a spiritual component that is not found in other group exercise classes� The teacher should greet each new student and have a conversation with them to learn of their experience level, any previous injuries or limitations, and to answer any questions they may have� I always like to show new students Balasana (Child’s pose) first, because I consider it to be the “7-11” pose of yoga—open all day and night, available for everyone at any time� It is also helpful to demonstrate the Vinyasa flow if you are using it in your practice and provide modifications if needed� If possible, group new students together in the room so you can easily demonstrate the poses and provide more specific instruction, and place them behind more experienced students who have engaged in steady practice to help the visual learners as you move throughout the room� Encourage the use of props if available� Having new students in class allows the teacher to describe the sequences with a beginner’s mind, and allows for established students to review the basic poses, which can in turn help them become more conscious of how they are breathing and moving through the poses�
Students with InjuriesStudents may come to yoga to heal and repair existing injuries, and sometimes to repair injuries sustained in practice� Your responsibility is to provide a safe setting, demonstrate modifications they need to move through the practice, and give them permission to take as many breaks as they need� Remind them that pain is their body’s way of communicating that they are in the wrong position in a pose, and that if they experience pain, they need to find a place in each pose where they can breath easily� It is also important for them to know that you are a yoga teacher—not a licensed medical professional� Structure the practice so that the sequence of poses enhances healing� There are many therapeutic yoga courses available to gather the knowledge base for working with students who have injuries�
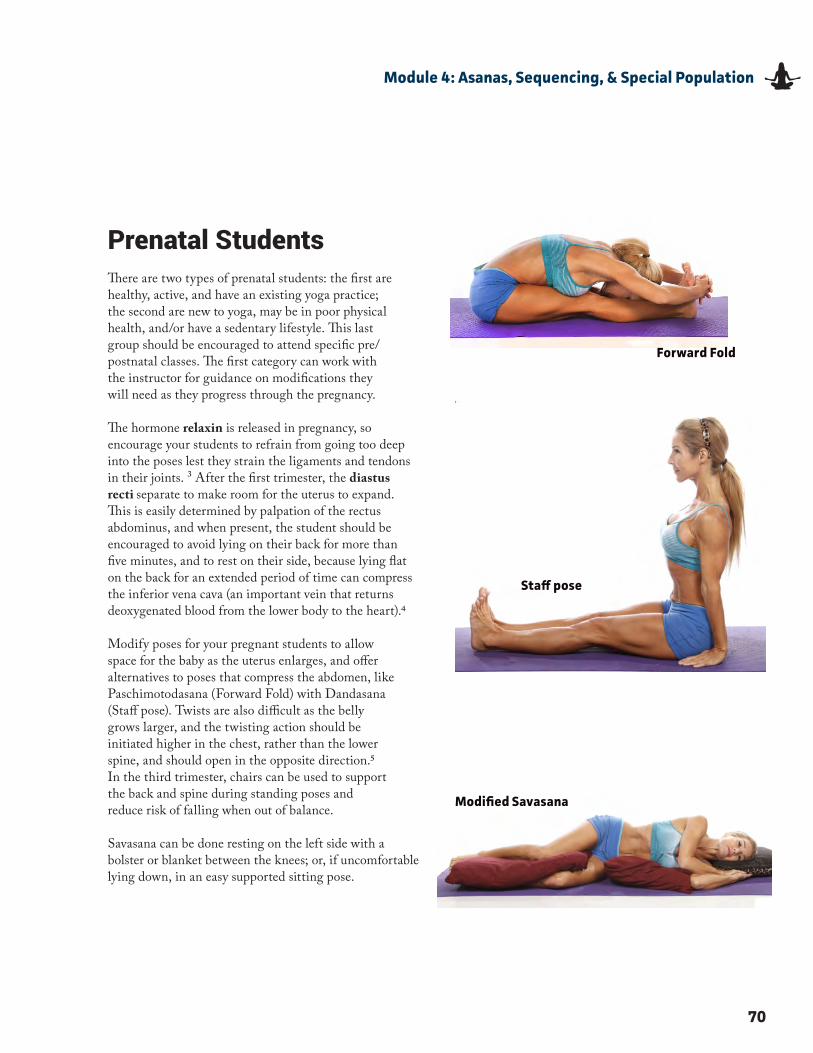
70
Module 4: Asanas, Sequencing, & Special Population
Prenatal StudentsThere are two types of prenatal students: the first are healthy, active, and have an existing yoga practice; the second are new to yoga, may be in poor physical health, and/or have a sedentary lifestyle� This last group should be encouraged to attend specific pre/postnatal classes� The first category can work with the instructor for guidance on modifications they will need as they progress through the pregnancy�
The hormone relaxin is released in pregnancy, so encourage your students to refrain from going too deep into the poses lest they strain the ligaments and tendons in their joints� 3 After the first trimester, the diastus recti separate to make room for the uterus to expand� This is easily determined by palpation of the rectus abdominus, and when present, the student should be encouraged to avoid lying on their back for more than five minutes, and to rest on their side, because lying flat on the back for an extended period of time can compress the inferior vena cava (an important vein that returns deoxygenated blood from the lower body to the heart)�4
Modify poses for your pregnant students to allow space for the baby as the uterus enlarges, and offer alternatives to poses that compress the abdomen, like Paschimotodasana (Forward Fold) with Dandasana (Staff pose)� Twists are also difficult as the belly grows larger, and the twisting action should be initiated higher in the chest, rather than the lower spine, and should open in the opposite direction�5In the third trimester, chairs can be used to support the back and spine during standing poses and reduce risk of falling when out of balance�
Savasana can be done resting on the left side with a bolster or blanket between the knees; or, if uncomfortable lying down, in an easy supported sitting pose�
Forward Fold
Staff pose
Modified Savasana
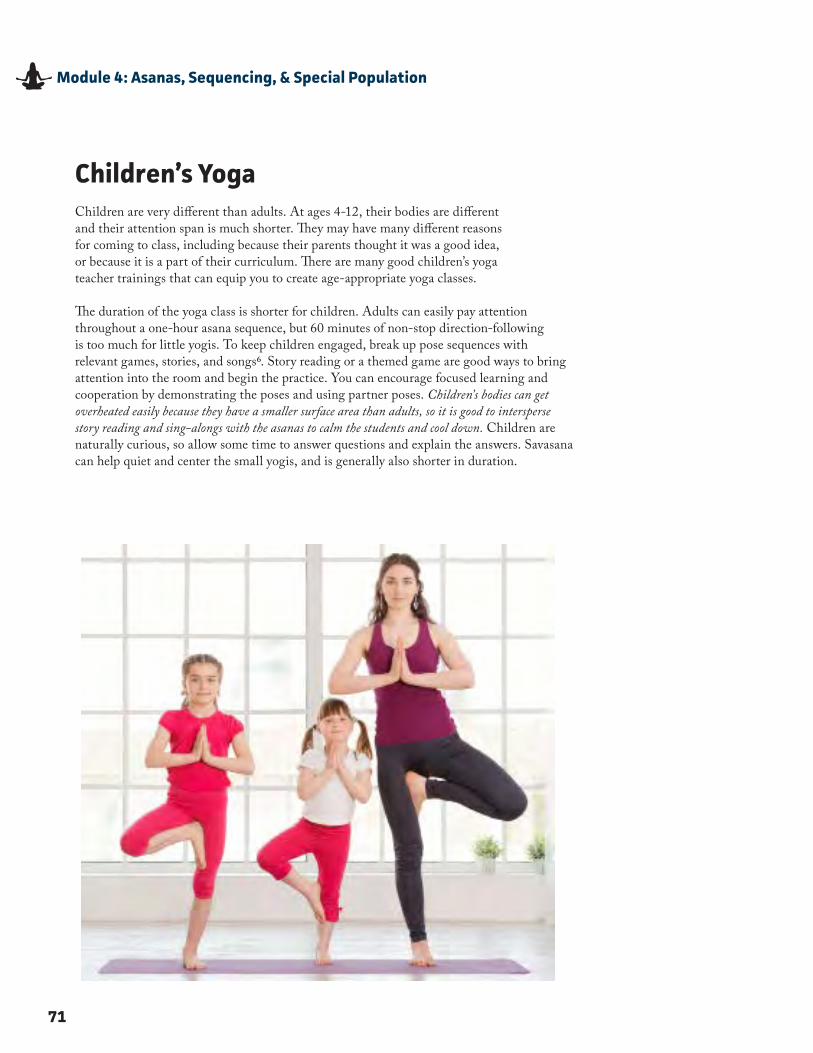
71
Module 4: Asanas, Sequencing, & Special Population
Children’s YogaChildren are very different than adults� At ages 4-12, their bodies are different and their attention span is much shorter� They may have many different reasons for coming to class, including because their parents thought it was a good idea, or because it is a part of their curriculum� There are many good children’s yoga teacher trainings that can equip you to create age-appropriate yoga classes�
The duration of the yoga class is shorter for children� Adults can easily pay attention throughout a one-hour asana sequence, but 60 minutes of non-stop direction-following is too much for little yogis� To keep children engaged, break up pose sequences with relevant games, stories, and songs6� Story reading or a themed game are good ways to bring attention into the room and begin the practice� You can encourage focused learning and cooperation by demonstrating the poses and using partner poses� Children’s bodies can get overheated easily because they have a smaller surface area than adults, so it is good to intersperse story reading and sing-alongs with the asanas to calm the students and cool down. Children are naturally curious, so allow some time to answer questions and explain the answers� Savasana can help quiet and center the small yogis, and is generally also shorter in duration�
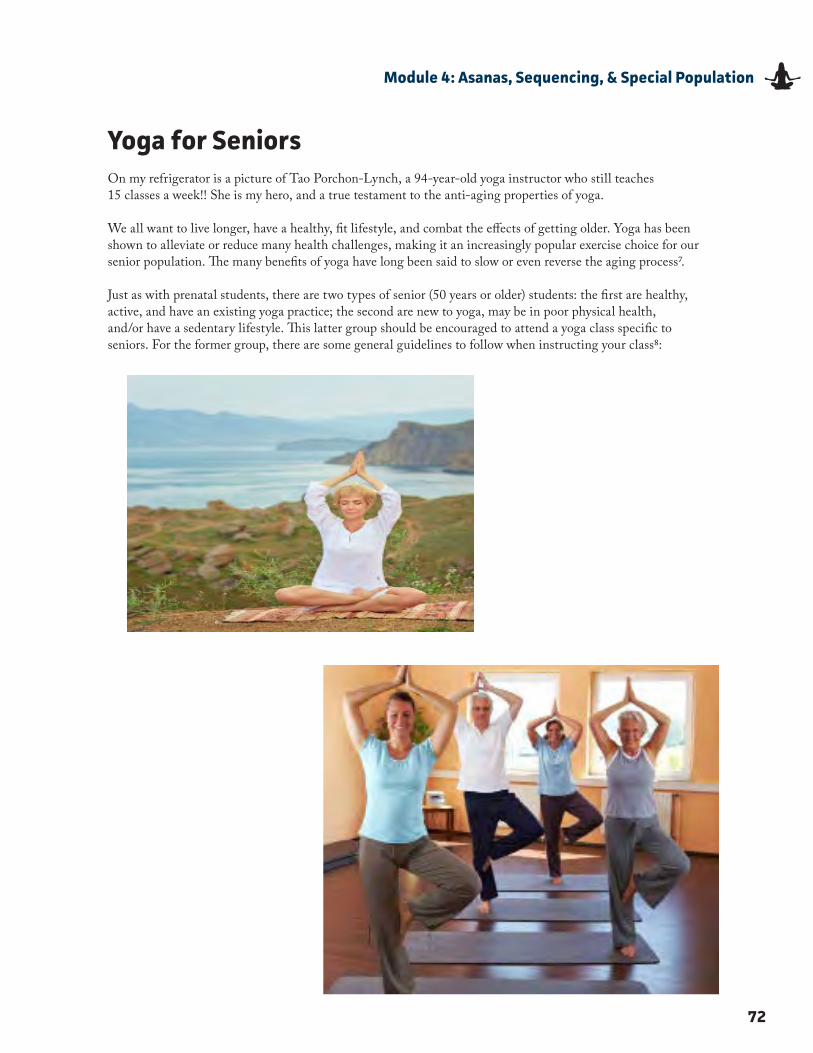
72
Module 4: Asanas, Sequencing, & Special Population
Yoga for SeniorsOn my refrigerator is a picture of Tao Porchon-Lynch, a 94-year-old yoga instructor who still teaches 15 classes a week!! She is my hero, and a true testament to the anti-aging properties of yoga�
We all want to live longer, have a healthy, fit lifestyle, and combat the effects of getting older� Yoga has been shown to alleviate or reduce many health challenges, making it an increasingly popular exercise choice for our senior population� The many benefits of yoga have long been said to slow or even reverse the aging process7�
Just as with prenatal students, there are two types of senior (50 years or older) students: the first are healthy, active, and have an existing yoga practice; the second are new to yoga, may be in poor physical health, and/or have a sedentary lifestyle� This latter group should be encouraged to attend a yoga class specific to seniors� For the former group, there are some general guidelines to follow when instructing your class8:
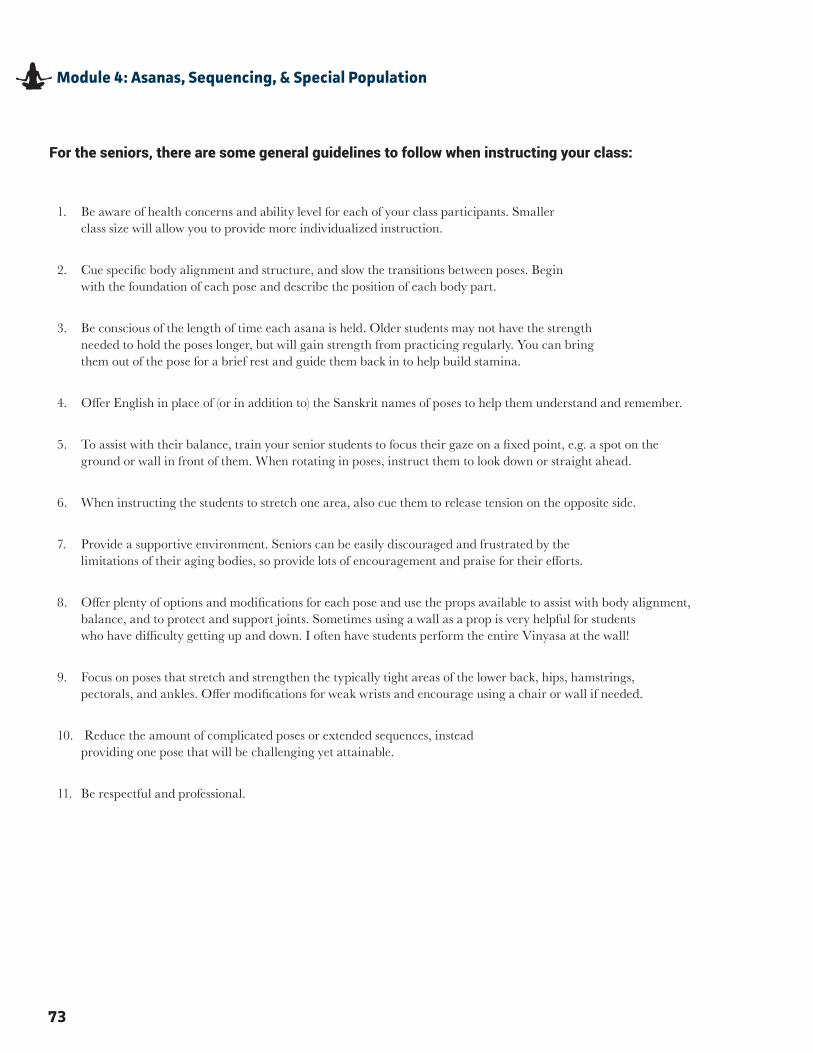
73
Module 4: Asanas, Sequencing, & Special Population
1. Be aware of health concerns and ability level for each of your class participants. Smaller class size will allow you to provide more individualized instruction.
2. Cue specific body alignment and structure, and slow the transitions between poses. Begin with the foundation of each pose and describe the position of each body part.
3. Be conscious of the length of time each asana is held. Older students may not have the strength needed to hold the poses longer, but will gain strength from practicing regularly. You can bring them out of the pose for a brief rest and guide them back in to help build stamina.
4. Offer English in place of (or in addition to) the Sanskrit names of poses to help them understand and remember.
5. To assist with their balance, train your senior students to focus their gaze on a fixed point, e.g. a spot on the ground or wall in front of them. When rotating in poses, instruct them to look down or straight ahead.
6. When instructing the students to stretch one area, also cue them to release tension on the opposite side.
7. Provide a supportive environment. Seniors can be easily discouraged and frustrated by the limitations of their aging bodies, so provide lots of encouragement and praise for their efforts.
8. Offer plenty of options and modifications for each pose and use the props available to assist with body alignment, balance, and to protect and support joints. Sometimes using a wall as a prop is very helpful for students who have difficulty getting up and down. I often have students perform the entire Vinyasa at the wall!
9. Focus on poses that stretch and strengthen the typically tight areas of the lower back, hips, hamstrings, pectorals, and ankles. Offer modifications for weak wrists and encourage using a chair or wall if needed.
10. Reduce the amount of complicated poses or extended sequences, instead providing one pose that will be challenging yet attainable.
11. Be respectful and professional.
For the seniors, there are some general guidelines to follow when instructing your class:
74
Module 4: Asanas, Sequencing, & Special Population
References
1. Stephens, Mark. Teaching Yoga Essential Foundations and Techniques pg 284
2. Stephens, Mark. Yoga Sequencing Designing Transformative Yoga Classes pg 80
3. Six Tips for Modifying Your Practice for Pregnant Students https://yogainternational.com/article/view/6-tips-for-modifying-your-class-for-pregnant-students
4. Ibid.
5. Ibid.
6. Heagburg, Kat. The Secret to Teaching Yoga to Children. https://yogainternational.com/article/view/the-secret-to-teaching-yoga-to-children
7. Kooperman, Sara, and Ackerman, Lisa. Yoga for the 50+. http://www.seniorfitness.net/YOGA.htm
8. Ibid.
Module 5 Teaching Pranayama

76
Module 5: Teaching Pranayama
understanding toward you� The pause that follows is an opportunity to sit quietly with God� The exhale is your path to move yourself closer to God, and the pause that follows the exhale is the moment of isvarapranidhana, the last limb of yoga, a surrender and knowing that there is something greater than you�” For me, paying attention to these four phases of the breath make it easier to stay aware and connected to my breath, during my practice�
The object of pranayama is to pay attention to the four phases of the breath, with particular awareness of the quality of exhalation� Yoga’s goal is to reduce avidya (ignorance, misconceptions) and eliminate impurities3� When the exhale is restricted or uneven, it is like a clogged pipe: the elimination of waste is blocked and does not leave room for clean, pure prana to flow in� When we can empty ourselves, then there is room to take in a new breath, and to practice breath retention for some techniques�
There is a physiological need to breath� Cells and tissues need the oxygen received from the inhale, and once oxidized, need to flush out the resulting carbon dioxide on the exhale� Oxygen gets delivered to cells from arterial blood via capillary membranes in the lungs and heart, and gets returned to the heart and lungs from cell membranes in deoxygenated venous blood� In normal subconscious breathing, this exchange occurs about 12-15 times per minute, and increases with stimulation such as exercise or elevated emotional states�
Breath Awareness
Prana is the Sanskrit word for life force� Pra means first and na is the smallest basic unit of energy, so prana is involved in every part of our being� Without prana, we are not alive� Free-flowing and undisturbed prana produces health and ease in both body and mind�
Pranayama is the lengthening and control of our breath� Pranayama enhances respiratory function, improves the circulatory system, and when practiced with asana, allows the student to move energy throughout the body and clarify the mind� The real practice of yoga is directing awareness to each breath, yet this is often the most elusive element� The distraction of thoughts, sounds, or physical sensations are constant and cause the breath to fade� When we are fully connected to and aware of every part of our breath, we experience what Pantajali describes in Yoga Sutras 1-2 yogas chitta vritti nirodha: 1 “Yoga is the cessation of the fluctuations of the mind”� When you are truly focused on each part of the breath—the inhales, the exhales, and the pauses that surround them—you are able to be present, aware, and engaged in the moment� Seane Corne taught a workshop where we matched the duration of the asana movement exactly with the length of inhales and exhales in Suryanamaskar A & B; it was a wonderful way to become very aware of the breath and left no time for the distractions of thought� Doug Keller says the “aim of pranayama is to foster a free and undisturbed flow of prana, which quiets the agitations of the mind by nurturing a smooth and clear flow of consciousness�” 2
Prana is associated with the inhale, and bringing energy into the body� Apana is the elimination or exhalation of negative energy or toxins� A healthy person has lots of prana inside, while the restrictions of an unhealthy or sick body keeps more prana outside of the corporeal� A clear and transparent mind does little to disturb the body; however, when we are blocked in our mind or body, there is little space for prana to flow� We can experience a myriad of emotions and thoughts that hinder the flow of prana, which is one of the reasons it is so difficult to be conscious of the breath for long periods of time� When the breath is smooth and even on the inhale, and more importantly on the exhale, it is physiologically difficult to feel anxious or “freaked out�” When the body and the mind are calm, they are prepared for meditation� Generally, extending the exhalation longer than the inhalation has a relaxing effect on the nervous system and the body; similarly, extending the inhalation longer than the exhalation has an energizing effect� Being aware of the breath is also a pathway for connection to God or Spirit� Sri T� K� V� Desikachar (son of Sri T� K� V� Krishnamacharya) taught me his father’s viewpoint on breathing: “When you inhale, you have a chance to draw God or the spirit of your own
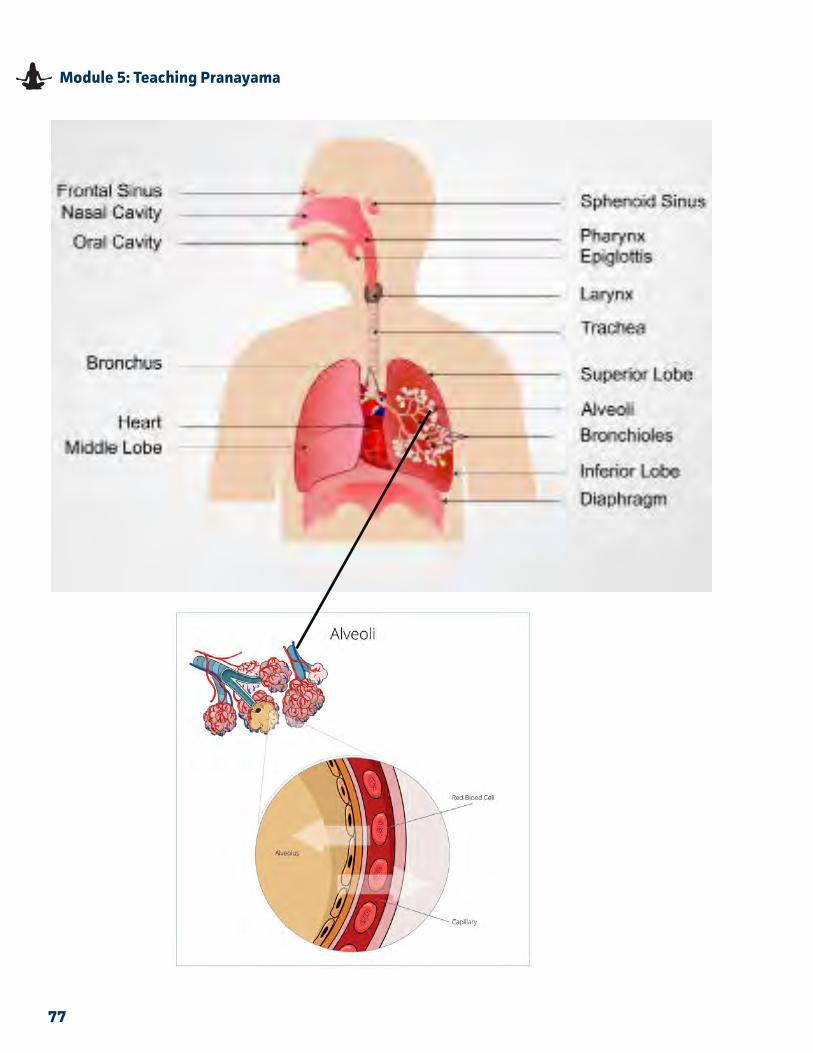
77
Module 5: Teaching Pranayama
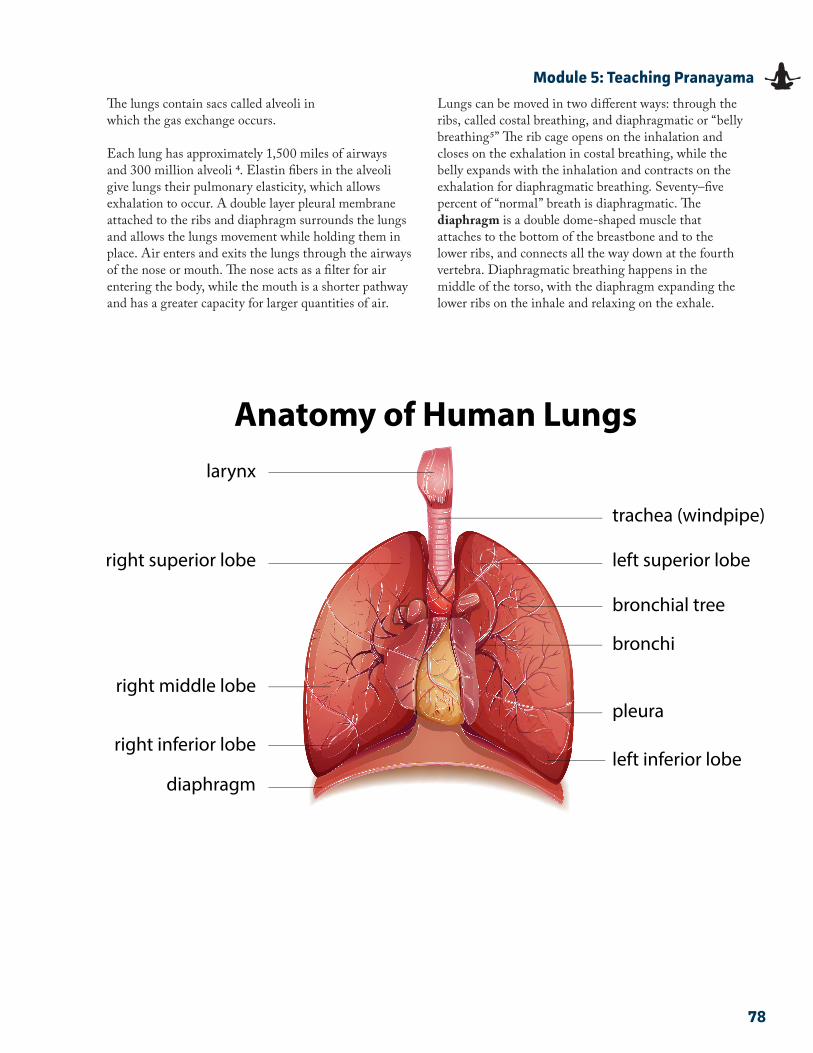
78
Module 5: Teaching Pranayama
The lungs contain sacs called alveoli in which the gas exchange occurs�
Each lung has approximately 1,500 miles of airways and 300 million alveoli 4� Elastin fibers in the alveoli give lungs their pulmonary elasticity, which allows exhalation to occur� A double layer pleural membrane attached to the ribs and diaphragm surrounds the lungs and allows the lungs movement while holding them in place� Air enters and exits the lungs through the airways of the nose or mouth� The nose acts as a filter for air entering the body, while the mouth is a shorter pathway and has a greater capacity for larger quantities of air�
Lungs can be moved in two different ways: through the ribs, called costal breathing, and diaphragmatic or “belly breathing5” The rib cage opens on the inhalation and closes on the exhalation in costal breathing, while the belly expands with the inhalation and contracts on the exhalation for diaphragmatic breathing� Seventy–five percent of “normal” breath is diaphragmatic� The diaphragm is a double dome-shaped muscle that attaches to the bottom of the breastbone and to the lower ribs, and connects all the way down at the fourth vertebra� Diaphragmatic breathing happens in the middle of the torso, with the diaphragm expanding the lower ribs on the inhale and relaxing on the exhale�
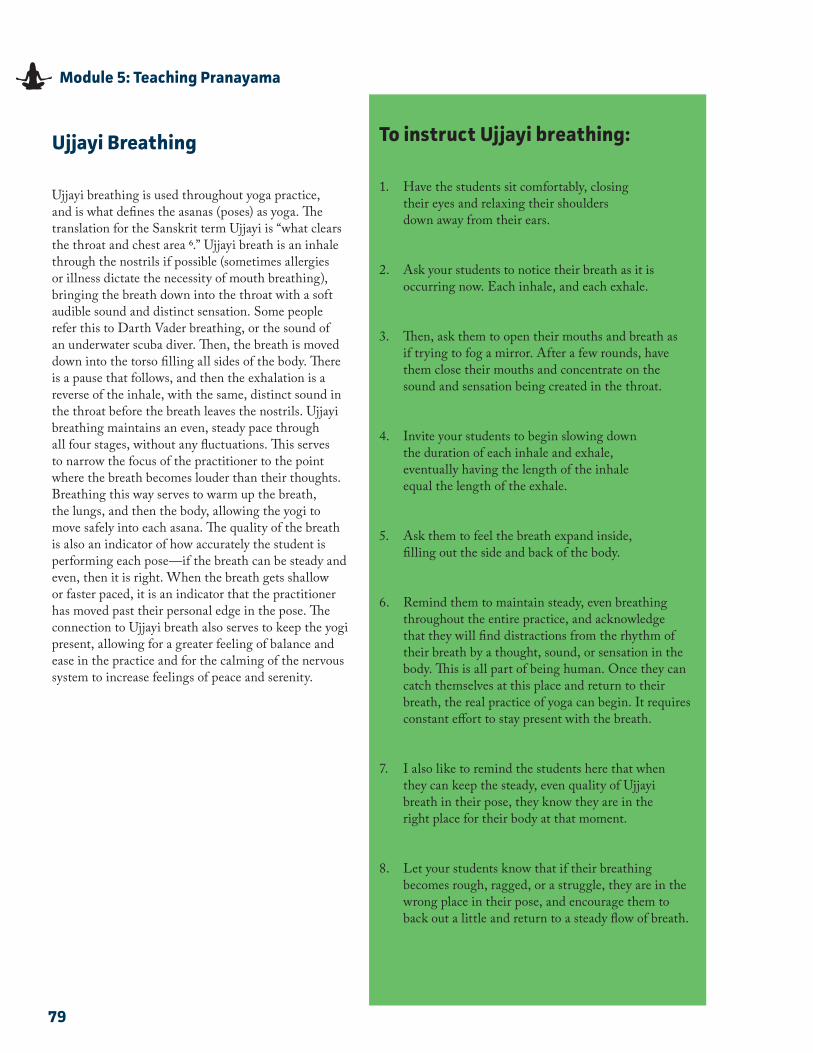
79
Module 5: Teaching Pranayama
Ujjayi Breathing
Ujjayi breathing is used throughout yoga practice, and is what defines the asanas (poses) as yoga� The translation for the Sanskrit term Ujjayi is “what clears the throat and chest area 6�” Ujjayi breath is an inhale through the nostrils if possible (sometimes allergies or illness dictate the necessity of mouth breathing), bringing the breath down into the throat with a soft audible sound and distinct sensation� Some people refer this to Darth Vader breathing, or the sound of an underwater scuba diver� Then, the breath is moved down into the torso filling all sides of the body� There is a pause that follows, and then the exhalation is a reverse of the inhale, with the same, distinct sound in the throat before the breath leaves the nostrils� Ujjayi breathing maintains an even, steady pace through all four stages, without any fluctuations� This serves to narrow the focus of the practitioner to the point where the breath becomes louder than their thoughts� Breathing this way serves to warm up the breath, the lungs, and then the body, allowing the yogi to move safely into each asana� The quality of the breath is also an indicator of how accurately the student is performing each pose—if the breath can be steady and even, then it is right� When the breath gets shallow or faster paced, it is an indicator that the practitioner has moved past their personal edge in the pose� The connection to Ujjayi breath also serves to keep the yogi present, allowing for a greater feeling of balance and ease in the practice and for the calming of the nervous system to increase feelings of peace and serenity�
To instruct Ujjayi breathing:
1� Have the students sit comfortably, closing their eyes and relaxing their shoulders down away from their ears�
2� Ask your students to notice their breath as it is occurring now� Each inhale, and each exhale�
3� Then, ask them to open their mouths and breath as if trying to fog a mirror� After a few rounds, have them close their mouths and concentrate on the sound and sensation being created in the throat�
4� Invite your students to begin slowing down the duration of each inhale and exhale, eventually having the length of the inhale equal the length of the exhale�
5� Ask them to feel the breath expand inside, filling out the side and back of the body�
6� Remind them to maintain steady, even breathing throughout the entire practice, and acknowledge that they will find distractions from the rhythm of their breath by a thought, sound, or sensation in the body� This is all part of being human� Once they can catch themselves at this place and return to their breath, the real practice of yoga can begin� It requires constant effort to stay present with the breath�
7� I also like to remind the students here that when they can keep the steady, even quality of Ujjayi breath in their pose, they know they are in the right place for their body at that moment�
8� Let your students know that if their breathing becomes rough, ragged, or a struggle, they are in the wrong place in their pose, and encourage them to back out a little and return to a steady flow of breath�
80
Module 5: Teaching Pranayama
Other Breathing Methods
Kumbhaka: Retention Breathing
Kumbhaka means “empty pot” in Sanskrit, and Khumbhaka pranayama is the practice of staying with and expanding the natural pauses that surround each inhale and each exhale� In these moments, the breath seems to vanish, and the body and mind can become more still and clear� In these effortless moments, meditation can begin�
The pause after the inhale is Antara Kumbhaka, and the retention after the exhale is Bahya Kumbhaka� These retentions are not forced; they have a sense of naturalness and ease�
To teach Antara Kumbhaka:
1� Have students sit in a comfortable, upright position, and ask them to notice their natural breathing rhythm�
2� Begin instructing Ujjayi breathing, having the students gradually deepen their breath� Encourage them to feel their heart space and to narrow their focus to each breath�
3� Ask the students to begin noticing the natural pause at the end of the inhale and ask them to become aware of what is happening in their body and mind�
4� Cue your students to gently hold the pause for a few seconds without forcing or struggling to hold it, then begin an easy transition to the exhale�
5� After one Antara retention, have your students breathe several rounds of Ujjayi, with a continuing smooth and steady rhythm to each inhale and exhale�
6� Then, on the next round of Antara, ask your students to lengthen the retention by a second or two� Repeat the Ujjayi for several rounds, each time lengthening the pause after the inhale until they can comfortably retain the pause for 15 seconds�
7� On the pause, have your students engage muladhara (root lock), uddiyana (belly lock), and jalandhara (chin lock) bhandas to contain the prana energy�
To teach Bahya Kumbhaka:
1� After the students can easily perform Antara kumbhaka, introduce the retention after the exhalation: Bayha Kumbhaka�
2� Begin with several rounds of Ujjayi breathing, having the students observe their natural exhalations and the pauses that follow�
3� As with Antara, have your students hold the pause after the exhalation for one count and then follow with several rounds of Ujjayi�
4� On the following Bayha round, lengthen the pause for one extra count, encouraging them to keep a relaxed face and body and to avoid gripping the belly� Return to several rounds of Ujjayi, and repeat the process until they reach a fifteen-second hold�
5� If the inhale rushes in, they have held the pause for too long—it should be a steady and smooth transition with a relaxed body�
81
Module 5: Teaching Pranayama
Viloma Pranayama
The Sanskrit Viloma means “interrupted” or “going against the grain�” This technique expands on the Kumbhaka, dividing both the inhale and the exhale into three parts, and is designed to make us more mindful during the pauses in our breathing� The pause is a suspension of breath instead of a hold, and there should be no strain or pressure during the pause so that a space is created inside to be still and quiet—there should be a feeling of no breath at all when the throat closes�Ujjayi breathing is again used and the breath and pauses are counted to help give equal attention to each part of the breathing cycle� The pace is an individual, steady rhythm� If you gasp for the next breath, you are going too slowly�
To instruct Viloma Pranayama:
1� Ask your students to lie down comfortably and begin Ujjayi breathing�
2� Tell them each part of the breathing should be relaxed and unstrained�
3� For the inhalation, breathe into the belly for a count of four�
4� Pause for a count of two�
5� Breathe into the mid-chest for a count of four�
6� Pause for a count of two�
7� Breathe into the upper chest for a count of four�
8� Pause for a count of two�
9� Release the breath in one long, smooth exhale�
10� Repeat for several rounds�
11� Return to Ujjayi breathing for several rounds and rest in Svavasana before working with the exhales�
12� Reverse the process for the exhalation cycles, taking one long Ujjayi inhale and then beginning the exhale from the belly, moving to mid-chest, and finishing with the upper chest using the four-to-two count ratio�
13� Repeat for several rounds and then rest in Savasana�
Other Breathing Methods
82
Module 5: Teaching Pranayama
Kapalabhati Pranayama
Kapala means “skull” in Sanskrit, and Bhati means “luster,” or “to shine with cleansing�” This pranayama practice is very energizing—it oxygenates the blood supply and improves circulation by working the diaphragm as a pump� It also drains and clears the sinuses and helps the lungs to become more elastic and supple� The skull shining effect comes from increased circulation to the brain as the oxygenated blood cleanses the brain and glands located in the head and upper body� It also massages and tones the abdominal muscles and digestive organs�
There are three parts to Kapalabhati breathing: a deep inhale, active puffs of breath through the nostrils, a retention (kumbhaka) for a few counts, and finally a natural exhalation�
To instruct Kapalabhati Pranayama:
1� Guide students through several rounds of Ujjayi breathing to warm up the lungs and body�
2� Take a deep inhalation�
3� At the beginning of the exhalation, blow 18-25 short puffs of air through the nostrils by pulling the abdominal muscles quickly in toward the spine� There will be a natural release of the abdominals that creates a mini-inhalation� This active phase of the exhalation comes from the diaphragm and should be steady, even, and unforced� This pumping action oxygenates the blood�
4� Follow with a slight retention, antara kumbhaka for a few counts, and a natural exhalation that is steady and not rushed�
5� Take a natural pause, then breath in a deep Ujjayi breath and repeat�
6� Perform several rounds, working up to five minutes�
7� When beginning, you can put Ujjayi in between rounds of Kapalabhati�
8� Finish with Savasana or move into an asana practice�
Other Breathing Methods
83
Module 5: Teaching Pranayama
Other Breathing Methods
Sitali Pranayama
Sitali means cooling, and is used to calm the mind and body and cool down� The breath in Sitali is performed with the mouth instead of the nostrils�
To instruct Sitali Pranayama:
1� Have students sit comfortably, close their eyes, and relax�
2� Curl the sides of your extended tongue to make a channel for air to move through�
3� Inhale smoothly and evenly through the tongue and fill the lungs without straining�
4� At the end of the inhale, withdraw the tongue and close the mouth�
5� Lower the head into Jalandhara bhanda and hold the breath for a short Kumbhaka�
6� Exhale slowly and evenly with Ujjayi breath through the nostrils�
7� Repeat for several rounds, up to 10 minutes�
8� Take one Ujjayi inhale and exhale�
9� Rest in Savasana�
Bhastrika Pranayama
Bhastrika means “bellows breath” and is similar, yet more vigorous than Kapalabhati pranayama, as there is no pause before the inhalation and the pace is faster� This can be introduced after your students are proficient with Kapalabhati breathing�
To instruct Bhastrika Pranayama:
1� Have students sit and perform several rounds of Ujjayi breathing to warm up the lungs and body�
2� Take a deep inhalation�
3� Actively exhale as in Kapalabhati but with a quicker pace and more forceful blasts of air through the nostrils� The abdomen releases immediately after each puffed exhalation� The 18-25 puffs of exhalation and the mini-inhalations as the diaphragm relaxes should be more regulated than with kapalabhati, creating the bellows effect with the belly�
4� Keeps nostrils and shoulders relaxed with eyes closed or gazing at the tip of the nose�
5� At the end of a round of Bhastrika, exhale steadily and without rushing, and then inhale fully and retain the breath for as long as is comfortable�
6� Exhale slowly and smoothly, pause, and then perform Kumbhaka abefore beginning next round of Bhastrika�
7� Work up to several minutes�
8� End with Savasana�
84
Module 5: Teaching Pranayama
Nadi Shodhana Pranayama
Nadhi Shodhana pranayama is alternate nostril breathing, and is designed to clean and clear the energies of the two sides of the body� Ha, meaning Sun, is the right side of the body and is associated with heat� Tha, meaning moon, is the left and cooler side of the body� The time of day can dictate on which side to begin Nadhi Shodhana� If the practice is during the day—the warmer time—begin with the cooler left side, and begin with the warmer right side for an evening practice� This breathing technique is performed with a hand mudra, and has the steady, even inhalations and exhalations of Ujjayi breath�
To instruct Nadi Shodhana for evening:
1� Have students sit upright and comfortably�
2� Rest the left hand in Chin mudra (first knuckle of thumb and fore-finger connected), palm down on left knee�
3� Place the thumb of the right hand gently on top of the notch of the right nostril� Position the forefinger and middle finger on the third eye at the forehead� Relax the right ring finger downward and place the pinkie finger gently on top of the notch on the left nostril�
4� Close the left nostril by pressing the pinkie finger in, and exhale through the right nostril�
5� Inhale smoothly through the right nostril�
6� When the lungs are full, press the right thumb in to close the right nostril and pause; Kumbhaka for a moment�
7� Release the left pinkie and exhale through the left nostril�
8� Pause when the lungs feel empty�
9� Inhale through the left nostril�
10� When the lungs are full, press the left pinkie in to close the left nos-tril and pause; Kumbhaka for a moment�
11� Release the right thumb and exhale through the right nostril�
12� Pause when the lungs feel empty�
13� Repeat again through the right side and work for up to several minutes of rounds of alternate breathing�
14� Finish with an inhalation through the right nostril, release both thumb and pinkie, and exhale through both nostrils�
15� Return to natural breath�
16� Rest in Savasana�
17� Reverse the process to begin on the left for a daytime practice�
Other Breathing Methods
85
Module 5: Teaching Pranayama
References
1� Desikachar, T� K� V� (1987) Pantajali’s Yogasutras: An Introduction p� 2
2� Keller, Doug� (2003) Refining the Breath: The Yogic Practice of Pranayama p� 9
3� Desikachar, T� K� V� (1999) The Heart of Yoga: Developing a Personal Practice p� 59
4� Stephens, Mark� (2010) Teaching Yoga: Essential Foundations and Techniques p� 241
5� Stephens, Mark� (2010) Teaching Yoga: Essential Foundations and Techniques p� 241
6� Desikachar, T� K� V� (1999) The Heart of Yoga: Developing a Personal Practice p� 60
86
Module 6
Techniques and Tools for Teaching Yoga
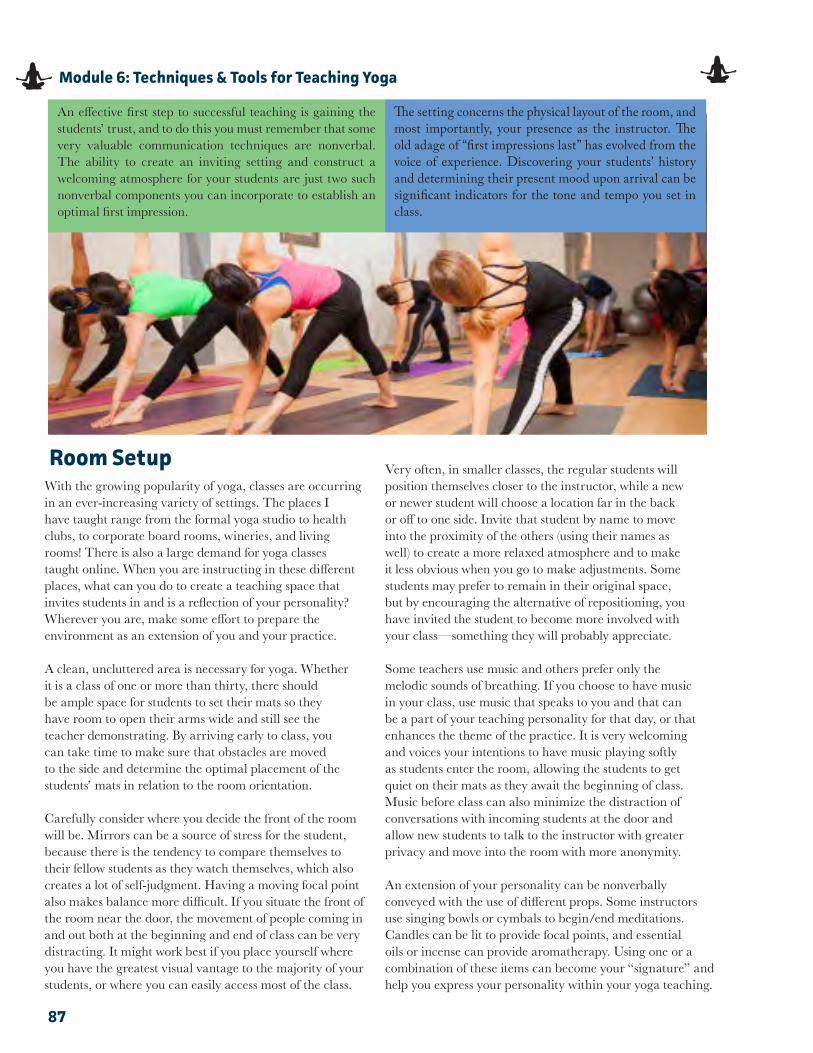
87
Module 6: Techniques & Tools for Teaching Yoga
An effective first step to successful teaching is gaining the students’ trust, and to do this you must remember that some very valuable communication techniques are nonverbal. The ability to create an inviting setting and construct a welcoming atmosphere for your students are just two such nonverbal components you can incorporate to establish an optimal first impression.
The setting concerns the physical layout of the room, and most importantly, your presence as the instructor� The old adage of “first impressions last” has evolved from the voice of experience� Discovering your students’ history and determining their present mood upon arrival can be significant indicators for the tone and tempo you set in class�
Room SetupWith the growing popularity of yoga, classes are occurring in an ever-increasing variety of settings. The places I have taught range from the formal yoga studio to health clubs, to corporate board rooms, wineries, and living rooms! There is also a large demand for yoga classes taught online. When you are instructing in these different places, what can you do to create a teaching space that invites students in and is a reflection of your personality? Wherever you are, make some effort to prepare the environment as an extension of you and your practice.
A clean, uncluttered area is necessary for yoga. Whether it is a class of one or more than thirty, there should be ample space for students to set their mats so they have room to open their arms wide and still see the teacher demonstrating. By arriving early to class, you can take time to make sure that obstacles are moved to the side and determine the optimal placement of the students’ mats in relation to the room orientation.
Carefully consider where you decide the front of the room will be. Mirrors can be a source of stress for the student, because there is the tendency to compare themselves to their fellow students as they watch themselves, which also creates a lot of self-judgment. Having a moving focal point also makes balance more difficult. If you situate the front of the room near the door, the movement of people coming in and out both at the beginning and end of class can be very distracting. It might work best if you place yourself where you have the greatest visual vantage to the majority of your students, or where you can easily access most of the class.
Very often, in smaller classes, the regular students will position themselves closer to the instructor, while a new or newer student will choose a location far in the back or off to one side. Invite that student by name to move into the proximity of the others (using their names as well) to create a more relaxed atmosphere and to make it less obvious when you go to make adjustments. Some students may prefer to remain in their original space, but by encouraging the alternative of repositioning, you have invited the student to become more involved with your class—something they will probably appreciate.
Some teachers use music and others prefer only the melodic sounds of breathing. If you choose to have music in your class, use music that speaks to you and that can be a part of your teaching personality for that day, or that enhances the theme of the practice. It is very welcoming and voices your intentions to have music playing softly as students enter the room, allowing the students to get quiet on their mats as they await the beginning of class. Music before class can also minimize the distraction of conversations with incoming students at the door and allow new students to talk to the instructor with greater privacy and move into the room with more anonymity.
An extension of your personality can be nonverbally conveyed with the use of different props. Some instructors use singing bowls or cymbals to begin/end meditations. Candles can be lit to provide focal points, and essential oils or incense can provide aromatherapy. Using one or a combination of these items can become your “signature” and help you express your personality within your yoga teaching.
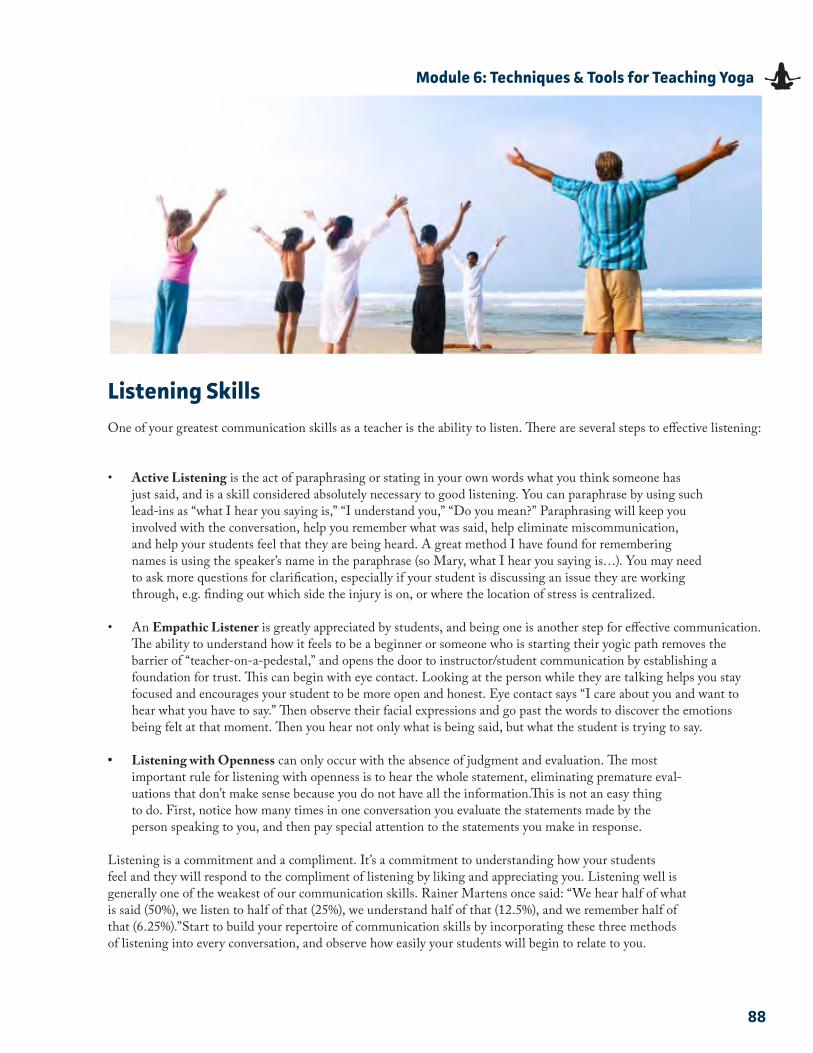
88
Module 6: Techniques & Tools for Teaching Yoga
Listening SkillsOne of your greatest communication skills as a teacher is the ability to listen� There are several steps to effective listening:
• Active Listening is the act of paraphrasing or stating in your own words what you think someone has just said, and is a skill considered absolutely necessary to good listening� You can paraphrase by using such lead-ins as “what I hear you saying is,” “I understand you,” “Do you mean?” Paraphrasing will keep you involved with the conversation, help you remember what was said, help eliminate miscommunication, and help your students feel that they are being heard� A great method I have found for remembering names is using the speaker’s name in the paraphrase (so Mary, what I hear you saying is…)� You may need to ask more questions for clarification, especially if your student is discussing an issue they are working through, e�g� finding out which side the injury is on, or where the location of stress is centralized�
• An Empathic Listener is greatly appreciated by students, and being one is another step for effective communication� The ability to understand how it feels to be a beginner or someone who is starting their yogic path removes the barrier of “teacher-on-a-pedestal,” and opens the door to instructor/student communication by establishing a foundation for trust� This can begin with eye contact� Looking at the person while they are talking helps you stay focused and encourages your student to be more open and honest� Eye contact says “I care about you and want to hear what you have to say�” Then observe their facial expressions and go past the words to discover the emotions being felt at that moment� Then you hear not only what is being said, but what the student is trying to say�
• Listening with Openness can only occur with the absence of judgment and evaluation� The most important rule for listening with openness is to hear the whole statement, eliminating premature eval-uations that don’t make sense because you do not have all the information�This is not an easy thing to do� First, notice how many times in one conversation you evaluate the statements made by the person speaking to you, and then pay special attention to the statements you make in response�
Listening is a commitment and a compliment� It’s a commitment to understanding how your students feel and they will respond to the compliment of listening by liking and appreciating you� Listening well is generally one of the weakest of our communication skills� Rainer Martens once said: “We hear half of what is said (50%), we listen to half of that (25%), we understand half of that (12�5%), and we remember half of that (6�25%)�”Start to build your repertoire of communication skills by incorporating these three methods of listening into every conversation, and observe how easily your students will begin to relate to you�
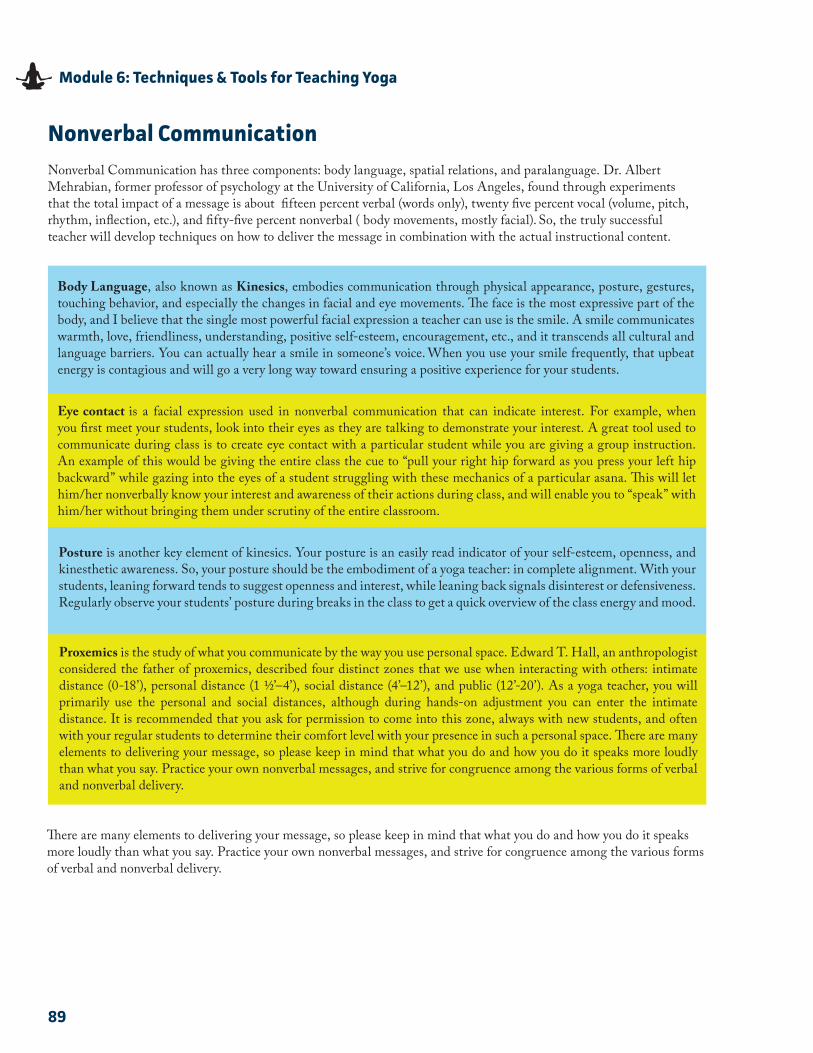
89
Module 6: Techniques & Tools for Teaching Yoga
Nonverbal CommunicationNonverbal Communication has three components: body language, spatial relations, and paralanguage� Dr� Albert Mehrabian, former professor of psychology at the University of California, Los Angeles, found through experiments that the total impact of a message is about fifteen percent verbal (words only), twenty five percent vocal (volume, pitch, rhythm, inflection, etc�), and fifty-five percent nonverbal ( body movements, mostly facial)� So, the truly successful teacher will develop techniques on how to deliver the message in combination with the actual instructional content�
Body Language, also known as Kinesics, embodies communication through physical appearance, posture, gestures, touching behavior, and especially the changes in facial and eye movements� The face is the most expressive part of the body, and I believe that the single most powerful facial expression a teacher can use is the smile� A smile communicates warmth, love, friendliness, understanding, positive self-esteem, encouragement, etc�, and it transcends all cultural and language barriers� You can actually hear a smile in someone’s voice� When you use your smile frequently, that upbeat energy is contagious and will go a very long way toward ensuring a positive experience for your students�
Eye contact is a facial expression used in nonverbal communication that can indicate interest� For example, when you first meet your students, look into their eyes as they are talking to demonstrate your interest� A great tool used to communicate during class is to create eye contact with a particular student while you are giving a group instruction� An example of this would be giving the entire class the cue to “pull your right hip forward as you press your left hip backward” while gazing into the eyes of a student struggling with these mechanics of a particular asana� This will let him/her nonverbally know your interest and awareness of their actions during class, and will enable you to “speak” with him/her without bringing them under scrutiny of the entire classroom�
Posture is another key element of kinesics� Your posture is an easily read indicator of your self-esteem, openness, and kinesthetic awareness� So, your posture should be the embodiment of a yoga teacher: in complete alignment� With your students, leaning forward tends to suggest openness and interest, while leaning back signals disinterest or defensiveness� Regularly observe your students’ posture during breaks in the class to get a quick overview of the class energy and mood�
Proxemics is the study of what you communicate by the way you use personal space� Edward T� Hall, an anthropologist considered the father of proxemics, described four distinct zones that we use when interacting with others: intimate distance (0-18’), personal distance (1 ½’–4’), social distance (4’–12’), and public (12’-20’)� As a yoga teacher, you will primarily use the personal and social distances, although during hands-on adjustment you can enter the intimate distance� It is recommended that you ask for permission to come into this zone, always with new students, and often with your regular students to determine their comfort level with your presence in such a personal space� There are many elements to delivering your message, so please keep in mind that what you do and how you do it speaks more loudly than what you say� Practice your own nonverbal messages, and strive for congruence among the various forms of verbal and nonverbal delivery�
There are many elements to delivering your message, so please keep in mind that what you do and how you do it speaks more loudly than what you say� Practice your own nonverbal messages, and strive for congruence among the various formsof verbal and nonverbal delivery�
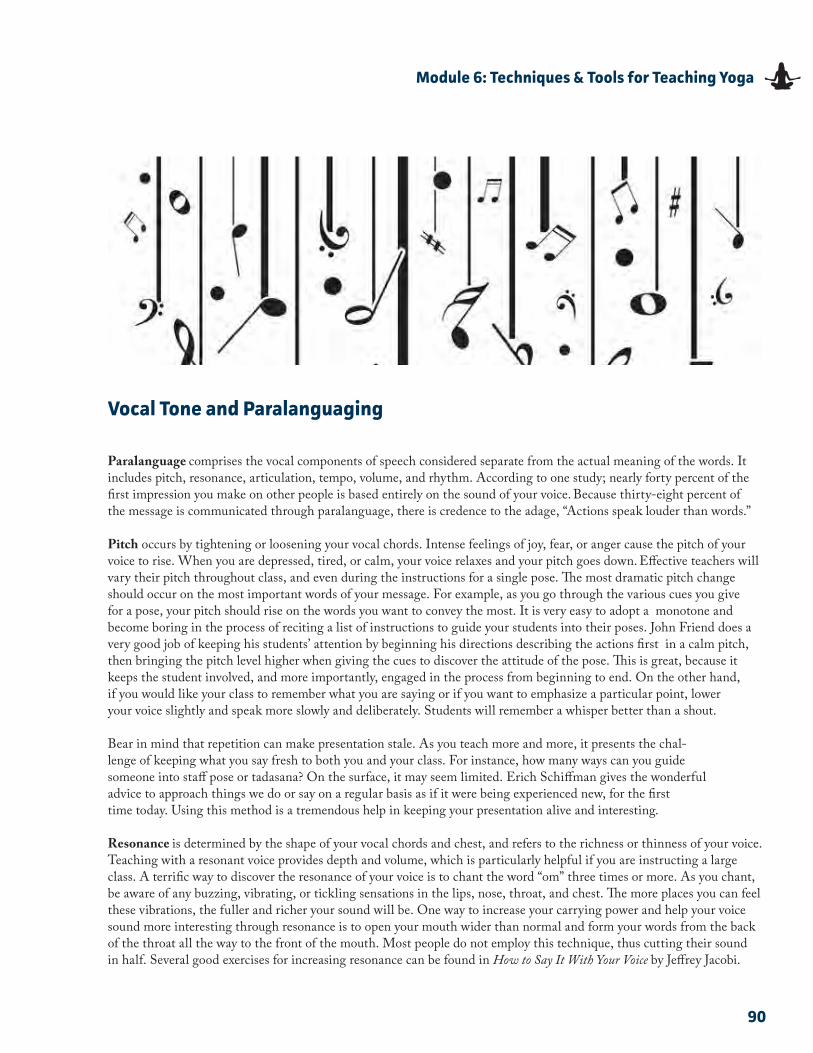
90
Module 6: Techniques & Tools for Teaching Yoga
Vocal Tone and Paralanguaging
Paralanguage comprises the vocal components of speech considered separate from the actual meaning of the words� It includes pitch, resonance, articulation, tempo, volume, and rhythm� According to one study; nearly forty percent of the first impression you make on other people is based entirely on the sound of your voice� Because thirty-eight percent of the message is communicated through paralanguage, there is credence to the adage, “Actions speak louder than words�”
Pitch occurs by tightening or loosening your vocal chords� Intense feelings of joy, fear, or anger cause the pitch of your voice to rise� When you are depressed, tired, or calm, your voice relaxes and your pitch goes down� Effective teachers will vary their pitch throughout class, and even during the instructions for a single pose� The most dramatic pitch change should occur on the most important words of your message� For example, as you go through the various cues you give for a pose, your pitch should rise on the words you want to convey the most� It is very easy to adopt a monotone and become boring in the process of reciting a list of instructions to guide your students into their poses� John Friend does a very good job of keeping his students’ attention by beginning his directions describing the actions first in a calm pitch, then bringing the pitch level higher when giving the cues to discover the attitude of the pose� This is great, because it keeps the student involved, and more importantly, engaged in the process from beginning to end� On the other hand, if you would like your class to remember what you are saying or if you want to emphasize a particular point, lower your voice slightly and speak more slowly and deliberately� Students will remember a whisper better than a shout�
Bear in mind that repetition can make presentation stale� As you teach more and more, it presents the chal-lenge of keeping what you say fresh to both you and your class� For instance, how many ways can you guide someone into staff pose or tadasana? On the surface, it may seem limited� Erich Schiffman gives the wonderful advice to approach things we do or say on a regular basis as if it were being experienced new, for the first time today� Using this method is a tremendous help in keeping your presentation alive and interesting�
Resonance is determined by the shape of your vocal chords and chest, and refers to the richness or thinness of your voice�
Teaching with a resonant voice provides depth and volume, which is particularly helpful if you are instructing a large class� A terrific way to discover the resonance of your voice is to chant the word “om” three times or more� As you chant, be aware of any buzzing, vibrating, or tickling sensations in the lips, nose, throat, and chest� The more places you can feel these vibrations, the fuller and richer your sound will be� One way to increase your carrying power and help your voice sound more interesting through resonance is to open your mouth wider than normal and form your words from the back of the throat all the way to the front of the mouth� Most people do not employ this technique, thus cutting their sound in half� Several good exercises for increasing resonance can be found in How to Say It With Your Voice by Jeffrey Jacobi�
91
Module 6: Techniques & Tools for Teaching Yoga
Articulation is the ability to pronounce distinctly—to enunciate—an extremely valuable tool for a yoga instructor, because often the Sanskrit terms for poses are very similar� For example, the Sanskrit words for the standing poses Parsvakonasana and Parsvottanasana can easily be mistaken for each other without clear, precise articulation� Dropping final consonants is one of the most common enunciation problems for many native-born speakers as well as foreigners� Recording a class you teach can be a very helpful method for discovering where you need some artic-ulation work; instructors who have a regional drawl should pay particular attention to their enunciation of words when working on improving communication techniques�
Tempo or the speed at which words are spoken, is important, because if you speak too slowly, the students’ attention can wander, they may question your knowledge of the topic, and the amount of time they hold the pose can be unintentionally elongated� On the other hand, if you speak too rapidly, many students may find it difficult to concentrate or to follow, and, if the teacher talks nonstop, they may feel overloaded with information� One of the most effective teaching skills to develop is the art of the pause� Pauses give your students a chance to check in with themselves, connect with their breath, and discover what they are feeling in the pose by finding the teacher within versus just following a list of instructions you are giving them� As a rule, it is generally a good idea to speak slowly and use short phrases when working with large classes, because sound needs more time to travel in larger spaces—a principle of acoustics� To get an idea if your instructions are succinct enough, ask yourself if the students would be able to easily repeat what you just said�
Voice Volume can vary dramatically throughout class, conveying many different emotions and energy levels� Finding the right volume comes from experience and an awareness of how your voice travels through a crowded or slightly populated space, as well as how it is interacting with outside noise or music in the classroom� Deep breath-ing, such as Ujjayi Pranayama, will enable you to use air more efficiently and allow you to raise and lower your voice for proper effect without shouting or speaking too low�
Rhythm determines which words will be emphasized in a sentence, and is the arbiter of your intention� For example, notice the different meanings of the following sentences as the rhythm changes: “Am I content!” versus “Am I content?” An exclamation of fact becomes a message of doubt when the emphasis changes between two words� Some roadblocks to effective teaching are using a “singsong” rhythm, or talking in a flat monotone� Using the pause can correct both of these problems� Pausing from time to time allows you to think your thoughts through and gives students a chance to absorb what you have said�
To discover what your voice really sounds like in class, Jeffrey Jacobi suggests you make a recording or your own speech in class and then listen to it for the following things:
1. Is your voice high pitched?
2. Is your voice too loud or soft?
3. Do you talk too fast or slow?
4. Do you sound nasal?
5. If you had to describe your voice to someone else, what words would you use?
6. Do you say your words clearly, making them easy to understand?
7. Are your words complete? (For example, do you drop your G’s? Do you cut off the ends of words?)
8. Do you salt your speech with fillers like “you know,” “okay,” and “uh”?
9. Do you frequently clear your throat or make other noises that interrupt your speech?
10. Do you sound confident or uneasy?
11. Do you sound interested or bored?
12. Does your voice trail off at the end of sentences?
13. Do you sound like someone with authority?
14. When you make a statement, does it sound like you’re asking a question?
15. Imagine you are someone else. Would you enjoy listening to the person on the recording?
It will probably take several reviews to be able to answer all these questions, but it is well worth the effort to unfold the true nature of your speech patterns�
92
Module 6: Techniques & Tools for Teaching Yoga
Neurolinguistic Programming
Neurolinguistic Programming is about learning to communicate effectively and consciously�“Neurolinguistics” describes the relationship between the words we use and the thoughts, reactions, and even results they lead to� Since there is so much material to be covered, only the elements that apply to teaching a yoga class will be included� Once you start to practice these steps, you should be able to “speak” to every student in the room!
The beginning of true communication starts with rapport� Rapport has nothing to do with philosophical agreement or assent, but rather is a state in which both parties feel free to communicate and perceive that they are being understood� Allowing people to communicate on the basis of a common world model will achieve this� The core of the NLP theory is the observation that each individual forms a relatively unconscious model of the world, consisting of assumptions about the world based on his or her experience thereof� Experience is shaped by cultural and physiological variables as well as social interactions, and as a result, each person brings what may be completely different understandings of common experiences to their encounters with others� For example, when students come to their second yoga class (the encounter) after their first yoga class (common experience), each student’s expectations (understandings) may be very different from those of the person on the mat beside them� Since people tend to operate as if their model of the world is the real model, one of the most important ingredients in being an influential teacher is the ability to elicit the belief that you understand� So, the astute teacher will keep in mind how the very different past experiences and interpretations of yoga affect each student coming into their classroom�
John Grinder and Richard Bandler, the founders of NLP, discovered that people habitually encode their thought processes in four well-defined and observable ways� Typically, thoughts or inner processes are expressed verbally as visual, auditory, kinesthetic, or digital modalities� Psychologists have also found a connection between personality (our model of the world) and physical characteristics� There are relatively few pure types, but most of your students will show a marked preference for one or another representational system� A vital key to successful teaching will be your ability to instruct across all four modalities� For instance, I’m a very kinesthetic person, but if I gave only kinesthetic-based cues to a visual student, they would not “see” what I wanted them to do� But, if instead I gave a cue in their primary preference (visual), I would be able to effectively communicate my instruction� The challenge you have as a teacher is to instruct in the other “languages” as well as your primary operating system�
Visual people tend to talk about internal pictures and litter their speech with phrases such as “show me the pose” or “is it supposed to look like this?” Generally, they stand erect with their shoulders held up or back, while breathing more into the upper portion of the chest� They will often keep their necks straight and erect, leading with their chin while they walk with stiff or jerky motions� A large portion of your students will be visual thinkers and learners, responding easily to the demonstration of poses and instructions such as “watch your hands come to the heart in Namaste” or “glance down at your foot�”
Kinesthetic individuals make up the other large portion of personality types; they respond to language that reflects action and feeling and what will “feel good” in a pose� Physical qualities are expressed by round shoulders, and they sometimes slightly bend forward as they speak and listen� Having a larger rib extension than people in other categories, they will breathe into the lower portion of the lungs� Kinesthetic students will easily understand cues such as “softly place your hands at your heart in Namaste” or “feel your muscles hug the bones�”
Auditory groups “hear” what you are saying and respond to terms in that vernacular; however, “tonals” are not very common� A frequent communicative posture for this group is to have the arms folded across the chest, with the head tilted down and to the side� They generally have larger ribcages and utilize their lungs more fully� Examples of tonal instruction would be “silently bring your hands to Namaste” or “quietly place your right foot between your hands in lunge position�”
The next category to address is the digital student, who typically does not respond to sensory cues� Instead, they react to linear and progressive statements such as “bend your elbows and position your hands in Namaste,” or “to help you breathe more, lift your ribcage up and away from the pelvis�” “Digitals’” breath is similar to that of visuals’, higher up in the chest�
There are certain patterns of behavior that seem to be consistent within each of these communication categories, particularly in stressful situations� We can apply these generalizations to the way students select their placement of mats in class� A “visual” pays most attention to the visual aspects of an interaction, including facial expressions and movements of those around him/her, very often placing their mats at an angle that will give them the best vantage point of the instructor and/or themselves� Students who are operating from the kinesthetic perspective rely heavily on feelings in order to understand and make sense of what

93
Module 6: Techniques & Tools for Teaching Yoga
is happening around them� They are most likely to place their mats in the center of the room whenever possible, where they can be close enough to “touch” people all around them, getting information from close proximity� “Tonals” like to hear and will be very close to the front, while the “digital” often selects the periphery of the room for their mat placement to gather all information before processing� These generalizations are based on the assumption that the students have a choice on where to position themselves in the classroom, and may help you select appropriate languaging of your instructions to smaller groups of students throughout the room�
Keeping your awareness of these four representational systems will help you to relate to your students in their language and increase your ability to connect with each student� Start to pepper your instructions with different types of cues� To use all four modalities every time you guide your students into a new pose would be a serious overload both to your brain and your students’� Watch your classes and determine which system they most reflect and respond to� If it is very different than your preferred “language,” make a conscious effort to include instructions they can “hear�” Initially, this takes some practice, but over time it will become more natural and easy for you�
Once you’ve worked on developing the technical com-munications skills, developing your linguistic abilities will bring you another step closer to connecting with your class� The following are suggestions for increasing your students’ understanding of each instruction and will provide you with an assortment of techniques to create an uplifting experience for everyone�
Positive Cueing
Positive Cueing is the ability to give instructions without negative commands, and is the most valuable communication tool I use in any class� Negative commands are subtle forms of indirect suggestion, and cause your students to unconsciously do what you are instructing them not to do� For, instance, if someone tells you not to think about pink elephants, and keeps repeating the request, guess what will happen? A similar phenomenon can happen in class� If you cue your students, “don’t lock your knees out” while they are in triangle pose, you can watch people in the room begin to hyperextend the knee� The brain does not seem to register the negative portion of the command� A positive instruction like “keep your knees unlocked” will instead give your students an action you would like to see happen, and provides them with a cue that is easy to follow� How often do you like to
be told not to do something? The cumulative effect of a class full of “dont’s” is very unempowering for your students, but when you use positive cues, it creates the opposite result� Again, record one of your classes and note how many negative commands you are using� There is always a positive way to state the action you desire� With practice, you will be able to teach entire classes without using the phrase “don’t” in any instruction, providing a successful roadmap for your students to follow!
Linking
Linking instructions is the next step for improving your teaching skills� When your cues are fragmented, it increases the tendency of your students’ attention to wander� There are several ways to link your instructions and allow them to keep focused on the pose at hand� You can integrate the action of one part of the pose with another�
“Press your hands firmly down into the mat with the middle finger pointing straight and the others spread like rays of sunshine; position your shoulders directly over the wrists” is an example of action-linking within the pose� Systematically construct the sequence of events for students to follow from beginning to the end� Then, provide a direction of action and/or energy to maintain the body/mind connection� When giving directions, strive to clarify simple statements like “arms parallel�” They should be parallel to what? Another method of linking will connect an action such as “keeping your legs in place, turn your torso to the right and open arms sideways into warrior two” with a feeling statement like “…and discover what your brave warrior feels like today�” Connecting feelings with a passive statement of actions or commands can develop and increase the mind/body experience for most everyone�
Linguistics
Be selective with the words you choose� Consciously construct the phrasing of your instructions, because literal and implied meanings are not always synchronized� For ex-ample, the instruction “straighten your spine” is ambiguous and frustrating for the student, because it is not physically possible to fully straighten a spine due to its natural lor-dotic curves� A clearer cue would be “lengthen your spine” or “elongate your spine” to indicate increasing the space between each vertebrae and the sensation of growing taller� In addition, you might want to take into consideration the subconscious effect of the words you select� “Adjusting” someone’s pose is more supportive than “correcting” it�
Another effective communication tool is asking a question like, “Are your toes resting lightly
94
Module 6: Techniques & Tools for Teaching Yoga
on the mat?” This is a powerful teaching technique and allows the student to discover their inner teacher� By deciding which of any adjustments are necessary, they are able to observe and assess their pose both subjectively and objectively� Empowering your students this way is a stepping stone toward an uplifting practice�
You can continue to keep the class experience positive by using action vs� completion wording� Since your practice is probably longer and deeper than most of your students’, your demonstration of many of the poses may reflect a position not physically obtainable by everyone in the classroom� For example, instead of instructing your students to “place your foot on your heart,” ask them to “guide your foot and your leg toward your heart�” Everyone can try, endeavor, move toward, etc� These are all excellent examples of action words without a final ending place the students feel they need to reach; using them will aid your students in successfully discovering the path of their practice with each class�
Often, your students are just beginning their mind/body journey� Consider the diversity of your students’ backgrounds and education, and use descriptions they can understand� When you use anatomical terms, Sanskrit words, and yoga jargon, take care to describe or define them at the moment of use� Done consistently, this will help further educate your regular students and provide much-needed clarification for the new members of your class� You can also avoid confusion by physically pointing out specific parts of the body you are describing, such as “tailbone” or “sacrum�”
With so many methods of positive instruction, there will hopefully be little room for ambiguous directions (terms with-out direct meaning that are less effective)� Using precise command statements at the beginning of your pose instructions will maintain your authority as teacher and will be much easier for the student to follow� For example, the instruction “What we are going to do now is move to the front of the mat” is excessively wordy and could be more clearly stated as: “Stand at the front of the mat�” “Sit in bound angle” is a more dynamic and confident instruction than “Why don’t we all sit in bound angle?” Once you start to link your instructions, the need to economize language becomes greater�
One positive element of the English language is the relatively few syllables per word� In many European languages, the same statement can contain up to three or four times the syllables per cue, which dra-matically increases the amount of time it takes to deliver the exact same message! As you honor your effort to streamline phrasing, avoid the words it, this, and that to keep your instructions clear and precise� It is just as easy and more specific to say, “Twist to the right” than “Twist this way�”
Humor
How you decide to phrase your instructions is one way to connect with the class� An additional method is to share some of your personal experiences or stories when they are relevant to the particular subject or pose that you are teaching� This lessens the perceived distance between student and teacher and will help your class to relate to you on a more personal level� By connecting through your experiences, your students will be able to more easily absorb your instructions�
Humor is a most uplifting way to connect with your students and is often injected through the anec-dotes you share� The ability to laugh at yourself gives unspoken permission to the class to do the same� Not everyone is a comic, but the proper placement of humor in your instructions, whether subtle or more pronounced, can lift the energy of the entire class� Laughter is a universal way to communicate�
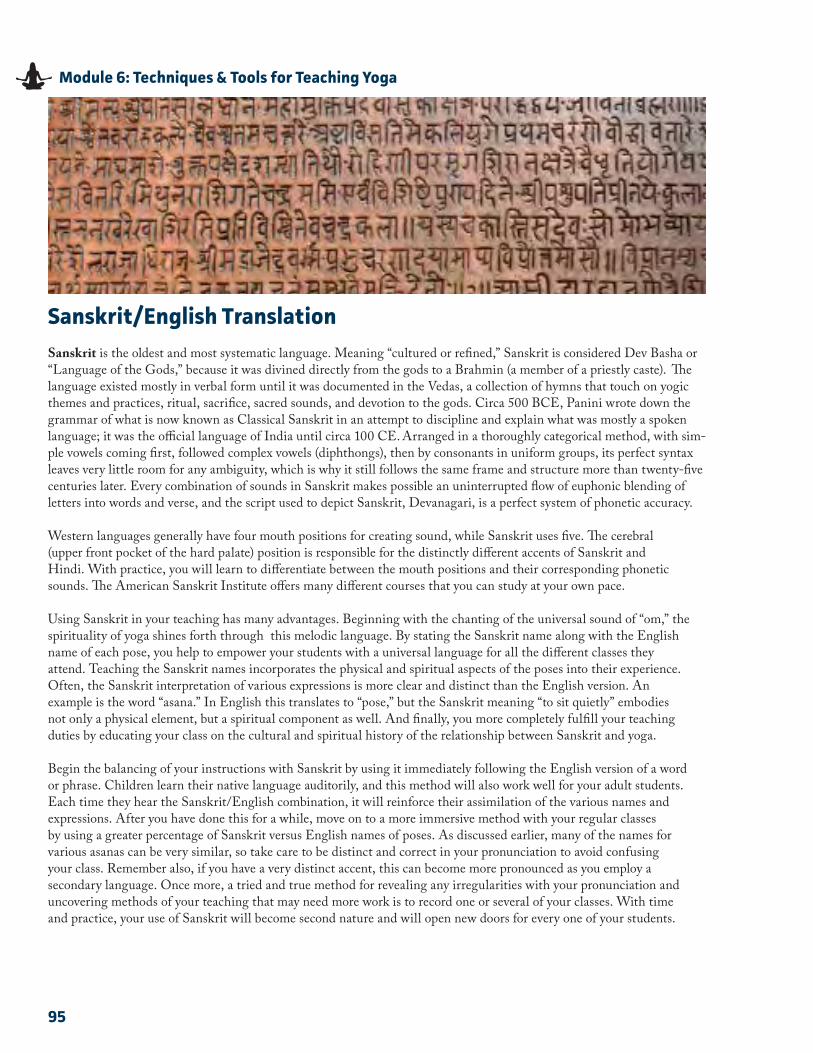
95
Module 6: Techniques & Tools for Teaching Yoga
Sanskrit/English TranslationSanskrit is the oldest and most systematic language� Meaning “cultured or refined,” Sanskrit is considered Dev Basha or “Language of the Gods,” because it was divined directly from the gods to a Brahmin (a member of a priestly caste)� The language existed mostly in verbal form until it was documented in the Vedas, a collection of hymns that touch on yogic themes and practices, ritual, sacrifice, sacred sounds, and devotion to the gods� Circa 500 BCE, Panini wrote down the grammar of what is now known as Classical Sanskrit in an attempt to discipline and explain what was mostly a spoken language; it was the official language of India until circa 100 CE� Arranged in a thoroughly categorical method, with sim-ple vowels coming first, followed complex vowels (diphthongs), then by consonants in uniform groups, its perfect syntax leaves very little room for any ambiguity, which is why it still follows the same frame and structure more than twenty-five centuries later� Every combination of sounds in Sanskrit makes possible an uninterrupted flow of euphonic blending of letters into words and verse, and the script used to depict Sanskrit, Devanagari, is a perfect system of phonetic accuracy�
Western languages generally have four mouth positions for creating sound, while Sanskrit uses five� The cerebral (upper front pocket of the hard palate) position is responsible for the distinctly different accents of Sanskrit and Hindi� With practice, you will learn to differentiate between the mouth positions and their corresponding phonetic sounds� The American Sanskrit Institute offers many different courses that you can study at your own pace�
Using Sanskrit in your teaching has many advantages� Beginning with the chanting of the universal sound of “om,” the spirituality of yoga shines forth through this melodic language� By stating the Sanskrit name along with the English name of each pose, you help to empower your students with a universal language for all the different classes they attend� Teaching the Sanskrit names incorporates the physical and spiritual aspects of the poses into their experience� Often, the Sanskrit interpretation of various expressions is more clear and distinct than the English version� An example is the word “asana�” In English this translates to “pose,” but the Sanskrit meaning “to sit quietly” embodies not only a physical element, but a spiritual component as well� And finally, you more completely fulfill your teaching duties by educating your class on the cultural and spiritual history of the relationship between Sanskrit and yoga�
Begin the balancing of your instructions with Sanskrit by using it immediately following the English version of a word or phrase� Children learn their native language auditorily, and this method will also work well for your adult students� Each time they hear the Sanskrit/English combination, it will reinforce their assimilation of the various names and expressions� After you have done this for a while, move on to a more immersive method with your regular classes by using a greater percentage of Sanskrit versus English names of poses� As discussed earlier, many of the names for various asanas can be very similar, so take care to be distinct and correct in your pronunciation to avoid confusing your class� Remember also, if you have a very distinct accent, this can become more pronounced as you employ a secondary language� Once more, a tried and true method for revealing any irregularities with your pronunciation and uncovering methods of your teaching that may need more work is to record one or several of your classes� With time and practice, your use of Sanskrit will become second nature and will open new doors for every one of your students�
96
Module 6: Techniques & Tools for Teaching Yoga
References
1� Matthew McKay, Martha Davis, and Patrick Fanning, Messages: The Communication Skills Book (Oakland, CA: New Harbinger Publications, 2009), 19�
2� McKay et al�, Messages, 6�
3� Ranier Martens, Coaches Guide to Sport Psychology (Champaign, IL: Human Kinetics Publishers, 1987), 55�
4� Bill Swetmon, Communication Skills for the 21st Century: How to Understand and Be Understood (Skill-Speak Press, 1998), 19�
5� Martens, Coaches Guide to Sports Psychology, 57�
6� Swetmon, Communication Skills, 19�
7� Swetmon, Communication Skills, 21�
8� McKay et al�, Messages, 63�
9� Jeffrey Jacobi, How to Say It with Your Voice (Paramus, NJ: Prentice Hall, 1996), 4�
10� McKay et al�, Messages, 63�
11� McKay et al�, Messages, 63�
12� Jacobi, How to Say It with Your Voice, 145�
13� Jacobi, How to Say It with Your Voice, 15�
14� McKay et al�, Messages, 64�
15� Jacobi, How to Say It with Your Voice, 5�
16� Richard Gray, “Tools for the Trade: Neuro-Linguistic Programming and the Art of Communication,” Federal Probation Quarterly LV, no� 1 (1991): 11—16�
17� Gray, “Tools for the Trade,” 2�
18� Gray, “Tools for the Trade,” 3�
19� Gray, “Tools for the Trade,” 3�
20� Gray, “Tools for the Trade,” 3�
21� Bryon Lewis and Frank Pucelik, Magic of NLP Demystified: A Pragmatic Guide to Communication & Change (Portland, OR: Metamorphous Press, 1990), 52�
22� Lewis and Pucelik, Magic of NLP Demystified, 51�
23� Lewis and Pucelik, Magic of NLP Demystified, 52
24� Lewis and Pucelik, Magic of NLP Demystified, 56�
25� Claude Brodeur, www�netjournalist�com/negative_commands�html (2002)�
26� John Friend, Anusara Teacher Training Manual (Anusara Yoga, 2014), 107�
97
Module 6: Techniques & Tools for Teaching Yoga
27� Friend, Anusara, 107�
28� Friend, Anusara, 107�
29� Friend, Anusara, 110�
30� “Sanskrit,” www�historyofindia�com/html (2002)�
31� Alison Barnard, “Sanskrit,” www�presby�edu/-gramsey/sanskrit�html (2002)�
32� Barnard, “Sanskrit�”
98
Module 7
Yoga Profession
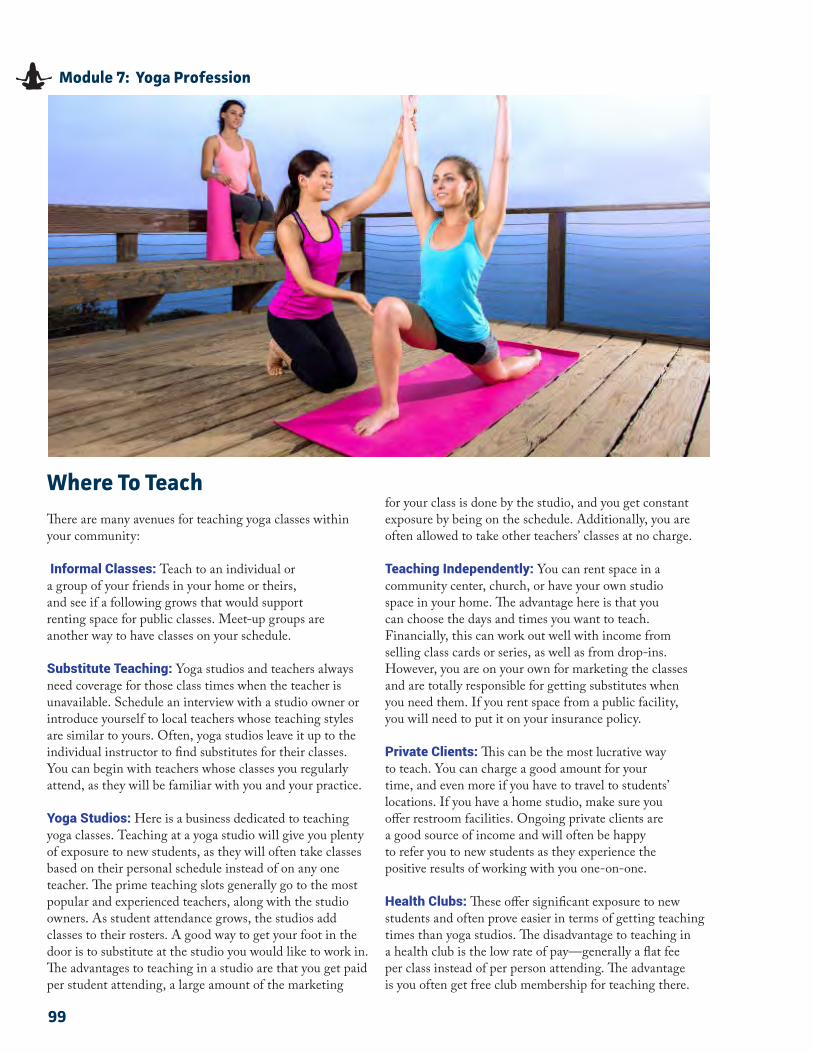
99
Module 7: Yoga Profession
Where To TeachThere are many avenues for teaching yoga classes within your community:
Informal Classes: Teach to an individual or a group of your friends in your home or theirs, and see if a following grows that would support renting space for public classes� Meet-up groups are another way to have classes on your schedule�
Substitute Teaching: Yoga studios and teachers always need coverage for those class times when the teacher is unavailable� Schedule an interview with a studio owner or introduce yourself to local teachers whose teaching styles are similar to yours� Often, yoga studios leave it up to the individual instructor to find substitutes for their classes� You can begin with teachers whose classes you regularly attend, as they will be familiar with you and your practice�
Yoga Studios: Here is a business dedicated to teaching yoga classes� Teaching at a yoga studio will give you plenty of exposure to new students, as they will often take classes based on their personal schedule instead of on any one teacher� The prime teaching slots generally go to the most popular and experienced teachers, along with the studio owners� As student attendance grows, the studios add classes to their rosters� A good way to get your foot in the door is to substitute at the studio you would like to work in� The advantages to teaching in a studio are that you get paid per student attending, a large amount of the marketing
for your class is done by the studio, and you get constant exposure by being on the schedule� Additionally, you are often allowed to take other teachers’ classes at no charge�
Teaching Independently: You can rent space in a community center, church, or have your own studio space in your home� The advantage here is that you can choose the days and times you want to teach� Financially, this can work out well with income from selling class cards or series, as well as from drop-ins� However, you are on your own for marketing the classes and are totally responsible for getting substitutes when you need them� If you rent space from a public facility, you will need to put it on your insurance policy�
Private Clients: This can be the most lucrative way to teach� You can charge a good amount for your time, and even more if you have to travel to students’ locations� If you have a home studio, make sure you offer restroom facilities� Ongoing private clients are a good source of income and will often be happy to refer you to new students as they experience the positive results of working with you one-on-one�
Health Clubs: These offer significant exposure to new students and often prove easier in terms of getting teaching times than yoga studios� The disadvantage to teaching in a health club is the low rate of pay—generally a flat fee per class instead of per person attending� The advantage is you often get free club membership for teaching there�
100
Module 7: Yoga Profession
Community Centers: Adult recreation centers often offer yoga classes in their activities schedule� Contact the director to see if they would like to add yoga to the next semester of their community program� You will earn a percentage of the class attendance�
Professional Settings and Corporations: Large business are increasingly offering their employees health benefits like yoga classes� Contact the business with a proposal for lunch or early morning classes that they could fit into their schedule�
Assisted Living: There are often fitness and wellness programs offered at assisted living facilities� Set up an appointment with the director to see if there is space to teach a yoga class� You can charge per student or arrange for compensation per class with the facility�
Alternative Locations: Many places, such as schools, prisons, senior citizen centers, wellness centers, and veterans’ centers, are open and in need of teachers to cater to their special populations�
Resorts and Cruise Lines: Vacation destinations offer yoga classes to their guests� This might be a way to travel and earn a living too!
Liability InsuranceIf you are teaching yoga, you need liability insurance� Instructors purchase insurance to cover liability risks related to student injuries occurring in their classes and also on the premises where they teach� Most studios, gyms, and other facilities require yoga teachers to show proof of liability insurance and name their facility as additionally insured on their policy as a condition of employment� You can find a list of companies providing this insurance with a Google search for “yoga liability insurance�” Compare the rates and coverage for each policy, and pick the one that best suits your modality of teaching� In contrast to malpractice premiums for medical professions, yoga insurance is relatively inexpensive and will provide you with peace of mind knowing that you are financially covered for incidents�
MarketingReferrals are a very powerful marketing tool� Ask your current students for referrals, and maybe offer a free class to the student who brings a friend that buys a class card from you�
How do you attract new students? Traditionally, it was word-of-mouth, flyers, and your e-mail list� Placing flyers in local community centers, health food stores, and alternative healing centers can help reach potential students who are open to yoga� Distribute your class schedule to coffee shops and local gathering spots� Put your schedule on your voicemail�
Today, social media rules� Facebook, Twitter, LinkedIn, YouTube, Pinterest, and Tumblr are the most popular social media sites� Because there is so much information posted on these sites daily, regularly posting and blogging often keeps your presence at the top of peoples’ awareness� Posting videos and podcasts of your classes is a good way to increase your internet exposure�
Having business cards that offer a free first class to new students is another valuable marketing tool� You can hand them out individually or go to local businesses and ask if you can leave a stack near their register� Make sure you offer the free class to store employees!
Having your own website is an inexpensive and valuable marketing tool� Place keywords related to yoga and your location to increase your online visibility� Include a place to register for a newsletter on your home page to increase your e-mail list� You might offer bonuses such as a free yoga class audio download for each new student that signs up� There are e-mail services like AWeber and MailChimp that have templates for newsletters and keep track of your broadcasts and subscription lists�
Go to Business Network International meetings for local business owners like Business Natwork International (BNI) or the Chamber of Commerce� These groups often reserve one spot for each profession and have a weekly meeting where the attendees are encouraged to refer the members of the group�
Get free publicity� The media loves human interest stories� Organize a demonstration class and tell the story of why yoga is so significant in your life� Send out a press release to lifestyle editors of local publications�
Choose a charity you believe in and find a way to be of service to the community by donating classes for fundraisers� Do so because it feels right in your heart, and word will get around� You could include this information in the press release you send to local media�
Be the local yoga expert� Speak and perform demos at public gatherings, health fairs, farmers’ markets, etc� Write and submit articles to your local paper about the benefits of this practice, and use case studies from your students if they give you permission�
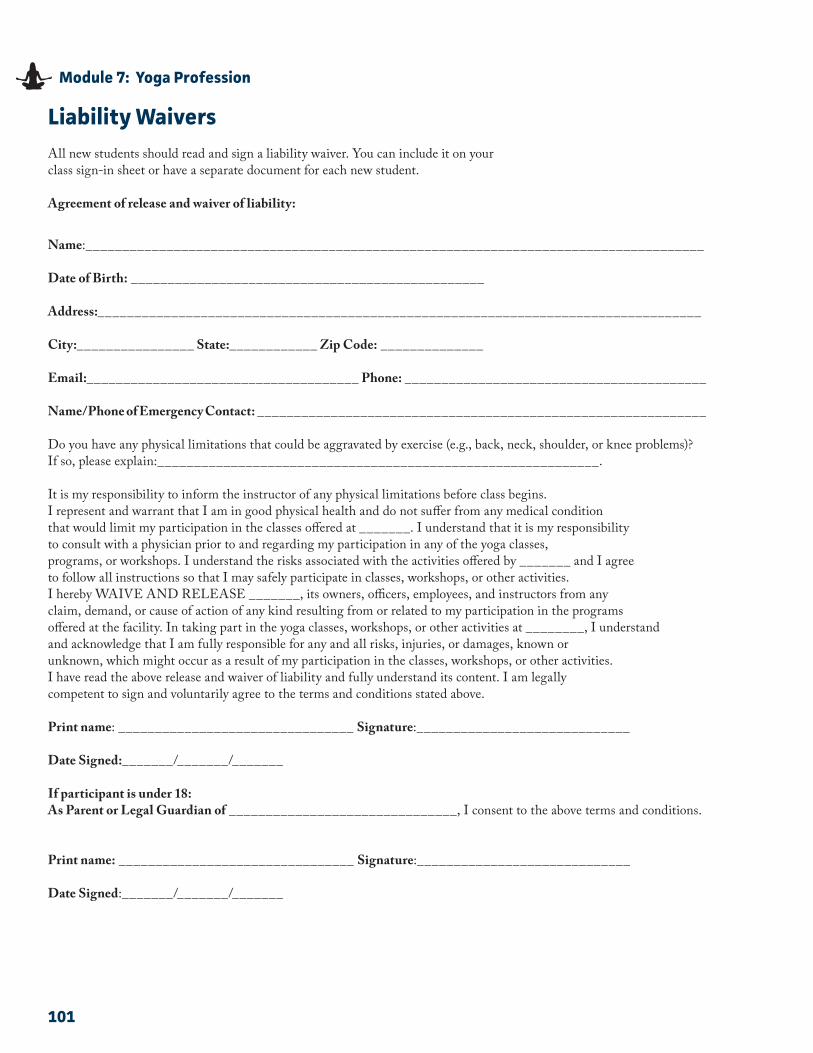
101
Module 7: Yoga Profession
Liability WaiversAll new students should read and sign a liability waiver� You can include it on yourclass sign-in sheet or have a separate document for each new student�
Agreement of release and waiver of liability:
Name:____________________________________________________________________________________
Date of Birth: ________________________________________________
Address:__________________________________________________________________________________
City:________________ State:____________ Zip Code: ______________
Email:_____________________________________ Phone: _________________________________________
Name/Phone of Emergency Contact: _____________________________________________________________
Do you have any physical limitations that could be aggravated by exercise (e�g�, back, neck, shoulder, or knee problems)?If so, please explain:____________________________________________________________�
It is my responsibility to inform the instructor of any physical limitations before class begins�I represent and warrant that I am in good physical health and do not suffer from any medical conditionthat would limit my participation in the classes offered at _______� I understand that it is my responsibilityto consult with a physician prior to and regarding my participation in any of the yoga classes,programs, or workshops� I understand the risks associated with the activities offered by _______ and I agreeto follow all instructions so that I may safely participate in classes, workshops, or other activities�I hereby WAIVE AND RELEASE _______, its owners, officers, employees, and instructors from anyclaim, demand, or cause of action of any kind resulting from or related to my participation in the programsoffered at the facility� In taking part in the yoga classes, workshops, or other activities at ________, I understandand acknowledge that I am fully responsible for any and all risks, injuries, or damages, known orunknown, which might occur as a result of my participation in the classes, workshops, or other activities�I have read the above release and waiver of liability and fully understand its content� I am legallycompetent to sign and voluntarily agree to the terms and conditions stated above�
Print name: ________________________________ Signature:_____________________________
Date Signed:_______/_______/_______
If participant is under 18:As Parent or Legal Guardian of _______________________________, I consent to the above terms and conditions�
Print name: ________________________________ Signature:_____________________________
Date Signed:_______/_______/_______
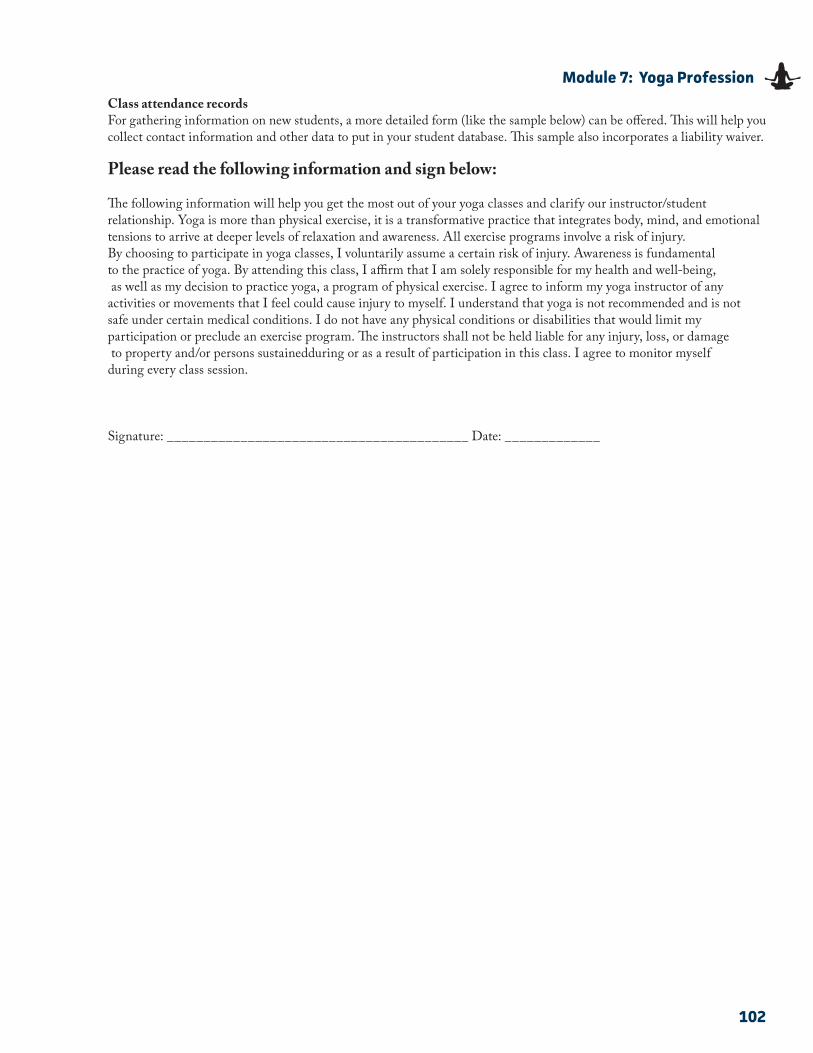
102
Module 7: Yoga Profession
Class attendance recordsFor gathering information on new students, a more detailed form (like the sample below) can be offered� This will help you collect contact information and other data to put in your student database� This sample also incorporates a liability waiver�
Please read the following information and sign below:
The following information will help you get the most out of your yoga classes and clarify our instructor/student relationship� Yoga is more than physical exercise, it is a transformative practice that integrates body, mind, and emotionaltensions to arrive at deeper levels of relaxation and awareness� All exercise programs involve a risk of injury� By choosing to participate in yoga classes, I voluntarily assume a certain risk of injury� Awareness is fundamental to the practice of yoga� By attending this class, I affirm that I am solely responsible for my health and well-being, as well as my decision to practice yoga, a program of physical exercise� I agree to inform my yoga instructor of any activities or movements that I feel could cause injury to myself� I understand that yoga is not recommended and is not safe under certain medical conditions� I do not have any physical conditions or disabilities that would limit myparticipation or preclude an exercise program� The instructors shall not be held liable for any injury, loss, or damage to property and/or persons sustainedduring or as a result of participation in this class� I agree to monitor myself during every class session�
Signature: _________________________________________ Date: _____________
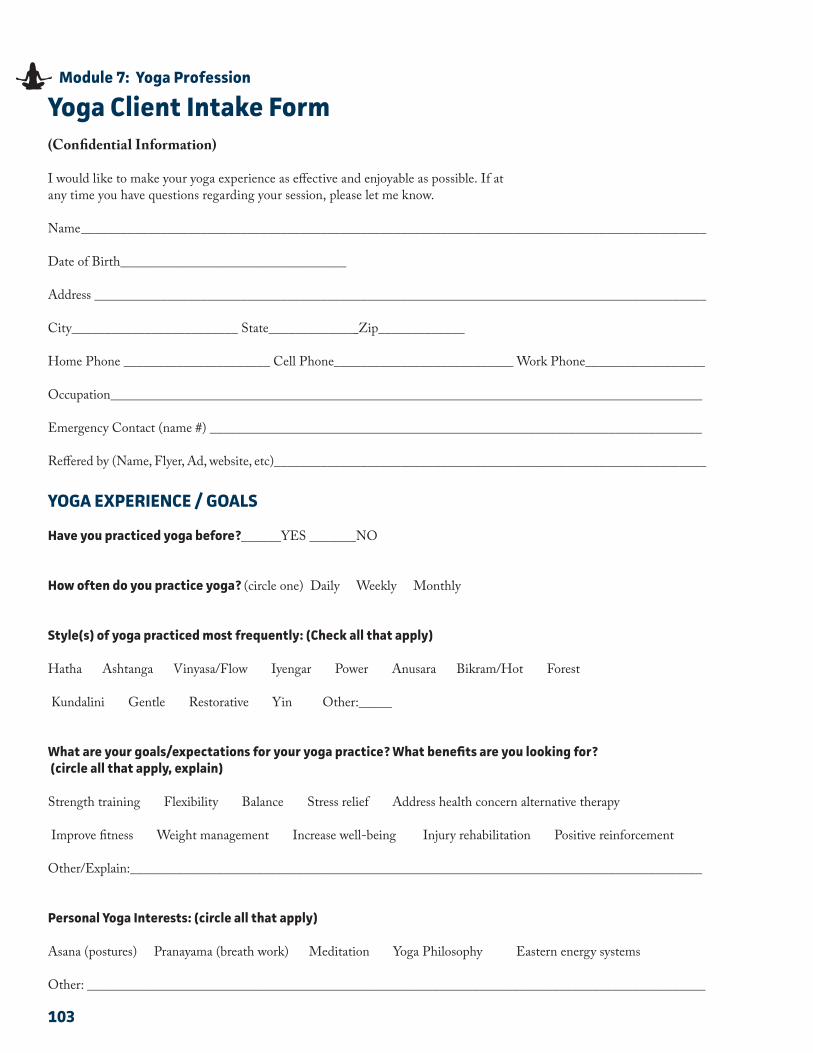
103
Module 7: Yoga Profession
Yoga Client Intake Form (Confidential Information)
I would like to make your yoga experience as effective and enjoyable as possible� If at any time you have questions regarding your session, please let me know�
Name ______________________________________________________________________________________________
Date of Birth__________________________________
Address ____________________________________________________________________________________________
City_________________________ State_____________ Zip_____________
Home Phone ______________________ Cell Phone___________________________ Work Phone__________________
Occupation_________________________________________________________________________________________
Emergency Contact (name #) __________________________________________________________________________
Reffered by (Name, Flyer, Ad, website, etc)_________________________________________________________________
YOGA EXPERIENCE / GOALS
Have you practiced yoga before?______YES _______NO
How often do you practice yoga? (circle one) Daily Weekly Monthly
Style(s) of yoga practiced most frequently: (Check all that apply)
Hatha Ashtanga Vinyasa/Flow Iyengar Power Anusara Bikram/Hot Forest
Kundalini Gentle Restorative Yin Other:_____
What are your goals/expectations for your yoga practice? What benefits are you looking for? (circle all that apply, explain)
Strength training Flexibility Balance Stress relief Address health concern alternative therapy Improve fitness Weight management Increase well-being Injury rehabilitation Positive reinforcement
Other/Explain:______________________________________________________________________________________
Personal Yoga Interests: (circle all that apply)
Asana (postures) Pranayama (breath work) Meditation Yoga Philosophy Eastern energy systems Other: _____________________________________________________________________________________________
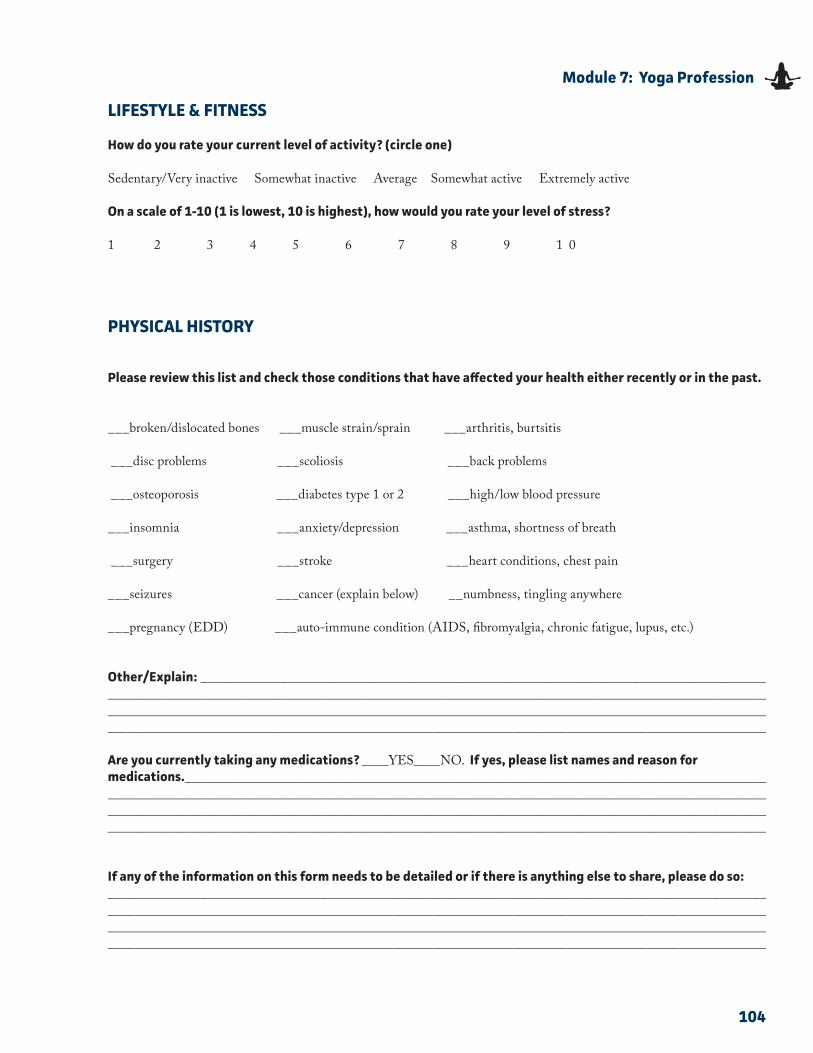
104
Module 7: Yoga Profession
LIFESTYLE & FITNESS
How do you rate your current level of activity? (circle one)
Sedentary/Very inactive Somewhat inactive Average Somewhat active Extremely active
On a scale of 1-10 (1 is lowest, 10 is highest), how would you rate your level of stress?
1 2 3 4 5 6 7 8 9 1 0
PHYSICAL HISTORY
Please review this list and check those conditions that have affected your health either recently or in the past.
___broken/dislocated bones ___muscle strain/sprain ___arthritis, burtsitis
___disc problems ___scoliosis ___back problems
___osteoporosis ___diabetes type 1 or 2 ___high/low blood pressure
___insomnia ___anxiety/depression ___asthma, shortness of breath
___surgery ___stroke ___heart conditions, chest pain
___seizures ___cancer (explain below) __numbness, tingling anywhere
___pregnancy (EDD) ___auto-immune condition (AIDS, fibromyalgia, chronic fatigue, lupus, etc�)
Other/Explain: ______________________________________________________________________________________________________________________________________________________________________________________________________________________________________________________________________________________________________________________________________________________________________________________________
Are you currently taking any medications? ____YES____NO� If yes, please list names and reason for medications._________________________________________________________________________________________________________________________________________________________________________________________________________________________________________________________________________________________________________________________________________________________________________________________________
If any of the information on this form needs to be detailed or if there is anything else to share, please do so:____________________________________________________________________________________________________________________________________________________________________________________________________________________________________________________________________________________________________________________________________________________________________________________________________________
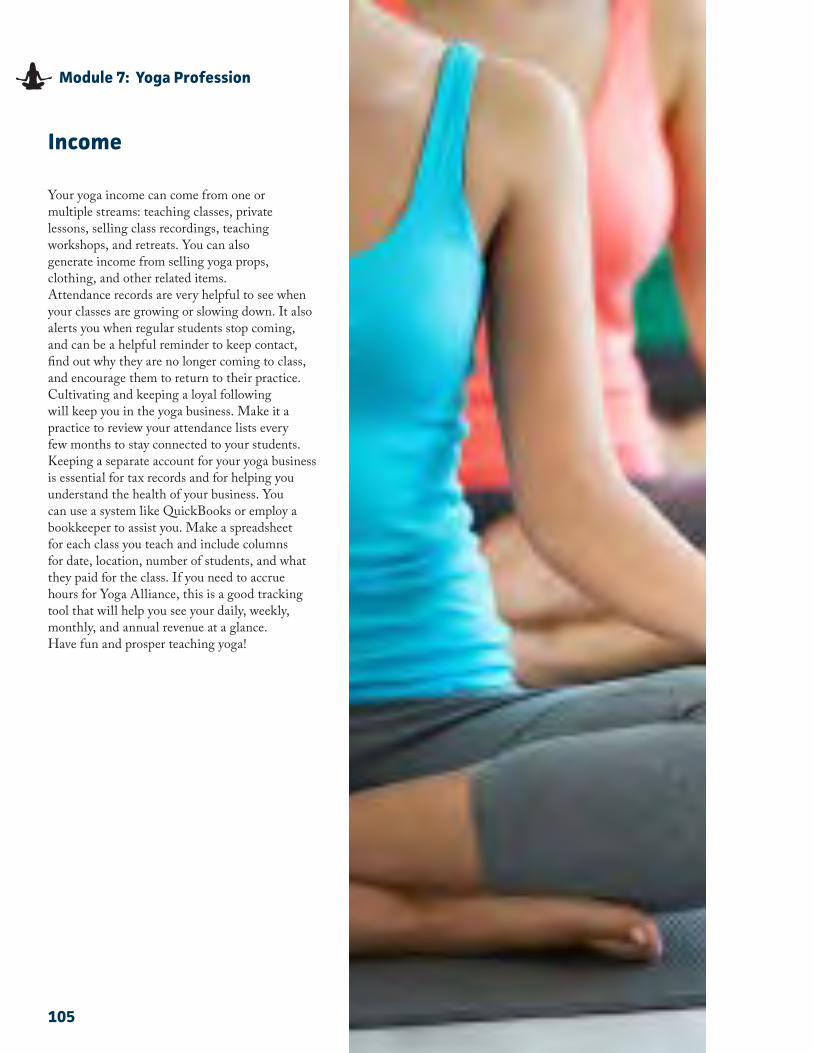
105
Module 7: Yoga Profession
Income
Your yoga income can come from one or multiple streams: teaching classes, private lessons, selling class recordings, teaching workshops, and retreats� You can also generate income from selling yoga props, clothing, and other related items� Attendance records are very helpful to see when your classes are growing or slowing down� It also alerts you when regular students stop coming, and can be a helpful reminder to keep contact, find out why they are no longer coming to class, and encourage them to return to their practice� Cultivating and keeping a loyal following will keep you in the yoga business� Make it a practice to review your attendance lists every few months to stay connected to your students�Keeping a separate account for your yoga business is essential for tax records and for helping you understand the health of your business� You can use a system like QuickBooks or employ a bookkeeper to assist you� Make a spreadsheet for each class you teach and include columns for date, location, number of students, and what they paid for the class� If you need to accrue hours for Yoga Alliance, this is a good tracking tool that will help you see your daily, weekly, monthly, and annual revenue at a glance� Have fun and prosper teaching yoga!
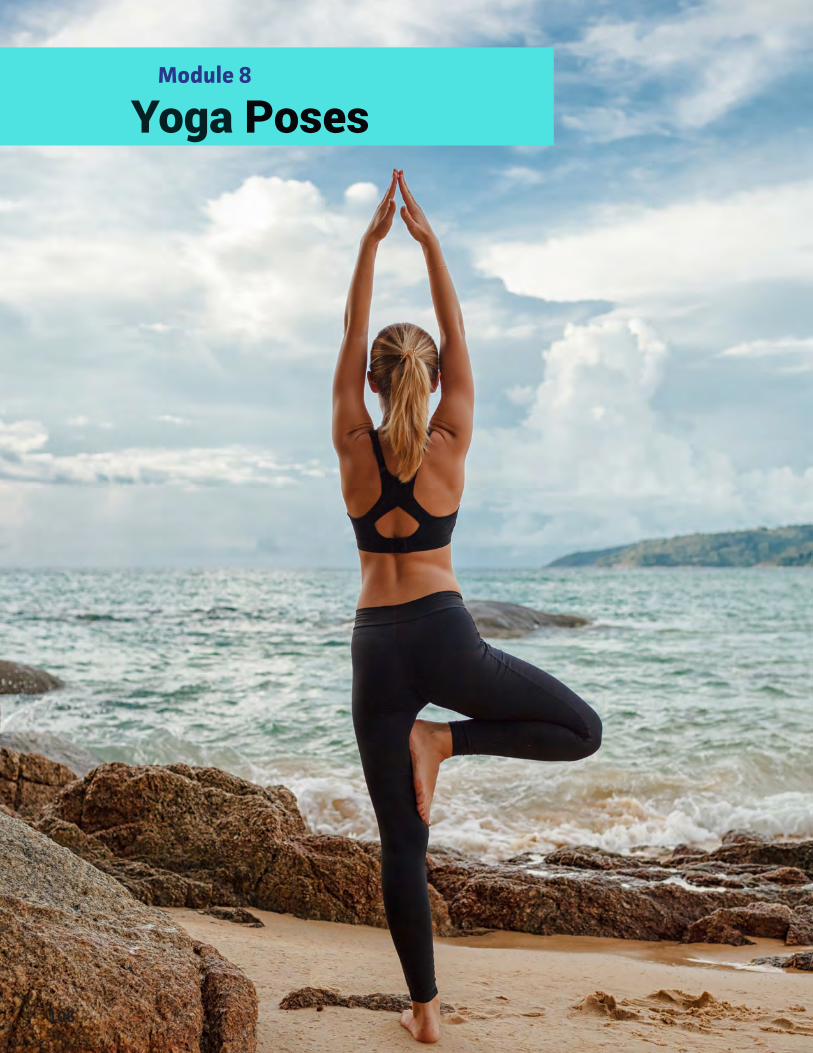
106
Module 8
Yoga Poses
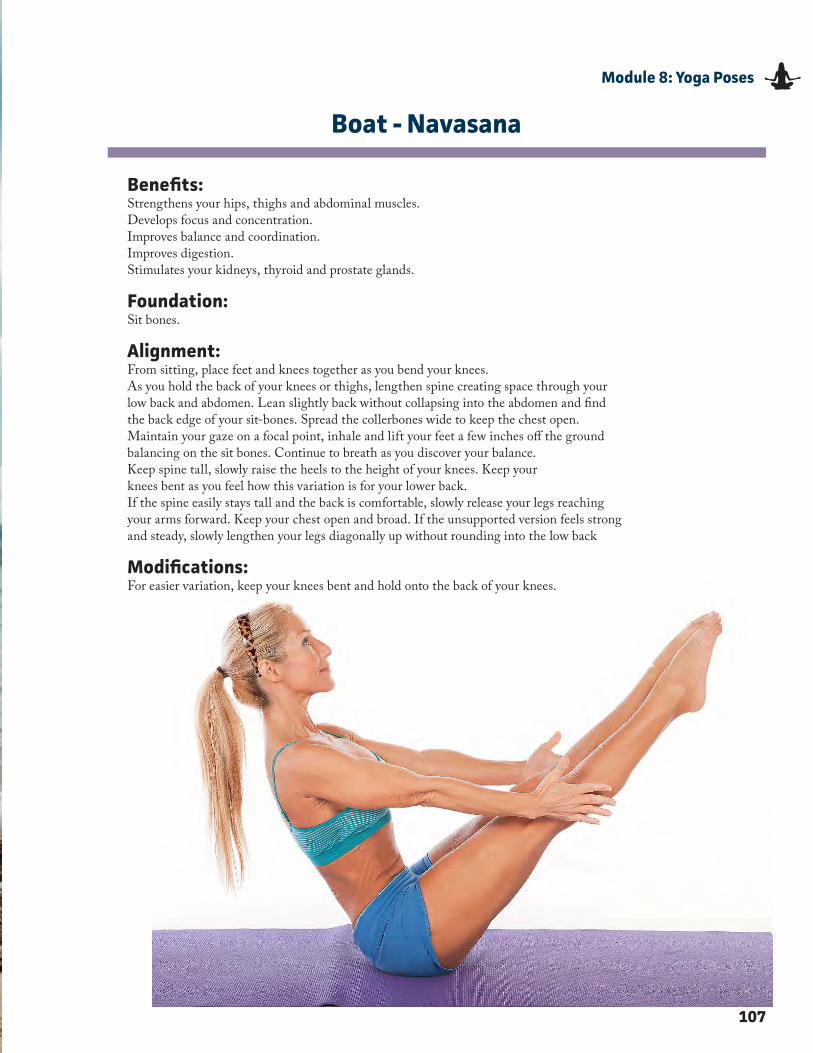
107
Module 8: Yoga Poses
Boat - Navasana
Benefits:Strengthens your hips, thighs and abdominal muscles�Develops focus and concentration�Improves balance and coordination�Improves digestion�Stimulates your kidneys, thyroid and prostate glands�
Foundation:Sit bones�
Alignment:From sitting, place feet and knees together as you bend your knees�As you hold the back of your knees or thighs, lengthen spine creating space through yourlow back and abdomen� Lean slightly back without collapsing into the abdomen and findthe back edge of your sit-bones� Spread the collerbones wide to keep the chest open�Maintain your gaze on a focal point, inhale and lift your feet a few inches off the groundbalancing on the sit bones� Continue to breath as you discover your balance�Keep spine tall, slowly raise the heels to the height of your knees� Keep yourknees bent as you feel how this variation is for your lower back�If the spine easily stays tall and the back is comfortable, slowly release your legs reachingyour arms forward� Keep your chest open and broad� If the unsupported version feels strongand steady, slowly lengthen your legs diagonally up without rounding into the low back
Modifications:For easier variation, keep your knees bent and hold onto the back of your knees�
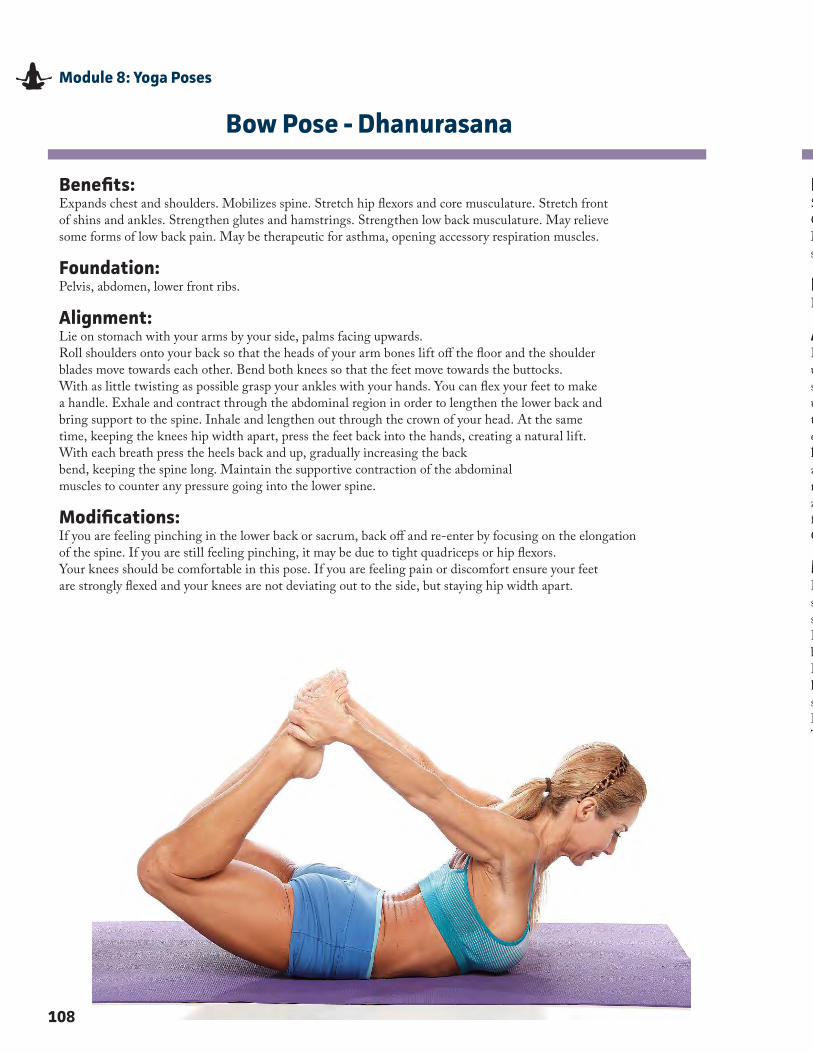
108
Module 8: Yoga Poses
Bow Pose - Dhanurasana
Benefits:Expands chest and shoulders� Mobilizes spine� Stretch hip flexors and core musculature� Stretch front of shins and ankles� Strengthen glutes and hamstrings� Strengthen low back musculature� May relieve some forms of low back pain� May be therapeutic for asthma, opening accessory respiration muscles�
Foundation:Pelvis, abdomen, lower front ribs�
Alignment:Lie on stomach with your arms by your side, palms facing upwards�Roll shoulders onto your back so that the heads of your arm bones lift off the floor and the shoulderblades move towards each other� Bend both knees so that the feet move towards the buttocks�With as little twisting as possible grasp your ankles with your hands� You can flex your feet to makea handle� Exhale and contract through the abdominal region in order to lengthen the lower back andbring support to the spine� Inhale and lengthen out through the crown of your head� At the sametime, keeping the knees hip width apart, press the feet back into the hands, creating a natural lift�With each breath press the heels back and up, gradually increasing the backbend, keeping the spine long� Maintain the supportive contraction of the abdominalmuscles to counter any pressure going into the lower spine�
Modifications:If you are feeling pinching in the lower back or sacrum, back off and re-enter by focusing on the elongationof the spine� If you are still feeling pinching, it may be due to tight quadriceps or hip flexors�Your knees should be comfortable in this pose� If you are feeling pain or discomfort ensure your feetare strongly flexed and your knees are not deviating out to the side, but staying hip width apart�
Benefits:Stretches chest, neck, spine and front of hips� Strengthens back, buttocks, and hamstring muscles� Calms brain and central nervous system which may help to alleviate stress and mild depression� May soothe digestive discomfort� Stimulates the lungs and thyroid glands and helps relieve the symptoms of menopause� May reduce anxiety, backache, headache, and insomnia�
Foundation:Backs of head, outer shoulders, arms, wrists and hands; both feet
Alignment:Lie supine on the floor� Bend knees and place feet flat on the ground� Position your heels hip width apart directly under your knees� Press palms down into the floor beside your hips� Position your chin slightly away from your sternum so the neck maintains its natural curve� Exhale, contract abdominal muscles and move your tailbone under toward the pubic bone� Feel how the pelvic tilt has flattened your lower back into the ground and raised the low end of your hips off the ground� Maintain pelvic tilt� Inhale and slowly lift the hips and lower back off the floor� Keep pressing into the inner edge of your feet to keep the knees and legs parallel� Continue to lift the middle and upper back until you lift the hips to the height of the knees� Maintain pelvic tilt to prevent arching into the lower back� Prevent the bottom front ribs from flying upwards� Roll the shoulders under, rising onto the back of the shoulders� Interlace the fingers and press shoulder blades firmly into the back as your arms root down� Ensure that your neck isn’t being forced into the ground� Avoid pulling your shoulders down from the ears as this forces and overstretches the neck� Maintain the natural curve and space under the neck� Gently move the pubis toward your navel� Reach your inner thighs down as you pull your sacrum forward�
Modifications:For beginners, only lift the hips, lower back and some of your middle backso the pose lifts only half way� Lift the torso high enough so that yourspine creates a straight line from the shoulders to the knees�For a deeper version, lift your heels as you press into the balls of the feet� Move the balls of your feetback under the knees and ground into the inside toe mounds to keep your knees and legs parallel�For a deeper chest opener, after the shoulders roll under the back, interlace your fingers and clasphands� Stretch the arms long and press the entire arm and wrist into the mat� Avoid the arms andshoulders from pulling down from the ears� Keep a natural curve and space under your neck�For tigh shoulders: hold strap between handsTo keep hip distance: place block between knees�
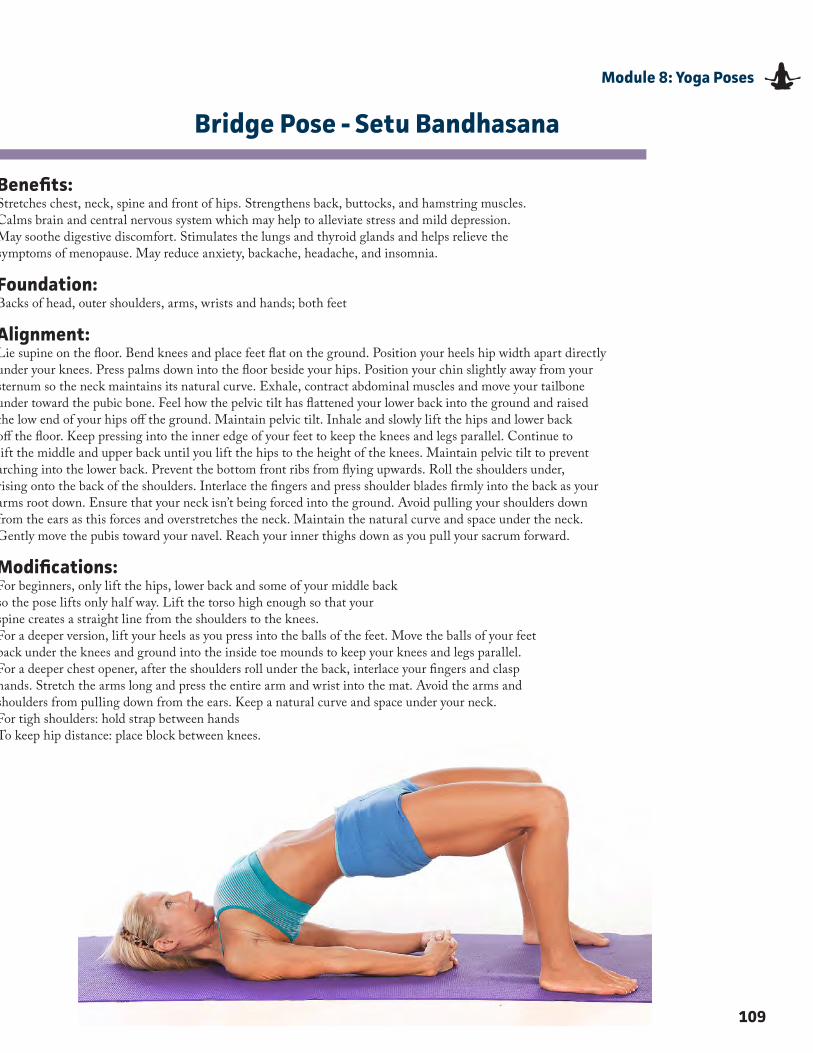
109
Module 8: Yoga Poses
Bridge Pose - Setu Bandhasana
Benefits:Stretches chest, neck, spine and front of hips� Strengthens back, buttocks, and hamstring muscles� Calms brain and central nervous system which may help to alleviate stress and mild depression� May soothe digestive discomfort� Stimulates the lungs and thyroid glands and helps relieve the symptoms of menopause� May reduce anxiety, backache, headache, and insomnia�
Foundation:Backs of head, outer shoulders, arms, wrists and hands; both feet
Alignment:Lie supine on the floor� Bend knees and place feet flat on the ground� Position your heels hip width apart directly under your knees� Press palms down into the floor beside your hips� Position your chin slightly away from your sternum so the neck maintains its natural curve� Exhale, contract abdominal muscles and move your tailbone under toward the pubic bone� Feel how the pelvic tilt has flattened your lower back into the ground and raised the low end of your hips off the ground� Maintain pelvic tilt� Inhale and slowly lift the hips and lower back off the floor� Keep pressing into the inner edge of your feet to keep the knees and legs parallel� Continue to lift the middle and upper back until you lift the hips to the height of the knees� Maintain pelvic tilt to prevent arching into the lower back� Prevent the bottom front ribs from flying upwards� Roll the shoulders under, rising onto the back of the shoulders� Interlace the fingers and press shoulder blades firmly into the back as your arms root down� Ensure that your neck isn’t being forced into the ground� Avoid pulling your shoulders down from the ears as this forces and overstretches the neck� Maintain the natural curve and space under the neck� Gently move the pubis toward your navel� Reach your inner thighs down as you pull your sacrum forward�
Modifications:For beginners, only lift the hips, lower back and some of your middle backso the pose lifts only half way� Lift the torso high enough so that yourspine creates a straight line from the shoulders to the knees�For a deeper version, lift your heels as you press into the balls of the feet� Move the balls of your feetback under the knees and ground into the inside toe mounds to keep your knees and legs parallel�For a deeper chest opener, after the shoulders roll under the back, interlace your fingers and clasphands� Stretch the arms long and press the entire arm and wrist into the mat� Avoid the arms andshoulders from pulling down from the ears� Keep a natural curve and space under your neck�For tigh shoulders: hold strap between handsTo keep hip distance: place block between knees�
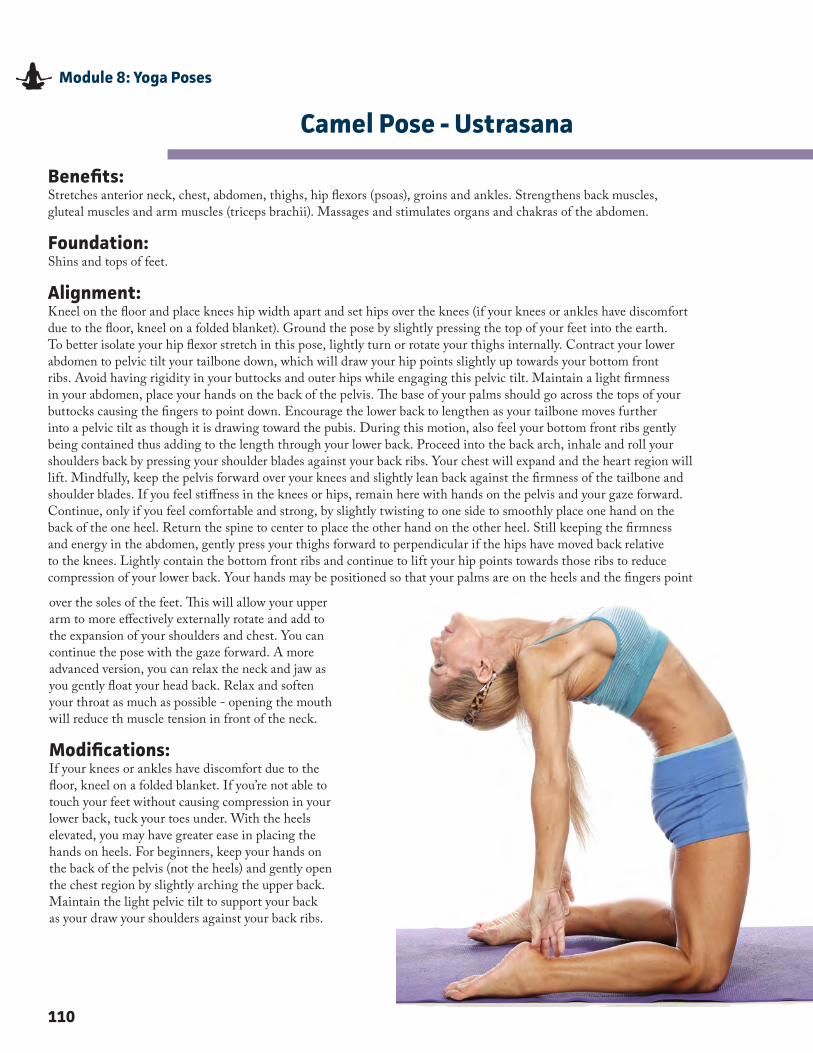
110
Module 8: Yoga Poses
Camel Pose - Ustrasana
Benefits:Stretches anterior neck, chest, abdomen, thighs, hip flexors (psoas), groins and ankles� Strengthens back muscles, gluteal muscles and arm muscles (triceps brachii)� Massages and stimulates organs and chakras of the abdomen�
Foundation:Shins and tops of feet�
Alignment:Kneel on the floor and place knees hip width apart and set hips over the knees (if your knees or ankles have discomfort due to the floor, kneel on a folded blanket)� Ground the pose by slightly pressing the top of your feet into the earth� To better isolate your hip flexor stretch in this pose, lightly turn or rotate your thighs internally� Contract your lower abdomen to pelvic tilt your tailbone down, which will draw your hip points slightly up towards your bottom front ribs� Avoid having rigidity in your buttocks and outer hips while engaging this pelvic tilt� Maintain a light firmness in your abdomen, place your hands on the back of the pelvis� The base of your palms should go across the tops of your buttocks causing the fingers to point down� Encourage the lower back to lengthen as your tailbone moves further into a pelvic tilt as though it is drawing toward the pubis� During this motion, also feel your bottom front ribs gently being contained thus adding to the length through your lower back� Proceed into the back arch, inhale and roll your shoulders back by pressing your shoulder blades against your back ribs� Your chest will expand and the heart region will lift� Mindfully, keep the pelvis forward over your knees and slightly lean back against the firmness of the tailbone and shoulder blades� If you feel stiffness in the knees or hips, remain here with hands on the pelvis and your gaze forward� Continue, only if you feel comfortable and strong, by slightly twisting to one side to smoothly place one hand on the back of the one heel� Return the spine to center to place the other hand on the other heel� Still keeping the firmness and energy in the abdomen, gently press your thighs forward to perpendicular if the hips have moved back relative to the knees� Lightly contain the bottom front ribs and continue to lift your hip points towards those ribs to reduce compression of your lower back� Your hands may be positioned so that your palms are on the heels and the fingers point
over the soles of the feet� This will allow your upper arm to more effectively externally rotate and add to the expansion of your shoulders and chest� You can continue the pose with the gaze forward� A more advanced version, you can relax the neck and jaw as you gently float your head back� Relax and soften your throat as much as possible - opening the mouth will reduce th muscle tension in front of the neck�
Modifications:If your knees or ankles have discomfort due to the floor, kneel on a folded blanket� If you’re not able to touch your feet without causing compression in your lower back, tuck your toes under� With the heels elevated, you may have greater ease in placing the hands on heels� For beginners, keep your hands on the back of the pelvis (not the heels) and gently open the chest region by slightly arching the upper back� Maintain the light pelvic tilt to support your back as your draw your shoulders against your back ribs�
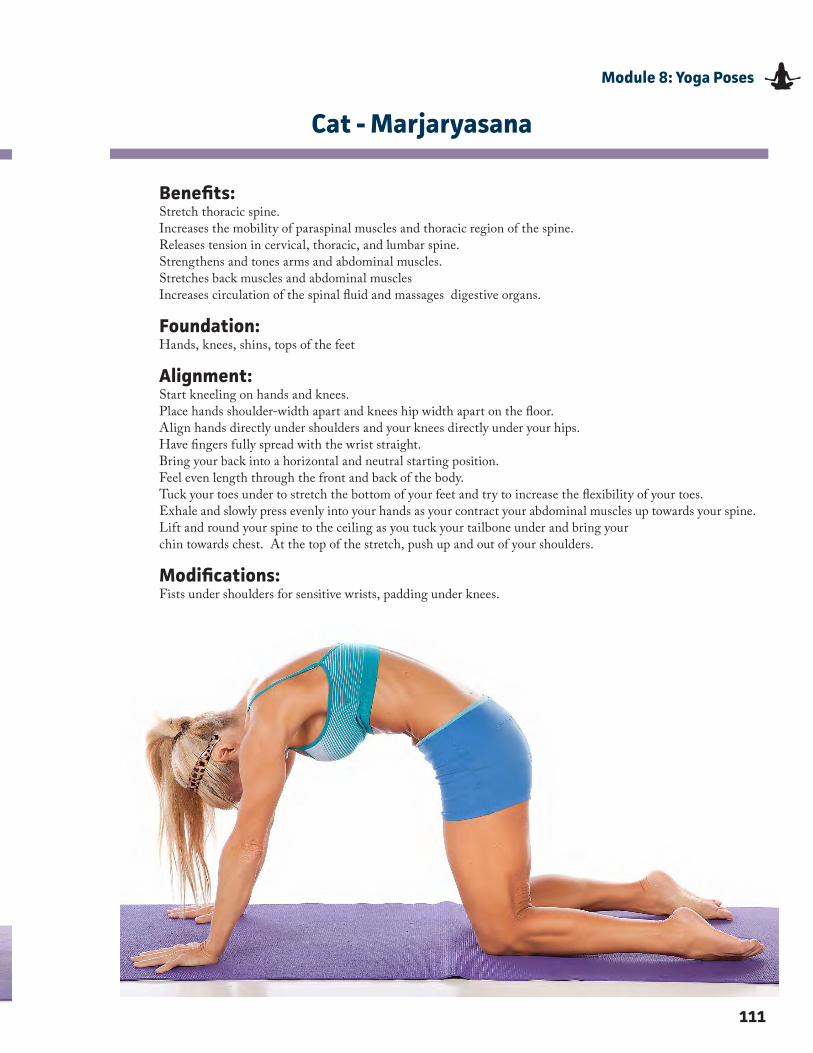
111
Module 8: Yoga Poses
Benefits:Stretch thoracic spine� Increases the mobility of paraspinal muscles and thoracic region of the spine�Releases tension in cervical, thoracic, and lumbar spine�Strengthens and tones arms and abdominal muscles�Stretches back muscles and abdominal muscles Increases circulation of the spinal fluid and massages digestive organs�
Foundation:Hands, knees, shins, tops of the feet
Alignment:Start kneeling on hands and knees�Place hands shoulder-width apart and knees hip width apart on the floor� Align hands directly under shoulders and your knees directly under your hips� Have fingers fully spread with the wrist straight�Bring your back into a horizontal and neutral starting position�Feel even length through the front and back of the body�Tuck your toes under to stretch the bottom of your feet and try to increase the flexibility of your toes�Exhale and slowly press evenly into your hands as your contract your abdominal muscles up towards your spine�Lift and round your spine to the ceiling as you tuck your tailbone under and bring your chin towards chest� At the top of the stretch, push up and out of your shoulders�
Modifications:Fists under shoulders for sensitive wrists, padding under knees�
Cat - Marjaryasana
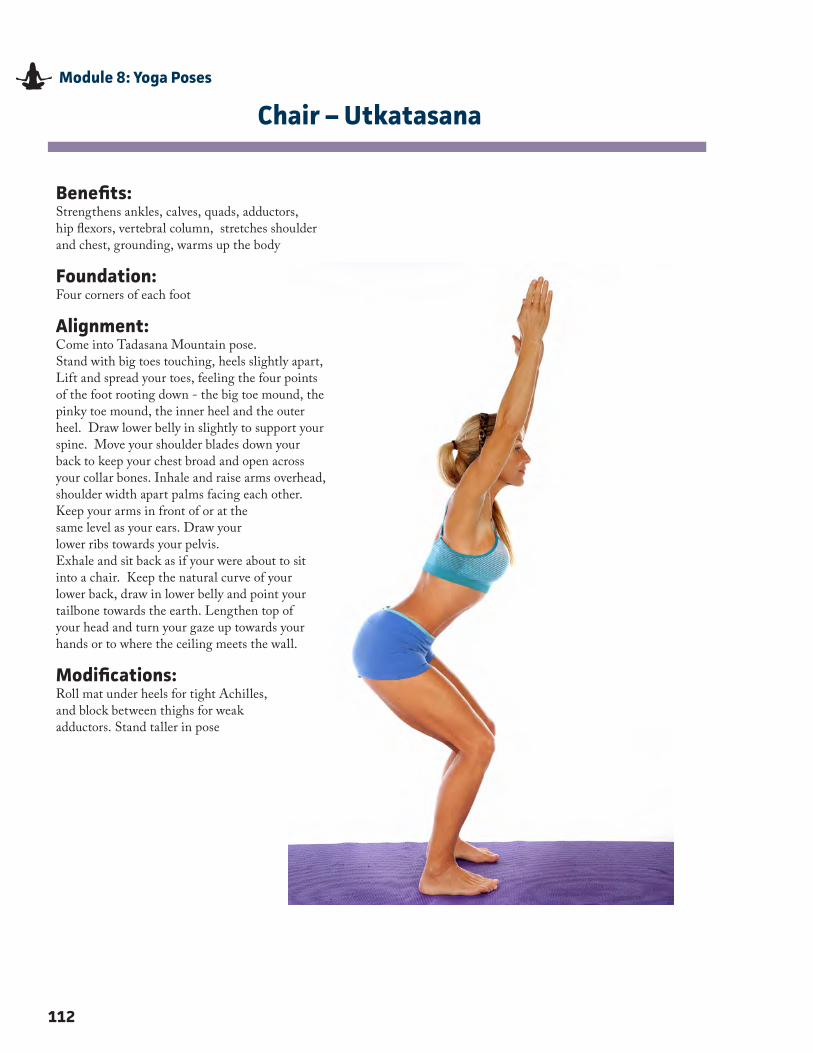
112
Module 8: Yoga Poses
Chair – Utkatasana
Benefits:Strengthens ankles, calves, quads, adductors, hip flexors, vertebral column, stretches shoulder and chest, grounding, warms up the body
Foundation:Four corners of each foot
Alignment:Come into Tadasana Mountain pose�Stand with big toes touching, heels slightly apart, Lift and spread your toes, feeling the four points of the foot rooting down - the big toe mound, the pinky toe mound, the inner heel and the outer heel� Draw lower belly in slightly to support your spine� Move your shoulder blades down your back to keep your chest broad and open across your collar bones� Inhale and raise arms overhead, shoulder width apart palms facing each other� Keep your arms in front of or at the same level as your ears� Draw your lower ribs towards your pelvis�Exhale and sit back as if your were about to sit into a chair� Keep the natural curve of your lower back, draw in lower belly and point your tailbone towards the earth� Lengthen top of your head and turn your gaze up towards your hands or to where the ceiling meets the wall�
Modifications:Roll mat under heels for tight Achilles, and block between thighs for weak adductors� Stand taller in pose
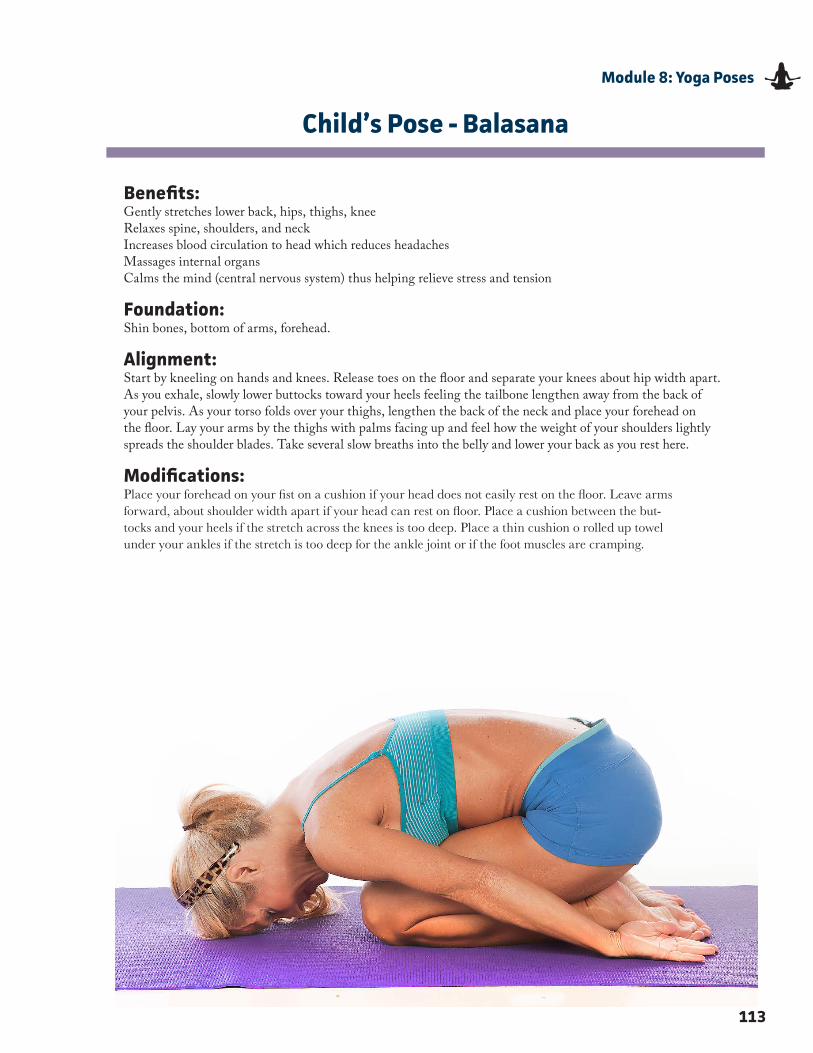
Benefits:Gently stretches lower back, hips, thighs, kneeRelaxes spine, shoulders, and neckIncreases blood circulation to head which reduces headachesMassages internal organsCalms the mind (central nervous system) thus helping relieve stress and tension
Foundation:Shin bones, bottom of arms, forehead�
Alignment: Start by kneeling on hands and knees� Release toes on the floor and separate your knees about hip width apart� As you exhale, slowly lower buttocks toward your heels feeling the tailbone lengthen away from the back of your pelvis� As your torso folds over your thighs, lengthen the back of the neck and place your forehead on the floor� Lay your arms by the thighs with palms facing up and feel how the weight of your shoulders lightly spreads the shoulder blades� Take several slow breaths into the belly and lower your back as you rest here�
Modifications:Place your forehead on your fist on a cushion if your head does not easily rest on the floor. Leave arms forward, about shoulder width apart if your head can rest on floor. Place a cushion between the but-tocks and your heels if the stretch across the knees is too deep. Place a thin cushion o rolled up towel under your ankles if the stretch is too deep for the ankle joint or if the foot muscles are cramping.
113
Module 8: Yoga Poses
Child’s Pose - Balasana
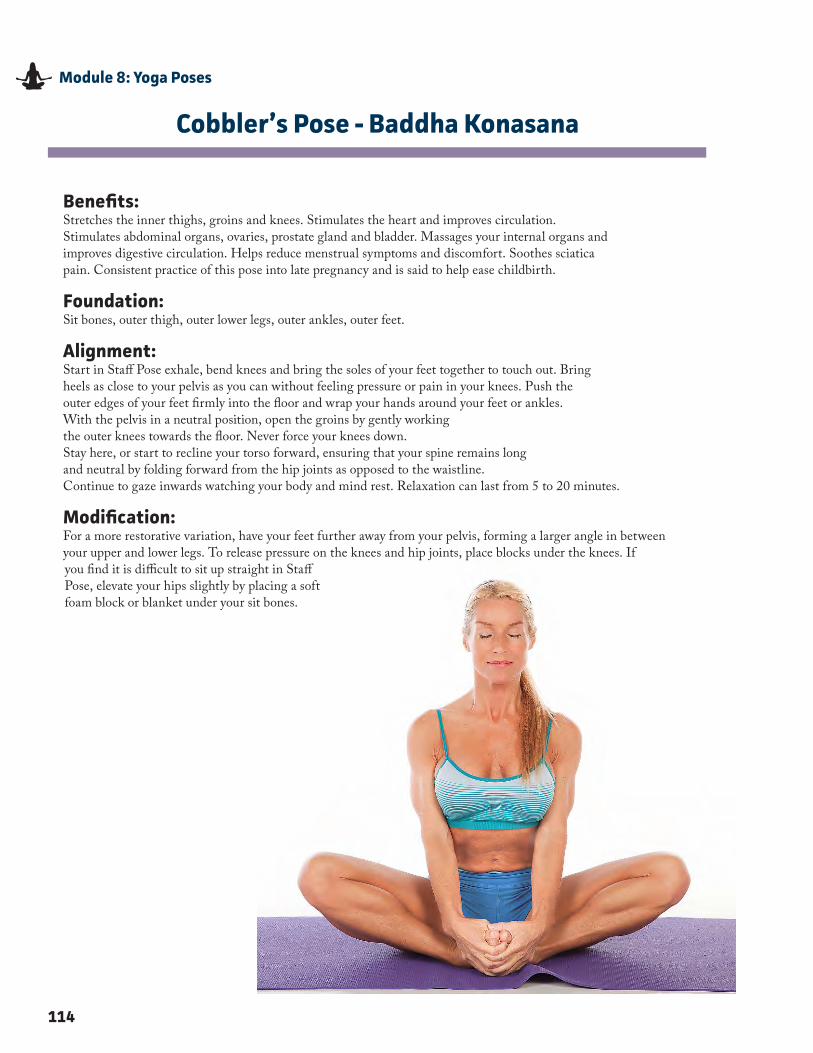
114
Module 8: Yoga Poses
Cobbler’s Pose - Baddha Konasana
Benefits:Stretches the inner thighs, groins and knees� Stimulates the heart and improves circulation� Stimulates abdominal organs, ovaries, prostate gland and bladder� Massages your internal organs and improves digestive circulation� Helps reduce menstrual symptoms and discomfort� Soothes sciatica pain� Consistent practice of this pose into late pregnancy and is said to help ease childbirth�
Foundation:Sit bones, outer thigh, outer lower legs, outer ankles, outer feet�
Alignment: Start in Staff Pose exhale, bend knees and bring the soles of your feet together to touch out� Bringheels as close to your pelvis as you can without feeling pressure or pain in your knees� Push theouter edges of your feet firmly into the floor and wrap your hands around your feet or ankles�With the pelvis in a neutral position, open the groins by gently workingthe outer knees towards the floor� Never force your knees down�Stay here, or start to recline your torso forward, ensuring that your spine remains longand neutral by folding forward from the hip joints as opposed to the waistline�Continue to gaze inwards watching your body and mind rest� Relaxation can last from 5 to 20 minutes�
Modification:For a more restorative variation, have your feet further away from your pelvis, forming a larger angle in between your upper and lower legs� To release pressure on the knees and hip joints, place blocks under the knees� If you find it is difficult to sit up straight in Staff Pose, elevate your hips slightly by placing a soft foam block or blanket under your sit bones�
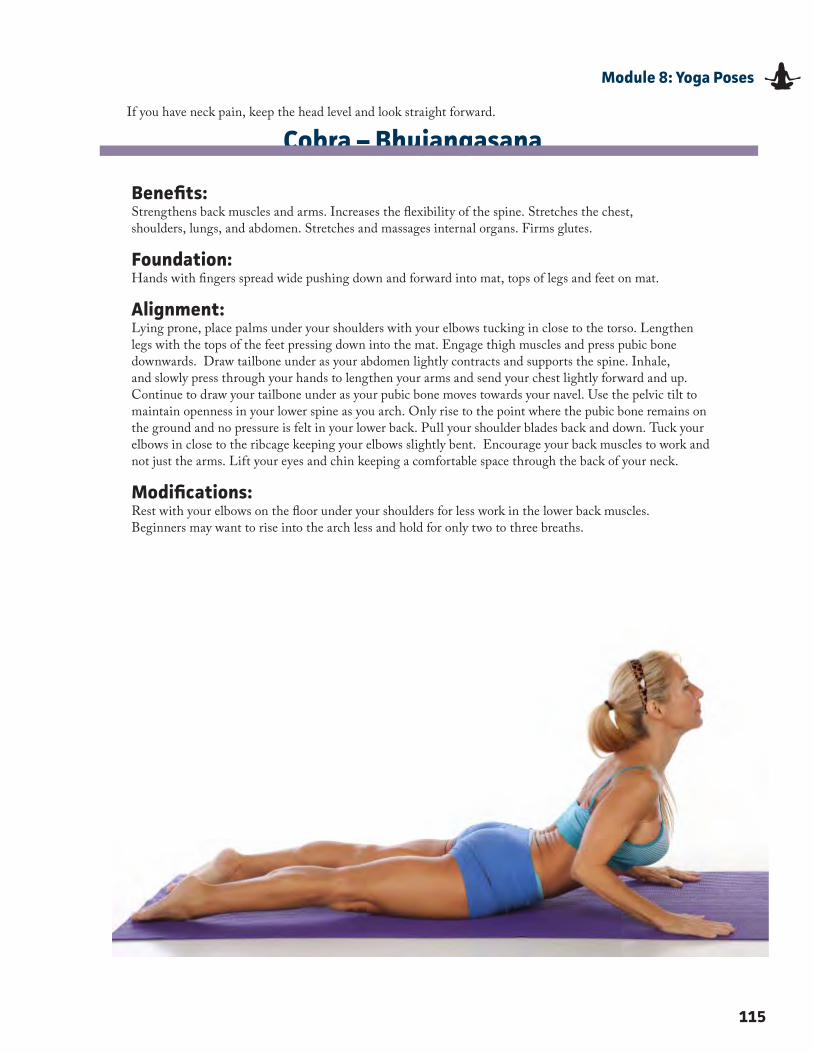
115
Module 8: Yoga Poses
If you have neck pain, keep the head level and look straight forward�
Cobra – Bhujangasana
Benefits:Strengthens back muscles and arms� Increases the flexibility of the spine� Stretches the chest, shoulders, lungs, and abdomen� Stretches and massages internal organs� Firms glutes�
Foundation:Hands with fingers spread wide pushing down and forward into mat, tops of legs and feet on mat�
Alignment:Lying prone, place palms under your shoulders with your elbows tucking in close to the torso� Lengthen legs with the tops of the feet pressing down into the mat� Engage thigh muscles and press pubic bone downwards� Draw tailbone under as your abdomen lightly contracts and supports the spine� Inhale, and slowly press through your hands to lengthen your arms and send your chest lightly forward and up� Continue to draw your tailbone under as your pubic bone moves towards your navel� Use the pelvic tilt to maintain openness in your lower spine as you arch� Only rise to the point where the pubic bone remains on the ground and no pressure is felt in your lower back� Pull your shoulder blades back and down� Tuck your elbows in close to the ribcage keeping your elbows slightly bent� Encourage your back muscles to work and not just the arms� Lift your eyes and chin keeping a comfortable space through the back of your neck�
Modifications:Rest with your elbows on the floor under your shoulders for less work in the lower back muscles�Beginners may want to rise into the arch less and hold for only two to three breaths�
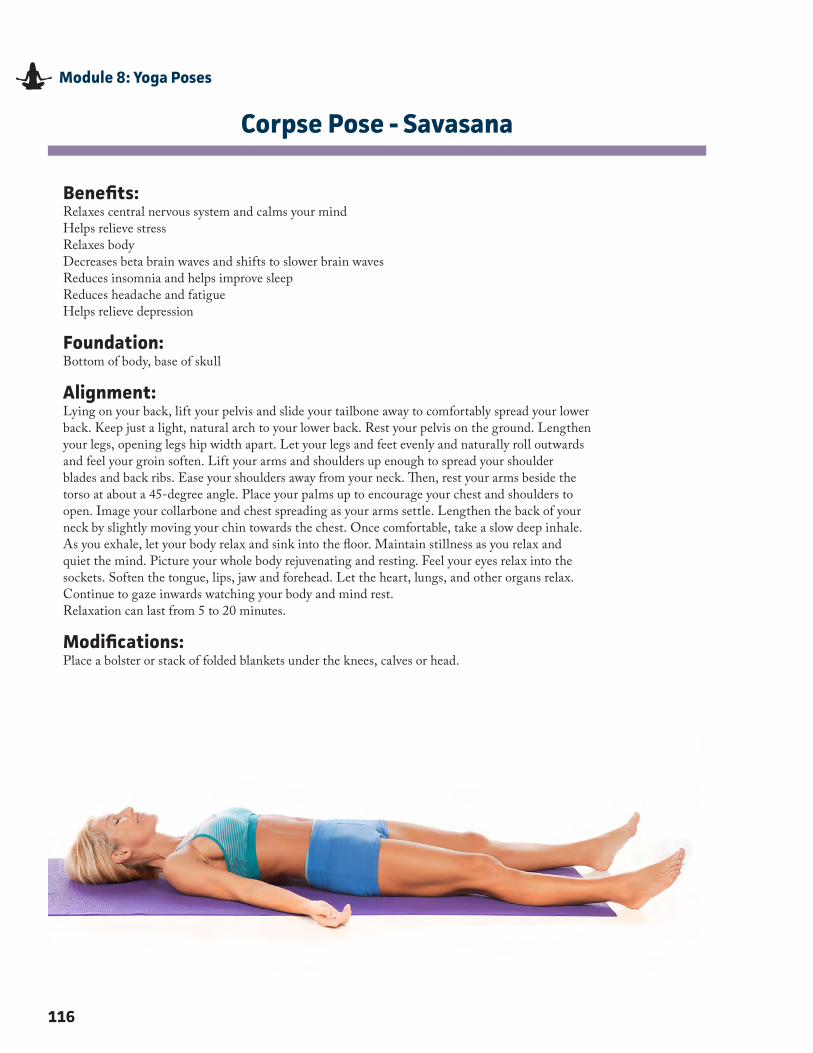
116
Module 8: Yoga Poses
Corpse Pose - Savasana
Benefits:Relaxes central nervous system and calms your mindHelps relieve stressRelaxes bodyDecreases beta brain waves and shifts to slower brain wavesReduces insomnia and helps improve sleepReduces headache and fatigueHelps relieve depression
Foundation:Bottom of body, base of skull
Alignment: Lying on your back, lift your pelvis and slide your tailbone away to comfortably spread your lowerback� Keep just a light, natural arch to your lower back� Rest your pelvis on the ground� Lengthenyour legs, opening legs hip width apart� Let your legs and feet evenly and naturally roll outwardsand feel your groin soften� Lift your arms and shoulders up enough to spread your shoulderblades and back ribs� Ease your shoulders away from your neck� Then, rest your arms beside thetorso at about a 45-degree angle� Place your palms up to encourage your chest and shoulders toopen� Image your collarbone and chest spreading as your arms settle� Lengthen the back of yourneck by slightly moving your chin towards the chest� Once comfortable, take a slow deep inhale�As you exhale, let your body relax and sink into the floor� Maintain stillness as you relax andquiet the mind� Picture your whole body rejuvenating and resting� Feel your eyes relax into thesockets� Soften the tongue, lips, jaw and forehead� Let the heart, lungs, and other organs relax�Continue to gaze inwards watching your body and mind rest� Relaxation can last from 5 to 20 minutes�
Modifications:Place a bolster or stack of folded blankets under the knees, calves or head�
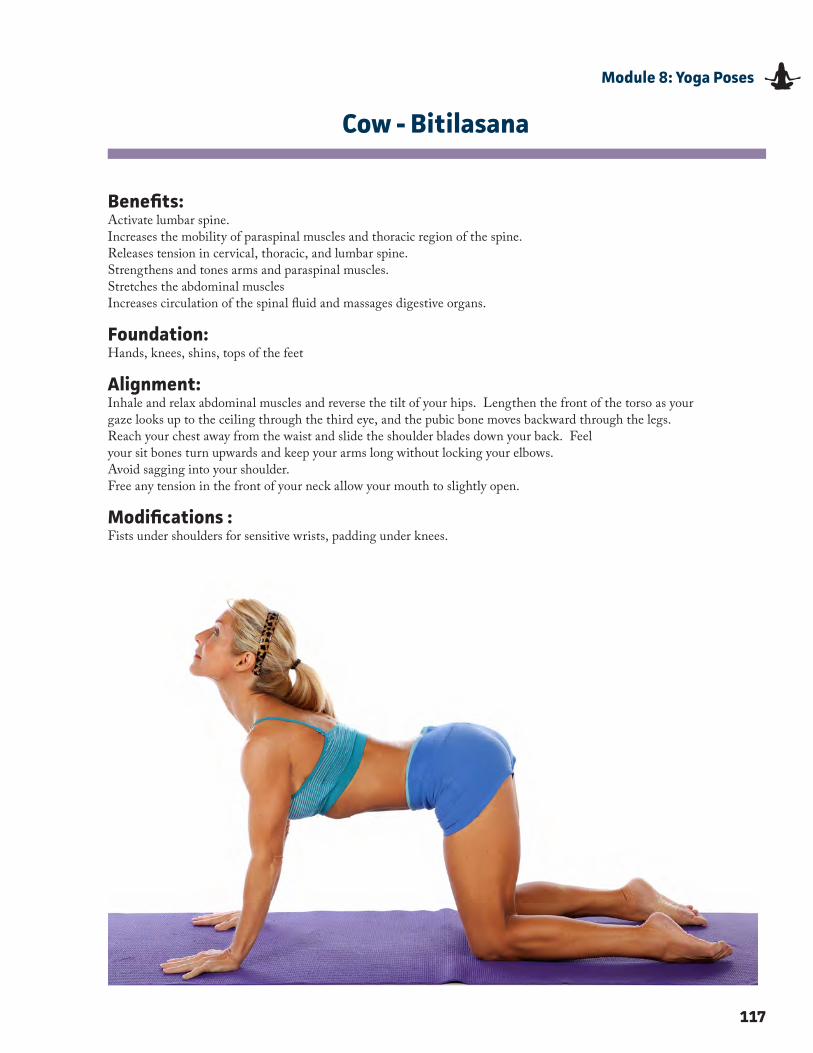
117
Module 8: Yoga Poses
Cow - Bitilasana
Benefits: Activate lumbar spine� Increases the mobility of paraspinal muscles and thoracic region of the spine�Releases tension in cervical, thoracic, and lumbar spine�Strengthens and tones arms and paraspinal muscles�Stretches the abdominal muscles Increases circulation of the spinal fluid and massages digestive organs�
Foundation: Hands, knees, shins, tops of the feet
Alignment: Inhale and relax abdominal muscles and reverse the tilt of your hips� Lengthen the front of the torso as your gaze looks up to the ceiling through the third eye, and the pubic bone moves backward through the legs�Reach your chest away from the waist and slide the shoulder blades down your back� Feel your sit bones turn upwards and keep your arms long without locking your elbows�Avoid sagging into your shoulder� Free any tension in the front of your neck allow your mouth to slightly open�
Modifications :Fists under shoulders for sensitive wrists, padding under knees�
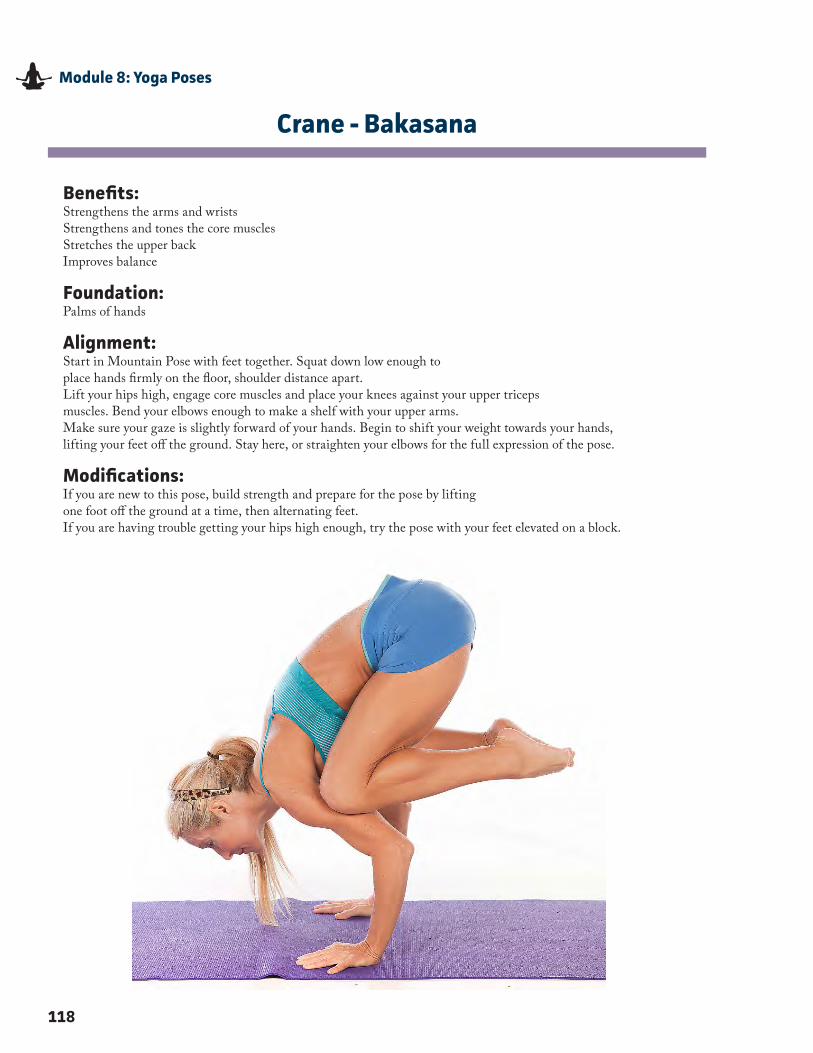
118
Module 8: Yoga Poses
Crane - Bakasana
Benefits:Strengthens the arms and wristsStrengthens and tones the core musclesStretches the upper backImproves balance
Foundation:Palms of hands
Alignment: Start in Mountain Pose with feet together� Squat down low enough toplace hands firmly on the floor, shoulder distance apart�Lift your hips high, engage core muscles and place your knees against your upper tricepsmuscles� Bend your elbows enough to make a shelf with your upper arms�Make sure your gaze is slightly forward of your hands� Begin to shift your weight towards your hands,lifting your feet off the ground� Stay here, or straighten your elbows for the full expression of the pose�
Modifications: If you are new to this pose, build strength and prepare for the pose by liftingone foot off the ground at a time, then alternating feet�If you are having trouble getting your hips high enough, try the pose with your feet elevated on a block�
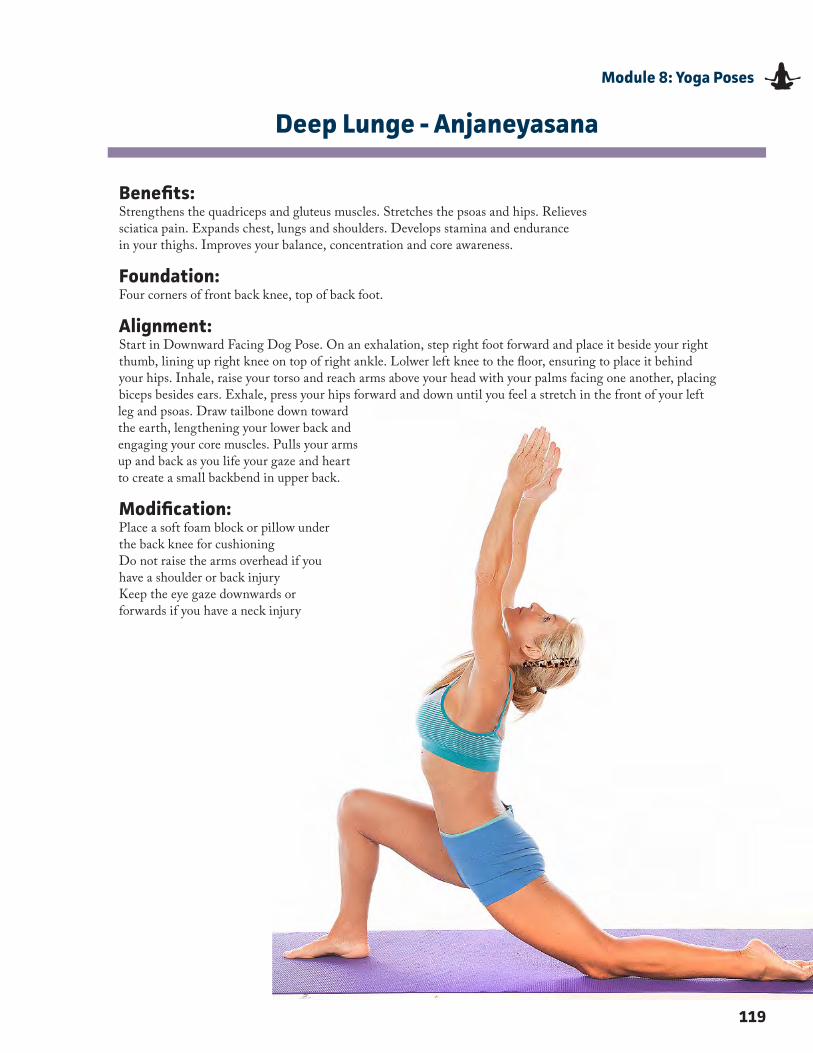
119
Module 8: Yoga Poses
Deep Lunge - Anjaneyasana
Benefits:Strengthens the quadriceps and gluteus muscles� Stretches the psoas and hips� Relieves sciatica pain� Expands chest, lungs and shoulders� Develops stamina and endurance in your thighs� Improves your balance, concentration and core awareness�
Foundation:Four corners of front back knee, top of back foot�
Alignment: Start in Downward Facing Dog Pose� On an exhalation, step right foot forward and place it beside your right thumb, lining up right knee on top of right ankle� Lolwer left knee to the floor, ensuring to place it behind your hips� Inhale, raise your torso and reach arms above your head with your palms facing one another, placing biceps besides ears� Exhale, press your hips forward and down until you feel a stretch in the front of your left
Modification:Place a soft foam block or pillow underthe back knee for cushioningDo not raise the arms overhead if youhave a shoulder or back injuryKeep the eye gaze downwards orforwards if you have a neck injury
leg and psoas� Draw tailbone down toward the earth, lengthening your lower back and engaging your core muscles� Pulls your arms up and back as you life your gaze and heart to create a small backbend in upper back�
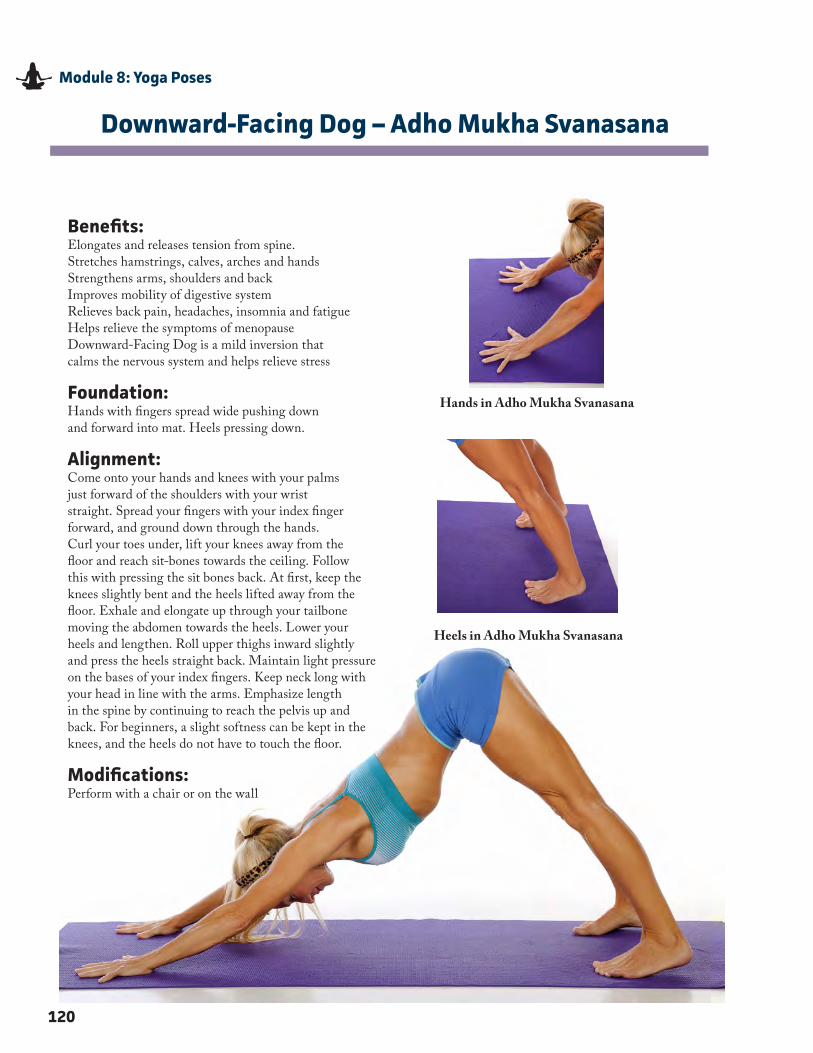
120
Module 8: Yoga Poses
Hands in Adho Mukha Svanasana
Heels in Adho Mukha Svanasana
Downward-Facing Dog – Adho Mukha Svanasana
Benefits:Elongates and releases tension from spine� Stretches hamstrings, calves, arches and handsStrengthens arms, shoulders and backImproves mobility of digestive systemRelieves back pain, headaches, insomnia and fatigueHelps relieve the symptoms of menopauseDownward-Facing Dog is a mild inversion that calms the nervous system and helps relieve stress
Foundation:Hands with fingers spread wide pushing down and forward into mat� Heels pressing down�
Alignment: Come onto your hands and knees with your palms just forward of the shoulders with your wrist straight� Spread your fingers with your index finger forward, and ground down through the hands�Curl your toes under, lift your knees away from the floor and reach sit-bones towards the ceiling� Follow this with pressing the sit bones back� At first, keep the knees slightly bent and the heels lifted away from the floor� Exhale and elongate up through your tailbone moving the abdomen towards the heels� Lower your heels and lengthen� Roll upper thighs inward slightly and press the heels straight back� Maintain light pressure on the bases of your index fingers� Keep neck long with your head in line with the arms� Emphasize length in the spine by continuing to reach the pelvis up and back� For beginners, a slight softness can be kept in the knees, and the heels do not have to touch the floor�
Modifications: Perform with a chair or on the wall
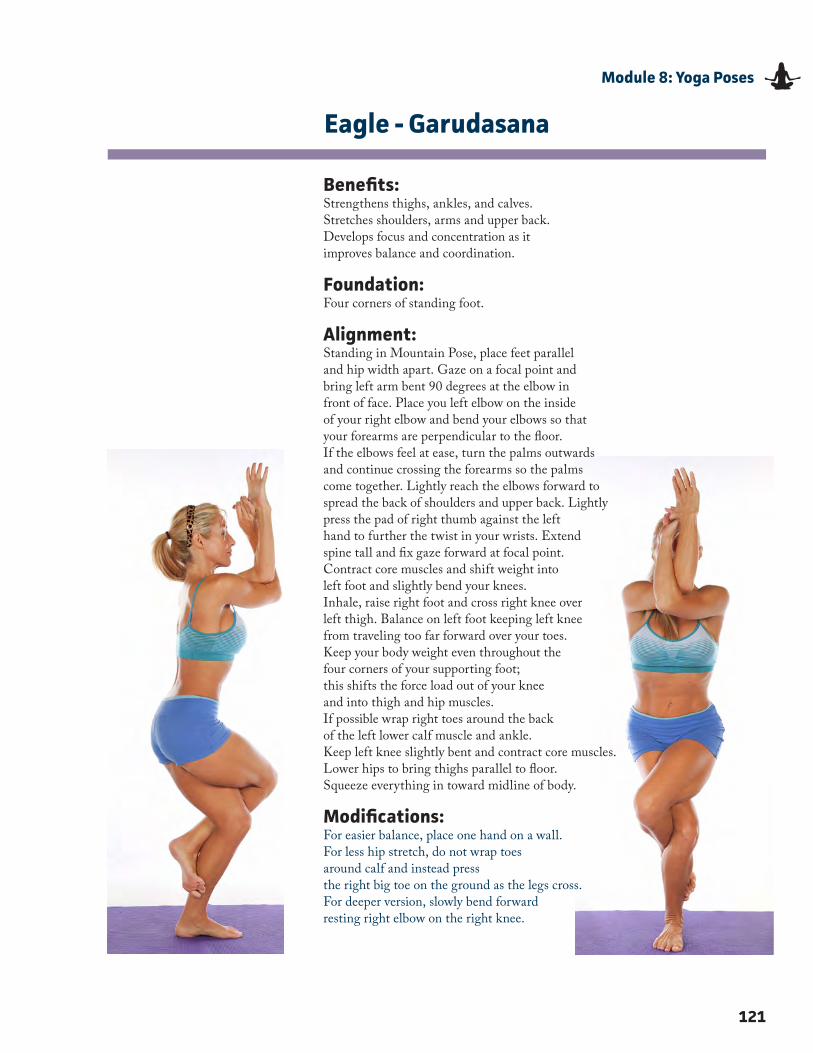
121
Module 8: Yoga Poses
Eagle - Garudasana
Benefits:Strengthens thighs, ankles, and calves�Stretches shoulders, arms and upper back�Develops focus and concentration as it improves balance and coordination�
Foundation:Four corners of standing foot�
Alignment:Standing in Mountain Pose, place feet parallel and hip width apart� Gaze on a focal point and bring left arm bent 90 degrees at the elbow infront of face� Place you left elbow on the inside of your right elbow and bend your elbows so that your forearms are perpendicular to the floor�If the elbows feel at ease, turn the palms outwards and continue crossing the forearms so the palms come together� Lightly reach the elbows forward to spread the back of shoulders and upper back� Lightlypress the pad of right thumb against the left hand to further the twist in your wrists� Extend spine tall and fix gaze forward at focal point�Contract core muscles and shift weight into left foot and slightly bend your knees�Inhale, raise right foot and cross right knee over left thigh� Balance on left foot keeping left knee from traveling too far forward over your toes�Keep your body weight even throughout the four corners of your supporting foot;this shifts the force load out of your knee and into thigh and hip muscles�If possible wrap right toes around the back of the left lower calf muscle and ankle�Keep left knee slightly bent and contract core muscles�Lower hips to bring thighs parallel to floor� Squeeze everything in toward midline of body�
Modifications:For easier balance, place one hand on a wall�For less hip stretch, do not wrap toes around calf and instead pressthe right big toe on the ground as the legs cross�For deeper version, slowly bend forward resting right elbow on the right knee�
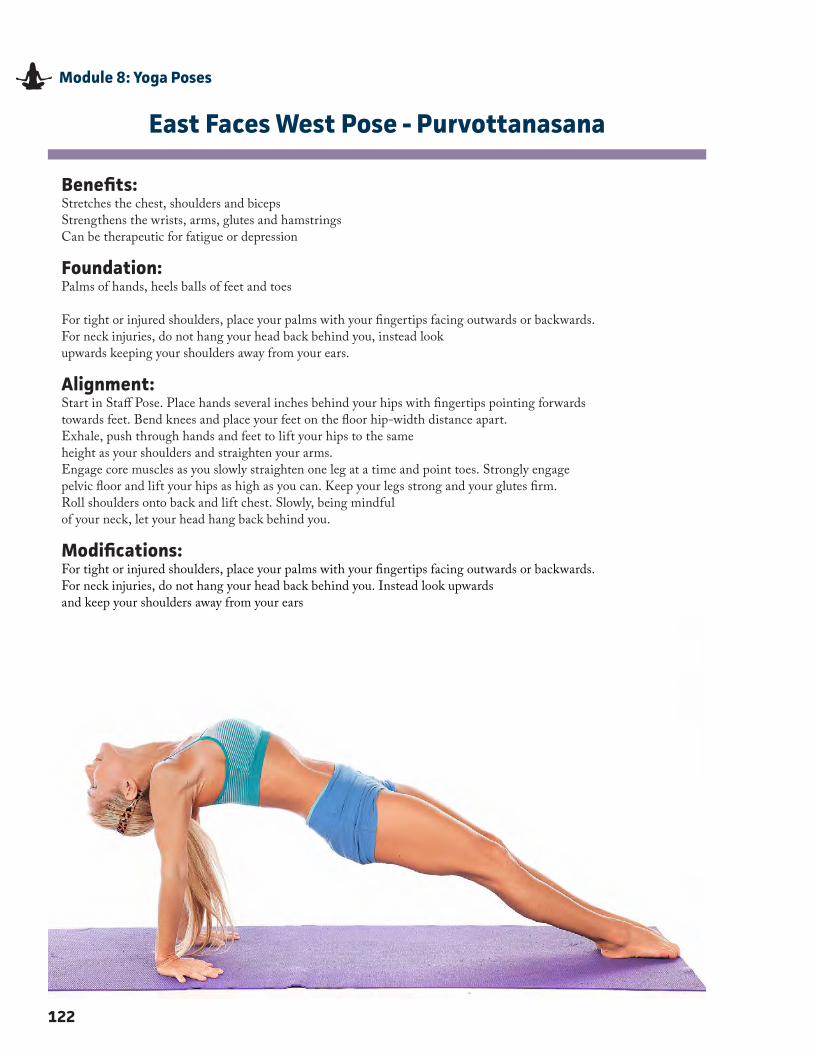
Benefits:Stretches the chest, shoulders and bicepsStrengthens the wrists, arms, glutes and hamstringsCan be therapeutic for fatigue or depression
Foundation:Palms of hands, heels balls of feet and toes
For tight or injured shoulders, place your palms with your fingertips facing outwards or backwards�For neck injuries, do not hang your head back behind you, instead lookupwards keeping your shoulders away from your ears�
Alignment:Start in Staff Pose� Place hands several inches behind your hips with fingertips pointing forwardstowards feet� Bend knees and place your feet on the floor hip-width distance apart�Exhale, push through hands and feet to lift your hips to the sameheight as your shoulders and straighten your arms�Engage core muscles as you slowly straighten one leg at a time and point toes� Strongly engagepelvic floor and lift your hips as high as you can� Keep your legs strong and your glutes firm�Roll shoulders onto back and lift chest� Slowly, being mindfulof your neck, let your head hang back behind you�
Modifications:For tight or injured shoulders, place your palms with your fingertips facing outwards or backwards�For neck injuries, do not hang your head back behind you� Instead look upwardsand keep your shoulders away from your ears
122
Module 8: Yoga Poses
East Faces West Pose - Purvottanasana
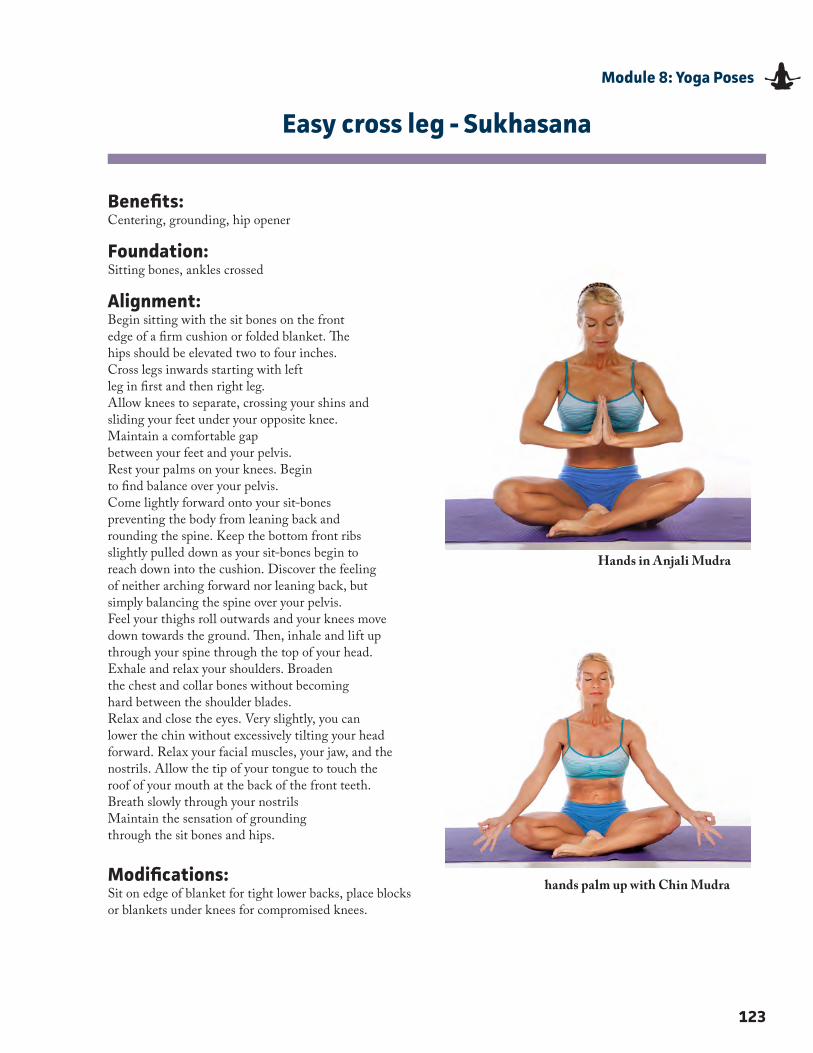
123
Module 8: Yoga Poses
Easy cross leg - Sukhasana
Benefits: Centering, grounding, hip opener
Foundation:Sitting bones, ankles crossed
Alignment:Begin sitting with the sit bones on the front edge of a firm cushion or folded blanket� The hips should be elevated two to four inches�Cross legs inwards starting with left leg in first and then right leg�Allow knees to separate, crossing your shins and sliding your feet under your opposite knee�Maintain a comfortable gap between your feet and your pelvis�Rest your palms on your knees� Begin to find balance over your pelvis�Come lightly forward onto your sit-bones preventing the body from leaning back and rounding the spine� Keep the bottom front ribs slightly pulled down as your sit-bones begin to reach down into the cushion� Discover the feeling of neither arching forward nor leaning back, but simply balancing the spine over your pelvis�Feel your thighs roll outwards and your knees move down towards the ground� Then, inhale and lift up through your spine through the top of your head�Exhale and relax your shoulders� Broaden the chest and collar bones without becoming hard between the shoulder blades�Relax and close the eyes� Very slightly, you can lower the chin without excessively tilting your head forward� Relax your facial muscles, your jaw, and the nostrils� Allow the tip of your tongue to touch the roof of your mouth at the back of the front teeth�Breath slowly through your nostrils Maintain the sensation of grounding through the sit bones and hips�
Modifications:Sit on edge of blanket for tight lower backs, place blocks or blankets under knees for compromised knees�
Hands in Anjali Mudra
hands palm up with Chin Mudra

Benefits:Strengthens the quadriceps and gluteus musclesStretches the psoas and hipsRelieves sciatica painExpands chest, lungs and shouldersDevelops stamina and endurance in your thighsImproves your balance, concentration and core awareness
Foundation:Four corners of front foot, ball of back foot�
Alignment:Start in Downward Facing Dog Pose On an exhalation, step right foot forwardand place it beside your right thumb, lining up right knee over rightankle� Lower left knee to the floor, ensuring to place it behind your hips�Inhale, raise your torso and reach arms above your head with your palms facingone another, placing biceps beside ears� Exhale, allow your hips to settle forwardsand down until you feel a stretch in the front of your left leg and psoas�Draw tailbone down towards the earth, lengthening your lower back and engagingyour core muscles� Begin to draw your thumbs into the back plane of your bodyas you reach up with your heart, and shift your gaze up for a mild backbend�For the full expression of the pose, send your gaze over yourright shoulder, keeping your chin parallel to the ground�
124
Module 8: Yoga Poses
Easy Twist in Lunge - Parivrtta Parsvakonasana
Modifications:Shift onto the outside edge (little-toe side) of the back foot�
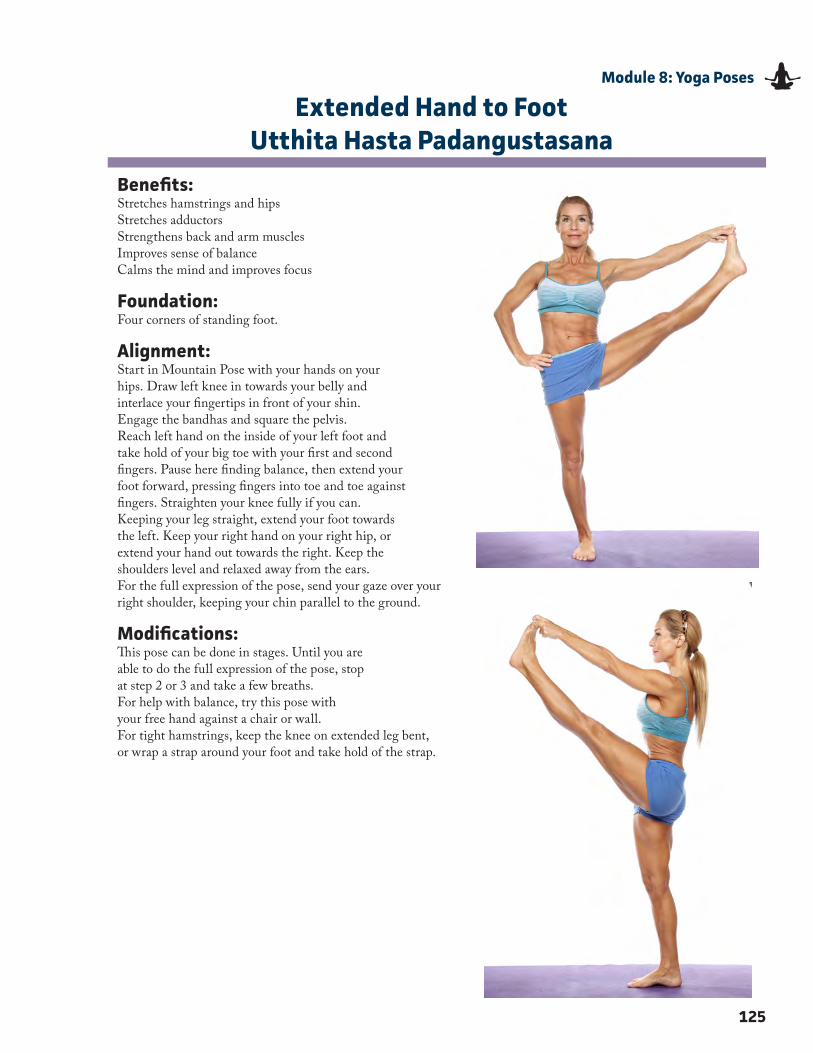
Benefits:Stretches hamstrings and hipsStretches adductorsStrengthens back and arm musclesImproves sense of balanceCalms the mind and improves focus
Foundation:Four corners of standing foot�
Alignment:Start in Mountain Pose with your hands on yourhips� Draw left knee in towards your belly andinterlace your fingertips in front of your shin�Engage the bandhas and square the pelvis�Reach left hand on the inside of your left foot andtake hold of your big toe with your first and secondfingers� Pause here finding balance, then extend yourfoot forward, pressing fingers into toe and toe againstfingers� Straighten your knee fully if you can�Keeping your leg straight, extend your foot towardsthe left� Keep your right hand on your right hip, orextend your hand out towards the right� Keep theshoulders level and relaxed away from the ears�For the full expression of the pose, send your gaze over yourright shoulder, keeping your chin parallel to the ground�
Modifications:This pose can be done in stages� Until you areable to do the full expression of the pose, stopat step 2 or 3 and take a few breaths�For help with balance, try this pose withyour free hand against a chair or wall�For tight hamstrings, keep the knee on extended leg bent,or wrap a strap around your foot and take hold of the strap�
125
Module 8: Yoga Poses
Extended Hand to FootUtthita Hasta Padangustasana
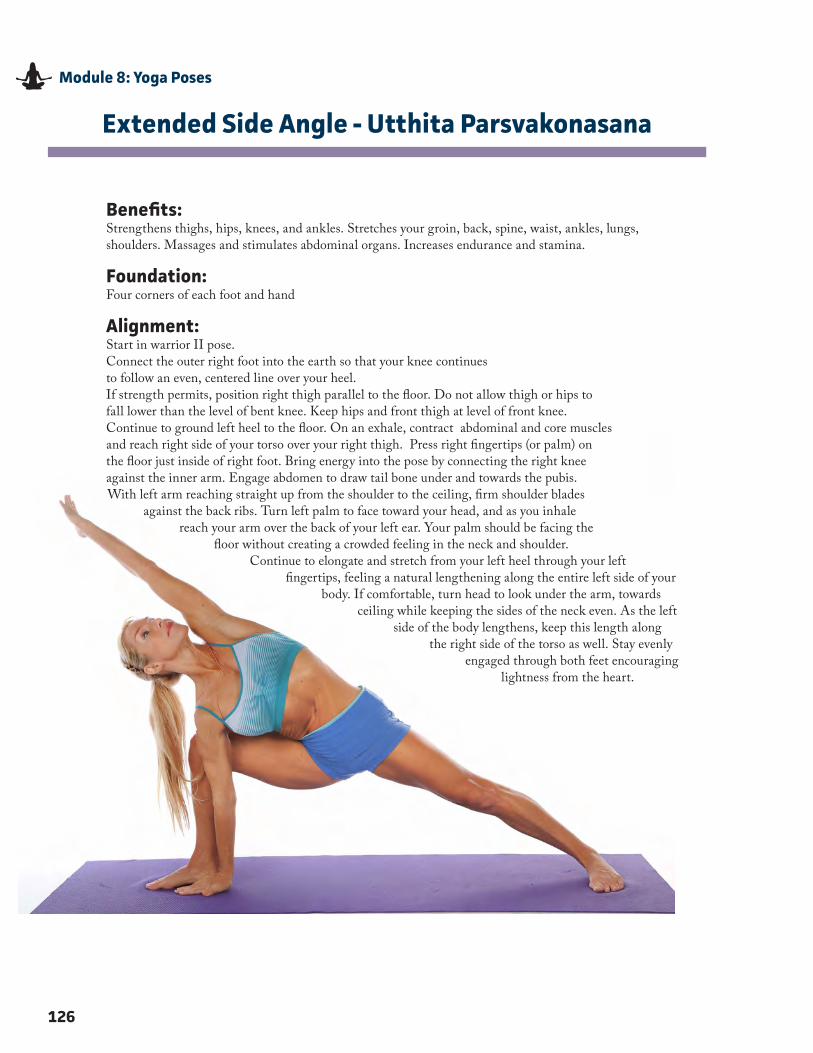
126
Module 8: Yoga Poses
Extended Side Angle - Utthita Parsvakonasana
Benefits:Strengthens thighs, hips, knees, and ankles� Stretches your groin, back, spine, waist, ankles, lungs, shoulders� Massages and stimulates abdominal organs� Increases endurance and stamina�
Foundation:Four corners of each foot and hand
Alignment:Start in warrior II pose� Connect the outer right foot into the earth so that your knee continues to follow an even, centered line over your heel�If strength permits, position right thigh parallel to the floor� Do not allow thigh or hips to fall lower than the level of bent knee� Keep hips and front thigh at level of front knee�Continue to ground left heel to the floor� On an exhale, contract abdominal and core muscles and reach right side of your torso over your right thigh� Press right fingertips (or palm) on the floor just inside of right foot� Bring energy into the pose by connecting the right knee against the inner arm� Engage abdomen to draw tail bone under and towards the pubis�With left arm reaching straight up from the shoulder to the ceiling, firm shoulder blades
against the back ribs� Turn left palm to face toward your head, and as you inhale reach your arm over the back of your left ear� Your palm should be facing the
floor without creating a crowded feeling in the neck and shoulder�Continue to elongate and stretch from your left heel through your left
fingertips, feeling a natural lengthening along the entire left side of your body� If comfortable, turn head to look under the arm, towards
ceiling while keeping the sides of the neck even� As the left side of the body lengthens, keep this length along
the right side of the torso as well� Stay evenly engaged through both feet encouraging
lightness from the heart�
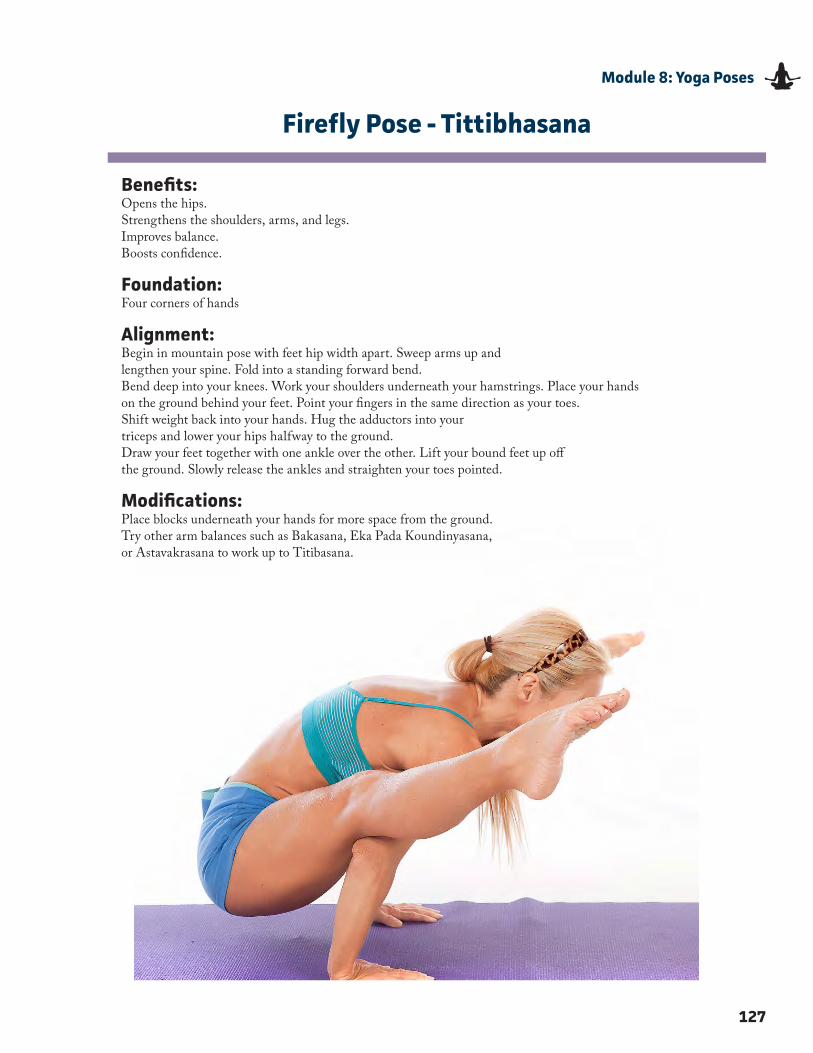
Benefits:Opens the hips�Strengthens the shoulders, arms, and legs�Improves balance�Boosts confidence�
Foundation:Four corners of hands
Alignment:Begin in mountain pose with feet hip width apart� Sweep arms up andlengthen your spine� Fold into a standing forward bend�Bend deep into your knees� Work your shoulders underneath your hamstrings� Place your handson the ground behind your feet� Point your fingers in the same direction as your toes�Shift weight back into your hands� Hug the adductors into yourtriceps and lower your hips halfway to the ground�Draw your feet together with one ankle over the other� Lift your bound feet up offthe ground� Slowly release the ankles and straighten your toes pointed�
Modifications:Place blocks underneath your hands for more space from the ground�Try other arm balances such as Bakasana, Eka Pada Koundinyasana,or Astavakrasana to work up to Titibasana�
127
Module 8: Yoga Poses
Firefly Pose - Tittibhasana
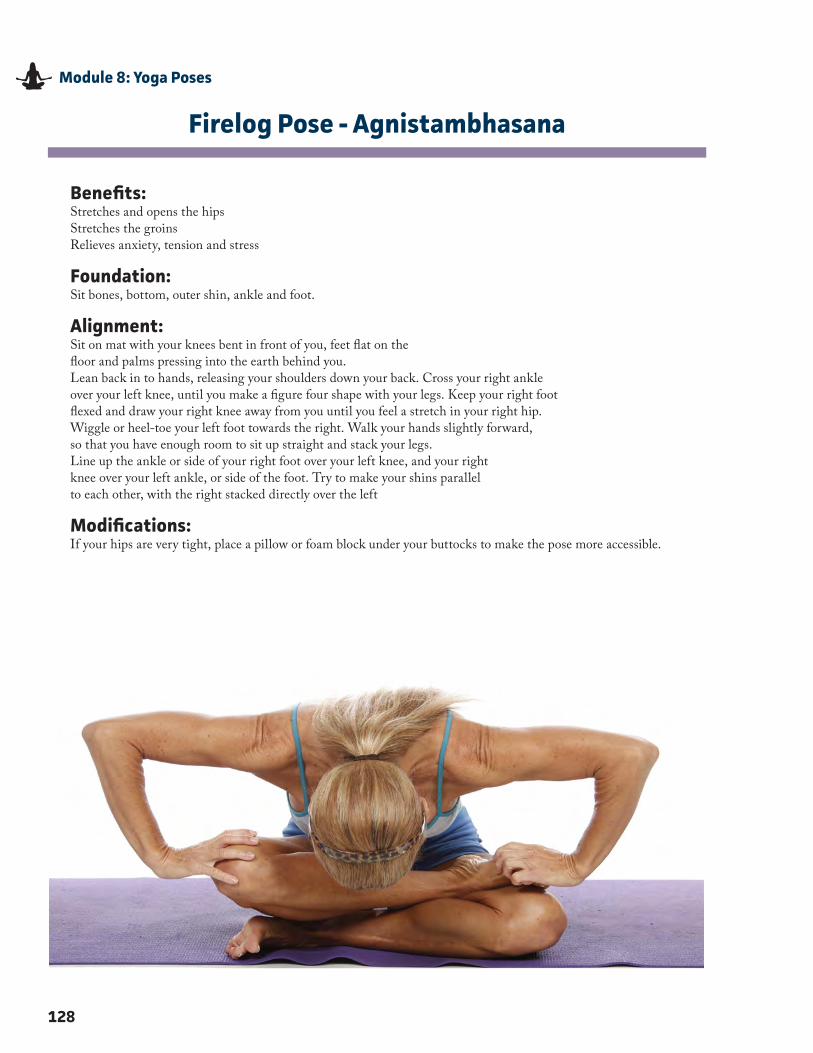
Benefits:Stretches and opens the hipsStretches the groinsRelieves anxiety, tension and stress
Foundation:Sit bones, bottom, outer shin, ankle and foot�
Alignment:Sit on mat with your knees bent in front of you, feet flat on thefloor and palms pressing into the earth behind you�Lean back in to hands, releasing your shoulders down your back� Cross your right ankleover your left knee, until you make a figure four shape with your legs� Keep your right footflexed and draw your right knee away from you until you feel a stretch in your right hip�Wiggle or heel-toe your left foot towards the right� Walk your hands slightly forward,so that you have enough room to sit up straight and stack your legs�Line up the ankle or side of your right foot over your left knee, and your rightknee over your left ankle, or side of the foot� Try to make your shins parallelto each other, with the right stacked directly over the left
Modifications:If your hips are very tight, place a pillow or foam block under your buttocks to make the pose more accessible�
128
Module 8: Yoga Poses
Firelog Pose - Agnistambhasana

Benefits:Opens pectoralis muscles of chest, the intercostal muscles between ribs, and upper portion of psoas muscles in hips�Improves the quality of breath by opening the accessory muscles of breathing�Opens muscles in abdomen and in the front of your neck�Relieves thoracic and mid back spinal tension�Strengthens musculature in back and neck�
Foundation:Bottom of forearms, back of hips, back of legs
Alignment:Begin by lying on the floor with both knees bent, feet flat on the floor�Bring arms by your side, palms down� Lift each hip to allow your thumb and firstfew fingers to fit under your hip, placing your hips back to the earth�Bend elbows, keeping your hands under your hips, and press into the earth with your forearms, lifting your bodyfrom the floor� Allow pelvis to rock almost onto your sitting bones, accentuating the natural curve of the low back�Send heart upwards and backwards, creating a back bend in your thoracic spine, where your ribcage is� Picture your spine getting longer and arching gently into a backwards curve�Imagine your neck is extension of your spine, reach out from the crown of your head, perhaps findingthe floor with A) the back of the head or B) the crown of the head� If this is not available to you,you may use props (see modifications below)� Your head is not supporting the weight of the body,but merely a balance point� The strong muscles of the back are supporting you in this pose�You may keep your legs A) knees bent, feet flat on the floor, B) legs extended on the floor, feet flexed, muscles engaged, C)cross your legs in siddhasana/easy sitting or find lotus pose� You should not feel any discomfort in your low back or neck�
Modifications: Using a bolster for a more passive back bend – to minimize the work in the spinal muscles you mayplace a bolster or a firmly rolled blanket perpendicular to your spine� Place your prop below yourshoulder blades and gently lie back, allowing your head to come into soft contact with the floor�This is an excellent preparatory pose if you have a lot of tension in the low back or rib cage�Using a block / bolster / blanket to bring the floor closer – to experience the strength of the backbend without straining the neck, place your prop under your head near the base of your skull beforeyou enter the pose� Enter the pose as above, and then allow your head to rest on the prop insteadof the floor� You may need to experiment with height� Do not sag into the support of the prop, butrather use to prop to work deeper into the pose, continuing to send your heart up and backNeck strain in the Pose – to relieve strain in the neck, shift your weight more into your hips and forearms, andincrease the length in your spine to create a bigger back bend and take the weight off of your head� You may alsoconsider less extension in the neck, and making contact with the back of your skull rather than the top�
129
Module 8: Yoga Poses
Fish Pose - Matsyasana
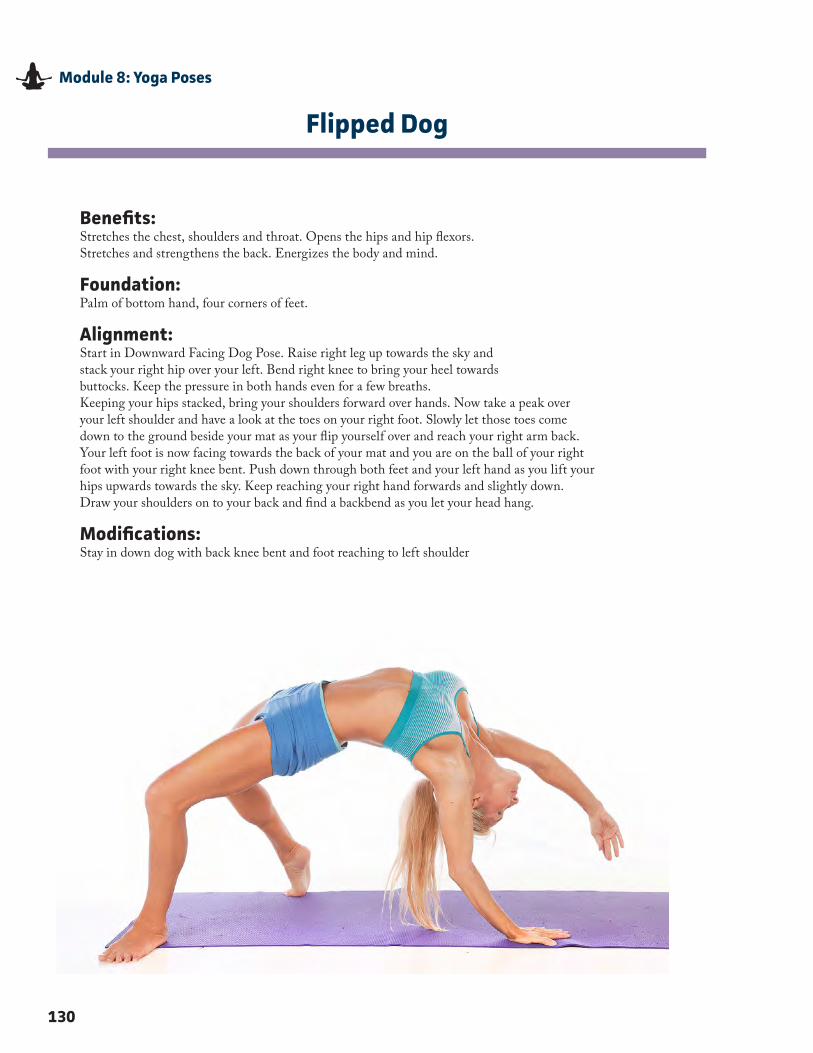
Benefits:Stretches the chest, shoulders and throat� Opens the hips and hip flexors� Stretches and strengthens the back� Energizes the body and mind�
Foundation:Palm of bottom hand, four corners of feet�
Alignment:Start in Downward Facing Dog Pose� Raise right leg up towards the sky andstack your right hip over your left� Bend right knee to bring your heel towardsbuttocks� Keep the pressure in both hands even for a few breaths�Keeping your hips stacked, bring your shoulders forward over hands� Now take a peak overyour left shoulder and have a look at the toes on your right foot� Slowly let those toes comedown to the ground beside your mat as your flip yourself over and reach your right arm back�Your left foot is now facing towards the back of your mat and you are on the ball of your rightfoot with your right knee bent� Push down through both feet and your left hand as you lift yourhips upwards towards the sky� Keep reaching your right hand forwards and slightly down�Draw your shoulders on to your back and find a backbend as you let your head hang�
Modifications: Stay in down dog with back knee bent and foot reaching to left shoulder
130
Module 8: Yoga Poses
Flipped Dog
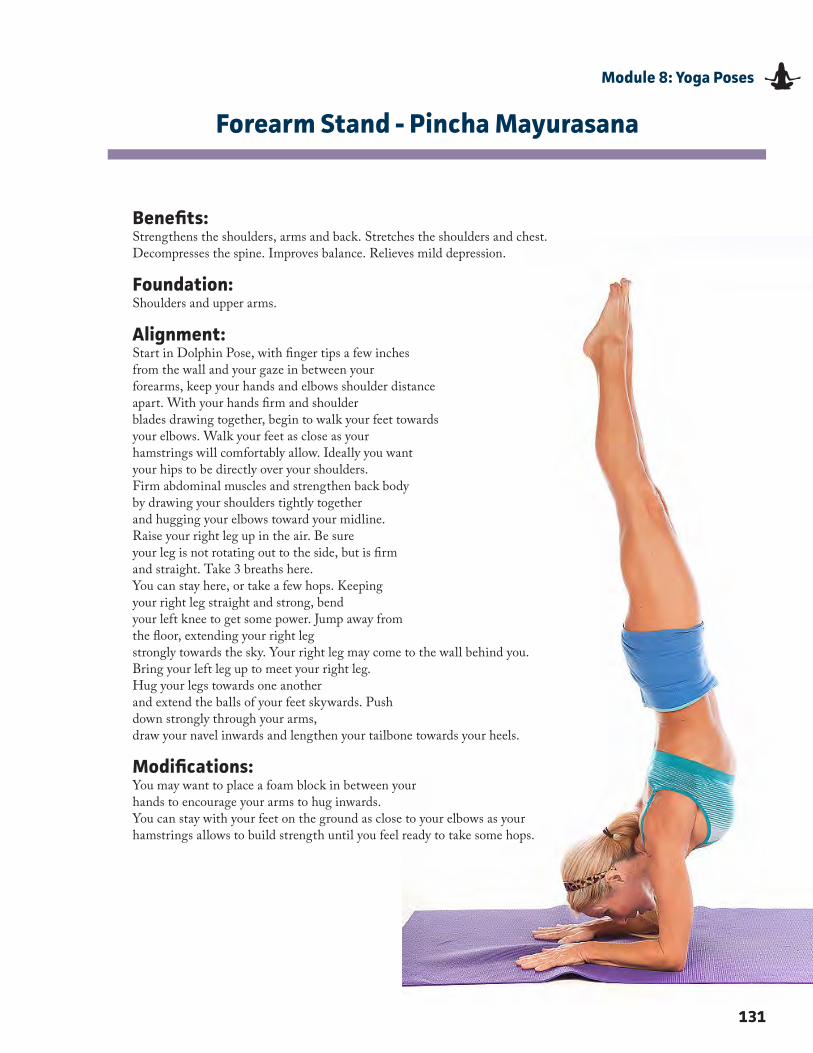
Benefits:Strengthens the shoulders, arms and back� Stretches the shoulders and chest� Decompresses the spine� Improves balance� Relieves mild depression�
Foundation:Shoulders and upper arms�
Alignment:Start in Dolphin Pose, with finger tips a few inches from the wall and your gaze in between yourforearms, keep your hands and elbows shoulder distance apart� With your hands firm and shoulderblades drawing together, begin to walk your feet towards your elbows� Walk your feet as close as yourhamstrings will comfortably allow� Ideally you want your hips to be directly over your shoulders�Firm abdominal muscles and strengthen back body by drawing your shoulders tightly togetherand hugging your elbows toward your midline� Raise your right leg up in the air� Be sureyour leg is not rotating out to the side, but is firm and straight� Take 3 breaths here�You can stay here, or take a few hops� Keeping your right leg straight and strong, bendyour left knee to get some power� Jump away from the floor, extending your right legstrongly towards the sky� Your right leg may come to the wall behind you�Bring your left leg up to meet your right leg� Hug your legs towards one anotherand extend the balls of your feet skywards� Push down strongly through your arms,draw your navel inwards and lengthen your tailbone towards your heels�
Modifications: You may want to place a foam block in between your hands to encourage your arms to hug inwards�You can stay with your feet on the ground as close to your elbows as your hamstrings allows to build strength until you feel ready to take some hops�
131
Module 8: Yoga Poses
Forearm Stand - Pincha Mayurasana
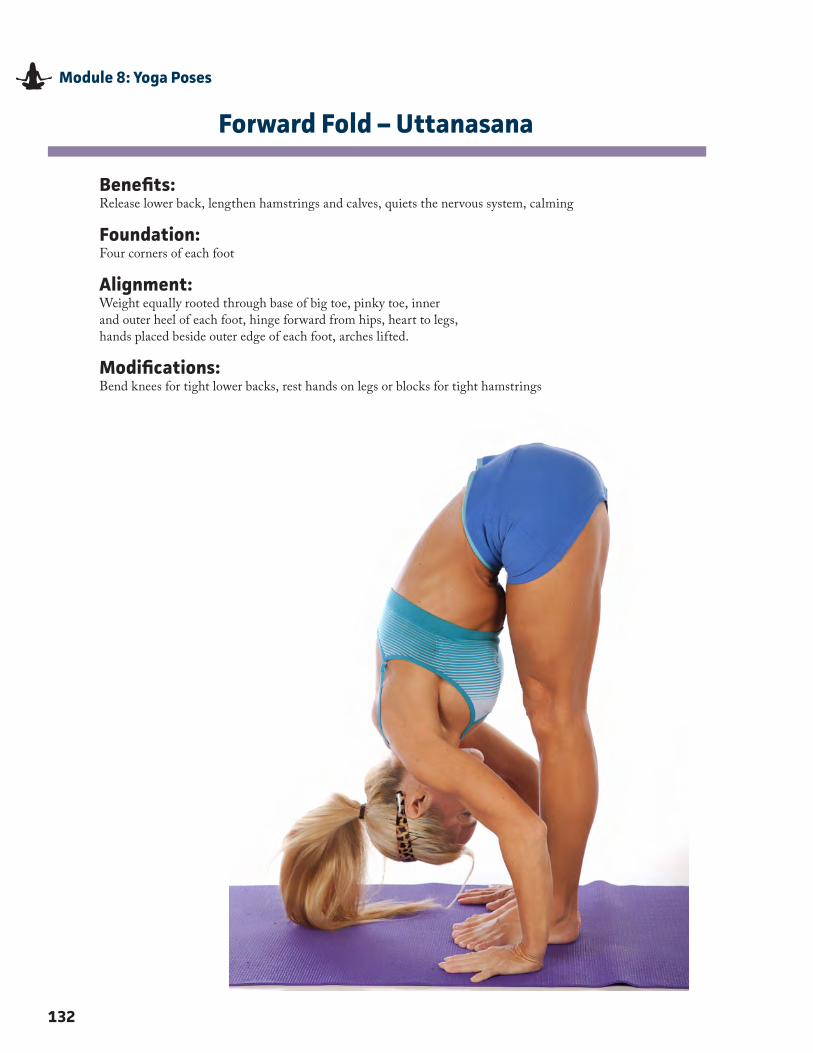
132
Module 8: Yoga Poses
Forward Fold – Uttanasana
Benefits:Release lower back, lengthen hamstrings and calves, quiets the nervous system, calming
Foundation: Four corners of each foot
Alignment:Weight equally rooted through base of big toe, pinky toe, inner and outer heel of each foot, hinge forward from hips, heart to legs, hands placed beside outer edge of each foot, arches lifted�
Modifications: Bend knees for tight lower backs, rest hands on legs or blocks for tight hamstrings
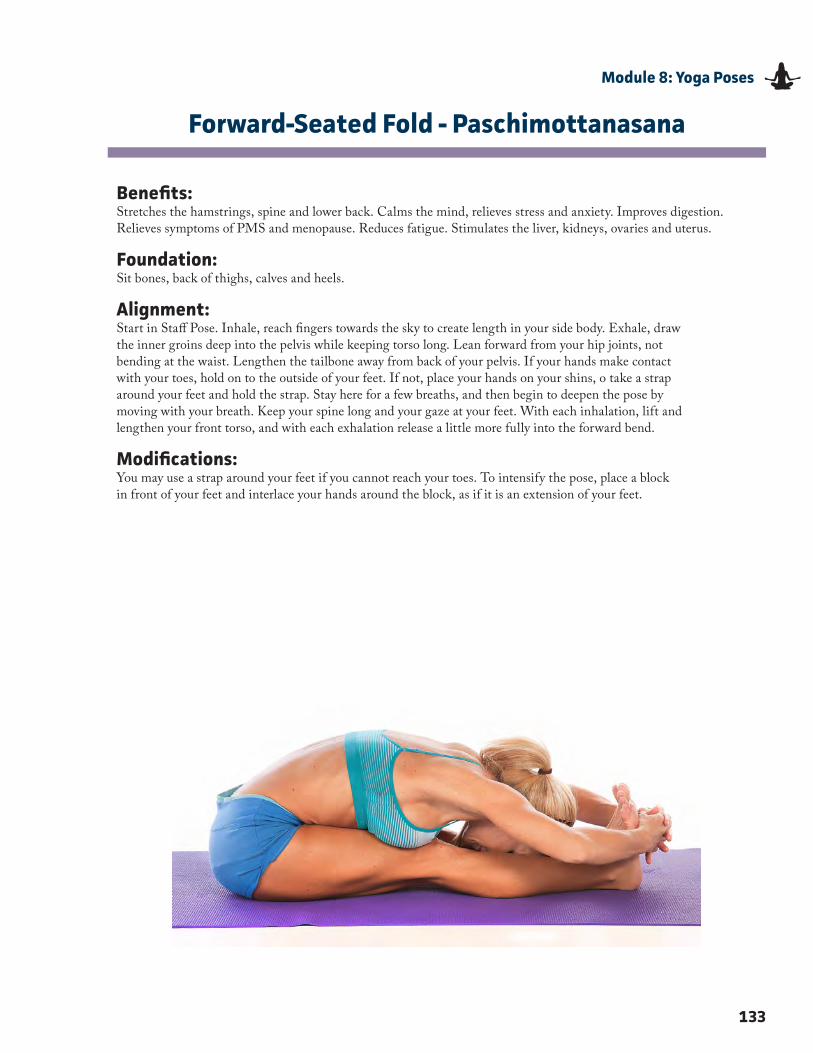
133
Module 8: Yoga Poses
Forward-Seated Fold - Paschimottanasana
Benefits:Stretches the hamstrings, spine and lower back� Calms the mind, relieves stress and anxiety� Improves digestion� Relieves symptoms of PMS and menopause� Reduces fatigue� Stimulates the liver, kidneys, ovaries and uterus�
Foundation:Sit bones, back of thighs, calves and heels�
Alignment:Start in Staff Pose� Inhale, reach fingers towards the sky to create length in your side body� Exhale, draw the inner groins deep into the pelvis while keeping torso long� Lean forward from your hip joints, not bending at the waist� Lengthen the tailbone away from back of your pelvis� If your hands make contact with your toes, hold on to the outside of your feet� If not, place your hands on your shins, o take a strap around your feet and hold the strap� Stay here for a few breaths, and then begin to deepen the pose by moving with your breath� Keep your spine long and your gaze at your feet� With each inhalation, lift and lengthen your front torso, and with each exhalation release a little more fully into the forward bend�
Modifications: You may use a strap around your feet if you cannot reach your toes� To intensify the pose, place a block in front of your feet and interlace your hands around the block, as if it is an extension of your feet�
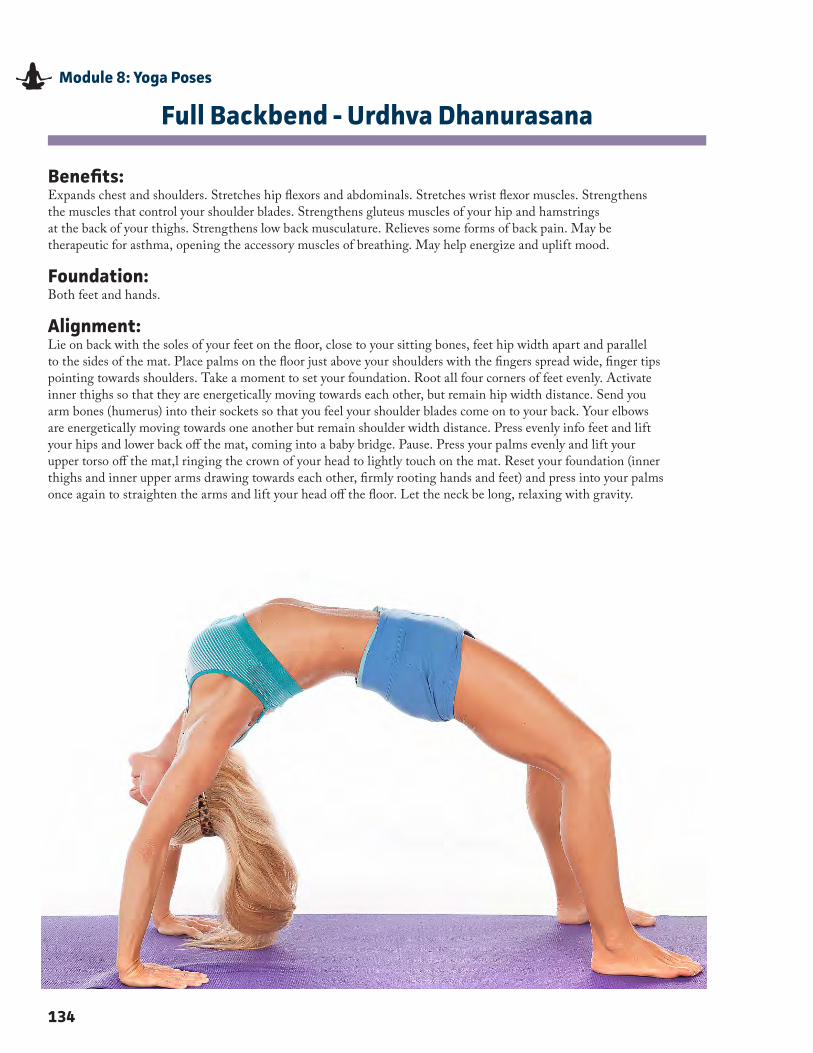
134
Module 8: Yoga Poses
Full Backbend - Urdhva Dhanurasana
Benefits:Expands chest and shoulders� Stretches hip flexors and abdominals� Stretches wrist flexor muscles� Strengthens the muscles that control your shoulder blades� Strengthens gluteus muscles of your hip and hamstrings at the back of your thighs� Strengthens low back musculature� Relieves some forms of back pain� May be therapeutic for asthma, opening the accessory muscles of breathing� May help energize and uplift mood�
Foundation:Both feet and hands�
Alignment:Lie on back with the soles of your feet on the floor, close to your sitting bones, feet hip width apart and parallel to the sides of the mat� Place palms on the floor just above your shoulders with the fingers spread wide, finger tips pointing towards shoulders� Take a moment to set your foundation� Root all four corners of feet evenly� Activate inner thighs so that they are energetically moving towards each other, but remain hip width distance� Send you arm bones (humerus) into their sockets so that you feel your shoulder blades come on to your back� Your elbows are energetically moving towards one another but remain shoulder width distance� Press evenly info feet and lift your hips and lower back off the mat, coming into a baby bridge� Pause� Press your palms evenly and lift your upper torso off the mat,l ringing the crown of your head to lightly touch on the mat� Reset your foundation (inner thighs and inner upper arms drawing towards each other, firmly rooting hands and feet) and press into your palms once again to straighten the arms and lift your head off the floor� Let the neck be long, relaxing with gravity�
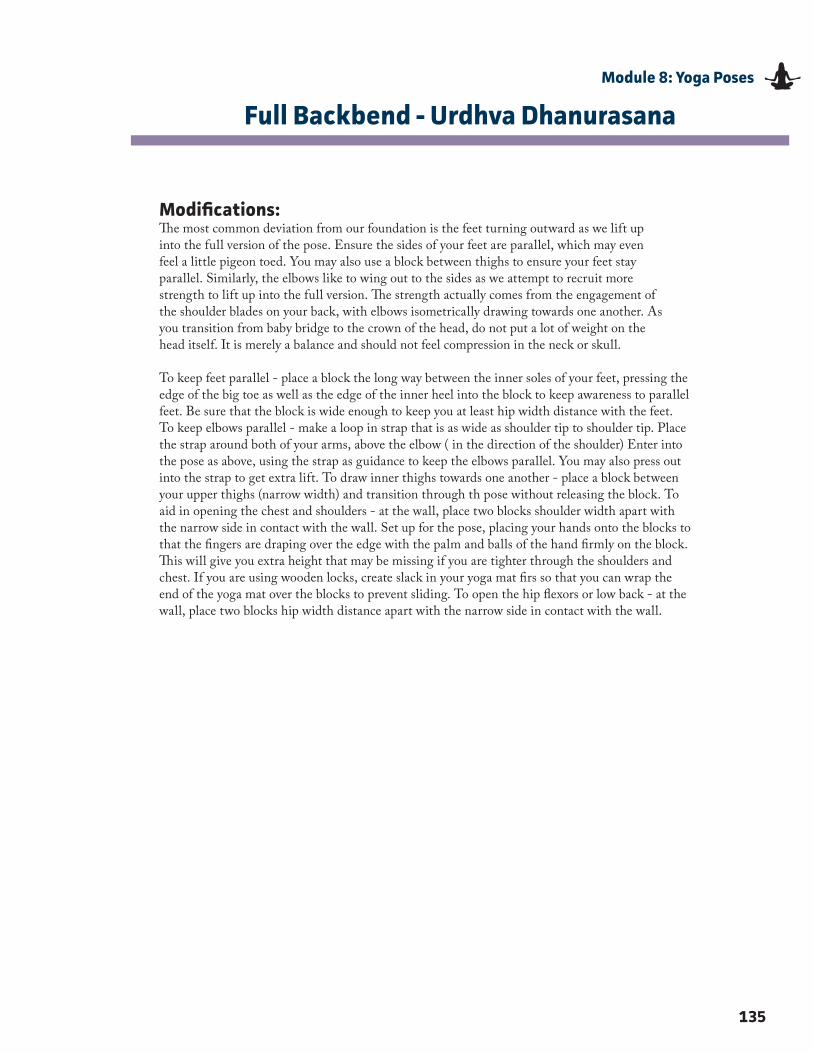
135
Module 8: Yoga Poses
Full Backbend - Urdhva Dhanurasana
Modifications: The most common deviation from our foundation is the feet turning outward as we lift up into the full version of the pose� Ensure the sides of your feet are parallel, which may even feel a little pigeon toed� You may also use a block between thighs to ensure your feet stay parallel� Similarly, the elbows like to wing out to the sides as we attempt to recruit more strength to lift up into the full version� The strength actually comes from the engagement of the shoulder blades on your back, with elbows isometrically drawing towards one another� As you transition from baby bridge to the crown of the head, do not put a lot of weight on the head itself� It is merely a balance and should not feel compression in the neck or skull�
To keep feet parallel - place a block the long way between the inner soles of your feet, pressing the edge of the big toe as well as the edge of the inner heel into the block to keep awareness to parallel feet� Be sure that the block is wide enough to keep you at least hip width distance with the feet� To keep elbows parallel - make a loop in strap that is as wide as shoulder tip to shoulder tip� Place the strap around both of your arms, above the elbow ( in the direction of the shoulder) Enter into the pose as above, using the strap as guidance to keep the elbows parallel� You may also press out into the strap to get extra lift� To draw inner thighs towards one another - place a block between your upper thighs (narrow width) and transition through th pose without releasing the block� To aid in opening the chest and shoulders - at the wall, place two blocks shoulder width apart with the narrow side in contact with the wall� Set up for the pose, placing your hands onto the blocks to that the fingers are draping over the edge with the palm and balls of the hand firmly on the block� This will give you extra height that may be missing if you are tighter through the shoulders and chest� If you are using wooden locks, create slack in your yoga mat firs so that you can wrap the end of the yoga mat over the blocks to prevent sliding� To open the hip flexors or low back - at the wall, place two blocks hip width distance apart with the narrow side in contact with the wall�
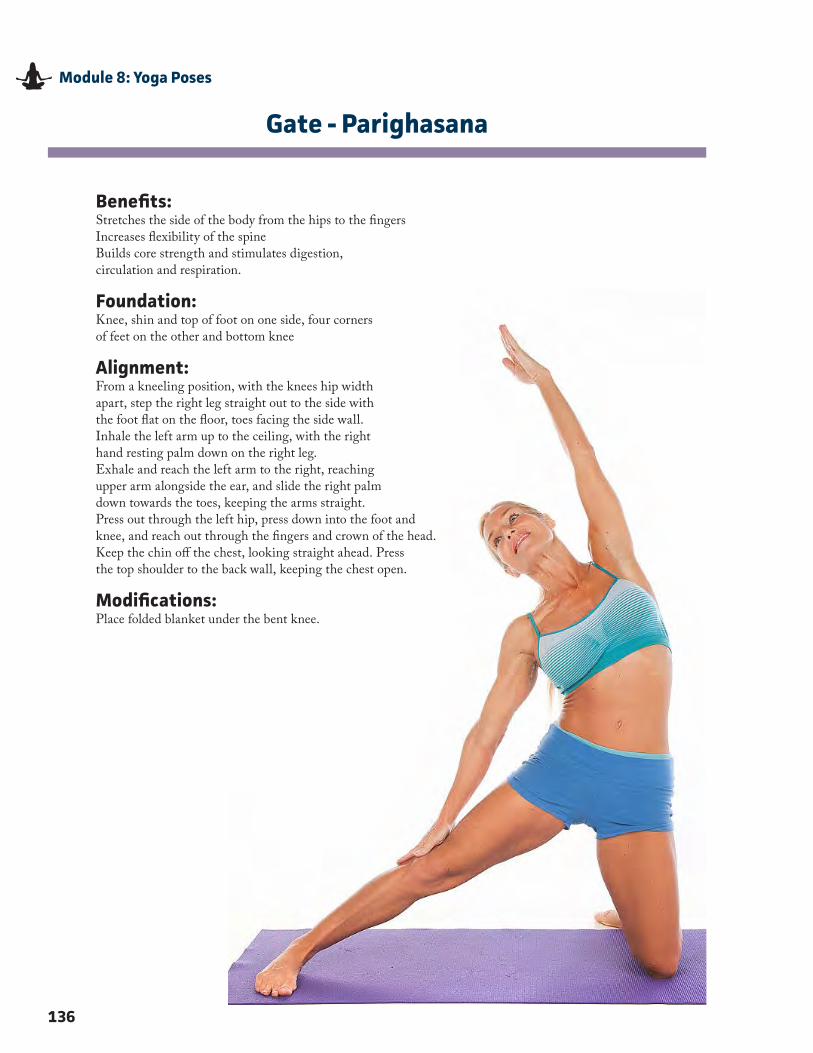
136
Module 8: Yoga Poses
Gate - Parighasana
Benefits:Stretches the side of the body from the hips to the fingersIncreases flexibility of the spineBuilds core strength and stimulates digestion,circulation and respiration�
Foundation:Knee, shin and top of foot on one side, four cornersof feet on the other and bottom knee
Alignment:From a kneeling position, with the knees hip widthapart, step the right leg straight out to the side withthe foot flat on the floor, toes facing the side wall�Inhale the left arm up to the ceiling, with the righthand resting palm down on the right leg�Exhale and reach the left arm to the right, reachingupper arm alongside the ear, and slide the right palmdown towards the toes, keeping the arms straight�Press out through the left hip, press down into the foot andknee, and reach out through the fingers and crown of the head�Keep the chin off the chest, looking straight ahead� Pressthe top shoulder to the back wall, keeping the chest open�
Modifications: Place folded blanket under the bent knee�
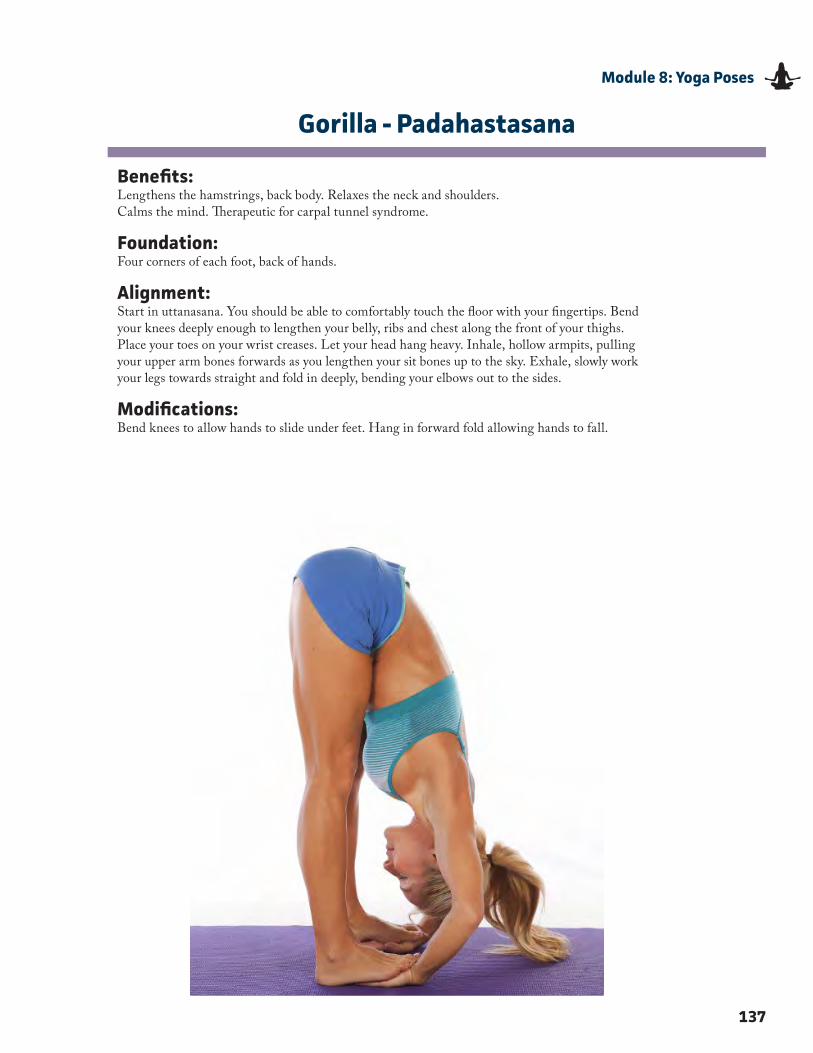
137
Module 8: Yoga Poses
Gorilla - Padahastasana
Benefits:Lengthens the hamstrings, back body� Relaxes the neck and shoulders� Calms the mind� Therapeutic for carpal tunnel syndrome�
Foundation:Four corners of each foot, back of hands�
Alignment:Start in uttanasana� You should be able to comfortably touch the floor with your fingertips� Bend your knees deeply enough to lengthen your belly, ribs and chest along the front of your thighs� Place your toes on your wrist creases� Let your head hang heavy� Inhale, hollow armpits, pulling your upper arm bones forwards as you lengthen your sit bones up to the sky� Exhale, slowly work your legs towards straight and fold in deeply, bending your elbows out to the sides�
Modifications: Bend knees to allow hands to slide under feet� Hang in forward fold allowing hands to fall�
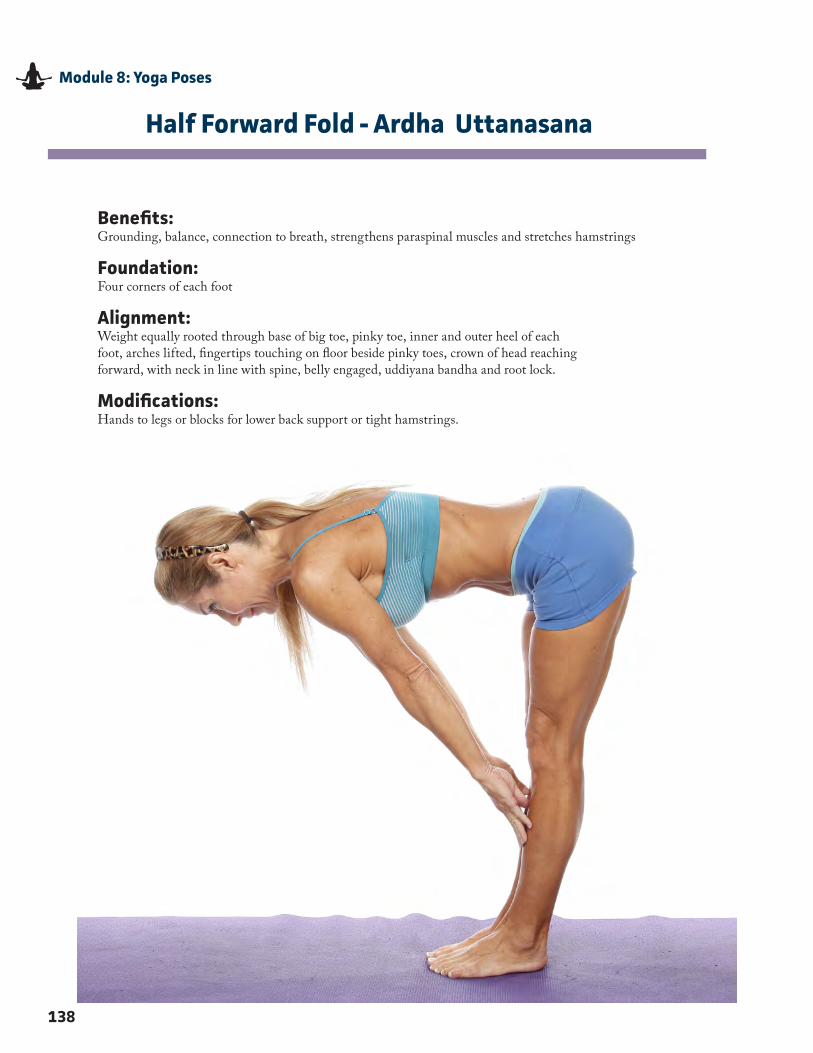
138
Module 8: Yoga Poses
Half Forward Fold - Ardha Uttanasana
Benefits:Grounding, balance, connection to breath, strengthens paraspinal muscles and stretches hamstrings
Foundation:Four corners of each foot
Alignment:Weight equally rooted through base of big toe, pinky toe, inner and outer heel of each foot, arches lifted, fingertips touching on floor beside pinky toes, crown of head reaching forward, with neck in line with spine, belly engaged, uddiyana bandha and root lock�
Modifications: Hands to legs or blocks for lower back support or tight hamstrings�
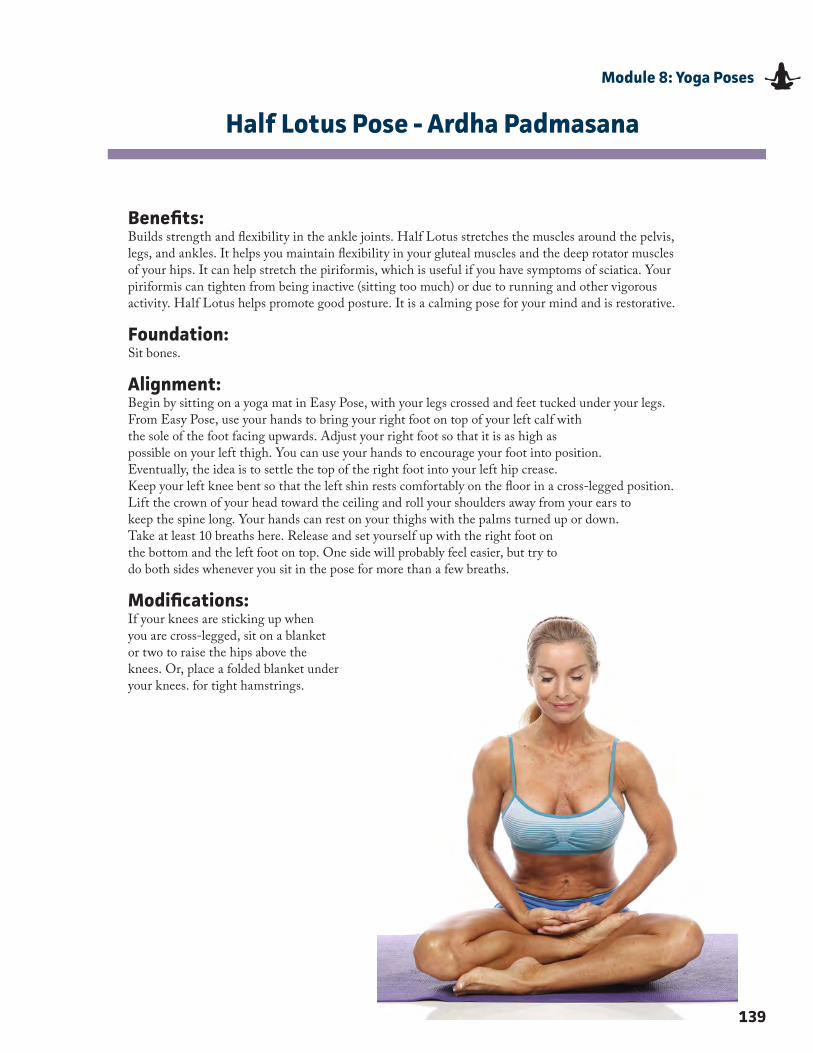
139
Module 8: Yoga Poses
Half Lotus Pose - Ardha Padmasana
Benefits:Builds strength and flexibility in the ankle joints� Half Lotus stretches the muscles around the pelvis, legs, and ankles� It helps you maintain flexibility in your gluteal muscles and the deep rotator muscles of your hips� It can help stretch the piriformis, which is useful if you have symptoms of sciatica� Your piriformis can tighten from being inactive (sitting too much) or due to running and other vigorous activity� Half Lotus helps promote good posture� It is a calming pose for your mind and is restorative�
Foundation:Sit bones�
Alignment:Begin by sitting on a yoga mat in Easy Pose, with your legs crossed and feet tucked under your legs�From Easy Pose, use your hands to bring your right foot on top of your left calf with the sole of the foot facing upwards� Adjust your right foot so that it is as high as possible on your left thigh� You can use your hands to encourage your foot into position� Eventually, the idea is to settle the top of the right foot into your left hip crease�Keep your left knee bent so that the left shin rests comfortably on the floor in a cross-legged position�Lift the crown of your head toward the ceiling and roll your shoulders away from your ears to keep the spine long� Your hands can rest on your thighs with the palms turned up or down�Take at least 10 breaths here� Release and set yourself up with the right foot on the bottom and the left foot on top� One side will probably feel easier, but try to do both sides whenever you sit in the pose for more than a few breaths�
Modifications: If your knees are sticking up when you are cross-legged, sit on a blanket or two to raise the hips above the knees� Or, place a folded blanket under your knees� for tight hamstrings�
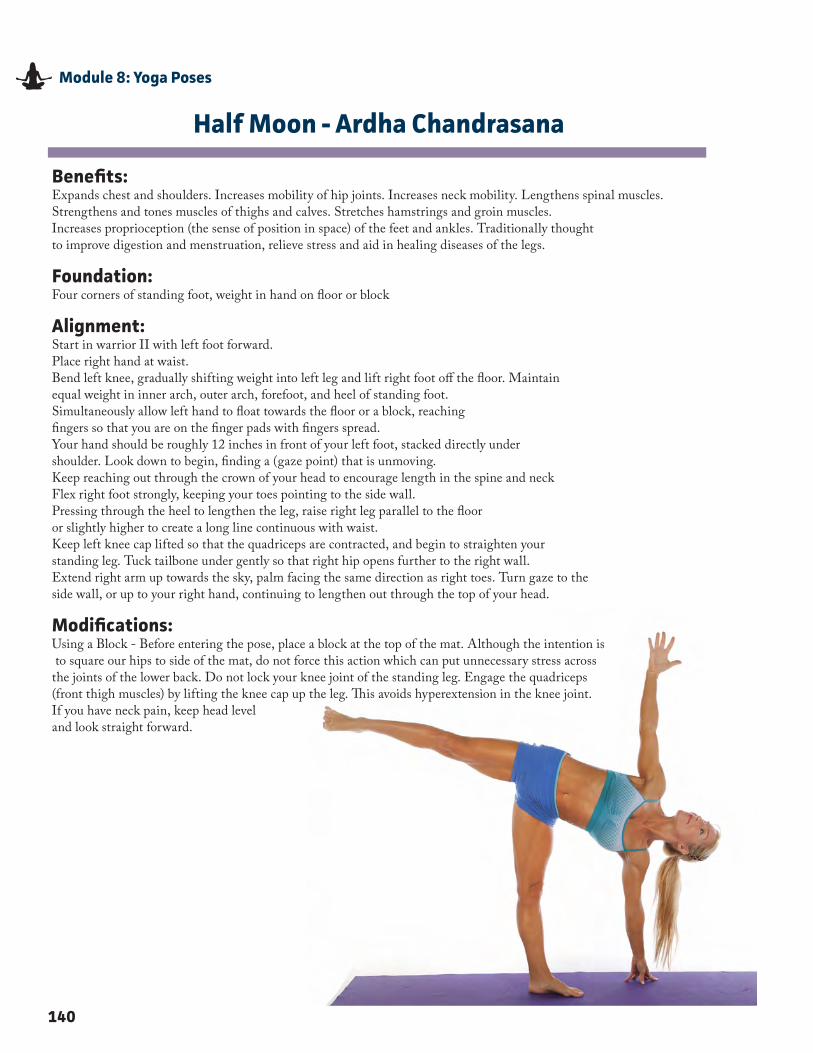
140
Module 8: Yoga Poses
Half Moon - Ardha Chandrasana
Benefits:Expands chest and shoulders� Increases mobility of hip joints� Increases neck mobility� Lengthens spinal muscles�Strengthens and tones muscles of thighs and calves� Stretches hamstrings and groin muscles�Increases proprioception (the sense of position in space) of the feet and ankles� Traditionally thought to improve digestion and menstruation, relieve stress and aid in healing diseases of the legs�
Foundation:Four corners of standing foot, weight in hand on floor or block
Alignment:Start in warrior II with left foot forward�Place right hand at waist�Bend left knee, gradually shifting weight into left leg and lift right foot off the floor� Maintain equal weight in inner arch, outer arch, forefoot, and heel of standing foot�Simultaneously allow left hand to float towards the floor or a block, reaching fingers so that you are on the finger pads with fingers spread�Your hand should be roughly 12 inches in front of your left foot, stacked directly under shoulder� Look down to begin, finding a (gaze point) that is unmoving�Keep reaching out through the crown of your head to encourage length in the spine and neckFlex right foot strongly, keeping your toes pointing to the side wall�Pressing through the heel to lengthen the leg, raise right leg parallel to the floor or slightly higher to create a long line continuous with waist�Keep left knee cap lifted so that the quadriceps are contracted, and begin to straighten your standing leg� Tuck tailbone under gently so that right hip opens further to the right wall�Extend right arm up towards the sky, palm facing the same direction as right toes� Turn gaze to the side wall, or up to your right hand, continuing to lengthen out through the top of your head�
Modifications:Using a Block - Before entering the pose, place a block at the top of the mat� Although the intention is to square our hips to side of the mat, do not force this action which can put unnecessary stress across the joints of the lower back� Do not lock your knee joint of the standing leg� Engage the quadriceps (front thigh muscles) by lifting the knee cap up the leg� This avoids hyperextension in the knee joint� If you have neck pain, keep head leveland look straight forward�
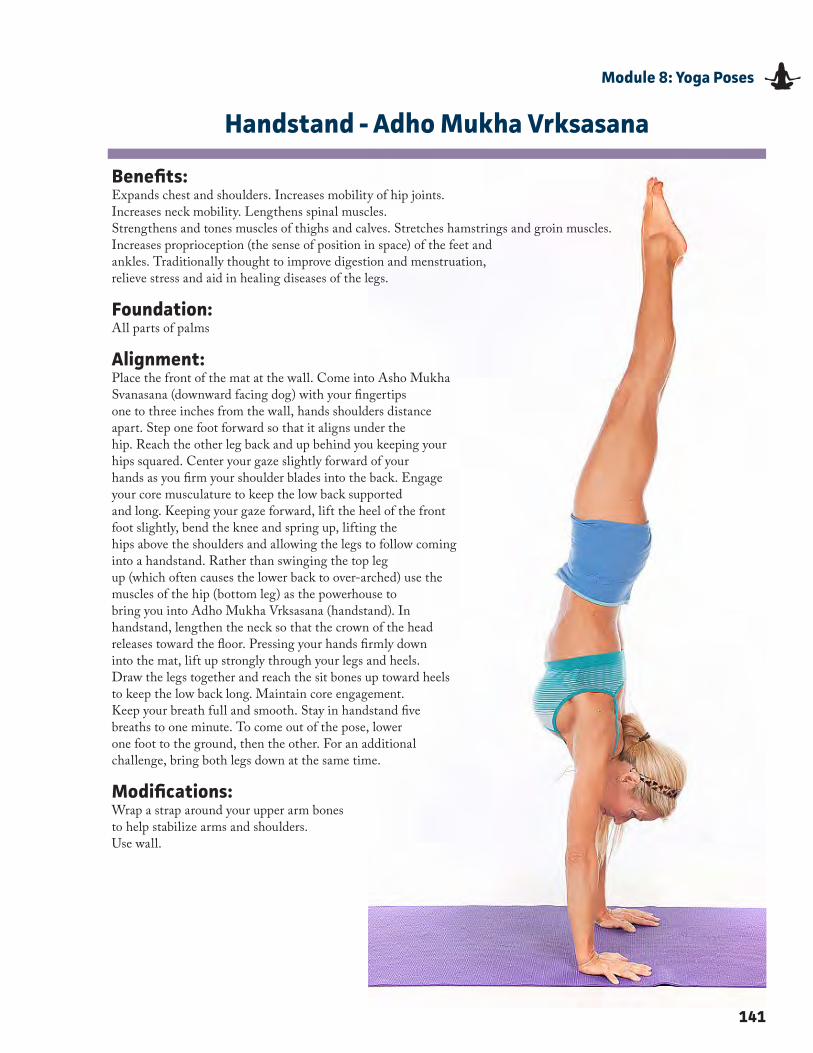
141
Module 8: Yoga Poses
Handstand - Adho Mukha Vrksasana
Benefits:Expands chest and shoulders� Increases mobility of hip joints� Increases neck mobility� Lengthens spinal muscles�Strengthens and tones muscles of thighs and calves� Stretches hamstrings and groin muscles�Increases proprioception (the sense of position in space) of the feet and ankles� Traditionally thought to improve digestion and menstruation, relieve stress and aid in healing diseases of the legs�
Foundation:All parts of palms
Alignment:Place the front of the mat at the wall� Come into Asho Mukha Svanasana (downward facing dog) with your fingertipsone to three inches from the wall, hands shoulders distance apart� Step one foot forward so that it aligns under thehip� Reach the other leg back and up behind you keeping your hips squared� Center your gaze slightly forward of yourhands as you firm your shoulder blades into the back� Engage your core musculature to keep the low back supportedand long� Keeping your gaze forward, lift the heel of the front foot slightly, bend the knee and spring up, lifting thehips above the shoulders and allowing the legs to follow coming into a handstand� Rather than swinging the top legup (which often causes the lower back to over-arched) use the muscles of the hip (bottom leg) as the powerhouse tobring you into Adho Mukha Vrksasana (handstand)� In handstand, lengthen the neck so that the crown of the headreleases toward the floor� Pressing your hands firmly down into the mat, lift up strongly through your legs and heels�Draw the legs together and reach the sit bones up toward heels to keep the low back long� Maintain core engagement�Keep your breath full and smooth� Stay in handstand five breaths to one minute� To come out of the pose, lowerone foot to the ground, then the other� For an additional challenge, bring both legs down at the same time�
Modifications:Wrap a strap around your upper arm bones to help stabilize arms and shoulders�Use wall�
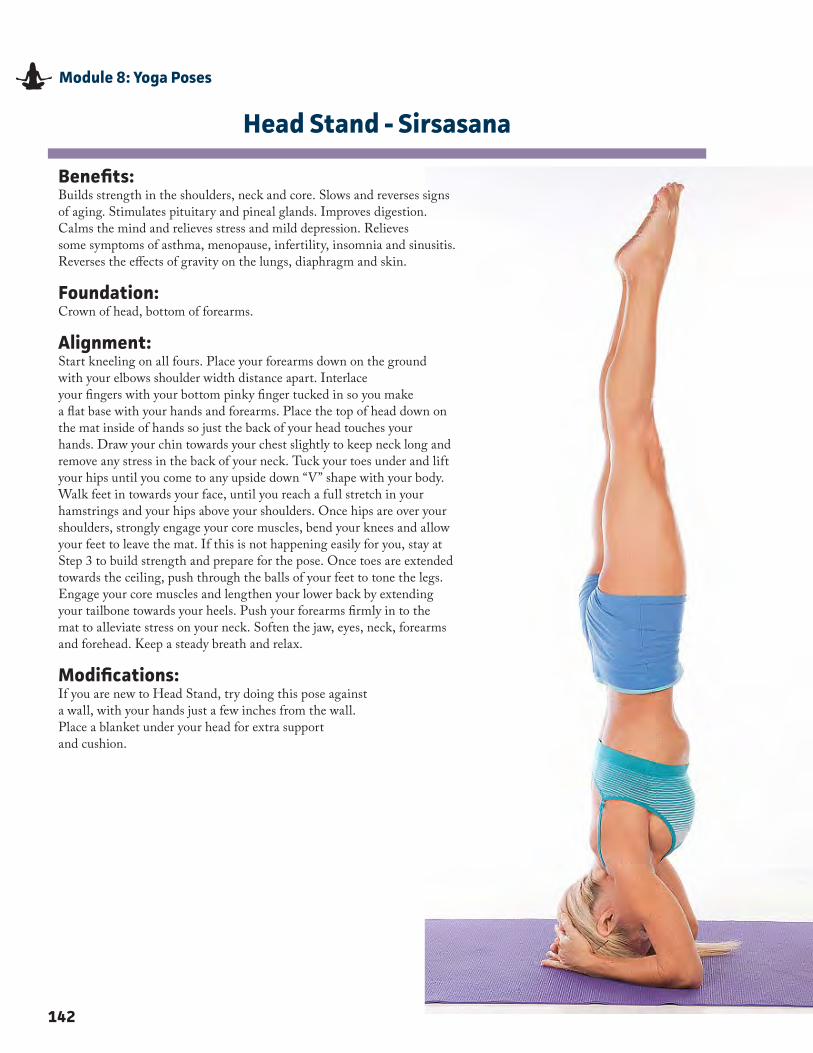
Benefits:Builds strength in the shoulders, neck and core� Slows and reverses signs of aging� Stimulates pituitary and pineal glands� Improves digestion� Calms the mind and relieves stress and mild depression� Relieves some symptoms of asthma, menopause, infertility, insomnia and sinusitis�Reverses the effects of gravity on the lungs, diaphragm and skin�
Foundation:Crown of head, bottom of forearms�
Alignment:Start kneeling on all fours� Place your forearms down on the groundwith your elbows shoulder width distance apart� Interlace your fingers with your bottom pinky finger tucked in so you makea flat base with your hands and forearms� Place the top of head down on the mat inside of hands so just the back of your head touches your hands� Draw your chin towards your chest slightly to keep neck long andremove any stress in the back of your neck� Tuck your toes under and liftyour hips until you come to any upside down “V” shape with your body�Walk feet in towards your face, until you reach a full stretch in your hamstrings and your hips above your shoulders� Once hips are over yourshoulders, strongly engage your core muscles, bend your knees and allowyour feet to leave the mat� If this is not happening easily for you, stay at Step 3 to build strength and prepare for the pose� Once toes are extendedtowards the ceiling, push through the balls of your feet to tone the legs�Engage your core muscles and lengthen your lower back by extendingyour tailbone towards your heels� Push your forearms firmly in to themat to alleviate stress on your neck� Soften the jaw, eyes, neck, forearmsand forehead� Keep a steady breath and relax�
Modifications:If you are new to Head Stand, try doing this pose againsta wall, with your hands just a few inches from the wall�Place a blanket under your head for extra supportand cushion�
142
Module 8: Yoga Poses
Head Stand - Sirsasana
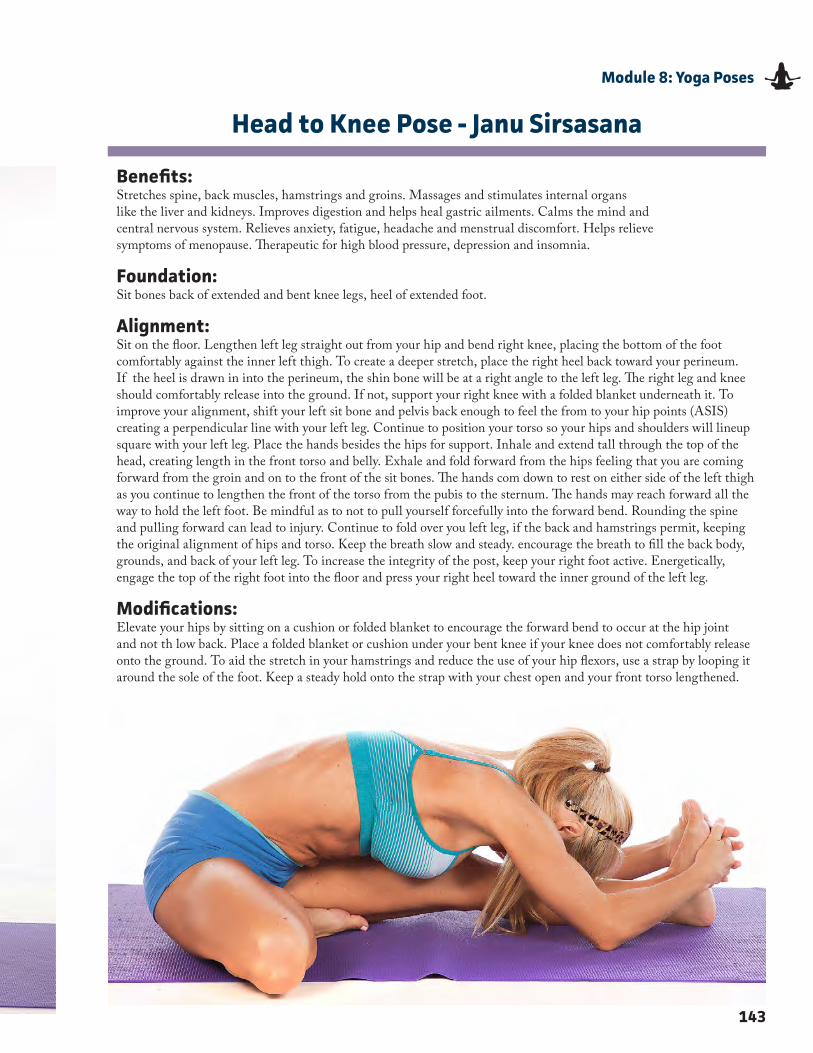
Benefits:Stretches spine, back muscles, hamstrings and groins� Massages and stimulates internal organs like the liver and kidneys� Improves digestion and helps heal gastric ailments� Calms the mind and central nervous system� Relieves anxiety, fatigue, headache and menstrual discomfort� Helps relieve symptoms of menopause� Therapeutic for high blood pressure, depression and insomnia�
Foundation:Sit bones back of extended and bent knee legs, heel of extended foot�
Alignment:Sit on the floor� Lengthen left leg straight out from your hip and bend right knee, placing the bottom of the foot comfortably against the inner left thigh� To create a deeper stretch, place the right heel back toward your perineum� If the heel is drawn in into the perineum, the shin bone will be at a right angle to the left leg� The right leg and knee should comfortably release into the ground� If not, support your right knee with a folded blanket underneath it� To improve your alignment, shift your left sit bone and pelvis back enough to feel the from to your hip points (ASIS) creating a perpendicular line with your left leg� Continue to position your torso so your hips and shoulders will lineup square with your left leg� Place the hands besides the hips for support� Inhale and extend tall through the top of the head, creating length in the front torso and belly� Exhale and fold forward from the hips feeling that you are coming forward from the groin and on to the front of the sit bones� The hands com down to rest on either side of the left thigh as you continue to lengthen the front of the torso from the pubis to the sternum� The hands may reach forward all the way to hold the left foot� Be mindful as to not to pull yourself forcefully into the forward bend� Rounding the spine and pulling forward can lead to injury� Continue to fold over you left leg, if the back and hamstrings permit, keeping the original alignment of hips and torso� Keep the breath slow and steady� encourage the breath to fill the back body, grounds, and back of your left leg� To increase the integrity of the post, keep your right foot active� Energetically, engage the top of the right foot into the floor and press your right heel toward the inner ground of the left leg�
Modifications:Elevate your hips by sitting on a cushion or folded blanket to encourage the forward bend to occur at the hip joint and not th low back� Place a folded blanket or cushion under your bent knee if your knee does not comfortably release onto the ground� To aid the stretch in your hamstrings and reduce the use of your hip flexors, use a strap by looping it around the sole of the foot� Keep a steady hold onto the strap with your chest open and your front torso lengthened�
143
Module 8: Yoga Poses
Head to Knee Pose - Janu Sirsasana
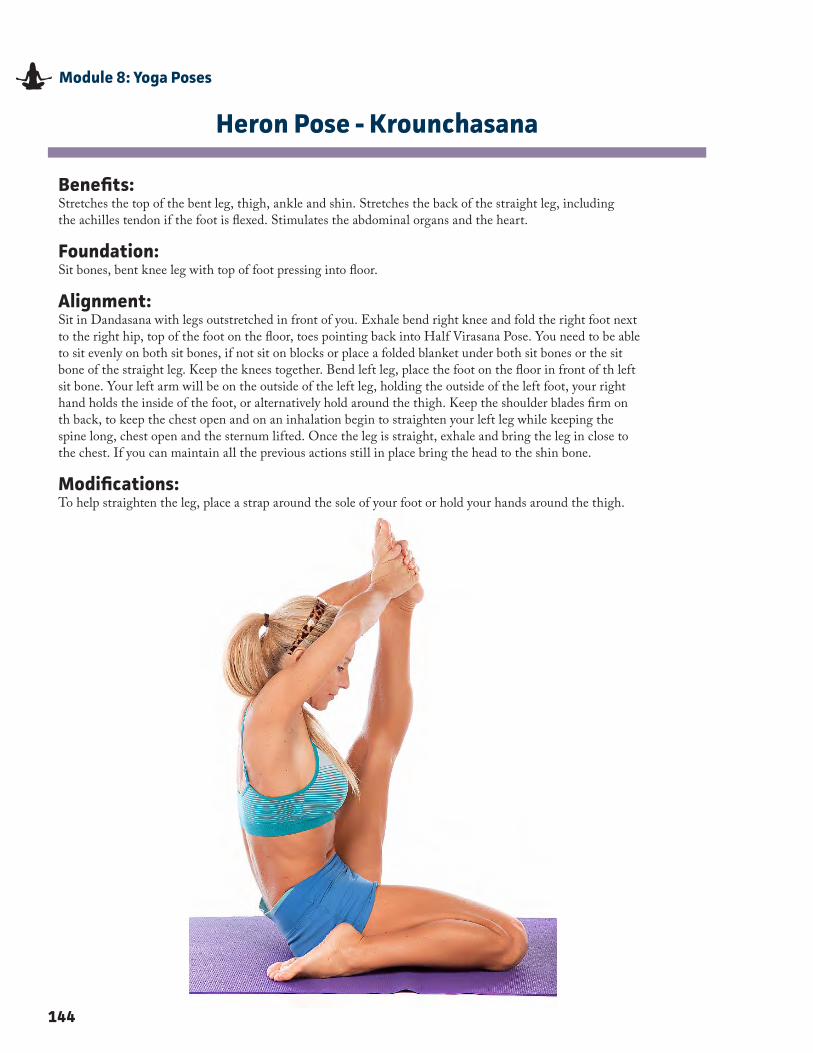
Benefits:Stretches the top of the bent leg, thigh, ankle and shin� Stretches the back of the straight leg, including the achilles tendon if the foot is flexed� Stimulates the abdominal organs and the heart�
Foundation:Sit bones, bent knee leg with top of foot pressing into floor�
Alignment:Sit in Dandasana with legs outstretched in front of you� Exhale bend right knee and fold the right foot next to the right hip, top of the foot on the floor, toes pointing back into Half Virasana Pose� You need to be able to sit evenly on both sit bones, if not sit on blocks or place a folded blanket under both sit bones or the sit bone of the straight leg� Keep the knees together� Bend left leg, place the foot on the floor in front of th left sit bone� Your left arm will be on the outside of the left leg, holding the outside of the left foot, your right hand holds the inside of the foot, or alternatively hold around the thigh� Keep the shoulder blades firm on th back, to keep the chest open and on an inhalation begin to straighten your left leg while keeping the spine long, chest open and the sternum lifted� Once the leg is straight, exhale and bring the leg in close to the chest� If you can maintain all the previous actions still in place bring the head to the shin bone�
Modifications:To help straighten the leg, place a strap around the sole of your foot or hold your hands around the thigh�
144
Module 8: Yoga Poses
Heron Pose - Krounchasana
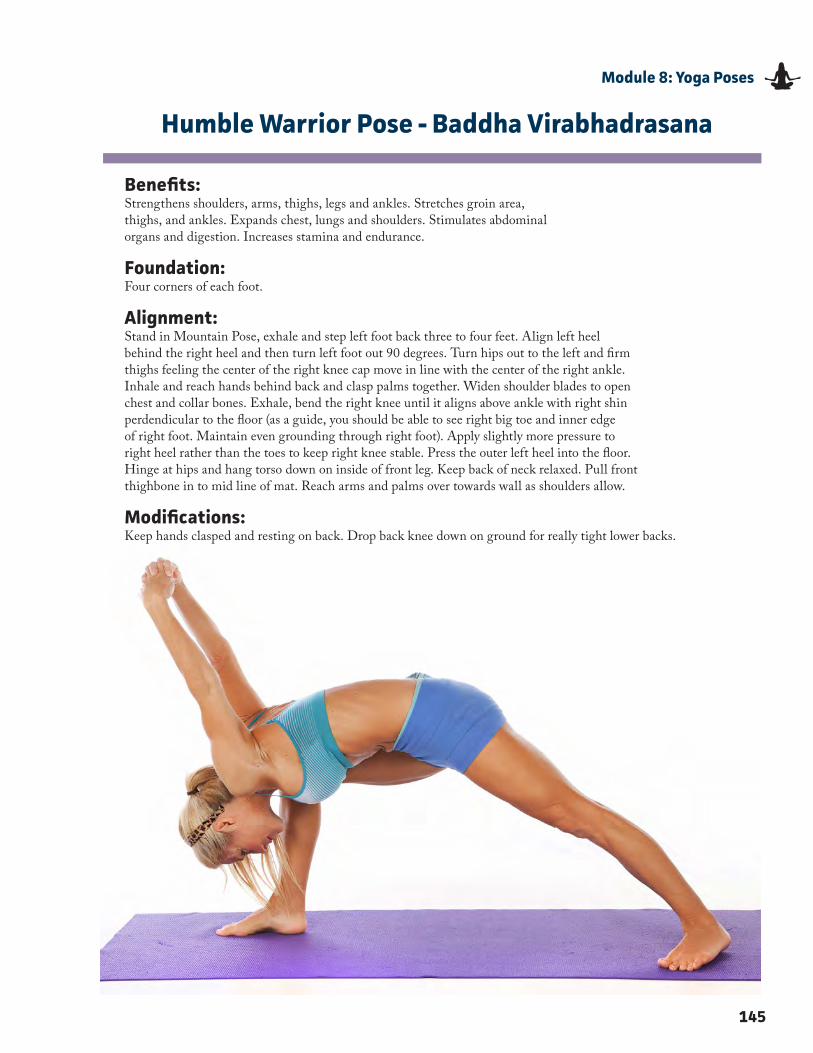
145
Module 8: Yoga Poses
Humble Warrior Pose - Baddha Virabhadrasana
Benefits:Strengthens shoulders, arms, thighs, legs and ankles� Stretches groin area,thighs, and ankles� Expands chest, lungs and shoulders� Stimulates abdominalorgans and digestion� Increases stamina and endurance�
Foundation:Four corners of each foot�
Alignment:Stand in Mountain Pose, exhale and step left foot back three to four feet� Align left heelbehind the right heel and then turn left foot out 90 degrees� Turn hips out to the left and firmthighs feeling the center of the right knee cap move in line with the center of the right ankle�Inhale and reach hands behind back and clasp palms together� Widen shoulder blades to openchest and collar bones� Exhale, bend the right knee until it aligns above ankle with right shinperdendicular to the floor (as a guide, you should be able to see right big toe and inner edgeof right foot� Maintain even grounding through right foot)� Apply slightly more pressure toright heel rather than the toes to keep right knee stable� Press the outer left heel into the floor�Hinge at hips and hang torso down on inside of front leg� Keep back of neck relaxed� Pull frontthighbone in to mid line of mat� Reach arms and palms over towards wall as shoulders allow�
Modifications:Keep hands clasped and resting on back� Drop back knee down on ground for really tight lower backs�
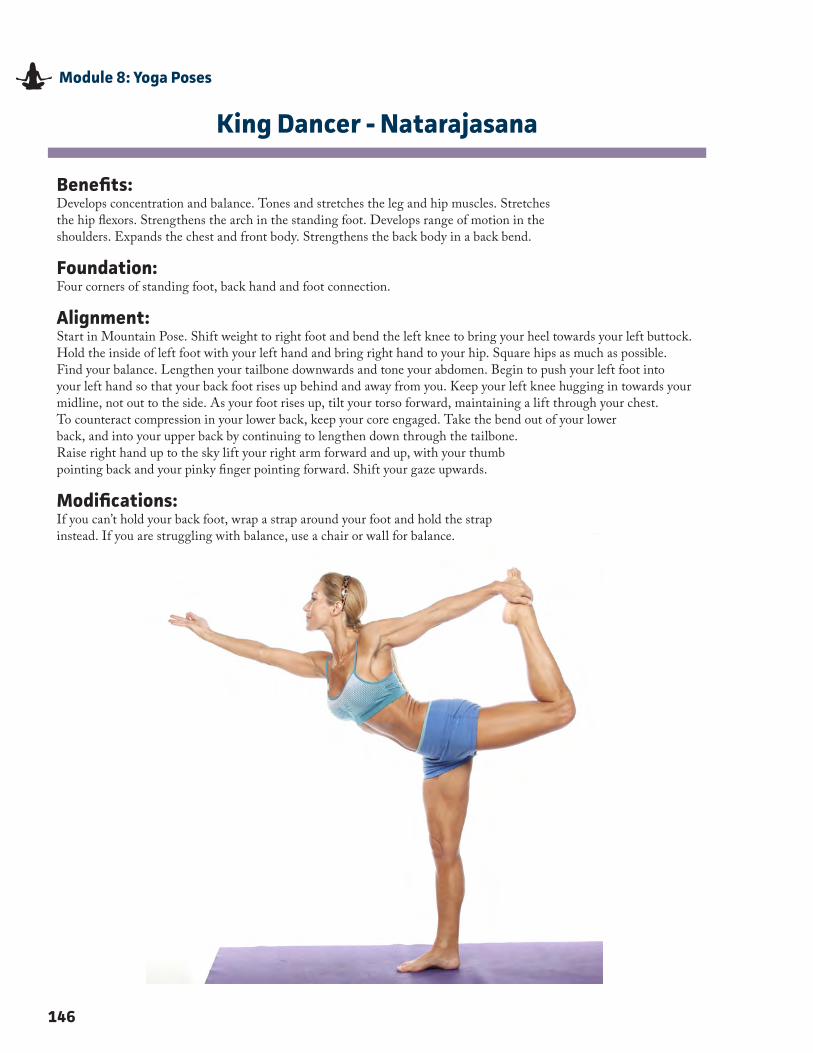
King Dancer - Natarajasana
Benefits:Develops concentration and balance� Tones and stretches the leg and hip muscles� Stretches the hip flexors� Strengthens the arch in the standing foot� Develops range of motion in the shoulders� Expands the chest and front body� Strengthens the back body in a back bend�
Foundation:Four corners of standing foot, back hand and foot connection�
Alignment:Start in Mountain Pose� Shift weight to right foot and bend the left knee to bring your heel towards your left buttock�Hold the inside of left foot with your left hand and bring right hand to your hip� Square hips as much as possible�Find your balance� Lengthen your tailbone downwards and tone your abdomen� Begin to push your left foot intoyour left hand so that your back foot rises up behind and away from you� Keep your left knee hugging in towards yourmidline, not out to the side� As your foot rises up, tilt your torso forward, maintaining a lift through your chest�To counteract compression in your lower back, keep your core engaged� Take the bend out of your lowerback, and into your upper back by continuing to lengthen down through the tailbone�Raise right hand up to the sky lift your right arm forward and up, with your thumbpointing back and your pinky finger pointing forward� Shift your gaze upwards�
Modifications:If you can’t hold your back foot, wrap a strap around your foot and hold the strap instead� If you are struggling with balance, use a chair or wall for balance�
146
Module 8: Yoga Poses
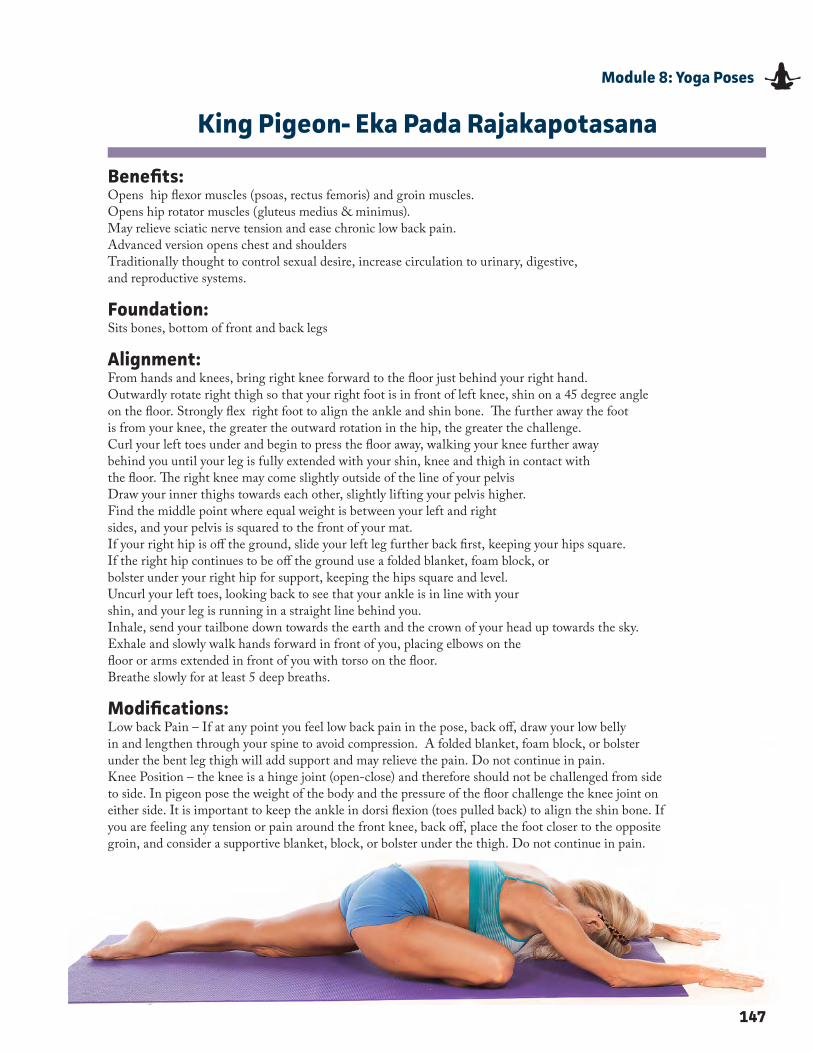
147
Module 8: Yoga Poses
King Pigeon- Eka Pada Rajakapotasana
Benefits:Opens hip flexor muscles (psoas, rectus femoris) and groin muscles�Opens hip rotator muscles (gluteus medius & minimus)�May relieve sciatic nerve tension and ease chronic low back pain�Advanced version opens chest and shouldersTraditionally thought to control sexual desire, increase circulation to urinary, digestive,and reproductive systems�
Foundation:Sits bones, bottom of front and back legs
Alignment:From hands and knees, bring right knee forward to the floor just behind your right hand�Outwardly rotate right thigh so that your right foot is in front of left knee, shin on a 45 degree angle on the floor� Strongly flex right foot to align the ankle and shin bone� The further away the foot is from your knee, the greater the outward rotation in the hip, the greater the challenge�Curl your left toes under and begin to press the floor away, walking your knee further away behind you until your leg is fully extended with your shin, knee and thigh in contact with the floor� The right knee may come slightly outside of the line of your pelvisDraw your inner thighs towards each other, slightly lifting your pelvis higher�Find the middle point where equal weight is between your left and right sides, and your pelvis is squared to the front of your mat�If your right hip is off the ground, slide your left leg further back first, keeping your hips square�If the right hip continues to be off the ground use a folded blanket, foam block, or bolster under your right hip for support, keeping the hips square and level�Uncurl your left toes, looking back to see that your ankle is in line with your shin, and your leg is running in a straight line behind you�Inhale, send your tailbone down towards the earth and the crown of your head up towards the sky�Exhale and slowly walk hands forward in front of you, placing elbows on the floor or arms extended in front of you with torso on the floor�Breathe slowly for at least 5 deep breaths�
Modifications:Low back Pain – If at any point you feel low back pain in the pose, back off, draw your low belly in and lengthen through your spine to avoid compression� A folded blanket, foam block, or bolster under the bent leg thigh will add support and may relieve the pain� Do not continue in pain�Knee Position – the knee is a hinge joint (open-close) and therefore should not be challenged from side to side� In pigeon pose the weight of the body and the pressure of the floor challenge the knee joint on either side� It is important to keep the ankle in dorsi flexion (toes pulled back) to align the shin bone� If you are feeling any tension or pain around the front knee, back off, place the foot closer to the opposite groin, and consider a supportive blanket, block, or bolster under the thigh� Do not continue in pain�
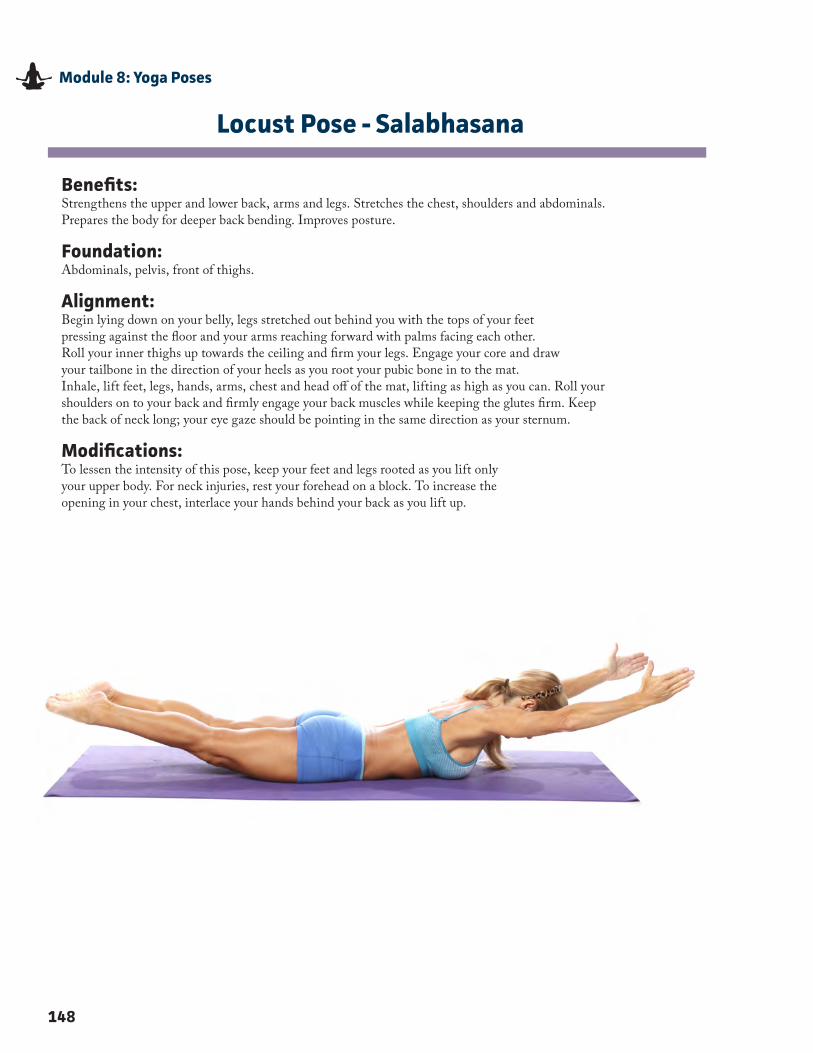
Locust Pose - Salabhasana
Benefits:Strengthens the upper and lower back, arms and legs� Stretches the chest, shoulders and abdominals� Prepares the body for deeper back bending� Improves posture�
Foundation:Abdominals, pelvis, front of thighs�
Alignment:Begin lying down on your belly, legs stretched out behind you with the tops of your feetpressing against the floor and your arms reaching forward with palms facing each other�Roll your inner thighs up towards the ceiling and firm your legs� Engage your core and drawyour tailbone in the direction of your heels as you root your pubic bone in to the mat�Inhale, lift feet, legs, hands, arms, chest and head off of the mat, lifting as high as you can� Roll yourshoulders on to your back and firmly engage your back muscles while keeping the glutes firm� Keepthe back of neck long; your eye gaze should be pointing in the same direction as your sternum�
Modifications:To lessen the intensity of this pose, keep your feet and legs rooted as you lift only your upper body� For neck injuries, rest your forehead on a block� To increase the opening in your chest, interlace your hands behind your back as you lift up�
148
Module 8: Yoga Poses
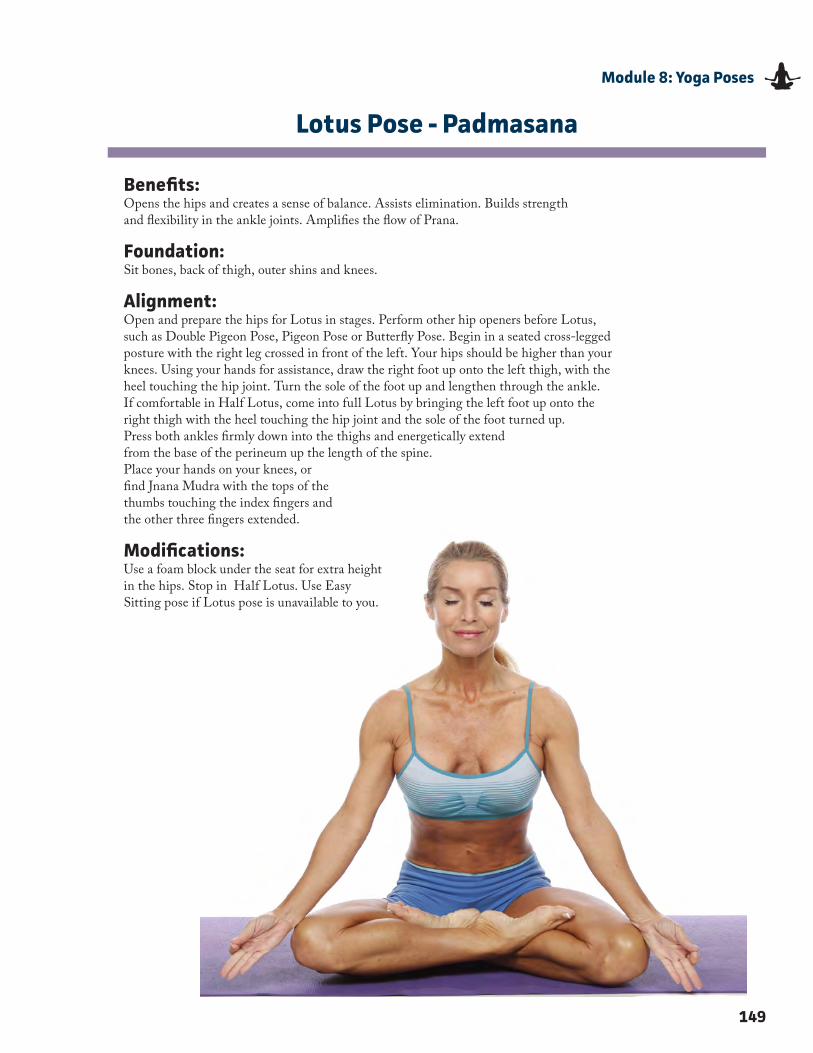
Lotus Pose - Padmasana
Modifications:Use a foam block under the seat for extra height in the hips� Stop in Half Lotus� Use Easy Sitting pose if Lotus pose is unavailable to you�
149
Module 8: Yoga Poses
Benefits:Opens the hips and creates a sense of balance� Assists elimination� Builds strength and flexibility in the ankle joints� Amplifies the flow of Prana�
Foundation:Sit bones, back of thigh, outer shins and knees�
Alignment:Open and prepare the hips for Lotus in stages� Perform other hip openers before Lotus,such as Double Pigeon Pose, Pigeon Pose or Butterfly Pose� Begin in a seated cross-leggedposture with the right leg crossed in front of the left� Your hips should be higher than yourknees� Using your hands for assistance, draw the right foot up onto the left thigh, with theheel touching the hip joint� Turn the sole of the foot up and lengthen through the ankle�If comfortable in Half Lotus, come into full Lotus by bringing the left foot up onto theright thigh with the heel touching the hip joint and the sole of the foot turned up�Press both ankles firmly down into the thighs and energetically extendfrom the base of the perineum up the length of the spine�Place your hands on your knees, orfind Jnana Mudra with the tops of thethumbs touching the index fingers andthe other three fingers extended�
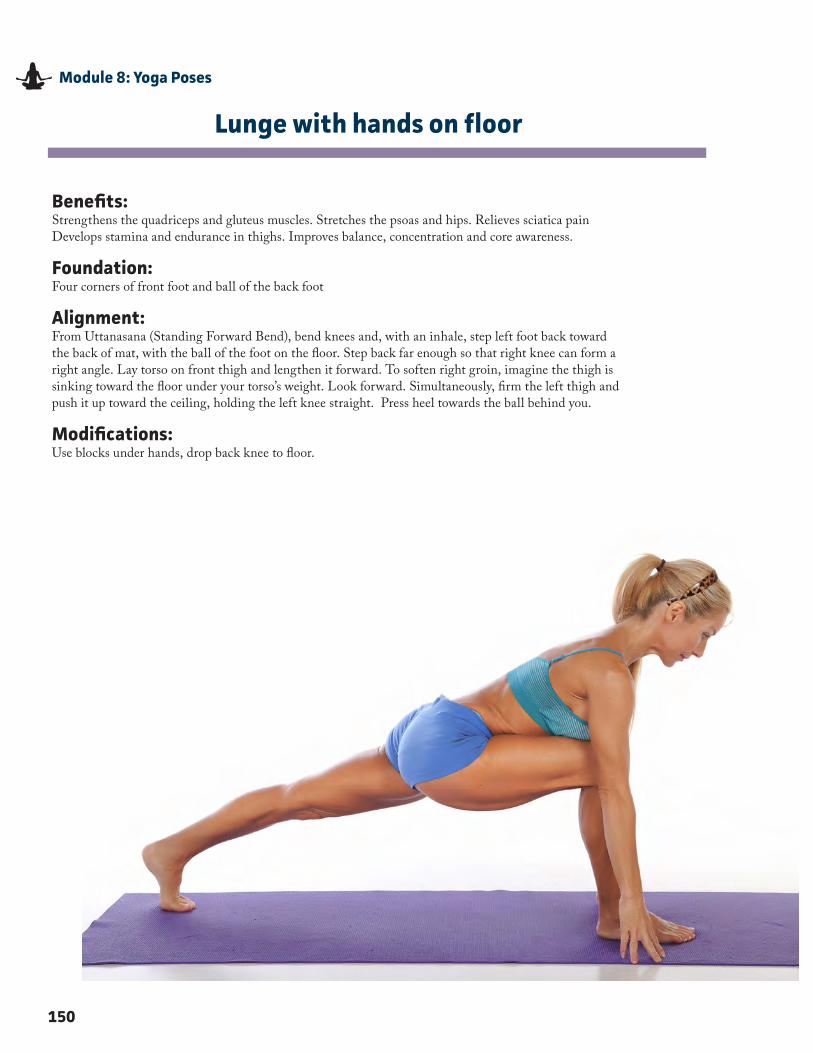
150
Module 8: Yoga Poses
Lunge with hands on floor
Benefits:Strengthens the quadriceps and gluteus muscles� Stretches the psoas and hips� Relieves sciatica pain Develops stamina and endurance in thighs� Improves balance, concentration and core awareness�
Foundation:Four corners of front foot and ball of the back foot
Alignment:From Uttanasana (Standing Forward Bend), bend knees and, with an inhale, step left foot back toward the back of mat, with the ball of the foot on the floor� Step back far enough so that right knee can form a right angle� Lay torso on front thigh and lengthen it forward� To soften right groin, imagine the thigh is sinking toward the floor under your torso’s weight� Look forward� Simultaneously, firm the left thigh and push it up toward the ceiling, holding the left knee straight� Press heel towards the ball behind you�
Modifications:Use blocks under hands, drop back knee to floor�
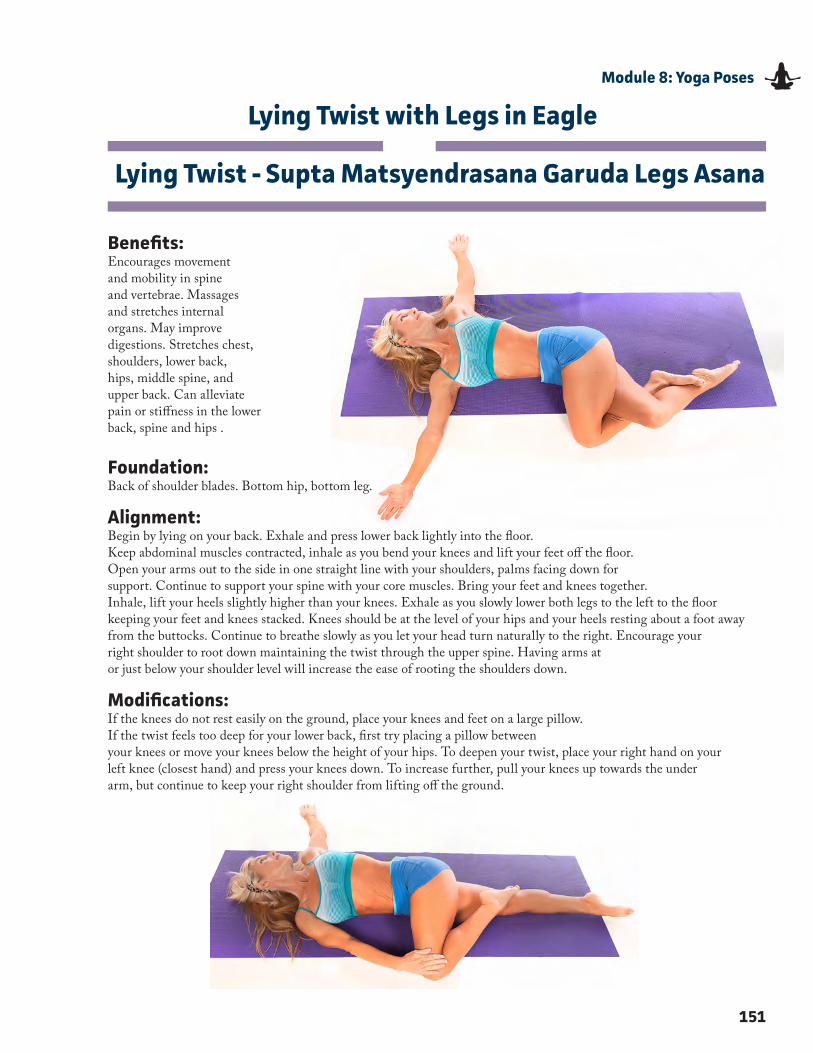
151
Module 8: Yoga Poses
Lying Twist - Supta Matsyendrasana Garuda Legs Asana
Lying Twist with Legs in Eagle
Benefits:Encourages movement and mobility in spine and vertebrae� Massages and stretches internalorgans� May improve digestions� Stretches chest, shoulders, lower back, hips, middle spine, andupper back� Can alleviate pain or stiffness in the lower back, spine and hips �
Foundation:Back of shoulder blades� Bottom hip, bottom leg�
Alignment:Begin by lying on your back� Exhale and press lower back lightly into the floor�Keep abdominal muscles contracted, inhale as you bend your knees and lift your feet off the floor�Open your arms out to the side in one straight line with your shoulders, palms facing down forsupport� Continue to support your spine with your core muscles� Bring your feet and knees together�Inhale, lift your heels slightly higher than your knees� Exhale as you slowly lower both legs to the left to the floor keeping your feet and knees stacked� Knees should be at the level of your hips and your heels resting about a foot away from the buttocks� Continue to breathe slowly as you let your head turn naturally to the right� Encourage yourright shoulder to root down maintaining the twist through the upper spine� Having arms ator just below your shoulder level will increase the ease of rooting the shoulders down�
Modifications:If the knees do not rest easily on the ground, place your knees and feet on a large pillow�If the twist feels too deep for your lower back, first try placing a pillow betweenyour knees or move your knees below the height of your hips� To deepen your twist, place your right hand on your left knee (closest hand) and press your knees down� To increase further, pull your knees up towards the underarm, but continue to keep your right shoulder from lifting off the ground�
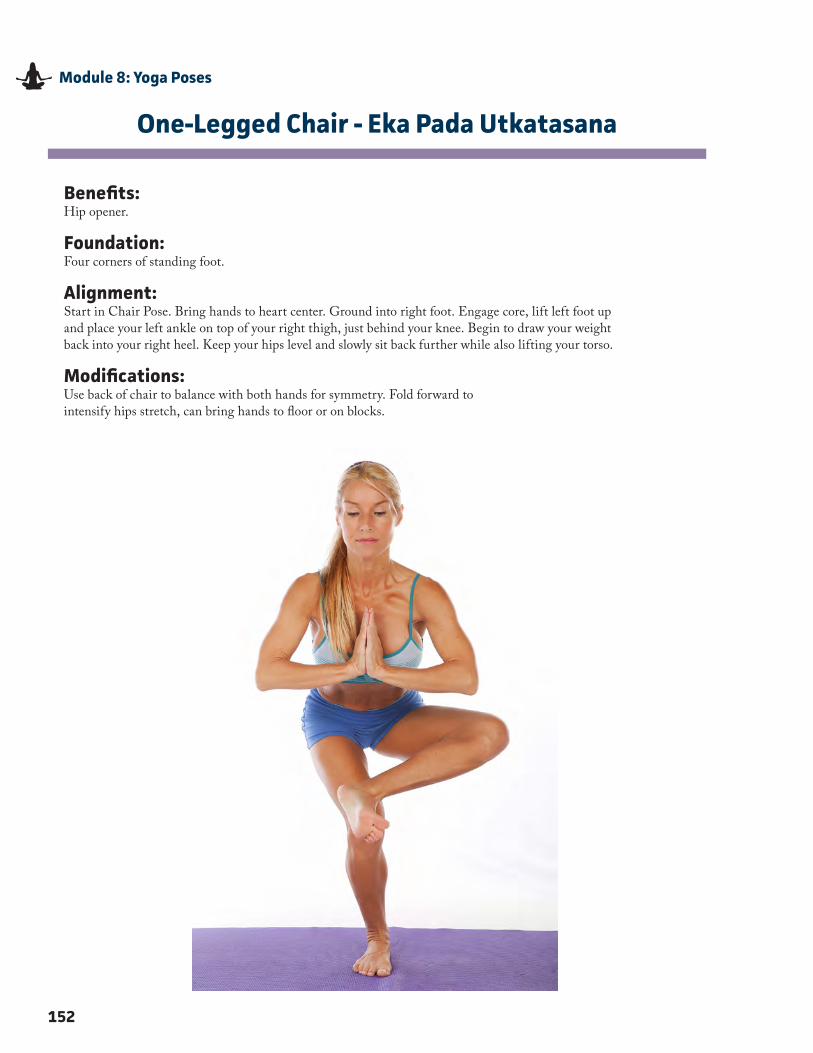
Benefits:Hip opener�
Foundation:Four corners of standing foot�
Alignment:Start in Chair Pose� Bring hands to heart center� Ground into right foot� Engage core, lift left foot up and place your left ankle on top of your right thigh, just behind your knee� Begin to draw your weight back into your right heel� Keep your hips level and slowly sit back further while also lifting your torso�
Modifications:Use back of chair to balance with both hands for symmetry� Fold forward to intensify hips stretch, can bring hands to floor or on blocks�
152
Module 8: Yoga Poses
One-Legged Chair - Eka Pada Utkatasana
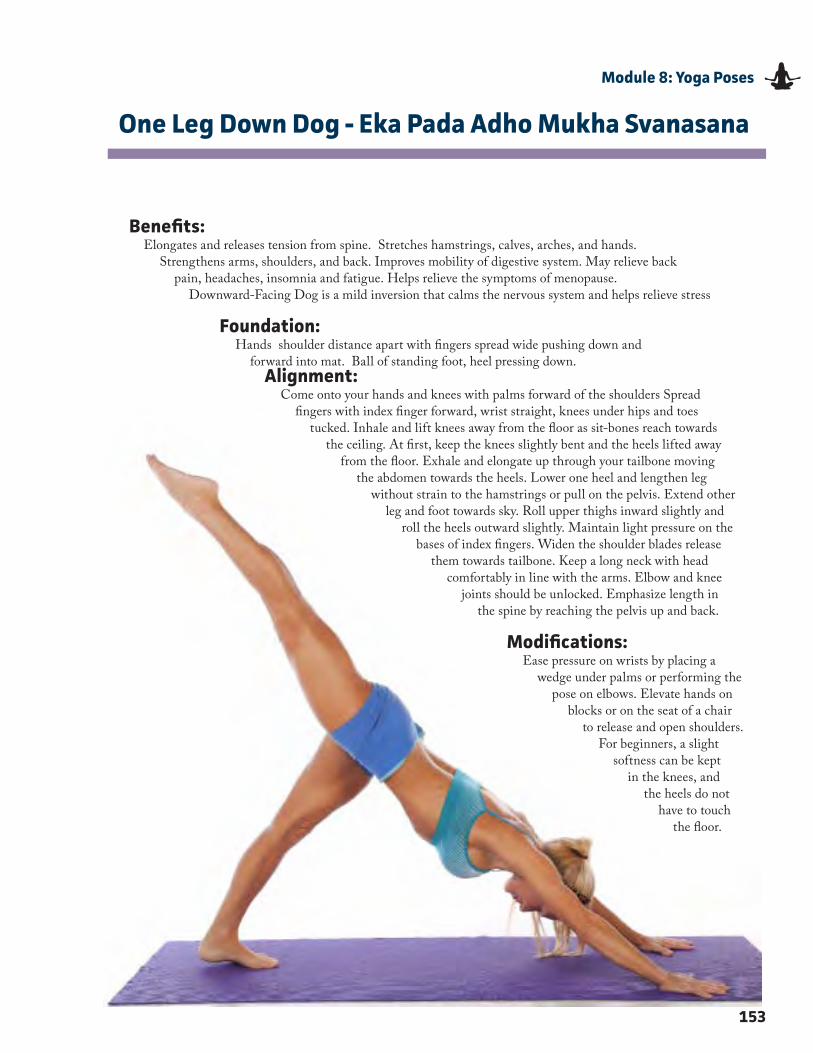
153
Module 8: Yoga Poses
One Leg Down Dog - Eka Pada Adho Mukha Svanasana
Benefits:Elongates and releases tension from spine� Stretches hamstrings, calves, arches, and hands�
Strengthens arms, shoulders, and back� Improves mobility of digestive system� May relieve back pain, headaches, insomnia and fatigue� Helps relieve the symptoms of menopause�
Downward-Facing Dog is a mild inversion that calms the nervous system and helps relieve stress
Foundation: Hands shoulder distance apart with fingers spread wide pushing down and
forward into mat� Ball of standing foot, heel pressing down�Alignment:
Come onto your hands and knees with palms forward of the shoulders Spread fingers with index finger forward, wrist straight, knees under hips and toes
tucked� Inhale and lift knees away from the floor as sit-bones reach towards the ceiling� At first, keep the knees slightly bent and the heels lifted away
from the floor� Exhale and elongate up through your tailbone moving the abdomen towards the heels� Lower one heel and lengthen leg
without strain to the hamstrings or pull on the pelvis� Extend other leg and foot towards sky� Roll upper thighs inward slightly and
roll the heels outward slightly� Maintain light pressure on the bases of index fingers� Widen the shoulder blades release
them towards tailbone� Keep a long neck with head comfortably in line with the arms� Elbow and knee
joints should be unlocked� Emphasize length in the spine by reaching the pelvis up and back�
Modifications:Ease pressure on wrists by placing a
wedge under palms or performing the pose on elbows� Elevate hands on
blocks or on the seat of a chair to release and open shoulders�
For beginners, a slight softness can be kept
in the knees, and the heels do not
have to touch the floor�
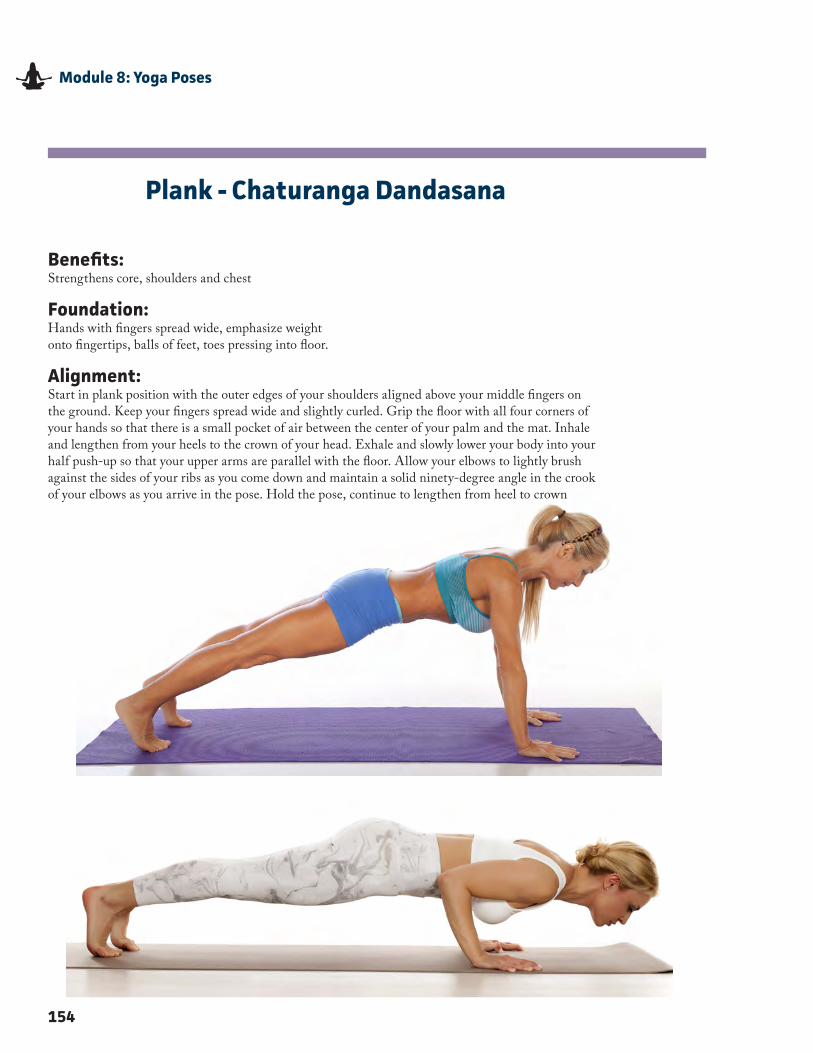
154
Module 8: Yoga Poses
Plank - Chaturanga Dandasana
Benefits:Strengthens core, shoulders and chest
Foundation:Hands with fingers spread wide, emphasize weight onto fingertips, balls of feet, toes pressing into floor�
Alignment:Start in plank position with the outer edges of your shoulders aligned above your middle fingers on the ground� Keep your fingers spread wide and slightly curled� Grip the floor with all four corners of your hands so that there is a small pocket of air between the center of your palm and the mat� Inhale and lengthen from your heels to the crown of your head� Exhale and slowly lower your body into your half push-up so that your upper arms are parallel with the floor� Allow your elbows to lightly brush against the sides of your ribs as you come down and maintain a solid ninety-degree angle in the crook of your elbows as you arrive in the pose� Hold the pose, continue to lengthen from heel to crown
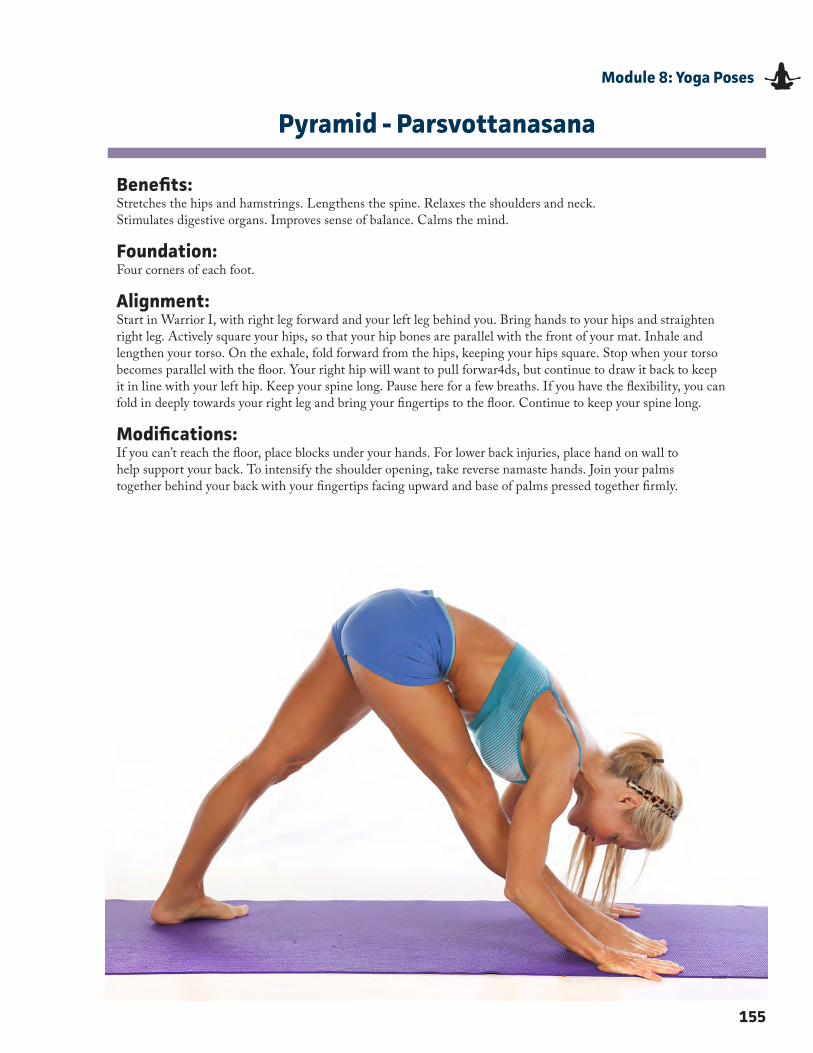
Benefits:Stretches the hips and hamstrings� Lengthens the spine� Relaxes the shoulders and neck� Stimulates digestive organs� Improves sense of balance� Calms the mind�
Foundation:Four corners of each foot�
Alignment:Start in Warrior I, with right leg forward and your left leg behind you� Bring hands to your hips and straighten right leg� Actively square your hips, so that your hip bones are parallel with the front of your mat� Inhale and lengthen your torso� On the exhale, fold forward from the hips, keeping your hips square� Stop when your torso becomes parallel with the floor� Your right hip will want to pull forwar4ds, but continue to draw it back to keep it in line with your left hip� Keep your spine long� Pause here for a few breaths� If you have the flexibility, you can fold in deeply towards your right leg and bring your fingertips to the floor� Continue to keep your spine long�
Modifications:If you can’t reach the floor, place blocks under your hands� For lower back injuries, place hand on wall to help support your back� To intensify the shoulder opening, take reverse namaste hands� Join your palms together behind your back with your fingertips facing upward and base of palms pressed together firmly�
155
Module 8: Yoga Poses
Pyramid - Parsvottanasana
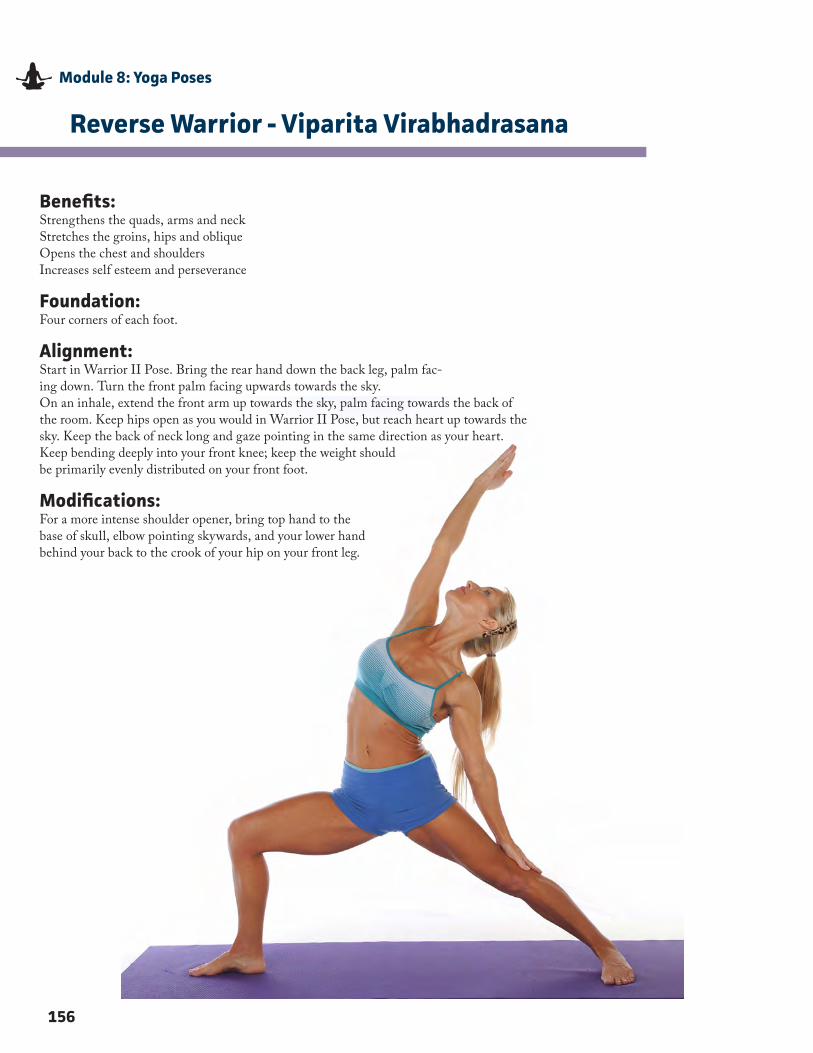
156
Module 8: Yoga Poses
Reverse Warrior - Viparita Virabhadrasana
Benefits:Strengthens the quads, arms and neckStretches the groins, hips and obliqueOpens the chest and shouldersIncreases self esteem and perseverance
Foundation:Four corners of each foot�
Alignment: Start in Warrior II Pose� Bring the rear hand down the back leg, palm fac-ing down� Turn the front palm facing upwards towards the sky�On an inhale, extend the front arm up towards the sky, palm facing towards the back of the room� Keep hips open as you would in Warrior II Pose, but reach heart up towards the sky� Keep the back of neck long and gaze pointing in the same direction as your heart�Keep bending deeply into your front knee; keep the weight should be primarily evenly distributed on your front foot�
Modifications:For a more intense shoulder opener, bring top hand to the base of skull, elbow pointing skywards, and your lower hand behind your back to the crook of your hip on your front leg�
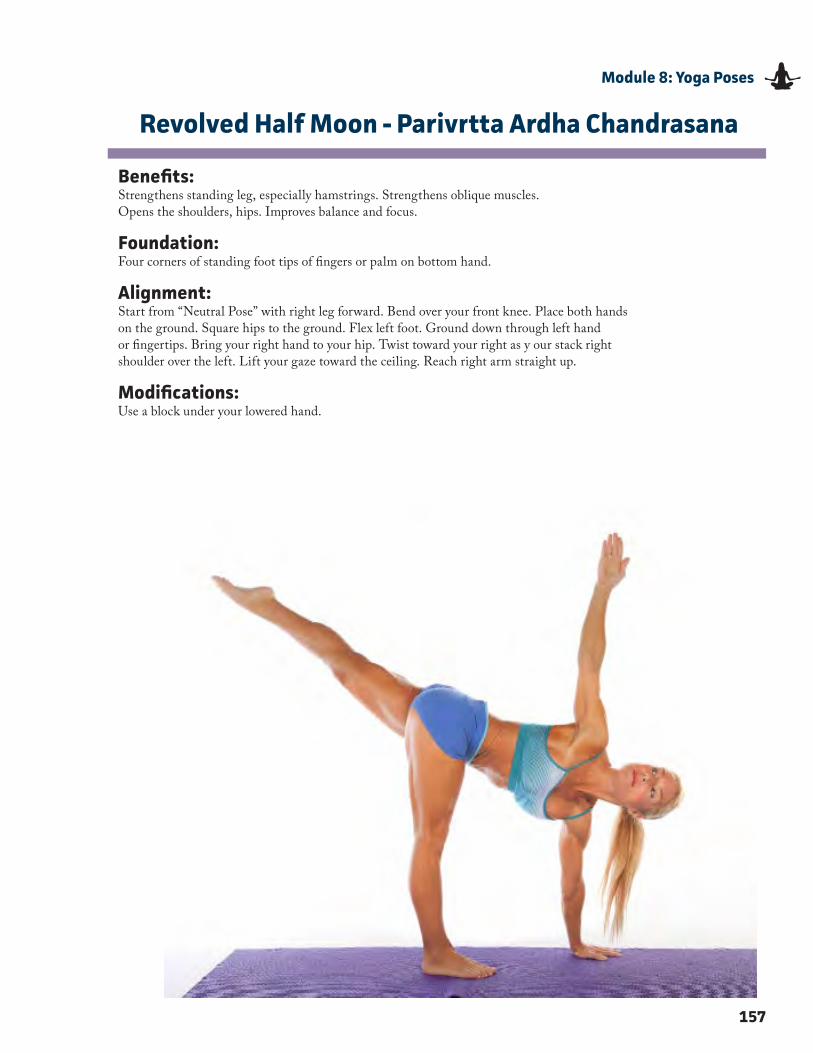
Benefits:Strengthens standing leg, especially hamstrings� Strengthens oblique muscles� Opens the shoulders, hips� Improves balance and focus�
Foundation:Four corners of standing foot tips of fingers or palm on bottom hand�
Alignment:Start from “Neutral Pose” with right leg forward� Bend over your front knee� Place both hands on the ground� Square hips to the ground� Flex left foot� Ground down through left hand or fingertips� Bring your right hand to your hip� Twist toward your right as y our stack right shoulder over the left� Lift your gaze toward the ceiling� Reach right arm straight up�
Modifications:Use a block under your lowered hand�
157
Module 8: Yoga Poses
Revolved Half Moon - Parivrtta Ardha Chandrasana
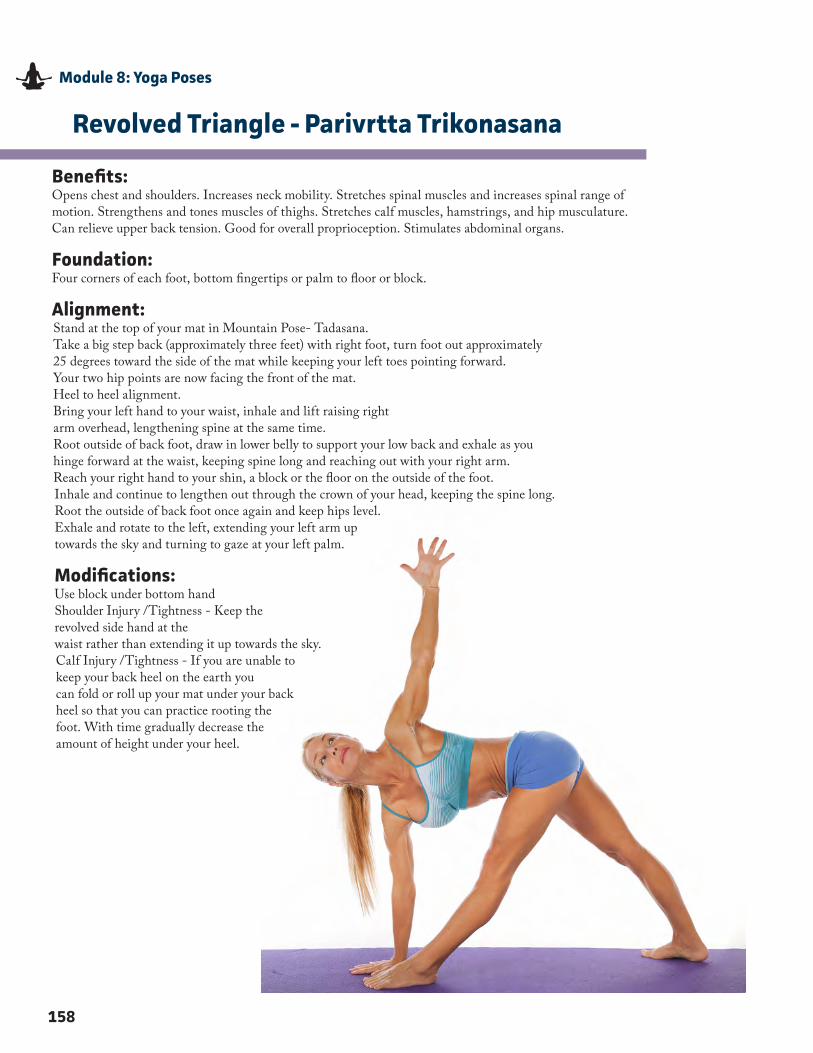
Benefits:Opens chest and shoulders� Increases neck mobility� Stretches spinal muscles and increases spinal range of motion� Strengthens and tones muscles of thighs� Stretches calf muscles, hamstrings, and hip musculature� Can relieve upper back tension� Good for overall proprioception� Stimulates abdominal organs�
Foundation:Four corners of each foot, bottom fingertips or palm to floor or block�
Alignment:Stand at the top of your mat in Mountain Pose- Tadasana�Take a big step back (approximately three feet) with right foot, turn foot out approximately25 degrees toward the side of the mat while keeping your left toes pointing forward�Your two hip points are now facing the front of the mat�Heel to heel alignment�Bring your left hand to your waist, inhale and lift raising rightarm overhead, lengthening spine at the same time�Root outside of back foot, draw in lower belly to support your low back and exhale as youhinge forward at the waist, keeping spine long and reaching out with your right arm�Reach your right hand to your shin, a block or the floor on the outside of the foot�Inhale and continue to lengthen out through the crown of your head, keeping the spine long�Root the outside of back foot once again and keep hips level�Exhale and rotate to the left, extending your left arm up towards the sky and turning to gaze at your left palm�
Modifications:Use block under bottom handShoulder Injury /Tightness - Keep the revolved side hand at thewaist rather than extending it up towards the sky�Calf Injury /Tightness - If you are unable to keep your back heel on the earth youcan fold or roll up your mat under your back heel so that you can practice rooting thefoot� With time gradually decrease the amount of height under your heel�
158
Module 8: Yoga Poses
Revolved Triangle - Parivrtta Trikonasana
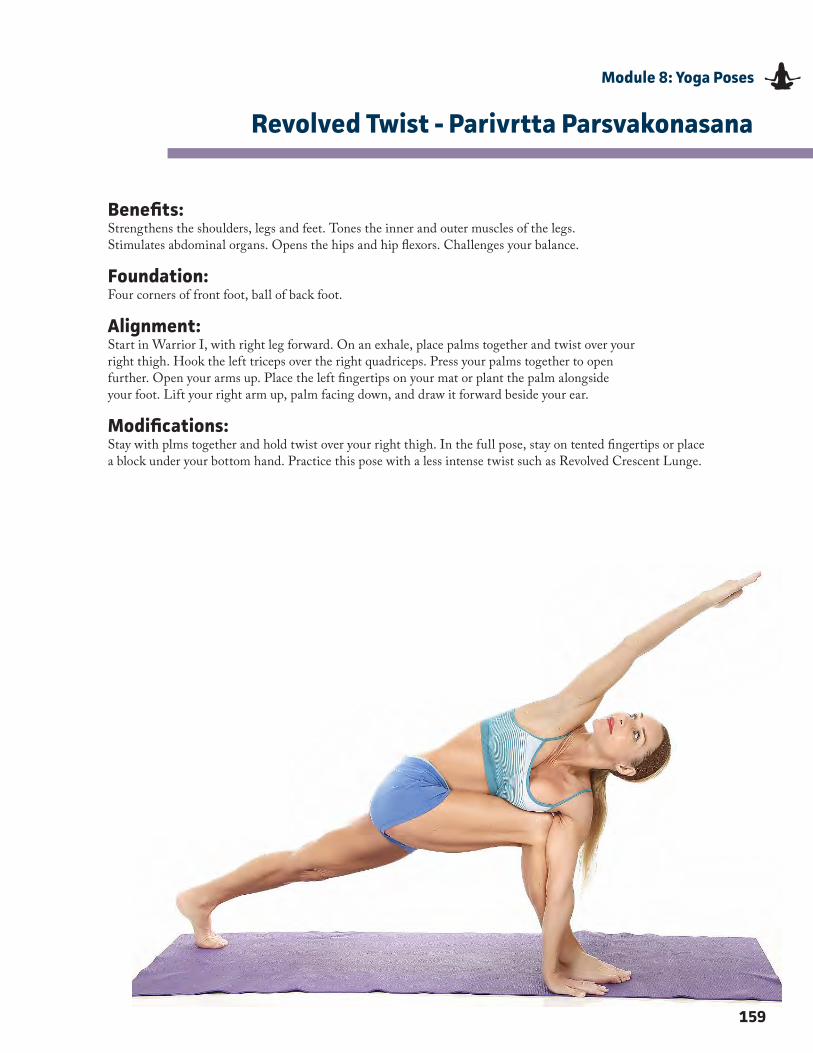
Benefits:Strengthens the shoulders, legs and feet� Tones the inner and outer muscles of the legs� Stimulates abdominal organs� Opens the hips and hip flexors� Challenges your balance�
Foundation:Four corners of front foot, ball of back foot�
Alignment:Start in Warrior I, with right leg forward� On an exhale, place palms together and twist over your right thigh� Hook the left triceps over the right quadriceps� Press your palms together to open further� Open your arms up� Place the left fingertips on your mat or plant the palm alongside your foot� Lift your right arm up, palm facing down, and draw it forward beside your ear�
Modifications:Stay with plms together and hold twist over your right thigh� In the full pose, stay on tented fingertips or place a block under your bottom hand� Practice this pose with a less intense twist such as Revolved Crescent Lunge�
159
Module 8: Yoga Poses
Revolved Twist - Parivrtta Parsvakonasana
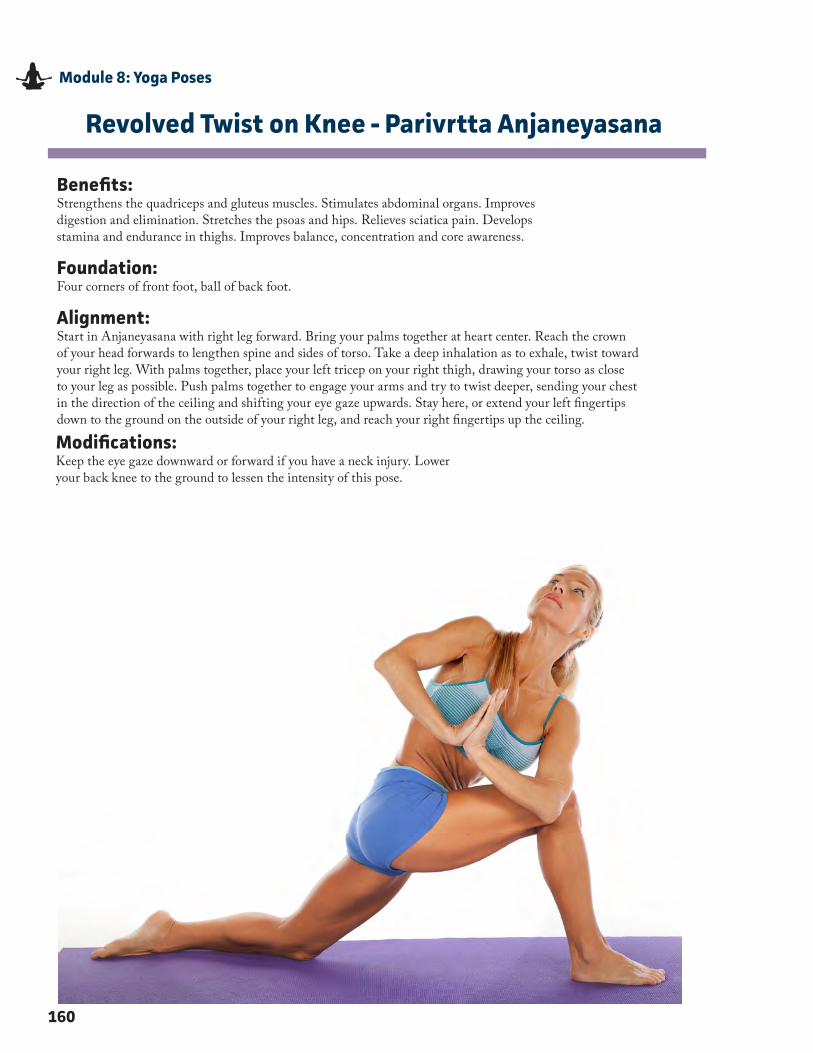
160
Module 8: Yoga Poses
Revolved Twist on Knee - Parivrtta Anjaneyasana
Benefits:Strengthens the quadriceps and gluteus muscles� Stimulates abdominal organs� Improves digestion and elimination� Stretches the psoas and hips� Relieves sciatica pain� Develops stamina and endurance in thighs� Improves balance, concentration and core awareness�
Foundation:Four corners of front foot, ball of back foot�
Alignment:Start in Anjaneyasana with right leg forward� Bring your palms together at heart center� Reach the crown of your head forwards to lengthen spine and sides of torso� Take a deep inhalation as to exhale, twist toward your right leg� With palms together, place your left tricep on your right thigh, drawing your torso as close to your leg as possible� Push palms together to engage your arms and try to twist deeper, sending your chest in the direction of the ceiling and shifting your eye gaze upwards� Stay here, or extend your left fingertips down to the ground on the outside of your right leg, and reach your right fingertips up the ceiling�
Modifications:Keep the eye gaze downward or forward if you have a neck injury� Lower your back knee to the ground to lessen the intensity of this pose�
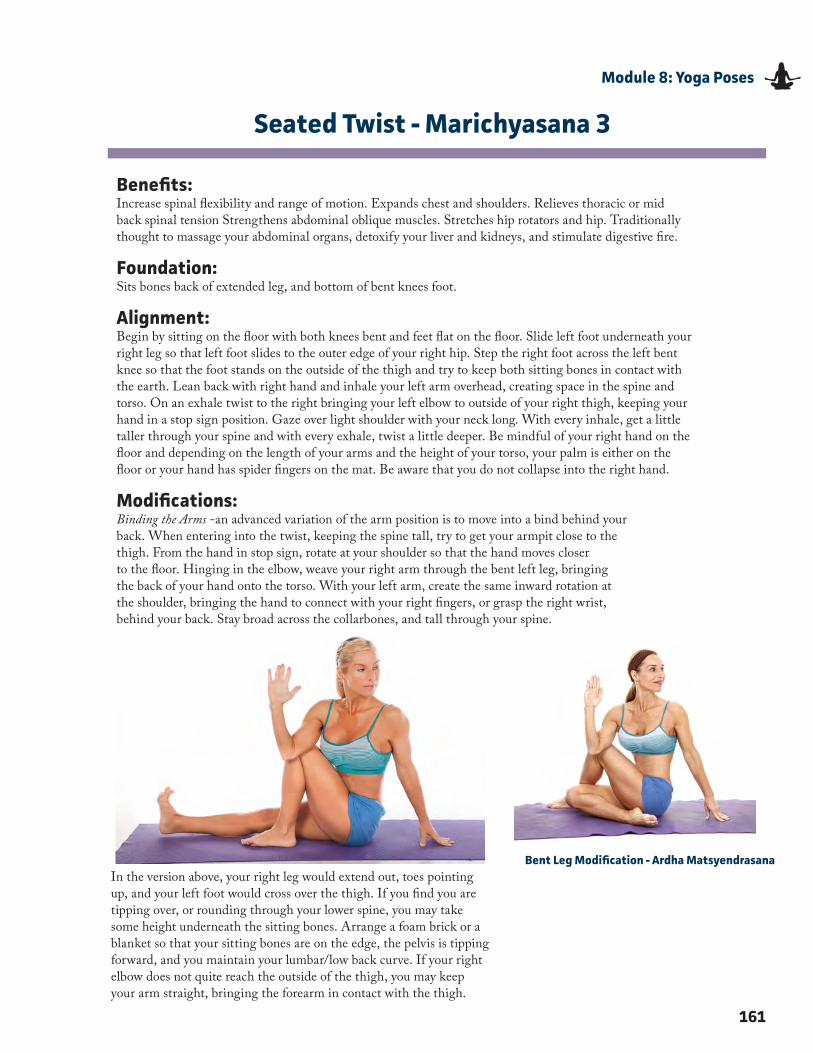
161
Module 8: Yoga Poses
Seated Twist - Marichyasana 3
Benefits:Increase spinal flexibility and range of motion� Expands chest and shoulders� Relieves thoracic or mid back spinal tension Strengthens abdominal oblique muscles� Stretches hip rotators and hip� Traditionally thought to massage your abdominal organs, detoxify your liver and kidneys, and stimulate digestive fire�
Foundation:Sits bones back of extended leg, and bottom of bent knees foot�
Alignment:Begin by sitting on the floor with both knees bent and feet flat on the floor� Slide left foot underneath your right leg so that left foot slides to the outer edge of your right hip� Step the right foot across the left bent knee so that the foot stands on the outside of the thigh and try to keep both sitting bones in contact with the earth� Lean back with right hand and inhale your left arm overhead, creating space in the spine and torso� On an exhale twist to the right bringing your left elbow to outside of your right thigh, keeping your hand in a stop sign position� Gaze over light shoulder with your neck long� With every inhale, get a little taller through your spine and with every exhale, twist a little deeper� Be mindful of your right hand on the floor and depending on the length of your arms and the height of your torso, your palm is either on the floor or your hand has spider fingers on the mat� Be aware that you do not collapse into the right hand�
Modifications:Binding the Arms -an advanced variation of the arm position is to move into a bind behind your back� When entering into the twist, keeping the spine tall, try to get your armpit close to the thigh� From the hand in stop sign, rotate at your shoulder so that the hand moves closerto the floor� Hinging in the elbow, weave your right arm through the bent left leg, bringingthe back of your hand onto the torso� With your left arm, create the same inward rotation atthe shoulder, bringing the hand to connect with your right fingers, or grasp the right wrist,behind your back� Stay broad across the collarbones, and tall through your spine�
In the version above, your right leg would extend out, toes pointing up, and your left foot would cross over the thigh� If you find you are tipping over, or rounding through your lower spine, you may take some height underneath the sitting bones� Arrange a foam brick or a blanket so that your sitting bones are on the edge, the pelvis is tipping forward, and you maintain your lumbar/low back curve� If your right elbow does not quite reach the outside of the thigh, you may keep your arm straight, bringing the forearm in contact with the thigh�
Bent Leg Modification - Ardha Matsyendrasana

162
Module 8: Yoga Poses
Shoulder Stand - Sarvangasana
Benefits:Stretches shoulders and improves flexibility of your upper spine� Calms the brain and nervous system, therefore helping to relieve stress� Improves digestion and massages and stimulates the thyroids� Flushes mucous from your lungs� Helps relieve the symptoms of menopause�
Foundation:Base of shoulders, bottom of upper elbows�
Alignment:Have a support under your shoulders to create more freedom and ease for your neck� Fold and stacka couple firm blankets large enough to support the width and depth of your shoulders� A stickymat placed over the blankets will help the upper arms stay in place while you are inverting�Position shoulders on the blankets so your neck and head drape and rest on the floor� Your 7thcervical vertebra, or the largest boney point on the back of your neck, should still be on the blankets�Lay arms on the floor alongside your torso, bend your knees, and contract your abdominal muscles�Exhale, press your arms against the floor so your feet, hips and back lift from the floor�Keep lifting your back� place your hands on your lower back as you draw yourthighs into the front torso� Make sure you are supporting your back withthe whole palm and not just with your thumbs and index fingers�Continue to support lower back as you draw your elbows towards each other� Then, raise your pelvismore so the thighs can lift to horizontal over your shoulders� With little or no weight on the lowerneck, lightly turn the head side to side to increase ease and space in the mid and upper neck region�Bring your head back to neutral and if you neck feel comfortable, move your handsfrom your lower back closer to your back ribs without letting the elbows slide outwards�Move your pelvis more over your shoulders listening to how your neck feels�Bring feet and knees together� As you inhale, lift your bent knees towards the ceiling,bringing your thighs into a perpendicular line with your torso� As your knees remain bent,draw your tailbone toward your pubis and rotate your upper thighs inward slightly�With your next inhale, straighten knees, sending the heels up toward the ceiling� Once the legsare fully lengthened, reach up through the balls of the big toes, creating length through the inneredges of the legs� As you slowly breathe, gaze softly into the chest, relax the tongue, throat andfacial muscles� Keep your chin perpendicular with the floor as you firmly press the backs of theupper arms and shoulders into the mat� The back of your neck should feel no pressure or tension�
Modifications:Beginners may find curling up with your pelvis and lifting into the pose difficult� You canassist your pelvis lifting by practicing near a wall� Position the blanket support a couplefeet away from the wall so your hips lay close to the wall� Press feet against the wall andwalk the feet up lifting the pelvis to find the position of the hands at the lower back�Beginners may also want to start in a half inverted variation by only lifting the legsupwards to a 45 degree angle� This allows your pelvis to remain slightly away fromyour shoulders, reducing the weight on your shoulder and lower neck region�To deepen the pose, press the entire hand against the ribs sending thesternum lightly towards the chin� At the same time, the tailbone pressesinto the pubic bone send the heels further up to the ceiling�
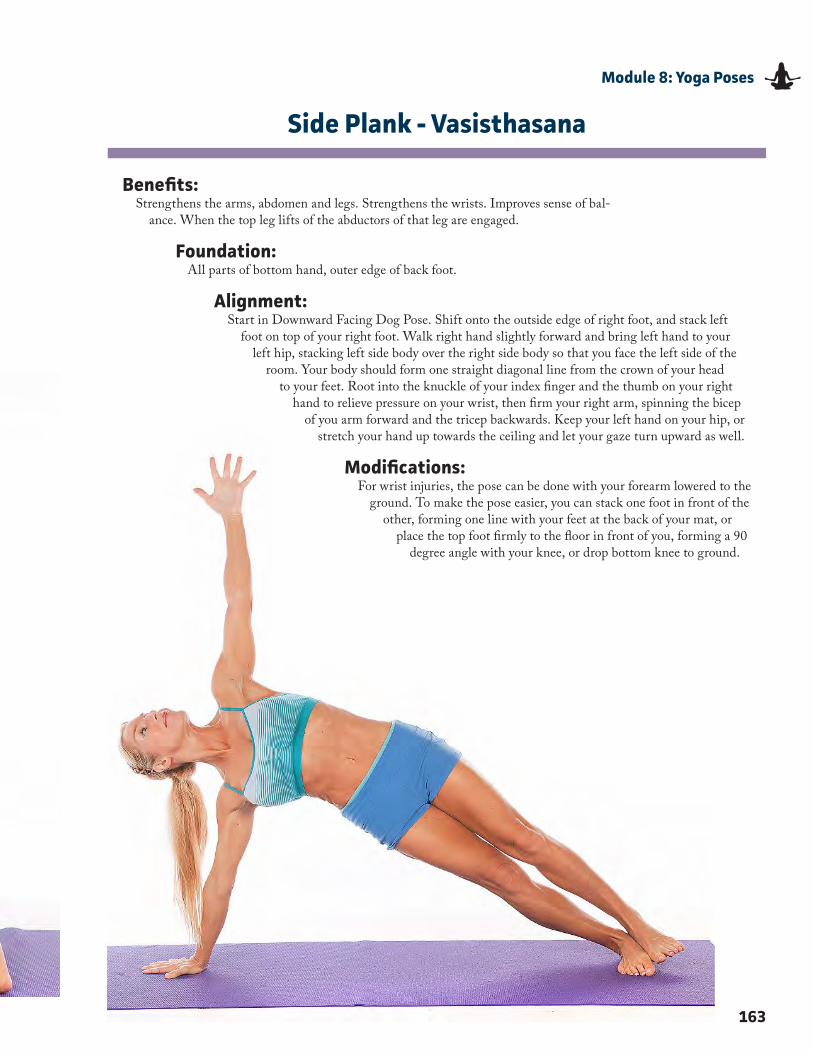
163
Module 8: Yoga Poses
Side Plank - Vasisthasana
Benefits:Strengthens the arms, abdomen and legs� Strengthens the wrists� Improves sense of bal-
ance� When the top leg lifts of the abductors of that leg are engaged�
Foundation:All parts of bottom hand, outer edge of back foot�
Alignment:Start in Downward Facing Dog Pose� Shift onto the outside edge of right foot, and stack left
foot on top of your right foot� Walk right hand slightly forward and bring left hand to your left hip, stacking left side body over the right side body so that you face the left side of the
room� Your body should form one straight diagonal line from the crown of your head to your feet� Root into the knuckle of your index finger and the thumb on your right
hand to relieve pressure on your wrist, then firm your right arm, spinning the bicep of you arm forward and the tricep backwards� Keep your left hand on your hip, or
stretch your hand up towards the ceiling and let your gaze turn upward as well�
Modifications:For wrist injuries, the pose can be done with your forearm lowered to the
ground� To make the pose easier, you can stack one foot in front of the other, forming one line with your feet at the back of your mat, or
place the top foot firmly to the floor in front of you, forming a 90 degree angle with your knee, or drop bottom knee to ground�
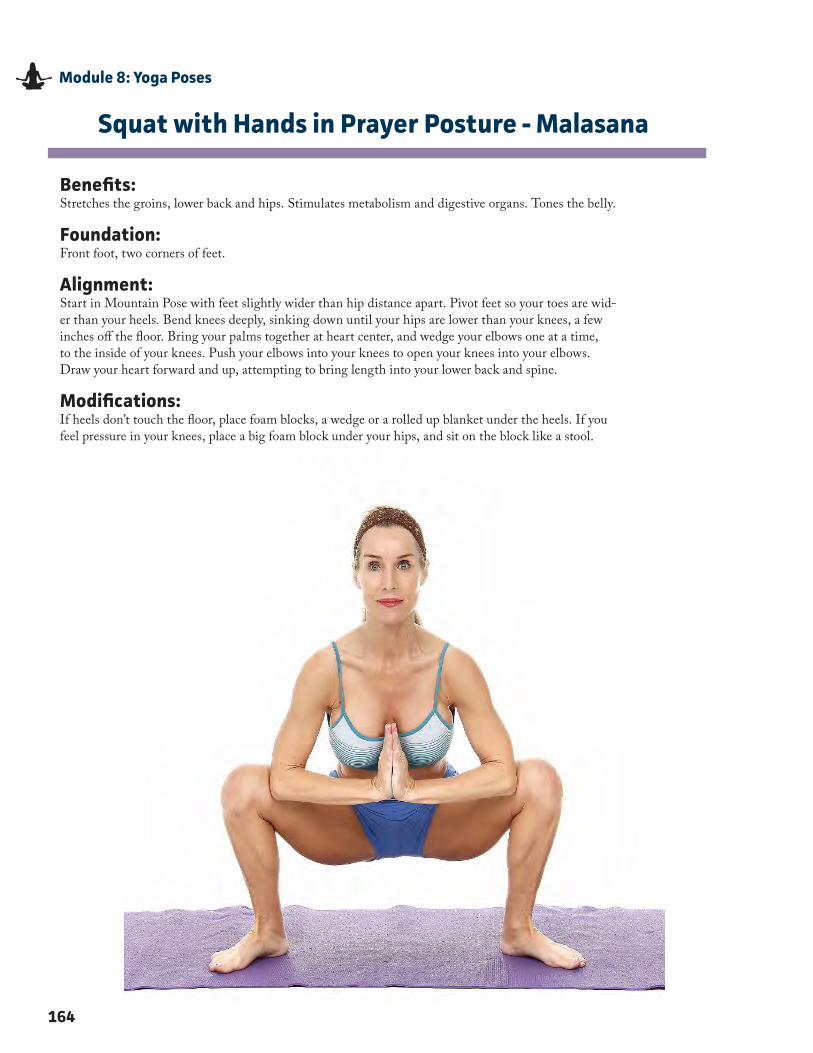
164
Module 8: Yoga Poses
Squat with Hands in Prayer Posture - Malasana
Benefits:Stretches the groins, lower back and hips� Stimulates metabolism and digestive organs� Tones the belly�
Foundation:Front foot, two corners of feet�
Alignment:Start in Mountain Pose with feet slightly wider than hip distance apart� Pivot feet so your toes are wid-er than your heels� Bend knees deeply, sinking down until your hips are lower than your knees, a few inches off the floor� Bring your palms together at heart center, and wedge your elbows one at a time, to the inside of your knees� Push your elbows into your knees to open your knees into your elbows� Draw your heart forward and up, attempting to bring length into your lower back and spine�
Modifications:If heels don’t touch the floor, place foam blocks, a wedge or a rolled up blanket under the heels� If you feel pressure in your knees, place a big foam block under your hips, and sit on the block like a stool�
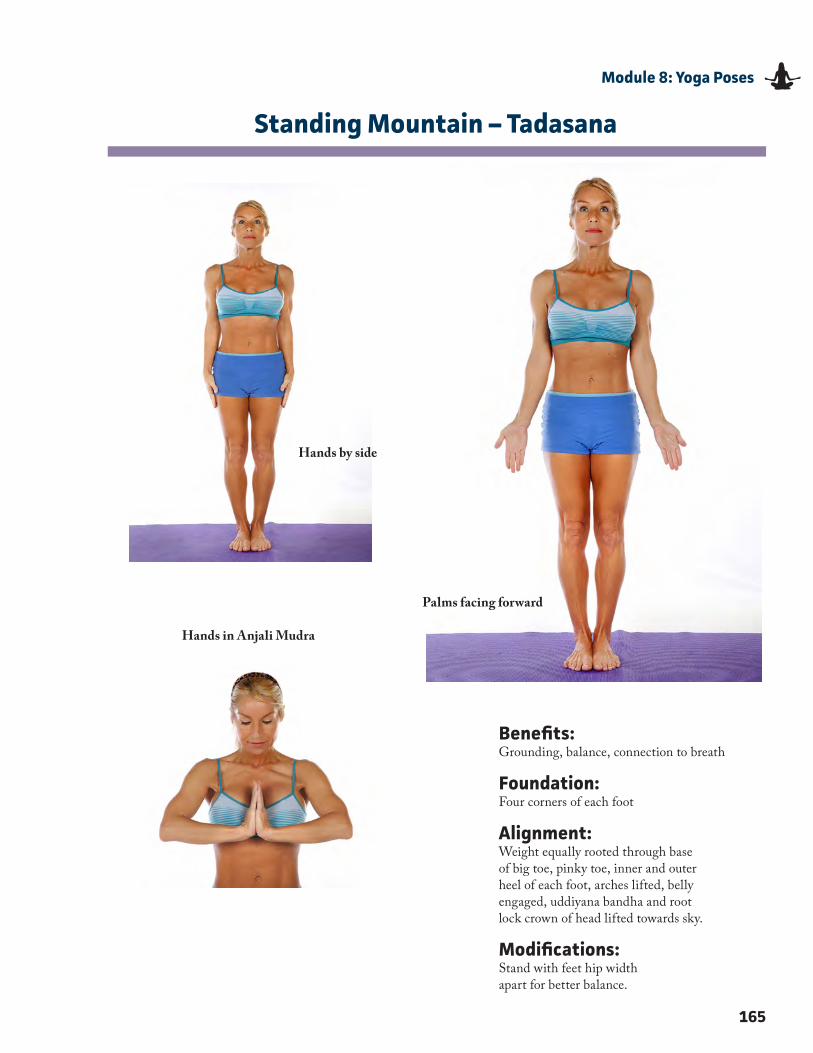
165
Module 8: Yoga Poses
Standing Mountain – Tadasana
Hands in Anjali Mudra
Benefits:Grounding, balance, connection to breath
Foundation:Four corners of each foot
Alignment:Weight equally rooted through base of big toe, pinky toe, inner and outer heel of each foot, arches lifted, belly engaged, uddiyana bandha and root lock crown of head lifted towards sky�
Modifications:Stand with feet hip width apart for better balance�
Hands by side
Palms facing forward
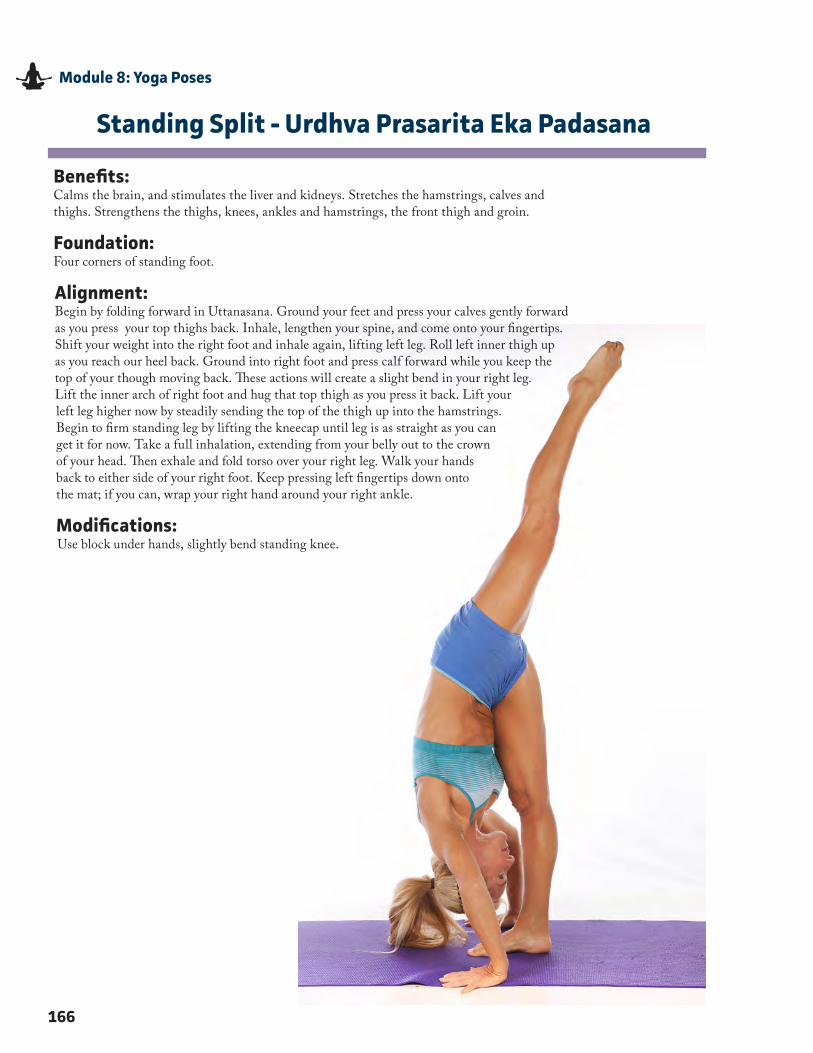
166
Module 8: Yoga Poses
Standing Split - Urdhva Prasarita Eka Padasana
Benefits:Calms the brain, and stimulates the liver and kidneys� Stretches the hamstrings, calves and thighs� Strengthens the thighs, knees, ankles and hamstrings, the front thigh and groin�
Foundation:Four corners of standing foot�
Alignment:Begin by folding forward in Uttanasana� Ground your feet and press your calves gently forward as you press your top thighs back� Inhale, lengthen your spine, and come onto your fingertips� Shift your weight into the right foot and inhale again, lifting left leg� Roll left inner thigh up as you reach our heel back� Ground into right foot and press calf forward while you keep the top of your though moving back� These actions will create a slight bend in your right leg� Lift the inner arch of right foot and hug that top thigh as you press it back� Lift your left leg higher now by steadily sending the top of the thigh up into the hamstrings� Begin to firm standing leg by lifting the kneecap until leg is as straight as you can get it for now� Take a full inhalation, extending from your belly out to the crown of your head� Then exhale and fold torso over your right leg� Walk your hands back to either side of your right foot� Keep pressing left fingertips down onto the mat; if you can, wrap your right hand around your right ankle�
Modifications:Use block under hands, slightly bend standing knee�
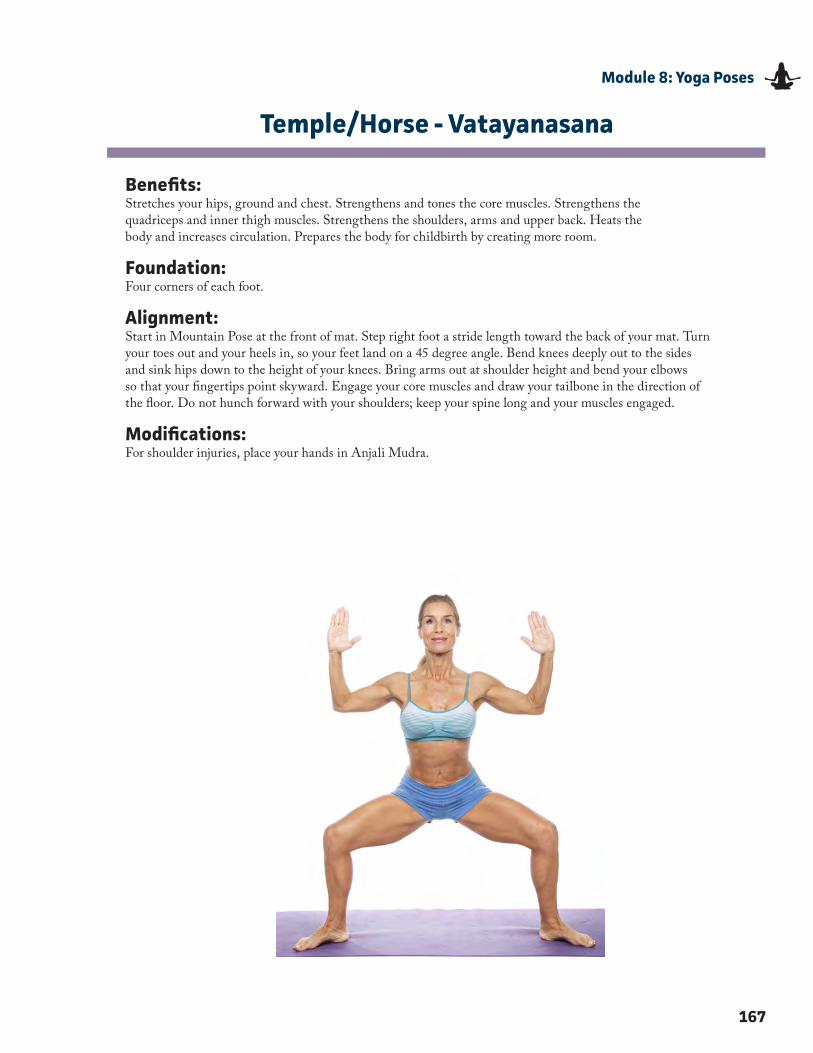
167
Module 8: Yoga Poses
Temple/Horse - Vatayanasana
Benefits:Stretches your hips, ground and chest� Strengthens and tones the core muscles� Strengthens the quadriceps and inner thigh muscles� Strengthens the shoulders, arms and upper back� Heats the body and increases circulation� Prepares the body for childbirth by creating more room�
Foundation:Four corners of each foot�
Alignment:Start in Mountain Pose at the front of mat� Step right foot a stride length toward the back of your mat� Turn your toes out and your heels in, so your feet land on a 45 degree angle� Bend knees deeply out to the sides and sink hips down to the height of your knees� Bring arms out at shoulder height and bend your elbows so that your fingertips point skyward� Engage your core muscles and draw your tailbone in the direction of the floor� Do not hunch forward with your shoulders; keep your spine long and your muscles engaged�
Modifications:For shoulder injuries, place your hands in Anjali Mudra�
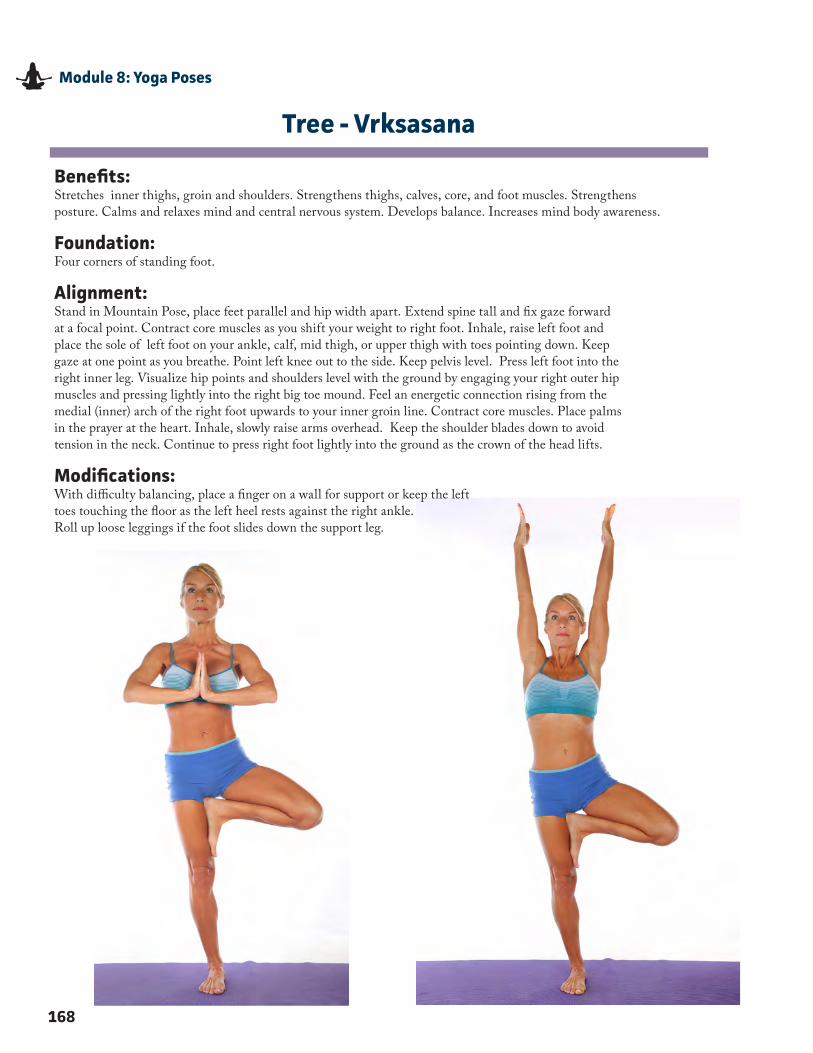
168
Module 8: Yoga Poses
Tree - Vrksasana
Benefits:Stretches inner thighs, groin and shoulders� Strengthens thighs, calves, core, and foot muscles� Strengthens posture� Calms and relaxes mind and central nervous system� Develops balance� Increases mind body awareness�
Foundation:Four corners of standing foot�
Alignment:Stand in Mountain Pose, place feet parallel and hip width apart� Extend spine tall and fix gaze forward at a focal point� Contract core muscles as you shift your weight to right foot� Inhale, raise left foot and place the sole of left foot on your ankle, calf, mid thigh, or upper thigh with toes pointing down� Keep gaze at one point as you breathe� Point left knee out to the side� Keep pelvis level� Press left foot into the right inner leg� Visualize hip points and shoulders level with the ground by engaging your right outer hip muscles and pressing lightly into the right big toe mound� Feel an energetic connection rising from the medial (inner) arch of the right foot upwards to your inner groin line� Contract core muscles� Place palms in the prayer at the heart� Inhale, slowly raise arms overhead� Keep the shoulder blades down to avoid tension in the neck� Continue to press right foot lightly into the ground as the crown of the head lifts�
Modifications:With difficulty balancing, place a finger on a wall for support or keep the left toes touching the floor as the left heel rests against the right ankle�Roll up loose leggings if the foot slides down the support leg�
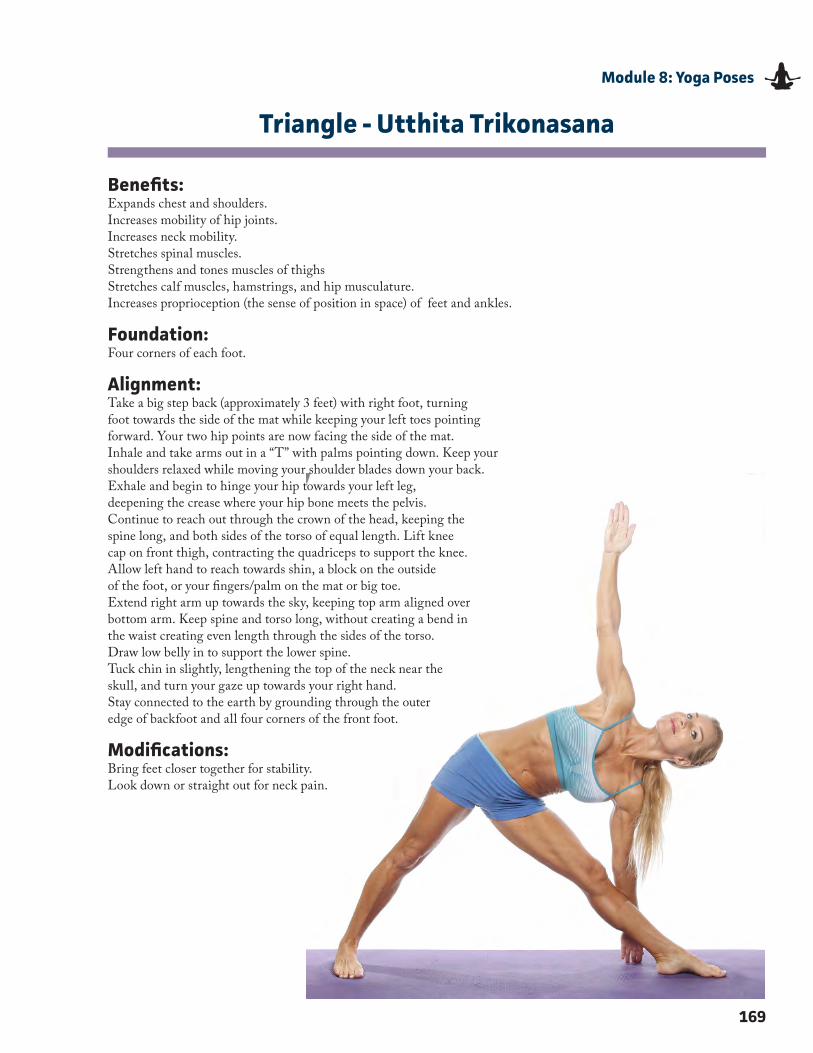
169
Module 8: Yoga Poses
Triangle - Utthita Trikonasana
Benefits:Expands chest and shoulders�Increases mobility of hip joints�Increases neck mobility�Stretches spinal muscles�Strengthens and tones muscles of thighsStretches calf muscles, hamstrings, and hip musculature�Increases proprioception (the sense of position in space) of feet and ankles�
Foundation:Four corners of each foot�
Alignment: Take a big step back (approximately 3 feet) with right foot, turning foot towards the side of the mat while keeping your left toes pointing forward� Your two hip points are now facing the side of the mat�Inhale and take arms out in a “T” with palms pointing down� Keep your shoulders relaxed while moving your shoulder blades down your back�Exhale and begin to hinge your hip towards your left leg, deepening the crease where your hip bone meets the pelvis�Continue to reach out through the crown of the head, keeping the spine long, and both sides of the torso of equal length� Lift knee cap on front thigh, contracting the quadriceps to support the knee�Allow left hand to reach towards shin, a block on the outside of the foot, or your fingers/palm on the mat or big toe�Extend right arm up towards the sky, keeping top arm aligned over bottom arm� Keep spine and torso long, without creating a bend in the waist creating even length through the sides of the torso�Draw low belly in to support the lower spine�Tuck chin in slightly, lengthening the top of the neck near the skull, and turn your gaze up towards your right hand�Stay connected to the earth by grounding through the outer edge of backfoot and all four corners of the front foot�
Modifications:Bring feet closer together for stability� Look down or straight out for neck pain�
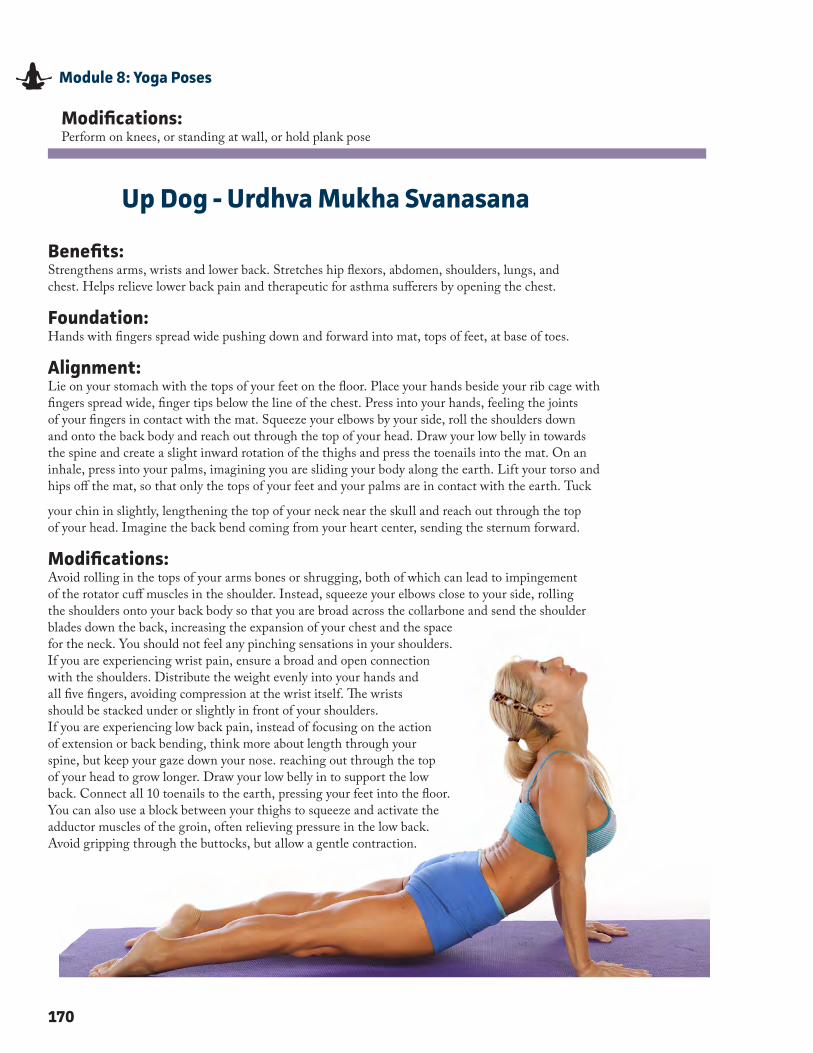
170
Module 8: Yoga Poses
Modifications:Perform on knees, or standing at wall, or hold plank pose
Up Dog - Urdhva Mukha Svanasana
Benefits:Strengthens arms, wrists and lower back� Stretches hip flexors, abdomen, shoulders, lungs, and chest� Helps relieve lower back pain and therapeutic for asthma sufferers by opening the chest�
Foundation:Hands with fingers spread wide pushing down and forward into mat, tops of feet, at base of toes�
Alignment:Lie on your stomach with the tops of your feet on the floor� Place your hands beside your rib cage with fingers spread wide, finger tips below the line of the chest� Press into your hands, feeling the joints of your fingers in contact with the mat� Squeeze your elbows by your side, roll the shoulders down and onto the back body and reach out through the top of your head� Draw your low belly in towards the spine and create a slight inward rotation of the thighs and press the toenails into the mat� On an inhale, press into your palms, imagining you are sliding your body along the earth� Lift your torso and hips off the mat, so that only the tops of your feet and your palms are in contact with the earth� Tuck
your chin in slightly, lengthening the top of your neck near the skull and reach out through the top of your head� Imagine the back bend coming from your heart center, sending the sternum forward�
Modifications: Avoid rolling in the tops of your arms bones or shrugging, both of which can lead to impingement of the rotator cuff muscles in the shoulder� Instead, squeeze your elbows close to your side, rolling the shoulders onto your back body so that you are broad across the collarbone and send the shoulder blades down the back, increasing the expansion of your chest and the space for the neck� You should not feel any pinching sensations in your shoulders�If you are experiencing wrist pain, ensure a broad and open connection with the shoulders� Distribute the weight evenly into your hands and all five fingers, avoiding compression at the wrist itself� The wrists should be stacked under or slightly in front of your shoulders�If you are experiencing low back pain, instead of focusing on the action of extension or back bending, think more about length through your spine, but keep your gaze down your nose� reaching out through the top of your head to grow longer� Draw your low belly in to support the low back� Connect all 10 toenails to the earth, pressing your feet into the floor� You can also use a block between your thighs to squeeze and activate the adductor muscles of the groin, often relieving pressure in the low back� Avoid gripping through the buttocks, but allow a gentle contraction�
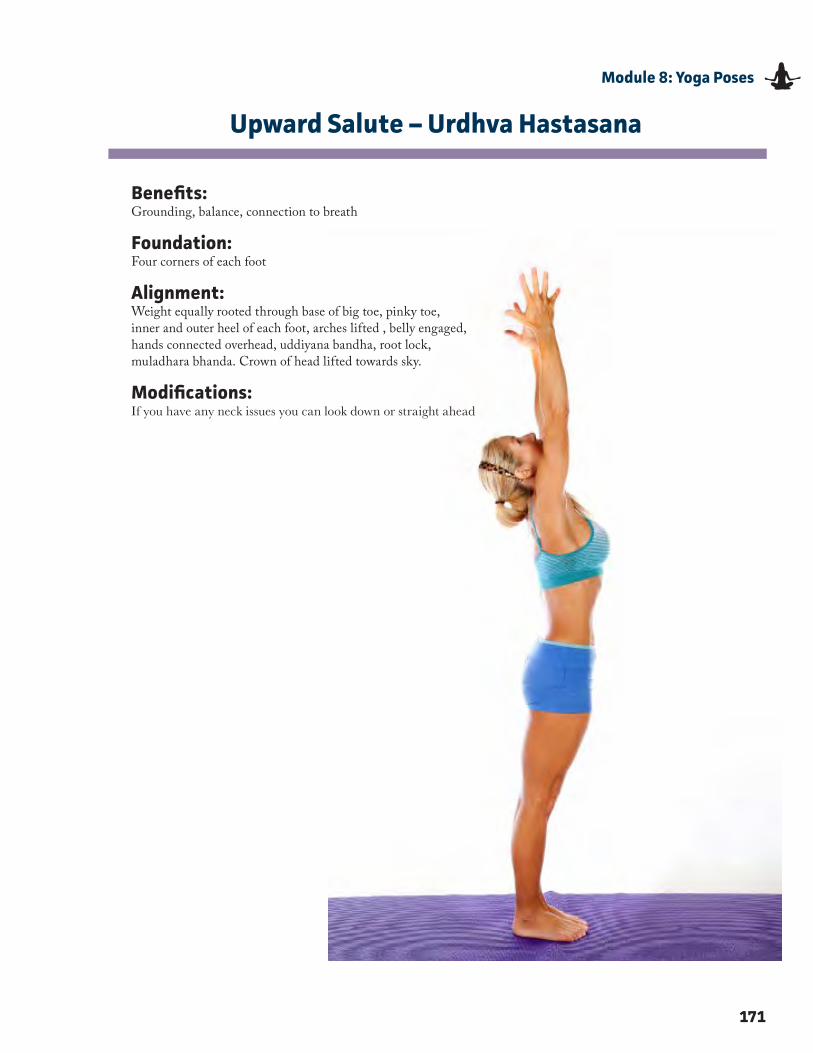
171
Module 8: Yoga Poses
Upward Salute – Urdhva Hastasana
Benefits:Grounding, balance, connection to breath
Foundation:Four corners of each foot
Alignment:Weight equally rooted through base of big toe, pinky toe, inner and outer heel of each foot, arches lifted , belly engaged, hands connected overhead, uddiyana bandha, root lock, muladhara bhanda� Crown of head lifted towards sky�
Modifications:If you have any neck issues you can look down or straight ahead
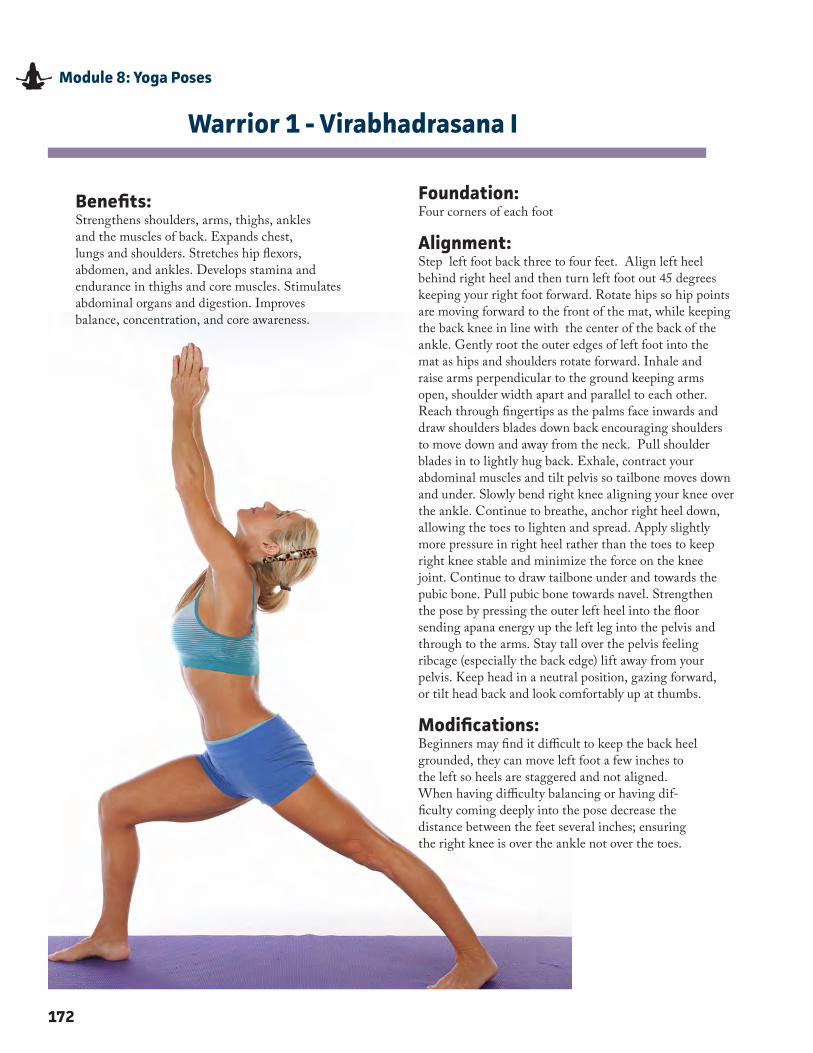
172
Module 8: Yoga Poses
Warrior 1 - Virabhadrasana I
Benefits:Strengthens shoulders, arms, thighs, ankles and the muscles of back� Expands chest, lungs and shoulders� Stretches hip flexors, abdomen, and ankles� Develops stamina and endurance in thighs and core muscles� Stimulates abdominal organs and digestion� Improves balance, concentration, and core awareness�
Foundation:Four corners of each foot
Alignment:Step left foot back three to four feet� Align left heel behind right heel and then turn left foot out 45 degrees keeping your right foot forward� Rotate hips so hip points are moving forward to the front of the mat, while keeping the back knee in line with the center of the back of the ankle� Gently root the outer edges of left foot into the mat as hips and shoulders rotate forward� Inhale and raise arms perpendicular to the ground keeping arms open, shoulder width apart and parallel to each other� Reach through fingertips as the palms face inwards and draw shoulders blades down back encouraging shoulders to move down and away from the neck� Pull shoulder blades in to lightly hug back� Exhale, contract your abdominal muscles and tilt pelvis so tailbone moves down and under� Slowly bend right knee aligning your knee over the ankle� Continue to breathe, anchor right heel down, allowing the toes to lighten and spread� Apply slightly more pressure in right heel rather than the toes to keep right knee stable and minimize the force on the knee joint� Continue to draw tailbone under and towards the pubic bone� Pull pubic bone towards navel� Strengthen the pose by pressing the outer left heel into the floor sending apana energy up the left leg into the pelvis and through to the arms� Stay tall over the pelvis feeling ribcage (especially the back edge) lift away from your pelvis� Keep head in a neutral position, gazing forward, or tilt head back and look comfortably up at thumbs�
Modifications:Beginners may find it difficult to keep the back heel grounded, they can move left foot a few inches to the left so heels are staggered and not aligned�When having difficulty balancing or having dif-ficulty coming deeply into the pose decrease the distance between the feet several inches; ensuring the right knee is over the ankle not over the toes�
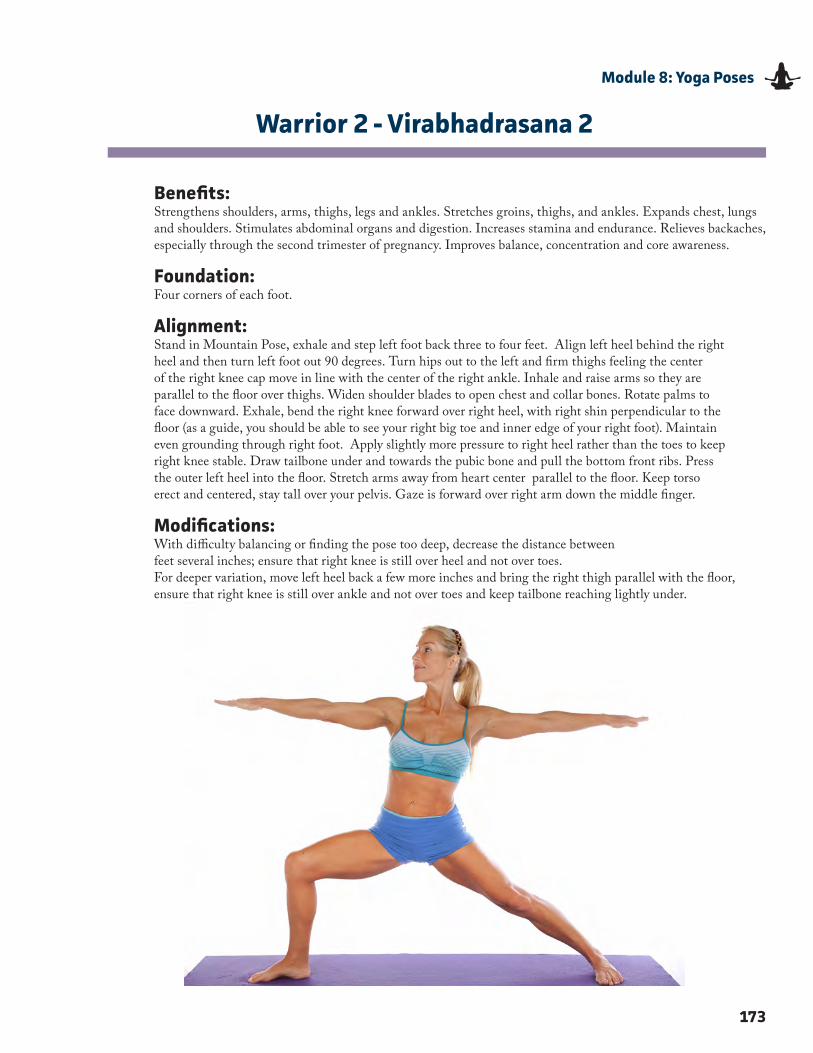
173
Module 8: Yoga Poses
Warrior 2 - Virabhadrasana 2
Benefits:Strengthens shoulders, arms, thighs, legs and ankles� Stretches groins, thighs, and ankles� Expands chest, lungs and shoulders� Stimulates abdominal organs and digestion� Increases stamina and endurance� Relieves backaches, especially through the second trimester of pregnancy� Improves balance, concentration and core awareness�
Foundation:Four corners of each foot�
Alignment:Stand in Mountain Pose, exhale and step left foot back three to four feet� Align left heel behind the right heel and then turn left foot out 90 degrees� Turn hips out to the left and firm thighs feeling the center of the right knee cap move in line with the center of the right ankle� Inhale and raise arms so they are parallel to the floor over thighs� Widen shoulder blades to open chest and collar bones� Rotate palms to face downward� Exhale, bend the right knee forward over right heel, with right shin perpendicular to the floor (as a guide, you should be able to see your right big toe and inner edge of your right foot)� Maintain even grounding through right foot� Apply slightly more pressure to right heel rather than the toes to keep right knee stable� Draw tailbone under and towards the pubic bone and pull the bottom front ribs� Press the outer left heel into the floor� Stretch arms away from heart center parallel to the floor� Keep torso erect and centered, stay tall over your pelvis� Gaze is forward over right arm down the middle finger�
Modifications:With difficulty balancing or finding the pose too deep, decrease the distance between feet several inches; ensure that right knee is still over heel and not over toes�For deeper variation, move left heel back a few more inches and bring the right thigh parallel with the floor, ensure that right knee is still over ankle and not over toes and keep tailbone reaching lightly under�
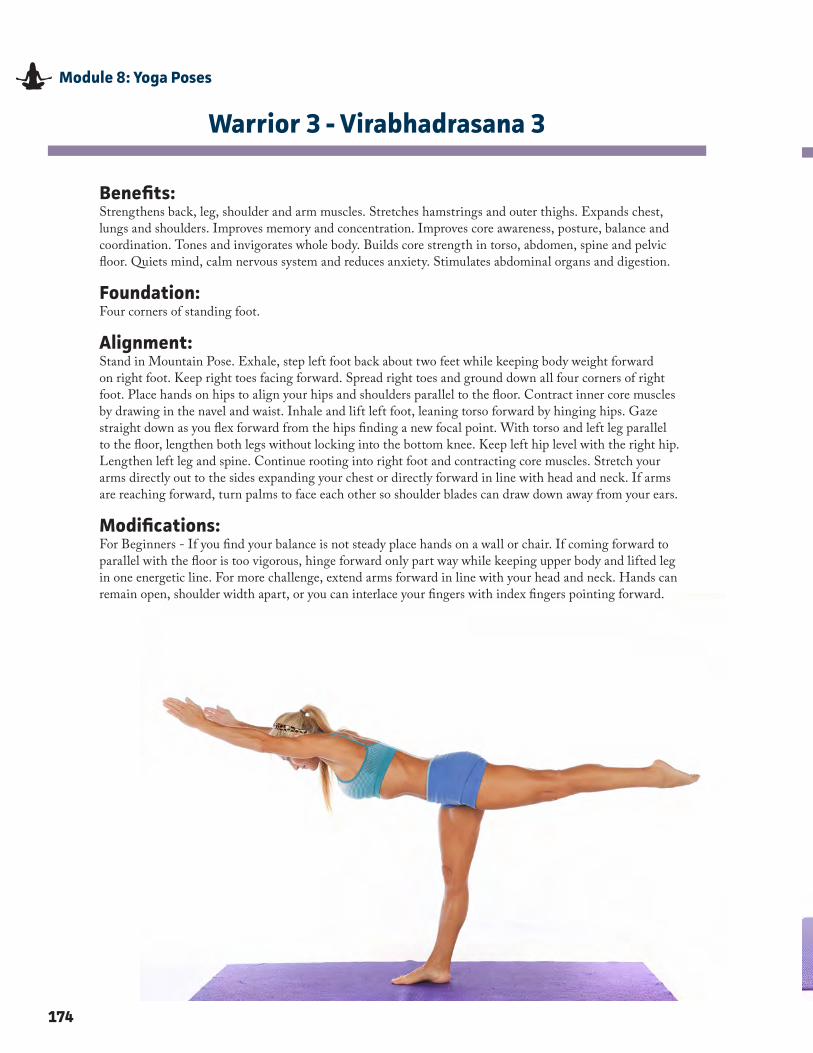
174
Module 8: Yoga Poses
Warrior 3 - Virabhadrasana 3
Benefits:Strengthens back, leg, shoulder and arm muscles� Stretches hamstrings and outer thighs� Expands chest, lungs and shoulders� Improves memory and concentration� Improves core awareness, posture, balance and coordination� Tones and invigorates whole body� Builds core strength in torso, abdomen, spine and pelvic floor� Quiets mind, calm nervous system and reduces anxiety� Stimulates abdominal organs and digestion�
Foundation:Four corners of standing foot�
Alignment:Stand in Mountain Pose� Exhale, step left foot back about two feet while keeping body weight forward on right foot� Keep right toes facing forward� Spread right toes and ground down all four corners of right foot� Place hands on hips to align your hips and shoulders parallel to the floor� Contract inner core muscles by drawing in the navel and waist� Inhale and lift left foot, leaning torso forward by hinging hips� Gaze straight down as you flex forward from the hips finding a new focal point� With torso and left leg parallel to the floor, lengthen both legs without locking into the bottom knee� Keep left hip level with the right hip� Lengthen left leg and spine� Continue rooting into right foot and contracting core muscles� Stretch your arms directly out to the sides expanding your chest or directly forward in line with head and neck� If arms are reaching forward, turn palms to face each other so shoulder blades can draw down away from your ears�
Modifications:For Beginners - If you find your balance is not steady place hands on a wall or chair� If coming forward to parallel with the floor is too vigorous, hinge forward only part way while keeping upper body and lifted leg in one energetic line� For more challenge, extend arms forward in line with your head and neck� Hands can remain open, shoulder width apart, or you can interlace your fingers with index fingers pointing forward�
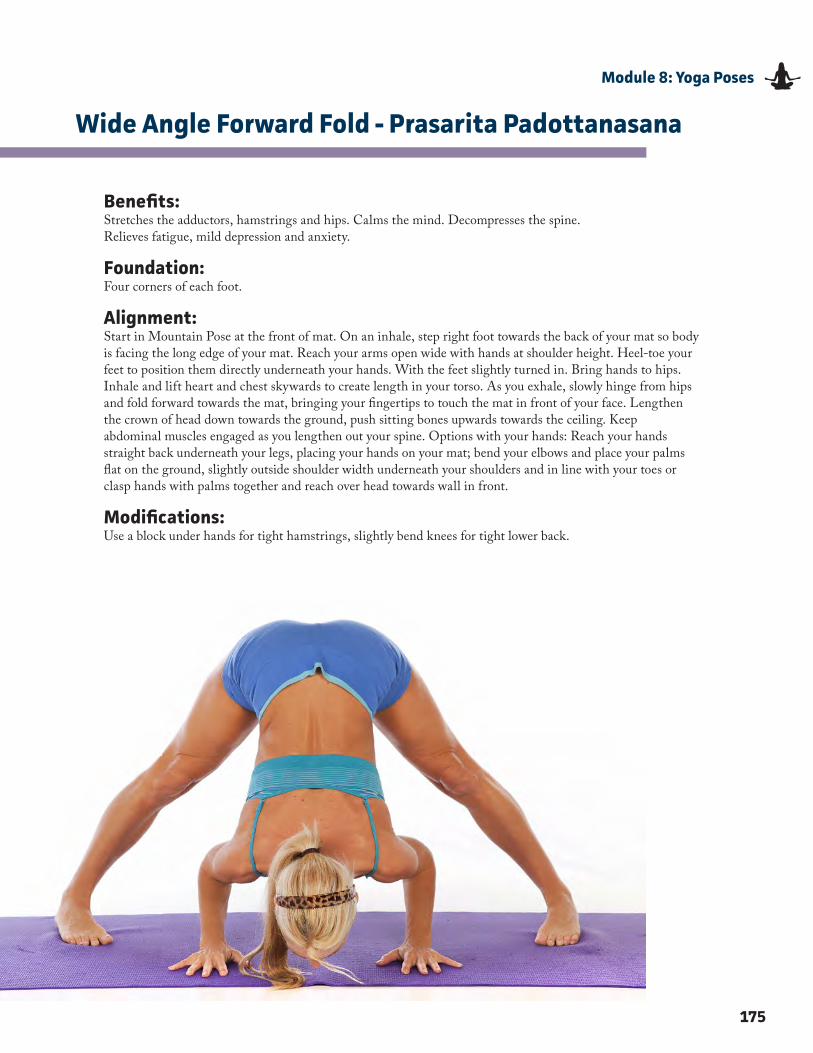
175
Module 8: Yoga Poses
Wide Angle Forward Fold - Prasarita Padottanasana
Benefits:Stretches the adductors, hamstrings and hips� Calms the mind� Decompresses the spine� Relieves fatigue, mild depression and anxiety�
Foundation:Four corners of each foot�
Alignment:Start in Mountain Pose at the front of mat� On an inhale, step right foot towards the back of your mat so body is facing the long edge of your mat� Reach your arms open wide with hands at shoulder height� Heel-toe yourfeet to position them directly underneath your hands� With the feet slightly turned in� Bring hands to hips� Inhale and lift heart and chest skywards to create length in your torso� As you exhale, slowly hinge from hipsand fold forward towards the mat, bringing your fingertips to touch the mat in front of your face� Lengthenthe crown of head down towards the ground, push sitting bones upwards towards the ceiling� Keepabdominal muscles engaged as you lengthen out your spine� Options with your hands: Reach your handsstraight back underneath your legs, placing your hands on your mat; bend your elbows and place your palmsflat on the ground, slightly outside shoulder width underneath your shoulders and in line with your toes orclasp hands with palms together and reach over head towards wall in front�
Modifications:Use a block under hands for tight hamstrings, slightly bend knees for tight lower back�

176
Module 8: Yoga Poses
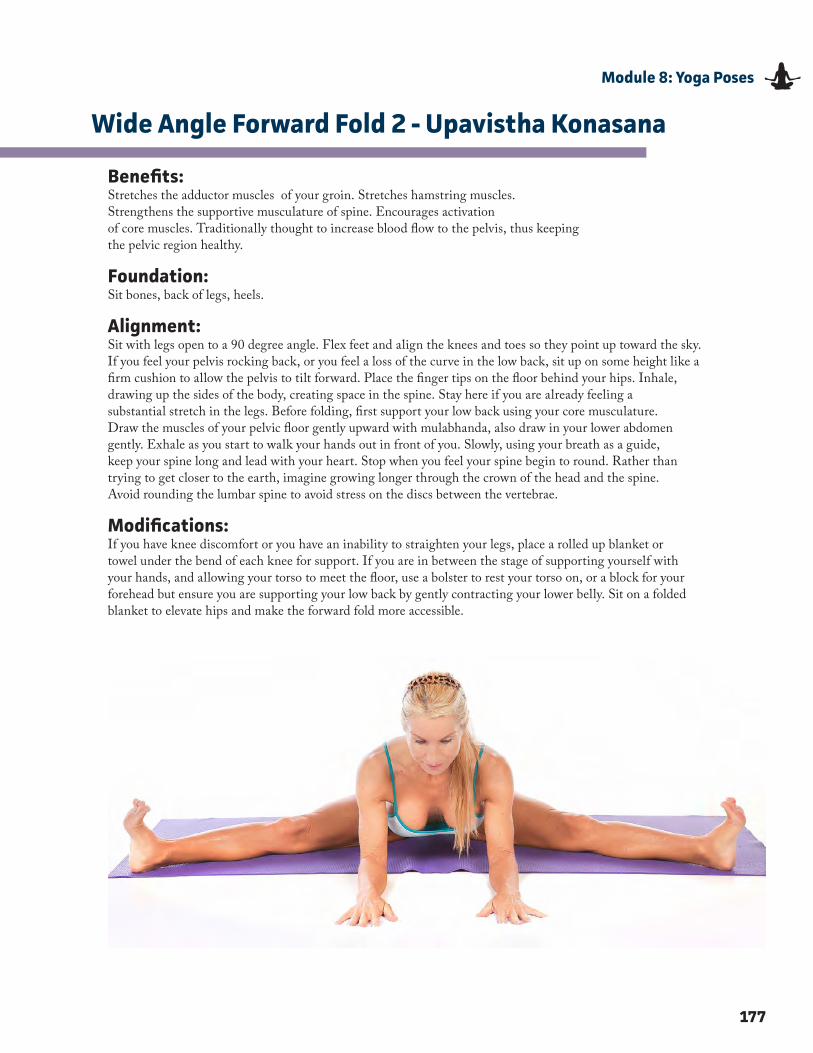
177
Module 8: Yoga Poses
Wide Angle Forward Fold 2 - Upavistha Konasana
Benefits:Stretches the adductor muscles of your groin� Stretches hamstring muscles� Strengthens the supportive musculature of spine� Encourages activation of core muscles� Traditionally thought to increase blood flow to the pelvis, thus keepingthe pelvic region healthy�
Foundation:Sit bones, back of legs, heels�
Alignment:Sit with legs open to a 90 degree angle� Flex feet and align the knees and toes so they point up toward the sky� If you feel your pelvis rocking back, or you feel a loss of the curve in the low back, sit up on some height like a firm cushion to allow the pelvis to tilt forward� Place the finger tips on the floor behind your hips� Inhale, drawing up the sides of the body, creating space in the spine� Stay here if you are already feeling a substantial stretch in the legs� Before folding, first support your low back using your core musculature� Draw the muscles of your pelvic floor gently upward with mulabhanda, also draw in your lower abdomen gently� Exhale as you start to walk your hands out in front of you� Slowly, using your breath as a guide, keep your spine long and lead with your heart� Stop when you feel your spine begin to round� Rather than trying to get closer to the earth, imagine growing longer through the crown of the head and the spine�Avoid rounding the lumbar spine to avoid stress on the discs between the vertebrae�
Modifications:If you have knee discomfort or you have an inability to straighten your legs, place a rolled up blanket or towel under the bend of each knee for support� If you are in between the stage of supporting yourself with your hands, and allowing your torso to meet the floor, use a bolster to rest your torso on, or a block for yourforehead but ensure you are supporting your low back by gently contracting your lower belly� Sit on a foldedblanket to elevate hips and make the forward fold more accessible�
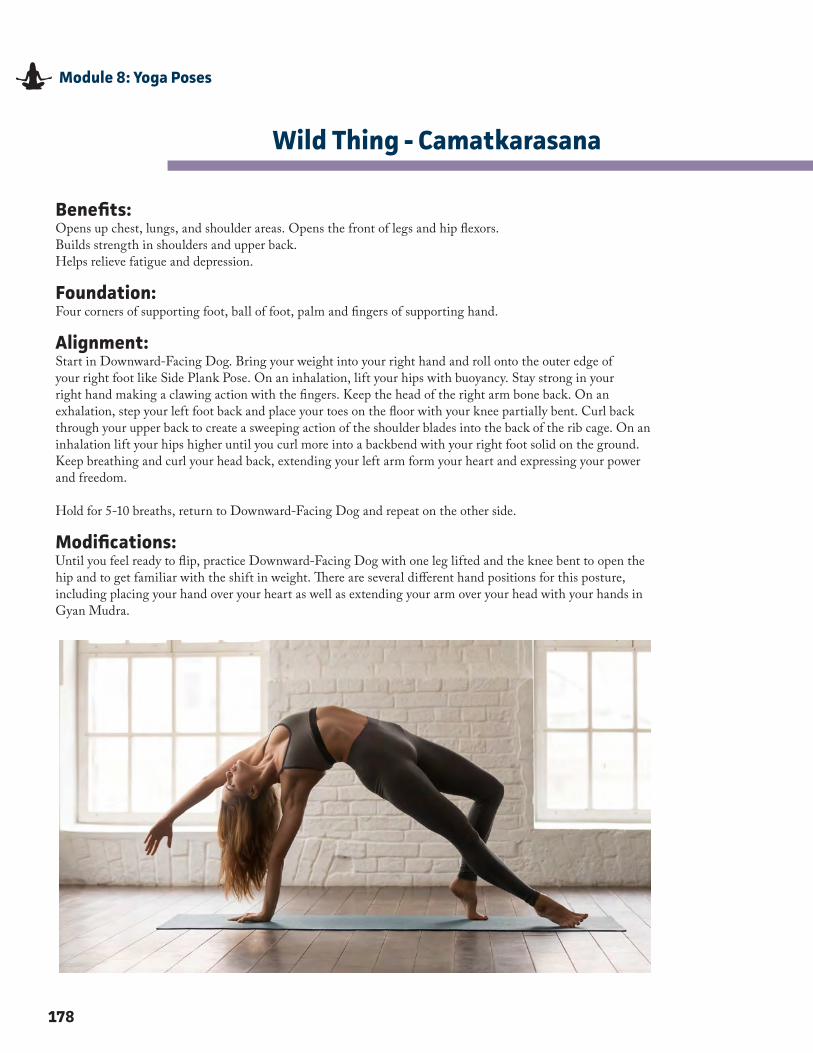
178
Module 8: Yoga Poses
Wild Thing - Camatkarasana
Benefits:Opens up chest, lungs, and shoulder areas� Opens the front of legs and hip flexors� Builds strength in shoulders and upper back� Helps relieve fatigue and depression�
Foundation:Four corners of supporting foot, ball of foot, palm and fingers of supporting hand�
Alignment:Start in Downward-Facing Dog� Bring your weight into your right hand and roll onto the outer edge of your right foot like Side Plank Pose� On an inhalation, lift your hips with buoyancy� Stay strong in your right hand making a clawing action with the fingers� Keep the head of the right arm bone back� On anexhalation, step your left foot back and place your toes on the floor with your knee partially bent� Curl backthrough your upper back to create a sweeping action of the shoulder blades into the back of the rib cage� On aninhalation lift your hips higher until you curl more into a backbend with your right foot solid on the ground�Keep breathing and curl your head back, extending your left arm form your heart and expressing your powerand freedom�
Hold for 5-10 breaths, return to Downward-Facing Dog and repeat on the other side�
Modifications:Until you feel ready to flip, practice Downward-Facing Dog with one leg lifted and the knee bent to open the hip and to get familiar with the shift in weight� There are several different hand positions for this posture,including placing your hand over your heart as well as extending your arm over your head with your hands inGyan Mudra�
Notes
179
Module 8: Yoga Poses
Notes

180
Glossary
Glossary
181
Certified Yoga Instructor
Ashtanga - an eight-fold path in Hatha yoga� � � � � � � � � � � � � � � � 3Ahimsa - literally means non-harming or injuring any creature or person
in any way� This yama asks the yogi to practice kindness and compassion in thought, word, and deed� On the mat, it means avoiding getting too deep into a pose or using negative self-talk when a challenging pose is experienced� � � � � � � � � � � 18
Ananda - developed during the 1960s by Kriyananda, provides a tool for spiritual growth while releasing unwanted tensions� 10
Anusara - founded in 1997 by John Friend, combines a strong emphasis on physical alignment with a positive philosophy expressing the intrinsic goodness of all beings� � � � � � � � � � � � � � � � � � � � 10
Aparigraha - meaning non-coveting� Aparigraha means to take only what is necessary, not taking advantage of a situation or acting greedy� If you take more, you are exploiting someone else, and that goes right back to ahimsa – non-harming� � � � � � � � � � � � � � � � � � � � 18
Ashtanga - meaning means “eight limbs” in Sanskrit; a fast-paced, intense yoga style with six established and strenuous pose sequences� � � � � � � � � � � � � � � � � � � � � � � � � � � � � � � � � � � � � � � 10
Asteya - meaning abhor theft� Steya means to steal, and asteya is the opposite – to take nothing that does not belong to us� 18
Bramacharya - meaning to sense control� In today’s interpretation, it is meant to have integrity in relationships, not using or manipulating others for one’s own gratification, but rather seeking the divine in one another and acting accordingly with mutual reverence and respect� � � � � � � � � � � � � � � � � � � � � � � � � � � � � � � � � � � � � 18
Bikram- Bikram Choudhury’s sequence of 26 poses, repeated twice in a sauna-like room� � � � � � � � � � � � � � � � � � � � � � � � � � � � � � � � � 12
Forrest - vigorous asana sequences to strengthen and purify the body, focusing on abdominals, inversions, and deep breathing; taught by Ana Forrest� � � � � � � � � � � � � � � � � � � � � � � � � � � � � � � � � � � � � 11
Hatha - one of the six original branches of yoga which encompasses nearly all types of modern yoga� � � � � � � � � � � � � � � � � � � � � � � � � � 11
Hot Yoga - yoga in a room of 95-100 degrees Fahrenheit, often a flowing, Vinyasa-style practice� � � � � � � � � � � � � � � � � � � � � � � � � � � � 11
Integral - a meditative form based on Sri Swami Satchidananda, seeks to improve the mind, body, and spirit, while using Hatha postures� � � � � � � � � � � � � � � � � � � � � � � � � � � � � � � � � � � � � � � � 11
Isvarapranidhana - the fifth niyama meaning to surrender to something greater than you� This is knowing that there is a divine presence and that you are part of it� � � � � � � � � � � � � � � � � � � � � � � � � � � � � 19
Iyengar - founded by B� K� S� Iyengar, a style using many props to practice positions; emphasizes holding poses over a long period � � � � � � � � � � � � � � � � � � � � � � � � � � � � � � � � � � � � � � � � � � � � � � � � � � � 11
A
B
F
H
I
182
Y
Yin - A quiet, meditative yoga practice, also called Taoist yoga� Developed by Paul Grilley to strengthen and lengthen the body’s connective tissue and joints� � � � � � � � � � � � � � � � � � � � � � � � � � � � � � � � � � � � � � � � � � � 12
Yamas - disciplines or restraints, and include the methods you use to interact with the world around you� � � � � � � � � � � � � � � � � � � � � � � � � 18
Yoga - to “yoke,” or join together� 2
Y
183
Certified Yoga Instructor
Jivamukti - meaning “a liberated soul,” this form was created by Sharon Gannon and David Life in 1984, it teaches Westerners about yoga’s spiritual elements� � � � � � � � � � � � � � � � � � � � � � � � � � � � � � � � � � � � � � � � 11
Kripalu - an inward self-paced yoga emphasing meditation, physical healing, and spiritual transformation� � � � � � � � � � � � � � � � � � � � � � � � � � 11
Kundalini - a fluid, constantly moving style with invigorating poses which help release the kundalini (serpent) energy in your body� � 11
Niyamas are the way we act in our relationship with ourselves� They are codes or rules that are followed for personal observance� 19
Prenatal - Yoga postures adapted for expectant mothers; tailored to help women in all stages of pregnancy, even those getting back in shape post-birth� � � � � � � � � � � � � � � � � � � � � � � � � � � � � � � � � � � � � � � � � � � 11
Restorative- a relaxing style which spends long periods of time in a pose and uses props to assist in passive streating and to move into the corrective tissues� � � � � � � � � � � � � � � � � � � � � � � � � � � � � � � � � � � � � � � � � � 11
Satya - meaning speaking the truth. All of the yamas follow the first yama of non-harming, so caution is advised when speaking a truth that could cause hurt or harm in some way. . . . . . . . .18
Samtosha - the second niyama meaning contentment. Being at peace with who you are and what you have is the essence of this niyama. . . . . . . . . 19
Sivananda- an unhurried style focusing on 12 basic asanas� It is a five- point philosophy that works together to form a healthy lifestyle� � � � � � � �12
Sauca - the first niyama meaning cleanliness. This involves being clean on the outside, but is really about being clean on the inside. This is accomplished by practicing the poses that purify and detoxify, as well as using meditation and pranayama to wash our minds of chaos. 19
Svadhyaya - the fourth niyama meaning the study of the self� Sva means self, and adhyaya means inquiry or examination� Through meditation and yoga asana, we learn more about ourselves� 19 Viniyoga- T�K�V� Krishnamacharya’s methodology of individualized practice where yogis apt poses and goals to their own needs and abilities� � � � � � � � � � � � � � � � � � � � � � 12
Tapas - the third niyama meaning fire. This refers to the discipline of a daily practice that results in toxins inside the body being burned away. It is the mental habit of routine. . . . . . . . . . . . . . . . . . . . . . . . . 19
Vinyasa/Power yoga- an athletic yoga style from the 1980s that stems from ashtanga and ranges vastly� It means breath-synchronized movement� � � � � � � � � � � � � � � � � � � � � � � � � � � � � � � � � � � � � � 12
J
K
NPRS
T
V
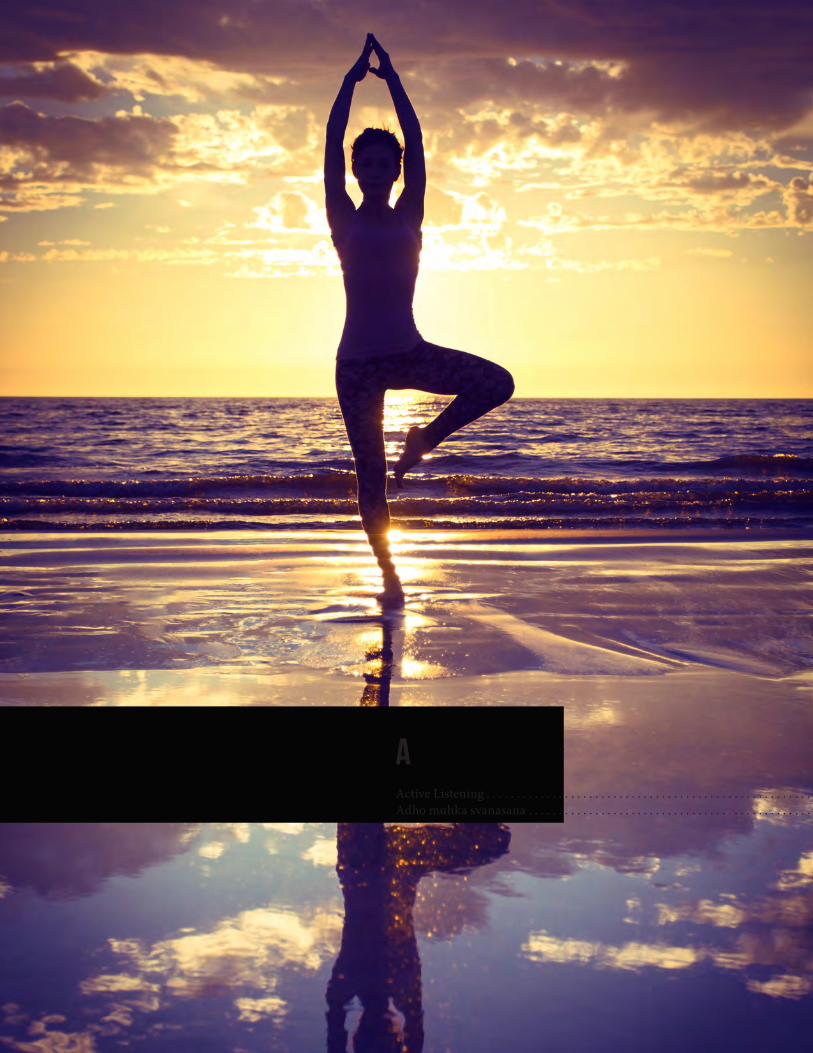
186
AActive Listening � � � � � � � � � � � � � � � � � � � � � � � � � � � � � � � � � � � � � � � � � � � � � � � � � � � � � � � � � � � � � � � � � � � � � � � � � � � � � � � � � � � � � � � � � � � �88Adho muhka svanasana � � � � � � � � � � � � � � � � � � � � � � � � � � � � � � � � � � � � � � � � � � � � � � � � � � � � � � � � � � � 44–46, 57, 63, 121, 131, 142, 154
187
Certified Yoga Instructor
Deep Lunge � � � � � � � � � � � � � � � � � � � � � � � � � � � � 35, 46, 120, 161Desikachar � � � � � � � � � � � � � � � � � � � � � � � � � 1, 8–9, 12, 18,21,76Dhanurasana � � � � � � � � � � � � � � � � � � � � � �46, 65, 109, 134–135Diaphragmatic breathing � � � � � � � � � � � � � � � � � � � � � � � � � � � 78diastus recti � � � � � � � � � � � � � � � � � � � � � � � � � � � � � � � � � � � � � � � 70Dual-peak class � � � � � � � � � � � � � � � � � � � � � � � � � � � � � � � � � � � 56
EEagle � � � � � � � � � � � � � � � � � � � � � � � � � � � � � � � � � � � � � � 45, 60, 122Easy Twist in Lunge � � � � � � � � � � � � � � � � � � � � � � � � � � � � 67, 125Edward T� Hall � � � � � � � � � � � � � � � � � � � � � � � � � � � � � � � � � � � � 89Eka Pada Adho Mukha Svanasana � � � � � � � � � � � � � � � 60, 154Eka Pada Utkatasana � � � � � � � � � � � � � � � � � � � � � � � � � � � 60, 153Empathic Listener � � � � � � � � � � � � � � � � � � � � � � � � � � � � � � � � � 88Extended Hand to Foot � � � � � � � � � � � � � � � � � � � � � � � � � � � � 126
FFirefly pose � � � � � � � � � � � � � � � � � � � � � � � � � � � � � � � � � � � 37, 127Firelog Pose � � � � � � � � � � � � � � � � � � � � � � � � � � � � � � � � � � � � � � 128Fish pose � � � � � � � � � � � � � � � � � � � � � � � � � � � � � � � � � � � � � 67, 129Flipped Dog � � � � � � � � � � � � � � � � � � � � � � � � � � � � � � � � � � � � � 130Forearm Stand � � � � � � � � � � � � � � � � � � � � � � � � � � � � � � � � � � � 131Forrest � � � � � � � � � � � � � � � � � � � � � � � � � � � � � � � � � � � � � � � � � � � 11Forward Fold � � � � � � � � � � � � � � � � � � � � � � � � � � � � � � � � � � � � � � �
32, 34, 41–42, 57, 59, 64, 66–67, 70, 137, 139, 177, 179Full Backbend � � � � � � � � � � � � � � � � � � � � � � � � � � � � � 65, 134–135
GGarudasana � � � � � � � � � � � � � � � � � � � � � � � � � � � � � � � � 45, 60, 122Gate � � � � � � � � � � � � � � � � � � � � � � � � � � � � � � � � � � � � � � � � � � � � 136Gorilla � � � � � � � � � � � � � � � � � � � � � � � � � � � � � � � � � � � � � � � � � � 137
HHalf Backbend � � � � � � � � � � � � � � � � � � � � � � � � � � � � � � � � � � � 138Half Forward Fold � � � � � � � � � � � � � � � � � � � � � � � � � � � � � 60, 139Half Moon � � � � � � � � � � � � � � � � � � � � � � � 37, 41, 44, 60, 141, 158Handstand � � � � � � � � � � � � � � � � � � � � � � � � � � � � � � � � � � � � � � � 142Hatha � � � � � � � � � � � � � � � � � � � � � � � � � � � 2–3, 6–7, 9–11, 56, 103Hatha yoga � � � � � � � � � � � � � � � � � � � � � � 2–3, 6–7, 9–11, 56, 103Headstand � � � � � � � � � � � � � � � � � � � � � � � � � � � � � � � � � 67–68, 143Head Stand � � � � � � � � � � � � � � � � � � � � � � � � � � � � � � � � � � � � � � 143Head to Knee Pose � � � � � � � � � � � � � � � � � � � � � � � � � � � � � 34, 144
Adho Mukha Vrksasana � � � � � � � � � � � � � � � � � � � � � � � � � � 142Agnistambhasana � � � � � � � � � � � � � � � � � � � � � � � � � � � � � � � 128Alternative Locations � � � � � � � � � � � � � � � � � � � � � � � � � � � � 100alveoli � � � � � � � � � � � � � � � � � � � � � � � � � � � � � � � � � � � � � 49, 76, 78American yoga � � � � � � � � � � � � � � � � � � � � � � � � � � � � � � � � � �7–10Ananda � � � � � � � � � � � � � � � � � � � � � � � � � � � � � � � � � � � � �7, 20, 10Anjali Mudra � � � � � � � � � � � � � � � � � � � � � � 42, 45, 57, 124, 167Anjanyasana � � � � � � � � � � � � � � � � � � � � � � � � � � 35, 46, 120, 161Anne Cushman � � � � � � � � � � � � � � � � � � � � � � � � � � � � � � � � �9, 15Anusara � � � � � � � � � � � � � � � � � � � � � � � � � � � � � � � 10, 96–97, 103Ardha Chandrasana � � � � � � � � � � � � � � � � 37, 44, 60, 141, 158Ardha Uttanasana� � � � � � � � � � � � � � � � � � � � � � � � � � 57, 60,139Articulation � � � � � � � � � � � � � � � � � � � � � � � � � � � � 7, 90–91, 103Ashtanga � � � � � � � � � � � � � � � � � � 3, 6–7, 10, 12 –14 17, 56, 103Assisted Living: � � � � � � � � � � � � � � � � � � � � � � � � � � � � � � � � � 100
BBaddha Konasana � � � � � � � � � � � � � � � � � � � � � � � � � � � � �37, 115Bakasana � � � � � � � � � � � � � � � � � � � � � � � � � � � � � �37, 45, 119, 127Balasana � � � � � � � � � � � � � � � � � � � � � � � � � � � � � � � 66–67, 69, 114belly breathing � � � � � � � � � � � � � � � � � � � � � � � � � � � � � � � � � � � �78Benefits of yoga � � � � � � � � � � � � � � � � � � � � � � � � � � � � � � � � � 4, 72Bhakti yoga � � � � � � � � � � � � � � � � � � � � � � � � � � � � � � � � � � � 3, 5–6Bhastrika � � � � � � � � � � � � � � � � � � � � � � � � � � � � � � � � � � � � � � � � 83Bhujangasana � � � � � � � � � � � � � � � � � � � � � � � � � � � � � �46, 57, 116Bikram � � � � � � � � � � � � � � � � � � � � � � � � � � � � � � 7, 12, 14, 56, 103Boat � � � � � � � � � � � � � � � � � � � � � � � � � � � � � � � � � � � � � � � � � � � 107Body Language � � � � � � � � � � � � � � � � � � � � � � � � � � � � � � � � � � � 89Bound Warrior Pose � � � � � � � � � � � � � � � � � � � � � � � � � � � � � 108Bow Pose � � � � � � � � � � � � � � � � � � � � � � � � � � � � � � � � � � � � � � � 109Breath � � � � � � � � � � � � � � � � � � � 2, 12, 17–21, 29, 40, 49, 56–57,
63, 69, 76, 78–83, 109, 114, 116 126 129–131, 133, 139–140, 142–144, 148, 156, 167, 169, 179
CCamel Pose � � � � � � � � � � � � � � � � � � � � � � � � � � � � � � � � � � � � � �115Candles � � � � � � � � � � � � � � � � � � � � � � � � � � � � � � � � � � � � � � � � � 87certification � � � � � � � � � � � � � � � � � � � � � � � � � � � � � � � � � � � � � � � �9Chair � � � � � � � 35, 57, 60, 70, 73, 113, 126, 147, 153–154, 176Chaturanga Dandasana � � � � � � � � � � � 37, 45, 57, 63, 70, 155Child’s pose � � � � � � � � � � � � � � � � � � � � � � � � � � � � 66–67, 69, 114Classical Yoga � � � � � � � � � � � � � � � � � � � � � � � � � � � � � � � � �3, 5, 11Cobra � � � � � � � � � � � � � � � � � � � � � � � � � � � � � � � � � 57, 116, 46, 57Community Center � � � � � � � � � � � � � � � � � � � � � � � � � � � 99–100Corpse pose � � � � � � � � � � � � � � � � � � � � � � � � � � � � 12, 60, 68, 117Crane � � � � � � � � � � � � � � � � � � � � � � � � � � � � � � � � � � � � � � � � � � �119
D
188
Health Clubs � � � � � � � � � � � � � � � � � � � � � � � � � � � � � � � � � � � � 87, 99Heron Pose � � � � � � � � � � � � � � � � � � � � � � � � � � � � � � � � � � � � � � � 146Horse � � � � � � � � � � � � � � � � � � � � � � � � � � � � � � � � � � � � � � � � � 60, 170Hot Yoga � � � � � � � � � � � � � � � � � � � � � � � � � � � � � � � � � � � � � � � � � � 11Humor � � � � � � � � � � � � � � � � � � � � � � � � � � � � � � � � � � � � � � � � � 10, 94
Iinferior vena cava � � � � � � � � � � � � � � � � � � � � � � � � � � � � � � � � � � � 70Informal Classes � � � � � � � � � � � � � � � � � � � � � � � � � � � � � � � � � � � � 99ingle-peak class � � � � � � � � � � � � � � � � � � � � � � � � � � � � � � � � � � � � 56Integral � � � � � � � � � � � � � � � � � � � � � � � � � � � � � � � � � � � � � � � � � 8, 11Iyengar � � � � � � � � � � � � � � � � � � � � � � � � � � � � � � � � 7–11, 14, 19, 103
JJanu Sirsasana � � � � � � � � � � � � � � � � � � � � � � � � � � � � � � � � � � � � � 144Jivamukti � � � � � � � � � � � � � � � � � � � � � � � � � � � � � � � � � � � � � � � � 8, 11Jnana yoga � � � � � � � � � � � � � � � � � � � � � � � � � � � � � � � � � � � � � � 3, 5–6John Friend � � � � � � � � � � � � � � � � � � � � � � � � � � � � � � � � � � � � � 10, 90John Grinder � � � � � � � � � � � � � � � � � � � � � � � � � � � � � � � � � � � � � � � 92
KKapalabhati � � � � � � � � � � � � � � � � � � � � � � � � � � � � � � � � � � � � � 82–83King Dancer � � � � � � � � � � � � � � � � � � � � � � � � � � � � � � � � � � � � � � 147Kripalu � � � � � � � � � � � � � � � � � � � � � � � � � � � � � � � � � � � � � � � � � � � � 11Kumbhaka � � � � � � � � � � � � � � � � � � � � � � � � � � � � � � � � � � � � � � 80–84Kundalini � � � � � � � � � � � � � � � � � � � � � � � � � � � � � � � � � � 11, 41, 103
LLiability Insurance � � � � � � � � � � � � � � � � � � � � � � � � � � � � � � � � � 100Liability waivers� � � � � � � � � � � � � � � � � � � � � � � � � � � � � � � � � � � 101Linguistics � � � � � � � � � � � � � � � � � � � � � � � � � � � � � � � � � � � � � � � � � 93Linking � � � � � � � � � � � � � � � � � � � � � � � � � � � � � � � � � � � � � � � � � � � 93Listening Skills � � � � � � � � � � � � � � � � � � � � � � � � � � � � � � � � � � � � � 88Listening with Openness � � � � � � � � � � � � � � � � � � � � � � � � � � � � 88Locust Pose � � � � � � � � � � � � � � � � � � � � � � � � � � � � � � � � � � � � 65, 149Lotus Pose � � � � � � � � � � � � � � � � � � � � � � � � � � � � � � � � 129, 140, 150Lunge � � � � � � � � � � � � � � � � � � � � � � � � � �35, 92, 120, 125, 151, 160Lying Leg Extension � � � � � � � � � � � � � � � � � � � � � � � � � � � � � � � � 66Lying Twist � � � � � � � � � � � � � � � � � � � � � � � � � � � � � � � � � � � � 64, 152Lying Twist with Legs in Eagle � � � � � � � � � � � � � � � � � � � � � � 152
MManipura � � � � � � � � � � � � � � � � � � � � � � � � � � � � � � � � � � � � � � 26, 64Marichyasana � � � � � � � � � � � � � � � � � � � � � � � � � � � � � 64, 162, 188Marketing � � � � � � � � � � � � � � � � � � � � � � � � � � � � � � � � � � � � 99–100Matsyasana � � � � � � � � � � � � � � � � � � � � � � � � � � � � � � � � � � � 67, 129Matsyasana hands � � � � � � � � � � � � � � � � � � � � � � � � � � � � � � � � 129Mirrors � � � � � � � � � � � � � � � � � � � � � � � � � � � � � � � � � � � � � � � � � � 87Modern Yoga � � � � � � � � � � � � � � � � � � � � � � � � � � � � � � � � � � 11, 13Multiple-peak class � � � � � � � � � � � � � � � � � � � � � � � � � � � � � � � � 56music � � � � � � � � � � � � � � � � � � � � � � � � � � � � � � � � � � � � � � � 7, 87, 91
NNadhi Shodhana Pranayama � � � � � � � � � � � � � � � � � � � � � � � � 84Natajarasana � � � � � � � � � � � � � � � � � � � � � � � � � � � � � � � � � � 42, 147Navasana � � � � � � � � � � � � � � � � � � � � � � � � � � � � � � � � � � � � � 37, 107Neurolinguistic Programming � � � � � � � � � � � � � � � � � � � � � � 92New Millennium Yoga � � � � � � � � � � � � � � � � � � � � � � � � � � � � � � 8
Oobblers Pose � � � � � � � � � � � � � � � � � � � � � � � � � � � � � � � � � � 37, 115One Leg Down Dog � � � � � � � � � � � � � � � � � � � � � � � � � � � � � � � 154One legged chair � � � � � � � � � � � � � � � � � � � � � � � � � � � � � � 60, 153
PPadangusthasana � � � � � � � � � � � � � � � � � � � � � � � � � � � � � � � � � � 66Padmasana � � � � � � � � � � � � � � � � � � � � � � � � � � � � � � � 37, 140, 150Paralanguage � � � � � � � � � � � � � � � � � � � � � � � � � � � � � � � � � � 89–90Paramahansa Yogananda � � � � � � � � � � � � � � � � � � � � � � � � � 7, 10Parighasana � � � � � � � � � � � � � � � � � � � � � � � � � � � � � � � � � � � � � � 136Parivrtta Anjanyasana � � � � � � � � � � � � � � � � � � � � � � � � � � � � 161Parivrtta Ardha Chandrasana � � � � � � � � � � � � � � � � � � � � � � 158Parivrtta Parsvakonasana � � � � � � � � � � � � � � � � � � � � � � 125, 160Parivrtta Trikonasana � � � � � � � � � � � � � � � � � � � � � � � � � � 62, 159Parsvakonasana � � � � � � � � � � � � � � � � �45, 60, 91, 125, 160, 164Parsvottanasana � � � � � � � � � � � � � � � � � � � � � � � � � � � � 62, 91, 156Paschimotodasana � � � � � � � � � � � � � � � � � � � � � � � � � � � � � � � � � 70Paschimottanasana � � � � � � � � � � � � � � � � � � � � � � � � � � � � � � � 133peak(s) � � � � � � � � � � � � � � � � � � � � � � � � � � � � � � � � � � � � � � � � � � � 56Pincha Mayurasana � � � � � � � � � � � � � � � � � � � � � � � � � � � � � � � 131Pitch � � � � � � � � � � � � � � � � � � � � � � � � � � � � � � � � � � � � � � � � � � 89–91Plank � � � � � � � � � � � � � � � � � � � � � � � � � � � � � �17 57, 155, 165, 180Positive Cueing � � � � � � � � � � � � � � � � � � � � � � � � � � � � � � � � � � � � 93Post Post-Classical Yoga � � � � � � � � � � � � � � � � � � � � � � � � � � � � � 6Power yoga � � � � � � � � � � � � � � � � � � � � � � � � � � � � � � � � � � 8, 12–14Prana � � � � � � � � � � � � � � � � � � � � � � � � � � � � � � � 29, 49, 76, 80, 150
189
Certified Yoga Instructor
pranayama � � � � � � � � � 1, 7, 10–11, 17, 19,29, 56, 75–84, 91, 103Prasarita Padottanasana � � � � � � � � � � � � � � � � � � � � � � � � � 60, 177Pre-Classical Yoga � � � � � � � � � � � � � � � � � � � � � � � � � � � � � � � � � � � 5Prem Prakash � � � � � � � � � � � � � � � � � � � � � � � � � � � � � � � � � � � � � � 10Prenatal � � � � � � � � � � � � � � � � � � � � � � � � � � � � � � � � � � � � � 11, 70, 72Private Clients � � � � � � � � � � � � � � � � � � � � � � � � � � � � � � � � � � � � � 99Professional Settings and Corporations � � � � � � � � � � � � � � � 100Props � � � � � � � � � � � � � � � � � � � � � � � � �11, 14, 68–69, 87, 105, 129Purvottanasana � � � � � � � � � � � � � � � � � � � � � � � � � � � � � � � � � � � 123Pyramid � � � � � � � � � � � � � � � � � � � � � � � � � � � � � � � � � � � � � � � � � � 156
RRainer Martens� � � � � � � � � � � � � � � � � � � � � � � � � � � � � � � � � � � � � 88Raja yoga � � � � � � � � � � � � � � � � � � � � � � � � � � � � � � � � � � � � � � � � � 3, 5Rapport � � � � � � � � � � � � � � � � � � � � � � � � � � � � � � � � � � � � � � � � � � � 92Recent Yoga � � � � � � � � � � � � � � � � � � � � � � � � � � � � � � � � � � � � � � � � � 7relaxin � � � � � � � � � � � � � � � � � � � � � � � � � � � � � � � � � � � � � � � � � � � � 70Resonance � � � � � � � � � � � � � � � � � � � � � � � � � � � � � � � � � � � � � � � � � 90Resorts and Cruise Lines � � � � � � � � � � � � � � � � � � � � � � � � � � � 100Restorative � � � � � � � � � � � � � � � � � � � � � � � � � 11, 103, 115, 138, 140Reverse Warrior � � � � � � � � � � � � � � � � � � � � � � � � � � � � � � � � 60, 157Revolved Half Moon � � � � � � � � � � � � � � � � � � � � � � � � � � � � � � � 158Revolved Triangle � � � � � � � � � � � � � � � � � � � � � � � � � � � � � � � � � 159Revolved Twist � � � � � � � � � � � � � � � � � � � � � � � � � � � � � � � � 160, 161Revolved Twist on Knee � � � � � � � � � � � � � � � � � � � � � � � � � � � � 161Richard Bandler � � � � � � � � � � � � � � � � � � � � � � � � � � � � � � � � � � � � 92Room Setup � � � � � � � � � � � � � � � � � � � � � � � � � � � � � � � � � � � � � � � � 87
SSalabhasana � � � � � � � � � � � � � � � � � � � � � � � � � � � � � � � � �42, 65, 149Salamba Sarvangasana � � � � � � � � � � � � � � � � � � � � � � � � � � � � � � 67Sanskrit � � � � � � 3, 5–7, 10–11, 21, 29, 73, 76, 79–82, 92, 94–95Sarvangasana � � � � � � � � � � � � � � � � � � � � � � � � � � � � � � � 65, 67, 163 Savasana � � � � � � 12, 43, 56, 59–60, 67–68, 70–71, 81–84, 115Seated Twist � � � � � � � � � � � � � � � � � � � � � � � � � � � � � � � � � � � 64, 162Setu Bhandasana � � � � � � � � � � � � � � � � � � � � � � � � � � � � � � � � � � 138Shoulderstand � � � � � � � � � � � � � � � � � � � � � � � � � � � � � � � � � � 67, 163Side Angle � � � � � � � � � � � � � � � � � � � � � � � � � � � � � � � � � � � � � 60, 164Side Plank � � � � � � � � � � � � � � � � � � � � � � � � � � � � � � � � � � � � 165, 180Single-peak class � � � � � � � � � � � � � � � � � � � � � � � � � � � � � � � � � � � 56Sirsasana � � � � � � � � � � � � � � � � � � � � � � � � � � � � � � � � � � 67, 143–144Sivananda � � � � � � � � � � � � � � � � � � � � � � � � � � � � � � � � � � � � � � � � � 12Squat � � � � � � � � � � � � � � � � � � � � � � � � � � � � � � � � � � � � � � � � � � � � � 193Staff pose � � � � � � � � � � � � � � � � � � � � �57, 63, 70, 90, 115, 123, 133Standing Split � � � � � � � � � � � � � � � � � � � � � � � � � � � � � � � � � � � � � 168Substitute Teaching � � � � � � � � � � � � � � � � � � � � � � � � � � � � � � � � � 99Sukhasana � � � � � � � � � � � � � � � � � � � � � � � � � � � � � � � � � � � � � � � � 124Supta Matsyendrasana � � � � � � � � � � � � � � � � � � � � � � � � � � 64, 152Supta Padangusthasana � � � � � � � � � � � � � � � � � � � � � � � � � � � � � 66
TTeaching Independently � � � � � � � � � � � � � � � � � � � � � � � � � � � � � 99Temple � � � � � � � � � � � � � � � � � � � � � � � � � � � � � � � � � � � � � � � � � 6, 170Tempo � � � � � � � � � � � � � � � � � � � � � � � � � � � � � � � � � � � � � � 87, 90–91Tittibhasana � � � � � � � � � � � � � � � � � � � � � � � � � � � � � � � � � � � 37, 127Towel � � � � � � � � � � � � � � � � � � � � � � � � � � � � � � � � � � � � � 14, 114, 179Tree � � � � � � � � � � � � � � � � � � � � � � � � � � � � � � � �6, 13, 33, 60, 63, 171Triangle � � � � � � � � � � � � � � � � � � � � � � � � � 35, 60–61, 93, 159, 172Trikonasana � � � � � � � � � � � � � � � � � � � � � 35, 60–61, 93, 159, 172
UUjjayi � � � � � � � � � � � � � � � � � � � � � � � � � � � � � � � � 19, 56, 79–84, 91Upavistha Konasana � � � � � � � � � � � � � � � � � � � � � � � � � � � � � � � 179Up Dog� � � � � � � � � � � � � � � � � � � � � � � � � � � � � � � � � � � � � � � � 57, 173Urdhva Dhanurasana � � � � � � � � � � � � � � � � � � � � � � �65, 134–135Urdhva Mukha Svanasana � � � � � � � � � � � � � � � � � � � � � � � 57, 173Urdhva Prasarita Eka Padasana � � � � � � � � � � � � � � � � � � � � � 168Ustrasana � � � � � � � � � � � � � � � � � � � � � � � � � � � � � � � � � � � � � � 65, 111Utkatasana � � � � � � � � � � � � � � � � � � � � � � � � � � � � � 57, 60, 113, 153UtthitaHasta Padangustasana � � � � � � � � � � � � � � � � � � � � � � � 126
VVasisthasana � � � � � � � � � � � � � � � � � � � � � � � � � � � � � � � � � � 165, 180Vatayanasana � � � � � � � � � � � � � � � � � � � � � � � � � � � � � � � � � � 60, 170Vedic Yoga � � � � � � � � � � � � � � � � � � � � � � � � � � � � � � � � � � � � � � � � � � 5Vendanta � � � � � � � � � � � � � � � � � � � � � � � � � � � � � � � � � � � � � � � � � � � 6Viloma � � � � � � � � � � � � � � � � � � � � � � � � � � � � � � � � � � � � � � � � � � � � 81Viniyoga � � � � � � � � � � � � � � � � � � � � � � � � � � � � � � � � � � � � � � � � 8, 12Vinyasa � � � � � � � � � � � � � � � � � � � � � � � � � � � � 7, 11–13, 69, 73, 103Viparita Karini � � � � � � � � � � � � � � � � � � � � � � � � � � � � � � � � � �67–68Virabhadrasana 2 � � � � � � � � � � � � � � � � � � � � � � � � � � � � 46, 57, 175Virabhadrasana 3 � � � � � � � � � � � � � � � � � � � � � � � � � � � � 46, 57, 176Virabhadrasana I � � � � � � � � � � � � � � � � � � � � � � � � � � � � � � � � � � � 57Virabhadrasnana 1 � � � � � � � � � � � � � � � � � � � � � � � � � � � � � � � � � 67Voice volume� � � � � � � � � � � � � � � � � � � � � � � � � � � � � � � � � � � � � � � 91Vrksasana � � � � � � � � � � � � � � � � � � � � � � � � � � � 33, 37, 60, 142, 171
WWarrior 1 � � � � � � � � � � � � � � � � � � � � � � � � � � � � � � � � 32, 57, 67, 174Warrior 2 � � � � � � � � � � � � � � � � � � � � � � � � � � � � � � � � � � � � � � � � � 175Warrior 3 � � � � � � � � � � � � � � � � � � � � � � � � � � � � � � � � � � � � � � � � � 176Warrior One � � � � � � � � � � � � � � � � � � � � � � � � � � � � � � � � � � � � � � � 67Western Yoga � � � � � � � � � � � � � � � � � � � � � � � � � � � � � � � � � � � � � � � 9Wide Angle Forward Fold � � � � � � � � � � � � � � � � � � � � � � 177, 179
190
YYin � � � � � � � � � � � � � � � � � � � � � � � � � � � � � � � � � � � � � � � � �12, 25–28Yoga Alliance � � � � � � � � � � � � � � � � � � � � � � � � � � � � � � � � � � � 9, 105Yoga Studios � � � � � � � � � � � � � � � � � � � � � � � � � � � � � � � � � � � � 14, 99