
cerberusmanual
141
Cerberus Helpdesk Handbook Cerberus Helpdesk™ Handbook Current Helpdesk Version: 2.4.0 (during this manual revision) Ben Halsted, Parser Lead Programmer <[email protected]> Jeff Standen, Project Manager / GUI Lead Programmer <[email protected]> Trent Ramseyer, Developer <[email protected]> Darren Sugita, Q/A Tester / Manual Revision <[email protected]> Jerry Kanoholani, Developer <[email protected]> Copyright © 2003, 2004 WebGroup Media, LLC.™ Table of Contents Overview 1. Cerberus Helpdesk™ 1.1. What is Cerberus Helpdesk? 1.2. How Cerberus Helpdesk Works 1.2.1. Brief Explanation 1.2.2. Technical Explanation 1.3. Components and Requirements 1.3.1. Parser 1.3.2. GUI 1.3.3. Database 1.3.4. Public-user Tools 2. Installation 2.1. Downloading the Cerberus Helpdesk Install Files 2.1.1. Downloading the Database Install Script 2.1.2. Downloading the GUI Files 2.1.3. Downloading the Parser Files 2.2. Setting up the Database 2.2.1. Using phpMyAdmin 2.2.2. Using the MySQL Console 2.3. Setting up the GUI 2.4. Setting up the Database http://www.cerberusweb.com/manual/ (1 of 5) [7/21/2004 5:58:57 PM]
-
Upload
api-3764104 -
Category
Documents
-
view
805 -
download
2
Transcript of cerberusmanual

Cerberus Helpdesk Handbook
Cerberus Helpdesk™ Handbook
Current Helpdesk Version: 2.4.0 (during this manual revision)
Ben Halsted, Parser Lead Programmer <[email protected]>Jeff Standen, Project Manager / GUI Lead Programmer <[email protected]>Trent Ramseyer, Developer <[email protected]>Darren Sugita, Q/A Tester / Manual Revision <[email protected]>Jerry Kanoholani, Developer <[email protected]>
Copyright © 2003, 2004 WebGroup Media, LLC.™
Table of ContentsOverview1. Cerberus Helpdesk™
1.1. What is Cerberus Helpdesk?1.2. How Cerberus Helpdesk Works
1.2.1. Brief Explanation1.2.2. Technical Explanation
1.3. Components and Requirements1.3.1. Parser1.3.2. GUI1.3.3. Database1.3.4. Public-user Tools
2. Installation2.1. Downloading the Cerberus Helpdesk Install Files
2.1.1. Downloading the Database Install Script2.1.2. Downloading the GUI Files2.1.3. Downloading the Parser Files
2.2. Setting up the Database2.2.1. Using phpMyAdmin2.2.2. Using the MySQL Console
2.3. Setting up the GUI2.4. Setting up the Database
http://www.cerberusweb.com/manual/ (1 of 5) [7/21/2004 5:58:57 PM]

Cerberus Helpdesk Handbook
2.5. Setting up the E-mail parser2.5.1. Parser Syntax2.5.2. Configuring the Parser with config.xml2.5.3. Using POP32.5.4. Using E-mail Piping
2.6. Installing the Support Center/Public Interface2.6.1. Installing the Support Center2.6.2. Running in Standalone2.6.3. Embedding the Support Center in Your Website2.6.4. Customizing the Support Center
2.7. Some Reminders3. Administrators Manual
3.1. Logging Into the GUI3.1.1. Lost your password?
3.2. First view of the Support-GUI3.3. Configuration - The Area 51 of Cerberus
3.3.1. Main Page3.3.2. Product Options3.3.3. Parser Config3.3.4. Custom Fields3.3.5. Service Level Agreement (SLA)3.3.6. Public Tools3.3.7. Queues3.3.8. Users3.3.9. Search Indexes3.3.10. Knowledgebase3.3.11. Branding3.3.12. Maintenance3.3.13. E-mail Addresses3.3.14. Development
3.4. Contacts3.4.1. Adding a Company3.4.2. Adding a Contact
3.5. Reports3.5.1. Agent Login Report3.5.2. Agent Performance Report3.5.3. Agent Summary Report3.5.4. Agent Ticket Assignment Report
http://www.cerberusweb.com/manual/ (2 of 5) [7/21/2004 5:58:57 PM]

Cerberus Helpdesk Handbook
3.5.5. Average Initial Handle Time Report3.5.6. Average Response Time Report3.5.7. Average Total Handle Time Report3.5.8. Group Assignment Overview3.5.9. Group Summary Report3.5.10. Queue Summary Report3.5.11. Service Level Report3.5.12. Total Tickets Offered per Queue
4. User/Technician Manual (support, staff, etc)4.1. The Basics
4.1.1. Logging in4.1.2. Overview of the GUI
4.2. Getting Your Feet Wet4.2.1. Quick Jumps and more!4.2.2. Links, just not on the golf course.4.2.3. System Overview4.2.4. Main Ticket View
4.3. Diving in (Ticket views)4.3.1. The Main Ticket View4.3.2. Ticket Functions
4.4. Driving Cerberus - (AKA The Dashboard)4.4.1. My Cerberus4.4.2. Preferences4.4.3. Notifications4.4.4. Quick Assign / Watcher4.4.5. Projects / Tasks4.4.6. Private Messages
4.5. Anti-Spam4.6. Knowledgebase Articles
4.6.1. Searching and Listing Articles4.6.2. Creating a New Article4.6.3. Commenting on Knowledgebase Articles
5. Support Center/Public Interface5.1. My Account5.2. Browse Knowledgebase5.3. Open a Ticket5.4. Track Open Ticket5.5. Ask a Question
http://www.cerberusweb.com/manual/ (3 of 5) [7/21/2004 5:58:57 PM]

Cerberus Helpdesk Handbook
5.6. Registering an Account6. Other Cerberus Helpdesk Related Resources
6.1. Forums6.2. Change Logs
2.4.02.3.2 RC42.3.12.3.0
7. FAQ - Frequently Asked Questions7.1. What are the different status types and what do they mean?
7.1.1. New7.1.2. Responded7.1.3. In Progress7.1.4. Info Needed7.1.5. Acceptance7.1.6. On Hold7.1.7. Escalated7.1.8. Fixed7.1.9. Reopened7.1.10. Resolved7.1.11. Dead
7.2. Why do the colors of a status change from red to black or black to red?7.3. What does batching a ticket do? Merging? Cloning?
Glossary
List of Figures1. The Cerberus Helpdesk web-based interface1-1. Customer e-mail to helpdesk1-2. The Cerberus Helpdesk parser is located on your mail/web servers1-3. The Cerberus Helpdesk Graphical User Interface (GUI)1-4. The customer receives their response from the helpdesk2-1. Upgrade.php Install List3-1. Login Screen3-2. First View of Home Page3-3. Configuration Screen3-4. Product Options3-5. Global Settings3-6. Product Options3-7. Ticket Settings
http://www.cerberusweb.com/manual/ (4 of 5) [7/21/2004 5:58:57 PM]

Cerberus Helpdesk Handbook
3-8. Search Index Settings3-9. Parser Settings3-10. xSP Master GUI Settings3-11. Knowledgebase Settings3-12. Viewing the 1.x Product Key
Next Overview
http://www.cerberusweb.com/manual/ (5 of 5) [7/21/2004 5:58:57 PM]

Overview
Cerberus Helpdesk™ Handbook: Current Helpdesk Version: 2.4.0 (during this manual revision)Prev Next
OverviewFigure 1. The Cerberus Helpdesk web-based interface
There is a variety of e-mail based interaction present in business today. This e-mail interaction exists more commonly (and in greater volume) in Internet-based companies, but can be present at any level in any business. E-mail communication as a customer support medium has several advantages over telephone conversations or written correspondence. First, e-mail is sent and received near instantaneously between any two points on Earth that have access to the Internet - and unlike the telephone or post office,
http://www.cerberusweb.com/manual/overview.html (1 of 2) [7/21/2004 5:58:59 PM]

Overview
you don't pay for the privilege (just the Internet access). Secondly, it is inherently simple to keep and review a log of previous e-mail conversions - this is not space-efficient with written correspondence, nor is it possible in telephone conversations without outrageously costly equipment out of reach to the majority of businesses.
As most support departments know, efficiently organizing solutions to previous problems is critical to the swiftness and success of your company's customer service. No company wants to pay five people to solve the same problem five different times.
Cerberus Helpdesk provides enterprise-level e-mail management with a web-based interface that is both visually and functionally optimized for extensive daily use. By indexing e-mail correspondence in a database, an accumulation of past support experience is at your staff's fingertips in whatever format you need.
Prev Home NextCerberus Helpdesk™ Handbook Cerberus Helpdesk™
http://www.cerberusweb.com/manual/overview.html (2 of 2) [7/21/2004 5:58:59 PM]

Cerberus Helpdesk
Cerberus Helpdesk™ Handbook: Current Helpdesk Version: 2.4.0 (during this manual revision)Prev Next
Chapter 1. Cerberus Helpdesk™
1.1. What is Cerberus Helpdesk?Cerberus Helpdesk provides enterprise-level e-mail management with a web-based interface that is both visually and functionally optimized for extensive daily use. By indexing e-mail correspondence in a database, an accumulation of past support experience is at your staff's fingertips in whatever format you need.
Here are several of the benefits of Cerberus over traditional e-mail:
● Tracking all communication with your customers in a single location. No more digging for past responses from your customers or staff in your personal e-mail client. No more quoting an entire conversation in every response, or forwarding replies to a dozen people just to keep everyone in the loop on an issue. The Cerberus e-mail parser acts as a proxy, making sure all new responses from your customers are directed back to the support system rather than directly to individual support team members.
● A new staff member can immediately pick up where another left off and be fully up-to-date on any given issue with information provided by the system. An audit log of past ticket actions and ticket correspondence history is available on all tickets. Know instantly what has been done and what needs to be done next.
● The ability to quickly search for past or present tickets based on common criteria, such as: sender, subject, status, queue, content, date-range, custom fields & more.
● You can store your own custom data and information with individual ticket or requestor (e-mail sender) records. No more mental or scribbled notes in various places -- your whole team will have access to this critical information for use in quickly responding to a customer in a personalized manner.
● Providing a uniform corporate image and brand(s) to your existing and potential customers. All the helpdesk tools can be branded with your company logo(s) and blend together to provide a support experience that keeps the focus on your company.
http://www.cerberusweb.com/manual/about.cerberus.html (1 of 2) [7/21/2004 5:58:59 PM]

Cerberus Helpdesk
Prev Home NextOverview How Cerberus Helpdesk Works
http://www.cerberusweb.com/manual/about.cerberus.html (2 of 2) [7/21/2004 5:58:59 PM]

How Cerberus Helpdesk Works
Cerberus Helpdesk™ Handbook: Current Helpdesk Version: 2.4.0 (during this manual revision)Prev Chapter 1. Cerberus Helpdesk™ Next
1.2. How Cerberus Helpdesk WorksTwo explanations are provided for how the system works -- brief and technical:
1.2.1. Brief Explanation
Step 1: Customer Sends an E-mail
The e-mail support process in Cerberus Helpdesk begins with an existing or potential customer sending an e-mail message to one of your company's contact addresses. The content of this e-mail would be redirected from your company mail server to the Cerberus Helpdesk parser.
Figure 1-1. Customer e-mail to helpdesk
Step 2: A Ticket is Created
The parser scans and compares components of the e-mail to the database to determine the proper course of action. Once the destination of an e-mail message is determined by pre-defined rules, the e-mail message is split into several parts and is stored in the database. At this time the message is considered "queued".
If this is a new ticket, the customer is sent an auto-response that their message has been received and they are assigned a ticket number for referencing the issue later. Ticket numbers allow you to bring up all
http://www.cerberusweb.com/manual/how.it.works.html (1 of 4) [7/21/2004 5:59:01 PM]

How Cerberus Helpdesk Works
previous notes and correspondence regarding an open issue, while saving your customer from the hassle of repeatedly having to explain their problem (or question) to multiple members of your support department. As well, this system allows for "escalation" when one of your support staff members needs to "pass" a ticket to another member with more experience in subjects the ticket may involve.
After a ticket is queued and the customer has been informed their ticket has been created, Cerberus Helpdesk will notify your customer support staff of the new ticket. This is done using the notification methods selected in the configuration of the product.
Figure 1-2. The Cerberus Helpdesk parser is located on your mail/web servers
Step 3: Staff Reviews Ticket & Replies to Customer
Once an available staff member reviews the new ticket in the GUI, they have the option to "take" it. A staff member who has taken a ticket will communicate with the customer to attempt to solve their problem. A number of tools are provided by Cerberus Helpdesk for exactly this purpose. For example, the supporting staff member could browse the knowledgebase for previous occurrences of a similar problem; or look at the individual support history for the client to determine a possible pattern; or utilize other company procedures to troubleshoot a new incident.
When the staff member is ready to communicate their initial (or final) findings with the client, they can initiate a reply from inside the ticket, quoting the customers text to answer separate questions or issues. At this point, the customer may choose to reply with feedback regarding the proposed solution. The communication continues until the customer's problem is solved or a suitable "work around" is found. It would be a perfect world if all ticket's issues were answered completely with one response. Knowing this, most staff members choose to work on another ticket while awaiting customer feedback.
Figure 1-3. The Cerberus Helpdesk Graphical User Interface (GUI)
http://www.cerberusweb.com/manual/how.it.works.html (2 of 4) [7/21/2004 5:59:01 PM]

How Cerberus Helpdesk Works
Step 4: Ticket Resolved
When the staff member is ready to close the ticket, they update the ticket and set the status to "resolved". They would then be prompted if they would like to enter a summary of the problem and its solution into the company knowledgebase for future use. If the knowledgebase is frequently updated in this fashion, customers browsing the public knowledgebase on your company's web site could potentially find answers to their questions without ever having to contact your support department.
After the ticket has been closed, the staff member moves on to the next unassigned ticket matching their skill set.
Figure 1-4. The customer receives their response from the helpdesk
1.2.2. Technical Explanation
When an e-mail is sent to one of your e-mail accounts, Cerberus can capture the message through one of
http://www.cerberusweb.com/manual/how.it.works.html (3 of 4) [7/21/2004 5:59:01 PM]

How Cerberus Helpdesk Works
the following methods:
● POP3 ("popping"): The system can check a standard POP3 mailbox at a set interval with any mailserver hostname/port/user/password combo. This is the easiest method to set up.
● Piping: This is the optimal solution. E-mail is piped directly from your mail server (MTA) to the Cerberus parser in real-time.
After parsing takes place through either method above (piping or popping), the e-mail has been stored and indexed in a MySQL database. This stored information can then be managed with the web-based GUI (graphical user interface).
Actions taken in the GUI can include the following: replying to a customer e-mail; commenting on a customer issue; assigning an issue to a staff member; changing an issue's status; viewing open or closed tickets; viewing queue loads & more.
Your actions may resolve a customers issues and answer their questions, or may prompt further communication through the helpdesk.
Prev Home NextCerberus Helpdesk™ Up Components and Requirements
http://www.cerberusweb.com/manual/how.it.works.html (4 of 4) [7/21/2004 5:59:01 PM]

Components and Requirements
Cerberus Helpdesk™ Handbook: Current Helpdesk Version: 2.4.0 (during this manual revision)Prev Chapter 1. Cerberus Helpdesk™ Next
1.3. Components and Requirements
1.3.1. Parser
The parser ultimately handles all incoming and outgoing e-mail to the e-mail addresses assigned to it. Inbound e-mail headers are scanned to determine their destination, and if the message is a response to a ticket that is already open. If the e-mail is not a communication relating to an existing issue, a new ticket is opened by the parser and the appropriate auto-responses and notifications are sent. Unlike many other helpdesk programs, the Cerberus Helpdesk e-mail parser processes messages in real-time instead of simply logging into a group of e-mail accounts at a predefined interval.
Requires a Windows or Unix-based server (WinNT/Win2K/WinXP, Solaris/FreeBSD/Linux), Mail server (MTA) capable of piping or POP3 (Sendmail, Qmail, Exim, Postfix, Imail, Xmail, Post.Office, etc.)
1.3.2. GUI
The graphical user interface is where your e-mail response staff will be provided the tools to manage the helpdesk and interface efficiently with your customer base.
Requires PHP 4.2.0 or later, MySQL 3.23.x enabled web server; client-side needs Internet Explorer 5 or later, Netscape 6 or later, Konqueror, Mozilla or Opera compatible browser. Other HTML browsers may work flawlessly, but are not unsupported officially.
1.3.3. Database
The database is effectively the "brain" of Cerberus Helpdesk. It contains all prior customer-to-company communication organized efficiently for future use. Acquiring an inventory of solutions for past incidents is fundamental for any support center, and the database does exactly that.
Requires MySQL 3.23.x enabled server
1.3.4. Public-user Tools
http://www.cerberusweb.com/manual/components.and.requirements.html (1 of 2) [7/21/2004 5:59:01 PM]

Components and Requirements
There are times when you want to share some of the functionality of your helpdesk with your customerbase, without giving your customers direct access to your database & support system. For such occasions we've provided the Cerberus Helpdesk public-user tools. Currently these tools include a public "front-end" to your company knowledgebase, where any articles marked for public use can be browsed by your customers from your existing web site; and a public front-end to your company helpdesk, where your customers can create and reply to tickets from their web browsers, and can view the status and correspondence histories of their existing tickets. These tools are completely independent of your Helpdesk GUI and can be installed on the same server as your helpdesk, or any website that supports PHP.
Requires PHP 4.2.0 or later and MySQL 3.23.x enabled web server
Prev Home NextHow Cerberus Helpdesk Works Up Installation
http://www.cerberusweb.com/manual/components.and.requirements.html (2 of 2) [7/21/2004 5:59:01 PM]

Installation
Cerberus Helpdesk™ Handbook: Current Helpdesk Version: 2.4.0 (during this manual revision)Prev Next
Chapter 2. InstallationThe following sections cover installing the three primary components of Cerberus Helpdesk: the database, GUI and parser. It will also explain how to install the Support Center add-on.
2.1. Downloading the Cerberus Helpdesk Install FilesThis section will guide you through downloading the relevant files for your server environment (operating system, mail server, web server, etc.)
You'll be downloading files for use in your installation. If you download to your local machine, these files need to be transferred to your server. This document assumes you understand how to move files to your server using FTP, SCP, Windows Networking or an equivalent alternative.
Many people find it easiest to move all the set up files into a temporary folder on the server until each file is needed. We'll be employing this method throughout this chapter.
Create a temporary folder somewhere on the server to store these files -- preferably in your home directory, such as: /home/myuser/cerberus-install/, where myuser is your server login (joeuser, jstanden, admin, etc).
For the remainder of these instructions we'll refer to this directory as temporary directory.
2.1.1. Downloading the Database Install Script
NOTE: As of version 2.2.0 the database install script is contained in the cerberus-gui/upgrade.php area. The installation instructions will be in one of the next sections.
The DB installation script in the downloads section is not needed unless you want to install that script, then upgrade from the 2.0.0 schema using the cerberus-gui/upgrade.php script.
2.1.2. Downloading the GUI Files
http://www.cerberusweb.com/manual/installation.html (1 of 4) [7/21/2004 5:59:03 PM]

Installation
1. Visit the www.cerberusweb.com website and click Downloads
2. Choose your server platform and version from the list.
3. Click Download GUI
4. Save the GUI files to a location on your local machine or server.
5. Move the GUI .tar.gz file to your temporary directory on the server if it's not there already. Several methods exist for doing this: ftp, scp, etc.
2.1.3. Downloading the Parser Files
1. Visit the www.cerberusweb.com website and click Downloads
http://www.cerberusweb.com/manual/installation.html (2 of 4) [7/21/2004 5:59:03 PM]

Installation
2. Choose your server platform and version from the list.
3. Click Download Cerberus Parser
4. Save the parser file to a location on your local machine or server.
5. Move the parser .tar.gz file to your temporary folder on the server if it's not there already. Several methods exist for doing this: ftp, scp, etc.
6. Extract the parser files using Winzip (www.winzip.com) on Windows machines or the tar command on Unix-based servers.
Windows-based Servers:
http://www.cerberusweb.com/manual/installation.html (3 of 4) [7/21/2004 5:59:03 PM]

Installation
Open the .tar.gz file with Winzip and click Extract. Point Winzip to your temporary directory and click the Extract button.
Unix-based Servers:
From the system console, in your temporary directory, type the following command:
tar xfz cerberus-x.x.x-os.tar.gz
Where x.x.x is the GUI version, such as 2.0.0, and OS is your operating system identifier, such as linux7.
7. Later you'll move the parser from the temporary directory into the path needed by your mail server. This is explained in the following sections.
Prev Home NextComponents and Requirements Setting up the Database
http://www.cerberusweb.com/manual/installation.html (4 of 4) [7/21/2004 5:59:03 PM]

Setting up the Database
Cerberus Helpdesk™ Handbook: Current Helpdesk Version: 2.4.0 (during this manual revision)Prev Chapter 2. Installation Next
2.2. Setting up the DatabaseThere are two supported ways to install the Cerberus database. Both are detailed below.
NOTE: If you have web server control panel software (such as Plesk, Ensim, Cpanel, etc.) some of the following steps may be accomplished more easily within such software -- specifically creating MySQL databases and database logins.
2.2.1. Using phpMyAdmin
phpMyAdmin is an opensource front-end to MySQL written in PHP. You can find it at: http://phpmyadmin.sourceforge.net/
Creating the Database through phpMyAdmin
1. Login to phpMyAdmin and create a new database (hereafter referred to as "cerberus_database").
2. Congratulations, the database has been created!
Creating a Database User through phpMyAdmin
If you plan to use the same login and password to access the Cerberus database as you did to connect to phpMyAdmin, or your server/host only provides one login/password for all your databases, you can skip this step. Otherwise, the following instructions explain how create a new database user through phpMyAdmin.
1. Log into phpMyAdmin if you haven't already.
2. Click Home in the left window.
3. Click Privileges in the bottom of the right window.
4. Click Add a New User.
5. In the Login Information box:
http://www.cerberusweb.com/manual/installing.database.html (1 of 4) [7/21/2004 5:59:05 PM]

Setting up the Database
For User name, select Use text field and enter your preferred database login.
For Host, select either Any host or Local depending on your security preference. Local will only allow the current server to access the database, even if someone has the login and password. Any host will allow remote connections. You can also set up specific host rules, but for the sake of brevity we will not cover that option here. Check the MySQL docs for more information.
For Password, select Use text field and enter your preferred database password to be used in conjunction with your login above.
For Re-type, enter your password again to confirm.
6. Leave the Global privileges box blank.
7. Click Go.
8. You should see the message "You have added a new user."
9. Under Database-specific privileges, select the database we created above in the drop-down box.
10. In the Global privileges box:
Under the Data column check SELECT, INSERT, UPDATE and DELETE.
Under the Structure column check CREATE, ALTER, INDEX and DROP.
Under the Administration column leave all options unchecked.
http://www.cerberusweb.com/manual/installing.database.html (2 of 4) [7/21/2004 5:59:05 PM]

Setting up the Database
11. Click Go.
12. Your new database user has been created!
2.2.2. Using the MySQL Console
Creating the Database through the MySQL Console
1. Log into the MySQL command line interface.
2. Create the Database
Issue the command:
CREATE DATABASE cerberus_database;
Where cerberus_database is the database name you'd like to create.
Creating a Database User through the MySQL Console
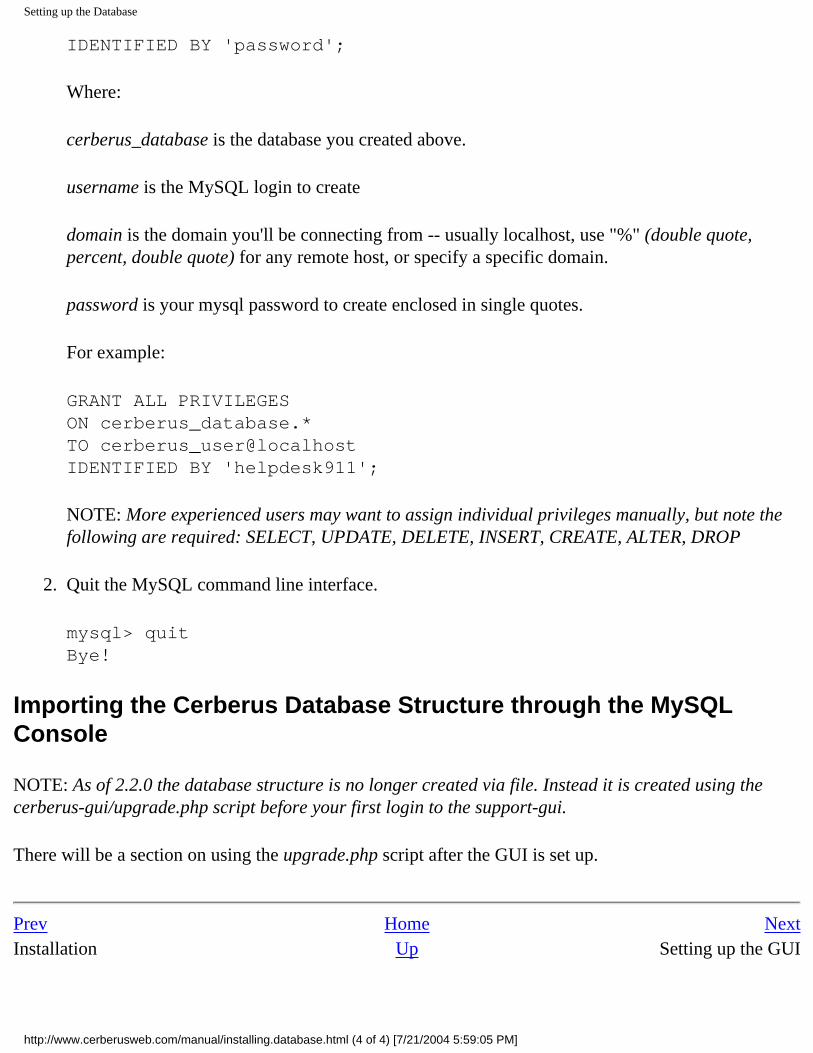
1. Create a user with full access to the Cerberus Helpdesk database.
Through the mysql command line, this is accomplished with:
GRANT ALL PRIVILEGES ON cerberus_database.* TO username@domain
http://www.cerberusweb.com/manual/installing.database.html (3 of 4) [7/21/2004 5:59:05 PM]
Setting up the Database
IDENTIFIED BY 'password';
Where:
cerberus_database is the database you created above.
username is the MySQL login to create
domain is the domain you'll be connecting from -- usually localhost, use "%" (double quote, percent, double quote) for any remote host, or specify a specific domain.
password is your mysql password to create enclosed in single quotes.
For example:
GRANT ALL PRIVILEGES ON cerberus_database.* TO cerberus_user@localhost IDENTIFIED BY 'helpdesk911';
NOTE: More experienced users may want to assign individual privileges manually, but note the following are required: SELECT, UPDATE, DELETE, INSERT, CREATE, ALTER, DROP
2. Quit the MySQL command line interface.
mysql> quitBye!
Importing the Cerberus Database Structure through the MySQL Console
NOTE: As of 2.2.0 the database structure is no longer created via file. Instead it is created using the cerberus-gui/upgrade.php script before your first login to the support-gui.
There will be a section on using the upgrade.php script after the GUI is set up.
Prev Home NextInstallation Up Setting up the GUI
http://www.cerberusweb.com/manual/installing.database.html (4 of 4) [7/21/2004 5:59:05 PM]

Setting up the GUI
Cerberus Helpdesk™ Handbook: Current Helpdesk Version: 2.4.0 (during this manual revision)Prev Chapter 2. Installation Next
2.3. Setting up the GUI1. You should have already downloaded the GUI files earlier in the installation process. If not, do that first.
2. Extract the GUI files using Winzip (www.winzip.com) on Windows machines or the tar command on Unix-based servers.
Windows-based Servers:
Open the .tar.gz file with Winzip and click Extract. Point Winzip to a directory in your webserver html docs path and click the Extract button.
Unix-based Servers:
From the system console in your httpdocs directory, type the following command:
tar xfz cerberus-gui-x.x.x.tar.gz
Where x.x.x is the GUI version, such as 2.0.0
3. Change into the newly created cerberus-gui directory and edit the file config.php
4. Set the values for your database connection on the following lines:
http://www.cerberusweb.com/manual/installing.gui.html (1 of 3) [7/21/2004 5:59:05 PM]

Setting up the GUI
define("DB_PLATFORM","mysql");
define("DB_SERVER","localhost"); define("DB_NAME","wgm_cerberus"); define("DB_USER","cerberus"); define("DB_PASS","cerberus");
// Path to the cerberus-gui files, *MUST* include a trailing slash '/'.// i.e.: define("FILESYSTEM_PATH","/www/htdocs/cerberus-gui/");define("FILESYSTEM_PATH","/www/htdocs/cerberus-gui/");
DB_SERVER - the database host machine (localhost works if MySQL is on the same machine, otherwise use an IP or domain)
DB_NAME - the name of your database
DB_USER - the name of your database user (login)
DB_PASS - the password for your database user
FILESYSTEM_PATH - the filesystem path to the cerberus-gui files (WITH trailing slash)
5. Save and exit the config.php file.
6. On Unix-based systems, check your file permissions!
From the cerberus-gui directory, run the following:
chmod -R 644 *chmod -R 666 logo.giffind . -type d -exec chmod 755 {} \;chmod -R g+w templates_c tempdir
This ensures your files have global read access, and that your logo.gif can be written to by the webserver. You may also need to change ownership of the files to yourself if you're running PHP in safe mode. This can be done with:
chown -R user:group *
Where user is your system login and group is your user group (:group is optional)
7. Congratulations! The GUI set up is complete.
Load the installation checker URL up in your web browser, i.e., http://www.yourdomain.com/cerberus-gui/install/
http://www.cerberusweb.com/manual/installing.gui.html (2 of 3) [7/21/2004 5:59:05 PM]

Setting up the GUI
Where www.yourdomain.com is your actual domain name, such as: www.webgroupmedia.com
If you get the message there are no fatal errors, you've successfully installed the GUI!
If you see errors in red, correct them or copy/paste the output into an e-mail to [email protected] if you need help.
Prev Home NextSetting up the Database Up Setting up the Database
http://www.cerberusweb.com/manual/installing.gui.html (3 of 3) [7/21/2004 5:59:05 PM]

Setting up the Database
Cerberus Helpdesk™ Handbook: Current Helpdesk Version: 2.4.0 (during this manual revision)Prev Chapter 2. Installation Next
2.4. Setting up the DatabaseAfter you have set up the GUI you will not be able to log into it until you install the database. To install the database you must use the cerberus-gui/upgrade.php script. If you try to log into the GUI and have missed a database upgrade (either from the install or from upgrading later) the login.php page will instruct you to visit the upgrade.php page to update the database structure.
Go ahead and visit the cerberus-gui/upgrade.php page. The url will be something like: http://www.yourdomain.com/cerberus-gui/upgrade.php
You will get an error stating that you do not have access to view the script. If you did not get this error, you are probably on a 192.168.1.0 network (private) and are allowed to access the script. You can change that access later. To add access to the script you will need to edit the config.php file and add your IP to the allowed IP list. Open the file and go down to around line 37. This is what you should see:
$authorized_ips = array("127.0", "192.168.1", "0.0.0.0", "0.0.0.0" );
Simply replace the first 0.0.0.0 IP with your IP number (which is displayed on the access denied error in the browser). After you have done this you will need to refresh the upgrade.php in your browser. After you have access to the page you will see something similar to this list here:
Figure 2-1. Upgrade.php Install List
Select the Cerberus Helpdesk 2.4.0 Release Clean Database Install and click the Run Script button. The script will then check the database if a table exists and then create it if it does not exist. At the bottom of the long page will be a result. If the script does not complete with Successfully updated! then something has gone wrong. Please copy the output of the script into an email to [email protected] for help.
After the database has been installed you can log into the GUI. A default login has been created by the database install.
http://www.cerberusweb.com/manual/installing.gui.database.html (1 of 2) [7/21/2004 5:59:07 PM]

Setting up the Database
The default URL is: http://www.yourdomain.com/cerberus-gui/
Login: superuser
Password: superuser
NOTE: You'll want to log in and change the superuser password as soon as possible.
Prev Home NextSetting up the GUI Up Setting up the E-mail parser
http://www.cerberusweb.com/manual/installing.gui.database.html (2 of 2) [7/21/2004 5:59:07 PM]

Setting up the E-mail parser
Cerberus Helpdesk™ Handbook: Current Helpdesk Version: 2.4.0 (during this manual revision)Prev Chapter 2. Installation Next
2.5. Setting up the E-mail parserThe parser can be installed in a Windows or Unix-based environment. Skip to the section that deals with your platform and mail server (MTA) after reading the following notes.
2.5.1. Parser Syntax
/path/to/cerberus <path to config.xml> <loglevel> <path to log file>
General Notes Regarding Parser Logging:
The 2nd and 3rd parameters to the Cerberus parser binary (loglevel and logfile respectively) are now required.
Your <loglevel> options are:
FATAL - This should be your setting in live environments. This only logs fatal errors. It is the default.
ERROR
WARN
INFO
TRACE
DEBUG - This is is the most intensive logging option, it logs just about everything. Use this if you're having parser problems.
In Unix-based environments, make sure the parser has write permission (chmod a+w, u+w, 666 or 644) on the logfile.
Example usage:
/etc/smrsh/cerberus /etc/smrsh/config.xml FATAL /var/log/cerberus.log
2.5.2. Configuring the Parser with config.xml
The configuration and behavior of the Cerberus parser can be controlled using the config.xml file. You can download the latest config.xml template from http://www.cerberusweb.com/ under Downloads.
*** Do NOT place your config.xml file in a location where it is web accessible
Below is a sample config.xml file:
<configuration> <debug> <xml value="0" /> <curl value="0" /> </debug> <key> <parser user="username" password="password" url="http://localhost/cerberus-gui/parser.php" />3632aec33f4113ac199f2ccadbc02c1037a60eb1dc404eb14dc309cfc6b39bdc1343e02da5548e72b7f0e07f4f25aa0e419
http://www.cerberusweb.com/manual/installing.parser.html (1 of 8) [7/21/2004 5:59:09 PM]

Setting up the E-mail parser
</key><!-- <pop3> <host value="domain.com" /> <user value="popuser" /> <password value="poppass" /> <port value="110" /> <delete value="true" /> </pop3>--> <global> <!-- tmp_dir: The location cerberus will store a copy of the emails it is given. It should include the trailing slash: *nix: /tmp/ Win: C:\temp\ --> <tmp_dir value="/tmp/" /> </global></configuration>
There are four sections to the config.xml file: <debug>, <key>, <pop3> and <global>.
<debug>
The <debug> section is used to produce debug information on the binary parser and its communication with the GUI/PHP. To enable a debug setting, simply set the value to 1 instead of 0.
<xml value="1" /> would show you the XML packet being sent to PHP via HTTP POST.
<curl value="1" /> will show any information returned by the GUI and/or PHP. This is useful for examining any errors or debug output placed in the GUI's parser.php.
Please note, the <debug> section does not add additional info to the log file. Enabling these elements will display debug output to the console (STDOUT).
<key>
The <key> section is used to match a destination email address with the helpdesk installation it should be delivered to. You may have more than one <key> section in the config.xml file.
The user and password attributes may be empty. If you would like to post to a password protected file/folder managed by your webserver (e.g., .htaccess files and Apache), you may put the username and password in the url attribute, like so: url="http://user@password:localhost/cerberus-gui/parser.php".
The key for the helpdesk needs to be placed between the beginning (<key>) and end (</key>) tags. If you have more than one key you will need to create additional <key> sections to place them in. The url attribute in the <key> element needs to point to the URL of the PHP parser.
URLs using HTTPS are not supported in 2.0.0 and below, but will be supported in 2.0.1+ where more configuration options exist to handle SSL.
<pop3>
The <pop3> section may be repeated if the parser needs to check more than one POP3 box. The parser will check mailboxes in the order they appear in the config.xml file.
In the example above the <pop3> section is commented out. To enable POP3 mode, remove the comments around the block (<!-- and -->). To disable POP3 mode and use piping, comment in the same style as the above example. Piping and POP3 modes are explained in more detail below.
http://www.cerberusweb.com/manual/installing.parser.html (2 of 8) [7/21/2004 5:59:09 PM]

Setting up the E-mail parser
There are five elements in the <pop3> section: <host>, <user>, <password>, <port> and <delete>.
You should have received a mailbox login, password and server upon creation of your mailbox. Contact your ISP or system administrator if you need to retrieve this information.
<host> should be a fully qualified domain name (FQDN), such as: mail.webgroupmedia.com, or the IP of the mail server hosting the POP3 box, such as: 12.34.56.78.
<user> and <password> need to be set to the username and password you would use to check this mailbox in your email client.
If your POP3 server does not run on the standard POP3 port (port 110), you can set the port using the <port> element.
The <delete> element should only be used to debug and troubleshoot your setup. This setting will leave messages on the server if the value is set to false, re-downloading the same messages again the next time the parser is run. This feature does not behave like the standard POP3 mail client 'Leave message on server' functionality, where the client does not download the same messages on subsequent connections.
<global>
The <global> section is used to specify additional options to the parser. Currently the only option available is the <tmp_dir> element. The <tmp_dir> element must be set to a location where the parser can store its temporary files during parsing. Note that you *must* have a trailing slash on the path (e.g., /tmp/ not /tmp). The files will be stored with secure permissions to help prevent outside users on the server from viewing any email or attached files stored to the disk.
2.5.3. Using POP3
Default method. Using POP3 to collect mail is simple on both Windows and Unix-based server platforms. Edit the config.xml file and add or uncomment the following XML block:
<pop3> <host value="localhost" /> <user value="pop3user" /> <password value="pop3pass" /> <port value="110" /> <delete value="true" /></pop3>
To collect e-mail for the helpdesk, run the parser with all three arguments:
/path/to/cerberus /path/to/config.xml FATAL /path/to/cerberus.log
The above can be automatically run every few minutes through various programs depending on your server platform. These methods are outlined below.
2.5.3.1. Unix-based Servers - Using crontab
To schedule a reoccuring task in Linux/BSD/Solaris, type the following command into the console:
[server]# crontab -e
And enter the following entry:
5 * * * * /path/to/cerberus /path/to/config.xml FATAL /path/to/cerberus.log
Make sure you've changed /path/to/ in the example to your own paths. This will run the Cerberus parser binary every 5 minutes. To increase or decrease the frequency of the task, change the number (in minutes) in the first column of the cron file above.
2.5.3.2. Windows-based Servers - Using Scheduled Tasks
http://www.cerberusweb.com/manual/installing.parser.html (3 of 8) [7/21/2004 5:59:09 PM]

Setting up the E-mail parser
The Win32 parser download archive should contain two files from version 1.4.1 and above. These files should be cerberus_console.exe and cerberus_noconsole.exe. The console executable will print errors or output to STDOUT and should be used for testing and troubleshooting. When the console executable runs as a Windows scheduled task, it will briefly pop up a DOS window. This can be annoying if someone is working on the server, and that's where the noconsole executable file comes in. The noconsole EXE will display no output to the console and will run invisibly -- perfect for use as a scheduled task.
To schedule a task in Windows, you'll need access to the task scheduler.
1. Make sure the Task Scheduler is running. Open Control Panel -> Administrator Tools -> Services:
Check that the line with the name Task Scheduler is set to Started under the Status column. If it's not started, press the Start button or right click the task and click Start.
2. Close the Services window. Return to the Conrol Panel and double click the Scheduled Tasks folder.
3. Double click Add Scheduled Task (shown below):
4. The Scheduled Task Wizard will pop up. Click Next. Click Browse.
5. Navigate to the Cerberus parser binary and click Open.
6. Choose a name for the Scheduled Task, such as Cerberus Parser POP3. Select Daily from the Perform this Task list and press Next.
7. Set the start time to 12:00 AM. Select Every Day under the Perform this Task list. Set the Start Date to the current date. Press Next.
8. Enter the user you would like to run the Cerberus parser as. The parser needs access to write to its log file, so make sure the user you select has these privileges. Enter the password for the user and press Next.
9. Check the box next to "Open advanced properties for this task when I click Finish". Click Finish.
10. Select the Schedule tab and click the Advanced button next to the start time.
11. Check the box next to Repeat Task and set Every 5 minutes. Set Until to Duration and fill in 24 hours. See image below:
http://www.cerberusweb.com/manual/installing.parser.html (4 of 8) [7/21/2004 5:59:09 PM]

Setting up the E-mail parser
12. Press OK to close the Advanced window. Click the Task tab and make sure the Enable box is checked.
Press OK again to close the Task edit window.
13. The Cerberus parser binary will now run every 5 minutes all day, every day. You can right click the Task and click Run to make sure everything works as planned.
2.5.4. Using E-mail Piping
If you'd prefer to have messages parser in real-time, you'll need to set up piping through your mail server (MTA). Once this is set up, the mail server will feed (pipe) new mail directly to the Cerberus parser without storing it in a mailbox. This is our recommended method of setting up the helpdesk. However, it is a much more Advanced method than POP3 and not officially supported. Below are notes on setting up piping in Windows or Unix environments.
2.5.4.1. Piping with Windows-based Servers
While Unix-based mail servers tend to be fairly similar in handling piping, Windows servers handle piping very differently. It's generally a good idea to consult with your mail server documentation to see if piping is possible and how it can be accomplished. If piping is not possible or you're not able to figure it out -- we suggest you read the section on configuration the Cerberus parser for Windows POP3. In most cases the mail server will dump e-mail to text files and you will have to set up a batch file (.bat extension) to pipe the text file to the parser binary. As an example, we'll cover such a situation using the open-source mail server Xmail (www.xmailserver.com) below.
Piping with Xmail under Windows
While these notes are specific to the Xmail mailserver in a Windows environment, serveral other Win32 mail applications work in a similar fashion -- namely iMail and Post.Office.
1. Create a directory named cerberus under your C:\MailRoot\bin directory and place the Cerberus parser and config.xml there.
2. Configure the parser with config.xml (explained later in the Installation chapter)
3. Decide what e-mail addresses you want Cerberus to manage. Open up the file C:\MailRoot\domains\domain\mailbox\mailproc.tab
Where in the above:
domain is the domain name of the e-mail address, such as: webgroupmedia.com
mailbox is the mailbox name, such as: support
4. The contents of the mailproc.tab file should look like:
http://www.cerberusweb.com/manual/installing.parser.html (5 of 8) [7/21/2004 5:59:09 PM]

Setting up the E-mail parser
"external" "0" "300" "c:\winnt\system32\cmd.exe /c c:\mailroot\bin\cerberus\cerbxml.bat" "@@TMPFILE"
Be sure to change the paths above to match your file system. Save and close the file.
5. Now create the C:\MailRoot\bin\cerberus\cerbxml.bat file with the following contents:
"c:\mailroot\bin\econv.exe" --input %1|"c:\mailroot\bin\cerberus\cerberus.exe" "c:\mailroot\bin\cerberus\config.xml" "FATAL" "c:\mailroot\bin\cerberus\log.txt"del %1exit
NOTE: There are only three seperate commands above. If you see four or more lines, then the first line has wrapped (there are five double quoted sections on the first line.) Be sure you enter the whole first line with only a single enter after the log.txt blurb.
6. Save and close the cerbxml.bat file.
7. If you don't have the file econv.exe in your C:\MailRoot\bin\ directory, you'll need to download it from: http://www.xmailserver.com/econv.c
If you need a compiled (EXE) version, contact WebGroup Media at [email protected]
8. You're all set! If you run into any problems, check the Cerberus log.txt file in C:\MailRoot\bin\cerberus\. You may want to change the loglevel "FATAL" to "TRACE" during your testing.
2.5.4.2. Piping with Unix-based Servers (Linux/BSD/Solaris)
Covered below are four of the most popular mail servers for Unix-based servers. If your MTA is not on this list, check your mail server documentation or ask a system administrator.
Sendmail
Default pipe file: /etc/aliases
Syntax:
[email protected]: "|/path/to/cerberus /path/to/config.xml FATAL /path/to/cerberus.log"
Instructions:
Open the pipe file and add the line specified in syntax. Replace the /path/to/ lines with your actual filesystem paths. Do this for every e-mail address you'd like Cerberus to manage.
Notes:
On many Sendmail systems, SMRSH is in effect. SMRSH is the Sendmail Restricted Shell which protects the mail system from running unauthorized programs. If this is enabled, you'll get a bounce when sending e-mail through the parser that reads something like "cerberus not available for sendmail programs". If SMRSH is running on your system, find out where to place your Cerberus parser binary by entering the following command at the console:
On many Sendmail systems, SMRSH is in effect. SMRSH is the Sendmail Restricted Shell which protects the mail system from running unauthorized programs. If this is enabled, you'll get a bounce when sending e-mail through the parser that reads something like "cerberus not available for sendmail programs". If SMRSH is running on your system, find out where to place your Cerberus parser binary by entering the following command at the console:
[server]# man smrsh
http://www.cerberusweb.com/manual/installing.parser.html (6 of 8) [7/21/2004 5:59:09 PM]

Setting up the E-mail parser
You should see a default smrsh path around the second paragraph, such as: /etc/smrsh or /usr/adm/sm.bin
You could also run the following command at the *nix console:
[server]# strings /path/to/smrsh | grep ^/
Where /path/to/smrsh is the appropriate path, such as /usr/sbin/smrsh
Move the parser and related files to the smrsh directory and adjust your pipe file.
After writing to your /etc/aliases file, run the command newaliases at the console.
Qmail
Default pipe file: /usr/local/qmail/mailnames/domain.com/account/.qmail
Syntax:
|/path/to/cerberus /path/to/config.xml FATAL /path/to/cerberus.log
Instructions:
The domain.com part of the pipe file path should be your domain name.
The account part should be the mail account name under that domain.
For example: [email protected] would be:
/usr/local/qmail/mailnames/webgroupmedia.com/support/.qmail
Open the pipe file and add the line specified in syntax. Replace the /path/to/ lines with your actual filesystem paths. Edit the pipe file for every e-mail address you'd like Cerberus to manage.
Save the pipe file(s) and test. There should be no need to reset Qmail.
Postfix
Default pipe file: /etc/postfix/aliases
Syntax:
[email protected]: "|/path/to/cerberus /path/to/config.xml FATAL /path/to/cerberus.log"
Instructions:
Open the pipe file and add the line specified in syntax. Replace the /path/to/ lines with your actual filesystem paths. Do this for every e-mail address you'd like Cerberus to manage.
After writing to your /etc/postfix/aliases file, run the command newaliases at the console.
Exim
Default pipe file: /etc/valiases/domain.com
Syntax:
http://www.cerberusweb.com/manual/installing.parser.html (7 of 8) [7/21/2004 5:59:09 PM]

Setting up the E-mail parser
[email protected]: "|/path/to/cerberus /path/to/config.xml FATAL /path/to/cerberus.log"
Instructions:
The domain.com part of the pipe file path should be your domain name.
Open the pipe file and add the line specified in syntax. Replace the /path/to/ lines with your actual filesystem paths. Do this for every e-mail address you'd like Cerberus to manage.
After writing to your /etc/valiases/domain.com file, run the command newaliases at the console.
Prev Home NextSetting up the Database Up Installing the Support Center/Public Interface
http://www.cerberusweb.com/manual/installing.parser.html (8 of 8) [7/21/2004 5:59:09 PM]

Installing the Support Center/Public Interface
Cerberus Helpdesk™ Handbook: Current Helpdesk Version: 2.4.0 (during this manual revision)Prev Chapter 2. Installation Next
2.6. Installing the Support Center/Public InterfaceThe following sections explain how to install the Support Center portion of Cerberus Helpdesk.
2.6.1. Installing the Support Center
1.) Untar the cerberus-support-center-3.0.0.tar.gz file. This will create a directory called 'support-center'. Move this file into your webserver path under the web site you want to have the public tool displayed to your customers.
2.) Edit the support-center/cerberus-support-center/config.php file and set the following values:
DB_* - your database connection details to the cerberus-gui database
FILESYSTEM_PATH - the filesystem path to the support-center directory
SMTP_HOST - the host you'll be sending mail through
PROFILE_ID - the profile ID you set up in the cerberus-gui [Configuration] area
3.) Set the permissions on the support-center files. You can do this recursively on most Unix systems with the following command:
chmod -R a+r support-center/
4.) You should be all set! If you open up the support-center/ directory in your browser, you should be able to browse your public knowledgebase articles from the Cerberus GUI.
2.6.2. Running in Standalone
If you choose to run the Support Center in standalone mode, meaning it's not embedded in one of your existing websites, you can modify the index.php file included in the support-center/ directory.
http://www.cerberusweb.com/manual/installation.supportcenter.html (1 of 3) [7/21/2004 5:59:10 PM]

Installing the Support Center/Public Interface
Simply move the entire support-center directory into your webserver path under any website.
2.6.3. Embedding the Support Center in Your Website
WebGroup Media has embeded the Support Center into the Cerberus Helpdesk site: http://www.cerberusweb.com/support.php
If you'd like to embed the Support Center into your existing website, you'll need to follow these simple steps.
1.) Move the 'cerberus-support-center' directory out of 'support-center' and into the website where you want to embed the tool.
2.) Open the 'index.php' file in the 'support-center' directory and find the three (3) sections marked "COPY:". They are:
i. The session system include around line 4.
ii. The stylesheet link around line 12.
iii. The Support Center include around line 36.
3.) You'll need to decide what page on your existing website you want to embed the Support Center on. For this example, we'll assume the page is named support.php
4.) Add the session system to the top of support.php, you can simply copy the entire PHP block from our example index.php file. Make sure you get everything between the php tags: <?php ...(code is here)... ?>
5.) Move the stylesheet link into the <HEAD> ... </HEAD> html block of the support.php page.
6.) Move the Support Center include into exact position in your support.php page's HTML where you want it to be displayed. It will create a 770 pixel width table. If you need to change those dimensions, you can edit the cerberus-support-center/main.php file.
7.) Once you've moved steps 4, 5, and 6 above into your existing website, the Support Center should be embedded and operational.
2.6.4. Customizing the Support Center
http://www.cerberusweb.com/manual/installation.supportcenter.html (2 of 3) [7/21/2004 5:59:10 PM]

Installing the Support Center/Public Interface
As with most of WebGroup Media's tools, the Support Center source code has been provided. You are free to make any modifications you need, provided you follow the basic tenets of the Cerberus Public License, which are fairly simple:
* You're free to share changes, but don't encrypt the source.
* You may not sell/share/give-away any components of the Support Center for use in any capacity outside those which relate directly to Cerberus Helpdesk.
You'll probably want to include your own company logo in the header of the Support Center, as well as modify the cerberus-support-center/cerberus.css stylesheet to match your company color scheme.
Happy customizing!
We'd love to see what you come up with. Be sure to drop us a note at: [email protected] to let us know how you're utilizing the Support Center. You can also discuss Support Center installation/customization/modifications/suggestions on the Cerberus Helpdesk forums at http://forum.cerberusweb.com>
Prev Home NextSetting up the E-mail parser Up Some Reminders
http://www.cerberusweb.com/manual/installation.supportcenter.html (3 of 3) [7/21/2004 5:59:10 PM]

Some Reminders
Cerberus Helpdesk™ Handbook: Current Helpdesk Version: 2.4.0 (during this manual revision)Prev Chapter 2. Installation Next
2.7. Some RemindersHere are some reminders for your installation. These may or may not relate to your exact install, but should be looked at if it does apply.
1) If you are encountering Smarty problems while using PHP's safe_mode, check to see if you have 'use_sub_dirs=false' set.
2) While Apache 2.0 is considered stable, PHP.net gives a warning to NOT use Apache 2.0 and PHP in a production environment in either Unix or Windows. (You can see the warning at http://www.php.net/manual/en/install.apache2.php)
3) Some default installs of the RedHat Apache and PHP defaults are not stable and you should be sure to upgrade PHP.
Prev Home NextInstalling the Support Center/Public Interface
Up Administrators Manual
http://www.cerberusweb.com/manual/installation.some.reminders.html [7/21/2004 5:59:10 PM]

Administrators Manual
Cerberus Helpdesk™ Handbook: Current Helpdesk Version: 2.4.0 (during this manual revision)Prev Next
Chapter 3. Administrators ManualThis section describes what you as an Administrator/Superuser can do after you have Cerberus HelpDesk installed.
3.1. Logging Into the GUIFigure 3-1. Login Screen
The first thing to do after Cerberus has been set up is to log into the Support-GUI. Use your browser to navigate to where you installed the Support-GUI. The default location would be: http://<yourdomain>/cerberus-gui/login.php. If you have just installed Cerberus you will need to use the default login: User: superuser Password: superuser (they are both the same). This is a superuser account. You will have full access to modify all settings of the system. The first thing you should do is create a different superuser account (with a different login name) and delete the default superuser account. This guide will walk you through that process.
3.1.1. Lost your password?
You may notice that there is an area on the login screen to get your password should you forget it. The first step is to enter your email address that is set to your account. The system will then email you a verification code. You then enter this code in step 2 and your password will be sent to you via email. It is important to have proper email addresses assigned to users so that they can receive the "E-mail reset
http://www.cerberusweb.com/manual/admin.manual.html (1 of 2) [7/21/2004 5:59:11 PM]

Administrators Manual
verification code".
Prev Home NextSetting up the E-mail parser First view of the Support-GUI
http://www.cerberusweb.com/manual/admin.manual.html (2 of 2) [7/21/2004 5:59:11 PM]

First view of the Support-GUI
Cerberus Helpdesk™ Handbook: Current Helpdesk Version: 2.4.0 (during this manual revision)Prev Chapter 3. Administrators Manual Next
3.2. First view of the Support-GUIFigure 3-2. First View of Home Page
This image is similar to what you would first see after you login. Many areas have no data yet and have little use. It will become obvious what these different areas are for once tickets start to enter the system. In the top-left area of the screen is the [configuration] link. Click this to start configuring your system.
http://www.cerberusweb.com/manual/adminmanual.home.html (1 of 2) [7/21/2004 5:59:11 PM]

First view of the Support-GUI
Prev Home NextAdministrators Manual Up Configuration - The Area 51 of
Cerberus
http://www.cerberusweb.com/manual/adminmanual.home.html (2 of 2) [7/21/2004 5:59:11 PM]

Configuration - The Area 51 of Cerberus
Cerberus Helpdesk™ Handbook: Current Helpdesk Version: 2.4.0 (during this manual revision)Prev Chapter 3. Administrators Manual Next
3.3. Configuration - The Area 51 of CerberusIf you think of the parser as the heart of Cerberus, then the Configuration area would be the brain of the operations. In here is where you will set up all your users, groups, queues, mail rules, etc etc. We highly recommend that you only give access to the configuration area to Administrators and Superusers. Although it would take a bit to render the helpdesk unusable, limiting access to this area ensures that changes aren't made by someone who doesn't have a good idea of what they are doing. We'll start off this section by explaining the main display of the configuration area.
3.3.1. Main Page
The first page you will encounter after entering the configuration area consists of the Helpdesk Environment listing, the Client/Server Environment, Developers, and a Useful Links area. This is mostly an informative page for your helpdesk.
Figure 3-3. Configuration Screen
http://www.cerberusweb.com/manual/adminmanual.firstlook.html (1 of 21) [7/21/2004 5:59:21 PM]

Configuration - The Area 51 of Cerberus
3.3.2. Product Options
Figure 3-4. Product Options
Under product options you will find two sections, Global Settings and View 1.x Product Key.
3.3.2.1. Global Settings
The global settings section is separated into 7 different settings areas. They are Global, Mail, Ticket, Search Index, Parser, xSP Master GUI, and Knowledgebase settings. As per the name, the Global Settings effects the entire helpdesk.
Global
From session lifespan to output buffering callback, the global settings section holds many of the functions of background checks and modes in Cerberus itself.
http://www.cerberusweb.com/manual/adminmanual.firstlook.html (2 of 21) [7/21/2004 5:59:21 PM]

Configuration - The Area 51 of Cerberus
Figure 3-5. Global Settings
Mail Settings
The mail settings section is where the system can be set to send mail, or use an external SMTP server.
Figure 3-6. Product Options
http://www.cerberusweb.com/manual/adminmanual.firstlook.html (3 of 21) [7/21/2004 5:59:21 PM]

Configuration - The Area 51 of Cerberus
Ticket Settings
The ticket settings area contains most of the settings that are used in ticket views and ticket actions.
Figure 3-7. Ticket Settings
http://www.cerberusweb.com/manual/adminmanual.firstlook.html (4 of 21) [7/21/2004 5:59:21 PM]

Configuration - The Area 51 of Cerberus
Search Index Settings
Only one option is included in this section, the Index Numbers. This option allows the search engine to index purely numeric values (1942, 911, etc). Enabling this option will take up slightly more database space, disabling will conserve space. After enabling this option, your system may need a re-index.
Figure 3-8. Search Index Settings
Parser settings
The parser settings section contains items that can be used to secure the parser from being run without a login and password. If you would like to run in Secure Mode, place a checkmark in the appropriate box. Enabling this means you must have a login and password in your config.xml file. The next two sections is where you stick your Parser User and Parser Password. Both of these sections must match the one in your config.xml file.
Figure 3-9. Parser Settings
XSP Settings
http://www.cerberusweb.com/manual/adminmanual.firstlook.html (5 of 21) [7/21/2004 5:59:21 PM]

Configuration - The Area 51 of Cerberus
As of the writing of this version of the manual, xSP has not been released yet and this section will be updated when xSP is fully released.
Figure 3-10. xSP Master GUI Settings
Knowledgebase Settings
Within the knowledgebase settings, you can enable the knowledge base, show knowledgebase topic totals, and make it required that knowledgebase comments require approval. If your knowledgebase seems to run slow, you can try unchecking the Show Knowledgebase Topic Totals.
Figure 3-11. Knowledgebase Settings
3.3.2.2. View 1.x Product Key
For users using pre 2.0.0 helpdesks, this section is here to view the key without going into MySQL or writing us for it. If you are using version 2.0.0 and above, you must place your key in your config.xml file.
Figure 3-12. Viewing the 1.x Product Key
http://www.cerberusweb.com/manual/adminmanual.firstlook.html (6 of 21) [7/21/2004 5:59:21 PM]

Configuration - The Area 51 of Cerberus
3.3.3. Parser Config
The parser config section contains two subsections, Parser Mail Rules, and Parser GUI Log.
3.3.3.1. Parser Mail Rules
In the parser mail rules, you can create rules to be executed as mails come in. Much like how a filter works for your regular e-mail client, you can set up rules to put specific senders into respective queues, or have spam mails automatically deleted.
Currently there are 7 different rule criteria and 5 different rule actions. The 7 rule criteria are as follows: Sender Address, Ticket Subject, Destination Queue, Ticket is New, Ticket is Reopened, Attachment Name, and Spam Probability. The 5 rule actions are as follows: Assign to, Move to Queue, Change Status to, Change Priority To, and Stop Processing Remaining Rules. (Note, as of the writing of this monitor, new mail rules and pre/post parser mail rules are being worked on. Please keep a lookout for an update that contains new functionality!)
3.3.3.2. Parser/GUI Error Log
If your system experiences any errors, you can view the error logs here. Should you need support for these errors, the Cerberus Helpdesk Team may ask to see any errors that have occurred.
http://www.cerberusweb.com/manual/adminmanual.firstlook.html (7 of 21) [7/21/2004 5:59:21 PM]

Configuration - The Area 51 of Cerberus
3.3.4. Custom Fields
Custom field groups allow you to add additional information to requesters as you need. Creating a custom field group will automatically allow you to select it in any ticket you view. As of the writing of this manual, the custom fields are currently undergoing development and this manual may not reflect any recent changes made by the Cerberus Helpdesk Development Team.
3.3.4.1. Create a New Custom Field Group
In this section you can create a new custom field group. After entering a field, the view will automatically change to "Editing" and allow to you continue entering new fields or remove a field you have already placed.
By clicking 'Create a New Custom Field Group', you will notice several fields. They include: Group Name, Field Name, Field Type, and Search Exclude.
http://www.cerberusweb.com/manual/adminmanual.firstlook.html (8 of 21) [7/21/2004 5:59:21 PM]

Configuration - The Area 51 of Cerberus
3.3.5. Service Level Agreement (SLA)
Service Level Agreements are integral parts of many businesses today. The application of an SLA plan is to make it so that your company has a set schedule of when to offer support, and in turn it lets customers know when you are available for support as well. Generally SLA's are used in conjunction with fees to guarantee response times or support. The SLA plans in Cerberus Helpdesk allow you to give precedence to tickets from certain companies and also allows you to restrict certain queues (also called 'Gated' queues), to customers/companies with the appropriate SLA plan.
3.3.5.1. Managing SLA Schedules
Schedules are used to maintain the working hours of your queues. The SLA plans depend on these schedules to set due dates.
http://www.cerberusweb.com/manual/adminmanual.firstlook.html (9 of 21) [7/21/2004 5:59:21 PM]

Configuration - The Area 51 of Cerberus
After clicking on the Create New Schedule link, you will be taken to a new page where you can enter the Schedule name and set the hours for each day of the week. For the time options you may set it to 24 hours, closed (gated), or customize the hours.
3.3.5.2. Managing SLA Plans
This section will allow you to manage different SLA plans. If you already have plans set up, you can edit or delete the existing plans, you can also create new plans.
After clicking on Create New SLA plan, you will be taken to a new screen which will show a blank field for the Plan name and will also list the queues in your system. The queue modes are open and gated: Open means the queue is available for use by any requestor, Gated queues are restricted to the SLA plan.
http://www.cerberusweb.com/manual/adminmanual.firstlook.html (10 of 21) [7/21/2004 5:59:21 PM]

Configuration - The Area 51 of Cerberus
3.3.6. Public Tools
The public tools is an add-on for Cerberus Helpdesk. Your system may or may not be incorporating this add-on. There is no cost for the public tools, and you may download it free of charge from http://www.cerberusweb.com (As of the writing of this article, the Public Tools Interface is undergoing some changes to the look and feel, the newest tools will be released with the 2.4.0 release of Cerberus Helpdesk)
3.3.6.1. Public GUI Profiles
The public GUI profiles section will allow you to manage multiple public GUI installations. While most companies will need only one profile and public GUI, you may have several which you wish to customize to meet different needs.
3.3.6.2. Public GUI Custom Field Groups
Public GUI custom fields allows you to bind groups of custom fields to queues within the public GUI interface. This is particularly useful if you wish to have two different queues but not ask for the same information for both.
3.3.7. Queues
http://www.cerberusweb.com/manual/adminmanual.firstlook.html (11 of 21) [7/21/2004 5:59:21 PM]

Configuration - The Area 51 of Cerberus
The Queues section is where you will be creating and editing your queues for use in the system. It is recommended that you set up your queues first before you set up all your users and groups.
3.3.7.1. Create New Queue
When creating a new queue, its important to note what each section contains so that your tickets will look exactly how you would like it to. This area includes the fields: Queue Name, Email Friendly 'From' Display, Queue Prefix, Send Auto Open, and Send Auto Close. If you have Send Auto Open/Close checked, these options will make it so that your helpdesk will automatically send a message whenever a ticket is opened or set resolved. Template tokens can be made so tickets have their IDs and status among other options in the ticket.
The template tokens available for use.
This section will allow you to set group access to this queue. You have the choice of setting read, write, or no access. This section is also where you will specify the e-mail address that will be associated with
http://www.cerberusweb.com/manual/adminmanual.firstlook.html (12 of 21) [7/21/2004 5:59:21 PM]

Configuration - The Area 51 of Cerberus
this queue (support @ yourcompany.com for example).
3.3.7.2. Edit/Delete Queues
In the edit/delete queues section, you can edit the queues you have already set up, or delete any existing queues.
3.3.8. Users
The section where you will create new users for use in your helpdesk. Here you will assign users/groups to queues, create new superuser accounts, and create groups for these users.
3.3.8.1. Creating a New User
When creating a new user, you will come upon this screen that will show you fields such as: User Name, User E-mail Address, User Login Name, User Password, User Group, and User is Superuser. It is important to note that the User E-mail Address should NOT be a queue address or else you may receive duplicate tickets or mail loops.
http://www.cerberusweb.com/manual/adminmanual.firstlook.html (13 of 21) [7/21/2004 5:59:21 PM]

Configuration - The Area 51 of Cerberus
3.3.8.2. Edit/Delete Users
Much like how the Edit/Delete Queues section worked, you may select users which you would like to delete or edit. Clicking on a username will bring you to the same screen as creating a new user.
3.3.8.3. Manage Groups
By creating groups, you separate your users and administrators into different categories, thus better organizing your system. You may create, edit, and delete groups from this section.
When you create a new group, you will notice there are many selections available. Please make sure you read each choice before selecting it to ensure that the correct choices are made per group. The following screenshots only show a few of each option available.
http://www.cerberusweb.com/manual/adminmanual.firstlook.html (14 of 21) [7/21/2004 5:59:21 PM]

Configuration - The Area 51 of Cerberus
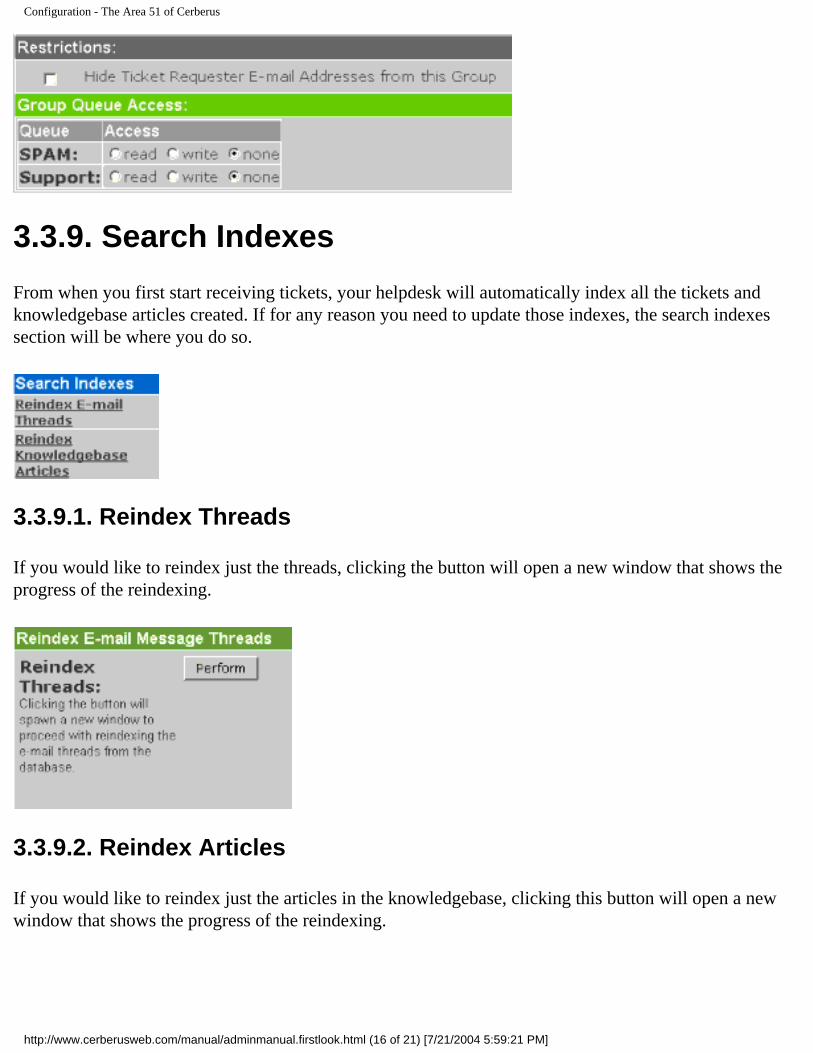
The following section will allow you to hide ticket requester e-mails from this group and you can also select which queues this group has access to.
http://www.cerberusweb.com/manual/adminmanual.firstlook.html (15 of 21) [7/21/2004 5:59:21 PM]
Configuration - The Area 51 of Cerberus
3.3.9. Search Indexes
From when you first start receiving tickets, your helpdesk will automatically index all the tickets and knowledgebase articles created. If for any reason you need to update those indexes, the search indexes section will be where you do so.
3.3.9.1. Reindex Threads
If you would like to reindex just the threads, clicking the button will open a new window that shows the progress of the reindexing.
3.3.9.2. Reindex Articles
If you would like to reindex just the articles in the knowledgebase, clicking this button will open a new window that shows the progress of the reindexing.
http://www.cerberusweb.com/manual/adminmanual.firstlook.html (16 of 21) [7/21/2004 5:59:21 PM]

Configuration - The Area 51 of Cerberus
3.3.10. Knowledgebase
This section will allow you to configure the base levels of the knowledgebase. You can make new, edit, or delete knowledgebase categories. This section will also allow you to approve/reject Article Comments if you have that option set.
3.3.10.1. New Category
In this section you will be able to create a new knowledgebase category. You will need to enter a name and select the section to which this category belongs to. Select 'None (Top Level)' to be the top of a tree (e.g. Support, Billing, etc).
3.3.10.2. Editing/Deleting Categories
You may edit any categories you have created in this section. You may rename the category or select a different category parent.
http://www.cerberusweb.com/manual/adminmanual.firstlook.html (17 of 21) [7/21/2004 5:59:21 PM]

Configuration - The Area 51 of Cerberus
3.3.10.3. Approve/Reject Article Comments
If you have selected the option that knowledgebase comments require approval in the global settings section, you will be able to view any comments made that needs to be approved here. Any comments that are awaiting approval will be listed and show the Users e-mail address, their IP address, the date and time, and the category and article in which the comment resides. You may select multiple comments to approve or reject. Any rejected comments will be automatically deleted.
3.3.11. Branding
This section allows you to upload a customized logo for your helpdesk if you wish to replace the default Cerberus Helpdesk logo. It only contains one section, Upload Logo. You may type in the location of the file or you can also browse to the file you would like to upload as your logo. Note that the image must be in GIF format, and has a limit of 100 pixels for the height with a variable width.
3.3.12. Maintenance
This section will allow you to either optimize your database tables or purge dead tickets. If you feel you are having a slowdown, you can try optimizing your database tables to see if that helps.
3.3.12.1. Optimize Tables
If you would like to optimize your database tables, click the optimize button. Optimizing your tables will
http://www.cerberusweb.com/manual/adminmanual.firstlook.html (18 of 21) [7/21/2004 5:59:21 PM]

Configuration - The Area 51 of Cerberus
attempt to make sure everything is performing as smoothly as possible within the database.
3.3.12.2. Purge Dead Tickets
To remove dead tickets from the system, click the Perform button on this section. Tickets marked as dead can only be purged if it meets the time requirement set under Global Settings.
3.3.13. E-mail Addresses
This section will allow you to either block senders or export the e-mail addresses from the system.
3.3.13.1. Block Senders
In the block senders area you can view all the e-mail addresses that are already being blocked. You may also search for an e-mail address if you can't seem to find it.
3.3.13.2. Export Addresses
The export addresses section allows you to export addresses from the queues in which you select. You also have the choice to select a comma or a line return delimiter, and whether or not you would like to export the addresses to a file, or print it to the screen.
http://www.cerberusweb.com/manual/adminmanual.firstlook.html (19 of 21) [7/21/2004 5:59:21 PM]

Configuration - The Area 51 of Cerberus
3.3.14. Development
The development section has 2 subsections, Bug Report, and Give Feedback. Both of these will send an e-mail out to the Cerberus Helpdesk team.
3.3.14.1. Report Bug
To report a bug, fill out the Bug Summary (Subject of mail), your name and e-mail address, and a detailed description of the bug you are experiencing. Debug information about your system will automatically be included in the text box to be sent to our team.
3.3.14.2. Send Feedback
To give feedback, fill out the subject line, your name and e-mail address, and whatever you wish to give feedback on in the text box provided.
http://www.cerberusweb.com/manual/adminmanual.firstlook.html (20 of 21) [7/21/2004 5:59:21 PM]

Configuration - The Area 51 of Cerberus
Prev Home NextFirst view of the Support-GUI Up Contacts
http://www.cerberusweb.com/manual/adminmanual.firstlook.html (21 of 21) [7/21/2004 5:59:21 PM]

http://www.cerberusweb.com/manual/adminmanual.contact.html
Cerberus Helpdesk™ Handbook: Current Helpdesk Version: 2.4.0 (during this manual revision)Prev Chapter 3. Administrators Manual Next
3.4. ContactsThe contacts link brings you to a new screen which will show you the listing of all the companies and registered contacts that are in the system. Here you can add, edit, or delete these companies/contacts.
3.4.1. Adding a Company
Companies group together the Registered Contacts with whom you communicate. To ensure various companies get the appropriate level of service according to your relationship with them, you can assign a Service Level Agreement (SLA) plan to the company. An SLA will allow Cerberus to automatically manage the ticket and response due dates for communication with Registered Contacts under a given company.
When adding a company, you have many fields in which to enter information, however it is not necessary to fill out all the fields in order to add a company.
http://www.cerberusweb.com/manual/adminmanual.contact.html (1 of 3) [7/21/2004 5:59:22 PM]

http://www.cerberusweb.com/manual/adminmanual.contact.html
3.4.2. Adding a Contact
A Registered Contact is a user who has access to any public customer services (Cerberus Support Center, etc.) that you may be providing to customers through your various websites. You can group all correspondence from this contact by adding their various e-mail addresses to their record. By adding the contact to a company, you can tie all correspondence to a company record -- and the contact may further benefit from company-wide Service Level Agreements (SLAs), etc.
When adding a contact, you will have many fields in which to enter information, however it is not necessary to fill out all the fields to add a client.
http://www.cerberusweb.com/manual/adminmanual.contact.html (2 of 3) [7/21/2004 5:59:22 PM]

http://www.cerberusweb.com/manual/adminmanual.contact.html
Prev Home NextConfiguration - The Area 51 of Cerberus
Up Reports
http://www.cerberusweb.com/manual/adminmanual.contact.html (3 of 3) [7/21/2004 5:59:22 PM]

Reports
Cerberus Helpdesk™ Handbook: Current Helpdesk Version: 2.4.0 (during this manual revision)Prev Chapter 3. Administrators Manual Next
3.5. ReportsCurrently in Cerberus Helpdesk there are 12 reports available in the system. These reports range from the Agent Login Report to the Total Tickets Offered per Queue Report.
3.5.1. Agent Login Report
The Agent Login Report displays the logins per day for users in the system over a specified date range. Note that you see the Agents Name (full name NOT the username), the time they logged in, the time they logged out, the total login time, and the IP address with that login. It is also important to note that if a user's login exceeds 12 midnight, their logout time will show on the previous days report.
http://www.cerberusweb.com/manual/adminmanual.reports.html (1 of 8) [7/21/2004 5:59:28 PM]

Reports
3.5.2. Agent Performance Report
The Agent Performance Report will list all e-mail replies and comments over a specified date range. You will notice the Agents Name (full name), the Agent Login name, Replies, and Comments. Please note that this will list all replies to a ticket and does not only count the initial reply.
3.5.3. Agent Summary Report
The Agent Summary Report gives a date range breakdown for every agent, showing the Agent Name,
http://www.cerberusweb.com/manual/adminmanual.reports.html (2 of 8) [7/21/2004 5:59:28 PM]

Reports
Agent Login, the number of Email Handled, the Average Response Time, and the Average Time Logged In. Please note that the number of Emails listed here only includes initial e-mails that are replied to and resolved. It does not count further replies to the same e-mail. If the date of the e-mail is before the range of the report, it will not show up for that report, but would show up in a report of the date range of when the ticket was created.
3.5.4. Agent Ticket Assignment Report
The Agent Ticket Assignment Report gives a breakdown of the number of assigned tickets per queue grouped by the agent name. You can filter the report to choose a specific agent, or you may show all agents (default).
3.5.5. Average Initial Handle Time Report
http://www.cerberusweb.com/manual/adminmanual.reports.html (3 of 8) [7/21/2004 5:59:28 PM]
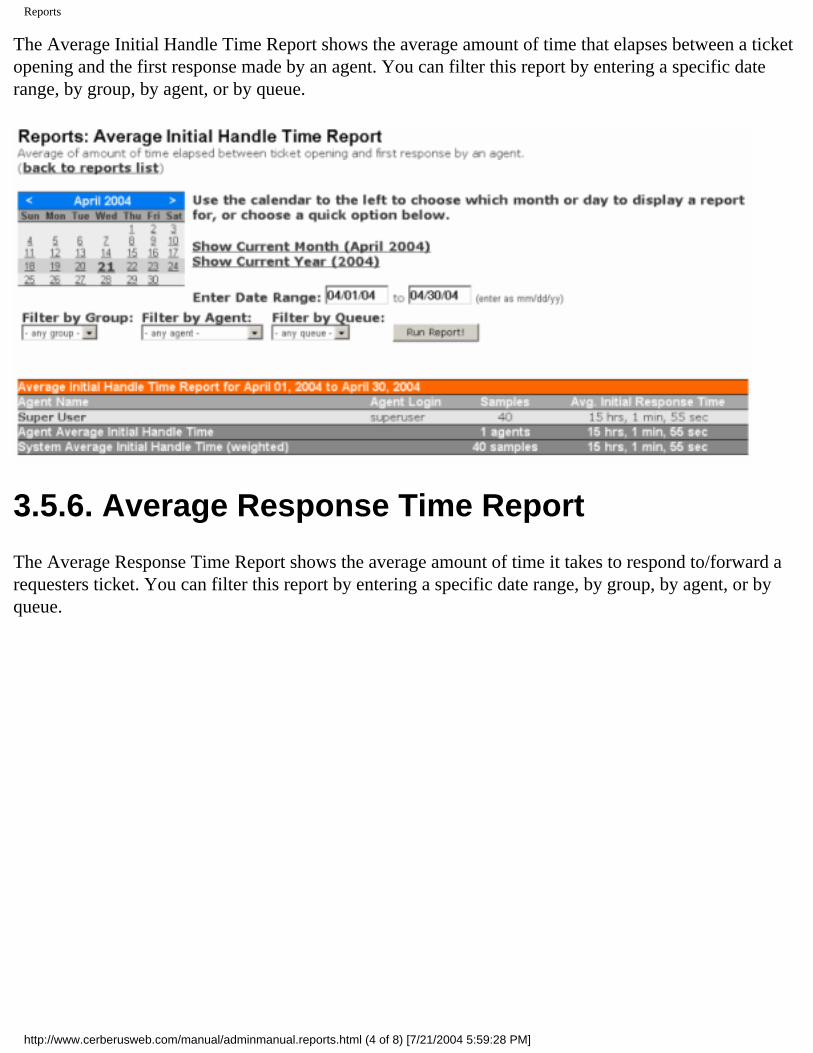
Reports
The Average Initial Handle Time Report shows the average amount of time that elapses between a ticket opening and the first response made by an agent. You can filter this report by entering a specific date range, by group, by agent, or by queue.
3.5.6. Average Response Time Report
The Average Response Time Report shows the average amount of time it takes to respond to/forward a requesters ticket. You can filter this report by entering a specific date range, by group, by agent, or by queue.
http://www.cerberusweb.com/manual/adminmanual.reports.html (4 of 8) [7/21/2004 5:59:28 PM]

Reports
3.5.7. Average Total Handle Time Report
The Average Total Handle Time Report shows the amount of time elapsed between a ticket being opened/reopened and being resolved by an agent. You can filter this report by entering a specific date range, by group, by agent, or by queue.
3.5.8. Group Assignment Overview
http://www.cerberusweb.com/manual/adminmanual.reports.html (5 of 8) [7/21/2004 5:59:28 PM]

Reports
The Group Assignment Overview report shows which user is assigned to a group. It will list the Agents Name, their Email Address, and their Agent Login name. You may filter this report by a specific group, or show all groups.
3.5.9. Group Summary Report
The Group Summary Report gives a date range breakdown by group for each agent, showing their average handle time and number of e-mails handled (actual number of e-mails, not replies).
3.5.10. Queue Summary Report
The Queue Summary Report gives a date range breakdown by queue for each agent, showing their
http://www.cerberusweb.com/manual/adminmanual.reports.html (6 of 8) [7/21/2004 5:59:28 PM]

Reports
average handle time and number of e-mails handled (actual number of e-mails, not replies).
3.5.11. Service Level Report
The Service Level Report shows what percentage of e-mail was responded to an agent within a given number of hours. You can filter this report by date, the number of hours, by group, and by queue.
http://www.cerberusweb.com/manual/adminmanual.reports.html (7 of 8) [7/21/2004 5:59:28 PM]

Reports
3.5.12. Total Tickets Offered per Queue
This report shows the total number of tickets offered per queue over a date range. You may filter this report by date, by queue, and additionally by a requester.
Prev Home NextContacts Up User/Technician Manual (support,
staff, etc)
http://www.cerberusweb.com/manual/adminmanual.reports.html (8 of 8) [7/21/2004 5:59:28 PM]

http://www.cerberusweb.com/manual/user.manual.html
Cerberus Helpdesk™ Handbook: Current Helpdesk Version: 2.4.0 (during this manual revision)Prev Next
Chapter 4. User/Technician Manual (support, staff, etc)Although we try to make Cerberus Helpdesk as user friendly and easily understandable as possible, we understand that some functions of the helpdesk may be totally new to you. This section of the manual will describe what and how functions such as "Quote and Reply" and "Set resolved" do.
4.1. The BasicsEveryone has to start somewhere and just as well, we will start off in the very basics of logging into the helpdesk and what you will first see after you login.
4.1.1. Logging in
The first thing to do after Cerberus has been set up is to log into the Support-GUI. Use your browser to navigate to where you installed the Support-GUI. The default location would be: http://<yourdomain>/cerberus-gui/login.php. Enter your username and password as supplied to you by your administrator.
You may notice that there is an area on the login screen to get your password should you forget it. The first step is to enter your email address that is set to your account. The system will then email you a verification code. You then enter this code in step 2 and your password will be sent to you via email. It is
http://www.cerberusweb.com/manual/user.manual.html (1 of 4) [7/21/2004 5:59:30 PM]

http://www.cerberusweb.com/manual/user.manual.html
important to enter the proper email addresses assigned to you so that you can receive the "E-mail reset verification code".
4.1.2. Overview of the GUI
This image will probably be similar to how you will first see the Support GUI (Note: There may or may not be any data in the system yet depending on how long your helpdesk has been live). You will notice that the GUI is laid out in a few different areas.
4.1.2.1. Quick Jump Setting
The top right of the GUI is where you will find your quick jump links. These items include: Ability to go to your Dashboard (if enabled by your administrators), Ability to jump to a specific queue, Ability to create a new ticket in a specific queue, and also the Ability to go to a specific ticket itself. Later sections
http://www.cerberusweb.com/manual/user.manual.html (2 of 4) [7/21/2004 5:59:30 PM]

http://www.cerberusweb.com/manual/user.manual.html
will cover what exactly each of these items will do.
The top left of the GUI contains links to go Home, the Knowledgebase, Configuration, Reports, and Search Results. (Note: Links will vary depending on what your administrators have set up)
4.1.2.2. System Overview
The left hand column is an overview of what is going on in the system. Here you can see the System Time/Status, the Last Ticket viewed, the Queues and the current Queue loads, the Last 7 days and amount of tickets per day, and general statistics of the system.
4.1.2.3. Main View
You'll notice that the right section of the helpdesk is the most prominent. This is the main view of any tickets in the system (dependent on the view you have set, more on that later) and any tickets assigned to
http://www.cerberusweb.com/manual/user.manual.html (3 of 4) [7/21/2004 5:59:30 PM]

http://www.cerberusweb.com/manual/user.manual.html
you.
Access to search tickets and view the other technicians online are located just below this main view.
The Who's Online section shows all current users and their ip addresses that are logged into the system.
Prev Home NextReports Getting Your Feet Wet
http://www.cerberusweb.com/manual/user.manual.html (4 of 4) [7/21/2004 5:59:30 PM]

http://www.cerberusweb.com/manual/usermanual.feetwet.html
Cerberus Helpdesk™ Handbook: Current Helpdesk Version: 2.4.0 (during this manual revision)Prev Chapter 4. User/Technician Manual (support, staff, etc) Next
4.2. Getting Your Feet WetWe here at WebGroup Media are using this as just a figure of speech. We would highly suggest notifying someone if your work area is flooded with water!
4.2.1. Quick Jumps and more!
Located on the top right of your screen are the Quick Jumps.
4.2.1.1. The Jump To _____ button
The Jump To button allows you to go to 6 different sections of the dashboard. The list is as follows: My Cerberus (Dashboard), My Notifications, My Projects/Tasks, My Messages, My Quick Assign/Watcher, and My Preferences. For a more detailed explanation of what the dashboard and its components do, please see
4.2.1.2. Quick Queue Jump
The Quick Queue jump allows you to quickly go and view tickets in a specific queue. Only queues that your group has access to will show up in this dropdown
4.2.1.3. New Ticket In _______
The New Ticket In button allows you to select a specific queue in which you would like to start a new ticket. After hitting the "Go!" button, you will be taken to a new ticket page.
4.2.1.4. GoTo Ticket
http://www.cerberusweb.com/manual/usermanual.feetwet.html (1 of 6) [7/21/2004 5:59:31 PM]

http://www.cerberusweb.com/manual/usermanual.feetwet.html
The Goto Ticket jump allows you to specify a ticket number you want to view. Both masked and non-masked ticket numbers (e.g. 1540, or #EFX-55467-153) apply in this area.
4.2.1.5. Configure My Quick Assign Link
This is the same as going to the Quick Assign portion of the top Jump To button.
4.2.2. Links, just not on the golf course.
Located just below the logo on the top left of your screen.
4.2.2.1. Home
As self explanatory as it gets, the Home link sends you to the front page of the helpdesk!
4.2.2.2. Search Results
The Search Results link only appears after you have done a search in the system. It will relist your last search results that you looked for. If no searches have been made (Like the first time you log in for the day), this link will not appear.
4.2.2.3. Knowledgebase
The Knowledgebase link (if applicable, your company may not be using the knowledgebase) takes you to, you guessed it, the Knowledgebase. Here you can view articles that your company has entered for referencing.
4.2.2.4. Configuration
The Configuration link sends you to the configuration page for Cerberus Helpdesk. You may or may not have access to this link depending on your group levels set by your Superuser/Administrators.
4.2.2.5. Contacts
http://www.cerberusweb.com/manual/usermanual.feetwet.html (2 of 6) [7/21/2004 5:59:31 PM]

http://www.cerberusweb.com/manual/usermanual.feetwet.html
The Contacts link sends you to a page with all the company and contact listings with whom you have communicated.
4.2.2.1. Reports
The Reports link will take you to the listing of reports that are available to be run on the system. You may or may not have access to these reports depending on your group access.
4.2.3. System Overview
The System Overview is located on the left hand column of your screen. This area has a blue header (set on default colors)
4.2.3.1. System Status
The System Status shows the Date and Time of your local Cerberus Helpdesk system.
4.2.3.2. Last Ticket Viewed
The Last Ticket Viewed shows the Ticket ID and Subject of the last ticket you opened. Useful if you just recently set a ticket to be resolved or dead and do not want to search for it.
4.2.3.3. Queue Load Percentage
The Queue Load %(Percentage) section shows all queues in the system and the number of tickets in each
http://www.cerberusweb.com/manual/usermanual.feetwet.html (3 of 6) [7/21/2004 5:59:31 PM]
http://www.cerberusweb.com/manual/usermanual.feetwet.html
queue. The bar next to each queue represents the percentage load to the system.
4.2.3.4. Last 7 Days (New Tickets)
The Last 7 Days section shows the amount of tickets that entered into the system day by day for the previous seven days (note: The current day is included in those seven days). These numbers may change depending on how many tickets you mark as dead/spam to ensure accuracy of the amount of tickets received.
4.2.3.1. Statistics
The Statistics view shows four different lines.
1) Number of Tickets Stored
The total amount of tickets stored in your system. Again this number may change as tickets are marked dead/spam and purged.
2) Amount of Correspondence Stored
The total amount of threads stored in the system. This can include replies, forwards, and comments.
3) Number of Addresses Stored
The total amount of requestor addresses stored in the system.
4) Number of Knowledgebase Articles
The total amount of articles available for use in the knowledgebase system. (Your system may not use a knowledgebase, so this field may be empty)
4.2.3.2. Auto Refresh GUI
This functions as the same under Preferences in your dashboard. You can use this to set how many minutes you want the system to automatically refresh the main page.
4.2.4. Main Ticket View
The main ticket views fills the majority of the page. Here you will find areas such as Highest Priority
http://www.cerberusweb.com/manual/usermanual.feetwet.html (4 of 6) [7/21/2004 5:59:31 PM]

http://www.cerberusweb.com/manual/usermanual.feetwet.html
Tickets Assigned and Newest Unassigned Tickets. (These are the default views when the system first goes live. Your views may differ as your company creates new views to better customize your helpdesk!)
4.2.4.1. Highest Priority Tickets Assigned (Default view)
In the default view, this area will show you all tickets assigned to you by order of priority. As you accumulate tickets, you can set the filter below to display as few/many tickets as you would like. Tickets contain checkboxes next to the Ticket ID which allows you to Change Status, Change Queue, Change Owner, and Perform Action on as many tickets as you would like at a time.
4.2.4.2. Newest Unassigned Tickets (Default view)
In this default view, this area will show all new tickets that are currently unassigned. This area may be set either by newest ticket first or oldest ticket, depending on how your company wishes to choose to set up their views. Like the Highest Priority Tickets Assigned view, you have the option to filter how many tickets to display and have the same four options to change the tickets in this view.
4.2.4.3. Quick Ticket Search
The Quick Ticket Search area allows you to do a multitude of searches. In this section you can search for tickets in a queue, by the status, by the sender, by the subject, by the content, by the ticket owner, and finally by company.
http://www.cerberusweb.com/manual/usermanual.feetwet.html (5 of 6) [7/21/2004 5:59:31 PM]

http://www.cerberusweb.com/manual/usermanual.feetwet.html
4.2.4.4. Who's Online
The Who's Online section will show all the users that are logged into the system. It displays the username, their IP address, their idle time, and also contains a link to send them a private message (PM).
Prev Home NextUser/Technician Manual (support, staff, etc)
Up Diving in (Ticket views)
http://www.cerberusweb.com/manual/usermanual.feetwet.html (6 of 6) [7/21/2004 5:59:31 PM]

http://www.cerberusweb.com/manual/usermanual.divingin.html
Cerberus Helpdesk™ Handbook: Current Helpdesk Version: 2.4.0 (during this manual revision)Prev Chapter 4. User/Technician Manual (support, staff, etc) Next
4.3. Diving in (Ticket views)We will start taking a more indepth look at how tickets look and what functions you, the technician, can do in this area.
4.3.1. The Main Ticket View
The normal view of a support ticket consists of a few different sections. We will show what each section contains and what you as a technician can do in each view.
4.3.1.1. The Header
The header on top of the page stays the same as the home page of the helpdesk so you can easily navigate out of a ticket.
4.3.1.2. Tabs
There are six tabs available to you. They include: Display Thread, Properties/Ticket Fields, Manage Requesters/Fields, Anti-Spam, Batch, and Log.
Display Thread
This tab is the main view of any ticket. It shows the, Ticket Properties at a Glance, Ticket Vital Signs, Customer Support History, Company/Service Level Agreement Details, Ticket Audit Log (Last 5 Actions), and the Ticket Thread.
Ticket Properties at a Glance
This section of the display thread allows you to quickly view and/or change a tickets owner/status without needing to scroll through the entire thread itself. You can see/change the Ticket ID, its Status, the
http://www.cerberusweb.com/manual/usermanual.divingin.html (1 of 8) [7/21/2004 5:59:34 PM]

http://www.cerberusweb.com/manual/usermanual.divingin.html
Ticket Owner, the time worked, the Ticket Priority, and the Queue which the ticket is in. Here you also have the Spam Probability Rating and Training button.
Ticket Vital Signs
The ticket vital signs section shows the date/time which the ticket was created, the due date/time of the ticket, the number of requesters (e-mail addresses) in the ticket, and the Ticket Users. Pay close attention to the Ticket Users portion, as it displays if another technician is already reading or perhaps replying to that ticket.
Customer Support History
The customer support history shows the last 10 tickets that were opened by that requester. There are also buttons to show the next 10 tickets created, or to show the full customer history by the requester.
Ticket Audit Log
The ticket audit log shows the last 5 actions that were performed on the ticket. It shows the date, time, and the action that was performed.
Company/Contacts
If you have companies already set up in your Contacts page, the requesters address may already be assigned to a company. If the address is not assigned, you can view or search through the contacts, or create a new contact for that requester.
http://www.cerberusweb.com/manual/usermanual.divingin.html (2 of 8) [7/21/2004 5:59:34 PM]

http://www.cerberusweb.com/manual/usermanual.divingin.html
Cerberus Fetch and Retrieve
Cerberus Fetch and Retrieve is an intelligent agent system. You train the system to recognize good articles that are relevant to the ticket you are currently answering. After the system is taught, it will attempt to suggest articles that may be able to answer the contents of the ticket.
Ticket Thread
The ticket thread itself shows the entire dialogue sent in by the requester and any comments, replies, or forwards done to the initial ticket. As a technician you have a multitude of options ranging from Reply to Print Thread. A more indepth look into these options will be later on in the manual.
4.3.1.3. Properties/Ticket Fields
The properties and ticket fields tab allows you to change the Subject, Status, Owner, Queue, and Priority of that ticket. If you also have any custom fields set up by your company, you will be able to edit those details on this tab, along with being able to merge the ticket with another (if you have access to this command).
4.3.1.4. Manage requesters/Fields
In the manage requesters and fields tab, you can change and add requesters to the ticket. You may also suppress certain requesters so that any replies will not be sent to a particular requester. If your company
http://www.cerberusweb.com/manual/usermanual.divingin.html (3 of 8) [7/21/2004 5:59:34 PM]

http://www.cerberusweb.com/manual/usermanual.divingin.html
has set up any custom requester fields, you may also edit those in this tab.
4.3.1.5. Anti-Spam
The anti-spam tab shows the spam probability, the training of that ticket as spam/not spam, and the words that factored into the probability rating.
4.3.1.6. Batch
The batch tab shows any tickets that you have added to your batch queue. In this tab you can do a batch comment or a batch reply to all the tickets in your batch queue.
4.3.1.7. Log
The log tab is just an expansion of the Ticket Audit Log. Instead of the last 5 you see on the Display Thread tab, you see all actions taken on the ticket.
4.3.2. Ticket Functions
By now you've seen many different places in which you can change the status of a ticket without ever reviewing the ticket itself. Now it's time to focus on all the functions you can do while viewing the actual ticket thread.
4.3.2.1. Reply
The reply button will bring you to a new blank e-mail screen for you to type in your message. You can see the From address which the requester will see who the e-mail is from, the requester's e-mail address that you are replying to, a section in which you can CC (Carbon Copy) the reply to, yet another status section in which you can manipulate the ticket upon working on it, an update type (typically you won't use this unless you change your mind on just replying), and a box in which in you can enter how much time you worked on this ticket.
Another Ticket Users line appears, remember to note if someone else is already replying or browsing that same ticket to avoid multiple replies.
Above the text box in which you will be typing the body of your message, there are a few buttons to note: Quote, Insert Signature, Use E-mail Template, Spellcheck, Take Ticket, and Set Resolved.
http://www.cerberusweb.com/manual/usermanual.divingin.html (4 of 8) [7/21/2004 5:59:34 PM]

http://www.cerberusweb.com/manual/usermanual.divingin.html
Quote
The quote button automatically inserts the [quote] and [/quote] tags so you can quote text from one of the replies in the review panel. Use this in case you changed your mind from just replying to wanting to reply and quote.
Insert Signature
Depending on your preferences from the dashboard, clicking this button will automatically insert your signature at the top or the bottom of your message body.
Use Template
If you have a response already set up for the ticket you are replying to, click this button to bring up the list of available E-mail Templates your company has set up. You may insert a template at anytime in your message and it will insert itself to the bottom of your message.
http://www.cerberusweb.com/manual/usermanual.divingin.html (5 of 8) [7/21/2004 5:59:34 PM]

http://www.cerberusweb.com/manual/usermanual.divingin.html
Spellcheck
We all know that spelling errors are abound while typing. Use this button to spellcheck your message and ensure you have all the correct spellings!
Take Ticket
If you want to automatically assign this ticket to you after working on it, click the Take Ticket button and it will set the Owner to your username.
Set Resolved
The set resolved button automatically sets the status of the message to "Resolved." Upon submitting the final changes to the ticket, the ticket will already be resolved.
Located below the text box you may also attach or remove any attachments to the ticket you are replying to. Clicking the Add/Remove attachment button brings up a browse window for your computer's hard disk.
Finally, you will see a Next Step, Go To: drop down item. From here you can tell the system to take you back to the same ticket thread you just replied to, the ticket listing of the current Queue you are in, the last search you performed, the Batched Tickets page, or back to the home page.
http://www.cerberusweb.com/manual/usermanual.divingin.html (6 of 8) [7/21/2004 5:59:34 PM]

http://www.cerberusweb.com/manual/usermanual.divingin.html
If for any reason you need to refer back to the thread details, the ticket thread review is located at the very bottom of the page.
4.3.2.2. Quote and Reply
The quote and reply button functions the same as the reply button, however the message you are replying to gets automatically quoted and inserted into the message body area.
4.3.2.3. Comment
Comments are used for adding information to the thread without actually replying back to the original ticket requester. You have the same abilities as reply and quote and reply, however the message gets added to the thread and no response is sent to the requester.
4.3.2.4. Quote and Forward
Quoting and forwarding is similar to quote and replying, however it is used to send the thread response to a 3rd party not listed in the requester fields. You have the same abilities in reply/quote and reply, and no response is sent to the original requester.
4.3.2.5. Forward
Forwarding a message will send off a copy of the message to another address with no chance to edit the message itself.
4.3.2.6. Bounce
The bounce feature allows you to send an e-mail directly to another address if it is mistakingly sent to you. It will act as if the original e-mail was "bounced" to the destination address to be taken care of.
http://www.cerberusweb.com/manual/usermanual.divingin.html (7 of 8) [7/21/2004 5:59:34 PM]

http://www.cerberusweb.com/manual/usermanual.divingin.html
4.3.2.7. Add to Requesters
The add to requesters button will automatically enter the e-mail address of the portion of the thread you are viewing to the requester list.
4.3.2.8. Block Sender
The block sender button will automatically add the offending e-mail address to the systems blocked senders list, disallowing any e-mail from that address to enter the system.
4.3.2.9. Strip HTML
In the case that someone sends you an HTML message, you can have the system strip the message of all HTML and save the ticket in its raw form. After hitting Strip HTML, you can preview the change and either Accept or Reject the changes. Note that the system will automatically attempt to strip HTML code from inbound e-mail as it comes in.
4.3.2.10. Print Thread
If you would like to print the ticket thread out for hardcopy purposes, clicking the Print Thread button will bring up a new window and display the printer friendly version of the thread. You may then Print or Close the window.
Prev Home NextGetting Your Feet Wet Up Driving Cerberus - (AKA The
Dashboard)
http://www.cerberusweb.com/manual/usermanual.divingin.html (8 of 8) [7/21/2004 5:59:34 PM]

Driving Cerberus - (AKA The Dashboard)
Cerberus Helpdesk™ Handbook: Current Helpdesk Version: 2.4.0 (during this manual revision)Prev Chapter 4. User/Technician Manual (support, staff, etc) Next
4.4. Driving Cerberus - (AKA The Dashboard)The dashboard contains many useful tabs for you to optimize the time you spend within the helpdesk. From the preferences to private messages, the dashboard is where it's at.
4.4.1. My Cerberus
Within My Cerberus you will notice a few things. The first being the calendar with the current month and year, and the current day in bold. The calendar provides you a way to see your ticket worked on history. Just click a day and it will automatically change the screen to show you your history for that day. To the right of the calendar you can view "My Performance." The My Performance area covers your assigned active tickets, your last resolved ticket, and a 7 day activity snapshot. You can list all your active assigned tickets and also go back to your last resolved ticket through the links provided. On the bottom of this page you will see the Tickets Worked History. This shows all tickets that you have performed an action on for the selected day.
4.4.2. Preferences
The preferences tab allows you to set some settings for your GUI and ticket viewing. The first section of the preferences tab is User Preferences. Here you can set how many minutes you would like the GUI to auto refresh itself, whether or not you would like to view tickets with the oldest/newest message first, and what language you would like the GUI to be set in.
http://www.cerberusweb.com/manual/usermanual.driving.html (1 of 6) [7/21/2004 5:59:37 PM]

Driving Cerberus - (AKA The Dashboard)
The second section allows you to change your password. You need to enter your current password, your new desired password, and another line to verify your new password.
The third section is where you set your signature for your replies/forwards etc. You have your text body space and then you can set whether or not you would like to place the signature before or after quoted text, and whether or not you want the signature to be automatically placed.
4.4.3. Notifications
The notifications tab allows you to configure an e-mail that will automatically be sent to you upon certain events such as assignment, or requester reply. You have different tokens that can be placed in the e-mail that gets sent to you ranging from the ticket ID to the requesters e-mail address itself.
http://www.cerberusweb.com/manual/usermanual.driving.html (2 of 6) [7/21/2004 5:59:37 PM]

Driving Cerberus - (AKA The Dashboard)
http://www.cerberusweb.com/manual/usermanual.driving.html (3 of 6) [7/21/2004 5:59:37 PM]

Driving Cerberus - (AKA The Dashboard)
4.4.4. Quick Assign / Watcher
The quick assign/watcher tab allows you to have certain queues automatically assign tickets to you or give you the ability to receive e-mails anytime something happens within a queue. For quick assignment, select the queues you want to have automatically assigned to you and then hit submit. You can also choose how many tickets you want to be assigned to you at once. Watchers receive an e-mail copy of all new tickets and correspondence for the queues you select.
4.4.5. Projects / Tasks
The Projects/Tasks tab will show all the projects that have been created in your helpdesk. If you do not have the hide completed tasks filter enabled, you will be able to see all current and finished projects in this tab. Depending on the access level that your company has given your group, you may or may not be able to create a new project or task.
http://www.cerberusweb.com/manual/usermanual.driving.html (4 of 6) [7/21/2004 5:59:37 PM]

Driving Cerberus - (AKA The Dashboard)
4.4.6. Private Messages
In a busy office environment its hard to communicate with coworkers (whether you are on the phone or your coworker is busy). With Private Messages, you can send and receive messages directly in Cerberus Helpdesk. When a new message arrives, it will bring up a pop up on your screen that says you have a new message and it will display who sent the message.
http://www.cerberusweb.com/manual/usermanual.driving.html (5 of 6) [7/21/2004 5:59:37 PM]

Driving Cerberus - (AKA The Dashboard)
Prev Home NextDiving in (Ticket views) Up Anti-Spam
http://www.cerberusweb.com/manual/usermanual.driving.html (6 of 6) [7/21/2004 5:59:37 PM]

Anti-Spam
Cerberus Helpdesk™ Handbook: Current Helpdesk Version: 2.4.0 (during this manual revision)Prev Chapter 4. User/Technician Manual (support, staff, etc) Next
4.5. Anti-SpamBy now you've seen a few instances of the anti-spam features that are provided in Cerberus Helpdesk. Cerberus incorporates what is known as Bayesian Filtering. Rather than just blocking certain keywords and e-mail addresses themselves, Bayesian Filtering gives a probability rating to show whether or not an e-mail is considered spam. By "training" the system with keywords that are more innocent(e.g. your company name) or more spammy (e.g. viagra), the system learns what is good and bad for your system. So whether your company is the leading publisher of children's books, or a major distributor of Viagra, it is up to you to train the system. So even though one word may be considered spam to you, to another company it may not. After you have trained the system sufficiently, you can then set a mail rule to move or delete spam above a certain probability rating, with little fear that an actual e-mail will get moved accidentally.
Prev Home NextDriving Cerberus - (AKA The Dashboard)
Up Knowledgebase Articles
http://www.cerberusweb.com/manual/usermanual.antispam.html [7/21/2004 5:59:38 PM]

Knowledgebase Articles
Cerberus Helpdesk™ Handbook: Current Helpdesk Version: 2.4.0 (during this manual revision)Prev Chapter 4. User/Technician Manual (support, staff, etc) Next
4.6. Knowledgebase ArticlesKnowledgebase Articles can be your best asset in determining a solution to a problem. With Cerberus Helpdesk's new Fetch and Retrieve™ Technology, the more the system learns that a knowledgebase article has provided good responses, the more accurate the system becomes.
4.6.1. Searching and Listing Articles
The Knowledgebase allows you to search through every article in every category, or you may specify which category you search in. You may also browse a category underneath the search boxes.
4.6.2. Creating a New Article
When creating a new knowledgebase category, you will be taken to a new page that will have several fields. The first field, Summary, should be a short description of the problem like "What kinds of payments do you accept?". The next field, Category, is where the article will be located. Your administrators probably have set up a few different categories in which you can place this article. The keywords field should contain relevant keywords to the article, make sure you don't enter common words such as, the, and, or. You may also select whether to make this article Public (available for viewing in the Support Center) or Private (only available in the helpdesk).
http://www.cerberusweb.com/manual/usermanual.knowledgebase.html (1 of 3) [7/21/2004 5:59:40 PM]

Knowledgebase Articles
The text box containing the 'Description of Problem' will be where you put in a more comprehensive description, as opposed to what you put in on the summary box. Rather than just saying "What type of payments do you accept?" it would now read something like, "Do you accept Visa, American Express, Mastercard, etc etc".
The 'Description of Solution' box is where you will type in the resolution to the problem.
4.6.3. Commenting on Knowledgebase Articles
Usually as a technician on the helpdesk, you won't need to add comments to a knowledgebase article. Comments are mainly used to allow the public to give feedback on the articles that they are allowed to see.
http://www.cerberusweb.com/manual/usermanual.knowledgebase.html (2 of 3) [7/21/2004 5:59:40 PM]

Knowledgebase Articles
Prev Home NextAnti-Spam Up Support Center/Public Interface
http://www.cerberusweb.com/manual/usermanual.knowledgebase.html (3 of 3) [7/21/2004 5:59:40 PM]

Support Center/Public Interface
Cerberus Helpdesk™ Handbook: Current Helpdesk Version: 2.4.0 (during this manual revision)Prev Next
Chapter 5. Support Center/Public InterfaceThe Support Center/Public Interface is a powerful tool for your clients/customers to be able to communicate or find information regarding your company in a highly customizable interface. From this interface, your clients and customers can check the status of their tickets, open new tickets, or find help through your public knowledgebase.
http://www.cerberusweb.com/manual/support.center.html (1 of 2) [7/21/2004 5:59:41 PM]

Support Center/Public Interface
5.1. My AccountIn the My Account section (only available after a user has logged in), you will see sections in which to fill out information such as, First/Last Name, Address, Phone number. This will help you keep track of your customers in your Contacts page in your helpdesk.
Prev Home NextKnowledgebase Articles Browse Knowledgebase
http://www.cerberusweb.com/manual/support.center.html (2 of 2) [7/21/2004 5:59:41 PM]

Browse Knowledgebase
Cerberus Helpdesk™ Handbook: Current Helpdesk Version: 2.4.0 (during this manual revision)Prev Chapter 5. Support Center/Public Interface Next
5.2. Browse KnowledgebaseBy selecting Browse Knowledgebase, your customers/clients can view any articles you have set as 'public' in your Knowledgebase. Any articles not set to 'public' will not appear in the Support Center/Public Interface.
Prev Home NextSupport Center/Public Interface Up Open a Ticket
http://www.cerberusweb.com/manual/x1508.html [7/21/2004 5:59:42 PM]

Open a Ticket
Cerberus Helpdesk™ Handbook: Current Helpdesk Version: 2.4.0 (during this manual revision)Prev Chapter 5. Support Center/Public Interface Next
5.3. Open a TicketWhen your client/customer chooses to open a new ticket, they will be presented with the available queues to post a ticket to. If you have SLA plans set up for these queues that require a user to be part of that plan, the user will not be able to open a ticket in that queue. Upon selecting a queue (e.g. Technical Support), the user is presented with a From section, where they will need to input their e-mail address. A Subject section to put the subject of the ticket, and a Body section for the text of the message to be put in.
Prev Home NextBrowse Knowledgebase Up Track Open Ticket
http://www.cerberusweb.com/manual/x1512.html [7/21/2004 5:59:43 PM]

Track Open Ticket
Cerberus Helpdesk™ Handbook: Current Helpdesk Version: 2.4.0 (during this manual revision)Prev Chapter 5. Support Center/Public Interface Next
5.4. Track Open TicketIf a user has logged in, they can click on Track Open Ticket and view all the tickets that they have submitted and the status of each ticket. If they are not logged in, they will receive a message saying that they need to log in or register an account.
Prev Home NextOpen a Ticket Up Ask a Question
http://www.cerberusweb.com/manual/x1516.html [7/21/2004 5:59:44 PM]

Ask a Question
Cerberus Helpdesk™ Handbook: Current Helpdesk Version: 2.4.0 (during this manual revision)Prev Chapter 5. Support Center/Public Interface Next
5.5. Ask a QuestionYour clients/customers have the option to "Ask a Question". By using natural language, users are able to try to find answers by asking a question and receiving an answer if the knowledgebase contains information regarding the question. Natural language simply means that the client/customer should phrase the question like they would ask a real person (e.g. How do I FTP? or How can I pay you?).
If the knowledgebase does not come up with any suggestions to the question, it will allow the client/customer to do a search using keywords.
Prev Home NextTrack Open Ticket Up Registering an Account
http://www.cerberusweb.com/manual/x1520.html [7/21/2004 5:59:45 PM]

Registering an Account
Cerberus Helpdesk™ Handbook: Current Helpdesk Version: 2.4.0 (during this manual revision)Prev Chapter 5. Support Center/Public Interface Next
5.6. Registering an AccountWhen your clients/customers go to register an account, all they need to do is enter their e-mail address twice (second time is to confirm). After they have entered their e-mail address and submitted it, they will be sent a Confirmation Code to that e-mail address which they need to validate to be able to become registered.
Prev Home NextAsk a Question Up Other Cerberus Helpdesk Related
Resources
http://www.cerberusweb.com/manual/x1526.html [7/21/2004 5:59:46 PM]

Other Cerberus Helpdesk Related Resources
Cerberus Helpdesk™ Handbook: Current Helpdesk Version: 2.4.0 (during this manual revision)Prev Next
Chapter 6. Other Cerberus Helpdesk Related Resources
6.1. ForumsCerberus Helpdesk Official Forums - http://forum.cerberusweb.com/
Prev Home NextRegistering an Account Change Logs
http://www.cerberusweb.com/manual/resources.html [7/21/2004 5:59:46 PM]

Change Logs
Cerberus Helpdesk™ Handbook: Current Helpdesk Version: 2.4.0 (during this manual revision)Prev Chapter 6. Other Cerberus Helpdesk Related Resources Next
6.2. Change Logs
2.4.0
################################################
2.3.2 Release -to- 2.4.0 Release
################################################
[+] Added a new "Free Version" key to the http://www.cerberusweb.com/ site. It will allow you to run Cerberus with FULL functionality for a single e-mail address with NO expiration! This will replace our old "Trial Key" system which gave you full functionality for 30 days. [WGM]
[+] Added the Cerberus Fetch & Retrieve system. This system automatically provides your agents with suggested solutions from the knowledgebase on the ticket display screen. You can train Cerberus what suggestions are helpful or not helpful, and it will learn the different ways your customers are asking similar questions to become MUCH more accurate. You can also suggest articles that would have been helpful in solving an issue. This training is also tied into the customer interface to provide increasingly accurate solutions to their questions (via self-help). [Ben Halsted]
[+] Added the ability to group custom fields, as well as spawn as many instances of a custom field group as needed. You can now bind custom field groups to tickets and requesters as needed. For example, you could create a custom field group called "Bug Tracking Fields" consisting of fields like "Reproducibility", "Priority" and "Version" and initiate the group for each ticket reporting a bug. This adds vast new potential for the custom fields. [Jeff Standen]
[+] Added the Service Level Agreement (SLA) system. Cerberus now helps you enforce guaranteed response times by automatically managing ticket due dates according to your customizable SLA schedules for each queue. For one customer you may respond on weekends, for everyone else you may want Friday's end-of-business issues automatically assigned for first thing Monday morning. Using SLA plans, you may also optionally lock certain queues/departments to customers who have an appropriate SLA plan (911 queues, pager access, priority paid support, to combat spam, etc.) [Jeff Standen]
[+] Added a scheduling system which ties into SLA. You can now define through a default schedule what hours your queues are staffed, and can override these schedules using SLA plans for important
http://www.cerberusweb.com/manual/x1536.html (1 of 20) [7/21/2004 5:59:49 PM]

Change Logs
customers. [Jeff Standen]
[+] Added the "ticket due date" system. You can now override ticket due dates on every ticket from the Display page, and can quickly sort by due dates from views. When a ticket is late, it will show up as "overdue". The due date column replaced the 'age' column as a ticket view default. [Jeff Standen]
[+] Added the Contact Management system. You can enter this module from the [Contacts] link in the Cerberus header. This is where you can set up e-mail address to contact relationships, contact to company relationships, assign SLA plans to companies, manage public users, etc. [Jeff Standen]
[+] Revamped the Agent-side Knowledgebase area using new techniques from the Cerberus Support Center tool. Agents can now "ask" a question of the knowledgebase and get matches based on Fetch & Retrieve (above) training. The knowledgebase search system also allows an agent to fall back on a 'keyword search' and will automatically pick the most indexed keywords from their question to save time and provide a better match. Removed all the old knowledgebase API code. This also fixed various issues with complex knowledgebase trees (10 sub-levels, etc.) [Jeff Standen]
[+] Revamped the Public GUI Profiles area to support the new Cerberus Support Center public tool. You can now choose which public modules to enable (knowledgebase, register, submit ticket, track ticket, update profile, etc.), and custom field group support was added. [Jeff Standen]
[+] Optimized and benchmarked with a 4.7 million ticket database. Too many improvements to list in a ChangeLog entry -- but trust us, it's faaast! [Ben Halsted + Jeff Standen]
[*] Revamped E-mail Templates. Added tokens for company/contact/sla details. You can now choose to have an e-mail template replace the current e-mail you're writing, or simply prepend/append. [Jeff Standen]
[*] Optimization: Major performance optimizations to the database and API. Merged the ticket_mask and ticket tables to remove a slower LEFT JOIN. Split up thread_content into 255 character chunks so the MySQL fixed width table could be properly and quickly indexed. [Jeff Standen + Ben Halsted]
[*] You can now only reply to a ticket in a queue that has a valid "from" address. Otherwise you're restricted to commenting on a ticket without any outgoing messages. [Ben Halsted]
[+] Added HOST_NAME define to config.php to allow the overriding of the automatic host name detection code. Autodetection doesn't seem to work properly in a few Apache/PHP or mod_rewrite environments, including some RAQs. [Jeff Standen]
[+] Added an agent login report showing date range logins by user, timestamp and IP. [Trent Ramseyer]
[+] Added new tokens to queue autoresponses: ticket due, sla plan, contact & company details, queue
http://www.cerberusweb.com/manual/x1536.html (2 of 20) [7/21/2004 5:59:49 PM]

Change Logs
working hours (by schedule), target response time. [Jeff Standen]
[*] Fixed a Ticket View col_span issue when advanced controls were disabled for a view. [Jeff Standen]
[+] Added the ability to verify database indexes in the database patcher system. [Ben Halsted]
[*] In ticket views, the "age" and "due" columns will now be colored red or black depending on the actual ticket due date. [Jeff Standen]
[*] Revamped "Total Time Worked" on a ticket to store the sum of all the time spent on a ticket in the 'ticket' table of the database, rather than calculating the number each time it was needed. Added "Total Time Worked" back as a Ticket View column. [Jeff Standen]
[*] In Configuration you can now sort the order of custom fields in a group, and options in a drop-down custom field. [Jeff Standen]
[*] Fixed an RFC compliance issue where our e-mail date was only using 2 digit years in the headers. Some programs see this as a sign of spam. [Ben Halsted]
[*] Optimization: Optimized the queries in the Ticket Views system. Many tables (especially 'thread') were LEFT JOIN'd when they didn't need to be. This was highly inefficient. [Jeff Standen]
[+] Added a "Last Opened Ticket" link to the top of the GUI header so you can quickly get back to the last ticket you were working on from the knowledgebase, contact management, configuration, etc. [Jeff Standen]
[*] Fixed the ability to sort on view columns and use next/prev page on the Ticket Batch screen. [Jeff Standen]
[*] Fixed the issue with 'Goto Ticket' field where ticket id masks were returning NaN (not a number) when hitting enter rather than clicking the 'goto' button. [Jeff Standen][+] Added a NO_OB_CALLBACK constant that won't load an output buffering handler (ob_gzhandler, etc.) if it's set. This is best for some pages (the upgrade script, attachment sending, etc.) where you need info sent immediately & uncompressed. [Jeff Standen]
[*] Refactored the storage of knowledgebase ratings to be more efficient. The average is now calculated when someone adds a new rating for an article, and that final average is stored with the knowledgebase article. No longer will we have to inefficiently calculate the average every time we need it, for each article. This will also allow for easier sorting by KB rating, which has been requested a few times. [Jeff Standen]
[*] Moved the database object into the new Cerb 3.x API. Moved ADODB into includes/third_party/
http://www.cerberusweb.com/manual/x1536.html (3 of 20) [7/21/2004 5:59:49 PM]

Change Logs
[Jeff Standen]
[*] Modified the Public GUI Profiles code for the new 3.x Public GUI tool and the Custom Field Groups enhancement for 2.4.0. [Jeff Standen]
[*] Optimization: Added a spam probability cache, so the analyzation doesn't have to occur every time you need to display or use the probability (display page, parser, views, etc.) The cache is cleared when a ticket is trained as spam or ham. This should _really_ speed up any views that are showing spam probabilities for 10 or more tickets at a time. [Ben Halsted + Jeff Standen]
[*] Optimization: Changed the spam probability code to use the existing search word index to analyze the e-mail, rather than re-indexing the first thread every time. Added a new bit to the `search_index` table for `in_first_thread` to denote a word occured in the original e-mail (or subject) that opened a ticket -- which is what we scan when doing a spam probability. This should make a huge difference in the speed of the computations and reduction of database query load. [Ben Halsted]
[*] Fixed escaping in view names (in the view dropdown) that had an apostrophe in the name. [Jeff Standen]
[*] You can now search custom field groups from the advanced search box. [Jeff Standen]
[*] The database patcher (upgrade.php) will now check for a valid database connection prior to showing you a list of available patches. [Jeff Standen]
[*] Refactored the "only w/ customer responses" filter in view to use the thread table "is_agent_msg" bit -- it's much faster now. [Jeff Standen]
[*] Tweaked the default view for search results to now show the last wrote address instead of the requester. The age is now colored according to the due date as well. [Jeff Standen]
[*] Major query optimizations on the ticket display page and search indexing. [Ben Halsted]
[*] Refactored the way threads denote if they were written by an agent (helpdesk staff member) or a customer. Now it's a simple bit on the thread table rather than having to compare on e-mail addresses, which was terribly inefficient. [Jeff Standen]
[+] Added GMT offset parsing to the cer_Datetime class in the API. This allows us to convert between GMT + local timestamps for various functionality. [Jeff Standen]
[*] We're now storing thread_date and thread_received for each e-mail message. thread_date is the timestamp when the message physically entered Cerberus, thread_received it when the message was
http://www.cerberusweb.com/manual/x1536.html (4 of 20) [7/21/2004 5:59:49 PM]

Change Logs
received (according to the mail headers). Both of these fields are now available for ticket views. [Jeff Standen]
[-] Removed "ICQ" from User Edit in Configuration. This was depreciated because you can do the same functionality from the notification system now. [Jeff Standen]
[*] Fixed a bug where clicking "Go to" in the header would report NaN (not a number) when using ticket masks. [Darren Sugita]
[*] Fixed a bug in the GUI parser where the "ticket" table was being joined in a query but never providing a relationship in the join, creating extra rows. [Ben Halsted]
[*] Fixed ##user_address## in e-mail templates. The code was expecting ##user_email## -- now both are valid. [Ben Halsted]
[*] Fixed the "Windows does not support negative values" date/epoch bug in the Project Management area. [Ben Halsted]
[*] When the GUI parser creates a new ticket, the inbound queue ID will now be saved in the audit log for later reporting purposes. This will allow you to see exactly where tickets are entering the system regardless of workflow after that point. [Ben Halsted]
[*] Spellchecking has been added to the Create Ticket page. [Ben Halsted]
[*] Added validation to ensure the "New Ticket" form contains a requester address. [Trent Ramseyer]
[*] Added subtotaling to the "Assignment" report. Changed "Total Open" to "Total Assigned" to be more clear. [Trent Ramseyer]
[*] Previously when creating a new user in Configuration with the same login as an existing user, the system would report "Success: User updated." -- but the UNIQUE index in the database would prevent the user from being inserted. The GUI will now properly report an error in such cases. [Trent Ramseyer]
[*] When adding custom field group names in Public GUI profiles, the group name is now required. Users were having problems after accidentally creating a group with no name, since you had to click the 'group name' in the GUI to edit it. [Trent Ramseyer]
[*] Changed the link [Print Thread] to [Print Message] on the Display Ticket page. This was confusing some users. [Trent Ramseyer]
[*] Fixed a bug in Knowledgebase Article Edit where greater than and less than was being turned into its
http://www.cerberusweb.com/manual/x1536.html (5 of 20) [7/21/2004 5:59:49 PM]

Change Logs
HTML equivilent (> and <) in articles. [Ben Halsted]
[*] You'll now receive a notice when editing a Public GUI Profile about how to use the PROFILE_ID in setting up a customer interface. [Jeff Standen]
[*] Added a note to the multi-line custom field element that it accepts a maximum of 255 characters (due to optimizations in the database utilizing static row sizes.) [Jeff Standen]
[*] Views "Assigned to Anyone" now includes user 'Nobody'. [Jeff Standen]
[*] Fixed a bug with chunk splits (optimization of 255 char chunks) of e-mail bodies where MySQL was stripping a trailing slash in some causes, causing to words that ran together in the GUI (but not in the sent e-mail). [Jeff Standen]
[*] "Clone Ticket" will now copy a ticket's custom fields to the new ticket. [Jeff Standen]
[*] "Merge Ticket" will now merge both ticket's custom fields. [Jeff Standen]
[*] Fixed a 2.3.2 bug where tickets without a ticket mask didn't show up in Customer Support History. [Ben Halsted]
[*] Removed the [Help] system in the GUI for now since all the information is now available in the User Manual and MUCH more recent. We may consider adding this back later in an improved format. [Ben Halsted]
/
################################################
2.4.0 Release Notes
################################################
This release includes some MAJOR refactorings and optimizations. As usual, we've tried to make the upgrade as painless and automated as possible. However, a few of the more "sweeping" improvements will require your attention. We've made a few release notes:
[*] Ticket workflow is now dependent on the 'Ticket Due Date'. You should update your views to reflect the new 'Ticket Due' column.
[*] The default logo changed, so if you're updating from CVS you'll want to make a backup copy of your
http://www.cerberusweb.com/manual/x1536.html (6 of 20) [7/21/2004 5:59:49 PM]

Change Logs
existing one so you can quickly replace it.
[*] You'll have to re-add any custom fields you were referencing in ticket views due to the new custom field group structure.
[*] You'll have to redefine any custom field groups you created for Public GUI Profiles due to the new custom field group structure. Check over your Public GUI Profiles as well, the public gui tool has been MUCH improved for 2.4.0+.
[*] Since permissions have changed this version, go through the Group Permissions screen and make sure your access control lists are still to your liking.
[*] With the introduction of SLA, we redesigned the relationship of Companies, Public Users and Addresses in the database. A Public User (customer) can now be a member of more than one company. A Public User can now have more than one e-mail address. Without a clean/automatic migration path for this data from 2.3.x to 2.4.0, you'll have to reassociate e-mail addresses to Public Users, and Public Users to Companies. This is something the new 3.x Public Tool will also do for you automatically when users use the tool to register a new account.
2.3.2 RC4
##################################################
2.3.1 Release -to- 2.3.2 RC1
##################################################
[*] Fixed a bug with the user queue access overrides where in certain instances allowed queues would not be visible for normal users. This had to do with a pointer not being nulled improperly after each check. This is fixed and verified, and should fix the issue for those of you who sent in bug reports that we were not previously able to reproduce. Phew! [Jeff Standen]
[*] Fixed a division by 0 bug on 'Reindex KB Articles' when no articles exist. [Ben Halsted]
[*] Fixed a bug with URLs in knowledgebase articles hyperlinking more than they should. [Ben Halsted]
[*] Fixed a bug with passwords being allow unlimited lengths in User Add/Edit, but only allowing 12 characters to be entered as a password on the login form. [Ben Halsted]
[*] Fixed a bug in a regexp causing double quotes to be escaped in "Quote & Reply" text. [Ben Halsted]
http://www.cerberusweb.com/manual/x1536.html (7 of 20) [7/21/2004 5:59:49 PM]

Change Logs
[*] Changed the attachment_send.php code to use ./tempdir + fpassthru() for reliability and to fix Win32 issues with null terminators in files when downloading attachments from the GUI. [Jeff Standen]
[*] Changed fopen() calls to always use binary mode for handling file attachments. [Jeff Standen]
[*] The 'friendly from' name will now be used properly on auto open/close responses. [Jeff Standen]
[*] Fixed various issues with escaping/quotes in notification templates. [Jeff Standen]
[*] Fixed the 'permissions swapped' bug for Report Bug + Give Feedback in the Configuration menu. [Jeff Standen]
[*] Fixed a bug with the 'spam probability' criteria in mail rules that was causing the probability to be higher than it should be in some cases. [Jeff Standen]
[*] E-mail addresses with apostrophes, such as: jeff.o'[email protected], should now work with Cerberus. Although apostrophes are considered valid by RFC 2821/2822, many e-mail clients may have problems with addresses containing them (such as many versions of Outlook). It's recommended you stick to alphanumeric (as well as '-' and '_') e-mail addresses. [Jeff Standen]
[-] By multiple requests, I've removed the extra blank lines and spaces above the signature when creating a new ticket. [Jeff Standen]
[*] Changed the PHP filesize() calls to use fstat() since Win32 versions of PHP sometimes don't work _at all_ with filesize(), and for absolutely no reason. This solved the issues in a few Windows installations where this problem occured. NOTE: ADODB and Smarty's libraries may still make references to filesize(), but Cerberus won't. [Jeff Standen]
[*] Fixed a bug in several files where wide characters (usually from non-latin-based charsets) were getting escaped into single character entities. You should now be able to store/read/send mail with all those characters, provided you're using the appropriate language & charset in your Cerberus preferences. Charsets are defined in the language files. [Ben Halsted]
[*] Forwarding a message from a ticket will now include attachments. System attachments (message_source.xml + html_mime_part.html) will not be sent to the third-party e-mail address. NOTE: The mail system reads in all the attachments before sending the message, so if you plan on forwarding large e-mails and have a php.ini memory_limit in place -- be sure you increase the limit to the size of your largest preferred attachment. [Jeff Standen]
[*] Fixed "Quote & Reply" attachment behavior. It will now forward the attachments from whatever message you are quoting as well as any new attachments you append. [Jeff Standen]
http://www.cerberusweb.com/manual/x1536.html (8 of 20) [7/21/2004 5:59:49 PM]

Change Logs
[*] Modified the regular expression that auto hyperlinks URLs to only add the HREF to URLs preceded by a space, carriage return, line feed, or if they are the first text in a blurb. This allows you to use your own descriptive HREFs in a text block (e.g., knowledgebase article) if you so desire, bypassing the auto-hyperlinking. Before this, using a HREF would trigger auto-hyperlinking and just generate a mess. [Jeff Standen]
[*] You can now use full HTML in KB articles. [Jeff Standen]
[*] Fixed another caching issue in the HTTP headers. Thanks to JBushey for pointing this out. [Jeff Standen]
[*] Changing your password no longer requires a re-login. Thanks to Ralf Ebeling for the suggestion + code snippet. [Jeff Standen]
##################################################
2.3.2 RC1 -to- 2.3.2 RC2
##################################################
[*] More no-caching HTTP header fixes. [Jeff Standen]
[*] Added no-caching META HTTP-EQUIV tags to all top-level pages. [Jeff Standen]
[*] Modularized the reports system to simplify the creation of new reports. Docs on the process to follow. [Jeff Standen]
[*] Changed the .xml file extension to mime type text/xml for attachments. [Jeff Standen]
[*] Commented out the "or from ticket requesters" option on the reply screen that was confusing some users. [Jeff Standen]
[*] Added "Date: " using the RFC822 syntax to the ticket thread list, as well as the top of the quoting in a reply. For example: "On Fri, 16 Jan 2004 17:32:18 -0800 [email protected] wrote:". [Jeff Standen]
[*] Added "Total Time Worked" as a new 'Views' column option. It will display the total time spent on a ticket in minutes for all tickets in the view. [Jeff Standen]
[*] Added all new database tables to the 'Configuration->Maintenance->Optimize Tables' query. [Jeff Standen]
http://www.cerberusweb.com/manual/x1536.html (9 of 20) [7/21/2004 5:59:49 PM]

Change Logs
[*] Increased the 'Configuration->Global Setting' "Purge Wait Time" from 3 digits (999 hrs max) to 4 digits (9999 hrs max). [Jeff Standen]
[*] Added a call to $smtp->quit() to 'QUIT' the SMTP session after the HtmlMimeMail class sends mail using SMTP rather than PHP Mail(). Before it was just sending the standard CRLF . (dot) CRLF, and some MTAs would hang waiting for more input from the SMTP session until they timed out. This should free up server resources a little quicker. [Jeff Standen]
[*] Changed the calls to the directory './tempdir' from using relative paths to using FILESYSTEM_PATH (from config.php) as their root. Apparently the relative path was causing problems with Win32 systems and virtual hosts. (Thanks to Matthieu Roger for reporting this.) [Jeff Standen]
[*] The GUI Installation Checker (/install/) will now test that FILESYSTEM_PATH is set properly in the config.php file. It will check validity of the path, whether GUI files exist there and it will verify the trailing slash in the path. [Jeff Standen]
[*] Cloned tickets will now have properly masked IDs if ticket ID masking is enabled for the helpdesk. [Jeff Standen]
[*] Anti-spam/Bayesian probabilities will now factor in an e-mail's subject line text as well as the body text when determining if an e-mail is spam or not. The subject line words will now also be used for spam/ham training. [Jeff Standen]
[*] You can now change the ticket priority option from the reply/comment update page. [Jeff Standen]
[*] You can now change the ticket queue option from the reply/comment update page. [Jeff Standen]
[*] Added an option to Global Settings to allow all-numerical words in the search indexes. [Ben Halsted]
[*] Added the ability to search the knowledgebase by article ID. [Ben Halsted]
[*] Combined the Knowledgebase Topic + Text searches. This will scan all the text of a knowledgebase article (topic/keywords/text) from a single query now. [Jeff Standen]
[*] Removed an erraneous non-breaking space (nbsp) in the Display Ticket "At a Glance" table that was moving the queue drop-down out of alignment with the other fields when viewed in a resized browser window or a small resolution. [Jeff Standen]
[*] The audit log will now properly log when a staff/watcher replies from their e-mail client instead of the GUI. [Jeff Standen]
http://www.cerberusweb.com/manual/x1536.html (10 of 20) [7/21/2004 5:59:49 PM]

Change Logs
[*] Moved the authorized IPs section of upgrade.php to config.php to reduce the number of files you need to edit on install or upgrade to one (config.php). These IP values will most likely need be set now, but will simplify subsequent upgrades. [Jeff Standen]
[*] Made the new ticket "Cc:'d address" formatting code consistent with the code from Reply/Comment, for those of you who were having a problem with this (generally on Postfix). [Jeff Standen]
[*] Refactored the DB patcher code to split up a database field type into 'type name', 'type size' and 'type flags' so we can do a more detailed comparison of database types than we were previously doing. In the past we simply compared the strings, which could vary between versions of MySQL (3.23 + 4.0 for example). You can now override specific types on comparison (such as 'timestamp', which doesn't need the 'size' or 'flags' elements compared (some systems report size 14, some report no size) -- where type 'int' would need name, size and flags to match exactly.) This should help fix any bugs from the 'DESCRIBE TABLE' syntax giving us slightly different results between MySQL versions. [Jeff Standen]
[*] When mail is sent out of the system, CC'd addresses will now be removed if they're already ticket requesters. [Jeff Standen] [*] Added a [Configuration]->Global Settings option to only show readable/writeable queues in a helpdesk users "change queue" dropdown lists. If this option is disabled (default) then the user will be able to assign tickets into any queue, but still can't list queues they don't have access to. Users have expressed their need for the system to work both ways, this option should help it work as needed for everyone. [Jeff Standen]
[*] Clone ticket functionality will now clone thread attachments as well. [Jeff Standen]
[*] Added a custom wordwrap routine to 'Quote & Reply' that will factor in the number of quoting characters (> ) and spaces leading a line when it wraps to the proper RFC 75 character width. This allows recipient e-mail clients to display the line to the width of the screen and wrap if needed. This will get rid of the issue where you have a single word from the end of a quoted line wrapped to its own line. If a long line is wrapped (didn't contain its own CRLFs) we add the same quoting indent level as the previous line to the new line(s). [Jeff Standen]
[*] Commented out the links for SLA Plans from config + [Clients] from the header since this functionality won't be in until 2.4.0. [Jeff Standen]
[*] Fixed a bug where the ticket subject was not available for mail rules when a staff member was replying to or commenting on a ticket from the GUI. [Jeff Standen]
##################################################
2.3.2 RC2 -to- 2.3.2 RC3
##################################################
http://www.cerberusweb.com/manual/x1536.html (11 of 20) [7/21/2004 5:59:49 PM]

Change Logs
[*] Added Unit Testing code and interface (/cerberus-gui/tests/). Unit Tests go with their objects/classes (/cerberus-gui/cerberus-api/). This should help greatly (in addition to our Functional Tests) for debugging and Q/A on our various supported platforms. [Jeff Standen]
[*] Changed all require/include/require_once calls in the 'cerberus-api' files to prefix FILESYSTEM_PATH, rather than use relative (./ and ../) pathing. This should allow us to call pages directly that aren't in the root 'cerberus-gui' directory (e.g. for pop-ups, for /tests/, for /install/). [Jeff Standen]
[*] Added constant LANG_CHARSET_CODE to the language files and replaced all hard-coded instances of ISO-8859-1 with it. Removed the now redundant LANG_ENCODING instances which were a workaround to this in some areas of the code. [Jeff Standen]
[*] Prefixed '@' suppression to all htmlentities() and htmlspecialchars() calls, since unsupported charsets return a fatal PHP error to the browser. With suppression they assume ISO-8859-1 if an unsupported charset is passed. [Jeff Standen]
[*] Added a filter to "Hide Completed Projects" on the Project Management project list screen. This filter is persistent for the length of a session. [Jeff Standen]
[*] Added columns for "Complete" and "Incomplete" task counts on the project list screen. [Jeff Standen]
[*] Added an option "Don't Forward Attachments" to the 'Forward' thread option in a ticket. [Jeff Standen]
[*] Fixed a bug that was causing existing file attachments on a message to be attached with any 'Reply' or 'Quote & Reply' to that message. [Jeff Standen]
[*] Now when using 'Quote & Reply', file attachments from the message you are quoting will appear in the multiple attachments list -- and you can decide which files you want to forward and which you do not. [Jeff Standen]
[*] Added the mime-types for 'tiff' image files to the attachment_send.php script, so a browser can properly decide what program to associate & open them with. Works for .tif and .tiff extensions (image/tiff). [Ben Halsted]
[*] Changed all htmlentities() calls to htmlspecialchars() for minimialistic escaping (< > " ' , etc.) for better handling of non ISO-8859-1 charsets. [Jeff Standen]
[*] By request, the notification system will no longer send a 'New Assignment Notification' to the e-mail address of users who are assigning more work to themselves. The e-mail address is only excluded if it
http://www.cerberusweb.com/manual/x1536.html (12 of 20) [7/21/2004 5:59:49 PM]

Change Logs
matches the e-mail in the staff member's user record. [Jeff Standen]
[*] Added the ability to override the content_type of an outgoing message based on the language. For example, the Greek language requires wide characters using text/html -- where English can use text/plaintext characters from ISO-8859-1/ASCII. [Jeff Standen]
[*] Fixed a wrapping issue when quoting a "wide character" charset, since HTML entities (e.g., & 1011 would be counted as 5 characters rather than one after translation. This would cause early wrapping on a line. Now we'll count each HTML entity in the e-mail body as a single character. [Jeff Standen]
[*] Replaced all |escape:"html" and |escape:"htmlall" Smarty modifiers with a new custom modifier called |short_escape. This allows foreign character HTML entities (Greek, etc.) to be displayed in the GUI without being double escaped by the template system. [Ben Halsted]
##################################################
2.3.2 RC3 -to- 2.3.2 RC4
##################################################
[*] Fixed a bug where a watcher could have a blank e-mail address, which could cause a mail loop with a mail server. The MTA would send back bounces and the watcher (with invalid e-mail) got a copy of each bounce on the ticket which would generate a new bounce -- ad infinitum, ad nauseum. [Jeff Standen]
[*] Fixed a bug in the login_handler object that was creating more database objects than really needed. The entire system should only need to share one database object. This may speed up database queries (and reduce load) on heavily utilized sites. [Jeff Standen]
[+] Added Report 'Total Handle Time'. [Jeff Standen]
[+] Added Report 'Total Offered Per Queue' [Trent Ramseyer]
[+] Added Report 'Average Handle Time' [Jeff Standen]
[+] Added Report 'Average Speed of Answer' [Jeff Standen]
[+] Added Report 'Group Assignment Overview' [Trent Ramseyer]
[+] Added Report 'Queue / Group Summary' [Jeff Standen]
[+] Added Report 'Agent Summary' [Jeff Standen]
http://www.cerberusweb.com/manual/x1536.html (13 of 20) [7/21/2004 5:59:49 PM]

Change Logs
[+] Added Report 'Service Level' [Jeff Standen]
[+] Added Report 'Total Active Tickets by Agent' [Trent Ramseyer]
[*] Fixed a bug with cross-site javascripting and IE6 that broke the 'Spellcheck via Cerberusweb.com' functionality. [Ben Halsted]
[*] Created a date handling object and added to the new API. Replaced instances in the Reports API code that used the older functionality. [Jeff Standen]
[*] A view can no longer be created or edited without a view name. [Trent Ramseyer]
[+] Added a Global Settings option to disable the message_source.xml system attachments. [Ben Halsted]
[*] Updated all require(), include() and require_once() calls to use FILESYSTEM_PATH rather than relative pathing. Fixes Win32 CGI errors, works on both *nix & Win32. NOTE: Path is case sensitive in config.php for Win32. [Ben Halsted]
[*] Fixed a bug where LANG_CHARSET_MAIL_CONTENT_TYPE and LANG_CHARSET_CODE were not translating into the appropriate values for notifications. [Ben Halsted]
[+] Added a new toggle to knowledgebase article add/edit that allows the user to choose whether the entered text should be interpreted as HTML or plaintext. HTML remains unchanged when displayed, while plaintext auto-hyperlinks URLs and preserves linefeeds. [Jeff Standen]
[*] Added the Cerberus parser binary version info on the Debug Info sections of Configuration & Report Bug. [Jeff Standen]
[*] A valid ticket subject is now required when using the 'Create Ticket' form. [Trent Ramseyer]
[*] Changed the username field on the login page to match the max allowed size of 32 from the database. Previously it was 24 characters. Apparently some people have really long login names. [Trent Ramseyer]
2.3.1
###############################################
2.3.0 Release -to- 2.3.1 Release
http://www.cerberusweb.com/manual/x1536.html (14 of 20) [7/21/2004 5:59:49 PM]

Change Logs
###############################################
[*] Fixed a bug on the notification screen when no queues were selected for notification. [Jeff Standen]
[*] Fixed a bug where a single watcher with the "do not send watcher notices the watcher who sent the e-mail" option would be able to send a watcher notice to a blank list (reported by skithund in forums). [Jeremy Johnstone]
[*] Changed the Configuration menu option 'Upload Product Key' to 'View 1.x Product Key'. The key should be entered in the parser's config.xml in 2.x and not the GUI. This was confusing some new users. [Jeff Standen]
[*] Fixed a Win32 multiple file attachment path bug reported by pscs in the forums. [Jeff Standen]
[*] CC addresses are now automatically added to the requester list when creating a ticket via the web-interface and the configuration variable auto_add_cc_reqs is enabled in Global Settings. [jxdemel in forums]
[*] Fixed a bug that allowed a user to bypass "set dead" permission when using non-English languages. [jxdemel in forums]
[*] Rewrote the "quote & reply" code to format the text according to standard conventions. [jxdemel in forums]
[+] Implemented a Global Setting toggle to add the SMTP Header "Precedence: bulk" for outgoing e-mails to prevent false auto-responses by other programs and vacation messages. [jxdemel in forums]
[+] Added a 'Bounce' option on the ticket thread display. It forwards the e-mail message to a third party using the original requester in the from field. [jxdemel in forums]
[*] The current knowledgebase category will now properly be selected in the drop-down when clicking "New Article in ..." [Jeff Standen]
[*] Fixed a bug where ticket counts in view paging could be tricked into displaying results like (Showing 11-4 of 4). The view will now reset to the first page when applying view filters or a new view scheme. [Jeff Standen]
[+] Added a new Global Setting option to allow you to choose the purge wait time for dead tickets. Default was the previous setting of 24 hours. You can raise or lower this (in hours) or set it to 0 to be able to purge all dead tickets instantly. (Thanks to pkolmann in the forums for the suggestion) [Jeff Standen]
http://www.cerberusweb.com/manual/x1536.html (15 of 20) [7/21/2004 5:59:49 PM]

Change Logs
[+] Added a new Global Setting toggle to automatically set any message "Marked as Spam" to status 'dead'. (Thanks to Dolphyn in the forums for the suggestion) [Jeff Standen]
[*] Fixed a bug where a certain combo of Global Settings watcher options could result in no watcher messages going out regardless of settings. [Jeff Standen]
[*] Fixed a bug where watcher emails would be sent to the ticket CC addresses as well when messages were sent or created through the web-based GUI. [Jeff Standen]
[*] Notification messages will now use queue 'friendly from' addresses if they are set. [Jeff Standen]
[*] Fixed file attachments for the bounce feature. [Jeff Standen]
2.3.0
##################################################
2.2.0 Release -to- 2.3.0 Release
##################################################
[*] Groups can now be assigned queue access rights (read/write/none) and users can inherit their queue access rights through their group. This should save a lot of time for those of you with 20+ users and 10+ queues, as changing the queue privs on a single group will automatically update all users associated with that group. You can also override a single user's queue privileges from the user edit screen. [Jeff Standen]
[+] You can now use email templates/tokens in auto-open and auto-close queue responses! Previously it was just 'ticket id', now it's most of the ticket details (id, subject, status, owner, body, etc). [Jeff Standen]
[+] Added the notification system! You can configure your notify options from the My Cerberus area. Current events are: on new ticket, on assignment and on client reply. You can set a list of e-mail addresses to notify along with a customizable e-mail template for each event. [Jeff Standen]
[+] You can now assign group queue permissions from the queue add/edit screen. This should be a big time saver. [Jeff Standen]
[*] When deleting queues, the system will now prompt you what queue to move the doomed tickets into rather than delete them. [Ben Halsted]
[+] Added anti-spam filter using Bayesian filter. Can be trained [Jeff Standen]
http://www.cerberusweb.com/manual/x1536.html (16 of 20) [7/21/2004 5:59:49 PM]
Change Logs
[*] Spam probability is now available as a criteria in mail rules. [Jeff Standen]
[+] Added the ability to mark tickets as spam or not spam in batches from any ticket view (home page, queue list, searches, etc.) [Jeremy Johnstone, Jeff Standen]
[*] Rewrote the user hash (in core.hash.php) to work better for helpdesks with over a dozen queues. It will no longer link each queue as a separate table. (It actually just runs 2 queries and won't even link a single table now -- before some of you had it over 31 tables.) Tested heavily, worked much better. [Jeff Standen]
[*] Changed the user performance report to use the audit log for data rather than your staff's email addresses and the thread table. Now your staff can change or share addresses and it won't affect the accuracy of the report. This new method should also be a lot quicker when dealing with many rows. [Jeff Standen]
[-] Removed an unnecessary eval() in the configuration values code which is run on each page. This may result in a performance boost on some systems. [Jeff Standen]
[+] Added Public GUI tool settings area in Configuration->Public Tools. These will power the new 2.x Public GUI, allowing you to choose what queues are displayed publicly, masking those queue names (i.e., displaying the queue "IT_Support_2" to public clients as "Technical Support"), enabling/disabling the public knowledgebase, email templates and more. [Jeff Standen]
[*] Users will no longer see "Customer Support History" items in queues they have no access to. Even with these visible, access was still denied on clicking. This should also improve this query execution time as well by better structuring the JOINs. [Jeff Standen]
[*] The database patcher script (upgrade.php) will now compare all field names and field types forced lowercase in the verify scripts + functions. This is due to some systems reporting types like char(16) and others CHAR(16). [Jeff Standen]
[-] Removed a trim() call when saving parser attachments that was eating the null terminator off the end of some larger files, causing corruption. [Ben Halsted]
[+] Added a new HTML removing class for the "Strip HTML" option when viewing a ticket. This one should be *a lot* more thorough. It will handle all the HTML 2.0 entity tags (such as nbsp, foreign chars, etc.) [Jeff Standen]
[*] The GUI parser will now generate a plaintext message part if only an HTML part was provided. Apparently this has been happing to a lot of you who are using certain versions of Outlook that only send in HTML. You should no longer be seeing HTML tags in your ticket display, requester and watcher
http://www.cerberusweb.com/manual/x1536.html (17 of 20) [7/21/2004 5:59:49 PM]

Change Logs
emails. [Jeff Standen]
[+] Added a "Public" column to knowledgebase category + search article lists. This will show an 'X' if the article is marked public, and will show up in the public tool. Articles without an 'X' are considered private & internal. Also added an "Access" field when viewing KB articles that will show Public or Private. This should save you from having to edit every KB article to gather this info. [Jeff Standen]
[+] Added the ability to have a personalized "From" name on each queue, such as "Widgets, Inc. Tech Support" rather than just [email protected]. This works for email sent to all requesters and the ticket open auto-response. This is configured from the queue new/edit screen. Leave blank to just display email addresses. [Jeremy Johnstone]
[*] Knowledgebase article URLs will now auto hyperlink. [Jeff Standen + Jeremy Johnstone]
[*] Fixed an issue where entering HREFs by hand in KB articles could create invalid links (quotes translated to quot; ) [Jeff Standen]
[*] Knowledgebase rating and number of votes will now show up when viewing an article. [Jeff Standen]
[*] Added the calendar object to the Average Response Times Report to allow date range selection for reporting. [Jeff Standen]
[*] Added a quick link called "Show Current Year" to all reports. [Jeff Standen]
[+] Pub tool profiles have been added. These allow you to set up multiple instances of the Public Helpdesk GUI. For example, you can have a Bug Reporting interface that just uses the big tracking custom fields and 'Bug' queue, and another Public GUI with Sales/Support. You can also use different company names/logos and e-mail templates for each profile. [Jeff Standen]
[+] Custom field groups now allow you to set any ticket/requester field as optional/required on the Public GUI. [Jeff Standen]
[+] Trigrams DB structure added. Trigrams allow us to anaylze language patterns in text. This has been implemented for future functionality, and is already collecting information for various functionality (such as making KB article suggestions based on the language in a new ticket). [Ben Halsted]
[*] Fixed a bug for "Lost Password" step1 + step2 in do_login.php [Ben Halsted]
[+] Trigrams code now extends the search/text indexing class. [Ben Halsted]
[+] Added SLA/Company Management framework. This will be enabled in 2.4.0. [Jeff Standen]
http://www.cerberusweb.com/manual/x1536.html (18 of 20) [7/21/2004 5:59:49 PM]

Change Logs
[*] When replying the ticket will now automatically be set to status 'responded'. [Ben Halsted]
[*] Auto-close response will now properly use the ticket mask ID. [Ben Halsted]
[*] Fixed a bug with auto-close being sent to the queue address rather than the requester. [Ben Halsted]
[*] If a view is sorted by a column that doesn't exist, at the request of the session, it will now attempt to locate the thread_date or ticket_id column inside itself before defaulting to the second column for sorting (first may be a checkbox field). Previously this would show an empty view and would require manually sorting on a column to fix. [Jeff Standen]
[*] Database cleanup code changes to make sure purging tickets removes all traces from the various tables. [Ben Halsted]
[*] Tickets marked as dead will no longer be indexed on manual search reindexes from Configuration. [Ben Halsted]
[*] Custom field searchable toggle. If enabled, custom fields won't show up in the advanced search box (to conserve screen space). [Jeff Standen, Ben Halsted][+] Added who's online strings for project management. [Ben Halsted]
[*] Added the view column ability to not be sortable. This can be used in conjunction with view procs that generate dynamic data that can't be sorted using SQL (like spam probabilities). [Jeff Standen]
[*] Added "spam probability" and "spam training" as view columns. Spam probabilities over 90% will be marked red. [Jeff Standen]
[*] URLs beginning with http:// or https:// in ticket threads will now be hyperlinked. [Ben Halsted]
[*] URLs beginning with http:// or https:// in projects task descriptions or task notes will now be hyperlinked. [Ben Halsted]
[*] DEMO_MODE flag moved to config.php from Configuration->Global Settings. This puts the setting out of reach on demo systems (showing helpdesk UI to potential XSP/resell clients, etc.) [Jeff Standen]
[*] Calendar object popup will now properly track the SID in the URL if the Global Setting for it is enabled. [Ben Halsted]
[+] Added the ability to "Assign/Unassign All Members" on the Project Manager panel. [Jeff Standen]
[*] Fixed a bug in the SMTP class that was sending malformed 'MAIL FROM' and 'RCPT TO'
http://www.cerberusweb.com/manual/x1536.html (19 of 20) [7/21/2004 5:59:49 PM]

Change Logs
commands when using 'friendly from' queue addresses. Most MTAs fixed this automatically, some (like Xmail) did not. [Ben Halsted]
[*] E-mail headers and values are now available for criteria in mail rules. [Jeff Standen]
[*] Made the admin_list variable static in cer_admin_list_struct to reduce the number of SQL calls across multiple uses of the class to 1. This should reduce the DB load slightly. [Jeff Standen]
[+] Added 'original email message' as an email template token, for those of you who wanted to quote the original message in the auto-open message. [Jeff Standen]
[+] Added Block/Unblock Sender(s) to ticket view mass actions (home/search/queue list/etc). [Jeff Standen]
[*] Ticket views will now mark blocked addresses with an '*', such as: [email protected]* [Jeff Standen]
[*] If a user has configuration privileges such as user edit, but can't see all queues, their changes will now not override settings on the queues they can't see. [Jeff Standen]
[*] Superusers are now granted automatic read/write access on every queue. [Jeff Standen]
[*] Fixed a bug with the 'only assigned tech' watcher option in Global Settings not sending out notices properly. [Jeff Standen]
[*] Fixed a bug where your view or quick assign settings wouldn't save if you didn't previously have a user preferences row from My Cerberus. [Jeff Standen]
[*] Fixed a bug where the assigned user name wasn't shown if the user only had read access on a ticket. [Jeff Standen]
[*] Fixed a bug where the ticket priority was still showing as a number if you only had read access on a ticket. [Jeff Standen]
Prev Home NextOther Cerberus Helpdesk Related Resources
Up FAQ - Frequently Asked Questions
http://www.cerberusweb.com/manual/x1536.html (20 of 20) [7/21/2004 5:59:49 PM]

FAQ - Frequently Asked Questions
Cerberus Helpdesk™ Handbook: Current Helpdesk Version: 2.4.0 (during this manual revision)Prev Next
Chapter 7. FAQ - Frequently Asked QuestionsThis page includes many frequently asked questions regarding Cerberus Helpdesk. If you do not find an answer to your question here, you may also go to our Support Center and search the knowledgebase.
7.1. What are the different status types and what do they mean?In the most recent release of Cerberus Helpdesk, there are 11 different status types. These include: New, Responded, In Progress, Info Needed, Acceptance, On Hold, Escalated, Fixed, Reopened, Resolved, and Dead.
7.1.1. New
The 'New' status is the default status when a ticket comes into the system. It signifies that it is 'New' and generally means no action has been taken upon it yet.
7.1.2. Responded
The 'Responded' status is the default status when a reply is sent to the requester. If no other status is set during a reply, a ticket will be marked as 'responded'
7.1.3. In Progress
In Progress can be used in a few different ways, depending on the nature of your company. If perhaps a ticket is being worked on but is awaiting a reply from the requester, then you can mark a ticket as 'in progress'.
7.1.4. Info Needed
http://www.cerberusweb.com/manual/cerberus.faq.html (1 of 3) [7/21/2004 5:59:49 PM]

FAQ - Frequently Asked Questions
Generally a ticket can be set to 'Info Needed' when a ticket is missing information or perhaps when you are awaiting a response from a requester for information regarding the ticket.
7.1.5. Acceptance
Geared more towards sales or accounting purposes, 'Acceptance' means that a ticket is in the stage of being accepted whether for a sale or purchase.
7.1.6. On Hold
Geared more towards sales or accounting purposes, 'On Hold' could mean that a ticket is suspended for non-payment or can not be completed to a later time.
7.1.7. Escalated
When a ticket is marked as 'Escalated', it means that the ticket has gone beyond the basic means of support and needs higher priority. Usually combined with setting a ticket as 'High' priority.
7.1.8. Fixed
When set to a 'Fixed' status, a problem in the ticket is most likely solved, but the ticket is not to a stage where it can be marked as 'Resolved' quite yet.
7.1.9. Reopened
When a ticket is marked as resolved and a requester responds, the default status that the ticket will be set to will be 'Reopened'. This just means that the ticket has been reopened by the requester.
7.1.10. Resolved
When a ticket is set to a 'Resolved' status, it means that a resolution has been found to the ticket and it no longer needs anymore work done to it.
7.1.11. Dead
Generally reserved for clearing tickets or for spam e-mails, marking a ticket as 'Dead' will set the ticket
http://www.cerberusweb.com/manual/cerberus.faq.html (2 of 3) [7/21/2004 5:59:49 PM]

FAQ - Frequently Asked Questions
to be able to be removed from the system completely by 'purging' it. The time set for purging dead tickets can be found in the Configuration area.
Prev Home NextChange Logs Why do the colors of a status
change from red to black or black to red?
http://www.cerberusweb.com/manual/cerberus.faq.html (3 of 3) [7/21/2004 5:59:49 PM]

Why do the colors of a status change from red to black or black to red?
Cerberus Helpdesk™ Handbook: Current Helpdesk Version: 2.4.0 (during this manual revision)Prev Chapter 7. FAQ - Frequently Asked Questions Next
7.2. Why do the colors of a status change from red to black or black to red?The colors reflect who wrote last to a ticket. Black means that the last person to reply/comment on a ticket was staff and Red means that the requester replied.
Prev Home NextFAQ - Frequently Asked Questions
Up What does batching a ticket do? Merging? Cloning?
http://www.cerberusweb.com/manual/x1837.html [7/21/2004 5:59:50 PM]

What does batching a ticket do? Merging? Cloning?
Cerberus Helpdesk™ Handbook: Current Helpdesk Version: 2.4.0 (during this manual revision)Prev Chapter 7. FAQ - Frequently Asked Questions Next
7.3. What does batching a ticket do? Merging? Cloning?When you batch a ticket, you mark the ticket so that you can do a mass reply or comment to those tickets. It saves you time if you have more than one ticket which requires the same answer or comment.
When you merge a ticket, you combine two tickets into one. Useful for when someone sends in multiple tickets or tickets have similar information to them. Merging a ticket will keep the ticket ID of the first ticket that came into the system.
When you clone a ticket, you create an exact duplicate of a ticket and the cloned ticket receives a new ticket ID.
Prev Home NextWhy do the colors of a status change from red to black or black to red?
Up Glossary
http://www.cerberusweb.com/manual/x1840.html [7/21/2004 5:59:50 PM]

Glossary
Cerberus Helpdesk™ Handbook: Current Helpdesk Version: 2.4.0 (during this manual revision)Prev
GlossaryThis is a quick reference for many of the terms in the manual and their definitions.
CCerberus
Cerberus is a three-headed guard dog in Greek & Roman mythology. It has come to be known as 'any vigilant custodian or guardian'.
Ddomain
An example domain name is: www.webgroupmedia.com
FFQDN
Fully Qualified Domain Name
Hhelpdesk
Helpdesk is a generic term referring to a customer support center that facilitates interaction between customers and customer service.
http://www.cerberusweb.com/manual/g1845.html (1 of 4) [7/21/2004 5:59:51 PM]

Glossary
Kknowledgebase
The knowledgebase contains an archive of solutions to previous problems. It can also hold answers to frequently asked questions. Knowledgebase items detailing problems and their solutions are called articles. Articles can be marked as private (internal use only) or public. A Cerberus Helpdesk Public Knowledgebase Interface can be set up easily on your company's web site to provide a self-help avenue for your customers.
Oowner
Tickets usually have one owner. An owner is responsible for seeing that the requestor of a ticket receives enough assistance to resolve their issue (ticket).
Ppipe
To pass from the output of one application to the intput of another application.Post Office Protocol (v3)(POP3)
Defined in RFC 1081. POP3 allows a client computer to retrieve electronic mail from a POP3 server via a TCP/IP connection.
Qqueue
Queues process incoming and outgoing e-mail and are usually used to seperate correspondance for a specific department. Example queues are: Billing, Support & Sales.
Rhttp://www.cerberusweb.com/manual/g1845.html (2 of 4) [7/21/2004 5:59:51 PM]

Glossary
requester
The requester is a person who opens a ticket. In the case of a User opening a ticket for a customer (i.e. by phone or other means) the requester is the user requiring support.
Ssuperuser
Superusers have complete authority over configuration and maintenance of the Helpdesk system. It is the responsibility of the initial Superuser to delegate groups for access to areas of the system for the user base. It is possible to have more than one Superuser.
Tthread
Threads are a string of responses to a particular message. This term is used in Cerberus Helpdesk to encompass all messages gathered under a single ticket.
ticket
Tickets are a way of grouping correspondance regarding a particular issue. Incoming tickets are sorted into queues. The multiple messages gathered under a single ticket are called threads. Example tickets are: support trouble tickets, sales lead tickets & billing inqueries.
Uuser
Users have a login and password to enter the system. They are typically staff members with daily duties to perform -- be it technically supporting your customer base, overseeing all correspondance with customers, answering billing inqueries or multiple other tasks.
Wwatcher
http://www.cerberusweb.com/manual/g1845.html (3 of 4) [7/21/2004 5:59:51 PM]

Glossary
A watcher is a support user who gets a copy of every email to his email client for the queues he is a watcher. He can then respond to those emails he receives and send them back to the Helpdesk. The helpdesk will save them into the database and send the watchers response on to the requester.
Prev Home What does batching a ticket do? Merging? Cloning?
http://www.cerberusweb.com/manual/g1845.html (4 of 4) [7/21/2004 5:59:51 PM]


