Centricity™ ShiftSelect v2017.1 Administrator Guide„¢ ShiftSelect® v2017.1 Administrator Guide...
105
GE Healthcare January 2017 Document Version 1 2017 General Electric Company. All Rights Reserved. Centricity™ ShiftSelect ® v2017.1 Administrator Guide
Transcript of Centricity™ ShiftSelect v2017.1 Administrator Guide„¢ ShiftSelect® v2017.1 Administrator Guide...

GE Healthcare
January 2017
Document Version 1
2017 General Electric Company. All Rights Reserved.
Centricity™ ShiftSelect® v2017.1
Administrator Guide
Acknowledgments
Prepared by GE Healthcare Centricity™ Solutions for Workforce Management Documentation Team.
Please send comments to [email protected].
Confidentiality and Proprietary Rights This document is the confidential property of GE Healthcare, a division of General Electric Company (“GE Healthcare”). No part of this document may be reproduced in any form, or incorporated into any information retrieval system, electronic or mechanical, without the written permission of GE Healthcare. Inquiries regarding copying and/or using the materials contained in this document outside of the limited scope described herein should be addressed to the e-mail address listed above.
GE Healthcare reminds you that there may be legal obligations for medical care providers to protect sensitive patient information when dealing with GE Healthcare. You should only share sensitive data if required.
Limitations and Conditions of Use GE Healthcare furnishes this document to you, a current GE Healthcare customer, as GE Healthcare confidential information pursuant to a non-disclosure agreement (“NDA”) or an agreement with confidentiality provisions between you and GE Healthcare. If you are not (i) a current GE Healthcare customer, and (ii) subject to an NDA with GE Healthcare, you are not authorized to access this document.
Trademarks GE, the GE Monogram, Centricity, and Imagination at Work are trademarks of General Electric Company. All other product names and logos are trademarks or registered trademarks of their respective companies.
ShiftSelect is a registered trademark of API Healthcare Corporation.
Copyright Notice Copyright © 2017 General Electric Company. All rights reserved.
GE Healthcare 9900 W. Innovation Drive Wauwatosa, WI 53226 U.S.A. www.gehealthcare.com
Centricity™ ShiftSelect® v2017.1 Administrator Guide
GE Healthcare Confidential and Proprietary Information. Page 3 of 105
Table of Contents
Introduction ................................................................................................................................ 6
Overview ............................................................................................................ 6
About this Guide ................................................................................................ 6
Getting Started ........................................................................................................................... 8
Understanding Roles .......................................................................................... 8
Definitions .......................................................................................................... 9
Calendar .................................................................................................. 10
Current Experience .................................................................................. 10
Employee Profile ..................................................................................... 10
Hospital/Facility ....................................................................................... 11
Job Title ................................................................................................... 11
Level of Care ........................................................................................... 11
Position Type ........................................................................................... 12
Position ................................................................................................... 12
Shift Award .............................................................................................. 13
Shift ......................................................................................................... 14
Signup Period .......................................................................................... 14
Skills ........................................................................................................ 15
Target ...................................................................................................... 16
Unit/Location ........................................................................................... 16
Signing In ......................................................................................................... 17
Navigating the Home Page .............................................................................. 17
Navigating Lists ................................................................................................ 19
Navigating Calendars ....................................................................................... 20
Managing Profiles .................................................................................................................... 23
Approve Profiles ............................................................................................... 23
Change Profile Status ...................................................................................... 27
Change Password ............................................................................................ 28
Edit Profiles ...................................................................................................... 28
Creating and Editing Announcements ...................................................................................... 29
Create an Announcement ................................................................................ 29
Edit an Announcement ..................................................................................... 30
Preview an Announcement .............................................................................. 30

Centricity™ ShiftSelect® v2017.1 Administrator Guide
GE Healthcare Confidential and Proprietary Information. Page 4 of 105
Printing ..................................................................................................................................... 32
Print a Unit or Multi-Unit Calendar .................................................................... 32
Print a Matrix Calendar .................................................................................... 33
Print a Daily Staffing Sheet .............................................................................. 33
Print Reports .................................................................................................... 33
Managing Shifts - Basic Scheduling ......................................................................................... 35
About the Matrix Calendar ............................................................................... 35
About the Ultra PowerPost Screen ................................................................... 40
Add Quick Shifts .............................................................................................. 41
Add Shifts to Employees .................................................................................. 41
Create a Default Baseline ................................................................................ 42
Approve a Schedule ........................................................................................ 43
Post Open Shifts with Ultra PowerPost ............................................................ 43
Check for Conflicts ........................................................................................... 45
Approve or Deny Non-Duty Requests .............................................................. 45
Managing Shifts - Self-Scheduling ........................................................................................... 48
Post Self-Schedule Shifts with Ultra PowerPost ............................................... 48
Create a Default Self-Scheduling Template ..................................................... 49
Post Self-Schedule Shifts ................................................................................ 49
Search for Self-Scheduled Shifts ..................................................................... 51
Approve or Deny Self-Scheduled Shifts ........................................................... 51
Edit Self-Scheduled Shifts ............................................................................... 52
Daily Staffing ............................................................................................................................ 53
About the Multi-Unit Calendar .......................................................................... 53
Set Up a Multi-Unit Calendar View ................................................................... 55
Manage Shifts from the Unit Calendars............................................................ 56
Award Shifts .................................................................................................... 59
Edit Open Shifts ............................................................................................... 60
Edit Scheduled Shifts ....................................................................................... 62
Edit Awarded Shifts ......................................................................................... 66
Add Shift Notes ................................................................................................ 67
Create Shifts Using PowerPost ........................................................................ 68
Manage Employees from the Unit Calendars ................................................... 70
Manage Employees from the Employee Centric Calendar ............................... 71
Last Minute Availability ............................................................................................................. 73
Use Last Minute Availability - Home Page ....................................................... 73
Use Last Minute Availability - Unit Calendar .................................................... 75
Use Last Minute Availability - StaffReach ......................................................... 77
Configuration ............................................................................................................................ 79
Configuration Hierarchy ................................................................................... 79

Centricity™ ShiftSelect® v2017.1 Administrator Guide
GE Healthcare Confidential and Proprietary Information. Page 5 of 105
Position Types ......................................................................................... 80
Job Titles ................................................................................................. 81
Hospitals ................................................................................................. 81
Level of Care ........................................................................................... 81
Unit/Locations .......................................................................................... 81
Employee Statuses .................................................................................. 83
Wage Rates ............................................................................................. 84
Skill Groups ............................................................................................. 84
Skills/Credentials ..................................................................................... 85
Employee Commitment Configuration ..................................................... 85
Edit Weekend Configuration .................................................................... 85
Primary Shift Configuration ...................................................................... 86
Safe Scheduling Options ......................................................................... 86
Overtime Warning Configuration .............................................................. 86
Role Configuration ................................................................................... 86
Management Admins ............................................................................... 87
Permission Descriptions ................................................................................... 87
Scheduling Setup ............................................................................................. 95
Default Positions...................................................................................... 96
Targets .................................................................................................... 97
Shift Shortcuts ......................................................................................... 98
Shift Subtypes ......................................................................................... 99
Self-Scheduling Setup .................................................................................... 101
Configure Self-Scheduling ..................................................................... 101
Productivity Setup .......................................................................................... 102
Configure Productivity ........................................................................... 103
Target by Census .................................................................................. 103
Productivity Calculation ......................................................................... 104
View Productivity Information................................................................. 104

Centricity™ ShiftSelect® v2017.1 Administrator Guide
GE Healthcare Confidential and Proprietary Information. Page 6 of 105
Introduction
This section gives you a brief introduction to Centricity™ ShiftSelect®.
Overview
The GE Healthcare team partners with our clients to facilitate achievement of identified
organizational goals and outcomes through creation of an effective staffing strategy
infrastructure. We offer participatory workforce management solutions that are delivered quickly
and generate sustainable ROI. We have always been committed to continued improvement of
our software to assist clients in achieving optimal outcomes.
Centricity™ ShiftSelect® is a web-based solution that matches qualified healthcare workers with
available shifts. Centricity ShiftSelect provides centralized, facility-wide access to both
scheduled and open shifts throughout the organization.
Features include:
Intuitive, easy-to-use user Interface for all staffing and scheduling functions
World class open shift management, including:
Skill-based matching of shifts to staff
Multiple phase open shift posting
Shifts posted in this way can be initially restricted to specific staff members by criteria
such as home unit, status, and seniority
Customized alerts for shift awards, edits, and cancels, as well as staff ability to set
notifications for preferred shifts
Robust incentive management, including points-based ShiftRewards® program
Credentials management and tracking
Basic productivity management
About this Guide
This document is intended for solution administrators responsible for configuring, managing, and
maintaining Centricity ShiftSelect. It contains instructions for all of the major functions an
administrator might perform within the solution. It begins with an overview of the software and
provides step-by-step instructions on how to use and configure the solution. If you come across

Centricity™ ShiftSelect® v2017.1 Administrator Guide
GE Healthcare Confidential and Proprietary Information. Page 7 of 105
a question that is not answered in this guide, contact your GE Healthcare Services
Representative.
Tip: A separate Centricity ShiftSelect Employee Guide is available for those using Centricity
ShiftSelect to view and request shifts.
The best way to use the guide is to read all introductory material first, which will familiarize you
with important concepts and terms in Centricity ShiftSelect. The rest of the guide serves as a
training manual on how to use and configure the solution. If your security configuration differs
from the standard solution, the guide will contain instructions for functions that do not appear in
your solution. Access to certain parts of Centricity ShiftSelect can vary depending on how it has
been set up and the type of administrative permissions you have. For example, a functional
solutions administrator (FSA) may be able to create positions and skills, but not post shifts. A
shift administrator may be able to create and copy shifts, but not create positions or change user
passwords. If you are unclear about your access levels, contact the person in charge of
Centricity ShiftSelect in your organization.
Tip: This guide is also available to you in the software under the program’s Help menu
header.
Centricity™ ShiftSelect® v2017.1 Administrator Guide
GE Healthcare Confidential and Proprietary Information. Page 8 of 105
Getting Started
This section contains information about Centricity ShiftSelect that is helpful to understand, such
as definitions and navigation basics, before you begin using any of its functionality.
Understanding Roles
An administrator role is assigned to each administrator and determines what each has
permission to do within Centricity ShiftSelect. General shift administrator functions include:
Reviewing and approving profiles of enrolled staff for one or more Unit/Locations
Scheduling staff
Posting open shifts not filled by existing staff or pre-assigned float pool resources
Reviewing information about staff that have requested the shifts you posted
Awarding shifts to staff that have requested open shifts
Changing passwords
Managing employee credentials
Generating reports
General functional solutions administrator activities include:
Building new Unit/Locations
Adding or editing positions and shift templates
Configuring credentialing and other skills-based position requirements
Configuring self-scheduling departmental permissions
Adding new administrator roles, assigning permissions and creating administrator profiles
Functions available to each defined role are described in Permission Descriptions (on page 87).
Roles can be built or edited only by a Centricity ShiftSelect functional system administrators
(FSA) assigned to the Application Administrator permission role, which is granted to one or two
client resources responsible for ongoing solution configuration and maintenance. Users who find
they need permissions other than those currently defined for them must request assistance from
their FSA to have this resolved.

Centricity™ ShiftSelect® v2017.1 Administrator Guide
GE Healthcare Confidential and Proprietary Information. Page 9 of 105
Centricity ShiftSelect comes with the following administrator types already defined.
Role Description
Application Administrator A Functional System Administrator with the Application
Administrator role is responsible for Centricity ShiftSelect and is
generally given to one or two people in an organization. A user
with the Application Administrator role can perform any function in
Centricity ShiftSelect. The name of this value should not be
changed.
Shift Administrator Generally, the Shift Administrator role is given to a manager for a
specific department or group of departments. A user with the Shift
Administrator role can schedule, create and post open shifts,
award shifts, and make daily staffing decisions. The name of this
value should not be changed.
Additional roles are defined by each organization as determined during implementation.
Some examples of additional roles are:
Role Description
Shift Administrator without
Pay
Includes any permissions associated to the Shift Administrator
role as desired by the client, with the exception of the ability to
view pay
Scheduler Includes all of the permissions associated to creating schedules
and posting open shifts, without the ability to approve profiles or
award requested shifts
Supervisor Includes all of the permissions associated to managing housewide
daily staffing, without the ability to approve profiles or receive
emails
Definitions
This section defines many of the terms and basic concepts used in Centricity ShiftSelect. Most
will be familiar but are included because they might be used in a different way in Centricity
ShiftSelect than you are used to.
Data, values, and other text associated with these terms are defined during the implementation
process and appear on various screens in Centricity ShiftSelect. In this document, examples are
noted as such, and it is understood that the values defined by your organization may be different
than what is shown here.

Centricity™ ShiftSelect® v2017.1 Administrator Guide
GE Healthcare Confidential and Proprietary Information. Page 10 of 105
The GE Healthcare Client Services team works with each client organization to ensure proper
design and configuration of their Centricity ShiftSelect solution. Contact your GE Healthcare
Client Services representative before changing or removing any high-level solution components
(such as Position Types, Levels of Care, and Units/Locations).
Calendar
Calendars combine employees, shifts, and dates into several different views. You can view by
employee or by single or multiple organization units. Display options on the calendars allow you
tailor the information you see and how it gets displayed.
Current Experience
Users indicate their Current Experience levels when completing profiles and managers validate
the accuracy of these selections when approving profiles. Current Experience is defined as the
ability to perform the skill at this moment. It does not mean that the employee was able to
perform this skill in the past.
Current Experience levels include:
No experience
Less than 1 year
1 year or greater
When a position is built requiring one or more skills, an employee must have experience for
each required skill. Positions are generally built with the minimum skill level of less than 1 year of
Current Experience, but this will vary based on the skill and the position being created.
Employee Profile
Employees must have an active Profile to view and request shifts. Profiles contain basic
employee demographics and information about the employee’s home unit, level of care, FTE
status, skills, and current experience.
A Profile completed by an employee during enrollment is in pending status until it is activated by
a Shift Administrator (generally, the manager of the employee submitting the Profile). Employees
with active Profiles can view and request open shifts in any department for which they are
qualified (such as having the Skills in their profile that match those for the position used to post
the shift).
For more information, see Managing Profiles (on page 23).
Profile statuses include:
Pending
Active
Centricity™ ShiftSelect® v2017.1 Administrator Guide
GE Healthcare Confidential and Proprietary Information. Page 11 of 105
Home Unit(s) Only
The profile is active. Shift visibility is limited to the employee's home unit, as listed in the
profile.
View Only
The profile is active. Employees can view all shifts for which they are qualified. Shifts
cannot be requested.
Inactive
The profile is no longer active and the employee cannot sign in to view or request shifts.
Permanently Delete
Hospital/Facility
A hospital (or facility) is the highest-level physical location in the organization. A hospital in
Centricity ShiftSelect can be an actual hospital or facility, a clinic, an outpatient center, a
hospice, a section of a hospital, or even a group of buildings. A hospital will have many units (or
departments) within it. Each shift is defined for a specific hospital and unit.
Job Title
A Job Title is a type of resource used to provide patient care and is used when creating and
staffing shifts.
Examples of Job Titles include:
RN, LPN, CNA, US
Patient Care Tech, Surg Tech, Lab Tech, Pharm Tech
CRNA, PA, Nurse Practitioner
Paramedic
Pharmacist
Level of Care
A Level of Care is a collection of similar departments. It is used, for example, during position
setup and for reporting. Level of Care is one of the ways staff may view shifts they are qualified
to request.
Examples of Levels of Care include:
Maternal Child Health
Surgical Services
Med Surg
Emergency Services
Pharmacy Services
Centricity™ ShiftSelect® v2017.1 Administrator Guide
GE Healthcare Confidential and Proprietary Information. Page 12 of 105
Position Type
A Position Type is the highest-level description of the kinds of resources configured to use
Centricity ShiftSelect. Resources with many different job titles can fall within a single Position
Type and these resources can see all the shifts for which they qualify that are opened to those
job titles. Job titles within a Position Type, however, cannot see shifts for job titles in a different
Position Type.
Note: It is recommended that, wherever possible, there be only one Position Type configured in
Centricity ShiftSelect.
Examples of Position Types and associated job titles include:
Nursing: RN, LPN
Nursing support: Patient Care Tech, CNA, US
Therapy: Occupational Therapist, Occupational Therapy Tech
Pharmacy: Pharmacist, Pharmacy Tech
Services: Housekeeper, Transporter
In the previous examples, an LPN would not see a shift for a Patient Care Tech and a CNA
would not see a Transporter shift.
In situations where shifts are often offered to multiple job titles, configuration might necessitate
creating a smaller number of Position Types, as in the following examples.
Patient Care: RN, LPN, Patient Care Tech, CNA, US, Occupational Therapist,
Occupational Therapy Tech
Pharmacy: Pharmacist, Pharmacy Tech
Services: Housekeeper, Transporter
Position
Positions are used to schedule and post shifts. The concept of Positions is central to much of
Centricity ShiftSelect's functionality.
Positions consist of the following components:
Job title
The primary job title associated with the shift being posted, such as an RN shift. The
Position may also be offered to other job titles, such as an RN shift being offered to
LPNs.
Level of care
The level of care associated with the shift being posted, such as a Med Surg RN.

Centricity™ ShiftSelect® v2017.1 Administrator Guide
GE Healthcare Confidential and Proprietary Information. Page 13 of 105
Differentiator descriptor
A particular type of shift within a level of care requiring more specialized skills (example,
a Med Surg – Chemo RN)
Minimum skills and/or credentials required for staff to see the shift
The minimum experiential skills a staff member must have in order to view and request,
or be scheduled for, the shift (example, Med Surg).
Non-required skills and/or credentials
Skills and/or credentials that would help the resource awarding a shift to make a decision
between two people both meeting the minimum requirements (differentiators for
selection).
Once a Position has been defined, it can be used repeatedly to schedule and fill different shifts
in various departments. No shifts can be posted or worked unless Positions have been correctly
configured.
A Position can allow one or many job titles to work shifts created for that Position. For example,
to allow shifts to be viewed only by qualified unit clerks or nursing assistants, but not aides, then
only the unit clerk and nursing assistant job titles should be used when creating the position.
Skills defined as being required for an employee to view, request, or be scheduled into a shift
must match the skills in the employee profile. For example, a Med Surg RN position that requires
Med Surg experience is only visible to RNs who have the Med Surg skill in their active profile.
For information on building and managing positions, see the Configuration (on page 79) section
related to positions.
Shift templates contain all of the components that make up an open shift and are used to quickly
and easily post open shifts, including:
Position
Units/Locations that should have access to the shift template for use in posting the
position
Wage rate (how the shift is to be offered, such as with or without incentive)
Restrictions (if any)
Phases (if multiple phasing is being used)
For information on building and managing shift templates, see the Configuration (on page 79)
section.
Shift Award
Shifts that have been requested by one or more individuals can be awarded to the employee
deemed most appropriate by the Shift Administrator performing the award. Shifts can remain
open to requests up to one hour before they begin (this setting is determined by the organization
during implementation). Shifts can be awarded at any time after they open, but it is best to

Centricity™ ShiftSelect® v2017.1 Administrator Guide
GE Healthcare Confidential and Proprietary Information. Page 14 of 105
award all shifts prior to the time they close to new requests so that requestors are clear about
what is expected of them and not confused or dissatisfied by shifts that remain unawarded.
Different actions take place when a shift is awarded, including:
The person awarded is automatically removed from any other shifts with signup periods
that overlap the time period of the awarded shift.
An optional e-mail is sent to one or more of the following people: the employee who was
awarded the shift, the manager of the employee awarded the shift, and/or the manager of
the unit for which the shift was posted.
For more information on awarding shifts, see Award Shifts (on page 59).
Shift
A Shift is a period of time to be worked on a specific unit/location and date and can be
scheduled to, or requested by, staff with the required skills. Shifts are created using either
default scheduling positions or open shift management templates. An example of a Shift is Med
Surg RN, Unit 4E, General Hospital, from 07:00-19:00 on August 3, 2011, with $10.00 bonus.
Each Shift has a posted wage rate as defined by the organization. Shifts can be posted at fixed
rates, such as regular rate of pay, premium multiplier (for example, 1.5x regular rate), or lump
sum bonus. Wage rates can also be set as variable rate, which includes automatic decrements
from a set maximum using either percentage or dollars.
The minimum time period for a Shift is one hour. The maximum time period for a Shift is
configurable. Typical Shift lengths are 8 or 12 hours. On call Shifts cannot be set for more than
24 hours at a time.
Many people can request a Shift, but only one person can be awarded the Shift. If more than
one person is needed for a single unit/location at the same time, identical Shifts can be created
when posting the open needs. For more information on creating open Shifts, see the sections on
Ultra PowerPost and PowerPost.
Shifts can also be posted to span two or more signup phases. The first phase can be limited to
certain staff members from a specific home unit or facility, or who have a specific job title, level
of care, seniority, or employee status. If no one bids on the phase, Shifts can automatically open
subsequent phases to a broader group of staff members. Single and multiphase Shifts are
created using shift templates containing all of the information needed to post these Shifts. For
more information on creating multiphase shift templates, see the section on Scheduling Setup.
Signup Period
The Signup Period is the time interval during which employees can request a posted shift. At the
end of the Signup Period, the shift is:
Awarded to a single employee,

Centricity™ ShiftSelect® v2017.1 Administrator Guide
GE Healthcare Confidential and Proprietary Information. Page 15 of 105
Automatically moved to a subsequent phase, or
Closed.
Note: A multiphase shift may have several Signup Periods before it is closed.
Note:
An administrator with the appropriate permissions can post shifts and set a future signup start
date and time. Shifts posted with a future signup start date will automatically open to requests on
that date and time. Shifts posted without a future signup start date and time will automatically
open immediately upon posting.
Tip: A Signup Period cannot start before the current date and time and can last for up to 90
days. The Signup Period must end at least one hour before the actual shift start time.
A Signup Period (or phase) has one of three following statuses.
Pending
The shift and Signup Period have been defined but the Signup Period has not yet
started.
Active
The Signup Period is in progress and employees are able to view and request the shift.
Closed
The Signup Period has ended and staff can no longer view or request the shift.
Employees submitting requests for a shift can retract their requests until the Signup Period
closes.
Skills
Skills are experiential levels of ability, as defined by your organization. Skills are a combination
of the minimum requirements needed to view and request shifts and those that might
differentiate one employee from another at the time of shift award. Skills can range from broad to
specific, depending on the level of detail defined within the organization.
Examples of Skills include:
Med Surg
Critical Care
Telemetry

Centricity™ ShiftSelect® v2017.1 Administrator Guide
GE Healthcare Confidential and Proprietary Information. Page 16 of 105
ACLS
Eligible for OR call
Scrub
Circulate
Employees can only view and request a shift when they have the minimum Skills defined for the
position used to post the shift. For this reason, it is important that Skills be defined carefully
during initial setup.
The following image shows how the relationship between the Skills defined for a position and
those saved in the employee staff profile determines the ability for employees to see qualified
shifts.
Target
A target denotes a predetermined level of staffing need. For example, a schedule may show a
target, or need, of 2 RNs for a particular shift.
Unit/Location
A Unit/Location is a unit or department within a facility and is used during position setup, for
filtering shift lists based on an individual’s home department or Unit/Location of the shift, and for
reporting. Each facility can contain one or many Unit/Locations and these are generally
associated with a specific cost center. Staff member profiles use Unit/Locations to indicate their

Centricity™ ShiftSelect® v2017.1 Administrator Guide
GE Healthcare Confidential and Proprietary Information. Page 17 of 105
home unit, but this information does not automatically exclude the individual from requesting
shifts.
Examples of Unit/Locations include:
Labor and Delivery
Operating Room
4 North Medical
Emergency Department
Pharmacy
Signing In
Before you can sign in to Centricity ShiftSelect, request the Centricity ShiftSelect URL and an
administrative user name and password from the appropriate person.
To sign in, complete the following steps.
1. Launch Internet Explorer from the Start menu.
2. In the browser's address bar, enter the URL.
The sign-in window appears.
3. Enter your user name and password and then click SIgn In.
Tip: The User Name and Password fields are case sensitive. If you have trouble signing in,
make sure Caps Lock is turned off on your keyboard.
Navigating the Home Page
After signing in, the Home page appears. The Home page consists of two main areas: the top
menu bar and the main contents.

Centricity™ ShiftSelect® v2017.1 Administrator Guide
GE Healthcare Confidential and Proprietary Information. Page 18 of 105
Depending on your administrative privileges, you may have some or all of the menu options
mentioned in this section. The following image of the Home page is a sample and may look
different from the way your application is configured.
a. Menu options across the top provide a quick path to a wide range of choices. What
displays under each tab is generally governed by your user security permissions. The
following menu options are available.
Home - takes you to the Home page from wherever you are in the solution
Role - your current role
Tip: If you have additional roles or types of access, you can change them from this menu.
Calendars - gives you options for scheduling and staffing calendars, and some
options for managing individual or groups of shifts
ShiftRewards (optional ShiftSelect module) - set up the reward solution (such as
assigning points to various transactions or assigning point values for various
rewards). Reports can be run about the rewards solution (such as a summary of
points accumulated for each staff member).
Reports - shows you available reports (such as usage, shift activity, and payroll)
Tip: Reports can be reviewed online or saved as comma separated value (CSV) files to open
in Microsoft Excel or as Portable Document Format (PDF) files.
Interfaces - shows you a list of interfaces configured for your organization
Configuration - shows you a list of build options available to you
Example: The Configuration menu includes the option to create or edit announcements that
appear in the Announcements section of the Home page.
Centricity™ ShiftSelect® v2017.1 Administrator Guide
GE Healthcare Confidential and Proprietary Information. Page 19 of 105
Search - takes you to a screen where you can search for employees, groups of
employees, and shifts
Quick Links - shows you a list of shortcuts to common locations
Help - takes you to a list of available documents and ways to get help
Logout - signs you out of Centricity ShiftSelect
Note: It is important to use the buttons and links provided in Centricity ShiftSelect for
navigation. Because Centricity ShiftSelect is not housed on the internet, but rather on
secure servers, it only uses the internet as a "transmission portal" for information.
Because of this, the browser's navigation buttons, such as back arrow, can result in
unexpected results or behavior.
b. Informational sections allow you to collapse and expand information to quickly access
points of interest. To expand or collapse a section, click on the little arrow next to the
section name. The following sections are available.
Quick Links - provides a way to quickly view information about positions, shifts, and
employees, and enables you to assign multiple employees to their primary shifts or
scheduling groups.
Tip: There is also a Quick Links menu option at the top of the Home page for easy access to
this functionality.
My To Dos - enables admins to see what actions need to be taken on specific items,
such as shifts with requests to be awarded or non-duty requests for review
My Shift Summary - enables a quick view of the status of shifts in departments for
which the admin has responsibility
Shift Rewards Summary - if Shift Rewards points are being used, it provides a quick
view of the status of earned points in departments for which the admin has
responsibility
c. The Announcement section displays announcements created by functional solution
administrators, shift administrators, and other managers. When employees sign in, they
are able to see general announcements meant for everyone and department-specific
announcements that have been posted by the department manager/admin.
For information on how to create and edit announcements, see Creating and Editing
Announcements (on page 29).
Navigating Lists
Specific details about how functionality works are included in the sections that cover those
features, but there are general principles that govern all lists. Click the appropriate button or
menu item to open the list you are interested in using.
Centricity™ ShiftSelect® v2017.1 Administrator Guide
GE Healthcare Confidential and Proprietary Information. Page 20 of 105
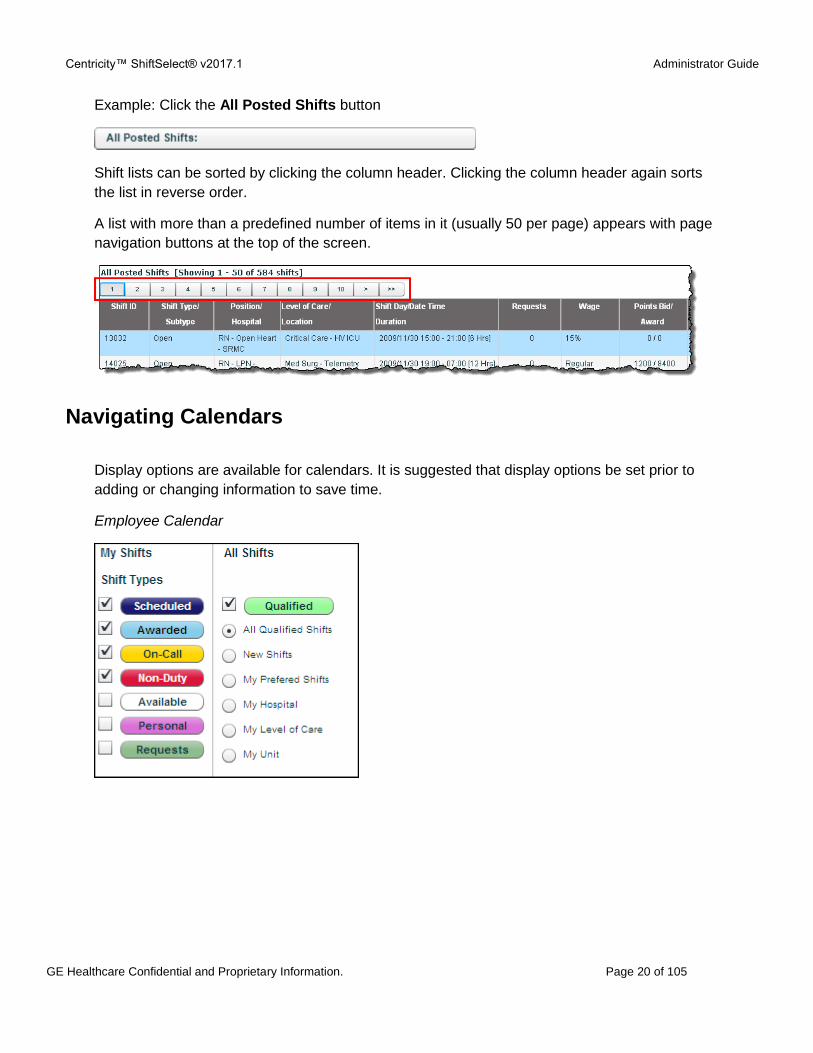
Example: Click the All Posted Shifts button
Shift lists can be sorted by clicking the column header. Clicking the column header again sorts
the list in reverse order.
A list with more than a predefined number of items in it (usually 50 per page) appears with page
navigation buttons at the top of the screen.
Navigating Calendars
Display options are available for calendars. It is suggested that display options be set prior to
adding or changing information to save time.
Employee Calendar

Centricity™ ShiftSelect® v2017.1 Administrator Guide
GE Healthcare Confidential and Proprietary Information. Page 21 of 105
Matrix Calendar
Centricity™ ShiftSelect® v2017.1 Administrator Guide
GE Healthcare Confidential and Proprietary Information. Page 22 of 105
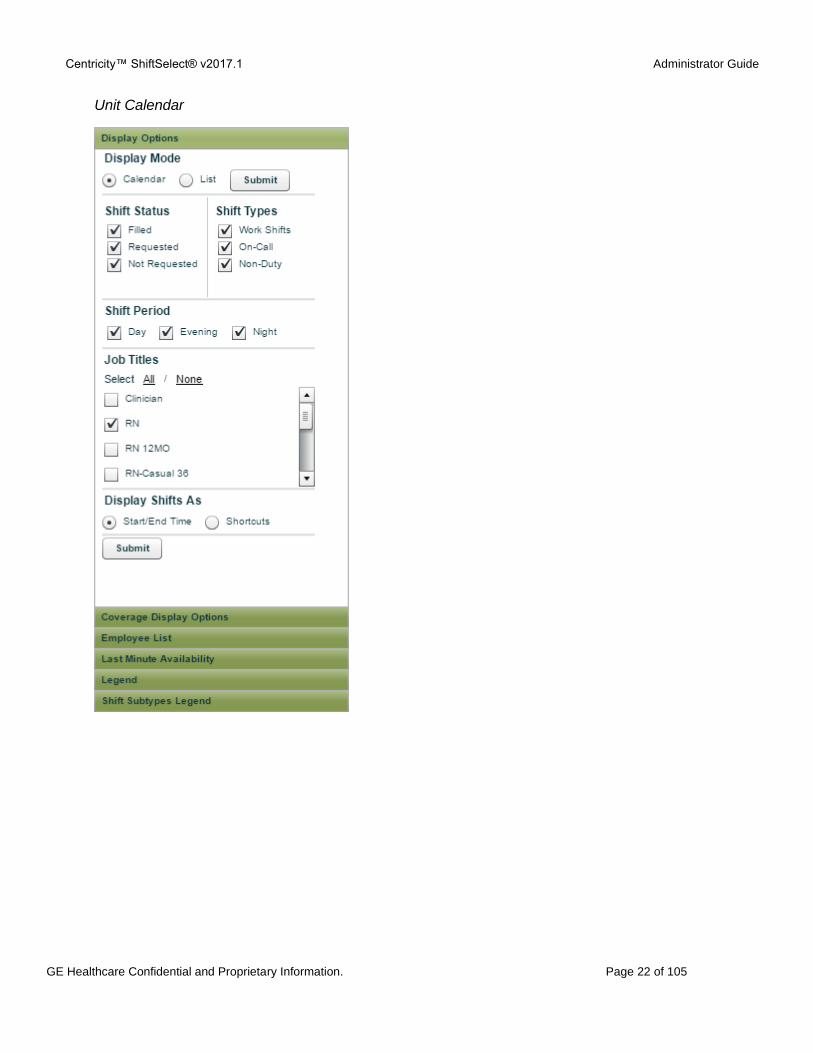
Unit Calendar

Centricity™ ShiftSelect® v2017.1 Administrator Guide
GE Healthcare Confidential and Proprietary Information. Page 23 of 105
Managing Profiles
When employees enroll in Centricity ShiftSelect, their information is contained in their profiles. A
profile remains in pending status until the status is changed by an administrator. This section
describes the process for approving profiles and options available for ongoing profile
management.
Approve Profiles
To approve profiles, complete the following steps.
1. Click Staff profiles awaiting approval.
2. On the profile list page, click the employee whose profile you want to approve.
3. Review and, if needed, make changes to the profile, including from the Profile Options
section.
Tip: See the following subsection for information about the Profile Options.
4. When finished, click Save.

Centricity™ ShiftSelect® v2017.1 Administrator Guide
GE Healthcare Confidential and Proprietary Information. Page 24 of 105
Profile Options
Note: Make sure to click Save if you make any changes.
a. Personal Demographics
This is the initial profile page you see. Confirm that the Position information is correct.
Tip: Employees can update their contact information and Last Minute Availability options after
approval.
b. Skill Competencies
This option displays the skills list. Confirm that the selections are accurate and update
any skills as needed.
Tip: Skill information cannot be edited by employees after approval.
c. Employee Credentials
If credentialing is being used by the organization, this option displays the credentials the
employee selected.
Centricity™ ShiftSelect® v2017.1 Administrator Guide
GE Healthcare Confidential and Proprietary Information. Page 25 of 105
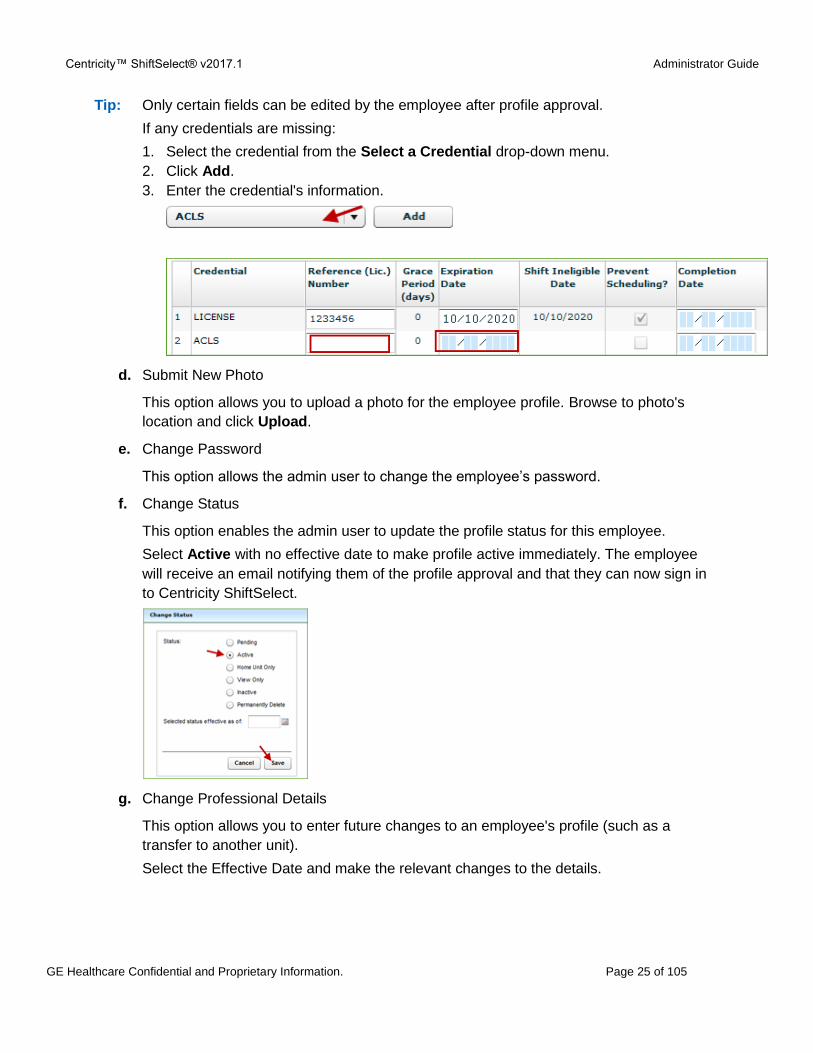
Tip: Only certain fields can be edited by the employee after profile approval.
If any credentials are missing:
1. Select the credential from the Select a Credential drop-down menu.
2. Click Add.
3. Enter the credential's information.
d. Submit New Photo
This option allows you to upload a photo for the employee profile. Browse to photo's
location and click Upload.
e. Change Password
This option allows the admin user to change the employee’s password.
f. Change Status
This option enables the admin user to update the profile status for this employee.
Select Active with no effective date to make profile active immediately. The employee
will receive an email notifying them of the profile approval and that they can now sign in
to Centricity ShiftSelect.
g. Change Professional Details
This option allows you to enter future changes to an employee's profile (such as a
transfer to another unit).
Select the Effective Date and make the relevant changes to the details.
Centricity™ ShiftSelect® v2017.1 Administrator Guide
GE Healthcare Confidential and Proprietary Information. Page 26 of 105
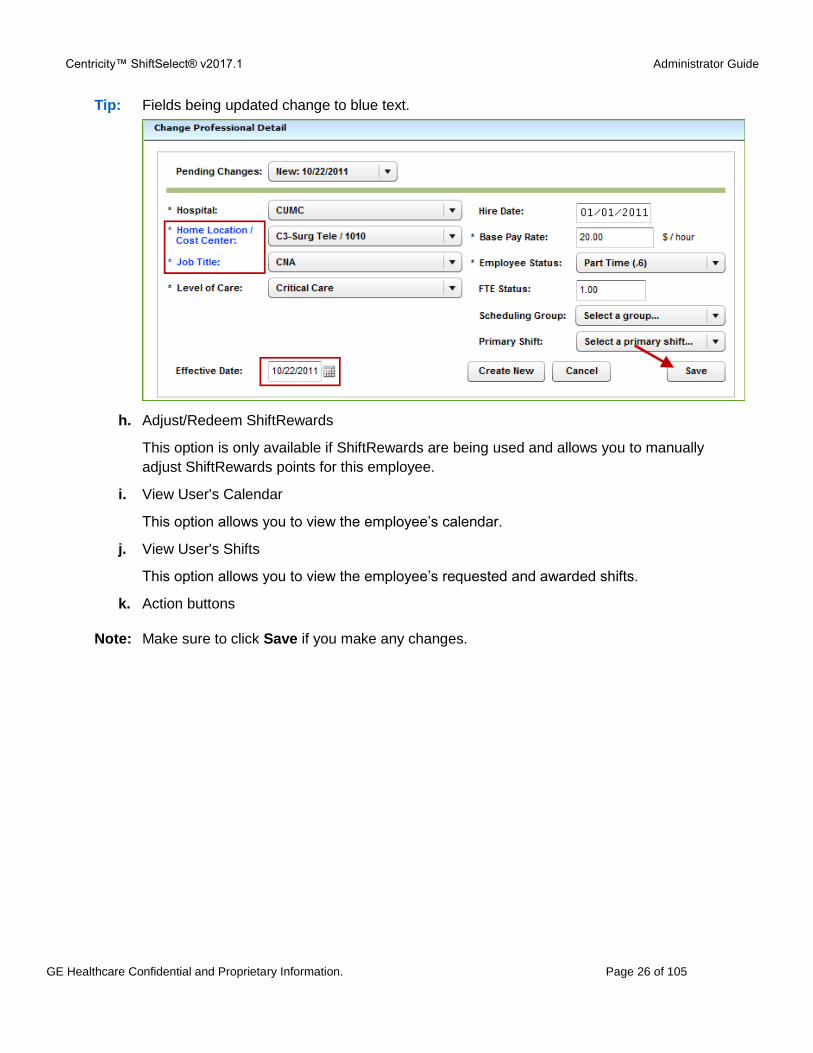
Tip: Fields being updated change to blue text.
h. Adjust/Redeem ShiftRewards
This option is only available if ShiftRewards are being used and allows you to manually
adjust ShiftRewards points for this employee.
i. View User's Calendar
This option allows you to view the employee’s calendar.
j. View User's Shifts
This option allows you to view the employee’s requested and awarded shifts.
k. Action buttons
Note: Make sure to click Save if you make any changes.

Centricity™ ShiftSelect® v2017.1 Administrator Guide
GE Healthcare Confidential and Proprietary Information. Page 27 of 105
Change Profile Status
Click the Change Status option to change the current status.
The following statuses are available:
Pending - profile is submitted and is waiting for admin approval
Tip: The employee with this status will not be able to sign in.
Active - profile that has full rights to view and request shifts
Home Unit(s) Only - profile that has rights to view and request shifts in the employee's
home unit only
View Only - profile that can view, but not request, shifts
Inactive - profile that has no rights to view or request shifts
Tip: The employee with this status will not be able to sign in.
Permanently Delete - this action removes a profile completely from Centricity ShiftSelect
Tip: This right is generally reserved for functional solutions administrators.
Note: Changing a profile status from Active to Home Unit Only releases any user shift requests
and awards on shifts outside the home unit.
Changing a profile status from Active to either Inactive or View Only releases all user
shift requests and awards.
Changing a profile from Active to Pending has no impact on requested or awarded shifts.

Centricity™ ShiftSelect® v2017.1 Administrator Guide
GE Healthcare Confidential and Proprietary Information. Page 28 of 105
Change Password
Click the Change Password option to change an employee's password.
Enter the new password in the two fields and click Save.
Tip: Be sure to notify the employee of he new password.
Edit Profiles
Administrators can change an employee's profile at any time (regardless of profile status).
Access a profile via the Search link on the Home page or by clicking the View Staff Profiles link
from the Quick Links menu on the Home page).
Once a profile has been approved, employees can only change their demographic information
and reset their passwords. Any changes to professional information, such as department,
employee status, job title, skills and credentials must be made by a administrator.

Centricity™ ShiftSelect® v2017.1 Administrator Guide
GE Healthcare Confidential and Proprietary Information. Page 29 of 105
Creating and Editing Announcements
You can create global and department-specific announcements. This section explains how you
can easily create announcements using the Edit Announcements feature.
Create an Announcement
To create an announcement, complete the following steps.
1. Navigate to Configuration > Edit Announcements.
The Announcements page appears.
2. At the bottom of the page, click the Add button.
3. Enter the desired information.
User Type - the type of user who will see the announcement
Unit Location - if the User Type is set to Staff, select All or the required units
Tip: To select multiple units, press Ctrl while clicking.
Announcement Start Date - the date the announcement will appear
Announcement Text - enter the text and use the editor features to customize the
display
4. Click Save.

Centricity™ ShiftSelect® v2017.1 Administrator Guide
GE Healthcare Confidential and Proprietary Information. Page 30 of 105
Edit an Announcement
To edit an announcement, complete the following steps.
1. Navigate to Configuration > Edit Announcements.
The Announcements page appears.
2. Click the announcement you would like to edit.
3. Make your changes and click Save.
Tip: Adding an announcement to an already existing announcement will result in the original
announcement being moved to the inactive list.
To view and reactivate an inactive announcement, complete the following steps.
1. Navigate to Configuration > Edit Announcements.
The Announcements page appears.
2. Click View Inactive/Past Announcements.
3. Click announcement you want to reactivate.
4. Make your changes, as needed, and click Save.
This action will reactivate the announcement and move the original one to the inactive
list.
Preview an Announcement
After completing an announcement, it is a good idea to preview it to see what it will look like
when viewed on the Announcements page.
1. Navigate to Configuration > Edit Announcements.
The Announcements page appears.

Centricity™ ShiftSelect® v2017.1 Administrator Guide
GE Healthcare Confidential and Proprietary Information. Page 31 of 105
2. Find the announcement you want to preview and click its preview link.
A new preview box appears.
Tip: Any global announcements will display above department-specific announcements.

Centricity™ ShiftSelect® v2017.1 Administrator Guide
GE Healthcare Confidential and Proprietary Information. Page 32 of 105
Printing
Reports, schedules, and employee information are often printed. This section gives you
information about printing in Centricity ShiftSelect.
Print a Unit or Multi-Unit Calendar
To print a Unit or Multi-Unit calendar, complete the following steps.
1. Navigate to Calendars > Unit Calendar or Calendars > Multi-Unit Calendar.
2. Use the Display Options and the calendar and organization unit pickers to view the
calendar to print.
Tip: The schedule will print exactly what is displayed, so be sure to remove any options (such
as hire date, employee status, etc) you do not want printed.
3. Click Print.
4. In the print options dialog, make any desired changes and click Generate PDF.
5. Open or save the PDF file.
Tip: On a daily view of a Unit calendar, shift times are shown horizontally across the page.
Tip: On a daily view of a Multi-Unit calendar, shift times are shown vertically. Additionally,
note the greater than and less than symbols that indicate the shift extends past or begins
before the display option setting.
Centricity™ ShiftSelect® v2017.1 Administrator Guide
GE Healthcare Confidential and Proprietary Information. Page 33 of 105
Print a Matrix Calendar
To print a Matrix calendar, complete the following steps.
1. Navigate to Calendars > Matrix Calendar.
2. Use the Display Options and calendar picker to view the pending or approved calendar to
print.
Tip: The schedule will print exactly what is displayed, so be sure to remove any options (such
as hire date, employee status, etc) you do not want printed.
3. In the Select a Function drop-down menu, select PDF View.
4. In the print options dialog, make any desired changes and click Print.
Note: If you receive an Internet Explorer warning, you will be required to download the file
before you can print to PDF. Contact your IT department to make Centricity ShiftSelect a
trusted site, which will prevent this warning from occurring in the future.
5. Open or save the PDF file.
Print a Daily Staffing Sheet
To print a daily staffing sheet, complete the following steps.
1. Navigate to Calendars > Matrix Calendar.
2. Use the Display Options and calendar picker to view the pending or approved calendar to
print.
3. In the Select a Function drop-down menu, select Daily Staffing Sheet.
4. In the print options dialog, make any desired changes and click Print.
5. Open or save the PDF file.
Note: In some cases when the Job title then start time sort is used, shifts may display for
times that are not consistent with headers.
Print Reports
Access to available reports is governed by solution permission. A separate document is
available that reviews each report in detail. To print reports, complete the following steps.
1. Navigate to Reports > select a report.
2. Set the report display options as desired and click Generate Report.

Centricity™ ShiftSelect® v2017.1 Administrator Guide
GE Healthcare Confidential and Proprietary Information. Page 34 of 105
Note: Each report has different display options.
Example: Employee Commitment Report display options
3. After the report data appears, click CSV or PDF View.
4. Open or save the CSV or PDF file.

Centricity™ ShiftSelect® v2017.1 Administrator Guide
GE Healthcare Confidential and Proprietary Information. Page 35 of 105
Managing Shifts - Basic Scheduling
Shifts may be scheduled by using manager core scheduling or self-scheduling functionality. This
section outlines the process for manager core scheduling.
Note: To begin using scheduling, a default scheduling position must be set up. For more
information, see Scheduling Setup (on page 95).
About the Matrix Calendar
The Matrix calendar is used to create shifts for employees and to approve schedules, which
publishes the shifts to employee and manager calendars.
Open the Matrix calendar by navigating to Calendars > Matrix Calendar.
Dates
Click (calendar image) to choose a date within the desired pending scheduling period.

Centricity™ ShiftSelect® v2017.1 Administrator Guide
GE Healthcare Confidential and Proprietary Information. Page 36 of 105
Pending Schedule
A schedule in pending status allows the manager to work on the schedule without staff being
able to see it.
Select a Function Menu
The following options are available in the drop-down menu.
Daily Staffing Sheet - print or display all staff for the specified days, including job title,
employee, shift types, and hours.
Tip: The schedule's status must be Approved to print this report.
PDF View - print or display the schedule
What displays on the screen (and is printed) is controlled by how the Display Options are
set.
Tip: The schedule's status can be either Pending or Approved to print this report.
Save Default Baseline - saves a master version of a schedule of shifts that are used from
scheduling period to scheduling period
Tip: The schedule's status can be either Pending or Approved to save as a default baseline.
Load Default Baseline - loads a master version of a schedule of shifts previously saved
then retrieved to populate a new blank schedule.
Note: Shifts on a previously-saved Default Baseline schedule will not overwrite any shifts
already existing on a pending schedule, such as non- duty requests or active shifts that
have been awarded via open shift management or actively scheduled via the unit or
multi-unit calendar. A previously-saved Default Baseline cannot be loaded onto a
schedule that has been set to Approved status.
Centricity™ ShiftSelect® v2017.1 Administrator Guide
GE Healthcare Confidential and Proprietary Information. Page 37 of 105
Approve Self Schedule Shifts - enables the manager to approve all requested self-
schedule shifts with a single click
Display Options
Set desired display options. If you make changes, click Submit to see the changes reflected on
the calendar.

Centricity™ ShiftSelect® v2017.1 Administrator Guide
GE Healthcare Confidential and Proprietary Information. Page 38 of 105
The following display options are available.
Unit/Location - one or more, depending upon user solution permissions
Number of Weeks - the number of weeks to display
Tip: The default is the maximum number of weeks in the scheduling period.

Centricity™ ShiftSelect® v2017.1 Administrator Guide
GE Healthcare Confidential and Proprietary Information. Page 39 of 105
View Shifts As - display shifts as start/end times (such as 0700-1500) or as shortcut
codes (for example, 0700-1500 might be displayed as D.
Tip: For information about shift shortcut codes, see Scheduling Setup (on page 95).
Show floats' non-unit shifts - show either the entire schedule for staff from other units
who are working in this unit or only those shifts being worked here
Show employee requested shifts - show shifts that employees have requested
Job Titles - show one or more of the available job titles (first one displays as default)
Employee Columns - whether to show total number of hours scheduled for each week,
employee FTE status, hire date, employee status, and primary shift
Tip: For information about primary shifts, see Scheduling Setup (on page 95).
View Totals - select what to show on the calendar
Number of staff scheduled (Actual)
Number of staff needed (Target)
Difference between the two
The type of shift (Working, On-Call, Non–Duty)
Tip: This can be helpful when trying to create an on-call schedule separate from the working
shifts or when trying to assess the impact of giving more than one staff member days off.
Display scheduled totals in 4, 8 or 12 hour increments
Display Days, Evenings, or Nights (alone or in combination).
View Productivity - show volume (census) information when scheduling (permission-
based)
Quick Shifts
Click to expand the Quick Shifts section to show the shifts used for scheduling.
For information about adding quick shifts and adding shifts to employees, see the next two
sections: Add Quick Shifts (on page 41) and Add Shifts to Employees (on page 41).

Centricity™ ShiftSelect® v2017.1 Administrator Guide
GE Healthcare Confidential and Proprietary Information. Page 40 of 105
About the Ultra PowerPost Screen
The following information appears on the Ultra PowerPost screen.
a. The job titles (selected from the Display Options) and the status of shifts for those job
titles (Posted or Not Posted)
b. The totals to be displayed on the screen
c. The number of shifts to post and the difference (the difference between what has actually
been scheduled and set targets)
d. The number of shifts to post for each start and end time (based on set targets and what
has already been scheduled)
e. The shift template for each shift to post
Centricity™ ShiftSelect® v2017.1 Administrator Guide
GE Healthcare Confidential and Proprietary Information. Page 41 of 105
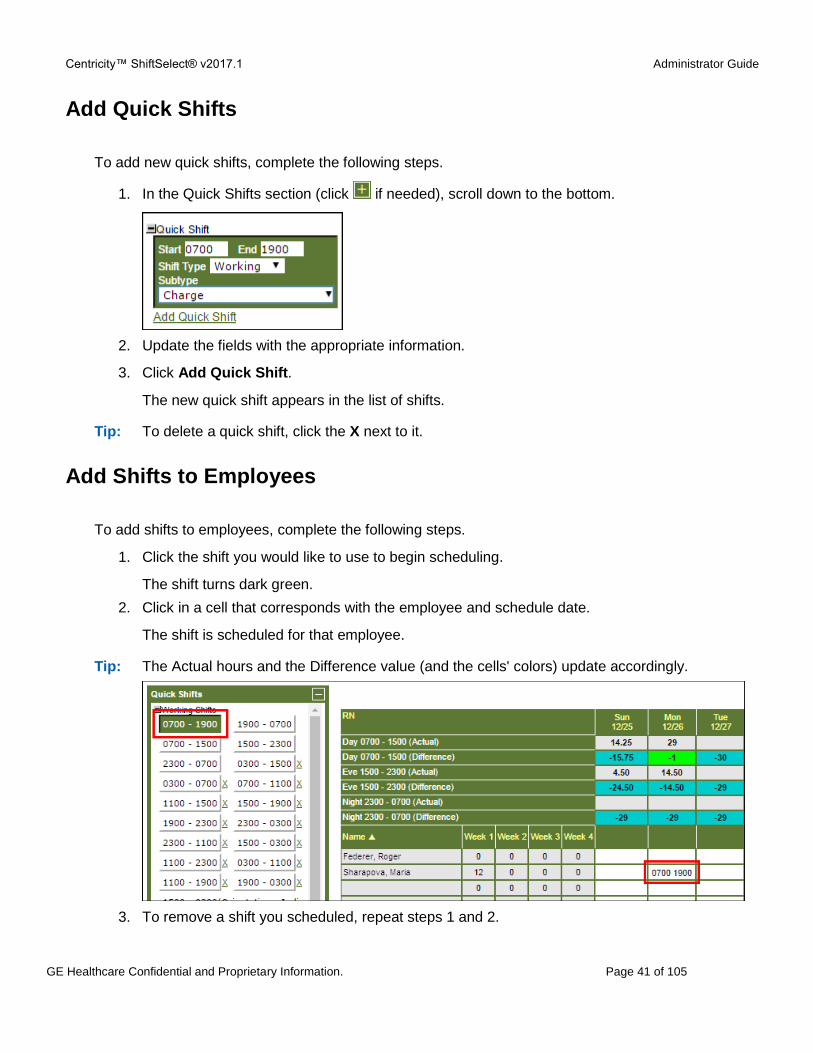
Add Quick Shifts
To add new quick shifts, complete the following steps.
1. In the Quick Shifts section (click if needed), scroll down to the bottom.
2. Update the fields with the appropriate information.
3. Click Add Quick Shift.
The new quick shift appears in the list of shifts.
Tip: To delete a quick shift, click the X next to it.
Add Shifts to Employees
To add shifts to employees, complete the following steps.
1. Click the shift you would like to use to begin scheduling.
The shift turns dark green.
2. Click in a cell that corresponds with the employee and schedule date.
The shift is scheduled for that employee.
Tip: The Actual hours and the Difference value (and the cells' colors) update accordingly.
3. To remove a shift you scheduled, repeat steps 1 and 2.

Centricity™ ShiftSelect® v2017.1 Administrator Guide
GE Healthcare Confidential and Proprietary Information. Page 42 of 105
Note: The shift selected in the Quick Shifts section must be the same as the shift you are
removing from the employee.
4. To add another shift to the same employee, double-click the employee's name to insert a
new row and then repeat steps 1 and 2.
5. Continue to create the schedule.
6. Click Save.
Tip: Click Save often.
Create a Default Baseline
A default baseline enables the manager to indicate which employees work specific shifts on
specific days of the week (such as every other weekend or every Wednesday) and to save the
baseline to be used every scheduling period. This saves time for the manager who otherwise
would have to start from a blank schedule each time.
To create a default baseline, complete the following steps.
1. For each employee, add the shifts they normally work.
Tip: For information about adding shifts, see Add Shifts to Employees (on page 41).
2. From the Select a function menu, select Save Default Baseline.
A warning appears indicating that any previously saved default baseline schedule will be
overwritten by saving this new baseline.
3. Click OK to continue.
4. When finished, click Back to Schedule.
Centricity™ ShiftSelect® v2017.1 Administrator Guide
GE Healthcare Confidential and Proprietary Information. Page 43 of 105
Load a Default Baseline
To load a default baseline onto a blank schedule, select Load Default Baseline from the Select
a function menu. Your baseline populates the previously blank schedule, allowing changes to
be made for that upcoming scheduling period.
Approve a Schedule
To approve a schedule, complete the following steps.
1. When the schedule is complete, click Approve.
The schedule's status changes from Pending to Approved.
Note: Approving the schedule publishes the shifts to the Employee and Unit Calendars.
2. In the warning message dialog, click OK.
Note: If a unit does not have the schedule completed for employees in every job title on that
unit, clicking OK to this message will publish either a partially completed schedule or, in
the case of no data having been entered, a blank schedule. Clicking Cancel stops the
approval process and returns you to the Pending schedule.
Tip: In the event you inadvertently approve a blank schedule for one or more employees, you
can go to the Unit Calendar for the appropriate date range, display the Employee List, set
display options for the appropriate number of shift hours, and drag the employee on top
of the job title for each date you want to schedule.
If the email notification functionality is enabled for your organization, employees with email
addresses in their profiles will receive emails indicating they can see their schedules via the
employee's My Calendar.
Once the schedule has been approved, open shifts can be posted according to defined targets
using the Ultra PowerPost functionality (see Posting Open Shifts with Ultra PowerPost (on page
43)).
Post Open Shifts with Ultra PowerPost
Ultra PowerPost is a quick way to post open shifts after approving a schedule. It is also used to
post self-scheduling shifts prior to schedule approval for those areas using self-scheduling.
1. Access the approved schedule for which you would like to post open shifts.
2. Click Ultra PowerPost.
3. Set the desired Display Options.
Centricity™ ShiftSelect® v2017.1 Administrator Guide
GE Healthcare Confidential and Proprietary Information. Page 44 of 105
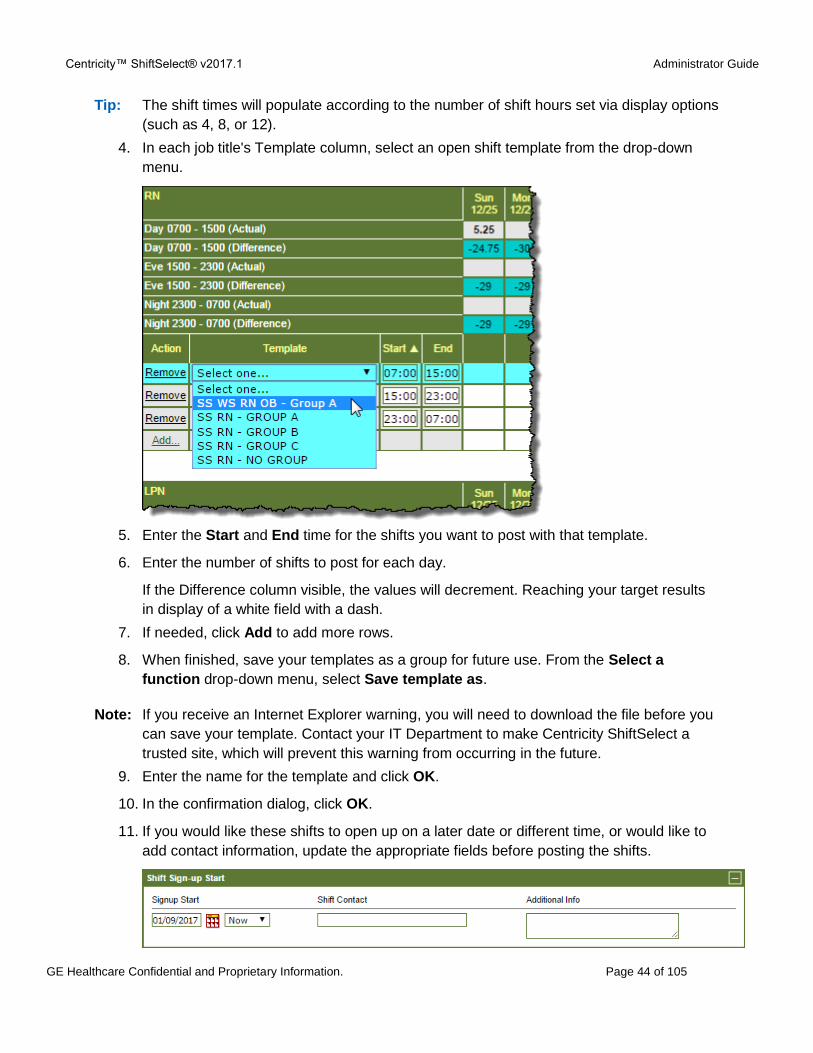
Tip: The shift times will populate according to the number of shift hours set via display options
(such as 4, 8, or 12).
4. In each job title's Template column, select an open shift template from the drop-down
menu.
5. Enter the Start and End time for the shifts you want to post with that template.
6. Enter the number of shifts to post for each day.
If the Difference column visible, the values will decrement. Reaching your target results
in display of a white field with a dash.
7. If needed, click Add to add more rows.
8. When finished, save your templates as a group for future use. From the Select a
function drop-down menu, select Save template as.
Note: If you receive an Internet Explorer warning, you will need to download the file before you
can save your template. Contact your IT Department to make Centricity ShiftSelect a
trusted site, which will prevent this warning from occurring in the future.
9. Enter the name for the template and click OK.
10. In the confirmation dialog, click OK.
11. If you would like these shifts to open up on a later date or different time, or would like to
add contact information, update the appropriate fields before posting the shifts.
Centricity™ ShiftSelect® v2017.1 Administrator Guide
GE Healthcare Confidential and Proprietary Information. Page 45 of 105
12. Click Post Shifts.
A list appears with the shifts about to be posted.
Tip: Shifts can be posted at any time using Ultra PowerPost once a schedule has been
approved.
Note: Open shifts cannot be posted for dates in the past and the sign-up date/time cannot be
prior to the current date/time.
13. Click Post.
14. In the confirmation dialog, click OK.
The open shifts status for the job titles are changed to Posted.
15. Click Back to Schedule to leave Ultra PowerPost and return to the schedule.
Check for Conflicts
Centricity ShiftSelect does not allow employees to be scheduled into two working shifts at one
time. This is not an issue when attempting to schedule employees for non-duty shifts that
overlap one they are already working, but it can be an issue if the employees have working
shifts on a pending schedule and working shifts that are already active. A conflict check runs
against shifts on a pending schedule and those that might have been previously posted as open
shifts and awarded, or scheduled via the unit or multi-unit calendar. A conflict check
automatically runs when the schedule is approved. In addition, a manager can initiate a conflict
check at any time. Any conflicts must be resolved prior to a schedule being successfully
approved.
1. To run a conflict check on a pending schedule, click Validate.
A confirmation message displays the results of the conflict check.
2. Click Done to return to the Matrix calendar.
Approve or Deny Non-Duty Requests
If the organization allows employees to place requests for time off using the Employee Calendar,
these requests will display on the Matrix calendar as non-duty requests (NDRs).
Centricity™ ShiftSelect® v2017.1 Administrator Guide
GE Healthcare Confidential and Proprietary Information. Page 46 of 105
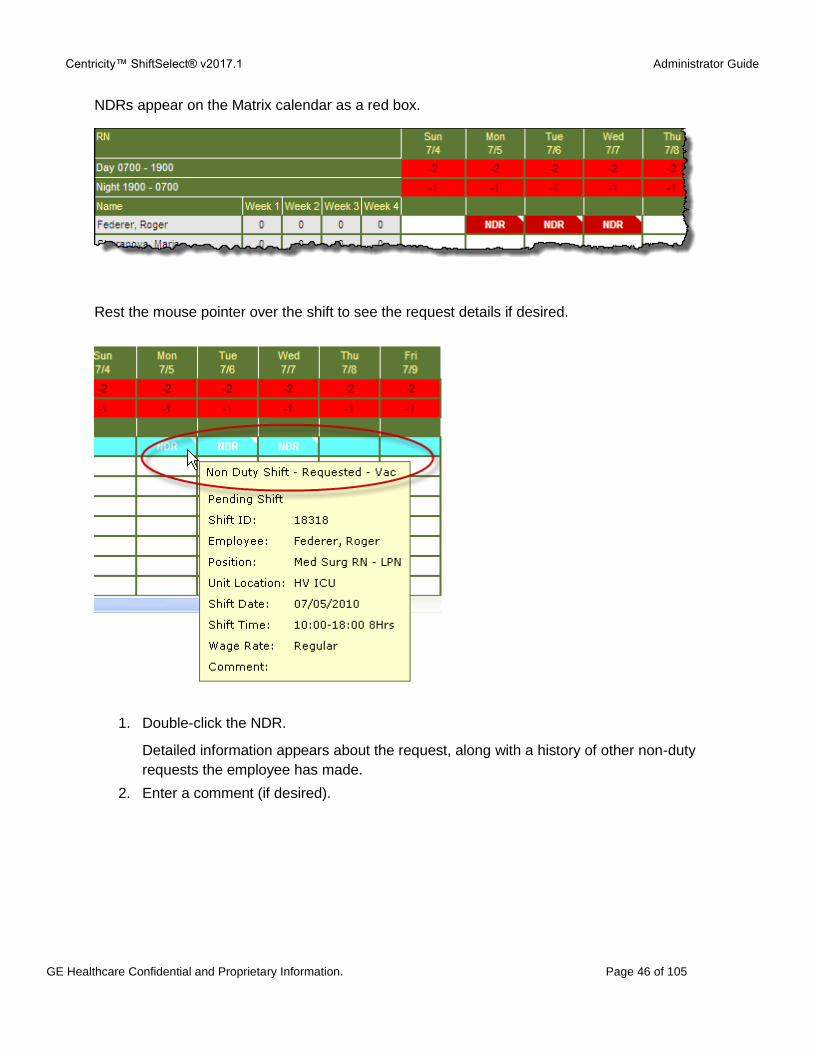
NDRs appear on the Matrix calendar as a red box.
Rest the mouse pointer over the shift to see the request details if desired.
1. Double-click the NDR.
Detailed information appears about the request, along with a history of other non-duty
requests the employee has made.
2. Enter a comment (if desired).
Centricity™ ShiftSelect® v2017.1 Administrator Guide
GE Healthcare Confidential and Proprietary Information. Page 47 of 105
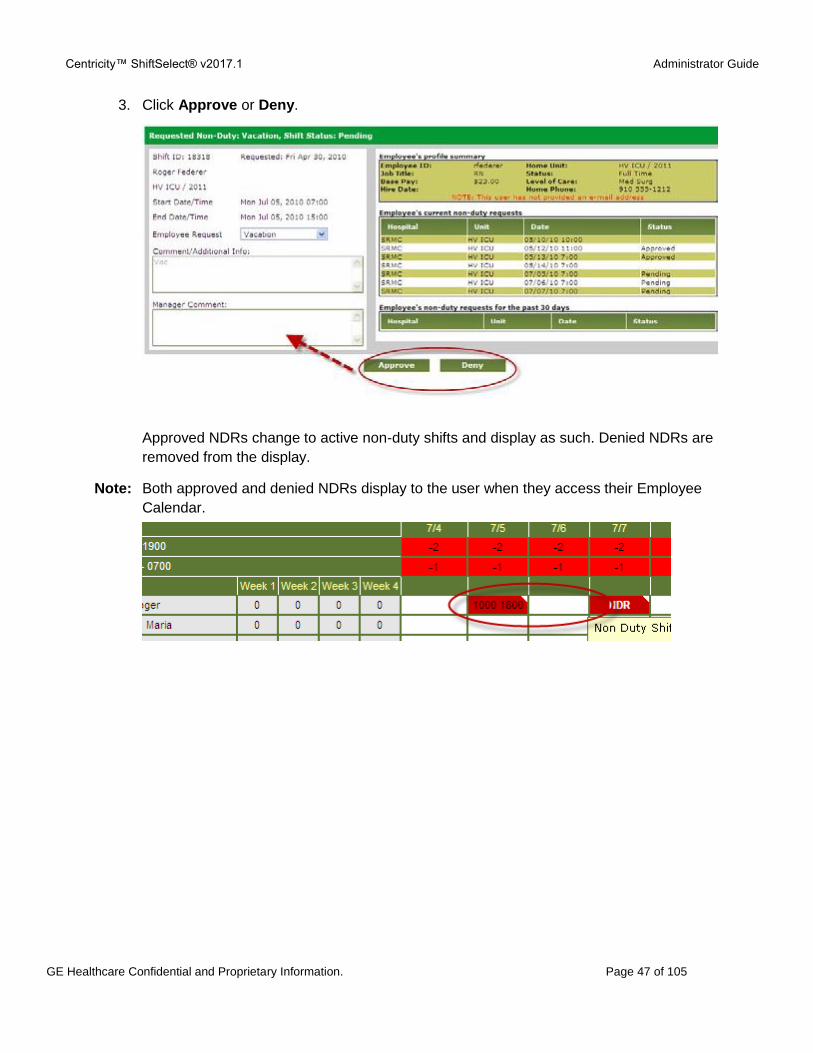
3. Click Approve or Deny.
Approved NDRs change to active non-duty shifts and display as such. Denied NDRs are
removed from the display.
Note: Both approved and denied NDRs display to the user when they access their Employee
Calendar.

Centricity™ ShiftSelect® v2017.1 Administrator Guide
GE Healthcare Confidential and Proprietary Information. Page 48 of 105
Managing Shifts - Self-Scheduling
Shifts may be scheduled by using manager core scheduling or self-scheduling functionality. This
section outlines the process for self-scheduling using the Matrix calendar.
Note: To begin using self-scheduling, it must first be configured. For more information, see
Self-Scheduling Setup (on page 101).
Post Self-Schedule Shifts with Ultra PowerPost
Ultra PowerPost is used to post self-scheduling shifts prior to schedule approval for those areas
using self-scheduling.
1. On the Matrix calendar, click (calendar image) to choose a date within the desired
pending scheduling period.
2. Set the desired Display Options.
3. Click Ultra PowerPost.
4. Select the appropriate self-scheduling template for each shift to post.
Tip: To remove a shift template for shifts you do not want to post, click the Remove link that
corresponds to the shift you want to remove.
5. If needed, edit the Start and End times to make them correspond to the desired shift
times.

Centricity™ ShiftSelect® v2017.1 Administrator Guide
GE Healthcare Confidential and Proprietary Information. Page 49 of 105
6. Enter the number of shifts to post in the cells.
7. Continue to create the shifts to be posted.
Tip: As you create self-scheduling shifts, the Difference column changes to indicate whether
set targets have been exceeded (too many staff = yellow), have been met (the right
number of staff = white), or have not yet been met (not enough staff = red).
Create a Default Self-Scheduling Template
A default self-scheduling template enables the manager to create a group of self-scheduling
shifts and to use them every schedule period. This saves time for the manager who otherwise
would have to start from a blank self-scheduling posting calendar each time.
To create a default self-scheduling template group, complete the following steps.
1. From the Select a function drop down menu, select Save template as.
Note: If you receive a pop-up blocker warning, click the warning to allow the content. Contact
your IT Department to make Centricity ShiftSelect a trusted site, which will prevent this
warning from occurring in the future.
2. Enter a name for your template and click OK.
3. If you make additional changes to shifts used in this scheduling template, select Save
template to save your changes to the existing template.
4. When finished, click Back to Schedule.
Post Self-Schedule Shifts
When you are ready to post self-scheduling shifts from the Ultra PowerPost page, complete the
following steps.
Tip: Before you can post self-scheduling shifts, you must first choose templates for all job
titles displayed.
Tip: When display options are set for 8 hours, the first template displayed is for Day shifts, the
second is for Evening, and the third is for Night. If shifts are displayed as 12 hours, the
first template displayed is for Day shifts and the second is for Night.
Tip: You cannot post self-scheduling shifts in the middle of a scheduling period. The shift post
date must be before the first schedule date.
1. If needed, load a different self-scheduling template.
From the Select a function menu, select the correct template.

Centricity™ ShiftSelect® v2017.1 Administrator Guide
GE Healthcare Confidential and Proprietary Information. Page 50 of 105
The System Calculated option calculates the shifts to be posted based on what has
already been added to the schedule.
2. Click Post Shifts.
The Post Self Scheduling Shifts dialog appears indicating the number of shifts to be
posted for each template in the group.
3. When ready, click Post.
Note: Only click the Post button once. Clicking more than once or double-clicking could result
in double the number of shifts being posted.
4. In the confirmation dialog, click OK.
The Ultra PowerPost page now displays a message alerting you that shifts have been
posted.

Centricity™ ShiftSelect® v2017.1 Administrator Guide
GE Healthcare Confidential and Proprietary Information. Page 51 of 105
Search for Self-Scheduled Shifts
To search for self-scheduled shifts that have been posted, complete the following steps.
1. Navigate to the Search page and find the Search Self Schedule Shift section.
2. Enter the desired search criteria in the fields and click Search.
A list of shifts appears. The number of needs/awards/requests can also be viewed from
this list.
Tip: Shifts can be inactivated individually by double clicking the shift.
Approve or Deny Self-Scheduled Shifts
Requested shifts display on the Matrix calendar as dark green and underlined. Self-scheduled
shifts can be approved individually or as a group. Approved self-scheduled shifts are active upon
approval, even if the schedule is still in pending status. Self-scheduled shifts can also be
approved after the schedule has been approved.
To approve or deny a self-scheduled shift, complete the following steps.
Individual Approval
1. FInd the requested self-scheduled shifts that you want to approve.

Centricity™ ShiftSelect® v2017.1 Administrator Guide
GE Healthcare Confidential and Proprietary Information. Page 52 of 105
2. Double-click the shift you want to approve or deny and then click Approve or Deny.
Multiple Approvals
1. To approve all requested self-scheduling shifts, select Approve Self Schedule Shifts
from the Select a function drop-down menu.
2. In the confirmation dialog, click OK.
Note: Approved self-scheduled shifts appear as white and underlined.
Edit Self-Scheduled Shifts
To change the details of a shift, complete the following steps.
1. Double-click the shift you need to change.
The shift dialog appears.
2. Click the Edit this Shift button found near the bottom of the dialog.
Tip: You may need to scroll down to find the button.
3. Make the required changes and then click Save.
Centricity™ ShiftSelect® v2017.1 Administrator Guide
GE Healthcare Confidential and Proprietary Information. Page 53 of 105
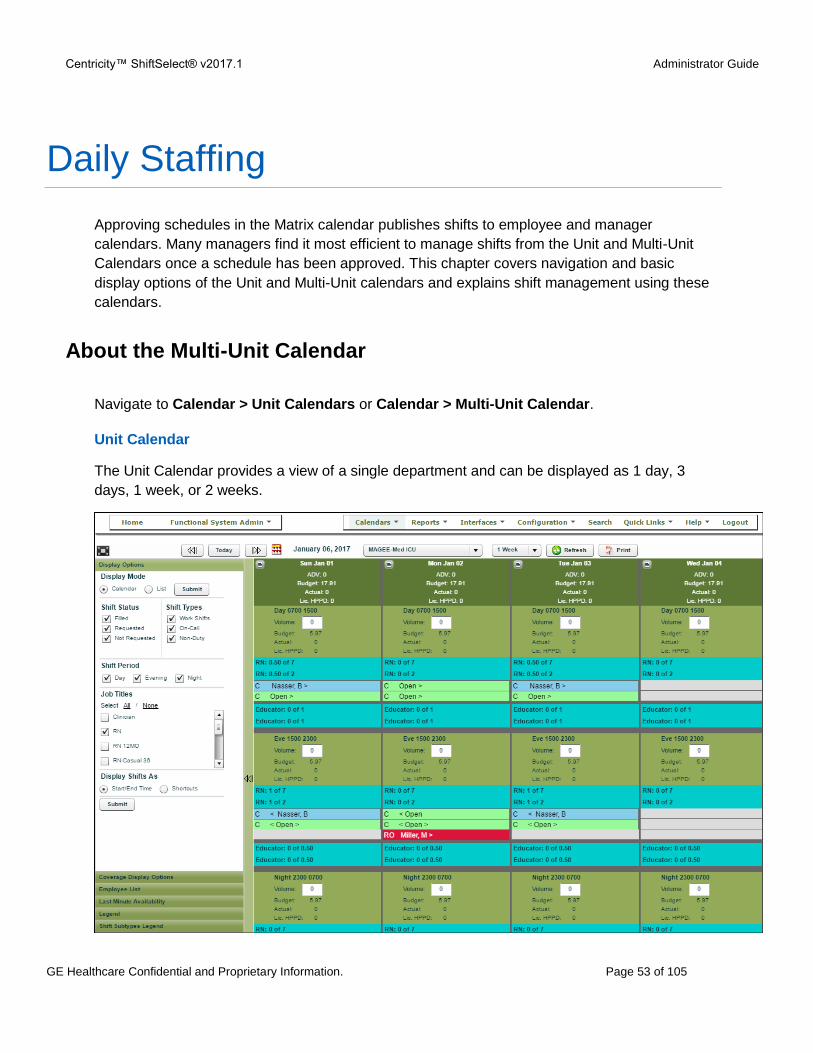
Daily Staffing
Approving schedules in the Matrix calendar publishes shifts to employee and manager
calendars. Many managers find it most efficient to manage shifts from the Unit and Multi-Unit
Calendars once a schedule has been approved. This chapter covers navigation and basic
display options of the Unit and Multi-Unit calendars and explains shift management using these
calendars.
About the Multi-Unit Calendar
Navigate to Calendar > Unit Calendars or Calendar > Multi-Unit Calendar.
Unit Calendar
The Unit Calendar provides a view of a single department and can be displayed as 1 day, 3
days, 1 week, or 2 weeks.

Centricity™ ShiftSelect® v2017.1 Administrator Guide
GE Healthcare Confidential and Proprietary Information. Page 54 of 105
Multi-Unit Calendar
The Multi-Unit Calendar provides a single day view of multiple departments (or just a single
department). Users with Multi-Unit Calendar Configuration permission can create one or more
views of their departments.
For information about setting up a multi-unit view, see Set Up a Multi-Unit Calendar (on page
55).
Explanations for both Calendars
- choose a different date for the calendar
Display Options:
Tip: Click Submit after making updates to see the changes take effect.
Display Mode - toggles between a calendar and list display
Shift Status:
Filled - scheduled and/or awarded
Requested - shifts with requests
Not Requested - open shifts
Shift Types - the kinds of shifts to display

Centricity™ ShiftSelect® v2017.1 Administrator Guide
GE Healthcare Confidential and Proprietary Information. Page 55 of 105
Shift Period - the time periods to display
Tip: If 12 Hours is selected as a Coverage Display Options, Evening will not be selectable.
Job Titles - the types of job titles to display
Display Shifts As - how the shift times appear
Tip: If shortcuts are not defined, shift appear with start and end times.
Coverage Display Options:
Coverage Totals - total the coverage by Working, On-Call, or Non-Duty shifts
Hours drop-down menu - display totals in 4-, 8-, or 12-hour increments
Other details to display, such as volume (census), targets, and summaries
Note: The previous screen shots appear with all Coverage Display Options selected.
Employee Totals - view the employees in the departments who you have access to
Tip: Click to expand the departments and job titles to view the list of employees.
Last Minute Availability - for information, see Last Minute Availability (on page 73)
Legend and Shift Subtypes Legend - shows a visual cue with how items on the calendars
appear
Set Up a Multi-Unit Calendar View
The Multi-Unit Calendar provides a daily view of one or more departments. Departments that
can be displayed in the Multi-Unit Calendar are limited to those that a manager has permission
to access. Views of the calendar are customized for each user.
To create a view of the Multi-Unit Calendar, complete the following steps.
1. Navigate to Configuration > Hospital/Unit(s) Configuration > Multi Unit/Locations
Group.
2. In the empty field under Multi Unit Group Configuraiton, enter a name for your calendar
or select a previously-created calendar from the drop-down menu.
3. From the drop-down menus in the row 1, select the departments to include in the
calendar.

Centricity™ ShiftSelect® v2017.1 Administrator Guide
GE Healthcare Confidential and Proprietary Information. Page 56 of 105
Tip: The order you use to select the departments when you create the view is the order they
will appear in on the Multi-Unit Calendar page.
4. After adding all the departments to display, click Save.
5. In the confirmation message, click Done.
To display the new Multi-Unit Calendar view, complete the following steps.
1. Navigate to Calendars > Multi-Unit Calendar.
2. From the calendar view drop-down menu, select the new calendar.
The screen refreshes to show the new calendar.
Manage Shifts from the Unit Calendars
This section explains the actions you can take on shifts from the Unit or Multi-Unit Calendars.
User-Requested Shifts
To view detailed information about shifts on the calendar, hover over the shift to see a ToolTip
with shift details.
To manage a user-requested shift, double-click the requested shift.

Centricity™ ShiftSelect® v2017.1 Administrator Guide
GE Healthcare Confidential and Proprietary Information. Page 57 of 105
View comprehensive information about each requester, then Award, Inactivate, or Edit the shift
as appropriate.
Open Shifts
To change information about an open shift, double-click an open shift.
From here, you can edit or inactivate the shift, or close the window without making any changes.
You can also use the Last Minute Availability functionality. For information, see Last Minute
Availability or Last Minute Availability Using StaffReach.
Scheduled Shifts
Double-click a scheduled shift to take an action on this type of shift.

Centricity™ ShiftSelect® v2017.1 Administrator Guide
GE Healthcare Confidential and Proprietary Information. Page 58 of 105
From here, you can view a history of shifts for this employee, edit or inactivate the shift, or close
the window without making any changes.
Create an Open Shift
To create an open shift, double-click the job title and time of the needed shift.
Tip: Be sure to have your Coverage Display Option set for the appropriate number of shift
hours (4, 8, or 12).
Note: Shifts greater than 24 hours in the past cannot be opened in this way.

Centricity™ ShiftSelect® v2017.1 Administrator Guide
GE Healthcare Confidential and Proprietary Information. Page 59 of 105
Award Shifts
To award a user-requested shift for a calendar, complete the following steps.
Tip: The Award Shifts screen can also be accessed from the Home Page > Shifts with
requests to be Awarded.
1. Double-click the requested shift.
The Award Shift screen appears and shows the following information.
a. Information about the shift, including shift date/time, location, time remaining for sign
up, wage rate/incentive information, shift restrictions (if any)
b. Information about the requesters, including whether or not they have requested all or
part (P) of the shift (and if partial, what part of the shift); wage amount (base rate if
regular rate shift, total amount with incentive added if bonus shift or asterisks if you
do not have permission; whether or not requester will be in OT if shift is granted, is
from home unit location or level of care of the posted shift; whether or not requester
belongs to a registered agency; if award of the shift will exceed recommending
scheduling safety limits; date and time of shift request
c. Profile information for the selected user (if multiple requesters, must click a requester
to see the information)
d. Area to record award information, inactivate or edit the shift, or cancel your actions
without saving

Centricity™ ShiftSelect® v2017.1 Administrator Guide
GE Healthcare Confidential and Proprietary Information. Page 60 of 105
2. If needed, click different requesters to view their profile information.
3. Click the Shift List tab to see a list of shifts for this user.
4. Click the Employee Calendar tab for a visual display of this user’s shifts.
5. When you are ready to award the shift, choose the reason from the Award Reason drop-
down menu.
6. If the shift would put the employee into overtime, select the $ This is an overtime shift
option to have the shift display as overtime with the designated OT signifier (typically $).
7. Click Award Shift button to complete the transaction.
The shift appears as awarded in the unit calendar.
8. To unassign an awarded shift, double-click the appropriate shift.
9. Click Unassign.
The shift is removed from the calendar.
Edit Open Shifts
To edit an open shift from the Unit or Multi- Unit Calendar, complete the following steps.
1. Double-click the open shift and then in the Open Shift dialog, click Edit Shift.
Note: Any of the open shift details can be changed without removing any requesters on the
shift.
2. Make the desired changes and then click Save.
3. Optional. To make additional shift changes, click Edit Additional Criteria.
Note: Clicking Edit Additional Criteria and then answering Yes to the confirmation message
will remove requesters from the shift.
The Edit a Multi Phase Shift Wizard page appears.

Centricity™ ShiftSelect® v2017.1 Administrator Guide
GE Healthcare Confidential and Proprietary Information. Page 61 of 105
4. Make any desired changes and then click Save.
5. Optional. To make additional changes, click Continue.
6. Make any desired changes and then click Save.
7. Optional. Click Add Another Phase if you need to build a multi-phase shift.

Centricity™ ShiftSelect® v2017.1 Administrator Guide
GE Healthcare Confidential and Proprietary Information. Page 62 of 105
Edit Scheduled Shifts
To edit a scheduled shift from the Unit or Multi- Unit Calendar, complete the following steps.
1. Double-click the scheduled shift.
The Edit Scheduled Shift screen appears and shows the following information.
a. Shift: ID, Department, Shift Type and Subtype, Shift Date, Start and End Time,
contact information and comments
b. Wage: Rate Type (from drop down list), hourly Wage, hourly Bonus (dollars or %
depending on how Centricity ShiftSelect is configured) or ShiftRewards Points (if
enabled)
2. Make the desired changes and then click Save.

Centricity™ ShiftSelect® v2017.1 Administrator Guide
GE Healthcare Confidential and Proprietary Information. Page 63 of 105
Example 1
Change a scheduled work shift to non-duty sick.
Example 2
Send an employee home sick halfway through the shift.
Tip: Follow these same steps to send a resource home on-call, except change the Shift Type
to On Call and enter an appropriate subtype, if any.
1. Double-click the working shift, change the End Time to reflect the time the employee
was sent home, and click Save.

Centricity™ ShiftSelect® v2017.1 Administrator Guide
GE Healthcare Confidential and Proprietary Information. Page 64 of 105
2. A prompt asks what to do with the employee’s remaining hours. Make changes and then
click Create New Shift.
3. Click Refresh to display both shifts (the shift with the hours worked and the new shift
reflecting the hours specified).
Example 3
Send someone home after part of the shift and do nothing with remaining hours.
1. Double-click the working shift, change the end time to reflect the time the employee was
sent home, and click Save.
2. A prompt asks what to do with the remaining hours. Make changes and then click
Discard Remaining Hours.
The shift hours change to reflect the actual time worked.
Example 4
Float an employee to a different department for all or part of a shift.
All of a shift:
Double-click the working shift, change the department to the float department, and click
Create New Shift.
The resource no longer appears on the current calendar, but will appear on the calendar
of the department to which the resource was floated.

Centricity™ ShiftSelect® v2017.1 Administrator Guide
GE Healthcare Confidential and Proprietary Information. Page 65 of 105
Part of a shift (employee works in home unit and then is floated):
1. Double-click the working shift, change the end time to reflect the time the resource was
floated, and click Save.
2. A prompt asks what to do with the remaining hours. Change the department to the float
department and then click Create New Shift.
Part of a shift (employee was floated at the beginning of the shift and then returned to the home
department):
1. Double-click the working shift, change the department to the float department and the
end time to indicate the time the resource returned to the home department, and click
Save.
2. A prompt asks what to do with the remaining hours. Change the department to the home
department and then click Create New Shift.
Tip: Remember to select a float subtype, if needed.
Example 5
Place Shift Rewards points on an upcoming shift.
Enter points in the Award field and click Save.
The points appear as pending until the date of the shift. They will be credited to the
account after the shift date.
Example 6
Place a fixed rate incentive on shift.
1. In the Rate Type menu, select the desired option.
2. In the Bonus field, enter the bonus dollar amount.
3. Click Save.
Example 7
Place a variable rate incentive on shift. and then click the < Save> button.
1. In the Rate Type menu, select the desired option.
2. In the Percentage field, enter the percentage in addition to base pay (such as 15 for base
pay plus 15%).
3. Click Save.

Centricity™ ShiftSelect® v2017.1 Administrator Guide
GE Healthcare Confidential and Proprietary Information. Page 66 of 105
Edit Awarded Shifts
To edit an awarded shift from the Unit or Multi- Unit Calendar, complete the following steps.
1. Double-click the awarded shift.
Note: Any of the awarded shift details can be changed without removing any requesters on the
shift.
2. Make the desired changes and then click Save.
3.
4. Optional. To make additional shift changes, click Edit Additional Criteria.
Note: Clicking Edit Additional Criteria and then answering Yes to the confirmation message
will remove requesters from the shift.
5. Make any desired changes and then click Save.
Note: Editing an awarded shift to a partial shift results in a prompt that asks you to either create
a new shift or discard remaining hours. For information about partial shifts, see Edit
Scheduled Shifts (on page 62).
6. To unassign an awarded shift, click Unassign.
The shift is removed from the calendar.
7. To view a shift history, click History.
The Bid History dialog appears.

Centricity™ ShiftSelect® v2017.1 Administrator Guide
GE Healthcare Confidential and Proprietary Information. Page 67 of 105
Add Shift Notes
Unit and Multi-Unit Calendar shift notes are governed by the following permissions. The
appropriate permissions must be set before you are able to interact with shift notes.
Create/Edit Shift Note - enables you to add or change shift notes
View Shift Note - enables you to view, but not add or revise, shift notes
To add shift notes, complete the following steps.
1. Click (shift note icon).
2. In the Notes dialog, enter the note in the New Note field.
3. Click Save.
The shift note icon has changed to red to indicate that a note has been placed.
4. To add another shift note to the same shift, click the shift note icon again.
5. Enter the new note and click Save.

Centricity™ ShiftSelect® v2017.1 Administrator Guide
GE Healthcare Confidential and Proprietary Information. Page 68 of 105
Create Shifts Using PowerPost
Multiple shifts can be posted quickly by using the PowerPost feature.
1. Navigate to Calendars > PowerPost.
The PowerPost screen appears.
Tip: Follow the steps as indicated on the screen.
2. Select the unit/location from the drop-down menu.
3. Select the job title for which the shift will be posted.

Centricity™ ShiftSelect® v2017.1 Administrator Guide
GE Healthcare Confidential and Proprietary Information. Page 69 of 105
4. Choose the appropriate shift template.
Tip: The list will be limited to the shift templates created for your positions and departments.
Shift templates with incentives and phases will have been built as needed by the
organization.
5. The start date of the upcoming scheduling period is defaulted into the Select Period field.
If needed, change the period for which you want to post shifts.
6. Enter the start and end times for the shifts you are preparing to post.
7. If needed, enter a signup start date and time.
Tip: Leave the signup start date and time blank to make shifts immediately visible to qualified
staff upon posting. The time of "Now" will reflect the time as indicated by the system at
the moment shifts are posted.
Tip: A leading practice suggests that the schedule for full- and part-time staff be complete by
the date the shifts are due to be open for requests, and that per diem/PRN staff pick up
all shifts using Centricity ShiftSelect (instead of being scheduled on the core schedule). If
the signup period should not start until a future date, change the signup date and set the
time to midnight (00:00).
8. Enter the number of open shifts for each date.
Tip: You can press the TAB key to move from date to date.
9. If needed, add or change the contact information.
10. Click Post These Shifts.
11. Verify that the information on the confirmation screen is correct.
If it is not correct, click Go Back and make changes.

Centricity™ ShiftSelect® v2017.1 Administrator Guide
GE Healthcare Confidential and Proprietary Information. Page 70 of 105
If it is correct, click Confirm (if you have no more shifts to post and want to return to
the Home page) or Confirm & Post More (if you want to return to the PowerPost
page to post more shifts).
Manage Employees from the Unit Calendars
Employees can be moved to different days and shifts on the same unit simply by dragging them
in the Unit Calendar. Employees can be moved to different departments on the same day by
dragging them in the Multi-Unit Calendar. The ability to use the drag-and-drop functionality is
governed by a security permission.
To move an employee from one shift to another in the same department, complete the following
steps.
1. Access the correct Unit Calendar and set the desired date and display options.
2. Drag the employee to the job title of the desired shift.
Note: Do not drag the employee onto an open shift. If you do, there will no longer be an open
shift for others to request.
3. Depending on how your site is configured, you may receive a warning when attempting
to drag an employee whose currently scheduled shift times do not match the number of
hours set in your display options. If you get the messages, select the appropriate button
for the shift times to use.
Note: If your site is not configured to display the warning, dragging an employee who is
scheduled for a different number of hours than the display options are set to will either
change them to the number of hours for which the options are set or maintain the
scheduled length (depending on the configuration setting).
4. Click Refresh to clean up the calendar's appearance.
Tip: An arrow to the right of the employee name indicates the shift extends past the hours
displayed on the screen. An arrow to the left indicates the shift begins before the hours
displayed on the screen.

Centricity™ ShiftSelect® v2017.1 Administrator Guide
GE Healthcare Confidential and Proprietary Information. Page 71 of 105
To add an employee from the Employee List, complete the following steps.
Note: Using the Employee LIst is helpful when an employee who is currently working
volunteers to stay and fill an open shift. Or, in cases when the census goes up and there
is no posted open shift, you may want to add an employee to your staffing.
1. Click the Employee List bar and expand the folders until you find the employee.
2. Drag the employee into the appropriate shift (either into the open shift or on the job title).
The employee is now scheduled into that shift.
Tip: The employee will be scheduled for the same number of hours as display options are set
to.
Tip: If you inadvertently approve a schedule in the Matrix calendar before all job titles have
been scheduled, it will be easiest to set your Unit Calendar view to two weeks and drag
the employees from the Employee List onto the job titles of the shifts you for which want
to schedule them.
To move an from one department to another, complete the following steps.
1. Access the correct Multi-Unit Calendar and set the desired date and display options.
2. Drag the employee from one department to another (either into an open shift or on the
job title).
Note: Centricity ShiftSelect checks the qualifications on the employee as they are moved.
3. When you attempt to drag an employee who does not meet the qualifications for the
position, a message appears stating that the employee is not qualified to work the shift.
Click OK to clear the message.
Note: The warning message appears when an employee is not qualified due to a mismatch in
the minimum skills required for the position, either the default position (in the event the
employee is being dragged onto the job title) or the position used to post the open shift.
Manage Employees from the Employee Centric Calendar
There are three ways to access an Employee Centric Calendar.
Navigate to Calendars > Employee Centric Calendar and then search for and double-
click the employee.
In the Unit or Multi-Unit Calendar, right-click the employee's name and select Employee
Calendar from the drop-down menu.
In the Unit or Multi-Unit Calendar, double-click the employee’s name in the Employee
List.

Centricity™ ShiftSelect® v2017.1 Administrator Guide
GE Healthcare Confidential and Proprietary Information. Page 72 of 105
Add a scheduled shift
1. In the Quick Shift area, enter the start and end time, shift location, type, and subtype.
2. Click the date of the shift.
The scheduled shift is added to the employee.
Edit a scheduled shift
1. Double-click the shift.
2. Make the needed changes and then click Save.

Centricity™ ShiftSelect® v2017.1 Administrator Guide
GE Healthcare Confidential and Proprietary Information. Page 73 of 105
Last Minute Availability
Last Minute Availability enables managers and supervisors to find and display staff members
who can work a shift on short notice. This functionality can be launched from the Home page or
a Unit Calendar, and displays an ordered list of qualified staff. When this functionality is used,
Centricity ShiftSelect automatically posts and awards/schedules shifts to any employees who
have accepted proposed shifts. Queries can also be saved and returned to at a later time,
making it easy for a single user to work one or more lists over a span of time, or for multiple
users to work lists concurrently.
Use Last Minute Availability - Home Page
To use Last Minute Availability from the Home page, complete the following steps.
1. From the Quick Links menu on the left or drop-down menu, click Last Minute
Availability (or Last Minute Scheduling).
2. On the Last Minute Availability search page, enter information about the shift you are
trying to fill.
3. Click View Available Employees.
A list appears with employees who are qualified to work (and not already working)
organized into three groups.
Requested - employees who requested a shift on this date and start time (not
selected and not awarded another shift)
Qualified, Willing - qualified employees who selected at least one Last Minute
Availability option in their profiles

Centricity™ ShiftSelect® v2017.1 Administrator Guide
GE Healthcare Confidential and Proprietary Information. Page 74 of 105
Qualified, Not Willing - qualified employees who did not select any Last Minute
Availability options in their profiles
The list is ordered using an algorithm that indicates which employees will be more
inclined to accept an offer to work the shift.
4. Click to expand a group.
5. Click an employee's name to see a list of shifts they are working that might be in such
close proximity to the needed shift that you would decide not to call them.
6. For each employee contacted, select the appropriate response from the Contacted for
this Shift drop-down menu.
Note: The System Contact option relates to StaffReach (automated calling solution) only.
Note: If you select DNC for rest of day, that employee will not show on any Last Minute
Availability list for the remainder of the day.
7. Click Save to save your progress.
Tip: You can resume where you left off at a later time.
To continue a previous session, on the Last Minute Availability search page, click
View Previous Queries.
8. When an employee accepts a shift, select Contacted, accepted and then click Save.
The shift is filled by the employee and displays as Accepted.
Also, the shift appears on the Unit and Matrix Calendars as a filled shift.
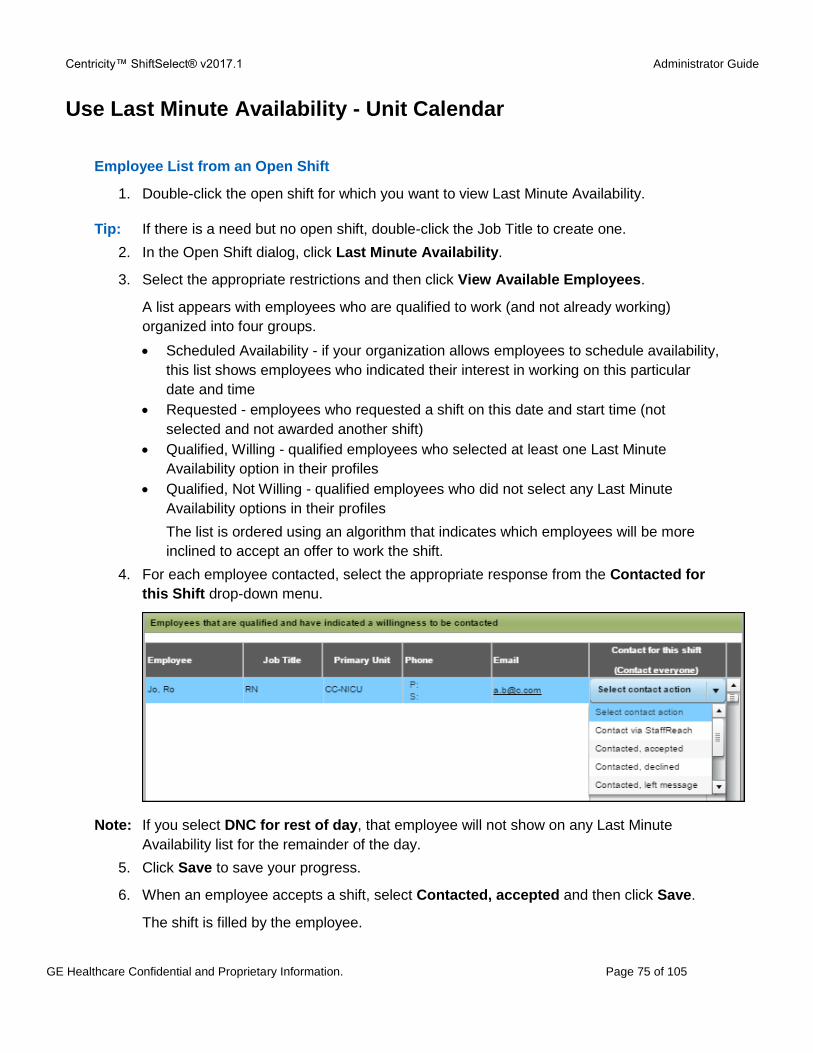
Centricity™ ShiftSelect® v2017.1 Administrator Guide
GE Healthcare Confidential and Proprietary Information. Page 75 of 105
Use Last Minute Availability - Unit Calendar
Employee List from an Open Shift
1. Double-click the open shift for which you want to view Last Minute Availability.
Tip: If there is a need but no open shift, double-click the Job Title to create one.
2. In the Open Shift dialog, click Last Minute Availability.
3. Select the appropriate restrictions and then click View Available Employees.
A list appears with employees who are qualified to work (and not already working)
organized into four groups.
Scheduled Availability - if your organization allows employees to schedule availability,
this list shows employees who indicated their interest in working on this particular
date and time
Requested - employees who requested a shift on this date and start time (not
selected and not awarded another shift)
Qualified, Willing - qualified employees who selected at least one Last Minute
Availability option in their profiles
Qualified, Not Willing - qualified employees who did not select any Last Minute
Availability options in their profiles
The list is ordered using an algorithm that indicates which employees will be more
inclined to accept an offer to work the shift.
4. For each employee contacted, select the appropriate response from the Contacted for
this Shift drop-down menu.
Note: If you select DNC for rest of day, that employee will not show on any Last Minute
Availability list for the remainder of the day.
5. Click Save to save your progress.
6. When an employee accepts a shift, select Contacted, accepted and then click Save.
The shift is filled by the employee.
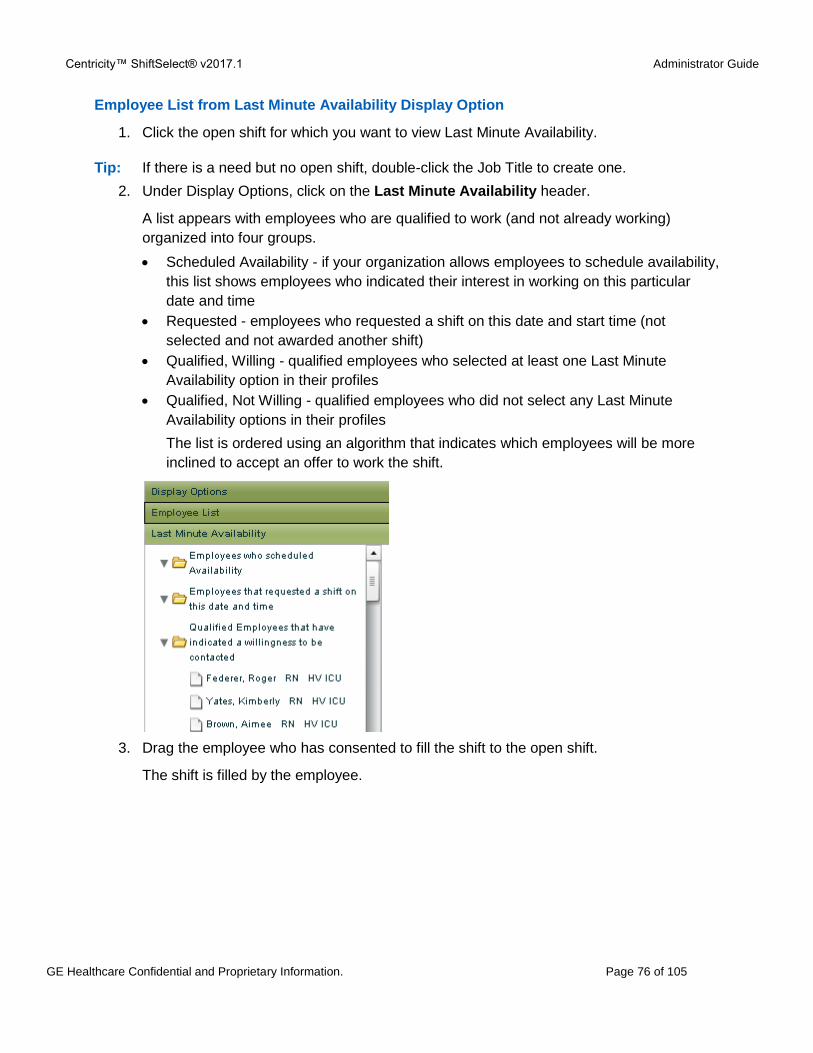
Centricity™ ShiftSelect® v2017.1 Administrator Guide
GE Healthcare Confidential and Proprietary Information. Page 76 of 105
Employee List from Last Minute Availability Display Option
1. Click the open shift for which you want to view Last Minute Availability.
Tip: If there is a need but no open shift, double-click the Job Title to create one.
2. Under Display Options, click on the Last Minute Availability header.
A list appears with employees who are qualified to work (and not already working)
organized into four groups.
Scheduled Availability - if your organization allows employees to schedule availability,
this list shows employees who indicated their interest in working on this particular
date and time
Requested - employees who requested a shift on this date and start time (not
selected and not awarded another shift)
Qualified, Willing - qualified employees who selected at least one Last Minute
Availability option in their profiles
Qualified, Not Willing - qualified employees who did not select any Last Minute
Availability options in their profiles
The list is ordered using an algorithm that indicates which employees will be more
inclined to accept an offer to work the shift.
3. Drag the employee who has consented to fill the shift to the open shift.
The shift is filled by the employee.

Centricity™ ShiftSelect® v2017.1 Administrator Guide
GE Healthcare Confidential and Proprietary Information. Page 77 of 105
Use Last Minute Availability - StaffReach
StaffReach is an automated calling component of Last Minute Availability.
Note: Contact your Client Services Representative about setup information. Note that the
phone number displayed to the caller can be configured to reflect a phone number
specific to your organization.
1. From the Unit Calendar, double-click the open shift for which you want to view Last
Minute Availability.
Tip: If there is a need but no open shift, double-click the Job Title to create one.
2. In the Open Shift dialog, click Last Minute Availability.
3. Select the appropriate restrictions and then click View Available Employees.
A list appears with employees who are qualified to work (and not already working)
organized into four groups.
Scheduled Availability - if your organization allows employees to schedule availability,
this list shows employees who indicated their interest in working on this particular
date and time
Requested - employees who requested a shift on this date and start time (not
selected and not awarded another shift)
Qualified, Willing - qualified employees who selected at least one Last Minute
Availability option in their profiles
Qualified, Not Willing - qualified employees who did not select any Last Minute
Availability options in their profiles
The list is ordered using an algorithm that indicates which employees will be more
inclined to accept an offer to work the shift.
4. Decide whether to use StaffReach for select employees or for all employees in the group.
For select employees, click Contact via StaffReach from the Contacted for this
Shift drop-down menu.
For all employees in the group, click Contact Everyone.
5. Click Save.
Centricity™ ShiftSelect® v2017.1 Administrator Guide
GE Healthcare Confidential and Proprietary Information. Page 78 of 105
6. Click Contact Selected Employees to invoke the calling process.
Note: Once the calling process is started, Centricity ShiftSelect will call each employee in the
list until either the shift is accepted or the list has been completed.
7. To view the status of the search while the calling is active, double-click the open shift.
In Progress appears in red in the top right corner of the dialog.
When an employee accepts the shift, the open shift is updated with the name of the
employee.
Tip: This should happen within ten minutes of the shift being accepted. The page may need
to be refreshed to view the updated information.
Note: The Awarded Shifts report shows the award reason as Staff Reach.
Centricity™ ShiftSelect® v2017.1 Administrator Guide
GE Healthcare Confidential and Proprietary Information. Page 79 of 105
Configuration
This section is intended for Functional System Administrators (FSA) responsible for initially
configuring Centricity ShiftSelect and then maintaining and adjusting the configuration over time.
Although most of the tasks in this section are done during initial configuration, you might need to
refer to this section if you want to change or modify your configuration in the future.
Configuring Centricity ShiftSelect is a logical process, proceeding from global changes to
specific data tables.
Tip: Notes within each step indicate information to consider when adding new facilities,
departments, or groups of people to an already existing configuration.
Note: It is assumed that back end configuration settings have been set prior to beginning the
core configuration.
Configuration Hierarchy
The following components are contained in the initial core configuration and are listed from
largest (global) to smallest (specific) changes. Because some components must be built before
others, it is strongly recommended to proceed in the following order.
Tip: The names in the list correspond to the names found in the Configuration drop-down
menu.
1. Position Types
2. Job Titles
3. Hospitals
4. Levels of Care
5. Unit/Locations
6. Employee Statuses
7. Wage Rates
8. Skill Groups
9. Skills/Credentials
10. Employee Commitment Configuration
11. Edit Weekend Configuration

Centricity™ ShiftSelect® v2017.1 Administrator Guide
GE Healthcare Confidential and Proprietary Information. Page 80 of 105
12. Primary Shift Configuration
13. Safe Scheduling Options
14. Overtime Warning Configuration
15. Role Configuration
16. Manage Admins
17. Create a Position*
18. Shift Template Configuration*
*Although positions and shift templates are built after the core configuration, it is expected that
position templates have been built on paper prior to beginning core configuration.
The following components are primarily related to scheduling and self scheduling configuration
but do not have a recommended configuration order.
Shift Subtype
Shift Shortcuts Configuration
Scheduling Group Configuration
Self-Scheduling Configuration
It may be desirable to reorder the items in a configuration list. To reorder, click the dots to the left
of the field and drag the item. The move must be saved by clicking Save.
Position Types
1. Navigate to Configuration > Position Configuration > Position Types.
A list of existing position types appears.
Note: Position types are mutually exclusive, meaning that job titles associated to one position
type will never be associated to a different position type, thus effectively blocking them
from being able to see each other’s shifts. For example, if an RN and LPN job title are
associated to a nursing position type, and a CNA is associated to a non-nursing position
type, then an RN could see LPN shifts and vice versa (if desired), but an LPN could not
see CNA shifts.
Centricity™ ShiftSelect® v2017.1 Administrator Guide
GE Healthcare Confidential and Proprietary Information. Page 81 of 105
A question to consider: Will the job titles associated to this position type need to view
shifts of employees with job titles in a different position type? If yes, then a new position
type should not be created. The existing position type should be used instead.
2. In the empty field, enter the new position type and then click Add.
Job Titles
1. Navigate to Configuration > Position Configuration > Job Titles.
A list of existing job titles appears.
2. In the empty field, enter the new job title.
3. From the drop-down menu, select the associated position type and then click Add.
Hospitals
1. Navigate to Configuration > Hospital/Unit(s) > Hospitals.
A list of existing hospitals appears.
2. In the empty field, enter the new hospital name and then click Add.
Level of Care
Levels of Care are commonly thought of as logical groupings of units/departments. Level of Care
is one of the ways staff may view shifts they are qualified to request.
Example: Example: ICU, CCU, and CVICU departments might logically be grouped into a Level
of Care labeled Critical Care.
1. Navigate to Configuration > Position Configuration > Level of Care.
A list of existing levels of care appears.
2. In the empty field, enter the new level of care and then click Add.
Unit/Locations
1. Navigate to Configuration > Hospital/Unit(s) Configuration > Unit/Locations.
The Unit/Locations page appears with the Unit/Location Settings tab selected.
2. Click Add Location.

Centricity™ ShiftSelect® v2017.1 Administrator Guide
GE Healthcare Confidential and Proprietary Information. Page 82 of 105
3. In the warning message dialog, click Yes to proceed.
The first hospital on the list default into the Hospital field.
4. If needed, in the Hospital drop-down menu, select the hospital that corresponds to the
department being added.
5. Continue updating the fields with the desired information.
Day Start - used to govern schedule target coverage and calendar views; use
HH:MM format
Exclude Cross Unit(s) - select this option if the department should be excluded from
statistical calculations in reports designed to measure self- directed floating
Tip: A department in which staff is expected to float (such as a Float Pool) should be
excluded from cross unit statistical calculations.
Show Self-Scheduling - select this option if the department will be self-scheduling
and should be shown functionality required to post self-schedule shifts
Allow Employee View of Unit Schedule - select this option to allow staff to see the
unit schedule.
6. Click Save to save to save what you have entered so far.
7. In the confirmation message dialog, click Close.
8. Click the Job Title Defaults tab.
This tab is used to set scheduling default positions.
Tip: The ability to see this screen is controlled by Calendar Scheduling permission.
9. Click Add.
10. Click in the Job Title field and select from the drop-down menu the job title to be used as
the default scheduling position.
11. Select the default scheduling position from the Default Position drop-down menu.
12. Select the default open shift management shift posting template from the Default Shift
Template drop-down menu.

Centricity™ ShiftSelect® v2017.1 Administrator Guide
GE Healthcare Confidential and Proprietary Information. Page 83 of 105
13. Ignore the HPPD and Licensed HPPD options.
Tip: These are placeholders for future functionality.
14. Click Save.
15. In the confirmation message dialog, click Close.
16. Continue entering information on the remaining tabs: Target Settings, Target Coverage,
and Target by Census.
17. Click Save on each tab.
Target Coverage Tab: Enter coverage for each job title.
Tip: Coverage can be entered one day at a time or right-click and select an auto-fill option to
automatically add coverage across the row or entire grid.
Once targets are set, they remain set for each period until you change them.
Tip: If you would like to copy the targets from a prior period, choose the desired period and
click Copy Targets From.
Employee Statuses
1. Navigate to Configuration > Employee Configuration > Employee Statuses.
A list of existing employee statuses appears.
2. In the empty field, enter the new employee status.

Centricity™ ShiftSelect® v2017.1 Administrator Guide
GE Healthcare Confidential and Proprietary Information. Page 84 of 105
Tip: It may be helpful to capture the FTE status or expected hours worked in a week or a pay
period (in addition to the employee status), especially if scheduling is not being used in
conjunction with ShiftSelect Open Shift Management. This will assist the manager in
making informed decisions as to whether the employee will be in overtime at the time of
shift award.
3. Select the appropriate Eligible for Incentives option and then click Add.
Always - employee will always see incentives on every shift posted with an incentive
Never - employee will never see incentives on any shift posted with an incentive, but
rather will see every shift posted with the default wage type (generally "regular" or
"base" rate)
After commitment - employee will see shifts posted with incentive at the incentive rate
at the first login after having been awarded their required hours (as built in Employee
Commitment Configuration)
Wage Rates
1. Navigate to Configuration > Employee Configuration > Job Titles.
A list of existing wage rates appears.
2. In the empty field, enter the new wage rate.
3. Enter the Multiplier.
The wage multiplier is used for reports and calculates the base rate times the multiplier.
Thus, an employee with a base rate of $20.00 requesting a shift with a multiplier of 1.5
will have their rate calculated (and displayed on the shift award screen) as $30.00.
4. Click Add.
5. Optional. After the new wage rate record is saved, select the Per Diem Default option
and then click Save.
The Per Diem Default option is used to display shifts to employees with statuses who are
either never eligible to see shifts with incentives or who have not yet met their
commitment at the time of shift request.
Skill Groups
1. Navigate to Configuration > Employee Configuration > Skill Groups.
A list of existing skill groups appears.
2. In the empty field, enter the new skill group and then click Add.
Note: Skill Groups are no longer used in Centricity ShiftSelect but still must be added. The Skill
Group records must match the Position Type records.
Centricity™ ShiftSelect® v2017.1 Administrator Guide
GE Healthcare Confidential and Proprietary Information. Page 85 of 105
Skills/Credentials
1. Navigate to Configuration > Employee Configuration > Skills/Credentials.
A list of existing skills and credentials appears.
2. In the empty field, enter the new skill or credential.
3. Select whether the new entry is a Skill or a Credential.
Tip: The following steps are optional.
4. From the drop-down menus, select the appropriate Skill Group and Position Type.
5. If needed, enter a short definition in Brief Description field.
6. Enter a number of days in the Grace Period field.
7. If needed, select the Prevent Scheduling? option.
8. Click Add.
Employee Commitment Configuration
1. Navigate to Configuration > Employee Configuration > Employee Commitment
Configuration.
A list of existing employee commitment configurations appears.
2. From the drop-down menus, select the appropriate Employee Status and Commitment
Type.
3. In the remaining fields, enter the appropriate values. If needed, enter a short definition in
Brief Description field.
Example: Example: If the employee is required to give 24 hours in a 4-week per diem
scheduling commitment period and 12 of which must be on a weekend, then there
would be a total hours entry of 24, a weekend hours entry of 12, and a scheduling
period entry of 1.
4. Click Add.
Edit Weekend Configuration
1. Navigate to Configuration > Hospital/Unit(s) Configuration > Edit Weekend
Configuration.
A list of existing weekend configurations appears.
Tip: Weekend Configuration settings are used in calculating employee commitment weekend
scheduled hours on the Employee Commitment Report.
2. From the drop-down menus, select the appropriate Hospital, Employee Status,
Weekend Start day and time, and Weekend End day and time.

Centricity™ ShiftSelect® v2017.1 Administrator Guide
GE Healthcare Confidential and Proprietary Information. Page 86 of 105
3. Click Save.
Primary Shift Configuration
1. Navigate to Configuration > Hospital/Unit(s) Configuration > Primary Shift
Configuration.
A list of existing primary shift configurations appears.
Note: Primary shifts are those that are shifts regularly worked by employees, such as 0700 to
1500.
2. Enter the Start TIme and End Time in hhmm format, such as 0700 and then click Add.
Safe Scheduling Options
1. Navigate to Configuration > Hospital/Unit(s) Configuration > Safe Scheduling
Configuration.
The Safe Scheduling Configuration page appears.
2. Fill in the appropriate information and then click Save.
Overtime Warning Configuration
1. Navigate to Configuration > Hospital/Unit(s) Configuration > Overtime Warning
Configuration.
The Overtime Warning Configuration page appears.
2. Fill in the appropriate information and then click Save.
Role Configuration
Permission components govern system administrator visibility into the system. Roles are high-
level categories containing sets of permissions used by administrators with various job titles.
System administrators are then configured in Centricity ShiftSelect and assigned the roles with
the permissions for the functions they are allowed to perform. For a description of each available
permission, see Permission Descriptions (on page 87).
1. Navigate to Configuration > Admin Configuration > Role Configuration.
The role configuration page appears.
2. From the Role drop-down menu, either select an existing role or Create New Role to add
a new role.
3. Enter the name of the new role and select the permissions this role should have.
4. Click Save.
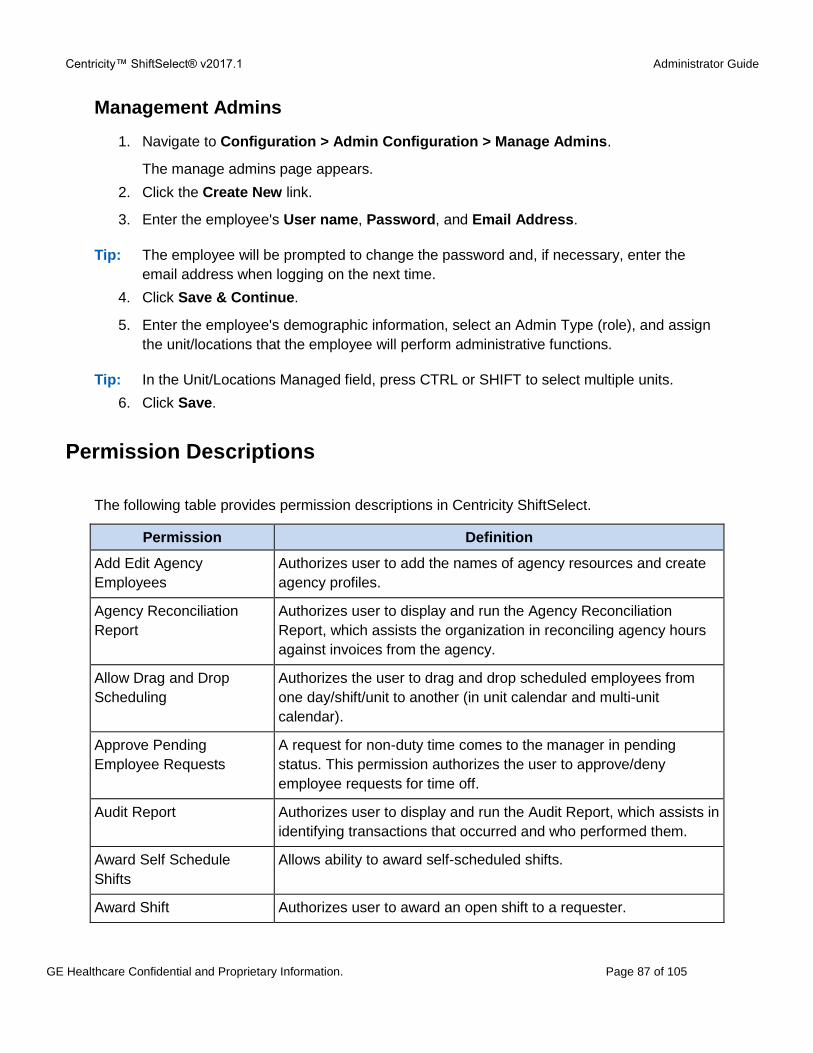
Centricity™ ShiftSelect® v2017.1 Administrator Guide
GE Healthcare Confidential and Proprietary Information. Page 87 of 105
Management Admins
1. Navigate to Configuration > Admin Configuration > Manage Admins.
The manage admins page appears.
2. Click the Create New link.
3. Enter the employee's User name, Password, and Email Address.
Tip: The employee will be prompted to change the password and, if necessary, enter the
email address when logging on the next time.
4. Click Save & Continue.
5. Enter the employee's demographic information, select an Admin Type (role), and assign
the unit/locations that the employee will perform administrative functions.
Tip: In the Unit/Locations Managed field, press CTRL or SHIFT to select multiple units.
6. Click Save.
Permission Descriptions
The following table provides permission descriptions in Centricity ShiftSelect.
Permission Definition
Add Edit Agency
Employees
Authorizes user to add the names of agency resources and create
agency profiles.
Agency Reconciliation
Report
Authorizes user to display and run the Agency Reconciliation
Report, which assists the organization in reconciling agency hours
against invoices from the agency.
Allow Drag and Drop
Scheduling
Authorizes the user to drag and drop scheduled employees from
one day/shift/unit to another (in unit calendar and multi-unit
calendar).
Approve Pending
Employee Requests
A request for non-duty time comes to the manager in pending
status. This permission authorizes the user to approve/deny
employee requests for time off.
Audit Report Authorizes user to display and run the Audit Report, which assists in
identifying transactions that occurred and who performed them.
Award Self Schedule
Shifts
Allows ability to award self-scheduled shifts.
Award Shift Authorizes user to award an open shift to a requester.

Centricity™ ShiftSelect® v2017.1 Administrator Guide
GE Healthcare Confidential and Proprietary Information. Page 88 of 105
Permission Definition
Award Shift to Agency Authorizes user to award an open shift to a requester submitted by
the agency (for their assigned departments). If admin does not have
the Award Shift to Agency function assigned to them, they can view
requests from agencies, but not award shifts to an agency
employee.
Awarded Shifts Report Authorizes user to display and run the Awarded Shifts Report,
which displays all shifts awarded on a particular date or range of
dates.
Calendar Scheduling
Configuration
Authorizes user to configure default positions, shift templates, and
targets for assigned departments.
Change Password Authorizes user to change employee password.
Cost Savings Report Authorizes user to display and run the Cost Savings Report, which
displays all hours for categories chosen across selected dates,
calculates costs of those resources and compares those costs to
what the organization would have spent had all hours been
awarded to agency (uses default or custom configured agency rates
in calculating agency costs).
Create Shift in Employee
Centric Calendar
Authorizes user to create shifts in the Employee Centric Calendar.
Create/Edit Admins Authorizes user to configure solution administrator roles, create
individual solution administrators, and assign them to roles.
Create/Edit
Announcements - Agency
Authorizes user to create announcements visible to agency staff
when they log in.
Create/Edit
Announcements - Overall
Authorizes user to create announcements visible to all managers
and all staff when they log in.
Create/Edit
Announcements - Unit
Location
Authorizes user to create announcements for authorized
departments visible to all staff when they log in. Does not allow
creation of announcements visible to all managers and/or all staff.
Create/Edit Care Types Authorizes user to configure levels of care in the solution. Levels of
care are generally groupings of like departments, such as Med
Surg, Critical Care, etc.
Create/Edit Employee
Groups
Authorizes user to create self-scheduling groups.
Create/Edit Employee
Statuses
Authorizes user to configure employee statuses in the solution.
Employee statuses are generally groupings of like employees, such
as Full Time, Part Time, Per Diem, etc.

Centricity™ ShiftSelect® v2017.1 Administrator Guide
GE Healthcare Confidential and Proprietary Information. Page 89 of 105
Permission Definition
Create/Edit Hospitals Authorizes user to configure hospitals in the solution. Hospitals are
usually, but not always, disparate facilities with separate tax
identification numbers.
Create/Edit Job Titles Authorizes user to configure job titles in the solution. Job titles are
generally individual HR designations for employees, such as RN,
LPN/LVN, Unit Secretary, etc.
Create/Edit Position Authorizes user to configure positions in the solution. Positions are
used to post shifts and consist of a combination of job titles and
skills.
Create/Edit Position Types Authorizes user to configure position types in the solution. Position
types are the highest category, anything configured within a position
type is confined to that position type. Example, job titles and
positions configured within one position type cannot see shifts for
job titles and positions configured within another position type.
Create/Edit Primary Shifts Authorizes user to enter primary shifts.
Create/Edit Self Schedule
Shift Hours
Allows access to Configuration > Hospital/Unit(s) Configuration >
Self-Scheduling Configuration screen.
Create/Edit Shift Authorizes user to configure shifts in the solution using the Create A
Shift wizard.
Create/Edit Shift Notes Authorizes user to configure shift notes in the solution. Shift notes
are used to document information of interest and can be found in
the unit and multi-unit calendars.
Create/Edit Shift
Templates
Authorizes user to configure shift templates in the solution. Shift
templates are used to post shifts using Power Post and consist of
each component of the Create A Shift Wizard consolidated into a
single object.
Create/Edit Skill Groups Authorizes user to configure Skill Groups in the solution. Skill
Groups are no longer used by the solution; however, they must be
added and must match the Position Types in order to complete a
successful build.
Create/Edit Skills and
Credentials
Authorizes user to configure skills and credentials in the solution.
These are used to match qualified employees to posted shifts using
configured positions.
Create/Edit Unit Locations Authorizes user to configure units/departments in the solution. Unit
locations are used to identify where shifts are to be worked. They
must have unit/department identifiers and unique names within the
same facility.

Centricity™ ShiftSelect® v2017.1 Administrator Guide
GE Healthcare Confidential and Proprietary Information. Page 90 of 105
Permission Definition
Create/Edit Wage Rates Authorizes user to configure wage rates in the solution. Wage rates
are used to identify how shifts will be paid in the solution. They
contain a description and multipliers. Multipliers are used in
calculating $ on ShiftSelect reports.
Credential Report Authorizes the user to generate the Credential Report.
Display Employee List in
Calendars
Authorizes the user to display the Employee list accordion. If not
selected, does not allow user to display the employee list.
Display Total ShiftRewards
Points
Authorizes user to display total number of points earned (when
ShiftRewards functionality is being used).
Download Archived Files Authorizes user to download awarded shifts that have previously
been downloaded via the interface, also referred to as archived
shifts. This is useful if the previously downloaded file is no longer
available or another administrator downloaded the file and you
cannot access it. You might also need to download the shifts again
if they need to be imported into a third-party scheduling tool.
Download Awarded Shifts Authorizes user to download awarded shifts via the interface.
Edit Agency Wage Rate
Configuration
Authorizes user to define custom (other than default) wage rates by
agency, for any configured position. Allows wage rate setup for
week day, eve, night and weekend day, eve, night.
Edit census Authorizes the user to enter/edit census information on the unit
calendar (backend configuration property must be set to true).
Edit Employees Not In My
Unit/Location
Authorizes user to edit profiles of employees outside the list of
departments authorized to a particular admin.
Edit Pending Shifts Authorizes user to approve the records requiring approval when the
upload of needs interface is used. The Upload Results Report
reflects the number of shifts that were uploaded successfully and
need approval. These shifts are not posted until approved.
Edit Profile Authorizes user to edit profiles of employees within the list of
departments authorized to a particular admin.
Edit Weekend
Configuration
Authorizes user to define custom (other than default) weekend start
and end times for any configured employee status in any defined
hospital.

Centricity™ ShiftSelect® v2017.1 Administrator Guide
GE Healthcare Confidential and Proprietary Information. Page 91 of 105
Permission Definition
Employee Commitment
Configuration
Authorizes user to define required hour commitments for each
employee status and commitment type (regular, on call, non-duty).
Employees with identified commitments display on Employee
Commitment Report. Required hours can be defined for total hours,
and then how many of the total hours must be worked on evenings,
nights and weekends. Hours are defined for a specific number of
per diem periods.
Employee Commitment
Report
Authorizes user to display and run the Employee Commitment
Report, which assists the organization in reconciling scheduled
hours with required hours for a particular per diem period. Displays
variance in the event required hours are less than scheduled hours.
Displays zero in the event scheduled hours exceed required hours.
Employee Payroll Report Authorizes user to display and run the Employee Report, which
assists the organization in identifying awarded shift hours and
associated incentives. Displays employees of a particular unit/units
and the shifts they worked, regardless of where those shifts were
worked.
Employee Upload Authorizes user to perform the employee upload of demographic
data from the HR Solution.
Last Minute Availability Authorizes user to view and perform last minute availability
functions within the solution.
Multi-unit Configuration Authorizes user to configure a personal view of multi-unit calendar
(assuming user has rights to view more than one unit).
Multiple Shift Inactivation Authorizes user to inactivate more than one shift at a time.
Multiple Shift Open/Close
to Agency
Authorizes user to review a list of open shifts and choose which
ones to make visible to agency. The selection is retained on the
screen so that the shifts that are open to agency are always
displayed. This method provides for discrete situational decision-
making surrounding the offering of work to agencies.
Open Shift to Agency Displays Open to Agency optionon the Create a Shift wizard.
Enables the user to value Yes/No in the box to control whether the
shift should be opened to agency upon posting.
OSR Report Authorizes user to display and run the Organization Status Report,
which assists the organization in identifying awarded shift fill rates
for shifts filled within the home unit, as well as shifts filled by staff
from outside the home unit.

Centricity™ ShiftSelect® v2017.1 Administrator Guide
GE Healthcare Confidential and Proprietary Information. Page 92 of 105
Permission Definition
Overtime Display Rules Authorizes user to configure settings for overtime warnings, which
consist of displaying warning flag, identifying shifts that count
toward overtime and number of hours in a day or week employee
must exceed to flag them as exceeding configured overtime.
Permanently delete staff
profile
Authorizes user to permanently remove a profile from the solution.
Once removed, a profile is no longer visible and cannot be
reactivated.
PowerPost Authorizes user to post shifts in the solution using the PowerPost
functionality.
Productivity Report Authorizes user to display and run the Productivity Report, which
assists the organization in identifying productivity information and
variances.
Receive Credential
Expiration Email
Authorizes user to receive emails regarding expiring credentials
according to backend configuration properties (which govern the
transactions responsible for triggering emails)
Receive Email Authorizes user to receive emails according to backend
configuration properties (which govern the transactions. responsible
for triggering emails).
Redemption Report Authorizes user to display and run the Redemption Report, which
displays all ShiftRewards redemptions within a specified time
period, including the name of the Administrator who performed each
redemption.
Safe Scheduling Display
Rules
Authorizes user to configure settings for safe scheduling warnings,
which consist of displaying warning flag (or not showing shifts that
violate), identifying maximum hours in a day, hours in a seven-day
period, and days in a row.
Scheduler Shift Approval Authorizes user to view and approve shifts uploaded into Centricity
ShiftSelect that were created from a third-party scheduling solution.
Scheduler Upload Authorizes user to upload shifts created in a third-party scheduling
solution.
Search Profile Authorizes user to search for employee profiles in the solution.
Search Self Schedule
Shifts
Authorized user to search for self-scheduled shifts in the solution.
Search Shifts Authorizes user to search for shifts in the solution.
Setup ShiftRewards
Awards
Authorizes user to configure ShiftRewards awards in the solution.

Centricity™ ShiftSelect® v2017.1 Administrator Guide
GE Healthcare Confidential and Proprietary Information. Page 93 of 105
Permission Definition
Setup ShiftRewards Points Authorizes user to configure ShiftRewards points in the solution.
Shift Connect (Add/Delete
Quick Shifts)
Authorizes user to add or delete quick shifts in the Matrix calendar.
Shift Connect (Scheduling) Authorizes user to view and schedule in the Matrix calendar.
Shift Connect (View Only) Authorizes user to view the Matrix calendar.
Shift Shortcuts
Configuration
Authorizes user to build shift shortcuts in the solution.
Shift Subtype
Configuration
Authorizes user to build shift subtypes in the solution. Also allows
user to set shift notations (for calendar display).
ShiftRewards Adjustment Authorizes user to make manual adjustments to employee
ShiftReward points (adding or subtracting).
ShiftRewards Adjustments
Report
Authorizes user to display and run the ShiftRewards Adjustments
Report, which shows all the ShiftRewards adjustments that have
been made, including the employee that had their points adjusted,
the administrator who made the adjustment, when the adjustment
was made and why.
ShiftRewards Summary
Report
Authorizes user to display and run the ShiftRewards Summary
Report, which provides a summary of ShiftReward points Earned,
Redeemed, Available, and Pending for each individual staff
member. It also shows the total points available for redemption on
the solution.
StaffReach Usage Authorizes the user to view StaffReach utilization.
Subtype Occurrence
Report
Authorizes the user to generate the Subtype Occurrence Report.
Time and Attendance
Export
Authorizes the user to execute the time and attendance export.
Unassign Awarded Shift Authorizes the user to unaward a previously awarded shift.
Unfilled Shifts Report Authorizes the user to run the Unfilled Shifts Report, which returns a
list of posted shifts that have not been awarded. The report may be
used to identify areas that have trouble filling open needs. The
report will allow administrators to preview the coming week or look
at past unfilled shifts by week, month or year. It can be grouped in
four ways: Unit/location, Position, Shift (day/evening/night), and
Rate of Pay.
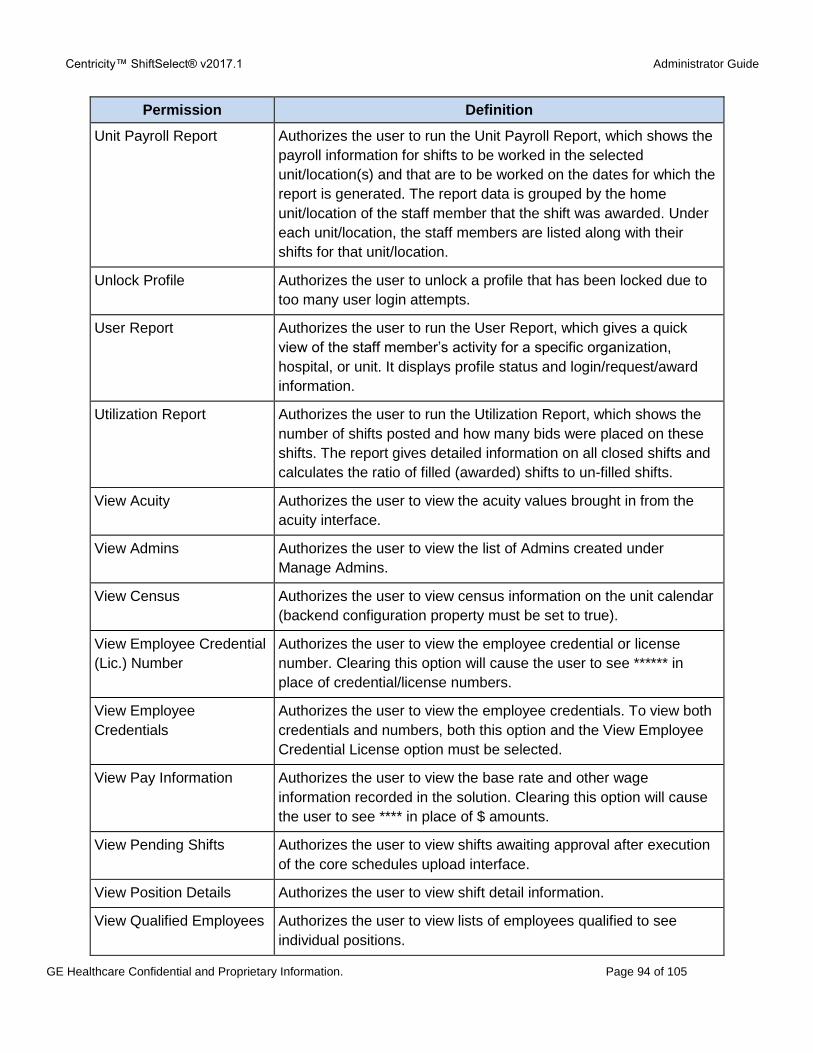
Centricity™ ShiftSelect® v2017.1 Administrator Guide
GE Healthcare Confidential and Proprietary Information. Page 94 of 105
Permission Definition
Unit Payroll Report Authorizes the user to run the Unit Payroll Report, which shows the
payroll information for shifts to be worked in the selected
unit/location(s) and that are to be worked on the dates for which the
report is generated. The report data is grouped by the home
unit/location of the staff member that the shift was awarded. Under
each unit/location, the staff members are listed along with their
shifts for that unit/location.
Unlock Profile Authorizes the user to unlock a profile that has been locked due to
too many user login attempts.
User Report Authorizes the user to run the User Report, which gives a quick
view of the staff member’s activity for a specific organization,
hospital, or unit. It displays profile status and login/request/award
information.
Utilization Report Authorizes the user to run the Utilization Report, which shows the
number of shifts posted and how many bids were placed on these
shifts. The report gives detailed information on all closed shifts and
calculates the ratio of filled (awarded) shifts to un-filled shifts.
View Acuity Authorizes the user to view the acuity values brought in from the
acuity interface.
View Admins Authorizes the user to view the list of Admins created under
Manage Admins.
View Census Authorizes the user to view census information on the unit calendar
(backend configuration property must be set to true).
View Employee Credential
(Lic.) Number
Authorizes the user to view the employee credential or license
number. Clearing this option will cause the user to see ****** in
place of credential/license numbers.
View Employee
Credentials
Authorizes the user to view the employee credentials. To view both
credentials and numbers, both this option and the View Employee
Credential License option must be selected.
View Pay Information Authorizes the user to view the base rate and other wage
information recorded in the solution. Clearing this option will cause
the user to see **** in place of $ amounts.
View Pending Shifts Authorizes the user to view shifts awaiting approval after execution
of the core schedules upload interface.
View Position Details Authorizes the user to view shift detail information.
View Qualified Employees Authorizes the user to view lists of employees qualified to see
individual positions.

Centricity™ ShiftSelect® v2017.1 Administrator Guide
GE Healthcare Confidential and Proprietary Information. Page 95 of 105
Permission Definition
View Scheduler Upload
Errors
Authorizes the user to view error logs as a result of the core
schedules upload.
View Self Schedule Shifts Allows ability to view self-scheduled shift requests.
View Shift Notes Authorizes user to view shift notes in the solution. Shift notes are
used to document information of interest and can be found in the
unit and multi-unit calendars.
View Shift Templates Authorizes the user to view the list of shift templates built in the
solution.
View Shifts Authorizes the user to view the shifts in the solution.
View Staff Profile Authorizes the user to view the employee profiles in the solution.
View Unit Calendar Authorizes the user to view the Unit calendar. Prior to version 5.0,
and after version 5.011a, users will no longer have the ability to
interact with the calendar when this permission is set.
VMShift Config Authorizes the user to create a role and a login for each agency.
Scheduling Setup
Before shifts can be scheduled, you need to complete some basic setup and each employee to
be scheduled must have an active profile.
Default positions and shift templates are used for scheduling and posting open shifts
Targets denote the expected numbers of staff for each job title each day.
If shortcut codes are desired, these must also be built. Sshortcuts are display codes for
shift start and end times. For example, 0700-1500 might be visually represented on a
schedule as D.
Shift Subtypes enable differentiation within types of shift (for example, a shift type of
Working might have subtypes of Charge or Float) and between shifts that have start
and/or end times within one hour of each other (for example, shift 1 is 7:00-3:30 and shift
2 is 7:30-4:00).
This section covers default setup (positions, targets, shift templates), as well as building and
using shortcuts and subtypes. In some organizations, one or more of these setup tasks fall to
managers; in others, to the Functional System Administrators.

Centricity™ ShiftSelect® v2017.1 Administrator Guide
GE Healthcare Confidential and Proprietary Information. Page 96 of 105
Default Positions
A default position is used to schedule an employee using the Matrix calendar. It is also used
when dragging someone from the Employee List in the Unit Calendar to a job title in the event
an open shift is not present. For this reason, the default position used in Setup should reflect the
position with the requirements needed when employees are floated to another department
(keeping in mind which employees can be floated where will assist in determining which position
(per job title) is best defined as the "default").
To set up default positions, complete the following steps.
1. Navigate to Configuration > Hospital/Unit(s) Configuration > Unit/Locations.
2. In the Unit/Locations list, expand the correct hospital and select the unit.
3. Click the Job Title Defaults tab and then click Add.
4. Click in an empty field in the Job Title column and select a job title from the drop-down
menu.
5. From the Default Position drop-down menu, select the position to be used as the
default.
6. From the Default Shift Template menu, select the position to be used for posting open
shifts.
7. Continue adding job titles and default positions and templates, and when you are
finished, click Save.

Centricity™ ShiftSelect® v2017.1 Administrator Guide
GE Healthcare Confidential and Proprietary Information. Page 97 of 105
Targets
Targets allow you to set the number of core employees in each job title needed to staff the
department each day.
To set targets, complete the following steps.
1. Click the Target Coverage tab.
2. Enter the number of people required for each four-hour block for each job title for each
day of the week of the schedule.
Tip: Right-click to select Auto-Fill Enter Row or Auto-Fill Entire Grid, if you would like.
Tip: If you have a department that does not fall into 4-hour blocks, or has staggered shifts,
you may find it helpful to create an ideal schedule, set Display Options to 4 hours, print
the schedule with actuals showing, and then transcribe those actual values into the target
boxes.
Tip: Target coverage rounds to two decimal places, which will enable a department with
staggered shift times to match what they need in terms of staffing without having to do
those calculations in advance.
Tip: Think of each 4-hour box as 1.0, where 1 hour each equals 0.25. So if a staff member
comes in at 08:00 and is there through until 11:00, that resource occupies 0.75 of the 7-
11 box.

Centricity™ ShiftSelect® v2017.1 Administrator Guide
GE Healthcare Confidential and Proprietary Information. Page 98 of 105
Tip: If you want to total staff together, set targets only for the staff you want to count. For
example, you may have 3 RNs and 1 LPN, but want to count them as total licensed. In
order to accomplish this, you would choose your default position for both job titles to be
"RN (also offered to LPN)" and set the targets for 4 for the RNs, with no targets set for
the LPNs. This will enable you to schedule a total of 4 licensed using the Matrix
Calendar.
3. After you have entered your targets, click Save.
Your default positions, targets, and shift templates can now be used when scheduling and
posting open needs using the Matrix Calendar and Ultra PowerPost. They will also be used
when opening shifts in the Unit Calendar.
Shift Shortcuts
Shift Shortcuts enable start and end times to display as codes that are used by each department
manager. These shortcuts may be used alone or in combination with shift subtypes, depending
on whether shift start or end times overlap by one hour or less.
Keep in mind that Shift Shortcuts are created in a one-to-one relationship with shift start and end
times. Thus, if you have a shift that starts at 07:00 and ends at 15:00, you can create a quick
shift for 0700-1500. But unless you create a corresponding Shift Shortcut of D (or whatever else
you want the shift to display as), that shift will only display as 0700-1500.
Note: Shift Shortcuts and corresponding start and end times when creating the corresponding
quick shift must match exactly.
Tip: You may find it helpful to create all of the desired shift shortcuts, print the list, and then
go back to build the corresponding Quick Shifts.
To create a shift shortcut, complete the following steps.
1. Navigate to Configuration > Shift Configuration > Shift Shortcuts Configuration.
2. Enter the appropriate information in each field and then click Add.
In the following example, notice that a shift with the exact same start and end times has been
entered. In this case, the shift is differentiated by the shift subtype. The shift shortcut, although
different, does not make this shift unique. It is the shift subtype that makes a shift with
overlapping start and end times (one hour or less on either side) unique.
Matrix Calendar
1. Navigate to Calendars > Matrix Calendar to create the corresponding Quick Shift(s).
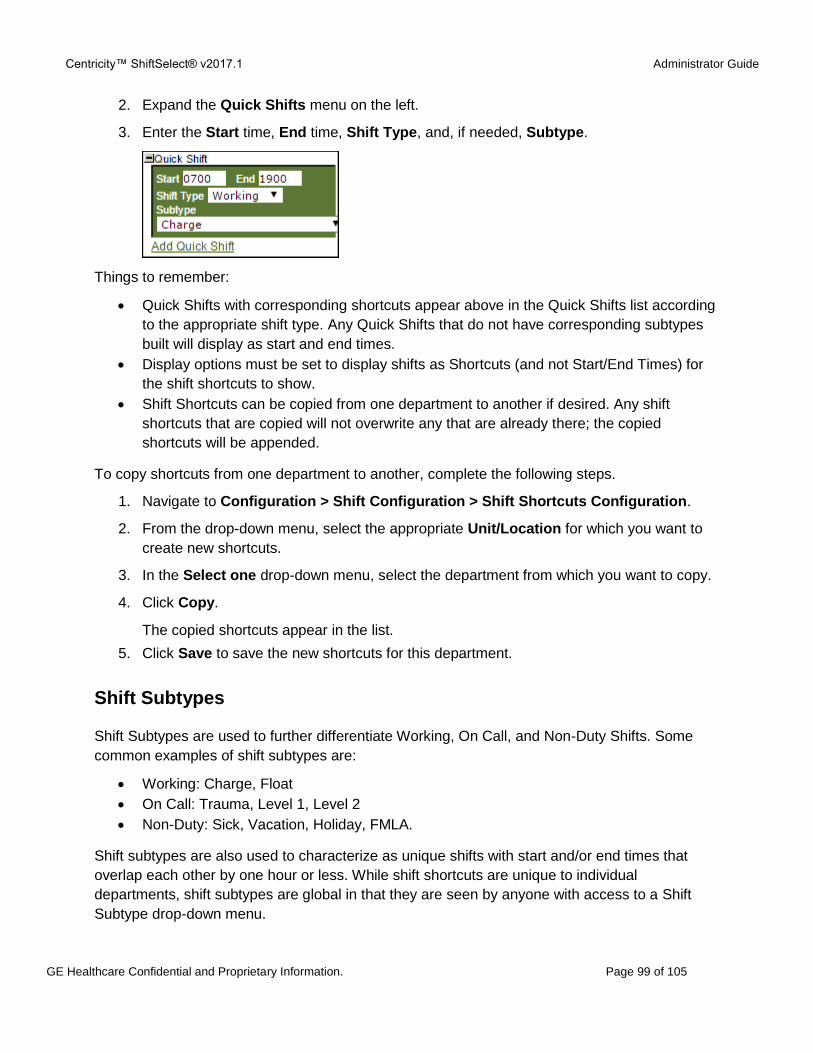
Centricity™ ShiftSelect® v2017.1 Administrator Guide
GE Healthcare Confidential and Proprietary Information. Page 99 of 105
2. Expand the Quick Shifts menu on the left.
3. Enter the Start time, End time, Shift Type, and, if needed, Subtype.
Things to remember:
Quick Shifts with corresponding shortcuts appear above in the Quick Shifts list according
to the appropriate shift type. Any Quick Shifts that do not have corresponding subtypes
built will display as start and end times.
Display options must be set to display shifts as Shortcuts (and not Start/End Times) for
the shift shortcuts to show.
Shift Shortcuts can be copied from one department to another if desired. Any shift
shortcuts that are copied will not overwrite any that are already there; the copied
shortcuts will be appended.
To copy shortcuts from one department to another, complete the following steps.
1. Navigate to Configuration > Shift Configuration > Shift Shortcuts Configuration.
2. From the drop-down menu, select the appropriate Unit/Location for which you want to
create new shortcuts.
3. In the Select one drop-down menu, select the department from which you want to copy.
4. Click Copy.
The copied shortcuts appear in the list.
5. Click Save to save the new shortcuts for this department.
Shift Subtypes
Shift Subtypes are used to further differentiate Working, On Call, and Non-Duty Shifts. Some
common examples of shift subtypes are:
Working: Charge, Float
On Call: Trauma, Level 1, Level 2
Non-Duty: Sick, Vacation, Holiday, FMLA.
Shift subtypes are also used to characterize as unique shifts with start and/or end times that
overlap each other by one hour or less. While shift shortcuts are unique to individual
departments, shift subtypes are global in that they are seen by anyone with access to a Shift
Subtype drop-down menu.

Centricity™ ShiftSelect® v2017.1 Administrator Guide
GE Healthcare Confidential and Proprietary Information. Page 100 of 105
To create a shift subtype, complete the following steps.
1. Navigate to Configuration > Shift Configuration > Shift Subtype Configuration.
2. Enter the appropriate information in each field and then click Add.
The following fields are available:
Name - a description or definition of the subtype being created
Quick Click Order - this dictates what is displayed to the user when editing shifts on the
unit calendar using the right-click "quick click" functionality
Display Name - this dictates what is displayed to the user in the drop-down menu when
choosing a shift subtype
Shift Notation - this dictates what is displayed to the user next to the name of the
employee in the Unit Calendar (field limit = 2 characters)
Shift Type - indicates the type of shift for which you are building the subtype
Counts towards Commitment - allows you to decide if shifts with this subtype should
count toward the commitments of employees
Counts towards Overtime - allows you to decide if shifts with this subtype should count
toward the overtime setting
Counts towards Safe Schedule - allows you to decide if shifts with this subtype should
count toward the safe scheduling settings
Counts toward Productivity - allows you to decide if shifts with this subtype should count
toward productivity
Counts towards Employee Weekly Totals - counts shifts with these subtypes toward
weekly totals in the Matrix calendar during scheduling
Visible to Employees - allows you to decide if shifts with this subtype should be visible to
employees when they are requesting time off via the Employee Calendar.
Note: Only non-duty shifts can be flagged as Visible to Employees.
Export - select if shifts with this subtype will be exported through an interface
Is Charge Nurse - determines if the shift is considered a charge shift
Remove - removes a shift subtype when you click Save.
Once a shift subtype is built, it is available for use when creating Quick Shifts, Shortcuts, and
Shift Templates. It is also available when editing shifts. Shift subtypes are included in the
Employee Payroll Report, and this report can be filtered by Shift Subtype as well.
Centricity™ ShiftSelect® v2017.1 Administrator Guide
GE Healthcare Confidential and Proprietary Information. Page 101 of 105
Self-Scheduling Setup
Before shifts can be scheduled using self-scheduling, you need to complete some basic setup.
Permissions govern which administrators and managers have access to self-scheduling.
Unit/locations denote which departments see self-scheduling functionality via the Matrix
Calendar.
Creation of Scheduling Groups is optional and can be used to determine which sets of
individuals see self-scheduled shifts first (for example Rotational Group A, B, or C) or
what shifts they see (such as Experienced or Novice).
Shift Templates must be built specifically for self-schedule shifts, and these are used to
post self-schedule shifts using Ultra Power-Post.
The Maximum Hours each employee status from each self-scheduling department can
schedule within a given calendar week is identified.
Primary Shifts, which can be defined regardless of whether self-scheduling is being used,
are used to provide a default display of self-schedule shifts to each employee using
Employee Calendar to view and request self-schedule needs.
This section covers the default setup for self-scheduling. Self-scheduling setup must be
completed in advance of managers being able to post, and users being able to view, self-
schedule shifts.
Configure Self-Scheduling
To set up self-scheduling, complete the following steps.
1. Navigate to Configuration > Hospital/Unit(s) Configuration > Unit/Locations.
2. Expand the hospitals and in the appropriate departments, select the Show Self-
Scheduling option.
3. Click Save for each.
4. Navigate to Configuration > Hospital/Unit(s) Configuration > Scheduling Group
Configuration.
5. Enter the names of the different groups that will be self-scheduling and then click Add.
6. Navigate Configuration > Shift Configuration > Shift Template Configuration.
7. Click the Create New link, build self-scheduling Shift Templates for each position that will
be used to post Self Schedule shifts.
Tip: Be sure to choose Self Schedule from the Post As drop-down menu.
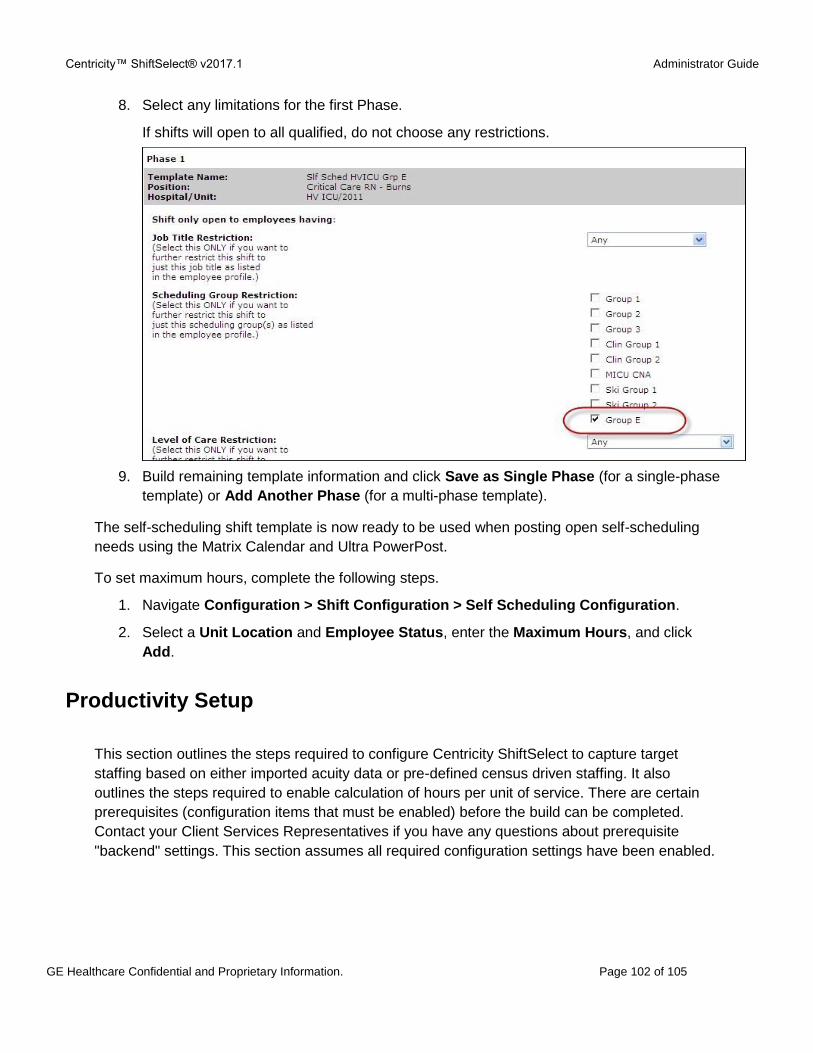
Centricity™ ShiftSelect® v2017.1 Administrator Guide
GE Healthcare Confidential and Proprietary Information. Page 102 of 105
8. Select any limitations for the first Phase.
If shifts will open to all qualified, do not choose any restrictions.
9. Build remaining template information and click Save as Single Phase (for a single-phase
template) or Add Another Phase (for a multi-phase template).
The self-scheduling shift template is now ready to be used when posting open self-scheduling
needs using the Matrix Calendar and Ultra PowerPost.
To set maximum hours, complete the following steps.
1. Navigate Configuration > Shift Configuration > Self Scheduling Configuration.
2. Select a Unit Location and Employee Status, enter the Maximum Hours, and click
Add.
Productivity Setup
This section outlines the steps required to configure Centricity ShiftSelect to capture target
staffing based on either imported acuity data or pre-defined census driven staffing. It also
outlines the steps required to enable calculation of hours per unit of service. There are certain
prerequisites (configuration items that must be enabled) before the build can be completed.
Contact your Client Services Representatives if you have any questions about prerequisite
"backend" settings. This section assumes all required configuration settings have been enabled.

Centricity™ ShiftSelect® v2017.1 Administrator Guide
GE Healthcare Confidential and Proprietary Information. Page 103 of 105
Configure Productivity
To update the unit/location settings, complete the following steps.
1. Navigate to Configuration > Hospitals/Unit(s) Configuration > Units/Locations.
2. Expand the correct hospital and select a department.
3. Enter the number of beds (this number generally is associated with either available or
total beds).
4. Click the Target Settings tab and enter the Budget value (the budgeted hours per
patient day, or BHPPD).
5. Optional. Enter the Coverage Warning Threshold values and select the corresponding
color.
Note: If your organization is using standardized coverage warning thresholds, do not enter any
values in this area.
6. Select the desired option to be used for reporting census type.
Average Daily Census (ADC) - displays the calculated average daily census (ADC) in
the Daily Summary section of the Unit Calendar and Multi-Unit calendar. Select this
option for census information that is being manually entered or imported from a third-
party acuity solution.
Midnight Census - displays the imported midnight census value from the
ADT/Census interface.
7. Select the desired option to be used for displaying census/acuity driven targets.
Display Target by Volume - displays the total number of employees working
compared to the target value calculated in Target by Census
Display Target values imported from Acuity System - displays the total number of
employees scheduled compared to target values imported from a third-party acuity
solution
Target by Census
To set the target by census, complete the following steps.
1. Navigate to Configuration > Hospitals/Unit(s) Configuration > Units/Locations.
2. Expand the correct hospital and select a department.
3. Click the Target by Census tab.
4. Configure the target by census for the initial four-hour period.
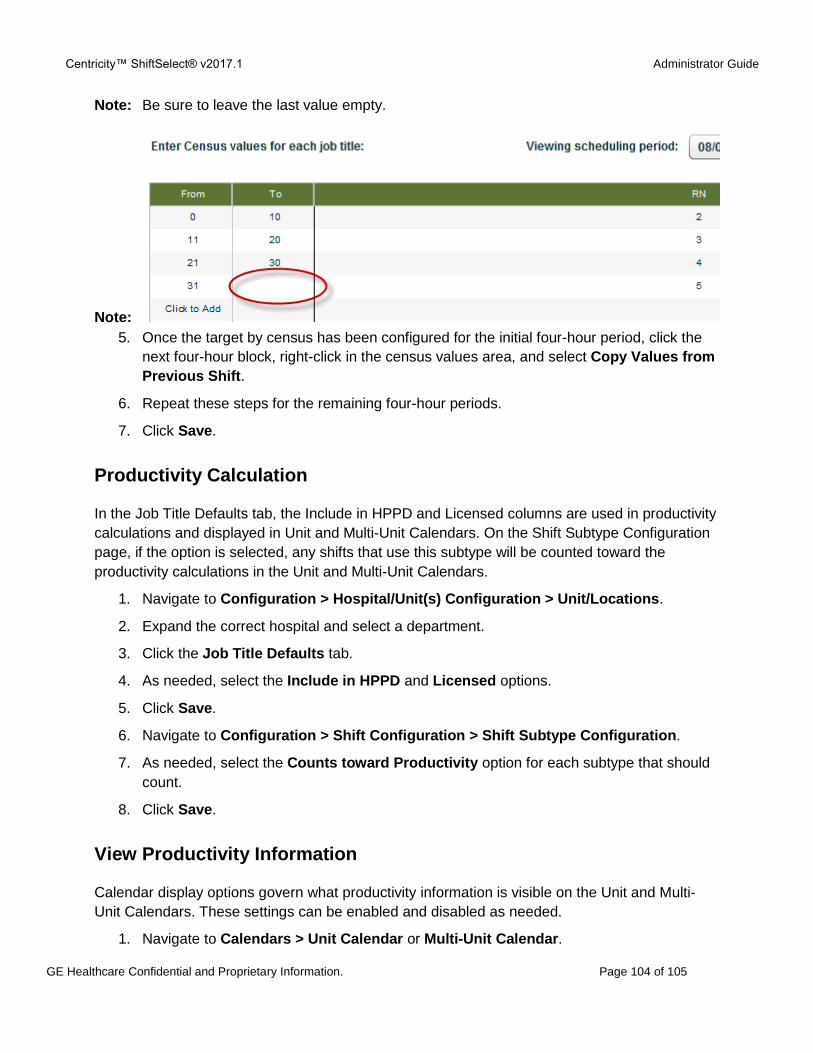
Centricity™ ShiftSelect® v2017.1 Administrator Guide
GE Healthcare Confidential and Proprietary Information. Page 104 of 105
Note: Be sure to leave the last value empty.
Note:
5. Once the target by census has been configured for the initial four-hour period, click the
next four-hour block, right-click in the census values area, and select Copy Values from
Previous Shift.
6. Repeat these steps for the remaining four-hour periods.
7. Click Save.
Productivity Calculation
In the Job Title Defaults tab, the Include in HPPD and Licensed columns are used in productivity
calculations and displayed in Unit and Multi-Unit Calendars. On the Shift Subtype Configuration
page, if the option is selected, any shifts that use this subtype will be counted toward the
productivity calculations in the Unit and Multi-Unit Calendars.
1. Navigate to Configuration > Hospital/Unit(s) Configuration > Unit/Locations.
2. Expand the correct hospital and select a department.
3. Click the Job Title Defaults tab.
4. As needed, select the Include in HPPD and Licensed options.
5. Click Save.
6. Navigate to Configuration > Shift Configuration > Shift Subtype Configuration.
7. As needed, select the Counts toward Productivity option for each subtype that should
count.
8. Click Save.
View Productivity Information
Calendar display options govern what productivity information is visible on the Unit and Multi-
Unit Calendars. These settings can be enabled and disabled as needed.
1. Navigate to Calendars > Unit Calendar or Multi-Unit Calendar.

Centricity™ ShiftSelect® v2017.1 Administrator Guide
GE Healthcare Confidential and Proprietary Information. Page 105 of 105
2. On the left, click Coverage Display Options and select the options you would like to
see.
Display Volume
Desired Coverage
Census/Acuity/Volume Driven Target
Daily Summary
Shift Summary
3. Click Submit.
The calendar refreshes with the requested information.
4. Enter the census or volume value.
The calculations change accordingly.